

Page 1

Quick Guide
Page 2

Page 3

Contents
Health and safety information ........................................................ 4
Care and maintenance .................................................................... 6
About your phone............................................................................ 7
Manufacturer’s limited warranty .................................................... 8
Other precautions.......................................................................... 10
Using your Vertu phone ............................................... 14
Vertu package contents.......................................................................... 14
Networks ................................................................................................ 14
Conventions used in this guide .............................................................. 14
Glossary ................................................................................................. 15
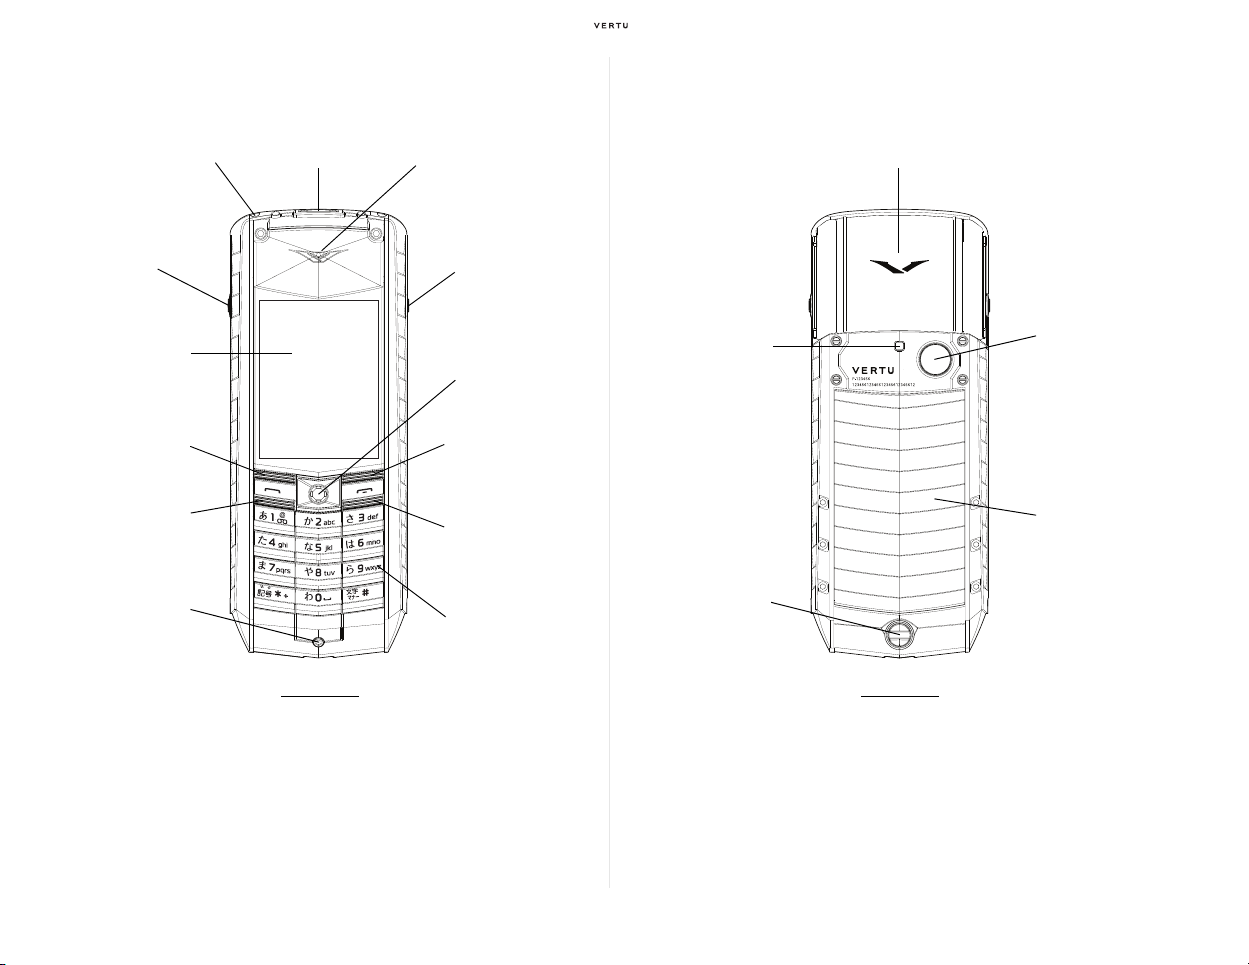
Your Vertu phone - front......................................................................... 16
Your Vertu phone - back ........................................................................ 16
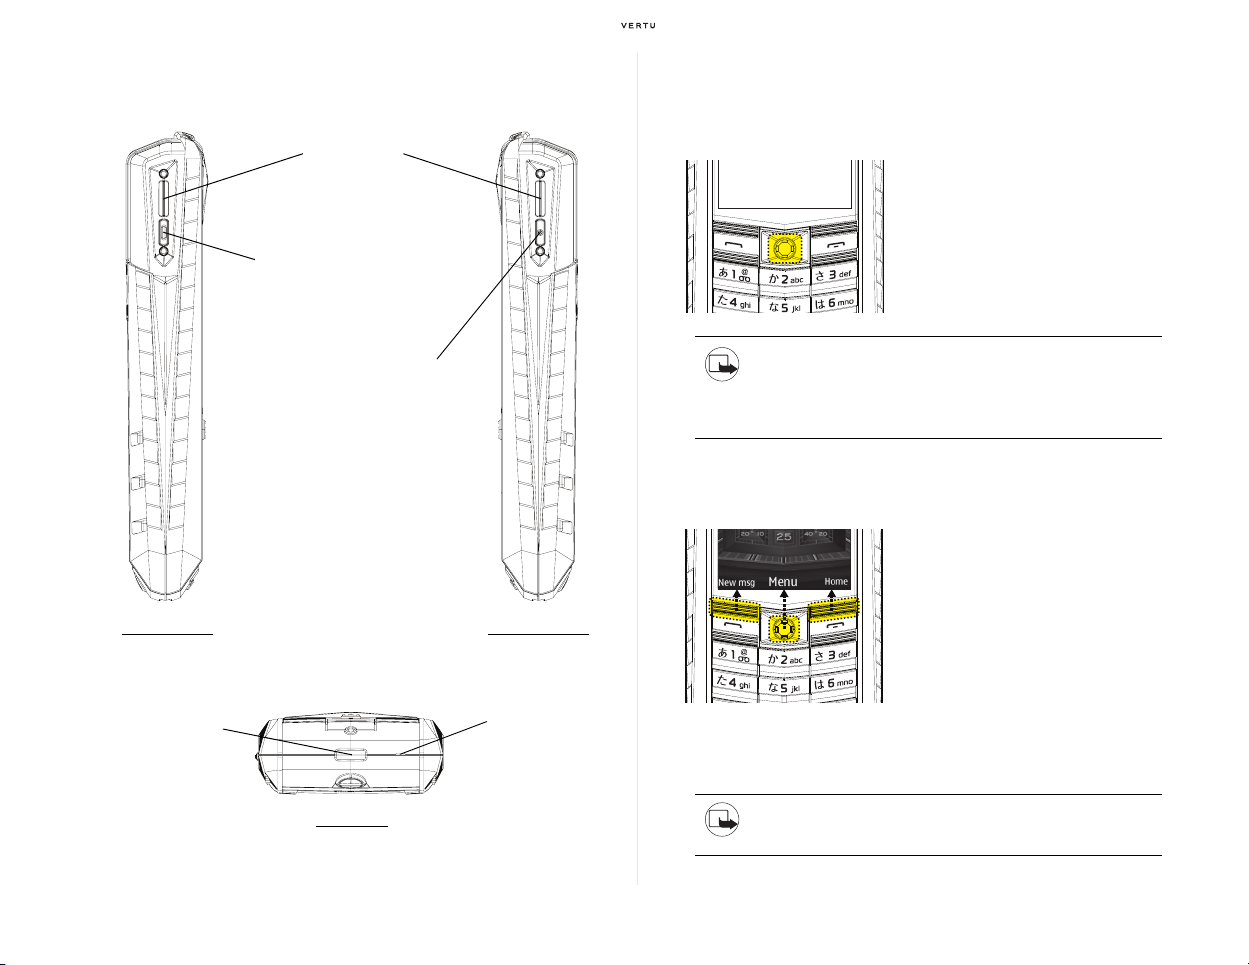
Your Vertu phone - left, right & base ...................................................... 17
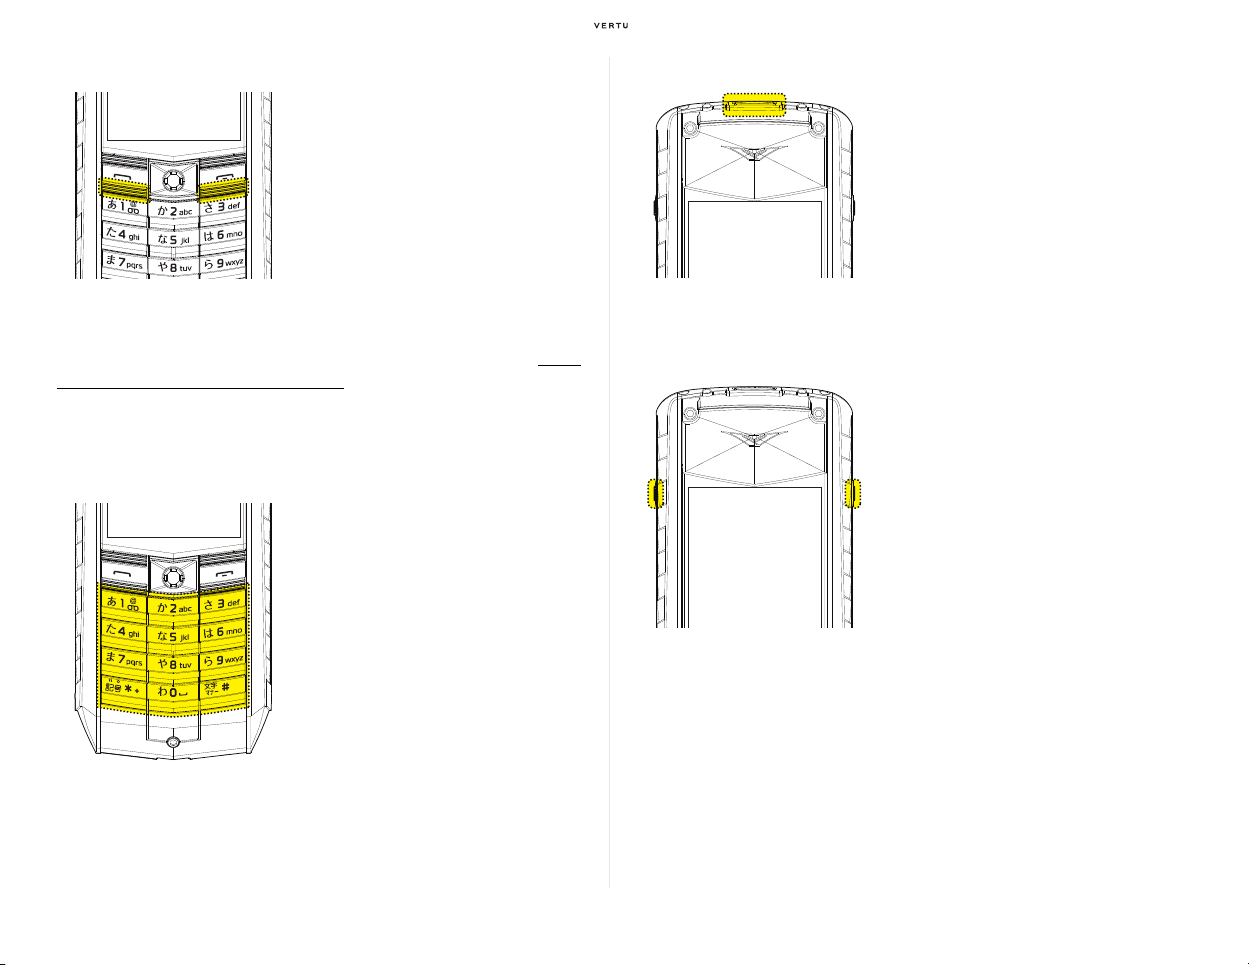
Principal key operations ......................................................................... 17
Display.................................................................................................... 19
Inserting the battery and SIM card ......................................................... 23
Switching your Vertu phone on and off................................................... 24
The Setup wizard (Initial settings) .......................................................... 24
Checking Accurate time settings ............................................................ 25
Personalising the Home screen.............................................................. 26
The Main Menu....................................................................................... 28
Making / receiving calls .......................................................................... 32
Text entry................................................................................................ 37
Sending messages ................................................................................. 38
Protecting your Vertu phone................................................................... 40
Memory management............................................................................. 42
Other useful features .............................................................................. 43
CD-ROM................................................................................................. 52
Accessories ............................................................................................ 54
Specifications ......................................................................................... 57
3
Page 4

Health and safety information
WARNING: Read the following simple guidelines. Not following
them may be dangerous or illegal.
General
> Do not attempt to dismantle the phone or any of its accessories. Only
qualified service personnel should repair your Vertu phone and its
accessories.
> Do not touch the phone, battery or wall charger with wet hands.
> Keep your Vertu phone, and all parts and accessories, out of the reach
of small children and pets. The SIM card and other small parts could
present a choking hazard.
> Use only batteries and accessories approved by Vertu for use with this
particular model. The use of any other types may invalidate any
approval or warranty, and may be dangerous. In particular, use of
unapproved chargers or batteries may present a risk of fire, explosion,
leakage or other hazard. For availability of approved accessories,
please check with Vertu Customer Service (page 34).
> The bundled battery and wall charger are only for use with your Vertu
phone. Do not use this battery or charger with any other device.
> Before connecting your Vertu phone to another device, read the
supporting documentation to confirm that the other device is compatible.
Operating environment
> In certain countries and regions, services may not be available with
certain handset models. Please contact any Vertu store, authorised
Vertu dealer or Vertu Customer Service (page 34) for further
information.
> Observe all local safety regulations regarding the use of mobile phones
while driving.
> Pull off the road and park before making or answering a call.
> Do not stop on the hard shoulder of a motorway to answer or make a
call, except in an emergency.
> If using an integrated handsfree device, make sure the phone is
securely placed in its holder.
> Do not place the phone on the passenger seat or where it can break
loose during a collision or sudden stop.
> Only qualified personnel should install the device in a vehicle. Faulty
installation or service may be dangerous. For more information, consult
your vehicle manufacturer or representative.
> Vehicle air bags inflate with great force. Do not place objects, including
either installed or portable wireless equipment, in the area over the
airbag or in the airbag deployment area.
> Switch off your Vertu phone when refuelling.
> Do not handle your Vertu phone when operating machinery.
> Switch your Vertu phone off if you are entering a hospital or health care
facility. Medical equipment may be affected by phone usage.
> Switch your Vertu phone off when travelling on an aircraft. The phone
signal may interfere with systems in the aircraft. You are legally bound
to comply with this recommendation.
> Switch your Vertu phone off in any facility where posted notices prohibit
phone usage. Always follow building regulations governing phone
usage.
> Switch your Vertu phone off when blasting is in progress, and observe
all provided guidelines and regulations.
> Switch your Vertu phone off in areas with potentially explosive
atmospheres, such as fuel storage areas and spray paint facilities.
> Keep your Vertu phone away from fuel and chemicals.
Electronic devices
> If you wear a pacemaker, or are in the company of someone who does,
you should be aware that there is a small risk of mobile phone usage
interfering with the operation of the pacemaker. You should contact your
doctor, or the manufacturer of the pacemaker, for more information. If
you have any reason to suspect that interference is taking place, switch
4 Health and safety information
Page 5

off your phone immediately.
> Persons with pacemakers should keep the phone more than 22 cm from
their pacemaker when the phone is switched on.
> Persons with pacemakers should not carry the phone in a breast pocket.
> Persons with pacemakers should use the ear opposite the pacemaker
to minimise the potential for interference.
> Mobile phone usage may interfere with some hearing aids. If this
happens, you should contact your doctor or Vertu Customer Service
(page 34).
> Mobile phone usage may interfere with the functionality of inadequately
shielded medical devices. Consult a physician or the manufacturer of
the device to ensure safe procedures are used.
> Mobile phone usage may interfere with the functionality of any
inadequately shielded electronic system in a motor vehicle. Examples
include airbags and fuel injection systems. You should contact the
manufacturer of the vehicle or system to ensure that the system is
properly shielded.
Battery safety
> Stop using the battery if you detect any abnormalities, such as odour,
discolouration or heat during use, charging or storage.
> Do not use your Vertu phone with a damaged battery.
> Do not short-circuit the battery. Accidental short-circuiting can occur
when a metallic object causes a direct connection between the + and terminals of the battery.
> Do not touch the battery terminals.
> Do not leave the battery in areas of extreme cold or heat.
> Do not store your Vertu phone in, or near, direct heat sources such as
radiators. This could cause the battery to overheat and explode.
> Never soak the battery in water or any other liquid.
> Never attempt to open the battery. The battery contains substances that
may be harmful if swallowed or allowed to come into contact with
unprotected skin.
> In the unlikely event of a battery leak, take care to keep the battery
discharge away from your eyes and skin. If the leakage does come into
contact with eyes or skin, flush thoroughly with clean water and consult
a doctor.
> Do not dispose of the battery in a fire.
> Do not dispose of the battery in a regular waste container. The battery
contains toxic chemicals and must be disposed of appropriately.
Contact your local authorities for more information.
Wall charger safety
> Do not use a damaged or worn charger. The use of a damaged or worn
charger could result in electric shock, burns or fire.
> Do not bend or twist the cable of the charger.
> Do not pull on the connected data cable in order to remove the charger
plug from a socket. Grasp the plug directly when unplugging the charger
to avoid causing any damage to the cable.
> Do not touch the pins of the plug when connecting or disconnecting it
from a power source.
> Never charge your Vertu phone when the connection point is damp or
wet.
> Chargers must only be used in dry conditions. They should never be
used when damp or wet.
> Do not place heavy objects on the charger.
> When the charger is not in use, disconnect it from the power source.
Health and safety information 5
Page 6

Care and maintenance
Your Vertu products have been crafted from some of the finest materials
and care should be taken to keep them in good condition. Damage caused
to your Vertu phone by failing to observe these care instructions is not
covered by the warranty.
General
> Always use your Vertu phone in the intended manner. Incorrect usage
may affect performance.
> To avoid permanent damage to your Vertu phone, use only Vertu
approved batteries and accessories.
> The bundled battery and wall charger are only for use with your Vertu
phone. Do not use this battery or charger with any other device. This
could cause permanent damage to the device, battery or charger.
> Use only batteries and accessories approved by Vertu for use with this
particular model.
> Before connecting your Vertu phone to another device, read the
supporting documentation to confirm that the other device is compatible.
> Keep your Vertu phone, and all parts and accessories, out of the reach
of small children and pets.
> Do not allow your Vertu phone, battery or accessories to come into
contact with liquids or moisture. If your Vertu handset accidentally gets
wet, dry it completely with a soft, absorbent cloth before removing the
back cover. Remove the battery and leave all parts to dry naturally. Do
not apply heat.
> Do not use or store your Vertu phone in dusty or dirty locations.
> Do not use or store your Vertu phone in hot or cold areas.
> Do not open your Vertu phone unless absolutely necessary. Before
replacing the back cover, ensure that the interior of the phone and the
back cover seals are dry, clean, and free of any foreign objects.
> Do not mishandle or abuse your Vertu phone.
> Do not apply paint or other such substances to your Vertu phone.
> Interference may affect the performance of your Vertu phone. This is
normal and the phone should operate as normal once you move away
from the source of the interference.
> If your Vertu phone, or any of the accessories, are not working as they
should, please consult Vertu Customer Service (page 34). They can
provide you with the expert assistance you require.
> Do not attempt to disassemble your Vertu phone. Only Vertu authorised
personnel should service the phone.
> Only use a soft, clean cloth to clean your Vertu phone. Do not use
chemicals, detergents, abrasive substances, or any liquids. Use a
cotton swab to clean the camera lens.
Battery
> Do not leave the battery connected to the charger and power source for
longer than necessary. This will result in repeated short charging, which
will reduce battery performance and lifespan. Please disconnect the
charger when the battery is full.
> Do not leave the battery in areas of extreme cold or heat. This could
affect the performance and lifetime of the battery. A device with a hot or
cold battery may not work temporarily. The battery has optimum
performance in an ambient temperature of between +15 °C (+59 °F) and
+25 °C (+77 °F)
> Only remove the battery with the phone switched off.
Ceramics and sapphire
Ceramics and sapphire are very hard materials, but are also brittle and can
be scratched by harder materials or objects. They can also be damaged if
dropped.
> Avoid contact between your Vertu phone and hard materials such as
diamond jewellery, nail files, abrasives, and mineral crystals.
> Do not drop or knock your Vertu phone on hard surfaces.
> Avoid repeated rubbing of your Vertu phone against hard surfaces.
6 Care and maintenance
Page 7

Leather
All Vertu leather products are made by expert craftsmen. Each leather hide
is unique and has natural markings which should be considered part of the
individuality of fine leather. All leather can be damaged and should be
treated with care.
> Avoid exposing your Vertu phone to water and high humidity.
> Avoid dropping, knocking or rubbing your Vertu phone on hard surfaces.
> Do not expose your Vertu phone to extreme temperatures.
> Avoid contact between your Vertu phone and oily substances, make-up
and solvents.
Metal
Vertu metals are finished to a high standard and care needs to be taken to
maintain their appearance.
> Avoid contact between your Vertu phone and chemicals such as
solvents, alkaline and acid solutions, cola-based drinks and salt water.
If contact occurs, wipe with a clean, soft cloth as soon as possible.
> Avoid contact between your Vertu phone and sharp objects.
> Avoid dropping or knocking your Vertu phone on hard surfaces.
> Do not use metal polishes on your Vertu phone.
Rubber
> Avoid direct exposure to strong light, heat and humidity
> Avoid contact with dark coloured or heavily dyed materials (such as
PVC, polyester and denim) as the colour may transfer to the rubber.
> Should you find that the rubber has attracted surface dirt, this can, in
some instances, be removed by gently rubbing with a soft, light coloured
damp cloth.
About your phone
This wireless device is approved for use on EGSM 900 MHz, GSM 850/1800/
1900 MHz, and 3G (WCDMA) Bands I, II, V and VI (2100, 1900, 850, 800
MHz). Contact your service provider for more information about networks.
To use a device, you must have service from a wireless service provider.
Some features are not available on all networks; other features may require
that you make specific arrangements with your service provider to use them.
Network services involve transmission of data. Check with your service
provider for details about fees in your home network and when roaming on
other networks. Your service provider can explain what charges will apply.
Your service provider may have requested that certain features be disabled
or not activated in your device. If so, these features will not appear on your
device menu. Your device may also have customised items such as menu
names, menu order and icons.
To use any features in this device other than the alarm clock, the device
must be switched on.
When using the features in this device, obey all laws, and respect all local
customs, privacy and legitimate rights of others, including copyrights.
Copyright protection may prevent some images, music and other content
from being copied, modified or transferred.
Content owners may use different types of digital rights management (DRM)
technologies to protect their intellectual property, including copyrights. This
device uses various types of DRM software to access DRM-protected
content. With this device you can access content protected with WMDRM
10 and OMA DRM 2.0. If certain DRM software fails to protect the content,
content owners may ask that such DRM software's ability to access new
DRM-protected content be revoked. Revocation may also prevent renewal
of such DRM-protected content already in your device. Revocation of such
DRM software does not affect the use of content protected with other types
of DRM or the use of non-DRM-protected content.
Remember to make back-up copies or keep a written record of all important
information stored in your device.
About your phone 7
Page 8
Manufacturer’s limited warranty
NOTE: This limited warranty does not affect your legal (statutory)
rights under your applicable national laws relating to the sale of
consumer products.
Vertu provides this limited warranty to purchasers of the Vertu product(s)
included in the sales package ("Product").
Vertu warrants to you that, during the warranty period, Vertu or a Vertu
authorised service centre will, in a commercially reasonable time, remedy
defects in materials, design and workmanship free of charge. The Product
will be repaired or, should Vertu in its discretion deem it necessary,
replaced in accordance with this limited warranty (unless otherwise
required by law).
Warranty period
The warranty period starts at the time of the Product's original purchase by
the first end user. The Product may consist of several different parts, and
different parts may be covered by a different warranty period (hereinafter
"warranty period"). The different warranty periods are:
a. Twenty-four (24) months for the mobile device
b. Twelve (12) months for accessories (whether included in the mobile
device sales package or sold separately)
As far as your national laws permit, the warranty period will not be extended
or renewed or otherwise affected due to subsequent resale, or Vertu
authorised repair or replacement of the Product. However, part(s) repaired
or replaced during the warranty period will be warranted for the remainder
of the original warranty period, or for ninety (90) days from the date of repair
or replacement, whichever is longer.
How to get warranty service
If you wish to make a claim under this limited warranty, please return your
Product or the affected part (if it is not the entire Product) to a Vertu
authorised service centre. You can call Vertu Customer Service (national or
premium rates may apply) for further details on how to make a claim.
Information about Vertu authorised service centres and Vertu Customer
Service can be found in the sales package or at local Vertu web pages,
where available.
Any claim under this limited warranty is subject to you notifying Vertu or a
Vertu authorised service centre of the alleged defect within a reasonable
time of it having come to your attention, and in any event no later than
before the expiry of the warranty period.
When making a claim under this limited warranty, you will be required to
provide:
a. the Product (or the affected part) and
b. the original proof of purchase, which clearly indicates the name and
address of the seller, the date and place of purchase, the product type,
and the IMEI or other serial number.
What is not covered?
1. This limited warranty does not cover user manuals or any third party
software, settings, content, data or links, whether included or
downloaded in the Product, whether included during installation,
assembly or shipping, or at any other time in the delivery chain or
otherwise, and in any way acquired by you. Vertu does not warrant that
any Vertu software will meet your requirements, will work in combination
with any hardware or software provided by a third party, that the
operation of any software will be uninterrupted or error free, or that any
defects in the software are correctable or will be corrected.
2. This limited warranty does not cover a) normal wear and tear (including,
without limitation, wear and tear of camera lenses, batteries or displays),
b) defects caused by rough handling (including, without limitation,
defects caused by sharp items, by bending, compressing or dropping,
8 Manufacturer’s limited warranty
Page 9

etc.), or c) defects or damage caused by misuse of the Product, including
use that is contrary to the instructions provided by Vertu (e.g. as set out
in the Product's User Guide) and/or e) other acts beyond the reasonable
control of Vertu.
3. This limited warranty does not cover defects or alleged defects caused
by the fact that the Product was used with, or connected to, any product,
accessory, software and/or service not manufactured, or supplied by
Vertu, or was used otherwise than for its intended use. Defects can be
caused by viruses from your or from a third party's unauthorised access
to services, other accounts, PC systems or networks. This unauthorised
access can take place through hacking, password mining, or through a
variety of other means.
4. This limited warranty does not cover defects caused by the battery being
short-circuited, the seals of the battery enclosure or cells being broken
or tampered with, or the battery being used in equipment other than that
for which it has been specified.
5. This limited warranty is not enforceable if the Product has been opened,
modified or repaired by anyone other than an authorised service centre,
if it has been repaired using unauthorised spare parts, or if the Product's
serial number, the mobile accessory date code or the IMEI number has
been removed, erased, defaced, altered or is illegible in any way. This
shall be determined at the sole discretion of Vertu.
6. This limited warranty is not enforceable if the Product has been exposed
to moisture, dampness, extreme thermal or environmental conditions or
rapid changes in such conditions, corrosion, oxidation, spillage of food
or liquid, or chemical products.
Other important notices
Operator provides the SIM card and cellular and/or other network or system
on which the Product operates. Therefore, Vertu will not accept
responsibility under this warranty for the operation, availability, coverage,
services or range of the cellular or other network or system. Before Vertu or
Vertu authorized service centre can repair or replace the Product, if any
SIM-lock or other lock that has been added to lock the Product to a specific
network or operator, it may need to be unlocked.
Please remember to make back-up copies or keep written records of all
important content and data stored in your Product, because content and
data may be lost during repair or replacement of the Product. Vertu, in a
manner consistent with the provisions of the section Limitation of
Vertu’s liability, shall not under any circumstances be liable, either
expressly or implied, for any damages or losses of any kind whatsoever
resulting from loss of, damage to, or corruption of, content or data during
repair or replacement of the Product.
All parts of the Product or other equipment that Vertu has replaced shall
become the property of Vertu. If the Product is found not to be covered by
the terms and conditions of this limited warranty, Vertu and its authorised
service centres reserve the right to charge a handling fee. When repairing
or replacing the Product, Vertu may use products or parts that are new,
equivalent to new or re-conditioned.
Your Product may contain country specific elements, including software. If
the Product has been re-exported from its original destination country to
another country, the Product may contain country specific elements that
are not considered to be a defect under this limited warranty.
Limitation of Vertu’s liability
This limited warranty is your sole and exclusive remedy against Vertu, and
Vertu's sole and exclusive liability in respect of defects in your Product.
This limited warranty replaces all other Vertu warranties and liabilities,
whether oral, written, (non-mandatory) statutory, contractual, in tort or
otherwise, including, without limitation, and where permitted by applicable
law, any implied conditions, warranties or other terms as to satisfactory
quality or fitness for purpose. However, this limited warranty shall neither
exclude nor limit i) any of your legal (statutory) rights under the applicable
national laws or ii) any of your rights against the seller of the Product.
Manufacturer’s limited warranty 9
Page 10
To the extent permitted by applicable law(s), Vertu does not assume any
liability for loss of or damage to or corruption of data, for any loss of profit,
loss of use of Products or functionality, loss of business, loss of contracts,
loss of revenues, loss of anticipated savings, increased costs or expenses,
or for any indirect loss or damage, consequential loss or damage or special
loss or damage.
To the extent permitted by applicable law, Vertu’s liability shall be limited to
the purchase value of the Product. The above limitations shall not apply in
case of gross negligence or intentional misconduct by Vertu, or in case of
death or personal injury resulting from Vertu's proven negligence.
NOTE: Your Product is a sophisticated electronic device. Vertu
strongly encourages you to familiarise yourself with the User Guide
and instructions provided with and for the Product.
NOTE: The Product may contain high precision displays, camera
lenses and other such parts, which could be scratched or otherwise
damaged if not handled very carefully.
Vertu
c/o Nokia Japan Co. Ltd
1-8-1, Shimomeguro,
Meguro-ku,
Tokyo 153-0064
Japan
Other precautions
SAR Notice – RM-589V
YOUR VERTU PHONE (MODEL: ASCENT X, TYPE: RM-589V, FCC ID:
P7QRM-589V) MEETS GUIDELINES FOR EXPOSURE TO RADIO WAVES.
Your Vertu phone is a radio transmitter and receiver. It is designed to not
exceed the limits for exposure to radio waves recommended by international
guidelines. These guidelines were developed by the independent scientific
organization ICNIRP, and include safety margins designed to assure the
protection of all persons, regardless of age and health.
The exposure guidelines for mobile devices employ a unit of measurement
known as the Specific Absorption Rate, or SAR. The SAR limit stated in the
ICNIRP guidelines is 2.0 Watts/kilogram (W/kg), averaged over ten grams of
tissue. Tests for SAR are conducted using standard operating positions,
with the device transmitting at its highest certified power level in all tested
frequency bands. The actual SAR level of an operating device can be
below the maximum value because the device is designed to use only the
power required to reach the network. That amount changes depending on
a number of factors, such as how close you are to a network base station.
The highest SAR value under the ICNIRP guidelines for use of the device
at the ear is 0.47 W/kg.
This phone meets RF exposure guidelines when used either in the normal
use position against the ear or when positioned at least 2.2 cm (7/8 inch)
away from the body. When a carry case, belt clip or holder is used for bodyworn operation, it should not contain metal, and should position the phone
at the above-stated distance away from your body.
In order to transmit data files or messages, this device requires a good
quality connection to the network. In some cases, transmission of data files
or messages may be delayed until such a connection is available. Ensure
that the above separation distance instructions are followed until the
transmission is completed.
Use of device accessories and enhancements may result in different SAR
values. SAR values may vary depending on national reporting and testing
requirements and the network band. Additional SAR information may be
provided under product information on the Vertu official web site.
10 Other precautions
Page 11
FCC / Industry Canada notice
Ascent X
-589V
Your Vertu phone may cause TV or radio interference (for example, when
using a phone in close proximity to receiving equipment). The FCC or
Industry Canada can require you to stop using your phone if such
interference cannot be eliminated. If you require assistance, contact Vertu
Customer Service (page 34).
This device complies with Part 15 of the FCC rules. Operation is subject to
the following two conditions: (1) this device may not cause harmful
interference, and (2) this device must accept any interference received,
including interference that may cause undesired operation.
NOTE: Vertu is not responsible for any radio or TV interference
caused by unauthorised modifications to this equipment. Such
modifications could void your authority to operate the equipment.
RM
Declaration of conformity
We, Vertu, declare under our sole responsibility that the product, Model
Ascent X, type RM-589V, is in conformity with the provision of the following
Council Directive: 1999/5/EC.
A copy of the Declaration of Conformity can be found on the Vertu official
web page.
Other precautions 11
Export controls
Your Vertu phone may contain commodities, technology, or software
exported from the United States in accordance with the Export
Administration regulations. Diversion contrary to U.S. law is prohibited.
Notices
Copyright © Vertu 2010. All rights reserved.
Reproduction, transfer, distribution or storage of part or all of the contents
in this document in any form without the prior written permission of Vertu is
prohibited. Vertu operates a policy of continuous development. Vertu
reserves the right to make changes and improvements to any of the
products described in this document without prior notice.
Under no circumstances shall Vertu be responsible for any loss of data or
income or any special, incidental, consequential or indirect damages
howsoever caused.
The contents of this document are provided “as is”. Except as required by
applicable law, no warranties of any kind, either expressed or implied,
including, but not limited to, the implied warranties of merchantability and
fitness for a particular purpose, are made in relation to the accuracy,
reliability or contents of this document. Vertu reserves the right to revise
this document or withdraw it at any time without prior notice. The availability
of particular products may vary by region. Please check with Vertu
Customer Service (page 34)
Vertu and the V logo are registered trademarks or trademarks. Other
product and company names mentioned herein may be trademarks or
registered trademarks of their respective owners.
Recycling notice
Always return your used electronic products, batteries, and packaging
materials to a dedicated collection point. This way you help prevent
uncontrolled waste disposal and promote the recycling of materials. More
detailed information is available from the product retailer, local waste
authorities, national producer responsibility organisations, or your local
Vertu representative.
Page 12
Licenses
Includes RSA BSAFE cryptographic or security protocol software from RSA
Security.
Java™ and all Java-based marks are trademarks or registered trademarks
of Sun Microsystems, Inc.
Bluetooth
Industrial, scientific and medical devices such as microwave ovens,
licensed premises radio stations for moving object identification system in
factory production lines, specified low power radio stations which do not
require licenses, and amateur radio stations (hereafter referred to as “other
radio stations”) also use the frequency bandwidth used by this product.
1. Make sure that there are no “other radio stations” nearby before using this
product.
2. If radio wave interferences between this product and “other radio
stations” occur, change your location or stop transmitting radio waves
to avoid radio wave interferences.
3. If you have any questions or encounter any problems in using this
product in Japan, contact the number below.
and トータルナビ are trademarks or registered trademarks
of NAVITIME JAPAN, Co., Ltd.
The third-party applications provided with your device may have been
created by, and may be owned by, persons or entities not affiliated with, or
related to, Vertu. Vertu does not own the copyrights or intellectual property
rights to the third-party applications. As such, Vertu does not take any
responsibility for end-user support, functionality of the applications, or the
information in the applications or these materials. Vertu does not provide
any warranty for the third-party applications.
BY USING THE APPLICATIONS, YOU ACKNOWLEDGE THAT THE
APPLICATIONS ARE PROVIDED AS IS, WITHOUT WARRANTY OF ANY
KIND, EXPRESS OR IMPLIED, TO THE MAXIMUM EXTENT
PERMITTED BY APPLICABLE LAW. YOU FURTHER ACKNOWLEDGE
THAT NEITHER VERTU NOR ITS AFFILIATES MAKE ANY
REPRESENTATIONS OR WARRANTIES, EXPRESS OR IMPLIED,
INCLUDING, BUT NOT LIMITED TO, WARRANTIES OF TITLE,
MERCHANTABILITY OR FITNESS FOR A PARTICULAR PURPOSE.
NEITHER VERTU NOR ITS AFFILIATES MAKE ANY
REPRESENTATIONS OR WARRANTIES, EXPRESS OR IMPLIED, THAT
THE APPLICATIONS WILL NOT INFRINGE ANY THIRD-PARTY
PATENTS, COPYRIGHTS, TRADEMARKS, OR OTHER RIGHTS.
12 Other precautions
Vertu Customer Service:
Passive Near Field Communication Device
Your Vertu handset contains a Passive Near Field Communication device.
This device enables Vertu to verify the authenticity of the phone if it is
presented at a Vertu branded store or Vertu authorised service centre.
03-6738-3955 (or +81-3-6738-3955 from countries outside Japan)
Operation hours: 9:00 a.m. - 8:00 p.m. (Mon - Sun, including holidays)
2.4 FH 1
This product uses 2.4 GHz and utilizes the FH-SS modulation
system.The estimated interference distance is 10 m or less.
Page 13

General Public Licence for the software known as MSNTP
(c) Copyright, N.M. Maclaren, 1996, 1997, 2000
(c) Copyright, University of Cambridge, 1996, 1997, 2000
Free use of MSNTP in source and binary forms is permitted, provided that
this entire licence is duplicated in all copies, and that any documentation,
announcements, and other materials related to use acknowledge that the
software was developed by N.M. Maclaren (hereafter referred to as the
Author) at the University of Cambridge. Neither the name of the Author nor
the University of Cambridge may be used to endorse or promote products
derived from this material without specific prior written permission.
The Author and the University of Cambridge retain the copyright and all
other legal rights to the software and make it available non-exclusively. All
users must ensure that the software in all its derivations carries a copyright
notice in the form:
(c) Copyright N.M. Maclaren,
(c) Copyright University of Cambridge.
No warranty
Because the MSNTP software is licensed free of charge, the Author and
the University of Cambridge provide absolutely no warranty, either
expressed or implied, including, but not limited to, the implied warranties of
merchantability and fitness for a particular purpose. The entire risk as to the
quality and performance of the MSNTP software is with you. Should
MSNTP prove defective, you assume the cost of all necessary servicing or
repair.
In no event, unless required by law, will the Author or the University of
Cambridge, or any other party who may modify and redistribute this
software as permitted in accordance with the provisions below, be liable for
damages for any losses whatsoever, including but not limited to lost profits,
lost monies, lost or corrupted data, or other special, incidental or
consequential losses that may arise out of the use or inability to use the
MSNTP software.
Copying policy
Permission is hereby granted for copying and distribution of copies of the
MSNTP source and binary files, and of any part thereof, subject to the
following licence conditions:
1. You may distribute MSNTP or components of MSNTP, with or without
additions developed by you or by others. No charge, other than an "atcost" distribution fee, may be charged for copies, derivations, or
distributions of this material without the express written consent of the
copyright holders.
2. You may also distribute MSNTP along with any other product for sale,
provided that the cost of the bundled package is the same regardless of
whether MSNTP is included or not, and provided that those interested
only in MSNTP must be notified that it is a product freely available from
the University of Cambridge.
3. If you distribute MSNTP software or parts of MSNTP, with or without
additions developed by you or others, then you must either make
available the source to all portions of the MSNTP system (exclusive of
any additions made by you or by others) upon request, or instead you
may notify anyone requesting source that it is freely available from the
University of Cambridge.
4. You may not omit any of the copyright notices on either the source files,
the executable files, or the documentation.
5. You may not omit transmission of this License agreement with whatever
portions of MSNTP that are distributed.
6. Any users of this software must be notified that it is without warranty or
guarantee of any nature, express or implied, nor is there any fitness for
use represented.
April 2010
Other precautions 13
Page 14
Using your Vertu phone
Vertu package contents
Thank you for choosing the Vertu Ascent.
After unpacking, please check the contents of the packaging for the
following items:
>
Vertu Ascent (RM-589V) phone
>
Japanese User Guide
>
Ascent Guide
>
CD-ROM
>
Authenticity Card
>
Battery
>
AC adapter (comprising the adapter itself and international adapter plugs)
>
Two USB data cables
>
Microfibre polishing cloth
> Back cover release key
Networks
To optimise the performance and make maximum use of the functions of
your Vertu phone, you will need a SIM card issued by VERTU Club. If you
use a SIM card issued by a non-Vertu service provider, your Vertu phone
may not operate properly. For more information, contact Vertu Customer
Service (page 34). For available services and charges when a SIM card
other than the one supplied by VERTU Club is used, contact your service
provider.
The wireless device described in this guide is approved for use on EGSM
900 MHz, GSM 850/1800/1900 MHz, and 3G (WCDMA) Bands I, II, V and
VI (2100, 1900, 850 and 800 MHz).
Conventions used in this guide
Menu
[Send] key
Warning:
Represents text that appears on your Vertu phone's
display.
Example: “From the Home screen, press Menu.”
Represents a Vertu phone key.
Example: "Press the [Send] key to make a call."
Important information relating to safety.
CD-ROM
The supplied CD-ROM contains the following items:
> Vertu PC Suite (for PC only)
> iSync Plug-in (for Macintosh only)
> Electronic versions of Japanese User Guide and English Quick Guide
> A link to download the Map Loader application.
(By downloading Map Loader from this link and installing it on your PC, you
can transfer the latest set of maps, which is used for the World Maps service,
onto your Vertu phone from the Internet. You should install Vertu PC Suite on
the PC before installing Map Loader.)
For more information, refer to "CD-ROM" (page 52).
14 Using your Vertu phone
> The screens and illustrations used in this document aim to help you deepen
your understanding of the product. They may, however, differ from those on the
actual product.
Tip:
Note:
Related pages:
Represents useful information or a quick way to access
or operate a feature.
Represents points to be aware of when using your
Vertu phone.
Guides you to the related page(s), where you may find
further information on the described feature/service.
Page 15

Glossary
[Joystick] key
Number keys
Default
SIM card
Service provider
Network service
Home screen
PIN code
A four-direction navigation key located on the front
face of the phone. Use this key to move the cursor (up,
down, left or right), select the desired item or scroll
between pages. This is the most frequently used key
in a variety of situations.
The keys that are used to enter text or numbers.
Initial product setting as supplied by Vertu when the
phone leaves our workshop.
Subscriber Identity Module. This is a small card
supplied by your service provider to insert into your
Vertu phone for a network connection.
The provider of your SIM card and all associated
network services. In this document, we simply refer to
it as a “service provider”.
A feature which is made available at the discretion of
your service provider. These services include
Voicemail and Call forwarding/divert. The operational
conditions of the individual services differ depending
on the service provider networks.
The display shown when the Vertu phone is turned on
or when the [End] key is pressed the necessary
number of times to exit the function in use. Menu is
displayed at the bottom of the Home screen.
A Personal Identification Number that allows only
authorised access to your SIM card. We strongly
recommend that you set this up when you receive your
new Vertu phone and SIM card.
GSM network
EGSM network
GPRS
High-speed Packet
Access (HSPA)
The second generation mobile communication
network with digital technology, which is a commonly
used standard throughout the world.
A network principally in use in Europe which has
expanded the GSM 900MHz band specifications.
The 2.5-generation mobile communication network,
resulting from an upgrade of GSM technology, making
data communications such as packet
communications more efficient. It is a commonly used
standard throughout the world.
Jointly refers to High Speed Downlink Packet Access
(HSDPA) that conforms to Release 5, issued by the
3GPP standards organisation, and to High Speed
Uplink Packet Access (HSUPA) that conforms to
Release 6, both of which are designed to accelerate
3G (WCDMA) network packet data communications.
Your Vertu phone supports these standards, enabling
a maximum HSDPA (incoming data) rate of 10.2 Mbps
and a maximum HSUPA (outgoing data) rate of
1.7 Mbps, on networks that can handle such rates.*
* The maximum HSDPA/HSUPA rates are based on
technical specifications; they are not actual
communication rates. Actual communication rates
will depend on various conditions, including network
traffic or other environments.
3G (WCDMA)
network
The third generation mobile communication network,
which conforms to the global Third Generation Partnership
Project (3GPP) standards. When used in Japan, this
mobile phone operates on this WCDMA network.
Using your Vertu phone 15
Page 16
Your Vertu phone - front Your Vertu phone - back
[Stopwatch] key
[
P
o
w
e
r
]
k
e
y
Light sensor Earpiece
Home screen
[Selection] key (Left) [Selection] key (Right)
[Send] key
[Joystick] key
[
E
n
d
]
k
e
y
[
C
o
n
c
i
e
r
g
e
]
k
e
y
Pulsing indicator
N
u
m
b
e
r
k
e
y
s
front view
A
n
t
e
n
n
a
a
r
e
a
Camera flash / Torch
Camera lens
B
a
c
k
c
o
v
e
r
Back cover release
back view
16 Using your Vertu phone
Page 17
Your Vertu phone - left, right & base Principal key operations
Speaker ports
[Stopwatch] key
[Concierge] key
M
i
c
r
o
p
h
o
n
e
P
o
w
e
r
/
U
S
B
d
a
t
a
c
a
b
l
e
c
o
n
n
e
c
t
o
r
left side view right side view
base view
[Joystick] key
Related pages: Shortcuts assigned to the [Joystick] key
→
[Selection] keys
"Shortcuts assigned to the [Joystick] key" (page 29)
→
"Using the Go to application" (page 30)
→
"Checking your own phone number" (page 30)
The [Joystick] key enables you to move the
cursor up, down, left and right around the
display, or to scroll pages. Pressing the
[Joystick] key (Centre) allows you to select
a highlighted option/item.
Press the [Selection] keys to select the
menu at the bottom of the Home screen.
> Press the [Selection] key (Left) to
select the bottom left menu (e.g., the
New msg option in the left figure).
> Press the [Selection] key (Right) to
select the bottom right menu (e.g., the
Home option in the left figure).
> Press the [Joystick] key (Centre) to
select the bottom centre menu (e.g.,
the Menu option in the left figure).
Related pages: Shortcuts assigned to the [Selection] keys
→
"Shortcuts assigned to the [Selection] keys" (page 29)
Using your Vertu phone 17
Page 18
[Send] key / [End] key
[Power] key
Press the [Send] key (the left key with a
highlight in the figure) to make a call,
answer a call or send a message. Press
the [End] key (the right key with a highlight
in the figure) to end a call or to exit a
running application.
Pressing the [Send] key from the Home
screen will display a log of dialled and
received calls.
In most cases, you can terminate any application immediately by pressing
the [End] key once or twice.
When playing music or video on Media player, however, you need to press
and hold the [End] key for a few seconds to both close Media player and
stop the played music/video.
Number keys
Press the Number keys to enter phone
numbers or text.
> To make an international call, press the
[ * ] key twice to display a “+” sign.
> Press the [ # ] key while entering text,
to switch between different text input
modes.
> Press the [ * ] key once or twice while
entering text, to show a symbol list or
Emoji (pictograph) list.
> Press and hold the [ # ] key from the
Home screen, to quickly activate or quit
the Manner profile.
> Press and hold the [ 0 ] key from the
Home screen, to quickly launch the
web browser.
> Press and hold the [ * ] key to quickly
turn on the torch on the back of the
phone for a period of approximately
one minute. See "Torch" on page 51 for
more information
Press and hold the [Power] key to switch
your Vertu phone on or off.
Or, give a short press on the key from the
Home screen, to show the profile list, which
gives you a list of options, such as
switching your phone off, locking the
keypad or changing the active profile on
the phone (e.g. switching profiles from
General to Meeting).
[Stopwatch] / [Concierge] keys
On the left and right sides of your Vertu
phone, you will find the [Stopwatch] and
the [Concierge] keys, respectively.
> [Stopwatch] key (left side)
You can quickly launch Stopwatch just by
pressing the [Stopwatch] key from the
Home screen.
When this key is pressed while the Home
screen clock type is currently Analogue or
Hide clock (hidden), the stopwatch starts
in analogue chronograph mode. On the
other hand, if the key is pressed while the
Home screen clock type is Digital or
Miniature, the stopwatch appears in digital
mode. For more information on using the
stopwatch, refer to "Stopwatch" (page 44).
> [Concierge] key (right side)
You can also quickly access the Concierge
menu by pressing the [Concierge] key from
the Home screen. From this screen, you
can call or send a message request to
Concierge. (Concierge is an exclusive
service for VERTU Club members.)
18 Using your Vertu phone
Page 19
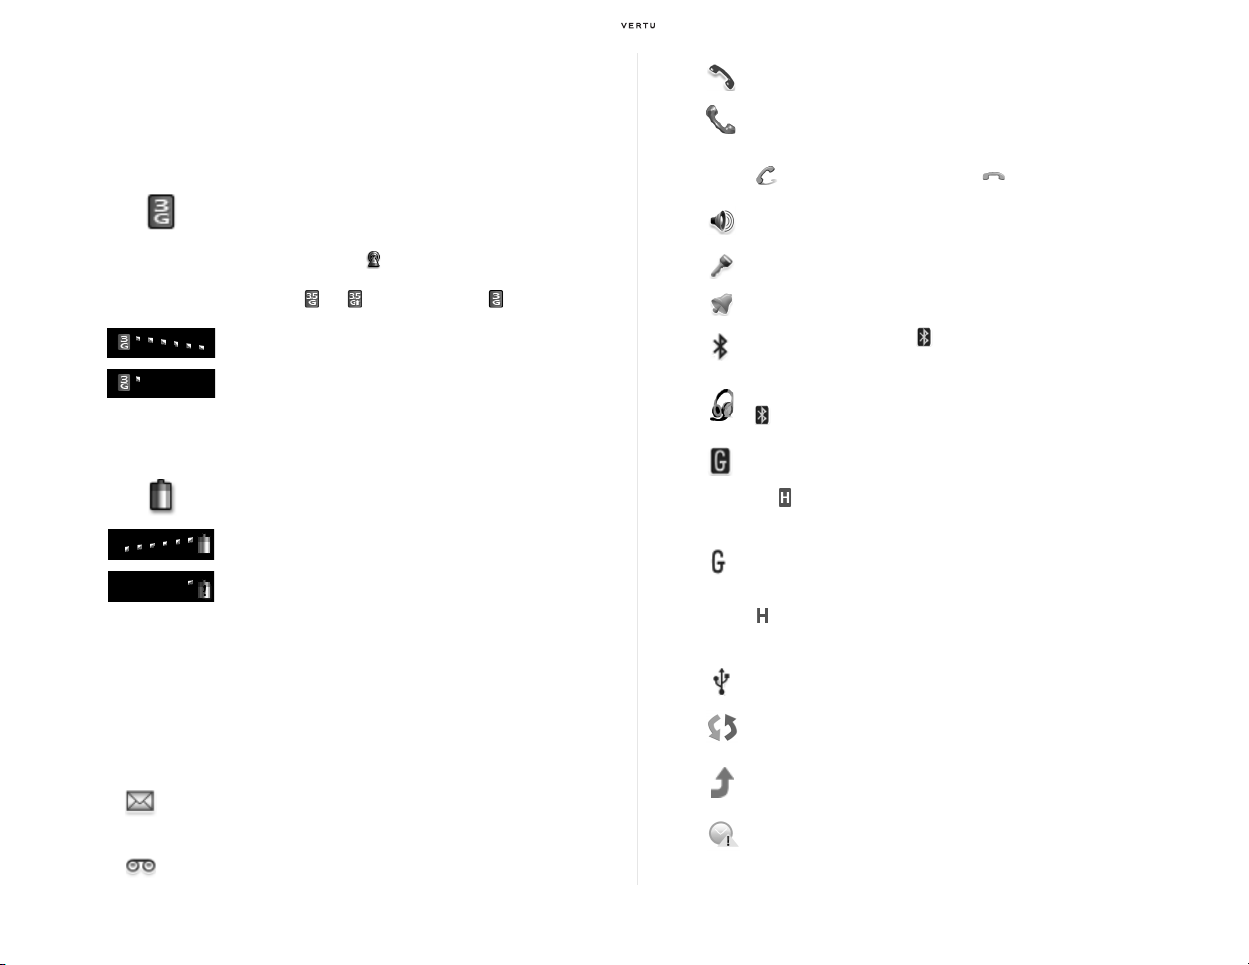
Display
You have missed a call. (This icon is displayed in red.)
Status indicators
When your Vertu phone is switched on, the following indicators appear at
the top of the display.
This icon shows the signal strength when your Vertu
phone is used through a 3G (WCDMA) network. It
appears at the top left of the display. When using a
GSM connection, appears. Or, if high-speed data
communication is possible using HS packet
access, or appears
This picture shows a strong signal.
This picture shows that the signal strength is weak.
(In this case, the signal icon is displayed in yellow, or
is displayed in red when you are out of signal range).
To obtain a stronger signal, move to an area clear of
obstructions that might otherwise block the signal.
This indicator displays the level of the battery charge.
It appears at the top right of the display.
This picture shows a fully charged battery.
This picture shows that the battery charge level is
low. (In this case, the battery charger icon is
displayed in yellow or red). You will need to recharge
your Vertu phone soon.
instead of .
Status icons
Status icons appear in the status bar (just below the status indicators
mentioned above) and display the status of various features of your Vertu
phone. The most commonly displayed icons are shown below.
You have one or more unread messages. (When this icon is
revolving on the display, your Vertu phone is downloading the
message(s) from the network.)
You have a voice message waiting (may not be shown on all
networks).
Making a call, receiving an incoming call or a call is in progress.
When a call is in progress or placed on hold, the following icons
also appear in the on-screen note:
(green): Call in progress (orange): Call on hold
Loud speaker is on.
The keypad is locked.
An alarm is set.
Bluetooth is switched on ( appears when data is being
transmitted back and forth with other Bluetooth devices).
Connected to headset. (When a Bluetooth headset is connected,
also appears.)
Packet transfer is active (connected to the Internet, with packet
communication in an active state).
Or, appears when high-speed data communication is possible
using HS packet access.
Your Vertu phone has completed terminal registration onto the
network, and is ready to begin packet transfer at any time. (Not
connected to the Internet yet.)
appears when high-speed data communication is possible
using HS packet access.
USB connection is in use.
Synchronising data with another phone, PC or remote storage
server, etc.
Your Vertu phone is currently set not to ring for Call divert/
forwarding or Voicemail services.
Accurate time not available.
Using your Vertu phone 19
Page 20
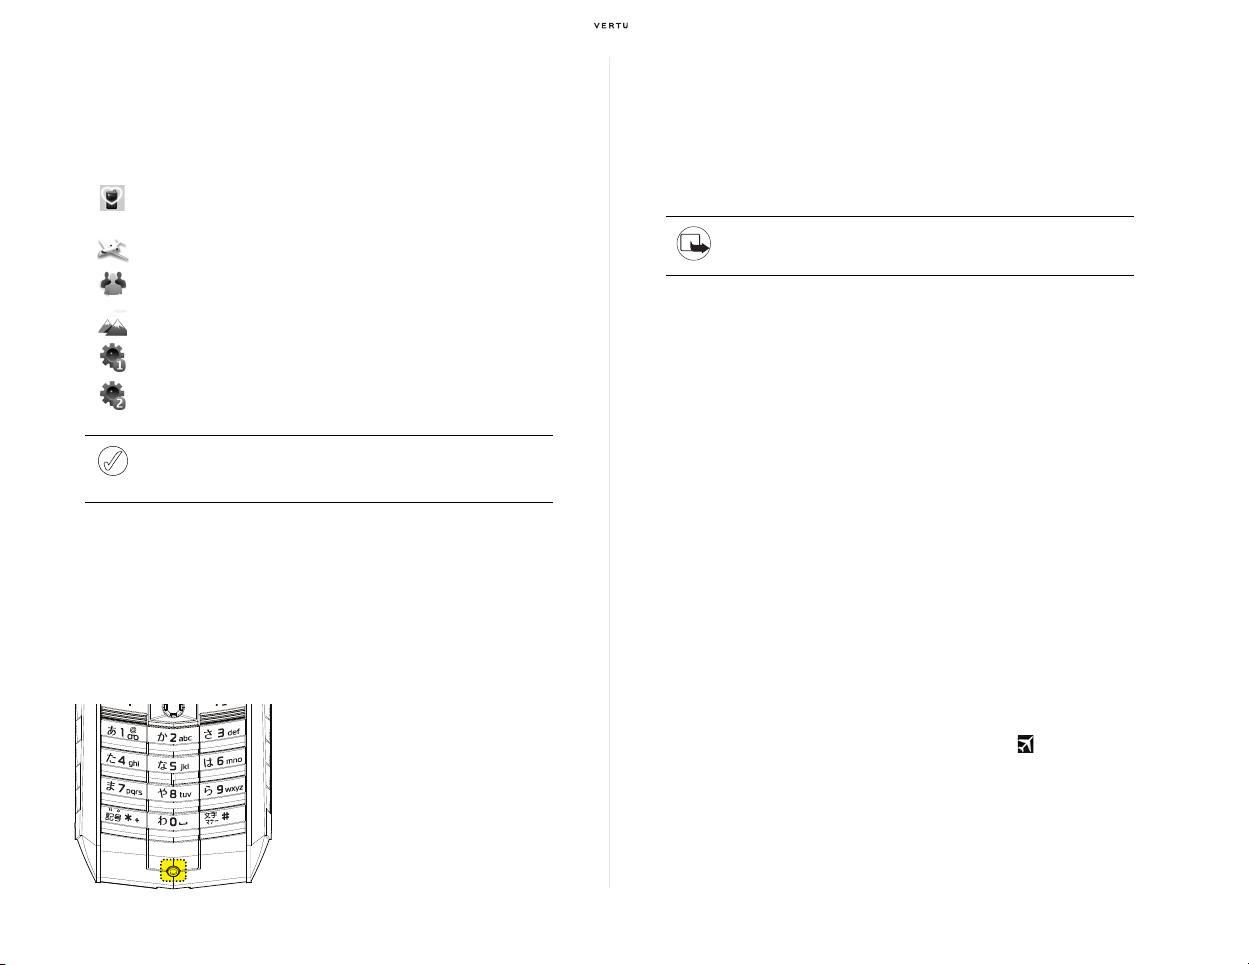
Profile icons
Your Vertu phone supports several profiles (page 47), including Manner or
Flight profiles. When switching to a profile other than General (the default
setting), one of the following icons is displayed alongside the other status
icons.
Manner
profile is selected. (Or
alert tone
Flight profile is selected.
Meeting profile is selected.
Outdoor profile is selected.
are both turned
Incoming call alert
Off
under
Menu
»
Settings
and
Message
»
Tones
.)
Clock display on the Home screen
Your Vertu phone supports the following three different clock types to be
displayed on the Home screen: Analogue, Digital and Miniature.
When your Vertu phone leaves our workshop, the clock type is Analogue.
You can change the setting to Digital or Miniature.
Related pages: To change the Home screen clock type
→
"Changing the Home screen clock type" (page 26)
My style 1 profile is selected.
My style 2 profile is selected.
Accurate time
Your Vertu phone is location aware. It can use this capability to
automatically maintain an accurate local time anywhere in the world.
Note: The profile icons above are displayed when a profile other than
General is selected. No icon is displayed when the General profile is
currently active on the phone.
When this feature ("Accurate time" in the remainder of this document) is
enabled, the local time in Japan will be displayed on the Home screen, if
you are in Japan. When you then travel to Paris, the time displayed on the
screen will automatically be updated to reflect the local time in Paris.
To use this feature, your Home location must be defined. If you are
Pulsing indicator
When your Vertu phone is on and there is no key press on the phone for a
certain period of time, the display is automatically turned off, and the light at
normally resident in Japan when you insert a VERTU Club SIM card and
switch on your Vertu phone for the first time, if you accept the Setup
wizard’s suggestion (page 24), Japan is set as the Home location.
the lower end of the phone (as shown below) begins to flash at different
rates to indicate the status of your Vertu phone.
> In stand-by mode, the light flashes
slowly.
> If you have missed a call or received a
message, the light flashes quickly.
>
When you are charging your Vertu
phone, the light will be on permanently.
When Accurate time is running, the time display is as follows.
> When in your Home location, the local time is shown on the Home screen.
> If you travel away from your home location, the clock time is adjusted to the
local time at your travel destination. An aeroplane icon ( ) appears alongside
the time to indicate that you are not in your home location.
> If the clock type is Analogue or Digital, your home time is also shown when
you are away from your Home location.
20 Using your Vertu phone
Page 21
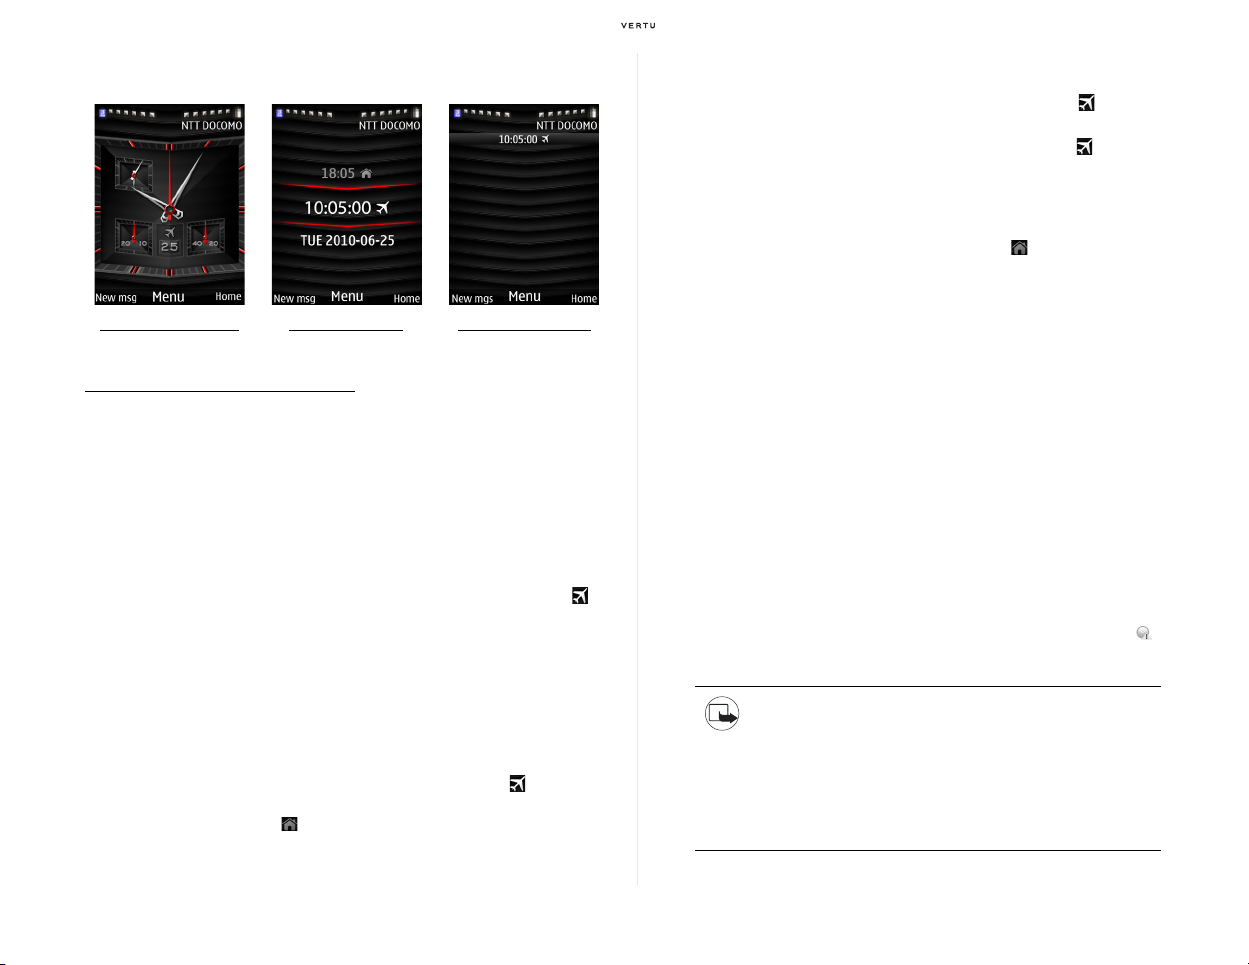
The following examples illustrate how the time is displayed on the Home
Clock Typ e:
Analogue
Clock type:
Digital
Clock type:
Miniature
screen when you are not in your Home location:
Highlights
> Accurate time is a location-based feature which uses an internet connection to
> When Accurate time is enabled, and you are in your Home location, the Home
> When you have travelled outside your Home location, the time display changes
of Accurate time feature:
accurately synchronise the clock of the phone with local time.
screen clock displays your local time.
as follows (dependent upon the current clock type setting).
> When the clock type is Analogue:
The time displayed at the large analogue clock (centre) changes to the
accurate local time of your travel destination with an aeroplane
which is shown only when travelling. In addition,
location is also displayed in the small analogue clock at the upper left,
which also can be seen while travelling.
(Note: The two-digit number shown just beneath the aeroplane icon
indicates the day of the month, and the small analogue clock at the lower
right displays the number of seconds (for the large analogue clock time).
> When the clock type is Digital:
The white large numbers in the centre of the sceen indicates the accurate
local time of your travel destination with an aeroplane icon ( ) alongside.
The grey numbers just above indicate the time in your Home location
with a home icon ( ) alongside.
(Note: The white text at the bottom displays the current date.)
the time in your Home
icon ( )
> When the clock type is Miniature
The local time in your travel destination is displayed at the top of the
screen in small digital numbers with an aeroplane icon ( ) alongside.
The time in your Home location is not displayed when travelling.
> When you return to your Home location, the aeroplane icon ( ) will no longer
be displayed, and the time in your Home location will appear on the Home
screen again.
(When the clock type is Analogue, the small analogue clock at the upper left
will also disappear from the screen. When the clock type is Digital, the time
displayed at the top in grey text, together with the icon, will also disappear
from the screen.)
>
Regardless of where you travel to, the local time in your travel destination will
automatically be displayed, with necessary time zone offsets (based on Greenwich
Mean Time, GMT) and daylight savings time calculation automatically adjusted.
> Should you have set any alarm before travelling, the time for that alarm will also
be automatically adjusted so that they will remain at the same time in the new
local time (e.g., an alarm set for 7 a.m. in Japan will remain at 7 a.m. at your
travel destination).
> The use of Accurate time requires an Internet connection to enable your Vertu
phone to successfully synchronise the time with an atomic clock on-line.
(Some SIM cards may require manual configuration, such as a connection
access point. Note that such configurations are not required when you are using
a VERTU Club SIM card.)
> In addition, the Internet assisted GPS (A-GPS) feature should be turned on
(select Yes) to have the location awareness feature always available.
> Should you be unable to connect to the Internet, or in the event of a failed
connection, Accurate time may no longer be available and the clock type may
not be updated correctly. When Accurate time is not working normally, is
displayed in the status bar at the top of the screen.
Related pages:
Basic settings for Accurate time / A-GPS
→ "The Setup wizard (Initial settings)" (page 24)
→ "Checking Accurate time settings" (page 25)
→ "Troubleshooting when Accurate time is not working:" (page 25)
Setting your Home location
→ "The Setup wizard (Initial settings)" (page 24)
Using your Vertu phone 21
Page 22
Note:
Before using Accurate time, you need to accept the Internet
network connection in such a setting screen as the Setup wizard. Once
accepted, your Vertu phone will attempt to connect to the network
periodically or every time you switch the phone off and on again. This
may incur data transmission fees, depending on the location where your
Vertu phone is used or the service provider you use.
Note: When the clock type is Analogue, you will find a red clock hand
displayed on the large analogue clock face. Note that this is not a
second hand of the clock. Seconds are indicated by the smaller
analogue clock shown at the lower right of the screen.
Wallpaper
With your Vertu phone, you can change the Home screen wallpaper to any
image you like. If the clock type is Analogue or Digital, however, note that
changing the wallpaper will also replace the clock type with Miniature.
Refer to "Changing the wallpaper" (page 27) for more information.
Related pages: How to change the wallpaper
→ "Changing the wallpaper" (page 27)
Stopwatch mode linked to Home screen clock type
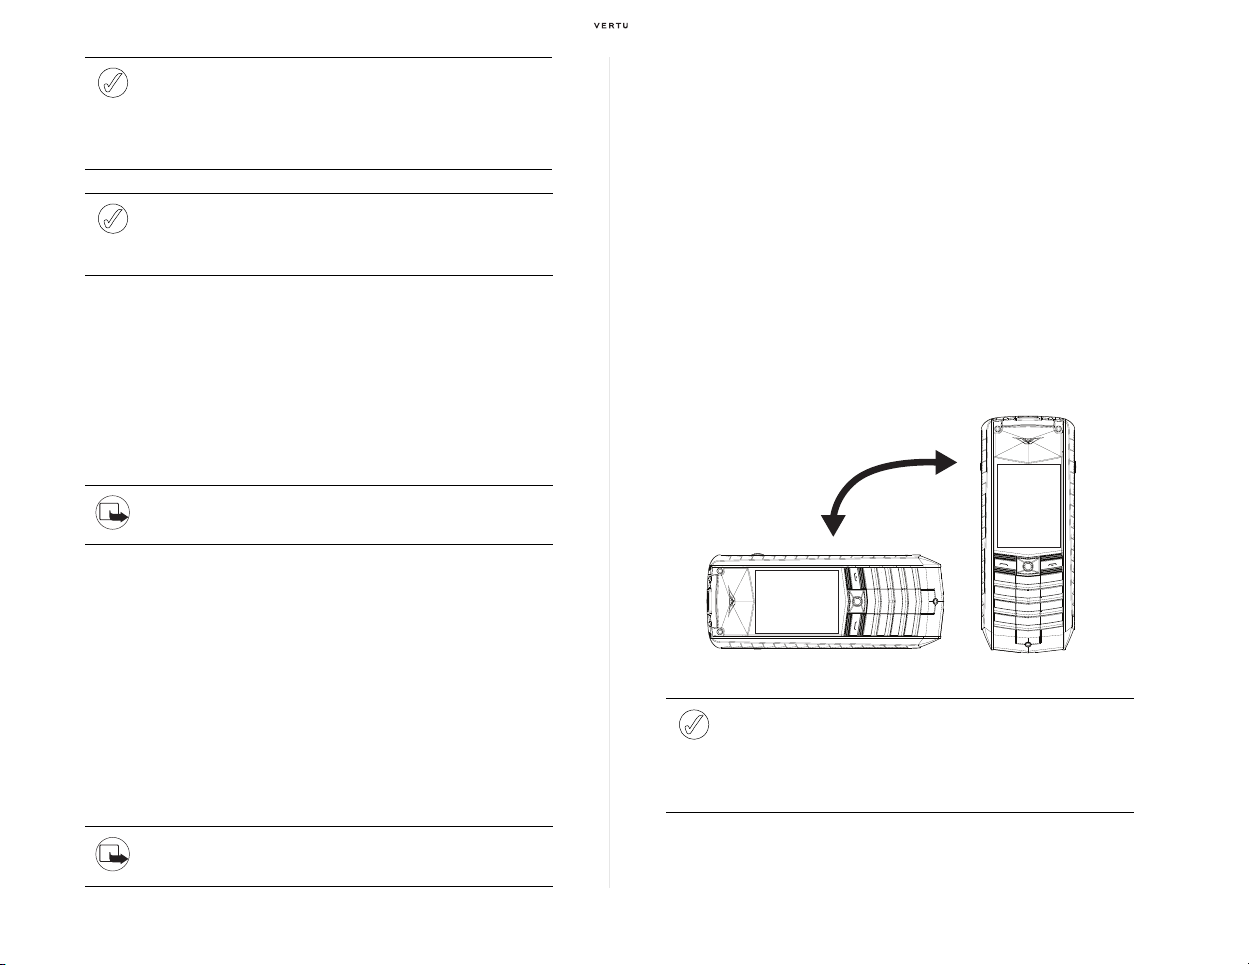
Tilt sensor (auto-detecting screen orientation)
Your Vertu phone includes a built-in Tilt sensor to automatically detect
whether it is being held vertically or horizontally.
Hold your Vertu phone the required way, while using any of the features
below. The screen orientation will automatically change as you move the
phone.
1. Pointing the camera at the shooting object, to take a photo or video clip
2. Viewing a still image or video clip from Gallery (page 46)
3. Browsing a web site after launching the web browser by any of the following
methods
> Select Menu » VERTU Club » Web from the Home screen
> Press and hold the [ 0 ] key on the Home screen
> Select Home (right [Selection] key) on the Home screen
The stopwatch can be displayed in analogue chronograph or digital mode.
These are linked to the clock type currently shown on the Home screen.
>
If the current Home screen clock type is
the [Stopwatch] key is pressed on the Home screen, the stopwatch is available in
analogue chronograph mode.
> If the clock type is Digital or Miniature, the stopwatch is available in digital
mode.
Related pages: Using the stopwatch
→ "Stopwatch" (page 44)
Analogue
or
Hide clock (hidden)
, when
22 Using your Vertu phone
Note: When the screen orientation changes from vertical to horizontal
(while displaying a still image, video clip or web site), the orientation of the
[Selection] key menus will also change to the horizontal mode. However,
depending on the menu option you select (including the one requiring
manual text entry, etc.), the screen orientation may temporarily return to
the vertical mode.
Page 23
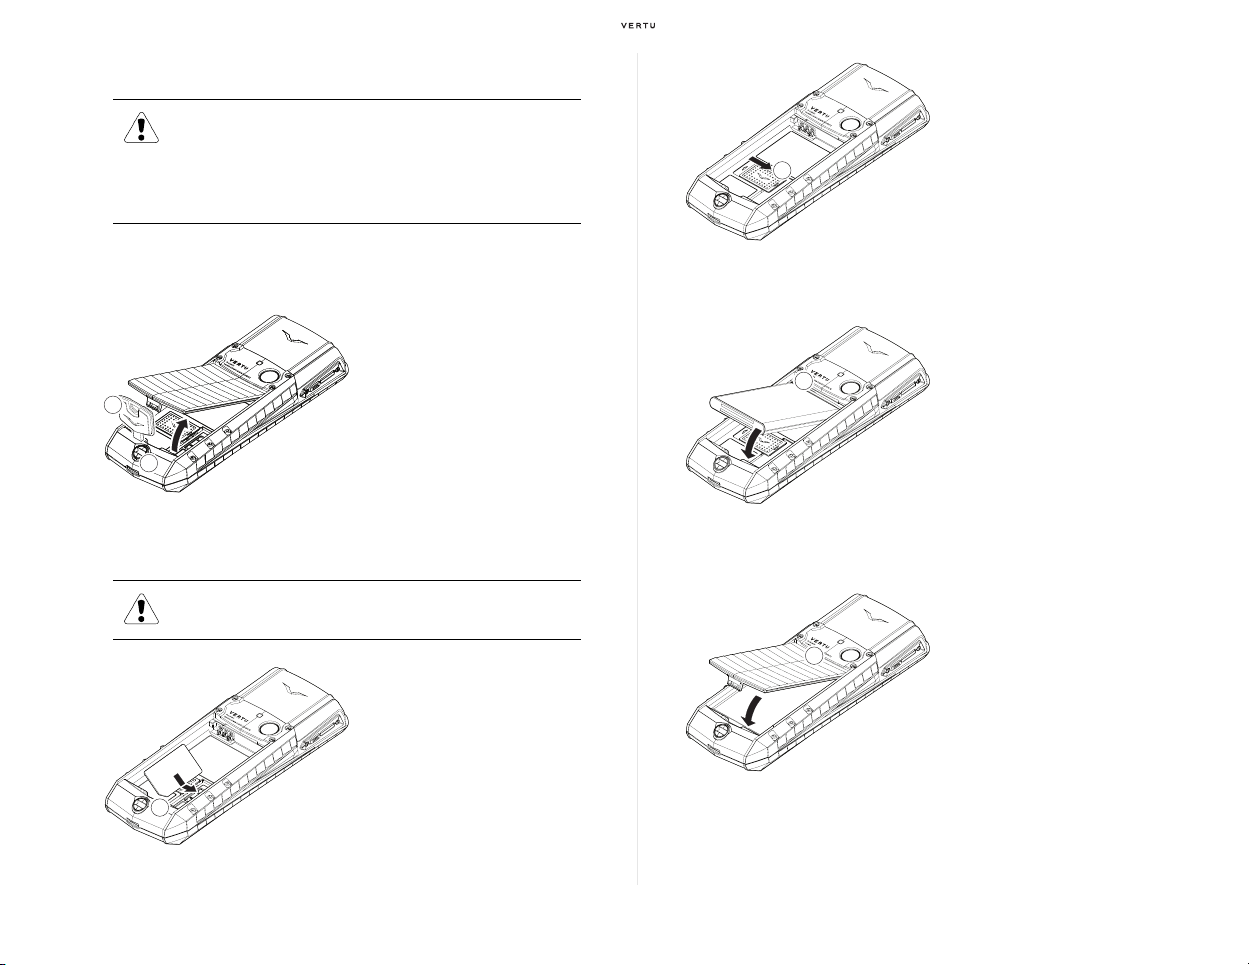
Inserting the battery and SIM card
01
02
03
04
05
06
Warning: Always switch the phone off and disconnect the
charger before touching the battery.
Keep SIM cards and the Back cover release key out of the reach
of small children.
Important: The SIM card and its contacts are easily damaged. Be
careful when handling, inserting or removing the SIM card.
Slide the locking mechanism
(04) over the SIM card to hold it
in place.
Removing the back cover
With the back of your Vertu
phone facing you, position the
Back cover release key (01)
into the slot of the locking
screw (02).
Turn the key (01) a quarter of a
turn anticlockwise, and gently
lift off the back cover as shown.
Insert the SIM card
Warning (Important): Always switch your Vertu phone off before
inserting or removing the SIM card.
With the gold contact area of
the SIM card facing downward,
align the SIM card such that the
bevelled corner (03) is located
at the bottom right, and then
insert the SIM card into the SIM
card tray.
Using your Vertu phone 23
Inserting the battery
Position the battery so that
the contacts align with the
contacts in the battery
compartment (05).
Ensure that the battery and
SIM card are seated correctly
before replacing the back
cover.
Replacing the back cover
To replace the back cover,
locate the internal clip (06) first.
Lower the back cover into
position until it clicks into place.
The cover should close tightly
using only light pressure.
Charging your Vertu phone
For information on charging your Vertu phone, see "Charging the battery"
(page 55).
Page 24
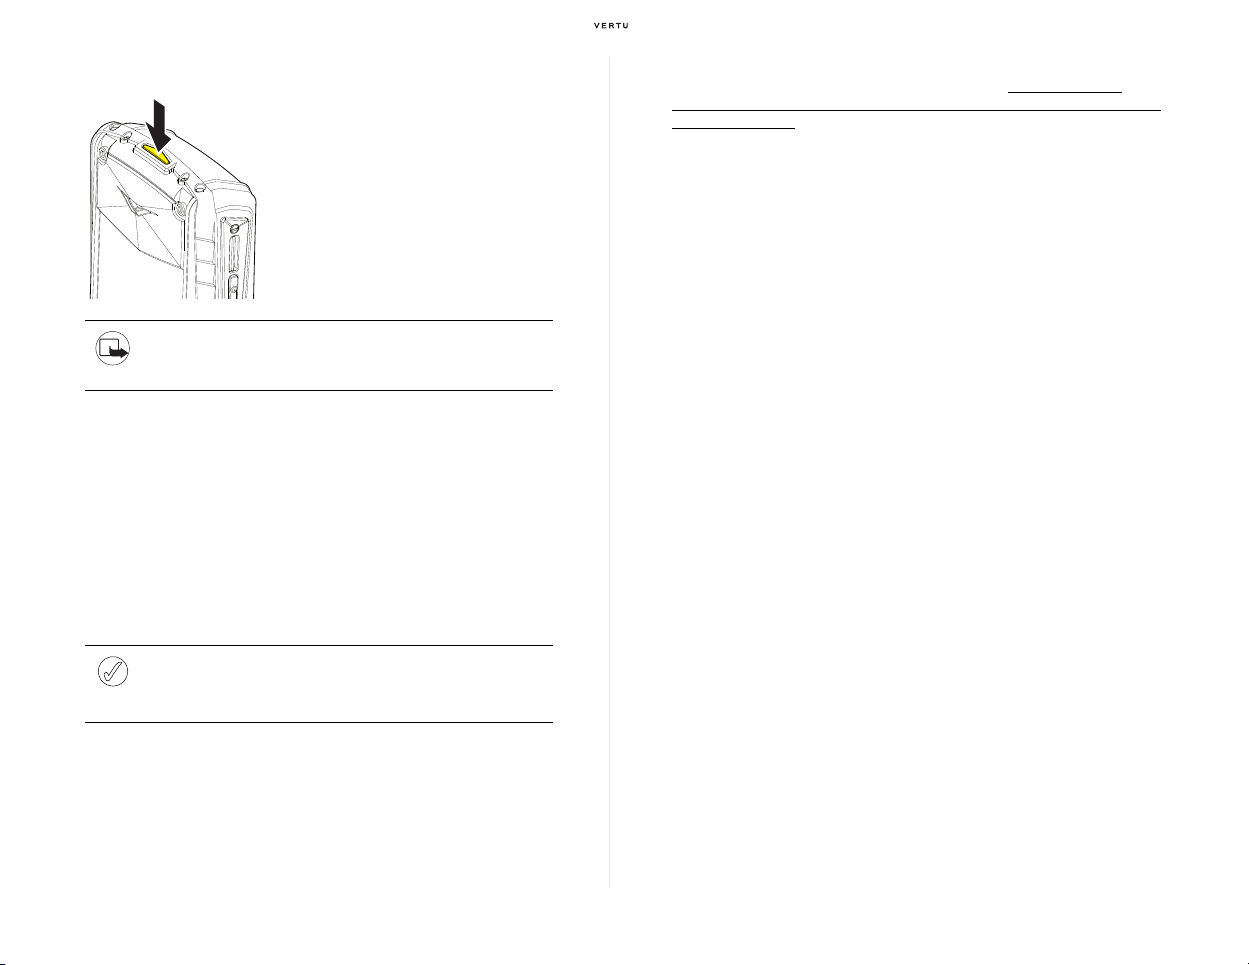
Switching your Vertu phone on and off
Press and hold the [Power] key to
switch your Vertu phone on or off.
> The battery may not be fully charged
when you first receive your Vertu
phone. If a “Battery low“ message is
displayed when you switch on your
Vertu phone, refer to "Charging the
battery" (page 55) for more information.
Related pages:
When a PIN code input screen appears upon turning your Vertu phone on
→
"PIN code" (page 40)
The Setup wizard (Initial settings)
When you switch on your Vertu phone for the first time with a valid SIM card in,
you will be guided through certain setup options by the Vertu Setup wizard.
When the wizard screen is displayed, select Start, and then accept
automatic Internet connection on the next screen (note that charges may
apply depending on your service provider). Then, the wizard helps you
quickly and easily set up the following functions:
Note: If necessary, you can decline the Internet connection here. But if
this is the case, note that you will not be able to use such features as
Accurate time (page 20) when the wizard is complete. Your Vertu
phone will use the Single fixed clock (page 26) as its clock mode.
> Home location
Specify the location (continent and country, and city if necessary) to be used on
the phone as the primary time zone. For example, if you are currently in a place
around Vertu Ginza Flagship Store in Japan and switch on your Vertu phone for
the first time with the VERTU Club SIM card in, the wizard will automatically
suggest Asia and Japan as the Home location. If changes are needed, select
Change and make the required changes. If no changes are needed, select
Accept and proceed to the next option.
> Date and time
This configures the date and time settings as needed. This option will be
displayed if you have declined automatic Internet connection in the earlier step
of the Setup wizard. Note that this option does not appear if you have accepted
the Internet connection in the earlier step. In this case, your Vertu phone will,
after all the wizard settings are complete, automatically attempt to connect to
the Internet and synchronise its clock, reflecting the time zone defined in the
Home location option of the previous step. When this option is shown, select
Change to change the settings. To proceed to the next option, select Accept.
> [Joystick] key (assigning shortcuts)
Shortcuts have been assigned to the four directions (Up, Down, Left and Right)
of the [Joystick] key ("Shortcuts assigned to the [Joystick] key" on page 29).
With this option, you can quickly reconfigure the pre-assigned shortcuts for Left,
Right and Down of the [Joystick] key to suit your own preferences. To change
any setting, move the cursor to an icon representing each [Joystick] key direction
(Left, Right or Down), press the [Joystick] key (Centre), and then select a new
shortcut from the function list that appears. Repeat this procedure until you
complete changing all necessary shortcuts. Then, select Accept to confirm the
settings and proceed to the next option. Note that the shortcut representing the
[Joystick] key (Up) is exclusively used for starting Vertu Feeds (page 31). You
cannot change this specific shortcut.
> Font size
You can define the font size used for displaying text for Messages, Contacts
and Web. To change the font size, move the cursor to each application name,
and then either press the [Joystick] key (Centre) or
or right as many times as necessary, to select
that the small font is not supported by Contacts,
or
Large
for this specific application. To proceed to the next option, press
> Bluetooth name
If you are going to use Bluetooth (page 49) on your Vertu phone, you can also
specify your preferred Bluetooth device name here in this Bluetooth name
option. To edit the name, select Change, modify the displayed Bluetooth name
to your preferred one, and then select OK.
move the [Joystick] key left
Small, Medium
so you can only select Medium
, or
Large
. Note
Accept
Once completing the whole settings above, select Accept at the end of the
Bluetooth name option, and then Finish on the following screen. A large
analogue chronograph clock appears on the Home screen, and now, you
will be able to use your Vertu phone.
Thus, when you switch on your Vertu phone for the first time, the clock
display type for the Home screen is Analogue. You can change it to Digital
or Miniature as you prefer. For more information on the Home screen clock,
refer to "Clock display on the Home screen" (page 20) and/or "Changing
the Home screen clock type" (page 26)
.
24 Using your Vertu phone
Page 25

To run the Setup wizard manually later:
If a SIM card not supplied by VERTU Club is inserted, your Vertu phone may
not be able to establish an Internet connection when necessary access point
setting is missing. If this is the case, you can first cancel the Setup wizard by
selecting Skip or Don't run again on the first screen of the wizard, and then
launch it again manually later after making necessary settings.
Skip, if selected, will immediately terminate the Setup wizard, but will
automatically launch it again when your phone is turned on the next time.
Don't run again will also close the Setup wizard immediately, but if this is the
case, the wizard will not be run again automatically even if you switch off and
on your Vertu phone the next time and afterwards. You can, however, use
the following procedure to run the Setup wizard manually at any time:
1. From the Home screen, select Menu » Settings.
2. Press the [Joystick] key (Up) once, and select Setup wizard from the list.
Checking Accurate time settings
Once you accept the network connection and complete all necessary settings
on the Setup wizard, your Vertu phone automatically selects Accurate time
(page 20) as its clock mode.
Normally, Accurate time should be available only by completing the Setup
wizard. However, there are some cases as well where Accurate time is not
immediately available due to such factors as the condition of the network or
some specific phone setting(s) possibly missing or not optimized for using
the feature.
Follow the steps below to make sure Accurate time is working correctly on
your Vertu phone:
1. From the Home screen, select Menu » Settings » Date and time »
Time management.
2. Confirm that the current Clock mode is Accurate time, and that the
Home location is set to the correct continent and country.
3. Press the [End] key to return to the Home screen, and confirm that there
is no
icon appearing in the status bar at the top of the screen.
Troubleshooting when Accurate time is not working:
If the icon appears at the top of the Home screen just in Step 3 of the
previous section, it is possible that Accurate time is not working properly for
some reasons. If this is the case, check the following:
> Check that your Vertu phone is turned on and that you are currently within
a service area.
To use the Accurate time feature, your Vertu phone needs an Internet connection
to synchronise the time over the air. Check that your Vertu phone is currently
within a service area and that the signal reception is strong enough. For information
on how to check the signal strength, refer to "Status indicators" (page 19).
> Check that the (Internet) access point has been properly configured.
Depending on the SIM cared used (for example, if you are using a SIM card not
supplied by Vertu), Internet connection may not be immediately available unless
you have properly configured the Internet access point for that specific SIM card.
You can use the following menu to check the access point currently active on
your phone:
> Menu » Settings » Configuration » Preferred access pt.
Access point settings normally require a certain level of network knowledge. If
you are not sure about those settings, consult with your service provider or
Vertu Customer Service (page 34).
Note that a VERTU Club member using your Vertu phone with a valid VERTU
Club SIM card in is not required to consider such settings, as necessary
provisioning has already been done in your phone when it leaves our workshop.
> Check that the Internet assisted GPS (A-GPS) feature has been enabled.
Accurate time uses the Internet assisted GPS (A-GPS) feature to automatically
detect your current location. Check that the current A-GPS setting is Yes in the
following menu:
> Menu » Settings » Connectivity » GPS » Internet assisted GPS
> When you are on a trip abroad, check the following settings:
> "Tips to use your Vertu phone abroad" » "Network mode" (page 36)
> "Tips to use your Vertu phone abroad" » "Operator selection" (page 36)
If the icon still appears on the Home screen even after following the whole
steps above, it is possible that the issue may be resolved by turning the phone
off once and then turning it back on. Then, again, if you still see the same issue
on your phone, please contact Vertu Customer Service (page 34).
Using your Vertu phone 25
Page 26
Single fixed clock (Turning Accurate time off)
If you would prefer, you can turn Accurate time off, to switch to a normal
manual clock mode following the procedure below:
1. From the Home screen, select Menu » Settings » Date and time »
Time management.
2. Select Clock mode.
3. Select Single fixed clock.
When Single fixed clock is selected here, the Accurate time feature is
disabled, and you will see a normal clock display on the Home screen. In
this clock mode, Internet connection will not be used to acquire location
information or to automatically adjust the time.
Your Vertu phone, however, can still continue to manage the time zone
(GMT) and daylight savings time (DST) offsets off-line in conjunction with
your Home location setting (specifically in Menu » Settings » Date and
time » Time management » Home location).
For example, assume that you are leaving Japan for a trip to Paris while
your current Home location setting is still Japan as per the configuration
done on the Setup wizard. Then, upon arrival in Paris, what you are
to do is simply to change the
»
Date and time
»
Time management
Home location
setting (under
Menu
) to Paris. By only following
advised
»
Settings
this, your
Vertu phone will automatically calculate the time difference between Japan
and France, and display the local time in Paris on the Home screen. On
your return, you then only need to revert the setting for your Home location
back to Japan, and the Home screen clock will once more display the time
in Japan.
Meanwhile, in order to quit the Single clock mode and return (switch) to the
Accurate time mode, select Accurate time in Step 3 above.
Tip: Home location change (if necessary)
→ Menu
»
Settings
»
Date and time
»
Time management
»
Home location
Personalising the Home screen
In addition to the clock type selectable from either Analogue, Digital or
Miniature, you can also customise the theme or wallpaper to easily change
the overall look and feel of the Home screen.
Changing the Home screen clock type
Follow the procedure below to change the clock type on the Home screen.
1. From the Home screen, select Menu » Settings » Date and time.
2. Select Date and time format » Time » Clock.
3. Select the desired clock type to be shown on the Home screen.
> Digital: Displays the current time in the centre of the Home screen with a set
of large digital white numerals in the hh(hour):mm(minute):ss(second) format.
Also shown directly underneath is today’s date including the abbreviated
alphabetical notation on the day of the week.
> Analogue (the default setting): Displays the current time in the centre of the
Home screen as a large analogue clock face, with a short hour hand and a
longer minute hand. A smaller analogue clock is shown at the lower right to
indicate the second hand. The two digits within a frame in the lower centre
represent today's date.
> Miniature: Displays the current time at the top of the Home screen with a set
of small digital white numerals in the hh(hour):mm(minute):ss(second) format.
> Hide clock: Hides the clock totally from the phone display, including not only
the Home screen but also the Main Menu screen (page 28), other lower-level
menu screens, or the various other application screens such as Calendar or
Contacts, etc.
Note:
Even if you have selected
above, your Vertu phone will automatically reset the Home screen clock
Miniature
type to
For more information, refer to
, when you change the wallpaper for the Home screen.
Digital
or
Analogue
in the settings
"Changing the wallpaper" (page 27).
Related pages: What’s Accurate time / Home location
→
"Accurate time" (page 20)
26 Using your Vertu phone
Related pages: Accurate time - Clock display examples & review
→
"Accurate time" (page 20) » "Highlights of Accurate time feature:"
(page 21)
Page 27

Themes
Your Vertu phone comes with several themes pre-installed. By switching
the current theme to a different one simply following the steps below, you
can change the background images for all the screens, including the Home
screen, Main Menu screen (page 28), other lower-level menu screens or
various other application screens, all at once and in a dramatical way.
1. From the Home screen, select Menu » Settings » Themes.
2. If folders are displayed, select one as necessary.
3. When you move the cursor to a theme and stay for a few seconds, you are
given a preview of the selected theme. Once you get a preview for a theme
that you would prefer, select it by pressing the [Joystick] key (Centre).
Changing the wallpaper
Your Vertu phone supports wallpaper settings, enabling you to replace the
background image of the Home screen with an image you prefer.
There are several ways to change the wallpaper. Shown in this section are
some typical examples of how to do it.
Before changing the wallpaper, confirm the following:
> If you change the wallpaper when an image selected by Theme is currently
shown on the Home screen, the background image of the Home screen will
change from the one selected by Theme to a new one you select.
> At this time, if the Home screen clock type was either Analogue or Digital,
changing the wallpaper here will automatically reset the clock type to Miniature.
> In this situation, if you would like to revert the Home screen clock type to
Analogue or Digital again, you can use the procedure in “Changing the Home
screen clock type” (page 26). If this is the case, however, the image to be
displayed on the Home screen will also be reverted to the one selected by
“Theme” (page 27).
> On the other hand, if you change the wallpaper when you have selected
Miniature or Hide clock, it is guaranteed that there will be no change in the
Home screen clock type (i.e. the Home screen clock type still stays the same).
> In all cases, changing the wallpaper does not affect the screens other than the
Home screen, such as the Main Menu screen (page 28), other lower-level menu
screens or various other application screens. For these screens (other than the
Home screen), an image selected by Theme” (page 27) will be used as the
respective screen background image.
Selecting a wallpaper image using the Display setting menu:
1. From the Home screen, select Menu » Settings » Display » Wallpaper.
2. Select Image, and then from the displayed folders, select a folder (see
"Gallery" (page 46)) that contains the image you prefer.
3. Select the desired image.
> After the "Wallpaper applied" message appears, you will return to the screen
after Step 1.
4. If necessary, select Adjust image, and select one of the following.
> Centre: When the height to width ratio of the phone's display differs from the
image size's height to width ratio, the image size is automatically adjusted to
match the height of your Vertu phone's display. The image is then displayed
as the wallpaper for the Home screen.
> Fit to display: When the height to width ratio of the phone's display differs
from the image size's height to width ratio, the image size is automatically
adjusted to match the width of your Vertu phone's display, so that all of it will
be visible. The image is then displayed on the Home screen.
> Rotate left: The image is rotated 90 degrees to the left and then displayed as
the wallpaper for the Home screen.
> Rotate right: The image is rotated 90 degrees to the right and then displayed
as the wallpaper for the Home screen.
Setting a photo taken with the camera as the wallpaper:
1. From the Home screen, select Menu » Settings » Display »
Wallpaper » Open camera.
2. Tale a photo, referring to "Taking photos" (page 46).
3. Select Set.
> After the "Wallpaper applied" message appears, you will return to the menu
screen just observed by selecting Wallpaper in Step 1.
4. If necessary, select Adjust image and select one of the following:
Centre, Fit to display, Rotate left or Rotate right.
Selecting a
wall paper image from Gallery:
1. From the Home screen, select Menu » Gallery, or Menu » Gallery »
Media (the folder displayed in the uppermost row).
2. Select a folder
(refer to "Gallery" on page 46)
that contains the desired image.
3. Move the cursor to the desired image and select Options » Use image.
4. Select Set as wallpaper
5. Select one of the following: Centre, Fit to display, Rotate left or
Rotate right.
Using your Vertu phone 27
Page 28
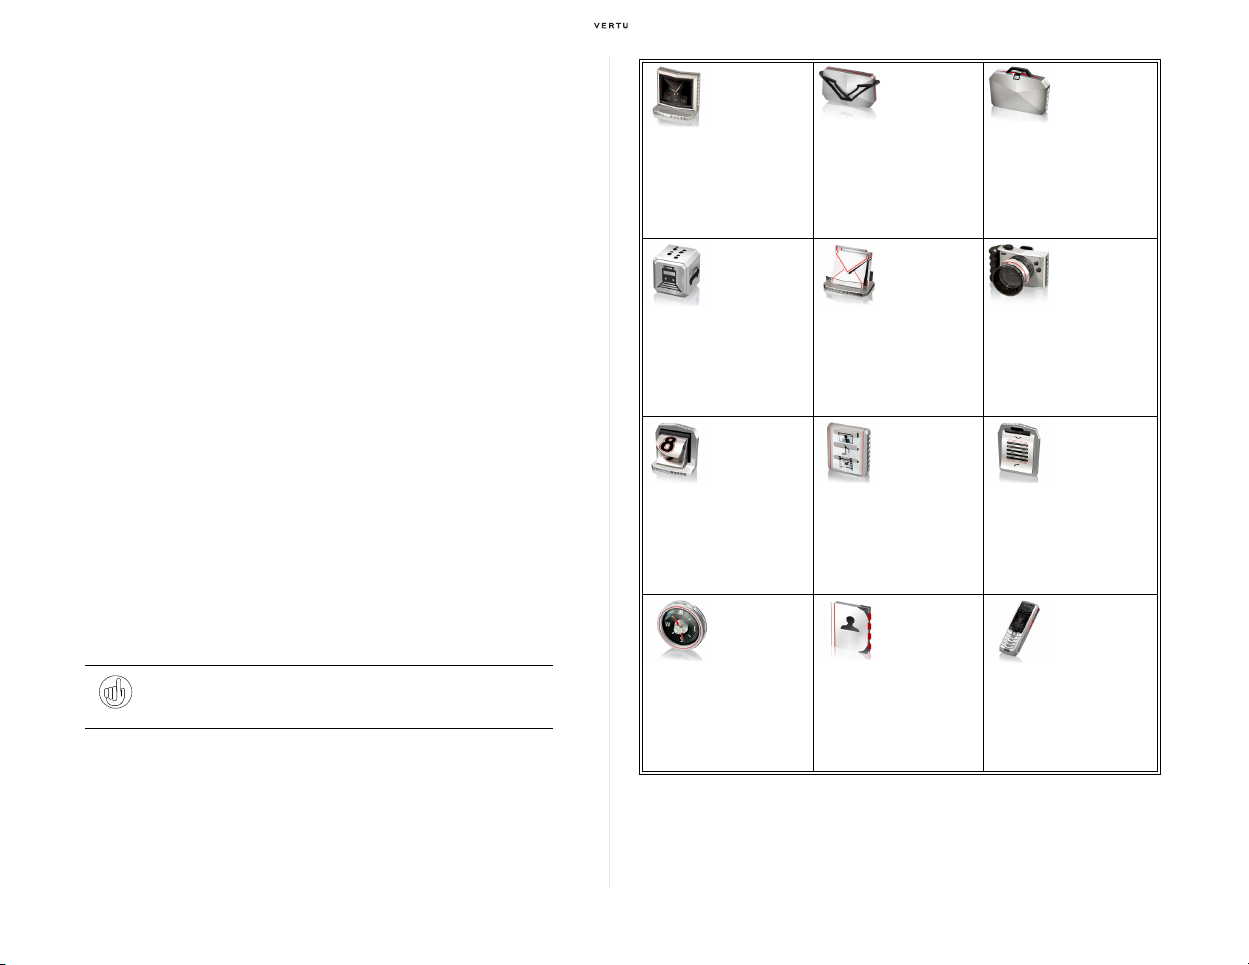
The Main Menu
After completing necessary settings on the Setup wizard, you can use the
following various applications and features from the Main Menu.
To display the Main Menu, select Menu (the [Joystick] key, centre) from the
Home screen. If Menu is not shown at the bottom centre of the screen,
press the [End] key (page 18) once or twice to end any applications
currently in use. Once you see that Menu is displayed, press the [Joystick]
key (Centre).
It is also possible to access some features quickly using shortcuts, without
displaying the Main Menu. Refer to the pages below for more information
on the relevant shortcuts:
> Shortcuts assigned to the [Selection] keys (page 29)
> Shortcuts assigned to the [Joystick] key (page 29)
> Go to application assigned to the [Joystick] key (Right) (page 30)
> Vertu Feeds application assigned to the [Joystick] key (Up) (page 31)
> Shortcuts assigned to the [Send] key (page 18)
> Shortcuts assigned to the Number keys (page 18)
> [Concierge] key (page 18)
> [Stopwatch] key (page 18)
> Shortcuts assigned to the [Power] key (page 18)
> Quick display of my number (page 30)
Alarm clock
Alarm settings
Snooze
Concierge
Web
NAVITIME
Fortress
Customer Service
VERTU Club
Additions
Media player
Video recorder
Equaliser
Vertu Feeds / 世界都市情報
Java applications / games
NAVITIME Messages Camera
NAVITIME service
(available in Japan only)
E-mail
SMS
PC mail
Take still images
Take video clips
Tools Gallery Call history
Calendar / Calculator / Note
Voice recorder / Bluetooth
Voicemail (playback)
Timer / Stopwatch
To rc h
Images / Video clips
Music files
Tones / Themes
Recordings
All calls
Messaging log
Packet communication
Sync log
Positioning
World Maps Contacts Settings
Tip: When the keypad lock (page 41) is on, Unlock will appear at the
bottom of the display. If this is displayed, press the [Joystick] key (Centre)
and then press the [ * ] key within two seconds to unlock the keypad.
World Maps service with
built-in GPS receiver and
map data on memory card
(available outside Japan)
* To use Concierge, Fortress, Vertu
(City Brief), dedicated RSS channel offered by VERTU Club and E-mail service
using the vertuclub.ne.jp domain, you must be a VERTU Club member.
28 Using your Vertu phone
Search
>
(AKaSaTaNa)
> List Search
Groups
Speed dials
ウェブ
Tab Search
Various phone settings
(Date and time, Profiles,
Display, My shortcuts,
Connectivity, Call / Phone,
Accessories, Security, etc.)
(Vertu Web), NAVITIME,
世界都市情
報
Page 29
Changing the Main Menu icon layout
You can rearrange the layout of the twelve menu icons displayed in the Main
Menu in any order that pleases you. For example, when your Vertu phone
leaves our workshop, the Settings menu icon appears at the bottom right,
but if you find that you use it frequently, you can move it to the centre of the
second row to make it easier to find.
You can customise the icon layout using the following procedure.
1. From the Home screen, select Menu to display the Main Menu.
2. Select Options » Organise.
3. Move the cursor to the menu icon whose position you want to change,
and select Move.
4. Using the [Joystick] key, move the cursor to the new desired position.
5. Select OK.
6. To change the position of other icons as well, repeat Steps 3 to 5 as
needed.
7. When all changes are complete, select Done » Yes.
Shortcuts assigned to the [Selection] keys
When your Vertu phone leaves our workshop, the following shortcuts have
been assigned to the left and right [Selection] keys (page 17). You can
quickly launch the relevant function simply by pressing the corresponding
key from the Home screen.
[Selection] keys (Left)
[Selection] keys (Right) Home (web homepage)
These shortcuts can be customised with the following procedure.
1. From the Home screen, select Menu » Settings » My shortcuts » Left
selection key or Right selection key.
2. From the list shown, select a new shortcut function to assign to the left
or right [Selection] key you chose in Step 1.
Create a new message
Shortcuts assigned to the [Joystick] key
In addition to the shortcuts assigned to the [Selection] keys, your Vertu phone
also has a set of pre-assigned shortcuts to each direction (Up, Down, Left and
Right) of the [Joystick] key (page 17). When it leaves our workshop, the
following functions have been assigned to each direction.
[Joystick] key (Up) Vertu Feeds (fixed)
[Joystick] key (Down) Names
[Joystick] key (Left) All calls
[Joystick] key (Right) Go to application
The shortcut assigned to the [Joystick] key (Up) is assumed to be used
exclusively for starting the Vertu Feeds application (page 31), so it cannot
be customised. However, the shortcuts assigned to other directions (Down,
Left and Right) can be customised using the "The Setup wizard (Initial
settings)" (page 24) or by using one of the following procedures:
Changing shortcuts
1. From the Home screen, select Menu » Settings » My shortcuts »
Navigation key.
2. Select one of the following, and then select a new shortcut from the
displayed list.
> T: Select this option to assign a new shortcut for the [Joystick] key (Down).
> W: Select this option to assign a new shortcut for the [Joystick] key (Left).
> X: Select this option to assign a new shortcut for the [Joystick] key (Right).
Opening a shortcut selection list directly from the Home screen:
1. From the Home screen, press and hold either the Down, Left or Right
direction of the [Joystick] key.
2. Select a new shortcut from the displayed list
Related pages: Go to application
Vertu Feeds
using the My shortcuts setting menu:
→
"Using the Go to application" (page 30)
→
"Vertu Feeds / 世界都市情報 (City Brief)" (page 31)
Using your Vertu phone 29
Page 30
Checking your own phone number
To customise the
Go to shortcut list:
The following shortcut can be used from the Home screen to quickly check
your own phone number.
1. Press the [Joystick] key (Centre) once, and then press the [ 0 ] key.
Or, you can also check your own phone number from the following menu:
Menu » Contacts » My numbers
Note:
Depending on the SIM card in use, this function may not work.
Using the Go to application
When you have not changed the default configuration after you first received
your Vertu phone, you can use the
[Joystick] key (Right) to manage a list of shortcuts.
For example, assume that you will often use Alarm and Calendar. You do
not have to remember in which layer of the menu (page 28) these functions
have been assigned. You can quickly select Alarm clock or Calendar from
the shortcut list, simply after pressing the [Joystick] key (Right) once from
the Home screen.
When your Vertu phone leaves our workshop, the following functions have
been assigned in the shortcut list. This list also can be customised.
> Alarm clock > Gallery
> Calendar > Operator selection
> Network mode > Bluetooth on/off
> Customer service > Calculator
> Profiles
Go to
shortcut application assigned to the
1. From the Home screen, press the [Joystick] key (Right).
> The Go to application starts and the shortcut list is displayed.
2. Select Options » Select options.
> The functions that can be added or removed to/from the Go to list are listed
with checkboxes.
3. Use the [Joystick] key to uncheck the boxes for the functions to be
removed from the Go to list and check the boxes for those to be added
to the list.
> When you find a folder on the checkbox list, you can open the folder by
placing the cursor to it and then pressing the [Joystick] key (Centre). To also
add or delete the shortcuts within the folder, check or uncheck the boxes as
necessary. When ready, select Done to return to the previous screen.
4. Select Done, and then Yes when a confirmation message appears.
> The changed settings are saved and you will return to the main screen of the
Go to shortcut list.
> Confirm that the list no longer contains the functions removed in Step 3 and
that the added functions are displayed at the bottom of the list.
5. To change the display order of any function added in Step 3, move the
cursor to it and select Options » Organise » Move.
6. Move the cursor up or down, and then press OK.
7. Select Done » Yes.
Auto sorting function of the Go to application
By enabling the Auto sorting function, you can set up the Go to shortcut
menu so that it automatically customises itself to your needs.
By default, this function is not enabled. To enable it, press the [Joystick]
key (Right) from the Home screen to display the Go to shortcut menu, and
then select Options » Auto sorting on. To disable it again, select
Options » Auto sorting off when the Go to shortcut menu is displayed.
Note: Vertu may apply changes to the assigned default shortcuts
without prior notice.
30 Using your Vertu phone
Page 31
Vertu Feeds / 世界都市情報 (City Brief)
By just moving the [Joystick] key upward from the Home screen, you can
quickly launch the Vertu Feeds application. The initial page displayed (the
landing page) has three main sections as follows:
> VERTU ウェブ (Vertu Web)
As part of the VERTU Club exclusive services, you can obtain a quick update of
special RSS contents, such as the latest news headlines, highlights of weathercast
report or other useful information, which are delivered by VERTU Club.
On the landing page, you can quickly review the top two last received content titles.
Here, when you select either of the titles, you can check the story summary, if one
is available. If no summary is available, the live story will be displayed via the web
browser.
MORE>>
To view the RSS contents other than the top two titles, select
Note that you need a valid VERTU Club SIM card to use this service.
> 世界都市情報 (City Brief)
This section gives you a list of two city names including your current location. When
one is selected, you are connected to a site that provides a digest of essential travel
information (including restaurant guides, tourist locales, shopping guides, business
etiquette, etc.) for that selected city.
If necessary, you can also search other cities by clicking the
(or, if a message, not a city name, is displayed in either of the two city name fields,
you can also do the same by selecting that message).
When your Vertu phone detects a content update in
running this Vertu Feeds application, the icon will appear at the top of the Home
screen.
Note that you need a valid VERTU Club SIM card to use this service.
> マイフィード (My Feeds)
マイフィード
to the contents above.
As long as your favourite site (for example, a news or blog site) offers feeds that
are RSS 2.0 or ATOM 1.0 compliant, you can easily add an RSS channel just by
selecting an RSS icon link on that site or by manually registering the link's URL
with the procedure described in "To add a new RSS channel to
manually:" (page 31).
Note that depending on the SIM card currently in use, you may need to manually
configure such a connection setting as Internet access point beforehand. If you
are a VERTU Club member using a valid SIM card, such setting is not necessary.
(My Feeds) allows you to register your own RSS feeds in addition
MORE CITIES>>
世界都市情報
.
link
while you are not
マイフィード
Note:
In order to use Vertu Feeds, you need to accept the automatic
network connection. The acceptance option is presented when running
the Setup wizard (page 24), or if you declined it on the wizard, the same
option appears when you enable the Accurate time feature (page 25) for
the first time or run the Vertu Feeds applications for the first time.
Once accepted, the Vertu Feeds application uses the Internet connection
to automatically update necessary feed contents. This may incur data
transmission fees, depending on your service provider or the location
where your Vertu phone is currently used. For information on charges,
contact your service provider or Vertu Customer Service (page 34).
To add a new RSS channel to マイフィード manually:
1. From the Home screen, press the [Joystick] key (Up) to launch the
Vertu Feeds application.
2. Move the cursor to the マイフィード section and select .
3. Select either Add (when registering an RSS channel for the first time)
or Options » Feed subscriptions » Options » Add.
4. Enter the URL for the new RSS channel, and then select OK.
To check
the feed contents registered in マイフィード :
1. From the Home screen, press the [Joystick] key (Up) to launch the
Vertu Feeds application.
2. Move the cursor to the マイフィード section and select .
> The list of RSS channels registered to マイフィード is displayed.
3. Move the cursor to the desired RSS channel and select Open.
>
The feed contents of the selected RSS channel (titles of latest news headlines,
etc.) are displayed in a list in chronological order.
>
When you select any of the contents, you can check the story summary, if one
is available. If no summary is available, the live story will be displayed via the
web browser.
Tip: Vertu Feeds can also be accessed from the following menu.
Menu » Additions » Collection » Vertu Feeds
Using your Vertu phone 31
Page 32

To end the Vertu Feeds application:
To close the
press the [End] key from any of the application pages, or select
Vertu Feeds
application and return to the Home screen, either
Hide
(right
[Selection] key) from the landing page of the application.
At this time, when either of the keys is selected, you can confirm that the screen
Vertu Feeds
of
application is now replaced with the Home screen. However,
note that this does not completely stop the application from continuously
updating the feed contents of VERTU
ウェブ
and
マイフィード
channels, in
the background. To completely stop the background updating as well, you need
Options
»
to select
of
マイフィード
Disable feeds
(a screen showing the list of all RSS channels registered).
from the landing page or from the top page
Making / receiving calls
You can make or receive a call simply following the procedure below.
To make a call:
1. Make sure that your Vertu phone is in a strong signal area and the battery
is charged fully enough. (Refer to "Status indicators" on page 19)
2. From the Home screen, press the Number keys (page 18) to enter a
phone number.
3. Press the [Send] key (page 18) to begin your call.
Other options / features available in Vertu Feeds:
With the Vertu Feeds application, you can also use the following features
or options:
>
To manually update the feed contents of all RSS channels, select
from the landing page or from the top page of
>
To change the application settings, select
or from the top page of
>
Activate images
included in the feed contents.
>
Activate links
in the feed contents. Selecting
as text.
>
Automatic update
updated. You can select any of the three options:
Once a day
feed contents at all.
>
To hide the already read contents or mark all feed contents as read, select
from the full page view of VERTU
channel, and then select
フィード
>
To change the name of a 3rd party feed channel, go to the top page of
move the cursor to the desired RSS channel, and then select
>
To temporarily stop updating any feed contents associated with a specific 3rd party
channel, select
, move the cursor to the desired RSS channel, and then select
ド
[Joystick] key, centre) and select
マイフィード
: Select whether to download images when they are
: Select whether to activate the URL links when included
: Select how often the whole feed contents are to be
. If you select
ウェブ
Hide read items
Options
»
Feed subscriptions
Yes
マイフィード
Options
»
Settings
, and then select the following:
Off
will disable all links and present them
Off
, the application will not try to update the
or from the full page view of each
.
or
from the top page of
Options
»
.
from the landing page
1 hour, 6 hours
Options
Mark all items read
マイフィード
Options
»
Rename
マイフィー
Unsubs...
Update
or
マイ
.
(the
To receive a call:
When you receive an incoming call, a call message appears on the display,
and a ringing tone is played when an incoming call alert has been enabled.
Your Vertu phone will also vibrate if you have set a vibrating alert.
1. When you have a call, select Silence (right [Selection] key) to stop the
ringing tone first.
2. To answer the call, either press the [Send] key (page 18) or press the
[Joystick] key (Centre) when you see Answer on the screen.
,
.
32 Using your Vertu phone
Tip: If the called party is the one who has already been registered in
Contacts, you can smoothly start your call just by selecting that person
Contacts list and then pressing the [Send] key. If you have not
from the
changed
the default configuration, you can launch the Contacts list by
just giving a short press on the [Joystick] key (Down) from the Home
screen.
Or you can also use the All calls log. The log list can be displayed just
by pressing the [Send] key from the Home screen, or if you have not
changed the default configuration, by pressing the [Joystick] key (Left).
Page 33

Using the loud speaker for hands-free calls
When you are currently in a call following the procedure in "To make a call:"
(page 32) or "To receive a call:" (page 32), you can switch it to the handsfree mode by the steps below.
1. To switch to hands-free mode, select Loudsp. (right [Selection] keys)
during a call.
> The hands-free mode is activated, and the voice output starts from the loud
speakers (page 17) located at the right and left sides of your Vertu phone.
> If you are the calling party and have just placed a call to the other party, you
may also be able to select Loudsp. even before the called party answers that
call.
2. To return to the normal speech mode, select the [Selection] key (Right)
once again.
> Once the hands-free mode is activated, the menu displayed at the bottom
right of the screen changes from Loudsp. to Handset. Thus, to return from
hands-free mode to normal speech mode, you now select the [Selection] key
(Right) again, whose menu is now shown as Handset at this point.
Adjusting the listening volume
To adjust the earpiece or speaker volume while you are in a call, move the
[Joystick] key upward or downward as necessary.
Ending or rejecting a call
To end an ongoing call or to reject an incoming call without answering it,
press the [End] key.
Other options available during a call
By pressing Options (left [Selection] key) during a call, you can also select
the following features during a call.
Displayed options may vary depending on the situation. Some selected
features may not function as expected when the network (your service
provider) does not support those services or when you have not subscribed
to them, turned them off or have not subscribed to some other associated
services such as Call waiting. For example, if you are a VERTU Club
member and using a VERTU Club SIM in Japan, you cannot use the
“Conference” feature, even if this option is displayed on the screen.
> Adjust the volume
> Switch between normal call and hands-free call
> Set / cancel a call on hold
> Mute / unmute a call
> Open your Contacts list while in a call
> Put a call on hold and make a new call
> Lock the keypad
> Record a voice call
> Turn Voice clarity on and off (a feature to enhance speech intelligibility
especially in noisy environment)
> End a call or all connected calls
> Send DTMF signals such as a password when necessary
> Conference (with three or more parties)
> Display the Main Menu
> Transfer (a feature to hang up your phone by connecting the first call currently
on hold and the second call currently in connection; not available in Japan)
In addition, you can also select the [Selection] key (Right) to mute a call, put
a call on hold or cancel a hands-free call when such an option is displayed
at the bottom right of the display. Or you can also select the [Joystick] key
(Centre) to display the Main Menu (page 28) or switch between first and
second calls (if you have a second call using the Call waiting service), when
you see such a menu at the bottom centre of the display.
For more information or inquiries, contact your service provider or Vertu
Customer Service (page 34).
Using your Vertu phone 33
Page 34
Calling Vertu Concierge
Your Vertu phone has a dedicated [Concierge] key (page 18) on its right
side. By pressing this key from the Home screen, you can quickly call Vertu
Concierge. If you are unable to reach Concierge, please contact Vertu
Customer Service (see the next section).
Calling Vertu Customer Service
To call Vertu Customer Service, you can select either of the ways: to press
the [Joystick] key (Right) to select Customer service from the Go to
shortcut list (page 30), or to select Menu » VERTU Club » Customer
Service.
1. From the Home screen, press the [Concierge] key on the right side of
your Vertu phone to see the Concierge menu
> You can also select Menu » VERTU Club » Concierge from the Home
screen to launch the same Concierge menu screen.
2. Select Call (the [Joystick] key (Centre) / page 17), or press the [Send]
key (page 18) to call Concierge
You can also select E-mail (left [Selection] key) in Step 2 to send a
message request to Concierge. For more information on this feature, refer
to "Sending a message (E-mail) request to Concierge" (page 39).
Note: To use the Concierge service, you must be a member of VERTU
Club. We recommend you to ring Concierge for any urgent request, not
relying solely on E-mail, as there might be a possible delay in message
delivery due to some network problems.
1. From the Home screen, select either of the following
> Press the [Joystick] key (Right), and select Customer service from the list of
displayed shortcuts (page 30) (available when the default configuration has
not been changed).
Or,
> Select Menu » VERTU Club » Customer Service.
2. Select Yes when a confirmation message appears.
3. Follow a procedure as requested by the automated guidance
> For example, if you hear such guidance as "If you need English service,
please press 2", then press the [ 2 ] key to select the English service.
You can also contact Vertu Customer Service by dialling the following
number directly.
Vertu Customer Service:
03-6738-3955 (or +81-3-6738-3955 from countries outside Japan)
Operation hours: 9:00 a.m. - 8:00 p.m. (Mon - Sun, including holidays)
Note: You must have network coverage to call both Concierge and
Vertu Customer Service.
34 Using your Vertu phone
Page 35
Making an international call
You can make an international call by entering a “+” first from the Home
screen, and then a country code, an area code (with the first “0” omitted)
and a phone number in turn.
Note that making or receiving international calls may incur expensive
roaming fees. Contact your service provider for information about these
charges.
To make an international call from Japan:
1. From the Home screen, press the [ * ] key twice to enter a + sign.
2. Enter a country code and the phone number you would like to call.
> Following the + sign, enter a country code, an area code (with the first 0
omitted), then a phone number.
> For example, to dial a number in London, 020-xxxx-xxxx, from Japan, enter
+4420xxxxxxx (44 is the country code for the United Kingdom, and 20 is
London's area code where the first 0 is omitted.)
3. Press the [Send] key to begin your call.
Note: If you are using a SoftBank SIM card in some areas of Japan,
you may need to configure the following settings before making an
international call. For specific details about the regions affected,
contact Softbank or Vertu Customer Service (page 34)
1. Register international prefix code (first time only):
> From the Home screen, select Menu » Settings » Call »
International Prefix » Edit IDD prefix.
> Enter 010 on the screen that appears, and then select Save.
Making a call while abroad
1. Make sure that your Vertu phone is in a strong signal area and the
battery is charged fully enough (page 19).
> If your Vertu phone is in a poor signal area or you suspect the state of signal
reception is not stable, refer to "Tips to use your Vertu phone abroad" (page
36) to make sure you have configured the relevant roaming settings as
required on your phone.
2. Press the [ * ] key twice to enter a + sign.
3. Enter the phone number you would like to call.
> Following a “+” sign, enter a country code, an area code (with the first 0
omitted), then a phone number.
> When you place a call to Japan from abroad, enter +81 first, followed by the
area code (with the first 0 omitted), then the phone number. For example, if
the area code is 03 (for the 23 wards in Tokyo), merely enter 3; for a mobile
phone number starting with 090, enter 90.
4. Press the [Send] key to begin your call.
Note: Regardless of which SIM card you are using, you must always
turn Off the following International Prefix setting, when you are in a
country outside Japan:
Menu » Settings » Call » International Prefix
2. Change the setting below, depending on your current location:
> From the Home screen, select Menu » Settings » Call »
International Prefix.
> Depending on the country you are staying in, select either of the
following:
> When you are in Japan, select Automatic.
> When you are in a country outside Japan, select Off.
Using your Vertu phone 35
Page 36
Tips to use your Vertu phone abroad
When signal reception is unstable while your Vertu phone is in use abroad,
check the following settings. Changing these settings may improve the
situation.
Network mode
1. From the Home screen, select Menu » Settings » Phone » Network
mode.
> If you have not changed the default configuration, you can also select this
menu just by pressing the [Joystick] key (Right) from the Home screen and
then scrolling the Go to shortcut list (page 30) that appears.
2. Select 3G or GSM as needed.
> The default network mode is 3G + GSM, a dual mode in which the phone
automatically selects either 3G (WCDMA) or GSM depending on the network
availability in your current location. Since GSM is a main network used in
many countries outside Japan, changing this setting to GSM may improve
signal reception when you are abroad.
> Note that your Vertu phone operates on the 3G (WCDMA) network when it is
used in Japan. Be sure to change this setting back to either 3G + GSM (the
default setting) or to 3G, when you return to Japan from a trip abroad.
Operator selection
1. From the Home screen, select Menu » Settings » Phone » Operator
selection.
> If you have not changed the default configuration, you can also select this
menu just by pressing the [Joystick] key (Right) from the Home screen, and
then scrolling the Go to shortcut list (page 30) that appears.
2. Select Manual.
> Your Vertu phone displays a list of network operators (service providers) in
your current location.
3. Select an operator that has a roaming agreement with your service
provider.
> Not all network operators have roaming agreements with other network
operators. Make sure you have selected a network operator here, which has a
roaming agreement with your service provider (such as VERTU Club, if you
are currently using the VERTU Club SIM card).
> When you return to Japan from a trip abroad, be sure to change this setting
back to Automatic (the default setting).
Tip: For information about network operators that have roaming
agreements with VERTU Club, check the Vertu official web site or
contact Vertu Customer Service (page 34).
Using network services (Voicemail, Call divert/
forwarding, etc.) while roaming
Depending on the SIM card that is currently in use on your Vertu phone,
you may need some extra steps or settings to use the Voicemail or Call
divert / Call forwarding services abroad.
For example, if you are a VERTU Club SIM card user frequently travelling
abroad, you will need such an extra step as dialling 159 (a setting which we
call “Remote Access setting”) before leaving Japan in order to set up the
Voicemail service for use abroad. Or to listen to the messages left on the
Voicemail centre while you are abroad, you will also need to dial +8190310,
followed by 1416 or 1417 (a normal four-digit Voice mailbox access number
to be dialled when you are in Japan).
Thus, the respective service providers may offer network services with their
own unique (and sometimes complex) variations. For information on these
variations, contact your service provider or Vertu Customer Service (page 34).
The following are the steps required for VERTU Club SIM card users to set
up the Voicemail or Call forwarding service while in Japan. (Note: Voicemail
and Call forwarding cannot be used at the same time.)
1. From the Home screen, select Menu » Settings » Call.
2. Select either Voicemail or Call forwarding.
3. Select Activate, and then either All voice calls or If not answered.
In addition, those users are also advised to have some extra steps to use
the Voicemail or Call forwarding service when abroad. Before leaving
Japan for a trip overseas, please contact Vertu Customer Service (page
34) or check the Vertu official web site for more details.
36 Using your Vertu phone
Page 37
Making an emergency call
Text entry
Warning: Your Vertu phone, like any wireless device, operates
using radio signals, wireless and landline networks as well as
user-programmed functions. Because of this, connections in all
conditions cannot be guaranteed. Therefore, you should never
rely solely upon any wireless device for essential
communications, such as for medical emergencies.
1. If the phone is not on, switch it on (refer to page 24).
> Some networks require that a valid SIM card is properly inserted in the phone.
2. Press the [End] key (page 18) until the Home screen appears.
3. Enter the emergency number, for example 000, 08, 110, 112, 118, 119,
911, 999 or other official emergency number
4. Press the [Send] key (page 18).
Tip: Emergency numbers vary by location and those listed above may
not be supported by your current network.
If certain features are in use, you may first need to turn those features off before
you can make an emergency call. For more information, consult your local
service provider.
When making an emergency call, remember to give all the necessary
information as accurately as possible.
Remember that your phone may be the only means of communication at the
scene of an accident - do not end the call until given permission to do so.
Your Vertu phone supports the Japanese predictive text input mode.
When the phone language is English, you can use the English predictive
text input mode as well.
To switch the text entry mode, press the [ # ] key while writing text. Each
time you press the [ # ] key, the entry modes will be switched from
Hiragana/Kanji through Katakana, Alphabet (English) and Numeric, in turn.
Tip: When the phone language is English, quickly press the [ # ] key
twice to change the entry modes from English to Numeric.
Press the [ * ] key once or twice while entering text, to display a list of
symbols or a list of Emoji (pictographs).
Select Options, and then Full width for two-byte character entry, or Half
width for one-byte character entry, while writing text in any of the
Katakana, Alphabet (English) or Numeric modes.
To add a voiced sound mark or semi-voiced sound mark to a Hiragana or
Katakana character, or to convert a Hiragana / Katakana character to
lowercase, enter the relevant Hiragana / Katakana character, and then
press the [ * ] key as many times as necessary.
You can also turn on and off Japanese prediction (or English prediction
when the phone language is English), by selecting Options » Prediction
options while writing text.
In addition, your Vertu phone provides the following useful functions:
> When in the Hiragana/Kanji, Katakana or Alphabet entry mode, press and hold
any of the Number keys ([ 0 ] - [ 9 ]) to quickly enter the corresponding number.
> To consecutively enter characters using the same key, enter the first character by
pressing any Number key, wait for a second or so to see the cursor automatically
moved forward, and then enter the next character using the same key.
> When in the Alphabet entry mode, press the [ 0 ] key to move the cursor forward
with a space automatically added to the last character you have entered.
Using your Vertu phone 37
Page 38
Sending messages
If you are a VERTU Club member, you can use your own original mail
address at a “vertuclub.ne.jp” domain to send an E-mail. Make sure you
have inserted the VERTU Club SIM card in your Vertu phone.
Note: While creating an E-mail or SMS message, you can specify
multiple recipients in the
not be delivered to all the specified recipients, if the network allows the
distribution only to a limited number of recipients at a time. Contact your
service provider for specific details.
Sending an E-mail
1.
From the Home screen, press the [Selection] key (Left) or select
Messages » Create message.
2. Enter the e-mail address of the recipient in the To: field.
> Directly enter an e-mail address, or press the [Joystick] key (Centre) to select
an address from Contacts or the message log.
> Press the [ * ] key once or twice to enter symbols or Emoji (pictographs).
3. Press the [Joystick] key (Down) to move to the subject field, and then
enter the subject.
4. Press the [Joystick] key (Down) to move to the text field, and then enter
the message text.
5. To attach a file, select Options » Insert.
6. Press the [Send] key or select Options » Send to send the E-mail.
Note:
The messaging service, described in this guide as “E-mail”, is
widely known in the world as “MMS”. This service may also be available
with a SIM card supplied by a foreign service provider other than
VERTU Club
address
additional
used.
Customer Service (page 34).
Related pages: Sending / receiving E-mail / SMS while abroad
→
→
, but if this is the case, note that you cannot use a mail
with the premium “vertuclub.ne.jp”
connection settings if such a non-VERTU Club SIM card is
For more information,
"Tips to use your Vertu phone abroad" (page 36)
"Sending / receiving messages while abroad" (page 39)
To: field. However, note that the message may
Menu »
domain. You may also need
contact your service provider or Vertu
Sending a Text message (SMS)
Your Vertu phone also supports Text messages (also known as SMS), the
most common form of messaging compatible with the widest range of
phones and available in most countries. If you are using a VERTU Club
SIM card, you are limited to 160 alphanumeric characters, or 70 full width
Japanese characters.
To send a Text message, you first need to open an E-mail editor following
Step 1 of the previous section. Then, from the new E-mail editor, select
Options » Change to text msg. to change the message type from E-mail
to Text message.
Note that you may not be able to send a Text message to the users of some
specific SIM cards from other service providers. When the delivery of a
Text message fails, you will see an icon at the top of the Home screen.
Undelivered messages are stored in the Outbox folder under Menu »
Messages.
1. Perform Step 1 in "Sending an E-mail" (page 38).
2. On the new E-mail message editor screen, select Options » Change
to text msg..
3. Enter the phone number of the message recipient in the To: field.
> Directly enter a phone number, or press the [Joystick] key (Centre) to select a
phone number from Contacts or the message log.
> To send a Text message to an international number, first enter a “+” sign, then
the country number, the area code (with the first 0 omitted) and then the
phone number. For example, if you would like to send a Text message to a
phone number of the United Kingdom such as 012-XXXX-XXXX, you would
enter +4412XXXXXXXX here. To enter the “+” sign, press the [ * ] key once
and then select “+” from the symbol list that appears.
4. Press the [Joystick] key (Down) once to move to the text field.
5. Enter the message text.
6. Press the [Send] key or select Options » Send to send the message.
Note:
When you are sending a Text message (SMS) to an international
numbers, to successfully deliver it to the designated recipient, you need
to ensure that your service provider has a roaming agreement with the
other party’s service provider. For information about the service providers
(network operators) that have roaming agreements with VERTU Club,
check the Vertu official web site or contact Vertu Customer Service
(page 34).
38 Using your Vertu phone
Page 39
Sending a message (E-mail) request to Concierge
If you are a VERTU Club member, you can send a message request to
Vertu Concierge using the E-mail service. Make sure that you have
inserted the VERTU Club SIM card in your Vertu phone before sending any
request.
Message requests can be accepted only when the sender’s domain is
specific to the “vertuclub.ne.jp” domain. Or, for any urgent request, we
recommend you give a ring to Concierge (not relying solely on E-mail), as
there might be a possible delay in message delivery due to some network
problems.
1. From the Home screen, press the [Concierge] key on the right side of
your Vertu phone to see the Concierge menu.
> You can also select Menu » VERTU Club » Concierge from the Home
screen to launch the same Concierge menu screen.
2. Select E-mail (left [Selection] key / page 17).
> An E-mail editor screen appears with the necessary e-mail address already in
the To: field.
3. Enter the message of your request in the text field.
4. Press the [Send] key (page 18) or select Options » Send to send the
request message.
Note: To send the request message to Concierge, you need to insert
the VERTU Club SIM card in your Vertu phone and must have network
coverage.
Sending / receiving messages while abroad
You can use the E-mail and Text message services also while abroad, just
as you would while in Japan. For example, if you use your Vertu phone in
countries outside Japan with the VERTU Club SIM card in, you can send an
E-mail using your current e-mail address (an address with the premium
“vertuclub.ne.jp” domain) just in the same manner as described in "Sending
an E-mail" (page 38).
However, sending / receiving E-mails or Text messages abroad may incur
additional expensive roaming fees, depending on the volume of data
transmitted. Contact your service provider for further information on the
charges that may apply while abroad.
The following configuration changes can be used to restrict data
transmission cost while roaming.
1. From the Home screen, select Menu » Messages » Message
settings.
2. Select E-mails » E-mail reception.
3. Change the following setting to Auto. in home nw. or Manual as
necessary.
> Automatic: Allows your Vertu phone to automatically download all messages
every time and as soon as they arrive at the message centre, regardless of
whether you are in Japan or abroad.
> Auto. in home nw.: Allows your Vertu phone to automatically download all
messages when you are in your home network (which would be Japan if you
are using a VERTU Club SIM card), and, when you are in a network outside
Japan, allows you to download messages manually. When an E-mail arrives
at the message centre while you are in a roaming network, you will see a
notification on your Vertu phone. If you accept the notification (by selecting
Retrieve on the notification screen), the message will then be downloaded to
the phone.
> Manual: Allows you to manually download all messages in whichever case
you are currently in your home network or in a roaming network.
> Off: Message reception is switched off regardless of location.
When either Auto. in home nw. or Manual is selected, an envelope icon
on the display will start revolving when your Vertu phone starts downloading
a message from the network. The animation will then continue until the
download is complete.
Using your Vertu phone 39
Page 40

Protecting your Vertu phone
Upon first receiving your Vertu phone, be sure to configure all available
password protections, such as the PIN code and Security code, to prevent
unauthorised use of your Vertu phone and your SIM card by a third party.
PIN code
The PIN (four to eight digit personal identification number) code allows you
to protect your SIM card against unauthorised use. Turn On the PIN code
request option, then you can change the PIN code to any number you like.
Once this is done, your Vertu phone will display a PIN code entry prompt,
every time you turn on the phone from the next time. Then here, if the
correct PIN code is not entered, you will not be able to use the SIM card to
launch your Vertu phone.
By default, the VERTU Club SIM card's PIN code is configured as 0000.
Contact your service provider for information about the default PIN code, if
you are using other SIM card.
1. From the Home screen, select Menu » Settings » Security » PIN code
request » On.
2. When the PIN code input screen appears, enter a four to eight digit PIN
code and select OK.
> If this step is taken for the first time for a new VERTU Club SIM card, enter
0000 (default PIN code) here, and select OK. (If you have already changed
the PIN code for a SIM card currently in use, enter the relevant PIN code you
have already set.)
> Once the settings are complete, a confirmation message appears, and the
PIN code request is enabled.
3. Next, select Menu » Settings » Security » Access codes » Change
PIN code.
4. Enter the current PIN code and select OK.
5. Enter a new PIN code and select OK.
> PIN codes can be any combination of a four to eight digit number.
6. Enter the new PIN code again (for reconfirmation), and then select OK.
> A confirmation message appears, and then, the new PIN code is enabled.
Once the PIN code has been configured, each time you turn your Vertu
phone on, you will be unable to start up your Vertu phone (with the currently
installed SIM card), unless you enter the PIN code correctly. Three
consecutive, incorrect PIN code entries will lock your SIM card. You will
need to contact your service provider and obtain a PIN unlocking (PUK)
code in order to use your SIM card again. Pay extreme caution when
entering your PIN code. For more information on the PUK code, contact
your service provider.
Security code
The Security code is a five to ten digit number (terminal code) that is
necessary when using several important features on your Vertu phone
(including deleting all the entries in your Contacts list or restoring all default
settings, etc.).
It can also protect your Vertu phone against unauthorized use, when, for
example, the Security keyguard feature (Menu » Settings » Phone »
Security keyguard) is turned On. See "Security keyguard" (page 41) for
more information on this feature.
Your phone may have been shipped with a default code of 12345. If not,
you need to follow the procedure below to create it:
To create Security code (when not preset by default):
1. From the Home screen, select Menu » Settings » Security » Access
codes » Create security code.
2. Enter any five to ten digit code and select OK.
3. Enter the same code again (for reconfirmation), and then select OK.
> A confirmation message appears, and then, the Security code is enabled.
40 Using your Vertu phone
Page 41
You can change the Security code with the following procedure. To reset
the code, you will need to bring your Vertu phone to the Vertu Customer
Service, Vertu store or authorised Vertu dealer. Extreme care should be
taken so as not to forget your Security code.
To change Security code:
1. From the Home screen, select Menu » Settings » Security » Access
codes » Change security code.
2. Enter the current Security code and select OK.
3. Enter a new five to ten digit Security code and select OK.
4. Enter the new Security code again (for reconfirmation), and then
select OK.
> A confirmation message appears, and then, the new Security code is enabled.
Locking the keypad
You can lock the keypad on your Vertu phone to prevent accidentally
dialling any numbers.
1. From the Home screen, press the [Joystick] key (Centre), then press
the [ * ] key within two seconds
> A confirmation message appears, and the keypad is temporarily locked. is
displayed at the top of the Home screen, with Unlock shown at the bottom.
Tip: You can use the following procedure to enable the Automatic
keyguard feature to automatically lock the keypad when there is no
key operation on the Home screen for a specified period of time.
1. From the Home screen, select Menu » Settings » Phone »
Automatic keyguard » On.
2. Enter the duration of inactivity (ranging from 5 seconds to 60
minutes) before automatically locking the keypad, and select OK.
Unlocking the keypad
You can unlock the keypad by pressing the [Joystick] key (Centre) and then
the [ * ] key within two seconds.
Security keyguard
By enabling the Security keyguard feature, you can make a Security code
entry necessary, each time the keypad is locked or you switch on your
Vertu phone. Since your Vertu phone cannot be used without a Security
code entry, this feature, if set, could be an effective prevention against
unauthorised use.
To enable the Security keyguard protection:
1. From the Home screen, select Menu » Settings » Phone » Security
keyguard » On.
2. Enter the Security code and select OK.
When you receive an incoming call, the keypad lock is automatically
suspended. When the call is ended, the keypad returns to the locked state.
Tip: You can also lock the keypad using the following procedure:
> From the Home screen, briefly press the [Power] key to display
the Profiles list. Press the [Joystick] key (Up) and select Lock
keypad from the list.
Using your Vertu phone 41
Typical Security keyguard use case example:
1. From the Home screen, press the [Joystick] key (Centre), then press
the [ * ] key within two seconds.
> The keypad lock is activated.
2. To unlock the keypad, press the [Joystick] key (Centre), and then press
the [ * ] key within two seconds again. Since the Security keyguard
feature has been set, the Security code input screen appears. Enter the
Security code to actually unlock the keypad.
Page 42
Memory management
Your Vertu phone has two internal memories - the phone memory and an
internal memory card.
The internal memory card provides much more space for storing data than
the phone memory, either 8 GB or 32 GB depending on your phone model.
When you receive your Vertu phone for the first time, the internal memory
card is specified as the default storage location of such files as pictures /
video clips taken with Camera or sound clips recorded with Voice recorder
(Menu » Tools » Voice recorder).
The internal memory card also stores map data used by the World Maps
application (page 51). When your Vertu phone leaves our workshop, a full
set of map data covering every country and region in the world are preinstalled on the internal memory card.
Viewing contents of internal memor y card
You can quickly review the files stored on the internal memory card by
opening Gallery (page 46). When Gallery is opened, you can see the folder
named “Media” in the uppermost row, which represents the top level folder
of the internal memory card.
1. From the Home screen, select Menu » Gallery.
2. To view the contents of internal memory card, move the cursor to the
Media folder at the top and select Open.
3. From the displayed folders, open the desired folders and select the files
you want.
Tip:
When your Vertu phone leaves our workshop, the folder shown at the
top of
Gallery
name following the steps below. Note that except where otherwise needed,
is named as “
this folder is referred to in this document as the “
1. From the Home screen, select Menu » Gallery.
2. Highlight the folder at the top (which, by default, is the Media folder)
with the cursor, and select Options » Memory card optio... »
Rename media mem..
3. Edit the folder name as necessary using alphanumeric characters,
and select OK.
Media
”. If necessary, you can change this
Media
folder”.
Checking the memory status
You can check the current memory status both associated with the phone
memory and internal memory card by selecting any of the following options.
(Note that these options do not show the memory status for Contacts.)
> From the Home screen, select Menu » Gallery » Options » Memory status.
> From the Home screen, select Menu » Messages » Options » Memory status.
> From the Home screen, select Menu » Settings » Phone » Memory status.
You can check the memory status for Contacts with the following option:
> From the Home screen, select Menu » Contacts » Settings » Memory status.
You can also use a USB data cable (page 56) or Bluetooth (page 49) to
connect your Vertu phone and a compatible PC. Once connected, you can
aunch the File manager application from Vertu PC Suite (page 52) to review
l
the files of both phone memory and internal memory card from your PC, or if
necessary, transfer them back and forth between your Vertu phone and PC.
Or, if you are using a USB data cable, you can also select the Data storage
mode (one of the USB modes available on your Vertu phone), when you see
the “
Select USB mode:
USB data cable to your PC. When this mode is selected, you can review
the files on the internal memory card from your PC without using Vertu PC
Suite, and when necessary, you can transfer data back and forth between
the internal memory card and your PC.
The internal memory card offers you relatively a large amount of space for
saving data, compared with the phone memory. However, it does not mean
that its free space is always limitless. When the memory is full, a confirmation
message is displayed, prompting you to delete unnecessary files. We
recommend that you always try to keep enough available memory space
on the phone.
If your internal memory card is full, the envelope icon ( ) starts flashing at
the top of the Home screen. If this happens, you will not be able to send or
receive messages. You need to delete something from your internal
memory card to ensure that you can still continue to receive new messages.
This could be messages, images, video clips or music files.
Note: The internal memory card cannot be removed from your Vertu
phone.
” screen on the phone as soon as
you connect the
42 Using your Vertu phone
Page 43
Precaution when formatting the internal memory card:
If necessary, you can use the following menu to format the internal memory
card:
> Menu » Gallery » Options » Memory card optio... » Format media mem.
When the internal memory card is formatted, such user data as messages,
in addition to the map data (page 53) used by World Maps (page 51) and
all media files in Gallery (page 46) which have been saved on the internal
memory card, are completely deleted.
Before formatting the internal memory card, be sure to create a backup
copy of all necessary data onto your PC, using the backup feature
(specifically, the Vertu Content Copier application) of the Vertu PC Suite
(page 52), which is available by connecting your Vertu phone to your PC.
Other useful features
Setting an alarm
Alarms can be set to ring at specific times. You can access the alarm
setting menu in either of the following ways:
> From the Home screen, select Menu » Alarm clock.
> If the default configuration has not been changed, press the [Joystick] key
(Right) from the Home screen, and then select Alarm clock from the shortcut
list (page 30) that appears.
After the alarm menu appears, make the necessary settings such as alarm
time. At this time, you can also select Options to set the snooze interval or
repeat function, or to cancel an alarm that has already been set.
Initialising your Vertu phone:
You can reset the settings and all of your personal data stored on the
phone memory to their default state using the following menu:
> Menu » Settings » Workshop reset » Restore all
If this menu is selected, your Vertu phone is reset to the state in which it
was shipped from the factory, except that the files and data stored on the
internal memory card (other than messages) are retained.
Before resetting your phone, you can use either of the following features to
create a backup copy of necessary data:
> Using the backup feature of your Vertu phone under Menu » Settings » Sync
and backup » Create backup.
> Using the backup feature (Vertu Content Copier) of Vertu PC Suite (page 52).
Note that if you use the backup feature of your Vertu phone (under Menu »
Settings » Sync and backup » Create backup), the resulting file is saved
to the Backup files folder on the internal memory card (specifically under
Menu » Gallery » Media folder). Be aware that this copy will also be
deleted should you format the internal memory card. If there is a possibility
of formatting the internal memory card, we recommend that you create a
backup copy of necessary data also to your PC, using the backup feature
of Vertu PC Suite.
Using your Vertu phone 43
When there is an alarm set, a bell icon appears on the Home screen. In
addition, when the Home screen clock type is Analogue, a white marker
will be displayed on the clock face on the Home screen, indicating the time
of the currently set alarm.
When an alarm rings, to activate the snooze feature, select Snooze from
the Home screen, or else rotate the phone by either 180 or 360 degrees
while the alarm is ringing. To stop an alarm without activating the snooze
feature, select Stop from the Home screen.
Tip: When an alarm starts ringing while you are using any feature or
application, or while a screen other than the Home screen is displayed,
you will need to press the [End] key until the Home screen appears to
snooze the alarm.
Note: If your Vertu phone is switched off, it will switch itself
alarm time. Remember this if you are
Related pages: About Home screen clock
→
"Clock display on the Home screen" (page 20)
→ "Changing the Home screen clock type" (page 26)
in a restricted area.
on at the
Page 44

Stopwatch
The stopwatch on your Vertu phone enables you to measure time, take split
times (intermediate times) or take lap times in 1/100 of a second intervals.
Your Vertu phone has a dedicated [Stopwatch] key on its left side. You can
quickly launch the stopwatch simply by pressing this key from the Home
screen.
Your Vertu phone's stopwatch can be displayed in two different modes:
analogue chronograph mode and digital mode. Each mode is linked to the
current Home screen clock type. When the clock type is Analogue (or Hide
clock), the analogue chronograph mode is available. When the clock type
is Digital or Miniature, the digital mode is available.
Split timing
5. Repeat Step 4 as necessary to continue measuring split times.
> The red second hand in the large analogue clock (when the stopwatch is
running in analogue mode) and the white digital numbers in the centre of the
screen (when the stopwatch is running in digital mode) continues to
accumulate time, with split time results being added at the upper right each
time you repeat Step 4.
6. Press either the [Stopwatch] key on the left side of the phone, or the [ 4 ]
key, to stop measuring time.
7. To save the measured results, select Save. To start measuring time
again, press the [Stopwatch] key on the left side of the phone (or the [ 4
] key). To reset the counter, press the [Concierge] key on the right side
of the phone (or press the [ 6 ] key).
> When you select Save, a field to enter a name appears. After selecting Edit,
enter a name for the results to be saved, and then select OK » Save.
1. From the Home screen, either press the [Stopwatch] key on the left side
Lap timing
of the phone, or select Menu » Tools » Stopwatch.
>
When the current Home screen clock type is
the stopwatch is activated in analogue mode.
> The stopwatch starts in digital mode if the Home screen clock type is Digital
or Miniature.
Analogue
or
Hide clock
(hidden),
2. Select Options » Split timing.
3. Press either the [Stopwatch] key on the left side of the phone, or the [ 4 ]
key, to begin measuring time.
> When the stopwatch is running in analogue mode, the red second hand in the
large analogue clock face in the centre of the screen begins to move,
measuring time. (The smaller digital clock at the upper left also begins
counting seconds.)
> When the stopwatch is in digital mode, the white digital numbers in the centre
of the screen begins to advance, measuring time.
1. From the Home screen, either press the [Stopwatch] key on the left side
of the phone, or select Menu » Tools » Stopwatch.
>
> The stopwatch starts in digital mode if the Home screen clock type is Digital
2. Select Options » Lap timing.
3. Press either the [Stopwatch] key on the left side of the phone, or the [ 4 ]
key, to begin measuring time.
> When the stopwatch is running in analogue mode, the red second hand in the
> When the stopwatch is in digital mode, the white digital numbers in the centre
4. Press either the [Concierge] key on the right side of the phone, or the
[ 6 ] key, to measure the first split time.
> The red second hand in the large analogue clock in the centre of the screen
(when the stopwatch is running in analogue mode), or the white digital
numbers in the centre of the screen (when the stopwatch is running in digital
mode) continues to accumulate time, and the first split time result is displayed
at the upper right.
4. Press either the [Concierge] key on the right side of the phone, or the
[ 6 ] key, to measure the first lap time.
>
44 Using your Vertu phone
When the current Home screen clock type is
the stopwatch is activated in analogue mode.
or Miniature.
large analogue clock face in the centre of the screen begins to move, measuring
time. (The smaller digital clock at the upper left also begins counting seconds.)
of the screen begins to advance, measuring time.
When the stopwatch is running in analogue mode, the red second hand in the
large analogue clock face in the centre of the screen returns to the start position
(and the small digital clock at the upper left returns to 00:00:00), to immediately
begin measuring the next lap time. The first lap time is shown at the upper right.
Analogue
or
Hide clock
(hidden),
Page 45

> When the stopwatch is in digital mode, the white digital numbers in the centre
of the screen return to 00:00:00 to immediately begin measuring the next lap
time. The first lap time is shown at the upper right.
5. Repeat Step 4 as necessary to continue measuring lap times.
> The red second hand in the large analogue clock face (when the stopwatch is
running in analogue mode) and the white digital numbers in the centre of the
screen (when the stopwatch is running in digital mode) returns to their
respective starting positions each time Step 4 is repeated and measurement
for the next lap time begins. In addition, each lap's measurement result will be
added to the display at the upper right.
6. Press either the [Stopwatch] key on the left side of the phone, or the [ 4 ]
key, to stop measuring time.
7. To save the measured results, select Save. To start measuring time
again, press [Stopwatch] key on the left side of the phone (or the [ 4 ]
key). To reset the counter, press the [Concierge] key on the right side of
the phone (or press the [ 6 ] key).
> When you select Save, a field to enter a name appears. After selecting Edit,
enter a name for the results to be saved, and then select OK » Save.
Tip: When measuring split or lap times in analogue mode, the red
second hand in the large clock face in the centre of the screen
measures seconds. The smaller analogue clock at the lower left
measures minutes.
The small analogue clock at the lower right, however, bears no
connection to the measurement of split or lap times. Even when the
stopwatch is running, the small analogue clock at the lower right
indicates the current time's seconds. The hour and minute hand for
the current time are displayed on the large analogue clock face as
the white hands on that face.
Checking measurement results
Follow the steps below to check or delete split times or lap times recorded
so far.
1. From the Home screen, either press the [Stopwatch] key on the left side
of the phone, or select Menu » Tools » Stopwatch.
2. Select any of the following as necessary:
> To review the last measurement results (the latest results), select Options »
Show last.
> To display a series of past results as a list and then to select results to review
from that list, select Options » View times.
> To delete past measurement results one by one, or to delete a series of
results all at once, select Options » Delete times.
Ending the stopwatch
To stop measuring time and return to the Home screen, select Exit (right
[Selection] key) or the [End] key when the stopwatch is displayed.
When closing the stopwatch, note that unless you reset the counter by
pressing the [Concierge] key on the right side of the phone (or the [ 6 ] key)
either in Step 7 of "Split timing" (page 44) or in Step 7 of "Lap timing" (page
45), the screen counter will not be automatically reset, even if you end the
application and return to the Home screen.
In this case, the stopwatch information is retained and will be displayed the
next time the stopwatch is activated.
Using your Vertu phone 45
Page 46

Camera
Your Vertu phone incorporates a 5 Megapixel camera with autofocus and
integral LED flash. Together with the 16 million colour QVGA screen, it
produces crisp, high quality images.
The phone also supports an image capture resolution of 2592 x 1944
pixels. Pictures are saved in jpg format and video clips are saved in 3gp
format. For information on the storage location where the images and video
clips you take are saved, refer to "Gallery" (page 46).
Taking photos
1. To start Camera, select Menu » Camera from the Home screen.
2. To zoom in or out, move the [Joystick] key up or down.
3. Select Capture (the [Joystick] key, centre) to take a photo.
Taking videos
1. To start Video recorder, select Menu » Additions » Video recorder,
or select Menu » Camera from the Home screen and then move the
[Joystick] key to the right.
2. To zoom in or out, move the [Joystick] key up or down.
3. Select Record (the [Joystick] key, centre) to start video recording.
> To pause the recording, select Pause. To continue the recording again, select
Continue. To stop recording, select Stop.
Related pages: To take a photo or video clip in a horizontal display
→
"Tilt sensor (auto-detecting screen orientation)" (page 22)
Gallery
You can manage various types of media files, such as the photos and video
clips you took with your camera, or music files you transferred from your
PC, in Gallery.
To display the Gallery, select Menu » Gallery from the Home screen.
When your Vertu phone leaves our workshop, it is set so that when Gallery
is launched, you will see the Media folder in the uppermost row, which
represents the content of the internal memory card. Beneath that will be
multiple media folders for the contents saved on the phone memory.
A set of world maps data, used by World Maps (page 51), is pre-installed
on the internal memory card. In addition, the following types of files are also
saved on the internal memory card, whose top level folder is “Media”,
followed by the lower-level sub folders as shown below:
> Images folder: If the default configuration has not been changed, photos taken
with Camera are saved in this folder.
> Video clips folder: If the default configuration has not been changed, video
clips taken with Camera are saved in this folder.
> Recordings folder: If the default configuration has not been changed, sound
clips recorded using Voice recorder (Menu » Tools » Voice recorder) are
saved in this folder.
> Received files folder: Media files, including images and video clips, transferred
to your Vertu phone using Bluetooth, are saved in this folder.
> In addition, such media files as images or video clips, received as E-mail
attachments and then saved to your Vertu phone, are stored in the root directory
of the Media folder.
The pre-installed ringing tones and themes (page 27) can be found in the
Menu
»
Gallery
»
Tones
and
Themes
folders (phone memory), respectively
When saving files you download from the Internet or saving media files
attached to PC mail, you will be asked each time where to save those files,
and can therefore select the storage folder you would prefer.
If necessary, you can move or copy these files to different folders using the
left [Selection] key Options menu, if it is shown at the bottom left of the
46 Using your Vertu phone
Page 47
screen (if the menu is available, you can also move or copy files to and from
the internal memory card and the phone memory). Or, in the similar way,
you can also create your own folders within the root directory of Gallery or
within any of the existing folders to better manage your own files.
Copyright protections may prevent some files from being copied, moved,
modified, transferred or forwarded.
For further information on this phone’s memory management or
precautions when formatting the internal memory card, refer to "Memory
management" (page 42) and "Precaution when formatting the internal
memory card:" (page 43).
Profiles (ringing tones / sound settings)
All tones settings such as Ringing tone, Ringing volume, Vibrating alert, or
the sound effects such as Keypad tones, are managed by the Profiles
application.
For example, you can set a loud ringing tone so as not to miss incoming
calls when you are outdoors, or set Message alert tone to beep just once so
that you can avoid disturbing other people while in an important meeting.
Like this, you can set up separate Profile lists according to various
assumable situations or usage.
Related pages:
Memory management including the internal memory card
→
"Memory management" (page 42)
Using the Tilt sensor to display images and video clips horizontally
→
"Tilt sensor (auto-detecting screen orientation)" (page 22)
Contacts
Contacts has capacity for up to 2,000 entries. A single entry can include up
to five phone numbers and five mail addresses, respectively, and according
to your preference, you can also switch the screen view between
“AKaSaTaNa” tab search mode and list search mode. It is also possible to
send Contacts data to another compatible device using E-mail or
Bluetooth.
To display the Contacts name list, select Menu » Contacts » Names from
the Home screen. If you have not changed the default configuration, you
can also display the Contacts name list just by pressing the [Joystick] key
(Down) from the Home screen.
To switch the screen view between “AKaSaTaNa” tab and list search
modes, select Options » Tab Search or List Search.
Checking and changing profile settings
You can use the following seven profiles on your Vertu phone:
> General
> Manner ()
> Meeting ()
> Outdoor ()
> My style 1 ()
> My style 2 ()
> Flight ()
Tip: When a profile other than General is selected, a profile icon
corresponding to that profile, as shown above, is displayed in the
status bar at the top of the Home screen. When the General profile is
currently active on the phone, no icon is displayed in the status bar.
To check the profile settings:
1. From the Home screen, select Menu » Settings » Profiles.
2. Select a desired profile.
3. Select Personalise.
4. Move the [Joystick] key upward or downward to check the current
settings.
5. Select Back to return to the previous display. Or press the [End] key to
return to the Home screen.
Using your Vertu phone 47
Page 48
To change the profile settings:
1. From the Home screen, select Menu » Settings » Profiles.
2. Select a desired profile.
3. Select Personalise.
4. Use the [Joystick] key to change the settings as necessary.
5. Select Save.
Switching profiles
You can use either of the following procedures to switch profiles:
Quick operation using the [Power] key:
1. From the Home screen, briefly press the [Power] key.
2. Move the [Joystick] key upward or downward, and then select the
profile to be activated.
Manner profile
To activate the Manner profile instantly, press and hold the [ # ] key from
the Home screen. Selecting the Manner profile will switch off the ringing
tone, message alert tone, keypad tone and other sounds. Your Vertu
phone will vibrate upon receiving phone calls or mails.
The following sounds are not switched off, even if the Manner profile is set:
> Camera shutter sound
> Video recording start/end sound and video playback sound
> Sound/voice from left/right speakers when a hands-free call is in progress
> Music playback sound from Media player
> Sound effects from browser plug-ins
> Alarm tone
Tip: Press and hold the [ # ] key from the Home screen to switch
(back) the profiles from Manner to General.
Related pages: Shortcuts assigned to the [Power] key
→
"[Power] key" (page 18)
Flight profile
The Flight profile allows you to deactivate all radio frequency functions.
With this profile, you can only use the functions that do not require
connection to the network.
Switching from the profile settings screen:
1. From the Home screen, select Menu » Settings » Profiles.
2. Select a desired profile.
3. Select Activate.
Tip: You can select Timed instead of Activate in Step 3 above, to set
a time for a specific profile (a profile other than Flight) so that it is
conditionally activated on the phone during the specified timer period.
For example, you may want to activate the Manner profile during an
important meeting, and then want to automatically resume the
General profile when the meeting is over.
When you enter a phone number on the Home screen and then press the
[Send] key while in the Flight profile, a message is displayed asking if you
would like to exit the Flight profile to allow the phone to make a call. If you
would prefer to switch the profile and place a call, select Yes to proceed.
48 Using your Vertu phone
Tip: If you switch off the phone when the current profile is
then switch it on again,
appear. To continue using the
will enable the
General
a message “
Flight
profile.)
Activate flight profile?
profile, select
Yes
. (Selecting No
Flight
“ will
and
Page 49
Warning: Always switch your Vertu phone off when wireless
device use is prohibited or when it may cause interference or
danger.
Ringing tones
Your Vertu phone comes with a variety of exclusive ringing tones. You can
also download files in AAC, MP3 and MIDI formats from a compatible PC or
a website and use them for use as ringing tones.
Changing the ringing tone:
Use the following procedure to change the ringing tone:
1. From the Home screen, select Menu » Settings » Tones.
(Or select Menu » Settings » Profiles » currently active profile »
Personalise).
2. Press the [Joystick] key (Down) and move the cursor to Ringing tone.
3. Select Change (the [Joystick] key, centre).
> When you select Change, a list of ringing tone files saved in the Tones »
Ringing tones folder in the Gallery (page 46) appears.
> When you select Change instead, you can move the [Joystick] key right and
left to select Open Gallery. In this case, a list of all Gallery folders appears.
Select one of the folders that includes files that can be used as ringing tones.
> In addition, you can also move the [Joystick] key left or right to select Tone
downloa... and download ringing tones from the web.
4. Move the [Joystick] key upward or downward to select the desired
ringing tone.
> Leave your cursor above a ringing tone for a second or so to listen to a
preview. Repeat this process to find a ringing tone you would prefer. When
you have it, press the centre [Joystick] key to select it.
5. Select Options » Save to save the settings.
Media player
Launch Media player to play various music files, video clips, ringing tones
and recorded sound clips.
These files can be transferred to your Vertu phone from a compatible PC
using Vertu PC Suite (page 52). In addition, when a USB data cable (page
56) is connected, you can also select Data storage or Printing & media
from the “Select USB mode:” screen that appears on your phone's display
when the cable is connected. This will allow you to transfer necessary files
(including video clips or music files) back and forth between the internal
memory card and your PC, or to synchronise the music files on your
internal memory card and on your PC.
To start Media player, select Menu » Additions » Media player from the
Home screen. Music files that you transfer to your Vertu phone are
automatically added to the media file list in Media player. If the media file
list is not automatically updated even after adding music files to your Vertu
phone, select Menu » Additions » Media player » Options » Update
library to manually update the media library.
Tip: To mute the speakers while on the Media player screen, press the
[ # ] key. To completely stop Media player while music is being played,
press and hold the [End] key
.
Bluetooth
Bluetooth enables you to wirelessly connect with various devices. When
you are connected, for example, with a compatible Bluetooth device, you
can wirelessly send and receive image and video files. You can also
connect a Bluetooth headset to listen to music or engage in phone
conversations. You first need to pair with the other device. Your Vertu
phone and the other device should be within 10 metres of each other.
To display the Bluetooth menu, select either Menu » Settings »
Connectivity » Bluetooth or Menu » Tools » Bluetooth from the Home
screen.
Use the Bluetooth menu to turn Bluetooth on, and the Conn. to audio
acce... or Paired devices menu to search other Bluetooth devices that can
be connected. Then, pair your phone with any of the detected devices by
entering the four to sixteen digit passcode agreed beforehand with other
Using your Vertu phone 49
Page 50
party. You can also change this Vertu phone's device name to be recognised
by other Bluetooth devices using
My phone's name
make your Vertu phone discoverable using
Tip: Using Bluetooth may drain the device battery faster. Switch off
Bluetooth when it's not being used, to maximise battery performance.
, and specify whether to
My phone's visibility
.
Web
Warning: Only download and use files from sources that offer
adequate security and protection against harmful software.
A VERTU Club member can immediately use the Web service by inserting
a VERTU Club SIM card.
To use the Web service, select Menu » VERTU Club » Web from the
Home screen.
You can also view Vertu ウェブ (Vertu Web), an exclusive web site for
VERTU Club members, following one of the procedures below:
> From the Home screen, select Menu » VERTU Club » Web » Home.
> From the Home screen, press the right [Selection] key (if the default settings
have not been changed).
> Press and hold the [ 0 ] key from the Home screen.
Although some SIM cards from other service providers, especially those
from outside Japan, may offer you Internet access, only VERTU Club SIM
cards will allow you to access Vertu ウェブ (Vertu Web). In addition, you
may need extra settings for Internet connection if you are using those non-
VERTU Club SIM cards. Using those SIM cards may also incur very
expensive data transmission fee, depending on the situation. For
information on charges, necessary settings and other service conditions,
contact your service provider or Vertu Customer Service (page 34).
Related pages: Using the Tilt sensor to display pages horizontally.
→ "Tilt sensor (auto-detecting screen orientation)" (page 22)
Travel application
Your Vertu phone includes the pre-installed Travel application, a helpful
tool for overseas travel. When using this application where an Internet
connection is possible, you can instantaneously get helpful and convenient
information for your trip, including world weather forecasts, real-time flight
information from major airlines, and the latest currency exchange rates.
To start the Travel application, select Menu » Additions » Collection »
Travel from the Home screen.
To use this application in an optimal way, you may allow an Internet
connection. Some SIM cards may require manual configurations, such as a
connection access point to access the Internet. Note that such settings are
not required when you are using a VERTU Club SIM card.
Travel application is provided by WorldMate Inc.
Navigation services
As a GPS solution, your Vertu phone offers the NAVITIME service when
you are in Japan, and the World Maps service (using the pre-installed
worldwide maps on the memory card) when you are travelling abroad.
NAVITIME
To use the NAVITIME service (available only in Japan), you must be a
member of VERTU Club. Before using this service, make sure that you
have inserted a VERTU Club SIM card in your Vertu phone.
Then, perform the following when you are in Japan:
1. From the Home screen, select Menu » NAVITIME or Menu » VERTU
Club » NAVITIME.
2. Select one of the service options, such as
乗換
(Transit) or
時刻表
(Timetable), etc., from the top menu screen of
NAVITIME.
3. Packet connection will begin, and when the main screen of the selected
service appears, select items, specify conditions or enter necessary
information to initiate the service.
NAVITIME is provided by NAVITIME JAPAN, Co., Ltd. The VERTU Club
membership fee covers the NAVITIME service fee.
トータルナビ
(Total navigation),
50 Using your Vertu phone
Page 51
Note: The NAVITIME service, offered on your Vertu phone, supports
the Japanese language only.
World Maps
World Maps is available to any SIM card users, designed for a wide range
of use in countries or regions other than Japan.
To use the World Maps service, select the following when you are outside
Japan and while in an outdoor area with a clear and unobstructed view of
the sky.
Note that in order to use this feature, you need a set of map data on the internal
memory card. When you first receive your Vertu phone, the latest maps for all
countries of the world have been pre-installed on the internal memory card.
1. From the Home screen, select Menu » World Maps.
2. When a screen prompt asking you to select either Yes, In home
network or No appears, select Yes to allow automatic Internet
connection whenever necessary, or select No to decline it.
> When you select Yes, you may be able to get faster and better GPS fix result
by also allowing the automatic Internet connection (packet network
connection) in addition to the reception of satellite signals through the phone's
built-in GPS receiver. In addition, map data can also be automatically
downloaded in packet connection when needed. Since map data involves files
that are larger in size, when downloading data while overseas, packet
connection can result in extraordinarily expensive roaming fee. Be aware of
this when selecting Yes.
> If you are a user of SIM card issued by foreign service provider, you can select
In home network to allow your phone to connect to the Internet automatically
only when you are in the home network of your service provider. If you are a
VERTU Club SIM card user or a user of SIM card issued by any Japanese
service provider, you can also select this option here to have the same effect
as selecting No, because this World Maps application is assumed to be used
in countries or regions other than Japan.
The map data stored on the internal memory card can be updated at any
time by using the Map Loader application and a PC. For more information
on Map Loader, refer to "Installing Map Loader" (page 53).
Note: Using the World Maps service while you are travelling abroad
may incur high costs in data transmission fees. For information on
charges (especially when you are in a roaming network) or on other
service conditions that may apply, contact your service provider or
Vertu Customer Service (page 34).
Torch
When you are outside at night or in an otherwise dark place and in need of
a light for a short period of time, press and hold the [ * ] key from the Home
screen to quickly illuminate the torch on the back of your Vertu phone.
Once the torch is lit, it will remain lit for approximately 60 seconds until you
press and hold the [ * ] key again.
You can use the other features of your Vertu phone as you normally would
while the torch is lit. For example, you can write a message or use nearly all
other applications, such as Web, Calendar, Contacts, Gallery, etc., while
the torch is lit.
However, the torch is turned off when you use Camera, Video recorder or
make / receive a call while the torch is lit.
While the torch is lit, the icon appears at the upper left of the Home
screen.
Tip: You can also turn the torch on and off using the following menu:
Menu » Tools » Torch
Checking the IMEI serial number
Should you want to check your Vertu phone's IMEI serial number, dial *#06#
from the Home screen. The IMEI serial number will be displayed on screen.
Make a note of your IMEI serial number and keep it in a safe place.
Using your Vertu phone 51
Page 52

Transfer contents from another Vertu phone
You can use a Bluetooth connection or a USB data cable to transfer
Contacts, Calendar and other data from a different (older) Vertu phone to
your Vertu phone. There are several different ways to do this, such as:
> Using the Sync and backup (Phone switch) feature
When you open your Vertu phone and select Menu » Settings » Sync and
backup » Phone switch » Copy to this from the Home screen, it is possible to
transfer from another Vertu phone to your Vertu phone any or all of the following
data: Contacts, Calendar, Text messages, E-mails, Notes. To use this feature,
both Vertu phones must have Bluetooth (page 49) enabled, and the other Vertu
phone must support this feature. If you are uncertain as to whether your Vertu
phone supports this feature, or if you have any other questions about the
process, contact Vertu Customer Service (page 34).
> Select individual data on an older Vertu phone and transfer it using Bluetooth to
your Vertu phone
Individual data such as a Contacts entry, Calendar entry, Notes file, image file,
video clip, music file, etc., can be sent using Bluetooth from one Vertu phone to
another. In order for the phones to be able to send data back and forth, they
must be paired. Refer to "Bluetooth" (page 49) for more information.
Using Bluetooth, you may also be able to send / receive multiple files of certain
format at the same time. For example, you can mark several image files in Gallery
at the same time and send them at once from one Vertu phone to another.
> Using Vertu PC Suite's synchronisation feature
If you connect your older Vertu phone to a PC using Bluetooth or a USB data
cable and then use Vertu PC Suite's (page 52) synchronisation feature to
synchronise any or all of Contacts, Calendar and Notes data to the PC, you can
then connect your new Vertu phone to the PC and use the same synchronisation
feature to update your new phone with a set of Contacts, Calendar and / or Notes
data which are currently on the PC.
> Using Vertu PC Suite's backup feature
As with the synchronisation feature above, you can connect an older Vertu
phone to your PC and use Vertu PC Suite's backup feature to back up any
necessary data to your PC. After that, you can then connect your new Vertu
phone and use the same backup feature to restore the data (a set of the data
already backed up on the PC) to it. Using this feature allows you to manage the
target data for backup or restoration by classifications, such as phone memory
user files, Contacts, Calendar, Notes, Text messages, Settings, Bookmarks,
etc., so you can only restore the data you need. Note that you may not be able
to restore some or all types of data, if your phone models are different.
CD-ROM
The Vertu CD-ROM works on a compatible PC with a CD-ROM drive, with
Microsoft® Windows® 2000, Microsoft® Windows® XP or Microsoft®
Windows Vista® installed. You need at least 250 MB of free disk space and
administrator rights to the PC.
The Vertu CD-ROM works on a Macintosh PC with Mac OS X 10.4.6 (or
later) and iSync 2.2 (or later) installed.
Connecting to a PC
To connect your Vertu phone to a PC, you need either a Vertu USB data
cable or your PC must be compatible with Bluetooth wireless technology.
Installing Vertu PC Suite
Follow the procedure below to install Vertu PC Suite on a Microsoft®
Windows® or Microsoft® Windows Vista® PC:
1. Insert the Vertu CD-ROM into your PC's CD-ROM drive.
2. Select English on the language selection screen.
3. Click the Install Now button.
4. Follow the on-screen instructions to complete the installation.
Ver tu PC Suite
When Vertu PC Suite has been installed, connect your Vertu phone to the
PC using Bluetooth or a USB data cable. Once connected, you can use the
following applications to extend the functionality of your Vertu phone. If you
see a message prompt asking you to select a USB mode, select PC Suite
from the list.
> Backup / Restore > Messages
> Synchronise > Transfer music
> Connect to the Internet > Store images
> File manager > View multimedia
> Contacts > Install applications
52 Using your Vertu phone
Page 53
Installing iSync Plug-in
You can install the iSync Plug-in on a Macintosh PC following the
procedure below. Using iSync, you can synchronise the Contacts and
Calendar data between your Vertu phone and Macintosh PC.
1. Insert the Vertu CD-ROM into your Macintosh’s CD-ROM drive.
2. Double-click the VERTU icon which appears on the desktop.
3. Double-click the Vertu.osx icon which appears in the Finder.
4. Select English on the language selection screen.
5. Click the Install Now button.
6. Follow the on-screen instructions to complete the installation.
Viewing the electronic Quick Guide
Using this CD-ROM, you can view the electronic version of the Quick Guide.
1. Insert the Vertu CD-ROM into your PC's CD-ROM drive.
2. Select English on the language selection screen.
3. Click the Launch PDF button.
Installing Map Loader
When you install Map Loader, you can update the following data to the
latest version.
> The maps data used by World Maps (page 51), on your Vertu phone's internal
memory card
> The voice guidance file used by Navigation services (separate license required)
Vertu PC Suite (page 52) must be installed on the same PC in order to use
Map Loader. We recommend that you install Vertu PC Suite first before
installing Map Loader.
You also need the Internet connection to download Map Loader.
1. Insert the Vertu CD-ROM into your PC's CD-ROM drive.
2. Select English on the language selection screen.
3. Click on the button which links to the Map Loader download site.
4. Download Map Loader from the download site, and then follow the onscreen instruction or double-click the EXE file to install Map Loader on
your PC.
When installation is complete, to update the map data, connect your Vertu
phone to your PC on which Map Loader and Vertu PC Suite have been
installed, using either a Bluetooth connection or a USB data cable. Then,
launch Vertu PC Suite, and then Map Loader, from the PC. When Map
Loader is activated, a dialogue appears on your PC explaining how to use
Map Loader. Follow the instructions to download the map files from the
Internet and update them. Contact Vertu Customer Service (page 34)
should you require any assistance.
Note that when your Vertu phone leaves our workshop, a full set of map
data for use with the World Maps service has been preinstalled on the
internal memory card. You do not need to update them unless a new
version of maps is released. If, however, you have formatted your internal
memory card using Menu » Gallery » Options » Memory card optio... »
Format media mem. and have therefore lost all map data, you then need
to re-install a full set of map data using Map Loader. (Or if you have a
backup copy of internal memory card already created using the backup
feature of Vertu PC Suite, you can also use that backup copy to restore the
map data).
It might also be possible to download maps using the packet data transfer
service available at your travel destination. However, this may incur
considerably a large amount of data transmission fees at a different
roaming rate. We recommend you complete all necessary update or
installation before you leave Japan for any trip abroad.
Note: Before you connect your Vertu phone to a PC for the first time to
use Map Loader, you should have selected the Menu » World Maps
menu and run the World Maps application at least once. If you have
never run the World Maps application, do so at least once before
connecting your Vertu phone to the PC.
Also, when updating map data, delete all maps on the internal memory
card first, and then download a new selection, to ensure that all maps
are from the same release.
Using your Vertu phone 53
Page 54
Accessories
The following accessories are provided with your Vertu phone:
> AC adapter (comprising the adapter itself and international adapter plugs)
> Battery
> Two USB data cables
*
One of the USB data cables is used to connect the AC adapter and your
Vertu phone. The other is used to connect your Vertu phone to a PC.
In addition, you can also use a vehicle charger or other optional
accessories. For more information on accessories approved for use with
your Vertu phone, please contact Vertu Customer Service (page 34) or
refer to the Vertu official website.
For safety information relating to your Vertu phone and accessories, refer
to "Health and safety information" (page 4). For care and maintenance
information relating to your Vertu phone and accessories, refer to "Care
and maintenance" (page 6).
Battery
Your Vertu phone is powered by a rechargeable battery. The battery
intended for use with your Vertu phone is BL-5C. Vertu may make
additional battery models available for your Vertu phone. The AC adapter
intended for use with your Vertu phone is AC-31.
The full performance of a new battery is achieved only after two or three
complete charge and discharge cycles.
If a battery is being used for the first time, or if the battery has not been
used for a prolonged period, it may take several minutes before the
charging indicator appears on the display or before any calls can be made.
Battery talk and standby times are estimates only and depend on signal
strength, network conditions, features used, battery age and condition,
temperatures to which battery is exposed, use in digital mode, and many
other factors. The amount of time your Vertu phone is used for calls will
affect the standby time. Likewise, the amount of time that your Vertu phone
is turned on and in the standby mode will affect the talk time.
You can maximise the performance of the battery by switching off certain
functions.
Note: If the battery is removed from your Vertu phone for longer than
an hour, you may need to reset the date and time.
The battery can be charged and discharged hundreds of times, but it will
eventually wear out. When the talk and standby times are noticeably
shorter than normal, replace the battery.
54 Using your Vertu phone
Page 55
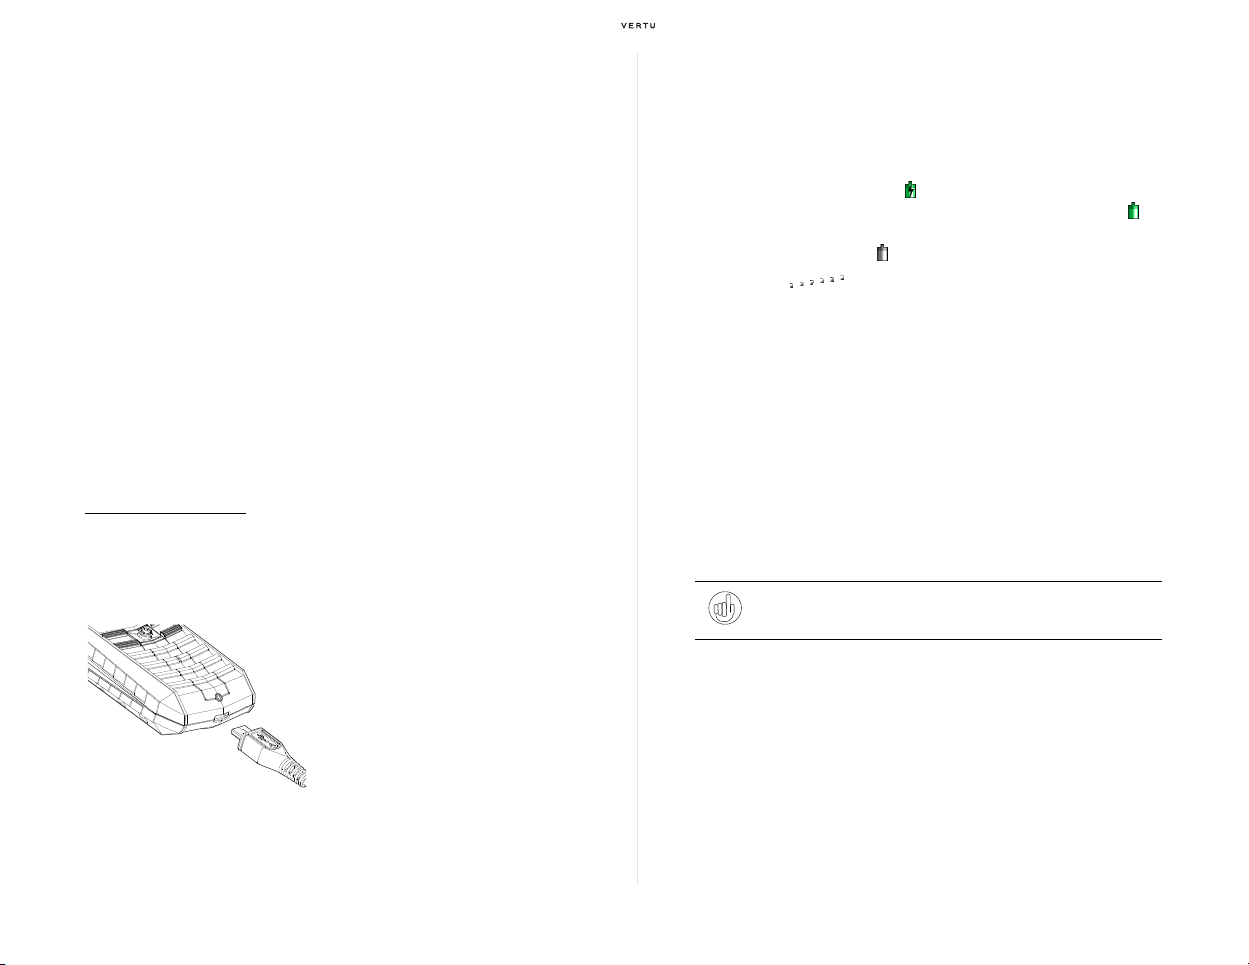
Charging the battery
The battery for your Vertu phone is rechargeable and requires charging at
regular intervals. The battery does not have to be completely discharged
before you can recharge it.
Use the charger (comprising the following three components) supplied to
charge your Vertu phone.
> AC charger
> USB data cable (to connect the AC charger and your Vertu phone)
> International adapter plugs (for use in Japan and North America, Europe and
the UK)
The adaptor plugs are designed to fit outlets in the different regions where
you might be using your Vertu phone. Use the adaptor plug for Japan and
North America when charging your Vertu phone in Japan. Before you plug
it in, make sure that that the electrical rating of the AC outlet is appropriate
for the charger.
Charging the battery:
Before starting to charge your battery, make sure that the correct adaptor
plug for your wall outlet is properly connected to the charger and that the
USB data cable’s connector is connected to the charger.
Make sure the data cable's USB
connector end
charger.
Micro USB charger connector to your
Vertu phone as shown. Ensure that the
connector is inserted correctly, with the
connector symbol uppermost.
Then, connect the charger body to a
powered AC outlet.
is already connected to the
Then, carefully connect the
When you start charging, the pulsing indicator (page 20) at the bottom of
your Vertu phone will be turned on (start lighting permanently). Also, when
your Vertu phone is powered on, a notification message is displayed for a
few seconds, and then the battery charge indicator (page 19) at the above
right of the display starts animating to indicate the current charging progress.
> When the battery indicator icon ( ) is displayed in green, the battery is not yet
fully charged. When the battery is fully charged, this icon changes to , which
is still indicated in green. (And then, when the charger cable is removed from
your Vertu phone, the icon ( ) is now indicated in grey.)
> The six dots ( ) just at the left of the battery icon indicate the level of
current battery charge. The more dots that stop flashing, the more complete the
battery charge. The colour of dots also indicate the current battery charge level.
When the dots are displayed in green or grey (while flashing), the battery is not
yet charged up to that level. When the dots are displayed in grey (without
flashing), the battery has been charged up to that level.
Always charge the battery until it is fully charged. When the battery is fully
charged, the pulsing indicator (page 20) will either slowly flash or go out. If
your Vertu phone is switched on, the battery indicator will stop flashing and
a confirmation message is displayed on the screen.
The charging time will vary with different power sources, and we
recommend the Vertu charger is always used.
Tip:
You can also charge the battery by connecting your Vertu phone
and your PC using a USB data cable.
Using your Vertu phone 55
Page 56
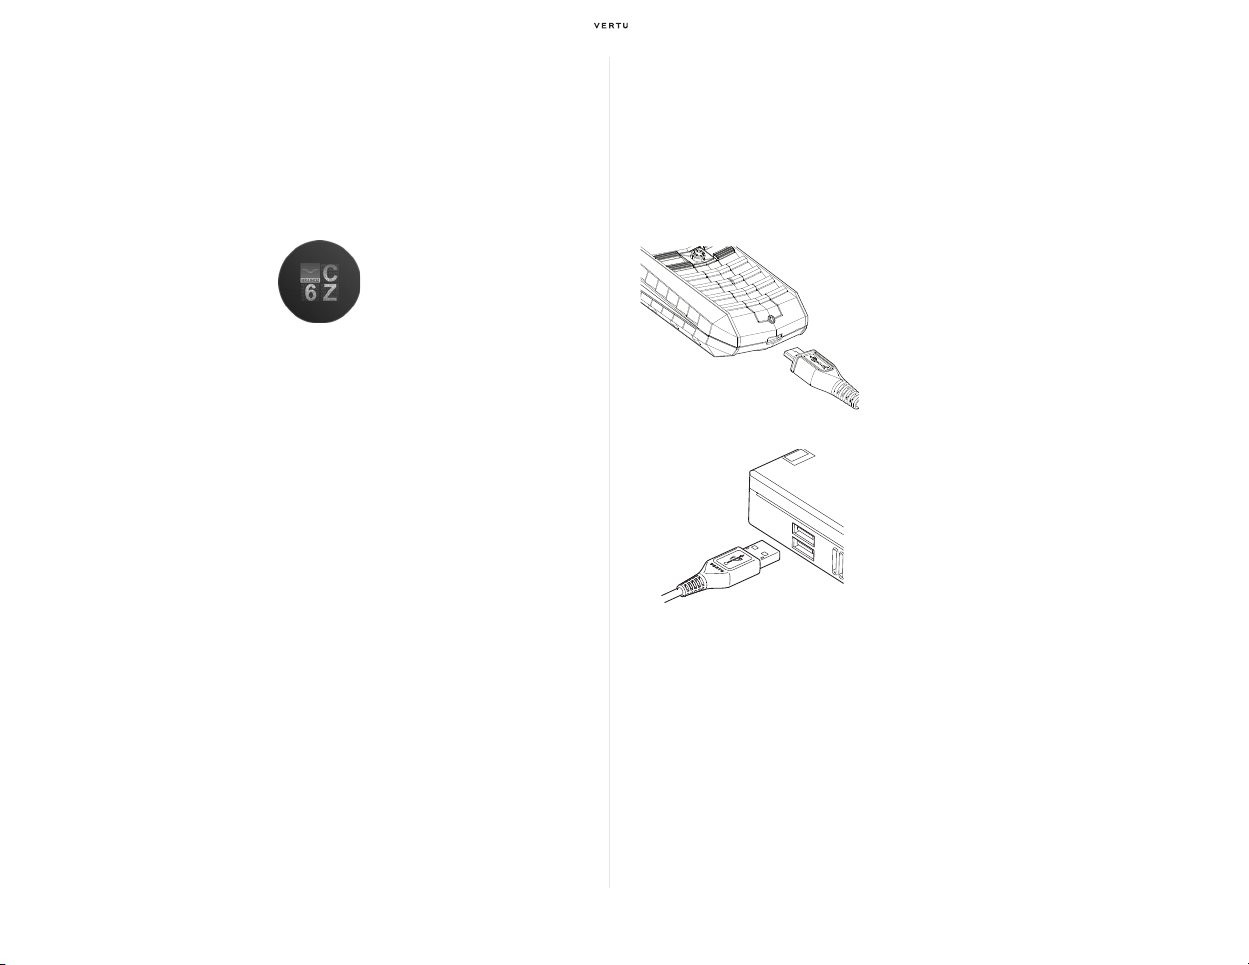
Vertu battery cer tification guidelines
For your safety, always use original Vertu batteries. To check that you are
getting an original Vertu battery, purchase it from a Vertu authorised
service centre or dealer, and inspect the holospot label using the following
steps:
1. When you look at the holospot on the label, you should see a Vertu
symbol and three characters, similar to those shown below.
2. In the background you should see the unique holospot serial
number.
Successful completion of these steps is not a total assurance of the
authenticity of the battery. If you cannot confirm authenticity, or if you have
any reason to believe that your Vertu battery with the holospot on the label
is not an authentic Vertu battery, you should refrain from using it and
contact Vertu Customer Service (page 34).
USB data cable
You can use the USB data cable to transfer data between your Vertu phone
and a compatible PC or a printer supporting PictBridge. You can also use
the USB data cable with Vertu PC Suite (page 52).
You can also charge the battery by connecting your Vertu phone to your
PC using a USB data cable.
Connect the Micro USB connector of the
data cable to your Vertu phone as shown.
Ensure that the connector is inserted
correctly, with the connector symbol
uppermost.
Connect the USB connector of the data
cable to a USB port of the PC.
56 Using your Vertu phone
Page 57
Specifications
Memory
Available memory
(internal memory card)
Maximum number of contacts
32 GB (Titanium)
8 GB (Aluminium)
2000
Number of messages Limited by the amount of free memory on the
internal memory card
Maximum number of
calendar entries
2000
Cellular protocols GSM 850/900/1800/1900
EDGE
WCDMA I (2100) II (1900) V (850) VI (800)
HSDPA
HSUPA
Power class WCDMA, Class 3, 24 dBm
Speech codecs WB-AMR, AMR, EFR, FR, HR
Physical characteristics
Dimensions (H × W × D)
Volume
117 mm x 46 mm x 19 mm
82.7 cc
Weight (including battery) Titanium: 170 g
Aluminium (with rubber): 148 g
Aluminium (with leather): 150 g
Interface
Cable, headset and phone
Micro-USB
charging
Audio/Video codecs
Audio Ringing tones: AAC, AMR, AMRWB, AWB, MID,
MP3, M4A, WAV, WMA
Media player: AAC, AAC+, eAAC+, MP3, WMA
Video
Bluetooth Bluetooth ver 2.0 + EDR
3GP, H.263, H.264, MP4
Advanced Audio Distribution Profile (A2DP)
Audio/Video Remote Control Profile (AVRCP)
Dial-Up Networking Profile (DUN)
File Transfer Profile (FTP)
General Audio/Video Distribution Profile (GAVDP)
Generic Access Profile (GAP)
Generic Object Exchange Profile (GOEP)
Hands-Free Profile (HFP)
Headset Profile (HSP)
Object Push Profile (OPP)
Personal Area Networking Profile (PAN)
Phone Book Access Profile (PBAP)
Serial Port Profile (SPP)
Service Discovery Application Profile (SDAP)
SIM Access Profile (SAP)
Camera 5 Megapixel
Browser OSS browser. X-HTML with TCP/IP, WAP 2.0
Java MIDP Java 2.0
Battery capacity 1050 mAh
Display
LCD 40.8 mm x 30.6 mm (2” active area) TFT
Resolution
QVGA, 240x320 (16 million colours)
Using your Vertu phone 57
 Loading...