

Vertiv Liebert PST5 Quick Installation Manual

LIEBERT® PST5™ 350 – 500 VA
Quick Installation Guide
Before installing, operating, or
maintaining your Liebert PST5
UPS Please review these
important safety instructions.
detailed safety, operating,
maintenance, and troubleshooting
information, refer to the PST5 User
Guide available at www.VertivCo.
com.
CAUTION: Connect the UPS
only to a properly grounded/
earthed outlet that is protected by
an appropriate branch circuit
protector (circuit breaker or fuse)
that meets national and/or local
electrical codes.
The Liebert PST5 should be
located near the wall outlet. Do
not use extension cords between
the wall outlet and the UPS. The
is designed for small oice and
home use only. It is not
recommended to be used with
life-support equipment or
applications.
WAR N ING: Risk of Electric
Shock. Observe all cautions and
warnings in this manual. Failure to
do so may result in serious injury
or death. Refer all UPS and
battery service to properly trained
and qualified service personnel.
Do not attempt to service this
product yourself beyond the
battery replacement procedures.
Opening or removing the cover
may expose you to lethal voltages
within this unit even when it is
apparently not operating and the
input wiring is disconnected from
the electrical source. Never work
alone.
In case of fire, use a dry chemical
fire extinguisher to put out the
fire. Using a fluid fire extinguisher
may cause electric shock. In the
event of an emergency, press and
hold the ON/OFF button for at
least one (1) second to turn o the
UPS then unplug the UPS from
the wall outlet.
For
FCC Notice Class B:
This equipment has been tested
and found to comply with the limits
for a Class B digital device,
pursuant to Part 15 of the FCC
Rules. These limits are designed to
provide reasonable protection
against harmful interference in a
residential installation. This
equipment generates, uses and can
radiate radiofrequency energy and,
if not installed and used in
accordance with the instructions,
may cause harmful interference to
radio communications. However,
there is no guarantee that
interference will not occur in a
particular installation. If this
equipment does cause harmful
interference to radio or television
reception, which can be
determined by turning the
equipment o and on, the user is
encouraged to try to correct the
interference by one or more of the
following measures:
• Re-orient or relocate the
receiving antenna.
• Increase the separation
between the equipment and
receiver.
• Connect the equipment into an
outlet on a circuit dierent from
that to which the receiver is
connected.
• Consult the dealer or an
experienced radio/TV
technician for help.
WAR N ING: Changes or
modifications to this unit not
expressly approved by the party
responsible for compliance could
void the user’s authority to operate
the equipment.
The PST5 ships with the following
items:
• USB cable; one 2m (6-1/2 ft.)
long
• Wall-mount template and
screws
• Quick Installation Guide with
safety instructions
IN STALL ATI ON
Install the PST5 in a temperaturecontrolled environment that is free
of corrosive and conductive
contaminants. Avoid locations near
heat or water sources and exposed
to direct sunlight. For proper
ventilation, leave approximately 2 to
4 inches clearance on all sides of
the UPS.
• The UPS unit ships with the
internal battery connected.
• The UPS may be mounted to a
wall using the mounting slots
on the bottom of the UPS and
provided screws. A template for
screw location is provided and
the unit should be mounted
ensuring they are in a wall stud
for a secure installation.
590-1789-501C/SL-70204_REV2_3-19 1
LIEBERT® PST5™ 350 – 500 VA
Quick Installation Guide
Liebert® PST5
TM
Setup and Start-up
Inspect the UPS for any signs of
obvious damage. If damage is
visible, do not proceed with the
setup and call our warranty support
line for assistance 1-800-222-5877
menu option 3, e mail:
microups.warranty@vertivco.com.
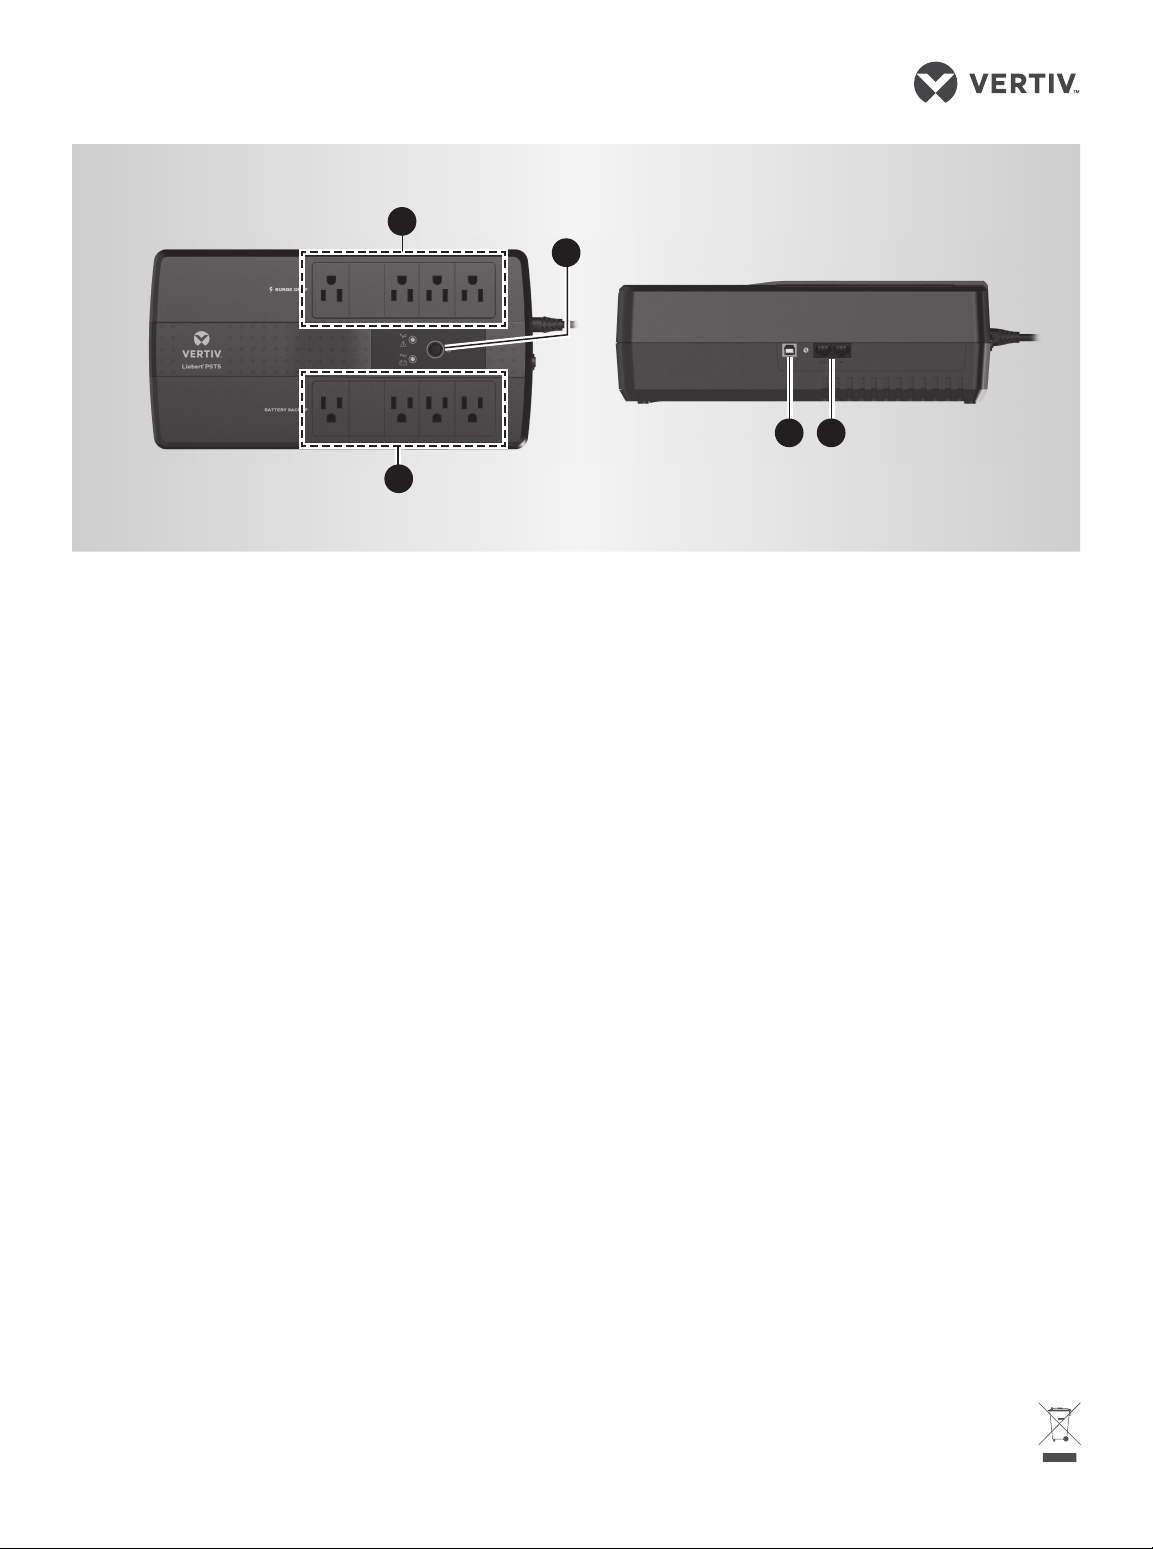
1. The UPS has 4 batterybacked and surgeprotected receptacles
and 4surge-protectedonly receptacles.
Plug your critical equipment
(such as computer, monitors,
etc.) into the battery-backed
receptacles and your lesscritical equipment (such as
printers and other less-often
used peripherals) into the
surge-only receptacles.
1
4
1
2. To use the USB
communication,
plug the provided cable into the
port on the UPS and the other
end into an open USB port on
your computer. This allows
unattended shutdown of your
computer using either the
built-in feature within the
Microsoft® Windows® operating
system or network-connected
Vertiv or third-party shut-down
software. Use of this feature is
not required for proper
operation of the UPS.
3. To protect your computer
network connection or
telephone,
use the network/telephone
surge-protection ports on the
side. Use the “IN” port to
connect the line from the wall
jack and the “OUT” port to
connect to your device port.
Use of this feature is not
required forproper operation of
the UPS.
2 3
4. Start the UPS.
Plug the UPS input cord into
the wall outlet. Plug-in all
equipment to protect in the
appropriate receptacles. To
turn on the UPS, press and hold
the ON/OFF button until you
hear the UPS beep, then
release the button. The
connected equipment
immediately receives power
and the UPS starts a short, self
system test (electronics and
battery check). When the unit
passes all self checks, only the
green LED should be lit
indicating normal operation.
While every precaution has been
taken to ensure that the battery is
in good condition, we recommend
allowing the UPS to charge the
battery for at least 12 hours prior to
providing full back-up time
protection for any utility-power
abnormality.
To contact Vertiv Technical Support: visit www.VertivCo.com
© 2019 Verti v Co. All rights res erved. Vertiv an d the Vertiv logo are tr ademarks or regis tered trademar ks of Vertiv Co. All othe r names and logo s referred to are trad e names,
tradema rks or registere d trademarks of thei r respective own ers. While ever y precaution ha s been taken to ensu re accuracy and co mpleteness h erein, Vertiv Co. a ssumes no
respon sibility, and disc laims all liabili ty, for damages res ulting from use of thi s information or fo r any errors or omis sions. Speci fications are s ubject to change w ithout notice.
2 590-1789-501C/SL-70204_REV2_3-19
 Loading...