

Vertiv Liebert DSE500 Installer/user Manual

Liebert®
DSE500™ PackagedSolution
ThermalManagementSystem
Installer/User Guide

The information contained in this document is subject to change
without notice and may not be suitable for all applications. While
every precaution has been taken to ensure the accuracy and
completeness of this document, Vertiv assumes no responsibility
and disclaims all liability for damages resulting from use of this
information or for any errors or omissions. Refer to other local
practices or building codes as applicable for the correct methods,
tools, and materials to be used in performing procedures not
specifically described in this document.
The products covered by this instruction manual are manufactured
and/or sold by Vertiv This document is the property of Vertiv and
contains confidential and proprietary information owned by Vertiv.
Any copying, use or disclosure of it without the written permission
of Vertiv is strictly prohibited.
Names of companies and products are trademarks or registered
trademarks of the respective companies. Any questions regarding
usage of trademark names should be directed to the original
manufacturer.
Technical Support Site
If you encounter any installation or operational issues with your product, check the pertinent
section of this manual to see if the issue can be resolved by following outlined procedures.
Visit https://www.VertivCo.com/en-us/support/ for additional assistance.
Vertiv | Liebert® D SE500™ Installer/User Guide

TABLE OF CONTENTS
1 Important Safety Instructions 5
2 Nomenclature and Components 9
2.1 Liebert DSE500 Packaged Solution Model-number Nomenclature 9
2.2 Component Location 10
2.3 Air-flow Configurations 11
3 Pre-installation PreparationandGuidelines 13
3.1 Planning Dimensions 13
3.2 Connections and System Setup 14
3.2.1 Electrical Connections 14
3.2.2 Evaporator Drip-pan Connection 14
3.3 Operating Conditions 15
3.3.1 Cooling 15
3.4 Unit Weights 15
4 Equipment Inspection and Handling 17
4.1 Rigging to Lift the Unit 17
5 Electrical Field Connections 19
6 Checklist for Completed Installation 23
6.1 Moving and Placing Equipment 23
6.2 Electrical Installation Checks 23
6.3 Other Installation Checks 23
6.4 BMS and Sensor Installation Checks 23
7 Initial Start-up Checks andCommissioning Procedure forWarrantyInspection 25
8 Maintenance 27
8.1 Service Access for Unit Maintenance 27
8.2 Filters 28
8.2.1 Replacing the Filters 29
8.3 Evaporator Fan Maintenance 29
8.3.1 Fan Assembly Troubleshooting 30
8.3.2 Fan Assembly Maintenance 30
8.3.3 Blower-motor Lubrication 30
8.3.4 Removing Fan Assembly 31
8.4 Electronic Expansion Valve (EEV) Maintenance 31
8.5 Compressor Maintenance 31
8.5.1 Compressor Oil 31
8.5.2 Rotalock Valve 31
8.5.3 Replacement Compressors 32
8.5.4 Compressor Motor Burnout 32
8.5.5 Unloading Solenoid(s) on a Digital-scroll Compressor 32
8.5.6 Replacing the Compressor 32
8.6 General Condenser Maintenance 33
8.7 Condenser Cleaning 33
8.7.1 When to Clean the Condenser Coil 33
8.7.2 What to Use to Clean the Condenser Coil 34
8.7.3 Cleaning the Condenser Coil 34
8.7.4 Cleaning the Condenser Fan 34
8.8 Replacing the Condenser Fan 35
8.8.1 Verifing the Fan Address 40
Vertiv | Liebert® DSE500™ Installer/User Guide | 3

8.9 Replacing the Premium-efficiency Control Board 44
8.9.1 Preparing to Replace the Board 44
8.9.2 Installing the Replacement Board 45
8.10 Pumped-refrigerant Economizer (PRE) 46
9 Preventive Maintenance Checklist 47
Appendices 51
Appendix A: Technical Support and Contacts 51
Appendix B: Submittal Drawings 53
Vertiv | Liebert® DSE500™ Installer/User Guide | 4
1 IMPORTANT SAFETY INSTRUCTIONS
SAVE THESE INSTRUCTIONS
This manual contains important safety instructions that should be followed during the installation and
maintenance of the Liebert®DSE500. Read this manual thoroughly before attempting to install or operate
this unit.
Only qualified personnel should move, install or service this equipment.
Adhere to all warnings, cautions, notices and installation, operating and safety instructions on the unit
and in this manual. Follow all installation, operation and maintenance instructions and all applicable
national and local building, electrical and plumbing codes.
WARNING! Arc flash and electric shock hazard. Open all local and remote electric power-supply
disconnect switches, verify with a voltmeter that power is Off and wear appropriate,
OSHA-approved personal protective equipment (PPE) per NFPA 70E before working within the
electric control enclosure. Failure to comply can cause serious injury or death. Customer must
provide earth ground to unit, per NEC, CEC and local codes, as applicable. Before proceeding
with installation, read all instructions, verify that all the parts are included and check the
nameplate to be sure the voltage matches available utility power. The Liebert® controller does
not isolate power from the unit, even in the “Unit Off” mode. Some internal components require
and receive power even during the “Unit Off” mode of the controller. The factory-supplied
disconnect switch is inside the unit. The line side of this switch contains live high-voltage. The
only way to ensure that there is NO voltage inside the unit is to install and open a remote
disconnect switch. Refer to unit electrical schematic. Follow all local codes.
WARNING! Risk of electric shock. Can cause serious injury or death. Open all local and remote
electric power supply disconnect switches and verify with a voltmeter that power is off before
working within the component electric-connection enclosures. Fan-motor controls can
maintain an electric charge for 10 minutes after power is disconnected. Wait 10 minutes after
power is verified as off before working within the electric control/connection enclosures.
WARNING! Risk of over-pressurization of the refrigeration system. Can cause explosive
discharge of high-pressure refrigerant, loss of refrigerant, environmental pollution, equipment
damage, injury, or death. This unit contains fluids and gases under high pressure. Use extreme
caution when charging the refrigerant system. Do not pressurize the system higher than the
design pressure marked on the unit's nameplate.
WARNING! Risk of pressurized doors flying open or slamming closed suddenly. Can cause
serious injury. Do not attempt to open doors while fans are running. Do not turn on fans with
doors open. Before opening the door, open all local and remote electric power supply
disconnect switches, verify with a voltmeter that power is off, and verify that all fans have
stopped rotating. Do not leave unsecured objects in the fan's bay after any maintenance
operation.
WARNING! Risk of very heavy, 250-lb (113.4-kg) fan modules and modules dropping downward
suddenly. Can cause injury or death.
Support fan modules before removing mounting hardware. Use caution to keep body parts out
of the fan modules pathway during repositioning. Only properly trained and qualified personnel
should work on this equipment.
1 Important Safety Instructions 5
WARNING! Risk of improper moving. Can cause equipment damage, injury or death. Use only
lifting equipment that is rated for the unit weight by an OSHA-certified rating organization. The
center of gravity varies depending on the unit size and selected options. The slings must be
equally spaced on either side of the center of gravity indicator.
Table 3.3 on page15. Use the center of gravity indicators on the unit to determine the position
of the slings.
WARNING! Risk of contact with high-speed rotating fan blades. Can cause serious injury or
death. Open all local and remote electric power-supply disconnect switches, verify with a
voltmeter that power is off, and verify that all fan blades have stopped rotating before working
in the unit cabinet or on the fan assembly. If control voltage is applied, the fan motor can restart
without warning after a power failure.
WARNING! Risk of improper wiring, piping, moving, lifting and handling. Can cause equipment
damage, serious injury or death. Installation and service of this equipment should be done only
by qualified personnel who have been specially-trained in the installation of air-conditioning
equipment and who are wearing appropriate, OSHA-approved PPE.
WARNING! Risk of improper wire sizing/rating and loose electrical connections. Can cause
overheated wire and electrical connection terminals resulting in smoke, fire, equipment and
building damage, injury or death. Use correctly sized copper wire only and verify that all
electrical connections are tight before turning power On. Check all electrical connections
periodically and tighten as necessary.
CAUTION: Risk of contact with sharp edges, splinters, and exposed fasteners. Can cause
injury. Only properly trained and qualified personnel wearing appropriate, OSHA-approved PPE
should attempt to move, lift, remove packaging from or prepare the unit for installation.
CAUTION: Risk of contact with hot surfaces. Can cause injury. The fan motor, and some
electrical components are extremely hot during unit operation. Allow sufficient time for them to
cool to a touch-safe temperature before working within the unit cabinet. Use extreme caution
and wear appropriate, OSHA-approved PPE when working on or near hot components.
CAUTION: Risk of handling heavy and lengthy parts. Can cause personal injury and equipment
damage. Cabinet panels can exceed 5 ft. (1.5 m) in length and weigh more than 35 lb. (15.9 kg).
Follow relevant OSHA lifting recommendations and consider using a two-person lift for safe
and comfortable removal and installation of cabinet panels. Only properly trained and qualified
personnel wearing appropriate, OSHA-approved PPE should attempt to remove or install
cabinet panels.
6
Vertiv | Liebert® D SE500™ Installer/User Guide
NOTICE
CAUTION: Risk of improper moving, lifting and handling. Can cause equipment damage or
injury. Only properly trained and qualified personnel should work on this equipment. Condenser
fan modules weigh in excess of 250lb(113.4kg) and evaporator fan modules weigh in excess of
125lb (57kg). Use proper lifting techniques and wear appropriate, OSHA-approved PPE to
avoid injury and dropping the fan module during removal. Equipment used in handling/lifting,
and/or installing the fan assembly must meet OSHA requirements. Use handling/lifting
equipment rated for the weight of the fan assembly. Use ladders rated for the weight of the fan
assembly and technicians if used during installation. Refer to handling/lifting, and/or
installation equipment operating manual for manufacturer's safety requirements and operating
procedures.
CAUTION: Risk of exposure to harmful noise levels. Can cause hearing injury or loss.
Depending on the installation and operating conditions, a sound pressure level greater than
70dB(A) may arise. Take appropriate technical safety measures. Operating personnel must
wear appropriate, OSHA-approved PPE and observe all appropriate hearing-protection safety
requirements.
Risk of improper power-supply connection. Can cause equipment damage and loss of warranty
coverage.
Prior to connecting any equipment to a main or alternate power source (for example: back-up
generator systems) for start-up, commissioning, testing, or normal operation, ensure that these
sources are correctly adjusted to the nameplate voltage and frequency of all equipment to be
connected. In general, power-source voltages should be stabilized and regulated to within
±10% of the load nameplate nominal voltage. Also, ensure that no three-phase sources are
single-phased at any time.
NOTICE
Risk of oil contamination with water. Can cause equipment damage.
Liebert®DSE500 systems require the use of POE (polyolester) oil. POE oil absorbs water at a
much faster rate when exposed to air than previously used oils. Because water is the enemy of
a reliable refrigeration system, extreme care must be used when opening systems during
service. If water is absorbed into the POE oil, it will not be easily removed and will not be
removed through the normal evacuation process. If the oil is too wet, it may require an oil
change. POE oils also have a property that makes them act as a solvent in a refrigeration
system. Maintaining system cleanliness is extremely important because the oil will tend to
bring any foreign matter back to the compressor.
NOTE: The Liebert® cooling unit has a factory-installed high pressure safety switch in the high-side
refrigerant circuit.
Agency Listed
Standard 60-Hz units are CSA Certified to the harmonized U.S. and Canadian product safety standard
CSA C22.2 No 236/UL 1995 for “Heating and Cooling Equipment” and are marked with the CSA c-us logo.
1 Important Safety Instructions 7

This page intentionally left blank
8
Vertiv | Liebert® D SE500™ Installer/User Guide

2 NOMENCLATURE AND COMPONENTS
This section describes the model-number configuration for Liebert® DSE500 units and components.
2.1 Liebert DSE500 Packaged Solution Model-number Nomenclature
Table 2.2 below describes each digit of the model number.
Table 2.1 DSE500 Model Number
Model Number Digits 1 to 10 Model Details
1 2 3 4 5 6 7 8 9
D P 5 0 0 T P 2 A T 0 H 0 8 1 6 L 0 U 0 P — — — 1
1011121314151617181920212223242
Model Number
Digits 11 to 14
Table 2.2 DSE500 Packaged Solution Model-number Digit Definitions
Digit Description
Digits 1 and 2 = Product Family
DP = Liebert® Packaged DSE
Digit 3to5 = CoolingCapacity, kW
Nominalsensible capacity, kW
Digit 6 = Air Discharge
F = Perimeter, front inlet/front supply
R = Roof-top, bottom supply/bottom return
Digit 7 = System Type
P = Air-cooled, Econ-O-Phase ready
Digit 8 = Air-flow (Fan Type)
2 = Direct-drive plenum, TEFC + VFD
Digit 9 = Power Supply
A = 460V - 3ph - 60Hz
Digit 10 = Cooling System
T = Tandem with digitalscroll, R-410A
Digit 11 = Humidifier
0 = None
Digit 12 = Display
H = Liebert® iCOM control
Digit 13 = Options
0 = None
A = Air isolating dampers:
Digit 6 = F - Dampers on front supply and return
Digit 6 = T - Dampers on front supply only
Digit 14 = Air Filter
8 = MERV 8, 4-in.
5
2 Nomenclature and Components 9
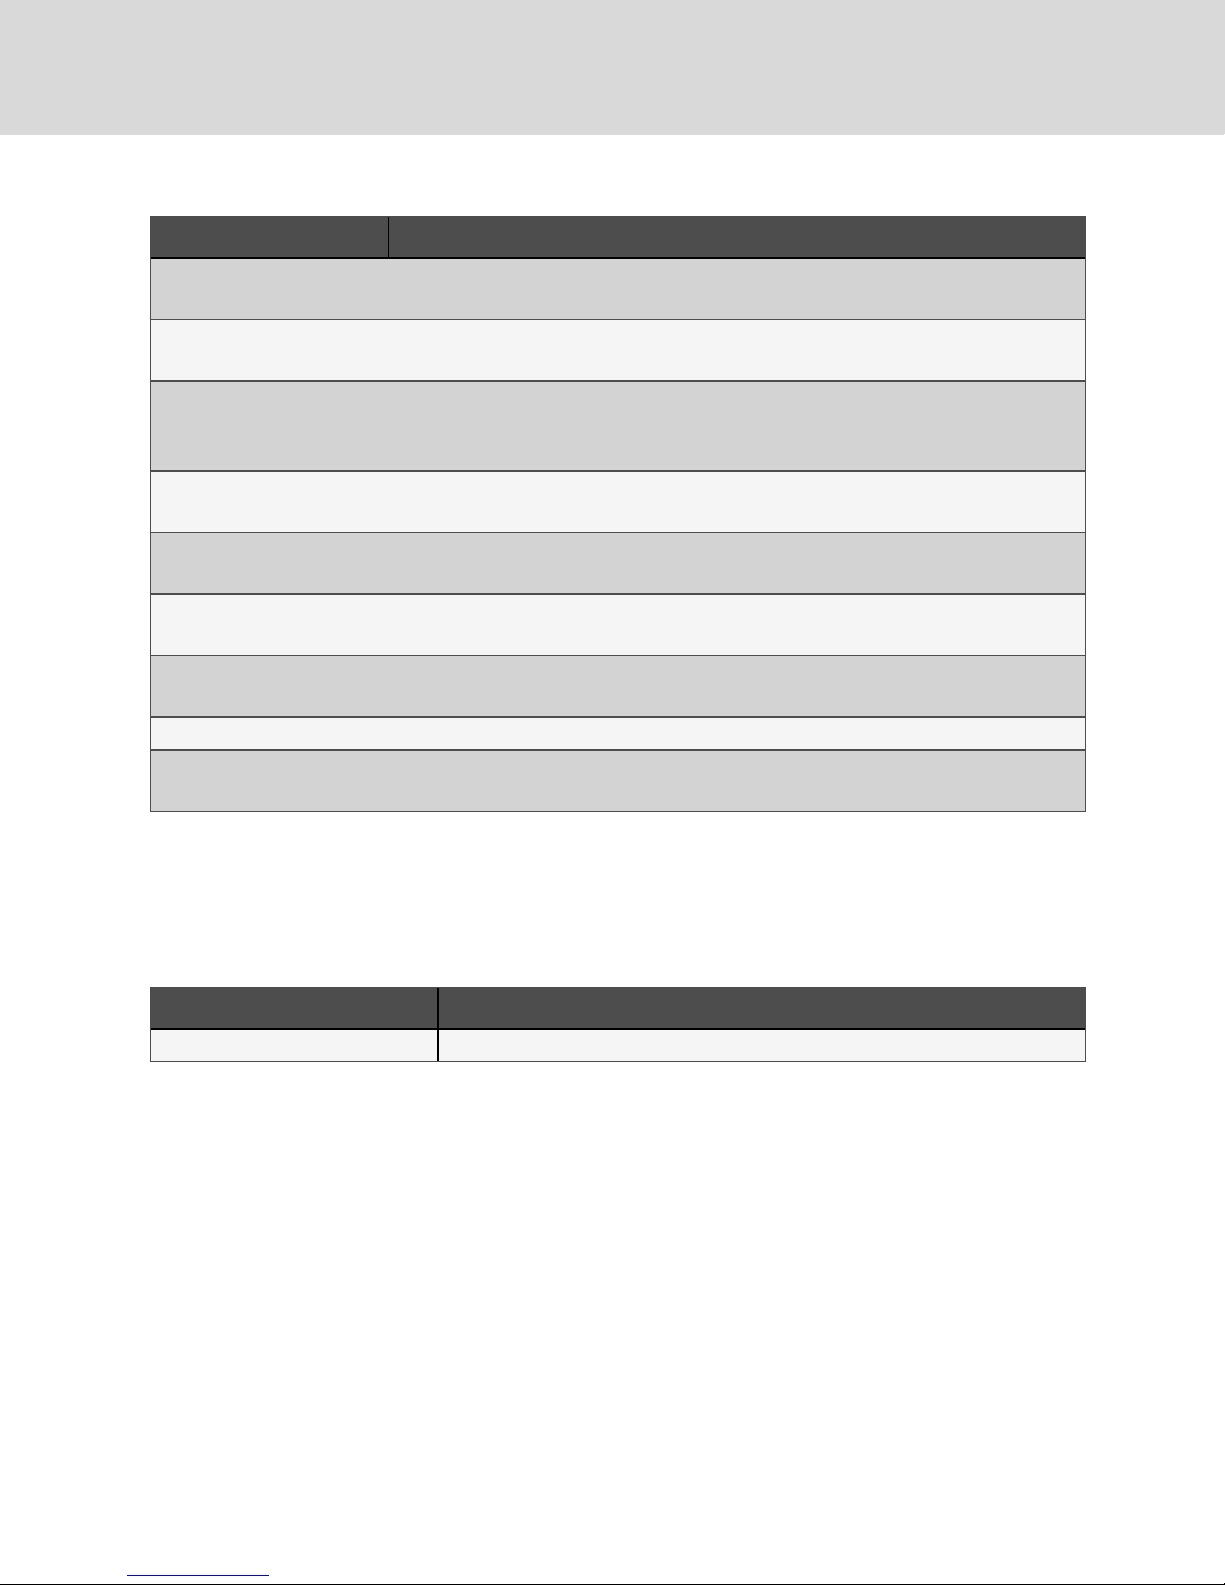
Table 2.2 DSE500 Packaged Solution Model-number Digit Definitions (continued)
Digit Description
Digit 15 = Coil Option
1 = Non-coated c oil
Digit 16 = Enclosure Option
6 = Liebert® standard pebble-graycolor
Digit 17 = High-voltage option
L = Locking disconnect
6 = Locking disconnect + ATS
Digit 18 = Option packages
0 = None
Digit 19 = Monitoring Cards
U = 1 Liebert® IS-UNITY-DP card
Digit 2 0 = Sensors
0 = None
Digit 2 1 = Packaging
P = Domestic
Digit 2 2 to 24 = Factory Configuration Number
Digit 2 5 = Configuration Code
S = SFA
2.2 Component Location
The unit component locations are described in the submittal documents included in the Submittal
Drawings on page53.
The following table lists the relevant documents by number and title.
Table 2.3 Component-location Drawings
Document Number Title
DPN004717 Component Location, Perimeter Unit
10
Vertiv | Liebert® D SE500™ Installer/User Guide
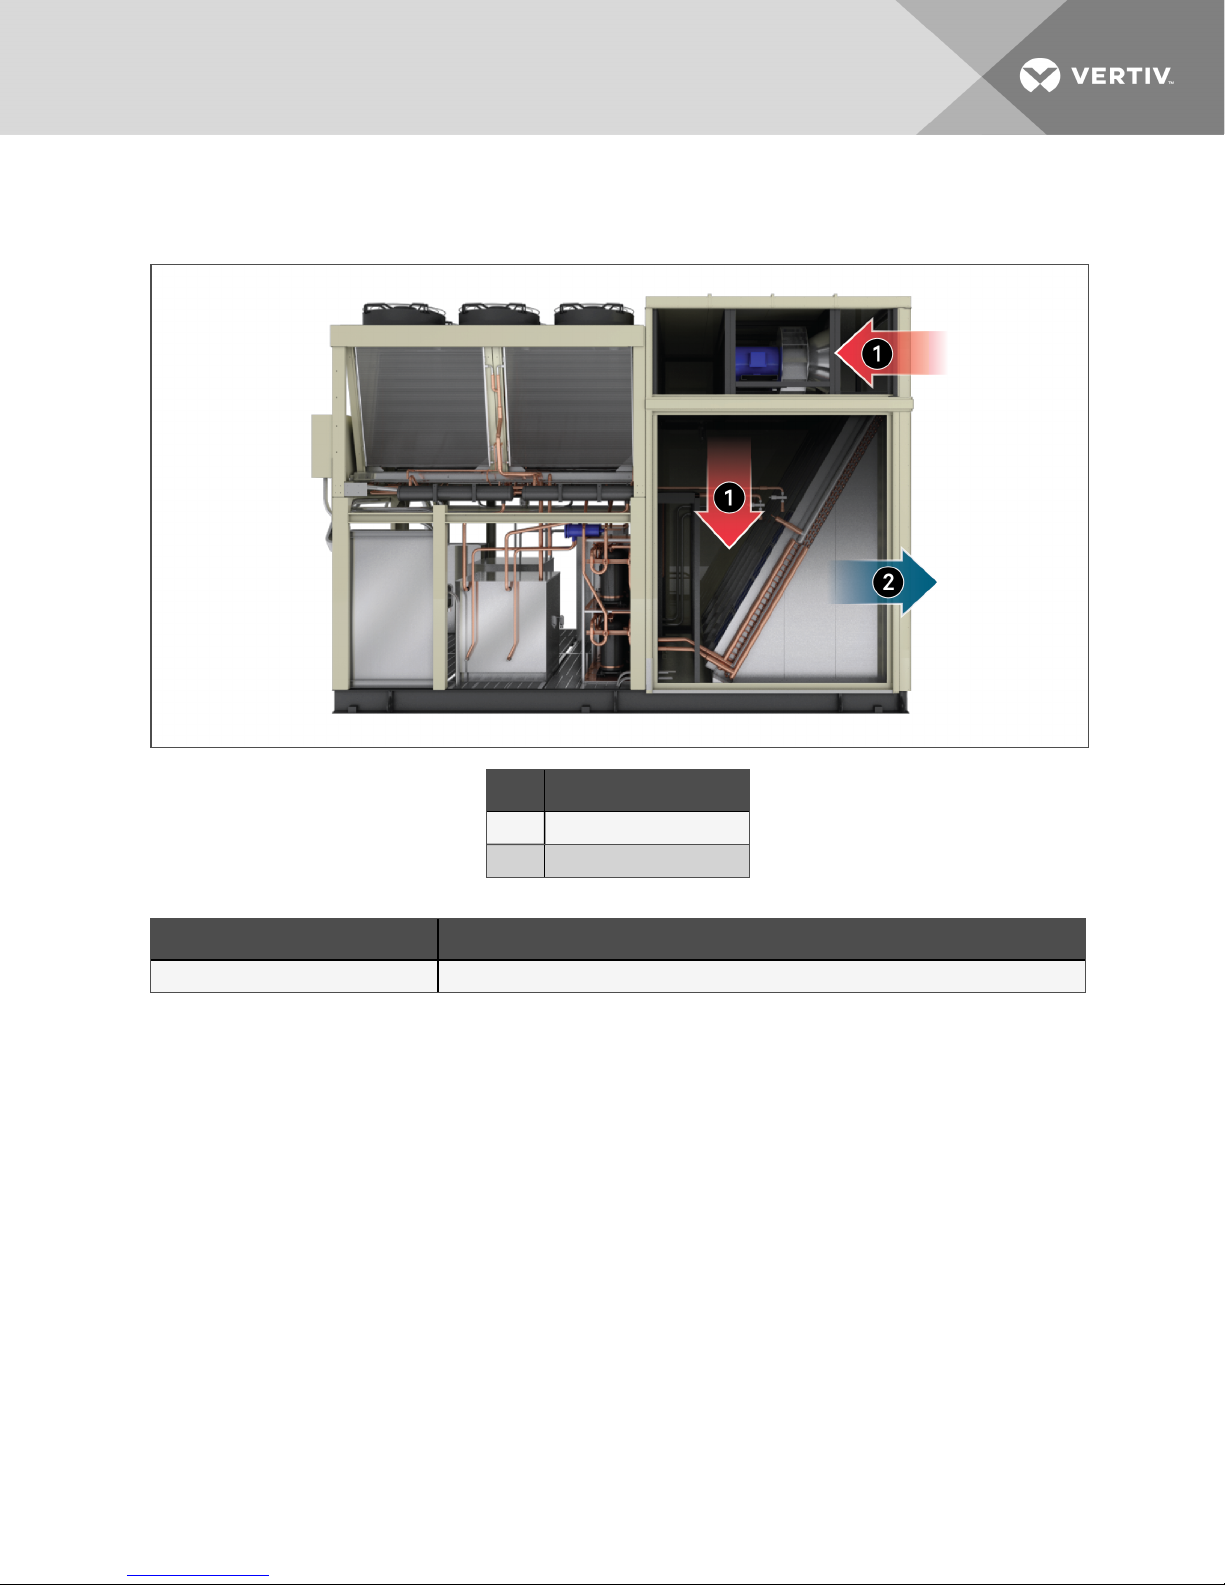
2.3 Air-flow Configurations
Figure 2.1 Perimeter-unit Air-flow Configuration
Item Description
1 Return air from data c enter
2 Supply air to data center
Table 2.4 Perimeter unit air-flow schematic and duct connection
Document Number Title
DPN004718 Airflow Schematic, Perimeter Unit
2 Nomenclature and Components 11

This page intentionally left blank
12
Vertiv | Liebert® D SE500™ Installer/User Guide
3 PRE-INSTALLATION PREPARATIONANDGUIDELINES
NOTE: Before installing unit, determine whether any building alterations are required to run wiring and
ductwork. Follow all unit dimensional drawings and refer to the submittal engineering dimensional
drawings of individual units for proper clearances.
Refer to Table 2.2 on page9, and submittal drawings to determine the type of system being installed
and anticipate building alterations and ductwork needed.
The unit and anchor dimensions are described in the submittal documents included in the Submittal
Drawings on page53.
• Verify that mounting surface/roof top is level, solid and sufficient to support the unit. See Table
3.3 on page15, for unit weights.
• Verify that the support structure for the unit (concrete or other type) has a flat, regular
surface and is adequate to support the unit operating weight.
• Verify that adequate water-control/drain system is in place. If connecting the drip-pan cleanout line, refer to the appropriate submittal document in Table 3.1 below, for the clean-out line
location and port size.
• Verify that the high-voltage electric-supply lines are adequately sized based on the electrical
specification on the unit's name plate and meet local code.
• Verify that the utility electric-supply lines (lights and outlet) are adequately sized and meet
local code.
• Verify that all control and communication wiring are properly routed to the unit control panel
and meet local code.
• Confirm that the conditioned space has a proper envelope and vapor barrier.
• Handle outside air and humidity control externally to the Liebert® DSE500 unit. The DSE500
does not control humidity and is not intended to handle outside air.
• Allow at least the minimum recommended clearances for maintenance and service. See the
appropriate submittal documents for dimensions in Submittal Drawings on page53
• Ensure that there is no obstruction when installing ductwork connections and transitions to
minimize friction losses and turbulence.
3.1 Planning Dimensions
The unit and anchor dimensions are described in the submittal documents included in the Submittal
Drawings on page53.
The following table lists the relevant documents by number and title.
Table 3.1 Dimension Planning Drawings
Document Number Title
DPN004706 Equipment Floor-planLayout for Perimeter and Roof-top Units
Perimeter Units
DPN004716 Cabinet and Anchor DimensionalData
DPN004713 Drip-panClean-out Access and Location
3 Pre-installation PreparationandGuidelines 13
3.2 Connections and System Setup
3.2.1 Electrical Connections
• Three-phase electrical service is required for all models. Electrical service must conform to
national and local electrical codes. See equipment nameplate for details.
• Plan the routing of wiring and ductwork to the unit. Refer to the appropriate electricalconnection drawings for your system in Submittal Drawings on page53.
NOTE: Verify that all electrical connections, service-access doors unit and ducting connections to the
building are sealed and water-tight. Failure to do so risks damage to the outdoor unit.
Table 3.2 Electrical Field-connection Drawings
Document Number Title
DPN004710 Electrical Connections Enclosure
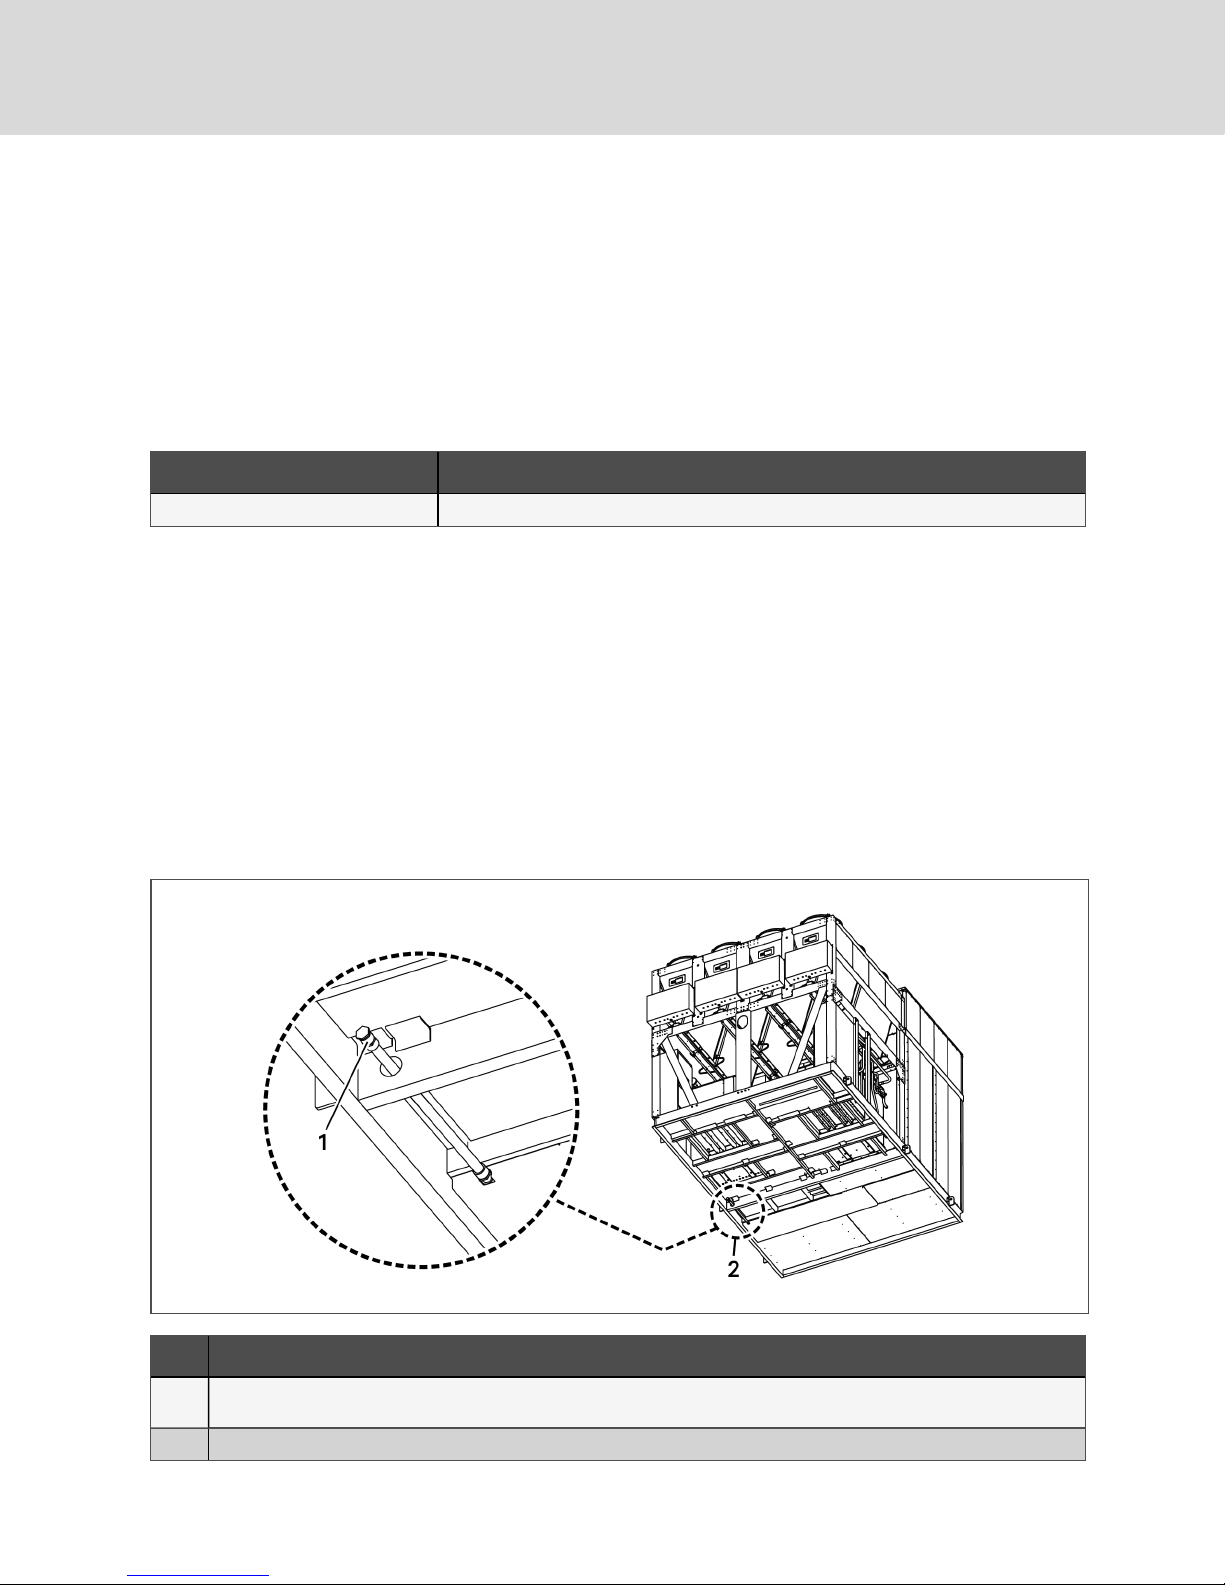
3.2.2 Evaporator Drip-pan Connection
Connect the evaporator clean-out line to an adequate water-drain system. See Figure 3.1 below, for the
connection on the unit. Observe the following requirements and 3.2 above, when installing and routing
the clean-out line:
• Insulate the line with a heat trace so it will not freeze.
• The line must be the full size of the drain connection. The connection port is 1-in. pipe with
CPVC 1-in. FPT fitting.
• Slope the drain line continuously away from the unit, and pitch the drain line toward the drain.
• The line must be made of a material that is suitable for draining water and be rigid enough that
it does not sag between supports, which creates unintentional traps.
• The drain line must comply with all applicable codes.
Figure 3.1 Drip-pan clean-out line location
Item Description
Water drain connection for evaporator drip pan. Accessed byremove the floor panelabove it (next to the compressor
1
compartment).
2 Location of the drip-pan clean-out line inthe perimeter unit.
14
Vertiv | Liebert® D SE500™ Installer/User Guide

3.3 Operating Conditions
The Liebert® DSE500 must supply air to a conditioned space within the operating envelope that ASHRAE
recommends for data centers. Operating the DSE500 outside of this envelope can decrease equipment
reliability. Refer to ASHRAE’s publication, “Thermal Guidelines for Data Processing Environments.”
3.3.1 Cooling
The recommended maximum return-air temperature is 105°F (40°C) and maximum dew point is 59°F
(15°C). The recommended minimum return-air temperature setpoint Dry Bulb is 85°F (29°C).
The DSE500 has a more limited operating envelope than the recommended ASHRAE limits. The DSE500
operating limits are as follows:
• Return Air Temp: 105°F (41°C) Max, 90°F (32°C) Min
• Supply Air Temp: 85°F (29°C) Max, 70°F (21°C) Min for Perimeter Unit, 75°F (24°C) Min for
Rooftop Unit
• Outdoor Air: 102° (39°C) Max, –30°F (–37°C) Min
Operating outside this envelope can decrease equipment reliability.
NOTE: When running above 77°F (25°C) supply air temperature, the superheat readings on the
refrigeration circuits may be higher than 7.2°F(–14°C). The EEVs will run out of stroke and limit
mass flow, which will result in higher than normal superheat.
Unit Weights
3.4
Table 3.3 DSE500 unit weights
Model Weight, lb (kg)
DSE500 Perimeter 23,000 (10,433)
3 Pre-installation PreparationandGuidelines 15

This page intentionally left blank
16
Vertiv | Liebert® D SE500™ Installer/User Guide
4 EQUIPMENT INSPECTION AND HANDLING
SAFETY INFORMATION
WARNING! Risk of improper moving. Can cause equipment damage, injury or death. Use only
lifting equipment that is rated for the unit weight by an OSHA-certified rating organization. The
center of gravity varies depending on the unit size and selected options. The slings must be
equally spaced on either side of the center of gravity indicator.
Unit weights are listed in Table 3.3 on page15.
CAUTION: Risk of contact with sharp edges, splinters, and exposed fasteners. Can cause
injury. Only properly trained and qualified personnel wearing appropriate, OSHA-approved PPE
should attempt to move, lift, remove packaging from or prepare the unit for installation.
• Carefully inspect all items for visible or concealed damage.
• Report damage immediately to the carrier and file a damage claim with a copy sent to Vertiv or
to your sales representative.
Equipment Recommended for Handling the Unit:
• Lift beam
• Slings
• Spreader bars
• Shims and blocks
4.1 Rigging to Lift the Unit
WARNING! Risk of improper moving. Can cause equipment damage, injury or death. Use only
lifting equipment that is rated for the unit weight by an OSHA-certified rating organization. The
center of gravity varies depending on the unit size and selected options. The slings must be
equally spaced on either side of the center of gravity indicator.
Unit weights are listed in Table 3.3 on page15.
See Figure 4.1 on the next page, for the location of the lifting lugs on the unit, and use spreader bars
and/or shimmed blocks to prevent damage to the unit.
• Unit must remain level when lifted to prevent damage to internal equipment.
• Do not place unit directly on the ground. If the unit must be set down, use shims or blocks for
leveling and to keep unit off the ground.
Before lifting or moving, clear the area of all unnecessary personnel. Clear the area of any debris and
unrelated tools or foreign objects.
4 Equipment Inspection andHandling 17
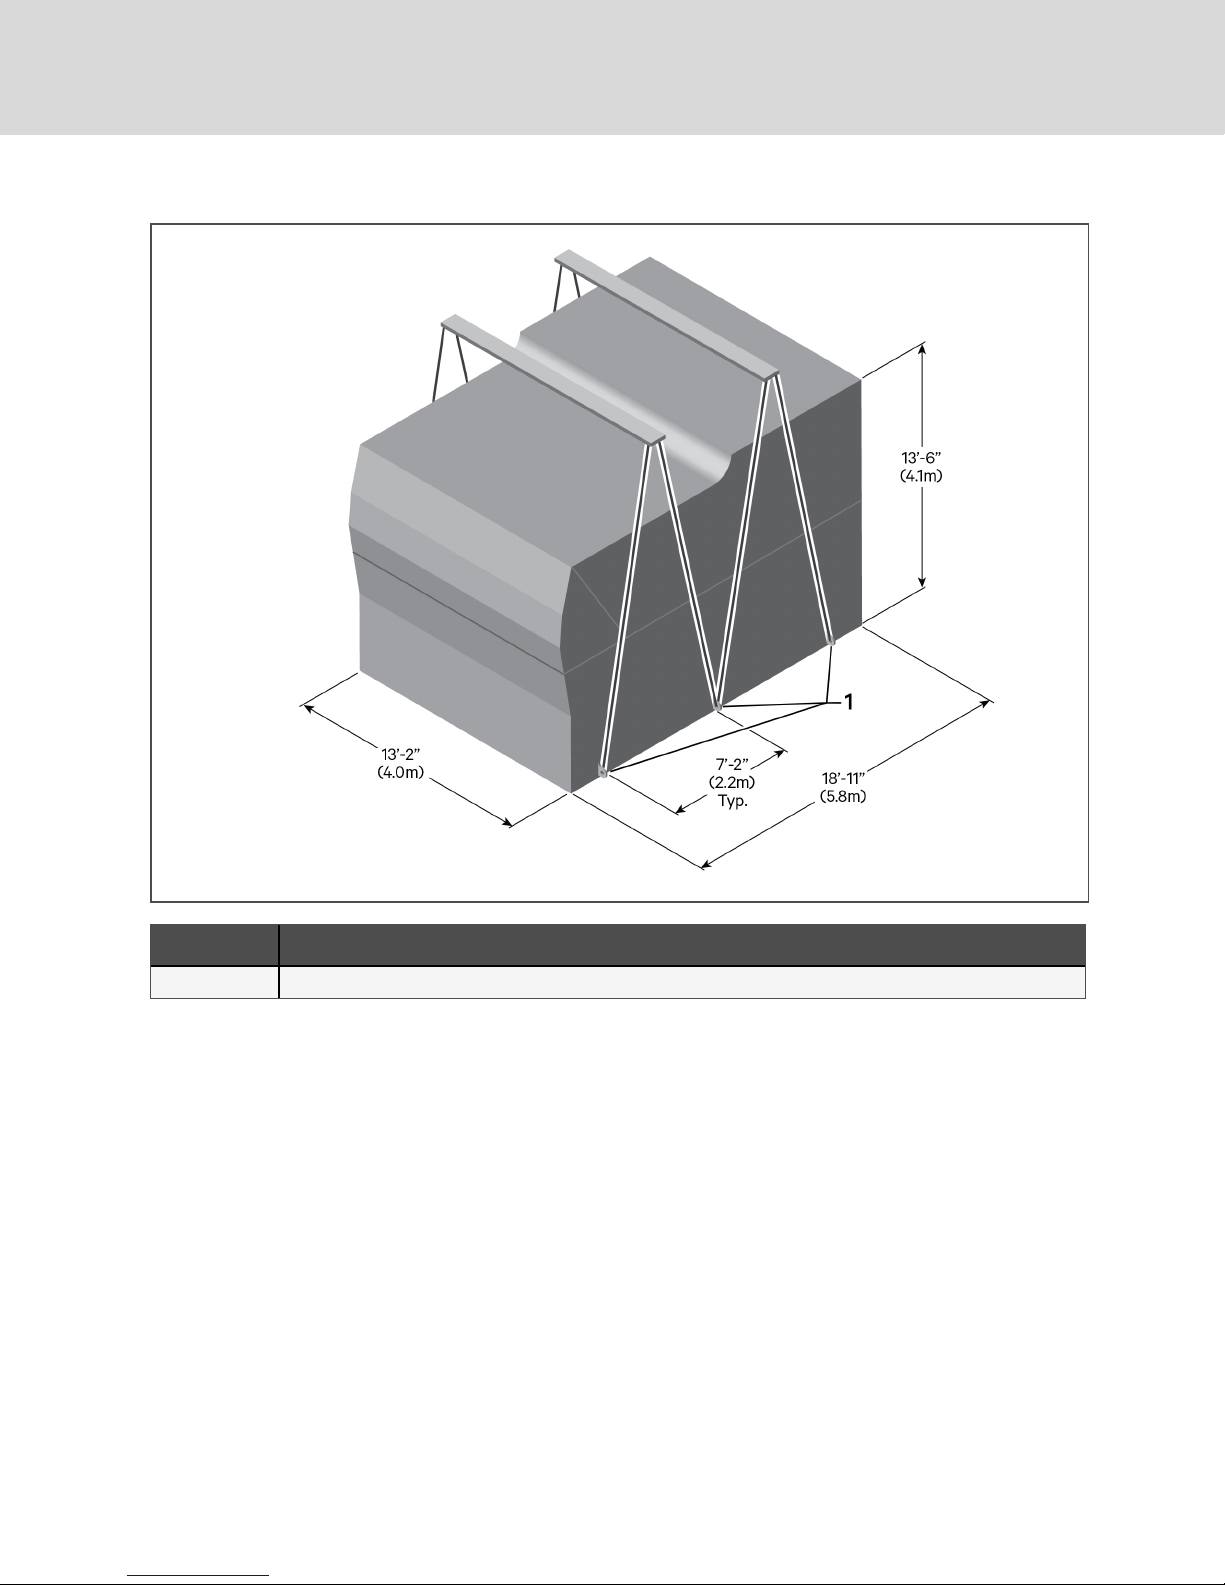
Figure 4.1 Lugs to attach rigging to a perimeter-unit configuration
Item Description
1 Lugs to attach rigging. Typicalboth sides.
18
Vertiv | Liebert® D SE500™ Installer/User Guide
5 ELECTRICAL FIELD CONNECTIONS
Three-phase electrical service is required for all models. Electrical service must conform to national and
local electrical codes. Refer to equipment nameplate regarding wire size and circuit protection
requirements. Refer to the appropriate submittal drawing, listed in Table 5.1 on the next page, for
electrical service entrances into unit
A manual electrical disconnect switch should be installed in accordance with local codes and distribution
system. Consult local codes for external disconnect requirements.
WARNING! Arc flash and electric shock hazard. Open all local and remote electric power-supply
disconnect switches, verify with a voltmeter that power is Off and wear appropriate,
OSHA-approved personal protective equipment (PPE) per NFPA 70E before working within the
electric control enclosure. Failure to comply can cause serious injury or death. Customer must
provide earth ground to unit, per NEC, CEC and local codes, as applicable. Before proceeding
with installation, read all instructions, verify that all the parts are included and check the
nameplate to be sure the voltage matches available utility power. The Liebert® controller does
not isolate power from the unit, even in the “Unit Off” mode. Some internal components require
and receive power even during the “Unit Off” mode of the controller. The factory-supplied
disconnect switch is inside the unit. The line side of this switch contains live high-voltage. The
only way to ensure that there is NO voltage inside the unit is to install and open a remote
disconnect switch. Refer to unit electrical schematic. Follow all local codes.
WARNING! Risk of electric shock. Can cause equipment damage, injury or death. Open all local
and remote electric power supply disconnect switches and verify with a voltmeter that power is
off before working within any electric connection enclosures. Service and maintenance work
must be performed only by properly trained and qualified personnel and in accordance with
applicable regulations and manufacturers’ specifications. Opening or removing the covers to
any equipment may expose personnel to lethal voltages within the unit even when it is
apparently not operating and the input wiring is disconnected from the electrical source.
WARNING! Risk of improper wire sizing/rating and loose electrical connections. Can cause
overheated wire and electrical connection terminals resulting in smoke, fire, equipment and
building damage, injury or death. Use correctly sized copper wire only and verify that all
electrical connections are tight before turning power On. Check all electrical connections
periodically and tighten as necessary.
WARNING! Risk of wiring damage, short circuits and electric shock. Can cause overheated
wiring, smoke, fire, activation of fire suppression systems and EMS personnel and equipment,
building and equipment damage, injury or death. Insert CSA certified or UL listed bushings into
holes and or knockouts used to route wiring through metal panels to protect the wire
insulation from contact with sheet metal edges.
5 Electrical Field Connections 19

NOTICE
NOTICE
NOTICE
Risk of improper power-supply connection. Can cause equipment damage and loss of warranty
coverage.
Prior to connecting any equipment to a main or alternate power source (for example: back-up
generator systems) for start-up, commissioning, testing, or normal operation, ensure that these
sources are correctly adjusted to the nameplate voltage and frequency of all equipment to be
connected. In general, power-source voltages should be stabilized and regulated to within
±10% of the load nameplate nominal voltage. Also, ensure that no three-phase sources are
single-phased at any time.
Risk of improper electrical connection of three-phase input power. Can cause backward
compressor rotation and unit damage. Service technicians should use a gauge set on the
system during the initial start up to verify that the three-phase power is connected properly.
The EC fans are not a reliable indicator of proper connection. The blowers will rotate the same
direction, regardless of the three-phase power input. Three-phase power must be connected
to the unit line voltage terminals in the proper sequence so that the compressors rotate in the
proper direction. Incoming power must be properly phased to prevent compressors from
running backward. We recommend checking the unit’s phasing with proper instrumentation to
ensure that power connections were made correctly. We also recommend verifying discharge
and suction pressures during start up to ensure that the compressors are running in the
correct direction.
Risk of improper electrical supply connection. Can cause equipment damage. See transformer
label for primary tap connections. Installer will need to change transformer primary taps if
applied unit voltage is other than pre-wired tap voltage.
NOTE: Seal openings around electrical connection to prevent water leakage. Connections must be
water-tight. Failure to do so risks damage to the outdoor unit.
The unit requires two separate power-supply connections:
• A 3-phase, 460-V power supply to the DSE500 unit electrical enclosure or ATS.
• A separate 120-V power feed to the utility box (for light switches/convenience outlet).
• An optional, separate 120-V power feed from a field-supplied UPS to the DSE500-unit lowvoltage controls, which are located in the main electrical panel.
The electrical connections are described in the submittal documents included in the Submittal Drawings
on page53. The low-voltage connections are further detailed in Figure 5.1 on the facing page, through
Figure 5.1 on the facing page.
The following table lists the relevant documents by number and title.
Table 5.1 Electrical Field-connection Drawings
Document Number Title
DPN004710 Electrical Connections Enclosure andElectrical-service Door Access Locations
DPN004336 Electrical Connections Automatic transfer-switch Enclosure
20
Vertiv | Liebert® D SE500™ Installer/User Guide

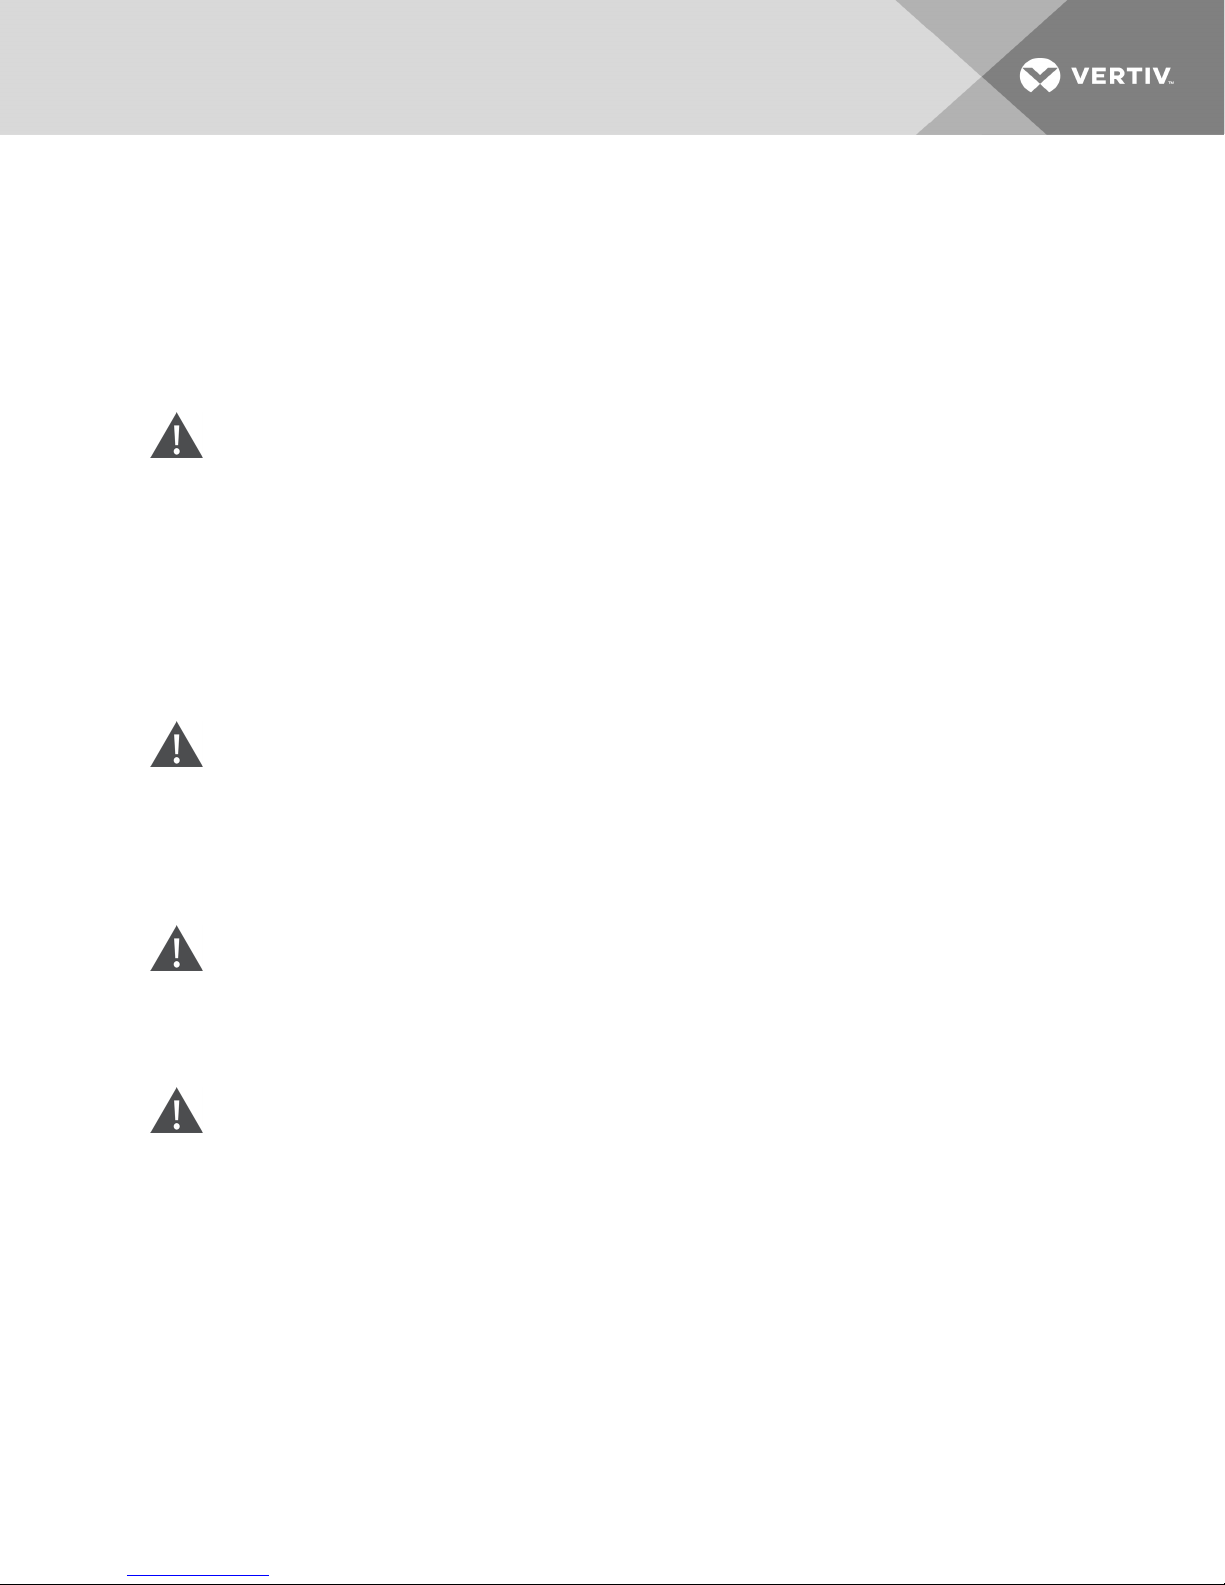
Figure 5.1 Low-voltage BMS wiring to unit in main electrical enclosure
Item Description
1
Location of IntelliSlot Unity card in the DSE500 main electrical enclosure for low-voltage
BMS wiring.
Figure 5.2 Location for filter-clog switch, air-proof switch, iCOM master board and iCOM slave board
5 Electrical Field Connections 21
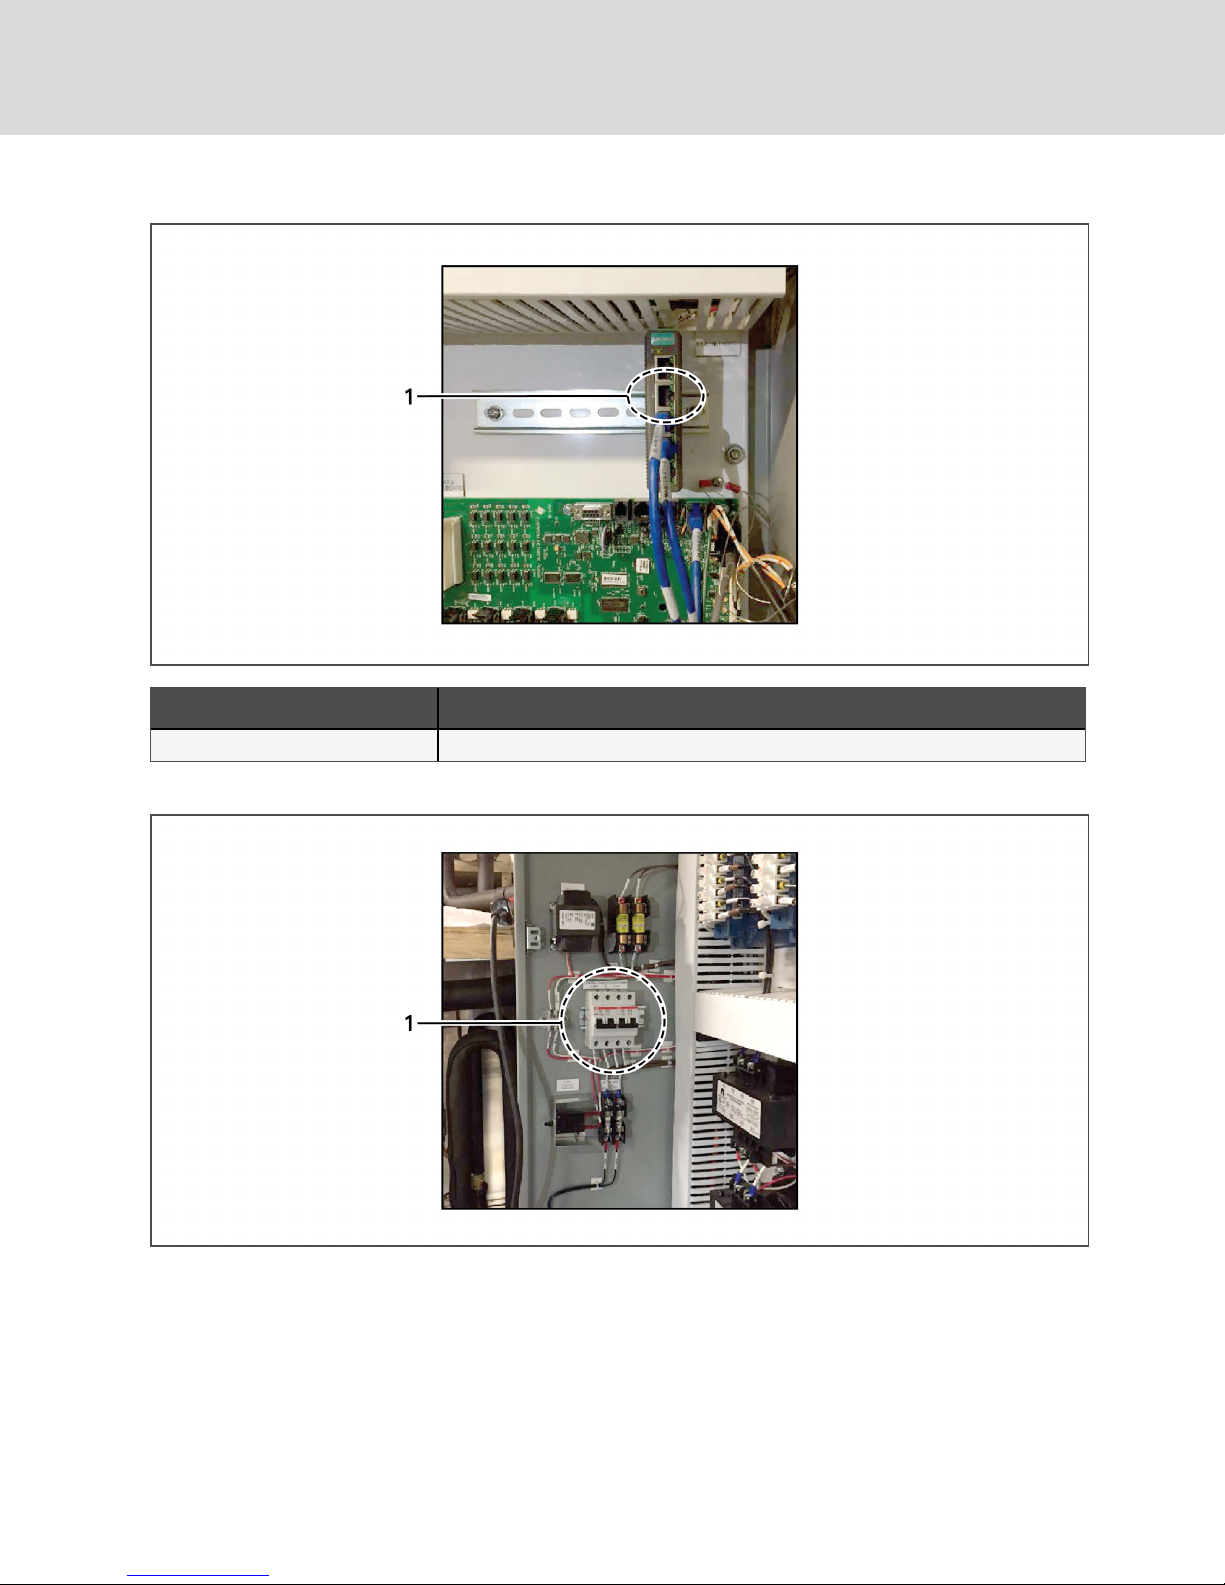
Figure 5.3 Low-voltage iCOM/vNSA switch wiring to unit in Main electrical enclosure
Item Description
1 Location of the connection for CAT5 cable from Liebert® VNSAICOM8 network switch.
Figure 5.4 120-V UPS power-feed connection for low-voltage controls in Main electrical enclosure
22
Vertiv | Liebert® D SE500™ Installer/User Guide

6 CHECKLIST FOR COMPLETED INSTALLATION
6.1 Moving and Placing Equipment
1. Unpack and check received material.
2. Proper clearance for service access has been maintained around the equipment.
3. Equipment is level and mounting fasteners are tight.
4. Proper evaporator drip pan clean-out system is in place for perimeter-unit applications.
6.2 Electrical Installation Checks
1. Supply voltage and phase matches equipment nameplate.
2. Power wiring connections completed to the disconnect switch.
3. Power line circuit breakers or fuses have proper ratings for equipment installed.
4. All internal and external high- and low-voltage wiring connections are tight.
5. Confirm that unit is properly grounded to an earth ground.
6. Control transformer setting matches incoming power.
7. Electrical service conforms to national and local codes.
8. Confirm that power-wiring connections to the utility box are completed.
6.3 Other Installation Checks
1. Ducting complete.
2. Confirm ducting is attached to unit and building structure, and any openings around supplyand return-duct connections are sealed.
3. Filters installed.
4. Check fasteners that secure evaporator-fan motors—some may have become loose during
shipment.
5. All fans are free of debris.
6. Seal openings around electrical connections.
7. Installation materials and tools have been removed from equipment (literature, shipping
materials, construction materials, tools, etc.).
8. Check for refrigerant leaks.
6.4 BMS and Sensor Installation Checks
1. CAT5 cables are installed from each unit and the network switch, and all cables have RJ45
jacks on each end.
2. The network switch/Liebert® vNSA panel (if present) is installed and powered.
3. Confirm the static-pressure-sensor transducer (if present) is installed in the room and wired
back to the DSE500 unit
4. Confirm the supply-air sensor is installed in the best location possible to obtain a temperature
reading representative of the supply air in the duct or plenum serviced by the unit and that
the sensor is wired back to the unit control panel.
5. All remote and 2T rack sensors (if present) are installed and wired using CANBUS cables.
6 Checklist for Completed Installation 23

This page intentionally left blank
24
Vertiv | Liebert® D SE500™ Installer/User Guide
 Loading...