

Page 1

Release 1.0
Wave
Phone User Guide
Page 2

Vertical Communications, Inc. reserves the right to revise this publication and to make changes
in content without notice.
© 2007 by Vertical Communications, Inc. All rights reserved.
This publication contains proprietary and confidential information of V ertical Communications,
Inc. The contents of this document may not be disclosed, copied or translated by third parties,
in any form, or by any means known, or not now known or conceived, without prior explicit
written permission from Vertical Communications, Inc.
LIMIT OF LIABILITY/DISCLAIMER OF WARRANTY
Vertical Communications, Inc. makes no representation or warranties with respect to the
accuracy or completeness of the content of this publication and specifically disclaims any
implied warranty of merchantability or fitness for any particular purpose, and shall not be liable
for any loss of profit or any other commercial damage, including but not limited to, special,
incidental, or consequential.
TRADEMARKS
Vertical Communications and the Vertical Communications logo and combinations thereof are
registered trademarks of Vertical Communications, Inc. All other brand and product names are
used for identification only and are the property of their respective holders.
October 2007 - Version 1.0
Page 3

Contents
Chapter 1 - Introduction
Chapter 2 - Basic Operation
How To Use This Guide - - - - - - - - - - - - - - - - - - - - - - - - - - - - - 1-1
Wave Phone Features - - - - - - - - - - - - - - - - - - - - - - - - - - - - - - - - - - 1-1
Specific Phone Model Information and Features - - - - - - - - - - - - - - - - 1-1
Getting Help - - - - - - - - - - - - - - - - - - - - - - - - - - - - - - - - - - - - - 1-2
Your System Administrator - - - - - - - - - - - - - - - - - - - - - - - - - - - - - - 1-2
Vertical Technical Support - - - - - - - - - - - - - - - - - - - - - - - - - - - - - - 1-2
Additional Documentation- - - - - - - - - - - - - - - - - - - - - - - - - - - - - - - 1-2
List of Features by Phone Type- - - - - - - - - - - - - - - - - - - - - - - - - 1-3
Wave Phone Account Management- - - - - - - - - - - - - - - - - - - - - - 2-1
Logging In To Your Account- - - - - - - - - - - - - - - - - - - - - - - - - - - - - 2-2
Setting/Changing Your Password - - - - - - - - - - - - - - - - - - - - - - - - - - 2-2
Recording Your Voice Title- - - - - - - - - - - - - - - - - - - - - - - - - - - - - - 2-3
Managing Your Greetings - - - - - - - - - - - - - - - - - - - - - - - - - - - - - - - 2-3
Setting Status Commands - - - - - - - - - - - - - - - - - - - - - - - - - - - - - - - 2-4
Setting Voicemail Call Notification - - - - - - - - - - - - - - - - - - - - - - - - 2-5
Basic Phone Handling- - - - - - - - - - - - - - - - - - - - - - - - - - - - - - - 2-6
Using a Wave Phone - - - - - - - - - - - - - - - - - - - - - - - - - - - - - - - - - - 2-6
Answering Calls - - - - - - - - - - - - - - - - - - - - - - - - - - - - - - - - - - - - - 2-9
Switching Between Calls- - - - - - - - - - - - - - - - - - - - - - - - - - - - - - - - 2-9
Ending a Call - - - - - - - - - - - - - - - - - - - - - - - - - - - - - - - - - - - - - - 2-10
Making Calls - - - - - - - - - - - - - - - - - - - - - - - - - - - - - - - - - - - - - - - 2-10
Wave Phone User Guide
Page 4

Contents TOC-ii
Voicemail Management - - - - - - - - - - - - - - - - - - - - - - - - - - - - -2 -14
Listening to Messages- - - - - - - - - - - - - - - - - - - - - - - - - - - - - - - - - 2-14
Managing Messages - - - - - - - - - - - - - - - - - - - - - - - - - - - - - - - - - - 2-17
Chapter 3 - Using Wave Phone Features
Authorization Codes- - - - - - - - - - - - - - - - - - - - - - - - - - - - - - - - -3-2
Using Authorization Codes [ALL] - - - - - - - - - - - - - - - - - - - - - - - - - 3-2
Auto Dial - - - - - - - - - - - - - - - - - - - - - - - - - - - - - - - - - - - - - - - -3-2
Programming and Using an Auto Dial Key [D]- - - - - - - - - - - - - - - - - 3-2
DIGITAL PHONES - - - - - - - - - - - - - - - - - - - - - - - - - - - - - - - - - - - - - - - - 3-2
Call History - - - - - - - - - - - - - - - - - - - - - - - - - - - - - - - - - - - - - -3-3
Using Call History [D] - - - - - - - - - - - - - - - - - - - - - - - - - - - - - - - - - 3-3
DIGITAL PHONES - - - - - - - - - - - - - - - - - - - - - - - - - - - - - - - - - - - - - - - - 3-3
Call Park - - - - - - - - - - - - - - - - - - - - - - - - - - - - - - - - - - - - - - - -3-4
Directed Park [ALL]- - - - - - - - - - - - - - - - - - - - - - - - - - - - - - - - - - - 3-4
SIP PHONES- - - - - - - - - - - - - - - - - - - - - - - - - - - - - - - - - - - - - - - - - - - - 3-4
DIGITAL PHONES - - - - - - - - - - - - - - - - - - - - - - - - - - - - - - - - - - - - - - - - 3-5
ANALOG PHONES - - - - - - - - - - - - - - - - - - - - - - - - - - - - - - - - - - - - - - - - 3-5
Self Park [ALL]- - - - - - - - - - - - - - - - - - - - - - - - - - - - - - - - - - - - - - 3-6
SIP PHONES [MODEL 480I/480ICT ONLY] - - - - - - - - - - - - - - - - - - - - - - - 3-6
DIGITAL PHONES - - - - - - - - - - - - - - - - - - - - - - - - - - - - - - - - - - - - - - - - 3-6
ANALOG PHONES - - - - - - - - - - - - - - - - - - - - - - - - - - - - - - - - - - - - - - - - 3-7
System Park [ALL] - - - - - - - - - - - - - - - - - - - - - - - - - - - - - - - - - - - 3-8
SIP PHONES- - - - - - - - - - - - - - - - - - - - - - - - - - - - - - - - - - - - - - - - - - - - 3-8
DIGITAL PHONES - - - - - - - - - - - - - - - - - - - - - - - - - - - - - - - - - - - - - - - - 3-9
ANALOG PHONES - - - - - - - - - - - - - - - - - - - - - - - - - - - - - - - - - - - - - - - - 3-9
Call Pickup - - - - - - - - - - - - - - - - - - - - - - - - - - - - - - - - - - - - - -3-10
Extension Pickup [ALL] - - - - - - - - - - - - - - - - - - - - - - - - - - - - - - - 3-10
SIP PHONES- - - - - - - - - - - - - - - - - - - - - - - - - - - - - - - - - - - - - - - - - - - -3-10
DIGITAL PHONES - - - - - - - - - - - - - - - - - - - - - - - - - - - - - - - - - - - - - - - -3-10
ANALOG PHONES - - - - - - - - - - - - - - - - - - - - - - - - - - - - - - - - - - - - - - - -3-11
Group Pickup [ALL] - - - - - - - - - - - - - - - - - - - - - - - - - - - - - - - - - 3-11
SIP PHONES- - - - - - - - - - - - - - - - - - - - - - - - - - - - - - - - - - - - - - - - - - - -3-11
DIGITAL PHONE - - - - - - - - - - - - - - - - - - - - - - - - - - - - - - - - - - - - - - - - -3-11
ANALOG PHONES (MUST BE PROGRAMMED FOR CALL PICKUP) - - - - - - - - -3-11
Wave Phone User Guide
Page 5

Contents TOC-iii
Call Record - - - - - - - - - - - - - - - - - - - - - - - - - - - - - - - - - - - - - 3-12
Recording a Call [D] / [A]- - - - - - - - - - - - - - - - - - - - - - - - - - - - - - 3-12
DIGITAL PHONES- - - - - - - - - - - - - - - - - - - - - - - - - - - - - - - - - - - - - - - - 3-12
ANALOG PHONES- - - - - - - - - - - - - - - - - - - - - - - - - - - - - - - - - - - - - - - - 3-12
Call Return - - - - - - - - - - - - - - - - - - - - - - - - - - - - - - - - - - - - - 3-13
Returning a Call [ALL]- - - - - - - - - - - - - - - - - - - - - - - - - - - - - - - - 3- 13
SIP & DIGITAL PHONES - - - - - - - - - - - - - - - - - - - - - - - - - - - - - - - - - - - 3-13
ANALOG PHONES- - - - - - - - - - - - - - - - - - - - - - - - - - - - - - - - - - - - - - - - 3-13
Call Waiting - - - - - - - - - - - - - - - - - - - - - - - - - - - - - - - - - - - - 3-13
Using Call Waiting [ALL]- - - - - - - - - - - - - - - - - - - - - - - - - - - - - - 3-13
SIP PHONES - - - - - - - - - - - - - - - - - - - - - - - - - - - - - - - - - - - - - - - - - - - 3-13
DIGITAL PHONES- - - - - - - - - - - - - - - - - - - - - - - - - - - - - - - - - - - - - - - - 3-15
ANALOG PHONES- - - - - - - - - - - - - - - - - - - - - - - - - - - - - - - - - - - - - - - - 3-15
Caller ID Blocking - - - - - - - - - - - - - - - - - - - - - - - - - - - - - - - - 3-16
Blocking Caller ID [ALL] - - - - - - - - - - - - - - - - - - - - - - - - - - - - - - 3-16
ALL PHONES- - - - - - - - - - - - - - - - - - - - - - - - - - - - - - - - - - - - - - - - - - - 3-16
Callers List - - - - - - - - - - - - - - - - - - - - - - - - - - - - - - - - - - - - - 3-16
Using the Callers List [S] - - - - - - - - - - - - - - - - - - - - - - - - - - - - - - 3-16
SIP PHONES - - - - - - - - - - - - - - - - - - - - - - - - - - - - - - - - - - - - - - - - - - - 3-16
Camp-on (Callback) - - - - - - - - - - - - - - - - - - - - - - - - - - - - - - - 3-19
Using Camp-on (Callback) [D] / [A]- - - - - - - - - - - - - - - - - - - - - - - 3-19
DIGITAL PHONES- - - - - - - - - - - - - - - - - - - - - - - - - - - - - - - - - - - - - - - - 3-19
ANALOG PHONES- - - - - - - - - - - - - - - - - - - - - - - - - - - - - - - - - - - - - - - - 3-20
Centrex Features - - - - - - - - - - - - - - - - - - - - - - - - - - - - - - - - - 3-20
Using Centrex Flash [D] / [A] - - - - - - - - - - - - - - - - - - - - - - - - - - - 3-20
DIGITAL PHONES- - - - - - - - - - - - - - - - - - - - - - - - - - - - - - - - - - - - - - - - 3-20
ANALOG PHONES- - - - - - - - - - - - - - - - - - - - - - - - - - - - - - - - - - - - - - - - 3-21
Conference Calls - - - - - - - - - - - - - - - - - - - - - - - - - - - - - - - - - 3-21
Setting Up a Conference Call [ALL] - - - - - - - - - - - - - - - - - - - - - - - 3-21
SIP PHONES - - - - - - - - - - - - - - - - - - - - - - - - - - - - - - - - - - - - - - - - - - - 3-21
DIGITAL PHONES- - - - - - - - - - - - - - - - - - - - - - - - - - - - - - - - - - - - - - - - 3-22
ANALOG PHONES- - - - - - - - - - - - - - - - - - - - - - - - - - - - - - - - - - - - - - - - 3-23
Wave Phone User Guide
Page 6

Contents TOC-iv
Dial By Name - - - - - - - - - - - - - - - - - - - - - - - - - - - - - - - - - - - -3-24
About Dial by Name [D] - - - - - - - - - - - - - - - - - - - - - - - - - - - - - - - 3-24
DIGITAL PHONES - - - - - - - - - - - - - - - - - - - - - - - - - - - - - - - - - - - - - - - -3-24
Direct Station Select/Busy Lamp Field - - - - - - - - - - - - - - - - - - -3-25
Using the DSS/BLF Feature [D] - - - - - - - - - - - - - - - - - - - - - - - - - - 3-25
DIGITAL PHONES - - - - - - - - - - - - - - - - - - - - - - - - - - - - - - - - - - - - - - - -3-25
Directory List - - - - - - - - - - - - - - - - - - - - - - - - - - - - - - - - - - - -3-26
Using the Directory List [S]- - - - - - - - - - - - - - - - - - - - - - - - - - - - - 3-2 6
SIP PHONES- - - - - - - - - - - - - - - - - - - - - - - - - - - - - - - - - - - - - - - - - - - -3-26
Do Not Disturb - - - - - - - - - - - - - - - - - - - - - - - - - - - - - - - - - - -3-27
Using Do Not Disturb [ALL] - - - - - - - - - - - - - - - - - - - - - - - - - - - - 3-28
ALL PHONES - - - - - - - - - - - - - - - - - - - - - - - - - - - - - - - - - - - - - - - - - - -3-28
SIP & ANALOG PHONES - - - - - - - - - - - - - - - - - - - - - - - - - - - - - - - - - - -3-28
DIGITAL PHONES - - - - - - - - - - - - - - - - - - - - - - - - - - - - - - - - - - - - - - - -3-28
Flash - - - - - - - - - - - - - - - - - - - - - - - - - - - - - - - - - - - - - - - - - -3-29
About Flash [ALL]- - - - - - - - - - - - - - - - - - - - - - - - - - - - - - - - - - - 3-29
Forward Calls - - - - - - - - - - - - - - - - - - - - - - - - - - - - - - - - - - - -3-29
Forwarding Calls [ALL] - - - - - - - - - - - - - - - - - - - - - - - - - - - - - - - 3-30
SIP PHONES- - - - - - - - - - - - - - - - - - - - - - - - - - - - - - - - - - - - - - - - - - - -3-30
DIGITAL PHONES - - - - - - - - - - - - - - - - - - - - - - - - - - - - - - - - - - - - - - - -3-30
ANALOG PHONES - - - - - - - - - - - - - - - - - - - - - - - - - - - - - - - - - - - - - - - -3-33
Headset - - - - - - - - - - - - - - - - - - - - - - - - - - - - - - - - - - - - - - - -3-34
Using a Headset [ALL] - - - - - - - - - - - - - - - - - - - - - - - - - - - - - - - - 3-34
SIP PHONES- - - - - - - - - - - - - - - - - - - - - - - - - - - - - - - - - - - - - - - - - - - -3-34
DIGITAL & ANALOG PHONES - - - - - - - - - - - - - - - - - - - - - - - - - - - - - - - -3-34
Hold - - - - - - - - - - - - - - - - - - - - - - - - - - - - - - - - - - - - - - - - - -3-35
Placing a Call on Hold [ALL] - - - - - - - - - - - - - - - - - - - - - - - - - - - 3-35
SIP PHONES- - - - - - - - - - - - - - - - - - - - - - - - - - - - - - - - - - - - - - - - - - - -3-35
DIGITAL PHONES - - - - - - - - - - - - - - - - - - - - - - - - - - - - - - - - - - - - - - - -3-36
ANALOG PHONES - - - - - - - - - - - - - - - - - - - - - - - - - - - - - - - - - - - - - - - -3-36
Intercom Button- - - - - - - - - - - - - - - - - - - - - - - - - - - - - - - - - - -3-37
Using the Intercom Button [S] - - - - - - - - - - - - - - - - - - - - - - - - - - - 3-37
SIP PHONES (480I/480ICT ONLY) - - - - - - - - - - - - - - - - - - - - - - - - - - - - -3-37
Wave Phone User Guide
Page 7

Contents TOC-v
Joining a Call- - - - - - - - - - - - - - - - - - - - - - - - - - - - - - - - - - - - 3-37
Using the Call Break-in Feature [D] - - - - - - - - - - - - - - - - - - - - - - - 3-37
DIGITAL PHONES- - - - - - - - - - - - - - - - - - - - - - - - - - - - - - - - - - - - - - - - 3-37
Message Waiting - - - - - - - - - - - - - - - - - - - - - - - - - - - - - - - - - 3-38
Retrieving Voicemail Messages [S] - - - - - - - - - - - - - - - - - - - - - - - 3-38
SIP PHONES - - - - - - - - - - - - - - - - - - - - - - - - - - - - - - - - - - - - - - - - - - - 3-38
Multiple Call Handling - - - - - - - - - - - - - - - - - - - - - - - - - - - - - 3-39
Using Call Appearance Keys with Line Keys [D] - - - - - - - - - - - - - - 3-39
DIGITAL PHONES- - - - - - - - - - - - - - - - - - - - - - - - - - - - - - - - - - - - - - - - 3-39
Mute - - - - - - - - - - - - - - - - - - - - - - - - - - - - - - - - - - - - - - - - - 3-40
Muting a Call [S] / [D] - - - - - - - - - - - - - - - - - - - - - - - - - - - - - - - - 3-40
SIP & DIGITAL PHONES - - - - - - - - - - - - - - - - - - - - - - - - - - - - - - - - - - - 3-40
Night Answer - - - - - - - - - - - - - - - - - - - - - - - - - - - - - - - - - - - 3-40
Setting Night Answer [ALL] - - - - - - - - - - - - - - - - - - - - - - - - - - - - 3-40
SIP & ANALOG PHONES - - - - - - - - - - - - - - - - - - - - - - - - - - - - - - - - - - - 3-40
DIGITAL PHONES- - - - - - - - - - - - - - - - - - - - - - - - - - - - - - - - - - - - - - - - 3-41
Page- - - - - - - - - - - - - - - - - - - - - - - - - - - - - - - - - - - - - - - - - - 3-41
Paging the Entire System [ALL]- - - - - - - - - - - - - - - - - - - - - - - - - - 3-41
SIP PHONES - - - - - - - - - - - - - - - - - - - - - - - - - - - - - - - - - - - - - - - - - - - 3-41
DIGITAL PHONES- - - - - - - - - - - - - - - - - - - - - - - - - - - - - - - - - - - - - - - - 3-42
ANALOG PHONES- - - - - - - - - - - - - - - - - - - - - - - - - - - - - - - - - - - - - - - - 3-42
Paging a Specific Group/Zone [S]- - - - - - - - - - - - - - - - - - - - - - - - - 3-42
SIP PHONES - - - - - - - - - - - - - - - - - - - - - - - - - - - - - - - - - - - - - - - - - - - 3-42
Page a Specific Group/ Zone [D] / [A]- - - - - - - - - - - - - - - - - - - - - - 3-43
DIGITAL PHONES- - - - - - - - - - - - - - - - - - - - - - - - - - - - - - - - - - - - - - - - 3-43
ANALOG PHONES- - - - - - - - - - - - - - - - - - - - - - - - - - - - - - - - - - - - - - - - 3-43
Password Protection - - - - - - - - - - - - - - - - - - - - - - - - - - - - - - - 3-44
Using Password Protection [D] - - - - - - - - - - - - - - - - - - - - - - - - - - 3-44
DIGITAL PHONES- - - - - - - - - - - - - - - - - - - - - - - - - - - - - - - - - - - - - - - - 3-44
Privacy - - - - - - - - - - - - - - - - - - - - - - - - - - - - - - - - - - - - - - - - 3-45
Using the Privacy Feature [D] - - - - - - - - - - - - - - - - - - - - - - - - - - - 3-45
DIGITAL PHONES- - - - - - - - - - - - - - - - - - - - - - - - - - - - - - - - - - - - - - - - 3-45
Wave Phone User Guide
Page 8

Contents TOC-vi
Redial - - - - - - - - - - - - - - - - - - - - - - - - - - - - - - - - - - - - - - - - -3-45
Using Redial [S] / [D]- - - - - - - - - - - - - - - - - - - - - - - - - - - - - - - - - 3-45
SIP PHONES- - - - - - - - - - - - - - - - - - - - - - - - - - - - - - - - - - - - - - - - - - - -3-45
DIGITAL PHONES - - - - - - - - - - - - - - - - - - - - - - - - - - - - - - - - - - - - - - - -3-46
Release- - - - - - - - - - - - - - - - - - - - - - - - - - - - - - - - - - - - - - - - -3-46
Using the Release Key [D] - - - - - - - - - - - - - - - - - - - - - - - - - - - - - 3-46
DIGITAL PHONES - - - - - - - - - - - - - - - - - - - - - - - - - - - - - - - - - - - - - - - -3-46
Saved Number Redial- - - - - - - - - - - - - - - - - - - - - - - - - - - - - - -3-47
Using Saved Number Redial [D] - - - - - - - - - - - - - - - - - - - - - - - - - 3-47
DIGITAL PHONES - - - - - - - - - - - - - - - - - - - - - - - - - - - - - - - - - - - - - - - -3-47
Shift- - - - - - - - - - - - - - - - - - - - - - - - - - - - - - - - - - - - - - - - - - -3-48
Using the Shift Feature [D] - - - - - - - - - - - - - - - - - - - - - - - - - - - - - 3-48
DIGITAL PHONES - - - - - - - - - - - - - - - - - - - - - - - - - - - - - - - - - - - - - - - -3-48
Silent Monitor - - - - - - - - - - - - - - - - - - - - - - - - - - - - - - - - - - - -3-49
Using Silent Monitor (Supervisors Only) [D] - - - - - - - - - - - - - - - - - 3-49
DIGITAL PHONES - - - - - - - - - - - - - - - - - - - - - - - - - - - - - - - - - - - - - - - -3-49
Speaker - - - - - - - - - - - - - - - - - - - - - - - - - - - - - - - - - - - - - - - -3-50
Using the Speaker Feature [S] / [D]- - - - - - - - - - - - - - - - - - - - - - - - 3-50
SIP PHONES- - - - - - - - - - - - - - - - - - - - - - - - - - - - - - - - - - - - - - - - - - - -3-50
DIGITAL PHONES - - - - - - - - - - - - - - - - - - - - - - - - - - - - - - - - - - - - - - - -3-50
Speed Dial - - - - - - - - - - - - - - - - - - - - - - - - - - - - - - - - - - - - - -3-51
Using Speed Dial [S] - - - - - - - - - - - - - - - - - - - - - - - - - - - - - - - - - 3-51
SIP PHONES- - - - - - - - - - - - - - - - - - - - - - - - - - - - - - - - - - - - - - - - - - - -3-51
Using System Speed Dial [D] / [A] - - - - - - - - - - - - - - - - - - - - - - - - 3-52
DIGITAL PHONES - - - - - - - - - - - - - - - - - - - - - - - - - - - - - - - - - - - - - - - -3-52
ANALOG PHONES - - - - - - - - - - - - - - - - - - - - - - - - - - - - - - - - - - - - - - - -3-52
Swap Key - - - - - - - - - - - - - - - - - - - - - - - - - - - - - - - - - - - - - - -3-53
Using the Swap Key [S] - - - - - - - - - - - - - - - - - - - - - - - - - - - - - - - 3-53
SIP PHONES (MODEL 9112I ONLY) - - - - - - - - - - - - - - - - - - - - - - - - - - - -3-53
Transfer - - - - - - - - - - - - - - - - - - - - - - - - - - - - - - - - - - - - - - - -3-53
Making a Blind Transfer [ALL] - - - - - - - - - - - - - - - - - - - - - - - - - - 3-53
SIP PHONES- - - - - - - - - - - - - - - - - - - - - - - - - - - - - - - - - - - - - - - - - - - -3-53
DIGITAL PHONES - - - - - - - - - - - - - - - - - - - - - - - - - - - - - - - - - - - - - - - -3-53
ANALOG PHONES - - - - - - - - - - - - - - - - - - - - - - - - - - - - - - - - - - - - - - - -3-54
Wave Phone User Guide
Page 9

Contents TOC-vii
Making a Supervised Transfer [ALL] - - - - - - - - - - - - - - - - - - - - - - 3-54
SIP PHONES - - - - - - - - - - - - - - - - - - - - - - - - - - - - - - - - - - - - - - - - - - - 3-54
DIGITAL PHONES- - - - - - - - - - - - - - - - - - - - - - - - - - - - - - - - - - - - - - - - 3-55
ANALOG PHONES- - - - - - - - - - - - - - - - - - - - - - - - - - - - - - - - - - - - - - - - 3-55
Transferring Calls to Voicemail [D] / [A] - - - - - - - - - - - - - - - - - - - 3-56
DIGITAL PHONES- - - - - - - - - - - - - - - - - - - - - - - - - - - - - - - - - - - - - - - - 3-56
ANALOG PHONES- - - - - - - - - - - - - - - - - - - - - - - - - - - - - - - - - - - - - - - - 3-56
User Programmable Keys - - - - - - - - - - - - - - - - - - - - - - - - - - - 3-57
Using Programmable Keys [D] - - - - - - - - - - - - - - - - - - - - - - - - - - 3-57
DIGITAL PHONES- - - - - - - - - - - - - - - - - - - - - - - - - - - - - - - - - - - - - - - - 3-57
Visual Voicemail - - - - - - - - - - - - - - - - - - - - - - - - - - - - - - - - - 3-58
Using Visual Mail [D] - - - - - - - - - - - - - - - - - - - - - - - - - - - - - - - - 3-58
DIGITAL PHONES- - - - - - - - - - - - - - - - - - - - - - - - - - - - - - - - - - - - - - - - 3-58
Voicecall- - - - - - - - - - - - - - - - - - - - - - - - - - - - - - - - - - - - - - - 3-60
Using the Voicecall Feature [D] - - - - - - - - - - - - - - - - - - - - - - - - - - 3-60
DIGITAL PHONES- - - - - - - - - - - - - - - - - - - - - - - - - - - - - - - - - - - - - - - - 3-60
Chapter 4 - About Wave SIP Phones
Wave SIP Phone Models - - - - - - - - - - - - - - - - - - - - - - - - - - - - - 4-1
SIP Phone 9133i - - - - - - - - - - - - - - - - - - - - - - - - - - - - - - - - - - - - - 4-2
SIP Phone 9112i - - - - - - - - - - - - - - - - - - - - - - - - - - - - - - - - - - - - - 4-4
SIP Phone 480i/480iCT - - - - - - - - - - - - - - - - - - - - - - - - - - - - - - - - 4-6
Using a SIP Phone - - - - - - - - - - - - - - - - - - - - - - - - - - - - - - - - - 4-8
Hard Keys - - - - - - - - - - - - - - - - - - - - - - - - - - - - - - - - - - - - - - - - - 4-8
Navigation Arrow Keys (Scroll and Select) - - - - - - - - - - - - - - - - - - - 4-8
Softkeys - - - - - - - - - - - - - - - - - - - - - - - - - - - - - - - - - - - - - - - - - - - 4-8
Line Keys - - - - - - - - - - - - - - - - - - - - - - - - - - - - - - - - - - - - - - - - - - 4-8
Line Status Lights - - - - - - - - - - - - - - - - - - - - - - - - - - - - - - - - - - - - 4- 9
Display Information - - - - - - - - - - - - - - - - - - - - - - - - - - - - - - - - - - 4-10
Phone Settings - - - - - - - - - - - - - - - - - - - - - - - - - - - - - - - - - - - 4-11
Setting Options - - - - - - - - - - - - - - - - - - - - - - - - - - - - - - - - - - - - - 4-11
Advanced Volume Controls for the Headset/Mic (Option 7) - - - - - - - 4-11
Wave Phone User Guide
Page 10

Contents TOC-viii
Pairing/Unpairing the Cordless Handset & Base (480i CT Only) - -4-12
Pairing the Handset to the Base - - - - - - - - - - - - - - - - - - - - - - - - - - 4-12
Unpairing Handset from the Base - - - - - - - - - - - - - - - - - - - - - - - - - 4-13
Outside Line Supported Features - - - - - - - - - - - - - - - - - - - - - - -4-14
Outside Line Keys - - - - - - - - - - - - - - - - - - - - - - - - - - - - - - - - - - - 4-14
SIP Phone Feature Codes - - - - - - - - - - - - - - - - - - - - - - - - - - - -4-16
Chapter 5 - About Wave Digital Phones
Wave Digital Phone Models - - - - - - - - - - - - - - - - - - - - - - - - - - -5-1
Edge 100 - 24 button - - - - - - - - - - - - - - - - - - - - - - - - - - - - - - - - - - 5-2
Edge 100 - 12 button - - - - - - - - - - - - - - - - - - - - - - - - - - - - - - - - - - 5-4
Impact SCS - 24 button - - - - - - - - - - - - - - - - - - - - - - - - - - - - - - - - - 5-6
Impact SCS - 12 button - - - - - - - - - - - - - - - - - - - - - - - - - - - - - - - - - 5-8
Using a Digital Phone- - - - - - - - - - - - - - - - - - - - - - - - - - - - - - -5-10
Line Keys - - - - - - - - - - - - - - - - - - - - - - - - - - - - - - - - - - - - - - - - - 5-10
Display Information - - - - - - - - - - - - - - - - - - - - - - - - - - - - - - - - - - 5-10
Set Up and Installation - - - - - - - - - - - - - - - - - - - - - - - - - - - - - -5-11
Adjusting the Pedestal- - - - - - - - - - - - - - - - - - - - - - - - - - - - - - - - - 5-11
Making the Connections - - - - - - - - - - - - - - - - - - - - - - - - - - - - - - - 5-12
Phone Settings- - - - - - - - - - - - - - - - - - - - - - - - - - - - - - - - - - - -5-13
Modifying the Display Contrast - - - - - - - - - - - - - - - - - - - - - - - - - - 5-13
Setting the Ring Melody and Volume - - - - - - - - - - - - - - - - - - - - - - 5-13
Digital Phone Feature Codes - - - - - - - - - - - - - - - - - - - - - - - - - -5-14
Chapter 6 - About Wave Analog Phones
Introduction - - - - - - - - - - - - - - - - - - - - - - - - - - - - - - - - - - - - - -6-1
Special Tones - - - - - - - - - - - - - - - - - - - - - - - - - - - - - - - - - - - - - - - 6-1
Analog Phone Feature Codes - - - - - - - - - - - - - - - - - - - - - - - - - - -6-2
Wave Phone User Guide
Page 11

Contents TOC-ix
Appendix A - CounterPath SIP Softphone
About the Eyebeam SIP Softphone - - - - - - - - - - - - - - - - - - - - - - A-1
Recommended USB Headsets - - - - - - - - - - - - - - - - - - - - - - - - - - - -A-1
Installing & Configuring the eyeBeam SIP Softphone - - - - - - - - - A-2
Before You Begin - - - - - - - - - - - - - - - - - - - - - - - - - - - - - - - - - - - -A-2
Installing and Configuring for Wave- - - - - - - - - - - - - - - - - - - - - - - -A-2
Using the Counterpath eyeBeam SIP Softphones with Wave- - - - - A-9
Appendix B - Troubleshooting
Q&A - - - - - - - - - - - - - - - - - - - - - - - - - - - - - - - - - - - - - - - - - - B-1
Phone Type Feature Index
Analog Phones- - - - - - - - - - - - - - - - - - - - - - - - - - - - - - - - - - IND-1
Digital Phones - - - - - - - - - - - - - - - - - - - - - - - - - - - - - - - - - - IND-2
SIP Phones - - - - - - - - - - - - - - - - - - - - - - - - - - - - - - - - - - - - IND-3
Wave Phone User Guide
Page 12

THIS PAGE INTENTIONALLY LEFT BLANK
Page 13

Chapter 1
Introduction
Thank you for purchasing a Vertical Communications phone. All Wave phones are
multifunctional and specifically designed for use with the Vertical Communications Vertical
Wave system.
How To Use This Guide
This guide provides a comprehensive description of each type of phone and its functionality.
Depending upon the type of phone you have (SIP, digital, or analog), you will need to review
the basic information in the first two chapters of this guide. You will also be directed to a
specific chapter pertaining to each phone type as provided in chapter 4 through 6.
Wave Phone Features
It is a good idea to review the information in chapters 1and 2 to familiarize yourself with the
basic operation of a Wave phone. You can then refer to specific model information as needed.
Specific Phone Model Information and Features
While general information for Wave phones can be found in Chapters 1 and 2 of this guide,
information regarding each type of phone and phone model are covered in chapters 4 through 6.
If You are Using a SIP Phone
For information on a Wave SIP Phone, see chapter 4 to review descriptions for each of the SIP
phone models shown below:
• Vertical 9133i SIP phone
• Vertical 9112i SIP phone
• Vertical 480i/480iCT SIP phone
Note: For details about SIP Softphone, see “” on page A-1of this guide.
If You are Using a Digital Phone
For information on a Wave Digital Phone, see chapter 5 to review descriptions for each of the
digital phone models shown below:
• Edge 100 - 12 button
• Edge 100 - 24 button
• Impact SCS - 12 button
• Impact SCS - 24 button
Wave Phone User Guide
Page 14

Getting Help 1-2
Introduction
If You are Using a Analog Phone
For information on a Wave Analog Phone, see chapter 6 to review specific details for analog
phones.
Getting Help
If you need information that is not included in this guide, you can get help from your System
Administrator, Vertical Technical Support and additional Wave documentation.
Your System Administrator
Your first line of support is your System Administrator. This person should be able to provide
you with any additional information you may need regarding your phone. For example, the
System Administrator can provide you with a list of any pre-programmed keys depending upon
the type of phone you are using.
Vertical Technical Support
If you System Administrator is unavailable or you have qu estions that he/she cannot answer,
you can contact Vertical Technical Support. Trained technicians are available during regular
business hours to provide you with information regarding the operation of your phone.
Additional Documentation
There are two kinds of documentation available to you besides this user guide. Contact your
System Administrator for information about obtaining the following documentation.
Quick Reference Guides
These guides provide concise information about each phone type. It is designed to provide basic
information and step-by-step instructions in a way that saves you time and gets you familiarized
with your phone as quickly as possible. If you did not receive a Quick Reference Guide with
your phone, contact your System Administrator. The following Vertical Quick Reference
Guides are available:
• Wave SIP Phone Quick Reference Guide
• Wave Digital Phone Quick Reference Guide
• Wave Analog Phone Quick Reference Guide
• Wave Voicemail Quick Reference Guide
Wave Phone User Guide
Page 15

List of Features by Phone Type 1-3
Introduction
Wave Viewpoint User Guide
The W ave V iewpoint User Guide describes how to use W ave’ s W indows interface which allows
you a quick and easy way to handle and manage calls and messages. Contact your System
Administrator for more information about Vertical Viewpoint.
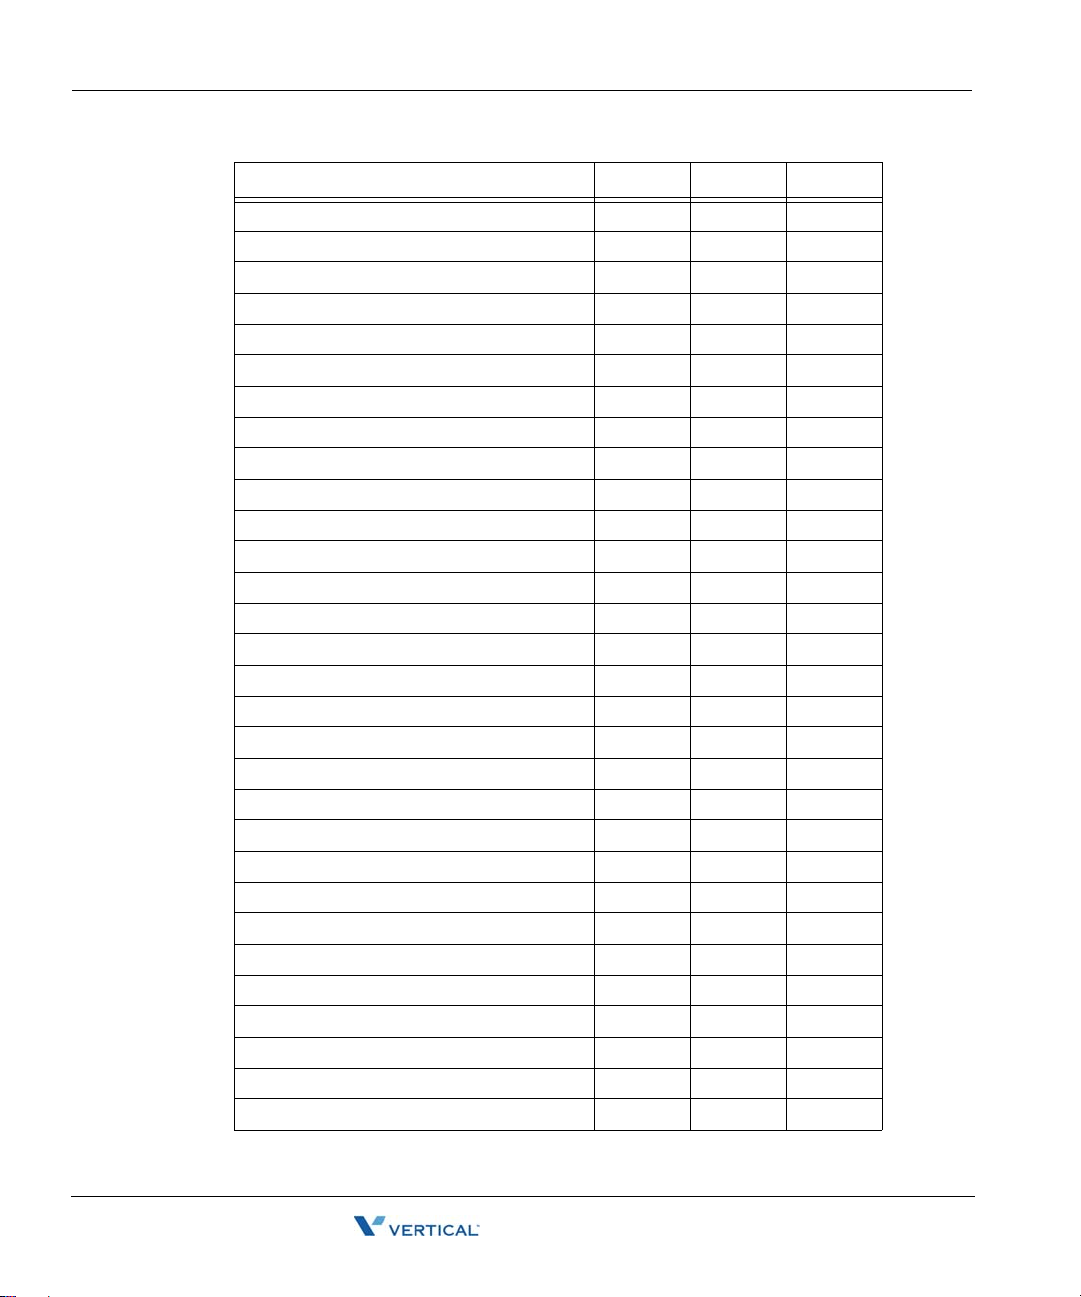
List of Features by Phone Type
The following table shows the three types of phones covered in this chapter and lists the features
available for each phone type.
Feature SIP Digital Analog
Account Codes
Authorization Codes
Auto Dial
Call Break-in
Call History
Call Lists
Call Park
Directed
Self
System Park
Call Pickup
Extension
Group
Call Record
Call Return
Call Waiting
Caller ID Blocking
Callers List
Camp-on
Centrex
Conference Calls
Dial By Name
Directory List
Wave Phone User Guide
Page 16
List of Features by Phone Type 1-4
Introduction
Feature SIP Digital Analog
Do Not Disturb (DND)
DSS/BLF
Feature Codes
Flash
Forward Calls
Greetings - manage
Headset
Hold
Intercom Button
Join a Call
Line Keys
Message Waiting
Multiple Call Handling
Mute
Night Answer
Paging
Specific Group/Zone
System/All
Password
Protection
Password - set/change
Privacy
Redial
Saved Number Redial
Release
Shift
Silent Monitor (Supervisors Only)
Speed Dial
Status Commands - set
Swap Key
Wave Phone User Guide
Page 17
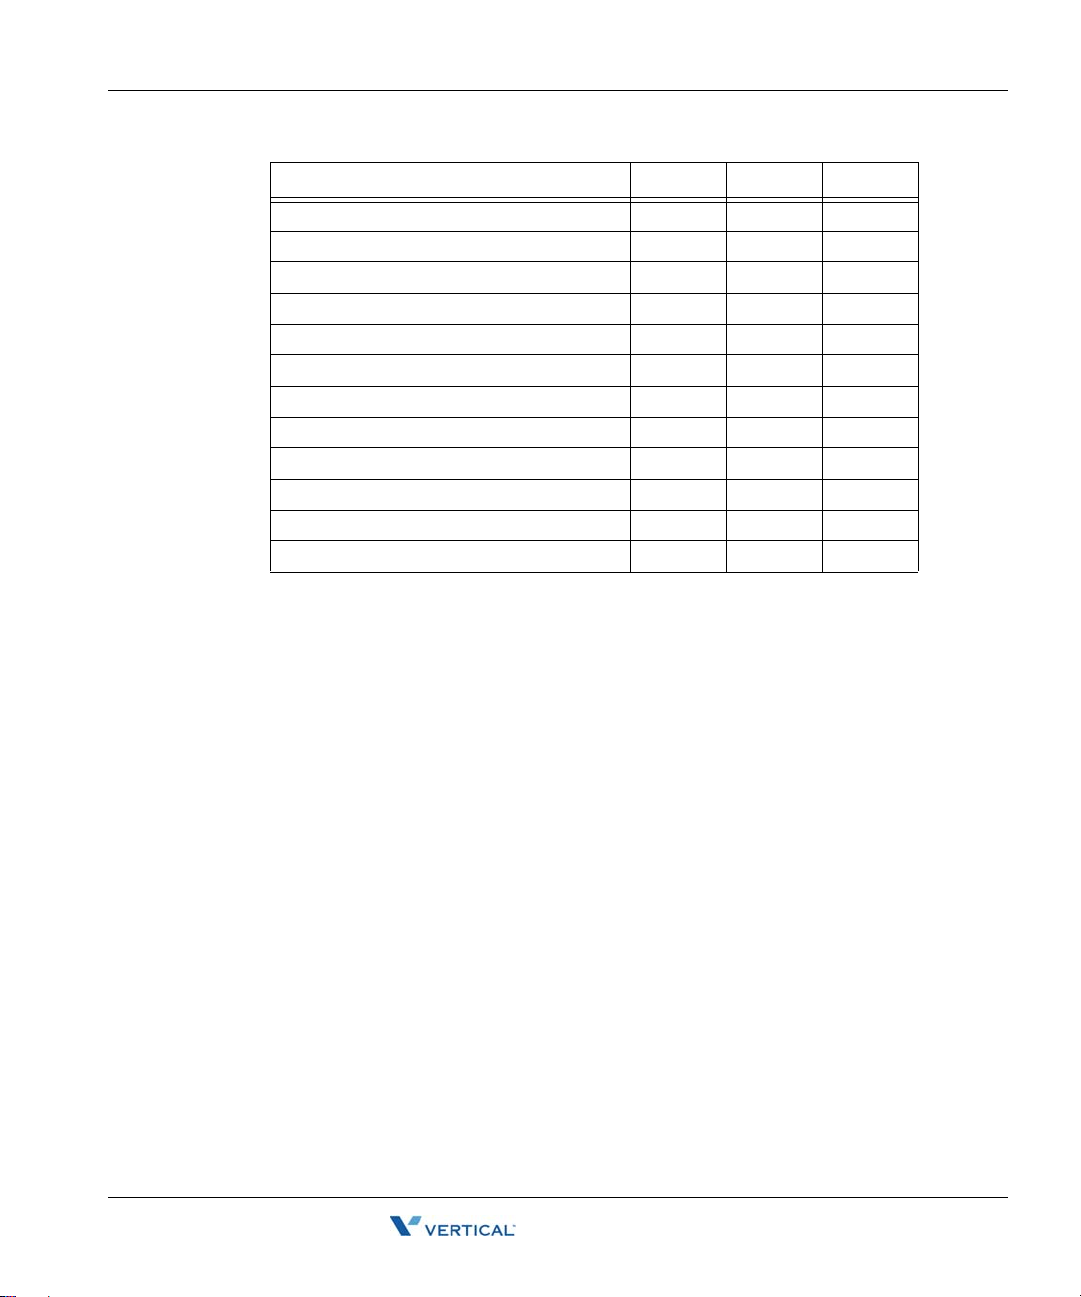
List of Features by Phone Type 1-5
Introduction
Feature SIP Digital Analog
Toggle/Switch Calls
Transfer
Blind
Supervised
(to) Voicemail
User Programmable Keys
Voice title
Voicecall
Voicemail
Call Notification
Management
Visual
Wave Phone User Guide
Page 18

THIS PAGE INTENTIONALLY LEFT BLANK
Page 19

Chapter 2
Basic Operation
This chapter describes the basic features common to all phones. The information here should
allow you to quickly familiarize yourself with the phones basic function. In this chapter you will
find information about the following:
• Phone Account Management (login, password, greetings, etc.)
• Basic Phone Handling (making, answering, ending calls, etc.)
• Voicemail Management (listening, replying to, deleting messages, etc.)
Hint: For details specific to your phone, please refer to the Table of Contents or Chapter 1
(“How To Use This Guide” on page 1-1) to locate additional information about your phone.
Note: Because of configuration changes and choices made by your System Administrator, there
are many features that may be different from the default values shown in this guide. Ask your
Administrator if there have been any configuration changes made that might affect the operation
of your phone.
Wave Phone Account Management
When you log on to your account, you hear the Voicemail/Account menu. From this menu you
can customize and manage your W ave account. You will also be able to set up and manage your
Voicemail account (see page 2-14 for more information about managing voicemail).
This section will describe the following processes
• Logging In
• Setting/Changing Your Password
• Recording Your Voice Title
• Managing Your Greetings
• Setting Status Commands
• Setting Voicemail Call Notification
Wave Phone User Guide
Page 20

Wave Phone Account Management 2-2
Basic Operation
Logging In To Your Account
You will need to log in to your account in order to manage the available account features for
your phone (passwords, greetings, status, etc.). You can log in from your own phone or any
W ave phone in your company’s phone system. In addition, if you have permission, you can also
log in from outside your company’s Wave phone system.
Hint: The very first time you log into your account, you will need to have the default password.
Y our system administrator will provide this number to you. Once you log in, it is recommended
that you change your password to maintain confidentiality of your account.
Note: Although # is the default on your Wave system, configuration changes may have
affected this. Contact your System Administrator if # does not work for the log in process.
Log in from Your Own Phone
Pick up the handset and enter: # # <your password> #.
Log in from a Phone Other than Your Own
Pick up any Wave phone handset and enter: # <your extension> # <your password> #.
Setting/Changing Your Password
Once you are logged into your account, you can change your password. Your password allows
you to maintain confidentiality with your account.
Your Vertical Wave phone system may be customized with specific rules or restrictions for
choosing a password. Please contact your phone system administrator for details.
In addition, when choosing a password, be sure that it is something you can easily remember,
yet not something someone else can easily guess.
To change your password
1. Log into your account.
Note: If you are setting up a new password, contact your phone system administrator to
obtain the default password.
2. Press 6 to access the Account Preferences menu.
3. Press 3 to access the Password feature, then enter the new password.
4. Enter the new password again to confirm it.
5. Press # to save the new password.
Wave Phone User Guide
Page 21

Wave Phone Account Management 2-3
Basic Operation
Recording Your Voice Title
You will need to record or change your name as it will be heard by callers when they dial your
extension.
To record your Voice Title
1. Log into your account.
2. Press 6 to access Account Preferences.
3. Press 2 to access the Voice Title menu.
4. Press 1 to record your name, then press # to save it.
5. Press 1 to re-record your name (then press #)
OR
Press 2 to revert to the existing title setting.
AND/OR
Press * to return to the previous menu, or hang up to end the session.
Managing Your Greetings
A greeting is the message that callers hear when they reach your voicemail. Y ou can record and
store multiple greetings for use in different situations. A primary greeting can be used daily for
times when you are unable to answer a call. Y ou can also create alternative greetings that can
be activated for a variety of reasons (such as if you will be out of the office for a particular period
of time, travelling, in a meeting, or on vacation).
Example: Your primary/daily greeting might be something like: “You have reached the
voicemail of Sue Smith. I’m either on the phone or away from my desk. Please
leave your name, number, and a brief message, and I will return your call as soon
as I can. Thank you.”
Note: Check with your phone system administrator regarding any company-established
greeting formats.
If you do not record and activate a primary greeting, the system will play a default greeting
which has been predefined by your company.
If you only have one greeting recorded it will be the “active” greeting.
Hint: Once you have created greetings, it’s a good idea to review them. Once you do that, you
can make them active, change them, and/or delete them.
Wave Phone User Guide
Page 22

Wave Phone Account Management 2-4
Basic Operation
To manage your greetings
1. Log into your account.
2. Press 4 to access Greetings and hear the currently active greeting.
From the Greetings Menu:
• Press 1 to replay the current greeting.
• Press 2 to skip to the next greeting (if you have more than one greeting recorded).
• Press 3 to make the current greeting active (if you have more than one greeting
recorded).
• Press 4 to re-record an existing greeting, then press # to complete and save it.
• Press 6 to record/add a new greeting, then press # to complete and save it.
• Press 7 to delete the current greeting.
• Press to * return to the previous menu.
Setting Status Commands
Status commands allow others to know when you are available and when you are not (and why).
When another user in the Wave phone system calls your phone, the status command you have
set will appear on their phone display.
To set status commands
1. Log into your account.
2. Press 6 to access Account Preferences.
3. Press 1 to access Status Commands and hear the currently set status.
4. Use the following Status options as needed.
From the Status Commands menu:
• Press 1 to set your status to Available.
• Press 2 to set your status to Do Not Disturb.
• Press 3 to set your status to In a Meeting.
• Press 4 to set your status to Out of the Office.
• Press 5 to set your status to On Vacation.
If you are a member of a call center queue:
• Press 6 to set your status to Available (Queue only).
• Press 7 to set your status to Available (non-Queue).
• Press 8 to set your status to On Break.
Wave Phone User Guide
Page 23

Wave Phone Account Management 2-5
Basic Operation
Setting Voicemail Call Notification
You can set up a voicemail notification destination that tells the phone system where to let you
know if/when you have a voicemail waiting. You can designate either an internal (extension) or
external (with access code) phone number for this feature.
To access the Notifications menu
1. Log into your account.
2. Press 6 to access Account Preferences.
3. Press 4 to access the Notifications menu.
4. Set the appropriate notification option using the steps below:
To keep the current notification number
5. Press 1 to keep the current Notification number (the default for this will be your own
extension number).
OR
To use an internal extension number
5. Press 2 if you want to be notified at a specific extension within the Vertical Wave phone
system.
6. Enter the extension number.
7. Press 1 to accept the entry or 2 to change the entry.
OR
To use an external number
5. Press 3 if you want to be notified at a specific number outside the Vertical Wave phone
system.
6. Enter the external number.
Note: You will need to include any access number (such as “9”), and any long distance
numbers (such as 1 and the area code) if applicable.
7. Press # to hear your entry repeated.
8. Press 1 to accept the entry or 2 to change the entry.
Wave Phone User Guide
Page 24

Basic Phone Handling 2-6
Basic Operation
Basic Phone Handling
There are certain basic functions about using the phone that is common to all phone m odels.
This section describes that functionality that applies to whatever phone you are using.
The following topics are included in this section:
• Using a Wave Phone
•Answering a Call
• Ending a Call
• Making a Call
• Switching between Active Calls
Using a Wave Phone
You can pick up a Wave phone and place a call in the same way that you place calls on other
phones. But you can also do much more. For example, you can dial other Wave users by name
and use special key combinations to redial your last call or call back your last caller. Depending
on your Wave system, you can also place calls over Centrex lines or over the Internet.
This section explains the following aspects of placing calls on a Wave phone:
• Using the Speaker to make and answer calls
• Adjusting the Handset and Speaker Volume
• Obtain Information for Your Phone
• Using phones other than your own (another user ’s phone)
• Dialing internal and external numbers
• Dialing by name
• Using the Hold feature (placing calls on hold to answer and switch between
other calls, etc.)
• Making a call using the * options (redialing the last number you called, returning
the last call that arrived
• Disabling call waiting for a call
• Using the Page and/or Intercom features
Hint: For information about placing calls visually using ViewPoint, refer to the W ave ViewPoint
User Guide.
Wave Phone User Guide
Page 25

Basic Phone Handling 2-7
Basic Operation
Using the Speaker
To make a call
1. Press a line or SPEAKER key.
Hint: You can also just start dialing at this point.
2. Follow the usual process for making calls beginning on page 2-10.
To answer a call
1. Press the line or SPEAKER key.
2. Follow the usual process for answering calls beginning on page 2-9.
To end a call
Press SPEAKER to drop the active call.
You can also use the RELEASE key (if programmed).
Adjusting the Volume
During a call it may be necessary to increase or decrease the volume.
Note: Changes in volume level will be retained for future calls.
To adjust the volume
Press the up or down VOLUME keys while the other party is speaking to change the
volume as needed.
Obtain Information for Your Phone
You can access a prompt that tells you your extension number and station ID.
To hear the prompt
1. Press the line or SPEAKER key to get a dial tone.
2. Press *00 to activate the prompt.
Wave Phone User Guide
Page 26

Basic Phone Handling 2-8
Basic Operation
Using a Phone Other than Your Own
If you use another user’s phone to place calls, you are subject to that user’ s dialing restrictions,
outgoing Caller ID information, and other settings, and your calls are logged as being from that
user. To make sure that your calls are placed and logged as yourself, do the following:
1. Log into your account from that phone (# <your extension> # <your password> #).
Once you are logged on:
2. Press 5 1 to forward your calls to that phone.
When you are finished placing calls at the other user’s phone:
3. Press *0 0 to log off.
Note: If the phone is idle for too long (for example, more than an hour) you may be logged off
automatically.
Using an IP Phone
If you have a voice-over-IP phone, you can place calls with it as if it was a normal phone.
Using the * Options
When you press * at a dial tone, the system offers you a menu of feature code commands. These
options include redialing and/or returning the last call as described below:
Hint: Refer to Chapters 4 through 6 for a list of * options available on your specific phone type.
To redial the last call you placed
Press
*66.
To return a call to your last identified caller
Note: You cannot return calls that do not have a specific caller ID.
Press
*69.
Wave reads the number it will dial and prompts you to approve it be fore it dials the call.
Wave Phone User Guide
Page 27

Basic Phone Handling 2-9
Basic Operation
Answering Calls
Aside from using the handset or speakerphone (when available), the operation of the Wave
phones is quite basic. The main functions you’ll probably be using are:
• Using the Hold feature
• Using the Call Waiting, Call Park, Pickup, and Transferring features
Using the Hold Feature
You can place calls on hold and place a new call, switch between calls on hold, and end a call
without losing other calls on hold.
To place your current call on hold and place a new call
1. Press
2. Dial your call.
Using the Call Waiting, Call Park, Pickup, and Transferring Features
These features are used slightly differently on each phone type (SIP, Digital, and Analog). You
can find these Wave phone features in Chapter 3 listed alphabetically and each feature shows
each phone type.
Flash # to place the current call on hold.
You will hear a dial tone.
While on a call
1. Press TRANS/CONF.
2. Dial the extension or press DSS.
3. Hang up to complete the operation.
Switching Between Calls
You can switch (or toggle) between calls that you have on hold. You can answer calls, make
calls, and transfer calls without losing other calls by using the Hold feature to switch between
the various calls.
To switch (toggle) from your current call to a call that is on hold
Press Flash 4.
If you have multiple calls on hold, you will hear a menu from which you can select the
call to which you want to connect.
Wave Phone User Guide
Page 28

Basic Phone Handling 2-10
Basic Operation
Ending a Call
You can either hang up the handset, press the SPEAKER key (if available) to end calls, or use
the Hold feature when ending a call.
• For SIP Phone Models 9112i and 9133i, you can also press Goodbye ( also known
as End Call on) to drop the active call.
• SIP Phone Models 480i/480iCT also includes a “Drop” softkey that can be pressed to end
the call.
Using Hold when Ending a Call
Y ou can use the Hold feature to end one call without losing other calls that might be on hold for
you.
To end a call without losing your call(s) on hold
1. Press Flash
If you hung up, pick up the phone.
3 to end the current call.
2. Press Flash
If you have multiple calls on hold, you will hear a menu from which you can select the
call to which you want to connect
Making Calls
Dialing Internal and External Numbers
Internal calls are calls to other Wave extensions. External calls are calls to outside numbers,
including calls to another phone system (PBX), a Centrex extension, another Wave system such
as a branch office, and an Internet address.
Note: If you encounter a delay after dialing before your calls are connected, you can press #
after the extension or number, for example, 187#. This skips the delay.
To dial an internal number, do one of the following
• Dial the extension number.
• Dial the extension number followed by * to go directly to voicemail
• Press
4 to connect to the call still on hold.
(if your administrator has enabled that feature).
411 for the dial-by-name directory.
Wave Phone User Guide
Page 29

Basic Phone Handling 2-11
Basic Operation
To dial an external number
You must dial an access code to start dialing an external number. Ask your Wave system
administrator what types of external calls you can place and what access codes you must use.
Enter
<access code><phone number>.
Example: Example:
Example: In the U.S. if you want to call the external phone number
555 1212, you must dial 9 (the usual access code) before you dial 555 1212.
Dialing by Name
You can dial another Wave user by name if you do not know the user’s extension.
Hint: Your system administrator can remove you from the dial-by-name directo ry, or you can
remove yourself using ViewPoint, so that only callers who know your extension can dial you.
To dial by name
Press
411.
Dialing a User’s Voicemail Directly
If your system administrator enables this feature, you can leave a message in a user’s
voicemailbox directly without ringing the user’s phone.
To dial directly into a user’s voicemail
Enter the user’s extension, then press
(for example
Hint: If the option is available, you may also dial the extension, then * from the point
187*).
* after the extension
when you hear the auto attendant or the user’s greeting to access their voicemail without
having to wait for the entire message to play.
Hint: In addition, this can be a useful feature for you to tell your frequent callers. You
can also use it as a quick way to leave yourself a voice message when calling in. Contact
your system administrator to find out if this option is available on your company’s Wave
system.
Wave Phone User Guide
Page 30

Basic Phone Handling 2-12
Basic Operation
Using Account Codes
Depending on your office’s configuration of Wave, you may be prompted to enter an account
code when you place an external call. Even if you are not prompted for an account code by the
system, your office may require you to enter one. Y our Wave system administrator can tell you
what account codes, if any, you must use.
Account codes can be entered prior to placing a call or during an active call
Entering Account Codes When Prompted
If you are prompted to enter an account code when you place a call, you will hear one of the
following prompts:
• A beep.
• “Please enter account code.”
• A double beep
• . This indicates that you are dialing a Wave contact who has an associated account code,
so that you do not need to enter one.
If you hear one of the previous prompts
Enter the account code followed by
#.
If you hear the double beep
You can press
# to use the contact’s associated account code.
OR
You can enter a different account code and press
Note: If you enter the wrong account code, press Flash before pressing # and the system
#.
will let you re-enter it.
Note: Depending on how your Wave system administrator configured your system, the
prompt may occur either after you dial the access code or after you dial the phone number.
If the prompt occurs after you dial the access code, enter the account code followed by
and then continue entering the phone number.
Example: You would dial 9 [listen for the prompt] 8812 # 212 123 4567 (where 9 is the access
code and 8812 is the account code, and the numbers after # are the area code and
phone number).
Wave Phone User Guide
#,
Page 31

Basic Phone Handling 2-13
Basic Operation
Entering or Revising an Account Code During or Before A Call
During a call you can enter an account code or revise an account code
already entered.
To enter or revise an account code
Press Flash *11 and enter the account code followed by
#. After pressing # you are
returned to the call.
Hint: You can also enter an account code before dialing the call. Press *11 at a dial tone,
and then enter the account code followed by
#. When you hear the dial tone, dial the
phone number.
Disabling Call Waiting for a Call
Disabling call waiting is useful if you are using your extension to send faxes or to connect to the
Internet. In both cases, a call waiting tone disrupts the data flow.
To disable call waiting for a call
Press *70 and dial the number.
You do not hear the call waiting tone during that call. Incoming calls while you are on
that call are sent directly to your voicemail. After the call ends, call waiting is enabled
again.
Note: You can enter *70 as part of your fax dial string. For example, your fax dial string
might be *70 9 1 617 555 7744.
Wave Phone User Guide
Page 32

Voicemail Management 2-14
Basic Operation
Voicemail Management
Vertical Wave Voicemail offers state-of-the-art messaging services. Previously in this chapter,
you were given the steps to log into your voicemail/phone account, set up your voicemail
password and greeting(s), as well as use voicemail notification. In this section, you will be
shown how to use the following additional features:
• Listen to Messages (replaying, saving, deleting, replying to messages)
• Record Messages
Hint: You will always need to log into your own voicemail account before you can access any
of your messages, options, and/or features. Please refer to “Wave Phone Account Management”
on page 2-1 for mo re information.
Note: If you are using a Wave Digital phone, be sure to review “Visual Voicemail” on
page 3-58.
Listening to Messages
When listening to messages you have received, you will have several options.
• Listening to new, saved, and deleted messages
• Using listening options
• Managing messages (after listening)
Listening to New Messages
New messages are those that have not yet been listened to, saved, or deleted
To listen to new messages
1. Log into your account.
2. Press 1 to listen to the first new message.
3. Press one of the designated option numbers to access other listening options
(see “Using the Listening Options” on page 2-16).
AND/OR
When the message has finished playing:
4. Press 2 to go to the next message.
Wave Phone User Guide
Page 33

Voicemail Management 2-15
Basic Operation
Listening to Saved Messages
Saved messages are those that you have listened to previously and have saved (see “Using the
Listening Options” on page 2-16 for more information about saving messages).
To listen to saved messages
1. Log into your account.
2. Press 2 to listen to the first saved message.
3. Press one of the designated option numbers to access other listening options (see
Listening Options described below).
AND/OR
When the message has finished playing:
Press 2 to go to the next message.
Listening to Deleted Messages (from the current session only)
Note: You cannot access deleted messages from any previous sessions.
1. Log into your account.
2. Press 5 to listen to the first deleted message.
3. Press one of the designated option numbers to access other listening options (see “Using
the Listening Options” on page 2-16).
AND/OR
When the message has finished playing:
Press 2 to go to the next message.
Wave Phone User Guide
Page 34

Voicemail Management 2-16
Basic Operation
Using the Listening Options
Use the options below when listening to new, saved, or deleted messages.
Press 1 to replay the current message.
Each time you press 1, option information plays and the message starts at the beginning.
Press 2 to skip to the next message while the current message
is playing.
Press 3 to delete the current message.
Press 4 to reply to or forward the message, or to callback the person that left
the message.
Hint: See “Managing Messages” on page 2-17.
Press 5 to play the previous message while the current message
is playing.
Press 6 to save the current message.
Press 7 to rewind the current message (by 4 seconds)
Each time you press 7 while the message is playing, it will rewind another 4 seconds.
Press 8 to undelete any messages deleted in this session.
WARNING: If you deleted messages in a previous message session, these messages cannot
be recovered.
Press 9 to fast forward the current message (by 4 seconds).
Each time you press 9, the message will fast forward another 4 seconds.
Press # during the “message-received” pre amble to skip to the beginning of the
current message.
Press # during the message itself to skip the re st o f th e message (and play th e
next message, if there is one).
Wave Phone User Guide
Page 35

Voicemail Management 2-17
Basic Operation
Managing Messages
After listening to a message, while you are in the Listening menu, use the options below to:
• Reply to a message (directly to the sender’s voicemail)
• Forward messages
• Return a call to the sender
Replying to a Message
You can send an immediate reply to the person who left the current voicemail. Your reply will
go directly to their voicemail. If the message was sent to multiple recipients, you have the choice
of replying to just the original sender or to all recipients.
To reply to a message
1. From the Listening options messages, press 4, then press 1 to access reply options.
2. Press 1 to reply to the original sender only.
OR
Press 2 to send to all recipients (if the message is sent to multiple recipients).
3. At the tone, record your reply, then press #.
4. Press 1 to send your reply.
Forwarding a Message
Send a copy of the current message to the voicemail of one or more users. In addition, you can
include a recorded message that explains the reason you are forwarding the message.
Example: “I just received this message from our customer, Mr. Jones. Can you please call him and
answer his questions? Thanks.”
To forward a message
From the Listening options messages:
1. Press 4, then press 2 during or after listening to a message.
2. At the tone, record your message, then press #.
3. Press 1 to accept your recording.
OR
Press 2 to hear your recording.
Hint: If you want to re-record the message, press 3.
4. Set deliver options or re-record your message, as needed.
Wave Phone User Guide
Page 36

Voicemail Management 2-18
Basic Operation
5. Enter the extension to which you want to forward the message, then press #.
6. Repeat step 5 for each extension you want to include.
Hint: If you do not know a user’s extension number, press 411, then select the user by
name.
If you want to send the message to all users on the system (which have voicemail
capabilities) press 8888
#.
7. Press # to send the message to the designated extension(s).
OR
Press * to cancel.
Hint: If you entered multiple extensions, press * to delete the most recently added
extension. Press * to delete each extension. Once all extensions have been deleted, press
* to delete the message itself.
Returning a Call to the Sender
Instead of using the reply method to call the sender ’s voicemail, use the Callback method to
directly call the extension or outside phone number of the sender.
To return a call to the sender
1. From the Listening options messages, press 4, then press 3 during or after listening to a
message (without deleting the original message).
OR
Press 4 during or after listening to a message (the original message WILL be deleted).
Note: If you are calling back a forwarded message or calling a sender with more than one
available phone number (for example a callback number and a Caller ID number), the system
will prompt you to select the appropriate number.
When the caller’s number appears:
2. Press 1 to dial that number.
OR
To choose from a list of available numbers for the sender:
Press 2 to display a list of numbers, then select the appropriate number to dial the sender.
Wave Phone User Guide
Page 37

Voicemail Management 2-19
Basic Operation
Recording Messages in Voicemail
When you want to send a specific message without first accessing another user’s email, or when
you call another user’s voicemail (either directly or because they are unavailable), you have
several features to utilize:
• Record a message
• Use Recording Options
• Send a message
Recording a Message
You can record a message without accessing another user’s voicemail. Once recorded, you can
use the record, send, and delivery options as appropriate.
1. Log into your account.
2. Press 3.
3. Record your message, then use the recording options as needed (see below).
Using Recording Options
Once you have recorded a message either before or after accessing a user’s voicemail, you can
use the following options:
From the Record menu:
Press 1 to accept the recording.
Press 2 to review the recording.
Press 3 to re-record the message.
Hint: When you are satisfied with your recording, press 1 to accept it. Otherwise, press
3 again to record the message again.
Press 4 to append to the end of the message.
Sending a Message
Once you have recorded a message, you can use the following options to send it to its
destination. You will need to:
1. Select a delivery option, if appropriate.
2. Enter a destination extension (if you are sending a message without first accessing a
user’s voicemail)
Wave Phone User Guide
Page 38

Voicemail Management 2-20
Basic Operation
Selecting Delivery Options (optional)
After you have pressed 1 to accept the recording
Press 5 to mark the message as URGENT.
The recipient will hear messages marked as “urgent” before any other message
regardless of time received.
Press 6 to mark the message as PRIVATE.
When a message is marked “private” the recipient cannot forward it, nor can users who
may share the recipient’s voicemailbox cannot play the message. Contact your phone
system administrator for more information.
Press 7 to enter a callback number.
This only applies to external callback numbers. You will be prompted to enter the external
number.
Press * to cancel the recorded message.
Enter Destination Extensions (if you have not yet accessed the user’s voicemail)
If you are sending a recorded message directly from your voicemail, without having accessed
the user’s voicemail either by dialing it directly or because the user is unavailable, you will need
to specify the destination extension for the recipient.
After you have pressed 1 to accept the recording and set any Delivery Options
(as described above)
1. Enter the extension to which you want to send the message,
then press #.
2. Repeat step 1 for each extension you want to include.
Hint: If you do not know a user’s extension number, press 411, then select the user by
name.
If you want to send the message to all users on the system (which have voicemail
capabilities) press 8888
#.
3. Press # to send the message to the designated extension(s).
Wave Phone User Guide
Page 39

Chapter 3
Using Wave Phone Features
This chapter describes the various features of each of the phone types. Some features are offered
on some phone types.
In addition, while some features are available on more than one phone type, the functionality
may differ . Therefore, please be sure to review the descriptions carefully to make sure that you
are reading the information for your specific phone type. To help you recognize which features
belong to which phones, the following designations have been provided:
When you see... It indicates that the feature description applies to the following
phone type:
[S] SIP Phones (unless otherwise noted, this designation applies to
all SIP phone models: 480i/480iCT, 3112i, and 3122i)
[D] Digital phones
[A] Analog phones
[ALL] All phones (but not necessarily all models within a phone type)
Hint: For additional details specific to your phone, refer to the following:
• Chapter 4 - About Wave SIP Phones
• Chapter 5 - About Wave Digital Phones
• Chapter 6 - About Wave Analog Phones
Wave Phone User Guide
Page 40

Authorization Codes 3-2
Using Wave Phone Features
Authorization Codes
You might be assigned an authorization code that gives you the ability to make calls on
restricted phone line keys. Authorization codes are used to override access restrictions.
Using Authorization Codes [ALL]
To use an authorization code
1. Dial a phone number.
You hear a long beep, and the display (on SIP and Digital phones only) prompts you to
enter your authorization code.
2. Enter your authorization code, and press #.
Auto Dial
Auto Dial allows you to dial frequently used phone numbers with one button. You can also use
your Auto Dial keys to dial digits while a call is connected.
Note: Not all phone types offer this feature.
Programming and Using an Auto Dial Key [D]
DIGITAL PHONES
Note: Not all keys are programmable, so you should first query the current programming (press
MENU, then the appropriate key - see “Using the Query Feature” on page 3-58 to find an
available button. Once you locate an unassigned button, follow the steps below to program it.
Hint: Also see “Storing the Saved Number as an Auto Dial” on page 3-48
To program an Auto Dial key
1. Choose the key you want to program.
From an idle phone:
2. Press the MENU softkey on the display.
3. Press
4. Press the key you want to use for the Auto Dial (see step 1 above).
5. Use the keypad to enter the name you want to assign to this key.
6. Press
NEXT until EDIT appears, then press the corresponding softkey.
NEXT when the name is entered.
Wave Phone User Guide
Page 41

Call History 3-3
Using Wave Phone Features
7. Enter the number you want to assign to this key.
If you are programming an external phone number, enter the full phone number
(including the external access digit(s) and area code).
You can press the TAP or Flash button to enter a flash at the start of the dialing string (to
use Flash codes). You can press HOLD to insert a pause in the dialing string.
8. Press SAVE when all the information has been entered.
9. Press SPEAKER to exit the menu.
To use Auto Dial key
Press the Auto Dial key assigned to the number you want to dial.
Call History
A list of (up to) the last ten outgoing, ten incoming, and ten missed calls is stored for each phone.
Note that multiple calls to or from the same destination will result in one entry in the list.
Missed calls are not logged if the call is to a hunt group in which the user is a member.
Using Call History [D]
DIGITAL PHONES
To access the Call Lists
From an idle phone:
1. Press MENU softkey on the display.
2. Press
3. Press
LISTS.
The display will show the number of outgoing calls (
calls (
I:) stored.
Out to view the outgoing list, Miss to view the missed calls list, or Next then In to
view the incoming calls list.
While viewing a list you can scroll through the list by pressing
the call and see when the call was made. Pressing
Wave Phone User Guide
O:), missed calls (M:), and incoming
Next, or press Sel to select
Dial at this point will call that user.
Page 42

Call Park 3-4
Using Wave Phone Features
To clear the Call Lists
From an idle phone:
1. Press MENU softkey on the display.
2. Press
3. Press
4. Press
5. Choose either the
LISTS.
Next.
Clear.
Out, Miss, (or Next, then) In list to clear, or All to clear all three.
Call Park
Use Call Park to place a call on hold for retrieval from any phone on the system.
Directed Park [ALL]
Directed Park allows you to park a call on another line. A specific extension number might be
programmed on your Directed Park key to allow you to always park a call on a specific line.
SIP PHONES
To direct park a call
With a party on the line:
1. Press Flash, then *66.
2. Dial the extension.
3. Listen for two beeps.
4. Hang up.
To retrieve a direct parked call
1. Listen for dial tone.
2. Press *65.
3. Dial the extension.
Wave Phone User Guide
Page 43

Call Park 3-5
Using Wave Phone Features
DIGITAL PHONES
To Direct Park a call
While on an active call:
1. Press Directed Park.
If you do not have a programmed Directed Park key, press Flash, then *66 to
park a call.
2. Enter an extension number, if necessary.
3. Listen for two short beeps, and hang up.
If the key is configured to display the status of the parked call, the green LED will flash
until the call is unparked. If the call does not get answered, you can retrieve the call by
pressing the Directed Park key. You can use the key to park another call on another line
even if the green LED is flashing.
You can only park one call on any given line. Any other phones that have a Directed Park
key targeted at the same line where the call was parked, and are configured to show
status, will flash red, indicating that there is a call already parked on the target line.
If you leave a call parked for a long period of time, your phone rings back, and
displayed.
PARK is
To retrieve a direct park call
Press Directed Park.
Note: The Direct Park key will not work if it has been pre-programmed for an extension
other than the target extension. Contact your Wave system administrator for more
information.
Hint: If the phone does not have a Directed Park key, dial *65 and the target extension
number. You can also use the Self Park key (if available), and the target extension number
ANALOG PHONES
To direct park a call
With a party on the line:
1. Press Flash, then #, then *66.
2. Dial the extension.
3. Listen for two beeps.
4. Hang up.
Wave Phone User Guide
Page 44

Call Park 3-6
Using Wave Phone Features
To retrieve a direct parked call
1. Listen for dial tone.
2. Press *65.
3. Dial the extension.
Self Park [ALL]
Self Park places a call in a parked state on your primary line for retrieval from other phones.
SIP PHONES [MODEL 480I/480ICT ONLY]
To park a call at your primary line
With a party on the line:
1. Press Flash, then *64.
2. Dial the extension.
3. Listen for two beeps.
4. Hang up.
To retrieve a parked call
From any phone:
1. Listen for dial tone.
2. Press *65.
3. Dial the extension.
DIGITAL PHONES
To park a call at your primary line
With a party on the line:
1. Press Park.
If you do not have a programmed Self Park key, press Flash, then *64 to park a call.
2. Listen for two short beeps, and hang up.
If you leave a call parked for a long period of time, your phone rings back, and
displayed.
Wave Phone User Guide
PARK is
Page 45

Call Park 3-7
Using Wave Phone Features
To retrieve a parked call
From any phone:
1. Press Self Park.
If the phone does not have a Self Park key, dial *65.
You can also use the Direct Park key (if programmed).
2. Dial the extension on which the call was parked.
ANALOG PHONES
To self park a call
With a party on the line:
1. Press Flash, then *64.
2. Listen for two beeps.
3. Hang up.
To retrieve a self parked call
1. Listen for dial tone.
2. Press *65.
3. Dial your extension.
Wave Phone User Guide
Page 46

Call Park 3-8
Using Wave Phone Features
System Park [ALL]
Place a call in one of the ten “parking slots” on the Vertical Wave system for retrieval from
another phone.
Note: Any V ertical W ave phone with the Enhanced Call W aiting feature with in the system may
be used to retrieve the call. Ask your phone administrator if you are unsure if this feature is
available on your phone.
SIP PHONES
This feature is pre-configured on the 480i/480iCT model
To park a call on the system
While on an active call:
1. Press Park.
If your phone does not have a programmed System Park key, press Flash and dial *62
to park a call.
2. Listen for two beeps.
3. Hang up.
The display shows the parking slot number at which the call is parked. Make a note of
this number as you will need it to retrieve the call.
To retrieve a call parked on system
From 480i/480iCT
Press RETRIEVE button, then enter slot number.
OR
From any other extension:
1. Press System Park.
If your phone does not have a System Park key, dial *63, the orbit number, then press the
Dial sofkey.
Note: The phone will automatically pause for approximately 3 seconds between each
digit. However, pressing the Dial key as mentioned above will quicken the retrieval
process.
2. Dial the parking slot number on which the call was parked.
Wave Phone User Guide
Page 47

Call Park 3-9
Using Wave Phone Features
DIGITAL PHONES
To system park a call
While on a call:
1. Press System Park.
If you do not have a programmed System Park key, press Flash, then *62 to park a call.
2. Listen for two short beeps, and hang up.
The display shows the parking slot number where the call is parked. Be Sure that you
remember this number since you’ll need to use it to retrieve the call.
The System Park red LED remains lit until the parked call is retrieved.
If you leave a call parked for a long period of time, your phone rings back, and
displayed.
Note: Even while a call is parked from your phone, and the System Park button’s red LED
is lit, you can still query parking slot of the last call parked from your phone by pressing
MENU, then the System Park button.
To retrieve a call parked on the system
From any extension:
1. Press System Park.
If you do not have a programmed System Park key, dial *63.
PARK is
2. Dial the parking slot number on which the call was parked.
ANALOG PHONES
To system park a call
With a party on the line:
1. Press Flash, then *66.
2. Listen for two beeps.
3. Hang up.
Note: You can also use the method shown below:
1. With a party on the line, press Flash, then 6.
2. Listen to the system prompt for the slot number.
Wave Phone User Guide
Page 48

Call Pickup 3-10
Using Wave Phone Features
To retrieve a system parked call
1. Listen for dial tone.
2. Press *63.
3. Dial the appropriate slot number.
Call Pickup
You can pick up a call on any extension within your call pickup group. If the line key you use
to pick up a call is not part of a call pickup group you can pick up other calls on lines that do not
belong to a call pickup group. There are two types of Call Pickup: Extension Pickup and Group
Pickup.
Extension Pickup [ALL]
Extension Pickup allows you to answer any ringing primary or secondary line in your call
pickup group.
SIP PHONES
To answer a specific extension
Press Pickup.
If your phone does not have a programmed Pickup key,
dial *75.
DIGITAL PHONES
To answer a specific extension
1. Press Extension Pickup.
If you do not have a programmed Extension Pickup key, di al *75.
2. Dial the extension number of the ringing station.
An extension number might be programmed on the Extension Pickup key to provide
directed pickup for a specific extension.
3. Speak to caller.
Wave Phone User Guide
Page 49

Call Pickup 3-11
Using Wave Phone Features
ANALOG PHONES
To answer a specific extension
1. Listen for dial tone and press *75.
2. Dial the extension number of the ringing station.
Group Pickup [ALL]
Group Pickup allows you to answer a call on any primary or secondary line within your call
pickup group. Pickup groups are configured by the system administrator.
SIP PHONES
To answer a call in your pickup group
Press Group Pickup.
If you do not have a programmed Group Pickup key, dial *74.
DIGITAL PHONE
To answer a call in your pickup group
1. Press Group Pickup.
If you do not have a programmed Group Pickup key, dial *74.
2. Speak to caller.
ANALOG PHONES
To answer a call in your pickup group
Listen for dial tone and press *74.
(MUST BE PROGRAMMED FOR CALL PICKUP)
Wave Phone User Guide
Page 50

Call Record 3-12
Using Wave Phone Features
Call Record
Call Record records the currently active call and saves it as a .wav file to a Voicemailbox. The
maximum length of a recording equals the maximum length of a V oicemail message. The Call
Record key is a programmed key, contact your system administrator for additional information.
Warning: In many localities, it is illegal to record a phone call without first notifying the person
or persons being recorded.
Recording a Call [D] / [A]
DIGITAL PHONES
To use Call Record
1. Notify the person or people with whom you are speaking that you are about to record the
call (see Warning above).
2. Press Call Record.
To end the recording session
3. Press Call Record again.
Using another phone feature will end a call recording session.
You access the recording in the same way you access Voicemail messages. See “Multiple
Call Handling” on page 3-39 for details.
ANALOG PHONES
To use Call Record
1. Notify the person or people with whom you are speaking that you are about to record the
call (see Warning above).
2. Press Flash, then *16.
To end the recording session
3. Press Flash, then *16 (or hang up to stop recording and end the call).
Wave Phone User Guide
Page 51

Call Return 3-13
Using Wave Phone Features
Call Return
Call Return calls back the last extension that called on your primary line.
Note: Call Return does not return calls from external phone numbers.
Returning a Call [ALL]
SIP & DIGITAL PHONES
To use Call Return
Press Call Return.
If your phone does not have a programmed Ca ll Return key, dial *69.
There is a 3-second delay that allows you to hang up and cancel the call return.
ANALOG PHONES
To use Call Return
1. Listen for dial tone
2. Press
*69 to dial the last dialed extension.
Call Waiting
Using Call Waiting [ALL]
During a call on your primary extension, you might hear a call waiting beep and see the Call
Waiting LED flash indicating an incoming call on Call Waiting.
Note: Call Waiting will not be active during a transfer or conference, if both the primary line
and an appearance for another line are connected, or if the primary line is ringing.
SIP PHONES
The L2 key on each model serves as the call waiting indicator. Also, models 480i/480iCT has
two softkeys: "
Pressing the Pickup sofkey key is equivalent to the L2 key; it will connect you to the new call
(and place the existing call on hold). However, pressing the Ignore softkey sends the incoming
call directly to to voicemail.
Pickup" and "Ignore".
Wave Phone User Guide
Page 52

Call Waiting 3-14
Using Wave Phone Features
To accept a call waiting call
Press L2 (or the Pickup softkey on models 480i/480iCT).
You can also press Flash to answer the call.
The initial call is placed on temporary hold. The corresponding primary line key LED
blinks, and the L2 LED lights (solid).
Hint: Remember, on models 480i/480iCT, you can also press Ignore to send the
incoming call directly to voicemail.
To reconnect to the initial call
Press your primary line key.
The call that was waiting is placed on temporary hold. The Call Waiting LED flickers,
and the corresponding primary line LED lights.
You can toggle back and forth between the initial call and the call waiting call by pressing
the primary line key and the Call Waiting key. The LEDs and display update to reflect
which caller is connected.
• Model 480i/480iCT has a Toggle softkey that allows you to switch
between calls.
• Model 9112i has a Swap key that allows you to toggle
between calls.
To release the call waiting call
While the Call Waiting call is active, press End Call.
• For Models 480i/480iCT, press Goodbye ( or use the “Drop” softkey.
The call waiting call is dropped and you are reconnected to the initial call.
To release the initial call
While the initial call is active, press End Call.
• For models 480i/480iCT, press Goodbye ( or use the
“Drop” softkey.
The initial call is dropped and you are reconnected to the call waiting call. The call
waiting call is rolled onto the primary line key.
Hint: Y ou can add a call waiting call to a call on your primary line by pressing Conference. See
“Blocking Caller ID [ALL]” on page 3-16 for more information about the Conference feature.
You can transfer a call waiting call to another extension. See “Transfer” on page 3-53 for more
information about the Transfer feature.
You can park a call waiting call for pickup on another extension. See “Call Pickup” on
page 3-10 for informat ion abo ut parking calls.
Wave Phone User Guide
Page 53

Call Waiting 3-15
Using Wave Phone Features
To disable Call Waiting
Press *70, and dial the phone number.
Call Waiting is disabled for the duration of the call. Call Waiting is re-enabled when the
call is terminated.
DIGITAL PHONES
To accept a call waiting call
Press Call Waiting.
If you do not have a programmed Call Waiting key, press Flash to answer the call.
The initial call is placed on temporary hold.
Note: If Call Appearance keys are programmed for a line, additional calls on that line will
appear on those keys. The Call Waiting key will only be utilized if there are no available Call
Appearance keys to associate with the new call. For more information see “Multiple Call
Handling” on page 3-39.
To reconnect to the initial call
Press the TAP key.
The call waiting call is placed on temporary hold.
You can toggle between the initial call and the call waiting by pressing the TAP key. The
display updates to reflect which caller is connected.
To disable Call Waiting
Press Call Waiting, or *70, then dial the phone number.
OR
Press Call Waiting during an active call.
Call Waiting is disabled for the duration of the call. Call Waiting is re-enabled when the
call is terminated.
ANALOG PHONES
To accept a call waiting call
Press Flash to place the current call on hold and connect to the incoming call.
To reconnect to the original call
Press Flash, then 3, then follow the prompts.
Wave Phone User Guide
Page 54

Caller ID Blocking 3-16
Using Wave Phone Features
To toggle back and forth between the two calls
Press Flash, then 4, then follow the prompts.
To disable Call Waiting
Press *70, then dial the extension or external phone number.
Caller ID Blocking
Keep your caller ID information private when making a phone call. This feature applies only
during the time of the current call. Therefore, it must be reapplied each time you want to make
a call.
Blocking Caller ID [ALL]
ALL PHONES
To block caller ID
1. Listen for the dial tone.
2. Press *67.
3. Dial your call.
Callers List
Using the Callers List [S]
SIP PHONES
The Callers List is a stored log of your incoming calls. Your telephone logs the number and
name (if available) of the caller, when they last called, and the number of times they tr ied to
reach you.
When the Callers List is full, the oldest call records are deleted to accommodate the information
of new callers. If the telephone number of an incoming or outgoing call matches a number that
you have programmed with a name in a programmable key or the Directory, the Callers List will
display the name and number.
The display shows you how many callers have been added to the list since you last checked it.
Note: Contact your system administrator for information about the maximum number of calls
allowed to be stored in your Callers List.
Wave Phone User Guide
Page 55

Callers List 3-17
Using Wave Phone Features
CALLERS LIST SCREEN DISPLAY
ICON DESCRIPTION
You have received a new voice message.
You have a call on hold. While browsing the
Callers list, indicates an unanswered call.
You are on an outgoing call. While browsing the
Callers list, indicates an answered call.
You are on an incoming call. While browsing the
Callers list, indicates a Call Waiting call.
You have an incoming Call Waiting call.
N
2x
XX New Callers This type of message shows the number of callers
You have a new incoming call.
You returned the call from the Callers list.
This type of indicator shows that the caller has
called twice. The display also shows the date and
time of the last call from the caller.
that have been added to the list since you last
checked it.
ACCESSING AND DIALING THE CALLERS LIST
Note: You can add numbers from the Callers List to your Directory. See “Saving Numbers &
Names to the Directory” on page 3-27 for details.
To access the Callers List
1. Press Callers List ( ), and scroll through the incoming call list.
2. Press the Up key to see the most recent call, or press the Down key to see the oldest call
on your list.
To dial the displayed number
1. Lift the handset or press .
2. Press a line key.
3. Press End Call to cancel.
Note: For models 480i/480iCT, press Goodbye () or the “Drop” softkey to
end/cancel the call.
Wave Phone User Guide
Page 56

Callers List 3-18
Using Wave Phone Features
EDITING IN THE CALLERS LIST
WARNING: The Callers List does not save changes. Editing in the Callers List is generally used
if you plan to call the number and need to add a prefix. Remember, you can add numbers from
the Callers List to your Directory. See “Saving Numbers & Names to the Directory” on
page 3-27 for detai ls.
Hint: In the Callers list, if a dial pad key is pressed when a number and/or a name is displayed,
the cursor will automatically add the digit at the left side of the number to enable the entry of
the prefix.
1. Press Callers List ().
2. Scroll to find the entry you want to edit.
Hint: Press the up key to see the most recent call, or the down key to see the oldest call
on your list.
3. Press any key on the dial pad to begin editing.
Hint: To erase one digit to the left of the cursor, press the left select key. To add a
one-second pause during number editing, press Hold (.
DELETING FROM THE CALLERS LIST
There are two ways to delete calls from the Callers List: one call at a time, or all calls.
To delete items one by one
1. Press Callers List ().
2. Scroll to find the item you want to delete.
Hint: Press the up key to see the most recent call, or the down key to see the oldest call
on your list.
3. Press Delete.
A prompt will appear to ask if you want to delete the current item.
4. Press Delete again to erase the item from the list.
To delete all calls
1. Press Callers List ().
2. Press Delete.
A prompt will appear to ask if you want to delete the current item.
3. Press Delete again to erase the item from the list.
Wave Phone User Guide
Page 57

Camp-on (Callback) 3-19
Using Wave Phone Features
Camp-on (Callback)
Camp-on (also known as Callback) allows your phone to automatically call back an extension
that is busy, does not answer , or forwards you to Voicemail. Camp-on does not work on external
phone numbers. The Camp-on key is a programmable key. Contact your system administrator
for details.
Using Camp-on (Callback) [D] / [A]
DIGITAL PHONES
After receiving a busy signal or no answer
1. Press Camp-on.
The Camp-on key red LED lights and you hear a beep.
If you do not have a programmed Camp-on key, dial *76.
Camp-on will remain enabled if you make or answer another call.
When the Camp-on
rings, the primary line LED flashes, and
2. Lift the handset, or press your primary line key.
The target extension will ring when you answer the callback.
If you do not answer the callback in three rings, Camp-on is canceled.
target extension becomes available you hear a callback of three short
CAMP-ON appears on the display.
Camp-on is not canceled if the target extension does not answer the call.
To cancel Camp-on
Press Camp-on.
The Camp-on key LED goes out, and you hear a beep.
If you do not have a programmed Camp-on key, dial *77 to cancel.
To display the Camp-on target extension
1. Press
2. Press Camp-on to display the Camp-on target extension.
MENU softkey on the display.
Wave Phone User Guide
Page 58

Centrex Features 3-20
Using Wave Phone Features
ANALOG PHONES
After receiving a busy signal or no answer
1. Press Flash, then #, then *76.
2. Listen for two beeps.
3. Hang up.
When the target extension becomes available your phone will ring:
4. Answer the ring to retry your call.
To cancel Camp-on
1. Listen for dial tone.
2. Press *77.
3. Listen for two beeps.
4. Hang up.
Centrex Features
The programmed Centrex Flash button allows you to access Centrex features.
Note: You must subscribe to Centrex service through your phone service provider to use this
feature. Contact your system administrator for more information.
Using Centrex Flash [D] / [A]
If your W ave system uses Centrex service, follow these steps to access the Centrex features. See
your phone administrator for more information.
DIGITAL PHONES
To use Centrex Flash
During a call:
1. Press Centrex Flash.
If you do not have a programmed Centrex Flash key, press Flash,
then *80.
2. Listen for dial tone, then enter Centrex feature code (as appropriate).
Wave Phone User Guide
Page 59

Conference Calls 3-21
Using Wave Phone Features
ANALOG PHONES
To access Centrex Flash
1. Listen for dial tone, then press *80.
2. Enter a Centrex feature code.
Conference Calls
You can set up a conference call that includes both internal and external parties. If you have a
Conference ( ) key or a Flash key, you can set up a conference call.
Hint: Contact your system administrator for the maximum number of parties allowed on a
single conference call.
Setting Up a Conference Call [ALL]
SIP PHONES
To set up a conference call using the Conference
With a party on the line:
1. Press Conference ( ) to place the other party on hold.
2. Listen for dial tone, then dial the number of the next party.
3. When that party answers, press Conference ( ) again to connect the calls.
• If a party is not available, press End Call to reconnect to the first party.
• For Models 480i/480iCT, press Goodbye ( to reconnect to the first party.
4. Repeat steps above for each party you want to include in the conference (up to the
allowed maximum).
When all parties have been connected:
5. Press Conference ( ) one more time to complete the set up process and begin the
conference call between all current parties.
() key
Wave Phone User Guide
Page 60

Conference Calls 3-22
Using Wave Phone Features
To make a conference call with feature codes
During a call:
1. Press Flash to place the other party on hold.
2. Listen for dial tone, then dial the extension of the third party.
When the third party answers:
3. Press Flash and dial *71 to connect the calls.
• If a party is not available, press Flash and dial *72 to reconnect to the first party.
• If a party’s Voicemail answers, or the party does not want to join the conference,
press End Call.
• For Models 480i/480iCT, press Goodbye ( to dro p the call and rejoin the first
party.
4. Press Flash again to place the conference call on hold and to add a fourth party.
5. Press Flash and Dial *71 to connect the fourth party to the conference.
To disconnect from a conference call
Hang up the handset, or press End Call
• For Models 480i/480iCT, press Goodbye ( or use the “Drop” softkey.
DIGITAL PHONES
Since all Wave Digital phones have a hard-coded TRANS/CONF key, a programmed
Conference feature key is not required. However, such a feature key is supported for backwards
compatibility.
The functionality between such a key and the TRANS/CONF key is identical. Therefore, you
can use the steps below substituting the feature key for the TRANS/CONF key.
Wave Phone User Guide
Page 61

Conference Calls 3-23
Using Wave Phone Features
To set up a Conference
During a call:
1. Press TRANS/CONF to place the other party on hold.
The HOLD key LED flashes red, and the line key LED is yellow.
2. Listen for dial tone, then dial the number of the next party.
When the other party answers:
3. Press TRANS/CONF again to connect the calls.
• The number of parties in the current conference call will appear on the display.
• If a party is not available, press TAP, or press the key corresponding to the initial
call to reconnect to the first party.
4. Press TRANS/CONF again to place the conference call on hold and add a fourth party.
5. Repeat steps 2 through 4 to add additional parties.*
6. Complete the conference by pressing TRANS/CONF.
ANALOG PHONES
To set up a Conference
With a party on the line:
1. Press Flash, then #.
2. Dial the phone or extension number of a conference member.
After the conference member answers:
3. Press Flash, then *5.
4. Repeat for each additional conference member.
If you dial a member that is not available
Press Flash, then *4 to return to the conference.
Wave Phone User Guide
Page 62

Dial By Name 3-24
Using Wave Phone Features
Dial By Name
The Dial by Name feature allows a call to be placed by entering a name using the keypad or by
scrolling through a list of names. There are two lists of names that can be searched: one of
internal names and one of external names.
About Dial by Name [D]
The Dial by Name Internal list will include the following numbers:
• Extensions in the database.
• Numbers listed in the Off-premise table.
• Primary Line Appearance Call List (if the calling party number is less than seven
digits).
• Autodial feature keys (if the stored number is less than seven digits).
• System Speed Dial numbers (if the stored number is less than seven digits).
The Dial by Name External list will include the following numbers:
• Primary Line Appearance Call List (if the calling party number is seven digits or
more).
• Autodial feature keys (if the stored number is seven digits or more).
• System Speed Dial numbers (if the stored number is seven digits or more).
DIGITAL PHONES
To use Dial By Name
From an idle phone:
1. Press the MENU softkey on the display.
2. Press
3. Press
4. Press
5. Press the keypad digit that corresponds to the first letter for the name being searched.
When the correct name is displayed:
6. Press More, then press Dial to place the call.
DIAL.
Int or Ext to specify an internal or external name.
First or Last. The name search can be done last name first or first name first.
If you do not see the correct name right away, you can spell out the name further using
the keypad, or press
Next to scroll through the list.
Wave Phone User Guide
Page 63

Direct Station Select/Busy Lamp Field 3-25
Using Wave Phone Features
Direct Station Select/Busy Lamp Field
Direct Station Select/Busy Lamp Field (DSS/BLF) keys allow you to monitor the status of
extensions, to call extensions with one key press, and to easily transfer calls to them.
DSS/BLF keys are configured by the system administrator or by user programming and can be
configured for blind or supervised transfer.
A solid red LED next to a DSS/BLF key
indicates the extension is ringing. A blinking LED indicates that the extension has a call on hold.
Using the DSS/BLF Feature [D]
DIGITAL PHONES
CALLING AN EXTENSION
Press the DSS/BLF key to call the programmed destination extension.
USING SUPERVISED TRANSFER
A supervised transfer allows you to announce a call before completing the transfer.
indicates that the line is in use. A flickering red LED
To make a Supervised Transfer
While connected to another party:
1. Press the DSS/BLF key for the destination extension.
2. When the destination party answers, announce the call.
3. Hang up or press SPEAKER to complete the transfer.
To cancel a Supervised Transfer
Press TAP to cancel the transfer before completion.
USING BLIND TRANSFER
A blind transfer allows you to transfer a call to another extension with one key press and without
announcing the transfer.
To make a Blind Transfer
While connected to another party:
1. Press a DSS/BLF key.
2. Hang up or press SPEAKER to complete the transfer
Wave Phone User Guide
Page 64

Directory List 3-26
Using Wave Phone Features
Directory List
Using the Directory List [S]
SIP PHONES
The Directory List is your personal phone book, conveniently stored within your phone. You
can enter up to 200 entries into the Directory by adding them manually, or by saving the number
and name from other lists stored on your phone. Each entry can contain a maximum of 16 letters
and numbers.
Note: If you do not have an Intercom key, you will need to enter the appropriate access code
when adding an external number to be saved.
ACCESSING AND VIEWING YOUR DIRECTORY
To access your directory
1. Press Directory.
The directory displays the number of entries in your list. If the Directory list is empty,
Directory Empty/Use Save to add is displayed.
2. Scroll through the displayed list to locate and access the entries.
To search for an entry by name
3. Press the dial pad number corresponding to the first letter of the name (for example, press
7 for the letter P).
Continue to press the dial pad number to access other letters on the same key (for
example, press 7 three times to display names that begin with the letter R). If there are
multiple entries under the same letter, you can scroll through the list, or continue to press
the next letters.
To dial the displayed number
4. Press , lift the handset, or press any line key.
5. Press Directory to cancel.
SAVING NUMBERS & NAMES TO THE DIRECTORY
You can save a number to your permanent Directory from the Redial list or Callers list, or by
entering a new number and name.
Wave Phone User Guide
Page 65

Do Not Disturb 3-27
Using Wave Phone Features
Saving from Hard keys to the Directory
To save an entry from your or Callers or Redial list
1. Press the associated key for the list you want to view - Callers List ( ) or Redial ().
2. Scroll through the list (selected in step 1) to find the name and number that you wish to
save to your directory.
3. Press Save to store the number and p
4. Press Directory to complete the process.
If the name is displayed with the number, both are saved to the directory. If no name is
displayed, you can enter the name using the dial pad.
Entering Numbers & Names in the Directory
1. Press Save.
2. Press Directory.
The
Enter number prompt will appear.
3. Use the dial pad to enter the number.
Hint: To add a one second pause during number editing press Hold (.
Do Not Disturb
Do Not Disturb (DND) prevents your phone from ringing. It also blocks pages and voice calls.
Callbacks from calls left on hold, park, and camp-on will still ring your phone.
• Using the Do Not Disturb key, you can enable or disable Do Not Disturb while you are
• If you enable Do Not Disturb while your primary line is ringing, the call is transferred to
Note: If your phone shares a line with other phones, only your phone is affected by switching
DND on or off.
IMPORTANT: Y ou will need to enter the appropriate access code when adding an external
number to be saved.
using the phone without interrupting your conversation.
your busy forward destination (for example, Voicemail), with one exception: if you are a
member of a Ring-All hunt group, and you enable Do Not Disturb for a call to the hunt
group, the call will continue to ring the other phones in the hunt group.
Wave Phone User Guide
Page 66

Do Not Disturb 3-28
Using Wave Phone Features
Using Do Not Disturb [ALL]
ALL PHONES
Hint: You can use the following alternative method for using DND on ANY phone or use the
specific method shown for each phone type below.
1. Login to voicemail.
2. Press 6 for account preferences.
3. Press 1 for personal status.
4. Press 2 to cancel DND.
5. Press 1 (or any of the other options besides 2) to set DND.
SIP & ANALOG PHONES
To enable Do Not Disturb
Press *41.
To cancel Do Not Disturb
Press *42.
DIGITAL PHONES
The Do Not Disturb programmable key on your phone is set up by your system administrator.
To enable Do Not Disturb
Press Do Not Disturb.
The Do Not Disturb red LED lights, and
If you do not have a programmed Do Not Disturb key, dial *41.
Note: When you go off hook you receive "stutter" dial tone to indicate your phone is a
special state.
Wave Phone User Guide
DND is displayed.
Page 67

Flash 3-29
Using Wave Phone Features
To cancel Do Not Disturb
Press Do Not Disturb.
The Do Not Disturb LED goes out.
If you do not have a programmed Do Not Disturb key, dial *42.
Note: You can also enable/disable DND using the following keys:
Press MENU, then press NEXT three times.
Select
DND.
Select
ON/OFF.
Exit or
SPKR to end.
Flash
About Flash [ALL]
The Flash button is utilized in many of the features of this phone (such as when making calls,
transferring calls, or placing calls on hold). It is often used in conjunction with “feature codes”
(see Feature Code Reference lists at the end of chapters 4 through 6 of this guide).
• The location of the Flash button may vary from model to model. Your phone may have
button labeled Flash. However, it might have a button labeled Link or Call Wait. Check
the diagrams of the various models in Chapters 4 though 6 of this guide according to the
type of phone you are using (SIP, digital, or analog).
• If there is no button labeled Flash, you can emulate a “flash function” by tapping the
button located under the handset.
Forward Calls
Use Forward to redirect your calls to another extension or phone number.
Hint: You can use the following alternative method for forwarding calls on ANY phone or use
the specific method shown for each phone type below.
1. Login to voicemail.
2. Press 5 for call forwarding.
3. Press 2 and follow the prompts for internal forwarding.
4. Press 3 and follow the prompts for external forwarding.
5. Press 4 to cancel forwarding.
Wave Phone User Guide
Page 68

Forward Calls 3-30
Using Wave Phone Features
Forwarding Calls [ALL]
SIP PHONES
The Forward key applies only to calls received on your primary line. Y ou can activate only one
Forward key on your phone at any given time.
The Forward feature will behave differently depending on whether or not your Forward key is
programmed with a target phone number.
To forward calls to an internal extension
1. Press Forward, then dial the extension number to which you want calls forwarded.
If you do not have a programmed Forward key, press *43.
2. Enter the extension number to which you want to forward calls.
To forward calls to an external phone number
1. Press Forward.
If you do not have a programmed Forward key, press *43.
2. Enter the external access digit(s).
This is the digit that allows you access to an external phone line
(usually a 9).
3. Enter the phone number to which you want to forward calls.
If you enter an international phone number, you must enter a # at the end of the number.
4. If you are prompted for a password, enter your Voicemail password, and press #.
You will hear two beeps, the Forward key will LED flash (indicating that Forward is
enabled), and
To cancel call forwarding
Press Forward.
The Forward key LED goes off.
If you do not have a programmed Forward key, dial *44 to cancel call forwarding.
FWD is displayed.
DIGITAL PHONES
The User Forward key applies only to calls received on your primary line. You can activate only
one User Forward key on your phone at any given time.
The Forward feature will behave differently depending on whether or not your User Forward
key is programmed with a target phone number.
Wave Phone User Guide
Page 69

Forward Calls 3-31
Using Wave Phone Features
To forward calls to internal extensions
1. Press User Forward.
2. Enter the extension number to which you want to forward calls.
The User Forward key red LED flashes indicating that Forward is enabled, and
FWD is
displayed.
If you do not have a programmed User Forward key, dial *43 plus the extension number
to which you want to forward calls.
To forward calls to external phone numbers
1. Press User Forward.
If you do not have a programmed User Forward key, dial *43.
2. Enter the external access digit(s).
The digit that allows you access to an external phone line (usually a 9).
3. Enter the phone number to which you want to forward calls.
If you enter an international phone number, you must enter a # at the end of the number.
4. If you are prompted for a password, enter your Voicemail password,
and press #.
You will hear two beeps, the User Forward key red LED will flash (indicating that
Forward is enabled), and
Note: When you go off hook you receive "stutter" dial tone to indicate your phone is a
FWD is displayed.
special state.
To cancel call forwarding (internal/external)
Press User Forward.
The User Forward key LED goes off.
If you do not have a programmed User Forward key, dial *44 to cancel call forwarding.
Wave Phone User Guide
Page 70

Forward Calls 3-32
Using Wave Phone Features
USING FORWARD (FOLLOW ME)
From any phone in the system, you can specify an extension to which you want your calls
forwarded.
Example: You go to work in a lab room and want all calls forwarded to that room, but have forgotten
to set the forward prior to leaving your office. You can pick up the phone in the lab and set
it for the Follow Me forward. All calls to your office phone will then ring in the lab (until
you cancel the setting).
1. Listen for the dial tone.
2. Press *78.
3. Enter the destination extension.
4. If prompted, enter the appropriate voicemail password.
To cancel Forward (Follow Me)
1. Listen for the dial tone.
2. Press *79.
PROGRAMMING THE USER FORWARD KEY
To program a number on your User Forward key
From an idle phone:
1. Press MENU softkey on the display.
2. Press
3. Press
4. Press the key you want to assign as the User Forward key.
5. Enter the number.
6. Press
7. Press SPEAKER to exit the menu.
NEXT until PROG appears, then press the corresponding softkey.
NEXT until UFwd appears, then press the corresponding softkey.
If you enter an external phone number, be sure to include the external line access digit
(usually a 9).
SAVE to store the setting.
To use the programmed User Forward key
1. Press the User Forward key.
2. If you are prompted for a password, enter your Voicemail password,
and press #.
You will hear two beeps, the User Forward key red LED will flash (indicating that
Forward is enabled), and
FWD is displayed.
Wave Phone User Guide
Page 71

Forward Calls 3-33
Using Wave Phone Features
ANALOG PHONES
You can have your calls forwarded to an outside line (for example to a branch office or your
home) or to another extension within the Wave phone system.
To forward your phone to an external phone
1. Listen for dial tone and press *43.
2. Enter the external line access code.
3. Dial the external (destination) phone number, then #.
4. Listen for two beeps.
5. If prompted, enter the appropriate voicemail password, then *.
To forward your phone to another extension
1. Listen for dial tone and press *43.
2. Dial the destination extension.
3. Listen for two beeps and hang up.
To cancel either external or internal forwarding
1. Listen for dial tone and press *44.
2. Listen for two beeps and hang up.
Wave Phone User Guide
Page 72

Headset 3-34
Using Wave Phone Features
Headset
Using a Headset [ALL]
Follow the procedure below when making and receiving calls using a headset.
SIP PHONES
1. Ensure that you have selected a headset audio mode by accessing the Options list
(under
Option 7.Headset Settings).
2. Plug the headset into the jack.
3. Press ( on models 9112i and 9133i) to obtain a dial tone or to answer an
incoming call.
Depending upon the audio mode selected from the options menu, a dial tone or an
incoming call will be received on either the headset or the handsfree speakerphone.
Hint: See pages 4-2 through 4-7 for information about phone models and their
associated keys/buttons. Also see “Using the Speaker Feature [S] / [D]” on page 3-50.
4. Press End Call.
Note: For models 480i/480iCT, press Goodbye ( or use the “Drop” softkey to end
the call.
DIGITAL & ANALOG PHONES
When using a headset on digital or analog phones, you can adjust the volume by using the
Volume buttons on the front of the phone. In addition to begin or end calls, you will need to use
the Speaker buttons with the headset plugged into the jack.
Wave Phone User Guide
Page 73

Hold 3-35
Using Wave Phone Features
Hold
You can place a call on hold to keep the other party connected while you hang up the handset
or use other phone features.
Placing a Call on Hold [ALL]
SIP PHONES
To place a call on hold
Press Hold ( on models 9112i and 9133i, or the key labeled Hold onModels
480i/480iCT.
The LED flashes next to the line key with a call on hold.
You can hang up the handset or use other phone features.
If you leave the call on hold for too long, your phone rings back to
remind you.
Note: The Flash key can be used to place calls on temporary hold.
To reconnect to a call on hold
Press the key corresponding to the line at which the call was placed on hold.
Using the Reconnect Soft Key (Model 480i/480iCT only)
Use this soft key to reconnect to a call that is on hold or parked.
Using the Toggle Soft Key (Model 480i/480iCT only)
Use this soft key when it appears on the display to switch between two calls in progress by
pressing the appropriate line appearance keys alternately .
Wave Phone User Guide
Page 74

Hold 3-36
Using Wave Phone Features
DIGITAL PHONES
To place a call on hold
Press HOLD.
When a call is on hold, the red LED flashes next to the corresponding line or call
appearance key.
You can hang up the handset or use other phone features.
If you leave the call on hold for longer than the system hold time (three minutes is the
default), your phone rings back and
Note: The Flash key can be used to place calls on temporary hold. However , you cannot
HELD is displayed.
hang up the handset or you will be reconnected to the call on hold.
To reconnect to a call on hold
Press the line or call appearance key that corresponds to the call that was placed on hold.
OR
Press the TAP key to retrieve the most recently held call.
Hint: If more than one call has been placed on hold, press TAP, then the HOLD key
while not connected to a call will scroll through all calls on hold. When the desired call is
shown on the display, press TAP to retrieve that one.
ANALOG PHONES
Place the current call on hold while you use other phone features.
To place a call on hold
With a party on the line:
1. Press FLASH, then #, then *64.
2. Listen for two beeps.
3. Hang up.
Reconnect to a call on hold
1. Listen for dial tone.
2. Press *65, then #.
Wave Phone User Guide
Page 75

Intercom Button 3-37
Using Wave Phone Features
Intercom Button
Using the Intercom Button [S]
You can use this button to make calls from your phone to another extension within your phone
system.
Note: To see other call procedures, refer to “Making Calls” on page 2-10.
SIP PHONES (480I/480ICT ONLY)
To make an intercom call
1. Press Intercom ().
2. Dial the extension.
To end the call:
3. Press Intercom (), Goodbye, or the Drop softkey.
Joining a Call
When a line appearance on your phone is in use by another party, the LED next to the
corresponding key indicates whether you can join that call.
• A Red LED indicates that Break-in is blocked.
• A flashing green LED indicates that Break-in is allowed.
Using the Call Break-in Feature [D]
DIGITAL PHONES
Note: Some outside lines can carry more than one call at one time. Break-in permission is not
allowed on those outside lines.
To join a call
Press the line key corresponding with the call if the green LED is flashing.
Wave Phone User Guide
Page 76

Message Waiting 3-38
Using Wave Phone Features
Message Waiting
If you have a Message Waiting key, the corresponding LED flashes when there are new
V oicemail messages. If there are new Voicemail messages, you will hear a stutter tone when you
select your primary line key. In addition, the number of messages waiting will appear next to
the Message Waiting icon ( ) on the display.
Retrieving Voicemail Messages [S]
SIP PHONES
To retrieve Voicemail
1. Press Voicemail.
If you do not have a programmed Voicemail key, dial extension 550.
Note: Extension 550 is the default voicemail number for your system. Cont act your
system administrator for additional information.
2. Follow the Voicemail prompts.
Refer to “Voicemail Management” on page 2-14 for more info rmation about using
Vertical Wave Voicemail.
Wave Phone User Guide
Page 77

Multiple Call Handling 3-39
Using Wave Phone Features
Multiple Call Handling
Using Call Appearance Keys with Line Keys [D]
To handle multiple calls on the same line, your system administ rato r can program Call
Appearance keys to work in conjunction with the Line key.
DIGITAL PHONES
• Using call appearance keys with line keys will increase the number of calls allowed to
ring into the line since calls will be allowed to ring if they can be shown on either the
Line key or a Call Appearance key.
• If you have one or more call connected or on hold, you are allowed to place another call
by pressing an available Line or Call Appearance key. You can select one of the multiple
calls by pressing the corresponding key, thereby placing the other calls will be placed on
hold. If there is not an available Line or Call Appearance button (or Call W aiting button if
Call Waiting is enabled) then calls will immediately forward or will return a busy signal
if the call cannot be forwarded.
• Call Appearance keys can also be programmed to correspond to a secondary Line
Appearance key (see “Using a SIP Phone” on page 5-10). If a line is shared with another
user, and that user has the line engaged, the corresponding LED(s) on your phone will
reflect the calls that user is handling. Conversely, if you are using the shared line, then the
user with whom you share lines will see the corresponding LED(s) lit.
Note: The number of Call Appearance keys for the lines on both phones need to be equal
or not all calls will be reflected.
Your system administrator can also increase the number of calls allowed to ring your phone by
increasing the number of Call W aiting calls allowed. However, without an available Line or Call
Appearance key programmed to show the call, the calls will be more difficult to manage from
the phone.
Increasing the number of Call Waiting calls allowed to be greater than 1 is not recommended
unless you are using the Vertical Wave ViewPoint application to manage the calls.
Wave Phone User Guide
Page 78

Mute 3-40
Using Wave Phone Features
Mute
This feature allows you to prevent the caller at the distant end to hear anything through your
microphone or handset during a call.
Note: If the Mute is enabled (on)via the speaker, it will be disabled (off) if you lift the handset
Muting a Call [S] / [D]
SIP & DIGITAL PHONES
To mute a call
While on a call:
Press MUTE ( ) to mute the microphone or handset.
The MUTE LED is solid red. You can hear the other party, but the other party cannot hear
you.
If you are on a hands-free call, the SPEAKER LED is solid red.
To speak to your caller
Press MUTE () again.
The MUTE LED will be cleared.
Night Answer
By using the Night Answer feature, you can manually place an Vertical Wave system into a
mode where all inbound calls to the Vertical Wave system are redirected to a predetermined
destination. Your system administrator can configure any on- or off-premise phone number as
the destination.
Setting Night Answer [ALL]
SIP & ANALOG PHONES
To turn on the Night Answer Service
To turn off the Night Answer Service
Press *85.
Press *86.
Wave Phone User Guide
Page 79

Page 3-41
Using Wave Phone Features
DIGITAL PHONES
To turn on the Night Answer Service
Press Night Answer.
If you do not have a programmed Night Answer key, dial *85.
When the Night Answer Service is active, the Night Service LED
flashes red.
To turn off the Night Answer Service
Press Night Answer.
If you do not have a programmed Night Answer key, dial *86.
Page
The Page feature can operate in one of two ways: the Page key gives you access to the public
address system and all the phone speakers on your system, or pages only a specific zone (group)
of phones.
Paging the Entire System [ALL]
Hint: Telephones receiving a page on the phone speaker can press SPEAKER to disconnect the
phone from the paging service.
SIP PHONES
To page all phones with speakers
1. Press Intercom ( ).
If you do not have an Intercom key as shown above, dial *11.
2. Make an announcement.
3. Hang up or press End Call when you are finished making your announcement.
for models 480i/480iCT, press Goodbye ( or use the "Drop” softkey.
Note: When receiving a page on the phone speaker, you can press
End Call or press Goodbye ( on models 480i/480iCT to disconnect the pho ne from
the paging service.
Wave Phone User Guide
Page 80

Page 3-42
Using Wave Phone Features
DIGITAL PHONES
To page all phones with speakers
1. Press System Page.
If you do not have a programmed System Page key, dial *11.
2. Make the announcement.
3. Hang up when you are finished making your announcement.
You will remain connected to the public address system until you hang up .
ANALOG PHONES
To page all phones with speakers
1. Press *11 and begin speaking.
If you do not have a programmed System Page key, dial *11.
2. Make the announcement.
3. Hang up to end the page.
You will remain connected to the public address system until you hang up .
Paging a Specific Group/Zone [S]
SIP PHONES
To page a specific group/zone
1. Press Intercom ( ).
If you do not have an Intercom key as shown above, dial *12 and the group number.
2. Make an announcement.
3. Hang up or press End Call when finished making your announcement.
For Models 480i/480iCT, press Goodbye ( ) or use the “Drop” softkey to cancel/end
the call.
Note: When receiving a page on the phone speaker, you can press
End Call or press Goodbye ( onmodels 480i/480iCT to disconnect the phone from
the paging service.
Wave Phone User Guide
Page 81

Page 3-43
Using Wave Phone Features
Page a Specific Group/ Zone [D] / [A]
DIGITAL PHONES
To page a specific group/zone
1. Press Zone Page.
If you do not have a programmed Zone Page key, dial *12 and the zone number.
2. Make the announcement.
3. Hang up when you are finished making your announcement.
You will remain connected to the public address system until you hang up .
Note: Telephones receiving a page on the phone speaker can press SPEAKER to
disconnect the phone from the paging service.
ANALOG PHONES
To page a specific group/zone
1. Press Page (Zone).
- OR - *12, then the zone number.
2. Begin speaking.
3. Hang up to end the page.
Wave Phone User Guide
Page 82

Password Protection 3-44
Using Wave Phone Features
Password Protection
Y ou can configure your phone so that it requires a password before allowing user programming
such as editing the Autodial buttons, programming feature keys, and changing the voicemail
display. Contact your Wave system administrator for information about password protection
settings.
Using Password Protection [D]
DIGITAL PHONES
To activate/deactivate password protection
From an idle phone:
1. Press MENU softkey on the display.
2. Press
3. Enter the appropriate password, then press # or
4. Select
NEXT until PPROT appears, then press the corresponding key.
Done.
On to require a password before allowing user programming.
OR
Select
Off if you don’t want a password required.
Wave Phone User Guide
Page 83

Privacy 3-45
Using Wave Phone Features
Privacy
The privacy feature is used to mark a call as private which means that shared line appearances
will be prevented from breaking into the call.
Additionally, a held private call can not be retrieved by a shared line appearance. Privacy is
generated from any privacy enabled party to all parties in a call.
Transferring or parking a private call removes privacy from the call.
Using the Privacy Feature [D]
DIGITAL PHONES
To make a call private
While ringback is heard or during a call:
Press Privacy.
If you don’t have a programmed Privacy key, press Flash, then *21.
If a call is in privacy, all parties in the call will have the LED on any configured Privacy
key illuminated red.
To turn privacy off
Press the illuminated Privacy key.
If you don’t have a Privacy key, press Flash, then *21.
Redial
Redial will place a call to the last phone number you dialed from the phone. Even if you dialed
digits while connected to a call, the system will only keep track of the phone number you dialed.
Using Redial [S] / [D]
SIP PHONES
Note: You can add Redial numbers to your Directory. See “Saving Numbers & Names to the
Directory” on page 3-27 for details.
To redial a number
Press Redial ().
Hint: To display the last number dialed, press Program, and press Redial. Press End Call to
clear the display.
For Models 480i/480iCT, press Goodbye ( or use the “Drop” softkey.
Wave Phone User Guide
Page 84

Release 3-46
Using Wave Phone Features
DIGITAL PHONES
To redial a number
Press Redial or #.
Hint: To display the last number dialed, from an idle phone press MENU then Redial
or #. Press SPEAKER to return the phone to idle.
Note: Y ou can also use Saved Number Redial to save a number you have just dialed or to
which you are connected (see “Saved Number Redial” below).
Release
The Release key disconnects an active call, clears the display , mutes the speaker during a page,
and cancels transfers, conference calls, and the Program feature.
Using the Release Key [D]
DIGITAL PHONES
To use the Release feature key
Press RELEASE.
Wave Phone User Guide
Page 85

Saved Number Redial 3-47
Using Wave Phone Features
Saved Number Redial
This feature allows a user to save a number he has just dialed or is connected to on a key so it
can be easily re-dialed. Saved Number Redial requires a programmed Save/Repeat key on your
phone. Contact your system administrator for more information.
Using Saved Number Redial [D]
DIGITAL PHONES
SAVING A NUMBER
While hearing ringback or while connected on a call, press Save/Repeat.
If the number to be saved is from an outgoing call, the number will be saved as dialed. If the
number to be saved is from an incoming call (and provided caller id for the call is available),
the Call Return access code will be added to the beginning of the before saving so that it can
then be dialed.
REDIALING A SAVED NUMBER
To redial a saved number
From an idle phone:
Press Save/Repeat.
The most recently stored number will be dialed.
Wave Phone User Guide
Page 86

Shift 3-48
Using Wave Phone Features
STORING THE SAVED NUMBER AS AN AUTO DIAL
The Save/Repeat key is intended to be a quick method to temporarily store a number. Only the
number is stored; the user is not prompted to enter a name and the value stored is not password
protected.
For numbers that will be used often by the user, programming an AutoDial key is recommended
(see page 3-2).
To program a saved number on an AutoDial key
From an idle phone:
1. Press MENU softkey on the display.
2. Press NEXT until EDIT appears, then press the corresponding key.
3. Follow the prompts: enter the location and the name to be assigned to the key.
When Number? appears on the screen:
4. Press the Save/Repeat key .
The number stored at that key will be copied into the AutoDial key.
Shift
The SHIFT key will allow the user to access a second level of feature keys. When the shift key
is pressed, the phone will enter into the shift mode, allowing the user to use the 12 or 24
programmable keys as auto dial keys.
If no keys are pressed, the phone will automatically exit the shift mode after 5 seconds.
Using the Shift Feature [D]
DIGITAL PHONES
To use the Shift feature keys
1. Press SHIFT.
2. Press a feature key.
Wave Phone User Guide
Page 87

Silent Monitor 3-49
Using Wave Phone Features
Silent Monitor
Silent Monitor allows a supervisor to monitor an agent call with either the agent or the caller
knowing that the call is being monitored. The supervisor hears both sides of the call but cannot
speak to either the agent or the caller. This feature requires that the supervisor ’s phone have a
(programmed) Silent Monitor key and that the extension to be monitored has Silent Monitoring
enabled.
Warning: Most states have laws requiring businesses to inform both their employees and their
customers that calls may be monitored.
This feature requires a license key, which will be issued at no charge upon request to your
Vertical Communications reseller.
Using Silent Monitor (Supervisors Only) [D]
DIGITAL PHONES
To use Silent Monitor
1. Press Silent Monitor.
2. Enter the extension to be monitored.
If the extension you enter does not have Silent Monitoring enabled,
appears on the phone display.
When a silent monitoring session is in progress, the information on the supervisor’s
phone display is the same as that of extension being monitored, with the added
designation
If the agent being monitored places a call on hard hold, the monitoring session will be
terminated.
When you are finished monitoring a call:
3. Hang up to end the session.
MON in the upper right.
Feature Unavail
Wave Phone User Guide
Page 88

Speaker 3-50
Using Wave Phone Features
Speaker
The SPEAKER key lets you switch between using the handset and using hands-free mode during
a call. It also will terminate a call while in hands free mode.
Using the Speaker Feature [S] / [D]
SIP PHONES
To toggle between the speaker and your handset during a call
Press ( on models 9112i and 9133i).
Note: If you have a headset plugged into the phone, this action will then only toggle between
the headset and the handset. The speaker will not be available until you unplug the headset. Also
see “Headset” on page 3-34.
DIGITAL PHONES
To switch from the handset to hands-free mode during a call
Press SPEAKER and hang up the handset.
To switch from hands-free mode to the handset during a call
Pick up the handset.
Wave Phone User Guide
Page 89

Speed Dial 3-51
Using Wave Phone Features
Speed Dial
Speed Dials can be programmed to dial directly to another person’s line or extension, or set up
to quickly access features such as Call return (*69), or Voicemail.
You can configure your speed dial number by saving a listing from your Directory list to a
programmable key through your phone. Y our system administrator can also program these keys
through the configuration files (these numbers are set up as System Speed Dial).
Using Speed Dial [S]
SIP PHONES
SAVING A SPEED DIAL NUMBER
Note: Saving a new number to the key through the Callers List (),
Redial ( ) or Directory buttons on your phone, overwrites the previous entry.
To save an entry from your Directory lists
1. Press Directory.
2. Scroll through the selected list to find the name and number that you wish to save to your
speed dial.
3. Press the programmable key to which you want to assign the speed dial number.
If the name is displayed with the number, both are saved to the speed dial.
4. Press Save to finish.
Hint: It’s a good idea to label the newly programmed key so that you know what speed
dial number is assigned to what key.
DIALING A SPEED DIAL NUMBER
To use a programmed speed dial number
1. Pick up the handset or press ( on models 9112i and 9133i).
2. Press the programmable key assigned to the speed dial number you want to dial.
Wave Phone User Guide
Page 90

Speed Dial 3-52
Using Wave Phone Features
Using System Speed Dial [D] / [A]
Depending on the feature key’s programming, System Speed Dial may work in one of three
ways:
System Speed Dial -- the System Dial key programming does not contain an index, and the
Preview option is not selected
System Speed Dial with a programmed number -- the System Dial key is progr amm ed wi th
a default index to use.
System Speed Dial with dialing preview -- the System Dial key is programmed with the
Preview option selected. If a default index is programmed, the browsing of the list will begin at
that number. If not, it will begin at the last index viewed.
DIGITAL PHONES
To use Regular System Speed Dial
1. Press System Dial.
2. Enter the speed dial index number (from 001 to 999).
The number is dialed as soon as you enter the last digit.
To use System Speed Dial with a Programmed Number
Press System Dial.
The programmed number will be dialed.
To use System Speed Dial with Dialing Preview
1. Press System Dial.
2. Use the VOLUME keys on your phone to browse the list.
If a 3-digit index number is entered, the corresponding system speed dial number will be
displayed.
3. Press System Dial again to dial the displayed number.
ANALOG PHONES
Dial frequently used phone numbers using a predefined three-digit code.
Note: Ask your system administrator for the list of available defined speed dial numbers.
To use a Speed Dial number
1. Listen for dial tone.
2. Press
3. Dial assigned speed dial number.
*89.
Wave Phone User Guide
Page 91

Swap Key 3-53
Using Wave Phone Features
Swap Key
Using the Swap Key [S]
SIP PHONES (MODEL 9112I ONLY)
The Swap key is a programmable key that allows you to toggle back and forth between an active
call and a call waiting (see “Call Waiting” on page 3-13).
Transfer
Transfer places a call on hold while you dial the destination extension number. Your system
administrator configures the Transfer keys as blind or supervised transfer keys.
Making a Blind Transfer [ALL]
A blind transfer allows you complete a transfer without announcing the party to the destination
extension.
SIP PHONES
To make a blind transfer
While on a call:
1. Press Transfer ( ) to place the active call on hold.
2. Listen for dial tone.
3. Enter the destination extension number.
4. Press Transfer ( ) again or hang up.
The party is transferred to the destination extension.
Hint: For models 480i/480iCT and 9133i, you can also use the L2 button to make this
transfer. See the Hint under Supervised Transfer for details.
DIGITAL PHONES
To make a blind transfer
While on a call:
1. Press TRNS/CONF to place the caller on hold.
2. Listen for dial tone, then enter the destination extension number.
3. Hang up to complete the transfer.
The party is transferred to the destination extension.
Wave Phone User Guide
Page 92

Transfer 3-54
Using Wave Phone Features
ANALOG PHONES
To make a blind transfer
While on a call:
1. Press Flash, then .
Hint: Dial the destination extension.You can also use this alternate step: While on a call,
press Flash then 1, then listen for the prompt to assist you with making the transfer.
2. Dial the destination extension.
Hang up to complete the transfer.
Making a Supervised Transfer [ALL]
A supervised transfer lets you announce a call before completing the transfer.
SIP PHONES
To make a supervised transfer
While on a call:
1. Press Transfer ( ) to place the caller on hold.
2. Listen for dial tone, then enter the destination extension number.
When the destination party answers:
3. Announce the call.
4. Press Transfer ( ) to complete the transfer.
To cancel the transfer
Press End Call to reconnect to the calling party.
Hint: For Models 480i/480iCT, press Goodbye ( or use the
“Drop” softkey.
Hint: Models 480i/480iCT and 9133i can use the L2 button to make
this transfer.
Note: A Transfer can become a Conference by pressing Conference ( ) after the
second party answers.
Wave Phone User Guide
Page 93

Transfer 3-55
Using Wave Phone Features
DIGITAL PHONES
To make a supervised transfer
While on a call:
1. PressTRNS/CONF or Flash, to place caller on hold.
2. Listen for dial tone, then enter the destination extension number.
When the destination party answers:
3. Announce the call.
4. Hang up to complete the transfer.
To cancel the transfer
Press TAP to reconnect to the caller on hold.
ANALOG PHONES
To make a supervised transfer
While on a call:
1. Press Flash, then .
Hint: Dial the destination extension.You can also use this alternate step: While on a call,
press Flash then 1, then listen for the prompt to assist you with making the transfer.
2. Dial the destination extension.
When the destination party answers:
3. Announce the call.
4. Hang up to complete the transfer.
If voicemail answers:
Hang up to transfer the call to Voicemail.
OR
Press Flash, then *4 to reconnect to the caller.
Wave Phone User Guide
Page 94

Transfer 3-56
Using Wave Phone Features
Transferring Calls to Voicemail [D] / [A]
If you are using a Wave Digital or Analog phone, you can transfer calls directly into voicemail
without ringing the destination extension.
Note: This feature requires a specially programmed feature key. Contact your system
administrator to find out if this feature is available on your Wave Digital phone.
DIGITAL PHONES
To transfer calls to voicemail
While on a call:
1. Press Transfer VM to place the active call on hold.
2. Enter the destination extension number.
3. Hang up to complete the transfer.
The party is transferred directly to the destination extension’s voicemailbox.
ANALOG PHONES
To transfer a call to voicemail
While on a call:
1. Press *83.
Hint: You can also press Flash, then press 2.
2. Dial the destination extension.
3. Enter the voicemail hunt group.
Contact your phone system administrator for a list of hunt groups.
4. Hang up to complete the transfer.
Wave Phone User Guide
Page 95

User Programmable Keys 3-57
Using Wave Phone Features
User Programmable Keys
The following features are user programmable (keys): Autodial, Call Return, Camp-On, Do Not
Disturb, DSS/BLF, Extension Pickup, Group Pickup, System Speed, Unassigned, User Forward,
and Voicecall. In addition to choosing which feature is associated with an assigned key, the user
can also specify select values for the keys.
Note: Some phones may have a programmed key (usually named “Program”) available for
performing these programming tasks. Contact your Wave system administrator for more
information about whether or not a “Program” key exists on your phone.
Using Programmable Keys [D]
DIGITAL PHONES
PROGRAMMING A FEATURE KEY
Note: Not all feature keys are user programmable, thus you cannot edit a key that is not in the
above list. Display the feature information as described above to determine which keys are
available for programming.
From an idle phone:
1. Decide which key you want to program.
2. Press
3. Press
4. Press
5. Press the key you wish to program.
6. Press SPEAKER to clear the display.
MENU softkey on the display.
NEXT until PROG appears, then press the corresponding key.
NEXT until the desired feature is displayed, then press the corresponding key.
If additional options are available (such as an extension for User Forward or Blind
Transfer for DSS/BLF) you will be prompted at this point to enter the information.
To clear a feature key
Follow the above steps, and program the key as “Unassigned”.
Wave Phone User Guide
Page 96

Visual Voicemail 3-58
Using Wave Phone Features
USING THE QUERY FEATURE
A query of a feature key will display what feature has been programmed onto the key.
To display feature information
From an idle phone:
1. Press MENU softkey on the display.
2. Press a feature key.
The feature key information is shown on the display including the feature name, key
number, and extension number, target number, or programmed number if applicable.
3. Press SPEAKER to clear the display.
Visual Voicemail
The Visual Voicemail feature allows the phone to display applicable prompts and soft key
options while the phone is connected to voicemail.
Example: When listening to a new voicemail message, the display will offer the choices “Replay Save
Del” (replay the message, save the message, delete the message), so that the user can select
one of these options without having to wait to hear the prompt.
Using Visual Mail [D]
DIGITAL PHONES
USING VISUAL VOICEMAIL AND SETTING OPTIONS
To use Visual Voicemail
While the phone is connected to voicemail:
1. Read the prompts on the display.
2. Press the corresponding soft key of the feature you want to access.
Wave Phone User Guide
Page 97

Visual Voicemail 3-59
Using Wave Phone Features
To increase the number of visual options offered
When using Visual Voicemail, there are basic options you have available (
Save). However, you can increase these options by enabling the Verbose Prompt Mo de.
Replay and
Once this feature has been enabled, you can press the More softkey to view additional
options for listening to voicemail.
Example: In addition to the typical options of Replay, Save, More, once you enable this option, you
can press More to see additional options such as Delete and Skip. If you press More again,
you’ll see Rew and FFwd. Press More a third time and you will be returned to the original
options of Replay, Save, Mo re.
From an idle phone:
1. Press MENU softkey on the display.
2. Press
3. Press
NEXT until VPRMT appears, then press the corresponding key.
On to select the Verbose Prompt mode.
VOICEMAIL MESSAGE NUMBER DISPLAY
When the phone is idle its display will either show VMAIL (if there are no new Voicemail
messages in the phone’s mailbox), or
mailbox).
# Msg (where # equals the number of new messages in the
To retrieve messages
When either
VMAIL or # Msg is on the display:
Press the leftmost softkey to initiate a call to Voicemail to retrieve the messages.
To deactivate/activate Voicemail Message Number Display
From an idle phone:
1. Press the MENU softkey on the display.
2. Press
NEXT until VDISP appears, then press the corresponding key.
Note: If a password is requested at this point, enter the phone’s password. Contact your
Wave system administrator for information about passwords.
3. Press
On to have VMAIL (or # Msg, where # equals the number of new messages in the
mailbox) displayed.
OR
Press
Off to have the extension number of the phone displayed.
Wave Phone User Guide
Page 98

Voicecall 3-60
Using Wave Phone Features
Voicecall
Voicecall is a page directed to a specific digital phone extension that allows the receiving party
to reply.
Using the Voicecall Feature [D]
DIGITAL PHONES
To use Voicecall
1. Press Voicecall.
If you do not have a programmed Voicecall key, dial *82.
Listen for dial tone.
2. Dial an extension.
The other party hears a tone on the phone speaker.
3. Begin speaking.
To receive a Voicecall
If your phone is two-way, your speaker is automatically enabled during a voice call, and
you can speak to the other party through the speaker without pressing any keys.
If your phone is configured for one-way communication, the SPEAKER red LED flashes
during a voice call, and you can lift the handset or press the SPEAKER key to speak to the
calling party.
Wave Phone User Guide
Page 99

Chapter 4
About Wave SIP Phones
This chapter illustrates and describes the specific features of the different Vertical Wave SIP
phones.
Wave SIP Phone Models
The following pages show the details of each SIP phone model:
Vertical 9133i SIP Phone
The 9133i SIP phone includes:
• 7 unassigned programmable key buttons
with status lights
• Programmable key support for up to 6
additional lines (set up by your system
administrator)
• 7 fixed/hard feature keys to manage
phone features and settings: Handsfree/Headset, Hold, End Call, Redial,
Transfer, Callers List,and Conference
• 6 programmed buttons: Options, Direc-
tory, Save, Delete, Flash, and Mute
• 3 line appearance buttons (L1 - L3)
• 4 navigation buttons for scrolling
through and selecting items from the
display
Vertical 480i/480iCT SIP Phone
The 480i/480iCT SIP phone includes:
• 2x16 character display screen
• 11 fixed feature keys to manage phone
features and settings: Hold, Redial,
Goodbye, Options, Intercom ( ),
Services, Transfer, Conference, Volume
Down/Up, Headset/Handsfree, Flash,
and Mute
• 6 soft key buttons (3 on each side of the
display)
• Speaker and microphone for hands-free
operation
Vertical 9112i SIP Phone
The 9112i SIP phone includes:
• 1 unassigned programmable button
• 7 fixed/hard feature keys to manage
phone features and settings: Handsfree/Headset, Hold, End Call, Redial,
Transfer, Caller Lists,and Conference
• 7 programmed buttons: Options, Directory, Save, Delete, Swap, Flash, and
Mute
• 4 navigation buttons for scrolling
through and selecting items
from the display
Wave Phone User Guide
Page 100

Wave SIP Phone Models 4-2
About Wave SIP Phones
SIP Phone 9133i
4 - Scroll &
3 - Hold
2 - Handset
Select
5 - Display
6 - End Call
7 - Programmable
Keys
1 - Speaker/
Microphone
19 - Volume
18 - Line
Appearance
Keys
Vertical 9133i SIP Phone
8 - Options
9 - Directory
10 - Save
11 - Delete
12 - Flash
12 - Callers List
13 - Conference
14 - Transfer
15 - Redial
16 - Mute
17 - Hands-free/Headset
Wave Phone User Guide
 Loading...