

Page 1

IP8000 Remote Phone
Release 3.5
June 2010
Configuration Guide
Page 2

Release 3.5
June 2010
THIS PAGE INTENTIONALLY LEFT BLANK
Page 3

Supported IP Phones page - 1
Release 3.5
June 2010
Remote Phone Set Up Instructions
Remote Phone Set Up Instructions
This document provides the following information about the set up of IP8000 on the SBX IP:
Supported IP Phones
• IP8012 and IP8024
• NomadIP Wireless
• Nomad SP Soft Phone
NOTE: This guide is specifically for setting up IP8000 series telephones.
Minimum Requirements
System
• SBX IP system with VOIP card
• Static IP address for VOIP card. If NAT is used, it must be a 1-to-1 NAT.
• Separate IP address for the KSU’s LAN port for system administration
NOTE: No VoIP communication takes place on the KSU LAN port
• SBX KSU software version 3.5aG or higher
• VOIP card software version B.1Dq
Installed Environment
• CAT5E or higher patch cords from VoIP car to LAN switch
• No hubs
• Adequate bandwidth for the anticipated number of H.323 VoIP calls.
SBX IP - IP8000 Phone Configuration Guide
Page 4

IP Endpoint Licensing page - 2
Release 3.5
June 2010
Remote Phone Set Up Instructions
IP Endpoint Licensing
Nomad SP requires a per-seat license. Two seats are automatically included. You do not have
to install activation codes for these two seats.
• IP8000 series and NomadIP wireless phones require no license.
NOTE: Entering IP address information to the KSU database from a digital phone is performed differently
from programming IP settings in an IP remote phone.
Digital Keyset on the KSU
Enter digits in groups of three, with no punctuation or decimal.
EXAMPLE:
To program the address 192.168.1.3, dial
192168001001
> Save
IP Phone
Enter digits with an asterisk [] as the decimal.
EXAMPLE:
To program the address 192.168.1.10, dial
192*168*1*10
> Save
IP Addressing
To begin, you will need to:
1. Obtain IP addresses from the network administrator for the location in which you are
setting up the SBX IP system.
2. Make a note here of the information gathered above for reference while programming
the system.
VoIP card
(VOIB)
KSU LAN Port IP Phone
(may be DHCP)
Your PC
(may be DHCP)
IP Address
Subnet Mask
Default Gateway
SBX IP - IP8000 Phone Configuration Guide
Page 5
IP Endpoint Licensing page - 3
Release 3.5
June 2010
Remote Phone Set Up Instructions
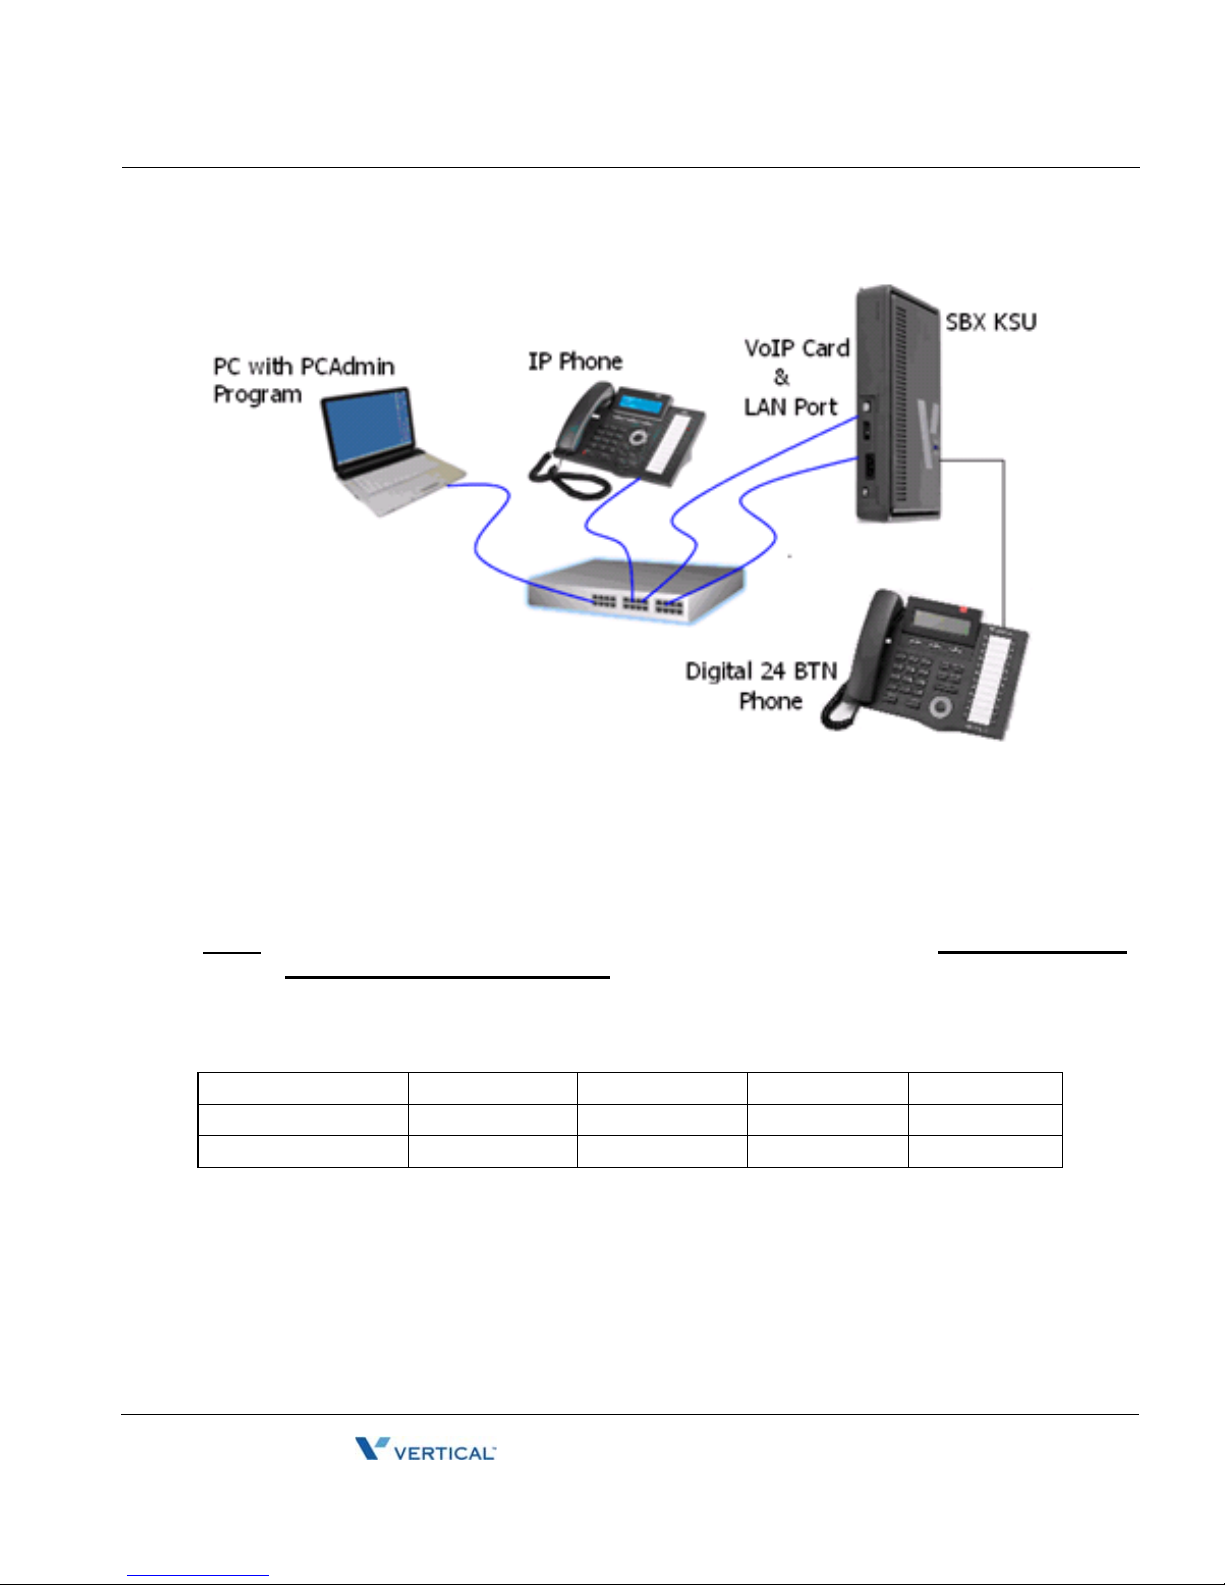
• You will also need a 24-button SBX digital telephone to set up the system.
• For a typical test-bench or demonstration setup, you need four connections to a LAN
switch: each via a straight-through CAT5E patch cord as shown above.
• You may use the following IP addressing information to set up a closed demo of the IP
phone.
NOTE: These addresses will not function in a wide-area network or the Internet, they are for testing
and demonstration purposes only.
VoIP Card KSU LAN Port IP Phone Your PC
IP Address
Subnet Mask
Default Gateway
192.168.1.4 192.168.1.3 192.168.1.5 192.168.1.2
255.255.255.0 255.255.255.0 255.255.255.0 255.255.255.0
192.168.1.1 192.168.1.1 192.168.1.1 192.168.1.1
SBX IP - IP8000 Phone Configuration Guide
Page 6

Preparation page - 4
Release 3.5
June 2010
Remote Phone Set Up Instructions
Preparation
Before starting:
1. Verify that your VOIP card is installed into the system properly and that the card is
recognized in the KSU database.
NOTE: KSU DIP switches must be set to enable the system to retain programming
changes.
2. Set your PC IP address, default gateway, and subnet mask as shown in the table
above.
3. Set the KSU’s IP addressing using PGM 108 when logged into KSU administration
from the 24-button digital attendant station (station 100 by default).
• This assigns the IP address to the KSU’s LAN port.
• The configuration for the VOIP card begins here.
PCAdmin Connection
Follow the PCAdmin User’s Guide or the Tech Tip regarding setting up PCAdmin to establish
connection to the SBX system from PCAdmin on your PC.
NOTE: Remember that when connecting to the SBX using a LAN switch, a straight-through patch
cable, not a crossover cable, is required.
Configuring the VoIP Card Using PCAdmin
NOTE: Digital phone-based programming is shown on page 2.
1. Double-click Pre-programmedXConfiguration.
SBX IP - IP8000 Phone Configuration Guide
Page 7

Configuring the VoIP Card Using PCAdmin page - 5
Release 3.5
June 2010
Remote Phone Set Up Instructions
2. Right-click on VoIB, then select Logical Assignment.
In Logical Assignments:
3. Right-click VoIB and Select (Virtual VoIB)XAppend to Station. A notation of 99 will be
entered in the STA Board field. Click Update when finished.
Î
SBX IP - IP8000 Phone Configuration Guide
Page 8

Configuring the VoIP Card Using PCAdmin page - 6
Release 3.5
June 2010
Remote Phone Set Up Instructions
In VoIB Gateway:
4. Go to VoIB Gatekeeper Settings, then enter the IP Address, Default Gateway and
Subnet Mask that you are assigning to the VOIP card per the worksheet on
page 2 of
this document. Then click Update.
In RSG IP Programming:
5. Double-click [VoIB Slot for RSG/IP].
6. Select the VoIB card (10), then click the
Î .
• You will now see the card slot appear on the right. Click Update.
SBX IP - IP8000 Phone Configuration Guide
> button sign.
Page 9

Configuring the VoIP Card Using PCAdmin page - 7
Release 3.5
June 2010
Remote Phone Set Up Instructions
From the VoIB Slot dropdown:
7. Select the card.
From the Channel Number dropdown:
8. Select 2 for the number of channels to be used for IP Phones.
9. Click Update Channel.
From the IP Phone Number dropdown
10. Select the 2, then click Update Num. This tells the system to assign 2 IP stations.
SBX IP - IP8000 Phone Configuration Guide
Page 10

Configuring the VoIP Card Using PCAdmin page - 8
Release 3.5
June 2010
Remote Phone Set Up Instructions
11. Click Update.
12. Reset the KSU.
13. Double-click RSG/IP Programming > IP Phone Attributes.
14. Double-click on bin #1 (row #1), then enter the MAC address (which you will find
labeled on the bottom of the IP phone).
SBX IP - IP8000 Phone Configuration Guide
Page 11

Configuring the VoIP Card Using PCAdmin page - 9
Release 3.5
June 2010
Remote Phone Set Up Instructions
15. Click Update.
Result:
NOTE:
• You must enter the colon characters in the MAC address.
• You do not need to program the other data values in PGM 386 for IP8000 remote
phones.
• The ID and Password values will be used when you are configuring a Nomad SP
Soft Phone.
SBX IP - IP8000 Phone Configuration Guide
Page 12

Configuring IP Phone Settings page - 10
Release 3.5
June 2010
Remote Phone Set Up Instructions
Configuring IP Phone Settings
Verifying Connectivity to the VoIP card
Ping the VoIP card from where the phone is located.
Setting Up the IP Phone
Setting up the IP Phone will vary dependent on the network infrastructure, IP Address Schema
and location of the System.
You will need to know ALL of the following information to properly configure the IP Phone.
- The IP Address of the VoIP card.
- Is IP Address information supplied dynamically (DHCP) or statically?
- An IP Address and Subnet Mask for the IP Phone (either static or DHCP).
- The Default Gateway IP Address (either static or DHCP).
NOTE: If IP Addresses are static you will need to obtain the correct IP Address, Subnet
Mask and Default Gateway information from the IT Administrator.
1. Connect the IP Phone to the local network.
• It can be powered with an AC power adapter or a port on a POE (Power Over
Ethernet) Switch.
• The power adaptor is part #6899-PS.
• When powered, the IP Phone will complete its boot sequence and attempt to
connect to the VOIP Card. If the phone is unable to connect to the VOIP card the
display will show:
NO RESPONSE FROM MFIM
SET [*] - RESTART [#]
2. Press S to begin configuring the phone. Use the Volume + and - to navigate the
settings. Enter information as follows:
• If you are prompted for a password, dial 147S.
• At MODE[R/L]? (This is the Remote/Local Setting.
- All IP Phones are considered remote to the SBX320 no matter where they are
physically or logically. Set the mode to REMOTE. Press # until the display shows:
MODE[R/L] ?
[REMOTE] – CHANGE[#]
• Press Hold/Save to store the setting as REMOTE.
SBX IP - IP8000 Phone Configuration Guide
Page 13

Configuring IP Phone Settings page - 11
Release 3.5
June 2010
Remote Phone Set Up Instructions
3. Press the volume + until DHCP? appears.
• If IP Addressing is assigned via DHCP, this should be enabled.
• If IP Addressing is Static, this sho
• Press # until the display shows the correct state.
• Press Hold/Save to retain the entry.
4. Press the Volume + until MFIM IP ADDRESS (DOT:*) appears.
• This is the VOIB IP Address Field. MFIM = VOIB.
• Enter the IP Address on the dial pad.
• Press the S to enter a decimal/period (.).
EXAMPLE
To enter 192.168.1.10, dial 192*168*1*10. Press Hold/Save to
retain the entry.
MFIM IP ADDRESS(DOT:*)
xxx.xxx.xxx.xxx (
The VOIB IP Addr)
5. Press the Volume + until ROUTER IP ADDRESS(DOT:*) appears. This is the Default
Gateway IP Address Field. If IP Addressing is being assigned you won’t need to
program this field. If IP Addressing is statically assigned enter the IP Address of the
Default Gateway and press Hold/Save.
ROUTER IP ADDRESS(DOT:*)
xxx.xxx.xxx.xxx (Default G/W IP Addr)
6. Press the Volume + until PHONE NET MASK(DOT:*) appears.
• This is the Subnet Mask associated with the IP Address of the phone.
• If IP Addressing is being dynamically assigned you won’t need to program this
field.
• If IP Addressing is statically assigned enter the IP Address of the Default Gateway
and press Hold/Save.
PHONE NET MASK(DOT:*)
xxx.xxx.xxx.xxx (
Subnet Mask)
SBX IP - IP8000 Phone Configuration Guide
Page 14

Configuring IP Phone Settings page - 12
Release 3.5
June 2010
Remote Phone Set Up Instructions
7. Press the Volume + until PHONE IP ADDRESS(DOT:*) appears.
• This is the station IP Address Field.
• If IP Addressing is being dynamically assigned you won’t need to program this
field.
• If IP Addressing is statically assigned enter the IP Address of the Station and
press Hold/Save.
PHONE IP ASSIGNED(DOT:*)
xxx.xxx.xxx.xxx (
Station IP Address)
8. When these fields have been completed:
• Press the Speaker button to reboot the IP Phone.
• The phone will contact the VOIP card and register to the system.
• It will receive its station number assignment from the KSU.
• In the following example, the IP address and station number information appears
after two IP phones have registered to the system:
• Test the IP phone by dialing an extension number.
SBX IP - IP8000 Phone Configuration Guide
Page 15

Programming VOIP Card Settings from a Digital Keyset page - 13
Release 3.5
June 2010
Remote Phone Set Up Instructions
Programming VOIP Card Settings from a Digital Keyset
This is an alternative programming method from the PCAdmin programming shown in the
previous section.
IMPORTANT!
Disregard this section if you have configured the IP phone using
PCAdmin.
1. Enter KSU programming from the digital attendant phone.
2. Press PGM.
3. Dial 103 (Logical Slot Assign).
4. Press Flex Button 2 (STA).
5. What to enter will depend on what cards are installed. If there are two CHB308 cards
installed the display will show
6. Dial 01 02 99 to assign station ports to the VOIB.
7. Press Save.
01 02 .. .. ..
Assign IP Address to the VoIB
1. Press PGM.
2. Dial 340 (VoIB Attributes).
3. Press Flex Button 1 (IP ADDR).
4. Dial the IP Address (e.g., 192.168.1.10 Dial 192168010010).
5. Press Save.
6. Press Flex Button 2 (Gateway ADDR) - Mandatory.
7. Dial Default Gateway for VoIB (e.g., 192.168.1.1 Dial 192168001001).
8. Press Save.
9. Press Flex Button 3 (Subnet Mask).
10. Dial Subnet Mask (e.g., 255.255.255.0 Dial 255255255000).
11. Press Save.
SBX IP - IP8000 Phone Configuration Guide
Page 16

Program IP Phone Attributes page - 14
Release 3.5
June 2010
Remote Phone Set Up Instructions
Assign VoIB Slot/Port Usage
1. Press PGM.
2. Dial 380 (VoIB Slot Assignment).
3. Press Flex Button (VoIB Slot).
4. Dial 10 (Slot Number to Program).
5. Press Save.
6. Press Flex button 2 (RSG/IP channel Assign).
7. Dial 10 (Slot Number).
8. Dial 4 (or number of channels to reserve for IP Phones).
9. Press Save.
Assign VoIB IP Station
1. Press PGM.
2. Dial 381 (RSG/IP No Assign).
3. Press Flex Button 2.
4. Dial the number of IP Stations you wish to program (e.g., 04).
5. Press Save.
6. Reset the System and VoIP card.
Program IP Phone Attributes
The number of bins available to program will correspond to the number of IP phones
programmed in PGM 381.
1. Press PGM.
2. Dial 386 (IP Phone Attrib).
3. Dial the Bin Number (e.g., 01 This would be the first IP Station).
4. Press Flex Button 1.
5. Dial the MAC Address of the IP Phone.
NOTE: S=A, #=B, NAV Left=C, NAV Right=D, NAV Up=E, NAV Down=F
6. Press Save.
SBX IP - IP8000 Phone Configuration Guide
 Loading...