

Page 1
Phone User Guide
For Review Only - Draft Document 11/26/07 COMPANY CONFIDENTIAL - DO NOT Distribute
Last Updated 11/26/07
Page 2

Vertical Communications, Inc. reserves the right to revise this publication and to make
For Review Only - Draft Document 11/26/07 COMPANY CONFIDENTIAL - DO NOT Distribute
changes in content without notice.
© 2007 by Vertical Communications, Inc. All rights reserved.
This publication contains proprietary and confidential information of Vertical Communications, Inc. The contents of this document may not be disclosed, copied or translated by third parties, in any form, or by any means known, or not now known or
conceived, without prior explicit written permission from Vertical Communications,
Inc.
LIMIT OF LIABILITY/DISCLAIMER OF WARRANTY
Vertical Communications, Inc. makes no representation or warranties with respect to
the accuracy or completeness of the content of this publication and specifically disclaims any implied warranty of merchantability or fitness for any particular purpose,
and shall not be liable for any loss of profit or any other commercial damage, including
but not limited to, special, incidental, or consequential.
TRADEMARKS
Vertical Communications and the Vertical Communications logo and combinations
thereof are trademarks of Vertical Communications, Inc. All other brand and product
names are used for identification only and are the property of their respective holders.
RESTRICTED RIGHTS LEGEND
Use, duplication, or disclosure of the technical data contained in this document by the
Government is subject to restrictions as set forth in subdivision (c) (1) (ii) of the Rights
in Technical Data and Computer Software clause at DFARS 52.227-7013 and/or in
similar or successor clauses in the FAR, or in the DOD or NASA FAR Supplement.
Unpublished rights reserved under the Copyright Laws of the United States. Contractor/manufacturer is Vertical Communications, Inc., 10 Canal Park, Suite 602, Cambridge, MA 02141-2249.
Page 3

Issue Release Date Changes Page
For Review Only - Draft Document 11/26/07 COMPANY CONFIDENTIAL - DO NOT Distribute
1.0 xx-xx Initial Release
Note that this document may contain information on ISDN, DCOB, and SMS. These
features are currently not supported.
Information pertaining to DID pertains only
to SIP Trunking.
--
Page 4

For Review Only - Draft Document 11/26/07 COMPANY CONFIDENTIAL - DO NOT Distribute
Page 5

Contents
For Review Only - Draft Document 11/26/07 COMPANY CONFIDENTIAL - DO NOT Distribute
Chapter 1 7224D Digital Phone Procedures
Getting Started - - - - - - - - - - - - - - - - - - - - - - - - - - - - - - - - - - - 1-1
7224D Input/Output Devices and Buttons - - - - - - - - - - - - - - - - 1-2
Cable Connections - - - - - - - - - - - - - - - - - - - - - - - - - - - - - 1-4
Placing or Answering Calls - - - - - - - - - - - - - - - - - - - - - - - - - - 1-5
Placing a Call - - - - - - - - - - - - - - - - - - - - - - - - - - - - - - - - - 1-5
Answering a Call - - - - - - - - - - - - - - - - - - - - - - - - - - - - - - - 1-5
Station User Programming - - - - - - - - - - - - - - - - - - - - - - - - - - 1-6
Soft Buttons and Navigation Button - - - - - - - - - - - - - - - - - - - - 1-9
Soft Buttons - - - - - - - - - - - - - - - - - - - - - - - - - - - - - - - - - - 1-9
Navigation Button - - - - - - - - - - - - - - - - - - - - - - - - - - - - - - 1-9
Basic Functions - - - - - - - - - - - - - - - - - - - - - - - - - - - - - - - - - 1-10
Barge-In Monitor - - - - - - - - - - - - - - - - - - - - - - - - - - - - - - 1-10
Call Back - - - - - - - - - - - - - - - - - - - - - - - - - - - - - - - - - - - 1-11
Call Forward - - - - - - - - - - - - - - - - - - - - - - - - - - - - - - - - - 1-11
Camp on - - - - - - - - - - - - - - - - - - - - - - - - - - - - - - - - - - - 1-12
Checking voice mail messages - - - - - - - - - - - - - - - - - - - 1-13
CO Dialing - - - - - - - - - - - - - - - - - - - - - - - - - - - - - - - - - - 1-13
CO Line Busy - - - - - - - - - - - - - - - - - - - - - - - - - - - - - - - - 1-14
CO Talk - - - - - - - - - - - - - - - - - - - - - - - - - - - - - - - - - - - - 1-15
Flexible Button Programming - - - - - - - - - - - - - - - - - - - - - 1-16
Idle - - - - - - - - - - - - - - - - - - - - - - - - - - - - - - - - - - - - - - - 1-17
Intercom Busy - - - - - - - - - - - - - - - - - - - - - - - - - - - - - - - 1-19
Intercom Dialing - - - - - - - - - - - - - - - - - - - - - - - - - - - - - - 1-19
Intercom Dialing Error - - - - - - - - - - - - - - - - - - - - - - - - - - 1-20
Intercom Do Not Disturb - - - - - - - - - - - - - - - - - - - - - - - - 1-20
Intercom Ring Back - - - - - - - - - - - - - - - - - - - - - - - - - - - - 1-20
Intercom Receiving - - - - - - - - - - - - - - - - - - - - - - - - - - - - 1-20
Intercom Talk - - - - - - - - - - - - - - - - - - - - - - - - - - - - - - - - 1-21
Name Display On My Phone - - - - - - - - - - - - - - - - - - - - - 1-21
Off Hook - - - - - - - - - - - - - - - - - - - - - - - - - - - - - - - - - - - 1-21
Paging - - - - - - - - - - - - - - - - - - - - - - - - - - - - - - - - - - - - - 1-21
i
Page 6

Contents
For Review Only - Draft Document 11/26/07 COMPANY CONFIDENTIAL - DO NOT Distribute
Park a call and Retrieve a Parked call - - - - - - - - - - - - - - - 1-22
Two way Recording - - - - - - - - - - - - - - - - - - - - - - - - - - - - 1-22
Use my voice mail (VMIU card required) - - - - - - - - - - - - - - 1-22
Voice Over - - - - - - - - - - - - - - - - - - - - - - - - - - - - - - - - - - 1-24
Call Log - - - - - - - - - - - - - - - - - - - - - - - - - - - - - - - - - - - - - - - 1-24
Received Call - - - - - - - - - - - - - - - - - - - - - - - - - - - - - - - - 1-25
Dialed Call - - - - - - - - - - - - - - - - - - - - - - - - - - - - - - - - - - - 1-26
Lost Call - - - - - - - - - - - - - - - - - - - - - - - - - - - - - - - - - - - - 1-27
Menu - - - - - - - - - - - - - - - - - - - - - - - - - - - - - - - - - - - - - - - - - 1-30
BASIC PROGRAM (Menu 1) - - - - - - - - - - - - - - - - - - - - - - 1-31
ADVANCED PROGRAM (Menu 2) - - - - - - - - - - - - - - - - - - 1-38
SPEED PROGRAM (Menu 3) - - - - - - - - - - - - - - - - - - - - - 1-47
CONFERENCE ROOM PROGRAM (Menu 4) - - - - - - - - - - 1-48
HOT DESK PROGRAM (Menu 5) - - - - - - - - - - - - - - - - - - 1-50
Phone Book - - - - - - - - - - - - - - - - - - - - - - - - - - - - - - - - - - - - 1-52
DIAL BY ICM NAME (Nav Button Down + 1) - - - - - - - - - - - 1-52
DIAL BY STA SPD NAME (Nav Button Down Twice + 2) - - 1-53
DIAL BY SYS SPD NAME (Nav Button Down Three Times + 3)
1-54
Attendant Functions - - - - - - - - - - - - - - - - - - - - - - - - - - - - - - - 1-55
Attendant Intrusion - - - - - - - - - - - - - - - - - - - - - - - - - - - - - 1-55
Attendant Station Programming - - - - - - - - - - - - - - - - - - - - 1-56
Overriding an extension in DND mode - - - - - - - - - - - - - - - 1-57
Setting day/night/weekend mode - - - - - - - - - - - - - - - - - - - 1-58
Storing system speed dial numbers - - - - - - - - - - - - - - - - - 1-58
Entering Characters - - - - - - - - - - - - - - - - - - - - - - - - - - - - - - - 1-59
Glossary - - - - - - - - - - - - - - - - - - - - - - - - - - - - - - - - - - - - - - - 1-60
Chapter 2 7208D Digital Phone Procedures
7208D Input/Output Devices and Buttons - - - - - - - - - - - - - - - - - 2-1
Cable Connections - - - - - - - - - - - - - - - - - - - - - - - - - - - - - - - - 2-3
Basic Functions - - - - - - - - - - - - - - - - - - - - - - - - - - - - - - - - - - - 2-4
Calls - - - - - - - - - - - - - - - - - - - - - - - - - - - - - - - - - - - - - - - - 2-4
Flexible Button Programming - - - - - - - - - - - - - - - - - - - - - - 2-5
ii
Page 7

Station Speed Dial Numbers - Storing - - - - - - - - - - - - - - - - 2-5
For Review Only - Draft Document 11/26/07 COMPANY CONFIDENTIAL - DO NOT Distribute
Station Speed Dial Numbers - Using - - - - - - - - - - - - - - - - - 2-5
Chapter 3 SLT Procedures
Basic Functions - - - - - - - - - - - - - - - - - - - - - - - - - - - - - - - - - - 3-1
Account Code Entry - - - - - - - - - - - - - - - - - - - - - - - - - - - - 3-1
Authorization Code Programming - - - - - - - - - - - - - - - - - - - 3-1
Calls - - - - - - - - - - - - - - - - - - - - - - - - - - - - - - - - - - - - - - - 3-1
Conference - - - - - - - - - - - - - - - - - - - - - - - - - - - - - - - - - - 3-5
Do Not Disturb (DND) - - - - - - - - - - - - - - - - - - - - - - - - - - - 3-5
Handset Off-hook Alarm - - - - - - - - - - - - - - - - - - - - - - - - - 3-5
Message Waiting - - - - - - - - - - - - - - - - - - - - - - - - - - - - - - 3-6
Paging - - - - - - - - - - - - - - - - - - - - - - - - - - - - - - - - - - - - - - 3-6
Paging - Meet Me - - - - - - - - - - - - - - - - - - - - - - - - - - - - - - 3-6
Pre-selected Messages - - - - - - - - - - - - - - - - - - - - - - - - - - 3-7
Programming Your Name - - - - - - - - - - - - - - - - - - - - - - - - 3-8
Queuing - - - - - - - - - - - - - - - - - - - - - - - - - - - - - - - - - - - - - 3-8
Returning Call to Host System - - - - - - - - - - - - - - - - - - - - - 3-8
Shuttle Call - - - - - - - - - - - - - - - - - - - - - - - - - - - - - - - - - - - 3-9
Station Speed Dial Numbers - Storing - - - - - - - - - - - - - - - - 3-9
Station Speed Dial Numbers - Using - - - - - - - - - - - - - - - - - 3-9
Universal Night Answer - - - - - - - - - - - - - - - - - - - - - - - - - - 3-9
Voice Announcements - - - - - - - - - - - - - - - - - - - - - - - - - - 3-10
Voice Mail Messages - - - - - - - - - - - - - - - - - - - - - - - - - - 3-12
Contents
Index
iii
Page 8

Contents
For Review Only - Draft Document 11/26/07 COMPANY CONFIDENTIAL - DO NOT Distribute
iv
Page 9

Chapter 1
For Review Only - Draft Document 11/26/07 COMPANY CONFIDENTIAL - DO NOT Distribute
7224D Digital Phone Procedures
Getting Started
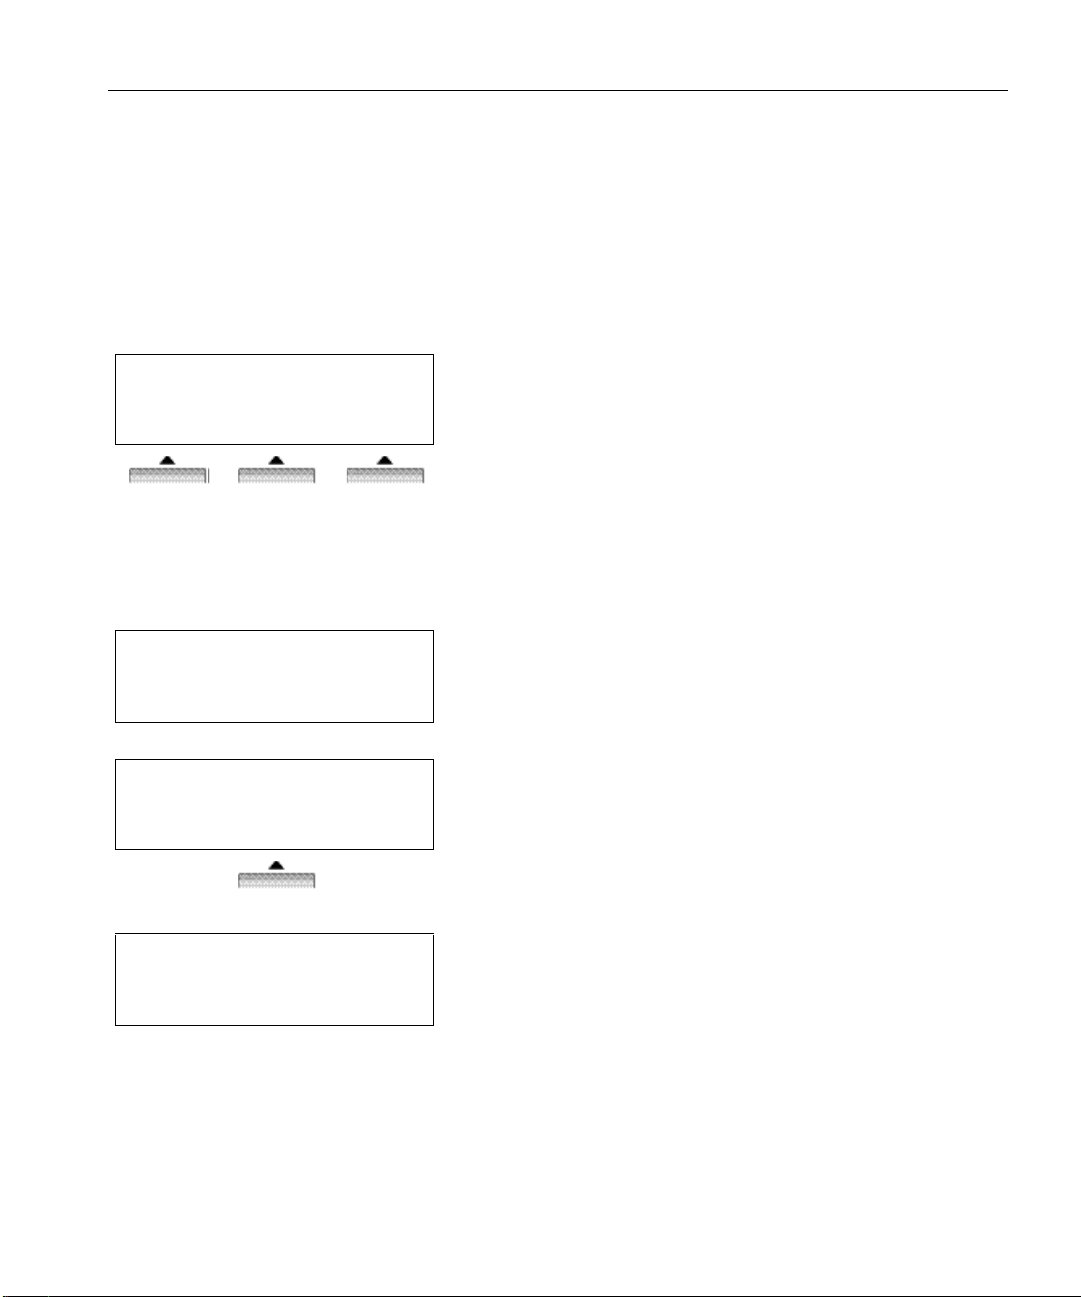
The 7224D is an advanced, user-friendly, digital keyset, offering the convenience of
3 soft buttons and a navigation key.
Features
• Multi Level 3 Line LCD (3 x 24)
• 24 Flexible buttons with dual-color LEDs
• Call Log Feature
• Wall Mountable (Bracket Optional)
Note: For use of the 7208D 8-button digital keyset, refer to Chapter 2.
1-1
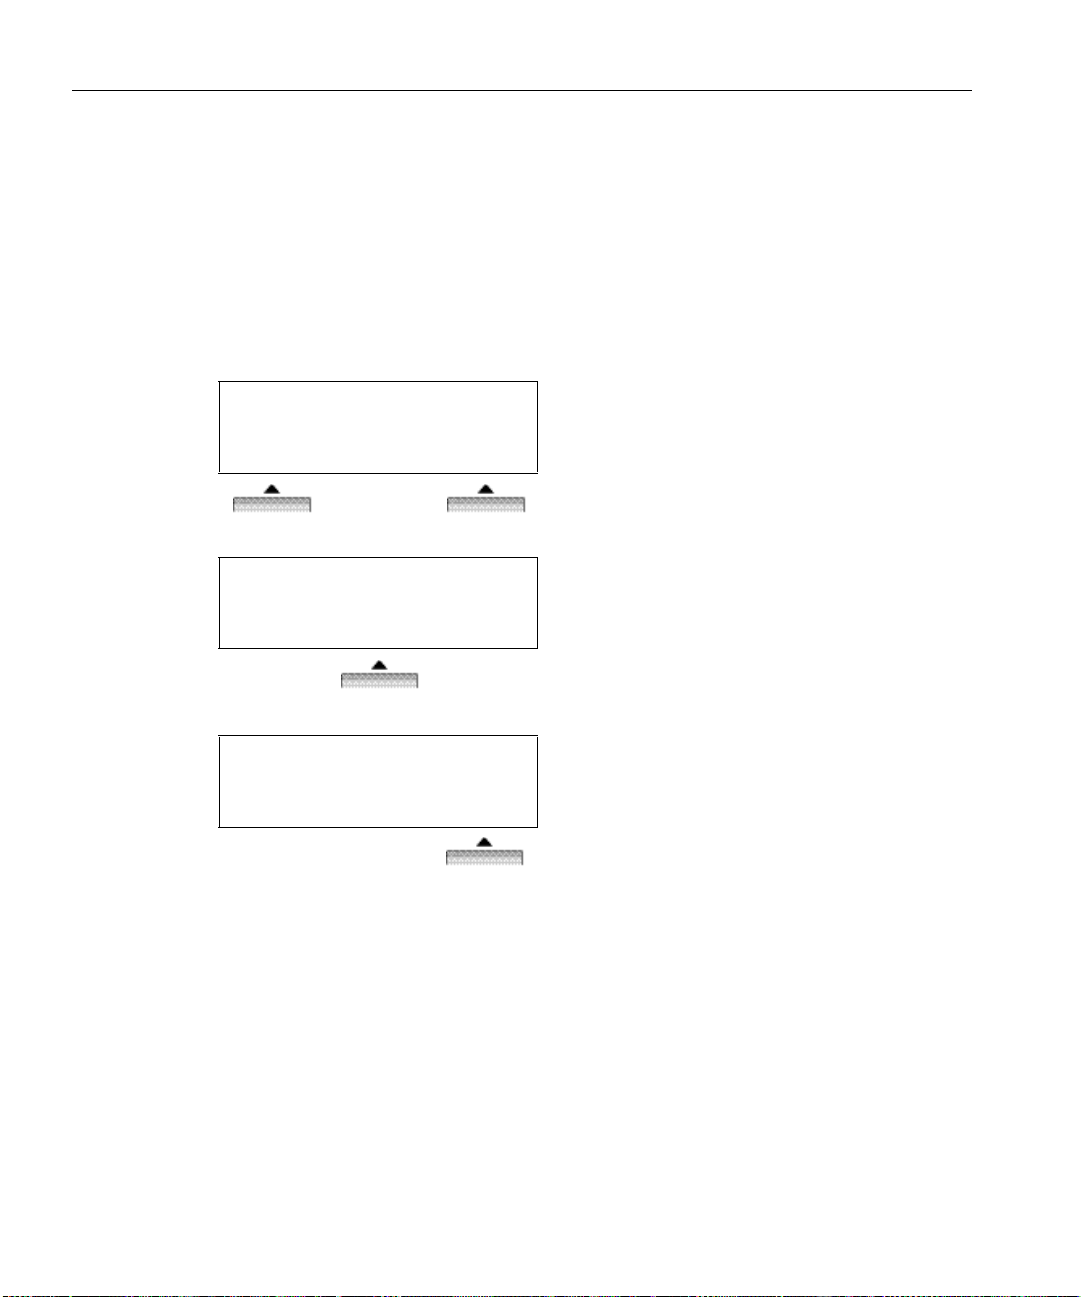
Page 10
SBX IP 320 User Guide
For Review Only - Draft Document 11/26/07 COMPANY CONFIDENTIAL - DO NOT Distribute
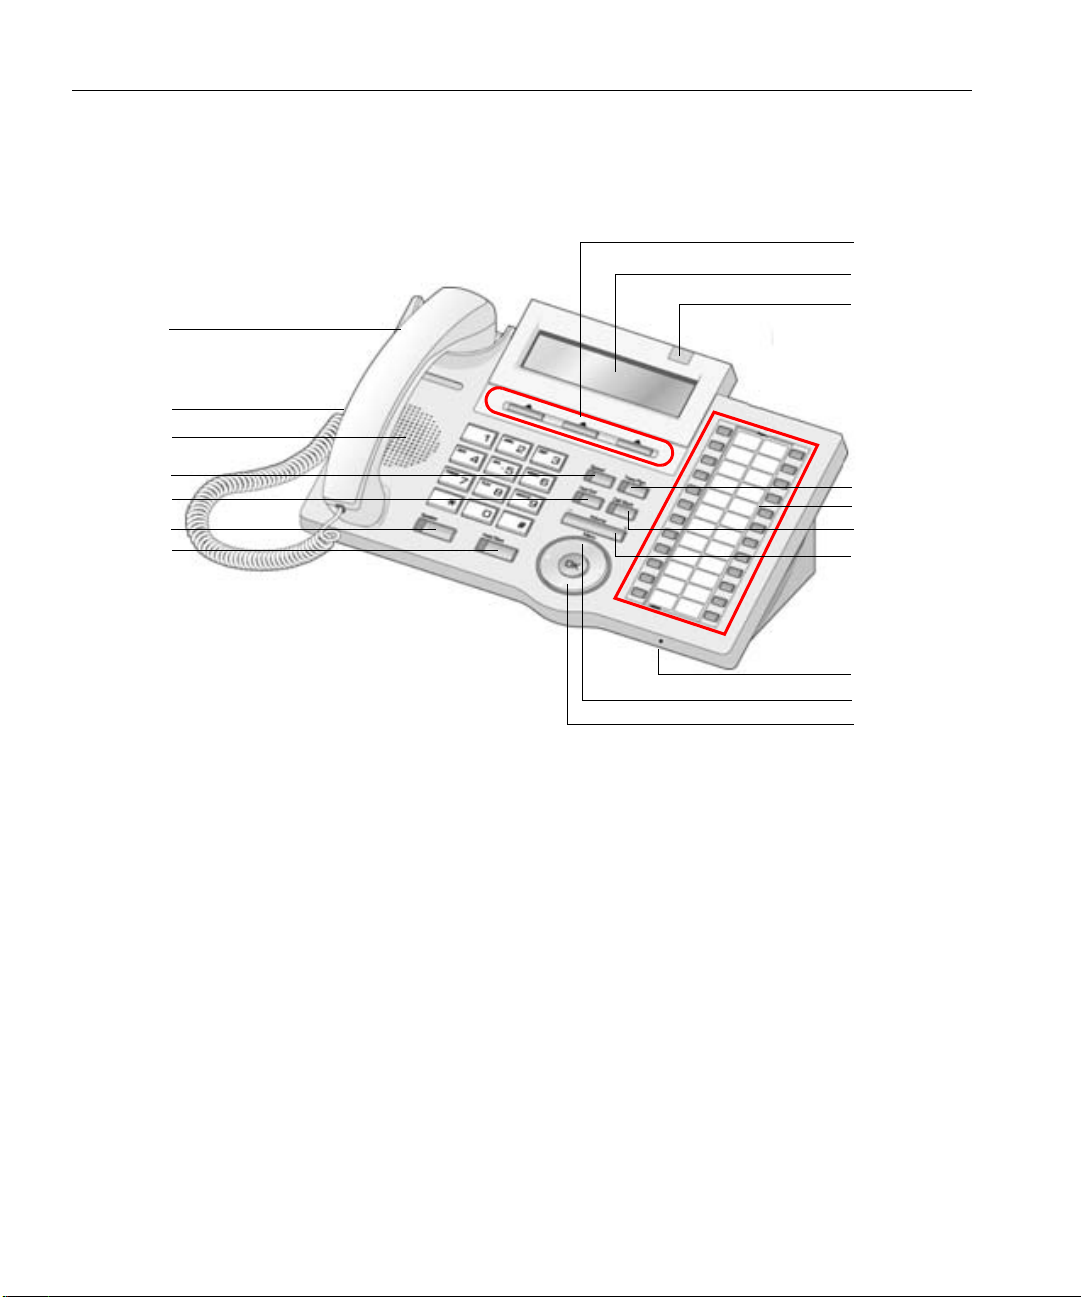
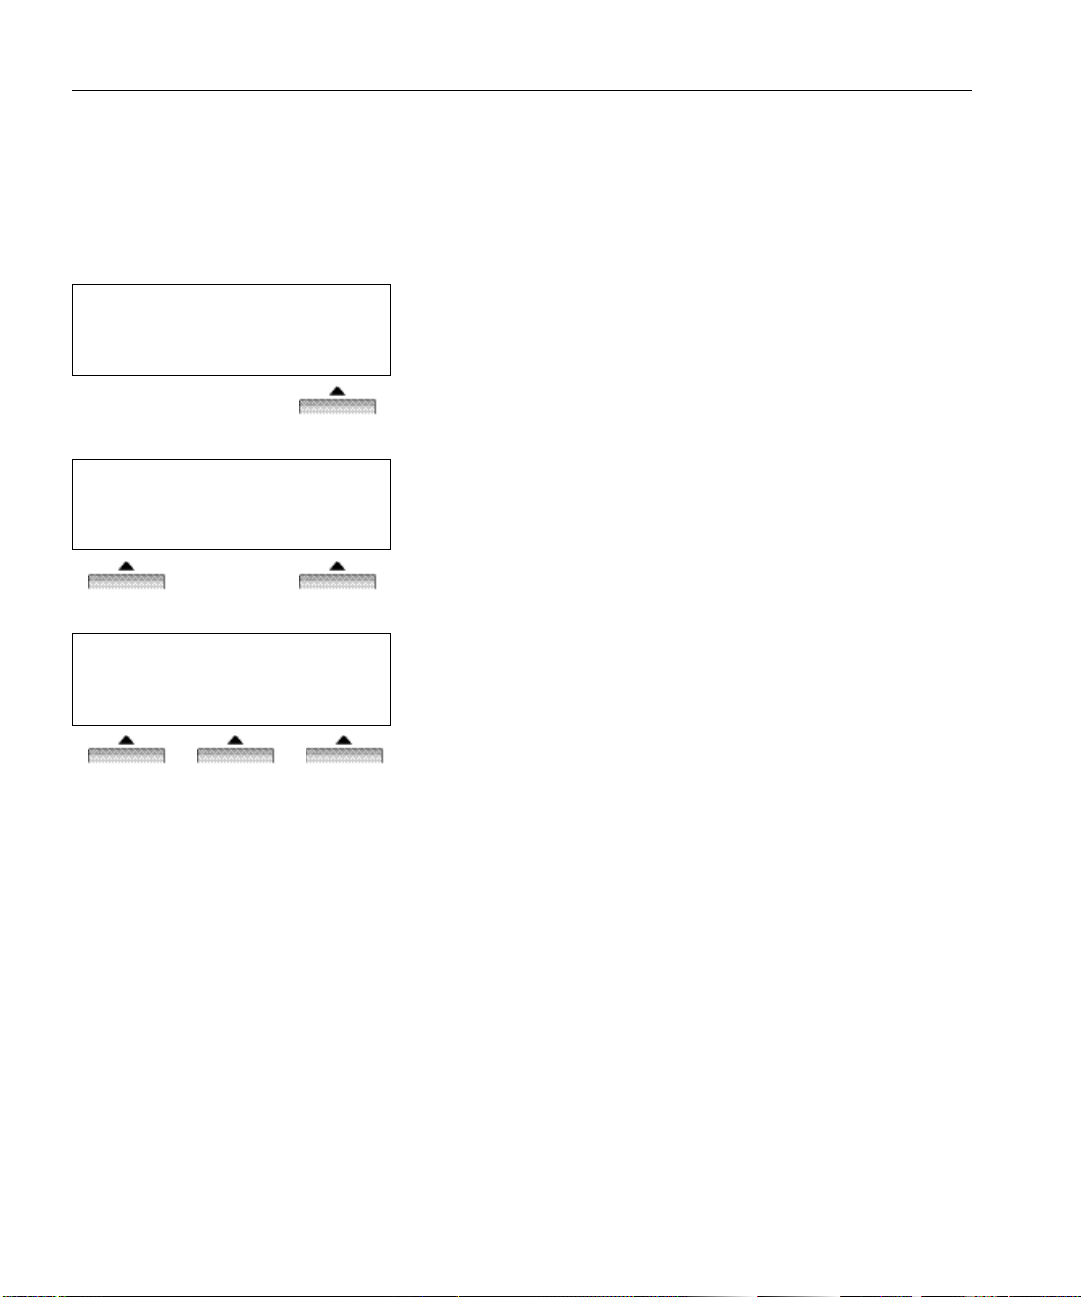
7224D Input/Output Devices and Buttons
1
2
3
4
5
6
7
8
9
10
11
12
13
14
1-2
15
16
17
Page 11

SBX IP 320 User Guide
For Review Only - Draft Document 11/26/07 COMPANY CONFIDENTIAL - DO NOT Distribute
SBX IP 320 24-Button Keyset - Basic Features (4024-00)
1 Handset Used for handset call.
2 Headphone Jack This allows connection of a 2.5mm headset.
3 Speaker Device used to listen to a caller in a handsfree mode when in
speaker mode.
4 Speed Used to access speed dialing, save number redial, and last
number redial. Button is also used to access flexible button
programming.
5 DND The Do Not Disturb feature lets you activate a “do not ring this
phone” mode. When DND is active, this button is red.
6 Speaker Button Speaker toggles speakerphone state between speaker mode and
handset mode. The button is red when speakerphone is active.
7 Hold/Save This button puts a call on hold or saves the PGM.
8 3 Soft Buttons Used to work in conjunction with fixed and flexible features.
9 LCD Display Displays phone status information, dialing directories, and test
message information.
10 Ring LED Illuminates when the phone is ringing.
11 Trans/PGM This button is used to set up a conference call or transfer a call.
12 Flexible 24 Flexible buttons are available for CO line, DSS/BLF, or feature
code assignment.
13 Call back A station can initiate a call back request to another busy station.
Once that station becomes idle, the station that left the call back
request is signaled.
14 Volume The volume button adjusts the audio level.
15 MIC Microphone used to speak to a caller in a handsfree mode when in
speaker mode.
16 Menu (Ç key) Use the menu button to move to the desired option (Dial, MSG,
Program) and use for arrows key.
17 Phone Book (È
key)
Use this button to save a phone number and to make calls with
saved information.
1-3
Page 12

SBX IP 320 User Guide
For Review Only - Draft Document 11/26/07 COMPANY CONFIDENTIAL - DO NOT Distribute
Cable Connections
A - Connect the telephone cord (curly cord) to the handset and the other end to the
handset jack at the bottom of the telephone.
B - Connect the line cable to the port at the bottom of telephone and the other end to the
wall socket.
C - Connect the Headphone to the headphone jack on the left side of the telephone.
(As viewed from the front.)
1-4
Page 13

Placing or Answering Calls
For Review Only - Draft Document 11/26/07 COMPANY CONFIDENTIAL - DO NOT Distribute
Placing a Call
Intercom
1. Lift the handset or press [SPEAKER].
2. Enter the station number.
3. Talk.
-or-
1. Dial the station number or press a preprogrammed DSS button.
2. Talk.
CO Line
1. Lift the handset or press [SPEAKER].
2. Dial [9] or press CO line flexible button.
SBX IP 320 User Guide
3. Enter desired phone number.
Answering a Call
Intercom
1. Lift the handset or press [SPEAKER].
2. Talk.
CO Line
1. Lift the handset or press [SPEAKER].
2. Press the flashing CO line flexible button or Loop key.*
3. Talk.
* = If PLA is enabled (default), you only need to lift the handset or press the Speaker button.
1-5
Page 14

SBX IP 320 User Guide
For Review Only - Draft Document 11/26/07 COMPANY CONFIDENTIAL - DO NOT Distribute
Station User Programming
A Station User Program Menu Display is provided on the keyset LCD to assist you in
programming the User Program Code features and functions.
• After pressing the [Trans/Pgm] button, items are available by dialing the Program Code
directly or by either using the [VOL
scroll through the keyset menu items.
• Dial pad keys are used to enter selected options.
Press the [Trans/Pgm] to enter the Station User Program Menu. The various levels of the display
menu are indicated by indentation.
[1] Ring
[1] Station Ring Type - dial (1-4)
[2] Answer Mode - dial (1-3); HTP
[3] SMS Msg Display
[4] Enblock Mode - dial 1, ON; dial 0, OFF
[5] SMS / Notice Display - (Invalid)
[6] Scroll Speed - (Invalid)
[7] Ear-Mic Headset - dial 1, ON; dial 0, OFF
ST] buttons or the up/down navigation buttons to
[8] ICM Bell - dial (01-15)
[9] CO Bell - dial (01-15)
[#] PTT Group - (Invalid)
[2] COS
[1] COS Down
[2] COS Restore
[3] Walking COS - enter COS override code
[4] COS Change - (Invalid)
[5] SMS Inbox (000/000) - (Invalid)
[6] Del All SMS Msgs - (Invalid)
1-6
Page 15

[3] Auth / Mobile-Ext
For Review Only - Draft Document 11/26/07 COMPANY CONFIDENTIAL - DO NOT Distribute
[1] Auth Register - (Invalid)
[2] Auth Change - enter current password
[3] Reg Mobile-Ext - (Access Denied)
[4] Active Mobile-Ext - (Access Denied)
[5] Reg Mobile-Ext CLI - (Access Denied)
[6] Active Mobile Hunt - (Access Denied)
[7] MW to Mobile-Ext - dial 1, ON; dial 0, OFF
[4] Time / Conf-Room
[1] Set Wake Up Time - dial HH:MM
[2] Wake Up Disable - dial HH:MM
[3] Active Conf-Room - dial 1-9 and password
[4] Deactive Conf-Room - dial 1-9 and password
[5] Call Cover Attr
[1] Call Coverage Mode - dial 1, ON; dial 0, OFF
SBX IP 320 User Guide
[2] Delay Ring Cycle - dial 0-9
[5] Message
[1] Set Preselected Msg - enter Msg number
[2] Set Custom Msg - enter Msg 00 (refer to “Entering Characters” on page 1-59)
[6] Announcement
[1] Rec User Greeting
[2] Listen Time / Date
[3] Listen Station Number
[4] Listen Station Status
[5] Record Page Msg
[6] Erase User Greeting
[7] Erase Page Msg
[8] Outbound Notify - dial 1, ON; dial 0, OFF
[9] Outbound Number - dial outbound telephone number
1-7
Page 16

SBX IP 320 User Guide
For Review Only - Draft Document 11/26/07 COMPANY CONFIDENTIAL - DO NOT Distribute
[7] Supplementary
[*] System
[1] LCD Display Language
[2] MPB Version Display
[3] BGM - dial 00-08
[4] Register Sta Name - enter name (refer to “Entering Characters” on page 1-59)
[5] Spk / Headset - dial 1, SPK; dial 0, Headset
[6] Headset Ring Mode - dial 1, S; dial 2, H; dial 3, both
[8] Serial Number
[9] PC - Phone Lock Key
[#] Enter Admin
[1] Relocation Out
[0] Hotdesk Login
[*] Hotdesk Logout
1-8
Page 17
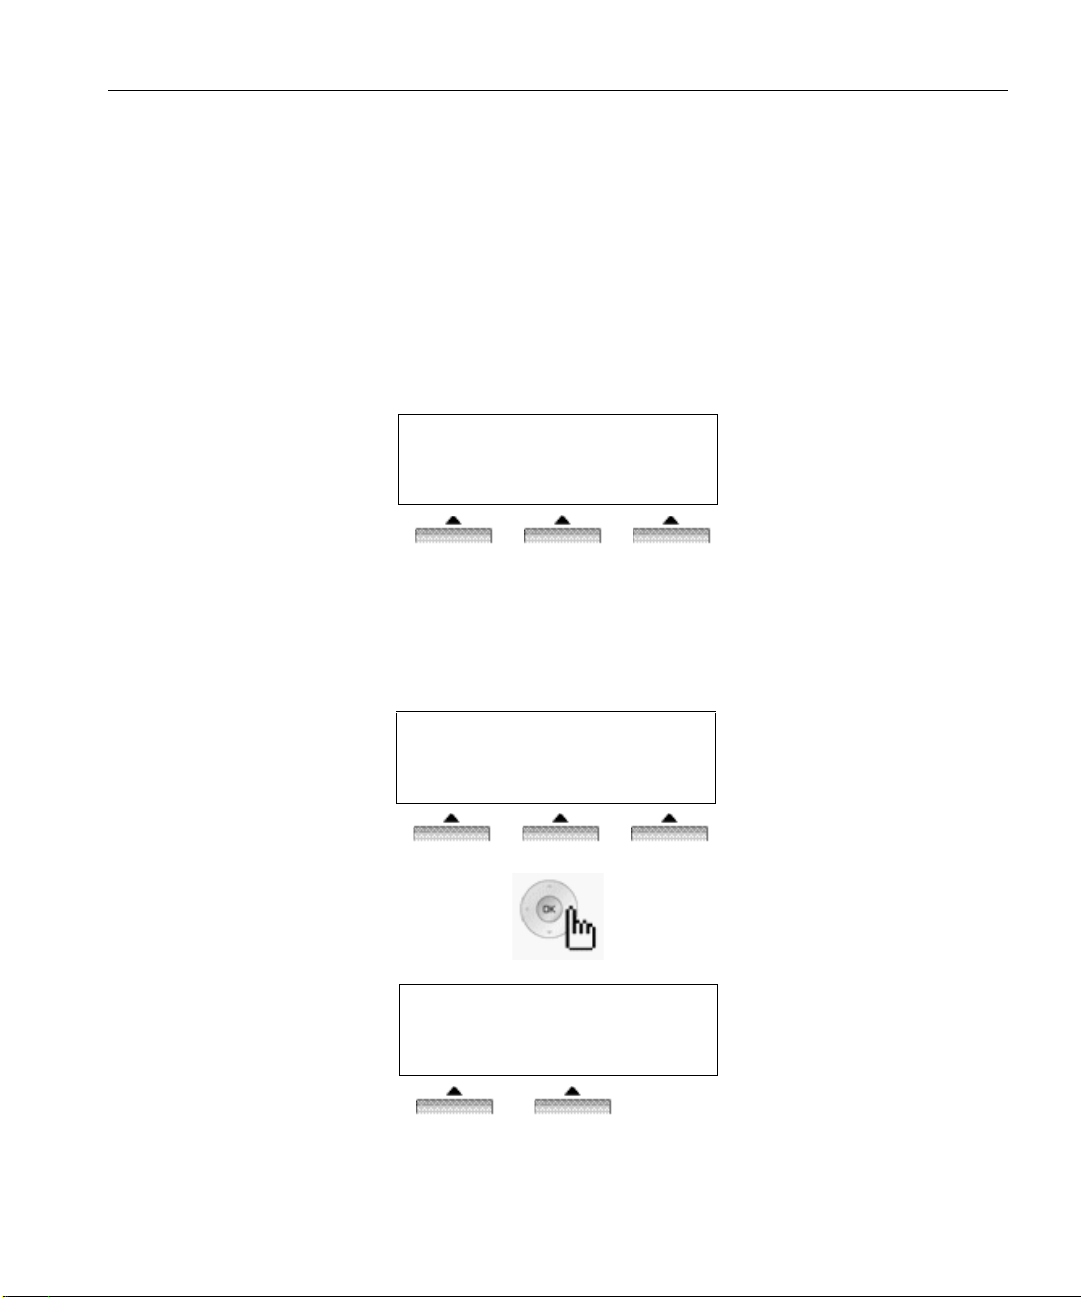
Soft Buttons and Navigation Button
For Review Only - Draft Document 11/26/07 COMPANY CONFIDENTIAL - DO NOT Distribute
Soft Buttons
The 3 Soft Buttons are located on the bottom of the LCD display . The function of each button
changes, subject to call status and progress. The current functions are displayed on the LCD
screen, directly above each button. For example, if the user calls a busy extension, busy tone
will be heard and the busy status displayed. The LCD screen will display the busy message
along with the different options available - “Message Wait”, “Camp-On” and “Flash”. By
pressing the relevant button the desired feature is activated.
[CALLBK] CAMP(*) OHVO(#)
MSG CAMP-ON FLASH
Navigation Button
In some instances, more than 3 current functions are available to the user, and this is indicated
by the appearance of a left (
the navigation key (located below the volume button), in the direction corresponding to the
arrow, any additional functions will be displayed.
←) or right (→) arrow in the LCD screen, (see below). By pressing
SBX IP 320 User Guide
BUSY : STA 100
STATION 100 (T)
APR 01 XX 05:34 pm
FWD CONF REDIAL--> Forward to more options
STATION 100 (T)
APR 01 XX 05:34 pm
Back to previous options
<--ICM FLASH
1-9
Page 18
SBX IP 320 User Guide
For Review Only - Draft Document 11/26/07 COMPANY CONFIDENTIAL - DO NOT Distribute
Basic Functions
Barge-In Monitor
Barge-in permits an authorized extension to intrude into other existing outside/internal calls.
Between intruding extension and parties on initial calls, a conference call is established. (refer
to the Programming Guide for detail).
BUSY : STA 101
[CALLBK] CAMP (*) STEP
MSG CAMP-ON FLASH-->
BUSY : STA 101
[CALLBK] CAMP (* STEP
<--MONITOR
MONITOR STA 101
JOIN DROP
MSG : Press to leave your station number or message.
CAMP-ON : Press to send a call waiting tone to a busy station
(indicating that they have a call waiting).
FLASH : Press to disconnect the line and re-seize.
MONITOR : Press to listen to existing conversation
(Barge-In Feature)
JOIN : Press to join the conversation during
monitor
DROP : Press to drop the conversation
1-10
Page 19
Call Back
For Review Only - Draft Document 11/26/07 COMPANY CONFIDENTIAL - DO NOT Distribute
When a called station is busy , call back can be requested.
SBX IP 320 User Guide
BUSY : STA 105
[CALLBK] CAMP (*) STEP
MSG CAMP-ON FLASH-->
Call Forward
ENTER FORWARD TYPE
( 0 - 9 , # )
Follow-me Forward
FOLLOW-ME FORWARD
ENTER STATION NO.
Unconditional, Busy, No Answer, Busy/No Answer Forward
UNCONDITIONAL FORWARD
ENTER STA/HUNT/#(VMIB)
MSG : Press to request call back.
CAMP-ON : Press to send a call waiting tone to a busy station.
FLASH : Press to disconnect the call and re-seize.
Press [ SPEAKER ] button.
Press [ DND/FWD ] button.
Dial 0.
Enter follow-me station number.
Enter forward type.
1: Unconditional 2: Busy
3: No answer 4: Busy/No answer
Enter forward destination (STA/HUNT/VMIB).
STA: station number, 100-132.
HUNT: Hunt group, 620-629.
VMIB: # ( Forward to VMIU)
1-11
Page 20
SBX IP 320 User Guide
For Review Only - Draft Document 11/26/07 COMPANY CONFIDENTIAL - DO NOT Distribute
Unconditional, No Answer Off-net Forward with speed bin
FORWARD TO OFF-_NET
ENTER CO BTN/SPD-BIN
Unconditional, No Answer Off-net Forward telephone number
FORWARD TO OFF-_NET
ENTER CO BTN/SPD-BIN
Camp on
BUSY : STA 105
[CALLBK] CAMP(*) STEP
MSG CAMP-ON FLASH ->
Enter off-net forward type.
5: Unconditional 6: No answer
Press desired CO button for off-net( This can be skipped.)
Enter speed bin number.
(station speed bin :000-099, system speed bin:2000-2499)
Enter off-net forward type.
8: Unconditional 9: No answer
Press desired CO button for off-net( This can be skipped.)
Enter telephone number.
When a called station is in a busy state, a camp-on can be requested.
1-12
Page 21
Checking voice mail messages
For Review Only - Draft Document 11/26/07 COMPANY CONFIDENTIAL - DO NOT Distribute
SBX IP 320 User Guide
VMIB MSG FROM EXTERNAL
NEXT REPEAT DELETE-->
VMIB MSG FROM EXTERNAL
<--ADD REWIND CALLBK
CO Dialing
CO access codes "9" or "88XX" can be changed by PGM 107 depending on the user’s needs.
NEXT : Press to move to the next message.
REPEAT : Press to repeat the current message.
DELETE : Press to erase the current message.
Note: Voice mail message can be transferred to desired
station by dialing station number while the message is
playing.
ADD : Press to tag the current message with your comment
before forwarding.
REWIND : Press to repeat part of current message.
CALLBK : Press to request a call back to the caller who leaved
message.
Manual Dialing
STATION 100 (T)
LINE 08 00:00:03
TRANS CONF MUTE-->
Press programmed flexible button for CO.
(CO can be accessed by dialing CO access code 9 or individual
CO access code 88XX. XX : CO line number, 01-12)
Dial telephone number.
1-13
Page 22

SBX IP 320 User Guide
For Review Only - Draft Document 11/26/07 COMPANY CONFIDENTIAL - DO NOT Distribute
Speed Dialing
SPD_NO LAST(*) SAVE(#)
DIAL_BY_NAME([SPEED])
SPEED
SPD_NO LAST(*) SAVE(#)
DIAL_BY_NAME([SPEED])
SPEED
1. DIAL BY ICM NAME
2. DIAL BY STA SPD NAME
OK
CO Line Busy
CO LINE 001 BUSY
QUEUEING ([CALLBK])
CALLBK
Press [SPEED] button.
Dial speed bin number.
(Station speed bin:000-099, System speed bin :2000-2499)
Press SPEED to search speed dial by name.
Press OK to enter DIAL BY STA / SYS SPD NAME.
Refer to “Phone Book” on page 1-52.
CALLBK: If, after dialing ‘9’ for a CO line, busy tone indicates
no lines are available, press [CALLBK] to reserve a
CO line.
.
1-14
Page 23
CO Talk
For Review Only - Draft Document 11/26/07 COMPANY CONFIDENTIAL - DO NOT Distribute
SBX IP 320 User Guide
12345678
LINE 08 00:00:03
TRANS CONF MUTE-->
12345678
LINE 08 00:00:03
RECORD FLASH ACNR-->
TRANS : Press to transfer a call to another station.
CONF : Press to initiate a conference call.
MUTE : Press to mute the handset, speakerphone, or headset
microphone. Press the [SPEAKER] button to re- activate
the microphone.
RECORD : Press to record the current conversation. (if outfitted)
FLASH : Press to disconnect the line and re-seize.
ACNR : Press to set automatic called number redial.
1-15
Page 24

SBX IP 320 User Guide
For Review Only - Draft Document 11/26/07 COMPANY CONFIDENTIAL - DO NOT Distribute
Flexible Button Programming
1. Press the [TRANS/PGM] button.
2. Press the flexible button to be programmed.
3. Enter the desired feature code from the following table.
4. Press the [HOLD/SAVE] button to save.
The following Numbering Plan code can be changed in PGM 104-107, 109 depending on the
user’s needs.
Numbering plan is applicable to both 8- and 24-button models, except as noted
Account Code TRANS/PGM + 80 Record Page MSG TRANS/PGM + 65
Alarm Reset 565 Record User Greeting TRANS/PGM + 61
Auth. Code Change TRANS/PGM + 32 Register Station Name TRANS/PGM + 74
Auth. Code Register TRANS/PGM + 31 Ring Answer Mode TRANS/PGM + 12
Background Music TRANS/PGM + 73 Ring Type TRANS/PGM + 11
Call Log TRANS/PGM + 57 Set Customer MSG TRANS/PGM + 52
Call Park 601-608 Set Pre-selected MSG TRANS/PGM + 51
Camp-on TRANS/PGM + 85 Set Wake-up Time TRANS/PGM + 41
COS Down TRANS/PGM + 21 Speakerphone/Headset TRANS/PGM + 75
COS Restore TRANS/PGM + 22 Speed Dial
Direct Station Select 100-132 Station speed dial SPEED + 000-099
Erase Page MSG TRANS/PGM + 67 System speed dial SPEED + 2000-2449
Erase User Greeting TRANS/PGM + 66 Two way recording TRANS/PGM + 54
Group Call Pick-up TRANS/PGM + 71 Universal Night Answer 569
Headset Ring Mode TRANS/PGM + 76 Wake-up Disable TRANS/PGM + 42
Hunt Group 620-629 Walking COS TRANS/PGM + 23
ICM Hold TRANS/PGM + 83 Button Assignment unique to 7208D
LCD Display Language TRANS/PGM + 71 CALLBK button TRANS + 92
Listen Station Number TRANS/PGM + 63 CONF button TRANS + 91
Listen Station Status TRANS/PGM + 64 DND button TRANS + 93
Listen Time & Date TRANS/PGM + 62 FLASH button TRANS + 94
LOOP button TRANS/PGM + 84 MUTE button TRANS + 95
MPB Version Display TRANS/PGM + 72 SPEAKER button TRANS + 96
Outside Line Access REDIAL button TRANS + 97
Group 801-808 H-T-P TRANS/PGM + 12
Group access 9
Individual Line Access 8801-8812
1-16
Page 25
Idle
For Review Only - Draft Document 11/26/07 COMPANY CONFIDENTIAL - DO NOT Distribute
SBX IP 320 User Guide
Three Soft Buttons are located below the LCD display.
By pressing one of the 3 soft buttons you are able to select the indicated function. For instance,
if you want to select call pickup (as shown below), press the first button on the left. If there are
more than three functions available at any point, an arrow will be displayed on the LCD display.
Use the navigation key to move to the next or previous screen to display additional functions.
STATION 100 (T)
FEB 01 08 05:34 am
PICKUP CONF REDIAL-->
Conference
You can establish a Conference with up to 15 parties. The other parties in the Conference may
be internal or external.
CALL TO STA 100
FEB 01 08 05:34 am
MSG FLASH
CALL TO STA 100
FEB 01 08 05:34 am
TRANS CONF MUTE
PICKUP : press to pickup a call ringing within the same pickup
group.
CONF : press to initiate & activate a conference (displayed, but not
used at Idle)
REDIAL : press to redial last number called.
Dial the desired station number.
(e.g.100)
Station 100 answers the call.
Press the [CONF] button.
CONFERENCE
FEB 01 08 05:34 am
FWD CONF REDIAL-->
Dial the phone number of the next desired station (e.g.104).
1-17
Page 26
SBX IP 320 User Guide
For Review Only - Draft Document 11/26/07 COMPANY CONFIDENTIAL - DO NOT Distribute
CALL TO STA 104
FEB 01 08 05:34 am
MSG FLASH
CALL TO STA 104
FEB 01 08 05:34 am
TRANS CONF MUTE
CONFERENCE
FEB 01 08 05:34 am
CONF MUTE
Pickup
A station can pickup a call ringing to an unattended station within the same pickup group by
using the pickup procedure.
Note: Refer to the SBX IP 320 Programming Guide.
Station 104 answers the call.
Press the [CONF] button twice.
A 3-party conference is now established.
STATION 100 (T)
FEB 01 08 05:34 am
PICKUP CONF REDIAL
CALL TO STA 104
FROM 100 05:34 am
TRANS CONF MUTE-->
1-18
Press the [PICKUP] button.
Talk.
Page 27
SBX IP 320 User Guide
For Review Only - Draft Document 11/26/07 COMPANY CONFIDENTIAL - DO NOT Distribute
Redial
The last number dialed on an external call is automatically saved in the LAST Number& Redial
(LNR) buffer or Call Log buffer.
STATION 100 (T)
FEB 01 08 05:34 am
PICKUP CONF REDIAL
> 1234567
FEB 01 08 05:34 am
BACK DELETE OK
> 1234567
LINE 008 00:00:10
TRANS CONF MUTE-->
Intercom Busy
BUSY : STA 105
[CALLBK] CAMP(*) STEP
MSG CAMP-ON FLASH ->
Press the [REDIAL] button.
Press the [OK] button to call the number listed or press the Èdown
navigation key to view scroll through additional numbers dialed
recently.
Talk.
MSG : Press to leave your station number or message.
CAMP-ON : Press to send a call waiting tone to a busy station
(indicating that they have a call waiting).
FLASH : Press to disconnect the line and re-seize.
Intercom Dialing
STATION 100 (T)
FEB 01 08 05:34 am
PICKUP CONF REDIAL
Dial a Station number or press a programmed flexible button for a station number.
1-19
Page 28

SBX IP 320 User Guide
For Review Only - Draft Document 11/26/07 COMPANY CONFIDENTIAL - DO NOT Distribute
Intercom Dialing Error
INVALID
FEB 01 08 05:34 am
FLASH
Intercom Do Not Disturb
DO NOT DISTURB STA 100
CALLBK FLASH
Intercom Ring Back
CALL TO STA 100
FEB 01 08 05:34 am
MSG FLASH
FLASH: Press to disconnect the line and re-seize.
CALLBK : Press leave a call back request or message.
FLASH : Press to disconnect the line and re-seize.
MSG : Press to leave your station number or message.
FLASH : Press to disconnect the line and re-seize.
Intercom Receiving
CALL FROM STA 104
FEB 01 08 05:34 am
DND
1-20
DND : Press to block all incoming calls. (Do Not Disturb)
Page 29

Intercom Talk
For Review Only - Draft Document 11/26/07 COMPANY CONFIDENTIAL - DO NOT Distribute
SBX IP 320 User Guide
CALL FROM STA 104
FEB 01 08 05:34 am
TRANS CONF MUTE
Name Display On My Phone
A name can be displayed on your LCD instead of your station number.
1. Press the [TRANS/PGM] button.
2. Dial "74".
3. Enter your name (see Entering character table in page 55).
4. Press the [HOLD/SAVE] button.
Off Hook
STATION 100 (T)
FEB 01 08 05:34 am
FWD CONF REDIAL
TRANS : Press to transfer an incoming call to another station.
CONF : Press to initiate a conference call.
MUTE : Press to mute the handset, speakerphone, or headset
microphone. Press the [SPEAK] button to re- activate
microphone.
FWD : Press the [FWD] button to forward calls to another
station, Voicemail, etc.
CONF : Press the [CONF] button to initiate a conference call.
REDIAL : Press the [REDIAL] button to call the last number dialed.
Paging
You may receive announcements from other stations and/or external speakers. Stations are
assigned to one or more of the Internal Page Zones. The system has one External Page Zone that
can be connected to external speakers.
PAGE FROM STA 103
FEB 01 08 05:34 am
MEET ME
MEET ME : Press to answer a paging request.
1-21
Page 30
SBX IP 320 User Guide
For Review Only - Draft Document 11/26/07 COMPANY CONFIDENTIAL - DO NOT Distribute
Park a call and Retrieve a Parked call
A call can be parked in a parking location and the call can be retrieved by dialing the location
number (The call can also be picked up by another extension.).
To park a call:
To retrieve a parked call at any station:
Two way Recording
Press [TRANS/PGM] and dial the Park Location(601-608).
Dial the Park Location (601-608).
1234567
LINE 008 00:00:10
--RECORD FLASH ACNR
Press RECORD or press a programmed Two way record button to
record a CO conversation on the VMIU.
If the Phone has a Two way record button, the LED flashes
while recording.
Two way record button:
[TRANS/PGM] + Flexible button + [TRANS/PGM] + 54
Use my voice mail (VMIU card required)
When a VMIB is installed, the voice mail service can be used.
To record a personal greeting:
1. Press the [TRANS/PGM] button and dial "61".
2. Press # to start recording.
To forward my phone to voice mail:
1. Press the [SPEAKER] button
2. Press the [DND/FWD] button
3. Dial the type of forwarding you want:
1 = Unconditional 3 = No Answer
2 = Busy 4 = Busy and/or No Answer
4. Dial "#" (confirmation tone will be heard if forwarding has been set).
1-22
Page 31
SBX IP 320 User Guide
For Review Only - Draft Document 11/26/07 COMPANY CONFIDENTIAL - DO NOT Distribute
To retrieve messages:
When a voice message is left on the station, the phone LCD will display as shown below.
MSG: VMIB(2)
PICKUP CONF REDIAL
MSG FROM: STA 100
NEXT REPEAT DELETE-->
MSG FROM: STA 100
<--ADD REWIND CALLBK
Press the [CALL BACK] button.
NEXT : Play next message REPEAT : Repeat playing current mes-
sage.
DELETE : Delete current message.
ADD : Add a message to the message which is being played.
REWIND : Rewind part of a message.
CALL BK : Call back request to the caller who left a message.
1-23
Page 32

SBX IP 320 User Guide
For Review Only - Draft Document 11/26/07 COMPANY CONFIDENTIAL - DO NOT Distribute
Voice Over
CAMP-ON BY STA 105
05 FE B 08 09:51
TRANS CONF MUTE-->
VOICE OVER STA 101
05 FE B 08 09:51
TRANS CONF MUTE-->
Call Log
The call log feature enables the digital phone user to view a log of the last (15-50) incoming and
outgoing CO calls. The user can scroll through the list of stored numbers, select a number, and
activate a redial to that number.
Call Log Button = PGM + flexible button + PGM "57"
Press the [Call Log] button.
1. RECEIVED CALL
2. DIALED CALL
OK
To answer the second (waiting) call,
press the flashing [HOLD/SAVE] button.
Whenever the [HOLD/SAVE] button is pressed, the
call is switched between first and second call.
RECEIVED CALL : Received call list *
DIALED CALL : Dialed call list
3. LOST CALL
^
OK
1-24
LOST CALL : Missed call list*
* CLI (Calling Line ID) mandatory and CLI M-Wait
feature must be enabled in Admin Program
Page 33

Call Log - Continued
For Review Only - Draft Document 11/26/07 COMPANY CONFIDENTIAL - DO NOT Distribute
Received Call
SBX IP 320 User Guide
1. RECEIVED CALL
2. DIALED CALL
OK
123456789
05 FEB 08
BACK OK
123456789
LINE 008 00:00:03
TRANS CONF MUTE-->
Press either the [OK] soft button or OK on the
navigation button.
Press either the [OK] soft button or OK on the
navigation button.
Note: BACK returns you to the previous screen
1-25
Page 34
SBX IP 320 User Guide
For Review Only - Draft Document 11/26/07 COMPANY CONFIDENTIAL - DO NOT Distribute
Call Log - Continued
Dialed Call
1. RECEIVED CALL
2. DIALED CALL
OK
123456789
05 FEB 08
BACK OK
123456789
LINE 01 00:00:03
TRANS CONF MUTE-->
Press either the [OK] soft button or OK on the
navigation button.
Press either the [OK] soft button or OK on the
navigation button.
Note: BACK returns you to the previous screen
1-26
Page 35

Call Log - Continued
For Review Only - Draft Document 11/26/07 COMPANY CONFIDENTIAL - DO NOT Distribute
Lost Call
SBX IP 320 User Guide
3. LOST CALL
^
OK
0123456789
03/10 16:02 CNT :01
BACK SELECT> ANSWER
Answer
0123456789
03/10 16:02 CNT :01
BACK SELECT> ANSWER
0123456789
LINE XXX 00:00:03
TRANS CONF MUTE-->
Press either the [OK] soft button or OK on the
navigation button.
Press the [SELECT] button to select the
following functions: ANSWER, DEL CUR (delete
current), DEL ALL (delete all), SAVE, NAME/TEL
Note: BACK returns you to the previous screen
Press [ANSWER] to call the displayed number.
1-27
Page 36

SBX IP 320 User Guide
For Review Only - Draft Document 11/26/07 COMPANY CONFIDENTIAL - DO NOT Distribute
Call Log - Continued
Lost Call - Continued
Delete Current
0123456789
03/10 16:02 CNT :01
BACK SELECT> DEL CUR
STATION 100 (T)
FEB 01 08 05:34 am
PICKUP CONF REDIAL
Delete All
0123456789
03/10 16:02 CNT :01
BACK SELECT> DEL ALL
ALL CLI DELETE
Press HOLD Key
BACK SELECT> DEL ALL
Press [DEL CUR] to erase the currently
displayed number.
Press [DEL ALL] to erase all numbers.
Press the [HOLD] button to confirm the "delete
all" function. All numbers are erased.
1-28
Page 37
Call Log - Continued
For Review Only - Draft Document 11/26/07 COMPANY CONFIDENTIAL - DO NOT Distribute
Lost Call - Continued
Save
SBX IP 320 User Guide
0123456789
03/10 16:02 CNT :01
BACK SELECT> SAVE
ENTER SPD BIN NO (000)
CLI MSG USED
PAUSE FLASH D-TONE
Name/Telephone Number
0123456789
03/10 16:02 CNT :01
BACK SELECT> NAME/TEL
EDWARD
03/10 16:02 CNT :01
BACK SELECT> NAME/TEL
Press the [SAVE] button to save the CLI.
Press the [HOLD] button or OK on the
navigation button to register the number in a
speed dial bin (refer to “SPEED PROGRAM
(Menu 3)” on page 1-47).
To check the name of the selected number,
press the [NAME/TEL] button.
To check the associated number if a name is
displayed, press the [NAME/TEL] button.
1-29
Page 38

SBX IP 320 User Guide
For Review Only - Draft Document 11/26/07 COMPANY CONFIDENTIAL - DO NOT Distribute
Menu
Press the "Up" position of the navigation button to access the programming Menu.
1. BASIC PROGRAM
2. ADVANCED PROGRAM
1. BASIC PROGRAM
2. ADVANCED PROGRAM
3. SPEED PROGRAM
4. MOBIL EXTENSION PGM
3. SPEED PROGRAM
4. MOBIL EXTENSION PGM
5. HOT DESK PROGRAM
Press the "Down" position of the navigation
button to scroll through the Menu options.
OK
Press the "Down" position of the navigation
button to scroll through the Menu options.
OK
Press the "Down" position of the navigation
button to scroll through the Menu options.
OK
Press the "Down" position of the navigation
button to scroll through the Menu options.
OK
OK
1-30
Page 39

BASIC PROGRAM (Menu 1)
For Review Only - Draft Document 11/26/07 COMPANY CONFIDENTIAL - DO NOT Distribute
SBX IP 320 User Guide
1. BASIC PROGRAM
2. ADVANCED PROGRAM
STATION NAME PROGRAM (Menu 1 + 1)
1. STATION NAME PROGRAM
2. RING PROGRAM
BACK OK
ENTER NAME ( )
BACK OK
Press the [OK] soft button or press OK on the
navigation button.
OK
Press the [OK] soft button or press OK on
the navigation button.
Enter the name (refer to “Entering
Characters” on page 1-59).
1-31
Page 40

SBX IP 320 User Guide
For Review Only - Draft Document 11/26/07 COMPANY CONFIDENTIAL - DO NOT Distribute
RING PROGRAM (Menu 1 + 2)
1. STATION NAME PROGRAM
2. RING PROGRAM
BACK OK
1. ICM RING
2. CO RING
BACK OK
RING TYPE : 01 (01-15)
SELECT BY [NEXT]
BACK NEXT OK
RING TYPE : 02 (01-15)
SELECT BY [NEXT]
BACK NEXT OK
Press the [OK] soft button or press OK on
the navigation button.
Press the [OK] soft button or press OK on
the navigation button.
Note: Use the same procedure in the
following LCD displays to select the CO Ring
type.
Step using [NEXT} or press the "Up"
position of the navigation button.
Press the [OK] soft button or press OK on
the navigation button.
1-32
Page 41

SBX IP 320 User Guide
For Review Only - Draft Document 11/26/07 COMPANY CONFIDENTIAL - DO NOT Distribute
MODE (H/T/P) PROGRAM (Menu 1 + 3)
Handsfree - You will hear three bursts of tone and an announcement. Reply handsfree or lift
handset for privacy. The calling party can hear any conversation in progress.
Tone - You will hear repeated bursts of intercom ring tone and the HOLD button slow flashes.
Lift the handset or press the SPEAKER button to answer.
Private - You will hear three bursts of tone and a one-way announcement. The calling party
cannot hear any conversation in progress.
3. MODE(H/T/P) PROGRAM
4. PASSWORD PROGRAM
BACK OK
TONE MODE
SELECT BY [NEXT]
BACK NEXT OK
PRIVATE MODE
SELECT BY [NEXT]
BACK NEXT OK
STATION 100 (P)
FEB 01 08 05:34 am
PICKUP CONF REDIAL
Press the [OK] soft button or press OK on
the navigation button.
Step using [NEXT] or press the "Up"
position of the navigation button to scroll
through the modes - handsfree, tone, or
private.
Press the [OK] soft button or press OK on
the navigation button.
The selected mode is saved.
1-33
Page 42
SBX IP 320 User Guide
For Review Only - Draft Document 11/26/07 COMPANY CONFIDENTIAL - DO NOT Distribute
PASSWORD PROGRAM (Menu 1 + 4)
Register:
3. MODE(H/T/P) PROGRAM
4. PASSWORD PROGRAM
BACK OK
> PASSWORD REGISTER
SELECT BY [NEXT]
BACK NEXT OK
ENTER PASSWORD :
BACK
PRESS OK KEY
BACK OK
Press the [OK] soft button or press OK on
the navigation button.
Use the [NEXT] soft button or press the
"Up" position of the navigation button to
select the password register option. Then
press the [OK] soft button or press OK on
the navigation button.
Enter a password (3-11 digits).
Press the [OK] soft button or press OK on
the navigation button.
1-34
Page 43

Password Change:
For Review Only - Draft Document 11/26/07 COMPANY CONFIDENTIAL - DO NOT Distribute
SBX IP 320 User Guide
3. MODE(H/T/P) PROGRAM
4. PASSWORD PROGRAM
BACK OK
> PASSWORD CHANGE
SELECT BY [NEXT]
BACK NEXT OK
ENTER CURRENT PASSWORD
BACK
ENTER PASSWORD :
BACK OK
Press the [OK] soft button or press OK on
the navigation button.
Use the [NEXT] soft button or press the
"Up" position of the navigation button to
select the password change option. Then
press the [OK] soft button or press OK on
the navigation button.
Enter the current password (3-11 digits).
Enter the new password (3-11 digits).
PRESS OK KEY
BACK OK
Press the [OK] soft button or press OK on
the navigation button.
1-35
Page 44
SBX IP 320 User Guide
For Review Only - Draft Document 11/26/07 COMPANY CONFIDENTIAL - DO NOT Distribute
LANGUAGE PROGRAM (Menu 1 + 5)
5. LANGUAGE PROGRAM
6. ENBLOCK PROGRAM ^
BACK OK
> ENGLISH
LCD LANGUAGE
BACK NEXT OK
> RUSSIAN
LCD LANGUAGE
BACK NEXT OK
Press the [OK] soft button or press OK on
the navigation button.
Use the [NEXT] soft button or press the
"Up" position of the navigation button to
select the language.
Press the [OK] soft button or press OK on
the navigation button.
1-36
Page 45
ENBLOCK PROGRAM (Menu 1 + 6)
For Review Only - Draft Document 11/26/07 COMPANY CONFIDENTIAL - DO NOT Distribute
SBX IP 320 User Guide
5. LANGUAGE PROGRAM
6. ENBLOCK PROGRAM ^
BACK OK
ENBLOCK MODE
> OFF
BACK NEXT OK
ENBLOCK MODE
> OFF
BACK NEXT OK
Press the [OK] soft button or press OK on
the navigation button.
Use the [NEXT] soft button or press the
"Up" position of the navigation button to
select ON/OFF.
Press the [OK] soft button or press OK on
the navigation button.
1-37
Page 46
SBX IP 320 User Guide
For Review Only - Draft Document 11/26/07 COMPANY CONFIDENTIAL - DO NOT Distribute
ADVANCED PROGRAM (Menu 2)
1. BASIC PROGRAM
2. ADVANCED PROGRAM
WAKE UP PROGRAM (Menu 2 + 1)
1. WAKE UP PROGRAM
2. PRESELECTED MSG PGM
BACK OK
ENTER YOUR WAKEUP TIME
HH:MM 10:00am
BACK ERASE OK
ENTER YOUR WAKEUP TIME
07:00-C 10:00am
BACK ERASE OK
Press the [OK] soft button or press OK on the
navigation button.
OK
Press the [OK] soft button or press OK on
the navigation button.
Enter the time and select single time or
every day.
S:Single (once only - Default)
C:Every Day (#)
* Set the time : 24 hr format
e.g. :7 am = 07:00 & 7 pm = 19:00
Press the [OK] soft button or press OK on
the navigation button.
STATION 100 (T)
FEB 01 08 *10:00am
PICKUP CONF REDIAL
1-38
A flashing [*] preceding the time indicates
that the alarm is set.
Page 47

SBX IP 320 User Guide
For Review Only - Draft Document 11/26/07 COMPANY CONFIDENTIAL - DO NOT Distribute
WAK EUP RIN G
FEB 01 08 *07:00am
The alarm will sound at the preset time.
To cancel the Wake Up program (Menu 2 + 1):
1. WAKE UP PROGRAM
2. PRESELECTED MSG PGM
BACK OK
ENTER YOUR WAKEUP TIME
07:00-S *10:00am
BACK ERASE OK
ERASED WAKEUP TIME
07:00-S 10:00am
BACK ERASE OK
Press the [OK] soft button or press OK on
the navigation button.
Press the [ERASE] soft button.
Press the [OK] soft button or press OK on
the navigation button.
1-39
Page 48
SBX IP 320 User Guide
For Review Only - Draft Document 11/26/07 COMPANY CONFIDENTIAL - DO NOT Distribute
PRESELECTED MSG PROGRAM (Menu 2 + 2)
Preselected Message types:
• 00 - USER CUSTOM MSG 00
• 01 - RETURN AT XX:XX
• 02 - ON VACATION / RETURN AT DATE XX:XX
• 03 OUT OF OFFICE / RETURN AT DATE XX:XX
• 04 OUT OF OFFICE / RETURN AT TIME XX :XX
• 05 OUT OF OFFICE / RETURN UNKNOWN
• 06 CALL TO (PHONE NO : Max 17 digits)
• 07 IN OFFICE STA ***
• 08 IN A MEETING / RETURN AT TIME XX:XX
• 09 AT HOME
• 10 AT BRANCH OFFICE
1. WAKE UP PROGRAM
2. PRESELECTED MSG PGM
BACK OK
SELECT BY UP/DOWN KEY
BACK
OUT OF OFFICE
RETURN AT TIME XX:XX
BACK OK
ENTER TIME
HH:MM
BACK
Press the [OK] soft button or press OK on
the navigation button.
Use the volume UP/DOWN button or the
navigation button to select the desired
message.
Press the [OK] soft button or press OK on
the navigation button.
* Set the time : 24 hr format
e.g. :7 am = 07:00 & 7 pm = 19:00
1-40
Page 49

SBX IP 320 User Guide
For Review Only - Draft Document 11/26/07 COMPANY CONFIDENTIAL - DO NOT Distribute
ENTER TIME
07:30 PRESS OK KEY
BACK P.DVU OK
OUT OF OFFICE
RETURN AT TIME 07:30
PICKUP CONF REDIAL
Press the [OK] soft button or press OK on
the navigation button.
The selected message is displayed.
To cancel or change a preselected MSG (Menu 2 + 2):
1. WAKE UP PROGRAM
2. PRESELECTED MSG PGM
BACK OK
OUT OF OFFICE
RETURN AT TIME 07:30
PICKUP ERASE OK
Press the [OK] soft button or press OK on
the navigation button.
- Press the [ERASE] button to cancel the
pre-selected message and return to the
[Message select mode].
- Press the [BACK] button to return to the
previous LCD screen.
- Press the [OK] button to return to the
[enter time mode].
SELECT BY UP/DOWN KEY
BACK
[Message select mode]
1-41
Page 50
SBX IP 320 User Guide
For Review Only - Draft Document 11/26/07 COMPANY CONFIDENTIAL - DO NOT Distribute
STATION COS PROGRAM (Menu 2 + 3)
There are three types of Station COS programming:
• COS DOWN MODE
• RESTORE COS MODE
• WALKING COS MODE
COS DOWN MODE
3. STATION COS PROGRAM
4. SPK/HEADSET PROGRAM
BACK OK
> COS DOWN MODE
SELECT BY NEXT
BACK NEXT OK
> COS DOWN MODE
ICM ONLY MODE
BACK NEXT OK
Press the [OK] soft button or press OK on
the navigation button.
Use the [NEXT] soft button or press the
"Up" position of the navigation button to
select the COS DOWN MODE.
Press the [OK] soft button or press OK on
the navigation button.
Press the [OK] soft button or press OK on
the navigation button and the mode is
changed.
1-42
Page 51
RESTORING COS MODE (Menu 2 + 3)
For Review Only - Draft Document 11/26/07 COMPANY CONFIDENTIAL - DO NOT Distribute
SBX IP 320 User Guide
3. STATION COS PROGRAM
4. SPK/HEADSET PROGRAM
BACK OK
> RESTORE COS MODE
SELECT BY NEXT
BACK NEXT OK
ENTER CURRENT PASSWORD
BACK NEXT OK
ORIGINAL COS RESTORED
PRESS OK KEY
BACK OK
Press the [OK] soft button or press OK on
the navigation button.
Use the [NEXT] soft button or press the
"Up" position of the navigation button to
select the RESTORE COS MODE.
Press the [OK] soft button or press OK on
the navigation button.
Enter the password (3-11 digits) to
RESTORE COS MODE.
Press the [OK] soft button or press OK on
the navigation button.
1-43
Page 52

SBX IP 320 User Guide
For Review Only - Draft Document 11/26/07 COMPANY CONFIDENTIAL - DO NOT Distribute
WALKING COS MODE (Menu 2 + 3)
3. STATION COS PROGRAM
4. SPK/HEADSET PROGRAM
BACK OK
> WALKING COS MODE
SELECT BY NEXT
BACK NEXT OK
ENTER COS OVERRIDE CODE
BACK
ENTER COS OVERRIDE CODE
PRESS OK KEY
BACK OK
Press the [OK] soft button or press OK on
the navigation button.
Use the [NEXT] soft button or press the
"Up" position of the navigation button to
select the WALKING COS MODE.
Press the [OK] soft button or press OK on
the navigation button.
Enter the COS Override code
(password – 3-11 digits).
Press the [OK] soft button or press OK on
the navigation button.
1-44
Page 53

SPK/HEADSET PROGRAM (Menu 2 + 4)
For Review Only - Draft Document 11/26/07 COMPANY CONFIDENTIAL - DO NOT Distribute
SBX IP 320 User Guide
3. STATION COS PROGRAM
4. SPK/HEADSET PROGRAM
BACK OK
SPEAKER MODE
SELECT BY NEXT
BACK NEXT OK
SPEAKER MODE
SELECT BY NEXT
BACK NEXT OK
Press the [OK] soft button or press OK on
the navigation button.
Use the [NEXT] soft button or press the
"Up" position of the navigation button to
toggle the mode between SPEAKER MODE
and HEADSET MODE.
Press the [OK] soft button or press OK on
the navigation button to save the selected
mode.
1-45
Page 54

SBX IP 320 User Guide
For Review Only - Draft Document 11/26/07 COMPANY CONFIDENTIAL - DO NOT Distribute
EAR-MIC PROGRAM (Menu 2 + 5)
5. EAR-MIC PROGRAM
BACK OK
EAR-MIC HEADSET
> ON
BACK NEXT OK
EAR-MIC HEADSET
> OFF
BACK NEXT OK
Press the [OK] soft button or press OK on
the navigation button.
^
Use the [NEXT] soft button or press the
"Up" position of the navigation button to
select ON or OFF.
Press the [OK] soft button or press OK on
the navigation button.
1-46
Page 55

SPEED PROGRAM (Menu 3)
For Review Only - Draft Document 11/26/07 COMPANY CONFIDENTIAL - DO NOT Distribute
SBX IP 320 User Guide
3. SPEED PROGRAM
4 CONFERENCE ROOM PGM
ENTER SPD BIN NO(000)
BACK
>
ENTER CO-BTN/DIGIT (007)
BACK DELETE
>123456789
ENTER SPD BIN NO(000)
BACK OK
Press the [OK] soft button or press OK on the
navigation button.
OK
Enter the speed bin number, e.g., 007.
Enter the phone number, e.g., 123456789.
Note: Press the [DELETE] soft button to
delete the speed bin number.
Press the [OK] soft button or press OK on
the navigation button.
>
ENTER NAME (SPD 007)
BACK OK
>ABC
ENTER NAME (SPD 007)
BACK OK
Enter the name (refer to “Entering
Characters” on page 1-59).
Press the [OK] soft button or press OK on
the navigation button.
1-47
Page 56
SBX IP 320 User Guide
For Review Only - Draft Document 11/26/07 COMPANY CONFIDENTIAL - DO NOT Distribute
CONFERENCE ROOM PROGRAM (Menu 4)
CREATE A CONFERENCE ROOM (Menu 4 + 1)
3. SPEED PROGRAM
4. CONFERENCE ROOM PGM
OK
1. CREATE CONF ROOM
2. DELETE CONF ROOM ^
BACK OK
DIAL NO(1-9) AND PASSWORD
BACK OK
PRESS OK KEY
BACK OK
Press the [OK] soft button or press OK on
the navigation button.
Press the [OK] soft button or press OK on
the navigation button.
Enter the conference room number and
password, e.g., 9 + 12345.
Press the [OK] soft button or press OK on
the navigation button.
1-48
Page 57
DELETE A CONFERENCE ROOM (Menu 4 + 2)
For Review Only - Draft Document 11/26/07 COMPANY CONFIDENTIAL - DO NOT Distribute
SBX IP 320 User Guide
3. SPEED PROGRAM
4. CONFERENCE ROOM PGM
OK
1. CREATE CONF ROOM
2. DELETE CONF ROOM ^
BACK OK
DIAL NO(1-9) AND PASSWORD
BACK OK
PRESS OK KEY
BACK OK
Press the [OK] soft button or press OK on
the navigation button.
Press the [OK] soft button or press OK on
the navigation button.
Enter the conference room number and
password, e.g., 9 + 12345.
Press the [OK] soft button or press OK on
the navigation button.
1-49
Page 58

SBX IP 320 User Guide
For Review Only - Draft Document 11/26/07 COMPANY CONFIDENTIAL - DO NOT Distribute
HOT DESK PROGRAM (Menu 5)
A hot desk enables a user to dynamically select a station by login / logout operation without
having a fixed station. For a call center, marketing department people on different shifts can
share a working place with one another . A user can use the "dummy station" by using the log-in
operation.
The user logs-out when the station is no longer needed.
HOT DESK LOG IN (Menu 5 + 1)
5. HOT DESK PROGRAM
OK
1. HOT DESK LOG IN
2. HOT DESK LOG OUT ^
BACK OK
DUMMY STATION 107
ENTER PASSWORD
STATION 132 (T)
01 FEB 08 06:00 am
PICKUP CONF REDIAL
Press the [OK] soft button or press OK on
the navigation button.
^
Press the [OK] soft button or press OK on
the navigation button.
Enter password (3-11 digits) and "#", e.g.,
55555#.
1-50
Page 59

HOT DESK LOG OUT (Menu 5 + 2)
For Review Only - Draft Document 11/26/07 COMPANY CONFIDENTIAL - DO NOT Distribute
SBX IP 320 User Guide
5. HOT DESK PROGRAM
1. HOT DESK LOG IN
2. HOT DESK LOG OUT ^
BACK OK
AGENT LOGOUT WITH
NO FORWARD SET ?
Forward Types
NO FORWARD SET
FORWARD TO VMIB
OK
Press the [OK] soft button or press OK on
the navigation button.
^
Press the [OK] soft button or press OK on
the navigation button.
Use the volume UP/DOWN button or the
navigation button to select the forward
type, then press the [OK] soft button or
press OK on the navigation button.
FORWARD TO VM...
FORWARD TO SPD2000
FORWARD TO STA...
DUMMY STATION 107
01 FEB 08 06:00 am
PICKUP CONF REDIAL
1-51
Page 60
SBX IP 320 User Guide
For Review Only - Draft Document 11/26/07 COMPANY CONFIDENTIAL - DO NOT Distribute
Phone Book
[PHONE BOOK] and [DIAL BY NAME] are the same feature. To enter the Phone Book,
press the "Down" area of the navigation button.
DIAL BY ICM NAME (Nav Button Down + 1)
To enter the Phone Book, press the "Down" area of the navigation button.
1. DIAL BY ICM NAME
2. DIAL BY STA SPD NAME
OK
1: CCC (105)
2: DDD (107)
BACK SEND
CALL TO CCC
01 FEB 08 06:00 am
MSG FLASH
Press the [OK] soft button or press OK on
the navigation button.
Use the volume UP/DOWN button or the
navigation button to select the desired
number, then press the [SEND] soft button
to call.
Talk
1-52
Page 61
DIAL BY STA SPD NAME (Nav Button Down Twice + 2)
For Review Only - Draft Document 11/26/07 COMPANY CONFIDENTIAL - DO NOT Distribute
To enter the Phone Book, press the "Down" area of the navigation button.
SBX IP 320 User Guide
1. DIAL BY ICM NAME
2. DIAL BY STA SPD NAME
OK
1:ABC
2:DEF(002)
BACK NAME/TEL SEND
123456789
LINE 008 00:00:03
TRANS CONF MUTE
Press the [OK] soft button or press OK on
the navigation button.
Use the volume UP/DOWN button or the
navigation button to select the desired
number, then press the [SEND] soft button
to call.
Talk
1-53
Page 62

SBX IP 320 User Guide
For Review Only - Draft Document 11/26/07 COMPANY CONFIDENTIAL - DO NOT Distribute
DIAL BY SYS SPD NAME (Nav Button Down Three Times + 3)
To enter the Phone Book, press the "Down" area of the navigation button.
1. DIAL BY SYS SPD NAME
OK
1. TEAM1(2000)
2. TEAM2(2001)
BACK NAME/TEL SEND
123456789
LINE 008 00:00:03
TRANS CONF MUTE
Press the [OK] soft button or press OK on
the navigation button.
^
Use the volume UP/DOWN button or the
navigation button to select the desired
number, then press the [SEND] soft button
to call.
Talk
1-54
Page 63

Attendant Functions
For Review Only - Draft Document 11/26/07 COMPANY CONFIDENTIAL - DO NOT Distribute
Attendant Intrusion
The Attendant can intrude into a conversation between an extension and an outside line and
create a 3-way conversation. An Intrusion flexible button is required to use intrusion and th e
attendant intrusion feature must be enabled in Admin Programming.
T o make an Intrusion flexible button:
1. Press the [TRANS/PGM] button.
2. Press the flexible button to be programmed.
3. Press the [TRANS/PGM] button.
4. Dial "86".
5. Press the [HOLD/SAVE] button.
To intrude into a busy extension:
Press the programmed Attendant intrusion button when you access a busy extension (an
Intrusion warning tone will be provided to the extension and a 3-way conference call is
established).
SBX IP 320 User Guide
To intrude into a busy line:
Press the CO button of the outside line (an Intrusion warning tone will be provided to the
busy extension and a 3-way conference call is established).
1-55
Page 64

SBX IP 320 User Guide
For Review Only - Draft Document 11/26/07 COMPANY CONFIDENTIAL - DO NOT Distribute
Attendant Station Programming
An Attendant Station User Program Menu Display is provided on the keyset LCD to assist you
in programming the features and functions.
• After pressing the [Trans/Pgm] button, items are available by dialing the Program Code
• Dial pad keys are used to enter selected options.
Press the [Trans/Pgm] to enter the Attendant Sta tion User Program Menu. The various levels of
the display menu are indicated by indentation.
[01] Print
[1] SMDR
[1] Print SMDR (Sta Base) - enter station range
[2] Delete Station Base - enter station range
[3] Print SMDR (Grp Base)
[4] Delete (Grp Base)
[5] Display Call Charge
[6] Abort Printing
[7] Print Lost Call
[8] Delete Lost Call
[2] Traffic
[1] Print All Summary - select analysis time & type
[2] Print All Periodic - enter print time
[3] Abort Periodic Print
[4] Print Atd Traffic - select analysis time & type
[5] Print Call Summary
[6] Print Call Hourly
[7] Print H/W Usage - select analysis time & type
[8] Print CO Summary
[9] Print CO Group Hourly - enter CO Grp number
[02] COS
[1] Set ICM Only Mode - enter station range
[2] Restore COS - enter station range
[03] Authorization
[1] Change Authorization - enter station
directly or by either using the [VOL
scroll through the keyset menu items.
ST] buttons or the up/down navigation buttons to
1-56
Page 65

SBX IP 320 User Guide
For Review Only - Draft Document 11/26/07 COMPANY CONFIDENTIAL - DO NOT Distribute
[04] Date And Time
[1] Change (System) Date Time
[2] Set Wake Up - enter station range
[3] Disable Wake Up - enter station range
[4] LCD Date Mode - DDMMYY or MMDDYY
[5] LCD Time Mode
[6] Use PX Time/Date
[7] Monitor Conf-Room - enter room number (1-9)
[8] Delete Conf-Room - enter room number (1-9)
[05] Message
[1] Pre-selected Msg Act - enter station range & msg (00-20)
[2] Preselected Msg Deact - enter station range
[3] (Sys) Custom Msg Reg - enter station range & msg (11-20)
[4] Erase VM Msg
[5] Atd Del All CLI Msg
[06] Rec VSF Announcement
enter VSF AA announcement (001-021)
[07] Supplementary
[1] Cancel Features
[2] Register Sta Name
enter station number and name
[3] Disable CO Outgoing - press CO flex btn (toggle)
[4] Auto Ring Mode (1: day/2: night/3: on demand/4: weekend/5: auto ring mode)
[5] ICM Box BGM Ch Sel - select BGM Src (0-8)
[6] BGM to Ext Port #1 - select BGM Src (0-8)
[7] BGM to Ext Port #2 - (Invalid)
[8] BGM to Ext Port #3 - (Invalid)
[9] Prepaid Call - enter station range, then enter money
[*] LCD Display Language - enter station range
Overriding an extension in DND mode
An Attendant can override a station in DND:
1. Call a station in DND(DND tone is heard).
2. Dial "*" to override the extension. The station in DND will receive ring.
1-57
Page 66

SBX IP 320 User Guide
For Review Only - Draft Document 11/26/07 COMPANY CONFIDENTIAL - DO NOT Distribute
Setting day/night/weekend mode
When a CO call comes in the system, the destination of CO call can be changed according to
the ring mode.There are 5 ring modes – Day mode, Night mode, Weekend mode, On-demand
mode, and Automatic Ring mode. The destination of a CO call can be set differently for each
ring mode in Admin Programming.
To activate Day / On-Demand / Night / Weekend / Auto mode manually:
1. Press the [DND/FWD] button at the Attendant Station.
2. Select the desired mode by dialing digit 1-5.
3. Press the [HOLD/SAVE] button.
Storing system speed dial numbers
SELECT RING MODE(1-5)
DAY
(1: DAY, 2: NIGHT, 3: ON-DEMAND, 4: WEEKEND, 5: AUTO)
1-58
ENTER SPEED BIN NO(2000)
PAUSE FLASH D-TONE
ENTER CO-BTN/DIGIT(2000)
PAUSE FLASH D-TONE
1234567
SPEED 2000
PAUSE FLASH D-TONE
JOHN
ENTER NAME (SPEED 2000)
PAUSE FLASH D-TONE
Press the [TRANS/PGM] button, then
press the [SPEED] button.
Dial the Speed Bin Number
(2000-2499)
Dial the phone number to be stored,
then press the [HOLD/SAVE] button to
save.
Enter a name (refer to “Entering
Characters” on page 1-59), then press
the [HOLD/SAVE] button to save.
Page 67

Entering Characters
For Review Only - Draft Document 11/26/07 COMPANY CONFIDENTIAL - DO NOT Distribute
SBX IP 320 User Guide
. – 13
Q – 11
Z – 12
1 – 10
G – 41
H – 42
I – 43
4 – 40
P – 71
Q – 72
R – 73
S – 74
7 – 70
Blank – ½1
: – ½2
, – ½3
A – 21
B – 22
C – 23
2 – 20
J – 51
K – 52
L – 53
5 – 50
T – 81
U – 82
V – 83
8 – 80
0 – 00
D – 31
E – 32
F – 33
3 – 30
M – 61
N – 62
O – 63
6 – 60
W– 91
X – 92
Y – 93
Z – 94
9 – 90
1-59
Page 68

SBX IP 320 User Guide
For Review Only - Draft Document 11/26/07 COMPANY CONFIDENTIAL - DO NOT Distribute
Glossary
CO Line Central Office Line – also known as a trunk line, exchange line, or outside line
CONF Conference – where you can talk to 2 or more internal or external parties
DKTU Digital Key Telephone Unit – an LG-Nortel digital telephone
DND Do Not Disturb – the station is blocked to all incoming calls
FWD Forward – calls can be sent to another location such a voice mailbox or another station
ICM Intercom – describes internal calls within the telephone system
SLT Single Line Telephone – an analog telephone
Speed Dial A commonly used number stored in a speed bin for easy access
VMIB (or VMIU) Voice Message Interface Board – LG-Nortel integral Voice Processing card
1-60
Page 69

Chapter 2
For Review Only - Draft Document 11/26/07 COMPANY CONFIDENTIAL - DO NOT Distribute
7208D Digital Phone Procedures
7208D Input/Output Devices and Buttons
The following diagram and its corresponding table identify the basic features of the 7208D keyset.
1
2
3
4
8
9
5
6
7
10
11
12
13
14
2-1
Page 70

SBX IP 320 User Guide
For Review Only - Draft Document 11/26/07 COMPANY CONFIDENTIAL - DO NOT Distribute
1 LCD Display Displays information about telephone status, dialing
7208D Keyset - Basic Features
directories, and test message information.
2 Handset Device used to listen/speak when on a call in handset
mode.
3 Headphone When using a headphone, this button toggles the
headphone state.
4 Speaker Device used to listen to a caller in a handsfree mode
when in speaker mode.
5 Speaker Button Speaker toggles speakerphone state between speaker
mode and handset mode. The button is red when
speakerphone is active.
6 Hold/Save Button This button puts a call on hold or saves the PGM.
7 Volume The volume button adjusts the audio level.
8 MSG LED This button illuminated to indicate you have a message
waiting.
9 Flexible Buttons The 8 flexible buttons can be assigned as specific
feature buttons.
10 DND Button
(Flex Btn 1)
11 Call Back Button
(Flex Btn 2)
The Do Not Disturb (DND) feature disables your phone
from ringing. When DND is active, this button is red.
A station can initiate a call back request to another busy
station. Once that station becomes idle, the station that
left the call back request is signaled.
12 Speed Button Used to access speed dialing, save number redial, and
last number redial. Also used to access flexible button
programming.
13 Trans/PGM Button This button is used to set up a conference call or to
transfer a call.
14 MIC Microphone used to speak to a caller in a handsfree
mode when in speaker mode.
2-2
Page 71

Cable Connections
For Review Only - Draft Document 11/26/07 COMPANY CONFIDENTIAL - DO NOT Distribute
SBX IP 320 User Guide
A: Connect the telephone cord (curly cord) to the handset and the other end to the
handset jack at the bottom of the telephone.
B: Connect the line cable to the port at the bottom of telephone and the other end to the
wall socket.
C: Connect the Headphone to the headphone jack on the left side of the telephone (as
viewed from the front).
2-3
Page 72

SBX IP 320 User Guide
For Review Only - Draft Document 11/26/07 COMPANY CONFIDENTIAL - DO NOT Distribute
Basic Functions
Calls
Answer a Waiting Call
Call Wait (Camp-on)
1. After receiving station busy tone, dial *. A Camp-on tone sounds at the called station.
2. When called party answers, talk, or hang up to transfer another call to the called party.
Group Call Pick-up
When hearing an unattended phone ringing in your area:
1. Lift handset.
2. Dial 566. You will be connected automatically to the caller.
Press the flashing CO button.
Note: you must be in the same pick-up group.
2-4
Last Number Redial
1. Lift the handset, press the [SPEAKER] button, or dial from a live keypad.
2. Dial 552 or press the [SPEED] button + dial * + press the [HOLD/SAVE] button.
Place an Intercom Call
1. Lift the handset, press the [SPEAKER] button, or dial from a live keypad.
2. Dial the station number.
Place an Outside Call
1. Lift the handset, press the [SPEAKER] button, or dial from a live keypad.
2. Dial 9.
3. Dial the desired number.
Place an Outside Call on Hold
While connected to an external call, press the [HOLD] button.
Page 73

Re-direct an Incoming Call (Call Pick-up)
For Review Only - Draft Document 11/26/07 COMPANY CONFIDENTIAL - DO NOT Distribute
When you hear another phone ringing in your area:
1. Lift the handset, press the [SPEAKER] button, or dial from a live keypad.
2. Dial 7.
3. Dial the extension number of the ringing station. You will be connected automatically to
the caller.
Retrieve an Outside Call on Hold
Press the flashing flexible button.
Note: Calls will automatically recall after a pre-defined time.
Flexible Button Programming
Use the procedure and Numbering Plan code shown in the section “Flexible Button
Programming” on page 1-16.
Station Speed Dial Numbers - Storing
SBX IP 320 User Guide
1. Press the [TRANS/PGM] and [SPEED] button.
2. Dial speed bin number (range = 000-099).
3. Dial speed dial number you wish to store.
4. Press the [HOLD/SAVE] button.
5. Enter the name associated to the number.
6. Press the [HOLD/SAVE] button. A confirmation tone will sound.
Station Speed Dial Numbers - Using
1. Press the [SPEED] button.
2. Dial the desired speed dial bin number.
2-5
Page 74

SBX IP 320 User Guide
For Review Only - Draft Document 11/26/07 COMPANY CONFIDENTIAL - DO NOT Distribute
2-6
Page 75

Chapter 3
For Review Only - Draft Document 11/26/07 COMPANY CONFIDENTIAL - DO NOT Distribute
SLT Procedures
Basic Functions
The following procedures use the default numbering plan code, which can be changed in Admin
Programming 104-107 and 109 depending on the user’s needs.
Account Code Entry
To identify a call, the system provides the user with an account code field in the Call Logging
printout by entering an account code while on an outside call.
1. After dialing or during a conversation with an external party, press the hook switch.
2. Dial 550 and the account code (An account code can be up to 12 digits.)
3. Press the hook switch. Continue the conversation and hang up to finish the call.
Authorization Code Programming
1. Lift the handset.
2. Dial 563.
3. Dial 31.
4. Dial 3-5 digits as authorization code.
5. Press the hook switch.
Calls
Answer a Waiting Call
You will receive warning tone in the handset. Hang up the present call to take a new one.
3-1
Page 76

SBX IP 320 User Guide
For Review Only - Draft Document 11/26/07 COMPANY CONFIDENTIAL - DO NOT Distribute
Call Forward
1. Lift the handset.
2. Dial 554.
3. Dial the desired call forward number.
4. Dial the station number or Hunt Group to forward incoming calls to (Station: 100-132,
1 - Unconditional 3 - No answer calls
2 - Busy calls 4 - Busy/no answer calls
5 - Station off-net, unconditional with speed bin
6 - Station off-net, no answer with speed bin.
7 - Incoming outside line off-net (ATD only)
8 - Station unconditional off-net with telephone number
9 - Station No answer off-net with telephone number
T o make a Call forward to the VMIB, press the # key after dialing call forward type
(1-4).
To make off-net forward type 8 or 9, press hook switch after entering telephone
number.
Hunt Group: 620-629).
5. Hang up.
To cancel Call Forward, lift handset and dial 554 and # or, dial 559.
Call Forward - Follow Me
1. Go to the forwarding station and lift the handset.
2. Dial 554.
3. Dial 0.
4. Dial the station number from which calls are to be forwarded.
5. Dial the authorization code of the forwarded extension (The authorization code must be
registered before "Follow Me" Call Forward can be set).
6. Dial the extension number that will receive the call.
7. Hang up.
3-2
Page 77

SBX IP 320 User Guide
For Review Only - Draft Document 11/26/07 COMPANY CONFIDENTIAL - DO NOT Distribute
Call Park
1. While connected to an outside call, lift the handset.
2. Press the hook switch.
3. Dial a parking location (601-610)
4. Hang up.
To retrieve a parked call:
1. Lift the handset.
2. Dial the parking location.
Call Wait (Camp-on)
1. After receiving an intercom busy tone, dial *.
2. Camp-on tone is heard at the called station.
3. When the called party answers, talk, or hang up to transfer the call.
Group Call Pick-up
1. When hearing an unattended phone ringing in your area, lift the handset.
2. Dial 566. You will be connected to an incoming extension or outside line call (you must
be in the same pick-up group).
Last Number Redial
1. Lift the handset.
2. Dial 552.
Place an Intercom Call
1. Lift the handset.
2. Dial the intercom number.
Place an Outside Call
1. Lift the handset.
2. Dial 9 to access a CO line (In the following countries, dial 0 to access a CO line: Finland,
Brazil, Norway, Netherlands, Belgium, Denmark, Spain, and Italy).
3. Dial the desired number.
3-3
Page 78

SBX IP 320 User Guide
For Review Only - Draft Document 11/26/07 COMPANY CONFIDENTIAL - DO NOT Distribute
Place an Outside Call on Hold
1. While connected to an extension call, press the hook switch.
2. Dial 560.
Place an Outside Call via CO Group Access
1. Lift the handset.
2. Dial 8 and a CO group number (01-24).
3. Dial the desired number.
Place an Outside Call via CO Individual Access
1. Lift the handset.
2. Dial 88 and a CO line number (01-12).
3. Dial the desired number.
Re-direct an Incoming Call (Call Pick-up)
1. When you hear a phone ringing in your area, lift the handset.
2. Dial 7.
3-4
3. Dial the extension number of the ringing phone.
Retrieve a Held Outside Call
1. Lift handset.
2. Dial 8 # and CO line number (01-12).
-orYou can dial 8 * in case you don’t remember the held CO number.
Screened Transfer
1. While connected to an outside line, press the hook switch.
2. Dial the desired extension number and wait to be answered.
3. Announce the call.
4. Hang up to complete the call transfer.
Page 79

Unscreened Transfer
For Review Only - Draft Document 11/26/07 COMPANY CONFIDENTIAL - DO NOT Distribute
1. While connected to an outside line, press the hook switch.
2. Dial the desired extension number.
3. Hang up to complete the call transfer.
Conference
The system allows you to set up a 3-way conference.
1. Lift the handset.
2. Call the desired party. (outside or internal).
3. Press the hook switch.
4. Dial the internal extension number.
5. When the other party answers, press the hook switch twice in 2 seconds (All three parties
are now connected).
Do Not Disturb (DND)
SBX IP 320 User Guide
1. Lift the handset.
2. Dial 553.
3. Hang up.
To cancel Do Not Disturb:
1. Lift the handset.
2. Dial 559.
3. Hang up.
Handset Off-hook Alarm
Should the handset be left off the cradle unattended for any length of time, the user will
receive a high pitched signal.
To cancel the signal, hang up.
3-5
Page 80

SBX IP 320 User Guide
For Review Only - Draft Document 11/26/07 COMPANY CONFIDENTIAL - DO NOT Distribute
Message Waiting
1. Lift the handset.
2. Dial the desired extension number. No reply from a key station or extension busy tone
3. Press the hook switch.
4. Dial 556.
5. Hang up.
Paging
1. Lift the handset.
2. Dial the desired page zone number.
3. Make your announcement.
4. Hang up to complete paging.
from an SLT station.
Page Zones
Call all zones :549
3-6
Call all internal zones :543
Internal zone 1-10 :501-510
External zone 1 :545
Paging - Meet Me
When hearing a paging announcement, dial 544.
Page 81

Pre-selected Messages
For Review Only - Draft Document 11/26/07 COMPANY CONFIDENTIAL - DO NOT Distribute
You can choose a pre-selected message to be displayed on the LCD of the phone calling your
station.
1. Lift the handset.
2. Dial 563 (Program Entry Code)
3. Dial 51.
4. Dial the following number and supplemental info to leave your message.
(01-10)
Dial 01 + (Time) LUNCH, RETURN HH:MM
Dial 02 + (Date) ON VACATION, RETURN AT MM:DD
Dial 03 + (Time) OUT OF OFFICE RETURN TIME HH:MM
Dial 04 + (Date) OUT OF OFFICE RETURN MM:DD
Dial 05 OUT OF OFFICE RETURN UNKNOWN
Dial 06 + (External no.) CALL XX.... (17 digits)
Dial 07 + (Extension you can be called) IN OFFICE, STA XXXX
Dial 08 + (Time) IN A MEETING, RETURN TIME HH:MM
Dial 09 AT HOME
SBX IP 320 User Guide
Dial 10 AT BRANCH OFFICE
5. Press the hook switch.
6. Hang up.
To erase a pre-selected message:
1. Lift the handset and dial 563 + 51 + #.
2. Press the hook switch.
3. Hang up.
3-7
Page 82

SBX IP 320 User Guide
For Review Only - Draft Document 11/26/07 COMPANY CONFIDENTIAL - DO NOT Distribute
Programming Your Name
1. Lift the handset.
2. Dial 563.
3. Dial 74.
4. Enter your name using the same codes as those of keysets (refer to “Entering Characters”
5. Press the hook switch. A confirmation tone sounds.
6. Hang up.
Queuing
If you access a busy line, you may request the system to place you on hold, until the next line
becomes idle.
1. Lift the handset.
2. Press the hook switch.
3. Dial 556. A confirmation tone will sound when the call is accepted.
4. Hang up.
on page 1-59).
Returning Call to Host System
If the SBX IP 320 is connected to another system, you can use this feature to transfer a call to
an extension on the other system.
1. While connected to an extension call, press the hook switch.
2. Dial 551.
3. When you hear new dial tone from the other system, dial the extension number on the
other system.
4. When the station answers, speak (Screened Transfer) or hang up (Unscreened Transfer)
to transfer the call.
3-8
Page 83

Shuttle Call
For Review Only - Draft Document 11/26/07 COMPANY CONFIDENTIAL - DO NOT Distribute
1. An extension user engaged in an internal or external call, should briefly press hook
switch to hold a call.
2. The holding party hears music on hold (if equipped).
3. Dial the second number of another internal or external party.
4. When the second call is connected, the extension user may alternate the call between
holding parties by pressing the hook switch.
5. Then, you may make a conference by pressing the hook switch.
Station Speed Dial Numbers - Storing
1. Lift the handset.
2. Dial 555.
3. Dial a speed dial number (000-099).
4. Dial speed dial number you wish to store.
5. Press the hook switch. A confirmation tone sounds.
6. Hang up.
SBX IP 320 User Guide
Station Speed Dial Numbers - Using
1. Lift handset.
2. Dial 558.
3. Dial the desired speed dial number (000-099).
Universal Night Answer
1. When hearing an incoming signal on another phone or night bell, lift the handset.
2. Dial the UNA Access Code 569. You will be connected to the incoming call if it was
programmed as an UNA line.
3-9
Page 84

SBX IP 320 User Guide
For Review Only - Draft Document 11/26/07 COMPANY CONFIDENTIAL - DO NOT Distribute
Voice Announcements
Date & Time Prompt
1. Lift the handset.
2. Dial 563.
3. After the confirmation tone sounds, dial 62. The date & time prompt plays, e.g., "Date is
Extension Number Prompt
1. Lift the handset.
2. Dial 563.
3. After the confirmation tone sounds, dial 63. The extension number prompt plays, "Th is
Extension Status Prompt
1. Lift the handset.
2. Dial 563.
March, 20th and Time is 00:00."
extension is XXXX.".
3-10
3. After the confirmation tone sounds, dial 64. The following item s wi ll be played:
a) Extension number
b) Intercom Answer Mode
c) Listed message X
d) Wake-up time XX:XX AM or PM
e) Do Not Disturb
f) Forwarded to extension XXXX
g) Forwarded to speed bin XXX
h) Queued CO XXX
i) Locked (Temporary Class of Service Charge)
j) COS X
Page 85

Recording Your Message
For Review Only - Draft Document 11/26/07 COMPANY CONFIDENTIAL - DO NOT Distribute
1. Lift the handset.
2. Dial 563.
3. After the confirmation tone sounds, dial 61.
4. Record your message.
5. Hang up.
Deleting Your Message:
1. Lift the handset.
2. Dial 563.
3. After the confirmation tone sounds, dial 66.
Recording a Paging Message
1. Lift the handset.
2. Dial 563.
3. After the confirmation tone sounds, dial 65.
4. Record paging message.
SBX IP 320 User Guide
5. Hang up.
Deleting a Paging Message:
1. Lift the handset.
2. Dial 563.
3. After the confirmation tone sounds, dial 67.
3-11
Page 86

SBX IP 320 User Guide
For Review Only - Draft Document 11/26/07 COMPANY CONFIDENTIAL - DO NOT Distribute
Voice Mail Messages
1. Lift the handset.
2. Dial 557.
3. The message number prompt and the first voice message is played.
4. To delete current voice message and hear next message, dial #1.
-orTo save current voice message and hear next message, dial #2.
-orTo hear current voice message, dial #3.
3-12
Page 87

Index
For Review Only - Draft Document 11/26/07 COMPANY CONFIDENTIAL - DO NOT Distribute
Numbers
7208D Input/Output Devices and Buttons, 2-1
A
Account Code Entry - SLT, 3-1
ADVANCED PROGRAM (Menu 2)
Answer a Waiting Call - 7208D
Answer a Waiting Call - SLT
Attendant Functions
Attendant intrusion
, 1-55
, 1-55
, 3-1
Attendant Station Progra mming
Authorization Code Programming - SLT
, 1-38
, 2-4
, 1-56
, 3-1
B
Barge-In Monitor, 1-10
BASIC PROGRAM (Menu 1)
, 1-31
C
Cable Connections - 7208D, 2-3
Cable Connections - 7224D
Call Back
Call Forward
, 1-11
, 1-11
, 1-4
Call Forward - Follow Me - SLT
Call Forward - SLT
Call Log
, 1-24
Dialed Call
Lost Call
, 1-27
Answer
Delete All
Delete Current
, 3-2
, 1-26
, 1-27
, 1-28
, 1-28
Name/Telephone Number
, 1-29
Save
Received Call
Call Park - SLT
, 1-25
, 3-3
, 3-2
, 1-29
Calls
Answer a Waiting Call - 7208D
Answer a Waiting Call - SLT
Call Forward - Follow Me - SLT
Call Forward - SLT
Call Park - SLT
, 3-2
, 3-3
Call Wait (Camp-on) - 7208D
Call Wait (Camp-on) - SL T
Group Call Pick-up - 7208D
Group Call Pick-up - SLT
Last Number Redial - 7208D
Last Number Redial - SLT
Place an Intercom Call - 7208D
Place an Intercom Call - SLT
Place an Outside Call - 7208D
Place an Outside Call on Hold - 7208D
Place an Outside Call on Hold - SLT
Place an Outside Call - SLT
, 2-4
, 3-1
, 3-2
, 2-4
, 3-3
, 2-4
, 3-3
, 2-4
, 3-3
, 2-4
, 3-3
, 2-4
, 2-5
, 3-4
, 3-3
Place an Outside Call via CO Group Access - SLT
3-4
Place an Outside Call via CO Individual Access -
,
i
Page 88

Index
For Review Only - Draft Document 11/26/07 COMPANY CONFIDENTIAL - DO NOT Distribute
SLT, 3-4
Re-direct an Incoming Call (Call Pick-up) - 7208D
2-5
Re-direct an Incoming Call (Call Pick-up) - SLT
3-4
Retrieve a Held Outside Call - SLT
Retrieve an Outside Call on Hold - 7208D
Screened Transfer - SLT
Unscreened Transfer - SLT
Calls (Placing or Answering)
, 3-4
, 3-5
, 1-5
Call Wait (Camp-on) - 7208D
Call Wait (Camp-on) - SLT
Camp on
Character Map
, 1-12
, 1-59
, 3-3
Checking voice mail messages
CO Dialing
CO Line Busy
Conference
, 1-13
, 1-14
, 1-17
, 3-4
, 2-5
, 2-4
, 1-13
CONFERENCE ROOM
Create
, 1-48
, 1-49
Delete
CONFERENCE ROOM PROGRAM (Menu 4)
Conference - SLT
CO Talk
, 1-15
, 3-5
, 1-48
CREATE A CONFERENCE ROOM (Menu 4 + 1)
1-48
DIAL BY NAME
,
DIAL BY STA SPD NAME (Nav Button Down
,
Twice + 2)
DIAL BY SYS SPD NAME (Nav Button Down three
times + 3)
Dialing Error
DND Override
Do Not Disturb
Do Not Disturb (DND) - SLT
, 1-52
, 1-53
, 1-54
, 1-20
, 1-57
, 1-20
, 3-5
E
EAR-MIC PROGRAM (Menu 2 + 5), 1-46
ENBLOCK PROGRAM (Menu 1 + 6)
Entering Characters
, 1-59
Extension Number Prompt - SLT
Extension Status Prompt - SLT
, 3-10
, 1-37
, 3-10
F
Flexible Button Programming, 1-16
Follow-me Forward
,
, 1-11
G
D
Date & Time Prompt - SLT, 3-10
Day/Night/Weekend Mode
DELETE A CONFERENCE ROOM (Menu 4 + 2)
, 1-58
,
Getting Started, 1-1
Glossary
, 1-60
Group Call Pick-up - 7208D
Group Call Pick-up - SLT
1-49
DIAL BY ICM NAME (Nav Button Down + 1)
ii
, 1-52
, 2-4
, 3-3
Page 89

Index
For Review Only - Draft Document 11/26/07 COMPANY CONFIDENTIAL - DO NOT Distribute
H
Handset Off-hook Alarm - SLT, 3-5
HOT DESK LOG IN (Menu 5 + 1)
, 1-50
HOT DESK LOG OUT (Menu 5 + 2)
HOT DESK PROGRAM (Menu 5)
H/T/P Programming
, 1-33
, 1-50
I
Idle Display, 1-17
Intercom Busy
Intercom Call - 7208D
Intercom Call - SLT
Intercom Dialing
Intercom Dialing Error
Intercom Do Not Disturb
Intercom Receiving
Intercom Ring BackRing Back
Intercom Talk Indications
, 1-19
, 2-4
, 3-3
, 1-19
, 1-20
, 1-20
, 1-20
, 1-20
, 1-21
, 1-51
Message Waiting - SLT
MODE (H/T/P) PROGRAM (Menu 1 + 3)
, 3-6
, 1-33
N
Name Display On My Phone, 1-21
Name Programming SLT
Navigation Button and Soft Buttons
, 3-8
, 1-9
No Answer Off-net Forward telephone number
(Unconditional)
, 1-12
No Answer Off-net Forward with speed bin
(Unconditional)
, 1-12
O
Off Hook, 1-21
Outside Call - 7208D
Outside Call on Hold - SLT
Outside Call - SLT
Overriding an extension in DND mode
, 2-4
, 3-4
, 3-3
, 1-57
L
LANGUAGE PROGRAM (Menu 1 + 5), 1-36
Last Number Redial - 7208D
Last Number Redial - SLT
, 2-4
, 3-3
P
Paging, 1-21
Paging - Meet Me - SL T
Paging - SLT
Park a call and Retrieve a Parked call
PASSWORD PROGRAM (Menu 1 + 4)
M
Manual Dialing, 1-13
Menu (Programming)
, 1-30
Phone Book
Pickup
, 1-18
Place an Intercom Call - 7208D
, 3-6
, 3-6
, 1-22
, 1-34
, 1-52
, 2-4
iii
Page 90

Index
For Review Only - Draft Document 11/26/07 COMPANY CONFIDENTIAL - DO NOT Distribute
Place an Intercom Call - SLT, 3-3
Place an Outside Call - 7208D
Place an Outside Call on Hold - SLT
Place an Outside Call - SLT
, 2-4
, 3-4
, 3-3
Place an Outside Call via CO Group Access - SLT
3-4
Place an Outside Call via CO Individual Access -
SLT
, 3-4
Placing or Answering Calls
Pre-selected Messages - SLT
, 1-5
, 3-7
PRESELECTED MSG PROGRAM (Menu 2 + 2)
1-40
Programming Menu
Programming Your Name - SLT
, 1-30
, 3-8
Q
Queuing - SLT, 3-8
R
Recording a Paging Message - SLT, 3-11
Recording Your Message - SLT
Redial
, 1-19
Re-direct an Incoming Call (Call Pick-up) - 7208D
2-5
Re-direct an Incoming Call (Call Pick-up) - SLT
RESTORING COS MODE (Menu 2 + 3)
Retrieve a Held Outside Call - SLT
Retrieve an Outside Call on Hold - 7208D
Returning Call to Host System - SLT
RING PROGRAM (Menu 1 + 2)
, 3-11
, 3-4
, 1-43
, 3-4
, 2-5
, 3-8
, 1-32
S
Screened Transfer - SLT, 3-4
Setting day/night/weekend mode
,
Shuttle Call - SLT
, 3-9
Soft Buttons and Navigation Button
Speed Dialing
, 1-14
SPEED PROGRAM (Menu 3)
SPK/HEADSET PROGRAM (Menu 2 + 4)
STATION COS PROGRAM (Menu 2 + 3)
,
STATION NAME PROGRAM (Menu 1 + 1)
Station Speed Dial Numbers - Storing - 7208D
Station Speed Dial Numbers - Storing - SLT
Station Speed Dial Numbers - Using - 7208D
Station Speed Dial Numbers - Using - SLT
Storing system speed dial numbers
System Speed Dial
, 1-58
, 1-58
, 1-9
, 1-47
, 1-45
, 1-42
, 1-31
, 2-5
, 3-9
, 2-5
, 3-9
, 1-58
T
Transfer
Screened - SLT
Unscreened - SLT
Two way Recording
,
, 3-4
, 3-5
, 1-22
U
Unconditional, No Answer Off-net Forward
telephone number
Unconditional, No Answer Off-net Forward with
speed bin
, 1-12
Universal Night Answer - SLT
, 1-12
, 3-9
iv
Page 91

Unscreened Transfer - SLT, 3-5
For Review Only - Draft Document 11/26/07 COMPANY CONFIDENTIAL - DO NOT Distribute
Use my voice mail (VMIU card required)
, 1-22
V
Voice Announcements - SLT, 3-10
Voice Mail
Voice mail messages (checking)
Voice Mail Messages - SLT
Voice Over
, 1-22
, 1-13
, 3-12
, 1-24
W
WAKE UP PROGRAM (Menu 2 + 1), 1-38
WALKING COS MODE (Menu 2 + 3)
, 1-44
Index
v
Page 92

Index
For Review Only - Draft Document 11/26/07 COMPANY CONFIDENTIAL - DO NOT Distribute
vi
 Loading...