

Page 1
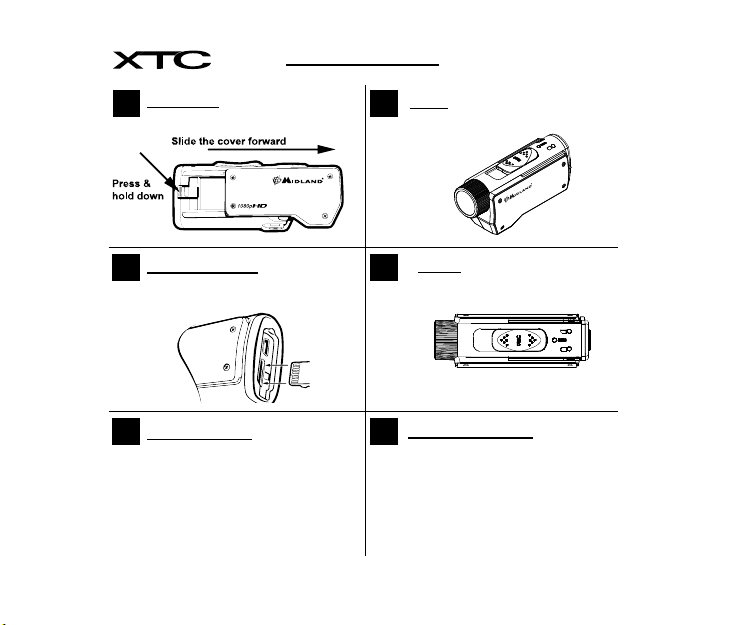
Quick Start Guide
Insert Battery - Open battery door
1
and install battery.
Install Micro SD Card - Open & fold
2
down rubber cover and insert Micro
SD card. Close the rubber cover.
Mount Your Camera - Mount the camera
3
where needed on your helmet, handle
bar, vehicle etc. with the mounts
supplied or purchased.
Record - Slide the record switch for-
4
ward. Recording starts in 8 seconds.
Turn Off - Once you have nished
5
recording, slide the switch to the
off position.
Download & View Video - To download
6
video simply remove your Micro SD
Card & plug it into your computer.
You can also plug your camera into the
computer and slide the REC switch to
the ON position.
midlandusa.com
Page 2

INDEX
Quick Start Guide ..................................................................................................................................................................................1
Welcome to the XTC Action Camera Experience .................................................................................................................................3
What’s in the Box ..................................................................................................................................................................................3
Features and Controls ...........................................................................................................................................................................3
Getting to Know the Camera .................................................................................................................................................................4
Battery .............................................................................................................................................................................................4
Micro SD Card .................................................................................................................................................................................4
Recording ........................................................................................................................................................................................4
Image Stabilization ..........................................................................................................................................................................4
Camera Mounting and Aiming ...............................................................................................................................................................5
Reformatting the Micro SD card ............................................................................................................................................................5
Compatible Systems .............................................................................................................................................................................6
Downloading Videos .............................................................................................................................................................................6
Minimum System Requirements ...........................................................................................................................................................6
Tips and Tricks ......................................................................................................................................................................................7
FCC Information ....................................................................................................................................................................................8
Limited Warranty ...................................................................................................................................................................................8
Accessories .........................................................................................................................................................................................24
Other Midland Products ......................................................................................................................................................................25
2 midlandusa.com
Page 3
Welcome to the XTC Action
Thank you for purchasing the XTC280 Action Camera. We are proud
to offer you the ultimate tool in capturing and recording your adventures.
With easy to use one switch operation, 118° lens and 2 hour battery life,
you never miss a minute of the action. Once captured, simply connect
to your computer and upload the videos to share with friends. It is that
simple. Enjoy!
Camera Experience
What’s in the Box
Features and Controls
1080 Features:
- 30 frames per second
- 118° lens
- 16:9 aspect ratio
- 1920 x 1080 (H) resolution
- Records as mp4
- Image Stabilization
720 Features:
- 60 frames per second
- 118° lens
- 16:9 aspect ratio
- 1280 x 720 (L) resolution
- Records as mp4
- Image Stabilization
English
François Español
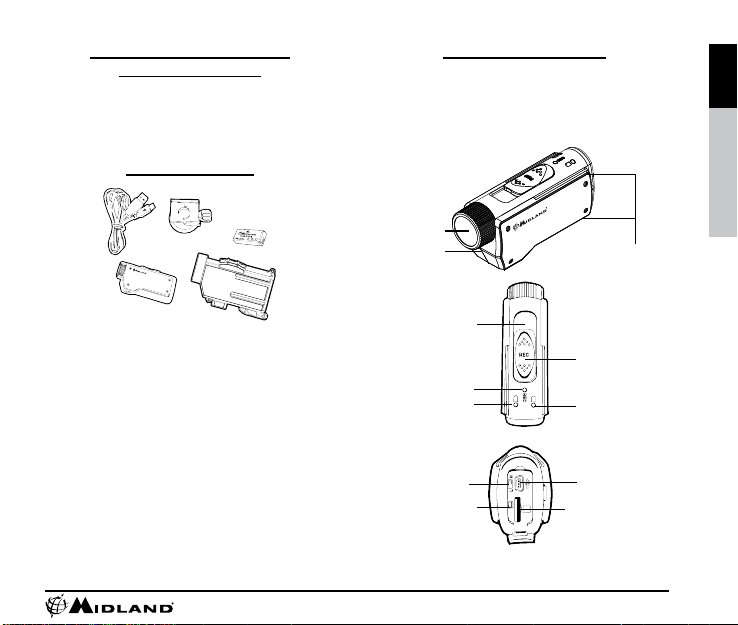
XTC280VP3 Package Includes:
1. Midland XTC280 Camera
2. Submersible Case
3. USB Cable
4. Lithium-Ion Battery Pack
5. Helmet Adhesive Mount
(includes two 3M adhesive pads)
118 Degree Lens
midlandusa.com
Microphone
RECORD Switch
Forward On/ Record
Record LED
Flashes RED when
Camera is Recording
Battery LED
H/L Mode
Switch
Micro SD card
Reformat Button
Track for Mounting
Accessories
RECORD Switch
Backward Stop
Recording/OFF
Micro SD Card LED
Mini USB
Connector
Micro SD Card Slot
3
Page 4
Getting to Know the Camera
Battery
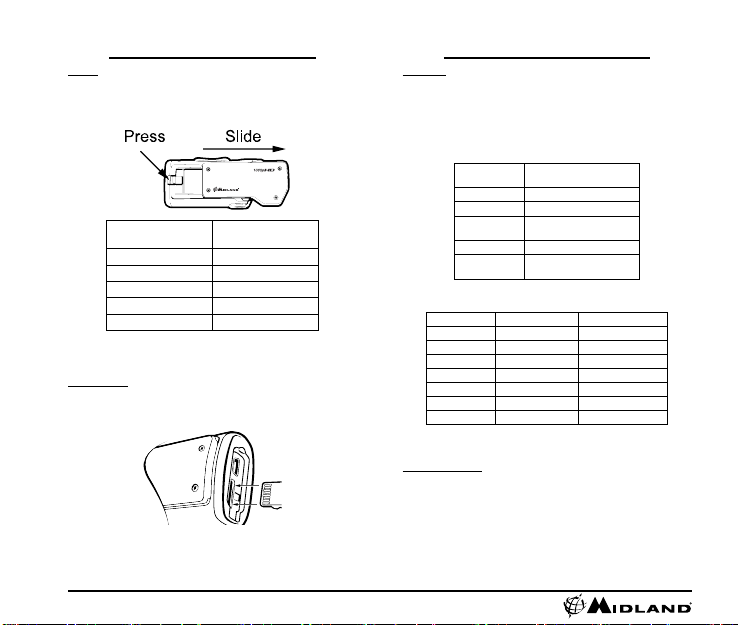
1. To insert the battery, push down the battery door latch on the right side
of the camera. Door will release. Push forward to remove.
2. Install Lithium-Ion battery.
3. Return battery door and click into place.
Battery Status
Indicator
Solid Green Indicates full battery life
Blinking Green Battery is charging
Solid Red Indicates half battery life
Blinking Red* Indicates low battery life
No Light Battery is dead
*Note: When the red battery LED begins blinking, be prepared
to charge the battery because the camera will stop recording
at this point.
Micro SD Card
1. Open and fold down the back rubber cover.
2. Insert Micro SD card into slot observing proper direction (shown below).
3. Return rubber ap into place.
4 midlandusa.com
Meaning
Getting to Know the Camera
Recording
1. Move the RECORD switch forward. This turns the camera on.
2. The battery indicator will light from red to green. The Micro SD card
indicator will light green. The record indictor will begin ashing red after
8 seconds. This indicates the camera is capturing video.
3. To stop recording, move the RECORD switch back to the off position.
Note: The camera will continue recording for 3 seconds after toggling
the switch to the off position.
Micro SD Card
LED Status
Green 1 GB or more available.
Orange 512 MB to 1 GB available.
Red
Flashing Red Cannot read the card.
Flashing Green
*Note: Requires Class 4 or higher Micro SD card
Memory Size 720 Record Time 1080 Record Time
512 MB 6.5 Minutes 5.5 Minutes
1 GB 13 Minutes 11 Minutes
2 GB 26 Minutes 22 Minutes
4 GB 52 Minutes 44 Minutes
8 GB 104 Minutes 88 Minutes
16 GB 208 Minutes 176 Minutes
32 GB 416 Minutes 352 Minutes
*Note: The camera automatically splits the video into 2 GB
segments.
Image Stabilization
The XTC280 uses Digital Image Stabilization (DIS) to visually stabilize
the video from a shaking or vibrating camera.
Meaning
available or
Below 512 MB
no Micro SD card installed.
Indicates card has been
reformatted.
Page 5
Camera Mounting and Aiming
Mount on Dual Track System
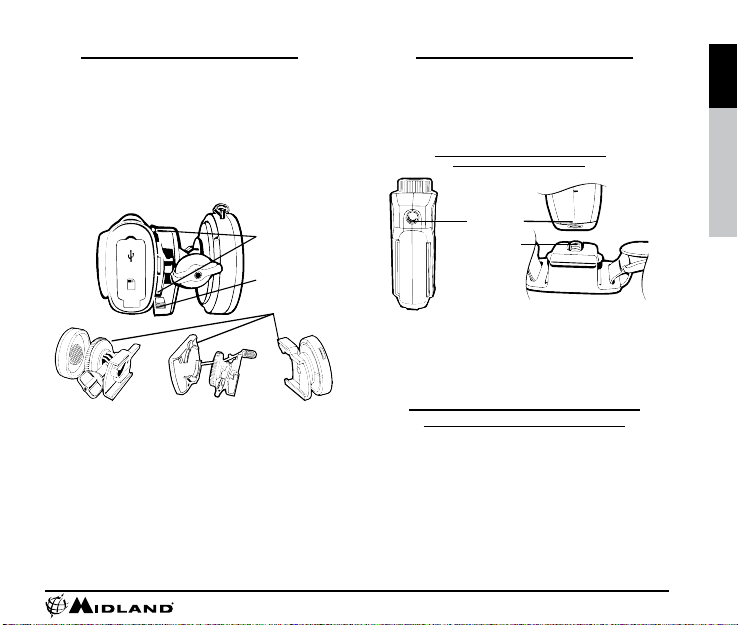
The XTC280 was designed with an innovative identical dual track
mount system on both sides of the camera. This allows you to mount
it on either side of a helmet with ease. In addition, the interchangeable
mount piece can be moved from the helmet mount to the goggle mount.
This eliminates the hassle of having to remount the camera every time.
To mount the camera on the interchangeable mount piece, slide the
camera onto the dual track system with the two notches on the mount
facing toward the back of the camera.
To detach the camera from the interchangeable mount, hold the
camera with the lens facing away from you. Press down the mount
release switch and pull the mount toward you.
Dual Track
Mounting System
Mount Release
Switch
Interchangeable
Mount
Aiming the Camera when mounted with the dual track mount:
When mounting the camera on a helmet, you must do the following:
1. Consider what you would like to shoot and mount the camera
accordingly- left side, right side or top.
2. Find a at surface and ensure the area is clean of dirt and debris.
Remove the cover of the adhesive pad and adhere to the helmet.
3. Once attached, adjust the camera to be sure you are not lming the
sky or the ground.
Camera Mounting and Aiming
Mount using the Thread Mount
On the bottom of the XTC280 is a standard thread mount that allows
the camera to be mounted to a tripod or other xture with a 1/4-20 (1/4”
diameter, 20 threads per inch) 5/16 deep thread. For example, the vented
helmet strap mount is a screw type mount. To afx the camera, insert
the screw on the mount into the camera thread and rotate the camera
clockwise to tighten down onto the screw.
Over tightening may cause damage
to the mount and/or camera
Thread Mount
Screw Mount
Aiming the Camera when mounted with the thread mount:
When mounting the camera on the handlebars of a bike or with the
vented helmet strap mount, follow these steps:
1. Consider what you would like to shoot and mount accordingly.
2. Once attached, make sure that the camera is aimed straight and not
toward the ground or at the sky.
Reformatting the Micro SD card
Ensure battery is fully charged before formatting
The Micro SD card can be reformatted while in the camera. This allows
you to delete all the videos at one time. Follow these steps:
1. Move the RECORD switch to the Forward On / Record position.
2. When the battery indicator turns green, press and hold the Micro SD
card reformat button.
3. Keep holding the Micro SD card reformat button down until the record
indicator turns off and the Micro SD card indicator begins blinking
green.
4. Move the RECORD switch to the off position.
Note: The camera cannot reformat the Micro SD card if the low
battery light is on.
English
François Español
midlandusa.com
5
Page 6
The XTC280 can be used on both a PC or MAC. Below are the compatible
operating systems:
Windows XP SP2, Vista, 7, 8
Macintosh OSX 10.4 and higher
For Windows we recommend Windows Media Player 10 or higher.
For Macintosh we recommend Quick Time 6.5 or higher.
Downloading Videos
There is no need to install any software with the XTC280. It is a
plug and play device. To download video, follow the below instructions
depending upon whether you have a PC or a MAC.
Downloading Videos on a PC with a WINDOWS Operating System
1. Connect the camera to the USB port using the included cable.
2. Turn the camera on by moving the RECORD switch to the Forward On
/ Record position.
3. The device should automatically install.
4. Operating system
a. Windows XP
i. Open “My Computer”. The camera will be listed under devices
with removable storage.
b. Windows Vista
i. Open “Computer”. The camera will be listed under devices with
removable storage.
c. Windows 7
i. Open “Computer”. The camera will be listed under devices with
removable storage.
d. Windows 8
i. From the desktop, open the File Explorer. The camera will be
listed under devices with removable stoarge
5. Click on the device.
6. Open DCIM Folder.
7. Open 100MEDIA folder.
8. Your videos will be in this folder.
6 midlandusa.com
Compatible Systems
Downloading Videos on a MAC
1. Connect the camera to the USB port using the included cable.
2. Turn the camera on by moving the RECORD switch to the Forward On
/ Record position.
3. MAC should automatically recognize the camera external hard
4. Click on the icon on the desktop.
5. Open DCIM Folder.
6. Open 100MEDIA folder.
7. Your videos will be in this folder.
8. Drag video les to your hard drive or double click to view.
drive.
Minimum System Requirements
Downloading Videos
Processor 3.0 GHz or faster 3.2 GHz or faster
Ram 1 GB or greater 2 GB or greater
Video Card 128 MB or greater 128 MB or greater
Video playback requires H.264 codec. To obtain more information
go to midlandusa.com
720 video 1080 video
Page 7
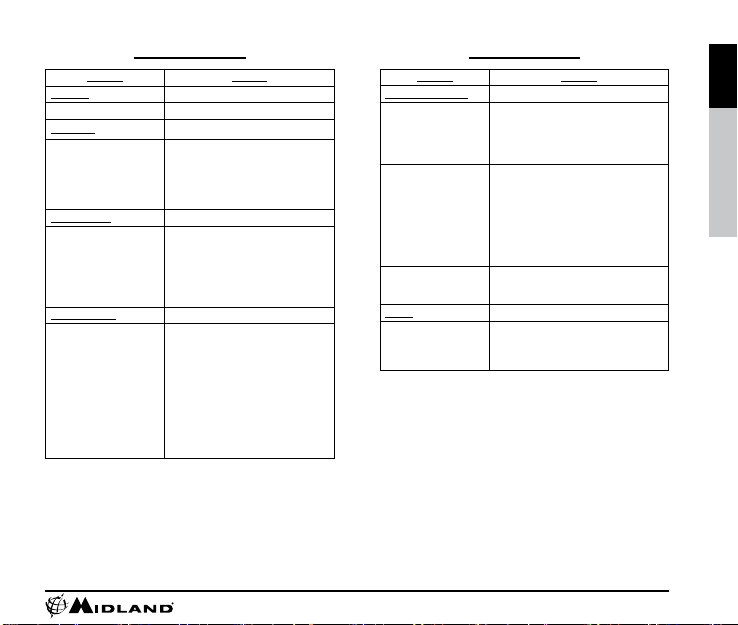
Tips and Tricks
Problem Solution
Batteries
Camera not turning on Make sure battery is fully charged.
Recording
Camera not recording
Micro SD card
Micro SD card not reading
Video Playback
Slow or choppy video
Make sure the switch is pushed all the
way forward. If the record LED does
not come on, turn off the device and
reinstall the battery.
Verify available memory.
Ensure the Micro SD card is inserted
properly.
Plug camera into the computer to
verify it has available storage.
Attempt formatting process.
Verify the camera is plugged into a
USB 2.0 device.
Remove other unused USB devices.
Transfer video to
viewing.
Verify computer meets minimum
requirements.
Verify proper codec is installed.
computer before
Tips and Tricks
Problem Solution
Video Downloading
Slow data transfer
Computer does not
recognize camera
File won’t transfer off
memory card
Sound
Excessive Wind Noise
Verify the camera is plugged into a USB
2.0 device. If registering as 1.1, unplug
and the re-plug the device.
Remove other unused USB devices.
Ensure record switch is in the Forward
On / Record position while connected
to computer.
Ensure the Micro SD card is inserted
properly.
Micro SD card may be corrupted.
Attempt formatting process.
In the run command type:
chkdsk volume:/f
then press enter
Place piece of tape over microphone
hole.
Try using the submersible case
English
François Español
midlandusa.com
7
Page 8

This device complies with Part 15 of the FCC Rules. Operation is subject
to the following two conditions: (1) This device may not cause harmful
interference, and (2) this device must accept any interference received,
including interference that may cause undesired operation.
Warning: Changes or modications to this unit not expressly approved by
MIDLAND RADIO CORPORATION could void the user’s authority to
operate the equipment. Note: This equipment has been tested and found
to comply with the limits for a Class B digital device, pursuant to Part
15 of the FCC Rules. These limits are designed to provide reasonable
protection against harmful interference in a residential installation. This
equipment generates, uses and can radiate radio frequency energy and
if not installed and used in accordance with instructions, it may cause
harmful interference to radio communications. There is no guarantee that
interference will not occur in a particular installation. If this equipment
does cause harmful interference to radio or television reception, which
can be determined by turning the equipment off and on, the user is
encouraged to try to correct the interference by one or more of the
following measures:
Reorient or relocate the receiving antenna.
Increase separation between equipment and receiver.
Connect the equipment into an outlet on a circuit different from that to
which the receiver is connected.
Consult the dealer or an experienced radio/TV technician for help
Service
If you have a problem which you believe requires service, please rst check the FAQ
section of the website, check your Owner’s Manual, or call and speak with a
service technician. Many problems can be remedied without returning the unit
for service. If necessary, return as follows:
Pack the unit in its original box and packing. Then pack the original box in a suitable
shipping carton. Caution: Improper packing may result in damage during
shipment.
Include the following:
a. Full description of any problems
b. Daytime telephone number, name & address
For warranty service include a photocopy of the bill of sale from an authorized dealer
or other proof of purchase showing the date of sale.
You do not need to return accessory items (AC/DC Adapter, Batteries, and Owners
Guide) unless they might be directly related to the problem.
Repairs not covered by warranty or units that are over ONE year old are subject to a
repair fee. Please call for a quote on repair service cost at 816-241-8500. Send only
cashier’s check, money order, Master Card or Visa card number.
Midland Radio Corporation
5900 Parretta Drive
Kansas City, Missouri 64120
Phone: (816) 241-8500
Fax: (816) 241-5713
E-mail: [email protected]
8 midlandusa.com
FCC Information
LIMITED WARRANTY
(United States and Canada)
Subject to the exclusions set forth below, Midland Radio Corporation will repair or
replace, at its option without charge, any Midland XTC Action Camera which fails
due to a defect in material or workmanship within Three Years following the initial
consumer purchase.
This warranty does not apply to water damage, battery leak, abuse or misuse of
unauthorized accessories, unauthorized service or modication or altered products.
Accessories have a 90 day warranty from date of purchase, including any chargers,
mounts, and cables.
This warranty does not include the cost of labor for removal or re-installation of the
product in a vehicle or other mounting.
ANY IMPLIED WARRANTIES, INCLUDING, WITHOUT LIMITATION THE IMPLIED
WARRANTIES OF MERCHANTABILITY AND FITNESS FOR A PARTICULAR
PURPOSE, SHALL BE LIMITED AS SET FORTH HEREIN AND TO THE
DURATION OF THE LIMITED WARRANTY, OTHERWISE THE REPAIR OR
REPLACEMENT AS PROVIDED UNDER THIS EXPRESS LIMITED WARRANTY
IS THE EXCLUSIVE REMEDY OF THE CONSUMER AND IS PROVIDED IN LIEU
OF ALL OTHER WARRANTIES, EXPRESS OR IMPLIED. IN NO EVENT SHALL
MIDLAND BE LIABLE, WHETHER IN CONTRACT OR TORT (INCLUDING BUT
NOT LIMITED TO NEGLIGENCE, GROSS NEGLIGENCE, BODILY INJURY,
PROPERTY DAMAGE AND DEATH) FOR DAMAGES IN EXCESS OF THE
PURCHASE PRICE OF THE PRODUCT OR ACCESSORY, OR FOR ANY
INDIRECT, INCIDENTAL, SPECIAL OR CONSEQUENTIAL DAMAGES OF ANY
KIND, OR LOSS OF REVENUE OR PROFITS, LOSS OF BUSINESS, LOSS OF
INFORMATION OR DATA OR OTHER FINANCIAL LOSS ARISING OUT OF OR IN
CONNECTION WITH THE ABILITY OR INABILITY TO USE THE PRODUCTS OR
ACCESSORIES TO THE FULL EXTENT THESE DAMAGES MAY BE DISCLAIMED
BY LAW.
For Product Purchased in the USA:
Performance of any obligation under this warranty may be obtained by returning the
warranted product, prepaid freight, along with proof of purchase to:
Midland Radio Corporation
Warranty Service Department
5900 Parretta Drive
Kansas City, MO 64120
This warranty gives you specic legal rights, and you may also have other rights,
which vary from state to state.
Note: The above warranty applies only to merchandise purchased in the United
States of America or any of the territories or possessions thereof, or from a U.S.
Military exchange.
For Product Purchased in Canada:
Performance of any obligation under this warranty may be obtained by returning
the warranted product, along with proof of purchase, to your place of purchase in
Canada.
This warranty gives you specied legal rights. Additional warranty rights may be
provided by law in some within Canada.
Page 9
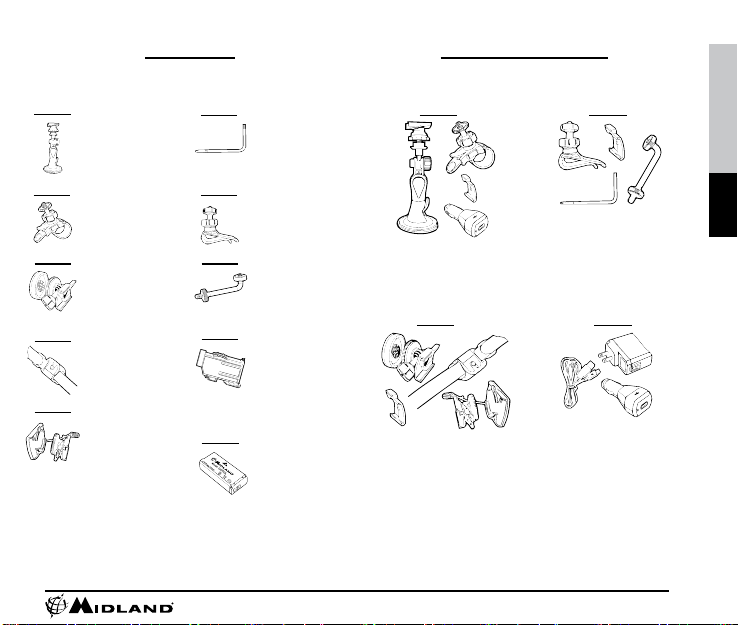
Accessories can be purchased at midlandusa.com or by lling in the form
Accessories
on the following page and mailing it to our address.
XTA101
XTA102
XTA103
XTA104
XTA105
Windshield Suction
Cup Mount
• Durable suction cup can
be attached to most
surfaces
• $29.99
Handlebar Mount
• Durable strap mount ts
all sizes of handlebars.
• $19.99
Standard Mount
• Heavy duty adhesive
mount for helmets.
• $19.99
Vented Helmet Strap
Mount
• Velcro strap mounts on
vented helmets.
• $14.99
Goggle Mount
• Mounts on the strap of
goggles.
• $19.99
XTA106
XTA107
XTA108
XTA303
BATT9L
Tree Mount
• Mount can be screwed into
a tree at many different
angles.
• $19.99
Visor Mount
• Clips onto the bill of a hat.
• $19.99
Bow Mount
• Screws into the stabilizer
on a bow.
• $19.99
Submersible Case
• Watertight case allows for
underwater use of the
camera.
• Has double track mount
system so camera
can still be used with
accessories.
• $29.99
XTC280 Battery
• 900mA Lithium-Ion
Battery Pack.
• $29.99
Accessory Value Packs
XTAVP1
Includes:
• Window Suction Cup
Mount
• Handlebar Mount
• DC Adapter
• Threaded to Slide Adapter
• $59.99
XTAVP2
Includes:
• Goggle Mount
• Helmet Mount
• Strap Mount
• Threaded to Slide Adapter
• $49.99
XTAVP3
Includes:
• Visor Mount
• Bow Mount
• Tree Mount
• Threaded to Slide Adapter
• $49.99
XTAVP4
Includes:
• USB cable
• DC Adapter (Car Charger)
• AC Adapter (Wall Charger)
• $49.99
English François Español
midlandusa.com
9
Page 10

Please send Money Order or ll in the Visa/Master Card information and mail to the address below.
Please DO NOT send cash or checks. Make Money Order to Midland Radio Corporation.
Accessories Order Form
Name: _____________________________________________________________________________________________
Address: ___________________________________________________________________________________________
City: ______________________________________________________________ State: ________ Zip Code: __________
Telephone: _________________________________________________________ E-mail: __________________________
Credit Card# _______________________________________________________ Type:_________ Exp: _______________
QTY ITEM DESCRIPTION PRICE TOTAL
XTA101 Window Suction Cup Mount $29.99
XTA102 Handlebar Mount $19.99
XTA103 Standard Helmet Mount with 2 3M Pads $19.99
XTA104 Vented Helmet Strap Mount $14.99
XTA105 Goggle Mount $19.99
XTA106 Tree Mount $19.99
XTA107 Visor Mount $19.99
XTA108 Bow Mount $19.99
XTA303 Submersible Case for XTC280 series $29.99
XTA113 Surfboard Mount $59.99
XTA114 Head Strap Mount $49.99
XTA115 Picatinny Rail Mount $49.99
BATT9L 900 mA Lithium-Ion Battery $29.99
Mail To:
Midland Radio Corporation
Consumer Dept.
5900 Parretta Drive
Kansas City, MO 64120
______________________________
Or Call 816.241.8500
Sub-total ______________________
Tax (MO, FL, WA Only) ______________________
S&H $14.95
(Applies to Domestic US only. For Hawaii, Alaska, and Puerto Rico S&H will
be $38.25 for 1 lb. and $64.25 for 2 lb. or more).
Total $
To order online go to www.midlandusa.com
Page 11
English
François Español
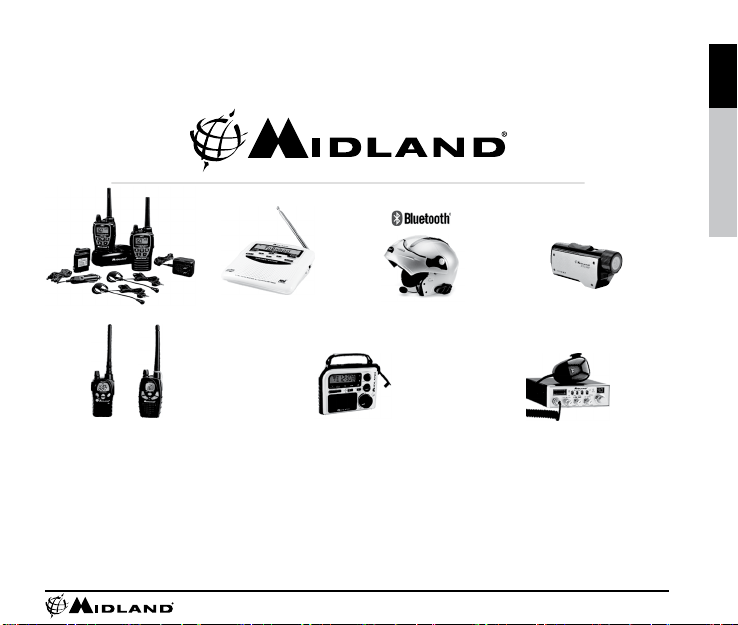
2-Way Radios
Marine Radios
Weather Radios
Emergency Crank Radios
Check out these and other great products at
midlandusa.com
Bluetooth Headsets
midlandusa.com
HD Wearable Video Cameras
CB Radios
11
Page 12

MIDLAND RADIO CORPORATION
5900 Parretta Drive
Kansas City, MO 64120
Call 816.241.8500
We’d love to hear from you! Let us know what you
think of your new Midland product at
or by visiting us at
midlandusa.com
Note: Features & Specifications are subject to change without
notice. MIDLAND is not responsible for unintentional errors or
omissions on its packaging.
08/07/13
 Loading...