

Page 1

AS420
E1 Digital Loopback (EDL) Device
34-00294.2
May 2000
i
Page 2

RONT
F
M
ATTER
Copyright N otice
Trademarks
EU Declaration of
Conformity
Copyright © 2000 Verilink Corporation. All rights reserved.
This document does not create any express or implied warranty about Verilink or about its
products or services. Verilink’s sole warranty is contained in its product warranty. The
end-user documentation is shipped with Verilink’s products and constitutes the sole specifications re ferred to in th e pr od u c t wa r ranty. Verili nk h as m a de re a so n ab le efforts t o ve r ify th at the
information contained herein is accurate, but Verilink assumes no responsibility for its use or
for any infringem ent of patents or other rights of third parties that may result. The customer is
solely responsible for verifying the suitability of Verilink’s products for its use. Specifications
are subj ect to change without notice.
Manual reorder # 34-00294
2nd Edition, May 2000
Verilink™ and the Verilink logo are registered trademarks of Verilink Corporation. All other
trademarks or registe red trademarks are the property of th eir respectiv e ow ners.
Model Number: AS420
Manufacturer’s Name: Verilink Corporation
Manufacturer’s Address: 127 Jetplex Circle
Madison, Ala bama 35758
USA
Telephone: (256) 772-3770
Facsimile: (256) 774-2277
The before me ntioned products comp ly with the following EU directive:
89 / 336 / EEC, “Council Directive of 3 M ay 1989 on the approximation of the
laws of Mem be r Sta tes relati ng to ele ct ro m a gn e tic compatibility”
The com pliance o f the above mention ed produc ts with th e Directives and with th e followin g
essent ial requirements is hereby confirmed:
Emissions Immunity Safety
EN 55022, Class A , 1995 EN 50082-1, 1992 EN 60950: 1992 / A1 + A2: 1993 /
A3: 1995 / A4: 1997
The technical files and other documentation are on file with Mr. Ron Hillis, Certification Manager.
As the manufacturer we declare under our sole responsibility that the above mentioned products compl y w ith the above named di rectives.
Ron Hillis,
Certification Manager, Verilink Corporation
Madison Ala bama, 6 May 1999
Canadian Emissions
Requirements
ii AS420 Reference Manual
This digital apparatu s d oe s not exceed the Class A limits for radio noise emissions from dig ital
apparatus set out in the Radio Interference Regulations of the Canadian Department of Communications.
Le présent appareil numérique n’émet pas de bruits radioélectriques dépassant les limites
applicables aux appareils numériques (de la class A) prescrites dans le Règlement sur le
brouillage radioélectrique édicté par le ministère des Communications du Canada.
Users should ensure for their own protection that the electrical ground connections of the
power utility, telephone lines and internal metal lic water pipe system, if present, are connected
together. This precaution may be particular ly important in rural areas.
Page 3

Caution: Users should not attempt to make such connections themselves, but
should contact the appropriate electric inspection authority, or
elect rician, as appropriate.
Warranty
Customer Service
Returning P roducts
Verilink's product warranty covers repair or replacement of all equipment under normal use for
a five-year period from date of shipment. Replacement product s may be new or reconditioned.
Any replaced or repaired product or part has a ninety (90) day warranty or the remainder of the
initial warranty period, whichever is longer. Our in-house Repair Center services on a standard
10-workday-turnaround basis.
Verilink offers the following services:
Customer support is available by telephone 24 hours a day, 7 days a week. To speak
•
directly with a Verilink customer service representative, you may dial one of the
followin g numbe rs:
Technical Support: 800- 285 -2755 (toll-free)
•
256-772 - 3770 (local)
Sales and Marketing: 800-VERILINK (837-4546)
•
You can request sales and marketing information or pose a technical support question
•
about your Verilink product by contacting us at the e-mail addresses provided below.
Verilink will respond to e- mailed requests for support during regular business hours
(8–5 CST, M onday–Friday).
Sales and Marketing: info@verilink.com
•
Technical Support: support@verilink.com
•
Access the latest information about Verilink products, customer service, technical
•
support, latest news releases and more by visiting Verilink’s Internet Web site:
www.verilink.com.
A product must be assigned a Return Materials Authorization (RMA) number before it is sent
to Verilink for repair. An RMA number is issued by Verilink Customer Service at (800)
926-0085 , ext. 2282.
Safety Precautions
When handling this equipment, follow these basic safety precautions to reduce the risk of electric shock and injury:
Follow all warnings and instructions marked on the product and in the manual.
•
Unplug the hardware from the wall outlet before cleaning. Do not use liquid cleaners or
•
aeros ol clea ners. Use a sl ight ly dam p clot h for cl eani ng.
Do not place t his product on an unstable cart, stand, or table. It may fall, causing serious
•
damage to the product.
This product should be operated only from the type of power source indicated on the
•
marking l abel and manual. If you are unsure of the type of power supply you are using,
consult your dealer or local power company.
Do not allow anything to rest on the power cord. Do not locate this product where the
•
cord in terf eres w ith th e free moveme nt of people .
Do not overload wall outlets and ext ension cords, as this can result in fire or electric
•
shock.
Never push objects of any kind into the unit. They may touch dangerous voltage points
•
or short out parts that could result in fire or electric shock. Never spill liquid of any kind
on this equipment.
Unplug the equipment from the wall outlet and refer servicing to qualified service
•
personnel under the following conditions:
When the power supply cord or plug is dama ged or frayed.
•
If liquid has been spill ed into the product.
•
If the product has been exposed to rain or water.
•
If the product has been dr opped or if the housing has been damaged.
•
iii
Page 4

iv AS420 Reference Manual
Page 5

Table of Cont ents
Copyright Notice ................................................................................................................................... ii
Trademarks ............................................................................................................................................ ii
EU Declaration of Conformity .............................................................................................................. ii
Canadian Emissions Requirements ........................................................................................................ ii
Warranty ............................................................................................................................................... iii
Customer Service .................................................................................................................................. iii
Returning Products ............................................................................................................................... iii
Safety Precautions ................................................................................................................................ iii
About This Manual
What is a Reference Manual? .................................................................................................................1
Where to go for Information ...................................................................................................................1
Conventions ............................................................................................................................................1
Chapter 1 General
Introduction .............................................................................................................................................3
Features ...................................................................................................................................................3
Specifications ..........................................................................................................................................4
Generic Interface Requirements (120 W and 75 W) .......................................................................4
E1 Interface ...............................................................................................................................4
T1 Interface ................................................................................................................................4
120 W Termination ....................................................................................................................4
75 W Termination ......................................................................................................................4
E1 Equipment Interface ....................................................................................................................4
120 W Termination ....................................................................................................................4
75 W Termination ......................................................................................................................5
Timing ..............................................................................................................................................5
Network .....................................................................................................................................5
Internal .......................................................................................................................................5
Management .....................................................................................................................................5
Mechanical .......................................................................................................................................5
Power Source ...................................................................................................................................5
Industry Standards ............................................................................................................................5
Europe ........................................................................................................................................5
Canada .......................................................................................................................................6
US ..............................................................................................................................................6
Environmental ..................................................................................................................................6
v
Page 6

Chapter 2 Installation and Configuration
Introduction .............................................................................................................................................7
Safety Summary ......................................................................................................................................7
Unpacking and Inspection ......................................................................................................................7
Supplied Materials ..................................................................................................................................8
Connections ............................................................................................................................................8
DTE and Network Connections .....................................................................................................8
User Interface Port Connection ........................................................................................................8
Power ................................................................................................................................................9
Configuration ..........................................................................................................................................9
Configuration Switch S1 ................................................................................................................9
E1 Mode Settings .......................................................................................................................9
Framed E1 ...........................................................................................................................9
CRC-4 .................................................................................................................................9
CAS Signalling ...................................................................................................................9
Timing Mode .......................................................................................................................9
Front Panel Rocker ..............................................................................................................9
Not Used .............................................................................................................................9
T1 Mode Settings .....................................................................................................................10
Framing T1 ........................................................................................................................10
CRC-4 ...............................................................................................................................10
Signalling ..........................................................................................................................10
Timing Source ...................................................................................................................10
Network Mode ..................................................................................................................10
Front Panel Rocker ............................................................................................................10
Not Used ...........................................................................................................................10
Supervisory (SUPV) Port ........................................................................................................10
Firmware Download Procedure ...............................................................................................11
Reloading Previous Firmware .................................................................................................11
Power Bypass .................................................................................................................................11
Chapter 3 Testing
Introduction ...........................................................................................................................................13
Indicators ..............................................................................................................................................13
Loopbacks .............................................................................................................................................14
Front Panel Rocker Switch ...................................................................................................................14
Network ..........................................................................................................................................15
Equipment ......................................................................................................................................15
Chapter 4 Terminal Operation
Terminal Interface ................................................................................................................................17
Screen Components ........................................................................................................................17
Header ......................................................................................................................................17
vi AS420 Reference Manual
Page 7

Main Title ................................................................................................................................18
Cursor Controls ........................................................................................................................18
Field Types ..............................................................................................................................18
vii
Page 8

viii AS420 Reference Manual
Page 9

A
C
0
HAPTER
What is a Reference Manual?
This is a reference manual. It provides information about unit installation,
configuration, testing and troubleshooting on a function-by-function basis. It
is not a user’s guide containing step-by-step procedures. This manual contains
specific information about a command, menu field, port, etc. Unless otherwise
noted, the information in this manual applies only to the Verilink AS420 (also
referred to as “the unit.”)
Where to go for Information
The chapters and appendices in this manual are arranged for quick reference.
It is not necessary to read previous chapters to understand the subsequent
chapters.
Chapter 1, General -- Introduces the unit, lists the features, and provides
•
specifications.
Chapter 2, Installation and Configuration -- Describes unit installation, port
•
and power connections, switch settings, and firmware upload procedures.
BOUT
T
HIS
M
ANUAL
Conventions
Chapter 3, Testing -- Describes the indicators, test switch, and loopbacks.
•
Chapter 4, Terminal Operation -- Describes the terminal interface’s screen
•
structure and menu controls.
The following table lists the conventions used throughout this manual.
Convention Description
Notices call attention to important features or instructions.
Cautions alert you to personal safety risk, system damage, or data loss.
Warnings alert you to the risk of severe personal injury.
italics Italics denote new terms or emphasis.
underline Default settings are underlined.
About This Manual 1
Page 10

2 AS420 Reference Manual
Page 11

Introduction
HAPTER
C
1
G
C
1
HAPTER
The AS420 is an E1 Digital Loopback device (EDL). This device allows
network management centers to remotely activate an E1 signal payload
loopback to facilitate installation and troubleshooting of the E1 circuit. This
EDL device responds to proprietary codes, transmitted by remote test
equipment, which does not interfere with network maintenance elements that
belong to local postal telegraph (PTT) authorities.
ENERAL
Features
Table top packaging
•
100–240 VAC autoranging power supply
•
BNC (75 ohm) and RJ-48C (120 ohm) NET and EQUIP connectors
•
Compatible with fractional, full, or unframed E1 services
•
LED status indicators
•
DIP switch configurable
•
Provides payload maintenance loop-back, towards network, on demand
•
Provides DTE line loopback on demand
•
Power bypass relays on EDL device to maintain E1 service to customer if the
•
EDL device loses power. Automatically terminates bypass mode when power
is restored to unit.
SUPV port for local firmware upgrades
•
General 3
Page 12

Specifications
Generic Interface Requirements (120 Ω
Ω and 75 ΩΩΩΩ)
Ω Ω
E1 Interface
Line Rate: 2.048 Mbps (± 32 ppm)
Framing: ITU-T G.704 (with or without CRC-4) G.703
Line Code: HDB3
Input Level: E1 to 6 decibels
Pulse Width: 244 (± 41) nanoseconds at half amplitude
Pulse Afterkick: 10 to 30 percent of pulse peak
T1 Interface
Line Rate: 1.544 Mbps (± 32 ppm)
Framing: D4 or ESF
Line Code: AMI or B8ZS
Input Level: 0 to -36 decibels
Pulse Width: 344 (± 45) nanoseconds at half amplitude
Pulse Afterkick: 10 to 30 percent of pulse peak
120 Ω
Ω Termination
Ω Ω
Interface: RJ-48C
Impedance: 120 Ω, balanced
Output Level: 3.0 (± 0.3) volts (base- to- peak)
75 Ω
Ω Termination
Ω Ω
Interface: BNC - coax
Impedance: 75 Ω, unbalanced
Output Level: 2.37 (± 0.24) volts (base- to -peak)
E1 Equipment Interface
N×64 kbps rate... for unframed E1: N= 32;
120 Ω
Ω Termination
Ω Ω
Interface: RJ-48C
Impedance: 120 Ω, balanced
for framed E1 without CAS: N= 1 to 31;
for framed E1 with CAS: N=1 to 15 and 17 to 31
4 AS420 Reference Manual
Page 13

Timing
Management
75 Ω
Ω Termination
Ω Ω
Interface: BNC - coax
Impedance: 75 Ω, unbalanced
Network
E1: 2.048 Mbps (±50ppm)
T1: 1.544 Mbps (±50ppm)
Internal
E1: 2.048 Mbps (±32ppm)
T1: 1.544 Mbps (±32ppm)
DIP switches and LEDs
Mechanical
Mounting: desktop
Dimensions: 1.3" H, 8.0" W, 8.0" D
Weight: 1 pound
Power Source
External: Input: 100 –240 VAC autoranging
Industry Standards
Europe
ITU-T G.703
ITU-T G.704
ITU-T G.706
ITU-T G.821
ITU-T G.823
Output: 24 VDC, 500 mA
Directive 89/ 336 /EEC
Directive 73/ 23 /EEC
Directive 98/ 13 /EEC
General 5
Page 14

Environmental
Canada
Canadian Safety CSA C22.2, No. 950-95
US
FCC Compliance Part 15, Class A
rd
US Safety UL 1950, 3
Operating Temp: 0° to 40°C (32° to 104°F)
Storage Temp: −20° to 70°C (−4° to 158°F)
Humidity: 95% maximum (non- condensing)
Edition
6 AS420 Reference Manual
Page 15

Introduction
HAPTER
C
2
I
C
2
HAPTER
NSTALLATION AND
C
ONFIGURATION
This chapter contains information and instructions required to prepare the
Verilink AS420 for use. Included are initial inspection procedures,
configuration guidelines, connection, and powering information.
Safety Summary
This manual contains information and warnings that must be followed to
ensure safe operation and retain the equipment in a safe condition.
This WARNING sign denotes a potential hazard to the operator. It calls attention
to a procedure or practice that, if not correctly performed or adhered to, could
result in injury or loss of life. Do not proceed beyond a WARNING sign until the
indicated conditions are fully understood and met.
Unpacking and Inspection
This unit is carefully packaged to prevent damage in shipment. Upon receipt,
inspect the shipping container for damage. If the shipping container or
cushioning material is damaged, notify the carrier immediately and make a
notation on the delivery receipt that the container was damaged (if possible,
obtain the signature and name of the person making delivery). Retain the
packaging material until verifying the contents of the shipment are complete
and the unit has been checked both mechanically and electrically.
If the contents of the shipment are incomplete or, if there is mechanical
damage or defect, notify Verilink. If the shipping container is also damaged,
or the cushioning material shows signs of stress, notify the carrier of the
damage as well as Verilink. Keep the shipping materials for the carrier’s
inspection. Verilink will arrange for repair or replacement without waiting for
claim settlement.
Installation and Configuration 7
Page 16

Supplied Materials
The AS420 is shipped from the factory with the following standard
equipment.
external AC power supply
•
reference manual
•
RJ-48 to RJ-48 cables
•
RJ-48 to DB-15 adapters
•
Connections
The AS420 has BNC and RJ-48C connectors for the network and equipment
interfaces, a supervisory port and a power connector. The following
paragraphs describe these connections.
DTE and Network Connections
Table 2.1 shows the pinout for the RJ-48C NET and EQUIP connectors.
Table 2.1
Pin NET EQUIP
1 Tip In Tip Output
2 Ring In Ring Output
4 Tip Out Tip Input
5 Ring Out Ring Input
3, 6–8 not used not used
RJ-48C Equipment and Network Connector Pinout
User Interface Port Connection
Table 2.2 shows the pinout for the RJ- 48C User Interface port.
Table 2.2
Pin User Interface Port
1 Not used
2RTS*
3 Chassis Ground
4TXD
5RXD
6 Ground
7CTS*
8 not used
RJ-48C User Interface Port Pinout
8 AS420 Reference Manual
Page 17

Power
Configuration
Plug the connector from the power supply into the unit. Plug the transformer
into an appropriate outlet. This applies power to the unit.
This section describes the configuration of the AS420. This unit is configured
using the rear panel DIP switches. Refer to Figure 2.1 for switch locations.
Figure 2.1
The switches are read every two seconds. Any change in the DIP switch
configuration takes effect within a four-second period.
Configuration Switch S1
Switch S1 is located on the rear panel. This switch provides the following
configuration parameters.
E1 Mode Settings
Framed E1.
unframed signals. The default is Framed (Down).
CRC-4.
The default is Disabled (Down).
CAS Signalling.
signalling in frame 16 of a framed E1 signal. The default is Disabled (Down).
Timing Mode.
timing is selected, the unit recovers timing from the network signal. Internal
timing recovers the clock from the unit’s internal circuitry.
Position S1-2 is used to enable or disable CRC4 for the equipment.
Verilink AS420
Position S1-1 sets the unit to receive and transmit framed or
Position S1-3 sets the unit to receive and transmit CAS
Position S1-4 sets the timing mode. When Network (Down)
Front Panel Rocker.
rocker switch to prevent inadvertent loopbacks. The default is Enabled
(Down).
Not Used.
Positions S1-5, S1 -7, and S1 -8 are reserved for future use.
Position S1-6 enables and disables the front panel
Installation and Configuration 9
Page 18

✍
NOTICE:
Switch positions 5, 7, and 8 must remain in the default (Down)
position for normal operation.
T1 Mode Settings
Framing T1.
framed signals. The default is ESF (Down).
CRC-4.
The default is Disabled
Signalling.
B8ZS signalling. The default is B8ZS (Down).
Timing Source.
timing is selected, the unit recovers timing from the network signal. Internal
timing recovers the clock from the unit’s internal circuitry.
Network Mode.
mode is selected, the unit receives and transmits E1 signals. When T1 (Up)
mode is selected, the unit receives and transmits T1 signals. The default is E1
(Down).
Front Panel Rocker.
rocker switch to prevent inadvertent loopbacks. The default is
Enabled(Down).
Position S1-1 sets the unit to receive and transmit D4 and ESF
Position S1-2 is used to enable or disable CRC4 for the equipment.
(Down).
Position S1-3 sets the unit to receive and transmit AMI and
Position S1-4 sets the timing source. When Network (Down)
Position S1-5 sets the network mode. When E1 (Down)
Position S1-6 enables and disables the front panel
Positions S1-7 and S1-8 are reserved for future use.
Switch positions 5, 7, and 8 must remain in the default (Down)
position for normal operation.
✍
Not Used.
NOTICE:
Supervisory (SUPV) Port
The front panel supervisory port is used for local downloading of firmware
updates.
The physical connection is an RJ-48 jack (electrically RS-232). The pinout is
shown in Table 2.3.
Table 2.3
Pin Description
1 Not Connected
2RTS*
3 Chassis Ground
4TXD
Supervisory Port Pinouts
10 AS420 Reference Manual
Page 19

Table 2.3
Pin Description
5RXD
6 Ground
7CTS*
8 Not Connected
Supervisory Port Pinouts
Firmware Download Procedure
This port is accessed through a direct connection. Configure the terminal for
VT100 emulation, 115200 bps, 8 bits, no parity, 1 stop bit.
✍
✍
NOTICE:
Begin the procedure by entering AT . The unit returns “OK.”.
1
NOTICE:
Put the unit into download mode by entering
2
“
Initiate the download or file transfer utility in your communication’s
3
package.
Enter the desired binary file name (.BIN extension) to download. The
4
transfer can take one or two minutes. After the unit successfully receives the
file, the display will read, “
After successfully downloading the binary file, reset the unit by
5
disconnecting and reconnecting the power.
After the unit has reset, enter
6
Commands to the unit are not case sensitive. When the word “enter”
is used in this manual, it means to press the Return or Enter key.
The unit does not echo the typed characters.
Ready for Flash download.
Reloading Previous Firmware
To reload the previous version of the firmware, enter
1
will read, “
Processing Previous Firmware.
. The display will return
AT$Y
”
Flash download was successful.
to verify the new software version.
ATI
. The display
AT$P
”
”
Power Bypass
After the firmware successfully loads, the unit returns “OK”.
2
After successfully downloading the binary file, reset the unit by
3
disconnecting and reconnecting the power.
To verify software, type
4
The AS420 can operate in a power bypass mode where the AS420 passes the
signal from the network to the equipment and vice versa whether in a
powered state or not.
.
ATI
Installation and Configuration 11
Page 20

The power bypass mode is done using relays that switch the network and
equipment connections. When the unit is powered and stable, the relays have
the network and equipment connections switched into the AS420’s internal
circuitry. When the unit loses power, the relays switch the network connection
to a direct connection path to the equipment connection. When power is
reestablished and the unit passes self test, the relays switch the network and
equipment connections back into the AS420’s internal circuitry.
The AS420 powers up and remains in the power bypass mode for two
minutes. This delay allows for any power glitches that may occur as power
resumes after an outage. This minimizes the unit switching from power
bypass to normal operation.
12 AS420 Reference Manual
Page 21

Introduction
HAPTER
C
3
T
C
3
HAPTER
ESTING
This chapter describes the diagnostic and test features of the AS420. The unit
is controlled manually using rear panel DIP switches (the DIP switches are
discussed on page 9). The front panel indicators and switch are shown in
Figure 3.1 and described below.
Indicators
Figure 3.1
The front panel indicators shown in Figure 3.1 convey major alarm conditions
and looping status.
Table 3.1
LED Condition Description
PWR Off
BPV Off
CRC Off
AS420 Front Panel
AS420 Front Panel Indicators
Power off.
Solid
Flashing Red
Solid Red
Flashing Red
Solid Red
Power is applied to the unit.
No errors.
Intermittent BPV errors.
Continuous BPV errors.
No errors.
Intermittent CRC-4 errors.
Continuous CRC-4 errors.
Testing 13
Page 22

Table 3.1
LED Condition Description
AS420 Front Panel Indicators
Loopbacks
NET Off
Flashing Red
Solid Red
LPBK Off
Flashing Yellow
Solid Yellow
No errors.
RAI/AIS detected.
Loss of signal.
No loopback active.
Equipment loopback active.
Payload loopback active.
The AS420 responds to remote loopup and loopdown codes from any channel
in the framed E1 data stream. The resulting payload loopback occurs on all
channels in the framed E1 data stream. Loopbacks are initiated after receiving
the loopback code for five seconds and remain until the time limit expires or
the loopdown code is received.
Loopback commands received from the far end must be initiated from test
equipment that sends data without packet protocols. This allows the AS420 to
detect loop-up and loop-down streams without stripping headers, footers, or
flags. The loop codes with their descriptions are provided in Table 3.2.
Table 3.2
Framed E1 Loops and Loop Codes
Description Code
Loop network traffic for 30 minutes. 00000111
Loop network traffic for 60 minutes. 00111000
Loop network traffic for 72 hours. 00010100
Cancel loop in progress. 00110010
For unframed E1 data, the unit responds to five seconds of a 1-in-5 (10000)
pattern by looping the entire E1 datastream until receiving a 1-in-3 (100)
pattern for three seconds.
In both framed and unframed E1 data payload loopback, the equipment
receives an all 1’s pattern.
Front Panel Rocker Switch
The front panel switch activates and deactivates a network or equipment
payload loopback. This switch can be overriden by disabling its functionality
with position S1-6. The loops requested default to a 72-hour loop and remain
in loopback until meeting one of three conditions: the switch is moved to the
middle position, the 72-hour clock expires, or a loopdown code is received
from the network.
14 AS420 Reference Manual
Page 23
Network
Setting the front panel rocker switch to NET activates a payload loopback
where every frame of the E1 datastream received is looped back to the
network. The equipment receives unframed 1’s.
Deactivate the loopback one of three ways: setting the rocker switch to the
middle position, allowing the 72-hour timer to expire, or receiving a
loopdown code from the network.
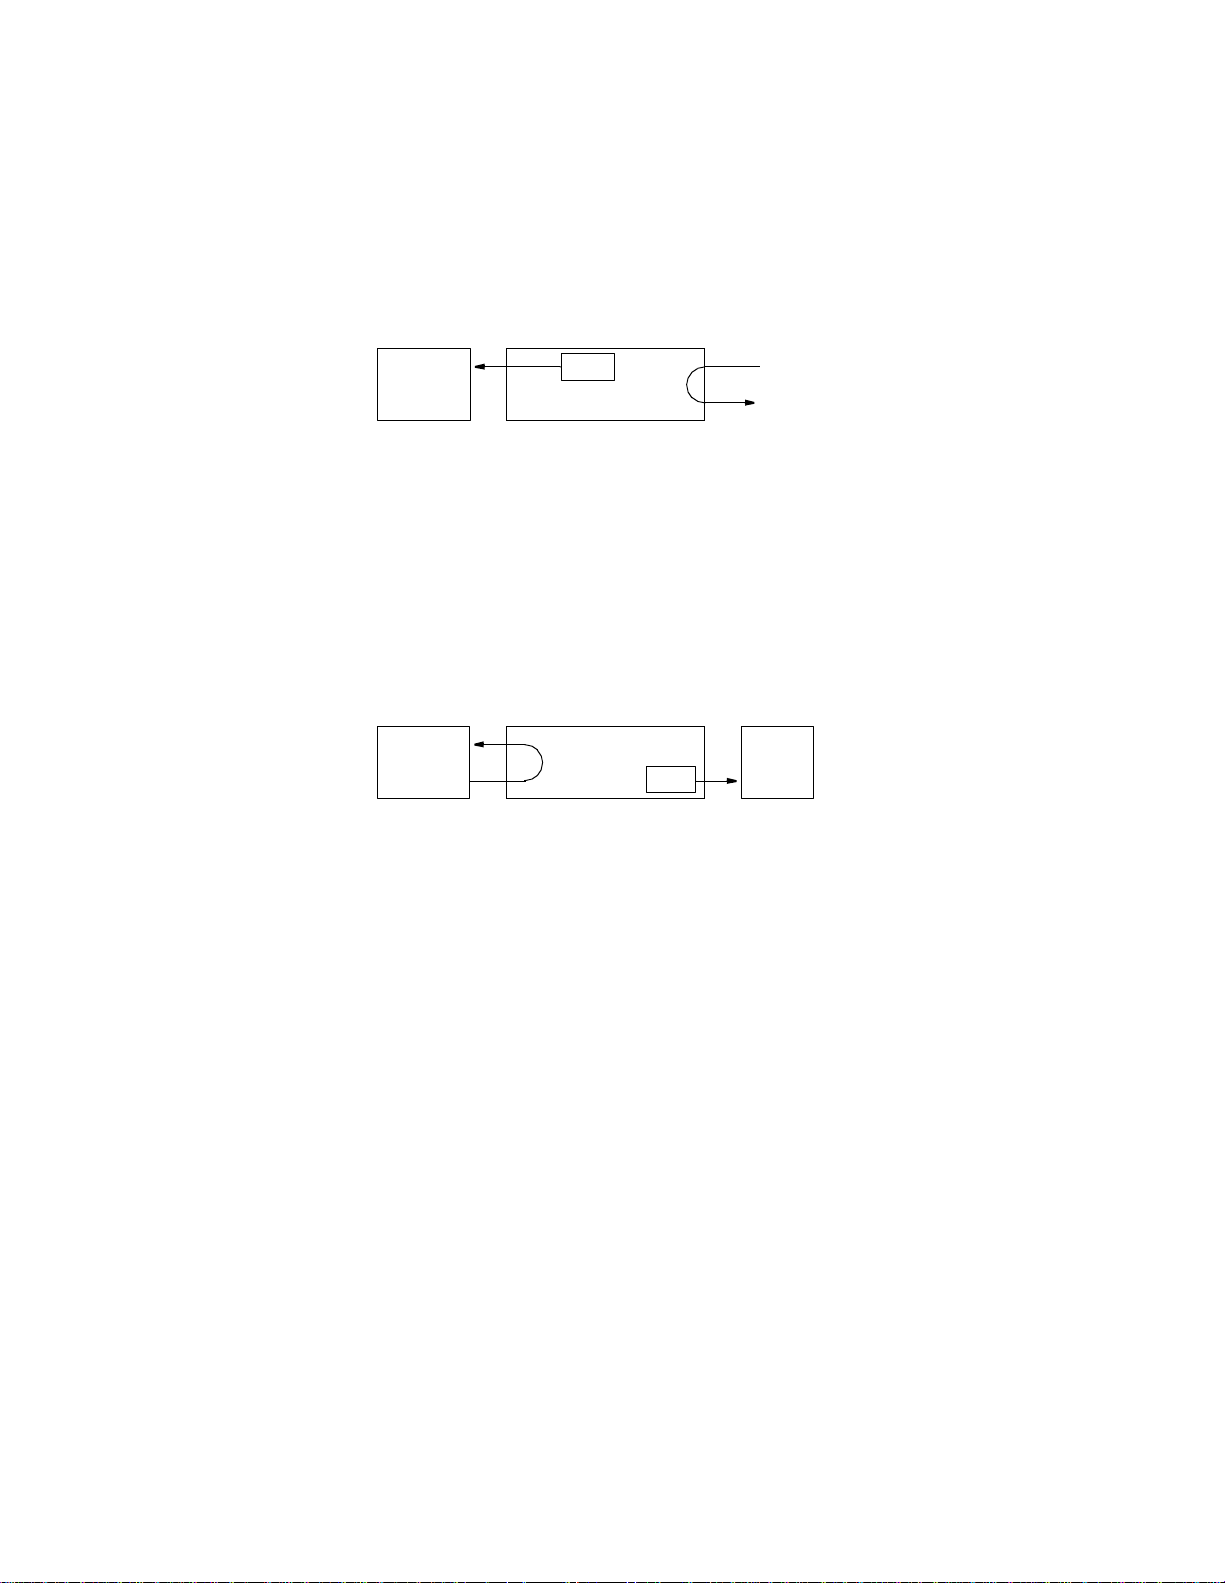
Equipment
Equipment
Figure 3.2
Payload Loopback
AIS
AS420
Network
Setting the front panel rocker switch to EQ activates an equipment loopback
where every frame received of the E1 datastream is looped back to the device.
The network receives all 1’s.
Deactivate the loopback one of three ways: setting the rocker switch to the
middle position, allowing the 72-hour timer to expire, or receiving a
loopdown code from the network.
Equipment
Figure 3.3
Equipment Loopback
AS420 Network
AIS
Testing 15
Page 24

16 AS420 Reference Manual
Page 25

HAPTER
C
4
Terminal Interface
This chapter describes the screens structure and menu controls for the
Verilink AS420 terminal interface. The interface is a firmware application
embedded inside the unit.
It requires an ANSI-compatible VT100 terminal (ASCII), or a computer
running an ANSI terminal emulation program. The terminal interface uses
ASCII break and escape functions, which are implemented differently with
the various terminal emulation programs.
Screen Components
Terminal interface screens have components common to all screens (Figure
4.1).
T
C
4
HAPTER
ERMINAL
Header
----- --------------- ------------------ Men u Ti tle ------ --------------------------- ---
O
PERATION
Figure 4.1
Header
The header contains the name of the device, which is “AS420.”
Figure 4-1 Terminal Interface Layout
Terminal Operation 17
Page 26

Main Title
The main title (third line, center) denotes the general classification of
functions currently accessible by the user (such as MAIN or
PERFORMANCE).
Cursor Controls
The terminal interface utilizes a highlighted cursor to make selections from
menus and select fields within the screens to be operated on. The cursor is
moved in different ways, depending on the terminal emulation program used.
Most programs allow use of the TAB and SHIFT+TAB keys. Others allow
use of the arrow keys. Once a field is highlighted, it is manipulated as
described in the section Field Types.
For keyboards that do not have these standard keys or have only some of
them, an alternate set if cursor commands is provided. Each command is
performed by pressing a letter key while holding down the CONTROL key.
Alternate commands may be freely mixed with the keyboard commands at
your discretion. Table 4-A shows the keyboard and equivalent commands.
Table 4.1
Keyboard
Command
left arrow CONTROL+S
right arrow CONTROL+D
up arrow CONTROL+E
down arrow CONTROL+X
backspace CONTROL+H
delete CONTROL+Z
Keyboard and Alternate Commands
Alternate
Command
Field Types
Each screen is made up of fields. The two basic types are user-selectable and
display-only. If the highlighted cursor can be moved to a field, it is a userselectable field. All other fields are for display only. User-selectable fields
allow for changes to be made or commands to be executed.
Fields without brackets or parenthesis are display-only. They cannot be
changed on the screen. Most user-selectable fields are enclosed in brackets or
parenthesis and are described in the following paragraphs.
Fields enclosed in brackets [ ] offer a list of selections from which to choose.
The selections may be toggled by pressing the spacebar. Each time it is
pressed, a new item appears. When the appropriate choice is displayed, press
ENTER to select it.
Fields enclosed in parenthesis ( ) are manipulated by one of the following
methods:
18 AS420 Reference Manual
Page 27

1 Pressing ENTER on such fields as (Reset) and (Start Test) simply executes
the function.
The most common type of field in parenthesis accepts typed input in the
2
form of letters and/or numbers. Typing characters when the field is
highlighted causes the current entry to be replaced with the new characters.
To edit an existing entry rather than replace it, press the right arrow key to
move the cursor to the point that needs editing. Characters may then be
inserted or deleted. Typed data is always inserted rather than typed over. If
the field is full, though, at least one character must be deleted to add
another.
Many fields of this type may also be toggled by pressing the spacebar.
3
Other fields are range checked, where the user is not allowed to exit with an
illegal value set.
✍
NOTICE:
Any screen may be redisplayed or refreshed by pressing
CONTROL+U. Any changes to fields on a screen that has not
been activated by pressing ENTER are discarded.
Terminal Operation 19
Page 28

20 AS420 Reference Manual
 Loading...