

Page 1

e285
Installation Guide
Verifone Part Number DOC087-513-EN-A, Revision A.6
Page 2

e285 Installation Guide
© 2019 Verifone, Inc.
All rights reserved. No part of the contents of this document may be reproduced or transmitted in any form without the written
permission of Verifone, Inc.
The information contained in this document is subject to change without notice. Although Verifone has attempted to ensure the
accuracy of the contents of this document, this document may include errors or omissions. The examples and sample programs are
for illustration only and may not be suited for your purpose. You should verify the applicability of any example or sample program
before placing the software into productive use. This document, including without limitation the examples and software programs, is
supplied “As-Is.”
Verifone and the Verifone logo are registered trademarks of Verifone. Other brand names or trademarks associated with Verifone’s
products and services are trademarks of Verifone, Inc.
All other brand names and trademarks appearing in this manual are the property of their respective holders.
Product Warranty:
For product warranty information, go to http://www.verifone.com/terms.
Comments? Please e-mail all comments on this document to your local Verifone Support Team.
Verifone, Inc.
1-800-Verifone
www.verifone.com
Verifone Part Number DOC087-513-EN-A, Revision A.6
Page 3

CONTENTS
PREFACE . . . . . . . . . . . . . . . . . . . . . . . . . . . . . . . . . . . . . . . 5
Audience. . . . . . . . . . . . . . . . . . . . . . . . . . . . . . . . . . . . . . . . . . . . . . . . . . . . . . . . 5
Organization . . . . . . . . . . . . . . . . . . . . . . . . . . . . . . . . . . . . . . . . . . . . . . . . . . . . . 5
Related Documentation . . . . . . . . . . . . . . . . . . . . . . . . . . . . . . . . . . . . . . . . . . . . 5
Conventions and Acronyms . . . . . . . . . . . . . . . . . . . . . . . . . . . . . . . . . . . . . . . . . 6
CHAPTER 1
Device Overview
CHAPTER 2
Device Setup Usage Guidelines . . . . . . . . . . . . . . . . . . . . . . . . . . . . . . . . . . . . . . . . . . . . . . . . 12
Features and Benefits . . . . . . . . . . . . . . . . . . . . . . . . . . . . . . . . . . . . . . . . . . . . . 8
Triple Radio Performance . . . . . . . . . . . . . . . . . . . . . . . . . . . . . . . . . . . . . . . . 8
Modern Application Environment . . . . . . . . . . . . . . . . . . . . . . . . . . . . . . . . . . 8
Accepts All Forms of Payment On-the-Go . . . . . . . . . . . . . . . . . . . . . . . . . . . 8
Exceptional Ease of Use. . . . . . . . . . . . . . . . . . . . . . . . . . . . . . . . . . . . . . . . . 8
Performance and Durability . . . . . . . . . . . . . . . . . . . . . . . . . . . . . . . . . . . . . . 8
Security . . . . . . . . . . . . . . . . . . . . . . . . . . . . . . . . . . . . . . . . . . . . . . . . . . . . . . 8
Connectivity . . . . . . . . . . . . . . . . . . . . . . . . . . . . . . . . . . . . . . . . . . . . . . . . . . 9
Environmental Factors . . . . . . . . . . . . . . . . . . . . . . . . . . . . . . . . . . . . . . . . . 12
Personal Security Considerations. . . . . . . . . . . . . . . . . . . . . . . . . . . . . . . . . 12
Electrical Considerations . . . . . . . . . . . . . . . . . . . . . . . . . . . . . . . . . . . . . . . 12
Unpacking the Shipping Carton . . . . . . . . . . . . . . . . . . . . . . . . . . . . . . . . . . . . . 12
Examining Device Features . . . . . . . . . . . . . . . . . . . . . . . . . . . . . . . . . . . . . . . . 13
Front Panel . . . . . . . . . . . . . . . . . . . . . . . . . . . . . . . . . . . . . . . . . . . . . . . . . . 13
Removing the Battery Cover . . . . . . . . . . . . . . . . . . . . . . . . . . . . . . . . . . . . . . . 14
Installing micro SIM and/or SAM Cards . . . . . . . . . . . . . . . . . . . . . . . . . . . . . . . 14
Initial Battery Charging . . . . . . . . . . . . . . . . . . . . . . . . . . . . . . . . . . . . . . . . . . . . 14
Starting Up and Shutting Down . . . . . . . . . . . . . . . . . . . . . . . . . . . . . . . . . . . . . 14
Using the Battery . . . . . . . . . . . . . . . . . . . . . . . . . . . . . . . . . . . . . . . . . . . . . . . . 15
Battery Life . . . . . . . . . . . . . . . . . . . . . . . . . . . . . . . . . . . . . . . . . . . . . . . . . . 16
Charging the Battery . . . . . . . . . . . . . . . . . . . . . . . . . . . . . . . . . . . . . . . . . . . 16
Charging via the Power Pack . . . . . . . . . . . . . . . . . . . . . . . . . . . . . . . . . . . . 16
Charging with the Folio . . . . . . . . . . . . . . . . . . . . . . . . . . . . . . . . . . . . . . . . . 17
Connecting to a Computer . . . . . . . . . . . . . . . . . . . . . . . . . . . . . . . . . . . . . . . . . 17
Conducting Wireless Transactions. . . . . . . . . . . . . . . . . . . . . . . . . . . . . . . . . . . 18
Using the Smart Card Reader . . . . . . . . . . . . . . . . . . . . . . . . . . . . . . . . . . . . . . 18
Using the Magnetic Card Reader . . . . . . . . . . . . . . . . . . . . . . . . . . . . . . . . . . . . 18
Using the CTLS Reader . . . . . . . . . . . . . . . . . . . . . . . . . . . . . . . . . . . . . . . . . . . 19
CHAPTER 3
Specifications Unit Power Requirement . . . . . . . . . . . . . . . . . . . . . . . . . . . . . . . . . . . . . . . . . . 21
Temperature. . . . . . . . . . . . . . . . . . . . . . . . . . . . . . . . . . . . . . . . . . . . . . . . . . . . 21
External Dimensions. . . . . . . . . . . . . . . . . . . . . . . . . . . . . . . . . . . . . . . . . . . . . . 21
Weight . . . . . . . . . . . . . . . . . . . . . . . . . . . . . . . . . . . . . . . . . . . . . . . . . . . . . . . . 21
Memory. . . . . . . . . . . . . . . . . . . . . . . . . . . . . . . . . . . . . . . . . . . . . . . . . . . . . . . . 21
Magnetic Stripe Card . . . . . . . . . . . . . . . . . . . . . . . . . . . . . . . . . . . . . . . . . . . . . 21
E285 INSTALLATION GUIDE 3
Page 4

CONTENTS
CHAPTER 4
Maintenance and
Cleaning
CHAPTER 5
Verifone Service
and Support
CHAPTER 6
Troubleshooting
Guidelines
SAM Card Reader . . . . . . . . . . . . . . . . . . . . . . . . . . . . . . . . . . . . . . . . . . . . . . . 21
Communication. . . . . . . . . . . . . . . . . . . . . . . . . . . . . . . . . . . . . . . . . . . . . . . . . . 21
Display . . . . . . . . . . . . . . . . . . . . . . . . . . . . . . . . . . . . . . . . . . . . . . . . . . . . . . . . 21
SD Memory. . . . . . . . . . . . . . . . . . . . . . . . . . . . . . . . . . . . . . . . . . . . . . . . . . . . . 21
Surface Cleaning . . . . . . . . . . . . . . . . . . . . . . . . . . . . . . . . . . . . . . . . . . . . . . . . 23
Terminal Contacts . . . . . . . . . . . . . . . . . . . . . . . . . . . . . . . . . . . . . . . . . . . . . . . 23
Magnetic Card Reader . . . . . . . . . . . . . . . . . . . . . . . . . . . . . . . . . . . . . . . . . . . . 23
Smart Card Reader . . . . . . . . . . . . . . . . . . . . . . . . . . . . . . . . . . . . . . . . . . . . . . 23
Additional Safety Information . . . . . . . . . . . . . . . . . . . . . . . . . . . . . . . . . . . . . . . 24
Returning a Device for Service. . . . . . . . . . . . . . . . . . . . . . . . . . . . . . . . . . . . . . 25
Accessories and Documentation . . . . . . . . . . . . . . . . . . . . . . . . . . . . . . . . . . . . 26
Accessories. . . . . . . . . . . . . . . . . . . . . . . . . . . . . . . . . . . . . . . . . . . . . . . . . . 26
Documentation . . . . . . . . . . . . . . . . . . . . . . . . . . . . . . . . . . . . . . . . . . . . . . . 26
Device Does Not Start . . . . . . . . . . . . . . . . . . . . . . . . . . . . . . . . . . . . . . . . . . . . 27
Device Display Does Not Show Correct/Readable Info . . . . . . . . . . . . . . . . . . . 27
Battery Does Not Charge . . . . . . . . . . . . . . . . . . . . . . . . . . . . . . . . . . . . . . . . . . 28
Blank Display . . . . . . . . . . . . . . . . . . . . . . . . . . . . . . . . . . . . . . . . . . . . . . . . . . . 28
Keypad Does Not Respond . . . . . . . . . . . . . . . . . . . . . . . . . . . . . . . . . . . . . . . . 28
Transactions Fail To Process . . . . . . . . . . . . . . . . . . . . . . . . . . . . . . . . . . . . . . . 29
APPENDIX A
Caution and
Warning Messages
e285 Caution and Warning Messages . . . . . . . . . . . . . . . . . . . . . . . . . . . . . . . . 31
4 E285 INSTALLATION GUIDE
Page 5

This guide is your primary source of information for setting up the e285.
PREFACE
Audience
Organization
Related
Documentation
This guide is useful for anyone installing an e285 device. Basic descriptions of the
device features are also provided.
This guide is organized as follows:
Chapter 1, Device Overview. Provides an overview of the e285.
Chapter 2, Device Setup. Explains how to set up the e285 device. It tells you how
to select a location, establish power connection, and install the SIM/SAM card.
Chapter 3, Specifications. Discusses power requirements and dimensions of the
e285.
Chapter 4, Maintenance and Cleaning. Explains how to maintain your e285.
Chapter 5, Verifone Service and Support. Provides information on how to contact
your local Verifone representative or service provider, and information on how to
order accessories or documentation from Verifone.
Chapter 6, Troubleshooting Guidelines. Provides troubleshooting guidelines,
should you encounter a problem in device installation.
SIO
VI
N
A
.
5
E
To learn more about the e285, refer to the following set of documents:
e285 Certifications and Regulations Sheet VPN DOC087-511-EN-x
R
e285 Quick Installation Guide VPN DOC087-512-EN-x
E285 INSTALLATION GUIDE 5
Page 6

PREFACE
NOTE
CAUTION
WARNING
Conventions and Acronyms
Conventions and
Acronyms
This section describes the conventions and acronyms used in this guide.
Various conventions are used to help you quickly identify special formatting.
Table 1 describes these conventions and provides examples of their use.
Table 1 Document Conventions
Convention Meaning Example
Blue Text in blue indicates terms that
are cross referenced.
Italics Italic typeface indicates book
titles or emphasis.
Courier The courier type face is used
while specifying onscreen text,
such as text that you would
enter at a command prompt, or
to provide an URL.
The pencil icon is used to
highlight important information.
.
5
The caution symbol indicates
possible hardware or software
failure, or loss of data.
A
See Conventions and Acronyms.
You must install a roll of thermal-
sensitive paper in the printer.
http://www.verifone.com
RS-232-type devices do not work
with the PIN pad port.
The device is not waterproof or
dustproof, and is intended for
indoor use only.
N
E
The lightning symbol is used as
SIO
a warning when bodily injury
VI
might occur.
Due to risk of shock do not use the
device near water.
R
6 E285 INSTALLATION GUIDE
Various acronyms are used in place of the full definition. Table 2 presents
acronyms and their definitions.
Table 2 Acronym Definitions
Acronym Definitions
AC Alternating Current
ARM Acorn RISC Machine
EMV Europay MasterCard and VISA
LCD Liquid Crystal Display
LED Light Emitting Diode
NFC Near Field Communication
MRA Merchandise Return Authorization
MSAM Micromodule-Size Security Access Module
PCI Payment Card Industry
PED PIN Entry Device
PIN Personal Identification Number
SIM Subscriber Identity Module
USB Universal Serial Bus
VPN Verifone Part Number
Page 7
Device Overview
CHAPTER 1
This chapter provides a brief description of the e285 device.
The e285 device is a standalone, wireless handheld payment device, making it
easy to process a transaction anywhere. It provides mobile payment capabilities
via 3G connectivity. It is also a powerful 3G/Bluetooth/Wi-Fi dual band solution –
featuring advanced communications for fewer dropped transactions so merchants
can accept payments securely, extending their point of sale opportunities.
The e285’s capacitive-touch with physical keypad design makes it easily
pocketable while still accepting all payment methods - MSR, PSCR, Contactless
and wallets. The easy to read color touch screen is capable of signature capture
and is fully supported by Verifone’s developer toolkit which enables to transform
ideas into applications.
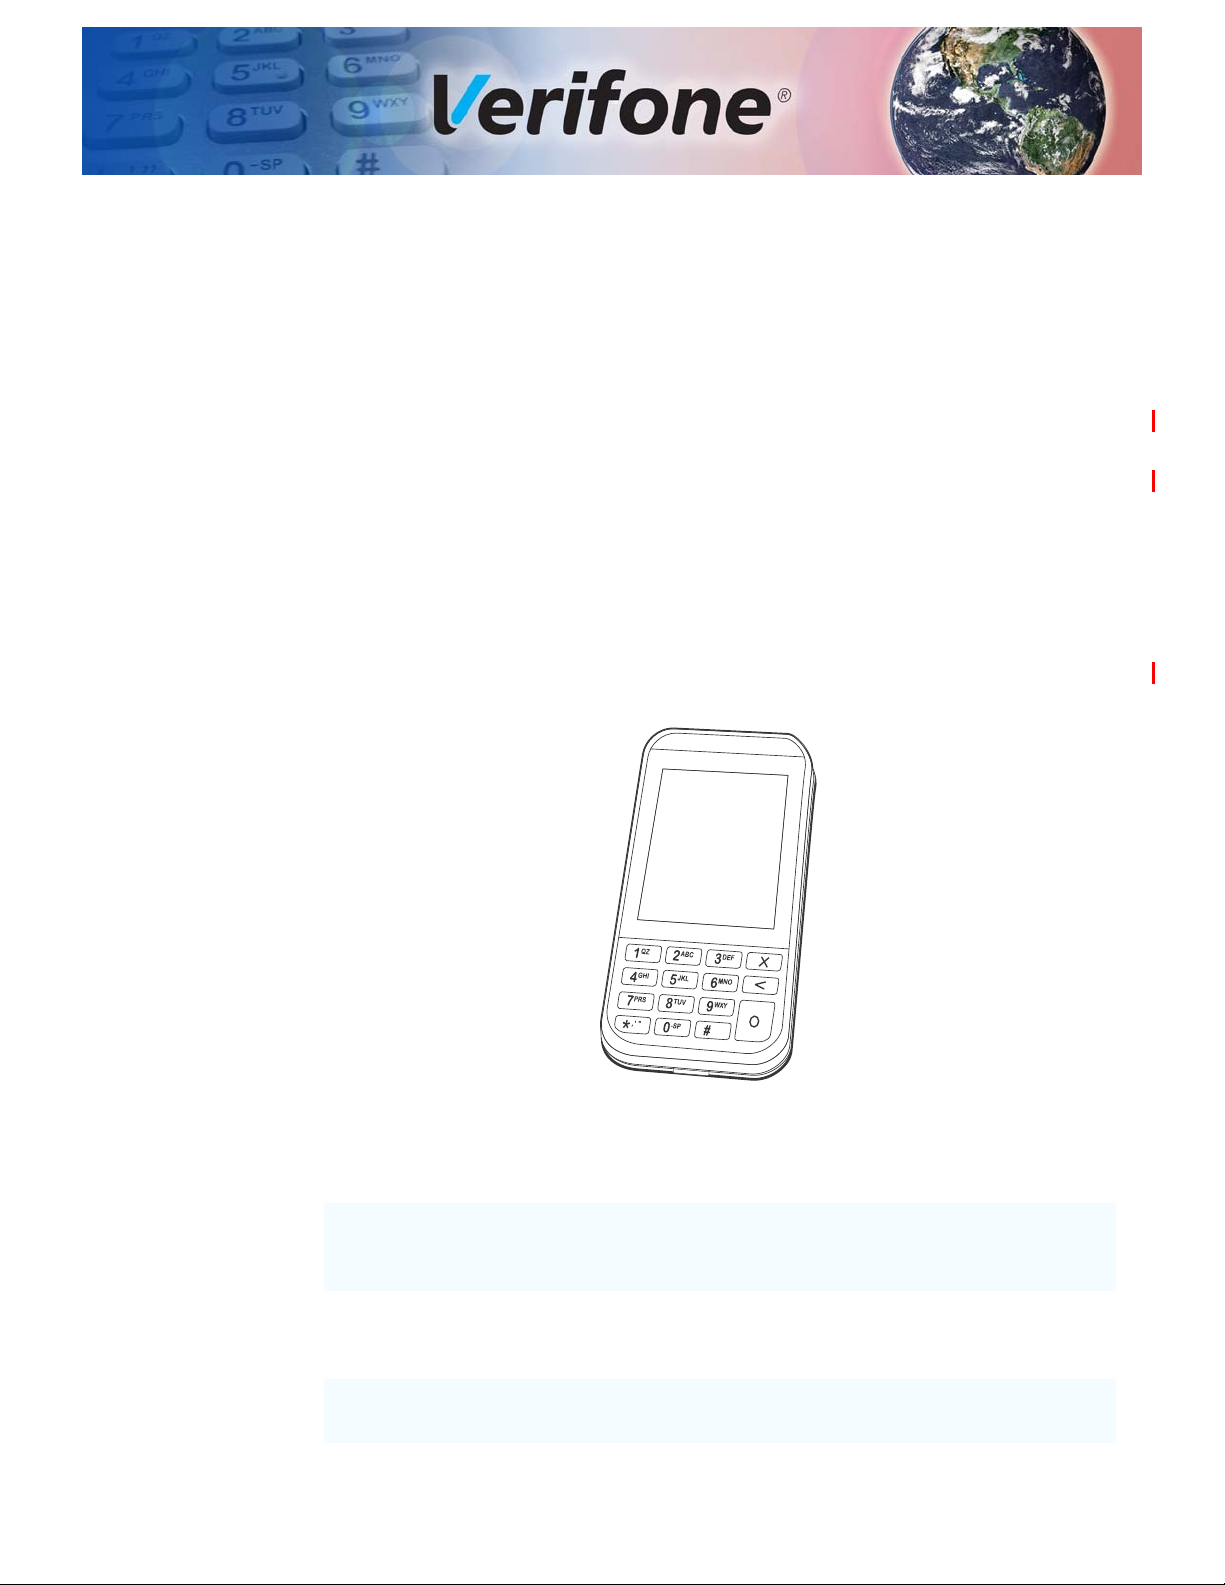
Figure 1 The e285 Unit
Key Features
• 300 MHz A9 processor delivers
power and usability in a convenient
“hand-over” design.
• Multi-application operating
environment.
• Advanced memory architecture to
meet tomorrow’s needs.
• 32-bit processing and multi-tasking
capabilities.
• Offers unsurpassed performance on
EMV smart card transactions.
• Security architecture exceeds
specifications for PCI-PED and
sophisticated file authentication.
• Multiple connectivity and
contactless options.
• Drop-resistant design minimizes
breakage.
E285 INSTALLATION GUIDE 7
Page 8

DEVICE OVERVIEW
Features and Benefits
Features and
Benefits
Triple Radio
Performance
Modern Application
Environment
Accepts All Forms
of Payment On-the-
Go
Exceptional Ease of
Use
The e285 provides the right combination of features and functions including a
triple-track magnetic-stripe card reader, smart card reader, integrated PIN pad,
and contactless/NFC support.
• The dynamic combination of Bluetooth chip, Wi-Fi and powerful 3G radio
delivers fast, wireless payment convenience, fewer dropped transactions and
flexible point-of-sale options.
• Reliable operating system and powerful tools to create richer customer
experiences.
• Common Engage software architecture enables faster and more cost effective
application development.
• Accommodates all payment types - Magstrip, EMV, Contactless/NFC, and
mobile wallets along with a 2.8-inch color touch screen capable of signature
capture.
• The lightweight, compact, stylish, and ergonomic balance allows convenient
device hand-off to the consumer for PIN entry or other input.
• Horizontal magnetic stripe card reader for optimal card swiping and reading.
Performance and
Durability
Security
• The e285 size is easily able to be dropped in most pockets.
• Powerful 300 MHz A9 processing completes transactions quickly.
• High-capacity lithium-ion battery pack (3.8 V / 1800mAh with Maxell
ICP425262AHR battery cell) that easily supports a full 12-hour business day
on a single charge.
• The USB-C port allows for convenient product charging as well as connection
to Android, iOS, and Windows devices.
• Rounded corners to minimize breakage and drop-resistant to 3 feet on
concrete surfaces.
• 256MB Flash, 128MB DDR of memory
• PCI PED 5.x approved for debit and other PIN-based transactions
• Tamper-resistant construction, SSL protocols
• Direct key injection using industry standard HSMs
• VeriShield Retain
• VeriShield Remote Key
8 E285 INSTALLATION GUIDE
• Verifone Secure Data
• VeriShield Total Protect
• MasterCard TQM
• IPP8 functionality plus multiple DUKPT engines
Page 9

• EMV L1 and L2
• ISO7816-3, ISO7816-10, and EMV 4.3 standards
DEVICE OVERVIEW
Features and Benefits
Connectivity
USB host/ device port
• Support UART0 software debug (TXD0, RXD0).
• USB2.0 high speed
• Support 5V/200mA for external USB peripherals
• USB host or device is configured by SW
• Type C USB connector at bottom
• Communication port for smart device on charge stand (Android, Windows, or
iDevice)
Bluetooth (wireless communication)
• Bluetooth 4.1 + EDR compliant
• Support Eddystone + iBeacon
• RF transmitter output power Class 1
• RF receiver GFSK typical -90dBm, /4 PSK typical -90dBm, 8DPSK typical -
83dBm
• UART3 interface for SOC communicates to BT
WiFi (wireless communication)
• BT, Wi-Fi, and 3G Options
• Wi-Fi dual band supports:
• 802.11 a/b/g/n/ac connectivity
• 2.4GHz and 5GHz
• Auto-band selection
3G (wireless communication)
• Gemalto EHS6
• GPRS/GSM Class 10
• UMTS/HSPA DL 7.2Mbps, UL 5.7Mbps
• Host interface USB
• Use RING0 for all wake events (new FW update from Gemalto)
E285 INSTALLATION GUIDE 9
Page 10

DEVICE OVERVIEW
Features and Benefits
10 E285 INSTALLATION GUIDE
Page 11

Device Setup
CAUTION
Usage
Guidelines
CHAPTER 2
This chapter describes the device setup procedure. You will learn about:
• Usage Guidelines
• Unpacking the Shipping Carton
• Device Features
• Removing the Battery Cover
• Installing micro SIM and/or SAM Cards
• Using the Battery
• Connecting to a Computer
• Conducting Wireless Transactions
N
A
• Using the Smart Card Reader
• Using the Magnetic Card Reader
• Using the CTLS Reader
SIO
.
5
VI
Follow these guidelines when using your e285.
E
R
Environmental
Factors
• Select a flat support surface, such as a countertop or table, to keep the device
safe in between uses.
• Do not use the device where there is high heat, dust, humidity, moisture, or
caustic chemicals or oils.
• Keep the device away from direct sunlight and anything that radiates heat,
such as a stove or motor.
• Do not use the device outdoors.
The device is not waterproof or dustproof, and is intended for indoor use only.
Any damage to the unit from exposure to rain or dust may void any warranty.
E285 INSTALLATION GUIDE 11
Page 12

DEVICE SETUP
CAUTION
NOTE
Unpacking the Shipping Carton
Personal Security
Considerations
Electrical
Considerations
Unpacking the
Shipping Carton
The e285 is a handover device. Always exercise extreme caution when
conducting transactions especially during PIN entry.
• Hand the e285 directly to the cardholder for PIN entry.
• Encourage the cardholder to hold the e285 close to avoid others from seeing
the information entered.
• Avoid using this product during electrical storms.
• Avoid locations near electrical appliances or other devices that cause
excessive voltage fluctuations or emit electrical noise (for example, air
conditioners, electric motors, neon signs, high-frequency or magnetic security
devices, or computer equipment).
• Do not use the device near water or in moist conditions.
Open the shipping carton and carefully inspect its contents for possible tampering
or shipping damage. The e285 is a secure product and any tampering may cause
the device to cease to function properly.
1 Remove and inspect the following items:
• e285 unit
• USB-C cable (Lightning-USB-C cable is not supported)
N
A
.
5
2 Remove all plastic wrapping from the unit and other components.
3 Remove the clear protective film from the unit.
E
SIO
VI
R
Do not use a unit that has been tampered with or otherwise damaged. This unit comes
equipped with tamper-evident labels. If a label or component appears damaged,
immediately notify the shipping company and your Verifone representative or service
provider.
4 Save the shipping carton and packing material for future repacking or moving
the device.
Charge the e285 device for eight hours before initial use.
12 E285 INSTALLATION GUIDE
Page 13

DEVICE SETUP
LCD DISPLAY
KEYPAD
MAGNETIC
SMART CARD READER
STRIPE READER
Device Features
Device Features
Front Panel
Before you continue the installation process, familiarize yourself with the features
of the e285. (See Figure 2)
The front panel includes the following features:
.
5
Figure 2 e285 Device Features (Front Panel)
• A colored capacitive-touch LCD Display
• Two types of keys:
N
A
a telephone style keypad (keypads may vary in style).
b three color-coded function keys below the keypad (from top to bottom:
• A smart card reader built into the bottom of the device to process smart card
transactions. For directions on how to use a smart card, see Using the Smart
Card Reader.
• A magnetic card reader, built into the top part of the device for performing
debit or credit card transactions. Swipe the card with the magnetic stripe
facing down, away from the display. For directions on how to use a magnetic
card, see Using the Magnetic Card Reader.
• A Power LED located on the left side that acts as power/charging indicators.
• A CTLS functionality for contactless payments. For directions on how to
conduct contactless transactions, see Using the CTLS Reader.
• Micro SIM 1 and SIM 2 compartments built into the bottom of the device inside
the back compartment (SIM on 3G version only).
• A micro SAM compartment built into the bottom of the device inside the back
compartment.
E
CANCEL, CLEAR, ENTER).
R
SIO
VI
E285 INSTALLATION GUIDE 13
Page 14

DEVICE SETUP
CAUTION
SIM1SIM1
SAMSAM
SIM2SIM2
Removing the Battery Cover
Removing the
Battery Cover
Installing micro
SIM and/or SAM
Cards
Remove the battery cover to access the battery as well as the micro SIM and
micro SAM slots.
1 Turn off the device.
2 Place the device upside down on a soft, clean surface to protect the screen
from scratches.
3 If installed, loosen the retaining screw.
4 Slide the battery cover down, away from the magnetic card reader.
Figure 3
The e285 device supports the installation of two GSM SIMs (Subscriber Identity
Module) and/or SAM (Security Access Module). Use the following procedures to
install a SIM and/or SAM card.
Observe standard precautions when handling electrostatically sensitive devices.
Electrostatic discharges can damage this equipment. Verifone recommends using
a grounded anti-static wrist strap.
A
1 Follow the steps in Removing the Battery Cover
N
.
5
Initial Battery
Charging
2 Insert the SIM and/or SAM card with the gold contacts facing down.
SIO
VI
3 Reinstall the battery cover back and if it was previously installed, reinstall and
Figure 4 Inserting the SIM
After unpacking your e285 device, connect the power pack to the unit for eight
hours or until fully charged.
The battery has a safety circuit to protect the Li-ion cells from overcharging and
over-discharging. If the battery is over-discharged, the safety circuit shuts down
the battery. The battery must then be recharged to restore operation.
E
R
tighten the retaining screw.
14 E285 INSTALLATION GUIDE
Page 15

DEVICE SETUP
NOTE
NOTE
NOTE
Starting Up and Shutting Down
Starting Up and
Shutting Down
The e285 device starts up differently depending on how it is powered.
• The device starts up automatically when the e285 is connected to a non-
battery power source, regardless of the battery charge state.
• To manually power up, hold the green key down for about 4 seconds until the
device displays the startup screen.
The 4-second power-up delay prevents device startup if the green key is
accidentally held down. The time required to hold the green key down to power
up the device is configurable.
The device lights up once the power is on.
The Verifone copyright screen starts and displays a unique copyright screen. If
the terminal comes pre-loaded with an application, this starts after the initial
Verifone copyright screen and usually displays its own copyright screen.
To manually shutdown, hold the red key down for about 4 seconds until the device
screen stays blank.
N
A
The e285 device will only operate when the battery is installed unless connected
to AC power, for example, in a stand.
.
5
Using the
Battery
SIO
The e285 device uses a single cell Li-ion battery which features:
• The battery has a safety circuit that:
• The battery provides power to the security circuit when the e285 device has
• Li-ion batteries are not affected by shallow charging.
Follow these best practices for best function:
• Conserve battery power by turning the e285 device off when not in use.
• Keep the Li-ion battery inserted in the device and power up the device
R
• Prevents cell damage from overcharge, over-discharge, or overheating.
• Activates when the battery is left in an unused device for extended
periods.
no external power source.
periodically to check the battery charge. Do not let the battery charge fall
below 10% for extended periods of time as this may permanently diminish
battery capacity.
VI
E
E285 INSTALLATION GUIDE 15
Page 16

DEVICE SETUP
NOTE
WARNING
CAUTION
WARNING
TIP
Using the Battery
• Recharge the battery by connecting the USB-C end of the power pack to the
device and plugging the other end of the power pack into a wall outlet.
The e285 device automatically shuts off when the battery reaches the critically
low charge state. If this occurs, the battery must be recharged for a minimum of
1/2 hour before it can power the device. It may take several recharge attempt s to
reset the safety circuit when charging a battery that has been discharged below
this critical state.
The e285 device has a simple two-color LED with two energized states:
• solid amber: charging
• solid white: charging complete
Battery Life
Charging the
Battery
Charging and discharging the e285 battery hundreds of times will wear out the
battery. Significantly reduced operating times indicate the need for battery
replacement (see Accessories and Documentation for ordering information).
Do not dispose batteries in a fire. Li-ion batteries must be recycled
or disposed of properly. Do not dispose Li-ion batteries in
municipal waste sites.
A
After installing the battery, the e285 device can be connected to the optional
power pack or charged with a wireless charger,.
N
.
5
SIO
Using an incorrectly rated power supply may damage the device or cause it not
to work as specified. Before troubleshooting, ensure that the power supply being
R
used to power the device matches the requirements specified on the bottom of
the device. (See Specifications for detailed power supply specifications.) Obtain
the appropriately rated power supply before continuing with troubleshooting.
Do not plug the power pack into an outdoor outlet or operate the device outdoors.
During a transaction, disconnecting the power by removing the battery or
unplugging the device from a wall power while at very low battery charge may
cause transaction data files not yet stored in the device memory to be lost.
VI
E
16 E285 INSTALLATION GUIDE
Charging via the
Power Pack
Verifone offers the optional power supply (VPN PWR087-300-01-A) to connect
the device directly to a power outlet and to charge the battery.
1 Insert the USB-C plug into the USB-C port of the e285 device.
2 Plug the AC power pack into a wall outlet or powered surge protector.
To protect against possible damage caused by lightning strikes and electrical
surges, consider installing a power surge protector.
Page 17

DEVICE SETUP
NOTE
NOTE
Connecting to a Computer
Charging with the
Folio
Connecting to a
Computer
Verifone also offers wireless charging accessories (VPN TBD) that can be
connect to the optional power supply (VPN PWR087-300-01-A) to charge the
e285 device when fitted with the Folio accessory.
1 Insert the USB-C plug into the USB-C port of the wireless charging accessory.
2 Plug the AC power pack into a wall outlet or powered surge protector.
3 Set the rear cover of the Folio-equipped e285 device against the front face of
the wireless charger.
When the e285 device is fitted with the Folio accessory, the Folio has inductive
charging that allows charging from any Qi charger.
Verifone provides specific accessories, as well (see Accessories and
Documentation for ordering information).
Upon startup, the e285 device loads its application, displays the Verifone
copyright screen, and shows a unique copyright screen.
If there is no available application in the device, DOWNLOAD NEEDED appears on
screen after the initial Verifone copyright screen.
A
.
5
N
Connect the e285 device to a PC or laptop to download applications.
1 Insert the USB-C plug into the USB-C port of the e285
SIO
VI
E
2 Connect the other end of the USB-C plug into the host computer’s USB port.
R
Conducting
Transactions
Using the Smart
Card Reader
Wireless
To conduct a wireless transaction:
• Ensure the device is in an optimal position for transmitting.
• Follow the on-screen instructions provided with your application.
The smart card transaction procedure may vary from one application to another.
Verify the procedure with your application provider before performing a smart card
transaction.
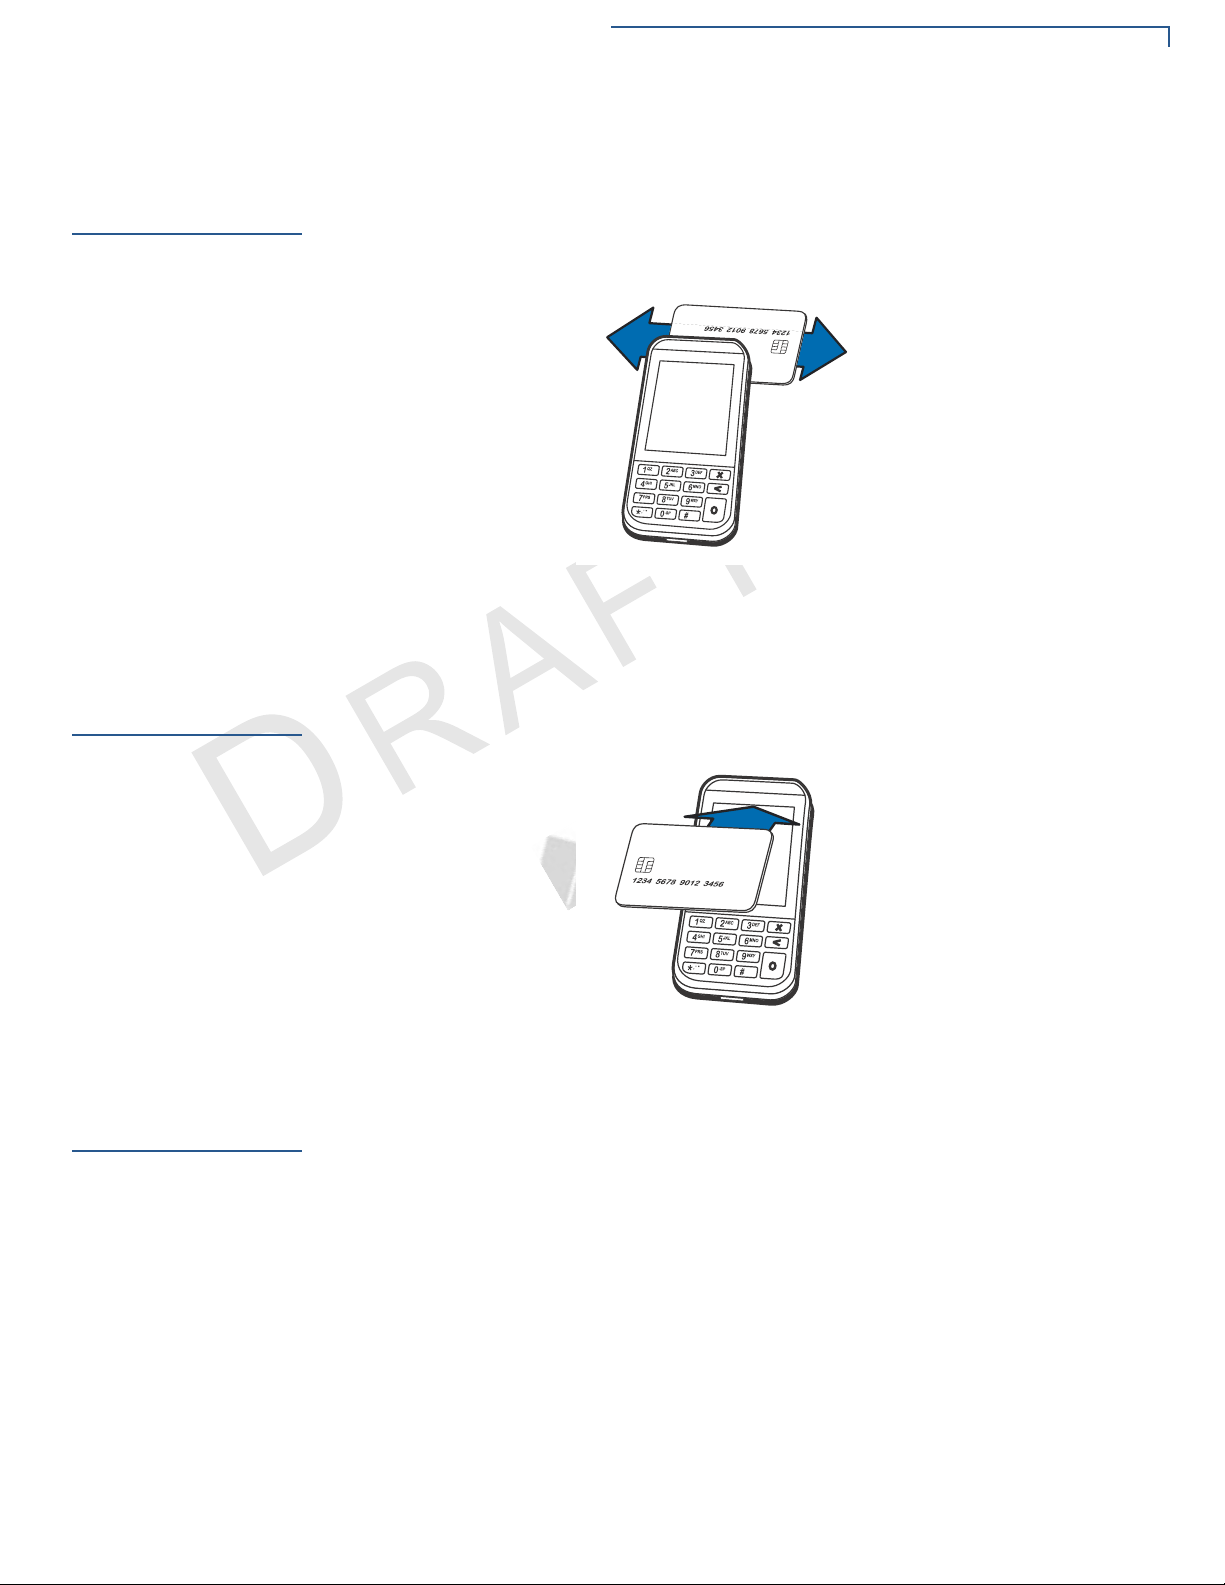
1 Position the smart card with the contacts facing upward (see illustration
below).
2 Insert the card into the reader slot in a smooth, continuous motion until it seats
firmly.
E285 INSTALLATION GUIDE 17
Page 18

DEVICE SETUP
Using the Smart Card Reader
3 Wait for the application to indicate a completed transaction before removing
the card. Premature card removal invalidates the transaction.
Figure 5 Inserting a Smart Card
R
E
VI
SIO
N
A
.
5
18 E285 INSTALLATION GUIDE
Page 19
DEVICE SETUP
Using the Magnetic Card Reader
Using the
Magnetic Card
Reader
Using the CTLS
Reader
Use the magnetic stripe reader to perform credit and debit card transactions.
1 Position the card with the magnetic stripe facing backwards.
2 To ensure a proper read of the magnetic swipe card, insert the magnetic card
from the top of the device, as shown in the illustration below.
Figure 6 Using Magnetic Stripe Card
3 Swipe the card through the magnetic card reader.
The e285 supports contactless credit or debit card transactions. To perform a
contactless transaction, gently tap the card or hold the card against the surface of
the contactless antenna, located above the keypad and LCD.
A
.
5
N
Using
Accessories
SIO
VI
E
R
Figure 7 Using the CTLS Reader
Verifone makes multiple accessories available:
• Optional power supply (VPN PWR087-300-01-A)
• Folio with with inductive Qi charging (VPN TBD)
• Charging Cradles for Bulk Charger (VPN TBD)
• Bulk Charger (VPN TBD)
See Accessories and Documentation for ordering information.
E285 INSTALLATION GUIDE 19
Page 20

DEVICE SETUP
Using Accessories
R
E
VI
SIO
N
A
.
5
20 E285 INSTALLATION GUIDE
Page 21

Specifications
CHAPTER 3
This chapter discusses power requirements, dimensions, and other specifications
of the e285 device.
Unit Power
Requirement
Temperatu re
External
Dimensions
Weight
Memory
Magnetic Stripe
Card
• Input power rating: 5 V DC, 1 A
Charging via USB-C to computer system or Verifone-certified power adapter
• Operating Environment: 0°C to +50 °C (32 °F to 122 °F)
• Non-Operating Environment: -20 °C to +60°C (- 4 °F to 140°F)
• Relative humidity: 5% to 90% RH non-condensing
• Length: 138 mm
• Width: 68 mm
• Height: 17.6 mm
• 186 grams
VI
SIO
N
A
.
5
E
R
• 256 MB Flash, 128MB DDR
• Triple-track
• Supports bi-directional card read, swipe speed at 10 IPS to 40 IPS
SAM Card
Reader
Communication
Display
• Non-sliding
• Card conserving plated landing contacts
• SC voltage 1.8V, 3.0V, 5.0V
• BT, Wi-Fi, and 3G Options
• Wi-Fi dual band supports:
• 802.11 a/b/g/n/ac connectivity
• 2.4GHz and 5GHz
• Auto-band selection
• 2.8" Color Touch (320 X 240)
E285 INSTALLATION GUIDE 21
Page 22

SPECIFICATIONS
SD Memory
SD Memory
• NAND Flash: 2 Gbit with 8-bit bus width
• LPDDR2 SDRAM memory: 1 Gbit with 32-bit bus width
5
.
A
N
R
SIO
VI
E
22 E285 INSTALLATION GUIDE
Page 23

Maintenance and Cleaning
CAUTION
CAUTION
NOTE
CAUTION
The e285 device has no user-maintainable parts. It can, however, be cleaned.
CHAPTER 4
Surface
Cleaning
Terminal
Contacts
Magnetic Card
Reader
To clean the device, use a clean cloth slightly dampened with water and a drop or
two of mild soap. For stubborn stains, use alcohol or an alcohol-based cleaner.
Never use thinner, trichloroethylene, or ketone-based solvents – they may cause
deterioration of plastic or rubber parts.
Do not spray cleaners or other solutions directly onto the keypad or device
display.
.
5
Gently swab the contacts with alcohol or contact cleaner to remove the dirt. It is
important that the exposed contacts of the e285 battery stay clean and unbent.
A
N
Avoid touching the contacts of the e285 battery. Finger oils tarnish contacts,
causing bad connections. When operating on battery power and experiencing a
high occurrence of bad or incomplete data transfers, clean the contacts
E
SIO
VI
R
Dirt accumulation can lead to MSR reading problems unless you clean the
magnetic stripe reader (MSR) on a regular basis (daily to once a week, depending
on usage).
Clean the MSR using commercially available card reader cleaning cards, or using
Verifone’s recommended MSR-cleaning card (PN 02746-02).
Smart Card
Reader
If using a commercially available cleaning card, use ONLY an approved MSR
cleaning card made specifically for POS MSR terminals or Petroleum MSR card
readers.
Do not attempt to clean the Smart Card Reader (SCR). Doing so may void any
warranty. For smart card reader service, contact your Verifone distributor or
service provider.
If you find foreign objects in the SCR, send your terminal to a Verifone authorized
repair center.
Do not use Verifone’s recommended MSR-cleaning card (PN 02746-02) or
commercially available card reader cleaning cards with the SCR.
E285 INSTALLATION GUIDE 23
Page 24

MAINTENANCE AND CLEANING
WARNING
Additional Safety Information
Additional
Safety
Information
The following is additional information for your safety in using this device.
Potentially Explosive Environments
When using the device in areas with potential risk of explosion, such as petrol
stations, follow the advice of all signs and instructions. If there has been a leak,
do not use this device.
5
.
A
N
R
SIO
VI
E
24 E285 INSTALLATION GUIDE
Page 25

Verifone Service and Support
NOTE
For e285 problems, contact your local Verifone representative or service provider.
For e285 product service and repair information:
• USA – Verifone Service and Support Group, 1-800-Verifone (837-4366),
Monday - Friday, 8 A.M. - 8 P.M., Eastern time
• International – Contact your Verifone representative
CHAPTER 5
Returning a
Device for
Service
Before returning a e285, you must obtain an MRA number. The following
procedure describes how to return one or more devices for repair or replacement
(U.S. customers only).
5
.
A
Customers outside the United States are advised to contact their local Verifone
representative for assistance regarding service, return, or replacement of devices
and accessories.
N
SIO
1 Get the following information from the printed labels at the back of each e285
to be returned:
R
• Product ID, including the model and part number. For example, “e285” and
“M087-XXX-XXX-XXX.”
• Serial number (S/N nnn-nnn-nnn)
2 Obtain the MRA number(s) by completing one of the following:
a Call Verifone toll-free within the United States at 1-800-Verifone and follow
the automated menu options.
• Select the MRA option from the automated message. The MRA
VI
E
department is open Monday to Friday, 8 A.M.–8 P.M., Eastern Time.
• Give the MRA representative the information you gathered in Step 1.
If the list of serial numbers is long, you can fax the list, along with the
information gathered in Step 1, to the MRA department at 727-9534172 (U.S.).
b Address a fax to “Verifone MRA Dept.” with the model and part number(s)
• Include a telephone number where you can be reached and your fax
number.
c Complete the Inquiry Contact Form at http://www.verifone.com/
aboutus/contact/contact_form.cfm.
E285 INSTALLATION GUIDE 25
Page 26

VERIFONE SERVICE AND SUPPORT
NOTE
Accessories and Documentation
• Address the Subject box with to “Verifone MRA Dept.”
• Reference the model and part number in the Note box.
One MRA number must be issued for each e285 you return to Verifone, even if
you are returning several of the same model.
3 Describe the problem(s).
4 Provide the shipping address where the repaired or replacement unit must be
returned.
5 Keep a record of the following items:
• Assigned MRA number(s).
• Verifone serial number assigned to the e285 you are returning for service
or repair (device serial numbers are located at the back of the unit.
Accessories and
Documentation
Accessories
• Shipping documentation, such as air bill numbers used to trace the
shipment.
• Model(s) returned (model numbers are located on the Verifone label at the
back of the e285).
A
.
5
N
Verifone produces the following accessories and documentation for the
e285. When ordering, please take note of the part number.
SIO
VI
• Verifone online store at www.store.verifone.com
E
R
• USA – Verifone Customer Development Center, 800-Verifone (837-4366),
Monday - Friday, 7 A.M. - 8 P.M., Eastern time
• International – Contact your Verifone representative
Verifone Certified Power Adapter PWR087-300-01-A
Verifone Cleaning Kit 02746-02-GRU
Verifone Folio with with inductive Qi charging VPN TBD
Verifone Charging Cradles for Bulk Charger VPN TBD
Verifone Bulk Charger VPN TBD
Documentation
26 E285 INSTALLATION GUIDE
e285 Certifications and Regulations Sheet VPN DOC087-511-EN-x
e285 Quick Installation Guide VPN DOC087-512-EN-x
Page 27

CHAPTER 6
NOTE
CAUTION
Troubleshooting
Guidelines
The troubleshooting guidelines provided in the following section are included to
help you install and configure your e285 successfully. Typical examples of
malfunction you may encounter while operating your e285 and steps you can take
to resolve them are listed in this chapter.
If the problem persists even after performing the outlined guidelines or if the
problem is not described below, contact your local Verifone representative for
assistance.
The e285 comes equipped with tamper-evident labels. The e285 unit contains no
user serviceable parts. Do not, under any circumstance, attempt to disassemble
the device. Perform only those adjustments or repairs specified in this guide. For
all other services, contact your local Verifone service provider. Service conducted
by parties other than authorized Verifone representatives may void any warranty.
A
.
5
N
Use only a Verifone-supplied power pack. Using an incorrectly rated power
supply may damage the device or cause it not to work as specified. Before
troubleshooting, ensure that the power supply being used to power the device
matches the requirements specified at the bottom of the device. (See
Specifications, for detailed power supply specifications.) Obtain the appropriately
rated power supply before continuing with troubleshooting.
E
R
SIO
VI
Device Does Not
Start
Device Display
Does Not Show
Correct/
Readable Info
• Ensure that the battery charge state is not below the critically low level.
• Replace or recharge the battery.
• Check if the battery is properly inserted.
• Ensure that you pressed the green ENTER/ON key for approximately four
seconds, until the unit lights up.
• Replace or recharge the battery.
• Connect the e285 into a known-good power supply (if available) to see if this
clears the problem.
• If the problem persists, contact your local Verifone representative for
assistance.
E285 INSTALLATION GUIDE 27
Page 28

TROUBLESHOOTING GUIDELINES
NOTE
Battery Does Not Charge
Battery Does Not
Charge
Blank Display
The e285 battery must initially receive a full charge to ensure proper operation.
• Allow the e285 device to remain connected to the power pack or Qi charger
for eight hours to ensure the battery receives a full charge.
• Li-ion batteries are not affected by shallow charging. Furthermore, when the
device has no external power source or battery the coin cell battery provides
power to the security circuit.
• Uninstalling the battery and unplugging the device power pack reduce the life
of the coin cell battery, which does not recharge and must be replaced if
drained.
• Conserve battery power by turning the e285 device off when not in use. Keep
the Li-ion battery inserted in the device and power up the device periodically
to check the battery charge. Do not let the battery charge fall below 10% for
extended periods of time as this may permanently diminish the battery
capacity. Recharge the battery by attaching USB end of the power pack to the
device and plugging the other end of the power pack into a wall outlet.
• The e285 device automatically shuts off when the battery reaches the
critically low charge state. If this occurs, the battery must recharge a
minimum of 1/2 hour before it can power the device. It may take several
recharge-attempts to reset the safety circuit when charging a battery that has
been discharged below this critical state.
SIO
VI
N
A
.
5
E
R
When the e285 device display screen does not show correct or clearly readable
information:
Keypad Does
Not Respond
28 E285 INSTALLATION GUIDE
• The battery pack may not be connected properly. Remove and reinstall the
battery pack.
• Check device power connection.
• Remove and reapply power to the device.
• If the problem persists, contact your local Verifone service provider.
If the keypad does not respond properly:
• Check the device display. If it displays the wrong character or nothing at all
when you press a key, follow the steps outlined in Transactions Fail to
Process.
• If pressing a function key does not perform the expected action, refer to the
user documentation for that application to ensure you are entering data
correctly.
• If the problem persists, contact your local Verifone representative.
Page 29

TROUBLESHOOTING GUIDELINES
Transactions Fail to Process
Transactions
Fail to Process
There are several reasons why the device may not be processing transactions.
Use the following steps to troubleshoot failures.
Check the Magnetic Card Reader
• Perform a test transaction using one or more different magnetic stripe cards to
ensure the problem is not a defective card.
• Ensure that you are swiping cards properly. With the e285 card reader, the
black magnetic stripe on the card should face down and outward, away from
the keypad (see Figure 6).
• Process a transaction manually, using the keypad instead of the card reader. If
the manual transaction works, the problem may be a defective card reader.
• Contact your Verifone distributor or service provider.
• If the manual transaction does not work, proceed to Check the Signal
Strength.
Check the Smart Card Reader
.
5
• Perform a test transaction using several different smart cards to ensure the
problem is not a defective card.
• Ensure that the card is inserted correctly and that the card is not removed
prematurely.
• Ensure the SIM card is properly inserted (see Installing micro SIM and/or SAM
Cards).
• Contact your Verifone distributor or service provider.
E
R
SIO
VI
N
A
• If the manual transaction does not work, proceed to Check the Signal
Strength.
Check the Signal Strength
• On-screen signal-strength indicator displays at least one bar to indicate
connectivity to radio network.
• Ensure that the radio has been activated by your service provider.
E285 INSTALLATION GUIDE 29
Page 30

TROUBLESHOOTING GUIDELINES
Transactions Fail to Process
R
E
VI
SIO
N
A
.
5
30 E285 INSTALLATION GUIDE
Page 31

Caution and Warning Messages
APPENDIX A
e285 Caution
and Warning
Messages
Products with UL/cUL certification include French translations of Caution and
Warning notices. The following table lists all notices found in the document, their
location and the equivalent French translations.
Table 3 Caution and Warning Messages
Notice Chapter Page English Text French Text
Caution Setup page 12The terminal is not waterproof or
dustproof, and is intended for
indoor use only.
Any damage to the unit from
exposure to rain or dust may void
any warranty.
Warning Setup page 13Do not use a unit that has been
tampered with or otherwise
damaged. This unit comes
equipped with tamper-evident
labels. If a label or component
appears damaged, immediately
notify the shipping company and
your Verifone representative or
service provider.
Caution Setup page 15Observe standard precautions
when handling electrostatically
sensitive devices. Electrostatic
discharges can damage this
equipment. Verifone recommends
using a grounded anti-static wrist
strap.
Caution Setup page 17Using an incorrectly rated power
supply may damage the terminal or
cause it not to work as specified.
Before troubleshooting, ensure
that the power supply being used
to power the terminal matches the
requirements specified on the
bottom of the terminal. (See
Specifications, for detailed power
supply specifications.) Obtain the
appropriately rated power supply
before continuing with
troubleshooting.
Le terminal est pas étanche ou à la
poussière, et est destiné à une utilisation
en intérieur.
Tout dommage à l'unité de l'exposition à
la pluie ou à la poussière peut annuler la
garantie.
Ne pas utiliser une unité qui a été altéré
ou endommagé. Cet appareil est équipé
d' étiquettes inviolables. Si une étiquette
ou d'un composant semble endommagé,
avertissez immédiatement la compagnie
de navigation et votre représentant ou du
prestataire de services Verifone.
Respecter les précautions standard lors
de la manipulation des appareils
sensibles aux dées électrostatiques. Les
dées électrostatiques peuvent
endommager cet équipement. Verifone
recommande d'utiliser un bracelet antistatique à la terre.
Utilisation d'une alimentation mal classé
peut endommager le terminal ou de
l'empêcher de travailler comme spécifié.
Avant de dépannage, assurez-vous que
l'alimentation est utilisé pour alimenter le
terminal correspond aux exigences
spécifiées sur le fond de la borne. (Voir le,
Caractéristiques, pour les
caractéristiques de l'alimentation.)
Obtenir l'alimentation nominale
appropriée avant de continuer avec le
dépannage.
E285 INSTALLATION GUIDE 31
Page 32

CAUTION AND WARNING MESSAGES
e285 Caution and Warning Messages
Table 3 Caution and Warning Messages (continued)
Notice Chapter Page English Text French Text
Warning Setup page 17Do not plug the power pack into an
outdoor outlet or operate the
terminal outdoors.
Disconnecting the power during a
transaction may cause transaction
data files not yet stored in terminal
memory to be lost.
To protect against possible
damage caused by lightning
strikes and electrical surges,
consider installing a power surge
protector.
Warning Setup 18 Do not dispose batteries in a fire.
Li-ion batteries must be recycled or
disposed of properly.
Do not dispose Li-ion batteries in
municipal waste sites.
Caution Maintenance
and
Cleaning
Caution Maintenance
and
Cleaning
Caution Troubleshoot
ing
Guidelines
page 23Never use thinner,
trichloroethylene, or ketone-based
solvents – they can deteriorate
plastic or rubber parts.
Avoid touching the contacts of the
e285 battery. Finger oils tarnish
contacts, causing bad connections.
When operating on battery power
and experiencing a high
occurrence of bad or incomplete
data transfers, clean the contacts.
27 Using an incorrectly rated power
supply may damage the unit or
cause it to not work properly.
Before troubleshooting, ensure
that the power supply used to
power the unit matches the
specified requirements (see
Specifications for detailed power
supply specifications). If not, obtain
the appropriately rated power
supply before continuing with
troubleshooting.
Ne pas brancher le bloc d'alimentation à
une prise extérieure ou exploiter le
terminal à l'extérieur.
Déconnexion de l' alimentation lors d'une
transaction peut entraîner des fichiers de
données de transaction non encore
stockées dans la mémoire terminal pour
être perdu.
Pour se protéger contre de possibles
dommages causés par la foudre et les
surtensions électriques, pensez à installer
un protecteur de surtension.
Ne jetez pas les batteries au feu. Les
batteries Li-ion doivent être recyclées ou
éliminées correctement.
Ne jetez pas les batteries Li-ion dans les
sites de déchets municipaux.
Ne jamais utiliser de diluant, le
trichloréthylène ou des solvants à base
de cétone - ils peuvent détériorer les
pièces en plastique ou en caoutchouc.
Évitez de toucher les contacts de la
batterie e285. Les huiles de doigt
ternissent les contacts, provoquant de
mauvaises connexions. Lorsque vous
utilisez une batterie et que la transmission
de données est incorrecte ou incomplète,
nettoyez les contacts.
Utilisation d'une alimentation mal classé
peut endommager l'appareil ou provo quer
sa ne fonctionne pas correctement. Avant
de dépannage, assurez-vous que
l'alimentation utilisée pour alimenter
l'unité correspond aux exigences
spécifiées (voir spécifications pour les
caractéristiques de l'alimentation) . Si non,
obtenir l'alimentation nominale appr opriée
avant de continuer avec le dépannage.
32 E285 INSTALLATION GUIDE
Page 33

Verifone, Inc.
1-800-Verifone
www.verifone.com
e285
Installation Guide
Verifone Part Number DOC087-513-EN-A, Revision A.6
 Loading...