


CommanderTM Site Controller
First Data Rapid Connect
EMV Configuration Guide
Date: October 27, 2016

First Data Rapid Connect EMV Configuration Guide
for Inside Contact EMV
This guide provides detailed information on how to configure the Inside Contact
EMV feature on the Verifone Commander Site Controller for First Data network
sites.
All references to EMV in this document mean Inside Contact EMV. This document
does not cover or address Contactless EMV.
Verifone's implementation of EMV involves the VIPER EPS and the associated
MX800 Series and MX900 Series PINpads only. As the POS terminals are not
involved in EMV processing, no POS overviews or configurations are covered in
this document.
Refer to the Inside Contact EMV Feature Reference for complete details on
configuring and using Verifone solutions for EMV.
Verifone, Inc.
88 West Plumeria Drive
San Jose, CA 95134
Telephone: 408-232-7800
http://www.verifone.com
© 2016 Verifone, Inc. All rights reserved.
No part of this publication covered by the copyrights hereon may be reproduced or copied in
any form or by any means - graphic, electronic, or mechanical, includingphotocopying, taping,
or information storage and retrieval systems - without written permission of the publisher.
The content of this document is subject to change without notice. The information contained
herein does not represent a commitment on the part of Verifone. All features and
specifications are subject to change without notice.
Verifone, Ruby SuperSystem, and Secure PumpPAY are registered trademarks of Verifone, Inc.
Ruby Card, iOrder, and Commander Site Controller are trademarks of Verifone. All other brand
names and trademarks mentioned in this document are the properties of their respective
holders.
i

Revision History
Date Description
10/27/2016 Initial Documentation Release
ii

Contents
Overview . . . . . . . . . . . . . . . . . . . . . . . . . . . . . . . . . . . . . . . . . . . . . 1
Support Contacts . . . . . . . . . . . . . . . . . . . . . . . . . . . . . . . . . . . . . . . . 1
System Requirements . . . . . . . . . . . . . . . . . . . . . . . . . . . . . . . . . . . . . 2
Configuring EMV . . . . . . . . . . . . . . . . . . . . . . . . . . . . . . . . . . . . . . . . 3
BuyPass Rapid Connect . . . . . . . . . . . . . . . . . . . . . . . . . . . . . . . . . . . . 4
BuyPass Configuration for Rapid Connect . . . . . . . . . . . . . . . . . . . . . . . . 5
Testing Rapid Connect Communications . . . . . . . . . . . . . . . . . . . . . . . . . 9
BuyPass EMV Configuration . . . . . . . . . . . . . . . . . . . . . . . . . . . . . . . . . 10
First Data EMV Links . . . . . . . . . . . . . . . . . . . . . . . . . . . . . . . . . . . . . . 16
Supported Hardware . . . . . . . . . . . . . . . . . . . . . . . . . . . . . . . . . . . 2
Supported Software. . . . . . . . . . . . . . . . . . . . . . . . . . . . . . . . . . . . 2
Supported Card Brands. . . . . . . . . . . . . . . . . . . . . . . . . . . . . . . . . . 2
Configuration Client Access. . . . . . . . . . . . . . . . . . . . . . . . . . . . . . . 3
Commander Site Controller . . . . . . . . . . . . . . . . . . . . . . . . . . . . . 3
Finding the Dealer ID and Terminal ID. . . . . . . . . . . . . . . . . . . . . . . . 6
BuyPass FEP Configuration . . . . . . . . . . . . . . . . . . . . . . . . . . . . . . . 7
Accessing EMV Configuration. . . . . . . . . . . . . . . . . . . . . . . . . . . . . . 10
Enabling EMV . . . . . . . . . . . . . . . . . . . . . . . . . . . . . . . . . . . . . . . . 14
CAPK File Download. . . . . . . . . . . . . . . . . . . . . . . . . . . . . . . . . . . . 15
Card Table Download. . . . . . . . . . . . . . . . . . . . . . . . . . . . . . . . . . . 15
EMV Testing . . . . . . . . . . . . . . . . . . . . . . . . . . . . . . . . . . . . . . . . . 15
iii

Overview
EMV is the new standard for credit card processing. It describes a transaction between
a chip card and an EMV -enabled terminal. EMV transactions are much more secure than
magnetic-stripe-card transactions.
This document describes Verifone’s implementation of inside contact EMV within the
Commander Site Controller environment for First Data networked sites.
For successful Rapid Connect configuration for EMV at First Data sites, in addition to
enabling and configuring EMV, BuyPass FEP configuration updates and a CAPK file
download are required.
Support Contacts
V erifone's P etroleum Helpdesk offers merchants chat and email support by visiting
http://support.verifone.com. Sites may also contact support via phone by calling
the branded dedicated support line.
VASCs may contact the Verifone VASC Helpdesk at 888-777-3536, or through Tech
Support Chat/Email Assistance on the Premier Portal at http://premier.verifone.com.
For First Data Support, contact the First Data BuyPass Helpdesk.
.
Verifone ExxonMobil Merchant Helpdesk 888-976-5022
Verifone Sinclair Merchant Helpdesk 866-625-9707
Verifone Sunoco Merchant Helpdesk 800-480-5848
Verifone Valero Merchant Helpdesk 888-432-7027
Helpdesk Phone Number
Verifone VASC Helpdesk 888-777-3536
First Data BuyPass Helpdesk 800-726-2629
1

System Requirements
Supported Hardware
EMV implementation requires PINpad hardware with EMV Chip
Reader capability.
• MX800 Series: MX 850, 860, 870, and 880 support EMV functions if equipped with a
chip reader.
• MX900 Series: MX915 and MX925
• Commander Site Controller/RubyCi with Topaz
• Commander Site Controller/RubyCi with Ruby2
• Sapphire V910/V920 with Topaz
• Sapphire V910/V920 with Ruby
Supported Software
Commander Site Controller/RubyCi systems require Production Software Base 42+.
Sapphire systems require Production Software Base 188+.
POS System Software may be eligible to Upgrade through
Verifone’s Remote Software Delivery. For more information visit
support.verifone.com and select Support Channels>Petro &
Convenience>Product Pages: Verifone Remote Software Delivery.
All MX PINpad devices require VIPERPay 4.xx+
MX900 Series devices require Kernel 7.00+.
MX800 Series devices require Kernel 4.00+ and must have RFS18.
MX800 Series devices without RFS18 must be upgraded at the Verifone repair facility.
See How to Tell if Your MX800 Series PINpad is EMV Capable at support.verifone.com.
Refer to the Inside Contact EMV Feature Reference for details on
determining software versions of MX and POS devices.
Supported Card Brands
Inside contact EMV supports the following card brands:
•American Express
•Discover
• Mastercard
•Visa
2

Configuring EMV
By default the POS system is installed with EMV disabled. The merchant’s POS system
must be enabled and configured for EMV processing.
For BuyPass locations, enabling the POS system for EMV processing is done manually
through the Configuration Client.
PINpads must be configured with Application Identifiers (AIDs) and Certificate Authority
Public Keys (CAPKs). AIDs and CAPKs provided by First Data through table downloads.
There is no configuration tool available to create AIDs or CAPKs.
Other EMV options may be configured to customize specific behavior for United States
Common AID preferred processing and EMV stand-in processing. Depending on the
Front-End Processor (FEP), these values may be pre-configured, downloaded in a PDL,
specified in a table download, or manually edited through the Configuration Client.
EMV Technical Fallback, which allows Magnetic Stripe Data (MSD) swipes of an EMV
card, is controlled by the Card Table in VIPER. This behavior is not locally configurable.
See the Inside Contact EMV Feature Reference for more details.
All controller EMV configuration is done through the Configuration Client.
Refer to the Inside Contact EMV Feature Reference for complete
details on configuring Verifone solutions for EMV.
Configuration Client Access
Commander Site Controller
Access the Configuration Client for Commander Site Controller at the following address:
https://192.168.31.11/ConfigClient.html, or by logging into the Configuration Manager
in the CSR Functions on the register.
Login to ConfigClient using the Manager login name and current password.
•User Name: Manager
• Password: (** the current valid Manager password **)
3

BuyPass Rapid Connect
All First Data merchants implementing EMV must contact the First
Data BuyPass Helpdesk to be converted to First Data’s Rapid
Connect. The BuyPass support contact number and the information
the merchant will need to provide as part of the conversion request
are included below.
Before beginning a network conversion to Rapid Connect, close
out the daily reports for any transactions run on the current
network configuration.
Contact the First Data Merchant HelpDesk at 800-726-2629.
When calling the First Data Merchant Helpdesk for support, make sure there is available
information regarding recent processed transactions to be used for verification
purposes.
Request to have the merchant account converted to Rapid Connect and setup for EMV
processing on a Verifone POS system.
Prior to calling the First Data Merchant Helpdesk for conversion, know the BuyPass
Communications Transport currently in-use: BuyPass IP or BuyPass Datawire.
• Using Config Client, navigate to Payment Controller>EPS Configuration>BuyPass
Configuration>FEP tab.
If the Communications Options: Domain Name and Port fields are active, then the
site is using BuyPass IP as the communication transport method.
If the Communications Options: Domain Name an Port fields are dimmed, the
Security: Secure Datawire Channel checkbox is selected, and the Secure Channel
Parameters: W eb Address field is visible, then the site is using Bu yP ass Datawire as
the communications transport method.
4

BuyPass Configuration for Rapid Connect
Before beginning a network conversion to Rapid Connect, close out the
daily reports for any transactions run on the current network
configuration.
To ensure proper configuration of the Verifone Viper EMV Solution, the
merchant’ s First Data profile must be set to allow for Rapid Connect~EMV
processing. Contact the First Data Merchant’s Helpdesk for assistance.
The table below shows the configuration parameters that will be modified for
conversion to Rapid Connect.
Review the information and proceed to the next page for further instruction.
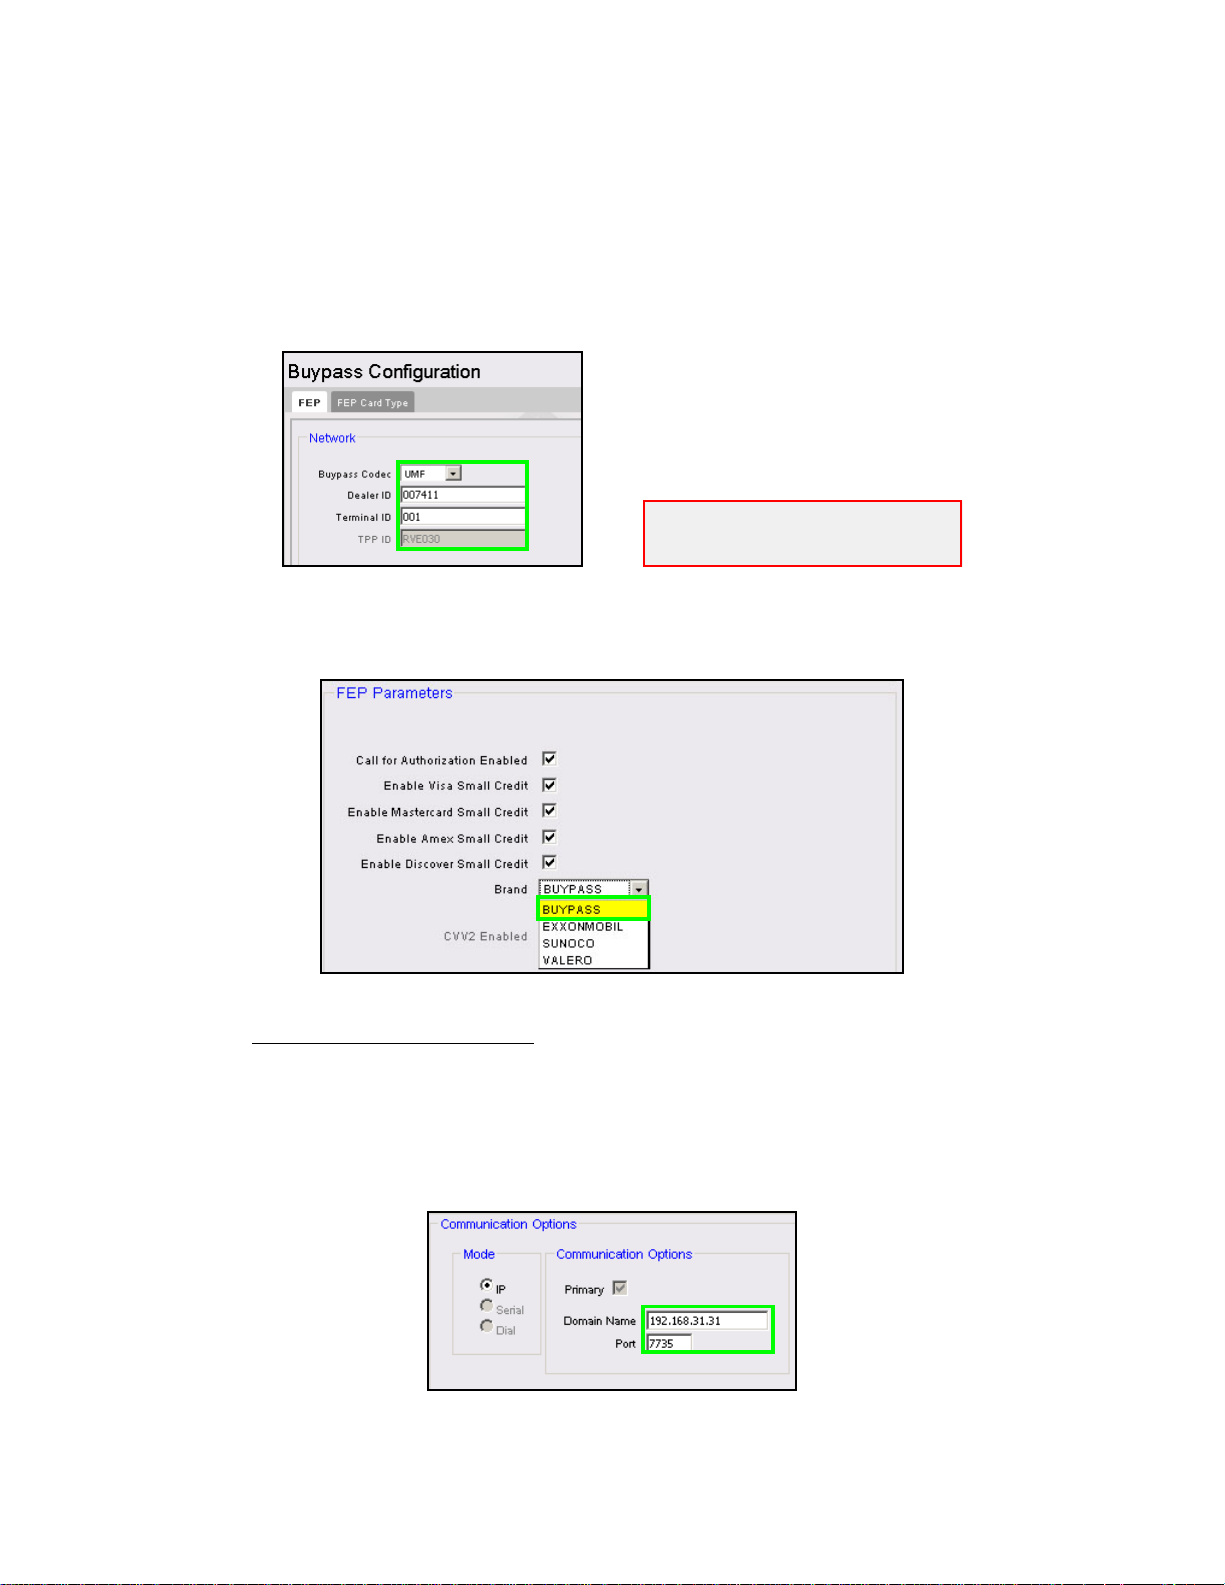
Payment Controller>EPS Configuration>BuyPass Configuration
Network BuyPass Codec UMF
Dealer ID 6-digit Rapid Connect Merchant ID.
Terminal ID 3-digit Terminal ID.
Communication
Options
(Non-Datawire Only)
FEP Parameters Brand BUYPASS (or major oil brand selection)
Security
(Datawire Only)
Communication Options address values may need to be updated
for proper Rapid Connect setup. Addresses are provided by the
Payment Host. Refer to the client’s Network Configuration Guide
for additional information.
Domain Name Provided by Payment Host.
Port Provided by Payment Host.
Datawire Secure
Channel
Web Address
Allow Registration Enabled
Enabled
https://prod.dw.us.fdcnet.biz/sd/srsxml.rc
5

Finding the Dealer ID and Terminal ID
Existing accounts using First Data Buypass Atlanta Native Enhanced Network (ATL 105)
use a formatted 13-character Dealer ID.
The Buypass ATL105 formatted string consists of the following:
• a 2-character terminal type code
• a 2-digit state code
• a 6-digit Merchant ID
• a 3-digit Terminal ID
The new Universal Message Format (UMF) associated with Rapid Connect uses a 6-digit
Dealer ID and 3-digit Terminal ID.
The UMF Dealer ID is the same 6-digit Merchant ID and the Terminal ID is the same
3-digit TID that is embedded within the ATL105 ID string.
As an example,
if the Buypass ATL105 Dealer ID is
VP13007411001,
then
the Rapid Connect Dealer ID = 007411,
and the Terminal ID = 001.
The 6-digit Dealer ID and the 3-digit TID
are the values that would be used to
configure the BuyPass Configuration FEP
Network settings.
6
BuyPass FEP Configuration
Dealer and ID values shown as
examples only.
1. Navigate to the Paymen t Controller>EPS Configuration>BuyPass Configuration>FEP.
2. Select the BuyPass Codec for Rapid Connect from the drop-down menu: UMF.
3. Enter/Confirm the 6-digit Rapid Connect Dealer ID.
4. Enter/Confirm the 3-digit Terminal ID.
5. Confirm the selected Brand: BUYPASS.
Or, make the correct brand selection as appropriate.
6. For NON-Datawire sites ONLY
Converting communications to Rapid Connect may require updates to the
Communication Options parameters as provided by the Payment Host or Brand Host.
Enter/Confirm the Communication Options parameters: Domain Name and Port.
Refer to brand-specific documentation for Communication Options settings.
.
7

7. For Datawire sites ONLY
Converting communications to Rapid Connect may require updates to the Security
parameters as provided by the Payment Host.
Enter/Confirm the Security settings and Datawire Security Channel Parameters.
Datawire Security Settings
Datawire Secure Channel Enabled
Web Address https://prod.dw.us.fdcnet.biz/sd/srsxml.rc
Allow Registration Enabled
Before saving configuration changes, confirm the Daily Report
has been closed.
Failure to close the Daily Repo rt will cause batches to not
reconcile with the previous network configuration.
8. Click [Save].
9. Reboot the Commander Site Controller.
Failure to reboot the Commander Site Controller, or RubyCi, may
prevent successful communications to the Payment Host.
8

Testing Rapid Connect Communications
After completing the BuyPass Rapid Connect communications updates, and rebooting
the Commander Site Controller, it is recommended to test communications to the host
prior to continuing with enabling EMV.
1. Log on to the POS, and select the CSR Functions button.
2. Select the [Network Menu].
3. Select [Diagnostic Check Host Status].
4. If the system response displays Payment Processor Offline, contact the First
Data BuyPass Helpdesk and troubleshoot communication errors prior to
continuing with EMV setup.
9

BuyPass EMV Configuration
EMV functions are disabled in the production software distribution and must be
manually enabled at the site.
CAPK tables are downloaded from the BuyPass host during the EMV CA Public Key File
Download initiated from POS Network Menu.
Accessing EMV Configuration
If the BuyPass Production Signed software installation is a new installation, all menu
selections to configure the system for EMV transaction processing are immediately
visible and available.
If the software is being updated for EMV-readiness from a prior installation, user
permissions must be updated to allow access to the EMV menu selections.
If accessing the Configuration Client from the POS, and the EMV Configuration and
Initialization tabs are greyed out, then this indicates the logged in user account does
not have the correct functions added to the associated role.
If accessing the Configuration Client from a PC, and the logged in user account does not
have the correct functions added to the associated role, then attempting to access the
EMV tabs returns a Permissions Denied message.
10
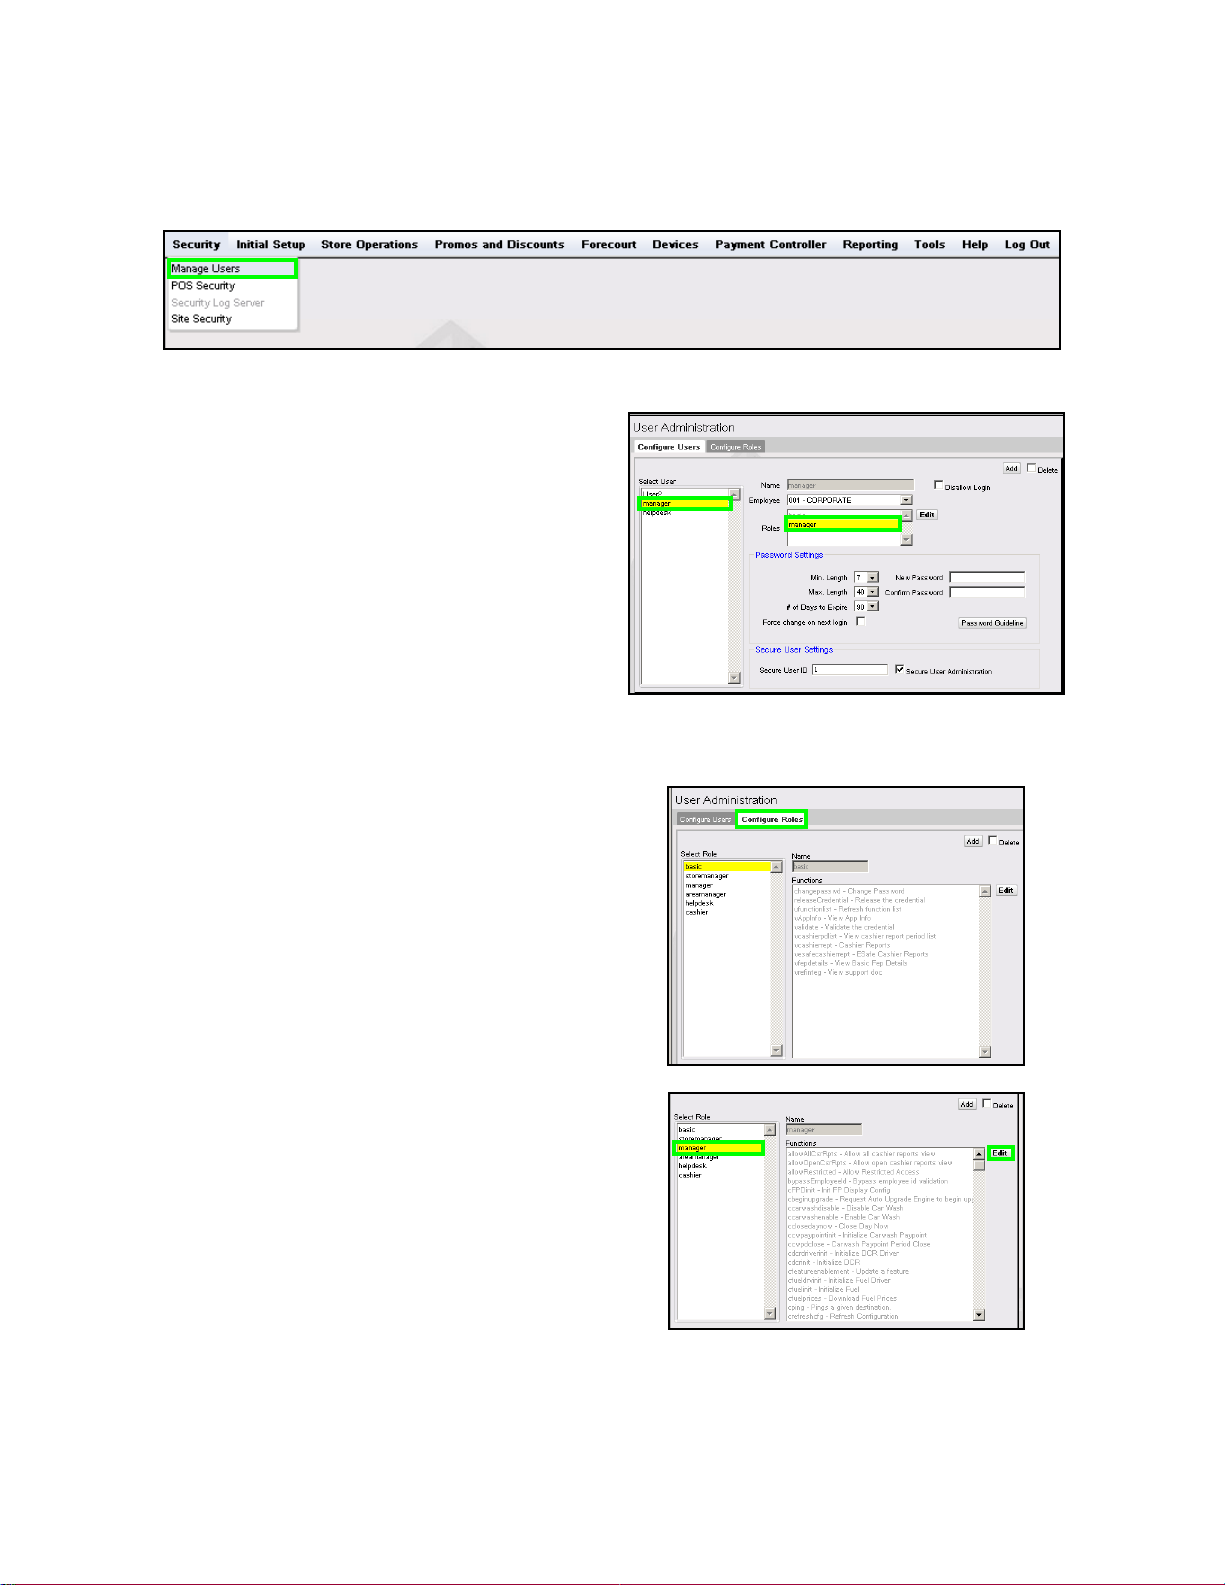
Functions can be updated to the user's roles through the Configuration Client.
1. Navigate to Security>Manage Users.
2. The Configure Users tab will be
displayed.
3. Click to select the User ID and
confirm the assigned Role.
4. Click to select the Configure
Roles tab
5. Click to select the Role to
update.
6. Click [Edit].
11

The Functions list is displayed with items listed alphabetically.
7. Scroll down the Functions list and locate
uemvcfg - Update EMV Configuration and
uemvinit - Update EMV Initialization.
8. Click the checkboxes to activate the
uemvcfg and uemvinit functions.
9. Scroll down the Functions list and locate
vemvcfg - View EMV Configuration and
vemvinit - View EMV Initialization.
10. Click the checkboxes to activate the
vemvcfg and vemvinit functions.
11. Click [Done]
12

12. Click [Save].
13. Log out of the Configuration Client.
14. Log into the Configuration Client for permission updates to be applied.
13
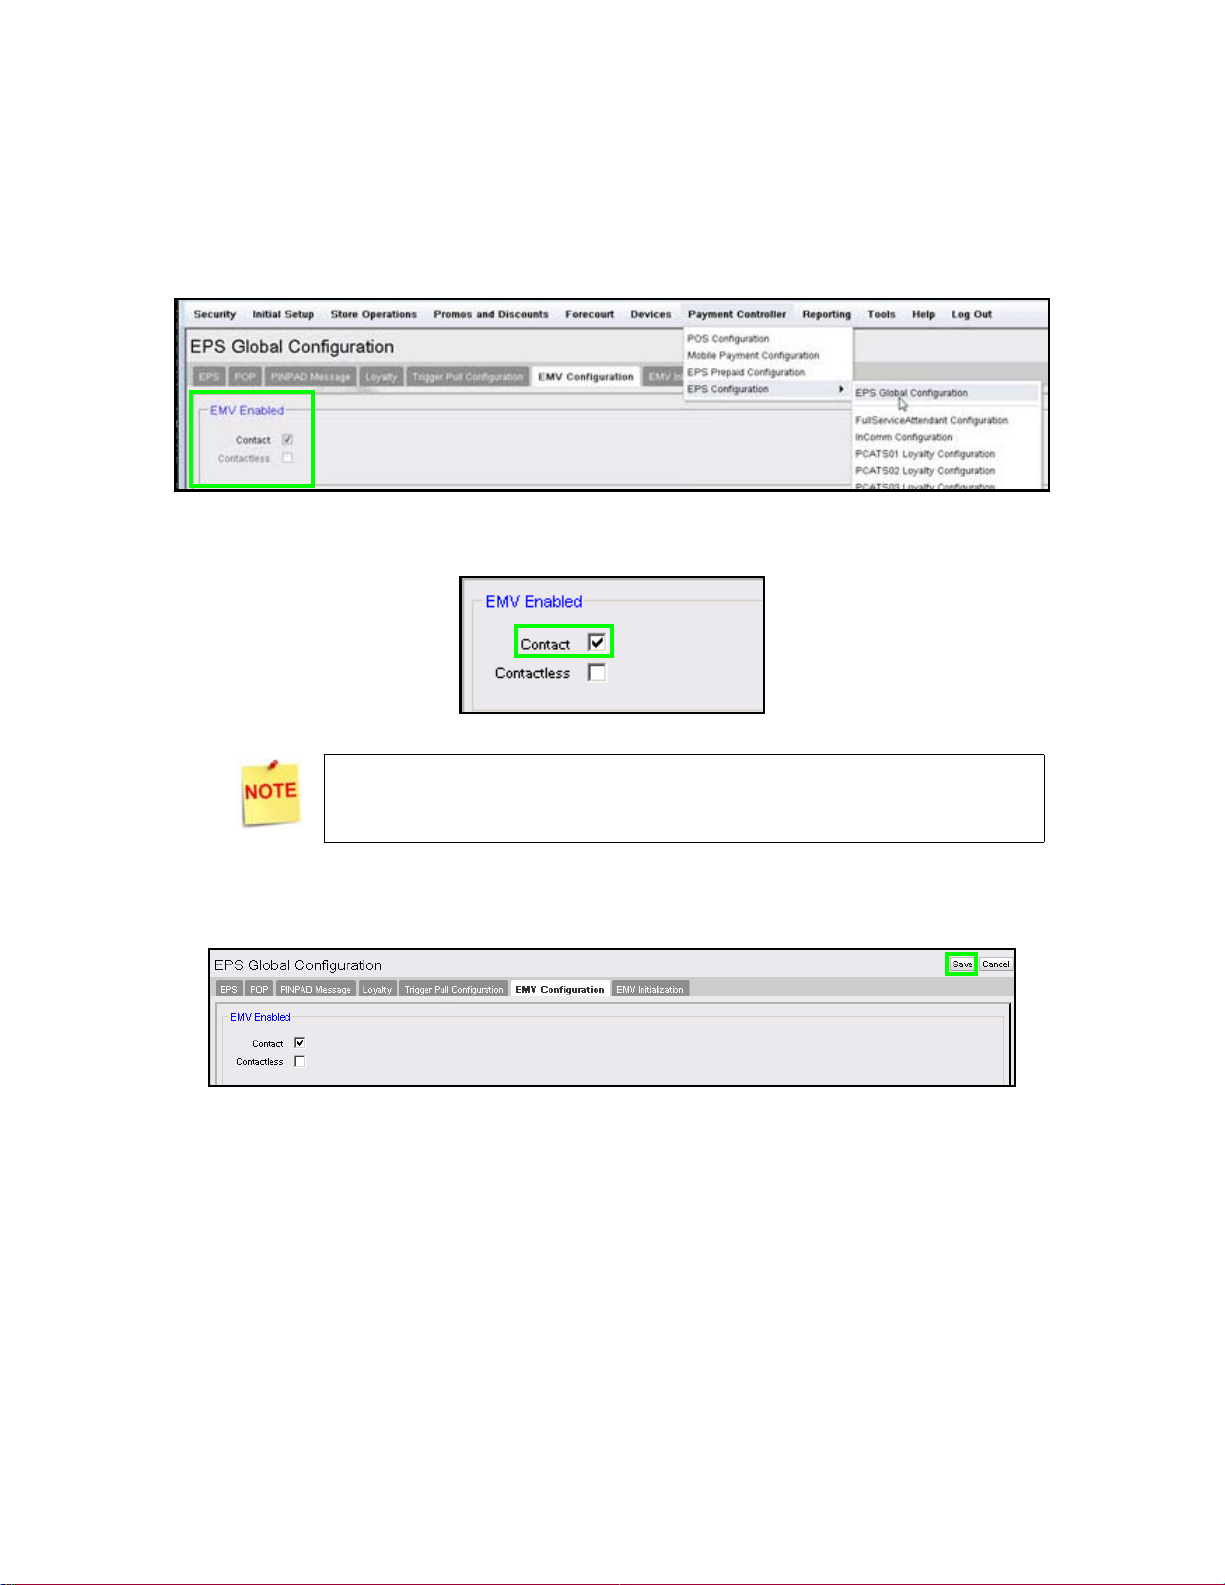
Enabling EMV
In order to process EMV transactions, EMV must be enabled on the Site Controller.
1. Navigate to Payment Controller>EPS Configuration>EPS Global Configuration>
EMV Configuration.
2. Click the checkbox to select and enable <Contact>.
Contactless EMV is not available and cannot be enabled at this time.
3. Save the configuration.
14

CAPK File Download
New functionality has been added to the POS EPS Network Functions to allow a
download of the EMV Certification Authority Public Keys file.
1. Navigate the POS menu to CSR Functions>Network Menu>EPS Network Functions.
2. Select “Perform EMV CA Public Key File Download”.
When the download completes, the EPS will send configurations to connected PINpads,
enabling EMV capabilities.
Card Table Download
Update the Card Tables from BuyPass.
1. Navigate the POS menu to CSR Functions>Network Menu>EPS Network Functions.
2. Select “Perform Table Load”.
EMV Testing
After completing the installation and conversion, run a test transaction to verify EMV
transactions are processing successfully.
To update the PINpads with EMV configurations, log out of the
Point of Sale registers, then log back in to sales mode.
The PINpad display should show the prompt “Swipe or Insert Card”
and the payment device EMV slot should illuminate
.
15

First Data EMV Links
EMV: A to Z (Terms and Definitions)
www.firstdata.com/downloads/marketing-merchant/EMV-A-toZ.pdf
First Data’s Program on EMV
www.firstdata.com/downloads/marketing-merchant/EMV_ISV_Webinar_Presentation.pdf
First Data’s EMV for Merchants
www.firstdata.com/en_us/all-features/emv/emv-for-merchants.html
16
 Loading...