

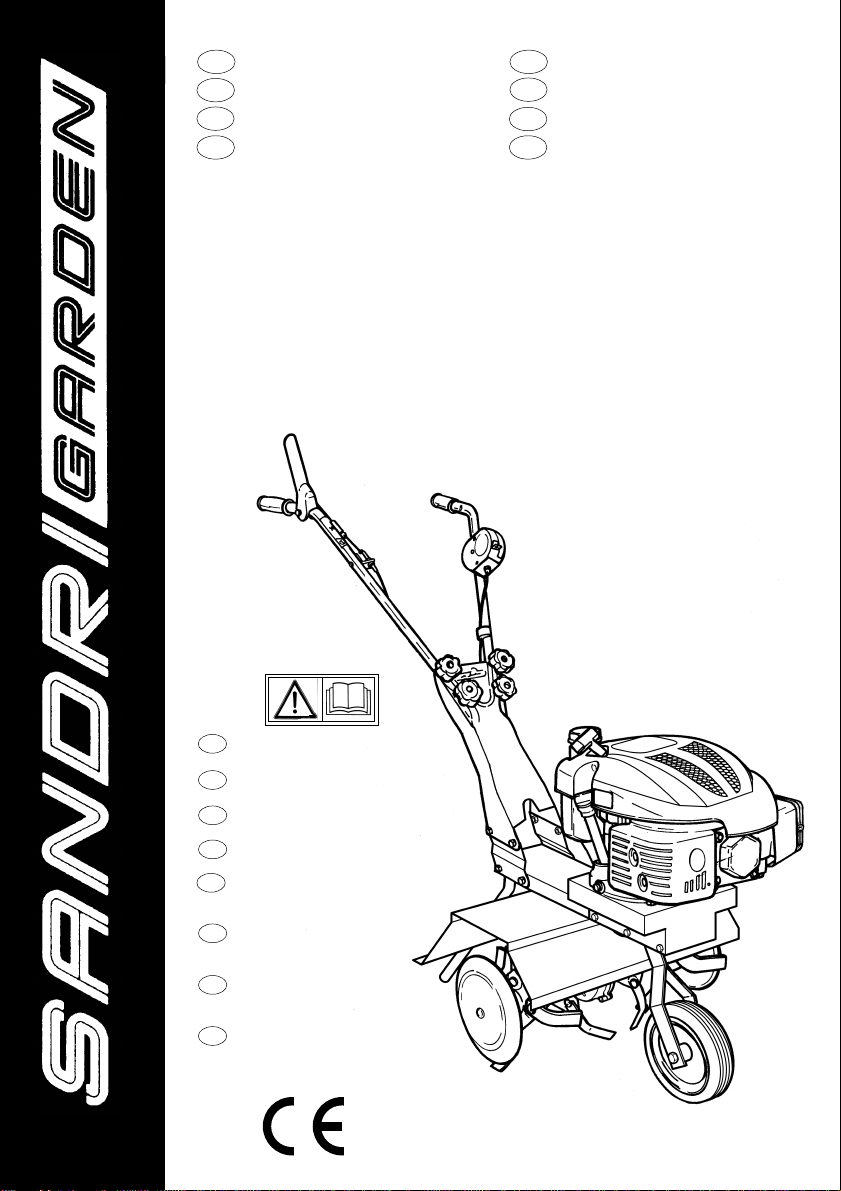
VERCIEL TL 40N, TL 60 User Manual
I
MANUALE ISTRUZIONI
GB
INSTRUCTION MANUAL
F
MODE D'EMPLOI
D
BEDIENUNGSSANLEITUNGEN
NL
BEDIENINGSHANDLEIDING
E
MANUAL DE INSTRUCCIONES
MANUAL DE INSTRUÇÕES
P
ЕГЧЕЙСЙДЙП ПДЗГЙЩН
GR
MOTOZAPPA - MOTOR HOE
MOTOBINEUSE - MOTORHACKE
HAKFREES - MOTOAZADA
MOTOENXADA - МПФПУКБРФЙКП
TL 60
Leggere attentamente le presenti
I
istruzioni prima del primo impiego.
Read this operators manual careful
GB
before the first use.
Lire avec attention ces instructions
F
avant la première utilisation
Vor der Anwendung die vorliegenden
D
Anweisungen aufmerksam lesen.
Lees aandachtig deze instructies
NL
door alvorens het apparaat voor het
eerst in gebruik te nemen.
Leer con cuidado estas
E
instrucciones antes de la primera
utilización.
Leia com atenção estas instruções
P
antes de utilizar pela primeira vez
o aparelho.
Рсйн чсзуймпрпйЮуефе фп
GR
мзчЬнзмб гйб рсюфз цпсЬ,
дйбвЬуфе рспуекфйкЬ бхфЭт фйт
пдзгЯет.
TL 40
N
6050470/028
1

(I)
ATTESTAZIONE DI CONFORMITÀ ALLE NORME CEE PER LE MACCHINE CON MOTORI < 3 KW
La sottoscritta SANDRIGARDEN srl, via Manzoni 22, 36027 ROSÀ (VI) ITALIA, dichiara che i seguenti prodotti: MOTOZAPP A TL 60 - TL 40/N sono
conformi alle direttive, 98/37/CE, 89/336/CE, 2000/14 CE, Art. 12 ANNEX VI, N°1232, CESMA s.c. a r .l. V ia Gorizia 49, 42100 Reggio Emilia
ITALIA e sono state sviluppate conformemente alle norme EN 709.
# Livello di potenza sonora misurata - Lwa = 91,6 dB(A)
# Livello di potenza sonora garantita - Lwa = 93 dB(A)
(ENG)
DECLARATION OF CONFORMITY TO EU STANDARDS RELATING TO MACHINES FITTED WITH MOTORS < 3 KW
SANDRIGARDEN srl, located in via Manzoni 22, 36027 ROSÀ (VI) ITALY, declares that the following products: TL 60 - TL 40/N MOTOR HOE
comply with directives 98/37/EC, 89/336/EC, 2000/14 EC, Art. 12 ANNEX VI, No. 1232, CESMA s.c. a r .l. Via Gorizia 49, 42100 Reggio Emilia
ITALY and that they have been designed in compliance with EN 709 standards.
# Measured sound power level - Lwa = 91.6 dB(A)
# Assured sound power level - Lwa = 93 dB(A)
(F)
ATTESTATION DE CONFORMITÉ AUX NORMES CEE POUR LES MACHINES AVEC MOTEURS < 3 KW
La société soussignée SANDRIGARDEN srl, via Manzoni 22, 36027 ROSÀ (VI) ITALIE, déclare que les produits suivants : MOTOBINEUSE
TL 60 - TL 40/N sont conformes aux directives 98/37/CE, 89/336/CE, 2000/14 CE, Art. 12 ANNEXE VI, N° 1232, CESMA s.c. a r.l. Via Gorizia
49, 42100 Reggio Emilia ITALIE et qu’ils ont été développés conformément à la norme EN 709.
# Niveau de puissance acoustique mesuré - Lwa = 91,6 dB(A)
# Niveau de puissance acoustique garanti - Lwa = 93 dB(A)
(D)
CE-KONFORMITÄTSERKLÄRUNG FÜR MASCHINEN MIT MOTOREN < 3 KW
Hiermit bestätigt die Firma SANDRIGARDEN srl, Via Manzoni 22, 36027 ROSÀ (VI) ITALIEN, dass die Bauart des Geräts: MOTORHACKE TL
60 - TL 40/N folgenden Richtlinien entspricht: 98/37/EG, 89/336/EG, 2000/14/EG, Art. 12 ANHANG VI, Nr . 1232, CESMA s.c. a r.l. Via Gorizia
49, 42100 Reggio Emilia ITALIEN und die Entwicklung des Produkts gemäß den Normen EN 709 erfolgte.
# Gemessener Schallpegel - Lwa = 91,6 dB(A)
# Garantierter Schallpegel - Lwa = 93 dB(A)
(NL)
VERKLARING VAN OVEREENSTEMMING MET DE EEG-NORMEN VOOR MACHINES MET MOTOREN < 3 KW
Ondergetekende SANDRIGARDEN srl, via Manzoni 22, 36027 ROSÀ (VI) ITALIË, verklaart dat de volgende producten: HAKFREES TL 60 - TL 40/N
in overeenstemming zijn met de Richtlijnen 98/37/EG, 89/336/EEG, 2000/14 EG, Art. 12 BIJLAGE VI, N°1232, CESMA s.c. a r .l. Via Gorizia 49,
42100 Reggio Emilia ITALIË en dat zij ontwikkeld zijn in overeenstemming met de normen EN 709
# Gemeten geluidsvermogenniveau - Lwa = 91,6 dB(A)
# Gegarandeerd geluidsvermogenniveau - Lwa = 93 dB(A)
(E)
CERTIFICADO DE CONFORMIDAD CON LAS NORMAS CEE PARA LAS MÁQUINAS CON MOTORES < 3 KW
La abajo firmante SANDRIGARDEN srl, via Manzoni 22, 36027 ROSÀ (VICENZA) ITALIA, declara que los siguientes productos: MOTOAZADA
TL 60 - TL 40/N son conformes a las directivas 98/37/CE, 89/336/CE, 2000/14 CE, Art. 12 ANEXO VI, N°1232, CESMA s.c. a r.l. Via Gorizia
49, 42100 Reggio Emilia ITALIA y se han desarrollado de acuerdo con las normas EN 709.
# Nivel de potencia sonora medida - Lwa = 91,6 dB(A)
# Nivel de potencia sonora garantizada - Lwa = 93 dB(A)
(P)
ATESTAÇÃO DE CONFORMIDADE DAS NORMAS CEE PARA AS MÁQUINAS COM MOTORES < 3 KW
A abaixo-assinada SANDRIGARDEN srl, via Manzoni 22, 36027 ROSÀ (VI) ITÁLIA, declara que os seguintes produtos: MOTOENXADA TL 60
- TL 40/N são conforme as directivas, 98/37/CE, 89/336/CE, 2000/14 CE, Art. 12 ANNEX VI, N°1232, CESMA s.c. a r.l. Via Gorizia 49, 42100
Reggio Emilia ITÁLIA e foram desenvolvidas em conformidade com as normas EN 709.
# Nível de potência sonora medida - Lwa = 91,6 dB(A)
# Nível de potência sonora garantida - Lwa = 93 dB(A)
(GR)
ВЕВБЙЩУЗ УХММПСЦЩУЗУ МЕ ФПХУ КБНПНЙУМПХУ ФЗУ ЕПК
РЕСЙ МЗЧБНЗМБФЩН МЕ КЙНЗФЗСЕУ < 3 КW
З хрпгсЬцпхуб ефбйсЯб SANDRIGARDEN srl, via Manzoni 22,
36027 ROSА (VI) ITALIA, дзлюней ьфй фб бкьлпхиб рспъьнфб:
ПФПУКБРФЙКП TL 60 - TL 40/N ухммпсцюнпнфбй ме фйт ПдзгЯет,
98/37/ÅÊ, 89/336/ÅÊ, 2000/14 ÅÊ, áñè. 12 ANNEX VI, N°1232,
CESMA s.c. a r.l. Via Gorizia 49, 42100 Reggio Emilia ITALIA êáé
кбфбукехЬуфзкбн уэмцщнб ме фпхт кбнпнйумпэт EN 709.
# ЕрЯредп мефсзмЭнзт йучэпт - Lwa = 91,6 dB(A)
# ЕрЯредп брь ЙУЧХУ sonora garantita - Lwa = 93 dB(A)
Rosà (VI) 19 - 04 - 2007
SANDRI GARDEN srl
Direttore Generale
Alberto Cattaneo
2

(I)
ATTESTAZIONE DI CONFORMITÀ ALLE NORME CEE PER LE MACCHINE CON MOTORI > 3 KW
La sottoscritta SANDRIGARDEN srl, via Manzoni 22, 36027 ROSÀ (VI) ITALIA, dichiara che i seguenti prodotti: MOTOZAPPA TL 60 - TL 40/N
sono conformi alle direttive, 98/37/CE, 89/336/CE e sono state sviluppate conformemente alle norme EN 709.
(ENG)
DECLARATION OF CONFORMITY TO EU STANDARDS RELATING TO MACHINES FITTED WITH MOTORS > 3 KW
SANDRIGARDEN srl, located in via Manzoni 22, 36027 ROSÀ (VI) ITALY, declares that the following products: MOT OR HOE TL 60 - TL 40/N
comply with directives 98/37/EC, 89/336/EC, and that they have been designed in compliance with EN 709 standards.
(F)
ATTESTATION DE CONFORMITÉ AUX NORMES CEE POUR LES MACHINES AVEC MOTEURS > 3 KW
La société soussignée SANDRIGARDEN srl, via Manzoni 22, 36027 ROSÀ (VI) ITALIE, déclare que les produits suivants : MOTOBINEUSE
TL 60 - TL 40/N sont conformes aux directives 98/37/CE, 89/336/CE et qu’ils ont été développés conformément à la norme EN 709.
(D)
CE-KONFORMITÄTSERKLÄRUNG FÜR MASCHINEN MIT MOTOREN > 3 KW
Hiermit bestätigt die Firma SANDRIGARDEN srl, Via Manzoni 22, 36027 ROSÀ (VI) ITALIEN, dass die Bauart des Geräts: MOTORHACKE
TL 60 - TL 40/N folgenden Richtlinien entspricht: 98/37/EG, 89/336/EG und die Entwicklung des Produkts gemäß den Normen EN 709 erfolgte.
(NL)
VERKLARING VAN OVEREENSTEMMING MET DE EEG-NORMEN VOOR MACHINES MET MOTOREN > 3 KW
Ondergetekende SANDRIGARDEN srl, via Manzoni 22, 36027 ROSÀ (VI) ITALIË, verklaart dat de volgende producten: HAKFREES TL 60 TL 40/N in overeenstemming zijn met de Richtlijnen 98/37/EG, 89/336/EEG en dat zij ontwikkeld zijn in overeenstemming met de normen EN 709
(E)
CERTIFICADO DE CONFORMIDAD CON LAS NORMAS CEE PARA LAS MÁQUINAS CON MOTORES > 3 KW
LA abajo firmante SANDRIGARDEN srl, via Manzoni 22, 36027 ROSÀ (VICENZA) ITALIA, declara que los siguientes productos: MOTOAZADA
TL 60 - TL 40/N son conformes A las directivas 98/37/CE y 89/336/CE y se han desarrollado de acuerdo con las normas EN 709.
(P)
ATESTAÇÃO DE CONFORMIDADE DAS NORMAS CEE PARA AS MÁQUINAS COM MOTORES > 3 KW
A abaixo-assinada SANDRIGARDEN srl, via Manzoni 22, 36027 ROSÀ (VI) ITÁLIA, declara que os seguintes produtos: MOTOENXADA TL 60
- TL 40/N são conforme as directivas, 98/37/CE, 89/336/CE e foram desenvolvidas em conformidade com as normas EN 709.
(GR)
ВЕВБЙЩУЗ УХММПСЦЩУЗУ УФПХУ КБНПНЙУМПХУ ЕПК
РЕСЙ МЗЧБНЗМБФЩН МЕ КЙНЗФЗСЕУ > 3 KW
З хрпгсЬцпхуб ефбйсЯб SANDRIGARDEN srl, via Manzoni
22, 36027 ROSА (VI) ITALIA, дзлюней ьфй фб бкьлпхиб
рспъьнфб: МПФПУКБРФЙКП TL 60 - TL 40/N
ухммпсцюнпнфбй ме фйт пдзгЯет, 98/37/ÅÊ, 89/336/ÅÊ кбй
Эчпхн кбфбукехбуфеЯ уэмцщнб ме фпхт кбнпнйумпэт EN 709.
Rosà (VI) 19 - 04 - 2007
SANDRI GARDEN srl
Direttore Generale
Alberto Cattaneo
3
SEGNALETICA DI SICUREZZA - WARNING SYMBOLS - SYMBOLES DE SECURIE
WARNZEICHEN - WAARSCHUWINGSYMBOLEN - SEÑALIZACIÓN DE
SEGURIDAD - SINAIS DE SEGURANÇA - УЗМБФБ БУЦБЛЕЙБУ
I
SIGNIFICATO DEI SIMBOLI
GB
DEFINITIONS OF SYMBOLS
F
SIGNIFICATION DES SYMBOLES
D
ERKLÄRUNG DER WARNSYMBOLE
NL
BETEKENIS VAN DE WAARSCHUWINGSSYMBOLEN
E
DEFINICIOND DE LOS SIMBOLOS
P
SIGNIFICADO DOS SÍMBOLOS
GR
УЗМБУЙБ УХМВПЛЩН
I
AVVERTENZE!
GB
WARNINGS!
F
AVVERTISSEMENT!
D
WARNUNG!
Chiunque utilizzi la motozappa deve prima leggere attentamente il manua
I
le di istruzioni e manutenzione e familiarizzarsi completamente con i comandi per un uso corretto della motozappa.
Read the operating and service instruction manual carefully. Be thoroughly
GB
familiar with the controls and the proper use of the motor hoe.
Lire soigneusement les instructions du manuel d’entretien et d’utilisation
F
avant d’utiliser la motobineuse et se familiariser complètement avec le
fonctionnement des commandes pour une utilisation correcte de la motobineuse.
Jeder Benutzer der Motorhacke muss zunächst aufmerksam die Betriebs-
D
und Wartungsanleitung lesen und sich für einen korrekten Gebrauch mit
allen Bedienungsteilen vertraut machen.
Alle personen die de hakfrees gebruiken dienen eerst de
NL
bedieningshandleiding zorgvuldig door te lezen om volledig vertrouwd te
raken met de instructies voor een correct gebruik van de hakfrees.
Cualquier persona, antes de utilizar la motoazada, tiene que leer
E
atentamente el presente manual de instrucciones y mantenimiento y
familiarizarse bien con los mandos para un empleo correcto de la motoazada.
Qualquer pessoa que utilize a motoenxada, deve primeiramente, ler com
P
atenção o manual de instruções e manutenção e familiarizarse completa-
mente com os comandos para um uso correcto uso da motoenxada.
ПРПЙПУ ЧСЗУЙМПРПЙЕЙ ФП МПФПУКБРФЙКП РСЕРЕЙ РСПЗГПХМЕНЩУ
GR
НБ ДЙБВБУЕЙ РСПУЕКФЙКБ ФП ЕГЧЕЙСЙДЙП ПДЗГЙЩН КБЙ УХНФЗСЗУЗУ КБЙ НБ
ЕОПЙКЕЙЩИЕЙ МЕ ФБ ЧЕЙСЙУФЗСЙБ ГЙБ ФЗ УЩУФЗ ЧСЗУЗ ФПХ МПФПУКБРФЙКПХ.
NL
WAARSCHUWINGEN!
E
ADVERTENCIAS!
P
ADVERTENCIAS!
GR
РСПЕЙДПРПЙЗУЕЙУ!
4
SEGNALETICA DI SICUREZZA - WARNING SYMBOLS - SYMBOLES DE SECURIE
WARNZEICHEN - WAARSCHUWINGSYMBOLEN - SEÑALIZACIÓN DE
SEGURIDAD - SINAIS DE SEGURANÇA - УЗМБФБ БУЦБЛЕЙБУ
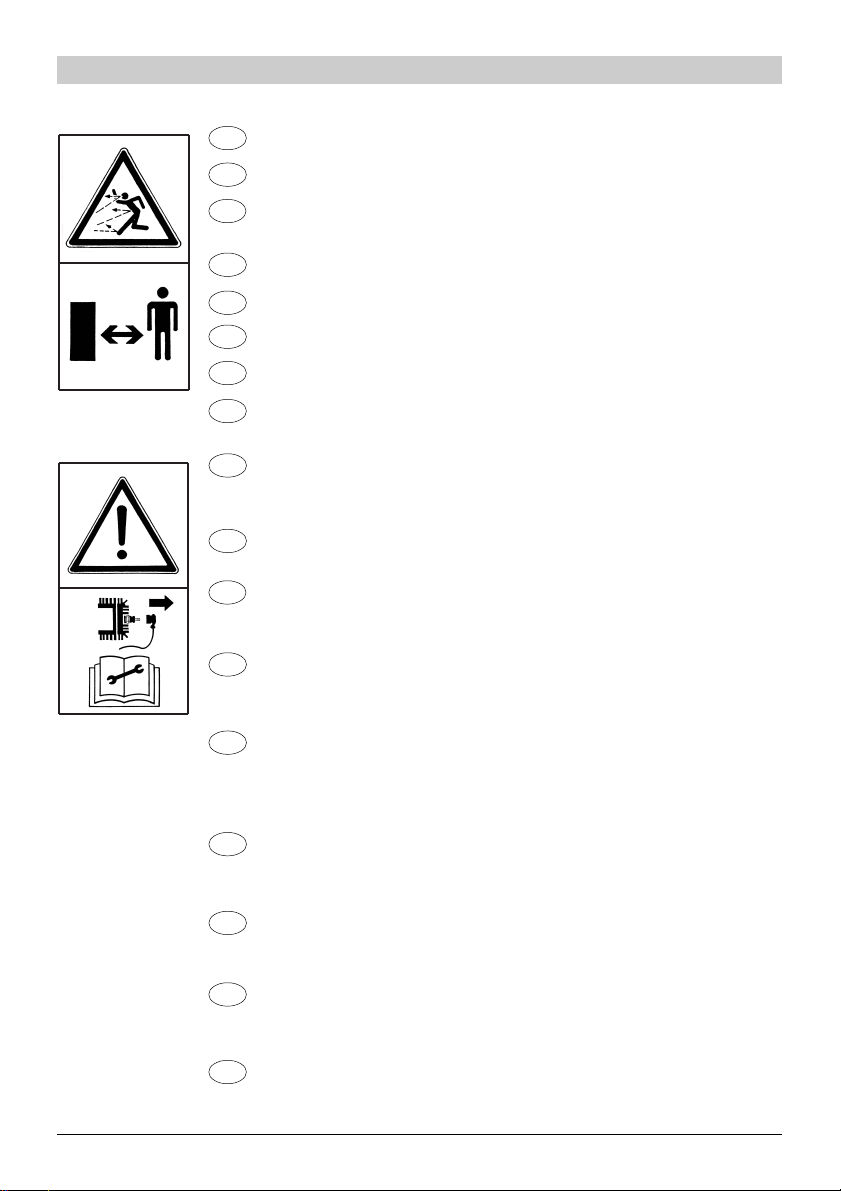
I
PERICOLO - Non mettere in moto e non utilizzare la motozappa in prossimità di persone, specialmente bambini o animali.
GB
DANGER - Never use the motor hoe while people, especially children, or
pets are nearby.
F
DANGER - Ne pas mettre en marche et ne pas utiliser la motobineuse
quand des personnes, surtout des enfants ou des animaux, se trouvent
à proximité.
D
GEFAHR - Setzen Sie die Motorhacke nicht in Betrieb, wenn sich in der
Nähe Personen, insbesondere Kinder, oder Tiere aufhalten.
GEVAAR - De hakfrees niet starten of gebruiken in de nabijheid van
NL
personen, en met name van kinderen en dieren.
E
PELIGRO - PELIGRO - No poner en marcha ni utilizar la motoazada si hay
personas, especialmente niños, o animales en los alrededores.
P
PERIGO - Não ligar e nem utilizar a motoenxada em proximidade de
pessoas, especialmente crianças ou animais.
КЙНДХНПУ - Мзн иЭфефе уе кЯнзуз кбй мз чсзуймпрпйеЯфе фп члппкпрфйкь
GR
кпнфЬ уе Ьфпмб кбй ейдйкьфесб уе рбйдйЬ Ю жюб.
I
PERICOLO - Prima di effettuare la pulizia, la manutenzione o l’ispezione,
accertarsi che le frese e tutte le altre parti in movimento si siano fermate
completamente. Scollegare il cavo della candela ed allontanarlo dalla candela stessa, in modo da evitare una messa in moto accidentale.
GB
DANGER - When cleaning, repairing, or inspecting, make certain the blades
and all moving parts have stopped. Disconnect the spark plug cap, and
keep the cap away from the plug to prevent accidental starting.
F
DANGER - Veiller à ce que les fraises ainsi que toutes les pièces en
mouvement soient arrêtées avant de nettoyer, réparer ou inspecter la
motobineuse. Déconnecter le fil de la bougie et le maintenir à l’écart pour
éviter une mise en marche accidentelle.
D
GEFAHR - Stellen Sie vor Reinigungs-, Wartungs- oder Inspektionsarbeiten
sicher, dass die Fräsen und alle anderen Bewegungsorgane vollständig
zum Stillstand gekommen sind. Ziehen Sie das Zündkabel ab und entfernen
Sie es von der Zündkerze, um ein versehentliches Anlassen zu vermeiden.
GEVAAR - Alvorens de machine schoon te maken of onderhoud of
NL
reparaties uit te voeren, moet u controleren of de frezen en alle andere
bewegende delen volledig tot stilstand zijn gekomen. Koppel de bougiekabel
af en houd deze weg van de bougie, om zo een ongewenste inschakeling
van de machine te voorkomen.
PELIGRO - PELIGRO - Antes de efectuar la limpieza, el mantenimiento o
E
la inspección, hay que asegurarse de que la fresas y todas las otras
piezas en movimiento estén completamente paradas. Desconectar el cable
de la bujía y alejarlo de la misma para evitar que el motor se pueda poner
en marcha de manera accidental.
PERIGO - Antes de efectuar a limpeza, a manutenção ou a inspecção,
P
certifiquese de que a lâmina e todas as outras partes em movimento
estejam completamente paradas. Desligar o cabo da vela e afastá-lo da
mesma, de modo a evitar uma ligação acidental.
КЙНДХНПУ - Рсйн кЬнефе кбибсйумь, ухнфЮсзуз Ю Элегчп, вевбйщиеЯфе ьфй з цсЭжб
GR
кбй ьлб фб Ьллб кйнпэменб фмЮмбфб Эчпхн уфбмбфЮуей енфелют. БрпухндЭуфе фп
кблюдйп брь фп мрпхжЯ кбйфпрпиефЮуфе фп мбксйЬ брь фп Ядйп фп мрпхжЯ, юуфе нб
брпцехчиеЯ фхчбЯб еккЯнзуз.
HINWEIS - WEITERE HINWEISE ZUR BEDIENUNS UND SERVICE DES
D
MOTORS FINDEN SIE IN DEA BEIGELEGTEN BEDIENUNGSANLEITÙNG DES
MOTORS.
5

SEGNALETICA DI SICUREZZA - WARNING SYMBOLS - SYMBOLES DE SECURIE
WARNZEICHEN - WAARSCHUWINGSYMBOLEN - SEÑALIZACIÓN DE
SEGURIDAD - SINAIS DE SEGURANÇA - УЗМБФБ БУЦБЛЕЙБУ
PERICOLO - Frese taglienti in rotazione! Non avvicinarsi per nessun
I
motivo con i piedi o con altre parti del corpo alla fresa in rotazione.
DANGER - Rotating cutting blades! Keep feet and other parts of the body
GB
away from the rotating cutters.
DANGER - Fraises coupantes en rotation! Ne s’approcher sous aucun pretexte de la
F
fraise en rotation avec les pieds ou d’autres parties du corps.
Gefahr - Scharfe DREHENDE Fräsen! nähern sie sich auf keinen fall der DREHENDEN
D
Fräse mit den füssen oder anderen körperteIlen.
GEVAAR - de SCHERPE frezen draaien! Kom om geen enkele reden met uw voeten
NL
of andere lichaamsdelen in de buurt van de draaiende frezen.
PELIGRO - ¡Fresas CORTANTES en rotacion! En ningún caso acercarse
E
con los pies o con otras partes del cuerpo a la fresa en rotacion.
PERIGO - Lâminas EM rotaÇÃo! Não aproxime-se por nenhum motivo com
P
os pés ou com outras partes do corpo à lâmina em rotação.
КЙНДХНПУ - Ресйуфсецьменет кпцфесЭт цсЭжет! Мзн рлзуйЬжефе гйб кбнЭнб
GR
льгп ме фб рьдйб Ю ме Ьллб мЭсз фпх уюмбфпт уфзн ресйуфсецьменз цсЭжб.
PARTI MACCHINA - MACHINE PARTS - PIECES DE LA MACHINE
MASCHINENTEILE - MACHINEDELEN - PARTES MÁQUINA
PARTES DA MÁQUINA - ФМЗМБФБ МЗЧБНЗМБФПУ
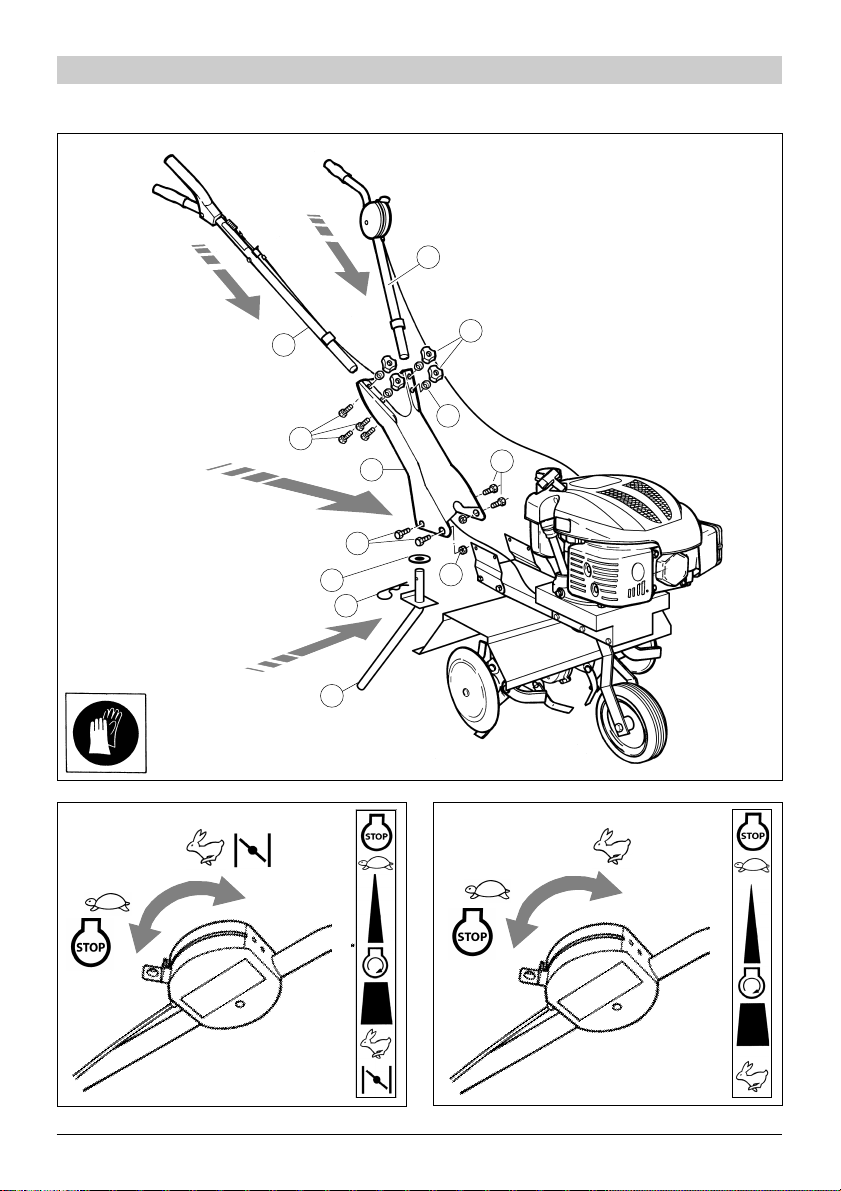
Fig. 1
TL 60
TL 40/N
A
B
N
O
S
C
D
F
Q
P
M
E
G H
I
L
R
6
ILLUSTRAZIONI DI FUNZIONAMENTO E MANUTENZIONE - ILLUSTRATION OF OPERATION &
MAINTENANCE - ILLUSTRATIONS DE MARCHE ET DE MAINTENANCE - BETRIES-UND
WARTUNGSANLEITUNGEN - AFBEELDINGEN VAN DE WERKING EN HET ONDERHOUD
ILUSTRACIONES DE FUNCIONAMIENTO Y MANTENIMIENTO - ILUSTRAÇÕES DE
FUNCIONAMENTO E MANUTENÇÃO - ЕЙКOНЕУ ЛЕЙФПХСГIБУ КБЙ УХНФHСЗУЗУ
Fig. 2
B
6
Fig. 3
A
C
2
5
8
1
2
10
11
9
7
3
2
4
Fig. 4
2
1
1
7

Fig. 5
Fig. 6
12
3
4
8
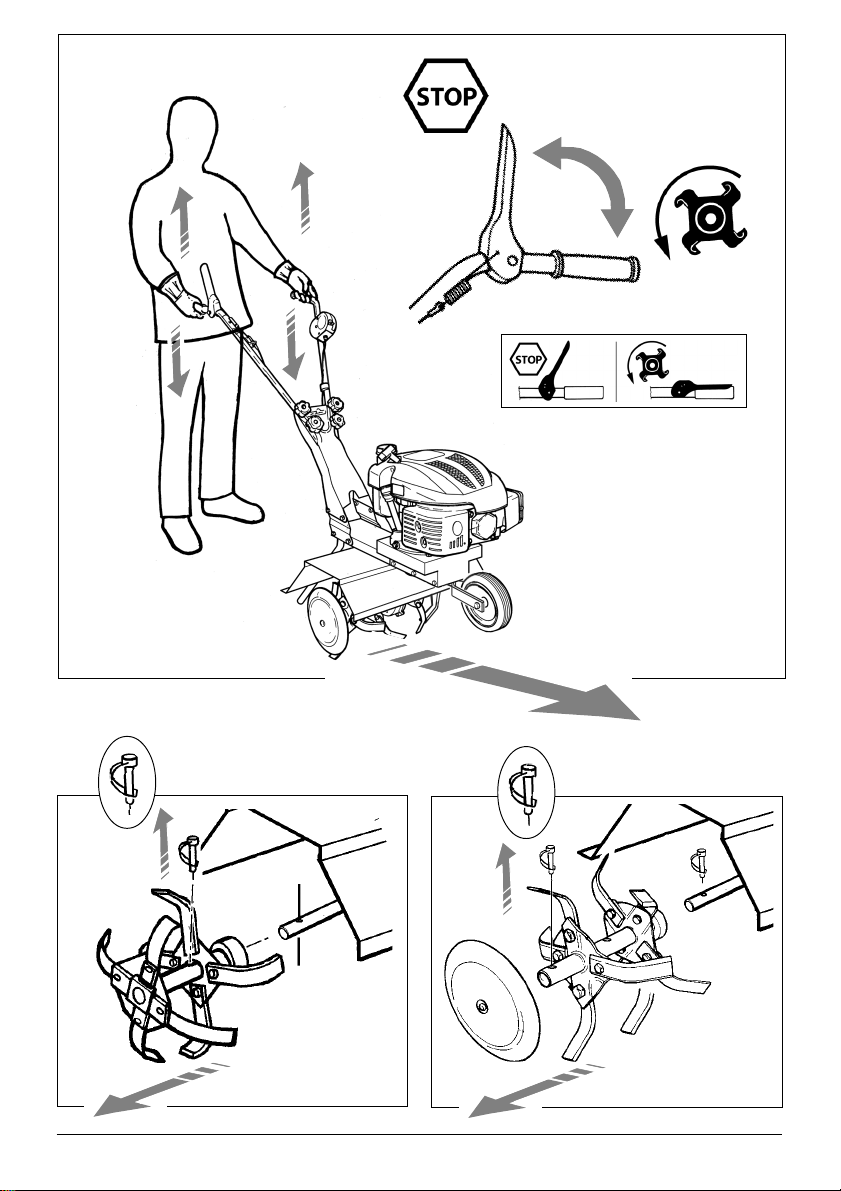
Fig. 7
1
2
1
TL 40/N
TL 40/N
2
Fig. 8
1
2
TL 60
TL 60
Fig. 9
9

I
MANUALE ISTRUZIONI MOTOZAPP A
1. CONGRATULAZIONI
Gentile cliente, vogliamo congratularci con Lei per
aver scelto un nostro prodotto per il giardino.
La Vostra MOTOZAPPA è stata costruita, tenendo
conto delle norme di sicurezza vigenti a tutela del
consumatore.
In questo manuale sono descritte ed illustrate le
varie operazioni di montaggio, di uso ed interventi
di manutenzione, necessari per mantenere in perfetta efficienza la Vostra MOTOZAPPA.
PER FACILIT ARE LA LETTURA
Le illustrazioni corrispondenti al montaggio e alla
descrizione della macchina si trovano all'inizio del
presente fascicolo.
Per rendere più comprensibile l'utilizzo della macchina consultare queste pagine durante la lettura
delle istruzioni di montaggio e di utilizzo.
Nel caso la Vostra MOTOZAPPA necessitasse di
assistenza o riparazione, Vi preghiamo di rivolgervi al nostro rivenditore, o ad un centro assistenza
autorizzato.
2. PRECAUZIONI FONDAMENTALI
DI SICUREZZA
NORME GENERALI
AVVERTENZE:
A1 - La MOTOZAPPA deve sempre
essere usata secondo le istruzioni del
costruttore comprese nel presente manuale.
A2 - L'utilizzo della MOTOZAPP A richie-
de il rispetto delle norme di sicurezza.
A3 - Chiunque utilizzi la MOTOZAPPA
deve prima leggere attentamente il manuale di istruzioni e manutenzione e
familiarizzare completamente con i comandi per un uso corretto dell'apparecchio.
A3.1 - Conservare il presente manuale per consultazioni future.
A4 - Non permettere l'uso della
MOTOZAPP A ai bambini e persone che
non siano completamente a conoscenza delle presenti istruzioni.
Specifiche norme nazionali potrebbero
limitare l'età dell'utilizzatore.
PERICOLO:
A5 - Fare attenzione al materiale pro-
iettato dalle frese.
A6 - Non mettere in moto e non utilizzare la motozappa in prossimità di persone, animali o cose.
A7 - L'operatore è responsabile in caso
di incidenti o pericoli occorsi ad altre
persone od alle loro cose.
PREPARAZIONE:
B1 - Ispezionare accuratamente l'area
in cui si intende usare la motozappa e
rimuovere qualsiasi oggetto che potrebbe essere lanciato o compromettere il
funzionamento della macchina.
B2 - Impiegare la MOTOZAPPA solamente per fresare terreni liberi da ostacoli.
Non impiegare l'apparecchio per scopi
diversi.
B3 - Durante l'utilizzo indossare abiti
aderenti e non sciolti. Indossare SEM-
PRE scarpe di sicurezza e pantaloni
lunghi. Non operare MAI a piedi
scalzi o con sandali aperti.
10
MANUALE ISTRUZIONI MOTOZAPP A
I
B4 - Indossare guanti robusti.
B5 - Chi utilizza la motozappa deve
essere in buona forma. NON UTILIZZARE la MOTOZAPP A in condizioni di
stanchezza, di malessere o sotto l'effetto dell'alcol e di altre droghe.
B6 - ATTENZIONE! I gas di scarico
sono velenosi ed asfissianti. Se inspirati possono quindi essere anche mortali. Non fare funzionare il motore in luogo chiuso o scarsamente ventilato.
B7 - ATTENZIONE! La benzina è
altamente infiammabile.
PERICOLO DI USTIONI ED INCENDIO.
In caso di incendio utilizzare un
estintore, se possibile; in alternativa
buttare terra sulle fiamme; se non si
riesce a spegnere le fiamme immediatamente allontanarsi dalla macchina almeno 20 metri, fino allo spegnimento naturale.
7.1 - Conservare la benzina in contenitori specificamente previsti per
questo uso.
7.2 - Fare il rifornimento di benzina solo
all’aperto; non fumare durante il rifornimento.
7.3 - Fare il rifornimento di benzina
prima di mettere in moto il motore. Non
togliere mai il tappo del serbatoio e non
fare il rifornimento di benzina mentre il
motore e in moto o a motore caldo.
7.4 In caso di benzina traboccata non
tentare di mettere in moto il motore ma
spostare la macchina lontano dal luogo
della benzina versata; evitare ogni causa di scintilla o fuoco, fino alla completa
scomparsa dei vapori di benzina.
7.5 - Richiudere il serbatoio della benzina ed i contenitori serrando con sicurezza i loro tappi.
B8 - Sostituire il silenziatore se difetloso
o danneggiato.
B9 - Prima dell’uso controllare sempre visivamente che le frese, i pioli
di bloccaggio frese ed i taglienti non
siano usurati o danneggiati. Sostituire le lame danneggiate o usurate per
lotti completi per mantenere il
bilanciamento.
FUNZIONAMENTO
C1 - Non fare funzionare il motore in
luogo chiuso o limitato dove può accumularsi il pericoloso gas monossido di
carbonio contenuto nei gas di scarico.
C2 - Operare solamente su terreni illuminati dalla luce diurna o da una adeguata illuminazione artificiale.
C3 - T enere l'apparecchio sempre con
ambedue le mani.
Assumere una posizione stabile e sicura sulle gambe.
C4 - Evitare, per quanto possibile, di
utilizzare la motozappa su terreni fangosi, su terreni pietrosi e terreni particolarmente duri (ghiacciati).
C5 - Sui pendii appoggiare con sicurezza i piedi sul terreno.
C6 - Camminare non correre mai con
la macchina.
C7 - Su terreni in pendenza avanzare
trasversalmente, senza mai procedere
verso I’alto o verso il basso.
C8 - Esercitare la massima precauzione nel cambiare direzione su terreni in
pendenza.
C9 - Evitare di operare su terreni con
una pendenza eccessiva.
C10 - Usare estrema precauzione nell’invertire la marcia e nel tirare la
motozappa all’indietro.
C11 - Arrestare il motore (e quindi le
frese) quando la motozappa deve attraversare un terreno diverso dal ter-
11

I
MANUALE ISTRUZIONI MOTOZAPP A
reno da lavorare e quando viene
trasportata verso e dall’area di lavoro.
C12 - Non modificare le regolazioni
del motore ne manomettere per
mandare su di giri il motore.
C13 - Nella messa in moto del motore usare attenzione seguendo le
istruzioni e tenendo i piedi ben lontani dalle frese.
C14 - Non porre le mani o i piedi in
prossimità o al di sotto delle parti rotanti.
C15 - Non sollevare mai e non trasportare mai la macchina mentre il motore in moto.
C16 - Arrestare il motore e
scollegare il cavo della cendela:
C17 - Prima di effettuare la pulizia, la
manutenzione o I’ispezione, accertarsi che le frese e tutte le altre parti in
movimento si siano fermate completamente. Scollegare il cavo della candela ed allontanarlo dalla candela stessa, in modo da evitare una messa in
moto accidentale.
C18 - Quando si colpisce un oggetto
estraneo, arrestare il motore,
scollegare il cavo della candela, ispezionare accuratamente le frese alla ricerca di eventuali danni. Fare riparare i danni evidenziati prima di mettere
in moto il motore; rivolgersi ad un centro assistenza specializzato.
C19 - Qualora la macchina presentasse vibrazioni anormale, arrestare il
motore e ricercare immediatamente la
causa delle vibrazioni. Di norma, le
vibrazioni segnalano la presenza di
un problema.
C20 - Arrestare il motore:
20.1 Ogni volta che si abbandona la
motozappa.
20.2 Prima di ogni rifornimento di
benzina.
20.3 Prima di regolare I’altezza del
vomere (attendere fino a che le frese
si siano arrestate).
C21 - Prima di sollevare o abbassare la ruota.
C22 - Prima di pulire o togliere materiale dalle frese.
C23 - Portare I’acceleratore al minimo durante lo spegnimento del
motore e chiudere il rubinetto della
benzina (se provvisto) dopo I’arresto
del motore.
C24 - Usare la macchina con temperature maggiori di 5°C, così che il
terreno sia completamente sgelato;
evitare l'utilizzo con terreni troppo
secchi e compatti, perchè risulterebbero particolarmente duri.
MANUTENZIONE E DEPOSITO
D1 - Mantenere ben serrati tutti i
dadi e le viti, in modo che la macchina sia in buone condizioni di funzionamento.
D2 - Non riporre mai la motozappa in
luogo chiuso lasciando benzina nel serbatoio, dato che i vapori di benzina possono raggiungere una fiamma libera o
una fonte di scintille.
D3 - Attendere che il motore si raffreddi
prima di riporre la macchina in uno spazio chiuso.
D4 - Al fine di ridurre il rischio di incendio tenere il motore, il silenziatore, puliti
da erba, foglie o eccesso di grasso.
D5 - Per ragioni di sicurezza sostituire
le parti usurate o danneggiate. Usare
solamente pezzi di ricambio originali.
Pezzi di ricambio prodotti da altri fabbri-
12
MANUALE ISTRUZIONI MOTOZAPP A
I
canti potrebbero adattarsi male e
causare danni e pericoli.
D6 - Nel caso si debba svuotare il
serbatoio effettuare I’operazione all’aperto.
D7 - Verificare o fare verificare ad
un centro assistenza ad intervalli regolari, il serraggio delle frese e delle viti di supporto del motore.
D8 - Le frese della motozappa sono
taglienti e possono provocare tagli all’epidermide. É necessario adottare le
opportune precauzioni quando si lavora in prossimità o sulle frese.
3. DESCRIZIONI PARTI MACCHINA
DESCRIZIONE (Fig.1)
A) Leva di comando rotazione frese.
B) Registro cavo comando frese
C) Leva acceleratore.
D) Pomoli bloccaggio semimanubri
E) Maniglia della fune di avviamento
F) Tappo serbatoio carburante
G) Tappo rabbocco olio motore
H) Avviatore
I) Cappuccio della candela
L) Silenziatore
M) Motore a scoppio
N) Riparo frese
O) Barra profondità lavoro
P) Frese
Q) Riduttore
R) Ruota per trasporto
S) Dischi frese (solo TL 60)
4. MONTAGGIO (FIG.2)
A) PIASTRA SEMIMANUBRI
Montare la piastra fissaggio semimanubri (1)
sulla scocca della motozappa, utilizzando le 4
viti (2) e bloccare il tutto con i dadi (4).
B) SEMIMANUBRI
Inserire nella piastra portamanici i due
semimanubri (5-6) e fissarli con le viti (8) e i
pomoli (7), facendo attenzione ad interporre il
piattello (3).
C) BARRA PER REGOLAZIONE
PROFONDITA' DI LAVORO
Fissare la barra (9) nella sede della scocca, interporre la rondella (10) e fissare il tutto con la
copiglia (11)
5. MESSA IN MOTO
ATTENZIONE !!
Questo motore viene spedito privo di olio.
NON METTERE IN MOTO prima di
aver riempito il serbatoio dell'olio.
NON SUPERARE IL LIVELLO MASSIMO.
ATTENZIONE !!
Prima di mettere in moto consultare l'allegato manuale del produttore del motore.
1) Preparare il carburante e fare rifor-
nimento solo all'aperto.
2) Conservare il carburante in un contenitore previsto per questo uso e con
tappo ben serrato.
13
I
MANUALE ISTRUZIONI MOTOZAPP A
6. AVVIAMENTO E ARRESTO
ATTENZIONE! Osservare scrupolosa-
mente gli avvertimenti contenuti nel
precedente Cap. 2 PRECAUZIONI FONDAMENTALI DI SICUREZZA.
ISTRUZIONI PER MOTORI CON COMANDO
ARIA SULLA LEVA ACCELERATORE (Fig.3)
La leva controlla la velocità del motore. Per
I’avviamento a freddo la leva deve essere portata sulla posizione (2).
Un motore caldo può essere messo in moto
sulla posizione MASSIMO .
Le migliori prestazioni della motozappa si ottengono sulla posizione MASSIMO .
.
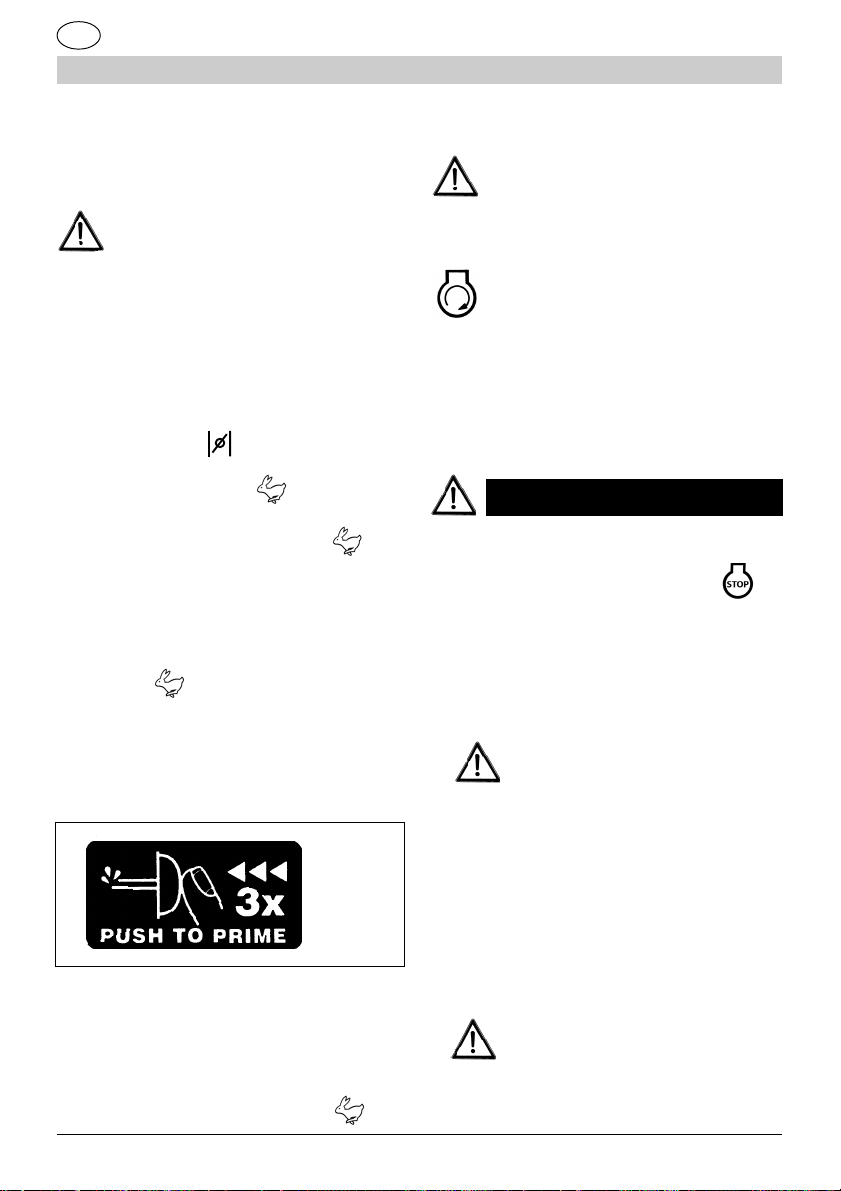
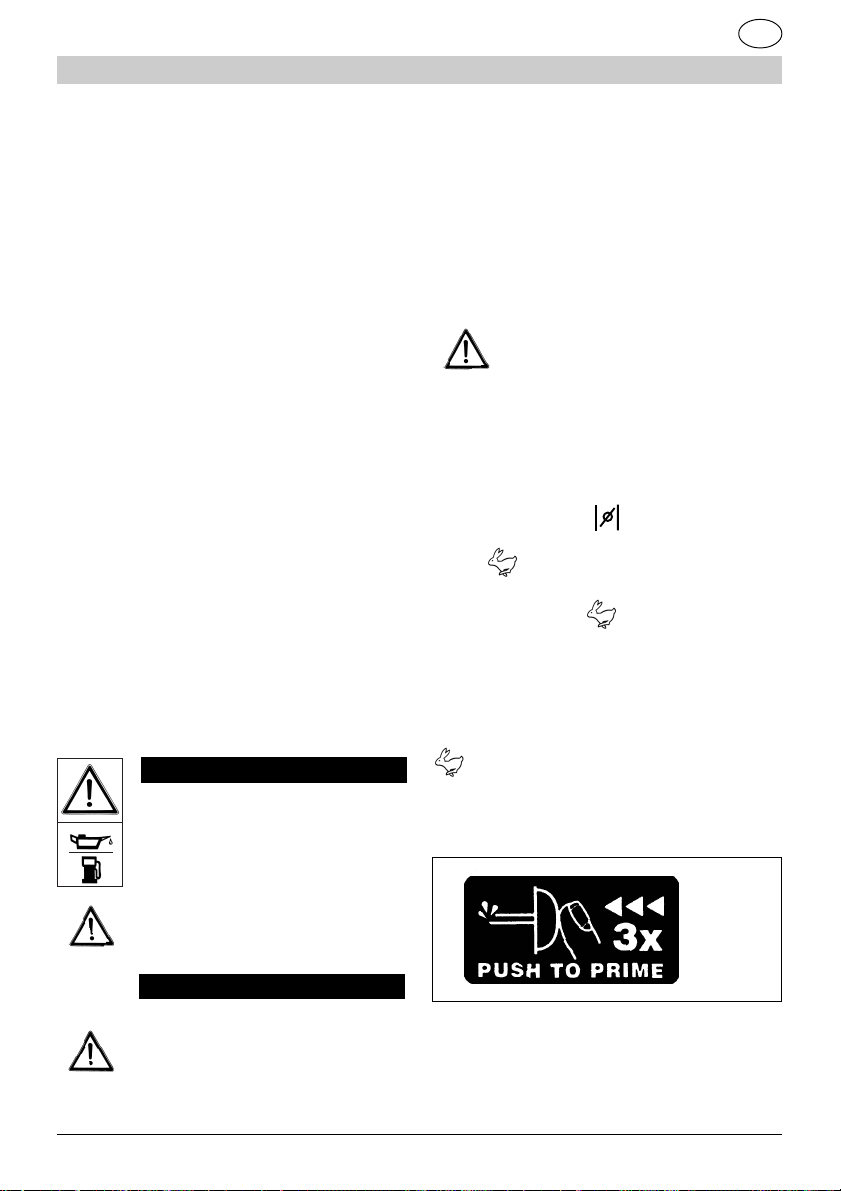
ISTRUZIONI PER MOTORI CON POMPETTA
(BULBO) CARBURANTE (Fig.4)
La leva controlla la velocità del motore. Per I’avviamento a freddo portare la leva sulla posizione
MASSIMO (2). Quindi premere energicamente per il bulbo della pompetta "primer"
(fig.11) prima di avviare il motore. (Inoltre, se il
motore si arresta per mancanza di carburante,
rabboccare il serbatoio di carburante e premere la pompetta di alimentazione 3 volte).
NOTA: Più ampie spiegazioni riguar-
danti I’utilizzo e la manutenzione del
motore sono riportate sul manuale del
costruttore del motore, allegato a parte.
Impugnare la stegola destra con la
mano sinistra, senza premere la leva di
comando frese, disporsi lateralmente all a zappa col corpo assumendo una posizione stabile
e lontana dal gruppo frese.
Impugnare la fune di avviamento (fig.5) e tirarla fino alla messa in moto. Lasciare funzionare
il motore per alcuni secondi.
ARRESTO MOTORE
1) Per arrestare il motore, portare la leva del-
l'acceleratore (fig. 3-4) nella posizione (1).
7. UTILIZZO
COME UTILIZZARE LA MOTOZAPPA
1) Portarsi in prossimità del terreno da lavora-
re.
Controllare che eventuali corpi
estranei, non siano rimasti sul
terreno da fresare.
Fig. 11
NOTA: In genere, non e necessario azionare la
pompetta quando si avvia un motore già caldo.
Tuttavia, in condizioni climatiche fredde, e possibile che si debba ripetere I’operazione iniziale.
Le migliori prestazioni della motozappa si ottengono sulla posizione MASSIMO .
14
2) Posizionare la ruota di trasporto nella posizione "ALTA" (vedi fig.6 - 1-2-3-4).
3) Avviare il motore. Vedi Cap.6.
4) Per avviare la rotazione delle frese, premere
la leva di comando frese (fig.7) e portarla nella
posizione (2). Al rilascio della leva le frese si
arrestano.
ATTENZIONE!! Non appena le
frese cominciano a ruotare, le
motozappa tende ad avanzare sul
terreno.
MANUALE ISTRUZIONI MOTOZAPP A
I
ATTENZIONE!! Nel caso le frese
entrino in rotazione con la leva
rilasciata, non utilizzare la macchina e rivolgersi ad un centro
di assistenza autorizzato.
5) Per regolare la velocità di avanzamento del-
la fresa, e quindi la profondità di lavoro delle
frese, l'operatore deve:
- MASSIMA PROFONDITÀ DI LAVORO
Premere sui semimanubri per fare affondare il
vomere sul terreno in modo da rallentare l'avanzamento della fresa (fig.7), ed aumentarne la
profondità di lavoro.
- MINIMA PROFONDITÀ DI LAVORO
Allegerire la pressione sui semimanubri per fare
affiorare il barra dal terreno in modo da aumentare l'avanzamento della fresa (fig.7), e diminuire la profondità di lavoro.
8. MANUTENZIONE
ATTENZIONE!! Spegnere il motore e staccare la candela prima di
eseguire qualunque manutenzione.
ATTENZIONE!! Attendere che il
motore si sia completamente raffreddato.
ATTENZIONE!! Calzare i guanti di
sicurezza per ogni intervento di
montaggio e manutenzione sulle
frese.
MOTORE
Vedi manuale costruttore allegato.
VERIFICA VITI E PARTI ROTANTI
Prima di ogni utilizzo controllare che non ci siano viti o parti allentate e che non ci siano cricche o notevoli usure sulle lame delle frese.
Sostituire le parti danneggiate prima dell'utilizzo.
SOSTITUZIONE FRESE (Fig.9)
Allentare la molla ed estrarre il perno di
bloccaggio (1). Estrarre la fresa sfilandola dall'albero (2). Inserire la nuova fresa, facendo attenzione a fare corrispondere i fori di fissaggio
all'albero e bloccare il tutto con perno e molla.
REGISTRO CAVO COMANDO FRESE REGOLAZIONE (fig.1 part.B)
L'operazione di regolazione e controllo deve essere eseguita da un
centro di assistenza autorizzato.
Una errata regolazione può costituire pericolo!
PULIZIA TRASPORTO E RIMESSAGGIO
# In caso di interruzione di utilizzo superiore a 2
mesi, vuotare il serbatoio del carburante.
# Non pulire con liquidi aggressivi.
# Conservare l'apparecchio in luogo asciutto e
sicuro non accessibile ai bambini.
# In occasione del trasporto vuotare il serbatoio
carburante.
9. SMALTIMENTO
Al termine della vita lavorativa della Vostra Zappa, rivolgersi ad un centro assistenza qualificato per informazioni relative a messa fuori servizio, smantellamento e smaltimento.
15
I
MANUALE ISTRUZIONI MOTOZAPP A
DATI TECNICI MOTOZAPPA
TL 40/N TL 60
Massa (senza carburante) 36 Kg 39 Kg
Larghezza di fresatura 38 cm 56 cm
Regime massimo rotazione frese 80 1/min
Vibrazioni al manubrio EN 1033: 1995
UNI EN 709: 1998 5,9 m/s
Livello di pressione acustica
EN 1553: 2001 LAcq 80,2 dB (A) - Lmax 98,7 dB ( C )
UNI EN 709: 1998 @ 3.000 rpm
Potenza
BRIGGS & STRA TTON - XC 35 - 450 SERIES 2,5 kW @ 3 .60 0 r pm
BRIGGS & STRATTON - XLS 50 - 625 SERIES 3,5 kW @ 3.600 rpm
HONDA - GVC 135 2,6 kW @ 3.600 rpm
SANDRIGARDEN 3,5 - 350 2,2 kW @ 3.600 rpm
SANDRIGARDEN 5,5 - 550 OHV 3,3 kW @ 3.600 rpm
2
@ 3.000 rpm
note _________________________________
_________________________________________________
____________________________________________________
_________________________________________________
___________________________________________________
___________________________________________________
_________________________________________________
____________________________________________________
_________________________________________________
___________________________________________________
___________________________________________________
_________________________________________________
____________________________________________________
_________________________________________________
___________________________________________________
16

MANUALE ISTRUZIONI MOTOZAPP A
I
note ______________________________
_________________________________________________
____________________________________________________
_________________________________________________
___________________________________________________
___________________________________________________
_________________________________________________
____________________________________________________
_________________________________________________
___________________________________________________
___________________________________________________
_________________________________________________
____________________________________________________
_________________________________________________
___________________________________________________
note ________________________________
_________________________________________________
____________________________________________________
_________________________________________________
___________________________________________________
___________________________________________________
_________________________________________________
____________________________________________________
_________________________________________________
___________________________________________________
___________________________________________________
_________________________________________________
____________________________________________________
_________________________________________________
___________________________________________________
___________________________________________________
_________________________________________________
____________________________________________________
_________________________________________________
___________________________________________________
___________________________________________________
_________________________________________________
____________________________________________________
_________________________________________________
___________________________________________________
___________________________________________________
_________________________________________________
____________________________________________________
_________________________________________________
___________________________________________________
___________________________________________________
_________________________________________________
____________________________________________________
_________________________________________________
___________________________________________________
17
GB
MOTOR HOE OPERA TING MANUAL
1. CONGRA TULATIONS
Dear Customer, We should like to congratulate you
for having preferred our garden product.
Your MOTOR HOE has been manufactured taking
into account all applicable consumer safety standards.
This manual describes and illustrates the various
assembly, use and maintenance operations needed
to keep your MOTOR HOE in perfect running condition.
TO MAKE READING EASIER
The illustrations referring to assembly and machine
description are at the beginning of this file.
T o make using the machine more understandable,
refer to these pages while reading the assembly
and operating instructions.
If your MOTOR HOE needs assistance or repairs,
please contact your dealer or an authorised aftersales centre.
2. BASIC SAFETY PRECAUTIONS
GENERAL RULES
IMPORTANT:
A1 - The MOTOR HOE must always
be used according to the manufacturer’s instructions provided in this manual.
A2 - When using the MOTOR HOE,
always following the safety regulations.
A3 - Anyone using the MOTOR HOE
must first of all carefully read the instruction and maintenance manual and become acquainted with the machine controls to ensure correct use.
A3.1 - Keep this manual handy for future reference.
A4 - Do not allow children or people
not acquainted with these instructions to
use the MOTOR HOE.
Specific national laws could restrict user
age.
HAZARD:
A5 - Mind any material thrown up by
the cutters.
A6 - Do not start and use the MOTOR
HOE near people, animals or things.
A7 - The operator is responsible in case
of accidents or hazards affecting persons or things.
PREPARATION:
B1 - Carefully inspect the area where
the MOTOR HOE is to be used and
remove any object that could be thrown
up or affect machine operation.
B2 - Only use the MOTOR HOE to hoe
land that is free of obstacles.
Do not use the machine for any other
use.
B3 - During use wear tight fitting and
not loose clothing. ALWAYS wear
safety shoes and long trousers.
NEVER work barefoot or in open sandals.
B4 - Wear sturdy gloves.
B5 - Anyone using the MOTOR HOE
must be fit. DO NOT USE THE MOTOR
HOE when you are tired, feeling bad
or under the effect of drink or drugs.
B6 - CAUTION! The exhaust gases
are poisonous and asphyxiating. If
breathed in they can kill. Do not run the
motor in a closed or badly ventilated
environment.
18

MOTOR HOE OPERA TING MANUAL
GB
OPERATION
B7 - CAUTION! Petrol is highly in-
flammable.
DANGER OF BURNS AND FIRE.
In case of fire, if possible, use a fire
extinguisher; alternatively, throw
earth on the flames; if the fire does
not go out immediately, move at least
20 metres away from the machine
and wait for the fire to go out naturally.
7.1 - Keep the petrol in special containers intended for such use.
7.2 - Only refuel outdoors; do not
smoke when filling up with petrol.
7.3 - Refuel before starting the motor.
Never take the cap off the tank and
never refuel while the motor is running
or hot.
7.4 In case of an overflow of petrol, do
not try starting the motor but move the
machine away from the spilt petrol; avoid
causing sparks or fire, until all the petrol
vapours have disappeared.
7.5 - Close the petrol tank and the containers and firmly tighten the caps.
B8 - Replace the silencer when faulty
or damaged.
B9 - Before using always make a sight
check to ensure the cutters, the cutter
etention pins and the cutting edges are
not worn or damaged. Change any
damaged or worn blades in complete
lots to maintain balance.
C1 - Do not run the motor in a closed or
restricted environment where the carbon monoxide in the exhaust gases
could build up.
C2 - Only work in daylight or where
there is good artificial lighting.
C3 - Always hold the machine with both
hands.
Assume a stable and safe position.
C4 - As much as possible, avoid using
the MOTOR HOE on muddy soils,
stony soils and very hard (frozen) soils.
C5 - Rest your feet firmly on the ground
on gradients.
C6 - Always walk and never run with
the machine.
C7 - On slopes, move crossways, without ever proceeding upwards or downwards.
C8 - Take every precaution when
changing direction on slopes.
C9 - Avoid working on very steep gradients.
C10 - Be very careful when changing
direction and pulling the MOTOR HOE
back.
C11 - Stop the motor (and consequently
the cutters) when the MOTOR HOE has
to cross ground different from that which
has to be hoed and when this is transported to and from the work area.
C12 - Do not change the motor settings or tamper with the motor to increase
rpm.
C13 - When starting up the motor, be
careful to follow all instructions and keep
your feet well away from the cutters.
C14 - Keep hands and feet well away
from rotating parts.
C15 - Never lift or transport the machine while the motor is running.
C16 - Stop the motor and disconnect the cable from the plug:
C17 - Before cleaning, servicing or
inspecting, make sure the cutters and
all other moving parts are completely
stopped. Disconnect the cable from the
plug and move this away from the plug
19
GB
MOTOR HOE OPERA TING MANUAL
itself to prevent accidentally starting
the machine.
C18 - If the machine hits a foreign
object while working, stop the motor,
disconnect the plug cable, carefully
inspect the cutters and determine
any damage. Repair any damage
before starting the motor. Contact a
specialised after-sales centre.
C19 - In the event of the machine
producing abnormal vibrations, stop
the motor and immediately seek the
cause. Vibrations normally indicate
a problem.
C20 - Stop the motor:
20.1 Every time you leave the MO-
TOR HOE.
20.2 Before filling up with petrol.
20.3 Before adjusting the height of the
ploughshare (wait until the cutters have
stopped).
C21 - Before lifting or lowering the
wheel.
C22 - Before cleaning or removing
material from the cutters.
C23 - Move the throttle to minimum
when switching off the motor and close
the petrol cock (if fitted) after stopping
the motor.
C24 - Use the machine in
temperatures higher than 5 °C, to
ensure that the ground is fully
defrosted; avoid using the machine
on grounds which are too dry and
compact, as they will be very hard.
MAINTENANCE AND DEPOSIT
D1 - Make sure all the nuts and
screws are tight so the machine is
always in good operating condition.
D2 - Never place the MOTOR HOE in
closed premises with petrol still in the
tank. Petrol vapours could reach an
open flame or sparks.
D3 - Wait for the motor to cool down
before storing the machine in closed
premises.
D4 - To reduce fire risks, keep the
motor and silencer free of grass,
leaves or excess grease.
D5 - For safety reasons, replace
worn or damaged parts. Only use
original spares. Spares made by
other manufacturers could adapt
badly and cause damage and danger.
D6 - If the tank has to be emptied, do
the job in the open.
D7 - Periodically check, or have
checked by an after-sales centre, the
tightness of the cutters and motor support screws.
D8 - The MOTOR HOE cutters are
sharp and can cut the skin. T ake every
precaution when working near or on
the cutters.
3. DESCRIPTION OF MACHINE
P ARTS
DESCRIPTION (Fig.1)
A) Cutter rotation control lever.
B) Cutter control cable adjuster
C) Throttle lever.
D) Handlebar lock knobs
E) Starting cable handle
F) Fuel tank cap
G) Engine oil topping-up cap
H) Starter
I) Plug cap
L) Silencer
M) Combustion engine
20
MOTOR HOE OPERA TING MANUAL
GB
N) Cutter guard
O) Work depth ploughshare
P) Cutters
Q) Reduction unit
R) Transport wheel
S) Tine disks (only TL 60)
4. ASSEMBLY (FIG.2)
A) - HANDLEBAR PLATE
Fit the handlebar retention plate (1) on the MOTOR HOE chassis using the 4 screws (2) and
secure by means of the nuts (4).
B) HANDLEBARS
Fit the two handlebars (5-6) in the handle holding plate and secure using the screws (8) and
the knobs (7), being careful to place the plate
(3) in between.
C) WORKING DEPTH ADJUSTMENT BAR
Fit the bar (9) inside the body, place the washer
(10) in between and fix it with the cotter pin (11)
5. STARTING
IMPORT ANT !!
The engine is shipped without oil.
DO NOT START until the sump has
been filled with oil.
1) Always prepare fuel and refuel out
of doors.
2) Keep the fuel in a container specially
intended for this purpose and keep the
container cap well tightened.
6. STARTING AND STOPPING
IMPORTANT! Carefully keep to the in
structions provided in Chap. 2 FUN-
DAMENTAL SAFETY PRECAUTIONS.
INSTRUCTIONS FOR MOTORS WITH AIR
CONTROL ON THROTTLE LEVER (Fig.3)
The lever controls motor speed. For cold starting
the lever must be on (2).
A warm motor can be started in MAXIMUM po-
sition .
Best MOTOR HOE performance is obtained in
MAXIMUM position .
INSTRUCTIONS FOR MOTORS WITH FUEL
PUMP (BULB) (Fig.4)
The lever controls motor speed. For cold starting the lever must be in MAXIMUM (2) position
. Next, pump the bulb of the “primer” pump
(fig.11) before starting the motor. (If the motor
stops due to lack of fuel, top up the tank and
press the supply pump 3 times).
Fig. 11
DO NOT FILL OVER MAXIMUM
LEVEL.
IMPORTANT !!
Before starting, refer to the attached motor manufacturer’s
manual.
NOTE: Generally speaking, the pump will not
be required if the motor is already warm on starting. Nevertheless, in cold climatic conditions,
the initial operation may have to be repeated.
21
GB
MOTOR HOE OPERA TING MANUAL
Best MOTOR HOE performance is obtained in
MAXIMUM position. .
NOTE: More detailed explanations concerning
motor use and maintenance are shown in the
motor manufacturer’s manual, attached separately.
Hold the right handlebar with the left
hand, without pressing the tine unit;
move to the side of the cultivator and take on
a stable position, away from the tine unit.
Hold the starting cable (fig.5) and pull it until
the machine starts up.
Leave the motor to run for a few seconds.
MOTOR STOP
1) To stop the motor, move the throttle lever (fig.
3-4) to position (1).
7. USE
HOW TO USE THE MOTOR HOE
1) Move the machine close to the area of land to be
hoed.
Make sure there are no foreign
bodies on the land to be hoed.
2) Set the transport wheel to the “HIGH” position
(see figure 6 - 1-2-3-4).
3) Start the motor. See chap.6.
4) T o start cutter rotation, press the cutter control
lever (fig.7) and move this to position (2). When the
lever is released, the cutter will stop.
IMPORTANT!! As soon as the cutter starts turning, the MOTOR HOE
will tend to move forward over
the ground.
WARNING!! Should the tines start
to rotate with the lever released,
do not use the machine and
contact an approved service
centre.
5) To adjust cutter speed, and consequently cut-
ter working depth, the operator should:
- MAXIMUM WORKING DEPTH
Press the handlebars so the ploughshare digs
into the soil, thereby reducing cutter speed (fig.
7) and increasing the working depth.
- MINIMUM WORKING DEPTH
Reduce the pressure on the handlebars so the
ploughshare lifts up from the ground, the cutter
speed (fig.7) increases and the working depth
is reduced.
8. MAINTENANCE
IMPORTANT!! Switch off the motor
and disconnect the plug before
performing any maintenance jobs.
IMPORTANT!! W ait for the motor to
completely cool down.
IMPORTANT!! Wear safety gloves
when fitting and servicing the
cutters.
MOTOR
See attached manufacturer’s manual.
CHECKING THE SCREWS AND ROTATING
PARTS
Before using, check there are no loose screws or
parts and that there are no cracks or extensive
wear on the cutter blades.
Replace any damaged parts before using.
22
 Loading...