

Page 1
INSTALLATION INSTRUCTIONS
Page 2
INTRODUCTION
PLANNING INSTALLATION (CONTINUED)
Verçade Wall Fashion with ISOCORE Technology® is an innovative and unique way to dramatically change the look of a
room in your home or place of business. The planks and tiles have a pillowed edge detail for dramatic look and feel, and
are simple to install with the proper adhesive and tools.
Verçade can also be installed as a full room, feature wall, wainscotting, kitchen backsplashes, islands and peninsulas,
headboards, fireplace surrounds where surface temperature does not exceed more than 90°F, and much more.
Verçade Wall Fashion can seamlessly transition outside and inside corners without the need for additional trim pieces.1
Corner angles can range from 0° to 90°, thus eliminating additional trim pieces and creating an amazing clean and
finished look. Simple instructions for installation on corners can be found in steps 5 and 6. Matching Verçade moldings are
also offered for an easier, simple finish. Moldings that are available are: inside corner, outside corner, end cap, and chair
rail.
Verçade can only be installed in dry applications. Please use approved adhesives or tape for installation as detailed below.
VENTILATION & SAFETY
PLEASE READ THIS ENTIRE MANUAL PRIOR TO INSTALLATION
• Be sure the work site has proper ventilation during installation.
• The use of a NIOSH or OSHA-approved dust mask is recommended during the cutting of Verçade with power tools to
prevent inhalation.
• Wear safety glasses.
PLANNING INSTALLATION
• The installation of Verçade does not require acclimation for residential installations. However, we recommend installing
in rooms with temperatures 55˚F - 90˚F (13˚C - 32˚C). The HVAC system must be on and functional before, during, and
after installation.
NOTE: If Verçade is subjected to extreme hot or cold temperatures prior to installation, it may make the product
more difficult to install. Allow the product to reach room temperature before installation.
• For commercial installations, Verçade must be acclimated for 24 hours prior to installation at the aforementioned
temperature range. Product should be stored horizontally in a dry area away from direct sunlight. Do not leave next to
heating or cooling ducts. Do not remove the product from the carton during this time.
• WARNING: Verçade is intended for interior installations only and in temperature controlled environments. Any exterior
usage (including seasonal porches) will void the warranty.
TILES AND PLANKS NEEDED TO COMPLETE YOUR PROJECT
• Measure in inches the height and width of the walls to be installed. Multiply those two values and divide by 144 to
determine the square footage of the walls. Most installations will require a 10% waste factor for cuts and mistakes.
However, this can vary depending upon the layout of the room. If you are installing in a diagonal pattern, factor in for
25% waste.
• EXAMPLE: For a normal staggered installation, an 8’H x 10’L wall = 80 sq. ft. + 10% = 88 sq. ft. to purchase. See
the chart below for required number of cartons.
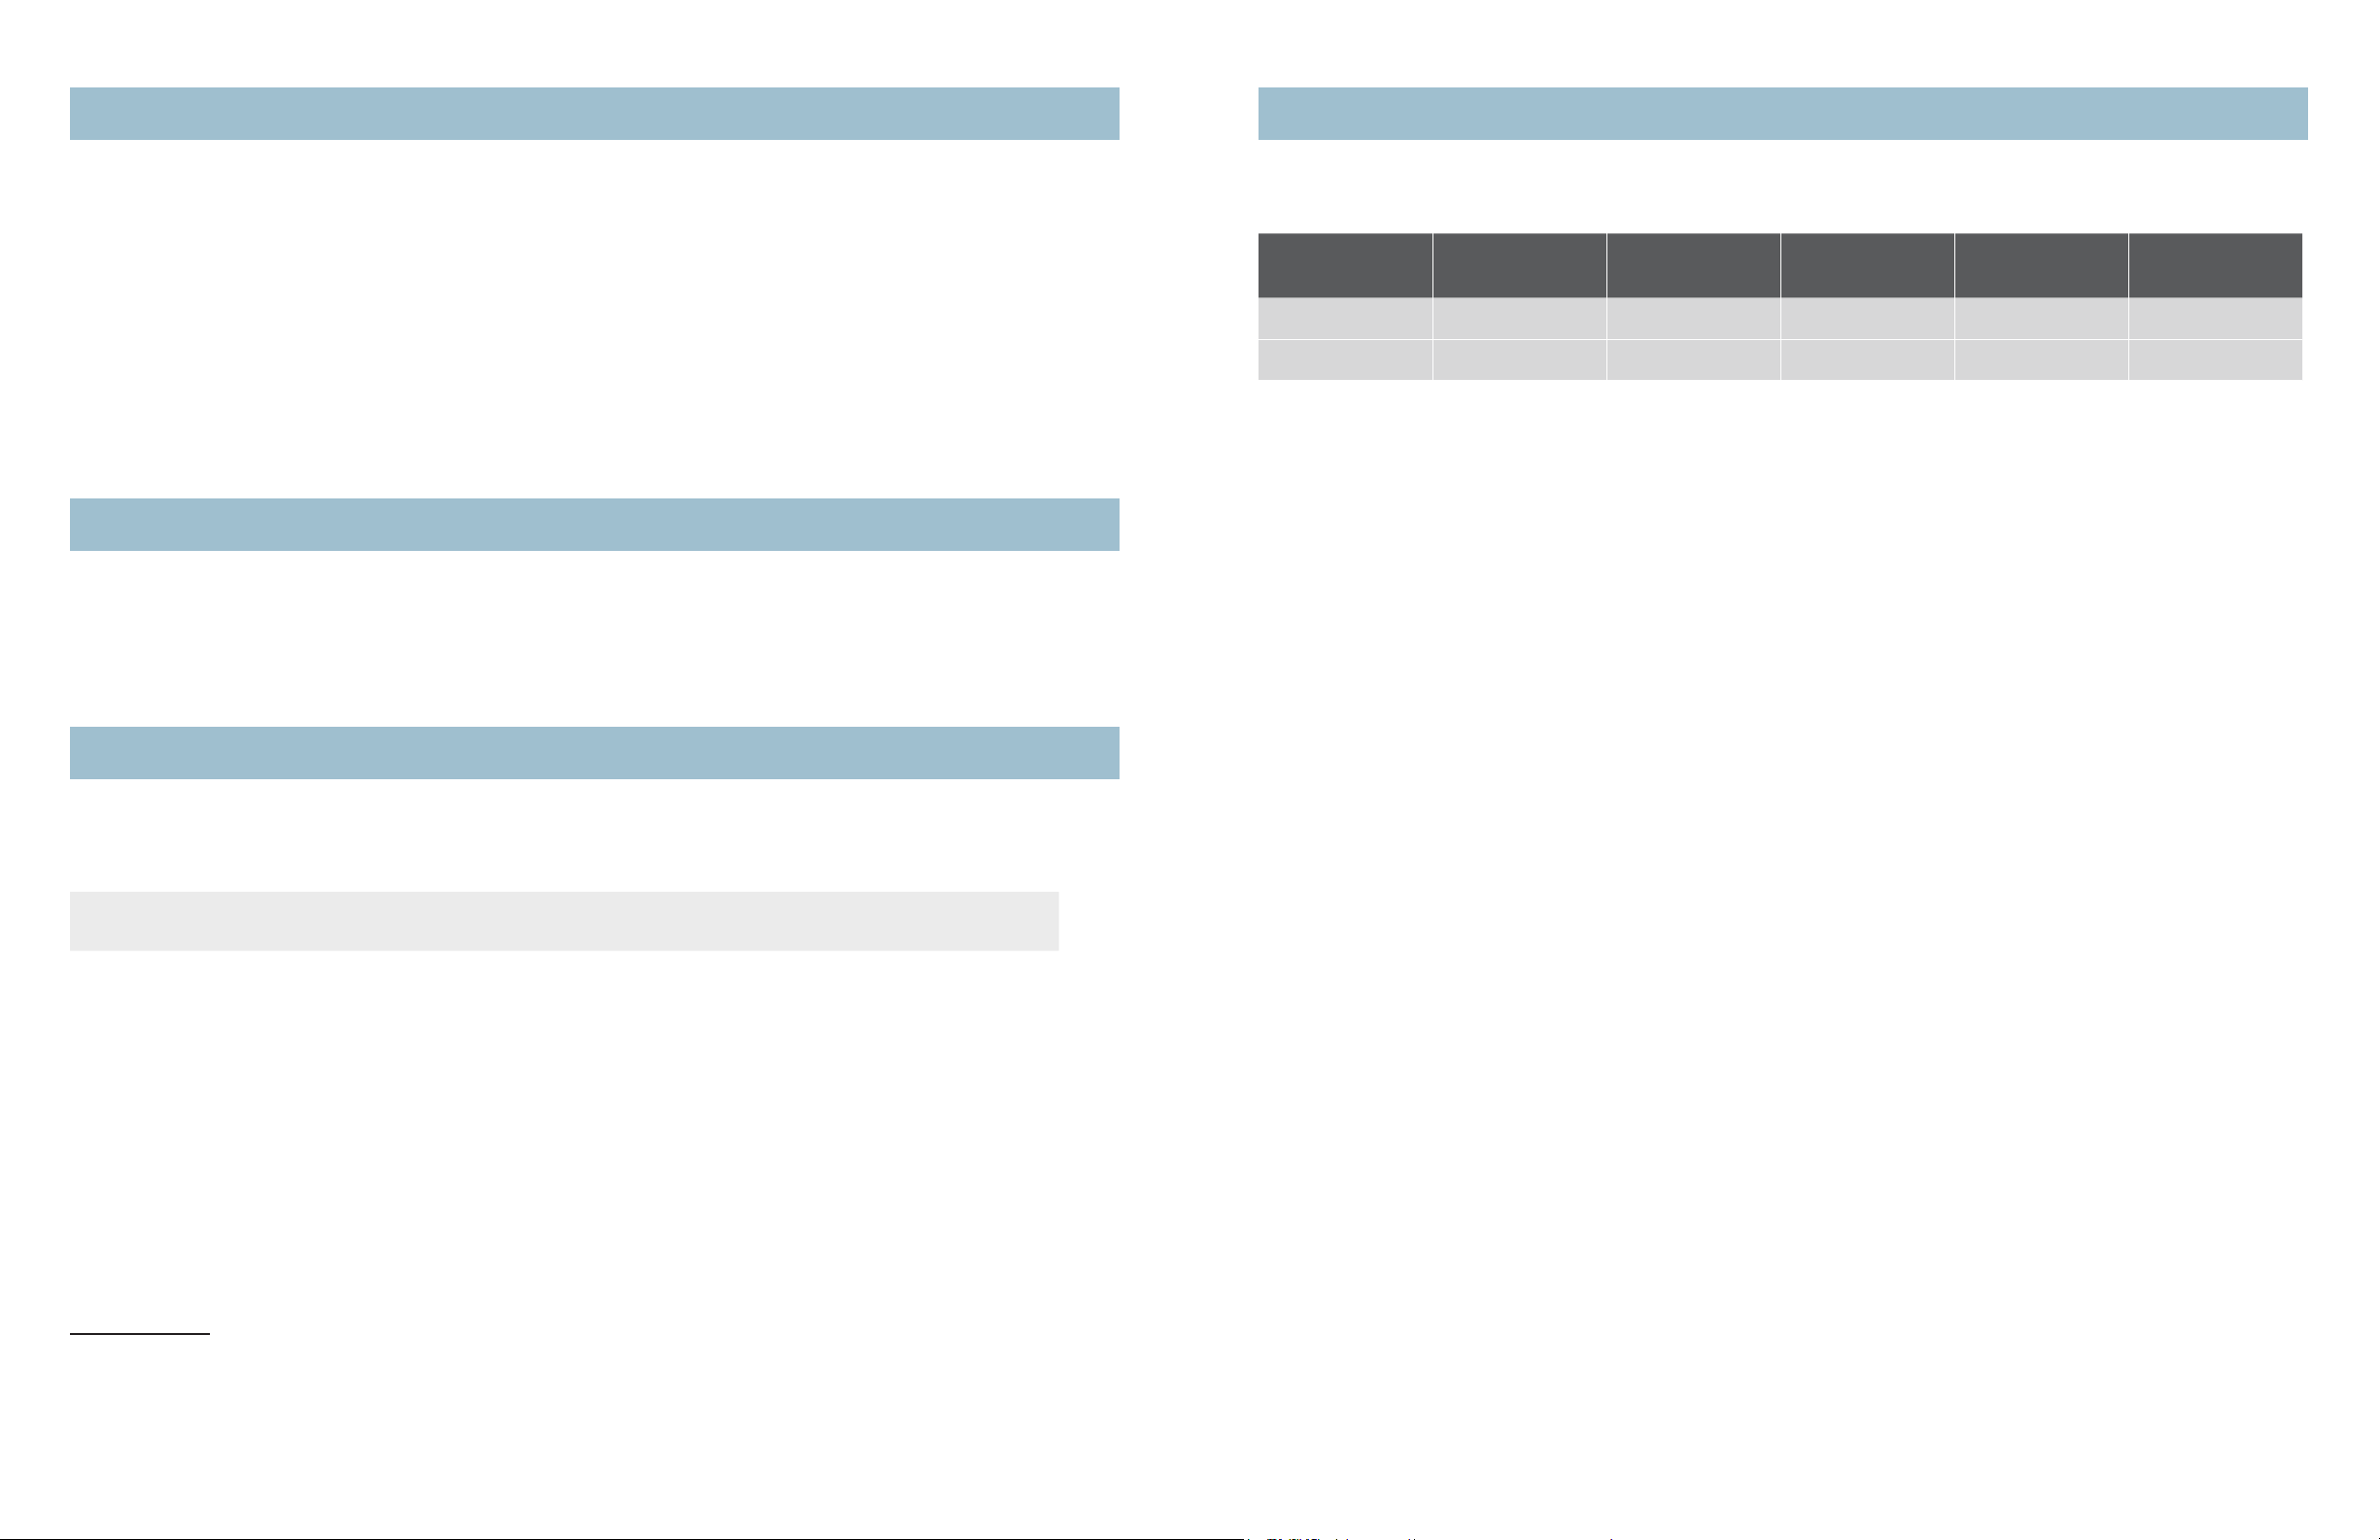
FORMAT SIZE PIECES/CARTON
Tile 12" x 24" 10 20 1.86 5
Plank 6" x 48" 10 20 1.86 5
SQ. FT./
CARTON
SQ. METER/
CARTON
# OF CARTONS
TO BUY
DYE LOTS
Verçade has specific dye lots which are identified as Run Numbers. The run # is located on the ends of the cartons.
Installations are preferably done with one run #. However, if you do have more than one run #, simply mix and match the
different run #’s by installing with several different cartons from different run #’s at the same time.
EXAMPLE
Run Number/Manufacture Date
18.02.16
TOOLS REQUIRED
• Tape measure
• Pencil
• Chalk line or laser level
• Utility knife
• Square
• Straight edge
• Hand roller
• Clean rag
• Blue painters tape
• Drop cloth/plastic sheeting/paper for masking adhesives
• NIOSH or OSHA-approved dust mask
• Safety glasses
• Hair dryer - used for bending method for outside and inside 90° corners
• 3/8" nap paint roller (if using the Verçade Adhesive application method)
• Caulking gun and hot melt glue gun (if using the construction adhesive/hot melt application method)
• Optional power tools
– High speed palm router (see page 7 for “V” grooving instructions and additional tools required.)
– Heat gun (can be used in place of hair dryer. However, please use caution to not overheat Verçade too quickly.
Slow, even heat is best. Keep heat gun minimum 12" away from tile.)
1. When installing Verçade seamlessly around corners, the construction adhesive/hot melt application method must be used.
32
Page 3
PLANNING INSTALLATION (CONTINUED)
INTERIOR WALL INSTALLATION (CONTINUED)
DRY WALL INSTALLATIONS
Verçade is only approved for dry wall installations. Verçade should not be installed on wet-wall application areas such as
shower and tub walls.
APPROVED SUBSTRATES
• Bead board/tile board
• Cement board
• Ceramic tile (excludes shower/tub surrounds and other 'wet' areas)
• Concrete (must be smooth, flat, dry and sealed)
• HardiBacker
• Plywood (must be A.P.A. approved with minimum grade of “BB” or “CC”)
• Sheetrock/drywall/green board – MUST BE PRIMED or PAINTED with flat latex paint
• Wood paneling
NON-APPROVED SUBSTRATES
• Brick
• Carpets & textiles
• Cinder block
• Fiberglass/plastics
• Glass
• Luan, particle board, OSB
• Vinyl/PVC
®
PROPER INSTALLATION METHODS
• Install full planks or tiles throughout the field area and cut planks or tiles to fit around the perimeter corners, ceiling,
floor and obstacles. Never install a cut edge tile or plank to a factory rounded beveled edge. This is to hide the
exposed cut edge where the factory rounded-over beveled edge detail was removed.
• Verçade can be “V” grooved for outside 90° corners. To accomplish this you must have the following tools, which are
readily available at most hardware stores (See step 5 ).
– High speed palm router with a round base attachment for running along clamped cutting guide/fence. This
ensures straight "V" groove cuts. A micro dial on the palm router is recommended and will make for a more
accurate depth in the "V" groove cuts. Use a 90° 1/2" diameter "V" grooving bit.
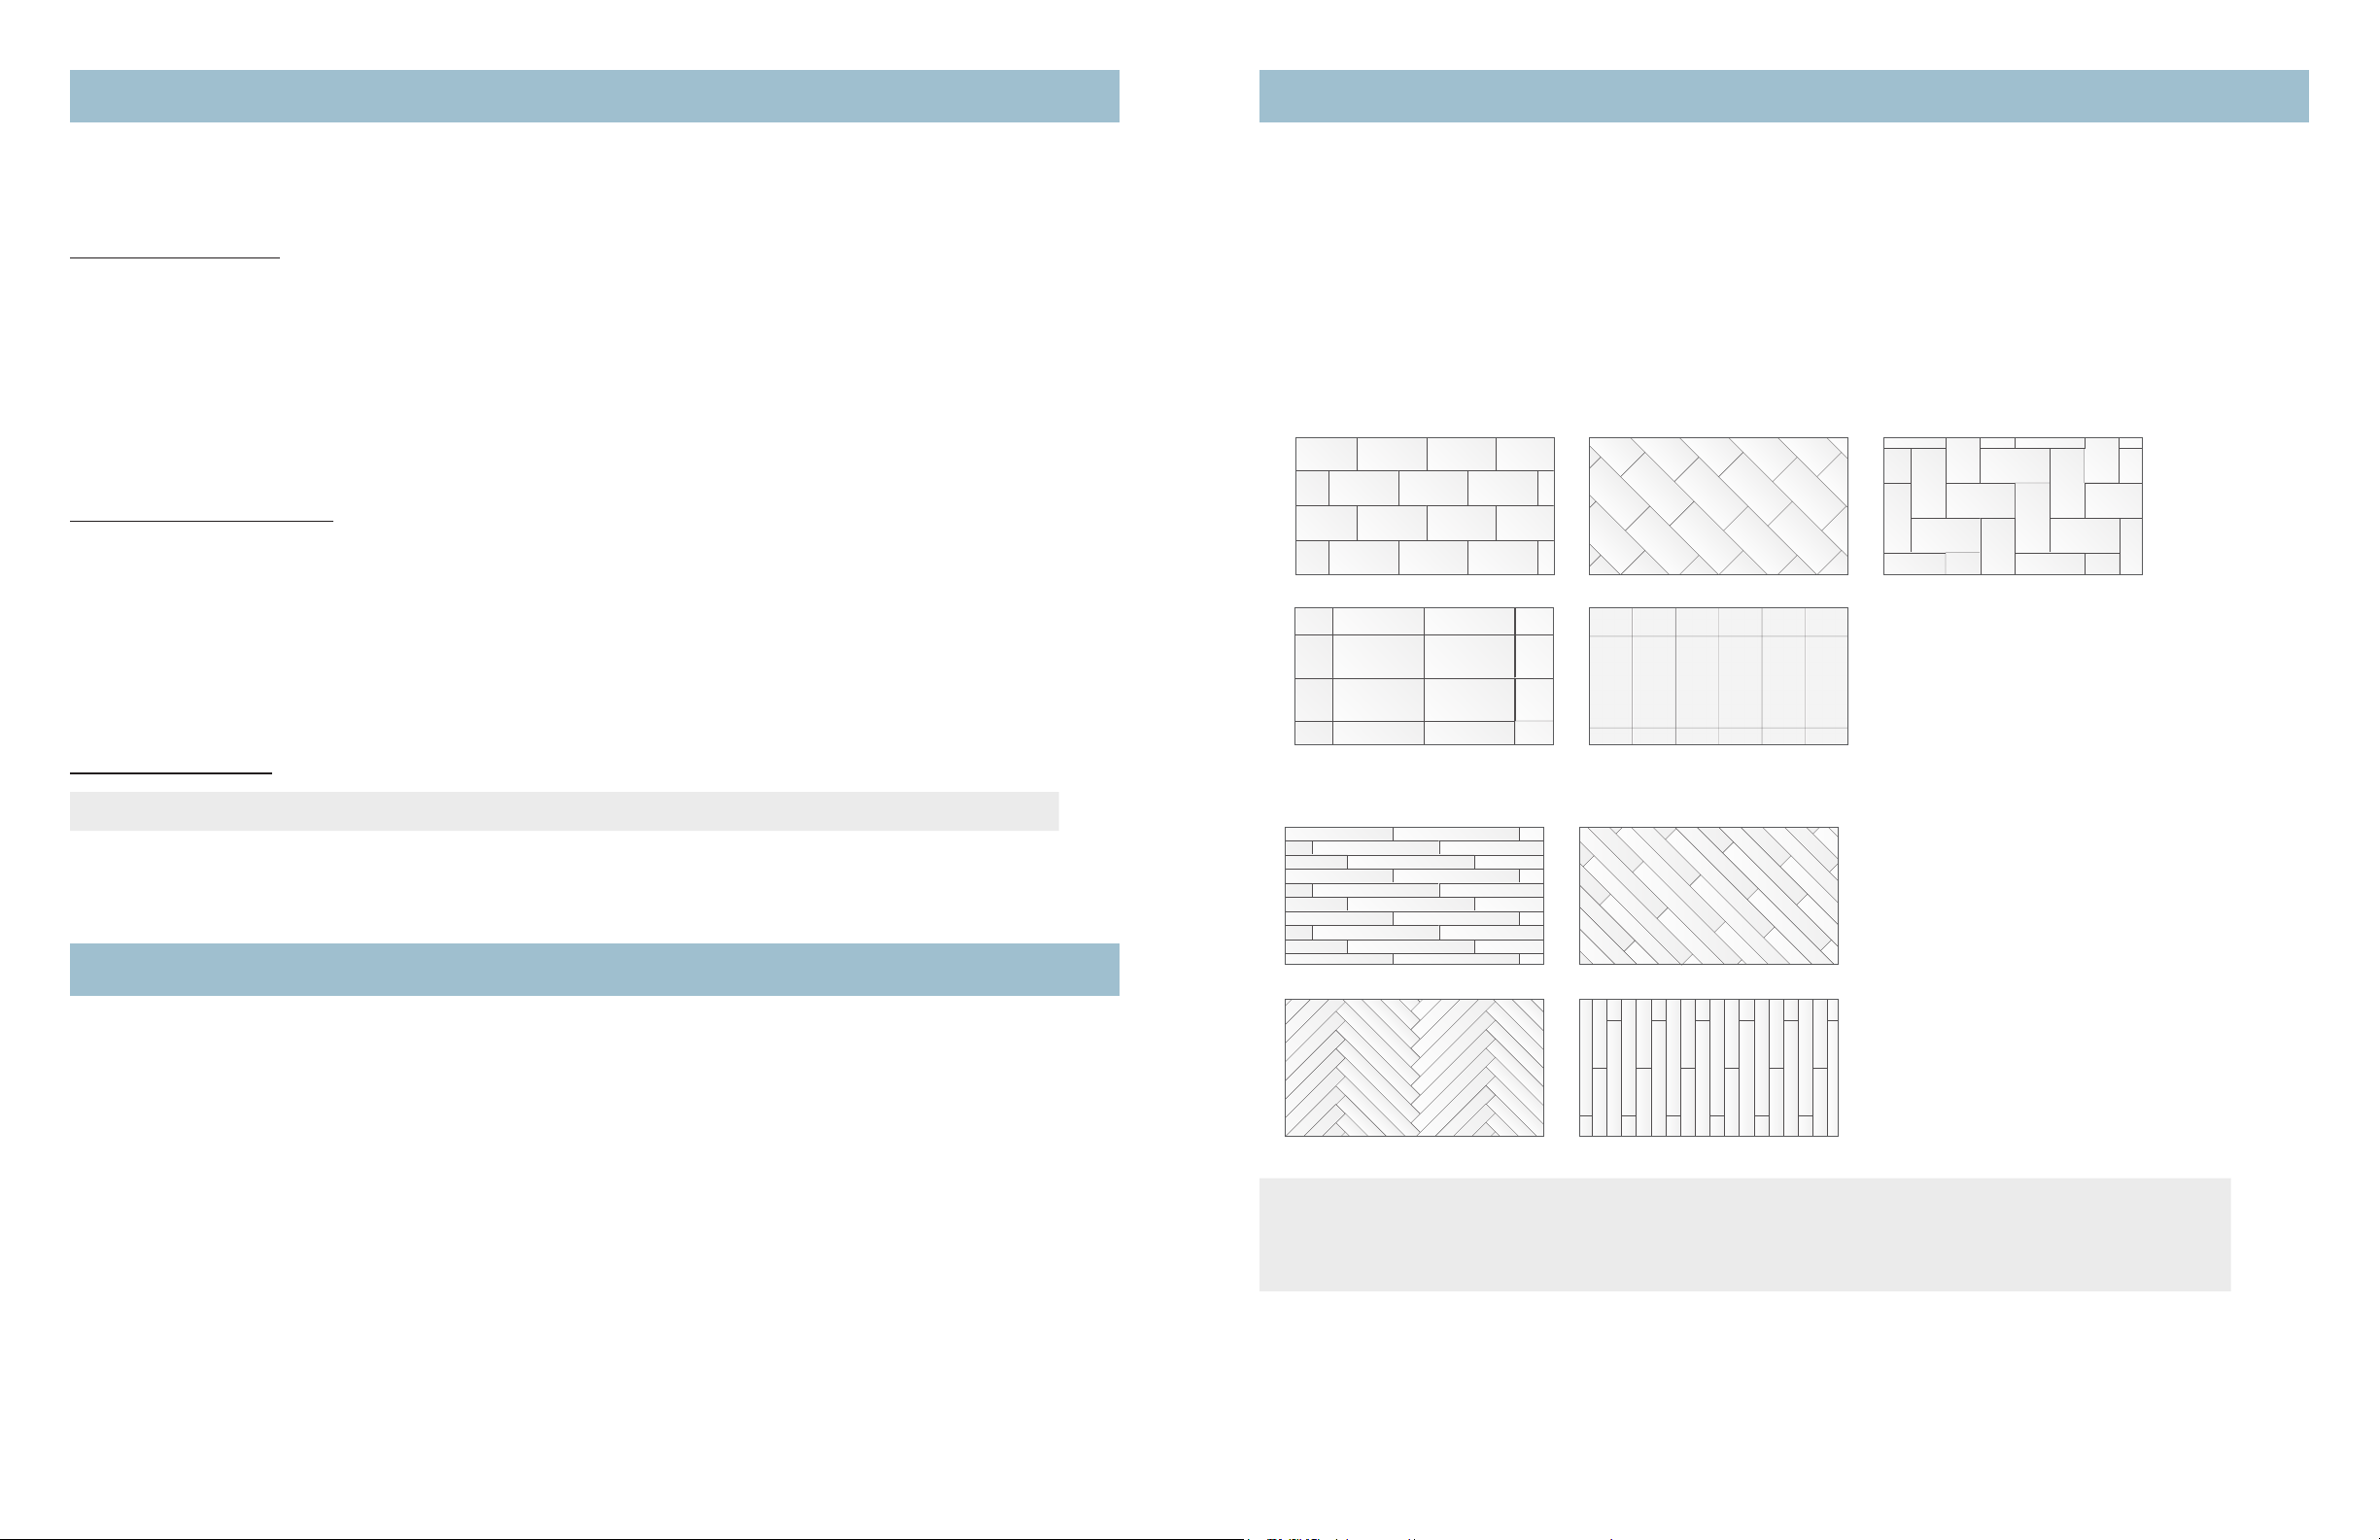
• Tiles can be installed in many different patterns, including:
Brick Diagonal
Basketweave
APPROVED ADHESIVES
NOTE: Adhesive must be maintained at 68°F (20°C) for a period of 36 hours prior to use.
• Liquid Nails® Heavy Duty Construction Adhesive (Part # LN-903) & Hot Melt Adhesive
• Verçade Roll-On Adhesive
• Verçade Adhesive Tape
INTERIOR WALL INSTALLATION
SURFACE PREPARATION
• Surface must be smooth, dry, flat and free of dust and foreign matter. Remove loose paint, wallpaper, old adhesive
residue, wax or any other substances that may interfere with the bonding of the adhesive.
• Voids or deviations of ¼" (6.5 mm) need to be leveled with spackle/joint compound. Follow spackle/joint compound
instructions to allow for proper drying time.
• For installations over new drywall, you will need to tape and finish the seams where new drywall sheets join together.
Drywall sheets are tapered along the long ends, and will need to be filled for a smooth, flush substrate.
• Remove all electrical plates, vents, and fixtures attached to the wall. Note: It may be necessary to purchase longer
screws when reattaching electric plates or fixtures after Verçade has been installed.
Corner-To-Corner Horizontal Corner-To-Corner Vertical
• Planks can be installed in a variety of patterns, including:
Horizontal Ashlar Diagonal
Vertical AshlarHerringbone
NOTE: When installing in-line patterns, it should be noted that a "pinhole" effect can occur where 4
tiles intersect. This is possible due to the soft nature of Verçade. Take caution and care not to damage
tile corners prior to installation. If the "pinhole" effect is noticed at any given intersection, it is advised to
use a very small amount of color matching 100% silicone adhesive to fill "pinholes".
54
Page 4
INTERIOR WALL INSTALLATION (CONTINUED)
INTERIOR WALL INSTALLATION (CONTINUED)
1 MEASUREMENT AND LAYOUT
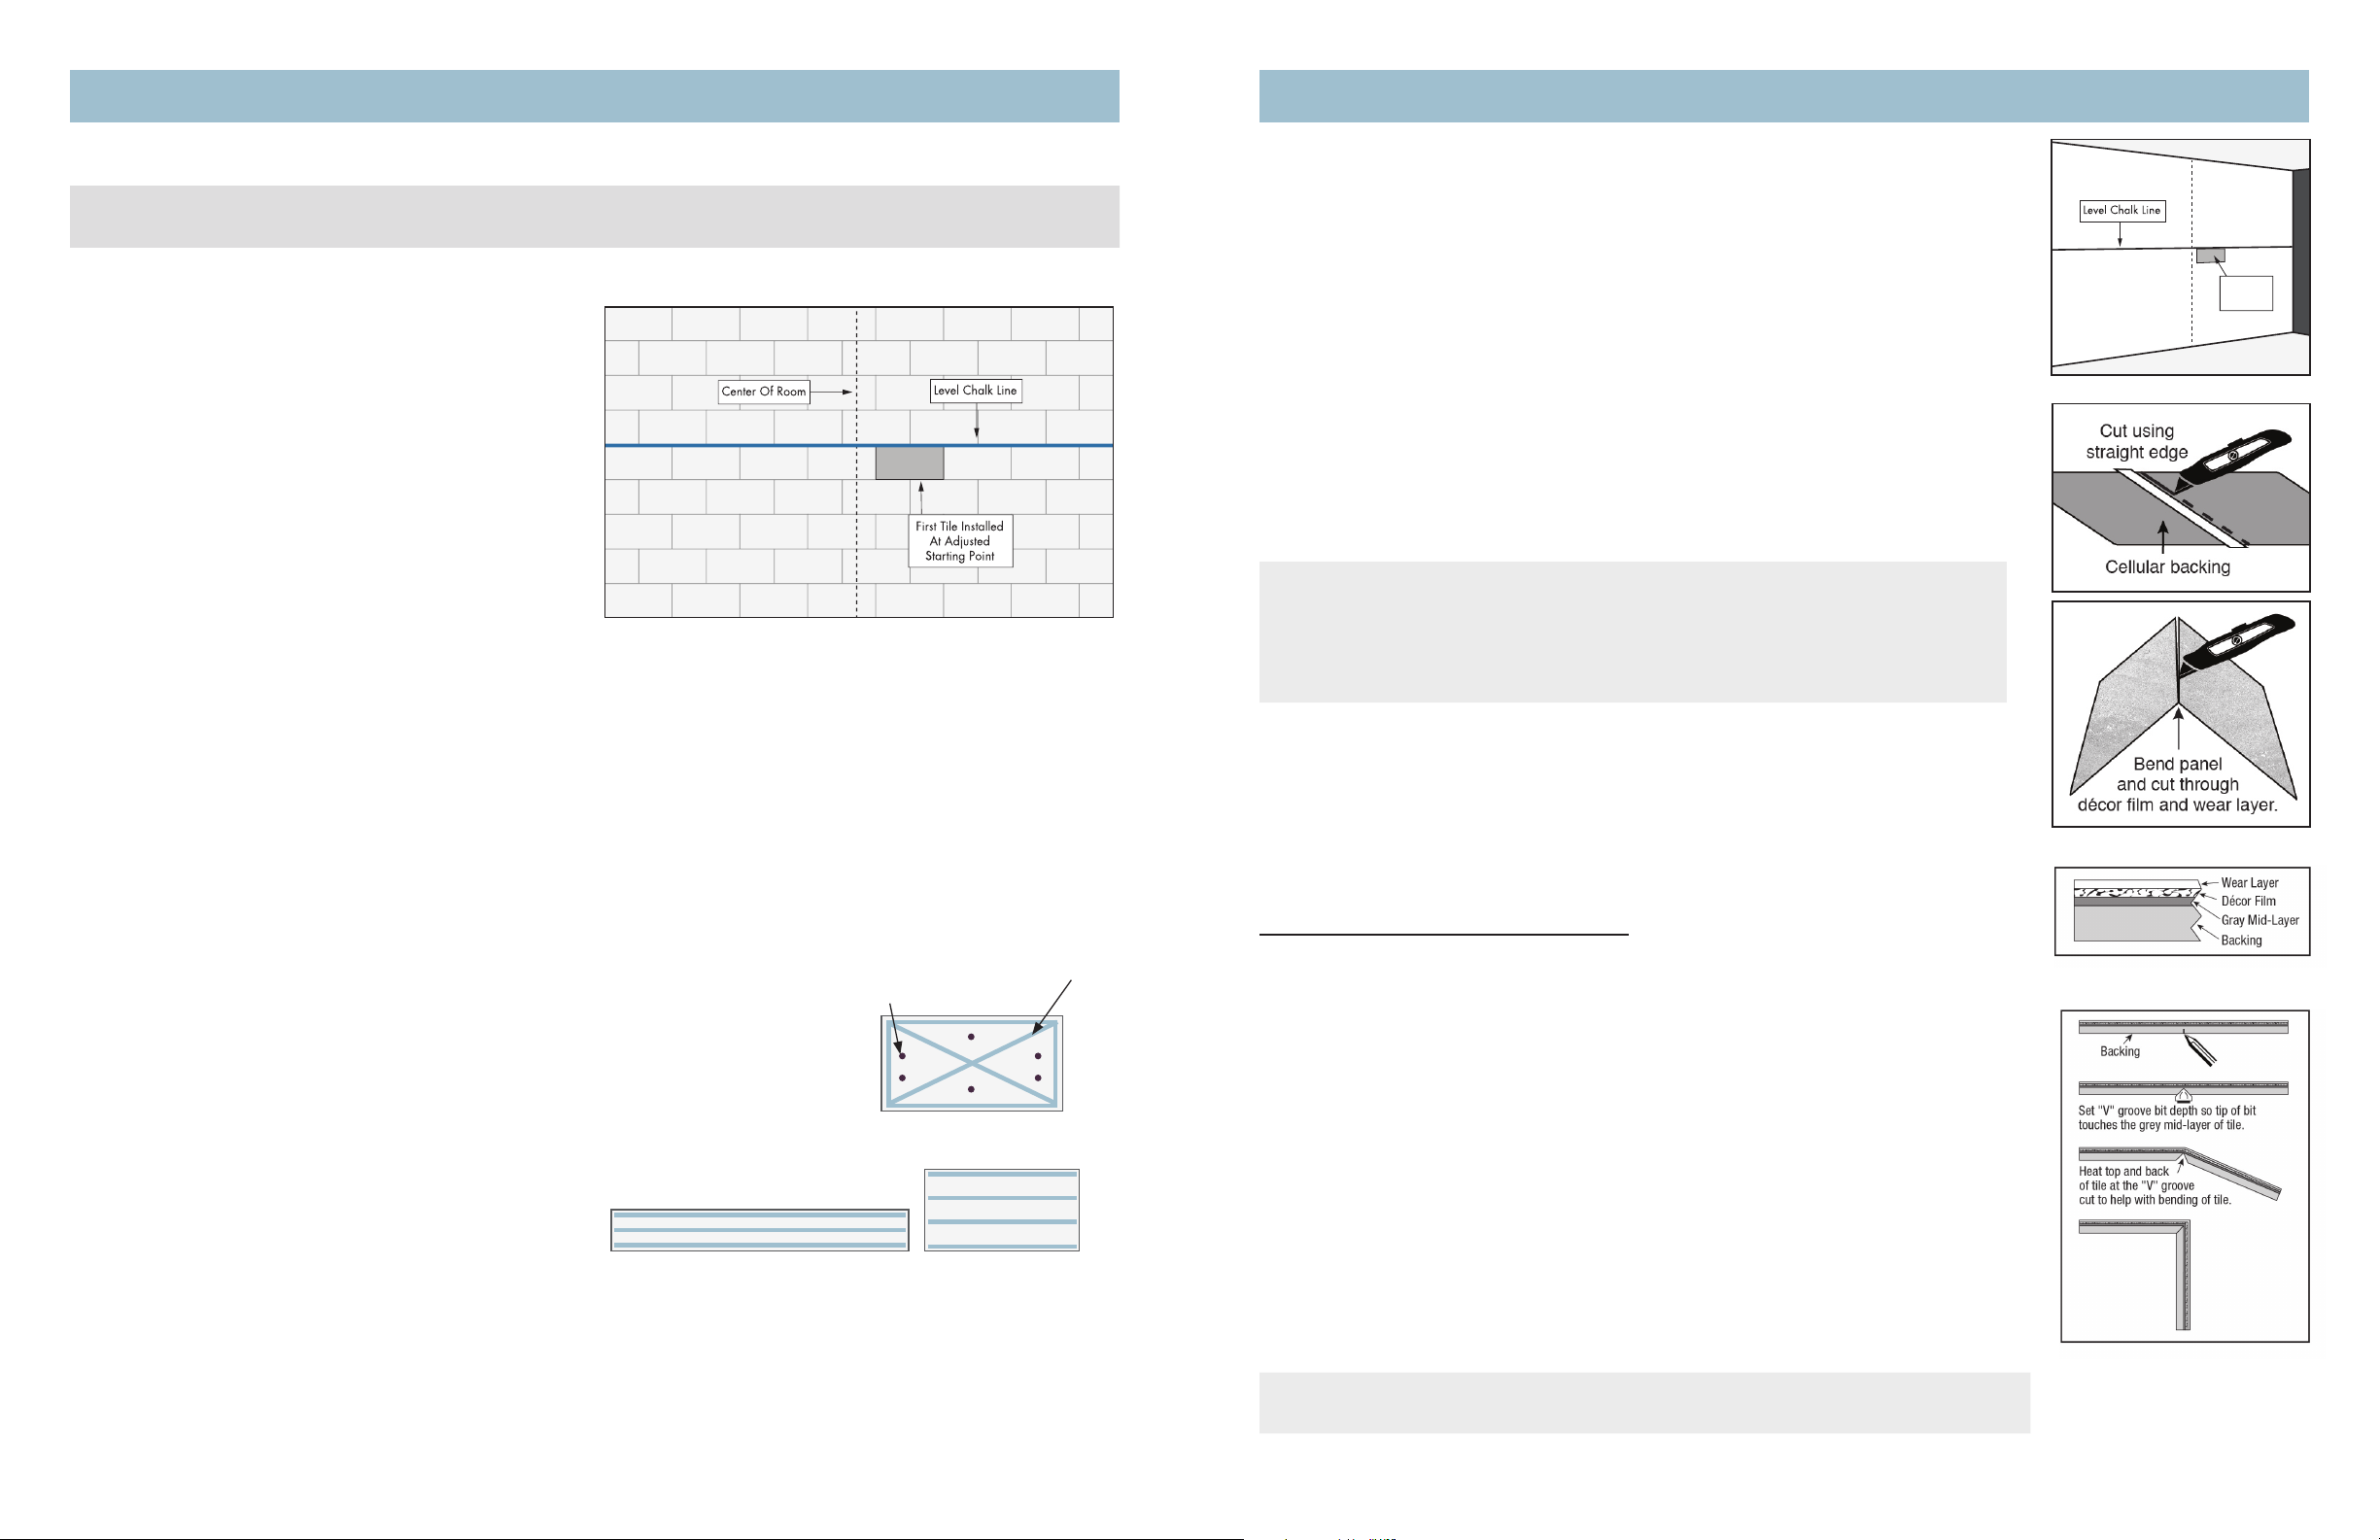
NOTE: The first row is the most important and care should be taken for a balanced appearance. Start the first row in
the center of the wall and work your way out from center. See order sequence in illustration below.
• Find the center point of the wall by measuring the
width of the wall and dividing by 2.
• Mark the wall at the bottom, center, and top at the
center point and either snap a chalk line, or draw a
straight line. The wall is now divided into two equal
parts.
• Depending upon the length of the product you are
installing, or the direction of the product you are
installing, divide the length of the room by the length
of the product to see how many full pieces are needed
to complete a row.
• Shift the center line if you will end up with a piece
that's less than 6" at the end of the first row. Do the
same thing for the height of the wall to see if you need
to cut the first row of product lengthwise.
• As your floor may not be level, it is recommended that you snap a level chalk line at the top of your first row to ensure
your entire first row is level.
4. 5.
1. 3.2.
7.6.
• As stated in step 1, use a level chalk line along the top edge of this first piece to
ensure a level first row.
• Continue the installation working your way out from center, as indicated in the
illustration in step 1. You do not need to hand roll each piece after placement,
only the first piece. However, we recommend that you pause from installation
after placing 10 full pieces and hand roll all 10 pieces before continuing on with
installation. Continue this method for the remainder of the installation. Hand roll
the entire wall one last time after you've completed the installation.
4 CUTTING VERÇADE
• When cutting pieces for length or width, use a straight edge and sharp utility
knife. Cut through the cellular backing of the product with your knife. Make
several passes with your knife and then snap. After snapping the piece, it is now
almost fully cut, leaving only the décor film and wear layer to be cut. Run your
utility knife along the décor film and wear layer to complete the cut.
NOTE: Do not force fit Verçade into place. When coming to the end of a wall,
window, or door casing, cut Verçade net or leave a narrow expansion space. You
can use color-matched 100% silicone caulk to finish off the installation, or trim
with molding (painted, stained or matching Verçade) to desired finish to hide the
cut end of the tiles.
Press Tile
Into Place
2 APPLYING ADHESIVE
When installing Verçade, you have the option of using Liquid Nails construction adhesive + hot melt, Verçade Roll-On
Adhesive, or Verçade Adhesive Tape.
• If using Verçade Roll-On Adhesive:
Use a drop cloth, paper, or plastic sheeting to protect floors from adhesive spillage. Apply Verçade adhesive using
3
⁄8
a
" nap paint roller following the manufacturer's instructions on adhesive container for application, flash time and
drying time. Apply the adhesive in sections as opposed to the entire wall. The adhesive only has so much "open time"
or workability.
• If using Liquid Nails construction adhesive + hot melt:
Apply a continuous bead of construction adhesive around the perimeter of the back
of the Verçade plank or tile, and make an "X" from corner to corner. Place several
spots of hot melt glue on the back as well. The hot melt adhesive will hold the
Verçade product in place until the construction adhesive sets.
• If using Verçade Adhesive Tape:
If installing planks, apply 3 strips of tape down the length of the plank.
If installing tiles, apply 4 strips of tape down the length of the tile.
Coverage:
Plank:1 roll of tape/2 cartons of product
Tile:1 roll of tape/3 cartons of product
Hot Melt Adhesive
3 APPLY FIRST PIECE
• After selecting one of the three application methods noted in step 2, place your first piece of Verçade into the desired
location and immediately press into place with your hands. Roll with a hand roller to ensure complete bonding of the
adhesive to the back of the plank or tile.
Bead of
Construction
Adhesive
5 "V" GROOVE CUTS FOR OUTSIDE 90° CORNERS
V-Grooving an outside corner should only be used when applying Verçade with Liquid
Nails and Hot Melt. If installing with Verçade Roll-On Adhesive, use the outside corner
molding to cover the edge of the planks/tiles.
VERY IMPORTANT: Do not cut through the décor film.
TOOLS REQUIRED TO PERFORM THIS STEP
• High speed palm router with round flat base attachment and micro adjust dial
• 90° 1/2" diameter "V" grooving bit
• Clamping fence/cutting guide
• Hair dryer or heat gun
PROCESS
• To make a “V” Groove cut for outside 90° corners, you must first mark the piece
on the back where the cut will be made.
• Measure the distance to the outside corner, add ½ the thickness of the material,
and transfer the measurement with a straight edge and pencil onto the back of
the wall tile.
• You will need to set your depth using the "micro adjust dial" on your high speed
palm router. Correct depth should have the point of the "V" groove bit tip just
touching the grey mid-layer of the piece just behind printed film.
• After making the “V” Groove cut, use a hair dryer to heat-up the beveled cut and
allow the tile to bend easily.
NOTE: Use caution when using a heat gun, as the extreme fast heat can damage
the tile. Go slowly and keep the heat gun tip a minimum of 12" from the tile.
OUTSIDE 90° CORNERS
76
Page 5
INTERIOR WALL INSTALLATION (CONTINUED)
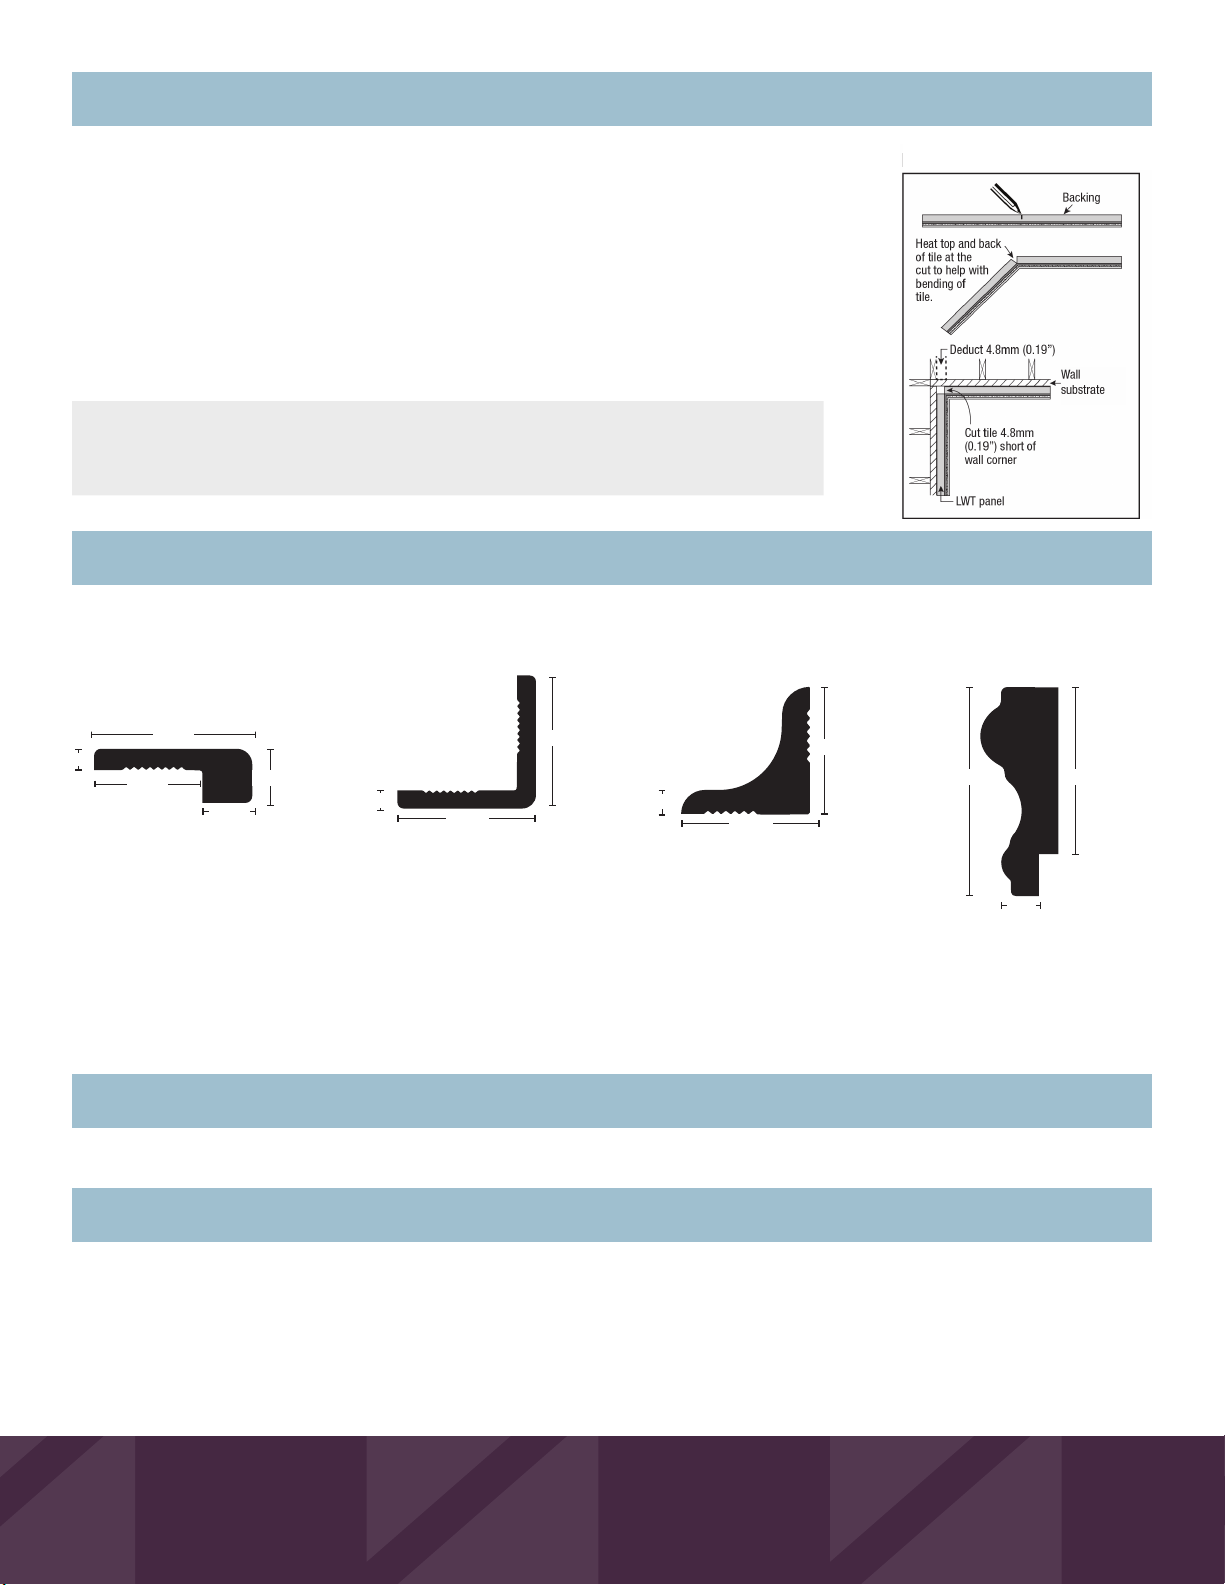
6 INSIDE 90° CORNERS
Cutting Verçade for an inside corner transition should only be used when applying
Verçade with Liquid Nails and hot melt. If installing with Verçade Roll-On Adhesive, use
the inside corner molding to cover the edge of the planks/tiles.
VERY IMPORTANT: Do not cut through the décor film.
Inside 90° cuts are simply done by cutting through the cellular backing of the product
with your utility knife and carefully bending it at that point. Using a hair dryer on the
back of the product will allow it to bend easily.
NOTE: WHEN MEASURING WHERE TO MARK THE PIECE FOR CUTTING for an
inside 90° corner, you need to deduct the thickness of the tile (4.8mm or 0.19")
because the length of the tile after bending will increase by the thickness of the tile.
MOLDING INSTALLATION
Moldings Available:
End Cap Outside Corner Inside Corner Chair Rail
4mm
21.5mm
30mm
9.5mm
10mm
4mm
20.8mm
20.8mm
4.5mm
20.8mm
INSIDE 90° CUTS
20.8mm
50mm 40mm
Tools Required: Miter Saw, Pencil, Clean Cloth, Tape Measure, Liquid Nails "Fuze It" (LN-2000)
9mm
1. Measure molding and cut to length. Expansion space is not necessary. Do not force fit molding.
2. Apply a scant bead of Liquid Nails "Fuze It" (LN-2000) to the back of the molding where it meets the wall. Joints and
inside corners should be glued to each other.
3. Press and hold in place. If necessary, use painters tape on longer pieces to hold in place.
4. Wipe excess adhesive away with a clean cloth.
WARRANTY
Lifetime Limited Warranty
CARE & MAINTENANCE
• Use a non-abrasive all purpose pH-neutral cleaner with paper towels or clean cloth, or vacuum with a soft bristle brush
attachment. Never use a vacuum with a beater bar assembly, as it could damage Verçade tiles and planks.
• Do NOT use any type of cleaning product containing bleach, abrasive cleaner, strong chemical detergent, or a scouring pad.
• Use door stops, knob protectors, or door knob covers to prevent damage from doors banging against the wall.
Verçade
15 Oakwood Ave.
Norwalk, CT 06850
Effective February 15, 2018
 Loading...