

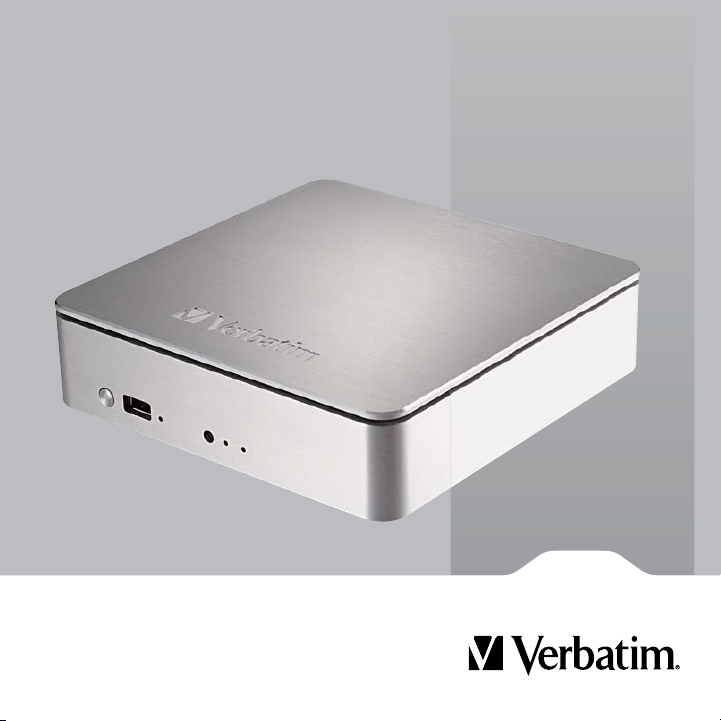
MediaShare
Quick Start Guide

2
Contents
9
9
9
9
9
59
English 3
Français
Français 9
Deutsch 14
Italiano 19
Italiano 1
Español 24
Português 29
Português 2
Wersja Polska 34
Русский 39
Русский 3
Magyar 44
Nederlands 49
Nederlands 4
Svenska 54
Українською 59
Українською

3
Introduction En
g
h
y
:
ower cable
cable
CD
e
f
C
f
y
3
M
Follow these instructions to install your Verbatim® MediaShare™ Server. Before starting
installation, make sure that
ou have an Internet connection.
lis
First, check your package contents
Before starting installation, check your package for the following items
• MediaShare Server
• P
• Ethernet
• MediaShare Installation
• Quick Start Guid
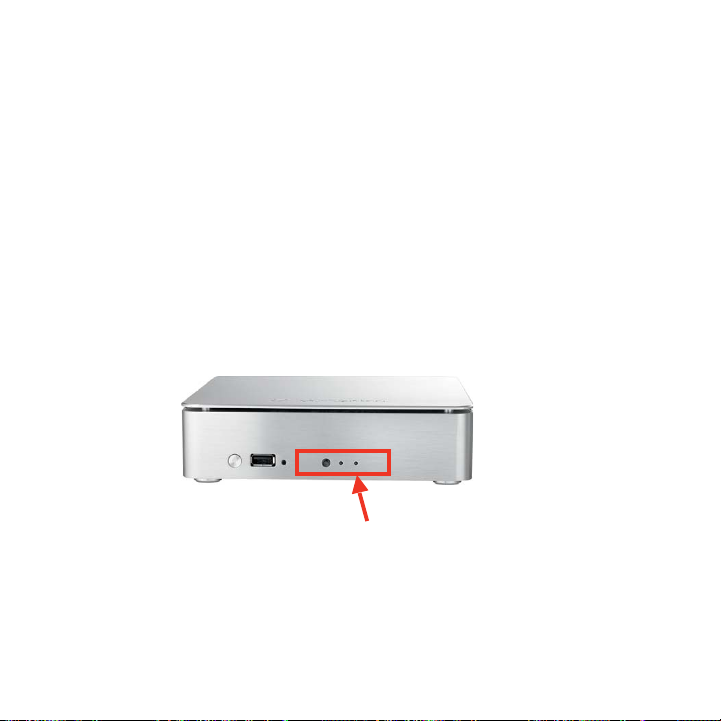
1. Connect the MediaShare to your network
1. Unpack the MediaShare server — be sure it has ample ventilation. Do not place items
the MediaShare, or place any liquids near or on top of the unit.
on top o
2.
onnect one end of the provided Ethernet cable to an available port on your router and
the other end to the back o
automaticall
. Plug in the power adapter to a power source and connect the other end to the
ediaShare server.
provide an IP address for your network devices.
the MediaShare unit. Your router must be configured to
4. Press the Power button on the back of your unit. The Green power indicator light will
f
G
R
u
S
:
“
s
y
f
C
S
g
g
c
c
g
f
licker while the unit boots and obtains an IP address. When power up is complete the
LED will turn solid
reen. Wait for the solid Green LED before proceeding to next steps.
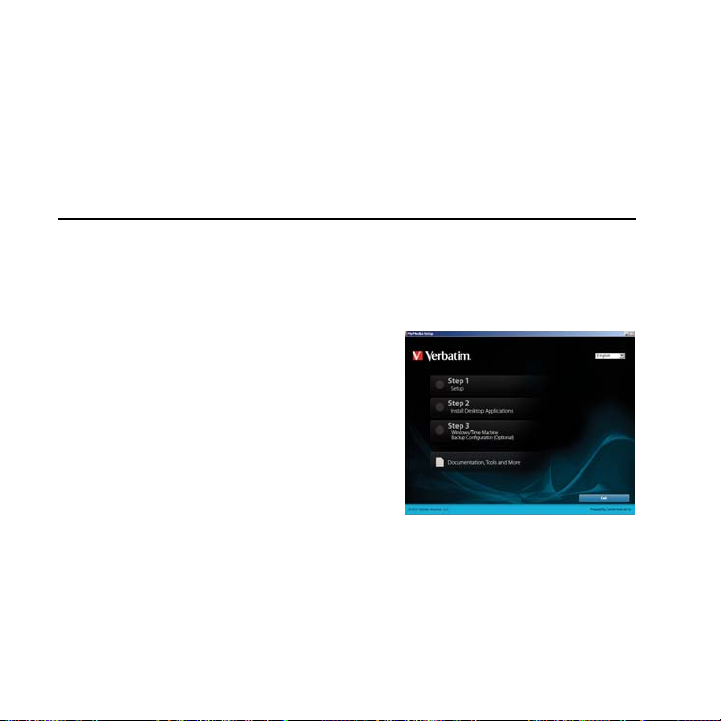
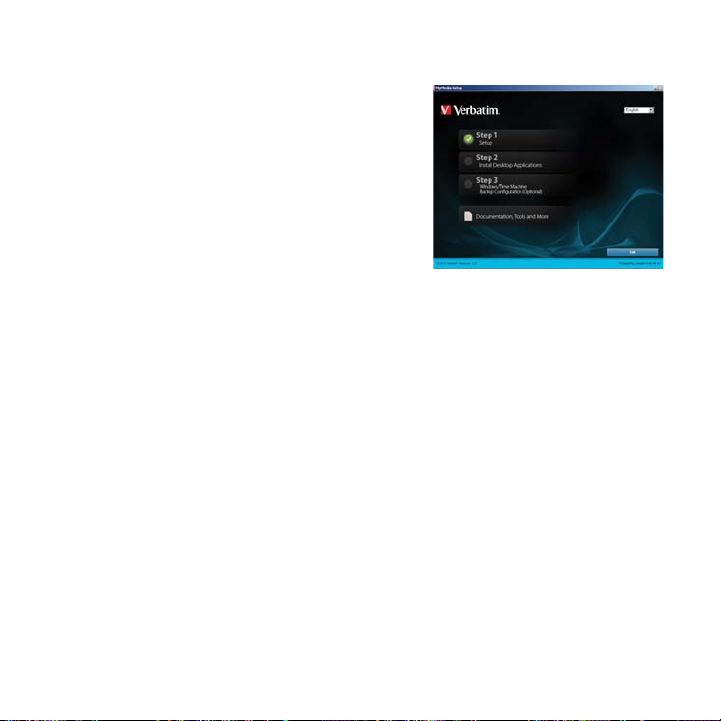
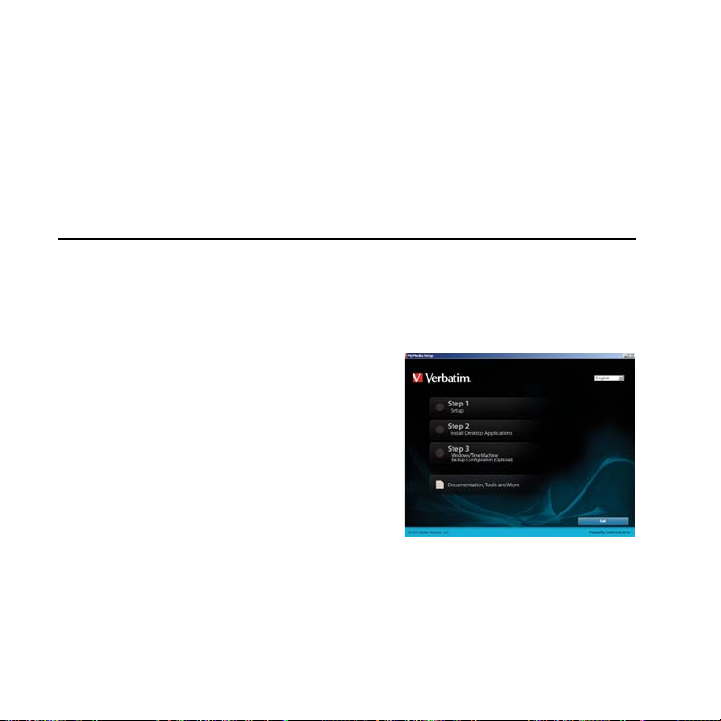
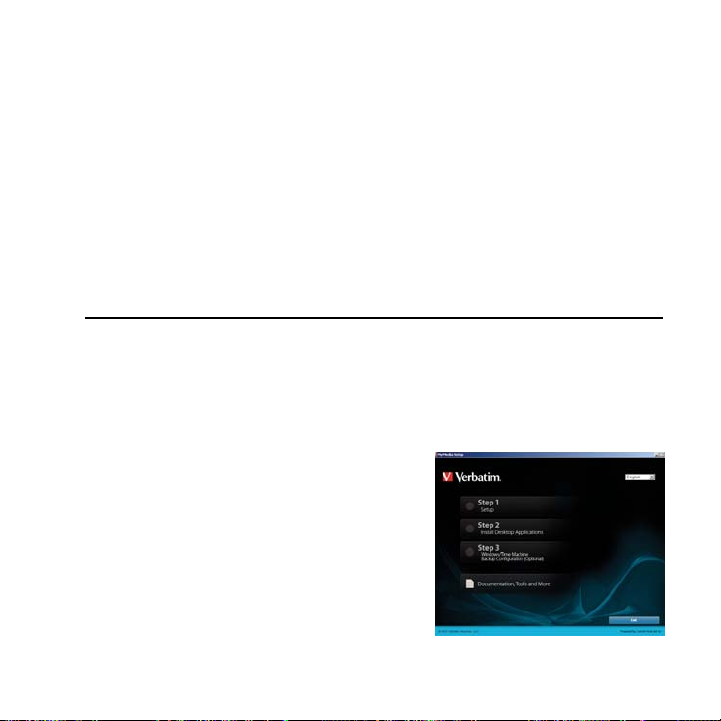
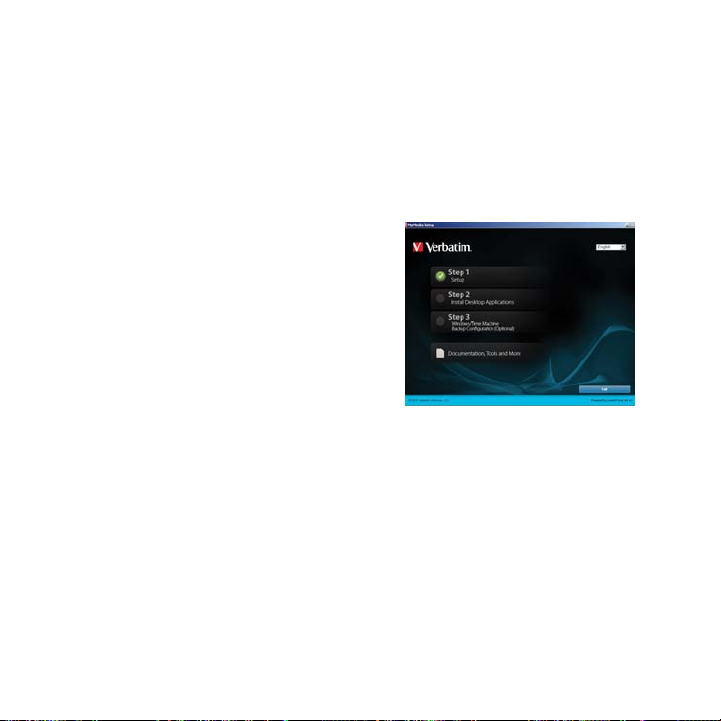
2. Run the Setup program on the Installation CD
unning the setup program will configure MediaShare. You will also give your MediaShare a
nique server name, and create your own user name and password.
To run the
etup program
1. Insert the Installation CD into your computer.
Welcome to MediaShare Setup” setup
The
creen displays. Wait for the Setup program
to initialize—approximatel
I
the CD does not start automatically, go to My
omputer and double-click MediaShareSetup.exe
to start the
Note: An error messa
Power LED is not solid
ables are not securely connected, or c) if your
omputer is behind a firewall.
2. Click Step 1, Setup to be
3. When the so
etup program.
tware license agreement displays, click I Accept.
2 minutes.
e could display if a) the
reen, b) the Ethernet
in setting up the MediaShare.
4
5
4. When the Registration screen displays, enter
y
s
g
S
5
6
c
S
c
O
8
9
fig
®
c
y
S
y
our Product Key, which is located on the
mall label attached to the CD sleeve. Then
n a name to your MediaShare, known as
assi
the Media
. In the provided fields, create your user name
and a password.
. Click Next and follow the on-screen prompts to
omplete. When the Setup screen re-displays,
the checkbox next to
hecked indicating that you have completed this step.
7.
. Click Step 2 Install Desktop Applications Follow the on-screen prompts to complete.
. Step 3, Windows/Time Machine Backup Configuration (Optional) is optional for you
to con
or Apple
omplete setup and can be run at any time in the future.
hare Name. Click Next.
tep 1 Setup will be
nce Step 1 is complete, proceed with Step 2.
ure your MediaShare for scheduled backup using either Windows Backup
Time Machine™ depending on your system. This step is not required to
Accessing MediaShare Remotel
1. Go to http://www.myverbatim.com and log in to your MediaShare server.
2. Enter the Media
3. Enter the Username and Password that
hare Name that you used when you set up your server.
ou created during Setup.
6
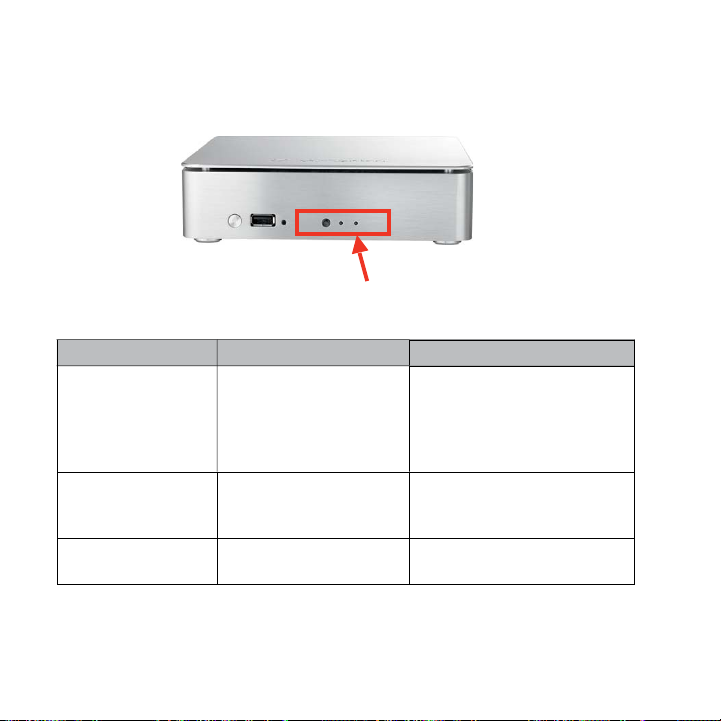
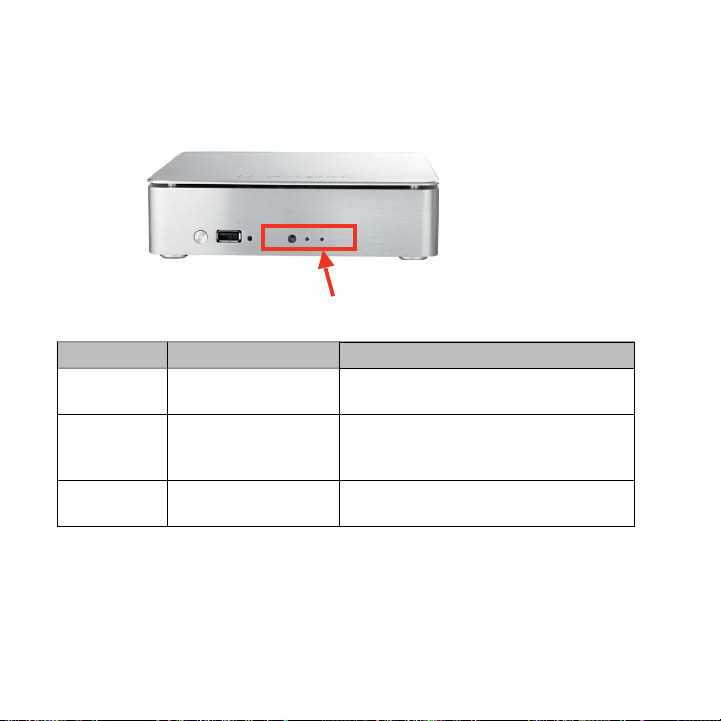
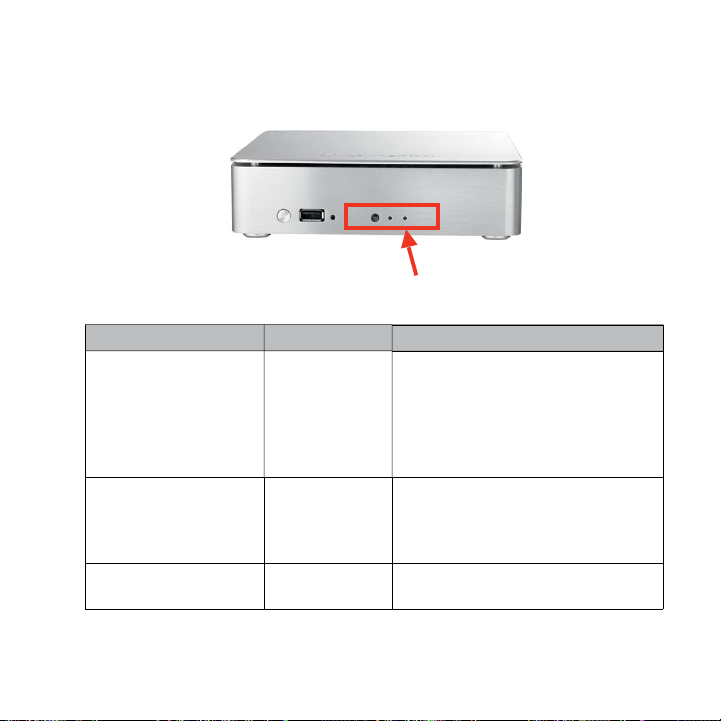
MediaShare Status LED’s
S
D
Purpose
L
ef
H
y
:
access to
ge:
g
off.Middle
R
y
y
y
e
Rig
eS
y
ard d
e
tatus LED’s
Status LE
t LED
L
ht LED
LED
ED Status
DD Activit
ear USB port(s) activit
ata port activit
Solid Green: Ready status.
Blink Blue
Blink Oran
Blink Orange: Read/write activit
to USB. Blink Blue: Read/write
activit
Blink Blue: Access to eSata port
h
Read/write
internal hard drive
System powerin
to internal hard driv
riv

7
Limited Warranty Terms
p
f
y
f
G
f
@
y
n
y
O
OSS O
OR SPEC
O
y f
O
notice
Verbatim Limited warrants this product to be free from defects in material and workmanship for a
eriod of 2 years from date of purchase. This warranty excludes batteries. If this product is found
ective within the warranty period, it will be replaced at no cost to you. You may return it
to be de
with
our original cash register receipt to the place of purchase or contact Verbatim.
In the
ollowing European countries, Austria, Belgium, Denmark, Finland, France, Germany,
reece, Hungary, Italy, Luxembourg, Monaco, Netherlands, Norway, Poland, Portugal, Republic
Ireland, Spain, Sweden, Switzerland and United Kingdom call 00 800 3883 2222. All other
o
European countries call +353 61 226586. You can email drivesupport
Product replacement is
ormal wear or to damage resulting from abnormal use, misuse, abuse, neglect or accident, or to
incompatibility or poor performance due to the specific computer software or hardware used.
an
VERBATIM WILL N
which var
N
IAL DAMAGES, HOWEVER CAUSED, FOR BREACH OF WARRANTIES OR
THERWISE. This warranty gives you specific legal rights and you may also have other rights
rom state to state or country to country.
TE: Verbatim Limited may at any time revise the content of this user guide without further
.
our sole remedy under this warranty, and this warranty does not apply to
T BE LIABLE FOR DATA L
R ANY INCIDENTAL, CONSEQUENTIAL
verbatim-europe.com.
8
WEEE Notice
y
e
f
household waste
about electronic and elec
y
y
y
The Directive on Waste Electrical and Electronic Equipment (WEEE), which entered into force
as European law on 13th Februar
quipment at end-of-life.
The WEEE logo (shown at the left) on the product or on its box indicates
that this product must not be disposed o
waste equipment disposal, recover
our local municipal household waste disposal service or shop from
where
2003, resulted in a major change in the treatment of electrical
or dumped with your other
. For more information
, and collection points, please contact
ou purchased the equipment.
trical

9
Introduction Français
S
c
P
:
e
n
t
e
e
j
f
e
f
’
S
uivez ces instructions pour installer votre serveur MediaShare™ Verbatim®. Avant de
ommencer l’installation, vérifiez que vous disposez bien d’une connexion Internet.
our commencer, vérifi ez le contenu de votre pack
Avant de commencer l’installation, vérifiez si votre pack contient les éléments suivants
• Serveur MediaShar
• Câble d’alimentatio
• Câble Etherne
• CD d’installation de MediaShar
• Guide de démarrage rapid
1. Connectez le serveur MediaShare à votre réseau
1. Sortez le serveur MediaShare de son emballage et installez-le dans un endroit bien aéré.
Ne posez aucun ob
2. Branchez l’une des extrémités du câble Ethernet
t l’autre extrémité à l’arrière de l’unité MediaShare. Votre routeur doit être configuré pour
ournir automatiquement une adresse IP aux périphériques de votre réseau.
3. Branchez l
au serveur Media
et sur le serveur MediaShare et n’approchez aucun liquide de l’unité.
ourni à un port disponible sur votre routeur
adaptateur secteur à une source d’alimentation et connectez l’autre extrémité
hare.
0
4. Appuyez sur le bouton d’alimentation à l’arrière de votre unité. Le voyant d’alimentation
g
y
clig
2
D
s
g
:
ordinateu
’écran de lanceme
M
prog
e
S
M
d’installatio
R
)
c
C
note pendant que l’unité démarre et obtient une adresse IP. Lorsque la mise sous
vert cli
tension est terminée, le vo
noter pour passer aux étapes suivantes.
ant vert devient fixe. Attendez que le voyant vert arrête de
. Lancez le programme d’installation à partir du C
Le programme d’installation permet de configurer l’unité MediaShare, de lui donner un nom de
erveur unique et de créer vos propres nom d’utilisateur et mot de passe.
Pour lancer le pro
1. Insérez le CD d’installation dans votre
ediaShare Setup s’affiche. Attendez que le
ramme d’installation s’initialise ; cela prend
nviron 2 minutes.
i le CD ne démarre pas automatiquement,
accédez au Poste de travail et double-cliquez sur
ediaShareSetup.exe pour lancer le programme
emarque : un message d’erreur peut apparaître
si le voyant d’alimentation vert ne cesse de clignoter, b) si les câbles Ethernet ne sont pas
a
orrectement connectés ou c) si votre ordinateur est protégé par un pare-feu.
liquez sur Step 1 Setup pour commencer la configuration de l’unité MediaShare.
2.
ramme d’installation, procédez comme suit
r. L
n.
nt Welcome to
1

1
3. Lorsque le contrat de licence du logiciel apparaît, cliquez sur I Accept.
’
fig
é
e
r
C
5
’
e
.
6
p
s’aff
q
’
8
l’
9
p
®
p
4. Lorsque l
votre clé de produit, qui
. Dans les champs qui s’affichent, définissez
votre nom d
. Cliquez sur Next et suivez les invites à l’écran
7. Après l
. Cliquez sur Step 2 Install Desktop Applications.Suivez les invites à l’écran pour terminer
. Step 3, Windows/Time Machine Backup Configuration (Optional). Cette étape facultative
Windows ou d’Apple
écran Registration apparaît, entrez
ure sur la petite
tiquette collée sur la pochette du CD. Donnez
nsuite un nom à votre unité MediaShare en
enseignant le champ MediaShare Name.
liquez sur Next.
utilisateur et votre mot de pass
our terminer l’étape. Lorsque l’écran Setup
iche à nouveau, la case située en regard de Step 1 Setup est cochée, ce qui indique
ue cette étape est terminée.
étape 1, passez à l’étape 2.
étape.
ermet de planifier des sauvegardes sur votre unité MediaShare à l’aide de la sauvegarde
Time Machine™, selon votre système. Elle n’est pas obligatoire
our terminer l’installation et peut être exécutée à tout moment.
1
2
A
ccès distant à l’unité MediaShare
M
g
serveur
’
t
1. Accédez à l’URL http://www.myverbatim.com et connectez-vous à votre serveur
ediaShare.
2. Rensei
3. Entrez le nom d
nez le champ MediaShare Nameà l’aide du nom utilisé lors de d’installation du
.
utilisateur et le mot de passe créés pendant l’installation.
MediaShare Status LED’s
Voyants de statu
1

3
Voy
ant de statu
t
e
É
t
e
V
g
/
é
g
y
y
u
l’a
é
l
clig
s
y
e
c
Voyant de gauch
ant du milie
Vo
ant de droit
Vo
Rôl
Activité du disque dur
Activité des ports USB à
rrière de l’unit
Activité du port eSATA Bleu clignotant : accès au disque dur
tat du voyan
ert fixe : prêt.
notant : accès en lecture
Bleu cli
criture au disque dur interne.
e clignotant : mise hors tension
Oran
stème.
du s
Orange clignotant : activité de
ecture/écriture sur le port USB. Bleu
notant : activité de lecture/écriture
ur le disque dur interne.
onnecté au port eSATA
1

Einleitun
g
folg
S
Ü
g
Ü
sein:
e
abe
erne
abe
S
g
k
f
g
S
S
gerä
en Sie diese Anweisungen, um den Verbatim® MediaShare™-Server zu installieren.
Be
tellen Sie vor Beginn der Installation sicher, dass Sie über eine Internetverbindung verfügen.
berprüfen Sie zuerst den Inhalt der Lieferun
berprüfen Sie vor Beginn der Installation den Inhalt der Lieferung. Folgendes muss enthalten
• MediaShare-Server
• N
• Eth
• Media
• Kurzanleitun
.
Verbinden Sie den MediaShare-Server mit Ihrem Netzwer
1. Packen Sie den MediaShare-Server aus. Stellen Sie sicher, dass er ausreichend
belü
Flüssi
2. Verbinden
Anschluss an Ihrem Router und das andere Ende mit der Rückseite des Media
Netzwerk
14
Kurzanleitung
tzk
l
t-K
l
hare-Installations-CD
tet wird. Legen Sie keine Gegenstände auf den MediaShare, und stellen Sie keine
keiten auf das Gerät oder in die Nähe des Geräts.
ie das eine Ende des mitgelieferten Ethernet-Kabels mit einem freien
hare-
eräts. Ihr Router muss so konfiguriert sein, dass automatisch eine IP-Adresse für Ihre
te bereitgestellt wird.
5
3. Schließen Sie das Netzteil an eine Spannungsquelle an, und verbinden Sie das andere
S
S
ge f
G
ll
s
S
enutzernamen sowie
:
S
“
g
C
u starte
Ende mit dem Media
4. Drücken
Betriebsanzei
das
ie ab, bis die grüne LED nicht mehr flackert, bevor Sie die nächsten Schritte ausführen.
ie an der Rückseite des Geräts auf den Schalter Power. Die grüne
erät hochgefahren ist, leuchtet die grüne LED durchgehend ohne Flackern. Warten
hare-Server.
lackert, während das Gerät hochfährt und eine IP-Adresse erhält. Wenn
2. Führen Sie das Setup-Programm auf der
Insta
ations-CD au
Durch das Ausführen des Setup-Programms wird MediaShare konfiguriert. Außerdem
werden
B
1. Legen Sie die Installations-CD in das CD-
Wenn die
z
ie MediaShare einen eigenen Servernamen geben sowie Ihren eigenen
Ihr Kennwort erstellen.
o führen Sie das Setup-Programm aus
M-Laufwerk Ihres Computers ein. Der
Bildschirm „Welcome to Media
wird angezeigt. Warten Sie die Initialisierun
des Setup-Programms ab. Dies dauert
ngefähr 2 Minuten.
D nicht automatisch startet, wechseln
ie zu Arbeitsplatz und doppelklicken Sie auf
ediaShareSetup.exe, um das Setup-Programm
n.
hare Setup
1
6
inweis: Eventuell wird eine Fehlermeldung angezeigt, wenn a) die Betriebsanzeige der
g
)
S
Sof
y
C
g
f
ff
g
S
S
S
gef
fig
LED nicht durch
Ihr Computer sich hinter einer Firewall befindet.
oder c
2. Klicken
3. Wenn die
4. Wenn der Registrierungsbildschirm
ingeblendet wird, geben Sie Ihren Product
Ke
der
ie Ihrem MediaShare-Server einen Namen,
den so
ie auf Next.
. Erstellen Sie Ihren Benutzernamen und ein
Kennwort in den da
. Klicken Sie auf Next, und befolgen Sie die
Au
Bildschirm erneut an
an, dass dieser
7. Wenn
. Klicken Sie auf Step 2 Install Desktop Applications. Befolgen Sie die Anweisungen auf
dem Bildschirm, um diesen
. Step 3 Windows/Time Machine Backup Configuration (Optional) muss nur
aus
kon
ehend grün leuchtet, b) die Ethernet-Kabel nicht sicher verbunden sind
ie auf Step 1 Setup, um mit dem Setup des MediaShare-Servers zu beginnen.
tware-Lizenzvereinbarung angezeigt wird, klicken Sie auf I Accept.
ein, der sich auf einem kleinen Etikett auf
D-Hülle befindet. Anschließend geben
enannten MediaShare Name. Klicken
ür vorgesehenen Feldern.
orderungen auf dem Bildschirm, um das Setup abzuschließen. Wenn der Setup-
ezeigt wird, ist das Kästchen neben Step 1 Setup markiert und zeigt
chritt abgeschlossen ist.
chritt 1 abgeschlossen ist, fahren Sie mit Schritt 2 fort.
chritt abzuschließen.
ührt werden, wenn Sie den MediaShare-Server für geplante Sicherungen
urieren möchten, die entweder mithilfe von Windows Backup oder Apple®
1

7
Time Machine™ (abhängig von Ihrem System) vorgenommen werden. Dieser
g
erwende
abe
g
abe
chritt ist nicht erforderlich, um das Setup abzuschließen. Er kann auch zu einem
en späteren Zeitpunkt ausgeführt werden.
beliebi
er Remotezugriff auf MediaShare zugreifen
1. Öffnen Sie http://www.myverbatim.com, und melden Sie sich bei Ihrem MediaShareerver an.
2.
eben Sie den MediaShare Name ein, den Sie beim Einrichten Ihres Servers
t h
v
.
eben Sie den Username und das Password ein, die Sie bei der Einrichtun
rstellt h
n.
n.
1
8
MediaShare-Status-LEDs
D
ge
e
ät
ereitschaftszustand
schlüssen auf de
e
US
/
e
schlusses
tatus LED’s
Status-LE
LED Festplattenaktivit
Link
ittlere LED Aktivität an den USB-
hte LED Aktivität des eSata-
1
Anzei
An
An
kseit
ED-Status
rün (durchgehend leuchtend):
B
Orange (blinkend): Lese-/Schreibaktivität
r
B-Anschluss Blau (blinkend): Lese-
mit
chreibaktivität mit interner Festplatt
Blau (blinkend): Zugriff auf Festplatte am
ata-Anschluss

9
Introduzione It
aliano
’
e
:
e
e
t
e
gg
C
S
’ind
esse alla rete
C
eguire le istruzioni indicate di seguito per installare il server MediaShare™ di Verbatim®. Prima
di avviare l
installazione, assicurarsi di avere una connessione a Internet.
Innanzitutto, controllare il contenuto della confezion
Prima di avviare l’installazione, controllare che la confezione includa i seguenti elementi
• Server MediaShar
• Cavo di alimentazion
• Cavo Etherne
• CD di installazione di MediaShar
• Guida rapida
1. Collegare MediaShare alla rete
1. Togli il MediaShare server dalla confezione assicurandosi che abbia a disposine una buona
ventilazione. Non posizionare alcun o
2.
ollega un capo del cavo Ethernet presente nella confezione ad una porta libera del vostro router e
l’altro capo alla presa di rete posta sul retro del Media
irizzo IP alle unità conn
l
3.
ollega la spina dell’alimentatore alla presa di corrente e l’altro capo al unità MediaShare server.
etto sul MediaShare e non lasciare liquidi vicino all’unità.
hare. Impostate il vostro router per fornire
in automatico.
1
0
. Premere il tastoPower sul retro dell’unità. L’indicatore di alimentazione VERDE
gg
,
p
D
S
:
errà
sua
f
)
è
p
.
.
erà durante l’avvio dell’unità e la ricezione di un indirizzo IP. Una volta completata
lampe
l’accensione
VERDE fisso
il LED diventerà di colore VERDE fisso. Attendere che il LED diventi di colore
rima di continuare la procedura.
. Avviare il programma di installazione dal C
l programma di installazione consente di configurare MediaShare. Sarà necessario fornire
hare un nome di server univoco e creare un proprio nome utente e password.
a Media
er avviare il programma di installazione
. Inserire il CD di installazionenel computer.
vi
V
ll’installazione di MediaShare. Attendere
irca 2 minuti per l’inizializzazione del
rogramma di configurazione.
e il CD non si avvia automaticamente, andare su
Risorse del computer e
xe per avviare il programma di installazione.
ota: è possibile che venga visualizzato un
messaggio di errore se a
ollegato correttamente, c) il computer è protetto da un firewall.
2. Fare clic sulla
3. Al momento della visualizzazione del contratto di licenza, fare clic su Accetto
lizzata la schermata di benvenuto
are clic su MediaShareSetup.
il LED non è di colore VERDE fisso, b) il cavo Ethernet non
rima fase di installazioneper iniziare l’installazione di MediaShare
2

1
. Al momento
della visualizzazione della
,
clic su Avanti.
g
à
d
.
p
chermata di registrazione, immettere il
odice prodotto, indicato sull’etichetta della
opertina del CD. Assegnare un nome all’unità
MediaShare
re
. Nei campi indicati, creare il proprio nome
tente e password.
. Fare clic su Avanti e seguire la procedura
uidata per continuare. Quando riapparirà
la schermata di confi
installazione sar
. Una volta completata la fase 1, procedere con la fase 2.
. Fare clic sulla seconda fase per l’installazione delle applicazioni desktop Seguire la
proce
9. La terza fase per la configurazione di Windows Backup/Time Machine (opzionale) è
pzionale per configurare MediaShare affinché esegua backup pianificati con Windows
Backu
necessaria per il completamento dell’installazione e può essere eseguita in un
ovvero il nome MediaShare .
urazione, la casella di controllo accanto allaprima fase di
selezionata, ad indicare che questa fase è stata completata.
ura guidata per continuare
o Apple® Time Machine™, a seconda del proprio sistema. Questa fase non
ivo momento.
2

2
Accedere a MediaShare in modalità remot
a
g
f
e
o
. Andare su http://www.myverbatim.com e collegarsi al proprio server MediaShare.
2. Immettere il Nome MediaShare scelto al momento della confi
3. Immettere il Nome utente e laPassword creata durante la con
urazione del server.
igurazione.
ED di stato di MediaShar
ED di stat
2

3
ED di stat
o
po
po
o
V
gg
accesso
gg
fase
ce
e
e
à
o
osso
LED sinistr
ntral
LED
LED r
Sco
Attività HDD
Attività della porta USB
osterior
Attività porta eSata Blu lampeggiante:Accesso alla porta
Sco
erde fisso: stato Pronto.
Blu lampe
ettura/scrittura al disco rigido interno
Arancione lampe
di spegnimento.
Arancione lampeggiante: Attivit
di lettura/scrittura su USB. Blu
ampeggiante: attività di lettura/scrittura
ul disco rigido intern
ata
iante:
in
iante: sistema in
2

Pr
ese
ció
e
:
e
n
t
e
o
g
dad
C
y
nta
iga estas instrucciones para instalar el servidor MediaShare™ de Verbatim®. Antes de
omenzar la instalación, asegúrese de que dispone de conexión a Internet.
n Español
n primer lugar, compruebe el contenido del paquet
Antes de comenzar la instalación, compruebe que el paquete incluye los siguientes artículos
• Servidor MediaShar
• Cable de alimentació
• Cable Etherne
• CD de instalación de MediaShar
• Guía de inicio rápid
1. Conecte el servidor MediaShare a la red
1. Desembale el servidor MediaShare y asegúrese de que tenga una buena ventilación.
No sitúe nin
i encima de la uni
2.
onecte un extremo del cable Ethernet incluido en el embalaje a un puerto disponible
del enrutador
nrutador debe estar configurado para asignar una dirección IP a los dispositivos de la
ún objeto encima del servidor MediaShare, ni coloque ningún líquido cerca
.
el otro extremo a la parte posterior de la unidad MediaShare. El
de forma automática.
24

5
3. Conecte el adaptador de alimentación a una fuente de alimentación y el otro extremo al
y
l
g
j
:
g
(
C y
ervidor MediaShare.
4. Pulse el botón de encendido ubicado en la parte posterior de la unidad. El indicador
de encendido verde parpadeará mientras la unidad arranca
uando el proceso de encendido haya finalizado el indicador LED pasará a iluminarse
n verde de forma continua. Espere a que el indicador LED se ilumine en verde de
orma continua antes de continuar con los pasos siguientes.
obtiene una dirección IP.
2. Ejecute el programa de instalación del CD de
insta
La ejecución del programa de instalación configurará la unidad MediaShare. También deberá
asi
Para e
ación
narle un nombre de servidor único al servidor MediaShare y crear su nombre de usuario y
u contraseña propios.
ecutar el programa de instalación
1. Inserte el CD de instalación en el equipo.
Aparecerá la pantalla de instalación
Bienvenido a la instalación de MediaShare”.
Espere a que el pro
2 minutos aproximadamente).
inicie
i el CD no se inicia automáticamente, vaya a Mi
haga doble clic en MediaShareSetup.exe
P
ara iniciar el programa de instalación.
rama de instalación se
2

6
Nota: Puede aparecer un mensaje de error si a) el indicador LED de encendido no se ilumina en
f
g
C
S
S
y
C
S
f
y
orma continua, b) los cables Ethernet no están conectados de forma adecuada, o c) si
verde de
u ordenador se encuentra detrás de un cortafuegos.
a clic en Step 1, Setup para iniciar la instalación de MediaShare.
2. Ha
uando aparezca el acuerdo de licencia de software, haga clic en I Accept.
3.
4. Cuando aparezca la pantalla Registration,
introduzca la clave del producto, que se encuentra
n la etiqueta pequeña que está pegada en la
unda del CD. A continuación, asigne un nombre
a la unidad Media
de Media
. En los campos proporcionados, cree su nombre
de usuario
. Haga clic en Next y siga las instrucciones
ue aparecen en pantalla para completar la
instalación.
tep 1, Setup aparecerá marcada, lo cual indica que ha completado este paso.
a
7. Una vez
. Haga clic en Step 2, Install Desktop Applications. Siga las instrucciones que aparecen en
antalla para completar la instalación.
. El Step 3, Windows/Time Machine Backup Configuration (opcional) es opcional y le permite
onfigurar MediaShare para que realice copias de seguridad programadas con Copias de
eguridad de Windows o con Time Machine™ de Apple® en función del sistema que tenga.
Este paso no es necesario para completar la instalación
n cualquier momento.
2
hare, conocido como Nombre
hare. Haga clic en Next.
una contraseña.
uando vuelva a aparecer la pantalla de instalación, la casilla de verificación junto
inalizado el Paso 1, continúe con el Paso 2.
puede ejecutarse posteriormente

7
Acceso remoto a MediaShar
e
S
e
o
1. Vaya a http://www.myverbatim.com e inicie una sesión en el servidor MediaShare.
2. Introduzca el nombre de Media
. Introduzca el nombre de usuario y la contraseña que creó durante la instalación.
hare que utilizó cuando instaló el servidor.
Indicadores LED de estado de MediaShar
ndicadores LED de estad
2

8
Indicador LED de
o
o
D
dad de la unidad
sco duro
V
:
acceso de
j
o
cado
A
j
dad
/
sco duro
o
cado
o
A
:
o
stad
Indicador LED izquierdoActivi
Indi
r LED central
Indi
r LED derech
ropósit
di
ctividad de los puertos
ctividad del puerto
ata
B traseros
stado del indicador LE
erde fijo: estado que indica que
tá listo
Azul intermitente
ectura/escritura al disco duro interno
a intermitente: el sistema se
Naran
stá apagand
Naran
a intermitente: activi
de lectura/escritura del USB Azul
ntermitente: actividad de lectura
ritura del di
Azul intermitente
ata del disco dur
intern
acceso al puerto
2

9
Introdução Portu
g
f
m
:
e
C
t
e
o
g
iga estas instruções para instalar o servidor Verbatim® MediaShare™. Antes de iniciar a
instalação, certi
de que dispone de conexión a Internet.
ique-se de que tem uma ligação à Internet. comenzar la instalación, asegúrese
rimeiro, verifi que o conteúdo da embalage
Antes de iniciar a instalação, procure na embalagem os componentes que se seguem
• Servidor MediaShar
• Cabo de energia
•
abo Etherne
• CD de instalação do MediaShar
• Guia de Início Rápid
1. Ligue o MediaShare à sua red
1. Desempacote o servidor MediaShare — certifique-se de que tem boa ventilação. Não
oloque objectos em cima do MediaShare, nem líquidos perto ou sobre a unidade.
2. Li
ue uma extremidade do cabo Ethernet fornecido a uma porta disponível no router
a outra extremidade à unidade MediaShare. O router tem de estar configurado para
ornecer automaticamente um endereço IP aos dispositivos de rede.
uês
2

3. Ligue o transformador a uma fonte de alimentação e ligue a outra extremidade ao
(
Q
f
ção
S
Conf
:
O
ervidor MediaShare.
4. Prima o botão Power
de energia pisca enquanto a unidade arranca e obtém um endereço IP.
rocesso de ligação estiver concluído, o LED muda para Verde sólido. Aguarde até que
o LED Verde
Energia) na parte de trás da unidade. A luz Verde indicadora
uando o
ique sólido para continuar.
. Execute o programa de Configuração do CD de
Instala
A execução do programa de configuração, configura o MediaShare. Atribua um nome exclusivo
ao servidor Media
hare e crie o seu próprio nome de utilizador e palavra-passe.
Para executar o programa de
1. Insira o CD de Instalação no computador.
É apresentado o ecrã de configuração
Welcome to MediaShare Setup”. Aguarde
até à inicialização do programa de
onfiguração—aproximadamente 2 minutos.
e o CD não for iniciado automaticamente, aceda
Meu Computador e faça duplo clique em
a
ediaShareSetup.exe para iniciar o programa de
onfiguração.
iguração

Nota: Poderá aparecer uma mensagem de erro se a) o LED da Energia não estiver verde
C
Q
C
).
Q
g
). S
®
ólido, b) os cabos Ethernet não estiverem bem ligados, ou c) o seu computador estiver
rotegido por uma firewall.
lique em Step 1, Setup (Passo 1, Configuração) para iniciar a configuração do
2.
ediaShare.
3. Quando for apresentado o contrato de licença de software, clique em I Accept (Aceito).
uando for apresentado o ecrã de Registo,
4.
introduza a sua
stá localizada numa pequena etiqueta
a capa do CD. Em seguida, atribua um
ome ao MediaShare, conhecido por Nome
ediaShare . Clique em Next (Seguinte
. Nos campos disponíveis, crie o seu nome de
tilizador e uma palavra-passe.
. Clique em Next e siga as indicações que
aparecem no ecrã para concluir.
crã de Configuração voltar a aparecer, a caixa de verificação junto de Step 1 Setup
Passo 1, Configuração) estará marcada, indicando que este passo foi concluído.
7. Uma vez concluído o Passo 1, si
. Clique em Step 2 Install Desktop Applications (Passo 2 Instalar Aplicações no Ambiente
de Trabalho
. Step 3, Windows/Time Machine Backup Configuration (Optional) é opcional ao
onfigurar o MediaShare para cópia de segurança agendada utilizando o Windows
Backup ou o Apple
have de Produto, que
uando o
a para o Passo 2.
iga as indicações apresentadas no ecrã para concluir.
Time Machine™, o que depende do sistema. Este passo não

necessário para concluir a configuração e pode ser executado a qualquer altura
e
S
e
o
futuro.
Aceder ao MediaShare Remotament
1. Aceda a http://www.myverbatim.com e inicie sessão no servidor MediaShare.
2. Introduza o Nome Media
3. Introduza o Nome de utilizador e a Palavra-passe que criou durante a
onfiguração.
hare que utilizou para configurar o servidor.
LEDs de Estado do MediaShar
ndicadores LED de estad

ED de EstadoObjectiv
o
D
dade
D
V
ado de concluído
A
/
do Meio
)
/
:
g
da
a
:
cesso à unidade de
g
LED da Esquerda Activi
LED
LED
Direit
Actividade da(s)orta(s
B posterior
Actividade da porta
ata
HD
stado do LE
erde Sólido: Est
Azul Intermitente:
scrita à unidade de disco rígido interna
aranja Intermitente: Desligar do sistema.
aranja Intermitente: Actividade de leitura
scrita para USB. Azul Intermitente
Actividade de leitura/escrita para a unidade
de disco rí
Azul Intermitente
ido da porta eSata
disco rí
cesso de leitura
ido interna
A
.

Wprowadzenie Wers
j
®
a
y:
e
y
y
e
y
a Polska
Aby zainstalować serwer Verbatim
instrukcjami. Przed rozpoczęciem instalacji należy sprawdzić połączenie internetowe.
MediaShare™, należy postępować zgodnie z poniższymi
W pierwszej kolejności należy sprawdzić zawartość opakowani
Przed rozpoczęciem instalacji, należy sprawdzić, czy opakowanie zawiera następujące
lement
• Serwer MediaShar
• Kabel zasilając
• Kabel sieciow
• Instalacyjny dysk CD z oprogramowaniem MediaShar
• Podręcznik wprowadzając
1. Podłącz serwer MediaShare do sieci
1. Odpakuj serwer MediaShare — ustaw go w miejscu o odpowiedniej wentylacji. Na
erwerze MediaShare nie należy umieszczać żadnych przedmiotów oraz stawiać na
im ani w jego pobliżu żadnych płynów.
2. Podłącz jeden z końców dostarczonego kabla sieciowego do wolnego portu routera, a
drugi koniec kabla podłącz do gniazda z tyłu jednostki MediaShare. Router musi być tak
konfigurowany, aby automatycznie przydzielał adres IP urządzeniom sieciowym.
4

3. Podłącz kabel zasilacza do źródła prądu, a drugi jego koniec do serwera MediaShare.
D
y
y:
yjny
4. Naciśnij przycisk zasilania znajdujący się z tyłu jednostki. Podczas uruchamiania
rządzenia i uzyskiwania adresu IP kontrolka zasilania będzie migać na zielono. Po
ruchomieniu kontrolka zacznie świecić na zielono światłem ciągłym. Przed przejściem
do następnego kroku procedury poczekaj aż kontrolka będzie świecić na zielono
wiatłem ciągłym.
2. Uruchom program instalacyjny z instalacyjnego
ysku C
Program instalacyjny umożliwia skonfigurowanie serwera MediaShare. Do serwera MediaShare
rzypisana zostanie unikalna nazwa i utworzona zostanie nazwa użytkownika oraz hasło.
uruchomić program instalacyjn
Ab
1. Włóż instalacyjny dysk CD do napędu
omputera. Wyświetlony zostanie ekran
owitalny „Welcome to MediaShare Setup”
Witamy w programie instalacyjnym serwera
ediaShare). Odczekaj około 2 minut na
inicjalizację programu instalacyjnego.
eżeli dysk CD nie uruchomi się automatycznie,
rzejdź do okna Mój komputer i kliknij dwukrotnie
lik MediaShareSetup.exe, aby uruchomić program
instalac
.

waga: Jeśli a) dioda LED nie świeci na zielono, b) kabel sieciowy nie został poprawnie
S
y
j
S
j
(
y
j
g
fig
))
odłączony, c) na komputerze włączono zaporę sieciową, może zostać wyświetlony
komunikat o błędzie.
2. Kliknij polecenie
erwera MediaShare.
3. Po wyświetleniu warunków umowy licencyjnej kliknij przycisk I Accept (Zgadzam się).
4. Po w
. W odpowiednich polach utwórz swoją nazwę
. Aby zakończyć konfigurację, kliknij polecenie
7. Po ukończeniu kroku 1 prze
. Kliknij pozycję Step 2 Install Desktop Applications (Krok 2 Instalacja aplikacji). Postępuj
.
świetleniu ekranu rejestracyjnego
wprowadź klucz produktu znajdujący się na
naklejce na kopercie z dyskiem CD.
małe
Następnie przypisz do serwera Media
azwę, zwaną Nazwa serwera MediaShare.
przycisk Next (Dalej).
Klikni
żytkownika oraz hasło.
Dalej) i postępuj zgodnie z instrukcjami
Next
świetlanymi na ekranie. Po ponownym wyświetleniu ekranu konfiguracyjnego
w
ole wyboru znajdujące się obok pozycji Step 1 Setup (Krok 1 Ustawienia) zostanie
zaznaczone, co wskazywać będzie, iż ten krok został ukończony.
odnie z komunikatami wyświetlanymi na ekranie, aby go ukończyć.
z
pcja Step 3, Windows/Time Machine Backup Configuration (Optional) (Krok 3,
uracja wykonywania kopii zapasowej Windows/Time Machine (Opcjonalne
Kon
tep 1, Setup (Krok 1, Ustawienia), aby rozpocząć konfigurację
hare
dź do kroku 2.

j
est krokiem opcjonalnym umożliwiającym skonfigurowanie procedury tworzenia kopii
S
®
ymagany
e
S
e
D
zapasowych przez serwer Media
Time Machine™ — w zależności od systemu operacyjnego. Krok ten nie jest
Apple
w
do ukończenia konfiguracji i można go ukończyć w dowolnym momencie w
rzyszłości.
hare za pomocą aplikacji Windows Backup lub
zyskiwanie zdalnego dostępu do serwera MediaShar
1. Przejdź do witryny http://www.myverbatim.com i zaloguj się do swojego serwera
ediaShare.
2. Wprowadź nazwę serwera Media
3. Wprowadź nazwę użytkownika oraz hasło utworzone podczas instalacji.
hare utworzoną podczas konfiguracji serwera.
ontrolki stanu serwera MediaShar
Diody LE

ontrolka stanu Wskazu
je
D
oda
go
i
/
/
/
go
oda
y
Lewa di
rodkowa dioda LED Aktywność portów USB
Prawa di
LED Aktywność dysku twarde
najdujących się z tyłu
rządzenia
LED Aktywność portu eSata
Stan diody LE
Świeci na zielono: Stan
otowośc
iga na niebiesko: Zapis
odczyt z dysku twardego
iga na pomarańczowo:
Trwa wyłączanie systemu.
iga na pomarańczowo:
odczyt z
Zapis
rządzenia USB.
niebiesko: Zapis
z wewnętrznego dysku
twarde
iga na niebiesko: Dostęp
sku twardego eSATA
do d
iga na
odczyt

Введени
е
у
С
e
абе
erne
абель
e
о
д
Русский
Чтобы
становить сервер Verbatim® MediaShare™, следуйте приведенным ниже
нструкциям. Перед началом установки убедитесь, что подключение к Интернету активно.
Сначала проверьте комплект поставки
Перед началом установки проверьте наличие приведенных ниже элементов.
ервер MediaShar
•
• К
ль питания
• Eth
• Установочный компакт-диск MediaShar
• Краткое руководств
t-к
1. Подключение MediaShare к сети
1. Распакуйте сервер MediaShare и обеспечьте вокруг него достаточное пространство
ля вентиляции. Не ставьте на сервер MediaShare другие предметы и не
азмещайте на нем или поблизости емкости с жидкостями.
2. Подключите один конец Ethernet-кабеля, входящего в комплект поставки,
к доступному порту маршрутизатора, а другой — к порту на задней панели
стройства MediaShare. Маршрутизатор должен быть настроен автоматически
ообщать IP-адрес сетевым устройствам.

0
3. Подключите один конец блока питания к источнику питания, а другой — к сервер
у
у
у
омпа
а
у
ера, созда
аро
у
у
у
“
ediaShare.
4. Нажмите кнопк
ервера и поиска им IP-адреса индикатор источника питания мигает зеленым
цветом. После включения
зеленым. Подождите, пока индикатор загорится зеленым, прежде чем перейти к
ледующему шагу.
Power (Питание) на задней панели устройства. Во время запуска
стройства светодиодный индикатор загорается
. Запуск программы установки с установочного
к
кт-диск
помощью программы установки осуществляется настройка сервера MediaShare.
В ходе этой процед
в
Чтобы зап
1. Вставьте
Если компакт-диск не зап
автоматически, перейдите к папке
стить программу установки, выполните приведенные ниже действия.
дисковод компьютера. После этого на
кране компьютера отобразится окно
становки “Добро пожаловать в программу
становки MediaShare”. Подождите,
нициализация программы установки
ожет занять около 2 минут.
ры вы также назначите устройству MediaShare уникальное имя
дите имя пользователя и п
становочный компакт-диск в
ль.
скается
Мой
4

1
компьютер” и дважды щелкните MediaShareSetup.exe, чтобы запустить программ
у
)
(
y
ользовате
аро
у
у
)
тановки.
Примечание. Может появиться сообщение об ошибке, если a
ндикатор не горит зеленым, b) Ethernet-кабели не подключены должным образом
ли c) на компьютере включен брандмауэр.
2. Нажмите Step 1 Setup (Шаг 1. Установка), чтобы начать процедуру установки
ediaShare.
3. Когда отобразится лицензионное соглашение программного обеспечения,
нажмите I Accept
4. В окне регистрации введите Product Ke
Ключ продукта), указанный на небольшой
наклейке на обложке компакт-диска. Затем
выберите имя для сервера MediaShare,
ак называемое MediaShare Name (Имя
ediaShare). Нажмите Next (Далее).
. В появившихся полях укажите имя
п
. Для завершения нажмите Next (Далее) и
7. После завершения шага 1 перейдите к шаг
. Нажмите Step 2 Install Desktop Applications (Шаг 2. Установка приложений для
ля и п
ледуйте подсказкам на экране. В повторно
открывшемся окне
тоять отметка, обозначающая, что этот шаг завершен.
настольных компьютеров
Я принимаю).
ль.
становки рядом с полем Step 1 Setup (Шаг 1. Установка) будет
2.
и следуйте подсказкам на экране.
светодиодный
4

2
. Step 3 Windows/Time Machine Backup Configuration (Optional) (Шаг 3. Настройка
(
у
e
S
ера
(
архивации Windows и Time Machine
используется для настройки устройства MediaShare на запланированное
оздание резервных копий с помощью программ Windows Backup или Apple®
Time Machine™, в зависимости от вашей системы. Этот шаг не обязателен для
завершения
становки и может быть пройден в любое время.
опционально)). Этот шаг опциональный
Удаленный доступ к MediaShar
1. Перейдите на сайт http://www.myverbatim.com и войдите на ваш сервер
ediaShare.
2. Введите Media
в
3. Введите Username
тановки.
hare Name (Имя MediaShare), использованное во время установки
.
Имя пользователя) и Password (Пароль), созданные во время
4

3
Светодиодные индикаторы состояния MediaShar
e
й
состо
е
ора
ор
жесткого
а
:
жесткого
р
ор
(
й
р
диска
ор
:
жесткому
.
ветодиодные индикаторы состояния
Светодиодны
индикатор
евый светодиодный
ндикат
редний светодиодный
ндикат
Правый светодиодный
ндикат
яния
Назначени
Активность
диск
Активность USB-
-ов) на
порта
панели
задне
Активность порта
ata
Состояние светодиодного
индикат
Зеленый свет:
Синее мигание
диска или запись на него.
анжевое мигание: выключение
О
истемы.
анжевое мигание: чтение USB-
О
стройства или запись на него. Синее
игание: чтение внутреннего жесткого
или запись на него.
Синее мигание
диску с помощью порта
ata
тояние готовности.
чтение внутреннего
обращение к
4

Bevezetés
®
g
t
:
erne
ábe
S
y
ó
z
gf
gy
g
j
C
agyar
A Verbatim
me
MediaShare™ kiszolgáló telepítéséhez kövesse az alábbi lépéseket. A telepítés
kezdése előtt győződjön meg arról, hogy rendelkezik-e működő internetkapcsolattal.
lső lépésként ellenőrizze a csomag tartalmá
A telepítés megkezdése előtt ellenőrizze, hogy a csomagban megtalálhatóak-e az alábbiak
• MediaShare kiszolgáló
• Tápkábel
• Eth
• Media
• Üzembe hel
t-k
l
hare telepítő CD
ezési útmutat
1. A MediaShare kiszolgáló csatlakoztatása a hálózatho
1. A MediaShare kiszolgálót a kicsomagolását követően helyezze el úgy, hogy az eszköz
elelő szellőzése biztosított legyen. A MediaShare kiszolgálóra ne helyezzen egyéb
me
akat, és ne tartson folyadékot a környékén.
tár
2. A csoma
ad
3.
44
ban található Ethernet-kábel segítségével csatlakoztassa a MediaShare
séget az útválasztójához. Az útválasztót úgy állítsa be, hogy az automatikusan
on IP-címet a hálózati eszközöknek.
satlakoztassa a hálózati adaptert az áramforráshoz és a MediaShare kiszolgálóhoz.

5
4. Az egység hátoldalán nyomja meg a Power (Be/Ki) gombot. A bekapcsolt állapotot
j
S
:
gj
g
gyj
y
S
j
gf
elző zöld jelzőfény az eszköz indulását és IP-címének lekérését villogással jelzi. A
olyamat befejezése után a LED jelzőfény folyamatosan zölden világít. Mielőtt áttérne a
övetkező lépésre, várja meg, hogy a jelzőfény villogása megszűnjön.
2. A telepítő CD-n található Setup program futtatása
A telepítőprogram futtatásával állíthatja be a MediaShare egységet. Itt adhatja meg a
ediaShare egyedi kiszolgálónevét, és itt állíthatja be a felhasználói nevet és jelszót.
A
etup program futttatása
1. Helyezze a Telepítő CD-t a számítógépébe.
Ekkor me
Welcome to the MediaShare Setup). Várjon,
amí
ejeződik. Ez na
Amenn
em keződik meg automatikusan, a Sajátgép
ablakban kattintson duplán a Media
xe lehetőségre a telepítés elindításához.
egjegyzés: Amennyiben a) a
bekapcsolást
elelően, vagy c) számítógépe tűzfal mögött található, hibaüzenetet kaphat.
me
elenik a telepítő üdvözlő ablaka
a program inicializálása be nem
ából 2 percet vesz igénybe.
iben a CD behelyezésével a telepítés
hareSetup.
elző jelzőfény villog, b az Ethernet-kábelt nem csatlakoztatta
4

6
2. Kattintson a Step 1, Setup (Első lépés: telepítés) lehetőségre a MediaShare
g
f
)
g
j
S
(
f
fej
)
(S
)
/
j
gy
g
g
telepítésének me
3. A szo
4. A re
kívánt
7. Az első lépést
tver licencszerződésének elolvasását követően kattintson az I Accept (Elfogadom
ehetőségre.
isztrációs ablakban adja meg a Product
Key-t (termékkulcsot), amelyet a CD tokjára
agasztott címkén talál meg. Ezt követően
a meg a MediaShare kiszolgálónevét a
ad
következő mezőben: Media
Kattintson a Next
. A megjelenő mezőkben adja meg a beállítani
elhasználói nevet és jelszót.
. Kattintson a Next (Tovább) gombra, majd a
ezéshez kövesse a ablakban megjelenő
be
tasításokat. A telepítőablak ismételt megjelenésekor a Step 1 Setup (Első lépés:
telepítés
.
Kattintson a Step 2 Install Desktop Applications (Második lépés: számítógépes alkalmazások
telepítése
. Step 3, Windows/Time Machine Backup Configuration (Optional) (3. lépés: Windows
Time Machine biztonsági mentés beállítása, választható): ezzel a lehetőséggel
beállíthat
Windows va
re. A telepítés befejezéséhez ezt a lépést nem kötelező végrehajtani, igény esetén
vé
később is elvé
kezdéséhez.
hare Name.
Tovább) gombra.
mellett található jelölőnégyzet jelzi, hogy a lépést már végrehajtotta.
tep 1) követően folytassa a telepítést a második lépéssel (Step 2).
lehetőségre. A telepítéshez kövesse a ablakban megjelenő utasításokat.
a a MediaShare kiszolgálót úgy, hogy előre meghatározott időközönként a
az Apple® Time Machine™ segítségével biztonsági mentést hajtson
ezheti.
4

7
A MediaShare távoli elérés
e
S
g
i
1. Keresse fel a http://www.myverbatim.com oldalt, és jelentkezzen be a MediaShare
iszolgálójára.
2. A Media
3. Adja meg a Your User Name mezőben a telepítéskor választott felhasználói nevet, a
hare name mezőben adja meg a telepítéskor beállított MediaShare nevet.
Your Password mezőben pedi
a telepítéskor válaszott jelszót.
A MediaShare jelzőfénye
elzőfények
4

8
Jelzőfén
y
a
y
űködése
g
j
y
)
ödése
en
y
Jelzett tevékenységJelzőfény állapot
Bal oldali jelzőfén
Középső
4
elzőfén
obb oldali jelzőfén
revlemez
m
átsó USB-port(ok
műk
ATA-port működéseéken villog: Hozzáférés az eSATA
Folyamatosan világít: Üzemkész
állapot.
éken villog: Írás/olvasás
belső merevlemezre
Narancssár
llítás alatt van.
Narancssárgán villog: Írás/olvasás az
B-porton.
belső merevlemez
orthoz kapcsolt merevlemezhez
án villog: A rendszer
éken villog: Írás/olvasás

9
ederlands
C
g
g
:
etsnoe
erne
abe
S
d
g
S
g
Inleiding N
Volg de onderstaande aanwijzingen om uw Verbatim® MediaShare™ Server te
installeren.
internetverbindin
ontroleer voordat u met de installatie begint of u beschikt over een werkende
.
e inhoud van de verpakkin
De volgende items behoren in de verpakking aanwezig te zijn
• MediaShare server
• N
• Eth
• Media
• Snelstartgids
r
t-k
l
hare installatie-c
1. Sluit de MediaShare aan op uw netwerk
1. Pak de MediaShare server uit en plaats deze op een vlakke, stabiele ondergrond. Zor
dat de server voldoende ventilatie heeft. Leg of zet geen voorwerpen op de MediaShare
n plaats geen vloeistoffen op of direct naast het apparaat.
2.
luit het ene uiteinde van de meegeleverde Ethernet-kabel aan op een vrije poort van
w router en het andere uiteinde op de achterkant van de MediaShare. De router moet
zijn geconfigureerd dat deze automatisch een IP-adres genereert voor uw
zodani
etwerkapparaten.
4

3. Steek de netadapter in een stopcontact en sluit de kabel aan op de MediaShare.
/
f
fg
g
ac
:
g
g
g
g
f c)
4. Druk op de aan
LED) knippert terwijl het apparaat wordt opgestart en er een IP-adres wordt verkregen.
Wanneer de opstart
Wacht totdat de LED ona
de vol
uit-knop aan de achterkant van het apparaat. Het groene aan/uit-lampje
ase voltooid is, brandt de LED onafgebroken in de kleur groen.
ebroken in de kleur groen brandt, voordat u verder gaat met
ende stappen.
2. Voer het installatieprogramma op de installatie-cd uit
Voer het installatieprogramma uit om de MediaShare te configureren. Met het installatieprogramma
unt u de MediaShare bovendien een unieke servernaam geven en een gebruikersnaam en
htwoord instellen.
w
voert het installatieprogramma als volgt uit
1. Plaats de installatie-cd in uw computer.
et welkomstscherm wordt weergegeven.
Wacht totdat het installatiepro
itgevoerd. Dit kan circa 2 minuten duren.
Als de cd niet automatisch wordt
aat u naar Deze computer en dubbelklikt
op MediaShareSetup.exe om het
installatiepro
pmerking: Er kan een foutbericht worden weergegeven indien a) het aan/uit-lampje niet
ononderbroken brandt in de kleur
o
ramma uit te voeren.
uw computer zich achter een firewall bevindt.
ramma wordt
estart,
roen, b) de Ethernet-kabels niet goed zijn aangesloten,

2. Klik op Step 1, Setup (Stap 1, Installatie) om te beginnen met de configuratie van de
f
(
O
S
bestemde velde
oltooie
oofdsche
g
)
G
g
/
ediaShare.
3. Wanneer de licentieovereenkomst voor de so
4.
. Typ een gebruikersnaam en wachtwoord in de
. Klik op Next (Volgende) en volg de aanwijzingen
7.
. Klik op Step 2 Install Desktop Applications (Stap 2, Desktoptoepassingen installeren).
. Stap 3, Windows/Time Machine Backup Configuration (Backup-configuratie voor
Akkoord).
Accept
p het registratiescherm voert u uw Product
Key (Productsleutel) in. Deze is afgedrukt op
en klein etiket op de cd-hoes. Typ een naam
voor uw Media
ediaShare-naam. Klik op Next (Volgende).
iervoor
op het scherm om het installatieproces te
n. Wanneer het h
v
installatiepro
Installatie
a verder met stap 2.
de aanwijzingen op het scherm om deze stap te voltooien.
Vol
Windows
ediaShare kunt laten maken met behulp van Windows Backup of Apple® Time
achine™, afhankelijk van het besturingssysteem dat u gebruikt. Deze stap is niet
oodzakelijk om het installatieprogramma te voltooien. U kunt deze stap altijd later nog
itvoeren.
hare. Dit noemen we de
n.
rm van het
ramma weer verschijnt, is het selectievakje naast Step 1, Setup (Stap 1,
ingeschakeld om aan te geven dat deze stap is voltooid.
Time Machine) is een optionele stap waarmee u geplande backups op uw
tware wordt weergegeven, klikt u op I

ediaShare op afstand gebruiken
y
e
s
1. Ga naar http://www.myverbatim.com en meld u aan op uw MediaShare server.
p de MediaShare-naam die u hebt opgegeven tijdens de configuratie van uw server.
2. T
3. Typ de Username (Gebruikersnaam) en het Password (Wachtwoord) dat u tijdens de
onfiguratie hebt ingesteld.
Statuslampjes van de MediaShar
Statuslampje

StatuslampjeBetekenis Status
j
jf
gang
t
dden
jde
jf
t
S
t
e links Activiteit op harde schi
Lamp
Lampje
mi
Lampje rechts Activiteit op eSATA-poor
Activiteit op USB-poort(en)
achterzi
Ononderbroken groen: Harde schijf is
ereed
nipperend blauw: Lees/schrijf-
toe
nipperend oranje: Systeem schakelt ui
nipperend oranje: Lees/schrijf-activiteit op
B-poort
activiteit op interne harde schi
nipperend blauw: Toegang tot harde schijf
op e
tot interne harde schijf
nipperend blauw: Lees/schrijf-
ATA-poor

Inledning
j
f
l
:
ätsladd
abe
S
S
e
k
g
j
g
ess
S
ern
dessa instruktioner för att installera din Verbatim® MediaShare™ Server. Innan du påbörjar
Föl
installationen,
örsäkra dig om att du har en Internetanslutning.
ontrollera först paketets innehål
Innan du påbörjar installationen, kontrollera att paketet innehåller följande
• MediaShare Server
• N
• Ethernetk
• Media
nabbstartsguid
•
l
hare Installations-CD
1. Anslut MediaShare-enheten till ditt nätver
1. Packa upp MediaShare-servern — se till att den har god ventilation. Placera inga föremål
a vätskor nära eller ovanpå enheten.
ovanpå MediaShare-enheten, och placera in
2. Anslut ena änden av den medföl
andra änden till baksidan av MediaShare-enheten. Din router måste vara konfi
tt automatiskt tilldela en IP-adr
3. Anslut nätadaptern till en strömkälla och anslut den andra änden till Media
v
.
4
ande Ethernetkabeln till en ledig port på din router och
till dina nätverksenheter.
venska
urerad
hare-
4. Tryck på Power-knappen på enhetens baksida. Den gröna strömindikatorlampan
y
ö
:
ä
gef
g
) S
g
g
g
ommer att blinka medan enheten startar upp och erhåller en IP-adress. När uppstart
fullbordats kommer lampan att sluta blinka och l
elt grönt innan du fortsätter med nästa steg.
sa helt grönt. Vänta på att lampan lyser
2. Kör Installationsprogrammet på Installations-CD:n
Körning av installationsprogrammet kommer att konfigurera MediaShare. Du kommer också att
e din MediaShare ett unikt servernamn, och skapa ditt eget användarnamn och lösenord.
F
r att köra Installationsprogrammet
1. Sätt i Installations-CD:n i din dator. Skärmen
Welcome to MediaShare Setup” visas.
Välkommen till MediaShare-Installationen”]
nta medan Installationsprogrammet
V
initialiseras — un
Om CD:n inte startar automatiskt,
datorn och dubbelklicka på MediaShareSetup.exe
ör att starta installationsprogrammet.
BS: Ett felmeddelande kan komma att visas
trömindikatorlampan inte är helt grön, b)
om a
Ethernetkablarna inte är ordentli
2. Klicka på Step 1, Setup [Ste
3. När licensavtalet visas, klicka på I Accept [Ja
är 2 minuter.
å till Den här
t anslutna, eller c) din dator är bakom en brandvägg.
1, Installation] för att börja installera MediaShare-enheten.
Accepterar].

4. När Registreringsskärmen visas, skriv in
y
andahå
g
g
f
Steg
j
/
S
f
din Produktn
tiketten på CD-fodralet. Tilldela sen din
ediaShare ett namn, kallat MediaShare
Name [Mediashare-namnet]. Klicka på Next
Nästa].
. Skapa ditt användarnamn och lösenord i de
tillh
. Klicka på Next [Nästa] och följ
anvisnin
När Installationsskärmen visas i
Installation] att vara ibockad
7. När
. Klicka på Step 2 Install Desktop Applications [Steg 2 Installera Skrivbordsapplikationer]
anvisningarna på skärmen för att fullfölja.
Föl
. Step 3, Windows/Time Machine Backup Configuration (Optional) [Steg 3, Windows
Time Machine Konfiguration för Säkerhetskopiering (Tillval)] är tillval för att konfigurera
din Media
ller Apple® Time Machine™ beroende på ditt system. Detta steg är inte nödvändigt för
ullfölja installationen och kan köras när som helst i framtiden.
att
ckel, som du hittar på den lilla
llna fälten.
arna på skärmen för att fullfölja.
en, kommer kryssrutan intill Step 1 Setup [Steg 1
ör att visa att du fullföljt detta steg.
1 fullföljts, fortsätt med Steg 2.
hare för schemalagd säkerhetskopiering med antingen Windows Backup

Fjärråtkomst till MediaShar
e
g
1. Gå till http://www.myverbatim.com och logga in på din MediaShare-server.
e det MediaShare Name [MediaShare-namn] du valde när du installerade din
2. An
ver.
3. Ange det Användarnamn och Lösenord du skapade under Installationen.
ediaShare Statuslampor
Statuslampor

Statuslam
pa
e
ä
et
edo-status
:
ge:
n
A
)
:
sk
t
Syft
ampstatus
nster lampa
V
ittlampa
er lampa
rddiskaktivit
ktivitet i bakre
B-port(ar
ata-portaktivitetBlinkar blått: Access till hårddisk via eSata-
Helt grön: R
Blinkar blått
rddisk
Blinkar oran
Blinkar orange: Läs-/skrivaktivitet hos USB.
Blinkar blått
rddi
or
.
Läs-/skrivaccess till intern
Systemet stängs av.
Läs-/skrivaktivitet hos intern

Вступ Укра
ї
у
:
S
у
і
у
у
у
у
ї
об встановити сервер Verbatim® MediaShare™, дотримуйтесь цих інструкцій. Перш ніж
озпочати інсталяцію, перевірте наявність підключення до Інтернету.
нською
Спочатку перевірте вміст комплект
Перш ніж розпочати інсталяцію, перевірте наявність таких елементів
• сервер MediaShare;
• кабель живлення;
• Ethernet-кабель;
• інсталяційний диск Media
• короткий посібник корист
hare;
вача
1. Підключення MediaShare до мереж
1. Розпакуйте сервер MediaShare та розташуйте його так, щоб забезпечити достатню
вентиляцію. Не кладіть на сервер інші предмети та не ставте поблиз
дини з рідиною.
пос
2. Підключіть один кінець кабелю Ethernet до вільного порт
інший - до рознім
ти на автоматичне призначення IP-адрес мережевим пристроям.
настро
на задній стороні модуля MediaShare. Маршрутизатор потрібно
або на нього
маршрутизатора, а

3. Підключіть один кінець блока живлення до джерела живлення, а інший з’єднайте
S
у
уру
у
о
а
у
ористувача та паро
у
S
ї
із сервером Media
4. Натисніть кнопк
завантаження та отримання IP-адреси на блоці сервера блиматиме зелений
індикатор живлення. Щойно процед
засвітиться безперервним зеленим світлом. Зачекайте, поки світлодіод засвітиться
безперервним зеленим світлом, перш ніж перейти до наст
hare.
Power (Ввімкнути) на задній панелі пристрою. Під час
ввімкнення буде завершено, індикатор
пних кроків.
. Запуск програми інсталяції з інсталяційног
компакт-диск
Під час запуску програми інсталяції відбувається налаштування сервера MediaShare.
Також ви призначаєте
к
Чтобы зап
1. Вставте інсталяційний
стить программу установки, выполните приведенные ниже действия.
компакт-диск у комп’ютер. На
крані з’явиться вікно майстра
інсталяції «Welcome to Media
etup» («Вітаємо у програмі інсталяції
ediaShare)». Зачекайте завершення
ініціалізаці
риває приблизно 2 хвилини.
нікальне ім’я сервера MediaShare, а також створюєте власне ім’я
ль.
hare
програми інсталяції. Вона

кщо компакт-диск не запускається автоматично, перейдіть до папки «M
y
у
)
у
у
’
у
)
укту
д
(
ористувача та паро
у
у
)
З
д
omputer» («Мій комп’ютер») і запустіть програму інсталяції, двічі клацнувши файл
ediaShareSetup.exe.
Примітка. Може з’явитися повідомлення про помилк
вітиться безперервним зеленим світлом; б) Ehternet-кабель не підключено належним
чином або в
2. Виберіть п
3. Коли на екрані з
4. Коли на екрані з’явиться вікно реєстрації,
. У відповідних полях вкажіть ім’я
к
. Натисніть «Next» («Далі») і дотримуйтесь
7.
. Виберіть пункт «Step 2 Install Desktop Applications» («Крок 2. Інсталяція програм
комп’ютер розташований поза брандмауером.
нкт «Step 1 Setup» («Крок 1. Інсталяція»), щоб розпочати процедур
інсталяції сервера MediaShare.
явиться ліцензійна угода про використання програмного
забезпечення, виберіть п
введіть ключ прод
аленькій наклейці на обкладинці компакт-
иска. Потім призначте ім’я сервера
ediaShare (MediaShare Name). Натисніть
«Далі»).
«Next»
ль.
кцій на екрані. Коли на екрані знову
інстр
з’явиться вікно інсталяції, пор
Інсталяція»
авершивши перший етап інсталяції, перейдіть до другого кроку (Step 2).
ля настільних комп’ютерів») і дотримуйтесь інструкцій на екрані.
стоятиме прапорець. Це означає, що цей етап завершено.
нкт «I Accept» («Приймаю»
, зазначений на
ч із пунктом кроком «Step 1 Setup» («Крок 1.
, якщо: а) індикатор живлення не

. «Step 3, Wndows/Time Machine Backup Configuration» («Крок 3. Налаштування
S
у
у
e
бу
’
езервного копіювання Windows Backup/Time Machine») – це додаткова процедура
настроювання резервного копіювання для сервера Media
тиліти Windows Backup (Архівація Windows) або Apple® Time Machine™, залежно
від системи. Ця процед
здійснити б
дь-коли.
ра не обов’язкова для завершення інсталяції, і її можна
hare за допомогою
Віддалений доступ до MediaShar
1. Перейдіть на веб-сайт http://myverbatim.com та увійдіть на свій сервер
ediaShare.
2. Введіть ім’я сервера MediaShare, яке
3. Введіть ім
я користувача та пароль, створені під час інсталяції.
ло призначено під час інсталяції.
Світлодіодні індикатори стану MediaShar
e
у
а
жорсткого
а
отовнос
осту
орсткого
р
о
ане
р
USB.
у
у
у
жорсткого
а
вітлодіоди стан
Індикатор стану
івий світлодіод Активність
ередній світлодіод Активність USB
Правий світлодіод Активність порт
изначення Стан світлодіод
портів на задній
лі
п
ata
диск
езперервний зелений:
ті.
г
Синій, блимає: д
диска для читання/записування
анжевий, блимає: живлення
О
истеми вимкнут
анжевий, блимає: читання/запис
О
на
Синій, блимає: читання/запис на
трішній жорсткий диск.
вн
Синій, блимає: дост
диск
тан
п до ж
п до порту eSata

m
m
e
m
m
a
m
m
m
a
m
m
6
o
m
6
g
m
m
6
ja
m
6
a
m
6
o
m
6
m
6
ye
m
6
m
m
6
m
6
m
6
a
m
6
ja
m
6
m
m
m
m
m
6
m
6
Technical Support
Country Email Hotline Number
nited Kingdo
Franc
eutschland drivesupport@verbatim-europe.co
Itali
spaña drivesupport@verbatim-europe.co
ortugal drivesupport@verbatim-europe.co
olsk
оссия drivesupport@verbatim-europe.co
Česk
agyarorszá
esti drivesupport@verbatim-europe.co
atvi
ietuv
Slovensk
Slovenija drivesupport@verbatim-europe.co
rki
Nederland drivesupport@verbatim-europe.co
λλάδα drivesupport@verbatim-europe.co
România drivesupport@verbatim-europe.co
ългария drivesupport@verbatim-europe.co
Hrvatsk
Srbi
Suomi drivesupport@verbatim-europe.co
Sverige drivesupport@verbatim-europe.co
anmark drivesupport@verbatim-europe.co
Norge drivesupport@verbatim-europe.co
ﺪﺤﺘﻤﻟﺍ ﺔﻴﺑﺮﻌﻟﺍ ﺕﺍﺭﺎﻣﻹﺍ drivesupport@verbatim-europe.co
Україна drivesupport@verbatim-europe.co
For any further suppor t please visit www.verbatim-europe.com/support
4
drivesupport@verbatim-europe.co
drivesupport@verbatim-europe.co
drivesupport@verbatim-europe.co
drivesupport@verbatim-europe.co
drivesupport@verbatim-europe.co
drivesupport@verbatim-europe.co
drivesupport@verbatim-europe.co
drivesupport@verbatim-europe.co
drivesupport@verbatim-europe.co
drivesupport@verbatim-europe.co
drivesupport@verbatim-europe.co
drivesupport@verbatim-europe.co
0 800 3883 2222
0 800 3883 2222
0 800 3883 2222
0 800 3883 2222
0 800 3883 2222
0 800 3883 2222
0 800 3883 2222
+353 61 22658
+353 61 22658
0 800 3883 2222
+353 61 22658
+353 61 22658
+353 61 22658
+353 61 22658
+353 61 22658
+353 61 22658
0 800 3883 2222
+353 61 22658
+353 61 22658
+353 61 22658
+353 61 22658
+353 61 22658
0 800 3883 2222
0 800 3883 2222
0 800 3883 2222
0 800 3883 2222
+353 61 22658
+353 61 22658
 Loading...