

Page 1
External Hard Drive NAS
User Guide
English
1
Page 2

6
l
7
0
0
2
3
5
g
7
S
7
8
0
ontents
Introduction
Controls, Connectors and Indicators 6
Front Pane
Rear Panel Area
About the Hard Disk 8
Locating NAS Drive on Your Desk 8
Which Interface: USB or Ethernet? 8
Connecting NAS drive Using USB 1
Storing and Transferring Data via USB 1
Disconnecting NAS drive from a PC or Mac Host 11
Connecting NAS Drive Using Ethernet 1
About NAS Drive User Accounts 12
Connecting the NAS Drive to Your LAN 1
Web-Based Administration Tool 1
Administration Login 16
Basic Settin
et Language, Password, Hostname, IP Address, and Time 1
Add New User Account 1
Add New Group 2
Add New Shared Folder 21
Area 6
s for Initial Setup 1
2
Page 3

NAS Drive Operation Using Ethernet 2
2
3
k
ghborhood
y Comp
2
fi
4
4
9
G
30
S
3
S S
32
S
33
3
Sharing fi les using Windows 2
Run Dialogue 23
Browse Networ
Search Dialogue 24
Browse M
Sharing
Attaching USB Devices 2
Attaching a Printer 25
Attaching a USB Storage Device 26
les using Mac OS X 2
Nei
uter
23
NAS Administration Reference 27
Users and Groups 2
User Management 29
roup Management
File and Print 31
File
FTP Server Setting 31
NF
Guest Access Setting 32
Share Management 32
Printer
System 3
Network Settings 33
Time Settings 34
erver
indows Setting 31
erver Setting
erver
4
1
3
Page 4

Turn Off Server 34
f
g
heck
fi
p-Up
k
5
36
3
36
7
7
S
37
7
38
8
8
8
9
CP S
39
ormation 34
In
Disk Usa
Error Notifi cation 35
Monitoring Services 35
C
E-mail Noti
Po
Networ
DHCP Server
Bonjour
Maintenance
Disk Utility 3
ormat 3
can
Unmount 3
Detail
Firmware Upgrade 3
Save Confi guration 3
Restore Confi guration 3
Factory Reset 39
Log File 3
Samba Log 39
FTP Log 39
DH
e 34
Interval 35
cation 35
Notifi cation 35
Service 3
6
erver Log
4
Page 5

Sy
39
f
0
0
2
2
3
3
4
stem Log
Administration Log 40
Account In
Logout 4
ormation 4
Te chnical Support 41
Limited Warranty Terms 41
Rights 4
FCC Compliance 4
WEEE Notice 4
CE Declaration 4
ROHS Compliance 4
5
Page 6
Introductio
n
y
p
s.
the u
.
ea
ff.
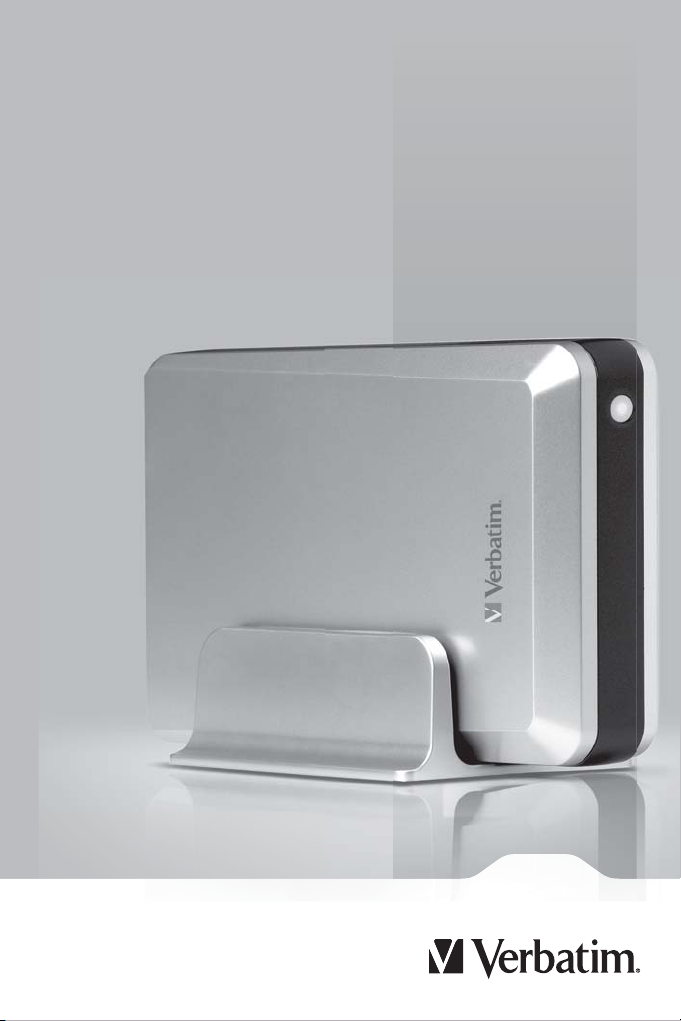
Your Verbatim Network Attached Storage (NAS) drive is a versatile external
ard drive featuring high-performance storage and a choice of either
igh-speed USB 2.0 or Ethernet interface. Once your drive is connected
properly to your network or computer, you will be able to use it as you
would an
nction
efore you begin to use the NAS drive there are a few important things to
earn about your new product.
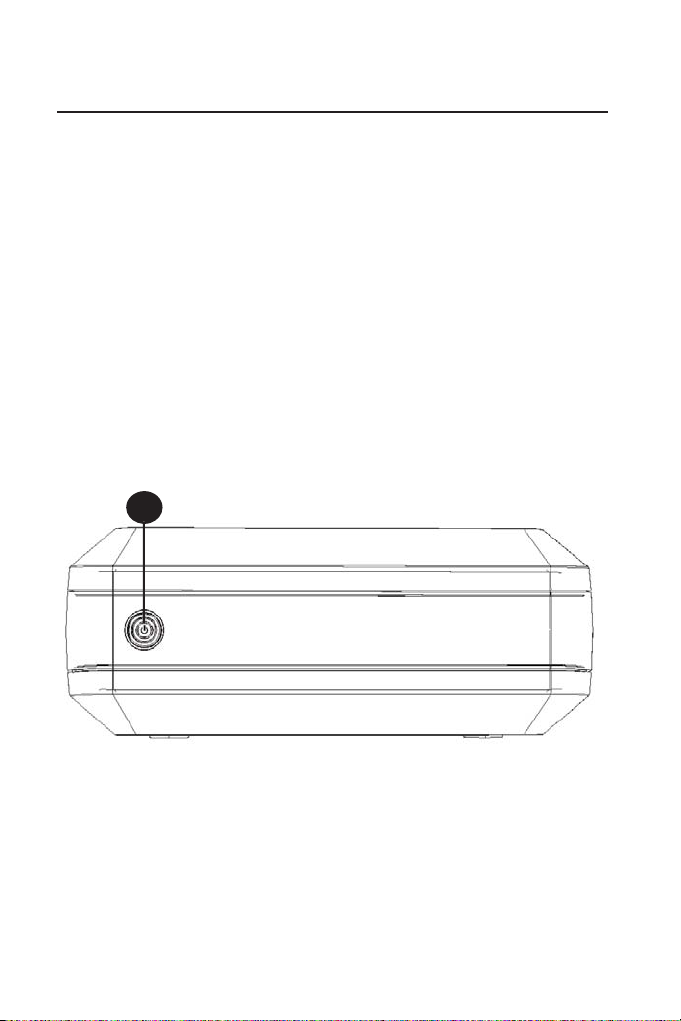
ontrols, Connectors and Indicators
irst familiarize yourself with the control keys and the various connectors on
Front Panel Ar
he front panel contains only the ON/OFF Button, as illustrated below.
hard drive for storing your data and for performing data back-u
nit
1
ON/OFF Button. Once the AC Adapter has been properly
connected to the NAS drive and an AC outlet, you can press the
ON/OFF button to power on the drive. The button’s green LED will
come on to indicate the power-on state. To turn off the drive, press
the ON/OFF button again. The LED will fl ash for about 15 seconds
hile the drive’s internal software shuts down in an orderlyashion.
The LED will then turn off to indicate that the drive is now fully
turned o
6
Page 7
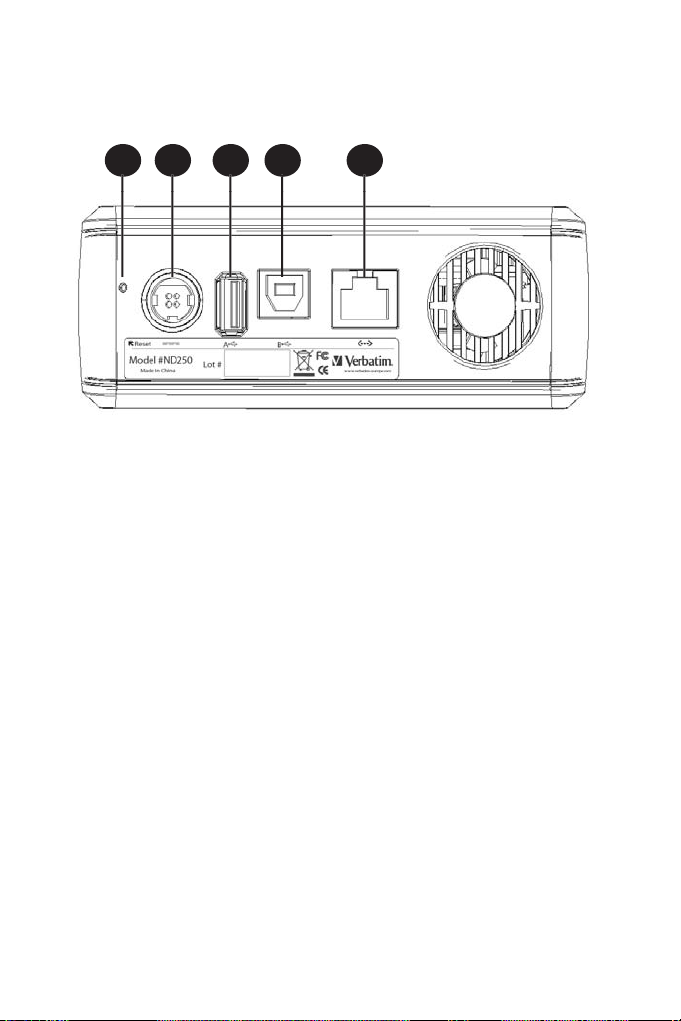
ear Panel Area
f
ual.
ual.
long the rear panel you will fi nd the interface connectors and a recessed
micro-switch that is used for reset functions. Refer to the fi gure below.
1 2 3 4 5
Reset Button. If the NAS drive is having a problem connecting1.
to the local area network (LAN) or appears to be hung, press the
Reset button momentarily with the end of a paper clip. This will
cause the unit to reset, similar to rebooting your PC. If the problem
ersists, or if you are unsure of current settings (such as forgetting
our administration password), press and hold in the Reset button
or 5 seconds. This will restore the factory default settings.
DC Input Connector. Connect the DC cable o
Adapter to the DC Input Connector.
SB-A Connector. Use this connector for attaching a USB printer,3.
SB fl ash disk, or other USB storage device.
B-B Connector. Use this connector to attach the NAS drive to 4.
our computer via USB. Refer to “Which Interface: USB or Ethernet”
ter in this man
Ethernet Connector. If you plan to use the Ethernet interface
to connect to a LAN, then use this connector to attach to your
network equipment. Refer to “Which Interface: USB or Ethernet”
ter in this man
your included AC
7
Page 8
A
bou
the prod
y
.
k
t
?
to both
T
t
.
t the Hard Disk
he NAS drive internal hard disk comes pre-formatted in three partitions.
he largest partition is pre-formatted in the FAT32 format and is available
or your data storage through either a USB or Ethernet connection. The
ther two partitions are in Linux EXT2 format and are used by the NAS
rive’s internal software for supporting the various networking features of
uct.
ote: Capacity dependent on model. Your operating system ma
eport capacity as fewer gigabytes. 1 GB = 1,000,000,000 bytes.
Your product’s hard drive is a complex electronic storage system and
ould be handled with care, as you might treat a sensitive portable
omputer or other state-of-the-art consumer electronics product. Do not
ubject it to shock, high temperatures, or strong magnetic fi elds
o extend the useful life of your NAS drive,
urn the unit OFF when not in use.
ocating NAS Drive on Your Des
lace the NAS drive on a sturdy desk or table that is free from clutter
hat could block airfl ow around the unit. The drive is designed to lie fl at
n its rubber feet, or may stand upright using the included stand. In
ither orientation take care not to block any air vents. If using the upright
rientation, install so that the ON/OFF button is at the top.
Which Interface:
USB or Ethernet
n order to install and use your NAS drive, you need to decide which
nterface is better for you. With the fl exibility of the NAS drive, you can
always change the interface you want to use later, depending on your
application or computer environment. However, never attempt to connect
USB-B and Ethernet at the same time.
Caution: Do not connect to both USB-B and
thernet connections at the same time
8
Page 9

If you do not have LAN setup, or you primarily want to provide additional
f
p
d
.
p
section e
led
storage to a single computer, then you should consider USB as your
interface choice. Please refer to the next section to learn how to install and
use your NAS drive using USB.
your PC is connected to a LAN over Ethernet (either wired or wireless),
I
and you primarily want to provide shared storage amongst two or more
uters on the LAN, then you should consider Ethernet as your interface
com
choice. The fi gure below provides one example of a LAN confi guration.
As a cautionary note, please be aware that data stored through an Ethernet
connection is stored in the same FAT32 partition that is accessible through
a USB-B connection. This is very convenient if you want to temporarily move
our network drive to another PC that is not connected to the LAN an
ou still want to read data stored on the drive. Since most computers have
a USB port available, you can connect your drive using USB-B and have
access to your previously stored data
On the other hand, if you have private information that you have stored
using the password protection features within the NAS environment, you
may want to take special precautions to protect this data from view during
B-B connection.
For details about user
to the
learn how to install and operate your NAS drive using Ethernet.
asswords and other network features, please jump
ntit
onnecting NAS drive Using Ethernet to
9
Page 10
onnecting NAS drive
B
p
w
.
.
.
lly
f
ply cl
sing US
Connecting your NAS drive to a USB host, such as a PC or Mac, is extremely
sim
le. Follow the steps below.
Note: If your computer is running Windows 98 Second Edition, you
ill need some additional software that you can download from the
Verbatim web site. Refer to the Getting Help section
Connect the included AC Adapter to the NAS drive, and then to a
all outlet using the included power cord.
Next press the ON/OFF button on the front of the NAS drive.2
Finally, connect the included USB cable from the USB-B port on 3
the NAS drive to an available USB port on your computer.
The NAS drive will mount automatica
appear in
the desktop (Mac).
you are using a USB 1.1 port on your Windows computer, the
Note: I
following cautionary note may appear on your display: Hi-Speed USB
Device plugged into non-Hi-Speed USB hub. This does not indicate a
roblem because the NAS drive is compatible with both USB 1.1 and
USB 2.0 ports. Sim
case the NAS drive will operate only at USB 1.1 speeds.
y Computer (Windows) or a new icon will appear on
ose the message and proceed. However, in this
, and a new icon will
Storing and Transferring Data via USB
Once your drive is connected to a computer via USB-B, it can be accessed
and used like any other removable disk. You can drag fi les to your unit’s
icon to copy them, navigate to your unit in Open or
delete fi les stored on your unit. For information on copying, opening, or
deleting fi les, consult your computer’s documentation.
10
ave dialog boxes, or
Page 11
isconnecting NAS drive from a PC or Mac Host
-
g
ff.
f
oss of d
.
:
y
.
.
l
.
.
.
f
fi
.
ppl
.
.
.
While connected using the USB-B interface, your NAS drive is hot
swappable. It can be connected and disconnected without restarting your
computer. To disconnect your drive at any time, perform the followin
steps. You can also disconnect your hard drive at any time while your
computer is powered o
Note: Please be careful to follow the correct procedure when
disconnecting your unit. Simply unplugging the unit without fi rst
ollowing the instructions below may result in damage to your unit and/
r l
For Windows Users
For Mac OS Users:
ata
If you have fi les located on your NAS drive open in an
applications, close them
Click the
Unp
Select your NAS drive from the menu that appears
After a moment, Windows will display a message that your
hardware can be safely removed
I
you have
a
ications, close them
Locate the icon for your NAS drive on the desktop, and drag it to 2
the trash
ug or Eject Hardware button in the System Tray
les located on your NAS drive open in any 1
1
11
Page 12

onnecting NAS Drive Using
p
f
A
des
y
ccounts
.
e
associated user accou
e
.
dminad
n
e
e
thernet
Installing the NAS drive using Ethernet requires that you have an available
Ethernet
Before attempting to establish a connection to the network it would be
use
rive handles data over the network. Basic to this understanding are the
undamental concepts of user accounts and shared folders.
bout NAS Drive User Accounts
The NAS drive keeps track of data stored by its network users by managing
the data’s
simply a “hare). Furthermore, the NAS drive must keep track of who ma
read from, and write to, each folder. It does this by setting up
nd
assign access privileges to a new share you have the option of either
making assignments for individual user accounts, or for an entire group of
users at once by referring to the group’s name
The default factory settings provide for two pre-defi ned user accounts, each
ith their own unique properties. These user accounts are:
Each of these two user accounts has an associated pre-defi ned folder.
The name of the folder is the same as its
name “guest-share” also happens to be pre-defi ned as a group name.
Additionally, there is a pre-defi ned folder called “public” that initially is not
associated with any user account. These properties are summarized in the
table below
ort on a router or switch.
ul fi rst to review some background information about how the NAS
tination folder (also referred to herein as a “shared folder” or
r a
roups A group is a collection of specifi c user accounts. When you
min
guest-shar
nt. Th
Pre-defi ned Name Group User Account Folder (Share)
ublic
a
uest-shar
@guest-share
min
uest-shar
ublic
mi
uest-share
12
Page 13

Here are other initial properties of these pre-defi ned groups, accounts, and
he g
y
.
.
.
y
e.
h
.
res:
roup @guest-share contains two members, which are user
T
admin” and user “guest-share”.
user “admin” can access the share “public”
Onl
The folder “guest-share” is a private folder for user “guest-share”.
This means only user “guest-share” can access this folder
The folder “admin” is a private folder for user “admin”. This means
only user “admin” can access this folder
By using the web-based administration tool, you can modify these initial
roperties.
Before can
guest-share”), you must use the web-based administration tool to setup a
new user account that defi nes your User Name and Password. Furthermore,
ou have the option to defi ne other properties for your user account. For
example, each user can optionally be given their own private folder, which
is automatically assigned the same name as that user’s User Name. A user
can also be given read-only-privileges, or read/write-privileges, to other
lders on the driv
ou can begin storing data (other than as user “admin” or as user
Connecting the NAS Drive to Your LAN
Now that you have some understanding of user accounts, you are ready
to connect your NAS drive to the LAN. Refer to the illustration below and
follow these steps.
Ensure t
is operating properly.
We recommended that you follow the directions of your LAN
equipment to enable a Dynamic Host Confi guration Protocol
(DHCP) server. This may be referenced in your equipment’s
documentation as “Assign IP addresses automatically”.
Since you will administer the NAS drive settings using a web
browser on your PC or Mac, ensure that this PC or Mac is powered
at your LAN equipment is powered on and that the LAN1
n and connected to the LAN.
13
Page 14
Connect the included Ethernet cable from the Ethernet port
.
.
b.
on the NAS drive to an Ethernet switch (100 Base-T), a wired or
ireless router, or a wireless access point.
Connect the included AC Adapter to the NAS drive, and then to a 5
all outlet.
Press the ON/OFF button on the front of the NAS drive. The
reen LED will come on to indicate that the unit is now powered
n.
Wait for the NAS drive to boot up and to auto-confi gure its7.
connection on the network. Depending on your particular LAN
confi guration and settings, this may take several minutes. The
following protocols will be followed during auto-confi guration:
DHCP client is enabled by default. So your router or a
other LAN equipment that is providing the DHCP
service will automatically assign an IP address to the
NAS drive and complete the network connection.
If no DHCP server is available on your isolated network,
then the auto-negotiation process will proceed in one
of two ways, depending on whether Bonjour protocol
is enabled or disabled. Bonjour protocol is built-in to
recent Mac OS X systems, and can also be optionally
installed on Windows systems.
Apple Bonjour protocol is enabled by
default. So if you are connecting to an
solated Bonjour-enabled network and
o DHCP server is present, your NAS
14
Page 15

drive will negotiate an address within the
.
e
c
sectio
sed Ad
ool
Bonjour range of
to determine the specifi c address within
this range, you can use the network “ping”
function to “ping sohonas” or “ping sohonas.
local”.
If the NAS drive has been previously accessed
i.
n order to disable Bonjour and you are now
connecting to a network with no DHCP server
resent, then a different auto-negotiation
takes place. In this case the NAS drive will
automatically launch its internal DHCP server.
This will result in the NAS drive taking the
default IP address of 192.168.1.1 and
ill also assign addresses (in the range of
92.168.1.2-50) to other DHCP clients on the
etwork .
After successfully connecting to your network you will be 8
able to see the NAS drive on your network. Its default name is
Sohonas” and it will be located in the network workgroup named
Workgroup”. In Windows go to My Network Places / Entire
Network / Microsoft Windows Network / Workgroup, or in Mac
OS X go to Finder / Network / Workgroup. You can open the
device to see the following default folders:
admin
uest-shar
ubli
Though you are now ready to begin storing data on your drive, at this point
ou have only the two default user accounts set up. To set up other user
accounts, and to confi gure other basic system settings, you are urged to
continue setup using the web-based administration tool described in the
next
n.
69.254.x.x
If you want
-Ba
The web-based administration tool is used to modify all internal settings of
our NAS drive. It is accessed using your computer’s web browser (such as
Internet Explorer or Netscape). To access the administration tool, your PC or
Mac should be on the same subnet as the NAS drive.
ministration T
15
Page 16

A
dministration Logi
n
-
.
o
address.
In most cases you need only to enter the default hostname (i.e., “//sohonas”
or Windows, or “//sohonas.local” for Bonjour) in your browser’s address
indow to access the administration tool. If for some reason the default
ostname was not assigned to the NAS drive’s IP address during auto
confi guration, then you can alternatively enter the NAS drive’s IP address
into the browser’s address window
As described previously, your router or other network equipment will
have assigned the IP address automatically, or the drive will have taken
one of its default addresses (either a Bonjour address
the non-Bonjour address 192.168.1.1) If your router assigns addresses
automatically your router’s manual will describe how to determine your
rive’s IP
After your browser retrieves the initial web page from the NAS drive, the
browser window will present the following login screen:
r
From this screen you must enter the following default Username and
Password:
sername: admin
Password: admin
16
Page 17

asic Settings for Initial Setu
p
eference”.
.
S
.
.
t
t
ue.
.
Now, from within the administration tool perform the following steps
to defi ne the basic settings. For more advanced features note that a full
description of all settings is provided later under “NAS Administration
R
lick on1
et Language, Password, Hostname, IP Address, and Time
A special setup wizard will lead you through the confi gurations
for user interface language, administrator password, hostname, IP
address, and time.
elect2
Select your language preference from the pull-down menu. The 3
selection “set from browser options” will automatically set the
administrator language to the current browser language setting.
If the browser language is not supported in the administrator,
the default language of English will be enabled. Press
The next screen allows you to defi ne a new password for the user
admin”. If you want to keep the current password, simply press
uick Setup to expand the selection group.
Wizard
ntin
xtto advance to the next screen
x
o
17
Page 18

The next screen allows you to defi ne a new Hostname for the NAS5
.
.
.
.
ess
t
.
A
t
p
/
r
b
drive. If you want to keep the current Hostname, simply press
Nextto advance to the next screen
The next screen allows you to select between automatic and static
addresses for the NAS drive’s IP Address and Domain Name
System (DNS) address. It is recommended that your network
equipment be enabled to provide DHCP service, and that both
settings on this screen remain at the factory settings
Alternatively, if your network requires that you defi ne static
addresses, then you may enter them in the form provided
Pr
Nextto continue.
The next screen allows you to manually set the date and time, or 7.
to use an available Network Time Protocol (NTP) server. It is useful
to set the correct date and time because time stamps are used
in the various status logs that are described later in this manual.
After fi lling in your selections, press
The settings made in the previous steps are summarized on8
this screen for your review. You may either go back to edit your
settings, or press
dd New User Accoun
Next setup a user account by selecting the
. Quick Setu
se
utton.
omplete to save the settings as shown.
ex
Add
18
Page 19

Fill in the initial screen with a User Name and Password. It is
h
y
lly
.
dual user accounts to a ma
.
.
recommended that these fi elds match the User Name and
Password that this user normally enters when logging into
Windows or to Mac OS X. The User Name must be lower-case
and may be a maximum of 20 alphanumeric characters, without
spaces. T
e User Name must begin with an alphabetic character.
Note: If
or begins with a number, you may want to modify your Windows
NAS drive. For Mac OS X user accounts, your username is automatica
saved without spaces as a fi eld called “Short Name”. In this way the
“Short Name” already follows the format required by the NAS drive
our Windows username currently contains a space character,
sername slightly so that it can follow the same format required by the
Also fi ll in the password. The password may be a maximum of
6 alphanumeric characters, without spaces. If you leave the
assword fi eld blank, the NAS drive will accept this as a null
assword. This means that you will not need to fi ll in any password
in the future when accessing the NAS drive using this username.
A description of this user may optionally be entered in the fi eld
rovided.
If you want to create a private folder that only this network user
can access, then check the box marked “Create Private Folder”.
This folder cannot be accessed via the “admin” user account
or any other user account. The folder name will automatically
be given the same name as User Name. The path of your newly
created private folder will automatically be set to /mnt/IDE1.
Though in some environments the NAS drive supports a quota
ture that limits indivi
of storage space on the drive, this feature is grayed-out and is
not selectable in the factory default condition. This is because
the default disk format type FAT32 does not support the quota
unction. If user account disk quotas are important to you, then
ou should consider reformatting the drive to EXT2 or EXT3
ormat, as described later in section “NAS Administration
Reference”
When done with this form, press
xt to continue
ximum amount
19
Page 20

The next screen allows you to assign this user to an existin
g
.
access to new user accounts
Add
p
.
p
10.
roup. As described above, the initial factory setting provides for
the default group named “@guest-share”. When done with this
form, press
The fi nal screen for adding a user allows you to assign access 11.
rivileges to currently defi ned shares. Of course, if you checked
Create Private Folder” in step (9), then read/write access has
automatically been provided to this user’s private folder.
Though the initial factory setting provides for three default shares
(admin, guest-share, and public), only “public” is available for
lection for
When done with this form, press
New Grou
Next you may optionally setup a new group. If you do not want to12.
set up a group at this time, you may jump ahead to Step 15
Begin group setup by selecting the Quick Setup/ Add Grou
button.
xt to continue
.
omplete
Fill in the initial screen with your group’s name. The group name
must be lower-case and may be a maximum of 20 alphanumeric
characters, without spaces. The group name must begin with an
alphabetic character. Press
xtto continue.
20
Page 21

The next screen allows you to assign any of the current users13.
o
.
Add
r
.
p
/ A
.
to your new group. When done with this form, press
continue
The next screen allows you to assign share access privileges for 14.
the new group. Each of the existing shares may be setup for no
access, read-only access, or full read/write access. When done
ith this form, press
New Shared Folde
The fi nal procedure for Quick Setup allows you to optionally 15.
setup a new share. If you do not want to set up a share at this
time, you may exit the administrator as described in Step 18
Begin share setup by selecting the Quick Setu
button
omplete
ext t
dd Share
Fill in the initial screen with a name for your new share. The
share name must be lower-case and may be a maximum of 20
alphanumeric characters, without spaces. The share name must
begin with an alphabetic character. After entering the name,
the path for the new share will automatically be displayed. A
description of this share may optionally be entered in the fi eld
rovided. When done with this form, press
The next two screens allow you to assign access privileges for the16.
xtto continue.
21
Page 22

new share. Access is defi ned separately for Server Message Block
Y
y
e.
lly
Y
d
.
g
access
ffere
subne
o:
(SMB) / Common Internet File System (CIFS) access than it is for
Network File System (NFS) access. Use the fi rst of the two screens,
titled “Windows, FTP Access” to assign access under SMB/CIFS.
ou can assign read-write access for all users and groups b
checking the box marked “Allow for all”. Alternatively, you can
assign no access, read-only access, or read-write access privileges
individually for each user and group. Note that group names in
the list provided are denoted with the “@” character as the fi rst
haracter in the nam
When done with this form, press Next to continue with
assignment of NFS access privileges.
The next screen is for NFS access. It will be of interest primarily if 17.
ou plan to operate Linux machines on your LAN and want to use
NFS protocol for fi le sharing. To enable NFS access to this share
from all users, you can check the box marked “Allow for all”. If this
ox is not checked then you may individua
rom specifi c IP addresses, or from specifi c subnets. When done
ith this form, press
ou have now completed the Basic setup. You may either return 18.
to Step 9 to add additional user accounts, groups or shares,
continue to set more advanced features as described under
NAS Administration Reference”, or press
administration tool and begin using the NAS drive to store an
share your data
omplete
assign NFS access
ogoutto leave the
AS Drive Operation Usin
thernet
Once the NAS drive is connected to your network and has been confi gured
or your network environment, it can be accessed from any computer within
the same subnet on your LAN. Furthermore, more advanced users may
choose to confi gure name servers (such as WIN servers or DNS servers) in
rder to
the drive from a di
22
nt
t. You will be able t
Page 23

Drag and drop fi les to NAS drive
s
s
a
.
n
t
butto
.
d
ghborhood
Copy and paste data to NAS drive
Make and delete folder
Share fi les and folder
Back-up your dat
How you access the drive will depend on your computer’s operating system.
A brief overview for accessing fi les for both Windows and Mac OS X is
rovided next. You should consult your computer’s documentation for more
detailed explanations of fi le sharing using your specifi c operating system.
Sharing fi les using Windows
The NAS drive supports Microsoft Common Internet File System (CIFS), also
nown as Server Message Block (SMB) protocol. Any PC running Windows
8, Windows Me, Windows 2000, and Windows XP can access shared
les on the NAS drive. Once you can view the folder in My Computer or in
Windows Explorer, you can drag and drop fi les to this folder like you can
ith any folder
There are several alternative ways to view the NAS shared folders in
Windows. For example, you ca
se the
undialogue box accessed through the
the system tray.
Browse through the
se the
earch dialogue box accessed through the
r File Browser.
Look through devices in
etwork Neighborhood
Computer.
tar
tart button
n in
un Dialogue
To fi nd the NAS drive using this method select
select
OK You may alternatively enter “\\” followed by the NAS drive’s IP address
and then press
. In the
en: fi eld provided enter “\\sohona
tart in the system tray and
” and then press
rowse Network Neighborhoo
Open the File Browser and double-click on Network Nei
My Network Places. Browse toWorkgroup to fi nd the NAS drive shared
olders.
23
or
Page 24

earch Dialogue
Workg
.
sh
X
.
.
A
s
Y
.
Select
tart in the system tray and select
to search for Computers For the computer name to search for enter
sohonas” and then press Search Now to fi nd the connected NAS drive.
Double-click the NAS drive entry to connect and view its shared folders.
earch. Use the Search dialogue
rowse My Computer
en
Computer and double-click on
roupto fi nd the NAS drive share folders
Once you have located the attached NAS drive’s shared folders, you can
map a drive letter to a folder. To do this, right-click on the folder and select
map network drive”. Fill out the dialogue box that Windows presents and
then select
ini
Network Places
Browse to
haring fi les using Mac OS
A Mac running Mac OS X can access a connected NAS drive. Click on
Network, open the folder “Workgroup” and locate the “sohonas” device.
Double-click “sohonas” to open the connection dialogue box
When prompted to “Select SMB/CIFS shared volume you want to connect
to” use the pull-down menu to select one of the current shares. You will next
be prompted to authenticate by entering your username and password.
For “username” use the Mac OS “Short Name” that you used to create your
account on the NAS drive.
After completing authentication your shared folder will appear on your
desktop. You can now drag and drop fi les to this folder as you can for any
folder
ttaching USB Device
our NAS drive contains a USB-A port that is active only while the drive
is connected using the Ethernet connection. This USB-A connection
is disabled when the drive is connected to a computer via the USB-B
nnection
The USB-A port can be used to attach either a USB printer or a USB storage
24
Page 25

device, such as a fl ash disk. This section describes how to install and use
.
A
:
.
.
y
abeled
.
Y
these USB devices while the NAS drive is connected to your LAN
This USB-A port operates at USB Full-Speed.
ttaching a Printer
Once your USB printer is attached and installed to the connected NAS
drive, you can send print jobs to this printer from any user account. Follow
these steps to attach and install your USB printer
Attach the USB cable from your USB printer to the USB-A 1
connector on the rear panel of the NAS drive
Power on the printer.
The Print Server setting within the web-based administration tool
is enabled as the factory default setting. If it has been previousl
disabled for any reason, enter the administration tool now and
heck the box l
Print / Printer Server. You may also use this opportunity to enter a
description for your printer.
From this point, you must follow the instructions of your computer’s
operating system to ensure that the printer is recognized and that the
roper printer driver is installed. For reference, the following additional
steps apply for Windows 2000 and Windows XP.
From your fi le browser or network places, open the Sohonas
older and locate the shared printer, which by default will have the
name “lp”.
Double-click on the “lp” folder and Windows will ask you if you5
ant to install the printer drivers, click “Yes”.
The “Select Printer” window will open and prompt you to select
our printer brand name, model name and number. After your
rinter model has been selected, the printer drivers will be
installed on your computer. If you cannot fi nd your printer in the
list, you can alternatively insert the driver CD-ROM from your
rinter manufacturer and follow the dialogue for installing a driver
from CD.
ou can verify that the Sohonas printer has been installed by 7.
going to Control Panel / Printers and Faxes. Under Printers and
Faxes you will see the Sohonas printer icon.
nable under Control Panel / File and
25
Page 26

Now your printer is ready to accept print jobs like any other printer on your system.
A
e
y
.
:
lash
sk
e
.
.
.
.
Y
.
.
Y
.
ghlight y
/US
p-
ess
YES
.
.
ttaching a USB Storage Devic
If you elect not to use the USB-A port for printing, then it is available to you
to attach another USB storage device, like a fl ash disk. Once your storage
device is attached and installed to the connected NAS drive,
and drop fi les to it like any other storage device
These types of USB storage devices can be attached
F
Di
Hard Driv
Memory Card Reader
Follow these steps to attach and use your USB storage device:
Attach the USB cable from your device (or the USB connector1
attached to your device) to the USB-A connector on the rear panel
of the NAS drive
If your device is self-powered, turn on the power to your device
2
our device should now be visible through your fi le browser. If it3
is not immediately visible it may mean that it is not formatted in a
ormat compatible with the NAS drive. In this case you must take
the additional step outlined in Step 4
ou must reformat the device using the administration tool before
NAS drive will recognize it
BEFORE PROCEEDING, MAKE CERTAIN THAT YOU HAVE
AFELY SAVED ALL OF YOUR DEVICE’S DATA TO ANOTHER
TORAGE DEVICE.
Enter the administration tool and go to the screen at Control
Panel / Maintenance / Disk Utility. Hi
list of devices. Its Mount Point will be /mnt
sequence number. Select the FAT32 Format Type in the dro
own menu. Now press the Format button. You will be prompted
to confi rm. Pr
our device, you can logout of the administration tool and again
look for the device in your fi le browser
Now you can drag and drop fi les to your USB storage device like any other
storage device on your system. Access to the attached USB storage device
is not password protected
to continue. After successfully reformatting
ou can drag
our device in the
Bx where x is a
26
Page 27

AS Administration Referenc
e
p
:
p
s
e
g
s
:
The web-browser-based administration tool provides full access to all
confi guration settings for the product when used as a NAS device. This
section of the manual
the following main areas
Setting up read/write access by User and by Grou
Setting up File Servers, Print Servers, and Share
System settings, such as IP Address and Date and Tim
Enabling services such as DHCP and Apple Bonjour
Maintenance features, such as hard disk formatting and fi rmware
updatin
Enabling data logging feature
The menu system of the administration tool is summarized in the following
outline
rovides a description for the settings within each of
27
Page 28

Ba
sic
p
p
e
l
p
U
t
t
y
gs
s
on
r
B
r
ce
t
g
g
FTP Log
g
g
on
A
t
g
Wizard
Add User
Add Grou
Add Shar
Control Pane
ser Management
Group Managemen
File and Print
File Server
Share Managemen
Print Server
Network Settin
Time Setting
Turn Off Server
Informati
Disk Usage
Error Notifi cation
Network Service
DHCP Serve
onjou
Maintenan
Disk Utility
Firmware Upgrade
Save Confi guration
Restore Confi guration
Factory Rese
Samba Lo
DHCP Server Lo
System Log
Administration Lo
Personal Information
Personal Informati
ccoun
28
Page 29

Because the Basic / Quick Setup functions (Wizard, Add User, Add Group,
.
y.
use
.
as
and Add Share) have been described previously under “Basic Settings
or Initial Setup”, we begin this reference section with a description of the
Control Panel group of functions.
sers and Groups
This group of settings provides an alternate way to create a new user
account or new group, and also provides a method to modify properties of
existing user accounts or groups
ser Management
Enter the main screen of User Management by selecting Control Panel /
sers and Groups / User Management. Here you are presented entry fi elds
for User Name and Password. If you want to create a new user account, fi ll
in these fi elds directly. The User Name must be lower-case and may be a
maximum of 20 alphanumeric characters, without spaces. The User Name
must begin with an alphabetic character. See further information about User
Name, Description, and the “Create Private Folder” check box under by
referring back to Step 9 of “Basic Setup for Initial Settings”.
If you want to edit an existing user account, select a user from the Existing
ser box, and the User Name and Password fi elds will fi ll in automaticall
After completing this form, press
r this
If you want to delete an existing user, fi rst highlight that user’s name in the
Existing User box, and then press the Delete User button
If you want to edit the group assignment properties of a current user,
fi rst highlight that user’s name in the Existing User box, and then press
theroups button. If you have created a new user account and want to
assign this user to one or more existing groups, then after pressing
described above, press the
The Groups screen presents a list of the selected user’s assigned groups in
the box on the left. The list of groups in the right box includes groups for
hich the user is not a member. By selecting group names and pressing
either the Add or
existing groups. When done with your assignments, press Save to save your
changes.
r.
move button you can reassign the user to various
ave to save the changes you have made
ave
roups button to proceed to the next screen.
29
Page 30

Note that if you are using the User Management dialogue to create a
g
s
new user, there may be other properties that you want to set for this
user. For example, after creating a new user through Control Panel /
ser Management, share access for that user can be set by leaving User
Management and going to File and Print / Share Management. This
dialogue is explained later in this reference section.
roup Management
As explained earlier, a group is a collection of user accounts. When you
assign access privileges to a new share you have the option of makin
assignments for an entire group of users at once by referring to the group’s
name. Enter the main screen of Group Management by selecting Control
Panel / Users and Groups / Group Management. Here you are presented
an entry fi eld for Group Name. If you want to create a new group, fi ll in this
fi eld directly. The Group Name must be lower-case and may be a maximum
of 20 alphanumeric characters, without spaces. The Group Name must
begin with an alphabetic character.
If you want to edit an existing group, select a group from the Existing
Groups box, and the Group Name fi eld will fi ll in automatically.
After completing this form, press
for this group.
If you want to delete an existing group, fi rst highlight that group’s name in
the Existing Groups box, and then press the
If you want to edit the member list of a current group, fi rst highlight that
roup’s name in the Existing Groups box, and then press the Member
button. If you have created a new group and want to assign one or more
existing users to this group, then after pressing
ress the
The Members screen presents a list of the selected group’s assigned
members in the box on the left. The users listed in the right box are not
currently members of the group. By selecting user names and pressing
either the Add or
the group. When done with your assignments, press Saveto save your
changes.
Note that if you are using the Group Management dialogue to create a
new group, there may be other properties that you want to set for this
roup. For example, after creating a new group through Control Panel /
Group Management, share access for that group can be set by leaving
mbersbutton to proceed to the next screen.
move button you can reassign various users to
ave to save the changes you have made
elete Group button.
ave as described above,
30
Page 31

Group Management and going to File and Print / Share Management. This
g
.
.
.
g
y
.
g
Y
.
.
.
dialogue is explained later in this reference section.
ile and Print
This group of settings allows for naming the Windows Workgroup, enablin
certain server protocols (such as FTP, NFS, and print server), as well as
roviding full control over the creation and management of folders (shares)
on the drive
ile Server
Enter the main screen of File Server Setting by selecting Control Panel / File
and Print / File Server. This screen presents options for Windows Workgroup
and Windows Internet Naming Service (WINS), for enabling File Transfer
Protocol (FTP), and Network File System (NFS) server
Each subgroup of settings is described below. After completing the form
ou must press
ave to save your changes
indows Settin
With these settings you can enable or disable the NETBEUI transport
rotocol, which is required for SMB/CIFS fi le sharing in Windows. For
example, for shared folders to be visible in “My Network Places”, this
rotocol needs to be running. It is enabled by default.
When Windows Setting is enabled, you can modify the Windows
Workgroup name and description. If a WINS server is available, you ma
optionally fi ll in its IP address
TP Server Settin
ou can enable or disable the FTP server support. If enabled, you can enter
the port number you will use for FTP
Once FTP is enabled, you can remotely login to the NAS drive via FTP
using your username and password. You will then have FTP access to those
olders for which you have access privileges
If you login to FTP anonymously and Guest Access is enabled (see below)
ou will access the guest-share folder
In order to reach the FTP server through the WAN, a public IP address
should be assigned to the NAS, or alternatively you can confi gure a
31
Page 32

Network Address Translation (NAT) router to map a public IP address to the
g
Y
.
pp
.
.
y.
NAS drive’s private IP address on the LAN.
FS Server Settin
ou can enable or disable NFS server support
If you have only Windows PCs on your home network and have no pressing
reason to use NFS su
box unchecked in order to free up system resources for other servers.
NFS and Samba perform similar functions for fi le sharing. The main
difference is the Windows PCs have Samba-compatible clients and servers
as part of their default network support. Conversely, UNIX systems usually
come with NFS by default, with Samba being used to provide fi le sharing
ith Windows PCs
Note that the NAS drive has Samba enabled at all times.
ort to share fi les, then you can normally leave this
uest Access Setting
When Guess Access is enabled, you can access the “guest-share” folder by
logging in with the username “guest-share” and leaving the password fi eld
blank. As explained earlier, the default disk format type FAT32 does not
support the quota function.
Also, when Guest Access is enabled, you can access the guest-share folder
ia FTP by logging into FTP anonymously. When Guess Access is disabled,
anonymous FTP is not permitted.
Guest access is enabled by default.
hare Management
Enter the main screen of Share Management by selecting Control Panel /
File and Print / Share Management. Here you are presented entry fi elds for
Share Name and Share Path. If you want to create a new share, fi ll in these
fi elds directly. The Share Name must be lower-case and may be a maximum
of 20 alphanumeric characters, without spaces. The Share Name must begin
ith an alphabetic character.
A description of this share may optionally be entered in the fi eld provided
If you want to edit an existing share, select a share from the Existing Shares
box, and the Share Name, Path, and Description fi elds will fi ll in automaticall
After completing this form, press
for this share.
ave to save the changes you have made
32
Page 33

If you want to delete an existing share, fi rst highlight that share name in the
.
s
.
.
Y
.
gs
.
Existing Shares box, and then press the Delete Share button.
Once you have highlighted an existing share, or have created and saved a
new share, you will want to assign access privileges for that share. Access is
defi ned separately for SMB/CIFS access than it is for NFS access
To assign SMB/CIFS access privileges for current share, press the Windows,
FTP Access button. To assign NFS access privileges, press the NFS Acces
button
sing the screen for SMB/CIFS access (Windows, FTP Access) you can
assign read-write access for all users and groups by checking the box
marked “Allow for all”. Alternatively, you can assign no access, read-only
access, or read-write access privileges individually for each user and group.
When done with this form, press
sing the screen for NFS access you can assign read-write access for all
users and groups by checking the box marked “Allow for all”. Alternatively,
ou can assign access to individual IP addresses or a subnet range. When
done with this form, press
ave to save your changes
ave to save your changes.
rinter Server
Enter this screen by selecting Control Panel / File and Print / Printer Server.
Here you may enable or disable the print server function. It is enabled as
the factory default. If a printer is attached to the USB-A port as described
reviously under “Attaching a Printer”, its name will be shown on this screen.
ou may optionally fi ll in a description for your printer. When done with this
form, press
ave to save your changes.
ystem
The System group of settings provides control for IP addressing, date and
time settings, control of error notifi cation services, and also displays basic
information about the product and its disk usage
etwork Settin
Enter this screen by selecting Control Panel / System / Network Settings.
The top entry fi eld shows the current hostname (factory default is
sohonas”). To change the hostname, type in a new name
33
Page 34

Next are IP Address settings. You will normally leave these in the factor
y
.
f
.
T
T
.
.
default condition, which selects “Obtain IP Address automatically” and
Obtain DNS Server Address automatically”. With this selections enabled,
the NAS drive will act as a DHCP client and attempt to retrieve its IP Address
rom the DHCP server active on your LAN
nder some LAN environments you will need to enter fi xed addresses in
orm provided.
the
The bottom of this screen displays the Media Access Control (MAC) address
of the product
When done with this form, press
ave to save your settings.
ime Settings
Enter this screen by selecting Control Panel / System / Time Settings. You
may manually enter the date, time, and time zone, or alternatively select a
Network Time Protocol (NTP) server available on your LAN. When done with
this form, press Save to save your changes.
urn Off Server
If you have a need to restart or turn off your fi le server, you may do so using
the buttons available through Control Panel / System / Turn Off Server. This
is a convenient feature if your administration computer is located far away
rom the NAS drive. Otherwise, you can simply power off the NAS drive to
turn off the server
nformation
Basic information about your system, such as the fi rmware version number
and IP address, can be displayed by selecting Control Panel / System /
Information. There are no user settings on this screen.
isk Usage
Basic information about your hard disk, such as total and free space, can be
displayed by selecting Control Panel / System / Disk Usage. If you have a
SB storage device connected to your USB-A port as described previously
under “Attaching a USB Storage Device”, then you will also see information
about this device on the screen
34
Page 35

rror Notifi cation
.
s
:
r
r
.
n
g
e
The NAS drive features a range of features to monitor product status and
to report errors. To enable and setup these features, select the screen at
Control Panel / System / Error Notifi cation. These settings are grouped into
four sections, as described below. After completing this form, press
save your changes
ave to
onitoring Service
Here you may select which of the following four functions you would like to
monitor
Disk Usage
Windows File Sharing Server
FTP Serve
DHCP Serve
heck Interval
Enter how frequently you would like functions to be checked
-mail Notifi catio
NAS drive has the capability to send you an e-mail message containin
status information for the functions being monitored. To enable this feature,
check the box marked “Enable” and fi ll in the form provided with the IP
address of the mail server that will process your automatic e-mail notices.
Also fi ll in up to fi ve (5) destination mail addresses for these e-mail notices.
op-Up Notifi cation
In addition to e-mail notifi cation, the product has the capability to use the
Messenger service to display a pop-up message on your computer screen.
To enable this feature, check the box marked “Enable” and fi ll in the form
rovided with the hostnames of up to fi ve (5) computers that will receive
these pop-up notices. This feature requires that your computer’s Messenger
service is enabled and running, and that your network administrator has not
locked the service.
etwork Servic
The Network Service group of settings provides control over the built-in
35
Page 36

DHCP server, and the Bonjour protoco
l.
g
.
by
.
y
back to this screen and revie
addresses that have bee
ssued
.
.
.
HCP Server
Enter the main screen for DHCP Server by entering Control Panel / Network
Service / DHCP Server. Most LAN environments will already have a Dynamic
Host Confi
issue IP addresses for attached devices. For example, your home router
equipment will likely provide this service. In the rare case that your
equipment does not provide this service, the NAS drive can run its built-in
DHCP Server
To enable the DHCP Server, check the box marked “Enable Server”. It is
disabled by factory default setting.
A form is provided to optionally control the way addresses will be issued to
clients from the NAS drive’s DHCP Server. You may also set the maximum
lease duration from the pull-down menu. When done with this form, press
aveto save your changes.
If your LAN contains some equipment with fi xed IP addresses that you
ould like the server to avoid when issuing new addresses, you can defi ne
these static IP addresses and MAC addresses on the screen accessed
ressing the
any changes you would like to make when entering static IP addresses
After the DHCP Server has been running on your LAN, you can periodicall
To view the address list, press the
the page
uration Protocol (DHCP) service running to automatically
tatic IP button at the bottom of the page. Be sure and save
w the
HCP Lease List button at the bottom of
n i
.
onjour
Bonjour protocol may be enabled or disabled by selecting the screen at
Control Panel / Network Service / Bonjour. The factory default setting is
enabled. Press
ave to save any change to this screen
aintenance
The Maintenance group of settings provides control over disk formatting
and status, fi rmware upgrades, and ways to make global changes to all
settings
36
Page 37

isk Utilit
y
.
.
t
:
ghp
s
y
.
S
ess the
.
.
f
y
Enter this screen by selecting Control Panel / Maintenance / Disk Utility. You
ill be presented with a table that lists the status of all detected storage
devices. The fi rst device listed (“/dev/hda/”) will be the main data partition
of the NAS hard drive
If you have another storage device attached to the USB-A port, its status will
be displayed on the next row of the table
From this table, you have the option to perform the following actions on a
specifi c storage device using the buttons provided:
rmat
The hard drive is preformatted at the factory as FAT32. If you want to
change the format to EXT2 or EXT3, make your selection from the pull-
own menu, and press
rma
Caution: Formatting the drive will delete all data
rom your drive and will reset all settings to factor
default. Use extreme care to protect any previously
stored data before reformatting your drive.
The FAT32 format is the most fl exible format, since it allows you to use the
drive with either the USB-B or Ethernet interface. Alternatively, if you plan to
use your drive only with Ethernet, you can realize the following benefi ts by
reformatting to EXT2 or EXT3
Faster data throu
Ability to allocate user storage quota
Prevent password-protected folders from being accessed via a
SB-B connection
Regarding auxiliary storage devices attached to your USB-A port, you ma
nd that you need to reformat your device to FAT32 using Disk Utility before
our device will mount properly using the NAS drive
ut
can
Pr
Scan button if you would like to scan your disk for errors
nmount
Press the
storage device. This button is disabled for the primary hard disk
nmountbutton if you would like to unmount the auxiliary
37
Page 38

etai
l
.
e
b
.
Press the
vice.
Also, in case you have made a recent change to a storage device, you can
ress the
the most current status
Finally, the fi eld at the bottom of the Disk Utility screen allows you to set an
automatic spin-down time for the hard drive. By spinning down the drive
hen not in use, you can conserve power and extend the life of the drive.
The default setting is 30 minutes. Press
tail button in order to view a detailed status report for your
efresh button at the bottom of the table to refresh the table with
ave to save your change.
irmware Upgrade
If a more recent version of the NAS drive’s internal fi rmware is available, you
ill want to download and install it. The most recent fi rmware version may
have improved performance or added features that could give you benefi ts
not present in your current version.
Enter this screen by selecting Control Panel / Maintenance / Firmware
pgrade. Make a note of your current version number, which is displayed at
the top of this screen. Then visit Verbatim’s Technical Support web site (refer
to the Getting Help section later in this manual) to check if a more recent
ersion is available. If so, follow the download instructions provided on the
te.
Once the upgrade fi le is available on your computer, browse to it from the
Firmware Upgrade screen, and then press the
tart Upgrade
utton.
ave Confi guration
After you have completely confi gured all of the NAS drive’s settings, you
may want to save the full confi guration for future reference. To do this enter
the Save Confi guration screen by selecting Control Panel / Maintenance /
Save Confi guration, and then press the
confi guration fi le (named “confi g.tar”) to your specifi ed location
av
utton. This action will save a
estore Confi guration
After saving a confi guration fi le as described above, you can later retrieve
38
Page 39

that fi le to restore all device settings in a single step. Enter this screen by
.
Y
.
.
g
g.
.
g
selecting Control Panel / Maintenance / Restore Confi guration, and then
browse to the saved confi guration fi le and press the
torebutton
actory Reset
ou can return all of the NAS drive’s settings to their factory default state
selecting Control Panel / Maintenance / Factory Reset, and pressing the
Factory Reset button on this screen.
As described earlier, an alternate way to reset the device to factory settings
is to press and hold in the Reset button for more than 5 seconds
og File
The NAS drive has the ability to record event logs for various activities that
occur during operation. Here you can control and display the available
event logs. Each log can be individually restarted by cleaning past events
and starting with a fresh log.
amba Log
To view the log of events that have occurred during Samba fi le sharing,
select Control Panel / Log File / Samba Log
TP Lo
To view the log of events that have occurred during FTP fi le transfers, select
Control Panel / Log File / FTP Lo
HCP Server Log
To view the log of events that have been recorded by the NAS drive’s DHCP
Server, select Control Panel / Log File / DHCP Server Log
stem Lo
To view the log of events that have recorded by the system monitor, select
Control Panel / Log File / System Log.
39
Page 40

Ad
ministration Lo
g
.
A
n
.
.
.
.
To view the log of events that have been recorded by the administration
monitor, select Control Panel / Log File / Administration Log
ccount Informatio
The Personal Info tab provides access to certain information about the
user currently logged into the web-based administration tool. Usually this
ill be the admin user. To view this screen select Personal Info / Personal
Information / Account
The top section provides input fi elds for changing the password, the
administration tool’s language setting, and the optional description text
The bottom section displays current information about disk usage and the
current user’s shared folders
When done with this form, press
ave to save changes.
ogout
After completing all of the intended changes for your current session
ith the administration tool, you can press the Logout button to end your
session
40
Page 41

echnical Suppor
t
.
or
w
f
(55)
g
6
.
s
.
g
l
d
y
If you are experiencing diffi culty installing or using your Verbatim product,
ease visit the main Verbatim Technical Support website at www.verbatim
ww.verbatim-europe.com. From this page you can access our
library o
and download available software updates. Although most of our customers
fi nd this content suffi cient to put them back on the right track, this page also
lists ways in which you can contact the Verbatim Technical Support Team
directly.
Mexico
Ar
Europe: For technical support in Europe e-mail drivesupport@verbatimeurope.com or call 00 800 3883 2222 in the following countries: Austria,
Belgium, Denmark, Finland, France, Germany, Hungary, Italy, Luxemburg,
Monaco, Netherlands, Norway, Poland, Portugal, Republic of Ireland, Spain,
Sweden and Switzerland. All other countries call +353 61 226586
user documentation, read answers to frequently asked questions,
S/Canada 800-538-8589
55284642
entina (54-11) 4943-333
imited Warranty Term
Verbatim Corporation warrants this product to be free from defects in material
and workmanship for a period of 1 year from date of purchase (a period of
years applies in countries of the European Union). This warranty excludes
batteries. If this product is found to be defective within the warranty period,
it will be replaced at no cost to you. You may return it with your original cash
register receipt to the place of purchase or contact Verbatim
In the U.S. and Canada, call 800-538-8589 or email techsupport@verbatim.com.
In the following European countries, Austria, Belgium, Denmark, Finland, France,
Germany, Greece, Hungary, Italy, Luxembourg, Monaco, Netherlands, Norway,
Poland, Portu
3883 2222. All other European countries call +353 61 226586. You can emai
drivesupport@verbatim-europe.com.
Pro
uct replacement is your sole remedy under this warranty, and this warrant
al, Republic of Ireland, Spain, Sweden, Switzerland, call 00 800
41
Page 42

does not apply to normal wear or to damage resulting from abnormal use, mis-
OSS O
g
.
e
.
use, abuse, neglect or accident, or to any incompatibility or poor performance
due to the specifi c computer software or hardware used. VERBATIM WILL NOT
E LIABLE FOR DATA L
PECIAL DAMAGES, HOWEVER CAUSED, FOR BREACH OF WARRANTIES
R OTHERWISE. This warranty gives you specifi c legal rights and you may also
have other ri
ser guide without further notice.
hts which vary from state to state or country to country.
TE: Verbatim Corporation may at any time revise the content of this
R ANY INCIDENTAL, CONSEQUENTIAL OR
ights
Copyright ©2007 Verbatim Corporation. No part of this document may be
reproduced in any form or by any means, for any purpose, without the express
ritten permission of Verbatim Corporation. All rights reserved. All other brands
and product names referenced herein are property of their respective owners
CC Complianc
This equipment has been tested and found to comply with the limits
for a Class B digital device, pursuant to Part 15 of the FCC Rules. These
limits are designed to provide reasonable protection against harmful
interference in a residential installation. This equipment generates, uses
and can radiate radio frequency energy and, if not installed and used in
accordance with the instructions, may cause harmful interference to radio
communications. However, there is no guarantee that interference will
not occur in a particular installation. If this equipment does cause harmful
interference to radio or television reception, which can be determined by
turning the equipment off and on, the user is encouraged to try to correct
the interference by one or more of the following measures:
Reorient or relocate the receiving antenna
Increase the separation between the equipment and receiver.
Connect the equipment into an outlet on a circuit different from
42
Page 43

that to which the receiver is connected.
W
ce
h
.
p
.
n
Y
y.
.
3
000-3-3
02
998
200
2003
C 61000
2002
2002
1
Consult the dealer or an experienced radio/TV technician for
elp.
EEE Noti
The Directive on Waste Electrical and Electronic Equipment (WEEE), whic
entered into force as European law on 13th February 2003, resulted in a major
change in the treatment of electrical equipment at end-of-life
The WEEE logo (shown at the left) on the product or on its
box indicates that this product must not be disposed of or
dumped with your other household waste. For more
information about electronic and electrical waste equipment
disposal, recovery, and collection points, please contact your
local municipal household waste disposal service or sho
from where you purchased the equipment
E Declaratio
EC DECLARATION OF CONFORMIT
It is hereby declared that this product complied with the essential protection
requirements of Council Directive 89/336/EEC and its amendments on the
approximation of the laws of the Member States relating to electromagnetic
compatibilit
This declaration applies to all specimens manufactured identical to the model
submitted for testing/evaluation
EN 55022: 1998 + A1: 2000 +A2: 200
EN 61
EN 55
IEC 61000-4-2: 1995 + A1: 1998 + A2: 2000
IE
IEC 61000-4-4: 1995 + A1: 2000 + A2: 200
:1995 + A1: 2001
4: 1
+ A1:
-4-3:
1 + A2:
+ A1:
43
Page 44

IEC 61
000
2000
000
000
000
993
2000
0
e
s
IEC 61
IEC 61
IEC 61000-4-11: 1994 + A1: 200
-4-5: 1995 + A1:
-4-6: 1996 + A1: 2
-4-8: 1
+ A1:
oHS Complianc
This product is in compliance with Directive 2002/95/EC of the European
Parliament and of the Council of 27 January 2003, on the restriction of the use
of certain hazardous substances in electrical and electronic equipment (RoHS)
nd its amendment
44
 Loading...