

Page 1

VERBATIM
CSP243/CSP247
COPYSMARTPLUS
CD Duplication Tower
User Manual
CSP247 CSP243
– V1.0 –
Copyright 2002 Verbatim Australia
Page 2

Chapter 1 Introduction
1.1 Overview
Users who want to backup their CDs normally have go through many steps by turning on their
computer, launching the software, setting up various parameters, and tiding up their computer.
Sometimes it can take up to an hour to get only a few CD backups. A standalone
CopySmartPlus will easily resolve this inconvenience.
CopySmartPlus is a CD-to-CD standalone duplicator and does not need to connect to a
computer. It duplicates almost any format of compact disc with excellent accuracy. With its
professional mechanism design and multi-function LCD panel, CopySmartPlus is easy for any
end-user to operate. It is a perfect cost-effective CD-R duplicator for audio, data, and video
applications. The simple four button control panel is designed to provide copy modes selection
and copy operation.
1.2 Features
• Standalone IDE to IDE CD Copy controller
• 4 (CSP243) / 8 (CSP247) independent IDE channel
• Self system diagnostics when power on
• Auto format detection
• User friendly interface with message rich LCD display
• Supports high speed CD-RW writing mode
• Easy operation without software and training are required
• Firmware upgrade via CD-ROM
1.3 Specifications
Power requirement - voltage : 240V
Environment - Temperature
Operating +5
Storage -20 oC to +50 oC
Dimensions:
CSP3
Length: 436 mm
Width: 190 mm
Height: 270 mm
CSP7
Length: 456 mm
Width: 190 mm
Height: 440 mm
CD Format - CD-ROM (Mode1 & Mode2), CD-ROM/XA (Mode2 form1 & form2), CD-DA, MixedMode, Video CD, CD-I, Karaoke CD, Photo CD (Single & Multi-session), CD-Extra, HFS,
CDBridge, ISO9660, CD-R, and CD-RW
Writing mode - Auto Detect (DAO, TAO)
oC to +50 oC
Page 3
Chapter 2 Installation and Operation Procedure
Unpack the duplicator.
Check the entire unit to see if there is any mal-function or damage found.
Make sure that the voltage setting is correct.
Connect power cable.
Switch on the CopySmartPlus with the front power button.
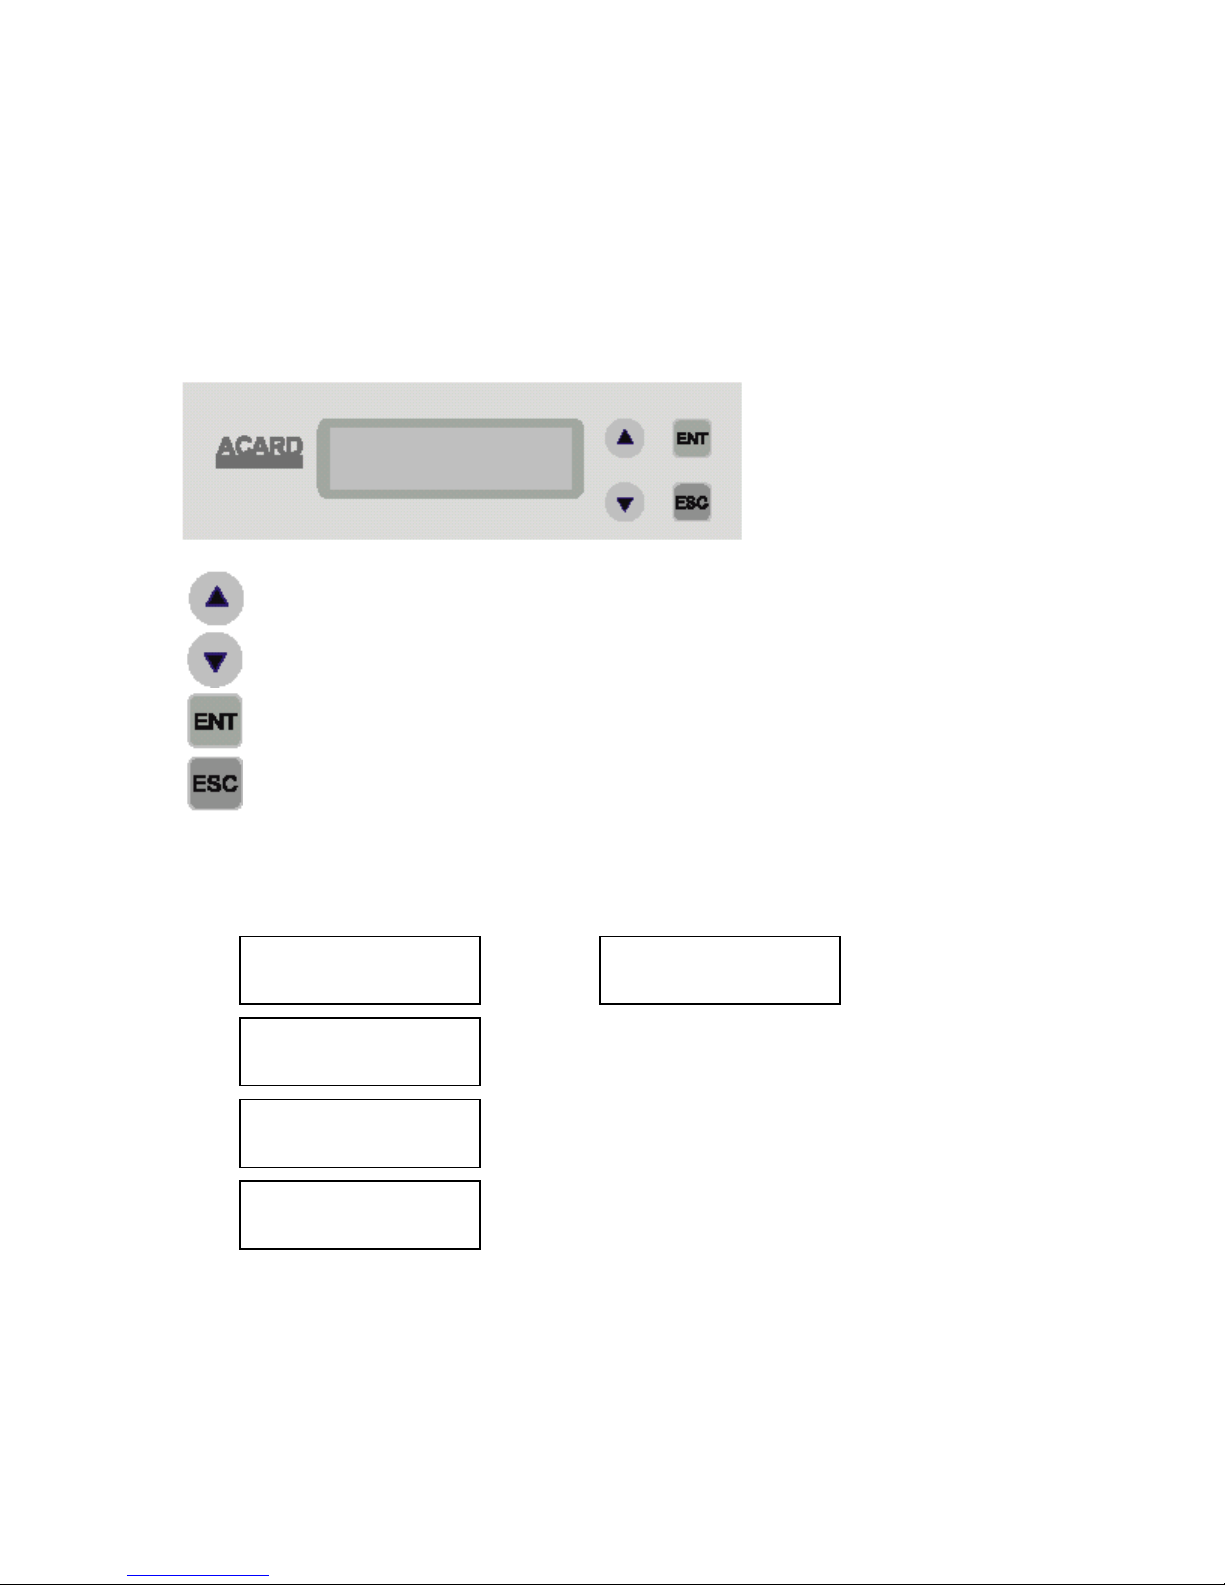
2.1 Key Functions and Operating Instructions
LCD Display Panel: Displays main functions and all messages.
Scroll up through menus or functions.
Scroll down through menus or functions.
Executes the function which you select.
Cancels the function which you select.
Power on the system. The CopySmartPlus will process a self-test for a few seconds. After the
self-test has completed , the LCD will show:
CD Duplicator or CD Duplicator
1-3 ver: 1.28B 1-7 ver: 1.28T
Initialize SDRAM.....
Detect Drives.....
1. Copy
Page 4

2.2 Quick Start
• Place master disc in CD-ROM.
• Switch to Copy function by pressing arrow button.
• Place a blank CD-R or CDRW disc into each the CD writer.
• Press “ENT” button to start copying once all writers detect the CD discs (front panel lights
stop flashing).
• When Copy is completed on all CD writers, the passed CD disc will be ejected
(Default setting: discs passed will be ejected. This can be changed according to your
need).
• For continuous duplication, place additional blank discs into the CD writers and repeat
the above procedures.
• Failed disc(s) will remain in the respective CD writer(s)
(Default setting: Failed disc NOT ejected. This can changed according to your need).
Pressing the “ENT” button will eject those failed CD discs from CD writers or press each
eject button on the CD writer to eject disc manually.
Page 5

Chapter 3 Function
3.1 Copy
When running the coping process, the data will really burn into the blank CD-R/RW discs. Before
starting the coping process, please make sure the master CD is put in the CD-ROM drive before
coping.
1. Copy
Place blank CD-R/CD-RW discs into the CD
writers. When all writers detect the CDs, press
“ENT” button, duplicator will start copying.
Copying-24X 0%
650.0MB 74:00 LCD will show the process of copying the disc.
1.Copy
OK: 03 When copying is completed, those discs passed will
be ejected automatically and failed ones will
remain in CD writers.
Put new CDs in the writers for additional copies.
NOTE: The CopySmartPlus is capable of CD-RW writing. Data stored in the CD-RW discs will be
quickly erased automatically before copying new data, no special setting or procedure is required
to erase the old data.
3.2 Test
This will simulate the CD-R/RW disc writing process. When testing is completed, the CD-R/RW
discs will remain blank.
2.Test
Press “ENT” button to start the disc copy simulation or
Erasing disc
Testing-24X 0%
650.0MB 74:00 LCD will show the process of testing the discs.
2.Test
OK: 03
Termination during Test will not affect the CD-R disc and they will remain blank. But please note
that CD-RW discs containing data will be destroyed and cannot be retrieved again. Some CD
writers may not support sudden termination during operation. The duplicator may hang up and
you can only reset those writers by re-starting the power.
press “ESC” to exit.
For CD-RW discs that contain data, emulate
will do quick erase of all old data before
emulation. Thus, never do emulate on CD-RW
discs that contain important data.
When the process is finished, the LCD will
show the message of the “Test” result.
Page 6

3.3 Test & Copy
3.Test & Copy
Press “ENT” button to do the disc testing then
really write the data on the disc or press “ESC”
to exit.
Testing-24X 0%
650.0MB 74:00
Before starting the copying process, the writers will
simulate the data writing process.
Copying-24X 0%
650.0MB 74:00 When testing process is completed, duplicator
will start writing data onto the CD-R/
RW disc. The CD-R/RW discs will contain data.
3.Test & Copy
OK: 03 When the process is finished, the LCD will
show the result of the “Test & Copy”.
3.4 Verify
This will verify if the target discs if can be read correctly in the CD-ROM drive after copying of the
discs. Discs in the CD writer and CD-ROM drive can be verified together simultaneously.
4.Verify
Press “ENT” button to start the disc verify or press “ESC”
to exit.
Verify--24X 0%
650.0MB 74:00 LCD will show the progress of the “Verify” process.
4.Verify
OK: 03
When the process is finished, the LCD will show the
“Verify” result.
3.5 Compare
The data on master and target discs will be compared to each other. This will confirm an accurate
copy has been made.
5.Compare
Press “ENT” button to run the disc compare or
press “ESC” to exit.
Compare-24X 0%
650.0MB 74:00 LCD will show the progress of “Compare” process.
Page 7

Compare OK: 3
Fail: 0 Diff: 0 When the process is finished, the LCD will show the
result of the “Compare” process. The CD discs will be
ejected by CD writer.
Src: 01 CD-ROM
Total: 650.0MB Press “ENT” button to see the results of “Compare”
Src: 02 CD-RW
Identical If the compare result is identical, the LCD will show the
message as left.
Compare OK: 2
Fail: 1 Diff: 0
If the compare result has failed the message will show
the number of discs failed & succeeded.
Src: 01 CD-ROM
Total: 0 Bytes Press “ENT” button to see the detail of “Compare”
information.
Src: 02 CD-RW
TOC not match If the compare result is failed, the LCD will show
the reason of fail message as left.
3.6 Prescan
This function will scan the master disc to confirm if can read correctly and test the reading speed.
6.Prescan
Press “ENT” button to prescan the disc or press “ESC”
to exit.
Scaning-24X 0%
650.0MB 74:00
LCD will show the process of the prescan.
PreScan OK!
If the master of the disc can be read correctly, the LCD
will show “OK!” message.
PreScan Fail!
If the master disc cannot read correctly, the LCD will
show “Fail!” message.
Page 8

3.7 Disc Info
This function will show the total amount information on the master disc.
7.Disc Info
Press “ENT” button to show the disc information or press
“ESC” to exit.
Total 02 Sessions
Total 10 Tracks
The LCD will show the total sessions and tracks on the
master disc.
Total: 74:00
Total: 650 MB Press “ENT” button again, the LCD will show the total
time and capacity on the master disc.
Session 01
Track 01 – 09
Press “ENT” button again and use the arrow button to
select the session, LCD will show what information is
contained on the session.
Track 01
AUDIO 03:54 Press “ENT” button again and use arrow button to select
the track, LCD will show what the information is
contained on the track.
3.8 Select Source
This function is provided to set the target source. The source could be selected from CD-ROM or
CD-R/RW
8.Select Source
Press “ENT” button to modify the select source function
or press “ESC” to exit..
Src: CD-ROM
01 IDE0 Master Use the arrow button to select the CD-ROM or CD-RW
as the master source.
CD-ROM selected!
When the source is selected, then press “ENT” button.
LCD will show the source information as on the left.
3.9 Image
This function will show “No HDD” on the LCD.
Page 9

3.10 Edit Track
This is a track-selecting function that can combine tracks on different CD discs into one single CD
disc. For example, you can make a collection of favorite songs from different music CDs and
store them into one CD disc.
10. Edit Track
Press “ENT” button and arrow button to select or press
“ESC” to exit.
3.10.1 CD to CD Edit
Select “CD to CD Edit” to choose the CD track on the CD-ROM, then you can copy directly from
CD to CD.
10-01. Edit Track
CD to CD Edit
Select Track:
Press “ENT” button to change setting; “ESC” button to
bring you to next setting.
1/10 03:25 Follow the LCD to select the track you want to edit
Select Track:
+1/10 03:25 Press “ENT” button to select track. After the track is
selected, the “+” will appear. Pressing “ENT” again will
cancel the track that you selected to edit.
Select Track:
End 1Trk03:25 Finally, when the track selection is made use the arrow
buttons to move to “End”.
End edit disc
and burn?Yes Press “ENT” button to finish the track selection. Using
the arrow buttons confirm to burn the track.
Copying- 24X Edit
1/10 - > 1/1 LCD will show the process of “CD Edit” copying process.
Burn Complete!
OK: 03 When track copying is finished, the LCD will show the
“Burn Complete!” message.
Continue edit
next Disc?Yes System will ask if to continue edit. Use the arrow buttons
to make “Yes” or “No” selection.
Insert next disc
If “Yes” is selected, the source disc will be ejected.
Please inset another audio disc to edit.
Select Track:
+2/10 04:25
Follow the step to select the track that you want to edit.
Then press “ENT” button to add it on the disc.
Page 10

Select Track:
End 2Trk07:50 Finally, when the track of selection is made. Please use
arrow button to move to the “End” menu.
End edit disc
and burn?Yes Press “ENT” button to finish the disc editing, using arrow
buttons to make “Yes” or “No” selection.
Copying- 24X Edit
1/10 - > 2/2
LCD will show the process of “CD Edit” copying process.
Burn Complete!
OK: 03 When Copy is finished, the LCD will show the “Burn
Complete!” message.
Continue edit
next Disc?No System will ask if you wish to continue editing. Use
arrow buttons to make the “No” selection then press
“ENT” button.
Close all disc’s
session? Yes The system will ask to close the disc session. Using
arrow buttons make “Yes” or “No” selection.
Closing Session
Please wait--- LCD will show the process of closing the session.
3.10.3 Play Audio Track
Select “Play Audio” will use the CopySmartPlus as a music player. You can plug speakers into
the audio out from the front panel of the CD-ROM drive.
10-03. Edit Track
Play Audio Track Press “ENT” button to enter the play audio function;
“ESC” button to bring you back one menu.
Select Track:
1/10 03:25
Use arrow buttons to select which track you are going to
play.
Playing Track-1
00:00 / 03:25 LCD will show the process of “Audio Playback”.
Page 11

3.10.4 Close Session
Selecting “Close Session” will make the disc close and you cannot write any additional data to it.
This function is required to allow the disc to be read on normal player.
10-04. Edit Track
Close Session Press “ENT” button to close session; “ESC” button to
bring you to next setting.
Close all disc’s
session? Yes System will ask a confirmation to close the disc’s
session. After this step, the disc cannot have additional
data written to it.
Closing Session
Please wait--- LCD will show the progress of the disc closing.
Closing Complete
OK :3 Fail :0 When closing session is finished, the LCD will show the
number of discs “OK” and “Fail” message.
3.11 Setup
This function contains a list of options that allow user to change the original default settings. As
there are different settings under the setup function to control the duplicator’s operation, we
suggest using the original default settings for optimal operation.
11. Setup Press “ENT” button to enter the “Setup” function.
3.11.1 Language (optional)
Use this option to set which language is shown on the LCD. There are English, Traditional
Chinese, Simplified Chinese and Japanese languages.
11-01. Setup
Language Press “ENT” to change the setting and “ESC” to exit.
3.11.2 Burn Speed
This setting controls the maximum writing speed of CD writers.
Default setting is “Auto” which will use the highest writing speed of the writers. Sometimes
maximum writing speed will cause high failure rates that may be due to poor CD quality or
unstable CD writing in high speed. Under these circumstances, please lower the writing
speed under this setting to get higher successful rate in CD writing.
11-02. Setup
Burn Speed
Press “ENT” to enter the setting and “ESC” to exit.
Burn Speed
24X Use arrow buttons to change the burning speed then
press “ENT”. (Depending on the CDRW drive maximum
speed support)
Page 12

3.11.3 Read Speed
Sets the reading speed of the target source CD-ROM.
11-03. Setup
Read Speed Press “ENT” to enter the setting and “ESC” to exit.
Read Speed
32X Use arrow buttons to change the reading speed then
press “ENT”. (Depends on the CDROM maximum speed
support)
3.11.4 Auto Start Drive
Use this setting to auto start copy or test when the blank discs are inserted into the CD/RW
drives. Default setting is “Off”.
11-04. Setup
Auto Start Drive
Press “ENT” button to enter “Auto Start Drive” and “ESC”
to exit.
Auto Start Drive
Off Use arrow buttons to change “The number” or “Off”
setting then press “ENT” or press “ESC” to go back.
3.11.5 Start up menu
This setting selects one of the menu items which will become the first menu item to show when
turning on duplicator.
11-05. Setup
Startup Menu Press “ENT” button to enter “Startup Menu” and “ESC”
to exit.
Startup Menu
1.Copy Use arrow buttons to select menu item setting for the
first menu item to show (1 to 11 items) then press “ENT”.
3.11.6 Auto Verify
This setting controls On and Off of auto verify for the target. Default setting is “Off”.
11-06. Setup
Auto Verify
Press “ENT” button to enter “Auto Verify ” and “ESC” to
exit.
Auto Verify
Off
Use arrow buttons to change “On” or “Off” setting then
press “ENT” or press “ESC” to go back.
Page 13

3.11.7 Auto Compare
This setting controls auto compare of the data between master and target discs after discs copy.
Default setting is “Off”.
11-07. Setup
Auto Compare Press “ENT” button to enter “Auto Compare” and “ESC”
to exit.
Auto Compare
Off Use arrow buttons to change “On” or “Off” setting then
press “ENT” or press “ESC” to go back.
3.11.8 Auto Prescan
This setting controls the auto prescan of the master of the disc and tests the reading speed.
Default setting is “OFF”.
11-08. Setup
Auto Prescan Press “ENT” button to enter “Auto Prescan” and “ESC”
to exit.
Auto Prescan
Off Use arrow buttons to change “On” or “Off” setting then
press “ENT” or press “ESC” to go back.
3.11.9 Eject Disc
This setting controls the ejection of discs by the CD writer. Three options are available: “Eject
Good Only” setting will only eject the passed discs automatically and leave the failed ones in the
CD writers. “Eject All Disc” means the CD writers will eject the CD discs no matter whether the
copy operation is successful or failed. “Do Not Eject” means all discs will remain in CD writers
when the job is done and you will have to eject discs from the CD writers manually.
11-09. Setup
Eject Disc Press “ENT” button to enter “Eject Disc” and “ESC” to
exit
Eject Disc
Eject Good Only
Use arrow buttons to select “Eject Good Only”, then
press “ENT” or press “ESC” to go back.
Eject Disc
Eject All Disc
Use arrow buttons to select “Eject All Disc”, then press
“ENT” or press “ESC” to go back.
Eject Disc
Do Not Eject Use arrow buttons to select “Do Not Eject”, then press
“ENT” or press “ESC” to go back.
Page 14

3.11.10 Burn on The Fly
This setting controls the writing methods of the CD writers. When the setting is “On”, the data will
direct copy from source drive to the target drives.
11-10. Setup
Burn On The Fly Press “ENT” button to enter “Burn On The Fly” and
“ESC” to exit
Burn On The Fly
On Using arrow button to change “On” or “Off” setting then
press “ENT” or press “ESC” to go back.
There is no HDD !
The CopySmartPlus has no hard drive, the LCD will
show the message as left.
3.11.11 Burn Mode
This setting controls the writing methods the CD-RW disc including “Disc At Once” (DAO) or
“Track At Once” (TAO). Default setting is “DAO”. Some CD writers may support different writing
methods. If the method selected is not supported, the duplicator will automatically switch to the
other one.
11-11. Setup
Burn Mode Press “ENT” button to enter “Burn Mode” and “ESC” to
exit
Burn Mode
DAO Use arrow buttons to change “TAO” or “DAO” mode
setting then press “ENT” or press “ESC” to go back.
3.11.12 Button Sound
This setting controls button sounds. Default setting is “On”. Press “ENT” button to change and
“ESC” to exit.
11-12. Setup
Button Sound Press “ENT” button to enter “Button Sound” and “ESC”
to exit
Button Sound
On Use arrow buttons to change “On” or “Off” setting then
press “ENT” or press “ESC” to go back.
3.11.13 Device Info
This function will show what devices are connected. Each devices brand and type of information
will be shown on LCD.
11-13. Setup
Device Info Press “ENT” button to enter the device information and
“ESC” to exit.
00 IDE0 Master
CD-ROM:BRAND Use arrows button to select the device or press “ESC” to
go back.
Page 15

MODEL
FIRMWARE Press “ENT” button to see the device information and
“ESC” to go BACK.
01 IDE1 Master
CD- RW:BRAND Using arrow button to select another device or press
“ESC” to go back.
MODEL
FIRMWARE Press “ENT” button to see the device information and
“ESC” to go back.
02 IDE2 Master
CD-RW:BRAND Using arrow button to select another device or press
“ESC” to go back.
MODEL
FIRMWARE
Press “ENT” button to see the device information and
“ESC” to go back.
03 IDE3 Master
CD-RW:BRAND Using arrow button to select another device or press
“ESC” to go back.
MODEL
FIRMWARE Press “ENT” button to see the device information and
“ESC” to go back.
3.11.14 System Info
This function will show the system of information on the LCD.
11-14. Setup
System Info Press “ENT” button to enter the “System Info” and see
the next information, press “ESC” to exit.
CD Duplicator
1-3 ver: 1.28B The LCD shows CSP3 as below:
SST: 39SF020
2001 / 11 / 16
CD Duplicator
1-7 ver: 1.10T
The LCD shows CSP7 as below:
WINBOND: W49F00
2001 / 11 / 16
Page 16

3.11.15 Quick Erase
This function will quick erase the data on the CD-RW discs. It will only take a short time to do it.
11-15. Setup
Quick Erase Press “ENT” button to enter the “Quick Erase” and
“ESC” to exit.
All data will be
lost, erase?Yes Use arrow buttons to change “Yes” or “No” setting then
press “ENT” or press “ESC” to go back.
Erasing disc
00:24 (Quick) LCD will show the process of the erasing disc.
Quick Erase
OK:01 Fail:00 When erasing disc is finished, the LCD will show the
message as left. Press “ESC” to go back.
.
3.11.16 Full Erase
This function will fully erase the data on the CD-RW disc. As it will completely erase all data, it will
take a few minutes complete.
11-16. Setup
Full Erase Press “ENT” button to enter the “Full Erase” and “ESC”
to exit.
All data will be
lost, erase?Yes Use arrow buttons to change “Yes” or “No” setting then
press “ENT” or press “ESC” to go back.
Erasing disc
03:24 (Full) LCD will show the process of the erasing disc.
Full Erase
OK:01 Fail:00
When erasing disc is finished, the LCD will show the
message as left. Press “ESC” to go back.
Page 17

Chapter 4 Trouble Shooting
1. No display on LCD or the unit does not operate when power on.
Please check the connection of power cable and the environment of power outlet is normal.
2. LCD shows the Error message.
During operations like Copy, Test, Compare and Verify, you may press ESC button to abort the
operation. An Error message will be shown on the LCD. With some CD writers the abort will
cause the duplicator to hang up and you have to re-start the power to return to normal operation.
Failed reading may cause the error message shown on the LCD display. Change the master CD
to try again.
During operation if buffer under run or writing errors occur, the LCD will show error message like:
Pass xx, failed xx.
If there is no device connected and detected by duplicator during power-on, the duplicator will
show error message on LCD before entering the main menu.
3. CD-ROM can not read disc and shows error message.
Check the format of master CD or master CD itself for damage.
Use any of the CD-Writers to read the master; if it works, the CD-ROM may be defective or not
compatible with CD-ROM.
4. Buttons do not function.
May be still busy on task.
Button malfunction.
Faulty board.
5. Copy completed but CD-R disc is not readable / executable?
Use compare to check.
Change to source drive to test.
6. The failure rate is high.
Lower the speed of CD-Writers and try again.
Quality of bland disc is poor.
Check for latest firmware version.
Check the CD-Writer maximum writing speed.
7. Can not boot-up or fail to upgrade firmware.
Contact your dealer to solve the problem. Please note you may be charged for this.
A failed firmware upgrade might cause failed boot. This can only be solved by returning the
duplicator to the agent or factory directly.
8. To cancel the duplicator working process.
Press “ESC” button for 2 seconds to cancel any “Copy”, “Test”, or “Verify” etc. function while the
job in working process.
Page 18

Appendix 1
Directory Structure
1. Copy
2. Test
3. Test&Copy
4. Verify
5. Compare
6. Prescan
7. Disc Info
8. Select Source
9. Image
10. Edit Track
10.01 CD to CD Edit
10.02 CD to HDD Edit
10.03 Play Audio Track
10.04 Close Session
11. Setup
12. Adv Setup
11.01 Language (LCD Type1:English)
11.02 Burn Speed (If no disc in CD-RW, list all supported speed else list speed supported by disc)
11.03 Read Speed (Maximum)
11.04 Auto Start Drive (If ready CD-RW number equals to this value, auto start to copy or test)
11.05 Startup Menu
11.06 Auto Verify (On Off)
11.07 Auto Compare (On Off)
11.08 Auto Prescan (On Off)
11.09 Eject Disc (1.Eject Good Only 2.Eject All Disc 3.Do Not Eject)
11.10 Burn On The Fly (On Off)
11.11 Burn Mode (1.DAO 2.TAO)
11.12 Button Sound (On Off)
11.13 Device Info
11.14 System Info
11.15 Quick Erase
11.16 Full Erase
(For AUDIO disc only)
Page 19

Appendix 2 LCD Message List
Normal LCD Message List:
Message Description
Initialize SDRAM Initialize the memory on the system
Detect Drives Detect what drives are connected to the system
User Abort! Job was cancelled
Analyzing.... Analyzing the source disc
Source Drive Not
Ready Source drive is not ready to read
Target Drive Not
Ready Target drive is not ready to write
Source Disc Not
Ready Source disc in not ready for reading
Target Disc Not
Ready Target drive is not ready for writing
Erasing disc System is erasing the data on the CD-RW disc
Fail to get Drive Info! The drive is not correctly recognised
Fail to get Src Disc
Info! Cannot read the information from CD-ROM
Save new config
Fail! The new setting of configuration cannot be saved
Load Default Config? Loading the factory default setting
Src&Tgt can't in the
same channel When doing the compare operation, the source and target can
not in the same channel
Preparing...... System is preparing the data and devices connecting for CD
recording
Check Target Please
Wait...... System is checking the target device, wait for a while
Audio Disc!!! Can't
compare! Audio disc comparing is not supported
Identical Confirmation after comparing that the contents of CD is the same
Read disc error During the comparing the disc has a read error
Cannot read TOC CD’s TOC data can not read
TOC not match After comparing, the source and target device’ s TOC do not
match
Source Disc
Empty !!! The source CD is blank without data
Target overflow The target blanks do not have enough space to record the
source
Target Disc Not
Empty!!! The target disc is not empty to record
Press a Key to Eject
Good Disc Press any key to eject the good disc after the recording process
Press a Key to Eject
Fail Disc Press any key to eject the fail disc after the recording process
CD-RW does not
Support the Func CD-RW drive does not support this function
Hold ESC to exit Press “ESC” for a seconds to terminate the testing
All data will be lost,
erase? All data on the CD disc will be lost. Confirm to erase the CD-RW
disc
Erase Finished CD-RW disc has been erased
No Eraseable Disc in
CD-RW !! The CD discs in the CD-RW drive is not erasable disc
Page 20

Audio Edit Messages:
Message Description
Lost selected
Tracks? Abort the tracks selected and delete it
End edit disc and
burn? Finish the music disc edit and start to record the CD
Continue edit next
Disc? Asking to continue editing next music disc or not
Target Overflow
Re-Select The CD disc space is not enough to record the selected track,
please re-select another
Close all disc’s
session? Closing the disc’s session and will not allow to record any further
data
Can’t edit HDD The hard drive can not edit as a source audio CD
No AUDIO track in
this disc The source CD disc can not find a audio track
Insert next disc Asking to insert the next audio disc
Sessions were
closed already ! The disc session has already been closed
Burn or Move to
partition? Confirmation of direct burning to CD disc or move the data to the
partition
Tgt overflow, del last
trk? The CD disc space is not enough to record the selected track,
asking to delete the last track.
Ins empty disc
Continue? Asking to insert an empty disc and continue the process
 Loading...