

Page 1
Familiarization Guide
This guide is for experienced HP Support Center
personnel and reseller technicians. They have already
completed the HP Vectra PC family training course, or
equivalent, and have at least six months of experience
servicing HP Vectra PCs.
It is a self-paced training guide designed to train you to
install, configure, and repair the HP Vectra 500 Series PC
(models 520 and 525), introduced as of Q3 1996. You can
follow it without having any equipment available.
HP Vectra 500 Series PC
Models 520 and 525
Page 2

Notice
The information contained in this document is subject to change without notice.
Hewlett-Packard makes no warranty of any kind with regard to this material,
including, but not limited to, the implied warranties of merchantability and
fitness for a particular purpose. Hewlett-Packard shall not be liable for errors
contained herein or for incidental or consequential damages in connection with
the furnishing, performance, or use of this material.
This document contains propriety information that is protected by copyright.
All rights are reserved. No part of this document may be photocopied,
reproduced, or translated to another language without the prior written
consent of Hewlett-Packard Company.
Adobe
TM
is a trademark of Adobe Systems Incorporated which may be
registered in certain jurisdictions.
CompuServe
Microsoft
TM
is a U.S. trademark of CompuServe, Inc.
®, MS-DOS® and Windows® are U.S. registered trademarks of
Microsoft Corporation.
Pentium
Lotus
® is a US registered trademark of Intel Corporation.
® is a U.S. registered trademark of Lotus Development Corporation.
All other trademarks and copyrights are property of their respective owners.
Hewlett-Packard France
Grenoble Personal Computer Division
Technical Marketing
38053 Grenoble Cedex 9
France
©1996 Hewlett-Packard Company
Page 3

Contents
1 Product Overview and Comparisons
Product Overview . . . . . . . . . . . . . . . . . . . . . . . . . . . . . . . . . . . . . . . . . . 2
Naming Conventions . . . . . . . . . . . . . . . . . . . . . . . . . . . . . . . . . . . . . . . . . . 2
Product Line Evolution . . . . . . . . . . . . . . . . . . . . . . . . . . . . . . . . . . . . . . . . 2
Main Features of the HP Vectra 500 Series PCs (models 520 and 525) . . 3
Accessory and Mass Storage Capabilities. . . . . . . . . . . . . . . . . . . . . . . . . . 5
Common Features . . . . . . . . . . . . . . . . . . . . . . . . . . . . . . . . . . . . . . . . . . . . 5
Model Comparisons. . . . . . . . . . . . . . . . . . . . . . . . . . . . . . . . . . . . . . . . . 6
Overview. . . . . . . . . . . . . . . . . . . . . . . . . . . . . . . . . . . . . . . . . . . . . . . . . . . . 6
System Board . . . . . . . . . . . . . . . . . . . . . . . . . . . . . . . . . . . . . . . . . . . . . . . . 6
Backplane . . . . . . . . . . . . . . . . . . . . . . . . . . . . . . . . . . . . . . . . . . . . . . . . . . . 6
Case. . . . . . . . . . . . . . . . . . . . . . . . . . . . . . . . . . . . . . . . . . . . . . . . . . . . . . . . 6
Air Flow Guide . . . . . . . . . . . . . . . . . . . . . . . . . . . . . . . . . . . . . . . . . . . . . . . 6
2 Casing, System Boards and Video
Desktop and Minitower Casing . . . . . . . . . . . . . . . . . . . . . . . . . . . . . . . 8
System Board, Switches and Jumpers . . . . . . . . . . . . . . . . . . . . . . . . . 9
System Board Layout . . . . . . . . . . . . . . . . . . . . . . . . . . . . . . . . . . . . . . . . . . 9
System Board Switches and Jumpers . . . . . . . . . . . . . . . . . . . . . . . . . . . . 10
Video Options. . . . . . . . . . . . . . . . . . . . . . . . . . . . . . . . . . . . . . . . . . . . . 12
Video Controller and Video Memory on the System Board . . . . . . . . . . . 12
Video Controller and Video Memory on a Video Card . . . . . . . . . . . . . . . 13
Video Controller on the System Board and Video Memory that is Shared
Main Memory . . . . . . . . . . . . . . . . . . . . . . . . . . . . . . . . . . . . . . . . . . . . . . . 14
3 Multimedia and Communications
Aztech AT3300 Connections. . . . . . . . . . . . . . . . . . . . . . . . . . . . . . . . . 16
Telephone Connections for the U.S., Canada and Spain . . . . . . . . . . . . . 16
International Telephone Connections. . . . . . . . . . . . . . . . . . . . . . . . . . . . 17
Connecting Audio Devices to the Rear Panel. . . . . . . . . . . . . . . . . . . . . . 17
Connecting the Headset . . . . . . . . . . . . . . . . . . . . . . . . . . . . . . . . . . . . . . 18
Aztech AT3300 Internal Connections . . . . . . . . . . . . . . . . . . . . . . . . . . . . 19
Communications Software. . . . . . . . . . . . . . . . . . . . . . . . . . . . . . . . . . 22
English iii
Page 4

4 Displays
Overview . . . . . . . . . . . . . . . . . . . . . . . . . . . . . . . . . . . . . . . . . . . . . . . . 24
5 Preinstalled Software
Software Packages. . . . . . . . . . . . . . . . . . . . . . . . . . . . . . . . . . . . . . . . 26
6 Support Tools
Software Recovery. . . . . . . . . . . . . . . . . . . . . . . . . . . . . . . . . . . . . . . . 30
MicroCom Carbon Copy . . . . . . . . . . . . . . . . . . . . . . . . . . . . . . . . . . . . . . 30
HP Vectra PC Checkup. . . . . . . . . . . . . . . . . . . . . . . . . . . . . . . . . . . . . . . 31
Service Handbook . . . . . . . . . . . . . . . . . . . . . . . . . . . . . . . . . . . . . . . . . . . 31
Running the HP Vectra PC Checkup . . . . . . . . . . . . . . . . . . . . . . . . . 32
Generating an HP Vectra PC Checkup Disk from Within Windows 95. . 32
Generating an HP Vectra PC Checkup Disk from the Product
Recovery CD-ROM . . . . . . . . . . . . . . . . . . . . . . . . . . . . . . . . . . . . . . . . . . 32
Running the HP Vectra PC Checkup from a Floppy Disk . . . . . . . . . . . . 32
Running the HP Vectra PC Checkup from the Hard Disk. . . . . . . . . . . . 32
iv English
Page 5

1
Product Overview and Comparisons
After reading this chapter you will be able to describe features specific to
HP Vectra 500 Series PCs (models 520 and 525).
1
Page 6

1 Product Overview and Comparisons
Product Overview
Product Overview
This section describes the HP Vectra 500 Series PCs (models 520 and 525)
by highlighting their main features, accessory and mass storage capabilities,
and common features.
For information regarding the Q3 1995 collection of Vectra 500 Series PCs,
refer to the Familiarization Guide for that collection (part number
D37xx + 49A-90001). For information regarding the Q1 1996 collection of
Vectra 500 Series PCs (models 510 and 515), refer to the Familiarization
Guide for that collection (part number D4110-90901).
Naming Conventions
The naming convention used by Vectra 500 Series PCs (models 520 and
525) is demonstrated in the following example:
520 MCx 5/200
1st Field
where:
1st Field 5 indicates “Vectra 500 Series”
2nd Field Nothing for standard models
3rd Field 5 indicates Pentium
2nd Field
2 indicates 2nd generation
0 indicates desktop. 5 indicates minitower
CD for models equipped with a CD-ROM drive
MCx for advanced multimedia and communications models
Second number indicates processor speed: 120, 133, 166
and 200 MHz
3rd Field
Product Line Evolution
There have been three releases of HP Vectra 500 Series PCs. They are:
Release Date Models
Q3 1995 502, 510, 512, 514, 522, 560, 562, 564, 572, 574
Q1 1996 510 and 515
Q3 1996 520 and 525
2
Page 7
1 Product Overview and Comparisons
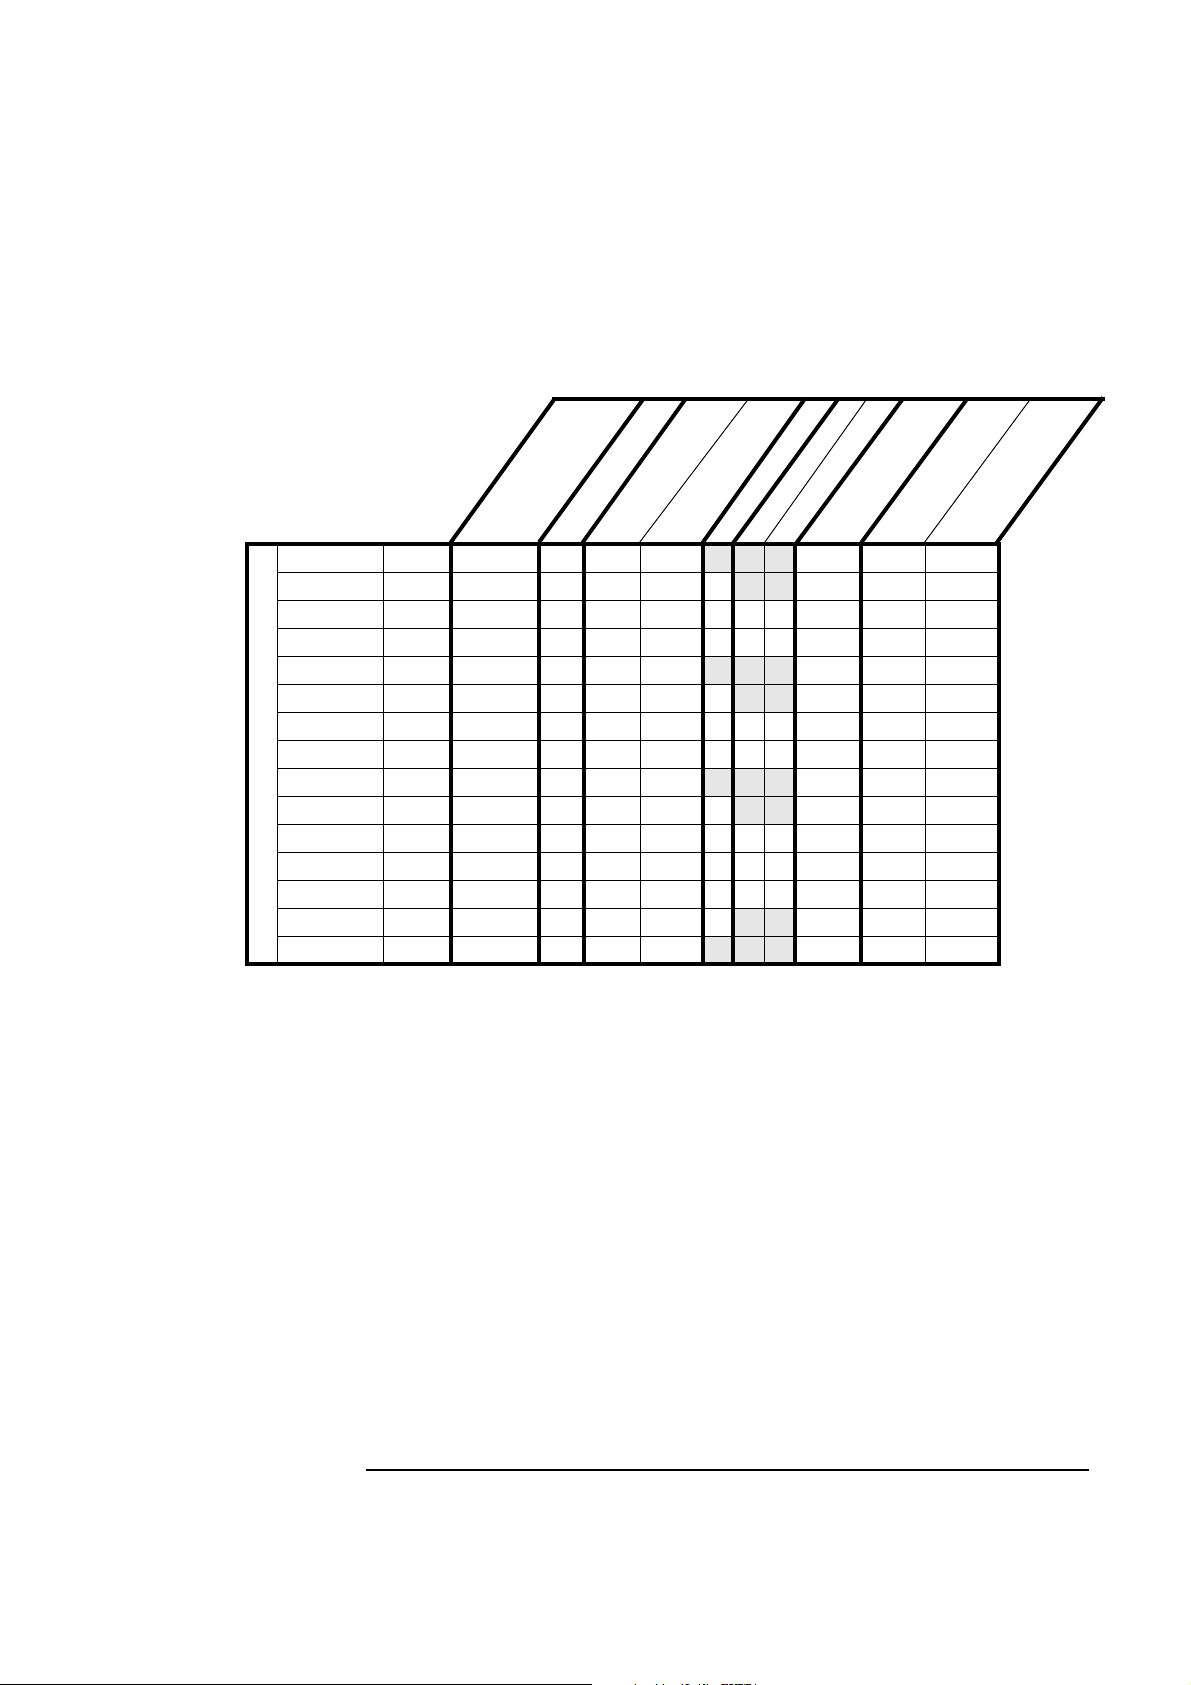
Main Features of the HP Vectra 500 Series PCs (models 520 and 525)
e
y
)
r
z
o
H
M
em
(
M
520 5/133 D4403A NA
d
ee
p
M
S
r
&
o
n
o
egi
R
1
s
ed
n
i
i
l
(
ces
o
r
P
p
p
u
S
133 12-192 256-256 1.2 GB Type A2UMA
c
ax
)
Ca
B
el
M
ed
ev
i
l
L
-
p
d
p
u
2n
S
520CD 5/133 D4437A NA 133 16-192 256-256 ✓ 1.2 GB Type A UMA
520MCx 5/133 D4442A NA 133 16-192 256-256 ✓✓✓1.2 GB Type A UMA
520MCx 5/120 D4428A NA 120 12-192 256-256 ✓✓✓1.2 GB Type A UMA
520 5/133 D4404A AE 133 12-192 0-256
520CD 5/133 D4414A AE 133
16-192 0-256 ✓ 1.2 GB Type A UMA
520MCx 5/133 D4440A AE 133 12-192 0-256 ✓✓✓ 1.2 GB Type A UMA
520MCx 5/166 D4443A AE 166 16-192 256-256 ✓✓✓ 1.6 GB Type A UMA
520 5/133 D4402A LA 133 12-192 0-256
Desktop Models
520CD 5/133 D4413A LA 133 12-192 0-256 ✓
520MCx 5/120 D4420A LA 120 12-192 0-256 ✓✓✓ 1.2 GB Type A UMA
520MCx 5/133 D4479A B 133 16-128 0-256 ✓✓✓ 1.2 GB Type B Integrated
520MCx 5/166 D4480A B 166 16-128 256-256 ✓✓✓ 1.6 GB Type B Integrated
520CD 5/133 D4460A C,I 133
12-192 0-256 ✓ 1.2 GB Type A UMA
520 5/133 D4434A APP 133 16-192 256-256
1
AE=All Europe, LA=Latin America, NA=North America, APP=Asia / Pacific Partner, B=Brazil,
C=China, I=India
2
There are three system board options for models 520 and 525: Type A = Part Number
D4051-63001, Type B = Part Number D3657-63001, and Type C = Part Number D3661-63001.
3
There are three video options for models 520 and 525, corresponding to the three system board
types: UMA = Unified Memory Architecture (shared main and video memory), Integrated = video
controller and memory on the system board, Matrox = Matrox MGA Millennium video card.
l
b
a
B
l
i
K
a
n
v
i
A
e
x
h
a
)
M
8x
(
&
M
O
o
i
R
-
d
u
A
CD
m
e
d
o
M
a
at
D
/
ax
t
F
e
s
ad
e
H
e
v
i
r
D
k
s
i
D
d
ar
H
ar
o
B
em
t
ys
S
1.2 GB Type A UMA
1.2 GB Type A UMA
1.2 GB Type A UMA
1.6 GB Type A UMA
Product Overview
e
p
y
T
d
e
Typ
o
e
d
i
V
3
3
Page 8
1 Product Overview and Comparisons
Product Overview
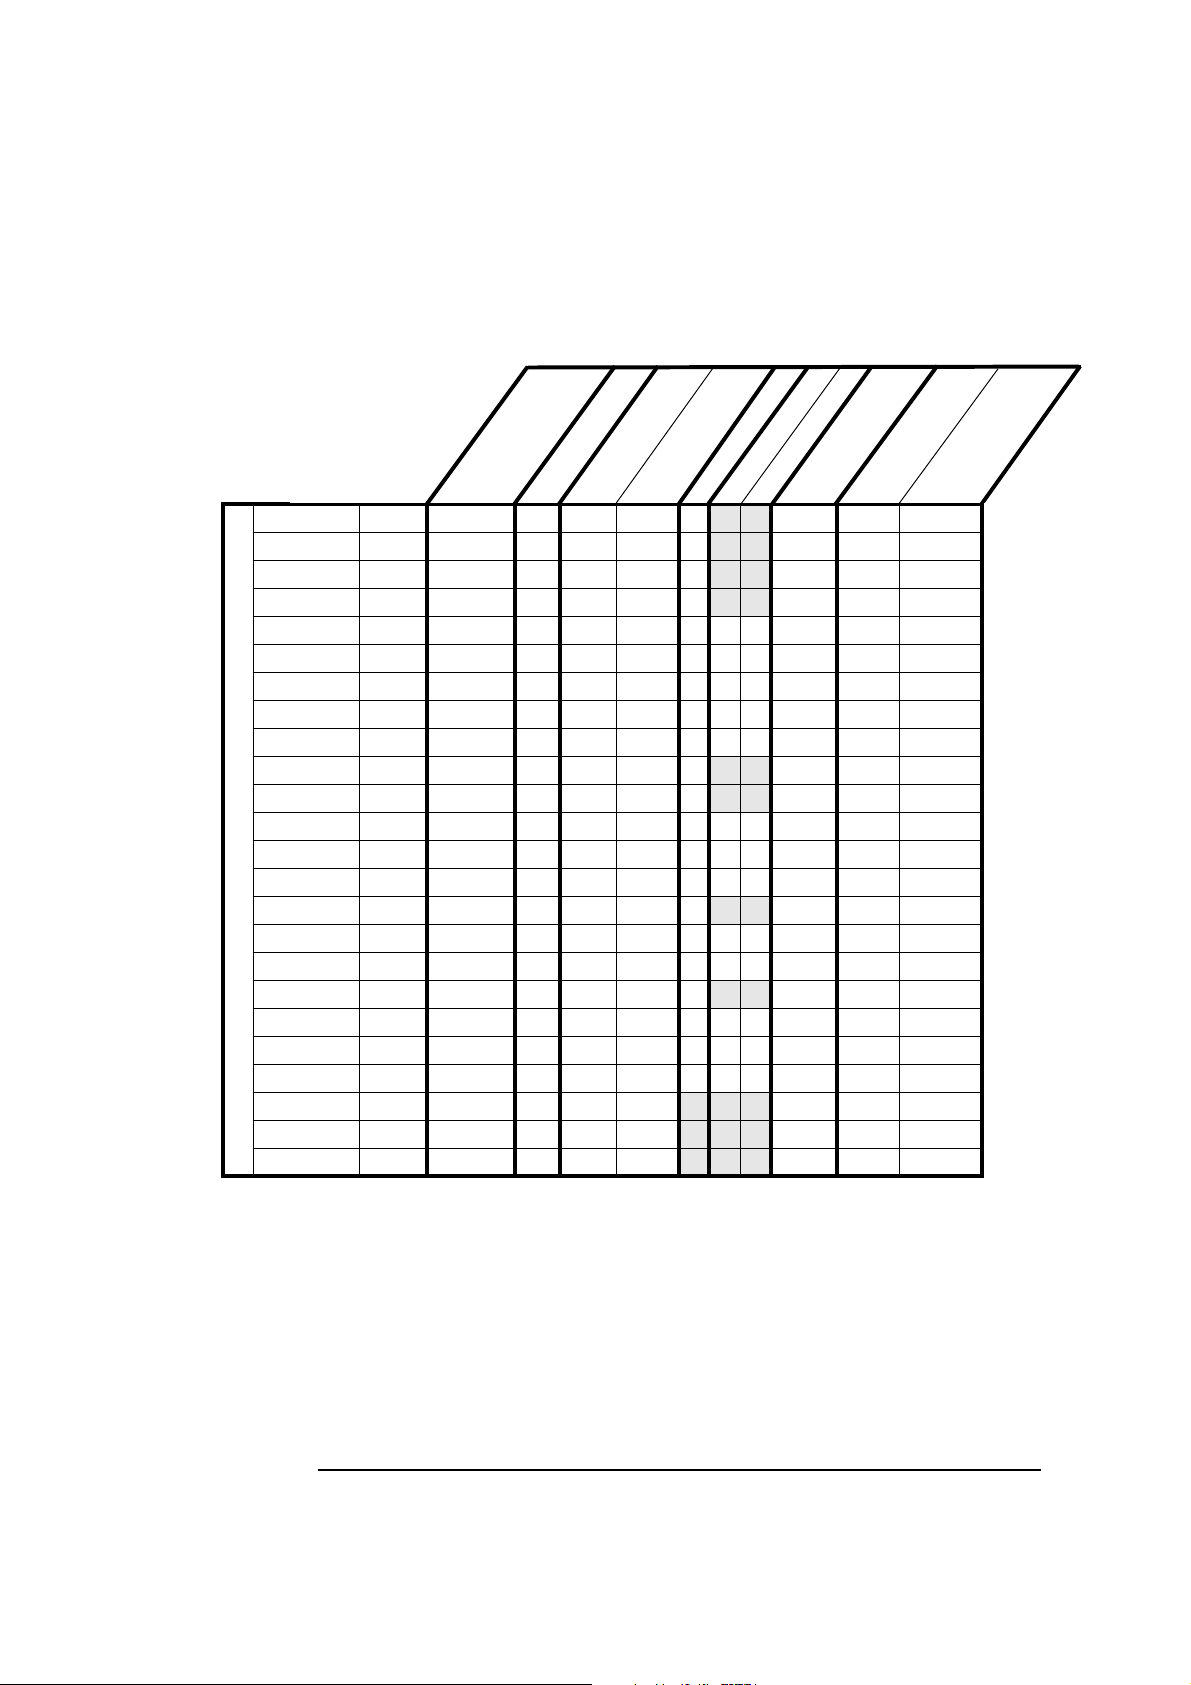
525CD 5/133 D4475A NA
y
r
)
o
z
H
em
M
M
(
x
ed
a
e
M
p
S
&
r
n
o
egi
R
1
o
ed
s
es
c
o
r
P
i
i
(
l
p
p
u
S
133 16-128 256-256 ✓ 1.2 GB Type B2Integrated
ch
)
Ca
B
l
M
d
n
e
eve
i
l
L
-
p
d
p
u
2n
S
e
l
b
B
a
l
K
ai
n
v
i
A
e
ax
)
x
M
8
(
&
M
O
o
R
i
-
d
D
u
C
A
m
e
d
o
M
a
at
D
/
x
a
et
F
s
d
ea
H
e
v
i
r
D
k
s
i
D
d
r
a
H
ar
Bo
em
t
ys
S
525CD 5/166 D4476A NA 166 16-128 256-256 ✓ 1.6 GB Type B Integrated
525CD 5/166 D4422A NA 166 16-192 256-256 ✓
525CD 5/200 D4470A NA 200 16-128 256-256 ✓
1.6 GB Type A UMA
2.5 GB Type B Integrated
525MCx 5/133 D4477A NA 133 16-128 256-256 ✓✓✓ 1.2 GB Type B Integrated
525MCx 5/166 D4478A NA 166 16-128 256-256 ✓✓✓ 1.6 GB Type B Integrated
525MCx 5/166 D4439A NA 166 16-192 256-256 ✓✓✓ 1.6 GB Type A UMA
525MCx 5/200 D4481A NA 200 32-128 256-256 ✓✓✓2.5 GB Type B Integrated
525MCx 5/200 D4471A NA 200 32-128 256-256 ✓✓✓2.5 GB Type C Matrox
525CD 5/166 D4423A AE 166 16-192 0-256 ✓
525CD 5/200 D4472A AE 200 16-128 256-256 ✓
1.6 GB Type A UMA
2.5 GB Type B Integrated
525MCx 5/133 D4416A AE 133 16-192 256-256 ✓✓✓ 1.2 GB Type A UMA
525MCx 5/166 D4441A AE 166 16-192 256-256 ✓✓✓ 1.6 GB Type A UMA
525MCx 5/200 D4473A AE 200 32-128 256-256 ✓✓✓ 2.5 GB Type B Integrated
Minitower Models
525CD 5/166 D4425A LA 166 16-192 256-256 ✓
1.2 GB Type A UMA
525MCx 5/133 D4418A LA 133 16-192 256-256 ✓✓✓ 1.6 GB Type A UMA
525MCx 5/166 D4427A LA 166 16-192 256-256 ✓✓✓1.6 GB Type A UMA
525CD 5/166 D4424A C,I 166 16-192 0-256 ✓
1.6 GB Type A UMA
525MCx 5/133 D4419A C,I,K 133 12-192 0-256 ✓✓✓1.2 GB Type A UMA
525MCx 5/166 D4426A C,I,K 166 16-192 256-256 ✓✓✓1.6 GB Type A UMA
525MCx 5/200 D4482A C,I,K 200 16-128 256-256 ✓✓✓2.5 GB Type B Integrated
525 5/133 D4454A APP,K 133 16-192 256-256
525 5/166 D4483A APP,K 166 16-128 256-256
525 5/200 D4474A APP,K 200 16-128 256-256
1
AE=All Europe, LA=Latin America, NA=North America, APP=Asia / Pacific Partner, C=China,
I=India, K=Korea
2
There are three system board options for models 520 and 525: Type A = Part Number
D4051-63001, Type B = Part Number D3657-63001, and Type C = Part Number D3661-63001.
3
There are three video options for models 520 and 525, corresponding to the three system board
1.6 GB Type A UMA
2.5 GB Type B Integrated
2.5 GB Type B Integrated
types: UMA = Unified Memory Architecture (shared main and video memory), Integrated = video
controller and memory on the system board, Matrox = Matrox MGA Millennium video card
e
p
y
T
d
e
p
y
T
eo
d
Vi
3
4
Page 9
Accessory and Mass Storage Capabilities
1 Product Overview and Comparisons
Product Overview
PC Model Type Accessory Slots
2 ISA Slots (one for half-length cards) 1 Internal
Desktop
Minitower
1
In all models, one front-access bay is occupied by a 3.5-inch floppy disk
1 PCI Slot 2 Front-Access
1 ISA/PCI Combo Slot 1 Internal/Front-Access Combo
3 ISA Slots (one for half-length cards) 2 Internal
2 PCI Slots 4 Front-Access
1 ISA/PCI Combo Slot 0 Internal/Front-Access Combo
Mass Storage Bays
1
1
drive. In models 520CD 5/xxx, 520MCx 5/xxx, 525CD 5/xxx and
525MCx 5/xxx an additional front-access bay is occupied by the CD-ROM
drive.
Common Features
The following features are common to all PCs in the HP Vectra 500 Series PC
range:
• Windows 95 preinstalled
• User and Administrator passwords
• HP BIOS Flash EEPROM
• One bi-directional parallel port, two serial ports, a VGA connector, a keyboard connector, and a mouse connector
• 100-watt power supply (full range between 90 and 264 VAC) on desktop
models
• 160-watt power supply (100-127 and 200-240 VAC manually switchable)
on minitower models
5
Page 10

1 Product Overview and Comparisons
Model Comparisons
Model Comparisons
Overview
HP Vectra 500 Series PCs are Pentium-processor, ISA/PCI-based PCs,
housed in desktop and minitower casings. The series is targeted at the Small
Business Small Office (SBSO) market.
System Board
There are three system board options for models 520 and 525. The three
options can be referred to as Type A, Type B and Type C.
Type A (part number D4051-63001) is a new system board which
incorporates a technology known as Unified Memory Architecture (UMA).
Using UMA, there is no dedicated video memory. Instead, a portion (1 MB or
2 MB) of main memory is shared as video memory. Refer to Chapter 2 for
more information about this system board.
Type B (part number D3657-63001) is the same as the system board used in
the Q1 1996 collection (models 510 and 515).
Type C (part number D3661-63001) is used for one product only. This board
is the same as the Type B board but without the onboard video controller
and memory. Video control and memory is obtained using a Matrox MGA
Millennium video card.
Backplane
There are two backplane options for models 520 and 525—one for the
desktop and one for the minitower. The two backplanes are the same as
those used in the Q1 1996 collection (models 510 and 515).
Case
There are two casing options for models 520 and 525—one for the desktop
and one for the minitower. The two backplanes are the same as those used
in the Q1 1996 collection (models 510 and 515).
Air Flow Guide
With high speed processors (166 MHz and above), an air flow guide is
required to help the fan dissipate the heat from the processor. On desktop
models, a special power supply unit integrates the fan over the processor.
6
Page 11

2
Casing, System Boards and Video
After reading this chapter you will be familiar with the HP Vectra 500 Series
PC (models 520 and 525) casing and hardware assembly.
7
Page 12

2 Casing, System Boards and Video
Desktop and Minitower Casing
Desktop and Minitower Casing
The casing for models 520 and 525 is the same as that for the Q1 1996
collection (models 510 and 515).
8
Page 13

2 Casing, System Boards and Video
System Board, Switches and Jumpers
System Board, Switches and Jumpers
As mentioned in Chapter 1, there are three system board options for models
520 and 525. This section describes the Type A system board (part number
D4051-63001).
System Board Layout
Cache Memory
Power
Connector 3.3 V
Battery
Status Panel VE
External Battery
Connector (not used)
External Start Connector
Power Connector
Processor Socket
CPU Core
Frequency
SW2
J6
Cache Jumper
J1
Floppy Disk Drive Connector
CD-ROM Connector (IDE Channel 2)
3
2
1
2
1
Multi-purpose Switch
A1
BANK A BANK B BANK C
A2
B1
B2
C1
C2
Main Memory Sockets
J7
13
24
CPU Bus Frequency
Backplane Connector
HDD Connector (IDE Channel 1)
VESA Feature Connector
SW1
3
2
1
Power-on Spacebar
JP4
Video
Serial B
Serial A
Parallel
Keyboard
Mouse
9
Page 14

2 Casing, System Boards and Video
System Board, Switches and Jumpers
System Board Switches and Jumpers
This section indicates the switches and jumpers used to modify the system
settings.
SW1 Switch
This switch is multi-purpose and is used to modify BIOS, CMOS and
password settings.
Switch Default
Setting
1 OFF Flashing Enable Flashing Disable Updating the BIOS. Set the security mode. Set the switch to the ON
2 OFF CMOS is in normal
3 OFF Password is in normal
OFF ON COMMENTS
position to prevent the BIOS from being upgraded.
CMOS Clear To clear the CMOS configuration. Set the switch to the ON position and
operation
Password Clear To clear the password. Set the switch to the ON position and restart the
operation
restart the PC. Return the switch to the OFF position and restart the PC
to return to normal operation.
PC. Return the switch to the OFF position and restart the PC to return to
normal operation.
SW2 Switch
This switch is used to select the CPU Bus Frequency / CPU Frequency ratio.
The following table includes some examples of the settings to use for
different processor speeds. (Jumper J7 settings are also shown. This jumper
is described on the next page.)
Processor Speeds
Switch Block SW2
Position
Jumper J7 Settings
Ratio
CPU Frequency 133 MHz 1 / 2 ON OFF 66 MHz 3 - 4
CPU Frequency 150 MHz 2 / 5 ON ON 60 MHz 1 - 3
CPU Frequency 166 MHz 2 / 5 ON ON 66 MHz 3 - 4
10
1 2 CPU Bus
Frequency
Pins Shorted
Page 15

2 Casing, System Boards and Video
System Board, Switches and Jumpers
CPU Bus Frequency Jumper (J7)
This jumper sets the CPU bus frequency. The following figure shows the
possible settings.
1
50 MHz 60 MHz 66 MHz
4
3
1
4
3
1
4
3
Cache Jumper (J6)
This jumper selects the cache type—either synchronous or asynchronous.
The default setting is for synchronous cache. The following figure shows the
two settings.
1
2
3
Synchronous Asynchronous
1
2
3
Space-bar Power-on Feature Jumper (JP4)
The Space-bar Power-On feature (“KBD Start” on the system board) enables
the PC to be turned on using the spacebar. To enable this feature, a jumper
has to be inserted. This setting overrides the setting in the Setup program.
Space-bar Power-on
enabled
11
Space-bar Power-on
disabled
Page 16

2 Casing, System Boards and Video
Video Options
Video Options
With models 520 and 525 there are three video options:
• Video controller and video memory on the system board.
• Video controller and video memory on a video card.
• Video controller on the system board and video memory that is shared
main memory.
Video Controller and Video Memory on the System Board
This option is the same as the video option in the Q1 1996 collection
(models 510 and 515). That is, 1 MB of video memory as standard on the
system board which can be upgraded to 2 MB by installing two memory
chips of 512 KB each.
The following video resolutions are typically available.
Resolution Number of colors Refresh Rate (Hz) Memory
640 x 480 16 60 1 MB
640 x 480 256, 64K 60, 72, 75
800 x 600 256, 64K 56, 60, 72, 75
1
1024 x 768 256 i43
640 x 480 16 60 2 MB
640 x 480 256, 64K, 16M 60, 72, 75
800 x 600 256, 64K, 16M 56, 60, 72, 75
1024 x 768 256, 64K i43
1280 x 1024 256 i45
1
Interlaced.
60, 70, 75
1
, 60, 70, 75
1
, 60, 72, 75
12
Page 17

2 Casing, System Boards and Video
2
Video Options
Video Controller and Video Memory on a Video Card
Product D4471A is supplied with 2 MB of video memory on a Matrox MGA
Millennium card, which can be increased to 4 MB or 8 MB. This PC does not
use the integrated video controller and memory. The card is in a PCI slot.
1
Millennium Card
The following video resolutions are typically available.
Resolution Number of colors Refresh Rate (Hz) Memory
640 x 480 256, 64K, 16M 60 - 120 2 MB
800 x 600 256, 64K, 16M 60 - 120
1024 x 768 256, 64K 60 - 120
1600 x 1200
1024 x 768 256, 64K, 16M 60 - 120 4 MB
1280 x 1024 256, 64K, 16M
1600 x 1200
1280 x 1024 256, 64K, 16M 60 - 90 8 MB
1600 x 1200
1
Upper limit of refresh rate for HP monitors is 60 Hz.
2
Bpp = Bits per pixel
1
1
1
256 60 - 72
60 - 90
2
(24 Bpp)
256, 64K 60 - 72
256, 64K, 16M 60 - 72
13
Page 18

2 Casing, System Boards and Video
Video Options
Video Controller on the System Board and Video Memory that is
Shared Main Memory
Some PCs have a video system that uses Unified Memory Architecture
(UMA). What this means is that the video controller does not use dedicated
video memory, but instead uses a portion of main memory as video memory.
The amount of “shared” memory can be set to either 1 MB or 2 MB. To do
this, use either the Video Memory Size item in the Setup program, or the
HP Dynamic Video Feature which is accessible via the Windows 95 Control
Panel.
The following video resolutions are typically available.
Resolution Number of colors Refresh Rate (Hz) Memory
640 x 480 16 60 1 MB
640 x 480 256, 64K 60, 72, 75, 85
800 x 600 256, 64K 56, 60, 72, 75, 85
1
1024 x 768 256 i43
640 x 480 16 60 2 MB
640 x 480 256, 64K, 16M 60, 72, 75, 85
800 x 600 256, 64K, 16M 56, 60, 72, 75, 85
1024 x 768 256, 64K i43
1280 x 1024 16, 256 i43
1
Interlaced.
60, 70, 75, 85
1
, 60, 70, 75, 85
1
, 60, 72, 75, 85
14
Page 19

3
Multimedia and Communications
The HP Vectra 500 Series PC (models 520 and 525) multimedia and communications option comes with an audio fax/data modem (an Aztech AT3300
card). This chapter describes the audio and communications features of the
card.
15
Page 20

3 Multimedia and Communications
Aztech AT3300 Connections
Aztech AT3300 Connections
The Aztech AT3300 audio fax/data modem incorporates built-in advanced
communication and audio telephony features, including the capability to
perform simultaneous audio playback and recording, as well as hands-free
communication.
CAUTION: To ensure that the telephony features of the Aztech card function correctly
a special phone cable is required. Using standard phone cables will result in
a loss of functionality.
Telephone Connections for the U.S., Canada and Spain
The Aztech AT3300 audio fax/data modem only has one external connection
so a splitter cable (delivered with the PC) is required to connect the
telephone line and handset. The connections are shown below.
Splitter Cable
WALL PHONE
Telephone extension
cord is connected
here
Telephone Handset
is connected here
16
Page 21

International Telephone Connections
Telephone line cable which
is specific to each country
3 Multimedia and Communications
Aztech AT3300 Connections
Connecting Audio Devices to the Rear Panel
Details on the use of each socket on the rear panel are given below:
TEL Connection for a telephone line.
LINE IN Connection for devices such as a cassette, DAT, or Minidisc
player.
MIC Connection for a microphone.
LINE OUT Connection for speakers, an external amplifier for audio
output, a recording device (tape deck) or headphones for
audio output.
JOYSTICK Connection for a joystick (for game software) or
MIDI instrument.
17
Page 22

3 Multimedia and Communications
Aztech AT3300 Connections
Connecting the Headset
The following figure shows how to connect the headset to the Aztech
AT3300 audio fax/data modem.
Audio Fax/Data
Modem
ON
VOLUME
MIC
OFF
Volume Control
18
Page 23

Waveblaster Connector
3 Multimedia and Communications
Aztech AT3300 Connections
Aztech AT3300 Internal Connections
The Aztech AT3300 audio fax/data modem has several connectors that allow
it to be connected to other devices.
U.S. and Canada Internal Connections
The following figure shows where the internal connectors are located on the
U.S. and Canada version of the Aztech AT3300 audio fax/data modem.
CDAUDIO 2 Connector
CDAUDIO 1 Connector
RADIO 1
Connector
TV AUDIO
Connector
JX MIC 1LOUT 1
19
Page 24

Waveblaster Connector
CDAUDIO 1 Connector
3 Multimedia and Communications
Aztech AT3300 Connections
International Internal Connections
The following figure shows where the internal connectors are located on the
international version of the Aztech AT3300 audio fax/data modem.
CDAUDIO 2 Connector
TV AUDIO
Connector
RADIO 1
Connector
JX MIC 1 LOUT 1
20
Page 25

3 Multimedia and Communications
Aztech AT3300 Connections
Waveblaster Connector
The audio fax/data modem has an on-card connector for the MIDI
synthesizer called Wave Blaster. This daughtercard module is capable of
producing extremely high-fidelity stereo music for computer audio systems.
CD Audio Connectors
There are two CD Audio Connectors, one labeled “CDAUDIO 1” and one
labeled “CDAUDIO 2”. These connectors allow the audio fax/data modem to
be connected to the CD-ROM drive via the audio cable. Either connector can
be used. If one connector is already selected for the CD Audio, the second
connector can be used to connect an external sound device.
TV Audio Connector
The TV Audio Connector allows an internal TV audio input from an optional
internal TV card to be connected.
Radio Connector
The Radio Connector allows an internal audio input from an optional
internal radio card to be connected.
JX Connector
This connector determines the microphone type. It is preconfigured and
should not be modified.
MIC Connector
The Microphone Connector is a 3-pin connector that accepts microphone
input. It has the same functions as the external microphone connector
(refer to “Connecting Audio Devices to the Rear Panel” on page 17).
However, only one connector can be selected. If the external microphone is
used, for example, the internal connector is disabled.
LOUT Connector
The LOUT Connector has the same function as the external line out
connector (refer to “Connecting Audio Devices to the Rear Panel” on page
17). However, only one connector can be selected. If the external line out is
used, for example, the internal connector is disabled.
21
Page 26

3 Multimedia and Communications
Communications Software
Communications Software
Multimedia and communications models are preloaded with a
comprehensive set of communications and sound tools.
The communications software performs a wide range of communications
tasks, such as sending and receiving faxes, answering and screening phone
calls, and recording voice messages.
22
Page 27

4
Displays
This chapter gives details of the displays which are recommended for the
HP Vectra 500 Series PCs (models 520 and 525).
23
Page 28

4 Displays
Overview
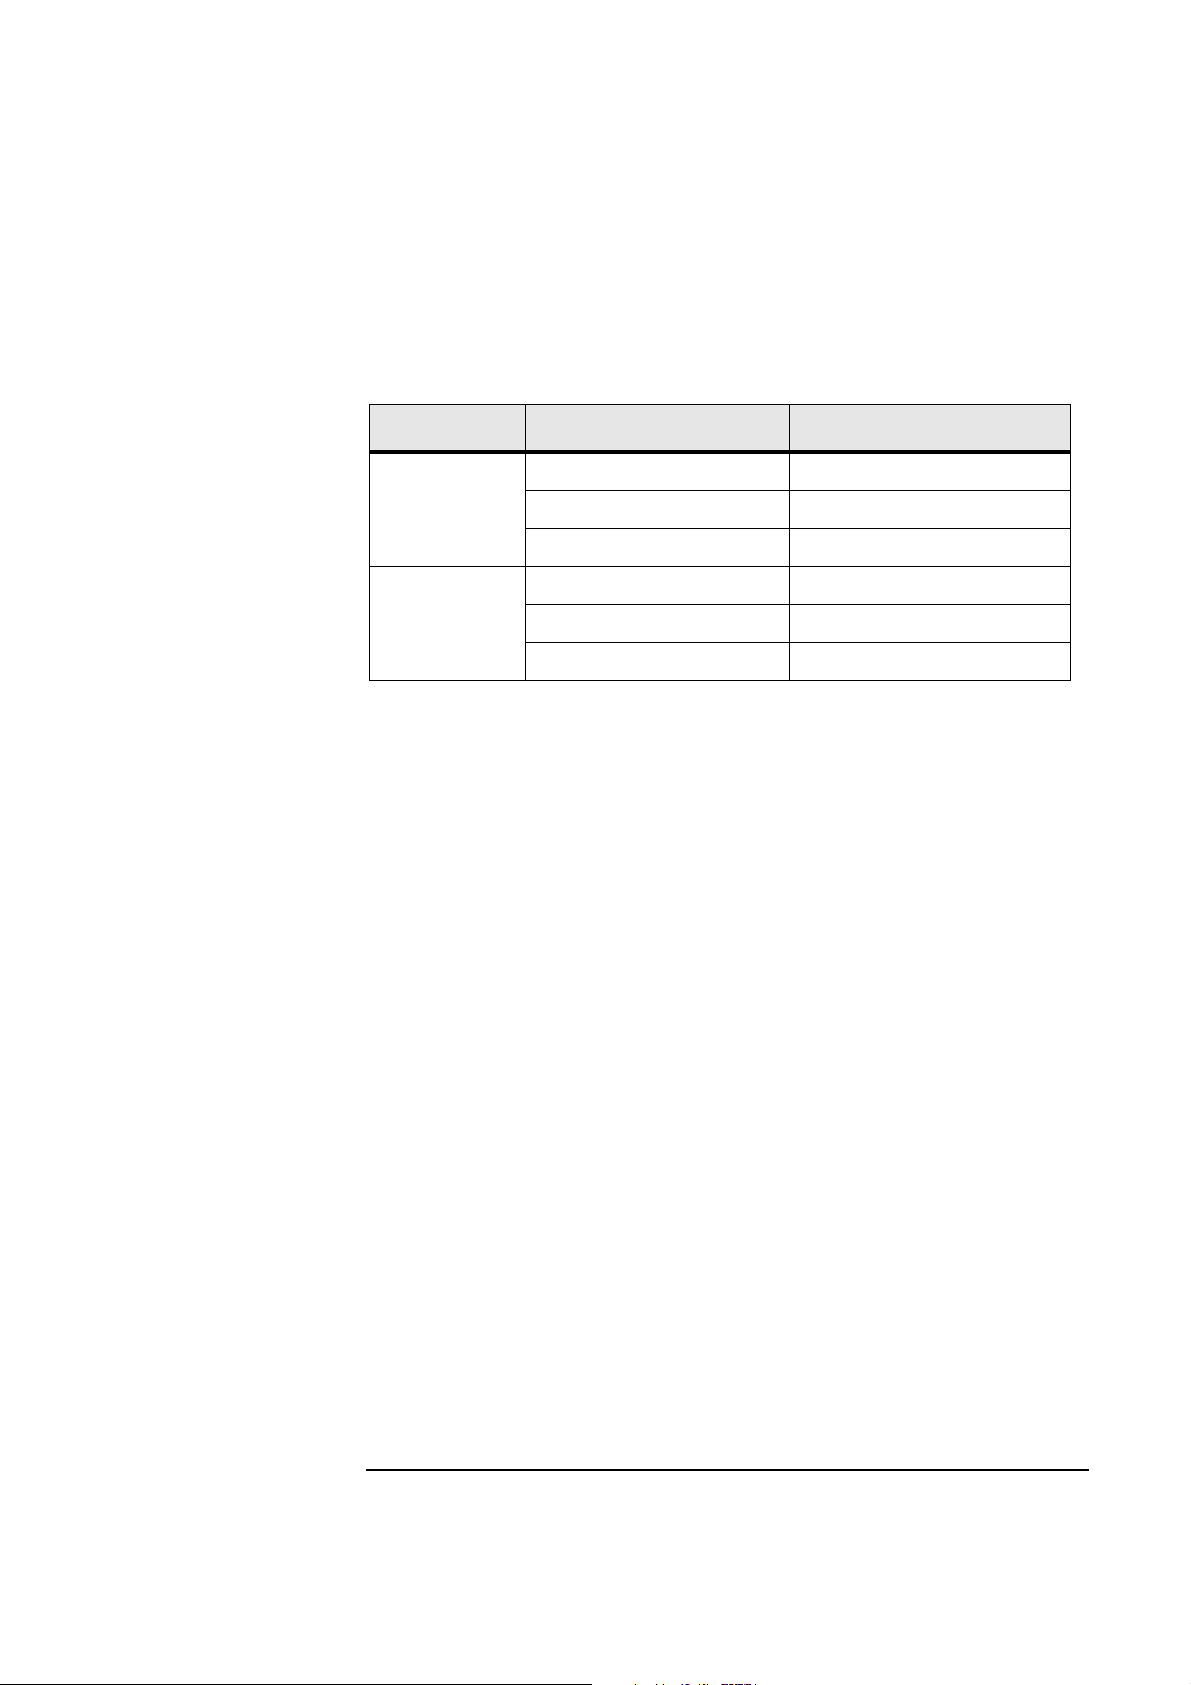
Overview
There are no displays delivered with the HP Vectra 500 Series (models 520
and 525). There is, however, a list of recommended displays. These are
listed by region in the following table.
Display Size Europe
14-inch D2811A D2813S D2811A D2810A
15-inch D2808S D2808S D2808A D2808A
15-inch
multimedia
17-inch D2817A D2817A D2817A D2817A
D2809A D2909A D2809A D2809A
US and
Canada
Asia/Pacific
and Japan
Latin
America
Displays for SBSO can be recognized by the ‘S’ in the part number (for
example, D2808S). SBSO displays come with customized documentation,
packaging and warranty.
24
Page 29

5
Preinstalled Software
HP Vectra 500 Series PCs come preinstalled with a range of software.
25
Page 30

5 Preinstalled Software
Software Packages
Software Packages
The following table shows the software packages delivered with
HP Vectra 500 Series PCs (models 520 and 525).
Operating
System
Business
Applications
Communications
Applications
Support/Utilities
Online Services
Preinstalled Software Available Localizations
MS Windows 95
Adobe Acrobat Reader 2.1
Microsoft Word
Microsoft Office
Microsoft Excel
Microsoft Powerpoint
QUIP
Proshare
TIMTEL
HP Message Sender V2.0
PC411
Microsoft Exchange
Carbon Copy Remote Support 3.0A
HP Vectra PC Checkup (low-level
hardware diagnostics)
McAfee VirusScan95
Scandisk
Safe Off
Datasafe Remote Backup US
CompuServe
America On Line
Infovia
T-Online
Netcom/Netscape
US, GR
FR
US
US, FR, UK, GR
SP
GR
US
1
Setup
HP Learning
Software
Administration
HP Registration Card
Start Up Sequence
HP Welcome Center
HP Help
HP Uninstall 2.0
26
Page 31

5 Preinstalled Software
Software Packages
Printer Drivers
Peripherals
1
US=United States of America, FR=France, GR=Germany, SP=Spain, UK=United
Kingdom
Video Drivers
LAN Ready
All software may be restored using CD-ROMs included with each PC.
Version numbers are correct at time of printing.
27
Page 32

Page 33

6
Support Tools
This chapter briefly outlines the support tools available for the
HP Vectra 500 Series PCs (models 520 and 525).
29
Page 34

6 Support Tools
Software Recovery
Software Recovery
All HP Vectra 500 Series PCs are delivered with a product recovery kit
which consists of:
• The HP Product Recovery CD-ROM which contains a backup of the pre-
loaded software, excluding business applications.
• The Windows 95 companion CD-ROM.
• Business software applications on CD-ROM (some models only).
The HP Product Recovery CD-ROM may be used to restore all the software
(except business applications).
CAUTION: The recovery process formats the hard disk. All files that are on the disk will
be lost when the recovery process is performed.
The software recovery process takes between 60 and 90 minutes—
depending on the computer’s configuration.
The HP Product Recovery CD-ROM also includes the Scandisk utility which
can be used to check the hard disk surface, files and folders for damage. The
CD-ROM also enables the following floppy disks to be created:
• An anti-virus disk that can be used to search for virus infections on the
hard disk (not for Asia / Pacific Partner models)
•
A checkup disk that can be used to identify hardware-related problems.
• A Windows 95 startup disk that can be used to start the computer if there
are problems with Windows 95.
MicroCom Carbon Copy
All HP Vectra 500 Series PCs sold with the multimedia and communications
option are delivered with a restricted version of Carbon Copy.
Carbon Copy allows HP Support personnel to connect and remotely control
a client’s PC in order to perform high-level troubleshooting. This tool is
extremely powerful and should be used only by qualified HP Support Center
personnel, and only after consent from the client.
30
Page 35

6 Support Tools
Software Recovery
HP Vectra PC Checkup
The HP Vectra 500 Series PCs are equipped with a low-level hardware
diagnostics program which can be used to identify hardware-related
problems. See the next section, The HP Checkup Program for more
information.
Service Handbook
The HP Vectra 500 Series PC Service Handbook containing service
information and part numbers is available.
Updated part number information is also available on the HP-SPI CD-ROM.
31
Page 36

6 Support Tools
Running the HP Vectra PC Checkup
Running the HP Vectra PC Checkup
HP Vectra 500 Series PCs are equipped with a checkup program which can
be used to identify and fix hardware-related problems. (The checkup
program is an enhanced version of the diagnostics toolkit which was
delivered with the Spring 1996 models—models 510 and 520.)
Generating an HP Vectra PC Checkup Disk from Within Windows 95
To generate a checkup disk you will need a blank floppy disk available.
1 Click the Start button in the bottom left corner of the screen.
2 Click Programs, then HP Support Utilities, then Diagnosis, then Create
Your PC Checkup Disk.
3 Follow the instructions on the screen.
Generating an HP Vectra PC Checkup Disk from the Product
Recovery CD-ROM
Refer to the instructions supplied with the Product Recovery CD-ROM.
Running the HP Vectra PC Checkup from a Floppy Disk
1 Shut down the PC in the normal way if you can.
2 Turn off the PC.
3 Insert the checkup program floppy disk that you have created.
4 Turn on the PC.
5 Follow the instructions on your screen.
Running the HP Vectra PC Checkup from the Hard Disk
1 Close down all applications if you can, as the checkup program first exits
from Windows 95.
2 Click Start.
3 Point to Programs, then HP Support Utilities, then Diagnosis.
4 Click Run your PC Checkup.
5 Follow the instructions on your screen.
32
Page 37

Page 38

HP Part No. 5964-8384-EN
 Loading...