


VOCSN
Table of contents
 Loading...
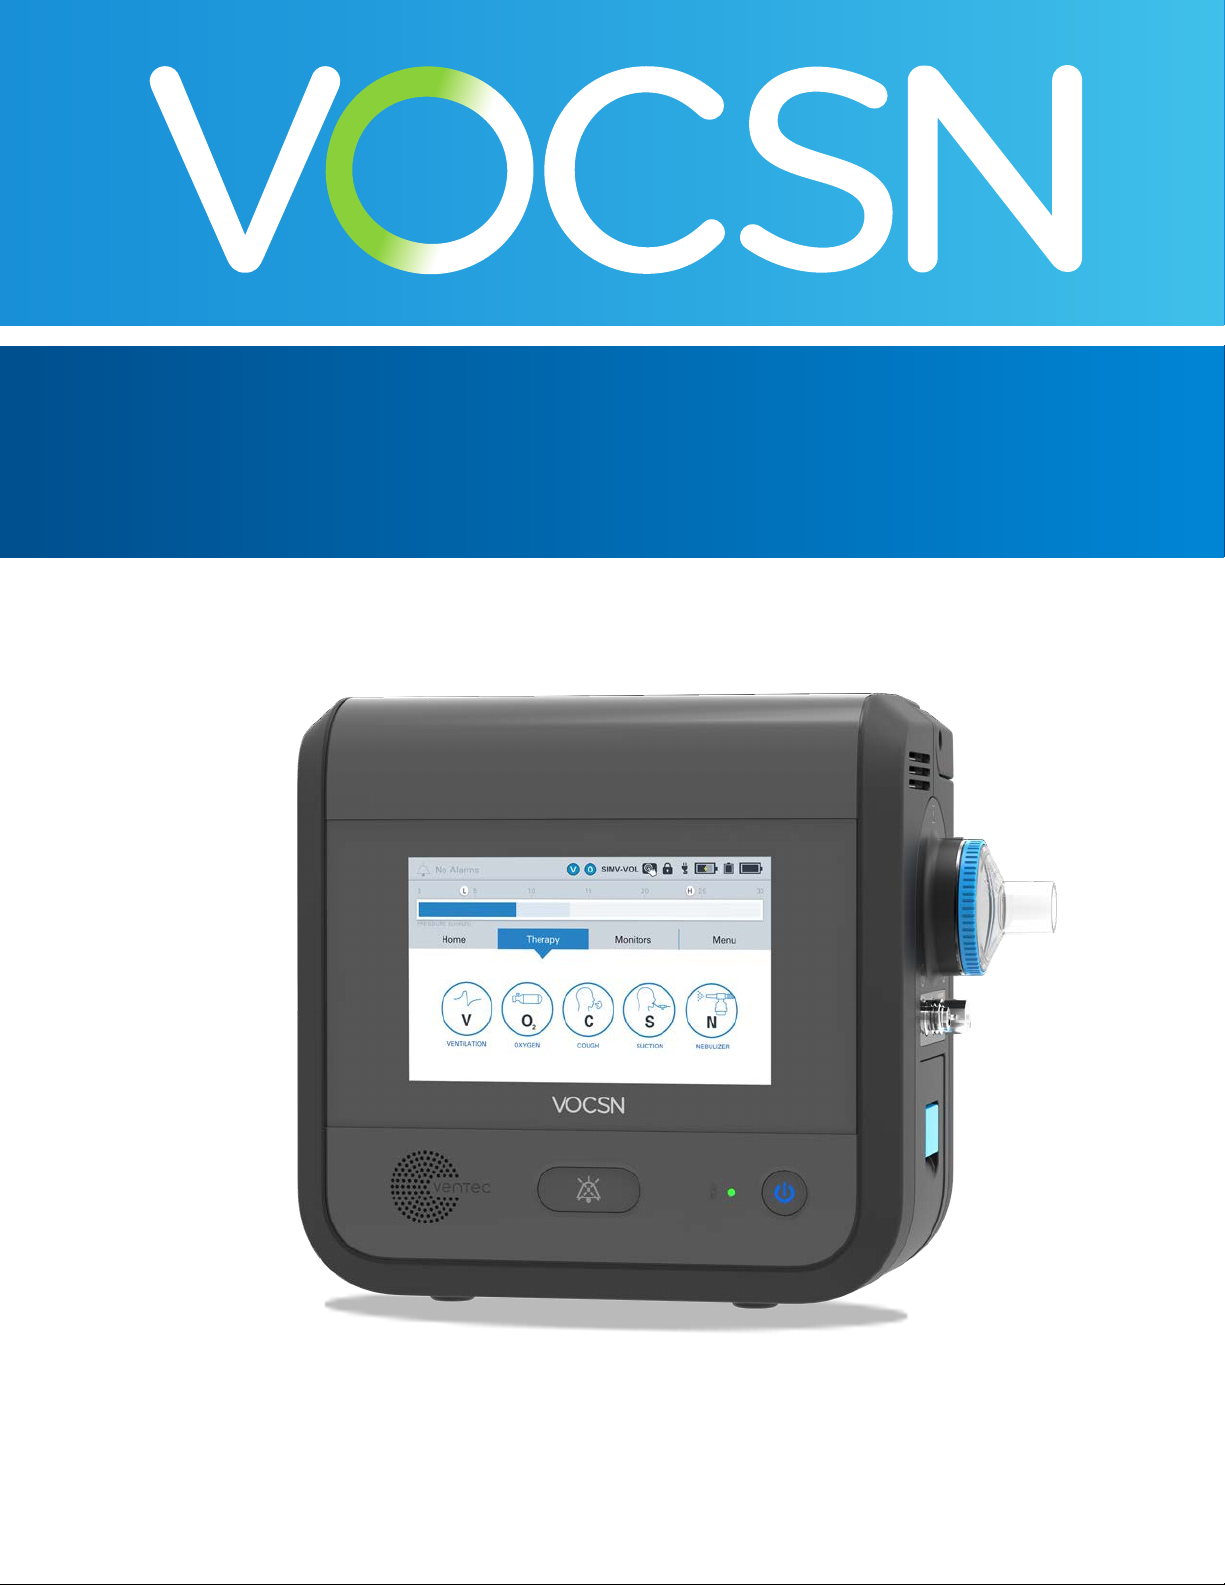
Clinical and Technical Manual
Software Version 4.06
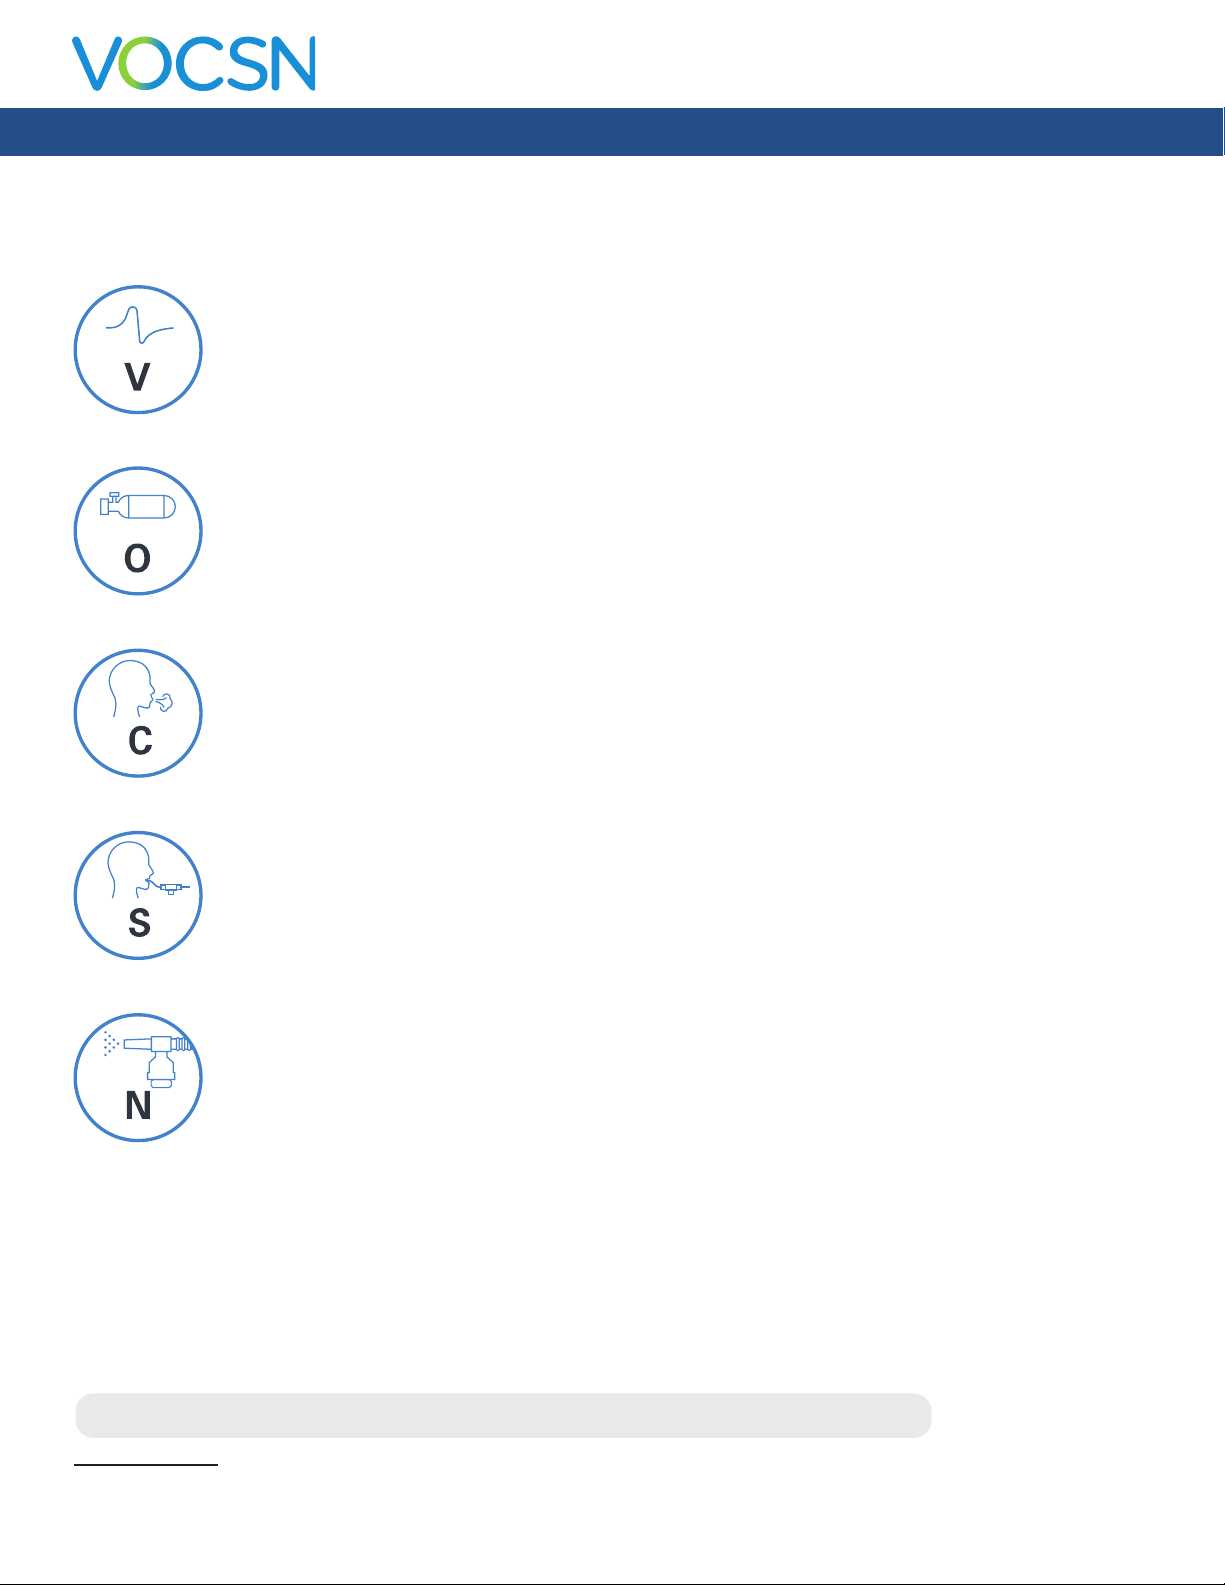
VOCSN offers mechanical Ventilation, Oxygen, Cough, Suction, and Nebulizer therapies in one compact, portable,
NEBULIZER
lightweight device.
Critical Care Ventilator
VOCSN is one of the few portable ventilators to achieve the rigorous critical care standard1 for safety
and accuracy. The ventilator provides invasive, noninvasive, and mouthpiece ventilation and delivers a
comprehensive set of modes and settings to meet patient needs.
VENTILATION
6 L/min Equivalent Internal Oxygen Concentrator
The VOCSN internal oxygen concentrator and Oxygen DirectTM system deliver the equivalent of
2
OXYGEN
6 L/min of oxygen or up to 40% FiO2. External high pressure and low pressure oxygen sources can
be connected when needed.
Touch Button Cough
Touch Button CoughTM therapy is activated in seconds rather than minutes, without changing the circuit.
Breath Sync monitors patient breathing and triggers a cough at a natural point in the breathing cycle.
COUGH
Hospital Grade Suction
Hospital grade suction system provides consistent high ows throughout the entire suction experience.
VOCSN Suction therapy is up to three times quieter than traditional portable suction machines.
SUCTION
High Performance Nebulizer
VOCSN automatically compensates for the airow from the nebulizer drive to ensure accurate
ventilation and comfortable breathing. VOCSN records each medication use and turns off the nebulizer
when the therapy is complete.
Copyright: © 2020, Ventec Life Systems
22002 26th Ave SE
Bothell, WA 98021 USA
Part Number: LBL-00001-001, Rev M
CAUTION: Federal law restricts this device to sale and use by or on the order of a physician.
1
ISO 80601-2-12
VentecLife.com 2

Table of Contents
Table of Contents
Introduction 12
Therapy Overview 12
VOCSN Congurations 13
Leak+ Performance 13
Ventilation 14
Oxygen Direct 14
Touch Button Cough 15
Suction 15
Nebulization 15
Portability 16
Indications for Use 16
VOCSN Training 16
Suggested Environments of Use 17
Home Environments 17
Hospital Environments 17
Institutional Environments 17
Transport Environments 17
Getting Started 18
Package Contents 18
Contraindications 18
System Overview 19
VentecLife.com 3

Table of Contents
Setup 20
VOCSN Placement 21
Power Setup 22
The Power Supply 23
The Optional 24 Volt Wheelchair Power Cable 24
The Removable, Rechargeable Batteries 24
Ventec One-Circuit Setup 25
Using a Trach, ET Tube, or Non-Vented Mask 26
Using a Vented Mask 26
Using a High Flow Nasal Cannula 26
Connecting an Active, Passive, or Valveless Ventec One-Circuit 27
Ventec One-Circuit Component Connection Order 28
Connecting an External Bacterial Filter 29
Connecting a Ventec One-Circuit Without a Humidier 29
Connecting a Humidier and Heated Wire Ventec One-Circuit 30
Connecting a Ventec One-Circuit to a Humidier (Without the Ventec Humidier Bypass) 31
Connecting a Ventec One-Circuit, Humidier, and Ventec Humidier Bypass 32
Connecting a Ventec One-Circuit O2 Tube 33
Connecting an Active Ventec One-Circuit 34
Connecting Ventec One-Circuit Components 35
Connecting an HME (Heat-Moisture Exchanger) 35
Connecting a Nebulizer Cup to the Patient Circuit 36
Connecting a Ventec Secretion Trap to the Patient Circuit 38
Connecting a Closed-Suction Catheter to the Patient Circuit 39
Setting up Ventilation therapy with a Speaking Valve 39
Mouthpiece Patient Circuit Setup 40
Oxygen Therapy Setup 41
Setting Up the Internal O2 Concentrator 42
Setting Up External Oxygen Sources 42
Connecting External High-Pressure Oxygen 43
Connecting External Low-Pressure Oxygen 44
Suction Setup 45
Removing and Reattaching the VOCSN Suction Cap 45
Connecting the Ventec Travel Suction Canister 46
Connecting Suction Tubing to the Travel Canister 47
Connecting the External Suction Canister Adapter 48
Connecting Suction Tubing to Suction Interfaces 48
Connecting a Nurse Call System or Remote Alarm 49
Running the Pre-Use Test 50
VentecLife.com 4

Table of Contents
Breath Types and Therapy Modes 51
Breath Types 51
Pressure Breaths 52
Volume Breaths 53
Spontaneous Breaths 53
VOCSN Ventilation Modes 54
Bi-Level Mode 54
Assist/Control-Pressure with an Active, Passive, or Valveless Ventec One-Circuit 55
Assist/Control-Pressure with a Mouthpiece Patient Circuit 55
SIMV-Pressure Mode 56
CPAP Function 56
High Flow Therapy 56
Assist/Control-Volume Mode 57
Assist/Control-Volume with an Active, Passive, or Valveless Ventec One-Circuit 57
Assist/Control-Volume with a Mouthpiece Patient Circuit 57
SIMV-Volume Mode 58
CPAP Function 58
High Flow Therapy 58
Volume Targeted Ventilation Overview 59
Vol. Targeted-PS Mode 60
Vol. Targeted-PS with an Active, Passive, or Valveless Ventec One-Circuit 60
Vol. Targeted-PS with a Mouthpiece Patient Circuit 60
Vol. Targeted-PC Mode 61
Vol. Targeted-PC with an Active, Passive, or Valveless Ventec One-Circuit 61
Assist/Control-Pressure with a Mouthpiece Patient Circuit 61
Vol. Targeted-SIMV Mode 62
Comparable Volume Ventilation Modes 63
Comparable Pressure Ventilation Modes (Including Volume-Targeted Ventilation) 64
Comparable Non-Invasive Ventilation Modes 65
VentecLife.com 5

Table of Contents
The Touchscreen 66
Locking the Touchscreen 66
The Status Bar 67
The Home Screen 68
Night Mode and Day Mode 68
The Therapy Screen 69
The Monitors Screen 70
The Customization Button 70
The Waveforms Button 70
The Menu Screen 71
The Pre-Use Test Button 71
The Settings & Alarms Button 72
The Device Settings Button 72
The Logs Button 72
The Clinician Access Button 72
The Enable Prescribed Therapies Button 73
The Permissions Button 73
The My VOCSN Button 73
Controls and Settings 74
Ventilation Therapy Controls 75
Changing Ventilation Therapy Settings 75
Available Ventilation Therapy Settings 76
Control Limiting 83
Controls Available in Each Ventilation Mode 84
Setting VOCSN Controls for Mouthpiece Ventilation 87
Setting VOCSN Controls for High Flow Therapy 87
Enabling and Disabling Prescribed Therapies 88
Oxygen Controls 90
Changing Oxygen Settings 90
Available Oxygen Settings 91
Cough Therapy Controls 93
Changing Cough Therapy Settings 93
Available Cough Therapy Settings 94
Changing Suction Settings 96
Changing Nebulizer Settings 97
Clinician Access Mode 98
Entering the Clinician Access Passcode 98
Conguring Permissions 99
Device Settings 100
Changing Device Settings 100
Available Device Settings 101
VOCSN Therapy Interactions 102
VentecLife.com 6

Table of Contents
Alarms 103
Alarm Silence Button 104
Changing Alarm Settings 104
Alarm Conditions and Settings 105
The Alarm Log 113
The Event Log 114
Clearing an Alarm 115
Remote Alarms and Nurse Call Systems (Optional) 115
Monitors 116
Ventilation Monitors 117
Waveform Monitors 119
Monitor Screen Customization 120
Oxygen Therapy Monitors 121
FiO2 Monitor 121
Calculated FiO2 Monitor 122
Cough Therapy Monitors 123
Suction Therapy Monitor 124
Nebulizer Therapy Monitor 125
System Monitors 126
Multi-View 127
Exporting Multi-View Data to a USB Drive 128
Generating Multi-View Reports 129
Reading Multi-View Reports 130
Report Information 130
Trend Summary 131
Compliance Calendar 131
Therapy Use 132
Settings Overview 132
Monitor Details 133
Logs 134
VentecLife.com 7

Table of Contents
Checkout Procedure 135
Visual Inspections 135
Inop Alarm Test 135
Power Testing Procedures 136
Ventilation and Oxygen Testing Procedures 137
Ventilation And Oxygen Tests 138
Ventilation Alarm Verication 139
Remote Alarm Test (Optional) 139
Decannulation Alarm Verication 140
Patient Circuit Disconnect Alarm Verication 140
Cough Therapy Testing Procedures 141
Suction Therapy Testing Procedures 142
Nebulizer Therapy Testing Procedures 142
Congure and Verify Control and Alarm Settings 142
Checkout Worksheet 143
Operating Instructions 144
Powering On VOCSN 145
Starting VOCSN Therapies 146
Starting Ventilation Therapy 147
Changing Between Congured Ventilation Presets 148
Starting Oxygen Therapy 149
Using O2 Flush 150
Using the Internal O2 Concentrator to Provide Pulse Dose Oxygen Direct Therapy 151
Using External High-Pressure Oxygen 152
Using External Low-Pressure Oxygen 152
Starting Cough Therapy 153
Starting Suction Therapy 154
Starting Nebulizer therapy 156
Responding to Alarms 158
Powering Off VOCSN 158
VentecLife.com 8

Table of Contents
Cleaning and Maintenance 159
Cleaning VOCSN 159
Cleaning VOCSN Exterior 160
Cleaning the Air and Fan Filters 161
Replacing Components 162
Emptying the Ventec Travel Suction Canister and Replacing Suction Components 162
Replacing the Power Supply 163
Replacing the Ventec One-Circuit or Ventec Humidier Bypass 163
Replacing Ventec One-Circuit Components 164
Replacing the Nebulizer Filter 164
Replacing the External Bacterial Filter 164
Replacing the Internal Bacterial Filter 165
Recommended Maintenance Schedule 166
Battery Care, Maintenance, and Replacement 167
Software Updates 168
Locating the VOCSN Software Version 168
Environmental Considerations 169
Shipping Considerations 169
Glossary 170
Glossary of Symbols 170
Glossary of Indicators 174
Glossary of Terms 176
Troubleshooting 177
Troubleshooting Alarms 177
Device Troubleshooting 183
Ventilation and Cough Troubleshooting 184
Oxygen Troubleshooting 185
Suction Troubleshooting 186
Nebulizer Troubleshooting 186
Multi-View Troubleshooting 187
Patient Circuit Troubleshooting 187
Recalibrating Batteries 188
VentecLife.com 9

Table of Contents
Technical Specications 189
Physical 189
Environmental 190
Inputs and Outputs 190
External Power Requirements 191
Removable, Rechargeable Batteries 191
Internal Rechargeable Battery 191
Expected Service Life and Intervals 192
Audible Volume 192
O2 Concentrator 192
Nebulizer Drive 193
FiO2 Monitor 193
Control Accuracy 194
Monitor Resolution and Accuracy 196
Classications 198
Standards Applied 198
Ventec One-Circuit Compliance 199
Pressure During Inop 199
Biocompatibility 199
Accessories 200
Available from Ventec Life Systems 200
Available from Other Manufacturers 205
EMC Information 206
Electromagnetic Emissions 207
Electromagnetic Immunity 208
Recommended Separation Distance Between Portable and Mobile RF Communications
Equipment and VOCSN 210
VentecLife.com 10

Table of Contents
Technical Description 211
Theory of Operation 211
Ventilation Therapy and FiO2 Oxygen Therapy 211
Leak Compensation 212
Leak Compensation with an Active Ventec One-Circuit 212
Leak Compensation with a Passive or Valveless Ventec One-Circuit 213
Leak Compensation with a Mouthpiece Circuit 213
The Oxygen Direct System 214
Touch Button Cough therapy and the Ventec Humidier Bypass 215
Suction 215
Nebulization 216
Internal Nebulizer Therapy 216
External Nebulizer Compensation 216
VOCSN Measurements 217
Airway Pressure Measurements 217
Flow Measurements 217
Volume Measurements 217
FiO2 Measurements 217
Alarm Detection Criteria 218
System Fault Detection Criteria and Recommended Action 219
Low-Pressure Oxygen Blending 221
Input Flow 100% Oxygen, Flow Trigger Set to 1-3 222
Input Flow 100% Oxygen, Flow Trigger Set to 9 222
Input Flow 93% Oxygen, Flow Trigger Set to 1-3 223
Input Flow 93% Oxygen, Flow Trigger Set to 9 223
Input Flow 100% Oxygen, High Flow Therapy 224
Input Flow 93% Oxygen, High Flow Therapy 224
VentecLife.com 11
Introduction
NEBULIZERSUCTIONCOUGHOXYGEN
Introduction
Therapy Overview
Using the Ventec One-CircuitTM, clinicians, home caregivers, and patients can use VOCSN to ventilate, provide air
enriched with oxygen to the patient, simulate natural coughs to clear secretions, remove those secretions from the
patient airway or circuit, and administer nebulized medication, minimizing the need to connect additional medical
equipment or recongure the patient circuit.
2
VENTILATION
NOTE: This manual describes the features included with version 4.06. Not all functionality is available in previous
versions of the VOCSN software. See “Software Updates” on page 168 for a description of features included in each
release, and instructions to check the software version of your device. To view revisions of the Clinical and Technical
manual associated with previous software versions, see VentecLife.com/resources.
VentecLife.com 12

Introduction
VOCSN Congurations
VOCSN offers mechanical Ventilation, Oxygen, Cough, Suction, and Nebulizer therapies in one compact, portable,
lightweight device. VOCSN is customizable and may be purchased in various congurations of the available integrated
therapies. There are many possible VOCSN congurations. This allows patients and caregivers to select a device that
provides therapies that meet the patient’s individual needs.
Your device may include all ve therapies and all the features described in this manual, or just the set of therapies and
features purchased or prescribed by the treating physician. Depending on its conguration, VOCSN will be able to
provide Ventilation, +Oxygen Concentration, +Cough, +Suction, and/or +Nebulizer therapy. It may also be able to
provide oxygen from an external high-pressure source and FiO2 monitoring (+Pro congurations) or low-pressure oxygen
(all congurations). The conguration name is based on the therapies VOCSN can provide. For example, the V+C
conguration provides Ventilation+Cough therapies. The conguration name is printed on the back of the device, and is
also visible on the My VOCSN screen.
Conguration
(Located on Device
Rear Label)
V+O+C+S+N+Pro
(or “VOCSN”)
V+O+C+S+N
V+C+Pro
(or “VOCSN-VC”)
V+C
High-Pressure
O2
Ventilation
(V)
Yes Yes Yes Yes Yes Yes Yes
Yes Yes Yes Yes Yes No Yes
Yes No Yes No No Yes Yes
Yes No Yes No No No Yes
Concentration
(+O)
Cough
(+C)
Suction
(+S)
Nebulizer
+(N)
External Oxygen
and FiO2 Monitor
(+Pro)
Low-Pressure
External
Oxygen
Leak+ Performance
The Leak+ feature allows VOCSN to deliver High Flow ventilation, as well as provide compensation for leaks up to
175 L/min at 20 cmH2O. The improved Leak Compensation may be particularly useful during non-invasive ventilation.
Leak+ is available on devices with compatible hardware running software version 4.06R and newer.
To see if your VOCSN is capable of Leak+ performance, install the latest software and check for the “V”
icon with a white background in the status bar. The availability of this feature can also be found on the
My VOCSN screen next to “Leak+.”
For more information about VOCSN leak compensation, see “Leak Compensation” on page 212.
WARNING: Delivered and monitored ventilation therapy may be affected by large leaks around the patient interface.
V
VentecLife.com 13

Introduction
Ventilation
VOCSN provides invasive or non-invasive ventilation. Using one of six ventilation modes, and an active, passive,
valveless, or mouthpiece Ventec One-Circuit, VOCSN delivers congurable pressure, volume, and/or spontaneous
breaths.
The congurable Flow Trigger control, in combination with the powerful integrated Leak Compensation feature, allows
VOCSN to perform well for both invasive and non-invasive applications, even with signicant leaks in the patient circuit.
VOCSN devices with the Leak+ feature can compensate for leaks up to 175 L/min at 20 cmH2O. Ventilation controls such
as Rise Time and Pressure Control Flow Termination can be adjusted to improve patient comfort.
The Ventilation therapy Presets feature allows clinicians to set up, label, and store up to three unique Ventilation therapy
congurations. Using the touchscreen, clinicians, home caregivers, and patients can switch between these three precongured therapies as needed. For example, some patients may benet from one ventilation Preset while awake,
another Preset while active, and a third Preset during sleep.
The Permissions feature allows clinicians to lock VOCSN control settings. VOCSN controls can be set to User and
Clinician, or Clinician Only. Controls set to Clinician Only cannot be modied until the Clinician Access Passcode is
entered. Controls set to User and Clinician will remain adjustable at all times.
Optional integrated oxygen blending provides a congurable FiO2 to the patient, utilizing an external high-pressure
oxygen source. The internal FiO2 monitor continuously monitors the FiO2 of the delivered gas as it ows to the Ventec
One-Circuit, to ensure the accuracy of delivered Oxygen therapy. The VOCSN also includes an internal O2 Concentrator,
which may be used to provide Oxygen DirectTM therapy to the patient. Alternatively, oxygen can be owed into the
Ventec One-Circuit through the low-pressure oxygen port.
Oxygen Direct
The VOCSN internal O2 Concentrator delivers Oxygen Direct therapy to the patient without requiring an external
oxygen source. It is intended for the administration of non-life-sustaining, supplemental oxygen to stable individuals.
Using the O2 Flow Equivalent control, the internal O2 Concentrator delivers the equivalent of up to 6 L/min as pulse
doses through a small integrated oxygen tube in the Ventec One-Circuit.
Traditional, portable oxygen concentrators include a pulse dose oxygen mode, used to deliver oxygen through a high
ow nasal cannula, but do not have a way to trigger pulsed doses of oxygen through a patient circuit for ventilation.
VOCSN unies ventilation and oxygen concentration to deliver oxygen as pulse doses through a small oxygen tube in
the Ventec One-Circuit, in synchronization with patient breathing.
VOCSN can also be connected to an external source of high-pressure oxygen to deliver oxygen through the Ventec One-
Circuit as a congured FiO2, or in pulse dose mode using an integrated Ventec One-Circuit O2 tube.
VentecLife.com 14

Introduction
Touch Button Cough
Integrated VOCSN Touch Button CoughTM therapy can be delivered with the touch of a button without modifying
the Ventec One-Circuit. Once initiated using the touchscreen, VOCSN transitions to Cough therapy and then back to
Ventilation therapy automatically. Touch Button Cough therapy delivers an insufation (positive) pressure, and then an
exsufation (negative) pressure through the Ventec One-Circuit to simulate a natural cough, moving secretions out of the
patient airway.
The Cough+Suction feature allows VOCSN to activate Suction therapy automatically when Cough therapy is initiated, to
simultaneously move secretions out of the patient airway, and from the Ventec One-Circuit.
The Breath Sync feature synchronizes cough maneuvers with patient effort to improve patient comfort. VOCSN also
monitors Peak Cough Flow and Cough Volume to help ensure Cough therapy is delivered effectively.
Suction
VOCSN includes a high-ow suction system designed to safely aid in effective airway clearance for both pediatric and
adult patients. If enabled, Suction therapy can be initiated at any time during Ventilation or Cough therapy, to help
remove secretions from the patient airway or Ventec One-Circuit.
The Cough+Suction feature allows VOCSN to activate Suction therapy automatically when Cough therapy is initiated, to
simultaneously move secretions out of the patient airway, and from the Ventec One-Circuit.
Suction therapy can be used with a Ventec Secretion Trap, or closed- or open-suction catheter. The Ventec Secretion Trap
collects secretions as they enter the Ventec One-Circuit during Cough therapy. Suction tubing connected to the Ventec
Secretion Trap vacuums those secretions out of the Ventec One-Circuit and into the detachable Ventec Travel Suction
Canister.
Nebulization
Optional Nebulizer therapy provides an integrated 6 L/min nebulizer drive, to power a nebulizer connected to the
Ventec One-Circuit. Nebulization can be initiated using the VOCSN touchscreen, and turns off automatically when the
congured Nebulizer therapy duration has elapsed. While Nebulizer therapy is active, VOCSN automatically adjusts the
delivered Ventilation therapy to compensate for nebulization ows.
VentecLife.com 15

Introduction
Portability
VOCSN is designed to support the transport of mechanically ventilated patients. VOCSN includes two removable,
rechargeable batteries and an internal rechargeable battery, used to power the device when no external source of
continuous power is available.
Using the power supply, VOCSN can be connected to a wall outlet or other AC power source. Ventec Life Systems also
offers an optional 24 Volt Wheelchair Power Cable, which can be used to power VOCSN from wheelchair outlets. VOCSN
batteries charge whenever an external power source is applied.
Indications for Use
VOCSN Unied Respiratory System is intended to provide continuous or intermittent ventilatory support for the care
of individuals who require mechanical ventilation. It may be used in invasive and non-invasive applications. VOCSN is
intended for pediatric through adult patients weighing at least 5 kg. It is intended for use in home, hospital, institutional,
and transport settings, including portable applications.
The integral oxygen concentrator is intended for the administration of supplemental oxygen. The integral suction
pump is intended for airway uid removal and oral/pharyngeal hygiene. The integral cough assist option is intended for
patients who are additionally unable to cough or clear secretions effectively.
VOCSN Training
The VOCSN clinician or caregiver must be capable of responding to alarm conditions, and trained to use VOCSN. A list
of available VOCSN training options is available at VentecLife.com.
CAUTION: Clinicians responsible for conguring and operating VOCSN must be trained to use it and should review
this manual in its entirety before using VOCSN to administer therapy. Home caregivers must also receive training,
and must review the Home Caregiver and Patient Guide (available at VentecLife.com) prior to setting up or operating
VOCSN.
VentecLife.com 16

Suggested Environments of Use
VOCSN is suitable for use in the following environments:
Home Environments
• Home care
• Home-based transport
Hospital Environments
• Emergency departments
• Step-down units
• Military hospitals
Introduction
WARNING: Do not use VOCSN within magnetic resonance (MR) environments. Using VOCSN within MR environments
may affect VOCSN or MR device performance, damage the devices, or harm individuals.
Institutional Environments
• Long-term acute care
• Skilled nursing facilities
• Long-term care/nursing homes
Transport Environments
• Intra-hospital transport
• Inter-hospital transport
• Emergency medical services
• Military transport
NOTE: VOCSN that include an airplane symbol on the back label are compliant with the regulations
for device use on board aircraft.
VentecLife.com 17

Getting Started
Package Contents
VOCSN includes the following items:
• One VOCSN (therapy conguration may vary)
• Two removable, rechargeable batteries
• One power supply
• One Ventec One-Circuit
• Bacterial lters
• One Quick Start Guide
• One Ventec Travel Suction Canister (included with VOCSN congurations with Suction therapy)
• One Nebulizer Filter (included with VOCSN congurations with Nebulizer therapy)
Introduction
NOTE: Contact Ventec Life Systems at 1-844-MY-VOCSN for assistance with setup, maintenance, or to report
unexpected device operation.
See “Accessories” on page 200 for a list of VOCSN components and accessories available from Ventec Life Systems.
Contraindications
Consult the patient’s healthcare professional before using a non-invasive interface with VOCSN if the patient experiences
any of the following medical conditions:
• Inability to maintain a patent airway
• Risk of aspirating gastric contents
• Epistaxis that causes pulmonary aspiration of blood
• Acute sinusitis or otitis media
• Hypotension
Consult the patient’s healthcare professional before using Cough therapy if the patient experiences any of the following
medical conditions:
• A medical history of bullous emphysema
• Recent barotrauma
• Susceptible to pneumothorax or pneumo-mediastinum
VentecLife.com 18
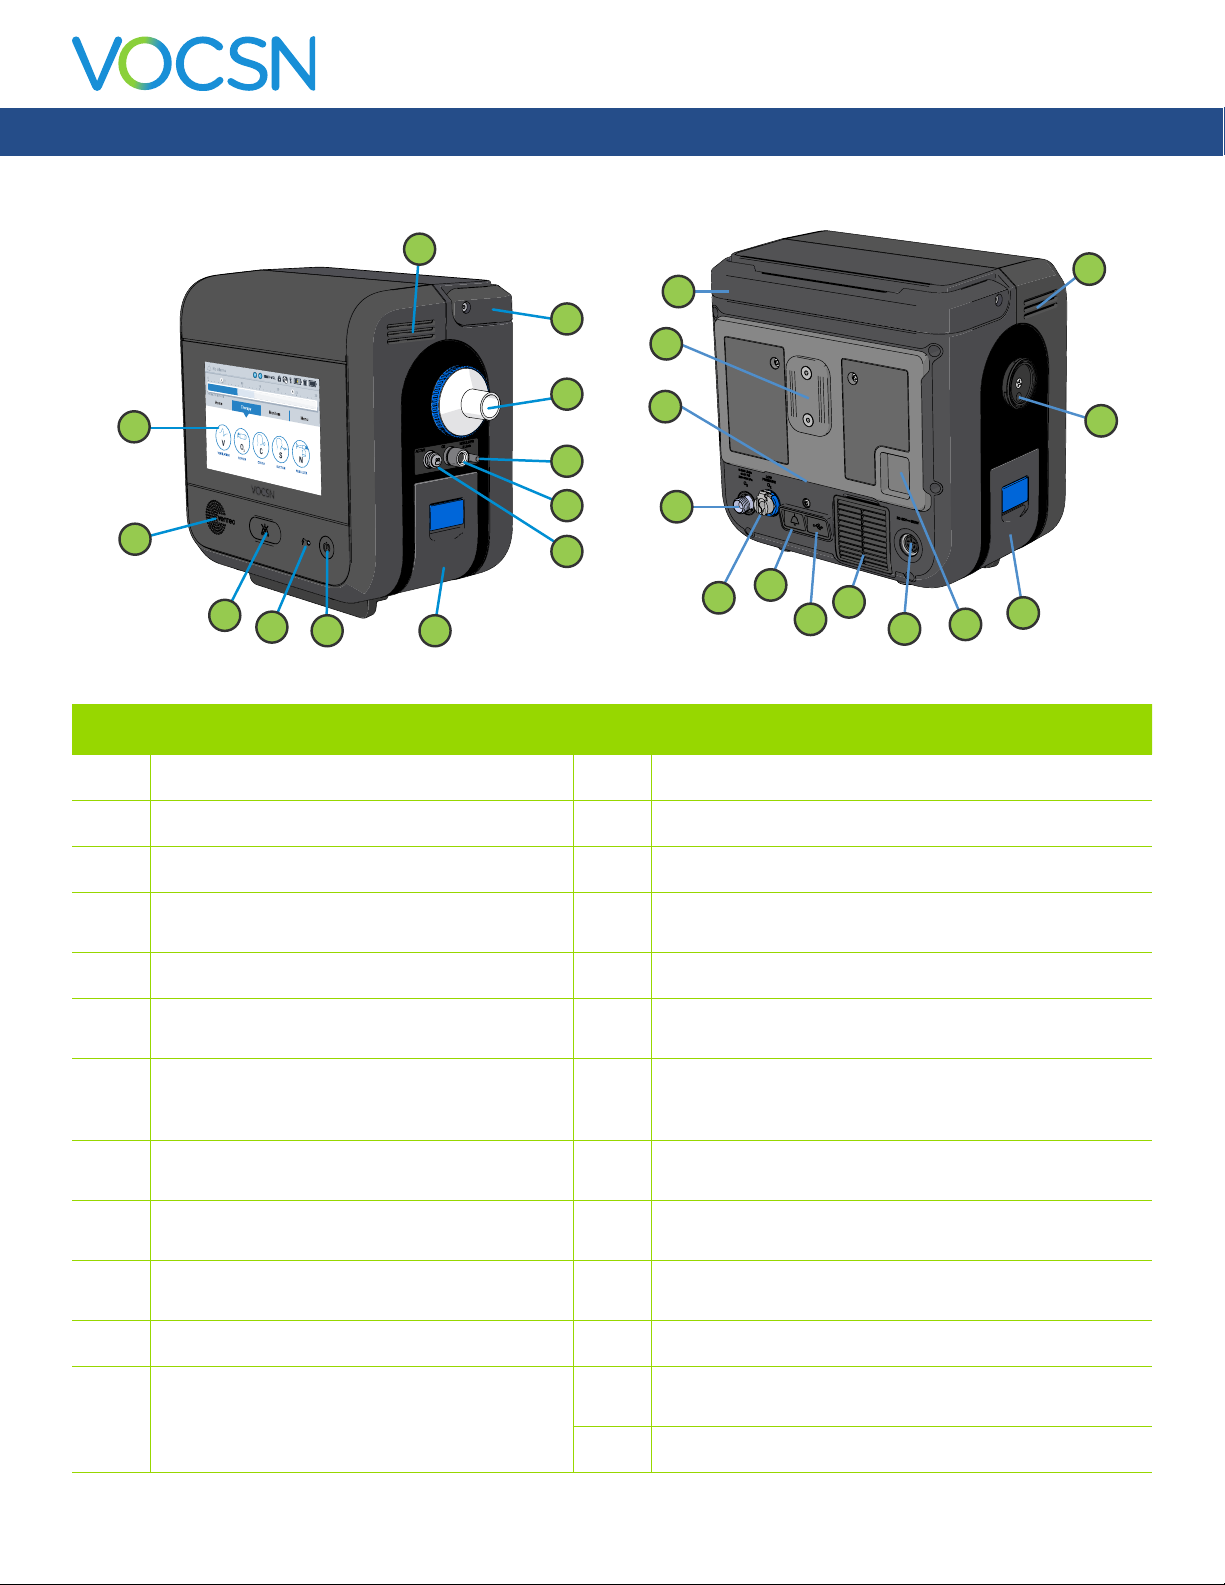
System Overview
Introduction
12
25
13
11
14
10
15
1
9
8
2
3
4
5 6
Description Description
1 Touchscreen 13 Handle (back view)
2 Speaker 14 T-Slot mount
3 Alarm Silence button 15 Cooling air outlet and Cough therapy exhaust
4 External Power / Charge Status indicator light 16 High-pressure O2 Inlet
5 On/Off button and indicator light 17 Low-pressure O2 Inlet
7
16
18
17
20
19
(+Pro congurations only)
21
22
23
24
6 Removable, rechargeable battery (right side) 18 Remote alarm port
7 Active exhalation valve connection port 19 USB port for use by trained personnel only. See “Exporting
Multi-View Data to a USB Drive” on page 127 for
instructions.
8 Ventec One-Circuit O2 tube connection port (+O
congurations only)
9 Nebulizer drive port
(+N congurations only)
10 External bacterial lter and Ventec One-Circuit
connection port
11 Handle (side view) 23 Removable, rechargeable battery (left side)
12 Cooling air outlet 24 Suction canister cap to protect suction canister interface
20 Cooling air intake and lter
21 Power connection port
22 Patient air inlet and lter
port (+S congurations only)
25 Cooling air outlets
VentecLife.com 19
Setup
Setup
This chapter includes instructions for placing and setting up VOCSN, including instructions for connecting Ventec OneCircuits, and additional Ventec One-Circuit components. VOCSN was designed for use with Ventec One-Circuits from
Ventec Life Systems. Do not use third-party patient circuits with VOCSN.
WARNING: Put VOCSN into service in accordance with the information provided in this Clinical and Technical Manual.
VOCSN operation may be impaired or become unsafe by failure to follow setup and operating instructions, the
connection of unauthorized accessories, or the unauthorized modication of VOCSN. All modications made, and
accessories used with VOCSN, must meet the requirements of IEC 60601-1. The organization responsible for device
setup must ensure the compatibility of VOCSN and all parts and accessories used to provide therapy to the patient
prior to use.
WARNING: VOCSN should be set up, congured, and used by trained clinicians and caregivers under the direction
of a physician. Patients and caregivers should be instructed not to modify the VOCSN setup or conguration without
direction and/or supervision from a clinician.
WARNING: Do not use lubricants on VOCSN or on any part of the Ventec One-Circuit. Lubricating ttings, connections,
tubing, or other accessories may result in re and burns to the patient or caregiver.
WARNING: Use only spare parts recommended by Ventec Life Systems. Using spare parts not recommended by the
VOCSN manufacturer may result in re and burns to the patient or caregiver.
WARNING: Only use carrying cases approved by Ventec Life Systems. Use of unauthorized carrying cases may result in
damage to VOCSN, impaired device performance, and risk to the patient.
NOTE: The VOCSN Ethernet and USB ports are intended for use by trained personnel only. The remote alarm port
and power connection port can be used with third-party equipment. However, it is the responsibility of the person
connecting the third-party equipment to ensure the system complies with clause 16 of IEC 60601-1, 3rd ed., as well as
any local laws.
NOTE: When using VOCSN to provide non-invasive ventilation, Ventec Life Systems recommends use of CO2
monitoring equipment compliant with ISO 80601-2-55. To connect and use CO2 monitoring with VOCSN, follow all
instructions from the equipment manufacturer.
VentecLife.com 20

Setup
VOCSN Placement
Place VOCSN in a well-ventilated area, ensuring air ows freely around its inlets and vents.
WARNING: Incorrect placement of VOCSN may affect device performance. Do not cover VOCSN, place it in an area
in which the vents may become obstructed (such as on its back or on top of compliant bedding), or use it in hazardous
environments (such as atmospheres containing pollutants).
NOTE: VOCSN emits heat and gas, including nitrogen, during normal operation. Use VOCSN in a well-ventilated area.
When used in a home environment, VOCSN should be kept away from concentrations of lint, dust, pet dander, and
pests. Small particles and/or pests can clog VOCSN lters over time and become lodged inside VOCSN. Clean the
air and fan lters regularly to prevent clogging, and move VOCSN to a new location if large volumes of particulate are
pulled into the lters. Place VOCSN somewhere it will not be easily accessible by children or pets, such as on a roll stand.
WARNING: Keep VOCSN out of reach of children to avoid the risk of strangulation by cords and tubes, as well as the
risk of inhalation or swallowing of small parts. VOCSN includes a hook-and-loop strap to wrap power adapter cabling
when not in use.
Over time, direct sunlight may compromise the integrity of VOCSN plastic housing or the Ventec One-Circuit. Place
VOCSN in a location that is not exposed to extended periods of direct sunlight.
WARNING: Use of VOCSN outside its recommended range of temperature, altitude, and/or relative humidity may
adversely affect the ventilation ow rate and oxygen concentration from VOCSN, and may result in patient harm. See
“Environmental” on page 190 for details.
WARNING: Do not use VOCSN in contaminated, hazardous, or explosive environments. Use of VOCSN can be
hazardous in these conditions.
WARNING: To protect against EMI (electromagnetic interference) affecting device performance:
• Do not use VOCSN within electromagnetic elds exceeding the limits specied in Appendix E, “EMC Information”.
Common sources of electromagnetic elds include security systems, wireless communications equipment,
appliances, and medical imaging systems.
• Do not stack VOCSN with other electrical devices during use.
• Do not connect VOCSN to unauthorized cables or accessories. Use of cables or other accessories not approved for
use with VOCSN may result in increased electromagnetic emissions or decrease its immunity from other sources of
EMI.
WARNING: Accidental button presses could result in inadvertent alteration of the VOCSN conguration or its
operation. To reduce the possibility of accidental button presses, do not place in areas that might result in inadvertent
touching of the VOCSN touchscreen or its buttons. Use the touchscreen lock feature during cleaning or transport.
VentecLife.com 21

Setup
Power Setup
VOCSN operates using external power (such as a wall outlet), or VOCSN batteries. Ventec Life Systems recommends
connecting VOCSN to a continuous external power source whenever possible. During transport, Ventec Life Systems
recommends the use of external power or the removable batteries. Use the internal (non-removable) battery in case of
power failure or power transition only.
NOTE: Use only the power supply approved by Ventec Life Systems to connect VOCSN to external sources of power.
Ensure the external source of power is rated for use with VOCSN. See “External Power Requirements” on page C-3 for
more information.
The VOCSN batteries will begin charging whenever an external power source is applied. All VOCSN features and
functions operate normally during battery charging. The charge status indicator light on the front of VOCSN will
illuminate orange when the batteries are charging, and illuminate green when the batteries are fully charged. In the
status bar, a lightning bolt will appear on the battery indicator of the charging battery.
NOTE: When VOCSN is disconnected from external power and transitions to running on battery power, or switches from
running on removable battery to internal battery power, the medium-priority Battery Use alarm will activate.
WARNING: Check the batteries and external power supply regularly to ensure functionality. VOCSN power failure may
interrupt ventilation therapy and result in patient harm or death. See “Power Testing Procedures” on page 136 for
instructions.
If the internal battery depletes fully, VOCSN Date and Time settings will reset to their default values. To ensure the Alarm
and Event logs record information accurately, verify the VOCSN Date and Time settings before use, and set them to the
correct values if necessary.
VentecLife.com 22
The Power Supply
The power supply included with VOCSN is part of the ventilation system,
and powers the device from AC wall outlets.
Before and during use, periodically inspect the power supply for damage
or frays, and to ensure the power supply cords are rmly connected. Do
not use damaged power supplies. Replace the power supply if necessary.
The power supply includes a wire retention clip. To ensure the cabling
remains seated in the adapter, rotate the retention clip so that it
secures the cable to the adapter.
The power supply also comes with a hook-and-loop strap to manage
excess cabling. Coil extra cabling between the outlet and VOCSN, and
then wrap the strap around the cabling to secure it.
NOTE: Position VOCSN so that it can be easily disconnected from the
AC supply mains. To disconnect VOCSN from the AC supply mains,
unplug the power supply from the outlet.
Setup
NOTE: Do not use portable (e.g., external 115-volt AC) power supplies
to power VOCSN, unless the power supply voltage variations are known to be within VOCSN operating limits. See
“External Power Requirements” on page 191.
To connect VOCSN to a continuous source of external power using the AC Adapter:
1 Plug the power supply into the power connection port on the back of VOCSN, and screw the connector
clockwise to secure it in place.
2 Plug the power supply into a power socket, such as a wall outlet, and verify the external power indicator ( )
appears on the touchscreen.
2
1
VentecLife.com 23
Setup
The Optional 24 Volt Wheelchair Power Cable
An optional 24 Volt Wheelchair Power Cable is available from Ventec
Life Systems. The 24 Volt Wheelchair Power Cable can be used to
connect VOCSN to external sources of DC power, such as wheelchair
power outlets.
PRECAUTION: When connected to an external battery (such as a
wheelchair battery), VOCSN pulls power from it to run and charge
its own batteries. This may affect battery life and/or wheelchair
performance (for instance, driving uphill).
When connected to wheelchair power for long periods of time, it may
be benecial to implement a supplemental energy use strategy. For
example, traveling with an AC power supply and/or additional, charged
VOCSN removable batteries.
The 24 Volt Wheelchair Power Cable comes with a hook-and-loop strap to manage excess cabling. Coil extra cabling
between the outlet and VOCSN, and then wrap the strap around the cabling to secure it.
NOTE: Before connecting the 24 Volt Wheelchair Power Cable to a power source, you must verify the voltage and
current emitted from the DC power source are within the range of VOCSN operating limits, and that the power source
has the correct connection type. See “External Power Requirements” on page 191.
The Removable, Rechargeable Batteries
VOCSN includes two removable, rechargeable batteries.
These batteries may be removed and reinstalled during
VOCSN use.
To remove a battery:
1 Lift the blue battery tab.
2 Use the tab to pull the battery out of the well gently.
To install a battery:
1 Lift the blue battery tab.
2 Gently press the battery into the well. Place the base
of the battery into the well rst, and then press the
top of the battery toward VOCSN and into the well.
2
1
3 Press the battery tab down so that it is at against
the battery.
VentecLife.com 24
Setup
Ventec One-Circuit Setup
VOCSN was designed for use with Active, Passive, Valveless, or Mouthpiece Ventec One-Circuits. Do not use third-party
patient circuits with VOCSN. Assemble Ventec One-Circuits and Ventec One-Circuit accessories using the procedures
and sequences depicted in this manual.
NOTE: See “Mouthpiece Patient Circuit Setup” on page 40 for detailed setup instructions for that circuit type.
Ventec Life Systems offers single-patient use adult and pediatric Ventec One-Circuits for use with VOCSN, which
incorporate an optional active or passive exhalation valve, an optional Ventec One-Circuit O2 tube (to deliver pulse dose
Oxygen Direct therapy), and an optional heated wire (for connection to a humidier). See “Accessories” on page 200
for a list of Ventec One-Circuits available from Ventec Life Systems.
Each time the Ventec One-Circuit or its conguration is changed, or the Circuit Type control is modied, run a Pre-Use
Test before initiating therapy. The Pre-Use Test will calculate the resistance, and leak of the Ventec One-Circuit to ensure
Ventilation therapy is delivered accurately.
WARNING: Adding unauthorized attachments, components, or sub-assemblies to the Ventec One-Circuit can change
the pressure gradient of the Ventec One-Circuit and adversely affect the performance of VOCSN.
WARNING: Ventec One-Circuit accessories (including but not limited to lters, nebulizers, and humidiers) may
increase the resistance of the Ventec One-Circuit and affect the accuracy of delivered Ventilation therapy. Inspect all
patient circuit lters frequently for signs of increased resistance or blockages, and ensure alarms are set appropriately
to verify the accuracy of delivered Ventilation therapy.
WARNING: To reduce the risk of electric shock, do not use anti-static or electrically conductive patient circuits or hoses
with the VOCSN system. Only Ventec One-Circuits are approved for use with VOCSN.
WARNING: To ensure patient safety, check the Ventec One-Circuit and verify that all system settings and Presets are
appropriate before providing therapy, and on a routine basis during therapy.
WARNING: Any components added to the breathing circuit between the Ventec One-Circuit exhalation valve and the
patient will increase the amount of gas that the patient rebreathes with each breath. The addition of components into
the breathing circuit should be considered carefully, especially for small pediatrics.
NOTE: When providing non-invasive ventilation, use CO2 monitoring equipment compliant with ISO 80601-2-55 to
ensure patient safety.
Ventec One-Circuits may be connected to a humidier and/or other patient circuit components as needed. See
“Connecting Ventec One-Circuit Components” on page 35 for detailed instructions.
VentecLife.com 25

Setup
Using a Trach, ET Tube, or Non-Vented Mask
VOCSN may be connected to a non-vented mask, trach or ET tube to provide Ventilation therapy using an Active or
Passive Ventec One-Circuit. These circuit types include an exhalation valve designed to expel exhaled gases. See the
following pages for detailed setup instructions.
NOTE: Masks with an anti-asphyxia valve should not be used with an Active Ventec One-Circuit, because bias ow may
not be sufcient to close the valve when needed. Active circuit valves open automatically when there is no pressure in
the circuit, serving the same purpose as anti-asphyxia valves.
Using a Vented Mask
VOCSN may be connected to a vented mask to provide Ventilation therapy using a Valveless or Passive Ventec OneCircuit. This circuit type does not include an exhalation valve, and is designed for use with a mask patient interface
incorporating a xed leak. See the following pages for detailed setup instructions.
NOTE: Vented masks used with VOCSN must be connected with a Valveless or Passive Ventec One-Circuit and have an
integrated leak of 20 to 50 L/min at 10 cmH2O to ensure proper device performance.
WARNING: Masks are not recommended for use with patients <7 kg, due to the unavailability of masks sized to
provide a seal tight enough to deliver effective Ventilation therapy.
Using a High Flow Nasal Cannula
VOCSN may be connected to a high ow nasal cannula to provide High Flow therapy using a Valveless Ventec One-
Circuit.
NOTE: When using a Valveless Ventec One-Circuit, leave the circuit connected to VOCSN, and disconnect the mask or
high ow nasal cannula while running the Pre-Use Test.
VentecLife.com 26

Setup
Connecting an Active, Passive, or Valveless Ventec One-Circuit
The Ventec One-Circuit comes with an optional active or passive exhalation valve, an optional Ventec One-Circuit O2
tube (to deliver pulse dose Oxygen Direct therapy), and an optional heated wire (for connection to a humidier). The
setup procedure will depend on the type of Ventec One-Circuit and the accessories used. To connect a Ventec OneCircuit to VOCSN:
1 Connect a bacterial lter. See “Connecting a Bacterial Filter” on page 29.
2 Connecting the Ventec One-Circuit depends on whether you are using an HME or a humidier, and whether or
not you are connecting the Ventec Humidier Bypass (for Touch Button Cough therapy). Follow the instruction
below the corresponds to the Ventec One-Circuit conguration:
• To congure the Ventec One-Circuit with an HME instead of a humidier, see “Connecting a Ventec
One-Circuit Without a Humidier” on page 29.
• To congure the Ventec One-Circuit with a humidier, without connecting a Ventec Humidier Bypass,
see “Connecting a Ventec One-Circuit to a Humidier (Without the Ventec Humidier Bypass)” on page
31.
• To congure the Ventec One-Circuit with a humidier and the Ventec Humidier Bypass (for Touch
Button Cough therapy), see “Connecting a Ventec One-Circuit, Humidier, and Ventec Humidier
Bypass” on page 32.
3 If the Ventec One-Circuit includes an integrated O2 tube, connect it to VOCSN. See “Connecting a Ventec One-
Circuit O2 Tube” on page 33 for instructions.
4 If you are using an active Ventec One-Circuit, connect the ow sensor (multilumen) tubing to VOCSN. See
“Connecting an Active Ventec One-Circuit” on page 34.
5 To attach other components to the Ventec One-Circuit, such as a nebulizer or closed suction catheter, see
“Connecting Ventec One-Circuit Components” on page 35.
6 The diagram on the next page illustrates the Ventec One-Circuit and optional components in the correct
conguration. Consult “Ventec One-Circuit Component Connection Order” on page 28 to verify that
everything is connected in the correct order.
VentecLife.com 27
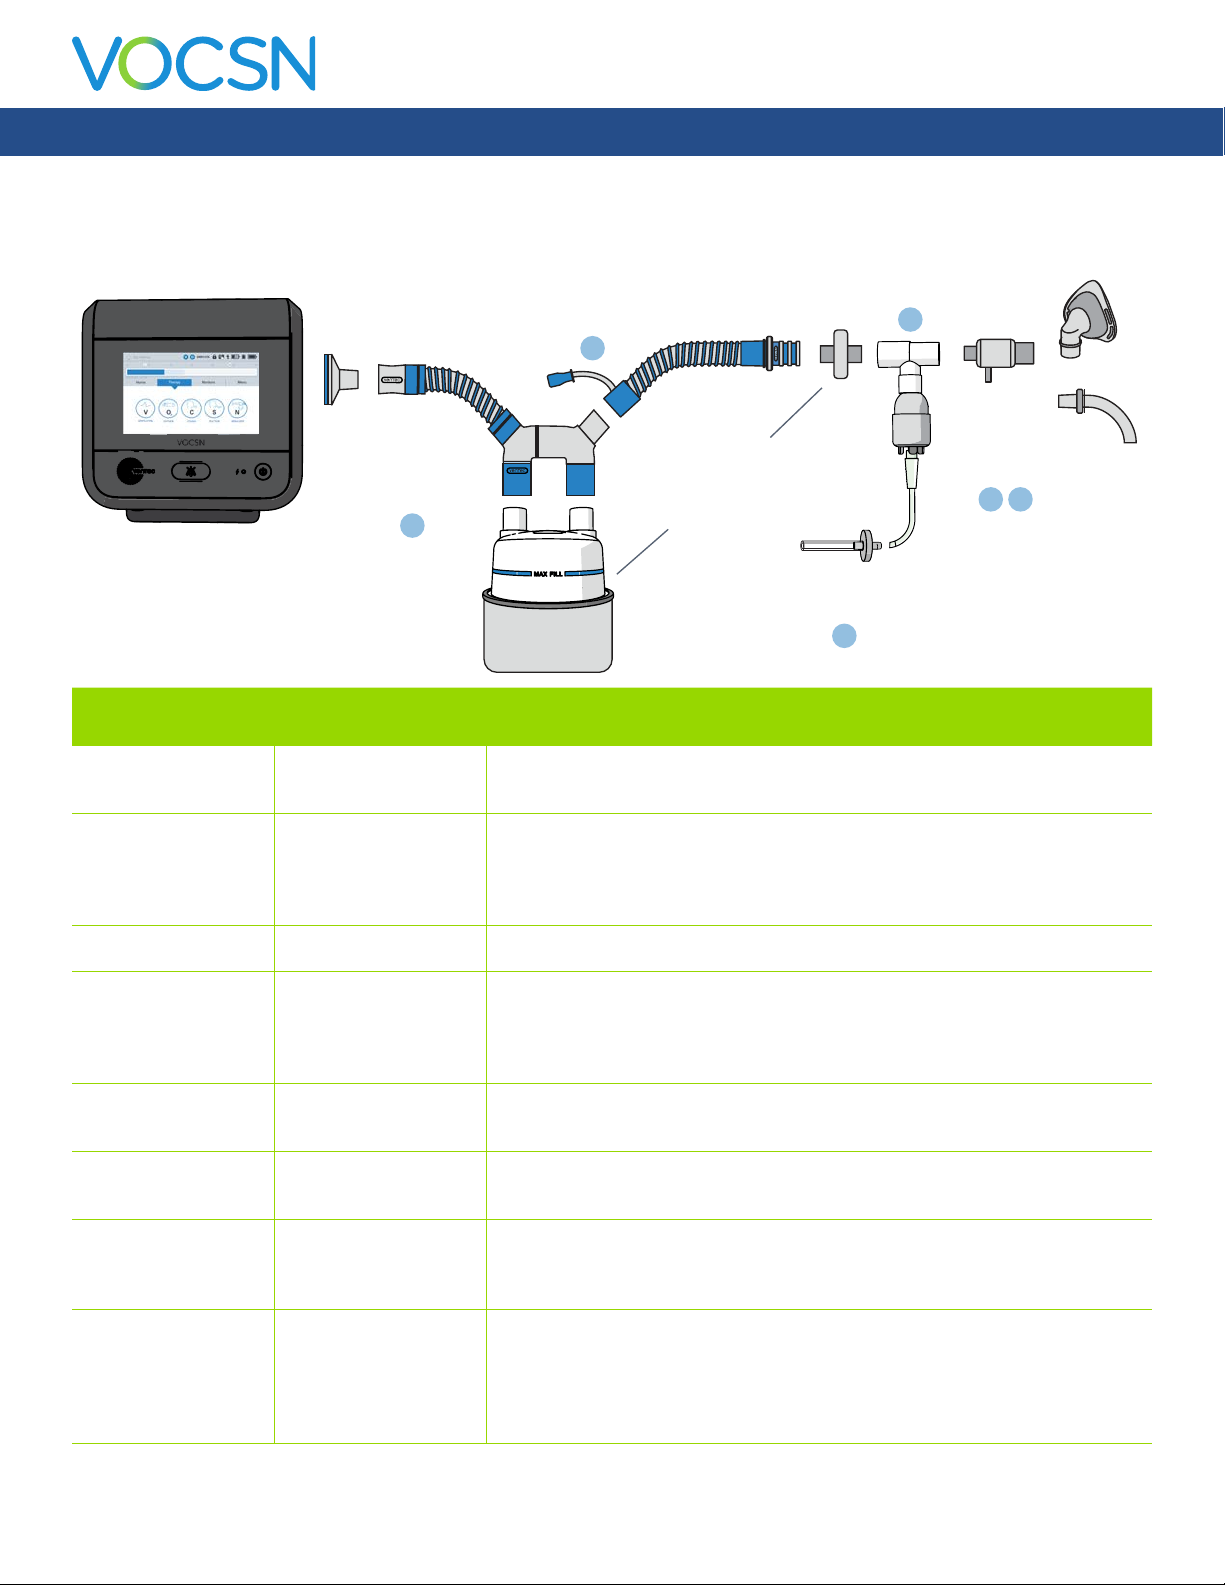
Ventec One-Circuit Component Connection Order
PATIENT
INTERFACE
Setup
BACTERIAL
FILTER
(optional
O
tube)
2
O
PATIENT
CIRCUIT
(optional
heated wire)
HUMIDIFIER
BYPASS
(required
for Cough)
C
HUMIDIFIER
VOCSN
Item Name Required? Additional Information
VOCSN Bacterial
Filter
Ventec Humidier
Bypass
Required See “Connecting a Bacterial Filter” on page 29 for instructions.
Required for using
Touch Button Cough
therapy with a
connected humidier
The Ventec Humidier Bypass prevents water damage to VOCSN during Cough
therapy.
HME
or
(choose one)
NEBULIZER
(optional)
NEBULIZER
FILTER
N
N
SECRETION
TRAP
(optional)
C
or
S
Humidier Optional Include a form of humidication (either an HME or humidier).
Ventec One-Circuit Required Use either an Active, Passive, or Valveless Ventec One-Circuit. Ventec One-
Circuits may include an integrated O2 tube and/or a heated wire. Active
Ventec One-Circuits include ow sensor tubing. (For Mouthpiece Patient Circuit
instructions, see “Mouthpiece Patient Circuit Setup” on page 40.)
Heat-Moisture
Exchanger (HME)
Optional Include a form of humidication (either an HME or humidier). See “Connecting
an HME (Heat-Moisture Exchanger)” on page 35 for instructions.
Nebulizer Optional Connect a nebulizer to the nebulizer drive port. See “Connecting a Nebulizer
Cup to the Patient Circuit” on page 36 for instructions.
Ventec Secretion Trap Optional Connect a Ventec Secretion Trap, using suction tubing, to a suction canister.
See “Connecting a Ventec Secretion Trap to the Patient Circuit” on page 38
for instructions.
Patient interface Required Examples of a patient interface include a mask, trach, or ET tube. Active and
Passive Ventec One-Circuits include an exhalation valve and are intended for
use with non-vented masks, trach, or ET tubes. Valveless Ventec One-Circuits
are intended for use with vented masks, or nasal cannulas for High Flow
therapy.
VentecLife.com 28
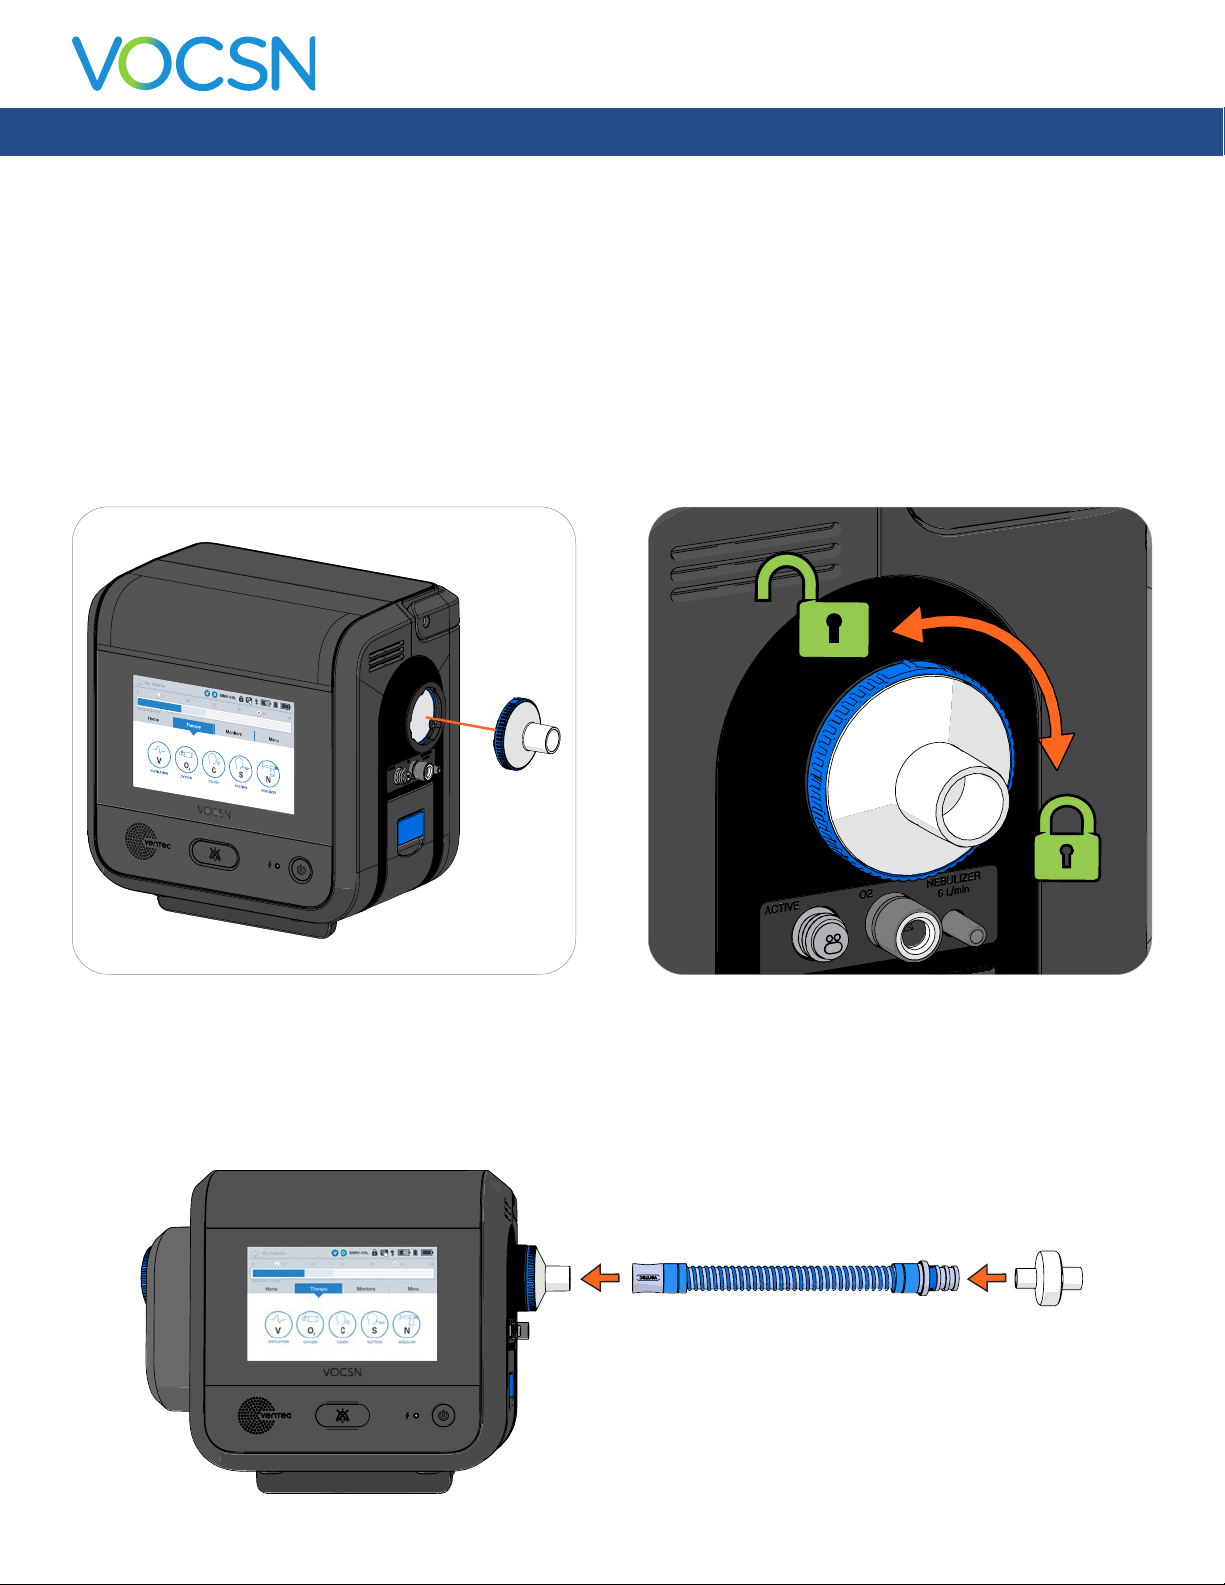
Setup
Connecting an External Bacterial Filter
Connect an external bacterial lter to reduce the risk of cross-contamination. Attach a bacterial lter to the Ventec One-
Circuit connection port before connecting a Ventec One-Circuit.
Fit the bacterial lter against VOCSN, aligning the icons on the lter and VOCSN, then twist the lter to lock it into place.
VOCSN contains a secondary, internal bacterial lter to help protect against cross-contamination in case of external
bacterial lter failure. The internal bacterial lter should be replaced whenever it may have become cross-contaminated,
such as when the external bacterial lter becomes compromised, or if an infectious disease specialist recommends its
replacement. See “Replacing the Internal Bacterial Filter” on page 165 for instructions.
Connecting a Ventec One-Circuit Without a Humidier
When not using a humidier as part of the Ventec One-Circuit conguration, connect the circuit to the bacterial lter.
Connect an HME to the Ventec One-Circuit to provide the patient with humidication, following the instructions in
“Connecting an HME (Heat-Moisture Exchanger)” on page 35.
VentecLife.com 29

Setup
Connecting a Humidier and Heated Wire Ventec One-Circuit
When using a humidier, use a heated-wire Ventec One-Circuit to manage water condensation inside the Ventec OneCircuit. Place the humidier below VOCSN and the patient to prevent water from leaking into the patient.
WARNING: Do not use heated wire Ventec One-Circuits on, within, or under localized heat sources or insulating
materials such as blankets or thermal chambers. External sources of heat or insulation may impair the performance of
heated wire Ventec One-Circuits.
CAUTION: Before delivering Cough therapy when using a heated humidier, verify a Ventec Humidier Bypass is
installed, or disconnect the humidier from the Ventec One-Circuit. Cough therapy may cause water damage to
VOCSN when a humidier is attached to the Ventec One-Circuit without an installed Ventec Humidier Bypass. See
“Connecting a Ventec One-Circuit, Humidier, and Ventec Humidier Bypass” on page 32 for installation instructions
and more information. The Ventec Humidier Bypass was designed to remain connected to the Ventec One-Circuit
during Ventilation therapy, allowing the delivery of Touch Button Cough therapy while using a humidier, without
reconguring the Ventec One-Circuit.
NOTE: Using humidiers or other accessories not specied for use with this system may impair VOCSN performance.
Ventec Life Systems recommends use of the Fisher & Paykel HC550, the Fisher & Paykel MR850, or equivalent.
Humidiers connected to the VOCSN Ventec One-Circuit should comply with ISO 8185.
Depending on whether you will use Touch Button Cough therapy with a connected humidier, follow the setup
instructions as described in “Connecting a Ventec One-Circuit to a Humidier (Without the Ventec Humidier Bypass)” on
page 31 or “Connecting a Ventec One-Circuit, Humidier, and Ventec Humidier Bypass” on page 32 to connect a
humidier, humidier bypass (if necessary), and heated wire Ventec One-Circuit to VOCSN.
VentecLife.com 30
Loading...