

Page 1
RANGE HOOD model:
HO50200 • HO50300 • HO50400 • HO50500 • HO60200 • HO60300
HO60400 • HO60500 • HO55200 • HO55300 • HO55400 • HO55500
Congratulations! You have made an excellent choice! This Venmar Ventilation line of range hoods is the most efficient on the market.
A 10-YEAR WARRANTY
Venmar’s range hoods are high quality products, built and packed with care. All products are guaranteed ten (10) years
against any operational defects. This warranty covers labor and parts (see details in the warranty section). If your unit is defective,
contact the Venmar Ventilation Service Department at the following toll-free numbers: 1-800-567-3855 from Canada and
1-800-836-6271 from United States. N.B. First, record the serial number of your unit. This can be found on the sticker under the filters
at the bottom of the hood or on the white sticker located on the box.
Table of Contents
1 Important safety instructions ................................................................... 1
2 Technical specifications .......................................................................... 2
3 Tools ........................................................................................................... 3
4 Installation of the hood with exterior outlet........................................... 3
5 Installation of the charcoal unit.............................................................. 7
6 Electronic control.................................................................................... 11
7 Mechanical control................................................................................ 12
8 Cleaning.................................................................................................. 12
USER’S MANUAL
Read and save these instructions
01930
Page 2

21
“Read and save these instructions”
Caution: “To reduce risk of fire and to properly exhaust air, be sure to
duct air outside. Do not vent exhaust air into spaces within walls or
ceilings or into attics, crawl spaces or garages.”
WARNING - TO REDUCE THE RISK OF FIRE, ELECTRIC SHOCK, OR INJURY
TO PERSONS, OBSERVE THE FOLLOWING:
A. Use this unit only in the manner intended by the manufacturer. If
you have questions, contact the manufacturer.
B. Before servicing or cleaning unit, switch power off at service panel
and lock (service disconnecting means) to prevent power from
being switched on accidentally. When the service disconnecting
means cannot be locked, securely fasten a prominent warning
device, such as a tag, to the service panel.
Caution: “For general ventilating use only. Do not use to exhaust
hazardous or explosive materials and vapors”
WARNING - TO REDUCE THE RISK OF A RANGE TOP GREASE FIRE:
A. Keep fan, filters and grease laden surfaces clean.
B. Always turn hood ON when cooking at high heat.
C. Use high settings on range only when necessary. Heat oil slowly on
low to medium settings.
D. Don’t leave range unattended when cooking.
E. Always use cookware and utensils appropriate for the type and
amount of food being prepared.
WARNING - TO REDUCE THE RISK OF INJURY TO PERSONS IN THE EVENT
OF RANGE TOP GREASE FIRE, OBSERVE THE FOLLOWING:
A. Smother flames with close-fitting lid, cookie sheet, or metal tray,
then turn off the burner. BE CAREFUL TO PREVENT BURNS.
* If the flames do not go out immediately, EVACUATE AND CALL THE
FIRE DEPARTMENT.
B. NEVER PICK UP A FLAMING PAN - You may be burned.
C. DO NOT USE WATER, including wet dishcloths or towels. A violent
steam explosion will result.
D. Use an extinguisher ONLY if:
1. You know you have a Class ABC extinguisher, and you already
know how to operate it.
2. The fire is small and contained in the area where it started.
3. The fire department has been called.
4. You can fight the fire with your back to an exit.
*Based on “Kitchen Firesafety Tips” published by NFPA.
WARNING - TO REDUCE THE RISK OF FIRE, ELECTRIC SHOCK, OR INJURY
TO PERSONS, OBSERVE THE FOLLOWING:
A. Installation work and electrical wiring must be done by qualified
person(s) in accordance with all applicable codes and standards,
including fire-rated construction.
B. Sufficient air is needed for proper combustion and exhausting of
gases through the flue (chimney) of fuel burning equipment to
prevent back drafting. Follow the heating equipment manufacturer’s
guideline and safety standards such as those published by “The
National Fire Protection Association” (NFPA) and “The American
Society for Heating, Refrigeration and Air Conditioning Engineers”
(ASHRAE), and the local code authorities.
C. When cutting or drilling into wall or ceiling, be careful not to
damage electrical wiring and other hidden utilities.
D. Ducted fans must always be vented to the outdoors.
“WARNING”: “To reduce the risk of fire, use only metal ductwork”
1
IMPORTANT SAFETY INSTRUCTIONS
2
TECHNICAL SPECIFICATIONS
The catchment capacity test procedures comply with the SS433-05-01 standard SEK (swedish), verified by CSA.
2 appliance bulbs model #A-15
91% HO50200 - HO55200 - HO60200
Catchment capacity 93% HO50300 - HO55300 - HO60300
96% HO50400 - HO55400 - HO60400
97% HO50500 - HO55500 - HO60500
Power supply 120 V AC, 60 Hz 120 V AC, 60 Hz
Total power consumption 115 W 160 W
Lighting 2 x 40 W 2 x 40 W
Model HOXX200 HOXX400
HOXX300 HOXX500
Page 3
34
3 TOOLS
2 5/8
V
E
N
M
A
R
1
2
3
F
1
•
2
•
3
•
O
0
•
5
m
i
n
.
5 1/2
3
9 7/8
10
20
163° 3
2 1/2
2 1/4
1 5/8
10 3/4
29 7/8
24 1/2
21
V
E
N
M
A
R
1
2
3
F
1
•
2
•
3
•
O
0
•
5
m
i
n
.
7/8
2 3/8
4 3/8
20
10
1 5/8
10 3/4
2 5/8
2 1/4
2 1/2
163°
3
21
24 1/2
29 7/8
HO5XXXX - 29 7/8 “
HO6XXXX - 35 7/8 “
HO5XXXX - 29 7/8 “
HO6XXXX - 35 7/8 “
TOOLS NEEDED TO INSTALL THE RANGE HOOD
- Philips screwdriver #2 or square #1.
- Hammer (To open the knockout hole and the exhaust port).
- Sheet metal shears (to make duct adjustments).
- Pair of pliers (to make duct adjustments).
Caution:
To reduce fire hazard and to properly exhaust stale air, be sure to duct air outside or recirculate the air with the HO 50950 charcoal unit. The exhaust port
must never lead into a chimney used to exhaust gases or smoke. Do not
exhaust stale air into spaces in walls, ceilings, attics, crawl spaces or garages.
Warning: The heating element of the range and the underside of the
hood must be, at least 20" (50cm) apart. Over a gas range, the distance must be increased to, at least, 24” (60 cm).
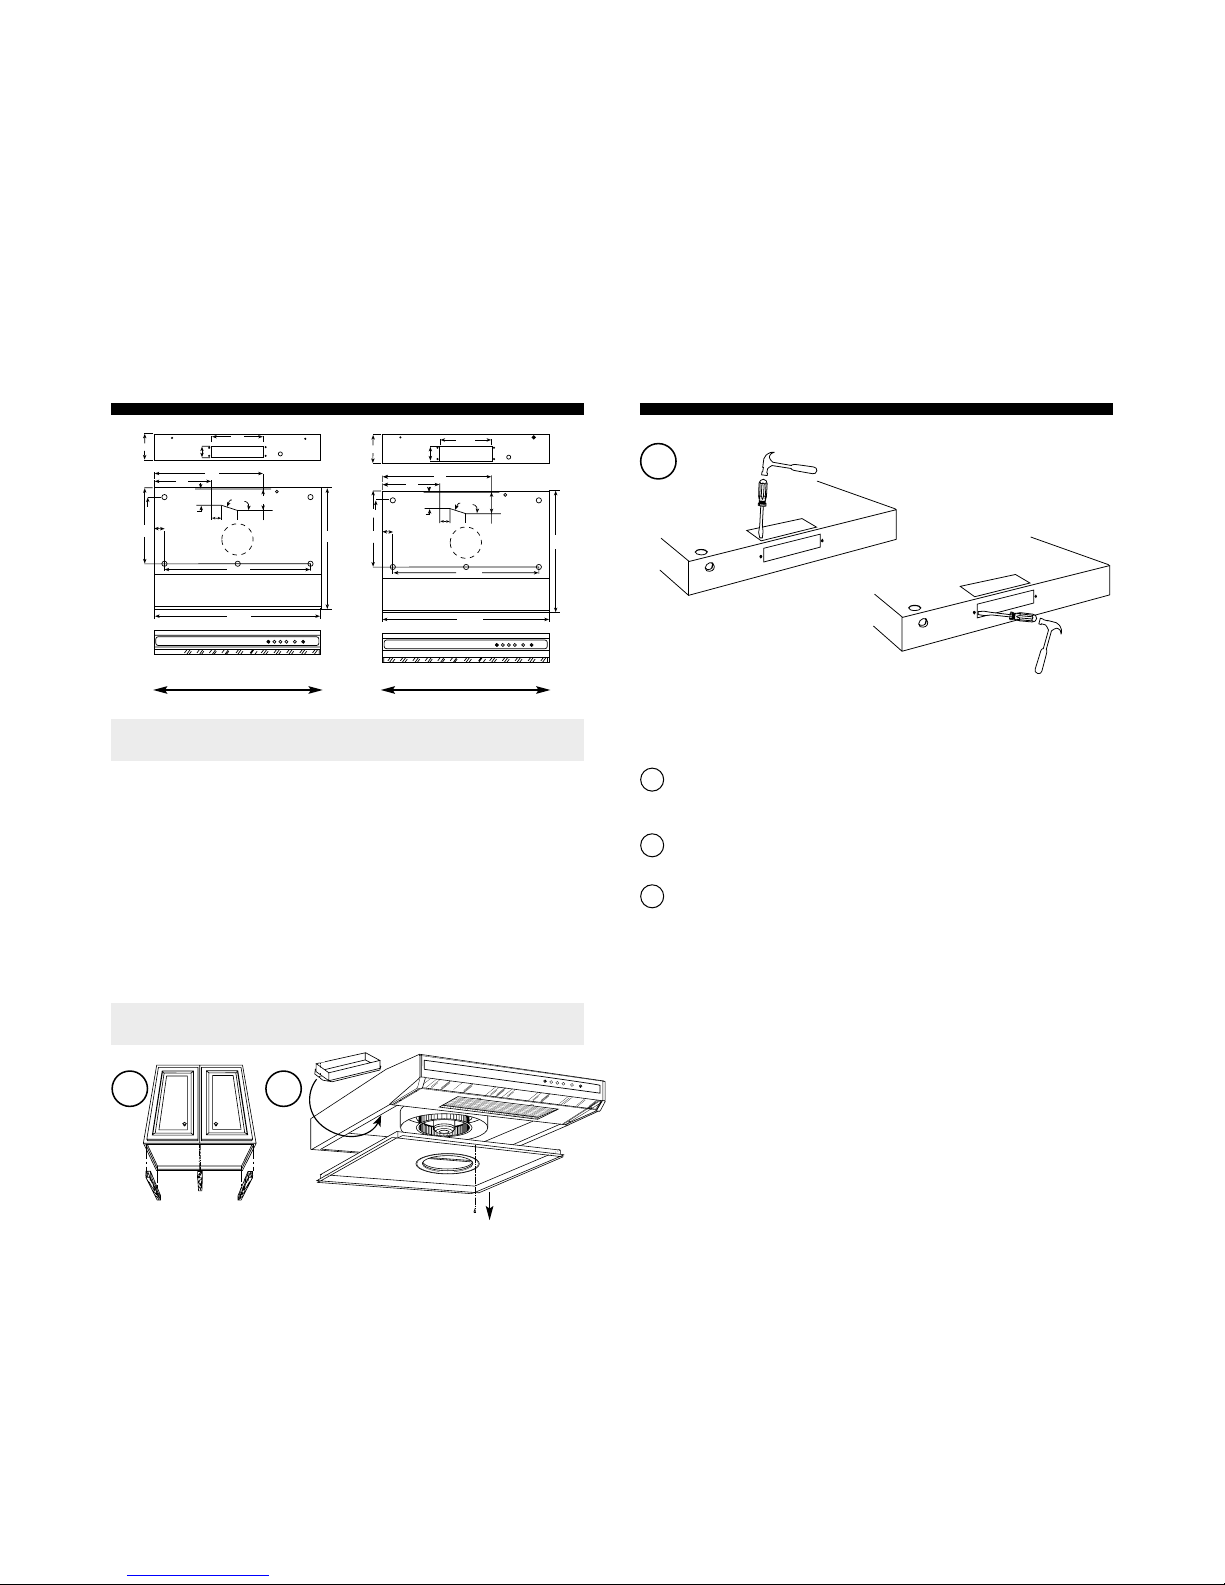
If the bottom of the cupboard is recessed, attach three wood
strips as shown to be able to screw the range hood under the
cabinet.
Remove the screw on the bottom of the hood and remove the cover.
* Be careful not to touch the electronic board.
Determine if the exhaust hole is on the top (3a) or rear (3b) of
the range hood. Disconnect the appropriate stale air outlet
using a hammer and screwdriver.
The best circular transition to a 3-1/4” x 10” (8.25 cm x 25.4 cm)
rectangular tubing measures 6” (15.24 cm) diameter. For better
Venmar Ventilation performance, it is recommended to follow
this instruction.
NOTE We recommend that the wall duct be well prepared to receive
the adaptor. Make sure that the adaptor fits easily in the duct before
doing the installation. The use of the adaptor is strongly recommended for better performance of your unit. If you purchase the Venmar
hood to replace another hood and you use the top outlet, please
note that location of the exhaust duct can vary from one manufacturer to another.
4
INSTALLATION OF THE HOOD WITH EXTERIOR OUTLET
3
1
a)
V
E
N
M
A
R
1
2
3
F
1
¥
2
¥
3
¥
O
0
¥
5
m
i
n
.
V
E
N
T
I
L
A
T
I
O
N
i
n
c
.
2
b)
1
2
3
Page 4

56
Take the adaptor inside the hood and install the adaptor
with the screws.
Position the 4 screws according to the embossed holes on the
hood.
Do not tighten the screws down so the hood can be placed on
them before tightening.
Punch out the power supply hole at the rear or on the top of the
range hood depending on the installation.
Make sure the power supply is on the right side of the hood.
Insert the electrical wire in the hole, ensuring the protective
bushing is in place (8a).
6
5
7
8
a
4
a)
b)
V
E
N
M
A
R
1
2
3
F
1
¥
2
¥
3
¥
O
0
¥
5
m
i
n
.
V
E
N
T
I
L
A
T
I
O
N
i
n
c
.
b
a
c
V
E
N
M
A
R
1
2
3
F
1
¥
2
¥
3
¥
O
0
¥
5
m
i
n
.
V
E
N
T
I
L
A
T
I
O
N
i
n
c
.
11
14
13
12
10
9
15
4
5
6
7
8
2
Page 5

78
Insert the screw head into the embossed key hole.
Push the chassis to the wall and insert the screws into the slots.
Tighten the screws so the hood is firmly attached to the
cupboard.
Insert the fifth screw in the centre of the chassis.
Caution: The electrical connection must comply with regional
electrical codes. The appliance must be grounded.
a- The ground lead must be attached to the connector
installed on the range hood chassis.
b- The white lead must be connected with the white lead of the
power supply (neutral).
c- The black lead must be connected with the black lead of
the power supply (live).
It is recommended to use insulated wire connectors.
Make sure the damper of the adaptor opens freely.
Install the five screws of the bottom cover using the four
additionnal screws available in the installation bag.
Put the filters back in place.
5 INSTALLATION OF THE CHARCOAL UNIT
V
E
N
M
A
R
1
2
3
F
1 ¥ 2 ¥ 3 ¥ O
0 ¥ 5 min.
V
E
N
T
I
L
A
T
I
O
N
i
n
c
.
4
5
6
7
1
3
2
8
9
10
Warning:
The heating element of the range and the underside of the hood must
be, at least 20” (50 cm) apart. Over a gas range, the distance must be
increased to, at least, 24” (60 cm).
Install the neoprene gasket on the charcoal unit.
If the bottom of the cupboard is recessed, attach two wood strips
as shown to be able to screw the range hood under the cabinet.
Position the 4 screws according to the holes on the charcoal unit.
Do not tighten the screws down so the hood can be placed on
them before tightening.
Insert the screw head into the key hole.
Push the charcoal unit to the wall and insert the screws into the
slots.
1
2
3
4
5
6
11
12
13
14
15
16
Page 6

910
Tighten the screws so the charcoal unit is firmly attached to the
cupboard.
Remove the screw on the bottom of the hood and remove the
cover. Take out the adaptor.
*Be careful not to touch the electronic PCB.
7
8
Disconnect the outlet from the top using a hammer and screwdriver.
Punch out the power supply hole on the back of the range
hood. When installing a carbon module do not use the power
supply hole on the top of the hood to feed electrical wiring.
Make sure the power supply is on the right side of the hood.
Insert the electrical wire in the hole, ensuring the protective
bushing is in place (11 a).
Attach the hood to the charcoal unit using the holes with unem
bossed insertion slots.
Caution: The electrical connection must comply with regional codes.
The appliance must be grounded.
a- The ground lead must be connected to the connector
installed on the range hood chassis.
b- The white lead must be connected with the white lead of
the power supply (neutral).
c- The black lead must be connected with the black lead of
the power supply (live).
It is recommended to use insulated wire connectors.
Install the five screws of the bottom cover using the four
additionnal screws available in the installation bag.
Slightly unscrew the air diffuser screws, remove it in order to put
the charcoal filter in place.
Remove the charcoal filter from the transparent plastic bag and
insert in charcoal unit.
Place the charcoal filter in the center of the unit.
Put the air diffuser and the filters back in place.
9
10
11
12
13
14
15
16
17
18
V
EN
M
A
R
1
2
3
F
1
¥
2
¥
3
¥
O
0
¥
5
m
i
n
.
V
E
N
T
I
L
A
T
I
O
N
i
n
c
.
V
E
N
M
A
R
1
2
3
F
1 ¥ 2 ¥ 3 ¥ O
0 ¥ 5 min.
V
E
N
T
I
L
A
T
I
O
N
i
n
c
.
V
E
N
M
A
R
1
2
3
F
1
¥
2
¥
3
¥
O
0
¥
5
m
i
n
.
V
E
N
T
I
L
A
T
I
O
N
i
n
c
.
6
"
6
"
3
0
"
17
10
14
9
15
V
E
N
M
A
R
1
2
3
F
1
•
2
•
3
•
O
0
•
5
m
i
n
.
V
E
N
T
I
L
A
T
I
O
N
i
n
c
.
16
11
b
a
c
13
12
a
Page 7

11 12
6 ELECTRONIC CONTROL
S
2
3
F
1 • 2 • 3 • O
5 min.
3 42
1
DELAY
When a speed is selected, press the Delay switch to activate the
delay function. The corresponding speed indicator light will start
flashing to indicate this function is being activated. The fan will
continue to operate for 5 minutes and will then stop automatically and return to normal operating mode. To cancel the Delay
function, press the Delay switch once.
START / STOP, SPEED SELECTION
Press the switch corresponding to the desired speed. The light indicates the selected speed .
Speed “S” indicates “silentsure” mode.
To turn off the motor, press the corresponding switch once.
MASTER OFF / FILTER MAINTENANCE
This switch has a dual function.
a) To turn off simultaneously the motor and the lights, press the
switch once.
b) After 25 hours of operation, the filter maintenance light indi-
cator will turn on. This indicates that the intake ring, the filters
and the blower wheel need to be cleaned to maintain efficient operation of the unit. The indicator light will stay on until
the function is reactivated by pressing the control switch.
LIGHT
The light switch allows three different lighting levels according to
your needs (2 x 40W maximum).
(Use of compact fluorescent is not recommended)
S
2
3
F
1
2
3
4
7 MECHANICAL CONTROL
8 CLEANING
Off / On lighting
Slide the swicth to turn the ligth on ( 2 x 40 watts intensity).
Off / On motor and speed control
Slide the switch to engage the motor at the desired speed.
Speed “S” indicates “silentsure” mode
1
2
0•S•2•30•1
1 2
V
EN
M
A
R
1
2
3
F
1
•
2
•
3
•
O
0
•
5
m
i
n
.
V
E
N
T
I
L
A
T
I
O
N
i
n
c
.
V
E
N
M
A
R
1
2
3
F
1
•
2
•
3
•
O
0
•
5
m
i
n
.
V
E
N
T
I
L
A
T
I
O
N
i
n
c
.
1
2
Page 8

13 14
V
E
N
M
A
R
S
2
3
F
1
¥
2
¥
3
¥
O
0
¥
5
m
i
n
.
V
E
N
T
I
L
A
T
I
O
N
i
n
c
.
4
3
Cleaning
Clean the inside of the range hood a few times a year. Remove
the filters, the impeller and the intake ring (fig:1 & 2 ). Wipe the
inside with a wet cloth and mild detergent. The filters, the intake
ring and the impeller may be cleaned in a dishwasher or by soaking in a mild detergent.
The easy way to remove the impeller is by holding it on each side
and pull down smoothly, one side at a time. Be aware that the
edge of the hood may be sharp.
NOTE: Some minerals, when in contact with dishwasher soap
additives, may cause a discolouration of the filters. This discolouration is not covered by the warranty.
When inserting the fan blades, be sure to position the alignement
lug in one of the holes on the motor head.
Changing the light bulbs
Remove the light diffuser by pushing on the clasps and pull down.
Bulbs to use: two (2) appliance bulbs; maximum 40 watts
10 years WARRANTY
We warrant VENMAR RANGE HOODS to be free from manufacturing
defects in material or workmanship under normal residential use for
ten (10) years after date of purchase. This warranty includes repair or,
at our option, replacement of any VENMAR RANGE HOOD found to
be defective. This express warranty will be null and void and of no
effect if the function or form of the VENMAR RANGE HOOD is altered
by anyone not acting under the supervision of VENMAR. This warranty
may be transferred or assigned to any subsequent owner.
THIS EXPRESS WARRANTY IS IN LIEU OF ALL OTHER WARRANTIES, EXPRESS
OR IMPLIED, INCLUDING THE WARRANTIES OF MERCHANTABILITY AND
FITNESS. WE WILL IN NO EVENT BE LIABLE FOR ANY BREACH OF THIS
EXPRESS WARRANTY IN AN AMOUNT EXCEEDING THE ORIGINAL PURCHASE PRICE OF THE VENMAR range hood, NOR WILL BE LIABLE FOR
ANY INCIDENTAL OR CONSEQUENTIAL DAMAGES.
To obtain warranty service, contact VENMAR VENTILATION INC. from
Canada at 1-800-567-3855 and from United States 1-800-836-6271. To
facilitate processing of any warranty claim, the owner of the VENMAR
RANGE HOOD should present the original, dated Bill of Sale for the
VENMAR range hood.
During the first ninety (90) days of the warranty period, VENMAR will
provide in-home warranty service. Thereafter, owner will be responsible for removing the VENMAR RANGE HOOD, transporting it to an
authorized VENMAR service depot and reinstalling the hood upon
completion of warranty repairs.
1-2
3
4
 Loading...