


VELUX INTEGRA®
KLI 110
Simple
set-up
ENGLISH: Instructions for control keypad - Simple set-up
ESPAÑOL: Instrucciones para el teclado de control - Configuración sencilla FRANÇAIS : Instructions pour le bloc numérique - Configuration simple
KLI110
VAS 452423-2014-04

ENGLISH |
Pages 3-21 |
|
|
|
|
|
|
|
ESPAÑOL |
Páginas 23-41 |
|
|
|
|
FRANÇAIS |
Pages 43-61 |
|
|
|
|
|
Pages 63-79 |
|
ENGLISH:
Contents of packaging |
4 |
|
|
Important information and Warnings |
5-7 |
|
|
Batteries and Operation |
8 |
|
|
Set-up of control keypad KLI 110 |
9-19 |
|
|
- To operate a solar powered blind |
10-11 |
|
|
- To operate products already registered in control pad KLR 200 |
12-13 |
|
|
- To operate products already registered in remote control KLR 100 |
14-15 |
|
|
- To operate products connected to control unit KLC 500 |
16-17 |
|
|
- To operate products already operated by an existing control |
|
keypad KLI 110 |
18-19 |
|
|
Deleting products from control keypad KLI 110 |
20 |
|
|
Wall installation |
21 |
|
|
VELUX® 3
1 |
2 |
+ |
+
3
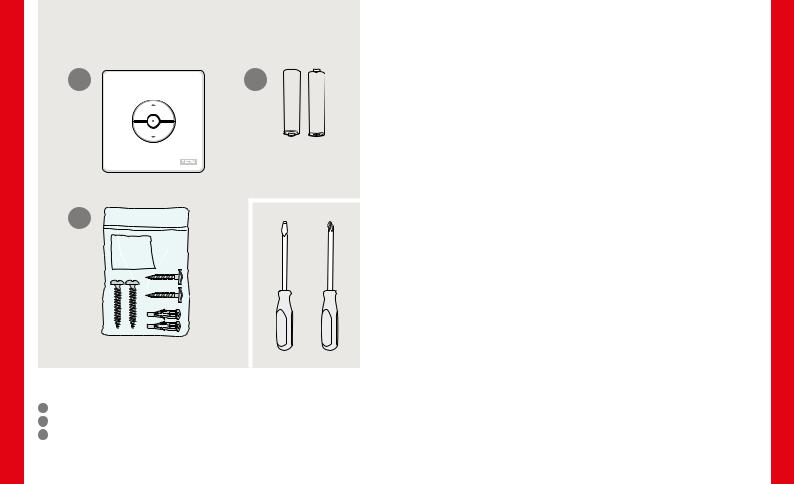
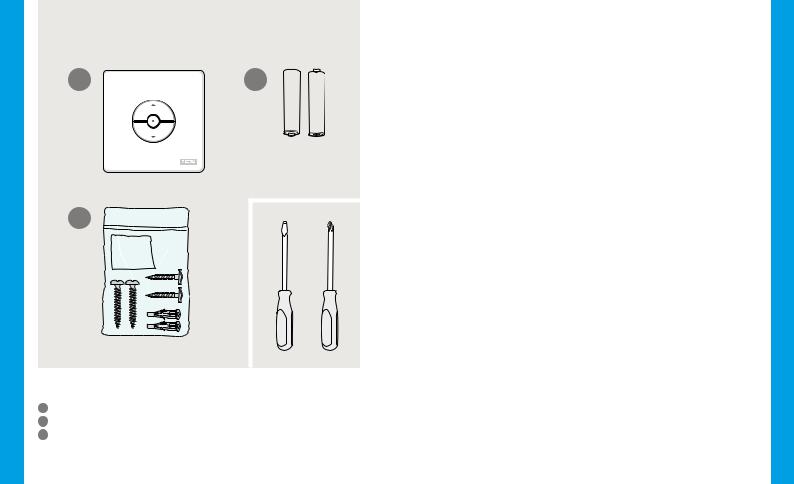
english: Contents of packaging
1: Control keypad
2: Two batteries (type AAA, 1.5 V)
3: Screws, wall anchors and double-sided adhesive tape

Important information
Warning – To reduce the risk of severe injury or death:
Read instructions carefully before installing and operating. Please keep instructions for future reference and hand them over to any new user.
Safety
•The control keypad is intended for use by persons with the relative experience and knowledge or persons who have been given instruction concerning its use by a person responsible for their safety.
•Children should be supervised to ensure that they do not play with the control keypad. It should be fitted out of reach of children at a minimum height of 4 feet (1.2 m).
•The control keypad must not be put into operation until it has been fitted according to these instructions.
•Before operating, ensure that the control keypad can be operated without risk of damage to property or injury to people or animals.
•The control keypad should be fixed at a position where the product to be operated is within sight.
•The control keypad has been designed for use with genuine VELUX products.
•The control keypad is a Class 2 Low Voltage product (3 V d.c.).
•The control keypad complies with part 15 of the FCC and RSS-210 of the IC rules. Operation is subject to the following two conditions:
(1) The control keypad may not cause harmful interference, and (2) the control keypad must accept any interference received, including interference that may cause undesired operation.
4 VELUX® |
VELUX® 5 |
•The control keypad has been tested and found to comply with the limits for a Class B digital device, pursuant to part 15 of the FCC Rules. These limits are designed to provide reasonable protection against harmful interference in a residential installation. The control keypad generates, uses and can radiate radio frequency energy and, if not installed and used in accordance with the instructions, may cause harmful interference to radio communications. However, there is no guarantee that interference will not occur in a particular installation. If the control keypad does cause harmful interference to radio or television reception, which can be determined by turning the control keypad off and on, the user is encouraged to try to correct the interference by one or more of the following measures:
-Reorient or relocate the receiving antenna.
-Increase the separation between the control keypad and receiver.
-Connect the control keypad into an outlet on a circuit different from that to which the receiver is connected.
-Consult the dealer or an experienced radio/TV technician for help. Changes or modifications not expressly approved by the party responsible for compliance could void the user's authority to operate the control keypad.
•FCC Radiation Exposure Statement: The control keypad complies with FCC RF radiation exposure limits set forth for an uncontrolled environment.
•The term "IC:" before the control keypad certification number only signifies that the Industry Canada technical specifications were met.
Installation
•The control keypad is for indoor use only.
•Installation in rooms with a high level of humidity and with hidden wiring must comply with relevant regulations (contact a qualified electrician if necessary).
•Before fixing the control keypad to the wall, verify that it can operate the product in question from the proposed position.
Product
•The control keypad has a built-in RF (radio frequency) unit and will not be operative if placed in a metal cabinet.
•Electrical products must be disposed of in conformity with all local codes, ordinances, rules and regulations for electronic waste and not with household waste.
•Used batteries must not be disposed of together with household waste but have to be disposed of in conformity with the relevant national environmental regulations. Batteries contain substances that can be harmful if not handled and recycled correctly.
• |
Use local authority battery disposal point where available. |
•The packaging can be disposed of with usual household waste.
•Radio frequency band: 2.4 GHz.
•Radio frequency range: 110 yards (100 m) free field. Depending on building construction, the indoor range is approx 30 ft (10 m). However, constructions with reinforced concrete, metal ceilings and plaster walls with steel members may reduce the range.
Maintenance and service
•The control keypad requires a minimal amount of maintenance. The surface may be cleaned with a soft, damp cloth using a small amount of household cleaner diluted in water.
•If you have any technical questions, please contact your VELUX sales company, see telephone list or www.velux.com.
io-homecontrol® provides advanced and secure radio technology that is easy to install. io-homecontrol® labelled products communicate with each other, improving comfort, security and energy savings.
www.io-homecontrol.com
6 VELUX® |
VELUX® 7 |
- |
|
|
+ |
+ |
L |
R |
- |
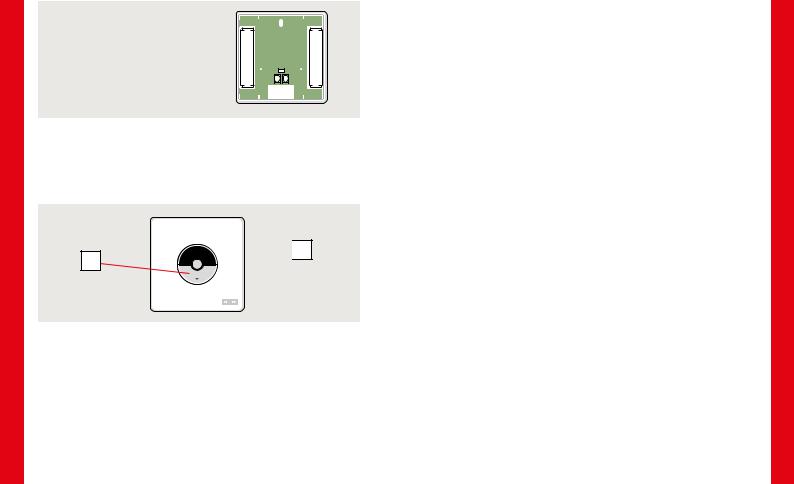
Batteries |
|
|
|
Insert batteries as shown. |
|
|
|
a 

 b
b
Operation
Keys for operating the product a  OPEN/UP or
  CLOSE/DOWN
Short key pressure: Product will travel to maximum top or bottom position.
Long key pressure: Product will travel only until the key is released. Note: If several electrical products are connected to a control unit
KLC 500, only one of the products (random) can be operated in this way.
Stop key b
 Product stops.
LED
L 

 R
R
L R
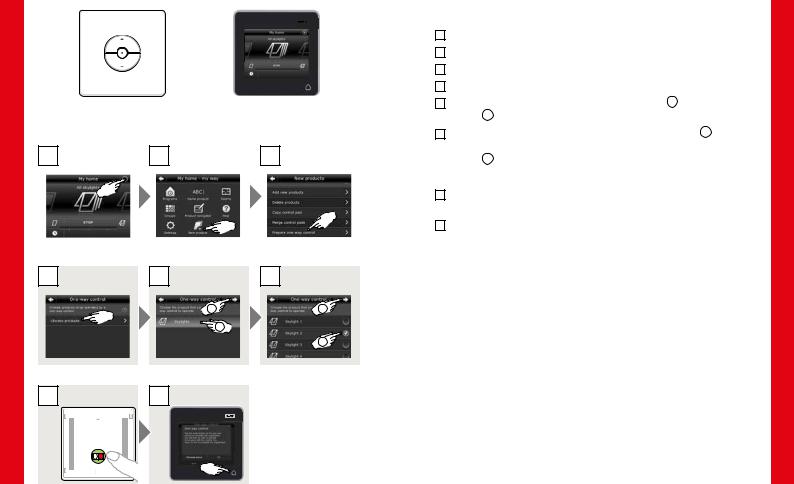
Set-up of control keypad KLI 110
On the back, the control keypad is equipped with two buttons L and R and a light-emitting diode LED to be used during set-up.
Do not fix the control keypad to the wall until set-up has been completed and it has been verified that the products can be operated from the proposed position.
Please refer to pages 10-19 to set-up KLI 110 to operate products with the controls below.
To operate a solar powered blind
Pages 10-11
To operate products already registered in control pad KLR 200
Pages 12-13
To operate products already registered in remote control KLR 100
Pages 14-15
To operate products connected to control unit KLC 500
Pages 16-17
To operate products already operated by an existing control keypad KLI 110
Pages 18-19
8 VELUX® |
VELUX® 9 |
|
|
|
|
|
|
|
Set-up of KLI 110 to operate a solar powered blind |
|
|
|
|
|
|
|
|
|
|
|
|
|
|
|
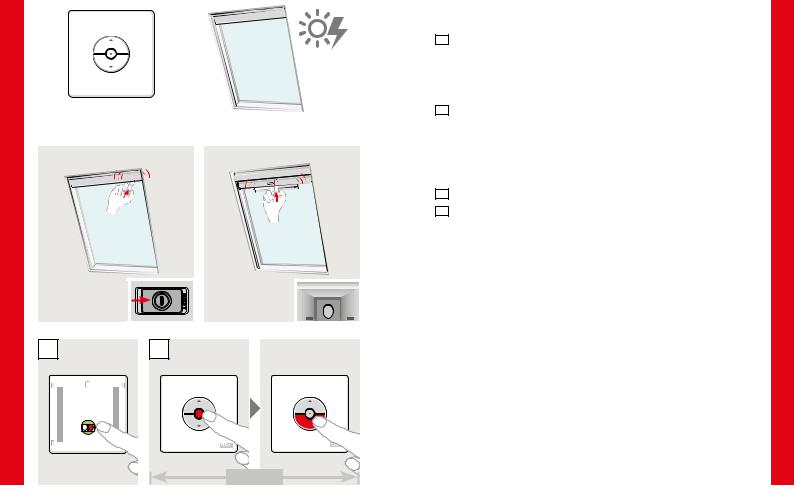
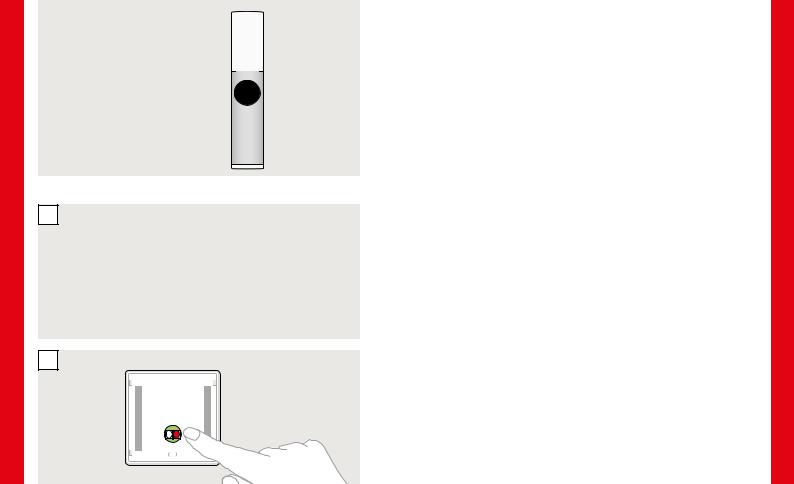
The solar powered blind can have two different designs: |
|
|
|
|
|
|
|
1a Solar powered blind with sliding switch on the right, bottom side of |
|
|
|
|
|
|
|
motor unit: |
|
|
|
|
|
|
|
Slide switch to the right and hold for 1 second. |
|
|
|
|
|
|
|
Caution: Sliding switch to the right and holding for 10 seconds will |
|
|
|
|
|
|
|
delete all previous set-ups. |
|
|
KLI 110 |
|
|
|||
|
|
|
|
1b Solar powered blind with button behind door at the bottom of motor |
|||
|
|
|
|
|
|
|
unit: |
|
|
|
|
|
|
|
Open solar battery door, press button behind the door for 1 second |
|
|
|
|
|
|
|
and close solar battery door. |
|
1a |
|
|
|
1b |
|
|
|
|
|
|
|
Caution: Pressing button for 10 seconds will delete all previous |
||
|
|
|
|||||
|
|
|
|
|
|
|
set-ups. |
|
|
|
|
|
|
|
2 Press button R on back of control keypad KLI 110 for 1 second. |
|
|
1 sec |
|
1 sec |
3 Press the stop key and then the DOWN key within 3 seconds. This is |
||
|
|
|
|
|
|
|
only necessary at the initial set-up after installing the blind. |
The blind can now be operated by KLI 110.
2 3
L
1 sec
max 3 sec
10 VELUX® |
VELUX® 11 |
|
|
|
|
|
|
|
|
|
|
|
|
|
|
|
|
|
|
|
|
|
|
|
|
|
|
|
|
|
|
|
|
|
|
|
|
|
KLI 110 |
|
|
|
KLR 200 |
||||||
|
|
|
|
|
|
|
|
|
|
|
|
1 |
KLR 200 |
|
2 |
KLR 200 |
|
|
3 |
KLR 200 |
|||
|
|
|
|
|
|
|
|
|
|
|
|
4 KLR 200 |
5 KLR 200 |
6 KLR 200 |
|
2 |
2 |
|
1 |
|
|
|
1 |
7 KLI 110 |
8 KLR 200 |
|
1 sec
L
Set-up of KLI 110 to operate products already registered in control pad KLR 200
1Tap  .
.
2Tap "New product".
3Tap "Prepare one-way control". 4 Tap "Choose products".
5Scroll down the display and choose product type 1 . Tap 2 .
2 .
6Scroll down the display and tap the product to be added 1 .
Note: The individual products can be identified by tapping the icon. Tap 2 .
2 .
You now have 10 minutes to execute item 7 with control keypad KLI 110.
7Press briefly the RESET button on the back to register the new product
8Tap  to finish.
Note: To add more products, tap "Choose more" and repeat items 5-8.
The products can now be operated with KLI 110 as well.
12 VELUX® |
VELUX® 13 |
KLI 110
KLR 100
1 KLR 100 |
System settings |
|
Register product
Copy system
Security key
Configure
Enter Back
P1 |
P2 |
2 KLI 110
L
1 sec
Set-up of KLI 110 to operate products already registered in remote control KLR 100
1 Scroll through the menus in remote control KLR 100:
Menu 

 Configure
and select the products to be operated by control keypad KLI 110. 2 Press button R on control keypad KLI 110 for 1 second.
The products can now be operated by KLI 110 as well.
14 VELUX® |
VELUX® 15 |

KLC 500
KLI 110
1 KLC 500
2 KLC 500
3 KLI 110
4 KLC 500
1 sec
1 sec
L
Set-up of KLI 110 to operate products connected to control unit KLC 500
1 Disconnect control unit KLC 500 from power outlet and remove cover. Temporarily disconnect product cables for products not to be operated by this control keypad KLI 110.
2 Reconnect control unit KLC 500 to power outlet and press test button for 1 second.
Caution: Press test button for 10 seconds if you want to delete all
previous set-ups.
3 When one of the products runs briefly back and forth, press button R on control keypad KLI 110 for 1 second.
Note: Steps 2-3 must be completed within 10 minutes.
4 Disconnect control unit KLC 500 from power outlet, reconnect all disconnected cables and replace cover. Reconnect control unit KLC 500 to power outlet.
Repeat steps 1-4 for each additional control keypad KLI 110. The products can now be operated by KLI 110.
|
|
|
|
|
|
|
|
|
|
|
|
|
|
|
|
|
|
|
|
|
|
|
|
|
|
|
|
|
|
|
|
|
|
|
|
|
|
|
|
|
|
|
|
|
|
|
|
|
|
|
|
|
|
16 VELUX® |
|
|
|
|
|
VELUX® 17 |
||
|
|
|
|
|
||||
1
2
Set-up of KLI 110 to operate products already operated by an existing control keypad KLI 110
1 If mounted on the wall, remove cover of the existing control keypad KLI 110 temporarily. Press button R for 10 seconds.
The LED flashes green and the products run briefly back and forth. 2 Press button R on the new control keypad KLI 110 for 1 second. The products can now be operated by the new KLI 110 as well.
|
|
|
|
|
KLI 110 - New |
KLI 110 - Existing |
|||
KLI 110 - Existing
L R
10
KLI 110 - New
L
1 sec
18 VELUX® |
VELUX® 19 |
L R
KLI 110 |
sec |
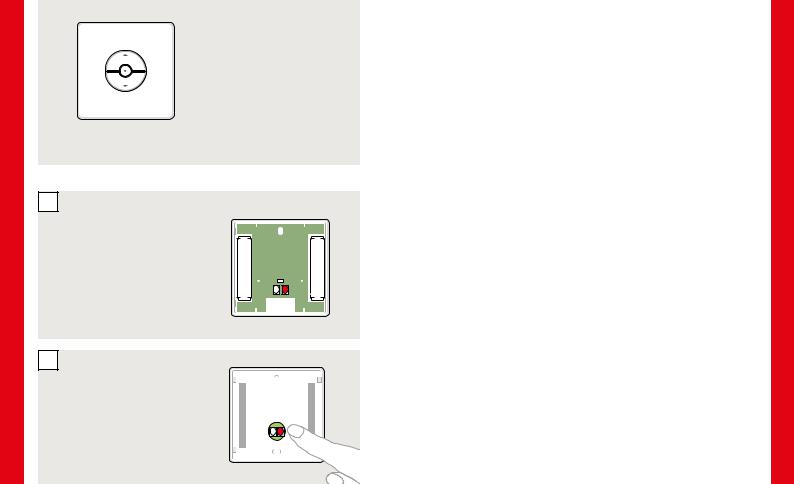
Deleting products from a control keypad KLI 110
Delete all products from a control keypad KLI 110 by pressing button L for 10 seconds. The LED flashes red briefly.
Now the products cannot be operated by this KLI 110 anymore.
1a |
1b |
2
L |
R |
3
Wall installation
Fix control keypad to wall with screws or double-sided adhesive tape.
20 VELUX® |
VELUX® 21 |

ESPAÑOL:
Contenido del embalaje |
24 |
|
|
Información importante y Advertencias |
25-27 |
|
|
Baterías y Funcionamiento |
28 |
|
|
Configuración del teclado de control KLI 110 |
29-39 |
|
|
- Para operar una persiana solar |
30-31 |
|
|
- Para operar productos ya registrados en un panel |
|
de control KLR 200 |
32-33 |
|
|
- Para operar productos ya registrados en el mando a |
|
distancia KLR 100 |
34-35 |
|
|
- Para operar productos conectados a la unidad de control KLC 500 |
36-37 |
|
|
- Para operar productos ya manejados con un teclado de control |
|
KLI 110 existente |
38-39 |
|
|
Eliminación de productos del teclado de control KLI 110 |
40 |
|
|
Instalación en la pared |
41 |
|
|
VELUX® 23
1 |
2 |
+ |
+
3
ESPAÑOL: Contenido del embalaje
1: Teclado de control
2: Dos baterías (tipo AAA, 1.5 V)
3: Tornillos, anclajes de pared, cinta adhesiva de dos caras

INFORMACIÓN IMPORTANTE
ADVERTENCIA – PARA REDUCIR LOS PELIGROS DE LESIONES GRAVES Y MUERTE:
Lea atentamente las instrucciones antes de la instalación y puesta en marcha. Conserve las instrucciones para su uso posterior y entréguelas a todo nuevo usuario.
Seguridad
•El teclado de control debe de ser usado por personas con la experiencia y el conocimiento adecuados o personas que han recibido instrucciones sobre su uso de parte de una persona responsable de su seguridad.
•Los niños deben tener supervisión para asegurarse de que no jueguen con el teclado de control. Debe mantenerse alejado del alcance de los niños a un mínimo de 4 pies de altura (1.2 m).
•El teclado de control no debe ponerse en funcionamiento hasta que se haya instalado según las presentes instrucciones.
•No haga funcionar el teclado de control sin antes asegurarse de que puede funcionar sin riesgo de causar daños a bienes o lesiones a personas o animales.
•El teclado de control debería instalarse en una posición en la que el producto que desea hacer funcionar esté a la vista.
•El teclado de control ha sido diseñado para ser usado con productos originales VELUX.
•El teclado de control es un producto Clase 2 de baja tensión (3 V CD.).
•El teclado de control cumple con la parte 15 de las normas de FCC y con RSS-210 de las normas de IC. Su funcionamiento depende de las
24 VELUX® |
VELUX® 25 |
 Loading...