

Page 1

FREEWAVE
STRYKER
LIGHTNING/MOTION TRIGGER
Page 2
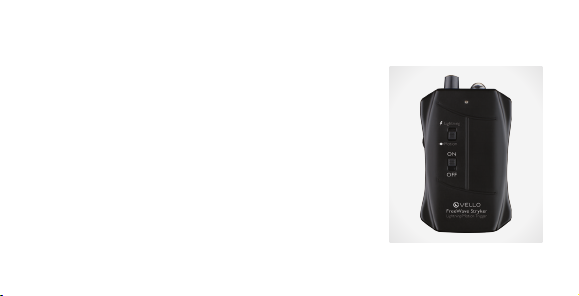
THANK YOU FOR CHOOSING VELLO
The Vello FreeWave Stryker
for Canon and Nikon is a
2-in- solution for intense
light and infrared (IR) image
triggering. In Lightning mode,
the device will trigger your
camera’s shutter release within
approximately 0. milliseconds
after a lightning burst reaches
2
the sensor, allowing you to
capture striking images of
storms or fireworks. Motion
mode sets the device to trigger
your camera once the unit
detects movement using the
IR motion sensor. This is ideal
for taking remote, candid shots
of passing humans or wildlife.
Page 3
FEATURES COMPATIBLE DEVICES
• Detects lightning and IR
heat motion
Triggers your camera
approximately 0.
milliseconds after detection
• Portable
Compact and lightweight
• Easy to use
Streamlined design for
simple operation
The Vello FreeWave
Stryker transmitter comes
in a Nikon or Canon kit.
The device can also be
used with other cameras
by using the appropriate
cables. See included cable
compatibility insert.
3
Page 4

PRECAUTIONS
• Please read and follow these
instructions and keep this
manual in a safe place.
• Lightning is very dangerous.
Stay in a safe place in a
storm area.
• Do not operate the unit in
the presence of flammable
gas or vapors.
4
• There are no userserviceable parts inside the
devices. Do not attempt to
disassemble or perform any
unauthorized modification.
• Turn o the power of the
camera before inserting or
removing the transmitter.
• Clean the unit with a soft,
dry cloth.
• Keep out of reach of
children. This device
contains small parts which
may pose a choking hazard.
• Observe caution when
handling batteries. Batteries
may leak or explode if
improperly handled. Use
only the batteries listed in
this manual. Make certain
to align the battery with the
correct polarity.
Page 5

• Batteries are prone
to leakage when fully
discharged. To avoid damage
to the product, be sure
to remove the batteries
when leaving the product
unattended for prolonged
periods or when no charge
remains.
• Make sure the item is
intact and that there are no
missing parts.
• Handle the unit with care.
• Do not use or leave the
devices in conditions of
extreme heat, severe cold,
or high humidity.
• Do not handle with wet
hands or immerse in or
expose to water or rain.
Failure to observe this
precaution could result in
fire or electric shock.
• Dispose of used batteries,
packaging, and old devices in
accordance to appropriate
local environmental
regulations.
• All photos are for
illustrative purposes only.
5
Page 6

OVERVIEW
Mode
Switch
On/O
Switch
Indicator
Light
Cold Shoe
Mount
Battery
Compartment
2.5 mm
Output Jack
LeftTo p Bottom
Front
Sensitivity
Dial
Lightning
6
Sensor
IR Motion
Sensor
Page 7

CONTENTS
• Trigger
• 2 camera-compatible cables
(Canon or Nikon)
• User manual
• Cable compatibility list
RCC-C and RCC-C2 with RC-LMC
RCC-N and RCC-N2 with RC-LMN
7
Page 8

BEFORE YOU BEGIN
Installing the Batteries
The Vello FreeWave Stryker
is powered by two AAA
batteries. To install, remove the
battery compartment door on
the bottom of the unit. Insert
the batteries with the correct
orientation, as displayed
within the compartment.
Re-install compartment door
to complete the process.
Page 9

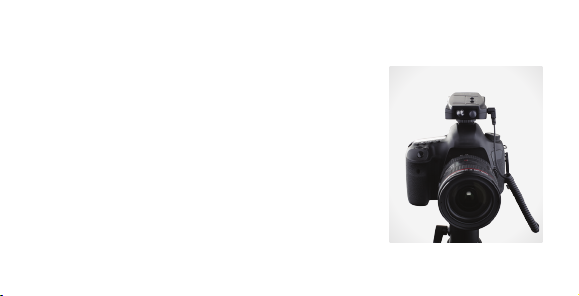
MOUNTING AND CONNECTING THE DEVICE
On-Camera or Bracket
The Vello FreeWave Stryker
has a cold-shoe foot on the
bottom of the unit. To mount
the device to a camera or
bracket, simply slide the shoe
mount foot into a shoe-mount.
Tighten the foot’s locking
ring to secure the device.
Then connect the included
shutter cable to the Stryker
and camera ports [ ].
On a Light Stand
The Vello FreeWave Stryker
has a /4"-20 threaded socket
on the unit’s cold-shoe foot.
To secure the device to a
light stand, simply screw it
onto a compatible threaded
post by turning it clockwise.
Rotate the device until secure.
Then connect the included
shutter cable to the Stryker
and camera ports [ ].
9
Page 10

LIGHTNING TRIGGERING
An individual’s trigger finger
is not fast enough to detect
and capture lightning as it
strikes. With your Vello
FreeWave Stryker in lightning
triggering mode, your camera
will automatically activate
your camera’s shutter within
approximately 0. milliseconds
of the trigger detecting a
flash or burst of light.
0
For operation in lightning
mode, point the device’s
sensor and camera in the
direction of where you’re
expecting a lightning flash.
Attach the camera and trigger
to a tripod for best results. We
recommend turning the trigger
on before the camera after
the two have been connected
with a cable. Additionally, your
camera’s shutter speed should
be set to a longer exposure.
To activate lightning triggering
mode, move the mode switch
to “Lightning”. For best
results, start at a 0 second
exposure & adjust your
camera’s exposure settings
while adjusting the Stryker’s
sensitivity using the dial on the
left side of the unit. Set your
camera / lens to manual focus.
Page 11

Setting the Lightning Sensitivity
The Trigger is very sensitive
and with any sudden flicker of
light, it will fire the shutter. The
sensitivity control adjusts the
degree to which the sensor
picks up on stimuli. The level of
sensitivity varies for dierent
conditions. To adjust the
sensitivity, rotate the sensitivity
dial on the left side of the
device. Rotate the dial counterclockwise and continue to
turn the dial until the LED
turns red. This indicates that
you have passed the threshold
that the device determines
as the ideal setting in your
current environment. Turn
the dial clockwise slowly until
the light turns o to find your
optimized sensitivity setting,
where a burst of light will
cause it to trigger the camera.
Page 12

MOTION TRIGGERING
The unit’s motion triggering
mode uses a Passive Infrared
(PIR) sensor. It detects
movement of infrared (IR)
sources, such as humans
or animals, from up to five
meters (6.4 feet) away, and
smaller wildlife at closer
range. When the sensor
detects IR motion within its
field of view (horizontal: 94°,
2
vertical: 82°), it will trigger
your camera’s shutter.
To activate motion triggering
mode, move the mode
switch to “Motion.”
For best results, adjust your
camera’s settings appropriate
for your triggering situation
before use. Mount the
device and your camera
on a light stand or tripod
for stable triggering.
Note: Device cannot detect IR
motion through a window.
Note: The sensitivity dial is not
active when in motion mode.
Page 13

SPECIFICATIONS
Lightning Response Time Approximately 0.ms
Motion Detection Range Maximum 6.4' (5 m)
Motion Detection Area Horizontal: 94°, Vertical: 82°, 64 zones
IR Temperature Detection
Power Source 2× AAA batteries (not included)
Dimensions .2 × 4. × 2.4" (3.3 × 0.5 × 6. cm)
Weight .9 oz. (53.7 g)
*
Note: Detection can occur at a ranger superior to the above values depending on the target’s speed and its
temperature dierence with its surroundings.
*
± 39.2°F (4°C)
3
Page 14

TROUBLESHOOTING
• Ensure the batteries are
installed with the correct
orientation as displayed
within the battery
compartment.
• If the trigger is triggering
your camera without a
reason, turn o any cell
phones in the immediate
vicinity.
4
• Ensure you are using the
correct cable between your
camera and the device.
• Ensure the cable is inserted
into the correct port on
your camera and the device.
• Ensure the device has the
correct batteries installed,
and installed correctly.
• Ensure the cable is
fully inserted into the
appropriate ports on your
camera and the device.
• The device cannot detect
stimuli through a window
or other interferences.
Make sure there is nothing
blocking the sensors.
Page 15

ONE-YEAR LIMITED WARRANTY
This VELLO product is warranted to the original purchaser
to be free from defects in materials and workmanship under
normal consumer use for a period of one () year from the
original purchase date or thirty (30) days after replacement,
whichever occurs later. The warranty provider’s
responsibility with respect to this limited warranty shall be
limited solely to repair or replacement, at the provider’s
discretion, of any product that fails during normal use of
this product in its intended manner and in its intended
environment. Inoperability of the product or part(s) shall
be determined by the warranty provider. If the product has
been discontinued, the warranty provider reserves the right
to replace it with a model of equivalent quality and function.
This warranty does not cover damage or defect caused
by misuse, neglect, accident, alteration, abuse, improper
installation or maintenance. EXCEPT AS PROVIDED
HEREIN, THE WARRANTY PROVIDER MAKES NEITHER
ANY EXPRESS WARRANTIES NOR ANY IMPLIED
WARRANTIES, INCLUDING BUT NOT LIMITED TO
ANY IMPLIED WARRANTY OF MERCHANTABILITY OR
FITNESS FOR A PARTICULAR PURPOSE. This warranty
provides you with specific legal rights, and you may also
have additional rights that vary from state to state.
To obtain warranty coverage, contact the Vello
Customer Service Department to obtain a return
merchandise authorization (“RMA”) number, and return
the defective product to Vello along with the RMA
number and proof of purchase. Shipment of the defective
product is at the purchaser’s own risk and expense.
For more information or to arrange
service, visit www.vellogear.com or call
Customer Service at 22-594-2353.
Product warranty provided by the Gradus Group.
www.gradusgroup.com
VELLO is a registered trademark of the Gradus Group.
© 204 Gradus Group LLC. All Rights Reserved.
Page 16

www.vellogear.com
All other trademarks are the property of their respective owners.
© Copyright 204 Gradus Group
GG4
 Loading...