

Page 1
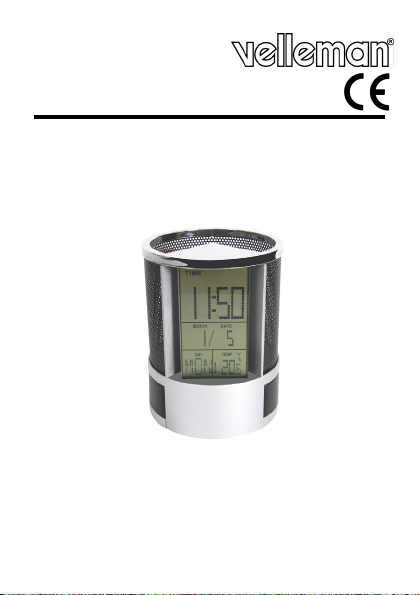
WT70
PEN HOLDER - CLOCK, ALARM, DATE, TEMP. & TIMER
PENHOUDER - KLOK, ALARM, DATUM, TEMP. & TIMER
PORTE-PLUME - HORLOGE, ALARME, DATE, TEMP., COMPTE À REBOURS
PORTA-LAPICEROS - RELOJ, ALARMA, FECHA, TEMP. & CUENTA ATRÁS
FEDERHALTER - UHR, ALARM, DATUM, TEMP. & COUNTDOWN
ORGANIZER NA BIURKO – ZEGAR, BUDZIK, KALENDARZ,
TERMOMETR
USER MANUAL 3
GEBRUIKERSHANDLEIDING 6
NOTICE D’EMPLOI 10
MANUAL DEL USUARIO 13
BEDIENUNGSANLEITUNG 17
INSTRUCKJA OBSŁUGI 21
Page 2
WT70
Figure 1
Figure 2
05/03/2010 2 Velleman
®
Page 3
WT70
USER MANUAL
1. Introduction
To all residents of the Euro pean Union
Important environmental information about this product
returned to your distributor or to a local recycling service. Respect
the local environmental rules. If in doubt, contact your local waste
disposal authorities.
Thank you for choosing Velleman! Please read the manual thoroughly
before bringing this device into service. If the device was damaged in
transit, don't install or use it and contact your dealer.
2. Safety Instructions
• Damage caused by disregard of certain guidelines in this manual is
• Note that damage caused by user modifications to the device is not
3. General Guidelines
• Protect this device from shocks and abuse. Avoid brute force when
• Protect the device against extreme heat and dust.
• Familiarise yourself with the functions of the device before actually
• All modifications of the device are forbidden.
• Only use the device for its intended purpose. Using the device in an
05/03/2010 3 Velleman
This symbol on the device or the package indicates that
disposal of the device after its lifecycle could harm the
environment. Do not dispose of the unit (or batteries) as
unsorted municipal waste; it should be taken to a
specialized company for recycling. This device should be
Keep the device away from children and unauthorised users.
For indoor use only. Keep this device away from rain,
moisture, splashing and dripping liquids
not covered by the warranty and the dealer will not accept
responsibility for any ensuing defects or problems.
covered by the warranty.
operating the device.
using it.
unauthorised way will void the warranty.
®
Page 4
WT70
4. Features
• 4 different modes
o time mode: the display shows time, week and the environment
temperature
o alarm mode: set daily alarm and snooze settings and choose
one of the eight alarm tunes
o timer mode: enables you to set a countdown timer / the
alarm will ring on the set time
o thermometer mode: displays the environment temperature
• 12h / 24h mode selection
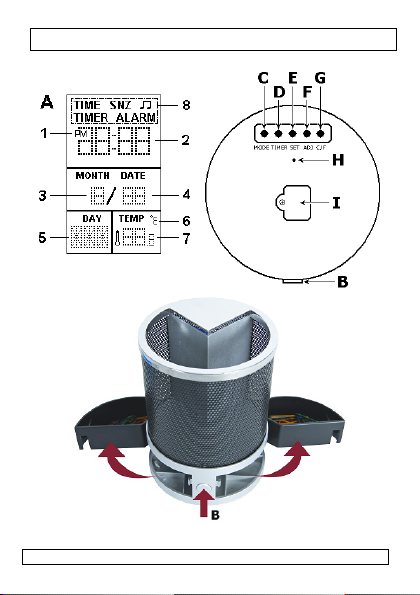
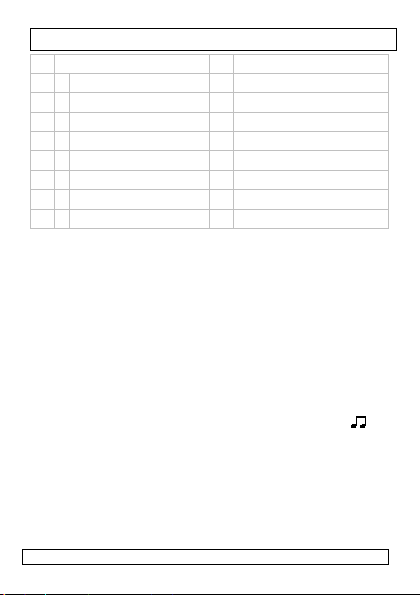
5. Overview
Refer to the illustration on page 2 of this manual.
A display B open compartments button
1 12/24h indication C mode button
2 time D timer button
3 month E set button
4 date F adjust button
5 day G °C/°F select
6 °C/°F indication H speaker
7 temperature I battery cover
8 display mode
6. Operation
• Pull the plastic protection strip out of the battery compartment
[I]. The clock starts in TIME mode (12h). The mode is indicated
on the top of the display [A8].
• To switch between 12h and 24h mode press the adjust button
[F]. In 12h mode, PM is shown [1] in the afternoon.
• Settings are made by using the adjust button [F] to increase or
°C/°F select button [G] to decrease the value.
• To set the time and date, press the set button [E] while in TIME
mode. Successively set hours, minutes, year, month and day.
Press the set button [E] to go to the next setting.
05/03/2010 4 Velleman
®
Page 5
WT70
• To set the alarm time and melody, go to ALARM mode with the
mode button [C]. Successively set the hours, minutes, snooze
time (in minutes) and melody (1~9). Press the set button [E] to
go to the next setting.
• To enable the alarm, while in ALARM mode, press the adjust
button [F]. The
adjust button [F] again to enable snooze mode, indicated by
SNZ. Press the adjust button [F] again to disable the alarm.
• When the alarm sounds, press the set button [E] to stop it in
case the snooze function is enabled, press any other button to
pause the alarm. When the snooze function is active, SNZ will
start flashing and after the set snooze-time the alarm will sound
again. To exit the snooze-function, press the set button [E].
• To use the countdown timer, press the timer button [D] to go in
timer mode. Set the starting time (max. 23:59:59) with the set
button [E]. Successively set the hours, minutes and seconds.
Press the set button [E] to go to the next setting. Press the timer
button [D] to start/pause the timer. When countdown reaches
00:00:00 the alarm will sound. Press any button to stop the
alarm. While in pause mode, press the adjust button [F] to reset
the timer to 00:00:00.
• To choose between °C and °F, press the °C/°F select button [G]
while in TIME mode.
• Press the compartment release button [B] at the back of the pen
holder to open the side compartments. To close them, push them
inwards until they snap into place.
-symbol indicates the alarm is set. Press the
7. Batteries
• Open the battery cover [I] by releasing the screw and lifting the
cover.
• Insert two new type AG13 batteries with polarity as indicated
inside the battery casing.
• Place the cover [I] back and secure the screw.
• Do not attempt to recharge batteries and do not throw in fire as
they might explode.
• Remove batteries when device is not to be used for a long time.
05/03/2010 5 Velleman
WARNING: handle batteries with care, observe
warnings on battery casing. Dispose of batteries in
accordance with local regulations.
Keep batteries away from children.
®
Page 6
WT70
8. Technical Specification
power supply 2x AG13 battery, incl.
dimensions Ø85 x 110mm
weight ±140g
Use this device with original accessories only. Velleman nv
cannot be held responsible in the event of damage or injury
resulted from (incorrect) use of this device. For more info
concerning this product and the latest version of this manual,
please visit our website www.velleman.eu. The information in
this manual is subject to change without prior notice.
© COPYRIGHT NOTICE
The copyright to this manual is owned by Velleman nv. All
worldwide rights reserved.
No part of this manual or may be copied, reproduced, translated or
reduced to any electronic medium or otherwise without the prior
written consent of the copyright holder.
GEBRUIKERSHANDLEIDING
1. Inleiding
Aan alle ingezetenen van de Europese Unie
Belangrijke milieu-informatie betreffende dit product
Dit symbool op het toestel of de verpakking geeft aan
dat, als het na zijn levenscyclus wordt weggeworpen, dit
toestel schade kan toebrengen aan het milieu. Gooi dit
toestel (en eventuele batterijen) niet bij het gewone
huishoudelijke afval; het moet bij een gespecialiseerd
bedrijf terechtkomen voor recyclage. U moet dit toestel naar uw
verdeler of naar een lokaal recyclagepunt brengen. Respecteer de
plaatselijke milieuwetgeving.
Hebt u vragen, contacteer dan de plaatselijke autoriteiten
betreffende de verwijdering.
Dank u voor uw aankoop! Lees deze handleiding grondig voor u het
toestel in gebruik neemt. Werd het toestel beschadigd tijdens het
transport, installeer het dan niet en raadpleeg u w dealer.
05/03/2010 6 Velleman
®
Page 7
WT70
2. Veiligheidsinstructies
Houd buiten het bereik van kinderen en onbevoegden.
Enkel voor gebruik binnenshuis. Bescherm tegen regen,
vochtigheid, stof, extreme temperaturen en opspattende
vloeistoffen.
• De garantie geldt niet voor schade door het negeren van
bepaalde richtlijnen in deze handleiding en uw dealer zal de
verantwoordelijkheid afwijzen voor defecten of problemen die
hier rechtstreeks verband mee houden.
• Schade door wijzigingen die de gebruiker heeft aangebracht valt
niet onder de garantie.
3. Algemene richtlijnen
• Bescherm tegen schokken. Vermijd brute kracht tijdens de
bediening.
• Leer eerst de functies van het toestel kennen voor u het gaat
gebruiken.
• Om veiligheidsredenen mag u geen wijzigingen aanbrengen.
• Gebruik het toestel enkel waarvoor het gemaakt is. Bij
onoordeelkundig gebruik vervalt de garantie.
4. Eigenschappen
• 4 gebruiksmodi:
o uur (TIME): display geeft tijd, datum en omgevingstemperatuur
weer
o alarm (ALARM): laat toe een alarm in te stellen en een van
de 8 alarmmuziekjes te kiezen
o timer (TIMER): activeert een afteltimer - eens aan nul
weerklinkt een alarm
o thermometer (TEMP): display geeft omgevingstemperatuur
weer
• 12-24 u-tijdsweergave
5. Omschrijving
Raadpleeg de figuur op pagina 2 van deze handleiding.
05/03/2010 7 Velleman
®
Page 8
WT70
A display B vergrendelknop opbergvak
1 12-24 u-weergave C MODE
2 tijd D TIMER
3 maand E SET
4 datum F ADJ
5 dag G °C-°F-selectieknop
6 °C-°F-weergave H luidspreker
7 temperatuur I batterijvak
8 displaymodus
6. Gebruik
• Verwijder het plastic lipje uit het batterijvak [I]. De klok start in
TIME-modus (12 u). De modus wordt bovenaan de display [A8]
weergegeven.
• Schakel tussen 12 u- en 24 u-weergave met ADJ [F]. In 12 u-
weergave verschijnt PM [1] om de namiddag aan te duiden.
• Verhoog de waarde met ADJ [F], verlaag de waarde met de
°C-°F-selectieknop [G].
• Instellen van tijd en datum: druk op SET [E] en stel
achtereenvolgens het uur, de minuten, het jaar, de maand en de
dag in. Ga naar het volgende niveau met SET [E].
• Ga naar ALARM met MODE [C] en stel het alarm en het muziekje
in. Stel achtereenvolgens het uur, de minuten, sluimertijd (in
minuten) en het muziekje (1~9) in. Ga naar het volgende niveau
met SET [E].
• Ga naar ALARM en schakel het alarm in met ADJ [F]. Het
symbool geeft aan dat het alarm is ingeschakeld. Druk opnieuw
op ADJ [F] om de sluimerfunctie (SNZ) in te schakelen. Druk een
derde keer op ADJ [F] om het alarm uit te schakelen.
• Bij het afgaan van het alarm, druk op SET [E] om het alarm uit
te schakelen. Is de sluimerfunctie ingeschakeld, druk dan op een
willekeurige knop op het alarm te pauzeren. Schakel de
sluimerfunctie uit met een druk op SET [E].
• Druk op TIMER [D] om de timer weer te geven. Stel de tijd in
(max. 23:59:59) met SET [E]. Stel achtereenvolgens het uur, de
minuten en de seconden in. Ga naar het volgende niveau met
05/03/2010 8 Velleman
-
®
Page 9
WT70
SET [E]. Druk op TIMER [D] om de timer te starten/pauzeren.
Eens aan nul weerklinkt het alarm. Druk op een willekeurige knop
om het alarm te stoppen. Druk op ADJ [F] om de timer op
00:00:00 te resetten. Ga naar TIMER en selecteer de
temperatuurweergave met °C/°F [G].
• Druk op de vergrendelknop [B] achteraan de penhouder om de
opbergvakjes te openen. Druk ze terug in de penhouder om ze te
sluiten.
7. De batterijen
• Ontspan de schroef en open het batterijvak [I].
• Plaats twee nieuwe AG13-abtterijen volgens de
polariteitaanduidingen.
• Sluit het batterijvak [I].
• Herlaad geen alkalinebatterijen en gooi batterijen nooit in het vuur.
• Verwijder de batterijen na gebruik.
LET OP: Leef de richtlijnen op de verpakking van de
batterijen zorgvuldig na. Houd de batterijen buiten
het bereik van kinderen.
8. Technische specificaties
voeding 2 x AG13-batterij (meegeleverd)
afmetingen Ø 85 x 110 mm
gewicht ± 140 g
Gebruik dit toestel enkel met originele accessoires. Velleman
nv is niet aansprakelijk voor schade of kwetsuren bij
(verkeerd) gebruik van dit toestel. Voor meer informatie over
dit product en de laatste versie van deze handleiding, zie
www.velleman.eu. De informat ie in deze handleiding kan te
allen tijde worden gewijzigd zonder voorafgaande
kennisgeving.
© AUTEURSRECHT
Velleman nv heeft het auteursrecht voor deze handleiding.
Alle wereldwijde rechten voorbehouden. Het is niet toegestaan
om deze handleiding of gedeelten ervan over te nemen, te kopiëren,
te vertalen, te bewerken en op te slaan op een elektronisch medium
zonder voorafgaande schriftelijke toestemming van de
rechthebbende.
05/03/2010 9 Velleman
®
Page 10

WT70
NOTICE D’EMPLOI
1. Introduction
Aux résidents de l'Union européenne
Des informations environnementales importantes concernant
ce produit
Ce symbole sur l'appareil ou l'emballage indique que
l’élimination d’un appareil en fin de vie peut polluer
l'environnement. Ne pas jeter un appareil électrique ou
électronique (et des piles éventuelles) parmi les déchets
municipaux non sujets au tri sélectif ; une déchèterie
traitera l’appareil en question. Renvoyer les équipements usagés à
votre fournisseur ou à un service de recyclage local. Il convient de
respecter la réglementation locale relative à la protection de
l’environnement.
En cas de questions, contacter les autorités locale s pour
élimination.
Nous vous remercions de votre achat ! Lire la présente notice
attentivement avant la mise en service de l’appareil. Si l’appareil a
été endommagé pendant le transport, ne pas l’installer et consulter
votre revendeur.
2. Consignes de sécurité
Garder hors de la portée des enfants et des personnes non
.
autorisées
Uniquement pour usage à l’intérieur. Protéger contre la
pluie, l’humidité, la poussière, les températures extrêmes et
les projections d’eau.
• La garantie ne s’applique pas aux dommages survenus en
négligeant certaines directives de cette notice et votre revendeur
déclinera toute responsabilité pour les problèmes et les défauts
qui en résultent.
• Les dommages occasionnés par des modifications par le client ne
tombent pas sous la garantie.
3. Directives générales
• Protéger contre les chocs l’opération.
• Se familiariser avec le fonctionnement avant l’emploi.
05/03/2010 10 Ve lleman
®
Page 11

WT70
• Toute modification est interdite pour des raisons de sécurité.
• N’utiliser qu’à sa fonction prévue. Un usage impropre annule
d'office la garantie.
4. Caractéristiques
• 4 fonctions
o mode horloge (TIME) : affichage de l’heure, la date et la
température ambiante
o mode alarme (ALARM) : paramétrage de l’alarme et de la
fonction de répétition, sélection de la tonalité
o mode compte à rebours (TIMER) : paramétrage du compte à
rebours - l’alarme est déclenchée une fois le temps écoulé
o mode thermomètre (TEMP) : affichage de la température
ambiante
• format de l’heure 12/24 h
5. Description
Se référer aux illustrations à la page 2 de cette notice.
A afficheur B verrouillage rangements
1 format 12/24 h C MODE
2 heure D TIMER
3 mois E SET
4 date F ADJ
5 jour G sélecteur °C/°F
6 indication °C/°F H haut-parleur
7 température I compartiment des piles
8 mode d’affichage
6. Emploi
• Retirer la languette en plastique hors du compartiment des piles
[I]. L’horloge se met en mode TIME (12 h), indiqué au haut de
l’afficheur [A8].
• Sélectionner le format 12 ou 24 h avec la touche ADJ [F]. en
mode 12 h, PM [1] indique l’après-midi.
05/03/2010 11 Ve lleman
®
Page 12

WT70
• Modification de la valeur : enfoncer la touche ADJ [F]/°C/°F [G]
pour augmenter/diminuer la valeur.
• En mode TIME, régler l’heure et la date avec la touche SET [E].
Régler successivement l’heure, les minutes, l’année, le mois et le
jour. Enfoncer la touche SET [E] pour accéder au niveau suivant.
• En mode ALARM, régler l’alarme et sélectionner la tonalité avec la
touche MODE [C]. Régler successivement l’heure, les minutes, le
délai de répétition (en minutes) et sélectionner la tonalité (1~9).
Enfoncer la touche SET [E] pour accéder au niveau suivant.
• En mode ALARM, activer/désactiver l’alarme en enfonçant la
touche ADJ [F] (le symbole
touche ADJ [F] pour activer la fonction de répétition (SNZ).
• Enfoncer la touche SET [E] pour arrêter une alarme déclenchée.
Avec la fonction de répétition est activée, enfoncer une touche
aléatoire pour interrompre l’alarme. Le symbole SNZ clignote.
• Accéder au compte à rebours avec la touche TIMER [D]. Régler le
compte à rebours (max. 23:59:59) avec la touche SET [E].
Régler successivement l’heure, les minutes et les secondes.
Enfoncer la touche SET [E] pour accéder au niveau suivant.
Démarrer/interrompre le compte à rebours avec la touche TIMER
[D]. Une fois le temps écoulé (00:00:00), l’alarme retentira.
Enfoncer une touche aléatoire pour arrêter le compte à rebours.
Réinitialiser le compte à rebours ave la touche ADJ [F].
• En mode TIME, sélectionner le mode d’affichage de la
température (°C/°F) avec la touche °C/°F [G].
• Enfoncer le bouton de verrouillage [B] pour ouvrir les
compartiments de rangement. Refermer en les poussant dans la
porte-plume.
indique l’activation). Renfoncer la
7. Les piles
• Desserrer la vis et ouvrir le compartiment des piles [I].
• Insérer deux piles AG13 selon les indications de polarité.
• Refermer le compartiment des piles [I].
• Ne pas recharger des piles alcalines et ne jamais jeter des piles
au feu.
• Retirer les piles après usage.
ATTENTION : Respecter les consignes de sécurité
mentionnées sur l’emballage des piles. Garder les
piles hors de la portée des enfants.
05/03/2010 12 Ve lleman
®
Page 13

WT70
8. Spécifications techniques
alimentation 2 piles AG13, incl.
dimensions Ø 85 x 110 mm
poids ± 140 g
N’employer cet appareil qu’avec des accessoires d’origine. SA
Velleman ne sera aucunement responsable de dommages ou
lésions survenus à un usage (incorrect) de cet appareil. Pour
plus d’information concernant cet article et la dernière
version de cette notice, visitez notre site web
www.velleman.eu. Toutes les informations présentées dans
cette notice peuvent être modifiées sans notification
préalable.
© DROITS D’AUTEUR
SA Velleman est l’ayant droit des droits d’auteur pour cette
notice. Tous droits mondiaux réservés.
Toute reproduction, traduction, copie ou diffusion, intégrale ou
partielle, du contenu de cette notice par quelque procédé ou sur tout
support électronique que se soit est interdite sans l’accord préalabl e
écrit de l’ayant droit.
MANUAL DEL USUARIO
1. Introducción
A los ciudadanos de la Unión Europe a
Importantes informaciones sobre el medio ambiente
concerniente a este producto
Este símbolo en este aparato o el embalaje indica que, si
tira las muestras inservibles, podrían dañar el medio
ambiente. No tire este aparato (ni las pilas, si las hubiera)
en la basura doméstica; debe ir a una empresa
especializada en reciclaje. Devuelva este aparato a su
distribuidor o a la unidad de reciclaje local. Respete las leyes locales
en relación con el medio ambiente.
Si tiene dudas, contacte con las autoridades locales para
residuos.
05/03/2010 13 Ve lleman
®
Page 14
WT70
¡Gracias por haber comprado el WT70! Lea atentamente las
instrucciones del manual antes de usarlo. Si el aparato ha sufrido
algún daño en el transporte no lo instale y póngase en contacto con
su distribuidor.
2. Instrucciones de seguridad
Mantenga el aparato lejos del alcance de personas no
capacitadas y niños.
Sólo para el uso en interiores. No exponga este equipo a
lluvia, humedad, temperaturas extremas, polvo ni a ningún
tipo de salpicadura o goteo.
• Los daños causados por descuido de las instrucciones de
seguridad de este manual invalidarán su garantía y su
distribuidor no será responsable de ningún daño u otros
problemas resultantes.
• Los daños causados por modificaciones no autorizadas, no están
cubiertos por la garantía.
3. Normas generales
• No agite el aparato. Evite usar excesiva fuerza durante el manejo
y la instalación.
• Familiarícese con el funcionamiento del aparato antes de
utilizarlo.
• Por razones de seguridad, las modificaciones no autorizadas del
aparato están prohibidas.
• Utilice sólo el aparato para las aplicaciones descritas en este
manual. Su uso incorrecto anula la garantía completamente.
4. Características
• 4 funciones
o modo reloj (TIME) : visualización de la hora, la fecha y la
temperatura
o modo alarma (ALARM) : para activar la alarma y la función
"snooze" y seleccionar una melodía
o modo cuenta atrás (TIMER) : para activar la cuenta atrás -
la alarma suena si se ha acabado el tiempo
o modo termómetro (TEMP) : visualización de la temperatura
ambiente
• formato de reloj de 12 ó 24 horas
05/03/2010 14 Ve lleman
ambiente
®
Page 15

WT70
5. Descripción
Véase las figuras en la página Error! Bookmark not defined. de
este manual del usuario.
A Display B botón de bloqueo para los
1 formato 12/24 h C MODO
2 hora D TIMER
3 mes E SET
4 fecha F ADJ
5 día G selector °C/°F
6 indicación °C/°F H altavoz
7 temperatura I compartimiento de pilas
8 modo de ’visualización
6. Uso
• Quite la lengüeta de plástico fuera del compartimiento de pilas
[I]. El reloj se pone en el modo TIME (12 h), indicado en la
parte superior de la pantalla [A8].
• Seleccione el formato 12 ó 24 h con la tecla ADJ [F]. En el modo
12 h, PM [1] indica la tarde.
• Modificar el valor: pulse la tecla ADJ [F]/°C/°F [G] para
aumentar/disminuir el valor.
• En el modo TIME, ajuste la hora y la fecha con la tecla SET [E].
Ajuste sucesivamente la hora, los minutos, el año, el mes y el
día. Pulse la tecla SET [E] para entrar en el siguiente nivel.
• En el modo ALARM, ajuste la alarma y seleccione la melodía con la
tecla MODO [C]. Ajuste sucesivamente la hora, los minutos, la
función « snooze » (repetición) en minutos y seleccione la melodía
(1~9). Pulse la tecla SET [E] para entrar en el sig uiente nivel.
• En el modo ALARM, activar/desactivar la alarma al pulsar la tecla
ADJ [F] (el símbolo
tecla ADJ [F] para activar la función « snooze » (SNZ).
• Pulse la tecla SET [E] para desactivar una alarme activada. Si
está activada la función de repetición, pulse cualquier tecla para
interrumpir la alarma. El símbolo SNZ parpadea.
05/03/2010 15 Ve lleman
indica la activación). Vuelva a pulsar la
compartimientos
®
Page 16

WT70
• Entre en el modo de cuenta atrás con la tecla TIMER [D]. Ajuste le
cuenta atrás (máx. 23:59:59) con la tecla SET [E ]. Ajuste
sucesivamente la h ora, los minutos y los segundos. Pulse la tecla
SET [E] para entrar en el siguiente nivel. Active/interrumpa la
cuenta atrás con la tecla TIMER [D]. Si se ha acabado el tiempo
(00:00:00), la alarma suena. Pulse cualquier tecla para desactivar la
cuenta atrás. Reinicialice la cuenta atrás con la tecla ADJ [F].
• En el modo TIME, seleccione el modo de visualización de la
temperatura (°C/°F) con la tecla °C/°F [G].
• Pulse el botón de bloqueo [B] para abrir los compartimientos.
Ciérrelos al pulsar en el porta-lapiceros.
7. Las pilas
• Desatornille el tornillo y abra el compartimiento de pilas [I].
• Introduzca dos pilas AG13. Respete la polaridad.
• Vuelva a cerrar el compartimiento de pilas [I].
• Nunca recargue pilas alcalinas. No eche la pila al fuego.
• Saque las pilas después del uso
¡OJO!: Respete las advertencias del embalaje.
Mantenga las pilas lejos del alcance de niños.
8. Especificaciones
alimentación 2 piles AG13, incl.
dimensiones Ø 85 x 110 mm
peso ± 140 g
Utilice este aparato sólo c on los accesorios originale s.
Velleman nv no será responsable de daños ni lesio nes
causados por un uso (indebi do) de este aparato. Para más
información sobre este producto y la versión más reciente de
este manual del usuario, visite nuestra página web
www.velleman.eu. Se pueden modificar las especific aciones y
el contenido de este manual sin previo aviso.
© DERECHOS DE AUTOR
Velleman nv dispone de los derech os de autor para este
manual del usuario. Todos los derechos mundiales
reservados. Está estrictamente prohibido reproducir, traducir,
copiar, editar y guardar este manual del usuario o partes de ello sin
previo permiso escrito del derecho habiente.
05/03/2010 16 Ve lleman
®
Page 17

WT70
BEDIENUNGSANLEITUNG
1. Einführung
An alle Einwohner der Europäischen Union
Wichtige Umweltinformationen über dieses Produkt
Dieses Symbol auf dem Produkt oder der Verpackung zeigt
an, dass die Entsorgung dieses Produktes nach seinem
Lebenszyklus der Umwelt Schaden zufügen kann.
Entsorgen Sie die Einheit (oder verwendeten Batterien)
nicht als unsortiertes Hausmüll; die Einheit oder
verwendeten Batterien müssen von einer spezialisierten Firma
zwecks Recycling entsorgt werden. Diese Einheit muss an den
Händler oder ein örtliches Recycling-Unternehmen retourniert
werden. Respektieren Sie die örtlichen Umweltvorschriften.
Falls Zweifel bestehen, wenden Sie sich für
Entsorgungsrichtlinien an Ihre örtliche Behörd e.
Wir bedanken uns für den Kauf des WT70! Lesen Sie diese
Bedienungsanleitung vor Inbetriebnahme sorgfältig durch.
Überprüfen Sie, ob Transportschäden vorliegen. Sollte dies der Fall
sein, verwenden Sie das Gerät nicht und wenden Sie sich an Ihren
Händler.
2. Sicherheitshinweise
Halten Sie Kinder und Unbefugte vom Gerät fern.
Nur für die Anwendung im Innenbereich.
Schützen Sie das Gerät vor Regen und Feuchte, Staub und
extremen Temperaturen. Setzen Sie das Gerät keiner
Flüssigkeit wie z.B. Tropf- oder Spritzwasser, aus.
• Bei Schäden, die durch Nichtbeachtung der Bedienungsanleitung
verursacht werden, erlischt der Garantieanspruch. Für daraus
resultierende Folgeschäden übernimmt der Hersteller keine
Haftung.
• Bei Schäden verursacht durch eigenmächtige Änderungen erlischt
der Garantieanspruch.
05/03/2010 17 Ve lleman
®
Page 18

WT70
3. Allgemeine Richtlinien
• Vermeiden Sie Erschütterungen. Vermeiden Sie rohe Gewalt
während der Installation und Bedienung des Gerätes.
• Nehmen Sie das Gerät erst in Betrieb, nachdem Sie sich mit
seinen Funktionen vertraut gemacht haben.
• Eigenmächtige Veränderungen sind aus Sicherheitsgründen
verboten.
• Verwenden Sie das Gerät nur für Anwendungen beschrieben in
dieser Bedienungsanleitung sonst kann dies zu Schäden am
Produkt führen und erlischt der Garantieanspruch.
4. Eigenschaften
• 4 Betriebsmodi:
o Uhrzeit (TIME): das Display zeigt Zeit, Woche und
Umgebungstemperatur
o Alarm (ALARM): erlaubt Ihnen, einen Alarm zu aktivieren
und eine der 8 Alarmmelodien auszuwählen
o Timer (TIMER): aktiviert einen Count-Down-Timer / eine
Alarm ertönt
o Thermometer (TEMP): das Display zeigt die
Umgebungstemperatur an
• 12- oder 24-Stunden-Anzeige
5. Umschreibung
Siehe Abbildungen, Sei te Error! Bookmark not defined. dieser
Bedienungsanleitung.
A Display B Verriegelungstaste Ablagefach
1 12- oder 24-Std.-Anzeige C MODE
2 Uhrzeit D TIMER
3 Monat E SET
4 Datum F ADJ
5 Tag G °C-°F-Wählschalter
6 °C-°F-Anzeige H Lautsprecher
7 Temperatur I Batteriefach
8 Displaymodus
05/03/2010 18 Ve lleman
®
Page 19

WT70
6. Anwendung
• Entfernen Sie die Plastiklasche aus dem Batteriefach [I]. Die Uhr
startet im TIME-Modus (12 Std.). Der Betrieb wird oben im
Display [A8] angezeigt.
• Schalten Sie zwischen der 12- und 24-Stunden-Anzeige mit ADJ
[F]. In der 12Std.-Anzeige erscheint PM [1] um dei Nachmittag
anzuzeigen.
• Erhöhen Sie den Wert mit ADJ [F], verringern Sie den Wert mit
dem °C-°F-Wählschalter [G].
• Die Uhrzeit und das Datum einstellen: drücken Sie SET [E] und
Geben Sie nacheinander die Stunden, die Minuten, das Jahr, den
Monat und den Tag ein. Gehen Sie danach mit SET [E] zum
nächsten Niveau.
• Wählen Sie ALARM mit MODE [C] und stellen Sie den Alarm und
die Melodie ein. Geben Sie nacheinander die Stunden, die
Minuten, die Schlummerfunktion (Snooze) in Minuten und die
Melodie (1~9) ein. Gehen Sie danach mit SET [E] zum nächsten
Niveau.
• Wählen Sie ALARM und schalten Sie den Alarm mit ADJ [F] ein.
-Symbol zeigt an, dass der Alarm eingeschaltet ist.
Das
Drücken Sie wieder auf ADJ [F] um die Schlummerfunktion
(SNZ) einzuschalten. Drücken Sie ADJ [F] ein drittes Mal, um
den Alarm auszuschalten.
• Wenn der Alarm ertönt, drücken Sie SET [E] um den Alarm
auszuschalten. Ist die Schlummerfunktion eingeschaltet, so
drücken Sie eine beliebige Taste zum Pausieren. Schalten Sie die
Schlummerfunktion ab, indem Sie SET [E] drücken.
• Drücken Sie TIMER [D] um den Timer anzuzeigen. Geben Sie die
Uhrzeit (max. 23:59:59) mit SET [E] ein. Geben Sie
nacheinander die Stunden, die Minuten und die Sekunden ein.
Gehen Sie danach mit SET [E] zum nächsten Niveau. Drücken
Sie TIMER [D] um den Timer zu starten/pausieren. Wenn Null
erreicht wird, ertönt den Alarm. Drücken Sie eine beliebige Taste
um den Alarm zu stoppen. Drücken Sie ADJ [F] um den Timer
auf 00:00:00 rückzusetzen. Wählen Sie TIMER und danach die
Temperaturanzeige mit °C/°F [G].
• Drücken Sie die Verriegelungstaste [B] auf der Rückseite des
Ferderhalters, um die Ablagefächer zu öffnen. Drücken Sie auf
den Federhalter, um diese zu schließen.
05/03/2010 19 Ve lleman
®
Page 20

WT70
7. Die Batterien
• Lockern Sie die Schraube und öffnen Sie das Batteriefach [I].
• Legen Sie zwei neue AG13-Batterien ein. Beachten Sie die
Polarität.
• Schließen Sie das Batteriefach [I].
• Laden Sie nie Alkalinebatterien auf. Werfen Sie nie Batterien ins
Feuer.
• Entfernen Sie die Batterie nach Gebrauch.
8. Technische Daten
Stromversorgung 2 x AG13-Batterie (mitgeliefert)
Abmessungen Ø 85 x 110 mm
Gewicht ± 140 g
Verwenden Sie dieses Gerät nur mit originellen Zubehörteilen.
Velleman nv übernimmt keine Haftung für Schaden oder
Verletzungen bei (falscher) Anwendung dieses Gerätes. Für
mehr Informationen zu diesem Produkt und die neueste
Version dieser Bedienungsanleitung, siehe www.velleman.eu.
Alle Änderungen ohne vorherige Ankündigung vorbehalten.
© URHEBERRECHT
Velleman nv besitzt das Urheberrecht für diese
Bedienungsanleitung. Alle weltweiten Rechte vorbehalten.
Ohne vorherige schriftliche Genehmigung des Urhebers ist es nicht
gestattet, diese Bedienungsanleitung ganz oder in Teilen zu
reproduzieren, zu kopieren, zu übersetzen, zu bearbeiten oder zu
speichern.
ACHTUNG: Beachten Sie die Warnungen der
Verpackung. Halten Sie die Batterien von Kindern
fern.
05/03/2010 20 Ve lleman
®
Page 21

WT70
INSTRUCKJA OBSŁUGI
1. Wstęp
Przeznaczona dla mieszkańców Unii Europejskiej.
Ważne informacje dotyczące środowiska.
Ten symbol umieszczony na urządzeniu bądź opakowaniu
wskazuje, że wyrzucenie produktu może być szkodliwe dla
środowiska. Nie wyrzucaj urządzenia lub baterii do
zbiorczego śmietnika, tylko do specjalnie przeznaczonych
do tego pojemników na urządzenia elektroniczne lub
skontaktuj się z firmą zajmującą się recyklingiem. Urządzenie
możesz oddać dystrybutorowi lub firmie zajmującej się recyklingiem.
Postępuj zgodnie z zasadami bezpieczeństwa dotyczącymi
środowiska. Jeśli masz wątpliwości skontaktuj się z firmą
zajmującą się utylizacją odpadów.
Dziękujemy za wybór produktu firmy Velleman! Prosimy o dokładne
zapoznanie się z instrukcją obsługi przed użyciem. Jeś
zostało uszkodzone podczas transportu prosimy o nie korzystanie z
niego i skontaktowanie się ze sprzedawcą.
2. Instrukcje bezpieczeństwa, środki ostrożności
Wyłącznie do użytku wewnętrznego. Chronić przed
deszczem, wilgocią, oblaniem oraz innym kontaktem z
cieczami. Chronić przed kurzem oraz przegrzaniem (np. nie
wystawiać na promieniowanie słoneczne, nie kłaść na
grzejniku,…).
Chronić przed dziećmi oraz użytkownikami
nieautoryzowanymi.
• Wszelkie szkody spowodowane użytkowaniem niezgodnym z
niniejszą instrukcją nie są objęte gwarancją a sprzedawca nie ponosi
odpowiedzialności za te szkody.
• Chroń to urządzenie przed opryskaniem i zamoknięciem.
• Gwarancja nie obejmuje uszkodzeń spowodowanych
nieuprawnioną ingerencją w urządzenie.
• Chronić przed dziećmi oraz użytkownikami nieautoryzowanymi.
li urządzenie
05/03/2010 21 Ve lleman
®
Page 22

WT70
3. Wskazówki ogólne
• Chroń to urządzenie przed wstrząsami i uderzeniami, zwłaszcza w
trakcie użytkowania.
• Chronić przed kurzem oraz przegrzaniem (np. nie wystawiać na
promieniowanie słoneczne, nie kłaść na grzejniku,…).
• Zapoznaj się z niniejszą instrukcją przed używaniem urządzenia.
• Ze względów bezpieczeństwa zabronione są jakiekolwiek
modyfikacje urządzenia.
Używaj urządzenie zgodnie z jego przeznaczeniem.
Użytkowanie niezgodne z przeznaczeniem spowoduje utratę
gwarancji.
4. Charakterystyka produktu
Organizer w swojej części elektronicznej może pracować w 4
trybach:
• ZEGAR – na wyświetlaczu widoczne są: czas bieżący, data i dzień
tygodnia oraz temperatura otoczenia,
• BUDZIK – dostępne są funkcje: czas budzenia codziennego,
opcja drzemki oraz możliwość wyboru jednej z ośmiu melodii
alarmu,
• STOPER – funkcja minutnika
• TERMOMETR – na wyświetlaczu widoczne są: temperatura
otoczenia oraz czas bieżący z możliwością wyboru wyświetlania w
systemie 12/24 godzinnym.
5. Opis produktu
Patrz rysunki 1 i 2.
Wyświetlacz (rys.1) Panel sterowania (rys.2)
1 Tryb 12/24 h B Przycisk otwierania
2 Czas C Wybór trybu pracy MODE
3 Miesiąc D Przycisk zegara TIMER
4 Dzień miesiąca E Przycisk zatwierdzania SET
5 Dzień tygodnia F Przycisk ustawiania ADJ
05/03/2010 22 Ve lleman
schowków
®
Page 23
WT70
6 Jednostki temperatury
°C/°F
7 Temperatura otoczenia H Głośnik
8 Tryb pracy I Pokrywa komory baterii
6. Ustawianie urządzenia
• Wyciągnij palstikowy pasek zabezpieczający spod baterii pod
pokrywą komory baterii [I]. Zegar uruchomi się w trybie 12h, co
będzie sygnalizowane napisem TIME w górnej części
wyświetlacza [A8].
• Przełączanie pomiędzy trybem 12h a 24h odbywa się przez
przyciśnięcie przycisku [F]. W trybie 12h PM oznacza
popołudnie.
• Ustawienia wartości dokonujemy przy pomocy przycisku [F]
zwiększanie wartości lub przyciskiem [G] zmniejszanie wartości
ustawianego parametru.
• Aby ustawić czas i datę naciśnij przycisk [E] tak, aż urządzenie
nie wejdzie w tryb TIME. Przyciskami [F] i [G] ustaw żądaną
wartość. Aby zatwierdzić ustawioną wartość i przejść do
kolejnego parametru (w kolejnoś
oraz dzień) naciskaj przycisk [E].
• Aby ustawić czas budzenia oraz melodyjkę budzika naciśnij
przycisk [C] tak, aby urządzenie ustawić w tryb ALARM.
Przyciskami [F] i [G] ustaw żądaną wartość. Aby zatwierdzić
ustawioną wartość i przejść do kolejnego parametru (w kolejności
godzina, minuta, czas drzemki w minutach oraz melodyjka (1~9)
) naciskaj przycisk [E].
• Funkcję budzenia można aktywować gdy urządzenie pracuje w
trybie ALARM. Włączenie funkcji budzenia dokonujemy przy
pomocy przycisku [F].
Gdy na wyświetlaczu pojawi się symbol
przycisku [F] umożliwia przejście do trybu ustawienia czasu
drzemki co jest sygnalizowane napisem SNZ. Kolejne naciśnięcie
przycisku [F] umożliwia zablokowanie fukcji budzenia ALARM.
• Alarm można wyłączyć przyciskiem [E] . Aby aktywować funkcję
drzemki wystarczy nacisnąć dowolny inny przycisk na panelu
sterujacym. Aktywność funkcji drzemki jest syganlizowana
pulsującym napisem SNZ do czasu pojawienia się kolejnego
05/03/2010 23 Ve lleman
G Przycisk wyboru jednostki
temperatury °C/°F
ci godzina, minuta, rok, miesiąc
kolejne naciśniecie
®
Page 24

WT70
alarmu. Zakończenie funkcji drzemki w dowolnym momencie
przez naciśnięcie przycisku [E].
• Fukcję minutnika aktywuje się przez naciśnięcie przycisku [D].
Maksymalny czas odliczania to 23:59:59. Przyciskami [F] i [G]
ustaw żądaną wartość. Aby zatwierdzić ustawioną wartość i
przejść do kolejnego parametru ( w kolejności godziny, miniuty,
sekundy ) naciskaj przycisk [E]. Przycisk [D] włącza i wyłącza
funkcje minutnika. W chwili gdy licznik zegara minutnika odliczy
czas do 00:00:00 zostaje uruchomiony alaram dźwiękowy.
Naciśnięcie jakiegokowiek przycisku alarm dźwiękowy. Dopóki
urządzenie jest w trybie zatrzymania minutnika przycisk [F]
zeruje licznik zegara minutnika do wartości 00:00:00.
• Aby zmienić jednostki pomiaru temperatury °C lub °F wcisnij
przycisk °C/°F [G].
• Aby otworzyć schowki na drobiazgi wciśnij przycisk [B], który
znajduje się w tylnej częsci urządzenia.
7. Baterie
• Otworzyć pokrywkę komory baterii [I] uprzednio odkręcając
śrubkę mocującą.
• Umieścić dwie nowe baterie AG13 zwracając uwagę na właściwą
polaryzację, stosując się do wskazówek graficznych wewnątrz
komory baterii.
• Założyć pokrywkę komory baterii [I] i przykręcić śrubkę
mocującą.
• Nie ładować zużytych baterii, nie wrzucać do ognia, gdyż grozi to
ich eksplozją.
• Wymienić baterie gdy urządzenie nie było długo u
OSTRZEŻENIE: Obchodzić się ostrożnie z bateriami.
Zwrócić szczególną uwagę na stan obudowy
baterii. Pozbądź się baterii zgodnie z lokalnymi
przepisami. Trzymaj baterie zdala od dzieci.
żywane.
05/03/2010 24 Ve lleman
®
Page 25

WT70
8. Specyfikacja techniczna
Zasilanie Bateria AG13 (w zestawie z produktem)
Wymiary Ø85 x 110mm
Waga ±140g
Używaj tylko oryginalnych akcesoriów. Velleman N.V. nie
ponosi odpowiedzialności za straty lub szkody
spowodowane złym korzystaniem z urządzenia. Jeśli chcesz
uzyskać więcej informacji o tym produkcie lub o marce
Velleman, wejdź na stronę: www.velleman.eu. Velleman nie
jest dystrybutorem wszystkich marek zawartych w tej
instrukcji. Informacje zawarte w niniejszej instrukcji
obsługi mogą ulec zmianie bez wcześniejszego
powiadomienia.
© INFORMACJA O PRAWACH WŁASNOŚCI
Instrukcja ta jest własnością firmy Velleman NV i jest chroniona
prawami autorskimi. Wszystkie prawa są zastrzeżone na całym
świecie. Żadna część tej instrukcji nie może być kopiowana,
przedrukowywana, tłumaczona lub konwertowania na wszelkie
nośniki elektronicznych lub w inny sposób, bez uprzedniej pisemnej
zgody właściciela praw autorskich.
05/03/2010 25 Ve lleman
®
Page 26

WT70
®
Velleman
Service and Quality
Warranty
®
has over 35 years of
Velleman
experience in the electronics
world and distributes its products
in more than 85 countries.
All our products fulfil strict quality
requirements and legal
stipulations in the EU. In order to
ensure the quality, our products
regularly go through an extra
quality check, both by an internal
quality department and by
specialized external organisations.
If, all precautionary measures
notwithstanding, problems should
occur, please make appeal to our
warranty (see guarantee
conditions).
General Warranty Conditions
Concerning Consumer
Products (for EU):
• All consumer products are
subject to a 24-month warranty
on production flaws and defective
material as from the original date
of purchase.
®
can decide to replace
• Velleman
an article with an equivalent
article, or to refund the retail
value totally or partially when the
complaint is valid and a free
repair or replacement of the
article is impossible, or if the
expenses are out of proportion.
You will be delivered a replacing
article or a refund at the value of
100% of the purchase price in
case of a flaw occurred in the first
year after the date of purchase
and delivery, or a replacing article
at 50% of the purchase price or a
refund at the value of 50% of the
retail value in case of a flaw
occurred in the second year after
the date of purchase and delivery.
• Not covered by warranty:
- all direct or indirect damage
caused after delivery to the article
(e.g. by oxidation, shocks, falls,
05/03/2010 26 Ve lleman
dust, dirt, humidity...), and by the
article, as well as its contents
(e.g. data loss), compensation for
loss of profits;
- frequently replaced consumable
goods, parts or accessories such
as batteries, lamps, rubber parts,
drive belts... (unlimited list);
- flaws resulting from fire, water
damage, lightning, accident,
natural disaster, etc.;
- flaws caused delib erately,
negligently or resulting from
improper handling, negligent
maintenance, abusive use or use
contrary to the manufacturer’s
instructions;
- damage caused by a
commercial, professional or
collective use of the article (the
warranty validity will be reduced
to six (6) months when the article
is used professionally);
- damage resulting from an
inappropriate packing and
shipping of the article;
- all damage caused by
modification, repair or alteration
performed by a third party
without written permission by
®
.
Velleman
• Articles to be repaired must be
delivered to your Velleman
dealer, solidly packed (preferably
in the original packaging), and be
completed with the original
receipt of purchase and a clear
flaw description.
• Hint: In order to save on cost
and time, please reread the
manual and check if the flaw is
caused by obvious causes prior to
presenting the article for repair.
Note that returning a nondefective article can also involve
handling costs.
• Repairs occurring after warranty
expiration are subject to shipping
costs.
®
®
Page 27

WT70
• The above conditions are
without prejudice to all
commercial warranties.
The above enumeration is subject
to modification according to the
article (see article’s manual).
Velleman
kwaliteitsgarantie
Velleman
ervaring in de elekt ronicawereld
en verdeelt in meer dan 85
landen.
Al onze producten beantwoorden
aan strikte kwaliteitseisen en aan
de wettelijke bepalingen geldig in
de EU. Om de kwaliteit te
waarborgen, ondergaan onze
producten op regelmatige
tijdstippen een extra
kwaliteitscontrole, zowel door
onze eigen kwaliteitsafdeling als
door externe gespecialiseerde
organisaties. Mocht er ondanks
deze voorzorgen toch een
probleem optreden, dan kunt u
steeds een beroep doen op onze
waarborg (zie
waarborgvoorwaarden).
Algemene
waarborgvoorwaarden
consumentengoederen (voor
Europese Unie):
• Op alle consumentengoederen
geldt een garantieperiode van 24
maanden op productie- en
materiaalfouten en dit vanaf de
oorspronkelijke aankoopdatum.
• Indien de klacht gegrond is en
een gratis reparatie of vervanging
van een artikel onmogelijk is of
indien de kosten hiervoor buiten
verhouding zijn, kan Velleman
beslissen het desbetreffende
artikel te vervangen door een
gelijkwaardig artikel of de
aankoopsom van het artikel
gedeeltelijk of volledig terug te
betalen. In dat geval krijgt u een
vervangend product of
terugbetaling ter waarde van
05/03/2010 27 Ve lleman
®
service- en
®
heeft ruim 35 jaar
®
100% van de aankoopsom bij
ontdekking van een gebrek tot
één jaar na aankoop en levering,
of een vervangend product tegen
50% van de kostprijs of
terugbetaling van 50% bij
ontdekking na één jaar tot 2 jaar.
• Valt niet onder waarborg:
- alle rechtstreekse of
onrechtstreekse schade na de
levering veroorzaakt aan het
toestel (bv. door oxidatie,
schokken, val, stof, vuil, vocht...),
en door het toestel, alsook zijn
inhoud (bv. verlies van data),
vergoeding voor eventuele
winstderving.
- verbruiksgoederen, onderdelen
of hulpstukken die regelmatig
dienen te worden vervangen,
zoals bv. batterijen, lampen,
rubberen onderdelen,
aandrijfriemen... (onbeperkte
lijst).
- defecten ten gevolge van brand,
waterschade, bliksem, ongevallen,
natuurrampen, enz.
- defecten veroorzaakt door
opzet, nalatigheid of door een
onoordeelkundige behandeling,
slecht onderhoud of abnormaal
gebruik of gebruik van het toestel
strijdig met de voorschriften van
de fabrikant.
- schade ten gevolge van een
commercieel, professioneel of
collectief gebruik van het
apparaat (bij professioneel
gebruik wordt de garantieperiode
herleid tot 6 maand).
- schade veroorzaakt door
onvoldoende bescherming bij
transport van het apparaat.
- alle schade door wijzigingen,
reparaties of modificaties
uitgevoerd door derden zonder
toestemming van Velleman
• Toestellen dienen ter reparatie
aangeboden te worden bij uw
®
-verdeler. Het toestel
Velleman
dient vergezeld te zijn van het
®
.
®
Page 28

WT70
oorspronkelijke aankoopbewijs.
Zorg voor een degelijke
verpakking (bij voorkeur de
originele verpakking) en voeg een
duidelijke foutomschrijving bij.
• Tip: alvorens het toestel voor
reparatie aan te bieden, kijk nog
eens na of er geen voor de hand
liggende reden is waarom het
toestel niet naar behoren werkt
(zie handleiding). Op deze wijze
kunt u kosten en tijd besparen.
Denk eraan dat er ook vo or nietdefecte toestellen een kost voor
controle aangerekend kan
worden.
• Bij reparaties buiten de
waarborgperiode zullen
transportkosten aangerekend
worden.
• Elke commerciële garantie laat
deze rechten onverminderd.
Bovenstaande opsomming kan
eventueel aangepast worden
naargelang de aard van het
product (zie handleiding van
het betreffende product).
Garantie de service et de
qualité Velleman
Velleman
de plus de 35 ans dans le monde
de l’électronique avec une
distribution dans plus de 85 pays.
Tous nos produits répondent à des
exigences de qualité rigoureuses
et à des dispositions légales en
vigueur dans l’UE. Afin de garantir
la qualité, nous soumettons
régulièrement nos produits à des
contrôles de qualité
supplémentaires, tant par notre
propre service qualité que par un
service qualité externe. Dans le
cas improbable d’un défaut
malgré toutes les précautions, il
est possible d’invoquer notre
garantie (voir les conditions de
garantie).
®
®
jouit d’une expérien ce
05/03/2010 28 Ve lleman
Conditions générales
concernant la garantie sur les
produits grand public (pour
l’UE) :
• tout produit grand public est
garanti 24 mois contre tout vice
de production ou de matériaux à
dater du jour d’acquisition
effective ;
• si la plainte est justifiée et que
la réparation ou le remplacement
d’un article est jugé impossible,
ou lorsque les coûts s’avèrent
disproportionnés, Velleman
s’autorise à remplacer ledit article
par un article équivalent ou à
rembourser la totalité ou une
partie du prix d’achat. Le cas
échéant, il vous sera consenti un
article de remplacement ou le
remboursement complet du prix
d’achat lors d’un défaut dans un
délai de 1 an après l’achat et la
livraison, ou un article de
remplacement moyennant 50%
du prix d’achat ou le
remboursement de 50% du prix
d’achat lors d’un défaut après 1 à
2 ans.
• sont par conséquent exclus :
- tout dommage direct ou indirect
survenu à l’article après livraison
(p.ex. dommage lié à l’oxydation,
choc, chute, poussière, sable,
impureté…) et provoqué par
l’appareil, ainsi que son contenu
(p.ex. perte de données) et une
indemnisation éventuelle pour
perte de revenus ;
- tout bien de consommation ou
accessoire, ou pièce qui nécessite
un remplacement régulier comme
p.ex. piles, ampoules, pièces en
caoutchouc, courroies… (liste
illimitée) ;
- tout dommage qui résulte d’un
incendie, de la foudre, d’un
accident, d’une catastrophe
naturelle, etc. ;
- tout dommage provoqué par une
négligence, volontaire ou non,
®
®
Page 29

WT70
une utilisation ou un entretien
incorrect, ou une utilisation de
l’appareil contraire aux
prescriptions du fabricant ;
- tout dommage à cause d’une
utilisation commerciale,
professionnelle ou collective de
l’appareil (la période de garantie
sera réduite à 6 mois lors d’une
utilisation professionnelle) ;
- tout dommage à l’appareil qui
résulte d’une utilisation incorrecte
ou différente que celle pour
laquelle il a été initialement prévu
comme décrit dans la notice ;
- tout dommage engendré par un
retour de l’appareil emballé dans
un conditionnement non ou
insuffisamment protégé ;
- toute réparation ou modification
effectuée par une tierce personne
sans l’autorisation explicite de SA
®
;
Velleman
- frais de transport de et vers
®
si l’appareil n’est plus
Velleman
couvert sous la garantie.
• toute réparation sera fournie par
l’endroit de l’achat. L’appareil doit
nécessairement être accompagné
du bon d’achat d’origine et être
dûment conditionné (de
préférence dans l’emballage
d’origine avec mention du
défaut) ;
• conseil : il est conseillé de
consulter la notice et de contrôler
câbles, piles, etc. avant de
retourner l’appareil. Un appareil
retourné jugé défectueux qui
s’avère en bon état de m arche
pourra faire l’objet d’une note de
frais à charge du consommateur ;
• une réparation effectuée endehors de la période de garantie
fera l’objet de frais de transport ;
• toute garantie commerciale ne
porte pas atteinte aux conditions
susmentionnées.
La liste susmentionnée peut
être sujette à une
complémentation selon le type
05/03/2010 29 Ve lleman
de l’article et être mentionnée
dans la notice d’emploi.
Garantía de servicio y calidad
Velleman
Velleman
experiencia de más de 35 años en
el mundo de la electrónica con
una distribución en más de 85
países.
Todos nuestros productos
responden a normas de calidad
rigurosas y disposicio nes legales
vigentes en la UE. Para garantizar
la calidad, sometimos nuestros
productos regularmente a
controles de calidad adicionales,
tanto por nuestro propio servicio
de calidad como por un servicio
de calidad externo. En el caso
improbable de que surgieran
problemas a pesar de todas las
precauciones, es posible apelar a
nuestra garantía (véase las
condiciones de garantía).
Condiciones generales
referentes a la garantía sobre
productos de venta al público
(para la Unión Europea):
• Todos los productos de ve nta al
público tienen un período de
garantía de 24 meses contra
errores de producción o errores
en materiales desde la adquisición
original;
• Si la queja está fundada y si la
reparación o la sustitución de un
artículo es imposible, o si los
gastos son desproporcionados,
Velleman® autoriza reemplazar el
artículo por un artículo
equivalente o reembolsar la
totalidad o una parte del precio de
compra. En este caso, recibirá un
artículo de recambio o el
reembolso completo del precio de
compra al descubrir un defecto
hasta un año después de la
compra y la entrega, o un artículo
de recambio al 50% del precio de
compra o la sustitución de un
®
®
disfruta de una
®
Page 30

WT70
50% del precio de compra al
descubrir un defecto después de 1
a 2 años.
• Por consiguiente, están
excluidos entre otras cosas:
- todos los daños causados
directamente o indirectamente al
aparato y su contenido después
de la entrega (p.ej. por oxidación,
choques, caída,...) y causados por
el aparato, al igual que el
contenido (p.ej. pérdida de datos)
y una indemnización eventual
para falta de ganancias;
- partes o accesorios que deban
ser reemplazados regularmente,
como por ejemplo baterías,
lámparas, partes de goma, ...
(lista ilimitada);
- defectos causados por un
incendio, daños causados por el
agua, rayos, accidentes,
catástrofes naturales, etc.;
- defectos causados a conciencia ,
descuido o por malos tratos, un
mantenimiento inapropiado o un
uso anormal del aparato contrario
a las instrucciones del fabricante;
- daños causados por un uso
comercial, profesional o colectivo
del aparato (el período de
garantía se reducirá a 6 meses
con uso profesional);
- daños causados por un uso
incorrecto o un uso ajeno al que
est está previsto el producto
inicialmente como está descrito en
el manual del usuario;
- daños causados por una
protección insuficiente al
transportar el aparato.
- daños causados por
reparaciones o modificaciones
efectuadas por una tercera
persona sin la autorización
explicita de SA Velleman
- se calcula gastos de transporte
de y a Velleman
no está cubierto por la garantía.
• Cualquier reparación se
efectuará por el lugar de compra.
05/03/2010 30 Ve lleman
®
;
®
si el aparato ya
Devuelva el aparato con la factura
de compra original y transpórtelo
en un embalaje sólido
(preferentemente el embalaje
original). Incluya también una
buena descripción del defec to;
• Consejo: Lea el manual del
usuario y controle los cables, las
pilas, etc. antes de devolver el
aparato. Si no se encuentra un
defecto en el artículo los gastos
podrían correr a cargo del cliente;
• Los gastos de transporte
correrán a carga del cliente para
una reparación efectuada fuera
del periode de garantía.
• Cualquier gesto comercial no
disminuye estos derechos.
La lista previament e
mencionada puede ser
adaptada según el tipo de
artículo (véase el manual del
usuario del artículo en
cuestión)
Velleman
Qualitätsgarantie
Velleman
Erfahrung in der Elektronikw elt
und vertreibt seine Produkte in
über 85 Ländern.
Alle Produkte entsprechen den
strengen Qualitätsforderungen
und gesetzlichen Anforderungen
in der EU. Um die Qualität zu
gewährleisten werden unsere
Produkte regelmäßig einer
zusätzlichen Qualitätskontrolle
unterworfen, sowohl von unserer
eigenen Qualitätsabteilung als
auch von externen spezialisierten
Organisationen. Sollten, trotz aller
Vorsichtsmaßnahmen, Probleme
auftreten, nehmen Sie bitte die
Garantie in Anspruch (siehe
Garantiebedingungen).
®
Service- und
®
hat gut 35 Jahre
®
Page 31

WT70
Allgemeine
Garantiebedingungen in Bezug
auf Konsumgüter (für d ie
Europäische Union ):
• Alle Produkte haben für
Material- oder Herstellungsfehler
eine Garantieperiode von 24
Monaten ab Verkaufsdatum.
• Wenn die Klage berechtigt ist
und falls eine kostenlose
Reparatur oder ein Austausch des
Gerätes unmöglicht ist, oder wenn
die Kosten dafür
unverhältnismäßig sind, kann
Velleman® sich darüber
entscheiden, dieses Produkt durch
ein gleiches Produkt zu ersetzen
oder die Kaufsumme ganz oder
teilweise zurückzuzahlen. In
diesem Fall erhalten Sie ein
Ersatzprodukt oder eine
Rückzahlung im Werte von 100%
der Kaufsumme im Falle eines
Defektes bis zu 1 Jahr nach Kauf
oder Lieferung, od er Sie
bekommen ein Ersatzprodukt im
Werte von 50% der Kaufsumme
oder eine Rückzahlung im Werte
von 50 % im Falle eines Defektes
im zweiten Jahr.
• Von der Garantie
ausgeschlossen sind:
- alle direkten oder indirekten
Schäden, die nach Lieferung am
Gerät und durch das Gerät
verursacht werden (z.B.
Oxidation, Stöße, Fall, Staub,
Schmutz, Feuchtigkeit, ...), sowie
auch der Inhalt (z.B.
Datenverlust), Entschädigung für
eventuellen Gewinnausfall.
- Verbrauchsgüter, Teile oder
Zubehörteile, die regelmäßig
ausgewechselt werden, wie z.B.
Batterien, Lampen, Gummiteile,
Treibriemen, usw. (unbeschränkte
Liste).
- Schäden verursacht durch
Brandschaden, Wasserschaden,
Blitz, Unfälle, Naturkatastrophen,
usw.
05/03/2010 31 Ve lleman
- Schäden verursacht durch
absichtliche, nachlässige oder
unsachgemäße Anwendung,
schlechte Wartung,
zweckentfremdete Anwendung
oder Nichtbeachtung von
Benutzerhinweisen in der
Bedienungsanleitung.
- Schäden infolge einer
kommerziellen, professionellen
oder kollektiven Anwendung des
Gerätes (bei gewerblicher
Anwendung wird die
Garantieperiode auf 6 Monate
zurückgeführt).
- Schäden verursacht durch eine
unsachgemäße Verpackung und
unsachgemäßen Transport des
Gerätes.
- alle Schäden verursacht durch
unautorisierte Änderungen,
Reparaturen oder Modifikationen,
die von einem Dritten ohne
Erlaubnis von Velleman
vorgenommen werden.
• Im Fall einer Reparatur, wenden
Sie sich an Ihren Velleman
Verteiler. Legen Sie das Produkt
ordnungsgemäß verpackt
(vorzugsweise die
Originalverpackung) und mit dem
Original-Kaufbeleg vor. Fügen Sie
eine deutliche
Fehlerumschreibung hinzu.
• Hinweis: Um Kosten und Zeit zu
sparen, lesen Sie die
Bedienungsanleitung nochmals
und überprüfen Sie, ob es keinen
auf de Hand liegenden Grund gibt,
ehe Sie das Gerät zur Reparatur
zurückschicken. Stellt sich bei der
Überprüfung des Geräts heraus,
dass kein Geräteschaden vorliegt,
könnte dem Kunden eine
Untersuchungspauschale
berechnet.
• Für Reparaturen nach Ablauf der
Garantiefrist werden
Transportkosten berechnet.
• Jede kommerzielle Garantie
lässt diese Rechte unberührt.
®
®
-
®
Page 32

WT70
Die oben stehende Aufzählung
kann eventuell angepasst
werden gemäß der Art des
Produktes (siehe
Bedienungsanleitung des
Gerätes).
Velleman
jakości
Velleman
doświadczenie w świecie
elektroniki. Dystrybuujemy swoje
produkty do ponad 85 krajów.
Wszystkie nasze produkty
spełniają surowe wymagania
jakościowe oraz wypełniają normy
i dyrektywy obowiązujące w
krajach UE. W celu zapewnienia
najwyższej jakości naszych
produktów, przechodzą one
regularne oraz dodatkowo
wyrywkowe badania kontroli
jakości, zarówno naszego
wewnętrznego dzi ału jakości jak
również wyspecjalizowanych firm
zewnętrznych. Pomimo dołożenia
wszelkich starań czasem mogą
pojawić się problemy techniczne,
prosimy odwołać się do gwarancji
(patrz warunki gwarancji).
Ogólne Warunki dotyczące
gwarancji:
Wszystkie produkty konsumenckie
podlegają 24-miesięcznej
gwarancji na wady produkcyjne i
materiałowe od daty zakupu.
W przypadku, gdy usterka jest
niemożliwa do usunięcia lub koszt
usunięcia jest nadmiernie wysoki
Velleman
wymianie artykułu na nowy,
wolny od wad lub zwrócić
zapłaconą kwotę. Zwrot gotówki
może jednak nastąpić z
uwzględnieniem poniższych
warunków:
zwrot 100% ceny zakupu w
przypadku, gdy wada wystąpiła w
ciągu pierwszego roku od daty
zakupu i dostawy
®
usługi i gwarancja
®
ma ponad 35-letnie
®
może zdecydować o
wymiana wadliwego artykułu na
nowy, wolny od wad z
odpłatnością 50% ceny detalicznej
lub zwrot 50% kwoty ceny
nabycia w przypadku gdy wada
wystąpiła w drugim roku od daty
zakupu i dostawy.
Produkt nie podlega naprawie
gwarancyjnej:
- gdy wszystkie bezpośrednie lub
pośrednie szkody spowodowane
są działaniem czynników
środowiskowych lub losowych (np.
przez utlenianie, wstrząsy,
upadki, kurz, brud, ...),
wilgotności;
- gwarant nie ponosi
odpowiedzialności za szkody
wynikających z utraty danych;
- utrata zysków z tytułu
niesprawności produktu; z
gwarancji wyłaczone są matriały
eksploatacyjne: baterie, żarówki,
paski napędowe, gumowe
elementy napędowe...
(nieograniczona lista);
- usterka wynika z działania
pożaru, zalania wszelkimi
cieczami, uderzenia pioruna,
upadku lub klęski żywiołowej, itp.;
- usterka wynika z zaniedbań
eksploatacyjnych tj. umyślne bądź
nieumyślne zaniechanie
czyszczenia, konserwacji,
wymiany materiałów
ekspolatacyjnych, niedbalstwa lub
z niewłaściwego obchodzenia się
lub niezgodnego użytkowania z
instrukcją producenta;
- szkody wynikające z
nadmiernego użytkowania gdy nie
jest do tego celu przezna czony tj.
działalność komerycjna,
zawodowa lub wspólne
użytkowanie przez wiele osób okres obowiązywania gwarancji
zostanie obniżony do 6 (sześć)
miesięcy;
- Szkody wynikające ze źle
zabezpieczonej wysyłki produktu;
05/03/2010 32 Ve lleman
®
Page 33

WT70
- Wszelkie szkody spowodowane
przez nieautoryzowaną naprawę,
modyfikację, przeróbkę produktu
przez osoby trzecie jak również
bez pisemnej zgody firmy
®
.
Velleman
Uszkodzony produkt musi zostać
dostarczony do sprzedawcy
®
, solidnie zapakowany
Velleman
(najlepiej w oryginalnym
opakowaniu), wraz z
wyposażeniem z jakim prod ukt
został sprzedany. W przypadku
wysyłki towaru w opakowaniu
innym niż oryginalnym ryzyko
usterki produktu oraz tego skutki
przechodzą na właściciela
produktu. Wraz z niesprawnym
produktem należy dołączyć jasny i
szczegółowy opis jego usterki,
wady;
Wskazówka: Aby zaoszczędzić na
kosztach i czasie, proszę
szczegółowo zapoznać się z
instrukcja obsługi; czy przyczyną
wady są okoliczności techniczne
czy też wynikaja wyłącznie z
nieznajomości obsługi produktu.
W przypadku wysyłki sprawnego
produktu do serwisu nabywca
może zostać obciążony kosztmi
obsługi oraz transportu.
W przypadku napraw
pogwarancyjnych lub odpłatnych
klient ponosi dodatkowo koszt
wysyłki produktu do i z serwisu.
wymienione wyżej warunki są bez
uszczerbku dla wszystkich
komercyjnych gwarancji.
Powyższe postanowienia
mogą podlegać modyfikacji w
ści od wyrobu (pa trz
zależno
art obsługi).
05/03/2010 33 Ve lleman
®
 Loading...