

Page 1

KSR18
DE TOBBIE DER ROBOTER
EN TOBBIE ROBOT
ES TOBBIE EL ROBOT
FR ROBOT TOBBIE
IT IL ROBOT TOBBIE
NL TOBBIE ROBOT
PL ROBOT TOBBIE
PT ROBÔ TOBBIE
Bedienungsanleitung
Assembly & Instruction Manual
Manual de instrucciones
Instructions de montage
Manuale di assemblaggio e istruzioni
Montagehandleiding
Manual de Instruções & Montagem
Page 2
LIEFERUMFANG / CONTENTS / INCLUYE / CONTENU
Einführung / Product Introduction / Introducción / Introduction / Introduzione / Inleiding / Opis produktu
Apresentação do Produto
Benötigte Werkzeuge / Tools You May Need / Herramientas necesarias / Outillage nécessaire
1
Ferramentas Que Vai Necessitar
Liste mit mechanischen Teilen / Mechanical Parts List / Lista de componentes mecánicos
Liste des composants mécaniques / Elenco delle parti meccaniche / Lijst met mechanische onderdelen
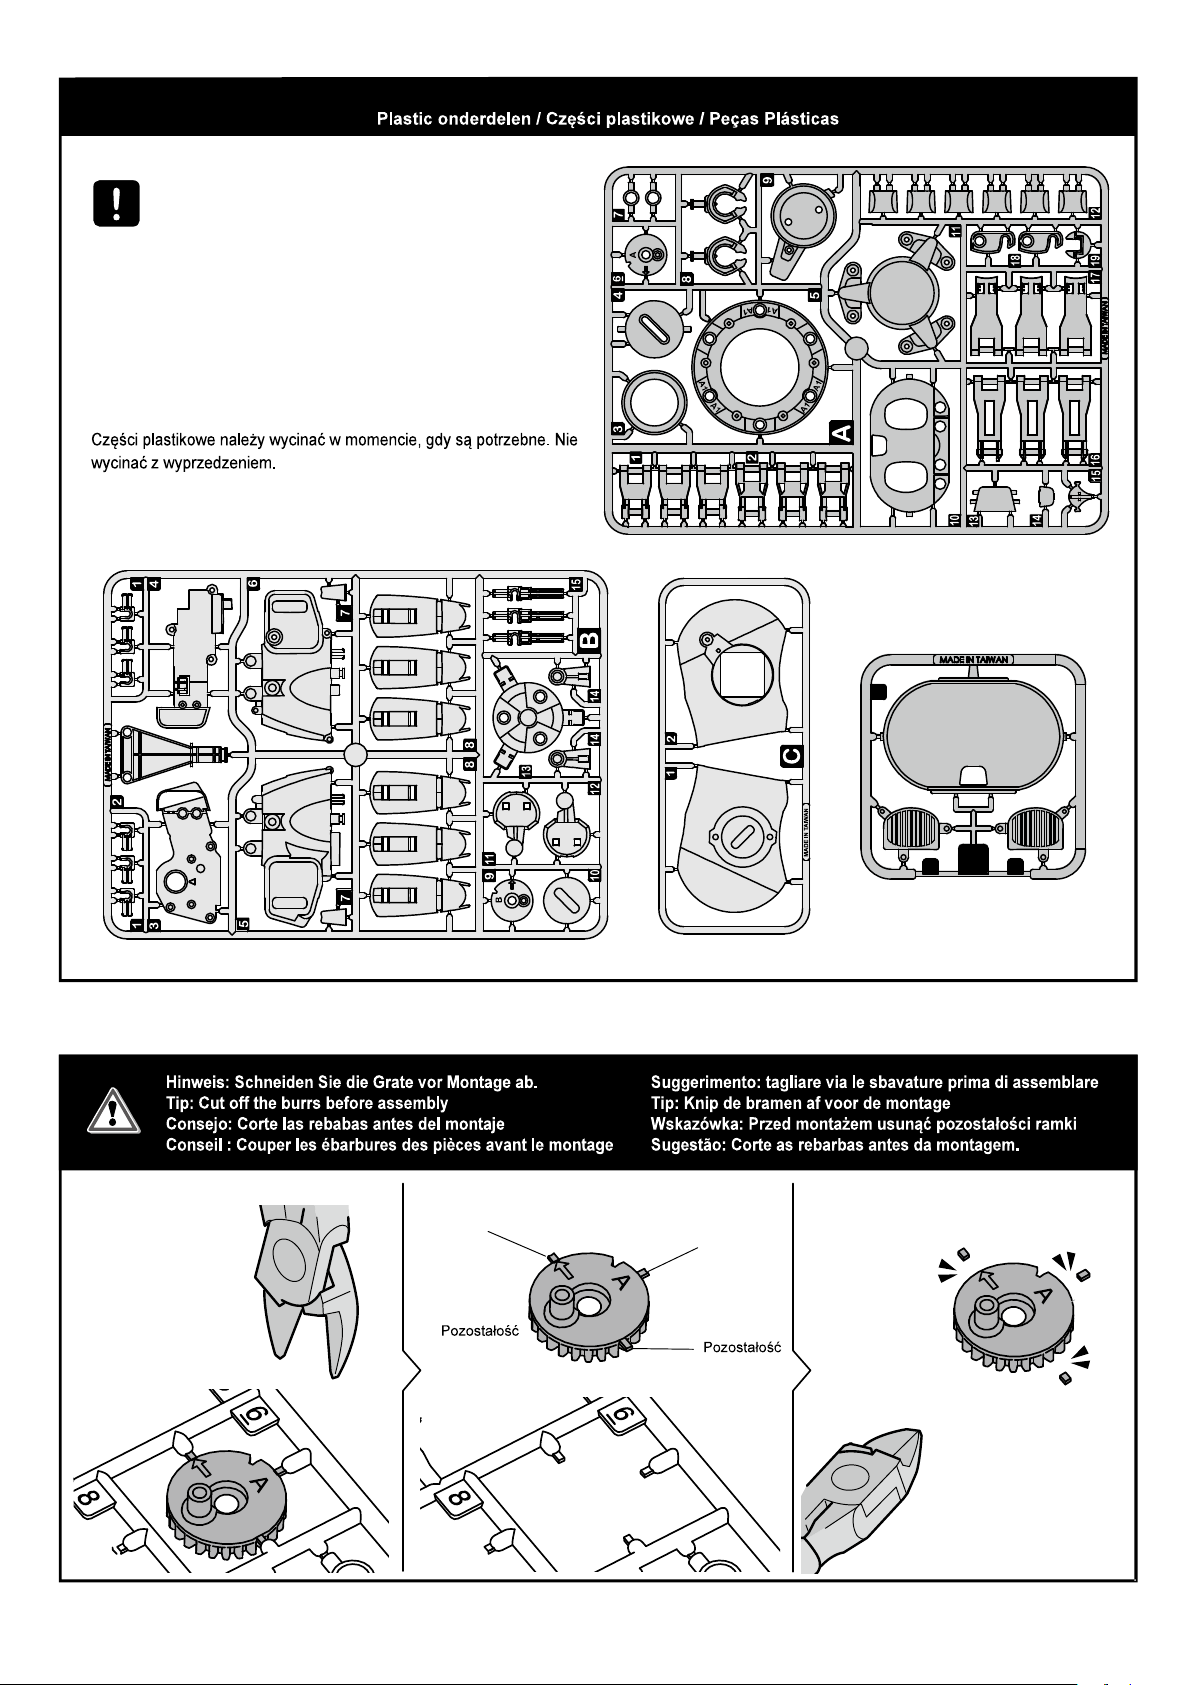
Kunststoffteile / Plastic Parts / Piezas de plástico / Pièces en plastique / Parti in plastica
Plastic onderdelen / Elementy plastikowe / Peças em Plástico
Hinweis: Schneiden Sie die Grate vor Montage ab / Tip: Cut Off The Burrs Before Assembly
Consejo: Corte las rebabas antes del montaje / Conseil : Couper les ébarbures des pièces avant le
montage / Suggerimento: Tagliare via le sbavature prima di assemblare / Tip: Knip de bramen af voor
Sugestão: Cortar as Rebarbas Antes da Montagem.
Den Körper montieren / Body Module Assembly / Montar el cuerpo / Montage du corps
Montagem do Módulo Corpo
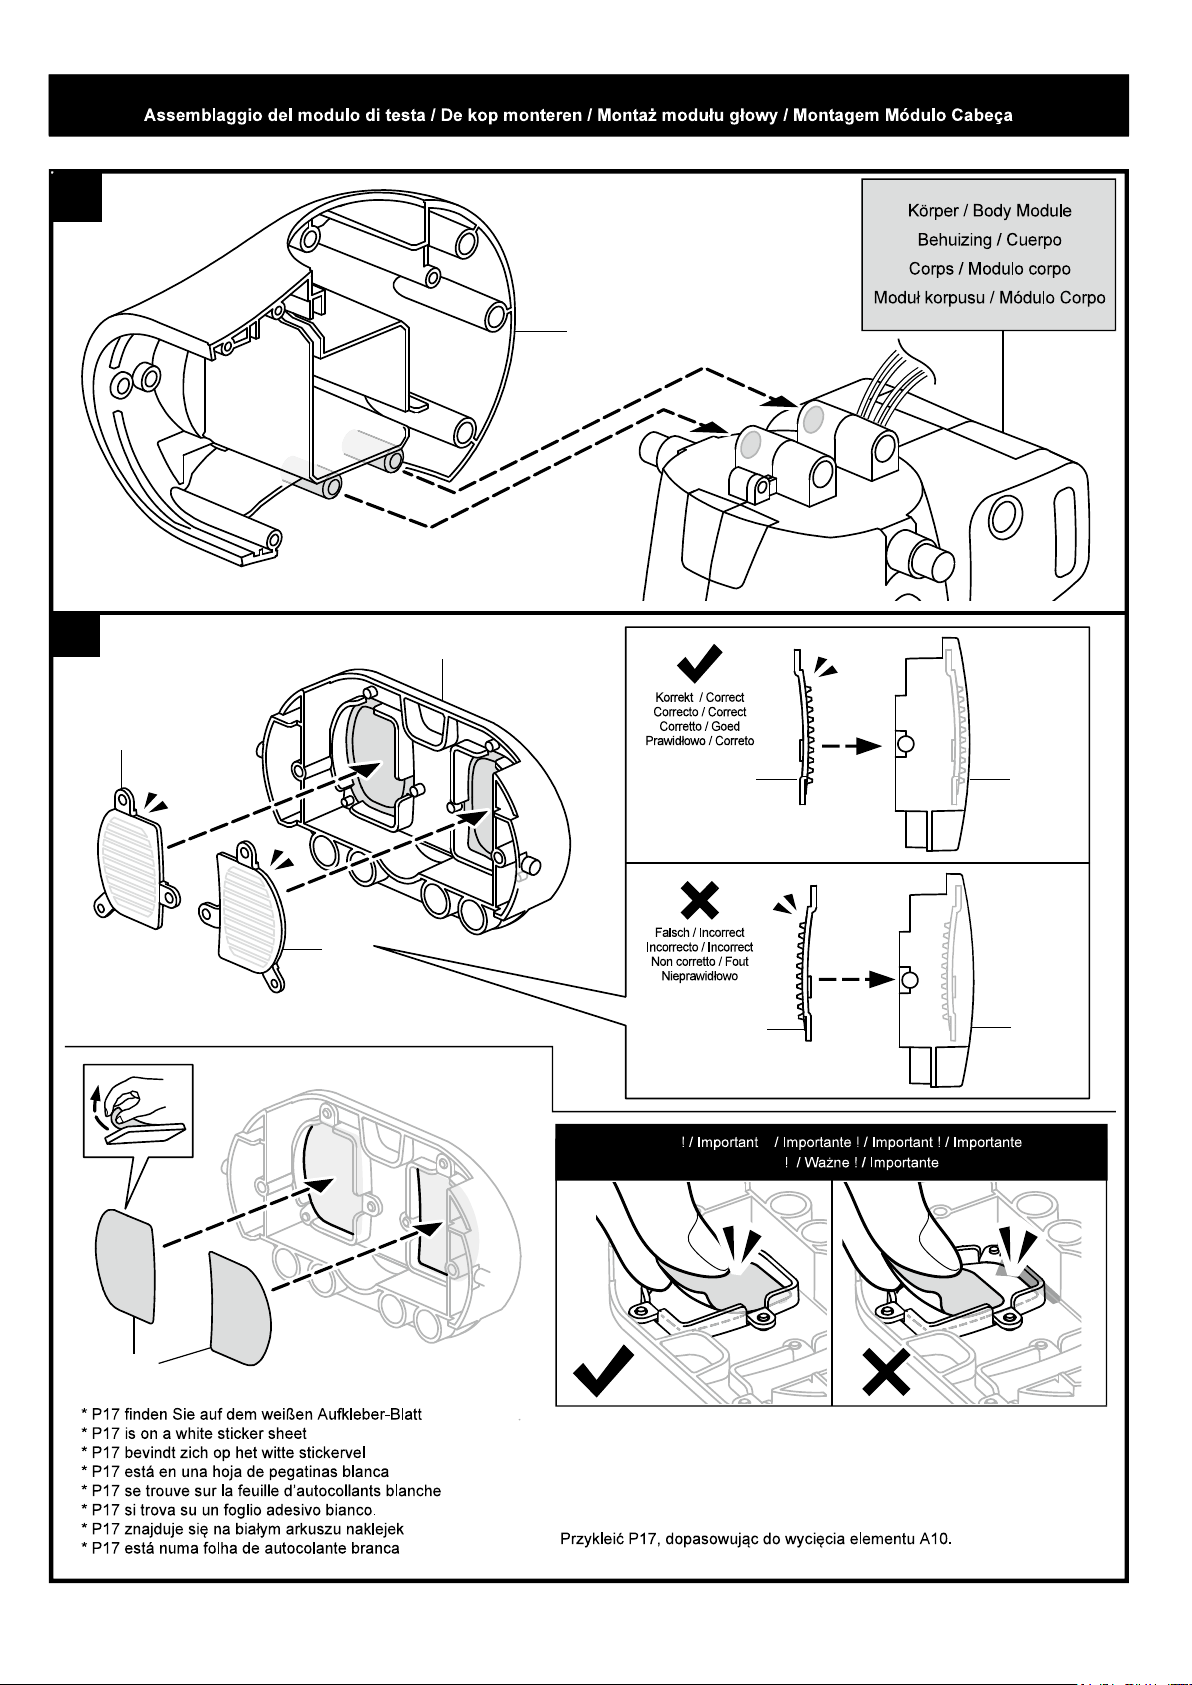
Den Kopf montieren / Head Module Assembly / Montar el cabezal / Montage de la tête
Montagem Módulo Cabeça
Arme und Beine montieren / Feet & Arms Module Assembly / Montar las patas y los brazos
Montage des pieds & bras / Assemblaggio del modulo piedi e braccia / De voeten en armen monteren
1
1
3
3
4
10
24
Die Batterien austauschen / How To Replace Batteries / Reemplazar las pilas / Remplacer les piles
Come sostituire le batterie / Batterijen vervangen / Wymiana baterii / Como Substituir As Pilhas
Wie funktioniert das Gerät / How To Play / Funcionamiento / Jouer / Come giocare / Spelen
Advertência
Problemlösung / Trouble Shooting / Solución de problemas / Problèmes et solutions
Risoluzione dei problemi / Probleemoplossing / Wykrywanie i usuwanie usterek
Resolução de Problemas
26
27
30
31
Page 3

TOBBIE DER ROBOTER / TOBBIE THE ROBOT / TOBBIE EL ROBOT / TOBBIE LE ROBOT
IL ROBOT TOBBIE / TOBBIE DE ROBOT / ROBOT TOBBIE / TOBBIE O ROBOT
Einführung / Product Introduction / Introducción / Introduction / Presentazione del prodotto
Inleiding / Opis produktu / Apresentação do Produto
Entdecken Sie Tobbies Möglichkeiten, indem Sie ihn herausfordern. Kreieren Sie ein Labyrinth oder lassen Sie Ihnen folgen. Und vor allem, behandeln Sie ihn nicht als einen normalen
moving. The little robot offers wonderful sound and light effect which develops its own emotions and gestures, just like a living pet.
Try to challenge Tobbie and figure out what it can do. Create a maze for it or allow it to follow you. Most of all, do not treat it as a normal robot, but an adorable smart friend.
Con sus maravillosos efectos sonoros y luminosos, el pequeño robot desarrollará sus propias emociones y gestos como si fuera un auténtico animal.
Desafíe a Tobbie y descubra lo que puede hacer. Cree un laberinto o deje que le siga. Y, sobre todo, no lo trate como si fuera un robot normal sino como un amigo inteligente y adorable.
nouvel itinéraire pour continuer à avancer. Le petit robot offre un effet sonore et lumineux merveilleux qui développe ses propres émotions et gestes, tout comme un animal vivant.
Essayez de défier Tobbie et de comprendre ce qu'il peut faire. Créez un labyrinthe ou permettez-lui de vous suivre. Mais surtout, ne le traitez pas comme un robot normal, mais comme un
adorable ami intelligent.
Tobbie è un robot intelligente con sei gambe che garantisce la massima interazione con i bambini. Tobbie è programmato con due modalità che gli consentono di seguire o evitare gli
oggetti. Nella modalità "Seguimi", Tobbie segue gli oggetti che gli si avvicinano ed è obbediente come un cagnolino. Grazie al rilevamento automatico IR, Tobb ie è in grado di evitare un
ostacolo in modalità "Esplora" e di trovare un nuovo percorso lungo il quale muoversi. Questo piccolo robot è dotato di fantastici effetti acustici e luminosi che esprimono le sue emozioni
e accompagnano i suoi gesti, proprio come se fosse un animale domestico.
Metti Tobbie alla prova e scopri cosa è in grado di fare. Crea un labirinto o fatti seguire. In ogni caso, non trattarlo come un normale robot, ma consideralo un vero e proprio adorabile
amico smart.
Tobbie is een intelligente robot met zes benen die uitstekende interactie met kinderen biedt. Tobbie heeft twee modi die zijn geprogrammeerd om objecten te volgen of te vermijden.
net als een levend dier.
Probeer Tobbie uit te dagen en begrijp wat hij kan doen. Maak een labyrint of laat hem je volgen. Maar bovenal, behandel hem niet als een normale robot, maar als een schattige
intelligente vriend.
O Tobbie é um robô inteligente de seis pernas que permite uma grande interação com as crianças. O Tobbie possui dois modos programados para seguir ou evitar objetos. No modo
acompanham as suas emoções e gestos, como se de um animal de estimação vivo se tratasse.
Tente desafiar o Tobbie e veja do que ele é capaz. Para tal, crie um labirinto ou deixe que ele vá atrás de si. Acima de tudo, não o trate como um robô normal, mas como um amigo
inteligente e super querido.
Seitenschneider / Diagonal Cutter
Alicates de corte en diagonal
Pince coupante / Tronchesino
Zijkniptang / Obcinak boczny
Cortador Diagonal
Schraubendreher / Screwdriver
Destornillador / Tournevis
Cacciavite / Schroevendraaier
AAA-Batterie x 4 / Battery(AAA) x 4
Pila (AAA) x 4 / Pile AAA x 4
4 Batterie (AAA) / 4 x AAA-batterij
4 baterie (AAA) / 4 pilhas (AAA)
Alkali-Mangan-Batterien empfohlen
Alkaline batteries are Recommended
Pilas alcalinas recomendadas
Les piles alcalines sont
Si consigliano batterie alcaline
Alkalinebatterijen zijn
Recomenda-se a utilização de
pilhas alcalinas.
Liste mit mechanischen Teilen / Mechanical Parts List / Lista de componentes mecánicos / Liste de pièces mécaniques
Das Produkt enthält scharfe Ecken und Spitzen. / Product contains functional edges and sharp points. / El producto incluye bordes funcionales y puntos afilados.
Certaines pièces sont pointues ou coupantes. / Il prodotto presenta bordi e spigoli appuntiti. / Dit product bevat functionele scherpe hoeken en punten.
P1 - Ritzel (weiß) x 2
P1 - Pinion Gear (White) Qty 2
P1 - Piñon (blanco) x 2
P1 - Pignon-engrenage (blanc) x 2
P1 -
Ingranaggio a pignone (bianco) Q.tà 2
P1 - Rondsel (wit) x 2
P1 - Pinhão (Branco) Quant. 2
P2 – Zahnrad 32/10T (Grau) Stckz. 1
P2 – Gear 32/10T (Gray) QTY 1
P2 – Engranaje 32/10T (Gris) Cant. 1
P2 - Engrenage 32/10T (Gris) x 1
P2 – Ingranaggio 32/10T (grigio) Q.tà 1
P2 - Tandwiel 32/10T (Grijs) x 1
P2 – Engrenagem 32/10T
(Cinzento) QUANT. 1
P3 – Zahnrad 32T (Blau) Stckz. 1
P3 – Gear 32T (Blue) QTY 1
P3 – Engranaje 32T (Azul) Cant. 1
P3 - Engrenage 32T (Bleu) x 1
P3 – Ingranaggio 32T (blu) Q.tà 1
P3 - Tandwiel 32T (Blauw) x 1
P3 – Engrenagem 32T (Azul) QUANT. 1
1
Page 4

P4 - Zahnrad 36/14T (Grün) Stckz. 1
P4 - Gear 36/14T (Green) QTY 1
P4 - Engranaje 36/14T (Verde) Cant. 1
P4 - Engrenage 36/14T (Vert) x 1
P4 – Ingranaggio 36/14T (verde) Q.tà 1
P4 - Tandwiel 36/14T (Groen) x 1
P5 – Zahnrad 36/14T (Weiß) Stckz. 2
P5 – Gear 36/14T (White) QTY 2
P5 – Engranaje 36/14T (Blanco) Cant. 2
P5 - Engrenage 36/14T (Blanc) x 2
P5 – Ingranaggio 36/14T (bianco) Q.tà 2
P5 - Tandwiel 36/14T (Wit) x 2
P6 – Zahnrad 36T (Orange) Stckz. 1
P6 – Gear 36T (Orange) QTY 1
P6 – Engranaje 36T (Naranja) Cant. 1
P6 - Engrenage 36T (Orange) x 1
P6 – Ingranaggio 36T (arancione) Q.tà 1
P6 - Tandwiel 36T (Oranje) x 1
P4 - Engrenagem 36/14T
(Verde) QUANT. 1
P7 – Zahnrad 40/10T (Rosa) Stckz. 1
P7 – Gear 40/10T (Pink) QTY 1
P7 – Engranaje 40/10T (Rosa) Cant. 1
P7 - Engrenage 40/10T (Rose) x 1
P7 – Ingranaggio 40/10T (rosa) Q.tà 1
P7 - Tandwiel 40/10T (Roze) x 1
P7 – Engrenagem 40/10T
(Rosa) QUANT. 1
P10 – Blechschraube Stckz. 4
P10 – Tapping Screw QTY 4
P10 – Tornillo autoroscante Cant. 4
P10 - Vis taraudeuse x 4
P10 – Vite autofilettante Q.tà 4
P10 - Zelftappende schroef x 4
P10 – Parafuso de Rosca QUANT. 4
P13 - Motor mit Anschluss (Schwarz, Blau) Stckz. 1
P13 - Motor With Connector (Black , Blue) QTY 1
P13 - Motor con conector (Negro, Azul) Cant. 1
P13 - Moteur avec connecteur (Noir, Bleu) x 1
P13 - Motore con connettore (bianco, blu) Q.tà 1
P13 - Motor met connector (Zwart, Blauw) x 1
P13 - Motor Com Conetor (Preto, Azul) QUANT. 1
P5 – Engrenagem 36/14T
(Branco) QUANT. 2
P8 – Zahnrad 10T (Orange) Stckz. 2
P8 – Gear 10T (Orange) QTY 2
P8 – Engranaje 10T (Naranja) Cant. 2
P8 - Engrenage 10T (Orange) x 2
P8 – Ingranaggio 10T (arancione) Q.tà 2
P8 - Tandwiel 10T (Oranje) x 2
P8 – Engrenagem 10T
(Laranja) QUANT. 2
P11 – Welle (Kurz) Stckz. 3
P11 – Shaft (Short) QTY 3
P11 – Eje (Corto) Cant. 3
P11 - Axe (Court) x 3
P11 – Albero (corto) Q.tà 3
P11 - As (Kort) x 3
1:1 1:1
Blau / Blue / Azul / Bleu / Blu
Blauw / Niebieski / Azul
P11 – Eixo (Curto) QUANT. 3
Schwarz / Black
Negro / Noir
Bianco / Zwart
Czarny / Preto
P14 - Motor mit Anschluss (Schwarz, Rot) Stckz. 1
P14 - Motor With Connector (Black, Red) QTY 1
P14 - Motor con conector (Negro, Rojo) Cant. 1
P14 - Moteur avec connecteur (Noir, Rouge) x 1
P14 - Motore con connettore (bianco, rosso) Q.tà 1
P14 - Motor met connector (Zwart, Rood) x 1
P14 - Motor Com Conetor
(Preto, Vermelho) QUANT. 1
P6 – Engrenagem 36T
(Laranja) QUANT. 1
P9 – Blechschraube Stckz. 20
P9 – Tapping Screw QTY 20
P9 – Tornillo autoroscante Cant. 20
P9 - Vis taraudeuse x 20
P9 – Vite autofilettante Q.tà 20
P9 - Zelftappende schroef x 20
P9 – Parafuso de Rosca QUANT. 20
P12 – Welle (Lang) Stckz. 2
P12 – Shaft (Long) QTY 2
P12 – Eje (Largo) Cant. 2
P12 - Axe (Long) x 2
P12 – Albero (lungo) Q.tà 2
P12 - As (Lang) x 2
P12 – Eixo (Comprido)
Q UA N T. 2
Rot / Red / Rojo / Rouge / Rosso
Rood / Czerwony / Vermelho
Schwarz / Black
Negro / Noir
Bianco / Zwart
Czarny / Preto
1:1
1:1
P15 – Batteriehalter mit Anschluss (DC 6V) Stckz. 1
P15 – Battery Holder With Connector (DC 6V) QTY 1
P15 – Portapilas con conector (DC 6V) Cant. 1
P15 - Support pour piles avec connecteur (CC 6V) x 1
P15 – Supporto ba tterie con connettore (6 V CC) Q.tà 1
P15 - Batterijhouder met connector (DC 6V) x 1
P15 – Suporte Da Pilha Com Conetor
(DC 6V) QUANT. 1
P17 – Aufkleber Stckz. 1
P17 – Sticker QTY 1
P17 – Pegatina Cant. 1
P17 - Autocollant x 1
P17 – Adesivo Q.tà 1
P17 - Sticker x 1
P17 – Naklejka 1 szt.
P17 – Adesivo QUANT. 1
DC 6V
P16 – Platine Stckz. 1
P16 – PC Board QTY 1
P16 – Circuito impreso Cant. 1
P16 - PCB x 1
P16 – Scheda PC Q.tà 1
P16 - PCB x 1
P16 - Placa PC QUANT. 1
P18 – Unterlegscheibe. 1
P18 – Washer QTY 1
P18 – Sluitring Cant. 1
P18 - Rondelle x 1
P18 – Arandela Q.tà 1
P18 - Anilha x 1
P18 – Rondella. 1
2
Page 5
Kunststoffteile / Plastic Parts / Piezas de plástico / Pièces en plastique / Parti in plastica
Schneiden Sie gegebenenfalls die Kunststoffteile. Schneiden
Sie diese aber nicht im Voraus.
Cut the plastic parts when they are required. Do not cut
them in advance.
Si fuera necesario, corte las piezas de plástico, pero no las corte de
antemano.
Couper les pièces en plastique au fur et à mesure du montage. Ne pas
couper les pièces en avance.
Tagliare le parti in plastica quando necessario. Non tagliarle in anticipo.
Knip de plastic onderdelen pas uit op het moment dat u ze nodig hebt.
Knip de onderdelen niet uit op voorhand uit.
Corte as peças em plástico quando for recomendado. Não as corte
antecipadamente.
Grat
Burr
Rebaba
Ebarbure
Sbavatura
Braam
Rebarba
Grat
Burr
Rebaba
Ebarbure
Sbavatura
Braam
Rebarba
1
D
2 3
3
Page 6

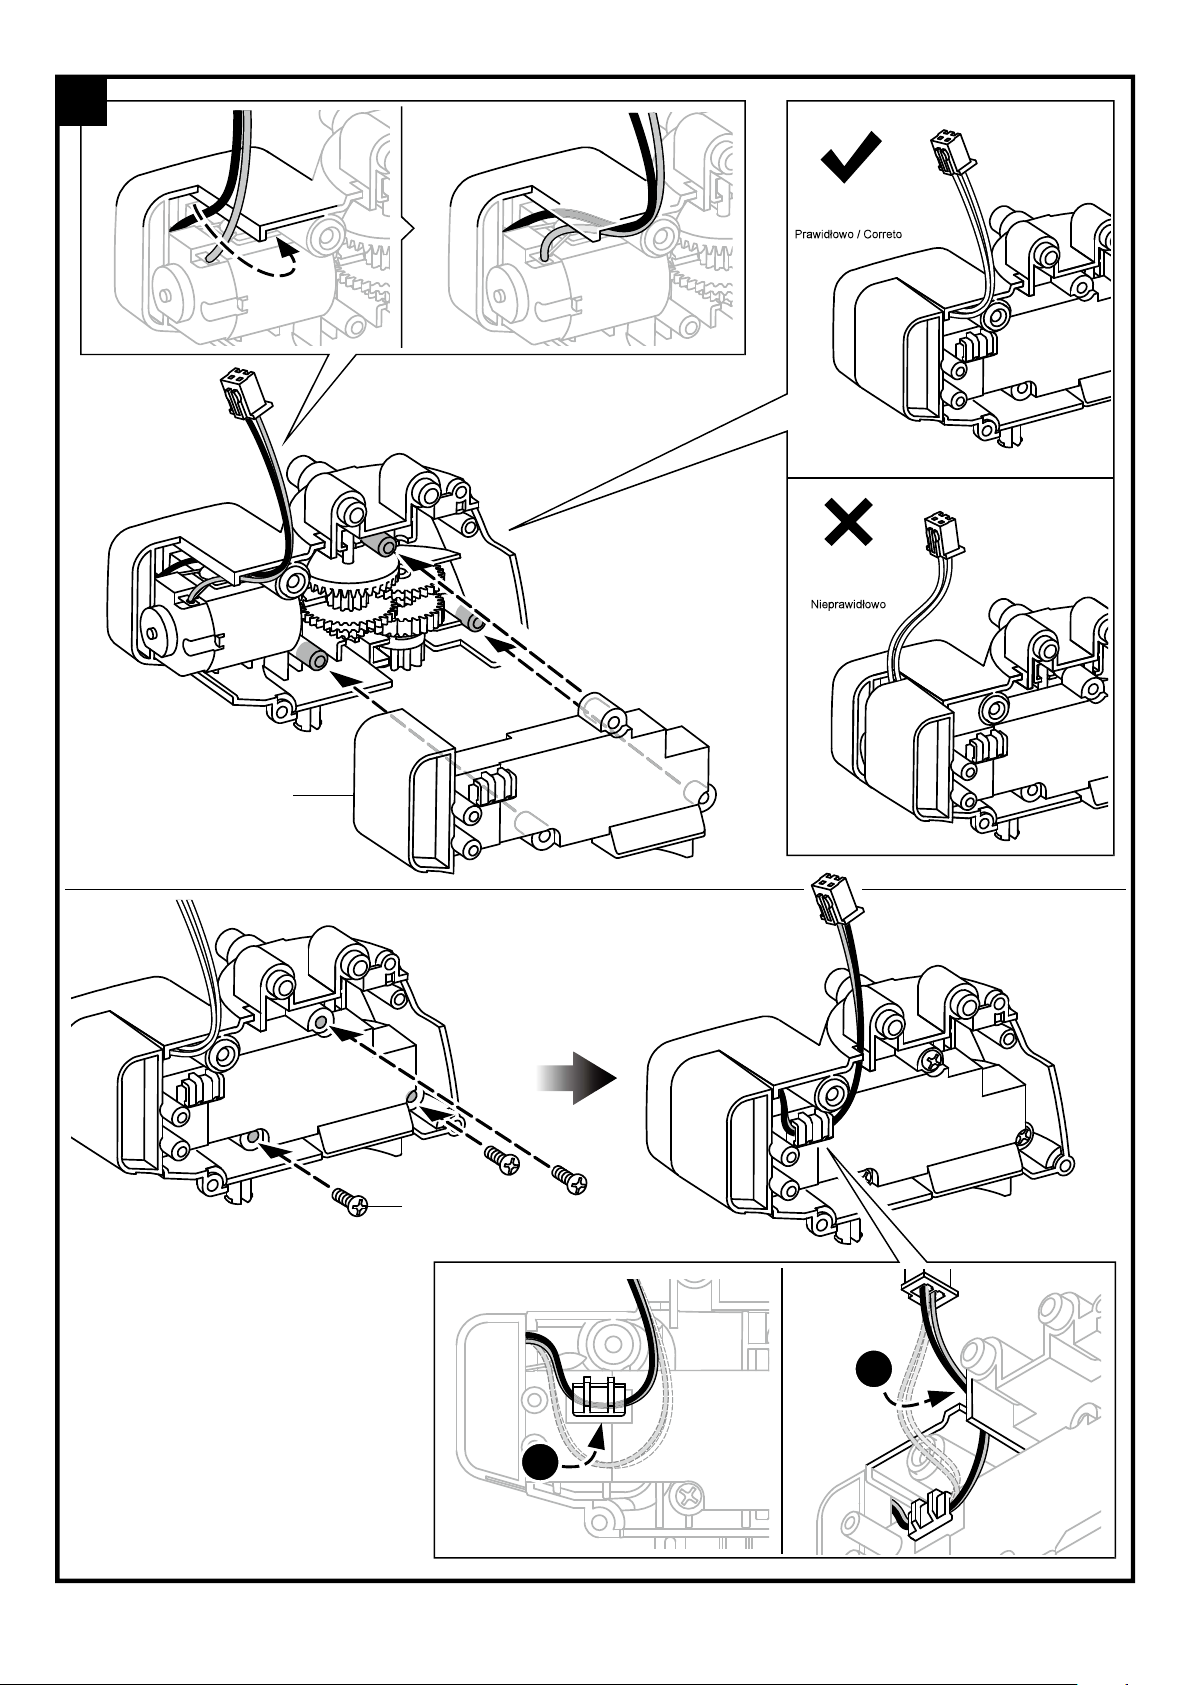
Den Körper montieren / Body Module Assembly / Montar el cuerpo / Monter le corps
1
B5
P11x3
Kurz
Short
Corto
court
corto
kort
krótki
Curt
P5
Weiß
White
Blanco
blanc
bianco
wit
Branco
P6
Orange
Orange
Naranja
orange
arancione
oranje
Laranja
P8
Orange
Orange
Naranja
orange
arancione
oranje
Laranja
2
Blau
Blue
Azul
Bleu
Blu
Blauw
Niebieski
Azul
P13
P1
1
Schwarz
2
Black
Negro
Noir
nero
zwart
Czarny
Preto
Korrekt / Correct
Correcto / Correct
Corretto / Goed
Falsch / Incorrect
Incorrecto / Incorrect
Non corretto / Fout
Incorreto
Korrekt / Correct
Correcto / Correct
Corretto / Goed
Falsch / Incorrect
Incorrecto / Incorrect
Non corretto / Fout
Incorreto
P7
Rosa
Pink
Rosa
rose
rosa
roze
Rosa
Blau
Blue
Azul
Bleu
Blu
Blauw
Niebieski
Azul
Schwarz
Black
Negro
Noir
nero
zwart
Czarny
Preto
4
Page 7

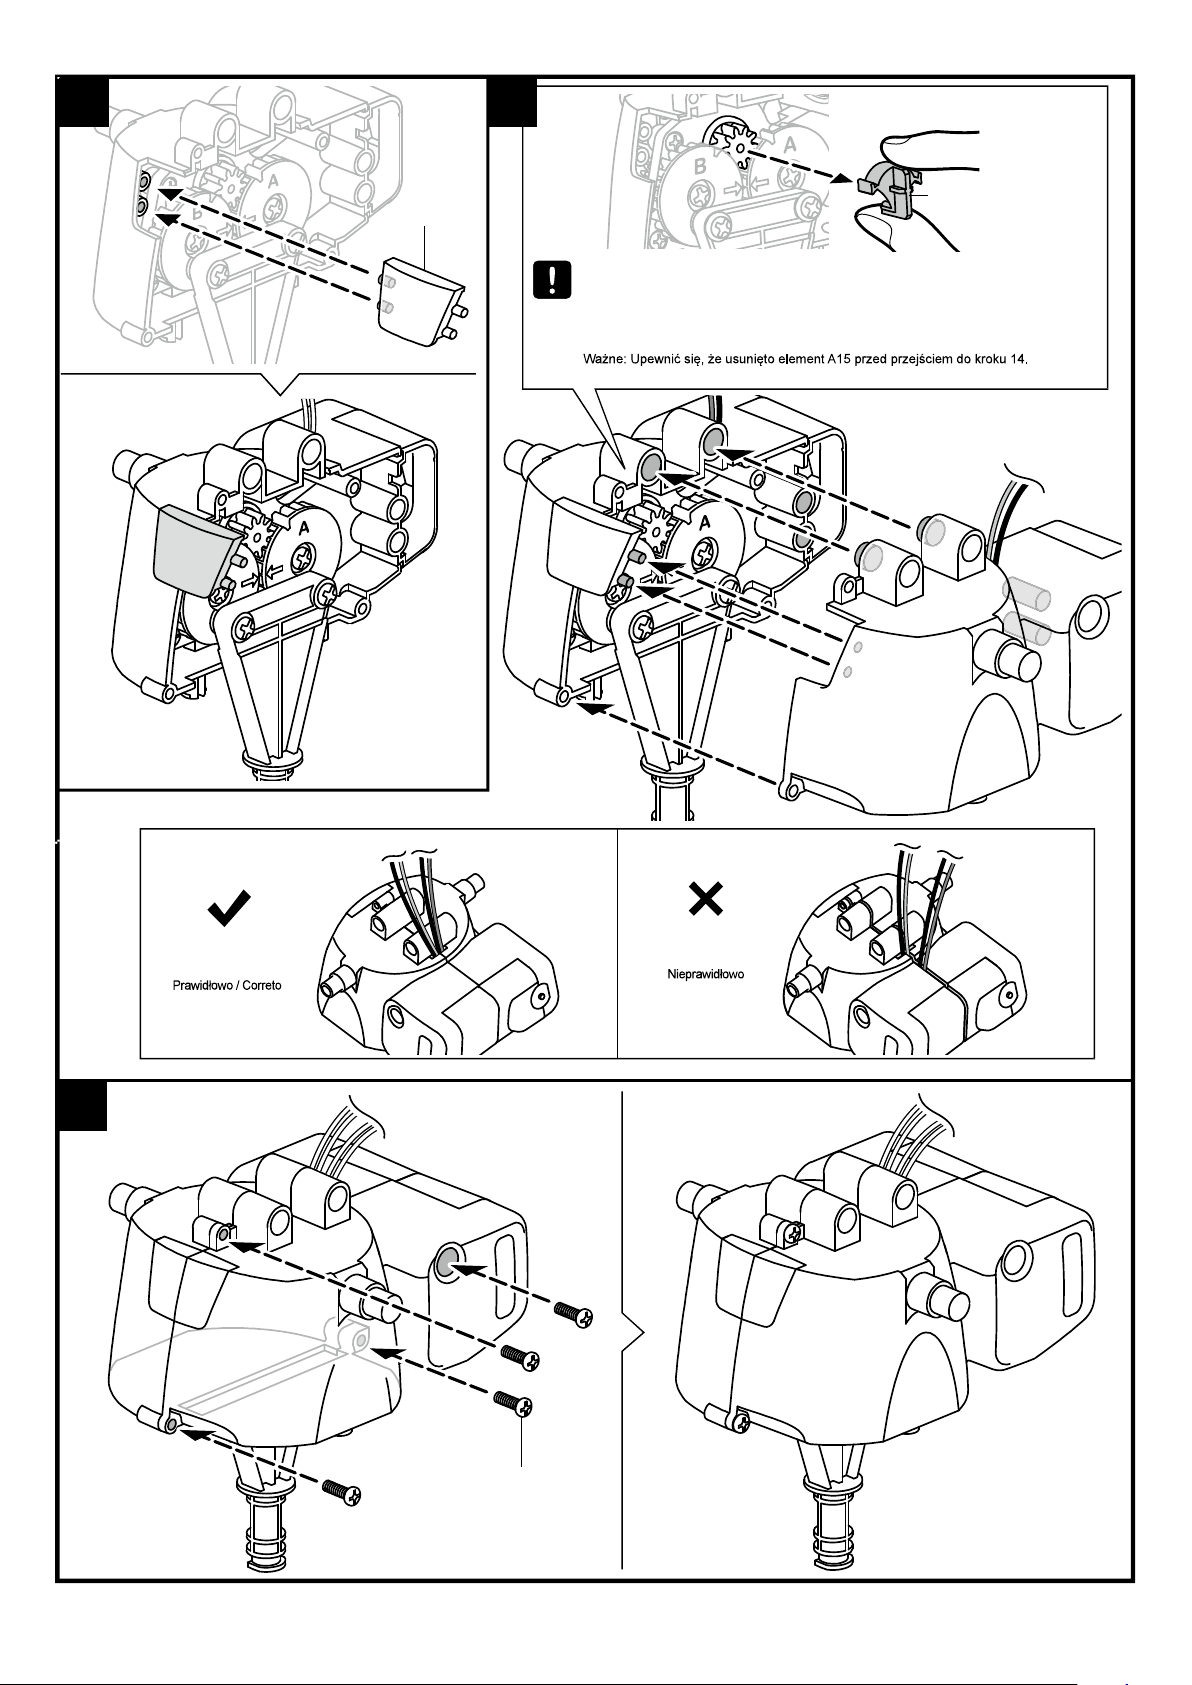
3
2
2
2
4 5
B3
1
A15
P9x3
Korrekt / Correct
Correcto / Correct
Corretto / Goed
Falsch / Incorrect
Incorrecto / Incorrect
Non corretto / Fout
Incorreto
5
Page 8

6
B9
A6
Korrekt / Correct
Correcto / Correct
Corretto / Goed
Falsch / Incorrect
Incorrecto / Incorrect
Non corretto / Fout
Incorreto
AB
7
8
Korrekt
Correct
Correcto
Correct
Corretto
Goed
Correto
Falsch
Incorrect
Incorrecto
Incorrect
Non corretto
Fout
Incorreto
P10
Befestigen Sie die 4 Bauteile « P10 » korrekt an der Unterseite (siehe Abb.).
Fasten P10 x4 to the bottom entirely.
Fije los 4 « P10 » a la parte inferior y asegúrese de introducirlos completamente.
Fixer les 4 "P10" à la partie inférieure et s'assurer de l'insérer complètement.
Stringere le viti P10 x 4 completamente fino in fondo.
Bevestig de 4 onderdelen "P10" correct aan de onderkant (zie afb.).
Aperte os 4x P10 completamente, até ao final.
Wichtig: Entfernen Sie Bauteil A15 nach dem Erledigen der obenerwähnten Schritte.
Important : Remove assistance tool-A15 after steps above are finished.
Importante: Quite la pieza A15 después de haber seguido los pasos de arriba.
Important : Retirer la pièce A15 après avoir effectué les étapes ci-dessus.
Importante: Una volta terminati i passaggi di cui sopra, rimuovere l’attrezzo A15 di aiuto.
Belangrijk: Verwijder het onderdeel "A15" nadat u de bovenstaande stappen hebt uitgevoerd.
B2
P10
RIMUOVERE
VERWIJDEREN
RETIRAR
A15
ENTFERNEN
REMOVE
QU ITAR
RETIRER
6
Page 9

9
10
Rot
Red
Rojo
Noir
rosso
zwart
czerwony
Vermelho
P14
P1
P12
Lang / Long / Largo /
long / lungo / lang /
Schwarz
Black
Negro
Rouge
nero
rood
czarny
Preto
Korrekt / Correct
Correcto / Correct
Corretto / Goed
Falsch / Incorrect
Incorrecto / Incorrect
Non corretto / Fout
Incorreto
B6
11
Lang / Long / Largo /
long / lungo / lang /
Grau / Gray / Gris /
gris / grigio / grijs /
Falsch / Incorrect
Incorrecto / Incorrect
Non corretto / Fout
Incorreto
P5
Weiß / White / Blanco
/ blanc / bianco / wit /
Grün / Green / Verde /
vert / verde / groen /
zielone / Verde
P12
P2
P3
Blau / Blue
Azul / Bleu
Blu / Blauw
Niebieskie
Azul
P4
Korrekt / Correct
Correcto / Correct
Corretto / Goed
Falsch / Incorrect
Incorrecto / Incorrect
Non corretto / Fout
Incorreto
Seitenansicht
Side View
Vista lateral
Vue latérale
P5
Weiß / White /
Blanco / blanc /
Vista laterale
Zijkant
Widok z boku
Vista Lateral
Grau / Gray /
Gris / gris /
grigio / grijs /
Blau / Blue /
Azul / bleu /
blu / blauw /
P2
szare
P3
niebieskie
P8
Orange / Orange
Naranja / orange
arancione / oranje
P8
P4
Grün / Green / Verde
/ vert / verde /
groen / zielone
Orange / Orange /
Naranja / orange /
arancione / oranje /
7
Page 10
12
Korrekt / Correct
Correcto / Correct
Corretto / Goed
Falsch / Incorrect
Incorrecto / Incorrect
Non corretto / Fout
Incorreto
B4
P9x3
2
1
8
Page 11
13
14
A13
A15
Wichtig: Beachten Sie, dass Sie A15 entfernt haben, bevor Sie Schritt 14 durchführen.
Important : Ensure A15 is removed before doing this step 14.
Importante: Asegúrese de haber quitado A15 antes de realizar paso 14.
Important : S'assurer que A15 est retiré avant d'effectuer cette étape 14.
Importante: Assicurarsi di rimuovere A15 prima di eseguire il passaggio 14.
Belangrijk: Verwijder het onderdeel "A15" voordat u stap 14 uitvoert.
Importante: Verificar se a ferramenta A15 foi retirada antes de passar ao passo 14.
15
Korrekt / Correct
Correcto / Correct
Corretto / Goed
P9x4
Falsch / Incorrect
Incorrecto / Incorrect
Non corretto / Fout
Incorreto
9
Page 12
1
Den Kopf montieren / Head Module Assembly / Montar el cabezal / Montage de la tête
C1
2
D2
D3
A10
D2&D3
Incorreto
D2&D3
Wichtig ! !
Belangrijk
!
A10
A10
P17
Befestigen Sie P17 an der Ecke von A10
Post P17 against corner of indent in A10
Kleef P17 tegen de hoek van A10
Fije P17 a la esquina de A10
Coller P17 contre le coin de A10
Incollare P17 aggiustandolo alla tagliatura dell’elemento A10.
Coloque P17 contra o canto do recuo em A10
10
Page 13
3
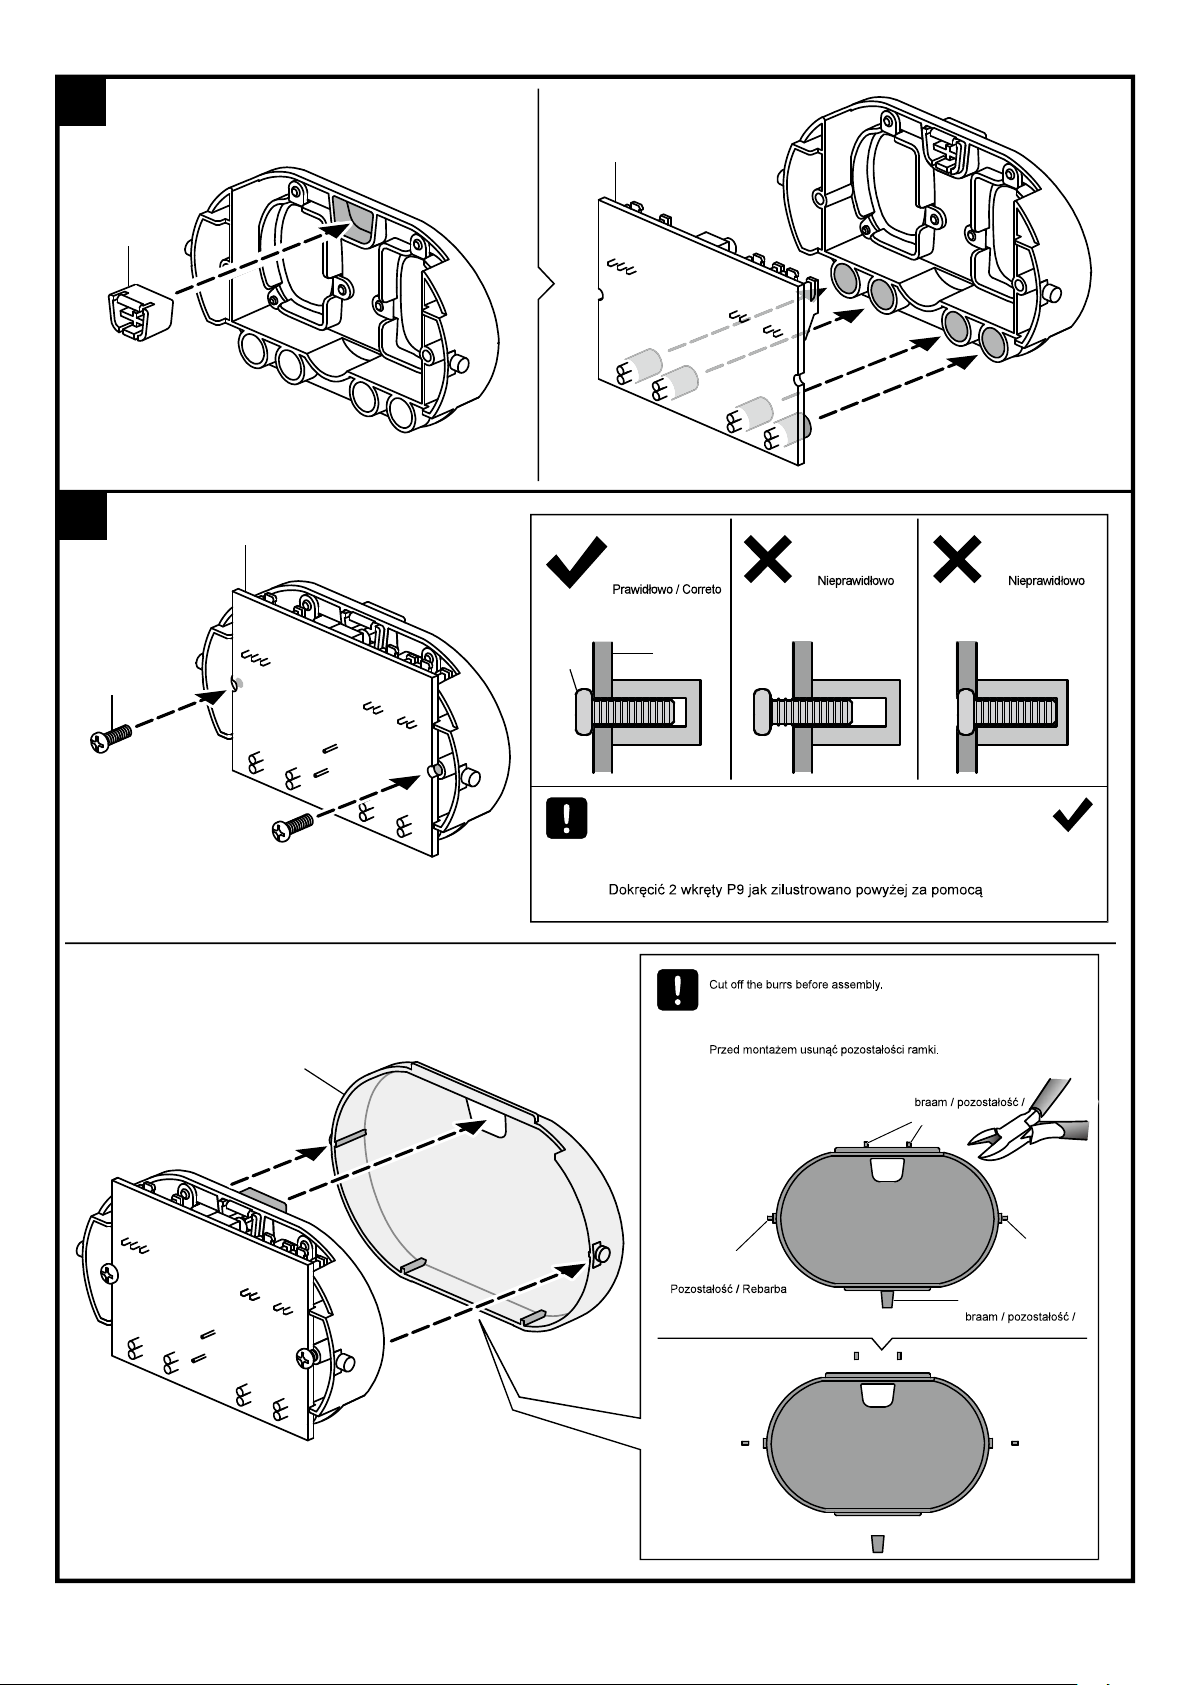
P16
A14
4
P9x2
P16
D1
P9
Korrekt / Correct
Correcto / Correct
Corretto / Goed
Falsch / Incorrect
Incorrecto / Incorrect
Non corretto / Fout
Incorreto
P16
Befestigen Sie P9 x 2 (siehe Abb.) mit
Fasten P9 x 2 as illustrated above with
Maak P9 x 2 vast zoals afgebeeld met
Fije P9 x 2 (véase la fig.) con
Serrer P9 x 2 comme illustré ci-dessus avec
Avvitare 2 viti P9 come presentato di sopra con
Aperte P9 x 2 conforme ilustração acima com
Schneiden Sie die Grate vor Montage ab.
Corte las rebabas antes del montaje.
Couper les ébarbures des pièces avant le montage.
Tagliare via le sbavature prima di assemblare.
Knip de bramen af voor de m ontage.
Cortar as rebarbas antes da montagem.
Falsch / Incorrect
Incorrecto / Incorrect
Non corretto / Fout
Grat / burr / reb aba /
ébarbure / sbavatura /
rebarba
Incorreto
11
Grat / Burr
Rebaba /ébarbure
Sbavatura / Braam
Grat / burr / reb aba /
ébarbure / sbavatura /
rebarba
D1
Page 14
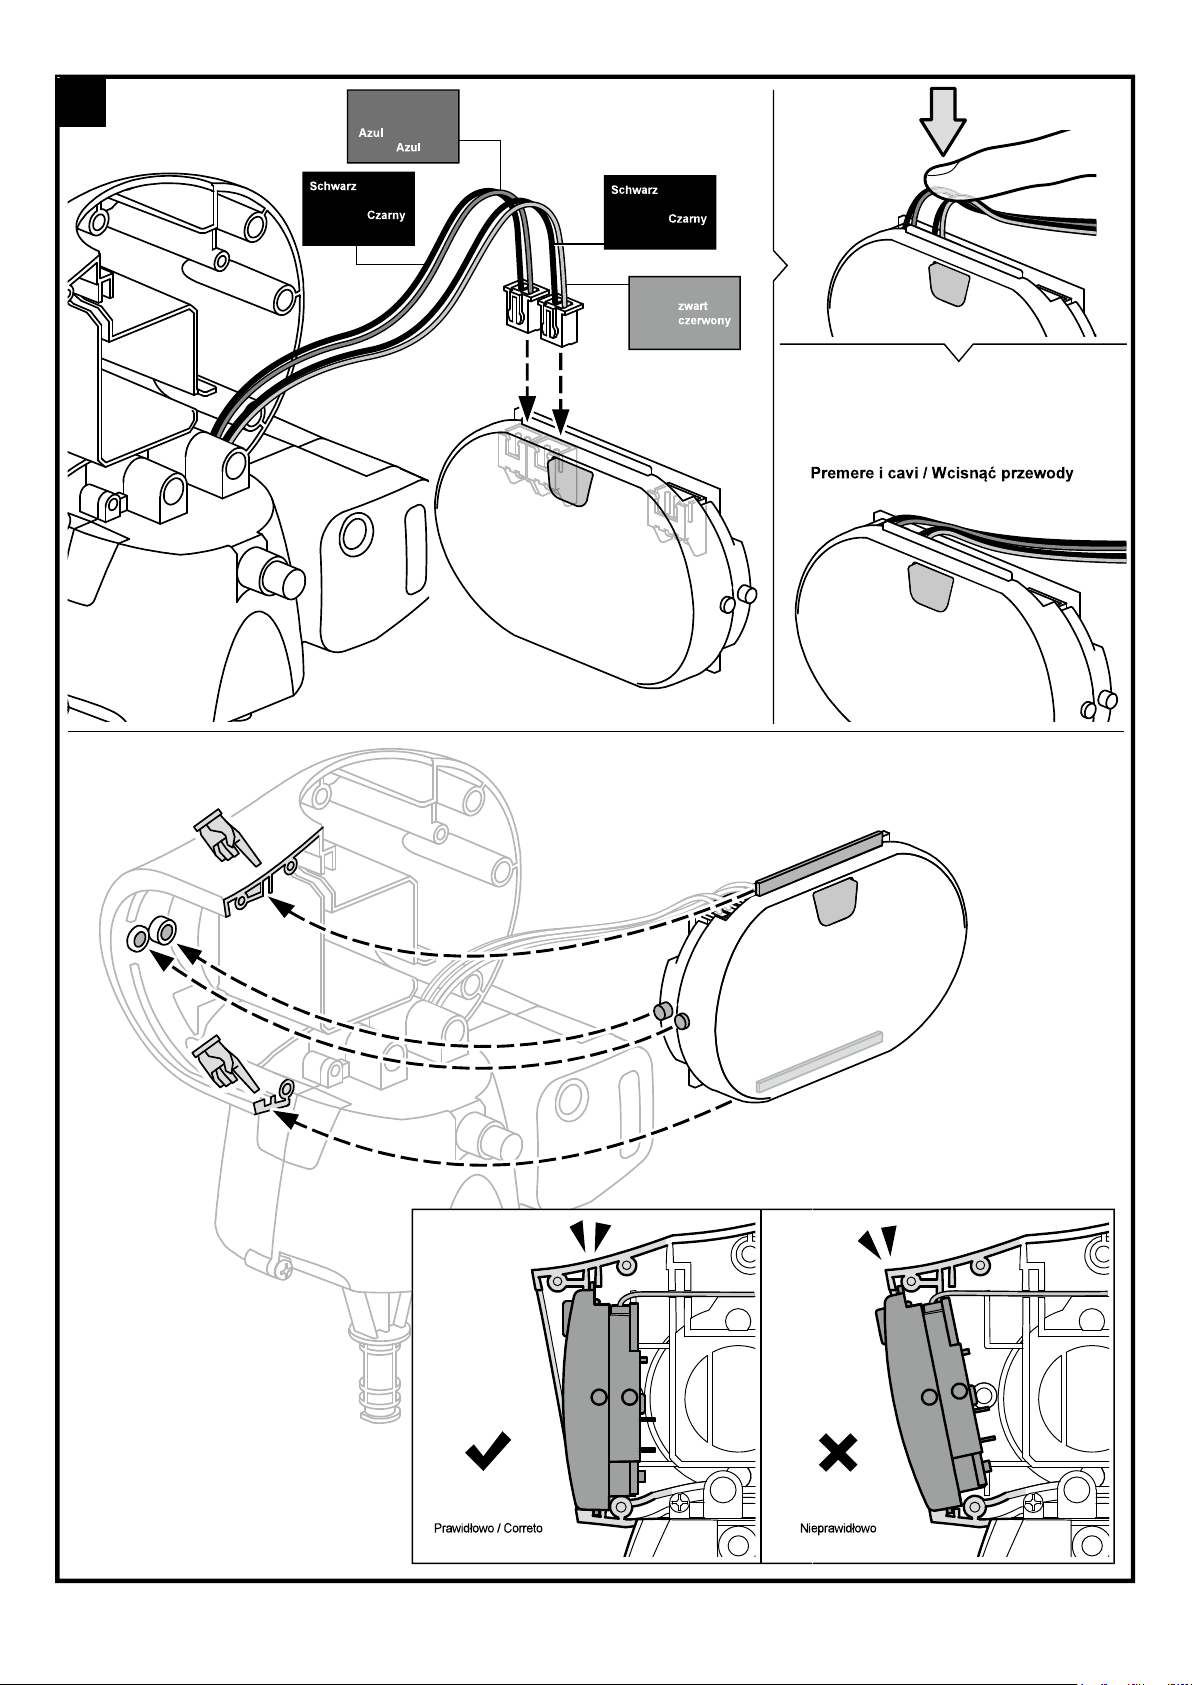
5
Blau
Blue
Noir
Blu
Zwart
Niebieski
Black
Negro
Rouge
Nero
Rood
Preto
Black
Negro
Rouge
Rot
Red
Rojo
Noir
Nero
Rood
Preto
rosso
Vermelho
Die Kabel nach unten wegführen
Press Down The Wires
Druk de bedrading naar beneden
Apretar los cables
Pousser les fils vers le bas
Pressione Os Fios
Korrekt / Correct
Correcto / Correct
Corretto / Goed
12
Falsch / Incorrect
Incorrecto / Incorrect
Non corretto / Fout
Incorreto
Page 15
6
7
AAA(x4)
P15
13
Page 16

8 9
1
2
3
1
2
14
Page 17

10
Korrekt / Correct
Correcto / Correct
Corretto / Goed
Falsch / Incorrect
Incorrecto / Incorrect
Non corretto / Fout
11
Seitenansicht
Side View
Vista lateral
Vue latérale
Vista laterale
Zijkant
Widok z boku
Vista Lateral
C2
15
P9
Page 18

Haben Sie Probleme bei der Montage, lassen Sie sich dann von Ihren Eltern helfen.
Vraag hulp aan een ouder als u problemen ondervindt bij het monteren.
Demandez l’aide d’un parent si vous rencontrez des problèmes lors du montage.
En caso de problemas durante el montaje pida ayuda a sus padres.
Pedir ajuda aos pais se surgir algum problema durante a montagem.
In caso di problemi durante l'assemblaggio, chiedi assistenza ai tuoi genitori.
A9
P18
A3
B10
P9
ziehen Sie fest.
Plaats de sluitring op de schroef en draai deze vast.
Glisser la rondelle sur la vis et serrez.
Fije la arandela al tornillo y
atorníllelo.
Coloque a anilha na ponta do
parafuso e depois aparafuse
diretamente.
Ansicht von rechts / Right View
Vista desde la derecha
Vue de droite / Vista da destra
Rechts / Widok z prawej
Vista Lado Direito
Ansicht von links / Left View / Vista desde la izquierda
Vue de gauche / Vista da sinistra / Links
Widok z lewej / Vista Lado Esquerdo
Posizionare la rondella sulla punta
della vite, quindi avvitare
direttamente.
Schneiden Sie die Grate vor Montage ab.
Cut off the burrs before assembly.
Corte las rebabas antes del montaje.
Couper les ébarbures des pièces avant le montage.
Tagliare via le sbavature prima di assemblare.
Knip de bramen af voor de montage.
Cortar as rebarbas antes da montagem.
Grat / Burr / Rebaba / Ébarbure / Sbavatura
Grat / Burr
Rebaba / Ébarbure
Sbavatura / Braam
Rebarba
Page 19

14
A5
Korrekt / Correct
Correcto / Correct
Corretto / Goed
Falsch / Incorrect
Incorrecto / Incorrect
Non corretto / Fout
15
A18x2
1
2
2
1
Stellen Sie sicher, dass A18 einrastet.
Make sure to snap on A18 with a “Click”
Klik A18 vast / Asegúrese de que oiga un clic al fijar A18. / Clipser A18
L’elemento A18 deve essere chiuso a scatto con un suono di un “Click”
Certifique-se de que encaixa na A18 fazendo um “clique”
Klicken / Click
Clic / Clic
Clic / Klik
Klik / Clicar
17
Klicken / Click
Clic / Clic
Clic / Klik
Klik / Clicar
Page 20

16
Skala 1:1
Scale 1:1
Escala 1:1
Échelle 1:1
Scala 1:1
Schaal 1:1
Skala 1:1
Escala 1:1
! Verwechseln Sie A1 & A2 nicht.
! Don’t mix up A1 & A2.
! Asegúrese de no intercambiar A1 & A2.
! Ne pas échanger A1 & A2.
! Non intercambiare A1 e A2.
! Let op dat u A1 & A2 niet verwisselt.
! Não troque o A1 & A2
B1
A1
B1
Korrekt / Correct
Correcto / Correct
Corretto / Goed
A1
x3
Falsch / Incorrect
Incorrecto / Incorrect
Non corretto / Fout
DRÜCKEN / PUSH
PRESIONAR / PRESSER
SPINGERE / INDRUKKEN
PUSH
DRÜCKEN / PUSH
PRESIONAR / PRESSER
SPINGERE / INDRUKKEN
Korrekt / Correct
Correcto / Correct
Corretto / Goed
Draufsicht / Top View / Vista desde arriba
Vue de dessus / Vista superiore / Bovenaanzicht
Widok z góry / Vista de Cima
Falsch / Incorrect
Incorrecto / Incorrect
Non corretto / Fout
18
Draufsicht / Top View / Vista desde arriba
Vue de dessus / Vista superiore / Bovenaanzicht
Widok z góry / Vista de Cima
Page 21

17
B1
Korrekt / Correct
Correcto / Correct
Corretto / Goed
A16
x3
B1
DRÜCKEN / PUSH
PRESIONAR / PRESSER
SPINGERE / INDRUKKEN
A16
DRÜCKEN / PUSH
PRESIONAR / PRESSER
SPINGERE / INDRUKKEN
18
Falsch / Incorrect
Incorrecto / Incorrect
Non corretto / Fout
B13
19
Page 22

19
Falsch / Incorrect
Incorrecto / Incorrect
Non corretto / Fout
Draufsicht / Top View / Vista desde arriba
Vue de dessus / Vista superiore / Bovenaanzicht
Widok z góry / Vista de Cima
Korrekt / Correct
Correcto / Correct
Corretto / Goed
20
Draufsicht / Top View / Vista desde arriba
Vue de dessus / Vista superiore / Bovenaanzicht
Widok z góry / Vista de Cima
Page 23

20
A19
Korrekt / Correct
Correcto / Correct
Corretto / Goed
Klicken / Click
Clic / Clic
Clic / Klik
Klik / Clicar
! Stellen Sie sicher, dass Sie A19 korrekt befestigen.
! Ensure the right direction of A19.
! Asegúrese de fijar A19 de manera correcta.
! Monter A19 dans la position correcte.
! Assicurarsi che A19 sia nella direzione corretta.
! Monteer A19 in de correcte positie.
Falsch / Incorrect
Incorrecto / Incorrect
Non corretto / Fout
21
A17
x3
! Assegure a direção correta do A19.
Korrekt / Correct
Correcto / Correct
Corretto / Goed
! Stellen Sie sicher, dass Sie A17 korrekt befestigen.
! Ensure the right direction of A17.
! Asegúrese de fijar A17 de manera correcta.
! Monter A17 dans la position correcte.
! Assicurarsi che A17 sia nella direzi one corretta.
! Monteer A17 in de correcte positie.
Falsch / Incorrect
Incorrecto / Incorrect
Non corretto / Fout
21
! Assegure a direção correta do A17.
Page 24

22
Skala 1:1
Scale 1:1
Escala 1:1
Échelle 1:1
Scala 1:1
Schaal 1:1
Skala 1:1
Escala 1:1
! Verwechseln Sie A2 & A1 nicht.
! Don’t mix up A2 & A1.
! Asegúrese de no intercambiar A2 & A1.
! Ne pas échanger A2 & A1.
! Non intercambiare A1 e A2.
! Let op dat u A2 & A1 niet verwisselt.
! Não troque o A1 & A2
B15
A2
x3
A2
A16
B15
Korrekt / Correct
Correcto / Correct
Corretto / Goed
A2+B15
A16
A17
A1+B1
Falsch / Incorrect
Incorrecto / Incorrect
Non corretto / Fout
A17
A1+B1
A2+B15
A16
A17
A2+B15
A1+B1
A16
22
Page 25

23 24
A11
P9x2
1
1
2
P9x2
P9x2
3
2
3
23
Page 26

Arme und Beine montieren / Feet & Arms Module Assembly / Montar los pies y los brazos / Monter les pieds & bras
1
B8
A12
2
1
x6
2
1
A7
A7
24
Page 27

2
ARM/R
BRAS/DROIT
BRACCIO/DX
B12
B7
A8
B14
ARM/R
BRAS/DROIT
BRACCIO/DX
Schneiden Sie die Grate vor Montage ab.
Cut off the burrs before assembly.
Corte las rebabas antes del montaje.
Couper les ébarbures des pièces avant le montage.
Tagliare via le sbavature prima di assemblare.
Knip de bramen af voor de m ontage.
Cortar as rebarbas antes da montagem.
Grat / burr / reb aba /
ébarbure / sbavatura /
rebarba
B7
ARM/L
BRAS/GAUCHE
BRACCIO/SX
ARM/L
BRAS/GAUCHE
BRACCIO/SX
A8
B14
B11
B7
Schneiden Sie die Grate vor Montage ab.
Cut off the burrs before assembly.
Corte las rebabas antes del montaje.
Couper les ébarbures des pièces avant le montage.
Tagliare via le sbavature prima di assemblare.
Knip de bramen af voor de m ontage.
Cortar as rebarbas antes da montagem.
25
Grat / burr / reb aba /
ébarbure / sbavatura /
rebarba
B7
Page 28

Ausführung / Finish / acabado / Produit fini / Fine / Afgewerkt product / Koniec / Acabamento
3
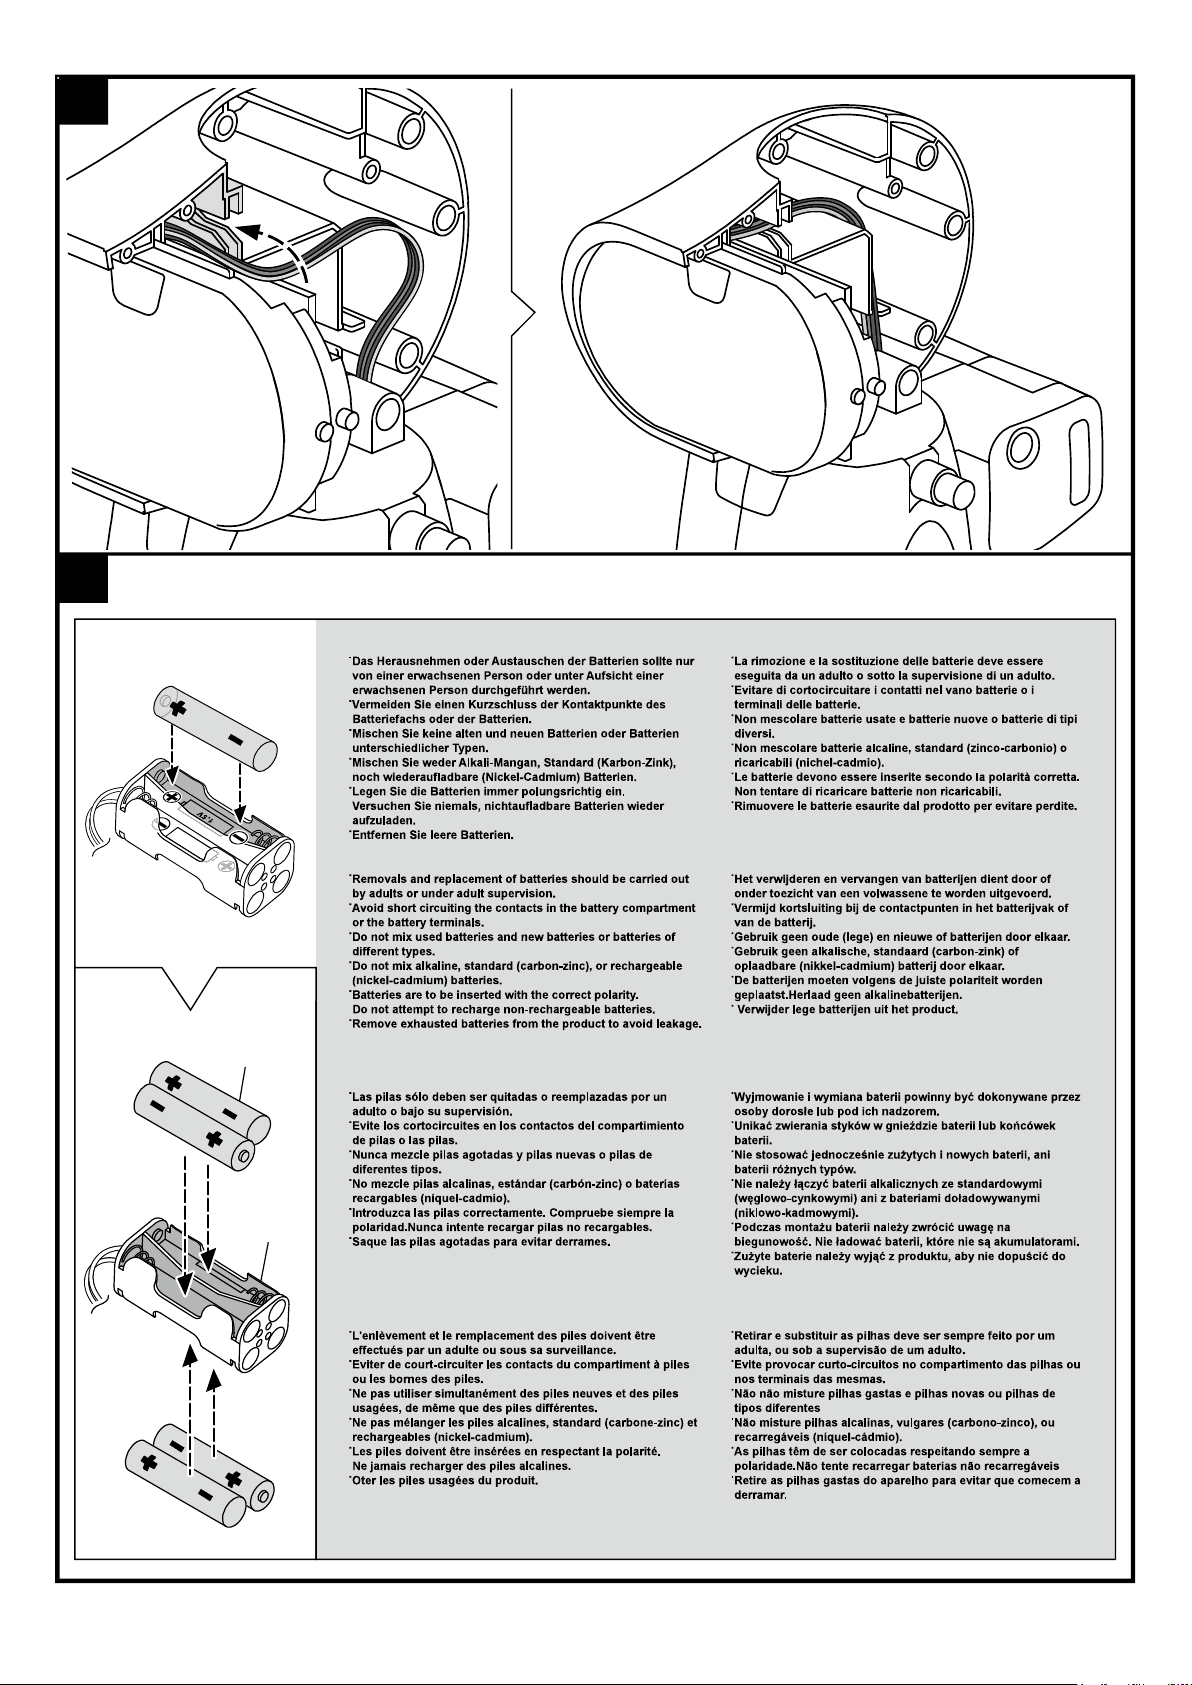
Die Batterien austauschen / How To Replace Batteries / Reemplazar las pilas / Remplacer les piles
Come sostituire le batterie / Batterijen vervangen / Wymiana baterii / Como Substituir As Pilhas
ENTFERNEN
REMOVE
QU ITAR
RETIRER
RIMUOVERE
VERWIJDER
RETIRAR
ENTFERNEN
REMOVE
QU ITAR
RETIRER
RIMUOVERE
VERWIJDER
RETIRAR
AAA-Batterie x 4
Battery (AAA) x 4
Pila (AAA) x 4
Pile (AAA) x 4
4 Batterie (AAA)
Batterij (AAA) x 4
4 baterie (AAA)
4 pilhas (AAA)
26
Page 29

Wie funktioniert das Gerät / How To Play / Funcionamiento / Jouer / Come giocare
Einschalten – Standby-Modus / Power On – « Standby » Phase / Encendido – Modo de espera (standby)
Allumer – « Mode veille » / Accensione - Fase di "stand-by" / Inschakelen – « Standby » modus
1
1. Drücken Sie die Taste während 2 Sekunden. Tobbies Augen (LED) leuchten mit Klangeffekten.
2. Blinkende LED
1. Long press the switch for 2 secs. Tobbie’s eyes (LED) light up with sound effects
2. LED flashes
1. Pulse el botón durante 2 segundos. Los ojos se iluminarán (LED) y oirá efectos sonoros.
2. LED intermitente
1. Maintenir le bouton enfoncé pendant 2 s. Les yeux (LED) de Tobbie s'allument avec des effets sonores.
2. LED clignote
1. Premere l'interruttore per 2 secondi. Gli occhi (LED) di Tobbie si accendono producendo effetti sonori.
2. Il LED lampeggia
1. Houd de knop gedurende 2 s ingedrukt. Tobbie's ogen (led) lichten op met geluidseffecten.
2. led knippert
1.
2. Dioda LED miga
2. LED intermitente entrar na fase "Standby" selecionar o modo desejado.
czone - faza "gotowo ci" / Ligado – Fase « Standby »
Standby-Modus öffnen den gewünschten Modus wählen.
enter « Standby » phase select playing mode.
entrar en el modo de espera (standby) seleccionar el modo deseado.
activer le mode veille activer le mode jouer.
Attivare la fase di "stand-by" Selezionare la modalità di gioco.
stand-bymodus activeren speelmodus activeren
Bemerkung: Solange Sie keinen Modus ausgewählt haben, trampelt Tobbie und ertönen Alarmtöne. Im Standby-Modus wird
Tobbie nach 60 Sekunden Inaktivität ausgeschaltet.
Note: Do not keep Tobbie waiting too long, Tobbie will keep stamping its feet with sound alerts to remind you. If " Standby " phase
stays more than 60 secs without mode selection, Tobbie will " power off ".
Observación: Mientras no seleccione un modo, Tobbie pataleará y oirá sonidos de alerta. En el modo de espera (standby),
Tobbie se apagará después de 60 segundos de inactividad.
Note: Tobbie est impatient - il va taper ses pieds et faire des sons pour vous pousser à sélectionner un mode. Après 60 s
d'inactivité en mode veille, Tobbie s'éteint automatiquement.
Nota: Non lasciare Tobbie in attesa troppo a lungo, poiché Tobbie inizierà a pestare i piedi e ad emettere allarmi acustici per
costringerti a fare la tua scelta, Se la fase di "stand-by" dura più di 60 secondi senza che venga selezionata alcuna modalità,
Tobbie si spegnerà.
Opmerking: Tobbie is ongeduldig - hij stampt met zijn voeten en maakt geluiden zodat u snel een modus selecteert.
Na 60 seconden in stand-bymodus schakelt Tobbie uit.
Uwaga
Observação: Não deixe o Tobbie à espera durante muito tempo, pois este começará a bater com os pés e a emitir alertas de
som para o obrigar a escolher. Se a fase de "Standby" durar mais do que 60 segundos, sem que escolha o modo pretendido,
o Tobbie "desliga-se".
27
Page 30

2
Nur eine Taste, um zwischen Funway 1 / Funway 2 zu schalten
Beispiel:
einmal drücken – LED (links) blinkt öffnet den Modus « Funway 1 »
One single button to switch between modes (Funway 1 / Funway 2) alternatively
Example:
Sólo un botón para conmutar entre Funway 1 / Funway 2
Ejemplo:
Un bouton pour basculer entre Funway 1 / Funway 2.
Exemple :
Utilizzando un unico pulsante è possibile passare dalla modalità Divertimento 1 alla modalità Divertimento 2.
Esempio:
2 Betriebsmodi / Two Interactive Modes / Dos modos interactivos / Deux modes interactifs / Due modalità interattive
Twee interactieve modi / Dwa tryby interaktywne: / Dois Modos Interativos
Een knop om te schakelen tussen Funway 1 / Funway 2
Bijvoorbeeld:
Um só botão para alternar entre Funway 1 / Funway 2
Exemplo:
Funway 1 = Modus « Folgen »
Funway 1 = Follow-me mode
Funway 1 = el modo « seguir »
Funway 1 = Mode Suivez-moi
Divertimento 1 = Modalità Seguimi
Funway 1 = « Volg mij » modus
Funway 2 = Modus « Explorieren »
Funway 2 = Explore mode
Funway 2 = el modo « expolorar »
Funway 2 = Mode Explorer
Divertimento 2 = Modalità Esplora
Funway 2 = « Verkennen » modus
Funway 2 = eksploruj
28
Page 31

Funway 1 = Modus « Folgen »
Funway 1 = Follow-me mode
Funway 1 = el modo « seguir »
Funway 1 = Mode Suivez-moi
Divertimento 1 = Modalità Seguimi
Funway 1 = « Volg mij » modus
Funway 1 = Modo "Follow-me" (segue-me)
Funway 2 = Modus « Explorieren »
Funway 2 = Explore mode
Funway 2 = el modo « expolorar »
Funway 2 = Mode Explorer
Divertimento 2 = Modalità Esplora
Funway 2 = « Verkennen » modus
Funway 2 = eksploruj
Funway 2 = Modo "Explore" (explorar)
29
Page 32

3
czenie zasilania / Desligar
Drücken Sie die Taste während 3 Sekunden.
Tobbie wird ausgeschaltet. Die Augen (LED) und Klangeffekten werden deaktiviert.
Tobbie funktioniert nicht mehr.
Drücken Sie die Taste während 3 Sekunden.
Tobbie wird ausgeschaltet. Die Augen (LED) und Klangeffekten werden deaktiviert.
Tobbie funktioniert nicht mehr.
Pulse el botón durante 3 segundos.
Tobbie se desactiva. Los ojos (LED) y los efectos sonoros se apagarán.
Tobbie deja de funcionar.
Maintenir enfoncé le bouton pendant 3 s.
Tobbie ne bouge plus, les yeux (LED)/effets sonores s'éteignent lentement.
Tobbie s'éteint.
Premere l'interruttore per 3 secondi.
Tobbie smette di funzionare, gli occhi LED/gli effetti sonori diminuiscono di intensità
fino a spegnersi.
Tobbie si spegne.
Houd de knop gedurende 3 s ingedrukt.
Tobbie stopt met bewegen, de ogen (led)/geluidseffecten schakelen langzaam uit.
Tobbie is uitgeschakeld.
Pressione o interruptor durante 3 segundos.
O Tobbie fica inativo. O efeito LED dos olhos e os efeitos de som vão-se
desvanecendo e por fim desligam.
O Tobbie "desliga-se".
! Achtung / ! Warning / ! Advertencia / ! Avertissement / ! Avvertenza / ! Waarschuwing
Korrekt / Correct
Correcto / Correct
Corretto / Goed
Seien Sie sehr vorsichtig, wenn Sie Tobbie beim Kopf festnehmen, um eine
Fehlfunktion zu vermeiden (siehe Abbildungen).
Be gentle to hold Tobbie by its head, any improper manners (as per the
right figs) might cause its malfunction.
Para evitar cualquier problema, sea cuidadoso cuando sujete a Tobbie por
la cabeza (consulte las imágenes).
Etre prudent en tenant Tobbie par la tête, des gestes brusques ou
inappropriés (voir plus bas) peuvent entraîner un dysfonctionnement.
Fare attenzione quando si afferra Tobbie per la testa, poiché una
movimentazione errata (vedere figure a destra) potrebbe causarne il
malfunzionamento.
Wees voorzichtig wanneer u Tobbie bij het hoofd vasthoudt (zie afb.
rechts), een incorrect gebruik kan leiden tot schade.
uszkodzenia.
Seja cuidadoso ao segurar o Tobbie pela cabeça, se o fizer de forma
incorreta (conforme as figuras da direita) isso poderá causar mau
funcionamento.
Falsch / Incorrect
Incorrecto / Incorrect
Non corretto / Fout
Incorreto
Falsch / Incorrect
Incorrecto / Incorrect
Non corretto / Fout
Incorreto
Falsch / Incorrect
Incorrecto / Incorrect
Non corretto / Fout
Incorreto
30
Page 33

Problemlösung / Trouble Shooting / Solución de problemas / Problèmes et solutions / Risoluzione dei problemi
Probleemoplossing / Wykrywanie i usuwanie usterek / Resolução de Problemas
1. Legen Sie die Batterien polungsrichtig ein (siehe Seite 13, Schritt 7)
1. Ensure batteries are placed in correct polarity (refer to page 13, step 7)
1. Asegúrese de haber introducido las pilas correctamente. Compruebe la polaridad (véase página 13, paso 7)
1. Insérer les piles en respectant la polarité (voir p. 13, étape 7)
1. Assicurarsi che le batterie siano inserite rispettando la corretta polarità (fare riferimento a pagina 13, passaggio 7).
1. Zorg ervoor dat de batterijen correct en met de juiste polariteit zijn geplaatst (zie p. 13, stap 7)
1. Certifique-se de que as pilhas estão colocadas respeitando a polaridade (consultar pág. 13, passo 7)
bottom entirely (refer to page 11, step 3)
que estén fijados correctamente (véase página 11, paso 3).
(voir p. 11, étape 3)
completamente fino a fine corsa (fare riferimento a pagina 11, passaggio 3).
zijn (zie p. 11, stap 3)
mesmo até ao final (consultar pág. 11, passo 3)
3. Überprüfen Sie die Verdrahtung (siehe Seite 12, Schritt 5)
3. Ensure all wirings are correct (refer to page 12, step 5 wire configuration as below)
3. Compruebe los cables (véase página 12, paso 5)
3. S'assurer que tous les câbles sont correctement branchés (voir p. 12, étape 5 schéma de connexion ci-dessous)
Assicurarsi che i cablaggi siano corretti (fare riferimento a pagina 12, passaggio 5 per la configurazione dei fili, come indicato di seguito)
3.
3. Controleer alle bedradingen (zie p. 12, stap 5 aansluitschema hieronder)
3. Certifique-se de que os fios estão ligados corretamente (consultar pág. 12, passo 5, configuração das ligações conforme abaixo)
Blu
Schwarz
Black
Negro
Rouge
Nero
Rood
Czarny
Preto
Blau
Blue
Azul
Noir
Schwarz
Black
Negro
Rouge
Zwart
Niebieski
Azul
Nero
Rood
Czarny
Preto
Rot
Red
Rojo
Noir
rosso
zwart
czerwony
Vermelho
31
Page 34

4. Setzen Sie Tobbie keinem direkten Sonnenlicht oder keiner Halogenlampe aus, um eine Fehlfunktion zu vermeiden.
4. Do not play the Tobbie under direct sunlight or halogen lamp, it may cause the robot to go wrong direction.
4. Para evitar cualquier problema, no exponga a Tobbie a la luz solar directa o lámparas halógenas.
4. Ne pas jouer directement sous le soleil ou une lampe halogène. Le robot pourrait se déplacer dans la mauvaise direction.
4. Non giocare con Tobbie esponendolo alla luce diretta del sole o ad una lampada alogena, poiché ciò potrebbe portare Tobbie a
muoversi nella direzione sbagliata.
4. Niet in direct zonlicht of onder halogeenlampen gebruiken. Hierdoor zou de robot in de verkeerde richting kunnen bewegen.
4. Não brinque com o Tobbie sob a luz direta do sol ou de um lâmpada de halogéneo, uma vez que isto pode fazer com o que o robô
vá na direção errada.
5. Ertönt « Bee Bee Bee », dann sind die Batterien leer. Führen Sie einen Batteriewechsel durch.
5. En cuanto Tobbie emita « Bee Bee Bee », las pilas están agotadas. Reemplácelas por unas nuevas.
5. Si Tobbie émet un bip sonore, cela signifie que la pile est faible. Remplacer la pile usagée.
5. Se Tobbie emette un suono del tipo "bip bip bip" durante l'uso, significa che la batteria si sta scaricando. Sostituire la batteria una
volta che si è scaricata completamente.
5. Geeft Tobbie een pieptoon weer, dan betekent dit dat de batterij bijna leeg is. Vervang de batterij.
baterie na nowe.
6. Funktioniert das Zahnrad im Modus « Explorieren », aber bewegt Tobbie sich nicht und ertönt ein das abnormale akustische Signal
« Da Da Da »:
Siehe Seite 21, Schritt 20. Stellen Sie sicher, dass Sie A19 korrekt installiert haben.
Siehe Seite 6, Schritt 8. Stellen Sie sicher, dass Sie A15 entfernt haben.
Siehe Seite 6, Schritt 7 und Seite 11, Schritt 3. Stellen Sie sicher, dass Sie alle Schraube fest angezogen haben.
6. Under « Explore » mode, if gearbox is still working but Tobbie does not move and come with abnormal sound « Da Da Da ».
Refer to page 21, step 20, check and ensure A19 is installed correctly.
Refer to page 6, step 8, check and ensure A15 is removed.
Refer to page 6, step 7 and page 11, step 3, check and ensure all screws are fastened tightly.
6. En el modo « Explorar », si el engranaje funciona pero Tobbie no se mueve y emite la señal acústica anormal « Da Da Da »,
consulte la página 21, paso 20. Compruebe y asegúrese de haber instalado A19 correctamente.
consulte la página 6, paso 8. Compruebe y asegúrese de haber quitado A15.
consulte la página 6, paso 7 y página 11, paso 3. Compruebe y asegúrese de haber apretado firmemente todos los tornillos.
6. Si en mode « Explorer » Tobbie ne bouge pas et produit un bruit anormal (et le pignon fonctionne correctement).
Voir p. 21, étape 20, vérifier que A19 est correctement monté.
Voir p. 6, étape 8, vérifier que A15 est correctement monté.
Voir p. 6, étape 7 et p.11, étape 3, s'assurer que toutes les vis sont bien serrées.
6. In modalità "Esplora", se gli ingranaggi funzionano ma Tobbie non si muove e produce un suono anomalo del tipo "da da da",
fare riferimento a pagina 21, passaggio 20 e assicurarsi che A19 sia installato correttamente.
Fare riferimento a pagina 6, passaggio 8 e assicurarsi che A15 sia stato rimosso.
Fare riferimento a pagina 6, passaggio 7 e a pagina 11, passaggio 3 e assicurarsi che tutte le viti siano strette completamente.
6. In « Verkennen » modus beweegt Tobbie niet en maakt een abnormaal geluid (en de aandrijving correct werkt).
Zie p. 21, stap 20, zorg ervoor dat A19 correct gemonteerd is.
Zie p. 6, stap 8, zorg ervoor dat A15 verwijderd is.
Zie p. 6, stap 7 en p. 11, stap 3, zorg ervoor dat alle schroeven stevig bevestigd zijn.
32
Page 35

33
Page 36

KSR18
34
Page 37

KSR18
35
Page 38

KSR18
36
Page 39

KSR18
37
Page 40

KSR18
38
Page 41

KSR18
39
Page 42

KSR18
40
Page 43

KSR18
41
Page 44

KSR18
42
Page 45

KSR18
43
Page 46

KSR18
44
Page 47

KSR18
45
Page 48

464748
Page 49

Page 50

Page 51

Das Herausnehmen oder Austauschen der Batterien sollte nur von einer erwachsenen Person oder unter Aufsicht einer erwachsenen
Person durchgeführt werden.
Vermeiden Sie einen Kurzschluss der Kontaktpunkte des Batteriefachs oder der Batterien.
Entfernen Sie leere Batterien.
Mischen Sie keine alten und neuen Batterien oder Batterien unterschiedlicher Typen.
Mischen Sie weder Alkali-Mangan, Standard (Karbon-Zink), noch wiederaufladbare (Nickel-Cadmium) Batterien.
Legen Sie die Batterien immer polungsrichtig ein.
Versuchen Sie niemals, nichtaufladbare Batterien wieder aufzuladen.
Das Aufladen von wiederaufladbaren Batterien sollte nur unter der Aufsicht einer erwachsenen Person durchgeführt werden.
Zum Wiederaufladen der Batterien, diese aus dem Gerät nehmen.
Removal and replacement of batteries should be carried out by adult or under adult supervision.
Avoid short circuiting the contacts in the battery compartment or the battery terminals.
Remove exhausted batteries from the product to avoid leakage.
Do not mix used batteries and new batteries or batteries of different types.
Do not mix alkaline, standard (carbon-zinc), or rechargeable (nickel-cadmium) batteries.
Batteries are to be inserted with the correct polarity.
Do not attempt to recharge non-rechargeable batteries.
Rechargeable batteries are only to be charged under adult supervision.
Rechargeable batteries are to be removed from the toy before being charged.
Las pilas sólo deben ser quitadas o reemplazadas por un adulto o bajo su supervisión.
Evite los cortocircuites en los contactos del compartimiento de pilas o las pilas.
Saque las pilas agotadas para evitar derrames.
Nunca mezcle pilas agotadas y pilas nuevas o pilas de diferentes tipos.
No mezcle pilas alcalinas, estándar (carbón-zinc) o baterías recargables (níquel-cadmio).
Introduzca las pilas correctamente. Compruebe siempre la polaridad.
Nunca intente recargar pilas que no sean recargables.
La recarga de las baterías recargables sólo debe hacerse bajo la supervisión de un adulto.
Quite las baterías recargables del producto antes de recargarlas.
L'enlèvement et le remplacement des piles doivent être effectués par un adulte ou sous sa surveillance.
Eviter de court-circuiter les contacts du compartiment à piles ou les bornes des piles.
Oter les piles usagées du produit.
Ne pas utiliser simultanément des piles neuves et des piles usagées, de même que des piles différentes.
Ne pas mélanger les piles alcalines, standard (carbone-zinc) et rechargeables (nickel-cadmium).
Les piles doivent être insérées en respectant la polarité.
Ne jamais recharger des piles non rechargeables.
Le chargement des piles rechargeables doit être effectué sous la surveillance d'un adulte.
Les piles rechargeables doivent être enlevées du produit avant le rechargement.
La rimozione e la sostituzione delle batterie deve essere eseguita da un adulto o sotto la supervisione di un adulto.
Evitare di cortocircuitare i contatti nel vano batterie o i terminali delle batterie.
Rimuovere le batterie esaurite dal prodotto per evitare perdite.
Non mescolare batterie usate e batterie nuove o batterie di tipi diversi.
Non mescolare batterie alcaline, standard (zinco-carbonio) o ricaricabili (nichel-cadmio).
Le batterie devono essere inserite secondo la polarità corretta.
Non provare a ricaricare batterie non ricaricabili.
Le batterie ricaricabili devono essere ricaricate solo sotto la supervisione di un adulto.
Le batterie ricaricabili devono essere rimosse dal giocattolo prima di essere ricaricate.
Het verwijderen en vervangen van batterijen dient door of onder toezicht van een volwassene te worden uitgevoerd.
Vermijd kortsluiting bij de contactpunten in het batterijvak of van de batterij.
Verwijder lege batterijen uit het product.
Gebruik geen oude (lege) en nieuwe of batterijen door elkaar.
Gebruik geen alkalische, standaard (carbon-zink) of oplaadbare (nikkel-cadmium) batterij door elkaar.
De batterijen dienen volgens de juiste polariteit geplaatst te worden.
Herlaad geen niet-oplaadbare batterijen.
Oplaadbare batterijen mogen alleen onder toezicht van een volwassene opgeladen worden.
Oplaadbare batterijen moeten voor het opladen uit het speelgoed verwijderd worden.
O retirar e substituir das pilhas deve ser sempre feito por um adulto ou sob a supervisão de um adulto.
Evite curto-circuitos nos contatos no compartimento da pilha ou nos terminais das pilha.
Retire as pilhas gastas do aparelho para evitar que derramem.
Não misture pilhas gastas com pilhas novas, ou pilhas de diferentes tipos.
Não misture pilhas alcalinas, padrão (carbono-zinco) com pilhas recarregáveis (níquel-cádmio).
As pilhas devem ser instaladas respeitando sempre a polaridade.
Não tente recarregar pilhas que não sejam recarregáveis.
As pilhas recarregáveis só devem ser carregadas sob a supervisão de um adulto.
As pilhas recarregáveis devem ser retiradas do brinquedo antes de serem carregadas.
Page 52

KSR18
DE TOBBIE DER ROBOTER
EN TOBBIE ROBOT
ES TOBBIE EL ROBOT
FR ROBOT TOBBIE
IT IL ROBOT TOBBIE
NL TOBBIE ROBOT
PL ROBOT TOBBIE
PT ROBÔ TOBBIE
ACHTUNG:
ERSTICKUNGSGEFAHR
Kleinteile
Nicht für Kinder unter
3 Jahren geeignet
AVVERTENZA:
PERICOLO DI SOFFOCAMENTO
Parti piccole
Non adatto a bambini di
età inferiore a 3 anni
Copyright © 2018 CIC. Alle Rechte vorbehalten
Copyright © 2018 CIC. All rights reserved
Copyright © 2018 CIC. Todos los derechos reservados
Droits d'auteur © 2018 CIC. Tous droits réservés
Niet geschikt voor kinderen
WARNING :
CHOKING HAZARD
Small parts
Not for children under
3 years
ADVERTENCIA:
RIESGO DE ASFIXIA
Pequeñas piezas
No apto para niños
menores de 3 años
WAARSCHUWING:
VERSTIKKINGSGEVAAR
Kleine onderdelen
jonger dan 3 jaar
Copyright © 2018 CIC. Tutti i diritti riservati
Auteursrecht © 2018 CIC. Alle rechten voorbehouden
Copyright © 2018 CIC. Todos os direitos reservados.
AVERTISSEMENT :
RISQUE D'ÉTOUFFEMENT
Partie arrière
Ne convient pas aux
enfants de moins de 3 ans
ATENÇÃO:
RISCO DE ASFIXIA
Peças pequenas
Não é indicado para crianças
com menos de 3 anos
KSR18I-B
 Loading...