

Page 1

V
S
S
E
OMABE
S
C
E
R
E
O
S
U
D
L
R
T
W
L
U
E
T
I
A
T
D
M
D
A
M
A
E
D
DSM
U
B/SD
D
UBBEL
D
OUBLE
D
OBLE R
D
OPPEL-
P33
ONTR
USB/
LECTEU
EPROD
USB/S
LLER
D-SPE
R USB/
CTOR
-PLAY
ITH M
ER EN
SD ET
SB/S
R UND
XER
UDIO
ABLE
Y MES
AUDIO
IXER
E MIX
DE M
IXER
GE AU
ZCLAS
IO
AUDIO
U
G
N
ER MAN
BRUIKE
TICE D’
NUAL D
DIENUN
UAL
SHAND
MPLOI
EL USUA
GSANLEI
EIDING
IO
UNG
11
15
19
3
7
Page 2
VDSMP33
V. 02 – 09/03/2012 2 ©Velleman nv
Page 3
.
oIm
t
.
.
u
n
n
m
w
w
e
eand
m
.
a
e
e
d
o
a
i
a
e
t
m
E
t
h
n
t
a
n
Q
d
t
s
a
a
e
i
S
d
s
s
e
r
,
s
r
s
e
d
r
f
n
t
r
c
l
i
o
m
g
p
d
e
m
i
h
w
e
t
e
y
s
e
t
o
.
h
d
n
s
W
e
d
d
d
o
A
n
c
r
n
b
n
t
c
t
o
e
h
v
n
i
i
g
m
o
e
a
e
o
m
t
e
a
e
v
r
e
o
e
t
g
u
(
r
s
e
a
w
o
m
r
r
d
b
u
n
h
d
m
n
n
i
e
o
b
c
w
t
c
e
o
c
p
e
h
d
u
i
n
e
b
n
l
c
s
e
u
e
VDSMP33
1
Introd
T
all reside
portant e
Th
ank you for
If
he device
2
Safety
This
har
shou
distri
If in
Be
Al
are
Ke
ction
ts of the
vironmen
symbol on t
the enviro
ld be taken
butor or to
doubt, co
choosing H
as damage
Instruc
very careful
ays disconn
performed.
p this devic
uropean U
al informa
e device o
ment. Do n
o a speciali
local recy
tact your l
Power™! P
in transit,
ions
during the
ect mains p
Handle the
e away fro
Us
ion
ion about
the packag
ot dispose
zed compan
ling service
ocal waste
ease read t
don't install
nstallation:
wer when
power cord
children a
r ma
his produ
e indicates
f the unit (
y for recycli
Respect th
disposal a
e manual t
or use it an
touching li
evice not i
by the plug
d unauthor
ual
t
hat disposa
r batteries)
ng. This de
local envi
uthorities.
oroughly b
d contact y
e wires can
use or wh
only.
zed users.
l of the devi
as unsorte
ice should
onmental r
fore bringi
ur dealer.
cause life-t
n servicing
ce after its l
municipal
e returned
les.
g this devi
reatening
or maintena
ifecycle cou
aste; it
o your
e into servi
lectroshock
nce activiti
d
e.
.
s
•
Make sure
•
Do not cri
necessary
3
Gener
Re
fer to the V
•
Familiaris
unqualifie
device.
•
All modific
the device
Only use t
•
lamp expl
Damage c
•
dealer will
A qualified
•
Do not sw
•
device ag
This devic
•
with an al
Use the or
•
Keep this
•
Th
re are no u
/or spare p
that the av
p the pow
l Guidel
lleman®
Indoor us
Never put
Keep this
at all time
Protect thi
yourself wi
people. An
ations of th
is not cove
he device fo
sion, crash
used by di
not accept
technician
tch the devi
inst damag
is designe
ernating cu
iginal packa
anual for
er-servicea
rts.
ilable volta
r cord and
nes
ervice an
e only. Kee
objects fille
evice away
. For suffici
device fro
th the funct
y damage t
device are
ed by the
r its intend
etc. Using
regard of c
esponsibilit
hould insta
ce on imme
by leaving
for profes
rent of 230
ging if the d
uture refere
ble parts in
e does not
rotect it ag
Quality
p this devic
d with liqui
from dust a
nt air circul
shocks an
ons of the
at may occ
forbidden f
arranty.
d purpose.
he device i
rtain guidel
for any en
ll and servi
diately afte
it switched
ional use o
VAC/50 Hz.
evice is to
nce.
ide the dev
exceed the
ainst dama
arranty on
away for
on top of o
nd extreme
ation, leave
abuse. Av
evice befor
ur will most
r safety re
ll other us
an unauth
ines in this
suing defec
e this devic
it has been
off until it h
stage, in d
e transport
ce. Refer to
voltage sta
e. Have an
the last pa
rain, moist
r close to th
heat. Make
at least 1”
id brute fo
actually u
probably b
sons. Dam
s may lead
rised way
anual is n
s or proble
.
exposed to
s reached
iscos, theat
d.
an authoriz
ed in the sp
authorised
es of this
re, splashi
e device.
sure the ve
± 2.5 cm)
ce when op
ing it. Do n
due to unp
ge caused
to short cir
ill void the
t covered b
s.
changes in
oom tempe
es, etc. It s
ed dealer f
ecifications
ealer repla
anual.
g and drip
tilation op
n front of t
rating the
t allow ope
rofessional
y user mod
uits, burns,
warranty.
y the warra
temperatur
rature.
hould only
r service
of this man
e it if
ing liquids.
nings are cl
e openings.
evice.
ration by
se of the
fications to
electroshoc
ty and the
. Protect th
e used indo
al.
ar
ks,
e
ors
V.
02 – 09/03/2
012
3
©Vellema
nv
Page 4

VDSMP33
4. Features
• MP3 player desk for USB/SD card
• scratch, brake and reverse effect, and re-loop function
• 16% pitch control
• 2 universal SD card and 2 USB ports
• multifunctional display with ID3 TAG
• SD card / USB / Phono / Line / Mic input
• jog searching
• single and continuous play mode
• 2 channel RCA master output & 2 channel REC outputs
• 2 channel mixer & 3 band EQ control.
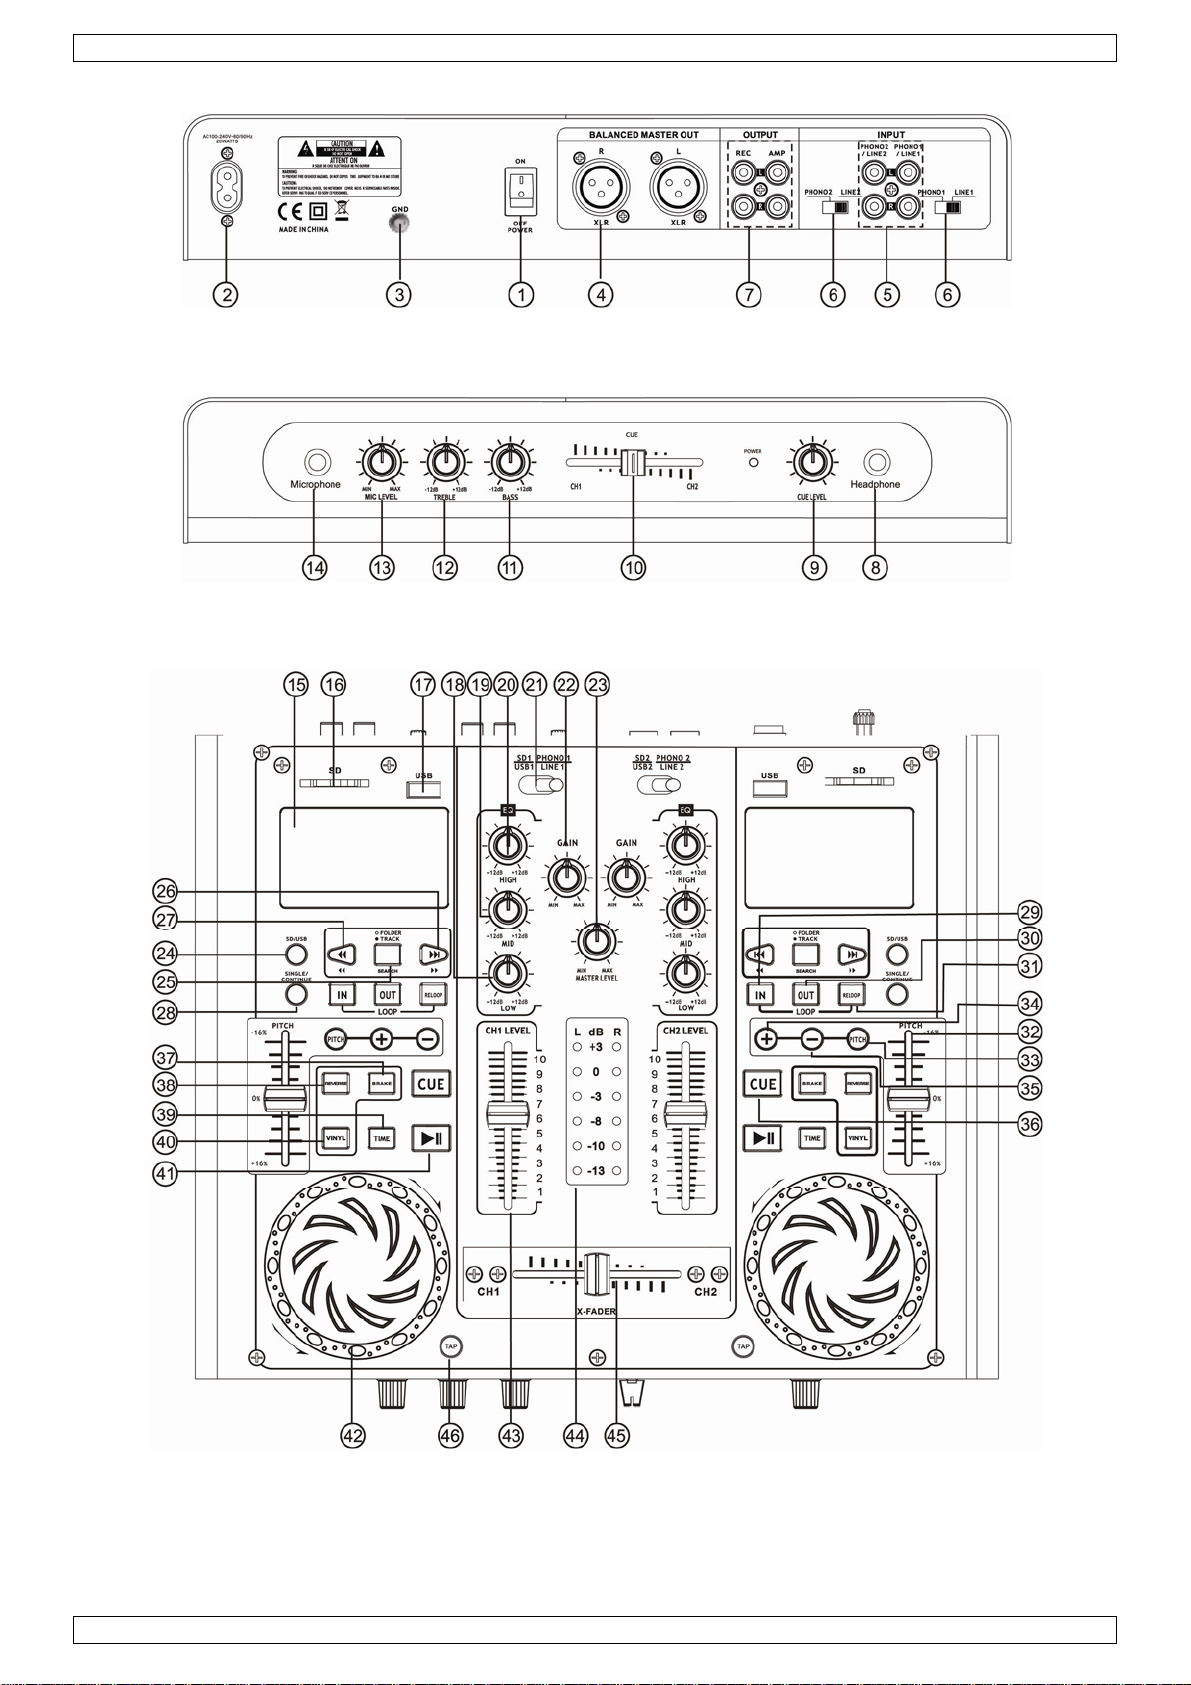
5. Overview
Refer to the illustrations on page 2 of this manual.
Note that the device has a dual lay-out, left and right parts are similar. Most buttons and indications on the top
panel are present twice.
1 power switch: turn the mixer on or off.
2 POWER SUPPLY INPUT: connect to 230VAC/50Hz power source
3 GND (ground) connection: when buzzing occurs, connect to turntables to create earth connection.
4 BALANCED MASTER OUT output: audio output signal connectors (XLR, symmetrical)
PHONO/LINE INPUT: connect an external device (not incl., e.g. turntable, CD player...) to these RCA
5
(cinch) connectors. Phono1/line1 = channel 1, Phono2/line2 = channel 2.
PHONO/LINE switches: set to PHONO if a turntable (not incl.) is connected to the input; otherwise set
6
to LINE.
LINE OUTPUT (REC/AMP): unbalanced outputs - connect a recording device (not incl.) to the REC
7
output; connect an amplifier (not incl.) to the AMP output.
Headphone jack: plug a headphone plug into this 6.35mm jack for audio monitoring. Headphone
8
impedance must be >32Ω. Signal to headphone is independent from output to amplifier.
9 CUE LEVEL control: adjust the output level of the headphones
CUE CROSS FADER for headphone output: moving the slider from left to right will fade in channel 2
10
(louder) while fading out channel 1 (more quiet). In the middle position, both channels are played at
equal volume through the headphones
11 BASS: microphone equalizer for low tones
12 TREBLE: microphone equalizer for high tones
13 MIC LEVEL: adjust the microphone input level
14 MICROPHONE INPUT: 6.35mm microphone input (microphone not incl.)
15 display: Liquid Crystal Display.
16 SD card slot: insert an SD card into these slots.
17 USB port: insert a USB storage medium to these ports.
18 LOW control: adjust the volume for low tones
19 MID control: adjust the volume for mid tones
20 HIGH control: adjust the volume for high tones
SD-USB/PHONO-LINE switch: slide to the left to select SD card or USB input; slide to the right to
21
select PHONO/LINE input from the connectors at the back
22 GAIN: channel volume control
23 MASTER LEVEL: master volume control
24 SD/USB button: press once to select SD card audio source; press again to select USB.
FOLDER/TRACK button: press to switch between folder and track searching. If the LED is on, folder
25
mode is enabled. If the LED is off, track mode is enabled.
V. 02 – 09/03/2012 4 ©Velleman nv
Page 5
22223
333333333444444
4
.
E
e
g
n
t
u
o
p
t
t
u
e
n
W
S
b
o
h
eDur
c
e
e
p
w
p
e
e
f
l
u
s
n
n
s
d
e
o
U
s
d
s
o
p
I
w
t
e
o
e
e
a
r
a
a
t
n
n
,
e
t
u
t
m
a
e
g
s
p
/
r
e
e
a
e
t
i
o
e
h
t
T
i
s
e
g
e
t
r
t
d
s
m
/
s
w
k
f
t
h
o
a
h
t
s
a
w
m
T
p
a
h
n
a
a
p
c
e
o
t
h
r
o
g
o
t
a
a
T
t
r
t
b
p
a
r
e
D
f
n
o
n
t
e
/
a
w
a
h
o
t
w
a
a
a
b
o
n
d
p
h
n
s
s
e
s
c
c
2
d
n
e
d
l
n
p
a
d
c
u
o
t
e
e
e
n
y
w
c
C
w
r
e
r
c
c
e
t
R
s
.
M
g
e
o
n
e
e
m
n
s
s
%
t
h
e
T
VDSMP33
6
7
8
9 IN but
0
1 RELOO
2
3 PITCH
4
5
6
: p
: p
SINGL
indicat
• Sin
• Co
OUT b
again t
Speed
Push u
PITCH
return
PITCH
return
CUE b
The cu
track a
again.
ress once f
ress once fo
/CONTIN
d on the di
le mode: p
tinuous mo
on: press t
tton: pres
exit the lo
P button:
control (P
to slow do
button: ac
BEND + (u
o original s
BEND – (d
o original s
tton: durin
point is th
d pause it
hen you p
r next track
r previous t
E button:
play.
lay a select
e: play a s
o set the st
to set the
p.
ress to jum
TCH): use
n speed.
ivate/deact
p) button:
tting.
wn) butt
tting.
g playback,
point wher
t the desir
ess CUE, th
folder, pre
ack/folder,
switch bet
d track and
lected trac
rting point
nding poin
p back to t
his slider t
vate pitch f
press and
n: press an
press this b
e you want
d cue point.
e song is in
s and hold
press and h
een single
stop playb
and contin
or a loop
for a loop.
e start poin
increase o
der.
old this but
d hold this
utton to ski
he song to
Use the se
tantly retu
o fast forw
old to fast
nd continu
ck at the e
ue with the
he selecte
of the loo
decrease t
on to insta
utton to in
back to a
start. To sp
rch button
ned to the
rd
ackward
us play mo
d of the tra
next track
part will n
.
e speed of
tly increase
tantly decr
pecified cu
cify the cu
for fine-tu
ue point.
e. The sele
k.
ntil the end
w play rep
he track wi
the pitch.
ase the pitc
point.
point in a
ing. Let the
ted mode i
of the folde
atedly. Pre
h max. 16
elease to
h. Release
ong: play t
song play
r.
s
.
o
e
7 BRAKE
8 REVER
TIME
9
track,
0 VINYL
Play/p
1
mode.
Jog w
• Wh
2
• Wh
3 Chann
4 LED m
Cross
5
channe
TAP b
6
value i
button: st
E button:
utton: sele
r total rem
button: ac
ause butto
eel
n VINYL i
ing play mo
clo
kwise, in th
wh
n the jog w
n VINYL i
In
ause mode
for
ard, count
In
layback mo
l fader: se
ter: indica
ader: movi
1 (more q
tton (Beat
shown on
rt or stop t
play curren
cts between
ining time (
ivate/deact
n ( ): u
dicator [40
de, turn for
e reverse di
heel is turn
dicator [40
turn the jo
r clockwise
de, turn the
t level of th
es the mas
ng the slide
iet). In the
s Per Minu
he display.
e track at
track back
elapsed ti
OTAL).
vate jog wh
e the play/
] is lit: scr
quick searc
rection whe
d faster.
] is off: se
wheel to f
moves the
jog wheel
two chann
er output l
from left t
middle posi
e): press t
slower sp
ards.
e (ELAPSE
eel scratch
ause butto
tch functi
. Scratch i
the jog is
rch or spe
st forward
oint backw
lockwise to
els (1~10)
vel
right will f
ion, both c
e TAP butt
ed than nor
) of the tra
unction [4
to switch b
n.
the forwar
urned antic
d functio
fast revers
rds.
increase an
ith these s
de in chan
annels are
n repeatedl
mal (track s
k, remainin
].
etween pla
direction
lockwise. S
.
the track.
anticlock
iders.
el 2 (loude
layed at eq
y to manual
lows down)
g time (RE
back mode
hen the jo
anning spe
lockwise m
ise to decre
) while fadi
ual volume.
ly determin
AIN) of the
and pause
is turned
d increases
ves the poi
ase the spe
g out
the BPM.
nt
d.
he
6
Cleani
•
All screws
The housi
•
trussing)
supports,
Moving m
•
The electri
•
device.
V.
02 – 09/03/2
and
should be ti
g, visible p
hould not b
o not chan
chanic part
c power su
012
aintena
ghtened an
rts, mounti
deformed,
e the locati
must not
ply cables
nce
free of cor
ng supports
modified o
on of the c
how any si
ust not sh
rosion.
and the ins
tampered
nnections.
ns of wear
w any dam
5
allation loc
ith e.g. do
nd tear.
ge. Have a
tion (e.g. c
not drill ext
qualified te
iling, susp
a holes in
hnician mai
nsion,
ounting
ntain the
©Vellema
nv
Page 6

VDSMP33
• Disconnect the device from the mains prior to maintenance activities.
• Wipe the device regularly with a moist, lint-free cloth. Do not use alcohol or solvents.
• There are no user-serviceable parts.
• Contact your dealer for spare parts if necessary.
7. Technical Specifications
power supply 230Vac/ 50Hz
pitch bend 16%
equalizer low +12dB, -12dB
mid +12dB, -12dB
high +12dB, -12dB
headphone impedance 32 Ohm
distortion <0.02%
channel separation 50dB (1KHz)
sensitivity PHONO 10mV, 47kOhm
LINE 1V, 10kOhm
MIC 10mV, 600Ohm
gain 0 to -20dB
output level 2.0 ± 0.2V RMS
frequency response 20Hz-20KHz
S/N ratio 80dB
dimensions 343 x 274 x 60mm
weight 3.6kg
Use this device with original accessories only. Velleman nv cannot be held responsible in the event
of damage or injury resulted from (incorrect) use of this device.
For more info concerning this product and the latest version of this manual, please visit our website
www.hqpower.eu.
The information in this manual is subject to change without prior notice.
© COPYRIGHT NOTICE
The copyright to this manual is owned by Velleman nv. All worldwide rights reserved.
No part of this manual or may be copied, reproduced, translated or reduced to any electronic medium or
otherwise without the prior written consent of the copyright holder.
V. 02 – 09/03/2012 6 ©Velleman nv
Page 7

.
aBeHeDa
.
.
n
e
m
y
g
e
c
g
w
d
e
e
k
u
z
e
k
g
g
e
V
h
e
d
e
a
a
r
h
b
o
c
e
r
r
k
e
o
e
a
g
t
®
n
t
n
t
.
n
o
o
e
e
e
n
e
p
r
f
h
n
e
a
h
a
t
p
r
i
t
a
k
e
n
n
s
b
o
e
e
d
e
e
h
e
e
t
k
e
e
e
g
k
e
g
s
2
m
g
a
o
e
o
o
t
e
w
n
a
a
a
g
t
r
a
d
d
o
a
h
a
e
g
e
r
b
m
d
n
u
e
e
n
o
t
d
u
e
r
p
h
e
e
d
g
k
e
n
d
t
V
v
o
c
e
w
k
t
r
i
o
t
.
n
h
e
n
e
e
a
w
v
e
c
e
o
n
p
r
o
g
o
d
o
e
n
e
k
e
n
e
a
1
Inleidi
A
n alle ing
langrijke
bt u vrage
nk u voor u
be
schadigd tij
2
Veiligh
Dit s
weg
batt
tere
bren
We
ele
zetenen v
ilieu-info
mbool op
eworpen, d
rijen) niet
htkomen v
en. Respe
n, contact
aankoop!
ens het tra
idsinst
s voorzicht
troshocks t
G
n de Euro
matie bet
et toestel o
it toestel sc
ij het gewo
or recyclag
teer de pla
er dan de
Lees deze
nsport, inst
ucties
ig bij de ins
e vermijden
bruik
ese Unie
effende di
de verpak
ade kan to
e huishoud
. U moet di
tselijke mili
plaatselijk
andleiding
lleer het da
allatie: raa
.
VDSMP33
rsha
product
ing geeft a
brengen a
elijke afval;
t toestel na
uwetgevin
autoritei
rondig voo
n niet en ra
geen kabe
dleidi
n dat, als h
n het milie
het moet bi
r uw verdel
.
en betreff
u het toest
dpleeg uw
s aan die o
ng
et na zijn le
. Gooi dit t
j een gespe
er of naar e
nd de ver
l in gebrui
dealer.
der stroom
enscyclus
estel (en e
ialiseerd b
n lokaal re
ijdering.
neemt. W
staan om d
ordt
entuele
drijf
yclagepunt
rd het toest
delijke
el
•
De beschi
handleidin
•
De voedin
plaatsen.
3
Algem
Ra
adpleeg de
•
Leer eerst
toestel nie
•
Om veilig
aangebrac
•
Gebruik h
brandwon
De garanti
•
dealer zal
houden.
Laat dit to
•
•
Om besch
temperatu
•
Dit toestel
binnenshu
Tre
het
Ho
Er
res
k de stekke
niet gebrui
d dit toest
ijn geen do
rveonderd
bare netsp
.
skabel ma
ne rich
elleman
Gebruik he
vloeistoffe
Bescherm
Voorzie ee
Bescherm
de functies
t gebruiken
eidsredene
ht valt niet
t toestel en
en, elektris
e geldt niet
de verantw
stel install
diging te v
urschomme
is ontworp
is gebruike
uit het sto
t.
l uit de buu
r de gebru
len, contac
nning mag
niet besch
lijnen
service- e
t toestel en
. Plaats ge
egen stof e
ruimte va
egen schok
van het toe
Meestal is
mag u gee
nder de ga
kel waarvo
che schokk
voor schad
ordelijkhei
ren en ond
rmijden, z
lingen. Wac
n voor prof
en aansluit
contact (tr
t van kinde
ker vervan
eer uw deal
niet hoger z
digd zijn of
n kwaliteit
el binnen
n objecten
extreme h
minstens
ken en ver
tel kennen
eschadigin
n wijziginge
rantie.
r het gema
n, enz. Bij
door het n
afwijzen v
rhouden d
t u het toes
t tot het to
ssioneel ge
en op een
k niet aan
ren en onbe
bare onder
er.
ijn dan de s
ingekort w
sgarantie
huis. Besc
gevuld met
itte. Zorg d
,5 cm tuss
ijd brute kr
voor u het
het gevolg
n aanbreng
kt is. Ande
noordeelku
geren van
or defecten
or een gesc
el best niet
stel op ka
bruik op po
isselspanni
e kabel!) v
voegden.
elen in dit
panning in
rden. Laat
chteraan d
erm tegen
vloeistof o
t de verluc
n het toest
acht tijdens
aat gebruik
van onprof
n. Schade
e toepassin
dig gebrui
epaalde ric
of problem
hoolde tech
aan onmid
ertempera
ia, in disco'
g van 230
ordat u he
oestel. Voo
e specificat
w dealer z
ze handleid
egen, voch
het toestel
tingsopeni
l en elk and
de bedienin
en. Ongesc
ssioneel g
oor wijzigi
en kunnen
vervalt de
htlijnen in d
n die hier r
icus.
ellijk nadat
uur gekom
s, enz. U m
AC/50 Hz.
toestel rein
onderhoud
es achteraa
nodig een
ing.
igheid en o
gen niet ve
er object.
g.
oolde pers
bruik.
gen die de
leiden tot k
garantie.
eze handlei
chtstreeks
het werd bl
n is.
g dit toest
igt en als u
of
n de
ieuwe kab
spattende
stopt gera
nen mogen
ebruiker h
rtsluitinge
ing en uw
verband m
otgesteld
l enkel
l
en.
dit
eft
,
e
an
V.
02 – 09/03/2
012
7
©Vellema
nv
Page 8

VDSMP33
• Gebruik de oorspronkelijke verpakking wanneer u het toestel vervoert.
• Bewaar deze handleiding voor verdere raadpleging.
4. Eigenschappen
• MP3-spelerfunctie met usb/sd-kaart
• scratch, brake en reverse effect alsook re-loop functie.
• 16% pitchregeling
• 2x SD-kaartslot en 2x USB-poort
• multifunctionele display met ID3 TAG-weergave
• SD-kaart/USB/Phono/Line/Mic-ingang
• zoekfunctie via jogwiel
• afzonderlijke/doorlopende afspeelmodi
• 2-kanaals RCA masteruitgang & 2-kanaals REC-uitgangen
• 2-kanaalsmixer & 3-band equalizer met versterkingsregeling
5. Omschrijving
Raadpleeg de afbeelding op pagina 2 van deze handleiding.
Dit toestel heeft een dubbel bedieningspaneel: de panelen links en rechts zijn gelijkaardig. De meeste
bedieningstoetsen en aanduidingen zijn tweemaal op het paneel aanwezig.
1 voedingsschakelaar: schakel het apparaat in en uit met deze schakelaar.
2 voedingsaansluiting: aansluiting voor 230 VAC/50 Hz voeding.
GND (ground) aansluiting: wanneer bromgeluiden optreden, verbind de draaitafels met deze GND om
3
een aardingslus te maken.
4 BALANCED MASTER OUT uitgang: gebalanceerde XLR audio-uitgangen (XLR, symmetrisch)
PHONO/LINE ingang: verbind een extern toestel (niet meegelev., bv. een draaitafel, CD-speler…) met
5
deze RCA (cinch) aansluitbussen. Phono1/line1 = kanaal 1, Phono1/line1 = kanaal 2.
PHONO/LINE schakelaars: plaats op PHONO indien een draaitafel (niet meegelev.) aangesloten is op
6
de ingang; zoniet, plaats op LINE.
LINE OUTPUT (REC/AMP): ongebalanceerde uitgangen – verbind opnameapparatuur (niet meegelev.)
7
met de REC uitgang; verbind een versterker (niet meegelev.) met de AMP uitgang.
ingangsaansluiting hoofdtelefoon: aansluiting voor een 6.35mm hoofdtelefoon. Impedantie van de
8
hoofdtelefoon moet >32Ω. Microfoonsignaal naar hoofdtelefoon is onafhankelijk van uitgang naar
versterker.
9 CUE LEVEL instelling: pas het uitgangsvolume van de hoofdtelefoon aan.
Crossfader voor hoofdtelefoon: regel de verhouding tussen de uitgangsvolumes van de kanalen.
10
Schuif van links naar rechts om kanaal 2 luider te maken terwijl kanaal 1 gedempt wordt. In de
middelste stand worden beide kanalen op hetzelfde volume afgespeeld via de hoofdtelefoon.
11 BASS: equalizer voor lage tonen op de microfoon
12 TREBLE: equalizer voor hoge tonen op de microfoon
13 MIC LEVEL: regel het ingangsvolume van de microfoon
14 MICROPHONE: 6,35 mm ingangsaansluiting voor microfoon (niet meegelev.)
15 display: LCD
16 SD kaartslot: plaats een SD-kaart in dit slot
17 USB poort: verbind een USB opslagmedium met deze poort
18 Knop LOW: regel het volume voor lage tonen
19 Knop MID: regel het volume voor midtones
20 Knop HIGH: regel het volume voor hoge tonen
Schakelaar SD-USB/PHONO-LINE: schuif de schakelaar naar links om SD card of USB input te
21
kiezen; schuif de schakelaar naar rechts voor PHONO/LINE input van de uitgangen op het achterpaneel
22 GAIN: regel het volume van het kanaal
V. 02 – 09/03/2012 8 ©Velleman nv
Page 9

22222
22333333333
3444444
4
R
d
d
E
o
g
n
u
o
u
e
n
n
e
e
S
k
d
j
i
u
i
e
e
a
o
n
n
e
g
u
k
a
a
U
s
d
N
O
u
v
n
a
r
a
t
p
u
I
v
Y
e
t
Y
c
e
h
d
n
e
D
d
e
a
k
d
)
e
p
e
:
o
t
u
e
g
u
0
f
0
h
f
f
v
a
f
e
r
a
t
m
p
e
o
e
n
e
m
g
e
d
a
i
u
e
h
e
a
w
o
c
r
h
s
r
e
e
e
h
v
e
e
E
r
t
e
u
e
r
o
d
e
e
u
u
a
e
d
f
t
v
w
f
a
d
e
o
p
a
u
o
a
s
p
r
r
l
.
l
n
t
e
c
e
e
n
A
A
]
a
t
e
f
w
a
d
o
v
p
n
t
e
D
n
e
j
e
e
e
g
u
r
d
e
k
e
e
g
e
r
a
o
e
o
m
o
g
)
d
e
n
s
s
f
s
o
e
n
e
e
VDSMP33
3 MASTE
4 SD/US
FOLDE
5
De LED
6
7
:
:
SINGL
wordt
8
• Sin
• Co
9 start l
Einde l
0
continu
1 RELOO
toonh
2
verlage
3 PITCH
PITCH
4
om ter
R volumere
B knop: dr
/TRACK
staat aan a
ruk éénma
ruk éénma
/CONTIN
p het lcd-sc
le modus:
tinuous mo
s knop (I
us knop (
afgespeeld.
P knop: dr
ogteregeli
n met max.
knop: acti
BEND + (h
g te keren
elaar: reg
k om de S
nop: druk
ls zoeken in
l voor volg
l voor vorig
E knop: ki
herm weerg
peel een tr
us: speel e
): druk de
UT): druk
Druk opnie
k om terug
ng (PITCH
16%. Schui
eer/deactiv
oger) kno
aar normal
l het maste
-kaart als
e knop in o
mappen ac
nde track/
e track/ma
es de ‘singl
egeven.
ck af en st
en track af
nop in om
e knop in o
uw op de k
te springen
: gebruik d
f omhoog o
er toonhoo
: houdt ing
toonhoogt
-uitgangsni
udio bron t
m te wissel
ief is, de L
ap, hou ing
, hou inged
’ of de ‘con
p het afspe
n speel all
het beginpu
m het eindp
op om de l
naar het b
ze schuive
de toonh
tefader
drukt om
e.
eau
kiezen, dr
n tussen z
D staat uit
edrukt om
ukt om sne
inuous’ afs
len na die t
volgende t
nt van de lu
unt van de
s te wissen
gin van de
om de too
ogte te verl
e toonhoog
k opnieuw
eken in ma
ls zoeken i
nel vooruit
l terug te k
eelmodus.
ack.
acks uit de
s te bepale
us te bepal
us
hoogte van
agen.
e onmiddell
oor USB
pen en zoe
tracks acti
e gaan
ren
e geselect
map af
n. De lus w
de track te
ijk te verho
en in track
f is.
erde modu
ordt nu
verhogen o
en. Laat lo
.
PITCH
5
terug t
CUE k
cue poi
6
De cue
speel h
stemm
7 BRAKE
8 REVER
TIME
9
afspeel
0 VINYL
1
Play/p
ogwie
• Ind
Dra
ach
2
ter
• Ind
Pau
Dra
sne
BEND – (l
keren naa
op: druk tij
t.
point is het
t nummer
n. Speel de
knop: star
E knop: s
nop: kies t
uur (REMA
knop: acti
ause knop
l
en de VIN
ai het wiel t
terwaarts t
ggescratch
en de VIN
zeer de tra
ai het wiel t
lheid te verl
ger) knop
normale to
dens bij he
punt waar
f en pause
track opnie
of stop de
eel de huid
ssen weer
N) van de t
ateer/deact
():gebr
L-knop [4
ijdens het a
scratchen.
.
L-knop [4
k en draai
ijdens het a
agen.
houdt inge
nhoogte.
afspelen v
de track w
r het op de
uw. Als u n
track aan e
ige track ac
ave van re
rack, of tot
iveer de jog
ik deze kn
] oplicht: s
spelen naa
Hoe sneller
] niet oplic
et wiel om
spelen naa
rukt om d
n een track
l laten start
gewenste c
op CUE dr
n lagere sn
terwaarts
ds afgespe
al resteren
iel scratch
p om te kie
ratchfunc
rechts om
u aan het
t: zoek- o
nel voorwa
rechts om
toonhoogt
op de knop
n. Om de
e point. G
kt, keert d
elheid dan
.
lde tijd (EL
e tijd (TOT
unctie [42
zen tussen
ie.
oorwaarts
iel draait, d
snelheids
rts/achter
e snelheid
onmiddelli
om terug t
ue point in
bruik de zo
track teru
ormaal (de
PSED) van
L).
.
fspeelmod
e scratchen
s te snelle
unctie.
aarts door
te verhogen
k te verlag
keren naa
en track v
kknoppen
naar de cu
track vertra
de track, n
s of pauze
, draai naar
wordt er d
e track te
, draai naar
n. Laat los
een specifi
st te legge
m fijn af te
point.
agt).
g resterend
odus.
links om
or- of
aan.
links om d
m
k
:
3 Chann
4 LED m
Crossf
5
rechts
kanale
TAP k
6
manue
l fader: g
ter: geeft
der: regel
m kanaal 2
op hetzelf
op (Beats
l te bepale
bruik deze
et niveau
de verhoudi
luider te m
e volume a
Per Minute
. De waard
aders om h
an de mast
ng tussen d
ken terwijl
gespeeld.
): druk her
verschijnt
t niveau va
r output w
uitgangsv
kanaal 1 ge
aaldelijk o
op de displ
n beide kan
er
lumes van
dempt word
de TAP kn
y.
len in te st
e kanalen.
t. In de mid
p om de BP
llen (1~10
Schuif van l
delste stan
M (maten p
.
inks naar
worden bei
r minuut)
de
V.
02 – 09/03/2
012
9
©Vellema
nv
Page 10

VDSMP33
6. Reiniging en onderhoud
• Alle gebruikte schroeven moeten goed zijn aangespannen en mogen geen sporen van roest vertonen.
• De behuizing, de lenzen, de montagebeugels en de montageplaats (bv. het plafond of het gebinte) mogen
niet vervormd zijn of aangepast worden (geen extra gaten in montagebeugels, aansluitingen niet
verplaatsen, enz.)
• Mechanisch bewegende delen mogen geen sporen van slijtage vertonen en mogen niet onregelmatig
bewegen.
• De voedingskabels mogen niet beschadigd zijn. Laat het toestel onderhouden door een geschoolde
technicus.
• Ontkoppel het toestel van het lichtnet voor u aan onderhoudswerkzaamheden begint.
• Maak het toestel geregeld schoon met een vochtige, niet pluizende doek. Gebruik geen alcohol of solvent.
• De gebruiker mag geen onderdelen vervangen.
• Bestel eventuele reserveonderdelen bij uw dealer.
7. Technische specificaties
voeding 230Vac/ 50Hz
pitchregeling 16%
equalizer laag +12dB, -12dB
midden +12dB, -12dB
hoog +12dB, -12dB
impedantie hoofdtelefoon 32 Ohm
distorsie <0.02%
kanaalscheiding 50dB (1KHz)
gevoeligheid PHONO 10mV, 47kOhm
LINE 1V, 10kOhm
MIC 10mV, 600Ohm
versterking 0 tot -20dB
uitgangsniveau 2.0 ± 0.2V RMS
frequentierespons 20Hz-20KHz
S/R verhouding 80dB
afmetingen 343 x 274 x 60mm
gewicht 3.6kg
Gebruik dit toestel enkel met originele accessoires. Velleman nv is niet aansprakelijk voor schade of
kwetsuren bij (verkeerd) gebruik van dit toestel.
Voor meer informatie over dit product en de laatste versie van deze handleiding, zie
www.hqpower.eu.
De informatie in deze handleiding kan te allen tijde worden gewijzigd zonder voorafgaande
kennisgeving.
© AUTEURSRECHT
Velleman nv heeft het auteursrecht voor deze handleiding. Alle wereldwijde rechten voorbehouden.
Het is niet toegestaan om deze handleiding of gedeelten ervan over te nemen, te kopiëren, te vertalen, te
bewerken en op te slaan op een elektronisch medium zonder voorafgaande schriftelijke toestemming van de
rechthebbende.
V. 02 – 09/03/2012 10 ©Velleman nv
Page 11

.
uDeEnNo
p
.
.
u
s
t
y
e
o
e
e
m
a
gn
Être
b
p
r
e
’
r
v
r
d
o
e
o
e
n
a
u
e
e
e
t
n
o
n
s
e
n
v
t
p
e
p
n
a
é
d
s
o
r
o
r
i
s
q
n
t
a
u
e
u
d
o
n
p
x
s
a
’
e
e
t
p
a
e
a
s
a
o
m
o
b
p
m
e
à
n
m
é
C
a
e
v
s
c
s
s
r
é
à
r
é
t
p
o
u
t
u
é
n
d
a
e
g
M
e
e
t
u
c
t
e
e
é
m
n
r
n
a
e
c
s
e
e
n
o
n
r
n
I
p
n
é
c
e
o
e
o
T
r
e
m
d
x
e
p
s
m
e
l
é
r
t
c
s
e
t
d
a
2
p
m
a
a
s
q
u
5
e
s
e
r
e
t
e
u
é
e
a
f
e
c
t
s
e
n
s
o
e
e
VDSMP33
1
Introd
A
x résident
s informa
cas de qu
us vous re
l’a
pareil. Si l’
2
Consi
Ce s
pollu
parm
Renv
resp
mo
Dé
l'a
Ga
ction
de l'Unio
ions envir
mbole sur l'
r l'environ
i les déchet
yer les équ
cter la régl
stions, co
ercions de
ppareil a é
es de s
prudent lo
rtels.
rancher l’a
pareil ; non
der hors de
europée
nnementa
appareil ou
ement. Ne
municipau
ipements u
mentation l
tacter les
otre achat
é endomm
écurité
rs de l’instal
pareil s’il n
pas le câbl
la portée d
NOTI
ne
les import
l'emballage
as jeter un
non sujets
agés à votr
ocale relati
autorités l
! Lire la pré
gé pendant
lation : tou
est pas utili
.
personnes
E D’E
ntes conc
indique que
appareil él
au tri sélec
fournisse
e à la prote
ocales pou
ente notice
le transpor
her un câbl
é ou pour l
non qualifi
PLO
rnant ce
l’éliminatio
ctrique ou
if ; une dé
r ou à un s
tion de l’en
r éliminati
attentivem
, ne pas l’in
sous tensi
nettoyer.
es et de jeu
roduit
d’un appa
lectronique
hèterie trai
rvice de re
vironnemen
n.
nt avant la
staller et co
n peut cau
irer la fich
nes enfants
eil en fin d
(et des pile
era l’appar
yclage local
t.
mise en se
nsulter votr
er des élec
pour débra
.
vie peut
éventuelle
il en questi
. Il convient
vice de
revendeur
rochocs
ncher
)
n.
de
.
•
La tension
notice.
•
Le câble d
renouvele
3
Directi
Se
référer à la
•
Se familia
non qualifi
•
Toute mo
modificati
N’utiliser l
•
des électr
La garanti
•
votre reve
Confier l’i
•
Ne pas br
•
attendre j
Cet appar
•
cet appar
Transport
•
Garder ce
•
Il n
ch
’y a aucune
z votre rev
réseau ne
alimentatio
le câble d’
es gén
garantie
Utiliser cet
projection
Protéger c
ventilation
et tout aut
Protéger c
iser avec le
ées d’opére
ification est
ns par le cl
spot qu’à
chocs, etc.
ne s’appli
ndeur décli
stallation e
ncher l’app
squ’à ce q
il a été dév
il à l’intérie
r l’appareil
te notice p
pièce main
ndeur.
eut pas dé
ne peut p
limentation
rales
e service
appareil un
d’eau. Ne j
ntre la pou
ne soient p
e objet.
ntre les ch
fonctionne
cet appare
interdite p
ent ne tom
a fonction
Un usage i
ue pas aux
era toute r
l’entretien
reil après e
e l’appareil
loppé pour
r et le con
ans son e
ur toute réf
enable par l
asser la ten
s être repli
si nécessai
t de qualit
iquement
mais place
sière. Prot
s bloquées.
cs et le trai
ent de l’ap
il. La plupar
ur des rais
ent pas so
révue. Tou
propre ann
dommages
sponsabilit
un person
xposition à
ait atteint l
usage prof
ecter à une
ballage ori
rence ultér
’utilisateur.
sion mentio
sé ou endo
e.
Vellema
l'intérieu
d’objet co
ger contre l
Laisser un
er avec cir
areil avant
t des dégât
ns de sécur
s la garanti
autre usag
le d'office l
survenus e
pour les pr
el qualifié.
es variatio
températu
ssionnel da
source de c
inel.
ieure.
Commande
nnée dans l
magé. De
® en fin de
. Protéger
tenant un li
chaleur e
distance d
onspection
de l’utiliser.
sont causé
té. Les do
.
peut caus
a garantie.
négligeant
blèmes et
s de temp
e ambiante
s des disco
ourant CA d
des pièces
s spécificat
ander à vo
notice.
e la pluie,
quide sur l’
trême. Veill
minimum
endant l’o
Ne pas per
par un us
mages occ
r des court
certaines di
es défauts
rature. Afin
avant de l’
thèques, de
e 230 VCA/
de rechang
ions à la fin
tre revende
e l’humidit
ppareil.
er à ce que
,5 cm entr
ération.
ettre pas
ge non pro
sionnés par
-circuits, d
rectives de
ui en résul
d’éviter de
tiliser.
s théâtres,
0 Hz.
éventuelle
de cette
r de
et des
les fentes d
le projecte
ux personn
essionnel.
des
s brûlures,
ette notice
ent.
dommages
tc. Employ
s
ur
es
et
,
r
V.
02 – 09/03/2
012
11
©Vellema
nv
Page 12

VDSMP33
4. Caractéristiques
• fonction lecteur MP3 pour carte USB/SD
• effets scratch, frein à disque et reverse ainsi que fonction reloop
• 16% contrôle de vitesse
• 2x port SD et 2x port USB
• afficheur polyvalent avec affichage de ID3 TAG
• entrée carte SD/USB/Phono/Line/Mic
• fonction de recherche par roue 'jog'
• lecture seule/en continu
• sortie maître RCA à 2 canaux & 2 sorties REC à 2 canaux
• table de mixage à 2 canaux & égaliseur 3 bandes avec réglage d'amplification.
5. Description
Se référer aux illustrations en page 2 de cette notice.
Ce lecteur MP3 dispose d’une double interface utilisateur : les commandes gauche et droite sont similaires. La
plupart des boutons et indications est doublée.
1 interrupteur de puissance : allumer/éteindre le lecteur avec cet interrupteur
2 prise d’alimentation : connexion 230 VCA/50 Hz.
connexion GND (terre) : en cas de signaux sonores, connecter au tourne-disque pour créer une mise
3
à la terre.
4 sortie BALANCED MASTER OUT : sorties audio XLR symétriques
entrée PHONO/LINE : relier un appareil externe (pas livré, p.ex. un tourne-disque, un lecteur CD etc.)
5
à ces connecteurs RCA (cinch). Phono1/line1 = canal 1, Phono2/line2 = canal 2.
sélecteurs PHONO/LINE : placer le sélecteur sur PHONO si un tourne-disque (pas livré) est connecté
6
à l’entrée ; sinon, mettre sur LINE.
LINE OUTPUT (REC/AMP) : sorties d’enregistrement asymétriques – connecter de l’équipement
7
d’enregistrement (pas livré) à la sortie REC; brancher un amplificateur (pas livré) à la sortie AMP.
HEADPHONE prise d’entrée pour casque d’écoute : connexion d’entrée de 6.35mm pour un casque
8
d’écoute. Impédance du casque d’écoute doit être >32Ω. Le signal vers le casque d’écoute est
indépendant du signal de sortie vers l’amplificateur.
9 réglage CUE LEVEL : réglage du niveau de sortie du casque d’écoute
CUE CROSS FADER pour sortie écouteurs : le fader permet de mélanger les signaux de sortie de
deux canaux.
10
diminuant le volume du canal 2. En plaçant la glissière en position centrale, les signaux de sortie des
deux canaux seront égaux pour les deux écouteurs.
11 BASS : égaliseur micro pour sons graves
12 TREBLE : égaliseur micro pour sons aigus
13 MIC LEVEL : réglage du niveau d’entrée du micro
14 entrée MICROPHONE : prise d’entrée 6,35 mm pour microphone. (microphone pas livré)
15 afficheur : LCD
Glisser vers la gauche pour augmenter graduellement le volume du canal 1 tout en
16 lecteur de carte SD : insérer une carte SD dans ce lecteur
17 port USB : connecter une interface USB à ce port
18 Bouton LOW : règle le volume pour sons graves
19 Bouton MID : règle le volume pour sons intermédiaires
20 Bouton HIGH : règle le volume pour sons aigus
Bouton SD-USB/PHONO-LINE : tournez le bouton vers la gauche pour sélectionner la carte SD ou
21
l’entrée USB; tournez vers la droite pour sélectionner l’entrée PHONO/LINE des connecteurs à l’arrière
22 GAIN : contrôle de volume du canal
23 réglage de volume MASTER : réglage du niveau de volume de sortie général
V. 02 – 09/03/2012 12 ©Velleman nv
Page 13

22222
23333333333444444
4
e
n
e
e
a
a
n
e
d
d
d
e
e
l
6
e
e
e
n
t
a
e
e
e
e
R
e
e
e
t
t
a
t
m
v
c
L
a
u
e
p
T
a
e
e
C
o
u
(
R
s
m
c
N
r
N
r
d
p
s
o
u
c
s
Y
m
o
Y
f
r
e
u
d
a
f
a
a
a
n
n
o
o
t
)
o
n
o
u
a
a
é
e
a
t
t
s
o
s
e
d
c
e
e
e
e
e
n
e
é
d
a
t
u
z
u
s
r
O
t
t
o
p
s
u
a
a
d
e
e
S
a
i
s
e
t
t
a
r
n
I
o
e
s
u
i
t
a
h
a
c
0
o
a
o
r
i
m
e
e
e
p
o
e
e
s
t
n
e
i
e
r
v
n
e
c
p
e
b
e
u
d
o
e
n
n
p
u
o
u
m
n
n
p
u
g
e
D
s
a
e
o
e
u
v
p
q
e
u
é
r
é
e
e
e
u
a
e
p
l
e
u
a
u
n
h
a
r
e
l
g
r
h
VDSMP33
touch
4
USB
Bouto
5
de plag
plages
6
7
:
rapide
:
rapide
bouto
s’affich
8
• Mo
• Mo
9 entrée
sortie
0
manièr
1 touch
contrô
2
avec 1
3 touch
SD/USB :
FOLDER/
s. Un LED
st actif.
ppuyez un
ppuyez un
SINGLE/
sur l’écran
e single : j
e Continuo
de boucle
e boucle
continue.
RELOOP :
e de vites
% au maxi
PITCH : a
presser pou
RACK : en
llumé indiq
fois pour l
fois pour l
ONTINUE
.
uez une pl
s : jouez u
(IN) : enfo
OUT) : enf
enfoncer p
enfoncer ce
e (PITCH)
um. Glisse
tiver/désac
r sélectionn
oncez le bo
ue que le m
plage ou l
plage ou l
: sélectionn
ge sélectio
e plage sél
cer pour d
ncer pour
ur effacer l
bouton pou
: utiliser ce
r vers le ha
iver le pote
r la carte
uton pour p
ode réperto
répertoire
répertoire
r le mode l
née et arrê
ctionnée e
terminer le
éterminer l
boucle.
r sauter ve
te glissière
t pour dimi
ntiomètre P
D comme s
sser de la
re est actif,
uivant, ma
précédent,
cture ‘singl
ez la lectur
arrêtez la l
point de dé
fin de la b
s le point d
pour augm
uer la vite
TCH
urce audio,
echerche d
un LED étei
ntenir enfo
aintenir e
’ ou ‘contin
en fin de
cture jusq
art de la b
ucle. La bo
départ de l
nter ou di
se.
presser de
répertoire
nt indique
cé pour un
foncé pour
uous’. La s
lage.
’à la fin du
ucle.
cle est rép
a boucle.
inuer la vit
nouveau po
la recherc
ue le mode
avance
n retour
lection
épertoire.
tée de
sse de la pl
ur
e
ge
touch
4
touche
touch
5
touche
bouto
Le poin
6
plage :
réglage
instant
touch
7
la plag
8 touch
touch
9
plage (
0 touch
1
touch
la rou
• La
En
2
en
• La
En
gau
la
PITCH BE
pour reveni
PITCH BE
pour reveni
CUE : pen
cue est le
faites jouer
fin. Refaite
nément au
BRAKE : d
diminue).
REVERSE
TIME : ch
EMAIN), o
VINYL : a
play/pau
jog
ouche VIN
ournant la
rrière. En t
ouche VIN
ode pause
che pour ef
itesse et ve
D + (plus
au pitch d’
D – (moi
au pitch d’
ant la lectu
oint où vo
la plage et
jouer la pl
point cue d
émarrer ou
: la plage s
isir entre l’
temps tota
tiver/désac
e ( ) : u
L [40] s’al
olette ver
urnant la r
L [40] ne
, tourner la
ectuer un r
s la gauche
: mainteni
rigine.
s) : mainte
rigine.
re, enfonce
s souhaitez
rrêtez-la a
ge. Si vou
fini.
arrêter la pl
lit en arriè
ffichage du
l restant (T
iver la fonc
iliser cette
lume : la fo
la droite p
ue plus ra
’allume pa
roue vers la
cul rapide.
pour dimin
r enfoncé p
nir enfoncé
ce bouton
que la plag
point cue
appuyez s
age à une v
e
temps écou
TAL).
ion de scra
ouche pour
nction scr
ur le scratc
idement, la
: modific
droite pour
En mode le
er la vitess
ur augmen
pour diminu
pour retour
commenc
ouhaité. Ut
r le bouton
tesse inféri
lé de la plag
ch [42].
choisir ent
tch est acti
ing en ava
vitesse de l
tion du pit
avancer ra
ture, tourn
e.
er le pitch i
er le pitch i
er vers un
. Pour défin
lisez les bo
CUE, la pla
ure à la vit
e (ELAPSE
e les mode
ée.
t, vers la g
cture accél
h ou rech
idement, t
r la roue v
stantaném
stantaném
oint cue.
ir le point c
tons de rec
e retourner
sse normal
), du temps
lecture ou
uche pour
ère de plus
rche par t
urner la ro
rs la droite
nt. Lâcher
nt. Relâche
e d’une
herche pou
(la vitess
restant de
ause.
e scratchin
n plus.
rame.
e vers la
pour accélé
la
r la
le
de
a
er
3 Fader
4 Mètre
crossf
5
pour a
plaçant
touch
6
(beats
anal : régl
ED : indiq
der : le fa
gmenter gr
la glissière
TAP (beat
ar minute)
r le niveau
e le niveau
er permet
duellement
en position
s par minu
manuellem
des deux c
de sortie m
e mélanger
le volume
entrale, les
te) : appuy
nt. L’affich
naux (1~1
ster
les signaux
u canal 1 t
signaux de
r plusieurs
ur indique l
) avec ces
de sortie d
ut en asso
sortie des
fois sur la t
valeur.
outons.
deux cana
rdissant le
eux canaux
uche TAP
x. Glisser v
olume du c
seront éga
our détermi
ers la gauc
nal 2. En
x.
ner le BPM
e
V.
02 – 09/03/2
012
13
©Vellema
nv
Page 14

VDSMP33
6. Nettoyage et entretien
• Serrer les écrous et les vis et vérifier qu’ils ne rouillent pas.
• Le boîtier, les lentilles, les supports de montage et la construction portante ne peuvent pas être déformés,
adaptés ou bricolés p.ex. pas de trous additionnels dans un support, ne pas déplacer les connexions etc.
• Les parties mécaniques mobiles ne peuvent pas être usées ou bouger de manière irrégulière.
• Les câbles d'alimentation ne peuvent pas être endommagés. Un technicien qualifié doit entretenir l’appareil.
• Débrancher l’appareil avant de le nettoyer.
• Essuyer l’appareil régulièrement avec un chiffon humide non pelucheux. Éviter l’usage d’alcool et de
solvants.
• Il n’y a aucune pièce maintenable par l’utilisateur.
• Commander des pièces de rechange éventuelles chez votre revendeur.
7. Spécifications techniques
alimentation 230VCA / 50Hz
contrôle de hauteur tonale 16%
égaliseur basses +12dB, -12dB
moyennes +12dB, -12dB
aigus +12dB, -12dB
impédance casque d'écoute 32 Ohm
distorsion <0.02%
séparation des canaux 50dB (1KHz)
sensibilité PHONO 10mV, 47kOhm
LINE 1V, 10kOhm
MIC 10mV, 600Ohm
amplification de 0 à -20db
niveau de sortie 2.0 ± 0.2V RMS
réponse en fréquence 20Hz-20KHz
rapport S/B 80dB
dimensions 343 x 274 x 60mm
poids 3.6kg
N’employer cet appareil qu’avec des accessoires d’origine. SA Velleman ne sera aucunement
responsable de dommages ou lésions survenus à un usage (incorrect) de cet appareil.
Pour plus d’information concernant cet article et la dernière version de cette notice, visiter notre
site web www.hqpower.eu.
Toutes les informations présentées dans cette notice peuvent être modifiées sans notification
préalable.
© DROITS D’AUTEUR
SA Velleman est l’ayant droit des droits d’auteur pour cette notice. Tous droits mondiaux réservés.
Toute reproduction, traduction, copie ou diffusion, intégrale ou partielle, du contenu de cette notice par quelque
procédé ou sur tout support électronique que se soit est interdite sans l’accord préalable écrit de l’ayant droit.
V. 02 – 09/03/2012 14 ©Velleman nv
Page 15

.
lImSi
.
.
u
a
e
r
c
a
a
f
c
n
s
p
n
unec
e
s
e
a
e
p
o
a
m
b
c
e
e
a
t
e
t
U
o
e
t
r
s
e
a
d
d
t
m
s
p
a
e
o
a
p
p
a
y
o
d
a
o
n
m
n
A
p
o
p
e
u
M
r
c
a
e
d
c
d
p
v
y
o
v
t
a
d
u
a
,
d
o
m
a
a
L
m
a
e
s
a
a
d
a
o
m
a
N
n
t
n
n
c
o
u
ú
e
a
s
c
.
n
U
o
u
a
s
m
r
e
u
a
d
t
s
a
o
o
e
q
a
s
u
b
a
s
o
a
A
n
R
e
s
m
o
i
c
r
d
p
a
í
e
c
a
a
c
e
e
o
n
b
a
o
d
a
e
o
n
s
a
u
a
e
o
r
s
o
e
p
e
c
d
u
u
d
n
o
e
a
e
s
c
g
á
a
o
n
a
s
c
s
r
o
í
s
1
Introd
A
os ciudad
portantes
tiene dud
¡G
racias por h
ap
arato ha su
2
Instru
Este
símbolo en
el m
No ti
espe
Resp
ete las leye
Cui
dado duran
co
cción
nos de la
informaci
dio ambien
e este apa
ializada en
s, contact
ber compr
rido algún
ciones
ectado a la
M
nión Euro
nes sobre
ste aparat
e.
ato (ni las
reciclaje. D
locales en
con las a
do el VDS
año en el tr
e segu
e la instala
red eléctric
NUA
ea
el medio a
o el embal
ilas, si las h
vuelva est
relación con
toridades
P33! Lea a
ansporte no
idad
ión: puede
.
VDSMP33
DEL
biente c
je indica q
ubiera) en l
aparato a
el medio a
locales pa
tentamente
lo instale y
ufrir una p
SUA
ncernient
e, si tira la
basura do
u distribuid
biente.
a residuos
las instrucc
póngase en
ligrosa des
IO
a este pr
muestras i
éstica; de
r o a la uni
.
ones del m
contacto c
arga eléctri
ducto
servibles,
e ir a una
dad de reci
nual antes
n su distrib
ca al tocar
odrían dañ
mpresa
laje local.
e usarlo. S
idor.
n cable
r
i el
•
Asegúrese
•
No aplast
afilada. Si
3
Norma
Vé
ase la Gara
•
Familiaríc
La mayorí
•
Por razon
causados
Utilice sól
•
quemadur
completa
Los daños
•
y su distri
La instala
•
•
No conect
aparato ll
•
Este apar
sólo en in
Transport
•
Guarde es
•
De
lim
Ma
El
conecte sie
iarlo. Tire
tenga el a
suario no h
esita piezas
de que la t
el cable de
es necesari
gener
ntía de ser
Utilice el a
tipo de sal
No expong
de que los
el aparato
No agite el
se con el fu
de los dañ
s de seguri
or modifica
el VDSMP3
s, descarg
ente.
causados p
uidor no se
ión y el ma
el aparato
gue a la te
to ha sido d
eriores. Co
el aparato
e manual d
pre el apa
iempre del
arato lejos
brá de efe
de recambi
nsión de re
alimentació
, pida a su
les
vicio y cali
arato sólo
icadura o g
este equi
orificios de
cualquier
aparato. E
ncionamien
s son caus
ad, las mo
ciones no a
3 para aplic
s eléctricas
r descuido
rá responsa
tenimiento
si ha estad
peratura a
iseñado par
éctelo a un
en su emba
el usuario p
rato si no v
nchufe par
el alcance
tuar el man
o.
d no sea m
n y protéjal
distribuidor
ad Velle
en interior
oteo. Nunc
o a polvo.
entilación
tro objeto.
ite usar exc
o del apara
dos por un
ificaciones
torizadas,
ciones des
etc. Un us
e las instr
ble de ning
deben ser r
expuesto
biente.
a uso profe
fuente de
laje original
ra cuando
a usarlo d
desconect
e personas
tenimiento
yor que la
contra po
reemplazar
an ® al fin
es. No exp
ponga un
o exponga
o estén blo
esiva fuerz
o. Sólo per
uso inadec
o autorizad
o están cu
ritas en est
desautoriz
cciones de
n daño u ot
alizados p
grandes ca
ional en un
orriente C
ecesite co
rante un la
r el cable
no capacita
e ninguna
ensión indic
ibles daños
el cable de
l de este m
nga este eq
bjeto con l
ste equipo
ueados. D
durante el
onas cualifi
ado.
as del apar
iertos por l
e manual a
do puede
eguridad d
ros problem
r personal
mbios de te
discoteca,
de 230VCA
sultarlo.
go periodo
e red, nunc
das y niños.
ieza. Conta
ada en las
causados p
limentació
anual del u
uipo a lluvi
quido, p.ej.
a temperat
je una dist
manejo y la
adas pued
to están pr
garantía.
fin de evita
ausar daño
este manu
as resultant
specializad
mperatura.
un teatro,
/ 50Hz.
e tiempo o
del propio
cte con su
specificacio
r algún tip
.
uario.
, humedad
un florero,
ras extrem
ncia de mín
instalación.
n manejar
hibidas. Lo
p.ej. corto
y anula la
al invalidar
es.
.
Espere hast
tc. y es apt
antes de
cable.
istribuidor
es.
de superfi
i a ningún
n el aparat
s. Asegúre
. 2,5cm ent
ste aparat
daños
ircuitos,
arantía
n su garant
que el
para un u
i
ie
o.
e
e
.
a
o
V.
02 – 09/03/2
012
15
©Vellema
nv
Page 16

VDSMP33
4. Características
• reproductor MP3 por tarjeta SD o memoria USB
• efecto 'scratch', 'brake' y 'reverse' y función 'reloop'
• ajuste del pitch 16%
• 2x ranura de tarjeta SD y 2x puerto USB
• pantalla multifunción con visualización ID3 TAG
• entrada tarjeta SD / USB / Phono / Line / Mic
• función de búsqueda por rueda 'jog'
• reproducción de una sola pista / reproducción continua
• salida maestro RCA de dos canales & salidas REC de dos canales
• mesa de mezclas de 2 canales & ecualizador de 3 bandas.
5. Descripción
Véase las figuras en la página 2 de este manual del usuario.
Este aparato incluye dos paneles de control: Ambos paneles son similares. La mayoría de los botones e
indicaciones está disponible en ambos paneles.
1 Interruptor ON/OFF: Active/desactive el aparato con este botón.
2 entrada de alimentación: 230 VAC/50 Hz
Conexión GND (masa): En caso de interferencias, conecte a unos tocadiscos para crear una conexión a
3
tierra.
4 salida BALANCED MASTER OUT: Salidas de audio XLR balanceadas
Entrada PHONO/LINE: Conecte un aparato (no incl., p.ej. tocadiscos, reproductor de CD, etc.) con
5
estos conectores RCA (cinch). Phono1/line1 = canal 1, Phono2/line2 = canal 2.
Selector PHONO/LINE: Ponga el selector en la posición PHONO si un tocadiscos (no incl.) está
6
conectado. Si no es el caso, ponga el selector en la posición LINE.
Salida LINE (REC/AMP): Salidas no balanceadas – conecte un equipo de grabación (no incl.) a la
7
salida REC. Conecte un amplificador (no incl.) a la salida AMP.
Conexión para auriculares: Entrada de 6.35mm para auriculares. Asegúrese de que la impedancia sea
8
>32Ω. La señal enviada a los auriculares puede ser distinta de la señal enviada al amplificador.
9 Ajuste CUE LEVEL: Para ajustar el volumen de salida de los auriculares
Conmutador deslizante horizontal para los auriculares: Desplace el conmutador deslizante de la
izquierda a la derecha para aumentar el volumen de canal 2 gradualmente y para silenciar canal 1.
10
Ambos canales se reproducen por los auriculares con el mismo nivel de volumen al poner el conmutador
deslizante en la posición central.
11 BASS: Ecualizador de micrófono para los graves
12 TREBLE: Ecualizador de micrófono para los agudos
13 MIC LEVEL: Ajuste del nivel de entrada del micrófono
14 MICROPHONE: Entrada de 6.35mm para micrófono (no incl.).
15 Pantalla: LCD.
16 Ranura para tarjeta SD: Introduzca una tarjeta SD en la ranura.
17 Puerto USB: Conecte un dispositivo de almacenamiento USB a este puerto.
18 Ajuste LOW: Para ajustar el volumen del tono de los graves
19 Ajuste MID: Para ajustar el volumen del tono de los medios
20 Ajuste HIGH: Para ajustar el volumen del tono de los agudos
Interruptor SD-USB/PHONO-LINE: Desplace el interruptor hacia la izquierda para seleccionar la
21
tarjeta SD o el puerto USB. Desplace el interruptor hacia la derecha para seleccionar la entrada
PHONO/LINE de los conectores de la parte trasera.
22 GAIN: Para ajustar el volumen del canal
23 Ajuste del volumen MASTER: Ajuste el nivel de salida maestro
V. 02 – 09/03/2012 16 ©Velleman nv
Page 17

2222223333333
3
3
3
4
444
4
S
p
F
d
t
P
P
S
o
d
d
S
E
e
R
a
P
P
P
C
m
o
u
f
«
B
R
T
V
P
a
e
e
á
e
e
i
i
e
d
u
o
u
o
R
o
O
d
»
f
O
m
u
a
m
i
e
u
r
t
I
e
i
e
V
u
m
V
a
u
d
i
u
t
e
e
»
s
i
u
e
l
s
v
n
)
1
e
d
n
t
r
t
A
e
]
p
d
]
u
p
a
a
e
e
o
s
s
n
p
p
e
a
a
a
e
q
n
e
ó
e
o
m
t
e
e
a
a
a
o
o
e
s
c
m
e
e
a
s
e
v
c
a
m
a
v
n
d
i
u
o
M
u
n
t
o
b
e
n
»
u
a
n
c
j
e
e
m
a
l
e
s
a
z
e
u
d
u
e
r
i
u
m
c
A
o
p
r
»
c
a
p
V
s
c
c
e
c
d
e
e
u
v
o
P
«
c
e
v
n
»
c
d
,
n
t
e
s
VDSMP33
Botón
4
pulsar
Botón
5
búsque
está ac
6
7
:
rápido.
:
rápido.
Botón
El mod
8
• Mo
• Mo
del
9 Botón
Botón
0
el bucl
1 Botón
Ajuste
2
de la pi
sta con un
velocid
D/USB: P
ara selecci
OLDER/T
a en pistas
ivado el m
ulse una ve
ulse una ve
INGLE/C
selecciona
o « single
o « continu
ichero.
TART LO
ND LOOP
indefinida
ELOOP: P
de velocid
d.
lse este bo
nar USB.
ACK: Puls
. Si el LED
do « track
z para selec
z para selec
NTINUE:
o se visual
: La reprod
ous »: La r
P (IN): Pu
(OUT): Pul
ente. Vuel
lse el botó
d (PITCH
áximo del
ón para sel
para conm
stá activad
.
cionar la pi
cionar la pi
eleccione el
za en la pa
cción se ac
producción
se el botón
e el botón
a a pulsar
para volve
: Utilice est
6%. Deslic
ccionar un
utar entre e
, está activ
ta/el ficher
ta/el ficher
modo de r
talla LCD.
tiva y se de
se activa y
para deter
ara determ
ara borrar
r al punto d
e conmutad
el conmut
tarjeta SD
l modo de b
do el mod
siguiente.
anterior. M
producción
activa en c
ontinúa co
inar el pun
inar el punt
l bucle
inicio del
r deslizant
dor desliza
como fuent
úsqueda en
« folder ».
antenga p
antenga pul
« single » o
anto se ter
las cancion
o de inicio
final del b
ucle.
para aum
te hacia ar
de audio.
ficheros y e
Si el LED e
lsado para
sado para u
el modo «
mine la can
es siguient
el bucle.
cle. Ahora,
ntar o redu
iba para re
uelva a
l modo de
tá apagado,
un avance
n retroceso
ontinuous
ión.
s hasta el fi
se reprodu
ir la veloci
ucir la
.
nal
irá
ad
3 Botón
Botón
4
5
para vo
Botón
para vo
lver al tono
lver al tono
Botón
previa
El punt
6
reprod
ajuste
ino. Deje q
punto
Botón
7
de man
era más len
8 Botón
Botón
9
pista, e
l tiempo res
0 Botón
Botón
1
« paus
Rueda
• Si
Gir
hac
ia adelante.
atr
2
• Si
En
ráp
ráp
Gir
rue
ITCH: Act
ITCH BEN
ITCH BEN
UE: Pulse
ente.
« cue » es
zca la canci
cue » dete
RAKE: Ac
EVERSE:
IME: con
INYL: Act
lay/paus
».
giratoria
l indicador
la rueda d
s. Cuanto
l indicador
l modo « p
da en la pis
da.
la rueda d
a en senti
ve/desactiv
D + (hacia
original.
D – (hacia
original.
ste botón
el punto do
ón y haga u
e la canció
minado.
ive o desac
ta).
nicia la rep
l botón de
tante (REM
ve/desactiv
():Utili
INYL [40
rante la re
Gire la rue
ás rápido g
INYL [40
usa », gire
ta. Gire la r
rante la re
o contrario
el conmut
arriba): M
abajo): M
urante la r
nde quiere
na pausa e
se reprodu
ive la pista
oducción d
iempo pued
IN) de la pi
la función
ce este bot
se ilumina:
roducción
a en sentid
ire, más au
no se ilumi
la rueda en
eda en sen
roducción
las agujas
dor desliza
ntenga pul
ntenga puls
producción
ue se inicie
el punto d
zca de nue
a una veloci
la pista ha
e seleccion
sta, o el tie
« scratch »
n para eleg
función «
n el sentido
contrario
entará la
na: funció
el sentido
ido contrar
n el sentido
del reloj pa
te « pitch
ado para s
ado para ba
para saltar
una canció
seado. Utili
o. Al pulsar
dad más ba
ia atrás.
r entre el ti
po restant
de la rueda
ir entre el
scratch ».
de las aguj
las agujas
elocidad de
de búsqu
e las aguja
o a las aguj
de las aguj
ra frenar.
.
bir el tono
jar el tono i
l punto « c
. Para dete
e los boton
CUE ahora,
a de lo nor
mpo trans
total (TOT
[42].
odo « repr
s del reloj
del reloj pa
« scratch
da o velo
del reloj p
as del reloj
s del reloj
inmediatam
nmediatam
e » determ
rminar el p
es de búsqu
la canción
al (se repr
urrido (ELA
L).
ducción » y
ara hacer
a hacer « s
.
idad.
ra avanzar
para retroc
ara acelera
nte. Suelte
nte. Suelte
inado
nto « cue »
eda para u
olverá al
duce la pis
SED) de la
el modo
scratch »
ratch » hac
de manera
der de man
r. Gire la
a
ia
ra
Conm
3
canales
4 Medid
V.
02 – 09/03/2
tador desl
(1~10).
r LED: vis
012
zante de c
aliza el niv
nal: Utilic
l de la salid
este conm
maestro.
17
tador desli
ante para a
justar el ni
el de los do
©Vellema
nv
Page 18

VDSMP33
Conmutador deslizante horizontal: Desplace el conmutador deslizante de la izquierda a la derecha
45
para aumentar el volumen de canal 2 gradualmente y para silenciar canal 1. Ambos canales se
reproducen con el mismo nivel de volumen al poner el conmutador deslizante en la posición central.
Botón TAP (Beats Per Minute): Pulse el botón varias veces para determinar manualmente los beats
46
por minuto. El valor aparece en la pantalla.
6. Limpieza y mantenimiento
• Apriete bien las tuercas y los tornillos y verifique que no hay señales de oxidación.
• No modifique la caja, los soportes y las ópticas p.ej. no taladre agujeros adicionales en un soporte o no
modifique las conexiones, etc.
• Las partes móviles no pueden mostrar ningún rastro de desgaste y deben estar bien equilibradas.
• No dañe los cables de alimentación. Contacte con un técnico especializado para instalar el aparato.
• Desconecte el aparato de toda fuente antes de limpiarlo.
• Limpie el aparato regularmente con un paño húmedo. Evite el uso de alcohol y de disolventes.
• El usuario no habrá de efectuar el mantenimiento de ninguna pieza.
• Contacte con su distribuidor si necesita piezas de recambio.
7. Especificaciones
alimentación 230Vac / 50Hz
ajuste del pitch 16%
ecualizador graves +12dB, -12dB
medios +12dB, -12dB
agudos +12dB, -12dB
impedancia auriculares 32 Ohm
distorsión <0.02%
separación de los canales 50dB (1KHz)
sensibilidad PHONO 10mV, 47kOhm
LINE 1V, 10kOhm
MIC 10mV, 600Ohm
ganancia de 0 a -20db
nivel de salida 2.0 ± 0.2V RMS
respuesta en frecuencia 20Hz-20KHz
relación señal/ruido 80dB
dimensiones 343 x 274 x 60mm
peso 3.6kg
Utilice este aparato sólo con los accesorios originales. Velleman NV no será responsable de daños ni
lesiones causados por un uso (indebido) de este aparato.
Para más información sobre este producto y la versión más reciente de este manual del usuario,
visite nuestra página www.hqpower.eu.
Se pueden modificar las especificaciones y el contenido de este manual sin previo aviso.
© DERECHOS DE AUTOR
Velleman NV dispone de los derechos de autor para este manual del usuario. Todos los derechos
mundiales reservados.
Está estrictamente prohibido reproducir, traducir, copiar, editar y guardar este manual del usuario o partes de
ello sin previo permiso escrito del derecho habiente.
V. 02 – 09/03/2012 18 ©Velleman nv
Page 19

.
nWiFa
rGe
.
.
e
r
o
w
e
e
e
c
h
e
h
t
g
e
e
e
B
a
e
u
h
h
n
w
e
n
e
u
E
m
u
e
t
r
e
e
w
e
u
d
u
,
B
s
n
h
e
n
e
i
S
S
g
t
n
r
e
k
h
r
ä
a
S
D
e
b
u
e
t
r
e
D
r
h
t
t
N
c
e
n
a
e
a
r
a
t
t
s
r
g
h
A
w
h
u
m
k
e
N
P
r
e
w
e
E
e
ä
r
g
u
z
G
e
g
n
I
n
h
e
e
e
u
r
e
e
k
e
o
t
N
g
m
c
e
s
h
r
e
n
o
r
e
c
e
,
b
m
c
e
.
b
c
c
U
d
E
h
g
e
n
i
n
g
t
a
s
d
T
n
t
r
d
a
u
n
d
v
u
h
t
s
e
r
D
e
r
s
r
f
e
h
s
e
e
e
S
f
t
n
e
a
s
e
a
e
s
t
t
e
n
e
ä
a
g
r
a
t
a
o
f
r
r
n
e
e
n
g
n
e
e
VDSMP33
1
Einfüh
A
alle Einw
chtige Um
lls Zweifel
Wi
r bedanken
so
gfältig dur
rät nicht un
2
Sicher
Dies
nach
verw
müss
Händ
Umw
Sei
ste
Tre
Ne
ung
hner der
eltinfor
s Symbol a
seinem Leb
ndeten Bat
en von eine
ler oder ein
ltvorschrift
bestehen,
uns für den
h. Überprüf
d wenden S
eitshin
n Sie währ
enden Leit
nnen Sie da
zstecker an
BE
uropäisch
ationen ü
f dem Prod
nszyklus d
erien) nich
spezialisie
örtliches Re
n.
wenden Si
Kauf des V
n Sie, ob T
ie sich an I
eise
nd der Ins
ngen könn
s Gerät bei
der Griffflä
IENU
n Union
er dieses
kt oder de
r Umwelt S
als unsorti
ten Firma z
cycling-Unt
sich für
SMP33! L
ansportsch
ren Händle
allation des
e zu lebens
ichtbenutz
he an und
GSA
rodukt
Verpackun
chaden zufü
rtes Haus
ecks Recy
rnehmen r
ntsorgung
sen Sie die
den vorlieg
.
Gerätes se
efährlichen
ng und vo
iehen Sie ni
LEIT
zeigt an,
gen kann.
üll; die Ein
ling entsor
tourniert w
srichtlinie
e Bedienun
en. Sollte d
r vorsichtig
elektrische
jeder Reini
e an der Ne
NG
ass die Ent
ntsorgen Si
eit oder ve
t werden.
rden. Resp
an Ihre ö
gsanleitung
es der Fall
: das Berüh
Schlägen
ung vom N
zleitung.
orgung die
die Einhei
wendeten B
iese Einhei
ktieren Sie
tliche Beh
vor Inbetri
ein, verwe
en von unt
ühren.
etz. Fassen
es Produkt
(oder
atterien
muss an d
die örtliche
rde.
bnahme
den Sie das
r Spannun
Sie dazu de
s
n
•
Vergewiss
beschrieb
Achten Si
•
kann. Bei
3
Allgem
Si
he Vellem
•
Nehmen S
Lassen Si
Beschädig
•
Eigenmäc
eigenmäc
Verwende
•
zu Schäde
Gefahren
Bei Schäd
•
Garantiea
Lassen Si
•
•
Das Gerät
Beschädig
Hal
Es
ten Sie Kin
ibt keine z
rn Sie sich
n in dieser
darauf, da
eschädigu
eine Ric
n® Servic
Verwende
Feuchte. S
Sie NIE m
Schützen
Beachten
Entfernun
Vermeiden
Bedienung
ie das Gerä
das Gerät
ng des Ge
tige Veränd
tige Änderu
Sie das G
n am Produ
ie Kurzschl
n, die durc
spruch. Fü
dieses Ger
bei Temper
ng, indem
er und Unb
wartenden
dass die a
edienungs
s die Netzl
gen soll ein
tlinien
- und Qu
Sie das Ge
tzen Sie d
t Flüssigkei
ie das Gerä
ie, dass die
von 2.5cm
Sie Erschüt
des Geräte
erst in Bet
icht von Pe
ätes das Er
erungen sin
ngen erlisc
rät nur für
t führen un
uss, Brand
Nichtbeac
daraus res
t von eine
turschwan
ie es ausg
fugte vom
Teile. Best
zuschließen
nleitung.
itung nicht
e Fachkraft
litätsgara
ät nur im
s Gerät kei
befüllten G
vor Staub.
Lüftungssc
zwischen d
terungen. V
.
ieb, nachde
rsonen bedi
ebnis von
d aus Siche
t der Garan
nwendung
d erlischt d
unden, ele
tung der B
ltierende F
Fachmann
ungen nich
schaltet las
erät fern.
llen Sie ev
de Netzspa
equetscht
das Kabel e
tie am End
nnenberei
er Flüssigk
egenstände
Schützen S
litze nicht
m Gerät un
rmeiden Si
m Sie sich
nen, die si
nfachmänni
heitsgründ
tieanspruch
n beschrie
r Garantiea
trischem S
dienungsan
lgeschäden
installieren
sofort eins
sen bis es a
ntuelle Ers
nung nicht
der durch
setzen.
dieser Be
h. Schütze
it wie z.B.
wie z.B. ei
ie das Gerä
lockiert we
d jedem an
e rohe Gew
it seinen F
h nicht mit
scher Bedie
n verboten.
en in dieser
nspruch. Je
hlag, usw.
leitung ver
übernimmt
und warten
halten. Sc
kklimatisier
tzteile bei I
höher ist al
charfe Kant
ienungsanl
n Sie das G
ropf- oder
e Vase, au
vor extrem
den. Beach
eren Gege
lt während
nktionen v
dem Gerät
ung.
Bei Schäde
Bedienung
e andere V
erbunden.
rsacht werd
der Herstell
.
ützen Sie d
ist (Zimm
rem Fachh
die Netzsp
n beschädi
itung.
rät vor Reg
pritzwasse
das Gerät.
en Temper
en Sie eine
stand.
der Installa
rtraut gem
uskennen.
n verursach
anleitung s
rwendung i
en, erlischt
er keine Ha
s Gerät vo
rtemperatu
ndler.
nnung
t werden
en und
, aus. Stell
turen.
minimale
ion und
cht haben.
Meist ist die
t durch
nst kann di
st mit
der
tung.
erreicht ha
n
s
t).
V.
02 – 09/03/2
012
19
©Vellema
nv
Page 20

VDSMP33
• Dieses Gerät wurde für den professionellen Einsatz auf Bühnen, in Discotheken, Theatern, usw. entworfen
und eignet sich nur für die Anwendung im Innenbereich. Verwenden Sie das Gerät mit einer
Wechselspannung von 230VAC / 50Hz.
• Verwenden Sie die Originalverpackung, wenn das Gerät transportiert werden soll.
• Bewahren Sie diese Bedienungsanleitung für künftige Einsichtnahme auf.
4. Eigenschaften
• MP3-Player über SD-Karte oder USB-Stick
• Scratch-, Brake- und Reverse-Effkekt und Reloop-Funktion
• 16%-Pitchregelung
• 2x SD-Karteneinschub und 2x USB-Anschluss
• Multifunktionsdisplay mit ID3 TAG-Anzeige
• SD card- / USB- / Phono- / Line- / Mic-Eingang
• Suchfunktion über Jog-Rad
• Einzeltitelwiedergabe / kontinuierliche Titelwiedergabe
• 2-Kanal CINC Master-Ausgang & 2-Kanal REC-Ausgänge
• 2-Kanal-Mixer & 3-Band-Equalizer
5. Umschreibung
Siehe Abbildungen, Seite 2 dieser Bedienungsanleitung.
Das Gerät hat zwei Bedienfelder: Beide ähneln sich. Es gibt die meisten Tasten und Anzeigen auf beiden
Bedienfeldern.
1 EIN/AUS-Schalter: Schalten Sie das Gerät mit diesem Schalter ein und aus.
2 Netzanschluss: 230 VAC/50 Hz
GND-Anschluss (Masse): Gibt es Interferenzen, verbinden Sie das Gerät dann mit diesem GND-
3
Anschluss für Plattenspieler, um so eine Masse-Anschluss zu kreieren.
4 BALANCED MASTER OUT-Ausgang: symmetrische XLR Audio-Ausgänge.
PHONO/LINE-Eingang: verbinden Sie ein externes Gerät (nicht mitgeliefert, z.B. Plattenspieler, CD-
5
Spieler, usw.) mit diesen RCA-Buchsen (Cinch). Phono1/line1 = Kanal 1, Phono2/line2 = Kanal 2.
PHONO/LINE-Taste: Stellen Sie diese Taste auf PHONO wenn ein Plattenspieler (nicht mitgeliefert) mit
6
dem LINE-Eingang verbunden ist; Ist dies nicht der Fall, so stellen Sie diese Taste auf LINE.
LINE OUTPUT (REC/AMP): Unsymmetrische Ausgänge – Verbinden Sie ein Aufnahmegerät (nicht
7
mitgeliefert) mit dem REC-Ausgang. Verbinden Sie einen Verstärker (nicht mitgeliefert) mit dem AMP-
Ausgang.
Kopfhöreranschluss: 6.35mm-Anschluss für Kopfhörer. Die Impedanz der Kopfhörer muss >32Ω. Das
8
Signal, das zum Kopfhörer gesendet wird, ist unabhängig vom Signal, das zum Verstärker gesendet wird.
9 CUE-Einstellung: Stellen Sie die Ausgangslautstärke des Kopfhörers ein
Horizontaler Schiebeschalter für Kopfhörer: Bewegen Sie den Schiebeschalter von links nach rechts
um die Lautstärke von Kanal 2 allmählich zu erhöhen und, um Kanal 1 stumm zu schalten. Stellen Sie
10
den Schiebeschalter in die mittlere Position, so werden beide Kanäle mit derselben Lautstärke über den
Kopfhörer abgespielt.
11 BASS: Mikrofon-Equalizer für die tiefen Töne
12 TREBLE: Mikrofon-Equalizer für die höhen Töne
13 MIC LEVEL: Zum Regeln der Eingangslautstärke des Mikrofons
14 MICROPHONE-Anschluss: 6.35mm-Anschluss für Mikrofon (nicht mitgeliefert).
15 Display: LCD.
16 SD-Karteneinschub: Stecken Sie eine SD-Karte in den Einschub.
17 USB-Anschluss: Verbinden Sie ein USB-Speichermedium mit diesem Port
18 LOW-Knopf: Zum Regeln der Lautstärke für die tiefen Töne
19 MID-Knopf: Zum Regeln der Lautstärke für die Mittentöne
20 HIGH-Knopf: Zum Regeln der Lautstärke für die höhen Töne
V. 02 – 09/03/2012 20 ©Velleman nv
Page 21

222222222333333333344
B
R
a
D
k
D
s
E
m
g
n
O
e
w
i
w
-
a
z
e
m
n
S
T
d
-
M
L
e
n
r
T
t
ü
U
g
D
d
d
t
s
x
m
i
e
d
n
d
s
e
h
e
c
ä
k
d
d
W
s
r
t
r
ü
i
(
e
ö
a
e
u
h
t
d
c
e
e
w
n
m
n
a
K
M
n
T
d
t
e
e
e
r
e
r
u
n
z
e
n
n
z
n
d
n
u
d
e
i
ä
c
t
i
d
d
d
e
e
r
g
h
d
e
w
e
D
g
a
L
w
t
u
e
ü
e
n
e
m
m
.
e
S
r
s
2
e
d
s
i
c
d
p
E
s
e
o
s
h
u
h
d
c
t
e
B
n
u
m
i
e
b
t
m
s
e
e
e
n
e
)
n
i
c
e
k
z
d
VDSMP33
SD-US
1
auszuw
auszuw
2 GAIN:
3 MASTE
SD/US
4
USB.
FOLDE
5
die LED
Modus
6
7
:
gedrüc
:
Zurück
SINGL
(Gesa
8
• Sin
• Co
abg
9 START
END L
0
Schleif
/PHONO-
ählen. Schi
ählen.
Zum Regel
R-Lautstä
B-Taste: D
/TRACK-
eingeschal
ktiviert.
rücken Sie
t
rücken Sie
pulen gedr
/CONTIN
ttitelwieder
le-Modus:
tinuous-Mo
espielt bis
LOOP-Tas
OP-Taste
wird nun u
IN-Schalt
ben Sie na
der Lautst
keregler: r
rücken Sie,
aste: drüc
et, dann ist
einmal für
einmal für
ckt
E-Taste:
abe) Modu
en Titel wi
us: Den Ti
as Ende de
e (IN): Dr
(OUT): Drü
nendliche w
r: schiebe
h rechts, u
rke des Ka
egeln Sie d
um die SD-
en Sie, um
der Folder-
en nächste
en vorigen
ählen Sie
aus. Der a
d abgespiel
el wird abg
Datei.
cken Sie di
cken Sie di
ederholt. D
Sie nach li
den PHON
als
s Master-A
arte als Au
zwischen d
odus aktiv
Titel/die n
itel/die nä
en ‘Single’-
usgewählte
und die W
spielt und
Taste, um
Taste, um
ücken Sie
ks, um die
/LINE-Ein
sgangsnive
ioquelle au
r Dateisuch
ert. Ist die
chste Datei
hste Datei.
(Einzeltitel
Modus wird
edergabe s
anach werd
den Startp
en Endpun
ie Taste wi
SD-Karte o
ang der An
u
szuwählen.
e und der T
ED ausges
. Halten Sie
Halten Sie
iedergabe)
im LCD-Dis
oppt beim
en die näch
nkt der Sch
kt der Schle
der, um die
er den US
chlüsse auf
Drücken Sie
telsuche zu
haltet, dan
die Taste z
ie Taste zu
oder den ‘C
lay angeze
nde des Tit
ten Titel e
leife zu bes
ife zu besti
Schleife zu
-Anschluss
der Rückse
wieder für
schalten. Is
ist der Tra
m Vorspul
ontinuous’-
gt.
ls.
enfalls
immen.
men. Die
löschen.
te
t
k-
n
1 RELOO
Gesch
2
eines T
Gesch
3 PITCH
PITCH
4
Sie los,
PITCH
5
Lassen
CUE-T
zurück
Der Cu
6
bestim
haben.
Drücke
BRAKE
7
(der Tit
8 REVER
TIME-
9
Titels,
0 VINYL
P-Taste: D
indigkeit
tels um ma
indigkeit zu
Taste: Sch
BEND + (h
um zur nor
BEND – (n
Sie los, um
ste: drück
ukehren.
-Punkt ist
en, spiele
Verwenden
Sie CUE,
-Taste: Sta
el läuft lang
E-Taste:
aste: Wähl
er Restzeit
Taste: Sch
rücken Sie,
kontrolle
. 16% zu e
reduzieren.
alten Sie de
öher) Tast
alen Tonh
edriger) T
zur normal
n Sie diese
er Punkt an
Sie ihn ab
Sie die Suc
ann kehrt d
rten oder s
samer).
pielen Sie
en Sie zwis
(REMAIN) d
alten Sie di
um auf den
PITCH): v
rhöhen ode
n Pitch-Schi
: Halten Si
he zurückz
ste: Halte
n Tonhöhe
Taste währ
dem Sie de
nd drücke
-Tasten für
er Titel sofo
oppen Sie d
en aktuelle
hen der An
s laufende
Scratch-Fu
Anfang der
rwenden Si
zu verring
ebeschalter
e diese ged
kehren.
Sie diese
urückzuke
nd der Wie
n Titel start
Sie Pause,
eine Feinab
rt zum Cueen Titel mit
Titel rück
eige von d
Titels, ode
nktion des
Schleife zur
diese Schi
rn. Schiebe
ein/aus.
ückt, um di
edrückt, u
ren.
ergabe, u
n möchten
wenn Sie d
stimmung.
Punkt zurüc
einem nied
ärts ab.
r bereits ge
r der vollstä
rehrads [4
ckzuspring
beschalter,
Sie nach
Tonhöhe
die Tonhö
zum vorhe
Um den C
n gewünsc
pielen Sie
k.
igeren Ges
pielten Zei
ndigen Rest
] ein/aus.
n.
um die Ge
ben, um di
ofort zu erh
e sofort zu
r eingestellt
e-Punkt in
ten Cue-Pu
en Titel wi
hwindigkeit
(ELAPSED)
zeit (TOTAL
chwindigkei
öhen. Lasse
senken.
n Cue-Pun
inem Titel
kt erreicht
der ab.
als normal
des laufen
.
t
n
t
u
en
Play/p
1
Pause-
V.
02 – 09/03/2
ause-Tast
odus zu sc
012
():Ver
alten.
enden Sie
iese Taste,
21
um zwisch
n den Wied
rgabe-Mod
us und den
©Vellema
nv
Page 22

VDSMP33
Drehrad
• Leuchtet die VINYL-Anzeige [40]: Scratch-Funktion.
Drehen Sie das Rad während des Abspielens nach rechts, um vorwärts zu scratchen. Drehen Sie das
Rad nach links, um rückwärts zu scratchen. Je schneller Sie drehen, umso schneller scratchen Sie
42
43
44 LED-Messgerät: Zeigt das Niveau des Masterausgangs an.
45
46
vor- oder rückwärts.
• Die VINYL-Anzeige [40] leuchtet nicht: Geschwindigkeits- oder Suchfunktion.
Pausieren Sie den Titel und drehen Sie nach rechts für einen schnellen Vorlauf. Drehen Sie nach links
für einen schnellen Rücklauf.
Drehen Sie das Rad während des Abspielens nach rechts, um die Geschwindigkeit zu erhöhen.
Drehen Sie nach links, um die Geschwindigkeit zu verringern.
Kanal-Schiebeschalter: Verwenden Sie diesen Schiebeschalter, um das Niveau beider Kanäle
einzustellen (1~10).
Horizontaler Schiebeschalter: Bewegen Sie den Schiebeschalter von links nach rechts um die
Lautstärke von Kanal 2 allmählich zu erhöhen und, um Kanal 1 stumm zu schalten. Stellen Sie den
Schiebeschalter in die mittlere Position, so werden beide Kanälen mit derselben Lautstärke abgespielt.
TAP-Taste (Beats Per Minute): Drücken Sie diese Taste wiederholt, um die Anzahl der Taktschläge
pro Minute zu ermitteln. Der Wert erscheint im Display.
6. Reinigung und Wartung
• Alle verwendeten Schrauben müssen fest angespannt werden und dürfen keine Rostspuren zeigen.
• Das Gehäuse, die Linsen, die Montagebügel und der Montageort (z.B. Decke oder Gebinde) dürfen nicht
angepasst werden, z.B. bohren Sie keine zusätzlichen Löcher in Montagebügel, verändern Sie die
Anschlüsse nicht, usw.)
• Mechanische bewegende Teile dürfen keine Spuren von Verschleiß aufweisen.
• Sorgen Sie dafür, dass die Netzkabel nicht beschädigt sind. Lassen Sie das Gerät von einer Fachkraft
warten.
• Trennen Sie das Gerät vom Netz ehe Sie mit den Servicearbeiten anfangen.
• Verwenden Sie zur Reinigung ein feuchtes, fusselfreies Tuch. Verwenden Sie auf keinen Fall Alkohol oder
irgendwelche Lösungsmittel.
• Die Teile dürfen nicht eigenmächtig ersetzt werden.
• Bestellen Sie eventuelle Ersatzteile bei Ihrem Fachhändler.
7. Technische Daten
Stromversorgung 230VAC / 50Hz
Pitchregelung 16%
Equalizer Bass +12dB, -12dB
Mitteltöne +12dB, -12dB
Höhen +12dB, -12dB
Impedanz Kopfhörer 32 Ohm
Klirrfaktor <0.02%
Kanaltrennung 50dB (1KHz)
Empfindlichkeit PHONO 10mV, 47kOhm
LINE 1V, 10kOhm
MIC 10mV, 600Ohm
Verstärkung 0 bis -20db
Ausgangspegel 2.0 ± 0.2V RMS
Frequenzbereich 20Hz-20KHz
Signal-/Rauschabstand 80dB
Abmessungen 343 x 274 x 60mm
Gewicht 3.6kg
V. 02 – 09/03/2012 22 ©Velleman nv
Page 23

VDSMP33
Verwenden Sie dieses Gerät nur mit originellen Zubehörteilen. Velleman NV übernimmt keine
Haftung für Schaden oder Verletzungen bei (falscher) Anwendung dieses Gerätes. Für mehr
Informationen zu diesem Produkt und die neueste Version dieser Bedienungsanleitung, siehe
www.hqpower.eu. Alle Änderungen ohne vorherige Ankündigung vorbehalten.
© URHEBERRECHT
Velleman NV besitzt das Urheberrecht für diese Bedienungsanleitung. Alle weltweiten Rechte
vorbehalten.
Ohne vorherige schriftliche Genehmigung des Urhebers ist es nicht gestattet, diese Bedienungsanleitung ganz
oder in Teilen zu reproduzieren, zu kopieren, zu übersetzen, zu bearbeiten oder zu speichern.
V. 02 – 09/03/2012 23 ©Velleman nv
Page 24

Velleman® Service and Quality Warranty
Since its foundation in 1972, Velleman® acquired extensive
experience in the electronics world and currently distributes its
products in over 85 countries.
All our products fulfil strict quality requirements and legal stipulations
in the EU. In order to ensure the quality, our products regularly go
through an extra quality check, both by an internal quality
department and by specialized external organisations. If, all
precautionary measures notwithstanding, problems should occur,
please make appeal to our warranty (see guarantee conditions).
General Warranty Conditions Concerning Consumer Products
(for EU):
• All consumer products are subject to a 24-month warranty on
production flaws and defective material as from the original date of
purchase.
• Velleman® can decide to replace an article with an equivalent
article, or to refund the retail value totally or partially when the
complaint is valid and a free repair or replacement of the article is
impossible, or if the expenses are out of proportion.
You will be delivered a replacing article or a refund at the value of
100% of the purchase price in case of a flaw occurred in the first
year after the date of purchase and delivery, or a replacing article at
50% of the purchase price or a refund at the value of 50% of the
retail value in case of a flaw occurred in the second year after the
date of purchase and delivery.
• Not covered by warranty:
- all direct or indirect damage caused after delivery to the article
(e.g. by oxidation, shocks, falls, dust, dirt, humidity...), and by the
article, as well as its contents (e.g. data loss), compensation for loss
of profits;
- consumable goods, parts or accessories that are subject to an aging
process during normal use, such as batteries (rechargeable, nonrechargeable, built-in or replaceable), lamps, rub ber parts, drive
belts... (unlimited list);
- flaws resulting from fire, water damage, lightning, accident, natural
disaster, etc.…;
- flaws caused deliberately, negligently or resulting from improper
handling, negligent maintenance, abusive use or use contrary to the
manufacturer’s instructions;
- damage caused by a commercial, professional or collective use of
the article (the warranty validity will be reduced to six (6) months
when the article is used professionally);
- damage resulting from an inappropriate packing and shipping of the
article;
- all damage caused by modification, repair or alteration performed
by a third party without written permission by Velleman®.
• Articles to be repaired must be delivered to your Velleman® dealer,
solidly packed (preferably in the original packaging), and be
completed with the original receipt of purchase and a clear flaw
description.
• Hint: In order to save on cost and time, please reread the manual
and check if the flaw is caused by obvious causes prior to presenting
the article for repair. Note that returning a non-defective article can
also involve handling costs.
• Repairs occurring after warranty expiration are subject to shipping
costs.
• The above conditions are without prejudice to all commercial
warranties.
The above enumeration is subject to modification according to
the article (see article’s manual).
Velleman® service- en kwaliteitsgarantie
Velleman® heeft sinds zijn oprichting in 1972 een ruime ervaring
opgebouwd in de elektronicawereld en verdeelt op dit moment
producten in meer dan 85 landen. Al onze producten beantwoorden
aan strikte kwaliteitseisen en aan de wettelijke bepalingen geldig in
de EU. Om de kwaliteit te waarborgen, ondergaan onze producten op
regelmatige tijd stippen een extra kwaliteitscontrole, zowel door onze
eigen kwaliteitsafdeling als door externe gespecialiseer de
organisaties. Mocht er ondanks deze voorzorgen toch een probleem
optreden, dan kunt u steeds een beroep doen op onze waarborg (zie
waarborgvoorwaarden).
Algemene waarborgvoorwaarden consumentengoederen
(voor Europese Unie):
• Op alle consumentengoederen geldt een garantieperiode van 24
maanden op productie- en materiaalfouten en dit vanaf de
oorspronkelijke aankoopdatum.
• Indien de klacht gegrond is en een gratis reparatie of vervanging
van een artikel onmogelijk is of indien de kosten hiervoor buiten
verhouding zijn, kan Velleman® beslissen het desbetreffende artikel
te vervangen door een gelijkwaardig artikel of de aankoopsom van
het artikel gedeeltelijk of volledig terug te betalen. In dat geval krijgt
u een vervangend product of terugbetaling ter waarde van 100% van
de aankoopsom bij ontdekking van een gebrek tot één jaar na
aankoop en levering, of een vervangend product tegen 50% van de
kostprijs of terugbetaling van 50 % bij ontdekking na één jaar tot 2
jaar.
• Valt niet onder waarborg:
- alle rechtstreekse of onrechtstreekse schade na de levering
veroorzaakt aan het toestel (bv. door oxidatie, schokken, val, stof,
vuil, vocht...), en door het toestel, alsook zijn inhoud (bv. verlies van
data), vergoeding voor eventuele winstderving.
- verbruiksgoederen, onderdelen of hulpstukken die onderhevig zijn
aan veroudering door normaal gebruik zoals bv. batterijen (zowel
oplaadbare als niet-oplaadbare, ingebouwd of vervangbaar), lampen,
rubberen onderdelen, aandrijfriemen... (onbep erkte lijst).
- defecten ten gevolge van brand, waterschade, bliksem, ongevallen,
natuurrampen, enz.
- defecten veroorzaakt door opzet, nalatigheid of door een
onoordeelkundige behandeling, slecht onderhoud of abnormaal
gebruik of gebruik van het toestel strijdig met de voorschriften van
de fabrikant.
- schade ten gevolge van een commercieel, prof essioneel of collectief
gebruik van het apparaat (bij professioneel gebruik wordt de
garantieperiode herleid tot 6 maand).
- schade veroorzaakt door onvoldoende bescherming bij transport
van het apparaat.
- alle schade door wijzigingen, reparaties of modificaties uitgevoerd
door derden zonder toestemming van Velleman®.
• Toestellen dienen ter reparatie aangeboden te worden bij uw
Velleman®-verdeler. Het toestel dient vergezeld te zijn van het
oorspronkelijke aankoopbewijs. Zorg voor een degelijke verpakking
(bij voorkeur de originele verpakking) en voeg een duidel ijke
foutomschrijving bij.
• Tip: alvorens het toestel voor reparatie aan te bieden, kijk nog
eens na of er geen voor de hand liggende reden is waarom het
toestel niet naar behoren werkt (zie handleiding). Op deze wijze kunt
u kosten en tijd besparen. Denk eraan dat er ook voor niet-defecte
toestellen een kost voor controle aangerekend kan worden.
• Bij reparaties buiten de waarborgperiode zullen transportkosten
aangerekend worden.
• Elke commerciële garantie laat deze rechten onverminderd.
Bovenstaande opsomming kan eventueel aangepast worden
naargelang de aard van het product (zie handleiding van het
betreffende product).
Garantie de service et de qualité Velleman®
Depuis 1972, Velleman® a gagné une vaste expérience dans le
secteur de l’électronique et est actuellement distributeur dans plus de
85 pays.
Tous nos produits répondent à des exigences de qualité rigoureuses
et à des dispositions légales en vigueur dans l’UE. Afin de garantir la
qualité, nous soumettons régulièrement nos produits à des c ontrôles
de qualité supplémentaires, tant par notre propre service qualité que
par un service qualité externe. Dans le cas improbable d’un défaut
malgré toutes les précautions, il est possible d’invoquer notre
garantie (voir les conditions de garantie).
Conditions générales concernant la garantie sur les produits
grand public (pour l’UE) :
• tout produit grand public est garanti 24 mois contre tout vice de
production ou de matériaux à dater du jour d’acquisition effective ;
• si la plainte est justifiée et que la réparation ou le remplacement
d’un article est jugé impossible, ou lorsque les coûts s’avèrent
disproportionnés, Velleman® s’autorise à remplacer ledit article par
un article équivalent ou à rembourser la totalité ou une partie du prix
d’achat. Le cas échéant, il vous sera consenti un article de
remplacement ou le remboursement complet du prix d’achat lors
d’un défaut dans un délai de 1 an après l’achat et la livraison, ou un
article de remplacement moyennant 50% du prix d’achat ou le
remboursement de 50% du prix d’achat lors d’un défaut après 1 à 2
ans.
• sont par conséquent exclus :
- tout dommage direct ou indirect survenu à l’article après livraison
(p.ex. dommage lié à l’oxydation, choc, chute, poussière, sable,
impureté…) et provoqué par l’appareil, ainsi que son contenu (p.ex.
perte de données) et une indemnisation éventuelle pour perte de
revenus ;
- toute pièce ou accessoire nécessitant un remplacement causé par
un usage normal comme p.ex. piles (rechargeables comme non
rechargeables, intégrées ou remplaçables), ampoules, pièces en
caoutchouc, courroies… (liste illimitée) ;
- tout dommage qui résulte d’un incendie, de la foudre, d’un
accident, d’une catastrophe naturelle, etc. ;
- out dommage provoqué par une négligence, volontaire ou non, une
utilisation ou un entretien incorrect, ou une utilisation de l’appareil
contraire aux prescriptions du fabricant ;
- tout dommage à cause d’une utilisation commerciale,
professionnelle ou collective de l’appareil (la période de garantie ser a
réduite à 6 mois lors d’une utilisation professionnelle) ;
- tout dommage à l’appareil qui résulte d’une utilisation incorrecte ou
différente que celle pour laquelle il a été initialeme nt prévu comme
décrit dans la notice ;
- tout dommage engendré par un retour de l’appareil emballé dans
un conditionnement non ou insuffisamment protégé.
- toute réparation ou modification effectuée par une tierce personne
sans l’autorisation explicite de SA Velleman® ; - frais de transport de
et vers Velleman® si l’appareil n’est plus couvert sous la garantie.
• toute réparation sera fournie par l’endroit de l’achat. L’appareil doit
nécessairement être accompagné du bon d’achat d’origine et être
dûment conditionné (de préférence dans l’emballage d’origine avec
mention du défaut) ;
• tuyau : il est conseillé de consulter la notice et de contrôler câbles,
piles, etc. avant de retourner l’appareil. Un appareil retourné jugé
défectueux qui s’avère en bon état de marche pourra faire l’objet
d’une note de frais à charge du consommateur ;
• une réparation effectuée en-dehors de la période de garantie fera
l’objet de frais de transport ;
• toute garantie commerciale ne porte pas atteinte aux conditions
susmentionnées.
La liste susmentionnée peut être sujette à une
complémentation selon le type de l’article et être mentionnée
dans la notice d’emploi.
Page 25

Garantía de servicio y calidad Velleman®
Desde su fundación en 1972 Velleman® ha adquirido una amplia
experiencia como distribuidor en el sector de la electrónica en más de
85 países. Todos nuestros productos responden a normas de calidad
rigurosas y disposiciones legales vigentes en la UE. Para garantizar la
calidad, sometemos nuestros productos regularmente a controles de
calidad adicionales, tanto a través de nuestro propio servicio de
calidad como de un servicio de calidad externo. En el caso
improbable de que surgieran problemas a pesar de todas las
precauciones, es posible recurrir a nuestra garantía (véase las
condiciones de garantía) .
Condiciones generales referentes a la garantía sobre
productos de venta al público (para la Unión Europea):
• Todos los productos de venta al público tienen un período de
garantía de 24 meses contra errores de producción o errores en
materiales desde la adquis ición original;
• Si la queja está fundada y si la reparación o sustitución de un
artículo no es posible, o si los gastos son desproporcionados,
Velleman® autoriza reemplazar el artículo por un artículo equivalente
o reembolsar la totalidad o una parte del precio de compra. En este
caso, usted recibirá un artículo de recambio o el reembolso completo
del precio de compra si encuentra algún fallo hasta un año después
de la compra y entrega, o un artículo de recambio al 50% del precio
de compra o el reembolso del 50% del precio de compra si encuentra
un fallo después de 1 año y hasta los 2 años después de la compra y
entrega.
Por consiguiente, están excluidos entre otras cosas:
- todos los daños causados directa o indirectamente al aparato (p.ej.
por oxidación, choques, caída,...) y a su contenido (p.ej. pérdida de
datos) después de la entrega y causados por el aparato, y cualquier
indemnización por posible p érdida de ganancias;
- partes o accesorios, que estén expuestos al desgaste causad o por
un uso normal, como por ejemplo baterías (tanto recargables como
no recargables, incorporadas o reemplazables), bombillas, partes de
goma, etc. (lista ilimitada);
- defectos causados por un incendio, daños causados por el agua,
rayos, accidentes, catástrofes naturales, etc.;
- defectos causados a conciencia, descuido o por malos tratos, un
mantenimiento inapropiado o un uso anormal del aparato contrario a
las instrucciones del fabricante;
- daños causados por un uso comercial, profesional o colectivo del
aparato (el período de garantía se reducirá a 6 meses con uso
profesional);
- daños causados por un uso incorrecto o un uso ajeno al que está
previsto el producto inicialmente como está descrito en el manual del
usuario;
- daños causados por una protección insuficiente al transportar el
aparato.
- daños causados por reparaciones o modificaciones efectuadas por
una tercera persona sin la autorización explícita de Velleman®;
- se calcula gastos de transporte de y a Velleman® si el aparato ya
no está cubierto por la garantía.
• Cualquier artículo que tenga que ser reparado tendrá que ser
devuelto a su distribuidor Velleman®. Devuelva el aparato con la
factura de compra original y transpórtelo en un embalaje sólido
(preferentemente el embalaje original). Incluya también una buena
descripción del fallo;
• Consejo: Lea el manual del usuario y controle los cables, las pilas,
etc. antes de devolver el aparato. Si no se encuentra un defecto en el
artículo los gastos podrían correr a cargo del cliente;
• Los gastos de transporte correrán a carga del cliente para una
reparación efectuada fuera del período de garantía.
• Cualquier gesto comercial no disminuye estos derechos.
La lista previamente mencionada puede ser adaptada según el
tipo de artículo (véase el manual del usuario del artículo en
cuestión).
Velleman® Service- und Qualitätsgarantie
Seit der Gründung in 1972 hat Velleman® sehr viel Erfahrung als
Verteiler in der Elektronikwelt in über 85 Ländern aufgebaut.
Alle Produkte entsprechen den strengen Qualitätsforderungen und
gesetzlichen Anforderungen in der EU. Um die Qualität zu
gewährleisten werden unsere Produkte regelmäßig einer zusätzlichen
Qualitätskontrolle unterworfen, sowohl von unserer eigenen
Qualitätsabteilung als auch von externen spezialisierten
Organisationen. Sollten, trotz aller Vorsichtsmaßnahmen, Probleme
auftreten, nehmen Sie bitte die Garantie in Anspruch (siehe
Garantiebedingungen).
Allgemeine Garantiebedingungen in Bezug auf Konsumgüter
(für die Europäische Union):
• Alle Produkte haben für Material- oder Herstellungsfehler eine
Garantieperiode von 24 Monaten ab Verkaufsdatum.
• Wenn die Klage berechtigt ist und falls eine kostenlose Reparatur
oder ein Austausch des Gerätes unmöglich ist, oder wenn die Kosten
dafür unverhältnismäßig sind, kann Velleman® sich darüber
entscheiden, dieses Produkt durch ein gleiches Produkt zu ersetzen
oder die Kaufsumme ganz oder teilweise zurückzuzahlen. In diesem
Fall erhalten Sie ein Ersatzprodukt oder eine Rückzahlung im Werte
von 100% der Kaufsumme im Falle eines Defektes bis zu 1 Jahr nach
Kauf oder Lieferung, oder Sie bekommen ein Ersatzprodukt im Werte
von 50% der Kaufsumme oder eine Rückzahlung im Werte von 50 %
im Falle eines Defektes im zweiten Jahr.
• Von der Garantie ausgeschlossen sind:
- alle direkten oder indirekten Schäden, die na ch Lieferung am Gerät
und durch das Gerät verursacht werden (z.B. Oxidation, Stöße, Fall,
Staub, Schmutz, Feuchtigkeit, ...), sowie auch der Inhalt (z.B.
Datenverlust), Entschädigung für eventuellen Gewinnausfall.
- Verbrauchsgüter, Teile oder Zubehörteile, die durch normalen
Gebrauch dem Verschleiß ausgesetzt sind, wie z.B. Batterien (nicht
nur aufladbare, sondern auch nicht aufladbare, eingebaute oder
ersetzbare), Lampen, Gummiteile, Treibriemen, usw. (unbeschränkte
Liste).
- Schäden verursacht durch Brandschaden, Wasserschaden, Blitz,
Unfälle, Naturkatastrophen, usw.
- Schäden verursacht durch absichtliche, nachlässige oder
unsachgemäße Anwendung, schlechte Wartung, zweckentfremdet e
Anwendung oder Nichtbeachtung von Benutzerhinweisen in der
Bedienungsanleitung.
- Schäden infolge einer kommerziellen, professionellen oder
kollektiven Anwendung des Gerätes (bei gewerblicher Anwendung
wird die Garantieperiode auf 6 Monate zurückgeführt).
- Schäden verursacht durch eine unsachgemäße Verpackung und
unsachgemäßen Transport des Gerätes.
- alle Schäden verursacht durch unautorisierte Änderungen,
Reparaturen oder Modifikationen, die von einem Dritten ohne
Erlaubnis von Velleman® vorgenommen werden.
• Im Fall einer Reparatur, wenden Sie sich an Ihren Velleman®Verteiler. Legen Sie das Produkt ordnungsgemäß verpackt
(vorzugsweise die Originalverpackung) und mit dem OriginalKaufbeleg vor. Fügen Sie eine deutliche Fehlerbeschreibung hinzu.
• Hinweis: Um Kosten und Zeit zu sparen, lesen Sie d ie
Bedienungsanleitung nochmals und überprüfen Sie, ob es keinen auf
de Hand liegenden Grund gibt, ehe Sie das Gerät zur Reparatur
zurückschicken. Stellt sich bei der Überprüfung des Gerätes heraus,
dass kein Geräteschaden vorliegt, könnte dem Kunden eine
Untersuchungspauschale berechnet.
• Für Reparaturen nach Ablauf der Garantiefrist werden
Transportkosten berechnet.
• Jede kommerzielle Garantie lässt diese Rechte unberührt.
Die oben stehende Aufzählung kann eventuell angepasst
werden gemäß der Art des Produktes (siehe
Bedienungsanleitung des Gerätes).
 Loading...