

Page 1
USER MANUAL
VDPLS1025
SUPER BRIGHT LED SPOT – DMX-CONTROLLED
ZEER HELDERE LED SPOT – DMX-GESTUURD
PROJECTEUR À LEDs SUPER BRILLANTES – PILOTAGE DMX
PROYECTOR CON LEDs MUY LUMINOSOS – CONTROLADO POR DMX
SUPERHELLER LED-SCHEINWERFER – DMX-GESTEUERT
GEBRUIKERSHANDLEIDING
NOTICE D’EMPLOI
MANUAL DEL USUARIO
BEDIENUNGSANLEITUNG
Page 2

2
VDPLS1025_v2 VELLEMAN
Page 3
3
VDPLS1025 – SUPER BRIGHT LED SPOT – DMX-CONTROLLED
1. Introduction
To all residents of the European Union
Important environmental information about this product
This symbol on the device or the package indicates that disposal of the device after its lifecycle could harm
the environment.
Do not dispose of the unit (or batteries) as unsorted municipal waste; it should be taken to a specialized
company for recycling.
This device should be returned to your distributor or to a local recycling service.
Respect the local environmental rules.
If in doubt, contact your local waste disposal authorities.
Thank you for buying the VDPLS1025! This is a super bright LED light. If the device was damaged in transit, don't
install or use it and contact your dealer. Please read the manual thoroughly before bringing this device into service.
2. Safety Instructions
Be very careful during the installation: touching live wires can cause life-threatening electroshocks.
Keep this device away from rain and moisture.
Unplug the mains lead before opening the housing.
• Damage caused by disregard of certain guidelines in this manual is not covered by the warranty and the dealer
will not accept responsibility for any ensuing defects or problems.
• A qualified technician should install and service this device.
• Do not switch the device on immediately after it has been exposed to changes in temperature. Protect the device
against damage by leaving it switched off until it has reached room temperature.
• This device falls under protection class I. It is therefore essential that the device be earthed. Have a qualified
person carry out the electric connection.
• Make sure that the available voltage does not exceed the voltage stated in the specifications of this manual.
• Do not crimp the power cord and protect it against damage. Have an authorized dealer replace it if necessary.
• Disconnect the device from the mains to clean it or when it is not in use. Handle the power cord by the plug only..
• Do not look directly at the light source as sensitive people may go into epileptic seizure if they do.
• Note that damage caused by user modifications to the device is not covered by the warranty.
• Keep the device away from children and unauthorized users.
3. General Guidelines
• This device is designed for professional use on stage, in discos, theatres, etc. The VDPLS1025 should only be
used indoors with an alternating current of max. 230VAC / 50Hz.
• Lighting effects are not designed for permanent operation: regular operation breaks will prolong their lives.
• Do not shake the device. Avoid brute force when installing or operating the device.
• Select a location where the device is protected against extreme heat, dust and moisture. Respect a minimum
distance of 0.5m between the device’s light output and any illuminated surface.
• Use an appropriate safety cable to fix the device (e.g. VDLSC8).
• Familiarize yourself with the functions of the device before actually using it. Do not allow operation by unqualified
people. Any damage that may occur will most probably be due to unprofessional use of the device.
• Use the original packaging if the device is to be transported.
• All modifications of the device are forbidden for safety reasons.
VDPLS1025_v2 VELLEMAN
Page 4
4
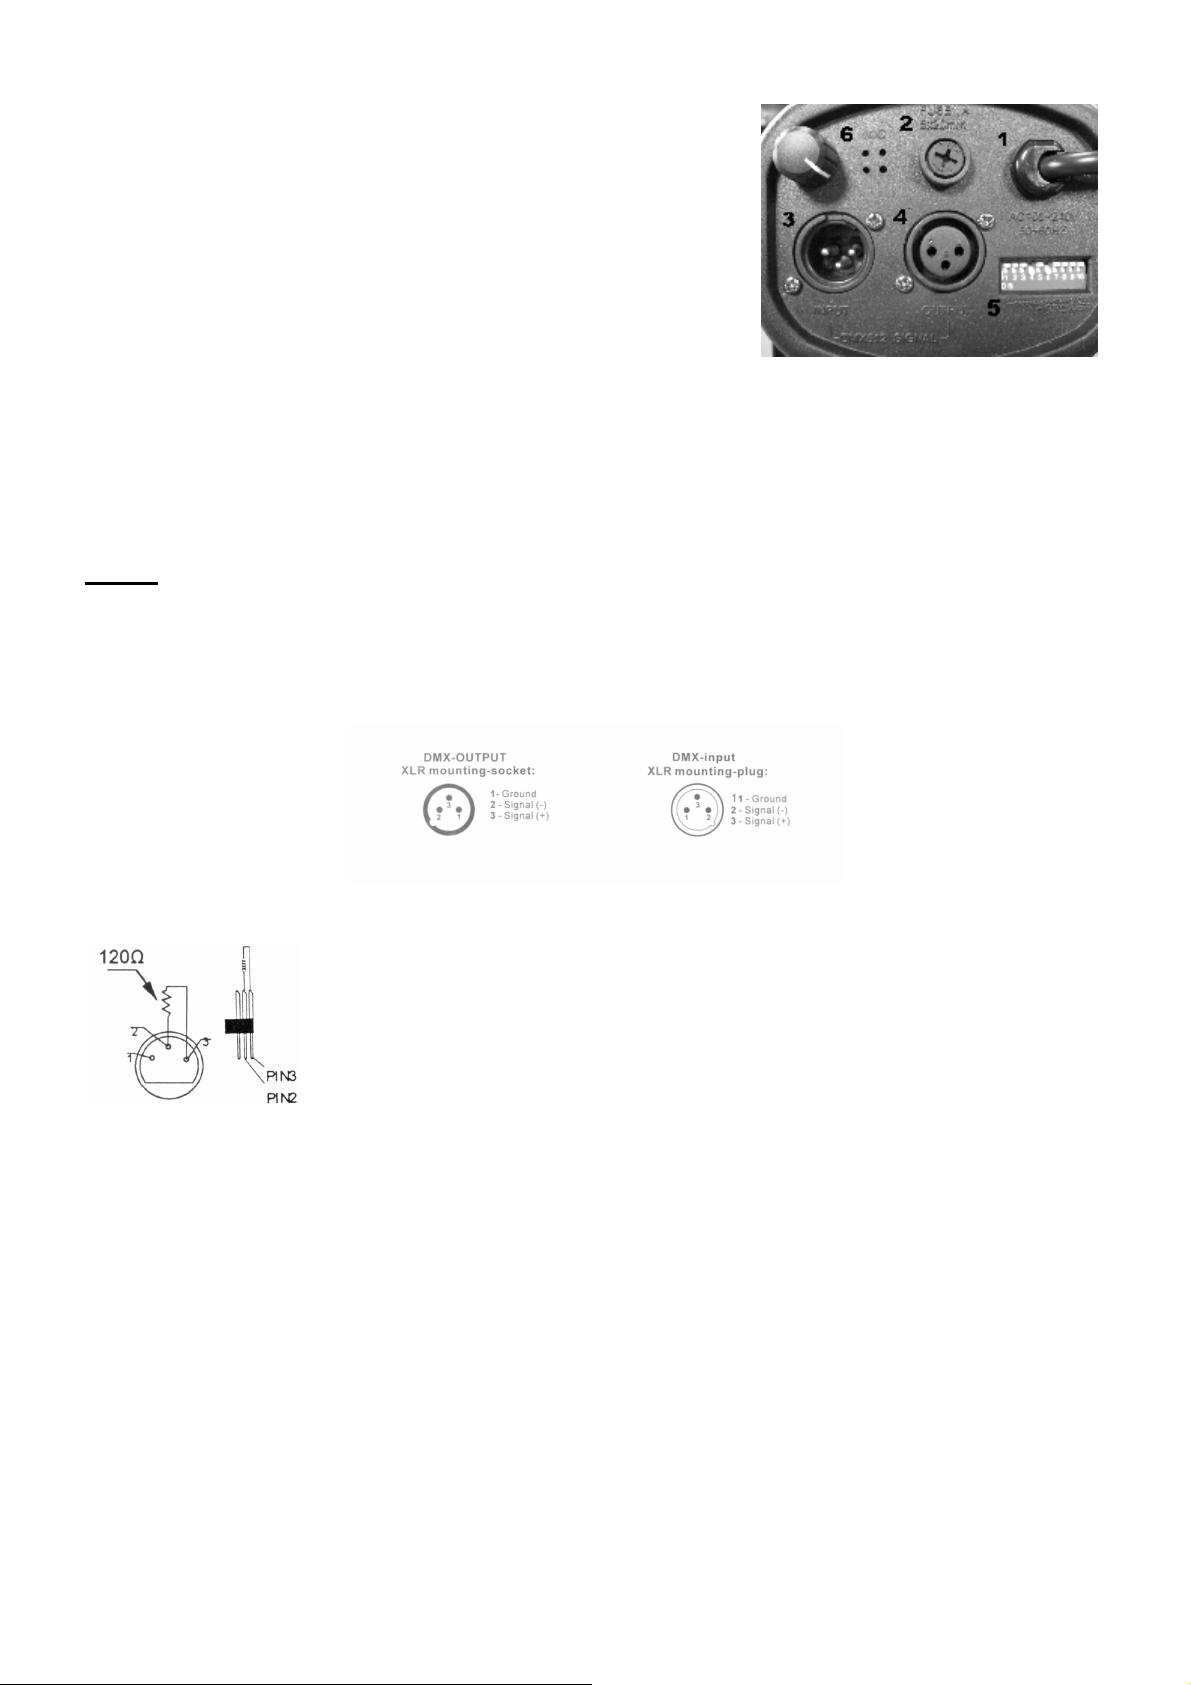
4. Installation
a. Connecting the Device
1. Power supply: 220VAC / 50-60Hz
2. Fuse: 5 x 20mm F1A (order code: FF1N)
3. Signal input: XLR connector connected with a DMX512 control panel.
4. Signal output: XLR connector connected with next spot.
5. DMX-address switches: Stand-alone function or DMX setting.
6. Microphone for sound activation
b. DMX512 Connections
Connect the provided XLR cable to the female 3-pin XLR output of your controller and the other side to the male 3pin XLR input of the VDPLS1025. Multiple VDPLS1025s can be linked through serial linking. The linking cable
should be two core, screened cable with XLR input and output connectors.
Caution: At the last fixture, the DMX cable has to be terminated with a terminator.
Only use a stereo shielded cable and 3-pin XLR plugs and connectors in order to connect the controller with the
fixture or one fixture with another.
c. Occupation of the XLR connector
d. DMX-512 Chain with Termination
A DMX terminator is recommended for installations where the DMX cable has to run a
long distance or is in an electrically noisy environment (e.g. discos). The terminator
prevents corruption of the digital control signal by electrical noise. The DMX terminator is
simply an XLR plug with a 120Ω resistor between pins 2 and 3, which is then plugged into
the XLR output socket of the last device in the chain.
Please see illustrations.
e. Projector DMX Start Address Selection
All DMX-controlled devices need a digital start address so that the correct device responds to the signals. This digital
start address is the channel number from which the device starts to “listen” to the DMX controller. Enter the correct
number and read it from the display located on the base of the VDPLS1025.
You can use the same starting address for a whole group of devices or enter an individual one for every device.
When all devices have the same address, all the units will “listen” to the control signal on one particular channel. In
other words: changing the settings of one channel will affect all devices simultaneously. If you set different
addresses, each device will “listen” to a separate channel number. Changing the settings of one channel will only
affect the device in question.
In the case of the 4-channel VDPLS1025, you will have to set the start address of the first unit to 1, the second unit
to 5 (1 + 4), the third to 9 (5 + 4), and so on.
VDPLS1025_v2 VELLEMAN
Page 5
5
5. Use
Function
• Automatic mode (7 colour change / 7 colour strobe / 7 colour automatic changing / 7 colour automatic
fade / sound activation)
• Master / slave mode
• DMX512 mode
Switch setting
Functions 1 2 3 4 5 6 7 8 9 10
Red ON
Green ON
Blue ON
strobe SLOW MED FAST FASTEST ON CYAN MAG YELLOW
Fade in/out SLOW MED FAST FASTEST ON
Colour flash SLOW MED FAST FASTEST
Sound-activated ON
DMX 1 2 4 8 16 32 64 128 256 ON
REMARK: Adjust the sensitivity via the rotary knob.
ON
6. DMX Setting
The VDPLS1025 has 4 DMX channels:
CHANNEL 1: function setting
0 – 127 dimmer (Ch2 - 4 dimmer valid)
128 – 250 strobe (Ch2 - 4 dimmer valid)
251 – 255 dimmer 100% (Ch2 - 4 dimmer valid)
CHANNEL 2: 0 – 255 RED
CHANNEL 3: 0 – 255 GREEN
CHANNEL 4: 0 – 255 BLUE
7. Cleaning and Maintenance
1. All screws should be tightened and free of corrosion.
2. The housing, the lenses, the mounting supports and the installation location (e.g. ceiling, suspension, trussing)
should not be deformed, modified or tampered with e.g. do not drill extra holes in mounting supports, do not
change the location of the connections…
3. Mechanically moving parts must not show any signs of wear and tear.
4. The electric power supply cables must not show any damage. Have a qualified technician maintain the device.
5. Disconnect the device from the mains prior to maintenance activities.
6. Wipe the device regularly with a moist, lint-free cloth. Do not use alcohol or solvents.
7. There are no user-serviceable parts, apart from the fuse (see “4. Installation”).
8. Contact your dealer for spare parts if necessary.
VDPLS1025_v2 VELLEMAN
Page 6
6
8. Technical Specifications
Wees voorzichtig bij de inst
allatie: raak geen kabels aan die onder stroom staan om
dodelijke elektroshocks
Power Supply max. 230VAC / 50-60Hz
Power Consumption max. 15W
LEDs 10mm x 90 pcs (30 x red, 30 x green, 30 x blue)
Angle 30°
DMX channels 4 channels
Fuse F1A, 120VAC (order code FF1N)
Dimensions 180 x 175 x 175mm
Total Weight 965g
For more info concerning this product, please visit our website www.hqpower.eu.
The information in this manual is subject to change without prior notice.
VDPLS1025 – ZEER HELDERE LED SPOT – DMX-GESTUURD
1. Inleiding
Aan alle ingezetenen van de Europese Unie
Belangrijke milieu-informatie betreffende dit product
Dit symbool op het toestel of de verpakking geeft aan dat, als het na zijn levenscyclus wordt weggeworpen,
dit toestel schade kan toebrengen aan het milieu.
Gooi dit toestel (en eventuele batterijen) niet bij het gewone huishoudelijke afval; het moet bij een
gespecialiseerd bedrijf terechtkomen voor recyclage.
U moet dit toestel naar uw verdeler of naar een lokaal recyclagepunt brengen.
Respecteer de plaatselijke milieuwetgeving.
Hebt u vragen, contacteer dan de plaatselijke autoriteiten inzake verwijdering.
Dank u voor uw aankoop! De VDPLS1025 is een zeer heldere LED spot. Lees deze handleiding grondig voor u het
toestel in gebruik neemt. Werd het toestel beschadigd tijdens het transport, installeer het dan niet en raadpleeg uw
dealer.
2. Safety Instructions
te vermijden.
Bescherm dit toestel tegen regen en vochtigheid.
Verzeker u ervan dat het toestel niet aangesloten is op een stroombron alvorens het te openen.
• De garantie geldt niet voor schade door het negeren van bepaalde richtlijnen in deze handleiding en uw dealer zal
de verantwoordelijkheid afwijzen voor defecten of problemen die hier rechtstreeks verband mee houden.
• Laat dit toestel installeren en onderhouden door een geschoolde technicus.
• Om beschadiging te vermijden, zet u het toestel best niet aan onmiddellijk nadat het werd blootgesteld aan
temperatuurschommelingen. Wacht tot het toestel op kamertemperatuur gekomen is.
• Dit toestel valt onder beschermingsklasse I, wat wil zeggen dat het toestel geaard moet zijn. Een geschoolde
technicus moet de elektrische aansluiting verzorgen.
• De beschikbare netspanning mag niet hoger zijn dan de spanning in de specificaties achteraan de handleiding.
• De voedingskabel mag niet omgeplooid of beschadigd zijn. Laat uw dealer zo nodig een nieuwe kabel plaatsen.
• Trek de stekker uit het stopcontact (trek niet aan de kabel!) voordat u het toestel reinigt en als u het niet gebruikt.
• Wanneer u het toestel voor het eerst gebruikt, kan dit gepaard gaan met een lichte rookontwikkeling en een
bepaalde geur. Dit is normaal en de eventuele rook of geur zal geleidelijk aan verdwijnen.
• Kijk niet rechtstreeks in de lichtbron. De lichtbron kan bij gevoelige mensen leiden tot een aanval van epilepsie.
• Schade door wijzigingen die de gebruiker heeft aangebracht aan het toestel vallen niet onder de garantie.
• Houd dit toestel uit de buurt van kinderen en onbevoegden.
VDPLS1025_v2 VELLEMAN
Page 7

7
3. Algemene richtlijnen
• Dit toestel is ontworpen voor professioneel gebruik op podia, in disco's, enz. U mag dit toestel enkel binnenshuis
gebruiken door de meegeleverde adapter aan te sluiten op een wisselspanning van maximum 230VAC / 50Hz.
• Lichteffecten zijn niet ontworpen voor continue werking: regelmatige onderbrekingen doen ze langer meegaan.
• Schud het toestel niet dooreen. Vermijd brute kracht tijdens de installatie en de bediening van dit toestel.
• Installeer het toestel weg van extreme temperaturen, vochtigheid en stof. Zorg voor een minimumafstand van
0.5m tussen de lichtuitgang van het toestel en het belichte oppervlak.
• Maak het toestel vast met een geschikte veiligheidskabel (bvb. VDLSC8).
• Leer eerst de functies van het toestel kennen voor u het gaat gebruiken. Ongeschoolde personen mogen dit
toestel niet gebruiken. Meestal is beschadiging het gevolg van onprofessioneel gebruik.
• Gebruik de oorspronkelijke verpakking wanneer u het toestel vervoert.
• Om veiligheidsredenen mag de gebruiker geen wijzigingen aanbrengen aan het toestel.
• Gebruik het toestel enkel waarvoor het gemaakt is. Andere toepassingen kunnen leiden tot kortsluitingen,
brandwonden, elektrische schokken, enz. Bij onoordeelkundig gebruik vervalt de garantie.
4. Installatie
a. Het toestel aansluiten
1. Voeding: 220VAC / 50-60Hz
2. Zekering: 5 x 20mm F1A (order code: FF1N)
3. Signaalingang: XLR connector met aansluiting op een DMX512
besturingspaneel.
4. Signaaluitgang: XLR connector aangesloten op de volgende spot.
5. DIP-schakelaars DMX-adres: autonoom of DMX-instelling.
6. Microfoon voor geluidsbesturing
b. DMX512-aansluiting
Sluit de meegeleverde XLR-kabel aan de vrouwelijke 3-pin XLR-uitgang van de controller en de andere kant van de
mannelijke 3-pin XLR-ingang van de VDPLS1025. U kunt verscheidene VDPLS1025s aan elkaar koppelen met
behulp van een seriële koppeling. Gebruik daarvoor een 2-aderige afgeschermde kabel met XLR ingang- en
uitgangsaansluitingen.
Opgelet: Beëindig de DMX-kabel van het laatste toestel met een terminator.
Gebruik voor de aansluiting van de controller met het toestel of toestellen aan elkaar enkel een afgeschermde
stereokabel en 3-pin XLR pluggen en connectors.
c. Bezetting van de XLR-aansluiting
d. DMX512-keten met termination
Een DMX terminator is aanbevolen als de DMX kabel vrij lang is of wordt gebruikt in een
omgeving met veel elektrische ruis (bvb. een discotheek). De terminator voorkomt corruptie
van het digitale controlesignaal door elektrische ruis. De DMX terminator is niets meer dan
een XLR plug met een weerstand van 120
Ω van pin 2 naar 3. Deze XLR plug wordt dan
aangesloten op de XLR uitgang van het laatste toestel in de reeks. Zie de illustratie.
VDPLS1025_v2 VELLEMAN
Page 8

8
e. Startadres van de DMX-spot
Alle DMX-gestuurde toestellen hebben een digitaal startadres nodig, zodat het juiste toestel reageert op de signalen.
Dit digitale startadres is het kanaalnummer van waarop het toestel “luistert” naar het signaal van de DMX controller.
Geef het correcte nummer in en lees het af op de display onderaan uw VDPLS1025.
U kunt één enkel startadres gebruiken voor een groep toestellen of u kunt per toestel een nieuw startadres ingeven.
Wanneer u één enkel startadres instelt, zullen alle toestellen “luisteren” naar hetzelfde kanaal. Met andere woorden:
wanneer u de instellingen voor 1 kanaal verandert, zullen alle toestellen er tegelijk op reageren.
Wanneer u verschillende adressen instelt, dan luistert elk toestel naar een ander kanaal. Met andere woorden:
wanneer u de instellingen van een kanaal verandert, zal enkel het toestel op dat kanaal reageren.
In het geval van de 4-kanaals VDPLS1025, zult u het startadres van het eerste toestel op 1 moeten instellen, van het
tweede toestel op 5 (1 + 4), van het derde op 9 (5 + 4) enz.
5. Gebruik
Functie
• Automatische modus (7-kleurige verandering / 7-kleurige stroboscoop / automatische 7-kleurige
verandering / automatische 7-kleurige dimmer / muziekbesturing)
• Master / slave-modus
• DMX512-modus
Instellen van de schakelaars
Functie 1 2 3 4 5 6 7 8 9 10
Rood ON
Groen ON
Blauw ON
Stroboscoop TRAAG MED SNEL SNELST ON CYAAN MAG GEEL
Fade in/out TRAAG MED SNEL SNELST ON
Kleurenflits TRAAG MED FAST SNELST
Muziekbesturing ON
DMX 1 2 4 8 16 32 64 128 256 ON
OPMERKING: Regel de gevoeligheid van functie 1, 2 en 3 via de draaiknop.
ON
6. DMX-instelling
De VDPLS1025 is uitgerust met 4 kanalen:
KANAAL 1: Functie-instelling
0 – 127 dimmer (Ch2 - 4 dimmer geldig)
128 – 250 stroboscoop (Ch2 - 4 dimmer geldig)
251 – 255 dimmer 100% (Ch2 - 4 dimmer geldig)
KANAAL 2: 0 – 255 ROOD
KANAAL 3: 0 – 255 GROEN
KANAAL 4: 0 – 255 BLAUW
7. Reiniging en onderhoud
1. Alle gebruikte schroeven moeten goed zijn aangespannen en mogen geen sporen van roest vertonen.
2. De behuizing, de lenzen, de montagebeugels en de montageplaats (bvb. het plafond of het gebinte) mogen niet
vervormd zijn of aangepast worden (geen extra gaten in montagebeugels, aansluitingen niet verplaatsen etc.)
3. Mechanisch bewegende delen mogen geen sporen van slijtage vertonen en mogen niet onregelmatig bewegen.
VDPLS1025_v2 VELLEMAN
Page 9

9
4. De voedingskabels mogen niet beschadigd zijn. Laat het toestel onderhouden door een geschoolde technicus.
5. Ontkoppel het toestel van het lichtnet voor u aan onderhoudswerkzaamheden begint.
6. Maak het toestel geregeld schoon met een vochtige, niet pluizende doek. Gebruik geen alcohol of solvent.
7. De gebruiker mag geen onderdelen vervangen uitgenomen de zekering (zie “4. Installatie”).
8. Bestel eventuele reserveonderdelen bij uw dealer.
8. Technische specificaties
Voeding max. 230VAC / 50-60Hz
Verbruik max. 15W
LEDs 10mm x 90 st. (30 x rood, 30 x groen, 30 x blauw)
Hoek 30°
DMX-kanalen 4 kanalen
Zekering F1A, 120VAC (order code FF1N)
Afmetingen 180 x 175 x 175mm
Gewicht 965g
Voor meer informatie omtrent dit product, zie www.hqpower.eu.
De informatie in deze handleiding kan te allen tijde worden gewijzigd zonder voorafgaande kennisgeving.
VDPLS1025 – PROJECTEUR À LEDs SUPER BRILLANTES – PILOTAGE DMX
1. Introduction
Aux résidents de l'Union européenne
Des informations environnementales importantes concernant ce produit
Ce symbole sur l'appareil ou l'emballage indique que l’élimination d’un appareil en fin de vie peut polluer
l'environnement.
Ne pas éliminer un appareil électrique ou électronique (et des piles éventuelles) parmi les déchets
municipaux non sujets au tri sélectif ; une déchetterie traitera l’appareil en question.
Renvoyer les équipements usagés à votre fournisseur ou à un service de recyclage local.
Il convient de respecter la réglementation locale relative à la protection de l’environnement.
Si vous avez des questions, contactez les autorités locales pour élimination.
Nous vous remercions de votre achat ! Le VDPLS1025 est un projecteur à LEDs super brillantes. Lisez la présente
notice attentivement avant la mise en service de l'appareil. Si l’appareil a été endommagé pendant le transport, ne
l'installez pas et consultez votre revendeur.
2. Prescriptions de sécurité
Soyez prudent lors de l'installation : toucher un câble sous tension peut causer des électrochocs mortels.
Protégez l'appareil contre la pluie et l'humidité.
Débranchez le câble d'alimentation avant d'ouvrir le boîtier.
• La garantie ne s'applique pas aux dommages survenus en négligeant certaines directives de cette notice et votre
revendeur déclinera toute responsabilité pour les problèmes et les défauts qui en résultent.
• Confiez l'installation et l’entretien à un personnel qualifié.
• Ne branchez pas l'appareil après exposition à des variations de température. Afin d’éviter des dommages,
attendez jusqu’à ce que l'appareil ait atteint la température ambiante avant de l'utiliser.
• Cet appareil ressort à la classe de protection I, ce qui implique que l'appareil doit être mis à la terre. Un technicien
qualifié doit établir la connexion électrique.
• La tension réseau ne peut pas dépasser la tension mentionnée dans les spécifications à la fin de cette notice.
VDPLS1025_v2 VELLEMAN
Page 10

10
• Le câble d'alimentation ne peut pas être replissé ou endommagé. Demandez à votre revendeur de renouveler le
câble d'alimentation si nécessaire.
• Débranchez l’appareil s’il n’est pas utilisé ou pour le nettoyer. Tirez la fiche pour débrancher l'appareil ; non pas le câble.
• Ne regardez pas directement la source lumineuse comme ceci peut entraîner des crises d'épilepsie chez certains gens.
• Les dommages occasionnés par des modifications à l'appareil par le client, ne tombent pas sous la garantie.
• Gardez votre VDPLS1025 hors de la portée de personnes non qualifiées et de jeunes enfants.
3. Directives générales
• Cet appareil a été développé pour usage professionnel dans des discothèques, des théâtres, etc. Employer cet
appareil à l’intérieur et avec l’adaptateur connecté à une source de courant CA de max. 230VCA / 50Hz.
• Un effet lumineux n’est pas conçu pour une opération continue. Des pauses régulières prolongeront sa vie.
• Éviter de secouer l’appareil et traiter l’appareil avec circonspection pendant l’installation et l’opération.
• Choisir un endroit où l’appareil est protégé contre la poussière, l’humidité et des températures extrêmes.
Respecter une distance minimum de 0.5m entre la sortie lumière de l’appareil et la surface illuminée.
• Fixer l’appareil à l’aide d’un câble de sécurité adéquat (p.ex. VDLSC8).
• Se familiariser avec le fonctionnement de l’appareil avant de l’utiliser. Ne pas permettre pas aux personnes non
qualifiées d’opérer cet appareil. La plupart des dégâts sont causés par un usage non professionnel.
• Transporter l’appareil dans son emballage originel.
• Toute modification de l’appareil est interdite pour des raisons de sécurité.
4. Installation
a. Connexion de l’appareil
1. Alimentation : 220VCA / 50-60Hz
2. Fusible : 5 x 20mm F1A (référence : FF1N)
3. Entrée de signal : connecteur XLR avec raccordement au panneau de
contrôle DMX512.
4. Sortie de signal : connecteur XLR avec raccordement au projecteur
suivant.
5. Interrupteurs adresse DMX : fonction autonome ou pilotage DMX.
6. Microphone pour pilotage par la musique
b. Connexion DMX512
Connectez le câble à fiche XLR inclus à la sortie XLR femelle à 3 broches de votre contrôleur et l’autre fiche XLR
mâle à 3 broches à l’entrée du VDPLS1025. Il est possible de reliez plusieurs VDPLS1025s à partir d’une connexion
sérielle. Utilisez un câble de connexion blindé à 2 conducteurs avec des connecteurs d’entrée et de sortie XLR.
Attention : Terminez le câble DMX du dernier appareil avec un terminaison.
N’utilisez qu’un câble stéréo blindé et des fiches et des connecteurs XLR à 3 broches lors de la connexion des
appareils et du contrôleur.
c. Occupation de la connexion XLR
VDPLS1025_v2 VELLEMAN
Page 11

11
d. Connexion DMX512 avec terminaison
Une terminaison DMX est à recommander si le câble DMX doit couvrir une grande
distance ou s’il est utilisé dans un environnement avec beaucoup de bruit électrique (p.ex.
une discothèque). La terminaison prévient la corruption du signal de contrôle numérique
par le bruit électrique. La terminaison DMX n’est rien d’autre qu’une fiche XLR avec une
résistance de 120Ω de broche 2 vers broche 3 (voir illustration à gauche). Cette fiche XLR
est connectée à la sortie XLR du dernier appareil de la série.
e. Sélection de l’adresse de départ DMX
Tous les appareils pilotés par un signal DMX demandent une adresse de départ DMX pour assurer que les appareils
corrects réagissent sur les signaux de contrôle. Cette adresse de départ numérique indique le numéro de canal sur
lequel l’appareil écoute le contrôleur DMX. Déterminez cette adresse avec les interrupteurs DIP au dos de l’appareil.
Vous avez le choix entre une seule adresse de départ pour toute une série d’appareils ou une adresse de départ par
appareil. Dans le cas d’une seule adresse, tous les appareils « écouteront » les mêmes signaux, sur un seul canal.
Tous les appareils seront donc influencés lorsque vous changez les réglages d’un seul canal. Avec des adresses de
départ individuelles, chaque appareil « écoutera » son propre canal. Par conséquent, un ajustement des réglages
d’un canal n’influence que l'appareil sur ce canal.
Pour le VDPLS1025 à 4 canaux, l’adresse de départ du premier appareil est 1, du deuxième 5 (1 + 4), du troisième 9
(5 + 4) etc.
5. Emploi
Fonction
• Mode automatique (Variation 7 couleurs / Stroboscope 7 couleurs / Variation 7 couleurs automatique / Fondu
7 couleurs automatique / Pilotage par la musique)
• Mode maître / esclave
• Mode DMX512
Configuration des interrupteurs
Fonctions 1 2 3 4 5 6 7 8 9 10
Rouge ON
Vert ON
Bleu ON
Stroboscope LENT MED RAPIDE MAX ON CYAN MAG JAUNE
Ouverture /
LENT MED RAPIDE MAX ON
fermeture en
fondu
Flash couleur LENT MED RAPIDE MAX ON
Pilotage
ON
musique
DMX 1 2 4 8 16 32 64 128 256 ON
REMARQUE : Réglez la sensibilité à l’aide du bouton rotatif.
VDPLS1025_v2 VELLEMAN
Page 12

12
6. Configuration DMX
Le VDPLS1025 est muni de 4 canaux DMX.
CANAL 1 : Configuration des fonctions
0 – 127 graduateur (Ch2 - 4 graduateur valide)
128 – 250 stroboscope (Ch2 - 4 graduateur valide)
251 – 255 graduateur 100% (Ch2 - 4 graduateur valide)
CANAL 2 : 0 – 255 ROUGE
CANAL 3 : 0 – 255 VERT
CANAL 4 : 0 – 255 BLEU
7. Nettoyage et entretien
1. Serrer les écrous et les vis et vérifier qu’ils ne rouillent pas.
2. Le boîtier, les lentilles, les supports de montage et la construction portante ne peuvent pas être déformés,
adaptés ou bricolés p.ex. pas de trous additionnels dans un support, ne pas déplacer les connexions etc.
3. Les parties mécaniques mobiles ne peuvent pas être usées ou bouger de manière irrégulière.
4. Les câbles d'alimentation ne peuvent pas être endommagés. Un technicien qualifié doit entretenir l’appareil.
5. Débrancher l’appareil avant de le nettoyer.
6. Essuyer l’appareil régulièrement avec un chiffon humide non pelucheux. Éviter l’usage d’alcool et de solvants.
7. Il n’y a aucune pièce maintenable par l’utilisateur excepté le fusible (voir « 4. Installation »).
8. Commander des pièces de rechange éventuelles chez votre revendeur.
8. Spécifications techniques
Alimentation max. 230VCA / 50-60Hz
Consommation max. 15W
LEDs 10mm x 90 pcs (30 x rouge, 30 x vert, 30 x bleu)
Angle 30°
Canaux DMX 4 canaux
Fusible F1A, 120VCA (référence FF1N)
Dimensions 180 x 175 x 175mm
Poids 965g
Pour plus d’information concernant cet article, visitez notre site web www.hqpower.eu.
Toutes les informations présentées dans cette notice peuvent être modifiées sans notification préalable.
VDPLS1025 – PROYECTOR CON LEDs MUY LUMINOSOS – CONTROLADO POR DMX
1. Introducción
A los ciudadanos de la Unión Europea
Importantes informaciones sobre el medio ambiente concerniente este producto
Este símbolo en este aparato o el embalaje indica que, si tira las muestras inservibles, podrían dañar el
medio ambiente.
No tire este aparato (ni las pilas eventuales) en la basura doméstica; debe ir a una empresa especializada
en reciclaje. Devuelva este aparato a su distribuidor o a la unidad de reciclaje local.
Respete las leyes locales en relación con el medio ambiente.
Si tiene dudas, contacte con las autoridades locales para eliminación.
¡Gracias por haber comprado el VDPLS1025! Es un proyector con LEDs muy luminosos. Lea cuidadosamente las
instrucciones del manual antes de usar el aparato. Si ha sufrido algún daño en el transporte no lo instale y póngase
en contacto con su distribuidor.
VDPLS1025_v2 VELLEMAN
Page 13

13
2. Instrucciones de seguridad
Cuidado durante la instalación: puede sufrir una peligrosa descar
ga eléctrica al tocar los cables con un
voltaje peligroso.
No exponga este equipo a lluvia ni humedad.
Desconecte el cable de alimentación de la red antes de abrir la caja.
• Daños causados por descuido de las instrucciones de seguridad de este manual invalidarán su garantía y su
distribuidor no será responsable de ningún daño u otros problemas resultantes.
• La instalación y el mantenimiento deben ser realizados por personal especializado.
• No conecte el aparato si ha estado expuesto a grandes cambios de temperatura. Espere hasta que el aparato
llegue a la temperatura ambiente.
• Este aparato pertenece a la clase de protección I. Por tanto, es esencial que el aparato esté puesto a tierra. La
conexión eléctrica debe llevarla a cabo un técnico cualificado.
• Asegúrese de que la tensión de red no sea mayor que la tensión indicada en las especificaciones.
• No aplaste el cable de alimentación y protéjalo contra posibles daños causados por algún tipo de superficie
afilada. Si es necesario, pida a su distribuidor reemplazar el cable de alimentación.
• Desconecte siempre el aparato si no va a usarlo durante un largo período de tiempo o antes de limpiarlo. Tire
siempre del enchufe para desconectar el cable de red, nunca del propio cable.
• No mire directamente a la fuente de luz. Esto puede causar un ataque epiléptico.
• Los daños causados por modificaciones no autorizadas, no están cubiertos por la garantía.
• Mantenga el VDPLS1025 lejos del alcance de personas no capacitadas y niños.
3. Normas generales
• Este aparato ha sido diseñado para uso profesional en una discoteca, un teatro, etc. Utilice este aparato en
interiores y con un adaptador conectado a una fuente de corriente CA de máx. 230VCA / 50Hz.
• No ha sido diseñado para un uso ininterrumpido. Introduzca frecuentemente una pausa para prolongar la vida del
aparato.
• No agite el aparato. Evite usar excesiva fuerza durante la instalación y la reparación.
• Seleccione un lugar de montaje donde el aparato no esté expuesto a polvo, humedad y calor extremo. Respete
una distancia de mín. 0.5m entre la salida de luz y el área iluminada.
• Fije el aparato con un cable de seguridad (p.ej. VDLSC8).
• Familiarícese con el funcionamiento del aparato. Sólo personas cualificadas pueden manejar este aparato. La
mayoría de los daños son causados por un uso inadecuado.
• Transporte el aparato en su embalaje original.
• Por razones de seguridad, las modificaciones no autorizadas del aparato están prohibidas.
4. Instalación
a. Conexión del aparato
1. Alimentación: 220VCA / 50-60Hz
2. Fusible: 5 x 20mm F1A (referencia: FF1N)
3. Entrada de la señal: conector XLR con conexión al panel de control
DMX512.
4. Salida de la señal: conector XLR con conexión al proyector siguiente.
5. Interruptores dirección DMX: función autónoma o control DMX.
6. Micrófono para el control por la música
VDPLS1025_v2 VELLEMAN
Page 14

14
b. Conexión DMX512
Conecte el cable XLR incluido a la salida XLR hembra de 3 polos del controlador y el otro conector XLR macho a la
entrada del VDPLS1025. Es posible conectar varios VDPLS1025 en serie. Use un cable de conexión blindado de 2
conductores con conectores XLR de entrada y de salida.
¡Ojo !: Termine el cable DMX del último aparato con una terminación.
Utilice sólo un cable estéreo blindado y conectores XLR de 3 polos para conectar los aparatos y el controlador.
c. Ocupación de la conexión XLR
d. Conexión DMX-512 con una terminación DMX
Se recomienda una terminación si el cable DMX debe cubrir una gran distancia o si se
usa en un medio ambiente con mucho ruido eléctrico (ej. una discoteca). La
terminación impide que el ruido eléctrico corrompa la señal de control numérico. La
terminación DMX no es más que un conector XLR con una resistencia de 120Ω de polo
2 a polo 3. Este conector XLR está conectado a la salida XLR del último aparato de la
serie.
e. Seleccionar la dirección inicial de la cegadora DMX
Si se usa una señal DMX, cada aparato tiene su propia dirección inicial DMX para asegurar que los aparatos
reaccionen a las señales de control correctas. Esta dirección inicial digital es el primer canal en el cual el aparato
reaccionará a las señales DMX del controlador DMX. Determine esta función con los interruptores DIP de la parte
trasera del aparato.
Es posible elegir entre una sola dirección inicial para toda una serie de aparatos o una dirección inicial por aparato.
Con una sola dirección inicial para una serie de aparatos, todos los aparatos reaccionarán sincronizadamente a la
misma señal. Por lo tanto, cambiar los ajustes de un solo canal afecta a los ajustes de todos los canales. Con varias
direcciones iniciales, cada aparato reaccionará independientemente. Por lo tanto, cambiar los ajustes de un solo
canal sólo afecta al canal en cuestión.
En el caso del VDPLS1025 de 4 canales, la dirección inicial del primer aparato es 1. Introduzca 5 (1 + 4) para el
segundo aparato, 9 (5 + 4) para el tercer aparato, etc.
5. Uso
Función
• Modo automático (cambio de 7 colores / estroboscopio 7 colores / cambio automático de 7 colores / Fade
automático 7 colores / Control por la música)
• Modo maestro / esclavo
• Modo DMX512
VDPLS1025_v2 VELLEMAN
Page 15

15
Configuración de los interruptores
Funciones 1 2 3 4 5 6 7 8 9 10
Rojo ON
Verde ON
Azul ON
Estroboscopio LENTO MED RÁPIDO MÁX ON CYAN MAG AMARILLO
Fade in/out LENTO MED RÁPIDO MÁX ON
Flash color LENTO MED RÁPIDO MÁX ON
Control por la
música
DMX 1 2 4 8 16 32 64 128 256 ON
NOTA: ajuste la sensibilidad con el botón giratorio.
6. Configuración DMX
El VDPLS1025 está equipado con 4 canales DMX.
CANAL 1: Configuración de las funciones
0 – 127 dimmer (Ch2 - 4 dimmer válido)
128 – 250 estroboscopio (Ch2 - 4 dimmer válido)
251 – 255 dimmer 100% (Ch2 - 4 dimmer válido)
CANAL 2: 0 – 255 ROJO
CANAL 3: 0 – 255 VERDE
CANAL 4: 0 – 255 AZUL
ON
7. Limpieza y mantenimiento
1. Apriete bien las tuercas y los tornillos y verifique que no hay señales de oxidación.
2. No modifique la caja, los soportes y las conexiones p.ej. no taladre agujeros adicionales en un soporte o no
modifique las conexiones, etc.
3. Las partes móviles no pueden mostrar ningún rastro de desgaste y deben estar bien equilibradas.
4. No dañe los cables de alimentación. Contacte con un técnico especializado para instalar el aparato.
5. Desconecte el aparato de toda fuente antes de limpiarlo.
6. Limpie el aparato regularmente con un paño húmedo y sin pelusas. Evite el uso de alcohol y de disolventes.
7. El usuario no habrá de efectuar el mantenimiento de ninguna pieza salvo el fusible (véase « 4. Instalación »).
8. Contacte con su distribuidor si necesita piezas de recambio.
8. Especificaciones
Alimentación máx. 230VCA / 50-60Hz
Consumo máx. 15W
LEDs 10mm x 90 uds. (30 x rojo, 30 x verde, 30 x azul)
Ángulo 30°
Canales DMX 4 canales
Fusible F1A, 120VCA (referencia FF1N)
Dimensiones 180 x 175 x 175mm
Peso 965g
Para más información sobre este producto, visite nuestra página web www.hqpower.eu.
Se pueden modificar las especificaciones y el contenido de este manual sin previo aviso.
VDPLS1025_v2 VELLEMAN
Page 16

16
VDPLS1025 – SUPERHELLER LED-SCHEINWERFER – DMX-GESTEUERT
Seien Sie vorsichtig bei der Installation: Fassen Sie die unter Strom stehenden Kabel nicht an, um
einen
1. Einführung
An alle Einwohner der Europäischen Union
Wichtige Umweltinformationen über dieses Produkt
Dieses Symbol auf dem Produkt oder der Verpackung zeigt an, dass die Entsorgung dieses Produktes nach
seinem Lebenszyklus der Umwelt Schaden zufügen kann.
Entsorgen Sie die Einheit (oder die verwendeten Batterien) nicht als unsortiertes Hausmüll; die Einheit oder
die verwendeten Batterien müssen von einer spezialisierten Firma zwecks Recycling entsorgt werden.
Diese Einheit muss an den Händler oder ein örtliches Recycling-Unternehmen retourniert werden.
Respektieren Sie die örtlichen Umweltvorschriften.
Falls Zweifel bestehen, wenden Sie sich für Entsorgungsrichtlinien an Ihre örtliche Behörde.
Danke für den Kauf des VDPLS1025! Er ist ein superheller LED-Scheinwerfer. Lesen Sie diese Bedienungsanleitung
vor Inbetriebnahme sorgfältig durch. Überprüfen Sie, ob Transportschäden vorliegen. Sollte dies der Fall sein,
verwenden Sie das Gerät nicht und wenden Sie sich an Ihren Händler.
2. Sicherheitshinweise
lebensgefährlichen elektrischen Schlag zu vermeiden.
Das Gerät vor Regen und Feuchtigkeit schützen.
Trennen Sie das Gerät vor dem Öffnen vom Netz.
• Bei Schäden, die durch Nichtbeachtung der Bedienungsanleitung verursacht werden, erlischt der
Garantieanspruch. Für daraus resultierende Folgeschäden übernimmt der Hersteller keine Haftung.
• Installation und Wartung sind einer autorisierten Fachkraft vorbehalten.
• Nehmen Sie das Gerät erst in Betrieb, nachdem es von einem kalten in einen warmen Raum gebracht wurde.
Lassen Sie das Gerät solange ausgeschaltet, bis es die Zimmertemperatur erreicht hat.
• Dieses Gerät entspricht Schutzklasse I. Deshalb muss das Gerät geerdet sein. Lassen Sie den elektrischen
Anschluss von einem qualifizierten Techniker ausführen.
• Vergewissern Sie sich, dass die anzuschließende Netzspannung nicht höher ist als die Netzspannung
beschrieben in den technischen Daten dieser Bedienungsanleitung.
• Achten Sie darauf, dass die Netzleitung nicht gequetscht oder durch scharfe Kanten beschädigt werden kann. Bei
Beschädigungen soll eine Fachkraft das Kabel ersetzen.
• Trennen Sie das Gerät bei Nichtbenutzung und vor jeder Reinigung vom Netz. Fassen Sie dazu den Netzstecker
an der Grifffläche an und ziehen Sie nie an der Netzleitung.
• Blicken Sie niemals direkt in die Lichtquelle da bei empfindlichen Menschen epileptische Anfälle ausgelöst
werden können.
• Beachten Sie, dass Schäden, die durch manuelle Veränderungen an diesem Gerät verursacht werden, nicht
unter den Garantieanspruch fallen.
• Halten Sie Kinder und Unbefugte vom Gerät fern.
3. Allgemeine Richtlinien
• Dieses Gerät ist eine Lichtsteuerung für den professionellen Einsatz auf Bühnen, in Discotheken, Theatern, usw.
Es ist nur für den Anschluss an einen AC-Strom von max. 230VAC / 50Hz zugelassen und wurde ausschließlich
zur Verwendung in Innenräumen konzipiert.
• Lichteffekte sind nicht für permanenten Betrieb entworfen worden. Regelmäßiges Ausschalten wird die
Lebensdauer verlängern.
• Vermeiden Sie Erschütterungen. Vermeiden Sie rohe Gewalt während der Installation und Bedienung des
Gerätes.
VDPLS1025_v2 VELLEMAN
Page 17

17
• Achten Sie bei der Wahl des Installationsortes darauf, dass das Gerät keinem Staub, keiner Feuchtigkeit und
extremen Temperaturen ausgesetzt wird. Sorgen Sie für einen Abstand von minimal 50cm zwischen dem Gerät
und einer beleuchteten Oberfläche.
• Sichern Sie das Gerät mit einem geeigneten Sicherheitsfangseil (VDLSC8).
• Nehmen Sie das Gerät erst in Betrieb, nachdem Sie sich mit seinen Funktionen vertraut gemacht haben. Lassen
Sie das Gerät nicht von Personen bedienen, die sich nicht mit dem Gerät auskennen. Meist ist die Beschädigung
des Gerätes das Ergebnis von unfachmännischer Bedienung.
• Verwenden Sie die Originalverpackung, wenn das Gerät transportiert werden soll.
• Eigenmächtige Veränderungen sind aus Sicherheitsgründen verboten.
4. Installation
a. Gerät anschließen
1. Stromversorgung: 220VAC / 50-60Hz
2. Sicherung: 5 x 20mm F1A (Artikelnummer: FF1N)
3. Signaleingang: XLR-Anschluss verbunden mit einem DMX512-
Bedienfeld.
4. Signal Ausgang: XLR-Anschluss verbunden mit dem nächsten
Scheinwerfer.
5. DMX-Adresse: Stand-Alone-Funktion oder DMX-Einstellung.
6. Mikrofon für Tonaktivierung
b. DMX512-Anschlüsse
Schließen Sie das mitgelieferte XLR-Kabel an die 3-polige XLR-Buchse Ihres Steuergerätes und die andere Seite an
den 3-poligen XLR-Stecker des VDPLS1025 an. Mehrere VDPLS1025s können seriell miteinander verbunden
werden. Das Kabel soll ein zweiadriges abgeschirmtes Kabel mit XLR-Eingangs- und Ausgangsanschlüsse sein.
Vorsicht: Bei der letzten Vorrichtung, muss das DMX-Kabel mit einem Abschlusswiderstand abgeschlossen werden.
Verwenden Sie nur ein abgeschirmtes Kabel und 3-polige XLR-Anschlüsse um das Steuergerät mit der Vorrichtung
oder eine Vorrichtung mit einer anderen zu verbinden.
c. Belegung XLR-Anschluss
d. DMX-512 Kette mit Abschlusswiderstand
Ein DMX-Abschlusswiderstand empfehlenswert für Installationen, bei denen das DMXKabel lang ist oder in einer Umgebung mit vielem elektrischem Rauschen (z.B. Diskos) .
Der Abschlusswiderstand verhindert Störung des digitalen Steuersignals durch
elektrisches Rauschen. Der DMX-Abschlusswiderstand ist nur eine XLR-Buchse mit
einem 120Ω Widerstand zwischen 2 und 3, die den XLR-Ausgang des letzten Gerätes in
der Kette angeschlossen wird.
e. Die Startadresse für den DMX-Projektor wählen
Alle DMX-gesteuerten Geräte brauchen eine digitale Startadresse, sodass das richtige Gerät auf die Signale
reagieren kann. Diese digitale Startadresse ist die Kanalnummer, von der das Gerät die Befehle der DMX-Steuerung
empfängt und ausführt. Sie können dieselbe Startadresse für eine ganze Gruppe von Geräten verwenden oder eine
VDPLS1025_v2 VELLEMAN
Page 18

18
separate Startadresse für jedes Gerät eingeben. Wenn alle Geräte dieselbe Startadresse haben, werden sie auf
einem spezifischen Kanal das Steuersignal empfangen. Mit anderen Worten, wenn Sie die Einstellungen von einem
Kanal ändern, werden alle Geräte zur gleichen Zeit beeinflusst. Wenn Sie verschiedene Adressen einstellen, wird
jedes Gerät auf einem anderen Kanal Signale empfangen. Wenn Sie die Einstellungen ändern, wird nur das besagte
Gerät beeinflusst.
Im Falle des 4-Kanal-VDPLS1025, werden Sie die Startadresse der ersten Einheit auf 1, der zweiten Einheit auf 5 (1
+ 4), der dritten Einheit auf 9 (5 + 4), usw. einstellen müssen.
5. Anwendung
Funktion
• Automatischer Modus (7 Farbwechsel / 7 Farbstroboskop / 7 automatischer Farbwechsel / 7
automatische Fadefunktion / Tonaktivierung)
• Master / Slave Modus
• DMX512-Modus
Schaltereinstellung
Funktionen 1 2 3 4 5 6 7 8 9 10
Rot EIN
Grün EIN
Blau EIN
Stroboskop LANGSAM MITTEL SCHNELL SCHNELLST EIN ZYAN MAG GELB
Fade ein/aus LANGSAM MITTEL SCHNELL SCHNELLST EIN
Farbblitz LANGSAM MITTEL SCHNELL SCHNELLST
Tonaktiviert EIN
DMX 1 2 4 8 16 32 64 128 256 EIN
BEMERKUNG: Regeln Sie die Empfindlichkeit über den Drehschalter.
EIN
6. DMX-Einstellung
Der VDPLS1025 hat 4 DMX-Kanäle:
KANAL 1: Funktionseinstellung
0 – 127 Dimmer (Kanal2 - 4 Dimmer gültig)
128 – 250 Stroboskop (Kanal2 - 4 Dimmer gültig)
251 – 255 Dimmer 100% (Kanal2 - 4 Dimmer gültig)
KANAL 2: 0 – 255 ROT
KANAL 3: 0 – 255 GRÜN
KANAL 4: 0 – 255 BLAU
7. Wartung und Pflege
1. Verwendete Schrauben müssen fest angespannt werden und dürfen keine Rostspuren zeigen.
2. Das Gehäuse, die Linsen, die Montagebügel und der Montageort (z.B. Decke oder Gebinde) dürfen nicht angepasst
werden, z.B. bohren Sie keine zusätzlichen Löcher in Montagebügel, verändern Sie die Anschlüsse nicht, usw.
3. Mechanisch bewegende Teile dürfen keine Spüren von Abnutzung aufweisen.
4. Sorgen Sie dafür, dass die Netzkabel nicht beschädigt sind. Lassen Sie das Gerät von einer Fachkraft warten.
5. Trennen Sie das Gerät vom Netz ehe Sie mit den Servicearbeiten anfangen.
6. Verwenden Sie zur Reinigung ein feuchtes Tuch. Verwenden Sie auf keinen Fall Alkohol oder irgendwelche
Lösungsmittel.
VDPLS1025_v2 VELLEMAN
Page 19

19
7. Die Teile dürfen nicht eigenmächtig ersetzt werden, (außer der Sicherung) (siehe "Installation").
8. Bestellen Sie eventuelle Ersatzteile bei Ihrem Fachhändler.
8. Technische Daten
Stromversorgung max. 230VAC / 50-60Hz
Stromverbrauch max. 15W
LEDs 10mm x 90 St. (30 x rot, 30 x grün, 30 x blau)
Angle 30°
DMX-Kanäle 4 Kanäle
Sicherung F1A, 120VAC (Artikelnummer: FF1N)
Abmessungen 180 x 175 x 175mm
Gesamtgewicht 965g
Für mehr Informationen zu diesem Produkt, siehe www.hqpower.eu.
Alle Änderungen vorbehalten.
VDPLS1025_v2 VELLEMAN
 Loading...