

Page 1
P
T
T
E
T
U
C
E
3
M
J
A
D
E
D
I
U
E
W
0
1
s
R
E
T
3
W
P
L
W
W
o
f
ß
w
w
h
c
e
VD
SMAR
SMAR
PROJ
FOCO
SMAR
L100
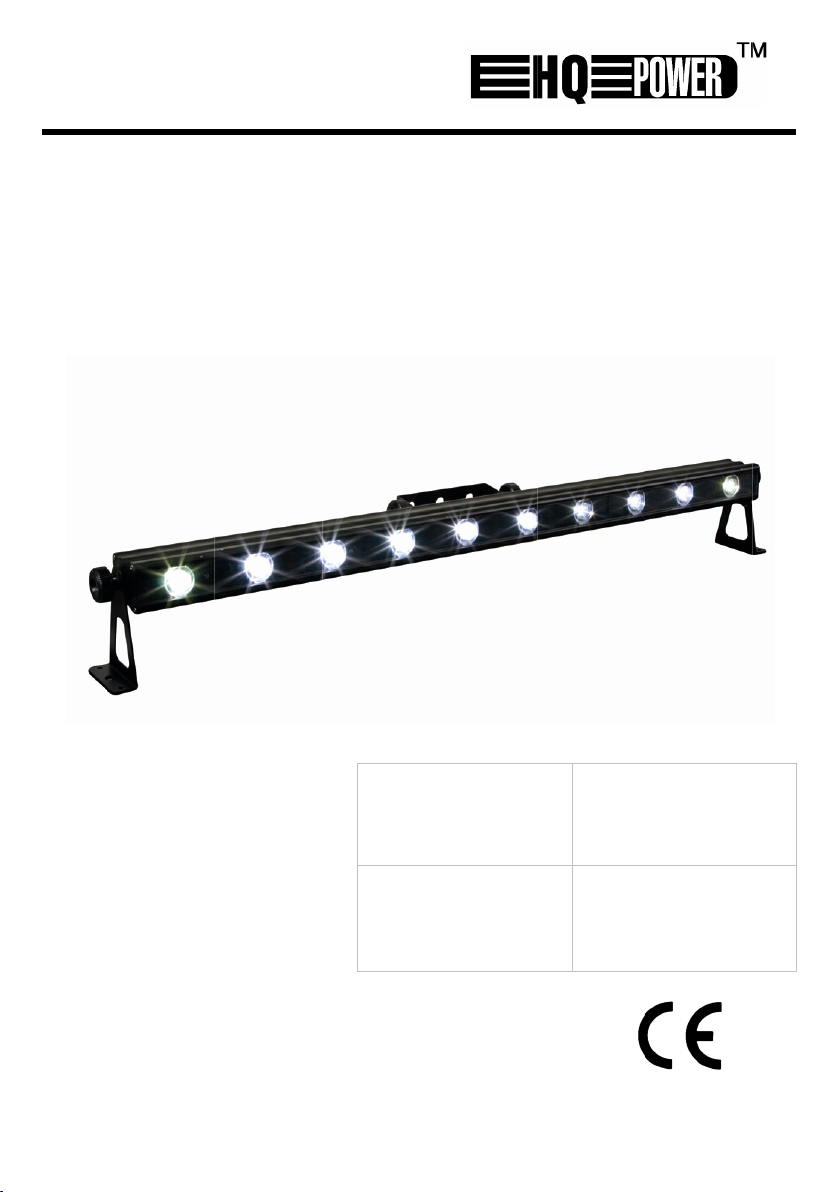
LED BEA
LED PRO
CTEUR SM
SMART LE
LED-SCH
xW
- 10 x 3
ECTOR - 1
RT LED -
- 10 LED
INWERFE
WHITE L
x 3W WI
0 LED DE
DE 3W
- 10 x 3
Ds
TE LEDS
W
LEDs
USER
GEBR
NOTI
MANU
BEDI
MANUAL
IKERSHAN
E D’EMPLO
AL DEL US
NUNGSANL
LEIDING
ARIO
ITUNG
15
21
27
3
9
VD
VDP
L1003C
1003W
cold wh
koud wi
blanc fr
blanco
kaltwei
warm
warm
blanc c
blanco
warmw
ite
t
id
río
hite
it
aud
álido
iß
Page 2
0
t
r
a
t
r
p
o
c
o
m
e
0
5
s
p
e
d
t
tTe
n
n
e
o
n
r
m
1
VDPL10
3xW
How to
Controll
Modifie
Modific
Die Con
25.03.2
urn the cont
er line van 3-
la ligne du c
r la línea del
roller-Linie v
11
oller line fro
in naar 5-pin
ntrôleur de 3
ontrolador d
n 3-Pin nach
3-pins into
aanpassen (
broches en 5
3 polos y 5
5-Pin anpass
r
ésistance de
-pins (plug a
tekker en co
broches (fich
olos (conect
n (Stecker u
2
terminato
ein
weerstand
erminaison
erminación
rminierung
d socket)
tact).
et contact)
r y contacto)
d Buchse).
©Velle
an nv
Page 3
0
t
e
a
TcwtI
o
I
b
f
e
u
a
a
t
p
t
n
e
m
e
d
t
o
a
n
p
c
o
t
e
p
m
e
n
d
r
a
s
0
r
e
t
®
a
e
t
c
h
D
t
c
a
t
u
h
s
t
o
p
a
s
s
s
e
t
r
r
f
i
W
Q
F
m
o
f
c
0
o
m
c
o
a
n
t
t
e
w
t
d
u
e
a
d
e
e
t
e
f
h
Q
a
e
r
b
e
r
f
o
b
e
y
a
f
r
e
o
a
R
t
e
o
r
m
M
a
t
f
a
c
s
e
n
f
c
n
h
p
i
x
e
m
m
t
o
a
b
m
y
a
i
a
o
v
t
e
i
e
i
u
a
VDPL10
3xW
1. In
To all r
Import
Thank y
service.
For mor
our we
2. Sa
• This
quali
• Mak
man
• Do n
nece
• Resp
• Use
• Inst
subs
• Kee
3. Ge
Refer to
• Fami
by u
of th
• All
to th
25.03.2
roduction
sidents of th
nt environme
his symbol on
ould harm the
aste; it shoul
o your distribu
f in doubt, c
u for choosing
f the device w
e info concer
site www.hq
ety Instru
Be very c
electrosh
Always di
activities
Indoor u
liquids.
Keep this
Caution:
Do not s
- epil
- tem
- per
There ar
service a
device falls un
fied person car
sure that the
al.
ot crimp the po
ssary.
ect a minimum
n appropriate
ll the VDPL10
ances. Keep th
the air vents f
neral Guid
he Velleman
Keep th
are cle
the ope
Protect
liarise yourself
qualified peopl
device.
odifications of
e device is not
11
European Un
ntal informati
the device or t
environment.
be taken to a
or or to a local
ntact your lo
HQ-power! Ple
s damaged in
ing this prod
ower.eu.
tions
areful during t
cks.
sconnect main
are performed.
se only. Keep
device away fr
device heats u
are directly
ptic seizure in
orarily loss of
anent (irrever
no user-servic
d/or spare par
er protection cl
y out the elect
vailable voltag
wer cord and p
distance of 0.5
afety cable to
3xW at a min
e VDPL1003x
ee at all times.
lines
Service and
is device away
r at all times.
nings.
this device fro
with the functi
e. Any damage
he device are
overed by the
User m
ion
on about this
e package indi
o not dispose
specialized co
recycling servi
al waste disp
se read the m
ransit, do not i
ct and the la
e installation:
power when d
Handle the po
his device awa
m children an
during use.
t the light so
ensitive peopl
ight (flash blin
ible) eye dam
able parts insi
s.
ass I. It is ther
ic connection.
e does not exc
otect it agains
m between the
ix the device (
mal distance o
at a minimal
Never cover t
uality Warr
from dust and
or sufficient ai
shocks and a
ns of the devic
that may occu
orbidden for sa
warranty.
anual
product
cates that disp
f the unit (or
pany for recycl
e. Respect the
sal authoriti
nual thoroughl
stall or use it
est version o
ouching live wi
vice not in us
er cord by the
y form rain, m
unauthorized
rce, as this m
dness)
ge
e the device.
fore essential
ed the voltage
damage. Hav
device’s light
.g. VDLSC7 o
0.5 m from fla
distance of 1
e device, nor p
nty on the last
xtreme heat.
circulation, le
use. Avoid bru
before actuall
will most prob
ety reasons. D
3
sal of the devi
atteries) as un
ing. This devic
local environm
s.
before bringin
nd contact you
this user ma
es can cause li
or when servi
plug only.
isture, splashi
users.
y cause
efer to an aut
hat the device
stated in the s
an authorised
utput and any
VDLSC8).
mmable and e
from the light
artially, nor co
pages of this
ake sure the v
ve at least 1” (
e force when
y using it. Do n
ably be due to
mage caused
e after its lifec
orted municip
should be retu
ental rules.
g this device in
r dealer.
ual, please v
e-threatening
ing or mainten
g and dripping
orized dealer f
be earthed. Ha
ecifications of
dealer replace i
lluminated surf
plosive objects
d surface.
pletely.
anual.
entilation open
±2.5 cm) in fro
perating the d
ot allow operat
unprofessional
y user modific
©Velle
cle
l
rned
to
sit
nce
r
e a
his
t if
ace.
or
ngs
nt of
vice.
on
se
tions
an nv
Page 4
VDPL1003xW
• Mechanical wear is not covered by warranty.
• Only use the device for its intended purpose. All other uses may lead to short circuits, burns,
electroshocks, lamp explosion, crash, etc. Using the device in an unauthorised way will void the
warranty.
• Damage caused by disregard of certain guidelines in this manual is not covered by the warranty and
the dealer will not accept responsibility for any ensuing defects or problems.
• A qualified technician should install and service this device.
• Do not switch the device on immediately after it has been exposed to changes in temperature.
Protect the device against damage by leaving it switched off until it has reached room temperature.
• This device is designed for professional use on stage, in discos, theatres, etc. The VDPL1003xW can
be used indoor (<35°C, <75%RH) with an alternating current of max. 240V AC/50Hz.
• Lighting effects are not designed for permanent operation: regular operation breaks will prolong their
lives.
• Use the original packaging if the device is to be transported.
• Keep this manual for future reference.
4. Features
• 12 channel in DMX mode for separate control of each LED
• master dimmer and shutter via DMX mode
• built-in programs for stand-alone and sound activated modes
• pulse effect with adjustable speed
• additional power output up to 10pcs at 230VAC
• truss or floor mounting
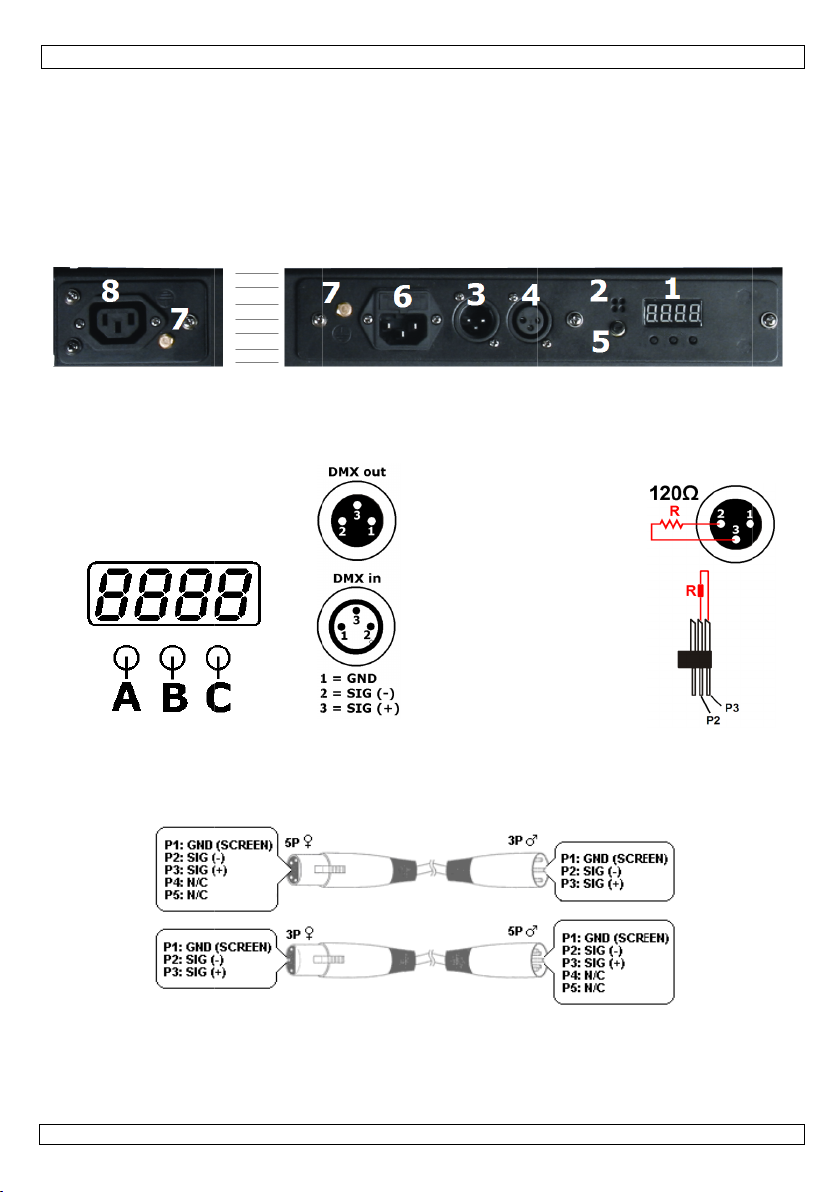
5. Overview
Refer to the illustrations on page 2 of this manual.
1 display with control buttons 4 DMX output
A MODE button 5 sound sensitivity adjustment knob
B UP button 6 power input/fuse holder
C DOWN button 7 GND
2 microphone 8 power output
3 DMX input
6. Installation
Refer to the illustrations on page 2 of this manual.
a) Overhead mounting
• Have the device installed by a qualified person, respecting EN 60598-2-17 and all other applicable
norms.
• The construction to which the device is attached should be able to support 10 times the weight of
the device for one hour without deformation.
• The installation must always be secured with a secondary attachment e.g. a safety cable.
• Never stand directly below the device when it is being mounted, removed or serviced. Have a
qualified technician check the device once a year and once before you bring it into service.
• Install the device in a location with few passers-by and inaccessible to unauthorised persons.
• Overhead mounting requires extensive experience: calculating workload limits, determining the
installation material to be used… Have the material and the device itself checked regularly. Do not
attempt to install the device yourself if you lack these qualifications as improper installation may
result in serious injuries.
• For truss-mounting, use an appropriate clamp (not incl.) and fit an M10 bolt through the centre of
the (folded) bracket.
• Adjust the desired inclination angle via the mounting bracket and tighten the bracket screws.
b) DMX-512 connection
• When applicable, connect an XLR cable to the female 3-pin XLR output of a controller (not incl.)
and the other side to the male 3-pin XLR input of the VDPL1003xW. Multiple VDPL1003xW’s can
be linked through serial linking. The linking cable should be a dual core, screened cable with XLR
input and output connectors.
• Maximum recommended serial data link distance is 500 meters (1640 ft). Maximum recommended
number of fixtures on a serial data link is 32 fixtures.
• A DMX terminator is recommended for installations where the DMX cable has to run a long distance
or is in an electrically noisy environment (e.g. discos). The terminator prevents corruption of the
25.03.2011 ©Velleman nv
4
Page 5
0
gres
t
e
o
v
rhe
e
t
F
A
M
P• U• P• U
d
m
P• U
s
M
S
O
o
m
A
s
n• W
n
p
s
v
b
e
a
t
s
D
D
e
n
u
o
t
s
h
i
e
h
a
e
d
p
c
p
c
o
s
D
f
d
s
o
e
0
X
g
o
t
t
t
h
h
M
c
c
u
t
t
s
d
u
e
e
h
s
L
v
s
s
t
o
t
d
t
p
e
n
o
e
o
s
d
s
)
r
d
t
o
v
c
o
t
m
Ω
v
o
s
v
o
o
n
di
ital control sig
istor between
in
he chain.
c) gen
7. Op
Refer to
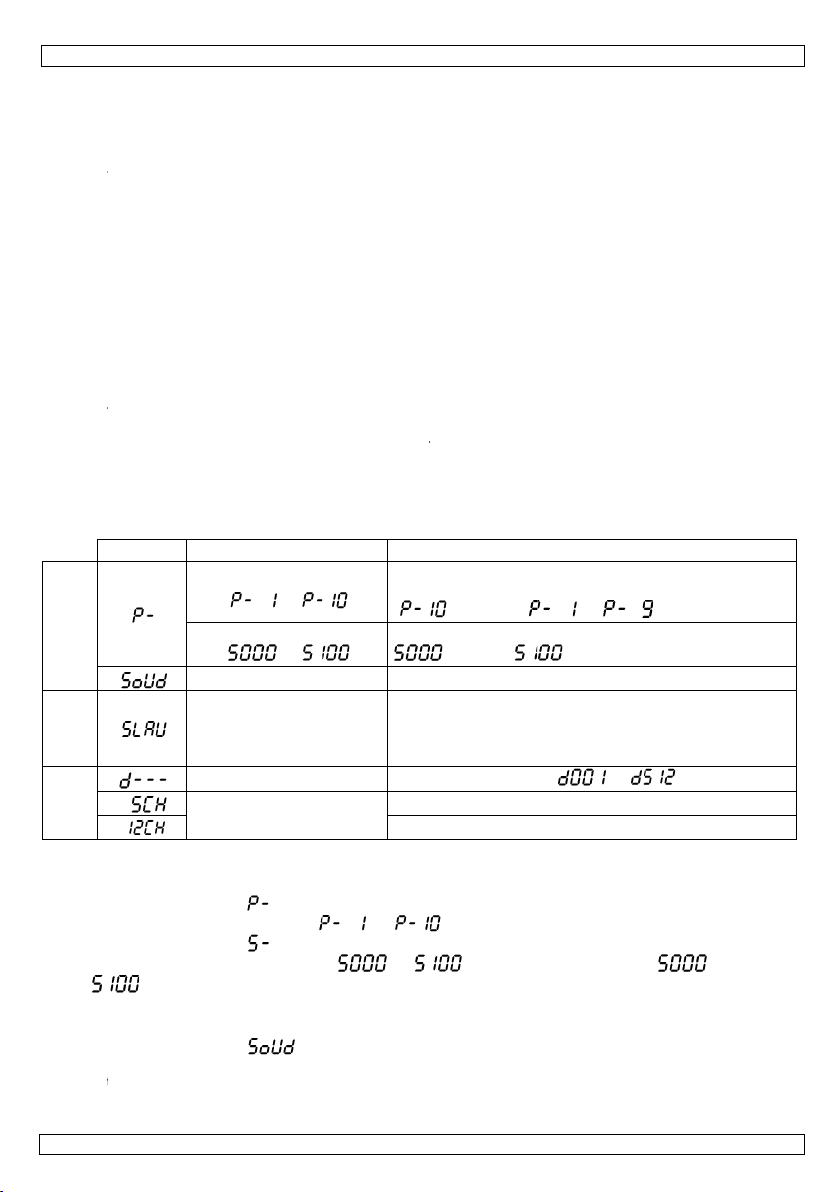
Menu
• Ma
co
• Ha
• All
sw
• Th
alone
stand-
ral
ke sure there i
ling.
e a qualified e
fixtures must
ostat or dimm
itch.
installation h
eration
he illustration
unctions
menu
al by electrical
ins 2 and 3, w
no flammable
lectrician carry
e powered dire
r circuit, even
s to be approv
on page 2 of t
function
built-in progr
~
speed
~
sound mod
VDPL10
noise. The DM
ich is then plu
material within
out the electric
ctly off a groun
f the rheostat
d by an exper
is manual.
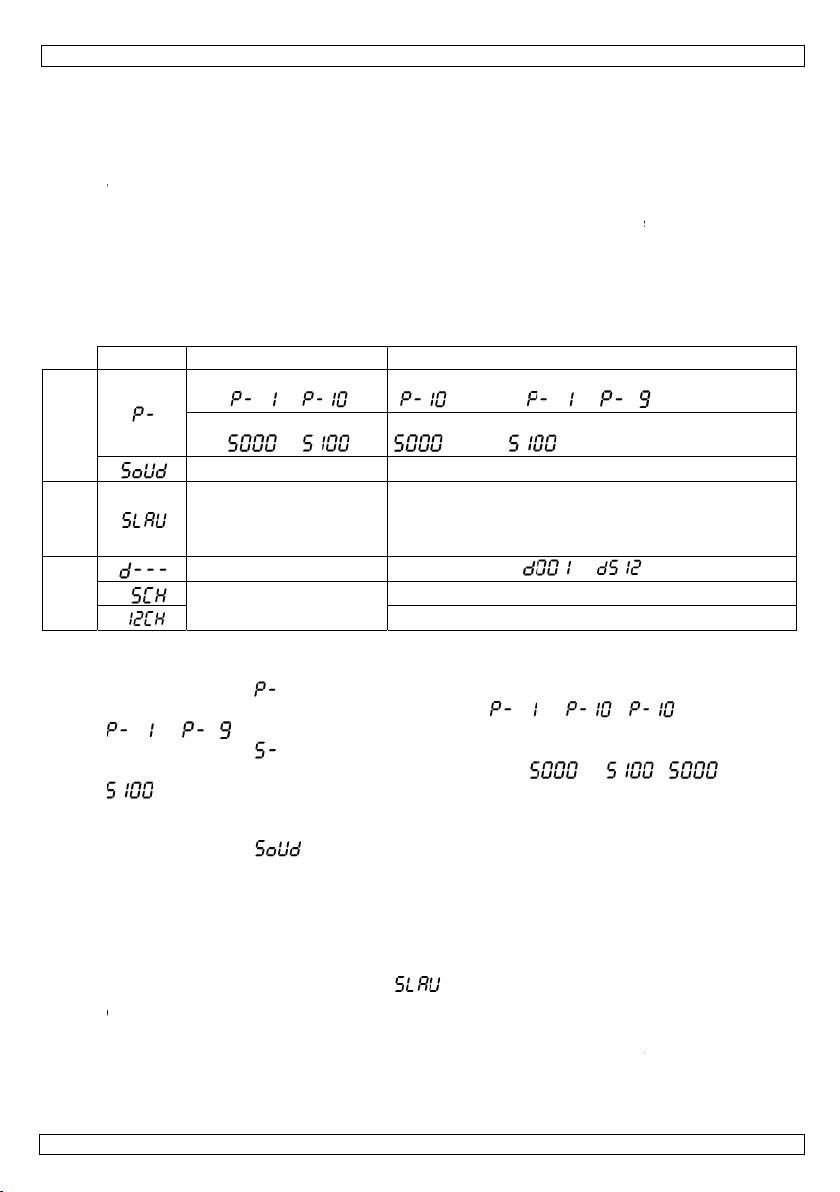
ms selec
(
selec
e set t
3xW
terminator is
ged into the X
a 50cm radius
al connection.
ded switched ci
r dimmer chan
before the de
between switc
= loop of
running speed
= slow,
e LED bar into
imply an XLR
R output sock
of the device a
rcuit and cann
nel is used sol
ice is taken int
description
hing and fading
~
of the internal
= fast
ound activate
lug with a 120
t of the last de
d there is suffi
t be run off a
ly for 0% to 10
service.
built-in progra
)
program
mode
ice
cient
0%
ms
Slave DMX
Stand-
Auto
•
Soun
This
•
Slave
This m
Active
•
•
DMX M
This
•
25.03.2
lone Mode
ode
ress <MODE>
se <UP> or <
~
ress <MODE>
se <UP> or <
= fast).
-Active Mode
ode allows a si
ress <MODE>
se the audio s
ensitive.
ode
ode allows a u
mode.
et the master
n each slave u
de
ode allows you
ll DMX-controll
ignals. This dig
t
o the DMX con
dividual addre
i
hen all device
11
slave mod
address
channel mo
until is dis
OWN> to sele
).
until is dis
OWN> to sele
ngle unit to run
until is
nsitivity knob
it to follow the
nit to auto or
nit, press <MO
to control the
ed devices nee
ital start addre
roller. The sam
ss can be set f
have the sam
set t
e
layed.
t the desired p
layed.
t the desired r
to the beat of
displayed.
n the back of
output of a ma
ound-activate
E> until
ixture by any
a digital start
s is the chann
e starting addr
r every device.
address, all t
e LED bar into
set D
X address (
ión modo DMX
selec
selec
ión modo DMX
rogram
nning speed
he music.
he fixture [5]
ter unit which
mode.
niversal DMX c
address so tha
l number from
ss can be use
e units will “lis
5
is displayed.
lave mode
~
5 canales (+di
12 canales (+
~
(
~
o make the fix
has been set t
ntroller.
the correct de
which the devi
for a whole gr
en” to the con
ección)
irección)
= loop of
( = sl
ure more or le
Auto or Sound
ice responds t
e starts to “list
up of devices
rol signal on o
©Velle
w,
s
-
the
en”
r an
e
an nv
Page 6
0
psn
m
1
o
(• P• U• P• U
C
5
n
-
2
d
D
D
s
d
o
0
001
00104070912141619212425
0
o
00000000101010202020303030304040405
5
50606060607
r
v
1
6
L
t
c
a
t
m
r
t
t
t
t
t
t
t
t
t
t
u
t
1
✓
✓
-
-
-
-
-
-
-
-
-
✓
✓
✓
✓
✓
✓
✓
✓
✓
-
-
-
-
-
0
h
s
w
~
)
D
t
t
A
~
w
t
h
o
n
6
✓
✓
✓
✓
s
C
e
1
.
m
4
m
e
n
u
articular chan
imultaneously.
umber. Changi
Exa
ple:
• I
n case of the 5
(CH1~5), the
n.
• I
n case of the 1
o 1 (CH1~12),
t
CH25~36), an
ress <MODE>
se <UP> or <
ress <MODE>
se <UP> or <
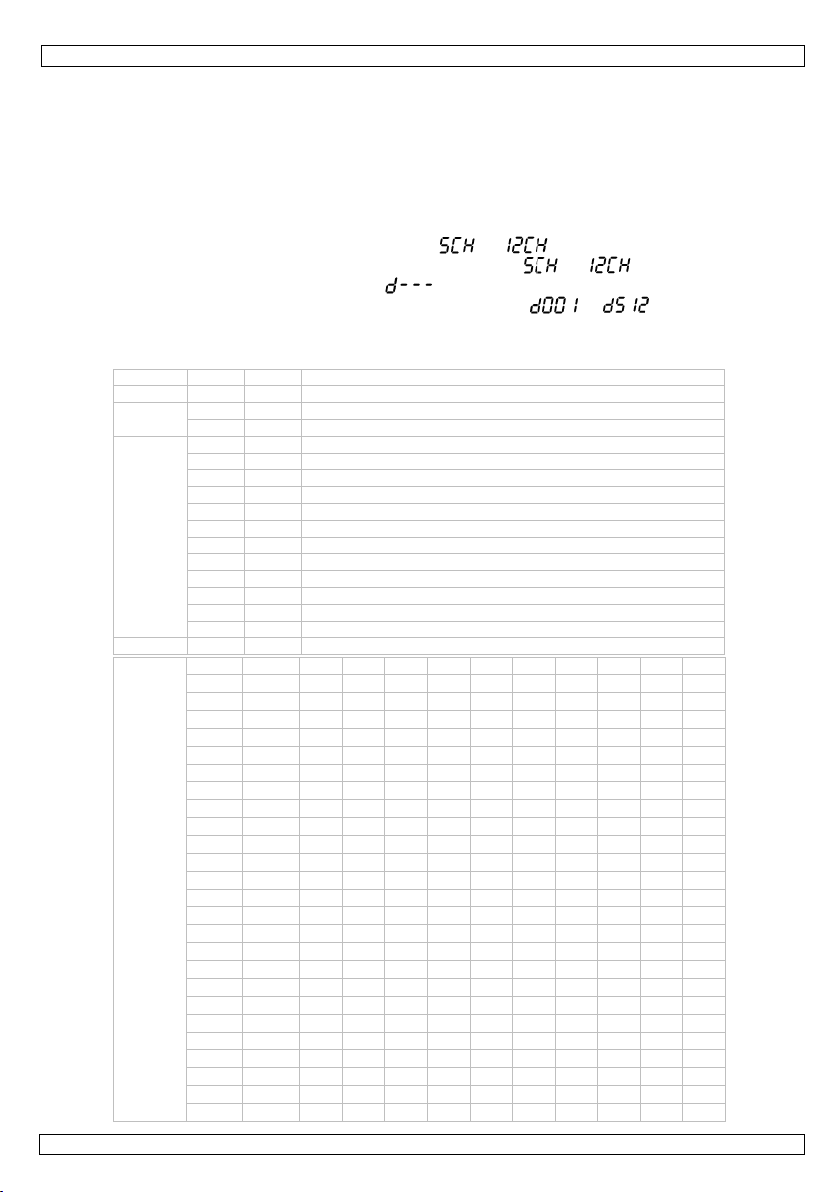
DMX
hannel Value
-Channel Mo
channel fr
25.03.2
11
1 0
2
3
4 0
fr
5
el. In other wo
If you set indi
ng the settings
channel VDPL
second unit to
-channel VDP
the second uni
so on.
until the DMX c
OWN> to sele
until the DMX
OWN> to set
e
m to
0 255 di
0 009 no
0
0 255 St
0 010 no
0
1 047 Au
8 071 Au
2 095 Au
6 119 Au
0 143 Au
4 167 Au
8 191 Au
2 215 Au
6 239 Au
0 249 Au
0 255 so
0 255 Au
m to L
002
0
0
005
3
008
6
011
9
014
2
017
5
020
8
023
1
026
4
029
7
032
0
035
3
038
6
041
9
044
2
047
5
050
8
1 053
056
0
4
0
7 059
0 062
3 065
6 068
9 071
2 074
VDPL10
ds: changing t
idual addresse
of one channel
003xW, you
(1 + 5) (CH6
1003xW, you
to 13 (1 + 12
hannel mode (
t the desired
ddress (
he desired star
mer 0 ~ 100%
function
obe: slow ~ fas
function
o 1
o 2
o 3
o 4
o 5
o 6
o 7
o 8
o 9
o 10 (=loop of
nd controlled
o-speed: slow
L2 L3
✓ ✓
- -
✓
-
- -
- -
- -
- -
- -
- -
- ✓
-
✓
-
✓
-
- -
- -
- -
- -
- -
- -
- -
✓ ✓
-
✓
-
✓
-
✓
-
✓
6
3xW
e settings of o
, each device
will only affect
ill have to set
10), the third
will have to se
(CH13~24), t
or
MX mode (
) is shown.
ing address (
descripti
(max. 20Hz)
uto 1 ~ Auto 9)
fast (when cha
L4 L5 L
✓ ✓
- - -
- - -
- - -
✓
- -
✓
-
- -
- - -
- - -
- - -
- - -
- - -
- - -
✓
- -
✓
-
- -
- - -
- - -
- - -
- - -
- - -
- -
✓
-
✓
- -
- - -
ne channel will
ill “listen” to a
the device in q
the start addre
to 11 (6 + 5) (
the start addr
e third to 25 (
) is displayed
or
~
n
nel 3 = 011~2
L7 L8
✓ ✓
- -
- -
- -
- -
-
- -
- -
✓
-
- -
- -
- -
- -
- -
-
- -
-
- -
- -
- -
- -
-
- -
-
✓
- -
✓
-
✓
- -
-
✓
affect all devic
separate chann
uestion.
s of the first u
H11~15), and
ss of the first
3 + 12)
ode)
).
9)
L9 L10
✓ ✓
- -
- -
- -
- -
- -
- -
- -
- -
✓
-
✓
-
- -
- -
- -
- -
- -
- -
- -
✓
-
-
✓
- -
- -
- -
- -
- -
©Velle
s
el
it to
so
nit
an nv
Page 7
VDPL1003xW
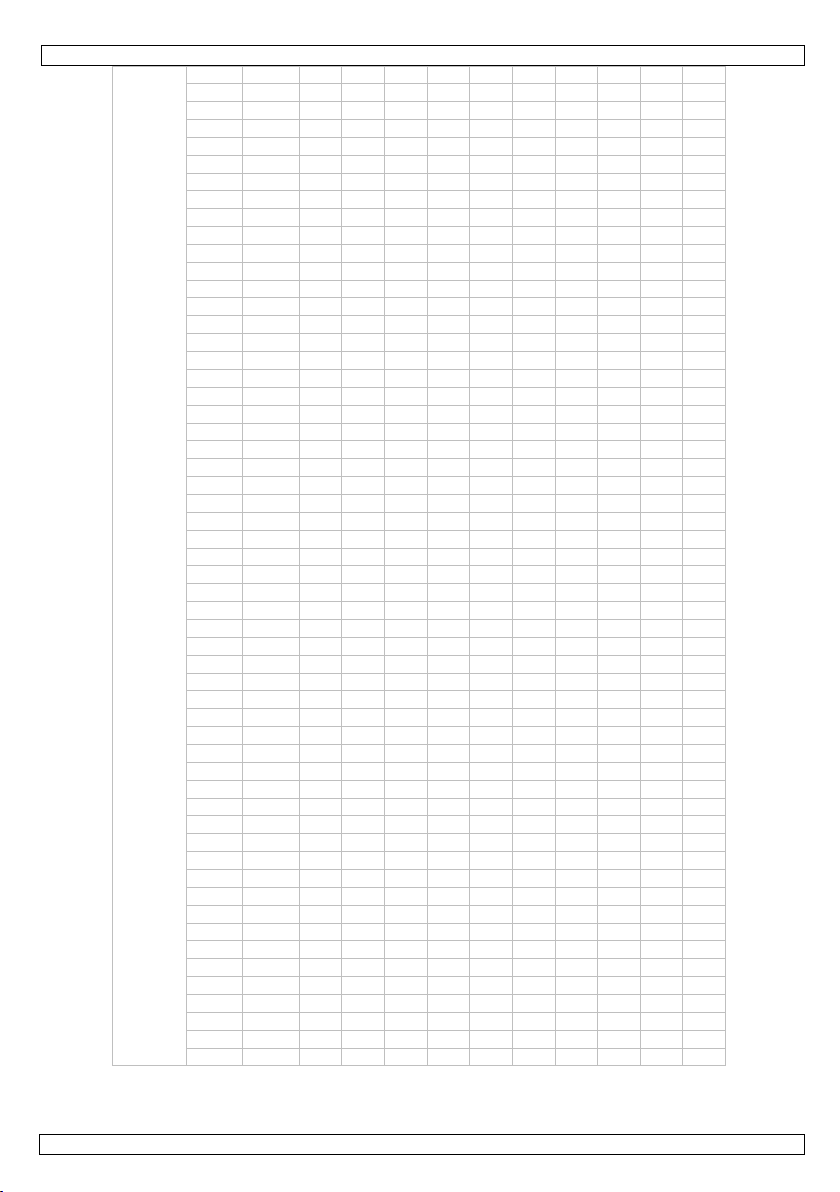
from to L1 L2 L3 L4 L5 L6 L7 L8 L9 L10
075 077 078 080 081 083 084 086 - 087 089 - 090 092 - 093 095 - 096 098 - 099 101 - 102 104 - 105 107 - - 108 110 - - 111 113 - - 114 116 - - 117 119 - - 120 122 - - 123 125 - - - 126 128 - - - 129 131 - - - 132 134 - - - 135 137 - - - 138 140 - - - - 141 143 - - - - 144 146 - - - - 147 149 - - - - 150 152 - - - - - 153 155 - - - - - 156 158 - - - - - 159 161 - - - - - - 162 164 - - - - - - 165 167 - - - - - - - 168 170
171 173
174 176
177 179
180 182 - 183 185 - 186 188 - 189 191 - - - 192 194 - - - 195 197
198 200 201 203 - 204 206 - - 207 209 - - - 210 212 - - - - 213 215 - - - - - 216 218 - - - - - - 219 221
222 224 - 225 227
228 230
231 233
234 236 - - - - 237 255
✓ ✓ ✓ ✓
✓ ✓
✓ ✓
✓ ✓
✓ ✓ ✓
✓ ✓ ✓
✓ ✓
✓ ✓ ✓ ✓ ✓
✓ ✓ ✓ ✓ ✓ ✓ ✓ ✓ ✓ ✓
- - - - -
✓
- - - - - -
✓
- - - - - - -
✓
✓ ✓
✓
✓
✓
✓
✓
✓
- -
- - - -
- - - - - -
✓ ✓ ✓ ✓
✓ ✓
✓ ✓
✓ ✓ ✓
✓ ✓ ✓
✓ ✓
- -
- - - - - -
-
- -
- - -
- - - -
- - - - -
- - - - - -
✓ ✓
✓
✓
✓
✓
✓
- - - - - - -
✓ ✓ ✓
- - - -
✓ ✓ ✓ ✓
- - - - -
✓
-
- -
- - -
- - - -
- - - - -
✓ ✓
✓
✓
✓
✓
- - - - - -
✓ ✓
- -
- - - -
✓ ✓ ✓ ✓
✓ ✓
- - - - - -
✓ ✓ ✓
- -
✓ ✓
- - - -
✓
✓
- - - - -
- - - -
✓
✓
- - - -
-
✓
- -
- - -
- - - -
✓ ✓
-
✓
- -
✓
- - -
✓
✓ ✓
✓
✓
- - - -
✓ ✓
- - - -
✓ ✓
- -
- - - - -
- - - -
✓ ✓ ✓
✓ ✓ ✓
✓ ✓
- -
- - - - -
✓ ✓ ✓ ✓ ✓
- -
✓
- - -
✓
- - -
✓
- - -
✓
- - -
✓
-
- -
✓ ✓
✓
- - -
✓ ✓ ✓
✓ ✓ ✓
-
✓
✓
- -
-
✓
✓
- -
-
✓
✓
- -
-
✓
✓
- -
-
✓
✓
- -
-
✓
✓
-
-
✓
✓ ✓
- -
✓ ✓
- -
✓ ✓
- -
✓ ✓
- -
-
- -
✓ ✓
25.03.2011 ©Velleman nv
7
Page 8
VDPL1003xW
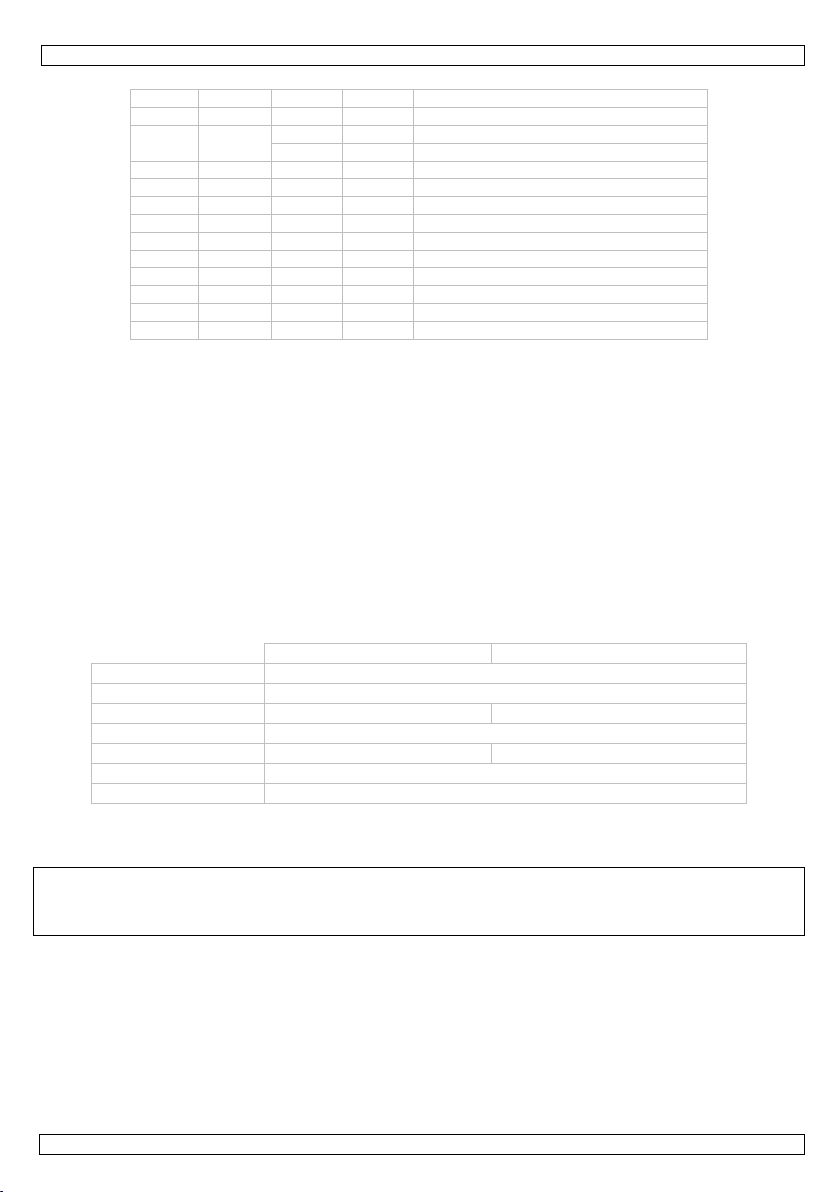
12-Channel Mode
channel LED from to description
1 all 000 255 dimmer 0 ~ 100%
2 all
3 1 000 255 dimmer 0 ~ 100%
4 2 000 255 dimmer 0 ~ 100%
5 3 000 255 dimmer 0 ~ 100%
6 4 000 255 dimmer 0 ~ 100%
7 5 000 255 dimmer 0 ~ 100%
8 6 000 255 dimmer 0 ~ 100%
9 7 000 255 dimmer 0 ~ 100%
10 8 000 255 dimmer 0 ~ 100%
11 9 000 255 dimmer 0 ~ 100%
12 10 000 255 dimmer 0 ~ 100%
8. Cleaning and maintenance
• All screws should be tight and free of corrosion.
• The housing, the lenses, the mounting supports and the installation location (e.g. ceiling, suspension,
trussing) should not be deformed, modified or tampered with e.g. do not drill extra holes in mounting
supports, do not change the location of the connections …
• The electric power supply cables must not show any damage. Have a qualified technician maintain
the device.
• Regularly remove dust from the housing and the air vents using a slightly damp cloth.
• There are no user-serviceable parts inside. Refer to an authorized dealer for service and/or spare
parts.
Fuse Replacement
• Wedge the fuse holder out of its housing with a flat-head screwdriver.
• Remove the damaged fuse from its holder and replace with exact same type of fuse.
• Insert the fuse holder back in its place and reconnect power.
9. Technical specifications
VDPL1003CW VDPL1003WW
power supply 230VAC ~ 50Hz
power consumption 37 W
LEDs 10 x CREE® 3W cold white 10 x CREE® 3W warm white
beam angle 140°
luminous flux 1200 @ 1m 1050 @ 1m
dimensions 1060 x 58 x 148mm
weight 3.5 kg
Use this device with original accessories only. Velleman nv cannot be held responsible in the
event of damage or injury resulted from (incorrect) use of this device. The information in this
manual is subject to change without prior notice.
© COPYRIGHT NOTICE
The copyright to this manual is owned by Velleman nv. All worldwide rights reserved.
No part of this manual or may be copied, reproduced, translated or reduced to any electronic medium or
otherwise without the prior written consent of the copyright holder.
000 009 no function
010 255 strobe slow ~fast (max. 20Hz)
25.03.2011 ©Velleman nv
8
Page 9
0
e
w
t
v
v
e
e
q
i
o
s
e
p
o
v
h
e
a
k
g
e
e
v
f
d
v
b
c
p
e
n
s
t
h
h
n
t
r
e
m
d
n
b
a
g
u
o
s
o
h
n
m
V
m
U
v
e
e
d
d
c
a
t
u
n
t
t
e
.
u
d
b
(
r
a
s
t
g
0
m
t
e
V
m
e
e
0
A
o
e
g
e
t
d
e
k
e
h
b
z
g
n
o
e
k
a
U
a
Z
e
r
d
A
D
s
t
g
r
o
a
r
a
g
k
e
z
n
a
S
t
n
l
e
e
g
v
e
c
e
k
l
h
o
t
V
n
n
8
o
i
g
o
s
m
d
u
f
n
d
w
p
g
e
f
VDPL10
3xW
1. Inl
Aan all
Belangr
Hebt u
Dank u
toestel b
Voor m
www.h
2. Ve
• Dit toe
gesch
• De be
handle
• De vo
kabel
• Zorg v
opper
• Maak
• Install
stoffen
• Zorg d
bedek
3. Al
Raadple
• Leer e
mogen
25.03.2
eiding
ingezetenen
ijke milieu-in
Dit symbool op
eggeworpen,
batterijen) niet
erechtkomen
recyclagepunt
ragen, conta
oor uw aankoo
schadigd tijde
er informatie
power.eu.
ligheidsin
Wees voo
dodelijke
Trek de s
en als u
Gebruik
opspatte
Houd dit
Let op: d
Kijk niet
- epil
- tijde
- per
te vermij
Er zijn ge
reserveo
stel valt onder
olde technicus
chikbare netsp
iding.
dingskabel ma
laatsen.
or een minim
lak
et toestel vast
er het toestel
. Houd het toe
t de ventilatie
en.
emene ric
g de Vellema
Bescher
geraken.
Bescher
rst de functies
dit toestel niet
11
GEBR
an de Europ
ormatie betr
het toestel of
it toestel scha
bij het gewone
oor recyclage.
rengen. Respe
teer dan de p
! Lees deze h
s het transpor
over dit prod
tructies
rzichtig bij de i
elektroshocks t
ekker uit het s
et niet gebruik
et toestel enk
de vloeistoffen
oestel uit de b
it toestel wordt
echtstreeks in
psieaanvallen
lijke blindheid
anente en onh
en.
en door de geb
derdelen, cont
eschermingskl
moet de elektri
nning mag nie
niet beschadi
mafstand van
met een geschi
p een minimu
tel op een mini
peningen nooi
tlijnen
®
service- en
tegen stof en
oorzie een rui
tegen schokk
van het toestel
gebruiken. Me
IKERSH
se Unie
ffende dit pr
e verpakking g
e kan toebren
huishoudelijke
U moet dit toes
teer de plaats
laatselijke au
ndleiding gron
, installeer het
ct en de me
stallatie: raak
e vermijden.
opcontact (tre
.
l binnenshuis
urt van kinder
zeer warm tijd
e lichtbron om
ij gevoelige pe
flitsblindheid)
erroepelijke sc
uiker vervang
cteer uw deale
asse I, wat wil
che aansluitin
hoger zijn da
d zijn of ingek
,5 m tussen d
kte veiligheids
afstand van 0,
mumafstand v
verstopt zijn.
kwaliteitsgar
xtreme hitte.
te van minst
n en vermijd b
kennen voor u
stal is bescha
NDLEI
duct
eft aan dat, al
en aan het mil
afval; het moe
tel naar uw ver
lijke milieuwet
oriteiten bet
ig voor u het t
dan niet en ra
st recente ve
geen kabels aa
niet aan de k
. Bescherm teg
n en onbevoe
ens het gebrui
rsonen
ade aan de og
are onderdelen
r.
eggen dat het
verzorgen.
de spanning i
rt worden. Laa
lichtuitgang v
abel (bv. VDL
5 m van ontvla
n 1 m van het
mag het toes
ntie achteraa
org dat de ver
ns 2,5 cm tuss
ute kracht tijd
het gaat gebru
iging het gevol
9
ING
het na zijn le
ieu. Gooi dit to
bij een gespe
deler of naar e
eving.
effende de ve
estel in gebrui
dpleeg uw dea
sie van deze
n die onder str
bel!) voordat u
en regen, voch
den.
.
n
in dit toestel.
toestel geaard
de specificatie
t uw dealer zo
n het toestel e
C7 of VDLSC
mbare en expl
belichte opperv
el nooit gedeel
deze handleid
uchtingsopenin
n het toestel e
ns de bedienin
iken. Ongesch
van onprofes
enscyclus wor
stel (en event
ialiseerd bedrij
n lokaal
rwijdering.
neemt. Werd
er.
andleiding, z
om staan om
het toestel rei
igheid en
oor onderhou
moet zijn. Een
s achteraan de
odig een nieu
het belichte
).
sieve voorwer
lak.
telijk of volledi
ng.
gen niet versto
n elk ander obj
.
olde personen
ioneel gebruik.
©Velle
t
ele
het
ie
igt
of
e
en of
pt
ct.
an nv
Page 10
VDPL1003xW
• Om veiligheidsredenen mag u geen wijzigingen aanbrengen. Schade door wijzigingen die de gebruiker
heeft aangebracht valt niet onder de garantie.
• Mechanische slijtage valt niet onder de garantie.
• Gebruik het toestel enkel waarvoor het gemaakt is. Andere toepassingen kunnen leiden tot kort-
sluitingen, brandwonden, elektrische schokken, enz. Bij onoordeelkundig gebruik vervalt de garantie.
• De garantie geldt niet voor schade door het negeren van bepaalde richtlijnen in deze handleiding en uw
dealer zal de verantwoordelijkheid afwijzen voor defecten of problemen die hier rechtstreeks verband
mee houden.
• Laat dit toestel installeren en onderhouden door een geschoolde technicus.
• Om beschadiging te vermijden, zet u het toestel best niet aan onmiddellijk nadat het werd blootgesteld
aan temperatuurschommelingen. Wacht tot het toestel op kamertemperatuur gekomen is.
• Dit toestel is ontworpen voor professioneel gebruik op podia, in disco's, enz. U mag dit toestel enkel
binnenshuis gebruiken (<35°C, <75%RH). Sluit aan op 240 VAC/50 Hz.
• Lichteffecten zijn niet ontworpen voor continue werking: regelmatige onderbrekingen doen ze langer
meegaan.
• Gebruik de oorspronkelijke verpakking wanneer u het toestel vervoert.
• Bewaar deze handleiding voor verdere raadpleging.
4. Eigenschappen
• 12-kanaals DMX-sturing met afzonderlijke aansturing van elke led
• masterdimmer en -sluiter in DMX-sturing
• stand-alone- en muzieksturing met ingebouwde effecten
• pulse-effect met instelbare snelheid
• extra 230V-voedingsuitgang geschikt voor aansluiting tot 10 projectoren
• geschikt voor montage in de hoogte of op de vloer
5. Overzicht
Raadpleeg de figuren op pagina 2 van deze handleiding.
1 display met bedieningsknoppen 4 DMX-uitgang
A MODE-knop 5 instelknop gevoeligheid
B UP-knop 6 voedingsingang/zekeringhouder
C DOWN-knop 7 GND-aansluiting
2 microfoon 8 voedingsuitgang
3 DMX-ingang
6. Installatie
Raadpleeg de figuren op pagina 2 van deze handleiding.
a) Het toestel monteren
• Laat een geschoolde technicus dit toestel installeren conform EN 60598-2-17 en andere toepasselijke
normen.
• De constructie waaraan het toestel wordt bevestigd, moet gedurende 1 uur 10 x het gewicht van dit
toestel kunnen dragen zonder te vervormen.
• Maak het toestel ook vast met een veiligheidskabel.
• Sta nooit recht onder het toestel wanneer u het monteert, verwijdert of schoonveegt. Laat het toestel
controleren door een geschoolde technicus voor u het in gebruik neemt en laat het 1 x per jaar
volledig nakijken.
• Installeer dit toestel op een plaats waar niemand langs moet lopen, kan neerzitten of het toestel kan
aanraken.
• Een degelijke praktijkervaring is vereist voor de plaatsing van dit toestel. U moet de
maximumbelasting van de draagconstructie kunnen berekenen, weten welk constructiemateriaal u
kunt gebruiken en u moet het gebruikte materiaal en het toestel af en toe laten nakijken. Monteer
het toestel niet zelf indien u er geen ervaring mee heeft. Een slechte montage kan leiden tot
verwondingen.
• Regel de gewenste invalshoek door middel van de montagebeugel en draai de regelschroeven stevig
aan.
• Een geschoolde elektricien moet het toestel aansluiten.
• Sluit het toestel via de stekker aan op het lichtnet. Sluit het niet aan op een dimmerpack.
25.03.2011 ©Velleman nv
10
Page 11
0
X
e
e
r
m
D
e
d
k
L
e
w
g
t
r
n
e
u
a
m
u
e
u
e
k
g
u
t
i
p
n
e
V
e
v
g
t
e
e
k
c
%
v
p
i
n
e
k
t
e
d
a
s
g
v
g
o
e
0
s
e
r
d
m
n
u
c
e
a
0
p
b
r
t
D
.
a
u
e
b
r
n
t
k
k
n
a
c
c
a
v
e
p
L
u
a
e
w
e
R
h
n
a
s
d
u
t
n
i
e
c
g
t
d
g
n
b
t
o
d
e
e
e
n
m
o
.
o
X
e
e
e
u
e
a
b) DM
Raadple
c) Alg
7. Ge
Raadple
Menuf
• Indi
(niet
kunt
Geb
• De
eenz
• Een
omg
het
stek
de X
• Ver
koeli
• Een
• Alle
wee
als e
• De i
stand-alone slave DMX
512-aanslu
g de figuren o
n van toepassi
meegeleverd)
verscheidene
uik daarvoor e
aximaal aanbe
elfde aansluitin
MX eindweers
ving met veel
igitale controle
er met een we
-uitgang van
meen
ijder alle brand
ng.
eschoolde ele
oestellen moet
stand of dimcir
en 0% tot 100
stallatie moet
bruik
g de figuren o
ncties
menu
ting
pagina 2 van
g, sluit een XL
n de andere k
DPL1003xW’
n 2-aderige af
olen kabellen
is 32.
and is aanbev
lektrische ruis
signaal door el
rstand van 12
het laatste toe
baar materiaal
tricien moet h
via een geaard
uit gevoed wo
inschakeling.
oor het eerste
pagina 2 van
functie
nterne progra
~
snelheid
~
muzieksturi
VDPL10
eze handleidin
-kabel aan de
nt van de man
aan elkaar ko
eschermde ka
te is 500 mete
len als de DMX
(bv. een disco
ktrische ruis.
Ω van pin 2 n
tel in de reeks
in een straal v
t toestel aansl
stopcontact g
den, ook al ge
gebruik gekeu
eze handleidin
ma’s
g scha
inter
overg
(
selec
3xW
g.
vrouwelijke 3-
nelijke 3-pin X
pelen met beh
el met XLR ing
, het aanbevol
-kabel vrij lang
heek). De eind
e DMX eindwe
aar 3. Deze XL
n 0,5 m rond
iten.
voed worden e
ruikt u de vari
d worden door
g.
e programma’
ang
= lus van
eer de snelhei
= traag,
el de muziekst
in XLR-uitgang
-ingang van
lp van een ser
ng- en uitgan
n maximumaa
is of wordt ge
eerstand voor
rstand is niets
-stekker word
et toestel en v
mogen niet vi
bele weerstan
een expert.
omschrijving
met plotseling
~
van het intern
= snel
ring in
van een contr
e VDPL1003x
iële koppeling.
saansluitingen
tal toestellen
ruikt in een
omt corruptie
meer dan een
dan aangeslot
orzie voldoend
a een variabel
of het dimcirc
of geleidelijk
)
programma
ller
W. U
p
van
LRn op
it
slave
adres
kanaalmod
s
Stand-
25.03.2
Auto
• Dr
• Ki
• Dr
• Ki
Muzie
Sturin
• Dr
• Ge
• He
lone
atische sturi
k op <MODE>
s het gewenst
k op <MODE>
s de gewenste
= snel).
sturing
van een enke
k op <MODE>
bruik de instel
toestel reage
11
g
tot op de l
programma (
op de l
tot
uitvoersnelheid
l toestel naarg
tot op
nop achteraan
rt nu op de be
d-display vers
cd-display vers
(
lang de beat v
de lcd-display
het toestel [5]
t van de muzi
scha
el de slavefunc
stel h
et DMX-adres i
aals DMX- stur
5-ka
12-k
naals DMX- stu
hijnt.
~
k dankzij de in
11
) met <UP>
hijnt.
) met <UP
n de muziek.
erschijnt.
om de gevoeli
~
ie in
( ~
ng
ring
n <DOWN>.
> en <DOWN>
heid in te stell
erne microfoo
)
( = tra
n.
.
©Velle
g,
an nv
Page 12

0
f
e
k
h
u
s
g
D
e
a
n
e
e
t
o
e
1
C
e
1
+
k
k
k
a
5
n
t
e
d
e
a
e
w
a
s
n
6
o
D
o
n
d
a
0
001
00104070912141619212425
0
a
0000000010101
202020303
p
e
D
r
b
r
u
r
s
t
n
w
P
e
a
e
e
>
m
o
o
e
t
t
t
t
t
t
t
t
t
t
u
t
1
✓
✓
-
-
-
-
-
-
-
-
-
✓
0
r
t
s
i
t
u
e
n
s
a
w
i
t
e
k
e
C
2
g
v
)
6
✓
✓
c
a
t
z
t
a
r
t
h
v
y
g
m
g
g
o
Slave
unctie
Een to
stel in slavefu
muzie
sturing).
• Sc
akel de autom
• Dr
k op elk slave
DMX-
turing
Sturin
van het toest
• Alle
MX-gestuurde
op d
signalen. Dit
sign
al van de DMX
kunt
per toestel een
• Wan
eer u een enk
and
re woorden: w
op r
ageren. Wann
kana
al. Met andere
el op dat kana
toes
Bijvo
rbeeld:
• In h
t geval van de
(CH
~5) moeten in
5) (
H11~15), enz.
• In h
t geval van de
(CH
~12) moeten i
(13
12) (CH25~3
• Dru
op <MODE> t
• Dru
op <UP> of <
• Dru
op <MODE> t
• Kies
het DMX-starta
DMX-w
25.03.2
arden per ka
-kanaals mo
11
kanaal v
1 0
2
3
4 0
v
5
ctie volgt het
atische of muzi
oestel op <MO
l via een unive
toestellen heb
igitale startad
controller. U k
nieuw startad
l startadres in
nneer u de ins
er u verschille
oorden: wann
l reageren.
5-kanaals VDP
tellen, van het
12-kanaals VD
stellen, van h
), enz.
t de DMX-kan
OWN> en sel
t het DMX-adr
dres met <UP
aal
us
n tot
0 255 di
0 009 str
0
0 255 str
0 010 ge
0
1 047 au
8 071 au
2 095 au
6 119 au
0 143 au
4 167 au
8 191 au
2 215 au
6 239 au
0 249 au
0 255 m
0 255 au
n tot L
002
0
0
005
3
008
6
011
9
014
2
017
5
020
8
023
0
1
026
4
029
7
032
0
035
3
VDPL10
rogramma van
ksturing in op
E> tot
sele DMX-cont
en een digitaal
es is het kanaa
nt één enkel s
3xW
het mastertoe
het mastertoes
op de lcd-displ
oller.
startadres nod
lnummer van
artadres gebru
es ingeven.
telt, zullen alle
ellingen voor 1
de adressen in
eer u de instell
L1003xW, zul
tweede toestel
L1003xW, z
t tweede toest
almodus (
cteer de gewe
s () op
toestellen ‘luis
kanaal verand
telt, dan luiste
ngen van een
u het startadr
op 6 (1 + 5) (
lt u het startad
l op 13 (1 + 1
of ) o
ste DMX-sturin
de lcd-display
of <DOWN> (
mer 0 ~ 100%
boscoop uit
boscoop: traag
n functie
o 1
o 2
o 3
o 4
o 5
o 6
o 7
o 8
o 9
o 10 (= lus van
zieksturing
omatische snelh
L2 L3
✓ ✓
- -
✓
-
- -
- -
- -
- -
- -
- -
- -
✓
~ snel (max. 20
auto 1 ~ auto 9
eid: traag ~ sne
L4 L5 L
✓ ✓
- - -
-
- - -
✓
- - -
✓
-
- -
- - -
- - -
- - -
- - -
-
- - -
12
~
omschrijv
- -
✓
tel (automatis
tel.
y verschijnt.
ig, zodat het ju
aarop het toes
ken voor een g
eren’ naar het
rt, zullen alle
rt elk toestel n
anaal verande
s van het eers
H6~10), van
res van het eer
) (CH13~24),
p de lcd-displa
( of
erschijnt.
).
ing
Hz)
l (als kanaal 3 =
L7 L8
✓ ✓
- -
- -
- -
- -
-
- -
- -
✓
-
- -
- -
- -
-
✓
he of
iste toestel rea
el ‘luistert’ naa
roep toestellen
elfde kanaal. M
oestellen er te
ar een ander
t, zal enkel het
e toestel op 1
et derde op 11
ste toestel op 1
an het derde
verschijnt.
).
011~249
L9 L10
✓ ✓
- -
- -
- -
- -
- -
- -
- -
- -
✓
-
✓
-
- -
©Velle
eert
r het
of u
et
elijk
(6 +
p 25
an nv
Page 13

VDPL1003xW
van tot L1 L2 L3 L4 L5 L6 L7 L8 L9 L10
25.03.2011 ©Velleman nv
038
036
039
042
045
048
051 053
054
057 059
060 062 063 065 066 068 069 071 072 074 075 077 078 080 081 083 084 086 - 087 089 - 090 092 - 093 095 - 096 098 - 099 101 - 102 104 - 105 107 - - 108 110 - - 111 113 - - 114 116 - - 117 119 - - 120 122 - - 123 125 - - - 126 128 - - - 129 131 - - - 132 134 - - - 135 137 - - - 138 140 - - - - 141 143 - - - - 144 146 - - - - 147 149 - - - - 150 152 - - - - - 153 155 - - - - - 156 158 - - - - - 159 161 - - - - - - 162 164 - - - - - - 165 167 - - - - - - - 168 170
171 173
174 176
177 179
180 182 - 183 185 - 186 188 - 189 191 - - - 192 194 - - - 195 197
198 200 201 203 - 204 206 - - 207 209 - - - -
✓
041
✓
044
✓
047
✓
050
✓
✓
056
✓
✓
✓ ✓ ✓ ✓
✓ ✓
✓ ✓
✓ ✓
✓ ✓ ✓
✓
-
- -
- - -
- - - -
- - - - -
- - - - - -
- - - - - - -
- - - - - - - -
✓ ✓
✓
✓
✓
✓
✓
✓
✓
✓ ✓ ✓
- - - - - - -
✓
- - - - - -
✓
- - - - -
✓
- - - -
✓
- - -
✓
- - - - - - -
-
- -
- - -
- - - -
- - - - -
- - - - - -
- - - - - - -
✓ ✓
✓
✓
✓
✓
✓
✓
- -
- - - -
- - - - - -
✓ ✓ ✓ ✓
✓ ✓
✓ ✓
✓ ✓ ✓
- - - - - -
✓
-
- -
- - -
- - - -
- - - - -
- - - - - -
✓ ✓
✓
✓
✓
✓
✓
- - - - - - -
✓ ✓ ✓
- - - - -
✓
- - - - - -
✓
-
- -
- - -
- - - -
- - - - -
✓ ✓
✓
✓
✓
✓
- - - - - -
✓ ✓
- -
- - - -
✓ ✓ ✓ ✓
✓ ✓
- - - - - -
✓ ✓ ✓
- - - -
✓
- - - - -
✓
- - - - -
✓
-
- -
- - -
- - - -
✓ ✓
✓
✓
✓
- - - - -
- - -
✓
✓
- - - -
- - -
✓
✓
- - - -
- - -
✓
✓
- - - -
- - -
✓
✓
- - -
-
✓
- -
- - -
✓ ✓
-
✓
- -
✓
✓ ✓
✓
- - - -
✓ ✓
- - - -
✓ ✓
- -
- - - -
- - -
13
- -
✓
-
✓
- -
-
✓
✓
- -
-
✓
✓
- -
-
✓
✓
- -
-
✓
✓
- -
-
✓
✓
- -
-
✓
✓
-
-
✓
✓ ✓
- -
✓ ✓
- -
✓ ✓
- -
✓ ✓
Page 14

VDPL1003xW
van tot L1 L2 L3 L4 L5 L6 L7 L8 L9 L10
210 212 - - - - 213 215 - - - - - 216 218 - - - - - - 219 221
222 224 - 225 227
228 230
231 233
234 236 - - - - 237 255
✓ ✓ ✓
✓ ✓
✓ ✓ ✓ ✓ ✓
✓ ✓ ✓ ✓ ✓ ✓ ✓ ✓ ✓ ✓
- - - -
✓ ✓
✓ ✓ ✓ ✓
- -
✓ ✓ ✓
✓ ✓ ✓
- -
✓ ✓
✓ ✓
- -
- - - - -
✓ ✓ ✓ ✓ ✓
12-kanaals modus
kanaal LED van tot omschrijving
1 alle 000 255 dimmer 0 ~ 100%
2 alle
3 1 000 255 dimmer 0 ~ 100%
4 2 000 255 dimmer 0 ~ 100%
5 3 000 255 dimmer 0 ~ 100%
6 4 000 255 dimmer 0 ~ 100%
7 5 000 255 dimmer 0 ~ 100%
8 6 000 255 dimmer 0 ~ 100%
9 7 000 255 dimmer 0 ~ 100%
10 8 000 255 dimmer 0 ~ 100%
11 9 000 255 dimmer 0 ~ 100%
12 10 000 255 dimmer 0 ~ 100%
000 009 stroboscoop uitgeschakeld
010 255 stroboscoop traag ~snel (max. 20 Hz)
8. Reiniging en onderhoud
• Alle gebruikte schroeven moeten goed zijn aangespannen en mogen geen sporen van roest vertonen.
• De behuizing, de lenzen, de montagebeugels en de montageplaats (bv. het plafond of het gebinte)
mogen niet vervormd zijn of aangepast worden (geen extra gaten in montagebeugels, aansluitingen
niet verplaatsen, etc.)
• De voedingskabels mogen niet beschadigd zijn. Laat het toestel onderhouden door een geschoolde
technicus.
• Verwijder regelmatig het stof van de behuizing en de ventilatieopeningen met een vochtige doek.
• U mag geen onderdelen vervangen. Raadpleeg uw erkende verdeler voor eventuele reserveonderdelen.
De zekering vervangen
• Maak de zekeringhouder los met behulp van een schroevendraaier met platte punt.
• Verwijder de oude zekering en vervang door een zekering van hetzelfde type.
• Plaats de zekeringhouder terug in het toestel en koppel het toestel aan het lichtnet.
9. Technische specificaties
VDPL1003CW VDPL1003WW
voeding 230 VAC ~ 50 Hz
verbruik 37 W
leds 10 x CREE® 3 W koud wit 10 x CREE® 3 W warm wit
stralingshoek 140°
lichtstroom 1200 @ 1 m 1050 @ 1 m
afmetingen 1060 x 58 x 148 mm
gewicht 3,5 kg
Gebruik dit toestel enkel met originele accessoires. Velleman nv is niet aansprakelijk voor
schade of kwetsuren bij (verkeerd) gebruik van dit toestel. De informatie in deze handleiding
kan te allen tijde worden gewijzigd zonder voorafgaande kennisgeving.
© AUTEURSRECHT
Velleman nv heeft het auteursrecht voor deze handleiding. Alle wereldwijde rechten voorbehouden. Het is niet
toegestaan om deze handleiding of gedeelten ervan over te nemen, te kopiëren, te vertalen, te bewerken en op te slaan
op een elektronisch medium zonder voorafgaande schriftelijke toestemming van de rechthebbende.
- -
-
✓ ✓ ✓
✓ ✓ ✓
- -
✓ ✓
25.03.2011 ©Velleman nv
14
Page 15

0
t
i
o
n
u
l
u
u
n
n
p
h
s
l
v
c
a
e
m
r
e
m
s
i
i
r
e
a
u
s
o
Ê
e
o
e
e
n
o
n
e
d
u
e
p
n
a
a
e
3
s
n
e
c
a
c
é
O
n
e
s
y
s
g
t
e
t
o
m
p
d
i
e
o
o
s
ê
n
0
s
a
i
p
o
s
n
t
0
s
q
n
o
e
g
s
e
h
é
t
n
e
u
n
e
u
u
m
e
s
s
a
d
m
o
o
a
v
a
u
I
c
r
v
c
c
v
s
p
u
t
e
t
’
s
C
u
m
m
r
o
e
t
a
n
é
c
a
m
o
f
a
s
è
ê
o
r
a
)
d
e
c
e
m
é
m
p
m
r
c
a
e
,
r
e
n
e
i
f
o
e
,
N
VDPL10
TICE D
3xW
’EMPLO
1. In
Aux rés
Des inf
l’environ
Nous vo
l’apparei
revende
Pour pl
visiter
2. Co
• Cet ap
Un tec
• La ten
notice.
• Le câb
renou
• Respe
• Fixer l’
• Install
explosi
• Ne ja
3. Di
Se référ
roduction
dents de l'Un
rmations env
Ce symbole su
peut polluer l'
éventuelles) p
l’appareil en q
recyclage local
ement. En ca
s remercions d
. Si l’appareil a
r.
s d’informati
otre site web
signes de
tre prud
électroch
Débranch
débranch
Utiliser c
projectio
Garder h
Attentio
Ne pas re
- de c
- d’av
- d’en
Il n’y a a
éventuell
areil ressort à
nicien qualifié
ion réseau ne
e d’alimentatio
eler le câble d’
ter une distanc
ppareil à l’aid
r le VDPL100
f. Installer le V
ais obstruer le
ectives gé
r à la garanti
Protéger
de ventil
projecteu
on européen
ronnemental
l'appareil ou l'
nvironnement.
rmi les déchet
estion. Renvo
. Il convient de
de question
e votre achat !
été endomma
n concernan
www.hqpow
sécurité
nt lors de l’ins
cs mortels.
er l’appareil s’il
r l'appareil ; n
t appareil uniq
s d’eau.
rs de la portée
: le boîtier du
garder directe
rise d’épilepsie
uglement tem
ommagement
cune pièce ma
s chez votre r
la classe de pr
doit établir la c
eut pas dépas
ne peut pas
limentation si
e minimum de
d’un câble de
xW à une dist
DPL1003xW à
fentes d’aérat
érales
de service et
ontre la poussi
tion ne soient
r et tout autre
e
s importante
emballage indi
Ne pas jeter u
municipaux n
er les équipem
respecter la ré
, contacter le
Lire la présent
é pendant le tr
cet article et
r.eu.
allation : touc
n’est pas utilis
n pas le câble.
uement à l'in
de personnes
spot chauffe p
ent dans la so
chez les perso
oraire (aveugl
permanent et i
ntenable par l’
vendeur.
tection I, ce q
nnexion électr
er la tension
tre replissé ou
écessaire.
,5 m entre la
écurité adéqu
nce minimale
une distance
on. Éviter de c
de qualité Ve
ère. Protéger c
as bloquées. L
bjet.
concernant
ue que l’élimin
appareil élect
n sujets au tri
nts usagés à
lementation lo
autorités lo
notice attenti
ansport, ne pa
la version la
er un câble so
ou pour le ne
érieur. Protég
on qualifiées e
ndant l’usage.
rce lumineuse
nes sujettes
ment par éclai
rréversible de l
tilisateur. Com
i implique que
ique.
entionnée dan
ndommagé. D
ortie lumière d
t (p.ex. VDLS
e 0,5 m de to
inimale de 1
uvrir, entière
lleman® à la fi
ntre la chaleu
isser une dista
e produit
ation d’un app
ique ou électro
sélectif ; une d
otre fournisseu
ale relative à l
ales pour éli
ement avant la
l’installer et c
lus récente d
s tension peut
toyer. Tirer la
r de la pluie, d
de jeunes enf
afin d’éviter le
r)
œil
mander des pi
l’appareil doit
les spécificati
emander à vot
e l’appareil et l
7 ou VDLSC8
t objet ou pro
de la surface i
ent ou partiell
n de cette noti
extrême. Veill
nce de minimu
reil en fin de vi
ique (et des pi
chèterie traite
r ou à un servi
protection de
ination.
mise en servic
nsulter votre
e cette notice
causer des
iche pour
e l’humidité et
nts.
risques
ces de rechang
tre mis à la ter
ns à la fin de c
e revendeur de
surface illumi
.
uit inflammabl
lluminée.
ment, l’appare
e.
r à ce que les
2,5 cm entre
e
les
a
e de
de
des
e
e.
tte
ée.
ou
l.
entes
le
Protéger
• Se fa
25.03.2
person
profes
iliariser avec le
nes non qualifi
ionnel.
11
ontre les choc
fonctionneme
es d’opérer ce
et le traiter a
t de l’appareil
appareil. La pl
15
ec circonspecti
vant de l’utilis
part des dégâ
n pendant l’op
r. Ne pas per
s sont causés
ration.
ettre pas aux
ar un usage n
©Velle
n
an nv
Page 16

VDPL1003xW
• Toute modification est interdite pour des raisons de sécurité. Les dommages occasionnés par des
modifications par le client ne tombent pas sous la garantie.
• L’usure mécanique ne tombe pas sous la garantie.
• N’utiliser votre VDPL1003xW qu’à sa fonction prévue. Tout autre usage peut causer des courts-
circuits, des brûlures, des électrochocs, etc. Un usage impropre annule d'office la garantie.
• La garantie ne s’applique pas aux dommages survenus en négligeant certaines directives de cette
notice et votre revendeur déclinera toute responsabilité pour les problèmes et les défauts qui en
résultent.
• Confier l’installation et l’entretien à un personnel qualifié.
• Ne pas brancher l’appareil après exposition à des variations de température. Afin d’éviter des
dommages, attendre jusqu’à ce que l’appareil ait atteint la température ambiante avant de l’utiliser.
• Cet appareil a été développé pour usage professionnel dans des discothèques, des théâtres, etc.
N’utiliser cet appareil qu’à l’intérieur (<35°C, <75°RH). Le raccorder à une source de courant CA de.
240 VCA/50 Hz.
• Un effet lumineux n’est pas conçu pour une opération continue. Des pauses régulières prolongeront sa
vie.
• Transporter l’appareil dans son emballage originel.
• Garder cette notice pour toute référence ultérieure.
4. Caractéristiques
• mode DMX à 12 canaux pour un pilotage séparé de chaque LED
• variateur et obturateur master en mode DMX
• modes autonome et de pilotage par le son avec effets préprogrammés
• effet de pulsation avec vitesse réglable
• sortie 230V supplémentaire pour l'interconnexion jusqu'à 10 projecteurs
• convient pour un montage en hauteur ou au sol
5. Description
Se référer aux illustrations à la page 2 de cette notice.
1 afficheur avec boutons de configuration 4 sortie DMX
A bouton de sélection MODE 5 réglage de sensibilité
B bouton UP 6 prise d’alimentation/porte-fusible
C bouton DOWN 7 connexion GND
2 microphone 8 sortie d’alimentation
3 entrée DMX
6. Installation
Se référer aux illustrations à la page 2 de cette notice.
a) Montage de l’appareil
• Un technicien qualifié doit installer l’appareil en respectant EN 60598-2-17 et toute autre norme
applicable.
• La construction portante de l’appareil doit être capable de supporter 10 x le poids de l’appareil
pendant une heure, sans qu’une déformation de la construction en résulte.
• Fixer votre VDPL1003xW à l’aide d’un câble de sécurité (sécurité supplémentaire).
• Éviter de vous positionner en dessous de l’appareil pour l’enlever ou lors du montage ou du
nettoyage. Un technicien qualifié doit réviser l’appareil avant la mise en service. Organiser une
révision minutieuse annuelle.
• Installer l’appareil à un endroit où personne ne peut passer ou s’asseoir et où personne ne peut le
toucher.
• L’installation de cet appareil exige une solide expérience pratique : le calcul de la charge max. de la
construction, les matériaux d’installation requis etc. De temps en temps, un technicien qualifié doit
vérifier la construction portante et l’appareil même. Ne pas essayer d’installer cet appareil vousmême si vous n’avez pas les qualifications requises ; une installation incorrecte peut entraîner des
blessures.
• Déterminer l’angle d’inclinaison au moyen de l’étrier de montage et serrer les vis de montage.
• Un électricien qualifié doit établir la connexion électrique.
• Brancher l’appareil sur le réseau électrique par la fiche d’alimentation. Ne pas le brancher sur un bloc
de puissance.
b) Connexion DMX512
• Si nécessaire, connecter un câble à fiche XLR à la sortie XLR femelle à 3 broches de votre contrôleur
25.03.2011 ©Velleman nv
16
Page 17

0
e
o
e
t
v
i
e
x
m
e
o
a
g
f
lbou
f
llen
a
m
f
g
e
j
t
e
3
e
e
u
s
u
t
e
a
e
i
r
t
o
o
u
e
o
e
o
e
t
g
j
e
e
’
d
n
X
e
m
e
e
e
u
c
c
t
v
M
q
q
q
e
e
0
s
a
a
n
o
c
r
%
e
t
t
a
a
t
t
a
a
u
u
s
P
r
m
e
h
r
s
g
d
d
a
e
a
m
r
a
c
e
v
q
e
p
c
s
n
a
O
O
p
m
r
u
c
s
a
(non
incl.) et l’autre
urs VDPL100
plusi
cond
ucteurs avec d
ueur maximale
• Long
lle : 32.
série
résistance de t
• Une
nce ou s’il est
dista
thèque). La ré
disc
par l
bruit électriq
résis
ance de 120 Ω
ectée à la sorti
conn
c) En g
7. E
Se référ
Foncti
• Enle
vent
• Un é
lectricien qualif
• Tout
alim
utilis
• Un e
mode
autonome
énéral
er tout matéri
lation suffisant
projecteur doit
nté depuis un
é comme un in
pert doit appr
ploi
r aux illustrati
ns du menu
menu
fiche XLR mâl
xW à partir d
s connecteurs
de la connexio
rminaison DM
tilisé dans un
istance de ter
e. La résistanc
de broche 2 v
XLR du derni
u inflammable
.
é doit établir la
être branché s
héostat ou un
errupteur mar
uver l’installati
ns en page 2 d
fonction
programme in
~
vitesse
~
pilotage par le
VDPL10
à 3 broches à
une connexion
’entrée et de
: 500 mètres.
est à recomm
nvironnement
inaison prévie
de terminaiso
rs broche 3 (v
r appareil de la
dans un rayon
connexion éle
r une prise de
ircuit variateu
he/arrêt (de 0
on avant qu’ell
e cette notice.
erne
son activ
sélec
sélec
3xW
l’entrée du VD
sérielle. Utilise
ortie XLR.
Nombre maxi
nder si le câbl
vec beaucoup
t la corruption
n DMX n’est rie
ir illustration à
série.
de 0,5 m autou
trique.
courant mise à
, même si le r
à 100%).
puisse être p
ion effet à tran
ion vitesse pro
= lent,
tion du mode
L1003xW. Il
un câble de co
al d’unités sur
DMX doit cou
de bruit électri
du signal de co
n d’autre qu’un
gauche). Cette
r de l’appareil
la terre et ne
éostat ou le cir
ise en service.
description
ition subite ou
rammes inter
= rapide
e pilotage par l
st possible de
nnexion blindé
une connexion
rir une grande
ue (p.ex. une
ntrôle numériq
e fiche XLR ave
fiche XLR est
t assurer une
eut pas être
uit variateur e
graduelle
es
e son
elier
à 2
e
c une
t
esclave DMX
mode escla
adresse
pilotage D
Mode
Mode
25.03.2
Pilota
• En
• Sé
• En
• Sé
Pilot
Ce
• En
• Ré
• Le
Un pro
ou par
• Ac
utonome
e automatiq
oncer la touch
ectionner le pr
cle de
oncer la touch
ectionner le pr
t ou =
ge par le son
ode permet de
oncer la touch
ler la sensibili
projecteur réa
sclave
ecteur en mod
le son).
iver le mode pi
11
e
<MODE> jus
gramme (
~ ).
<MODE> jus
gramme (
rapide).
faire réagir un
<MODE> jus
é depuis le bou
it au rythme d
esclave suit l
lotage automat
e activ
adres
X
u’à ce que
sélec
sélec
~
u’à ce que
~
seul appareil a
u’à ce que
ton de réglage
la musique de
programme d
ique ou par le
17
tion du mode
sage DMX (
ion mode DMX
ion mode DMX
s’affiche.
)
vec les touch
s’affiche.
)
vec les touche
rythme de la
s’affiche.
à l’arrière du p
puis le microph
projecteur m
on sur le proje
e pilotage escl
~ )
5 canaux
12 canaux
s <UP> et <D
s <UP> et <D
usique.
ojecteur [5].
one interne.
ître (mode de
teur maître.
ve
WN> (
WN> (
ilotage autom
©Velle
=
=
tique
an nv
Page 18

0
f
d
d
s
s
é
p
x
x
n
n
n
c
e
D
i
i
r
e
a
d
s
x
x
<
<
<
s
a
d
0
0
1
00104070912141619212425
0
0000000010101020202
3
30303040404
5
c
g
n
u
o
n
d
g
t
x
’
W
’
t
s
o
s
t
t
t
t
t
t
t
t
t
t
o
e
1
✓
✓
-
-
-
-
-
-
-
-
-
✓
✓
✓
✓
✓
✓
✓
0
e
n
n
u
o
d
s
r
a
é
d
5
d
n
r
e
r
0
~
d
q
s
C
u
»
n
u
u
5
H
M
s
<
o
2
6
✓
✓
✓
D
a
d
e
p
r
’
m
e
r
a
e
u
• En
oncer la touch
Mode
25.03.2
Ce mo
• Tous
que l
indiq
une
• Dan
cana
Avec
cons
Exem
• Pour
deu
• Pour
deu
• Enfo
• Enfo
• Enfo
• Séle
Valeu
Mode
e pilotage
e permet de p
les appareils p
es appareils co
ue le numéro d
eule adresse d
le cas d’une s
l. Tous les app
des adresses
quent, un aju
le :
le VDPL1003
ième 6 (1 + 5)
le VDPL1003
ième 13 (1 + 1
cer la touche
cer la touche
cer la touche
tionner l’adres
rs DMX par c
5 canaux
11
canal
1 0
2
3
4 0
5
MX
loter votre proj
lotés par un si
e canal sur leq
e départ pour t
reils seront do
e départ indivi
tement des ré
(CH6~10), du
2) (CH13~24),
nal
e à
0
0
0
d
e à
0
0
0
0
<MODE> sur
rects réagisse
ule adresse, to
W à 5 canaux,
W à 12 canau
MODE> jusqu
UP> ou <DO
MODE> jusqu
e DMX (
0 255 ob
0 009 pa
0 255 str
0 010 pa
1 047 au
8 071 au
2 095 au
6 119 au
0 143 au
4 167 au
8 191 au
2 215 au
6 239 au
0 249 au
0 255 pil
0 255 vit
002
0
005
3
008
6
011
9
014
2
017
5
020
8
023
1
026
4
029
7
032
0
035
3
038
6
041
9
044
2
047
5
050
8
1 053
VDPL10
haque project
ecteur sans co
nal DMX dema
t sur les signa
el l’appareil éc
ute une série
us les appareil
c influencés lo
uelles, chaque
lages d’un can
l’adresse de d
roisième 11 (6
, l’adresse de
du troisième 2
à ce que le mo
N> et sélectio
à the DMX add
~ ) av
urateu
0 ~ 10
de fonction
boscope : lent
de fonction
o 1
o 2
o 3
o 4
o 5
o 6
o 7
o 8
o 9
o 10 (= boucle
tage par le son
sse: lent ~ rapi
L
L2 L3
✓ ✓
- -
✓
-
- -
- -
- -
- -
- -
- -
- -
✓
-
✓
-
✓
-
- -
- -
- -
- -
- -
3xW
ur esclave jus
trôleur DMX.
dent une adre
x de contrôle.
ute le contrôle
’appareils ou
« écouteront
sque vous cha
appareil « éco
l n’influence q
part du premie
+ 5) (CH11~1
épart du premi
(13 + 24) (C
e DMX (
ner le mode D
ess ( )
c les touches
descripti
%
rapide (max.
e auto 1 ~ auto
de (si canal 3 =
L4 L5 L
✓ ✓
- - -
- - -
- - -
✓
-
- -
- - -
- - -
- - -
- - -
- - -
- - -
✓
-
- -
- - -
- - -
18
ur DMX. Vous
ne adresse de
les mêmes sig
r appareil est 1
er appareil est
’affiche.
0 Hz)
9)
011~249)
- -
- -
- -
- -
- -
✓
-
- -
-
- -
- -
- -
- -
- -
- -
✓
-
- -
-
u’à ce que
se de départ
ette adresse d
gez les réglag
tera » son pro
e l'appareil su
), etc.
25~36), etc.
ou ) s
X ( ou
UP> et <DOW
n
L7 L8
✓ ✓
- -
✓
-
✓
- -
✓
-
✓
s’affiche.
MX pour assur
e départ numé
vez le choix en
épart par app
naux, sur un s
s d’un seul can
re canal. Par
ce canal.
(CH1~5), du
1 (CH1~12), d
affiche.
).
N>.
L9 L10
✓ ✓
- -
- -
- -
- -
- -
- -
- -
- -
✓
-
✓
-
- -
- -
- -
- -
- -
- -
- -
©Velle
r
ique
tre
reil.
ul
al.
an nv
Page 19

VDPL1003xW
de à
054
057 059
060 062 063 065 066 068 069 071 072 074 075 077 078 080 081 083 084 086 - 087 089 - 090 092 - 093 095 - 096 098 - 099 101 - 102 104 - 105 107 - - 108 110 - - 111 113 - - 114 116 - - 117 119 - - 120 122 - - 123 125 - - - 126 128 - - - 129 131 - - - 132 134 - - - 135 137 - - - 138 140 - - - - 141 143 - - - - 144 146 - - - - 147 149 - - - - 150 152 - - - - - 153 155 - - - - - 156 158 - - - - - 159 161 - - - - - - 162 164 - - - - - - 165 167 - - - - - - - 168 170
171 173
174 176
177 179
180 182 - 183 185 - 186 188 - 189 191 - - - 192 194 - - - 195 197
198 200 201 203 - 204 206 - - 207 209 - - - 210 212 - - - - 213 215 - - - - - 216 218 - - - - - - 219 221
222 224 - 225 227
25.03.2011 ©Velleman nv
L1 L2 L3 L4 L5 L6 L7 L8 L9 L10
056
✓
- - - - - - -
- - - - - - - -
✓
✓ ✓
✓
✓
✓
✓
✓
✓
✓
✓ ✓ ✓ ✓
✓ ✓
✓ ✓
✓ ✓
✓ ✓ ✓
✓ ✓ ✓
✓ ✓ ✓
- - - - - - -
-
- -
- - -
- - - -
- - - - -
- - - - - -
- - - - - - -
✓ ✓
✓
✓
✓
✓
✓
✓
- -
- - - -
- - - - - -
✓ ✓ ✓ ✓
✓ ✓
✓ ✓
✓ ✓ ✓
✓ ✓
- - - - - -
✓
-
- -
- - -
- - - -
- - - - -
- - - - - -
✓ ✓
✓
✓
✓
✓
✓
- - - - - - -
✓ ✓ ✓
- - - -
✓ ✓ ✓ ✓
- - - - -
✓
- - - - - -
✓
-
- -
- - -
- - - -
- - - - -
✓ ✓
✓
✓
✓
✓
- - - - - -
✓ ✓
- -
- - - -
✓ ✓ ✓ ✓
✓ ✓
- - - - - -
✓ ✓ ✓
- -
- - - -
✓
- - - - -
✓
- - - - -
✓
-
- -
- - -
- - - -
✓ ✓
✓
✓
✓
- - - - -
✓ ✓ ✓
- - -
✓
✓
- - - -
- - -
✓
✓
- - - -
- - -
✓
✓
- - - -
- - -
✓
✓
- - -
-
✓
- -
- - -
✓ ✓
-
✓
- -
✓
✓ ✓
✓
- - - -
✓ ✓
- - - -
✓ ✓
- -
- - - -
- - -
✓ ✓ ✓
✓ ✓ ✓
✓ ✓ ✓
✓ ✓
19
✓
-
✓
- -
-
✓
✓
- -
-
✓
✓
- -
-
✓
✓
- -
-
✓
✓
- -
-
✓
✓
- -
-
✓
✓
-
-
✓
✓ ✓
- -
✓ ✓
- -
✓ ✓
- -
✓ ✓
- -
-
- -
Page 20

VDPL1003xW
de à
228 230
231 233
234 236 - - - - 237 255
Mode 12 canaux
canal LED de à description
1 toutes 000 255 obturateur 0 ~ 100%
2 toutes
3 1 000 255 obturateur 0 ~ 100%
4 2 000 255 obturateur 0 ~ 100%
5 3 000 255 obturateur 0 ~ 100%
6 4 000 255 obturateur 0 ~ 100%
7 5 000 255 obturateur 0 ~ 100%
8 6 000 255 obturateur 0 ~ 100%
9 7 000 255 obturateur 0 ~ 100%
10 8 000 255 obturateur 0 ~ 100%
11 9 000 255 obturateur 0 ~ 100%
12 10 000 255 obturateur 0 ~ 100%
8. Nettoyage et entretien
• Serrer les écrous et les vis et vérifier qu’ils ne rouillent pas.
• Le boîtier, les lentilles, les supports de montage et la construction portante ne peuvent pas être
déformés, adaptés ou bricolés p.ex. pas de trous additionnels dans un support, ne pas déplacer les
connexions, etc.
• Les câbles d'alimentation ne peuvent pas être endommagés. Un technicien qualifié doit entretenir
l’appareil.
• Dépoussiérer régulièrement le boîtier et les fentes d’aération avec un chiffon humide.
• Il n’y a aucune pièce maintenable par l’utilisateur. Commander des pièces de rechange éventuelles
chez votre revendeur.
Remplacement du fusible
• Retirer le porte-fusible de son emplacement à l’aide d’un tournevis à lame plate.
• Retirer le fusible usagé et le remplacer par un fusible du même type.
• Réinsérer le porte-fusible dans son emplacement et reconnecter l’alimentation.
9. Spécifications techniques
VDPL1003CW VDPL1003WW
alimentation
consommation
LED
angle de rayonnement
flux lumineux
dimensions
poids
N’employer cet appareil qu’avec des accessoires d’origine. SA Velleman ne sera aucunement
responsable de dommages ou lésions survenus à un usage (incorrect) de cet appareil. Toutes
les informations présentées dans cette notice peuvent être modifiées sans notification
préalable.
© DROITS D’AUTEUR
SA Velleman est l’ayant droit des droits d’auteur pour cette notice. Tous droits mondiaux réservés. Toute
reproduction, traduction, copie ou diffusion, intégrale ou partielle, du contenu de cette notice par quelque
procédé ou sur tout support électronique que se soit est interdite sans l’accord préalable écrit de l’ayant droit.
L1 L2 L3 L4 L5 L6 L7 L8 L9 L10
✓ ✓
✓ ✓ ✓ ✓ ✓
✓ ✓ ✓ ✓ ✓ ✓ ✓ ✓ ✓ ✓
000 009 pas de fonction
010 255 stroboscope : lent ~ rapide (max. 20 Hz)
- -
✓ ✓
- -
- - - - -
✓ ✓ ✓ ✓ ✓
✓ ✓
230 VCA ~ 50 Hz
37 W
10 x CREE
®
3 W blanc froid 10 x CREE® 3 W blanc chaud
140°
1200 @ 1 m 1050 @ 1 m
1060 x 58 x 148 mm
3,5 kg
25.03.2011 ©Velleman nv
20
Page 21

0
t
u
a
d
á
,
s
r
e
a
o
c
a
r
a
c
n
o
b
a
c
p
n
a
s
d
e
t
l
b
a
p
a
c
d
u
o
o
o
e
n
a
d
i
c
u
o
r
e
e
e
u
N
e
e
o
t
e
t
1
a
r
w
d
l
t
p
n
r
t
o
c
f
i
e
p
m
u
m
f
r
e
o
o
f
0
L
e
e
n
a
e
t
p
e
u
h
e
d
o
s
e
e
b
e
P
o
q
n
b
a
o
m
a
®
p
ó
f
u
R
e
a
s
.
s
u
a
c
o
o
c
r
7
b
e
e
b
u
c
o
e
a
e
é
o
o
e
o
i
u
e
e
r
m
d
s
u
o
d
s
e
e
a
MA
VDPL10
UAL DE
3xW
USUA
IO
1. In
A los ci
Import
Si tiene
¡Gracias
usarlo. S
distribui
Para m
usuario
2. In
• Este
a tie
• Aseg
• No a
supe
• Resp
• Fije
• Inst
expl
• Nun
3. No
Véase la
roducción
dadanos de l
ntes informa
Este símbolo e
dañar el medi
doméstica; de
distribuidor o
ambiente.
dudas, conta
por haber com
i el aparato ha
or.
s informació
visite nuestr
truccione
Cuidado
cable con
Desconec
antes de
propio ca
Utilice el
ningún ti
Manteng
¡Ojo!: la
No mire
- un a
- ceg
- lesi
El usuari
distribuid
aparato perten
ra. La conexió
úrese de que l
plaste el cable
rficie afilada. S
ete una distan
l aparato con
le el aparato a
sivo. Instale el
a bloquee los
rmas gene
Garantía de s
No expon
Asegúres
mín. 2,5c
Unión Europ
iones sobre
este aparato
ambiente. No
e ir a una emp
la unidad de r
te con las au
rado el VDPL
sufrido algún d
sobre este p
página ww
de seguri
urante la insta
ctado a la red
e siempre el a
impiarlo. Tire s
le.
parato sólo e
o de salpicadu
el aparato lejo
aja del proyec
irectamente a l
taque epiléptic
era temporal (
nes permanent
no habrá de e
r si necesita p
ce a la clase d
eléctrica debe
tensión de red
e alimentación
es necesario,
ia de mín. 0.5
n cable de seg
una distancia
aparato a una
rificios de venti
ales
rvicio y calid
ga este equipo
de que los ori
m entre el apa
a
l medio ambi
el embalaje i
ire este aparat
resa especializ
ciclaje local. R
oridades loca
003xW! Lea a
ño en el trans
oducto y la v
.hqpower.eu.
ad
ación: puede s
eléctrica.
arato si no va
iempre del enc
interiores. N
a o goteo.
s del alcance d
or se calienta
a fuente lumin
en personas s
eguera por de
es e irreversibl
ectuar el mant
ezas de recam
protección I.
llevarse a cab
no sea mayor
y protéjalo co
ida a su distri
entre la salid
ridad adecuad
ínima de 0,5m
distancia míni
lación. No cubr
ad Velleman
a polvo. No ex
icios de ventila
ato y cualquier
nte concerni
dica que, si tir
o (ni las pilas,
da en reciclaje
spete las leye
les para resid
entamente las
orte no lo inst
rsión más re
frir una peligr
a usarlo durant
ufe para desc
o exponga este
personas no
urante su ope
sa para evitar
ensibles
tello)
s del ojo
nimiento de ni
io.
or lo tanto, es
por un técnico
ue la tensión i
tra posibles da
uidor reemplaz
de luz y el áre
(p.ej. VDLSC
de cualquier o
a de 1 m de la
, ni entero ni
al final de est
onga este equi
ción no estén
otro objeto.
nte a este pr
las muestras i
i las hubiera)
Devuelva este
locales en rel
os.
instrucciones d
le y póngase e
iente de este
sa descarga el
e un largo peri
nectar el cable
equipo a lluvia
apacitadas y ni
ación.
nguna pieza. C
esencial que el
cualificado.
ndicada en las
ños causados p
ar el cable de a
a iluminada.
o VDLSC8).
jeto o product
superficie ilum
n parte, el apa
manual del us
po a temperatu
loqueados. Dej
ducto
nservibles, pod
n la basura
aparato a su
ción con el me
l manual ante
n contacto con
manual del
ctrica al tocar
do de tiempo
de red, nunca
, humedad ni a
ños.
ntacte con su
aparato esté p
specificacione
or algún tipo d
limentación.
inflamable o
nada.
rato.
ario.
ras extremas.
una distancia
rían
io
de
su
n
el
uesto
.
de
• Fami
apar
• Por
25.03.2
No agite
liarícese con el
to. La mayoría
azones de seg
11
l aparato. Evit
funcionamient
de los daños s
ridad, las modi
usar excesiva
del aparato. S
n causados po
icaciones no a
21
fuerza durante
lo personas c
r un uso inade
torizadas del a
el manejo y la
alificadas pued
uado.
parato están p
instalación.
n manejar est
ohibidas. Los d
©Velle
ños
an nv
Page 22

VDPL1003xW
causados por modificaciones no autorizadas, no están cubiertos por la garantía.
• El desgaste mecánico no está cubierto por la garantía.
• Utilice sólo el VDPL1003xW
cortocircuitos, quemaduras, descargas eléctricas, etc. Un uso desautorizado puede causar daños y
anula la garantía completamente.
• Los daños causados por descuido de las instrucciones de seguridad de este manual invalidarán su
garantía y su distribuidor no será responsable de ningún daño u otros problemas resultantes.
• La instalación y el mantenimiento deben ser realizados por personal especializado.
• No conecte el aparato si ha estado expuesto a grandes cambios de temperatura. Espere hasta que el
aparato llegue a la temperatura ambiente.
• Este aparato ha sido diseñado para uso profesional en una discoteca, un teatro, etc. y es apto para
un uso sólo en interiores (<35°C, <75%RH). Conéctelo a una fuente de corriente CA de máx.
240VCA / 50Hz.
• No ha sido diseñado para un uso ininterrumpido. Introduzca frecuentemente una pausa para
prolongar la vida del aparato.
• Transporte el aparato en su embalaje original.
• Guarde este manual del usuario para cuando necesite consultarlo.
4. Características
• modo DMX de 12 canales para un control separado de cada LED
• dimmer y obturador maestro en el modo DMX
• modo autónomo (stand alone) y control por la música con efectos preprogramados
• efecto de pulsación con velocidad ajustable
• salida de 230V adicional para la interconexión hasta 10 focos
• ideal para un montaje en altura o en el suelo
5. Descripción
Véase las figuras en la página 2 de este manual del usuario.
1 pantalla con botones de ajuste 4 salida DMX
2
3
botón de selección MODE
A
botón UP
B
botón DOWN 7
C
micrófono
entrada DMX
6. Instalación
Véase las figuras en la página 2 de este manual del usuario.
a) Montaje del aparato
• Respete la directiva EN 60598-2-17 y toda norma nacional antes de instalar el aparato. La
instalación debe ser realizada por un técnico especializado.
• El soporte donde irá el aparato, debe ser capaz de sostener 10 veces el peso de éste durante una
hora, sin que se produzca una deformación de dicho soporte.
• Fije siempre el VDPL1003xW
• Evite ponerse debajo del aparato durante el montaje, la limpieza, etc. Un técnico especializado
debe revisar el aparato antes de la puesta en marcha. Después, debe revisarlo una vez al año.
• Instale el aparato fuera del alcance de personas no autorizadas y en un lugar con poca gente.
• La instalación de este aparato exige una sólida experiencia práctica: debe poder calcular la carga
máx. del soporte, debe conocer los materiales necesarios para la instalación, etc. De vez en
cuando, una verificación de la estructura y del aparato mismo debe ser llevada a cabo por un
técnico especializado. No intente instalar este aparato si no tiene las cualificaciones requeridas;
una instalación incorrecta puede causar lesiones.
• Ajuste el ángulo de inclinación a su gusto mediante un soporte de montaje y fije los tornillos del
soporte.
• Pregunte a un electricista cómo hacer la conexión eléctrica.
• Conecte el aparato a la red eléctrica con la conexión de alimentación. Normalmente, no se
conectan efectos luminosos a dimmer packs (reguladores).
para aplicaciones descritas en este manual a fin de evitar p.ej.
ajuste de sensibilidad
5
entrada de alimentación/portafusibles
6
conexión GND
8
salida de alimentación
con un cable de seguridad (seguridad adicional).
25.03.2011 ©Velleman nv
22
Page 23

0
e
fdelconcon
n
eeléXLRXLR
e
a
e
e
u
o
s
n
)
a
P• S• P• S
o
m
P• A
E
e
o
m
A
P
1
f
e
D
e
l
o
a
t
a
a
c
t
p
p
ú
c
M
o
M
o
o
d
a
M
i
a
s
d
M
r
n
s
0
s
o
n
e
n
h
o
d
a
e
e
m
v
a
t
o
p
m
0
o
0
d
u
5
a
n
a
s
o
a
a
c
c
c
o
o
e
t
t
e
t
d
a
L
e
ó
/
ú
m
d
d
P
r
c
o
c
L
R
t
L
o
n
e
u
/
a
a
a
a
m
p
o
u
u
s
t
c
c
t
b) Con
c) gen
7. Us
Véase la
Funcio
modo
• Si
• Lo
• Se
recomienda un
m
ctrico corromp
• Qu
ite todo materi
un
• Pr
• As
si
• Un
experto debe
alone
(stand
autónomo
xión DMX5
uera necesario
controlador y
ectar varios V
ectores XLR d
gitud máx. de
dio ambiente c
con una resis
del último ap
ral
ventilación su
gunte a un ele
gúrese de que
tiliza el reósta
figuras en la
es del men
menú
2
, conecte un ca
l otro conecto
PL1003xW e
entrada y de
a conexión: 50
a terminación
n mucho ruid
la señal de co
encia de 120Ω
rato de la seri
l inflamable e
ficiente.
tricista cómo
los aparatos n
o o el circuito
robar la instal
ágina 2 de est
función
programa int
~
velocidad
~
ontrol por la
VDPL10
ble con conect
XLR macho de
serie. Use un
alida VDPL10
metros. Núme
i el cable DMX
eléctrico (ej.
trol numérico.
de polo 2 a pol
.
un radio de 0.
acer la conexió
estén aliment
immer como u
ción antes de l
manual del u
rno efect
(
veloci
úsica activ
3xW
r XLR (no incl.)
3 polos a la en
cable blindado
3xW.
ro máx. de uni
ebe cubrir un
na discoteca).
La terminación
o 3. Este conec
m alrededor d
n eléctrica.
dos por un re
interruptor ✓
puesta en ma
uario.
con cambio s
= bucle de
dad del progra
= lento,
ción del modo
a la salida X
rada del VDP
de doble hilo c
ades en una co
gran distancia
a terminación
DMX no es má
tor XLR está co
l aparato y as
stato o un circ
OFF (de 0% a
rcha.
descripción
bito o gradual
~
a interno
= rápido
e control por l
hembra de 3
1003xW. Es p
nductor con
exión en serie:
o si se usa en
impide que el r
que un conec
nectado a la sa
gúrese de que
ito dimmer, in
100%).
)
música
olos
sible
32.
n
ido
or
lida
haya
luso
esclavo DMX
Modo
Modo
•
Contr
Este
•
•
Modo
Un foc
por la
•
•
25.03.2
utónomo
automático
ulse la tecla <
eleccione el pr
~
ulse la tecla <
eleccione la ve
= rápid
l por el soni
odo permite h
ulse la tecla <
juste la sensib
l foco reaccion
sclavo
en el modo e
úsica).
ctive el modo
ulse la tecla <
11
modo escla
dirección
modo can
ODE> hasta q
grama (
).
ODE> hasta q
locidad (
).
o
cer reaccionar
ODE> hasta q
lidad con el bo
por el micróf
clavo sigue el
e control auto
ODE> until
o activ
direc
l
ue se visualice
~
ue se visualice
~
sólo un aparat
ue se visualice
ón de ajuste d
no interno al ri
rograma del fo
selec
selec
) c
) co
ático o el con
is display
23
ción del modo
ión DMX (
ión modo DMX
ión modo DMX
.
n las teclas <U
.
n las teclas <U
al ritmo de la
.
la parte trase
mo de la músi
co maestro (m
rol por la músi
d.
e control escl
~ )
5 canales
12 canales
P> y <DOWN>
> y <DOWN>
música.
a del aparato [
a.
do de control
a en el foco m
vo
( = bu
( = len
5].
utomático o co
estro.
©Velle
le de
o,
ntrol
an nv
Page 24

0
d
sapacanent
uindcue
o
l
l
l
l
l
l
e
M
s
a
e
e
c
e
o
n
P
a
P
a
O
P
O
c
a
d
0
001
001
4
70912141619212425
0
000000001010102020203
3030304
4040505
s
p
s
o
a
a
o
C
e
y
e
u
t
t
t
t
t
t
t
t
t
t
t
n
1
✓
✓
-
-
-
-
-
-
-
-
-
✓
✓
✓
✓
✓
✓
✓
✓
0
r
a
r
a
o
j
i
r
d
e
m
c
r
o
e
c
r
n
e
o
a
a
l
d
o
c
<
ó
o
9
3
6
✓
✓
✓
g
o
c
e
a
~
r
(
)
ó
m
e
g
r
5
~
c
Modo
Ejempl
25.03.2
Este m
• Si
• Co
n una sola dire
sin
aj
• En
el caso del VD
de
• En
el caso del VD
de
• Pu
• Pu
• Pu
• Se
Valor
Modo
e control D
odo permite co
e usa una señ
ratos reaccion
al en el cual el
re una sola dir
cronizadament
stes de todos l
ependienteme
stión.
:
segundo apar
segundo apar
se la tecla <M
se la tecla <U
se la tecla <M
eccione la dire
s DMX por c
de 5 canales
11
canal
1 0
2
3
4 0
d
5
X
ntrolar su foco
l DMX, cada a
n a las señale
aparato reacci
cción inicial p
ción inicial par
a la misma se
s canales. Con
te. Por lo tant
L1003xW de
to 6 (1 + 5) (
L1003xW de
to 13 (1 + 12)
DE> hasta qu
> o <DOWN>
DE> hasta qu
ción DMX (
nal
e a
0 255 sh
0 009 sin
0
0 255 es
0 010 sin
0
1 047 Au
0
8 071 Au
0
2 095 Au
6 119 Au
0 143 Au
4 167 Au
8 191 Au
2 215 Au
6 239 Au
0 249 Au
0 255 co
0 255 vel
e a L
002
0
0
005
3
008
6
011
9
014
2
017
5
020
8
023
1
026
4
029
7
032
0
035
0
3
038
6
041
9
044
2
047
0
5
050
8
1 053
056
4
VDPL10
in controlador
arato tiene su
de control cor
nará a las señ
ra toda una se
una serie de
ñal. Por lo tant
varias direccio
, cambiar los a
5 canales, la d
H6~10), del te
12 canales, la
(CH13~24), d
se visualice el
seleccione el
se visualice la
~ )
tte
0 ~ 100%
función
roboscopio: lent
función
o 1
o 2
o 3
o 4
o 5
o 6
o 7
o 8
o 9
o 10 (=bucle d
trol por la músi
ocidad: lento ~
L2 L3
✓ ✓
- -
✓
-
- -
- -
- -
- -
- -
- -
- ✓
-
✓
-
✓
-
- -
- -
- -
- -
- -
- -
24
3xW
DMX.
propia direcció
ectas. Esta dir
les DMX del c
ie de aparatos
paratos, todos
, cambiar los
nes iniciales, c
ustes de un so
rección inicial
cer aparato 11
irección inicial
l tercer aparat
modo DMX (
odo DMX (
dirección DMX
on las teclas
descripci
~ rápido (máx
Auto 1 ~ Auto
a
ápido (si canal
L4 L5 L
✓ ✓
- - -
- - -
- - -
✓
- -
✓
-
- -
- - -
- - -
- - -
- - -
- - -
- - -
✓
- -
✓
-
- -
- - -
- - -
- - -
inicial DMX pa
cción inicial di
ntrolador DMX.
o una dirección
los aparatos re
justes de un s
da aparato rea
o canal sólo af
el primer apar
(6 + 5) (CH11
del primer apa
25 (13 + 12)
o
o).
().
UP> y <DOWN
n
. 20Hz)
)
= 011~249)
L7 L8
✓ ✓
- -
- -
- -
- -
-
- -
- -
✓
-
- -
- -
- -
- -
- -
-
- -
-
- -
-
✓
- -
✓
-
✓
ra asegurar qu
ital es el prime
Es posible ele
inicial por apa
accionarán
lo canal afecta
cionará
cta al canal en
to es 1 (CH1~
15), etc.
ato es 1 (CH1
CH25~36), et
.
>.
L9 L10
✓ ✓
- -
- -
- -
- -
- -
- -
- -
- -
✓
-
✓
-
- -
- -
- -
- -
- -
- -
- -
✓
-
©Velle
los
r
ir
ato.
a los
),
12),
.
an nv
Page 25

VDPL1003xW
de a L1 L2 L3 L4 L5 L6 L7 L8 L9 L10
057 059
060 062 063 065 066 068 069 071 072 074 075 077 078 080 081 083 084 086 - 087 089 - 090 092 - 093 095 - 096 098 - 099 101 - 102 104 - 105 107 - - 108 110 - - 111 113 - - 114 116 - - 117 119 - - 120 122 - - 123 125 - - - 126 128 - - - 129 131 - - - 132 134 - - - 135 137 - - - 138 140 - - - - 141 143 - - - - 144 146 - - - - 147 149 - - - - 150 152 - - - - - 153 155 - - - - - 156 158 - - - - - 159 161 - - - - - - 162 164 - - - - - - 165 167 - - - - - - - 168 170
171 173
174 176
177 179
180 182 - 183 185 - 186 188 - 189 191 - - - 192 194 - - - 195 197
198 200 201 203 - 204 206 - - 207 209 - - - 210 212 - - - - 213 215 - - - - - 216 218 - - - - - - 219 221
222 224 - 225 227
228 230
25.03.2011 ©Velleman nv
- - - - - - - -
✓
✓ ✓
✓
✓
✓
✓
✓
✓
✓
✓ ✓ ✓ ✓
✓ ✓
✓ ✓
✓ ✓
✓ ✓ ✓
✓ ✓ ✓
✓ ✓ ✓
✓ ✓
- - - - - - -
-
- -
- - -
- - - -
- - - - -
- - - - - -
- - - - - - -
✓ ✓
✓
✓
✓
✓
✓
✓
- -
- - - -
- - - - - -
✓ ✓ ✓ ✓
✓ ✓
✓ ✓
✓ ✓ ✓
✓ ✓
- -
- - - - - -
✓
-
- -
- - -
- - - -
- - - - -
- - - - - -
✓ ✓
✓
✓
✓
✓
✓
- - - - - - -
✓ ✓ ✓
- - - -
✓ ✓ ✓ ✓
- - - - -
✓
- - - - - -
✓
-
- -
- - -
- - - -
- - - - -
✓ ✓
✓
✓
✓
✓
- - - - - -
✓ ✓
- -
- - - -
✓ ✓ ✓ ✓
✓ ✓
- - - - - -
✓ ✓ ✓
- -
✓ ✓
- - - -
✓
✓
- - - - -
- - - -
✓
✓
- - - - -
- - - -
✓
✓
- - - -
-
✓
- -
- - -
- - - -
✓ ✓
-
✓
- -
✓
- - -
✓
✓ ✓
✓
✓
- - - -
✓ ✓
- - - -
✓ ✓
- -
- - - - -
- - - -
✓ ✓ ✓
✓ ✓ ✓
✓ ✓
- -
25
✓
- - -
- -
✓
- - -
✓
- - -
✓
- - -
✓
- - -
✓
-
- -
✓ ✓
✓
- - -
✓ ✓ ✓
✓ ✓ ✓
-
✓
✓
- -
-
✓
✓
- -
-
✓
✓
- -
-
✓
✓
- -
-
✓
✓
- -
-
✓
✓
-
-
✓
✓ ✓
- -
✓ ✓
- -
✓ ✓
- -
✓ ✓
- -
-
- -
✓ ✓
Page 26

VDPL1003xW
de a L1 L2 L3 L4 L5 L6 L7 L8 L9 L10
231 233
234 236 - - - - 237 255
✓ ✓ ✓ ✓ ✓
✓ ✓ ✓ ✓ ✓ ✓ ✓ ✓ ✓ ✓
Modo de 12 canales
canal LED de a descripción
1 todos 000 255 shutter 0 ~ 100%
2 todos
3 1 000 255 shutter 0 ~ 100%
4 2 000 255 shutter 0 ~ 100%
5 3 000 255 shutter 0 ~ 100%
6 4 000 255 shutter 0 ~ 100%
7 5 000 255 shutter 0 ~ 100%
8 6 000 255 shutter 0 ~ 100%
9 7 000 255 shutter 0 ~ 100%
10 8 000 255 shutter 0 ~ 100%
11 9 000 255 shutter 0 ~ 100%
12 10 000 255 shutter 0 ~ 100%
000 009 sin función
010 255 estroboscopio: lento ~ rápido (máx. 20Hz)
8. Limpieza y mantenimiento
• Apriete bien las tuercas y los tornillos y verifique que no hay señales de oxidación.
• No modifique la caja, los soportes y las conexiones p.ej. no taladre agujeros adicionales en un
soporte o no modifique las conexiones, etc.
• No dañe los cables de alimentación. Contacte con un técnico especializado para instalar el aparato.
• Quite el polvo regularmente de la caja y los orificios de ventilación con un paño húmedo.
• El usuario no habrá de efectuar el mantenimiento de ninguna pieza. Contacte con su distribuidor si
necesita piezas de recambio.
Reemplazar el fusible
• Desatornille el portafusibles con el destornillador con punta plana.
• Saque el fusible fundido y reemplácelo.
• Vuelva a poner el portafusibles en su lugar.
9. Especificaciones
VDPL1003CW VDPL1003WW
alimentación
230VAC ~ 50Hz
consumo
LEDs
10 x CREE® 3W blanco frío 10 x CREE® 3W blanco cálido
ángulo del haz
flujo luminoso
dimensiones
1200 @ 1m 1050 @ 1m
1060 x 58 x 148mm
peso
Utilice este aparato sólo con los accesorios originales. Velleman NV no será responsable de
daños ni lesiones causados por un uso (indebido) de este aparato. Se pueden modificar las
especificaciones y el contenido de este manual sin previo aviso.
© DERECHOS DE AUTOR
Velleman NV dispone de los derechos de autor para este manual del usuario. Todos los derechos
mundiales reservados. Está estrictamente prohibido reproducir, traducir, copiar, editar y guardar este manual
del usuario o partes de ello sin previo permiso escrito del derecho habiente.
- - - - -
✓ ✓ ✓ ✓ ✓
37 W
140°
3.5 kg
25.03.2011 ©Velleman nv
26
Page 27

0
n
E
e
w
b
w
h
u
c
A
d
e
h
e
u
h
o
g
g
e
r
r
h
e
r
n
e
t
s
n
,
n
g
S
e
S
e
:
e
i
m
e
e
ä
e
e
c
e
d
e
m
ä
n
ä
e
d
i
v
e
e
d
d
E
n
e
k
s
t
n
n
r
p
h
n
t
e
t
n
d
n
e
h
z
n
t
s
n
e
m
f
f
i
t
t
r
0
u
p
w
s
z
o
c
o
e
d
G
z
n
ü
ä
e
h
u
s
o
r
z
c
e
e
a
h
z
t
m
U
a
u
H
z
m
n
B
ä
e
r
e
S
t
B
r
e
n
a
r
r
c
t
a
G
r
s
n
c
t
ö
t
e
m
N
t
e
S
n
b
m
t
s
t
c
a
ä
e
d
d
m
e
d
t
e
u
u
t
n
.
l
u
n
o
e
1. Ei
An alle
Wichtig
Falls Z
Wir beda
Inbetrie
sein, ver
Für me
Bedien
2. Si
• Der
• Verg
• Acht
• Beac
• Mac
• Sorg
• Beac
3. All
Siehe V
25.03.2
führung
inwohner de
Umweltinfo
Dieses Symbol
Produktes nac
Einheit (oder v
verwendeten B
werden. Diese
retourniert we
eifel bestehe
nken uns für d
nahme sorgfäl
enden Sie da
r Informatio
ngsanleitung
herheitshi
ufbau des Ger
geer
et sein. Der el
wissern Sie si
besc
rieben in dies
n Sie darauf,
werd
en kann. Bei B
hten Sie eine
bele
chteten Fläche
en Sie das Ger
en Sie für eine
siven Gegenst
expl
Gerä
t und einer bel
hten Sie, dass
völli
.
emeine R
lleman® Ser
11
Seien Sie
Spannun
führen.
Trennen
dazu den
Verwend
Feuchte.
Halten Si
Achtung
auf.
Blicken Si
- epil
- zeitl
- per
zu v
Es gibt k
Fachhänd
Schütz
Beacht
minima
Vermei
und Be
BEDI
Europäische
mationen üb
auf dem Produ
seinem Leben
rwendeten Ba
atterien müsse
Einheit muss a
den. Respektie
, wenden Sie
n Kauf des VD
ig durch. Über
Gerät nicht un
en zu diesem
siehe www.
weise
während der I
stehenden Lei
ie das Gerät b
Netzstecker an
n Sie das Gerä
etzen Sie das
Kinder und U
Berühren Sie
e nicht direkt i
ptische Anfälle
che Blindheid (
anente und un
rmeiden
ine zu wartend
ler.
tes entspricht
ktrische Ansc
h, dass die an
r Bedienungsa
ass die Netzlei
schädigungen
inimale Entfer
.
t mit einem g
Abstand von
nden oder Sto
uchteten Ober
ie Lüftungssch
chtlinien
ice- und Qual
n Sie das Gerä
n Sie, dass die
le Entfernung v
en Sie Erschüt
ienung des Ge
VDPL10
NUNGS
Union
r dieses Prod
t oder der Ver
zyklus der Um
terien) nicht al
von einer spe
den Händler
en Sie die örtli
sich für Ents
PL1003xW! L
rüfen Sie, ob T
d wenden Sie s
Produkt und
qpower.eu.
stallation des
ungen könnte
i Nichtbenutzu
der Grifffläche
nur im Inne
Gerät keiner Fl
befugte vom G
as Gehäuse w
die Lichtquell
bei empfindlic
Blitzblindheid)
widerrufliche A
n Teile. Bestel
der Schutzklas
luss darf nur v
uschließende N
leitung.
ung nicht gequ
oll eine Fachk
ung von 0.5m
eigneten Siche
in. 0,5 m zwis
fen. Sorgen Si
läche.
litze nie blocki
tätsgarantie
vor Staub. Sc
Lüftungsschlit
on 2.5cm zwisc
erungen. Ver
ätes.
27
3xW
ANLEIT
kt
ackung zeigt
elt Schaden z
unsortiertes
ialisierten Fir
der ein örtliche
hen Umweltvo
rgungsrichtli
sen Sie diese
ransportschäde
ich an Ihren H
ie neueste V
erätes sehr vo
u lebensgefäh
ng und vor jed
an und ziehen
bereich. Schü
ssigkeit wie z.
erät fern.
hrend des Bet
, um
en Menschen
genschäden
len Sie eventu
e I. Gemäß de
n einer Fachkr
etzspannung ni
etscht oder du
aft das Kabel e
wischen der Li
rheitskabel fest
hen dem Gerä
für einen Abst
rt sind. Bedeck
m Ende dieser
ützen Sie das
e nicht blockie
hen dem Gerät
eiden Sie rohe
NG
n, dass die Ent
fügen kann. E
ausmüll; die Ei
a zwecks Recy
s Recycling-Un
rschriften.
ien an Ihre
edienungsanlei
n vorliegen. So
ndler.
rsion dieser
rsichtig: das B
lichen elektrisc
r Reinigung vo
ie nie an der
zen Sie das G
. Tropf- oder
iebs nicht, den
lle Ersatzteile
Vorschriften
ft durchgeführ
cht höher ist al
ch scharfe Kan
setzen.
htausbeute un
(z.B. VDLSC7
und entflamm
nd von min. 1
en Sie das Ger
Bedienungsanl
erät vor extre
t werden. Beac
und jedem an
Gewalt währen
orgung dieses
tsorgen Sie di
nheit oder
ling entsorgt
ernehmen
rtliche Behör
ung vor
llte dies der Fal
rühren von unt
hen Schlägen
Netz. Fassen
etzleitung.
rät vor Regen
pritzwasser, a
das Gehäuse
ei Ihrem
uss das Gerät
werden.
die Netzspan
en beschädigt
d irgendeiner
oder VDLSC8)
baren und
m zwischen de
t weder partiel
itung.
en Temperat
hten Sie eine
eren Gegensta
der Installati
©Velle
e.
l
r
Sie
nd
s.
heizt
ung
m
noch
ren.
d.
n
an nv
Page 28

VDPL1003xW
• Nehmen Sie das Gerät erst in Betrieb, nachdem Sie sich mit seinen Funktionen vertraut gemacht
haben. Lassen Sie das Gerät nicht von Personen bedienen, die sich nicht mit dem Gerät auskennen.
Meist ist die Beschädigung des Gerätes das Ergebnis von unfachmännischer Bedienung.
• Eigenmächtige Veränderungen sind aus Sicherheitsgründen verboten. Bei Schäden verursacht durch
eigenmächtige Änderungen erlischt der Garantieanspruch.
• Mechanischer Schaden werden nicht durch die Garantie gedeckt.
• Verwenden Sie das Gerät nur für Anwendungen beschrieben in dieser Bedienungsanleitung sonst
kann dies zu Schäden am Produkt führen und erlischt der Garantieanspruch. Jede andere
Verwendung ist mit Gefahren wie Kurzschluss, Brandwunden, elektrischem Schlag, usw. verbunden.
• Bei Schäden, die durch Nichtbeachtung der Bedienungsanleitung verursacht werden, erlischt der
Garantieanspruch. Für daraus resultierende Folgeschäden übernimmt der Hersteller keine Haftung.
• Lassen Sie dieses Gerät von einem Fachmann installieren und warten.
• Das Gerät bei Temperaturschwankungen nicht sofort einschalten. Schützen Sie das Gerät vor
Beschädigung, indem Sie es ausgeschaltet lassen bis es akklimatisiert ist (Zimmertemperatur
erreicht hat).
• Dieses Gerät wurde für den professionellen Einsatz auf Bühnen, in Discotheken, Theatern, usw.
entworfen und eignet sich nur für die Anwendung im Innenbereich (<35°C, <75%RH). Verwenden
Sie das Gerät mit einer Wechselspannung von max. 240VAC / 50Hz.
• Das Gerät eignet sich nicht für permanenten Betrieb: eine regelmäßige Pause verlängert die
Lebensdauer.
• Verwenden Sie die Originalverpackung, wenn das Gerät transportiert werden soll.
• Bewahren Sie diese Bedienungsanleitung für künftige Einsichtnahme auf.
4. Eigenschaften
• 12-Kanal DMX-Modus mit separater Ansteuerung jeder LED
• Masterdimmer und -Shutter über DMX-Modus
• Stand-Alone-Modus und musikgesteuerter Modus mit eingebauten Effekten
• Pulse-Effekt mit einstellbarer Geschwindigkeit
• zusätzlicher 230V-Netzteilausgang zum Anschließen von bis zu 10 Scheinwerfern
• eignet sich für Höhen- oder Bodenmontage
5. Umschreibung
Siehe Abbildungen, Seite 2 dieser Bedienungsanleitung.
1 Display mit Einstellknöpfen 4 DMX-Ausgang
2 Mikrofon
3 DMX-Eingang
6. Installation
Siehe Abbildungen, Seite 2 dieser Bedienungsanleitung.
a) Das Gerät montieren
• Lassen Sie das Gerät von einem Fachmann und gemäß den EN 60598-2-17 und allen anderen
zutreffenden Normen installieren.
• Die Konstruktion muss während einer Stunde eine Punktlast von maximal 10 x dem Gewicht des
Geräts tragen können, ohne dass Verformung verursacht wird.
• Das Gerät muss immer mit einer zweiten Befestigung z.B. mit einem Sicherheitskabel gesichert
werden.
• Stehen Sie während der Montage, Entfernung oder Wartung nie direkt unter dem Gerät. Lassen Sie
das Gerät jährlich und vor der Inbetriebnahme von einem Fachmann prüfen.
• Montieren Sie das Gerät an einem Ort, an dem es wenig Vorübergehende gibt und der
unzugänglich ist für Unbefugte.
• Oberirdische Montage erfordert erhebliche Sachkenntnis in Bezug auf das Berechnen der
maximalen Lasten, das geeignete Montagematerial…Lassen Sie das Material und das Gerät
regelmäßig kontrollieren. Versuchen Sie das Gerät nicht selber zu installieren, denn wenn Sie nicht
über diese Qualifikationen verfügen, könnte es zu Verletzungen führen.
• Regeln Sie den Neigungswinkel über den Montagebügel und drehen Sie die Schrauben fest an.
• Lassen Sie das Gerät von einem qualifizierten Elektriker anschließen.
• Schließen Sie das Gerät an das Hauptnetz und nicht an einen Dimmer an.
25.03.2011 ©Velleman nv
MODE-Taste
A
UP-Taste
B
DOWN-Taste 7
C
5 Einstellknopf Empfindlichkeit
6 Netzeingang/Sicherungshalter
GND-Anschluss
8
Netzausgang
28
Page 29

0
X
emitvermit
edem
n
Abs
e
hund
s
aodeEIN
e
w
u
o
m
D• W
S• D• W
k
r
D• V
e• D
M
r
h
ü
u
d
P
A
e
a
s
,
e
e
u
e
e
g
a
d
e
o
a
D
e
e
l
i
S
t
e
q
b
,
)
e
e
m
k
u
u
u
o
s
s
p
e
s
M
0
R
n
e
d
r
h
i
B
s
b
e
t
e
g
n
g
e
t
t
n
n
a
p
p
k
D
s
r
s
s
-
d
v
h
e
n
e
g
m
h
A
r
e
m
n
e
T
e
g
D
x
a
e
e
k
s
n
n
n
d
d
e
D
n
E
e
e
e
m
t
n
K
l
h
e
s
s
a
b) DM
c) Gen
7. An
Siehe Ab
Menüf
• W
• Di
• Ei
ist
De
3,
• Ac
• La
• Be
• Di
Stand-Alone Slave DMX
512-Anschl
nn nötig, so ve
geliefert) und
schiedene VD
XLR Ein- und
max. empfohl
selben Anschl
DMX-Abschlus
oder in einer U
chlusswiderst
r DMX-Abschlu
die den XLR-Au
ral
ten Sie darauf
beachten Sie,
sen Sie das G
chten Sie, das
r Dimmkreis v
/AUS-Schalter
Installation m
bildungen, Seit
nktionen
Menü
endung
ss
rbinden Sie ein
ie andere Seit
L1003xWin S
usgangsansch
ne Kabellänge
uss ist 32.
swiderstand ist
mgebung mit v
nd verhindert
swiderstand is
sgang des letzt
dass sich kein
dass es genüg
rät von einem
s alle Geräte ü
rsorgt werden
(0% bis 100%
ss vor Inbetri
2 dieser Bedi
Funktion
interne Progra
~
Geschwindig
~
Musiksteuer
VDPL10
-Kabel mit
XL
mit dem 3-Pi
rie schalten. V
üssen.
ist 500 Meter,
empfehlenswe
elem elektrisc
törung des dig
nur eine XLR-
en Geräts in de
entflammbare
nd Kühlung gi
ualifizierten El
er eine geerde
auch wenn Si
verwenden.
bnahme von ei
nungsanleitun
eit
ng schal
me
inter
Über
(
wähl
aus
3xW
dem 3-Pin XLR
XLR-Eingang
rwenden Sie e
ie Höchstzahl
t für Installatio
em Rauschen (
talen Steuersig
uchse mit eine
r Kette angesc
Material in ein
t.
ktriker anschli
e Steckdose u
den Regelwid
nem Experten
.
e Programme
ang
= Schleife v
n Sie die Gesc
= langsam,
en Sie die Musi
Ausgang der S
es VDPL1003
in zweipoliges
on Geräten, v
nen, bei denen
z.B. Discos). D
nals durch ele
m 120Ω Wider
lossen wird.
em Umkreis vo
ßen.
d nicht über ei
rstand oder de
enehmigt wer
Beschreibung
it plötzliche o
on ~
windigkeit der
= schn
ksteuerung ein
teuerung (nich
W. Sie könne
bgeschirmtes
rbunden mit
das DMX-Kabe
r
trisches Rausc
tand zwischen
50 cm befind
en Regelwider
Dimmkreis al
en.
er allmähliche
internen Progr
ll
abel
lang
en.
2 und
t
tand
)
mme
en Sie die Slav
Auton
Slave-
25.03.2
Auto
•
Musi
Steue
•
Ein Ge
Musiks
• Sc
• Dr
mer Modus
atische Steu
rücken Sie auf
ählen Sie das
chleife von
rücken Sie auf
ählen Sie die
steuerung
ung eines einzi
rücken Sie auf
erwenden Sie
inzustellen.
as Gerät reagi
odus
ät im Slave-M
teuerung).
alten Sie den
cken Sie <MO
11
= langs
Slave-Mod
Adresse
Kanal-Mod
(Stand-Alon
rung
<MODE> bis
gewünschte Pr
~
<MODE> bis
ewünschte Ge
m, =
gen Gerätes ab
<MENÜ> bis
en Einstellkno
rt nun dank d
dus befolgt da
utomatischen
E> auf jedem
s
s
e)
gramm (
).
chwindigkeit
chnell).
hängig vom Ta
f auf der Rück
s internen Mik
Programm de
Slave-Gerät bi
schal
stelle
5-Ka
12-K
im LCD-Dis
im LCD-Dis
im LCD-
odus oder die
29
Sie die DMXal DMX- Steue
nal DMX- Steu
lay erscheint.
~
lay erscheint.
~
t der Musik.
isplay erschei
eite des Gerät
ofons auf den
Master-Gerät
Musiksteuerun
im LC
e-Funktion ein
dresse ein (
ung
rung
)
it <UP> und <
) mit <UP> u
t.
s [5], um die
akt der Musik.
s (automatisch
auf dem Mast
-Display ersch
~ )
OWN> (
d <DOWN> (
mpfindlichkeit
r Modus oder
-Gerät ein.
int.
©Velle
=
an nv
Page 30

0
t
r
eSigBefgan
eSte
dnur
H(CH
H(CH
üers
üode
ü
ä
W
a
t
r
S
n
f
e
G
n
e
a
w
e
M
n
o
0
0
1
00104070912141619212425
0
o
000000001010102020203
30303
g
f
e
d
e
Z
a
t
x
f
e
3
u
e
r
W
e
m
r
t
t
t
t
t
t
t
t
t
t
t= 0
1
✓
✓
-
-
-
-
-
-
-
-
-
✓
✓
✓
0
C
t
s
ü
w
a
m
e
6
M
e
r
h
s
n
a
e
s
c
n
e
e
r
ü
a
u
g
6
✓
✓
r
d
a
a
e
h
e
s
G
1
M
h
a
m
u
i
e
b
w
2
p
DMX-S
25.03.2
Steue
• All
• W
we
je
Beispi
• Im
(C
• Im
(C
• Dr
• Dr
• Dr
• W
DMX-
5-K
euerung
ung vom Gerä
DMX-gesteue
nale reagieren
ehle der DMX-
ze Gruppe vo
nn alle Geräte
uersignal emp
rden alle Gerät
es Gerät auf ei
das besagte
el:
Falle des 5-Ka
1~5), der zwe
11~15) usw.
Falle des 12-K
1~12), der z
25~36) usw.
cken Sie auf <
cheint.
cken Sie auf <
cken Sie auf <
hlen Sie die D
erte pro Ka
nal-Modus
11
).
Kanal V
1 0
2
3
4 0
V
5
über einen uni
ten Geräte bra
kann. Diese di
teuerung emp
Geräten verw
dieselbe Starta
angen. Mit and
zur gleichen
nem anderen K
erät beeinfluss
al VDPL1003
iten Einheit au
instellen müss
nal VDPL100
eiten Einheit a
instellen müss
MODE> bis de
UP> oder <DO
MODE> bis die
X-Startadress
al
n bis
0 255 Di
0 009 kei
0
0
0 255 St
0 010 kei
0
1 047 Au
8 071 Au
2 095 Au
6 119 Au
0 143 Au
4 167 Au
8 191 Au
2 215 Au
6 239 Au
0 249 Au
0 255 Mu
0 255
n bis L
002
0
0
005
3
008
6
011
9
014
2
017
5
020
8
023
1
026
4
029
7
032
0
035
0
3
038
6
041
9
VDPL10
versellen DMX-
uchen eine digi
itale Startadre
ängt und ausf
nden oder eine
resse haben,
ren Worten, w
eit beeinflusst.
nal Signale e
.
W, werden Si
6 (1 + 5) (CH
n.
xW, werden S
f 13 (1 + 12) (
n.
gewünschte D
N> und wähl
DMX- Adresse
mit <UP> ode
me
0 ~ 100%
ne Funktion
oboskop: langsa
ne Funktion
o 1
o 2
o 3
o 4
o 5
o 6
o 7
o 8
o 9
o 10 (=Schleife
siksteuerung
omatische Gesc
au
11~249)
L2 L3
✓ ✓
- -
✓
-
- -
- -
- -
- -
- -
- -
- ✓
-
- -
3xW
ontroller.
ale Startadres
se ist die Kana
hrt. Sie könne
separate Start
erden sie auf
enn Sie die Ein
Wenn Sie vers
pfangen. Wen
die Startadres
~10), der dritt
ie die Startadr
CH13~24), de
X-Modus (
n Sie den gew
()im LC
r <DOWN> (
Umschreib
m ~ schnell (m
von Auto 1 ~ A
windigkeit: lan
L4 L5 L
✓ ✓
- - -
-
- - -
✓
- - -
✓
- -
✓
-
- -
- - -
- - -
- - -
- - -
- - -
-
✓
- - -
✓
- -
30
e, sodass das
lnummer, von
dieselbe Start
dresse für jed
inem spezifisc
tellungen von
hiedene Adres
Sie die Einstel
se des ersten
n Einheit auf
sse des ersten
dritten Einheit
oder
nschten DMX-
D-Display ersc
~
ung
x. 20Hz)
to 9)
sam ~ schnell (
L7 L8
✓ ✓
- -
- -
- -
- -
-
- -
- -
✓
-
- -
- -
- -
- -
- -
-
✓
ichtige Gerät a
er das Gerät d
dresse für ein
s Gerät einge
en Kanal das
inem Kanal än
en einstellen,
lungen ändern,
erätes auf 1
1 (6 + 5)
Gerätes auf 1
auf 25 (13 + 1
) im LCD-Dis
odus aus (
eint.
.
ls Kanal 3
L9 L10
✓ ✓
- -
- -
- -
- -
- -
- -
- -
- -
✓
-
✓
-
- -
- -
- -
©Velle
f die
e
en.
dern,
ird
wird
)
lay
an nv
Page 31

VDPL1003xW
Von bis L1 L2 L3 L4 L5 L6 L7 L8 L9 L10
25.03.2011 ©Velleman nv
044
042
045
048
051 053
054
057 059
060 062 063 065 066 068 069 071 072 074 075 077 078 080 081 083 084 086 - 087 089 - 090 092 - 093 095 - 096 098 - 099 101 - 102 104 - 105 107 - - 108 110 - - 111 113 - - 114 116 - - 117 119 - - 120 122 - - 123 125 - - - 126 128 - - - 129 131 - - - 132 134 - - - 135 137 - - - 138 140 - - - - 141 143 - - - - 144 146 - - - - 147 149 - - - - 150 152 - - - - - 153 155 - - - - - 156 158 - - - - - 159 161 - - - - - - 162 164 - - - - - - 165 167 - - - - - - - 168 170
171 173
174 176
177 179
180 182 - 183 185 - 186 188 - 189 191 - - - 192 194 - - - 195 197
198 200 201 203 - 204 206 - - 207 209 - - - 210 212 - - - - 213 215 - - - - - -
✓
047
✓
050
✓
✓
056
✓
✓
✓ ✓ ✓ ✓
✓ ✓
✓ ✓
✓ ✓
✓ ✓ ✓
- - -
- - - -
- - - - -
- - - - - -
- - - - - - -
- - - - - - - -
✓ ✓
-
✓
- -
✓
- - -
✓
- - - -
✓
- - - - -
✓
- - - - - -
✓
- - - - - - -
✓
✓ ✓
✓
✓
✓
✓
✓
✓
- -
- - - -
- - - - - -
✓ ✓ ✓ ✓
✓ ✓
✓ ✓
✓ ✓ ✓
✓ ✓ ✓
✓
- - - - -
✓
- - - -
✓
- - -
✓
- - - - - - -
- - - - - -
✓
-
- -
- - -
- - - -
- - - - -
- - - - - -
✓ ✓
✓
✓
✓
✓
✓
- - - - - - -
✓ ✓ ✓
- - - - -
✓
- - - - - -
✓
-
- -
- - -
- - - -
- - - - -
✓ ✓
✓
✓
✓
✓
- - - - - -
✓ ✓
- -
- - - -
✓ ✓ ✓ ✓
✓ ✓
- - - - - -
✓ ✓ ✓
- - - -
✓
- - - - -
✓
- - - - -
✓
-
- -
- - -
- - - -
✓ ✓
✓
✓
✓
- - - - -
✓ ✓ ✓
- - -
✓
✓
- - - -
- - -
✓
✓
- - - -
- - -
✓
✓
- - - -
- - -
✓
✓
- - -
-
✓
- -
- - -
✓ ✓
-
✓
- -
✓
✓ ✓
✓
- - - -
✓ ✓
- - - -
✓ ✓
- -
- - - -
- - -
✓ ✓ ✓
31
- -
✓
-
✓
- -
-
✓
✓
- -
-
✓
✓
- -
-
✓
✓
- -
-
✓
✓
- -
-
✓
✓
- -
-
✓
✓
-
-
✓
✓ ✓
- -
✓ ✓
- -
✓ ✓
- -
✓ ✓
- -
-
Page 32

VDPL1003xW
Von bis L1 L2 L3 L4 L5 L6 L7 L8 L9 L10
216 218 - - - - - - 219 221
222 224 - 225 227
228 230
231 233
234 236 - - - - 237 255
✓ ✓ ✓
✓ ✓
✓ ✓ ✓ ✓ ✓
✓ ✓ ✓ ✓ ✓ ✓ ✓ ✓ ✓ ✓
- - - -
✓ ✓
- -
- -
✓ ✓ ✓ ✓
✓ ✓
- - - - -
✓ ✓ ✓ ✓ ✓
12-Kanal-Modus
Kanal LED
1 alle 000 255 Dimmer 0 ~ 100%
2 alle
3 1 000 255 Dimmer 0 ~ 100%
4 2 000 255 Dimmer 0 ~ 100%
5 3 000 255 Dimmer 0 ~ 100%
6 4 000 255 Dimmer 0 ~ 100%
7 5 000 255 Dimmer 0 ~ 100%
8 6 000 255 Dimmer 0 ~ 100%
9 7 000 255 Dimmer 0 ~ 100%
10 8 000 255 Dimmer 0 ~ 100%
11 9 000 255 Dimmer 0 ~ 100%
12 10 000 255 Dimmer 0 ~ 100%
Von bis
000 009 keine Funktion
010 255 Stroboskop: langsam ~ schnell (max. 20Hz)
Umschreibung
8. Reinigung und Wartung
• Verwendete Schrauben müssen fest angespannt werden und dürfen keine Rostspuren zeigen.
• Das Gehäuse, die Linsen, die Montagebügel und der Montageort (z.B. Decke oder Gebinde) dürfen
nicht angepasst werden, z.B. bohren Sie keine zusätzlichen Löcher in Montagebügeln, verändern Sie
die Anschlüsse nicht, usw.
• Sorgen Sie dafür, dass die Netzkabel nicht beschädigt sind. Lassen Sie das Gerät von einer Fachkraft
installieren.
• Entfernen Sie den Staub regelmäßig mit einem feuchten Tuch vom Gehäuse und den
Lüftungsschlitzen.
• Die Teile dürfen nicht eigenmächtig ersetzt werden. Bestellen Sie eventuelle Ersatzteile bei Ihrem
Fachhändler.
Die Sicherung ersetzen
• Lockern Sie den Sicherungshalter mit einem Schlitz-Schraubendreher.
• Entfernen Sie die defekte Sicherung und setzen Sie eine neue Sicherung gleichen Typs ein.
• Bringen Sie den Sicherungshalter wieder in das Gehäuse ein und verbinden Sie das Gerät mit dem
Netz.
9. Technische Daten
VDPL1003CW VDPL1003WW
Stromversorgung 230VAC ~ 50Hz
Stromverbrauch 37 W
LEDs 10 x CREE® 3W kaltweiß 10 x CREE® 3W warmweiß
Abstrahlwinkel 140°
Lichtstrom 1200 @ 1m 1050 @ 1m
Abmessungen 1060 x 58 x 148mm
Gewicht 3.5 kg
Verwenden Sie dieses Gerät nur mit originellen Zubehörteilen. Velleman NV übernimmt keine
Haftung für Schaden oder Verletzungen bei (falscher) Anwendung dieses Gerätes. Alle
Änderungen ohne vorherige Ankündigung vorbehalten.
© URHEBERRECHT
Velleman NV besitzt das Urheberrecht für diese Bedienungsanleitung. Alle weltweiten Rechte vorbehalten. Ohne
vorherige schriftliche Genehmigung des Urhebers ist es nicht gestattet, diese Bedienungsanleitung ganz oder in Teilen zu
reproduzieren, zu kopieren, zu übersetzen, zu bearbeiten oder zu speichern.
25.03.2011 ©Velleman nv
32
✓ ✓ ✓
✓ ✓ ✓
✓ ✓
- -
- -
✓ ✓
Page 33

Velleman® Service and Qual ity Warranty
Velleman® has over 35 years of experience in the electronics world and
distributes its products in more than 85 countries.
All our products fulfil strict quality requirements and legal stipulations in
the EU. In order to ensure the quality, our products regularly go through
an extra quality check, both by an internal quality department and by
specialized external organisations. If, all precautionary measures
notwithstanding, problems should occur, please make appeal to our
warranty (see guarantee conditions).
General Warranty Conditions Concerning Consumer Products (for
EU):
• All consumer products are subject to a 24-month warranty on
production flaws and defective material as from the original date of
purchase.
• Velleman® can decide to replace an article with an equivalent article,
or to refund the retail value totally or partially when the complaint is
valid and a free repair or replacement of the article is impossible, or if
the expenses are out of proportion.
You will be delivered a replacing article or a refund at the value of 100%
of the purchase price in case of a flaw occurred in the first year after the
date of purchase and delivery, or a replacing article at 50% of the
purchase price or a refund at the value of 50% of the retail value in case
of a flaw occurred in the second year after the date of purchase and
delivery.
• Not covered by warranty:
- all direct or indirect damage caused after delivery to the article (e.g. by
oxidation, shocks, falls, dust, dirt, humidity...), and by the article, as
well as its contents (e.g. data loss), compensation for loss of profits;
- frequently replaced consumable goods, parts or accessories such as
batteries, lamps, rubber parts, drive belts... (unlimited list);
- flaws resulting from fire, water damage, lightning, accident, natural
disaster, etc. …;
- flaws caused deliberately, negligently or resulting from improper
handling, negligent maintenance, abusive use or use contrary to the
manufacturer’s instructions;
- damage caused by a commercial, professional or collective use of the
article (the warranty validity will be reduced to six (6) months when the
article is used professionally);
- damage resulting from an inappropriate packing and shipping of the
article;
- all damage caused by modification, repair or alteration performed by a
third party without written permission by Velleman®.
• Articles to be repaired must be delivered to your Velleman® dealer,
solidly packed (preferably in the original packaging), and be completed
with the original receipt of purchase and a clear flaw description.
• Hint: In order to save on cost and time, please reread the manual and
check if the flaw is caused by obvious causes prior to presenting the
article for repair. Note that returning a non-defective article can also
involve handling costs.
• Repairs occurring after warranty expiration are subject to shipping
costs.
• The above conditions are without prejudice to all commercial
warranties.
The above enumeration is subject to modification according to
the article (see article’s manual).
Velleman® service- en kwaliteitsgarantie
Velleman® heeft ruim 35 jaar ervaring in de elektronicawereld en
verdeelt in meer dan 85 landen.
Al onze producten beantwoorden aan strikte kwaliteitseisen en aan de
wettelijke bepalingen geldig in de EU. Om de kwaliteit te waarborgen,
ondergaan onze producten op regelmatige tijdstippen een extra
kwaliteitscontrole, zowel door onze eigen kwaliteitsafdeling als door
externe gespecialiseerde organisaties. Mocht er ondanks deze
voorzorgen toch een probleem optreden, dan kunt u steeds een beroep
doen op onze waarborg (zie waarborgvoorwaarden).
Algemene waarborgvoorwaarden consumentengoederen (voor
Europese Unie):
• Op alle consumentengoederen geldt een garantieperiode van 24
maanden op productie- en materiaalfouten en dit vanaf de
oorspronkelijke aankoopdatum.
• Indien de klacht gegrond is en een gratis reparatie of vervanging van
een artikel onmogelijk is of indien de kosten hiervoor buiten verhouding
zijn, kan Velleman® beslissen het desbetreffende artikel te vervangen
door een gelijkwaardig artikel of de aankoopsom van het artikel
gedeeltelijk of volledig terug te betalen. In dat geval krijgt u een
vervangend product of terugbetaling ter waarde van 100% van de
aankoopsom bij ontdekking van een gebrek tot één jaar na aankoop en
levering, of een vervangend product tegen 50% van de kostprijs of
terugbetaling van 50 % bij ontdekking na één jaar tot 2 jaar.
• Valt niet onder waarborg:
- alle rechtstreekse of onrechtstreekse schade na de levering veroorzaakt
aan het toestel (bv. door oxidatie, schokken, val, stof, vuil, vocht...), en
door het toestel, alsook zijn inhoud (bv. verlies van data), vergoeding
voor eventuele winstdervi ng.
- verbruiksgoederen, onderdelen of hulpstukken die regelmatig dienen te
worden vervangen, zoals bv. batterijen, lampen, rubberen onderdelen,
aandrijfriemen... (onbeperkte lijst).
- defecten ten gevolge van brand, waterschade, bliksem, ongevallen,
natuurrampen, enz.
- defecten veroorzaakt door opzet, nalatigheid of door een
onoordeelkundige behandeling, slecht onderhoud of abnormaal gebruik
of gebruik van het toestel strijdig met de voorschriften van de fabrikant.
- schade ten gevolge van een commercieel, professioneel of collectief
gebruik van het apparaat (bij professioneel gebruik wordt de
garantieperiode herleid tot 6 maand).
- schade veroorzaakt door onvoldoende bescherming bij transport van
het apparaat.
- alle schade door wijzigingen, reparaties of modificaties uitgevoerd door
derden zonder toestemming van Velleman®.
• Toestellen dienen ter reparatie aangeboden te worden bij uw
Velleman®-verdeler. Het toestel dient vergezeld te zijn van het
oorspronkelijke aankoopbewijs. Zorg voor een degelijke verpakking (bij
voorkeur de originele verpakking) en voeg een duidelijke
foutomschrijving bij.
• Tip: alvorens het toestel voor reparatie aan te bieden, kijk nog eens na
of er geen voor de hand liggende reden is waarom het toestel niet naar
behoren werkt (zie handleiding). Op deze wijze kunt u kosten en tijd
besparen. Denk eraan dat er ook voor niet-defecte toestellen een kost
voor controle aangerekend kan worden.
• Bij reparaties buiten de waarborgperiode zullen transportkosten
aangerekend worden.
• Elke commerciële garantie laat deze rechten onverminderd.
Bovenstaande opsomming kan eventueel aangepast worden
naargelang de aard van het product (zie handleiding van het
betreffende product).
Garantie de service et de qualité Velleman®
Velleman® jouit d’une expérience de plus de 35 ans dans le monde de
l’électronique avec une distribution dans plus de 85 pays.
Tous nos produits répondent à des exigences de qualité rigoureuses et à
des dispositions légales en vigueur dans l’UE. Afin de garantir la qualité,
nous soumettons régulièrement nos produits à des contrôles de qualité
supplémentaires, tant par notre propre service qualité que par un service
qualité externe. Dans le cas improbable d’un défaut malgré toutes les
précautions, il est possible d’invoquer notre garantie (voir les conditions
de garantie).
Conditions générales concernant la g arantie sur les produits
grand public (pour l’UE) :
• tout produit grand public est garanti 24 mois contre tout vice de
production ou de matériaux à dater du jour d’acquisition effective ;
• si la plainte est justifiée et que la réparation ou le remplacement d’un
article est jugé impossible, ou lorsque les coûts s’avèrent
disproportionnés, Velleman® s’autorise à remplacer ledit article par un
article équivalent ou à rembourser la totalité ou une partie du prix
d’achat. Le cas échéant, il vous sera consenti un article de remplacement
ou le remboursement complet du prix d’achat lors d’un défaut dans un
délai de 1 an après l’achat et la livraison, ou un article de remplacement
moyennant 50% du prix d’achat ou le remboursement de 50% du prix
d’achat lors d’un défaut après 1 à 2 ans.
• sont par conséquent exclus :
- tout dommage direct ou indirect survenu à l’article après livraison
(p.ex. dommage lié à l’oxydation, choc, chute, poussière, sable,
impureté…) et provoqué par l’appareil, ainsi que son contenu (p.ex.
perte de données) et une indemnisation éventuelle pour perte de
revenus ;
- tout bien de consommation ou accessoire, ou pièce qui nécessite un
remplacement régulier comme p.ex. piles, ampoules, pièces en
caoutchouc, courroies… (liste illimitée) ;
- tout dommage qui résulte d’un incendie, de la foudre, d’un accident,
d’une catastrophe naturelle, etc. ;
- out dommage provoqué par une négligence, volontaire ou non, une
utilisation ou un entretien incorrects, ou une utilisation de l’appareil
contraire aux prescriptions du fabricant ;
- tout dommage à cause d’une utilisation commerciale, professionnelle
ou collective de l’appareil (la période de garantie sera réduite à 6 mois
lors d’une utilisation professionnelle) ;
- tout dommage à l’appareil qui résulte d’une utilisation incorrecte ou
différente que celle pour laquelle il a été initialement prévu comme décrit
dans la notice ;
- tout dommage engendré par un retour de l’appareil emballé dans un
conditionnement non ou insuffisamment protégé.
- toute réparation ou modification effectuée par une tierce personne sans
l’autorisation explicite de SA Velleman® ; - frais de transport de et vers
Velleman® si l’appareil n’est plus couvert sous la garantie.
• toute réparation sera fournie par l’endroit de l’achat. L’appareil doit
nécessairement être accompagné du bon d’achat d’origine et être
dûment conditionné (de préférence dans l’emballage d’origine avec
mention du défaut) ;
Page 34

• tuyau : il est conseillé de consulter la notice et de contrôler câbles,
piles, etc. avant de retourner l’appareil. Un appareil retourné jugé
défectueux qui s’avère en bon état de marche pourra faire l’objet d’une
note de frais à charge du consommateur ;
• une réparation effectuée en-dehors de la période de garantie fera
l’objet de frais de transport ;
• toute garantie commerciale ne porte pas atteinte aux conditions
susmentionnées.
La liste susmentionnée peut être sujette à une complémentation
selon le type de l’article et être mentionnée dans la notice
d’emploi.
Garantía de servicio y calidad Velleman®
Velleman® disfruta de una experiencia de más de 35 años en el mundo
de la electrónica con una distribución en más de 85 países. Todos
nuestros productos responden a normas de calidad rigurosas y
disposiciones legales vigentes en la UE. Para garantizar la calidad,
sometemos nuestros productos regularmente a controles de calidad
adicionales, tanto a través de nuestro propio servicio de calidad como de
un servicio de calidad externo. En el caso improbable de que surgieran
problemas a pesar de todas las precauciones, es posible recurrir a
nuestra garantía (véase las condiciones de garantía).
Condiciones generales referentes a la garantía sobre productos
de venta al público (para la Unión Europea):
• Todos los productos de venta al público tienen un período de garantía
de 24 meses contra errores de producción o errores en materiales desde
la adquisición original;
• Si la queja está fundada y si la reparación o sustitución de un artículo
no es posible, o si los gastos son desproporcionados, Velleman® autoriza
reemplazar el artículo por un artículo equivalente o reembolsar la
totalidad o una parte del precio de compra. En este caso, usted recibirá
un artículo de recambio o el reembolso completo del precio de compra si
encuentra algún fallo hasta un año después de la compra y entrega, o un
artículo de recambio al 50% del precio de compra o el reembolso del
50% del precio de compra si encuentra un fallo después de 1 año y hasta
los 2 años después de la compra y entrega.
Por consiguiente, están excluidos entre otras cosas:
- todos los daños causados directa o indirectamente al aparato (p.ej. por
oxidación, choques, caída,...) y a su contenido (p.ej. pérdida de datos)
después de la entrega y causados por el aparato, y cualquier
indemnización por posible pérdida de ganancias;
- partes o accesorios que deban ser reemplazados regularmente, como
por ejemplo baterías, lámparas, partes de goma, etc. (lista ilimitada)
- defectos causados por un incendio, daños causados por el agua, rayos,
accidentes, catástrofes naturales, etc.;
- defectos causados a conciencia, descuido o por malos tratos, un
mantenimiento inapropiado o un uso anormal del aparato contrario a las
instrucciones del fabricante;
- daños causados por un uso comercial, profesional o colectivo del
aparato (el período de garantía se reducirá a 6 meses con uso
profesional);
- daños causados por un uso incorrecto o un uso ajeno al que está
previsto el producto inicialmente como está descrito en el manual del
usuario;
- daños causados por una protección insuficiente al transportar el
aparato.
- daños causados por reparaciones o modificaciones efectuadas por una
tercera persona sin la autorización explícita de Velleman®;
- se calcula gastos de transporte de y a Velleman® si el aparato ya no
está cubierto por la garantía.
• Cualquier artículo que tenga que ser reparado tendrá que ser devuelto
a su distribuidor Velleman®. Devuelva el aparato con la factura de
compra original y transpórtelo en un embalaje sólido (preferentemente el
embalaje original). Incluya también una buena descripción del fallo;
• Consejo: Lea el manual del usuario y controle los cables, las pilas, etc.
antes de devolver el aparato. Si no se encuentra un defecto en el artículo
los gastos podrían correr a cargo del cliente;
• Los gastos de transporte correrán a carga del cliente para una
reparación efectuada fuera del período de garantía.
• Cualquier gesto comercial no disminuye estos derechos.
La lista previamente mencionada puede ser adaptada según el
tipo de artículo (véase el manual del usuario del artículo en
cuestión)
Velleman® Service- und Qualitätsgarantie
Velleman® hat gut 35 Jahre Erfahrung in der Elektronikwelt und
vertreibt seine Produkte in über 85 Ländern.
Alle Produkte entsprechen den strengen Qualitätsforderungen und
gesetzlichen Anforderungen in der EU. Um die Qualität zu gewährleisten
werden unsere Produkte regelmäßig einer zusätzlichen Qualitätskontrolle
unterworfen, sowohl von unserer eigenen Qualitätsabteilung als auch von
externen spezialisierten Organisationen. Sollten, trotz aller
Vorsichtsmaßnahmen, Probleme auftreten, nehmen Sie bitte die Garantie
in Anspruch (siehe Garantiebedingungen).
Allgemeine Garantiebedingungen in Bezug auf Konsumgüter (für
die Europäische Union):
• Alle Produkte haben für Material- oder Herstellungsfehler eine
Garantieperiode von 24 Monaten ab Verkaufsdatum.
• Wenn die Klage berechtigt ist und falls eine kostenlose Reparatur oder
ein Austausch des Gerätes unmöglich ist, oder wenn die Kosten dafür
unverhältnismäßig sind, kann Velleman® sich darüber entscheiden,
dieses Produkt durch ein gleiches Produkt zu ersetzen oder die
Kaufsumme ganz oder teilweise zurückzuzahlen. In diesem Fall erhalten
Sie ein Ersatzprodukt oder eine Rückzahlung im Werte von 100% der
Kaufsumme im Falle eines Defektes bis zu 1 Jahr nach Kauf oder
Lieferung, oder Sie bekommen ein Ersatzprodukt im Werte von 50% der
Kaufsumme oder eine Rückzahlung im Werte von 50 % im Falle eines
Defektes im zweiten Jahr.
• Von der Garantie ausgeschlossen sind:
- alle direkten oder indirekten Schäden, die nach Lieferung am Gerät und
durch das Gerät verursacht werden (z.B. Oxidation, Stöße, Fall, Staub,
Schmutz, Feuchtigkeit, ...), sowie auch der Inhalt (z.B. Datenverlust),
Entschädigung für eventuellen Gewinnausfall.
- Verbrauchsgüter, Teile oder Zubehörteile, di e regelmäßig
ausgewechselt werden, wie z.B. Batterien, Lampen, Gummiteile,
Treibriemen, usw. (unbeschränkte Liste).
- Schäden verursacht durch Brandschaden, Wasserschaden, Blitz,
Unfälle, Naturkatastrophen, usw.
- Schäden verursacht durch absichtliche, nachlässige oder
unsachgemäße Anwendung, schlechte Wartung, zweckentfremdete
Anwendung oder Nichtbeachtung von Benutzerhinweisen in der
Bedienungsanleitung.
- Schäden infolge einer kommerziellen, professionellen oder kollektiven
Anwendung des Gerätes (bei gewerblicher Anwendung wird die
Garantieperiode auf 6 Monate zurückgeführt).
- Schäden verursacht durch eine unsachgemäße Verpackung und
unsachgemäßen Transport des Gerätes.
- alle Schäden verursacht durch unautorisierte Änderungen, Reparaturen
oder Modifikationen, die von einem Dritten ohne Erlaubnis von
Velleman® vorgenommen werden.
• Im Fall einer Reparatur, wenden Sie sich an Ihren Velleman®-Verteiler.
Legen Sie das Produkt ordnungsgemäß verpackt (vorzugsweise die
Originalverpackung) und mit dem Original-Kaufbeleg vor. Fügen Sie eine
deutliche Fehlerbeschreibung hinzu.
• Hinweis: Um Kosten und Zeit zu sparen, lesen Sie die
Bedienungsanleitung nochmals und überprüfen Sie, ob es keinen auf de
Hand liegenden Grund gibt, ehe Sie das Gerät zur Reparatur
zurückschicken. Stellt sich bei der Überprüfung des Geräts heraus, dass
kein Geräteschaden vorliegt, könnte dem Kunden eine
Untersuchungspauschale berechnet.
• Für Reparaturen nach Ablauf der Garantiefrist werden Transportkosten
berechnet.
• Jede kommerzielle Garantie lässt diese Rechte unberührt.
Die oben stehende Aufzählung kann eventuell angepasst werden
gemäß der Art des Produktes (siehe Bedienungsanleitung des
Gerätes
 Loading...