

Page 1
USER MANUAL
VDP1001GLD7
LASER LIGHT PROJECTOR – GREEN (7 DMX CHANNELS)
LASERPROJECTOR – GROEN (7 DMX-KANALEN)
PROJECTEUR LASER – VERT (7 CANAUX DMX)
PROYECTOR LÁSER – VERDE (7 CANALES DMX)
LASERPROJEKTOR – GRÜN (7 DMX-KANÄLE)
GEBRUIKERSHANDLEIDING
NOTICE D’EMPLOI
MANUAL DEL USUARIO
BEDIENUNGSANLEITUNG
Page 2

2
VDP1001GLD7 VELLEMAN
Page 3
3
VDP1001GLD7 – LASER PROJECTOR – GREEN (7 DMX CHANNELS)
DANGER! Class
III
B laser product. Avoid direct eye contact with the laser light. Never intentionally
distance.
1. Introduction & Features
To all residents of the European Union
Important environmental information about this product
This symbol on the device or the package indicates that disposal of the device after its lifecycle could harm
the environment.
Do not dispose of the unit (or batteries) as unsorted municipal waste; it should be taken to a specialized
company for recycling.
This device should be returned to your distributor or to a local recycling service.
Respect the local environmental rules.
If in doubt, contact your local waste disposal authorities.
Thank you for buying the VDP1001GLD7! Please read the manual thoroughly before bringing this device into service.
Carefully unpack your projector and place it on a flat and stable surface. Inspect the device for damage. If the device
was damaged in transit, don't install or use it and contact your dealer. The package should contain: 1 x 3-pin power cord
(3m), 1 x DMX cable (1m) and this manual.
2. Safety Instructions
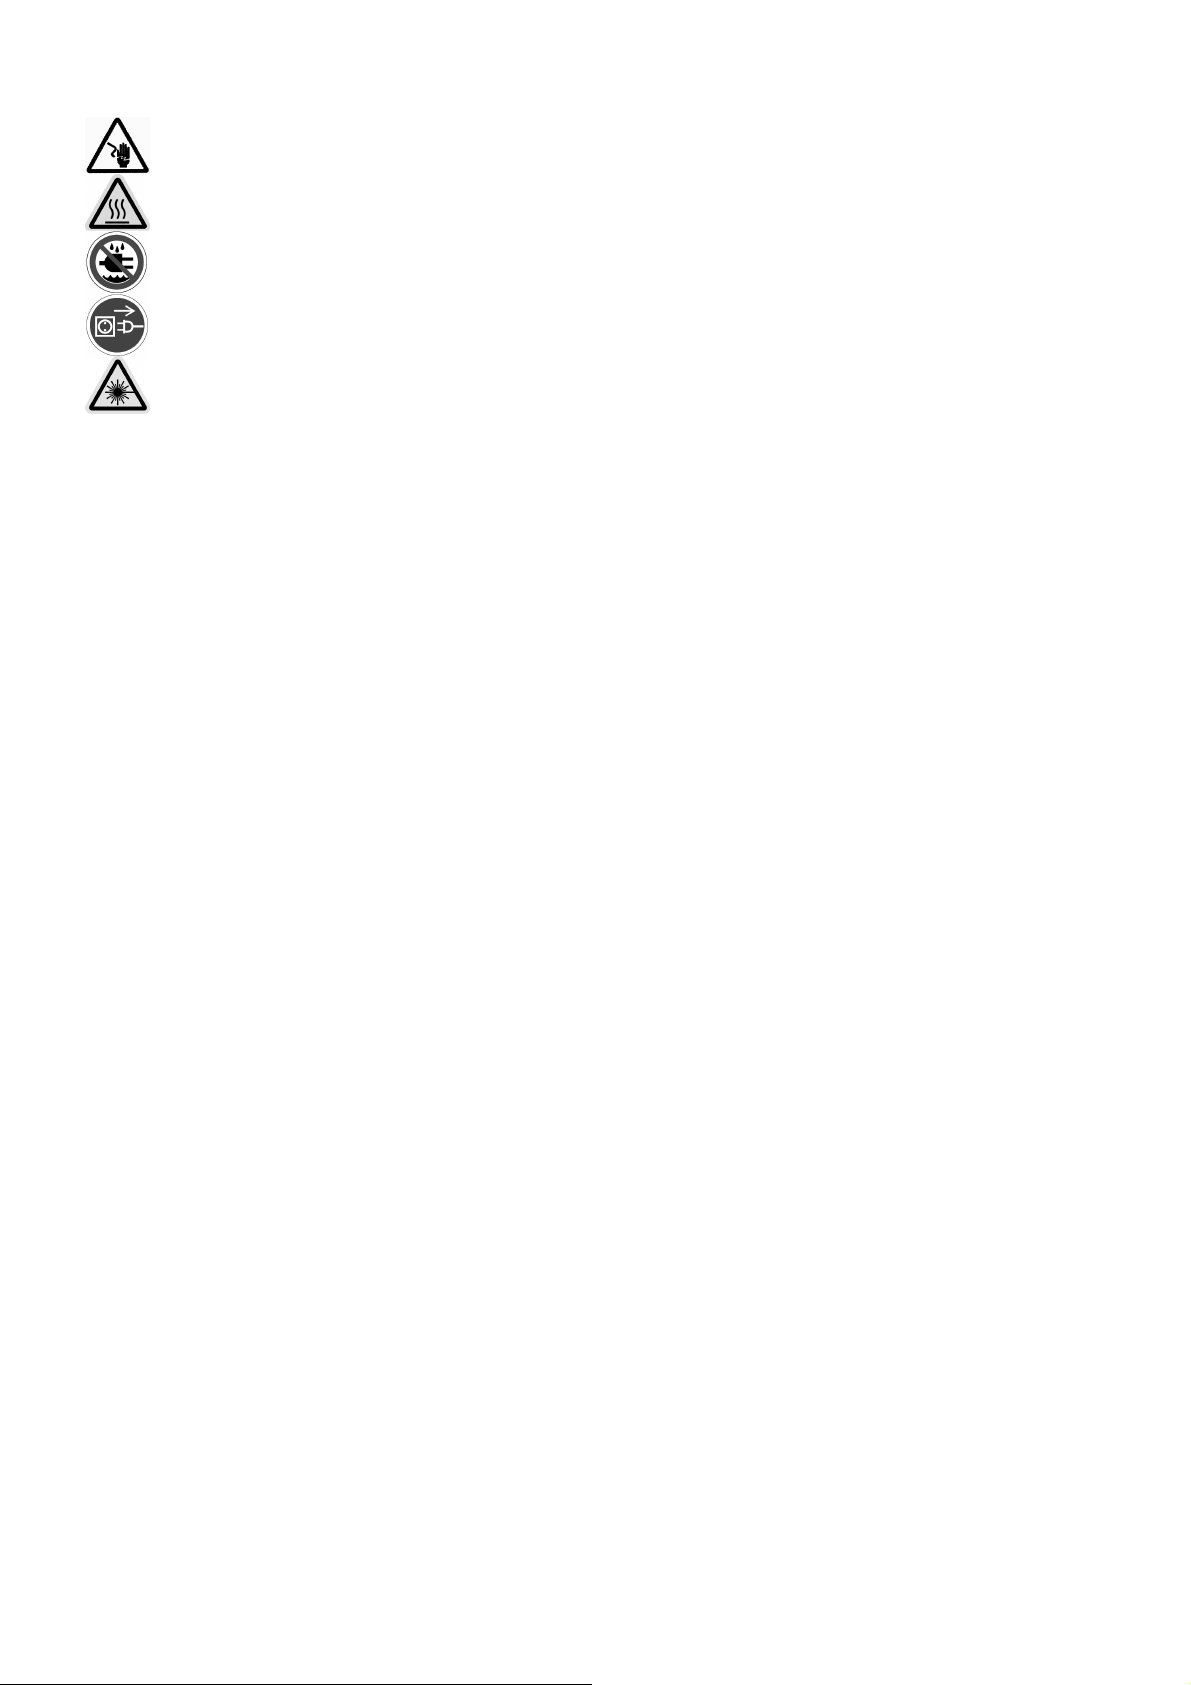
Be very careful during the installation: touching live wires can cause life-threatening electroshocks.
Do not touch the device during operation as the housing heats up.
Keep this device away from rain and moisture.
Unplug the mains lead before servicing, removing or installing the projector.
expose eyes to direct laser radiation and do not look at the laser through binoculars, even at a
• Damage caused by disregard of certain guidelines in this manual is not covered by the warranty and the dealer
will not accept responsibility for any ensuing defects or problems.
• A qualified technician should install and service this device.
• This device is designed for professional use on stage, in discos, theatres, etc. The VDP1001GLD7 should only be
used indoors and connected to an alternating current of max. 240VAC / 50Hz.
• Make sure that the available voltage does not exceed the voltage stated in the specifications of this manual.
• Do not crimp the power cord and protect it against damage. Have an authorised dealer replace it if necessary.
• Disconnect the device from the mains to clean it or when it is not in use. Handle the power cord by the plug only.
• Always ground the projector electrically. Failure to do so may damage your projector.
• There are no user serviceable parts inside.
• Never operate the projector with missing covers or damaged housing.
• Never open the housing of the projector. Opening the housing will defeat the interlocks inside the projector and
cause the laser output to stop.
• Never attempt to bypass the fuses. Always replace defective fuses with fuses of the specified type and ratings.
• Never cover the aperture with filters or other materials.
• Note that damage caused by user modifications to the device is not covered by the warranty.
• Use the original packaging if the device is to be transported.
• All modifications of the device are forbidden for safety reasons.
• Keep the device away from children and unauthorised users.
• Connect the device to the mains with the power plug. Do not connect it to a dimming pack.
VDP1001GLD7 VELLEMAN
Page 4
4
3. Installation
a) Fuse
• Only fit or replace a fuse when the device is unplugged from the mains.
• Replace a blown fuse with a fuse of the same type and rating (see “Technical Specifications”):
1. Remove the fuse holder using a flat-head screwdriver.
2. Remove the old fuse and install a new one.
3. Replace the fuse holder.
b) Mounting the Device
• Have the device installed by a qualified person, respecting EN 60598-2-17 and all other applicable norms.
• The carrying construction must be able to support 10 times the weight of the device for 1 hour without deforming.
• The installation must always be secured with a secondary attachment e.g. a safety cable.
• Never stand directly below the device when it is being mounted, removed or serviced. Have a qualified technician
check the device once a year and once before you bring it into service.
• Install the device out of reach of unauthorized persons, i.e. at a minimum height of 2.5m, in a location with few
passers-by.
• Overhead mounting requires extensive experience: calculating workload limits, determining the installation
material to be used… Have the material and the device itself checked regularly. Do not attempt to install the
device yourself if you lack these qualifications as improper installation may result in injuries.
• Adjust the desired inclination angle via the mounting bracket and tighten the bracket screws.
• Make sure there is no flammable material within a 0.5m radius of the device.
• Respect a minimum distance of 0.5m between the device’s light output and any illuminated surface.
• Do not place any object within a distance of 0.5m of the projector’s fan and air vents.
• Avoid illuminating the projector.
• Have a qualified electrician carry out the electric connection.
• Connect the device to the mains with the power plug. Do not connect it to a dimming pack.
• The installation has to be approved by an expert before the device is taken into service.
4. Description
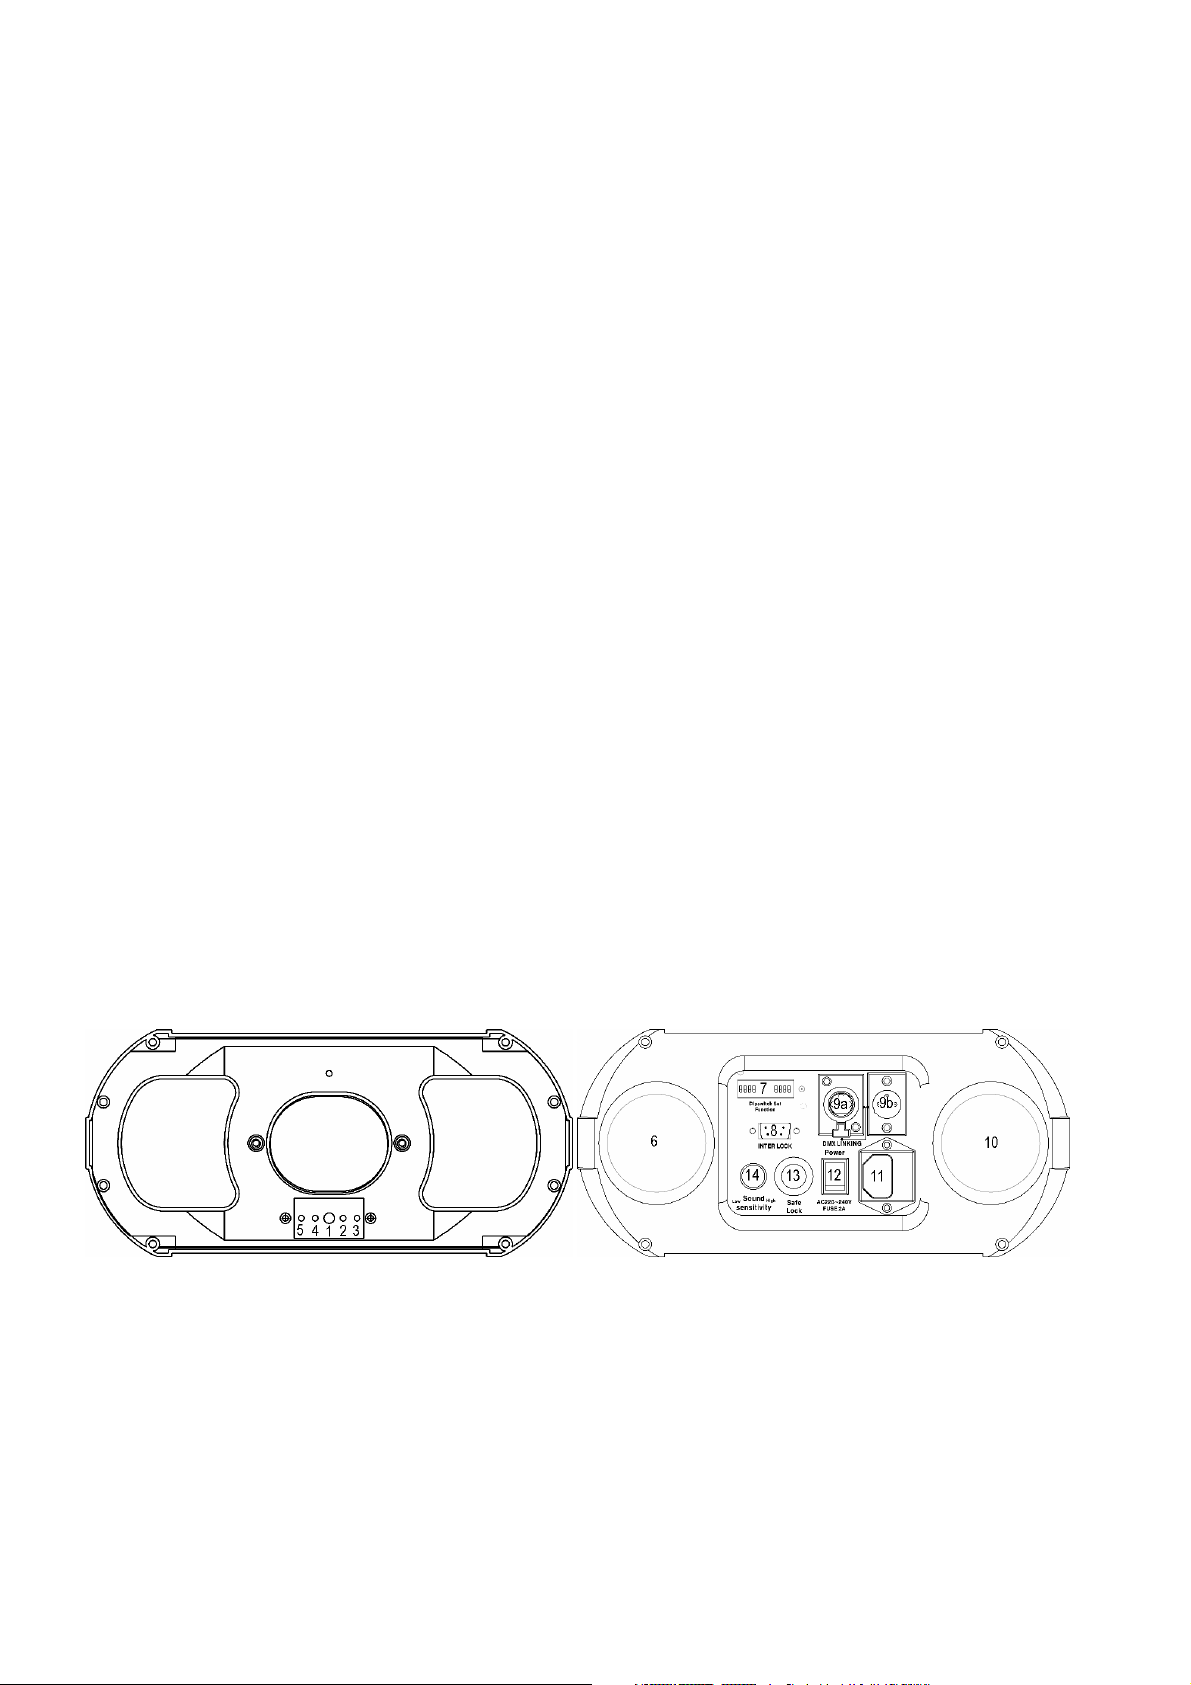
a. Front
1. Sound-active microphone
2. DMX indicator
3. Blue sound mode indicator
4. Red laser indicator
5. Green power indicator
VDP1001GLD7 VELLEMAN
Page 5
5
b. Back
6. Cooling fan intake
7. DIP switches: allow you to assign your projector a DMX address as well as select operation modes
8. Remote interlock connector: DE-9 connector to the remote interlock which stops the laser beam emission once
the connection loop has been opened
9. a. Signal in: standard DMX512 cable connection to a DMX controller or connection used to run projector in a
master-slave chain
b. Signal out: standard DMX512 cable connection to a DMX controller or connection used to run projector in a
master-slave chain
10. Cooling fan outlet
11. Power cord input storing the internal fuse
12. Power switch: turn the unit on or off. Make sure the unit is turned off before connecting to the mains
13. Locking system: when locked, the unit will stop emitting the laser beam but will remain active
14. Sound sensitivity control for use in sound mode
5. Operation
Your VDP1001GLD7is designed to operate using the DMX512 protocol which allows you to control the projector
using a DMX512 controller. However, a profile must be created for some controllers. By following the instructions
below, you will be able to ensure a safe use of your projector.
Your projector can be operated using three modes: DMX512 mode, master-slave mode or stand alone operation.
Additionally, the device can be remotely operated from a DMX512 remote controller. It features over 300 effects
triggered by the above modes.
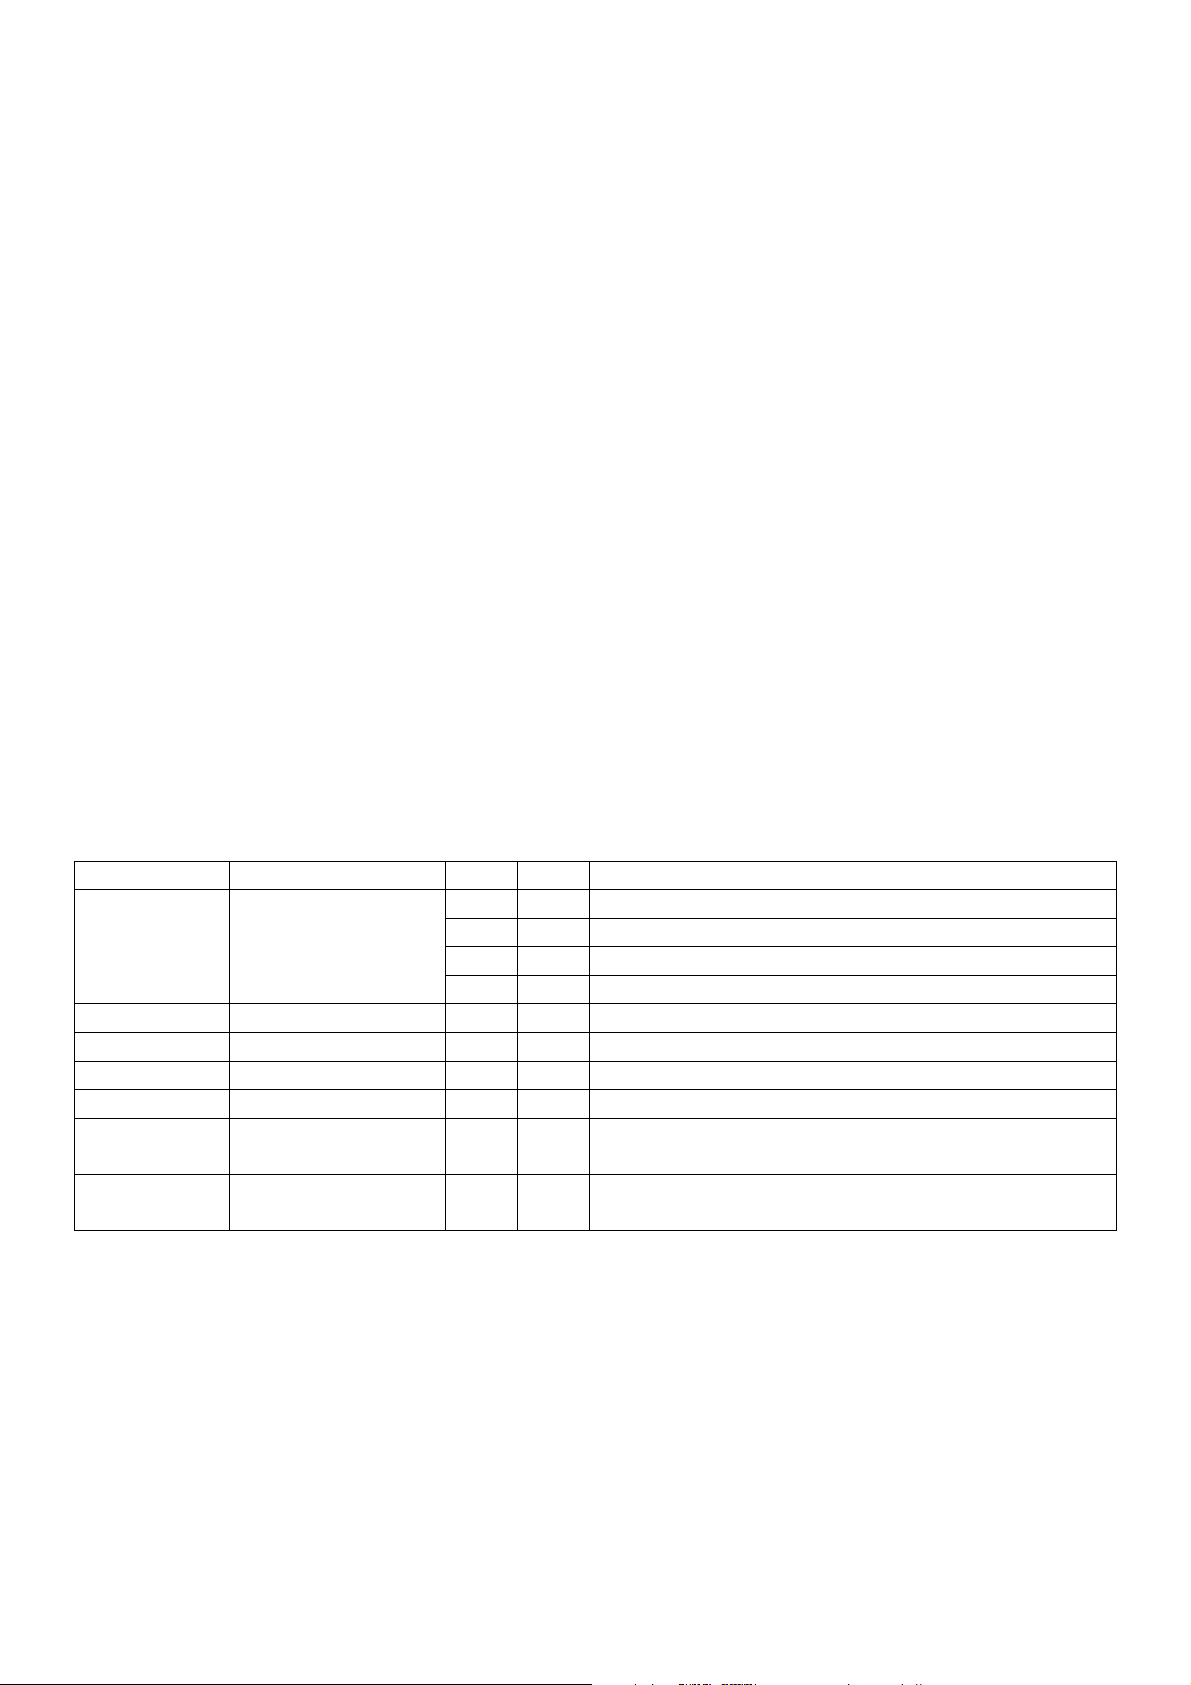
a. Detailed DMX Values per Channel
Channel Function From To Description
1 10 Laser off, laser and scanner stop working
Channel 1 MODE
Channel 2 PATTERN 0 255 Choose your static or dynamic pattern
Channel 3 POSITION X 0 255 Adjust position X
Channel 4 POSITION Y 0 255 Adjust position Y
Channel 5 SCANNING SPEED 0 255 0 = fast, 255 = slow
Channel 6
Channel 7
DYNAMIC PATTERN
PLAYING SPEED
STATIC PATTERN
SIZE
b. DMX512 Connection
Connect the provided XLR cable to the female 3-pin XLR output of your controller and the other side to the male 3pin XLR input of the VDP1001GLD7. Multiple VDP1001GLD7s can be linked through serial linking. The linking cable
should be a two-core screened cable with XLR input and output connectors.
11 120 Dynamic patterns
121 250 Static patterns
251 255 Sound active mode
0 255 0 = fast, 255 = slow
0 255 0 = small, 255 = large
VDP1001GLD7 VELLEMAN
Page 6
6
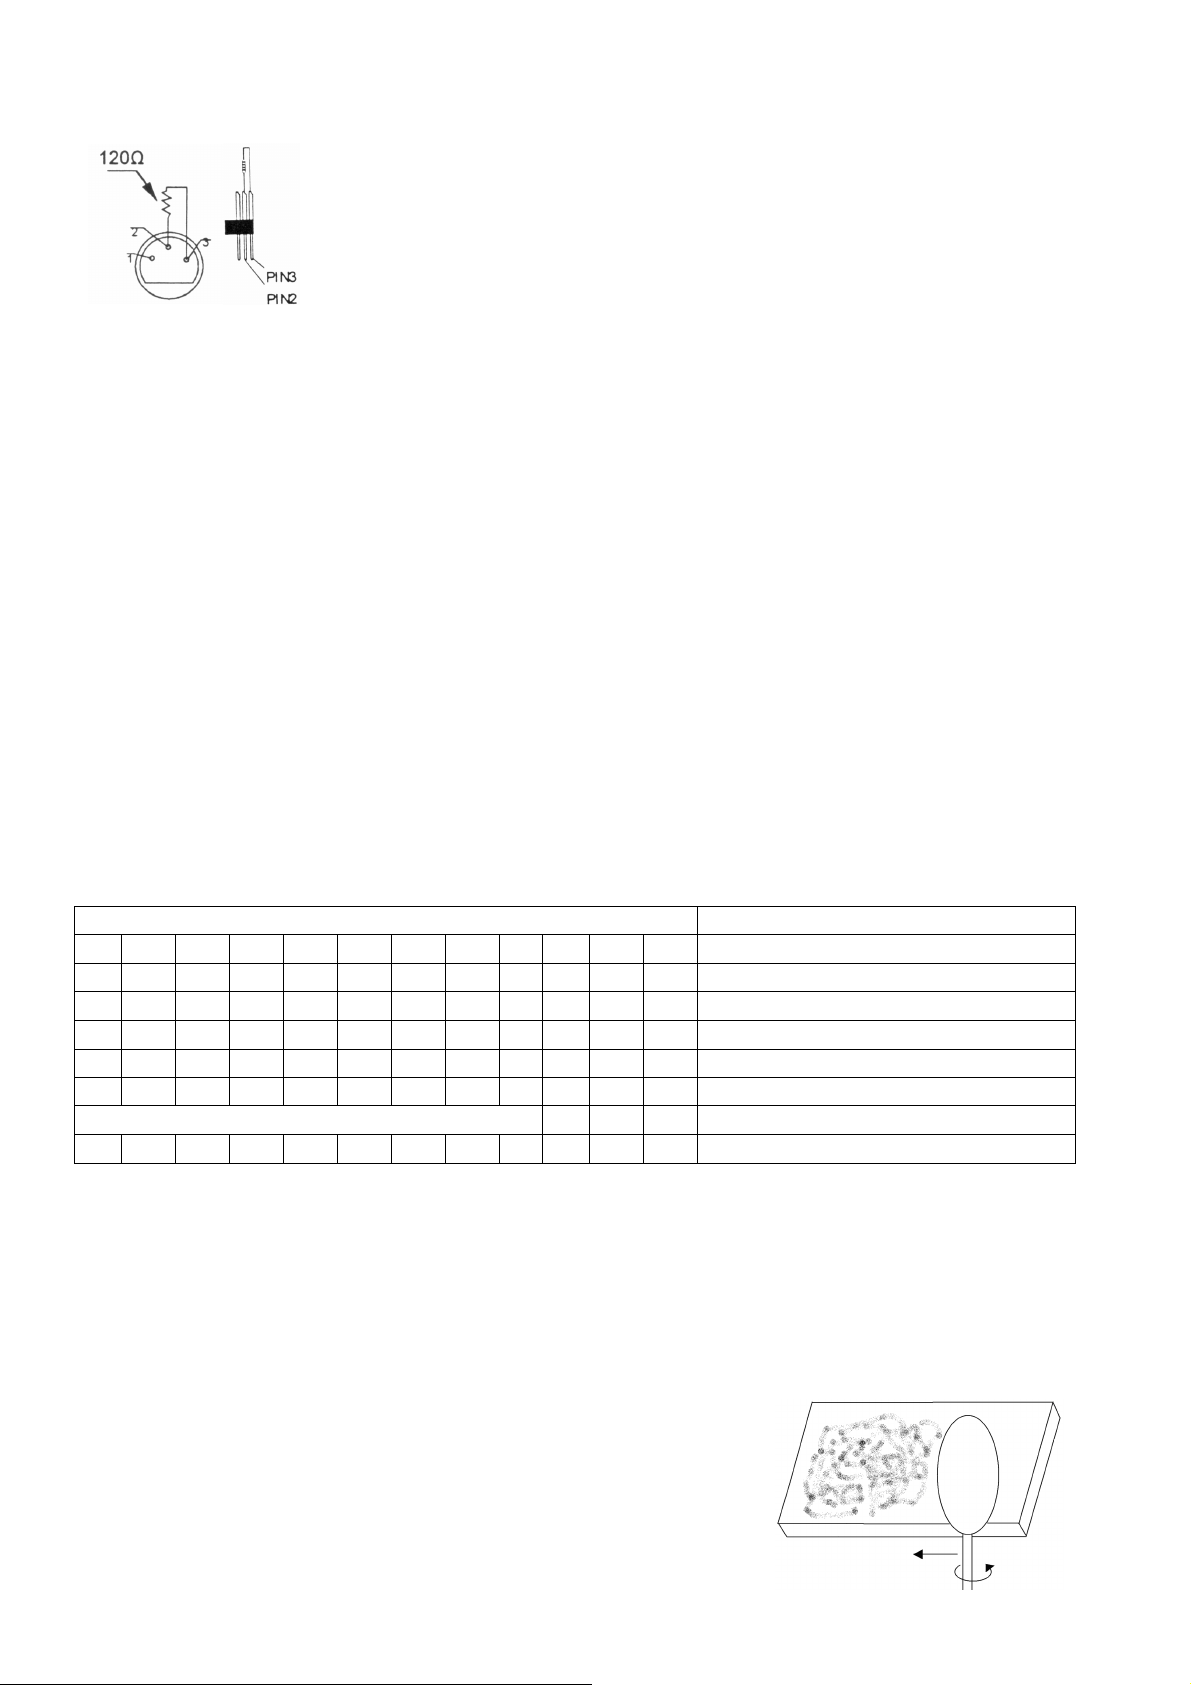
c. DMX512 Chain with Termination
A DMX terminator is recommended for installations where the DMX cable has to run a
long distance or is in an electrically noisy environment (e.g. discos). The terminator
prevents corruption of the digital control signal by electrical noise. The DMX terminator is
simply an XLR plug with a 120Ω resistor between pins 2 and 3, which is then plugged into
the XLR output socket of the last device in the chain.
Please see illustrations.
d. DMX Start Address
All DMX-controlled devices need a digital start address so that the correct device responds to the signals. This start
address is the channel number from which the device starts to “listen” to the DMX controller. Enter the correct
number and read it from the display located on the base of the VDP1001GLD7.
You can use the same starting address for a whole group of devices or enter an individual one for every device.
When all devices have the same address, all the VDP1001GLD7s will “listen” to the control signal on one particular
channel. In other words: changing the settings of one channel will affect all devices simultaneously. If you set
different addresses, each device will “listen” to a separate channel number. Changing the settings of one channel will
only affect the device in question.
In the case of the 7-channel VDP1001GLD7, you will have to set the start address of the first VDP1001GLD7 to 1,
the second VDP1001GLD7 to 8 (1 + 7), the third to 15 (8 + 7) and so on.
The DMX start address is defined by the first 9 DIP switches. The encoding is binary: DIP n° 1 is value 1, DIP n° 2 is
value 2, DIP n° 3 is value 4, DIP n° 4 is value 8, etc. Example: If the start address should be 95, the settings would
be as follows: 111110100 (1 + 2 + 4 + 8 + 16 + 0 +64 + 0 + 0 = 95).
DIP switches 10, 11 and 12 are used to select the following modes: sound-active mode, auto mode, master sound,
master auto, slave mode, DMX mode and test mode.
Depending on how you wish to control the projector, you will need to assign the correct DIP switch address according
to the chart below (0 = off, 1 = on, X = on or off):
DIP switch chart Function
1 2 3 4 5 6 7 8 9 10 11 12
X X X X X X X X X 0 0 0 Sound active mode
X X X X X X X X X 0 0 1 Auto mode
X X X X X X X X X 0 1 0 Master sound mode
X X X X X X X X X 0 1 1 Master auto mode
X X X X X X X X X 1 0 0 Slave mode
Set DMX address 1 0 1 DMX mode
X X X X X X X X X 1 1 0 Test mode
6. Cleaning and Maintenance
One of the most critical components in your VDP1001GLD7 is the optics. If the optics are dirty, you will experience a
loss in output power. To ensure that your projector output is at its maximum, it is recommended to regularly clean
your device, especially if the projector is subject to large amounts of dust. Take following notes into consideration:
1. Disconnect the device from the mains prior to maintenance activities.
2. Use a new cotton bud for each pass. Do not use any coarse materials such as newspapers. These will scratch
the surface which will lead to loss in power output.
3. Only use reagent grade acetone or 90% isopropyl alcohol.
4. Take care not to apply too much force to avoid breaking the mirror.
5. Let the mirror dry before use.
6. Proceed with motions shown at right.
VDP1001GLD7 VELLEMAN
Page 7
7
7. Troubleshooting
Problem Origin Solution
Main power off Turn on the device
No power
Erratic
output
appears dim
Not plugged in Plug the device into the mains
Fuse Check that the fuse is intact and serviceable
Check the presence of a proper connection between the control
DMX cable
Poor signal from control Check the DMX cables and control DMX selection switch if
DMX address offset Reassign the DMX address via the DIP switches; remove and
Dirty optics
and the device
Individually check all cables for continuity on all three pins
Check the polarity of the DMX cable
present
reinsert the power cable
Clean the optics Laser
Check that the fade is set at 100%
8. Technical Specifications
Power Supply max. 240VAC / 50Hz
Laser Classification IIIB
Laser Type DPSS (diode pumped solid state) green laser
Output Power > 100mW
Wavelength 532nm
Cooling System TE cooled
Fuse 2.5A, 250VAC (5 x 20mm) (order code FF2.5N)
Scanning micro motor
Operation Modes DMX512, auto and sound activation, master/slave
Dimensions 300 x 280 x 130mm
Total Weight 5.3kg
Max. Ambient Temperature 30°C
The information in this manual is subject to change without prior notice.
VDP1001GLD7 – LASERPROJECTOR - GROEN (7 DMX-KANALEN)
1. Inleiding en kenmerken
Aan alle ingezetenen van de Europese Unie
Belangrijke milieu-informatie betreffende dit product
Dit symbool op het toestel of de verpakking geeft aan dat, als het na zijn levenscyclus wordt weggeworpen,
dit toestel schade kan toebrengen aan het milieu.
Gooi dit toestel (en eventuele batterijen) niet bij het gewone huishoudelijke afval; het moet bij een
gespecialiseerd bedrijf terechtkomen voor recyclage.
U moet dit toestel naar uw verdeler of naar een lokaal recyclagepunt brengen.
Respecteer de plaatselijke milieuwetgeving.
Hebt u vragen, contacteer dan de plaatselijke autoriteiten inzake verwijdering.
Dank u voor uw aankoop! Lees deze handleiding grondig voor u het toestel in gebruik neemt. Verwijder voorzichtig de
verpakking rond het toestel en plaats de projector op een vlak en stabiel oppervlak. Inspecteer het toestel. Werd het
toestel beschadigd tijdens het transport, installeer het dan niet en raadpleeg uw dealer. Inhoud: 1 x 3-pin
voedingskabel (3m), 1 x DMX-kabel (1m) en deze handleiding.
VDP1001GLD7 VELLEMAN
Page 8
8
2. Veiligheidsinstructies
Verzeker u ervan dat het toestel niet aangesloten is op een stroombron alvorens
het toestel te
GEVAAR! Laserklasse IIIB. Vermijd direct oogcontact met de laserstraal. Kijk nooit direct in de
niet op
grote afstand.
Wees voorzichtig bij de installatie: raak geen kabels aan die onder stroom staan om
dodelijke elektroshock
s
te vermijden.
Raak het toestel niet aan wanneer het in gebruik is: de behuizing wordt warm.
Bescherm dit toestel tegen regen en vochtigheid.
installeren, te verplaatsen of schoon te maken.
laserstraal en observeer de laserstraal nooit door optische instrumenten zoals een verrekijker, zelfs
• De garantie geldt niet voor schade door het negeren van bepaalde richtlijnen in deze handleiding en uw dealer zal
de verantwoordelijkheid afwijzen voor defecten of problemen die hier rechtstreeks verband mee houden.
• Laat dit toestel installeren en onderhouden door een geschoolde technicus.
• Dit toestel is ontworpen voor professioneel gebruik op podia, in disco's, enz. U mag dit toestel enkel binnenshuis
gebruiken en aansluiten op een wisselspanning van maximum 240VAC / 50Hz.
• De beschikbare netspanning mag niet hoger zijn dan de spanning in de specificaties achteraan de handleiding.
• De voedingskabel mag niet omgeplooid of beschadigd zijn. Laat uw dealer zo nodig een nieuwe kabel plaatsen.
• Trek de stekker uit het stopcontact (trek niet aan de kabel!) voordat u het toestel reinigt en als u het niet gebruikt.
• Zorg voor een elektrische aarding van het toestel om beschadiging aan de projector te voorkomen.
• De gebruiker mag geen onderdelen vervangen.
• Gebruik de projector nooit wanneer de behuizing niet goed is gesloten.
• Open de behuizing van de projector niet. Wanneer u de behuizing opent, zal het beveiligingssysteem binnenin de
projector de laserstraal afbreken.
• Overbrug de zekering nooit. Vervang een defecte zekering met een zekering van hetzelfde type.
• Bedek nooit de lensopening met filters of andere objecten.
• Schade door wijzigingen die de gebruiker heeft aangebracht aan het toestel vallen niet onder de garantie.
• Gebruik de oorspronkelijke verpakking wanneer u het toestel vervoert.
• Om veiligheidsredenen mag de gebruiker geen wijzigingen aanbrengen aan het toestel.
• Houd dit toestel uit de buurt van kinderen en onbevoegden.
• Sluit het toestel via de stekker aan op het lichtnet. Sluit het niet aan op een dimmerpack.
3. Installatie
a) Zekering
• U mag een zekering enkel plaatsen of vervangen wanneer het toestel niet is aangesloten op het lichtnet.
• Vervang een gesprongen zekering door een zekering van hetzelfde type en met dezelfde specificaties (zie
“Technische specificaties”). Ga als volgt te werk:
1. Verwijder de zekeringhouder met behulp van een schroevendraaier met platte kop.
2. Verwijder de oude zekering en breng de nieuwe in.
3. Plaats de zekeringhouder terug in het toestel.
b) Het toestel monteren
• Laat een geschoolde technicus dit toestel installeren conform EN 60598-2-17 en andere toepasselijke normen.
• De constructie waaraan het toestel wordt bevestigd, moet gedurende 1 uur 10 x het gewicht van dit toestel
kunnen dragen zonder te vervormen.
• Maak het toestel ook vast met een veiligheidskabel.
• Sta nooit recht onder het toestel wanneer u het monteert, verwijdert of schoonveegt. Laat het toestel controleren
door een geschoolde technicus voor u het in gebruik neemt en laat het 1 x per jaar volledig nakijken.
VDP1001GLD7 VELLEMAN
Page 9

9
• Installeer dit toestel op een plaats waar niemand langs moet lopen en op een minimale hoogte van 2.5m.
• Een degelijke praktijkervaring is vereist voor de plaatsing van dit toestel. U moet de maximumbelasting van de
draagconstructie kunnen berekenen, weten welk constructiemateriaal u kunt gebruiken en u moet het gebruikte
materiaal en het toestel af en toe laten nakijken. Monteer het toestel niet zelf indien u er geen ervaring mee heeft.
Een slechte montage kan leiden tot verwondingen.
• Regel de gewenste invalshoek door middel van de montagebeugel en draai de regelschroeven stevig aan.
• Verwijder alle brandbaar materiaal in een straal van 0.5m rond het toestel.
• Behoud een afstand van minimaal 0.5m tussen het toestel en het belichte oppervlak.
• Plaats geen objecten binnen een straal van 0.5m van de ventilator en verluchtingsgaten.
• Verlicht de projector niet.
• Een geschoolde elektricien moet het toestel aansluiten.
• Sluit het toestel via de stekker aan op het lichtnet. Sluit het niet aan op een dimmerpack.
• De installatie moet voor het eerste gebruik gekeurd worden door een expert.
4. Omschrijving
a. Voorpaneel
1. Microfoon met muzieksturing
2. Aanduiding DMX
3. Blauwe aanduiding muzieksturing
4. Rode aanduiding laser
5. Groene aanduiding voeding
b. Achterpaneel
6. Ingang ventilator
7. DIP-schakelaars: toewijzen van het DMX-adres en keuze tussen de gebruiksmodi
8. Beveiligingsaansluiting: DE-9-aansluiting die de laserstraal afbreekt wanneer de aansluiting wordt
onderbroken
9. a. Signaalingang: standaard DMX512-aansluiting naar een DMX controller of aansluiting om de projector in
een master-slaveconfiguratie te gebruiken
b. Signaaluitgang: standaard DMX512-aansluiting naar een DMX controller of aansluiting om de projector in
een master-slaveconfiguratie te gebruiken
10. Uitgang ventilator
11. Aansluiting voor de voedingskabel met interne zekering
12. Voedingsschakelaar: in- en uitschakeling van het toestel. Zorg dat het toestel is uitgeschakeld wanneer u deze
aan het lichtnet koppelt
13. Vergrendeling: het toestel produceert geen laserstraal wanneer u de vergrendeling inschakelt
14. Regeling gevoeligheid tijdens muziekgestuurde modus
VDP1001GLD7 VELLEMAN
Page 10

10
5. Gebruik
Uw VDP1001GLD7 gebruikt het DMX512-protocol en kan met een DMX512 controller worden gestuurd. Sommige
controllers moeten eerst een DMX-adres krijgen. Volg de instructies hieronder om uw projector op een veilige manier
te gebruiken.
De projector kent drie gebruiksmodi: DMX512, master-slavemodus en autonome gebruiksmode. Bovendien kunt u
de projector op afstand bedienen vanaf een afstandsbediening met DMX512-protocol. Het toestel kan meer dan 300
patronen projecteren.
a. Gedetailleerde DMX-waarden per kanaal
Kanaal Functie Van Tot Omschrijving
1 10 Laser uit, laser en scanner zijn uitgeschakeld
Kanaal 1 MODUS
Kanaal 2 PATROON 0 255 Selectie van het bewegende of statische patroon
Kanaal 3 POSITIE X 0 255 Regel positie X
Kanaal 4 POSITIE Y 0 255 Regel positie Y
Kanaal 5 SCANSNELHEID 0 255 0 = snel, 255 = traag
SNELHEID
Kanaal 6
BEWEGEND
PATROON
GROOTTE
Kanaal 7
STATISCH
PATROON
b. DMX512-aansluiting
Sluit de meegeleverde XLR-kabel aan de vrouwelijke 3-pin XLR-uitgang van de controller en de andere kant van de
mannelijke 3-pin XLR-ingang van de VDP1001GLD7. U kunt verscheidene VDP1001GLD7s aan elkaar koppelen
met behulp van een seriële koppeling. Gebruik daarvoor een 2-aderige afgeschermde kabel met XLR ingang- en
uitgangsaansluitingen.
c. DMX512-keten met terminator
Een DMX terminator is aanbevolen als de DMX-kabel vrij lang is of wordt gebruikt in een
omgeving met veel elektrische ruis (bvb. een discotheek). De terminator voorkomt
corruptie van het digitale controlesignaal door elektrische ruis. De DMX terminator is niets
meer dan een XLR-stekker met een weerstand van 120Ω van pin 2 naar 3. Deze XLRstekker wordt dan aangesloten op de XLR uitgang van het laatste toestel in de reeks. Zie
de illustraties links.
d. DMX-startadres
Alle DMX-gestuurde toestellen hebben een digitaal startadres nodig, zodat het juiste toestel reageert op de signalen.
Dit digitale startadres is het kanaalnummer van waarop het toestel “luistert” naar het signaal van de DMX controller.
Geef het correcte nummer in en lees het af op de display onderaan uw VDP1001GLD7.
U kunt één enkel startadres gebruiken voor een groep toestellen of u kunt per toestel een nieuw startadres ingeven.
Wanneer u één enkel startadres instelt, zullen alle toestellen “luisteren” naar hetzelfde kanaal. Met andere woorden:
wanneer u de instellingen voor 1 kanaal verandert, zullen alle toestellen er tegelijk op reageren.
Wanneer u verschillende adressen instelt, dan luistert elk toestel naar een ander kanaal. Met andere woorden:
wanneer u de instellingen van een kanaal verandert, zal enkel het toestel op dat kanaal reageren.
VDP1001GLD7 VELLEMAN
11 120 Bewegen de patronen
121 250 Statische patronen
251 255 Muzieksturing
0 255 0 = snel, 255 = traag
0 255 0 = klein, 255 = groot
Page 11

11
In het geval van de 7-kanaals VDP1001GLD7, zult u het startadres van het eerste toestel op 1 moeten instellen, van
het tweede toestel op 8 (1 + 7), van het derde op 15 (8 + 7) enz.
Het DMX-startadres wordt door de 9 eerste DIP-schakelaars bepaald. Het coderen is van het binaire type: DIP nr. 1
heeft waarde 1, DIP nr. 2 heeft waarde 2, DIP nr. 3 heeft waarde 4, DIP nr. 4 heeft waarde 8, enz.
Voorbeeld: Wenst u waarde 95 als startadres, stel de DIP-schakelaars dan als volgt in: 111110100 (1 + 2 + 4 + 8 +
16 + 0 +64 + 0 + 0 = 95).
DIP-schakelaars 10, 11 en 12 worden gebruikt om de gebruiksmodi te selecteren: muziekgestuurde modus,
automatische modus, master sound, master auto, slave-modus, DMX-modus en testmodus.
Kies de gewenste besturingsmodus en stel de DIP-schakelaars als volgt in (0 = uit, 1 = aan, X = aan of uit):
Tabel DIP-schakelaars Functie
1 2 3 4 5 6 7 8 9 10 11 12
X X X X X X X X X 0 0 0 Muziekgestuurde modus
X X X X X X X X X 0 0 1 Automatische modus
X X X X X X X X X 0 1 0 Master sound
X X X X X X X X X 0 1 1 Master auto
X X X X X X X X X 1 0 0 Slave-modus
DMX-adres 1 0 1 DMX-modus
X X X X X X X X X 1 1 0 Testmodus
6. Reiniging en onderhoud
Een van de belangrijkste componenten in de projector zijn de spiegeltjes. Een toestel met bevuilde spiegeltjes zal
een zwakkere laserstraal produceren. Maak een toestel dat in een stoffige omgeving staat geregeld schoon. Volg de
procedure hieronder:
1. Ontkoppel het toestel van het lichtnet voor u aan onderhoudswerkzaamheden begint.
2. Gebruik elke keer een nieuw wattenstaafje. Gebruik geen grove doeken of krantenpapier om krassen te
vermijden.
3. Gebruik enkel zuivere aceton of 90% isopropanol.
4. Duw niet op het spiegeltje maar wrijf zachtjes het staafje heen en weer.
5. Laat het spiegeltje drogen voor gebruik.
6. Beweeg het wattenstaafje zoals hiernaast geïllustreerd.
7. Problemen en oplossingen
Probleem Oorzaak Oplossing
Uitgeschakeld Schakel de projector in
Geen stroom
Onregelmatige
laser
laserstraal
Niet aangesloten Koppel de projector aan het lichtnet
Zekering Ga na of de zekering niet opgebrand is
Zorg dat alle kabels goed zijn aangesloten
DMX-kabel
Controleer de continuïteit van elke kabel op alle pennen
Controleer de polariteit van de DMX-kabel
Zwak signaal Controleer de DMX-kabels en de DMX keuzeschakelaar
Verkeerd DMX-adres Wijs een nieuw DMX-adres toe via de DIP-schakelaars;
ontkoppel en koppel het toestel opnieuw aan het lichtnet
Bevuilde lens
Maak de lans schoon Zwakke
Stel de fade op 100%
VDP1001GLD7 VELLEMAN
Page 12

12
8. Technische specificaties
DANGER
! Class
III
B laser product. Avoid direct eye contact with the laser light. Never intentionally
distance.
Voeding max. 240VAC / 50Hz
Laserklasse IIIB
Type laser groene DPSS-laser (diode pumped solid state)
Vermogen > 100mW
Golflengte 532nm
Koelsysteem thermo-elektrisch
Zekering 2.5A, 250VAC (5 x 20mm) (order code FF2.5N)
Scanning micromotor
Gebruiksmodi DMX512, automatisch en muziekgestuurd, master-slave
Afmetingen 300 x 280 x 130mm
Gewicht 5.3kg
De informatie in deze handleiding kan te allen tijde worden gewijzigd zonder voorafgaande kennisgeving.
VDP1001GLD7 – PROJECTEUR LASER – VERT (7 CANAUX DMX
1. Introduction et caractéristiques
Aux résidents de l'Union européenne
Des informations environnementales importantes concernant ce produit
Ce symbole sur l'appareil ou l'emballage indique que l’élimination d’un appareil en fin de vie peut polluer
l'environnement.
Ne pas jeter un appareil électrique ou électronique (et des piles éventuelles) parmi les déchets municipaux
non sujets au tri sélectif ; une déchèterie traitera l’appareil en question.
Renvoyer les équipements usagés à votre fournisseur ou à un service de recyclage local.
Il convient de respecter la réglementation locale relative à la protection de l’environnement.
En cas de questions, contacter les autorités locales pour élimination.
Nous vous remercions de votre achat ! Lire la présente notice attentivement avant la mise en service de l’appareil.
Déballer le projecteur avec précaution et le placer sur une surface plate et stable. Inspecter l’appareil. Si l’appareil a
été endommagé pendant le transport, ne pas l’installer et consulter votre revendeur. Contenu de l’emballage : 1
cordon d’alimentation à 3 points (3m), 1 câble DMX (1m) et cette notice.
2. Prescriptions de sécurité
Être prudent lors de l’installation : toucher un câble sous tension peut causer des électrochocs mortels.
Ne pas toucher l’appareil lorsqu’il est en service : le boîtier chauffe !
Protéger l’appareil contre la pluie et l’humidité.
Débrancher le câble d'alimentation avant de déplacer, d’installer et de nettoyer l’appareil.
expose eyes to direct laser radiation and do not look at the laser through binoculars, even at a
• La garantie ne s’applique pas aux dommages survenus en négligeant certaines directives de cette notice et votre
revendeur déclinera toute responsabilité pour les problèmes et les défauts qui en résultent.
• Confier l’installation et l’entretien à un personnel qualifié.
• Cet appareil a été développé pour usage professionnel dans des discothèques, des théâtres, etc. Employer cet
appareil à l’intérieur et le connecter à une source de courant CA de max. 230VCA / 50Hz.
VDP1001GLD7 VELLEMAN
Page 13

13
• La tension réseau ne peut pas dépasser la tension mentionnée dans les spécifications à la fin de cette notice.
• Le câble d’alimentation ne peut pas être replissé ou endommagé. Demander à votre revendeur de renouveler le
câble d’alimentation si nécessaire.
• Débrancher l’appareil s’il n’est pas utilisé ou pour le nettoyer. Tirer la fiche pour débrancher l'appareil ; non pas le câble.
• Veiller à mettre le projecteur à la masse électriquement pour éviter les endommagements.
• Il n’y a aucune pièce maintenable par l’utilisateur.
• Ne jamais utiliser le projecteur avec un boîtier ouvert.
• Ne jamais ouvrir le boîtier du projecteur. L’ouverture du boîtier neutralise le dispositif de sécurité est interrompra
le faisceau laser.
• Ne pas court-circuiter les fusibles. Remplacer un fusible grillé par un fusible identique.
• Éviter de boucher la sortie du laser avec des filtres ou autres objets.
• Les dommages occasionnés par des modifications à l’appareil par le client, ne tombent pas sous la garantie.
• Transporter l’appareil dans son emballage originel.
• Toute modification de l’appareil est interdite pour des raisons de sécurité.
• Garder votre VDP1001GLD7 hors de la portée de personnes non qualifiées et de jeunes enfants.
• Brancher l’appareil sur le réseau électrique par la fiche d’alimentation. Ne pas le brancher sur un bloc de
puissance.
3. Installation
a) Fusible
• Débranchez l’appareil du réseau électrique avant de remplacer un fusible.
• Remplacez un fusible sauté par un exemplaire identique (voir « Spécifications techniques ») :
1. Dévissez le porte-fusible à l’aide d’un tournevis à lame plate.
2. Retirez l’ancien fusible et remplacez-le.
3. Replacez le porte-fusible dans l’appareil.
b) Montage de l’appareil
• Un technicien qualifié doit installer l’appareil en respectant EN 60598-2-17 et toute autre norme applicable.
• La construction portante de l’appareil doit être capable de supporter 10 x le poids de l’appareil pendant une
heure, sans qu’une déformation de la construction en résulte.
• Fixer votre VDP1001GLD7 à l’aide d’un câble de sécurité (sécurité supplémentaire).
• Éviter de vous positionner en dessous de l’appareil pour l’enlever ou lors du montage ou du nettoyage. Un
technicien qualifié doit réviser l’appareil avant la mise en service. Organiser une révision minutieuse annuelle.
• Installer l’appareil à un endroit où personne ne peut passer et à une hauteur minimale de 2.5m.
• L’installation de cet appareil exige une solide expérience pratique : le calcul de la charge max. de la construction,
les matériaux d’installation requis etc. De temps en temps, un technicien qualifié doit vérifier la construction
portante et l’appareil même. Ne pas essayer d’installer cet appareil vous-même si vous n’avez pas les
qualifications requises ; une installation incorrecte peut entraîner des blessures.
• Déterminer l’angle d’inclinaison au moyen de l’étrier de montage et serrez les vis de montage.
• Enlever tout matériau inflammable dans un rayon de 0.5m autour de l’appareil.
• Maintenir une distance minimale de 0.5m entre la sortie du laser et la surface illuminée.
• Éviter de placer des objets dans un rayon de 0.5m autour des bouches de ventilation du projecteur.
• Ne pas illuminer le projecteur.
• Un électricien qualifié doit établir la connexion électrique.
• Brancher l’appareil sur le réseau électrique par la fiche d’alimentation. Ne pas le brancher sur un bloc de
puissance.
• Un expert doit approuver l’installation avant qu’elle puisse être prise en service.
VDP1001GLD7 VELLEMAN
Page 14

14
4. Description
a. Panneau frontal
1. Microphone sensible à la musique
2. Voyant DMX
3. Voyant bleu (mode pilotage par la musique)
4. Voyant rouge (laser)
5. Voyant vert (alimentation)
b. Panneau arrière
6. Entrée de la ventilation
7. Interrupteurs DIP : configuration de l’adresse DMX et sélection des modes d’opération.
8. Connecteur de sécurité : connecteur de type DE-9. Une coupure dans le circuit de sécurité interrompra le
faisceau laser
9. a. Entrée du signal : connexion DMX512 standard vers un contrôleur DMX ou connexion utilisée pour la
configuration maître-esclave
b. Sortie du signal : connexion DMX512 standard vers un contrôleur DMX ou connexion utilisée pour la
configuration maître-esclave
10. Sortie de la ventilation
11. Prise du cordon d’alimentation et fusible intégré
12. Interrupteur d’alimentation : (dés)activation du projecteur. Veiller à désactiver le projecteur avant de la
brancher sur le réseau électrique
13. Verrouillage : le projecteur n’émet plus de faisceau maser lorsqu’il est verrouillé
14. Réglage de la sensibilité en mode pilotage par la musique
5. Emploi
Votre VDP1001GLD7 utilise le protocole DMX512 qui vous permet de contrôler le projecteur depuis un contrôleur
DMX512. Il faut cependant attribuer une adresse DMX à certains contrôleurs. Suivez les instructions ci-dessous et
jouissez de votre projecteur en toute sécurité.
Le projecteur utilise les modes d’opération suivants : le mode DMX512, le mode maître-esclave ou le mode
autonome. En outre, il est possible de contrôler l’appareil à distance en utilisant un contrôleur DMX512. Le
VDP1001GLD7 est en grade de projeter plus de 300 motifs.
VDP1001GLD7 VELLEMAN
Page 15

15
a. Valeurs DMX détaillées par canal
Canal Fonction De À Description
1 10 Laser désactivé, laser et balayeur désactivés
Canal 1 MODE
11 120 Motif dynamique
121 250 Motif stationnaire
251 255 Pilotage par la musique
Canal 2 MOTIF 0 255 Sélection des motifs stationnaire et dynamique
Canal 3 POSITION X 0 255 Réglage position X
Canal 4 POSITION Y 0 255 Réglage position Y
Canal 5
Canal 6
Canal 7
VITESSE DE
BALAYAGE
VITESSE MOTIF
DYNAMIQUE
TAILLE MOTIF
STATIQUE
0 255 0 = rapide, 255 = lent
0 255 0 = rapide, 255 = lent
0 255 0 = petit, 255 = large
b. Connexion DMX512
Connectez le câble à fiche XLR inclus à la sortie XLR femelle à 3 broches de votre contrôleur et l’autre fiche XLR
mâle à 3 broches à l’entrée du VDP1001GLD7. Il est possible de reliez plusieurs VDP1001GLD7s à partir d’une
connexion sérielle. Utilisez un câble de connexion blindé à 2 conducteurs avec des connecteurs d’entrée et de sortie
XLR.
c. Connexion DMX512 avec terminaison
Une terminaison DMX est à recommander si le câble DMX doit couvrir une grande
distance ou s’il est utilisé dans un environnement avec beaucoup de bruit électrique (p.ex.
une discothèque). La terminaison prévient la corruption du signal de contrôle numérique
par le bruit électrique. La terminaison DMX n’est rien d’autre qu’une fiche XLR avec une
résistance de 120Ω de broche 2 vers broche 3 (voir illustration à gauche). Cette fiche XLR
est connectée à la sortie XLR du dernier appareil de la série.
d. Adresse de départ DMX
Tous les appareils pilotés par un signal DMX demandent une adresse de départ DMX pour assurer que les appareils
corrects réagissent sur les signaux de contrôle. Cette adresse de départ numérique indique le numéro de canal sur
lequel l’appareil écoute le contrôleur DMX. Déterminez cette adresse avec les interrupteurs DIP au dos de l’appareil.
Vous avez le choix entre une seule adresse de départ pour toute une série d’appareils ou une adresse de départ par
appareil. Dans le cas d’une seule adresse, tous les appareils « écouteront » les mêmes signaux, sur un seul canal.
Tous les appareils seront donc influencés lorsque vous changez les réglages d’un seul canal. Avec des adresses de
départ individuelles, chaque appareil « écoutera » son propre canal. Par conséquent, un ajustement des réglages
d’un canal n’influence que l'appareil sur ce canal.
Pour le VDP1001GLD7 à 7 canaux, l’adresse de départ du premier appareil est 1, du deuxième 8 (1 + 7), du
troisième 15 (8 + 7), etc.
L’adresse de départ DMX est définie par les premiers 9 commutateurs DIP de l’appareil. L’encodage est de type
binaire : DIP n° 1 à la valeur 1, DIP n° 2 à la valeur 2, DIP n° 3 à la valeur 4, DIP n° 4 à la valeur 8, etc.
Exemple : Si vous désirez établir l’adresse de départ 95, positionnez les commutateurs DIP comme suit : 111110100
(1 + 2 + 4 + 8 + 16 + 0 +64 + 0 + 0 = 95).
Les interrupteurs DIP n° 10, 11 et 12 sont utilisés pour la sélection des modes : mode piloté par la musique, mode
auto, master sound, master auto, mode esclave, mode DMX et mode test.
Configurez les interrupteurs DIP selon le mode d’opération souhaité (0 = éteint, 1 = allumé, X = allumé ou éteint):
VDP1001GLD7 VELLEMAN
Page 16

16
Table des interrupteurs DIP Fonction
1 2 3 4 5 6 7 8 9 10 11 12
X X X X X X X X X 0 0 0 Pilotage par la musique
X X X X X X X X X 0 0 1 Mode auto
X X X X X X X X X 0 1 0 Master sound
X X X X X X X X X 0 1 1 Master auto
X X X X X X X X X 1 0 0 Mode esclave
Adressage DMX 1 0 1 Mode DMX
X X X X X X X X X 1 1 0 Mode test
6. Nettoyage et entretien
Un composant de votre VDP1001GLD7 d’une importance cruciale est le miroir. Un miroir non propre influencera le
faisceau laser. Nettoyer régulièrement les miroirs pour obtenir un faisceau puissant, particulièrement les miroirs d’un
projecteur installé dans un endroit poussiéreux. Voici quelques instructions :
1. Débranchez l'appareil avant de le nettoyer.
2. Utiliser un nouveau coton-tige pour chaque passage. Éviter l’utilisation de chiffons rudes ou de papier journal
pour éviter de rayer le miroir.
3. N’utiliser que de l’acétone de qualité réactive ou de l’alcool isopropylique à
90%.
4. Ne pas trop appuyer sur le miroir pour éviter de l’endommager.
5. Laisser sécher le miroir avant usage.
6. Procéder avec les mouvements comme illustré.
7. Problèmes et solutions
Problème Cause Solution
Pas de
tension
Appareil éteint Allumer l’appareil
Appareil débranché Connecter l’appareil au réseau électrique
Fusible Vérifier le fusible et le remplacer si nécessaire
Contrôler la connexion entre le contrôleur et l’appareil
Faisceau
laser
irrégulier
Câble DMX
Signal faible du contrôleur Vérifier les câbles DMX et l’interrupteur de sélection DMX
Vérifier la continuité de chaque câble
Contrôler la polarité du câble DMX
Configuration DMX erronée Reconfigurer l’adresse DMX à l’aide des interrupteurs DIP ;
retirer et réinsérer le cordon d’alimentation
Laser flou Miroirs souillés
Nettoyer les miroirs
Positionner l’intensité au maximum (100%)
8. Spécifications techniques
Alimentation max. 240VCA / 50Hz
Classe laser IIIB
Type de laser DPSS (« Diode Pumped Solid State » – laser à diode) à laser vert
Puissance > 100mW
Longueur d’onde 532nm
Système de refroidissement refroidissement thermoélectrique
Fusible 2.5A, 250VCA (5 x 20mm) (référence FF2.5N)
Balayage micro-moteur
Modes d’opération DMX512, automatique et pilotage par la musique, configuration maître-
esclave
Dimensions 300 x 280 x 130mm
Poids 5.3kg
Température ambiante max. 30°C
Toutes les informations présentées dans cette notice peuvent être modifiées sans notification préalable.
VDP1001GLD7 VELLEMAN
Page 17

17
VDP1001GLD7 – PROYECTOR LÁSER – VERDE (7 CANALES DMX)
¡PELIGRO! Producto láser clase IIIB.
N
unca
mire directamente a la
luz lá
ser.
Nunca exponga los
a
una
distanc
ia.
Cuidado durante la instalación: puede sufrir una peligrosa descarga eléctrica al tocar los cables con un
voltaje peligroso
.
1. Introducción & Características
A los ciudadanos de la Unión Europea
Importantes informaciones sobre el medio ambiente concerniente este producto
Este símbolo en este aparato o el embalaje indica que, si tira las muestras inservibles, podrían dañar el
medio ambiente.
No tire este aparato (ni las pilas eventuales) en la basura doméstica; debe ir a una empresa especializada
en reciclaje. Devuelva este aparato a su distribuidor o a la unidad de reciclaje local.
Respecte las leyes locales en relación con el medio ambiente.
Si tiene dudas, contacte con las autoridades locales para residuos.
¡Gracias por haber comprado el VDP1001GLD7! Lea cuidadosamente las instrucciones del manual antes de usarlo.
Desembale el proyector cuidadosamente y póngalo en una superficie plana y estable. Controle el aparato. Si el
aparato ha sufrido algún daño en el transporte no lo instale y póngase en contacto con su distribuidor. Incluye: 1
cable de alimentación de 3 polos (3m), 1 cable DMX (1m) y este manual del usuario.
2. Instrucciones de seguridad
¡No toque el aparato durante su operación: la caja se calienta!
No exponga este equipo a lluvia ni humedad.
Desconecte el cable de alimentación de la red antes de abrir la caja.
ojos intencionadamente a la radiación directa del láser y no mire a la luz láser con gemelos, incluso
• Daños causados por descuido de las instrucciones de seguridad de este manual invalidarán su garantía y su
distribuidor no será responsable de ningún daño u otros problemas resultantes.
• La instalación y el mantenimiento deben ser realizados por personal especializado.
• Este aparato ha sido diseñado para el uso profesional en una discoteca, un teatro, etc. Utilice este aparato en
interiores y conéctelo a una fuente de corriente CA de máx. 230VCA / 50Hz.
• Asegúrese de que la tensión de red no sea mayor que la tensión indicada en las especificaciones.
• No aplaste el cable de alimentación y protéjalo contra posibles daños causados por algún tipo de superficie
afilada. Si es necesario, pida a su distribuidor reemplazar el cable de alimentación.
• Desconecte siempre el aparato si no va a usarlo durante un largo período de tiempo o antes de limpiarlo. Tire
siempre del enchufe para desconectar el cable de red, nunca del propio cable.
• Asegúrese de que conecte el proyector de manera eléctrica a la tierra para evitar daños.
• El usuario no habrá de efectuar el mantenimiento de ninguna pieza.
• Nunca utilice el proyector con la caja abierta.
• Nunca abra la caja del proyector. El sistema de seguridad se activará al abrir la caja e interrumpirá el rayo láser.
• No cortocircuite los fusibles. Reemplace un fusible fundido por otro del mismo tipo.
• No bloquee la salida del láser con filtros u otros objetos.
• Los daños causados por modificaciones no autorizadas, no están cubiertos por la garantía.
• Transporte el aparato en su embalaje original.
• Por razones de seguridad, las modificaciones no autorizadas del aparato están prohibidas.
• Mantenga el VDP1001GLD7 lejos del alcance de personas no capacitadas y niños.
• Conecte el aparato a la red eléctrica con la conexión de alimentación. No lo conecte a un dimmer.
VDP1001GLD7 VELLEMAN
Page 18

18
3. Instalación
a) Fusible
• Desconecte el aparato de la red antes de reemplazar el fusible.
• Reemplace un fusible fundido por otro del mismo tipo (véase « Especificaciones ») :
1. Desatornille el portafusibles con un destornillador adecuado.
2. Saque el fusible fundido y reemplácelo -le.
3. Vuelva a poner el portafusibles en el aparato.
b) Montaje del aparato
• Respete la directiva EN 60598-2-17 y toda norma nacional antes de instalar el aparato. La instalación debe ser
realizada por un técnico especializado.
• El soporte donde irá el aparato, debe ser capaz de sostener 10 veces el peso de éste durante una hora, sin que
se produzca una deformación de dicho soporte.
• Fije el VDP1001GLD7 con un cable de seguridad (seguridad adicional).
• Evite ponerse debajo del aparato durante el montaje, la limpieza, etc. Un técnico especializado debe revisar el
aparato antes de la puesta en marcha. Después, debe revisarlo una vez al año.
• Instale el aparato fuera del alcance de personas no autorizadas y en un lugar con poca gente y a una altura de
mín. 2.5m.
• La instalación de este aparato exige una sólida experiencia práctica: debe poder calcular la carga máx. del
soporte, debe conocer los materiales necesarios para la instalación, etc. De vez en cuando, una verificación de la
estructura y del aparato mismo debe ser llevada a cabo por un técnico especializado. No intente instalar este
aparato si no tiene las cualificaciones requeridas; una instalación incorrecta puede causar lesiones.
• Ajuste el ángulo de inclinación mediante el soporte de montaje y atornille los tornillos de montaje.
• Quite todo material inflamable en un radio de 0.5m alrededor del aparato.
• Respete una distancia de mín. 0.5m entre la salida de luz y el área iluminada.
• No pone objetos en un rayo de 0.5m alrededor de los orificios de ventilación del proyector.
• No ilumine el proyector.
• Un electricista debe llevar a cabo la conexión eléctrica.
• Conecte el aparato a la red eléctrica con la conexión de alimentación. No lo conecte a un dimmer.
• Un experto debe probar la instalación antes de la puesta en marcha.
4. Descripción
a. Panel frontal
1. Micrófono sensible a la música
2. Indicador DMX
3. Indicador azul (modo control por la música)
4. Indicador rojo (láser)
5. Indicador verde (alimentación)
VDP1001GLD7 VELLEMAN
Page 19

19
b. Panel trasero
6. Entrada de la ventilación
7. Interruptores DIP: configuración de la dirección DMX y selección de los modos de funcionamiento.
8. Conector de seguridad: conector del tipo DE-9. Un corte en el circuito de seguridad interrumpirá el rayo láser
9. a. Entrada de la señal: conexión DMX512 estándar a un controlador DMX o conexión utilizada para la
configuración maestro-esclavo
b. Salida de la señal: conexión DMX512 estándar a un controlador DMX o conexión utilizada para la
configuración maestro-esclavo
10. Salida de la ventilación
11. Conexión para el cable de alimentación con fusible incorporado
12. Interruptor de alimentación: (des)activación del proyector. Asegúrese de que el proyector esté desactivado
antes de conectarlo a la red eléctrica
13. Bloqueo: El proyector ya no emite un rayo láser si está bloqueado
14. Ajuste de la sensibilidad en el modo control por la música
5. Uso
El VDP1001GLD7 utiliza el protocolo DMX512 que le permite controlar el proyector con un controlador DMX512.
Algunos controladores necesitan una dirección DMX. Siga las instrucciones (véase abajo) para utilizar el proyector
de manera segura.
El proyector utiliza los siguientes modos de funcionamiento: el modo DMX512, el modo maestro-esclavo o el modo
autónomo. Además, es posible controlar el aparato a distancia al utilizar un controlador DMX512. El VDP1001GLD7
puede proyectar más de 300 motivos.
a. Valores DMX detallados por canal
Canal Función De A Descripción
1 10 Láser desactivado, láser y escáner desactivados
Canal 1 MODO
Canal 2 MOTIVO 0 255 Selección de los motivos estáticos y dinámicos
Canal 3 POSICIÓN X 0 255 Ajuste de la posición X
Canal 4 POSICIÓN Y 0 255 Ajuste de la posición Y
Canal 5
Canal 6
Canal 7
VELOCIDAD DE
EXPLORACIÓN
VELOCIDAD
MOTIVO DINÁMICO
TAMAÑO MOTIVO
ESTÁTICO
b. Conexión DMX512
Conecte el cable con conector XLR (incl.) a la salida XLR hembra de 3 polos del controlador y el otro conector XLR
macho de 3 polos a la entrada del VDP1001GLD7. Es posible conectar varios VDP1001GLD7 en serie. Use un
cable blindado de doble hilo conductor con conectores XLR de entrada y de salida.
11 120 Motivo dinámico
121 250 Motivo estático
251 255 Control por la música
0 255 0 = rápido, 255 = lento
0 255 0 = rápido, 255 = lento
0 255 0 = pequeño, 255 = largo
VDP1001GLD7 VELLEMAN
Page 20

20
c. Conexión DMX-512 con una terminación DMX
Se recomienda una terminación DMX si el cable DMX debe cubrir una gran distancia o si
se usa en un medio ambiente con mucho ruido eléctrico (p.ej. una discoteca). La
terminación impide que el ruido eléctrico corrompa la señal de control numérico. La
terminación DMX no es más que un conector XLR con una resistencia de 120Ω de polo 2
a polo 3. Este conector XLR está conectado a la salida XLR del último aparato de la serie.
Véase la figura a la izquierda.
d. Determinar la dirección inicial del proyector DMX
Si se usa una señal DMX, cada aparato tiene su propia dirección inicial DMX para asegurar que los aparatos
reaccionen a las señales de control correctas. Esta dirección inicial digital es el primer canal en el cual el aparato
reaccionará a las señales DMX del controlador DMX. Determine esta función con los interruptores DIP de la parte
trasera del aparato.
Es posible elegir entre una sola dirección inicial para toda una serie de aparatos o una dirección inicial por aparato.
Con una sola dirección inicial para una serie de aparatos, todos los aparatos reaccionarán sincronizadamente a la
misma señal. Por lo tanto, cambiar los ajustes de un solo canal afecta a los ajustes de todos los canales. Con varias
direcciones iniciales, cada aparato reaccionará independientemente. Por lo tanto, cambiar los ajustes de un solo
canal sólo afecta al canal en cuestión.
En el caso del VDP1001GLD7 de 7 canales, la dirección inicial del primer aparato es 1. Introduzca 8 (1 + 7) para el
segundo aparato, introduzca 15 (8 + 7) para el tercer aparato, etc.
La dirección inicial DMX del aparato se determina por los 9 conmutadores DIP del aparato. El código es binario: el
valor del DIP n° 1 es 1, del DIP n° 2 es 2, del DIP n° 3 es 4, del DIP n° 4 es 8, etc.
Ejemplo: Si los interruptores DIP están configurados de la siguiente manera para la dirección inicial 95: 111110100
(1 + 2 + 4 + 8 + 16 + 0 +64 + 0 + 0 = 95).
Los interruptores DIP n° 10, 11 y 12 se utilizan para la selección de los modos: modo controlado por la música,
modo autónomo, master sound, master auto, modo esclavo, modo DMX y modo test.
Configure los interruptores DIP según el modo de funcionamiento deseado (0 = apagado, 1 = encendido, X =
encendido o apagado):
Lista de los interruptores DIP Función
1 2 3 4 5 6 7 8 9 10 11 12
X X X X X X X X X 0 0 0 Control por la música
X X X X X X X X X 0 0 1 Modo autónomo
X X X X X X X X X 0 1 0 Master sound
X X X X X X X X X 0 1 1 Master auto
X X X X X X X X X 1 0 0 Modo esclavo
Dirección DMX 1 0 1 Modo DMX
X X X X X X X X X 1 1 0 Modo test
6. Limpieza y mantenimiento
El espejo es un componente de la mayor importancia del VDP1001GLD7. Un espejo sucio influirá el rayo láser.
Limpie regularmente los espejos para obtener un rayo potente, sobre todo los espejos de un proyector instalado en
un lugar polvoriento. Lea las siguientes instrucciones:
1. Desconecte el aparato de toda fuente antes de limpiarlo.
2. Utilice cada vez un nuevo bastoncillo de algodón. No utilice un paño basto ni
papel de periódico para no rayar el espejo.
3. Utilice sólo acetona de calidad o alcoholo con 90% isopropanol.
4. No apriete demasiado el espejo para no dañarlo.
5. Deje que el espejo se seque antes del uso.
6. Mueva el bastoncillo de algodón como está indicado en la figura de al lado.
VDP1001GLD7 VELLEMAN
Page 21

21
7. Solución de problemas
Problema Causa Solución
No hay
tensión
Aparato desactivado Active el aparato
Aparato desconectado Conecte el aparato a la red eléctrica
Fusible Controle el fusible y reemplácelo si fuera necesario
Controle la conexión entre el controlador y el aparato
Rayo láser
irregular
Cable DMX
Débil señal del controlador Controle los cables DMX y el interruptor de selección DMX
Controle la continuidad de cada cable
Controle la polaridad del cable DMX
Configuración DMX incorrecta Vuelva a configurar la dirección DMX con los interruptores DIP ;
conecte y vuelva a conectar el cable de alimentación
Limpie los espejos Rayo láser
Ponga la intensidad del fade en la posición máxima (100%)
débil
Espejos sucios
8. Especificaciones
Alimentación máx. 240VCA / 50Hz
Clase láser IIIB
Tipo del láser DPSS (« Diode Pumped Solid State » – diodo láser) a láser verde
Potencia > 100mW
Longitud de la onda 532nm
Sistema de enfriamiento enfriamiento termoeléctrico
Fusible 2.5A, 250VCA (5 x 20mm) (referencia FF2.5N)
Exploración micromotor
Modos de funcionamiento DMX512, automático y control por la música, configuración maestro-
esclavo
Dimensiones 300 x 280 x 130mm
Peso 5.3kg
Temperatura ambiente máx. 30°C
Se pueden modificar las especificaciones y el contenido de este manual sin previo aviso.
VDP1001GLD7 – LASERPROJEKTOR – GRÜN (7 DMX-KANÄLE)
1. Einführung & Eigenschaften
An alle Einwohner der Europäischen Union
Wichtige Umweltinformationen über dieses Produkt
Dieses Symbol auf dem Produkt oder der Verpackung zeigt an, dass die Entsorgung dieses Produktes nach
seinem Lebenszyklus der Umwelt Schaden zufügen kann.
Entsorgen Sie die Einheit (oder die verwendeten Batterien) nicht als unsortiertes Hausmüll; die Einheit oder
die verwendeten Batterien müssen von einer spezialisierten Firma zwecks Recycling entsorgt werden.
Diese Einheit muss an den Händler oder ein örtliches Recycling-Unternehmen retourniert werden.
Respektieren Sie die örtlichen Umweltvorschriften.
Falls Zweifel bestehen, wenden Sie sich für Entsorgungsrichtlinien an Ihre örtliche Behörde.
Wir bedanken uns für den Kauf des VDP1001GLD7! Bitte lesen Sie diese Bedienungsanleitung vor Inbetriebnahme
sorgfältig durch. Nehmen Sie das Gerät vorsichtig aus der Verpackung und stellen Sie es auf eine ebene und stabile
Oberfläche. Überprüfen Sie, ob Transportschäden vorliegen. Sollte dies der Fall sein, verwenden Sie das Gerät nicht
und wenden Sie sich an Ihren Händler. Inhalt: 1 x 3-pin Versorgungskabel (3m), 1 x DMX-Kabel (1m) und diese
Bedienungsanleitung.
VDP1001GLD7 VELLEMAN
Page 22

22
2. Sicherheitshinweise
GEFAHR
! Laserklasse IIIB.
Vermeiden Sie eine direkte Bestrahlung der Augen.
Blicken Si
e niemals
z.B.
mit
einem Fernglas, sogar nicht in einer großen Entfernung.
Seien Sie während der Installation des Gerätes sehr vorsichtig: das Berühren von unter Spannung stehenden
Berühren Sie das Gehäuse währ
end des Betriebs nicht, denn das Gehäuse heizt auf
.
Leitungen könnte zu lebensgefährlichen elektrischen Schlägen führen.
Schützen Sie das Gerät vor Feuchtigkeit und Feuchte.
Trennen Sie das Gerät vom Netz bevor Sie das Gehäuse öffnen.
direkt in den Laserstrahl und beobachten Sie den Laserstrahl nie mit optischen Instrumenten, wie
• Bei Schäden, die durch Nichtbeachtung der Bedienungsanleitung verursacht werden, erlischt der
Garantieanspruch. Für daraus resultierende Folgeschäden übernimmt der Hersteller keine Haftung.
• Lassen Sie dieses Gerät von einem Fachmann installieren und warten.
• Dieses Gerät eignet sich für den professionellen Einsatz auf Bühnen, in Discotheken, Theater, usw. Das Gerät ist
nur zur Verwendung in Innenräumen und mit einer mit einer Wechselspannung von 240VAC / 50Hz konzipiert
worden.
• Vergewissern Sie sich, dass die anzuschließende Netzspannung nicht höher ist als die Netzspannung
beschrieben in dieser Bedienungsanleitung.
• Achten Sie darauf, dass die Netzleitung nicht gequetscht oder durch scharfe Kanten beschädigt werden kann. Bei
Beschädigungen soll eine Fachkraft das Kabel ersetzen.
• Trennen Sie das Gerät bei Nichtbenutzung und vor jeder Reinigung vom Netz. Fassen Sie dazu den Netzstecker
an der Grifffläche an und ziehen Sie nie an der Netzleitung.
• Sorgen Sie für eine elektrische Erdung des Gerätes um Beschädigungen zu vermeiden.
• Im Geräteinneren befinden sich keine zu wartenden Teile.
• Verwenden Sie das Gerät niemals wenn das Gehäuse geöffnet ist.
• Das Gehäuse darf niemals geöffnet werden. Wenn Sie das Gehäuse öffnen, wird das Sicherungssystem im
Geräteinneren den Laserstrahl unterbrechen.
• Überbrücken Sie nie eine Sicherung. Ersetzen Sie eine Sicherung nur durch eine Sicherung desselben Typs und
derselben Leistung.
• Bedecken Sie nie die Laseraustrittsöffnung mit Filtern oder anderen Gegenständen.
• Bei Schäden verursacht durch eigenmächtige Änderungen erlischt der Garantieanspruch.
• Verwenden Sie die Originalverpackung, wenn das Gerät transportiert werden soll.
• Eigenmächtige Veränderungen sind aus Sicherheitsgründen verboten.
• Halten Sie Kinder und Unbefugte vom Gerät fern.
• Schließen Sie das Gerät über den Stecker an das Netz an. Schalten Sie das Gerät nicht über Dimmerpacks.
3. Installation
a) Sicherung
• Trennen Sie das Gerät vor dem Sicherungswechsel von der Netzspannung.
• Ersetzen Sie eine Sicherung nur durch eine Sicherung desselben Typs und derselben Leistung (siehe
“Technische Daten”). Vorgehensweise:
1. Entfernen Sie den Sicherungshalter mit einem geeigneten Schraubendreher.
2. Entfernen Sie die defekte Sicherung und setzen Sie eine neue Sicherung gleichen Typs ein.
3. Bringen Sie den Sicherungshalter wieder in das Gehäuse ein.
VDP1001GLD7 VELLEMAN
Page 23

23
b) Das Gerät montieren
• Lassen Sie das Gerät von einem Fachmann und gemäß den EN 60598-2-17 und allen anderen zutreffenden
Normen installieren.
• Die Konstruktion muss während einer Stunde eine Punktlast von maximal 10 x dem Gewicht des Gerätes tragen
können, ohne dass Verformung verursacht wird.
• Das Gerät muss immer mit einer zweiten Befestigung z.B. mit einem Sicherheitskabel gesichert werden.
• Stehen Sie während der Montage, Entfernung oder Wartung nie direkt unter dem Gerät. Lassen Sie das Gerät
jährlich und vor der Inbetriebnahme von einem Fachmann prüfen.
• Montieren Sie das Gerät an einem Ort, wo niemand es berühren kann und wo wenige Leute vorübergehen.
Montieren Sie das Gerät in einer Höhe von min. 2.5m.
• Eine gründliche praktische Erfahrung ist für die Installation des Gerätes notwendig: Sie müssen die max.
Belastung der Tragkonstruktion berechnen können, wissen welches Konstruktionsmaterial Sie verwenden dürfen.
Außerdem müssen Sie das verwendete Material und das Gerät regelmäßig nachsehen lassen. Montieren Sie das
Gerät nie selber wenn Sie damit keine Erfahrung haben. Eine schlechte Montage kann Verletzungen
verursachen.
• Regeln Sie den Neigungswinkel über den Montagebügel und drehen Sie die Schrauben fest an.
• Entfernen Sie alle entflammbaren Materialen in einem Abstand von 0.5m.
• Sorgen Sie für einen Abstand von min. 0.5m zwischen den Lichtaustritt vom Gerät und der zu beleuchteten
Oberfläche.
• Stellen Sie keine Gegenstände in einem Strahl von 0.5m des Lüfters und Lüftungschlitze.
• Beleuchten Sie den Projektor nicht.
• Lassen Sie das Gerät von einem qualifizierten Elektriker anschließen.
• Schließen Sie das Gerät über den Stecker an das Netz an. Schalten Sie das Gerät nicht über Dimmerpacks.
• Die Installation muss vor Inbetriebnahme von einem Experten genehmigt werden.
4. Umschreibung
a. Frontplatte
1. Mikrofon mit Musiksteuerung
2. DMX-Anzeige
3. Blaue Anzeige Musiksteuerung
4. Rote Anzeige Laser
5. Grüne Anzeige Stromversorgung
b. Rückseite
6. Eingang Lüfter
7. DIP-Schalter: eingeben der DMX-Startadresse und Wahl zwischen den verschiedenen Betriebsmodi
8. Sicherungsanschluss: DE-9-Anschluss, der den Laserstrahl abbrecht wenn der Anschluss unterbrochen wird
9. a. Signaleingang: Standard DMX512-Anschluss an den DMX-Controller oder Anschluss zur Verwendung des
Projektors in einem Master-Slave-Betrieb
VDP1001GLD7 VELLEMAN
Page 24

24
b. Signalausgang: Standard DMX512-Anschluss an den DMX-Controller oder Anschluss zur Verwendung des
Projektors in einem Master-Slave-Betrieb
10. Ausgang Lüfter
11. Anschluss für das Netzkabel mit interner Sicherung
12. Netzschalter: Ein- und Ausschaltung des Gerätes. Sorgen Sie dafür, dass das Gerät ausgeschaltet ist, wenn
Sie es an das Netz anschließen
13. Verriegelung: Das Gerät erzeugt keinen Laserstrahl wenn Sie die Verriegelung einschalten
14. Regelung der Empfindlichkeit während des musikgesteuerten Betriebs
5. Gebrauch
Der VDP1001GLD7 verwendet das DMX512-Protokoll und kann mit einem DMX512-Controller betrieben werden.
Manche Controller müssen zuerst eine DMX- Adresse bekommen. befolgen Sie die Anweisungen (siehe unten) um
das Gerät sicher zu verwenden.
Der VDP1001GLD7 hat drei Betriebsmodi: DMX512, Master-Slave-Betrieb und Stand-Alone-Betrieb. Außerdem
können Sie das Gerät mit einer Fernbedienung mit DMX512-Protokoll betreiben. Das Gerät kann über 300 Muster
erzeugen.
a. Detaillierte DMX-Werte pro Kanal
Kanal Funktion Von Bis Umschreibung
1 10 Laser aus, laser und Scanner sind ausgeschaltet
Kanal 1 MODUS
Kanal 2 MUSTER 0 255 Auswahl des bewegenden oder statischen Musters
Kanal 3 STELLUNG X 0 255 Regelung Stellung X
Kanal 4 STELLUNG Y 0 255 Regelung Stellung Y
Kanal 5
GESCHWINDIGKEIT
SCAN-
GESCHWINDIGKEIT
Kanal 6
DES BEWEGENDEN
MUSTERS
GRÖßE DES
Kanal 7
STATISCHEN
MUSTERS
b. DMX-512-Anschluss
Verbinden Sie ein XLR-Kabel mit dem 3-pol. XLR-Ausgang der Steuerung und die andere Seite mit dem 3-pol. XLREingang des VDP1001GLD7. Sie können verschiedene VDP1001GLD7 in Serie schalten. Die Verbindung muss mit
einem zweipoligen geschirmten Kabel mit XLR-Stecker und -Kupplung erfolgen.
c. DMX-512-Kette mit Abschlusswiderstand
Ein DMX-Abschlusswiderstand empfehlenswert für Installationen, bei denen das DMXKabel lang ist oder in einer Umgebung mit vielem elektrischem Rauschen (z.B. Diskos) .
Der Abschlusswiderstand verhindert Störung des digitalen Steuersignals durch elektrisches
Rauschen. Der DMX-Abschlusswiderstand ist nur eine XLR-Buchse mit einem 120Ω
Widerstand zwischen 2 und 3, die den XLR-Ausgang des letzten Geräts in der Kette
angeschlossen wird. Siehe Abbildung links.
11 120 Bewegende Muster
121 250 Statische Muster
251 255 Musiksteuerung
0 255 0 = schnell, 255 = langsam
0 255 0 = schnell, 255 = langsam
0 255 0 = klein, 255 = groß
VDP1001GLD7 VELLEMAN
Page 25

25
d. DMX- Startadresse
Jedes Gerät muss eine separate DMX-Startadresse haben wenn ein DMX-Signal verwendet wird, damit das richtige
Gerät auf die richtigen Kontrollesignale reagiert. Die digitale Startadresse ist der erste Kanal, auf den der Projektor
auf Signale vom DMX-Controller reagiert. Geben Sie diese Startadresse ein und lesen Sie sie vom Display auf dem
Fuß des VDP1001GLD7.
Sie können mehrere Geräte auf eine einzelne Startadresse definieren oder Sie können pro Gerät eine neue
Startadresse eingeben.
Werden mehrere Geräte auf eine Startadresse definiert, so funktionieren alle Geräte synchron. Mit anderen Worten:
wenn Sie die Einstellungen für 1 Kanal verändern, ändern sich die Einstellungen aller Kanäle.
Definieren Sie mehrere Adressen, so funktionieren alle Geräte unabhängig voneinander. Mit anderen Worten: wenn
Sie die Einstellungen für 1 Kanal verändern, werden nur die Einstellungen von diesem Kanal geändert.
Im Fall des 7-Kanal VDP1001GLD7, werden Sie die Startadresse der ersten Einheit auf 1, der zweiten Einheit auf 8
(1 + 7), des dritten Gerätes auf 15 (8 + 7) usw.
Die ersten 9 DIP-Schaltern bestimmen die DMX-Startadresse des Controllers. Die Kodierung ist binär: DIP-Schalter
1 hat Wert 1, DIP-Schalter 2 hat Wert 2, DIP-Schalter 3 hat 4, DIP-Schalter 4 hat 8, usw.
Zum Beispiel: Wenn die Startadresse 95 sein soll, ist die Einstellung: 111110100 (1 + 2 + 4 + 8 + 16 + 0 +64 + 0 + 0
= 95).
Die DIP-Schalter 10, 11 und 12 werden verwendet, um die Betriebsarte auszuwählen: musikgesteuert, Stand-Alone,
Master Sound, Master Auto, Slave-, DMX- und Test-Modus.
Wählen Sie die gewünschten Betriebsarten aus und stellen Sie die DIP-Schalter ein wie folgt (0 = ausgeschaltet, 1 =
eingeschaltet, X = ausgeschaltet oder eingeschaltet):
Tabelle DIP-Schalter Funktion
1 2 3 4 5 6 7 8 9 10 11 12
X X X X X X X X X 0 0 0 Musikgesteuerter Modus
X X X X X X X X X 0 0 1 Stand-Alone-Modus
X X X X X X X X X 0 1 0 Master Sound
X X X X X X X X X 0 1 1 Master Auto
X X X X X X X X X 1 0 0 Slave-Modus
DMX-Adresse 1 0 1 DMX-Modus
X X X X X X X X X 1 1 0 Test-Modus
6. Reinigung und Wartung
Eine der wichtigsten Komponenten des Gerätes sind die Spiegel. Ein Gerät mit schmutzigen Spiegeln wird einen
schwächeren Laserstrahl erzeugen. Reinigen Sie ein Gerät, das sich in einer staubigen Umgebung steht regelmäßig.
Vorgehensweise:
1. Trennen Sie das Gerät vom Netz ehe Sie mit den Servicearbeiten anfangen.
2. Verwenden Sie jedes Mal ein neues Wattestäbchen. Verwenden Sie kein grobes Tuch oder Zeitungspapier, um
Kratzer zu vermeiden.
3. Verwenden Sie nur sauberes Aceton oder 90% Isopropanol.
4. Drücken Sie die Spiegel nicht, sondern reiben Sie vorsichtig mit einem Wattestäbchen hin und her.
5. Lassen Sie den Spiegelt vor dem Gebrauch trocknen.
6. Bewegen Sie das Wattestäbchen wie in der Abbildung gezeigt.
VDP1001GLD7 VELLEMAN
Page 26

26
7. Problemlösung
Problem Ursache Lösung
Ausgeschaltet Schalten Sie das Gerät ein
Keine Funktion
Nicht angeschlossen Schließen Sie das Gerät an das Netz an
Sicherung Überprüfen Sie, ob die Sicherung nicht defekt ist
Sorgen Sie dafür, dass alle Kabel gut angeschlossen sind
Unregelmäßiger
Laser
DMX-Kabel
Schwaches Signal Überprüfen Sie die DMX-Kabel und DMX-Wählschalter
Überprüfen Sie die Kontinuität aller Kabel auf die 3 Pins
Überprüfen Sie die Polarität des DMX-Kabels
Falsche DMX-Adresse Geben Sie eine neue DMX-Adresse über die DIP-Schalter ein;
trennen Sie das Gerät vom Netz und schießen Sie es wieder an
Reinigen Sie die Spiegel Schwacher
Stellen sie Fade auf 100%
Laserstrahl
Schmutzige Spiegel
8. Technische Daten
Stromversorgung max. 240VAC / 50Hz
Laserklasse IIIB
Typ Laser grüner DPSS-Laser (diode pumped solid state)
Ausgangsleistung > 100mW
Wellenlänge 532nm
Kühlsystem thermo-elektrisch
Sicherung 2.5A, 250VAC (5 x 20mm) (order code FF2.5N)
Scanning Mikromotor
Betriebsarten DMX512, Stand Alone und musikgesteuert, Master-Slave
Abmessungen 300 x 280 x 130mm
Gewicht 5.3kg
Alle Änderungen ohne vorherige Ankündigung vorbehalten.
VDP1001GLD7 VELLEMAN
 Loading...