

Page 1
VD
L
B
B
B
O
B
M
E
A
N
S
1
O
D
A
STRO
STRO
STRO
ESTR
STRO
1500
OSCOPE 1
OSCOOP
OSCOPE 1
BOSCOPI
OSKOP 15
T
500W
500 W
500 W
1500W
00W
USER
GEBRU
NOTIC
MANU
BEDIE
ANUAL
IKERSHAN
D’EMPLOI
L DEL USU
UNGSANLE
LEIDING
RIO
ITUNG
3
6
9
1
2
1
5
REV. 02
Page 2
w
D
e
d
n
d
n
t
e
o
D
h
d
p
n
o
é
s
m
o
t
e4 m
n
b
e
s
h
s
k
s
0
n
t
e
t
ó
a
g
k
p
p
n
s
v
a
o
s
VDL15
0ST
Re
. 02
1 po
2 GN
3 fus
4 mo
5 sou
1 cor
2 con
3 por
4 sél
5 régl
1 Str
2 GN
3 Sic
4 Mo
5 Em
er cord
holder
e switch
d sensitivity co
on d’alimentati
exion GND
e-fusible
cteur de mode
age de sensibilit
mkabel
-Anschluss
erungshalter
usschalter
findlichkeitsregl
6 l
7
8 i
9
trol 10
1 s
2 G
3 z
5 i
n 6
7
8
9
10
1 ca
2 con
3 por
4 sel
5 aju
6 Lic
7 Ge
8 Ein
9 Mi
er 10 Au
ight intensity co
trobe speed con
nput jack
icrophone
utput jack
roomkabel
ND-aansluiting
keringhouder
odusschakelaar
stelknop gevoeli
réglage d’int
réglage de vi
entrée
microphone
sortie
le de alimentaci
exión GND
tafusibles
ctor de modo
te de sensibilid
tstärkeregler
chwindigkeitsre
gang
rofon
gang
trol
rol
gheid geluid
nsité
esse
n 6
7
8
9
d 10
ler des Strobos
6 instelkno
7 instelkno
8 ingang
9 microfoo
10 uitgang
ajuste de inten
ajuste de veloci
entrada jack
micrófono
salida jack
ops
lichtsterkte
snelheid strob
idad
dad del estrobo
scoop
copio
22.11.201
1
2
©Vellem
n nv
Page 3
t
s
n
ThbaI
u
e
e
f
d
o
o
s
e
a
n
l
a
a
e
E
t
h
n
e
n
Q
n
c
n
c
c
d
s
n
s
e
v
w
d
a
o
e
S
s
d
s
w
n
o
h
n
n
e
n
r
e
l
v
e
p
s
o
d
c
y
a
m
a
m
b
u
d
r
0
d
e
t
T
n
a
n
h
e
t
m
v
e
r
o
o
m
a
e
u
h
o
s
f
d
a
t
e
u
a
s
r
±
c
n
d
g
o
i
t
e
c
s
e
n
a
r
a
n
e
d
o
n
g
s
b
v
a
u
v
s
k
n
a
n
c
s
o
o
e
VDL15
0ST
Re
. 02
1. In
To all re
Importa
Thank yo
the devic
For mor
www.hq
2. Sa
• This
pers
• Make
• Do n
nece
• Resp
• Use
• The i
3. Ge
Refer to t
roduction
idents of the
t environmen
his symbol on t
arm the enviro
e taken to a sp
local recycling
f in doubt, co
for choosing H
was damaged i
info concerni
power.eu.
ety Instru
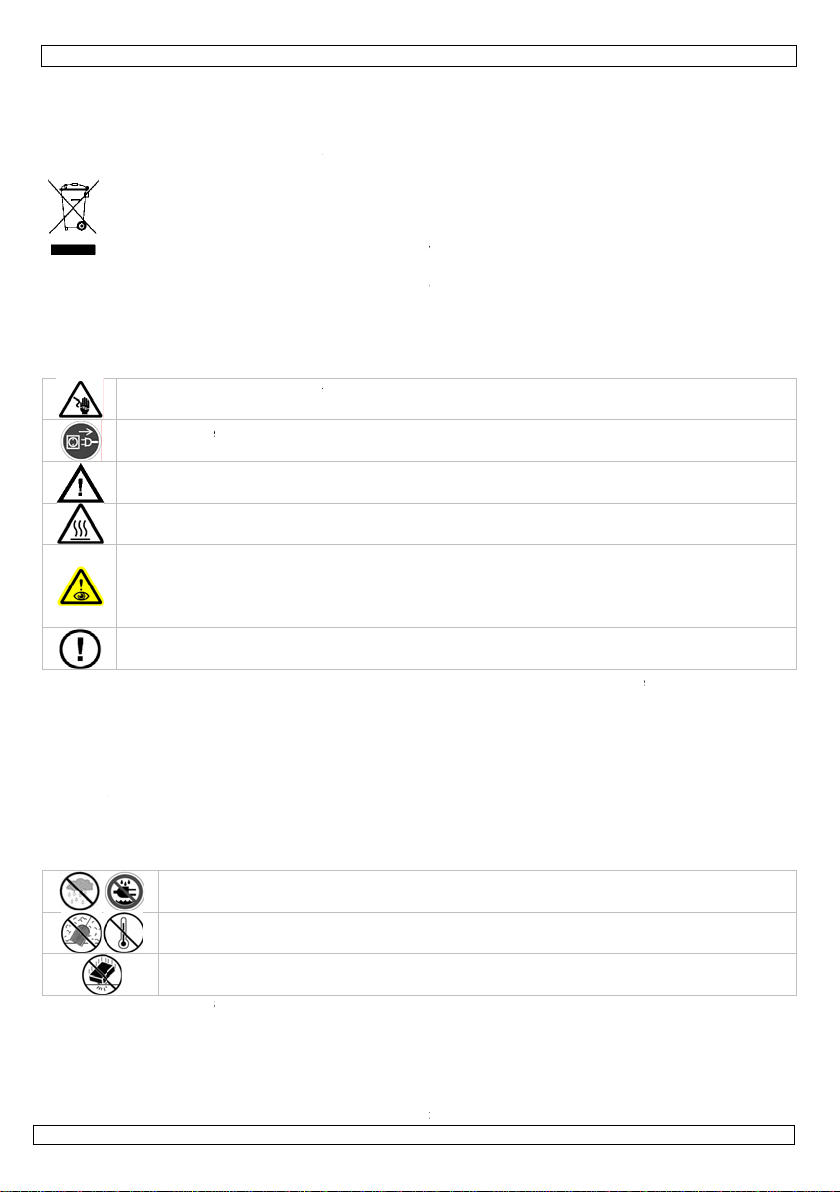
Be very careful
Always discon
are performed.
Keep this devi
Caution: devi
Do not stare
- epileptic
- temporar
- permane
There are no u
spare parts.
evice falls unde
n carry out the
sure that the a
t crimp the po
sary.
ct a minimum
n appropriate s
stallation has t
neral Guid
he Velleman®
uropean Unio
al information
e device or the
ment. Do not di
cialized compa
service. Respect
tact your local
Power™! Pleas
n transit, don't i
g this product
tions
during the insta
ect mains powe
Handle the pow
e away from chi
e heats up durin
irectly at the l
eizure in sensiti
ily loss of sight (
t (irreversible)
er-serviceable
r protection clas
lectric connecti
ailable voltage
er cord and prot
istance of 0.5 m
fety cable to se
be approved b
lines
ervice and Qu
User m
about this pro
package indicat
spose of the uni
y for recycling.
the local enviro
waste disposa
read the manu
stall or use it a
and the latest
llation: touching
when device no
r cord by the pl
dren and unaut
g use.
ight source, as
e people
flash blindness)
ye damage
arts inside the d
I. It is therefor
n.
oes not exceed
ect it against da
between the de
ure the device (
an expert befo
lity Warranty
anual
uct
s that disposal
(or batteries) a
his device shoul
mental rules.
l authorities.
l thoroughly be
d contact your
version of this
live wires can c
t in use or when
ug only.
orized users.
this may cause
evice. Refer to a
essential that
he voltage stat
age. Have an a
ice’s light outp
.g. VDLSC7 or
e the device is t
n the last page
f the device aft
unsorted muni
d be returned to
ore bringing thi
ealer.
manual, pleas
use life-threate
servicing or mai
n authorized de
he device be ea
d in the specific
uthorised dealer
t and any illumi
VDLSC8).
ken into servic
of this manual.
r its lifecycle co
ipal waste; it sh
your distributor
device into ser
visit our web
ing electroshoc
ntenance activiti
ler for service a
thed. Have a qu
tions of this ma
replace it if
ated surface.
.
ld
ould
or to
ice. If
ite
s.
es
d/or
lified
ual.
• Fami
unqu
devic
• All m
devic
• Only
lamp
• Dam
deal
22.11.201
Indoor u
Keep this
at all time
Protect thi
iarise yourself
lified people. A
e.
odifications of th
e is not covered
use the device f
explosion, cras
ge caused by di
r will not accept
1
e only. Keep th
evice away fro
. For sufficient
s device from sh
ith the functions
y damage that
e device are for
by the warranty
r its intended p
, etc. Using the
sregard of certai
responsibility fo
is device away f
dust and extre
ir circulation, le
ocks and abuse.
of the device b
ay occur will m
idden for safety
.
rpose. All other
evice in an una
n guidelines in t
any ensuing de
3
rm rain, moistu
e heat. Make s
ve at least 1” (
Avoid brute for
fore actually usi
ost probably be
reasons. Dama
uses may lead t
thorised way w
is manual is no
fects or problem
e, splashing an
ure the ventilati
2.5 cm) in fro
e when operatin
g it. Do not allo
ue to unprofes
e caused by use
short circuits,
ll void the warra
covered by the
s.
dripping liquids
n openings are
t of the opening
the device.
w operation by
ional use of the
r modifications t
urns, electrosh
nty.
warranty and th
©Vellem
.
lear
.
the
cks,
n nv
Page 4
VDL1500ST Rev. 02
• A qualified technician should install and service this device.
• Do not switch the device on immediately after it has been exposed to changes in temperature. Protect the
device against damage by leaving it switched off until it has reached room temperature.
• There may be some smoke or a particular smell when the device is activated for the first time. This is normal
and any smoke or smell will gradually disappear.
• Never operate the stroboscope without glass pane or with a broken glass pane. Ask your dealer or authorized
agent to replace the glass pane.
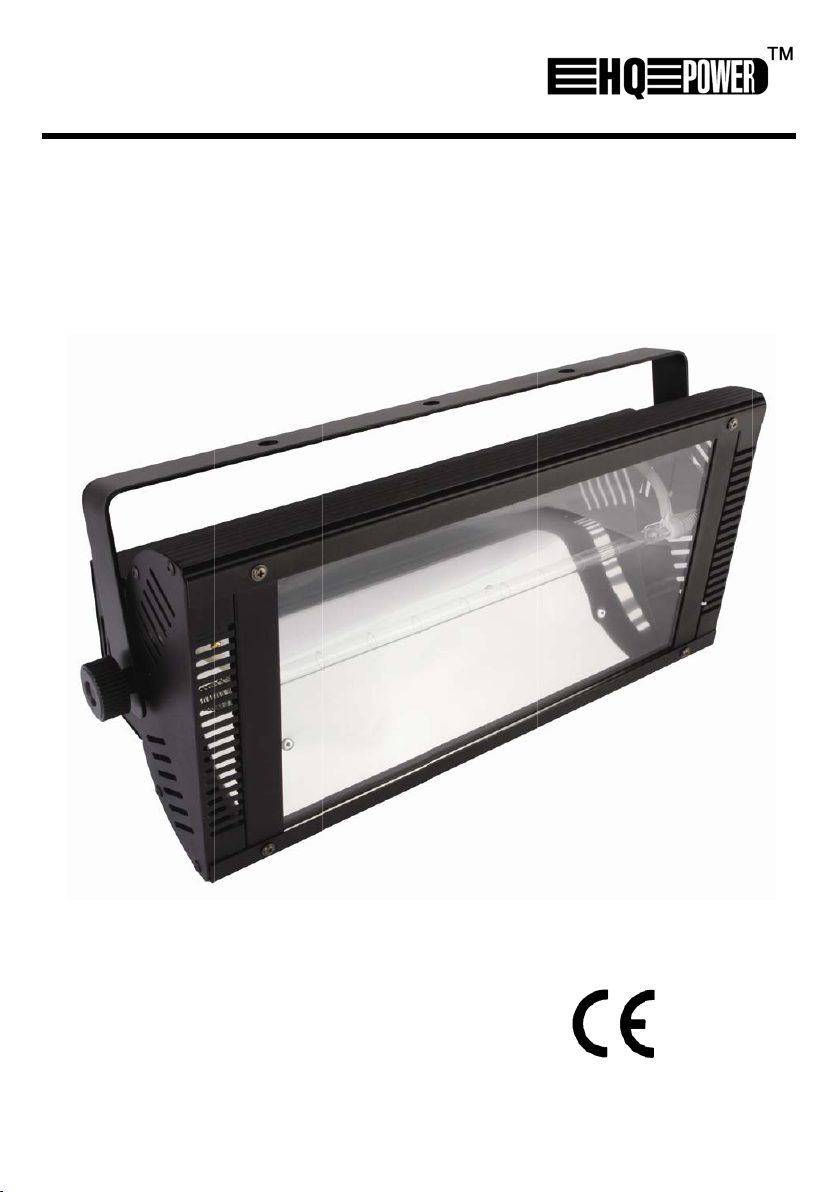
• This device is designed for professional use on stage, in discos, theatres, etc. The VDL1500ST can be used
indoor with an alternating current of 230 VAC~50 Hz.
• Lighting effects are not designed for permanent operation: regular operation breaks will prolong their lives.
• Use the original packaging if the device is to be transported.
• Keep this manual for future reference.
4. Features
• 1500W
• controls: sound (sensitivity), speed (velocity), dimmer (intensity)
5. Installation
a) Lamps
• Only fit or replace a lamp when the device is unplugged from the mains.
• Let a lamp cool down for at least 10 minutes before replacing it as the temperature of a lamp can reach
up to 700°C during operation.
• When handling a halogen lamp, do not touch it with your bare hands. Use a cloth to insert or remove it.
• Do not install lamps with a higher wattage. They get hotter than this device was designed for.
• Replace any deformed or damaged lamp with a lamp of the same type (see “Technical
Specifications”):
1. Unscrew the glass pane (4 screws) and make sure it doesn’t get damaged.
2. Remove the old lamp carefully.
3. Insert the new lamp.
4. Close the glass pane and fasten the screws.
Remark: Do not operate the device when the cover is open. Replace the glass panel when
damaged.
b) Fuse
• Only fit or replace a fuse when the device is unplugged from the main s.
• If the lamp burns out, chances are you will need to replace the fuse as well.
• Unscrew the fuse holder [3] anticlockwise.
• Replace a blown fuse with a fuse of the same type and rating (see “Technical Specifications”).
• Reseat the fuse holder [3] in the housing and tighten it by turning it clockwise.
• When the fuse blows again, discontinue using the device and contact your local dealer.
c) Overhead mounting
Risk of injury. Overhead mounting requires extensive experience: calculating workload limits,
determining the installation material to be used… Have the material and the device itself checked
regularly. Do not attempt to install the device yourself if you lack these qualifications as improper
installation may result in injuries.
• Have the device installed by a qualified person, respecting EN 60598-2-17 and all other applicable
norms.
• The construction to which the device is attached should be able to support 10 times the weight of the
device for one hour without deformation.
• The installation must always be secured with a secondary attachment e.g. a safety cable.
• Never stand directly below the device when it is being mounted, removed or serviced. Have a qualified
technician check the device once a year and once before you bring it into service.
• Install the device in a location with few passers-by and inaccessible to unauthorised persons.
• For truss-mounting, use an appropriate clamp (not incl.) and fit an M10 bolt through the centre of the
(folded) bracket.
• Adjust the desired inclination angle via the mounting bracket and tighten the bracket screws.
d) general
• Make sure there is no flammable material within a 50cm radius of the device and there is sufficient
cooling.
• Have a qualified electrician carry out the electrical connection.
• Connect the device to the mains with the power plug. All fixtures must be powered directly off a
grounded switched circuit and cannot be run off a rheostat or dimmer circuit, even if the rheostat or
dimmer channel is used solely for 0% to 100% switch.
• The installation has to be approved by an expert before the device is taken into service.
22.11.2011 ©Velleman nv
4
Page 5
VDL1500ST Rev. 02
6. Use
Refer to the illustrations on page 2 of this manual.
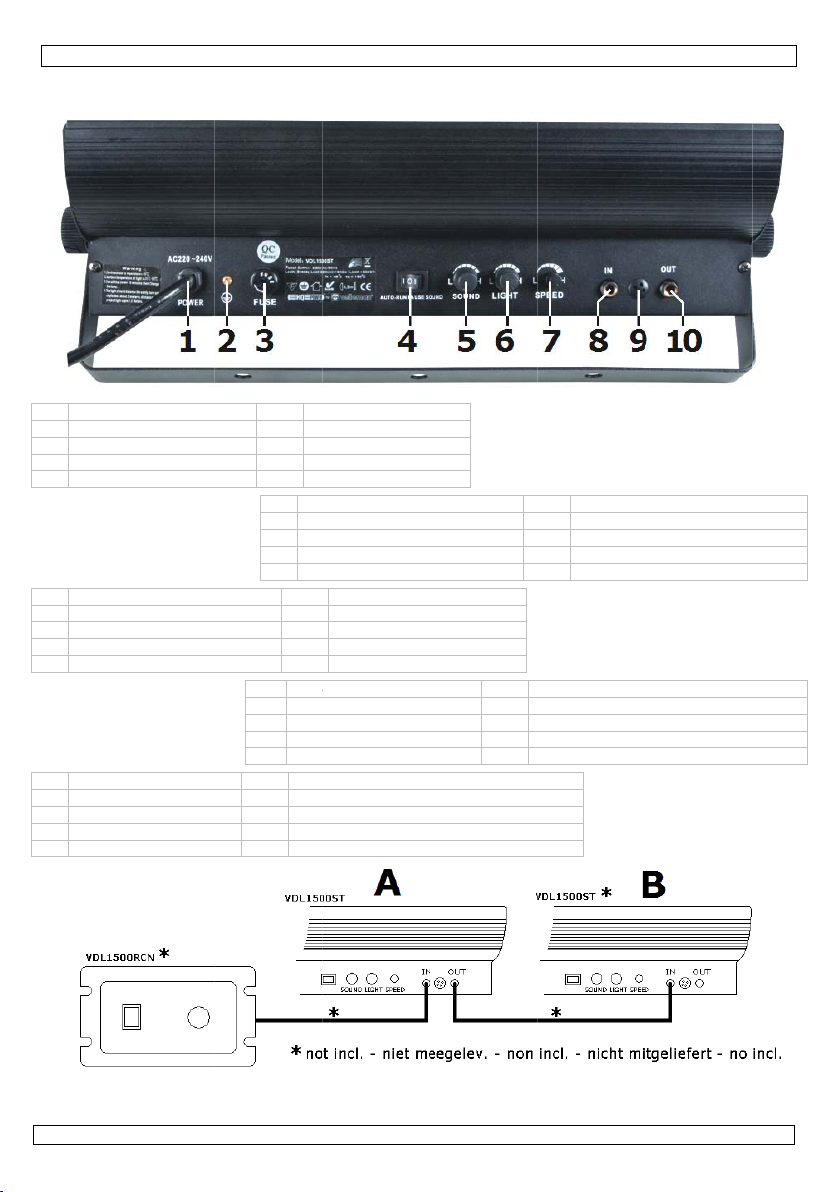
• Insert the plug into the mains outlet.
• Set the mode switch [4] to I (AUTO-RUN) to use the stroboscope in manual mode: light intensity is set by
control [6], strobe speed is set by control [7].
• Set the mode switch [4] to II (SOUND) to use the stroboscope in sound controlled mode: sound sensitivity is
set by control [5]; light intensity is set by control [6].
Using a remote controller (not incl., e.g. VDL1500RCN)
• Plug the connector of the remote control cable (not incl.) into the input jack [8] of the VDL1500ST.
• Set the mode switch [4] to II (SOUND) and rotate the sound sensitivity control [5] fully anticlockwise to
avoid that the VDL1500ST reacts to sound.
• Switch on the remote controller and control the strobe speed using the knob on the remote.
Connecting multiple VDL1500STs
• If you want to connect multiple VDL1500STs, plug one side of the connection cable wit h 6.35mm TRS
stereo connectors (not incl.) in the output jack [10] of the master [A] and plug the other end into the
input jack [8] of the slave device [B].
Note: when using a remote controller in this setting, it must be connected to the master device.
NOTE: It is possible that your stroboscope is not working. In this case, open the cover at the front and check the
connections. The insulation may be too deep in the connector. Loosen the screws and pull the wires out a
few millimetres to make a good connection. Fasten the screws again.
• To switch off the device, set the mode switch [4] to the middle position (O).
7. Cleaning and maintenance
• All screws should be tightened and free of corrosion.
• The housing, visible parts, mounting supports and the installation location (e.g. ceiling, suspension, trussing)
should not be deformed, modified or tampered with e.g. do not drill extra holes in mounting supports, do not
change the location of the connections.
• The electric power supply cables must not show any damage. Have a qualified technician maintain the
device.
• Disconnect the device from the mains prior to maintenance activities.
• Wipe the device regularly with a moist, lint-free cloth. Do not use alcohol or solvents.
• There are no user-serviceable parts.
• Contact your dealer for spare parts if necessary.
8. Technical Specifications
power supply max. 230Vac / 50Hz
power consumption max. 1600W
lamp 1 x 1500W lamp (order code LAMP1500ST)
fuse F 20A, 250VAC (6.35 x 32mm) (order code 6FF20N)
dimensions 530 x 200 x 117mm
Max. Ambient Temperature 45°C
weight 4.5kg
Use this device with original accessories only. Velleman nv cannot be held responsible in the event of
damage or injury resulted from (incorrect) use of this device. For more info concerning this product
and the latest version of this manual, please visit our website www.hqpower.eu. The information in
this manual is subject to change without prior notice.
© COPYRIGHT NOTICE
The copyright to this manual is owned by Velleman nv. All worldwide rights reserved.
No part of this manual or may be copied, reproduced, translated or reduced to any electronic medium or
otherwise without the prior written consent of the copyright holder.
22.11.2011 ©Velleman nv
5
Page 6
j
Dwbtb
r
o
g
e
i
o
n
e
l
o
s
k
g
g
e
e
v
e
u
d
a
e
a
r
h
i
b
o
e
s
t
t
e
e
e
s
a
n
o
e
e
g
u
o
h
f
m
m
s
n
n
s
t
r
e
e
v
u
m
j
a
r
t
t
n
a
w
t
v
p
a
t
d
k
w
e
e
e
c
i
e
e
o
w
0
t
a
n
v
t
o
v
a
a
n
a
d
e
d
t
i
b
o
e
o
n
u
v
e
n
e
c
G
e
r
n
e
e
d
o
e
e
w
h
7
e
e
n
c
s
s
o
e
n
y
e
a
e
m
z
e
e
h
g
t
n
e
.
d
n
a
t
v
a
t
s
u
h
b
v
n
h
e
w
m
VDL15
0ST
Re
. 02
1. Inl
Aan alle
Belangri
Hebt u v
Dank u v
beschadi
Voor me
www.hq
2. Ve
• Dit t
tech
• De b
hand
• De v
plaat
• Zorg
• Maa
• De in
3. Al
Raadplee
• Leer
toest
• Om
aang
• Gebr
bran
• De g
deal
22.11.201
eiding
ingezetenen v
ke milieu-info
it symbool op
eggeworpen, d
atterijen) niet
erechtkomen v
rengen. Respec
agen, contact
or uw aankoop!
d tijdens het tra
r informatie o
power.eu.
ligheidsin
Wees voorzich
elektroshocks
Trek de stekk
niet gebruikt.
Houd dit toest
Let op: dit to
Kijk niet recht
- epilepsie
- tijdelijke
- permane
te vermijden.
Er zijn geen d
reserveonderd
estel valt onder
icus moet de el
schikbare netsp
eiding.
edingskabel ma
en.
voor een minim
het toestel vast
stallatie moet v
emene ric
de Velleman
Gebruik
vloeisto
Bescher
geraken
Bescher
erst de functie
l niet gebruike
eiligheidsredene
bracht valt niet
ik het toestel e
wonden, elektri
rantie geldt nie
r zal de verantw
1
Geb
n de Europes
matie betreff
et toestel of de
t toestel schade
ij het gewone h
or recyclage. U
teer de plaatseli
er dan de pla
Lees deze handl
nsport, installee
ver dit produc
tructies
ig bij de installa
e vermijden.
r uit het stopco
l uit de buurt v
stel wordt zeer
treeks in de lich
anvallen bij ge
blindheid (flitsbl
te en onherroe
or de gebruiker
len, contacteer
beschermingskl
ktrische aanslui
anning mag niet
niet beschadig
mafstand van 0
met een geschi
or het eerste ge
tlijnen
®
service- en k
het toestel enk
fen.
tegen stof en
. Voorzie een rui
tegen schokk
van het toestel
. Meestal is bes
n mag u geen w
onder de garant
kel waarvoor h
che schokken,
voor schade do
oordelijkheid af
uikersh
Unie
nde dit produc
erpakking geeft
kan toebrengen
ishoudelijke afv
oet dit toestel
ke milieuwetge
tselijke autori
eiding grondig v
het dan niet en
en de laatste
ie: raak geen k
tact (trek niet a
n kinderen en o
arm tijdens het
bron om
oelige personen
indheid)
elijke schade a
vervangbare on
uw dealer.
sse I, wat wil z
ing verzorgen.
hoger zijn dan
zijn of ingekor
,5 m tussen de l
te veiligheidska
bruik gekeurd w
aliteitsgaranti
l binnenshuis.
xtreme hitte. Z
mte van minste
n en vermijd br
kennen voor u h
hadiging het ge
jzigingen aanbr
ie.
t gemaakt is. A
nz. Bij onoorde
r het negeren v
ijzen voor defe
6
andleidi
aan dat, als het
aan het milieu.
l; het moet bij
aar uw verdele
ing.
eiten betreffe
or u het toestel
raadpleeg uw d
ersie van dez
bels aan die on
n de kabel!) vo
bevoegden.
gebruik.
n de ogen
erdelen in dit to
ggen dat het to
e spanning in d
worden. Laat u
chtuitgang van
el (bv. VDLSC
rden door een
achteraan dez
Bescherm tege
rg dat de verlu
s 2,5 cm tussen
te kracht tijden
et gaat gebruike
olg van onprofe
ngen. Schade d
dere toepassing
lkundig gebruik
an bepaalde rich
ten of probleme
ng
na zijn levensc
ooi dit toestel (
en gespecialise
of naar een lok
de de verwijd
in gebruik nee
aler.
handleiding,
er stroom staan
rdat u het toest
estel. Voor onde
stel geaard mo
specificaties ac
dealer zo nodi
et toestel en he
of VDLSC8).
xpert.
handleiding.
regen, vochtigh
htingsopeninge
het toestel en e
de bediening.
n. Ongeschoold
sioneel gebruik
or wijzigingen
n kunnen leide
vervalt de garan
tlijnen in deze h
die hier rechts
clus wordt
en eventuele
rd bedrijf
al recyclagepun
ring.
t. Werd het toe
ie
om dodelijke
l reinigt en als
rhoud of
t zijn. Een gesc
teraan de
een nieuwe ka
belichte opper
eid en opspatte
niet verstopt
lk ander object.
personen moge
ie de gebruiker
tot kortsluiting
tie.
ndleiding en u
reeks verband
©Vellem
tel
het
oolde
el
lak
de
n dit
eeft
n,
ee
n nv
Page 7

VDL1500ST Rev. 02
houden.
• Laat dit toestel installeren en onderhouden door een geschoolde technicus.
• Om beschadiging te vermijden, zet u het toestel best niet aan onmiddellijk nadat het werd blootgesteld aan
temperatuurschommelingen. Wacht tot het toestel op kamertemperatuur gekomen is.
• Wanneer u het toestel voor het eerst gebruikt, kan dit gepaard gaan met een lichte rookontwikkeling en een
bepaalde geur. Dit is normaal en de eventuele rook of geur zal geleidelijk aan verdwijnen.
• Gebruik het toestel nooit wanneer het glazen ruitje beschadigd is of ontbreekt. Vraag uw verdeler of om het
ruitje te vervangen.
• Dit toestel is ontworpen voor professioneel gebruik op podia, in disco's, enz. U mag dit toestel enkel
binnenshuis gebruiken. Sluit aan op 230 VAC~50 Hz.
• Lichteffecten zijn niet ontworpen voor continue werking: regelmatige onderbrekingen doen ze langer
meegaan.
• Gebruik de oorspronkelijke verpakking wanneer u het toestel vervo ert.
• Bewaar deze handleiding voor verdere raadpleging.
4. Eigenschappen
• 1500 W
• regelingen: sound (gevoeligheid), speed (snelheid), dimmer (lichtsterkte)
5. Installatie
a) Lampen
• Plaats of vervang een lamp enkel wanneer het toestel niet is aangesloten op het lichtnet.
• Laat een lamp gedurende minstens 10 minuten afkoelen voor u ze vervangt: de bedrijfstemperatuur van
een lamp ligt rond de 700°C.
• Raak een halogeenlamp niet aan met uw blote handen. Gebruik een doek om een halogeenlamp te
vervangen.
• Plaats geen lampen met een te hoog wattage. Deze worden warmer dan die waarop dit toestel is
voorzien.
• Vervang een vervormde of beschadigde lamp door een lamp van hetzelfde type (zie Technische
specificaties). Ga als volgt te werk:
1. Schroef voorzichtig het ruitje los (4 schroeven) zodat u het niet beschadigd.
2. Verwijder voorzichtig de oude lamp.
3. Pl aats een ni eu we l amp.
4. Plaats het ruitje terug en span de schroeven aan.
Opmerking: Stel het toestel niet in werking wanneer het deksel eraf is. Vervang het ruitje
wanneer dit beschadigd is.
b) Zekering
• U mag een zekering enkel plaatsen of vervangen wanneer het toestel niet is aangesloten op het lichtnet.
• Als de lamp springt, is het heel goed mogelijk dat de zekering ook moet worden vervangen.
• Schroef de zekeringhouder [3] los.
• Vervang een gesprongen zekering door een zekering van hetzelfde type en met dezelfde specificaties
(zie Technische specificaties).
• Schroef de zekeringhouder [3] terug in het toestel.
• Gebruik het toestel niet en contacteer uw verdeler als de zekering opnieuw smelt.
c) Het toestel monteren
Gevaar voor verwondingen. Een degelijke praktijkervaring is vereist voor de plaatsing van dit
toestel. U moet de maximumbelasting van de draagconstructie kunnen berekenen, weten welk
constructiemateriaal u kunt gebrui ken en u moet het gebruikte materiaal en het toestel af en toe
laten nakijken. Monteer het toestel niet zelf indien u er geen ervaring mee heeft. Een slechte
montage kan leiden tot verwondingen.
• Laat een geschoolde technicus dit toestel installeren conform EN 60598-2-17 en andere toepasselijke
normen.
• De constructie waaraan het toestel wordt bevestigd, moet gedurende 1 uur 10 x het gewicht van dit
toestel kunnen dragen zonder te vervo rmen.
• Maak het toestel ook vast met een veiligheidskabel.
• Sta nooit recht onder het toestel wanneer u het monteert, verwijdert of schoonveegt. Laat het toestel
controleren door een geschoolde technicus voor u het in gebruik neemt en laat het 1 x per jaar volledig
nakijken.
• Installeer dit toestel op een plaats waar niemand langs moet lopen, kan neerzitten of het toestel kan
aanraken.
• Regel de gewenste invalshoek door middel van de montagebeugel en draai de regelschroeven stevig
aan.
• Een geschoolde elektricien moet het toestel aansluiten.
• Sluit het toestel via de stekker aan op het l ichtnet. Sluit het niet aan op een dimmerpack.
22.11.2011 ©Velleman nv
7
Page 8

VDL1500ST Rev. 02
d) Algemeen
• Verwijder alle brandbaar materiaal in een straal van 0,5 m rond het toestel en voorzie voldoende
koeling.
• Een geschoolde elektricien moet het toestel aansluiten.
• Sluit het toestel via de stekker aan op het lichtnet. Alle toestellen moet via een geaard stopcontact
gevoed worden en mogen niet via een variabele weerstand of dimcircuit gevoed worden, ook al gebruikt
u de variabele weerstand of het dimcircuit als een 0% tot 100% inschakeling.
• De installatie moet voor het eerste gebruik gekeurd worden door een expert.
6. Gebruik
Raadpleeg de afbeeldingen op pagina 2.
• Steek de stekker in het stopcontact.
• Plaats de modusschakelaar [4] op I (AUTO-RUN) om de stroboscoop handmatig te bedienen. Regel de
lichtsterkte met regelaar [6] en de flitssnelheid met regelaar [7].
• Plaats de modusschakelaar [4] op II (SOUND) om de stroboscoop in muziekgestuurde modus te plaatsen.
Regel de gevoeligheid met regelaar [5] en de lichtsterkte met regelaar [6].
Gebruik van de afstandsbediening (niet meegeleverd, bv. VDL1500RCN)
• Sluit de afstandsbediening aan op ingang [8] van de VDL1500ST.
• Plaats de modusschakelaar [4] op II (SOUND) en draai de regelaar voor de gevoeligheid [5] volledig dicht
zodat de stroboscoop niet meer op de omgevingsmuziek reageert.
• Schakel de stroboscoop in en regel de gevoeligheid bij.
Aansluiting van meerdere VDL1500ST’s
• Koppel de uitgang [10] van het mastertoestel [A] aan de ingang [8] van het slavetoestel [B] met behulp
van een kabel met ¼” TRS-stereostekkers (niet meegeleverd).
Opmerking: Sluit eventueel een afstandsbediening aan op het mastertoestel.
OPMERKING: Het is mogelijk dat uw stroboscoop niet functioneert. Open het deksel aan de voorzijde en
controleer de verbindingen. Het is mogelijk dat de isolatie van de kabels te diep in de aansluiting steken.
Maak de schroeven enigszins los en trek de kabels een paar millimeter aan zodat er een goede verbinding
kan gemaakt worden. Draai de schroeven terug aan.
• Schakel het toestel uit door de modusschakelaar [4] op de middelste stand (O) te plaatsen.
7. Reiniging en onderhoud
• Alle gebruikte schroeven moeten goed zijn aangespannen en mogen geen sporen van roest vertonen.
• De behuizing, de lenzen, de montagebeugels en de montageplaats (bvb. het plafond of het gebinte) mogen
niet vervormd zijn of aangepast worden (geen extra gaten in montagebeugels, aansluitingen niet
verplaatsen, etc.)
• De voedingskabels mogen niet beschadigd zijn. Laat het toestel onderhouden door een geschoolde technicus.
• Ontkoppel het toestel van het lichtnet voor u aan onderhoudswerkzaamheden begint.
• Maak het toestel geregeld schoon met een vochtige, niet pluizende doek. Gebruik geen alcohol of solvent.
• De gebruiker mag geen onderdelen vervangen.
• Bestel eventuele reserveonderdelen bij uw dealer.
8. Technische specificaties
voeding max. 230 VAC ~ 50 Hz
verbruik max. 1600 W
type lamp 1x 1500 W lamp (ordercode LAMP1500ST)
zekering F20A, 250 VAC (6.35 x 32 mm) (ordercode 6FF20N)
afmetingen 530 x 200 x 117 mm
Max. omgevingstemperatuur 45°C
gewicht 4,5 kg
Gebruik dit toestel enkel met originele accessoires. Velleman nv is niet aansprakelijk voor schade of
kwetsuren bij (verkeerd) gebruik van dit toestel. Voor meer informatie over dit product en de laatste
versie van deze handleiding, zie www.hqpower.eu. De informatie in deze handleiding kan te allen
tijde worden gewijzigd zonder voorafgaande kennisgeving.
© AUTEURSRECHT
Velleman nv heeft het auteursrecht voor deze handleiding. Alle wereldwijde rechten voorbehouden.
Het is niet toegestaan om deze handleiding of gedeelten ervan over te nemen, te kopiëren, te vertalen, te
bewerken en op te slaan op een elek tronisch medium zonder voorafgaande schriftelijke toestemming van de
rechthebbende.
22.11.2011 ©Velleman nv
8
Page 9

t
d
r
Cld
e
s
.
s
w
n
n
n
b
e
t
r
r
q
e
f
r
a
o
'
a
n
n
o
n
e
e
d
e
m
e
e
o
n
c
e
e
n
d
c
o
r
o
a
r
e
e
t
l
q
n
N
i
u
o
à
o
e
p
e
o
c
a
e
a
b
t
e
e
t
0
s
u
e
q
i
s
t
a
d
u
m
0
’
q
e
u
e
p
t
p
d
c
u
l
m
j
p
i
n
n
s
m
é
e
e
a
g
é
a
s
a
s
s
o
u
t
c
n
n
n
t
n
n
i
n
v
d
p
s
o
c
o
d
N
m
r
c
e
é
e
c
e
c
m
v
r
h
c
t
e
o
é
u
e
v
a
p
m
o
e
e
n
u
e
e
n
s
e
VDL15
0ST
Re
. 02
1. In
Aux rési
Des info
En cas d
Nous vou
l’appareil
Pour plu
web ww
2. Co
• Cet a
tech
• La te
• Le câ
le câ
• Resp
• Fixer
• L’ins
3. Di
Se référe
• Se fa
non
• Tout
modi
• N’util
élect
• La g
votre
22.11.201
roduction
ents de l'Unio
mations envir
e symbole sur l
'environnement.
échets municip
l
es équipements
l
a réglementatio
questions, co
remercions de
Si l’appareil a é
d’informatio
.hqpower.eu.
signes de
Être prudent l
mortels.
Débrancher l’a
l'appareil ; no
Garder hors d
Attention : le
Ne pas regard
- de crise
- d’aveugl
- d’endom
Il n’y a aucun
chez votre rev
ppareil ressort à
icien qualifié doi
sion réseau ne
ble d’alimentati
le d’alimentatio
cter une distan
l’appareil à l’aid
allation doit êtr
ectives gé
à la garantie
Utiliser
projecti
Protége
ventilati
et tout
Protége
miliariser avec l
ualifiées d’opér
modification es
ications par le c
iser le spot qu’à
ochocs, etc. Un
rantie ne s’appli
revendeur décli
1
n européenne
nnementales
appareil ou l'em
Ne pas jeter un
ux non sujets a
usagés à votre f
locale relative
ntacter les aut
votre achat ! Lir
té endommagé
concernant c
sécurité
rs de l’installati
ppareil s’il n’est
pas le câble.
la portée de pe
boîtier du spot
r directement d
’épilepsie chez l
ment temporair
agement perm
pièce maintena
ndeur.
la classe de pro
t établir la conn
peut pas dépass
n ne peut pas ê
si nécessaire.
e minimum de
d’un câble de
approuvée par
érales
e service et d
et appareil uni
ns d’eau.
contre la pouss
n ne soient pas
utre objet.
contre les choc
fonctionnemen
r cet appareil. L
interdite pour
ient ne tombent
sa fonction prév
usage impropre
ue pas aux do
era toute respo
otice d
mportantes co
ballage indique
appareil électriq
tri sélectif ; un
urnisseur ou à
la protection d
rités locales
la présente no
endant le trans
t article et la
n : toucher un
pas utilisé ou po
rsonnes non qua
hauffe pendant
ns la source lu
es personnes su
(aveuglement
nent et irrévers
le par l’utilisate
ection I, ce qui
xion électrique.
r la tension me
re replissé ou e
,5 m entre la so
écurité adéquat
n expert avant
qualité Velle
uement à l'int
ère. Protéger co
bloquées. Laiss
et le traiter av
de l’appareil av
plupart des dé
es raisons de s
pas sous la gar
e. Tout autre u
annule d'office l
mages survenu
nsabilité pour le
9
emploi
ncernant ce pr
ue l’élimination
ue ou électroniq
déchèterie trai
n service de re
l’environneme
our éliminatio
ice attentiveme
ort, ne pas l’ins
ernière versio
âble sous tensio
r le nettoyer. T
lifiées et de jeu
’usage.
ineuse afin d’é
ettes
ar éclair)
ible de l’œil
ur. Commander
mplique que l’a
tionnée dans le
dommagé. Dem
rtie lumière de l’
(p.ex. VDLSC7
a mise en servi
an® en fin de n
rieur. Protéger
ntre la chaleur e
r une distance
c circonspection
nt de l’utiliser.
âts sont causés
curité. Les dom
ntie.
age peut cause
garantie.
en négligeant
problèmes et l
duit
d’un appareil en
e (et des piles
era l’appareil en
yclage local. Il c
t.
.
t avant la mise
aller et consulte
de cette noti
peut causer d
rer la fiche pour
es enfants.
iter les risques
es pièces de re
pareil doit être
spécifications à
ander à votre re
appareil et la su
u VDLSC8).
e.
tice.
de la pluie, de l’
xtrême. Veiller à
e minimum 2,5
pendant l’opéra
e pas permettr
par un usage n
ages occasionn
des courts-circ
ertaines directiv
s défauts qui en
fin de vie peut
ventuelles) par
question. Renv
onvient de resp
n service de
r votre revendeu
e, visiter notr
s électrochocs
débrancher
hange éventuell
is à la terre. U
la fin de cette n
endeur de reno
face illuminée.
umidité et des
ce que les fent
m entre le proj
ion.
pas aux perso
n professionnel.
s par des
its, des brûlure
s de cette notic
résultent.
©Vellem
olluer
i les
yer
cter
r.
site
es
otice.
veler
s de
cteur
nes
, des
et
n nv
Page 10

VDL1500ST Rev. 02
• Confier l’installation et l’entretien à un personnel qualifié.
• Ne pas brancher l’appareil après exposition à des variations de température. Afin d’éviter des dommages,
attendre jusqu’à ce que l’appareil ait atteint la température ambiante avant de l’utiliser.
• La première mise en service peut s’accompagner d’un peu de fumée ou d’une odeur particulière. C’est
normal. Toute fumée ou odeur disparaîtra graduellement.
• N’opérez jamais l’appareil si la vitre et endommagée ou si elle est manquante. Demandez à votre revendeur
de la remplacer.
• Cet appareil a été développé pour usage professionnel dans des discothèques, des théâtres, etc. N’utiliser cet
appareil qu’à l’intérieur. Le raccorder à une source de courant de 230 VCA~50 Hz.
• Un effet lumineux n’est pas conçu pour une opération continue. Des pauses régulières prolongeront sa vie.
• Transporter l’appareil dans son emballage originel.
• Garder cette notice pour toute référence ultérieure.
4. Caractéristiques
• 1500 W
• réglages : sound (sensibilité), speed (vitesse), dimmer (intensité)
5. Installation
a) Lampes
• Déconnecter l’appareil du réseau électrique avant d’installer ou de remplacer une lampe.
• Laisser refroidir une lampe pendant au moins 10 minutes avant de la remplacer ; elle peut atteindre une
température de 700°C.
• Éviter de toucher une lampe halogène les mains nues. Remplacer l’ampoule à l’aide d’un chiffon.
• Ne pas installer de lampe dont la puissance dépasse la puissance maximum comme ces ampoules
deviennent plus chaudes que la température maximale prévue.
• Remplacer toute lampe déformée ou endommagée par une lampe du même type (voir Spécifications
techniques) :
1. Dévisser la vitre (4 vis) et veiller à ne pas l’endommager.
2. Retirer l’ancienne lampe.
3. Insérer la nouvelle lampe.
4. Replacer la vitre et resserrer les vis.
Remarque : Il est interdit d’opérer l’appareil quand le couvercle est ouvert. Remplacer la vitre si
elle est endommagée.
b) Fusible
• Débrancher l’appareil du réseau électrique avant de remplacer un fusible.
• Si la lampe est grillée, le fusible doit probablement également être remplacé.
• Dévisser le porte-fusible [3].
• Remplacer un fusible sauté par un exemplaire identique (voir Spécifications techniques).
• Réinsérer le porte-fusible [3] dans le stroboscope.
• Ne plus utiliser le stroboscope et contacter votre revendeur si le fusible grille de nouveau.
c) Montage de l’appareil
Risque de blessures. L’installation de cet appareil exige une solide expérience pratique : le
calcul de la charge max. de la construction, les matériaux d’installation requis etc. De temps en
emps, un technicien qualifié doit vérifier la construction portante et l’appareil même. Ne pas
essayer d’installer cet appareil vous-même si vous n’avez pas les qualifications requises ; une
installation incorrecte peut entraîner des blessures.
• Un technicien qualifié doit installer l’appareil en respectant EN 60598-2-17 et toute autre norme
applicable.
• La construction portante de l’appareil doit être capable de supporter 10 x le poids de l’appareil pendant
une heure, sans qu’une déformation de la construction en résulte.
• Fixer votre VDL1500ST à l’aide d’un câble de sécurité (sécurité supplémentaire).
• Éviter de vous positionner en dessous de l’appareil pour l’enlever ou lors du montage ou du nettoyage.
Un technicien qualifié doit réviser l’appareil avant la mise en service. Organiser une révision minutieuse
annuelle.
• Installer l’appareil à un endroit où personne ne peut passer ou s’asseoir et où personne ne peut le
toucher.
• Déterminer l’angle d’inclinaison au moyen de l’étrier de montage et serrer les vis de montage.
• Un électricien qualifié doit établir la connexion électrique.
• Brancher l’appareil sur le réseau électrique par la fiche d’alimentation. Ne pas le brancher sur un bloc de
puissance.
d) En général
• Enlever tout matériau inflammable dans un rayon de 0,5 m autour de l’appareil et assurer une
ventilation suffisante.
• Un électricien qualifié doit établir la connexion électrique.
22.11.2011 ©Velleman nv
10
Page 11

VDL1500ST Rev. 02
• Brancher l’appareil sur le réseau électrique par la fiche d’alimentation. Tout projecteur doit être branché
sur une prise de courant mise à la terre et ne peut pas être alimenté depuis un rhéostat ou un circuit
variateur, même si le rhéostat ou le circuit variateur est utilisé comme un interrupteur marche/arrêt (de
0% à 100%).
• Un expert doit approuver l’installation avant qu’elle puisse être prise en service.
6. Emploi
Se référer aux illustrations en page 2.
• Insérer la fiche dans une prise de courant.
• Placer le sélecteur de mode [4] en posit ion I (AUTO-RUN) pour un pilotage manuel du stroboscope. Régler
l’intensité avec le réglage [6] et la vitesse des éclats avec le réglage [7].
• Placer le sélecteur de mode [4] en position II (SOUND) pour un pilot age par le son du st ro bosco p e. Ré gler la
sensibilité avec le réglage [5] et l’intensité avec le réglage [6].
Utilisation d’une télécommande (non incluse, p.ex. VDL1500RCN)
• Connecter la télécommande à l’entrée [8] du VDL1500ST.
• Placer le sélecteur de mode [4] en position II (SOUND) et tourner le réglage de sensibilité [5]
entièrement vers la gauche afin d’éviter que le VDL1500ST ne réagisse au son.
• Allumer la télécommande et régler la sensibilité du stroboscope.
Interconnexion de plusieurs VDL1500ST
• Connecter la sortie [10] du stroboscope maître [A] à l’entrée [8] du stroboscope esclave [B] à l’aide d’un
câble à fiches stéréo TRS ¼”.
Remarque : Ne connecter la télécommande qu’à l’appareil maître.
REMARQUE : Il est possible que votre stroboscope ne fonctionne pas. Ouvrez le couvercle à l’avant et vérifiez les
connexions. Il est possible que les câbles soient enfoncés trop profondément dans le connecteur. Desserrez
légèrement les vis et tirez les câbles de quelques millimètres pour établir une connexion correcte. Resserrez
les vis.
• Éteindre le stroboscope en plaçant le sélecteur de mode [4] en position O.
7. Nettoyage et entretien
• Serrer les écrous et les vis et vérifier qu'ils ne rouillent pas.
• Le boîtier, les lentilles, les supports de montage et la construction portante ne peuvent pas être déformés,
adaptés ou bricolés p.ex. pas de trous additionnels dans un support, ne pas déplacer les connexions, etc.
• Les câbles d'alimentation ne peuvent pas être endommagés. Un technicien qualifié doit entretenir l’apparei l.
• Débrancher l'appareil avant de le nettoyer.
• Essuyer l'appareil régulièrement avec un chiffon humide non pelucheux. Éviter l'usage d'alcool et de solvants.
• Il n’y a pas de parties maintenables par l’utilisateur.
• Commander des pièces de rechange éventuelles chez votre revendeur.
8. Spécifications techniques
alimentation max. 230 VCA ~ 50 Hz
consommation max. 1600 W
type de lampe 1 ampoule de 1500 W (réf. LAMP1500ST)
fusible F20A, 250 VCA (6.35 x 32 mm) (réf. 6FF20N)
dimensions 530 x 200 x 117 mm
température ambiante max. 45°C
poids 4,5 kg
N’employer cet appareil qu’avec des accessoires d’origine. SA Velleman ne sera aucunement
responsable de dommages ou lésions survenus à un usage (incorrect) de cet appareil. Pour plus
d’information concernant cet article et la dernière version de cette notice, visiter notre site web
www.hqpower.eu. Toutes les informations présentées dans cette notice peuvent être modifiées sans
notification préalable.
© DROITS D’AUTEUR
SA Velleman est l’ayant droit des droits d’auteur pour cette notice. Tous droits mondiaux réservés.
Toute reproduction, traduction, copie ou diffusion, intégrale ou partielle, du contenu de cette notice par quelque
procédé ou sur tout support électronique que se soit est interdite sans l’accord préalable écrit de l’ayant droit.
22.11.2011 ©Velleman nv
11
Page 12

t
d
n
EmelS
p
s
p
s
a
a
ú
p
d
e
e
x
G
l
o
a
a
e
m
p
s
s
U
o
e
s
a
d
s
q
s
e
p
d
a
t
p
h
s
c
é
t
e
i
a
b
r
r
d
g
u
a
0
p
á
a
m
l
a
j
n
a
p
d
d
h
a
n
r
r
r
p
a
o
d
i
c
b
u
e
o
a
i
a
c
a
e
0
e
m
e
ó
a
o
n
a
o
u
s
i
x
g
e
p
u
o
d
o
s
o
a
m
s
.
e
c
c
e
a
g
e
c
c
m
V
n
m
a
t
s
o
b
m
a
d
t
m
p
o
f
ú
m
x
m
.
u
a
v
a
ñ
a
a
o
r
f
n
e
t
s
n
M
VDL15
nual de
0ST
l usuari
. 02
Re
1. In
A los ciu
Importa
¡Gracias
aparato h
Para má
nuestra
2. In
• Este
tierr
• Aseg
• No a
afila
• Resp
• Fije
• Un e
3. No
Véase la
• Fami
may
• Por r
caus
• Utilic
que
com
• Los d
su di
• La in
22.11.201
roducción
adanos de la
tes informaci
ste símbolo en
edio ambiente.
mpresa especia
ocal. Respete la
i tiene dudas,
or haber compr
a sufrido algún
información
ágina www.h
truccione
Cuidado duran
conectado a la
Desconecte si
limpiarlo. Tire
Mantenga el a
¡Ojo!: la caja
No mire direct
- un ataqu
- ceguera
- lesiones
El usuario no
necesita pieza
parato pertene
. La conexión el
rese de que la
laste el cable d
a. Si es necesar
te una distanci
l aparato con un
perto debe pro
rmas gene
arantía de se
Utilice el a
de salpica
No expon
que los ori
aparato y
No agite e
iarícese con el f
ría de los daños
zones de seguri
dos por modific
sólo el VDL15
aduras, descarg
letamente.
años causados
tribuidor no ser
talación y el ma
1
nión Europea
nes sobre el
ste aparato o e
No tire este ap
lizada en recicla
leyes locales e
contacte con l
do el VDL1500
año en el trans
obre este pro
power.eu.
de seguri
te la instalación:
red eléctrica.
mpre el aparato
siempre del enc
arato lejos del
el proyector se
mente a la fue
e epiléptico en p
emporal (cegue
ermanentes e i
abrá de efectua
de recambio.
e a la clase de
ctrica debe llev
ensión de red n
alimentación y
o, pida a su dist
de mín. 0.5m e
cable de seguri
ar la instalación
ales
vicio y calidad
parato sólo en
ura o goteo.
a este equipo a
ficios de ventila
cualquier otro o
l aparato. Evite
ncionamiento d
son causados p
dad, las modific
ciones no autor
0ST para aplic
as eléctricas, et
or descuido de l
responsable d
ntenimiento deb
edio ambiente
embalaje indica
rato (ni las pilas
e. Devuelva est
relación con el
s autoridades
ST! Lea atenta
orte no lo instal
ucto y la versi
ad
puede sufrir un
si no va a usarl
ufe para descon
lcance de perso
calienta durante
te luminosa par
ersonas sensible
a por destello)
reversibles del
el mantenimien
rotección I. Por
rse a cabo por
sea mayor que
protéjalo contra
ribuidor reempla
ntre la salida de
ad adecuado (p
antes de la pue
Velleman ® al f
nteriores. No e
polvo. No expon
ión no estén blo
jeto.
sar excesiva fu
l aparato. Sólo
r un uso inadec
ciones no autori
zadas, no están
ciones descritas
. Un uso desaut
s instrucciones
ningún daño u
en ser realizado
12
concerniente
que, si tira las
, si las hubiera)
aparato a su di
medio ambiente
locales para r
ente las instruc
y póngase en
n más recient
peligrosa desc
durante un lar
ectar el cable d
as no capacitad
su operación.
evitar
s
jo
to de ninguna pi
lo tanto, es esen
n técnico cualifi
la tensión indica
posibles daños
zar el cable de a
luz y el área ilu
.ej. VDLSC7 o
ta en marcha.
nal de este man
ponga este equ
a este equipo a
queados. Deje u
rza durante el
ersonas cualific
ado.
zadas del apara
cubiertos por la
en este manual
rizado puede ca
e seguridad de
tros problemas
por personal e
este product
uestras inservi
en la basura do
tribuidor o a la
siduos.
iones del manu
ontacto con su
de este manu
rga eléctrica al
o periodo de tie
red, nunca del
as y niños.
eza. Contacte c
cial que el apara
ado.
da en las especi
ausados por alg
limentación.
inada.
DLSC8).
ual del usuario.
ipo a lluvia, hu
temperaturas e
a distancia de
anejo y la instal
das pueden ma
o están prohibid
garantía.
a fin de evitar p
usar daños y an
este manual inv
resultantes.
pecializado.
les, podrían da
éstica; debe ir
unidad de recicl
l antes de usarl
istribuidor.
al del usuario,
ocar un cable
po o antes de
ropio cable.
n su distribuido
to esté puesto a
icaciones.
n tipo de super
edad ni a ningú
tremas. Asegúr
ín. 2,5cm entre
ación.
ejar este apara
s. Los daños
ej. cortocircuito
la la garantía
lidarán su gara
©Vellem
ar el
una
je
. Si el
visite
si
icie
tipo
se de
el
o. La
,
tía y
n nv
Page 13

VDL1500ST Rev. 02
• No conecte el aparato si ha estado expuesto a grandes cambios de temperatura. Espere hasta que el aparato
llegue a la temperatura ambiente.
• Puede producirse humo u olor durante la primera puesta en marcha. Es normal y el humo o el olor
desaparecerá poco a poco.
• Nunca utilice el aparato si el cristal está dañado o si falta. Contacte con su distribuidor para reemplazarlo.
• Este aparato ha sido diseñado para uso profesional en una discoteca, un teatro, etc. y es apto para un uso
sólo en interiores. Conéctelo a una fuente de corriente CA de 230VCA / 50Hz.
• No ha sido diseñado para un uso ininterrumpido. Introduzca frecuentemente una pausa para prolongar la
vida del aparato.
• Transporte el aparato en su embalaje original.
• Guarde este manual del usuario para cuando necesite consultarlo.
4. Características
• 1500W
• ajustes : sound (sensibilidad), speed (velocidad), dimmer (intensidad luminosa)
5. Instalación
a) Lámparas
• Desconecte el aparato de la red antes de instalar o reemplazar una lámpara.
• Las lámparas llegan a temperaturas de hasta 700°C. Deje que la lámpara se enfríe antes de
reemplazarla.
• No toque una lámpara halógena con las manos sin protección. Use un paño para reemplazar una
lámpara.
• No use lámparas con más vatios porque éstas generan temperaturas para las que este aparato no ha
sido diseñado.
• Reemplace cada lámpara deformada o defectuosa por una lámpara del mismo tipo (véase
"Especificaciones"):
1. Desatornille el cristal (4 tornillos) y asegúrese de que no lo dañe.
2. Saque la lámpara vieja.
3. Introduzca la nueva lámpara.
4. Vuelva a poner el cristal y apriete los tornillos.
Observación: ¡No use este aparato con la caja abierta! Reemplace el cristal si está dañado.
b) Fusible
• Desconecte el aparato de la red antes de reemplazar un fusible.
• Si se funde una lámpara, es posible que se deba también reemplazar el fusible.
• Desatornille el portafusibles [3] en sentido contrario a las agujas del reloj.
• Reemplace un fusible fundido por otro del mismo tipo (véase "Especificaciones ").
• Vuelva a introducir el portafusibles [3] en el estroboscopio.
• No utilice el estroboscopio y contacte con su distribuidor si el fusible se funde de nuevo.
c) Montaje del aparato
Riesgo de lesiones. La instalación de este aparato exige una sólida experiencia práctica: el cálculo
de la carga máx. de la construcción, los materiales de instalación requeridos, etc. De vez en
cuando, un técnico cualificado debe controlar la construcción portante y el aparato mismo. No
intente instalar este aparato usted mismo si no tiene las cualificaciones requeridas; una instalación
incorrecta puede causar lesiones.
• Respete la directiva EN 60598-2-17 y toda norma nacional antes de instalar el aparato. La instalación
debe ser realizada por un técnico especializado.
• El soporte donde irá el aparato, debe ser capaz de sostener 10 veces el peso de éste durante una hora,
sin que se produzca una deformación de dicho soporte.
• Fije siempre el VDL1500ST con un cable de seguridad (seguridad adicional).
• Evite ponerse debajo del aparato durante el montaje, la limpieza, etc. Un técnico especializado debe
revisar el aparato antes de la puesta en marcha. Después, debe revisarlo una vez al año.
• Instale el aparato fuera del alcance de personas no autorizadas y en un lugar con poca gente.
• Ajuste el ángulo de inclinación a su gusto mediante un soporte de montaje y fije los tornillos del soporte.
• Pregunte a un electricista cómo hacer la conexión eléctrica.
• Conecte el aparato a la red eléctrica con la conexión de alimentación. Normalmente, no se conectan
efectos luminosos a dimmer packs (reguladores).
d) general
• Quite todo material inflamable en un radio de 0.5m alrededor del aparato y asegúrese de que haya una
ventilación suficiente.
• Pregunte a un electricista cómo hacer la conexión eléctrica.
• Conecte el aparato a la red eléctrica con la conexión de alimentación. Asegúrese de que los aparatos no
estén alimentados por un reóstato o un circuito dimmer, incluso si utiliza el reóstato o el circuito dimmer
como un interruptor ON/OFF (de 0% a 100%).
22.11.2011 ©Velleman nv
13
Page 14

VDL1500ST Rev. 02
• Un experto debe probar la instalación antes de la puesta en marcha.
6. Uso
Véase las figuras en la página 2 de este manual del usuario 2.
• Introduzca el conector en un enchufe.
• Ponga el selector de modo [4] en la posición I (AUTO-RUN) para un control manual del estr oboscopio. Ajuste
la intensidad con el ajuste de intensidad [6] y la velocidad de los destellos con el ajuste de velocidad del
estroboscopio [7].
• Ponga el selector de modo [4] en la posición II (SOUND) para un control por la música del estroboscopio.
Ajuste la sensibilidad con el ajuste de sensibilidad [5] y la intensidad con el ajuste de intensidad [6].
Utilizar un mando a distancia (no incl., p.ej. VDL1500RCN)
• Conecte el mando a distancia a la entrada [8] del VDL1500ST.
• Ponga el selector de modo [4] en la posición II (SOUND) y gire el ajuste de sensibilidad [5] completamente
hacia la izquierda para evitar que el VDL1500ST no reaccione a la música.
• Active el mando a distancia y ajuste la sensibilidad del estroboscopio.
Interconectar varios VDL1500ST
• Conecte la salida [10] del estroboscopio maestro [A] con un cable con conectores estéreo TRS ¼” a la
entrada [8] del estroboscopio esclavo [B].
Nota: Conecte sólo el mando a distancia al aparato maestro.
OBSERVACIÓN: Es posible que el estroboscopio no funcione. Abra la tapa de la parte frontal y verifique las
conexiones. Es posible que los cables estén introducidos de manera demasiado profunda en el conector.
Desatornille los tornillos ligeramente y tire de los cables algunos milímetros para hacer una conexión
correcta. Vuelva atornillar los tornillos.
• Desactive el estroboscopio al poner el selector de modo [4] en la posición O.
7. Limpieza y mantenimiento
• Apriete bien las tuercas y los tornillos y verifique que no hay señales de oxidación.
• No modifique la caja, los soportes y las ópticas p.ej. no taladre agujeros adicionales en un soporte o no
modifique las conexiones, etc.
• No dañe los cables de alimentación. Contacte con un técnico especializado para instalar el aparato.
• Desconecte el aparato de toda fuente antes de limpiarlo.
• Limpie el aparato regularmente con un paño húmedo. Evite el uso de alcohol y de disolventes.
• El usuario no habrá de efectuar el mantenimiento de ninguna pieza.
• Contacte con su distribuidor si necesita piezas de reca mbi o.
8. Especificaciones
alimentación máx. 230Vca / 50Hz
consumo máx. 1600W
tipo de bombilla 1 lámpara de 1500W (ref. LAMP1500ST)
fusible F 20A, 250VCA (6.35 x 32mm) (ref. 6FF20N)
dimensiones 530 x 200 x 117mm
Temperatura ambiente máx. 45°C
peso 4.5kg
Utilice este aparato sólo con los accesorios originales. Velleman NV no será responsable de daños ni
lesiones causados por un uso (indebido) de este aparato. Para más información sobre este producto y
la versión más reciente de este manual del usuario, visite nuestra página www.hqpower.eu.
pueden modificar las especificaciones y el contenido de este manual sin previo aviso.
© DERECHOS DE AUTOR
Velleman NV dispone de los derechos de autor para este manual del usuario. Todos los derechos
mundiales reservados. Está estrictamente prohibido reproducir, traducir, copiar, editar y guardar este manual
del usuario o partes de ello sin previo permiso escrito del derecho habiente.
Se
22.11.2011 ©Velleman nv
14
Page 15

n
E
e
Dnvvo
o
.
n
h
r
w
c
S
s T
N H
A B
z E
A
e
e
h
e
h
d
g
l
m
e
h
n
n
E
m
u
e
t
S
n
u
n
n
n
e
i
e
w
t
s
n
t
i
i
c
n
e
S
d
s
n
g
d
u
d
U
d
m
u
w
r
h
5
o
e
ä
h
p
f
r
n
c
i
f
n
g
e
t
n
e
r
t
t
n
n
u
e
0
gs
u
u
e
i
e
n
e
o
n
e
c
v
s
c
t
s
t
n
E
e
r
e
n
c
e
ä
ü
u
n
s
t
p
o
n
s
n
a
c
e
e
s
e
u
.
n
e
f
r
v
d
n
u
B
g
e
u
e
e
n
s
u
c
a
N
s
n
V
o
u
n
t
n
u
v
a
e
s
l
l
,
n
t
e
u
a
g
n
i
Be
VDL15
ienun
0ST
anleitu
Re
. 02
1. Ei
An alle
Wichtig
Umweltv
Behörde
Wir beda
sorgfältig
Gerät nic
Für meh
siehe w
2. Si
• Der
Der
• Verg
besc
• Acht
Bei B
• Beac
Fläch
• Mach
• Vor
3. All
Siehe Ve
• Neh
Lass
Besc
• Eige
eige
22.11.201
führung
inwohner der
Umweltinfor
ieses Symbol a
ach seinem Leb
erwendeten Bat
on einer speziali
der ein örtliches
rschriften. Falls
ken uns für den
durch. Überprüf
t und wenden
Informatione
w.hqpower.e
herheitshi
eien Sie währe
tehenden Leitu
rennen Sie das
etzstecker an d
alten Sie Kinde
chtung: Berüh
licken Sie nicht
- epileptisch
- zeitliche Bl
- permanent
u vermeiden.
s gibt keine zu
ufbau des Gerä
lektrische Ansch
wissern Sie sich
rieben in dieser
n Sie darauf, da
eschädigungen
ten Sie eine mi
e.
en Sie das Gerä
er ersten Inbetr
emeine R
leman® Servi
Verwende
Setzen Si
Schützen
Sie, dass
2.5cm zwi
Vermeide
Bedienun
en Sie das Gerä
n Sie das Gerät
ädigung des Ge
mächtige Verän
mächtige Änder
1
uropäischen
ationen über
f dem Produkt o
nszyklus der U
erien) nicht als
sierten Firma z
Recycling-Unte
Zweifel beste
Kauf des VDL1
en Sie, ob Trans
ie sich an Ihren
zu diesem Pr
.
weise
d der Installatio
gen könnte zu l
Gerät bei Nichtb
er Grifffläche an
r und Unbefugte
ren Sie das Geh
direkt in die Lic
Anfälle bei em
ndheid (Blitzblin
und unwiderru
artenden Teile.
es entspricht de
luss darf nur vo
, dass die anzus
Bedienungsanle
ss die Netzleitun
oll eine Fachkra
imale Entfernu
mit einem geei
ebnahme soll di
chtlinien
e- und Qualitä
Sie das Gerät
das Gerät kein
ie das Gerät vo
ie Lüftungsschli
chen dem Gerä
Sie Erschütteru
des Gerätes.
t erst in Betrieb,
nicht von Perso
rätes das Ergeb
erungen sind a
ngen erlischt d
nion
ieses Produkt
der der Verpack
welt Schaden z
nsortiertes
ecks Recycling
nehmen retourn
en, wenden Si
00ST! Lesen Si
portschäden vorl
Händler.
dukt und die
n des Gerätes s
bensgefährliche
enutzung und v
und ziehen Sie
vom Gerät fern.
use während d
tquelle, um
findlichen Mens
dheid)
liche Augenschä
Bestellen Sie e
Schutzklasse I.
einer Fachkraft
hließende Netz
tung.
g nicht gequets
t das Kabel erse
g von 0.5m zwi
neten Sicherhei
Installation vo
sgarantie am
ur im Innenb
r Flüssigkeit wie
Staub. Schütze
ze nicht blockie
und jedem and
ngen. Vermeide
nachdem Sie si
en bedienen, di
is von unfachm
s Sicherheitsgr
r Garantieanspr
Haus
15
ng zeigt an, da
fügen kann. En
müll; die Einheit
ntsorgt werden.
ert werden. Res
e sich für Ents
diese Bedienu
iegen. Sollte die
eueste Versio
hr vorsichtig: d
n elektrischen S
r jeder Reinigun
ie an der Netzl
s Betriebs nicht,
hen
den
entuelle Ersatzt
Gemäß den Vor
durchgeführt w
pannung nicht h
ht oder durch sc
zen.
chen der Lichta
skabel fest (z.B
einem Experte
nde dieser Bedi
reich. Schützen
z.B. Trop
n Sie das Gerät
t werden. Beach
ren Gegenstan
Sie rohe Gewal
h mit seinen Fu
sich nicht mit d
nnischer Bedien
nden verboten.
ch.
- ode
s die Entsorgun
sorgen Sie die E
oder verwendet
Diese Einheit m
ektieren Sie di
rgungsrichtlin
gsanleitung vor
der Fall sein, v
dieser Bedie
s Berühren von
hlägen führen.
g vom Netz. Fas
itung.
denn das Gehä
ile bei Ihrem Fa
chriften muss d
rden.
öher ist als die
harfe Kanten be
sbeute und irge
VDLSC7 oder
geprüft werden
nungsanleitung.
Sie das Gerät v
Spritzwasser, a
or extremen Te
ten Sie eine min
.
t während der I
ktionen vertrau
em Gerät auske
ng.
ei Schäden ver
dieses Produkt
inheit (oder
n Batterien mü
ss an den Händ
örtlichen
ien an Ihre ört
Inbetriebnahme
rwenden Sie da
ungsanleitung
unter Spannung
en Sie dazu de
se heizt auf.
hhändler.
s Gerät geerde
etzspannung
chädigt werden
deiner beleucht
DLSC8).
.
r Regen und Fe
s.
mperaturen. Be
imale Entfernun
stallation und
gemacht habe
nen. Meist ist d
rsacht durch
©Vellem
s
sen
er
iche
s
sein.
kann.
ten
chte.
chten
von
.
e
n nv
Page 16

VDL1500ST Rev. 02
• Verwenden Sie das Gerät nur für Anwe ndungen beschrieben in dieser Bedienungsanleitung sonst kann dies
zu Schäden am Produkt führen und erlischt der Garantieanspruch. Jede andere V erwendung ist mit Gefahren
wie Kurzschluss, Brandwunden, elektrischem Schlag, usw. verbunden.
• Bei Schäden, die durch Nichtbeachtung der Bedienungsanleitung verursacht werden, erlischt der
Garantieanspruch. Für daraus resultierende Folgeschäden übernimmt der Hersteller keine Haftung.
• Lassen Sie dieses Gerät von einem Fachmann installieren und warten.
• Das Gerät bei Temperaturschwankungen nicht sofort einschalten. Schützen Sie das Gerät vor Beschädigung,
indem Sie es ausgeschaltet lassen bis es akklimatisiert ist (Zimmertemperatur erreicht hat).
• Wenn Sie dieses Gerät zum ersten Mal verwenden, könnte es Rauchentwicklung und einen bestimmten
Geruch geben. Das ist normal und wird nach einiger Zeit allmählich verschwinden.
• Verwenden Sie das Gerät nie wenn ein Fensterchen beschädigt ist oder fehlt. Wenden Sie sich zur Reparatur
an Ihren Händler.
• Dieses Gerät wurde für den professionellen Einsatz auf Bühnen, in Discotheken, Theatern, usw. entworfen
und eignet sich nur für die Anwendung im Innenbereich (<45°C, <50%RH). Verwenden Sie das Gerät mit
einer Wechselspannung von 230VAC / 50Hz.
• Das Gerät eignet sich nicht für permanenten Betrieb: eine regelmäßige Pause verlängert die Lebensdauer.
• Verwenden Sie die Originalverpackung, wenn das Gerät transportiert werden soll.
• Bewahren Sie diese Bedienungsanleitung für künftige Einsichtnahme auf.
4. Eigenschaften
• 1500W
• Bedienelemente: sound (Empfindlichkeit), speed (Geschwindigkeit), dimmer (Lichtstärke)
5. Installation
a) Lampen
• Wechseln oder setzen Sie nur eine Lampe ein wenn das Gerät vom Netz getrennt ist.
• Lassen Sie die Lampe zuerst mindestens 10 Minuten abkühlen, bevor Sie die Lampe wechseln, denn die
Temperatur einer Lampe kann während des Betriebs bis zu 700°C betragen.
• Installieren Sie keine Lampe mit einer höheren Leistung als diejenige wofür die Lampe konzipiert wurde.
• Ersetzen Si e jed e deformierte oder beschädigte Lampe durch eine Lamp e desselben Typs (sie
“Technische Daten”). Machen Sie folgendes:
1. Schrauben Sie vorsichtig das Fensterchen los (4 Schrauben), damit Sie es nicht beschädigen.
2. Entfernen Sie vorsichtig die alte Lampe.
3. Setzen Sie die eine neue Lampe in.
4. Bringen Sie das Fensterchen wieder an und schrauben Sie die Schrauben an.
BEMERKUNG: Betreiben Sie das Gerät nie mit geöffnetem Deckel. Ersetzen Sie das Fensterchen
wenn es beschädigt ist.
b) Sicherung
• Ersetzen Sie nur eine Sicherung wenn das Gerät vom Netz getrennt ist.
• Wenn die Lampe gesprungen ist, müssen Sie auch die Sicherung wechseln.
• Lockern Sie den Sicherungshalter [3] gegen den Uhrzeigersinn.
• Ersetzen Sie eine durchgebrannte Sicherung immer durch eine Sicherung desselben Typs und mit
derselben Leistung (siehe “Technische Daten”).
• Schrauben Sie den Sicherungshalter [3] wieder fest.
• Verwenden Sie das Gerät nicht und kontaktieren Sie Ihren Händler wenn die Sicherung schmilzt.
c) Das Gerät montieren
Gefahr vor Verletzungen. Für die Installation des Gerätes ist eine solide praktische Erfahrung
notwendig. Sie müssen die Höchstlast einer Tragkonstruktion berechnen können, wissen welches
Baumaterial Sie verwenden können un d Sie müssen das verwendete Material und das Gerät af und
zu kontrollieren lassen. Montieren Sie das Gerät nie selber wenn Sie keine Erfahrung damit haben.
Eine schlechte Montage kann zu Verletzungen führen .
• Lassen Sie das Gerät von einem Fachmann und gemäß den EN 60598-2-17 und allen anderen
zutreffenden Normen installieren.
• Die Konstruktion muss während einer Stunde eine Punktlast von maximal 10 x dem Gewicht des Geräts
tragen können, ohne dass Verformung verursacht wird.
• Das Gerät muss immer mit einer zweiten Befestigung z.B. mit einem Sicherheitskabel gesichert werden.
• Stehen Sie während der Montage, Entfernung oder Wartung nie direkt unter dem Gerät. Lassen Sie das
Gerät jährlich und vor der Inbetriebnahme von einem Fachmann prüfen.
• Montieren Sie das Gerät an einem Ort, an dem es wenig Vorübergehende gibt und der unzugänglich ist
für Unbefugte.
• Regeln Sie den Neigungswinkel über den Montagebügel und drehen Sie die Schrauben fest an.
• Lassen Sie das Gerät von einem qualifizierten Elektriker anschließen.
• Schließen Sie das Gerät an das Hauptnetz und nicht an einen Dimmer an.
22.11.2011 ©Velleman nv
16
Page 17

VDL1500ST Rev. 02
d) General
• Achten Sie darauf, dass sich kein entflammbares Material in einem Umkreis von 50 cm befindet und
beachten Sie, dass es genügend Kühlung gibt.
• Lassen Sie das Gerät von einem qualifizierten Elektriker anschließen.
• Beachten Sie, dass alle Geräte über eine geerdete Steckdose und nicht über einen Regelwiderstand oder
Dimmkreis versorgt werden, auch wenn Sie den Regelwiderstand oder den Dimmkreis als EIN/AUSSchalter (0% bis 100%) verwenden.
• Die Installation muss vor Inbetriebnahme von einem Experten genehmigt werden.
6. Anwendung
Siehe Abbildungen, Seite 2.
• Stecken Sie den Stecker in die Steckdose.
• Stellen Sie den Modusschalter [4] auf I (AUTO-RUN) um das Stroboskop manuell zu bedienen. Regeln Sie
die Lichtstärke mit dem Lichtstärkeregler [6] und die Blitzgeschwindigkeit mit dem Geschwindigkeitsregler
des Stroboskops [7].
• Stellen Sie den Modusschalter [4] auf II (SOUND) um das Stroboskop in den musikgesteuerten Modus zu
stellen. Regeln Sie die Empfindlichkeit mit dem Empfindlichkeitsregler [5] und die Lichtstärke mit dem
Lichtstärkeregler [6].
Die Fernbedienung verwenden (nicht mitgeliefert, z.B. VDL1500RCN)
• Verbinden Sie die Fernbedienung mit dem Eingang [8] des VDL1500ST.
• Stellen Sie den Modusschalter [4] auf II (SOUND) und drehen Sie den Empfindlichkeitsregler [5] völlig
gegen den Uhrzeigersinn damit das Stroboskop nicht mehr auf Umgebungsmusik reagiert.
• Schalten Sie das Stroboskop ein und regeln Sie die Empfindlichkeit.
Mehrere VDL1500ST anschließen
• Verbinden Sie den Ausgang [10] des Master-Gerätes [A] über ein Kabel mit ¼” TRS-Stereosteckern (nicht
mitgeliefert) mit dem Eingang [8] des Slave-Gerät [B].
Bemerkung: Verbinden Sie eventuell eine Fernbedienung mit dem Master-Gerät.
BEMERKUNG: Es ist möglich, dass Ihr Stroboskop nicht funktioniert. Öffnen Sie den Deckel an der Vorderseite
und kontrollieren Sie die Verbindungen. Es ist möglich, dass die Isolation der Kabel zu tief im Anschluss sitzt.
Machen Sie die Schrauben los und ziehen Sie die Kabel ein Paar Millimeter an, sodass eine gute Verbindung
hergestellt werden kann. Drehen Sie die Schrauben wieder an.
• Schalten Sie das Gerät aus, indem Sie den Modusschalter [4] auf die mittlere Position (O) stellen.
7. Reinigung und Wartung
• Verwendete Schrauben müssen fest angespannt werden und dürfen keine Rostspuren zeigen.
• Das Gehäuse, die Linsen, die Montagebügel und der Montageort (z.B. Decke oder Gebinde) dürfen nicht angepasst
werden, z.B. bohren Sie keine zusätzlichen Löcher in Montagebügeln, verändern Sie die Anschlüsse nicht, usw.
• Sorgen Sie dafür, dass die Netzkabel nicht beschädigt sind. Lassen Sie das Gerät von einer Fachkraft installieren.
• Trennen Sie das Gerät vom Netz ehe Sie mit den Servicearbeiten anfangen.
• Verwenden Sie zur Reinigung ein feuchtes Tuch. Verwenden Sie auf keinen Fall Alkohol oder irgendwelche
Lösungsmittel.
• Es gibt keine wartbaren Teile außer der Lampe und der Sicherung (siehe “Installation”).
• Bestellen Sie eventuelle Ersatzteile bei Ihrem Fachhändler.
8. Technische Daten
Stromversorgung max. 230Vac / 50Hz
Stromverbrauch max. 1600W
Lampentyp 1 x 1500W Lampe (Artikelnummer: LAMP1500ST)
Sicherung F 20A, 250VAC (6.35 x 32mm) (Artikelnummer: 6FF20N)
Abmessungen 530 x 200 x 117mm
Max. Umgebungstemperatur 45°C
Gewicht 4.5kg
Verwenden Sie dieses Gerät nur mit originellen Zubehörteilen. Velleman NV übernimmt keine Haftung
für Schaden oder Verletzungen bei (falscher) Anwendung dieses Gerätes. Für mehr Informationen zu
diesem Produkt und die neueste Version dieser Bedienungsanleitung, siehe www.hqpower.eu. Alle
Änderungen ohne vorherige Ankündigung vorbehalten.
© URHEBERRECHT
Velleman NV besitzt das Urheberrecht für diese Bedienungsanleitung. Alle weltweiten Rechte
vorbehalten. Ohne vorherige schriftliche Genehmigung des Urhebers ist es nicht gestattet, diese
Bedienungsanleitung ganz oder in Teilen zu reproduzieren, zu kopieren, zu übersetzen, zu bearbeiten oder zu
speichern.
22.11.2011 ©Velleman nv
17
Page 18

Velleman® Service and Quality Warranty
Velleman® has over 35 years of experience in the electronics world
and distributes its products in more than 85 countries.
All our products fulfil strict quality requirements and legal
stipulations in the EU. In order to ensure the quality, our products
regularly go through an extra quality check, both by an internal
quality department and by specialized external organisations. If, all
precautionary measures notwithstanding, problems should occur,
please make appeal to our warranty (see guarantee conditions).
General Warranty Conditions Concerning Consumer Products
(for EU):
• All consumer products are subject to a 24-month warranty on
production flaws and defective material as from the original date of
purchase.
• Velleman® can decide to replace an article with an equivalent
article, or to refund the retail value totally or partially when the
complaint is valid and a free repair or replacement of the article is
impossible, or if the expenses are out of proportion.
You will be delivered a replacing article or a refund at the value of
100% of the purchase price in case of a flaw occurred in the first
year after the date of purchase and delivery, or a replacing article at
50% of the purchase price or a refund at the value of 50% of the
retail value in case of a flaw occurred in the second year after the
date of purchase and delivery.
• Not covered by warranty:
- all direct or indirect damage caused after delivery to the article
(e.g. by oxidation, shocks, falls, dust, dirt, humidity...), and by the
article, as well as its contents (e.g. data loss), compensation for loss
of profits;
- frequently replaced consumable goods, parts or accessories such as
batteries, lamps, rubber parts, drive belts... (unlimited list);
- flaws resulting from fire, water damage, lightning, accident, natural
disaster, etc. …;
- flaws caused deliberately , negligently or resulting from improper
handling, negligent maintenance, abusive use or use contrary to the
manufacturer’s instructions;
- damage caused by a commercial, professional or collective use of
the article (the warranty validity will be reduced to six (6) months
when the article is used professionally);
- damage resulting from an inappropriate packing and shipping of
the article;
- all damage caused by modification, repair or alteration performed
by a third party without written permission by Velleman®.
• Articles to be repaired must be delivered to your Velleman®
dealer, solidly packed (preferably in the original packaging), and be
completed with the original receipt of purchase and a clear flaw
description.
• Hint: In order to save on cost and time, please reread the manual
and check if the flaw is caused by obvious causes prior to presenting
the article for repair. Note that returning a non-defective article can
also involve handling costs.
• Repairs occurring after warranty expiration are subject to shipping
costs.
• The above conditions are without prejudice to all commercial
warranties.
The above enumeration is subject to modification according
to the article (see article’s manual).
Velleman® service- en kwaliteitsgarantie
Velleman® heeft ruim 35 jaar ervaring in de elektronicawereld en
verdeelt in meer dan 85 landen.
Al onze producten beantwoorden aan strikte kwaliteitseisen en aan
de wettelijke bepalingen geldig in de EU. Om de kwaliteit te
waarborgen,
ondergaan onze producten op regelmatige tijdstippen een extra
kwaliteitscontrole, zowel door onze eigen kwaliteitsafdeling als door
externe gespecialiseerde organisaties. Mocht er ondanks deze
voorzorgen toch een probleem optreden, dan kunt u steeds een
beroep doen op onze waarborg (zie waarborgvoorwaarden).
Algemene waarborgvoorwaarden consumentengoederen
(voor Europese Unie):
• Op alle consumentengoederen geldt een garantieperiode van 24
maanden op productie- en materiaalfouten en dit vanaf de
oorspronkelijke aankoopdatum.
• Indien de klacht gegrond is en een gratis reparatie of vervanging
van een artikel onmogelijk is of indien de kosten hiervoor buiten
verhouding zijn, kan Velleman® beslissen het desbetreffende artikel
te vervangen door een gelijkwaardig artikel of de aankoopsom van
het artikel gedeeltelijk of volledig terug te betalen. In dat geval krijgt
u een vervangend product of terugbetaling ter waarde van 100% van
de aankoopsom bij ontdekking van een gebrek tot één jaar na
aankoop en levering, of een vervangend product tegen 50% van de
kostprijs of terugbetaling van 50 % bij ontdekking na één jaar tot 2
jaar.
• Valt niet onder waarborg:
- alle rechtstreekse of onrechtstreekse schade na de levering
veroorzaakt aan het toestel (bv. door oxidatie, schokken, val, stof,
vuil, vocht...), en door het toestel, alsook zijn inhoud (bv. verlies van
data), vergoeding voor eventuele winstderving.
- verbruiksgoederen, onderdelen of hulpstukken die regelmatig
dienen te worden vervangen, zoals bv. batterijen, lampen, rubberen
onderdelen, aandrijfriemen... (onbeperkte lijst).
- defecten ten gevolge van brand, waterschade, bliksem, ongevallen,
natuurrampen, enz.
- defecten veroorzaakt door opzet, nalatigheid of door een
onoordeelkundige behandeling, slecht onderhoud of abnormaal
gebruik of gebruik van het toestel strijdig met de voorschriften van
de fabrikant.
- schade ten gevolge van een commercieel, professioneel of collectief
gebruik van het apparaat (bij professioneel gebruik wordt de
garantieperiode herleid tot 6 maand).
- schade veroorzaakt door onvoldoende bescherming bij transport
van het apparaat.
- alle schade door wijzigingen, reparaties of modificaties uitgevoerd
door derden zonder toestemming van Velleman®.
• Toestellen dienen ter reparatie aangeboden te worden bij uw
Velleman®-verdeler. Het toestel dient vergezeld te zijn van het
oorspronkelijke aankoopbewijs. Zorg voor een degelijke verpakking
(bij voorkeur de originele verpakking) en voeg een duidelijke
foutomschrijving bij.
• Tip: alvorens het toestel voor reparatie aan te bieden, kijk nog
eens na of er geen voor de hand liggende reden is waarom het
toestel niet naar behoren werkt (zie handleiding). Op deze wijze kunt
u kosten en tijd besparen. Denk eraan dat er ook voor niet-defecte
toestellen een kost voor controle aangerekend kan worden.
• Bij reparaties buiten de waarborgperiode zullen transportkosten
aangerekend worden.
• Elke commerciële garantie laat deze rechten onverminderd.
Bovenstaande opsomming kan eventueel aangep ast worden
naargelang de aard van het product (zie handleiding van het
betreffende product).
Garantie de service et de qualité Velleman®
Velleman® jouit d’une expérience de plus de 35 ans dans le monde
de l’électronique avec une distribution dans plus de 85 pays.
Tous nos produits répondent à des exigences de qualité rigoureuses
et à des dispositions légales en vigueur d ans l’UE. Afin de garantir la
qualité, nous soumettons régulièrement nos produits à des contrôles
de qualité supplémentaires, tant par notre propre service qualité que
par un service qualité externe. Dans le cas improbable d’un défaut
malgré toutes les précautions, il est possible d’invoquer notre
garantie (voir les conditions de garantie).
Conditions générales concernant la garantie sur les produits
grand public (pour l’UE) :
• tout produit grand public est garanti 24 mois contre tout vice de
production ou de matériaux à dater du jour d’acquisition effective ;
• si la plainte est justifiée et que la répa ration ou le re mplacement
d’un article est jugé impossible, ou lorsque les coûts s’avèrent
disproportionnés, Velleman® s’autorise à remplacer ledit article par
un article équivalent ou à rembourser la totalité ou une partie du prix
d’achat. Le cas échéant, il vous sera consenti un article de
remplacement ou le remboursement complet du prix d’achat lors
d’un défaut dans un délai de 1 an après l’achat et la livraison, ou un
article de remplacement moyennant 50% du prix d’achat ou le
remboursement de 50% du prix d’achat lors d’un défaut après 1 à 2
ans.
• sont par conséquent exclus :
- tout dommage direct ou indirect survenu à l’article après livraison
(p.ex. dommage lié à l’oxydation, choc, chute, poussière, sable,
impureté…) et provoqué par l’appareil, ainsi que son contenu (p.ex.
perte de données) et une indemnisation éventuelle pour perte de
revenus ;
- tout bien de consommation ou accessoire, ou pièce qui nécessite un
remplacement régulier comme p.ex. piles, ampoules, pièces en
caoutchouc, courroies… (liste illimitée) ;
- tout dommage qui résulte d’un incendie, de la foudre, d’un
accident, d’une catastrophe naturelle, etc. ;
- out dommage provoqué par une négligence, volontaire ou non, une
utilisation ou un entretien incorrects, ou une utilisation de l’appareil
contraire aux prescriptions du fabricant ;
- tout dommage à cause d’une utilisation commerciale,
professionnelle ou collective de l’appareil (la période de garantie sera
réduite à 6 mois lors d’une utilisation professionnelle) ;
- tout dommage à l’appareil qui résulte d’une utilisation incorrecte ou
Page 19

différente que celle pour laquelle il a été initialement prévu comme
décrit dans la notice ;
- tout dommage engendré par un retour de l’appareil emballé dans
un conditionnement non ou insuffisamment protégé.
- toute réparation ou modification effectuée par une tierce personne
sans l’autorisation explicite de SA Velleman® ; - frais de transport
de et vers Velleman® si l’appareil n’est plus couvert sous la garantie.
• toute réparation sera fournie par l’endroit de l’achat. L’appareil doit
nécessairement être accompagné du bon d’achat d’origine et être
dûment conditionné (de préférence dans l’emballage d’origine avec
mention du défaut) ;
• tuyau : il est conseillé de consulter la notice et de contrôler câbles,
piles, etc. avant de retourner l’appareil. Un appareil retourné jugé
défectueux qui s’avère en bon état de marche pourra faire l’objet
d’une note de frais à charge du consommateur ;
• une réparation effectuée en-dehors de la période de garantie fera
l’objet de frais de transport ;
• toute garantie commerciale ne porte pas atteinte aux conditions
susmentionnées.
La liste susmentionnée peut être sujette à une
complémentation selon le type de l’article et être mentionnée
dans la notice d’emploi.
Garantía de servicio y calidad Velleman®
Velleman® disfruta de una experiencia de más de 35 años en el
mundo de la electrónica con una distribución en más de 85 países.
Todos nuestros productos responden a normas de calidad rigurosas y
disposiciones legales vigentes en la UE. Para garantizar la calidad,
sometemos nuestros productos regularmente a controles de calidad
adicionales, tanto a través de nuestro propio servicio de calidad
como de un servicio de calidad externo. En el caso improbable de
que surgieran problemas a pesar de todas las precauciones, es
posible recurrir a nuestra garantía (véa se las condiciones de
garantía).
Condiciones generales referentes a la garantía sobre
productos de venta al público (para la Unión Europea):
• Todos los productos de venta al público tienen un período de
garantía de 24 meses contra errores de producción o errores en
materiales desde la adquis ición original;
• Si la queja está fundada y si la reparación o sustitución de un
artículo no es posible, o si los gastos son desproporcionados,
Velleman® autoriza reemplazar el artículo por un artículo
equivalente o reembolsar la totalidad o una parte del precio de
compra. En este caso, usted recibirá un artículo de recambio o el
reembolso completo del precio de compra si encuentra algún fallo
hasta un año después de la compra y entrega, o un artículo de
recambio al 50% del precio de compra o el reembolso del 50% del
precio de compra si encuentra un fallo después de 1 año y hasta los
2 años después de la compra y entrega.
Por consiguiente, están excluidos entre otras cosas:
- todos los daños causados directa o indirectamente al aparato (p.ej.
por oxidación, choques, caída,...) y a su contenido (p.ej. pérdida de
datos) después de la entrega y causados por el aparato, y cualquier
indemnización por posible pérdida de ganancias;
- partes o accesorios que deban ser reemplazados regularmente,
como por ejemplo baterías, lámparas, partes de goma, etc. (lista
ilimitada)
- defectos causados por un incendio, daños causados por el agua,
rayos, accidentes, catástrofes naturales, etc.;
- defectos causados a conciencia, descuido o por malos tratos, un
mantenimiento inapropiado o un uso anormal del aparato contrario a
las instrucciones del fabricante;
- daños causados por un uso comercial, profesional o colectivo del
aparato (el período de garantía se reducirá a 6 meses con uso
profesional);
- daños causados por un uso incorrecto o un uso ajeno al que está
previsto el producto inicialmente como está descrito en el manual del
usuario;
- daños causados por una protección insuficiente al transportar el
aparato.
- daños causados por reparaciones o modificaciones efectuadas por
una tercera persona sin la autorización explícita de Velleman®;
- se calcula gastos de transporte de y a Velleman® si el aparato ya
no está cubierto por la garantía.
• Cualquier artículo que tenga que ser reparado tendrá que ser
devuelto a su distribuidor Velleman®. Devuelva el aparato con la
factura de compra original y transpórtelo en un embalaje sólido
(preferentemente el embalaje original). Incluya también una buena
descripción del fallo;
• Consejo: Lea el manual del usuario y controle los cables, las pilas,
etc. antes de devolver el aparato. Si no se encuentra un defecto en
el artículo los gastos podrían correr a cargo del cliente;
• Los gastos de transporte correrán a carga del cliente para una
reparación efectuada fuera del período de garantía.
• Cualquier gesto comercial no disminuye estos derechos.
La lista previamente mencionada puede ser adaptada segú n el
tipo de artículo (véase el manual del usuario del artículo en
cuestión)
Velleman® Service- und Qualitätsgarantie
Velleman® hat gut 35 Jahre Erfahrung in der Elektronikwelt und
vertreibt seine Produkte in über 85 Ländern.
Alle Produkte entsprechen den strengen Qualitätsforderunge n und
gesetzlichen Anforderungen in der EU. Um die Qualität zu
gewährleisten werden unsere Produkte regelmäßig einer zusätzlichen
Qualitätskontrolle unterworfen, sowohl von unserer eigenen
Qualitätsabteilung als auch von externen spezialisierten
Organisationen. Sollten, trotz aller Vorsichtsmaßnahmen, Probleme
auftreten, nehmen Sie bitte die Garantie in Anspruch (siehe
Garantiebedingungen).
Allgemeine Garantiebedingungen in Bezug auf Ko nsumgüter
(für die Europäische Union):
• Alle Produkte haben für Material- oder Herstellungsfehler eine
Garantieperiode von 24 Monaten ab Verkaufsdatum.
• Wenn die Klage berechtigt ist und falls eine kostenlose Reparatur
oder ein Austausch des Gerätes unmöglich ist, oder wenn die Kosten
dafür unverhältnismäßig sind, kann Velleman® sich darüber
entscheiden, dieses Produkt durch ein gleiches Produkt zu ersetzen
oder die Kaufsumme ganz oder teilweise zurückzuzahlen. In diesem
Fall erhalten Sie ein Ersatzprodukt oder eine Rückzahlung im Werte
von 100% der Kaufsumme im Falle eines Defektes bis zu 1 Jahr nach
Kauf oder Lieferung, oder Sie bekommen ein Ersatzprodukt im Werte
von 50% der Kaufsumme oder eine Rückzahlung im Werte von 50 %
im Falle eines Defektes im zweiten Jahr.
• Von der Garantie ausgeschlossen sind:
- alle direkten oder indirekten Schäden, die nach Lieferung am Gerät
und durch das Gerät verursacht werden (z.B. Oxidation, Stöße, Fall,
Staub, Schmutz, Feuchtigkeit, ...), sowie auch der Inhalt (z.B.
Datenverlust), Entschädigung für eventuellen Gewinnausfall.
- Verbrauchsgüter, Teile oder Zubehörteile, die regelmäßig
ausgewechselt werden, wie z.B. Batterien, Lampen, Gummiteile,
Treibriemen, usw. (unbeschränkte Liste).
- Schäden verursacht durch Brandschaden, Wasserschaden, Blitz,
Unfälle, Naturkatastrophen, usw.
- Schäden verursacht durch absichtliche, nachlässige oder
unsachgemäße Anwendung, schlechte Wartung, zweckentfremdete
Anwendung oder Nichtbeachtung von Benutzerhinweisen in der
Bedienungsanleitung.
- Schäden infolge einer kommerziellen, professionellen oder
kollektiven Anwendung des Gerätes (bei gewerblicher Anwendung
wird die Garantieperiode auf 6 Monate zurückgeführt).
- Schäden verursacht durch eine unsachgemäße Verpackung und
unsachgemäßen Transport des Gerätes.
- alle Schäden verursacht durch unautorisierte Änderungen,
Reparaturen oder Modifikationen, die von einem Dritten ohne
Erlaubnis von Velleman® vorgenommen werden.
• Im Fall einer Reparatur, wenden Sie sich an Ihren Velleman®Verteiler. Legen Sie das Produkt ordnungsgemäß verpackt
(vorzugsweise die Originalverpackung) und mit dem OriginalKaufbeleg vor. Fügen Sie eine deutliche Fehlerbeschreibung hinzu.
• Hinweis: Um Kosten und Zeit zu sparen, lesen Sie die
Bedienungsanleitung nochmals und überprüfen Sie, ob es keinen auf
de Hand liegenden Grund gibt, ehe Sie das Gerät zur Reparatur
zurückschicken. Stellt sich bei der Überprüfung des Geräts heraus,
dass kein Geräteschaden vorliegt, könnte dem Kunden eine
Untersuchungspauschale berechnet.
• Für Reparaturen nach Ablauf der Garantiefrist werden
Transportkosten berechnet.
• Jede kommerzielle Garantie lässt diese Rechte unberührt.
Die oben stehende Aufzählung kann eventuell angepasst
werden gemäß der Art des Produktes (siehe
Bedienungsanleitung des Gerätes
 Loading...