

Page 1
LX501
OIL CRACKER HAZE MACHINE – 500 W
'OIL CRACKER' NEVELMACHINE – 500 W
MACHINE À BROUILLARD 'OIL CRACKER' – 500 W
MÁQUINA DE NIEBLA 'OIL CRACKER' – 500 W
'OIL CRACKER' NEBELMASCHINE – 500 W
USER MANUAL 4
GEBRUIKERSHANDLEIDING 10
MODE D‟EMPLOI 16
MANUAL DEL USUARIO 22
BEDIENUNGSANLEITUNG 28
Page 2
LX501
V. 03 – 08/02/2013 2 ©Velleman nv
Page 3
LX501
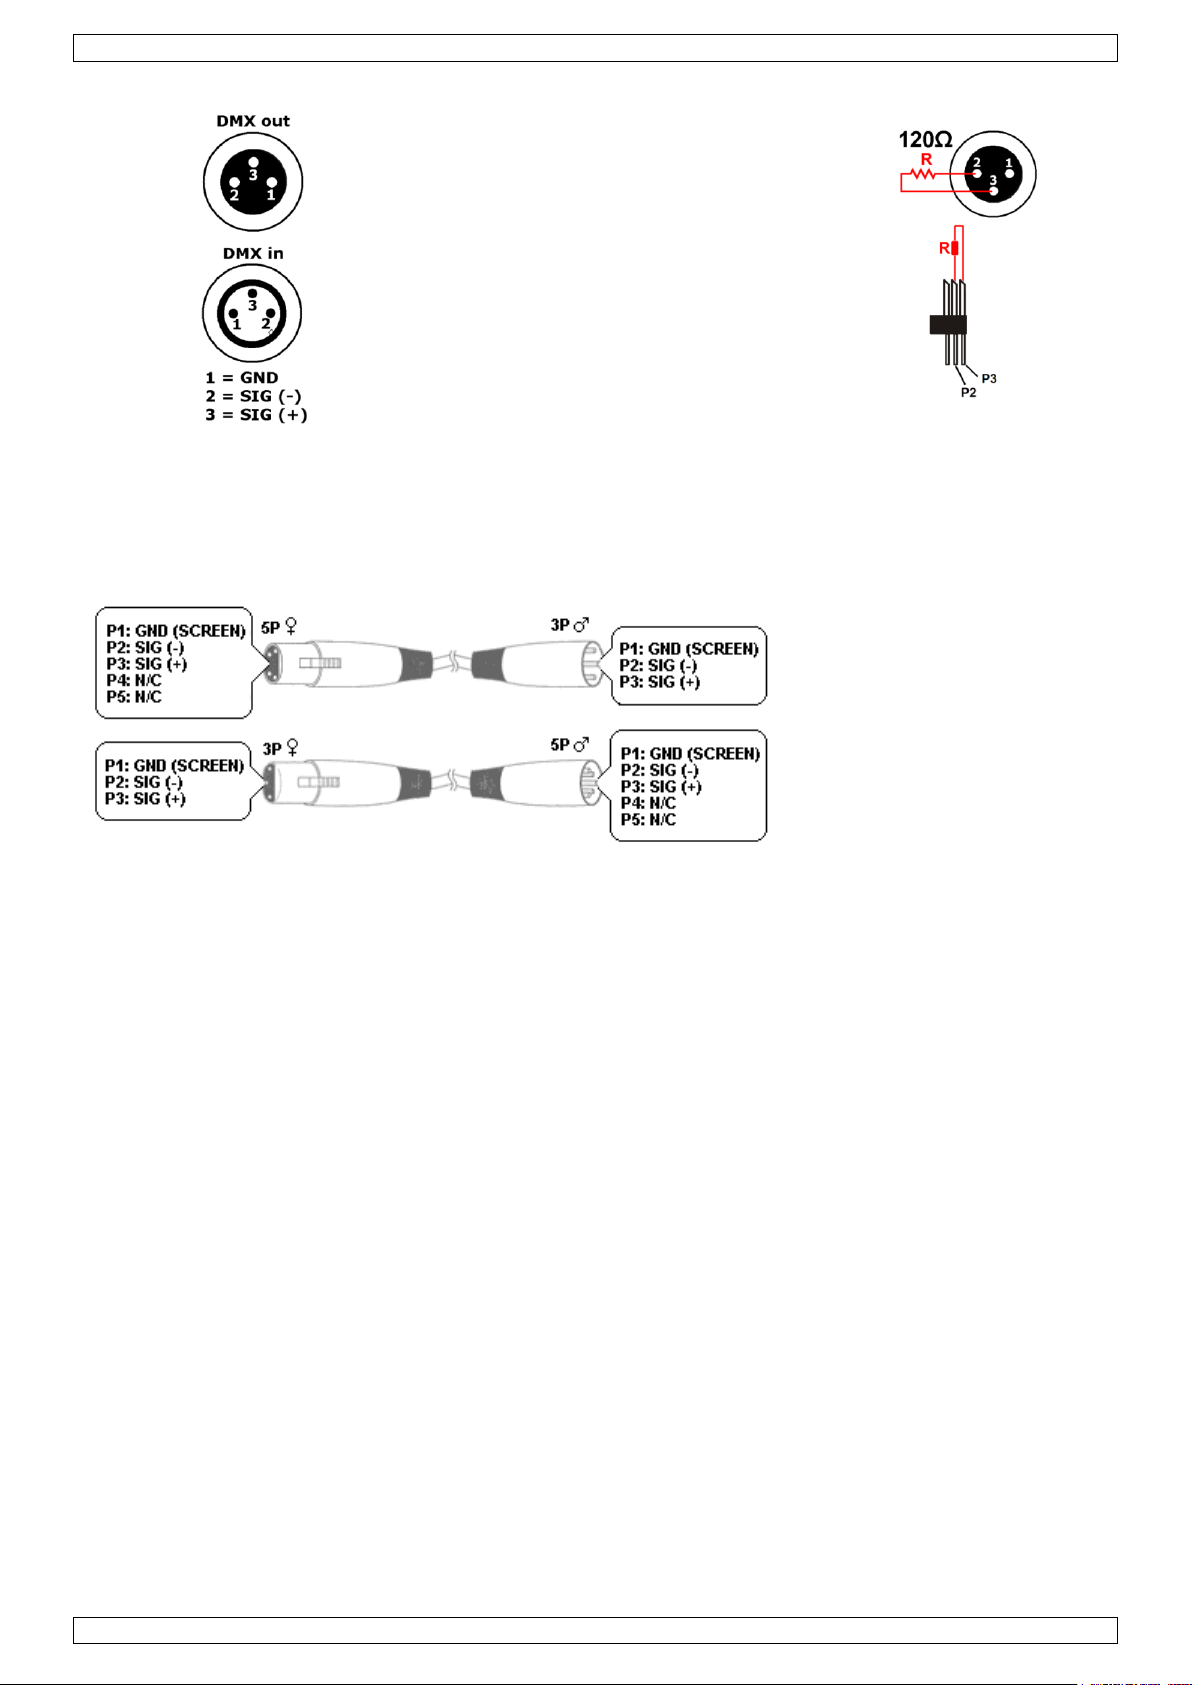
terminator
eindweerstand
résistance de terminaison
terminación
Terminierung
How to turn the controller line from 3-pins into 5-pins (plug and socket).
Controller line van 3-pin naar 5-pin aanpassen (stekker en contact).
Modifier la ligne du contrôleur de 3 broches en 5 broches (fiche et contact).
Modificar la línea del controlador de 3 polos y 5 polos (conector y contacto).
Die Controller-Linie von 3-Pin nach 5-Pin anzupassen (Stecker und Kontakt).
V. 03 – 08/02/2013 3 ©Velleman nv
Page 4

LX501
This appliance is not intended for use by persons (including children) with reduced physical,
sensory or mental capabilities, or lack of experience and knowledge, unless they have been
given supervision or instruction concerning use of the appliance by a person responsible for
their safety.
Children should be supervised to ensure that they do not play with the appliance.
Warning: If the supply cord is damaged, it must be replaced by the manufacturer, its service
agent, or similarly qualified persons in order to avoid any hazard.
Do not use the device when damage to housing or cables is noticed. Do not attempt to service
the device yourself but contact an authorised dealer.
Make sure that the available voltage does not exceed the voltage stated in the specifications of
this manual.
This device falls under protection class I. It is therefore essential that the device be earthed.
Have a qualified person carry out the electric connection.
Disconnect the device from the mains to clean it, to fill the reservoir, or when it is not in use.
Handle the power cord by the plug only.
Indoor use only. Keep this device away form rain, moisture, splashing and dripping liquids.
Never put objects filled with liquids on top of or close to the device.
Do not immerse the device in any liquid.
Caution: device heats up during use. Do not touch hot surfaces. Let the smoke machine cool
down sufficiently after switching off before handling.
Never cover the smoke machine and do not install it on a carpet or wooden floor.
Keep this device away from dust and extreme temperatures. Make sure the ventilation
openings are clear at all times. For sufficient air circulation, leave at least 0.5 m on all sides.
Make sure the air inlet is free at all times, and clean the filter periodically.
The maximum ambient temperature is 40 °C. Do not operate the device at higher
temperatures.
Install the device in a well-ventilated place, at a minimal distance of 0.5 m from flammable and
explosive objects or substances.
Make sure the haze outlet is free at all times. Never aim the outlet directly at humans or
animals. Keep the outlet at a minimum distance of 0.5 m from any obstacle.
To avoid health risks and to optimise the lifespan of the device, use only haze liquids as
specified in this user manual (order code LX550). Do not add oils, perfume, or any other fluid
or substance to the hazer liquid. This may cause toxic fumes or a fire hazard.
Do not drink hazer liquid. If it is ingested, contact a doctor immediately. If the liquid comes in
contact with eyes or skin, rinse abundantly with water.
Never run the device without liquid: this may cause permanent damage to the device.
Always empty the fluid reservoir before storing or transporting the device.
Protect this device from shocks and abuse. Avoid brute force when operating the device.
USER MANUAL
1. Introduction
To all residents of the European Union
Important environmental information about this product
This symbol on the device or the package indicates that disposal of the device after its lifecycle could
harm the environment. Do not dispose of the unit (or batteries) as unsorted municipal waste; it
should be taken to a specialized company for recycling. This device should be returned to your
distributor or to a local recycling service. Respect the local environmental rules.
If in doubt, contact your local waste disposal authorities.
Thank you for choosing Luxibel®! Please read the manual thoroughly before bringing this device into service. If
the device was damaged in transit, don't install or use it and contact your dealer.
2. Safety Instructions
V. 03 – 08/02/2013 4 ©Velleman nv
Page 5

LX501
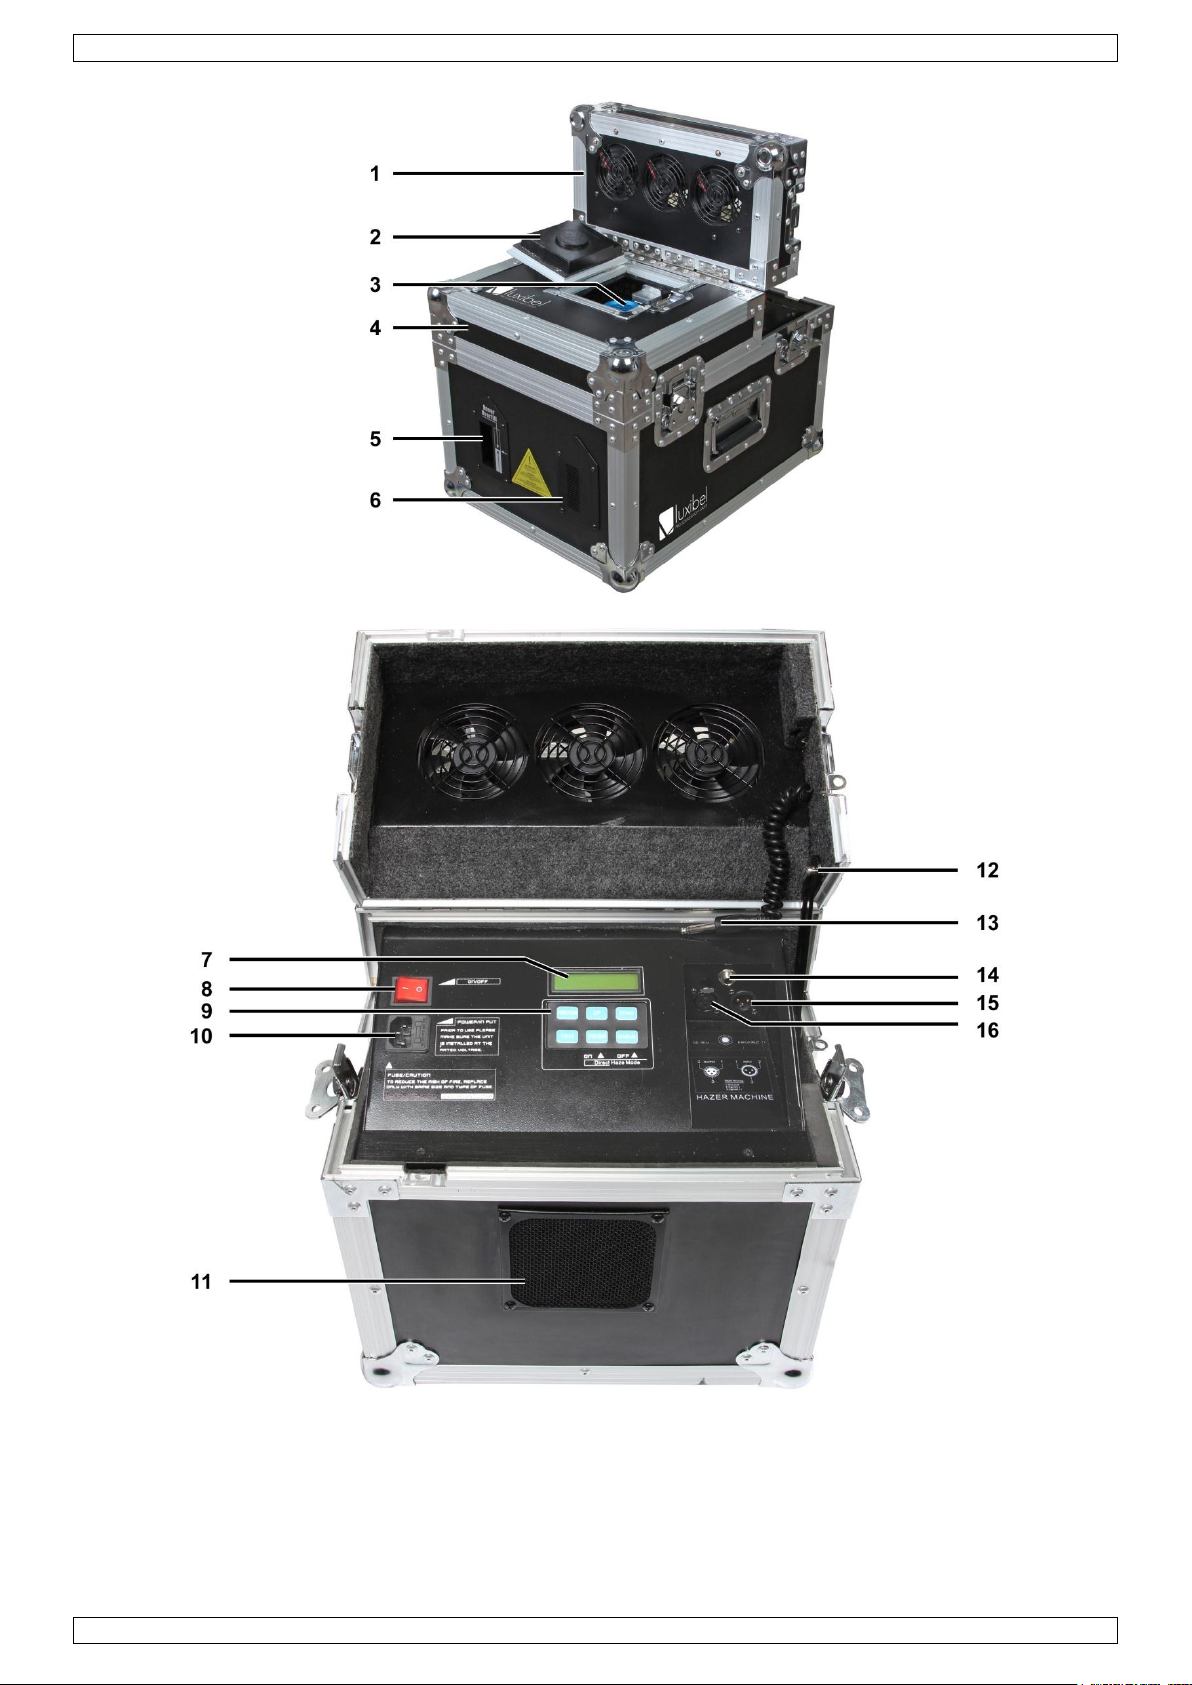
1
ventilation panel
7
display
13
ventilator plug
2
nozzle cover
8
power switch
14
ventilator jack
3
nozzle
9
control buttons
15
DMX input
4
top cover
10
power input + fuse holder
16
DMX output
5
max. fluid level indication
11
cooling fan exhaust
6
air inlet and filter
12
ventilation panel support
3. General Guidelines
Refer to the Velleman® Service and Quality Warranty on the last pages of this manual.
Familiarise yourself with the functions of the device before actually using it. Do not allow operation by
unqualified people. Any damage that may occur will most probably be due to unprofessional use of the
device.
All modifications of the device are forbidden for safety reasons. Damage caused by user modifications to
the device is not covered by the warranty.
Only use the device for its intended purpose. All other uses may lead to short circuits, burns, electroshocks,
lamp explosion, crash, etc. Using the device in an unauthorised way will void the warranty.
Damage caused by disregard of certain guidelines in this manual is not covered by the warranty and the
dealer will not accept responsibility for any ensuing defects or problems.
A qualified technician should install and service this device.
Do not switch the device on immediately after it has been exposed to changes in temperature. Protect the
device against damage by leaving it switched off until it has reached room temperature.
This device is designed for professional use on stage, in discos, theatres, etc. The LX501 should only be
used indoors with an alternating current of 230 VAC/50 Hz.
Fog machines are not designed for permanent operation: regular operation breaks will prolong their lives.
Permanent pumping may overheat and damage the pump. A duty cycle of 30 % is advisable.
Depending on the amount of fog or haze that is produced, the device may set off smoke detectors.
Keep this manual for future reference.
4. Features
equipped with an internal, maintenance-free air compressor and a sophisticated haze transfer mechanism
combination between the ultimate haze quality from high capacity, low fluid consumption and quiet
operation demanded by modern venues and professionals alike
producing a large volume of haze output
the fine translucence and staying power of the haze is even more remarkable because this hazer has no
temperature controls, hot air, or warm-up times during operation
extremely powerful, quiet and very efficient internal compressor
90° adjustable ventilation panel, adjustable fan speed
DMX controlled via 2 channels (output and ventilator control)
with easy menu setting via LCD screen, with timer
only use with LX550 haze liquid
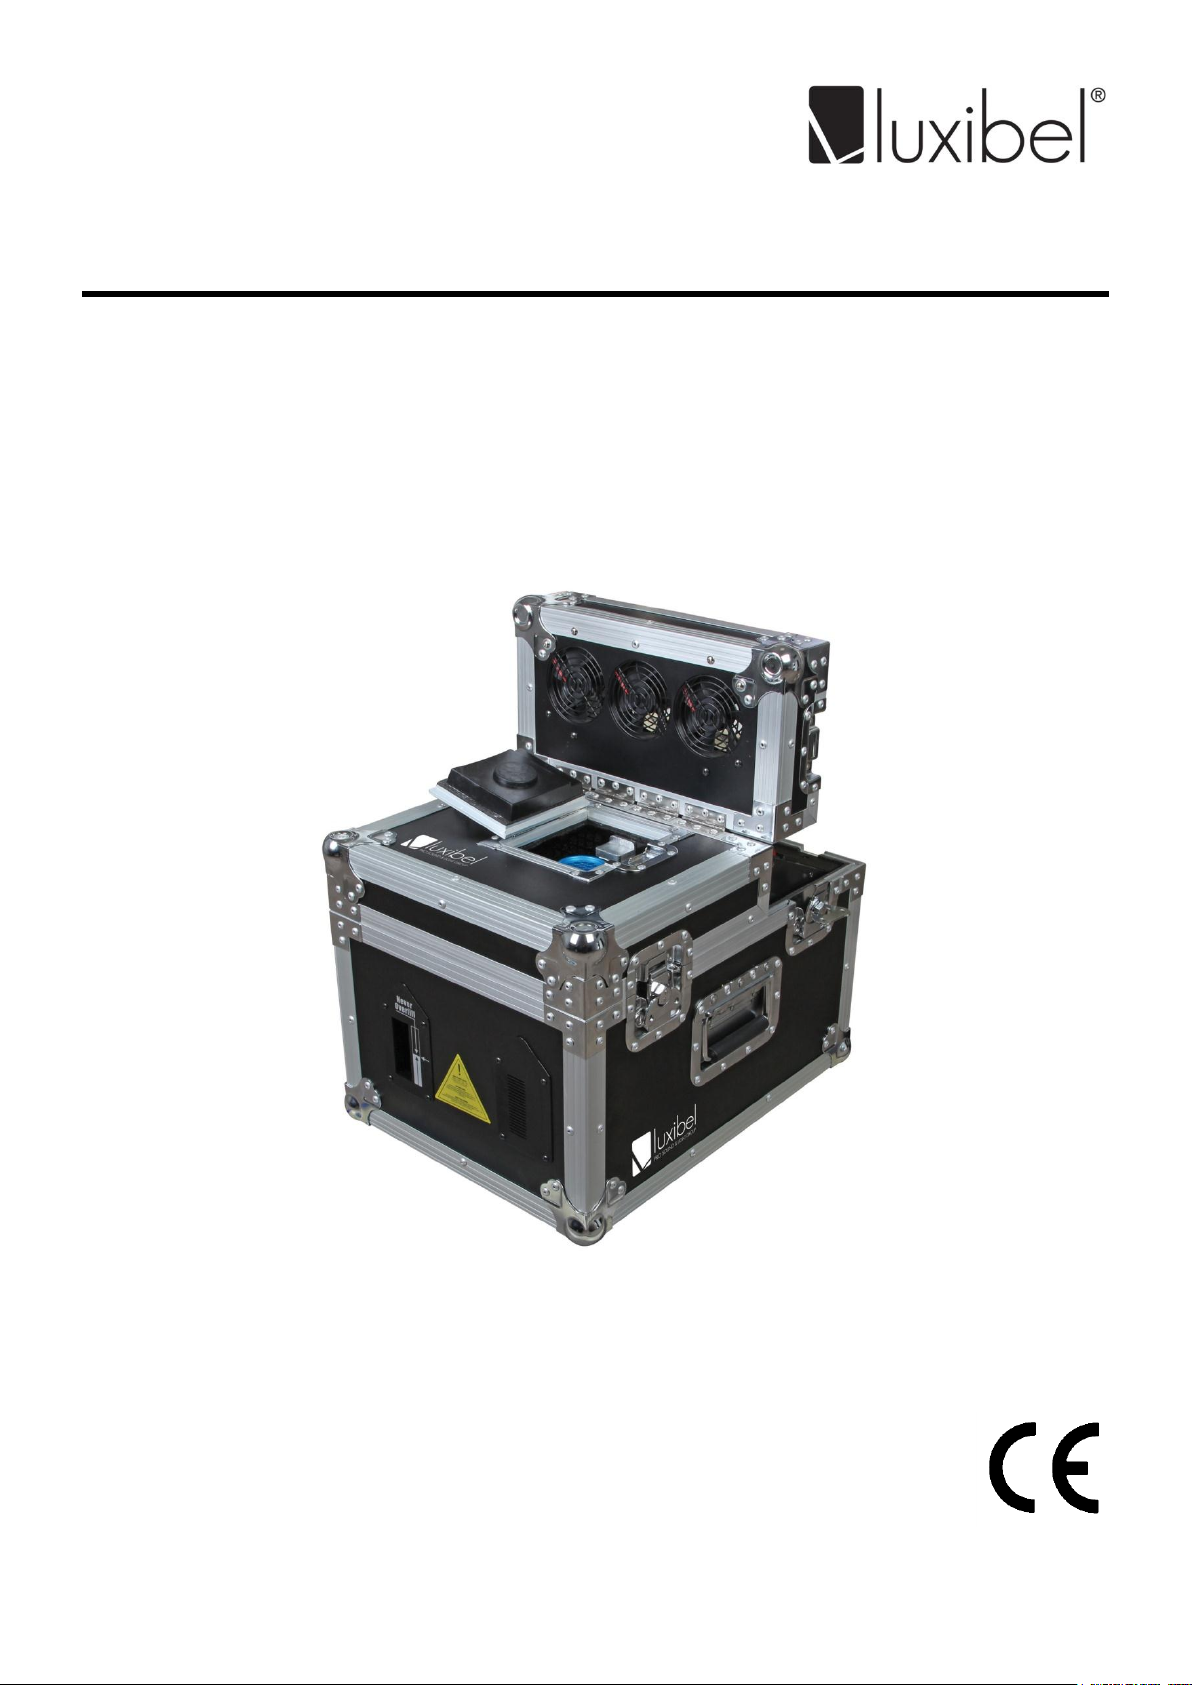
delivered in flight-case.
5. Overview
Refer to the illustrations on page 2 of this manual.
V. 03 – 08/02/2013 5 ©Velleman nv
Page 6
LX501
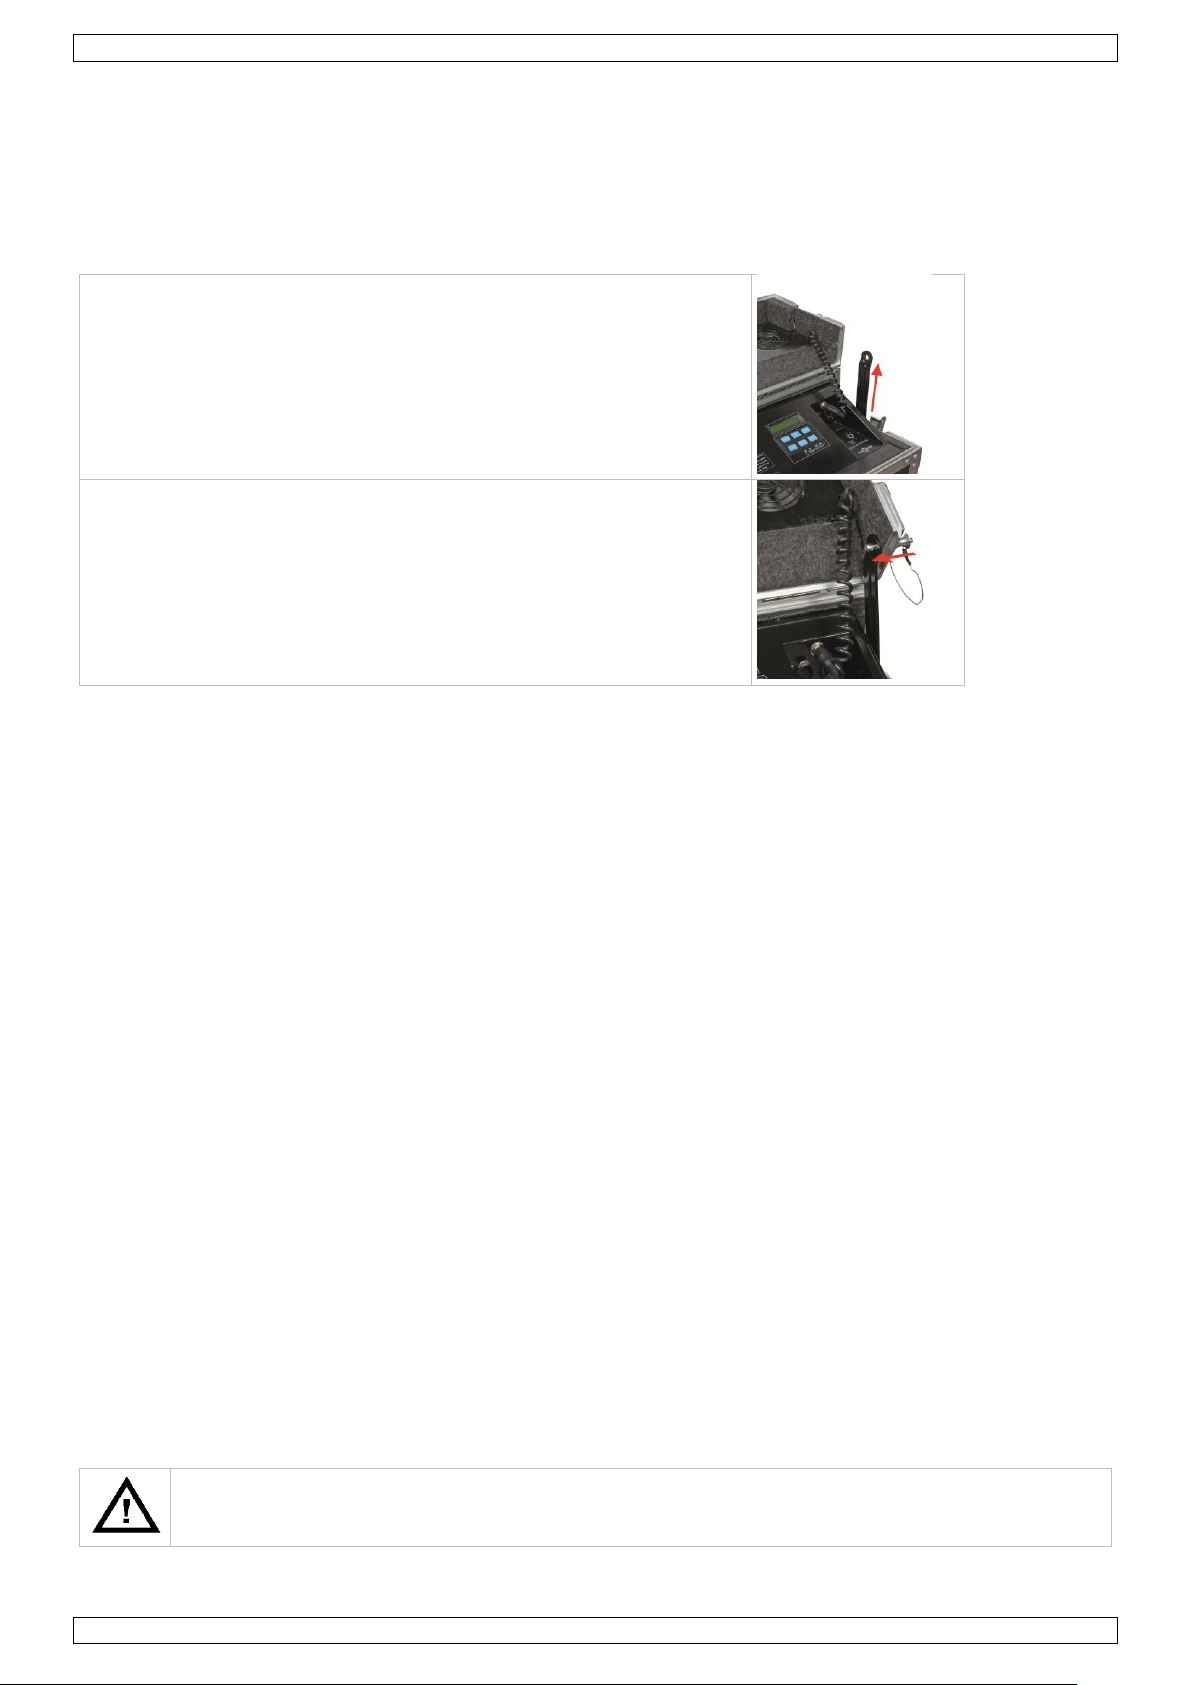
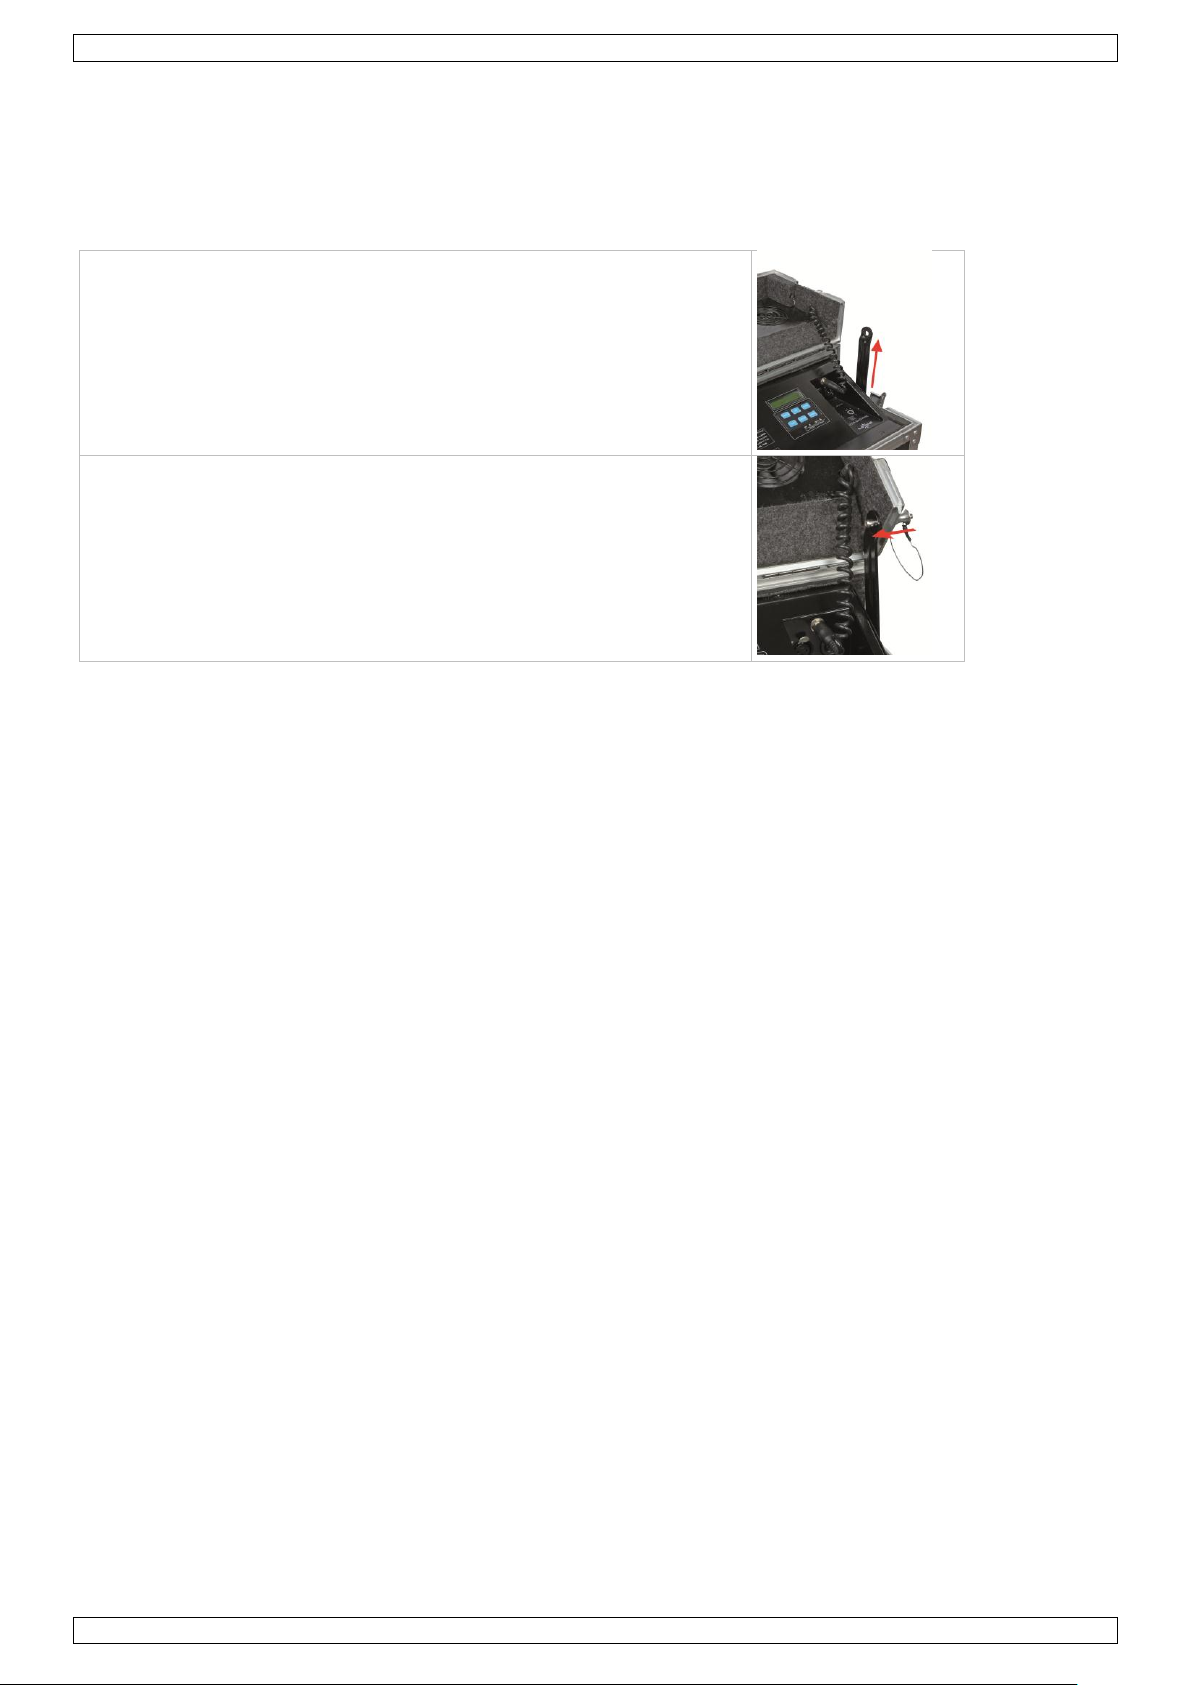
1. With the cover open, lift the bracket upwards.
2. Keep the bracket in front of the hole at the inside of the flight case
and insert the rivet. The cover will now remain open.
The device does not feature an automatic stop function when running out of fluid; the
pump will continue working. Always monitor the reservoir fluid level during operation as
the device can suffer permanent damage when running without fluid.
6. Installation
Choose a suitable mounting spot. Place the device on a level, flat surface. Do not hang the device.
Securing the flight-case cover
To make sure the cover does not close accidentally, you can secure it with the rivet, as follows.
Mounting the device
Have the device installed by a qualified person, respecting EN 60598-2-17 and all other applicable norms.
The carrying construction must be able to support 10 times the weight of the device for 1 hour without
deforming.
The installation must always be secured with a secondary attachment e.g. a safety cable.
Never stand directly below the device when it is being mounted, removed or serviced. Have a qualified
technician check the device once a year and once before you bring it into service.
Install the device in a location with few passers-by that is inaccessible to unauthorised persons.
Overhead mounting requires extensive experience: calculating workload limits, determining the installation
material to be used… Have the material and the device itself checked regularly. Do not attempt to install
the device yourself if you lack these qualifications as improper installation may result in injuries.
Make sure there is no flammable material within a 0.5 m radius of the device.
Have a qualified electrician carry out the electric connection.
Connect the device to the mains with the power plug. All devices must be powered directly off a grounded
switched circuit and cannot be run off a rheostat or dimmer circuit, even if the rheostat or dimmer channel
is used solely for 0 % to 100 % switching.
The installation has to be approved by an expert before the device is taken into service.
DMX-512 Connection
When applicable, connect an XLR cable to the female XLR output of a controller (not incl.) and the other
side to the male XLR input [15] of the LX501. Multiple LX501s can be linked through serial linking. The
linking cable should be a dual core, screened cable with XLR input and output connectors.
Maximum recommended serial data link distance is 500 meters (1640 ft). Maximum recommended number
of devices on a serial data link is 32 devices.
A DMX terminator is recommended for installations where the DMX cable has to run a long distance or is in
an electrically noisy environment (e.g. discos). The terminator prevents corruption of the digital control
signal by electrical noise. The DMX terminator is simply an XLR plug with a 120 Ω resistor between pins 2
and 3, which is then plugged into the XLR output socket [16] of the last device in the chain.
7. Operation
V. 03 – 08/02/2013 6 ©Velleman nv
Page 7

LX501
Button
Function
<FUNCTION>
accesses the menu and scrolls through the menu options
<UP>
scrolls through the menu options in ascending order, or increases a numeric value
<DOWN>
scrolls through the menu options in descending order, or decreases a numeric value
<TIMER>
starts the timer-controlled mode
<VOLUME>
starts continuous mode
<MANUAL>
starts the manual mode, and stops continuous mode
If you experience low output, mechanical noise or no output at all, unplug the device immediately. Check the
fluid level, the external fuse, and the power cord. If all appears to be working properly, plug in the unit again. If
the device will not function after 30 seconds, discontinue operation to avoid permanent damage. Return the
device to your dealer. Remember to drain the reservoir before transporting the unit.
A little smoke may continue to escape from the nozzle after operation. This is perfectly normal.
The LX501 can be used in the following modes:
stand-alone mode
with a DMX512 controller.
7.1 Control Panel Navigation
Access the control panel functions using the control buttons [9] located directly underneath the display [7].
7.2 General Use
1. Make sure the power cable is not plugged into the mains.
2. Open the top cover [4].
3. Unscrew the nozzle [3] from the reservoir.
4. Fill the reservoir with the appropriate haze fluid (order code LX550). Do not overfill the reservoir. Do not
spill liquid onto the device.
Note: If you overfill the reservoir, the device will not work. Make sure that the fluid level does not exceed
the maximum level mark [5].
5. Screw the nozzle back on the reservoir and close the top cover [4].
6. Open the nozzle cover [2].
7. Open the ventilator panel [1] and use the support [12] to adjust the angle.
8. Plug the ventilator plug [13] into the ventilator jack [14].
9. Connect one end of the power cable to the power input [10] and plug the other end into a suitable mains
outlet.
10. Set the power switch [8] to “1”.
11. Wait until the display shows “READY TO HAZE”. Refer to Stand-Alone Mode and DMX Mode for operating
instructions.
12. This device features an automatic heater cleaning function. After use, wait for 3 minutes before switching
off the power to let the machine complete the cleaning process. Then disconnect the power cable and let
the device cool down.
Caution: Unplug the ventilator plug [13] before closing the flight-case covers.
7.3 Stand-Alone Mode
In stand-alone mode, the device can run:
in timer-controlled mode: produce haze in pre-defined time intervals. You can set the duration of the haze
output and the time in between outputs.
in continuous mode: produce haze continuously.
in manual mode: manually produce haze while you press the <MANUAL> button.
Timer-Controlled Mode
1. Connect nothing to the DMX input [15] of the device.
2. Press <FUNCTION> until <INTERVAL SET> is displayed.
3. Use <UP> and <DOWN> to set the interval between two haze outputs (1 ~ 200 seconds).
4. Press <FUNCTION> until <DURATION SET> is displayed.
5. Use <UP> and <DOWN> to set the duration of the haze output (1 ~ 200 seconds).
6. Press <TIMER> to start timer-controlled operation.
7. To stop timer-controlled operation, press <TIMER> again.
V. 03 – 08/02/2013 7 ©Velleman nv
Page 8

LX501
Channel
From
To
Description
1 0 255
output volume 0 ~ 100 %
2 0 255
fan speed 0 ~ 100 %
Notes:
The device can produce continuous haze without reheating. When the interval between outputs comes to an
end, the device starts producing haze immediately.
The timer settings are saved in the internal memory. The next time you plug in the device and press
<TIMER>, it will start in timer-controlled mode with the settings as specified for the previous use.
Continuous Mode
1. Connect nothing to the DMX input [15] of the device.
2. Press <VOLUME> to start continuous operation.
3. To stop continuous operation, press <MANUAL>.
Note: The device can produce continuous haze without reheating. Each time you press <VOLUME>, the device
starts producing haze immediately.
Manual Mode
1. Connect nothing to the DMX input [15] of the device.
2. Press and hold <MANUAL>. The device starts producing haze.
3. Release the <MANUAL> button to stop.
Setting the Fan Speed
1. Press <FUNCTION> until <FAN SPEED> is displayed.
2. Use <UP> and <DOWN> to set the fan speed (0 ~ 10).
7.4 DMX Mode
This mode allows you to control the device by any universal DMX controller.
All DMX-controlled devices need a digital start address so that the correct device responds to the signals.
This digital start address is the channel number from which the device starts to “listen” to the DMX
controller. The same starting address can be used for a whole group of devices or an individual address can
be set for every device.
When all devices have the same address, all the units will “listen” to the control signal on one particular
channel. In other words: changing the settings of one channel will affect all devices simultaneously. If you
set individual addresses, each device will “listen” to a separate channel number. Changing the settings of
one channel will only affect the device in question.
In case of the 2-channel mode, you will have to set the start address of the first unit to 1 (CH1~2), the
second to 3 (1 + 2) (CH3~4), the third to 5 (3 + 2) (CH5~6), and so on. The highest start address is 511.
To set the device to work with a DMX controller:
1. Press <FUNCTION> until <DMX 512 ADD> is displayed.
2. Use <UP> and <DOWN> to set the DMX starting address (001 ~ 512).
DMX Channel Values
8. Cleaning and Maintenance
This device features an automatic heater cleaning function. After use, wait for 3 minutes before switching
off the power to let the machine complete the cleaning process.
Disconnect the device from the mains prior to maintenance activities. Let the device cool down.
All screws should be tightened and free of corrosion.
The housing, visible parts, the mounting supports and the installation location should not be deformed,
modified or tampered with; e.g. do not drill extra holes in mounting supports, do not change the location of
the connections…
The electric power supply cables must not show any damage. Have a qualified technician maintain the
device.
Clean the filters periodically.
Wipe the device regularly with a moist, lint-free cloth. Do not use alcohol or solvents.
V. 03 – 08/02/2013 8 ©Velleman nv
Page 9
LX501
power supply
230 VAC / 50 Hz
power consumption
500 W
heating time
no
tank capacity
3.2 L
fluid consumption rate
18 h per L
suitable haze liquid
LX550 oil-based professional hazer liquid
DMX512
3-pin XLR for in- and output
dimensions
590 x 450 x 450 mm
weight
33.2 kg
Do not immerse the device in any liquid.
There are no user-serviceable parts. Contact your dealer for repairs if necessary.
Replacing the Fuse
Only replace the fuse by a fuse of the same type and rating.
1. Before replacing the fuse, unplug the mains lead.
2. Wedge the fuse holder out of its housing with a flat-head screwdriver.
3. Remove the damaged fuse from its holder and replace with the exact same type of fuse.
4. Insert the fuse holder back in its place and reconnect power.
9. Technical Specifications
Use this device with original accessories only. Velleman nv cannot be held responsible in the event
of damage or injury resulting from (incorrect) use of this device.
For more info concerning this product and the latest version of this manual, please visit our website
www.luxibel.com.
The information in this manual is subject to change without prior notice.
© COPYRIGHT NOTICE
The copyright to this manual is owned by Velleman nv. All worldwide rights reserved. No part of this
manual may be copied, reproduced, translated or reduced to any electronic medium or otherwise without the
prior written consent of the copyright holder.
V. 03 – 08/02/2013 9 ©Velleman nv
Page 10
LX501
Dit toestel is niet geschikt voor gebruik door personen (kinderen inbegrepen) met verminderde
fysieke, zintuiglijke of geestelijke capaciteiten of gebrek aan ervaring en kennis, tenzij zij onder
toezicht staan of instructie hebben gekregen over het gebruik van het toestel van een persoon
die verantwoordelijk is voor hun veiligheid.
Houd toezicht op kinderen om te voorkomen dat ze met het apparaat spelen.
Waarschuwing: als de voedingskabel beschadigd is, moet deze door de fabrikant, technische
dienst, of een andere bevoegde persoon vervangen worden om elk mogelijk risico te vermijden.
Gebruik het toestel niet indien de behuizing of de kabels beschadigd zijn. Repareer het toestel
niet zelf; neem contact op met een erkende dealer.
De beschikbare netspanning mag niet hoger zijn dan de spanning in de specificaties achteraan
de handleiding.
Dit toestel valt onder beschermingsklasse I, wat wil zeggen dat het toestel geaard moet zijn.
Een geschoolde technicus moet de elektrische aansluiting verzorgen.
Trek de stekker uit het stopcontact (trek niet aan de kabel!) voordat u het toestel reinigt of vult
en als u het niet gebruikt.
Gebruik het toestel enkel binnenshuis. Bescherm tegen regen, vochtigheid en opspattende
vloeistoffen. Plaats geen objecten gevuld met vloeistof op of naast het toestel.
Dompel het toestel niet onder.
Let op: dit toestel wordt zeer warm tijdens het gebruik. Raak de hete oppervlaktes niet aan.
Laat de nevelmachine na gebruik voldoende afkoelen alvorens ze met de blote hand aan te
raken.
U mag een ingeschakelde nevelmachine nooit bedekken. Installeer de nevelmachine niet op
een tapijt of houten vloer.
Bescherm tegen stof en extreme temperaturen. Zorg dat de verluchtingsopeningen niet
verstopt geraken. Voorzie een ruimte van minstens 0.5 m aan alle zijden. Houd de luchtinlaten
steeds vrij, en reinig de filter regelmatig.
De maximale omgevingstemperatuur bedraagt 40 °C. Gebruik het toestel niet bij hogere
temperaturen.
Installeer op een goed geventileerde plaats, op een minimumafstand van 0.5 m van alle
brandbaar en explosief materiaal.
Zorg ervoor dat de neveluitlaat steeds vrij is. Richt de uitlaat nooit rechtstreeks op mensen of
dieren. Voorzie een ruimte van minstens 0.5 m aan alle zijden.
Om schade aan de gezondheid te vermijden en om de levensduur van het toestel te verlengen,
gebruik uitsluitend nevelvloeistoffen zoals beschreven in deze handleiding (bestelcode LX550).
Voeg geen olie, parfum of andere vloeistof of substantie toe aan de nevelvloeistof. Hierdoor
kunnen giftige stoffen vrijkomen of kan brandgevaar ontstaan.
Drink geen nevelvloeistof. Is dit toch het geval, bel onmiddellijk een arts. Komt nevelvloeistof
in contact met huid of ogen, spoel dan overvloedig met water.
Gebruik de nevelmachine nooit zonder vloeistof: dit kan het toestel onherroepelijk beschadigen.
Zorg ervoor dat het vloeistofreservoir altijd leeg is voordat u het toestel bewaart of vervoert.
GEBRUIKERSHANDLEIDING
1. Inleiding
Aan alle ingezetenen van de Europese Unie
Belangrijke milieu-informatie betreffende dit product
Dit symbool op het toestel of de verpakking geeft aan dat, als het na zijn levenscyclus wordt
weggeworpen, dit toestel schade kan toebrengen aan het milieu. Gooi dit toestel (en eventuele
batterijen) niet bij het gewone huishoudelijke afval; het moet bij een gespecialiseerd bedrijf
terechtkomen voor recyclage. U moet dit toestel naar uw verdeler of naar een lokaal recyclagepunt
brengen. Respecteer de plaatselijke milieuwetgeving.
Hebt u vragen, contacteer dan de plaatselijke autoriteiten betreffend de verwijdering.
Dank u voor uw aankoop! Lees deze handleiding grondig voor u het toestel in gebruik neemt. Werd het toestel
beschadigd tijdens het transport, installeer het dan niet en raadpleeg uw dealer.
2. Veiligheidsinstructies
V. 03 – 08/02/2013 10 ©Velleman nv
Page 11

LX501
Bescherm tegen schokken. Vermijd brute kracht tijdens de bediening.
1
ventilatiepaneel
7
display
13
ventilatorstekker
2
deksel neveluitlaat
8
aan/uit-schakelaar
14
ventilatoraansluiting
3
neveluitlaat
9
bedieningstoetsen
15
DMX-ingang
4
bovendeksel
10
aansluiting voedingskabel + zekering
16
DMX-uitgang
5
max.-aanduiding
vloeistofniveau
11
ventilatoruitlaat
6
luchtinlaat en filter
12
houder ventilatiepaneel
3. Algemene richtlijnen
Raadpleeg de Velleman® service- en kwaliteitsgarantie achteraan deze handleiding.
Leer eerst de functies van het toestel kennen voor u het gaat gebruiken. Ongeschoolde personen mogen dit
toestel niet gebruiken. Meestal is beschadiging het gevolg van onprofessioneel gebruik.
Om veiligheidsredenen mag u geen wijzigingen aanbrengen. Schade door wijzigingen die de gebruiker heeft
aangebracht valt niet onder de garantie.
Gebruik het toestel enkel waarvoor het gemaakt is. Andere toepassingen kunnen leiden tot kortsluitingen,
brandwonden, elektrische schokken, enz. Bij onoordeelkundig gebruik vervalt de garantie.
De garantie geldt niet voor schade door het negeren van bepaalde richtlijnen in deze handleiding en uw
dealer zal de verantwoordelijkheid afwijzen voor defecten of problemen die hier rechtstreeks verband mee
houden.
Laat dit toestel installeren en onderhouden door een geschoolde technicus.
Om beschadiging te vermijden, zet u het toestel best niet aan onmiddellijk nadat het werd blootgesteld aan
temperatuurschommelingen. Wacht tot het toestel op kamertemperatuur gekomen is.
Dit toestel is ontworpen voor professioneel gebruik op podia, in disco's, enz. U mag dit toestel enkel
binnenshuis gebruiken en aansluiten op een wisselspanning van 230 VAC/50 Hz.
Nevelmachines zijn niet ontworpen voor continue werking: regelmatige onderbrekingen doen ze langer
meegaan. Door het permanent pompen, kan de pomp verhit en beschadigd raken. Als werkcyclus wordt
30% aangeraden.
Afhankelijk van de hoeveelheid geproduceerde mist of nevel, kan het toestel rookmelders in werking zetten.
Bewaar deze handleiding voor verdere raadpleging.
4. Eigenschappen
uitgerust met een interne, onderhoudsvriendelijke luchtcompressor en een doordacht systeem voor
neveloverdracht
zeer hoge nevelkwaliteit, laag vloeistofverbruik, stille werking
produceert een grote hoeveelheid nevel
produceert een langdurige en zeer fijne nevel, zonder temperatuurregeling, zonder warme lucht, zonder
opwarmtijd
extreem krachtige, stille en zeer efficiënte interne compressor
90° regelbaar ventilatiepaneel, instelbare ventilatiesnelheid
DMX-gestuurd via 2 kanalen (output- en ventilatorcontrole)
gemakkelijke menu-instelling via LCD-scherm, met timer
enkel te gebruiken met LX550 nevelvloeistof
geleverd in een flightcase.
5. Omschrijving
Raadpleeg de afbeeldingen op pagina 2 van deze handleiding.
6. Installatie
Kies een geschikte montageplaats. Plaats het apparaat horizontaal op een plat oppervlak. Het toestel
niet ophangen.
Het deksel van de flightcase vastmaken
Om te vermijden dat het deksel van de flightcase dichtvalent, kunt u het als volgt vastmaken.
V. 03 – 08/02/2013 11 ©Velleman nv
Page 12

LX501
1. Open het deksel en trek de beugel omhoog.
2. Hou de beugel ter hoogte van de uitsparing aan de binnenkant van
het deksel en schuif de veiligheidspin erin. Het deksel blijft nu open.
Het apparaat stopt niet automatisch wanneer de tank geen rookvloeistof meer bevat; de
pomp blijft werken. Houd het reservoir gedurende het gebruik van het toestel altijd in de
gaten. U kunt het toestel beschadigen wanneer u het zonder rookvloeistof laat werken!
Het toestel monteren
Laat een geschoolde technicus dit toestel installeren conform EN 60598-2-17 en andere toepasselijke
normen.
De constructie waaraan het toestel wordt bevestigd, moet gedurende 1 uur 10 x het gewicht van dit toestel
kunnen dragen zonder te vervormen.
Maak het toestel ook vast met een veiligheidskabel.
Sta nooit recht onder het toestel wanneer u het monteert, verwijdert of schoonveegt. Laat het toestel
controleren door een geschoolde technicus voor u het in gebruik neemt en laat het 1 x per jaar volledig
nakijken.
Installeer dit toestel op een plaats waar niemand langs moet lopen, kan neerzitten of het toestel kan
aanraken.
Een degelijke praktijkervaring is vereist voor de plaatsing van dit toestel. U moet de maximumbelasting van
de draagconstructie kunnen berekenen, weten welk constructiemateriaal u kunt gebruiken en u moet het
gebruikte materiaal en het toestel regelmatig laten nakijken. Monteer het toestel niet zelf indien u er geen
ervaring mee heeft. Een slechte montage kan leiden tot verwondingen.
Verwijder alle brandbaar materiaal in een straal van 0.5 m rond het toestel.
Een geschoolde elektricien moet het toestel aansluiten.
Sluit het toestel via de stekker aan op het lichtnet. Alle toestellen moet via een geaard stopcontact gevoed
worden en mogen niet via een variabele weerstand of dimcircuit gevoed worden, ook al gebruikt u de
variabele weerstand of het dimcircuit als een 0% tot 100% inschakeling.
De installatie moet voor het eerste gebruik gekeurd worden door een expert.
DMX512-aansluiting
Indien van toepassing, sluit een XLR-kabel aan de vrouwelijke XLR-uitgang van een controller (niet
meegelev.) en de andere kant van de mannelijke XLR-ingang [15] van de LX501. U kunt verscheidene
LX501‟s aan elkaar koppelen met behulp van een seriële koppeling. Gebruik daarvoor een 2-aderige
afgeschermde kabel met XLR ingang- en uitgangsaansluitingen.
De maximaal aanbevolen kabellengte is 500 meter, het aanbevolen maximumaantal toestellen op eenzelfde
aansluiting is 32.
Een DMX eindweerstand is aanbevolen als de DMX-kabel vrij lang is of wordt gebruikt in een omgeving met
veel elektrische ruis (bv. een discotheek). De eindweerstand voorkomt corruptie van het digitale
controlesignaal door elektrische ruis. De DMX eindweerstand is niets meer dan een XLR-stekker met een
weerstand van 120 Ω van pin 2 naar 3. Deze XLR-stekker wordt dan aangesloten op de XLR-uitgang [16]
van het laatste toestel in de reeks.
7. Gebruik
Produceert het toestel weinig of geen rook of maakt het mechanische geluiden, ontkoppel het toestel dan
onmiddellijk van het lichtnet. Controleer de reservoirinhoud, de externe zekering, en de voedingskabel. Ziet u
niets verdachts, koppel het toestel terug aan het lichtnet. Werkt het toestel niet na 30 seconden, schakel het
V. 03 – 08/02/2013 12 ©Velleman nv
Page 13

LX501
Toets
Functie
<FUNCTION>
toegang tot het menu en scrollen door de verschillende menuopties
<UP>
scroll door de verschillende menuopties in stijgende volgorde, of een numerieke waarde
verhogen
<DOWN>
scroll door de verschillende menuopties in dalende volgorde, of een numerieke waarde
verlagen
<TIMER>
de tijdsgestuurde modus activeren
<VOLUME>
de continu-modus activeren
<MANUAL>
de handmatige modus activeren, de continu-modus stoppen
dan uit om permanente beschadiging te vermijden. Breng het toestel naar uw verdeler. Leeg de tank voor u het
toestel vervoert.
Na een rookvlaag te hebben geproduceerd, kan er nog een beetje rook vrijkomen. Dit is normaal.
De LX501 kan in verschillende modi gebruikt worden:
standalone
met DMX512-sturing.
7.1 Het bedieningspaneel
Bedien het paneel met behulp van de toetsen [9] onder de display [7].
7.2 Algemeen gebruik
1. Zorg ervoor dat de voedingskabel niet aangesloten is op het lichtnet.
2. Open het bovendeksel [4].
3. Draai de uitlaat [3] los van het reservoir.
4. Vul het reservoir met de geschikte nevelvloeistof (bestelcode LX550). Giet niet te veel vloeistof in het
reservoir. Mors geen vloeistof op het toestel.
Opmerking: Indien u teveel vloeistof giet in het reservoir, zal het toestel niet werken. Zorg ervoor dat het
vloeistofniveau de max.-aanduiding [5] niet overschrijdt.
5. Draai de uitlaat opnieuw op het reservoir en sluit het bovendeksel [4].
6. Open het deksel van de neveluitlaat [2].
7. Open het ventilatiepaneel [1] en gebruik de houder [12] om de hoek in te stellen.
8. Steek de ventilatorstekker [13] in de ventilatoraansluiting [14].
9. Sluit één uiteinde van de voedingskabel aan op de voedingsingang [10] en sluit het andere uiteinde aan op
een geschikt stopcontact.
10. Zet de Aan/Uit-schakelaar [8] op “1”.
11. Wacht totdat er op het scherm “READY TO HAZE” verschijnt. Raadpleeg Standalone en DMX-modus voor
gebruiksinstructies.
12. Dit toestel is uitgerust met een automatische reinigingsfunctie voor het verwarmingselement. Na gebruik,
wacht ongeveer 3 minuten voordat u het toestel uitschakelt om het reinigingsproces te voltooien. Trek de
stekker uit het stopcontact en laat het toestel afkoelen.
Opgelet: Verwijder de ventilatorstekker [13] voordat u de deksels van de flightcase sluit.
7.3 Standalone
In autonome modus, kan het toestel werken in:
in tijdsgestuurde modus: produceert nevel in voorgeprogrammeerde tijdsintervallen. Zo kan de duur van de
neveluitstoot en de tijdsduur tussen de neveluitstoten ingesteld worden.
in continu-modus: produceert voortdurend nevel.
in handmatige modus: produceert handmatig nevel bij het indrukken van de knop <MANUAL>.
Tijdsgestuurde modus
1. Sluit niets aan op de DMX-ingang [15] van het toestel.
2. Druk op <FUNCTION> tot <INTERVAL SET> op de display verschijnt.
3. Gebruik de <UP> of <DOWN> toetsen om de tijdsduur tussen twee neveluitstoten in te stellen
(1 ~ 200 seconden).
4. Druk op <FUNCTION> tot <DURATION SET> op de display verschijnt.
5. Gebruik de <UP> of <DOWN> toetsen om de duur van de neveluitstoot in te stellen (1 ~ 200 seconden).
6. Druk op <TIMER> om de tijdsgestuurde werking te activeren.
7. Om de tijdsgestuurde werking te stoppen, druk nogmaals op <TIMER>.
V. 03 – 08/02/2013 13 ©Velleman nv
Page 14

LX501
Kanaal
Van
Tot
Functie
1 0 255
uitstootvolume 0 ~ 100 %
2 0 255
ventilatorsnelheid 0 ~ 100 %
Opmerkingen:
Het toestel kan voortdurend nevel produceren zonder opnieuw op te warmen. Wanneer het interval tussen
de uitstoten afloopt, begint het toestel onmiddellijk nevel te produceren.
De tijdsinstellingen zijn opgeslagen in het interne geheugen. De volgende keer dat u het toestel aansluit en
op <TIMER> drukt, zal het onmiddellijk starten in tijdsgestuurde modus met de instellingen zoals
gespecificeerd werd voor het vorige gebruik.
Continu-modus
1. Sluit niets aan op de DMX-ingang [15] van het toestel.
2. Druk op <VOLUME> om de werking in continu-modus te starten.
3. Om de werking in continu-modus te stoppen, druk op <MANUAL>.
Opmerking: Het toestel kan voortdurend nevel produceren zonder opnieuw op te warmen. Telkens u drukt op
<VOLUME>, begint het toestel onmiddellijk nevel te produceren.
Handmatige modus
1. Sluit niets aan op de DMX-ingang [15] van het toestel.
2. Houd <MANUAL> ingedrukt. Het toestel begint nevel te produceren.
3. Laat de knop <MANUAL> los om te stoppen.
De ventilatorsnelheid instellen
1. Druk op <FUNCTION> tot <FAN SPEED> op de display verschijnt.
2. Gebruik de <UP> of <DOWN> toetsen om de ventilatorsnelheid in te stellen (0 ~ 10).
7.4 DMX-sturing
Sturing van het toestel via een universele DMX-controller.
Alle DMX-gestuurde toestellen hebben een digitaal startadres nodig, zodat het juiste toestel reageert op de
signalen. Dit digitale startadres is het kanaalnummer van waarop het toestel „luistert‟ naar het signaal van
de DMX controller. U kunt één enkel startadres gebruiken voor een groep toestellen of u kunt per toestel
een nieuw startadres ingeven.
Wanneer u een enkel startadres instelt, zullen alle toestellen „luisteren‟ naar hetzelfde kanaal. Met andere
woorden: wanneer u de instellingen voor 1 kanaal verandert, zullen alle toestellen er tegelijk op reageren.
Wanneer u verschillende adressen instelt, dan luistert elk toestel naar een ander kanaal. Met andere
woorden: wanneer u de instellingen van een kanaal verandert, zal enkel het toestel op dat kanaal reageren.
In het geval van de 2-kanaalsmodus, zult u het startadres van het eerste toestel op 1 (CH1~2) moeten
instellen, van het tweede toestel op 3 (1 + 2) (CH3~4), van het derde op 5 (3 + 2) (CH5~6), enz. De
hoogste startwaarde is 511.
Om het toestel in te stellen met DMX-sturing:
1. Druk op <FUNCTION> tot < DMX 512 ADD> op de display verschijnt.
2. Gebruik de <UP> of <DOWN> toetsen om het DMX-adres in te stellen (001 ~ 512).
DMX512-waarden per kanaal
8. Reiniging en onderhoud
Dit toestel is uitgerust met een automatische reinigingsfunctie voor het verwarmingselement. Na gebruik,
wacht ongeveer 3 minuten voordat u het toestel uitschakelt om het reinigingsproces te voltooien.
Ontkoppel het toestel van het lichtnet voor u aan onderhoudswerkzaamheden begint. Laat het toestel
afkoelen.
Alle gebruikte schroeven moeten goed zijn aangespannen en mogen geen sporen van roest vertonen.
De behuizing, de montagebeugels en de montageplaats mogen niet vervormd zijn of aangepast worden
(geen extra gaten in montagebeugels, aansluitingen niet verplaatsen, enz.).
De voedingskabels mogen niet beschadigd zijn. Laat het toestel onderhouden door een geschoolde
technicus.
Reinig de filters regelmatig.
Maak het toestel geregeld schoon met een vochtige, niet pluizende doek. Gebruik geen alcohol of solventen.
V. 03 – 08/02/2013 14 ©Velleman nv
Page 15

LX501
voeding
230 VAC / 50 Hz
verbruik
500 W
opwarmtijd
geen
tankinhoud
3.2 L
vloeistofverbruik
18 u per liter
geschikte nevelvloeistof
LX550 professionele nevelvloeistof op oliebasis
DMX512
3-polige XLR-stekker voor in- en uitgang
afmetingen
590 x 450 x 450 mm
gewicht
33.2 kg
Dompel het toestel niet onder.
De gebruiker mag geen onderdelen vervangen. Contacteer uw plaatselijke verdeler voor eventuele
reparaties.
De zekering vervangen
Vervang een gesprongen zekering enkel door een zekering van hetzelfde type.
1. Ontkoppel het toestel van de netspanning voor u de zekering vervangt.
2. Maak de zekeringhouder los met behulp van een schroevendraaier met platte kop.
3. Verwijder de oude zekering en vervang door een zekering van hetzelfde type.
4. Plaats de zekeringhouder terug in het toestel en schakel de stroom weer in.
9. Technische specificaties
Gebruik dit toestel enkel met originele accessoires. Velleman nv is niet aansprakelijk voor schade of
kwetsuren bij (verkeerd) gebruik van dit toestel.
Voor meer informatie over dit product en de laatste versie van deze handleiding, zie
www.luxibel.com.
De informatie in deze handleiding kan te allen tijde worden gewijzigd zonder voorafgaande
kennisgeving.
© AUTEURSRECHT
Velleman nv heeft het auteursrecht voor deze handleiding. Alle wereldwijde rechten voorbehouden.
Het is niet toegestaan om deze handleiding of gedeelten ervan over te nemen, te kopiëren, te vertalen, te
bewerken en op te slaan op een elektronisch medium zonder voorafgaande schriftelijke toestemming van de
rechthebbende.
V. 03 – 08/02/2013 15 ©Velleman nv
Page 16

LX501
Cet appareil ne convient pas aux personnes (y compris enfants) qui possèdent des capacités
physiques, sensorielles ou mentales réduites, ou manquent d‟expérience et de connaissances,
sauf si elles ont reçu une supervision ou des instructions concernant l‟utilisation de l‟appareil de
la part d‟une personne responsable de leur sécurité.
Veiller à ce que les enfants ne puissent pas jouer avec l‟appareil.
Avertissement : si le câble d'alimentation est endommagé, il doit être remplacé par le
fabricant, son service technique out toute autre personne qualifiée pour éviter tout risque.
Ne pas utiliser cet appareil en cas d‟endommagement visible au boîtier ou au câble. Confier
toute réparation à votre revendeur agrée.
La tension réseau ne peut pas dépasser la tension mentionnée dans les spécifications à la fin de
cette notice.
Cet appareil ressort à la classe de protection I, ce qui implique que l‟appareil doit être mis à la
terre. Un technicien qualifié doit établir la connexion électrique.
Débrancher l‟appareil s‟il n‟est pas utilisé, pour le nettoyer ou pendant que le réservoir est
rempli. Tirer la fiche pour débrancher l'appareil; non pas le câble.
Utiliser cet appareil uniquement à l'intérieur. Protéger de la pluie, de l‟humidité et des
projections d‟eau. Ne jamais placer d‟objets remplis de liquides au-dessus ou à proximité de
l‟appareil.
Ne jamais immerger l‟appareil dans un liquide.
Attention : l‟appareil chauffe pendant l‟usage. Ne pas toucher les surfaces chaudes. Après
extinction, laisser suffisamment refroidir l‟appareil avant de le manier.
Ne jamais couvrir l‟appareil et ne pas l‟installer sur un tapis ou un revêtement en bois.
Protéger contre la poussière. Protéger contre la chaleur extrême. Veiller à ce que les fentes de
ventilation ne soient pas bloquées. Laisser une distance de minimum 0.5 m entre l‟appareil et
tout autre objet. Veiller à ce que l‟entrée d‟air ne soit pas bloquée, et que le filtre soit
régulièrement nettoyé.
La température ambiante maximale s'élève à 40 °C. Ne pas utiliser l'appareil à des
températures plus élevées.
Installer l'appareil dans un endroit bien ventilé, à une distance minimale de 0.5 m de tout
matériau inflammable ou explosif.
S'assurer que la sortie à brouillard ne soit pas obstruée. Ne jamais diriger directement le jet
vers des personnes ou des animaux. Laisser une distance de minimum 0.5 m entre l‟appareil et
tout autre objet. Pour éviter tout risque de santé et pour prolonger la durée de vie de l'appareil,
n'utiliser que les liquides à brouillard spécifiés dans ce mode d'emploi (code de commande
LX550). Ne pas ajouter de l'huile, du parfum, ou tout autre liquide ou substance au liquide à
brouillard. Des vapeurs toxiques peuvent se dégager ou causer un incendie.
Ne pas ingérer le liquide à brouillard. Consulter immédiatement un médecin après ingestion. Si
le liquide entre en contact avec la peau ou les yeux, rincer abondamment avec de l'eau.
Ne jamais faire fonctionner l'appareil sans liquide : cela pourrait causer des dommages
irrévocables à l'appareil.
Toujours vidanger le réservoir de fluide avant de stocker ou de transporter l'appareil.
MODE D’EMPLOI
1. Introduction
Aux résidents de l'Union européenne
Des informations environnementales importantes concernant ce produit
Ce symbole sur l'appareil ou l'emballage indique que l‟élimination d‟un appareil en fin de vie peut
polluer l'environnement. Ne pas jeter un appareil électrique ou électronique (et des piles éventuelles)
parmi les déchets municipaux non sujets au tri sélectif ; une déchèterie traitera l‟appareil en question.
Renvoyer les équipements usagés à votre fournisseur ou à un service de recyclage local. Il convient de
respecter la réglementation locale relative à la protection de l‟environnement.
En cas de questions, contacter les autorités locales pour élimination.
Nous vous remercions de votre achat ! Lire la présente notice attentivement avant la mise en service de
l‟appareil. Si l‟appareil a été endommagé pendant le transport, ne pas l‟installer et consulter votre revendeur.
2. Consignes de sécurité
V. 03 – 08/02/2013 16 ©Velleman nv
Page 17

LX501
Protéger contre les chocs et le traiter avec circonspection pendant l‟opération.
1
panneau de ventilation
7
afficheur
13
fiche de ventilateur
2
couvercle de l'embouchure
8
interrupteur marche/arrêt
14
prise jack de ventilateur
3
embouchure
9
touches
15
entrée DMX
4
couvercle supérieur
10
entrée d‟alimentation + fusible
16
sortie DMX
5
indication de niveau maximum
de liquide
11
sortie du ventilateur
6
entrée d'air et filtre
12
support du panneau de
ventilation
3. Directives générales
Se référer à la garantie de service et de qualité Velleman® en fin de notice.
Se familiariser avec le fonctionnement de l‟appareil avant de l‟utiliser. Ne pas permettre pas aux personnes
non qualifiées d‟opérer cet appareil. La plupart des dégâts sont causés par un usage non professionnel.
Toute modification est interdite pour des raisons de sécurité. Les dommages occasionnés par des
modifications par le client ne tombent pas sous la garantie.
N‟utiliser le spot qu‟à sa fonction prévue. Tout autre usage peut causer des courts-circuits, des brûlures,
des électrochocs, etc. Un usage impropre annule d'office la garantie.
La garantie ne s‟applique pas aux dommages survenus en négligeant certaines directives de cette notice et
votre revendeur déclinera toute responsabilité pour les problèmes et les défauts qui en résultent.
Confier l‟installation et l‟entretien à un personnel qualifié.
Ne pas brancher l‟appareil après exposition à des variations de température. Afin d‟éviter des dommages,
attendre jusqu‟à ce que l‟appareil ait atteint la température ambiante avant de l‟utiliser.
Cet appareil a été développé pour usage professionnel dans des discothèques, des théâtres, etc. Employer
cet appareil à l‟intérieur et le connecter à une source de courant CA de 230 VCA/50 Hz.
Une machine à brouillard n‟est pas conçue pour une opération continue. Des pauses régulières prolongeront
sa vie. Le pompage permanent risque de surchauffer ou d'endommager la pompe. Un cycle de service de
30% est recommandé.
Tout selon la quantité de brume ou de brouillard dégagée, l'appareil peut faire déclencher les détecteurs de
fumée.
Garder cette notice pour toute référence ultérieure.
4. Caractéristiques
équipée d'un système de transmission de brouillard et un compresseur d'air interne qui n'exige aucune
maintenance
haute qualité de brouillard, faible consommation de liquide à brouillard, silencieuse
génère une grande quantité de brouillard
produit un brouillard très fin qui reste longtemps sans réglage de température, sans air chaud, sans
préchauffage
compresseur interne haute efficacité, extrêmement puissant et silencieux
panneau de ventilation ajustable sur 90°, vitesse de ventilation réglable
pilotage DMX depuis 2 canaux (contrôle de sortie et du ventilateur)
configuration de menu facile depuis afficheur LCD, avec temporisateur
seulement utiliser avec le liquide à brouillard LX550
livrée dans un flight-case.
5. Description
Se référer aux illustrations en page 2 de cette notice.
V. 03 – 08/02/2013 17 ©Velleman nv
Page 18

LX501
1. Ouvrez le couvercle et levez le support.
2. Maintenez le support à hauteur de la fente et insérez le rivet. Le
couvercle restera ouvert.
6. Installation
Choisir un emplacement approprié. Installer sur une surface stable et horizontale. Ne pas suspendre
l'appareil.
Fixer le couvercle du flight-case
Pour faire en sorte que le couvercle ne referme pas accidentellement, vous pouvez le fixer à l‟aide du rivet,
comme suit.
Montage de l’appareil
Un technicien qualifié doit installer l‟appareil en respectant EN 60598-2-17 et toute autre norme applicable.
La construction portante de l‟appareil doit être capable de supporter 10 x le poids de l‟appareil pendant une
heure, sans qu‟une déformation de la construction en résulte.
Fixer votre LX501 à l‟aide d‟un câble de sécurité (sécurité supplémentaire).
Éviter de vous positionner en dessous de l‟appareil pour l‟enlever ou lors du montage ou du nettoyage. Un
technicien qualifié doit réviser l‟appareil avant la mise en service. Organiser une révision minutieuse
annuelle.
Installer l‟appareil à un endroit où personne ne peut passer ou s‟asseoir et où personne ne peut le toucher.
L‟installation de cet appareil exige une solide expérience pratique : le calcul de la charge max. de la
construction, les matériaux d‟installation requis etc. De temps en temps, un technicien qualifié doit vérifier
la construction portante et l‟appareil même. Ne pas essayer d‟installer cet appareil vous-même si vous
n‟avez pas les qualifications requises ; une installation incorrecte peut entraîner des blessures.
Enlever tout matériau inflammable dans un rayon de 0.5 m autour de l‟appareil.
Un électricien qualifié doit établir la connexion électrique.
Brancher l‟appareil sur le réseau électrique par la fiche d‟alimentation. Tout projecteur doit être branché sur
une prise de courant mise à la terre et ne peut pas être alimenté depuis un rhéostat ou un circuit variateur,
même si le rhéostat ou le circuit variateur est utilisé comme un interrupteur marche/arrêt (de 0% à 100%).
Un expert doit approuver l‟installation avant qu‟elle puisse être prise en service.
Connexion DMX512
Si nécessaire, connecter un câble à fiche XLR à la sortie XLR femelle de votre contrôleur (non incl.) et
l‟autre fiche XLR mâle à l‟entrée [15] du LX501. Il est possible de relier plusieurs LX501 à partir d‟une
connexion sérielle. Utiliser un câble de connexion blindé à 2 conducteurs avec des connecteurs d‟entrée et
de sortie XLR.
Longueur maximale de la connexion : 500 mètres. Nombre maximal d‟unités sur une connexion
sérielle : 32.
Une résistance de terminaison DMX est à recommander si le câble DMX doit couvrir une grande distance ou
s‟il est utilisé dans un environnement avec beaucoup de bruit électrique (p.ex. une discothèque). La
résistance de terminaison prévient la corruption du signal de contrôle numérique par le bruit électrique. La
résistance de terminaison DMX n‟est rien d‟autre qu‟une fiche XLR avec une résistance de 120 Ω de
broche 2 vers broche 3. Cette fiche XLR est connectée à la sortie XLR [16] du dernier appareil de la série.
V. 03 – 08/02/2013 18 ©Velleman nv
Page 19
LX501
L’appareil ne s’arrête pas automatiquement lorsque le réservoir est vide ; la pompe
continue à fonctionner. Tenir donc l’appareil à l’œil pendant son service. L’appareil peut
s’endommager s’il tourne sans liquide fumigène !
Touche
Fonction
<FUNCTION>
accès au menu et défilement du menu
<UP>
défilement du menu de bas en haut, ou augmenter une valeur numérique
<DOWN>
défilement du menu de haut en bas, ou diminuer une valeur numérique
<TIMER>
activer le mode temporisé
<VOLUME>
activer le mode continu
<MANUAL>
activer le mode manuel, et désactiver le mode continu
7. Emploi
Si l‟appareil ne produit que peu ou pas de brouillard du tout ou des bruits mécaniques, débrancher-le tout de
suite. Contrôler le niveau du liquide, le fusible externe et le cordon d‟alimentation. Si tous apparaissent dans un
état de bon fonctionnement, rebrancher l‟appareil. Si celui-ci ne fonctionne pas après 30 secondes, interrompre
son utilisation pour éviter de l‟endommager davantage. Porter l‟appareil chez votre revendeur. N‟oublier pas de
vidanger le réservoir avant le transport.
Il est normal qu‟un peu de fumée s‟échappe de la bouche après l‟opération.
Le LX501 peut être utilisé en plusieurs modes de fonctionnement :
mode autonome
avec pilotage DMX512.
7.1 Navigation dans le menu
Accéder aux fonctions en utilisant les touches [9] au bas de l‟afficheur [7].
7.2 Usage général
1. S'assurer que le cordon d'alimentation ne soit pas branché sur le secteur.
2. Ouvrir le couvercle supérieur [4].
3. Desserrer l'embouchure [3] du réservoir.
4. Remplir le réservoir avec du liquide à brouillard approprié (code de commande LX550). Ne pas remplir
excessivement le réservoir. Ne pas renverser de liquide sur l'appareil.
Remarque : Si le réservoir est rempli excessivement, l'appareil ne fonctionnera pas. S'assurer que le
niveau de fluide ne dépasse pas l'indication de niveau maximum [5].
5. Resserrer l'embouchure sur le réservoir et fermer le couvercle supérieur [4].
6. Ouvrir le couvercle de l'embouchure [2].
7. Ouvrir le panneau de ventilation [1] et utiliser le support [12] pour ajuster l'angle.
8. Brancher la fiche du ventilateur [13] dans la prise jack du ventilateur [14].
9. Connecter une extrémité du cordon d'alimentation à l'entrée d'alimentation [10] et brancher l'autre
extrémité dans une prise secteur appropriée.
10. Régler l'interrupteur marche/arrêt [8] sur “1”.
11. Patienter jusqu'à ce que “READY TO HAZE” s'affiche. Se référer à Mode autonome et Mode DMX pour des
instructions d'utilisation.
12. Cet appareil est doté d'une fonction de nettoyage automatique pour l'élément d'échauffement. Après
utilisation, patienter pendant 3 minutes avant d'éteindre la machine afin de compléter le processus de
nettoyage. Puis déconnecter le cordon d'alimentation et laisser refroidir l'appareil.
Attention : Déconnecter la fiche du ventilateur [13] avant de fermer les couvercles du flight-case.
7.3 Mode autonome
En mode autonome, l'appareil peut fonctionner en :
en mode temporisé : produit du brouillard à des intervalles préprogrammés. Il est possible de régler la
durée du jet de brouillard et l'écart entre deux jets de brouillard.
en mode continu : produit du brouillard en continu.
en mode manuel : produit du brouillard en appuyant sur le bouton <MANUAL>.
Mode temporisé
1. Ne rien connecter à l'entrée DMX [15] de l'appareil.
2. Enfoncer la touche <FUNCTION> jusqu‟à ce que <INTERVAL SET> s‟affiche.
V. 03 – 08/02/2013 19 ©Velleman nv
Page 20

LX501
Canal
De
À
Description
1 0 255
volume de sortie 0 ~ 100 %
2 0 255
vitesse du ventilateur 0 ~ 100 %
3. Utiliser les touches <UP> ou <DOWN> pour régler l'intervalle entre deux jets de brouillard
(1 ~ 200 secondes).
4. Enfoncer la touche <FUNCTION> jusqu‟à ce que <DURATION SET> s‟affiche.
5. Utiliser les touches <UP> ou <DOWN> pour régler la durée du jet de brouillard (1 ~ 200 secondes).
6. Enfoncer la touche <TIMER> pour activer le fonctionnement en mode temporisé.
7. Pour arrêter le fonctionnement en mode temporisé, appuyer de nouveau sur <TIMER>.
Remarques :
L'appareil peut produire du brouillard en continu sans se réchauffer. Lorsque l'intervalle entre deux jets se
termine, l'appareil commence immédiatement à produire du brouillard.
Les réglages du minuteur sont sauvegardés dans la mémoire interne. La prochaine fois que l'appareil sera
connecté et le bouton <TIMER> appuyé, l'appareil démarrera en mode temporisé avec les réglages
spécifiés pour l'utilisation précédente.
Mode continu
1. Ne rien connecter à l'entrée DMX [15] de l'appareil.
2. Enfoncer la touche <VOLUME> pour lancer le fonctionnement en mode continu.
3. Pour arrêter le fonctionnement en mode continu, appuyer sur <MANUAL>.
Remarque : L'appareil peut produire du brouillard en continu sans se réchauffer. A chaque appui sur
<VOLUME>, l'appareil commence immédiatement à produire du brouillard.
Mode manuel
1. Ne rien connecter à l'entrée DMX [15] de l'appareil.
2. Maintenir enfoncé <MANUAL>. L'appareil commence à produire du brouillard.
3. Relâcher le bouton <MANUAL> pour arrêter.
Régler la vitesse du ventilateur
1. Enfoncer la touche <FUNCTION> jusqu‟à ce que <FAN SPEED> s‟affiche.
2. Utiliser les touches <UP> ou <DOWN> pour régler la vitesse du ventilateur (0 ~ 10).
7.4 Mode de pilotage DMX
Ce mode permet de piloter votre projecteur sans contrôleur DMX.
Tous les appareils pilotés par un signal DMX demandent une adresse de départ DMX pour assurer que les
appareils corrects réagissent sur les signaux de contrôle. Cette adresse de départ numérique indique le
numéro de canal sur lequel l‟appareil écoute le contrôleur DMX. Il y a le choix entre une seule adresse de
départ pour toute une série d‟appareils ou une adresse de départ par appareil.
Dans le cas d‟une seule adresse, tous les appareils « écouteront » les mêmes signaux, sur un seul canal.
Tous les appareils seront donc influencés lorsque les réglages d‟un seul canal seront changés. Avec des
adresses de départ individuelles, chaque appareil « écoutera » son propre canal. Par conséquent, un
ajustement des réglages d‟un canal n‟influence que l'appareil sur ce canal.
Pour le mode à 2 canaux, l‟adresse de départ du premier appareil est 1 (CH1~2), du deuxième 3 (1 + 2)
(CH3~4), du troisième 5 (3 + 2) (CH5~6), etc. La valeur de départ la plus élevée est de 511.
Régler l'appareil pour un fonctionnement avec pilotage DMX :
1. Enfoncer la touche <FUNCTION> jusqu‟à ce que <DMX 512 ADD> s‟affiche.
2. Utiliser les touches <UP> ou <DOWN> pour régler l'adresse DMX (001 ~ 512).
Valeurs DMX par canal
8. Nettoyage et entretien
Cet appareil est doté d'une fonction de nettoyage automatique pour l'élément d'échauffement. Après
utilisation, patienter pendant 3 minutes avant d'éteindre la machine afin de compléter le processus de
nettoyage.
Débrancher l‟appareil avant de le nettoyer. Laisser refroidir l'appareil.
Serrer les écrous et les vis et vérifier qu‟ils ne rouillent pas.
V. 03 – 08/02/2013 20 ©Velleman nv
Page 21
LX501
alimentation
230 VCA / 50 Hz
consommation
500 W
temps d'échauffement
non
capacité du réservoir
3.2 L
consommation de liquide
18 h par L
liquide fumigène approprié
LX550 liquide à brouillard à base d'huile professionnel
DMX512
connecteur XLR à 3 broches pour entrée et sortie
dimensions
590 x 450 x 450 mm
poids
33.2 kg
Le boîtier, les supports de montage et la construction portante ne peuvent pas être déformés, adaptés ou
bricolés p.ex. pas de trous additionnels dans un support, ne pas déplacer les connexions etc.
Les câbles d'alimentation ne peuvent pas être endommagés. Un technicien qualifié doit entretenir l‟appareil.
Nettoyer les filtres régulièrement.
Essuyer l‟appareil régulièrement avec un chiffon humide non pelucheux. Éviter l‟usage d‟alcool et de
solvants.
Ne jamais immerger l‟appareil dans un liquide.
Il n‟y a aucune pièce maintenable par l‟utilisateur. Confier toute réparation à votre revendeur agrée.
Remplacement du fusible
Remplacer le fusible défectueux par un exemplaire identique.
1. Débrancher l‟appareil du réseau avant de remplacer le fusible.
2. Retirer le porte-fusible de son emplacement à l‟aide d‟un tournevis à lame plate.
3. Retirer le fusible défectueux et remplacer par un fusible du même type.
4. Réinsérer le porte-fusible dans son emplacement et reconnecter l‟alimentation.
9. Spécifications techniques
N’employer cet appareil qu’avec des accessoires d’origine. La SA Velleman ne peut, dans la mesure
conforme au droit applicable être tenue responsable des dommages ou lésions (directs ou indirects)
pouvant résulter de l’utilisation de cet appareil.
Pour plus d’information concernant cet article et la dernière version de cette notice, visiter notre
site web www.luxibel.com.
Toutes les informations présentées dans cette notice peuvent être modifiées sans notification
préalable.
© DROITS D’AUTEUR
SA Velleman est l’ayant droit des droits d’auteur pour cette notice. Tous droits mondiaux réservés.
Toute reproduction, traduction, copie ou diffusion, intégrale ou partielle, du contenu de cette notice par quelque
procédé ou sur tout support électronique que se soit est interdite sans l‟accord préalable écrit de l‟ayant droit.
V. 03 – 08/02/2013 21 ©Velleman nv
Page 22

LX501
Este aparato no es apto para personas (niños incl.) con capacidades físicas, sensoriales o
mentales reducidas ni personas con una falta de experiencia y conocimientos del producto,
salvo si están bajo la vigilancia de una persona que pueda garantizar la seguridad.
Para proteger a los niños de los peligros de los aparatos eléctricos, nunca los deje solos con el
aparato sin supervisión.
Advertencia: Un cable de alimentación dañado debe ser reemplazado por el distribuidor, un
técnico u otra persona cualificada para evitar cualquier peligro.
No utilice este aparato en cas si la caja o el cable están dañados. La reparación debe ser
realizada por personal especializado.
Asegúrese de que la tensión de red no sea mayor que la tensión indicada en las
especificaciones.
Este aparato pertenece a la clase de protección I. Por lo tanto, es esencial que el aparato esté
puesto a tierra. La conexión eléctrica debe llevarse a cabo por un técnico cualificado.
Desconecte siempre el aparato si no va a usarlo durante un largo período de tiempo, antes de
limpiarlo o antes de llenar el depósito. Tire siempre del enchufe para desconectar el cable de
red, nunca del propio cable.
Utilice el aparato sólo en interiores. No exponga este equipo a lluvia, humedad ni a ningún
tipo de salpicadura o goteo. Nunca ponga un objeto con líquido en el aparato.
Nunca sumerja el aparato en un líquido.
¡Ojo! La caja del aparato se calienta durante su operación. Nunca toque las superficies
calientes. Después de haber desactivado el aparato, deje que se enfríe suficientemente antes
de manejarlo.
Nunca cubra el aparato y no lo instale en una alfombra o un suelo de madera.
No exponga este equipo a polvo. No exponga este equipo a temperaturas extremas. Asegúrese
de que los orificios de ventilación no estén bloqueados. Deje una distancia de mín. 0.5 m entre
el aparato y cualquier otro objeto. Asegúrese de que nunca bloquee el orificio de ventilación.
Limpie el filtro regularmente.
La temperatura ambiente máx. es de 40 °C. No sobrepase esta temperatura.
Instale el aparato en un lugar bien aireado, a una distancia mínima de 0.5 m de cualquier
material inflamable o explosivo.
No bloquee nunca la salida de humo. Nunca dirija la boquilla directamente a personas ni
animales. Mantenga una distancia de mín. 0.5m entre la boquilla y cualquier obstáculo.
Para evitar riesgos de salud y prolongar la duración de vida del aparato, utilice sólo el líquido
adecuado (referencia LX550). Nunca añada aceite, perfume ni cualquier otra sustancia al
líquido de humo. Esto podría causar un humo tóxico o incluso un incendio.
No beba el líquido de humo. Contacte con un médico inmediatamente si se traga líquido. Si hay
contacto con los ojos o la piel, enjuáguese con abundante agua.
Nunca deje funcionar el aparato sin líquido: Esto podría dañar el aparato.
Vacíe siempre el depósito antes de almacenar o transportar el aparato.
MANUAL DEL USUARIO
1. Introducción
A los ciudadanos de la Unión Europea
Importantes informaciones sobre el medio ambiente concerniente a este producto
Este símbolo en este aparato o el embalaje indica que, si tira las muestras inservibles, podrían dañar
el medio ambiente.
No tire este aparato (ni las pilas, si las hubiera) en la basura doméstica; debe ir a una empresa
especializada en reciclaje. Devuelva este aparato a su distribuidor o a la unidad de reciclaje local.
Respete las leyes locales en relación con el medio ambiente.
Si tiene dudas, contacte con las autoridades locales para residuos.
¡Gracias por haber comprado la LX501! Lea atentamente las instrucciones del manual antes de usarla. Si el
aparato ha sufrido algún daño en el transporte no lo instale y póngase en contacto con su distribuidor.
2. Instrucciones de seguridad
V. 03 – 08/02/2013 22 ©Velleman nv
Page 23

LX501
No agite el aparato. Evite usar excesiva fuerza durante el manejo y la instalación.
1
panel de ventiladores
7
pantalla
13
conector de ventilador macho
2
tapa de la salida de humo
8
interruptor ON/OFF
14
conexión de ventilador hembra
3
salida de humo
9
botones de control
15
entrada DMX
4
tapa
10
entrada para cable de
alimentación + fusible
16
salida DMX
5
indicación del nivel máx.
11
salida para el ventilador de
enfriamiento
6
orificios de ventilación y filtro
12
soporte para el panel de
ventiladores
3. Normas generales
Véase la Garantía de servicio y calidad Velleman® al final de este manual del usuario.
Familiarícese con el funcionamiento del aparato. Sólo personas cualificadas pueden manejar este aparato.
La mayoría de los daños son causados por un uso inadecuado.
Por razones de seguridad, las modificaciones no autorizadas del aparato están prohibidas. Los daños
causados por modificaciones no autorizadas, no están cubiertos por la garantía.
Utilice sólo el LX501 para aplicaciones descritas en este manual a fin de evitar p.ej. cortocircuitos,
quemaduras, descargas eléctricas, etc. Un uso desautorizado puede causar daños y anula la garantía
completamente.
Los daños causados por descuido de las instrucciones de seguridad de este manual invalidarán su garantía
y su distribuidor no será responsable de ningún daño u otros problemas resultantes.
La instalación y el mantenimiento deben ser realizados por personal especializado.
No conecte el aparato si ha estado expuesto a grandes cambios de temperatura. Espere hasta que el
aparato llegue a la temperatura ambiente.
Este aparato ha sido diseñado para uso profesional en una discoteca, un teatro, etc. y es apto para un uso
sólo en interiores. Conéctelo a una fuente de corriente CA de 230 VCA / 50 Hz.
No ha sido diseñado para un uso ininterrumpido. Introduzca frecuentemente una pausa para prolongar la
vida del aparato. No deje que la bomba funcione continuamente. Esto podría causar un sobrecalentamiento
o dañar la bomba. Un ciclo de trabajo de 30 % es ideal.
Es posible que el aparato active los detectores de humo. Esto depende de la cantidad de humo producida.
Guarde este manual del usuario para cuando necesite consultarlo.
4. Características
está equipada con un sistema de transmisión de niebla y un compresor de aire interno que no necesita
ningún mantenimiento
alta calidad de niebla, bajo consumo de líquido de niebla, silenciosa
produce un volumen elevado de niebla
produce una neblina muy fino que aguanta mucho tiempo, sin control de temperatura, sin aire caliente, sin
tiempo de calentamiento
muy potente, silencioso y compresor interno eficaz
panel de ventilación ajustable (90°), velocidad del ventilador ajustable
controlado por DMX con 2 canales (control de la salida y del ventilador)
fácil ajuste del menú por la pantalla LCD, con temporizador
sólo para el uso con el líquido de humo LX550
se entrega en flight case.
5. Descripción
Véase las figuras en la página 2 de este manual del usuario.
V. 03 – 08/02/2013 23 ©Velleman nv
Page 24
LX501
1. Desplace el soporte hacia arriba mientras que la tapa está abierta.
2. Mantenga el soporte delante del agujero en el flight case e
introduzca el remache. Ahora, la tapa queda abierta.
6. Instalación
Seleccione un lugar adecuado. Instale el aparato en una superficie estable y horizontal. No lo cuelgue
de la pared o del techo.
Fijar la tapa del flight case
Para evitar que la tapa se cierre por accidente, puede fijarla de la siguiente manera.
Montaje del aparato
Respete la directiva EN 60598-2-17 y toda norma nacional antes de instalar el aparato. La instalación debe
ser realizada por un técnico especializado.
El soporte donde irá el aparato, debe ser capaz de sostener 10 veces el peso de éste durante una hora, sin
que se produzca una deformación de dicho soporte.
Fije siempre el LX501 con un cable de seguridad (seguridad adicional).
Evite ponerse debajo del aparato durante el montaje, la limpieza, etc. Un técnico especializado debe revisar
el aparato antes de la puesta en marcha. Después, debe revisarlo una vez al año.
Instale el aparato fuera del alcance de personas no autorizadas y en un lugar con poca gente.
La instalación de este aparato exige una sólida experiencia práctica: debe poder calcular la carga máx. del
soporte, debe conocer los materiales necesarios para la instalación, etc. De vez en cuando, una verificación
de la estructura y del aparato mismo debe ser llevada a cabo por un técnico especializado. No intente
instalar este aparato si no tiene las cualificaciones requeridas; una instalación incorrecta puede causar
lesiones.
Quite todo material inflamable en un radio de 0.5 m alrededor del aparato.
La conexión eléctrica debe llevarla a cabo un electricista cualificado.
Conecte el aparato a la red eléctrica con la conexión de alimentación. Todos los aparatos deben recibir
alimentación directamente de un circuito conmutado a tierra. Asegúrese de que los aparatos no estén
alimentados por un reóstato o un circuito dimmer, incluso si utiliza el reóstato o el circuito dimmer como un
interruptor ON/OFF (de 0% a 100%).
Un experto debe probar la instalación antes de la puesta en marcha.
Conexión DMX512
Si fuera necesario, conecte un cable con conector XLR (no incl.) a la salida XLR hembra del controlador y el
otro conector XLR macho a la entrada [15] de la LX501. Es posible conectar varios LX501 en serie. Use un
cable blindado de doble hilo conductor con conectores XLR de entrada y de salida LX501.
Longitud máx. de la conexión: 500 metros. Número máx. de unidades en una conexión en serie: 32.
Se recomienda una terminación si el cable DMX debe cubrir una gran distancia o si se usa en un medio
ambiente con mucho ruido eléctrico (ej. una discoteca). La terminación impide que el ruido eléctrico
corrompa la señal de control numérico. La terminación DMX no es más que un conector XLR con una
resistencia de 120 Ω de polo 2 a polo 3. Este conector XLR está conectado a la salida XLR [16] del último
aparato de la serie.
V. 03 – 08/02/2013 24 ©Velleman nv
Page 25
LX501
El aparato no se desactive automáticamente si el depósito está vacío; la bomba sigue
funcionando. Por tanto, siempre vigile el depósito durante su funcionamiento. ¡Puede
dañar el aparato al utilizarlo sin líquido de humo!
Tecla
Función
<FUNCTION>
entrar en el menú o desplazarse en el menú
<UP>
desplazarse en el menú desde abajo hacia arriba o aumentar el valor
<DOWN>
desplazarse en el menú desde arriba hacia abajo o disminuir el valor
<TIMER>
iniciar el modo « Timer »
<VOLUME>
iniciar el modo continuo
<MANUAL>
iniciar el modo manual y desactivar el modo continuo
7. Uso
Si el aparato produce sólo un poco de humo, si no produce humo en absoluto o si oye ruidos mecánicos,
desconéctelo inmediatamente. Controle el nivel del líquido, el fusible externo y el cable de alimentación. Si todo
parece funcionar correctamente, vuelva a conectar el aparato. Si sigue sin funcionar después de 30 segundos,
desconéctelo de nuevo para evitar dañarlo aún más. Devuelva el aparato a su distribuido. No se olvide de
vaciar el depósito antes del transporte.
Un poco de humo puede escaparse de la boquilla después del uso. Esto es normal.
Hay varios modos de funcionamiento:
modo autónomo (stand-alone)
modo controlado por DMX512.
7.1 Navegar por el menú
Acceder a las funciones al utilizar las teclas [9] de la parte inferior de la pantalla [7].
7.2 Uso general
1. Asegúrese de que el cable de alimentación no está conectado a la red eléctrica.
2. Abra la tapa [4].
3. Saque la salida de humo [3] del depósito.
4. Rellene el depósito con el líquido adecuado (referencia LX550). No sobrellene el depósito. No derrame
ningún líquido en el aparato.
Observación: El aparato no funciona si sobrellena el depósito. Asegúrese de que el nivel del líquido no
sobrepase la indicación del nivel máx. [5].
5. Vuelva a poner la salida de humo en el depósito y cierre la tapa [4].
6. Saque la tapa de la salida de humo [2].
7. Abra el panel de ventiladores [1] y utilice el soporte [12] para ajustar el ángulo.
8. Introduzca el conector de ventilador macho [13] en la conexión de ventilador hembra [14].
9. Conecte un extremo del cable a la entrada de alimentación [10] y el otro extremo a un enchufe.
10. Ponga el interruptor ON/OFF [8] en la posición “1”.
11. Espere hasta que la pantalla visualice “READY TO HAZE”. Consulte Modo autónomo (stand-alone) y
Modo DMX.
12. Este aparato está equipado con una función de limpieza automática del calentador. Después del uso, espere
3 minutos antes de activar el aparato para que pueda terminar el procedimiento de limpieza. Luego,
desconecte el cable de la red eléctrica y deje que el aparato se enfríe.
Advertencia: Desconecte el conector de ventilador macho [13] antes de cerrar la tapa del flight case
7.3 Modo autónomo (stand-alone)
Hay tres modos de funcionamiento:
Modo « Timer »: El aparato produce humo en intervalos de tiempo preprogramados. Puede seleccionar la
duración y el tiempo entre dos salidas de humo.
Modo continuo: El aparato produce humo de manera continua.
Modo manual: El aparato produce humo de manera manual al pulsar el botón <MANUAL>.
Modo « Timer »
1. No conecte nada a la entrada DMX [15] del aparato.
2. Pulse el botón <FUNCTION> hasta que se visualice <INTERVAL SET>.
3. Utilice <UP> y <DOWN> para ajustar el tiempo entre dos salidas de humo (1 ~ 200 segundos).
V. 03 – 08/02/2013 25 ©Velleman nv
Page 26

LX501
Canal
De
A
Función 1 0
255
volumen de salida 0 ~ 100 %
2 0 255
velocidad del ventilador 0 ~ 100 %
4. Pulse el botón <FUNCTION> hasta que se visualice <DURATION SET>.
5. Utilice <UP> y <DOWN> para ajustar la duración de la salida de humo (1 ~ 200 segundos).
6. Pulse el botón <TIMER> para iniciar el modo « Timer ».
7. Para desactivar el modo « Timer », vuelva a pulsar <TIMER>.
Observaciones:
El aparato puede producir humo de manera continua sin necesidad de recalentarse. El aparato empieza a
producir humo inmediatamente después de que se haya terminado el tiempo entre dos salidas.
Los ajustes de temporización se guardan en la memoria interna. El aparato se activa automáticamente en el
modo « Timer » con sus ajustes programados al activar el aparato después de una desactivación y al pulsar
el botón <TIMER>.
Modo continuo
1. No conecte nada a la entrada DMX [15] del aparato.
2. Pulse la tecla <VOLUME> para iniciar el modo continuo.
3. Para desactivar el modo continuo, pulse <MANUAL>.
Observación: El aparato puede producir humo de manera continua sin necesidad de recalentarse. El aparato
produce humo cada vez que pulsa <VOLUME>.
Modo manual
1. No conecte nada a la entrada DMX [15] del aparato.
2. Mantenga pulsado <MANUAL>. El aparato produce humo.
3. Suelte el botón <MANUAL> para parar.
Ajustar la velocidad del ventilador
1. Pulse la tecla <FUNCTION> hasta que se visualice <FAN SPEED>.
2. Utilice <UP> y <DOWN> para ajustar la velocidad del ventilador (1 ~ 10).
7.4 Modo controlado por DMX
Este modo permite controlar su foco sin controlador DMX.
Si se usa una señal DMX, cada aparato tiene su propia dirección inicial DMX para asegurar que los aparatos
reaccionen a las señales de control correctas. Esta dirección inicial digital es el primer canal en el cual el
aparato reaccionará a las señales DMX del controlador DMX. Es posible elegir entre una sola dirección inicial
para toda una serie de aparatos o una dirección inicial por aparato.
Con una sola dirección inicial para una serie de aparatos, todos los aparatos reaccionarán
sincronizadamente a la misma señal. Por lo tanto, cambiar los ajustes de un solo canal afecta a los ajustes
de todos los canales. Con varias direcciones iniciales, cada aparato reaccionará independientemente. Por lo
tanto, cambiar los ajustes de un solo canal sólo afecta al canal en cuestión.
En el caso del modo de 2 canales, la dirección inicial del primer aparato es 1 (CH1~2), del segundo aparato
3 (1 + 2) (CH3~4), del tercer aparato 5 (3 + 2) (CH5~6), etc. La dirección inicial más alta es 511.
Hacer funcionar el aparato con un controlador DMX:
1. Pulse la tecla <FUNCTION> hasta que se visualice <DMX 512 ADD>.
2. Utilice <UP> o <DOWN> para introducir la dirección inicial DMX (001 ~ 512).
Valores DMX512 detallados por canal
8. Limpieza y mantenimiento
Este aparato está equipado con una función de limpieza automática del calentador. Después del uso, espere
3 minutos antes de activar el aparato para que pueda terminar el procedimiento de limpieza.
Desconecte el aparato de toda fuente antes de limpiarlo. Deje que el aparato se enfríe.
Apriete bien las tuercas y los tornillos y verifique que no hay señales de oxidación.
No modifique la caja o los soportes, p.ej. no taladre agujeros adicionales en un soporte o no modifique las
conexiones, etc.
No dañe los cables de alimentación. Contacte con un técnico especializado para instalar el aparato.
Limpie los filtros regularmente.
V. 03 – 08/02/2013 26 ©Velleman nv
Page 27

LX501
alimentación
230 VAC / 50 Hz
consumo
500 W
tiempo de calentamiento
no
capacidad del depósito
3.2 L
consumo del líquido
18 h por litro
líquido de humo adecuado
LX550 líquido de humo profesional a base de aceite
DMX512
XLR de 3 polos para entrada y salida
dimensiones
590 x 450 x 450 mm
peso
33.2 kg
Limpie el aparato regularmente con un paño húmedo sin pelusas. Evite el uso de alcohol y de disolventes.
Nunca sumerja el aparato en un líquido.
El usuario no habrá de efectuar el mantenimiento de ninguna pieza. La reparación debe ser realizada por
personal especializado.
Reemplazar el fusible
Reemplace un fusible fundido por otro del mismo tipo.
1. Desconecte el aparato de la red antes de reemplazar el fusible.
2. Desatornille el portafusibles con un destornillador con punta plana.
3. Saque el fusible fundido y reemplácelo.
4. Vuelva a poner el portafusibles en su lugar.
9. Especificaciones
Utilice este aparato sólo con los accesorios originales. Velleman NV no será responsable de daños ni
lesiones causados por un uso (indebido) de este aparato.
Para más información sobre este producto y la versión más reciente de este manual del usuario,
visite nuestra página www.luxibel.com.
Se pueden modificar las especificaciones y el contenido de este manual sin previo aviso.
© DERECHOS DE AUTOR
Velleman NV dispone de los derechos de autor para este manual del usuario. Todos los derechos
mundiales reservados. Está estrictamente prohibido reproducir, traducir, copiar, editar y guardar este
manual del usuario o partes de ello sin previo permiso escrito del derecho habiente.
V. 03 – 08/02/2013 27 ©Velleman nv
Page 28

LX501
Dieses Gerät ist nicht für Personen mit körperlich, sensorisch oder geistig eingeschränkten
Fähigkeiten oder für unerfahrene und unwissende Personen geeignet, es sei denn, diese
wurden von einer schutzbefohlenen Person in Bezug auf den Gebrauch des Geräts beaufsichtigt
oder angeleitet.
Das Produkt ist kein Spielzeug, es gehört nicht in Kinderhände. Lassen Sie in Anwesenheit von
Kindern besondere Vorsicht walten.
Achtung: Ist der Stromkabel beschädigt, dann soll der Hersteller, eine Fachkraft oder eine
andere geeignete Person das Kabel ersetzen.
Verwenden Sie das Gerät nicht wenn das Gehäuse oder das Kabel beschädigt sind. Lassen Sie
dieses Gerät von einem Fachmann reparieren.
Vergewissern Sie sich, dass die anzuschließende Netzspannung nicht höher ist als die
Netzspannung beschrieben in dieser Bedienungsanleitung.
Der Aufbau des Gerätes entspricht der Schutzklasse I. Gemäß den Vorschriften muss das Gerät
geerdet sein. Der elektrische Anschluss darf nur von einer Fachkraft durchgeführt werden.
Trennen Sie das Gerät bei Nichtbenutzung und vor jeder Reinigung oder vor Befüllen vom Netz.
Fassen Sie dazu den Netzstecker an der Grifffläche an und ziehen Sie nie an der Netzleitung.
Verwenden Sie das Gerät nur im Innenbereich. Schützen Sie das Gerät vor Regen und
Feuchte. Stellen Sie keine mit Flüssigkeit befüllten Gegenstände auf das Gerät.
Tauchen Sie das Gerät nicht ein.
Warnung: Berühren Sie das Gehäuse während des Betriebs nicht, denn das Gehäuse heizt auf.
Lassen Sie die Nebelmaschine nach Gebrauch genügend abkühlen, bevor Sie diese berühren.
Bedecken Sie nie eine eingeschaltete Nebelmaschine. Installieren Sie diese auch weder auf
einem Teppich oder einem Holzboden.
Schützen Sie das Gerät vor Staub. Schützen Sie das Gerät vor extremen Temperaturen.
Beachten Sie, dass die Lüftungsschlitze nicht blockiert werden. Beachten Sie eine minimale
Entfernung von 0.5 m zwischen dem Gerät und jedem anderen Gegenstand. Verdecken Sie
niemals die Lüftungsschlitze und reinigen Sie das Filter regelmäßig.
Die max. Umgebungstemperatur ist 40 °C. Verwenden Sie das Gerät nicht bei höheren
Temperaturen.
Installieren Sie das Gerät an einem gut gelüfteten Ort, min. 0.5 m aller brennbaren und
explosiven Materialien.
BEDIENUNGSANLEITUNG
1. Einführung
An alle Einwohner der Europäischen Union
Wichtige Umweltinformationen über dieses Produkt
Dieses Symbol auf dem Produkt oder der Verpackung zeigt an, dass die Entsorgung dieses Produktes
nach seinem Lebenszyklus der Umwelt Schaden zufügen kann. Entsorgen Sie die Einheit (oder
verwendeten Batterien) nicht als unsortiertes Hausmüll; die Einheit oder verwendeten Batterien
müssen von einer spezialisierten Firma zwecks Recycling entsorgt werden. Diese Einheit muss an den
Händler oder ein örtliches Recycling-Unternehmen retourniert werden. Respektieren Sie die örtlichen
Umweltvorschriften.
Falls Zweifel bestehen, wenden Sie sich für Entsorgungsrichtlinien an Ihre örtliche Behörde.
Wir bedanken uns für den Kauf der LX501! Lesen Sie diese Bedienungsanleitung vor Inbetriebnahme sorgfältig
durch. Überprüfen Sie, ob Transportschäden vorliegen. Sollte dies der Fall sein, verwenden Sie das Gerät nicht
und wenden Sie sich an Ihren Händler.
2. Sicherheitshinweise
V. 03 – 08/02/2013 28 ©Velleman nv
Page 29

LX501
Blockieren Sie niemals die Nebelaustrittsdüse. Richten Sie die Nebelaustrittsdüse niemals direkt
auf Personen oder Tiere. Beachten Sie einen Mindestabstand von 0.5m zwischen dem
Austrittsdüse und jedem Hindernis.
Um Gesundheitsrisiken zu vermeiden und die Lebensdauer des Gerätes zu optimieren,
verwenden Sie nur das empfohlene Nebelfluid (Bestell-Nr. LX550). Mischen Sie niemals Öle,
Duftstoffe oder andere Fluide unter das Nebelfluid. Dies kann giftige Gase oder sogar Brand
verursachen.
Trinken Sie niemals Nebelfluid. Sollte es dennoch einmal verschluckt werden, konsultieren Sie
bitte sofort einen Arzt. Sollte die Haut oder die Augen einmal mit Nebelfluid in Berührung
kommen, bitte sorgfältig mit Wasser auswaschen.
Betreiben Sie das Gerät nie ohne Nebelfluid: dies kann zu permanenten Schäden führen.
Entleeren Sie den Tank immer bevor Sie das Gerät lagern oder transportieren.
Vermeiden Sie Erschütterungen. Vermeiden Sie rohe Gewalt während der Installation und
Bedienung des Gerätes.
3. Allgemeine Richtlinien
Siehe Velleman® Service- und Qualitätsgarantie am Ende dieser Bedienungsanleitung.
Nehmen Sie das Gerät erst in Betrieb, nachdem Sie sich mit seinen Funktionen vertraut gemacht haben.
Lassen Sie das Gerät nicht von Personen bedienen, die sich nicht mit dem Gerät auskennen. Meist ist die
Beschädigung des Gerätes das Ergebnis von unfachmännischer Bedienung.
Eigenmächtige Veränderungen sind aus Sicherheitsgründen verboten. Bei Schäden verursacht durch
eigenmächtige Änderungen erlischt der Garantieanspruch.
Verwenden Sie das Gerät nur für Anwendungen beschrieben in dieser Bedienungsanleitung sonst kann dies
zu Schäden am Produkt führen und erlischt der Garantieanspruch. Jede andere Verwendung ist mit
Gefahren wie Kurzschluss, Brandwunden, elektrischem Schlag, usw. verbunden.
Bei Schäden, die durch Nichtbeachtung der Bedienungsanleitung verursacht werden, erlischt der
Garantieanspruch. Für daraus resultierende Folgeschäden übernimmt der Hersteller keine Haftung.
Lassen Sie dieses Gerät von einem Fachmann installieren und warten.
Das Gerät bei Temperaturschwankungen nicht sofort einschalten. Schützen Sie das Gerät vor
Beschädigung, indem Sie es ausgeschaltet lassen bis es akklimatisiert ist (Zimmertemperatur erreicht hat).
Dieses Gerät wurde für den professionellen Einsatz auf Bühnen, in Discotheken, Theatern, usw. entworfen
und eignet sich nur für die Anwendung im Innenbereich. Verwenden Sie das Gerät mit einer
Wechselspannung von 230 VAC / 50 Hz.
Das Gerät eignet sich nicht für permanenten Betrieb: eine regelmäßige Pause verlängert die Lebensdauer.
Ein permanenter Betrieb der Pumpe kann zu Überhitzung und Beschädigung der Pumpe führen. Ein
Arbeitszyklus von 30 % ist empfohlen.
Das Gerät kann dafür sorgen, dass die Rauchmelder aktiviert werden. Dies hängt von der erzeugten
Nebelmenge.
Bewahren Sie diese Bedienungsanleitung für künftige Einsichtnahme auf.
4. Eigenschaften
verfügt über einen internen, wartungsfreien Luftkompressor und ein durchdachtes Nebel-Transfersystem
sehr hohe Nebelqualität, niedriger Fluidverbrauch, geräuscharm
hoher Nebelausstoß
erzeugt einen langanhaltenden sehr feinen Dunstnebel, ohne Temperatursteuerung, ohne Heißluft, ohne
Aufwärmzeit
sehr leistungsstark, geräuscharm und sehr effizienter interner Kompressor
regelbare Lüftungsplatte (90°), einstellbare Ventilatorgeschwindigkeit
DMX-gesteuert über 2 Kanäle (Kontrolle von Ausstoß und Ventilator)
einfache Menü-Einstellung über LCD-Bildschirm, mit Timer
nur für den Gebrauch mit LX550 Nebelfluid
Lieferung in Flightcase
V. 03 – 08/02/2013 29 ©Velleman nv
Page 30

LX501
1
Panel mit Ventilatoren
7
Display
13
Ventilatorstecker
2
Kappe der Nebelaustrittsdüse
8
EIN/AUS-Schalter
14
Ventilatorbuchse
3
Nebelaustrittsdüse
9
Einstellknöpfe
15
DMX-Eingang
4
Kappe
10
Anschluss für Stromkabel +
Sicherung
16
DMX-Ausgang
5
Anzeige des max.
Flüssigkeitspegels
11
Ausgang für die Kühlung
6
Lüftungsschlitze und Filter
12
Halter für das Panel mit
Ventilatoren
1. Heben Sie die Halterung hoch, wenn der Deckel geöffnet ist.
2. Halten Sie die Halterung vor dem Loch im Flightcase und stecken
Sie eine Blindniete ein. Der Deckel bleibt nun offen.
5. Umschreibung
Siehe Abbildungen, Seite 2 dieser Bedienungsanleitung.
6. Installation
Wählen Sie einen geeigneten Montageort. Installieren Sie das Gerät auf einer stabilen und horizontalen
Oberfläche. Hängen Sie das Gerät nicht auf.
Den Deckel des Flightcases blockieren.
Um zu vermeiden, dass der Deckel sich unabsichtlich schließt, können Sie ihn auf folgende Weise blockieren.
Das Gerät montieren
Lassen Sie das Gerät von einem Fachmann und gemäß den EN 60598-2-17 und allen anderen zutreffenden
Normen installieren.
Die Konstruktion muss während einer Stunde eine Punktlast von maximal 10 x dem Gewicht des Gerätes
tragen können, ohne dass Verformung verursacht wird.
Das Gerät muss immer mit einer zweiten Befestigung z.B. mit einem Sicherheitskabel gesichert werden.
Stehen Sie während der Montage, Entfernung oder Wartung nie direkt unter dem Gerät. Lassen Sie das
Gerät jährlich und vor der Inbetriebnahme von einem Fachmann prüfen.
Montieren Sie das Gerät an einem Ort, wo niemand es berühren kann und wo wenige Leute vorübergehen.
Eine gründliche praktische Erfahrung ist für die Installation des Gerätes notwendig: Sie müssen die max.
Belastung der Tragkonstruktion berechnen können, wissen welches Konstruktionsmaterial Sie verwenden
dürfen. Außerdem müssen Sie das verwendete Material und das Gerät regelmäßig nachsehen lassen.
Montieren Sie das Gerät nie selber wenn Sie damit keine Erfahrung haben. Eine schlechte Montage kann
Verletzungen verursachen.
Entfernen Sie alle entflammbaren Materialen in einem Abstand von 0.5 m.
Lassen Sie das Gerät von einem qualifizierten Elektriker anschließen.
Schließen Sie das Gerät an das Hauptnetz an. Beachten Sie, dass alle Geräte über eine geerdete Steckdose
und nicht über einen Regelwiderstand oder Dimmkreis versorgt werden, auch wenn Sie den
Regelwiderstand oder den Dimmkreis als EIN/AUS-Schalter (0% bis 100%) verwenden.
Die Installation muss vor Inbetriebnahme von einem Experten genehmigt werden.
V. 03 – 08/02/2013 30 ©Velleman nv
Page 31

LX501
Das Gerät stoppt nicht automatisch wenn der Behälter leer ist. Die Pumpe bleibt
funktionieren. Achten Sie darauf, dass der Behälter während des Betriebs nie leer wird. Ein
Betrieb ohne Nebelfluid kann zu Schäden führen.
Taste
Funktion
<FUNCTION>
Zugang zum Menü oder Durch die verschiedenen Menü-Optionen blättern
<UP>
Durch die verschiedenen Menü-Optionen in aufsteigender Reihenfolge blättern oder den Wert
erhöhen
<DOWN>
Durch die verschiedenen Menü-Optionen in absteigender Reihenfolge blättern oder den Wert
verringern
<TIMER>
startet den Timer-Modus
<VOLUME>
startet den kontinuierlichen Modus
<MANUAL>
startet den manuellen Modus und stoppt den kontinuierlichen Modus
DMX512-Anschluss
Wenn nötig, so verbinden Sie ein XLR-Kabel mit dem XLR-Ausgang der Steuerung (nicht mitgeliefert) und
die andere Seite mit dem XLR-Eingang [15] des LX501. Sie können verschiedene LX501 in Serie schalten.
Verwenden Sie ein zweipoliges abgeschirmtes Kabel mit XLR Ein- und Ausgangsanschlüssen.
Die max. empfohlene Kabellänge ist 500 Meter, die Höchstzahl von Geräten, verbunden mit demselben
Anschluss ist 32.
Ein DMX-Abschlusswiderstand ist empfehlenswert für Installationen, bei denen das DMX-Kabel lang ist oder
in einer Umgebung mit vielem elektrischem Rauschen (z.B. Discos). Der Abschlusswiderstand verhindert
Störung des digitalen Steuersignals durch elektrisches Rauschen. Der DMX-Abschlusswiderstand ist nur eine
XLR-Buchse mit einem 120 Ω Widerstand zwischen 2 und 3, die den XLR-Ausgang [16] des letzten Geräts
in der Kette angeschlossen wird.
7. Anwendung
Erzeugt das Gerät wenig oder keinen Nebel, oder macht es mechanische Geräusche, trennen Sie es dann sofort
vom Netz. Überprüfen Sie den Tankeinhalt, die externe Sicherung und das Stromkabel. Sehen Sie nichts
ungewohnt, schließen Sie das Gerät dann wieder an das Netz an. Funktioniert es nicht nach 30 Sekunden,
schalten Sie es wieder aus, um Schäden zu vermeiden. Bringen Sie das Gerät zu Ihrem Verteiler. Entleeren Sie
den Tank, ehe Sie das Gerät transportieren.
Nach einem Nebelausstoß, kann das Gerät immer noch ein bisschen Nebel erzeugen. Dies ist normal.
Nachfolgende Betriebsmodi können ausgewählt werden:
Stand-Alone-Modus
DMX512-gesteuerter Modus
7.1 Bedienfeld
Bedienen Sie das Bedienfeld mit den Tasten [9] unten im Display [7].
7.2 Allgemeine Anwendung
1. Stellen Sie sicher, dass das Kabel vom Netz getrennt ist.
2. Öffnen Sie die Kappe [4].
3. Trennen Sie die Nebelaustrittsdüse [3] vom Tank.
4. Füllen Sie die geeignete Flüssigkeit (Bestell-Nr. LX550) in den Tank. Überfüllen Sie den Tank nicht. Gießen
Sie keine Flüssigkeit auf das Gerät.
Bemerkung: Überfüllen Sie den Tank, dann funktioniert das Gerät nicht. Beachten Sie, dass der
Flüssigkeitspegel die max. Anzeige [5] nicht überschreitet.
5. Befestigen Sie die Nebelaustrittsdüse wieder am Tank und schließen Sie die Kappe [4].
6. Entfernen Sie die Kappe der Nebelaustrittsdüse [2].
7. Öffnen Sie das Panel mit Ventilatoren [1] und verwenden Sie die Halterung [12] um den Winkel
einzustellen.
8. Stecken Sie den Ventilatorstecker [13] in die Ventilatorbuchse [14].
9. Verbinden Sie das eine Kabelende mit dem Netzeingang [10] und das andere Ende mit einer geeigneten
Steckdose.
10. Stellen Sie den EIN/AUS-Schalter [8] auf “1”.
11. Warten Sie bis das Display “READY TO HAZE” anzeigt. Siehe Stand-Alone-Modus und DMX-Modus.
V. 03 – 08/02/2013 31 ©Velleman nv
Page 32

LX501
12. Das Gerät verfügt über eine Funktion, die das Heizelement automatisch reinigt. Nach dem Gebrauch warten
Sie 3 Minuten, bevor Sie das Gerät ausschalten. So kann das Reinigungsverfahren ganz durchgeführt
werden. Trennen Sie das Gerät danach vom Netz und lassen Sie es abkühlen.
Achtung: Trennen Sie den Ventilatorstecker [13] von der Ventilatorbuchse [14]bevor Sie die Kappe des
Flightcases schließen.
7.3 Stand-Alone-Modus
Es gibt 3 verschiedene Modi:
Timer-Modus: Nebel lässt sich in bestimmten Intervallen ausstoßen. Die Dauer der Ausstoß und die Zeit
zwischen zwei Nebelausstößen können eingestellt werden.
im kontinuierlichen Modus: der Nebel wird kontinuierlich erzeugt.
Manueller Modus: der Nebel wird manuell erzeugt während der Knopf <MANUAL> gedrückt bleibt.
Timer-Modus
1. Verbinden Sie nichts mit dem DMX-Eingang [15] des Gerätes.
2. Drücken Sie auf <FUNCTION> bis <INTERVAL SET> im Display erscheint.
3. Verwenden Sie <UP> und <DOWN> um die Zeit zwischen zwei Nebelausstößen (1 ~ 200 Sekunden)
einzustellen.
4. Drücken Sie auf <FUNCTION> bis <DURATION SET> im Display erscheint.
5. Verwenden Sie <UP> und <DOWN> um die Dauer des Nebelausstoßes (1 ~ 200 Sekunden) einzustellen.
6. Drücken Sie auf <TIMER> um den Timer-Modus zu starten.
7. Um den Timer-Modus zu stoppen, drücken Sie wieder auf <TIMER>.
Bemerkungen:
Das Gerät kann, ohne Nachheizung, kontinuierlich Nebel ausstoßen. Endet die Zeit zwischen den
Nebelproduktionen, dann stößt das Gerät wieder Nebel aus.
Die Timer-Einstellungen werden im internen Speicher gespeichert. Schalten Sie das Gerät nach Abschaltung
wieder ein und drücken Sie <TIMER>, dann wird der Timer-Modus mit den von Ihnen programmierten
Einstellungen gestartet.
Kontinuierlicher Modus
1. Verbinden Sie nichts mit dem DMX-Eingang [15] des Gerätes.
2. Drücken Sie auf <VOLUME> um den kontinuierlichen Modus zu starten.
3. Um den kontinuierlichen Modus zu stoppen, drücken Sie <MANUAL>.
Bemerkung: Das Gerät kann, ohne Nachheizung, kontinuierlich Nebel ausstoßen. Jedes Mal, wenn Sie
<VOLUME> drücken, stößt das Gerät sofort Nebel aus.
Manueller Modus
1. Verbinden Sie nichts mit dem DMX-Eingang [15] des Gerätes.
2. Halten Sie <MANUAL> gedrückt. Die Nebelmaschine stößt Nebel aus.
3. Lassen Sie <MANUAL> los, um zu stoppen.
Die Ventilatorgeschwindigkeit einstellen
1. Drücken Sie auf <FUNCTION> bis <FAN SPEED> im Display erscheint.
2. Verwenden Sie <UP> und <DOWN> um die Ventilatorgeschwindigkeit (1 ~ 10) einzustellen.
7.4 DMX-Steuerung
Steuerung vom Gerät über einen universellen DMX-Controller.
Alle DMX-gesteuerten Geräte brauchen eine digitale Startadresse, sodass das richtige Gerät auf die Signale
reagieren kann. Diese digitale Startadresse ist die Kanalnummer, von der das Gerät die Befehle der DMXSteuerung empfängt und ausführt. Sie können dieselbe Startadresse für eine ganze Gruppe von Geräten
verwenden oder eine separate Startadresse für jedes Gerät eingeben.
Wenn alle Geräte dieselbe Startadresse haben, werden sie auf einem spezifischen Kanal das Steuersignal
empfangen. Mit anderen Worten, wenn Sie die Einstellungen von einem Kanal ändern, werden alle Geräte
zur gleichen Zeit beeinflusst. Wenn Sie verschiedene Adressen einstellen, wird jedes Gerät auf einem
anderen Kanal Signale empfangen. Wenn Sie die Einstellungen ändern, wird nur das besagte Gerät
beeinflusst.
Im Falle des 2-Kanal-Modus, werden Sie die Startadresse des ersten Gerätes auf 1 (CH1~2), der zweiten
Einheit auf 3 (1 + 2) (CH3~4), der dritten Einheit auf 5 (3 + 2) (CH5~6) usw. einstellen müssen. Die
höchste Startadresse ist 511.
V. 03 – 08/02/2013 32 ©Velleman nv
Page 33

LX501
Kanal
von
bis
Funktion
1 0 255
Ausstoßmenge 0 ~ 100 %
2 0 255
Ventilatorgeschwindigkeit 0 ~ 100 %
Stromversorgung
230 VAC / 50 Hz
Stromverbrauch
500 W
Aufwärmzeit
nein
Tankinhalt
3.2 L
Verbrauch der Flüssigkeit
18 Std. pro Liter
geeignete Nebelfluid
LX550 professionelles ölbasierte Nebelfluid
DMX512
3-pol. XLR für Ein- und Ausgang
Abmessungen
590 x 450 x 450 mm
Gewicht
33.2 kg
Den DMX-Modus einstellen:
1. Drücken Sie auf <FUNCTION> bis <DMX 512 ADD> im Display erscheint.
2. Verwenden Sie <UP> oder <DOWN> um die DMX-Startadresse (001 ~ 512) auszuwählen.
DMX-Werte pro Kanal
8. Reinigung und Wartung
Das Gerät verfügt über eine Funktion, die das Heizelement automatisch reinigt. Nach dem Gebrauch warten
Sie 3 Minuten, bevor Sie das Gerät ausschalten.
Trennen Sie das Gerät vom Netz ehe Sie mit den Servicearbeiten anfangen. Lassen Sie das Gerät abkühlen.
Alle verwendeten Schrauben müssen fest angespannt werden und dürfen keine Rostspuren zeigen.
Das Gehäuse, die Montagebügel und der Montageort dürfen nicht angepasst werden, z.B. bohren Sie keine
zusätzlichen Löcher in Montagebügel, verändern Sie die Anschlüsse nicht, usw.
Sorgen Sie dafür, dass die Netzkabel nicht beschädigt werden. Lassen Sie das Gerät von einer Fachkraft
installieren.
Reinigen Sie die Filter regelmäßig.
Verwenden Sie zur Reinigung ein feuchtes, fusselfreies Tuch. Verwenden Sie auf keinen Fall Alkohol oder
irgendwelche Lösungsmittel.
Tauchen Sie das Gerät nicht ein.
Es gibt keine zu wartenden Teile. Lassen Sie dieses Gerät von einem Fachmann reparieren.
Die Sicherung ersetzen
Ersetzen Sie eine Sicherung durch eine Sicherung desselben Typs und derselben Leistung.
1. Trennen Sie das Gerät vom Netz ehe Sie die Sicherung ersetzen.
2. Lockern Sie den Sicherungshalter mit einem Schlitz-Schraubendreher.
3. Entfernen Sie die defekte Sicherung und setzen Sie eine neue Sicherung gleichen Typs ein.
4. Bringen Sie den Sicherungshalter wieder in das Gehäuse ein und verbinden Sie das Gerät mit dem Netz.
9. Technische Daten
Verwenden Sie dieses Gerät nur mit originellen Zubehörteilen. Velleman NV übernimmt keine
Haftung für Schaden oder Verletzungen bei (falscher) Anwendung dieses Gerätes.
Für mehr Informationen zu diesem Produkt und die neueste Version dieser Bedienungsanleitung,
siehe www.luxibel.com.
Alle Änderungen ohne vorherige Ankündigung vorbehalten.
© URHEBERRECHT
Velleman NV besitzt das Urheberrecht für diese Bedienungsanleitung. Alle weltweiten Rechte
vorbehalten. Ohne vorherige schriftliche Genehmigung des Urhebers ist es nicht gestattet, diese
Bedienungsanleitung ganz oder in Teilen zu reproduzieren, zu kopieren, zu übersetzen, zu bearbeiten oder zu
speichern.
V. 03 – 08/02/2013 33 ©Velleman nv
 Loading...