

Page 1
L
A
SGEMOMABE
0
A
A
A
E
ÁQ
A
A
R
M
O
E
L
R
T
W
W
R
T
0
4
X50
H
ZE M
N
EVELM
M
ACHIN
M
N
EBELM
UIN
CHINE
CHINE
À BR
DE NI
SCHIN
– 900
– 900
UILLA
EBLA –
– 900
D – 90
900W
W
W
U
ER MAN
BRUIKE
DE D’E
NUAL D
DIENUN
UAL
SHAND
PLOI
EL USUA
GSANLEI
EIDING
IO
UNG
1
20
26
3
8
Page 2
LX500
terminator
eindweerstand
résistance de terminaison
terminación
Terminierung
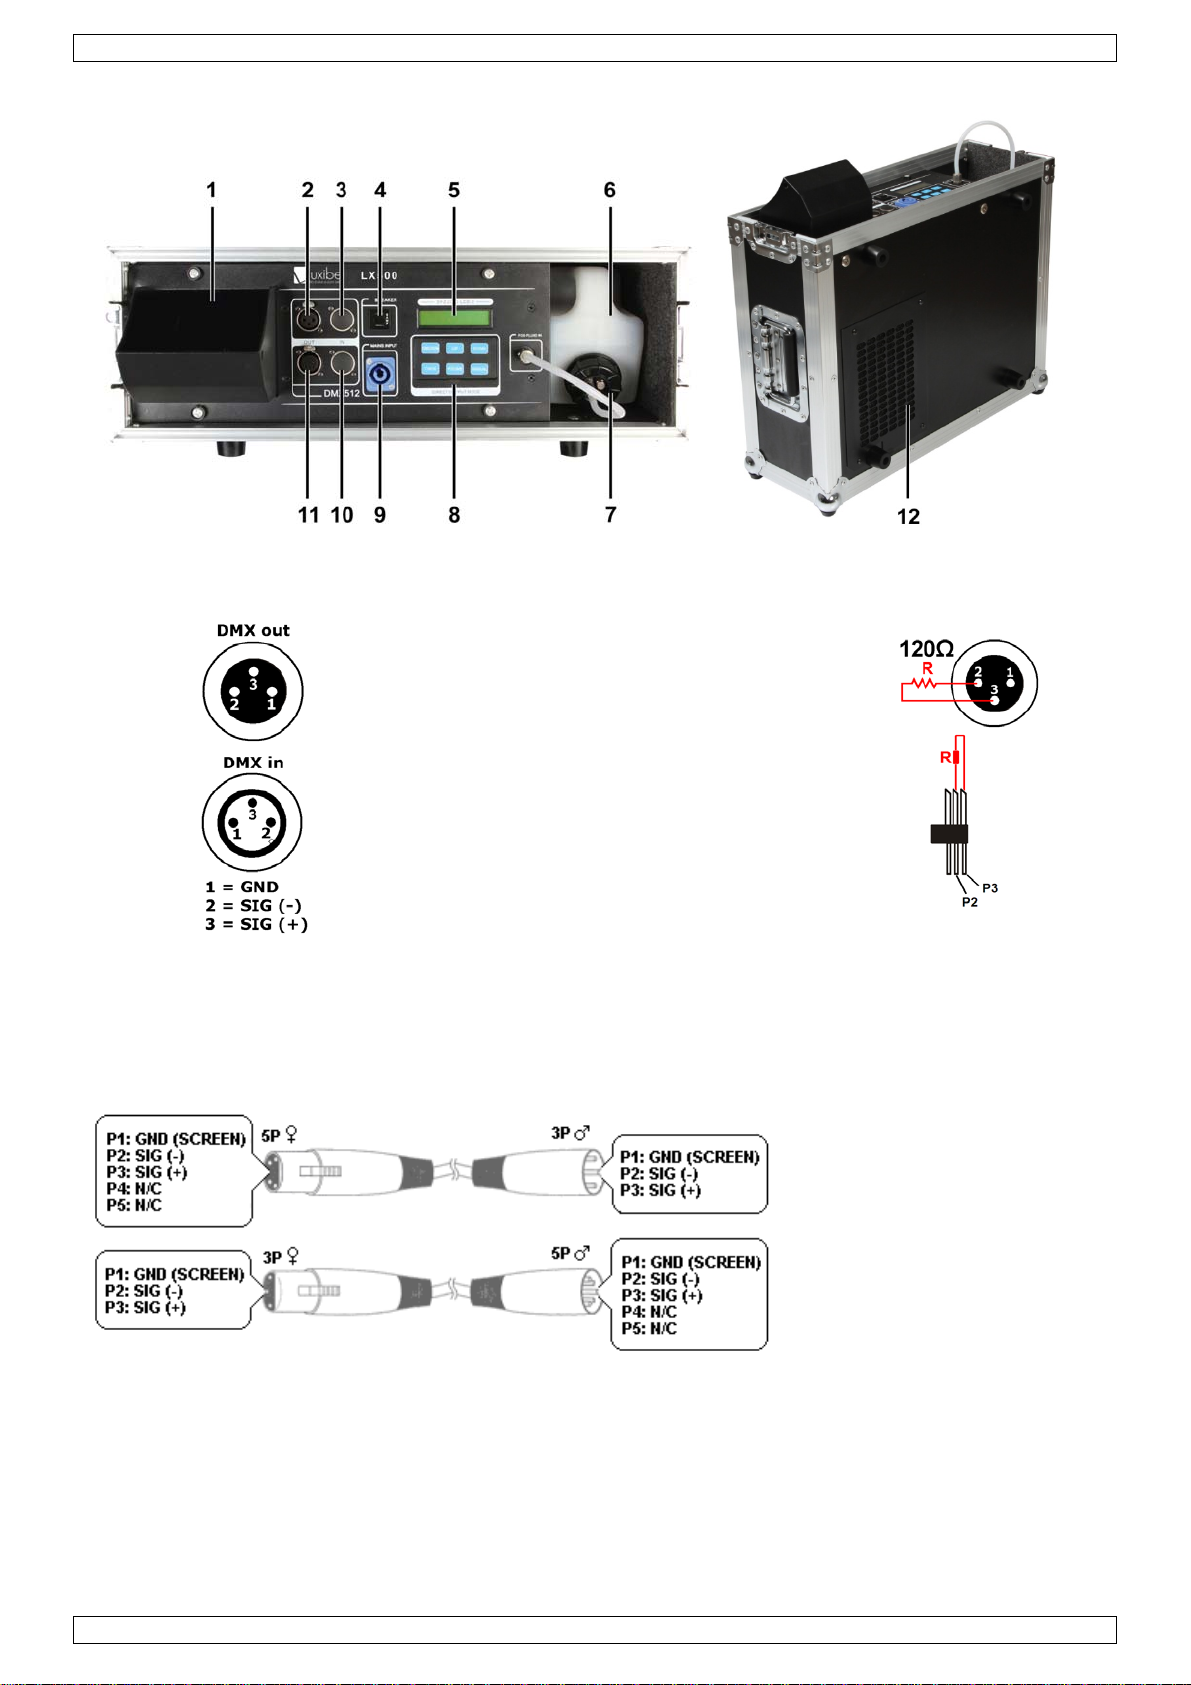
How to turn the controller line from 3-pins into 5-pins (plug and socket).
Controller line van 3-pin naar 5-pin aanpassen (stekker en contact).
Modifier la ligne du contrôleur de 3 broches en 5 broches (fiche et contact).
Modificar la línea del controlador de 3 polos y 5 polos (conector y contacto).
Die Controller-Linie von 3-Pin nach 5-Pin anzupassen (Stecker und Kontakt).
V. 02 – 18/12/2012 2 ©Velleman nv
Page 3
.
oIm
e
.
o
n
n
m
s
t
E
t
h
n
t
a
n
u
n
u
a
r
e
t
:
e
o
e
u
c
e
s
i
v
a
e
m
u
e
e
K
h
i
m
n
t
r
c
o
p
n
a
e
v
r
o
d
e
e
s
r
k
y
t
n
u
t
a
m
t
s
w
d
t
o
.
r
o
e
a
a
a
g
c
d
y
o
a
a
o
t
u
i
m
e
n
b
i
b
n
N
t
c
t
o
e
r
c
e
s
m
t
n
n
t
n
m
a
n
e
a
a
t
n
s
L
a
n
n
v
v
r
o
r
n
k
p
a
e
h
s
h
t
u
r
o
a
t
d
o
m
o
o
d
b
u
h
e
t
t
w
u
v
0
b
o
s
e
a
e
p
w
t
e
p
e
c
p
m
.
i
o
o
f
m
o
d
q
e
n
l
c
.
o
a
LX500
1
Intr
T
all reside
portant e
Th
ank you for
th
device wa
2
Safe
This
symbol on t
har
the enviro
shou
ld be taken
distri
butor or to
If in
doubt, co
choosing L
duction
ts of the
vironmen
damaged i
y Instr
This appli
sensory o
given sup
their safe
Children s
Warning
agent, or
Do not us
attempt t
Make sur
this manu
This devic
Have a q
uropean U
al informa
e device o
ment. Do n
o a speciali
local recy
tact your l
xibel®! Plea
transit, d
ctions
nce is not i
mental ca
rvision or i
y.
hould be su
If the supp
similarly qu
the device
service th
that the a
al.
e falls unde
alified pers
USE
ion
ion about
the packag
ot dispose
zed compan
ling service
ocal waste
se read the
n't install o
ntended for
abilities, or
struction c
pervised to
ly cord is d
lified perso
when dam
device you
ailable volt
protection
n carry out
R MA
his produ
e indicates
f the unit (
y for recycli
Respect th
disposal a
manual tho
use it and
use by pers
lack of exp
ncerning u
nsure that
maged, it
ns in order
ge to housi
rself but co
ge does no
class I. It is
the electric
UAL
t
hat disposa
r batteries)
ng. This de
local envi
uthorities.
oughly bef
ontact you
ons (includi
rience and
e of the ap
they do not
ust be repl
o avoid any
g, fluid res
tact an aut
exceed the
therefore e
connection.
l of the devi
as unsorte
ice should
onmental r
re bringing
dealer.
g children)
nowledge,
liance by a
play with t
ced by the
hazard.
rvoir, or ca
orised deal
voltage sta
sential tha
ce after its l
municipal
e returned
les.
this device i
with reduc
unless they
person res
e appliance
manufactur
bles is noti
r.
ed in the s
the device
ifecycle cou
aste; it
o your
nto service.
d physical,
have been
onsible for
.
r, its servi
ed. Do not
ecifications
be earthed.
d
If
e
of
Disconne
Handle th
Indoor u
Never put
Do not im
Caution:
down suff
Never co
Keep this
openings
Make sur
The maxi
temperat
Install th
explosive
Make sur
animals.
To avoid
specified i
fluid or su
Do not dri
contact w
Never run
Always e
t the device
power cor
e only. Ke
objects fill
merse the d
device heat
ciently afte
er the smo
device awa
re clear at
the air inle
um ambie
res.
device in a
objects or s
the haze o
eep the ou
ealth risks
n this user
bstance to
nk hazer liq
th eyes or
the device
pty the flui
from the m
by the plu
p this devi
d with liqui
evice in an
up during
switching
e machine
from dust
all times. F
at the bot
t temperat
well-ventila
ubstances.
tlet is free
let at a min
nd to opti
anual (ord
he hazer liq
uid. If it is i
kin, rinse a
ithout liqu
reservoir
ains to clea
only.
e away for
s on top of
liquid.
use. Do not
ff before h
nd do not i
nd extrem
r sufficient
om is free
re is 40 °C.
ted place, a
at all times.
mum dista
ise the life
r code VD
uid. This m
gested, co
undantly w
d: this may
efore stori
it, to fill t
rain, mois
or close to
touch hot s
ndling.
stall it on a
temperatu
ir circulati
t all times,
Do not ope
a minimal
Never aim
ce of 0.5 m
pan of the
SLHT5). Do
y cause tox
tact a doct
ith water.
cause per
g or transp
e reservoir,
ture, splash
he device.
rfaces. Let
carpet or
es. Make s
n, leave at l
nd clean th
rate the de
distance of
he outlet di
from any o
evice, use
not add oil
ic fumes or
r immediat
anent dam
rting the d
or when it i
ing and drip
the smoke
ooden floor
re the vent
east 0.5 m
e filter peri
ice at highe
.5 m from
rectly at hu
stacle.
nly haze liq
, perfume,
a fire hazar
ly. If the li
ge to the d
vice.
s not in use
ping liquids
achine co
lation
n all sides.
dically.
r
lammable
ans or
uids as
r any other
.
uid comes i
vice.
.
l
nd
n
Protect th
V.
02 – 18/12/2
012
is device fro
m shocks a
d abuse. A
3
oid brute f
rce when o
erating the
device.
©Vellema
nv
Page 4

LX500
3. General Guidelines
Refer to the Velleman® Service and Quality Warranty on the last pages of this manual.
• Familiarise yourself with the functions of the device before actually using it. Do not allow operation by
unqualified people. Any damage that may occur will most probably be due to unprofessional use of the
device.
• All modifications of the device are forbidden for safety reasons. Damage caused by user modifications to
the device is not covered by the warranty.
• Only use the device for its intended purpose. All other uses may lead to short circuits, burns, electroshocks,
lamp explosion, crash, etc. Using the device in an unauthorised way will void the warranty.
• Damage caused by disregard of certain guidelines in this manual is not covered by the warranty and the
dealer will not accept responsibility for any ensuing defects or problems.
• A qualified technician should install and service this device.
• Do not switch the device on immediately after it has been exposed to changes in temperature. Protect the
device against damage by leaving it switched off until it has reached room temperature.
• This device is designed for professional use on stage, in discos, theatres, etc. The LX500 should only be
used indoors with an alternating current of 230 VAC/50 Hz.
• Fog machines are not designed for permanent operation: regular operation breaks will prolong their lives.
Permanent pumping may overheat and damage the pump. A duty cycle of 30 % is advisable.
• Depending on the amount of fog or haze that is produced, the device may set off smoke detectors.
• Keep this manual for future reference.
4. Features
• integrates the features of a rugged flight case in its new slim design
• special heating system gives extremely dry fog; output leaves no residue, and no liquid left in the machine
• DMX control or onboard timer functions
• long time continuous fogging with minimal fluid consumption
• only use with VDLSLHT5 haze liquid.
5. Overview
Refer to the illustrations on page 2 of this manual.
1 haze outlet 5 display 9 power input
2 3-pins DMX output 6 haze liquid reservoir 10 5-pins DMX input
3 3-pins DMX input 7 cap 11 5-pins DMX output
4 circuit breaker 8 control buttons 12 air inlet and filter
6. Installation
Choose a suitable mounting spot. Place the device on a level, flat surface. Do not hang the device.
Mounting the Device
• Have the device installed by a qualified person, respecting EN 60598-2-17 and all other applicable norms.
• The carrying construction must be able to support 10 times the weight of the device for 1 hour without
deforming.
• The installation must always be secured with a secondary attachment e.g. a safety cable.
• Never stand directly below the device when it is being mounted, removed or serviced. Have a qualified
technician check the device once a year and once before you bring it into service.
• Install the device in a location with few passers-by that is inaccessible to unauthorised persons.
• Overhead mounting requires extensive experience: calculating workload limits, determining the installation
material to be used… Have the material and the device itself checked regularly. Do not attempt to install
the device yourself if you lack these qualifications as improper installation may result in injuries.
• Make sure there is no flammable material within a 0.5 m radius of the device.
• Have a qualified electrician carry out the electric connection.
• Connect the device to the mains with the power plug. All devices must be powered directly off a grounded
switched circuit and cannot be run off a rheostat or dimmer circuit, even if the rheostat or dimmer channel
is used solely for 0 % to 100 % switching.
• The installation has to be approved by an expert before the device is taken into service.
V. 02 – 18/12/2012 4 ©Velleman nv
Page 5
M
.
a
y
t
u<F<U<D<T<V<M
0
n
e
b
m
e
r
pum
e
n
w
n
n
X
n
a
f
h
q
s
d
n
e
t
n
e
w
n
n
e
d
e
n
e
t
p
m
N
u
t
r
r
c
n
t
e
b
d
o
m
s
n
e
c
e
t
3
d
(
X
u
i
m
w
e
n
n
n
e
e
o
n
d
t
o
r
t
b
e
D
o
0
c
n
a
)
r
p
o
s
m
r
r
d
s
e
r
e
o
r
w
o
n
m
e
n
n
h
n
a
p
e
8
g
n
d
o
9
I
S
n
o
d
0
a
n
w
e
w
i
w
g
o
a
n
d
n
T
t
t
e
n
n
u
Ω
e
n
e
e
n
e
n
a
o
t
g
n
m
t
d
e
s
i
t
n
p
d
y
t
e
d
u
a
e
e
t
e
o
a
n
e
b
2
e
g
D
X-512 Co
•
When appl
side to th
linking ca
•
Maximum
of devices
A DMX ter
•
an electric
signal by
and 3, whi
7
Ope
Th
e device do
m
ins.
If
ou experie
flu
id level, the
If
he device
de
vice to your
Th
e LX500 ca
•
stand-alo
with a DM
•
The
the
nection
icable, con
male XLR i
le should b
recommend
on a serial
inator is r
ally noisy e
lectrical noi
ch is then p
ation
device do
p will con
device can
s not have
ce low out
circuit brea
ill not funct
dealer. Re
be used in
e mode
512 contro
ect an XLR
put [3,10]
a dual cor
ed serial da
ata link is
commende
vironment
se. The DM
lugged into
s not feat
inue work
suffer per
an on/off s
ut, mechan
ker, and th
ion after 30
ember to d
the followin
ller.
able to the
of the LX5
, screened
a link dista
2 devices.
for install
e.g. discos
terminato
the XLR out
re an aut
ng. Alway
anent da
itch. It sta
ical noise o
power cor
seconds, di
rain the res
g modes:
LX500
female XLR
0. Multiple
able with X
ce is 500
tions wher
. The termi
is simply a
ut socket [
matic stop
monitor t
age whe
ts operating
no output
. If all appe
continue o
rvoir befor
output of a
LX500s can
LR input an
eters (164
the DMX c
ator preve
XLR plug
2,11] of th
function
e reservo
running
as soon as
t all, unplu
rs to be w
eration to
transporti
controller (
be linked th
output co
ft). Maxim
ble has to r
ts corruptio
ith a 120
last devic
hen runni
r fluid lev
ithout flui
you plug th
the device
rking prope
void perma
g the unit.
ot incl.) an
rough serial
nectors.
m recomm
un a long di
n of the dig
resistor be
in the chai
g out of fl
l during o
d.
power cor
immediatel
rly, plug in
ent damag
the other
linking. Th
nded num
tance or is
tal control
ween pins
.
uid; the
eration as
into the
. Check th
he unit aga
. Return th
er
in
in.
e
7.
1 Contr
Ac
cess the co
B
tton
UNCTION>
P>
OWN>
IMER>
OLUME>
ANUAL>
7.
2 Prep
1.
Make sure
2.
Open the
Remove t
3.
Fill the res
4.
not spill li
Screw the
5.
place and
Put the re
6.
To direct t
7.
the desire
Connect o
8.
outlet.
The devic
Wait until
9.
instructio
. This devic
1
off the po
the device
ol Panel
trol panel f
Function
accesses
scrolls th
scrolls th
starts the
starts the
starts the
ration
the power
light case a
e cap [7] o
ervoir with
uid onto th
cap firmly
in good con
ervoir back
he haze up
direction.
e end of th
starts war
he display
s.
features a
er to let th
cool down.
avigatio
nctions usi
he menu a
ough the m
ough the m
timer-contr
volume-co
manual mo
able is not
d pull out
f the reserv
he appropri
device.
ack on the
ition.
in the fligh
r down, pu
e power ca
ing up. Th
hows “REA
automatic
machine c
g the contr
d scrolls th
nu options
nu options
lled mode
trolled mod
e
plugged int
he reservoi
ir.
ate haze flu
eservoir, m
case. Make
ll out the ha
le to the po
display sh
Y TO HAZE
heater clea
mplete the
ol buttons [
ough the m
in ascendin
in descendi
the mains.
[6].
id (order co
aking sure t
sure the h
ze outlet [1
er input [
ws “WARM
”. Refer to
ing functio
cleaning pr
] located
enu options
order, or i
g order, or
e VDLSLH
hat the plas
se from the
] (squeeze
] and plug
NG UP”.
tand-Alon
. After use,
cess. Then
irectly und
creases a
decreases
5). Do not
tic hoses at
reservoir is
he sides to
he other e
Mode and
wait for 3
disconnect
rneath the
umeric val
numeric v
verfill the r
ached to th
not bent.
ether) and
d into a sui
DMX Mod
inutes bef
he power c
isplay [5].
e
lue
servoir. Do
cap are in
re-insert it i
able mains
for operati
re switchin
ble and let
n
ng
V.
02 – 18/12/2
012
5
©Vellema
nv
Page 6

LX500
7.3 Stand-Alone Mode
In stand-alone mode, the device can run:
• in timer-controlled mode: produce haze in pre-defined time intervals. You can set the duration of the haze
output, the time in between outputs, and the output volume.
• in volume-controlled mode: produce haze continuously. You can set the output volume and the fan speed.
• in manual mode: manually produce haze while you press the <MANUAL> button. The output volume is
100 %.
Timer-Controlled Mode
1. Connect nothing to the DMX input [3,10] of the device.
2. Press <FUNCTION> until <INTERVAL SET> is displayed.
3. Use <UP> and <DOWN> to set the interval between two haze outputs (1 ~ 200 seconds).
4. Press <FUNCTION> until <DURATION SET> is displayed.
5. Use <UP> and <DOWN> to set the duration of the haze output (1 ~ 200 seconds).
6. Press <FUNCTION> until <TIMER OUT> is displayed.
7. Use <UP> and <DOWN> to set the volume of the haze output (1 ~ 100 %).
8. Press <TIMER> to start timer-controlled operation.
9. To stop timer-controlled operation, press <TIMER> again.
Notes:
• The device can produce continuous haze without reheating. When the interval between outputs comes to an
end, the device starts producing haze immediately.
• The timer settings are saved in the internal memory. The next time you plug in the device and press
<TIMER>, it will start in timer-controlled mode with the settings as specified for the previous use.
Volume-Controlled Mode
1. Connect nothing to the DMX input [3,10] of the device.
2. Press <FUNCTION> until <VOLUME OUT> is displayed.
3. Use <UP> and <DOWN> to set the volume of the haze output (1 ~ 100 %).
4. Press <FUNCTION> until <FAN SPEED> is displayed.
5. Use <UP> and <DOWN> to set the fan speed (1 ~ 100 %).
6. Press <VOLUME> to start volume-controlled operation.
7. To stop volume-controlled operation, press <VOLUME> again.
Notes:
• The device can produce continuous haze without reheating. Each time you press <VOLUME>, the device
starts producing haze immediately.
• The volume settings are saved in the internal memory. The next time you plug in the device and press
<VOLUME>, it will start in volume-controlled mode with the settings as specified for the previous use.
Manual Mode
1. Connect nothing to the DMX input [3,10] of the device.
2. Press and hold <MANUAL>. The device starts producing haze at 100%.
3. Release the <MANUAL> button to stop.
7.4 DMX Mode
This mode allows you to control the device by any universal DMX controller.
• All DMX-controlled devices need a digital start address so that the correct device responds to the signals.
This digital start address is the channel number from which the device starts to “listen” to the DMX
controller. The same starting address can be used for a whole group of devices or an individual address can
be set for every device.
• When all devices have the same address, all the units will “listen” to the control signal on one particular
channel. In other words: changing the settings of one channel will affect all devices simultaneously. If you
set individual addresses, each device will “listen” to a separate channel number. Changing the settings of
one channel will only affect the device in question.
• In case of the 2-channel mode, you will have to set the start address of the first unit to 1 (CH1~2), the
second to 3 (1 + 2) (CH3~4), the third to 5 (3 + 2) (CH5~6), and so on. The highest start address is 511.
V. 02 – 18/12/2012 6 ©Velleman nv
Page 7
M
.
e
t
.
nsmsuiDMdimwe
sof FowwTh
Thma
l
n
e
w
t
n
w
n
f
d
m
e
t
v
b
o
o
m
r
o
.
t
H
o
w
n
N
d
n
e
n
o
p
p
a
e
v
e
w
t
a
r
g
n
a
1
n
o
a
d
r
x
m
m
t
i
h
a
e
t
o
A
W
i
m
L
d
k
s
m
d
s
w
r
a
t
t
n
o
e
y
i
t
o
e
k
e
0
s
t
m
y
t
c
l
t
%
1
n
o
c
o
a
f
e
u
d
n
h
r
a
u
o
f
l
c
e
k
t
w
n
m
e
c
e
m
e
p
r
o
o
w
o
m
i
t
N
n
g
n
i
i
e
To
set the dev
1.
Press <FU
2.
Use <UP>
ice to work
NCTION> u
and <DOW
ith a DMX
til <DMX 5
> to set th
controller:
2> is displ
e DMX star
LX500
yed.
ing address
(001 ~ 512
).
X Channe
D
Channel
1
2
8
Clea
•
This devic
off the po
•
Disconnec
•
All screws
•
The housi
tampered
connectio
•
The electri
device.
•
Clean the
•
Wipe the
•
Do not im
There are
•
R
setting th
If
he resettab
1.
Disconnec
Let the de
2.
3.
Press the
Plug the p
4.
manual.
Values
From
0
0
ing an
features a
er to let th
the device
should be ti
g, the mou
ith; e.g. d
s…
c power su
ilter [12]
evice regul
erse the d
no user-ser
Circuit Br
le circuit br
the power
ice cool do
reaker swi
wer cord b
To
255
255
Mainte
automatic
machine c
from the m
ghtened an
ting suppo
not drill e
ply cables
eriodically.
rly with a
vice in any
iceable par
eaker
aker [4] tr
cord from t
n for at le
ch [4] to r
ck into the
Descrip
fan spee
output v
ance
heater clea
mplete the
ins prior to
free of cor
ts and the i
tra holes in
ust not sh
oist, lint-fr
liquid.
s. Contact
ps, the dev
e mains.
st 15 minu
set it. Do n
mains. Mak
ion
d 0 ~ 100
olume 0 ~
ing functio
cleaning pr
maintenan
rosion.
nstallation l
mounting s
w any dam
e cloth. Do
our dealer
ce is switch
es.
t force.
sure you
00 %
. After use,
cess.
e activities.
cation sho
pports, do
ge. Have a
not use alc
or repairs i
d off comp
se the devi
wait for 3
Let the dev
ld not be d
not change
qualified te
hol or solv
necessary.
etely. To re
e as recom
inutes bef
ice cool do
formed, m
the location
hnician mai
nts.
set the brea
ended in t
re switchin
n.
dified or
of the
ntain the
ker:
his user
9
Tech
po
wer supply
po
wer consu
he
ating time
ta
k capacity
oke output
table haze l
X512
ensions
ight
U
e this devi
damage o
r more inf
w.luxibel
e informa
©
COPYRIG
e copyrigh
nual may b
pri
or written c
If y
inte
u cannot
rnal dama
nical Sp
ption
iquid
ce with ori
injury res
concerni
com.
ion in this
T NOTICE
t to this m
e copied, re
nsent of th
eset the ci
e. Contac
ecificati
230 V
900
1.6 m
3.5 L
100
VDLS
3- an
600 x
20.5
ginal acce
ulting fro
g this pro
manual is
nual is o
produced, t
e copyright
rcuit brea
your deal
ns
C / 50 Hz
n
³/min (350
HT5 profes
5-pin inpu
590 x 265
g
sories onl
(incorrec
uct and th
ubject to
ned by Ve
anslated or
holder.
er (you ca
r for repai
ft³/min)
ional high-
and output
m
. Vellema
) use of t
e latest ve
hange wit
leman nv.
reduced to
nnot toggl
r.
ensity smo
connectors
nv canno
is device.
sion of thi
hout prior
All world
ny electro
the switc
e liquid
be held r
s manual,
notice.
ide rights
ic medium
h), there
sponsible
lease visi
eserved.
r otherwise
ay be
n the eve
our webs
o part of th
without th
t
te
s
V.
02 – 18/12/2
012
7
©Vellema
nv
Page 8
.
aBeHeDa
.
e
m
y
g
e
c
g
w
d
g
a
r
h
b
o
c
e
n
l
t
t
z
u
e
k
l
h
t
e
e
e
e
n
g
m
u
r
o
o
5
k
n
e
o
R
p
r
f
h
n
e
a
h
a
c
f
s
d
e
n
a
e
u
n
e
e
o
e
e
o
n
d
e
e
u
e
g
s
f
h
l
R
t
k
e
e
e
g
e
n
v
v
k
e
g
e
c
n
r
t
e
t
r
t
f
u
r
o
o
r
N
a
a
a
g
t
r
a
p
n
o
d
a
a
v
o
z
w
e
c
t
a
t
e
n
m
g
o
m
e
s
e
b
a
t
e
D
u
e
e
i
a
b
h
o
e
e
e
s
e
e
n
p
R
o
m
m
z
v
d
f
d
w
h
a
v
o
c
e
w
k
e
t
m
d
o
h
e
e
t
e
i
j
e
e
n
a
s
w
v
e
c
e
e
n
n
o
t
r
e
o
t
a
h
e
d
j
v
o
n
j
n
d
o
h
a
v
e
.
e
o
e
o
o
.
LX500
1
Inlei
A
n alle ing
langrijke
bt u vrage
nk u voor u
be
schadigd tij
2
Veili
Dit s
weg
batt
tere
bren
ding
zetenen v
ilieu-info
mbool op
eworpen, d
rijen) niet
htkomen v
en. Respe
n, contact
aankoop!
ens het tra
heidsi
Dit toeste
fysieke, zi
toezicht s
die veran
Houd toe
Waarsch
dienst, of
Gebruik h
Repareer
De beschi
de handle
Dit toeste
Een gesc
GEB
n de Euro
matie bet
et toestel o
it toestel sc
ij het gewo
or recyclag
teer de pla
er dan de
Lees deze
nsport, inst
structie
is niet ges
ntuiglijke o
aan of instr
woordelijk i
icht op kind
wing: als
een andere
t toestel ni
het toestel
bare netsp
iding.
valt onder
oolde techn
UIKE
ese Unie
effende di
de verpak
ade kan to
e huishoud
. U moet di
tselijke mili
plaatselijk
andleiding
lleer het da
s
hikt voor g
geestelijke
uctie hebbe
voor hun
eren om te
e voedings
bevoegde p
t indien de
iet zelf; ne
nning mag
beschermin
icus moet d
SHA
product
ing geeft a
brengen a
elijke afval;
t toestel na
uwetgevin
autoritei
rondig voo
n niet en ra
bruik door
capaciteite
gekregen
eiligheid.
oorkomen
abel besch
ersoon verv
behuizing,
m contact
niet hoger
sklasse I,
elektrisch
DLEI
n dat, als h
n het milie
het moet bi
r uw verdel
.
en betreff
u het toest
dpleeg uw
ersonen (k
of gebrek
ver het ge
at ze met
digd is, m
ngen word
loeistofres
p met een
ijn dan de
at wil zegg
aansluiting
ING
et na zijn le
. Gooi dit t
j een gespe
er of naar e
nd de ver
l in gebrui
dealer.
nderen inb
an ervaring
ruik van he
et apparaa
et deze doo
n om elk
rvoir, of de
rkende dea
panning in
n dat het t
verzorgen.
enscyclus
estel (en e
ialiseerd b
n lokaal re
ijdering.
neemt. W
grepen) m
en kennis,
t toestel va
spelen.
r de fabrika
ogelijk risic
kabels besc
ler.
e specifica
estel geaa
ordt
entuele
drijf
yclagepunt
rd het toest
t verminder
tenzij zij on
een perso
t, technisc
te vermijd
hadigd zijn.
ies achtera
d moet zijn.
el
de
er
n
e
en.
n
Trek de s
en als u h
Gebruik h
vloeistoff
Dompel h
Let op: d
Laat de n
raken.
U mag ee
een tapijt
Bescherm
verstopt
onderaan
De maxi
temperat
Installeer
brandbaa
Zorg ervo
dieren. V
Om schad
gebruik ui
VDLSLHT
Hierdoor
Drink gee
in contact
Gebruik d
Zorg ervo
ekker uit h
et niet gebr
t toestel e
n. Plaats g
t toestel ni
it toestel w
velmachine
ingeschak
of houten v
tegen stof
eraken. Vo
steeds vrij,
ale omgevi
ren.
op een goe
en explosi
r dat de n
orzie een r
e aan de ge
tsluitend ne
). Voeg ge
unnen gifti
nevelvloei
met huid o
nevelmac
r dat het v
t stopconta
ikt.
kel binne
en objecten
t onder.
rdt zeer wa
na gebruik
lde nevelm
loer.
n extreme
rzie een rui
en reinig d
gstempera
geventilee
f materiaal.
veluitlaat s
imte van m
zondheid te
velvloeistof
n olie, parf
e stoffen v
tof. Is dit t
ogen, spoe
ine nooit z
oeistofrese
t (trek niet
shuis. Bes
gevuld me
m tijdens h
voldoende
achine nooi
emperatur
mte van mi
filter regel
uur bedraa
de plaats,
eeds vrij is.
instens 0.5
vermijden
en zoals be
m of ander
ijkomen of
ch het gev
l dan overvl
nder vloeis
voir altijd l
aan de kab
herm tege
vloeistof o
et gebruik.
fkoelen alv
bedekken.
n. Zorg dat
stens 0.5
atig.
t 40 °C. Ge
p een mini
Richt de uit
aan alle
n om de le
chreven in
vloeistof o
rand veroo
l, bel onmi
edig met
of: dit kan
eg is voord
l!) voordat
regen, voc
of naast h
aak de het
rens ze me
Installeer d
de verlucht
aan alle zi
bruik het to
umafstand
laat nooit r
ijden.
ensduur va
eze handle
substantie
rzaken.
dellijk een
ater.
et toestel o
t u het toe
u het toest
tigheid en
t toestel.
oppervlak
de blote h
nevelmac
ngsopening
den. Houd
stel niet bi
van 0.5 m
chtstreeks
het toeste
iding (beste
toe aan de
rts. Komt
nherroepeli
tel bewaart
l reinigt of
pspattend
es niet aan
nd aan te
ine niet op
n niet
e luchtinlat
hogere
an alle
p mensen
l te verleng
lcode
nevelvloeist
evelvloeist
k beschadig
of vervoert
ult
n
f
n,
f.
f
en.
V.
02 – 18/12/2
012
8
©Vellema
nv
Page 9

LX500
Bescherm tegen schokken. Vermijd brute kracht tijdens de bediening.
3. Algemene richtlijnen
Raadpleeg de Velleman® service- en kwaliteitsgarantie achteraan deze handleiding.
• Leer eerst de functies van het toestel kennen voor u het gaat gebruiken. Ongeschoolde personen mogen dit
toestel niet gebruiken. Meestal is beschadiging het gevolg van onprofessioneel gebruik.
• Om veiligheidsredenen mag u geen wijzigingen aanbrengen. Schade door wijzigingen die de gebruiker heeft
aangebracht valt niet onder de garantie.
• Gebruik het toestel enkel waarvoor het gemaakt is. Andere toepassingen kunnen leiden tot kortsluitingen,
brandwonden, elektrische schokken, enz. Bij onoordeelkundig gebruik vervalt de garantie.
• De garantie geldt niet voor schade door het negeren van bepaalde richtlijnen in deze handleiding en uw
dealer zal de verantwoordelijkheid afwijzen voor defecten of problemen die hier rechtstreeks verband mee
houden.
• Laat dit toestel installeren en onderhouden door een geschoolde technicus.
• Om beschadiging te vermijden, zet u het toestel best niet aan onmiddellijk nadat het werd blootgesteld aan
temperatuurschommelingen. Wacht tot het toestel op kamertemperatuur gekomen is.
• Dit toestel is ontworpen voor professioneel gebruik op podia, in disco's, enz. U mag dit toestel enkel
binnenshuis gebruiken en aansluiten op een wisselspanning van 230 VAC/50 Hz.
• Nevelmachines zijn niet ontworpen voor continue werking: regelmatige onderbrekingen doen ze langer
meegaan. Door het permanent pompen, kan de pomp verhit en beschadigd raken. Als werkcyclus wordt
30% aangeraden.
• Afhankelijk van de hoeveelheid geproduceerde mist of nevel, kan het toestel rookmelders in werking zetten.
• Bewaar deze handleiding voor verdere raadpleging.
4. Eigenschappen
• in flightcase, klein en compact
• het speciaal verwarmingselement zorg voor een zeer droge nevel; laat geen residu en vloeistof achter in de
machine
• DMX-sturing of ingebouwde timerfuncties
• langdurige, continue nevelproductie met laag vloeistofverbruik
• enkel te gebruiken met VDLSLHT5 rookvloeistof.
5. Omschrijving
Raadpleeg de afbeeldingen op pagina 2 van deze handleiding.
1 neveluitlaat 5 display 9 voedingsingang
2 3-pins DMX-uitgang 6 reservoir nevelvloeistof 10 5-pins DMX-ingang
3 3-pins DMX-ingang 7 dop 11 5-pins DMX-uitgang
4 stroombreker 8 bedieningstoetsen 12 luchtinlaat en filter
6. Installatie
Kies een geschikte montageplaats. Plaats het apparaat horizontaal op een plat oppervlak. Het toestel
niet ophangen.
Het toestel monteren
• Laat een geschoolde technicus dit toestel installeren conform EN 60598-2-17 en andere toepasselijke
normen.
• De constructie waaraan het toestel wordt bevestigd, moet gedurende 1 uur 10 x het gewicht van dit toestel
kunnen dragen zonder te vervormen.
• Maak het toestel ook vast met een veiligheidskabel.
• Sta nooit recht onder het toestel wanneer u het monteert, verwijdert of schoonveegt. Laat het toestel
controleren door een geschoolde technicus voor u het in gebruik neemt en laat het 1 x per jaar volledig
nakijken.
• Installeer dit toestel op een plaats waar niemand langs moet lopen, kan neerzitten of het toestel kan
aanraken.
V. 02 – 18/12/2012 9 ©Velleman nv
Page 10
M
.
e
hPro
m
e
o<F<U<D<T<V<M
j
o
m
m
a
o
o
w
n
a
m
a
g
e
r
g
a
r
pom
e
e
t
a
p
t
e
e
n
b
o
d
s
j
e
u
n
e
a
i
e
t
f
o
,
e
m
n
b
v
s
h
n
n
s
g
e
h
c
l
l
a
j
o
e
v
d
v
k
m
n
r
c
e
n
v
o
u
v
a
d
l
e
e
e
e
j
u
m
e
e
e
h
d
n
a
s
0
e
i
e
a
m
X
h
v
e
k
a
v
e
g
d
r
m
m
t
e
s
s
e
m
m
%
e
e
k
a
v
a
a
d
e
e
h
d
e
d
o
s
i
r
n
o
e
t
G
m
m
m
a
e
e
n
s
u
e
e
r
5
n
v
g
e
e
0
v
n
r
v
e
e
h
o
t
o
v
o
p
e
m
n
o
u
r
v
a
e
t
k
u
r
t
e
e
b
k
o
r
e
o
n
v
t
e
e
e
f
m
1
e
u
s
e
•
Een degeli
de draagc
gebruikte
ervaring
•
Verwijder
•
Een gesch
•
Sluit het t
worden en
variabele
•
De installa
D
X512-aan
•
Indien va
meegelev.
LX500’s a
afgescher
•
De maxim
aansluitin
•
Een DMX
veel elekt
controlesi
weerstand
van het la
ke praktijk
nstructie k
ateriaal e
ee heeft. E
lle brandb
olde elektr
estel via d
mogen nie
eerstand o
tie moet vo
sluiting
toepassing
) en de and
n elkaar ko
de kabel
al aanbevo
is 32.
indweersta
ische ruis (
naal door e
van 120 Ω
tste toestel
rvaring is v
nnen bere
het toestel
n slechte
ar materiaa
cien moet h
stekker aa
via een va
het dimcir
r het eerst
sluit een X
re kant va
ppelen met
et XLR inga
len kabellen
d is aanbe
v. een disc
lektrische r
an pin 2 n
in de reeks
ereist voor
enen, wete
regelmatig
ontage kan
l in een stra
et toestel a
op het lich
iabele weer
uit als een
gebruik g
LR-kabel aa
de mannel
behulp van
ng- en uitg
gte is 500
olen als de
theek). De
is. De DMX
ar 3. Deze
.
LX500
e plaatsing
welk const
laten nakijk
leiden tot v
al van 0.5
nsluiten.
tnet. Alle to
tand of di
% tot 100
keurd word
n de vrouw
jke XLR-ing
en seriële
ngsaansluit
eter, het a
DMX-kabel
eindweerst
eindweerst
LR-stekker
van dit toe
ructiemater
en. Montee
rwondinge
rond het t
estellen mo
circuit gevo
inschakeli
n door een
lijke XLR-ui
ang [3,10]
oppeling.
ingen.
nbevolen
rij lang is o
nd voorko
nd is niets
wordt dan
tel. U moet
aal u kunt
het toestel
.
estel.
t via een g
ed worden,
ng.
expert.
gang van e
van de LX5
ebruik daar
aximumaa
f wordt geb
t corruptie
eer dan e
angesloten
de maximu
ebruiken e
niet zelf ind
aard stopc
ook al gebr
en controlle
0. U kunt
oor een 2-
tal toestell
uikt in een
an het digi
n XLR-stek
op de XLR-
belasting
u moet he
ien u er ge
ntact gevo
ikt u de
(niet
erscheiden
derige
n op eenzel
omgeving
ale
er met een
itgang [2,
an
n
d
de
et
1]
7
Geb
H
t toestel he
lic
tnet.
duceert he
on
middellijk v
ve
rdachts, ko
o
permanen
ve
rvoert.
D
LX500 kan
•
standalon
met DMX5
•
7.
1 Het b
Be
dien het pa
T
ets
UNCTION>
P>
OWN>
IMER>
OLUME>
ANUAL>
Het
gat
uik
apparaat
p blijft we
n. U kunt
ft geen aa
toestel wei
n het licht
pel het toe
e beschadi
in verschill
12-sturing.
dienings
eel met be
Fun
toeg
scro
verh
scro
verl
de ti
de v
de h
topt niet a
rken. Hou
et toestel
/uit-schake
nig of geen
et. Control
tel terug aa
ing te verm
nde modi g
paneel
ulp van de
tie
ang tot het
l door de v
ogen
l door de v
gen
dsgestuurd
lumegestu
andmatige
utomatisc
het reser
beschadig
aar en wer
rook of ma
er de reser
n het lichtn
ijden. Bren
bruikt wor
toetsen [8]
menu en sc
rschillende
rschillende
e modus ac
rde modus
odus activ
wanneer
oir gedur
n wanne
t van zodra
kt het mec
oirinhoud,
t. Werkt h
het toestel
en:
onderaan d
ollen door
enuopties
enuopties
iveren
activeren
ren
e tank ge
nde het g
r u het zo
de voeding
anische gel
e stroombr
t toestel ni
naar uw ve
e display [
e verschille
in stijgende
in dalende
n rookvlo
bruik van
der rookvl
kabel word
iden, ontk
ker, en de
t na 30 sec
deler. Leeg
].
de menuo
volgorde, o
olgorde, of
istof mee
et toestel
eistof laa
aangeslot
ppel het to
oedingska
nden, scha
de tank vo
ties
f een nume
een numeri
bevat; de
altijd in d
werken!
n op het
stel dan
el. Ziet u ni
el het dan
r u het toe
ieke waard
ke waarde
ets
it
tel
7.
2 Voor
1.
Zorg ervo
Open de fl
2.
Verwijder
3.
Vul het re
4.
reservoir.
V.
02 – 18/12/2
ereiding
r dat de vo
ightcase en
e dop [7]
ervoir met
Mors geen
012
dingskabel
verwijder h
an het res
e geschikt
loeistof op
niet aange
t reservoir
rvoir.
nevelvloei
et toestel.
loten is op
[6].
tof (bestelc
10
het lichtnet.
de VDLSLH
T5). Giet ni
t te veel vl
eistof in he
©Vellema
t
nv
Page 11

LX500
5. Schroef de dop terug op het reservoir, zorg ervoor dat de plastic buisjes bevestigd aan de dop goed op hun
plaats zitten en in goede staat zijn.
6. Plaats het reservoir terug in de flightcase. Zorg ervoor dat de buis van het reservoir niet geplooid is.
7. Om de nevel naar boven of naar onder te richten, verwijder de neveluitlaat [1] (druk de zijkanten samen)
en plaats opnieuw in de gewenste richting.
8. Sluit één uiteinde van de voedingskabel aan op de voedingsingang [9] en sluit het andere uiteinde aan op
een geschikt stopcontact.
Het toestel begint op te warmen. Op het scherm verschijnt: “WARMING UP”.
9. Wacht totdat er op het scherm “READY TO HAZE” verschijnt. Raadpleeg Standalone en DMX-modus voor
gebruiksinstructies.
10. Dit toestel is uitgerust met een automatische reinigingsfunctie voor het verwarmingselement. Na gebruik,
wacht ongeveer 3 minuten voordat u het toestel uitschakelt om het reinigingsproces te voltooien. Trek de
stekker uit het stopcontact en laat het toestel afkoelen.
7.3 Standalone
In autonome modus, kan het toestel werken in:
• in tijdsgestuurde modus: produceert nevel in voorgeprogrammeerde tijdsintervallen. Zo kan de duur van de
neveluitstoot, de tijdsduur tussen de neveluitstoten, en het uitstootvolume ingesteld worden.
• in volumegestuurde modus: produceert voortdurend nevel. U kunt het uitstootvolume en de
ventilatorsnelheid instellen.
• in handmatige modus: produceert handmatig nevel bij het indrukken van de knop <MANUAL>. Het
uitstootvolume is 100 %.
Tijdsgestuurde modus
1. Sluit niets aan op de DMX-ingang [3,10] van het toestel.
2. Druk op <FUNCTION> tot <INTERVAL SET> op de display verschijnt.
3. Gebruik de <UP> of <DOWN> toetsen om de tijdsduur tussen twee neveluitstoten in te stellen
(1 ~ 200 seconden).
4. Druk op <FUNCTION> tot <DURATION SET> op de display verschijnt.
5. Gebruik de <UP> of <DOWN> toetsen om de duur van de neveluitstoot in te stellen (1 ~ 200 seconden).
6. Druk op <FUNCTION> tot <TIMER OUT> op de display verschijnt.
7. Gebruik de <UP> of <DOWN> toetsen om het volume van de neveluitstoot in te stellen. (1 ~ 100 %).
8. Druk op <TIMER> om de tijdsgestuurde werking te activeren.
9. Om de tijdsgestuurde werking te stoppen, druk nogmaals op <TIMER>.
Opmerkingen:
• Het toestel kan voortdurend nevel produceren zonder opnieuw op te warmen. Wanneer het interval tussen
de uitstoten afloopt, begint het toestel onmiddellijk nevel te produceren.
• De tijdsinstellingen zijn opgeslagen in het interne geheugen. De volgende keer dat u het toestel aansluit en
op <TIMER> drukt, zal het onmiddellijk starten in tijdsgestuurde modus met de instellingen zoals
gespecificeerd werd voor het vorige gebruik.
Volumegestuurde modus
1. Sluit niets aan op de DMX-ingang [3,10] van het toestel.
2. Druk op <FUNCTION> tot <VOLUME OUT> op de display verschijnt.
3. Gebruik de <UP> of <DOWN> toetsen om het volume van de neveluitstoot in te stellen (1 ~ 100 %).
4. Druk op <FUNCTION> tot <FAN SPEED> op de display verschijnt.
5. Gebruik de <UP> of <DOWN> toetsen om de ventilatorsnelheid in te stellen (1 ~ 100 %).
6. Druk op <VOLUME> om de volumegestuurde werking te activeren.
7. Om de volumegestuurde werking te stoppen, druk nogmaals op <VOLUME>.
Opmerking:
• Het toestel kan voortdurend nevel produceren zonder opnieuw op te warmen. Telkens u drukt op
<VOLUME>, begint het toestel onmiddellijk nevel te produceren.
• De volume-instellingen zijn opgeslagen in het interne geheugen. De volgende keer dat u het toestel aansluit
en op <VOLUME> drukt, zal het toestel onmiddellijk starten in volumegestuurde modus met de instellingen
zoals gespecificeerd werd voor het vorige gebruik.
V. 02 – 18/12/2012 11 ©Velleman nv
Page 12

a
4
u
m
M
.
e
ares
A
s
e
g
D
o
u
w
u
w
v
e
a
i
t
i
r
g
f
t
e
k
.
e
e
o
e
o
i
n
D
e
A
a
o
k
s
d
d
e
s
n
k
n
t
m
o
e
g
e
s
e
k
l
r
s
t
t
s
b
k
n
e
e
d
o
e
o
a
t
t
g
g
s
e
h
a
r
.
n
o
g
n
k
e
t
o
v
t
a
n
t
n
c
n
k
n
h
n
d
n
s
s
s
1
n
e
o
m
v
p
e
h
t
u
e
z
r
n
r
k
e
n
e
e
a
g
e
r
o
e
o
u
t
e
n
t
c
g
n
o
k
e
e
n
r
r
e
t
a
.
o
e
a
o
n
i
n
d
e
n
k
e
t
r
k
H
ndmatige
1.
Sluit niets
2.
Houd <M
3.
Laat de kn
7.
DMX-
St
ring van h
•
Alle DMXsignalen.
de DMX c
een nieuw
•
Wanneer
woorden:
Wanneer
woorden:
•
In het gev
instellen,
hoogste st
O
het toeste
1.
Druk op <
2.
Gebruik d
modus
aan op de
NUAL> ing
op <MANU
turing
t toestel vi
estuurde t
it digitale s
ntroller. U
startadres i
een enkel
anneer u
verschillen
anneer u
al van de 2-
an het twe
artwaarde i
l in te stelle
FUNCTION>
<UP> of <
MX-ingang
drukt. Het
L> los om
een univer
estellen he
tartadres is
unt één en
ngeven.
tartadres i
e instelling
de adressen
e instelling
kanaalsmo
de toestel
511.
met DMX tot < DMX
DOWN> to
[3,10] van
oestel begi
e stoppen.
ele DMX-c
ben een di
het kanaaln
el startadre
stelt, zullen
n voor 1 ka
instelt, da
n van een
us, zult u h
p 3 (1 + 2)
sturing:
512> op de
tsen om he
LX500
het toestel.
t nevel te p
ntroller.
itaal starta
ummer van
s gebruiken
alle toestel
naal verand
luistert elk
anaal vera
t startadre
(CH3~4), v
display ver
DMX-adre
roduceren a
res nodig,
waarop het
voor een g
len ‘luistere
ert, zullen a
toestel naa
dert, zal en
van het ee
an het derd
chijnt.
in te stelle
an 100%.
odat het jui
toestel ‘luis
oep toestell
’ naar hetz
lle toestelle
een ander
el het toes
rste toestel
op 5 (3 +
(001 ~ 51
ste toestel
ert’ naar h
en of u kun
lfde kanaal
er tegelijk
kanaal. Met
el op dat k
op 1 (CH1~
2) (CH5~6)
2).
eageert op
t signaal va
per toestel
. Met ander
op reagere
andere
naal reager
2) moeten
, enz. De
e
n
.
en.
D
X512-wa
Kanaal
1
2
8
Rein
•
Dit toestel
wacht ong
stekker ui
•
Ontkoppel
afkoelen.
Alle gebru
•
De behuizi
•
(geen ext
De voedin
•
technicus.
Reinig de
•
Maak het
•
Dompel h
•
De gebrui
•
reparaties
rden per
Van
0
0
ing en
is uitgerust
eveer 3 min
het stopco
het toestel
kte schroev
ng, de mon
a gaten in
skabels m
ilter [12] r
oestel gere
t toestel ni
er mag gee
anaal
Tot
255
255
onderh
met een au
uten voord
tact en laa
van het lich
en moeten
agebeugels
ontagebeu
gen niet be
gelmatig.
eld schoon
t onder.
n onderdele
Functie
ventilat
uitstoot
ud
tomatische
t u het toes
het toestel
net voor u
oed zijn aa
en de mon
els, aanslui
chadigd zij
met een vo
n vervange
rsnelheid 0
olume 0 ~
reinigingsfu
el uitschak
afkoelen.
an onderh
gespannen
ageplaats
tingen niet
. Laat het t
htige, niet
. Contacte
~ 100 %
00 %
ctie voor h
lt om het r
udswerkza
en mogen
ogen niet v
erplaatsen,
oestel onde
luizende d
r uw plaats
t verwarmi
inigingspro
mheden be
een sporen
rvormd zij
enz.).
houden do
ek. Gebrui
lijke verdel
ngselement
es te volto
int. Laat h
van roest v
of aangep
r een gesch
geen alcoh
r voor eve
Na gebrui
ien. Trek d
t toestel
ertonen.
st worden
oolde
l of solven
tuele
,
en.
stroombr
D
W
nneer de h
etten:
Ontkoppel
1.
Laat het t
2.
Druk op d
3.
Sluit de v
4.
in deze ha
V.
02 – 18/12/2
ker resett
rinstelbare
de voeding
estel minst
stroombre
edingskabe
ndleiding.
en u de st
Ind
er i
wendige
012
en
stroombrek
kabel van
ns 15 minu
er [4] om
opnieuw a
oombreke
chade zijn
r [4] scha
et lichtnet.
ten afkoele
te resetten.
n op het lic
niet kunt
Neem co
elt, wordt
.
Geen krach
tnet. Zorg
resetten (
tact op m
12
et toestel v
gebruiken.
ervoor dat
kunt de s
t uw deale
lledig uitg
het toestel
chakelaar
r om te he
schakeld. O
gebruikt zo
iet aan/u
stellen.
m de breke
als aanbevo
tzetten),
©Vellema
te
len
an
nv
Page 13

LX500
9. Technische specificaties
voeding 230 VAC / 50 Hz
verbruik 900 W
opwarmtijd 1.6 min
tankinhoud 3.5 L
neveluitstoot 100 m³/min (3500 ft³/min)
geschikte nevelvloeistof VDLSLHT5 professionele high-density rookvloeistof
DMX512 3- en 5-polige ingangs- en uitgangsconnectoren
afmetingen 600 x 590 x 265 mm
gewicht 20.5 kg
Gebruik dit toestel enkel met originele accessoires. Velleman nv is niet aansprakelijk voor schade of
kwetsuren bij (verkeerd) gebruik van dit toestel.
Voor meer informatie over dit product en de laatste versie van deze handleiding, zie
www.luxibel.com.
De informatie in deze handleiding kan te allen tijde worden gewijzigd zonder voorafgaande
kennisgeving.
© AUTEURSRECHT
Velleman nv heeft het auteursrecht voor deze handleiding. Alle wereldwijde rechten voorbehouden.
Het is niet toegestaan om deze handleiding of gedeelten ervan over te nemen, te kopiëren, te vertalen, te
bewerken en op te slaan op een elektronisch medium zonder voorafgaande schriftelijke toestemming van de
rechthebbende.
V. 02 – 18/12/2012 13 ©Velleman nv
Page 14

.
uDeEnNo
p
.
o
s
t
y
e
o
e
e
m
a
s
n
o
n
s
e
n
v
t
e
e
e
u
e
i
C
n
c
e
t
e
r
t
n
,
c
n
r
u
i
p
q
5
r
g
e
v
n
p
x
s
a
t
e
e
u
e
n
e
p
e
p
p
t
n
’
f
u
p
e
t
a
n
e
e
u
d
j
e
n
o
e
r
E
a
e
v
s
s
i
m
o
s
p
e
é
s
c
e
n
n
e
s
l
a
f
.
d
a
s
a
M
e
e
t
u
c
t
y
é
o
s
t
a
n
I
n
u
e
u
e
e
e
p
e
e
s
u
a
s
f
e
e
s
u
t
p
n
é
c
e
o
e
n
e
i
é
o
p
t
e
q
u
d
p
d
p
t
N
e
o
t
u
e
p
r
t
c
p
t
o
e
a
n
e
r
v
l
a
a
m
m
a
i
d
i
m
m
s
p
e
s
e
r
e
e
o
d
é
r
t
t
e
t
d
e
e
,
e
m
e
t
i
o
e
m
a
n
s
o
s
o
d
e
r
d
LX500
1
Intr
A
x résident
s informa
cas de qu
us vous re
l’a
pareil. Si l’
2
Con
Ce s
pollu
parm
Renv
resp
duction
de l'Unio
ions envir
mbole sur l'
r l'environ
i les déchet
yer les équ
cter la régl
stions, co
ercions de
ppareil a é
ignes d
Cet appar
physiques
sauf si ell
la part d’
Veiller à c
Avertiss
fabricant,
Ne pas ut
au câble.
La tensio
cette noti
Cet appar
terre. Un
europée
nnementa
appareil ou
ement. Ne
municipau
ipements u
mentation l
tacter les
otre achat
é endomm
sécuri
il ne convi
, sensoriell
s ont reçu
ne personn
e que les e
ment : si l
son service
liser cet ap
onfier tout
réseau ne
e.
il ressort à
echnicien q
MOD
ne
les import
l'emballage
as jeter un
non sujets
agés à votr
ocale relati
autorités l
! Lire la pré
gé pendant
é
nt pas aux
s ou mental
ne supervi
responsab
fants ne pu
câble d'ali
technique
areil en ca
réparation
eut pas dé
la classe d
ualifié doit
D’E
ntes conc
indique que
appareil él
au tri sélec
fournisse
e à la prote
ocales pou
ente notice
le transpor
personnes (
es réduites,
ion ou des i
le de leur s
ssent pas j
entation e
ut toute au
d’endomm
à votre rev
asser la te
protection
tablir la co
PLOI
rnant ce
l’éliminatio
ctrique ou
if ; une dé
r ou à un s
tion de l’en
r éliminati
attentivem
, ne pas l’in
compris e
ou manque
nstructions
curité.
uer avec l’a
t endomma
re personn
gement vis
endeur agr
sion menti
, ce qui im
nexion élec
roduit
d’un appa
lectronique
hèterie trai
rvice de re
vironnemen
n.
nt avant la
staller et co
ants) qui
nt d’expérie
concernant
ppareil.
gé, il doit ê
qualifiée p
ble au boîti
e.
nnée dans l
lique que l’
rique.
eil en fin d
(et des pile
era l’appar
yclage local
t.
mise en se
nsulter votr
ossèdent d
nce et de c
l’utilisation
re remplac
ur éviter to
r, réservoi
es spécifica
ppareil doi
vie peut
éventuelle
il en questi
. Il convient
vice de
revendeur
s capacités
nnaissance
e l’appareil
par le
ut risque.
de fluide,
ions à la fin
être mis à
)
n.
de
.
,
de
u
de
la
Débranch
rempli. Ti
Utiliser ce
projection
l’appareil.
Ne jamais
Attentio
extinction
Ne jamais
Protéger
ventilatio
tout autre
soit réguli
La tempé
températ
Installer l'
matériau
S'assurer
vers des
tout autre
n'utiliser
VDLSLHT
à brouilla
Ne pas in
le liquide
Ne jamais
irrévocabl
Toujours
r l’appareil
er la fiche
appareil u
s d’eau. Ne
immerger l
: l’appareil
laisser suf
couvrir l’ap
ontre la po
ne soient
objet. Veill
èrement ne
ature ambi
res plus éle
appareil da
nflammabl
que la sorti
ersonnes o
objet. Pour
ue les liqui
). Ne pas a
d. Des vap
érer le liqui
ntre en co
faire foncti
es à l'appar
idanger le
s’il n’est pa
our débran
iquement
jamais plac
appareil da
chauffe pe
isamment r
pareil et ne
ssière. Prot
as bloquée
r à ce que
toyé.
nte maxim
vées.
s un endroi
ou explosi
à brouillar
des anima
éviter tout
es à brouill
outer de l'h
urs toxique
de à brouill
tact avec la
nner l'appa
il.
éservoir de
utilisé, po
her l'appar
à l'intérie
r d’objets r
s un liquid
dant l’usag
froidir l’ap
pas l’install
éger contre
. Laisser un
es fentes d
le s'élève à
t bien ventil
ne soit pa
ux. Laisser
risque de s
rd spécifié
uile, du par
peuvent s
rd. Consult
peau ou le
reil sans liq
fluide avan
r le nettoy
il; non pas
r. Protéger
mplis de li
.
. Ne pas to
areil avant
r sur un ta
la chaleur e
e distance
ventilation
40 °C. Ne
é, à une dis
obstruée.
ne distanc
nté et pour
dans ce m
um, ou tou
dégager o
r immédiat
yeux, rinc
ide : cela
de stocker
r ou penda
le câble.
de la pluie,
uides au-d
cher les su
e le manie
is ou un re
xtrême. Vei
e minimum
ne soient p
as utiliser l'
ance mini
e jamais di
de minimu
prolonger l
de d'emplo
autre liqui
causer un
ement un
r abondam
ourrait cau
ou de trans
t que le rés
de l’humidi
ssus ou à p
rfaces chau
.
êtement en
ler à ce qu
0.5 m entr
s bloquées
ppareil à d
ale de 0.5
riger direct
0.5 m en
durée de v
i (code de c
e ou substa
incendie.
édecin aprè
ent avec d
er des dom
orter l'app
rvoir est
é et des
roximité de
es. Après
bois.
les fentes
l’appareil
et que le fi
s
de tout
ment le jet
re l’appareil
e de l'appa
mmande
nce au liqui
s ingestion.
l'eau.
ages
reil.
e
t
ltre
et
eil,
e
Si
V.
02 – 18/12/2
012
14
©Vellema
nv
Page 15

LX500
Protéger contre les chocs et le traiter avec circonspection pendant l’opération.
3. Directives générales
Se référer à la garantie de service et de qualité Velleman® en fin de notice.
• Se familiariser avec le fonctionnement de l’appareil avant de l’utiliser. Ne pas permettre pas aux personnes
non qualifiées d’opérer cet appareil. La plupart des dégâts sont causés par un usage non professionnel.
• Toute modification est interdite pour des raisons de sécurité. Les dommages occasionnés par des
modifications par le client ne tombent pas sous la garantie.
• N’utiliser le spot qu’à sa fonction prévue. Tout autre usage peut causer des courts-circuits, des brûlures,
des électrochocs, etc. Un usage impropre annule d'office la garantie.
• La garantie ne s’applique pas aux dommages survenus en négligeant certaines directives de cette notice et
votre revendeur déclinera toute responsabilité pour les problèmes et les défauts qui en résultent.
• Confier l’installation et l’entretien à un personnel qualifié.
• Ne pas brancher l’appareil après exposition à des variations de température. Afin d’éviter des dommages,
attendre jusqu’à ce que l’appareil ait atteint la température ambiante avant de l’utiliser.
• Cet appareil a été développé pour usage professionnel dans des discothèques, des théâtres, etc. Employer
cet appareil à l’intérieur et le connecter à une source de courant CA de 230 VCA/50 Hz.
• Une machine à brouillard n’est pas conçue pour une opération continue. Des pauses régulières prolongeront
sa vie. Le pompage permanent risque de surchauffer ou d'endommager la pompe. Un cycle de service de
30% est recommandé.
• Tout selon la quantité de brume ou de brouillard dégagée, l'appareil peut faire déclencher les détecteurs de
fumée.
• Garder cette notice pour toute référence ultérieure.
4. Caractéristiques
• dans un flight-case robuste et compact
• l'élément chauffant produit du brouillard très sec; ne laisse pas de résidus ni de liquide dans la machine
• pilotage DMX ou fonctions de temporisation intégrées
• sortie de brouillard prolongée et continue avec faible consommation de liquide
• seulement utiliser avec le liquide fumigène VDLSLHT5.
5. Description
Se référer aux illustrations en page 2 de cette notice.
1 sortie à brouillard 5 afficheur 9 entrée d’alimentation
2 sortie DMX à 3 broches 6 réservoir de liquide à brouillard 10 entrée DMX à 5 broches
3 entrée DMX à 3 broches 7 couvercle 11 sortie DMX à 5 broches
4 disjoncteur 8 touches 12 entrée d'air et filtre
6. Installation
Choisir un emplacement approprié. Installer sur une surface stable et horizontale. Ne pas suspendre
l'appareil.
Montage de l’appareil
• Un technicien qualifié doit installer l’appareil en respectant EN 60598-2-17 et toute autre norme applicable.
• La construction portante de l’appareil doit être capable de supporter 10 x le poids de l’appareil pendant une
heure, sans qu’une déformation de la construction en résulte.
• Fixer votre LX500 à l’aide d’un câble de sécurité (sécurité supplémentaire).
• Éviter de vous positionner en dessous de l’appareil pour l’enlever ou lors du montage ou du nettoyage. Un
technicien qualifié doit réviser l’appareil avant la mise en service. Organiser une révision minutieuse
annuelle.
• Installer l’appareil à un endroit où personne ne peut passer ou s’asseoir et où personne ne peut le toucher.
• L’installation de cet appareil exige une solide expérience pratique : le calcul de la charge max. de la
construction, les matériaux d’installation requis etc. De temps en temps, un technicien qualifié doit vérifier
la construction portante et l’appareil même. Ne pas essayer d’installer cet appareil vous-même si vous
n’avez pas les qualifications requises ; une installation incorrecte peut entraîner des blessures.
V. 02 – 18/12/2012 15 ©Velleman nv
Page 16

o
.
abra
iétasonvid
o<F
U
D<T<V<M
u
c
d
e
M
h
X
m
3
a
i
v
l
p
t
n
p
e
e
n
s
t
o
a
g
o
a
q
l
m
e
n
e
e
r
m
u
v
e
m
3
s
c
r
u
e
d
n
u
c
s
e
e
t
7
v
d
d
r
e
é
r
3
o
t
e
s
e
h
s
e
m
r
s
u
t
e
e
e
t
v
m
a
é
v
s
,
a
n
X
x
o
a
o
t
o
q
’
d
c
r
n
f
t
e
t
.
r
e
s
m
a
l
m
e
X
p
r
b
i
a
n
o
n
r
’
h
u
e
e
u
e
d
r
u
d
M
u
e
a
r
a
n
c
5
u
c
o
s
c
c
u
s
r
n
t
d
r
s
s
e
n
m
D
o
t
r
e
r
d
u
0
a
o
p
m
e
e
e
’
N
o
d
n
s
%
e
L
o
p
d
n
é
•
Enlever to
Un électri
•
•
Brancher l
une prise
même si l
•
Un expert
t matériau
ien qualifié
’appareil su
e courant
rhéostat o
doit approu
inflammabl
doit établir l
le réseau
ise à la ter
le circuit v
er l’installa
dans un ra
a connexio
lectrique pa
e et ne peu
ariateur est
tion avant q
LX500
yon de 0.5
électrique.
r la fiche d’
t pas être a
utilisé com
u’elle puiss
autour de
limentation
imenté dep
e un interr
être prise
l’appareil.
. Tout proje
is un rhéos
upteur mar
n service.
teur doit ê
tat ou un ci
he/arrêt (d
re branché
cuit variate
0% à 100
ur
ur,
).
nnexion D
C
•
Si nécessa
l’autre fic
connexion
de sortie
•
Longueur
sérielle :
•
Une résist
s’il est util
résistance
résistance
broche 2
série.
7
Emp
L'
ppareil n'a
nché sur le
Si
l’appareil n
su
te. Contrôl
t de bon fo
utilisation
anger le ré
Le
LX500 peu
mode aut
•
avec pilot
•
L’a
con
s’e
X512
ire, connect
e XLR mâle
sérielle. Uti
LR.
aximale d
2.
nce de ter
sé dans un
de terminai
de terminai
ers broche
oi
pareil ne
inue à fon
dommage
as d'interr
secteur.
produit qu
r le niveau
ctionneme
pour éviter
ervoir avan
être utilisé
nome
ge DMX512
er un câble
à l’entrée [
liser un câbl
la connexi
inaison DM
environnem
son prévien
son DMX n’
. Cette fich
’arrête pa
tionner. T
s’il tourn
pteur marc
peu ou pa
u liquide, l
t, rebranch
de l’endom
t le transpo
en plusieur
.
à fiche XLR
,10] du L
e de conne
n : 500 mè
X est à rec
ent avec be
la corrupti
st rien d’au
e XLR est c
automati
enir donc l
sans liqui
e/arrêt et
de brouilla
disjoncteu
er l’appareil
ager dava
t.
modes de
à la sortie
500. Il est
ion blindé à
tres. Nomb
mmander si
ucoup de
n du signal
re qu’une f
nnectée à l
uement lo
appareil à
e fumigè
ommence à
rd du tout o
et le cord
. Si celui-ci
tage. Porte
onctionnem
LR femelle
ossible de
2 conducte
e maximal
le câble D
ruit électriq
de contrôle
che XLR av
sortie XLR
rsque le ré
l’œil pend
e !
fonctionne
u des bruits
n d’aliment
e fonction
l’appareil
ent :
e votre con
elier plusie
rs avec de
’unités sur
X doit couv
e (p.ex. u
numérique
c une résis
[2,11] du
servoir est
nt son se
dès que le
mécanique
tion. Si tou
e pas après
hez votre r
trôleur (non
rs LX500 à
connecteu
une connexi
rir une gran
e discothèq
par le bruit
ance de 12
ernier app
vide ; la p
vice. L’ap
cordon d'ali
, débranch
apparaiss
30 second
vendeur. N
incl.) et
partir d’une
s d’entrée
on
e distance
e). La
électrique.
Ω de
reil de la
mpe
areil peut
entation s
r-le tout de
nt dans un
s, interrom
oublier pas
t
ou
a
it
re
e
7.
1 Navi
Ac
céder aux f
T
uche
UNCTION>
<
P>
<
OWN>
IMER>
OLUME>
ANUAL>
7.
2 Prép
1.
S'assurer
Ouvrir le f
2.
Enlever le
3.
Remplir le
4.
excessive
Revisser l
5.
place et e
Remettre l
6.
Pour dirig
7.
et réinsér
ation dan
nctions en
Fon
accè
défil
défil
activ
activ
activ
ration
ue le cordo
ight-case e
couvercle [
réservoir a
ent le rése
couvercle
bon état.
e réservoir
r le brouilla
r dans la di
s le men
tilisant les
tion
au menu
ment du m
ment du m
er le mode
er le mode
er le mode
n d'aliment
retirer le r
] du réser
ec du liquid
rvoir. Ne pa
u réservoir
ans le fligh
rd vers le h
ection souh
ouches [8]
t défilemen
nu de bas
nu de haut
emporisé
olume cont
anuel
tion ne soi
servoir [6]
oir.
e à brouilla
renverser
vérifier qu
t-case. S'as
ut ou vers l
aitée.
au bas de l
du menu
n haut, ou
en bas, ou
rôlé
pas branc
d approprié
de liquide s
les tubes
urer que le
e bas, retir
afficheur [
augmenter
diminuer un
é sur le se
(code de c
r l'appareil.
n plastique
tube du ré
r la sortie à
].
ne valeur
e valeur nu
teur.
mmande V
attachés au
ervoir ne s
brouillard [
umérique
érique
LSLHT5).
couvercle s
it pas plié.
1] (serrer
e pas rempl
ient bien e
es deux côt
ir
s)
V.
02 – 18/12/2
012
16
©Vellema
nv
Page 17

LX500
8. Connecter une extrémité du cordon d'alimentation à l'entrée d'alimentation [9] et brancher l'autre
extrémité sur une prise secteur appropriée.
L'appareil commence à se réchauffer. Il s'affiche “WARMING UP”.
9. Patienter jusqu'à ce que “READY TO HAZE” s'affiche. Se référer à Mode autonome et Mode DMX pour les
instructions d'utilisation.
10. Cet appareil est doté d'une fonction de nettoyage automatique pour l'élément d'échauffement. Après
utilisation, patienter pendant 3 minutes avant d'éteindre la machine afin de compléter le processus de
nettoyage. Puis déconnecter le cordon d'alimentation et laisser refroidir l'appareil.
7.3 Mode autonome
En mode autonome, l'appareil peut fonctionner en :
• en mode temporisé : produit du brouillard à des intervalles préprogrammés. Il est possible de régler la
durée du jet de brouillard, l'écart entre deux jets de brouillard, et le volume de sortie.
• en mode volume contrôlé : produit du brouillard en continu. Il est possible de régler le volume de sortie et
la vitesse du ventilateur.
• en mode manuel : produit du brouillard en appuyant sur le bouton <MANUAL>. Le volume de sortie est de
100 %.
Mode temporisé
1. Ne rien connecter à l'entrée DMX [3,10] de l'appareil.
2. Enfoncer la touche <FUNCTION> jusqu’à ce que <INTERVAL SET> s’affiche.
3. Utiliser les touches <UP> ou <DOWN> pour régler l'intervalle entre deux jets de brouillard
(1 ~ 200 secondes).
4. Enfoncer la touche <FUNCTION> jusqu’à ce que <DURATION SET> s’affiche.
5. Utiliser les touches <UP> ou <DOWN> pour régler la durée du jet de brouillard (1 ~ 200 secondes).
6. Enfoncer la touche <FUNCTION> jusqu’à ce que <TIMER OUT> s’affiche.
7. Utiliser les touches <UP> ou <DOWN> pour régler le volume de sortie (1 ~ 100 %).
8. Enfoncer la touche <TIMER> pour activer le fonctionnement en mode temporisé.
9. Pour arrêter le fonctionnement en mode temporisé, appuyer de nouveau sur <TIMER>.
Remarques :
• L'appareil peut produire du brouillard en continu sans se réchauffer. Lorsque l'intervalle entre deux jets se
termine, l'appareil commence immédiatement à produire du brouillard.
• Les réglages du minuteur sont sauvegardés dans la mémoire interne. La prochaine fois que l'appareil sera
connecté et le bouton <TIMER> appuyé, l'appareil démarrera en mode temporisé avec les réglages
spécifiés pour l'utilisation précédente.
Mode volume contrôlé
1. Ne rien connecter à l'entrée DMX [3,10] de l'appareil.
2. Enfoncer la touche <FUNCTION> jusqu’à ce que <VOLUME OUT> s’affiche.
3. Utiliser les touches <UP> ou <DOWN> pour régler le volume de sortie (1 ~ 100 %).
4. Enfoncer la touche <FUNCTION> jusqu’à ce que <FAN SPEED> s’affiche.
5. Utiliser les touches <UP> ou <DOWN> pour régler la vitesse du ventilateur (1 ~ 100 %).
6. Enfoncer la touche <VOLUME> pour activer le fonctionnement en mode volume contrôlé.
7. Pour arrêter le fonctionnement en mode volume contrôlé, appuyer de nouveau sur <VOLUME>.
Remarques :
• L'appareil peut produire du brouillard en continu sans se réchauffer. A chaque appui sur <VOLUME>,
l'appareil commence immédiatement à produire du brouillard.
• Les réglages de volume sont sauvegardés dans la mémoire interne. La prochaine fois que l'appareil sera
connecté et le bouton <VOLUME> appuyé, l'appareil démarrera en mode volume contrôlé avec les réglages
spécifiés pour l'utilisation précédente.
Mode manuel
1. Ne rien connecter à l'entrée DMX [3,10] de l'appareil.
2. Maintenir enfoncé <MANUAL>. L'appareil commence à produire du brouillard à 100%.
3. Relâcher le bouton <MANUAL> pour arrêter.
V. 02 – 18/12/2012 17 ©Velleman nv
Page 18

4
e
a
.
é
s
.
ntemcap
m
p
c
e
u
p
d
o
d
e
a
o
e
.
e
e
a
c
u
t
f
u
à
n
e
c
n
u
s
t
n
g
r
t
g
e
o
d
a
e
o
U
U
t
d
e
a
s
s
u
a
m
c
t
e
d
n
é
e
e
r
a
c
a
e
(
e
j
e
o
n
f
e
e
n
e
t
t
o
d
r
a
i
C
W
i
m
L
c
d
e
e
a
q
a
e
c
o
t
d
d
t
u
o
t
,
e
s
j
n
0
D
C
e
u
a
e
a
1
s
u
~
t
t
n
n
r
a
u
j
t
r
d
s
o
a
a
e
%
a
u
a
n
u
r
p
s
u
e
t
t
n
o
e
p
n
e
p
n
s
e
n
.
m
t
c
t
o
r
r
m
p
r
n
s
e
u
r
x
7.
Mode
C
mode per
•
Tous les a
appareils
numéro d
départ po
•
Dans le ca
Tous les a
adresses
ajustemen
•
Pour le m
(CH3~4),
Ré
gler l'appar
Enfoncer l
1.
Utiliser les
2.
de pilota
et de pilote
pareils pilo
orrects réa
canal sur l
r toute une
s d’une seul
pareils ser
e départ in
t des réglag
de à 2 can
u troisièm
il pour un f
touche <F
touches <
e DMX
votre proj
és par un s
issent sur l
quel l’appa
série d’app
e adresse, t
nt donc infl
ividuelles,
es d’un can
ux, l’adress
5 (3 + 2)
nctionnem
NCTION>
P> ou <DO
cteur sans
ignal DMX d
s signaux
eil écoute l
reils ou un
ous les app
uencés lors
haque app
l n’influenc
de départ
CH5~6), et
nt avec pil
usqu’à ce q
WN> pour r
LX500
ontrôleur
emandent u
e contrôle.
contrôleur
adresse d
reils « éco
ue les régl
reil « écout
que l'appa
du premier
. La valeur
tage DMX :
ue <DMX 5
égler l'adre
MX.
ne adresse
ette adres
DMX. Il y a
départ par
teront » les
ges d’un se
ra » son pr
reil sur ce c
ppareil est
de départ l
2> s’affich
se DMX (00
e départ D
e de dépar
le choix en
appareil.
mêmes sig
ul canal ser
pre canal.
nal.
1 (CH1~2),
plus élevé
.
1 ~ 512).
MX pour as
numérique
re une seul
aux, sur u
nt changés
Par conséqu
du deuxiè
est de 511
urer que le
indique le
adresse d
seul canal.
Avec des
ent, un
e 3 (1 + 2)
.
leurs DMX
V
Canal
1
2
8
Nett
•
Cet appar
utilisation,
nettoyage
•
Débranch
Serrer les
•
Le boîtier,
•
bricolés p.
•
Les câbles
•
Nettoyer l
•
Essuyer l’
solvants.
•
Ne jamais
•
Il n’y a au
armer le d
R
Si
le disjoncte
joncteur :
di
1.
Déconnec
Laisser re
2.
Appuyer s
3.
Brancher
4.
recomma
par canal
De
0
0
yage e
il est doté
patienter p
r l’appareil
écrous et le
les support
ex. pas de t
d'alimentat
filtre [12]
ppareil rég
immerger l’
une pièce
isjoncteur
r réenclen
er le cordon
roidir l'appa
r l'interrup
nouveau l
dations dan
À
255
255
entreti
'une foncti
ndant 3 mi
vant de le
vis et véri
de montag
rous additio
ion ne peuv
régulièrem
lièrement a
ppareil da
aintenable
hable [4] s
d'alimenta
reil pendan
eur du disj
cordon d'al
s ce mode
Descrip
vitesse
volume
n
n de nettoy
nutes avant
ettoyer. La
ier qu’ils ne
e et la cons
nnels dans
nt pas être
nt.
vec un chiff
s un liquide
par l’utilisa
déclenche
ion du sect
au moins 1
ncteur [4]
imentation
'emploi.
ion
u ventilate
e sortie 0
age automa
d'éteindre l
isser refroid
rouillent pa
ruction por
n support,
endommag
n humide
.
eur. Confie
l'appareil s
ur.
5 minutes.
pour réiniti
ur le secte
r 0 ~ 100
100 %
ique pour l'
a machine
ir l'appareil.
s.
ante ne pe
e pas dépl
és. Un tech
on peluche
toute répa
'éteint com
liser. Ne pa
r. Veiller à
élément d'é
fin de com
vent pas êt
cer les con
icien qualifi
x. Éviter l’u
ation à votr
lètement. P
forcer.
tiliser l'app
chauffemen
léter le pro
re déformés
exions etc.
é doit entre
sage d’alco
e revendeu
our réarme
areil confor
. Après
essus de
, adaptés o
enir l’appa
l et de
agrée.
le
ément au
eil.
st imposs
S'il
ue d'avoir
risq
9
Spé
ali
mentation
co
sommatio
ps d'écha
acité du ré
vo
lume de sor
liq
uide fumigè
V.
02 – 18/12/2
ificatio
ffement
ervoir
ie
e appropri
012
ible de réa
es domm
s techn
230 V
900
1.6 m
3.5 L
100
VDLS
mer le dis
ges inter
ques
A / 50 Hz
n
³/min (350
HT5 liquide
oncteur (i
es. Contac
ft³/min)
fumigène p
18
mpossible
er votre r
ofessionnel
de bascule
vendeur
à haute de
r l'interru
our toute
sité
teur), il
éparation.
©Vellema
nv
Page 19

LX500
DMX512 connecteurs d'entrée et de sortie à 3 et à 5 broches
dimensions 600 x 590 x 265 mm
poids 20.5 kg
N’employer cet appareil qu’avec des accessoires d’origine. La SA Velleman ne peut, dans la mesure
conforme au droit applicable être tenue responsable des dommages ou lésions (directs ou indirects)
pouvant résulter de l’utilisation de cet appareil.
Pour plus d’information concernant cet article et la dernière version de cette notice, visiter notre
site web www.luxibel.com.
Toutes les informations présentées dans cette notice peuvent être modifiées sans notification
préalable.
© DROITS D’AUTEUR
SA Velleman est l’ayant droit des droits d’auteur pour cette notice. Tous droits mondiaux réservés.
Toute reproduction, traduction, copie ou diffusion, intégrale ou partielle, du contenu de cette notice par quelque
procédé ou sur tout support électronique que se soit est interdite sans l’accord préalable écrit de l’ayant droit.
V. 02 – 18/12/2012 19 ©Velleman nv
Page 20

.
lImSi
.
o
a
e
c
a
a
f
r
n
U
o
r
s
e
a
d
a
s
e
n
o
n
e
c
a
t
t
o
a
a
m
c
a
b
g
s
o
n
r
n
e
e
c
m
A
p
o
p
e
u
0
g
ñ
ó
a
o
e
c
n
e
e
o
g
r
t
e
u
s
u
ó
L
m
a
h
e
n
t
s
o
e
n
a
e
r
ó
í
n
c
s
e
s
n
m
a
s
a
j
U
o
u
a
s
m
r
n
o
s
a
ó
e
p
o
N
d
5
d
E
r
R
e
s
m
e
a
n
a
e
e
t
t
o
u
n
q
n
o
c
c
u
d
e
c
e
t
o
b
a
o
f
u
d
b
c
e
r
q
t
e
m
u
a
u
e
e
r
p
e
c
u
u
o
d
e
t
a
a
m
r
e
m
n
c
s
t
ó
n
a
e
t
s
e
t
o
h
1
Intr
A
os ciudad
portantes
tiene dud
¡G
racias por h
ap
arato ha su
2
Inst
Este
el m
No ti
espe
Resp
ducció
nos de la
informaci
símbolo en
dio ambien
re este apa
ializada en
ete las leye
s, contact
ber compr
rido algún
uccione
M
nión Euro
nes sobre
este aparat
te.
ato (ni las
reciclaje. D
locales en
con las a
do la LX50
año en el tr
s de se
NUA
ea
el medio a
o el embal
ilas, si las
vuelva est
relación co
toridades
! Lea aten
ansporte no
uridad
LX500
DEL
biente c
je indica q
ubiera) en l
aparato a
el medio a
locales pa
amente las
lo instale y
SUA
ncernient
e, si tira la
basura do
u distribuid
biente.
a residuos
instruccion
póngase en
IO
a este pr
muestras i
éstica; de
or o a la uni
.
s del manu
contacto c
ducto
nservibles,
e ir a una
dad de reci
l antes de
n su distrib
odrían dañ
mpresa
laje local.
sarla. Si el
idor.
r
Este apar
mentales
salvo si e
Para prot
aparato si
Adverte
técnico u
No utilice
reparació
Asegúres
especifica
Este apar
puesto a
Desconec
limpiarlo
red, nunc
Utilice el
tipo de sa
Nunca su
¡Ojo! La
calientes.
de manej
Nunca cu
to no es ap
reducidas ni
tán bajo la
ger a los ni
n supervisi
cia: Un cab
tra person
este aparat
debe ser r
de que la t
iones.
to pertene
ierra. La co
e siempre
antes de ll
del propio
parato sól
lpicadura o
erja el apa
aja del apa
Después de
rlo.
ra el apara
to para per
personas c
vigilancia d
os de los p
n.
le de alime
cualificada
en cas si l
alizada por
ensión de r
e a la clase
exión eléct
l aparato si
nar el dep
cable.
en interio
oteo. Nunc
rato en un l
ato se calie
haber desa
o y no lo in
onas (niños
n una falta
una perso
eligros de l
tación daña
para evitar
caja, el de
personal e
d no sea m
de protecci
ica debe lle
no va a usa
sito. Tire si
res. No exp
a ponga un
quido.
ta durante
tivado el a
tale en una
incl.) con c
de experie
a que pued
s aparatos
do debe ser
cualquier p
pósito de líq
pecializado.
yor que la
n I. Por lo
varse a cab
rlo durante
mpre del e
onga este e
objeto con l
su operació
arato, deje
alfombra o
pacidades
cia y conoci
garantizar
léctricos, n
reemplaza
ligro.
uido o el ca
ensión indi
anto, es es
por un téc
n largo pe
chufe para
uipo a lluvi
íquido en el
. Nunca to
que se enfr
un suelo de
ísicas, sens
mientos del
la segurida
nca los dej
o por el dis
le están d
ada en las
ncial que el
nico cualific
íodo de tie
desconecta
a, humedad
aparato.
ue las sup
íe suficiente
madera.
riales o
producto,
.
solos con
ribuidor, un
ñados. La
aparato es
do.
po, antes d
el cable de
ni a ningún
rficies
mente ante
l
é
e
No expon
de que lo
el aparat
la parte i
La tempe
Instale el
material i
No bloqu
animales.
Para evita
adecuado
líquido de
No beba
contacto
Nunca dej
Vacíe sie
V.
02 – 18/12/2
012
a este equi
orificios de
y cualquier
ferior. Limp
atura ambi
aparato en
flamable o
e nunca la
Mantenga
r riesgos de
(referencia
humo. Esto
l líquido de
on los ojos
e funcionar
pre el dep
po a polvo.
ventilación
otro objeto
ie el filtro r
nte máx. e
n lugar bie
explosivo.
alida de hu
na distanci
salud y pro
VDLSLHT5).
podría cau
humo. Cont
o la piel, en
el aparato s
sito antes d
No exponga
no estén bl
. Asegúrese
gularmente
de 40 °C.
aireado, a
o. Nunca
de mín. 0.
longar la du
Nunca aña
ar un humo
cte con un
uáguese co
in líquido:
e almacena
20
este equip
queados. D
de que nun
.
o sobrepas
una distan
irija la boq
m entre la
ración de vi
a aceite, p
tóxico o in
médico inm
n abundant
sto podría d
o transpor
a tempera
eje una dist
a bloquee
e esta temp
ia mínima d
illa directa
boquilla y c
a del apar
rfume ni c
luso un inc
ediatament
agua.
añar el apa
ar el aparat
uras extre
ancia de mí
l orificio de
eratura.
e 0.5 m de
ente a per
alquier obs
to, utilice s
alquier otra
ndio.
si se traga
ato.
o.
as. Asegúr
. 0.5 m en
ventilación
ualquier
onas ni
áculo.
lo el líquid
sustancia a
líquido. Si
©Vellema
se
re
de
l
ay
nv
Page 21

LX500
No agite el aparato. Evite usar excesiva fuerza durante el manejo y la instalación.
3. Normas generales
Véase la Garantía de servicio y calidad Velleman® al final de este manual del usuario.
• Familiarícese con el funcionamiento del aparato. Sólo personas cualificadas pueden manejar este aparato.
La mayoría de los daños son causados por un uso inadecuado.
• Por razones de seguridad, las modificaciones no autorizadas del aparato están prohibidas. Los daños
causados por modificaciones no autorizadas, no están cubiertos por la garantía.
• Utilice sólo el LX500 para aplicaciones descritas en este manual a fin de evitar p.ej. cortocircuitos,
quemaduras, descargas eléctricas, etc. Un uso desautorizado puede causar daños y anula la garantía
completamente.
• Los daños causados por descuido de las instrucciones de seguridad de este manual invalidarán su garantía
y su distribuidor no será responsable de ningún daño u otros problemas resultantes.
• La instalación y el mantenimiento deben ser realizados por personal especializado.
• No conecte el aparato si ha estado expuesto a grandes cambios de temperatura. Espere hasta que el
aparato llegue a la temperatura ambiente.
• Este aparato ha sido diseñado para uso profesional en una discoteca, un teatro, etc. y es apto para un uso
sólo en interiores. Conéctelo a una fuente de corriente CA de 230 VCA / 50 Hz.
• No ha sido diseñado para un uso ininterrumpido. Introduzca frecuentemente una pausa para prolongar la
vida del aparato. No deje que la bomba funcione continuamente. Esto podría causar un sobrecalentamiento
o dañar la bomba. Un ciclo de trabajo de 30 % es ideal.
• Es posible que el aparato active los detectores de humo. Esto depende de la cantidad de humo producida.
• Guarde este manual del usuario para cuando necesite consultarlo.
4. Características
• en flight case robusto y compacto
• produce una niebla muy seca gracias al sistema especial de calentamiento, no deja residuos ni líquido en el
depósito
• control DMX o funciones de temporizador incorporados
• salida de niebla continua y prolongada con bajo consumo del líquido
• sólo para el uso con el líquido de humo VDLSLHT5.
5. Descripción
Véase las figuras en la página 2 de este manual del usuario.
1 salida de humo 5 pantalla 9 entrada de alimentación
2 salida DMX de 3 polos 6 depósito para el líquido de humo 10 entrada DMX de 5 polos
3 entrada DMX de 3 polos 7 tapa 11 salida DMX de 5 polos
4 disyuntor 8 botones de control 12 orificios de ventilación y filtro
6. Instalación
Seleccione un lugar adecuado. Instale el aparato en una superficie estable y horizontal. No lo cuelgue
de la pared o del techo.
Montaje del aparato
• Respete la directiva EN 60598-2-17 y toda norma nacional antes de instalar el aparato. La instalación debe
ser realizada por un técnico especializado.
• El soporte donde irá el aparato, debe ser capaz de sostener 10 veces el peso de éste durante una hora, sin
que se produzca una deformación de dicho soporte.
• Fije siempre el LX500 con un cable de seguridad (seguridad adicional).
• Evite ponerse debajo del aparato durante el montaje, la limpieza, etc. Un técnico especializado debe revisar
el aparato antes de la puesta en marcha. Después, debe revisarlo una vez al año.
• Instale el aparato fuera del alcance de personas no autorizadas y en un lugar con poca gente.
V. 02 – 18/12/2012 21 ©Velleman nv
Page 22

o
.
é
a
e<F<U<D<T<V<M
c
e
u
t
ó
ó
o
r
o
M
e
c
m
e
c
l
a
e
p
c
a
e
p
n
n
d
s
ó
t
g
f
a
g
a
u
p
a
t
s
f
d
a
e
ó
e
a
n
c
d
o
r
r
c
d
s
P
d
e
m
r
e
i
D
nentdesdes
c
c
c
a
x
n
p
c
ó
g
m
a
c
c
%
c
b
r
0
c
é
p
e
s
a
t
v
ñ
e
t
e
e
a
e
n
a
o
r
o
e
n
m
m
e
c
ú
M
d
m
c
u
N
o
e
á
e
a
e
e
o
e
e
ñ
s
a
n
a
c
o
e
o
0
r
a
M
R
i
s
m
u
a
f
a
h
o
m
t
D
e
d
t
t
s
a
e
s
s
ó
c
t
o
o
n
p
o
o
d
o
q
o
c
o
e
e
a
l
n
s
u
o
e
d
u
e
e
d
a
o
d
m
o
e
l
c
,
a
c
n
3
o
.
e
n
e
e
m
s
e
•
La instala
soporte, d
de la estr
instalar es
lesiones.
•
Quite todo
•
La conexi
Conecte el
•
alimentaci
alimentad
interrupto
•
Un expert
C
nexión D
•
Si fuera n
otro cone
un cable b
•
Longitud
Se recomi
•
ambiente
corrompa
resistenci
aparato d
ión de este
be conocer
ctura y del
e aparato
material in
n eléctrica
aparato a l
n directam
s por un re
ON/OFF (d
debe prob
X512
cesario, co
tor XLR ma
lindado de
áx. de la c
nda una te
on mucho
a señal de
de 120 Ω
la serie.
aparato exi
los materia
parato mis
i no tiene la
lamable en
ebe llevarl
red eléctri
nte de un
stato o un
0% a 100
r la instala
ecte un ca
ho a la ent
oble hilo co
nexión: 50
minación si
uido eléctri
ontrol num
e polo 2 a
e una sólid
les necesari
o debe se
s cualificaci
un radio de
a cabo un
a con la co
ircuito con
circuito dim
).
ión antes d
le con cone
ada [3,10]
nductor con
metros. N
el cable D
o (ej. una
rico. La ter
olo 3. Este
LX500
experienci
s para la i
llevada a c
nes requeri
0.5 m alred
lectricista
exión de al
utado a tie
er, inclus
la puesta
tor XLR (n
de la LX50
conectores
mero máx.
X debe cub
iscoteca). L
inación D
onector XL
práctica:
stalación, e
bo por un
das; una in
edor del ap
ualificado.
imentación.
rra. Asegúr
si utiliza el
n marcha.
incl.) a la
. Es posible
XLR de entr
de unidade
ir una gran
terminaci
X no es má
está cone
ebe poder
c. De vez e
écnico espe
talación inc
rato.
Todos los a
se de que l
reóstato o
alida XLR h
conectar v
ada y de sa
en una co
distancia o
n impide q
s que un co
tado a la sa
alcular la c
n cuando, u
cializado. N
orrecta pue
paratos deb
s aparatos
l circuito di
mbra del c
rios LX500
ida LX500.
exión en se
i se usa en
e el ruido e
nector XLR
lida XLR [2
rga máx. d
na verificaci
intente
e causar
en recibir
no estén
mer como
ntrolador y
n serie. Us
rie: 32.
un medio
éctrico
on una
11] del últi
l
ón
un
el
o
7
Uso
El
aparato no
el
ctrica.
Si
el aparato
de
sconéctelo i
pa
rece funcio
de
sconéctelo
va
ciar el depó
H
y varios mo
•
modo aut
modo con
•
7.
1 Nave
Ac
ceder a las
T
cla
UNCTION>
P>
OWN>
IMER>
OLUME>
ANUAL>
El a
fun
dañ
arato no
ionando.
r el apara
stá equipa
roduce sólo
mediatam
ar correcta
e nuevo pa
ito antes d
dos de func
nomo (stan
rolado por
ar por el
unciones al
Fu
ini
ini
ini
e desactiv
or tanto,
to al utiliz
o con un in
un poco de
nte. Contro
ente, vuel
a evitar da
l transport
onamiento:
d-alone)
MX512.
menú
utilizar las
ción
rar en el m
plazarse en
plazarse en
iar el modo
iar el modo
iar el modo
automáti
iempre vig
rlo sin líq
erruptor O
humo, si n
le el nivel d
a a conecta
arlo aún m
.
eclas [8] d
nú o despl
el menú d
el menú d
controlado
controlado
manual
camente s
ile el depó
ido de hu
/OFF. Empi
produce h
l líquido, el
r el aparato
s. Devuelv
la parte in
zarse en el
sde abajo h
sde arriba
por el temp
por el volu
el depósit
ito duran
o!
eza a funci
mo en abs
disyuntor y
. Si sigue si
el aparato
erior de la
menú
cia arriba
acia abajo
rizador
en
o está vací
e su funci
nar en cuan
luto o si oy
el cable de
funcionar
a su distrib
antalla [5]
aumentar
disminuir
o; la bomb
namiento.
to lo conect
ruidos me
alimentació
espués de
ido. No se
.
l valor
l valor
sigue
¡Puede
e a la red
ánicos,
. Si todo
0 segundo
lvide de
,
7.
2 Prep
1.
Asegúrese
2.
Abra el fli
Saque la t
3.
Rellene el
4.
ningún líq
Vuelva a a
5.
estén mon
Vuelva a
6.
V.
02 – 18/12/2
ración
de que el c
ht case y e
pa [7] del
depósito co
ido en el a
tornillar la t
tados corre
oner el dep
012
ble de alim
traiga el d
depósito.
el líquido
arato.
apa firmem
tamente y
sito en el fl
entación n
pósito [6].
decuado (r
nte en el d
o estén da
ight case. A
está conec
ferencia V
pósito y as
ados.
egúrese de
22
ado a la re
LSLHT5). N
gúrese de
que el tub
eléctrica.
sobrellene
ue el tubo
del depósit
el depósito
e plástico f
o no esté pl
No derram
ijado a la ta
gado.
©Vellema
pa
nv
Page 23

LX500
7. Para dirigir el humo hacia arriba o hacia abajo, extraiga la salida de humo [1] (apriete ambos lados) y
vuelva a introducirla en la dirección deseada.
8. Conecte un extremo del cable a la entrada de alimentación [9] y el otro extremo a un enchufe.
El aparato empieza a calentarse. La pantalla visualiza “WARMING UP”.
9. Espere hasta que la pantalla visualice “READY TO HAZE”. Consulte Modo autónomo (stand-alone) y
Modo DMX.
10. Este aparato está equipado con una función de limpieza automática del calentador. Después del uso, espere
3 minutos antes de activar el aparato para que pueda terminar el procedimiento de limpieza. Luego,
desconecte el cable de la red eléctrica y deje que el aparato se enfríe.
7.3 Modo autónomo (stand-alone)
Hay tres modos de funcionamiento:
• Modo « Timer »: El aparato produce humo en intervalos de tiempo preprogramados. Puede seleccionar la
duración, el tiempo entre dos salidas de humo y la cantidad.
• Modo « Volume »: El aparato produce humo de manera continua. Puede seleccionar la cantidad y la
velocidad del ventilador.
• Modo manual: El aparato produce humo de manera manual al pulsar el botón <MANUAL>. El aparato
produce la cantidad máx. de humo.
Modo « Timer »
1. No conecte nada a la entrada DMX [3,10] del aparato.
2. Pulse el botón <FUNCTION> hasta que se visualice <INTERVAL SET>.
3. Utilice <UP> y <DOWN> para ajustar el tiempo entre dos salidas de humo (1 ~ 200 segundos).
4. Pulse el botón <FUNCTION> hasta que se visualice <DURATION SET>.
5. Utilice <UP> y <DOWN> para ajustar la duración de la salida de humo (1 ~ 200 segundos).
6. Pulse el botón <FUNCTION> hasta que se visualice <TIMER OUT>.
7. Utilice <UP> y <DOWN> para ajustar la cantidad (1 ~ 100 %).
8. Pulse el botón <TIMER> para iniciar el modo « Timer ».
9. Para desactivar el modo « Timer », vuelva a pulsar <TIMER>.
Observaciones:
• El aparato puede producir humo de manera continua sin necesidad de recalentarse. El aparato empieza a
producir humo inmediatamente después de que se haya terminado el tiempo entre dos salidas.
• Los ajustes de temporización se guardan en la memoria interna. El aparato se activa automáticamente en el
modo « Timer » con sus ajustes programados al activar el aparato después de una desactivación y al pulsar
el botón <TIMER>.
Modo « Volume »
1. No conecte nada a la entrada DMX [3,10] del aparato.
2. Pulse la tecla <FUNCTION> hasta que se visualice <VOLUME OUT>.
3. Utilice <UP> y <DOWN> para ajustar la cantidad de salida de humo (1 ~ 100 %).
4. Pulse la tecla <FUNCTION> hasta que se visualice <FAN SPEED>.
5. Utilice <UP> y <DOWN> para ajustar la velocidad del ventilador (1 ~ 100 %).
6. Pulse la tecla <VOLUME> para iniciar el modo « Volume ».
7. Para desactivar el modo « Volume », vuelva a pulsar <VOLUME>.
Observaciones:
• El aparato puede producir humo de manera continua sin necesidad de recalentarse. El aparato produce
humo cada vez que pulsa <VOLUME>.
• Los ajustes de la cantidad se guardan en la memoria interna. El aparato se activa automáticamente en el
modo « Volume » con sus ajustes programados al activar el aparato después de una desactivación y al
pulsar el botón <VOLUME>.
Modo manual
1. No conecte nada a la entrada DMX [3,10] del aparato.
2. Mantenga pulsado <MANUAL>. El aparato produce la cantidad de humo máxima.
3. Suelte el botón <MANUAL> para parar.
V. 02 – 18/12/2012 23 ©Velleman nv
Page 24

4
t
a
a
.
e
s
.
n
p
r
u
n
o
d
o
m
(
a
P
5
p
a
e
e
q
s
o
f
a
m
d
d
e
e
s
d
d
e
e
a
m
d
l
M
e
e
n
a
C
s
e
e
o
N
a
m
t
a
o
e
u
r
e
o
e
a
o
X
a
o
ñ
r
m
n
r
e
n
o
q
a
r
u
A
W
i
m
L
s
n
ó
n
a
r
n
d
e
e
e
q
a
h
e
y
5
r
d
n
0
r
ó
M
r
a
c
p
,
a
m
D
h
e
p
r
t
s
r
a
g
p
s
e
e
0
c
a
d
a
t
L
s
e
i
e
i
r
c
1
l
o
d
e
n
o
n
n
.
C
r
u
e
d
a
e
s
d
m
a
e
e
m
e
y
c
n
t
c
e
a
e
a
s
e
n
7.
Modo
Es
e modo pe
•
Si se usa
reaccione
aparato re
para toda
•
Con una s
sincroniza
de todos l
tanto, ca
•
En el caso
3 (1 + 2)
H
cer funcion
1.
Pulse la te
2.
Utilice <U
controla
mite contro
na señal D
a las señal
accionará a
una serie d
la direcció
amente a l
s canales.
biar los aju
del modo d
CH3~4), d
r el aparat
cla <FUNCT
> o <DOW
o por DM
ar su foco s
X, cada ap
s de contr
las señales
aparatos o
inicial para
misma se
on varias d
tes de un s
2 canales,
l tercer apa
con un con
ION> hasta
> para int
in controlad
rato tiene
l correctas.
DMX del co
una direcci
una serie d
al. Por lo ta
irecciones i
olo canal só
la dirección
rato 5 (3 +
trolador DM
que se visu
oducir la di
LX500
or DMX.
u propia di
Esta direcci
trolador D
n inicial po
e aparatos,
nto, cambia
iciales, cad
lo afecta al
inicial del
2) (CH5~6)
X:
lice <DMX
ección inici
ección inici
n inicial di
X. Es posibl
aparato.
todos los a
r los ajuste
aparato re
anal en cu
rimer apara
etc. La dir
512>.
l DMX (001
l DMX para
ital es el pr
e elegir ent
aratos reac
de un solo
accionará in
stión.
to es 1 (CH
cción inicia
~ 512).
asegurar q
mer canal
e una sola
ionarán
canal afect
dependient
~2), del se
más alta e
e los apara
n el cual el
irección ini
a los ajust
mente. Por
gundo apar
511.
os
ial
s
lo
to
lores DMX
V
Canal
1
2
8
Lim
•
Este apar
3 minutos
Desconect
•
Apriete bi
•
No modifi
•
conexione
No dañe l
•
Limpie el
•
Limpie el
•
Nunca su
•
El usuario
•
personal e
iniciar el
R
El
aparato se
di
yuntor:
Desconect
1.
Deje que
2.
Pulse el di
3.
Vuelva a c
4.
usuario.
12 detall
De
0
0
ieza y
to está equi
antes de ac
el aparato
n las tuerc
ue la caja
, etc.
s cables de
iltro [12] r
parato reg
erja el apa
no habrá d
specializad
isyuntor
esactiva au
el aparato
l aparato s
yuntor [4]
onectar el a
dos por ca
A
255
255
anteni
pado con u
ivar el apa
de toda fu
s y los torni
los soporte
alimentació
gularmente
larmente c
ato en un lí
efectuar el
.
tomáticame
de la red el
enfriar por
para rearm
parato a la
nal
Funció
velocida
volumen
iento
a función d
ato para qu
nte antes d
llos y verifi
s, p.ej. no t
. Contacte
.
n un paño
uido.
mantenimi
nte si el dis
éctrica.
lo menos 1
rlo. No fue
ed eléctrica
del ventila
de salida 0
limpieza a
pueda ter
limpiarlo.
ue que no
ladre aguj
con un técn
úmedo sin
nto de ning
untor [4]
minutos.
ce.
. Utilice el a
dor 0 ~ 10
~ 100 %
utomática d
inar el pro
eje que el
ay señales
ros adicion
ico especiali
elusas. Evi
una pieza.
earmable e
parato corr
%
el calentad
edimiento
parato se
e oxidació
les en un s
zado para i
e el uso de
a reparació
tá activado
ctamente.
r. Después
e limpieza.
nfríe.
.
porte o no
stalar el ap
alcohol y d
debe ser r
Para rear
onsulte est
el uso, esp
odifique l
rato.
disolvente
alizada por
ar el
manual d
re
s
.
l
e ser que
Pue
pue
9
Esp
ali
mentación
co
sumo
tie
mpo de cal
ca
acidad del
vo
lumen de s
líq
uido de hu
V.
02 – 18/12/2
e conmut
cificaci
ntamiento
depósito
lida
o adecuado
012
el aparato
r el interr
nes
230 V
900
1.6 m
3.5 L
100
VDLS
esté daña
ptor). Co
C / 50 Hz
n.
³/min. (35
HT5 líquido
o en el in
tacte con
0 ft³/min.)
de humo p
24
erior si no
u distribu
ofesional d
puede rea
dor para u
alta densid
mar el dis
na repara
ad
untor (si
ión.
©Vellema
o
nv
Page 25

LX500
DMX512 3 y 5 polos para entrada y salida
dimensiones 600 x 590 x 265 mm
peso 20.5 kg
Utilice este aparato sólo con los accesorios originales. Velleman NV no será responsable de daños ni
lesiones causados por un uso (indebido) de este aparato.
Para más información sobre este producto y la versión más reciente de este manual del usuario,
visite nuestra página www.luxibel.com.
Se pueden modificar las especificaciones y el contenido de este manual sin previo aviso.
© DERECHOS DE AUTOR
Velleman NV dispone de los derechos de autor para este manual del usuario. Todos los derechos
mundiales reservados. Está estrictamente prohibido reproducir, traducir, copiar, editar y guardar este
manual del usuario o partes de ello sin previo permiso escrito del derecho habiente.
V. 02 – 18/12/2012 25 ©Velleman nv
Page 26

.
nWiFa
.
ü
o
w
e
e
l
e
ü
e
E
m
u
e
t
r
e
h
e
o
e
u
e
e
s
n
e
S
e
S
S
g
e
p
g
i
U
u
n
D
e
b
u
e
r
c
e
X
c
r
u
u
S
o
o
s
e
i
e
k
t
N
e
S
m
e
i
ä
e
t
e
n
N
P
c
e
w
e
E
e
e
s
e
e
m
n
s
c
e
ä
c
t
o
b
c
d
i
m
N
g
g
c
r
e
h
n
h
n
n
n
z
n
f
e
ü
n
h
a
S
n
t
e
t
U
g
e
n
n
e
d
h
T
n
g
e
d
e
e
a
ä
e
g
s
e
w
D
e
r
e
e
,
c
e
n
o
d
d
e
G
d
e
e
m
h
n
F
l
a
a
c
n
t
w
t
c
s
m
t
ü
g
s
e
d
m
ö
r
n
n
h
t
o
r
e
a
.
LX500
1
Einf
A
alle Einw
chtige Um
lls Zweifel
Wi
r bedanken
du
rch. Überpr
un
d wenden S
2
Sich
Diese
nach
verw
müss
Händ
Umw
hrung
hner der
eltinfor
s Symbol a
seinem Leb
ndeten Bat
n von eine
er oder ein
ltvorschrift
bestehen,
uns für den
fen Sie, ob
ie sich an I
rheitsh
Dieses Ge
Fähigkeit
wurden v
oder ang
Das Prod
Kindern b
Achtung:
andere ge
Verwende
Lassen Si
Vergewis
Netzspan
Der Aufba
geerdet s
BE
uropäisch
ationen ü
f dem Prod
nszyklus d
erien) nicht
spezialisie
örtliches Re
n.
wenden Si
Kauf der L
Transports
ren Händle
inweise
rät ist nicht
n oder für
n einer sch
leitet.
kt ist kein
sondere V
Ist der Str
eignete Per
n Sie das G
dieses Ger
ern Sie sich
ung beschr
u des Gerät
in. Der ele
IENU
n Union
er dieses
kt oder der
r Umwelt S
als unsorti
ten Firma z
ycling-Unt
sich für
500! Lesen
häden vorli
.
für Persone
nerfahrene
tzbefohlen
pielzeug, e
rsicht walte
mkabel bes
on das Kab
rät nicht w
ät von eine
, dass die a
eben in die
s entsprich
trische Ans
GSA
rodukt
Verpackun
haden zufü
rtes Hausm
ecks Recy
rnehmen re
ntsorgung
Sie diese B
gen. Sollte
n mit körpe
und unwiss
n Person in
gehört nic
n.
chädigt, da
l ersetzen.
nn das Ge
Fachman
zuschließe
er Bedienu
t der Schut
hluss darf
LEIT
zeigt an, d
en kann. E
üll; die Einh
ling entsor
tourniert w
srichtlinie
edienungsa
dies der Fal
lich, sensor
nde Person
Bezug auf
t in Kinder
n soll der H
äuse, den
reparieren.
de Netzspa
gsanleitun
klasse I. G
ur von eine
NG
ass die Ent
ntsorgen Si
eit oder ver
t werden.
rden. Resp
an Ihre ö
leitung vor
l sein, verw
isch oder g
n geeignet
en Gebrau
ände. Lass
ersteller, ei
ank oder da
nung nicht
.
mäß den V
r Fachkraft
orgung dies
die Einheit
endeten B
iese Einheit
ktieren Sie
tliche Beh
Inbetriebna
nden Sie d
istig einges
es sei den
h des Gerä
n Sie in An
e Fachkraf
s Kabel bes
höher ist al
rschriften
urchgeführ
es Produkte
(oder
tterien
muss an de
die örtliche
rde.
hme sorgfäl
s Gerät nic
hränkten
, diese
s beaufsich
esenheit v
oder eine
hädigt sind
die
uss das Ge
werden.
s
n
tig
t
igt
n
.
ät
Trennen
Fassen Si
Verwende
Feuchte.
Tauchen
Warnun
Lassen Si
Bedecken
einem Te
Schützen
Beachten
Entfernun
niemals d
Die max.
Temperat
Installiere
explosive
ie das Gerä
dazu den
n Sie das G
tellen Sie k
ie das Gerä
: Berühren
die Nebel
Sie nie ein
pich oder e
Sie das Ger
Sie, dass di
von 0.5 m
e Lüftungss
mgebungs
ren.
n Sie das G
Materialie
bei Nichtb
etzstecker
rät nur im
eine mit Flü
t nicht ein.
ie das Geh
aschine na
eingeschal
nem Holzb
t vor Stau
Lüftungss
zwischen d
chlitze auf
emperatur
rät an eine
.
nutzung un
an der Griff
Innenber
ssigkeit bef
use währe
h Gebrauc
ete Nebelm
den.
. Schützen
hlitze nicht
em Gerät u
er Untersei
st 40 °C. V
gut gelüf
d vor jeder
läche an un
ich. Schütz
llten Gegen
d des Betri
genügend
schine. Ins
ie das Ger
blockiert w
d jedem an
e und reini
rwenden Si
eten Ort, m
Reinigung o
ziehen Si
n Sie das
stände auf
bs nicht, d
bkühlen, b
tallieren Sie
t vor extre
rden. Beac
deren Gege
en Sie das
e das Gerät
in. 0.5 m al
er vor Bef
nie an der
erät vor Re
as Gerät.
nn das Geh
vor Sie die
diese auch
en Temper
ten Sie ein
stand. Ver
ilter regel
nicht bei h
er brennba
llen vom N
Netzleitung.
en und
äuse heizt
e berühren
weder auf
aturen.
minimale
ecken Sie
äßig.
heren
en und
tz.
uf.
V.
02 – 18/12/2
012
26
©Vellema
nv
Page 27

.
e
.
.
e
1
234
ge
a
e
u
h
h
n
w
e
n
e
u
r
t
n
g
n
a
s
e
n
c
n
s
R
s
n
n
ü
n
n
s
i
r
n
g
R
e
t
n
r
e
k
h
r
ä
a
S
r
e
%
e
e
n
e
e
r
n
2
e
s
e
t
l
r
n
e
e
a
r
g
h
A
w
h
u
m
k
e
s
d
5
r
p
h
s
s
T
o
n
n
e
o
H
s
v
V
n
e
u
r
e
e
k
e
o
t
n
B
Ü
m
k
o
r
e
y
ü
M
d
N
n
c
d
G
S
e
m
c
e
.
b
c
c
ü
V
e
v
s
e
f
e
a
e
r
D
u
n
w
d
u
n
d
v
u
h
t
s
S
g
d
.
a
s
m
e
f
b
t
p
d
e
e
a
s
e
a
e
T
r
P
c
e
i
S
d
n
e
a
a
o
f
r
r
w
L
e
c
n
a
u
n
e
e
n
r
LX500
3
All
Si
he Vellem
•
Nehmen S
Lassen Si
Beschädig
•
Eigenmäc
eigenmäc
Verwende
•
zu Schäde
Gefahren
Bei Schäd
•
Garantiea
Lassen Si
•
•
Das Gerät
Beschädig
•
Dieses Ge
und eigne
Wechselsp
•
Das Gerät
Ein perma
Arbeitszyk
•
Das Gerät
Nebelmen
Bewahren
•
Blockiere
auf Perso
Austrittsd
Um Gesu
verwende
Öle, Duft
Brand ver
Trinken S
bitte sofo
kommen,
Betreiben
Entleeren
Vermeide
Bedienun
meine
n® Servic
ie das Gerä
das Gerät
ng des Ge
tige Veränd
tige Änderu
Sie das G
n am Produ
ie Kurzschl
n, die durc
spruch. Fü
dieses Ger
bei Temper
ng, indem
ät wurde fü
sich nur fü
annung von
eignet sich
enter Betri
lus von 30
kann dafür
e.
Sie diese B
Sie niemal
en oder Tie
se und jed
dheitsrisike
Sie nur da
toffe oder a
ursachen.
e niemals N
t einen Arz
bitte sorgfä
Sie das Ge
Sie den Ta
Sie Erschü
des Gerät
ichtlini
- und Qu
erst in Bet
icht von Pe
ätes das Er
erungen sin
ngen erlisc
rät nur für
t führen un
uss, Brand
Nichtbeac
daraus res
t von eine
turschwan
ie es ausg
r den profe
die Anwen
230 VAC /
nicht für pe
b der Pum
ist empfo
sorgen, das
dienungsan
die Nebela
re. Beachte
m Hinderni
n zu vermei
s empfohle
ndere Fluid
ebelfluid. S
. Sollte die
tig mit Was
ät nie ohne
k immer be
tterungen.
s.
n
litätsgara
ieb, nachde
rsonen bedi
ebnis von
d aus Siche
t der Garan
nwendung
d erlischt d
unden, ele
tung der B
ltierende F
Fachmann
ungen nich
schaltet las
sionellen Ei
ung im Inn
0 Hz.
manenten
e kann zu
len.
die Rauch
leitung für
ustrittsdüse
Sie einen
s.
den und die
e Nebelflui
unter das
llte es den
aut oder di
er auswas
Nebelfluid:
or Sie das
ermeiden
tie am End
m Sie sich
nen, die si
nfachmänni
heitsgründ
tieanspruch
n beschrie
r Garantiea
trischem S
dienungsan
lgeschäden
installieren
sofort eins
sen bis es a
satz auf B
enbereich.
etrieb: ein
berhitzung
elder akti
ünftige Ein
. Richten Si
indestabst
Lebensdau
(Bestell-N
ebelfluid.
och einmal
e Augen ein
hen.
ies kann z
erät lager
ie rohe Ge
dieser Be
it seinen F
h nicht mit
scher Bedie
n verboten.
en in dieser
nspruch. Je
hlag, usw.
leitung ver
übernimmt
und warten
halten. Sc
kklimatisier
hnen, in Di
erwenden
regelmäßi
und Beschä
iert werden
ichtnahme
die Nebela
nd von 0.5
r des Gerät
. VDLSLHT5
ies kann gi
verschluckt
mal mit Ne
permanen
oder trans
alt währen
ienungsanl
nktionen v
dem Gerät
ung.
Bei Schäde
Bedienung
e andere V
erbunden.
rsacht werd
der Herstell
.
ützen Sie d
ist (Zimm
cotheken,
ie das Gerä
e Pause ve
igung der
Dies hängt
uf.
ustrittsdüse
m zwischen
es zu optim
). Mischen
tige Gase o
werden, ko
elfluid in B
en Schäden
ortieren.
der Install
itung.
rtraut gem
uskennen.
n verursach
anleitung s
rwendung i
en, erlischt
er keine Ha
s Gerät vo
rtemperatu
heatern, us
t mit einer
längert die
umpe führ
von der erz
niemals dir
dem
eren,
ie niemals
er sogar
sultieren Si
rührung
führen.
tion und
cht haben.
Meist ist die
t durch
nst kann di
st mit
der
tung.
erreicht ha
. entworfe
ebensdaue
n. Ein
eugten
kt
e
s
t).
.
4
Eige
•
im Flightc
dank des
•
Tank
DMX-Steu
•
lange, kon
•
nur für de
•
5
Ums
Si
he Abbildu
Nebelau
3-Pin DM
3-Pin XL
Leitungs
V.
02 – 18/12/2
schaft
se, klein u
peziellen H
rung oder
tinuierliche
Gebrauch
hreibu
gen, Seite
trittsdüse
X-Ausgang
-Eingang
chutzschalt
012
n
d kompakt
izsystems i
ingebaute
Nebelausst
mit VDLSLH
dieser Bed
r
t der Nebel
imerfunkti
ß mit nied
T5 Nebelflui
ienungsanl
5 Displa
6 Tank f
7 Kappe
8 Einstell
sehr trocke
nen
igem Fluidv
d.
itung.
r das Nebel
knöpfe
27
n, hinterläs
rbrauch
luid
t weder Rü
9 Netz
10 5-Pin
11 5-Pin
12 Lüftu
kstände no
ingang
XLR-Einga
DMX-Ausg
ngsschlitze
h Fluid im
g
ng
nd Filter
©Vellema
nv
Page 28

.
äObDa
M
.
aErz
h
a
a
n
H
o
e
r
n
e
d
g
e
ü
r
a
g
e
V
e
A
m
e
s
d
e
k
r
f
e
e
c
s
n
t
v
s
d
e
ä
s
n
s
ä
c
f
v
ä
R
v
d
S
d
t
S
m
p
N
b
o
s
r
d
M
e
a
i
m
z
e
u
e
s
r
a
t
r
b
X
g
p
e
t
k
l
e
u
e
k
N
N
n
a
e
t
u
n
a
e
n
n
e
d
/
m
]
w
a
k
s
a
h
e
a
e
e
a
e
a
.
n
r
n
n
E
s
r
e
e
-
a
s
B
u
B
h
e
k
t
e
u
8
i
S
t
e
e
o
t
a
e
m
e
n
R
e
b
D
X
e
o
G
n
n
G
a
a
e
k
n
g
s
g
n
e
g
b
a
s
g
P
e
t
m
e
h
n
d
e
v
e
e
g
c
d
e
d
a
s
l
v
e
e
n
e
e
n
n
o
d
d
e
E
o
s
S
6
Inst
W
hlen Sie ei
erfläche.
llation
en geeigne
ängen Sie
en Montag
das Gerät
ort. Install
nicht auf.
LX500
ieren Sie d
s Gerät a
f einer st
bilen und
orizontal
n
s Gerät m
•
Lassen Si
Normen in
Die Konst
•
tragen kö
Das Gerät
•
•
Stehen Si
Gerät jähr
•
Montieren
•
Eine grün
Belastung
dürfen. Au
Montieren
Verletzun
Entfernen
•
Lassen Si
•
•
Schließen
und nicht
Regelwide
•
Die Install
X512-Ans
D
•
Wenn nöti
die ander
schalten.
•
Die max.
Anschluss
Ein DMX-
•
in einer U
Störung d
XLR-Buch
Geräts in
ntieren
das Gerät
stallieren.
uktion mus
nen, ohne
muss imme
während d
lich und vor
Sie das Ger
liche prakti
der Tragko
ßerdem mü
Sie das Ger
en verursa
Sie alle ent
das Gerät
Sie das Ger
ber einen
stand oder
tion muss
chluss
, so verbin
Seite mit d
erwenden
mpfohlene
ist 32.
bschlusswi
gebung mi
s digitalen
e mit eine
er Kette an
on einem F
während e
ass Verfor
r mit einer
r Montage,
der Inbetri
t an einem
che Erfahr
struktion b
sen Sie da
t nie selbe
hen.
lammbaren
on einem q
t an das H
egelwiders
den Dimmk
or Inbetrie
en Sie ein
em XLR-Ein
ie ein zwei
Kabellänge i
erstand ist
vielem ele
teuersigna
120 Ω Wid
geschlossen
chmann u
ner Stunde
ung verurs
weiten Bef
Entfernung
bnahme vo
Ort, wo nie
ng ist für di
rechnen kö
verwendet
wenn Sie
Materialen i
ualifizierten
uptnetz an.
and oder Di
eis als EIN
nahme von
LR-Kabel
ang [3,10
oliges abge
st 500 Mete
mpfehlens
trischem R
s durch ele
rstand zwi
wird.
d gemäß d
eine Punktl
cht wird.
stigung z.B
oder Wartu
einem Fac
mand es be
e Installatio
nen, wisse
Material u
amit keine
n einem Ab
Elektriker a
Beachten S
mmkreis ve
AUS-Schalt
einem Exp
it dem XLR
des LX500
schirmtes K
r, die Höch
ert für Inst
uschen (z.
trisches Ra
chen 2 und
n EN 6059
st von max
mit einem
g nie direk
hmann prüf
ühren kann
n des Gerät
welches K
d das Gerä
rfahrung h
tand von 0.
nschließen.
ie, dass alle
sorgt werd
r (0% bis 1
rten geneh
Ausgang d
. Sie könne
bel mit XL
tzahl von G
allationen,
. Discos).
schen. Der
3, die den
-2-17 und
mal 10 x d
icherheits
unter dem
n.
und wo we
s notwendi
nstruktion
regelmäßi
ben. Eine s
5 m.
Geräte übe
n, auch we
00%) verw
igt werden
r Steuerun
verschiede
Ein- und A
räten, ver
ei denen d
er Abschlu
DMX-Absch
LR-Ausgan
llen andere
m Gewicht
abel gesich
Gerät. Lass
ige Leute
: Sie müss
material Si
nachsehen
chlechte Mo
r eine geerd
n Sie den
nden.
.
(nicht mit
ne LX500 in
usgangsans
unden mit
s DMX-Kab
swiderstan
lusswiderst
[2,11] de
zutreffend
es Gerätes
rt werden.
en Sie das
orübergehe
n die max.
verwende
lassen.
ntage kann
ete Steckd
eliefert) un
Serie
hlüssen.
emselben
l lang ist o
verhindert
nd ist nur
letzten
n
.
se
er
ine
7
Anw
D
s Gerät ver
eugt das G
vo
m Netz. Üb
un
gewohnt, s
sc
alten Sie e
de
n Tank, ehe
N
chfolgende
•
Stand-Alo
DMX512-g
•
Das
fun
Bet
ndung
Gerät sto
tionieren.
ieb ohne
ügt nicht ü
rät wenig
rprüfen Sie
hließen Sie
wieder au
Sie das Ge
Betriebsmo
e-Modus
esteuerter
pt nicht a
Achten Si
ebelfluid
er einen EI
der keinen
den Tankei
das Gerät d
, um Schäd
ät transpor
i können a
odus
tomatisch
darauf, d
ann zu Sc
/AUS-Scha
ebel, oder
halt, den L
nn wieder
n zu verm
ieren.
sgewählt w
wenn der
ss der Be
äden führ
lter. Es fun
macht es m
itungsschu
n das Netz
iden. Bring
rden:
ehälter le
älter währ
n.
tioniert sof
echanische
zschalter u
an. Funktio
n Sie das
r ist. Die
end des B
rt Sie es mi
eräusche,
d das Stro
iert es nich
erät zu Ihr
umpe blei
triebs nie
t dem Netz
rennen Sie
kabel. Seh
t nach 30 S
m Verteiler.
bt
eer wird.
erbinden.
es dann sof
n Sie nicht
kunden,
Entleeren
in
rt
ie
V.
02 – 18/12/2
012
28
©Vellema
nv
Page 29

LX500
7.1 Bedienfeld
Bedienen Sie das Bedienfeld mit den Tasten [8] unten im Display [5].
Taste Funktion
<FUNCTION> Zugang zum Menü oder Durch die verschiedenen Menü-Optionen blättern
<UP> Durch die verschiedenen Menü-Optionen in aufsteigender Reihenfolge blättern oder den Wert
erhöhen
<DOWN> Durch die verschiedenen Menü-Optionen in absteigender Reihenfolge blättern oder den Wert
verringern
<TIMER> startet den Timer-gesteuerten Modus
<VOLUME> startet den Volumen-gesteuerten Modus
<MANUAL> startet den manuellen Modus
7.2 Vorbereitung
1. Stellen Sie sicher, dass das Kabel vom Netz getrennt ist.
2. Öffnen Sie das Flightcase und ziehen Sie den Tank [6] heraus.
3. Entfernen Sie die Kappe [7] vom Behälter.
4. Füllen Sie die geeignete Flüssigkeit (Bestell-Nr. VDLSLHT5) in den Tank. Überfüllen Sie den Tank nicht.
Gießen Sie keine Flüssigkeit auf das Gerät.
5. Schrauben Sie die Kappe wieder gut fest und beachten Sie, dass der an der Kappe befestigte
Plastikschlauch gut befestigt worden ist und nicht beschädigt ist.
6. Legen Sie den Behälter wieder in das Flightcase. Beachten Sie, dass der Schlauch nicht gebogen ist.
7. Um den Rauch nach oben oder nach unten zu richten, ziehen Sie die Nebelaustrittsdüse [1] heraus
(drücken Sie beide Seiten zusammen) und stecken Sie diese wieder in der gewünschten Richtung ein.
8. Verbinden Sie das eine Kabelende mit dem Netzeingang [9] und das andere Ende mit einer geeigneten
Steckdose.
Das Gerät heizt auf. Das Display zeigt “WARMING UP” an.
9. Warten Sie bis das Display “READY TO HAZE” anzeigt. Siehe Stand-Alone-Modus und DMX-Modus.
10. Das Gerät verfügt über eine Funktion, die das Heizelement automatisch reinigt. Nach dem Gebrauch warten
Sie 3 Minuten, bevor Sie das Gerät ausschalten. So kann das Reinigungsverfahren ganz durchgeführt
werden. Trennen Sie das Gerät danach vom Netz und lassen Sie es abkühlen.
7.3 Stand-Alone-Modus
Es gibt 3 verschiedene Modi:
• Timer-Modus: Nebel lässt sich in bestimmten Intervallen ausstoßen. Die Dauer der Ausstoß, die Zeit
zwischen zwei Nebelausstößen und die Ausstoßmenge können eingestellt werden.
• Volume-Modus: der Nebel wird kontinuierlich erzeugt. Der Nebelvolumen und die Ventilatorgeschwindigkeit
können eingestellt werden.
• Manueller Modus: der Nebel wird manuell erzeugt während der Knopf <MANUAL> gedrückt bleibt. Die
Nebelmaschine stößt Nebel mit maximaler Menge aus.
Timer-gesteuerter Modus
1. Verbinden Sie nichts mit dem DMX-Eingang [3,10] des Gerätes.
2. Drücken Sie auf <FUNCTION> bis <INTERVAL SET> im Display erscheint.
3. Verwenden Sie <UP> und <DOWN> um die Zeit zwischen zwei Nebelausstößen (1 ~ 200 Sekunden)
einzustellen.
4. Drücken Sie auf <FUNCTION> bis <DURATION SET> im Display erscheint.
5. Verwenden Sie <UP> und <DOWN> um die Dauer des Nebelausstoßes (1 ~ 200 Sekunden) einzustellen.
6. Drücken Sie auf <FUNCTION> bis <TIMER OUT> im Display erscheint.
7. Verwenden Sie <UP> und <DOWN> um die Menge (1 ~ 100 %) einzustellen.
8. Drücken Sie auf <TIMER> um den Timer-Modus zu starten.
9. Um den Timer-Modus zu stoppen, drücken Sie wieder auf <TIMER>.
Bemerkungen:
• Das Gerät kann, ohne Nachheizung, kontinuierlich Nebel ausstoßen. Endet die Zeit zwischen den
Nebelproduktionen, dann stößt das Gerät wieder Nebel aus.
• Die Timer-Einstellungen werden im internen Speicher gespeichert. Schalten Sie das Gerät nach Abschaltung
wieder ein und drücken Sie <TIMER>, dann wird der Timer-Modus mit den von Ihnen programmierten
Einstellungen gestartet.
V. 02 – 18/12/2012 29 ©Velleman nv
Page 30

LX500
Volume-Modus
1. Verbinden Sie nichts mit dem DMX-Eingang [3,10] des Gerätes.
2. Drücken Sie auf <FUNCTION> bis <VOLUME OUT> im Display erscheint.
3. Verwenden Sie <UP> und <DOWN> um die Menge des Nebelausstoßes (1 ~ 100 %) einzustellen.
4. Drücken Sie auf <FUNCTION> bis <FAN SPEED> im Display erscheint.
5. Verwenden Sie <UP> und <DOWN> um die Ventilatorgeschwindigkeit (1 ~ 100 %) einzustellen.
6. Drücken Sie auf <VOLUME> um den Volume-Modus zu starten.
7. Um den Volume-Modus zu stoppen, drücken Sie wieder auf <VOLUME>.
Bemerkungen:
• Das Gerät kann, ohne Nachheizung, kontinuierlich Nebel ausstoßen. Jedes Mal, wenn Sie <VOLUME>
drücken, stößt das Gerät sofort Nebel aus.
• Die Timer-Einstellungen werden im internen Speicher gespeichert. Schalten Sie das Gerät nach Abschaltung
wieder ein und drücken Sie <VOLUME>, dann wird der Volume-Modus mit den von Ihnen programmierten
Einstellungen gestartet.
Manueller Modus
1. Verbinden Sie nichts mit dem DMX-Eingang [3,10] des Gerätes.
2. Halten Sie <MANUAL> gedrückt. Die Nebelmaschine stößt Nebel mit maximaler Menge aus.
3. Lassen Sie <MANUAL> los, um zu stoppen.
7.4 DMX-Steuerung
Steuerung vom Gerät über einen universellen DMX-Controller.
• Alle DMX-gesteuerten Geräte brauchen eine digitale Startadresse, sodass das richtige Gerät auf die Signale
reagieren kann. Diese digitale Startadresse ist die Kanalnummer, von der das Gerät die Befehle der DMXSteuerung empfängt und ausführt. Sie können dieselbe Startadresse für eine ganze Gruppe von Geräten
verwenden oder eine separate Startadresse für jedes Gerät eingeben.
• Wenn alle Geräte dieselbe Startadresse haben, werden sie auf einem spezifischen Kanal das Steuersignal
empfangen. Mit anderen Worten, wenn Sie die Einstellungen von einem Kanal ändern, werden alle Geräte
zur gleichen Zeit beeinflusst. Wenn Sie verschiedene Adressen einstellen, wird jedes Gerät auf einem
anderen Kanal Signale empfangen. Wenn Sie die Einstellungen ändern, wird nur das besagte Gerät
beeinflusst.
• Im Falle des 2-Kanal-Modus, werden Sie die Startadresse des ersten Gerätes auf 1 (CH1~2), der zweiten
Einheit auf 3 (1 + 2) (CH3~4), der dritten Einheit auf 5 (3 + 2) (CH5~6) usw. einstellen müssen. Die
höchste Startadresse ist 511.
Den DMX-Modus einstellen:
1. Drücken Sie auf <FUNCTION> bis <DMX 512> im Display erscheint.
2. Verwenden Sie <UP> oder <DOWN> um die DMX-Startadresse (001 ~ 512) auszuwählen.
DMX-Werte pro Kanal
Kanal von bis Funktion
1 0 255 Ventilatorgeschwindigkeit 0 ~ 100 %
2 0 255 Ausstoßmenge 0 ~ 100 %
8. Reinigung und Wartung
• Das Gerät verfügt über eine Funktion, die das Heizelement automatisch reinigt. Nach dem Gebrauch warten
Sie 3 Minuten, bevor Sie das Gerät ausschalten.
• Trennen Sie das Gerät vom Netz ehe Sie mit den Servicearbeiten anfangen. Lassen Sie das Gerät abkühlen.
• Alle verwendeten Schrauben müssen fest angespannt werden und dürfen keine Rostspuren zeigen.
• Das Gehäuse, die Montagebügel und der Montageort dürfen nicht angepasst werden, z.B. bohren Sie keine
zusätzlichen Löcher in Montagebügel, verändern Sie die Anschlüsse nicht, usw.
• Sorgen Sie dafür, dass die Netzkabel nicht beschädigt werden. Lassen Sie das Gerät von einer Fachkraft
installieren.
• Reinigen Sie den Filter [12] regelmäßig.
• Verwenden Sie zur Reinigung ein feuchtes, fusselfreies Tuch. Verwenden Sie auf keinen Fall Alkohol oder
irgendwelche Lösungsmittel.
• Tauchen Sie das Gerät nicht ein.
• Es gibt keine zu wartenden Teile. Lassen Sie dieses Gerät von einem Fachmann reparieren.
V. 02 – 18/12/2012 30 ©Velleman nv
Page 31

e
i
.
rStr
MAbGe
eHaFüsieAll
Vevo
e
s
s
z
e
u
c
m
S
S
o
u
R
l
a
i
c
t
m
n
r
z
n
e
D
G
d
n
.
v
s
e
e
e
s
d
n
A
W
i
m
L
d
k
m
u
m
A
e
i
e
a
v
s
E
m
(
u
n
e
m
d
n
n
b
s
A
u
l
u
U
h
h
l
g
o
u
e
e
z
e
ü
B
s
n
m
d
a
h
t
s
R
e
e
n
h
u
D
n Leitung
Wi
rd der rück
Le
tungsschut
1.
Trennen S
2.
Lassen Si
3.
Drücken S
4.
Verbinden
Bedienung
9
Tech
St
omversorg
omverbrau
Au
fwärmzeit
Ta
nkinhalt
Au
sstoß-Volu
ge
eignete Neb
D
X512
messungen
wicht
V
rwenden
ftung für
r mehr Inf
he www.l
e Änderun
©
URHEBER
lleman NV
rbehalten.
Be
dienungsan
sp
ichern.
Kön
und
Rep
schutzsch
etzbarer Le
schalter rü
ie das Gerä
das Gerät
ie den Leitu
Sie das Ge
sanleitung
nen Sie de
her schalt
aratur mit
nische
ng
h
en
elfluid
ie dieses
chaden o
rmatione
xibel.com
gen ohne
ECHT
besitzt da
Ohne vorh
eitung ganz
lter rücks
tungsschalt
kzusetzen:
vom Netz.
indestens
gsschutzsc
ät wieder m
u Rate.
Leitungs
n), so ist
Ihrem Hä
aten
230 V
900
1.6 m
3.5 L
100
VDLS
3- un
600 x
20.5
erät nur
er Verletz
zu diese
orherige
Urheberr
rige schriftl
oder in Teil
tzen
r [4] ausg
15 Minuten
halter [4] u
it dem Netz
chutzscha
as Gerät
dler in Ver
C / 50 Hz
n.
³/Min. (350
HT5 profes
5-pol. für
590 x 265
g
it originell
ngen bei
Produkt
nkündigu
cht für di
che Geneh
en zu repro
LX500
löst, so wir
bkühlen.
m diesen rü
. Verwende
lter nicht r
ielleicht i
bindung.
0 ft³/Min.)
ionelles Ne
in- und Au
m
en Zubehö
falscher)
nd die ne
g vorbeha
se Bedien
igung des
uzieren, zu
d das Gerät
ckzusetzen.
Sie das Ge
ücksetzen
tern besc
elfluid mit
gang
rteilen. Ve
nwendun
este Versi
ten.
ngsanleit
rhebers ist
kopieren, z
völlig ausg
Forcieren S
rät korrekt.
(Sie könn
ädigt. Set
oher Dicht
leman NV
dieses Ge
n dieser
ng. Alle w
es nicht ge
u übersetze
schaltet. U
ie nicht.
Ziehen Sie
n den Sch
en Sie sic
bernimm
rätes.
edienung
eltweiten
tattet, dies
, zu bearb
Den
ie
lter nicht
für eine
keine
anleitung,
echte
iten oder z
in
V.
02 – 18/12/2
012
31
©Vellema
nv
Page 32

Velleman® Service and Quality Warranty
Since its foundation in 1972, Velleman® acquired extensive
experience in the electronics world and currently distributes its
products in over 85 countries.
All our products fulfil strict quality requirements and legal
stipulations in the EU. In order to ensure the quality, our products
regularly go through an extra quality check, both by an internal
quality department and by specialized external organisations. If, all
precautionary measures notwithstanding, problems should occur,
please make appeal to our warranty (see guarantee conditions).
General Warranty Conditions Concerning Consumer Products
(for EU):
• All consumer products are subject to a 24-month warranty on
production flaws and defective material as from the original date of
purchase.
• Velleman® can decide to replace an article with an equivalent
article, or to refund the retail value totally or partially when the
complaint is valid and a free repair or replacement of the article is
impossible, or if the expenses are out of proportion.
You will be delivered a replacing article or a refund at the value of
100% of the purchase price in case of a flaw occurred in the first
year after the date of purchase and delivery, or a replacing article at
50% of the purchase price or a refund at the value of 50% of the
retail value in case of a flaw occurred in the second year after the
date of purchase and delivery.
• Not covered by warranty:
- all direct or indirect damage caused after delivery to the article
(e.g. by oxidation, shocks, falls, dust, dirt, humidity...), and by the
article, as well as its contents (e.g. data loss), compensation for loss
of profits;
- consumable goods, parts or accessories that are subject to an
aging process during normal use, such as batteries (rechargeable,
non-rechargeable, built-in or replaceable), lamps, rubber parts, drive
belts... (unlimited list);
- flaws resulting from fire, water damage, lightning, accident, natural
disaster, etc.…;
- flaws caused deliberately, negligently or resulting from improper
handling, negligent maintenance, abusive use or use contrary to the
manufacturer’s instructions;
- damage caused by a commercial, professional or collective use of
the article (the warranty validity will be reduced to six (6) months
when the article is used professionally);
- damage resulting from an inappropriate packing and shipping of
the article;
- all damage caused by modification, repair or alteration performed
by a third party without written permission by Velleman®.
• Articles to be repaired must be delivered to your Velleman®
dealer, solidly packed (preferably in the original packaging), and be
completed with the original receipt of purchase and a clear flaw
description.
• Hint: In order to save on cost and time, please reread the manual
and check if the flaw is caused by obvious causes prior to
presenting the article for repair. Note that returning a non-defective
article can also involve handling costs.
• Repairs occurring after warranty expiration are subject to shipping
costs.
• The above conditions are without prejudice to all commercial
warranties.
The above enumeration is subject to modification according to
the article (see article’s manual).
Velleman® service- en kwaliteitsgarantie
Velleman® heeft sinds zijn oprichting in 1972 een ruime ervaring
opgebouwd in de elektronicawereld en verdeelt op dit moment
producten in meer dan 85 landen. Al onze producten beantwoorden
aan strikte kwaliteitseisen en aan de wettelijke bepalingen geldig in
de EU. Om de kwaliteit te waarborgen, ondergaan onze producten
op regelmatige tijdstippen een extra kwaliteitscontrole, zowel door
onze eigen kwaliteitsafdeling als door externe gespecialiseerde
organisaties. Mocht er ondanks deze voorzorgen toch een probleem
optreden, dan kunt u steeds een beroep doen op onze waarborg
(zie waarborgvoorwaarden).
Algemene waarborgvoorwaarden consumentengoederen (voor
Europese Unie):
• Op alle consumentengoederen geldt een garantieperiode van 24
maanden op productie- en materiaalfouten en dit vanaf de
oorspronkelijke aankoopdatum.
• Indien de klacht gegrond is en een gratis reparatie of vervanging
van een artikel onmogelijk is of indien de kosten hiervoor buiten
verhouding zijn, kan Velleman® beslissen het desbetreffende artikel
te vervangen door een gelijkwaardig artikel of de aankoopsom van
het artikel gedeeltelijk of volledig terug te betalen. In dat geval krijgt
u een vervangend product of terugbetaling ter waarde van 100%
van de aankoopsom bij ontdekking van een gebrek tot één jaar na
aankoop en levering, of een vervangend product tegen 50% van de
kostprijs of terugbetaling van 50 % bij ontdekking na één jaar tot 2
jaar.
• Valt niet onder waarborg:
- alle rechtstreekse of onrechtstreekse schade na de levering
veroorzaakt aan het toestel (bv. door oxidatie, schokken, val, stof,
vuil, vocht...), en door het toestel, alsook zijn inhoud (bv. verlies van
data), vergoeding voor eventuele winstderving.
- verbruiksgoederen, onderdelen of hulpstukken die onderhevig zijn
aan veroudering door normaal gebruik zoals bv. batterijen (zowel
oplaadbare als niet-oplaadbare, ingebouwd of vervangbaar),
lampen, rubberen onderdelen, aandrijfriemen... (onbeperkte lijst).
- defecten ten gevolge van brand, waterschade, bliksem,
ongevallen, natuurrampen, enz.
- defecten veroorzaakt door opzet, nalatigheid of door een
onoordeelkundige behandeling, slecht onderhoud of abnormaal
gebruik of gebruik van het toestel strijdig met de voorschriften van
de fabrikant.
- schade ten gevolge van een commercieel, professioneel of
collectief gebruik van het apparaat (bij professioneel gebruik wordt
de garantieperiode herleid tot 6 maand).
- schade veroorzaakt door onvoldoende bescherming bij transport
van het apparaat.
- alle schade door wijzigingen, reparaties of modificaties uitgevoerd
door derden zonder toestemming van Velleman®.
• Toestellen dienen ter reparatie aangeboden te worden bij uw
Velleman®-verdeler. Het toestel dient vergezeld te zijn van het
oorspronkelijke aankoopbewijs. Zorg voor een degelijke verpakking
(bij voorkeur de originele verpakking) en voeg een duidelijke
foutomschrijving bij.
• Tip: alvorens het toestel voor reparatie aan te bieden, kijk nog
eens na of er geen voor de hand liggende reden is waarom het
toestel niet naar behoren werkt (zie handleiding). Op deze wijze
kunt u kosten en tijd besparen. Denk eraan dat er ook voor nietdefecte toestellen een kost voor controle aangerekend kan worden.
• Bij reparaties buiten de waarborgperiode zullen transportkosten
aangerekend worden.
• Elke commerciële garantie laat deze rechten onverminderd.
Bovenstaande opsomming kan eventueel aangepast worden
naargelang de aard van het product (zie handleiding van het
betreffende product).
Garantie de service et de qualité Velleman®
Depuis 1972, Velleman® a gagné une vaste expérience dans le
secteur de l’électronique et est actuellement distributeur dans plus
de 85 pays.
Tous nos produits répondent à des exigences de qualité
rigoureuses et à des dispositions légales en vigueur dans l’UE. Afin
de garantir la qualité, nous soumettons régulièrement nos produits à
des contrôles de qualité supplémentaires, tant par notre propre
service qualité que par un service qualité externe. Dans le cas
improbable d’un défaut malgré toutes les précautions, il est possible
d’invoquer notre garantie (voir les conditions de garantie).
Conditions générales concernant la garantie sur les produits
grand public (pour l’UE) :
• tout produit grand public est garanti 24 mois contre tout vice de
production ou de matériaux à dater du jour d’acquisition effective ;
• si la plainte est justifiée et que la réparation ou le remplacement
d’un article est jugé impossible, ou lorsque les coûts s’avèrent
disproportionnés, Velleman® s’autorise à remplacer ledit article par
un article équivalent ou à rembourser la totalité ou une partie du prix
d’achat. Le cas échéant, il vous sera consenti un article de
remplacement ou le remboursement complet du prix d’achat lors
d’un défaut dans un délai de 1 an après l’achat et la livraison, ou un
article de remplacement moyennant 50% du prix d’achat ou le
remboursement de 50% du prix d’achat lors d’un défaut après 1 à 2
ans.
• sont par conséquent exclus :
- tout dommage direct ou indirect survenu à l’article après livraison
(p.ex. dommage lié à l’oxydation, choc, chute, poussière, sable,
impureté…) et provoqué par l’appareil, ainsi que son contenu (p.ex.
perte de données) et une indemnisation éventuelle pour perte de
revenus ;
- toute pièce ou accessoire nécessitant un remplacement causé par
un usage normal comme p.ex. piles (rechargeables comme non
rechargeables, intégrées ou remplaçables), ampoules, pièces en
caoutchouc, courroies… (liste illimitée) ;
- tout dommage qui résulte d’un incendie, de la foudre, d’un
accident, d’une catastrophe naturelle, etc. ;
- out dommage provoqué par une négligence, volontaire ou non,
une utilisation ou un entretien incorrect, ou une utilisation de
l’appareil contraire aux prescriptions du fabricant ;
- tout dommage à cause d’une utilisation commerciale,
professionnelle ou collective de l’appareil (la période de garantie
sera réduite à 6 mois lors d’une utilisation professionnelle) ;
- tout dommage à l’appareil qui résulte d’une utilisation incorrecte ou
différente que celle pour laquelle il a été initialement prévu comme
décrit dans la notice ;
- tout dommage engendré par un retour de l’appareil emballé dans
un conditionnement non ou insuffisamment protégé.
- toute réparation ou modification effectuée par une tierce personne
sans l’autorisation explicite de SA Velleman® ; - frais de transport
de et vers Velleman® si l’appareil n’est plus couvert sous la
garantie.
• toute réparation sera fournie par l’endroit de l’achat. L’appareil doit
nécessairement être accompagné du bon d’achat d’origine et être
dûment conditionné (de préférence dans l’emballage d’origine avec
mention du défaut) ;
• tuyau : il est conseillé de consulter la notice et de contrôler câbles,
piles, etc. avant de retourner l’appareil. Un appareil retourné jugé
défectueux qui s’avère en bon état de marche pourra faire l’objet
d’une note de frais à charge du consommateur ;
• une réparation effectuée en-dehors de la période de garantie fera
l’objet de frais de transport ;
• toute garantie commerciale ne porte pas atteinte aux conditions
susmentionnées.
La liste susmentionnée peut être sujette à une
complémentation selon le type de l’article et être mentionnée
dans la notice d’emploi.
Garantía de servicio y calidad Velleman®
Desde su fundación en 1972 Velleman® ha adquirido una amplia
experiencia como distribuidor en el sector de la electrónica en más
de 85 países. Todos nuestros productos responden a normas de
calidad rigurosas y disposiciones legales vigentes en la UE. Para
garantizar la calidad, sometemos nuestros productos regularmente
a controles de calidad adicionales, tanto a través de nuestro propio
servicio de calidad como de un servicio de calidad externo. En el
caso improbable de que surgieran problemas a pesar de todas las
precauciones, es posible recurrir a nuestra garantía (véase las
condiciones de garantía).
Condiciones generales referentes a la garantía sobre
productos de venta al público (para la Unión Europea):
• Todos los productos de venta al público tienen un período de
garantía de 24 meses contra errores de producción o errores en
materiales desde la adquisición original;
• Si la queja está fundada y si la reparación o sustitución de un
artículo no es posible, o si los gastos son desproporcionados,
Velleman® autoriza reemplazar el artículo por un artículo
equivalente o reembolsar la totalidad o una parte del precio de
compra. En este caso, usted recibirá un artículo de recambio o el
reembolso completo del precio de compra si encuentra algún fallo
hasta un año después de la compra y entrega, o un artículo de
recambio al 50% del precio de compra o el reembolso del 50% del
precio de compra si encuentra un fallo después de 1 año y hasta los
2 años después de la compra y entrega.
Por consiguiente, están excluidos entre otras cosas:
- todos los daños causados directa o indirectamente al aparato
(p.ej. por oxidación, choques, caída,...) y a su contenido (p.ej.
pérdida de datos) después de la entrega y causados por el aparato,
y cualquier indemnización por posible pérdida de ganancias;
- partes o accesorios, que estén expuestos al desgaste causado por
un uso normal, como por ejemplo baterías (tanto recargables como
no recargables, incorporadas o reemplazables), bombillas, partes
de goma, etc. (lista ilimitada);
- defectos causados por un incendio, daños causados por el agua,
rayos, accidentes, catástrofes naturales, etc.;
- defectos causados a conciencia, descuido o por malos tratos, un
mantenimiento inapropiado o un uso anormal del aparato contrario
a las instrucciones del fabricante;
- daños causados por un uso comercial, profesional o colectivo del
aparato (el período de garantía se reducirá a 6 meses con uso
profesional);
- daños causados por un uso incorrecto o un uso ajeno al que está
previsto el producto inicialmente como está descrito en el manual
del usuario;
- daños causados por una protección insuficiente al transportar el
aparato.
- daños causados por reparaciones o modificaciones efectuadas
por una tercera persona sin la autorización explícita de Velleman®;
- se calcula gastos de transporte de y a Velleman® si el aparato ya
no está cubierto por la garantía.
• Cualquier artículo que tenga que ser reparado tendrá que ser
devuelto a su distribuidor Velleman®. Devuelva el aparato con la
factura de compra original y transpórtelo en un embalaje sólido
(preferentemente el embalaje original). Incluya también una buena
descripción del fallo;
• Consejo: Lea el manual del usuario y controle los cables, las pilas,
etc. antes de devolver el aparato. Si no se encuentra un defecto en
el artículo los gastos podrían correr a cargo del cliente;
• Los gastos de transporte correrán a carga del cliente para una
reparación efectuada fuera del período de garantía.
• Cualquier gesto comercial no disminuye estos derechos.
La lista previamente mencionada puede ser adaptada según el
tipo de artículo (véase el manual del usuario del artículo en
cuestión).
Velleman® Service- und Qualitätsgarantie
Seit der Gründung in 1972 hat Velleman® sehr viel Erfahrung als
Verteiler in der Elektronikwelt in über 85 Ländern aufgebaut.
Alle Produkte entsprechen den strengen Qualitätsforderungen und
gesetzlichen Anforderungen in der EU. Um die Qualität zu
gewährleisten werden unsere Produkte regelmäßig einer
zusätzlichen Qualitätskontrolle unterworfen, sowohl von unserer
eigenen Qualitätsabteilung als auch von externen spezialisierten
Organisationen. Sollten, trotz aller Vorsichtsmaßnahmen, Probleme
auftreten, nehmen Sie bitte die Garantie in Anspruch (siehe
Garantiebedingungen).
Allgemeine Garantiebedingunge n in Bezu g a uf Ko ns umgüter
(für die Europäische Union):
• Alle Produkte haben für Material- oder Herstellungsfehler eine
Garantieperiode von 24 Monaten ab Verkaufsdatum.
• Wenn die Klage berechtigt ist und falls eine kostenlose Reparatur
oder ein Austausch des Gerätes unmöglich ist, oder wenn die
Kosten dafür unverhältnismäßig sind, kann Velleman® sich darüber
entscheiden, dieses Produkt durch ein gleiches Produkt zu ersetzen
oder die Kaufsumme ganz oder teilweise zurückzuzahlen. In diesem
Fall erhalten Sie ein Ersatzprodukt oder eine Rückzahlung im Werte
von 100% der Kaufsumme im Falle eines Defektes bis zu 1 Jahr
nach Kauf oder Lieferung, oder Sie bekommen ein Ersatzprodukt im
Werte von 50% der Kaufsumme oder eine Rückzahlung im Werte
von 50 % im Falle eines Defektes im zweiten Jahr.
• Von der Garantie ausgeschlossen sind:
- alle direkten oder indirekten Schäden, die nach Lieferung am
Gerät und durch das Gerät verursacht werden (z.B. Oxidation,
Stöße, Fall, Staub, Schmutz, Feuchtigkeit, ...), sowie auch der Inhalt
(z.B. Datenverlust), Entschädigung für eventuellen Gewinnausfall.
- Verbrauchsgüter, Teile oder Zubehörteile, die durch normalen
Gebrauch dem Verschleiß ausgesetzt sind, wie z.B. Batterien (nicht
nur aufladbare, sondern auch nicht aufladbare, eingebaute oder
ersetzbare), Lampen, Gummiteile, Treibriemen, usw.
(unbeschränkte Liste).
- Schäden verursacht durch Brandschaden, Wasserschaden, Blitz,
Unfälle, Naturkatastrophen, usw.
- Schäden verursacht durch absichtliche, nachlässige oder
unsachgemäße Anwendung, schlechte Wartung, zweckentfremdete
Anwendung oder Nichtbeachtung von Benutzerhinweisen in der
Bedienungsanleitung.
- Schäden infolge einer kommerziellen, professionellen oder
kollektiven Anwendung des Gerätes (bei gewerblicher Anwendung
wird die Garantieperiode auf 6 Monate zurückgeführt).
- Schäden verursacht durch eine unsachgemäße Verpackung und
unsachgemäßen Transport des Gerätes.
- alle Schäden verursacht durch unautorisierte Änderungen,
Reparaturen oder Modifikationen, die von einem Dritten ohne
Erlaubnis von Velleman® vorgenommen werden.
• Im Fall einer Reparatur, wenden Sie sich an Ihren Velleman®Verteiler. Legen Sie das Produkt ordnungsgemäß verpackt
(vorzugsweise die Originalverpackung) und mit dem OriginalKaufbeleg vor. Fügen Sie eine deutliche Fehlerbeschreibung hinzu.
• Hinweis: Um Kosten und Zeit zu sparen, lesen Sie die
Bedienungsanleitung nochmals und überprüfen Sie, ob es keinen
auf de Hand liegenden Grund gibt, ehe Sie das Gerät zur Reparatur
zurückschicken. Stellt sich bei der Überprüfung des Gerätes heraus,
dass kein Geräteschaden vorliegt, könnte dem Kunden eine
Untersuchungspauschale berechnet.
• Für Reparaturen nach Ablauf der Garantiefrist werden
Transportkosten berechnet.
• Jede kommerzielle Garantie lässt diese Rechte unberührt.
Die oben stehende Aufzählung kann eventuell angepasst
werden gemäß der Art des Produktes (siehe
Bedienungsanleitung des Gerätes).
Legen Heirweg 33, 9890 Gavere, Belgium
Imported by Velleman nv
Made in PRC
www.velleman.eu
 Loading...