

Page 1

3
W
S
O
S
M
A
N
O
C
I
K
D
A
0
0
0
E
LX
3000
DMX
STRO
ESTR
DMX-
01
DMX C
TROBOS
BOSCOPE
BOSCOP
TROBOS
NTROLLE
OOP – 3
DMX – 3
O DMX –
OP – 30
D STROB
00W
00W
3000W
0W
USER
GEBRU
MODE
MANU
BEDIE
ANUAL
IKERSHAN
D’EMPLOI
L DEL USU
UNGSANLE
LEIDING
RIO
ITUNG
2
8
14
20
26
Page 2
0
I
e
a
o
I
S
a
d
a
e
e
u
o
p
e
m
p
e
p
G
t
s
V
t
.
o
e
o
h
u
o
c
a
l
h
c
d
c
e
g
d
r
a
c
o
a
a
h
a
®
n
h
a
o
o
e
t
t
g
a
r
b
r
r
i
r
l
n
m
e
n
Q
o
p
0
A
e
o
y
s
s
t
e
s
a
w
e
e
t
r
h
p
e
a
g
c
p
r
y
R
t
b
n
a
a
i
r
d
t
e
i
o
p
o
h
v
c
a
r
b
p
s
h
m
e
a
m
e
p
a
o
u
v
t
T
d
d
LX3
1
1.
To all r
Import
Thank y
service.
2.
•
Dam
the
•
A qu
•
Do n
Prot
•
This
quali
•
Mak
man
•
Do n
nece
•
Disc
the
•
Ther
nor
•
Do n
•
Kee
of th
•
Note
•
The l
•
Kee
3.
Refer to
•
This
be u
230
•
Ligh
lives
ntroducti
sidents of th
nt environme
This symbol
could harm t
waste; it sho
returned to y
rules.
If in doubt,
u for choosing
f the device w
afety Inst
Be very carefu
electroshocks.
Do not touch t
Keep this devi
Unplug the ma
ge caused by
ealer will not a
lified technicia
ot switch the d
ct the device a
device falls un
fied person car
sure that the
al.
ot crimp the po
ssary.
nnect the devi
lug only.
may be some
al and any sm
ot look directly
the device aw
device.
that damage c
amps and mec
the device aw
eneral Gu
he Velleman
device is desig
ed indoors wit
AC/50Hz.
ing effects are
n
European Un
ntal informati
n the device or
e environment.
ld be taken to
ur distributor
ontact your l
Luxibel®! Pleas
s damaged in
ructions
during the ins
e device durin
e away from r
ins lead before
isregard of ce
cept responsi
n should install
vice on immed
ainst damage
er protection cl
y out the elect
vailable voltag
wer cord and p
e from the ma
smoke or a pa
ke or smell wil
at the light sou
y from splashi
used by user
anical wear ar
y from childre
idelines
Service and
ed for professi
the included
not designed fo
USER M
ion
on about this
the package in
Do not dispos
specialized c
r to a local rec
cal waste di
read the man
ransit, don't in
allation: touchi
operation as
in and moistur
opening the ho
tain guidelines
ility for any en
and service thi
iately after it h
by leaving it s
ass I. It is ther
ic connection.
e does not exc
otect it agains
ns to clean it o
ticular smell w
gradually disa
rce as sensitiv
g and dripping
odifications to
not covered b
and unauthori
uality Warr
nal use on sta
ower adapter
r permanent o
NUAL
product
dicates that dis
of the unit (o
mpany for rec
cling service.
posal authori
ual thoroughly
tall or use it a
ng live wires c
he housing he
.
using.
in this manual
uing defects o
s device.
s been expose
itched off until
fore essential
ed the voltage
damage. Hav
when it is not
en the device
pear.
people may g
liquids. Never
the device is n
y warranty.
sed users.
nty on the last
e, in discos, t
onnected to an
eration: regula
posal of the de
batteries) as u
cling. This devi
espect the loc
ies.
efore bringing
d contact your
n cause life-th
ts up.
s not covered
problems.
to changes in
it has reached
hat the device
stated in the s
an authorised
in use. Handle
s activated for
into epileptic
ut objects fille
t covered by t
pages of this
eatres, etc. Th
alternating cur
r operation bre
ice after its lif
nsorted munici
e should be
l environment
this device int
dealer.
eatening
y the warranty
temperature.
room temperat
be earthed. Ha
ecifications of
dealer replace i
the power cord
the first time.
eizure if they
with liquid on
e warranty.
anual.
LX301 shoul
rent of max.
ks will prolong
cycle
al
l
and
re.
e a
his
t if
by
his is
o.
top
only
their
V. 01 –
8/06/2012
2
©Velle
an nv
Page 3

LX301
• Do not shake the device. Avoid brute force when installing or operating the device.
• Select a location where the device is protected against extreme heat (see Technical
Specifications), dust and moisture. Respect a minimum distance of 0.5m between the device’s light
output and any illuminated surface.
• Use an appropriate safety cable to fix the device (e.g. VDLSC8).
• Familiarise yourself with the functions of the device before actually using it. Do not allow operation
by unqualified people. Any damage that may occur will most probably be due to unprofessional use
of the device.
• Use the original packaging if the device is to be transported.
• All modifications of the device are forbidden for safety reasons.
• Only use the device for its intended purpose. All other uses may lead to short circuits, burns,
electroshocks, crash, etc. Using the device in an unauthorised way will void the warranty.
• The installation has to be approved by an expert before the device is taken into service.
• Connect the device to the mains with the power plug. Don’t connect it to a dimming pack.
4. Features
• continuous blinder effect with auto fades
• smart integrated heat control eliminates cool down time
• variable flash duration, intensity and rate
• special preprogrammed effects
• 5600K
• DMX-controlled in 1, 3, or 4 channel mode
• optional controller: LX302.
5. Installation
5.1 Mounting the Device
•
Have the device installed by a qualified person, respecting EN 60598-2-17 and all other applicable
norms.
• The carrying construction must be able to support 10 times the weight of the device for 1 hour
without deforming.
• The installation must always be secured with a secondary attachment e.g. a safety cable.
• Never stand directly below the device when it is being mounted, removed or serviced. Have a
qualified technician check the device once a year and once before you bring it into service.
• Install the device in a location with few passers-by that is inaccessible to unauthorised persons.
• Overhead mounting requires extensive experience: calculating workload limits, determining the
installation material to be used… Have the material and the device itself checked regularly. Do not
attempt to install the device yourself if you lack these qualifications as improper installation may
result in injuries.
• Adjust the desired inclination angle via the mounting bracket and tighten the bracket screws.
• Make sure there is no flammable material within a 0.5m radius of the device.
• Have a qualified electrician carry out the electric connection.
• Connect the device to the mains with the power plug. Do not connect it to a dimming pack.
• The installation has to be approved by an expert before the device is taken into service.
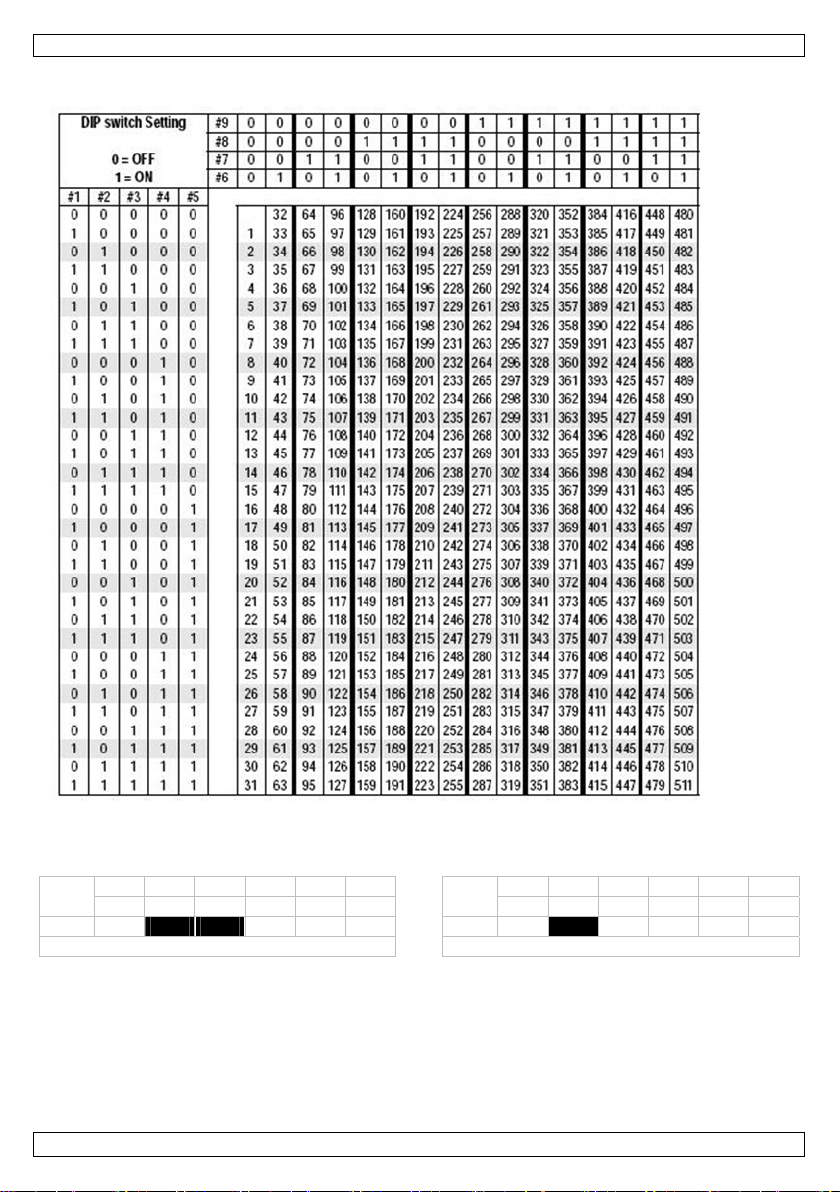
5.2 Lamp Power Setting
The LX301 can be set at high or low power setting. The high power setting provides you maximum flash
intensity, the low power setting reduces the output by approximately 50% and extends the lamp lifetime.
Select the desired setting through DIP switch 6. The setting applies regardless of the other switch
setting.
1 2 3 4 5 6
↓
ON ON
high power low power
1 2 3 4 5 6
↓
V. 01 – 08/06/2012 3 ©Velleman nv
Page 4

LX301
5.3 Lamps
Only fit or replace a lamp when the device is unplugged from the
•
mains.
• Let a lamp cool down before replacing it as the temperature of a
lamp can reach 700°C during operation.
• When handling a halogen lamp, do not touch it with your bare
hands. Use a cloth to insert or remove it.
• Do not install lamps with a higher wattage than what this device was
designed for.
• Replace any deformed or damaged lamp with a lamp of the same
type (see Technical Specifications):
1. Unscrew the 2 marked screws on the side of the fixture and open the front glass cover.
2. Disconnect the wires at the screw terminals. Lift the lamp and remove.
3. Replace the lamp and close the lamp compartment.
6. Use
6.1 Detailed DMX Values per Channel
Channel Function From To Description
1 INTENSITY 0 5 Blackout
2 FLASH DURATION 0 255 From 0 ~ 530ms
3 FLASH RATE 0 5 No rate
4 EFFECTS 0 5 No effect
• INTENSITY: Set the flash intensity from minimum (blackout) up to maximum using the intensity
fader. The maximum intensity is reduced in low power mode.
• FLASH RATE: Set the flash rate from 0 to 25 flashes per second using the flash rate fader. Switch
the flashing on and off with the run/stop button (red LED when switched on, green LED when
switched off).
• CHASE/SYNC: The chase/sync button toggles between staggered and simultaneous flashing of
multiple fixtures. The LED blinks in chase mode and remains steady in sync mode.
• BLINDER EFFECT: The blinder effect is controlled through the momentary blinder effect button. The
lamp power is electronically regulated to prevent the lamp from overheating.
• SINGLE FLASH: Press the single flash button to select the single flash mode with continuous
flashing stopped. The flash rate cycle can be restarted by pressing the single flash button while
continuous flashing is running.
6 255 Intensity from 0 ~ 100%
6 255 From 0.6 ~ 30Hz
6 42 Ramp up
43 85 Ramp down
86 128 Ramp up-down
129 171 Random
172 214 Lighting
215 255 Spikes
V. 01 – 08/06/2012 4 ©Velleman nv
Page 5

0
D
o
D
D
c
t
e
u
e
g
L
D
X
n
a
n
d
n
d
n
L
o
d
c
e
t
h
t
f
+
o
1
o
t
3
o
f
i
4
f
a
m
i
g
t
D
e
a
e
o
s
w
o
o
P
t
t
n
0
L
0
m
r
h
o
n
e
h
s
c
N
t
s
t
p
u
y
d
R
r
s
b
t
n
e
d
t
f
d
i
2
o
p
h
3
v
i
t
h
O
h
e
m
e
n
o
c
t
t
g
l
v
e
e
X
6.2
Connect
the male
cable sh
6.3
6.4
All DMXThis star
Enter th
You can
device.
When all
particula
simultan
Changin
In the ca
second
6.5
The DM
1-Chan
The 1-ch
the 1-ch
↓
ON
3-Chan
The 3-ch
advance
↓
ON
4-Chan
The 4-ch
advance
mode by
↓
ON
MX512 Co
the provided X
3-pin XLR inpu
uld be a two-c
MX512 Cha
MX Start A
ontrolled devi
address is the
correct numb
se the same s
devices have t
r channel. In o
ously. If you s
the settings o
se of the 4-cha
X301 to 5 (1
MX Control
control modes
el Mode
annel mode all
nnel DMX mod
1 2
el Mode
annel mode all
control. Selec
1 2
el Mode
annel mode all
control and o
setting DIP sw
1 2
nection
R cable to the
t of the LX301
re screened c
in with Ter
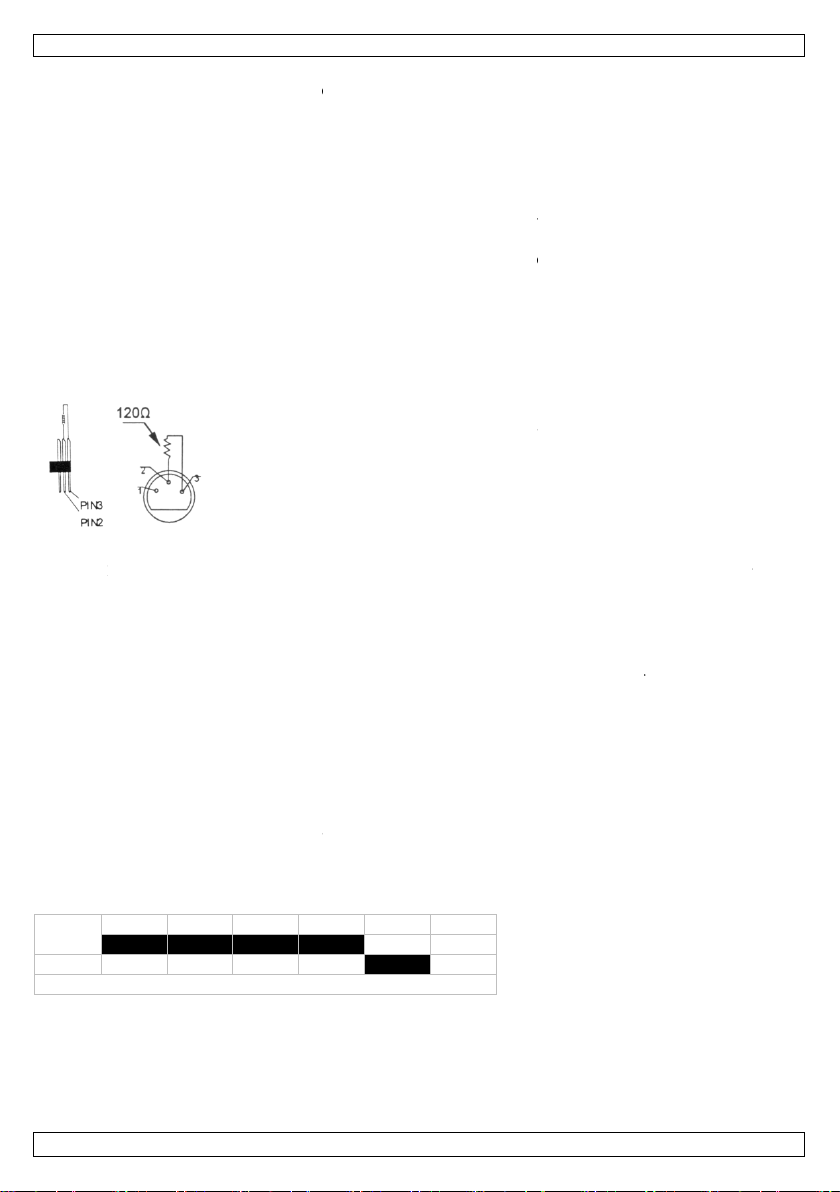
A DMX term
to run a lon
The termina
noise. The
pins 2 and 3
device in th
Please see il
dress
es need a digit
channel numb
r and read it fr
arting address
e same addre
her words: cha
et different add
one channel
nnel LX301, y
4), the third t
Modes
are selected th
ws you to use
e by setting DI
3
-channel mode
ws you to con
the 3-channel
3
-channel mode
ws you to con
fers a 4th chan
tch 4 to ON.
3
-channel mode
LX3
emale 3-pin X
. Multiple LX3
ble with XLR in
R output of yo
1s can be linke
put and output
ination
nator is recom
distance or is
or prevents co
MX terminator
, which is then
chain.
lustration.
l start address
r from which t
m the display
for a whole gr
s, all the LX30
nging the setti
resses, each d
ill only affect t
u will have to
9 (5 + 4) and
rough DIP swit
the whole flash
switch 5 to O
4 5
rol the flash in
DMX mode by
4 5
rol the flash in
el special pre-
4 5
in an electricall
is simply an XL
plugged into th
so that the co
located on the
up of devices o
1s will “listen”
gs of one chan
vice will “listen
et the start ad
so on.
range (0 ~ ma
ensity, flash du
ensity, flash du
1
ended for inst
ruption of the
e device start
e device in qu
hes 1 to 5.
.
6
etting DIP swi
6
rogrammed ef
6
r controller an
d through seria
connectors.
allations where
noisy environ
igital control s
plug with a 1
e XLR output s
rect device res
to “listen” to t
ase of the LX
r enter an indi
o the control s
el will affect al
” to a separate
stion.
ress of the firs
x.) and the blin
ration and flas
ches 1 ~ 5 to
ration and flas
ects. Select th
the other sid
l linking. The li
the DMX cable
ent (e.g. disc
gnal by electri
0Ω resistor be
cket of the las
onds to the si
e DMX control
01.
idual one for e
gnal on one
l devices
channel numb
LX301 to 1, t
der effect. Sel
rate for more
FF.
rate for more
4-channel DM
to
king
has
s).
al
ween
nals.
er.
ery
r.
he
ct
V. 01 –
8/06/2012
5
©Velle
an nv
Page 6
LX301
6.6 DMX Control Modes
DIP switch 10 must always be set to OFF.
6.7 Mode Setting
The remote controller is powered through the master fixture. Set DIP switches 2 and 3 to ON to select
the master fixture. Connect the slave fixtures and set DIP switch 2 to ON.
V. 01 – 08/06/2012 6 ©Velleman nv
1 2 3 4 6 8
↓
1 2 3 4 5 6
↓
ON ON
MASTER mode SLAVE mode
Page 7
LX301
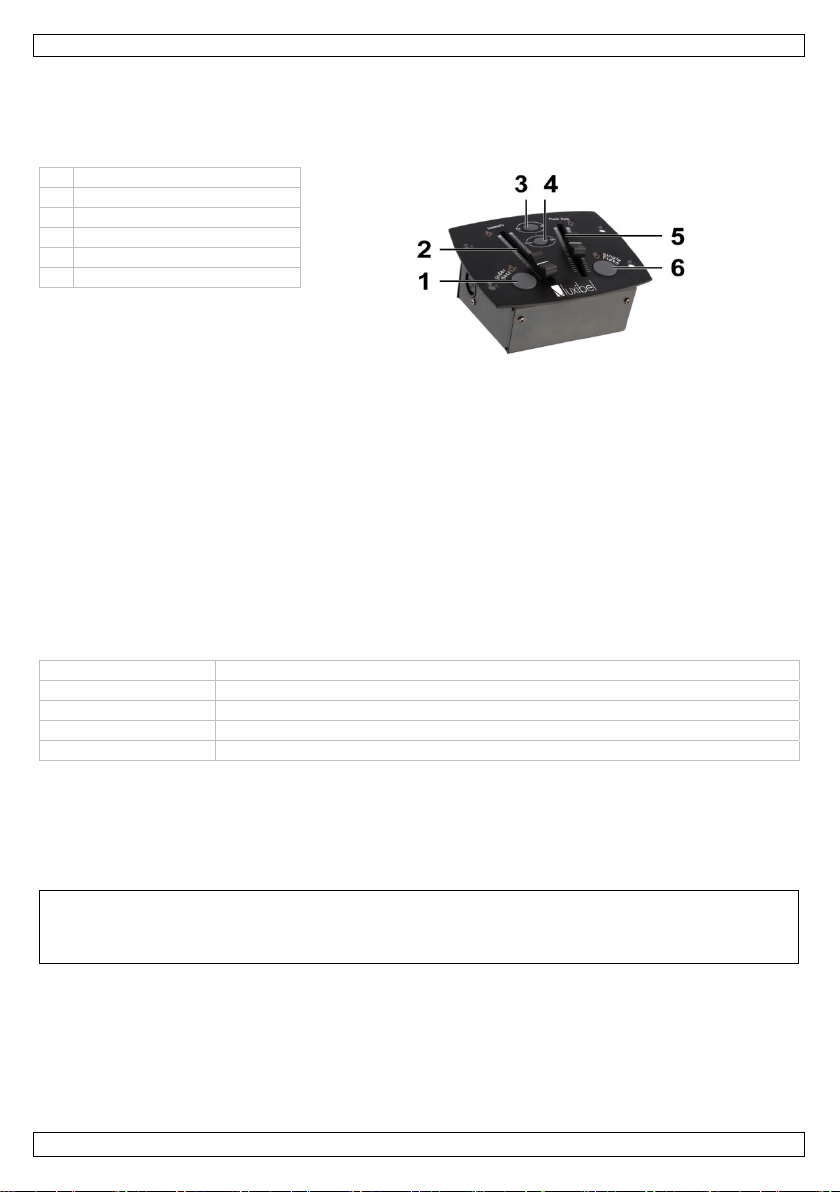
7. Remote Controller (optional)
The controller allows you to control the functions more easily. Connect the LX302 to the fixtures using a
3-pin XLR cable. The controller is able to control up to 20 fixtures. Remove the terminator from the last
LX301 in the chain when using the LX302 controller. Install a signal splitter after the first fixture if
necessary.
1 blinder effect button
2 intensity fader
3 run/stop toggle switch
4 chase/sync toggle switch
5 flash rate fader
6 single flash button
8. Cleaning and Maintenance
• All screws should be tightened and free of corrosion.
• The housing, visible parts, mounting supports and the installation location (e.g. ceiling, suspension,
trussing) should not be deformed, modified or tampered with; e.g. do not drill extra holes in
mounting supports, do not change the location of the connections…
• Moving mechanic parts must not show any signs of wear and tear.
• The electric power supply cables must not show any damage. Have a qualified technician maintain
the device.
• Disconnect the device from the mains prior to maintenance activities.
• Wipe the device regularly with a moist, lint-free cloth. Do not use alcohol or solvents.
• There are no user-serviceable parts.
• Contact your dealer for spare parts if necessary.
9. Technical Specifications
power supply 230VAC / 50Hz
lamp Philips Xenon discharge lamp XOP 15-OF (LAMP3000ST, incl.)
DMX input 3 or 5-pin XLR
dimensions 245 x 425 x 240mm
weight 7.5kg
Use this device with original accessories only. Velleman nv cannot be held responsible in the
event of damage or injury resulted from (incorrect) use of this device.
For more info concerning this product and the latest version of this manual, please visit our
website www.luxibel.com.
The information in this manual is subject to change without prior notice.
© COPYRIGHT NOTICE
The copyright to this manual is owned by Velleman nv. All worldwide rights reserved.
No part of this manual may be copied, reproduced, translated or reduced to any electronic medium or
otherwise without the prior written consent of the copyright holder.
V. 01 – 08/06/2012 7 ©Velleman nv
Page 8
0
I
e
e
v
e
V
a
a
b
t
o
h
d
o
t
g
n
e
n
d
n
a
d
v
f
e
t
e
p
n
i
t
t
e
o
a
e
r
a
m
e
s
m
h
t
u
k
d
f
n
d
U
e
e
n
a
t
a
n
g
t
e
r
m
s
t
s
n
p
b
a
0
A
o
k
e
s
s
d
r
h
o
e
o
e
e
c
w
a
d
d
n
u
d
n
e
D
a
m
o
e
e
e
o
a
u
s
e
m
t
e
d
a
g
e
h
e
e
e
n
k
l
s
r
o
d
i
t
m
r
t
d
e
h
e
s
e
m
n
r
j
e
g
s
d
k
n
a
e
LX3
1
1.
Aan all
Belangr
verwijd
Dank u
toestel b
2.
•
De g
uw d
verb
•
Laat
•
Om
bloo
geko
•
Dit t
gesc
•
De b
han
•
De v
plaa
•
Trek
niet
•
Wan
en e
•
Kijk
epile
•
Hou
gevu
•
Scha
gara
•
De l
•
Hou
nleiding
ingezetenen
ijke milieu-in
Dit symbool o
weggeworpen
batterijen) ni
terechtkomen
recyclagepun
Hebt u vrag
ring.
oor uw aankoo
schadigd tijde
eiligheids
Wees voorzich
elektroshocks
Raak het toest
Bescherm dit t
Verzeker u erv
rantie geldt ni
ealer zal de ve
nd mee houde
dit toestel inst
eschadiging te
gesteld aan te
men is.
estel valt ond
oolde technicu
eschikbare net
leiding.
edingskabel
sen.
de stekker uit
ebruikt.
eer u het toes
n bepaalde ge
iet rechtstree
psie.
dit toestel uit
ld met vloeisto
de door wijzigi
tie.
mp en mechan
dit toestel uit
GEBR
an de Europ
ormatie betr
p het toestel of
, dit toestel sch
t bij het gewo
voor recyclage
brengen. Resp
n, contacteer
! Lees deze h
s het transpor
nstructies
ig bij de install
e vermijden.
l niet aan wan
estel tegen re
n dat het toes
t voor schade
antwoordelijkh
n.
lleren en onde
vermijden, zet
peratuurscho
r bescherming
s moet de elek
panning mag n
ag niet omgepl
et stopcontact
el voor het eer
r. Dit is norma
s in de lichtbro
e buurt van o
op het toestel.
gen die de ge
ische schade v
e buurt van ki
IKERSH
se Unie
ffende dit pr
de verpakking
ade kan toebre
e huishoudelij
. U moet dit to
ecteer de plaat
dan de plaat
ndleiding gron
, installeer het
tie: raak geen
eer het in geb
en en vochtig
el niet aangesl
door het neger
id afwijzen vo
houden door e
u het toestel b
melingen. Wa
klasse I, wat
rische aansluiti
iet hoger zijn d
ooid of bescha
(trek niet aan
t gebruikt, ka
al en de event
. De lichtbron
spattende en
ruiker heeft aa
llen niet onder
nderen en onb
NDLEI
duct
geeft aan dat,
ngen aan het
e afval; het m
stel naar uw v
elijke milieuw
elijke autorit
ig voor u het t
dan niet en ra
kabels aan die
uik is: de beh
eid.
ten is op een
n van bepaald
r defecten of p
n geschoolde t
st niet aan on
ht tot het toes
il zeggen dat h
ng verzorgen.
n de spanning
igd zijn. Laat u
e kabel!) voor
dit gepaard g
ele rook of geu
kan bij gevoeli
ruppelende vlo
gebracht aan
de garantie.
voegden.
ING
ls het na zijn l
ilieu. Gooi dit t
et bij een gesp
rdeler of naar
tgeving.
iten betreffe
estel in gebrui
dpleeg uw dea
onder stroom
izing wordt wa
troombron alv
richtlijnen in
roblemen die h
echnicus.
iddellijk nada
el op kamerte
t toestel geaa
in de specifica
w dealer zo no
at u het toest
an met een lic
r zal geleidelijk
e mensen leid
istoffen. Plaat
et toestel vall
venscyclus wo
oestel (en eve
cialiseerd bed
en lokaal
d de
neemt. Werd
er.
taan om dodeli
m.
rens het te op
eze handleidin
er rechtstreek
het werd
peratuur
d moet zijn. Ee
ies achteraan
ig een nieuwe
l reinigt en als
te rookontwik
aan verdwijne
n tot een aanv
geen objecten
n niet onder d
rdt
tuele
ijf
het
ke
nen.
en
n
e
kabel
u het
eling
.
l van
V. 01 –
8/06/2012
8
©Velle
an nv
Page 9

LX301
3. Algemene richtlijnen
Raadpleeg de Velleman® service- en kwaliteitsgarantie achteraan deze handleiding.
• Dit toestel is ontworpen voor professioneel gebruik op podia, in disco's, enz. U mag dit toestel enkel
binnenshuis gebruiken door de meegeleverde adapter aan te sluiten op een wisselspanning van
maximum 230 VAC/50 Hz.
• Lichteffecten zijn niet ontworpen voor continue werking: regelmatige onderbrekingen doen ze langer
meegaan.
• Schud het toestel niet dooreen. Vermijd brute kracht tijdens de installatie en de bediening van dit
toestel.
• Installeer het toestel weg van extreme temperaturen (zie Technische specificaties), vochtigheid en
stof. Zorg voor een minimumafstand van 0,5 m tussen de lichtuitgang van het toestel en het belichte
oppervlak.
• Maak het toestel vast met een geschikte veiligheidskabel (bv. VDLSC8).
• Leer eerst de functies van het toestel kennen voor u het gaat gebruiken. Ongeschoolde personen
mogen dit toestel niet gebruiken. Meestal is beschadiging het gevolg van onprofessioneel gebruik.
• Gebruik de oorspronkelijke verpakking wanneer u het toestel vervoert.
• Om veiligheidsredenen mag de gebruiker geen wijzigingen aanbrengen aan het toestel.
• Gebruik het toestel enkel waarvoor het gemaakt is. Andere toepassingen kunnen leiden tot
kortsluitingen, brandwonden, elektrische schokken, enz. Bij onoordeelkundig gebruik vervalt de
garantie.
• De installatie moet voor het eerste gebruik gekeurd worden door een expert.
• Sluit het toestel via de stekker aan op het lichtnet. Sluit het niet aan op een dimmerpack.
4. Eigenschappen
• continue blinder met automatische fade
• verminderde koeltijd dankzij ingebouwde hittecontroller
• instelbare flitsduur, intensiteit en snelheid
• speciale ingebouwde effecten
• 5600K
• DMX-sturing in 1-, 3-, of 4-kanaalsmodus
• optionele controller: LX302.
5. Installatie
5.1 Het toestel monteren
•
Laat een geschoolde technicus dit toestel installeren conform EN 60598-2-17 en andere toepasselijke
normen.
• De constructie waaraan het toestel wordt bevestigd, moet gedurende 1 uur 10 x het gewicht van dit
toestel kunnen dragen zonder te vervormen.
• Maak het toestel ook vast met een veiligheidskabel.
• Sta nooit recht onder het toestel wanneer u het monteert, verwijdert of schoonveegt. Laat het toestel
controleren door een geschoolde technicus voor u het in gebruik neemt en laat het 1 x per jaar
volledig nakijken.
• Installeer dit toestel op een plaats waar niemand langs moet lopen, kan neerzitten of het toestel kan
aanraken.
• Een degelijke praktijkervaring is vereist voor de plaatsing van dit toestel. U moet de
maximumbelasting van de draagconstructie kunnen berekenen, weten welk constructiemateriaal u
kunt gebruiken en u moet het gebruikte materiaal en het toestel af en toe laten nakijken. Monteer
het toestel niet zelf indien u er geen ervaring mee heeft. Een slechte montage kan leiden tot
verwondingen.
• Regel de gewenste invalshoek door middel van de montagebeugel en draai de regelschroeven stevig
aan.
• Verwijder alle brandbaar materiaal in een straal van 0,5 m rond het toestel.
• Een geschoolde elektricien moet het toestel aansluiten.
V. 01 – 08/06/2012 9 ©Velleman nv
Page 10

LX301
• Sluit het toestel via de stekker aan op het lichtnet. Sluit het niet aan op een dimmerpack.
• De installatie moet voor het eerste gebruik gekeurd worden door een expert.
5.2 Vermogeninstelling van de lamp
De LX301 heeft twee vermogeninstellingen nl. hoog en laag. Aan hoog vermogen levert de lamp de
maximale flitsintensiteit; aan laag vermogen wordt de intensiteit met ongeveer 50 % verminderd maar
wordt de levensduur van de lamp verlengd. Selecteer de gewenste instelling met DIP-schakelaar 6. Deze
instelling is onafhankelijk van alle andere instellingen.
1 2 3 4 5 6
↓
ON ON
hoog vermogen laag vermogen
1 2 3 4 5 6
↓
5.3 Lamp
Plaats of vervang een lamp enkel wanneer het toestel niet is
•
aangesloten op het lichtnet.
• Laat een lamp afkoelen voor u ze vervangt: de bedrijfstemperatuur
van een lamp ligt rond de 700 °C.
• Raak een halogeenlamp niet aan met uw blote handen. Gebruik een
doek om een halogeenlamp te vervangen.
• Plaats geen lampen met een te hoog wattage. Deze worden warmer
dan die waarop dit toestel is voorzien.
• Vervang een vervormde of beschadigde lamp door een lamp van
hetzelfde type (zie Technische specificaties). Ga als volgt te werk:
1. Maak de 2 schroeven aan de zijkant van de stroboscoop los en open het lampcompartiment.
2. Schroef de terminals los en verwijder de kabels. Verwijder de lamp uit de fitting.
3. Vervang door een gelijkaardige lamp en sluit het compartiment.
6. Gebruik
6.1 Gedetailleerde DMX-waarden per kanaal
Kanaal Functie Van Tot Omschrijving
1 INTENSITEIT 0 5 Black-out
2 FLITSDUUR 0 255 Van 0 ~ 530 ms
3 FLITSSNELHEID 0 5 Geen functie
4 EFFECTEN 0 5 Geen functie
V. 01 – 08/06/2012 10 ©Velleman nv
6 255 Intensiteit van 0 ~ 100 %
6 255 Van 0,6 ~ 30 Hz
6 42 Versnelling
43 85 Vertraging
86 128 Versnelling-vertraging
129 171 Willekeurig
172 214 Flits
215 255 Spike
Page 11
0
E
n
T
m
N
m
E
D
m
n
D
D
X
D
é
e
r
r
e
t
D
r
a
k
r
a
k
n
.
l
S
t
d
o
H
u
n
X
s
e
s
G
d
a
e
a
o
u
o
o
u
a
o
u
e
d
h
s
d
c
r
k
n
o
w
n
e
n
e
r
e
e
t
v
,
o
e
n
z
a
s
u
3
0
m
v
t
k
a
e
3
0
a
m
o
n
0
r
e
s
a
e
a
e
k
)
e
d
e
k
t
d
n
n
s
a
a
z
h
p
n
r
k
e
.
a
t
m
e
e
h
j
a
e
d
u
o
e
v
e
R
d
t
e
e
r
o
d
n
r
m
r
e
R
e
e
o
R
e
r
g
0
e
e
u
t
•
INT
inte
•
FLI
Scha
indie
•
CHA
van
•
BLI
ver
•
ENK
de fli
6.2
Sluit de
kant van
koppele
XLR inga
6.3
6.4
Alle DM
de signal
van de
U kunt é
startadr
Wannee
woorden
reageren
Wannee
woorden
reageren
In het g
van het
6.5
Selectee
1-kana
In de 1Selectee
↓
ON
3-kana
In de 3en flitss
plaatsen
NSITEIT: Ste
siteitfader. De
SSNELHEID:
kel de flitsfunc
n uitgeschakel
SE-SYNC: Met
eerdere strob
DEREFFECT:
ogen van de la
LE FLITS: Dr
tssnelheid met
MX512-aa
eegeleverde
de mannelijke
met behulp va
ng- en uitgang
MX512-ket
MX-startad
-gestuurde toe
en. Dit digitale
MX controller.
n enkel starta
s ingeven.
u één enkel st
: wanneer u de
.
u verschillend
: wanneer u de
.
val van de 4-k
weede toestel
MX-aanstu
de aanstuurm
ls aanstuurm
anaals aanstu
de 1-kanaals
1 2
1-kan
ls aanstuurm
anaals aanstu
elheid instellen
de flitsintensit
maximale waar
tel de flitssnel
ie in of uit met
).
de chase-sync
scopen. De le
et blindereffe
mp wordt elekt
k op de instel
een druk op de
sluiting
LR-kabel aan d
3-pin XLR-inga
n een seriële k
aansluitingen.
n met eind
Een DMX ei
gebruikt in
eindweersta
elektrische r
met een we
aangesloten
Zie de illust
res
tellen hebben
startadres is h
eef het correc
res gebruiken
rtadres instelt
instellingen vo
adressen inst
instellingen va
naals LX301,
p 5 (1 + 4), v
rmodus
dus met DIP-
dus
rmodus kunt u
anstuurmodus
3
aals aanstuurm
dus
rmodus heeft
. Selecteer de
LX3
it in van mini
e wordt gehal
eid in van 0 to
de aan-uitscha
chakelaar scha
knippert in ch
t wordt ingeste
onisch gestuur
nop voor enkel
instelknop voo
e vrouwelijke
g van de LX3
ppeling. Gebru
kelaar (rode le
ld via de instel
d om oververhi
r enkele flits tij
-pin XLR-uitga
ik daarvoor ee
eerstand
dweerstand is
en omgeving
d voorkomt c
uis. De DMX ei
rstand van 12
op de XLR-uitg
atie links.
en digitaal sta
t kanaalnumm
e nummer in e
oor een groep
zullen alle toe
r 1 kanaal ver
lt, dan luistert
een kanaal v
ult u het start
n het derde op
chakelaar 1 tot
het hele flitssp
door DIP-scha
4 5
odus
meer instelmo
-kanaals aanst
rruptie van het
ang van het la
n lees het af o
toestellen of u
elk toestel naa
randert, zal en
9 (5 + 4), enz
5.
gelijkheden en
uurmodus door
1
aal (black-out
eerd in de lag
25 flitsen per
elt u tussen d
semodus en bl
flits om de en
1. U kunt vers
anbevolen als
et veel elektri
dweerstand is
Ω van pin 2 n
tadres nodig,
van waarop
tellen ‘luistere
ndert, zullen a
dres van het e
ctrum (0 ~ m
elaar 5 op ON
6
tot maximaal
vermogeninst
seconde met d
indien ingesc
aparte en geli
ijft constant br
nop voor blind
ting te vermij
kele flitsmodus
ens de contin
g van de contr
cheidene LX30
2-aderige afg
de DMX-kabel
che ruis (bv. e
digitale control
niets meer dan
ar 3. Deze XL
tste toestel in
odat het juiste
et toestel ‘luis
de display ond
kunt per toest
’ naar hetzelfd
lle toestellen e
een ander kan
el het toestel
rste toestel op
x.) en het blin
e plaatsen.
kunt u de flitsi
DIP-schakelaa
et de
lling.
snelheidsfade
akeld, groene l
ktijdige flitsfun
nden in syncm
reffect. Het
en.
te selecteren.
e flitsmodus.
ller en de and
1’s aan elkaar
schermde kab
rij lang is of w
n discotheek).
esignaal door
een XL
toestel reagee
eraan uw LX3
l een nieuw
tegelijk op
aal. Met ander
1 moeten inst
-stekk
-stekker wordt
e reeks.
ert’ naar het si
kanaal. Met a
p dat kanaal
ereffect gebrui
tensiteit, flitsd
1 ~ 5 op OFF
.
d
ctie
odus.
eset
re
l met
rdt
De
r
dan
t op
naal
1.
ndere
llen,
ken.
ur
e
V. 01 –
8/06/2012
11
©Velle
an nv
Page 12

LX301
↓
1 2 3 4 5 6
ON
3-kanaals aanstuurmodus
4-kanaals aanstuurmodus
In de 4-kanaals aanstuurmodus kunt u, net zoals in de 3-kanaals aanstuurmodus, de flitsintensiteit,
flitsduur en flitssnelheid instellen. Bovendien beschikt u over een 4
effecten. Selecteer de 4-kanaals aanstuurmodus door DIP-schakelaar 4 op ON te plaatsen.
↓
1 2 3 4 5 6
e
kanaal met geprogrammeerde
ON
4-kanaals aanstuurmodus
6.6 DMX-adres
Plaats DIP-schakelaar 10 altijd op OFF.
V. 01 – 08/06/2012 12 ©Velleman nv
Page 13

LX301
6.7 Master-slavemodus
De afstandsbediening wordt gevoed via de stroboscoop. Plaats DIP-schakelaar 2 en 3 op ON om de
masterfunctie te selecteren. Koppel de slavestroboscopen aan de masterstroboscoop en plaats DIPschakelaar 2 van de slavestroboscopen op ON.
1 2 3 4 6 8
↓
1 2 3 4 5 6
↓
ON ON
MASTER SLAVE
7. Afstandsbediening (optie)
Met de afstandsbediening kunt u de functies van 20 stroboscopen gemakkelijker aansturen. Sluit de
LX302 aan de stroboscoop met een 3-pin XLR-kabel. Verwijder de eindweerstand uit de laatste LX301 in
de reeks indien u een LX302-afstandsbediening gebruikt. Installeer een splitter na de eerste stroboscoop
indien nodig.
1 knop blindereffect
2 intensiteitfader
3 aan-uitschakelaar
4 chase-syncschakelaar
5 snelheidsfader
6 knop enkele flits
8. Reiniging en onderhoud
• Alle gebruikte schroeven moeten goed zijn aangespannen en mogen geen sporen van roest vertonen.
• De behuizing, de lenzen, de montagebeugels en de montageplaats (bv. het plafond of het gebinte)
mogen niet vervormd zijn of aangepast worden (geen extra gaten in montagebeugels, aansluitingen
niet verplaatsen, enz.)
• Mechanisch bewegende delen mogen geen sporen van slijtage vertonen en mogen niet onregelmatig
bewegen.
• De voedingskabels mogen niet beschadigd zijn. Laat het toestel onderhouden door een geschoolde
technicus.
• Ontkoppel het toestel van het lichtnet voor u aan onderhoudswerkzaamheden begint.
• Maak het toestel geregeld schoon met een vochtige, niet pluizende doek. Gebruik geen alcohol of
solvent.
• De gebruiker mag geen onderdelen vervangen.
• Bestel eventuele reserveonderdelen bij uw dealer.
9. Technische specificaties
voeding 230VAC / 50Hz
lamp Philips Xenon ontladingslamp XOP 15-OF (LAMP3000ST, meegelev.)
DMX-ingang 3 of 5-pin XLR
afmetingen 245 x 425 x 240mm
gewicht 7.5kg
Gebruik dit toestel enkel met originele accessoires. Velleman nv is niet aansprakelijk voor
schade of kwetsuren bij (verkeerd) gebruik van dit toestel. Voor meer informatie over dit
product en de laatste versie van deze handleiding, zie www.luxibel.com. De informatie in deze
handleiding kan te allen tijde worden gewijzigd zonder voorafgaande kennisgeving.
© AUTEURSRECHT
Velleman nv heeft het auteursrecht voor deze handleiding. Alle wereldwijde rechten voorbehouden.
Het is niet toegestaan om deze handleiding of gedeelten ervan over te nemen, te kopiëren, te vertalen, te bewerken en op
te slaan op een elektronisch medium zonder voorafgaande schriftelijke toestemming van de rechthebbende.
V. 01 – 08/06/2012 13 ©Velleman nv
Page 14

0
I
i
o
d
u
l
u
C
a
c
i
a
m
a
e
e
c
â
u
a
b
r
t
a
r
d
d
n
u
o
i
i
u
p
q
a
e
c
d
o
r
a
c
p
n
p
e
i
e
d
n
t
c
e
1
M
n
e
t
e
a
g
é
q
a
d
x
e
p
a
s
s
s
’
e
s
s
t
0
E
s
u
n
m
é
e
n
i
é
u
e
a
q
v
a
c
t
d
a
m
à
o
e
c
n
t
i
o
n
v
s
n
e
p
m
m
r
a
o
d
u
o
e
s
n
e
t
t
o
h
e
d
o
m
e
m
v
p
e
i
e
e
t
n
i
e
d
o
.
t
LX3
1
1.
Aux rés
Des inf
En cas
Nous vo
l’apparei
revende
2.
•
La g
noti
résul
•
Conf
•
Ne p
dom
•
Cet
Un t
•
La t
noti
•
Le c
reno
•
Débr
le câ
•
La p
C’es
•
Ne p
certa
•
Teni
liqui
•
Les
gara
•
L’us
•
Gard
ntroducti
dents de l'Un
rmations env
Ce symbole s
peut polluer l'
éventuelles)
l’appareil en
recyclage loc
l’environnem
e questions,
s remercions d
. Si l’appareil a
r.
onsignes
Être prudent l
mortels.
Ne pas touche
Protéger l’app
Débrancher le
rantie ne s’ap
e et votre reve
tent.
er l’installation
s brancher l’a
ages, attendr
ppareil ressort
chnicien qualif
nsion réseau n
e.
ble d’alimentat
veler le câble
ncher l’appareil
le.
emière mise e
normal. Toute
s regarder direc
ins gens.
l’appareil à l’é
e sur l’appareil
ommages occa
tie.
re mécanique
er votre LX30
n
on européen
ronnemental
r l'appareil ou
environnement
armi les déche
uestion. Renvo
l. Il convient d
nt.
ontacter les
e votre achat !
été endomma
e sécurit
rs de l’installati
l’appareil lors
reil contre la pl
âble d'aliment
lique pas aux
deur déclinera
et l’entretien à
pareil après e
jusqu’à ce qu
à la classe de
é doit établir la
peut pas dép
ion ne peut pa
’alimentation
s’il n’est pas utili
service peut s
fumée ou odeu
ement la sourc
art d’éclabous
.
sionnés par de
t l’ampoule ne
hors de la por
ODE D’
e
s importante
l'emballage ind
. Ne pas jeter
s municipaux
yer les équipe
respecter la r
utorités local
Lire la présent
é pendant le tr
on : toucher u
u’il est en serv
uie et l’humidit
tion avant d'o
ommages surv
toute respons
un personnel
position à des
l’appareil ait
rotection I, ce
connexion éle
sser la tension
être replissé o
i nécessaire.
é ou pour le ne
accompagner
r disparaîtra gr
lumineuse com
ures et de jailli
modifications
tombent pas s
ée de personn
MPLOI
concernant
ique que l’élimi
n appareil élec
on sujets au tr
ents usagés à
glementation l
es pour élimi
notice attenti
ansport, ne pa
câble sous te
ce : le boîtier c
.
vrir le boîtier.
nus en néglig
bilité pour les
ualifié.
ariations de te
tteint la tempé
qui implique qu
trique.
mentionnée da
u endommagé.
toyer. Tirer la fic
’un peu de fu
duellement.
e ceci peut ent
ssements. Ne j
l’appareil par
us la garantie.
s non qualifiée
e produit
ation d’un app
rique ou électr
sélectif ; une
votre fournisse
cale relative à
ation.
ement avant la
l’installer et c
sion peut caus
hauffe !
ant certaines d
roblèmes et le
pérature. Afi
rature ambiant
e l’appareil doi
ns les spécifica
Demander à v
he pour débranc
ée ou d’une od
aîner des crises
mais placer d’
le client, ne to
s et de jeunes
areil en fin de
nique (et des
échèterie trait
r ou à un serv
la protection d
mise en servic
nsulter votre
r des électroch
irectives de cet
défauts qui e
d’éviter des
avant de l’util
être mis à la t
ions à la fin de
tre revendeur
er l'appareil ; n
ur particulière
’épilepsie chez
bjet contenan
bent pas sous
nfants.
ie
iles
ra
ce de
de
ocs
e
ser.
rre.
cette
e
n pas
un
la
V. 01 –
8/06/2012
14
©Velle
an nv
Page 15

LX301
3. Directives générales
Se référer à la garantie de service et de qualité Velleman® en fin de notice.
• Cet appareil a été développé pour usage professionnel dans des discothèques, des théâtres, etc.
Employer cet appareil à l’intérieur et avec l’adaptateur connecté à une source de courant CA de max.
230 VCA/50 Hz.
• Un effet lumineux n’est pas conçu pour une opération continue. Des pauses régulières prolongeront
sa vie.
• Éviter de secouer l’appareil et traiter l’appareil avec circonspection pendant l’installation et
l’opération.
• Choisir un endroit où l’appareil est protégé contre la poussière, l’humidité et des températures
extrêmes (voir « Spécifications techniques »). Respecter une distance minimum de 0,5 m entre la
sortie lumière de l’appareil et la surface illuminée.
• Fixer l’appareil à l’aide d’un câble de sécurité adéquat (p.ex. VDLSC8).
• Se familiariser avec le fonctionnement de l’appareil avant de l’utiliser. Ne pas permettre pas aux
personnes non qualifiées d’opérer cet appareil. La plupart des dégâts sont causés par un usage non
professionnel.
• Transporter l’appareil dans son emballage originel.
• Toute modification de l’appareil est interdite pour des raisons de sécurité.
• N’utiliser votre LX301 qu’à sa fonction prévue. Tout autre usage peut causer des courts-circuits, des
brûlures, des électrochocs etc. Un usage impropre annule d'office la garantie.
• L’installation doit être approuvée par un expert avant sa mise en service.
4. Caractéristiques
• blinder continu avec fondu automatique
• délai de refroidissement réduit grâce au dispositif de contrôle de chaleur
• délai, intensité et vitesse des éclats réglables
• effets intégrés spéciaux
• 5600K
• pilotage DMX en mode 1, 3 ou 4 canaux
• contrôleur optionnel : LX302.
5. Installation
5.1 Montage de l’appareil
•
Un technicien qualifié doit installer l’appareil en respectant EN 60598-2-17 et toute autre norme
applicable.
• La construction portante de l’appareil doit être capable de supporter 10 x le poids de l’appareil
pendant une heure, sans qu’une déformation de la construction en résulte.
• Fixer votre LX301 à l’aide d’un câble de sécurité (sécurité supplémentaire).
• Éviter de vous positionner en dessous de l’appareil pour l’enlever ou lors du montage ou du
nettoyage. Un technicien qualifié doit réviser l’appareil avant la mise en service. Organiser une
révision minutieuse annuelle.
• Installer l’appareil à un endroit où personne ne peut passer ou s’asseoir et où personne ne peut le
toucher.
• L’installation de cet appareil exige une solide expérience pratique : le calcul de la charge max. de la
construction, les matériaux d’installation requis etc. De temps en temps, un technicien qualifié doit
vérifier la construction portante et l’appareil même. Ne pas essayer d’installer cet appareil vousmême si vous n’avez pas les qualifications requises ; une installation incorrecte peut entraîner des
blessures.
• Déterminer l’angle d’inclinaison au moyen de l’étrier de montage et serrer les vis de montage.
• Enlever tout matériau inflammable dans un rayon de 0,5 m autour de l’appareil.
• Un électricien qualifié doit établir la connexion électrique.
• Brancher l’appareil sur le réseau électrique par la fiche d’alimentation. Ne pas le brancher sur un bloc
de puissance.
• Un expert doit approuver l’installation avant qu’elle puisse être prise en service.
V. 01 – 08/06/2012 15 ©Velleman nv
Page 16

LX301
5.2 Sélection de la puissance de l’ampoule
La puissance de sortie du LX301 est sélectionnable. La sélection maximale offre l’intensité maximale ; la
sélection minimale réduit cette puissance de sortie d’environ 50 % ce qui prolonge la durée de vie de
l’ampoule. Sélectionner la puissance avec l’interrupteur DIP n° 6. Ce réglage est indépendant d’autres
réglages.
1 2 3 4 5 6
↓
ON ON
mode puissance maximale mode puissance minimale
1 2 3 4 5 6
↓
5.3 Ampoule
Déconnecter l’appareil du réseau électrique avant d’installer ou de
•
remplacer une ampoule.
• Laisser refroidir une ampoule avant de la remplacer; elle peut
atteindre une température de 700 °C.
• Éviter de toucher une ampoule halogène les mains nues. Remplacer
l’ampoule à l’aide d’un chiffon.
• N’installer aucune ampoule dont la puissance dépasse la puissance
maximale mentionnée dans cette notice.
• Remplacer toute ampoule déformée ou endommagée par une
ampoule du même type (voir « Spécifications techniques ») :
1. Desserrer les 2 vis marquées sur le côté du stroboscope et ouvrir le compartiment de l’ampoule.
2. Desserrer les cosses et déconnecter les câbles. Retirer l’ampoule.
3. Remplacer l’ampoule par une nouvelle et refermer la compartiment.
6. Emploi
6.1 Valeurs DMX détaillées par canal
Canal Fonction De À Description
1 INTENSITÉ 0 5 Noir
6 255 Intensité de 0 ~ 100 %
2 DURÉE DE L’ÉCLAT 0 255 De 0 ~ 530 ms
3 VITESSE DE L’ÉCLAT 0 5 Pas de fonction
4 EFFETS 0 5 Pas de fonction
• INTENSITÉ : Régler l’intensité de l’éclat de l’intensité minimale (noir) jusqu’à l’intensité maximale
avec la glissière d’intensité. L’intensité maximale est réduite en mode puissance minimale.
• VITESSE DE L’ÉCLAT : Régler la vitesse de 0 à 25 éclats par secondes avec le réglage de vitesse.
Activer/désactiver les éclats avec l’interrupteur marche/arrêt (éclats activés : DEL rouge, éclats
désactivés : DEL verte).
V. 01 – 08/06/2012 16 ©Velleman nv
6 255 De 0,6 ~ 30 Hz
6 42 Accélération
43 85 Ralentissement
86 128 Accélération-ralentissement
129 171 Effets aléatoires
172 214 Foudre
215 255 Éclats
Page 17

0
n
e
E
p• ÉCLA
C
e
R
r
C
A
s
d
e
a
l
a
L
e
M
n
n
e
C
m
R
n
h
h
s
X
s
q
s
e
n
n
e
u
.
D
t
c
m
c
b
c
c
g
e
L
C
g
c
e
s
p
d
d
e
n
P
0
e
g
a
t
d
s
e
e
r
e
n
e
p
t
o
e
u
m
P
O
u
r
a
n
u
i
e
s
s
a
M
h
à
d
s
r
s
e
s
t
N
d
c
é
n
X
r
u
a
d
r
s
a
r
r
m
(
c
m
i
n
e
s
r
t
a
r
u
e
s
g
u
•
POU
la fo
mod
•
EFF
l’am
vites
6.2
Connect
fiche XL
connexio
et de so
6.3
6.4
Tous les
appareil
numéro
interrupt
Vous av
départ p
signaux,
d’un seu
canal. P
Pour le
troisièm
6.5
Sélectio
Mode 1
Le mode
Sélectio
↓
ON
Mode 3
Le mode
canaux
↓
ON
RSUITE/SYN
ction d’éclate
synchro.
T BLINDER :
oule évite sa s
T UNIQUE : E
se des éclats e
onnexion D
r le câble à fic
mâle à 3 broc
n sérielle. Utili
tie XLR.
onnexion D
dresse DM
appareils piloté
corrects réagi
e canal sur le
eurs DIP au do
z le choix entr
r appareil. Da
sur un seul ca
canal. Avec d
r conséquent,
X301 à 4 cana
9 (5 + 4), etc
odes DMX
ner les modes
canal
1 canal perme
ner le mode 1
1 2
canaux
3 canaux perm
n plaçant les in
1 2
HRO : Le séle
ent simultané.
égler l’effet bli
urchauffe.
nfoncer le bout
enfonçant le
MX512
e XLR inclus à
es à l’entrée d
er un câble de
MX512 ave
Une résistan
couvrir une
beaucoup d
terminaison
électrique.
XLR avec un
à gauche).
la série.
de départ
s par un signal
sent sur les si
uel l’appareil é
de l’appareil.
une seule adr
s le cas d’une
al. Tous les ap
s adresses de
n ajustement
ux, l’adresse d
MX avec les i
l’utilisation de
anal en plaçan
3
mode 1 canal
et de régler l’in
terrupteurs DI
3
ode 3 canaux
LX3
teur poursuite/
La DEL clignot
nder avec le ré
on d’effet à écl
outon d’effet à
la sortie XLR fe
u LX301. Il es
onnexion blin
une résista
ce de terminai
rande distanc
bruit électriqu
prévient la cor
a résistance de
e résistance de
ette fiche XLR
DMX demande
naux de contrô
oute le contrôl
sse de départ
eule adresse,
areils seront d
épart individu
es réglages d’
départ du pre
terrupteurs DI
l’effet blinder e
t l’interrupteur
4 5
tensité, la duré
n° 1 ~ 5 sur
4 5
synchro comm
éclat unique e
melle à 3 broch
possible de rel
é à 2 conducte
nce de term
on DMX est à r
ou s’il est utili
uption du sign
terminaison D
120 Ω de broc
le. Cette adres
ous les apparei
lles, chaque ap
t du spectre en
DIP n° 5 sur O
e et la vitesse
1
en mode pou
lage momenta
t unique pour
(p.ex. une di
st connectée
t une adresse
ur DMX. Déte
our toute une
nc influencés l
n canal n’influ
ier appareil e
1 à 5.
6
FF.
6
te entre la fon
suite et s’allum
né. Le contrôle
ctiver un seul
mode continu.
es de votre co
ier plusieurs L
rs avec des co
naison
commander si
é dans un envi
cothèque). La
l de contrôle n
X n’est rien d’
e 2 vers broch
la sortie XLR
e départ DMX
e de départ nu
miner cette ad
érie d’appareil
ls « écouteront
orsque vous ch
pareil « écoute
nce que l'appa
t 1, du deuxiè
ier des éclats
.
es éclats. Séle
tion de poursu
e en continu e
électronique d
clat. Réinitiali
trôleur et l’aut
301 à partir d’
nnecteurs d’en
le câble DMX d
ronnement ave
ésistance de
mérique par le
utre qu’une fic
e 3 (voir illustr
u dernier appa
pour assurer q
érique indiqu
esse avec les
ou une adres
» les mêmes
ngez les régla
a » son propre
eil sur ce canal
e 5 (1 + 4), d
0 ~ max.).
tionner le mod
te et
er la
e
une
rée
oit
c
bruit
he
tion
eil de
e les
le
e de
es
.
e 3
V. 01 –
8/06/2012
17
©Velle
an nv
Page 18

LX301
Mode 4 canaux
Le mode 4 canaux permet de régler l’intensité, la durée et la vitesse des éclats. En outre, il offre un 4
ème
canal avec des effets préprogrammés. Sélectionner le mode 4 canaux en plaçant l’interrupteur DIP n° 4
sur ON.
↓
1 2 3 4 5 6
ON
mode 4 canaux
6.6 Adresse DMX
Placer l’interrupteur DIP n° 10 sur OFF.
6.7 Sélection du mode
La télécommande est alimentée depuis le stroboscope maître. Placer les interrupteurs DIP n° 2 et 3 sur
ON pour sélectionner le stroboscope maître. Raccorder les stroboscopes esclaves au stroboscope maître
placer l’interrupteur DIP n° 2 des stroboscopes esclaves sur ON.
V. 01 – 08/06/2012 18 ©Velleman nv
Page 19

LX301
1 2 3 4 6 8
↓
ON ON
mode MAÎTRE mode ESCLAVE
1 2 3 4 5 6
↓
7. Télécommande (optionnelle)
La télécommande vous permet d’actionner les fonctions de 20 stroboscopes. Raccorder le LX302 au
stroboscope en utilisant un câble XLR à 3 broches. Retirer la résistance de terminaison du dernier LX301
dans la série lors de l’utilisation de la LX302. Installer un répartiteur après le premier stroboscope si
nécessaire.
1 effet blinder
2 réglage d’intensité
3 interrupteur marche/arrêt
4 sélecteur poursuite/synchro
5 réglage de la vitesse des éclats
6 éclat unique
8. Nettoyage et entretien
• Serrer les écrous et les vis et vérifier qu’ils ne rouillent pas.
• Le boîtier, les lentilles, les supports de montage et la construction portante ne peuvent pas être
déformés, adaptés ou bricolés p.ex. pas de trous additionnels dans un support, ne pas déplacer les
connexions etc.
• Les parties mécaniques mobiles ne peuvent pas être usées ou bouger de manière irrégulière.
• Les câbles d'alimentation ne peuvent pas être endommagés. Un technicien qualifié doit entretenir
l’appareil.
• Débrancher l’appareil avant de le nettoyer.
• Essuyer l’appareil régulièrement avec un chiffon humide non pelucheux. Éviter l’usage d’alcool et de
solvants.
• Il n’y a aucune pièce maintenable par l’utilisateur.
• Commander des pièces de rechange éventuelles chez votre revendeur.
9. Spécifications techniques
alimentation 230VCA / 50Hz
ampoule lampe à décharge Philips Xenon XOP 15-OF (LAMP3000ST, incl.)
entrée DMX XLR 3 ou 5 broches
dimensions 245 x 425 x 240mm
poids 7.5kg
N’employer cet appareil qu’avec des accessoires d’origine. SA Velleman ne sera aucunement
responsable de dommages ou lésions survenus à un usage (incorrect) de cet appareil.
Pour plus d’information concernant cet article et la dernière version de cette notice, visiter
notre site web www. luxibel.com. Toutes les informations présentées dans cette notice
peuvent être modifiées sans notification préalable.
© DROITS D’AUTEUR
SA Velleman est l’ayant droit des droits d’auteur pour cette notice. Tous droits mondiaux
réservés.
Toute reproduction, traduction, copie ou diffusion, intégrale ou partielle, du contenu de cette notice par
quelque procédé ou sur tout support électronique que se soit est interdite sans l’accord préalable écrit de
l’ayant droit.
V. 01 – 08/06/2012 19 ©Velleman nv
Page 20

0
I
u
a
t
I
o
n
o
a
r
m
x
o
d
o
t
N
m
a
o
g
c
e
e
ó
a
c
a
e
p
g
n
t
p
c
r
m
t
t
e
n
a
d
i
p
t
a
a
g
n
e
o
s
o
E
N
e
e
o
p
c
e
t
u
s
v
s
e
d
m
e
p
o
e
o
c
e
n
e
0
L
e
e
v
r
o
u
a
d
n
a
n
P
q
n
b
u
d
a
a
®
r
n
R
e
r
m
p
a
e
t
e
o
n
l
e
q
c
c
e
o
c
o
s
o
e
a
o
a
n
o
e
m
j
s
e
m
c
e
m
r
u
a
s
e
,
5
a
LX3
1
1.
A los ci
Import
¡Gracias
el apara
2.
•
Dañ
gara
•
La in
•
No c
apar
•
Este
a tie
•
Aseg
•
No a
supe
•
Desc
limpi
•
No
•
No e
un fl
•
Los
•
La b
•
Man
3.
Véase la
•
Este
per
•
No h
prol
•
No a
•
Sele
extr
el ár
ntroducci
dadanos de l
ntes informa
Este símbolo
dañar el med
No tire este
empresa esp
reciclaje local
Si tiene dud
por haber com
o ha sufrido al
nstruccio
Cuidado duran
con un voltaje
¡No toque el a
No exponga es
Desconecte el
s causados po
tía y su distrib
stalación y el
necte el apara
to llegue a la
aparato perten
ra. La conexió
úrese de que l
plaste el cable
rficie afilada. S
onecte siempre
arlo. Tire siem
ire directamen
ponga el apar
rero, en el ap
años causados
mbilla y el des
enga el LX301
ormas ge
Garantía de s
aparato ha sid
itido para el u
sido diseñad
ngar la vida de
ite el aparato.
cione un lugar
mas (véase «
a iluminada.
MA
n
Unión Europ
iones sobre
en este aparat
io ambiente.
parato (ni las
cializada en re
. Respete las l
as, contacte c
rado el LX301
ún daño en el
es de seg
e la instalación
peligroso.
arato durante
te equipo a llu
able de alimen
descuido de la
uidor no será r
antenimiento
o si ha estado
emperatura a
ce a la clase d
eléctrica debe
tensión de red
e alimentación
es necesario,
el aparato si n
re del enchufe
e a la fuente d
to a ningún tip
rato.
por modificaci
aste no están
lejos del alcan
erales
rvicio y calid
diseñado para
o en interiores
para un uso in
l aparato.
Evite usar exc
de montaje do
specificacion
UAL DE
a
l medio ambi
o el embalaje
ilas, si las hubi
iclaje. Devuel
yes locales en
on las autorid
! Lea atentame
ransporte no l
ridad
: puede sufrir
u operación: l
ia ni humedad.
tación de la re
instrucciones
sponsable de
eben ser realiz
expuesto a gra
biente.
protección I,
llevarla a cabo
no sea mayor
y protéjalo co
ida a su distri
va a usarlo d
para desconect
luz. Esto pue
o de salpicadur
nes no autoriz
cubiertos por l
e de personas
ad Velleman
uso profesiona
y conéctelo a u
interrumpido. I
siva fuerza du
de el aparato
s »). Respete
USUA
nte concerni
indica que, si ti
ra) en la basu
a este aparato
elación con el
ades locales
nte las instrucc
instale y póng
na peligrosa d
caja se calien
antes de abrir
de seguridad d
ingún daño u
dos por perso
des cambios d
or lo tanto, es
un técnico cua
ue la tensión i
tra posibles da
uidor reemplaz
rante un largo
ar el cable de r
e causar un ata
a o goteo. Nun
das, no están
garantía.
no capacitadas
al final de est
l en una discot
na fuente de c
ntroduzca frecu
ante la instala
o esté expuest
una distancia d
IO
nte a este pr
ra las muestra
a doméstica; d
a su distribuid
edio ambient
ara residuos.
iones del manu
se en contact
scarga eléctric
a!
la caja.
este manual i
tros problemas
al especializad
e temperatura.
esencial que el
ificado.
ndicada en las
ños causados p
ar el cable de a
período de tie
d, nunca del p
ue epiléptico.
a ponga un ob
ubiertos por la
y niños.
e manual del u
ca, un teatro,
rriente CA de
entemente una
ión y la repara
o a polvo, hum
e mín. 0.5m en
ducto
inservibles, po
ebe ir a una
r o a la unidad
.
l antes de usa
con su distrib
al tocar los c
validarán su
resultantes.
.
Espere hasta q
aparato esté p
specificacione
or algún tipo d
limentación.
po o antes de
ropio cable.
eto con líquido
garantía.
uario.
tc. Sólo está
áx. 230VCA /
pausa para
ión.
dad y temper
tre la salida de
drían
de
lo. Si
idor.
bles
ue el
uesto
.
p.ej.
0Hz.
turas
luz y
V. 01 –
8/06/2012
20
©Velle
an nv
Page 21

LX301
• Fije el aparato con un cable de seguridad adecuado (p.ej. VDLSC8).
• Familiarícese con el funcionamiento del aparato. Sólo personas cualificadas pueden manejar este
aparato. La mayoría de los daños son causados por un uso inadecuado.
• Transporte el aparato en su embalaje original.
• Por razones de seguridad, las modificaciones no autorizadas del aparato están prohibidas.
• Utilice sólo el LX301 para aplicaciones descritas en este manual a fin de evitar p.ej. cortocircuitos,
quemaduras, descargas eléctricas, etc. Un uso desautorizado puede causar daños y anula la garantía
completamente.
• Un experto debe probar la instalación antes de la puesta en marcha.
4. Características
• cegadora continua con fade automático
• tiempo de enfriamiento reducido gracias al controlador de calor
• duración, intensidad y velocidad de los destellos ajustables
• efectos especiales incorporados
• 5600K
• control DMX en el modo 1, 3 ó 4 canales
• controlador en opción: LX302.
5. Installación
5.1 Montaje del aparato
•
Respete la directiva EN 60598-2-17 y toda norma nacional antes de instalar el aparato. La instalación
debe ser realizada por un técnico especializado.
• El soporte donde irá el aparato, debe ser capaz de sostener 10 veces el peso de éste durante una
hora, sin que se produzca una deformación de dicho soporte.
• Fije el LX301 con un cable de seguridad (seguridad adicional).
• Evite ponerse debajo del aparato durante el montaje, la limpieza, etc. Un técnico especializado debe
revisar el aparato antes de la puesta en marcha. Después, debe revisarlo una vez al año.
• Instale el aparato fuera del alcance de personas no autorizadas y en un lugar con poca gente.
• La instalación de este aparato exige una sólida experiencia práctica: debe poder calcular la carga
máx. del soporte, debe conocer los materiales necesarios para la instalación, etc. De vez en cuando,
una verificación de la estructura y del aparato mismo debe ser llevada a cabo por un técnico
especializado. No intente instalar este aparato si no tiene las cualificaciones requeridas; una
instalación incorrecta puede causar lesiones.
• Ajuste el ángulo de inclinación a su gusto mediante un soporte de montaje y fije los tornillos del
soporte.
• Quite todo material inflamable en un radio de 50cm alrededor del aparato.
• Pregunte a un electricista cómo hacer la conexión eléctrica.
• Conecte el aparato a la red eléctrica con la conexión de alimentación. No lo conecte a un dimmer pack
(regulador).
• Un experto debe probar la instalación antes de la puesta en marcha.
5.2 Seleccionar la potencia de la bomb i lla
Es posible seleccionar la potencia de salida del LX301. La selección máx. ofrece la intensidad máx. ; La
selección mínima reduce esta potencia de salida de aproximadamente un 50 % lo que prolonga la
duración de vida de la bombilla. Seleccione la potencia con el interruptor DIP n° 6. Este ajuste no
depende de otros ajustes.
1 2 3 4 5 6
↓
ON ON
modo potencia máx. modo potencia mín.
1 2 3 4 5 6
↓
V. 01 – 08/06/2012 21 ©Velleman nv
Page 22

LX301
5.3 Bombilla
Desconecte el aparato de la red antes de instalar o reemplazar una
•
lámpara.
• Las lámparas llegan a temperaturas de hasta 700°C. Deje que la
lámpara se enfríe durante al menos 10 minutos antes de
reemplazarla.
• No toque una lámpara halógena con las manos sin protección. Use
un paño para reemplazar una lámpara.
• No use lámparas con más vatios porque éstas generan temperaturas
para las que este aparato no ha sido diseñado.
• Reemplace cada lámpara defectuosa por una otra del mismo tipo
(véase « Especificaciones »):
1. Desatornille los 2 tornillos del lateral del estroboscopio y abra el compartimiento de la bombilla.
2. Desatornille los terminales y desconecte los cables. Saque la bombilla.
3. Quite la lámpara vieja e introduzca la nueva. Vuelva a cerrar el compartimiento.
6. Uso
6.1 Valores DMX detallados por canal
Canal Función De A Descripción
1 INTENSIDAD 0 5 Black-out
2 DURACIÓN DEL
DESTELLO
3 VELOCIDAD DEL
DESTELLO
4 EFECTOS 0 5 Sin función
• INTENSIDAD: Ajuste la intensidad de mín. (negro) a máx. con el conmutador deslizante de
intensidad. La intensidad máx. se disminuye en el modo de potencia mín.
• VELOCIDAD DE DESTELLOS: Ajuste la velocidad de 0 a 25 destellos por segundos con el ajuste de
velocidad. Active/desactive los destellos con el interruptor ON/OFF (destellos activados: LED rojo,
destellos desactivados: LED verde).
• CHASE/SYNCHRO: El selector « chase/synchro conmuta entre la función del « chase » y la función
de destellos simultánea. El LED parpadea en el modo « chase » y se ilumina de manera continua en
el modo « synchro ».
• EFECTO « BLINDER »: Ajuste el efecto « blinder » con el ajuste del efecto « blinder ». El control
electrónico de la bombilla evita el sobrecalentamiento.
• DESTELLO ÚNICO: Pulse el botón de efecto de destello único para activar un solo destello.
Reinicialice la velocidad de los destellos al pulsar el botón de de efecto de destello único en el modo
continuo.
V. 01 – 08/06/2012 22 ©Velleman nv
6 255 Intensidad de 0 ~ 100 %
0 255 De 0 ~ 530 ms
0 5 Sin función
6 255 De 0,6 ~ 30 Hz
6 42 Aceleración
43 85 Desaceleración
86 128 Aceleración - desaceleración
129 171 Efectos aleatorios
172 214 Rayo
215 255 Destellos
Page 23

0
C
C
S
a
d
d
M
n
n
c
n
M
n
b
M
l
X
a
o
p
m
o
a
M
e
r
m
O
m
t
t
n
s
c
u
u
D
o
a
e
ó
p
o
s
b
r
t
i
t
r
t
p
0
L
1
r
i
m
c
m
p
d
.
o
o
d
m
i
m
e
r
5
r
e
a
c
e
n
r
a
e
d
s
a
a
n
c
c
c
d
r
X
.
e
c
u
s
a
s
n
s
s
s
m
e
s
R
c
a
o
i
x
n
,
r
u
6.2
Conecte
conector
un cable
6.3
6.4
Si se us
aparatos
el cual el
interrupt
Es posibl
aparato.
sincroniz
ajustes
indepen
Para el L
segundo
6.5
Seleccio
Modo 1
El modo
Seleccio
↓
ON
Modo 3
El modo
modo 3
↓
ON
Modo 4
El modo
ofrece u
DIP n° 4
↓
ON
onexión D
el cable con co
XLR macho de
blindado de do
onexión D
eleccionar
una señal DM
reaccionen a l
aparato reacci
ores DIP de la
e elegir entre u
Con una sola d
adamente a la
e todos los can
ientemente. P
X301 de 4 can
aparato, introd
odos DMX
e los modos D
canal
1 canal permit
e el modo 1 ca
1 2
canales
3 canales perm
anales al pone
1 2
canales
4 canales perm
cuarto canal c
en la posición
1 2
X512
ector XLR (incl
3 polos a la en
le hilo conduc
X512 con u
Se recomien
distancia o
una discote
de control n
una resisten
a la salida X
Véase la fig
a dirección
, cada aparato
s señales de c
nará a las señ
arte trasera d
na sola direcci
irección inicial
isma señal. P
ales. Con varia
r lo tanto, cam
les, la direcció
uzca 9 (5 + 4)
X con los inte
utilizar el efec
nal al poner el
3
modo 1 canal
ite ajustar la in
les interrupto
3
odo 3 canales
ite ajustar la in
on efectos pre
N.
3
odo 4 canales
LX3
.) a la salida X
rada del LX30
or con conecto
a terminac
da una termina
i se usa en un
a). La termina
mérico. La ter
cia de 120Ω de
LR del último a
ra a la izquier
R hembra de 3
ón DMX
ción DMX si el
ión impide que
polo 2 a polo 3
a.
MX inicial
tiene su propia
ntrol correctas
les DMX del c
l aparato.
n inicial para t
ara una serie
r lo tanto, ca
direcciones in
iar los ajustes
n inicial del pri
para el tercer a
ruptores DIP d
o « blinder » y
nterruptor DIP
4 5
ensidad, la du
es DIP n° 1 ~
4 5
ensidad, la du
rogramados. S
4 5
dirección inici
Esta dirección
ntrolador DMX.
biar los ajuste
ciales, cada ap
de un solo can
parato, etc.
del espectro e
n° 5 en la posi
ación y la velo
ación y la velo
1
. Es posible co
es XLR de entr
edio ambient
inación DMX
arato de la se
da una serie d
e aparatos, to
er aparato es
1 a 5.
6
en la posición
6
leccione el mo
6
polos del cont
nectar varios L
da y de salida
able DMX deb
con mucho rui
el ruido eléctri
o es más que
. Este conector
ie.
l DMX para ase
inicial digital e
Determine est
aparatos o un
os los aparato
de un solo ca
rato reacciona
l sólo afecta al
1. Introduzca 5
tero de los de
ión ON.
idad de los de
OFF.
idad de los de
o 4 canales al
olador y el otro
301 en serie.
cubrir una gra
do eléctrico (p.
o corrompa la
n conector XL
XLR está cone
gurar que los
el primer can
función con l
a dirección inici
reaccionarán
al afecta a los
rá
canal en cuest
(1 + 4) para e
tellos (0 ~ má
tellos. Seleccio
tellos. Además
poner el inter
Use
n
j.
eñal
con
tado
l en
s
al por
ón.
l
.).
e el
ptor
V. 01 –
8/06/2012
23
©Velle
an nv
Page 24

LX301
6.6 Dirección DMX
Ponga el interruptor DIP n° 10 en la posición OFF.
6.7 Seleccionar el modo
El mando a distancia funciona con el estroboscopio maestro. Ponga los interruptores DIP n° 2 y 3 en la
posición ON para seleccionar el estroboscopio maestro. Conecte los estroboscopios esclavos al
estroboscopio maestro. Ponga el interruptor DIP n° 2 de los estroboscopios esclavos en la posición ON.
V. 01 – 08/06/2012 24 ©Velleman nv
1 2 3 4 6 8
↓
1 2 3 4 5 6
↓
ON ON
modo MAESTRO modo ESCLAVO
Page 25

LX301
7. Mando a distancia (opcional)
El mando a distancia le permite activar las funciones de 20 estroboscopios. Conecte el LX302 con un
cable XLR de 3 polos al estroboscopio. Saque la terminación del último LX301 de la serie al utilizar el
LX302. Instale un separador después del primer estroboscopio si fuera necesario.
1 efecto « blinder » (cegadora)
2 ajuste de intensidad
3 interruptor ON/OFF
4 selector Chase/Sync
5 ajuste de la velocidad de los destellos
6 botón un solo destello
8. Mantenimiento
• Apriete bien las tuercas y los tornillos y verifique que no hay señales de oxidación.
• No modifique la caja, los soportes y las ópticas p.ej. no taladre agujeros adicionales en un soporte o
no modifique las conexiones, etc.
• Las partes móviles no pueden mostrar ningún rastro de desgaste y deben estar bien equilibradas.
• No dañe los cables de alimentación. Contacte con un técnico especializado para instalar el aparato.
• Desconecte el aparato de toda fuente antes de limpiarlo.
• Limpie el aparato y el depósito con un paño húmedo sin pelusas. Evite el uso de alcohol y de
disolventes.
• El usuario no habrá de efectuar el mantenimiento de ninguna pieza.
• Contacte con su distribuidor si necesita piezas de recambio.
9. Especificaciones
alimentación 230Vac / 50Hz
tipo de bombilla lámpara de descarga Philips Xenon XOP 15-OF (LAMP3000ST, incl.)
entrada DMX XLR 3 ó 5 polos
dimensiones 245 x 425 x 240mm
peso 7.5kg
Utilice este aparato sólo con los accesorios originales. Velleman NV no será responsable de
daños ni lesiones causados por un uso (indebido) de este aparato.
Para más información sobre este producto y la versión más reciente de este manual del
usuario, visite nuestra página www. luxibel.com.
Se pueden modificar las especificaciones y el contenido de este manual sin previo aviso.
© DERECHOS DE AUTOR
Velleman NV dispone de los derechos de autor para este manual del usuario. Todos los
derechos mundiales reservados.
Está estrictamente prohibido reproducir, traducir, copiar, editar y guardar este manual del usuario o
partes de ello sin previo permiso escrito del derecho habiente.
V. 01 – 08/06/2012 25 ©Velleman nv
Page 26

0
E
E
e
w
g
S
S
e
m
a
A
d
r
e
h
e
n
s
e
m
S
h
e
r
r
o
c
v
B
e
e
n
e
n
r
h
a
F
e
r
s
ä
e
e
z
c
e
d
e
r
G
t
m
e
ö
a
d
n
E
n
e
u
n
a
e
a
e
3
a
n
a
e
e
e
t
h
s
t
z
n
t
s
n
n
c
a
e
n
m
o
0
u
m
a
e
o
l
o
.
e
b
a
n
s
a
h
s
o
r
r
i
z
n
e
c
U
z
m
e
o
n
t
t
n
n
v
m
r
n
n
a
t
r
r
n
e
s
M
t
a
E
E
y
n
ö
r
s
e
S
h
d
e
m
t
s
s
t
s
D
p
n
m
s
i
d
m
n
r
n
a
i
e
n
d
i
n
LX3
1
1.
An alle
Wichtig
Falls Z
Wir beda
sorgfälti
das Gerä
2.
•
Bei
Gara
•
Lass
•
Neh
gebr
hat.
•
Der
geer
•
Schli
dafü
•
Verg
besc
•
Acht
werd
•
Tren
Netz
•
Halt
Obje
•
Bei
wird
•
Blick
ausg
•
Bei
•
Mec
•
Halt
inführung
inwohner de
Umweltinfo
Dieses Symb
Produktes na
Einheit (oder
verwendeten
werden. Dies
retourniert w
eifel bestehe
nken uns für d
durch. Überpr
t nicht und we
icherheits
Seien Sie wäh
Spannung ste
Berühren Sie d
Schützen Sie d
Trennen Sie d
chäden, die du
ntieanspruch.
n Sie dieses G
en Sie das Ge
cht wurde. La
ufbau des Ger
et sein. Der el
eßen Sie das G
, dass das Net
wissern Sie si
rieben in dies
n Sie darauf,
en kann. Bei B
en Sie das Ge
tecker an der
n Sie das Gerä
kt in Kontakt
ersten Gebrau
nach einiger Z
en Sie niemals
elöst werden k
chäden verurs
anischer Scha
n Sie Kinder u
BEDI
Europäische
mationen üb
l auf dem Prod
h seinem Lebe
erwendeten B
atterien müss
Einheit muss
rden. Respekti
, wenden Sie
n Kauf des LX
üfen Sie, ob Tr
den Sie sich a
hinweise
end der Install
enden Leitung
as Gehäuse wä
as Gerät vor F
s Gerät vom N
rch Nichtbeach
ür daraus resul
rät von einem
ät nicht sofort
sen Sie das Ge
tes entspricht
ktrische Ansc
rät erst an da
kabel nicht mi
h, dass die an
r Bedienungsa
ass die Netzlei
schädigungen
ät bei Nichtbe
rifffläche an u
von Flüssigkei
it dem elektris
ch könnte es R
it allmählich v
direkt in die Lic
nnen.
cht durch eige
en und die La
d Unbefugte v
NUNGS
Union
r dieses Prod
kt oder der Ve
szyklus der U
tterien) nicht
n von einer sp
n den Händler
ren Sie die ört
sich für Ents
01! Lesen Sie
nsportschäden
Ihren Händler
tion des Gerät
n könnte zu le
hrend des Betri
uchtigkeit und
tz bevor Sie d
ung der Bedie
tierende Folge
Fachmann inst
in Betrieb, nac
rät solange aus
der Schutzklas
luss darf nur v
Netz an wenn
anderen Kabel
uschließende N
leitung.
ung nicht gequ
oll eine Fachk
utzung und vo
d ziehen Sie n
ten fern. Sorge
hen Kreis, Net
uch oder eine
rschwinden.
htquelle da bei
mächtige Änd
pen werden ni
m Gerät fern.
ANLEIT
kt
rpackung zeigt
welt Schaden
ls unsortiertes
zialisierten Fir
der ein örtlich
ichen Umweltv
rgungsrichtli
diese Bedienun
vorliegen. Soll
s sehr vorsich
ensgefährliche
ebs nicht, denn
Feuchte.
s Gehäuse öff
ungsanleitung
chäden überni
llieren und wa
dem es von ei
geschaltet, bis
e I. Gemäß de
n einer Fachkr
Sie mit der Ins
n in Kontakt ko
etzspannung ni
etscht oder du
aft das Kabel e
jeder Reinigu
e an der Netzl
n Sie dafür, da
kabel kommt.
spezifischen G
empfindlichen
rungen erlisch
ht durch die G
NG
an, dass die En
ufügen kann.
Hausmüll; die
a zwecks Rec
s Recycling-U
rschriften.
ien an Ihre
gsanleitung vo
e dies der Fall
ig: das Berühr
elektrischen
das Gehäuse
en.
erursacht wer
mt der Herstel
ten.
em kalten in ei
es die Zimmert
Vorschriften
ft durchgeführ
allation fertig
mmt.
cht höher ist al
ch scharfe Kan
setzen.
g vom Netz. Fa
itung.
s da keine Flü
eruch geben.
enschen epile
der Garantiea
rantie gedeckt
tsorgung diese
ntsorgen Sie d
inheit oder
cling entsorgt
ternehmen
rtliche Behör
Inbetriebnah
ein, verwende
n von unter
chlägen führen
eizt auf.
en, erlischt de
ler keine Haftu
nen warmen R
mperatur erre
uss das Gerät
werden.
ind. Sorgen Si
die Netzspan
en beschädigt
ssen Sie dazu
sigkeit oder ke
as ist normal u
tische Anfälle
spruch.
e
e.
e
Sie
.
g.
um
cht
ung
en
n
d
V. 01 –
8/06/2012
26
©Velle
an nv
Page 27

LX301
3. Allgemeine Richtlinien
Siehe Velleman® Service- und Qualitätsgarantie am Ende dieser Bedienungsanleitung.
• Dieses Gerät wurde für den professionellen Einsatz auf Bühnen, in Discotheken, Theatern, usw.
entworfen. Verwenden Sie das Gerät nur in Innenräumen und mit einer Wechselspannung von max.
230VAC / 50Hz.
• Das Gerät eignet sich nicht für permanenten Betrieb: eine regelmäßige Pause verlängert die
Lebensdauer.
• Vermeiden Sie Erschütterungen. Vermeiden Sie rohe Gewalt während der Installation und Bedienung
des Gerätes.
• Achten Sie bei der Wahl des Installationsortes darauf, dass das Gerät keinem Staub, keiner
Feuchtigkeit und extremen Temperaturen ausgesetzt wird. Beachten Sie eine minimale Entfernung
von 0.5m zwischen der Lichtausbeute und irgendeiner beleuchteten Fläche.
• Machen Sie das Gerät mit einem geeigneten Sicherheitskabel fest (z.B. VDLSC8).
• Nehmen Sie das Gerät erst in Betrieb, nachdem Sie sich mit seinen Funktionen vertraut gemacht
haben. Lassen Sie das Gerät nicht von Personen bedienen, die sich nicht mit dem Gerät auskennen.
Meist ist die Beschädigung des Gerätes das Ergebnis von unfachmännischer Bedienung.
• Verwenden Sie die Originalverpackung, wenn das Gerät transportiert werden soll.
• Eigenmächtige Veränderungen sind aus Sicherheitsgründen verboten.
• Verwenden Sie das Gerät nur für Anwendungen beschrieben in dieser Bedienungsanleitung sonst
kann dies zu Schäden am Produkt führen und erlischt der Garantieanspruch. Jede andere
Verwendung ist mit Gefahren wie Kurzschluss, Brandwunden, elektrischem Schlag, usw. verbunden.
• Die Installation muss vor Inbetriebnahme von einem Experten genehmigt werden.
• Schließen Sie das Gerät an das Hauptnetz und nicht an einen Dimmer an.
4. Eigenschaften
• kontinuierlicher Blinder mit automatischem Fade
• verringerte Kühlzeit dank des eingebauten Wärmereglers
• einstellbare Blitzdauer, Intensität und Geschwindigkeit
• speziellle eingebaute Effekte
• 5600K
• DMX-gesteuert im 1-, 3- oder 4-Kanal-Modus
• optionales Controller: LX302
5. Installation
5.1 Das Gerät montieren
•
Lassen Sie das Gerät von einem Fachmann und gemäß den EN 60598-2-17 und allen anderen
zutreffenden Normen installieren.
• Die Konstruktion muss während einer Stunde eine Punktlast von maximal 10 x dem Gewicht des
Gerätes tragen können, ohne dass Verformung verursacht wird.
• Das Gerät muss immer mit einer zweiten Befestigung z.B. mit einem Sicherheitskabel gesichert
werden.
• Stehen Sie während der Montage, Entfernung oder Wartung nie direkt unter dem Gerät. Lassen Sie
das Gerät jährlich und vor der Inbetriebnahme von einem Fachmann prüfen.
• Montieren Sie das Gerät an einem Ort, wo niemand es berühren kann und wo wenige Leute
vorübergehen.
• Eine gründliche praktische Erfahrung ist für die Installation des Gerätes notwendig: Sie müssen die
max. Belastung der Tragkonstruktion berechnen können, wissen welches Konstruktionsmaterial Sie
verwenden dürfen. Außerdem müssen Sie das verwendete Material und das Gerät regelmäßig
nachsehen lassen. Montieren Sie das Gerät nie selber wenn Sie damit keine Erfahrung haben. Eine
schlechte Montage kann Verletzungen verursachen.
• Regeln Sie den Neigungswinkel über den Montagebügel und drehen Sie die Schrauben fest an.
• Entfernen Sie alle entflammbaren Materialen in einem Abstand von 0.5m.
• Lassen Sie das Gerät von einem qualifizierten Elektriker anschließen.
V. 01 – 08/06/2012 27 ©Velleman nv
Page 28

LX301
• Schließen Sie das Gerät an das Hauptnetz und nicht an einen Dimmer an.
• Die Installation muss vor Inbetriebnahme von einem Experten genehmigt werden.
5.2 Leistungsstufe der Lampe
Das LX301 hat zwei Leistungsstufen nl. hoch und niedrig. An eine hohe Leistung liefert die Lampe die
max. Blitzintensität; an eine niedrige Leistung wird die Intensität um etwa 50 % verringert aber die
Lebensdauer der Lampe wird verlängert. Wählen Sie die gewünschte Einstellung mit DIP-Schalter 6.
Diese Einstellung ist unabhängig von allen anderen Einstellungen.
1 2 3 4 5 6
↓
ON ON
Hohe Leistung Niedrige Leistung
1 2 3 4 5 6
↓
5.3 Lampe
Setzen Sie eine Lampe nur bei uneingeschaltetem Gerät ein und
•
wechseln Sie jede beschädigte Lampe.
• Die Lampen können eine Temperatur von bis zu 700°C erreichen.
Lassen Sie die Lampen deshalb erst abkühlen.
• Berühren Sie die Halogenlampen nicht mit bloßen Händen.
Verwenden Sie ein sauberes Tuch um Lampen einzusetzen und zu
wechseln.
• Setzen Sie keine Lampen mit einer höheren Leistungsangabe ein.
Lampen mit einer höheren Leistung entwickeln höhere
Temperaturen, für die das Gerät nicht ausgelegt ist.
• Ersetzen Sie eine verformte oder beschädigte Lampe durch eine
Lampe gleichen Typs (siehe « Technische Daten »).
Vorgehensweise:
1. Lockern Sie die 2 Schrauben auf der Seite des Stroboskops und öffnen Sie das Lampenabteil.
2. Schrauben Sie die Anschlüsse los und entfernen Sie die Kabel. Entfernen Sie die Lampe aus der
Fassung.
3. Ersetzen Sie durch eine Lampe gleichen Typs und schließen Sie das Abteil wieder.
6. Anwendung
6.1 Detaillierte DMX-Werte pro Kanal
Kanal Funktion Von Bis Umschreibung
1 INTENSITÄT 0 5 Black-out
6 255 Intensität von 0 ~ 100 %
2 BLITZDAUER 0 255 Von 0 ~ 530 ms
3 BLITZGESCHWINDIGKEIT 0 5 Keine Funktion
6 255 Von 0,6 ~ 30 Hz
V. 01 – 08/06/2012 28 ©Velleman nv
Page 29

0
F4 E
E
T
h
c
N
m
D
L
m
D
D
e
i
d
e
e
m
e
ä
E
e
ö
D
w
u
n
D
I
ä
s
K
g
d
s
u
a
r
e
e
S
A
3
V11
2
e
n
a
e
k
c
i
e
3
n
b
c
s
e
d
u
e
S
D
n
a
u
e
e
0
U
K
B
V
B
B
B
S
e
g
n
m
n
h
o
e
c
s
e
c
r
X
b
a
e
e
d
s
e
n
h
h
f
e
u
w
e
R
hLR
e
M
a
n
r
ä
u
i
n
m
r
t
u
t
m
u
d
D
m
d
w
e
r
E
d
t
m
b
e
m
e
n
d
m
e
s
d
m
K
e
n
m
d
Kanal
•
INT
maxi
•
BLI
von
oder
•
CHA
gleic
Syn
•
BLI
Leist
•
EIN
Blitz
für e
6.2
Verbinde
3-pol. X
mit eine
6.3
6.4
Jedes G
das richt
auf den
lesen Si
Sie könn
neue Sta
Werden
anderen
Kanäle.
Definier
Worten:
Kanal ge
Im Fall d
zweiten
unktion
FFEKTE
NSITÄT: Stell
mal ein. Der H
ZGESCHWIN
0 bis 25 Blitze
aus (rote LED
SE-SYNC: Miet
zeitigen Blitzf
-Modus konsta
DEREFFEKT:
ung der Lampe
EINZIGER BL
odus auszuw
inen einzigen B
MX512-An
n Sie ein XLR-
-Eingang des
zweipoligen
MX-512-Ke
MX-Starta
rät muss eine
ge Gerät auf di
er Projektor a
sie vom Displ
n mehrere Ge
rtadresse eing
ehrere Gerät
Worten: wenn
n Sie mehrere
wenn Sie die Ei
ndert.
er 4-Kanal LX
inheit auf 5 (1
n Sie die Blitzi
chstwert wird i
IGKEIT: Stell
per Sekunde ei
enn eingesch
dem Chase/Sy
nktion mehrer
t brennen.
er Blindereffe
wird elektronis
TZ: Drücken S
hlen. Setzen Si
litz im kontinui
chluss
abel mit dem
LX301. Sie kö
eschirmten Ka
tte mit Abs
Ein DMX-Ab
das DMX-Ka
Rauschen (z
digitalen St
Abschlusswi
zwischen 2
angeschloss
resse
eparate DMX-
e richtigen Kon
f Signale vom
y auf dem Fuß
äte auf eine ei
ben.
auf eine Start
ie die Einstell
dressen, so fu
nstellungen für
01, werden Si
+ 4), der dritt
LX3
on Bis
0 5
6 42
43 85
86 128
29 171
72 214
15 255
ntensität mit d
n der niedrigen
n Sie die Blitz
. Schalten Sie
ltet, grüne LED
nc-Schalter sch
r Stroboskope.
t wird über de
h gesteuert, u
e den Einstellk
e die Blitzgesc
rlichen Blitzm
-pol. XLR-Ausg
nen verschied
el mit XLR-Ste
hlusswider
chlusswidersta
bel lang ist ode
.B. Diskos) . D
uersignals dur
erstand ist nu
nd 3, die den
n wird.
tartadresse ha
trollesignale re
MX-Controller
der LX301.
zelne Startadr
dresse definier
ngen für 1 Kan
nktionieren all
1 Kanal verän
die Startadres
n Einheit auf 9
1
mschreibung
eine Funktion
eschleunigung
erlangsamung
eschleunigung
eliebig
litz
pike
m Intensitätsr
Leistungsstufe
eschwindigkeit
die Blitzfunktio
wenn ausgesc
alten Sie zwisc
Die LED blinkt
Einstellknopf
Überhitzung
opf für einen
windigkeit mit
dus.
ang der Steuer
ne LX301 in S
ker und -Kupp
tand
nd empfehlens
r in einer Umg
r Abschlusswid
h elektrisches
eine XLR-Buc
-Ausgang d
en wenn ein D
giert. Die digit
reagiert. Gebe
sse definieren
t, so funktionie
al verändern, ä
Geräte unabh
ern, werden n
e der ersten E
(5 + 4), usw.
- Verlangsamu
gler von mini
auf die Hälfte
mit dem Gesch
mit dem EIN/
altet).
en der separa
im Chase-Mod
ür Blindereffek
zu vermeiden.
inzigen Blitz, u
einem Druck a
ng und die an
erie schalten.
lung erfolgen.
ert für Installa
bung mit viele
erstand verhin
auschen. Der
se mit einem 1
s letzten Gerät
X-Signal ver
le Startadress
Sie diese Sta
oder Sie könne
en alle Geräte
ndern sich die
ngig voneinan
r die Einstellun
nheit auf 1eins
g
al (black-out)
eduziert.
windigkeitsregl
US-Schalter e
en und
s und bleibt i
eingestellt. Di
den einzigen
f den Einstellk
ere Seite mit
ie Verbindung
tionen, bei den
elektrischem
ert Störung de
DMX-
20Ω Widerstan
in der Kette
endet wird, da
ist der erste
tadresse ein un
n pro Gerät ein
synchron. Mit
instellungen al
er. Mit andere
gen von diese
ellen müssen,
is
r
in
opf
em
uss
n
it
anal,
d
ler
er
V. 01 –
8/06/2012
29
©Velle
an nv
Page 30

LX301
6.5 DMX-Modus
Wählen Sie den Modus mit DIP-Schalter 1 bis 5 aus.
1-Kanal-Modus
Im 1-Kanal-Modus können Sie das ganze Blitzspektrum (0 ~ max.) und den Blindereffekt verwenden.
Wählen Sie den 1-Kanal-Modus aus, indem Sie DIP-Schalter 5 auf ON stellen.
↓
ON
3-Kanal-Modus
Im 3-Kanal-Modus haben Sie mehr Einstellungsmöglichkeiten und können Sie die Blitzintensität,
Blitzdauer und Blitzgeschwindigkeit einstellen. Wählen Sie den 3-Kanal-Modus aus, indem Sie DIPSchalter 1 ~ 5 auf OFF stellen.
↓
ON
4-Kanal-Modus
Im 4-Kanal-Modus können Sie, genauso wie beim 3-Kanal-Modus, die Blitzintensität, Blitzdauer und
Blitzgeschwindigkeit einstellen. Außerdem verfügen Sie über einen vierten Kanal mit programmierten
Effekten. Wählen Sie den 4-Kanal-Modus aus, indem Sie DIP-Schalter 4 auf ON stellen.
↓
ON
1 2 3 4 5 6
1-Kanal-Modus
1 2 3 4 5 6
3-Kanal-Modus
1 2 3 4 5 6
4-Kanal-Modus
V. 01 – 08/06/2012 30 ©Velleman nv
Page 31

LX301
6.6 DMX-adresse
Stellen Sie DIP-Schalter 10 immer auf OFF.
6.7 Master-Slavemodus
Die wird über das Stroboskop mit Strom versorgt. Stellen Sie DIP-Schalter 2 und 3 auf ON um die
Masterfunktion auszuwählen. Verbinden Sie die Slavestroboskope mit dem Masterstroboskop und stellen
Sie DIP-Schalter 2 der Slavestroboskope auf ON.
V. 01 – 08/06/2012 31 ©Velleman nv
1 2 3 4 6 8
↓
1 2 3 4 5 6
↓
ON ON
MASTER SLAVE
Page 32

LX301
7. Fernbedienung (Option)
Mit dieser Fernbedienung können Sie die Funktionen von 20 Stroboskopen einfacher ansteuern.
Verbinden Sie die LX302 über ein 3-pol. XLR-Kabel mit dem Stroboskop. Trennen Sie den
Abschlusswiderstand vom letzten LX301 der Serie wenn Sie eine LX302-Fernbedienung verwenden.
Installieren Sie einen Splitter nach dem ersten Stroboskop wenn nötig.
1 Taste Blindereffekt
2 Intensitätsregler
3 EIN/AUS-Schalter
4 Chase/Sync-Schalter
5 Geschwindigkeitsregler
6 Taste nur ein einziger Blitz
8. Wartung
• Alle verwendeten Schrauben müssen fest angespannt werden und dürfen keine Rostspuren zeigen.
• Das Gehäuse, die Linsen, die Montagebügel und der Montageort (z.B. Decke oder Gebinde) dürfen
nicht angepasst werden, z.B. bohren Sie keine zusätzlichen Löcher in Montagebügel, verändern Sie
die Anschlüsse nicht, usw.
• Die mechanisch bewegenden Teile dürfen keinen Verschleiß aufweisen.
• Sorgen Sie dafür, dass die Netzkabel nicht beschädigt werden. Lassen Sie das Gerät von einer
Fachkraft installieren.
• Trennen Sie das Gerät vor der Reinigung oder Wartung vom Netz.
• Verwenden Sie zur Reinigung ein feuchtes, fusselfreies Tuch. Verwenden Sie auf keinen Fall Alkohol
oder irgendwelche Lösungsmittel.
• Außer Lampen und Sicherung gibt es keine zu wartenden Teile.
• Bestellen Sie eventuelle Ersatzteile bei Ihrem Fachhändler.
9. Technische Daten
Stromversorgung 230VAC / 50Hz
Leuchtmittel Philips Xenon Entladungslampe XOP 15-OF (LAMP3000ST, mitgeliefert)
DMX-Eingang 3- oder 5-pol. XLR
Abmessungen 245 x 425 x 240mm
Gewicht 7.5kg
Verwenden Sie dieses Gerät nur mit originellen Zubehörteilen. Velleman NV übernimmt keine
Haftung für Schaden oder Verletzungen bei (falscher) Anwendung dieses Gerätes. Für mehr
Informationen zu diesem Produkt und die neueste Version dieser Bedienungsanleitung, siehe
www. luxibel.com. Alle Änderungen ohne vorherige Ankündigung vorbehalten.
© URHEBERRECHT
Velleman NV besitzt das Urheberrecht für diese Bedienungsanleitung. Alle weltweiten Rechte
vorbehalten.
Ohne vorherige schriftliche Genehmigung des Urhebers ist es nicht gestattet, diese Bedienungsanleitung
ganz oder in Teilen zu reproduzieren, zu kopieren, zu übersetzen, zu bearbeiten oder zu speichern.
V. 01 – 08/06/2012 32 ©Velleman nv
Page 33

Velleman® Service and Quality Warranty
Since its foundation in 1972, Velleman® acquired extensive experience in
the electronics world and currently distributes its products in over 85
countries.
All our products fulfil strict quality requirements and legal stipulations in
the EU. In order to ensure the quality, our products regularly go through
an extra quality check, both by an internal quality department and by
specialized external organisations. If, all precautionary measures
notwithstanding, problems should occur, please make appeal to our
warranty (see guarantee conditions).
General Warranty Conditions Concerning Consumer Products (for
EU):
• All consumer products are subject to a 24-month warranty on production
flaws and defective material as from the original date of purchase.
• Velleman® can decide to replace an article with an equivalent article, or
to refund the retail value totally or partially when the complaint is valid and
a free repair or replacement of the article is impossible, or if the expenses
are out of proportion.
You will be delivered a replacing article or a refund at the value of 100%
of the purchase price in case of a flaw occurred in the first year after the
date of purchase and delivery, or a replacing article at 50% of the
purchase price or a refund at the value of 50% of the retail value in case
of a flaw occurred in the second year after the date of purchase and
delivery.
• Not covered by warranty:
- all direct or indirect damage caused after delivery to the article (e.g. by
oxidation, shocks, falls, dust, dirt, humidity...), and by the article, as well
as its contents (e.g. data loss), compensation for loss of profits;
- consumable goods, parts or accessories that are subject to an aging
process during normal use, such as batteries (rechargeable, nonrechargeable, built-in or replaceable), lamps, rubber parts, drive belts...
(unlimited list);
- flaws resulting from fire, water damage, lightning, accident, natural
disaster, etc.…;
- flaws caused deliberately, negligently or resulting from improper
handling, negligent maintenance, abusive use or use contrary to the
manufacturer’s instructions;
- damage caused by a commercial, professional or collective use of the
article (the warranty validity will be reduced to six (6) months when the
article is used professionally);
- damage resulting from an inappropriate packing and shipping of the
article;
- all damage caused by modification, repair or alteration performed by a
third party without written permission by Velleman®.
• Articles to be repaired must be delivered to your Velleman® dealer,
solidly packed (preferably in the original packaging), and be completed
with the original receipt of purchase and a clear flaw description.
• Hint: In order to save on cost and time, please reread the manual and
check if the flaw is caused by obvious causes prior to presenting the
article for repair. Note that returning a non-defective article can also
involve handling costs.
• Repairs occurring after warranty expiration are subject to shipping costs.
• The above conditions are without prejudice to all commercial warranties.
The above enumeration is subject to modification according to the
article (see article’s manual).
Velleman® service- en kwaliteitsgarantie
Velleman® heeft sinds zijn oprichting in 1972 een ruime ervaring
opgebouwd in de elektronicawereld en verdeelt op dit moment producten
in meer dan 85 landen. Al onze producten beantwoorden aan strikte
kwaliteitseisen en aan de wettelijke bepalingen geldig in de EU. Om de
kwaliteit te waarborgen, ondergaan onze producten op regelmatige
tijdstippen een extra kwaliteitscontrole, zowel door onze eigen
kwaliteitsafdeling als door externe gespecialiseerde organisaties. Mocht
er ondanks deze voorzorgen toch een probleem optreden, dan kunt u
steeds een beroep doen op onze waarborg (zie waarborgvoorwaarden).
Algemene waarborgvoorwaarden consumentengoederen (voor
Europese Unie):
• Op alle consumentengoederen geldt een garantieperiode van 24
maanden op productie- en materiaalfouten en dit vanaf de oorspronkelijke
aankoopdatum.
• Indien de klacht gegrond is en een gratis reparatie of vervanging van
een artikel onmogelijk is of indien de kosten hiervoor buiten verhouding
zijn, kan Velleman® beslissen het desbetreffende artikel te vervangen
door een gelijkwaardig artikel of de aankoopsom van het artikel
gedeeltelijk of volledig terug te betalen. In dat geval krijgt u een
vervangend product of terugbetaling ter waarde van 100% van de
aankoopsom bij ontdekking van een gebrek tot één jaar na aankoop en
levering, of een vervangend product tegen 50% van de kostprijs of
terugbetaling van 50 % bij ontdekking na één jaar tot 2 jaar.
• Valt niet onder waarborg:
- alle rechtstreekse of onrechtstreekse schade na de levering veroorzaakt
aan het toestel (bv. door oxidatie, schokken, val, stof, vuil, vocht...), en
door het toestel, alsook zijn inhoud (bv. verlies van data), vergoeding voor
eventuele winstderving.
- verbruiksgoederen, onderdelen of hulpstukken die onderhevig zijn aan
veroudering door normaal gebruik zoals bv. batterijen (zowel oplaadbare
als niet-oplaadbare, ingebouwd of vervangbaar), lampen, rubberen
onderdelen, aandrijfriemen... (onbeperkte lijst).
- defecten ten gevolge van brand, waterschade, bliksem, ongevallen,
natuurrampen, enz.
- defecten veroorzaakt door opzet, nalatigheid of door een
onoordeelkundige behandeling, slecht onderhoud of abnormaal gebruik of
gebruik van het toestel strijdig met de voorschriften van de fabrikant.
- schade ten gevolge van een commercieel, professioneel of collectief
gebruik van het apparaat (bij professioneel gebruik wordt de
garantieperiode herleid tot 6 maand).
- schade veroorzaakt door onvoldoende bescherming bij transport van het
apparaat.
- alle schade door wijzigingen, reparaties of modificaties uitgevoerd door
derden zonder toestemming van Velleman®.
• Toestellen dienen ter reparatie aangeboden te worden bij uw
Velleman®-verdeler. Het toestel dient vergezeld te zijn van het
oorspronkelijke aankoopbewijs. Zorg voor een degelijke verpakking (bij
voorkeur de originele verpakking) en voeg een duidelijke foutomschrijving
bij.
• Tip: alvorens het toestel voor reparatie aan te bieden, kijk nog eens na
of er geen voor de hand liggende reden is waarom het toestel niet naar
behoren werkt (zie handleiding). Op deze wijze kunt u kosten en tijd
besparen. Denk eraan dat er ook voor niet-defecte toestellen een kost
voor controle aangerekend kan worden.
• Bij reparaties buiten de waarborgperiode zullen transportkosten
aangerekend worden.
• Elke commerciële garantie laat deze rechten onverminderd.
Bovenstaande opsomming kan eventueel aangepast worden
naargelang de aard van het product (zie handleiding van het
betreffende product).
Garantie de service et de qualité Velleman®
Depuis 1972, Velleman® a gagné une vaste expérience dans le secteur
de l’électronique et est actuellement distributeur dans plus de 85 pays.
Tous nos produits répondent à des exigences de qualité rigoureuses et à
des dispositions légales en vigueur dans l’UE. Afin de garantir la qualité,
nous soumettons régulièrement nos produits à des contrôles de qualité
supplémentaires, tant par notre propre service qualité que par un service
qualité externe. Dans le cas improbable d’un défaut malgré toutes les
précautions, il est possible d’invoquer notre garantie (voir les conditions
de garantie).
Conditions générales concernant la garantie sur les produits grand
public (pour l’UE) :
• tout produit grand public est garanti 24 mois contre tout vice de
production ou de matériaux à dater du jour d’acquisition effective ;
• si la plainte est justifiée et que la réparation ou le remplacement d’un
article est jugé impossible, ou lorsque les coûts s’avèrent
disproportionnés, Velleman® s’autorise à remplacer ledit article par un
article équivalent ou à rembourser la totalité ou une partie du prix d’achat.
Le cas échéant, il vous sera consenti un article de remplacement ou le
remboursement complet du prix d’achat lors d’un défaut dans un délai de
1 an après l’achat et la livraison, ou un article de remplacement
moyennant 50% du prix d’achat ou le remboursement de 50% du prix
d’achat lors d’un défaut après 1 à 2 ans.
• sont par conséquent exclus :
- tout dommage direct ou indirect survenu à l’article après livraison (p.ex.
dommage lié à l’oxydation, choc, chute, poussière, sable, impureté…) et
provoqué par l’appareil, ainsi que son contenu (p.ex. perte de données) et
une indemnisation éventuelle pour perte de revenus ;
- toute pièce ou accessoire nécessitant un remplacement causé par un
usage normal comme p.ex. piles (rechargeables comme non
rechargeables, intégrées ou remplaçables), ampoules, pièces en
caoutchouc, courroies… (liste illimitée) ;
- tout dommage qui résulte d’un incendie, de la foudre, d’un accident,
d’une catastrophe naturelle, etc. ;
Page 34

- out dommage provoqué par une négligence, volontaire ou non, une
utilisation ou un entretien incorrect, ou une utilisation de l’appareil
contraire aux prescriptions du fabricant ;
- tout dommage à cause d’une utilisation commerciale, professionnelle ou
collective de l’appareil (la période de garantie sera réduite à 6 mois lors
d’une utilisation professionnelle) ;
- tout dommage à l’appareil qui résulte d’une utilisation incorrecte ou
différente que celle pour laquelle il a été initialement prévu comme décrit
dans la notice ;
- tout dommage engendré par un retour de l’appareil emballé dans un
conditionnement non ou insuffisamment protégé.
- toute réparation ou modification effectuée par une tierce personne sans
l’autorisation explicite de SA Velleman® ; - frais de transport de et vers
Velleman® si l’appareil n’est plus couvert sous la garantie.
• toute réparation sera fournie par l’endroit de l’achat. L’appareil doit
nécessairement être accompagné du bon d’achat d’origine et être dûment
conditionné (de préférence dans l’emballage d’origine avec mention du
défaut) ;
• tuyau : il est conseillé de consulter la notice et de contrôler câbles, piles,
etc. avant de retourner l’appareil. Un appareil retourné jugé défectueux
qui s’avère en bon état de marche pourra faire l’objet d’une note de frais à
charge du consommateur ;
• une réparation effectuée en-dehors de la période de garantie fera l’objet
de frais de transport ;
• toute garantie commerciale ne porte pas atteinte aux conditions
susmentionnées.
La liste susmentionnée peut être sujette à une complémentation
selon le type de l’article et être mentionnée dans la notice d’emploi.
Garantía de servicio y calidad Velleman®
Desde su fundación en 1972 Velleman® ha adquirido una amplia
experiencia como distribuidor en el sector de la electrónica en más de 85
países. Todos nuestros productos responden a normas de calidad
rigurosas y disposiciones legales vigentes en la UE. Para garantizar la
calidad, sometemos nuestros productos regularmente a controles de
calidad adicionales, tanto a través de nuestro propio servicio de calidad
como de un servicio de calidad externo. En el caso improbable de que
surgieran problemas a pesar de todas las precauciones, es posible
recurrir a nuestra garantía (véase las condiciones de garantía).
Condiciones generales referentes a la garantía sobre productos de
venta al público (para la Unión Europea):
• Todos los productos de venta al público tienen un período de garantía
de 24 meses contra errores de producción o errores en materiales desde
la adquisición original;
• Si la queja está fundada y si la reparación o sustitución de un artículo no
es posible, o si los gastos son desproporcionados, Velleman® autoriza
reemplazar el artículo por un artículo equivalente o reembolsar la
totalidad o una parte del precio de compra. En este caso, usted recibirá
un artículo de recambio o el reembolso completo del precio de compra si
encuentra algún fallo hasta un año después de la compra y entrega, o un
artículo de recambio al 50% del precio de compra o el reembolso del 50%
del precio de compra si encuentra un fallo después de 1 año y hasta los 2
años después de la compra y entrega.
Por consiguiente, están excluidos entre otras cosas:
- todos los daños causados directa o indirectamente al aparato (p.ej. por
oxidación, choques, caída,...) y a su contenido (p.ej. pérdida de datos)
después de la entrega y causados por el aparato, y cualquier
indemnización por posible pérdida de ganancias;
- partes o accesorios, que estén expuestos al desgaste causado por un
uso normal, como por ejemplo baterías (tanto recargables como no
recargables, incorporadas o reemplazables), bombillas, partes de goma,
etc. (lista ilimitada);
- defectos causados por un incendio, daños causados por el agua, rayos,
accidentes, catástrofes naturales, etc.;
- defectos causados a conciencia, descuido o por malos tratos, un
mantenimiento inapropiado o un uso anormal del aparato contrario a las
instrucciones del fabricante;
- daños causados por un uso comercial, profesional o colectivo del
aparato (el período de garantía se reducirá a 6 meses con uso
profesional);
- daños causados por un uso incorrecto o un uso ajeno al que está
previsto el producto inicialmente como está descrito en el manual del
usuario;
- daños causados por una protección insuficiente al transportar el
aparato.
- daños causados por reparaciones o modificaciones efectuadas por una
tercera persona sin la autorización explícita de Velleman®;
- se calcula gastos de transporte de y a Velleman® si el aparato ya no
está cubierto por la garantía.
• Cualquier artículo que tenga que ser reparado tendrá que ser devuelto a
su distribuidor Velleman®. Devuelva el aparato con la factura de compra
original y transpórtelo en un embalaje sólido (preferentemente el
embalaje original). Incluya también una buena descripción del fallo;
• Consejo: Lea el manual del usuario y controle los cables, las pilas, etc.
antes de devolver el aparato. Si no se encuentra un defecto en el artículo
los gastos podrían correr a cargo del cliente;
• Los gastos de transporte correrán a carga del cliente para una
reparación efectuada fuera del período de garantía.
• Cualquier gesto comercial no disminuye estos derechos.
La lista previamente mencionada puede ser adaptada según el tipo
de artículo (véase el manual del usuario del artículo en cuestión).
Velleman® Service- und Qualitätsgarantie
Seit der Gründung in 1972 hat Velleman® sehr viel Erfahrung als Verteiler
in der Elektronikwelt in über 85 Ländern aufgebaut.
Alle Produkte entsprechen den strengen Qualitätsforderungen und
gesetzlichen Anforderungen in der EU. Um die Qualität zu gewährleisten
werden unsere Produkte regelmäßig einer zusätzlichen Qualitätskontrolle
unterworfen, sowohl von unserer eigenen Qualitätsabteilung als auch von
externen spezialisierten Organisationen. Sollten, trotz aller
Vorsichtsmaßnahmen, Probleme auftreten, nehmen Sie bitte die Garantie
in Anspruch (siehe Garantiebedingungen).
Allgemeine Garantiebedingunge n in Be zu g a uf Ko nsumgüter (für die
Europäische Union):
• Alle Produkte haben für Material- oder Herstellungsfehler eine
Garantieperiode von 24 Monaten ab Verkaufsdatum.
• Wenn die Klage berechtigt ist und falls eine kostenlose Reparatur oder
ein Austausch des Gerätes unmöglich ist, oder wenn die Kosten dafür
unverhältnismäßig sind, kann Velleman® sich darüber entscheiden,
dieses Produkt durch ein gleiches Produkt zu ersetzen oder die
Kaufsumme ganz oder teilweise zurückzuzahlen. In diesem Fall erhalten
Sie ein Ersatzprodukt oder eine Rückzahlung im Werte von 100% der
Kaufsumme im Falle eines Defektes bis zu 1 Jahr nach Kauf oder
Lieferung, oder Sie bekommen ein Ersatzprodukt im Werte von 50% der
Kaufsumme oder eine Rückzahlung im Werte von 50 % im Falle eines
Defektes im zweiten Jahr.
• Von der Garantie ausgeschlossen sind:
- alle direkten oder indirekten Schäden, die nach Lieferung am Gerät und
durch das Gerät verursacht werden (z.B. Oxidation, Stöße, Fall, Staub,
Schmutz, Feuchtigkeit, ...), sowie auch der Inhalt (z.B. Datenverlust),
Entschädigung für eventuellen Gewinnausfall.
- Verbrauchsgüter, Teile oder Zubehörteile, die durch normalen Gebrauch
dem Verschleiß ausgesetzt sind, wie z.B. Batterien (nicht nur aufladbare,
sondern auch nicht aufladbare, eingebaute oder ersetzbare), Lampen,
Gummiteile, Treibriemen, usw. (unbeschränkte Liste).
- Schäden verursacht durch Brandschaden, Wasserschaden, Blitz,
Unfälle, Naturkatastrophen, usw.
- Schäden verursacht durch absichtliche, nachlässige oder
unsachgemäße Anwendung, schlechte Wartung, zweckentfremdete
Anwendung oder Nichtbeachtung von Benutzerhinweisen in der
Bedienungsanleitung.
- Schäden infolge einer kommerziellen, professionellen oder kollektiven
Anwendung des Gerätes (bei gewerblicher Anwendung wird die
Garantieperiode auf 6 Monate zurückgeführt).
- Schäden verursacht durch eine unsachgemäße Verpackung und
unsachgemäßen Transport des Gerätes.
- alle Schäden verursacht durch unautorisierte Änderungen, Reparaturen
oder Modifikationen, die von einem Dritten ohne Erlaubnis von Velleman®
vorgenommen werden.
• Im Fall einer Reparatur, wenden Sie sich an Ihren Velleman®-Verteiler.
Legen Sie das Produkt ordnungsgemäß verpackt (vorzugsweise die
Originalverpackung) und mit dem Original-Kaufbeleg vor. Fügen Sie eine
deutliche Fehlerbeschreibung hinzu.
• Hinweis: Um Kosten und Zeit zu sparen, lesen Sie die
Bedienungsanleitung nochmals und überprüfen Sie, ob es keinen auf de
Hand liegenden Grund gibt, ehe Sie das Gerät zur Reparatur
zurückschicken. Stellt sich bei der Überprüfung des Gerätes heraus, dass
kein Geräteschaden vorliegt, könnte dem Kunden eine
Untersuchungspauschale berechnet.
• Für Reparaturen nach Ablauf der Garantiefrist werden Transportkosten
berechnet.
• Jede kommerzielle Garantie lässt diese Rechte unberührt.
Die oben stehende Aufzählung kann eventuell angepasst werden
gemäß der Art des Produktes (siehe Bedienungsanleitung des
Gerätes).
 Loading...