

Page 1
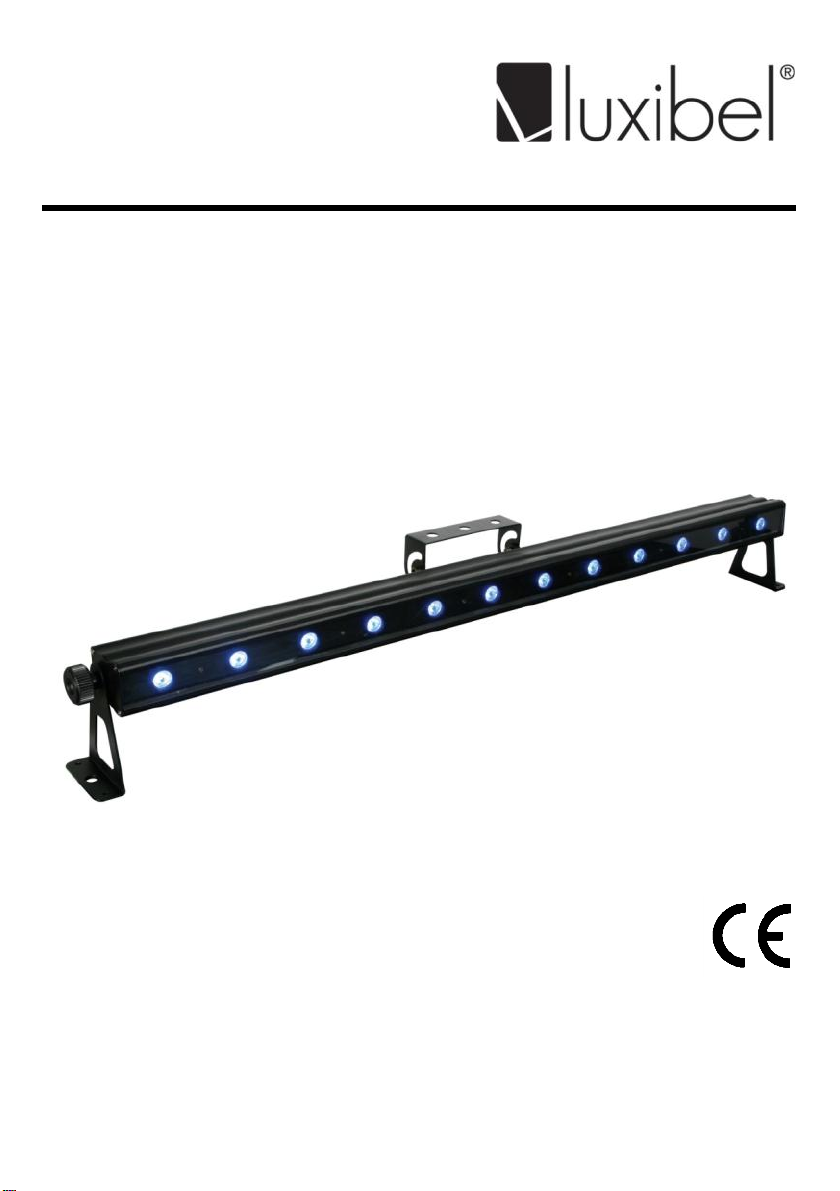
LX103
LED WASH-EFFECT – 12 X 3W DRIEKLEURIGE LEDS
EFFET WASH À LED – 12 LED TRICOLORES DE 3W
EFECTO 'WASH' CON LEDS – 12 LEDS TRICOLORES DE 3W
USER MANUAL
SMART LED COLOUR BEAM – 12 X 3W TRI -COLOUR LEDS
LED WASH-EFFEKT – 12 X 3W DREIFARBIGE LEDS
Page 2
LX103
rési stance de termi nai son
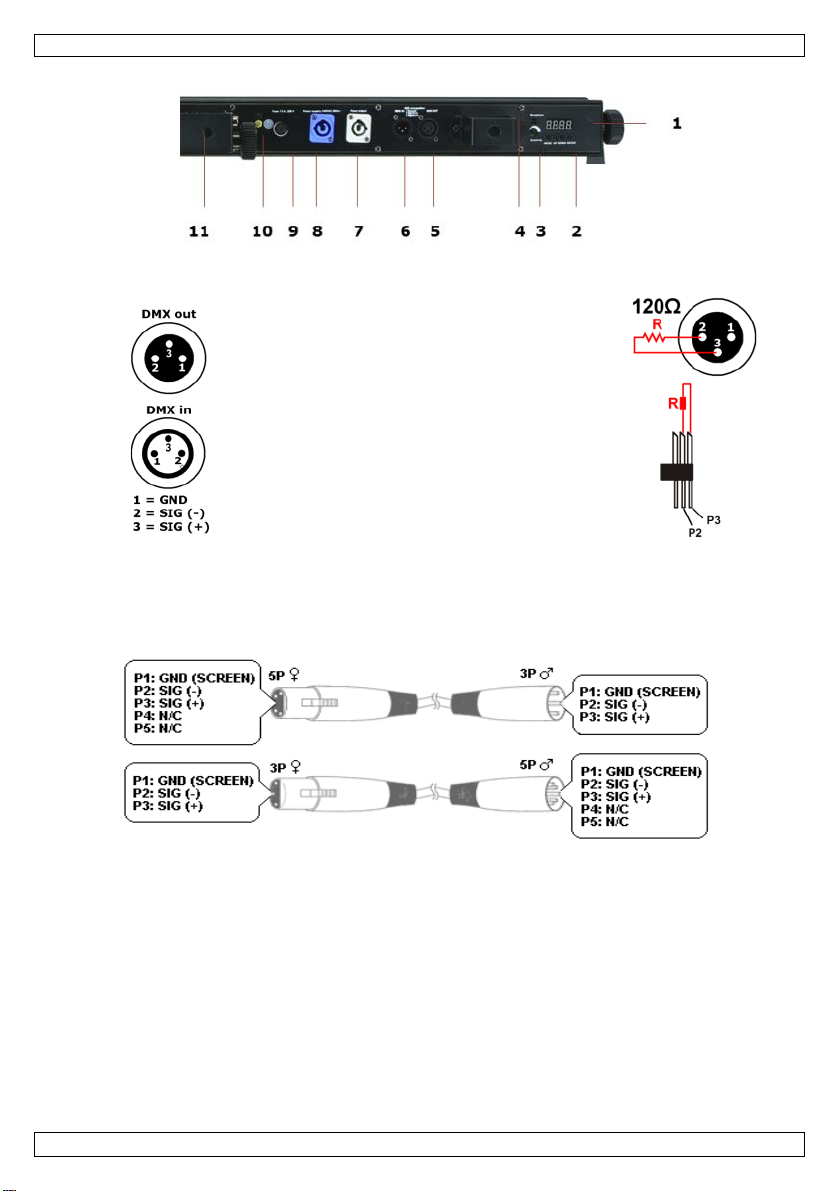
How to turn the controller line from 3-pins into 5-pins (plug and socket).
terminator
eindweerstand
terminación
Terminierung
Controller line van 3-pin naar 5-pin aanpassen (stekker en contact).
Modifier la ligne du contrôleur de 3 broches en 5 broches (fiche et contact).
Modificar la línea de l controlado r de 3 polos y 5 polos (conec tor y contacto).
Die Controller-Linie vo n 3-Pin nach 5-Pin anzupassen (Stecker und Kontakt).
V. 04 – 11/12/2013 2 ©Velleman nv
Page 3
LX103
Do not stare directly at the light source, as this may cause
USER MANU AL
1. Introduction
To all residents of the European Union
Important environmental information about this product
Thank you for choosing Luxibel
service. If the device was damaged in transit, don't install or use it and contact your dealer.
2. Safety Instructions
This symb ol on th e d evice or the package i ndicates that d isposal of the device after its lifecycle
could harm the environment. Do not dispose of the unit (or batteries) as unsorted municipal
waste; it sho uld be taken to a specialized company for recycling. This device should be
returned to your distributor or to a local recycling serv ice. Respect the local environmental
rules.
If in do u bt, co n t a c t y o ur loc a l was te dis p o sa l au t h o rit ies.
Be very careful during the installation: touching live wires can cause life-threatening
electroshocks.
Always disconnect mains power when device not in use or when servicing or
main tenance acti vities are performed . Hand le the power cord by the plug only.
Indoor use only. Keep this device away form rain, moisture, splashing and dripping
liquids.
Keep th is device away from children and unauthorized users.
Caution: device heats up during use.
®
! Please read the manual thoroughly before bringing this device into
• epileptic sei zure in sensitive people
• temporarily loss of sight (flash blindness)
• permanent (ir reversible) eye dam age.
There a r e no user -serviceabl e parts insid e the device. Refer to an authori zed dealer for
service and/or spare parts.
• This device falls under protection class I. I t is therefore essential that the device be earthed. H a ve a
qualified person carry out the electric connection.
• Make sur e that the available vol tag e does not e xceed th e voltage stated in the specificati ons of this
manual.
• Do not crimp the power cord and protect it against damage. Have an authorised dealer replace it if
necessary.
• Use an app ropriate safety cable t o fix the device (e.g. VDLSC7 or VDLSC8).
• Install the LX103 at a minimal distance of 0.5 m from flammable and explosive objects or
substances.
• Res pec t a mi ni mu m distance of 1m between the device’s light output and any illuminated surface.
• Keep th e air vents free at all ti mes. N ever cover the device, nor par tially, nor completely.
V. 04 – 11/12/2013 3 ©Velleman nv
Page 4

LX103
Keep th is device away fro m dust and extreme temperatu res. M ake sure th e venti lation
1
display
7
Neutrik powerCON out
2
control buttons
8
Neutrik powerCON in
3
built-in microphone
9
fuse holder
4
sensitiv ity kno b
10
GND
5
11
6
3. General G uidel ines
Refer to the Velleman® Service and Quality Warranty on the last pages of this manual.
openings are clear at all times. For sufficient air circulation, leave at least 1” (±2.5 cm) in
front of the openings.
Protect this device from shocks and abuse. Avoid brute force when operating the device.
• Familiarise yo urself with the functions of the device before actually using it. Do not allow operation
by unqualified people. Any damage that may occur will most probably be due to unprofessional use
of the de vice.
• All modi f ications of the device are f orbidden for safet y reasons. Damage caused by user modif ications
to the device is not covered by the warranty.
• Mechani cal wear is n ot covered b y warranty.
• Only use the device for its intended purpose. Al l other uses may lead to short circui ts, bur ns,
electroshocks, lamp explosio n, crash, etc. Using the device in an unauthorised way will void the
warranty.
• Damage caused by disregard of certain guidelines in this manual is not covered by the warranty and
the dealer will not accept respon sibility for any en sui ng def ects or problems.
• A qualified technician should install and service this device.
• Do not switch th e d evice on immediately after it has been exposed to changes in temperatu re.
Protect the device against damage by leaving it switched off until it has reached room temperature.
• This device is design e d for professi ona l use on stage, in discos, theatres, etc. Th e LX103 can be
used indoors (<35°C, <75%RH) with an alternating current of max. 240V AC/50Hz.
• Lighting effects are not designed for permanent operation: regular operation breaks will prolong their
lives.
• Use the original packaging if the device is to be transported.
• Keep this manual for future reference.
4. Features
• tri-colour LED wash effe ct
• RGB control via max. 36 channels
o 3 channels: RGB
o 4 channels: RGB, dimmer
o 6 channels: 2-section RG B cont rol
o 7 channels: RGB, macro, shutter, auto/sound, dimmer
o 9 channels: 3-section RG B cont rol
o 12 channels: 4-sectio n RG B control
o 18 channels: 6-section R GB cont rol
o 36 channels: separate RGB control for each LED
• static or colour mixing, with or without DMX
• built-in programs for stand-alone and sound-activated modes
• pulse effect with adj ustable speed
• tr u s s or floor m ount i n g.
5. Overview
Refer to the illustrations on page 2 of this manual.
DMX o ut
DMX in
V. 04 – 11/12/2013 4 ©Velleman nv
bracket
Page 5

LX103
button
functio n
<ENTER>
used to select and store the current menu or option within the menu
<UP>
scrolls through the menu options in ascending order
<DOWN>
scrolls through the menu options in descending order
6. Installation
Refer to the illustrations on page 2 of this manual.
6.1 Overhead mounting
Have the device installed by a qualified person, respecting EN 60598-2-17 and all other applicable
•
no rms.
• The construction to which the device is attached should be able to support 10 times the weight of the
dev ice for one hour without d eformation.
• The installation must always be secured with a secondary attachment e.g. a safety cable.
• Never st and directly below the d evice when it is being mounted , rem o ved or serviced . Have a
qualified technicia n check the d evice once a year and once bef ore you bring it into service.
• Install the device in a locatio n with few passers-by and inaccessible to unauthorised persons.
• Overhead mounting requires extensive experience: calcul ati ng workload limits, determining the
install ati on material to be used… H ave the mater ial and the device itself checked regul arl y. Do not
attempt to install the device yourself if you lack these qualifications as improper installat ion may
result in serious injuries.
• For truss-mounting, use an appropriate clamp (not incl.) and fit an M10 bolt through the centre of
the (folded) bracket.
• Adjust the desired inclination angle via the mounting bracket and tighten the bracket screws.
6.2 DMX-512 connection
When applicable, connect an XLR cable to th e f emale 3-pin XLR output of a controller (not incl.) and
•
the other side to the male 3-pin XLR input of the LX103. Multiple LX103’s can be linked through
ser ia l li n king. The linking cable should be a dual core, screened cable with XLR input and output
connectors.
• Maximum recommended s eri al data link di stan ce is 500 meters (1640 ft). Maximum rec o mmended
number of fixtures on a serial data link is 32 fixtures.
• A DMX terminator is recommended for installations where the DMX cable has to run a long distance
or is in an electrically noisy environment (e.g. discos). The terminator prevents corruption of the
digital control signal by electrical noise. The DMX terminator is simply an XLR plug with a 120Ω
resistor between pins 2 and 3, which is then plugged into the XLR output socket of the last device in
the chain.
6.3 General
Make sure there is no flammable material within a 50cm radius of the device and there is sufficient
•
coo ling.
• Have a qualified electric ian carry out the electrical connection.
• All fixtures must be powered directly off a grounded switched circuit and cannot be run off a rheostat
or dimmer circuit, even if the rheostat or dimmer channel is used solely for 0% to 100% s wi tch .
• The installation has to be approved by an expert bef ore th e device is taken i nto service.
7. Operation
Refer to the illustrations on page 2 of this manual.
7.1 Control Panel Navigation
Access the control panel functions using the four panel buttons located directly underneath the LCD
display.
<MENU> used to access the menu or to return to a previous menu option
The control panel LCD shows the menu items you select from the menu map. When a menu function is
selected, the display will show immediately the first available optio n for the selected menu function. To
select a menu item, press <ENTER>.
V. 04 – 11/12/2013 5 ©Velleman nv
Page 6

LX103
menu
sub-menu
functio n
description
red
cyan
magenta
yellow
white
select 4 -channel DMX mode (+ address)
select 9 -channel DMX mode (+ address)
select 1 8-channel DMX mode (+ address)
blue
Use the <UP> and <DOWN> buttons to navigate the menu map and menu options. Press <ENTER> to
access the menu function currently displayed or to enable a menu option. To return to the previous
option or menu without changing the value, press the <MENU> button.
7.2 Menu Functions
green
blue
select between 7 stati c colours
~
built-in programs select between switching and fading built-in programs
speed
address
channel mode
red
green
set speed of built-in programs ( ~ )
set DMX a ddr ess ( )
select 3 -channel DMX mode (+ address)
select 6 -channel DMX mode (+ address)
select 7 -channel DMX mode (+ address)
select 1 2-channel DMX mode (+ address)
select 3 6-channel DMX mode (+ address)
custom colour red ( ~ )
custom colour green ( ~ )
custom colour blue ( ~ )
7.3 Stand-Alone Mode
Auto Mode
1. P ress <MEN U > until is displayed.
2. P ress <ENTER> to confirm your selection.
3. U se <U P> or <DOWN> to select the desired pr ogra m ( ~ ).
4. Press <ENTER> t o confirm your selection.
Sound-Active Mode
This mo de allows a single unit to run to the beat of the music.
1. Press <MENU> until is displayed.
2. P ress <ENTER> to confirm your selection.
3. Use <UP> or <DOWN> to select .
4. Press <ENTER> to confirm your selection.
5. Use the audio sensitivity knob on the back of the fixture [5] to make the f ixture more or less
sensitive.
Preset Colours
This device has pr e -programmed static colours.
1. Press <MENU> until is displayed.
2. P ress <ENTER> to confirm your selection.
3. U se <U P> or <DOWN> to select the desired pr ogra m (
4. P ress <ENTER> to confirm your selection.
~ ).
V. 04 – 11/12/2013 6 ©Velleman nv
Page 7

LX103
channel
functio n
from
to
description
1
red
000
255
dimmer 0 ~ 10 0%
2
green
000
255
dimmer 0 ~ 10 0%
3
blue
000
255
dimmer 0 ~ 10 0%
Custom Static Colours
This device allows you to crea te custom st at ic colours.
1. Press <MENU> until is displayed.
2. P ress <ENTER> to confirm your selection.
3. U se <U P> or <DOWN> to select the desired colour.
4. P ress ent er to chan ge the red colour value ( ~ , from 0 to 100%).
5. P ress <ENT ER> to confirm and to move to the n ext colour (gr een, blue). Set the value f or the
second and third colour.
7.4 Master/Slave Mode
This mode allows control several units simultaneously.
1. Use standard DMX cables to daisy-chain your units together via the DMX connector on the rear of
each fixture. For longer cable runs we suggest using a terminator on the last fixture.
2. Choose the first unit in the chain to function as the master fixture. Press <MENU> and choose a
mode (
, or ).
3. On each of the connected slave units, set the same channel mode as the master (via ).
Chasing Mode
This mo de allows multiple units to run in sequence.
1. P ress <MEN U > until is displayed.
2. P ress <ENTER> to confirm your selection.
3. Use <UP> or <DOWN> to select or .
4. P ress <ENTER> to confirm your selection.
5. U se <U P> or <DOWN> to select the position of the device in the ch ase:
o On the master , se t the position to
o On the slaves, set the position to ~ depending on the physical layout of the
chain.
Note: for older devi ces r evision 1.0, set the master to addres s ; set version 2. 0 slaves to
~ .
7.5 DMX Mode
This mode allows you to control the fixture by any universal DMX controller.
• All DMX-controlled devices need a d igital start addr ess so that the corr ect devi ce r esponds to the
signal s. This digital st art address is the chan nel number from which the device starts to “listen ” to
the DMX controller. The same starting address can be used for a whole group of devices or an
individ ual add r ess can be set f or every device.
• When all devices have the same address, all the units will “listen” to the control signal on one
particular channel. In other words: changing the settings of one channel will affect all devices
simultaneo usly. If you set individua l addresses, each device will “listen” to a separate channel
number. Changing the settings of one channel will only affect the device in question.
Example:
o In case of the 9-channel LX103, you will have to set the start add r e ss of th e f irst unit to 1
(CH1~9), the s ec ond unit to 10 (1 + 9) (CH10 ~1 8) , the thir d to 19 (10 + 9) (CH19~27), and
s o on .
1. Press <MENU> until the desir ed DMX channel mode ( , , , , ,
2. P ress <ENTER> to confirm your selection.
3. U se < U P> or <D OWN > t o select the desired DMX starting a ddr ess ( ~ ).
DMX Channel Values
3-Channel Mode
, or ) is displayed.
V. 04 – 11/12/2013 7 ©Velleman nv
Page 8

LX103
channel
functio n
from
to
description
1
red
000
255
dimmer 0 ~ 10 0%
2
green
000
255
dimmer 0 ~ 10 0%
3
blue
000
255
dimmer 0 ~ 10 0%
4
mas ter dimmer
000
255
dimmer 0 ~ 10 0%
channel
functio n
from
to
description
1
red
000
255
dimmer 0 ~ 10 0%
2
green
000
255
dimmer 0 ~ 10 0%
3
blue
000
255
dimmer 0 ~ 10 0%
000
015
no function
016
255
colour macros
speed
strobe
000
015
no function
016
255
slow ~ fast (1 Hz ~ 30 Hz)
000
031
RGB
096
114
pulse 100 ~ 0 ~ 100% with RGB f a ders
115
127
chase
128
159
auto fade
160
191
auto switch (3 colours)
7
dimmer
000
255
dimmer 100 to 0 %
sections
channel
functio n
6CH
9CH
12CH
18CH
36CH
from
to
description
1
red
000
255
dimmer 0 ~ 10 0%
3
blue
000
255
dimmer 0 ~ 10 0%
4
red
000
255
dimmer 0 ~ 10 0%
5
green
000
255
dimmer 0 ~ 10 0%
6
blue
000
255
dimmer 0 ~ 10 0%
7
red
000
255
dimmer 0 ~ 10 0%
9
blue
000
255
dimmer 0 ~ 10 0%
10
red
000
255
dimmer 0 ~ 10 0%
11
green
000
255
dimmer 0 ~ 10 0%
12
blue
000
255
dimmer 0 ~ 10 0%
13
red
000
255
dimmer 0 ~ 10 0%
16
red
000
255
dimmer 0 ~ 10 0%
17
green
000
255
dimmer 0 ~ 10 0%
18
blue
000
255
dimmer 0 ~ 10 0%
19
red
000
255
dimmer 0 ~ 10 0%
20
green
000
255
dimmer 0 ~ 10 0%
4-Channel Mode
7-Channel Mode
4 colour macros
(channel 6 @ 032 ~ 223)
5
000 255 slow ~ fast
(channels 1 ~ 4 only)
032 063 pulse 0 ~ 10 0% with RGB f ade rs
064 095 pulse 100 ~ 0% with RGB faders
mode
6
(channel 5 controls speed
when channel 6 = 032 ~ 223)
192 223 auto switch (7 colours)
224 255 sound control
6, 9, 1 2, 18 and 36-Channel Mode
2 green 000 255 dimme r 0 ~ 10 0%
A A A A A
B B B B B
8 green 000 255 dimme r 0 ~ 10 0%
C C C C
D D D
14 green 000 255 dimme r 0 ~ 10 0%
15 blue 000 255 dimme r 0 ~ 10 0%
E E
F F
G
V. 04 – 11/12/2013 8 ©Velleman nv
Page 9

LX103
sections
channel
functio n
6CH
9CH
12CH
18CH
36CH
from
to
description
21
blue
000
255
dimmer 0 ~ 10 0%
22
red H 000
255
dimmer 0 ~ 10 0%
23
green
000
255
dimmer 0 ~ 10 0%
24
blue
000
255
dimmer 0 ~ 10 0%
25
red I 000
255
dimmer 0 ~ 10 0%
26
green
000
255
dimmer 0 ~ 10 0%
27
blue
000
255
dimmer 0 ~ 10 0%
28
red J 000
255
dimmer 0 ~ 10 0%
29
green
000
255
dimmer 0 ~ 10 0%
30
blue
000
255
dimmer 0 ~ 10 0%
32
red K 000
255
dimmer 0 ~ 100%
31
green
000
255
dimmer 0 ~ 10 0%
33
blue
000
255
dimmer 0 ~ 10 0%
34
red L 000
255
dimmer 0 ~ 10 0%
35
green
000
255
dimmer 0 ~ 10 0%
36
blue
000
255
dimmer 0 ~ 10 0%
power con sumption
47W
light source
12 x hi g h-power 3W tri-colour LEDs
beam angle
42°
luminous flux
1360 lux @ 1m
dimensions
1000 x 60 x 150mm
weight
3.5kg
8. Cleaning and maint enance
• All screws should be tight and free of corros ion.
• The housing, the lenses, the mounting supports and the installation location (e.g. ceiling, suspension,
trussing) should not be deformed, modified or tampered with; e.g. do not drill extra holes in
mounting supports, do not change the location of the connections…
• Mechanically moving parts must not show any signs of wear and tear.
• The electric power supply cables must not show any damage. Have a qualified technic ian maintain
the device.
• Regularly remove dust from the housing and the air vents using a slightly damp cloth.
• There a r e no user -serviceabl e parts insid e. Refer to an authorized dealer for service and /or spar e
parts.
Fuse Replacement
1. Wedge the f use holder [6] out of its housing with a flat-head screwdriver.
2. Remove the damaged fuse from its holder and repl ace with exact s ame type of fuse.
3. Insert the fuse holder back in its place and reconnect power.
9. Technica l Specifica tions
power supply 240V A C ~ 50H z
Use this device with original accessories only. Velleman nv cannot be he ld respons ible in the
event of damage or injury resulted f rom (incorrect) use of this devic e.
For more info concerning this product and the latest version of this manual, please visit our
website www.luxibel.com.
The information in this manual is subject to change without prior notice.
© COPYRIGHT NOTICE
The copyright to this manual is owned by Velleman nv. All worldwide rights reserved.
No part of this manual may be copied, reproduced, translated or reduced to any electronic medium or
otherwise without the prior written consent of the copyright holder.
V. 04 – 11/12/2013 9 ©Velleman nv
Page 10

Vellem an® Service and Qu al ity War ranty
Since its foun dat ion in 1972, Velleman® a cqu ired ex tensive experienc e in t he ele ctronics world and cur r ent ly distributes its products in over 85
countries.
All our products fulf il st r ict qua lit y requirements and lega l s t ipulations in t he E U. In order t o ensure the quality, our products r egular ly go through an ext r a
quality check, bot h by an internal qua lit y department and by specializ ed ex t er nal organisatio ns. If , all precaut ionary meas ur es notwithstanding,
problems should occur , please make appe al t o our war ranty (see guar antee conditions).
General Warranty Conditions Concerning Consumer Products (for EU):
• All consumer pr oducts are subj ect to a 24-month w arr ant y on production f laws and defe ctive materi al as fro m t he or igin al dat e of purchase.
• Velleman® can decide to repla c e an arti cle wit h an equivalent articl e, or t o r ef und the retail value totally or part ially when the complaint is valid and a
free repair or replace me nt of the artic le is impos sible, or if the expenses are out of proport ion.
You w ill be d elivered a replac ing artic le or a refu nd at t he value of 100% of the pur chase pri c e in case of a f law occur red in the first year after the dat e of
purchase an d deliv er y, or a repla cing ar t icle at 50% of the pur ch as e price or a refund at the value of 50% of t he r et ail value in case of a f law occur red in
the second year after the date of purchase and de livery.
• Not covered by w arranty:
- all dire ct or indire ct damage caus ed after del ivery to the art icle ( e. g. by oxidation, sho cks, falls, dus t , dirt, hu midit y...), and by the article, as well as its
content s ( e. g. data loss ) , compensation for loss of profits;
- consumable goods, parts or accessori es t hat are subje ct t o an aging process during normal use, s uc h as batter ies ( rechargea ble, non-rechargeable,
built-in or r epla ce able), lamps, rubber part s , dr ive belts. . . (unli mited list) ;
- flaws r es ult ing fr om fire, w at er damage, lightning, accident, natural disaster , etc.…;
- flaws ca us ed del iberately, negligently or resulting f r om i m proper handling, negligent ma int enance, abusive use or use cont rar y to the manufacturer’s
instructions;
- damage caused by a commercial, pr of es sional or collective us e of the article (the war r anty validity will be reduced to six (6) months when the article is
used profes sionally);
- damage resulting from an inappr opriate packing and shipping of the arti cle;
- all dama ge caused by modificati on, r epair or alt eration performed by a thir d party without written permission by Velleman®.
• Articles to be r epaired must be d elivered to your Velleman® dea ler, s olidly packed (pr eferably in t he or iginal pa ck aging), and be co mp let ed with the
original receipt of purc has e and a cle ar flaw d escription.
• Hint: I n or der t o s ave on cost and time, pl eas e reread the manual an d c heck if the flaw is ca us ed by obvious causes prior to presenting the ar t icle for
repair. Note that returning a non-defe ctive article can also involv e handling costs .
• Repairs occur ring after warra nt y expiration are s ubje ct to shippi ng costs.
• The above conditions are without prejudi ce to all comm ercial warranties .
The abov e enumer at i on is su bject to mod ifi cation according to the article (s ee article’s manual).
Legen Heirweg 33, 9890 Gavere, Be lgium
Imported by Velleman nv
Made in P RC
www.velleman.eu
 Loading...