

Page 1
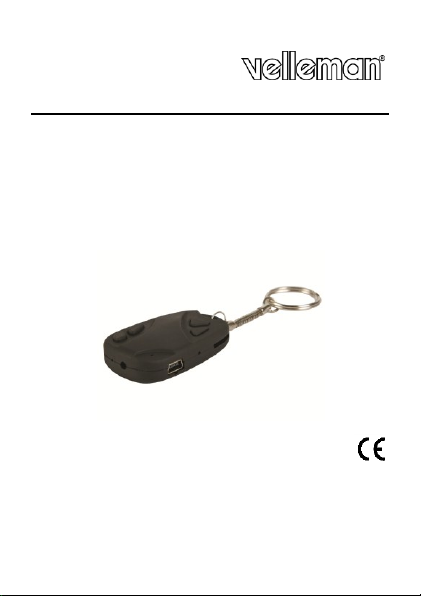
CAMCOLVC8N1
HIGH DEFINITION REMOTE CONTROL SHAPED COLOUR
CAMERA
KLEURENCAMERA IN DE VORM VAN EEN
AFSTANDSBEDIENING
CAMÉRA COULEUR EN FORME DE TÉLÉCOMMANDE
CÁMARA COLOR CON FORMA DE MANDO A DISTANCIA
FARBKAMERA IN FORM EINER FERNBEDIENUNG
CÂMARA A CORES EM FORMATO DE COMANDO À DISTÂNCIA
KOLOROWA KAMERA W BRELOCZKU DO KLUCZY
USER MANUAL 2
GEBRUIKERSHANDLEIDING 7
MODE D'EMPLOI 11
MANUAL DEL USUARIO 16
BEDIENUNGSANLEITUNG 21
MANUAL DO UTILIZADOR 26
INSTRUKCJA OBSŁUGI 31
Page 2
CAMCOLVC8N1
Keep the device away from children and unauthorised
users.
*not incl. – niet meegelev. - non incl. – no incl. - nicht mitgeliefert –
no incl. - brak w zestawie
USER MANUAL
1. Introduction To all residents of the European Union
Important environmental information about this product
This symbol on the device or the package indicates that
disposal of the device after its lifecycle could harm the
environment. Do not dispose of the unit (or batteries) as
unsorted municipal waste; it should be taken to a
specialized company for recycling. This device should be
returned to your distributor or to a local recycling service.
Respect the local environmental rules.
If in doubt, contact your local waste disposal authorities.
Thank you for choosing Velleman! Please read the manual thoroughly
before bringing this device into service. If the device was damaged in
transit, don't install or use it and contact your dealer.
2. Safety Instructions
V. 02 – 01/07/2013 2 ©Velleman nv
Page 3
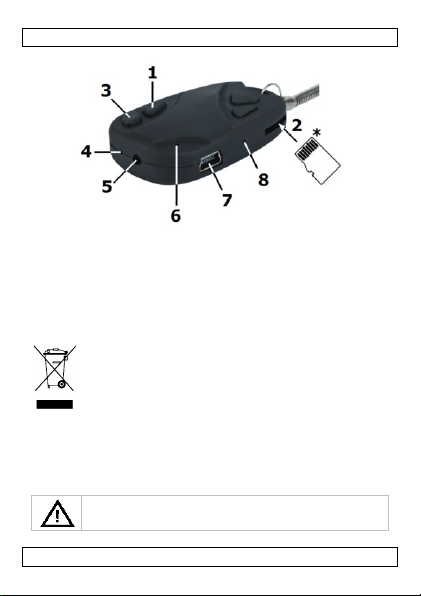
CAMCOLVC8N1
1
ON/OFF button
5
camera
2
micro SD card slot
6
status LED
3
control button
7
Mini-B USB port
4
microphone
8
reset button
3. General Guidelines
Refer to the Velleman® Service and Quality Warranty on the
final pages of this manual.
Protect this device from shocks and abuse. Avoid brute force when
operating the device.
Protect the device against extreme heat and dust.
Indoor use only. Keep this device away from rain, moisture,
splashing and dripping liquids.
Familiarise yourself with the functions of the device before actually
using it.
All modifications of the device are forbidden for safety reasons.
Damage caused by user modifications to the device is not covered
by the warranty.
Only use the device for its intended purpose. Using the device in
an unauthorised way will void the warranty.
Damage caused by disregard of certain guidelines in this manual
is not covered by the warranty and the dealer will not accept
responsibility for any ensuing defects or problems.
DO NOT use this product to violate privacy laws or perform other
illegal activities.
4. Features
very small digital video recorder camera
recording on micro SD-card (not incl.)
no flash memory built in
only 2 operation switches
picture, audio and video recording
comes with USB cable
no remote control function
5. Overview
Refer to the illustration on page 2 of this manual.
V. 02 – 01/07/2013 3 ©Velleman nv
Page 4
CAMCOLVC8N1
6. Operation Switching the device ON and OFF
1. Press the ON/OFF button [1] to switch the device on. The status
LED [6] turns on orange to indicate that the device is ready.
2. Press and hold the ON/OFF button [1] for 3 seconds to switch the
device off.
Taking pictures
1. Point the camera [5] towards the field of interest.
2. Press the control button [3] shortly. The status LED [6] switches
off and on again.
Recording
1. Point the camera [5] towards the field of interest.
2. Press and hold the control button [3] for 3 seconds. The status
LED [6] flashes 3 times and switches off. The device is now
recording. The recorded format is AVI.
3. Press the control button [3] again to stop recording. The LED [6]
turns orange again. Note that this might take a few seconds.
Note: When the memory is full or battery power becomes low, the
current file is saved and the device powers off automatically.
Playback
1. Connect the included USB cable to the USB port [7] and insert the
other end into a USB port of a computer (not incl.).
2. The status LED [6] will light up orange and the device will now act
as a regular USB memory device. Copy, open or delete the
recordings as you would with other files on your computer system.
3. Pictures are saved in the folder IMAGE, video in the VIDEO folder.
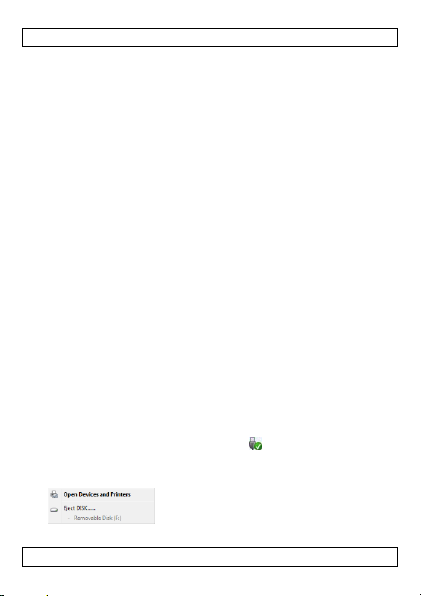
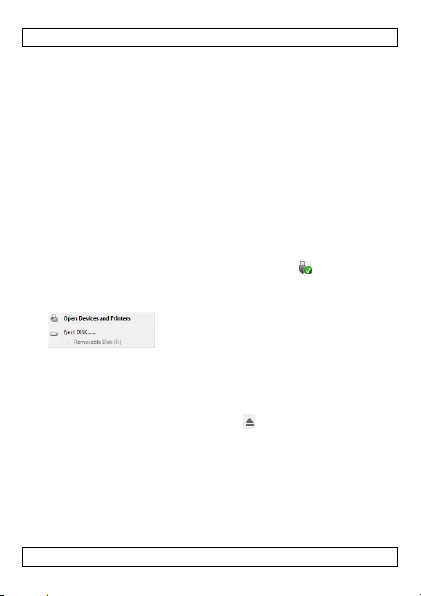
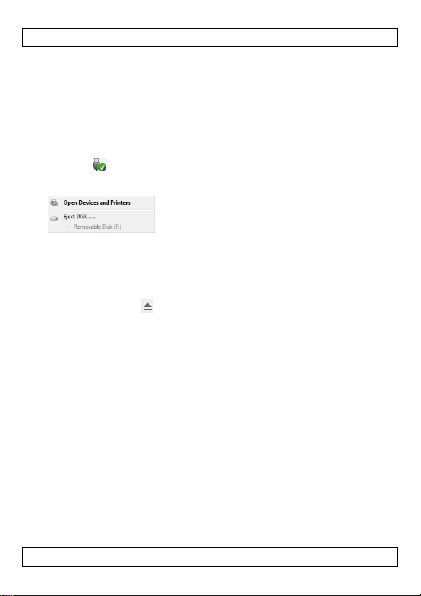
Safely remove the device from your computer
Windows®
To safely remove the device:
1. Click the icon Safely Remove Hardware in the notification area
at the right of the taskbar and click the device that you want to
remove.
V. 02 – 01/07/2013 4 ©Velleman nv
Page 5
CAMCOLVC8N1
This device contains an internal rechargeable battery.
When the device is end-of-life, it must be disposed of in
accordance with local regulations.
Do not throw the device into the fire as it may explode.
pick-up element
colour CMOS sensor
lens angle
65°
storage capacity
max. 16GB micro SD card (not incl.)
video recording
recording format: AVI (audio and video)
Windows will display a notification telling you it's safe to remove
the device.
2. Unplug the device from the USB port.
Macintosh®
1. In the Finder, click the Eject icon next to the device.
2. Unplug the device from the USB port.
7. Set the time on the device
To set the date on the device:
1. On your computer, create a text file named time.txt with the date
and time in the following format:
2012-01-18 11:38:54
2. Plug the device into the USB port of your PC.
3. Copy the text file time.txt to the root directory of the device.
4. Safely remove the device from your computer (see above).
5. Switch on the device. At this point, date and time as specified in
the time.txt file are loaded into the system memory and the file
itself is removed from the directory.
Reset
When the device does not react anymore, use a small pin (for
example a paper clip) to gently press the reset button [8].
8. Battery
When the status LED [6] is flashing slowly, battery power is low.
The battery charges when the device is connected to a powered
USB port or USB power adapter (not included).
You cannot take pictures or record video while the device is
connected to your computer.
9. Technical Specification
V. 02 – 01/07/2013 5 ©Velleman nv
Page 6
CAMCOLVC8N1
video resolution: 720 x 480 pixels
frame rate (fps): 25
recording capacity: <30MB/min
image recording
recording format: JPEG
image resolution: 1280 x 1024 pixels
(interpolation)
power supply
built-in Li-battery (recharge via USB)
battery capacity
1h
charging time
2h
current consumption
max. 170mA
dimensions
52 x 32 x 12mm
weight
20g
operating
temperature
0°C ~ 40°C
Use this device with original accessories only. Velleman nv
cannot be held responsible in the event of damage or injury
resulted from (incorrect) use of this device. For more info
concerning this product and the latest version of this manual,
please visit our website www.velleman.eu. The information in
this manual is subject to change without prior notice.
Windows, Windows XP, Windows 2000, Windows Vista, Windows
Aero, Windows 7, Windows 8, Windows Mobile, Windows Server are
registered trademarks of Microsoft Corporation in the United States
and other countries.
iPad, iPod, iPod touch, iPhone, Mac, iMac, MacBook, PowerBook,
Power Mac, Mac OS are trademarks of Apple Inc., registered in the
U.S. and other countries.
© COPYRIGHT NOTICE
The copyright to this manual is owned by Velleman nv. All
worldwide rights reserved. No part of this manual may be copied,
reproduced, translated or reduced to any electronic medium or
otherwise without the prior written consent of the copyright holder.
V. 02 – 01/07/2013 6 ©Velleman nv
Page 7

CAMCOLVC8N1
Houd dit toestel uit de buurt van kinderen en
onbevoegden.
GEBRUIKERSHANDLEIDING
1. Inleiding
Aan alle ingezetenen van de Europese Unie
Belangrijke milieu-informatie betreffende dit product
Dit symbool op het toestel of de verpakking geeft aan dat,
als het na zijn levenscyclus wordt weggeworpen, dit toestel
schade kan toebrengen aan het milieu. Gooi dit toestel (en
eventuele batterijen) niet bij het gewone huishoudelijke
afval; het moet bij een gespecialiseerd bedrijf
terechtkomen voor recyclage. U moet dit toestel naar uw
verdeler of naar een lokaal recyclagepunt brengen. Respecteer de
plaatselijke milieuwetgeving.
Hebt u vragen, contacteer dan de plaatselijke autoriteiten
betreffend de verwijdering.
Dank u voor uw aankoop! Lees deze handleiding grondig voor u het
toestel in gebruik neemt. Werd het toestel beschadigd tijdens het
transport, installeer het dan niet en raadpleeg uw dealer.
2. Veiligheidsinstructies
3. Algemene richtlijnen
Raadpleeg de Velleman® service- en kwaliteitsgarantie
achteraan deze handleiding.
Bescherm tegen schokken. Vermijd brute kracht tijdens de
bediening.
Bescherm tegen stof en extreme temperaturen.
Gebruik het toestel enkel binnenshuis. Bescherm het toestel
tegen regen, vochtigheid en opspattende vloeistoffen.
Leer eerst de functies van het toestel kennen voor u het gaat
gebruiken.
Om veiligheidsredenen mag u geen wijzigingen aanbrengen.
Schade door wijzigingen die de gebruiker heeft aangebracht aan
het toestel valt niet onder de garantie.
Gebruik het toestel enkel waarvoor het gemaakt is. De garantie
vervalt automatisch bij ongeoorloofd gebruik.
V. 02 – 01/07/2013 7 ©Velleman nv
Page 8

CAMCOLVC8N1
1
AAN/UIT-knop
5
camera
2
poort voor micro SD-kaart
6
statusled
3
functieknop
7
Mini-B USB-poort
4
microfoon
8
resetknop
De garantie geldt niet voor schade door het negeren van bepaalde
richtlijnen in deze handleiding en uw dealer zal de
verantwoordelijkheid afwijzen voor defecten of problemen die hier
rechtstreeks verband mee houden.
Installeer en gebruik deze camera NIET voor illegale praktijken en
respecteer ieders privacy.
4. Eigenschappen
zeer kleine, digitale camera met opnamefunctie
opname op micro SD-kaart (niet meegelev.)
geen intern flashgeheugen
slechts 2 bedieningsknoppen
beeldopname, audio- en video-opname
geleverd met USB-kabel
bevat geen afstandsbedieningsfunctie
5. Omschrijving Raadpleeg de afbeeldingen op pagina 2 van deze handleiding.
6. Gebruik Het toestel IN en UIT schakelen
1. Druk de AAN/UIT-knop [1] in om het toestel in te schakelen. De
oranje statusled [6] licht op om aan te geven dat de camera
gebruiksklaar is.
2. Houd de AAN/UIT-knop [1] gedurende 3 seconden ingedrukt om
de camera uit te schakelen.
Een foto nemen
1. Richt de camera [5].
2. Druk kort op de functietoets [3]. De statusled [6] dooft en licht
opnieuw op.
Opname
1. Richt de camera [5].
2. Houd de functietoets [3] gedurende 3 seconden ingedrukt. De
statusled [6] knippert 3 keer en dooft. De camera neemt nu de
beelden op in AVI-formaat.
V. 02 – 01/07/2013 8 ©Velleman nv
Page 9
CAMCOLVC8N1
3. Druk opnieuw op de functietoets [3] om de opname te stoppen.
De oranje statusled [6] licht opnieuw op. Dit kan enkele seconden
duren.
Opmerking: Bij een vol geheugen of zwakke batterij wordt het
huidige bestand bewaard en schakelt het toestel automatisch uit.
Afspelen
1. Sluit één uiteinde van de USB-kabel (meegelev.) aan op de USB-
poort [7] en het andere uiteinde op een USB-poort van een
ingeschakelde computer (niet meegelev.).
2. De oranje statusled [6] licht op. U kunt het toestel nu gebruiken
als USB-geheugen en bestanden kopiëren, openen en verwijderen.
3. Foto's worden opgeslagen in de map IMAGE, video's in de map
VIDEO.
Het toestel veilig van de computer loskoppelen
Windows®
Het toestel veilig van de computer loskoppelen:
1. Klik op het pictogram "Safely Remove Hardware" (hardware
veilig verwijderen) in de notification area (rechts in de taakbalk)
en klik op het toestel dat u wilt verwijderen.
Windows geeft een melding weer dat u het toestel veilig kunt
verwijderen.
2. Ontkoppel het toestel van de USB-poort.
Macintosh®
1. Klik in de Finder op het eject-symbool naast het toestel.
2. Ontkoppel het toestel van de USB-poort.
7. De tijd op het toestel instellen
De datum op het toestel instellen:
1. Maak een tekstbestand genaamd time.txt waarbij de datum en
tijd worden weergegeven in het volgende formaat:
2012-01-18 11:38:54
2. Sluit het toestel aan op de USB-poort van uw pc.
V. 02 – 01/07/2013 9 ©Velleman nv
Page 10

CAMCOLVC8N1
Dit toestel bevat een interne herlaadbare batterij. Wanneer
het product het einde van zijn levensduur heeft bereikt,
ontdoe u er dan van volgens de plaatselijke regelgeving.
Gooi het toestel niet in het vuur, het kan immers
ontploffen
opneemelement
kleuren CMOS-sensor
lenshoek
65°
opslagcapaciteit
micro SD-kaart van max. 16GB (niet meegelev.)
video-opname
opnameformaat: AVI (audio en video)
videoresolutie: 720 x 480 pixels
beelden per seconde: 25
opnamecapaciteit: <30MB/min
beeldopname
opnameformaat: JPEG
beeldresolutie: 1280 x 1024 pixels (interpolatie)
voeding
ingebouwde lithiumbatterij (herladen via USB)
autonomie batterij
1u
laadduur
2u
stroomverbruik
max. 170mA
3. Kopieer het tekstbestand time.txt naar de rootdirectory van het
toestel.
4. Koppel het toestel veilig los van de computer (zie boven).
5. Schakel het toestel in. Datum en tijd worden, zoals geconfigureerd
in time.txt, naar het systeemgeheugen gekopieerd. Het bestand
zelf wordt uit de directory verwijderd.
Reset
Wanneer het toestel niet meer reageert, gebruik een klein voorwerp
(bijv. een paperclip) om de resetknop [8] voorzichtig in te drukken.
8. Batterij
Bij een zwakke batterij knippert de statusled [6] langzaam.
Sluit het toestel aan op een USB-poort of een USB-
voedingsadapter (niet meegelev.), om de interne batterij op te
laden.
U kunt u geen foto's nemen of video's opnemen terwijl het toestel
is aangesloten op uw pc.
9. Technische specificaties
V. 02 – 01/07/2013 10 ©Velleman nv
Page 11
CAMCOLVC8N1
afmetingen
52 x 32 x 12mm
gewicht
20g
werktemperatuur
0°C ~ 40°C
Gebruik dit toestel enkel met originele accessoires. Velleman
nv is niet aansprakelijk voor schade of kwetsuren bij
(verkeerd) gebruik van dit toestel. Voor meer informatie over
dit product en de laatste versie van deze handleiding, zie
www.velleman.eu. De informatie in deze handleiding kan te
allen tijde worden gewijzigd zonder voorafgaande
kennisgeving.
Windows, Windows XP, Windows 2000, Windows Vista, Windows
Aero, Windows 7, Windows 8, Windows Mobile, Windows Server zijn
geregistreerde handelmerken van Microsoft Corporation in de
Verenigde Staten en andere landen.
iPad, iPod, iPod touch, iPhone, Mac, iMac, MacBook, PowerBook,
Power Mac, Mac OS zijn handelsmerken van Apple Inc., geregistreerd
in de V.S. en andere landen.
© AUTEURSRECHT
Velleman nv heeft het auteursrecht voor deze handleiding.
Alle wereldwijde rechten voorbehouden. Het is niet toegestaan
om deze handleiding of gedeelten ervan over te nemen, te kopiëren,
te vertalen, te bewerken en op te slaan op een elektronisch medium
zonder voorafgaande schriftelijke toestemming van de
rechthebbende.
MODE D'EMPLOI
1. Introduction Aux résidents de l'Union européenne
Informations environnementales importantes concernant ce
produit
Ce symbole sur l'appareil ou l'emballage indique que
l'élimination d'un appareil en fin de vie peut polluer
l'environnement. Ne pas jeter un appareil électrique ou
électronique (et des piles éventuelles) parmi les déchets
municipaux non sujets au tri sélectif; une déchèterie
V. 02 – 01/07/2013 11 ©Velleman nv
Page 12

CAMCOLVC8N1
Garder votre appareil hors de la portée de jeunes enfants
et de personnes non qualifiées.
traitera l'appareil en question. Renvoyer cet appareil à votre
fournisseur ou à un service de recyclage local. Il convient de
respecter la réglementation locale relative à la protection de
l'environnement.
En cas de questions, contacter les autorités locales pour
élimination.
Nous vous remercions de votre achat ! Lire le présent mode d'emploi
attentivement avant la mise en service de l'appareil. Si l'appareil a
été endommagé pendant le transport, ne pas installer et consulter
votre revendeur.
2. Consignes de sécurité
3. Directives générales
Se référer à la garantie de service et de qualité Velleman® en
fin de notice.
Protéger l’appareil des chocs. Traiter l'appareil avec circonspection
pendant l’opération.
Protéger l'appareil des températures extrêmes et de la poussière.
Utiliser cet appareil uniquement à l'intérieur. Protéger de la
pluie, de l’humidité et des projections d’eau.
Se familiariser avec le fonctionnement de l'appareil avant de
l'utiliser.
Il est interdit de modifier l'appareil pour des raisons de sécurité.
Les dommages occasionnés par des modifications par le client ne
tombent pas sous la garantie.
N’utiliser votre lumineux qu’à sa fonction prévue. Un usage
interdit peut annule d'office la garantie.
Les dommages occasionnés par des modifications à l'appareil par
le client, ne tombent pas sous la garantie et votre revendeur
déclinera toute responsabilité pour les problèmes et les défauts
qui en résultent.
Installer et utiliser l'appareil en respectant la législation et la vie
privée des tiers.
4. Caractéristiques
petite caméra numérique avec fonction d'enregistrement
enregistrement sur carte SD micro (non incl.)
V. 02 – 01/07/2013 12 ©Velleman nv
Page 13
CAMCOLVC8N1
1
bouton ON/OFF
5
caméra
2
slot pour carte micro SD
6
LED d’état
3
bouton de fonction
7
port USB Mini-B
4
microphone
8
bouton de réinitialisation
pas de mémoire flash intégrée
seulement 2 touches d'opération
capture d'image, enregistrements audio et vidéo
livré avec câble USB
pas de fonction télécommande
5. Description Se référer aux illustrations en page 2 de ce mode d'emploi.
6. Emploi Allumer et éteindre l'appareil
1. Enfoncer le bouton ON/OFF [1] pour allumer l'appareil. La LED
[6] s’allume (orange) pour indiquer que l'appareil est prêt à
l’emploi.
2. Éteindre l’appareil en maintenant enfoncé le bouton [1] pendant 3
secondes.
Prendre une photo
1. Pointer la caméra [5].
2. Enfoncer brièvement le bouton de fonction [3]. La LED [6]
s’éteint et se rallume.
Enregistrement
1. Pointer la caméra [5].
2. Maintenir enfoncé le bouton de fonction [3] pendant 3 secondes.
La LED [6] clignote 3 fois et s’éteint. L’enregistrement est en
cours et se fait au format AVI.
3. Appuyer de nouveau sur le bouton de fonction [3] pour
interrompre l’enregistrement. La LED [6] se rallume (orange)
(ceci peut durer quelques secondes).
Remarque : Le fichier est sauvegardé et l'appareil s’éteint
automatiquement lorsque la mémoire est pleine ou en cas de pile
faible.
V. 02 – 01/07/2013 13 ©Velleman nv
Page 14

CAMCOLVC8N1
Lecture
1. Connecter une extrémité du câble USB (inclus) au port USB [7]
et connecter l'autre extrémité à un port USB d'un ordinateur
allumé (non incl.).
2. La LED d'état [6] s'allume (orange). Il est possible d'utiliser
l'appareil comme mémoire USB et d'ouvrir, copier ou effacer les
enregistrements.
3. Les images sont sauvegardées dans le dossier IMAGES, les vidéos
dans le dossier VIDEO.
Déconnecter l'appareil de votre ordinateur en toute sécurité
Windows®
Déconnecter l'appareil en toute sécurité :
1. Cliquer sur le symbole "Safely Remove Hardware" (retirer le
matériel en toute sécurité) dans la zone de notification (à droite
de la barre de tâches) et cliquer sur l'appareil à déconnecter.
Windows affichera un message indiquant que l'appareil peut être
déconnecté en toute sécurité.
2. Déconnecter l'appareil du port USB.
Macintosh®
1. Depuis le Finder, cliquer sur le symbole Eject situé à côté de
l'appareil.
2. Déconnecter l'appareil du port USB.
7. Mise à jour de l’heure du système
Régler la date sur l'appareil :
1. Créer un fichier texte avec le nom time.txt et la date et l'heure
au format suivant :
2012-01-18 11:38:54
2. Connecter l'appareil à un port USB de votre PC.
3. Copier le fichier texte time.txt dans le répertoire racine de
l'appareil.
4. Déconnecter l'appareil de votre ordinateur en toute sécurité (voir
ci-dessus).
V. 02 – 01/07/2013 14 ©Velleman nv
Page 15

CAMCOLVC8N1
Cet appareil contient une pile rechargeable. A la fin de sa
durée de vie, se débarrasser de ce produit en respectant la
législation d'élimination locale.
Ne pas jeter l'appareil au feu pour éviter tout risque
d'explosion.
capteur
capteur CMOS couleur
angle de vue
65°
capacité de mémoire
carte micro-SD de max. 16Go (non incl.)
enregistrement vidéo
format d'enregistrement: AVI (audio et vidéo)
définition vidéo: 720 x 480 pixels
images par seconde: 25
capacité d'enregistrement: <30MB/min
capture d'image
format d'enregistrement: JPEG
définition d'image: 1280 x 1024 pixels
(interpolation)
alimentation
accu au lithium intégré (recharge via USB)
autonomie pile
1h
temps de charge
2h
consommation de
courant
max. 170mA
dimensions
52 x 32 x 12mm
5. Allumer l'appareil. A ce point, date et heure comme paramétrées
dans le fichier texte time.txt, sont copiées dans la mémoire de
l'appareil. Le fichier est effacé du répertoire.
Réinitialisation
Lorsque l'appareil ne répond plus, utiliser une petite tige (p.ex. un
trombone) pour enfoncer le bouton de réinitialisation [8].
8. Batterie
Un clignotement lent de la LED [6] indique que le niveau de la
pile est faible.
Connecter l'appareil à un port USB d’un ordinateur allumé ou à un
adaptateur USB (non inclus) pour recharger la pile.
Il n'est pas possible de prendre des photos ou d'enregistrer des
vidéos lorsque l'appareil est connecté à votre ordinateur.
9. Spécifications techniques
V. 02 – 01/07/2013 15 ©Velleman nv
Page 16

CAMCOLVC8N1
poids
20 g
température de
service
0°C ~ 40°C
N'employer cet appareil qu'avec des accessoires d'origine. SA
Velleman ne sera aucunement responsable de dommages ou
lésions survenus à un usage (incorrect) de cet appareil. Pour
plus d'information concernant cet article et la dernière
version de cette notice, consulter notre site
www.velleman.eu. Les spécifications et le contenu de cette
notice peuvent être modifiés sans avis préalable.
Windows, Windows XP, Windows 2000, Windows Vista, Windows
Aero, Windows 7, Windows 8, Windows Mobile, Windows Server sont
des marques déposées de Microsoft Corporation aux Etats-Unis et
dans d'autres pays.
iPad, iPod, iPod touch, iPhone, Mac, iMac, MacBook, PowerBook,
Power Mac, Mac OS sont des marques d'Apple Inc., déposées aux
États-Unis et dans d'autres pays.
© DROITS D’AUTEUR
SA Velleman est l’ayant droit des droits d’auteur pour cette
notice. Tous droits mondiaux réservés. Toute reproduction,
traduction, copie ou diffusion, intégrale ou partielle, du contenu de
cette notice par quelque procédé ou sur tout support électronique
que ce soit est interdite sans l’accord préalable écrit de l’ayant droit.
MANUAL DEL USUARIO
1. Introducción A los ciudadanos de la Unión Europea
Importantes informaciones sobre el medio ambiente
concerniente a este producto
Este símbolo en este aparato o el embalaje indica que, si
tira las muestras inservibles, podrían dañar el medio
ambiente. No tire este aparato (ni las pilas, si las hubiera)
en la basura doméstica; debe ir a una empresa
especializada en reciclaje. Devuelva este aparato a su
distribuidor o a la unidad de reciclaje local. Respete las
V. 02 – 01/07/2013 16 ©Velleman nv
Page 17

CAMCOLVC8N1
Mantenga el aparato lejos del alcance de personas no
capacitadas y niños.
leyes locales en relación con el medio ambiente.
Si tiene dudas, contacte con las autoridades locales para
residuos.
¡Gracias por elegir Velleman! Lea atentamente las instrucciones del
manual antes de usar el aparato. Si el aparato ha sufrido algún daño
en el transporte no lo instale y póngase en contacto con su
distribuidor.
2. Instrucciones de seguridad
3. Normas generales
Véase la Garantía de servicio y calidad Velleman® al final de
este manual del usuario.
No agite el aparato. Evite usar excesiva fuerza durante el manejo
y la instalación.
No exponga este aparato a polvo ni temperaturas extremas.
Utilice el aparato sólo en interiores. No exponga este equipo a
lluvia, humedad ni a ningún tipo de salpicadura o goteo.
Familiarícese con el funcionamiento del aparato antes de utilizarlo.
Por razones de seguridad, las modificaciones no autorizadas del
aparato están prohibidas. Los daños causados por modificaciones
no autorizadas, no están cubiertos por la garantía.
Utilice sólo el aparato para las aplicaciones descritas en este
manual. Su uso incorrecto anula la garantía completamente.
Los daños causados por descuido de las instrucciones de
seguridad de este manual invalidarán su garantía y su distribuidor
no será responsable de ningún daño u otros problemas
resultantes.
Instale y utilice la cámara al respetar la legislación et la vida
privada de terceros.
4. Características
pequeña cámara digital con función de grabación
grabación en tarjeta micro SD (no incl.)
no hay memoria flash incorporada
sólo 2 pulsadores
captura de imagen, grabación de audio y vídeo
se entrega con cable USB
V. 02 – 01/07/2013 17 ©Velleman nv
Page 18

CAMCOLVC8N1
1
interruptor ON/OFF
5
cámara
2
puerto para tarjeta micro SD
6
LED de estado
3
botón de función
7
puerto USB Mini-B
4
micrófono
8
botón de reinicialización (reset)
no incluye una función de mando a distancia
5. Descripción Véase las figuras en la página 2 de este manual del usuario.
6. Funcionamiento Activar y desactivar el aparato
1. Pulse el interruptor ON/OFF [1] para activar la cámara. El LED
[6] se ilumina (naranja) para indicar que el aparato está listo
para utilizar.
2. Desactive el aparato al mantener pulsado el botón [1] 3
segundos.
Sacar una foto
1. Apunte la cámara [5].
2. Pulse brevemente el botón de función [3]. El LED [6] se apaga y
vuelve a iluminarse.
Grabación
1. Apunte la cámara [5].
2. Mantenga pulsado el botón de función [3] 3 segundos. El LED [6]
parpadea 3 veces y se apaga. El aparato graba las imágenes en el
formato AVI.
3. Vuelva a pulsar el botón de función [3] para interrumpir la
grabación. El LED [6] vuelve a iluminarse (naranja) (esto puede
durar algunos segundos).
Observación: El fichero se guarda y la cámara se desactiva
automáticamente si la memoria está llena o si la pila está agotada.
Reproducción
1. Conecte el llavero con el cable USB [7] incluido a un puerto USB
de un ordenador activado.
2. El LED de estado [6] se ilumina (naranja). Es posible utilizar el
bolígrafo como memoria USB y abrir, copiar o borrar archivos.
3. Las imágenes se guardan en el fichero IMAGE. Los vídeos se
guardan en el fichero VIDEO.
V. 02 – 01/07/2013 18 ©Velleman nv
Page 19

CAMCOLVC8N1
Quitar el dispositivo de forma segura
Windows®
Para quitar el aparato de forma segura:
1. Haga clic en el icono Safely Remove Hardware (quitar
hardware de forma segura) en el área de notificación situada a la
derecha de la barra de tareas y haga clic en el aparato que quiere
quitar.
Windows visualizará una notificación para informarle que puede
quitar el dispositivo de forma segura.
2. Desconecte el aparato de la puerta USB.
Macintosh®
1. En el Finder, haga clic en el icono Eject (expulsar) al lado del
dispositivo.
2. Desconecte el aparato de la puerta USB.
7. Actualizar la hora del sistema
Ajustar la fecha en el aparato:
1. Cree un archivo de texto con el nombre time.txt y la fecha y el
tiempo en el siguiente formato:
2012-01-18 11:38:54
2. Introduzca el camera en un puerto USB del ordenador.
3. Copie el fichero time.txt al directorio raíz de la camera.
4. Quite el aparato de forma segura (véase arriba).
5. Active el aparato Ahora, se copian la fecha y la hora, como han
sido configuradas en el fichero time.txt, a la memoria de la
camera. El fichero mismo se borra del directorio.
Reset
Si el aparato ya no reacciona, utilice un pequeño pin (p.ej.
sujetapapeles) para pulsar cuidadosamente el botón de
reinicialización[8].
8. Batería
El parpadeo lento del [6] indica que la pila agotada está agotada.
V. 02 – 01/07/2013 19 ©Velleman nv
Page 20
CAMCOLVC8N1
Este aparato funciona con una batería recargable. Al final
de su vida útil, respete las leyes locales en relación con el
medio ambiente.
No eche el aparato al fuego porque puede explotar.
elemento de imagen
CMOS a color
ángulo de visión
65°
capacidad de memoria
tarjeta micro SD de máx. 16GB (no incl.)
grabación de vídeo
formato de grabación: AVI (audio y vídeo)
resolución vídeo: 720 x 480 píxeles
imágenes por segundo 25
capacidad de grabación: <30MB/min
captura de imagen
formato de grabación: JPEG
resolución de la imagen: 1280 x 1024
píxeles (interpolación)
alimentación
batería de litio incorporada (recargar por
USB)
autonomía de la
batería
1h
tiempo de carga
2h
consumo de corriente
max. 170mA
dimensiones
52 x 32 x 12mm
peso
20g
temperatura de
funcionamiento
0°C ~ 40°C
Conecte el llavero a un puerto USB de un ordenador activado o a
un adaptador USB (no incl.) para recargar la pila.
No es posible sacar fotos o grabar un vídeo mientras el aparato
esté conectado al ordenador.
9. Especificaciones
Utilice este aparato sólo con los accesorios originales.
Velleman NV no será responsable de daños ni lesiones
causados por un uso (indebido) de este aparato. Para más
información sobre este producto y la versión más reciente de
este manual del usuario, visite nuestra página
V. 02 – 01/07/2013 20 ©Velleman nv
Page 21

CAMCOLVC8N1
www.velleman.eu. Se pueden modificar las especificaciones y
el contenido de este manual sin previo aviso.
Windows, Windows XP, Windows 2000, Windows Vista, Windows
Aero, Windows 7, Windows 8, Windows Mobile, Windows Server son
marcas registradas de Microsoft Corporation en los Estados Unidos y
otros países.
iPad, iPod, iPod touch, iPhone, Mac, iMac, MacBook, PowerBook,
Power Mac, Mac OS son marcas comerciales de Apple Inc.,
registradas en EE.UU. y otros países.
© DERECHOS DE AUTOR
Velleman NV dispone de los derechos de autor para este
manual del usuario. Todos los derechos mundiales
reservados. Está estrictamente prohibido reproducir, traducir,
copiar, editar y guardar este manual del usuario o partes de ello sin
previo permiso escrito del derecho habiente.
BEDIENUNGSANLEITUNG
1. Einführung An alle Einwohner der Europäischen Union
Wichtige Umweltinformationen über dieses Produkt
Dieses Symbol auf dem Produkt oder der Verpackung zeigt
an, dass die Entsorgung dieses Produktes nach seinem
Lebenszyklus der Umwelt Schaden zufügen kann.
Entsorgen Sie die Einheit (oder verwendeten Batterien)
nicht als unsortiertes Hausmüll; die Einheit oder
verwendeten Batterien müssen von einer spezialisierten
Firma zwecks Recycling entsorgt werden. Diese Einheit muss an den
Händler oder ein örtliches Recycling-Unternehmen retourniert
werden. Respektieren Sie die örtlichen Umweltvorschriften.
Falls Zweifel bestehen, wenden Sie sich für
Entsorgungsrichtlinien an Ihre örtliche Behörde.
Vielen Dank, dass Sie sich für Velleman entschieden haben! Lesen
Sie diese Bedienungsanleitung vor Inbetriebnahme sorgfältig durch.
Überprüfen Sie, ob Transportschäden vorliegen. Sollte dies der Fall
sein, verwenden Sie das Gerät nicht und wenden Sie sich an Ihren
Händler.
V. 02 – 01/07/2013 21 ©Velleman nv
Page 22

CAMCOLVC8N1
Halten Sie Kinder und Unbefugte vom Gerät fern.
2. Sicherheitshinweise
3. Allgemeine Richtlinien
Siehe Velleman® Service- und Qualitätsgarantie am Ende dieser
Bedienungsanleitung.
Vermeiden Sie Erschütterungen. Vermeiden Sie rohe Gewalt
während der Installation und Bedienung des Gerätes.
Schützen Sie das Gerät vor extremen Temperaturen und Staub.
Verwenden Sie das Gerät nur im Innenbereich. Schützen Sie
das Gerät vor Regen und Feuchte. Setzen Sie das Gerät keiner
Flüssigkeit wie z.B. Tropf- oder Spritzwasser, aus.
Nehmen Sie das Gerät erst in Betrieb, nachdem Sie sich mit
seinen Funktionen vertraut gemacht haben.
Eigenmächtige Veränderungen sind aus Sicherheitsgründen
verboten. Bei Schäden verursacht durch eigenmächtige
Änderungen erlischt der Garantieanspruch.
Verwenden Sie das Gerät nur für Anwendungen beschrieben in
dieser Bedienungsanleitung. Dies kann zu Schäden am Produkt
führen und erlischt der Garantieanspruch.
Bei Schäden, die durch Nichtbeachtung der Bedienungsanleitung
verursacht werden, erlischt der Garantieanspruch. Für daraus
resultierende Folgeschäden übernimmt der Hersteller keine
Haftung.
Installieren und verwenden Sie das Gerät nicht für illegale
Praktiken und beachten Sie die Intimsphäre aller
4. Eigenschaften
sehr kleine digitale HD-Kamera
Aufnahme auf Micro SD-Karte (nicht mitgeliefert)
es gibt keinen internen Flash-Speicher
nur 2 Bedienungstasten
Bild-, Audio- und Video-Aufnahme
Lieferung mit USB-Kabel
enthält keine Fernbedienungsfunktion
V. 02 – 01/07/2013 22 ©Velleman nv
Page 23

CAMCOLVC8N1
1
EIN/AUS-Schalter
5
Kamera
2
Anschluss für micro SDKarte
6
Status-LED
3
Funktionstaste
7
Mini-B USB-Anschluss
4
Mikrofon
8
Reset-Taste (Rücksetzung)
5. Beschreibung Siehe Abbildungen, Seite 2 dieser Bedienungsanleitung.
6. Betrieb Das Gerät ein- und ausschalten
1. Drücken Sie den EIN/AUS-Schalter [1] um das Gerät
einzuschalten. Die LED [6] leuchtet (orange), um anzuzeigen,
dass die Kamera fertig ist, um aufzunehmen.
2. Halten Sie den EIN/AUS-Schalter [1] 3 Sekunden gedrückt, um
die Kamera auszuschalten.
Ein Foto machen
1. Richten Sie die Kamera [5].
2. Drücken Sie kurz die Funktionstaste [3]. Die Status-LED [6]
erlischt und leuchtet wieder.
Aufnahme
1. Richten Sie die Kamera [5].
2. Halten Sie die Funktionstaste [3] 3 Sekunden gedrückt. Die
Status-LED [6] blinkt 3 Mal und erlischt. Das Gerät macht nun die
Bilder in AVI-Format.
3. Drücken Sie die Funktionstaste [3] wieder, um die Aufnahme zu
stoppen. Die Status-LED [6] leuchtet wieder. Dies kann einige
Sekunden dauern.
Bemerkung: Bei einem vollen Speicher oder einer schwachen
Batterie wird die aktuelle Datei gespeichert und schaltet der
Schlüsselanhänger automatisch aus.
Wiedergabe
1. Verbinden Sie den Schlüsselanhänger [7] über das mitgelieferte
USB-Kabel mit dem USB-Anschluss eines eingeschalteten
Computers.
2. Die orangefarbige Status-LED [6] leuchtet. Sie können den
Kugelschreiber nun als Memorystick verwenden und Dateien
kopieren, öffnen und löschen.
V. 02 – 01/07/2013 23 ©Velleman nv
Page 24

CAMCOLVC8N1
3. Abbildungen werden in der IMAGE-Datei gespeichert. Videos
werden in der VIDEO-Datei gespeichert.
Das Gerät sicher entfernen
Windows®
Um das Gerät sicher zu entfernen:
1. Klicken Sie auf das Symbol Safely Remove Hardware
(Hardware sicher entfernen) im Benachrichtigungsbereich rechts
von der Taskleiste und klicken Sie auf das Gerät, dass Sie
entfernen möchten.
Es erscheint die Meldung: das Gerät kann sicher entfernt werden.
2. Trennen Sie das Gerät vom USB-Port.
Macintosh®
1. Klicken Sie im Finder auf das Eject-Symbol (auswerfen) neben
das Gerät.
2. Trennen Sie das Gerät vom USB-Port.
7. Die Systemzeit aktualisieren
Das Datum auf das Gerät einstellen:
1. Erstellen Sie eine Textdatei mit dem Namen time.txt. Schreiben
Sie das Datum und die Uhrzeit im folgenden Format:
2012-01-18 11:38:54
2. Verbinden Sie die Kamera mit dem USB-Port des PC.
3. Kopieren Sie die Datei time.txt zum Hauptverzeichnis der
Kamera.
4. Entfernen Sie das Gerät (siehe oben).
5. Schalten Sie die Kamera ein. Datum und Uhrzeit, wie in time.txt
konfiguriert, werden zum Speicher kopiert. Die Datei selber wird
gelöscht.
Reset
Setzen Sie das Gerät zurück, indem Sie die Reset-Taste [8] mit
einem kleinen Gegenstand (z.B. Heftklammer) vorsichtig drücken.
V. 02 – 01/07/2013 24 ©Velleman nv
Page 25

CAMCOLVC8N1
Dieses Gerät enthält eine interne wieder aufladbare
Batterie. Entsorgen Sie das Produkt am Ende seiner
Lebensdauer gemäß den geltenden gesetzlichen.
Werfen Sie das Gerät nicht ins Feuer, denn es könnte
explodieren.
Aufnahme-Element
Farb-CMOS-Sensor
Blickwinkel
65°
Speicherkapazität
SD-Microkarte von max. 16GB (nicht
mitgeliefert)
Video-Aufnahme
Aufnahmeformat: AVI (Audio und Video)
Video-Auflösung: 720 x 480 Pixel
Bilder per Sekunde): 25
Aufnahmekapazität: <30MB/min
Bildaufnahme
Aufnahmeformat: JPEG
Bildauflösung: 1280 x 1024 Pixel (Interpolation)
Netzteil
eingebaute Lithiumbatterie (über USB aufladen)
Autonomie
Batterie
1 Std.
Ladezeit
2 Std.
Stromverbrauch
max. 170mA
Abmessungen
52 x 32 x 12mm
Gewicht
20 g
Betriebstemperatu
r
0°C ~ 40°C
8. Batterie
Bei einer schwachen Batterie blinkt die Status-LED [6] langsam.
Verbinden Sie den Schlüsselanhänger mit einem USB-Port oder
mit einem USB-Netzteil, um die interne Batterie zu laden).
Es ist unmöglich, Fotos zu machen oder ein Video aufzunehmen
solange das Gerät mit dem Computer verbunden ist.
9. Technische Daten
Verwenden Sie dieses Gerät nur mit originellen Zubehörteilen.
Velleman NV übernimmt keine Haftung für Schaden oder
Verletzungen bei (falscher) Anwendung dieses Gerätes. Für
mehr Informationen zu diesem Produkt und die neueste
V. 02 – 01/07/2013 25 ©Velleman nv
Page 26

CAMCOLVC8N1
Version dieser Bedienungsanleitung, siehe www.velleman.eu.
Alle Änderungen ohne vorherige Ankündigung vorbehalten.
Windows, Windows XP, Windows 2000, Windows Vista, Windows
Aero, Windows 7, Windows 8, Windows Mobile, Windows Server sind
eingetragene Warenzeichen von Microsoft Corporation in den VS und
anderen Ländern.
iPad, iPod, iPod touch, iPhone, Mac, iMac, MacBook, PowerBook,
Power Mac, Mac OS sind Warenzeichen von Apple Inc., eingetragen
in den USA und anderen Ländern.
© URHEBERRECHT
Velleman NV besitzt das Urheberrecht für diese
Bedienungsanleitung. Alle weltweiten Rechte vorbehalten.
Ohne vorherige schriftliche Genehmigung des Urhebers ist es nicht
gestattet, diese Bedienungsanleitung ganz oder in Teilen zu
reproduzieren, zu kopieren, zu übersetzen, zu bearbeiten oder zu
speichern.
MANUAL DO UTILIZADOR
1. Introdução Aos cidadãos da União Europeia
Importantes informações sobre o meio ambiente no que
respeita a este produto
Este símbolo no aparelho ou na embalagem indica que,
enquanto desperdícios, poderão causar danos no meio
ambiente. Não deite o aparelho (nem as pilhas, se as
houver) no lixo doméstico; dirija-se a uma empresa
especializada em reciclagem. Devolva o aparelho ao seu
distribuidor ou ao posto de reciclagem local. Respeite a
legislação local relativa ao meio ambiente.
Em caso de dúvidas, contacte com as autoridades locais para
os resíduos.
Agradecemos o facto de ter adquirido este aparelho. Leia
atentamente as instruções do manual antes de usar o aparelho. Caso
o aparelho tenha sofrido algum dano durante o transporte não o
instale e entre em contacto com o seu distribuidor.
V. 02 – 01/07/2013 26 ©Velleman nv
Page 27

CAMCOLVC8N1
Mantenha o aparelho fora do alcance de crianças e pessoas
não autorizadas.
2. Instruções de segurança
3. Normas gerais
Consulte a Garantia de serviço e qualidade Velleman® na parte
final deste manual do utilizador.
Proteja o aparelho de quedas e má utilização. Evite usar força
excessiva ao utilizar o aparelho.
Proteja o aparelho de temperaturas extremas e do pó.
Usar apenas em interiores. Proteger o aparelho contra a chuva
e humidade ou qualquer tipo de salpicos ou gotas.
Familiarize-se com o funcionamento do aparelho antes de o
utilizar.
Por razões de segurança, estão proíbidas quaisquer modificações
do aparelho desde que não autorizadas. Os danos provocados por
modificações não autorizadas, não estão cobertos pela garantia.
Utilize o aparelho apenas para as aplicações descritas neste
manual. Uma utilização incorrecta anula a garantia
completamente.
Danos causados pelo não cumprimento das normas de segurança
referidas neste manual anulam a garantia e o seu distribuidor não
será responsável por qualquer danos ou outros problemas daí
resultantes.
Nunca utilize este aparelho para violar as leis de privacidade ou
levar a cabo quaisquer actividades ilegais.
4. Características
pequena câmara digital com função de gravação
gravação em cartão de memória micro SD (não incl.)
sem memória flash incorporada
apenas 2 pulsadores
captura de imagem, gravação áudio e vídeo
cabo USB incluído
não inclui função de comando à distância
V. 02 – 01/07/2013 27 ©Velleman nv
Page 28

CAMCOLVC8N1
1
botão on/off
5
camera
2
entrada para cartão micro
SD
6
LED de estado
3
botão de função
7
porta USB Mini-B
4
microfone
8
botão de reinicialização
5. Descrição
Ver as figuras da página 2 deste manual do utilizador.
6. Utilização Função ON e OFF
1. Prima o interruptor ON/OFF [1] para activar a câmara. O LED [6]
acende-se (laranja) para indicar que o aparelho está pronto a
utilizar.
2. Desligue o aparelho pressionando o botão [1] durante 3
segundos.
Tirar uma foto
1. Aponte a câmara [5].
2. Prima brevemente o botão de função [3]. O LED [6] apaga-se e
volta a acender-se.
Gravação
1. Aponte a câmara [5].
2. Pressione o botão de função [3] durante 3 segundos. O LED [6]
pisca 3 vezes e apaga-se. O aparelho grava as imagens em
formato AVI.
3. Volte a pressionar o botão de função [3] para interromper a
gravação. O LED [6] volta a acender (laranja) (pode demorar
segundos).
Nota: O ficheiro é guardado e a câmara desliga-se automáticamente
caso a memória esteja cheia ou a pilha esteja gasta.
Reprodução
1. Ligue o porta-chaves usando o cabo USB [7] incluído a uma porta
USB de um computador ligado.
2. O LED de estado [6] acende na cor laranja e o equipamento não
terá a função de um dispositivo de memória USB. Copiar, abrir ou
apagar as gravações como faria com qualquer outros ficheiros no
seu computador.
V. 02 – 01/07/2013 28 ©Velleman nv
Page 29

CAMCOLVC8N1
3. As imagens são gravadas na pasta IMAGE, os vídeos na pasta
VIDEO.
Remova o dispositivo do seu computador em segurança
Windows®
Para remover o dispositivo em segurança:
1. Clique no ícone Safely Remove Hardware na área de
notificações à direita da barra de tarefas e clique no dispositivo
que pretende remover.
O Windows emite uma notiificação a informar que é seguro
remover o dispositivo.
2. Retire o dispositivo da porta USB.
Macintosh®
1. No Finder, clique no ícone Eject junto ao dispositivo.
2. Retire o dispositivo da porta USB.
7. Actualizar a hora do sistema
Acertar a data do dispositivo:
1. Cirar um ficheiro de texto com o nome time.txt com a data e
hora conforme o formato a seguir indicado:
2012-01-18 11:38:54
2. Introduza a câmera na porta USB com computador.
3. Copie o ficheiro time.txt para o directório raiz da câmera.
4. Remova o dispositivo do seu computador em segurança
5. Ligue a câmera. Agora, a data e a hora são copiadas, conforme
foram configuradas no ficheiro time.txt, para a memória da
câmera.
Reinicializar Prima o botão de reinicialização [8] utilizando um objecto pequeno.
8. A bateria interna
O piscar lento de [6] indica que a pilha está gasta.
Ligue o porta-chaves a uma porta USB de um computador ligado
ou a um adaptador USB (não incl.) para recarregar a pilha.
V. 02 – 01/07/2013 29 ©Velleman nv
Page 30

CAMCOLVC8N1
Este equipamento tem incorporada uma bateria
recarregável interna. No termo da sua duração o
equipamento deve ser eliminado de acordo com a
legislação local.
Não aproximar do lume pois há o perigo de explosão.
elemento de imagem
sensor CMOS a cores
ângulo da lente
65°
capacidade de memória
micro cartão de memória SD de máx. 16GB
(não incl.)
gravação em vídeo
formato de gravação: AVI (áudio e vídeo)
resolução de vídeo: 720 x 480 pixeis
imagens por segundo): 25
capacidade de gravação: <30MB/min
captura de imagem
formato de gravação: JPEG
resoluçao de imagem: 1280 x 1024 pixeis
(interpolação)
alimentação
bateria de litio incorporada
(recarregamento por USB)
autonomia da bateria
1h
tempo de carregamento
2h
consumo de corrente
max. 170mA
dimensões
52 x 32 x 12 mm
peso
20g
temperatura de
funcionamento
0°C ~ 40°C
Não poderá tirar fotografias or gravar vídeos enquanto o
dispositivo estiver ligado ao computador.
9. Especificações
Utilize este aparelho apenas com acessórios originais. A
Velleman NV não será responsável por quaisquer danos ou
lesões causados pelo uso (indevido) do aparelho. Para mais
informação sobre este produto e para aceder à versão mais
recente deste manual do utilizador, visite a nossa página
www.velleman.eu. Podem alterar-se as especificações e o
conteúdo deste manual sem aviso prévio.
V. 02 – 01/07/2013 30 ©Velleman nv
Page 31

CAMCOLVC8N1
Windows, Windows XP, Windows 2000, Windows Vista, Windows
Aero, Windows 7, Windows 8, Windows Mobile, Windows Server são
marcas da Microsoft Corporation registadas tanto nos Estados Unidos
como em outros países.
iPad, iPod, iPod touch, iPhone, Mac, iMac, MacBook, PowerBook,
Power Mac, Mac OS são marcas da Apple Inc., registadas nos U.S. e
em outros países.
© DIREITOS DE AUTOR
A Velleman NV detém os direitos de autor deste manual do
utilizador. Todos os direitos mundiais reservados. É
estritamente proibido reproduzir, traduzir, copiar, editar e gravar
este manual do utilizador ou partes deste sem prévia autorização
escrita por parte da detentora dos direitos.
INSTRUKCJA OBSŁUGI
1. Wstęp
Przeznaczona dla mieszkańców Unii Europejskiej.
Ważne informacje dotyczące środowiska.
Ten symbol umieszczony na urządzeniu bądź opakowaniu
wskazuje, że wyrzucenie produktu może być szkodliwe dla
środowiska. Nie wyrzucaj urządzenia lub baterii do
zbiorczego śmietnika, tylko do specjalnie przeznaczonych
do tego pojemników na urządzenia elektroniczne lub
skontaktuj się z firmą zajmującą się recyklingiem.
Urządzenie możesz oddać dystrybutorowi lub firmie zajmującej się
recyklingiem. Postępuj zgodnie z zasadami bezpieczeństwa
dotyczącymi środowiska.
Jeśli masz wątpliwości skontaktuj się z firmą zajmującą się
utylizacją odpadów.
Dziękujemy za wybór produktu firmy Velleman! Prosimy o dokładne
zapoznanie się z instrukcją obsługi przed użyciem. Jeśli urządzenie
zostało uszkodzone podczas transportu prosimy o nie korzystanie z
niego i skontaktowanie się ze sprzedawcą.
V. 02 – 01/07/2013 31 ©Velleman nv
Page 32

CAMCOLVC8N1
Chronić urządzenie przed dziećmi i nieupoważnionymi
użytkownikami.
2. Instrukcje bezpieczeństwa
3. Informacje ogólne
Proszę zapoznać się z informacjami w części Velleman® usługi i
gwarancja jakości na końcu niniejszej instrukcji.
Chronić urządzenie przed wstrząsami i użytkować wyłącznie
zgodnie z przeznaczeniem. Podczas obsługi urządzenia unikać
stosowania siły.
Chronić urządzenie przed zbyt wysoką temperaturą i pyłem.
Wyłącznie do użytku wewnątrz pomieszczeń. Chronić
urządzenie przed deszczem, wilgocią, rozpryskami i ściekającymi
cieczami.
Przed rozpoczęciem pracy z urządzeniem należy zapoznać się z
jego funkcjami.
Wprowadzanie zmian w urządzeniu jest zabronione ze względów
bezpieczeństwa. Należy pamiętać, że uszkodzenia spowodowane
przez zmiany wprowadzone przez użytkownika nie są objęte
gwarancją.
Urządzenie należy używać jedynie zgodnie z przeznaczeniem.
Używanie urządzenia niezgodnie z przeznaczeniem spowoduje
unieważnienie gwarancji.
Gwarancja nie obejmuje uszkodzeń spowodowanych w wyniku
nieprzestrzegania niniejszej instrukcji, a sprzedawca nie ponosi
odpowiedzialności za wynikłe uszkodzenia lub problemy.
NIE INSTALUJ I NIE KORZYSTAJ z kamery w celach nielegalnych
oraz szanuj prawo do prywatności.
4. Cechy
bardzo mała cyfrowa kamera
Rejestracja na karcie micro-SD, (brak w zestawie.)
brak wbudowanej pamieci flash
obsluga przy pomocy 2 przycisków
rejestracja dzwieku oraz obrazu
przewód USB w komplecie
no remote control function
V. 02 – 01/07/2013 32 ©Velleman nv
Page 33

CAMCOLVC8N1
1
Przełącznik wł/wył (ON/OFF)
5
camera
2
gniazdo karty pamięci microsd
6
dioda LED status kamery
3
przycisk sterowania
7
port USB
4
mikrofon
8
przycisk resetowania
5. Przegląd Patrz rysunki na stronie 2 niniejszej instrukcji.
6. Zastosowanie Włączanie i wyłączanie
1. Włącznikiem ON/OFF [1] włącz kamerę. Gotowość kamery do
pracy potwierdzi zaświecenie się diody LED statusu kamery [6] w
kolorze pomarańczowym.
2. Aby wyłączyć kamerę naciśnij i przytrzymaj przycisk ON/OFF [1]
na czas nie krótszy niż 3 sekundy.
Robienie zdjęć
1. Skieruj obiektyw kamery [5] w kierunku, który cię interesuje.
2. Aby zrobić zdjęcie wciśnij krótko przycisk sterowania [3].
Wykonanie zdjęcia zostanie zasygnalizowane krótkim zgaśnięciem
diody LED statusu kamery [6].
Nagrywanie
1. Skieruj obiektyw kamery [5] w kierunku, który cię interesuje.
2. Aby rozpocząć rejestrację obrazu ( filmu) wciśnij i przytrzymaj nie
przez okres nie krótszy niż 3 sekundy przycisk sterowania [3].
Rozpoczęcie filmowania zostanie zasygnalizowane trzykrotnym
błyskiem diody LED statusu kamery [6]. Obraz video zostanie
zarejestrowany w formacie AVI.
3. Aby zatrzymać rejestrację obrazu naciśnij ponownie przycisk
sterowania [3]. Dioda LED [6] statusu kamery zaświeci się w
kolorze pomarańczowym.
Uwaga: Gdy zostanie zapełniona pamięć micro-SD lub akumulator
zostanie rozładowany, urządzenie zapisze bieżący plik i wyłączy się.
Odtwarzanie plików.
1. Przy pomocy przewodu USB [7] będącego w zestawie podłącz
kamerę z komputerem PC.
2. Dioda LED statusu kamery [6] zaświeci się w kolorze
pomarańczowym. Podłączona kamera do komputera będzie
V. 02 – 01/07/2013 33 ©Velleman nv
Page 34
CAMCOLVC8N1
widziana w systemie jako dysk wymienny USB. Dane można
kopiować, odtwarzać lub kasować.
3. Zdjęcia zostały zapisane w folderze IMAGE, filmy w folderze
VIDEO.
Usuń w bezpieczny sposób urządzenie z komputera Windows®
Aby w bezpieczny sposób usunąć urządzenie:
1. Kliknij na ikonę Safely Remove Hardware [Bezpieczne usuwanie
sprzętu] w obszarze powiadomień, po prawej od pasku zadań,
następnie kliknij na urządzenie jeśli chcesz je usunąć.
Windows wyświetli powiadomienie, że sprzęt może zostać w
bezpieczny sposό b usunięty.
2. Wyjmij urządzenie z portu USB.
Macintosh®
1. Kliknij ikonę Eject zboku urządzenia.
2. Wyjmij urządzenie z portu USB.
7. Ustawianie daty systemowej.
Aby ustawić datę na urządzeniu:
1. Utwórz plik tekstowy z nazwą time.txt z datą i godziną w
następującym formacie:
2012-01-18 11:38:54
2. Za pomocą przewodu USB podłącz kamerę do komputera PC.
3. Skopiuj plik time.txt do katalogu głównego kamery widzianej
jako pamięć masowa kamerę.
4. W bezpieczny sposό b usuń urządzenie z komputera (zobacz
powyżej).
5. Włącz kamerę. W chwili włączenia plik time.txt zostaje
załadowany do systemu kamery i ustawiony czas i data. Plik
ustawiania daty po jego załadowaniu jest automatycznie usuwany
z katalogu głównego systemu plików kamery.
V. 02 – 01/07/2013 34 ©Velleman nv
Page 35

CAMCOLVC8N1
Urządzenie to posiada wewnętrzny akumulator. Gdy
skończy się jego przydatność, urządzenie usuwać zgodnie z
lokalnymi przepisami.
Nie wyrzucać urządzenia do ognia, ponieważ mogą
eksplodować.
przetwornik obrazu
CMOS kolor
kąt widzenia obiektywu
65°
pojemność pamięci
max. 16 GB micro-SD (brak w zestawie)
format zapisu video
format zapisu: AVI (audio i video)
rozdzielczość: 720 x 480 pikseli
liczba półobrazów 25
prędkość zapisu: <30MB/min
format zapisu zdjec
format zapisu: JPEG
rozdzielczość: 1280 x 1024 pixels
(interpolacja)
zasilanie
wbudowany akumulator litowy
(ładowanie przez port USB)
pojemność akumulatora
wewnętrznego
1h
Czas ładowania
2h
pobór prądu
max. 170mA
wymiary
52 x 32 x 12mm
Resetowanie urządzenia.
Jeżeli urządzenie nie reaguje na żadne przyciski, należy je
zresetować. W tym celu należy użyć igłę lub spinacz do papieru i
wcisnąć przycisk resetowania kamery [8].
8. Bateria
Niski stan naładowania akumulatora sygnalizowany jest powolnym
pulsowaniem dioda LED statusu kamery [6].
Aby naładować wewnętrzną baterie aparatu/kamery podłącz do
komputera przy pomocy przewodu USB lub do ładowaki z
wyjściem USB ( brak w zestawie).
Gdy urządzenie jest podłączone do komputera robienie zdjęć lub
nagrywanie filmό w będzie niemożliwe.
9. Specyfikacja techniczna
V. 02 – 01/07/2013 35 ©Velleman nv
Page 36

CAMCOLVC8N1
waga
20g
temperaturowy zakres
pracy
0°C ~ 40°C
Używaj tylko oryginalnych akcesoriów. Firma Velleman nv nie
ponosi odpowiedzialności w przypadku uszkodzeń lub
obrażeń ciała powstałych w wyniku (nieprawidłowej) obsługi
urządzenia. Aby uzyskać więcej informacji dotyczących tego
produktu i najnowsza wersja tej instrukcji, odwiedź naszą
stronę internetową www.velleman.eu. Informacje zawarte w
niniejszej instrukcji obsługi mogą ulec zmianie bez
wcześniejszego powiadomienia.
Windows, Windows XP, Windows 2000, Windows Vista, Windows
Aero, Windows 7, Windows 8, Windows Mobile oraz Windows Server
to zarejestrowane znaki handlowe firmy Microsoft Corporation w
Stanach Zjednoczonych i innych krajach.
iPad, iPod, iPod touch, iPhone, Mac, iMac, MacBook, PowerBook,
Power Mac oraz Mac OS to zarejestrowane znaki handlowe firmy
Apple Inc., zarejestrowanej w USA i innych krajach.
© INFORMACJA O PRAWACH WŁASNOŚCI
Instrukcja ta jest własnością firmy Velleman NV i jest
chroniona prawami autorskimi. Wszystkie prawa są
zastrzeżone na całym świecie. Żadna część tej instrukcji nie może
być kopiowana, przedrukowywana, tłumaczona lub konwertowana na
wszelkie nośniki elektronicznych lub w inny sposób, bez uprzedniej
pisemnej zgody właściciela praw autorskich.
V. 02 – 01/07/2013 36 ©Velleman nv
Page 37

Velleman® Service and Quality Warranty
Since its foundation in 1972, Velleman®
acquired extensive experience in the
electronics world and currently distributes its
products in over 85 countries.
All our products fulfil strict quality requirements
and legal stipulations in the EU. In order to
ensure the quality, our products regularly go
through an extra quality check, both by an
internal quality department and by specialized
external organisations. If, all precautionary
measures notwithstanding, problems should
occur, please make appeal to our warranty
(see guarantee conditions).
General Warranty Conditions Concerning
Consumer Products (for EU):
• All consumer products are subject to a 24month warranty on production flaws and
defective material as from the original date of
purchase.
• Velleman® can decide to replace an article
with an equivalent article, or to refund the retail
value totally or partially when the complaint is
valid and a free repair or replacement of the
article is impossible, or if the expenses are out
of proportion.
You will be delivered a replacing article or a
refund at the value of 100% of the purchase
price in case of a flaw occurred in the first year
after the date of purchase and delivery, or a
replacing article at 50% of the purchase price
or a refund at the value of 50% of the retail
value in case of a flaw occurred in the second
year after the date of purchase and delivery.
• Not covered by warranty:
- all direct or indirect damage caused after
delivery to the article (e.g. by oxidation,
shocks, falls, dust, dirt, humidity...), and by the
article, as well as its contents (e.g. data loss),
compensation for loss of profits;
- consumable goods, parts or accessories that
are subject to an aging process during normal
use, such as batteries (rechargeable, nonrechargeable, built-in or replaceable), lamps,
rubber parts, drive belts... (unlimited list);
- flaws resulting from fire, water damage,
lightning, accident, natural disaster, etc.…;
- flaws caused deliberately, negligently or
resulting from improper handling, negligent
maintenance, abusive use or use contrary to
the manufacturer’s instructions;
- damage caused by a commercial,
professional or collective use of the article (the
warranty validity will be reduced to six (6)
months when the article is used
professionally);
- damage resulting from an inappropriate
packing and shipping of the article;
- all damage caused by modification, repair or
alteration performed by a third party without
written permission by Velleman®.
• Articles to be repaired must be delivered to
your Velleman® dealer, solidly packed
(preferably in the original packaging), and be
completed with the original receipt of purchase
and a clear flaw description.
• Hint: In order to save on cost and time,
please reread the manual and check if the flaw
is caused by obvious causes prior to
presenting the article for repair. Note that
returning a non-defective article can also
involve handling costs.
• Repairs occurring after warranty expiration
are subject to shipping costs.
• The above conditions are without prejudice
to all commercial warranties.
The above enumeration is subject to
modification according to the article (see
article’s manual).
Velleman® service- en kwaliteitsgarantie
Velleman® heeft sinds zijn oprichting in 1972
een ruime ervaring opgebouwd in de
elektronicawereld en verdeelt op dit moment
producten in meer dan 85 landen. Al onze
producten beantwoorden aan strikte
kwaliteitseisen en aan de wettelijke bepalingen
geldig in de EU. Om de kwaliteit te
waarborgen, ondergaan onze producten op
regelmatige tijdstippen een extra
kwaliteitscontrole, zowel door onze eigen
kwaliteitsafdeling als door externe
gespecialiseerde organisaties. Mocht er
ondanks deze voorzorgen toch een probleem
optreden, dan kunt u steeds een beroep doen
op onze waarborg (zie waarborgvoorwaarden).
Page 38

Algemene waarborgvoorwaarden
consumentengoederen (voor Europese
Unie):
• Op alle consumentengoederen geldt een
garantieperiode van 24 maanden op
productie- en materiaalfouten en dit vanaf de
oorspronkelijke aankoopdatum.
• Indien de klacht gegrond is en een gratis
reparatie of vervanging van een artikel
onmogelijk is of indien de kosten hiervoor
buiten verhouding zijn, kan Velleman®
beslissen het desbetreffende artikel te
vervangen door een gelijkwaardig artikel of de
aankoopsom van het artikel gedeeltelijk of
volledig terug te betalen. In dat geval krijgt u
een vervangend product of terugbetaling ter
waarde van 100% van de aankoopsom bij
ontdekking van een gebrek tot één jaar na
aankoop en levering, of een vervangend
product tegen 50% van de kostprijs of
terugbetaling van 50 % bij ontdekking na één
jaar tot 2 jaar.
• Valt niet onder waarborg:
- alle rechtstreekse of onrechtstreekse schade
na de levering veroorzaakt aan het toestel (bv.
door oxidatie, schokken, val, stof, vuil,
vocht...), en door het toestel, alsook zijn
inhoud (bv. verlies van data), vergoeding voor
eventuele winstderving.
- verbruiksgoederen, onderdelen of
hulpstukken die onderhevig zijn aan
veroudering door normaal gebruik zoals bv.
batterijen (zowel oplaadbare als nietoplaadbare, ingebouwd of vervangbaar),
lampen, rubberen onderdelen,
aandrijfriemen... (onbeperkte lijst).
- defecten ten gevolge van brand,
waterschade, bliksem, ongevallen,
natuurrampen, enz.
- defecten veroorzaakt door opzet, nalatigheid
of door een onoordeelkundige behandeling,
slecht onderhoud of abnormaal gebruik of
gebruik van het toestel strijdig met de
voorschriften van de fabrikant.
- schade ten gevolge van een commercieel,
professioneel of collectief gebruik van het
apparaat (bij professioneel gebruik wordt de
garantieperiode herleid tot 6 maand).
- schade veroorzaakt door onvoldoende
bescherming bij transport van het apparaat.
- alle schade door wijzigingen, reparaties of
modificaties uitgevoerd door derden zonder
toestemming van Velleman®.
• Toestellen dienen ter reparatie aangeboden
te worden bij uw Velleman®-verdeler. Het
toestel dient vergezeld te zijn van het
oorspronkelijke aankoopbewijs. Zorg voor een
degelijke verpakking (bij voorkeur de originele
verpakking) en voeg een duidelijke
foutomschrijving bij.
• Tip: alvorens het toestel voor reparatie aan
te bieden, kijk nog eens na of er geen voor de
hand liggende reden is waarom het toestel niet
naar behoren werkt (zie handleiding). Op deze
wijze kunt u kosten en tijd besparen. Denk
eraan dat er ook voor niet-defecte toestellen
een kost voor controle aangerekend kan
worden.
• Bij reparaties buiten de waarborgperiode
zullen transportkosten aangerekend worden.
• Elke commerciële garantie laat deze rechten
onverminderd.
Bovenstaande opsomming kan eventueel
aangepast worden naargelang de aard van
het product (zie handleiding van het
betreffende product).
Garantie de service et de qualité
Velleman®
Depuis 1972, Velleman® a gagné une vaste
expérience dans le secteur de l’électronique et
est actuellement distributeur dans plus de 85
pays.
Tous nos produits répondent à des exigences
de qualité rigoureuses et à des dispositions
légales en vigueur dans l’UE. Afin de garantir
la qualité, nous soumettons régulièrement nos
produits à des contrôles de qualité
supplémentaires, tant par notre propre service
qualité que par un service qualité externe.
Dans le cas improbable d’un défaut malgré
toutes les précautions, il est possible
d’invoquer notre garantie (voir les conditions
de garantie).
Conditions générales concernant la
garantie sur les produits grand public
(pour l’UE) :
• tout produit grand public est garanti 24 mois
contre tout vice de production ou de matériaux
à dater du jour d’acquisition effective ;
• si la plainte est justifiée et que la réparation
ou le remplacement d’un article est jugé
impossible, ou lorsque les coûts s’avèrent
Page 39

disproportionnés, Velleman® s’autorise à
remplacer ledit article par un article équivalent
ou à rembourser la totalité ou une partie du
prix d’achat. Le cas échéant, il vous sera
consenti un article de remplacement ou le
remboursement complet du prix d’achat lors
d’un défaut dans un délai de 1 an après l’achat
et la livraison, ou un article de remplacement
moyennant 50% du prix d’achat ou le
remboursement de 50% du prix d’achat lors
d’un défaut après 1 à 2 ans.
• sont par conséquent exclus :
- tout dommage direct ou indirect survenu à
l’article après livraison (p.ex. dommage lié à
l’oxydation, choc, chute, poussière, sable,
impureté…) et provoqué par l’appareil, ainsi
que son contenu (p.ex. perte de données) et
une indemnisation éventuelle pour perte de
revenus ;
- toute pièce ou accessoire nécessitant un
remplacement causé par un usage normal
comme p.ex. piles (rechargeables comme non
rechargeables, intégrées ou remplaçables),
ampoules, pièces en caoutchouc, courroies…
(liste illimitée) ;
- tout dommage qui résulte d’un incendie, de
la foudre, d’un accident, d’une catastrophe
naturelle, etc. ;
- out dommage provoqué par une négligence,
volontaire ou non, une utilisation ou un
entretien incorrect, ou une utilisation de
l’appareil contraire aux prescriptions du
fabricant ;
- tout dommage à cause d’une utilisation
commerciale, professionnelle ou collective de
l’appareil (la période de garantie sera réduite à
6 mois lors d’une utilisation professionnelle) ;
- tout dommage à l’appareil qui résulte d’une
utilisation incorrecte ou différente que celle
pour laquelle il a été initialement prévu comme
décrit dans la notice ;
- tout dommage engendré par un retour de
l’appareil emballé dans un conditionnement
non ou insuffisamment protégé.
- toute réparation ou modification effectuée par
une tierce personne sans l’autorisation
explicite de SA Velleman® ; - frais de
transport de et vers Velleman® si l’appareil
n’est plus couvert sous la garantie.
• toute réparation sera fournie par l’endroit de
l’achat. L’appareil doit nécessairement être
accompagné du bon d’achat d’origine et être
dûment conditionné (de préférence dans
l’emballage d’origine avec mention du défaut) ;
• tuyau : il est conseillé de consulter la notice
et de contrôler câbles, piles, etc. avant de
retourner l’appareil. Un appareil retourné jugé
défectueux qui s’avère en bon état de marche
pourra faire l’objet d’une note de frais à charge
du consommateur ;
• une réparation effectuée en-dehors de la
période de garantie fera l’objet de frais de
transport ;
• toute garantie commerciale ne porte pas
atteinte aux conditions susmentionnées.
La liste susmentionnée peut être sujette à
une complémentation selon le type de
l’article et être mentionnée dans la notice
d’emploi.
Garantía de servicio y calidad Velleman®
Desde su fundación en 1972 Velleman® ha
adquirido una amplia experiencia como
distribuidor en el sector de la electrónica en
más de 85 países. Todos nuestros productos
responden a normas de calidad rigurosas y
disposiciones legales vigentes en la UE. Para
garantizar la calidad, sometemos nuestros
productos regularmente a controles de calidad
adicionales, tanto a través de nuestro propio
servicio de calidad como de un servicio de
calidad externo. En el caso improbable de que
surgieran problemas a pesar de todas las
precauciones, es posible recurrir a nuestra
garantía (véase las condiciones de garantía).
Condiciones generales referentes a la
garantía sobre productos de venta al
público (para la Unión Europea):
• Todos los productos de venta al público
tienen un período de garantía de 24 meses
contra errores de producción o errores en
materiales desde la adquisición original;
• Si la queja está fundada y si la reparación o
sustitución de un artículo no es posible, o si
los gastos son desproporcionados, Velleman®
autoriza reemplazar el artículo por un artículo
equivalente o reembolsar la totalidad o una
parte del precio de compra. En este caso,
usted recibirá un artículo de recambio o el
reembolso completo del precio de compra si
encuentra algún fallo hasta un año después
de la compra y entrega, o un artículo de
Page 40

recambio al 50% del precio de compra o el
reembolso del 50% del precio de compra si
encuentra un fallo después de 1 año y hasta
los 2 años después de la compra y entrega.
Por consiguiente, están excluidos entre
otras cosas:
- todos los daños causados directa o
indirectamente al aparato (p.ej. por oxidación,
choques, caída,...) y a su contenido (p.ej.
pérdida de datos) después de la entrega y
causados por el aparato, y cualquier
indemnización por posible pérdida de
ganancias;
- partes o accesorios, que estén expuestos al
desgaste causado por un uso normal, como
por ejemplo baterías (tanto recargables como
no recargables, incorporadas o
reemplazables), bombillas, partes de goma,
etc. (lista ilimitada);
- defectos causados por un incendio, daños
causados por el agua, rayos, accidentes,
catástrofes naturales, etc.;
- defectos causados a conciencia, descuido o
por malos tratos, un mantenimiento
inapropiado o un uso anormal del aparato
contrario a las instrucciones del fabricante;
- daños causados por un uso comercial,
profesional o colectivo del aparato (el período
de garantía se reducirá a 6 meses con uso
profesional);
- daños causados por un uso incorrecto o un
uso ajeno al que está previsto el producto
inicialmente como está descrito en el manual
del usuario;
- daños causados por una protección
insuficiente al transportar el aparato.
- daños causados por reparaciones o
modificaciones efectuadas por una tercera
persona sin la autorización explícita de
Velleman®;
- se calcula gastos de transporte de y a
Velleman® si el aparato ya no está cubierto
por la garantía.
• Cualquier artículo que tenga que ser
reparado tendrá que ser devuelto a su
distribuidor Velleman®. Devuelva el aparato
con la factura de compra original y
transpórtelo en un embalaje sólido
(preferentemente el embalaje original). Incluya
también una buena descripción del fallo;
• Consejo: Lea el manual del usuario y
controle los cables, las pilas, etc. antes de
devolver el aparato. Si no se encuentra un
defecto en el artículo los gastos podrían correr
a cargo del cliente;
• Los gastos de transporte correrán a carga
del cliente para una reparación efectuada
fuera del período de garantía.
• Cualquier gesto comercial no disminuye
estos derechos.
La lista previamente mencionada puede ser
adaptada según el tipo de artículo (véase el
manual del usuario del artículo en
cuestión).
Velleman® Service- und Qualitätsgarantie
Seit der Gründung in 1972 hat Velleman®
sehr viel Erfahrung als Verteiler in der
Elektronikwelt in über 85 Ländern aufgebaut.
Alle Produkte entsprechen den strengen
Qualitätsforderungen und gesetzlichen
Anforderungen in der EU. Um die Qualität zu
gewährleisten werden unsere Produkte
regelmäßig einer zusätzlichen
Qualitätskontrolle unterworfen, sowohl von
unserer eigenen Qualitätsabteilung als auch
von externen spezialisierten Organisationen.
Sollten, trotz aller Vorsichtsmaßnahmen,
Probleme auftreten, nehmen Sie bitte die
Garantie in Anspruch (siehe
Garantiebedingungen).
Allgemeine Garantiebedingungen in Bezug
auf Konsumgüter (für die Europäische
Union):
• Alle Produkte haben für Material- oder
Herstellungsfehler eine Garantieperiode von
24 Monaten ab Verkaufsdatum.
• Wenn die Klage berechtigt ist und falls eine
kostenlose Reparatur oder ein Austausch des
Gerätes unmöglich ist, oder wenn die Kosten
dafür unverhältnismäßig sind, kann
Velleman® sich darüber entscheiden, dieses
Produkt durch ein gleiches Produkt zu
ersetzen oder die Kaufsumme ganz oder
teilweise zurückzuzahlen. In diesem Fall
erhalten Sie ein Ersatzprodukt oder eine
Rückzahlung im Werte von 100% der
Kaufsumme im Falle eines Defektes bis zu
1 Jahr nach Kauf oder Lieferung, oder Sie
bekommen ein Ersatzprodukt im Werte von
50% der Kaufsumme oder eine Rückzahlung
im Werte von 50 % im Falle eines Defektes im
zweiten Jahr.
Page 41

• Von der Garantie ausgeschlossen sind:
- alle direkten oder indirekten Schäden, die
nach Lieferung am Gerät und durch das Gerät
verursacht werden (z.B. Oxidation, Stöße, Fall,
Staub, Schmutz, Feuchtigkeit, ...), sowie auch
der Inhalt (z.B. Datenverlust), Entschädigung
für eventuellen Gewinnausfall.
- Verbrauchsgüter, Teile oder Zubehörteile, die
durch normalen Gebrauch dem Verschleiß
ausgesetzt sind, wie z.B. Batterien (nicht nur
aufladbare, sondern auch nicht aufladbare,
eingebaute oder ersetzbare), Lampen,
Gummiteile, Treibriemen, usw. (unbeschränkte
Liste).
- Schäden verursacht durch Brandschaden,
Wasserschaden, Blitz, Unfälle,
Naturkatastrophen, usw.
- Schäden verursacht durch absichtliche,
nachlässige oder unsachgemäße Anwendung,
schlechte Wartung, zweckentfremdete
Anwendung oder Nichtbeachtung von
Benutzerhinweisen in der
Bedienungsanleitung.
- Schäden infolge einer kommerziellen,
professionellen oder kollektiven Anwendung
des Gerätes (bei gewerblicher Anwendung
wird die Garantieperiode auf 6 Monate
zurückgeführt).
- Schäden verursacht durch eine
unsachgemäße Verpackung und
unsachgemäßen Transport des Gerätes.
- alle Schäden verursacht durch unautorisierte
Änderungen, Reparaturen oder
Modifikationen, die von einem Dritten ohne
Erlaubnis von Velleman® vorgenommen
werden.
• Im Fall einer Reparatur, wenden Sie sich an
Ihren Velleman®-Verteiler. Legen Sie das
Produkt ordnungsgemäß verpackt
(vorzugsweise die Originalverpackung) und
mit dem Original-Kaufbeleg vor. Fügen Sie
eine deutliche Fehlerbeschreibung hinzu.
• Hinweis: Um Kosten und Zeit zu sparen,
lesen Sie die Bedienungsanleitung nochmals
und überprüfen Sie, ob es keinen auf de Hand
liegenden Grund gibt, ehe Sie das Gerät zur
Reparatur zurückschicken. Stellt sich bei der
Überprüfung des Gerätes heraus, dass kein
Geräteschaden vorliegt, könnte dem Kunden
eine Untersuchungspauschale berechnet.
• Für Reparaturen nach Ablauf der
Garantiefrist werden Transportkosten
berechnet.
• Jede kommerzielle Garantie lässt diese
Rechte unberührt.
Die oben stehende Aufzählung kann
eventuell angepasst werden gemäß der Art
des Produktes (siehe Bedienungsanleitung
des Gerätes).
Velleman ® usługi i gwarancja jakości
Od czasu założenia w 1972, Velleman®
zdobył bogate doświadczenie w dziedzinie
światowej elektroniki. Obecnie firma
dystrybuuje swoje produkty w ponad 85
krajach.
Wszystkie nasze produkty spełniają surowe
wymagania jakościowe oraz wypełniają normy
i dyrektywy obowiązujące w krajach UE. W
celu zapewnienia najwyższej jakości naszych
produktów, przechodzą one regularne oraz
dodatkowo wyrywkowe badania kontroli
jakości, zarówno naszego wewnętrznego
działu jakości jak również wyspecjalizowanych
firm zewnętrznych. Pomimo dołożenia
wszelkich starań czasem mogą pojawić się
problemy techniczne, prosimy odwołać się do
gwarancji (patrz warunki gwarancji).
Ogólne Warunki dotyczące gwarancji:
• Wszystkie produkty konsumenckie podlegają
24-miesięcznej gwarancji na wady
produkcyjne i materiałowe od daty zakupu.
• W przypadku, gdy usterka jest niemożliwa do
usunięcia lub koszt usunięcia jest nadmiernie
wysoki Velleman ® może zdecydowa
wymianie artykułu na nowy, wolny od wad lub
zwrócić zapłaconą kwotę. Zwrot gotówki może
jednak nastąpić z uwzględnieniem poniższych
warunków:
- zwrot 100% ceny zakupu w przypadku, gdy
wada wystąpiła w ciągu pierwszego roku od
daty zakupu i dostawy
- wymiana wadliwego artykułu na nowy, wolny
od wad z odpłatnością 50% ceny detalicznej
lub zwrot 50% kwoty ceny nabycia w
przypadku gdy wada wystąpiła w drugim roku
od daty zakupu i dostawy.
• Produkt nie podlega naprawie
gwarancyjnej:
- gdy wszystkie bezpośrednie lub pośrednie
szkody spowodowane są działaniem
czynników środowiskowych lub losowych (np.
ć o
Page 42

przez utlenianie, wstrząsy, upadki, kurz, brud,
...), wilgotności;
- gwarant nie ponosi odpowiedzialności za
szkody wynikających z utraty danych;
- produkty konsumenckie, części zamienne lub
akcesoria podatne na process starzenia,
wynikającego z normalnego użytkowania, np:
baterie (ładowalne, nieładowalne, wbudowane
lub wymienne), żarówki, paski napędowe,
gumowe elementy napędowe...
(nieograniczona lista);
- usterka wynika z działania pożaru, zalania
wszelkimi cieczami, uderzenia pioruna,
upadku lub klęski żywiołowej, itp.;
- usterka wynika z zaniedbań
eksploatacyjnych tj. umyślne bądź nieumyślne
zaniechanie czyszczenia, konserwacji,
wymiany materiałów ekspolatacyjnych,
niedbalstwa lub z niewłaściwego obchodzenia
się lub niezgodnego użytkowania z instrukcją
producenta;
- szkody wynikające z nadmiernego
użytkowania gdy nie jest do tego celu
przeznaczony tj. działalność komerycjna,
zawodowa lub wspólne użytkowanie przez
wiele osób - okres obowiązywania gwarancji
zostanie obniżony do 6 (sześć) miesięcy;
- Szkody wynikające ze
wysyłki produktu;
- Wszelkie szkody spowodowane przez
nieautoryzowaną naprawę, modyfikację,
przeróbkę produktu przez osoby trzecie jak
również bez pisemnej zgody firmy Velleman
®.
• Uszkodzony produkt musi zostać
dostarczony do sprzedawcy ® Velleman,
solidnie zapakowany (najlepiej w oryginalnym
opakowaniu), wraz z wyposażeniem z jakim
produkt został sprzedany. W przypadku
wysyłki towaru w opakowaniu innym niż
oryginalnym ryzyko usterki produktu oraz tego
skutki przechodzą na właściciela produktu.
Wraz z niesprawnym produktem należy
dołączyć jasny i szczegółowy opis jego usterki,
wady;
• Wskazówka: Aby zaoszczędzić na kosztach i
czasie, proszę szczegółowo zapoznać się z
instrukcja obsługi; czy przyczyną wady są
okoliczności techniczne czy też wynikaja
wyłącznie z nieznajomości obsługi produktu.
W przypadku wysyłki sprawnego produktu do
serwisu nabywca może zostać obciążony
kosztmi obsługi oraz transportu.
źle zabezpieczonej
• W przypadku napraw pogwarancyjnych lub
odpłatnych klient ponosi dodatkowo koszt
wysyłki produktu do i z serwisu.
wymienione wyżej warunki są bez uszczerbku
dla wszystkich komercyjnych gwarancji.
Powyższe postanowienia mogą podlegać
modyfikacji w zależności od wyrobu (patrz
art obsługi).
Garantia de serviço e de qualidade
Velleman®
Desde a sua fundação em 1972 Velleman®
tem adquirido uma amplia experiencia no
sector da eletrónica com uma distribuição em
mais de 85 países.
Todos os nossos produtos respondem a
exigências rigorosas e a disposições legais
em vigor na UE. Para garantir a qualidade,
submetemos regularmente os nossos
produtos a controles de qualidade
suplementares, com o nosso próprio serviço
qualidade como um serviço de qualidade
externo. No caso improvável de um defeito
mesmo com as nossas precauções, é possível
invocar a nossa garantia. (ver as condições de
garantia).
Condições gerais com respeito a garantia
sobre os produtos grande público (para a
UE):
• qualquer produto grande público é garantido
24 mês contra qualquer vício de produção ou
materiais a partir da data de aquisição
efectiva;
• no caso da reclamação ser justificada e que
a reparação ou substituição de um artigo é
impossível, ou quando os custo são
desproporcionados, Velleman® autoriza-se a
substituir o dito artigo por um artigo
equivalente ou a devolver a totalidade ou
parte do preço de compra. Em outro caso,
será consentido um artigo de substituição ou
devolução completa do preço de compra no
caso de um defeito no prazo de 1 ano depois
da data de compra e entrega, ou um artigo de
substituição pagando o valor de 50% do preço
de compra ou devolução de 50% do preço de
compra para defeitos depois de 1 a 2 anos.
• estão por consequência excluídos:
- todos os danos directos ou indirectos depois
da entrega do artigo (p.ex. danos ligados a
Page 43

oxidação, choques, quedas, poeiras, areias,
impurezas…) e provocado pelo aparelho,
como o seu conteúdo (p.ex. perca de dados) e
uma indemnização eventual por perca de
receitas;
- consumíveis, peças ou acessórios sujeitos a
desgaste causado por um uso normal, como
p.ex. pilhas (recarregáveis, não recarregáveis,
incorporadas ou substituíveis), lâmpadas,
peças em borracha correias… (lista ilimitada);
- todos os danos que resultem de um
incêndio, raios, de um acidente, de una
catastrophe natural, etc.;
- danos provocados por negligencia, voluntária
ou não, uma utilização ou manutenção
incorrecta, ou uma utilização do aparelho
contrária as prescrições do fabricante;
- todos os danos por causa de uma utilização
comercial, profissional ou colectiva do
aparelho ( o período de garantia será reduzido
a 6 meses para uma utilização profissional);
- todos os danos no aparelho resultando de
uma utilização incorrecta ou diferente daquela
inicialmente prevista e descrita no manual de
utilização;
- todos os danos depois de uma devolução
não embalada ou mal protegida ao nível do
acondicionamento.
- todas as reparações ou modificações
efectuadas por terceiros sem a autorização de
SA Velleman®;
- despesas de transporte de e para
Velleman® se o aparelho não estiver coberto
pela garantia.
• qualquer reparação será fornecida pelo local
de compra. O aparelho será obrigatoriamente
acompanhado do talão ou factura de origem e
bem acondicionado (de preferência dentro da
embalagem de origem com indicação do
defeito ou avaria);
• dica: aconselha-mos a consulta do manual e
controlar cabos, pilhas, etc. antes de devolver
o aparelho. Um aparelho devolvido que estiver
em bom estado será cobrado despesas a
cargo do consumidor;
• uma reparação efectuada fora da garantia,
será cobrado despesas de transporte;
• qualquer garantia comercial não prevalece
as condições aqui mencionadas.
A lista pode ser sujeita a um complemento
conforme o tipo de artigo e estar
mencionada no manual de utilização.
Legen Heirweg 33, 9890 Gavere, Belgium
Made in PRC
Imported by Velleman nv
www.velleman.eu
 Loading...