

Page 1

LPTJUNIOR – 6-CHANNEL DMX DIMMING CONSOLE
1. Introduction & Features
Thank you for buying the LPTJUNIOR! Please read the manual carefully before bringing this device into service. This
small and light, yet powerful and versatile device can control 512 channels, save 46 scene settings (a combination of
channel settings) - 6 of which under 'hot keys', features a built-in battery with a 3-hour autonomy and can work
simultaneously with another console.
Should this device be damaged during transportation, don't install it and consult your dealer.
2. Safety Instructions
Be very careful during the installation: touching live wires can cause life-threatening electroshocks.
Do not touch the device during operation as the housing heats up.
Keep this device away from rain and moisture.
Unplug the mains lead before opening the housing.
• A qualified technician should install and service this device.
• Damage caused by disregarding certain guidelines in this manual is not covered by the warranty and the dealer
will not accept responsibility for the ensuing defects or problems.
• Do not switch the device on immediately if it has been exposed to changes in temperature. Protect the device
against damage by leaving it switched off until it has reached room temperature.
• This device falls under protection class I. It is essential, therefore, that the device be earthed. A qualified person
must carry out the electric connection.
• Make sure that the available voltage does not exceed the voltage stated in the specifications of this manual.
• Do not crimp the power cord and protect it against damage. Ask an authorised dealer to replace it if necessary.
• Always disconnect the device from the mains when it is not in use or when you wish to clean it. Only handle the
power cord by the plug. Never pull out the plug by tugging the power cord.
• Note that damage caused by user modifications to the device is not covered by the warranty. Keep the device
away from children and unauthorised users.
3. General Guidelines
• This device is a lighting controller for professional use on stages, in discos, theatres, etc. This fixture can only be
operated with an alternating current of max. 230Vac/50Hz and was designed for indoor use only.
• Do not shake the device. Avoid brute force when installing or operating the device.
• Make sure to install the device where it is not exposed to extreme temperatures (<5 or >35°C), moisture or dust.
• Familiarise yourself with the functions of the device before actually using it. Do not permit operation by unqualified
persons. Most damages are the result of unprofessional operation.
• Please use the original packaging if the device is to be transported.
• For safety reasons, please be aware that all modifications on the device are forbidden.
• Do not remove the serial number sticker from the device as doing so will void the warranty.
• Only use the device for its intended purpose. All other uses may lead to short-circuits, burns, electroshocks, lamp
explosion, crash, etc. Using the device in an unauthorised way will void the warranty.
LPTJUNIOR 1 VELLEMAN
Page 2
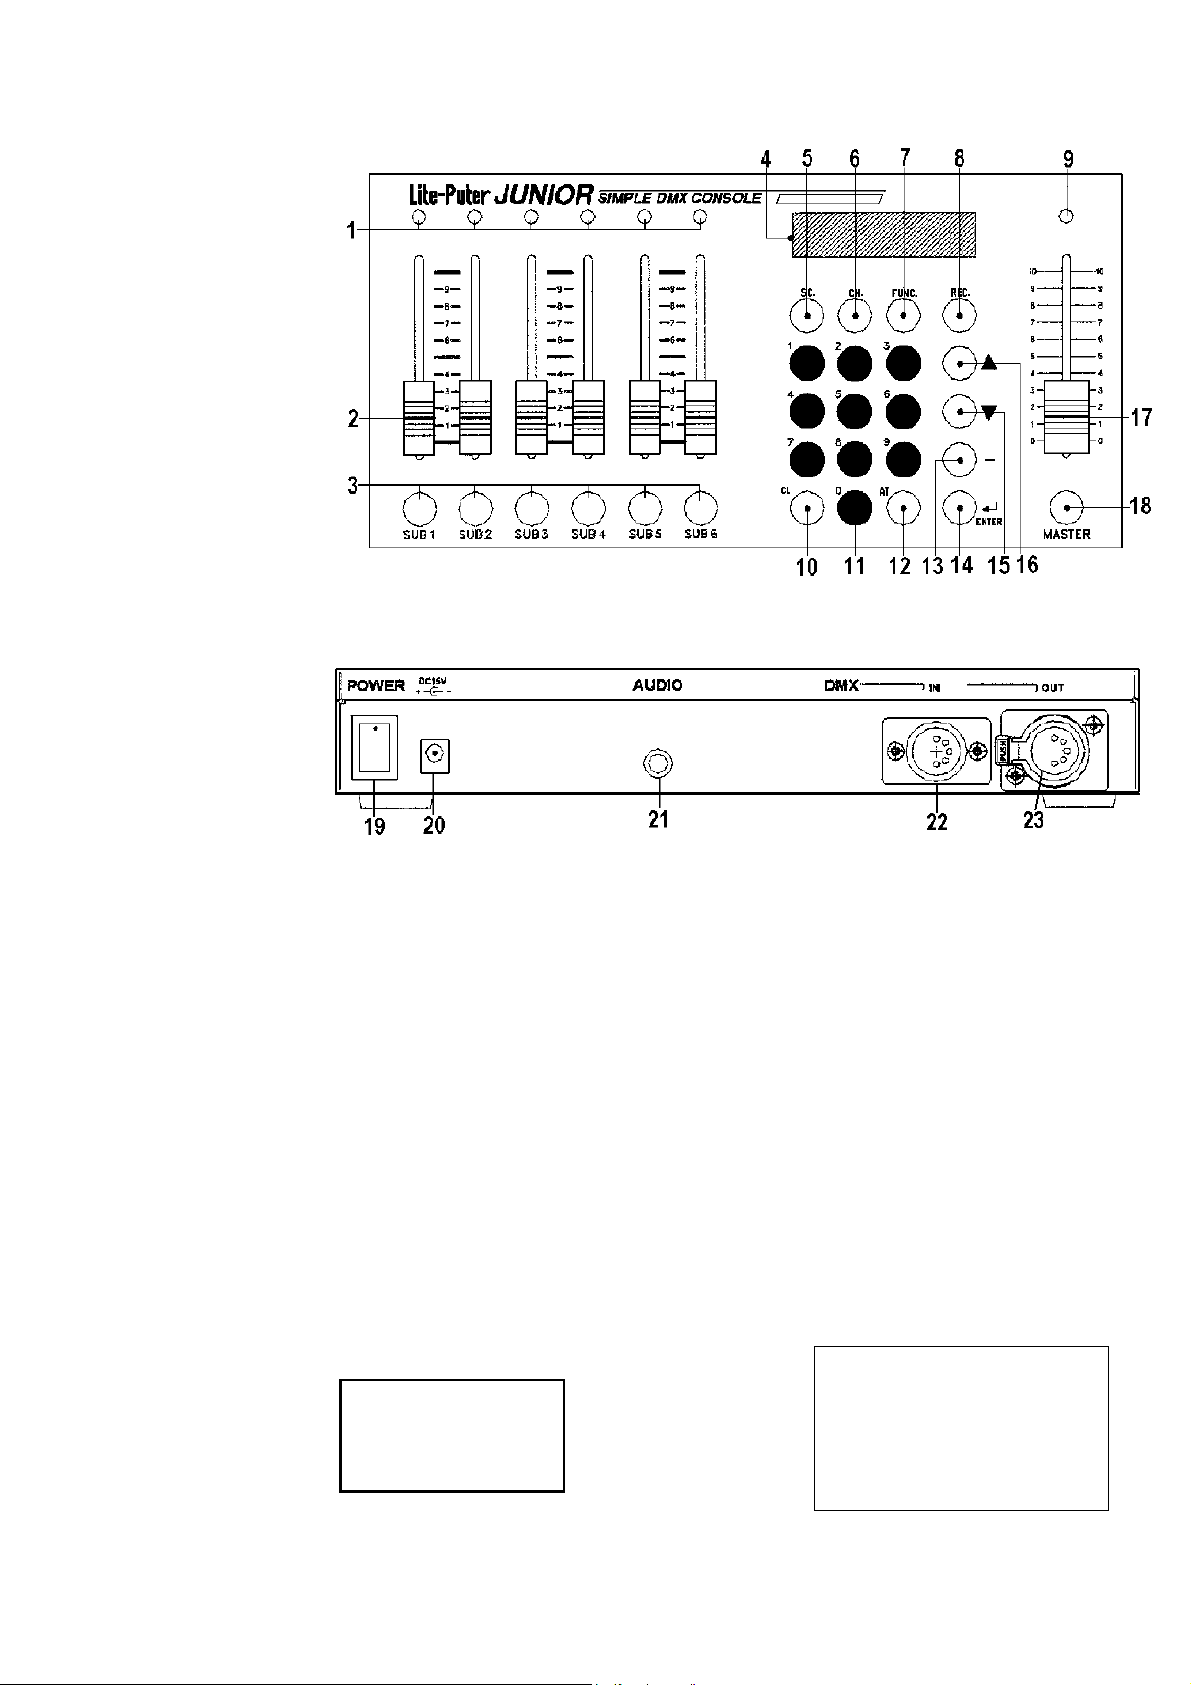
4. Function Description
a. Control Panel
1. Channel/scene LEDs
2. Channel faders
3. SUB scene hotkeys
4. LCD display
5. Scene key (SC)
6. Channel setting key (CH)
7. Function key (FUNC)
8. Record scene key (REC)
9. Master LED
10. Clear key (CL)
11. Number/letter keys
12. Channel value key (AT)
13. Range selection key (-)
14. Confirmation key ('ENTER')
15. Down key (▼)
16. Up key (▼)
17. Master fader
18. Master dimming key
b. Back Panel
19. Power switch
20. Power connector 15V/1A
21. Audio input max. 100mV (-10dB)
22. DMX signal connector: XLR 5-pin DMX in
23. DMX signal connector: XLR 5-pin DMX out
Fig. 1
Fig. 2
5. Connections
• Connect a 15Vdc/1A adapter to the device - mind the polarity! - and plug the adapter onto the mains.
• Make all connections with the appropriate cable type, set all controls to 0 and switch the device on (#19 above).
The manufacturer or dealer will not be held responsible for damage caused by improper connections.
• After switching on the device, set the master fader (#17) to 10 to have a 100% range with the other faders.
• Let the built-in battery charge for approx. 4 hours before using the device for the first time.
• The device will automatically store all settings before powering off.
• All data will be lost if the device is not switched on for 7 days.
6. Operating Instructions
a. Function Menu
Press the function key (#7) ; you will obtain this screen:
→ CH
SETTING
SUB
MASTER
In fact this menu consists of the six submenus at the right; you can navigate
up and down this menu with the ▲ (#16) and ▼ (#15) keys.
→ CH SETTING
SUB MASTER
CHANNEL CHASE…
SUB CHASE…
AUTO FADE …
CHASE FADE …
LPTJUNIOR 2 VELLEMAN
Page 3
b. Setting Channel Levels
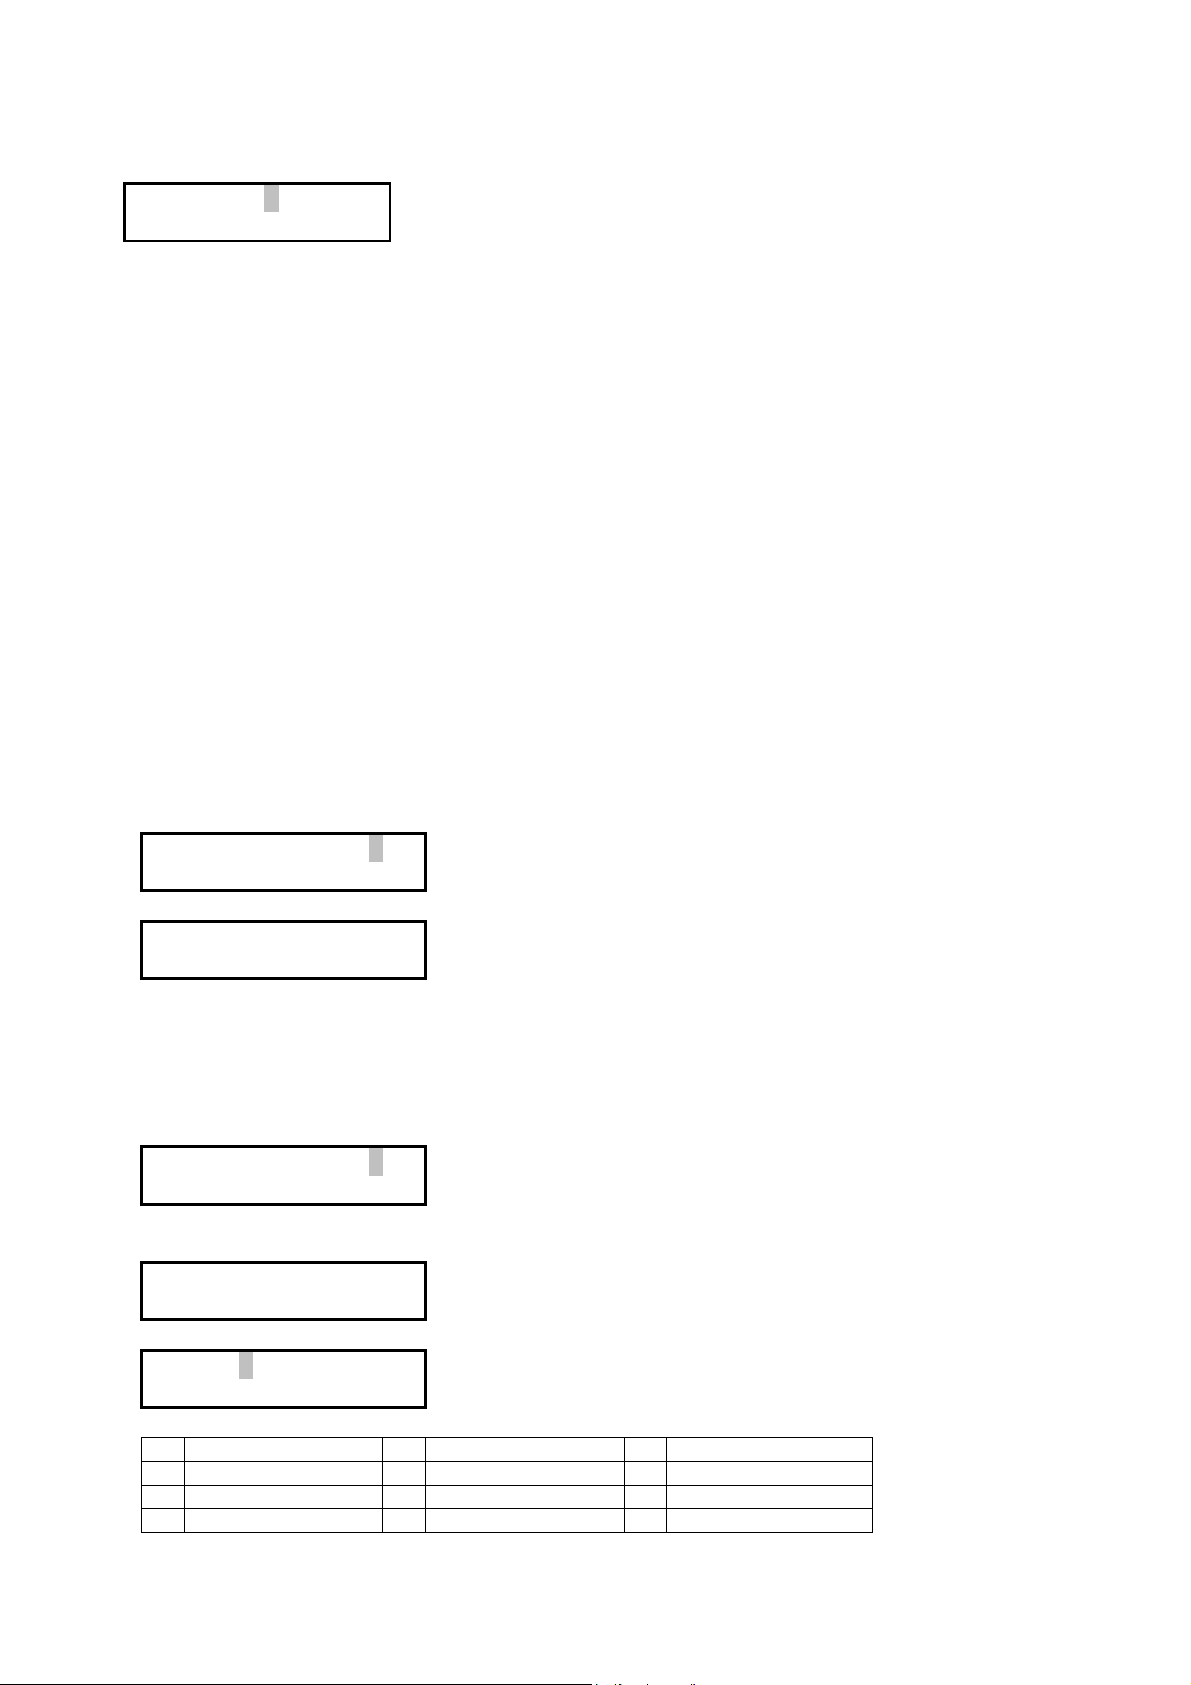
1. Press the function key (#7), select the "CH SETTING" line and press enter (#14); the LCD will display:
CH.SET 1--- 6
CH 1 -----= 0%
The upper row indicates which channels the faders operate.
The bottom row indicates the value of the channel that has last been
modified.
2. Use the ▲ (#16) and ▼ (#15) keys to select the channel range available on the faders (always 6 successive
channels). For example: press the ▼ key once ; the upper row now reads "CH. SET 2---7".
3. Set the level of channel 2 with the first fader (the one to the left), channel 3 with the second fader etc.
4. You can set a range of channels to the same level:
1) press the CH key (#6) ; the cursor goes to the selected channel location on the bottom row
2) enter the number of the first channel of the range with the numeric keys (#11)
3) press the range selection key (#13)
4) enter the number of the last channel of the range with the numeric keys (#11)
5) press the AT key (#12) ; the cursor will move to the number before the %
6) enter the desired output value with the numeric keys (#11) or select it with the first fader (the one to the left)
7) press Enter (#14) ; the display will automatically show the channel number following the programmed range.
5. All channel programming can be cleared by pressing the CL and CH keys (#6 & 10) simultaneously followed by
pressing the CH key (#6) only, or by setting the master fader to 0 and pressing the MASTER key (#18).
c. Scenes
1) Store a scene under a hotkey
1. Program the scene (see "b. Setting Channel Levels" above)
2. Press the REC key (#8) ; the LCD will display
RECORD TO SC _
KEYIN SC 1...40
3. Press the desired key under #3 (SUB1 - SUB6) (example here: SUB1) ; the LCD will display
SAVE TO SUB1
ENT=SURE ANY=NO
4. Press Enter (#14) to confirm or any other key to cancel.
2) Store a scene under a regular scene memory
1. Program the scene (see "b. Setting Channel Levels" above)
2. Press the REC key (#8) ; the LCD will display
RECORD TO SC _
KEYIN SC 1...40
3. Press the desired number on the numeric keypad (#11) (example: 5) and press Enter (#14).
If there is already a scene stored in Scene 5, the LCD will display
OVERWRITE DATA?
1:YES , 2:NO
4. Press 1 to confirm or 2 to cancel. If you confirm or there was no data in Scene 5, the LCD will display:
Name: _
Keyin ENGLISH.
5. Use the numeric keys to enter a scene name (9 characters max.), following this scheme:
1 A - B - C 2 D - E - F 3 G - H - I
4 J - K - L 5 M - N - O 6 P - Q - R
7 S - T - U 8 V - W - X 9 = - Y - Z
0 Next character / Space
6. Press Enter (#14) to confirm.
LPTJUNIOR 3 VELLEMAN
Page 4
3) Call out a scene saved in SUB1-6
1. Press the function key (#7), select the "SUB MASTER" line and press Enter (#14) ; the LCD will display:
SUB MASTER 1--6
LITE-PUTER CORP.
2. Press the desired hotkey under #3 (example here: SUB1) ; while you press the key, the scene in SUB1 will be
sent out at 100% and the LCD will display:
LOAD SUBSCENE 1
3. Set the corresponding fader to control the output level of the SUB-scene. The LCD will display:
SUB MASTER 1--6
SUB1 = 15%
4) Call out a scene saved in Scene1-40
1. Press the function key (#7), select the "SUB MASTER" line and press Enter (#14) ; the LCD will display:
SUB MASTER 1--6
LITE-PUTER CORP.
2. Press the SC key (#5) ; the LCD will display:
LOAD SCENE _
KEYIN SC 1...40
3. Select the desired scene with the numeric keypad (#11) (example: 5). The LCD will display the selected scene
number in the top row and the name of the scene in the bottom row:
LOAD SCENE 5
DISCO
4. Press Enter (#14) to confirm. The LCD will return to the display as shown in step 1.
5) Edit a scene
1. Call out the desired scene and press the CH key (#6) ; the LCD will display:
CHANNEL MODIFY
CH 1 -----= 0%
2. Press the numeric keys (#11) or the ▲and ▼keys (#15 & 16) to select the channel, press the AT key (#12) to put
the cursor on the channel value and modify the value with the numeric keypad ; the LCD will display (e.g.):
CHANNEL MODIFY
CH 15 -----= 60%
3. Press enter to save the new data ; the LCD will display:
SUB MASTER 1--6
LITE-PUTER CORP.
6) Clear the scene output
Press the CL and SC keys (#5 & 10) simultaneously or pull the master fader (#17) to 0 and press the master key
(#18) to clear all values.
LPTJUNIOR 4 VELLEMAN
Page 5

d. Chase
1) Setting Channel Chase
1. Press the Function key (#7), press the ▼ key (#15) twice ("CHANNEL CHASE…" selected) and enter:
CH CHASE 1- 6
MAS.=100% 9sec
2. Use the numeric keypad (#11) or the ▲/▼keys (#15 & 16) to set the start channel ; a range of 6 successive
channels is automatically selected. Press Enter (#14) ; the cursor will move to the time setting.
CH CHASE 1- 6
MAS.=100% 9sec
3. Press the ▲/▼ keys (#15 & 16) to select the speed (21 possibilities between 0.1sec and 1min).
4. Set the channel faders (#2) to the desired level and the chase will automatically run the selected channels.
5. To modify channel range or chase time during a chase, press Enter (#14) and repeat the steps above.
6. The chase can also be music-controlled: connect an audio signal to the audio connector at the back (#21) ; the
device will now react to the beat of the music.
2) Setting Chase + Scene
1. After setting a chase, press the SC key (#5) to call out a scene ; the LCD will display
LOAD SCENE _
KEYIN SC 1...40
2. Use the numeric keypad (#11) to enter a scene number and press Enter (#14) to confirm. The LCD returns to:
CH CHASE 1- 6
MAS.=100% 9sec
• If the scene value of a channel differs from the value defined by the fader, the higher one will be selected.
• Press any "SUB" key (#3) to send out the corresponding channel at 100%.
• Upon exiting chase mode, the selected chase speed will be memorized automatically.
3) Setting Chase Fade
1. Press the Function key (#7), press the ▼ key (#15) 5 times ("CHASE FADE…" selected) and enter:
→ FADE OFF
FADE ON
2. Press the ▼ key (#15) to select "FADE ON" and press Enter (#14):
CH CHASE 1- 6
MAS.=100% 9sec
3. Set the channel faders (#2) to the desired level and the chase will automatically run in fade mode.
4) Setting Sub Chase
1. Press the Function key (#7), press the ▼ key (#15) 3 times ("SUB CHASE…" selected) and enter:
→ CHASE 1-6
CHASE 3-6
2. Press the ▼ key (#15) to select "CHASE 3-6" and press Enter (#14):
SUB CHASE 3-6
MAS.=100% 9sec
3. Press the ▲/▼ keys (#15 & 16) to adjust the chase speed and set the CH3-CH6 faders (#2) to the desired level
to control the chase ; the CH1-CH2 faders control the dimming of the selected scene.
4. To return to full chase mode, repeat steps 1 and 2 but select "CHASE 1-6" in step 2.
LPTJUNIOR 5 VELLEMAN
Page 6

e. Auto Fade
1) Individual Channel Auto Fade
1. Press the Function key (#7), press the ▼ key (#15) 4 times ("AUTO FADE…" selected) and enter:
AUTO FADE 9sec
CH 1------> 22%
down.
2. Use the numeric keypad (#11) or the ▲/▼ keys (#15 & 16) to select the auto fade channel.
Press Enter (#14) ; the cursor will move to the time setting:
AUTO FADE 9sec
CH 1------> 22%
3. Press the ▲/▼ keys (#15 & 16) to select the fade speed (21 possibilities between 0.1sec and 1min).
2) Grouped Channels Auto Fade
1. Press the Function key (#7), press the ▼ key (#15) 4 times ("AUTO FADE…" selected) and enter:
AUTO FADE 9sec
CH 1------> 22%
2. Select the desired starting channel by means of the numeric keypad (#11) or the ▲/▼ keys (#15 & 16), then
press the Range selection key (#13):
AUTO FADE 9sec
CH 1-- 2-> 22%
3. Select the range by means of the numeric keypad (#11) or the ▲/▼ keys (#15 & 16), then press Enter (#14) ;
the cursor will move to the time setting:
AUTO FADE 9sec
CH 1------> 22%
4. Press the ▲/▼ keys (#15 & 16) to select the fade speed (21 possibilities between 0.1sec and 1min).
Auto Fade speed and Chase speed are separate systems. Consequently, different speeds are allowed.
Channel 1 is now in Auto Fade mode ; the degree of fading is determined
by the master fader (#17). The fade value (%) is constantly going up and
7. Cleaning and Maintenance
The following points have to be considered during inspection:
1. All screws for installing the devices or parts of the device have to be screwed down tight and must not be corroded.
2. The housing and connections should not be modified or tampered with.
3. The electric power supply cables must be undamaged. Have the device installed by a qualified technician.
4. Disconnect the device from the mains prior to maintenance activities.
5. Wipe the device regularly with a moist cloth. Do not use alcohol or solvents.
6. Have a qualified technician maintain this device. Contact your dealer for spare parts if necessary.
8. Technical Specifications
Power Supply 15Vdc / 1A
DMX signal input/output DMX512 / 1990
DMX Signal Connector XLR 5-pin (IN male ; OUT female)
Audio input Line in, max. 100mV (-10dB)
Dimensions 268 x 132 x 45mm
Weight 3kg
CE certificate ET87S-09-058
The information in this manual is subject to change without prior notice.
LPTJUNIOR 6 VELLEMAN
Page 7

LPTJUNIOR – 6-KANAALS DMX DIMCONSOLE
1. Inleiding
Dank u voor uw aankoop! Lees deze handleiding grondig voor u het toestel in gebruik neemt. Dit kleine en lichte
maar tevens krachtige en veelzijdige toestel kan 512 kanalen aansturen, 46 scènes (combinaties van
kanaalinstellingen) opslaan - waarvan 6 onder sneltoetsen, heeft een ingebouwde batterij met een autonomie van 3
uur en kan simultaan met een andere console werken.
Mocht het toestel beschadigd zijn tijdens het transport, installeer het dan niet en raadpleeg uw verdeler.
2. Veiligheidsinstructies
Wees voorzichtig bij de installatie: raak geen kabels aan die onder stroom staan om
dodelijke elektroshocks te vermijden.
Raak het toestel niet aan wanneer het in gebruik is: de behuizing wordt warm.
Bescherm dit toestel tegen regen en vochtigheid.
Ontkoppel de voedingskabel en open dan pas de behuizing.
• Laat het toestel installeren en onderhouden door een geschoolde technicus.
• De garantie geldt niet voor schade door het negeren van bepaalde richtlijnen in deze handleiding en uw dealer zal
de verantwoordelijkheid afwijzen voor defecten of problemen die hier rechtstreeks verband mee houden.
• Om beschadiging te vermijden, mag u het toestel niet onmiddellijk inschakelen indien het werd blootgesteld aan
temperatuurschommelingen. Wacht tot het toestel kamertemperatuur heeft bereikt.
• Dit toestel valt onder beschermingsklasse I, wat wil zeggen dat het toestel geaard moet zijn. Een geschoolde
technicus moet de elektrische aansluiting verzorgen.
• De netspanning mag niet hoger zijn dan de spanning vermeld in de specificaties achteraan de handleiding.
• De voedingskabel mag niet omgeplooid of beschadigd zijn. Laat uw verdeler zo nodig een nieuwe kabel plaatsen.
• Trek de stekker uit het stopcontact (trek nooit aan de kabel!) voor u het toestel reinigt en als u het niet gebruikt.
• Schade veroorzaakt door wijzigingen die de klant heeft aangebracht aan het toestel vallen niet onder de garantie.
Houd dit toestel uit de buurt van kinderen en amateurs.
3. Algemene Richtlijnen
• Dit toestel is een dimconsole voor professioneel gebruik in disco's, theaters, enz. U mag dit toestel enkel
gebruiken met een AC stroom van max. 230Vac/50Hz en het is enkel geschikt voor gebruik binnenshuis.
• Schud het toestel niet dooreen. Vermijd brute kracht tijdens de installatie en de bediening van dit toestel.
• Installeer het toestel weg van extreme temperaturen (<5 of >35°C), vochtigheid en stof.
• Leer eerst de functies van het toestel kennen voor u het gaat gebruiken. Ongeschoolde personen mogen dit
toestel niet gebruiken. Meestal is beschadiging het gevolg van onprofessioneel gebruik.
• Gebruik de oorspronkelijke verpakking wanneer u het toestel vervoert.
• Om veiligheidsredenen mag de gebruiker geen wijzigingen aanbrengen aan het toestel.
• De garantie vervalt indien u de sticker met het serienummer verwijdert.
• Gebruik het toestel enkel voor de toepassingen die hier worden beschreven om kortsluitingen, brandwonden,
elektroshocks, gevaar voor ontploffing van de lampen, enz. te vermijden. U kunt het toestel beschadigen en de
garantie vervalt automatisch indien u het toestel op een ongeoorloofde manier gebruikt.
LPTJUNIOR 7 VELLEMAN
Page 8

4. Beschrijving van het toestel
a. Bedieningspaneel (zie figuur 1 blz. 2)
1. Kanaal/scène LEDs
2. Kanaalschuifregelaars
3. SUB scène sneltoetsen
4. LCD display
5. Scèneknop (SC)
6. Knop voor kanaalinstelling (CH)
7. Functieknop (FUNC)
8. Knop om scène op te slaan (REC)
9. Master LED
10. Wisknop (CL)
11. Cijferknoppen
12. Knop voor kanaalwaarde (AT)
13. Knop voor bereikinstelling (-)
14. Bevestigingsknop ('ENTER')
15. Neer-knop (▼)
16. Op-knop (▲)
17. Master schuifregelaar
18. Master dimknop
b. Achterpaneel (zie figuur 2 blz. 2)
19. Voedingsschakelaar
20. Voedingsconnector 15V/1A
21. Audio-ingang 100mV (-10dB)
22. Connector DMX-signaal: XLR 5-pin DMX in
23. Connector DMX-signaal: XLR 5-pin DMX out
5. Aansluitingen
• Sluit een 15Vdc/1A adapter aan op het toestel - let op de polariteit! - en sluit de adapter aan op het lichtnet.
• Maak de gewenste aansluitingen met het geschikte kabeltype, zet alle regelaars op 0 en zet het toestel aan (#19).
De fabrikant of leverancier is niet aansprakelijk voor schade die werd veroorzaakt door verkeerde aansluitingen.
• Zet de master schuifregelaar (#17) op 10 om een bereik van 100% te verkrijgen met de andere schuifregelaars.
• Laat de ingebouwde batterij ongeveer 4 uur opladen voordat u het toestel voor het eerst gaat gebruiken.
• Het toestel zal automatisch alle instellingen opslaan als u het uitschakelt.
• Als u het toestel gedurende 7 dagen niet gebruikt zal alle opgeslagen informatie gewist zijn.
6. Bediening
a. Functiemenu
Druk op de Functieknop (#7) ; u zult dit scherm zien:
→ CH
SETTING
SUB
MASTER
Eigenlijk bestaat dit menu uit de 6 submenu's die u rechts ziet ; u kunt de
submenu's selecteren met de ▲- en ▼-knoppen (#16 & 15).
→ CH SETTING
SUB MASTER
CHANNEL CHASE…
SUB CHASE…
AUTO FADE …
CHASE FADE …
LPTJUNIOR 8 VELLEMAN
Page 9
b. Kanaalniveaus instellen
1. Druk op de functieknop (#7), selecteer "CH SETTING" en druk op enter (#14); dit scherm zal verschijnen:
CH.SET 1--- 6
CH 1 -----= 0%
De bovenste regel geeft aan welke kanalen de schuifregelaars bedienen.
De onderste regel geeft de waarde van het kanaal dat het laatst gewijzigd is.
2. Gebruik de ▲- en ▼-knoppen (#16 & 15) om het bereik te bepalen dat beschikbaar is op de schuifregelaars
(altijd 6 opeenvolgende kanalen). Druk bvb 1 keer op de ▼-knop om het bereik "CH. SET 2---7" in te stellen.
3. Regel het niveau van kanaal 2 met schuifregelaar 1 (links), kanaal 3 met schuifregelaar 2 etc.
4. U kunt ook een opeenvolging van kanalen op hetzelfde niveau instellen:
1) druk op de CH-knop (#6) ; de cursor springt naar het geselecteerde kanaal op de onderste regel
2) geef het nummer van het eerste kanaal van het bereik in met de cijfertoetsen (#11)
3) druk op de knop voor bereikinstelling (#13)
4) geef het nummer van het laatste kanaal van het bereik in met de cijfertoetsen (#11)
5) druk op de AT-knop (#12) ; de cursor springt naar het getal voor het %-teken
6) geef de gewenste uitgangswaarde in met de cijfertoetsen (#11) of met de eerste schuifregelaar (de linkse)
7) druk op Enter (#14) ; op het scherm verschijnt automatisch het eerste kanaalnummer na het ingestelde bereik.
5. U kunt alle instellingen wissen door eerst tegelijk op de CL- en CH-knop (#6 & 10) te drukken en daarna enkel op
de CH-knop (#6), of door de master schuifregelaar op 0 te zetten en de MASTER-knop (#18) in te drukken.
c. Scènes
1) Een scène opslaan onder een sneltoets
1. Programmeer de scène (zie "b. Kanaalniveaus instellen " hierboven)
2. Druk op de REC-knop (#8) ; dit scherm zal verschijnen:
RECORD TO SC _
KEYIN SC 1...40
3. Druk op de gewenste knop onder #3 (SUB1 - SUB6) (hier bvb SUB1) ; dit scherm zal verschijnen:
SAVE TO SUB1
ENT=SURE ANY=NO
4. Druk op Enter (#14) om te bevestigen of op een andere knop om te annuleren.
2) Een scène opslaan onder een gewoon scènegeheugen
1. Programmeer de scène (zie "b. Kanaalniveaus instellen" hierboven)
2. Druk op de REC-knop (#8) ; dit scherm zal verschijnen:
RECORD TO SC _
KEYIN SC 1...40
3. Druk het gewenste getal in met de cijfertoetsen (#11) (bvb 5) en druk op Enter (#14).
Als er al een scène opgeslagen is onder Scène 5, zal dit scherm verschijnen:
OVERWRITE DATA?
1:YES , 2:NO
4. Druk op 1 om te bevestigen of op 2 om te annuleren. Als u bevestigt, of er zat geen data in Scène 5, ziet u dit:
Name: _
Keyin ENGLISH.
5. Gebruik de cijfertoetsen om een scènenaam (max. 9 karakters) in te geven, volgens dit schema:
1 A - B - C 2 D - E - F 3 G - H - I
4 J - K - L 5 M - N - O 6 P - Q - R
7 S - T - U 8 V - W - X 9 = - Y - Z
0 Volgend karakter / Spatie
6. Druk op Enter (#14) om te bevestigen.
LPTJUNIOR 9 VELLEMAN
Page 10
3) Een scène onder een snelknop (SUB1-6) oproepen
1. Druk op de functieknop (#7), selecteer "SUB MASTER" en druk op Enter (#14) ; dit scherm zal verschijnen:
SUB MASTER 1--6
LITE-PUTER CORP.
2. Druk op de gewenste sneltoets onder #3 (bvb SUB1) ; terwijl u de knop ingedrukt houdt, wordt de scène in SUB1
aan 100% uitgestuurd en dit scherm verschijnt:
LOAD SUBSCENE 1
3. Regel het uitgangsniveau van de SUB-scène met de overeenkomstige schuifregelaar. Dit scherm zal verschijnen:
SUB MASTER 1--6
SUB1 = 15%
4) Een scène onder Scene1-40 oproepen
1. Druk op de functieknop (#7), selecteer "SUB MASTER" en druk op Enter (#14) ; dit scherm zal verschijnen:
SUB MASTER 1--6
LITE-PUTER CORP.
2. Druk op de SC-knop (#5) ; dit scherm zal verschijnen:
LOAD SCENE _
KEYIN SC 1...40
3. Selecteer de gewenste scène met de cijfertoetsen (#11) (bvb 5). Op het scherm zal het nummer van de
geselecteerde scène op de bovenste regel verschijnen en de naam van de scène op de onderste regel:
LOAD SCENE 5
DISCO
4. Druk op Enter (#14) om te bevestigen. De LCD zal terugkeren naar het scherm onder 1.
5) Een scène wijzigen
1. Roep de gewenste scène op en druk op de CH-knop (#6) ; dit scherm zal verschijnen:
CHANNEL MODIFY
CH 1 -----= 0%
2. Geef via de cijfertoetsen (#11) of de ▲- en ▼-knoppen (#15 & 16) het kanaal in, druk op de AT-knop (#12) om
de kanaalwaarde te selecteren en wijzig deze met de cijfertoetsen (#11) ; dit scherm zal verschijnen (vb):
CHANNEL MODIFY
CH 15 -----= 60%
3. Druk op enter om de nieuwe data op te slaan ; dit scherm zal verschijnen:
SUB MASTER 1--6
LITE-PUTER CORP.
6) Een scène wissen
Druk tegelijk op de CL- en SC-knoppen (#5 & 10) of zet de master schuifregelaar (#17) op 0 en druk op de master
knop (#18) om alle waarden te wissen.
LPTJUNIOR 10 VELLEMAN
Page 11

d. Chase
1) Chase instellen
1. Druk op de functieknop (#7), 2 keer op de ▼-knop (#15) ("CHANNEL CHASE…" geselecteerd) en op enter:
CH CHASE 1- 6
MAS.=100% 9sec
2. Stel het startkanaal in met de cijfertoetsen (#11) of de ▲/▼-knoppen (#15 & 16) ; een bereik van 6 opeen-
volgende kanalen wordt automatisch geselecteerd. Druk ▲ Enter (#14) ; de cursor gaat naar de tijdsinstelling.
CH CHASE 1- 6
MAS.=100% 9sec
3. Stel de snelheid (21 mogelijkheden tussen 0.1sec en 1min) in met de ▲/▼-knoppen (#15 & 16).
4. Stel de kanaalschuifregelaars (#2) in op het gewenste niveau en de chase zal automatisch beginnen lopen.
5. Om tijdens een chase het kanaalbereik of de chasetijd te wijzigen: druk op Enter (#14) en herhaal stap 1-3.
6. De chase kan ook muziekgestuurd werken: sluit een audiosignaal aan op de audio-ingang achteraan het toestel
(#21) ; de chase zal nu lopen volgens het ritme van de muziek.
2) Chase + Scène instellen
1. Druk, als er een chase loopt, op de SC-knop (#5) om een scène op te roepen ; dit scherm zal verschijnen:
LOAD SCENE _
KEYIN SC 1...40
2. Geef met de cijfertoetsen (#11) een scènenummer in en druk op Enter (#14). De LCD keert terug naar:
CH CHASE 1- 6
MAS.=100% 9sec
• Als het niveau van een kanaal in een scène verschilt van de schuifregelaar, zal de hoogste waarde gelden.
• Druk op eender welke "SUB"-knop (#3) om het desbetreffende kanaal aan 100% uit te sturen.
• Als u de chase mode verlaat, zal het toestel de ingestelde chase-snelheid automatisch opslaan.
3) Chase fade instellen
1. Druk op de functieknop (#7), 5 keer op de ▼-knop (#15) ("CHASE FADE…" geselecteerd) en op enter:
→ FADE OFF
FADE ON
2. Druk op de ▼-knop (#15) om "FADE ON" te selecteren en druk op Enter (#14):
CH CHASE 1- 6
MAS.=100% 9sec
3. Zet de kanaalschuifregelaars (#2) op het gewenste niveau en de chase zal automatisch in fade mode lopen.
4) Sub chase instellen
1. Druk op de functieknop (#7), 3 keer op de ▼-knop (#15) ("SUB CHASE…" geselecteerd) en op enter:
→ CHASE 1-6
CHASE 3-6
2. Druk op de ▼-knop (#15) om "CHASE 3-6" te selecteren en druk op Enter (#14):
SUB CHASE 3-6
MAS.=100% 9sec
LPTJUNIOR 11 VELLEMAN
Page 12

3. Stel de chase-tijd in met de ▲/▼-knoppen (#15 & 16) en de niveaus met de CH3-CH6 schuifregelaars (#2) ; de
CH1-CH2 schuifregelaars regelen de dimming van de scène.
4. Om terug te keren naar de volledige chase mode: herhaal stappen 1 en 2 maar selecteer "CHASE 1-6" in stap 2.
e. Auto Fade
1) Auto Fade op 1 kanaal
1. Druk op de functieknop (#7), 4 keer op de ▼-knop (#15) ("AUTO FADE…" geselecteerd) en op enter:
AUTO FADE 9sec
CH 1------> 22%
2. Stel het gewenste kanaal in met de cijfertoetsen (#11) of met de ▲/▼-knoppen (#15 & 16).
Druk op Enter (#14) ; de cursor zal naar de tijdsinstelling springen:
AUTO FADE 9sec
CH 1------> 22%
3. Regel de fadesnelheid (21 mogelijkheden tussen 0.1sec en 1min) met de ▲/▼-knoppen (#15 & 16).
2) Auto Fade op meerdere kanalen
1. Druk op de functieknop (#7), 4 keer op de ▼-knop (#15) ("AUTO FADE…" geselecteerd) en op enter:
AUTO FADE 9sec
CH 1------> 22%
2. Stel het gewenste startkanaal in met de cijfertoetsen (#11) of met de ▲/▼-knoppen (#15 & 16) en druk
vervolgens op de knop voor bereikinstelling (#13):
AUTO FADE 9sec
CH 1-- 2-> 22%
3. Stel het bereik in met de cijfertoetsen (#11) of met de ▲/▼-knoppen (#15 & 16) en druk op Enter (#14) ; de
cursor zal naar de tijdsinstelling springen:
AUTO FADE 9sec
CH 1------> 22%
4. Regel de fadesnelheid (21 mogelijkheden tussen 0.1sec en 1min) met de ▲/▼-knoppen (#15 & 16).
Auto Fadesnelheid en Chase-snelheid zijn afzonderlijke systemen. U kunt dus verschillende snelheden instellen.
Kanaal 1 is nu in Auto Fade mode ; het fade-niveau wordt bepaald door de
master-schuifregelaar (#17). De fadewaarde (%) gaat constant op en neer.
7. Reiniging en onderhoud
1. Alle gebruikte schroeven moeten goed zijn aangespannen en mogen geen sporen van roest vertonen.
2. De behuizing en de aansluitingen mogen niet beschadigd of veranderd zijn.
3. De voedingskabels mogen niet beschadigd zijn. Laat het toestel installeren door een geschoolde technicus.
4. Ontkoppel het toestel van het lichtnet voor u het reinigt.
5. Veeg het toestel geregeld schoon met een klamme doek. Gebruik geen alcohol of solventen.
6. Haal eventuele reserveonderdelen bij uw plaatselijke dealer.
LPTJUNIOR 12 VELLEMAN
Page 13

8. Technische specificaties
Voeding 15Vdc / 0.5A
DMX-signaal ingang/uitgang DMX512 / 1990
DMX-aansluitingen XLR 5-pins (IN mannelijk, OUT vrouwelijk)
Ingang audiosignaal lijningang 100mV (-10dB)
Afmetingen 268 x 132 x 45mm
Gewicht 3kg
CE-certificaat ET87S-09-058
De informatie in deze handleiding kan worden gewijzigd zonder voorafgaande kennisgeving.
LPTJUNIOR – CONSOLE DMX DE MODULATION À 6 CANAUX
1. Introduction
Nous vous remercions de votre achat ! Lisez le présent manuel attentivement avant la mise en service de l'appareil.
Le LPTJUNIOR est un appareil léger et compact, mais cependant performant et versatile, qui peut contrôler 512
canaux, sauvegarder 46 scènes (combinaisons de réglages de canaux), dont 6 sous des touches rapides, est équipé
d'une pile incorporée avec une autonomie de 3 heures et peut marcher simultanément avec une autre console.
Vérifiez si l'appareil n'a pas été endommagé pendant le transport. Si c'est le cas, remettez l'installation de l'appareil à
plus tard et consultez votre revendeur.
2. Prescriptions de sécurité
Soyez prudent lors de l'installation : toucher un câble sous tension peut causer des électrochocs mortels.
Ne touchez pas l'appareil lorsqu'il est en usage : le boîtier chauffe !
Protégez l'appareil contre la pluie et l'humidité.
Débranchez le câble d'alimentation avant d'ouvrir le boîtier.
• Un technicien qualifié doit s'occuper de l'installation et de l’entretien.
• La garantie ne s'applique pas aux dommages survenus en négligeant certaines directives de ce manuel et votre
revendeur déclinera toute responsabilité pour les problèmes et les défauts qui en résultent.
• Ne branchez pas l'appareil après exposition à des variations de température. Afin d’éviter des dommages,
attendez jusqu’à ce que l'appareil ait atteint la température ambiante avant de l'utiliser.
• Cet appareil ressort à la classe de protection I, ce qui implique que l'appareil doit être mis à la terre. La connexion
électrique doit être établie par un technicien qualifié.
• La tension d'alimentation disponible ne peut pas dépasser celle mentionnée dans les spécifications.
• Le câble d'alimentation ne peut pas être serti ou endommagé. Demandez à votre revendeur de renouveler le
câble d'alimentation si nécessaire.
• Débranchez l’appareil s’il n’est pas utilisé ou pour le nettoyer. Tirez la fiche pour le débrancher ; non pas le câble.
• Ne regardez pas directement la source lumineuse, comme ceci peut occasionner des crises d'épilepsie.
• Les dommages occasionnés par des modifications à l'appareil du côté du client ne tombent pas sous la garantie.
Tenez votre LPTJUNIOR à l'écart d'amateurs et de jeunes enfants.
LPTJUNIOR 13 VELLEMAN
Page 14

3. Directives Générales
• Cet appareil est développé pour usage professionnel dans des discothèques, des théâtres, etc. Employez cet
appareil à l'intérieur et uniquement avec une source de courant CA de max. 230Vac/50Hz.
• Evitez de secouer l'appareil et traitez-le avec circonspection pendant l'installation et l'opération.
• Choisissez un lieu de montage où l’appareil sera protégé contre la poussière, l’humidité et des températures
extrêmes (<5 ou >35°C).
• Familiarisez-vous avec le fonctionnement de l'appareil. Il est interdit aux personnes non qualifiées d'opérer cet
appareil. La plupart des dégâts sont causés par un usage non professionnel.
• Transportez l'appareil dans son emballage d'origine.
• Il est interdit de modifier l'appareil pour des raisons de sécurité.
• La garantie est invalidée si vous enlevez l'autocollant portant le numéro de série. Employez le LPTJUNIOR
uniquement pour les applications décrites dans ce manuel afin d'éviter les courts-circuits, les brûlures, les
électrochocs, etc. Un usage interdit peut occasionner des dommages et annule d'office la garantie.
4. Description de l'appareil
a. Panneau de commande (voir figure p.2)
1. LEDs canal/scène
2. Glissières des canaux
3. Touche rapide SUB scène
4. Écran LCD
5. Bouton poussoir scène (SC)
6. Bouton poussoir pour sélection de canal (CH)
7. Bouton poussoir fonction (FUNC)
8. Bouton poussoir pour sauvegarder une scène (REC)
9. LED master
10. Bouton poussoir d'effacement (CL)
11. Clavier numérique
12. Bouton poussoir pour valeur du canal (AT)
13. Bouton poussoir portée (-)
14. Bouton poussoir confirmation ('ENTER')
15. Bouton poussoir pour descendre/diminuer (▼)
16. Bouton poussoir pour monter/augmenter (▲)
17. Glissière Master
18. Bouton poussoir Master
b. Panneau arrière (voir figure p.2)
19. Interrupteur d'alimentation
20. Connecteur d'alimentation 15V/1A
21. Entrée audio 100mV (-10dB)
22. Connecteur signal DMX: XLR à 5 broches DMX in
23. Connecteur signal DMX: XLR à 5 broches DMX out
5. Connexions
• Connectez un adaptateur 15Vcc à l'appareil - attention à la polarité! - et branchez l’adaptateur sur le réseau.
• Faites les connexions avec les types de câble appropriés, mettez toutes les glissières sur 0 et allumez l'appareil
(#19) Ni le fabricant ni le fournisseur sera responsable pour des dommages causés par des connexions erronées.
LPTJUNIOR 14 VELLEMAN
Page 15

• Mettez la glissière master (#17) sur 10 pour obtenir une portée de 100% avec les autres glissières.
• Chargez la pile incorporée pendant env. 4 heures avant d'utiliser l'appareil pour la première fois.
• L'appareil sauvegarde automatiquement tous les réglages quand vous l'éteignez.
• Si l'appareil n'est pas utilisé pendant 7 jours, toute donnée sauvegardée est effacée.
6. Commande
a. Menu fonction
Pressez le bouton fonction (#7) ; vous verrez cet écran:
→ CH
SETTING
SUB
MASTER
En fait, ce menu est composé des 6 sous-menus que vous voyez à droite ; vous
pouvez sélectionner les sous-menus avec les boutons #16 et #15
b. Régler les niveaux des canaux
1. Pressez le bouton fonction (#7), sélectionnez "CH SETTING" et pressez Enter (#14); vous verrez cet écran:
CH.SET 1--- 6
CH 1 -----= 0%
2. Sélectionnez la portée disponible sur les glissières (toujours 6 canaux successifs) par moyen des boutons ▲et
▼(#16 & 15) Par exemple: pressez 1 fois le bouton ▼ pour sélectionner la portée "CH. SET 2---7".
3. Réglez le niveau du canal 2 avec glissière 1 (à gauche), canal 3 avec glissière 2 etc.
4. Vous pouvez également régler un nombre de canaux successifs en une fois:
1) pressez le bouton CH (#6) ; le curseur se déplace au canal sélectionné sur la ligne inférieure.
2) entrez le numéro du premier canal de la portée avec le clavier numérique (#11)
3) pressez le bouton "-" (#13)
4) entrez le numéro du dernier canal de la portée avec le clavier numérique (#11)
5) pressez le bouton AT (#12) ; le curseur se déplace au chiffre devant le signe %
6) entrez la valeur de sortie désirée par le clavier numérique (#11) ou par la première glissière (à gauche)
7) pressez Enter (#14) ; l'écran affiche automatiquement le numéro du premier canal après la portée.
5. Vous pouvez effacer toutes les réglages en pressant simultanément les boutons CL et CH (#6 & 10) et puis
uniquement le bouton CH (#6), ou en mettant la glissière master sur 0 et en pressant le bouton MASTER (#18).
c. Scènes
1) Attribuer une scène à une touche rapide
1. Programmez la scène (voir "b. Régler les niveaux des canaux " supra)
2. Pressez le bouton REC (#8) ; vous verrez cet écran:
RECORD TO SC _
KEYIN SC 1...40
3. Pressez le bouton désiré sous #3 (SUB1 - SUB6) (ici p.ex. SUB1) ; vous verrez cet écran:
SAVE TO SUB1
ENT=SURE ANY=NO
4. Pressez Enter (#14) pour confirmer ou tout autre bouton pour annuler.
La ligne supérieure indique les canaux opérés par les glissières.
La ligne inférieure indique la valeur du canal dernièrement modifié.
→ CH SETTING
SUB MASTER
CHANNEL
CHASE…
SUB
CHASE…
AUTO FADE
…
CHASE FADE
…
LPTJUNIOR 15 VELLEMAN
Page 16

2) Attribuer une scène à une mémoire de scène régulière
1. Programmez la scène (voir "b. Régler les niveaux des canaux " supra)
2. Pressez le bouton REC (#8) ; vous verrez cet écran:
RECORD TO SC _
KEYIN SC 1...40
3. Entrez le chiffre désiré avec le clavier numérique (#11) (p.ex. 5) et pressez Enter (#14).
S'il y a déjà une scène sous le numéro 5, vous verrez cet écran:
OVERWRITE DATA?
1:YES , 2:NO
4. Pressez 1 pour confirmer ou 2 pour annuler. Si vous confirmez, ou si scène 5 était vide, vous verrez:
Name: _
Keyin ENGLISH.
5. Entrez un nom de scène (9 caractères max.) par le clavier numérique, suivant ce schéma:
1 A - B - C 2 D - E - F 3 G - H - I
4 J - K - L 5 M - N - O 6 P - Q - R
7 S - T - U 8 V - W - X 9 = - Y - Z
0 Caractère suivant / espace
6. Pressez Enter (#14) pour confirmer.
3) Activer une scène sous une touche rapide (SUB1-6)
1. Pressez le bouton fonction (#7), sélectionnez "SUB MASTER" et pressez Enter (#14) ; vous verrez cet écran:
SUB MASTER 1--6
LITE-PUTER CORP.
2. Sélectionnez la touche rapide désirée sous #3 (p.ex. SUB1) ; pendant que vous enfoncez le bouton, la scène
sous SUB1 sera émise à 100% et vous verrez cet écran:
LOAD SUBSCENE 1
3. Réglez le niveau de sortie de la scène SUB avec la glissière correspondante. Vous verrez cet écran:
SUB MASTER 1--6
SUB1 = 15%
4) Activer une scène sous Scène1-40
1. Pressez le bouton fonction (#7), sélectionnez "SUB MASTER" et pressez Enter (#14) ; vous verrez cet écran:
SUB MASTER 1--6
LITE-PUTER CORP.
2. Pressez le bouton SC (#5) ; vous verrez cet écran:
LOAD SCENE _
KEYIN SC 1...40
3. Sélectionnez la scène désirée avec le clavier numérique (#11) (p.ex. 5). Sur l'écran, vous verrez le numéro de la
scène sélectionnée sur la ligne supérieure et le nom de la scène sur la ligne inférieure.
LOAD SCENE 5
DISCO
4. Pressez sur Enter (#14) pour confirmer. Le LCD retournera à l'écran sous 1.
LPTJUNIOR 16 VELLEMAN
Page 17

5) Modifier une scène
1. Activez la scène à modifier et pressez le bouton CH (#6) ; vous verrez cet écran:
CHANNEL MODIFY
CH 1 -----= 0%
2. Entrez le numéro du canal avec le clavier numérique (#11) ou les boutons ▲et ▼(#15 & 16), sélectionnez la valeur
du canal en pressant le bouton AT (#12) et modifiez-la avec le clavier numérique (#11) ; vous verrez cet écran:
CHANNEL MODIFY
CH 15 -----= 60%
3. Pressez sur Enter (#14) pour sauvegarder les nouvelles données ; vous verrez cet écran:
SUB MASTER 1--6
LITE-PUTER CORP.
6) Effacer une scène
Enfoncez simultanément les boutons CL et SC (#5 & 10) ou mettez la glissière master (#17) sur 0 et pressez le
bouton master (#18) pour effacer toutes les valeurs.
d. Chenillard
1) Activer un chenillard
1. Pressez le bouton de fonction (#7), 2 fois le bouton ▼(#15) ("CHANNEL CHASE…" sélectionné) et Enter (#14):
CH CHASE 1- 6
MAS.=100% 9sec
2. Déterminez le canal de départ avec le clavier numérique (#11) ou les boutons ▲/▼(#15 & 16) ; une portée de 6
canaux successifs est sélectionnée automatiquement. Pressez Enter (#14) ; le curseur se met au réglage du temps.
CH CHASE 1- 6
MAS.=100% 9sec
3. Réglez la vitesse (21 possibilités entre 0.1sec et 1min) avec les boutons ▲/▼(#15 & 16).
4. Mettez les glissières (#2) sur le niveau désiré et le chenillard commencera automatiquement.
5. Pour modifier le temps ou la portée pendant un chenillard: pressez Enter (#14) et répétez les étapes 1-3.
6. Le chenillard peut également être piloté par la musique: connectez un signal audio sur l'entrée audio à l'arrière de
l'appareil (#21) ; le chenillard marchera sur le rythme de la musique.
2) Activer chenillard + scène
1. Quand un chenillard est actif, pressez le bouton SC (#5) pour évoquer une scène; vous verrez cet écran:
LOAD SCENE _
KEYIN SC 1...40
2. Entrez un numéro d'une scène avec le clavier numérique (#11) et pressez Enter (#14). Le LCD retourne à:
CH CHASE 1- 6
MAS.=100% 9sec
• Si le niveau d'un canal dans une scène diffère de celui de la glissière, la valeur la plus haute est valable.
• Pressez n'importe quel bouton "SUB" (#3) pour émettre le canal en question à 100%.
• Quand vous quittez la mode chenillard, l'appareil sauvegardera automatiquement la vitesse programmée.
LPTJUNIOR 17 VELLEMAN
Page 18

3) Instaurer la durée de variation sur un chenillard
1. Pressez le bouton de fonction (#7), 5 fois le bouton ▼(#15) ("CHASE FADE…" sélectionné) et Enter (#14):
→ FADE OFF
FADE ON
2. Pressez le bouton ▼(#15) pour sélectionnez "FADE ON" et pressez Enter (#14):
CH CHASE 1- 6
MAS.=100% 9sec
3. Mettez les glissières (#2) sur le niveau désiré et le chenillard fonctionnera automatiquement en mode fade.
4) Activer un sous-chenillard
1. Pressez le bouton de fonction (#7), 5 fois le bouton ▼(#15) ("SUB CHASE…" sélectionné) et Enter (#14):
→ CHASE 1-6
CHASE 3-6
2. Pressez le bouton ▼(#15) pour sélectionner "CHASE 3-6" et pressez Enter (#14):
SUB CHASE 3-6
MAS.=100% 9sec
3. Réglez le temps du chenillard avec les boutons ▲/▼(#15 & 16) et les niveaux du chenillard avec les glissières
CH3-CH6 ; les glissières CH1-CH2 règlent la variation de la scène.
4. Pour retourner à la mode chenillard seul: répétez les étapes 1 et 2 mais sélectionnez "CHASE 1-6" dans étape 2.
e. Auto Fade
1) Auto Fade sur 1 canal
1. Pressez le bouton de fonction (#7), 4 fois le bouton ▼(#15) ("AUTO FADE…" sélectionné) et Enter (#14):
AUTO FADE
9sec
CH 1------>
22%
Le canal 1 est maintenant en mode Auto Fade ; le niveau du fade est
déterminé par la glissière master (#17). La valeur du fade (%) monte et
descend toujours.
2. Entrez le numéro du canal désiré avec le clavier numérique (#11) ou les
boutons ▲/▼(#15 & 16).
Pressez Enter (#14) ; le curseur se déplacera au réglage de temps:
AUTO FADE 9sec
CH 1------> 22%
3. Réglez la vitesse du fade (21 possibilités entre 0.1sec et 1min) avec les boutons ▲/▼(#15 & 16).
2) Auto Fade sur plusieurs canaux
1. Pressez le bouton de fonction (#7), 4 fois le bouton ▼(#15) ("AUTO FADE…" sélectionné) et Enter (#14):
AUTO FADE 9sec
CH 1------> 22%
2. Entrez le canal de départ avec le clavier numérique (#11) ou les boutons ▲/▼(#15 & 16) et pressez ensuite le
bouton portée (#13):
AUTO FADE 9sec
CH 1-- 2-> 22%
3. Entrez la portée avec le clavier numérique (#11) ou les boutons ▲/▼(#15 & 16) et pressez Enter (#14) ; le
curseur se déplacera au réglage de temps:
AUTO FADE 9sec
CH 1------> 22%
LPTJUNIOR 18 VELLEMAN
Page 19

4. Réglez la vitesse du fade (21 possibilités entre 0.1sec et 1min) avec les boutons ▲/▼(#15 & 16).
Les vitesses Auto Fade et Chenillard sont des systèmes séparés. Vous pouvez donc mettre de différentes vitesses.
7. Nettoyage et entretien
1. Serrez les écrous et les vis et vérifiez qu’elles ne sont pas rouillées.
2. Le boîtier et les connecteurs ne peuvent pas être déformés, adaptés ou bricolés.
3. Les câbles d'alimentation ne peuvent pas être endommagés. Un technicien qualifié doit installer l'appareil.
4. Débranchez l'appareil du réseau avant de le nettoyer.
5. Essuyez l’appareil régulièrement à l’aide d’un chiffon humide. Evitez l’usage d’alcool et de solvants.
6. Commandez des pièces de rechange éventuelles chez votre revendeur.
8. Spécifications techniques
Alimentation 15Vcc / 0.5A
Signal DMX entrée/sortie DMX512 / 1990
Connexions DMX XLR à 5 broches (IN mâle ; OUT femelle)
Entrée audio pour chenillard Entrée ligne, 100mV (-10dB) max.
Dimensions 268 x 132 x 45mm
Poids 3kg
Certificat CE ET87S-09-058
Toutes les informations de ce manuel peuvent être modifiées sans notification préalable.
LPTJUNIOR – CONSOLA DMX DE MODULACIÓN DE 6 CANALES
1. Introducción & Características
¡Gracias por haber comprado la LPTJUNIOR! Lea cuidadosamente las instrucciones del manual antes de montarlo.
La LPTJUNIOR no sólo es un aparato ligero y compacto, sino también potente y versátil, que puede controlar 512
canales, almacenar 46 escenas (combinaciones de ajustes de canales), 6 bajo teclas aceleradora s. Está equipada
de una pila incorporada con una autonomía de 3 horas y puede funcionar simultáneamente con otra consola.
Verifique si el aparato ha sufrido algún daño en el transporte antes de la puesta en marcha. Si es el caso, no
conecte el aparato a la red y póngase en contacto con su distribuidor.
2. Indicaciones de seguridad
Cuidado durante la instalación : puede sufrir una peligrosa descarga eléctrica al tocar los cables con un
voltaje peligroso.
No exponga este equipo a lluvia o humedad.
No exponga este equipo a lluvia o humedad.
Desconecte el cable de alimentación de la red antes de abrir la caja.
LPTJUNIOR 19 VELLEMAN
Page 20

• La instalación y el mantenimiento deben ser realizados por personal especializado.
• Daños causados por descuido de las instrucciones de seguridad de este manual invalidarán su garantía y su
distribuidor no será responsable por ningún daño u otros problemas resultantes.
• No conecte el aparato si ha estado expuesto a grandes cambios de temperatura. Espere hasta que el aparato
llegue a la temperatura ambiente.
• Este aparato pertenece a la clase de protección I. Por lo tanto, es esencial que el aparato esté puesto a tierra. La
conexión eléctrica debe llevarse a cabo por un técnico calificado.
• Asegúrese de que la tensión de red no sea mayor que la tensión indicada en las especificaciones.
• No aplaste el cable de alimentación y protéjalo contra daños por algún tipo de superficie afilada. Si es necesario,
pida a su distribuidor reemplazar el cable de alimentación.
• Siempre desconecte el aparato si no va a usarlo durante un largo periodo de tiempo o antes de limpiarlo.
Siempre tire del enchufe para desconectar el cable de red, nunca del propio cable.
• No mire directamente a la fuente de luz. Esto puede causar un ataque epiléptico.
• Los daños causados por modificaciones no autorizadas no están cubiertos por la garantía. Mantenga la
LPTJUNIOR lejos del alcance de personas no autorizadas y de niños.
3. Directivas generales
• Este aparato es un efecto de luz para uso profesional en una discoteca, un teatro, etc. La LPTJUNIOR sólo es
permitido para una conexión con una fuente de corriente CA de máx. 230Vca/50Hz y para el uso en interiores.
• No agite el aparato. Evite usar excesiva fuerza durante la instalación y la reparación.
• Seleccione un lugar de montaje donde el aparato no está expuesto a polvo, humedad y calor extremo (<5 o
>35°C).
• Familiarícese con el funcionamiento del aparato. Sólo personas calificadas pueden operar este aparato. La
mayoría de los daños se causan por un uso inadecuado.
• Transporte el aparato en su embalaje original.
• Por razones de seguridad, las modificaciones no autorizadas del aparato están prohibidas.
• Sólo use la LPTJUNIOR para aplicaciones descritas en este manual a fin de evitar p.ej. cortocircuitos,
quemaduras, descargas eléctricas, explosión de la lámpara, etc. Un uso desautorizado puede causar daños y
anula la garantía completamente.
4. Descripción del aparato
a. Panel frontal (véase figura 1 p.2)
1. LEDs canal/escena
2. Conmutadores deslizantes de los canales
3. Tecla aceleradora SUB escena
4. Pantalla LCD
5. Botón pulsador escena (SC)
6. Botón pulsador para selección de canal (CH)
7. Botón pulsador función (FUNC)
8. Botón pulsador para almacenar una escena (REC)
9. LED master
10. Botón pulsador borrar (CL)
11. Teclado digital
12. Botón pulsador para valor del canal (AT)
13. Botón pulsador alcance (-)
14. Botón pulsador confirmación ('ENTER')
15. Botón pulsador para bajar/disminuir (▼)
LPTJUNIOR 20 VELLEMAN
Page 21

16. Botón pulsador para montar/aumentar (▲)
17. Conmutador deslizante Master
18. Botón pulsador Master
b. Panel posterior (véase figura 2 p.2)
19. Interruptor de alimentación
20. Conector de alimentación 15V/1A
21. Entrada audio 100mV (-10dB)
22. Conector de señal DMX: XLR de 5 contactos DMX in
23. Conector de señal DMX: XLR de 5 contactos DMX out
5. Conexiones
• Conecte un adaptador de 15Vcc al aparato – ¡cuidado a la polaridad! – y conecte el adaptador a la red.
• Haga las conexiones con los tipos de cable apropiados, coloque todos los conmutadores deslizantes en 0 y
enciende el aparato (#19). El distribuidor no aceptará responsabilidad por daños causados por conexiones
incorrectas.
• Coloque el conmutador deslizante master (#17) en 10 para obtener un alcance de 100% con los otros
conmutadores deslizantes.
• Cargue la pila incorporada durante aproximadamente 4 horas antes de usar el aparato por primera vez.
• El aparato almacena todos los ajustes automáticamente al activarlo.
• Se borran todos los datos almacenados si no se usa el aparato durante 7días.
6. Operación
a. Menú función
Apriete el botón función (#7) ; aparece esta pantalla:
→ CH SETTING
SUB MASTER
De hecho, este menú consta de 6 submenús (véase a la derecha) ; es
posible seleccionar los submenús con los botones #16 et #15
b. Ajustar los niveles de los canales
1. Apriete el botón función (#7), seleccione "CH SETTING" y apriete Enter (#14); aparece esta pantalla:
CH.SET 1--- 6
CH 1 -----= 0%
2. Seleccione el alcance disponible en los conmutadores deslizantes (siempre 6 canales sucesivos) mediante los
botones ▲y ▼(#16 & 15) Por ejemplo: apriete el botón ▼ 1 vez para seleccionar el alcance "CH. SET 2---7".
3. Ajuste el nivel del canal 2 con el conmutador deslizante 1 (a la izquierda), canal 3 con el conmutador deslizante 2
etc.
4. También, es posible ajustar varios canales sucesivos a la vez:
1) apriete el botón CH (#6) ; el cursor se desplaza hacia el canal seleccionado en la línea inferior.
2) introduzca el número del primer canal del alcance con el teclado digital (#11)
3) apriete el botón "-" (#13)
4) introduzca el número del último canal del alcance con el teclado digital (#11)
La línea superior indica los canales operados por los conmutadores deslizantes.
La línea inferior indica el valor del canal modificado en último lugar.
→ CH SETTING
SUB MASTER
CHANNEL CHASE…
SUB CHASE…
AUTO FADE …
CHASE FADE …
LPTJUNIOR 21 VELLEMAN
Page 22

5) apriete el botón AT (#12) ; el cursor se desplaza hacia la cifra delante de %
6) introduzca el valor de salida deseada por el teclado digital (#11) o por el primer conmutador deslizante (a la
izquierda)
7) apriete Enter (#14) ; la pantalla visualiza automáticamente el número del primer canal después del alcance.
5. Es posible borrar todos los ajustes apretando simultáneamente los botones CL y CH (#6 & 10) y luego sólo el
botón CH (#6) o colocando el conmutador deslizante master en 0 y apretando el botón MASTER (#18).
c. Escenas
1) Almacenar una escena bajo una tecla aceleradora
1. Programe la escena (véase arriba "b. Ajustar los niveles de los canales")
2. Apriete el botón REC (#8) ; aparece esta pantalla:
RECORD TO SC _
KEYIN SC 1...40
3. Apriete el botón deseado bajo #3 (SUB1 - SUB6) (aquí p.ej. SUB1) ; aparece esta pantalla:
SAVE TO SUB1
ENT=SURE ANY=NO
4. Apriete Enter (#14) para confirmar o cualquier otro botón para anular.
2) Almacenar una escena bajo una memoria de escena regular
1. Programe la escena (véase arriba "b. Ajustar los niveles de los canales")
2. Apriete el botón REC (#8) ; aparece esta pantalla:
RECORD TO SC _
KEYIN SC 1...40
3. Introduzca la cifra deseada con el teclado digital (#11) (p.ej. 5) y apriete Enter (#14).
Si ya se encuentra una escena bajo el número 5, aparece esta pantalla:
OVERWRITE DATA?
1:YES , 2:NO
4. Apriete 1 para confirmar o 2 para anular. Si confirma, o si escena 5 está vacía, aparece:
Name: _
Keyin ENGLISH.
5. Introduzca un nombre de escena (9 caracteres máx.) por el teclado digital, siguiendo este esquema:
1 A - B - C 2 D - E - F 3 G - H - I
4 J - K - L 5 M - N - O 6 P - Q - R
7 S - T - U 8 V - W - X 9 = - Y - Z
0 Caracter siguiente /
espacio
6. Apriete Enter (#14) para confirmar.
3) Activar una escena bajo una tecla aceleradora (SUB1-6)
1. Apriete el botón función (#7), seleccione "SUB MASTER" y apriete Enter (#14) ; aparece esta pantalla:
SUB MASTER 1--6
LITE-PUTER CORP.
LPTJUNIOR 22 VELLEMAN
Page 23

2. Seleccione la tecla aceleradora deseada bajo #3 (p.ej. SUB1) ; durante que apriete el botón, la escena bajo
SUB1 se emitirá a 100% y aparecerá esta pantalla:
LOAD SUBSCENE 1
3. Ajuste el nivel de salida de la escena SUB con el conmutador deslizante correspondiente. Aparece esta pantalla:
SUB MASTER 1--6
SUB1 = 15%
4) Activar una escena bajo Scene1-40
1. Apriete el botón función (#7), seleccione "SUB MASTER" y apriete Enter (#14) ; aparece esta pantalla:
SUB MASTER 1--6
LITE-PUTER CORP.
2. Apriete el botón SC (#5) ; aparece esta pantalla:
LOAD SCENE _
KEYIN SC 1...40
3. Seleccione la escena deseada con el teclado digital (#11) (p.ej. 5). En la pantalla, aparece el número de la
escena seleccionada en la línea superior y el nombre de la escena en la línea inferior.
LOAD SCENE 5
DISCO
4. Apriete Enter (#14) para confirmar. La pantalla LCD se vuelve a la pantalla bajo 1.
5) Modificar una escena
1. Active la escena que quiere modificar y apriete el botón CH (#6) ; aparece esta pantalla:
CHANNEL MODIFY
CH 1 -----= 0%
2. Introduzca el número del canal con el teclado digital (#11) o los botones ▲y ▼(#15 & 16), seleccione el valor del
canal apretando el botón AT (#12) y modefíquelo con el teclado digital (#11) ; aparece esta pantalla:
CHANNEL MODIFY
CH 15 -----= 60%
3. Apriete Enter (#14) para almacenar los nuevos datos ; aparece esta pantalla:
SUB MASTER 1--6
LITE-PUTER CORP.
6) Borrar una escena
Apriete simultáneamente los botones CL y SC (#5 & 10) o coloque el conmutador deslizante master (#17) en 0 y
apriete el botón master (#18) para borrar todos los valores.
d. Chase
1) Activar un chase
1. Apriete el botón función (#7), 2 veces el botón ▼(#15) ("CHANNEL CHASE…" seleccionado) y Enter (#14):
CH CHASE 1- 6
MAS.=100% 9sec
2. Determine el canal inicial con el teclado digital (#11) o los botones ▲/▼(#15 & 16) ; se selecciona un alcance de 6
canales sucesivos automáticamente. Apriete Enter (#14) ; el cursor se coloque en "ajuste del tiempo".
LPTJUNIOR 23 VELLEMAN
Page 24

CH CHASE 1- 6
MAS.=100% 9sec
3. Ajuste la velocidad (21 posibilidad entre 0.1seg. y 1min.) con los botones ▲/▼(#15 & 16).
4. Coloque los conmutadores deslizantes (#2) en el nivel deseado y el chase empezará automáticamente.
5. Para modificar el tiempo o el alcance durante un chase: apriete Enter (#14) y repita los pasos 1-3.
6. También, es posible controlar el chase por la música: conecte una señal audio a la entrada audio en la parte
posterior del aparato (#21) ; el chase funciona al ritmo de la música.
2) Activar Chase + Escena
1. Si está activado un chase, apriete el botón SC (#5) para llamar una escena; aparece esta pantalla:
LOAD SCENE _
KEYIN SC 1...40
2. Introduzca el número de una escena con el teclado digital (#11) y apriete Enter (#14). La pantalla LCD se vuelve
a:
CH CHASE 1- 6
MAS.=100% 9sec
• Si el nivel de un canal en una escena es destinto del nivel del conmutador deslizante, se selecciona el valor
más elevado.
• Apriete cualquier botón "SUB" (#3) para emitir el canal en cuestión a 100%.
• Quitando el modo chase, el aparato almacena automáticamente la velocidad programada.
3) Colocar un Chase Fade
1. Apriete el botón función (#7), 5 veces el botón ▼(#15) ("CHASE FADE…" seleccionado) y Enter (#14):
→ FADE OFF
FADE ON
2. Apriete el botón ▼(#15) para seleccionar "FADE ON" y apriete Enter (#14):
CH CHASE 1- 6
MAS.=100% 9sec
3. Coloque los conmutadores deslizantes (#2) en el nivel deseado y el chase funcionará automáticamente en modo
fade.
4) Activar un subchase
1. Apriete el botón función (#7), 5 veces el botón ▼(#15) ("SUB CHASE…" seleccionado) y Enter (#14):
→ CHASE 1-6
CHASE 3-6
2. Apriete el botón ▼(#15) para seleccionar "CHASE 3-6" y apriete Enter (#14):
SUB CHASE 3-6
MAS.=100% 9sec
3. Ajuste el tiempo del chase con los botones ▲/▼(#15 & 16) y los niveles del chase con los conmutadores
deslizantes CH3-CH6 ; los conmutadores deslizantes CH1-CH2 ajustan la variación de la escena.
4. Para volver al modo chase (sólo este modo): repita los pasos 1 y 2 pero seleccione "CHASE 1-6" en el paso 2.
LPTJUNIOR 24 VELLEMAN
Page 25

e. Auto Fade
1) Auto Fade en 1 canal
1. Apriete el botón función (#7), 4 veces el botón ▼(#15) ("AUTO FADE…" seleccionado) y Enter (#14):
AUTO FADE 9sec
CH 1------> 22%
siempre sube y baja.
2. Introduzca el número de canal deseado con el teclado digital (#11) o los botones ▲/▼(#15 & 16).
Apriete Enter (#14) ; el cursor se desplaza hacia el ajuste de tiempo:
AUTO FADE 9sec
CH 1------> 22%
3. Ajuste la velocidad del fade (21 posibilidades entre 0.1seg. y 1min.) con los botones ▲/▼(#15 & 16).
2) Auto Fade en varios canales
1. Apriete el botón función (#7), 4 veces el botón ▼(#15) ("AUTO FADE…" seleccionado) y Enter (#14):
AUTO FADE 9sec
CH 1------> 22%
2. Introduzca el canal inicial con el teclado digital (#11) o los botones ▲/▼(#15 & 16) y luego apriete el botón
alcance (#13):
AUTO FADE 9sec
CH 1-- 2-> 22%
3. Introduzca el alcance con el teclado digital (#11) o los botones ▲/▼(#15 & 16) y apriete Enter (#14) ; el cursor
se desplaza hacia el ajuste de tiempo:
AUTO FADE 9sec
CH 1------> 22%
4. Ajuste la velocidad del fade (21 posibilidades entre 0.1seg. y 1min.) con los botones ▲/▼(#15 & 16).
Las velocidades Auto Fade y Chase son sistemas separados. Por lo tanto, es posible introducir diferentes
velocidades.
El canal 1 está ahora en el modo Auto Fade ; el nivel del fade se
determina por el conmutador deslizante master (#17). El valor del fade (%)
7. Limpieza y mantenimiento
1. Apriete bien las tuercas y los tornillos y verifique que no corren.
2. No modifique la caja, los soportes y las ópticas p.ej. no taladre agujeros adicionales en un soporte o no modifique
las conexiones, etc.
3. No dañe los cables de alimentación. Contacte con un técnico especializado para instalar el aparato.
4. Desconecte el aparato de toda fuente antes de limpiarlo.
5. Limpie el aparato regularmente con un paño húmedo. Evite el uso de alcohol y de disolventes.
6. Contacte con su distribuidor si necesita piezas de recambio.
8. Especificaciones
Alimentación 15Vcc / 0.5A
Señal DMX entrada/salida DMX512 / 1990
Conexiones DMX XLR de 5 contactos (IN macho ; OUT hembra)
Entrada audio para chase Entrada línea, 100mV (-10dB) máx.
Dimensiones 268 x 132 x 45mm
LPTJUNIOR 25 VELLEMAN
Page 26

Peso 3kg
Normas CE ET87S-09-058
Se pueden modificar las especificaciones y el contenido de este manual sin previo aviso.
LPTJUNIOR – 6-KANAL DMX-DIMMERPANEL
1. Einführung & Eigenschaften
Wir bedanken uns für den Kauf des LPTJUNIOR! Lesen Sie diese Bedienungsanleitung vor Inbetriebnahme
sorgfältig durch. Dieses kräftige und vielseitige Gerät kann 512 Kanäle ansteuern, 46 Szenen (Kombinationen von
Kanaleinstellungen) speichern –6 unter Schnelltasten, hat eine eingebaute Batterie mit einer Autonomie von 3
Stunden und kann gleichzeitig mit einem anderen Panel funktionieren.
Überprüfen Sie zuerst, ob Transportschäden vorliegen. In diesem Fall, nehmen Sie das Gerät nicht in Betrieb und
setzen Sie sich mit Ihrem Fachhändler in Verbindung.
2. Sicherheitshinweise
Seien Sie vorsichtig bei der Installation : Fassen Sie keine Kabel an, die unter Strom stehen um einen
lebensgefährlichen elektrischen Schlag zu vermeiden
Berühren Sie das Gerät niemals während des Betriebes, denn das Gehäuse erhitzt sich.
Schützen Sie das Gerät vor Feuchtigkeit und Nässe.
Trennen Sie das Gerät vor Öffnen vom Netz.
• Installation und Wartung sind einer autorisierten Fachkraft vorbehalten.
• Bei Schäden, die durch Nichtbeachtung der Bedienungsanleitung verursacht werden, erlischt der
Garantieanspruch. Für daraus resultierende Folgeschäden übernimmt der Hersteller keine Haftung.
• Nehmen Sie das Gerät erst in Betrieb, nachdem es von einem kalten in einen warmen Raum gebracht wurde.
Lassen Sie das Gerät solange ausgeschaltet, bis es die Zimmertemperatur erreicht hat.
• Der Aufbau des Gerätes entspricht der Schutzklasse I. Gemäß den Vorschriften muss das Gerät geerdet sein.
Der elektrische Anschluss darf nur von einer Fachkraft durchgeführt werden.
• Vergewissern Sie sich, dass die anzuschließende Netzspannung nicht höher ist als die Netzspannung
beschrieben im Punkt 8 “Technische Daten.
• Achten Sie darauf, dass die Netzleitung nicht gequetscht oder durch scharfe Kanten beschädigt werden kann. Bei
Beschädigungen soll eine Fachkraft das Kabel ersetzen.
• Trennen Sie das Gerät bei Nichtbenutzung und vor jeder Reinigung vom Netz. Fassen Sie dazu den Netzstecker
an der Grifffläche an und ziehen Sie nie an der Netzleitung.
• Beachten Sie, dass Schäden, die durch manuelle Veränderungen an diesem Gerät verursacht werden, nicht
unter den Garantieanspruch fallen. Halten Sie Kinder und Unbefugte vom Gerät fern.
LPTJUNIOR 26 VELLEMAN
Page 27

3. Allgemeine Richtlinien
• Dieses Gerät ist ein Dimmerpack für den professionellen Einsatz auf Bühnen, in Discotheken, Theater, usw. Das
LPTJUNIOR ist nur für den Anschluss an einen AC-Strom von max. 230Vac/50Hz zugelassen und wurde
ausschließlich zur Verwendung in Innenräumen konzipiert.
• Vermeiden Sie Erschütterungen. Vermeiden Sie rohe Gewalt während der Installation und Bedienung des
Gerätes.
• Achten Sie bei der Wahl des Installationsortes darauf, dass das Gerät keinem Staub, keiner Feuchtigkeit und
extremen Temperaturen ausgesetzt wird. Das Gerät darf weder transportiert noch verwendet werden bei
Temperaturen von < 5 und > 35°C.
• Nehmen Sie das Gerät erst in Betrieb, nachdem Sie sich mit seinen Funktionen vertraut gemacht haben. Lassen
Sie das Gerät nicht von Personen bedienen, die sich nicht mit dem Gerät auskennen. Meist ist die Beschädigung
des Gerätes das Ergebnis von unfachmännischer Bedienung.
• Verwenden Sie die Originalverpackung, wenn das Gerät transportiert werden soll.
• Eigenmächtige Veränderungen sind aus Sicherheitsgründen verboten.
• Der Garantieanspruch erlischt wenn Sie den Sticker mit der Serienummer entfernen.
• Verwenden Sie das Gerät nur für Anwendungen beschrieben in dieser Bedienungsanleitung sonst kann dies zu
Schäden am Produkt führen und erlischt der Garantieanspruch. Jede andere Verwendung ist mit Gefahren wie
Kurzschluss, Brandwunden, elektrischem Schlag, Lampenexplosion, usw. verbunden.
4. Beschreibung des Gerätes
a. Vorderseite (siehe Abbildung, S. 2)
1. Kanal-/Szene-LEDs
2. Kanal-Schiebeschalter
3. SUB Szene-Schnelltasten
4. LCD-Display
5. Szene-Taste (SC)
6. Taste zur Kanaleinstellung (CH)
7. Funktionstaste (FUNC)
8. Taste zum Speichern einer Szene (REC)
9. Master LED
10. Lösch-Taste (CL)
11. Numerischen Tasten
12. Taste für Kanalwert (AT)
13. Taste für Bereichseinstellung (-)
14. Befestigungstaste ('ENTER')
15. DOWN-Taste (▼)
16. Up-Taste (▲)
17. Master-Schiebeschalter
18. Master-Dimmtaste
b. Rückseite (siehe Abbildung, S. 2)
19. Ein/Aus-Schalter
20. Leistungsstecker 15V/1A
21. Audio-Eingang 100mV (-10dB)
22. Anschluss DMX-Signal: XLR 5-pol. DMX in
23. Anschluss DMX-Signal: XLR 5-pol. DMX out
LPTJUNIOR 27 VELLEMAN
Page 28

5. Anschluss
• Schließen Sie einen 15Vdc/1A-Adapter an das Gerät an – Beachten Sie die Polarität! - und schließen Sie den
Adapter an das Netz an.
• Machen Sie die gewünschte Anschlüsse mit dem geeigneten Kabeltyp, stellen Sie alle Regler auf 0 und schalten
Sie das Gerät ein (#19).
Für Schäden, die durch falsche Anschlüsse verursacht wurden, übernimmt der Hersteller oder der Händler keine
Haftung.
• Stellen Sie den Master-Schiebeschalter (#17) auf 10 um einen Bereich von 100% mit den anderen
Schiebeschaltern zu bekommen.
• Laden Sie die eingebaute Batterie vor der ersten Inbetriebnahme etwa 4 Stunden auf.
• Das Gerät speichert automatisch alle Einstellungen wenn Sie es ausschalten.
• Wenn Sie das Gerät während 7 Tage nicht verwenden, wird alle gespeicherte Information gelöscht.
6. Bedienung
a. Funktionsmenü
Drücken Sie die Funktionstaste (#7) ; nachfolgender Bildschirm erscheint:
→ CH SETTING
SUB MASTER
Eigentlich besteht dieses Menü aus den 6 Submenüs, die Sie rechts sehen ;
Sie können die Submenüs mit den ▲- und ▼-Tasten (#16 & 15)
auswählen.
b. Kanalpegel einstellen
1. Drücken Sie die Funktionstaste (#7), wählen Sie "CH SETTING" aus und drücken Sie "Enter" (#14) ;
nachfolgender Bildschirm erscheint:
CH.SET 1--- 6
CH 1 -----= 0%
2. Verwenden Sie die ▲- und ▼-Tasten (#16 & 15), um den verfügbaren Bereich auf den Schiebeschaltern zu
bestimmen (immer 6 aufeinanderfolgende Kanäle). Drücken Sie z.B. 1x die ▼-Taste um den "CH. SET 2---7"Bereich einzustellen.
3. Regeln Sie das Niveau von Kanal 2 mit Schiebeschalter 1 (links), Kanal 3 mit Schiebeschalter 2, usw.
4. Sie können auch eine Aufeinanderfolge von Kanälen auf demselben Niveau einstellen:
1) Drücken Sie die CH-Taste (#6) ; der Cursor springt zum gewählten Kanal auf der unteren Zeile
2) Geben Sie die Nummer des ersten Kanals vom Bereich mit den numerischen Tasten (#11) ein
3) Drücken Sie die Taste für die Bereichseinstellung (#13)
4) Geben Sie die Nummer des letzten Kanals vom Bereich mit den numerischen Tasten (#11) ein
5) Drücken Sie die AT-Taste (#12) ; der Cursor springt zur Ziffer vor dem %-Zeichen
6) Geben Sie den gewünschten Ausgangswert mit den numerischen Tasten (#11) oder mit dem ersten
Schiebeschalter (dem linken) ein
7) Drücken Sie "Enter" (#14) ; Im Bildschirm erscheint automatisch die erste Kanalnummer nach dem
eingestellten Bereich.
5. Sie können alle Einstellungen löschen indem Sie zuerst die CL- und CH-Taste (#6 & 10) drücken und danach nur
die CH-Taste (#6), oder indem Sie den Master-Schiebeschalter auf 0 stellen und die MASTER-Taste (#18)
drücken.
Die obere Zeile zeigt welche Kanäle die Schiebeschalter bedienen.
Die untere Zeile zeigt den Kanalwert, der letzt geändert wurde.
→ CH SETTING
SUB MASTER
CHANNEL CHASE…
SUB CHASE…
AUTO FADE …
CHASE FADE …
LPTJUNIOR 28 VELLEMAN
Page 29

c. Szenen
1) Eine Szene unter einer Schnelltaste speichern
1. Programmieren Sie die Szene (siehe oben "b. Kanalpegel einstellen ")
2. Drücken Sie die REC-Taste (#8) ; nachfolgender Bildschirm erscheint:
RECORD TO SC _
KEYIN SC 1...40
3. Drücken Sie die gewünschte Taste unter #3 (SUB1 - SUB6) (hier z.B. SUB1) ; nachfolgender Bildschirm
erscheint:
SAVE TO SUB1
ENT=SURE ANY=NO
4. Drücken Sie "Enter" (#14) um zu bestätigen oder drücken Sie eine andere Taste um zu annullieren.
2) Eine Szene unter einem normalen Szenenspeicher speichern
1. Programmieren Sie die Szene (siehe oben "b. Kanalpegel einstellen ")
2. Drücken Sie die REC-Taste (#8) ; nachfolgender Bildschirm erscheint:
RECORD TO SC _
KEYIN SC 1...40
3. Drücken Sie die gewünschte Zahl mit den numerischen Tasten (#11) ein (z.B. 5) und drücken Sie "Enter" (#14).
Wenn schon eine Szene unter Szene 5 gespeichert wurde, erscheint nachfolgender Bildschirm:
OVERWRITE DATA?
1:YES , 2:NO
4. Drücken Sie 1 um zu bestätigen oder 2 um zu annullieren. Wenn Sie bestätigen, oder wenn es keine Daten in
Szene 5 gab, erscheint nachfolgender Bildschirm:
Name: _
Keyin ENGLISH.
5. Verwenden Sie die numerischen Tasten um einen Szenenamen (max. 9 Zeichen) einzugeben. Verwenden Sie
dieses Schema:
1 A - B - C 2 D - E - F 3 G - H - I
4 J - K - L 5 M - N - O 6 P - Q - R
7 S - T - U 8 V - W - X 9 = - Y - Z
0 Folgendes Zeichen/
Spatium
6. Drücken Sie "Enter" (#14) um zu bestätigen.
3) Ein Szene unter einer Schnelltaste (SUB1-6) aufrufen
1. Drücken Sie die Funktionstaste (#7), wählen Sie "SUB MASTER" aus und drücken Sie "Enter" (#14) ;
nachfolgender Bildschirm erscheint:
SUB MASTER 1--6
LITE-PUTER CORP.
2. Drücken Sie die gewünschte Schnelltaste unter #3 (z.B. SUB1) ; während Sie die Taste gedrückt halten, wird die
Szene in SUB1 an 100% ausgesendet und nachfolgender Bildschirm erscheint:
LOAD SUBSCENE 1
LPTJUNIOR 29 VELLEMAN
Page 30

3. Regeln Sie das Ausgangsniveau der SUB-Szenen mit dem übereinstimmenden Schiebeschalter. Nachfolgender
Bildschirm erscheint:
SUB MASTER 1--6
SUB1 = 15%
4) Eine Szene unter Scene1-40 aufrufen
1. Drücken Sie die Funktionstaste (#7), wählen Sie "SUB MASTER" aus und drücken Sie "Enter" (#14) ;
nachfolgender Bildschirm erscheint:
SUB MASTER 1--6
LITE-PUTER CORP.
2. Drücken Sie die SC-Taste (#5) ; nachfolgender Bildschirm erscheint:
LOAD SCENE _
KEYIN SC 1...40
3. Wählen Sie die gewünschte Szene mit den numerischen Tasten (#11) aus (z.B. 5). Am Bildschirm erscheint die
Nummer der ausgewählten Szene auf der oberen Zeile und der Szenename auf der unteren Zeile:
LOAD SCENE 5
DISCO
4. Drücken Sie "Enter" (#14) um zu bestätigen. Das LCD-Display kehrt zur Anzeige zurück (siehe Schritt 1).
5) Eine Szene ändern
1. Rufen Sie die gewünschte Szene auf und drücken Sie die CH-Taste (#6) ; nachfolgender Bildschirm erscheint:
CHANNEL MODIFY
CH 1 -----= 0%
2. Geben Sie über die numerischen Tasten (#11) oder die ▲- und ▼-Tasten (#15 & 16) den Kanal ein, drücken Sie
die AT-Taste (#12) um den Kanalwert auszuwählen und ändern Sie diesen mit den numerischen Tasten (#11) ;
nachfolgender Bildschirm erscheint (z.B.):
CHANNEL MODIFY
CH 15 -----= 60%
3. Drücken Sie "Enter" um die neuen Daten zu speichern ; nachfolgender Bildschirm erscheint:
SUB MASTER 1--6
LITE-PUTER CORP.
6) Eine Szene löschen
Drücken Sie gleichzeitig die CL- und SC-Tasten (#5 & 10) oder stellen Sie den Master-Schiebeschalter (#17) auf 0
und drücken Sie die Master-Taste (#18) um alle Werte zu löschen.
d. Chase
1) Chase einstellen
1. Drücken Sie die Funktionstaste (#7), 2x die ▼-Taste (#15) ("CHANNEL CHASE…" ausgewählt) und "Enter" :
CH CHASE 1- 6
MAS.=100% 9sec
2. Stellen Sie den Startkanal mit den numerischen Tasten (#11) oder den ▲/▼-Tasten (#15 & 16) ein ; es wird
automatisch einen Bereich von 6 aufeinanderfolgenden Kanälen ausgewählt. Drücken Sie ▲ Enter (#14) ; der
Cursor springt zur Zeiteinstellung.
LPTJUNIOR 30 VELLEMAN
Page 31

CH CHASE 1- 6
MAS.=100% 9sec
3. Stellen Sie die Geschwindigkeit (21 Möglichkeiten zwischen 0.1Sek. und 1Min.) mit den ▲/▼-Tasten (#15 & 16)
ein.
4. Stellen Sie die Kanalschiebeschalter (#2) auf das gewünschte Niveau ein und das Chase fängt automatisch an,
zu laufen.
5. Um den Kanalbereich oder die Chase-Zeit während eines Chases zu ändern: drücken Sie "Enter" (#14) und
wiederholen Sie Schritt 1-3.
6. Das Chase kann auch musikgesteuert funktionieren: schließen Sie ein Audiosignal an den Audio-Eingang auf der
Rückseite des Gerätes (#21) an ; das Chase läuft nun musikgesteuert.
2) Chase + Szene einstellen
1. Drücken Sie, wenn ein Chase läuft, di SC-Taste (#5) um eine Szene aufzurufen ; nachfolgender Bildschirm
erscheint:
LOAD SCENE _
KEYIN SC 1...40
2. Geben Sie mit den numerischen Tasten (#11) eine Szenenummer ein und drücken Sie "Enter" (#14). Das LCD
kehrt zurück zu:
CH CHASE 1- 6
MAS.=100% 9sec
• Wenn der Szenewert eines Kanals sich vom Wert des Schiebeschalters unterscheidet, gilt der höchste Wert.
• Drücken Sie eine beliebige "SUB"-Taste (#3) um den diesbezüglichen Kanal an 100% auszusenden.
• Wenn Sie den Chase-Modus verlassen, speichert das Gerät die eingestellte Chase-Geschwindigkeit
automatisch.
3) Chase Fade einstellen
1. Drücken Sie die Funktionstaste (#7), 5x die ▼-Taste (#15) ("CHASE FADE…" ausgewählt) und "Enter":
→ FADE OFF
FADE ON
2. Drücken Sie die ▼-Taste (#15) um "FADE ON" auszuwählen und drücken Sie "Enter" (#14):
CH CHASE 1- 6
MAS.=100% 9sec
3. Stellen Sie die Kanalschiebeschalter (#2) auf das gewünschte Niveau ein und das Chase fängt automatisch an, in
Fade-Mode zu laufen.
4) Sub Chase einstellen
1. Drücken Sie die Funktionstaste (#7), 3x die ▼-Taste (#15) ("SUB CHASE…" ausgewählt) und "Enter":
→ CHASE 1-6
CHASE 3-6
2. Drücken Sie die ▼-Taste (#15) um "CHASE 3-6" auszuwählen und drücken Sie "Enter" (#14):
SUB CHASE 3-6
MAS.=100% 9sec
3. Stellen Sie die Chase-Zeit mit den ▲/▼-Tasten (#15 & 16) ein und die Niveaus mit den CH3-CH6Schiebeschaltern (#2) ; die CH1-CH2-Schiebeschalter regeln das Dimmen der Szene.
LPTJUNIOR 31 VELLEMAN
Page 32

4. Um zum völligen Chase-Modus zurückzukehren: wiederholen Sie Schritt 1 und 2 aber wählen Sie "CHASE 1-6" in
Schritt 2 aus.
e. Auto Fade
1) 1-Kanal Auto Fade
1. Drücken Sie die Funktionstaste (#7), 4x die ▼-Taste (#15) ("AUTO FADE…" ausgewählt) und "Enter":
AUTO FADE 9sec
CH 1------> 22%
ständig.
2. Stellen Sie den gewünschten Startkanal mit den numerischen Tasten (#11) oder mit den ▲/▼-Tasten (#15 & 16) ein.
Drücken Sie "Enter" (#14) ; der Cursor springt zur Zeiteinstellung:
AUTO FADE 9sec
CH 1------> 22%
2. Regeln Sie die Fade-Geschwindigkeit (21 Möglichkeiten zwischen 0.1Sek. und 1Min.) mit den ▲/▼-Tasten (#15
& 16).
2) Auto Fade, auf mehreren Kanälen
1. Drücken Sie die Funktionstaste (#7), 4x die ▼-Taste (#15) ("AUTO FADE…" ausgewählt) und "Enter":
AUTO FADE 9sec
CH 1------> 22%
2. Stellen Sie den gewünschten Startkanal mit den numerischen Tasten (#11) oder mit den ▲/▼-Tasten (#15 & 16)
ein und drücken Sie danach die Taste für die Bereichseinstellung (#13):
AUTO FADE 9sec
CH 1-- 2-> 22%
3. Stellen Sie den Bereich mit den numerischen Tasten (#11) oder mit den ▲/▼-Tasten (#15 & 16) ein und
drücken Sie "Enter" (#14) ; der Cursor springt zur Zeiteinstellung:
AUTO FADE 9sec
CH 1------> 22%
4. Regeln Sie die Fade-Geschwindigkeit (21 Möglichkeiten zwischen 0.1Sek. und 1Min.) mit den ▲/▼-Tasten (#15
& 16).
Die Auto-Fade-Geschwindigkeit und die Chase-Geschwindigkeit sind einzelne Systeme. Sie können also
verschiedene Geschwindigkeiten einstellen.
Kanal 1 befindet sich nun im Auto Fade Mode ; Der Master-Schiebeschalter
bestimmt das Fade-Niveau (#17). Der Fade-Wert (%) steigt oder senkt
7. Reinigung und Wartung
1. Alle verwendeten Schrauben müssen fest angespannt werden und dürfen keine Rostspuren zeigen.
2. Das Gehäuse und die Anschlüsse dürfen nicht beschädigt oder angepasst werden.
3. Sorgen Sie dafür, dass die Netzkabel nicht beschädigt werden. Lassen Sie das Gerät von einer Fachkraft
installieren.
4. Trennen Sie das Gerät vom Netz ehe Sie mit den Servicearbeiten anfangen.
5. Verwenden Sie zur Reinigung ein feuchtes Tuch. Verwenden Sie auf keinen Fall Alkohol oder irgendwelche
Lösungsmittel.
6. Bestellen Sie eventuelle Ersatzunterteile bei Ihrem Fachhändler.
LPTJUNIOR 32 VELLEMAN
Page 33

8. Technische Daten
Spannungsversorgung 15Vdc / 0.5A
DMX-Signal Eingang/Ausgang DMX512 / 1990
DMX-Anschlüsse XLR 5-polig (IN Stecker, OUT Buchse)
Eingang Audiosignal Line in 100mV (-10dB)
Abmessungen 268 x 132 x 45mm
Gewicht 3kg
CE-Norm ET87S-09-058
Änderungen in Technik und Ausstattung ohne vorherige Ankündigung vorbehalten.
LPTJUNIOR 33 VELLEMAN
 Loading...