

Page 1
M
I
I
É
A
I
M
A
N
O
E
P
S
O
D
A
R
–
ÓN
X
X
IÓ
CA
USB
USBCAM
CÁM
USB-
COL
NSPECTI
NSPECTI
RA D'INS
RA DE IN
NSPEKTI
I4
N CAME
CAMERA
ECTION
PECCI
NSKAME
A
CONNE
– CONE
RA
ION USB
N USB
USER
GEBRU
MODE
MANU
BEDIE
ANUAL
IKERSHAN
D’EMPLOI
L DEL USU
UNGSANLE
LEIDING
RIO
ITUNG
2
6
10
14
18
Page 2
0
I
e
a
o
I
S
o
e
o
h
u
o
c
a
a
i
n
a
o
o
s
t
h
h
e
v
v
a
O
A
e
o
y
s
n
s
g
f
/
s
r
y
R
t
n
d
y
a
e
v
c
a
g
p
a
u
m
e
p
a
CAMC
LI4
1.
To all r
Import
Thank y
service.
2.
ntroducti
sidents of th
nt environme
This symbol
could harm t
waste; it sho
returned to y
rules.
If in doubt,
u for choosing
f the device w
afety Inst
Keep th
Do not
Note th
Never
This is
Misuse
There a
service
n
European Un
ntal informati
n the device or
e environment.
ld be taken to
ur distributor
ontact your l
Velleman! Plea
s damaged in
ructions
is device away
use in areas w
t the camera
nsert the cam
ot a medical d
may lead to se
re no user-ser
and/or spare p
USER M
ion
on about this
the package in
Do not dispos
specialized c
r to a local rec
cal waste di
e read the ma
ransit, don't in
from children a
ere explosive
ead is made o
ra in energised
evice hence it
ere injuries or
iceable parts in
rts.
NUAL
product
dicates that dis
of the unit (o
mpany for rec
cling service.
posal authori
ual thoroughly
tall or use it a
nd unauthorize
asses reside.
metal and ma
operational m
hould never b
even death.
side the device
posal of the de
batteries) as u
cling. This devi
espect the loc
ies.
before bringin
d contact your
users.
cause short-ci
chines or equi
used on hum
. Refer to an a
ice after its lif
nsorted munici
e should be
l environment
this device int
dealer.
rcuits.
ment.
ns or animals.
thorized dealer
cycle
al
l
o
for
V. 01 –
6/09/2012
2
©Velle
an nv
Page 3

CAMCOLI4
3. General Guidelines
Refer to the Velleman® Service and Quality Warranty on the last pages of this manual.
Keep this device away from dust and extreme temperatures.
Protect this device from shocks and abuse. Avoid brute force when operating the device.
• Familiarise yourself with the functions of the device before actually using it.
• All modifications of the device are forbidden for safety reasons. Damage cause d by user modifications
to the device is not covered by the warranty.
• Only use the device for its intended purpose. Using the device in an unauthorised way will void the
warranty.
• Damage caused by disregard of certain guidelines in this manual is not covered by the warranty and
the dealer will not accept responsibility for any ensuing defects or problems .
• Warranty is limited to the device itself; installation and use of the included software is the sole risk of
the user.
• Always allow the device to reach room temperature before switching it on.
• Do not use the device if condensation forms inside the lens. Let the water evaporate before using
again.
• The camera and gooseneck are waterproof and can be submerged in pH-neutral liquid (not acid or
alkaline). Never submerge the handle as this will cause irreversible damage. Keep the handle away
from rain, moisture, splashing and dripping liquids.
• Avoid strong mechanical strains or vibrations. The bending radius of the gooseneck must be at least
6 cm.
• Clean the CAMCOLI4 after each use.
• Do not use when visible damage to the device is noticed.
4. Features
• ideal for checking hard-to-reach areas, e.g. behind walls, suspended ceilings, etc.
• 4 built-in white LEDs
• adjustable LED intensity.
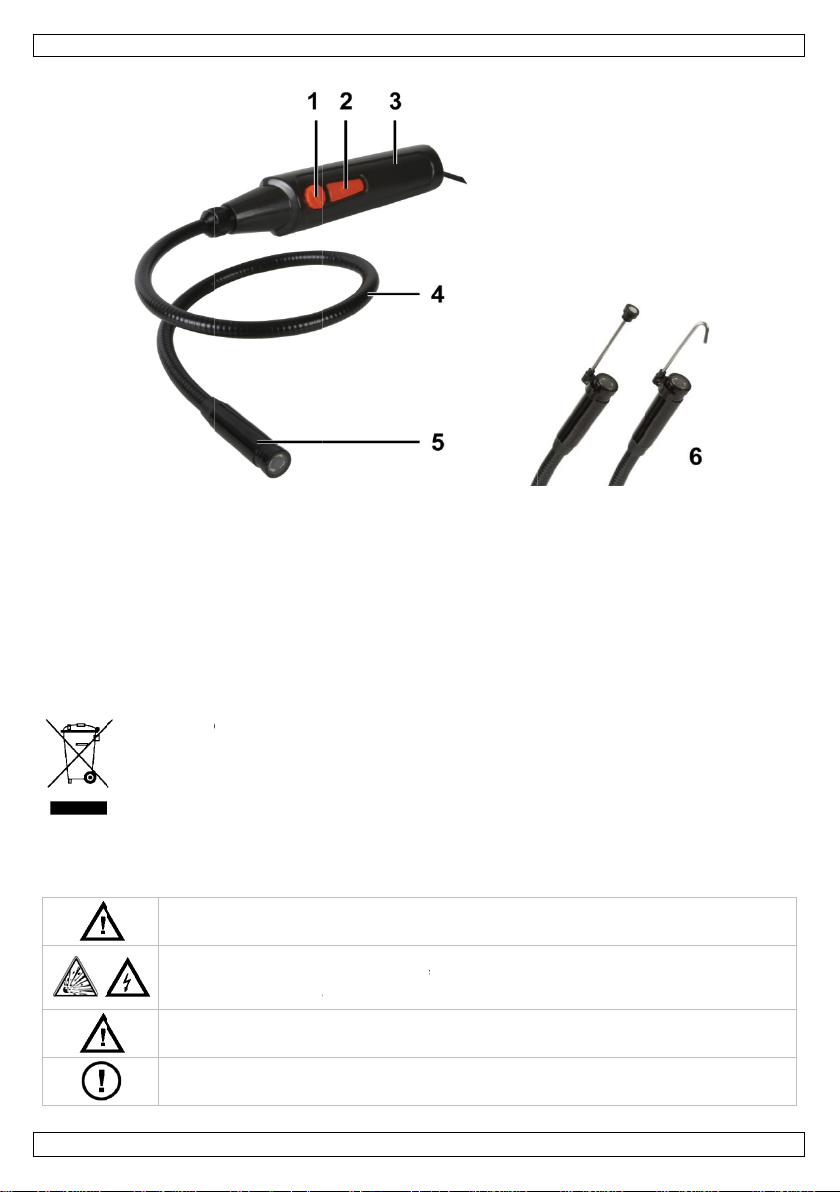
5. Overview
Refer to the illustrations on page 2 of this manual.
1 LED brightness control 4 gooseneck (± 60 cm)
2 snapshot button 5 camera head with LEDs
3 handle 6 accessory tools: hook, magnet
6. Preparation
Installing the Driver on Windows XP or Earlier
On Windows XP® operating system (or earlier), proceed as follows:
1. Connect the camera to a free USB 2.0 port on your pc.
Note: Make sure to use USB 2.0 or higher. Correct operation is not guaranteed with USB 1.1.
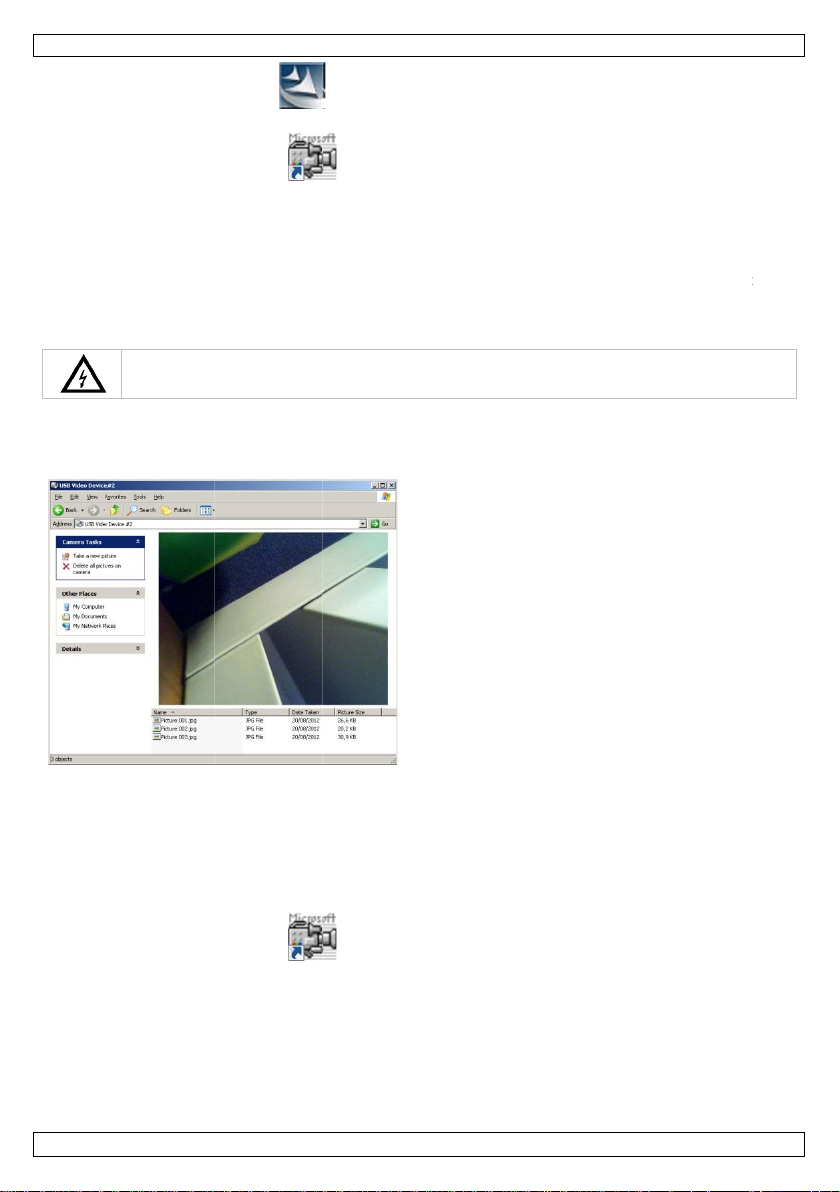
2. Windows automatically recognises the device and installs the driver. Depending on the settings,
Windows may (not) display the message “Your new hardware is installed and ready for use”.
Your camera is now ready for use.
Installing the Driver on Windows Vista / 7
For Windows Vista / 7, proceed as follows:
1. Connect the camera to a free USB 2.0 port on your pc.
Note: Make sure to use USB 2.0 or higher. Correct operation is not guaranteed with USB 1.1.
2. Insert the included CD-ROM in your pc.
V. 01 – 06/09/2012 3 ©Velleman nv
Page 4
0
u
o
u
a
n
c
c
U
w
e
eNot
n
s
w
u
m
n
e
t
n
c
m
o
c
r
e
h
e
t
m
e
h
e
a
o
o
m
e
t
h
y
1
t
v
o
h
y
1
e
O
a
k
e
s
e
a
u
a
n
Th
u
k
e
a
n
s
m
c
s
e
s
s
d
e
u
l
.
a
r
a
S
m
t
t
s
i
CAMC
LI4
3. Do
4. Foll
5. Do
The inst
Attachi
Slide the
place.
•
Atta
•
Atta
7.
Windo
1. Con
2. Op
ble-click the se
w the instructi
ble-click the A
llation is now c
g Tools
plastic clamp
h the magneti
h the hook to
se
Never insert
s XP
nect the camer
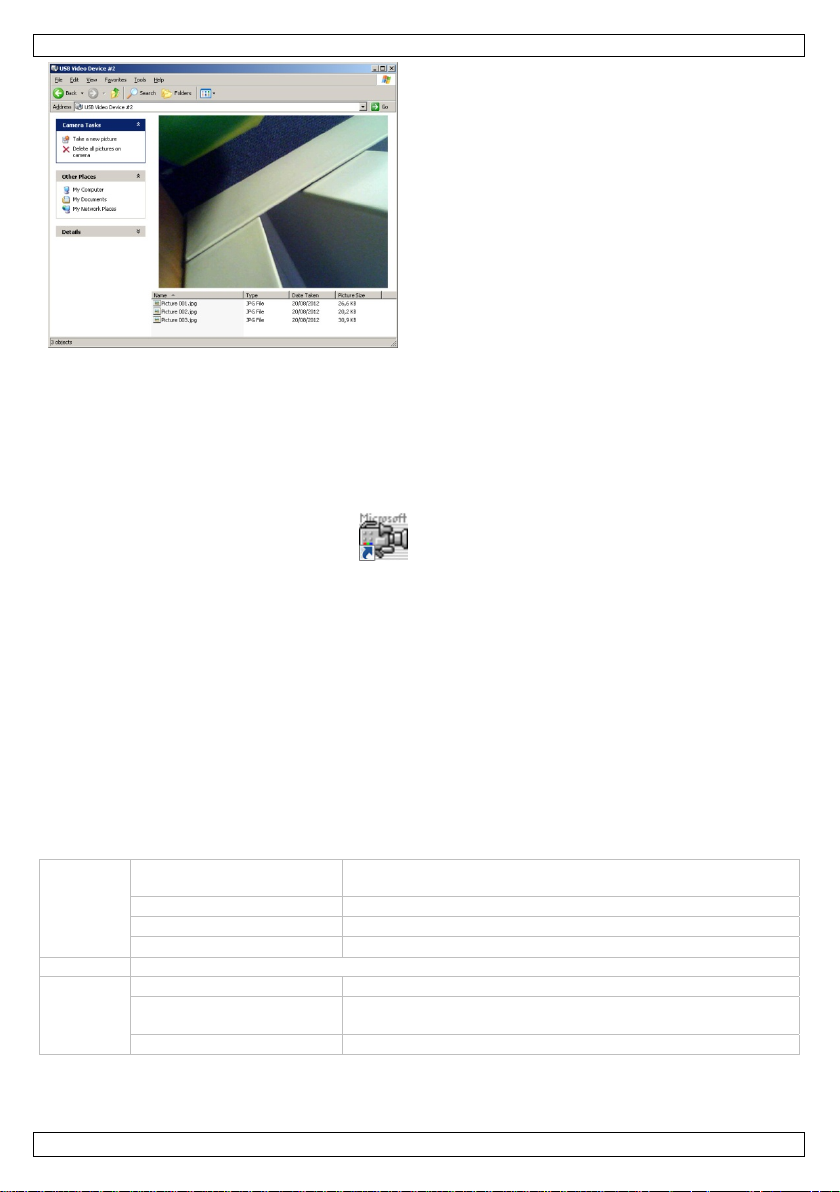
n My Comput
tup icon
ons of the inst
cap icon
omplete and y
f the tool [6]
top to the ca
etract wires or
the camera in
a to a free USB
r and look for
to start install
llation wizard.
on your des
ur camera is r
ver the narrow
era to pick up
other small obj
nergised/oper
2.0 port on yo
he “USB Video
tion.
top to run the
ady for use.
part of the ca
mall metal pie
cts.
tional machine
r pc.
Device” to see
oftware.
era head [5]
es from difficu
or equipment
live images.
ntil it snaps in
t to reach loca
o
ions.
3. Ins
4. Tur
5. Pre
Windo
1. Con
2. Do
3. In t
4. If
5. Ins
6. Tur
7. To
V. 01 –
You
me
No
rt the camera
e: The goosen
the LED brigh
s the snapshot
can copy, dele
s Vista / 7
nect the camer
ble-click the A
he Options m
ore than one U
u.
rt the camera
e: The goosen
the LED brigh
apture a video
6/09/2012
ead [5] into t
ck should easil
tness button [
button [2] to
e, or view the
a to a free USB
cap icon
nu, select Pre
SB camera is c
ead [5] into t
ck should easil
tness button [
file, first set th
e space you w
manoeuvre i
] to adjust the
ake a photo.
photos from he
2.0 port on yo
on your des
iew to see live
nnected to th
e space you w
manoeuvre i
] to adjust the
default folder
nt to inspect.
to position. Do
intensity of th
e list of photo
re.
r pc.
top to run the
images.
pc, select the
nt to inspect.
to position. Do
intensity of th
and file name:
4
not apply force
LEDs on the c
appears unde
oftware.
esired camera
not apply force
LEDs on the c
choose File >
.
mera head.
the camera im
in the Device
.
mera head.
et Capture F
©Velle
age.
le.
an nv
Page 5

CAMCOLI4
8. Choose Capture > Start Capture and click OK to confirm.
The pc now starts capturing the video file.
9. To stop, choose Capture > Stop Capture.
10. Press the snapshot button [2] to take a photo. The photo appears in a separate window. To save
the photo, choose File > Save.
11. When finished, close the Amcap program and unplug the camera from the USB port.
Software Overview
Note: Only for Windows Vista / 7.
File Set Capture File set the default folder and file name for recordings
Allocate File Space set size of recordings
Save Captured Video save recording manually to a desired location
Exit quit AmCap software
Devices list of devices that are connected to the software
Options Preview select to see live images
Video Capture Filter set parameters (white balance, exposure, etc.) and effects
(flip image, etc.)
Video Capture Pin set the size of the video window
Capture Start Capture start video capture
Stop Capture stop video capture
Set Frame Rate set the number of recorded frames per second
Set Time Limit set a maximum duration for the recording
8. Cleaning and Maintenance
• Unplug the device from the USB port.
• Wipe the device with a lint-free, soft anti-static cloth. Do not use abrasive solutions or solvents.
• Clean the gooseneck and camera with clean water after each use and let it dry before storing it.
9. Technical Specifications
pick-up element 1/6" CMOS
number of pixels 640 (H) x 480 (V)
viewing angle 56°
focus 6 cm
input interface USB 2.0
S/N ratio 46 dB
white balance auto
picture format JPEG, BMP
system requirements
IP rating IP66 (camera + flexible tube)
power supply 5 VDC via USB port
dimensions
operating temperature 0 – 50°C
weight 310 g
Use this device with original accessories only. Velleman nv cannot be held responsible in the
event of damage or injury resulting from (incorrect) use of this device.
For more info concerning this product and the latest version of this manual, please visit our
website www.velleman.eu.
The information in this manual is subject to change without prior notice.
All registered trademarks and trade names are properti es of their respective owners and are used only
for the clarification of the compatibility of our products with the products of the different manufacturers.
Windows, Windows XP, Windows Vista, Windows 7, are registered trademarks of Microsoft Corporation in
V. 01 – 06/09/2012 5 ©Velleman nv
• Windows® XP/Vista/Windows 7/Mac OS
• free USB 2.0 port.
camera Ø 14 x 72 mm
flexible tube 54 cm
USB cable 200 cm
Page 6
0
e
t
y
t
I
e
e
v
e
V
A
e
v
u
r
a
a
a
t
E
y
m
c
n
v
f
e
t
e
p
n
i
u
k
a
a
n
g
r
n
m
m
e
n
g
e
a
e
r
a
n
M
n
c
e
U
v
e
e
n
a
t
k
t
e
k
e
n
n
e
t
e
e
O
a
o
e
A
o
k
e
s
s
d
e
a
a
d
a
g
a
r
r
s
e
o
o
A
D
a
m
o
e
e
e
o
a
n
g
e
e
e
a
k
e
m
e
e
e
e
n
k
l
u
n
d
n
n
v
d
i
s
m
p
w
n
r
k
u
n
g
s
the Unit
United S
© COPY
The cop
of this m
without
d States and o
ates and other
RIGHT NOTIC
right to this
anual may be
he prior writte
her countries.
countries.
anual is ow
opied, reprodu
consent of th
CAMC
ac, Mac OS, a
ed by Vellem
ed, translated
copyright hold
LI4
re trademarks
n nv. All wor
r reduced to a
r.
f Apple Inc., r
ldwide rights
ny electronic m
gistered in the
reserved. No
edium or other
art
ise
1.
Aan all
Belangr
verwijd
Dank u
toestel b
2.
3.
Raadple
•
Leer
•
Om
gebr
•
Geb
•
De g
uw d
verb
•
De g
nleiding
ingezetenen
ijke milieu-in
Dit symbool o
weggeworpen
batterijen) ni
terechtkomen
recyclagepun
Hebt u vrag
ring.
oor uw aankoo
schadigd tijde
eiligheids
Houd b
Gebrui
De met
Steek d
Deze c
mense
Er zijn
reserve
lgemene
g de Vellema
Bescher
Bescher
eerst de functi
eiligheidsrede
iker heeft aan
uik het toestel
rantie geldt ni
ealer zal de ve
nd mee houde
rantie geldt e
GEBR
an de Europ
ormatie betr
p het toestel of
, dit toestel sch
t bij het gewo
voor recyclage
brengen. Resp
n, contacteer
! Lees deze h
s het transpor
nstructies
iten het berei
dit toestel nie
len kop van d
e camera nooit
mera is niet ge
of dieren. Ver
een door de g
onderdelen, co
ichtlijnen
® service- e
tegen stof en
tegen schokk
s van het toes
en mag u geen
ebracht valt ni
nkel waarvoor
t voor schade
antwoordelijkh
n.
kel voor het to
IKERSH
se Unie
ffende dit pr
de verpakking
ade kan toebre
e huishoudelij
. U moet dit to
ecteer de plaat
dan de plaat
ndleiding gr o n
, installeer het
van kinderen
nabij ontplofb
camera kan in
in een ingesch
schikt voor me
eerd gebruik k
bruiker vervan
tacteer uw de
kwaliteitsga
extreme hitte.
n en vermijd b
el kennen voor
wijzigingen aa
et onder de ga
het gemaakt i
door het neger
id afwijzen vo
stel en is niet
NDLEI
duct
geeft aan dat,
ngen aan het
e afval; het m
stel naar uw v
elijke milieuw
elijke autorit
ig voor u het t
dan niet en ra
n onbevoegde
re gassen.
uitzonderlijke
keld toestel.
ische doeleind
n ernstige lets
bare onderdel
ler.
antie achteraa
rute kracht tijd
u het gaat geb
nbrengen. Sch
antie.
. Bij onoordeel
n van bepaald
r defecten of p
geldig voor de
ING
ls het na zijn l
ilieu. Gooi dit t
et bij een gesp
rdeler of naar
tgeving.
iten betreffe
estel in gebrui
dpleeg uw dea
.
evallen kortsl
n en mag nooi
els veroorzake
n in dit toestel
n deze handlei
ns de bedieni
ruiken.
de door wijzigi
undig gebruik
richtlijnen in
roblemen die h
eegeleverde
venscyclus wo
oestel (en eve
cialiseerd bed
en lokaal
d de
neemt. Werd
er.
iting veroorza
t gebruikt word
.
. Voor onderho
ing.
g.
gen die de
ervalt de gara
eze handleidin
er rechtstreek
oftware.
rdt
tuele
ijf
het
en.
en op
d of
tie.
en
V. 01 –
6/09/2012
6
©Velle
an nv
Page 7

CAMCOLI4
• Om beschadiging te vermijden, zet u het toestel best niet aan onmiddellijk nadat het werd
blootgesteld aan temperatuurschommelingen. Wacht tot het toestel op kamertemperatuur
gekomen is.
• Gebruik het toestel niet indien er condensatie wordt gevormd binnenin de lens. Laat het vocht eerst
verdampen voor u het toestel opnieuw gebruikt.
• De camera en zwanenhals zijn waterdicht en zijn geschikt voor onderdompeling in een pH-neutrale
vloeistof (geen zuur of base). Onderdompeling van het handvat kan leiden tot onherroepelijke
schade. Bescherm het handvat tegen regen, vochtigheid en opspatt ende vloeistoffen.
• Plooi de zwanenhals niet overmatig; de plooistraal moet minstens 6 cm bedragen.
• Maak de CAMCOLI4 schoon na elk gebruik.
• Gebruik geen zichtbaar beschadigde camera.
4. Eigenschappen
• ideaal voor het checken van moeilijk bereikbare plaatsen zoals achter een muur, binnenin een
verlaagd plafond, enz.
• 4 witte leds
• instelbare lichtsterkte van de leds.
5. Omschrijving
Raadpleeg de afbeeldingen op pagina 2 van deze handleiding.
1 helderheidregelaar leds 4 zwanenhals (± 60 cm)
2 fotoknop 5 camerakop met leds
3 handgreep 6 opzetstukken: haak, magneet
6. Voorbereiding
De driver installeren in Windows XP of eerdere versie
Voor een Windows XP®-besturingssysteem (of eerdere versie), gaat u als volgt te werk:
1. Sluit de camera aan op een vrije USB 2.0-poort op uw pc.
Opmerking: Gebruik een USB 2.0-poort of hoger. Een correcte werking is niet gegarandeerd bij
een aansluiting op een USB 1.1-poort.
2. Windows herkent het toestel automatisch en installeert de driver. Afhankelijk van de instellingen,
geeft Windows het bericht (of niet) “Your new hardware is installed and ready for use” ("Uw nieuwe
hardware is geïnstalleerd en is gebruiksklaar").
Uw camera is nu gebruiksklaar.
De driver installeren in Windows Vista / 7
Voor Windows Vista / 7, ga als volgt te werk:
1. Sluit de camera aan op een vrije USB 2.0-poort op uw pc.
Opmerking: Gebruik een USB 2.0-poort of hoger. Een correcte werking is niet gegarandeerd bij
een aansluiting op een USB 1.1-poort.
2. Plaats de meegeleverde CD-ROM in uw pc.
3. Dubbelklik op de setup-icoon om de installatie te starten.
4. Volg de instructi es in de ins t allatiewizard .
5. Dubbelklik op de Amcap-icoon op uw bureaublad om de software op te starten.
De installatie is nu voltooid en uw camera is ge b ruiksklaar.
Opzetstukken
Schuif de plastic clip van het opzetstuk [6] over het vernauwde gedeelte van de camerakop [5] totdat
het vastklikt.
• Koppel het magnetisch opzetstuk aan de camera om kleine metalen voorwerpen op moeilijk
bereikbare plaatsen op te rapen.
• Bevestig de haak om kabels of andere kleine voorwerpen terug te trekken.
V. 01 – 06/09/2012 7 ©Velleman nv
Page 8

0
G
w
e
e
m
a
m
w
b
h
n
aOpm
a
s
p
t
m
n
e
o
w
o
d
n
m
o
S
o
w
a
e
o
e
U
r
m
t
[
f
U
m
t
[
n
n
e
t
f
O
e
t
u
s
D
n
e
e
o
t
u
s
m
t
D
n
e
n
l
o
s
i
n
n
l
j
m
e
g
n
a
t
g
a
B
m
t
e
7.
ebruik
CAMC
LI4
Windo
1. Slui
2. Op
3. Ste
Op
4. Dra
5. Dru
ca
Van
Windo
1. Slui
Steek de ca
s XP
t de camera aa
n My Comput
k de camerak
erking: De z
i aan de helde
k op de fotokn
erabeeld.
hieruit kunt u
s Vista / 7
t de camera aa
era nooit in e
op een vrije
r en zoek naa
p [5] in de rui
anenhals moe
rheidsregelaar
p [2] om een
e foto's kopiër
op een vrije
n ingeschakeld
SB 2.0-poort o
“USB Video D
te die u wens
gemakkelijk k
1] om de licht
oto te nemen.
en, verwijdere
SB 2.0-poort o
toestel.
p uw pc.
vice” om liveb
te inspecteren
nnen bewege
terkte van de
e lijst met fot
of bekijken.
p uw pc.
elden te bekijk
.
. Gebruik dus
eds in de came
's verschijnt o
n.
een kracht.
rakop te regele
der het
n.
2. Du
3. In
4. Indi
5. Pla
6. Dra
7. Om
8. Kie
9. Om
10. Dru
11. Een
V. 01 –
me
Set
De
op
belklik op de A
et menu Opti
en meerdere U
u Devices.
ts de camerak
erking: De z
i aan de helde
een videobest
Capture File.
Capture > St
c start met de
te stoppen, ki
k op de fotokn
e slaan, kies Fi
maal klaar, slui
6/09/2012
cap-icoon
ns, selecteer P
B-camera's zij
p [5] in de rui
anenhals moe
rheidsregelaar
nd op te neme
art Capture e
opname van h
s Capture > S
p [2] om een
le > Save.
t het Amcap-pr
op uw bur
review om liv
n aangesloten
te die u wens
gemakkelijk k
1] om de licht
, stel eerst de
klik op OK o
t videobestand
op Capture.
oto te nemen.
ogramma en o
aublad om de
beelden te bek
p de pc, select
te inspectere
nnen bewege
terkte van de
standaardmap
te bevestigen.
.
e foto verschi
tkoppel de ca
8
oftware te dra
jken.
eer de gewens
.
. Gebruik dus
eds in de came
en bestandsna
nt in een apart
era van de US
ien.
e camera in he
een kracht.
rakop te regele
m in: kies File
venster. Om d
-poort.
©Velle
n.
>
foto
an nv
Page 9

CAMCOLI4
Overzicht van de software
Opmerking: Enkel voor Windows Vista / 7.
File Set Capture File instellen van standaard map en bestandsnaam van
opnamebestanden
Allocate File Space instellen van grootte van opnamebestanden
Save Captured Video opslaan van de opname in gewenste map
Exit afsluiten van AmCap-software
Devices lijst met toestellen die met de software verbonden zijn
Options Preview weergeven van real-time beelden
Video Capture Filter instellen van parameters (witbalans, belichting, enz.) en
effecten (afbeelding draaien, enz.)
Video Capture Pin instellen van het formaat van het videovenster
Capture Start Capture opname starten
Stop Capture opname stoppen
Set Frame Rate instellen van aantal frames per seconde
Set Time Limit instellen van maximale opnameduur
8. Reiniging en onderhoud
• Ontkoppel de camera van de computer.
• Maak de camera schoon met een antistatische doek. Gebruik geen alcohol of solvent.
• Spoel de zwanenhals na elk gebruik af met zuiver water en laat hem drogen voor u hem opbergt.
9. Technische specificaties
opneemelement 1/6" CMOS
aantal pixels 640 (H) x 480 (V)
gezichtshoek 56°
focus 6 cm
interface USB 2.0
S/R verhouding 46 dB
witbalans auto
beeldformaat JPEG, BMP
systeemvereisten
IP-waarde IP66 (camera + zwanenhals)
voeding 5 VDC via USB-poort
afmetingen
werktemperatuur 0 – 50°C
gewicht 310 g
Gebruik dit toestel enkel met originele accessoires. Velleman nv is niet aansprakelijk voor
schade of kwetsuren bij (verkeerd) gebruik van dit toestel.
Voor meer informatie over dit product en de laatste versie van deze handleiding, zie
www.velleman.eu.
De informatie in deze handleiding kan te allen tijde worden gewijzigd zonder voorafgaande
kennisgeving.
Alle geregistreerde handelsmerken en handelsnamen zijn eigendo m van hun respectievelijke bezitters, en
zijn enkel gebruikt als voorbeeld van de compatibiliteit tussen onze producten en de producten van de
verschillende fabrikanten. Windows, Windows XP, Windows Vista, Windows 7, zijn geregistreerde
handelsmerken van Microsoft Corporation in de Verenigde Staten en andere landen. Mac, Mac OS, zijn
handelsmerken van Apple Inc., geregistreerd in de Verenigde Staten en andere landen.
• Windows® XP/Vista/Windows 7/Mac OS
• vrije USB 2.0-poort.
camera Ø 14 x 72 mm
flexibele buis 54 cm
USB-kabel 200 cm
V. 01 – 06/09/2012 9 ©Velleman nv
Page 10

0
U
h
,
j
I
i
o
d
u
l
u
C
D
e
a
e
l
a
c
a
a
m
t
e
o
i
i
u
p
q
a
e
c
d
c
a
e
g
e
e
c
p
n
u
a
e
t
o
h
M
n
e
t
e
a
g
é
é
é
e
d
m
s
e
u
e
n
d
p
e
O
l
E
s
u
n
m
é
e
e
d
a
o
n
o
c
v
p
g
r
e
a
e
e
e
c
n
t
i
o
n
v
s
e
s
m
t
i
o
n
i
d
e
e
p
t
m
é
r
o
d
u
o
e
p
e
c
p
p
a
s
o
t
m
v
p
e
i
e
e
s
n
t
n
r
© AUTE
Vellema
voorbe
kopiëren
schrifteli
RSRECHT
n nv heeft he
ouden. Het is
te vertalen, t
ke toestemmin
auteursrech
niet toegestaan
bewerken en
g van de recht
CAMC
voor deze ha
om deze hand
p te slaan op e
ebbende.
LI4
ndleiding. All
eiding of gede
en elektronisch
wereldwijde
lten ervan ove
medium zonde
rechten
te nemen, te
r voorafgaande
1.
Aux rés
Des inf
En cas
Nous vo
l’apparei
revende
2.
3.
Se référ
•
Se f
•
Tout
modi
•
N’uti
•
La g
noti
résul
•
La g
•
Ne p
dom
V. 01 –
ntroducti
dents de l'Un
rmations env
Ce symbole s
peut polluer l'
éventuelles)
l’appareil en
recyclage loc
l’environnem
e questions,
s remercions d
. Si l’appareil a
r.
onsignes
Garder
Ne pas
La tête
courts-
Cette c
sur des
graves.
Il n’y a
éventu
irectives
r à la garanti
Protéger
Protéger
miliariser avec
modification
fications par le
iser qu’à sa fon
rantie ne s’ap
e et votre reve
tent.
rantie s’appliq
s allumer la c
ages, attendr
6/09/2012
n
on européen
ronnemental
r l'appareil ou
environnement
armi les déche
uestion. Renvo
l. Il convient d
nt.
ontacter les
e votre achat !
été endomma
e sécurit
hors de la port
utiliser la camé
de la sonde m
ircuits. Ne jam
méra ne convi
personnes ou
aucune pièce
lles chez votre
énérales
de service et
contre la pous
contre les choc
le fonctionnem
st interdite po
client ne tomb
tion prévue. U
lique pas aux
deur déclinera
e uniquement
méra après ex
jusqu’à ce qu
ODE D’
e
s importante
l'emballage ind
. Ne pas jeter
s municipaux
yer les équipe
respecter la r
utorités local
Lire la présent
é pendant le tr
e des enfants
ra à proximité
tallique peut d
ais insérer la s
nt pas à des fi
es animaux. T
aintenable par
revendeur.
de qualité Ve
ière. Protéger
s et le traiter a
nt avant l’em
r des raisons d
nt pas sous la
usage improp
ommages surv
toute respons
à la caméra et
osition à des v
la caméra ait
10
MPLOI
concernant
ique que l’élimi
n appareil élec
on sujets au tr
ents usagés à
glementation l
es pour élimi
notice attenti
ansport, ne pa
t des personn
e gaz explosif
ns certains cas
nde dans une
s médicales e
ute utilisation
l’utilisateur. C
lleman® en fi
ontre la chaleu
ec circonspect
loi.
e sécurité. Les
arantie.
e annule d'offic
nus en néglig
bilité pour les
xclut l’insta lla
ariations de te
atteint la temp
e produit
ation d’un app
rique ou électr
sélectif ; une
votre fournisse
cale relative à
ation.
ement avant la
l’installer et c
s non autorisé
.
exceptionnels
achine allumé
ne peut en au
ncorrecte peut
mmander des
de notice.
r extrême.
on pendant l’o
ommages occ
la garantie.
ant certaines d
roblèmes et le
ion et l’utilisati
pérature. Afin
rature ambian
areil en fin de
nique (et des
échèterie trait
r ou à un serv
la protection d
mise en servic
nsulter votre
s.
rovoquer des
.
un cas être util
causer des ble
ièces de recha
ération.
sionnés par de
irectives de cet
défauts qui e
n du logiciel in
d’éviter des
e avant de l’uti
©Velle
ie
iles
ra
ce de
de
isée
sures
ge
s
e
clus.
lise
an nv
.
Page 11
CAMCOLI4
• Ne pas utiliser l'appareil en cas de formation de condensation à l'intérieur de l'objectif. Laisser
d'abord l'eau s'évaporer avant de l'utiliser de nouveau.
• La sonde et le col-de-cygne sont étanches et peuvent être submergés dans un liquide à pH neutre
(donc non acide ou basique). Ne jamais submerger la p oignée afin d’éviter des endommagements
irrévocables. Pro tég e r la po ignée de la pluie, de l’humid ité et des projections d’eau.
• Éviter de plier le col-de-cygne de manière excessive (c.à.d. un rayon de moins de 6 cm).
• Nettoyer la caméra après chaque utilisation.
• Ne pas utiliser une caméra visiblement endommagée.
4. Caractéristiques
• idéal pour explorer les endroits les moins accessibles comme p.ex. derrière un mur, à l'intérieur d'un
faux plafond, etc.
• 4 LEDs blanches
• intensité des LE Ds réglable.
5. Description
Se référer aux illustrations en page 2 de cette notice.
1 bouton pour le réglage de luminosité des LEDs 4 col-de-cygne (± 60 cm)
2 bouton de capture d’image 5 tête de caméra avec LED
3 poignée 6 accessoires : crochet, tête magnétique
6. Préparation
Installer le pilote sur Windows XP ou version ultérieure
Pour un système d'exploitation Windows XP® (ou version ultérieure), procéder comme suit :
1. Connecter la caméra à un port USB 2.0 libre de votre pc.
Remarque : S'assurer d'utiliser un port USB 2.0 ou supérieur. Un fonctionnement correct n'est pas
garanti en cas d'une connexion à un port USB 1.1.
2. Windows reconnaît au tomatiquement l'a pp a r e i l e t ins talle le pilote. Selon les r ég lages, Windows
affiche (ou pas) le message “Your new hardware is installed and ready for use” ("Votre nouveau
matériel est installé et prêt à l'emploi").
Votre caméra est prête à l'emploi.
Installer le pilote sur Windows Vista / 7
Pour Windows Vista / 7, procéder comme suit :
1. Connecter la caméra à un port USB 2.0 libre sur votre pc.
Remarque : S'assurer d'utiliser un port USB 2.0 ou supérieur. Un fonctionnement correct n'est pas
garanti en cas d'une connexion à un port USB 1.1.
2. Glisser le CD-ROM dans le lecteur sur votre pc.
3. Double-cliquer sur l'icône de configuration pour démarrer l'installation.
4. Suivre les instru ctions de l'ass is t ant d'installa t i o n .
5. Double-cliquer su r l'icône Amcap sur votre bureau pour exécuter le logiciel.
L'installation est maintenant complète et votre caméra est prête à l'emploi.
Accessoires
Glisser le clip en plastic de l'outil [6] sur la partie étroite de la tête de caméra [5] jusqu'au déclic.
• Placer l’attache magnétique sur la caméra pour ramasser des petites pièces métalliques dans des
endroits difficilement accessible.
• Attacher le crochet pour récupérer des câbles ou autres petits objets.
V. 01 – 06/09/2012 11 ©Velleman nv
Page 12

0
E
w
v
éRem
p
sDep
w
u
n
pDev
éRem
e
o
p
p
a
e
d
s
r
t
c
i
r
a
c
c
e
u
v
t
e
e
u
d
B
e
s
e
B
n
é
s
e
t
t
r
O
v
D
p
v
e
c
p
é
O
>
e
p
m
o
d
g
o
L
u
e
s
é
o
é
m
L
a
e
r
a
g
f
o
o
c
e
a
f
o
e
m
r
i
ê
7.
mploi
CAMC
LI4
Windo
1. Con
2. Ou
3. Ins
4. Tou
5. Ap
des
Windo
1. Con
Ne jamais in
s XP
necter la camé
rir My Compu
rer la tête de
arque : Le co
rner la molette
uyer sur le bou
ous de l'image
uis cette liste,
s Vista / 7
necter la camé
érer la sonde
a à un port US
er et recherch
améra [5] dan
l-de-cygne doit
de réglage [1]
ton de capture
de caméra.
l est possible d
a à un port US
ans une machi
2.0 libre sur
r “USB Video
l'espace à in s
se manœuvrer
pour ajuster l'i
[2] pour prend
copier, suppri
2.0 libre sur
ne allumée.
otre pc.
evice” pour re
ecter.
aisément en p
ntensité des LE
re une photo.
mer, ou de vis
otre pc.
arder des ima
sition. Ne pas
Ds dans la tête
a liste de phot
aliser les phot
es en direct.
orcer.
de caméra.
s apparaît au-
s.
2. Do
3. Da
4. Si
5. Ins
6. Tou
7. Pou
Fil
8. Ch
Le
9. Pou
10. Ap
sép
11. Un
Aperçu
Remarq
File
V. 01 –
ble-cliquer sur
s le menu Opti
lusieurs camér
ices.
rer la tête de
arque : Le co
rner la molette
r capturer un fi
> Set Captur
isir Capture >
c lance la capt
r arrêter, choisi
uyer sur le bou
rée. Pour sau
fois terminée,
u logiciel
ue : Seulemen
Set Captur
Allocate Fil
Save Capt
Exit
6/09/2012
l'icône Amcap
ons, sélection
s sont connect
améra [5] dan
l-de-cygne doit
de réglage [1]
hier video, rég
File.
Start Captur
re du fichier vi
r Capture > S
ton de capture
egarder la pho
fermer le prog
pour Windows
File
Space
red Video
sur votr
er Preview po
es au pc, séle
l'espace à in s
se manœuvrer
pour ajuster l'i
lér d'abord le r
et cliquer sur
déo.
op Capture.
[2] pour prend
o, choisir File
amme Amcap
Vista / 7.
régler le ré
enregistre
configurati
sauvegarde
fermeture
12
bureau pour
ur regarder de
tionner la cam
ecter.
aisément en p
ntensité des LE
pertoire par d
pour confir
re une photo.
Save.
t déconnecter l
ertoire par déf
ents
n de la taille d
du fichier d’en
u logiciel AmC
xécuter le logi
images en dir
ra souhaitée d
sition. Ne pas
Ds dans la tête
faut et le nom
er.
a photo appara
a caméra du p
ut et le nom d
s fichiers d’enr
egistrement
p
iel.
ct.
ns le menu
orcer.
de caméra.
du fichie
: cho
ît dans une fen
rt USB.
u fichier pour d
gistrement
©Velle
sir
tre
es
an nv
Page 13

CAMCOLI4
Devices liste d'appareils connectés au lo giciel
Options Preview images en temps réel
Video Capture Filter set parameters (white balance, exposure, etc.) and effects
(flip image, etc.)
Video Capture Pin set the size of the video window
Capture Start Capture lancement de l’enregistrement
Stop Capture arrêt de l’enregistrement
Set Frame Rate configuration du nombre d’images par seconde
Set Time Limit configuration de la durée de l’enregistrement
8. Nettoyage et entretien
• Déconnecter la caméra du port USB.
• Nettoyer la caméra avec un chiffon antistatique. Éviter l’usage d’alcool et de solvants.
• Rincer le col-de-cygne avec de l’eau claire après chaque utilisation et laisser séch er avant le
rangement.
9. Spécifications techniques
capteur 1/6" CMOS
nombre de pixels 640 (H) x 480 (V)
angle de vue 56°
focale 6 cm
interface USB 2.0
rapport S/B 46 dB
balance des blancs auto
format d'image JPEG, BMP
système requis
indice IP IP66 (caméra + col-de-cygne)
alimentation 5 VCC via port USB
dimensions
température de service 0 – 50°C
poids 310 g
N’employer cet appareil qu’avec des accessoires d’origine. La SA Velleman ne peut, dans la
mesure conforme au droit applicable être tenue responsable des dommages ou lésions
(directs ou indirects) pouvant résulter de l’utilisation de cet appareil.
Pour plus d’information concernant cet article et la dernière version de cette notice, visiter
notre site web www.velleman.eu.
Toutes les informations présentées dans cette notice peuvent être modifiées sans notification
préalable.
Les marques déposées et les raisons sociales sont la propriété de leurs détenteurs respectifs, et sont
uniquement utilisées dans le but de démontrer la compatibilité entre nos articles et les articles des
fabricants. Windows, Windows XP, Windows Vista, Windows 7, sont des marques déposées de Microsoft
Corporation aux Etats-Unis et dans d'autres pays. Mac, Mac OS, sont des marques d'Apple Inc., déposées
aux Etats-Unis et dans d'autres pays.
© DROITS D’AUTEUR
SA Velleman est l’ayant droit des droits d’auteur pour cette notice. Tous droits mondiaux
réservés. Toute reproduction, traduction, copie ou diffusion, intégrale ou partielle, du contenu de cette
notice par quelque procédé ou sur tout support électronique que se soit est interdite sans l’acc or d
préalable écrit de l’ayant droit.
• Windows® XP/Vista/Windows 7/Mac OS
• port USB 2.0 libre.
caméra Ø 14 x 72 mm
tube flexible 54 cm
câble USB 200 cm
V. 01 – 06/09/2012 13 ©Velleman nv
Page 14

0
I
u
a
d
I
N
r
a
c
n
d
n
a
o
a
t
e
o
r
o
t
ó
a
c
a
e
p
n
g
c
m
e
r
n
e
n
u
t
v
t
t
t
i
p
e
t
a
N
e
e
o
p
c
e
O
a
u
e
p
n
a
t
o
f
t
c
e
á
m
d
e
e
O
L
e
e
e
v
r
t
p
x
b
n
d
e
n
m
®
p
a
n
u
s
a
n
n
n
n
n
u
d
R
e
r
m
p
t
a
o
q
e
o
e
o
u
a
o
u
i
o
s
o
e
m
d
a
s
u
r
o
u
s
d
m
e
a
u
a
s
t
CAMC
LI4
1.
A los ci
Import
¡Gracias
usarla. S
distribui
2.
3.
Véase la
•
Fami
•
Por
caus
•
Utili
gara
•
Los
gara
•
La g
inclu
•
No c
apar
•
No u
volv
•
La s
neut
irrev
•
No p
•
Limp
•
No u
ntroducci
dadanos de l
ntes informa
Este símbolo
dañar el med
No tire este
empresa esp
reciclaje local
Si tiene dud
por haber com
i el aparato ha
or.
nstruccio
Manten
No utili
En algu
cortocir
Esta cá
animal
El usua
distribu
ormas ge
Garantía de s
No expo
No agite
liarícese con el
azones de seg
dos por modifi
e sólo el apara
tía completam
años causados
tía y su distrib
rantía sólo es
ido.
necte el apara
to llegue a la
ilice el aparato
r a utilizarlo.
nda y el cuello
o (por consigu
cables. No ex
liegue el cuello
ie la cámara d
ilice nunca un
MA
n
Unión Europ
iones sobre
en este aparat
io ambiente.
parato (ni las
cializada en re
. Respete las l
as, contacte c
rado la CAMC
sufrido algún d
es de seg
a el aparato l
e la cámara ce
nos casos exce
cuitos. Nunca i
ara no es apt
s. Cualquier us
io no habrá de
idor si necesita
erales
rvicio y calid
ga este equipo
el aparato. Evi
funcionamient
ridad, las modi
caciones no au
o para las apli
ente.
por descuido d
uidor no será r
álida para la c
o si ha estado
emperatura a
si se ha forma
de cisne son r
ente no líquido
onga el mango
de cisne de ma
spués de cada
cámara visibl
UAL DE
a
l medio ambi
o el embalaje
ilas, si las hubi
iclaje. Devuel
yes locales en
on las autorid
LI4! Lea aten
ño en el trans
ridad
jos del alcance
rca de gases e
cionales, la ca
troduzca la so
para fines mé
o incorrecto pu
efectuar el ma
piezas de reca
ad Velleman
a polvo. No ex
e usar excesiv
del aparato a
icaciones no a
orizadas, no e
aciones descrit
e las instruccio
sponsable de
mara. No está
expuesto a gra
biente.
o condensació
sistentes al ag
ácido o base).
a lluvia, hume
nera excesiva (
uso.
mente dañada.
USUA
nte concerni
indica que, s i ti
ra) en la basu
a este aparato
elación con el
ades locales
amente las ins
orte no lo inst
de personas n
plosivos.
eza metálica d
da en una má
icos. No utilic
de causar lesi
tenimiento de
bio.
al final de est
onga este equ
fuerza durant
tes de utilizarl
torizadas del a
tán cubiertos p
s en este man
es de segurid
ingún daño u
incluidos la in
des cambios d
en la lente. D
a. Es posible s
Nunca sumerja
ad ni a ningún
es decir un rad
IO
nte a este pr
ra las muestra
a doméstica; d
a su distribuid
edio ambient
ara residuos.
rucciones del
le y póngase e
capacitadas y
e la sonda pue
uina activada.
nunca el apar
nes graves.
ninguna pieza.
e manual del u
ipo a temperat
el manejo y la
.
parato están p
or la garantía.
al. Su uso inc
d de este man
tros problemas
stalación y el u
e temperatura.
eje que el agua
mergirlos en u
el mango para
tipo de salpica
o de menos de
ducto
inservibles, po
ebe ir a una
r o a la unidad
.
anual antes d
n contacto con
niños.
e causar
to con person
Contacte con s
uario.
ras extremas.
instalación.
ohibidas. Los d
rrecto anula la
al invalidarán
resultantes.
o del software
Espere hasta q
se evapore an
n líquido de pH
evitar daños
ura o goteo.
6cm).
drían
de
su
s o
ños
u
ue el
es de
V. 01 –
6/09/2012
14
©Velle
an nv
Page 15
0
C
D
o
s
ó
ó
n
P
r
s
r
a
r
s
r
r
g
a
g
e
e
s
U
w
a
i
n
p
e
n
W
u
(
s
W
R
s
n
s
o
e
e
e
S
u
o
n
r
a
n
S
u
l
e
m
n
e
e
S
O
t
D
s
i
P
o
o
P
o
t
e
P
”
:
s
a
s
c
a
z
L
z
a
w
[
o
m
o
s
o
e
f
4.
•
ideal
•
4 LE
•
es p
5.
Véase la
1 bot
2 bot
3 ma
6.
Instala
Para Win
1. Con
Ob
cor
2. Win
Win
Ahora, l
Instala
Para Win
1. Con
Ob
cor
2. Int
aracteríst
para explorar l
s blancos
sible ajustar la
Descripció
figuras en la
n de ajuste de
n de captura d
go
reparació
el driver en
dows XP® (o u
ecte la cámara
ervación: Ase
ecto al utilizar
dows reconoce
dows visualiza
cámara está li
el driver en
dows Vista / 7,
ecte la cámara
ervación: Ase
ecto con USB 1
oduzca el CD-
cas
ugares de difíci
intensidad lu m
ágina 2 de est
la luminosidad
imagen
indows XP o
na versión ant
a un puerto U
gúrese de que
n puerto USB
el aparato aut
o no) el siguie
ta para utiliza
indows Vist
haga lo siguie
a un puerto U
gúrese de que
.1.
OM (incl.) en e
CAMC
l acceso (p.ej.
inosa de los LE
manual del u
LED
una versión a
rior), haga lo s
B 2.0 libre del
tilice USB 2.0
1.1.
máticamente e
te mensaje “Y
.
/ 7
te:
B 2.0 libre del
tilice USB 2.0
PC.
LI4
echo falso)
s.
uario.
4 cuello de c
5 cabeza de
6 accesorios
nterior
guiente:
C.
superior. No
instale el drive
ur new hardw
C.
superior. No
isne (± 60 cm)
la cámara con
gancho, cabe
e garantiza un
r. Dependiendo
re is install ed
e garantiza un
ED
a magnética
funcionamient
de los ajustes,
nd ready for u
funcionamient
e”.
3. Ha
4. Sig
5. Ha
Ahora, s
Accesor
Deslice
encaje.
•
Pong
acce
•
Póng
7.
Windo
1. Con
2. Abr
V. 01 –
a clic dos vece
las instruccio
a clic dos vece
ha completad
ios
l gancho de plá
a la punta mag
o.
ale el gancho p
so
Nunca introd
s XP
ecte la cámara
My Comput
6/09/2012
en el icono de
es del asistent
en el icono A
la instalación
stico [6] sobre
nética en la so
ara retirar cabl
uzca la sonda
a un puerto U
r y busque “US
configuración
de instalación
cap de
y la cámara es
la parte estrec
da para recog
s u otros pequ
n una máquina
B 2.0 libre del
B Video Device
15
para ini
.
l escritorio par
á lista para util
ha de la cabeza
r pequeñas pie
eños objetos.
activada.
C.
para ver imág
iar la instalació
iniciar el soft
izar.
de la cámara
as metálicas e
enes en direct
n.
are.
5] hasta que s
lugares de di
.
©Velle
ícil
an nv
Page 16
CAMCOLI4
3. Introduzca la cabeza de la cámara [5] en el espacio que quiere inspeccionar.
Observación: Normalmente, es fácil posicionar el cuello de cisne. No lo fuerce.
4. Ajuste la intensidad de los LEDs con el botón de ajuste [1].
5. Pulse el botón de captura de imagen [2] para hacer una foto. La lista de fotos se visualiza debajo
de la imagen.
Aquí, es posible copiar, borrar o visualizar las fotos.
Windows Vista / 7
1. Conecte la cámara a un puerto USB 2.0 libre del PC.
2. Haga clic dos veces en el icono Amcap del escritorio para iniciar el software.
3. En el menú Options, seleccione Preview para ver las imágenes en directo.
4. Seleccione la cámara deseada en el menú Devices si están conectadas más cámaras USB al PC .
5. Introduzca la cabeza de la cámara [5] en el espacio que quiere inspeccionar.
Observación: Normalmente, es fácil posicionar el cuello de cisne. No lo fuerce.
6. Ajuste la intensidad de los LEDs con el botón de ajuste [1].
7. Para grabar un vídeo, introduzca la carpeta y el nombre del fichero estándar: seleccione File > Set
Capture File.
8. Seleccione Capture > Start Capture y haga clic en OK para confirmar.
Ahora, el PC empieza a grabar.
9. Para desactivar, seleccione Capture > Stop Capture.
10. Pulse el botón de captura de imagen [2] para hacer una foto. La foto se visualiza en otra ventana.
Para guardar la foto, seleccione File > Save.
11. Si ha terminado, cierre el programa Amcap y desconecta la cámara del puerto USB.
Resumen del software
Observación: sólo para Windows Vista / 7.
File Set Capture File ajustar la carpeta y el nombre del fichero estándar de los
ficheros de grabación
Allocate File Space ajustar el tamaño de los ficheros de grabación
Save Captured Video guardar el fichero de grabación en la carpeta deseada
Exit cerrar el software AmCap
Devices lista de los dispositivos conectados al software
Options Preview imágenes en tiempo real
Video Capture Filter ajustar los parámetros (balance de blancos, exposición, etc.) y
efectos (girar una imagen, etc.)
Video Capture Pin ajustar el tamaño de la ventana de vídeo
V. 01 – 06/09/2012 16 ©Velleman nv
Page 17

CAMCOLI4
Capture Start Capture activar la grabación
Stop Capture desactivar la grabación
Set Frame Rate ajustar el número de imágenes por segundo
Set Time Limit ajustar la duración de la grabación
8. Limpieza y mantenimiento
• Desconecte la cámara del puerto USB.
• Limpie la cámara con un paño antiestático. Evite el uso de alcohol y de disolventes.
• Limpie el cuello de cisne con agua clara después de cada uso y deje que se seque antes de
almacenarlo.
9. Especificaciones
elemento de imagen 1/6" CMOS
número de píxeles 640 (H) x 480 (V)
ángulo de visión 56°
foco 6 cm
interfaz USB 2.0
relación señal / ruido 46 dB
balance de blancos auto
formato de la imagen JPEG, BMP
exigencias del sistema
grado de protección IP IP66 (cámara + cuello de cisne)
alimentación 5 VDC por puerto USB
dimensiones
temperatura de funcionamiento 0 – 50°C
peso 310 g
Utilice este aparato sólo con los accesorios originales. Velleman NV no será responsable de
daños ni lesiones causados por un uso (indebido) de este aparato.
Para más información sobre este producto y la versión más reciente de este manual del
usuario, visite nuestra página www.velleman.eu.
Se pueden modificar las especificaciones y el contenido de este manual sin previo aviso.
Las marcas registradas y el nombre comercial son propiedad de sus propietarios respectivos, y sólo se
utilizan para mostrar la compatibilidad entre nuestros productos y los productos de los fabricantes.
Windows, Windows XP, Windows Vista, Windows 7, son marcas comerciales o marcas registradas de
Microsoft Corporation en los Estados Unidos y otros países. Mac, Mac OS, son marcas comerciales de
Apple Inc., registradas en los Estados Unidos y otros países.
© DERECHOS DE AUTOR
Velleman NV dispone de los derechos de autor para este manual del usuario. Todos los
derechos mundiales reservados. Está estrictamente prohibido reproducir, traduc ir , copiar, editar y
guardar este manual del usuario o partes de ello sin previo permiso escrito del derecho habiente.
• Windows® XP/Vista/Windows 7/Mac OS
• puerto USB 2.0 libre.
cámara Ø 14 x 72 mm
tubo 54 cm
cable USB 200 cm
V. 01 – 06/09/2012 17 ©Velleman nv
Page 18
0
E
E
e
w
b
w
S
A
e
m
e
n
n
w
S
G
m
a
w
K
n
e
r
r
o
c
v
B
e
e
n
e
t
s
S
e
t
n
d
n
v
n
e
n
r
e
G
e
F
c
r
s
G
W
n
a
h
w
E
n
e
u
n
a
e
a
e
M
p
U
ä
m
a
i
e
n
n
i
v
e
e
n
f
t
s
h
G
t
O
u
m
a
e
o
l
o
n
u
g
e
a
t
a
ü
e
s
n
e
n
s
h
c
E
e
U
z
m
e
o
n
e
ä
i
e
c
V
u
e
G
e
o
e
e
v
m
g
n
a
e
E
E
y
n
ö
g
s
e
e
e
m
e
s
d
a
e
v
t
u
v
m
s
i
d
i
n
s
r
n
a
i
e
CAMC
LI4
1.
An alle
Wichtig
Falls Z
Wir beda
Inbetrie
sein, ver
2.
3.
Siehe V
•
Neh
hab
•
Eige
eige
•
Ver
kann
•
Bei
Gara
•
Der
•
Neh
gebr
hat.
•
Ver
Wart
•
Die
(kei
Schä
•
Bieg
6 cm
V. 01 –
inführung
inwohner de
Umweltinfo
Dieses Symb
Produktes na
Einheit (oder
verwendeten
werden. Dies
retourniert w
eifel bestehe
nken uns für d
nahme sorgfäl
enden Sie da
icherheits
Halten
Betreib
Der Me
Stecke
Diese K
anwen
Es gibt
Fachhä
llgemeine
lleman® Ser
Schütze
Vermeid
Bedienu
en Sie das Ge
n.
mächtige Verä
mächtige Änd
enden Sie das
dies zu Schäd
chäden, die du
ntieanspruch.
arantieanspru
en Sie das Ge
cht wurde. La
enden Sie das
en Sie bis das
amera und de
e Säure oder b
den führen. Sc
n Sie den Sch
.
6/09/2012
BEDI
Europäische
mationen üb
l auf dem Prod
h seinem Lebe
erwendeten B
atterien müss
Einheit muss
rden. Respekti
, wenden Sie
n Kauf der CA
ig durch. Über
Gerät nicht un
hinweise
ie Kinder und
n Sie das Ger
allkopf der Ka
Sie die Kamer
amera eignet s
en. Eine falsch
keine zu warte
dler.
Richtlinie
ice- und Qual
Sie das Gerät
n Sie Erschütt
g des Gerätes.
ät erst in Betri
nderungen sind
rungen erlischt
erät nur für A
n am Produkt
rch Nichtbeach
ür daraus resul
h gilt nur für d
ät nicht sofort
sen Sie das Ge
erät nicht, we
asser verduns
Schwanenhal
sisch) getauc
ützen Sie der
anenhals nich
NUNGS
Union
r dieses Prod
kt oder der Ve
szyklus der U
tterien) nicht
n von einer sp
n den Händler
ren Sie die ört
sich für Ents
COLI4! Lese
rüfen Sie, ob T
d wenden Sie s
nbefugte vom
t nicht in der N
era kann in A
nie in ein ein
ch nicht für m
Anwendung k
den Teile. Bes
tätsgarantie
or Staub. Sch
rungen. Verm
b, nachdem Si
aus Sicherheit
der Garantiea
wendungen b
ühren und erlis
ung der Bedie
tierende Folge
as Gerät und ni
in Betrieb, nac
rät solange aus
nn sich Konden
tet ist.
sind wasserdi
t werden. Das
riff vor Regen
übermäßig; B
18
ANLEIT
kt
rpackung zeigt
welt Schaden
ls unsortiertes
zialisierten Fir
der ein örtlich
ichen Umweltv
rgungsrichtli
Sie diese Bedi
ransportschäde
ich an Ihren H
Gerät fern.
ähe von explos
snahmefällen
eschaltetes Ge
dizinische Zwe
nn ernsthafte
ellen Sie event
m Ende dieser
tzen Sie das G
iden Sie rohe
e sich mit sein
gründen verb
spruch.
schrieben in di
cht der Garanti
ungsanleitung
chäden überni
cht für die mit
dem es von ei
geschaltet, bis
swasser innerh
ht und können
intauchen des
und Feuchte.
achten Sie ein
NG
an, dass die En
ufügen kann.
Hausmüll; die
a zwecks Rec
s Recycling-U
rschriften.
ien an Ihre
nungsanleitun
n vorliegen. So
ndler.
ven Gasen.
inen Kurzschlu
rät.
ke. Nicht auf P
erletzungen v
elle Ersatzteil
Bedienungsanl
rät vor extre
ewalt während
n Funktionen v
ten. Bei Schäd
ser Bedienung
anspruch.
erursacht wer
mt der Herstel
elieferte Softw
em kalten in ei
es die Zimmert
lb des Objekti
in eine pH-neu
Griffes kann z
n Biegeradios
tsorgung diese
ntsorgen Sie d
inheit oder
cling entsorgt
ternehmen
rtliche Behör
vor
llte dies der Fal
s verursachen.
rsonen oder T
rursachen.
bei Ihrem
itung.
en Temperatur
der Installatio
ertraut gemach
n verursacht d
anleitung son
en, erlischt de
ler keine Haftu
re.
nen warmen R
mperatur erre
s gebildet hat.
rale Flüssigkeit
unwiderruflich
on mindestens
©Velle
e
e.
l
ere
en.
und
t
urch
t
g.
um
cht
n
an nv
Page 19

0
w
E
t
i
n
f
V
bBem
s
e
e
bBem
e
k
g
k
a
r
n
s
A
w
b
n
e
t
r
e
r
s
n
n
r
K
w
t
d
t
n
g
K
w
t
e
a
w
a
a
k
M
n
H
g
d
K
m
h
e
r
e
w
m
N
o
e
w
m
p
u
r
m
.
e
e
c
O
S
g
o
2
r
a
2
r
e
o
k
a
2
V
e
h
p
i
e
b
e
e
r
a
t
a
e
m
g
t
g
k
o
k
s
z
u
m
k
e
k
k
a
e
•
Reini
•
Ver
4.
•
ideal
•
4 we
•
eins
5.
Siehe Ab
1 Hell
2 Sch
3 Grif
6.
Den Tre
Für Wind
1. Ver
Fun
2. Win
Ein
(od
Die Kam
Den Tre
Für Wind
1. Ver
Fun
2. Leg
gen Sie das Ge
enden Sie kein
igenschaf
zum Kontrollie
iße LEDs
ellbare Lichtstä
Umschreib
bildungen, Seit
gkeitsregler fü
appschuss-Ta
orbereitu
iber unter Wi
ows XP® (ode
inden Sie die
erkung: Ver
ktionieren nich
dows erkennt
tellungen, zeig
r nicht).
ra ist nun betr
iber unter Wi
ows Vista / 7,
inden Sie die
erkung: Ver
ktionieren nich
n Sie die mitg
rät nach jedem
sichtbar besc
en
en von schwer
rke der LEDs
ung
2 dieser Bedi
LED
te
g
dows XP ode
früher), gehen
amera mit ein
enden Sie USB
gewährleistet
as Gerät auto
Windows die
iebsfertig.
dows Vista /
ehen Sie wie f
amera mit ein
enden Sie USB
gewährleistet
lieferte CD-RO
CAMC
Gebrauch.
ädigte Kamera
zugänglichen
nungsanleitun
früher instal
Sie wie folgt v
m freien USB
2.0 oder höhe
orden.
atisch und inst
achricht “Your
7 installieren
lgt vor:
m freien USB
2.0 oder höhe
orden.
M in das Laufw
LI4
.
tellen (z.B. inn
.
4 Schwanen
5 Kamerako
6 Zubehörte
lieren
r:
.0-Port an Ihr
. Verwenden Si
lliert den Trei
new hardware
.0-Port an Ihr
. Verwenden Si
rk ein.
rhalb einer ab
als (± 60 cm)
f mit LED-Lich
le: Haken, ma
m Computer.
e USB 1.1, so
er. Abhängig v
is installed an d
m Computer.
e USB 1.1, so
ehängten Dec
netische Spitz
ann kein korre
n den
ready for use”
ann kein korre
e)
tes
an
tes
3. Klic
4. Fol
5. Klic
Die Inst
Zubehö
Schiebe
•
•
7.
Windo
1. Ver
2. Öff
V. 01 –
Verb
zugä
Befe
en Sie zwei M
en Sie den An
en Sie zwei M
llation ist nun
teile
Sie den Plasti
inden Sie den
nglichen Stelle
tigen Sie den
nwendun
Stecken Sie
s XP
inden Sie die
en Sie My Co
6/09/2012
l auf u
eisungen des I
l auf die Amca
bgeschlossen
haken [6] übe
agnetaufsatz
aufzunehmen
aken, um Kab
ie Kamera nie
amera mit ein
puter und su
die Installati
nstallationsassi
-Ikone
nd die Kamera
den schmalen
it der Kamera,
l oder andere
in ein eingesch
m freien USB
hen Sie “USB
19
n zu starten.
stenten.
der Arbeitsob
ist betriebsfert
Teil des Kame
um kleine Met
leinen Gegens
ltetes Gerät.
.0-Port an Ihr
ideo Device” u
rfläche, um die
ig.
akopfes [5] bi
llgegenstände
ände zurückzu
m Computer.
Live-Bilder z
Software zu st
dieser einrast
an schwer
iehen.
sehen.
©Velle
rten.
t.
an nv
Page 20

CAMCOLI4
3. Leiten Sie den Kamerakopf [5] zur Stelle, die Sie untersuchen möchten.
Bemerkung: Der Schwanenhals ist normalerweise einfach zu positionieren. Wenden Sie keine Kraft
an.
4. Stellen die Lichtstärke der LEDs über den Helligkeitsregler [1] ein.
5. Drücken Sie auf die Schnappschuss-Taste [2] um ein Photo zu machen. Die Liste mit Photos
erscheint unter dem Kamerabild.
Die Bilder können hier kopiert, gelöscht oder angesehen werden.
Windows Vista / 7
1. Verbinden Sie die Kamera mit einem freien USB 2.0-Port an Ihrem Computer.
2. Klicken Sie zwei Mal auf die Amcap-Ikone der Arbeitsoberfläche, um die Software zu starten.
3. Im Menü Options, wählen Sie Preview wenn Sie sich die Live-Bilder ansehen möchten.
4. Sind mehrere USB-Kameras an den PC angeschlossen, dann wählen Sie die gewünschte Kamera im
Menü Devices.
5. Leiten Sie den Kamerakopf [5] zur Stelle, die Sie untersuchen möchten.
Bemerkung: Der Schwanenhals ist normalerweise einfach zu positionieren. Wenden Sie keine Kraft
an.
6. Stellen die Lichtstärke der LEDs über den Helligkeitsregler [1] ein.
7. Um eine Video-Aufnahme zu machen, geben Sie zuerst den Standard-Ordner und den Dateinamen
ein: wählen Sie File > Set Capture File.
8. Wählen Sie Capture > Start Capture und klicken Sie auf OK um zu bestät igen.
Der PC startet die Aufnahme.
9. Um zu stoppen, wählen Sie Capture > Stop Capture.
10. Drücken Sie die Schnappschuss-Taste [2] um ein Photo zu machen. Das Photo erscheint in einem
anderen Fenster. Um das Photo zu speichern, wählen Sie File > Save.
11. Wenn Sie stoppen, schließen Sie das Amcap-Programm und trennen Sie die Kamera vom USB-Port.
Übersicht der Software
Bemerkung: Nur für Windows Vista / 7.
File Set Capture File den Standard-Ordner und den Dateiname der
Aufnahmedateien einstellen
Allocate File Space die Größe der Aufnahmedateien einstellen
Save Captured Video die Aufnahme in den gewünschten Ordner speichern
Exit die AmCap-Software schließen
Devices Liste mit Geräten , die an die Software angeschlossen sind
Options Preview Echtzeitbilder anzeigen
Video Capture Filter Parameter einstellen (Weißbalance, Belichtung, usw.) und
Effekte (Bild drehen, usw.)
Video Capture Pin die Größe des Videofensters einstellen
V. 01 – 06/09/2012 20 ©Velleman nv
Page 21

CAMCOLI4
Capture Start Capture die Aufnahme starten
Stop Capture die Aufnahme stoppen
Set Frame Rate die Anzahl Frames per Sekunde einstellen
Set Time Limit die Aufnahmedauer einstellen
8. Reinigung und Wartung
• Trennen Sie die Kamera vom PC.
• Reinigen Sie die Kamera mit einem antistatischen Tuch. Verwenden Sie auf keinen Fall Alkohol oder
irgendwelche Lösungsmittel.
• Spülen Sie den Schwanenhals nach jedem Gebrauch mit sauber em Wasser und lassen Sie ihn
trocknen, bevor Sie ihn im Koffer lagern.
9. Technische Daten
Aufnahme-Element 1/6" CMOS
Pixelanzahl 640 (H) x 480 (V)
Betrachtungswinkel 56°
Fokus 6 cm
Schnittstelle USB 2.0
S/N Rate 46 dB
Weißabgleich automatisch
Bildformat JPEG, BMP
Systemvoraussetzungen
IP-Schutzart IP66 (Kamera + Schwanenhals)
Stromversorgung 5 VDC über USB-Port
Abmessungen
Betriebstemperatur 0 – 50°C
Gewicht 310 g
Verwenden Sie dieses Gerät nur mit originellen Zubehörteilen. Velleman NV übernimmt keine
Haftung für Schaden oder Verletzungen bei (falscher) Anwendung dieses Gerätes.
Für mehr Informationen zu diesem Produkt und die neueste Version dieser
Bedienungsanleitung, siehe www.velleman.eu.
Alle Änderungen ohne vorherige Ankündigung vorbehalten.
Alle registrierten Schutzmarken und Handelsnamen sind das Eigentum Ihrer jeweiligen Eigentümer und
werden nur als Beispiel verwendet, um die Kompatibilität zwischen unseren Artikeln und die sen der
verschiedenen Fabrikanten anzuzeigen. Windows, Windows XP, Windows Vista, Windows 7, sind
eingetragene Warenzeichen von Microsoft Corporation in den USA und anderen Ländern. Mac, Mac OS,
sind Warenzeichen von Apple Inc., eingetragen in den USA und anderen Ländern.
© URHEBERRECHT
Velleman NV besitzt das Urheberrecht für diese Bedienungsanleitung. Alle weltweiten Rechte
vorbehalten. Ohne vorherige schriftliche Genehmigung des Urhebers ist es nicht gestattet, diese
Bedienungsanleitung ganz oder in Teilen zu reproduzieren, zu kopieren, zu übersetzen, zu bearbeiten
oder zu speichern.
• Windows® XP/Vista/Windows 7/Mac OS
• freier USB 2.0-Port
Kamera Ø 14 x 72 mm
Schlauch 54 cm
USB-Kabel 200 cm
V. 01 – 06/09/2012 21 ©Velleman nv
Page 22

Velleman® Service and Quality Warranty
Since its foundation in 1972, Velleman® acquired extensive experience in
the electronics world and currently distributes its products in over 85
countries.
All our products fulfil strict quality requirements and legal stipulations in
the EU. In order to ensure the quality, our products regularly go through
an extra quality check, both by an internal quality department and by
specialized external organisations. If, all precautionary measures
notwithstanding, problems should occur, please make appeal to our
warranty (see guarantee conditions).
General Warranty Conditions Concerning Consumer Products (for
EU):
• All consumer products are subject to a 24-month warranty on production
flaws and defective material as from the original date of purchase.
• Velleman® can decide to replace an article with an equivalent article, or
to refund the retail value totally or partially when the complaint is valid and
a free repair or replacement of the article is impossible, or if the expenses
are out of proportion.
You will be delivered a replacing article or a refund at the value of 100%
of the purchase price in case of a flaw occurred in the first year after the
date of purchase and delivery, or a replacing article at 50% of the
purchase price or a refund at the value of 50% of the retail value in case
of a flaw occurred in the second year after the date of purchase and
delivery.
• Not covered by warranty:
- all direct or indirect damage caused after delivery to the article (e.g. by
oxidation, shocks, falls, dust, dirt, humidity...), and by the article, as well
as its contents (e.g. data loss), compensation for loss of profits;
- consumable goods, parts or accessories that are subject to an aging
process during normal use, such as batteries (rechargeable, nonrechargeable, built-in or replaceable), lamps, rubber parts, drive belts...
(unlimited list);
- flaws resulting from fire, water damage, lightning, accident, natural
disaster, etc.…;
- flaws caused deliberately, negligently or resulting from improper
handling, negligent maintenance, abusive use or use contrary to the
manufacturer’s instructions;
- damage caused by a commercial, professional or collective use of the
article (the warranty validity will be reduced to six (6) months when the
article is used professionally);
- damage resulting from an inappropriate packing and shipping of the
article;
- all damage caused by modification, repair or alteration performed by a
third party without written permission by Velleman®.
• Articles to be repaired must be delivered to your Velleman® dealer,
solidly packed (preferably in the original packaging), and be completed
with the original receipt of purchase and a clear flaw description.
• Hint: In order to save on cost and time, please reread the manual and
check if the flaw is caused by obvious causes prior to presenting the
article for repair. Note that returning a non-defective article can also
involve handling costs.
• Repairs occurring after warranty expiration are subject to shipping costs.
• The above conditions are without prejudice to all commercial warranties.
The above enumeration is subject to modification according to the
article (see article’s manual).
Velleman® service- en kwaliteitsgarantie
Velleman® heeft sinds zijn oprichting in 1972 een ruime ervaring
opgebouwd in de elektronicawereld en verdeelt op dit moment producten
in meer dan 85 landen. Al onze producten beantwoorden aan strikte
kwaliteitseisen en aan de wettelijke bepalingen geldig in de EU. Om de
kwaliteit te waarborgen, ondergaan onze producten op regelmatige
tijdstippen een extra kwaliteitscontrole, zowel door onze eigen
kwaliteitsafdeling als door externe gespecialiseerde organisaties. Mocht
er ondanks deze voorzorgen toch een probleem optreden, dan kunt u
steeds een beroep doen op onze waarborg (zie waarborgvoorwaarden).
Algemene waarborgvoorwaarden consumentengoederen (voor
Europese Unie):
• Op alle consumentengoederen geldt een garantieperiode van 24
maanden op productie- en materiaalfouten en dit vanaf de oorspronkelijke
aankoopdatum.
• Indien de klacht gegrond is en een gratis reparatie of vervanging van
een artikel onmogelijk is of indien de kosten hiervoor buiten verhouding
zijn, kan Velleman® beslissen het desbetreffende artikel te vervangen
door een gelijkwaardig artikel of de aankoopsom van het artikel
gedeeltelijk of volledig terug te betalen. In dat geval krijgt u een
vervangend product of terugbetaling ter waarde van 100% van de
aankoopsom bij ontdekking van een gebrek tot één jaar na aankoop en
levering, of een vervangend product tegen 50% van de kostprijs of
terugbetaling van 50 % bij ontdekking na één jaar tot 2 jaar.
• Valt niet onder waarborg:
- alle rechtstreekse of onrechtstreekse schade na de levering veroorzaakt
aan het toestel (bv. door oxidatie, schokken, val, stof, vuil, vocht...), en
door het toestel, alsook zijn inhoud (bv. verlies van data), vergoeding voor
eventuele winstderving.
- verbruiksgoederen, onderdelen of hulpstukken die onderhevig zijn aan
veroudering door normaal gebruik zoals bv. batterijen (zowel oplaadbare
als niet-oplaadbare, ingebouwd of vervangbaar), lampen, rubberen
onderdelen, aandrijfriemen... (onbeperkte lijst).
- defecten ten gevolge van brand, waterschade, bliksem, ongevallen,
natuurrampen, enz.
- defecten veroorzaakt door opzet, nalatigheid of door een
onoordeelkundige behandeling, slecht onderhoud of abnormaal gebruik of
gebruik van het toestel strijdig met de voorschriften van de fabrikant.
- schade ten gevolge van een commercieel, professioneel of collectief
gebruik van het apparaat (bij professioneel gebruik wordt de
garantieperiode herleid tot 6 maand).
- schade veroorzaakt door onvoldoende bescherming bij transport van het
apparaat.
- alle schade door wijzigingen, reparaties of modificaties uitgevoerd door
derden zonder toestemming van Velleman®.
• Toestellen dienen ter reparatie aangeboden te worden bij uw
Velleman®-verdeler. Het toestel dient vergezeld te zijn van het
oorspronkelijke aankoopbewijs. Zorg voor een degelijke verpakking (bij
voorkeur de originele verpakking) en voeg een duidelijke foutomschrijving
bij.
• Tip: alvorens het toestel voor reparatie aan te bieden, kijk nog eens na
of er geen voor de hand liggende reden is waarom het toestel niet naar
behoren werkt (zie handleiding). Op deze wijze kunt u kosten en tijd
besparen. Denk eraan dat er ook voor niet-defecte toestellen een kost
voor controle aangerekend kan worden.
• Bij reparaties buiten de waarborgperiode zullen transportkosten
aangerekend worden.
• Elke commerciële garantie laat deze rechten onverminderd.
Bovenstaande opsomming kan eventueel aangepast worden
naargelang de aard van het product (zie handleiding van het
betreffende product).
Garantie de service et de qualité Velleman®
Depuis 1972, Velleman® a gagné une vaste expérience dans le secteur
de l’électronique et est actuellement distributeur dans plus de 85 pays.
Tous nos produits répondent à des exigences de qualité rigoureuses et à
des dispositions légales en vigueur dans l’UE. Afin de garantir la qualité,
nous soumettons régulièrement nos produits à des contrôles de qualité
supplémentaires, tant par notre propre service qualité que par un service
qualité externe. Dans le cas improbable d’un défaut malgré toutes les
précautions, il est possible d’invoquer notre garantie (voir les conditions
de garantie).
Conditions générales concernant la garantie sur les produits grand
public (pour l’UE) :
• tout produit grand public est garanti 24 mois contre tout vice de
production ou de matériaux à dater du jour d’acquisition effective ;
• si la plainte est justifiée et que la réparation ou le remplacement d’un
article est jugé impossible, ou lorsque les coûts s’avèrent
disproportionnés, Velleman® s’autorise à remplacer ledit article par un
article équivalent ou à rembourser la totalité ou une partie du prix d’achat.
Le cas échéant, il vous sera consenti un article de remplacement ou le
remboursement complet du prix d’achat lors d’un défaut dans un délai de
1 an après l’achat et la livraison, ou un article de remplacement
moyennant 50% du prix d’achat ou le remboursement de 50% du prix
d’achat lors d’un défaut après 1 à 2 ans.
• sont par conséquent exclus :
- tout dommage direct ou indirect survenu à l’article après livraison (p.ex.
dommage lié à l’oxydation, choc, chute, poussière, sable, impureté…) et
provoqué par l’appareil, ainsi que son contenu (p.ex. perte de données) et
une indemnisation éventuelle pour perte de revenus ;
- toute pièce ou accessoire nécessitant un remplacement causé par un
usage normal comme p.ex. piles (rechargeables comme non
rechargeables, intégrées ou remplaçables), ampoules, pièces en
caoutchouc, courroies… (liste illimitée) ;
- tout dommage qui résulte d’un incendie, de la foudre, d’un accident,
d’une catastrophe naturelle, etc. ;
Page 23

- out dommage provoqué par une négligence, volontaire ou non, une
utilisation ou un entretien incorrect, ou une utilisation de l’appareil
contraire aux prescriptions du fabricant ;
- tout dommage à cause d’une utilisation commerciale, professionnelle ou
collective de l’appareil (la période de garantie sera réduite à 6 mois lors
d’une utilisation professionnelle) ;
- tout dommage à l’appareil qui résulte d’une utilisation incorrecte ou
différente que celle pour laquelle il a été initialement prévu comme décrit
dans la notice ;
- tout dommage engendré par un retour de l’appareil emballé dans un
conditionnement non ou insuffisamment protégé.
- toute réparation ou modification effectuée par une tierce personne sans
l’autorisation explicite de SA Velleman® ; - frais de transport de et vers
Velleman® si l’appareil n’est plus couvert sous la garantie.
• toute réparation sera fournie par l’endroit de l’achat. L’appareil doit
nécessairement être accompagné du bon d’achat d’origine et être dûment
conditionné (de préférence dans l’emballage d’origine avec mention du
défaut) ;
• tuyau : il est conseillé de consulter la notice et de contrôler câbles, piles,
etc. avant de retourner l’appareil. Un appareil retourné jugé défectueux
qui s’avère en bon état de marche pourra faire l’objet d’une note de frais à
charge du consommateur ;
• une réparation effectuée en-dehors de la période de garantie fera l’objet
de frais de transport ;
• toute garantie commerciale ne porte pas atteinte aux conditions
susmentionnées.
La liste susmentionnée peut être sujette à une complémentation
selon le type de l’article et être mentionnée dans la notice d’emploi.
Garantía de servicio y calidad Velleman®
Desde su fundación en 1972 Velleman® ha adquirido una amplia
experiencia como distribuidor en el sector de la electrónica en más de 85
países. Todos nuestros productos responden a normas de calidad
rigurosas y disposiciones legales vigentes en la UE. Para garantizar la
calidad, sometemos nuestros productos regularmente a controles de
calidad adicionales, tanto a través de nuestro propio servicio de calidad
como de un servicio de calidad externo. En el caso improbable de que
surgieran problemas a pesar de todas las precauciones, es posible
recurrir a nuestra garantía (véase las condiciones de garantía).
Condiciones generales referentes a la garantía sobre productos de
venta al público (para la Unión Europea):
• Todos los productos de venta al público tienen un período de garantía
de 24 meses contra errores de producción o errores en materiales desde
la adquisición original;
• Si la queja está fundada y si la reparación o sustitución de un artículo no
es posible, o si los gastos son desproporcionados, Velleman® autoriza
reemplazar el artículo por un artículo equivalente o reembolsar la
totalidad o una parte del precio de compra. En este caso, usted recibirá
un artículo de recambio o el reembolso completo del precio de compra si
encuentra algún fallo hasta un año después de la compra y entrega, o un
artículo de recambio al 50% del precio de compra o el reembolso del 50%
del precio de compra si encuentra un fallo después de 1 año y hasta los 2
años después de la compra y entrega.
Por consiguiente, están excluidos entre otras cosas:
- todos los daños causados directa o indirectamente al aparato (p.ej. por
oxidación, choques, caída,...) y a su contenido (p.ej. pérdida de datos)
después de la entrega y causados por el aparato, y cualquier
indemnización por posible pérdida de ganancias;
- partes o accesorios, que estén expuestos al desgaste causado por un
uso normal, como por ejemplo baterías (tanto recargables como no
recargables, incorporadas o reemplazables), bombillas, partes de goma,
etc. (lista ilimitada);
- defectos causados por un incendio, daños causados por el agua, rayos,
accidentes, catástrofes naturales, etc.;
- defectos causados a conciencia, descuido o por malos tratos, un
mantenimiento inapropiado o un uso anormal del aparato contrario a las
instrucciones del fabricante;
- daños causados por un uso comercial, profesional o colectivo del
aparato (el período de garantía se reducirá a 6 meses con uso
profesional);
- daños causados por un uso incorrecto o un uso ajeno al que está
previsto el producto inicialmente como está descrito en el manual del
usuario;
- daños causados por una protección insuficiente al transportar el
aparato.
- daños causados por reparaciones o modificaciones efectuadas por una
tercera persona sin la autorización explícita de Velleman®;
- se calcula gastos de transporte de y a Velleman® si el aparato ya no
está cubierto por la garantía.
• Cualquier artículo que tenga que ser reparado tendrá que ser devuelto a
su distribuidor Velleman®. Devuelva el aparato con la factura de compra
original y transpórtelo en un embalaje sólido (preferentemente el
embalaje original). Incluya también una buena descripción del fallo;
• Consejo: Lea el manual del usuario y controle los cables, las pilas, etc.
antes de devolver el aparato. Si no se encuentra un defecto en el artículo
los gastos podrían correr a cargo del cliente;
• Los gastos de transporte correrán a carga del cliente para una
reparación efectuada fuera del período de garantía.
• Cualquier gesto comercial no disminuye estos derechos.
La lista previamente mencionada puede ser adaptada según el tipo
de artículo (véase el manual del usuario del artículo en cuestión).
Velleman® Service- und Qualitätsgarantie
Seit der Gründung in 1972 hat Velleman® sehr viel Erfahrung als Verteiler
in der Elektronikwelt in über 85 Ländern aufgebaut.
Alle Produkte entsprechen den strengen Qualitätsforderungen und
gesetzlichen Anforderungen in der EU. Um die Qualität zu gewährleisten
werden unsere Produkte regelmäßig einer zusätzlichen Qualitätskontrolle
unterworfen, sowohl von unserer eigenen Qualitätsabteilung als auch von
externen spezialisierten Organisationen. Sollten, trotz aller
Vorsichtsmaßnahmen, Probleme auftreten, nehmen Sie bitte die Garantie
in Anspruch (siehe Garantiebedingungen).
Allgemeine Garantiebedingunge n in Be zu g a uf Ko nsumgüter (für die
Europäische Union):
• Alle Produkte haben für Material- oder Herstellungsfehler eine
Garantieperiode von 24 Monaten ab Verkaufsdatum.
• Wenn die Klage berechtigt ist und falls eine kostenlose Reparatur oder
ein Austausch des Gerätes unmöglich ist, oder wenn die Kosten dafür
unverhältnismäßig sind, kann Velleman® sich darüber entscheiden,
dieses Produkt durch ein gleiches Produkt zu ersetzen oder die
Kaufsumme ganz oder teilweise zurückzuzahlen. In diesem Fall erhalten
Sie ein Ersatzprodukt oder eine Rückzahlung im Werte von 100% der
Kaufsumme im Falle eines Defektes bis zu 1 Jahr nach Kauf oder
Lieferung, oder Sie bekommen ein Ersatzprodukt im Werte von 50% der
Kaufsumme oder eine Rückzahlung im Werte von 50 % im Falle eines
Defektes im zweiten Jahr.
• Von der Garantie ausgeschlossen sind:
- alle direkten oder indirekten Schäden, die nach Lieferung am Gerät und
durch das Gerät verursacht werden (z.B. Oxidation, Stöße, Fall, Staub,
Schmutz, Feuchtigkeit, ...), sowie auch der Inhalt (z.B. Datenverlust),
Entschädigung für eventuellen Gewinnausfall.
- Verbrauchsgüter, Teile oder Zubehörteile, die durch normalen Gebrauch
dem Verschleiß ausgesetzt sind, wie z.B. Batterien (nicht nur aufladbare,
sondern auch nicht aufladbare, eingebaute oder ersetzbare), Lampen,
Gummiteile, Treibriemen, usw. (unbeschränkte Liste).
- Schäden verursacht durch Brandschaden, Wasserschaden, Blitz,
Unfälle, Naturkatastrophen, usw.
- Schäden verursacht durch absichtliche, nachlässige oder
unsachgemäße Anwendung, schlechte Wartung, zweckentfremdete
Anwendung oder Nichtbeachtung von Benutzerhinweisen in der
Bedienungsanleitung.
- Schäden infolge einer kommerziellen, professionellen oder kollektiven
Anwendung des Gerätes (bei gewerblicher Anwendung wird die
Garantieperiode auf 6 Monate zurückgeführt).
- Schäden verursacht durch eine unsachgemäße Verpackung und
unsachgemäßen Transport des Gerätes.
- alle Schäden verursacht durch unautorisierte Änderungen, Reparaturen
oder Modifikationen, die von einem Dritten ohne Erlaubnis von Velleman®
vorgenommen werden.
• Im Fall einer Reparatur, wenden Sie sich an Ihren Velleman®-Verteiler.
Legen Sie das Produkt ordnungsgemäß verpackt (vorzugsweise die
Originalverpackung) und mit dem Original-Kaufbeleg vor. Fügen Sie eine
deutliche Fehlerbeschreibung hinzu.
• Hinweis: Um Kosten und Zeit zu sparen, lesen Sie die
Bedienungsanleitung nochmals und überprüfen Sie, ob es keinen auf de
Hand liegenden Grund gibt, ehe Sie das Gerät zur Reparatur
zurückschicken. Stellt sich bei der Überprüfung des Gerätes heraus, dass
kein Geräteschaden vorliegt, könnte dem Kunden eine
Untersuchungspauschale berechnet.
• Für Reparaturen nach Ablauf der Garantiefrist werden Transportkosten
berechnet.
• Jede kommerzielle Garantie lässt diese Rechte unberührt.
Die oben stehende Aufzählung kann eventuell angepasst werden
gemäß der Art des Produktes (siehe Bedienungsanleitung des
Gerätes).
 Loading...