

KSR10
ROBOTIC ARM
ROBOTARM
BRAS ROBOTIQUE
BRAZO ROBÓTICO
ROBOTERARM
RAMIĘ ROBOTA
USER MANUAL
GEBRUIKERSHANDLEIDING
NOTICE D’EMPLOI
MANUAL DEL USUARIO
BEDIENUNGSANLEITUNG
INSTRUKCJA UŻYTKOWNIKA

KSR10 – ROBOTIC ARM
1 Introduction
To all residents of the European Union
Important environmental information about this product
This symbol on the device or the package indicates that disposal of the device after its lifecycle could harm
the environment. Do not dispose of the unit (or batteries) as unsorted municipal waste; it should be taken to
a specialized company for recycling. This device should be returned to your distributor or to a local recycling
service. Respect the local environmental rules.
If in doubt, contact your local waste disposal authorities.
Thank you for choosing Velleman! Please read the manual thoroughly before bringing this device into service. If the
device was damaged in transit, do not install or use it and contact your dealer.
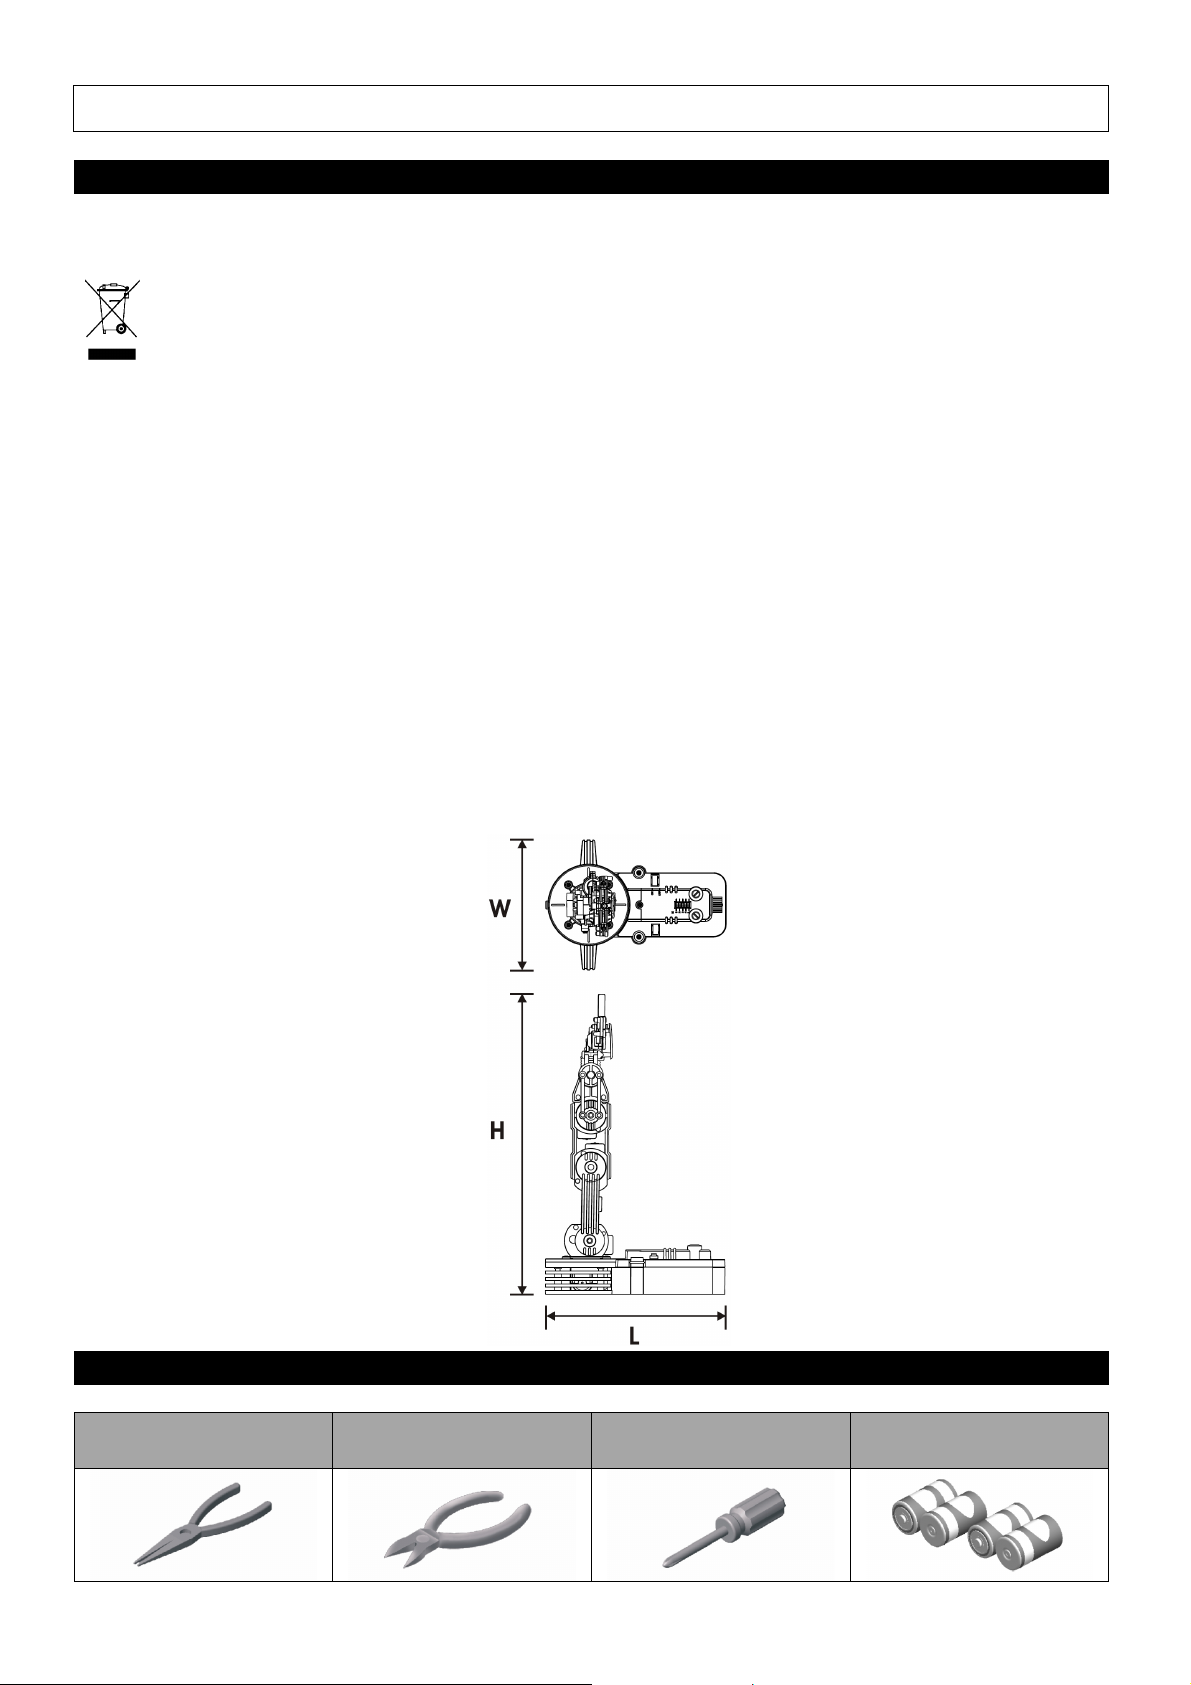
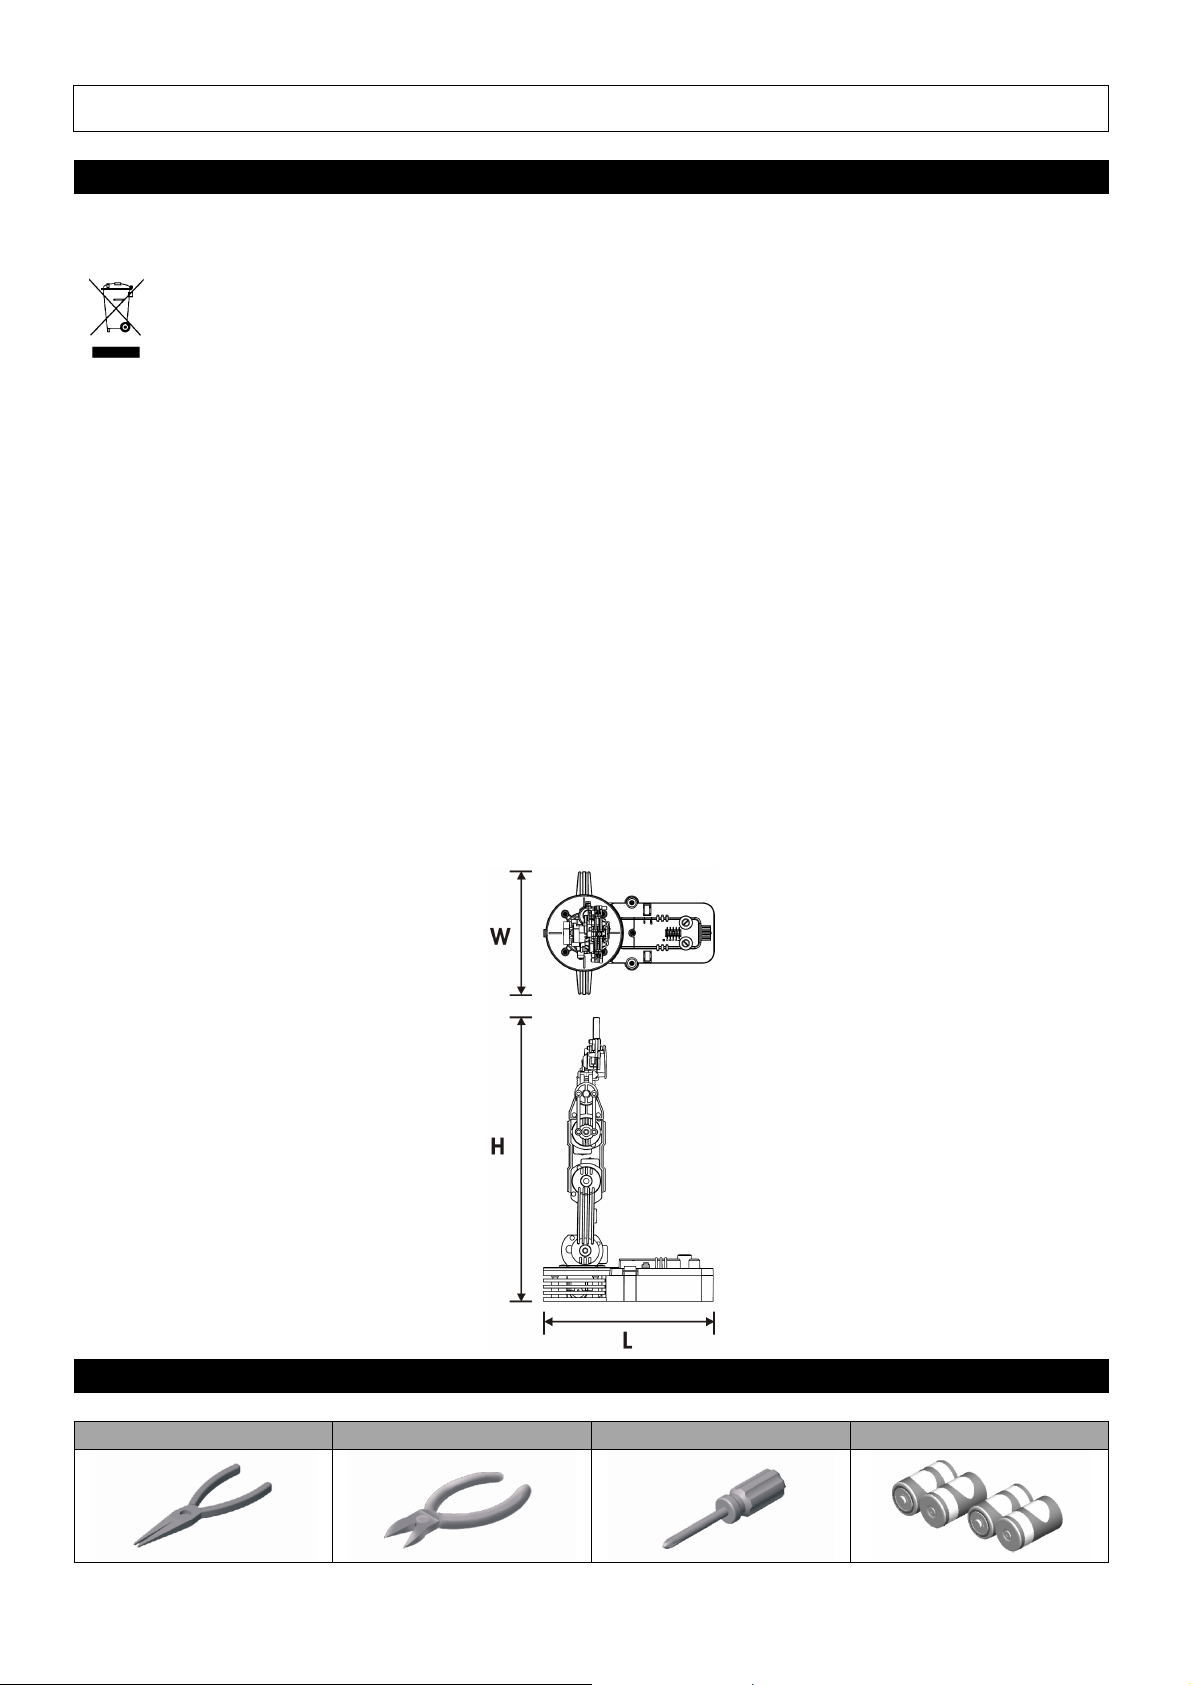
Enter the world of basic robotic technology and build your own robotic arm with five motors and five joints. The arm
features a five-switch hard-wired control unit, a rotating base, elbow and wrist articulations, and a functional gripper.
The built-in searchlight brings more fun when operated in the dark.
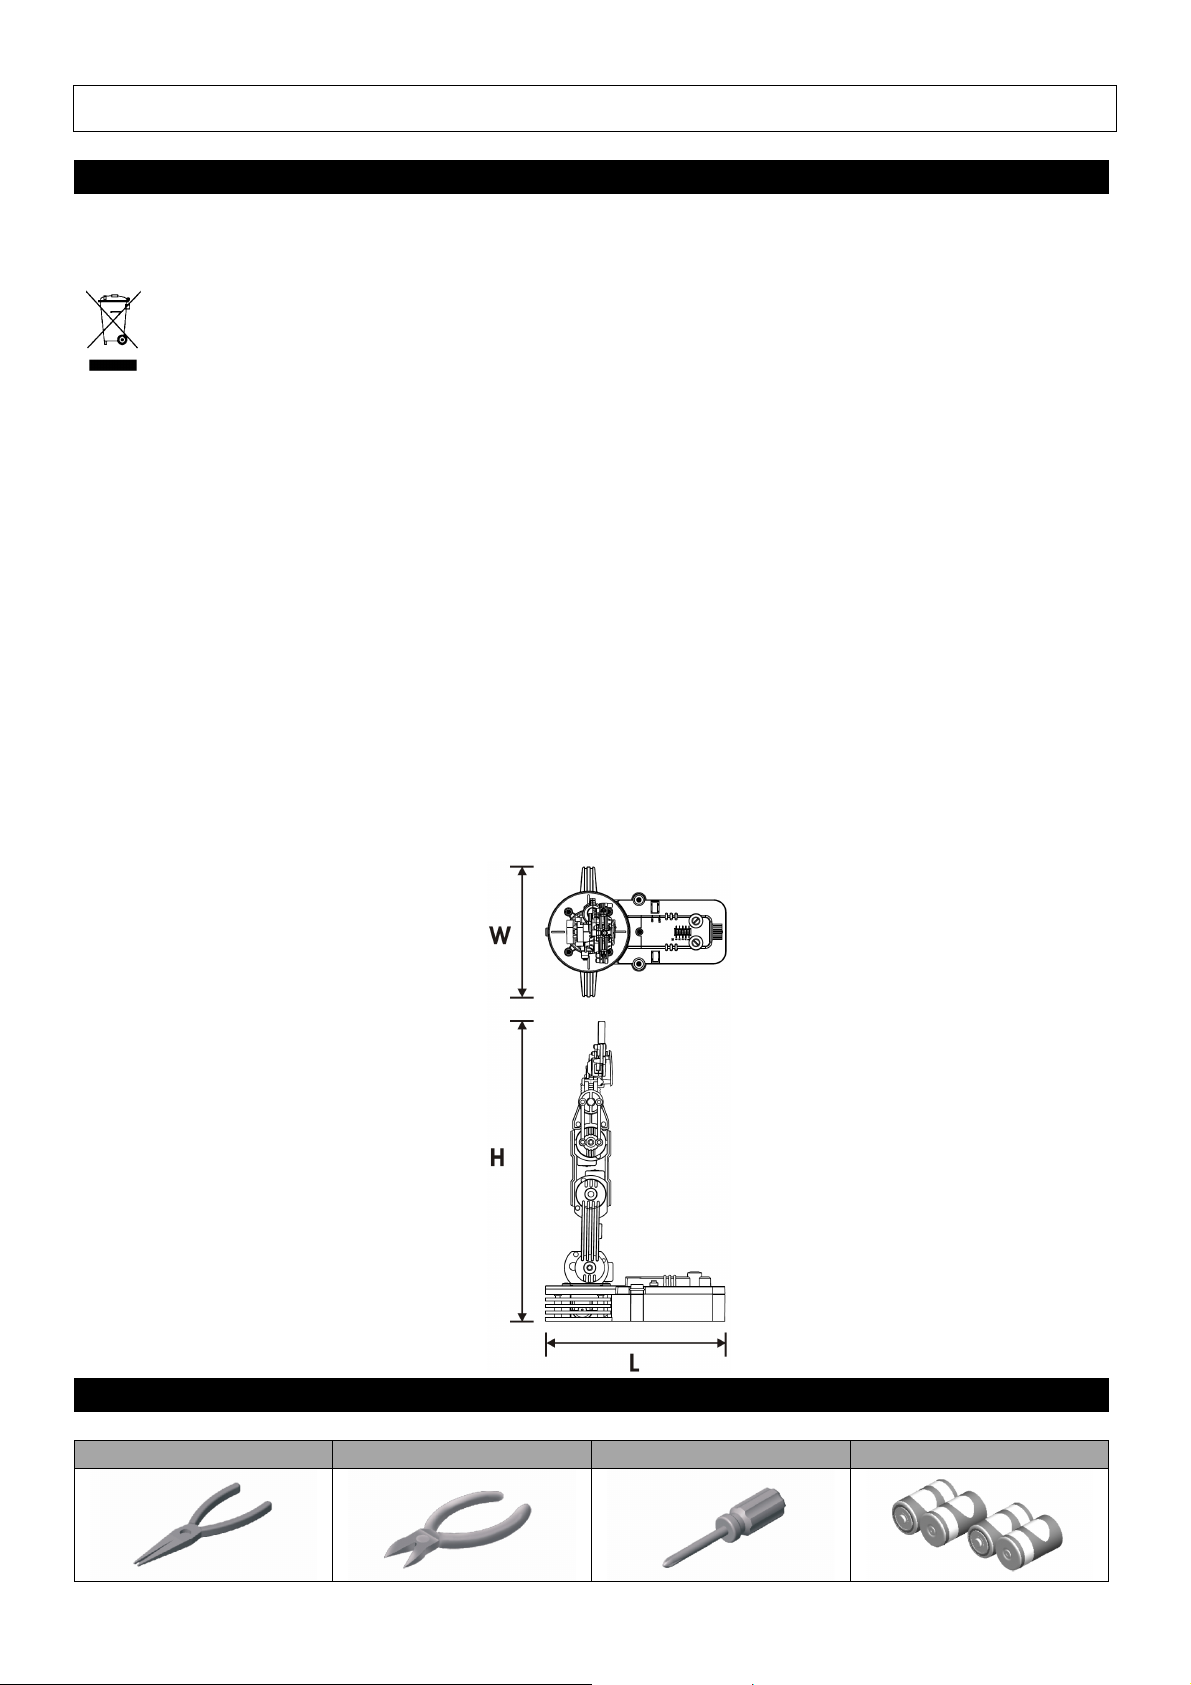
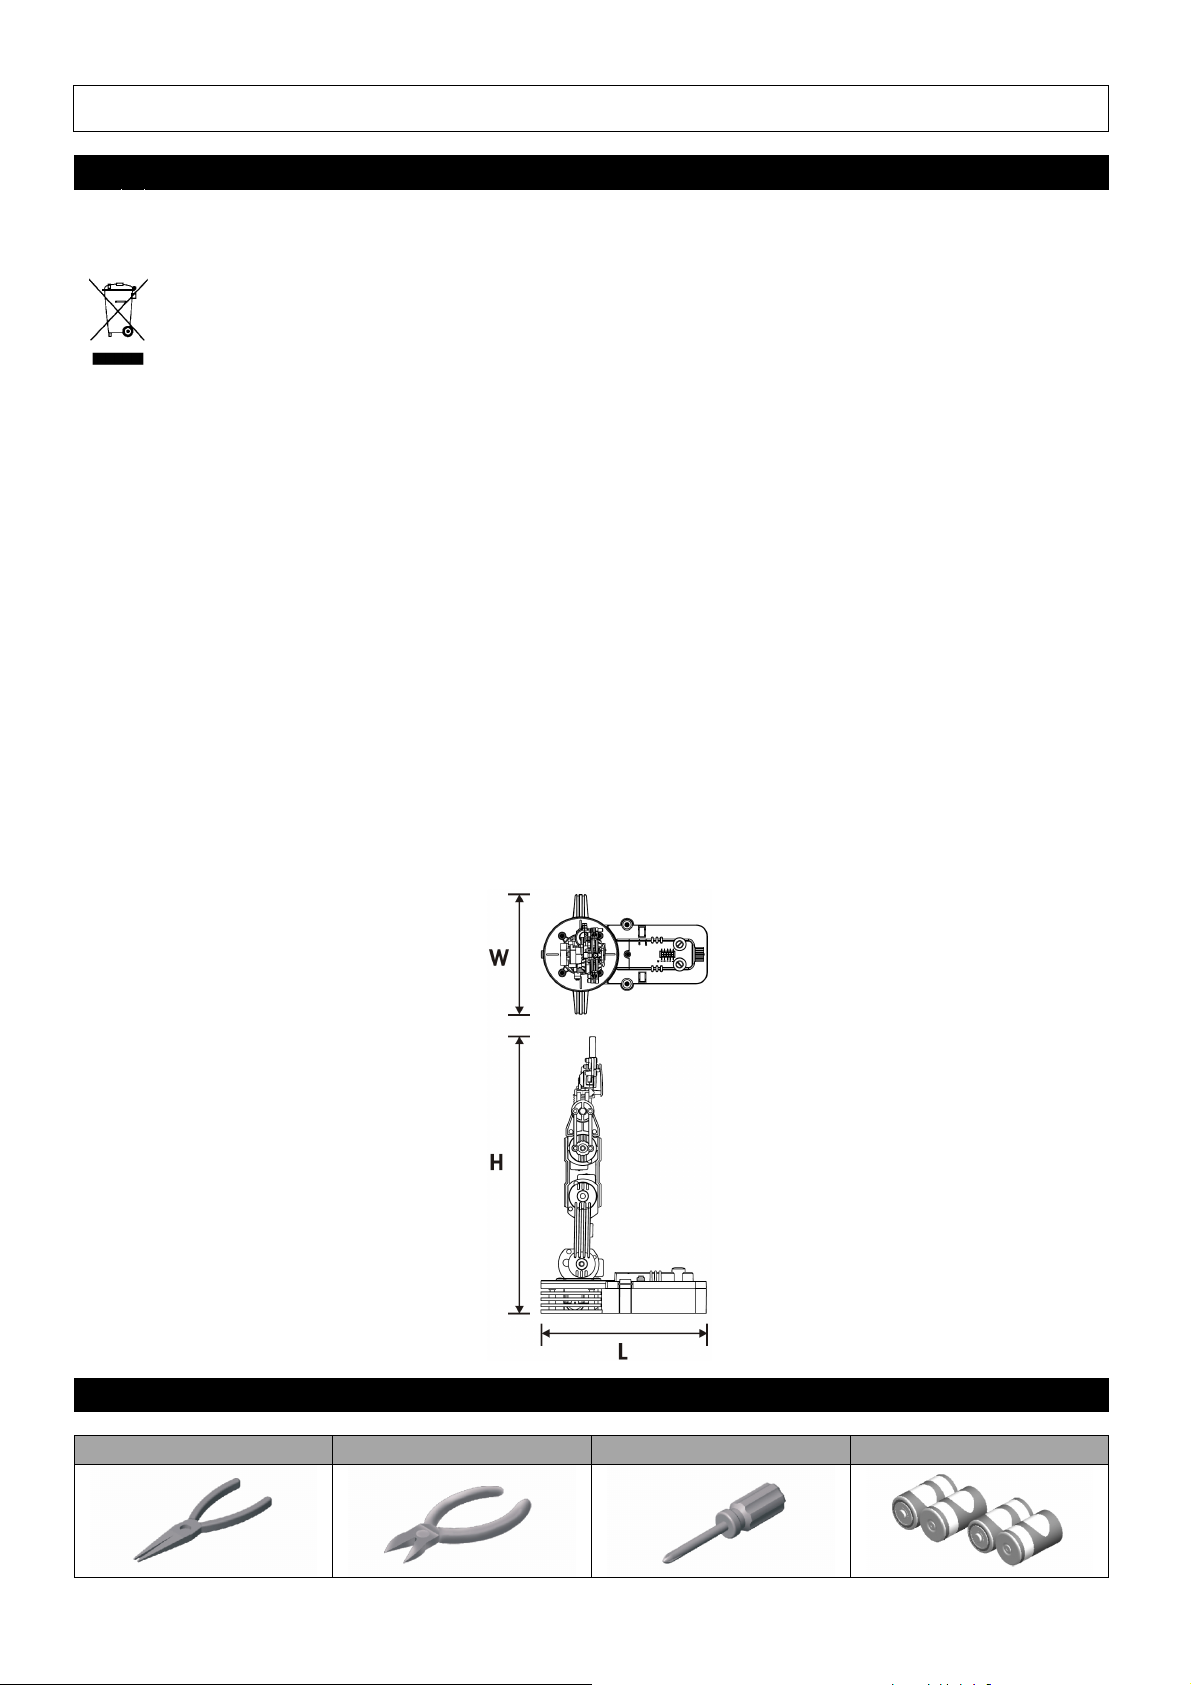
Specifications
Max. Lift Capacity 100g
Power Supply 4 x D batteries (order code LR20C, not incl.)
Full Extension Height 38cm
Weight 660g
Dimensions 22.85cm (L) x 16cm (W) x 38cm (H)
2 Tools You May Need
Long Nose Pliers Diagonal Cutter Screwdriver D Battery x 4
KSR10_v5 VELLEMAN
- 2 -

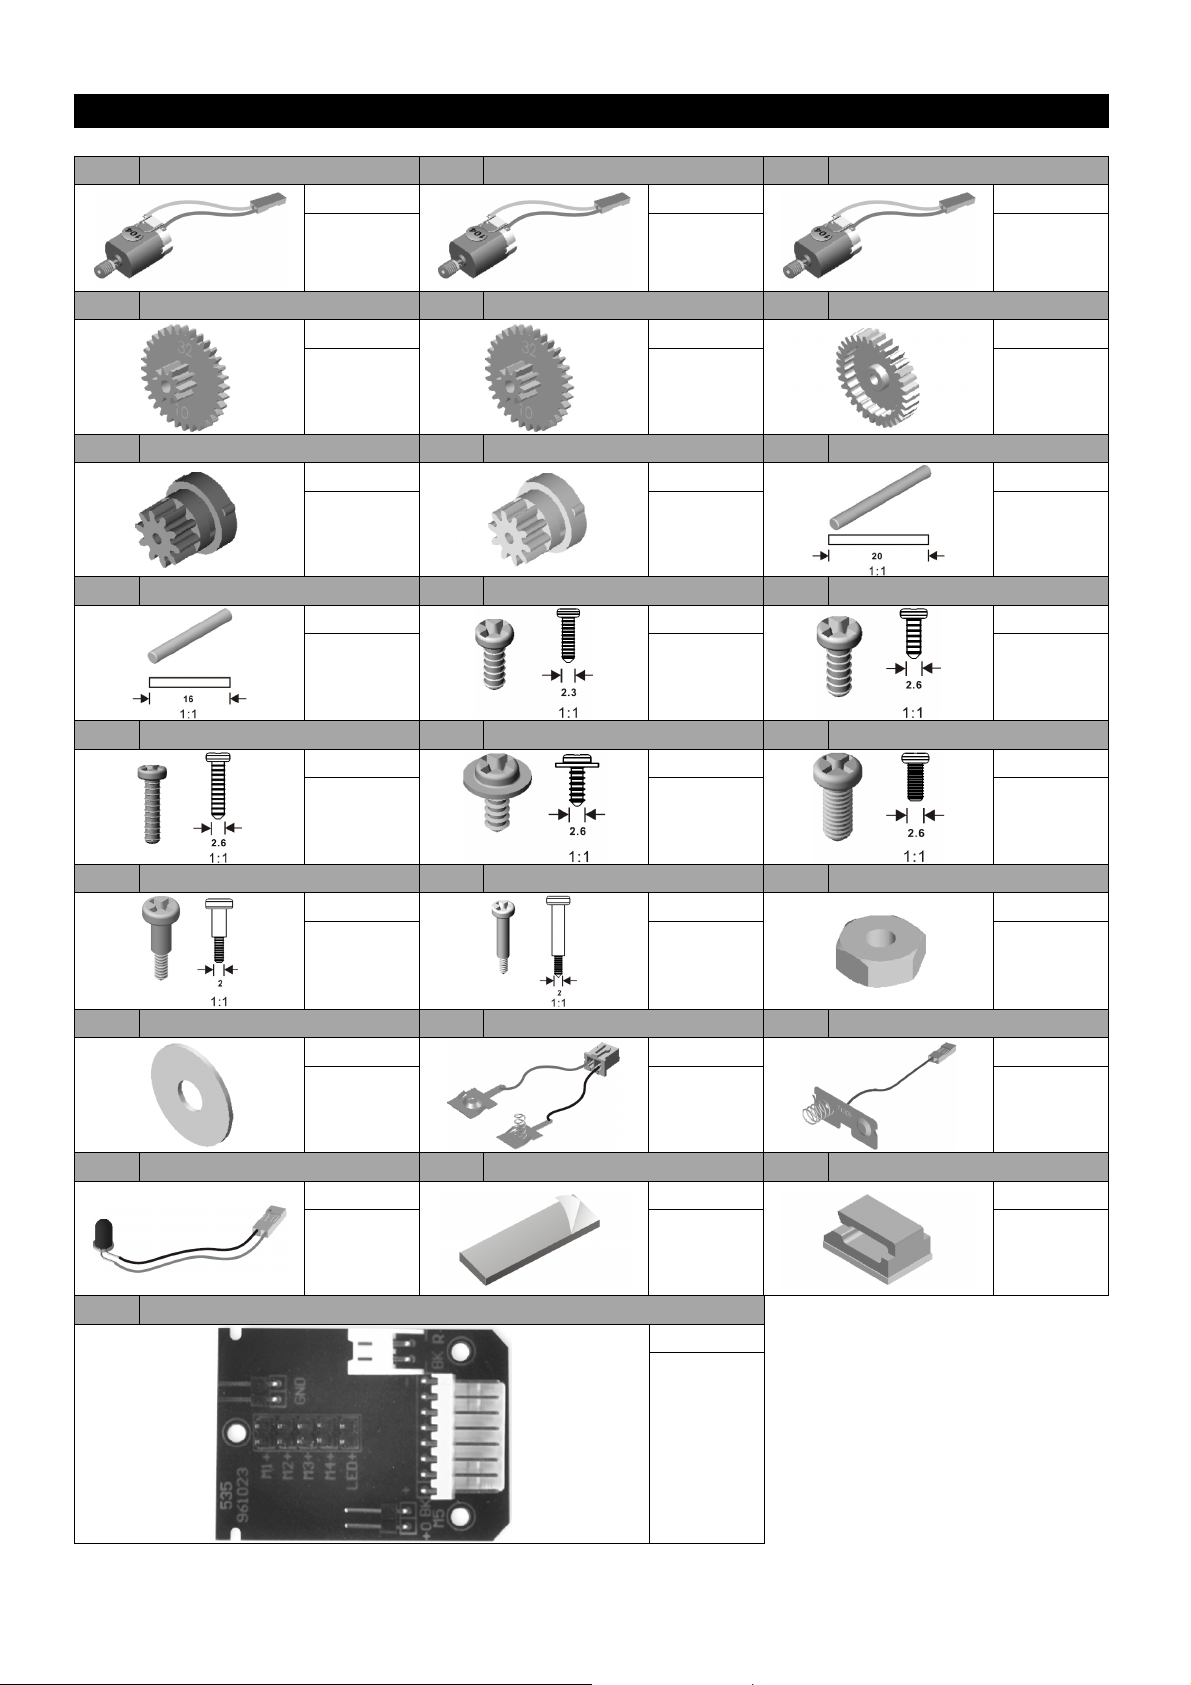
3 Mechanical Parts List
P1 Motor (M4.M5) * P2 Motor (M2.M3) * P3 Motor (M1) *
Qty
2 2 1
P4 Gear 32/10T (Grey) P5 Gear 32/10T (Brown) P6 Gear 32T (Blue)
Qty
10 5 5
P7 Output Gear 10T (Black) P8 Output Gear 10T (White) P9 Round Shaft
Qty
Qty
Qty
Qty
Qty
Qty
Qty
4 1
(2x20)
P10 Round Shaft P11 Tapping Screw P12 Tapping Screw
Qty
1
(2x16)
Qty
5
(2.3x7)
(2.6x6)
P13 Tapping Screw P14 Tapping Screw P15 Machine Screw
Qty
19
(2.6x10)
Qty
12
(2.6x6)
(2.6x6)
P16 Self Tapping Screw P17 Self Tapping Screw P18 Nut
Qty
4
(3x11)
Qty
3
(3x16)
P19 Washer P20 Battery Terminal P21 Battery Terminal
Qty
Qty
9
Qty
11
Qty
10
Qty
16
Qty
3 1 1
P22 LED With Wire P23 Sponge (Black) P24 Wire Clip
Qty
1 2 3
Qty
Qty
P25 PCB
Qty
1
* P1 = orange + black; P2 = blue + black; P3 = yellow + black
KSR10_v5 VELLEMAN
- 3 -
4 Plastic Parts
KSR10_v5 VELLEMAN
- 4 -

5 Mechanical Parts List Control Box
P1 Metal Plate P3 PCB
P2 Tapping Screw
(3x10)
6 Plastic Parts Control Box
Qty
5
Qty
9
Qty
1
KSR10_v5 VELLEMAN
- 5 -

7 Mechanical Assembly
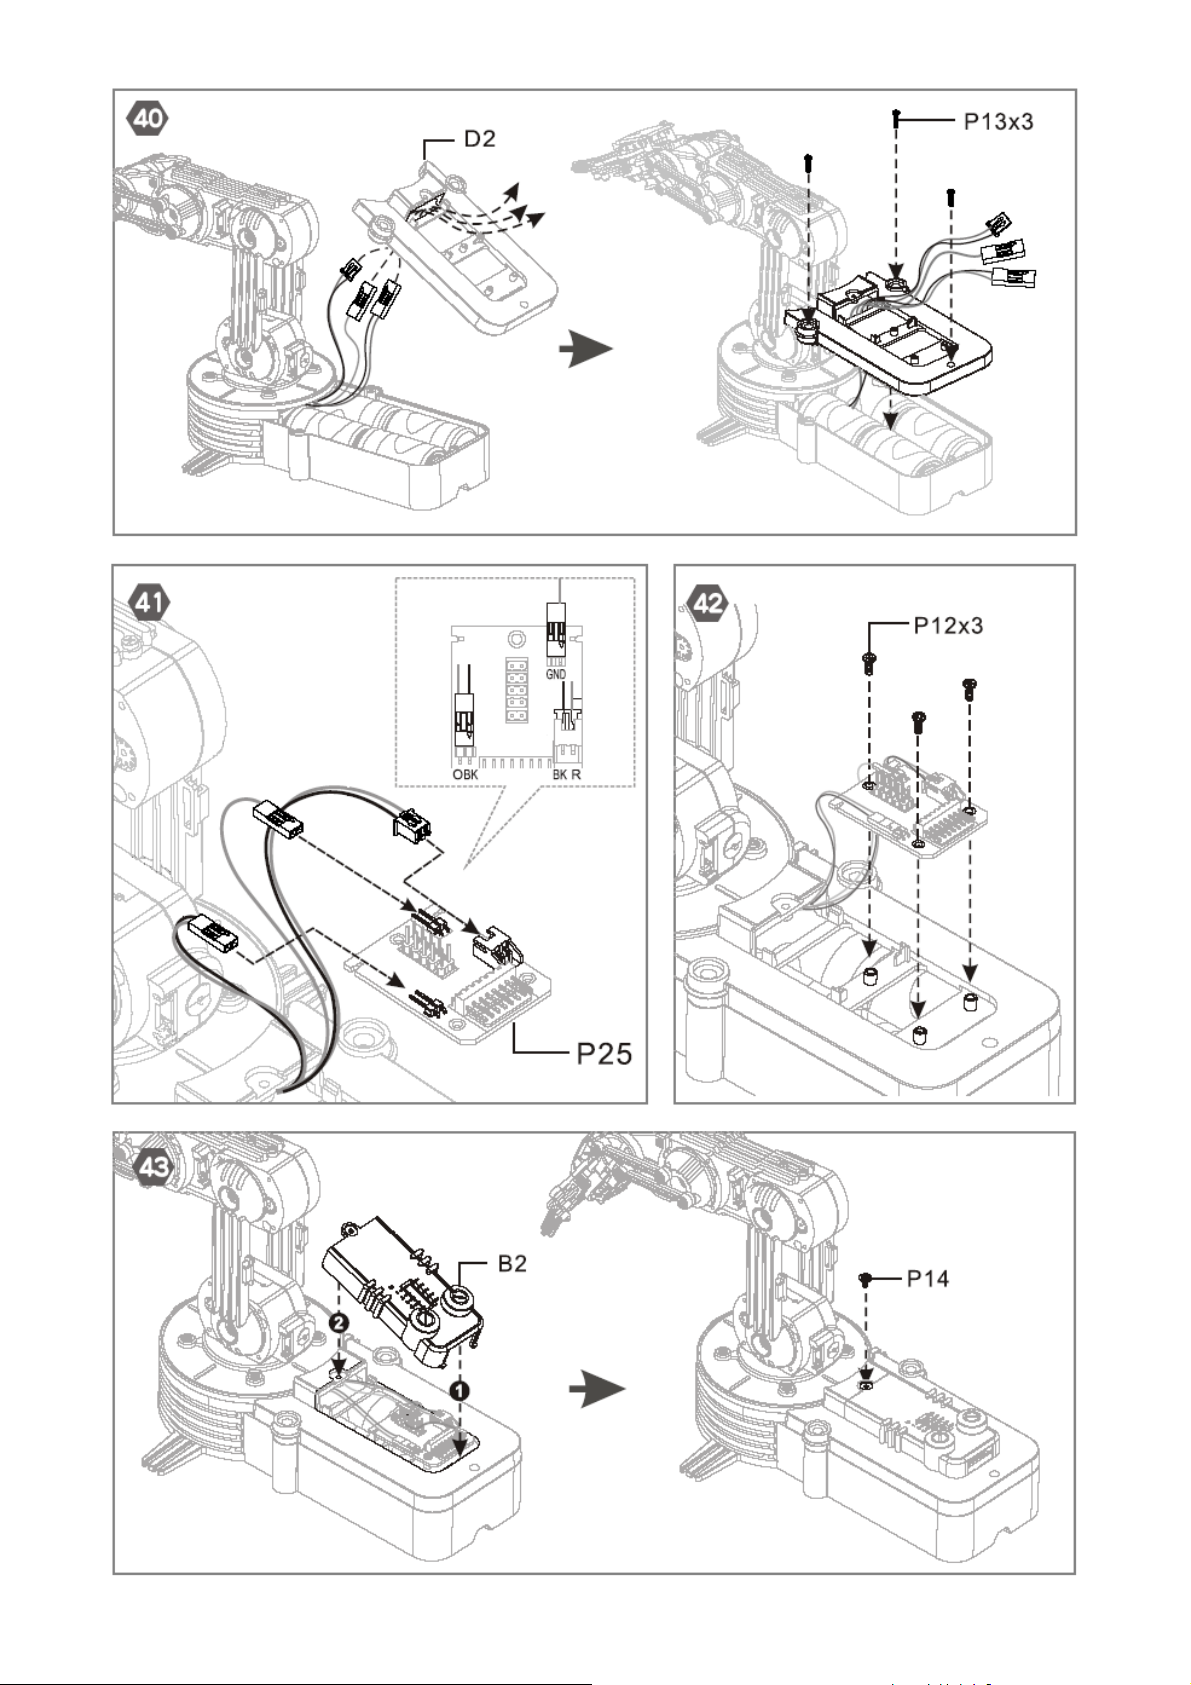
Please refer to pages 37 ~ 60.
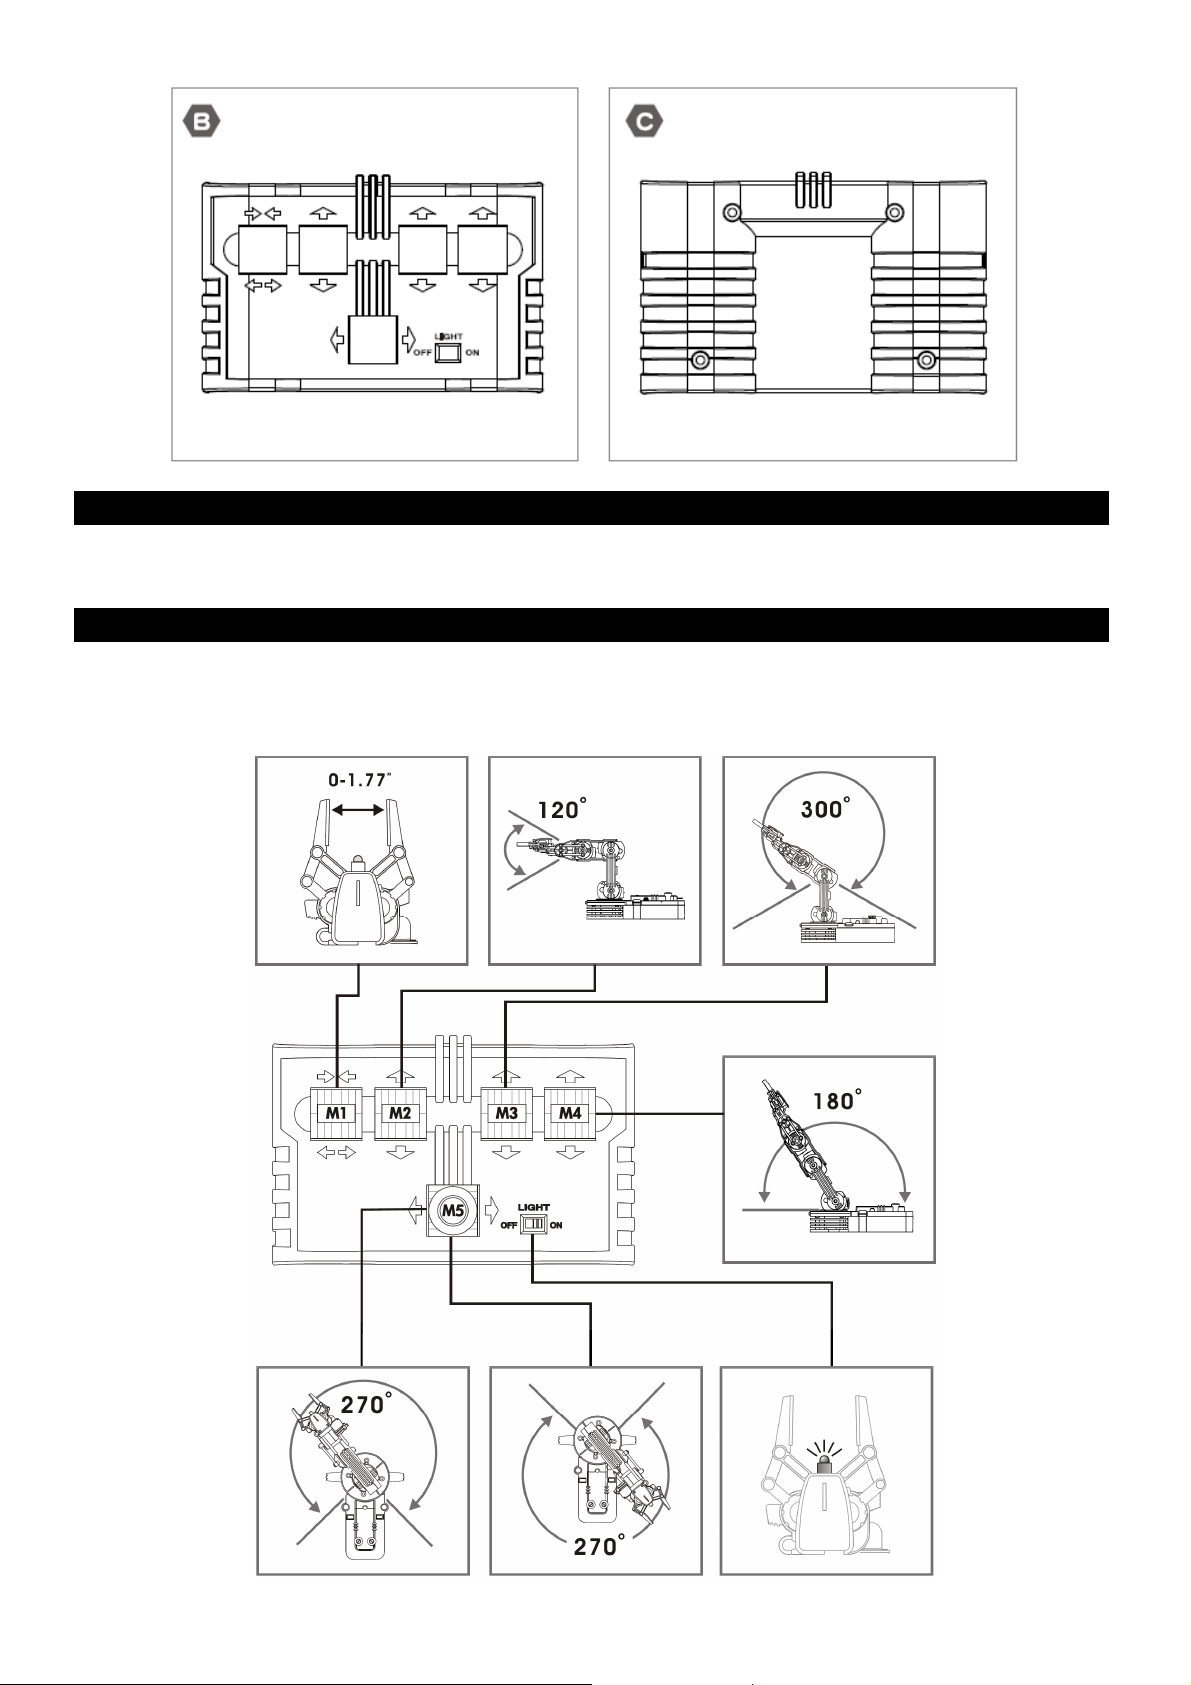
8 How It Works
1. Push any lever on the wired controller to start operation.
2. The 12 movements of the robotic arm are shown below:
KSR10_v5 VELLEMAN
- 6 -

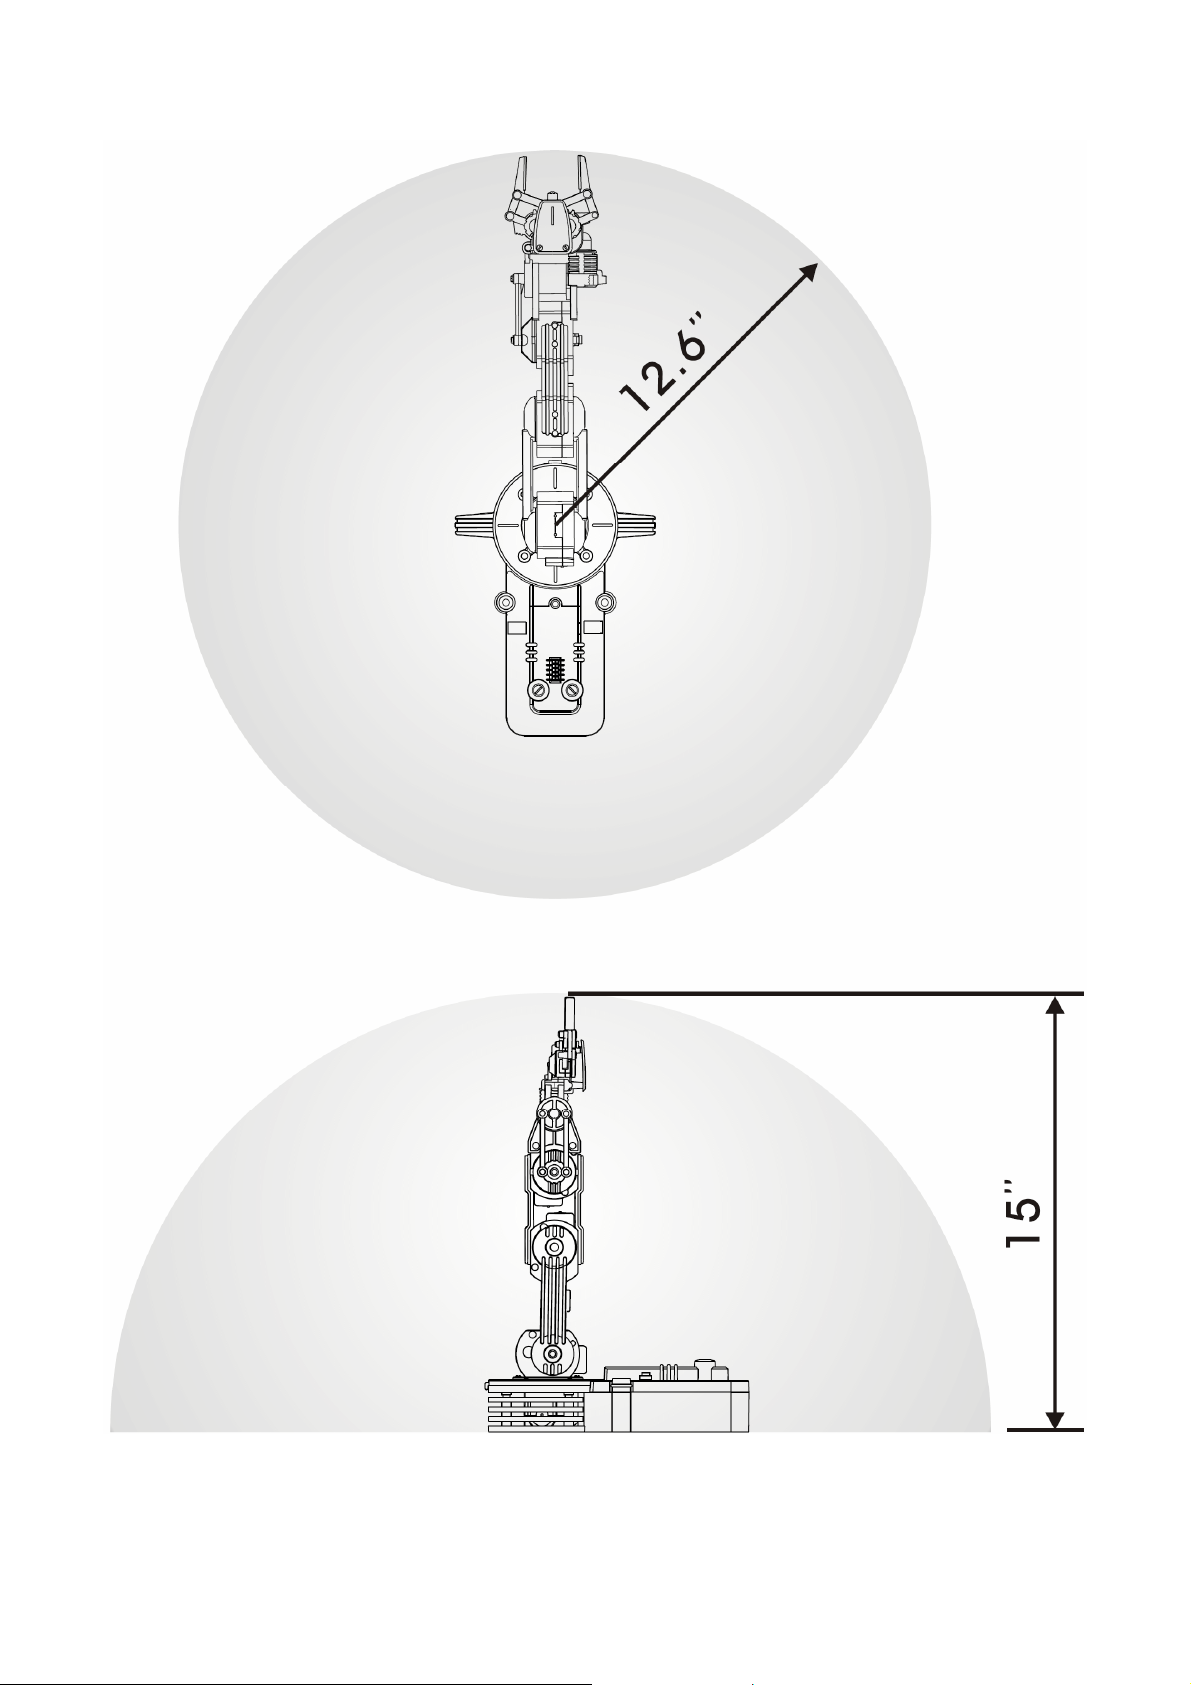
3. Working area:
4. All the gearboxes are equipped with safety devices which will kick in as soon as the maximum movement range
has been reached.
5. To extend the life of the gearboxes, release the control buttons as soon as the maximum movement range has
been reached.
KSR10_v5 VELLEMAN
- 7 -
9 Troubleshooting
1. Ensure all wirings are correct. Please refer to on pages 56 ~ 57.
2. If the robotic arm does not respond to any of the controls, check the BATTERY and GND connectors. Also check
if the batteries are correctly inserted. Please refer to on page 46.
3. If the robotic arm moves in the opposite direction of the desired control, check if wirings M1, M2, M3, M4 and M5
have not been inversed. Please refer to on pages 56 ~ 57.
4. If the searchlight does not function, check if the L connector is correctly wired. Please refer to on pages 56 ~ 57.
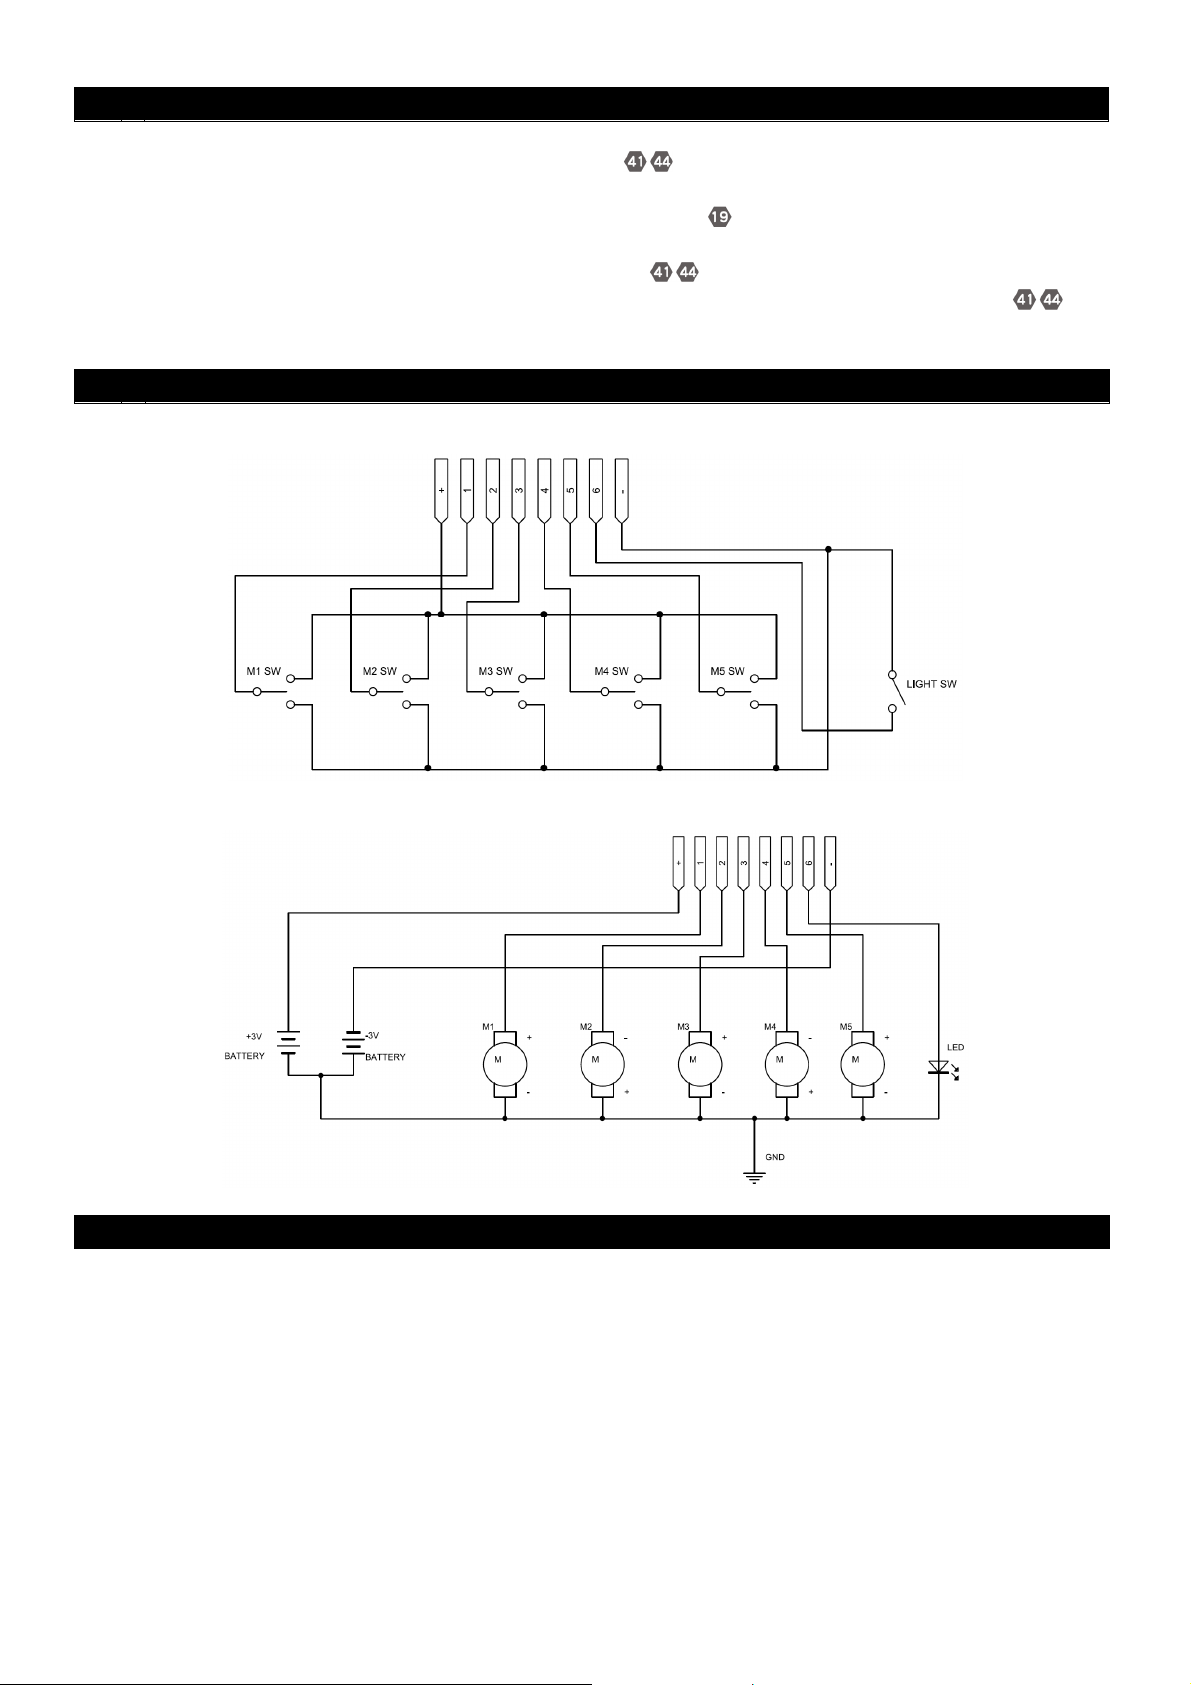
10 Circuit Diagram
Wired Control Box
Robotic Arm
11 Safety Prescriptions
• Removal and replacement of batteries should be carried out by an adult or under adult supervision.
• Do not recharge non-rechargeable batteries. Remove exhausted batteries from the product to avoid leakage.
• Do not mix old and new batteries or batteries of different types.
• The use of rechargeable batteries or mercury-oxide batteries is not recommended for this product.
• Avoid short-circuiting the contacts.
Use this device with original accessories only. Velleman nv cannot be held responsible in the event of
damage or injury resulted from (incorrect) use of this device.
For more info concerning this product, please visit our website www.velleman.eu.
The information in this manual is subject to change without prior notice.
KSR10_v5 VELLEMAN
- 8 -
KSR10 – ROBOTARM
1 Inleiding
Aan alle ingezetenen van de Europese Unie
Belangrijke milieu-informatie betreffende dit product
Dit symbool op het toestel of de verpakking geeft aan dat, als het na zijn levenscyclus wordt weggeworpen,
dit toestel schade kan toebrengen aan het milieu. Gooi dit toestel (en eventuele batterijen) niet bij het
gewone huishoudelijke afval; het moet bij een gespecialiseerd bedrijf terechtkomen voor recyclage. U moet
dit toestel naar uw verdeler of naar een lokaal recyclagepunt brengen. Respecteer de plaatselijke milieuwetgeving.
Hebt u vragen, contacteer dan de plaatselijke autoriteiten inzake verwijdering.
Dank u voor uw aankoop! Lees deze handleiding grondig voor u het toestel in gebruik neemt. Werd het toestel
beschadigd tijdens het transport, installeer het dan niet en raadpleeg uw dealer.
Stap de wereld van de robotica binnen dankzij deze robotarm met vijf motors en vijf gewrichten. De arm wordt
bediend vanaf een besturingseenheid en is uitgerust met een roterende basis, beweegbare elleboog en pols, en een
functionele hand. De ingebouwde schijnwerper is handig bij gebruik in het donker.
Specificaties
Max. hefvermogen 100 g
Voeding 4 x D-batterijen (ordercode LR20C, niet meegelev.)
Reikhoogte 38 cm
Gewicht 660 g
Afmetingen 22,85 cm (L) x 16 cm (W) x 38 cm (H)
2 Benodigdheden
Ronde bektang Zijkniptang Schroevendraaier D-batterij x 4
KSR10_v5 VELLEMAN
- 9 -

3 Mechanische Onderdelen
P1 Motor (M4.M5) * P2 Motor (M2.M3) * P3 Motor (M1) *
Hoev.
2 2 1
P4 Tandwiel 32/10T (grijs) P5 Tandwiel 32/10T (bruin) P6 Tandwiel 32T (blauw)
Hoev.
10 5 5
P7 Tandwiel 10T (zwart) P8 Tandwiel 10T (wit) P9 Ronde as
Hoev.
Hoev.
Hoev.
Hoev.
Hoev.
Hoev.
Hoev.
4 1
(2x20)
P10 Ronde as P11 Schroef P12 Schroef
Hoev.
1
(2x16)
Hoev.
5
(2.3x7)
Hoev.
(2.6x6)
P13 Schroef P14 Schroef P15 Schroef
Hoev.
19
(2.6x10)
Hoev.
12
(2.6x6)
Hoev.
(2.6x6)
P16 Zelftappende schroef P17 Zelftappende schroef P18 Moer
Hoev.
4
(3x11)
Hoev.
3
(3x16)
Hoev.
P19 Afdichtingring P20 Batterijterminal P21 Batterijterminal
Hoev.
Hoev.
Hoev.
9
11
10
16
3 1 1
P22 Led met aansluiting P23 Spons (zwart) P24 Clip
Hoev.
1 2 3
Hoev.
Hoev.
P25 Printplaat
Hoev.
1
* P1 = oranje + zwart; P2 = blauw + zwart; P3 = geel + zwart
KSR10_v5 VELLEMAN
- 10 -

4 Plastic onderdelen
KSR10_v5 VELLEMAN
- 11 -

5 Onderdelen afstandsbediening
P1 Metalen plaat P3 Printplaat
Hoev.
5
P2 Zelftappende schroef
Hoev.
9
(3x10)
6 Plastic onderdelen afstandsbediening
Hoev.
1
KSR10_v5 VELLEMAN
- 12 -
7 Assemblage
Zie pagina’s 37 ~ 60.
8 Hoe stuurt u de robotarm
1. Bedien een hendel om de robotarm te starten.
2. De 12 bewegingen van de robotarm staan hieronder afgebeeld:
KSR10_v5 VELLEMAN
- 13 -

3. Werkbereik:
4. Elke tandwielkast is uitgerust met een veiligheidssysteem dat wordt ingeschakeld als de maximale beweging
werd bereikt.
5. Om de levensduur van deze tandwielkasten te verlengen, laat u best de hendel los van zodra de maximale
beweging werd bereikt.
KSR10_v5 VELLEMAN
- 14 -
9 Problemen en oplossingen
1. Zorg voor een correcte elektrische aansluiting. Raadpleeg op pagina’s 56 ~ 57.
2. Controleer de BATTERIJ- en de GND-aansluitingen indien de robotarm niet op de bedieningen reageert.
Controleer eveneens of de batterij correct zijn geplaatst. Raadpleeg op pagina 46.
3. Een tegenovergestelde beweging bij een bediening wijst vaak op een verkeerde aansluiting. Controleer
aansluitingen M1, M2, M3, M4 en M5 op inversie. Raadpleeg op pagina’s 56 ~ 57.
4. Controleer of de L-aansluiting correct werd uitgevoerd indien het zoeklicht niet functioneert. Raadpleeg op
pagina’s 56 ~ 57.
10 Circuitschema
Afstandsbediening
Robotarm
11 Veiligheidsinstructies
• Laat het verwijderen en het vervagen van de batterijen aan een volwassen persoon over.
• Herlaad geen niet-herlaadbare batterijen. Verwijder zwakke batterijen om lekken te verwijden.
• Gebruik geen oude en nieuwe batterijen of batterijen van een verschillend type door elkaar.
• Het gebruik van herlaadbare of kwikbatterijen is niet aan te bevelen.
• Vermijd kortsluiting van de contacten.
Gebruik dit toestel enkel met originele accessoires. Velleman nv is niet aansprakelijk voor schade of
kwetsuren bij (verkeerd) gebruik van dit toestel.
Voor meer informatie omtrent dit product, zie www.velleman.eu.
De informatie in deze handleiding kan te allen tijde worden gewijzigd zonder voorafgaande kennisgeving.
KSR10_v5 VELLEMAN
- 15 -
KSR10 – BRAS ROBOTIQUE
1 Introduction
Aux résidents de l'Union européenne
Des informations environnementales importantes concernant ce produit
Ce symbole sur l'appareil ou l'emballage indique que l’élimination d’un appareil en fin de vie peut polluer
l'environnement. Ne pas jeter un appareil électrique ou électronique (et des piles éventuelles) parmi les
déchets municipaux non sujets au tri sélectif ; une déchèterie traitera l’appareil en question. Renvoyer les
équipements usagés à votre fournisseur ou à un service de recyclage local. Il convient de respecter la
réglementation locale relative à la protection de l’environnement.
En cas de questions, contacter les autorités locales pour élimination.
Nous vous remercions de votre achat ! Lire la présente notice attentivement avant la mise en service de l’appareil. Si
l’appareil a été endommagé pendant le transport, ne pas l’installer et consulter votre revendeur.
Découvrez le monde de la robotique grâce à ce bras de manipulation à cinq moteurs et cinq articulations. Le bras est
piloté à partir d’une unité de contrôle à cinq commandes et intègre un socle rotatif, coude et poignet articulés, et un
grappin fonctionnel. Le projecteur s’avère bien pratique pour une manipulation dans l’obscurité.
Spécifications
Puissance de levage max. 100 g
Alimentation 4 piles type R20 (référence LR20C, non incl.)
Hauteur max. à bras déployé 38 cm
Poids 660 g
Dimensions 22,85 cm (L) x 16 cm (W) x 38 cm (H)
2 Outillage nécessaire
Pince plate Pince coupante Tournevis 4 x pile type R20 (D)
KSR10_v5 VELLEMAN
- 16 -

3 Pièces mécaniques
P1 Moteur (M4.M5) * P2 Moteur (M2.M3) * P3 Moteur (M1) *
Qté
2 2 1
P4 Pignon 32/10T (gris) P5 Pignon 32/10T (marron) P6 Pignon 32T (bleu)
Qté
10 5 5
P7 Pignon de sortie 10T (noir) P8 Pignon de sortie 10T (blanc) P9 Essieu
Qté
Qté
Qté
Qté
Qté
Qté
Qté
4 1
(2x20)
P10 Essieu P11 Vis taraudeuse P12 Vis taraudeuse
Qté
1
(2x16)
Qté
5
(2.3x7)
(2.6x6)
P13 Vis taraudeuse P14 Vis taraudeuse P15 Vis
Qté
19
(2.6x10)
Qté
12
(2.6x6)
(2.6x6)
P16 Vis taraudeuse P17 Vis taraudeuse P18 Boulon
Qté
4
(3x11)
Qté
3
(3x16)
P19 Rondelle P20 Borne pour pile P21 Borne pour pile
Qté
Qté
9
Qté
11
Qté
10
Qté
16
Qté
3 1 1
P22 LED câblée P23 Éponge (noir) P24 Clips
Qté
1 2 3
Qté
Qté
P25 CI
Qté
1
* P1 = orange + noir ; P2 = bleu + noir ; P3 = jaune + noir
KSR10_v5 VELLEMAN
- 17 -

4 Pièces en plastique
KSR10_v5 VELLEMAN
- 18 -

5 Pièces mécaniques unité de contrôle
P1 Plaque métallique P3 PCB
Qté
5
P2 Vis taraudeuse
Qté
9
(3x10)
6 Pièces en plastique unité de contrôle
Qté
1
KSR10_v5 VELLEMAN
- 19 -

7 Assemblage
Voir les pages 37 ~ 60.
8 Comment ça marche
1. Actionner une commande sur l’unité de contrôle pour enclencher le bras.
2. Les 12 mouvements du bras sont décris ci-dessous :
KSR10_v5 VELLEMAN
- 20 -
3. Portée du bras :
4. Chaque train d’engrenage intègre un dispositif de sécurité qui s’enclenche dès qu’un mouvement a atteint sa
portée maximale.
5. Relâcher la commande dès qu’un mouvement a atteint sa portée maximale afin de prolonger la durée de vie des
trains d’engrenage.
KSR10_v5 VELLEMAN
- 21 -

9 En cas de problèmes
1. Veiller à dûment raccorder le circuit. Consulter à la page 56 ~ 57.
2. Vérifier les raccordements BATTERY et GND lorsque le bras ne répond pas aux commandes. Vérifier également
si les piles ont été insérées de manière correcte. Consulter à la page 46.
3. Vérifier une inversion des raccordements M1, M2, M3, M4 et M5 lorsque le bras réagit inversement à la
commande souhaitée. Consulter à la page 56 ~ 57.
4. Vérifier le raccordement L lorsque le projecteur ne fonctionne pas. Consulter à la page 56 ~ 57.
10 Schéma électrique
Unité de contrôle
Bras robotique
11 Prescriptions de sécurité
• Confier le remplacement et l’insertion des piles à une personne adulte.
• Ne pas recharger des piles non rechargeables. Retirer des piles usagées afin d’éviter l’écoulement.
• Ne pas utiliser simultanément des piles neuves et usagées ou des piles de type différent.
• L’utilisation de piles au mercure ou de piles rechargeables est déconseillée.
• Éviter de court-circuiter les contacts.
N’employer cet appareil qu’avec des accessoires d’origine. SA Velleman ne sera aucunement responsable
de dommages ou lésions survenus à un usage (incorrect) de cet appareil.
Pour plus d’information concernant cet article, visitez notre site web www.velleman.eu.
Toutes les informations présentées dans cette notice peuvent être modifiées sans notification préalable.
KSR10_v5 VELLEMAN
- 22 -
KSR10 – BRAZO ROBÓTICO
1 Introducción
A los ciudadanos de la Unión Europea
Importantes informaciones sobre el medio ambiente concerniente a este producto
Este símbolo en este aparato o el embalaje indica que, si tira las muestras inservibles, podrían dañar el
medio ambiente. No tire este aparato (ni las pilas, si las hubiera) en la basura doméstica; debe ir a una
empresa especializada en reciclaje. Devuelva este aparato a su distribuidor o a la unidad de reciclaje local.
Respete las leyes locales en relación con el medio ambiente.
Si tiene dudas, contacte con las autoridades locales para residuos.
¡Gracias por haber comprado el KSR10! Lea atentamente las instrucciones del manual antes de usarlo. Si el aparato
ha sufrido algún daño en el transporte no lo instale y póngase en contacto con su distribuidor.
Descubra el mundo de la robótica gracias al brazo con cinco motores y cinco articulaciones. El brazo está
manipulado por unidad de control y está equipado con base giratoria, codo y muñeca móviles y una mano funcional.
El proyector es práctico una manipulación a oscuras.
Especificaciones
Capacidad elevadora máx. 100g
Alimentación 4 pilas tipo R20 (referencia LR20C, no incl.)
Altura máx. del brazo extendido 38cm
Peso 660g
Dimensiones 22,85 cm (L) x 16 cm (An) x 38 cm (Al)
2 Herramientas necesarias
alicates de punta plana
larga
alicates de corte Destornillador 4 x pila tipo R20 (D)
KSR10_v5 VELLEMAN
- 23 -
3 Piezas mecánicas
P1 Motor (M4.M5) * P2 Motor (M2.M3) * P3 Moto (M1) *
Cantidad
2 2 1
P4 Piñón 32/10T (gris) P5 Piñón 32/10T (marrón) P6 Piñón 32T (azul)
Cantidad
10 5 5
P7 Piñón de salida 10T (negro) P8 Piñón de salida 10T (blanco) P9 Eje redondo
Cantidad
Cantidad
Cantidad
Cantidad
Cantidad
Cantidad
Cantidad
4 1
(2x20)
P10 Eje redondo P11 tornillo autoroscante P12 Tornillo
Cantidad
1
(2x16)
Cantidad
5
(2.3x7)
Cantidad
(2.6x6)
P13 Tornillo P14 Tornillo P15 Tornillo
Cantidad
19
(2.6x10)
Cantidad
12
(2.6x6)
Cantidad
(2.6x6)
P16 Tornillo autoroscante P17 Tornillo autoroscante P18 Tuerca
Cantidad
4
(3x11)
Cantidad
3
(3x16)
Cantidad
P19 Arandela P20 Borne para pila P21 Borne para pila
Cantidad
Cantidad
Cantidad
9
11
10
16
3 1 1
P22 LED cableado P23 Esponja (negra) P24 Clip
Cantidad
1 2 3
Cantidad
Cantidad
P25 CI
Cantidad
1
* P1 = naranja + negro; P2 = azul + negro; P3 = amarillo + negro
KSR10_v5 VELLEMAN
- 24 -

4 Piezas de plástico
KSR10_v5 VELLEMAN
- 25 -

5 Piezas mecánicas unidad de control
P1 Placa metálica P3 PCB
Cantidad
5
P2 Tornillo
Cantidad
9
(3x10)
6 Piezas de plástico unidad de control
Cantidad
1
KSR10_v5 VELLEMAN
- 26 -

7 Montaje
Véase las páginas 37 ~ 60.
8 Funcionamiento
1. Active un mando de la unidad de control para hacer mover el brazo.
2. Los 12 movimientos del brazo se describen a continuación:
KSR10_v5 VELLEMAN
- 27 -

3. Alcance del brazo:
4. Cada caja de engranajes incluye un dispositivo de seguridad que se activa en cuanto un movimiento haya
alcanzado su rango máximo.
5. Suelte el mando en cuanto un movimiento haya alcanzado su rango máximo para de prolongar la duración de
vida de las cajas de engranajes.
KSR10_v5 VELLEMAN
- 28 -

9 En caso de problemas
1. Asegúrese de que haya conectado el circuito correctamente. Consulte en la página 56 ~ 57.
2. Controle las conexiones BATTERY y GND si el brazo no reacciona ante los mandos. Controle también si las pilas
han sido introducidas de manera correcta. Consulte en la página 46.
3. Controle una inversión de las conexiones M1, M2, M3, M4 y M5 si el brazo reacciona de manera inversa ante el
mando deseado. Consulte en la página 56 ~ 57.
4. Controle la conexión L si el proyector no funciona. Consulte en la página 56 ~ 57.
10 Esquema eléctrica
Unidad de control
Brazo robótico
11 Instrucciones de seguridad
• Deje que un adulto reemplace e introduzca las pilas.
• No recargue pilas no recargables. Saque las pilas agotadas del compartimiento.
• No mezcle las pilas agotadas con las nuevas ni pilas de diferentes tipos.
• Desaconsejamos utilizar pilas de óxido de mercurio o pilas recargables.
• No cortocircuite los contactos.
Utilice este aparato sólo con los accesorios originales. Velleman Spain SL no será responsable de daños ni
lesiones causados por un uso (indebido) de este aparato.
Para más información sobre este producto, visite nuestra página web www.velleman.eu.
Se pueden modificar las especificaciones y el contenido de este manual sin previo aviso.
KSR10_v5 VELLEMAN
- 29 -
KSR10 – ROBOTERARM
1 Einführung
An alle Einwohner der Europäischen Union
Wichtige Umweltinformationen über dieses Produkt
Dieses Symbol auf dem Produkt oder der Verpackung zeigt an, dass die Entsorgung dieses Produktes nach
seinem Lebenszyklus der Umwelt Schaden zufügen kann. Entsorgen Sie die Einheit (oder verwendeten
Batterien) nicht als unsortiertes Hausmüll; die Einheit oder verwendeten Batterien müssen von einer
spezialisierten Firma zwecks Recycling entsorgt werden. Diese Einheit muss an den Händler oder ein
örtliches Recycling-Unternehmen retourniert werden. Respektieren Sie die örtlichen Umweltvorschriften.
Falls Zweifel bestehen, wenden Sie sich für Entsorgungsrichtlinien an Ihre örtliche Behörde.
Wir bedanken uns für den Kauf des KSR10! Lesen Sie diese Bedienungsanleitung vor Inbetriebnahme sorgfältig
durch. Überprüfen Sie, ob Transportschäden vorliegen. Sollte dies der Fall sein, verwenden Sie das Gerät nicht und
wenden Sie sich an Ihren Händler.
Treten Sie dank diesem Roboterarm mit fünf Motoren und fünf Gelenken in die Welt der Robotertechnologie ein. Der Arm
wird ab einem Kontrollgerät bedient und verfügt über eine rotierende Basis, einen bewegbaren Ellbogen, ein bewegbares
Handgelenk und eine funktionelle Hand. Der eingebaute Scheinwerfer ist praktisch bei Anwendung im Dunkeln.
Technische Daten
Max. Tragfähigkeit 100g
Stromversorgung 4 x D-Batterien (Bestell-Nr. LR20C, nicht mitgeliefert)
max. Höhe Arm 38 cm
Gewicht 660 g
Abmessungen 22,85cm (L) x 16cm (B) x 38cm (H)
2 Erforderliche Werkzeuge
Spitzzange Seitenschneider Schraubendreher D-Batterie x 4
KSR10_v5 VELLEMAN
- 30 -

3 Mechanische Stückliste
P1 Motor (M4.M5) * P2 Motor (M2.M3) * P3 Motor (M1) *
Anzahl
2 2 1
P4 Zahnrad 32/10T (grau) P5 Zahnrad 32/10T (braun) P6 Zahnrad 32T (blau)
Anzahl
10 5 5
P7 Zahnrad 10T (schwarz) P8 Zahnrad 10T (weiß) P9 Achse
Anzahl
Anzahl
Anzahl
Anzahl
Anzahl
Anzahl
Anzahl
4 1
(2x20)
P10 Achse P11 Schraube P12 Schraube
Anzahl
1
(2x16)
Anzahl
5
(2.3x7)
Anzahl
(2.6x6)
P13 Schraube P14 Schraube P15 Schraube
Anzahl
19
(2.6x10)
Anzahl
12
(2.6x6)
Anzahl
(2.6x6)
P16 Selbstschneidende Schraube P17 Selbstschneidende Schraube P18 Mutter
Anzahl
4
(3x11)
Anzahl
3
(3x16)
Anzahl
P19 Dichtungsring P20 Batterieklemme P21 Batterieklemme
Anzahl
Anzahl
Anzahl
9
11
10
16
3 1 1
P22 LED mit Anschluss P23 Schwamm (schwarz) P24 Clip
Anzahl
1 2 3
Anzahl
Anzahl
P25 Leiterplatte
Anzahl
1
* P1 = orange + schwarz; P2 = blau + schwarz; P3 = gelb + schwarz
KSR10_v5 VELLEMAN
- 31 -

4 Zubehörteile aus Plastik
KSR10_v5 VELLEMAN
- 32 -
5 Zubehörteile Fernbedienung
P1 Metallplatte P3 Leiterplatte
Anzahl
5
P2 Selbstschneidende Schraube
Anzahl
9
(3x10)
6 Zubehörteile aus Plastik Fernbedienung
Anzahl
1
KSR10_v5 VELLEMAN
- 33 -

7 Bestückung
Siehe Seiten 37 ~ 60.
8 Den Roboterarm bedienen
1. Bedienen Sie einen Hebel, um den Roboterarm zu starten.
2. Die 12 Bewegungen des Roboterarms werden nachstehend dargestellt:
KSR10_v5 VELLEMAN
- 34 -

3. Arbeitsbereich:
4. Jedes Getriebe verfügt über ein Sicherheitssystem, das eingeschaltet wird wenn die max. Bewegung erreicht
wird.
5. Um die Lebensdauer der Getriebe zu verlängern, lassen Sie am besten den Hebel los sobald die max. Bewegung
erreicht wird.
KSR10_v5 VELLEMAN
- 35 -

9 Problemlösung
1. Beachten Sie einen korrekten elektrischen Anschluss. Siehe , Seiten 56 ~ 57.
2. Überprüfen Sie den BATTERIE- und GND-Anschluss wenn der Roboterarm nicht auf die Bedienungen reagiert.
Überprüfen Sie ebenfalls, ob die Batterien korrekt eingelegt wurden. Siehe Seite 46.
3. Eine entgegengesetzte Bewegung bei einer Bedienung deutet auf einen falschen Anschluss. Überprüfen Sie die
Anschlüsse M1, M2, M3, M4 und M5 auf Inversion. Siehe Seiten 56 ~ 57.
4. Überprüfen Sie, ob den L-Anschluss korrekt gemacht wurde wenn der Scheinwerfer nicht funktioniert. Siehe
Seiten 56 ~ 57.
10 Schaltplan
Fernbedienung
Robotarm
11 Sicherheitshinweise
• Lassen Sie die Batterien von einem Erwachsenen entfernen und austauschen.
• Laden Sie keine nicht aufladbare Batterien. Entfernen Sie schwache Batterien, um eine Leckage zu vermeiden.
• Mischen Sie keine alten und neuen Batterien oder mischen Sie keine verschiedenen Batterietypen.
• Verwenden Sie weder aufladbare Batterien noch Silberoxyd-Batterien.
• Vermeiden Sie einen Kurzschluss der Kontakte.
Verwenden Sie dieses Gerät nur mit originellen Zubehörteilen. Velleman NV übernimmt keine Haftung für
Schaden oder Verletzungen bei (falscher) Anwendung dieses Gerätes.
Für mehr Informationen zu diesem Produkt, siehe www.velleman.eu.
Alle Änderungen ohne vorherige Ankündigung vorbehalten.
KSR10_v5 VELLEMAN
- 36 -
KSR10 – RAMIĘ ROBOTA
1 Wstęp
Przeznaczona dla mieszkańców Unii Europejskiej.
Ważne informacje dotyczące środowiska.
Ten symbol umieszczony na urządzeniu bądź opakowaniu wskazuje, że wyrzucenie produktu może być
szkodliwe dla środowiska. Nie wyrzucaj urządzenia lub baterii do zbiorczego śmietnika, tylko do specjalnie
przeznaczonych do tego pojemników na urządzenia elektroniczne lub skontaktuj się z firmą zajmującą się
recyklingiem. Urządzenie możesz oddać dystrybutorowi lub firmie zajmującej się recyklingiem. Postępuj
zgodnie z zasadami bezpieczeństwa dotyczącymi środowiska.
Jeśli masz wątpliwości skontaktuj się z firmą zajmującą się utylizacją odpadów.
Dziękujemy za wybór produktu Velleman! Zanim zdecydujecie się Państwo dostarczyć produkt do serwisu prosimy o
uważne zapoznanie się z jego instrukcją obsługi. Jeśli urządzenie zostało uszkodzone w transporcie, proszę ten fakt
zgłosić dostawcy i nie instalować urządzenia.
Wejdźcie w świat robotyki budując swój robot w postaci ramienia o 5 stopniach swobody. Ramie robota wyposażone
jest w 5 ruchomych przegubów ( obrót ramienia w podstawie, łokcie, nadgarstek oraz chwytak), które są napędzane
pięcioma silniczkami za pośrednictwem jednostki sterującej. Ramię robota wyposażono w oświetlenie co uatrakcyjnia
zabawę robotem w ciemności.
Specyfikacja techniczna
Maksymalny udźwig ramienia 100g
Zasilanie 4 x D baterie ( R20) (kod dostawcy LR20C, nie są w zestawie)
Maksymalna wysokość 38cm
Waga 660g
Wymiary 22.85cm (L) x 16cm (W) x 38cm (H)
2 Niezbędne narzędzia do złożenia ramienia robota
Szczypce płaskie długie Obcinaczki boczne Wkrętak D baterie typ D (R20)
KSR10_v5 VELLEMAN
- 37 -

3 Mechanical Parts List
Silniczek elektryczny (M4.M5)*
P1
Sztuk
2 2 1
P4 Koło zębate 32/10T (Szare) P5
Sztuk
10 5 5
P7
Koło wyjściowe 10T (Czarne)
Sztuk
Silniczek elektryczny (M2.M3)*
P2
P3 Silniczek elektryczny (M1) *
Sztuk
Koło zębate 32/10T (Brązowe)
P6 Koło zębate 32T (Niebieski)
Sztuk
P8 Koło wyjściowe 10T (Białe) P9 Sworzeń
Sztuk
Sztuk
Sztuk
Sztuk
4 1
9
(2x20)
P10 Sworzeń P11 Śruba samogwintująca P12 Śruba samogwintująca
Sztuk
1
(2x16)
Sztuk
5
(2.3x7)
Sztuk
11
(2.6x6)
P13 Śruba samogwintująca P14 Śruba samogwintująca P15 Wkręt do metalu
P16
Sztuk
19
(2.6x10)
Śruba samogwintująca z
dystansem
Sztuk
4
(3x11)
P17
Śruba samogwintująca z
dystansem
Sztuk
12
(2.6x6)
Sztuk
3
(3x16)
Sztuk
10
(2.6x6)
P18 Nakrętka
Sztuk
16
P19 Podkładka P20 Złącze baterii P21 Złącze baterii
Sztuk
Sztuk
Sztuk
3 1 1
P22 LED With Wire P23 Mikroguma (Czarna) P24 Uchwyt przewodów
Sztuk
1 2 3
Sztuk
Sztuk
P25 Płytka drukowna PCB
Sztuk
1
* P1 = pomarańcz + czarny; P2 = niebieski + czarny; P3 = zółty + czarny
KSR10_v5 VELLEMAN
- 38 -

4 Elementy plastikowe
KSR10_v5 VELLEMAN
- 39 -

5 Elementy mechaniczne modułu sterowania.
P1 Płytka metalowa P3 Płytka drukowna PCB
Sztuk
5
P2 Śruba samogwintująca
Sztuk
9
(3x10)
6 Elementy plastikowe modułu sterowania.
Sztuk
1
KSR10_v5 VELLEMAN
- 40 -

7 Montaż mechanizmu.
Więcej informacji na str. 37 ~ 60.
8 Jak to działa ?
1. Naciśnij dowolną dźwignię na pilocie sterowania.
2. 12 możliwych ruchów ramienia robota pokazują rysunki poniżej.
KSR10_v5 VELLEMAN
- 41 -

3. Obszar roboczy:
4. Wszystkie przekładnie wyposażone są w system zabezpieczeń, które działają, gdy maksymalny zasięg ruchu
ramienia robota zostanie osiągnięty.
5. Aby przedłużyć żywotność przekładni silników, zwalniaj przyciski sterujące możliwie szybko, gdy maksymalny
zasięg ruchu ramienia robota zostanie osiągnięty.
9 Rozwiązywanie problemów.
1. Upewnij się czy wszystkie połączenia przewodów są prawidłowe. Zapoznaj się z rysunkami w poprzednim
rozdziale.
2. Jeżeli ramię robota nie reaguje na sterowanie z pulpitu sprawdź stan baterii oraz połączenie masy GND. Sprawdź
również czy prawidłowo są umieszczone baterie w pojemniku. Zapoznaj się z rysunkiem w poprzednim
rozdziale.
KSR10_v5 VELLEMAN
- 42 -

3. Jeżeli kierunek ruchu ramienia robota jest odbywa się w kierunku przeciwnym do oczekiwanego, sprawdź czy
okablowanie odpowiedniego M1, M2, M3, M4 lub M5 nie została zamieniona biegunowość. Zapoznaj się z
rysunkami w poprzednim rozdziale.
4. Jeżeli nie działa reflektor sprawdź czy jest prawidłowo połączone złącze L.. Zapoznaj się z rysunkami w
poprzednim rozdziale.
10 Schematy elektryczne.
Schemat modułu sterowania.
Schemat ramienia robota.
11 Środki ostrożności.
• Wymiana lub wyjmowanie baterii z urządzenia powinno odbywać przez osoby dorosłe lub pod ich nadzorem.
• Nigdy nie ładuj baterii. Aby uniknąć rozszczelnienia i wycieku baterii, wyjmij zużyte baterie z urządzenia.
• Nie mieszaj różnych typów baterii oraz baterii częściowo zużytych
• Nie zaleca się stosowania akumulatorów NiMH w zestawie ramienia robota.
• Unikaj zwarć na połączeniach.
Używaj tylko oryginalnych akcesoriów. Velleman N.V. nie ponosi odpowiedzialności za straty lub szkody
spowodowane złym korzystaniem z urządzenia.
Jeśli chcesz uzyskać więcej informacji o tym produkcie lub o marce Velleman, wejdź na stronę:
www.velleman.eu. Velleman nie jest dystrybutorem wszystkich marek zawartych w tej instrukcji. Informacje
zawarte w niniejszej instrukcji obsługi mogą ulec zmianie bez wcześniejszego powiadomienia.
© INFORMACJA O PRAWACH WŁASNOŚCI
Instrukcja ta jest własnością firmy Velleman NV i jest chroniona prawami autorskimi. Wszystkie prawa są
zastrzeżone na całym świecie. Żadna część tej instrukcji nie może być kopiowana, przedrukowywana, tłumaczona
lub konwertowania na wszelkie nośniki elektronicznych lub w inny sposób, bez uprzedniej pisemnej zgody
właściciela praw autorskich.
KSR10_v5 VELLEMAN
- 43 -

7 Mechanical Assembly – Assemblage – Assemblage – Montaje – Bestückung - Montaż
mechanizmu
M4 ● M5 Gearbox – Tandwielkast – Train d’engrenages – Caja de engranajes – Getriebe
– Przekładnia
P4 = grey – grijs – gris – gris – grau – koło szare / P5 = brown – bruin – marron – marrón – braun – koło brązowe
P6 = blue – blauw – bleu – azul – blau – koło niebieski / P7 = black – zwart – noir – negro – schwarz – koło czarne
KSR10_v5 VELLEMAN
- 44 -

KSR10_v5 VELLEMAN
- 45 -

M3 Gearbox – Tandwielkast – Train d’engrenages – Caja de engranajes – Getriebe –
Przekładnia
P4 = grey – grijs – gris – gris – grau – koło szare / P5 = brown – bruin – marron – marrón – braun – koło brązowe
P6 = blue – blauw – bleu – azul – blau – koło niebieskie / P7 = black – zwart – noir – negro – schwarz – koło czarne
KSR10_v5 VELLEMAN
- 46 -

KSR10_v5 VELLEMAN
- 47 -

M2 Gearbox – Tandwielkast – Train d’engrenages – Caja de engranajes – Getriebe –
Przekładnia
P4 = grey – grijs – gris – gris – grau – koło szare / P5 = brown – bruin – marron – marrón – braun – koło brązowe
P6 = blue – blauw – bleu – azul – blau – koło niebieskie / P8 = white – wit – blanc – blanco – weiß – koło białe
KSR10_v5 VELLEMAN
- 48 -

KSR10_v5 VELLEMAN
- 49 -

M2 = white gear – wit tandwiel – pignon blanc – piñon blanco – weißer Zahnrad – przekładnia biała
M3 = black gear – zwart tandwiel – pignon noir – piñon negro – schwarzer Zahnrad – przekładnia czarna
M4 = black gear – zwart tandwiel – pignon noir – piñon negro – schwarzer Zahnrad – przekładnia czarna
M5 = black gear – zwart tandwiel – pignon noir – piñon negro – schwarzer Zahnrad – przekładnia czarna
KSR10_v5 VELLEMAN
- 50 -

KSR10_v5 VELLEMAN
- 51 -

KSR10_v5 VELLEMAN
- 52 -

KSR10_v5 VELLEMAN
- 53 -

KSR10_v5 VELLEMAN
- 54 -

KSR10_v5 VELLEMAN
- 55 -

M1 Gripper Gearbox – Tandwielkast grijper – Train d’engrenages grappin –
Caja de engranajes pala – Getriebe Greifer – Mechanizm chwytaka ramienia robota
KSR10_v5 VELLEMAN
- 56 -

KSR10_v5 VELLEMAN
- 57 -

KSR10_v5 VELLEMAN
- 58 -

KSR10_v5 VELLEMAN
- 59 -

KSR10_v5 VELLEMAN
- 60 -

KSR10_v5 VELLEMAN
- 61 -
KSR10_v5 VELLEMAN
- 62 -

Wiring – Bekabeling – Câblage – Cableado – Verdrahtung – System połączeń
elektrycznych
KSR10_v5 VELLEMAN
- 63 -

KSR10_v5 VELLEMAN
- 64 -

Finished Product – Afgewerkte arm – Bras terminé –
Brazo terminado – Vollendeter Arm – Produkt finalny
Remote Control – Afstandsbediening – Unité de contrôle
Unidad de control – Fernbediening – Moduł pilota
KSR10_v5 VELLEMAN
- 65 -

KSR10_v5 VELLEMAN
- 66 -

Wiring – Bekabeling – Câblage – Cableado – Verkabelung – Połączenie pilota do
ramienia robota
KSR10_v5 VELLEMAN
- 67 -

®
Service and Quality War ranty
Velleman
®
has over 35 years of experi ence in the electronics w orld and distributes its
Velleman
products in more than 85 countries.
All our products fulfil strict quality requirements and legal stipulations in the EU. In order to
ensure the quality, our products regularly go through an extra quality check, both by an
internal quality department and by specialized external organisations. If, all precautionary
measures notwithstanding, problems should occur, please make appeal to our warranty (see
guarantee conditions).
General Warranty Conditions Conce rning Consumer Products (for EU):
• All consumer products are subject to a 24-month warranty on production flaws and
defective material as from the original date of purchase.
®
• Velleman
value totally or partially when the complaint is valid and a free repair or replacement of the
article is impossible, or if the expenses are out of proportion.
You will be delivered a replacing article or a refund at the value of 100% of the purchase
price in case of a flaw occurred in the first year after the date of purchase and delivery, or a
replacing article at 50% of the purchase price or a refund at the value of 50% of the retail
value in case of a flaw occurred in the second year after the date of purchase and delivery.
• Not covered by warranty:
- all direct or indirect damage caused after delivery to the article (e.g. by oxidation, shocks,
falls, dust, dirt, humidity...), and by the article, as well as its contents (e.g. data loss),
compensation for loss of profits;
- frequently replaced consumable goods, parts or accesso ries such as batteries, lamps,
rubber parts, drive belts... (un limited list);
- flaws resulting from fire, water damage, lightning, accident, natural disaster, etc.;
- flaws caused deliberately, negligently or resulting from improper handling, negligent
maintenance, abusive use or use contrary to the manufacturer’s instructions;
- damage caused by a commercial, professional or collective use of the article (the warranty
validity will be reduced to six (6) months when the article is used professionally);
- damage resulting from an inappropriate packing and shipping of the article;
- all damage caused by modification, repair or alteration performed by a third party without
written permission by Velleman
• Articles to be repaired must be delivered to your Velleman
(preferably in the original packaging), and be completed with the original receipt of purchase
and a clear flaw description.
• Hint: In order to save on cost and time, please reread the manual and check if the flaw is
caused by obvious causes prior to presenting the article for repair. Note that returning a nondefective article can also invol ve handling costs.
• Repairs occurring after warranty expiration are subject to shipping costs.
• The above conditions are without prejudice to all commercial warranties.
The above enumeration is subject to modification according to the article (see article’s
manual).
Velleman
Velleman
landen.
Al onze producten beantwoorden aan strikte kwaliteitseisen en aan de wettelijke bepalingen
geldig in de EU. Om de kwaliteit te waarborgen, ondergaan onze producten op regelmatige
tijdstippen een extra kwaliteitscontrole, zowel door onze eigen kwaliteitsafdeling als door
externe gespecialiseerde organisaties. Mocht er ondanks deze voorzorgen toch een probleem
optreden, dan kunt u steeds een beroep doen op onze waarborg (zie waarborgvoorwaarden).
Algemene waarborgvoorwaarden consum entengoederen (voor Europese Uni e):
• Op alle consumentengoederen geldt een garantieperiode van 24 maanden op productie- en
materiaalfouten en dit vanaf de oorspronkelijke aankoopdatum.
• Indien de klacht gegrond is en een gratis reparatie of vervanging van een artikel
onmogelijk is of indien de kosten hiervoor buiten verhouding zijn, kan Velleman
het desbetreffende artikel te vervangen door een gelijkwaardig artikel of de aankoopsom van
het artikel gedeeltelijk of volledig terug te betalen. In dat geval krijgt u een vervangend
product of terugbetaling ter waarde van 100% van de aankoopsom bij ontdekking van een
gebrek tot één jaar na aankoop en levering, of een vervangend product tegen 50% van de
kostprijs of terugbetaling van 50% bij ontdekking na één jaar tot 2 jaar.
• Valt niet onder waarborg:
- alle rechtstreekse of onrechtstreekse schade na de levering veroorzaakt aan het toestel (bv.
door oxidatie, schokken, val, stof, vuil, vocht...), en door het toest el, alsook zijn inhoud (bv.
verlies van data), vergoeding voor eventuele winstderving.
- verbruiksgoederen, onderdelen of hulpstukken die regelmatig dienen te worden vervangen,
zoals bv. batterijen, l ampen, rubberen onderdel en, aandrijfriemen... (onbeperkte lijst).
- defecten ten gevolge van brand, waterschade, bliksem, ongevallen, natuurrampen, enz.
- defecten veroorzaakt door opzet, nalatigheid of door een onoordeelkundige behandeling,
slecht onderhoud of abnormaal gebruik of gebruik van het toestel strijdig met de
voorschriften van de fabrikant.
- schade ten gevolge van een commercieel, professioneel of collectief gebruik van het
apparaat (bij professioneel gebruik wordt de garantieperiode herleid tot 6 maand).
- schade veroorzaakt door onvoldoende bescherming bij transport van het apparaat.
- alle schade door wijzigingen, reparaties of modificaties uitgevoerd door derden zonder
toestemming van Velleman
• Toestellen dienen ter reparatie aangeboden te worden bij uw Velleman
toestel dient vergezeld te zijn van het oorspronkelijke aankoopbewijs. Zorg voor een
degelijke verpakking (bij voorkeur de originele verpakking) en voeg een duidelijke
foutomschrijving bij.
• Tip: alvorens het toestel voor reparatie aan te bieden, kijk nog eens na of er geen voor de
hand liggende reden is waarom het toestel niet naar behoren werkt (zie handleiding). Op
deze wijze kunt u kosten en tijd besparen. Denk eraan dat er ook voor niet-defecte toestellen
een kost voor controle aangerekend kan worden.
• Bij reparaties buiten de waarborgperiode zullen transportkosten aangerekend worden.
• Elke commerciële garantie laat deze rechten onverminderd.
Bovenstaande opsomming kan eventueel aangep ast worden naargelang de aard
van het product (zie handleiding v an het betreffende product).
Garantie de service et de qualité Velleman
Velleman
distribution dans plus de 85 pays.
Tous nos produits répondent à des exigences de qualité rigoureuses et à des dispositions
légales en vigueur dans l’UE. Afin de garantir la qualité, nous soumettons régulièrement nos
produits à des contrôles de qualité supplémentaires, tant par notre propre service qualité que
par un service qualité externe. Dans le cas improbable d’un défaut malgré toutes les
précautions, il est possible d’invoquer notre garantie (voir les conditions de garantie).
Conditions générales concernant la garantie s ur les produits grand public (po ur
l’UE) :
• tout produit grand public est garanti 24 mois contre tout vice de production ou de
matériaux à dater du jour d’acquisition effective ;
• si la plainte est justifiée et que la réparation ou le remplacement d’un article est jugé
impossible, ou lorsque les coûts s’avèrent disproportionnés, Velleman
ledit article par un article équivalent ou à rembourser la totalité ou une partie du prix d’achat.
Le cas échéant, il vous sera consenti un article de remplacement ou le remboursement
complet du prix d’achat lors d’un défaut dans un délai de 1 an après l’achat et la livraison, ou
un article de remplacement moyennant 50% du prix d’achat ou le remboursement de 50%
du prix d’achat lors d’un défaut après 1 à 2 ans.
• sont par conséquent exclus :
- tout dommage direct ou indirect survenu à l’article après livraison (p.ex. dommage lié à
l’oxydation, choc, chute, poussière, sable, impureté…) et provoqué par l’appareil, ainsi que
son contenu (p.ex. perte de données) et une indemnisation éventuelle pour perte de
revenus ;
- tout bien de consommation ou accessoire, ou pièce qui nécessite un remplacement régulier
comme p.ex. piles, ampoules, pièces en caoutchouc, courroies… (liste illimitée) ;
- tout dommage qui résulte d’un incendie, de la foudre, d’un accident, d’une catastrophe
naturelle, etc. ;
- tout dommage provoqué par une négligence, volontaire ou non, une utilisation ou un
entretien incorrect, ou une utilisation de l’appareil contraire aux prescriptions du fabricant ;
can decide to replace an article with an equivalent article, or to refund the retail
®
.
®
service- en kwaliteitsg arantie
®
heeft ruim 35 jaar ervari ng in de elektronicawereld en verdeelt in meer dan 85
®
.
®
jouit d’une expérience de plus de 35 ans dans le monde de l’électronique avec une
®
dealer, solidly packed
®
beslissen
®
-verdeler. Het
®
®
s’autorise à remplacer
- tout dommage à cause d’une utilisation commerciale, professionnelle ou collective de
l’appareil (la période de garantie sera réduite à 6 mois lors d’une utilisation professionnelle) ;
- tout dommage à l’appareil qui résulte d’une utilisation incorrecte ou différente que celle
pour laquelle il a été initialement prévu comme décrit dans la notice ;
- tout dommage engendré par un retour de l’appareil emballé dans un conditionnement non
ou insuffisamment protégé ;
- toute réparation ou modification effectuée par une tierce personne sans l’autorisation
explicite de SA Velleman
- frais de transport de et vers Velleman
• toute réparation sera fournie par l’endroit de l’achat. L’appareil doit nécessairement être
accompagné du bon d’ach at d’origine et être dûm ent conditionné (de préférence dans
l’emballage d’origine avec mention du défaut) ;
• conseil : il est conseillé de consulter la notice et de contrôler câbles, piles, etc. avant de
retourner l’appareil. Un appareil retourné jugé défectueux qui s’avère en bon état de marche
pourra faire l’objet d’une note de frais à charge du consommateur ;
• une réparation effectuée en-dehors de la période de garantie fera l’objet de frais de
transport ;
• toute garantie commerciale ne porte pas atteinte aux conditions susmentionnées.
La liste susmentionnée peut être sujette à une complémentation selon le type de
l’article et être mentionnée dan s la notice d’emploi.
Garantía de servicio y calidad Vellem an
®
disfruta de una experiencia de más de 35 años en el mundo de la electrónica con
Velleman
una distribución en más de 85 países.
Todos nuestros productos responden a normas de calidad rigurosas y disposiciones legales
vigentes en la UE. Para garantizar la calidad, sometimos nuestros productos regularmente a
controles de calidad adicionales, tanto por nuestro propio servicio de calidad como por un
servicio de calidad externo. En el caso improbable de que surgieran problemas a pesar de
todas las precauciones, es posible apelar a nuestra garantía (véase l as condiciones de
garantía).
Condiciones generales referentes a la garantía sobre productos de v enta al público
(para la Unión Europea):
• Todos los productos de venta al público tienen un período de garantía de 24 meses contra
errores de producción o errores en materiales desde la adquisición original;
• Si la queja está fundada y si la reparación o la sustitución de un artículo es imposible, o si
los gastos son desproporcionados, Velleman® autoriza reemplazar el artículo por un artículo
equivalente o reembolsar la totalidad o una parte del precio de compra. En este caso, recibirá
un artículo de recambio o el reembolso completo del precio de compra al descubrir un defecto
hasta un año después de la compra y la entrega, o un artículo de recambio al 50% del precio
de compra o la sustitución de un 50% del precio de compra al descubrir un defecto después
de 1 a 2 años.
• Por consiguiente, están excluidos entre otras co sas:
- todos los daños causados dire ctamente o indirectamente al aparato y su contenido después
de la entrega (p.ej. por oxidación, choques, caída,...) y causados por el aparato, al igual que
el contenido (p.ej. pérdida de datos) y una indemnización eventual para falta de ganancias;
- partes o accesorios que deban ser reemplazados regularmente, como por ejemplo baterías,
lámparas, partes de goma, ... (lista ilimitada);
- defectos causados por un incendio, daños causados por el agua, rayos, accidentes,
catástrofes naturales, etc.;
- defectos causados a conciencia , descuido o por malos tratos, un mantenimiento
inapropiado o un uso anormal del aparato contrario a las instrucciones del fabricante;
- daños causados por un uso comercial, profesional o colectivo del aparato (el período de
garantía se reducirá a 6 meses con uso profesional);
- daños causados por un uso incorrecto o un uso ajeno al que est está previsto el producto
inicialmente como está descrito en el manual del usuario;
- daños causados por una protección insuficiente al transportar el aparato.
- daños causados por reparaciones o modificaciones efectuadas por una tercera persona sin
la autorización explicita de SA Velleman
- se calcula gastos de transporte de y a Velleman
garantía.
• Cualquier reparación se efectuará por el lugar de compra. Devuelva el aparato con la
factura de compra original y transpórtelo en un embalaje sólido (preferentemente el
embalaje original). Incluya también una buena descripción del defecto;
• Consejo: Lea el manual del usuario y controle los cables, las pilas, etc. antes de devolver el
aparato. Si no se encuentra un defecto en el artículo los gastos podrían correr a cargo del
cliente;
• Los gastos de transporte correrán a carga del cliente para una reparación efectuada fuera
del periode de garantía.
• Cualquier gesto comercial no disminuye estos derechos.
La lista previamente mencionada pued e ser adaptada según el tipo de artículo
(véase el manual del usuario del artículo en cuestión)
®
Velleman
Service- und Qualitätsg arantie
®
hat gut 35 Jahre Erfahrung in der Elektronikwelt und vertreibt seine Produkte in
Velleman
über 85 Ländern.
Alle Produkte entsprechen den strengen Qualitätsforderungen und gesetzlichen
Anforderungen in der EU. Um die Qualität zu gewährleisten werden unsere Produkte
regelmäßig einer zusätzlichen Qualitätskontrolle unterworfen, sowohl von unserer eigenen
Qualitätsabteilung al s auch von externen spezialisierten Organisationen. Sollten, trotz aller
Vorsichtsmaßnahmen, Probleme auftreten, nehmen Sie bitte die Garantie in Anspruch (siehe
Garantiebedingungen).
Allgemeine Garantiebedingungen in Bezug auf Konsumgüter (für die Europäische
Union):
• Alle Produkte haben für Material- oder Herstellungsfehler eine Garantieperiode von 24
Monaten ab Verkaufsdatum.
• Wenn die Klage berechtigt ist und falls eine kostenlose Reparatur oder ein Austausch des
Gerätes unmöglicht ist, oder wenn die Kosten dafür unverhältnismäßig sind, kann Velleman®
sich darüber entscheiden, dieses Produkt durch ein gleiches Produkt zu ersetzen oder die
Kaufsumme ganz oder teilweise zurückzuzahlen. In diesem Fall erhalten Sie ein
Ersatzprodukt oder eine Rückzahlung im Werte von 100% der Kaufsumme im Falle eines
Defektes bis zu 1 Jahr nach Kauf oder Lieferung, oder Sie bekommen ein Ersatzprodukt im
Werte von 50% der Kaufsumme oder eine Rückzahlung im Werte von 50 % im Falle eines
Defektes im zweiten Jahr.
• Von der Garantie ausgeschlossen sind:
- alle direkten oder indirekten Schäden, die nach Lieferung am Gerät und durch das Gerät
verursacht werden (z.B. Oxidati on, Stöße, Fall, Staub, Schmutz, Feuchtigkeit, ...), sowie auch
der Inhalt (z.B. Datenverlust), Entschädigung für eventuellen Gewinnausfall.
- Verbrauchsgüter, Teil e oder Zubehörteile, di e regelmäßig ausgewechselt werden, wie z.B.
Batterien, Lampen, Gummiteile, Treibriemen, usw. (unbeschränkte Liste).
- Schäden verursacht durch Brandschaden, Wasserschaden, Blitz, Unfälle,
Naturkatastrophen, usw.
- Schäden verursacht durch absichtliche, nachlässige oder unsachgemäße Anwendung,
schlechte Wartung, zweckentfremdete Anwendung oder Nichtbeachtung von
Benutzerhinweisen in der Bedienungsanleitung.
- Schäden infolge einer kommerziellen, professionellen oder kollektiven Anwendung des
Gerätes (bei gewerblicher Anwendung wird die Garantieperiode auf 6 Monate zurückgeführt).
- Schäden verursacht durch eine unsachgemäße Verpackung und unsachgemäßen Transport
des Gerätes.
- alle Schäden verursacht durch unautorisierte Änderungen, Reparaturen oder
Modifikationen, die von einem Dritten ohne Erlaubnis von Velleman
• Im Fall einer Reparatu r, wenden Sie sich an Ih ren Velleman
Produkt ordnungsgemäß verpackt (vorzugsweise die Originalverpackung) und mit dem
Original-Kaufbeleg vor. Fügen Sie eine deutliche Fehlerumschreibung hinzu.
• Hinweis: Um Kosten und Zeit zu sparen, lesen Sie die Bedienungsanleitung nochmals und
überprüfen Sie, ob es k einen auf de Hand liege nden Grund gibt, ehe Sie das Gerät zur
Reparatur zurückschicken. Stellt sich bei der Überprüfung des Geräts heraus, dass kein
Geräteschaden vorliegt, könnte dem Kunden eine Untersuchungspauschale berechnet.
• Für Reparaturen nach Ablauf der Garantiefrist werden Transportkosten berechnet.
• Jede kommerzielle Garantie lässt diese Rechte unberührt.
Die oben stehende Aufzählung kann eventuell angepasst werden gem äß der Art des
Produktes (siehe Bedienungsanleitung des Gerät es).
®
;
®
si l’appareil n’est plus couvert sous la garantie.
®
®
;
®
si el aparato ya no está cubierto por la
®
vorgenommen werden.
®
-Verteiler. Legen Sie das
 Loading...