

Page 1

CARSFM1
CAR FM TRANSMITTER
DRAADLOZE FM-ZENDER
ÉMETTEUR FM SANS FIL
EMISOR FM INALÁMBRICO
DRAHTLOSER FM-SENDER
TRASMETTITORE FM DA AUTO
USER MANUAL 3
GEBRUIKERSHANDLEIDING 9
NOTICE D’EMPLOI 15
MANUAL DEL USUARIO 21
BEDIENUNGSANLEITUNG 27
MANUALE UTENTE 33
Page 2

CARSFM1
Table 1
A car plug
B display
C SD card slot
D USB connector
E mini jack (2.5mm)
A sigarettenplug
B display
C poort voor SD-kaart
D USB-aansluiting
mini jackaansluiting
E
(2,5 mm)
A fiche allume-cigare A conector mechero
B afficheur B pantalla
C port pour carte SD C conexión para tarjeta SD
D prise USB D conexión USB
E mini-prise jack (2,5 mm) E mini jack (2.5mm)
A Zigarettenanzünderstecker A spina per accen disigari
B Display B display
C Anschluss für SD-Karte C slot per SD card
D USB-Anschluss D connettore USB
E Mini Jackanschluss (2,5 mm) E presa jack (2,5mm)
24/09/2009 2 Velleman
®
Page 3
CARSFM1
USER MANUAL
1. Introduction
To all residents of the European Union
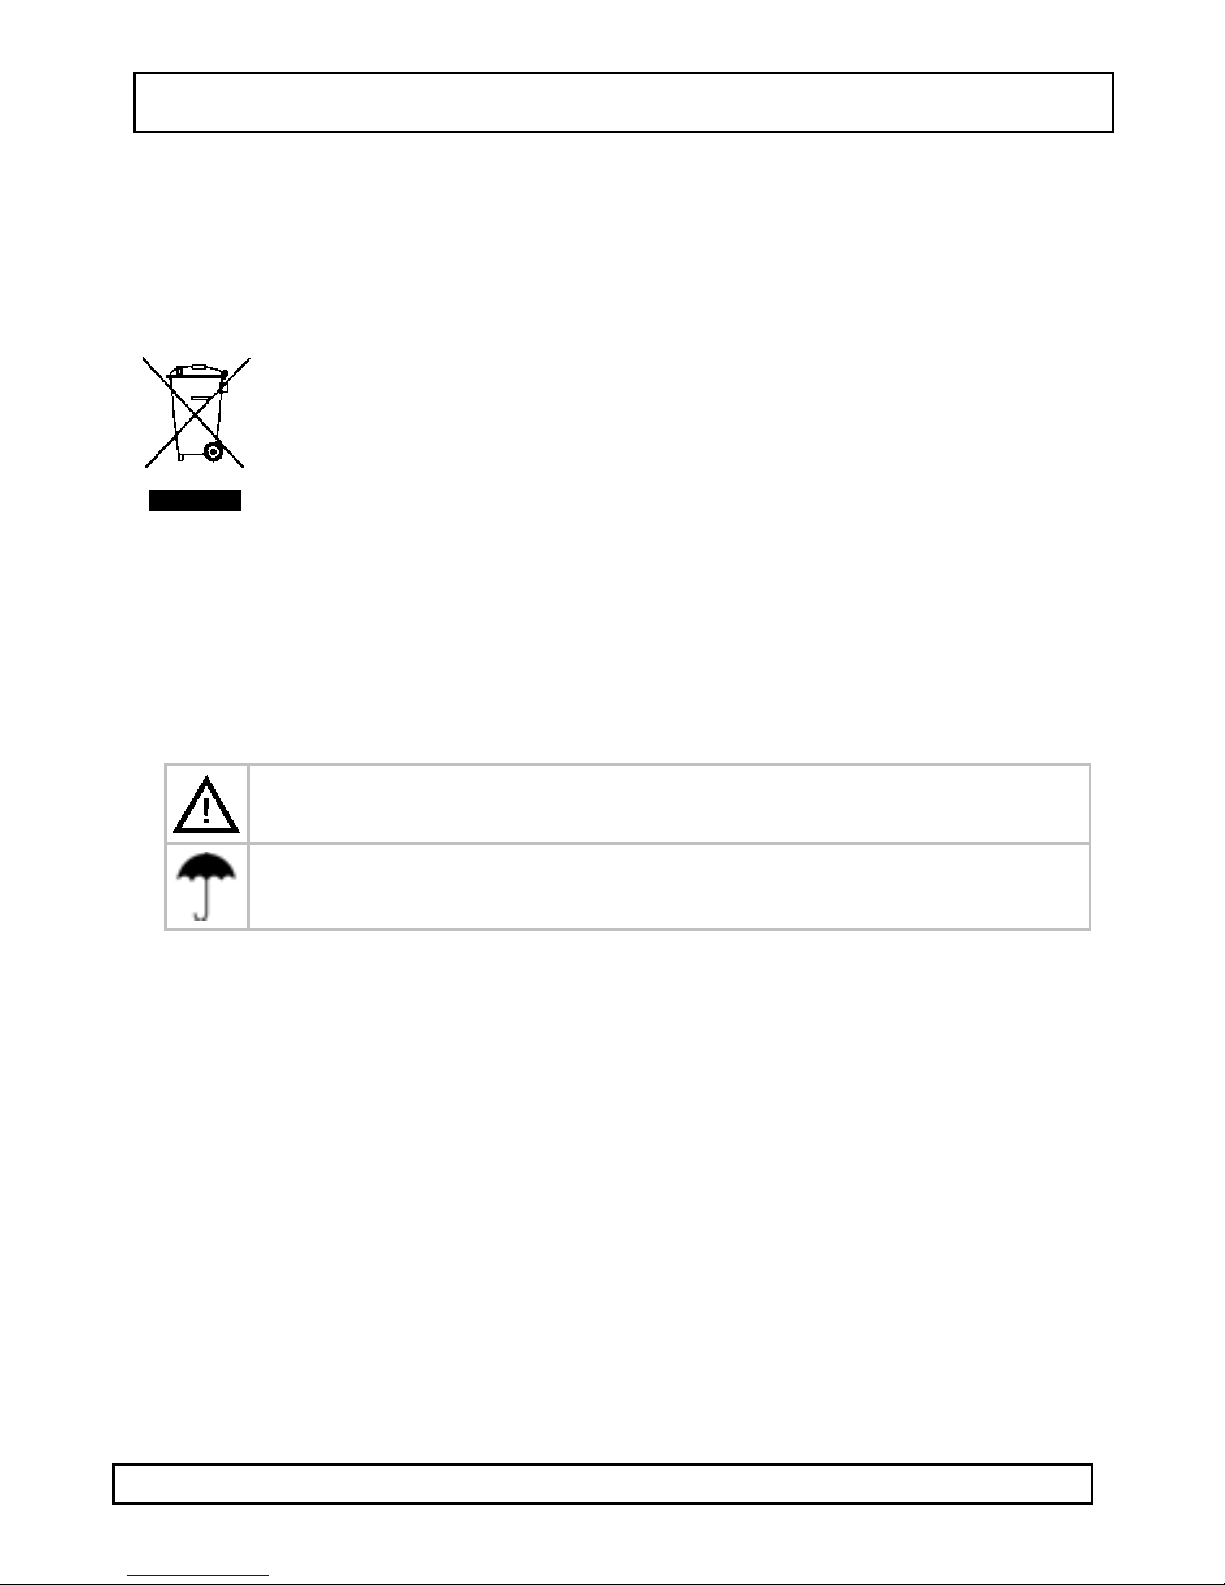
Important environmental information about this product
This symbol on the device or the package indicates that
disposal of the device after its lifecycle could harm the
environment. Do not dispose of the unit (or batteries) as
unsorted municipal waste; it should be taken to a
specialized company for recycling. This device should be
returned to your distributor or to a local recycling service.
Respect the local environmental rules.
If in d oubt, contact your local waste disposal aut horities.
Thank you for choosing Velleman! Please read the manual thoroughly
before bringing this device into service. If the device was damaged in
trans it, do n' t ins ta ll or u se it and co nt act yo ur de ale r.
2. Safety Instructions
Keep the device away from children and unauthorised users.
For indoor use only. Keep this device away from rain,
moisture, splashing and dripping liquids
• Damage caused by disregard of certain guidelines in this manual is
not cover e d by the warr ant y an d the de a ler w ill no t acce p t
responsibility for any ensuing defects or problems.
• Note that damage caused by user modifications to the device is not
covere d by the warran ty.
3. General Guidel ines
• Prote ct t his de vice fro m sho cks and a buse . Av oid br ute forc e w hen
operating the device.
• Protect the device against extreme heat and dust.
• Familiarise yourself with the functio ns of the device before ac tually
using it.
• All modif ica tio ns of the dev ice are fo rb idd e n for sa fe ty reaso ns.
• Only use the device for its intended purpose. Using the device in an
unauthorised way will void the warranty.
24/09/2009 3 Velleman
®
Page 4
CARSFM1
4. Features
• supports RDS (Radio Data System)
• transmits on all FM freq (87.6-107.9MHz)
• memorizes up to 7 FM freq
• powers on & off automatically
• plug & play
• standard USB port, SD slot & 2.5mm stereo input
• 3.5mm cable included for use with MP3, CD & DVD players
• reads MP3 & WMA files (no DRM file s)
• plays de fin e d fo lder
• scroll t hro ug h fold ers
• displays FM freq/equalizer/remaining playback time
• 5-leve l dept h, ma x 50 dire ctor ie s
• remote control
o fast forw ard & rew ind : 2x, 5x, 10 x
o repeat defined section
o bookmarking
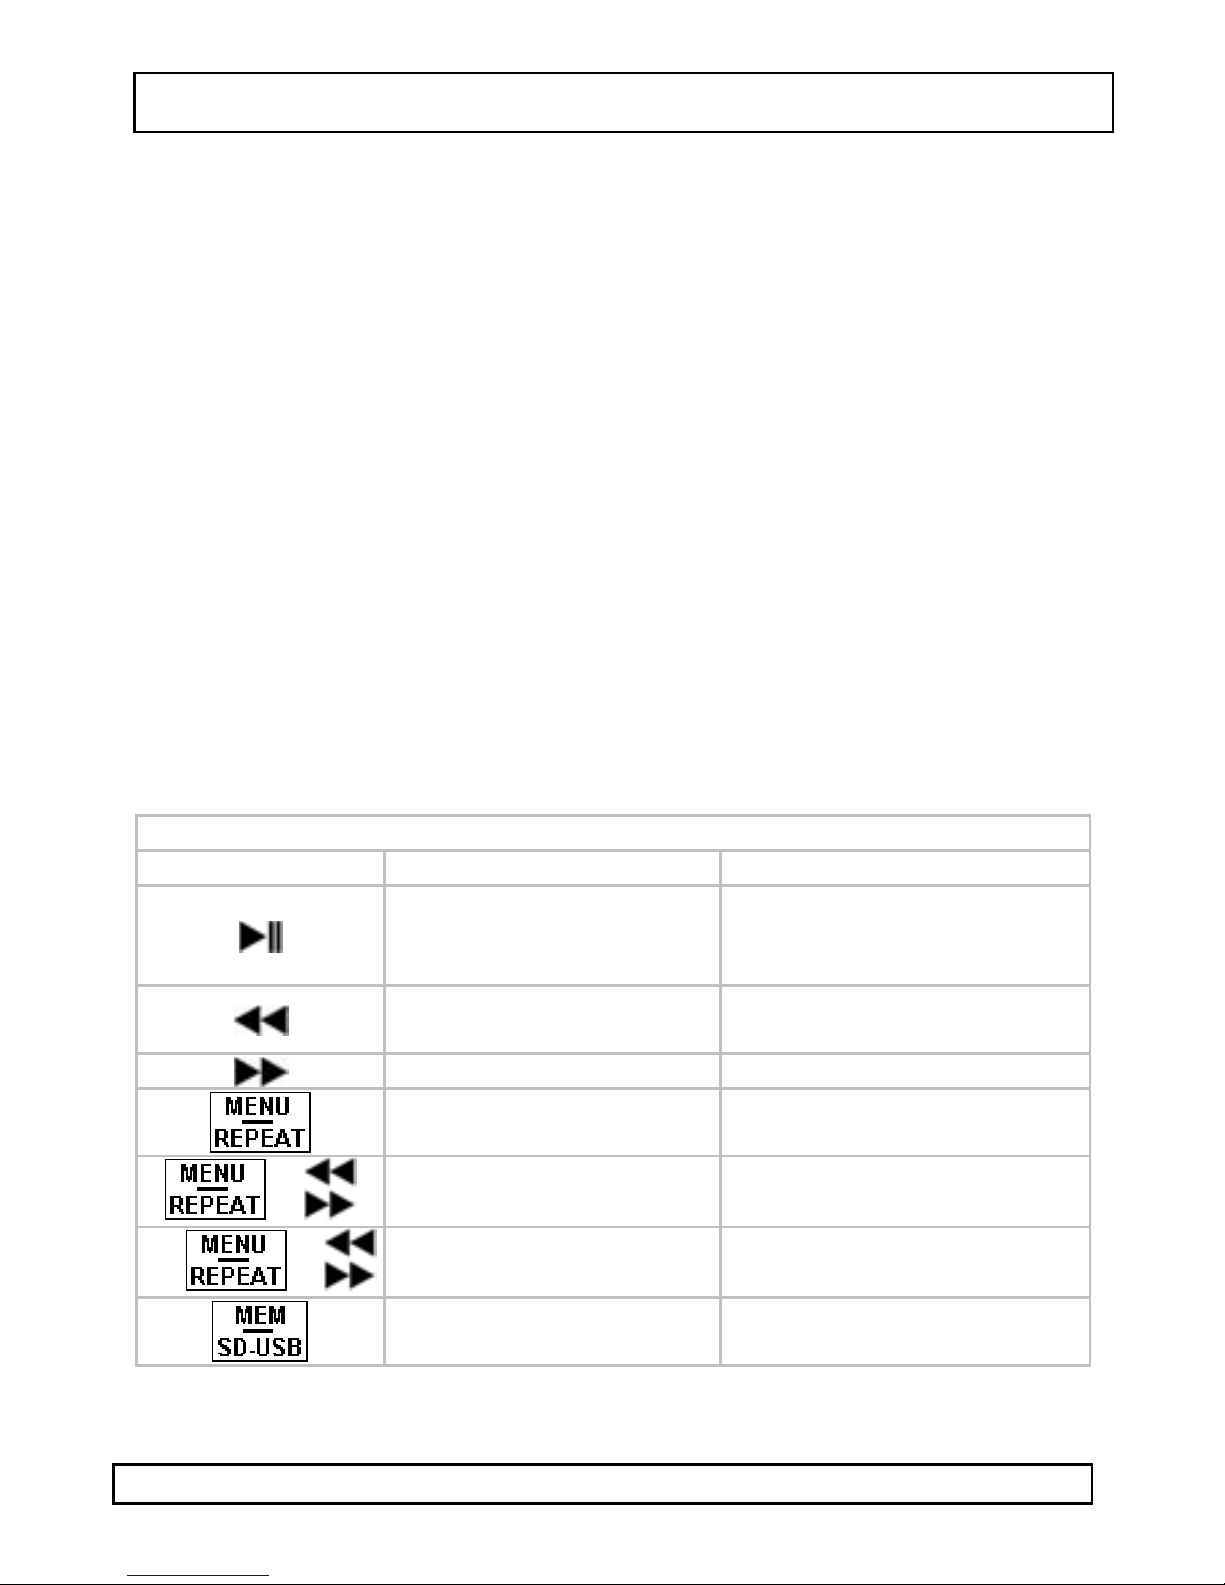
5. Overview
Refer to the image at page 2 of this manual. .
audio transmitter
button press once press an d hold (±2s)
play – pause display: frequency /
+
2x +
play previous track move to previous
play next track move to next directory
change transmitting
frequency
move to next frequency
(step 0.1MHz)
volume up/down -
equalizer / rem aining
time
directory
repeats current track
move to next frequency
(step 1.0MHz)
store frequency & sets
24/09/2009 4 Velleman
stored frequ en cy
change between USB and
SD-card input
®
Page 5
CARSFM1
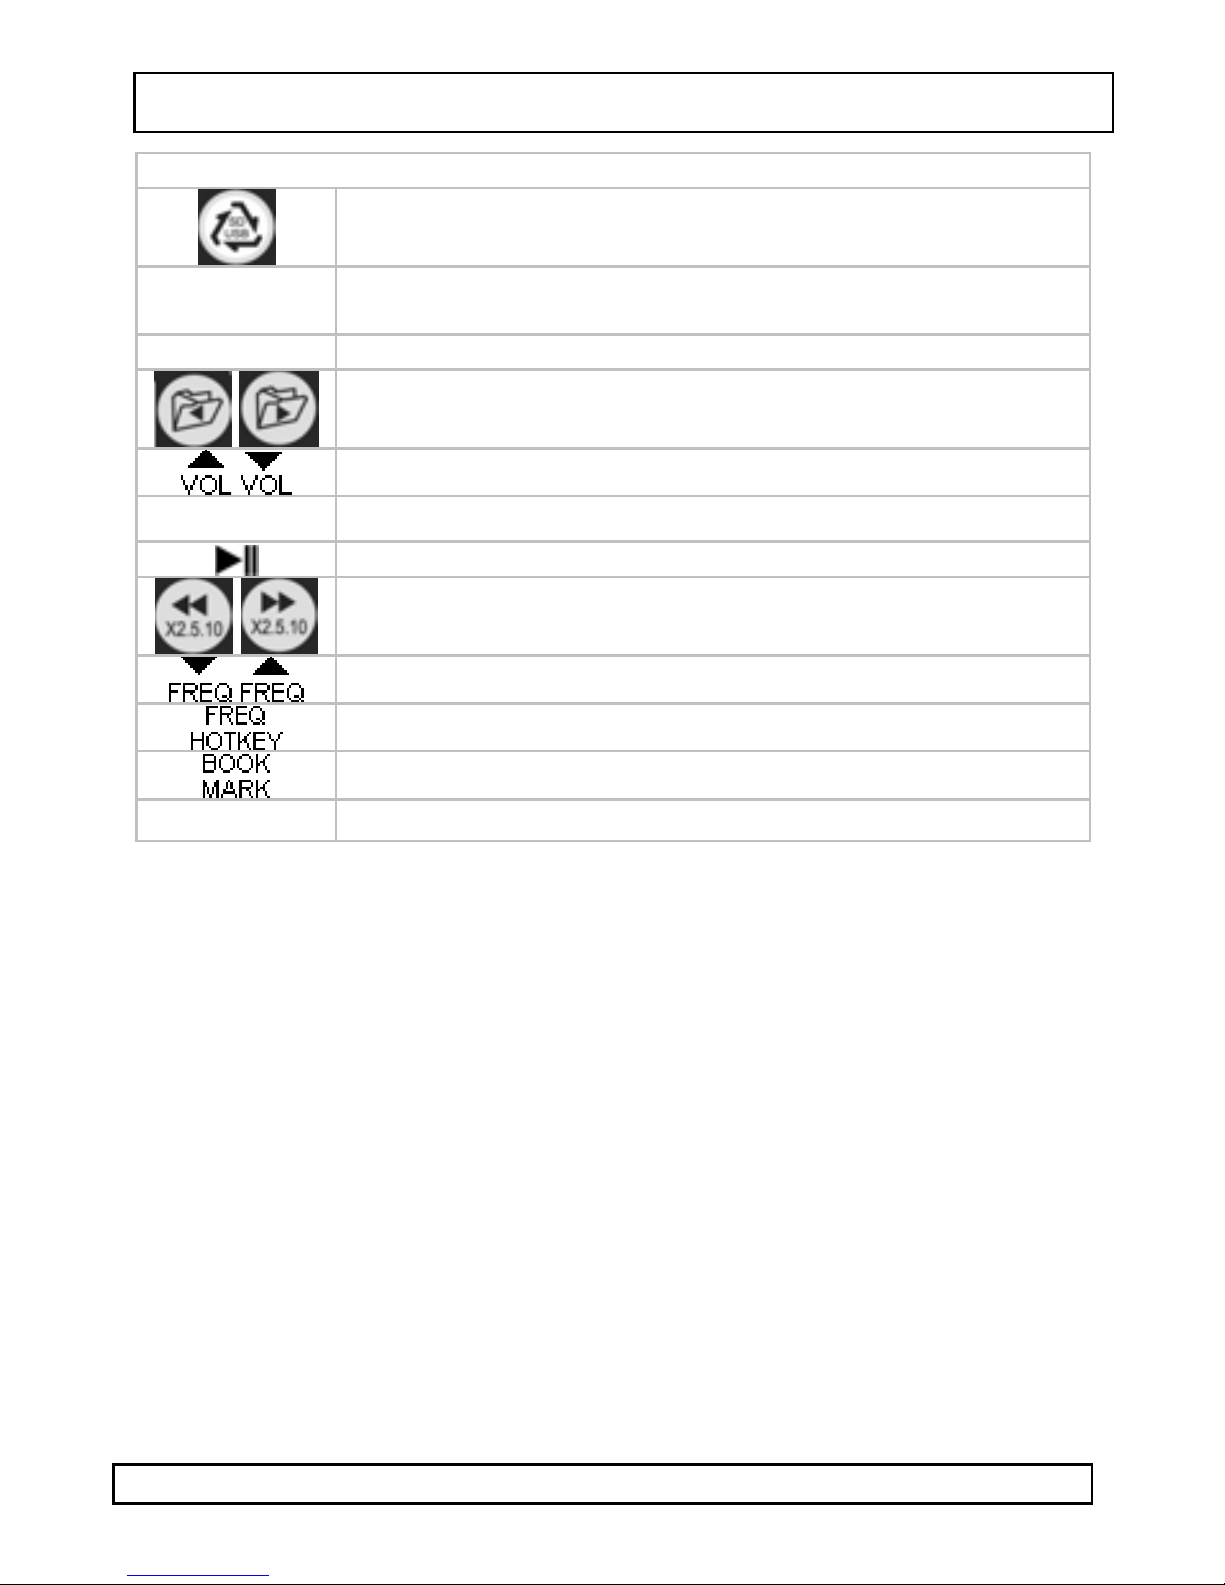
remote control
switch between SD and USB
DISPLAY
REPEAT switch between repeat current track and normal
scroll between displa y inform ation: frequency,
equalizer and remain ing time
move to previous or next folder
volume up or down
skip to previous or next track
play or pause
fast reverse or fast forward, speed x2, x5 or x10
move to previous or next frequency
A B
jump to stored frequency
set a bookmark
set boundaries for repeat section
6. Installation and operation
• Start the cars’ engine and plug the car plug [A] into t he 12V DC ca r
cigar lighter sock et. T he tr ansm itter star ts auto matica lly. If not,
verify the condition of the fuse inside the plug [A] (see §8).
• Switch on t he car ra dio and se arc h for a free fre que ncy o n t he FM-
band. Set the same frequency on the transmitter by pressing the
MENU/REPEAT button once followed by the
the MENU/REPEAT button again to store the setting.
• There are 3 way s to pr o vide mus ic f iles to t he tr ans mit ter :
1. using an SD-card. Slide the SD-card in the SD-card slot [C]
(pins facing down).
2. via a USB device. Connect the USB device to the USB connector
[D].
3. through the 2.5mm mini jack. Plug the 2.5mm plug into the mini
jack [E].
or button. Pr ess
• Set the vo lu me on th e tra nsm itt er to an ave rage leve l. Pre ss t he
MENU/REPE AT butto n twic e fo llowe d by the
24/09/2009 5 Velleman
or buttons (7
®
Page 6
CARSFM1
levels). Use the volume control on the radio to get the best signal
quality.
• Press the
play mode, press the
track. Press and hold
folder (see §7: file organization).
• In playback mode, press and hold the
the transmitter display between frequency, equalizer or
remaining play time.
• In playback mode, press and hold the MENU/REPEAT button for ±2s
to repeat the current track. Press and hold the MENU/REPEAT
button again for ±2s to return to normal playback.
• 7 frequencies can be stored for quick access . First select the desire d
frequency, than press the MEM/SD-USB button. Use the
buttons to select a memory ad dress (1~7 ).
• To recall a stored frequency, press the MEM/SD-USB button
repeate d ly unt il the de sire d freq uen cie s is s hown on the dis play.
• For music tracks that are provided through the USB-port and that
contain an ID3-tag, a car radio with RDS (Radio Data System)
funct ion ality will s how the tr ack in for matio n o n its dis pla y.
• Briefly press the MENU/REPEAT button 3 times. Use the
button to select the RDS display method and press the
MENU/REPEAT button again.
NOR: display shows 8 characters
SCR: d is play s cr olls with 1 s int er v a l
• Briefly press the MENU/REPEAT button 4 times. Use the
button to select the interval time under normal RDS display
mode (2~6s) and press the MENU/REPEAT button again.
Remote control
• Refer to the overview under §5 for ke y functio ns.
• Use the fast reverse () or fas t forw ar d () buttons to scroll back
or forward through the current track at increased speed (2x, 5x or
10x).
• To recall a stored frequency, press the FREQ HOTKEY button
repeate d ly unt il the de sire d freq uen cie s is s hown on the dis play.
• To repeat o nly a cer t ain se ctio n of a tr ac k, press t he A button at
the des ire d st art ing poin t an d press t he B button at the desired
end poin t. T he sec t ion be twee n A en B will b e re pe ated until t he B
button is pressed again.
button, to toggle between pause and play mode. In
or buttons to skip to pr e v io us o r next
or for ±2s to sk ip to prev io us or nex t
button for ±2s to switch
or
or
or
24/09/2009 6 Velleman
®
Page 7
CARSFM1
• When pressing the BOOKMARK key before switching off the device,
playback will resume at the bookmarked point.
It is not recommended to use the USB port as power supply for
other USB devices.
Keep the tra nsm itt er away fro m stro ng ma gnetic fields .
7. File organization
• Music files must be mp3 o r W MA for m at to enable play ba ck
through the transmitter. Other files will not be recognized. The
storage media size is limited to 32Gb (FAT32), max. 999 files, in 20
directo ries , 5 leve ls dee p.
• To shorten lookup-time, create a directory on the storage media
named: MP3. Create max. 10 subdirectories under the MP3
directory e.g. per type of music (rock, classic, pop…) and copy up to
50 files under each subdirectory.
• At start up, t he tr a ns m itte r w ill look on t he storage media for t his
folder . When it is pre sen t, all f iles un der tha t fold er w ill be playe d
and fast moving between directories is enabled. When the MP3
direc tor y d oe s no t exist, a ll f i le s o n the storage me d ia w ill b e p lay ed
in order of appearance.
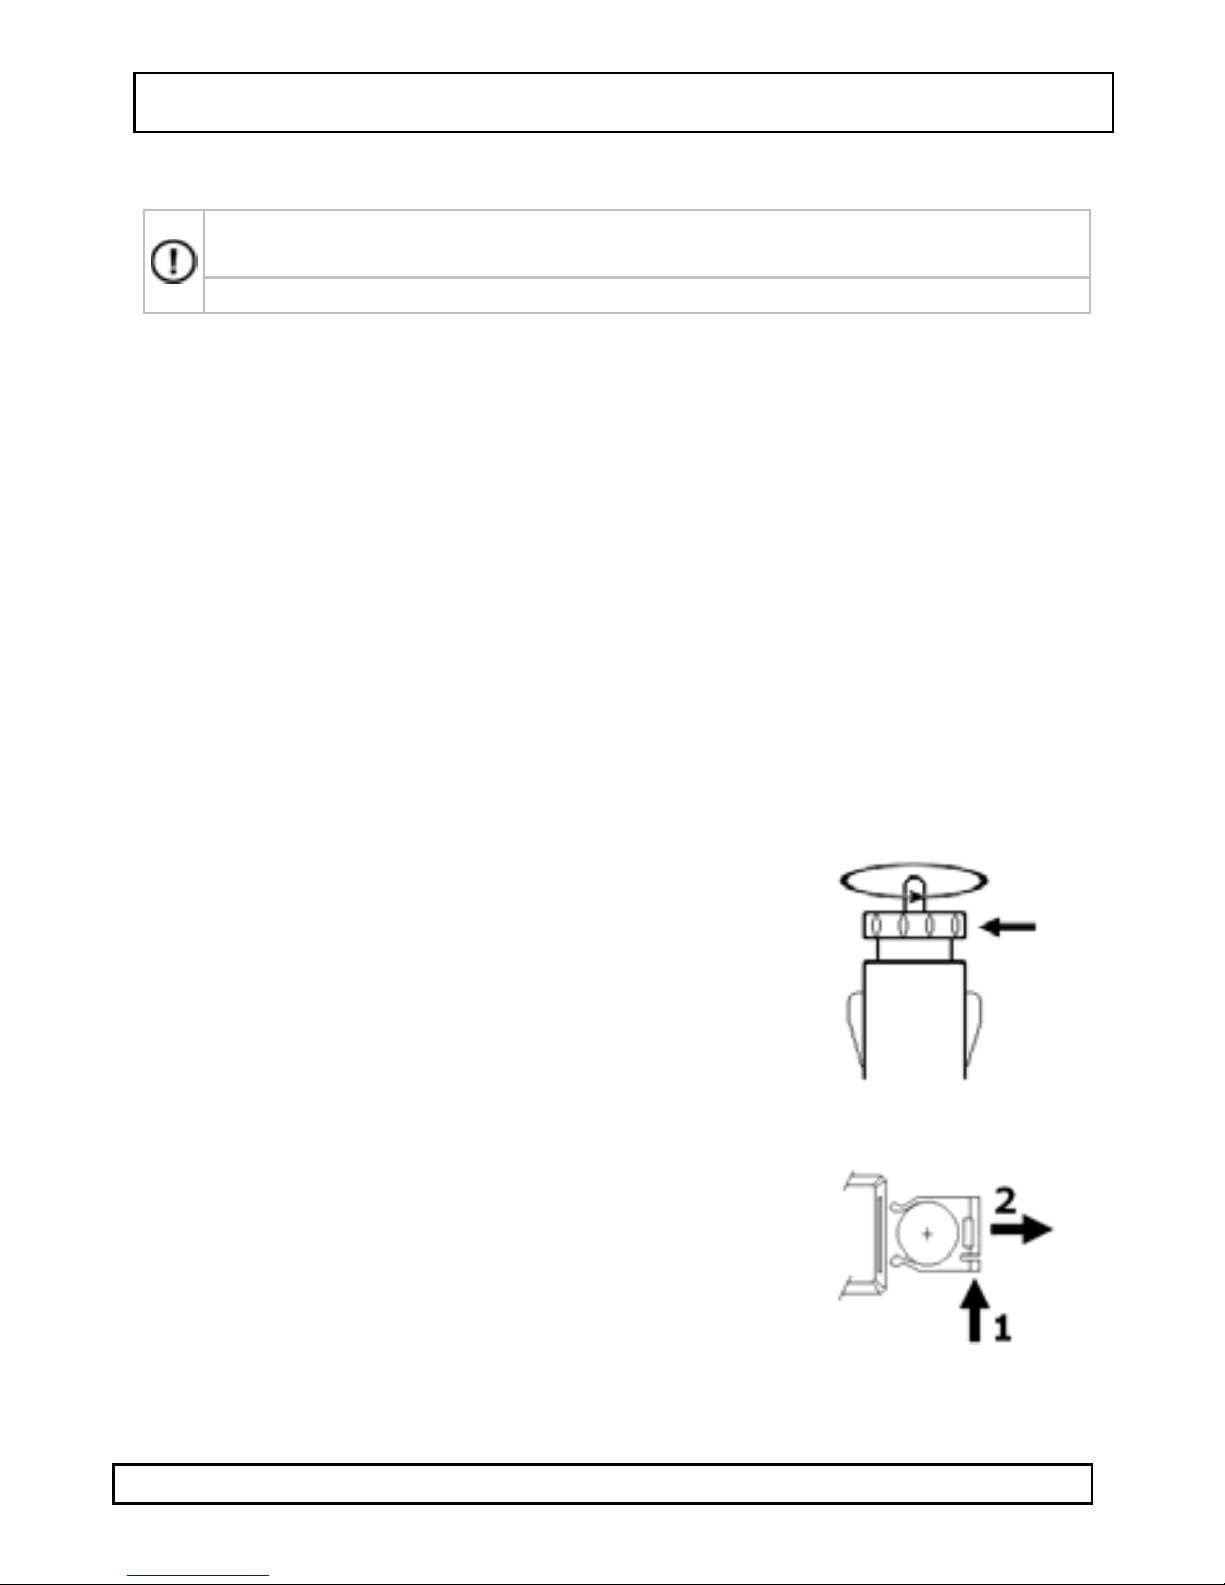
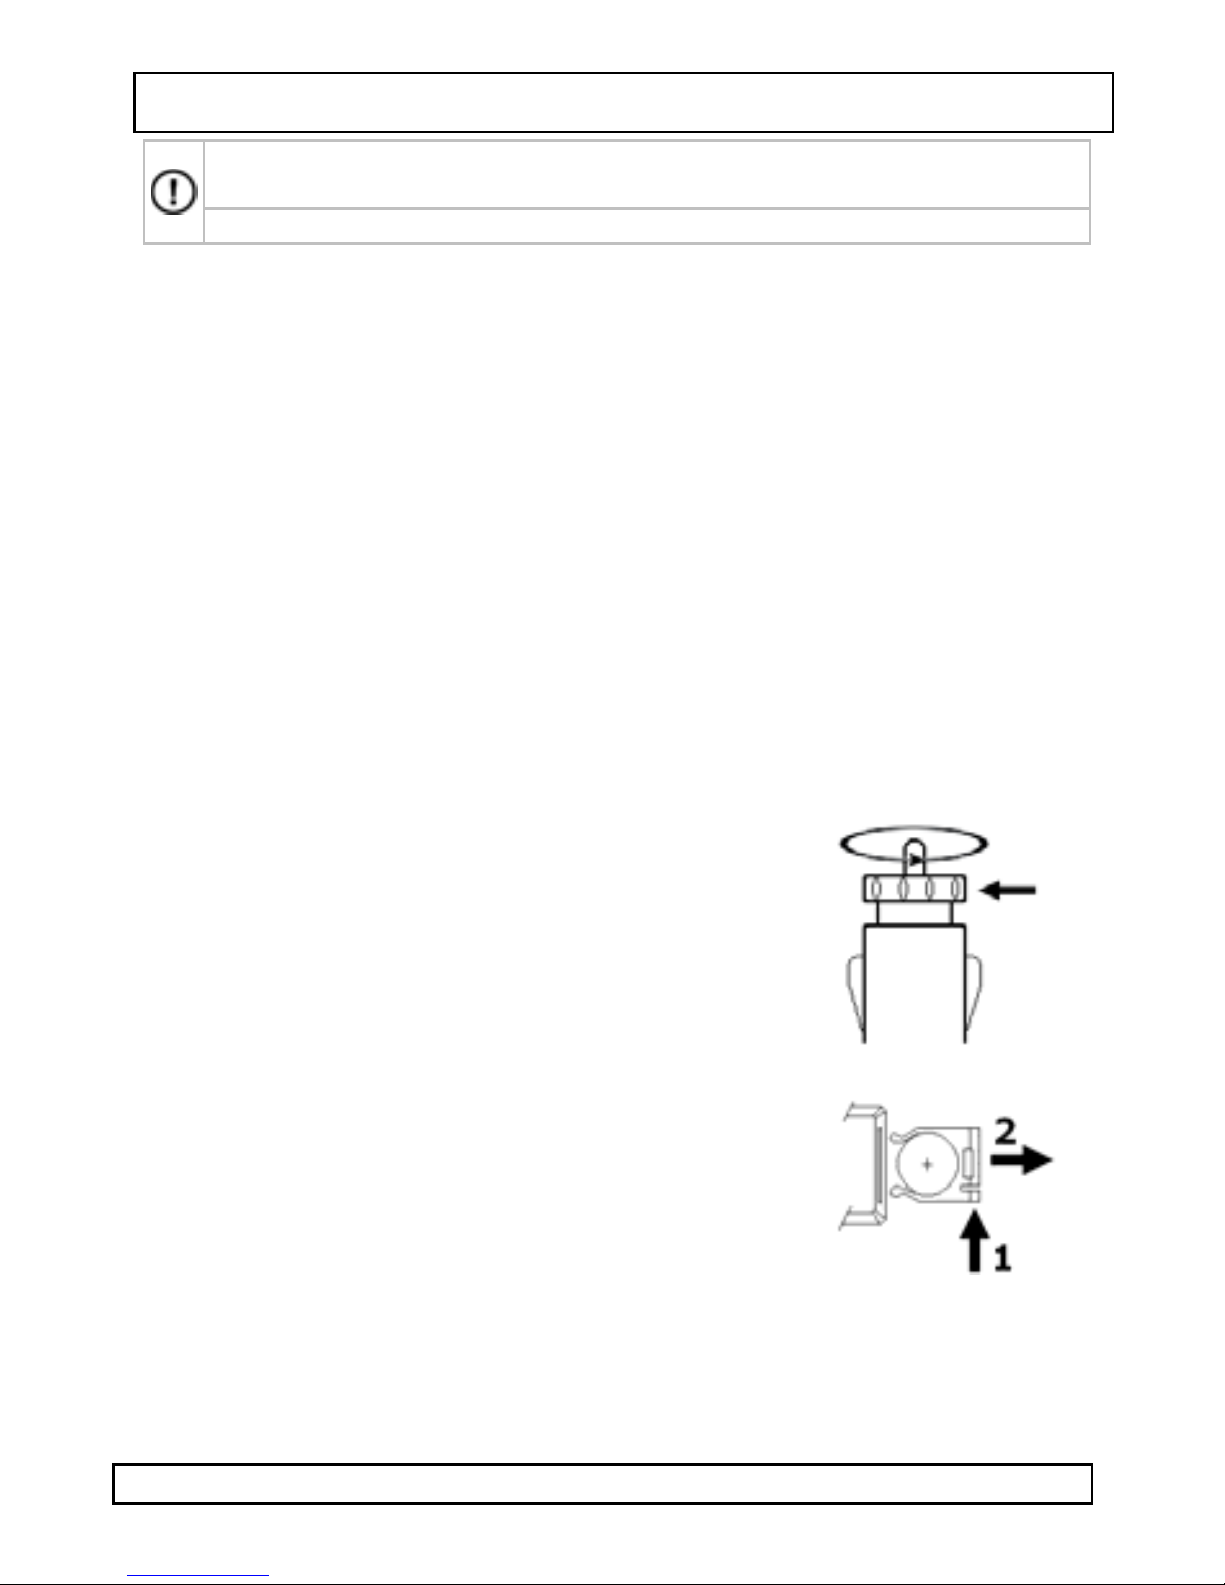
8. Replace fuse
• To replace the fuse, unscrew the tip of the
plug. Turn the ring (see arrow) counter
clockwise.
• Remove and re-insert a fuse of the same
type (5x20mm fast, 0.5A).
• Place the metal tip on the fuse and screw
the ring back in place.
9. Battery
• The remote control uses 1 battery type 3V
lithium CR2025 battery (included).
• To (re)place the battery, press on the side
of the battery cover [1] and pull [2] to
slide it open.
• Insert the battery with the right polarity
(‘+’ facing back of remote control) and
close the battery compartment by pushing it back into the
housing until it snaps into place.
24/09/2009 7 Velleman
®
Page 8
CARSFM1
WARNING: handle batteries with care, observe
warnings on battery casing. Dispose of batteries in
accordance with local regulations. Keep batteries
away from children.
10. Techni cal S pe cif ica ti o n
transmit frequencies 87.6 – 107.9 MHz (205 channels)
modulation FM (F3E)
supported capacity up to 32GB
overload protection
0.5A / 250V fast fuse, Ø5 x 20mm
(FF0.5A)
input 12VDC (car cigar lighter plug)
power
USB port 5VDC/300mA
supply
remote contro l 3V lithium CR 202 5, inc l.
FM transmitter 45 x 55 x 95 mm
remote control 86 x 40 x 6mm
dime nsions
cable 2.5 -3 .5m m
250mm
jack M-M
Use this device with original accessories only. Velleman nv
cannot be held respon sible in the event of damag e or injury
resulted from (incorrect) use of this device. For more info
concerning this product, please visit our website
www.velleman.eu. The information in this manual is subject
to cha nge without prior notice.
© COPYRIGHT NOTICE
This manual is copyrighted. The copyright to this manual is
owned by Velleman n v . All worldwide rights reserved. No part of
this manual may be copied, reproduced, translated or reduced to any
electronic medium or other w ise without the prior written consent of
the copyright holder.
24/09/2009 8 Velleman
®
Page 9
CARSFM1
GEBRUIKERSHANDLEIDING
1. Inleiding
Aan alle ingezetenen van de Europese Unie
Belangrijke milieu-informatie betreffende dit product
Dit symbool op het toestel of de verpakking geeft aan dat,
als het na zijn levenscyclus wordt weggeworpen, dit toeste l
schade kan toebrengen aan het milieu. Gooi dit toestel (en
eventuele batterijen) niet bij het gewone huishoudelijke
afval; het moet bij een gespecialiseerd bedrijf terechtkomen voor
recyclage. U moet dit toestel naar uw verdeler of naar een lokaal
recyclagepunt brengen. Respecteer de plaatselijke milieuwetgeving.
Hebt u vragen, contacteer dan de plaatselijke auto riteiten
betreffende de verwij der ing.
Dank u voor uw aankoop! Lees deze handleiding grondig voor u het
toestel in gebruik neemt. Werd het toestel beschadigd tijdens het
transport, installeer het dan niet en raadpleeg uw dealer.
2. Veiligheidsinstructies
Houd buiten het bereik van kinderen en onbevoegden.
Enkel voor gebruik binnenshuis. Bescherm tegen regen,
vochtigh eid, stof, extreme tem p e rat u ren en opspattende
vloeistoffen.
• De garantie geldt niet voor schade door het negere n van
bepaalde richtlijnen in deze handleiding en uw dealer zal de
verantwoordelijkheid afwijzen voor defecten of problemen die
hier rechtstreeks verband mee houde n.
• Schade door wijzigingen die de gebruiker heeft aangebracht valt
niet onder de garantie.
3. Algemene richtlijnen
• Bescherm tegen schokken. Vermijd brute kracht tijdens de
bediening.
• Leer eerst de func tie s van het toestel kenne n voor u het gaat
gebruiken.
• Om veiligheidsredenen mag u geen wijzigingen aanbrengen.
• Gebruik het toestel enkel waarvoor het gemaakt is. Bij
onoordeelkundig gebruik vervalt de garantie.
24/09/2009 9 Velleman
®
Page 10

CARSFM1
4. Eigenschappen
• gebr uikt RD S (Ra dio Data Syste m)
• zendt uit op alle FM-frequenties (87,6 ~ 107,9 MHz)
• geheugen voor 7 FM -frequenties
• autom at isc he in- en ui ts cha ke ling
• plug-and-play
• standaard USB-poort, SD-slot en stereo-ingang van 2,5 mm
• gelever d me t 3,5 mm -kab e l voor ge br uik me t mp3- , cd - en dv d-
spelers
• leest mp3- en WMA-bestanden af (niet compatibel met DRM-
bestanden)
• afspelen van een geselecteerde map
• scroll t hro ug h fold ers
• weergave: FM-frequentie/EQ/resterende afspeelduur
• 5 niveaus, maximaal 50 directories
• afstandsbediening
o door-/terugspoelen: 2x, 5x, 10x
o afspelen van een selectie
o bladwijzerfunctie
5. Omschrijving
Raadpleeg de figuur op pagina 2 van deze handleiding.
zender
toets druk eenmaal in houd ingedrukt (± 2 s)
display:
+
2x +
afspelen – pauzeren
afspelen vorig nummer ga naar vorige directory
afspelen volgend
nummer
wijzig zendfrequentie herhalen huid ig nummer
ga naar volgende
frequentie (stap 0 ,1 MHz )
volume hoger/lager -
frequentie/EQ/resterende
afspeelduur
ga naar volgende
directory
ga naar volgende
frequentie (stap 1,0 MHz)
frequentie opslaan USB <> SD-kaart
24/09/2009 10 Velleman
®
Page 11

CARSFM1
afstandsbediening
selecteer USB <> SD-kaart
DISPLAY
REPEAT selecteer huidig nummer herhalen <> normaal
scroll info op display: frequent ie, EQ en resterende
afspeelduur
ga naar vorige/volgende map
A B
volume hoger/lager
ga naar vorig/volgend nummer
afspelen/pauzeren
terugspoelen/doorspoelen, x2, x5 of x10
ga naar vorige/volgende frequentie
ga naar opgeslagen frequentie
maak een bladwijzer
bepaal begin- en eindpunt van de lus
6. Installatie en gebruik
• Start de w a ge n e n p lug de ze n de r [A] in de 12 VDC-
sigarettenuitgang. De zender wordt automatisch ingeschakeld.
Indien niet, controleer de zekering binnenin de plug [A] (zie §8).
• Schakel de autoradio in en zoek een onbezette FM-frequentie. Stel
diezelfde frequentie in op de zender door eenmaal op MENU/REPEAT
te druk ken, gevo lg d door
om de fre que nt ie in he t ge he uge n op te sla an.
• U kunt op 3 manieren via de zender naar muziek luisteren:
1. via een SD-kaart. Plaats een SD-kaart in het kaartslot [C]
(pinnetjes na ar o n der geric h t ).
2. via een USB-apparaat. Koppel een USB-apparaat aan de USBaansluiting [D].
3. via de 2,5 mm mini jackaansluiting. Plug 2,5 mm-plug in de mini
jackaa n sluiting [E].
• Rege l het vo lum e va n de ze nd er. Dru k twee m aal o p MEN U/RE PE AT
gevolgd door
de autoradio voor de beste resultaten.
24/09/2009 11 Velleman
of (7 nivea us). Gebr uik de volum erege ling va n
of . Druk opnieuw op MENU/REPEAT
®
Page 12

CARSFM1
• Druk op om het bestand af te spelen of te pauzeren. Druk
tijdens het afspelen op
bestand te springen. Houd
de vorige/volgende subdirectory te selecteren (zie §7 De
bestanden indelen).
• Houd tijdens het afspelen
frequentie, de EQ of de resterende afspeelduur op de display
weer te geven.
• Houd tij de ns he t af spe len ME NU /RE PEAT ged uren de ± 2 s inge dr ukt
om het huidige bestand opnieuw af te spelen. Houd MENU/REPEAT
opnie uw ge dure nde ± 2 s inge dr uk t om na ar de no rma le
afspee lmo du s ter ug te keren.
• U kunt tot 7 frequenties in het geheugen opslaan. Selecteer eerst de
gewens te freq uentie en druk d a n o p M EM / SD - USB . Se le c te er he t
gewenste voorkeuzenummer met
• Vraag een opgeslage n frequent ie op door o p MEM /SD-U SB te
drukke n to t de gewe n ste fr eq ue ntie op de d ispla y wee rge geve n
wordt.
• Met muziekbestanden die op een USB-medium opgeslagen zijn en
die voorzien zijn van een ID3-tag kunt u de RDS-functie (Radio Data
System).
• Druk driemaal op MENU/REPEAT. Selecteer de RDS-functie met
of e n dr uk o pnieuw op MEN U/REPEAT.
NOR: display geeft 8 karakters weer
SCR: display scrollt de info
• Druk viermaal kor t o p MEN U/ REPEAT. Se lecteer d e s cro lls ne lheid
(2 ~ 6 s) met
De afstandsbe dien ing
• Raadpleeg §5 voor de verschillende functies.
• Spoel terug of door met
• Vraag een opgeslagen frequentie op door herhaaldelijk op FREQ
HOTKEY te dr ukke n to t de ge wens te f req uen tie op de d isp lay wo rdt
weerge geven.
• Herh alin g va n ee n lus : Dr uk op A om het beginpunt en op B om
het eindpunt van de lus te bepalen. Deze lus wordt herhaaldelijk
afges pee ld to t u op nie uw op B drukt.
• Druk op BOOKMARK voor u de zender uitschakelt om de positie in
het bes ta nd in het ge he ug en o p te s laa n. B ij ee n vo lge nde
insch akelin g z al de ze nder vanaf dat p unt he rva tte n.
of en druk opnieuw op MENU/REPEAT.
of om naar het vorige/volgende
of ge d urende ± 2 s inge dr uk t o m
gedurende ± 2 s ingedrukt om de
of (1~7).
of (snelheid 2x, 5x of 10x).
24/09/2009 12 Velleman
®
Page 13
CARSFM1
Het gebruik van de USB-aansluiting als voeding voor andere USBapparaten is niet aan te raden.
Houd de zender weg van sterke magnetische velden.
7. De bestanden indel en
• De FM-ze nder is enke l comp at ibel me t m p3- of WMA- besta nde n;
andere bestanden worden niet herkend. De opslagcapaciteit
bedraagt maximaal 32 GB (FAT32), maximaal 999 bestanden in 20
directories, 5 nive aus.
• Om de zoe ktij d te beper ke n, creë e r de nie uwe direc tor y MP3 op het
opslagmedium. Creëer maximaal 10 subdirectory’s onder MP3, bv.
per muziekgenre (rock, klassiek, pop…) en kopieer tot 50 bestanden
naar elke subdirectory.
• Na inschakeling zal de zender de directory MP3 op het
opslagmedium zoeken. Eenmaal de directory is gevonden, worden
alle bestan de n o n de r de eers te s u bd ir e ctory af ges p eeld. U k u nt o ok
zelf uw subdirectory selecteren. Heeft de zender de directory MP3
niet ge vo nde n, dan wor de n al le be sta nde n op het o psla gme d ium na
elkaar afgespeeld.
8. De zekering vervangen
• Schroef de tip van de sigarettenplug los.
Draai de ring (zie pijl) naar links toe.
• Verwijder de oude zekering en plaats een
nieuwe (5 x 20 mm snel, 0,5 A).
• Plaats de metalen tip op de zekering en
schroef de ring vast.
9. De batterij
• de afstandsbediening gebruikt een
CR2025 lithiumbatterij van 3 V
(meegeleverd).
• Druk het lipje van de batterijhouder
lichtjes in [1] en trek de houder uit de
afstandsbediening [2].
• Plaats de batterij in de houder (‘+’ naar
de onderkant van de afstandbediening toe) en schuif de houder
terug in de afstandsbediening.
24/09/2009 13 Velleman
®
Page 14

CARSFM1
LET OP: Leef de richtlijnen op de verpakking van de
batterijen zorgvuldig na. Houd de batterijen buiten
het bereik van kinderen.
10. Technis che spe cificat ies
frequenties 87,6 ~ 107,9 MHz (205 kanalen)
modulatie FM (F3E)
capaciteit tot 32 GB
beveiliging tegen overbelasting
0, 5 A/250 V snel, Ø 5 x 20 m m
(FF0.5A)
ingang 12 VDC (sigarettenplug)
voeding
USB-poort 5 VDC/300 mA
afstandsbediening CR2025 lithiumbatterij 3 V, meegelev.
FM-zender 45 x 55 x 95 mm
afstandsbediening 86 x 40 x 6 mm
afmetingen
kabel 2, 5 ~ 3, 5 mm
250 mm
jack M-M
Gebruik dit toestel enkel met originele accessoires. Velleman
nv is niet aansprakelij k v oo r schade of kwet suren bij
(verkeerd) gebruik van dit toestel. Voor meer informatie over
dit product, zie www.velleman.eu. De informatie in deze
handleiding kan te allen tijde worden gewijzigd zonder
voorafgaande kennisgeving.
© AUTEURSRECHT
Velleman nv heeft het auteursrecht voor deze handleiding.
Alle wereldwijde rechten voorbehouden. Het is niet toegestaan om
deze handleiding of gedeelten ervan over te nemen, te kopiëren, te
vertalen, te bewerken en op te slaan op een elektronisch medium
zonder voorafgaande schriftelijke toestemming van de
rechthebbende.
24/09/2009 14 Velleman
®
Page 15

CARSFM1
NOTICE D’EMPLOI
1. Introduction
Aux résidents de l'Union européenne
Des informati o ns environnement ale s im portantes conc ernant
ce produit
Ce symbole sur l'appar eil ou l'emballage indi que que l’élimination
d’un appareil en fin de vie peut polluer l'environnement. Ne
pas jeter un appareil électr ique ou électronique (et des piles
éventuelles) parmi les déchets municipaux non sujets au tri
sélectif ; une déchèterie traitera l’appareil en question.
Renvoyer les équipements usagés à votre fournisseur ou à un service
de recyclage local. Il convient de res pecter la réglementation locale
relative à la protection de l’environnement.
En cas de questions, contacter les autorit é s loca les pour
élimination.
Nous vous remercions de votre achat ! L ire la présente notice
attentivement avant la mise en service de l’appareil. Si l’ap pareil a
été endommagé pendant le transport, ne pas l’installer et consulter
votre revendeu r.
2. Consignes de sécurité
Garder hors de la po rtée des enfants et des pers onnes non
autorisées.
Uniquement pour usage à l’inté rieur. Protéger contr e la
pluie, l’humidité, la poussière, les températures extrêmes et
les projections d’eau.
• La garantie ne s’applique pas aux dommages survenus en
négligeant certaines directives de cette notice et votre revendeur
déclinera toute responsabilité pour les problèmes et les défauts
qui en rés ultent .
• Les dommages occasionnés par des modifications par le client ne
tombent pas sous la garantie.
3. Directives géné ra le s
• Protéger contre les chocs et le traiter avec circonspection pendant
l’opération.
• Se familiariser avec le fonctionnement avant l’emploi.
• Toute modification est interdite pour des raisons de sécurité.
24/09/2009 15 Velleman
®
Page 16

CARSFM1
/
• N’utiliser qu’à sa fonction prévue. Un usage impropre annule
d'office la garantie.
4. Caractéristiques
• utilise la fo nc t io n R DS ( Ra dio Data S ys te m )
• émet sur toute s le s fré que nces FM ( 87, 6 ~ 107, 9 MHz)
• mémoire pour 7 fréquences FM
• allumag e /ex tin ct ion a uto ma tiq ue
• plug-and-play
• port USB standard, port SD et prise stéréo 2,5 mm
• livré avec câble 3,5 mm pour utilisation avec lecteur MP3, CD et DVD
• lect ur e de f ich ier s M P3 et WM A ( non co mp ati ble av e c les f ich ie rs DR M)
• lecture d'un dossier sélectionné
• dérou le me n t de s do ssiers
• affichage : fréquence FM/égaliseur/temps de lecture restant
• répertoire : 5 niveaux, max. 50 répertoires
• télécommande
o avance/recul rapide : 2x, 5x, 10x
o lect ure d' une sé lec tio n
o fonction marque-pa ge
5. Description
Se référer à l’image à la page 2 de cette notice.
émetteur
touche enfoncer maintenir enfoncé
affichage fréquence / EQ
temps de lecture restant
sélection n er répertoire
précédent
sélection n er répertoire
suivant
fréquence suivante
(+ 1,0 MHz)
-
+
2x +
lecture – pause
lecture piste
précédente
lecture piste suivante
modifier fréquence répéter piste actuelle
fréquence suivante
(+0,1 MHz)
augmenter/diminuer
volume
(± 2 s)
sauvegarde de la
24/09/2009 16 Velleman
fréquence
sélectionner USB <> SD
®
Page 17

CARSFM1
télécommande
sélectionner USB <> SD
DISPLAY affichage fréquence / EQ / temps de lecture restant
REPEAT répéter piste actuelle/lecture normale
sélection n er répertoire p ré c édent/suivant
A B
augmenter/diminuer volume
sélectionner piste précédente/suivante
lecture ou pause
lecture rapide en arrière/avant, vitesse x2, x5 ou x10
sélectionner fréquence précédente/suivante
sélectionner fréquence sauvegardée
insérer marque-page
déterminer début/fin de la bouc le
6. Installation et emploi
• Démarrer le moteur et insérer la fiche de l’émetteur [A] dans la
prise a llum e-c igar e 12 V. L’émetteur s’allume automatiquement.
Vérifier le fusible dans le fiche [A] s’il n e s’ a llu me pa s (vo ir § 8 ).
• Allumer l’autoradio et rechercher une fréquence FM non attribuée.
Sélectionner la même fréquence sur l’émetteur en enfonçant la
touc he MEN U /REP EAT suiv i de
pour sa uve g arde r la fré que nce .
• Le CARSFM 1 émet depuis 3 sources :
1. carte SD. Insérer une carte SD dans le port [C] (bro c hes vers le
bas).
2. appare il US B. Co nnec ter un app are il US B à la co nnex ion [D].
3. mini-p r ise jac k 2, 5 mm. Co nne c ter le c âb le 2, 5 mm à la pris e
mini-jack [E].
• Régler le volume sur l’émetteur. Enfoncer MENU/REPEAT à deux
repris es suivi de
partir de l’autoradio.
• Enfoncer
lecture, enf on ce r
24/09/2009 17 Velleman
pour démarrer/interrompre la lecture. En mode
ou (7 niveaux). Régler le volume général à
ou pour sélectionner la piste
ou . Renfoncer MENU/REPEAT
®
Page 18

CARSFM1
précédente/suivante. Maintenir enfoncé ou pendant ± 2 s
pour sélectionner le répertoire précédent/suivant (voir §7).
• En mode le ct ure, main te nir enfo ncé
sélectionner le mode d’aff ichage : fréquenc e, égaliseur ou temps
de lecture restant.
• En mode lecture, m ain t en ir enfoncé MEN U/ REPEAT pe n da n t ± 2 s
pour ré péte r la le ct ure de la p iste sé lect ion née . Renfo nc er
MENU/ RE PEAT pe nd a n t ± 2 s pour re venir ve r s la le c t ur e no r m a le .
• L’émetteur peut mettre 7 fréquences en mémoire. Sélectionner
d’abord la fréquence et enfoncer MEM/SD-USB. Sélectionner le
numéro de présélection (1 ~ 7) avec
• Sélectionner une fréquence sauvegardée avec MEM/SD-USB jusqu’à
ce que la fréquence s’affiche.
• Un autoradio avec fonction RDS (Radio Data System) affichera
l’information contenu dans tous les fichiers ID3 sur support USB.
• Enfonce r br iève men t la to uche MEN U/RE PEAT à 3 r epr ise s.
Sélec tion ner l’aff ic hage RDS avec
MENU/REPE AT .
NOR : affichage de 8 caractères
SCR : déf ile men t de l’ info
• Enfonce r br iève men t la to uche MEN U/RE PEAT à 4 r epr ise s.
Sélec tion ner l’int erv a lle d’af f icha ge RDS (2 ~ 6 s) ave c
et renfoncer MENU/REPEAT.
La télécommande
• Se référer à l’aperçu des commandes sous §5.
• Enfon ce r la to uc he ou pour une lecture rapide en
arrière/avant de la piste (vitesse 2x, 5x ou 10x).
• Sélectionner une fréquence sauvegardée en enfonçant la touche
FREQ HOTKEY jusqu’à ce que la fréquence s’affiche.
• Lecture répétée d’une boucle : Enfoncer la touche A pour
déter min e r le po in t de d é pa r t de la boucle ; enfoncer la to u c he B
pour dé ter m iner la fin de la bouc le. Le mor c eau s éle ct io nné e ntre les
points A et B sera répété jusqu’à ce que la touche B soit
renfoncée.
• Enfon cer la to uc he BOO KM AR K ava nt d’é te indr e l’ é mette ur po ur
mettre la po sit ion de lec ture da ns le fic hier e n mémo ire . La lect ure
reprend automatiquement à partir de cette position lors d’une
prochaine lecture.
pendant ± 2 s pour
ou .
ou et renfoncer
ou
24/09/2009 18 Velleman
®
Page 19

CARSFM1
Il n’es t pas co nse illé d ’ alim ente r u n app are il US B depu is le por t
USB de l’émetteur.
Protéger l’émetteur contre les champs magnétiques.
7. L’organisation des fichiers
• L’émetteur ne reconnaît que des fich iers au format MP3 ou WMA.
D’autres formats ne sont pas compa tibles. La capacité de mémoire
est de 32 Go (FAT32), max. 999 fichiers, 20 répertoires, 5 niveaux.
• Afin de ré du ire le tem ps de rech erc he des fic hie rs par l’é met te ur, il
est conseillé de créer un répertoire principal MP3 sur le périphérique
de stockage. Créer un maximum de 10 sous-répertoires sous ce
répertoire principal MP3, p.ex. un sous -ré pe r toir e po ur chaq ue sty le
de musique (rock, pop, classique…). Chaque sous-répertoire peut
contenir un maximum de 50 fichiers.
• Lors de l’allumage, l’émetteur cherchera le répertoire MP3 sur le
périphérique de stockage. Une fois ce répertoire trouvé, l’émetteur
comme ncer a la lec tur e de to us les f ic hier s so us le pr e mier sou srépertoire. Il est également possible de sélectionner le sousrépertoire. Si le répertoire MP3 n’e st p as d ispo n ible, l’é met te ur
effec tuer a u ne lec tur e alp ha bé tique de tous les fich iers sur le
périphérique de stockage.
8. Remplaceme nt du fus ib le
• Desserrer la fiche en tournant l’anneau
vers la gauche (voir flèche).
• Retirer et réinsérer le fusible (5 x 20 mm
rapide, 0,5 A).
• Réassembler la fiche métallique et
resserrer l’anneau.
9. La pile
• la télécommande est alimentée par une
pile au lithium de 3 V de type CR2025
(incluse).
• Pincer la languette vers l’in térieur [1] et
tirer le support hors de la télécommande
[2].
• Insérer la pile, la face positive vers le dos
de la télécommande et réinsérer le s upport dans la
télécommande.
24/09/2009 19 Velleman
®
Page 20

CARSFM1
ATTENTION : Respecter les consignes de sécurité
mention nées sur l’emballage des piles. Garde r les
piles hors de la portée des enfants.
10. Spécifications techniques
fréquences 87,6 ~ 107,9 MHz (205 canaux)
modulation FM (F3E)
capacité jusqu’à 32 Go
protection contre surcharges
0,5 A/250 V rapide, Ø 5 x 20 mm
(FF0.5A)
entrée 12 VCC (fiche allu me -cig ar e )
alimentation
port USB 5 VCC/300 mA
télécommande pile au lithium 3 V type CR2025, incl.
émetteur FM 45 x 55 x 95 mm
télécommande 86 x 40 x 6 mm
dime nsions
câble 2,5 ~ 3, 5 mm
250 mm
jack M-M
N’employer cet appareil qu’avec des accessoires d’origine. SA
Velleman ne sera a ucunement respons able de dommages ou
lésions survenus à un usage (incorrect) de cet appareil. Pour
plus d’information concernant cet article, visitez notre site
web www.velleman.eu. Toutes les informations présentées
dans cette notice peuvent être modifiées sans notification
préalable.
© DROITS D’AUTEUR
SA Velleman est l’ayant droit des droits d’auteur pour cette
notice.
Tous droits mondiaux réservés. Toute reproduction, traduction, copie
ou diffusion, intégrale ou partielle, du contenu de cette notice par
quelque procédé ou sur tout s upport électronique que se soit est
interdite sans l’accord préalable écrit de l’ayant dro it.
24/09/2009 20 Velleman
®
Page 21

CARSFM1
MANUAL DEL USUARIO
1. Introducción
A los ciudad anos de la Unión Eur o pe a
Importantes informaciones sobre el medio ambiente
concerniente a este producto
Este símbolo en este aparato o el embalaje indica que, si
tira las muestras inservibles, podrían dañar el medio
ambiente. No tire este aparato (ni las p ilas, si las hubiera)
en la basura doméstica; debe ir a una empresa
especializada en reciclaje. Devuelva este aparato a su distribuidor o
a la unidad de reciclaj e local. Respete las leyes locales en relación
con el medio ambiente.
Si tie ne dudas, contacte con las aut oridades local es para
residuos.
¡Gracias por haber comprado el CARSFM1! Lea atentamente las
instrucciones del manual ant es de usarlo. Si el aparato ha sufrido
algún daño en el transporte no lo instale y póngase en contacto con
su distribuidor.
2. Instrucciones de seguridad
Mantenga el aparato lejos del alcance de personas no
capacitadas y niños.
Sólo para el uso en i n t eriores. No exponga est e equipo a
lluvia, humedad, temperaturas extremas, polvo ni a ningún
tipo de salpicadura o goteo.
• Los daños causados por descuido de las instrucciones de
seguridad de este manual invalidarán su garantía y su
distribuidor no será responsable de ningún daño u otros
problemas resu ltantes.
• Los daños causados por modificaciones no autorizadas, no están
cubiertos por la garantía.
3. Normas generales
• No agite el aparato. Evite usar excesiva fuerza durante el manejo
y la instalación.
• Familiarícese con el funcionamiento del aparato antes de
utilizarlo.
24/09/2009 21 Velleman
®
Page 22

CARSFM1
• Por razones de seguridad, las modificacione s no autorizadas del
aparato están prohibidas.
• Utilice sólo el aparato para las aplicaciones descritas en este
manual. Su uso incorrecto anula la gar a ntía completamente.
4. Características
• usa la función RDS (Radio Data System)
• emite en todas las frecuencias FM (87.6 ~ 107.9MHz)
• memoria para 7 frecuencias FM
• activación/desactivación automática
• plug-and-play (enchufar y listo)
• puerto US B e s tá n da r, p uer to S D y e nt r ad a e s té re o de 2.5m m
• se entrega con cable de 3.5mm para uso con reproductores MP3, CD y
DVD
• reproducción de ficheros MP3 y WMA (no compatible con los ficheros
DRM)
• reproduce un fichero seleccionado
• desplazarse por carpetas
• visualización: frecuencia FM/equalizador/tiempo de reproducción
restante
• directorio: 5 niveles, máx. 50 directorios
• mando a distancia
o avanzar/retroceder: 2x, 5x, 10x
o reproducción de una selección
o función 'bookmark'
5. Descripción
Véase las figuras en la página Error! Bookmark not defined. de
este manual del usuario.
emisor
tecla pulsar mantener pulsada
(± 2 s)
visualización frecuencia /
reproducción – pausa
anterior
reproducción del título
24/09/2009 22 Velleman
siguiente
EQ / tiempo de
reproducción restante
seleccionar directorio
siguiente
seleccionar directorio
siguiente
®
Page 23

CARSFM1
+
2x +
DISPLAY
REPEAT repetir título actual/reproducción normal
modificar frecuencia repetir el título actual
frecuencia siguiente
(+0,1 MHz)
aumentar/disminuir el
volumen
guardar la fre cuencia seleccionar USB <> SD
mando a distan c i a
seleccionar USB <> SD
visualización frecuencia / EQ / tiempo de reproducción
restante
seleccionar el directorio anterior/siguiente
aumentar/disminuir el volumen
frecuencia siguient e
(+ 1,0 MHz)
-
A B
seleccio nar el título anterior/siguiente
reproducción o pausa
reproducción rápida hacia atrás/hacia adelante,
velocidad x2, x5 o x10
seleccionar la frecuencia anterior/siguient e
seleccionar la frecuencia guardada
Introducir ‘bookmark’
déterminer début/fin de la bouc le
6. Instalación y uso
• Arranque el motor e introduzca el conector mechero 12 V [A]. El
emisor se ilumina automáticamente. Controle el fusible del conector
mechero [A] si no se ilumina (véase §8).
• Active la autorradio y busque una frecuencia FM no atribuida.
Selecc io ne la m isma fr ecue nc ia e n el emis or al puls ar la tec la
MENU/REPE AT y lue go
guardar la frecuencia.
• El CARSFM1 emite desde 3 fuentes:
o . Vuelva a pulsar MENU/REPEAT para
24/09/2009 23 Velleman
®
Page 24

CARSFM1
1. tarje ta S D. I ntr o duzc a un a tar j et a SD e n la conexión para
tarjeta SD [C] (polos hacia abajo).
2. aparato USB. Conecte un aparato USB a la conexión USB [D].
3. mini ja ck 2, 5mm. Cone cte el cab le de 2,5m m a la en tra da minijack [E].
• Ajuste el volu men de l emis or . Pu lse MEN U/RE PEA T dos veces y
luego
autorradio.
• Pulse
reproducción, pulse
anterior/siguiente. Mantenga pulsada la tecla
para seleccionar la carpeta anteriora/siguiente (véase §7).
• En el modo reproducción, mantenga pulsada la tecla
± 2 s para seleccionar e l modo de visualización: frecuencia,
equalizador o tiempo de reproducción restante.
• En el modo de reproducción, mantenga pulsada la tecla
MENU/REPEAT durante ± 2 s para repetir la reproducción del título
seleccionado. Vualva a pulsar MENU/REPEAT durante ± 2 s para
volver a la repr od ucc ión nor mal.
• El em iso r p ue de g u ard ar 7 fre c ue ncias. L ue go , s e le c c io ne la
frec ue ncia y p u lse MEM/S D -U SB . Se le c cione e l nú m e ro de
preselección (1 ~ 7) con
• Selecc io ne u na fr ec ue ncia guar d ada con ME M/ SD-U SB h as ta que la
frec ue ncia se v is ua lice.
• Una autorradio con función RDS (Radio Data System) visualizará la
infor m ac ió n de to do s los f ic he r os I D 3 e n soporte U S B.
• Pulse br eve ment e la te cla MENU /REPE AT 3 vecees . Sele cc ione la
NOR: visualización de 8 caracteres
SCR: el d isp lay des pla za la in for ma ción
• Pulse br evemente la te c la ME NU / REPEAT 4 vec e s. Selecc io ne el
El mando a distancia
• Véase el resumen de los mandos bajo §5.
• Pulse la tecla o para una reproducción rápida hacia
atrás/hacia adelante del tí t ul o (v e l ocid a d 2 x, 5 x o 1 0x ) .
• Selecc io ne un a frec ue ncia guar da da al p uls ar la tec la F REQ HOT KEY
hasta q ue la fr ec uencia se visualiza .
o (7 n ive le s). Aj uste el vo lum en ge ner a l a part ir de la
para activar/interrumpir la reproducción. En el modo
o para seleccionar el título
o durante ± 2 s
durante
o .
visualización RDS con
interv alo de vis ualiz ac ió n RDS (2 ~ 6 s) co n
pulsar MENU/REPEAT.
o y vuelva a pulsar MENU/REPEAT.
o y vuelva a
24/09/2009 24 Velleman
®
Page 25

CARSFM1
• Reprod ucc ió n repe t ida de un bu cle : Pu lse la tec la A para
determ inar el pu nto inic i al de l buc le; pulse la te cla B par a
determ inar el pu nto f ina l del b ucle . El t ítu lo se leccio na do e ntre el
punto A y B se repetirá hasta que vuelva a pulsar la tecla B.
• Pulse la tecla BO OKMARK antes de des activar e l emisor par a guardar la
posición de reproduc ción en la memor ia. La re produc ción com ienza
automáticamente a p artir de e sta posición a l activar e l aparato.
No alimen te u n apar ato US B por el puer to US B del e misor .
No exponga el emi sor a cam pos ma gné ti cos.
7. Organizar las carpetas
• El emisor sólo reconece ficheros en formato MP3 o WMA. Otros
forma to s no e s tá n compat ibles. L a c a pa cidad de la memo r ia es de
32 GB (FAT32), máx. 999 ficheros, 20 directorios, 5 niveles.
• Para re duc ir e l t iempo de bús q ueda de lo s fic her os por e l em isor,
cree u n direc tor io pr in cip al MP3 en el dispositivo de
almacenamiento. Cree máx. 10 subdirectorios bajo este directorio
principal MP3, p.ej. un subdirectorio para cada género musical
(rock, pop, clásico, etc.). Cada subdirectorio puede contener máx.
50 ficheros.
• Al activar el emisor, buscará el directorio MP3 en e l d isp o sit iv o de
almacenamiento. Despué s de ha be r encontr a do e s te directorio , e l
emisor empieza a reproducir todos les ficheros bajo el primer
subdirectorio. También es posible seleccionar el subdirectorio. Si el
directorio MP3 no está dis p o nib le, el em iso r efectua r á u na
repro duc ció n a lf abé tic a de to dos los fic her os del dispositivo de
almacenamiento.
8. Reemplazar el fusible
• Desatornille el conector al girar el anillo
hacia la izq uierd a (v éase f le c h a ) .
• Saque el fusible y vuelva a introducirlo
(5 x 20mm rápido, 0,5 A).
• Vuelva a montar el conector metálico y
atornille el tornillo.
9. La pila
• El mando a distancia funciona con una pila
de litio CR2025 de 3V (incl.).
• Apriete la lengüeta hacia el interior [1] y
saque el soporte del mando a distancia [2].
24/09/2009 25 Velleman
®
Page 26

CARSFM1
• Introduzca la pila con la cara positiva hacia la parte trasera del
mando a distancia y vuelva a introducir el soporte en el mando a
distancia.
¡OJO!: Respete las advertencias del emb alaj e.
Mantenga las pilas le jos del alcance de niños.
10. Espe cificaciones
frecuencias 87,6 ~ 107,9 MHz (205 canales)
modulatción FM (F3E)
capacidad hasta 32 GB
protección contra sobrecargas
0,5 A/250 V rápido, Ø 5 x 20 mm
(FF0.5A)
entrad a 12 VCC (conector me c her o )
alimen t a ción
puerto USB 5 VCC/300 mA
mando a dis ta ncia pila de litio CR2 025 de 3V, inc l.
emisor FM 45 x 55 x 95 mm
mando a distancia 86 x 40 x 6 mm
dime nsiones
cable 2,5 ~ 3, 5 mm
250 mm
jack M-M
Utilice este aparato sólo con los accesorios originales.
Velleman NV no será responsable de daños ni lesiones
causados por un uso (indebido) de este aparato. Para más
información sobre este producto, visite nuestra página web
www.velleman.eu. Se pueden modificar las especificaciones y
el contenido de este manual sin previo aviso.
© DERECHOS DE AUTOR
Velleman NV dispone de los derechos de autor para este
manual del usuario .
Todos los derechos mundiales reservados. Está estrictamente
pro hibido reproducir, traducir, copiar, editar y guardar este man ual
del usuario o partes de ello sin previo permiso escrito del derecho
habiente.
24/09/2009 26 Velleman
®
Page 27

CARSFM1
BEDIENUNGSANLEITUNG
1. Einführung
An alle Einwo hner der Euro päischen Union
Wichtige Umweltinformationen über dieses Produkt
Dieses Symbol auf dem Produkt oder der Verpackung
zeigt an, dass die Entsorgung dieses Produktes nach
seinem Lebenszyklus der Umwelt Schaden zufügen kann.
Entsorgen Sie die Einheit (oder verwendeten Batterien)
nicht als unsortiertes Hausmüll; die Einheit oder
verwendeten Batterien müssen von einer spezialisierten Firma
zwecks Recycling entsorgt werden. Diese Einheit muss an den
Händler oder ein örtliches Recycling-Unternehmen retourniert
werden. Respektieren Sie die örtlichen Umweltvorschriften.
Falls Zweifel best ehen, wenden Sie sich fü r
Entsorgungsrichtlinien an Ihre ört lich e Behörde.
Wir be d a nke n u ns f ür den K auf des CARSFM1! Lesen Sie diese
Bedienungsanleitung vor Inbetriebnahme sorgfältig durch. Überprüfen
Sie, ob Tr ansp orts ch äden vor lie gen . So llte dies der Fall se in, verwe nde n
Sie das Gerät nicht und wenden Sie sich an Ihren Händler.
2. Sicherheitshinweise
Halten Sie Kinder und Unbefugte vom Gerät fern.
Nur für die Anwendung im Innenbereich.
Schützen Sie das Gerät vor Re gen und Feuchte, Staub und
extremen Temperaturen. Setzen Sie das Gerät keiner
Flüssigkeit wie z.B. Tropf- oder Spritzwasser, aus.
• Bei Schäden, die durch Nichtbeachtung der Bedienungsanleitung
verursacht werden, erlischt der Garantieanspruch. Für daraus
resultierende Folgeschäden übernimmt der Hersteller keine Haftung.
• Bei Schäden verursac ht durch eigenmächtige Änderungen er lischt
der Garantieanspruch.
3. Allgemeine Richtlin ie n
• Vermeiden Sie Erschütter ungen. Vermeiden Sie rohe Gewalt während der
Installation und Bedienung de s Gerätes.
• Nehmen Sie das Gerät erst in Betrieb, nachdem Sie sich mit
seinen Funktionen vertraut gemacht haben.
24/09/2009 27 Velleman
®
Page 28

CARSFM1
• Eigenmächtige Veränderungen sind aus Sicherheitsgründe n
verboten.
• Verwenden Sie das Gerät nur f ür Anwendungen beschriebe n in
dieser Bedienungsanle it ung sonst kann dies zu Schäden am
Produkt führe n und erlischt der Garantieanspruch.
4. Eigenschaften
• verwen de t RDS (Ra dio Data S ys tem)
• sendet in allen FM-Frequenzen (87.6 ~ 107.9MHz)
• Speicher für 7 FM-Frequenzen
• automatische Ein- und Ausschaltung
• plug-a nd -pla y (so for t be tr iebs ber eit )
• Standard USB-Anschluss, SD-Karteneinschub und Stereo-Eingang
von 2.5mm
• Lieferung mit 3.5mm-Kabel für Anwendung mit MP3-, CD- und
DVD-Sp ielern
• für MP3- und WMA-Dateien (nicht kompatibel mit DRM-Dateien)
• spielt eine aus ge w ä hlte Date i ab
• durch Ordner scrollen
• Anzeige: FM-Frequenz/EQ/Restzeit
• 5 Pegel, max. 50 Datenverzeichnisse
• Fernbedienung
o vorspule n/r ück sp ulen: 2x, 5x, 10x
o Abspielen einer Auswahl
o Bookmark-Funktion
5. Umschreibung
Siehe Abbildungen, Seite Error! Bookmark not defined. dieser
Bedienungsanleitung.
Sender
Taste Drücken Sie einmal Gedrückt halten (± 2 s)
abspielen – paus ieren
vorigen Titel abspielen
nächsten Titel
abspielen
die Sendefrequenz
ändern
gehen Sie zur fol gend en
+
24/09/2009 28 Velleman
Frequenz ( Schritt
Display:
Frequenz/EQ/Restzeit
gehen Sie zum vorigen
Datenverzeichnis
gehen Sie zum folgenden
Datenverzeichnis
den aktuellen Titel
wiederholen
gehen Sie zur fol gend en
Frequenz (Schritt
®
Page 29

CARSFM1
0,1 MHz) 1,0 MHz)
Lautstärke
2x +
DISPLAY
REPEAT wählen Sie “aktuellen Titel wiederholen“ <> normal
erhöhen/verringern
Frequenz speichern USB <> SD-Karte
Fernbedienung
wählen Sie USB <> SD-Karte aus
Information erscheint im Display: Frequenz, EQ und
Restzeit
Gehen Sie zum vorigen/nächsten Ordner
Lautstärke erhöhen/verringern
Gehen Sie zum vorigen/nächsten Titel
abspielen/pausieren
-
vorspulen/rückspulen, x2, x5 of x10
A B
Gehen Sie zur vorige n/nächsten Frequenz
Gehen Sie zur gespeicherten Frequenz
Kreieren Sie Bookmark
Bestimmen Sie Anfangs- und Endpunkt der Schleife
6. Installation und Anwendung
• Starte n S ie de W age n und stec ke n S ie de n Se nde r [A] in de n
12 VDC-Zigarettenanzünderausgang. Der Sender wird automatisch
eingeschaltet. Wenn dies nicht der Fall ist, überprüfen Sie die
Sicherung innerhalb des Steckers [A] (siehe §8).
• Schalten Sie das Autoradio ein und suchen Sie eine freie FM-
Frequenz. Stellen Sie dieselbe Frequenz des Senders ein, indem Sie
ein Mal MENU/REPEAT drücken, und danach
Sie wieder auf MENU/REPEAT um die Frequenz zu speichern.
• Es gibt 3 Weis en , um Mus ik über de n Send er zu hör en :
1. Über eine SD-Karte. Legen Sie eine SD-Karte in den Einschub
[C] ein. (beachten Sie, dass die Pole nach unten gerichtet sind).
oder . Drücken
24/09/2009 29 Velleman
®
Page 30

CARSFM1
2. Über ein USB-Gerät. Verbinden Sie ein USB-Gerät mit dem
USB-Anschluss [D].
3. Über 2,5 mm Mini Jackanschluss. Stecken Sie den 2,5mmAnschluss in den Mini Jackanschluss [E].
• Regeln Sie die Lautstärke vom Sender. Drücken Sie zwei Mal
MENU/REPEAT und danach
Lautstärkeregler des Autoradios für die besten Ergebnisse.
• Drück e n Sie
Drück e n Sie
vorige n /folgen de n D a tei zu gehen. H a lt e n S ie
gedrückt um das vorige/folgende Subdatenverzeichnis auszuwählen
(siehe §7 Die Dateien einteilen).
• Halten Sie
Frequenz, den EQ oder die Restzeit im Display anzuzeigen.
• Halten Sie MENU/REPEAT während der Wiedergabe ± 2 s gedrückt
um die aktuelle D a te i w ie de r a b zus p ie le n. Halte n S ie MENU/REPE AT
wieder ± 2 s ge dr ückt um zum nor mal en W iede rga be mo dus
zurückzukehren.
• Sie können bis zu 7 Frequenzen speichern. Wählen Sie zuerst die
gewüns c hte Freq ue nz und dr üc ken Sie dan n MEM/ SD -US B. W äh len
Sie de n gew üns c hten Tite l m it
• Rufen Sie eine gespeicherte Frequenz ab, indem Sie MEM/SD-USB
drücken bis die gewünschte Frequenz im Display angezeigt wird.
• Mit Musikdateien, die im USB-Medium gespeichert worden sind und
die über einen ID3-Tag verfügen, können Sie die RDS-Funktion
(Radio Data System) verwenden.
• Drücken Sie drei Mal MENU/REPEAT. Wählen Sie die RDS-
Funktion mit oder und drücken S ie MENU / RE PEAT wi e de r .
NOR: Dis play ze igt 8 Ze ic hen an
SCR: Display scrollt die Inform ation
• Drücken Sie vier Mal kurz MENU/REPEAT. Wählen Sie die
Scrollgeschwindigkeit (2 ~ 6 s) mit
wieder auf MENU/REPEAT.
Die Fernbedie nung
• Siehe §5 f ür die ver sc hie de ne n Fu nkt io ne n.
• Spulen Sie vor oder zurück mit
oder 10x).
• Rufen Sie eine gespeicherte Frequenz ab indem Sie FREQ HOTKEY
wieder ho lt drüc ke n b is die ge wü nsc hte Fr e que nz im Dis pla y
angezeigt wird.
um die Date i abzuspielen oder zu pausieren.
oder währe nd de r W ieder g abe , um zur
während der Wiedergabe ± 2 s gedrückt um die
oder (7 Pegel) . Ver wen de n Sie de n
oder ± 2 s
oder (1~7).
oder und dr üc ken Sie
oder (Geschwin digk e it 2x, 5x
24/09/2009 30 Velleman
®
Page 31

CARSFM1
• Eine Schleife wiederholen: Drücken Sie A um den Anfa ngs p unk t
und B um de n End pu nkt der Sch lei fe z u bes tim me n. D iese
Schle ife wir d wie der holt abges pie lt bis S ie B drü cke n.
• Drücken Sie BOOKMARK ehe Sie den Sender ausschalten, um die
Positio n in der D ate i zu sp eic her n. Bei der näc hste n Eins ch altu ng
wird der Sender ab diesem Punkt anfangen.
Verwenden Sie den USB-Anschluss nicht als Stromversorgung für
andere USB-Geräte.
Setzen Sie den Se nder kei nen mag ne tisch en Feld ern a us .
7. Die Dateien einteilen
• Der FM-Sender ist nur mit MP3- oder WMA-Dateien kompatibel;
andere Dateien werden nicht erkennt. Die Speicherkapazität beträgt
max. 32 GB (FAT32), max. 999 Dateien in 20 Datenverzeichnissen,
5 Pegel.
• Um die Suchzeit zu beschränken, kreieren Sie das neue
Datenverzeichnis MP3 im Speichermedium. Kreieren Sie max. 10
Subda te nver ze ic hn isse un ter MP3, z.B. per Musikgenre (Rock,
Klassisch, Pop…) und kopieren Sie bis zu 50 Dateien zu jedem
Subdatenverzeichnis.
• Nach Einschaltung sucht der Sender das Datenverzeichnis MP3 im
Speichermed ium. Nac hdem das Da tenver zeichn is gef unden is t, werden
alle Dateien unter dem ersten Subdatenverzeichnis abgespielt. Sie
können auch selber ein Subdatenverzeichnis auswählen. Hat der
Sender das Da tenverze ichn is MP3 nicht gefunden, so werden alle
Dateien im Speic hermedium nache inander abgespielt.
8. Die Sicherung ersetzen
• Schrauben Sie die Spitze des
Zigarettenanzündersteckers los. Drehen Sie
den Ring (siehe Pfeil) nach links.
• Entfernen Sie die alte Sicherung und legen
Sie eine neue ein (5 x 20 mm schnell, 0,5 A).
• Legen Sie die Metallspitze auf der Sicherung
und schrauben Sie den Ring fes t.
9. Die Batterie
• Die Fernbedienung funktion iert mit einer
CR2025 3V-Lithiumbatterie (mitgeliefert).
• Drücken Sie die Lasche des Batteriehalters
leicht [1] und ziehen Sie den Halter aus der
24/09/2009 31 Velleman
®
Page 32

CARSFM1
Fernbedienung [2].
• Legen Sie die Batterie in den Halter (‘+’ in Richtung der
Unterseite der Fernbe dienung) ein und schieben Sie den Halter
zurück in die Fernbedienung.
10. Technis che Da ten
Frequenz 87,6 ~ 107,9 MHz (205 Kanäle)
Modulation FM (F3E)
Kapazität tot 32 GB
ACHTUNG: Beachten Sie die Warnungen der
Verpackung. Halten Sie die Batterien von Kindern
fern.
Überlastungsschutz
0,5 A/250 V schnell, Ø 5 x 20 mm
(FF0.5A)
12 VDC
Eingang
(Zigarettenanzünderstecker)
Stromversorgung
USB-Anschluss 5 VDC/300 mA
CR2025 Lithiumbatterie 3V,
Fernbedienung
mitgeliefert
FM-Sender 45 x 55 x 95 mm
Fernbedienung 86 x 40 x 6 mm
Abmessungen
Kabel 2,5 ~
250 mm
3,5 mm jack M-M
Verwen den Sie die ses Gerät nur mit originellen Zubehörteilen.
Velle man NV überni mmt keine Haftung für Sc haden oder
Verletzungen bei (fal scher) Anwendung diese s Gerätes. Für
mehr Informationen zu diesem Produkt, siehe
www.velleman.eu. Alle Änderung en ohne vorherige
Ankündigung vorbehalten.
© URHEBERRECHT
Velleman NV besitzt das Urheberrecht für diese Bedienungsanleitung.
Alle weltweiten Rechte vorbe halten. Ohne vorherige schriftliche Gene hmig ung des
Urhebers ist es nicht gestattet, d ie s e Bedie nungsanleitung ganz oder in Teilen zu
reproduzieren, zu kopieren, zu übersetzen, zu bearbeiten oder zu speichern.
24/09/2009 32 Velleman
®
Page 33

CARSFM1
MANUALE UTENTE
1. Introduzione
A tutti i res identi nell’Unione Europea
Importanti informazioni ambientali relative a questo prodotto
Questo simbolo riportato sul prodotto o sull’imballaggio, indica che è
vietato s maltire il prodotto ne ll’ambiente al termine del suo
ciclo vitale in quanto può essere nocivo per l’ambiente
stesso. Non smaltire il prodotto (o le pile, se utilizzate)
come rifiuto urbano indifferenziato; dovrebbe essere
smaltito da un’impresa specializzata nel riciclaggio.
Per informazioni più dettagliate circa il riciclaggio di questo
prodotto, contatt ar e l’ufficio comunal e, il serv izio locale di
smalti me nto rifiut i oppure il ne gozio presso il quale è sta t o
effettuato l’acquisto.
La ringraziamo per aver scelto Velleman! Si prega di leggere
attentamente le informazioni contenute nel presente manuale prima di
utilizz ar e il d isp os itiv o. Assic urar s i che l’ ap pare cch io no n s ia sta to
danne ggia to d ura nte il t ra spo rto ; in t ale even ien za, c ont at tar e il pr opr io
fornitore.
2. Istruzioni relative alla sicurezza
Tenere il dispositivo lontano d alla portata dei bambini e
delle persone non qualificate
Solo per utilizz o in ambienti interni. Tenere il d ispositivo
lontano dall’acqua e dalla polvere.
• I danni der iv ant i dall’ ino ss er van za de lle indic az io ni for nit e ne l
prese nte ma nua le no n so no c ope r ti da g ar anz ia; il ve nd itor e no n
sarà ritenuto responsabile di eventuali danni cagionati a cose o
persone.
• Eventua li da nni c aus at i da mod if iche appor t ate a l disp os itiv o, da
parte dell’utente, non sono coperti dalla garanzia.
.
3. Informazioni general i
• Evitare di scuotere o di urtare violentemente il dispositivo, sia
durante l’ inst allaz io ne c he dur an te l’ utiliz zo .
• Prima di u tilizz ar e il d ispo sit ivo , è co ns iglia bi le co nos ce re a fo ndo
tutte le fun zio ni dis po nibil i.
24/09/2009 33 Velleman
®
Page 34

CARSFM1
• Per ovvie ragioni di sicurezza è vietato apportare delle modifiche al
dispositivo.
• Utilizza re il dis pos it ivo sola me nte per lo sco po per il q ua le è s tato
progettato. Ogni altro tipo di utilizzo determina la decadenza della
garanzia.
4. Caratteristiche
• supporta RDS (Radio Data System)
• trasmette su tutte le frequenze FM (87,6-107,9MHz)
• memorizza fino a 7 frequenze FM
• accens io ne e spe g n imento a u to ma t ic i
• plug & play
• porta USB, slot SD Card e presa jack 2,5mm stereo di tipo standard
• cavo 3,5mm per utilizzo con MP3, CD e DVD players, incluso
• legge file MP3 e WM A (no f ile DRM )
• possibilit à d i sc orre re le car te lle
• visualizzazione frequenza FM/equalizzatore/tempo di riproduzione
rimanente
• 5 sottolivelli, max 50 directory
• Telecomando
o Avanzamento e riavvolgimento rapido: 2x, 5x, 10x
o Ripetizione di sezioni definite
o segnalibro
5. Panoramica
Fare riferimento all’immagine riportata a pag.2 del presente manuale.
Trasmettitore audio
tasto S ingola pressione Pressione lunga (±2s)
play – pause visualizza: frequenza /
Riproduce traccia
precedente
Riproduce traccia
successiva
Cambia la frequ enza di
trasmissione
Passa alla frequenza
successiva (passo
+
24/09/2009 34 Velleman
0,1MHz)
equalizzatore / tempo
rimanente
Passa alla directory
precedente
Passa alla directory
successiva
Ripete la traccia corrente
Passa alla frequenza
successiva (passo 1MHz)
®
Page 35

CARSFM1
volume up/down -
2x +
DISPLAY
REPEAT
A B
Memorizza frequenza e
imposta frequenza
memorizzata
Telecomando
Sele ziona ingresso USB e SD-car d
Visualizz a le informazion i relative a: frequenza,
equalizzatore e tempo rimanente
Passa da ripetizione traccia corrente a riproduzione
normale
Passa alla cartella precedente o a quella successiva
volume up o down
Passa alla traccia precedente o a quella successiva
play o pause
Riavvolgimento o avanzamento veloce, velocità x2, x5
o x10
Passa alla frequenza precedente o a quella successiva
Passa alla frequenza memorizzata
Imposta il segnalibro
Imposta la porzione di traccia da ripetere
Selez io n a ing r esso
USB e SD-card
6. Installazione e utilizzo
• Avviare il m o tore de ll’ au to q uin di ins er ire la sp ina del d ispo sit ivo [A]
nella presa accendisigari (12VDC). Il trasmettitore si accende
autom atic ame nte. Se c iò no n avv iene , ver ific are l’int egr it à de l
fusib ile inser it o ne lla s pin a [A ] (v e d i c a p. 7).
• Accende re l’ a utor a dio e ric er car e un a fre q uenz a lib er a ne lla b and a
FM. Impostare la stessa frequenza sul trasmettitore premendo una
volta il ta sto MENU/ REPEAT o di seg uito il tas to
nuova mente il t asto MENU/ REPE AT per memo riz zare la fre que nz a
selezionata.
24/09/2009 35 Velleman
o . Premere
®
Page 36

CARSFM1
• I file music ali p oss ono esser e for nit i al tr asme tt itor e in tre mo di
differenti:
1. Tramite SD-c ard . Inserir e nell’apposito s lot [C] una SD -car d
contenente le trace audio (con i pin rivolti verso il basso).
2. Tramite dis pos itivo USB. Co lle gare a lla po rt a USB de l
trasmettitore [D] un disposit ivo USB.
3. Tramite la presa jack da 2,5mm. Inserire la spina jack 2,5mm
nella pr es a [E]del dis posit ivo .
• Impostar e il v olu me de l tras met tit ore ad un livello me dio . Pre mere
due volte il tasto MENU/REPEATe di seguito il tasto
livelli) . Reg olar e il v olu me de lla r ad io per ot tene re la mig lior qua lità
del segnale.
• Premere
premere
successiva. Premere e tenere premuto
alla cartella precedente o a quella successiva (vedere cap. 6:
organizzazione dei file).
• In modalit à r ipr od uz io ne, pre me re e tene re pre mut o
visualizzare la freque nza, l'equalizzatore, o il tempo rimanente.
• In modalit à r ipr od uz ione , pre me re e tene re pr e mut o il ta s to
MENU/REPEAT per ±2s per ripetere la traccia c orrente. Premere e
tenere premuto nuovamente per ±2s il tasto MENU/REPEAT per
tornare alla riproduzione normale.
• È possib ile me mo riz zar e fin o a 7 fr eq ue nze pe r per me tte re u n
acces so ra pido . Se lez io nare prim a la fr eq uen za des id er ata, quin di
premere il tas to MEM /SD- USB . Utiliz zar e il t as to
selez iona re l' indir izz o di memo ria (1~ 7).
• Per richiamare una frequenza memorizzata premere ripetutamente
il tasto MEM/SD-USB fino a quando non viene visualizzata sul
display.
• L'autoradio dotata di RDS (Radio Data System) visualizzerà sul
propr io dis play le infor maz io ni re lat ive alle tr acce a udio fo rnit e al
dispositivo tr am it e U SB (sempre c he q ue ste sian o d is ponibili) .
• Premere 3 volt e il t as to MENU/ REPE AT. U tiliz zar e il t as to
per selezionare la modalità di visualizzazione RDS quindi
premere nuovamente il tasto MENU/REPEAT.
NOR: il dis pla y mos tr a 8 car atter i
SCR: il dis pla y scor re con inte rv allo di 1 se co ndo.
per passare da pause a play. In modalità play,
o per pas sar e alla tr acc ia precedente o a quella
o per ±2s per pass are
o (7
per ±2s per
o per
o
24/09/2009 36 Velleman
®
Page 37

CARSFM1
• Premere brevemente per 4 volte il tasto MENU/REPEAT.
Utilizz are il t asto
della modalità di visualizzazione RDS (2~6s) quindi premere
nuovamente il tasto MENU/REPEAT.
Telecomando
• Per le funzio ni de i tas ti f are rifer imen to alla ta bella “Tele co mando ”
riportata a pagina 5.
• Utilizza re il tas to () o () per r iavvolgere o avanzare ve locemente
la traccia corrente con velocità (2x, 5x or 10x).
• Per richiamare una frequenza memorizzata, premere ripetutamente
il tasto FREQ HOTKEY fino a quando non viene visualizzata sul
display quella desiderata.
• Per riprodurre solo una determinata porzione di traccia, premere il
tasto A per def inir e l' ini zio de lla por z ione e di seg uit o pr emer e il
tasto B per de fin ire la fin e. La po rz ione di br ano de f init a tra A e B
verrà ripe tu ta f ino a q uand o no n ve rr à pre muto nuo va me nte il t as to
B.
• Se si preme il t as to BO OKM AR K prim a di spe gne re il d isp os itiv o , alla
successiva accensione la riproduzione del brano riprenderà dal
punto in c u i e r a stata int er ro t t a.
o per se le zio nare l' inte rva llo d i te mpo
SI RACCOMAN DA DI NON utilizzare la porta USB per alimentare
altri d ispo sit ivi U SB .
Tenere il disposi tivo l ontan o da campi mag neti ci!
7. Organizzazione dei file
• I file mus ica li, pe r po ter ess ere tras mes si d al d ispos itiv o , devo no
essere in forma to mp3 o WMA. Gli a ltr i form ati no n ve ngono
riconosciuti. La capacità del supporto di archiviazione è limitata a
32GB (FAT32), max. 999 file, in 20 directory con 5 sottolivelli.
• Per ridurre i tempi di ricerca creare una directory sul supporto di
arch iv ia z io ne denomin a ta : MP 3 . Creare sotto questa cartella max.
10 sottodirectory indicanti ad esempio il tipo di musica (rock,
classic, pop…) e copiare in ciascuna di esse max.50 file musicali.
24/09/2009 37 Velleman
®
Page 38

CARSFM1
• All'avv io il d isp os itiv o ved rà q ues ta car tella e r ipro dur rà i f ile
presenti secondo l'ordine di archiviazione adottato. Anche la ricerca
sarà facilitata. Se invece la directory MP3 non è pres en te , tutt i i file
disponibili sul supporto di memorizzazione verranno riprodotti
secondo l'ordine di apparizione.
8. Sostituzione del fusibile
• Per sostituire il fusibile svitare l'estremità
della spina per accen disigari (r uotare la
ghiera come ind icato nella figura).
• Sostituire il fusibile con uno di pari
caratteristiche (5x20mm rapido, 0,5A).
• Rimettere il cappuccio metallico sul fusibile
e riavvitare la ghiera.
9. Batteria
• Il telecomando utilizza una batteria al litio
da 3V tipo CR2025 (inclusa).
• Per sostituirla premere sul lato del
cassetto portabatteria [1] quindi tirare
per estrarlo [2].
• Inserire la batteria rispettando la polarità
(il ‘+’ rivolto verso il retro del telecomando) e richiudere il
cassetto portabatteria spingendo lo fino ad udire un “click”.
ATTENZIONE: maneggiare le batterie con
cautela. Osservare le indicazioni di sicurezza
riportate sul loro involucro. Smaltire le batterie
secondo le vigenti direttive locali. Tenere le
batter ie fuori dalla porta ta dei bambini.
24/09/2009 38 Velleman
®
Page 39

CARSFM1
10. Specifiche tecniche
Frequenze di trasmissione 87,6 – 107,9 MHz (205 canali)
modulazione FM (F3E)
Capacità supportata Fino a 32GB
Protezione elettrica
Fusib ile rapido 0,5A / 250V, Ø5 x
20mm
Ingres so 12VDC (presa ac ce ndis iga r i auto )
Alimentazi
one
Porta USB 5VDC/300mA
Telecomando Batteria al litio 3V, CR2025, inclusa
Trasmettitore FM 45 x 55 x 95 mm
dimensioni
Telecomando 86 x 40 x 6mm
Cavo 2, 5 -3, 5mm
250mm
jack M-M
Utilizzare solo accessori originali. Velleman nv non può essere
ritenuta responsabile per danni a cose o person e che
potrebbero derivare da un errato utilizzo del dispositivo. Per
ulteriori informazioni relative a questo prodotto, visitare il
nostro sito www.hqpower.com. Le informazioni contenute in
questo manuale poss ono ess ere soggette soggette a
modifiche senza alcun preavviso.
24/09/2009 39 Velleman
®
Page 40

CARSFM1
R&TTE Declaration of Conformit y
R&TTE-verklaring van overeenstemming
Déclaration de conformité R&TTE
R&TTE Konformitätserklärung
Declaración de conformidad R&TTE
We / wij / nous / Wir / nostros
Velleman Components NV
Legen Heirweg, 33
9890 Gavere (België)
Declare on our own responsibility that the finished product(s):
Verklaren op eigen verantwoordelijkheid dat het afgewerkte product:
Déclarons sous notre propre res ponsabilité que le produit fini :
Erklären voll verantwortlich dass nachfolgendes Produkt:
Declaramos bajo nuestra sola responsabilidad que el producto
mencionado a continuación:
Brand / merk / marque / Marke / marca:
Velleman
Trade name / handelsnaam / denomination commerciale /
Markenname / denominación commercial:
CAR FM TRANSMITTER FOR MP3 PLAYERS WITH RDS -
USB/SD-SLOT/MINI JACK - REMOTE CONTROL
Type or model / type of model / type ou modèle / Typ oder Modell /
tipo o modelo:
CARSFM1
24/09/2009 40 Velleman
®
Page 41

CARSFM1
constituting the subject of this declaration, conforms
with the essential requirements and other relevant stipulations of the
R&TTE Directive (1999/5/EC).
die het voorwerp uitmaakt van deze verklaring,
voldoet aan de essentiële ve reisten en an dere releva nte bepalingen
van de R&TTE-richtlijn (1999/5/EC).
faisant l’objet de la présente déclaration, satisfait aux
exigences essentielles et toute autre stipulation pertinente de la
directive R&TTE (1999/5/EC).
auf das sich diese Erklärung bezieht, den
grundlegenden Anforderungen und anderen relevanten
Vereinbarungen der R&TTE-Richtlinie (1999/5/EC) entspricht.
cumple los requisitos ese nciales y las otras
estipulaciones relevantes de la Directiva R&TTE (1999/5/EC).
The product con f orms to the foll ow i n g norm ( s) an d / or on e or sev era l
other normative documents:
Het product voldoet aan de volgende norm(en) en/of meerdere
andere normgevende documenten:
Le produit est conforme à la norme suivante / aux normes suivantes
et/ou à plusieurs autres documents normatifs :
Das Produkt entspricht den folgenden Normen und/oder anderen
normativen Dokumenten:
Es conforme a la ( s) sig uiente(s) norma(s) y/ o a u n o o vari os ot r os
documentos normativos:
EMC: EN 301 489-1 v1.6.1
EN 301 489-9 v1.3.1
LVD: EN 60950-1
R&TTE: EN 300 357-1 v1.3.1
EN 300 357-2 v1.3.1
24/09/2009 41 Velleman
®
Page 42

CARSFM1
Technical data are available and can be obtained from:
Les données techniques sont disponibles et peuvent être obtenues
chez :
Technische gegevens zijn beschikbaar en kunnen worden
aangevraagd bij:
Die technische Dokumentation zu den oben gennanten Produkten
wird geführt bei:
Los d atos técnicos están disp onibles y puede n ser solicita dos a:
Velleman Components NV
Legen Heirweg, 33
9890 Gavere (België)
Place and date of issue / Plaats en datum van uitgifte / Place et date
d’émission / Ort und Datum der Ausstellung / Lugar y fecha de
emisión:
Gavere, 07/01/2009
Authorised signatory for the company / Bevoegde ondertekenaar
voor de firma / Signataire autorisé(e) de la société / bevollmächtigte
Person/ Respabonsle de la empresa:
Mr. Luc De Meyer - Purchasing Manager
24/09/2009 42 Velleman
®
 Loading...