

Page 1

CAMTVI7N/CAMTVI7WN/
CAMTVI8N/CAMTVI8WN
MULTI PROTOCOL CAMERA – OUTDOOR
MULTIPROTOCOL-CAMERA - GEBRUIK BUITENSHUIS
CAMÉRA MULTI PROTOCOLES – EXTÉRIEUR
CÁMARA MULTI-PROTOCOLO – EXTERIORES
MULTIPROTOKOLL-KAMERA –FÜR DEN AUßENBEREICH
KAMERA WIELOPROTOKOŁOWA – ZEWNĘTRZNA
CÂMARA MULTI-PROTOCOLO – EXTERIOR
CAMTVI7N/CAMTVI8N
CAMTVI7WN/CAMTVI8WN
HD-TVI / CVI / AHD / ANALOGUE – DOME – 1080P
USER MANUAL 4
HANDLEIDING 10
MODE D'EMPLOI 16
MANUAL DEL USUARIO 22
BEDIENUNGSANLEITUNG 28
INSTRUKCJA OBSŁUGI 34
MANUAL DO UTILIZADOR 40
Page 2

CAMTVI7N/CAMTVI7WN/CAMTVI8N/CAMTVI8WN
V. 01 – 18/07/2016 2 ©Velleman nv
A
video
vidéo
vídeo
Video
B
power
voeding
alimentation
alimentación
Stromversorgung
zasilanie
alimentação
Page 3
CAMTVI7N/CAMTVI7WN/CAMTVI8N/CAMTVI8WN
V. 01 – 18/07/2016 3 ©Velleman nv
AE
BRIGHTNESS
1-20
EXPOSURE MODE
GLOBE
CENTER
BLC
FLC
GAIN
1-8
RETURN
WB
MODE
ATW
MWB
RGAIN
1-16
BGAIN
1-16
RETURN
DAY&NIGHT
MODE
AUTO
COLOR
B/W
RETURN
VIDEO SETTING
CONTRAST
SHARPNESS
COLOR GAIN
DNR
FORMATE
PAL
NTSC
WDR
ON
OFF
RETURN
LANGUAGE
ENGLISH
中文
ESPANOL
РУССКИЙ
ITALIAN
RESET
SAVE-EXIT
EXIT
Page 4

CAMTVI7N/CAMTVI7WN/CAMTVI8N/CAMTVI8WN
V. 01 – 18/07/2016 4 ©Velleman nv
USER MANUAL
1. Introduction
To all residents of the European Union
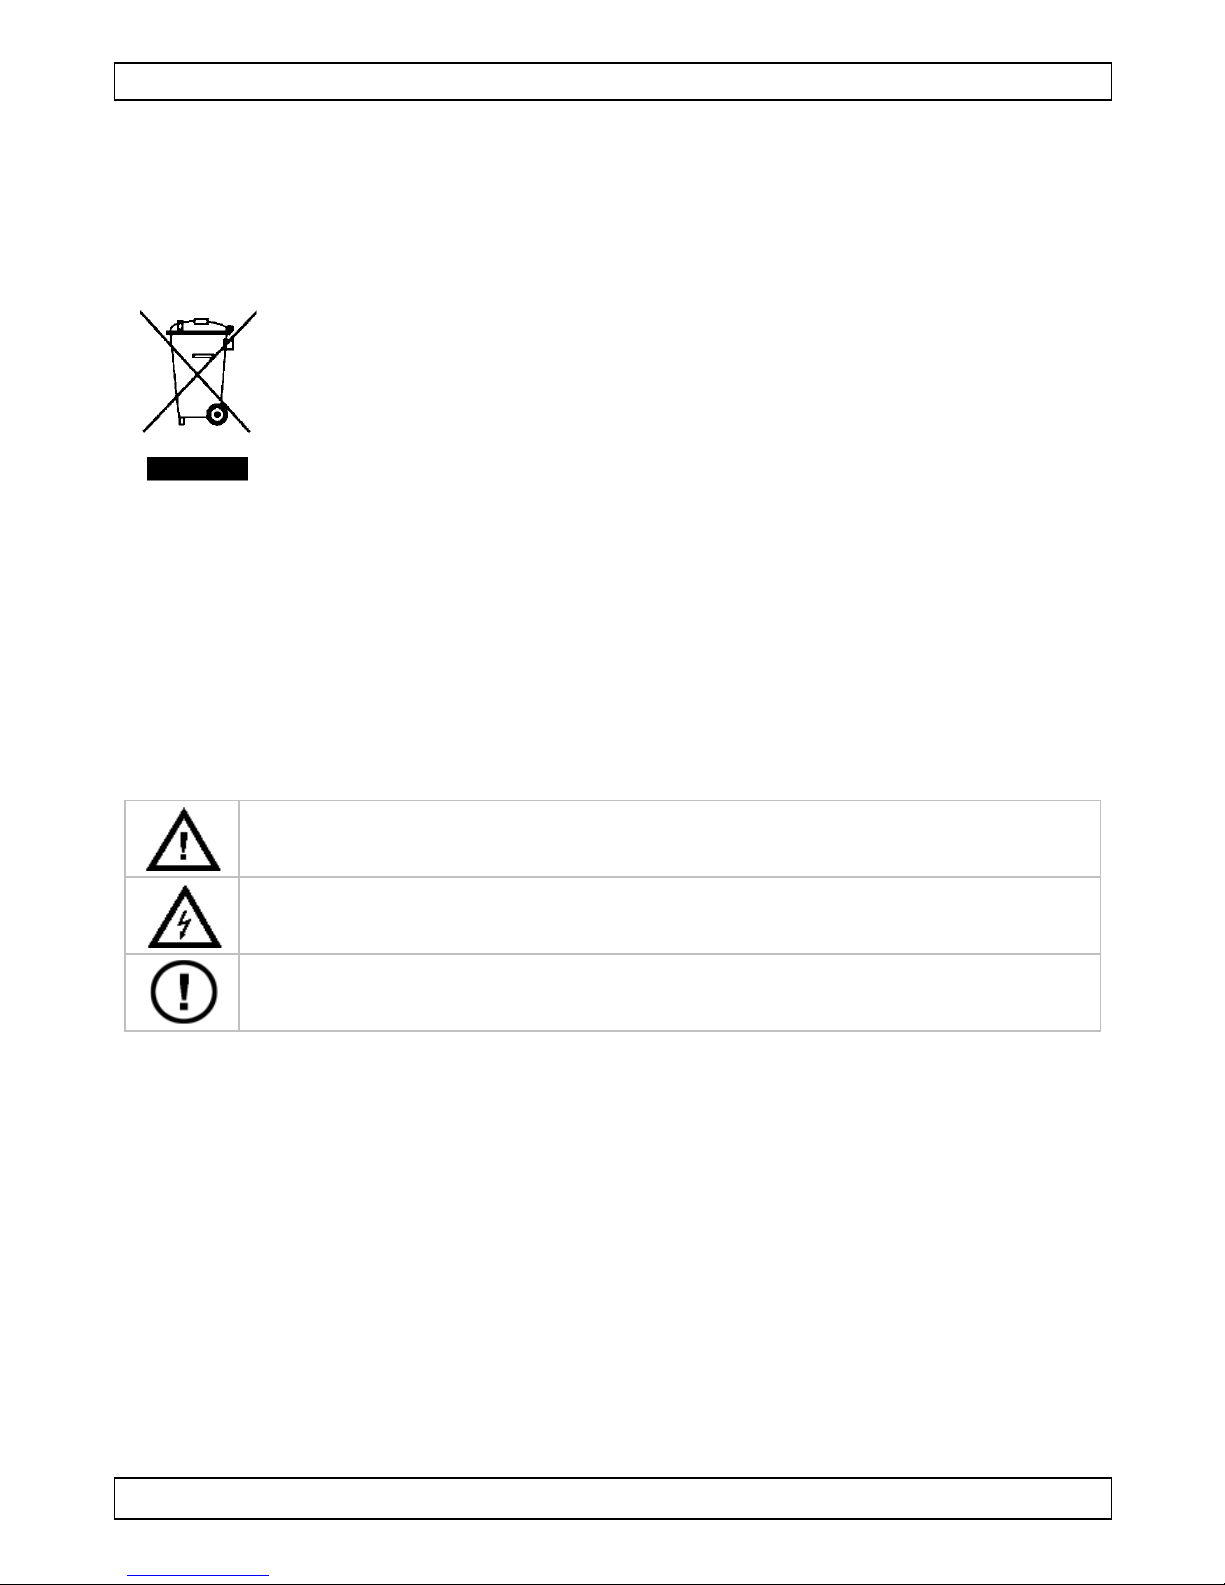
Important environmental information about this product
This symbol on the device or the package indicates that disposal
of the device after its lifecycle could harm the environment. Do
not dispose of the unit (or batteries) as unsorted municipal waste;
it should be taken to a specialized company for recycling. This
device should be returned to your distributor or to a local
recycling service. Respect the local environmental rules.
If in doubt, contact your local waste disposal authorities.
Thank you for choosing Velleman! Please read the manual thoroughly before
bringing this device into service. If the device was damaged in transit, do
not install or use it and contact your dealer.
2. Safety Instructions
Keep the device away from children and unauthorised users.
Risk of electric shock when opening the cover.
DO NOT disassemble or open the cover. There are no user-
serviceable parts inside the device. Refer to an authorized dealer
for service and/or spare parts.
3. General Guidelines
Refer to the Velleman® Service and Quality Warranty on the last pages
of this manual.
Familiarise yourself with the functions of the device before actually using it.
All modifications of the device are forbidden for safety reasons. Damage
caused by user modifications to the device is not covered by the warranty.
Only use the device for its intended purpose. Using the device in an
unauthorised way will void the warranty.
Damage caused by disregard of certain guidelines in this manual is not
covered by the warranty and the dealer will not accept responsibility for
any ensuing defects or problems.
Keep this device away from extreme heat.
Protect this device from shocks and abuse. Avoid brute force when
operating the device.
DO NOT use this product to violate privacy laws or perform other illegal
activities.
Page 5
CAMTVI7N/CAMTVI7WN/CAMTVI8N/CAMTVI8WN
V. 01 – 18/07/2016 5 ©Velleman nv
4. Features
This HD CCTV camera is equipped with a CMOS image sensor. The
video image quality is 1080P. The video signals can be set to HD-TVI, HD-
CVI, AHD and analogue video signals. The IR-cut filter will filter the IR
light, so it cannot distort the colour image. When it gets dark, the camera
automatically switches to night mode. In night mode, the camera enables
the IR LEDs and disables the IR-cut filter.
weatherproof
with B/W night vision (IR LEDs)
1080P video signal
vandal-proof bracket
varifocal lens (CAMTVI8(W)N only)
5. Overview
Refer to the illustrations on page 2 of this manual.
1
mounting plate
7 lens
2
fixation ring
8 manual focus
3
positioning ring
9 light sensor
4
manual zoom
10
cable slot
5
lens enclosure (sphere)
11
cable
6
IR night LEDs
6. Hardware installation
Refer to the illustrations on page 2 of this manual.
Choose a location for the camera, keeping following guidelines in mind:
o do not install the camera in locations where extremely high or low
temperatures or excessive vibrations may occur.
o avoid mounting the camera near high electro-magnetic fields.
o do not aim the camera at the sun or other extremely bright objects
or reflections (e.g. metal doors).
Hold the mounting plate [1] and unscrew the fixation ring [2] by
turning it counter-clockwise. Note that the lens enclosure [5] and
positioning ring [3] are also released.
Use the mounting plate [1] to determine the position of the mounting
holes. Drill the holes.
Guide the power and video cable [11] through one of the cable slots
[10] and fix the mounting plate [1] on the ceiling or wall with the four
screws.
Position the positioning ring [3] over the lens enclosure [5] onto the
mounting plate [1] and then fix the ensemble by screwing the fixation
ring [2] onto the mounting plate [1]. Make sure the fixation ring is not
Page 6
CAMTVI7N/CAMTVI7WN/CAMTVI8N/CAMTVI8WN
V. 01 – 18/07/2016 6 ©Velleman nv
screwed too tight to leave the option open to position the lens into the
direction of the desired field of operation.
Connect the two wires for an analogue PAL signal; leave them
unconnected for a HD 1080P TVI signal.
Connect the video connector [A] to a monitor (not incl.) or a sequential
switcher/quad splitter (not incl.) in case of multiple domes.
Connect the power connector [B] to a 12 VDC power supply (not incl.).
Set up the desired field of observation by adjusting the position of the
lens enclosure [5] in the positioning ring [3].
Manually adjust the zoom [4] and focus [8] with their screws. The
location of the screws can be determined by looking at the position of
the light sensor [9].
Tighten the fixation ring [2] to secure the camera’s position.
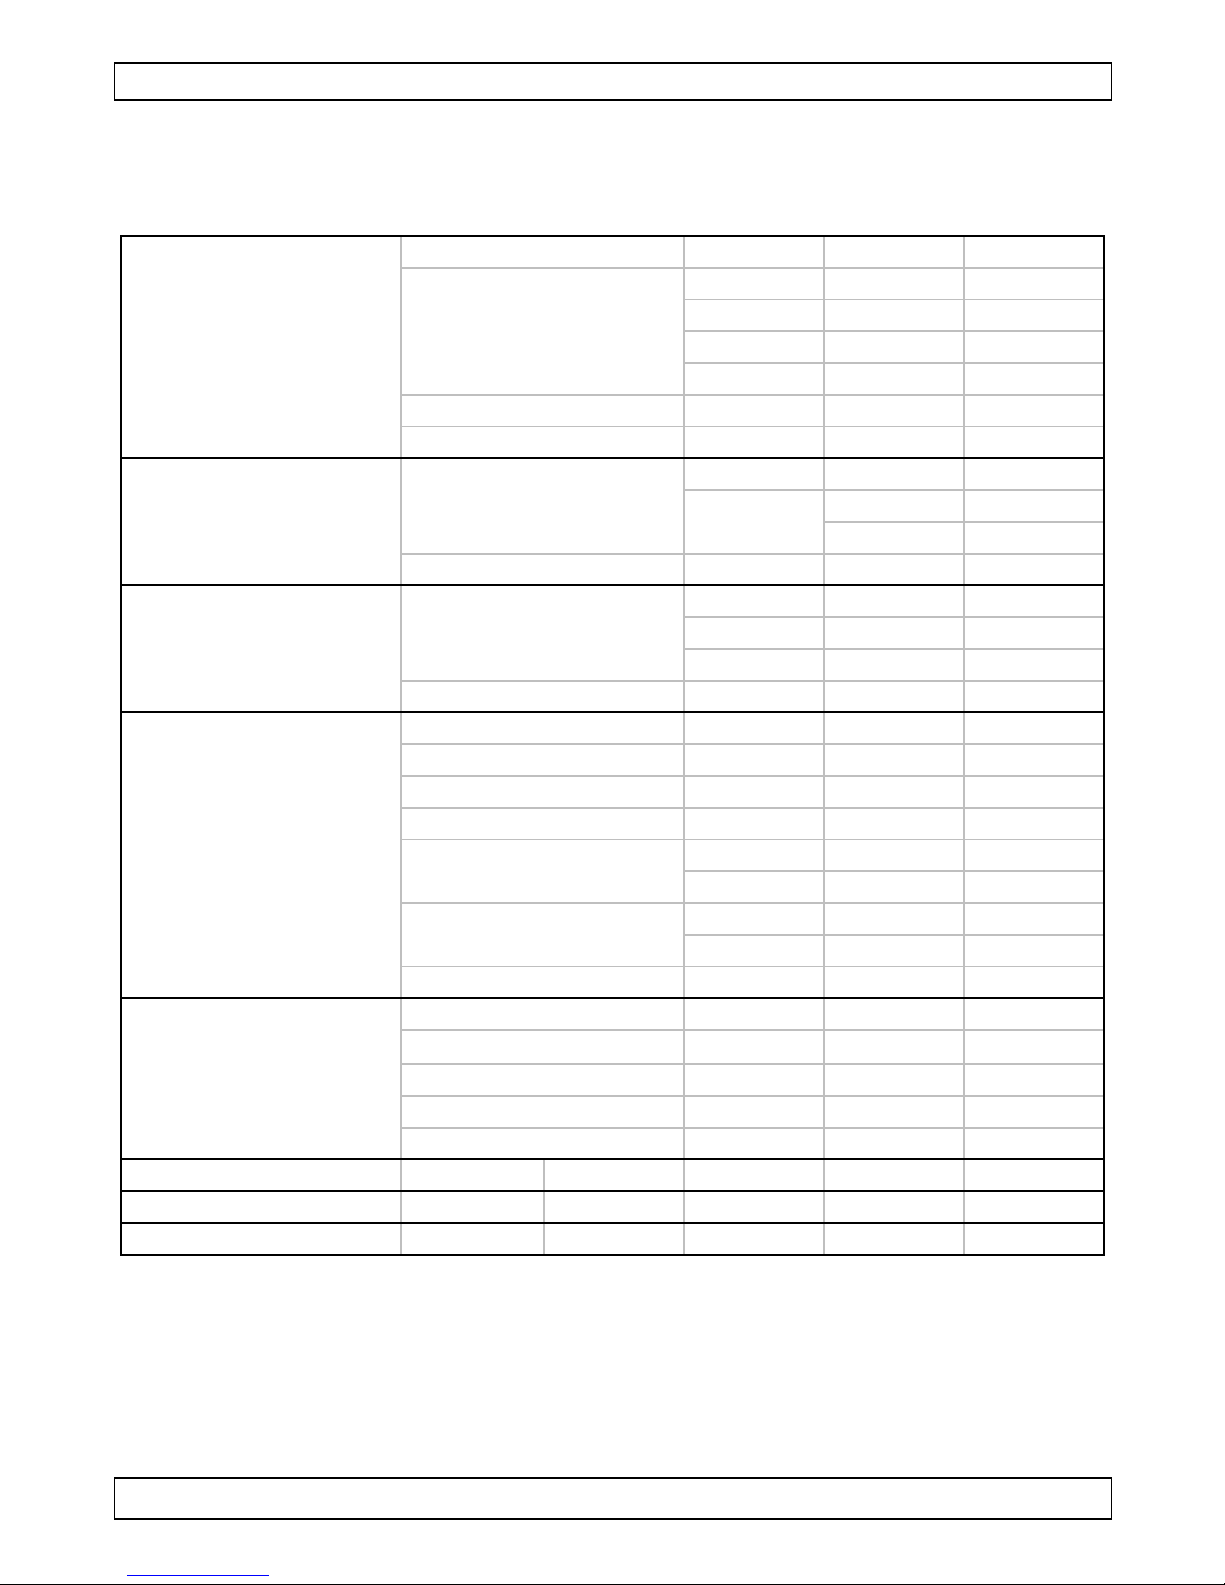
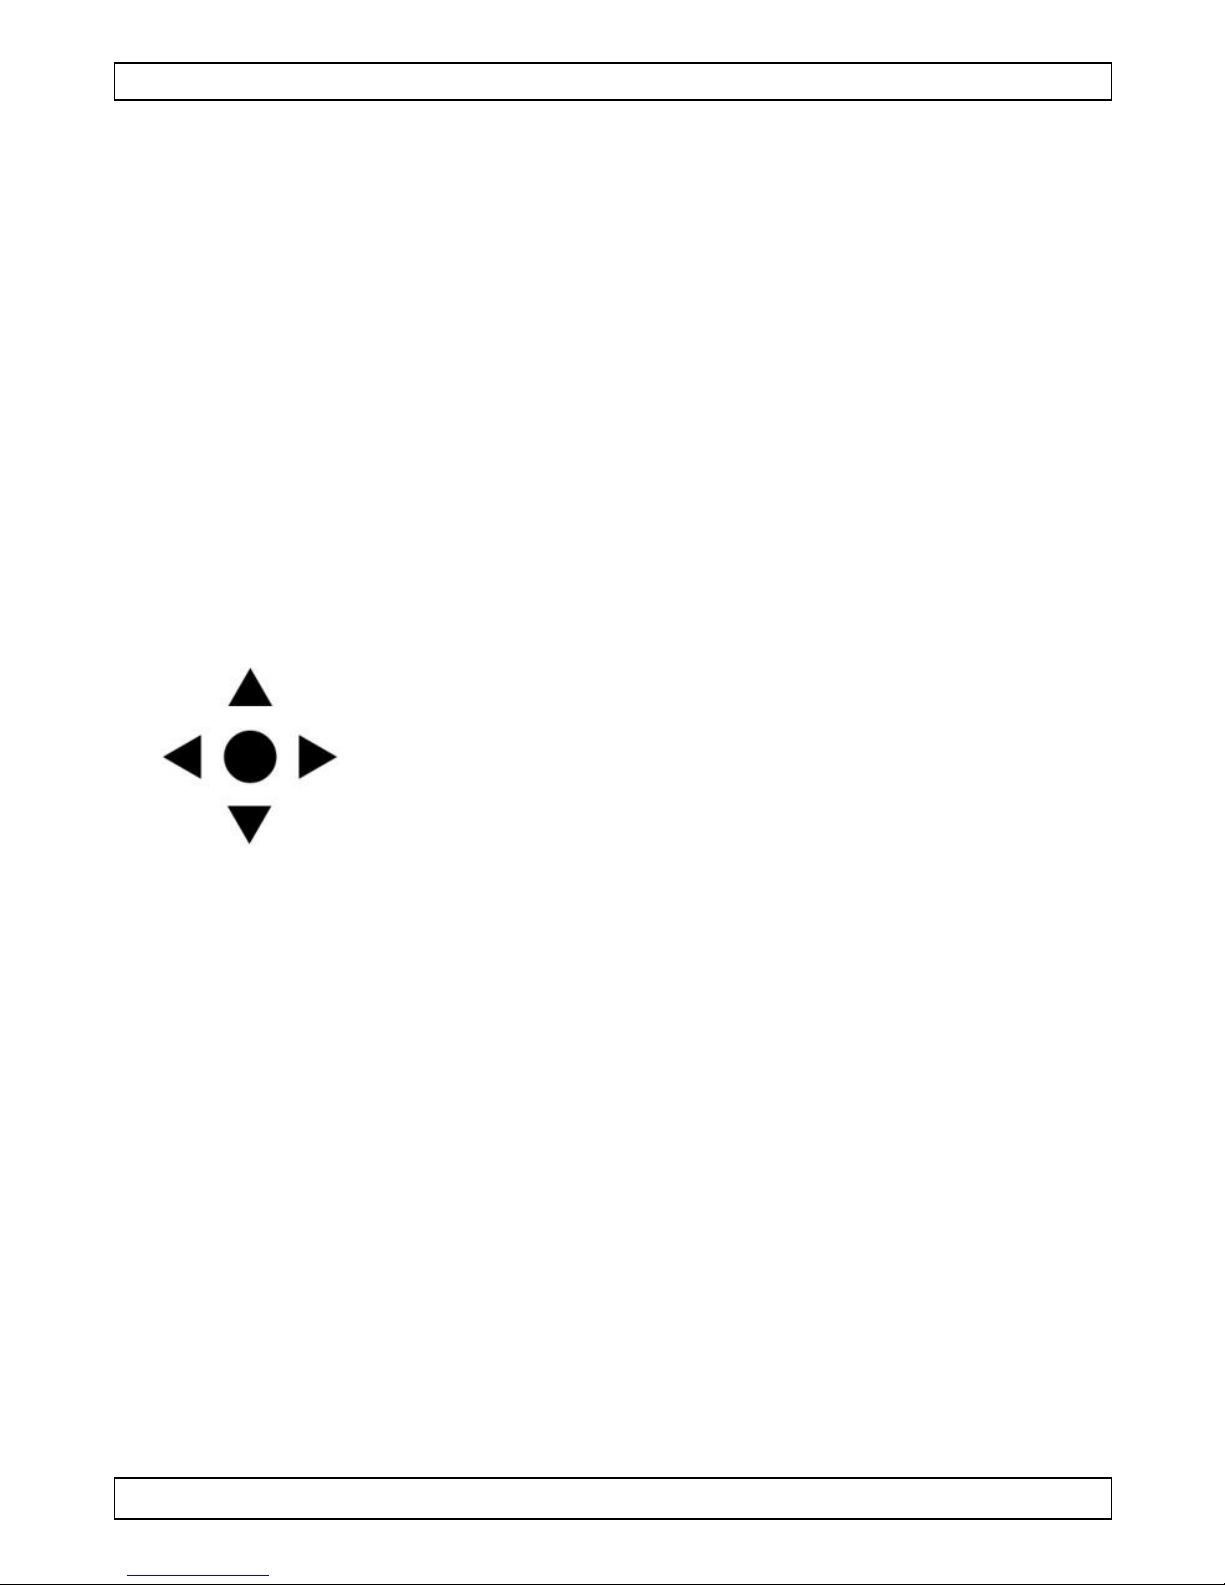
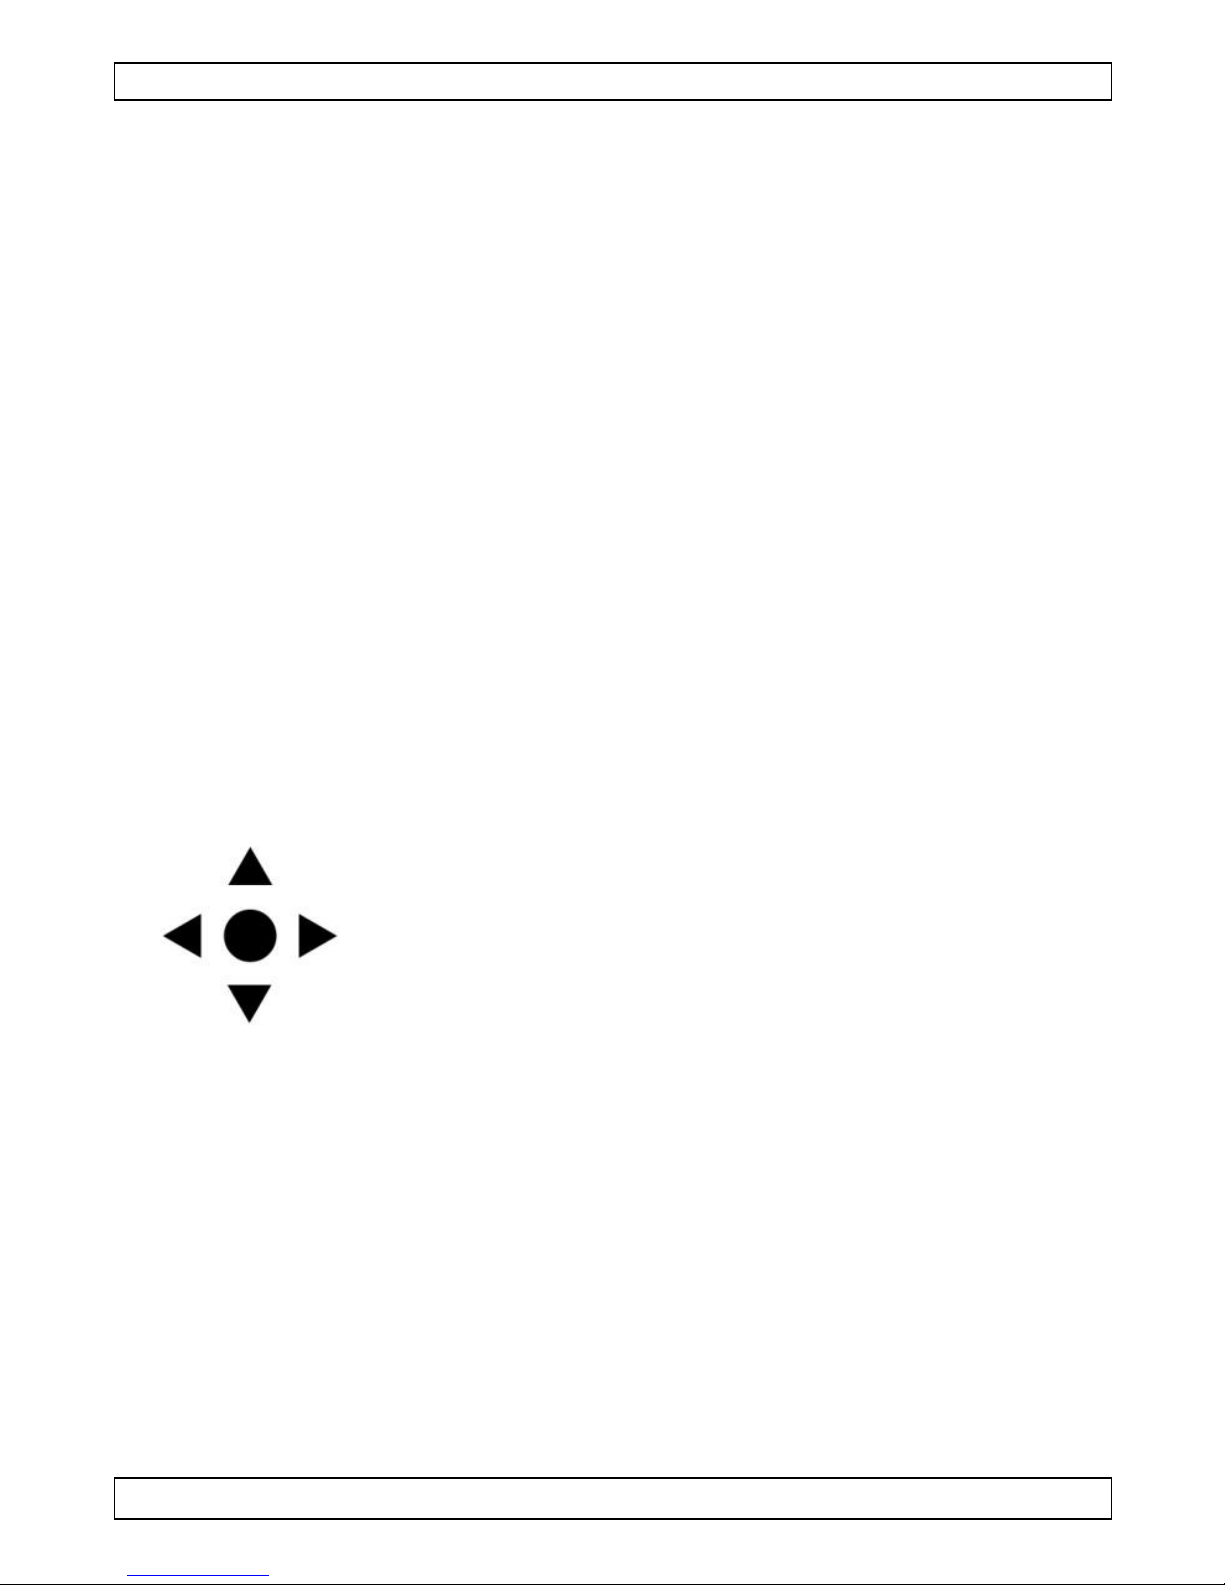
7. OSD Settings
There is a small joystick in the camera cable that allows you to adjust the
settings of the camera using an on-screen display (OSD).
Press the middle button to access the menu, or to
select an option.
Press the up and down buttons to move up and
down in the menu.
Press the left and right buttons to modify the menu
parameters.
In the OSD menu:
NEXT/BACK: select this option and press the middle button to go to the
next/previous page of options in the menu.
RETURN: select this option and press the middle button to return to the
previous level in the menu.
EXIT: select this option and press the middle button to leave the OSD
menu without saving the settings.
SAVE ALL: select this option and press the middle button to save all
settings.
CAMERA RESET: select this option and press the middle button to reset
the camera to the factory defaults.
The OSD menu settings are described in detail below.
Refer to the table on page 3.
Page 7
CAMTVI7N/CAMTVI7WN/CAMTVI8N/CAMTVI8WN
V. 01 – 18/07/2016 7 ©Velleman nv
7.1 Selecting the Video Signal
Hold the joystick button pressed for 5 seconds to select your video signal
(default signal: TVI).
AHD
CVBS
TVI
CVI
7.2 Automatic Exposure (AE)
Use this menu to set the common adjustments for video images.
7.3 White Balance (WB)
Use this menu option to define the white balance adjustment.
7.4 Day & Night
The camera can switch automatically between colour images in day
conditions and black-and-white images in night conditions. Use this function
to control the day/night behaviour of the camera.
Note: black-and-white images are much clearer and contain less noise at
low light levels.
7.5 Video Setting
Use this menu option to set the different video options.
7.6 Language
Use this function to set the language of the OSD menu.
7.7 Reset
Use this menu to reset all settings back to factory settings.
Page 8

CAMTVI7N/CAMTVI7WN/CAMTVI8N/CAMTVI8WN
V. 01 – 18/07/2016 8 ©Velleman nv
7.8 Save-Exit
Use this option to save your settings and to exit the menu.
7.9 Exit
Use this option to exit the menu without saving.
8. Technical specifications
IP rating...................................................................... IP66
pick-up element .............................1/2.7" CMOS image sensor
pixels ................................................... 1920 (H) x 1080 (V)
resolution .......................................................... 1080P video
DSP .............................................. Techpoint & HTC1080 chip
min. illumination ....................................................0.001 lux
IR-cut filter .................................................................... yes
S/N ratio ................................................... > 50 dB (AGC off)
WDR ............................................................................. yes
AGC ............................................................................. yes
white balance ....................................................... automatic
video output ................................................. BNC connection
TVI signal ............................................................ 1080P
PAL video ............... 960H (selectable via alarm input wires)
CVI signal ............................................................ 1080P
AHD signal .......................................................... 1080P
audio ............................................................................. no
power supply ........................................................... 12 VDC
operating temperature ............ -10 °C to 40 °C - RH max. 95 %
CAMTVI7(W)N
IR LEDs.......................................................................... 24
max. IR projection distance ........................................... 20 m
lens .................................................................... f3.6 / F2.0
lens angle
horizontal ................................................................83°
vertical ...................................................................47°
diagonal ..................................................................96°
current consumption ............... 100 mA (IR off), 320 mA (IR on)
dimensions ..................................................... Ø 92 x 75 mm
weight ....................................................................... 300 g
Page 9
CAMTVI7N/CAMTVI7WN/CAMTVI8N/CAMTVI8WN
V. 01 – 18/07/2016 9 ©Velleman nv
CAMTVI8(W)N
IR LEDs.......................................................................... 36
max. IR projection distance ........................................... 30 m
lens ............................................................... f2.8 ~ 12 mm
lens angle .......................................................... 104° ~ 33°
current consumption ............... 130 mA (IR off), 420 mA (IR on)
dimensions ................................................. Ø 119 x 105 mm
weight ....................................................................... 570 g
Use this device with original accessories only. Velleman nv cannot
be held responsible in the event of damage or injury resulted from
(incorrect) use of this device. For more info concerning this product
and the latest version of this user manual, please visit our website
www.velleman.eu. The information in this manual is subject to
change without prior notice.
© COPYRIGHT NOTICE
This manual is copyrighted. The copyright to this manual is owned by
Velleman nv.
All worldwide rights reserved. No part of this manual may be copied,
reproduced, translated or reduced to any electronic medium or otherwise
without the prior written consent of the copyright holder.
Page 10

CAMTVI7N/CAMTVI7WN/CAMTVI8N/CAMTVI8WN
V. 01 – 18/07/2016 10 ©Velleman nv
HANDLEIDING
1. Inleiding
Aan alle ingezetenen van de Europese Unie
Belangrijke milieu-informatie betreffende dit product
Dit symbool op het toestel of de verpakking geeft aan dat, als het
na zijn levenscyclus wordt weggeworpen, dit toestel schade kan
toebrengen aan het milieu. Gooi dit toestel (en eventuele
batterijen) niet bij het gewone huishoudelijke afval; het moet bij
een gespecialiseerd bedrijf terechtkomen voor recyclage. U moet
dit toestel naar uw verdeler of naar een lokaal recyclagepunt
brengen. Respecteer de plaatselijke milieuwetgeving.
Hebt u vragen, contacteer dan de plaatselijke autoriteiten
betreffende de verwijdering.
Dank u voor uw aankoop! Lees deze handleiding grondig door voor u het
toestel in gebruik neemt. Werd het toestel beschadigd tijdens het transport,
installeer het dan niet en raadpleeg uw dealer.
2. Veiligheidsvoorschriften
Houd dit toestel uit de buurt van kinderen en onbevoegden.
Elektrocutiegevaar bij het openen van het toestel.
Demonteer of open dit toestel NOOIT. Er zijn geen onderdelen
in het toestel die door de gebruiker gerepareerd kunnen worden.
Contacteer uw verdeler voor eventuele reserveonderdelen.
3. Algemene richtlijnen
Raadpleeg de Velleman® service- en kwaliteitsgarantie achteraan deze
handleiding.
Leer eerst de functies van het toestel kennen voor u het gaat gebruiken.
Om veiligheidsredenen mag u geen wijzigingen aanbrengen aan het
toestel. Schade door wijzigingen die de gebruiker heeft aangebracht aan
het toestel valt niet onder de garantie.
Gebruik het toestel enkel waarvoor het gemaakt is. De garantie vervalt
automatisch bij ongeoorloofd gebruik.
De garantie geldt niet voor schade door het negeren van bepaalde
richtlijnen in deze handleiding en uw dealer zal de verantwoordelijkheid
afwijzen voor defecten of problemen die hier rechtstreeks verband mee
houden.
Bescherm dit toestel tegen extreme temperaturen.
Page 11
CAMTVI7N/CAMTVI7WN/CAMTVI8N/CAMTVI8WN
V. 01 – 18/07/2016 11 ©Velleman nv
Bescherm tegen schokken. Vermijd brute kracht tijdens de bediening
van het toestel.
Installeer en gebruik dit toestel NIET voor illegale praktijken en
respecteer ieders privacy.
4. Eigenschappen
Deze HDCCTV-camera is voorzien van een CMOS-beeldsensor en heeft
een videokwaliteit van 1080P. De videosignalen kunnen worden ingesteld op
HD-TVI, HD-CVI, AHD of analoge videosignalen. De IR-filter filtert het
infraroodlicht zodat er geen vervorming van de kleuren ontstaat. Bij
verduistering schakelt de camera automatisch over naar nachtmodus. In
nachtmodus worden de IR-leds ingeschakeld en de IR-filter uitgeschakeld.
weerbestendig
met Z/W-nachtzicht (IR-leds)
1080P-videosignaal
vandaalbestendige montagebeugel
varifocale lens (enkel CAMTVI8(W)N)
5. Omschrijving
Raadpleeg de afbeeldingen op pagina 2 van deze handleiding.
1
montageplaat
7 lens
2
bevestigingsring
8 manuele focus
3
stelring
9 lichtsensor
4
manuele zoom
10
kabelsleuf
5
lensbehuizing (rond)
11
kabel
6
IR-leds voor nachtzicht
6. Hardware-installatie
Raadpleeg de afbeeldingen op pagina 2 van deze handleiding.
Kies een geschikte montageplaats voor de camera en houd rekening met
volgende punten:
o Monteer de camera nooit op een plaats onderhevig aan extreme
temperaturen en trillingen.
o Monteer de camera nooit in de buurt van elektromagnetische velden.
o Richt de camera niet naar de zon of naar een lichtweerkaatsend
voorwerp (bv. een metalen deur).
Houd de montageplaat [1] vast en schroef de bevestigingsring [2] los,
door deze in tegenwijzerzin te draaien. Merk op dat de lensbehuizing [5]
en de bevestigingsring [3] ook loskomen.
Gebruik de montageplaat [1] om de positie van de montagegaten te
bepalen. Boor de gaten.
Page 12
CAMTVI7N/CAMTVI7WN/CAMTVI8N/CAMTVI8WN
V. 01 – 18/07/2016 12 ©Velleman nv
Voer de stroom- en videokabel [11] door een van de kabelsleuven [10] en
bevestig de montageplaat [1] aan het plafond of de muur met de 4 schroeven.
Leg de lensbehuizing [3] in de stelring [3] en leg beide in de
bevestigingsring [2]. Bevestig de bevestigingsring [2] aan de
montageplaat [1]. Draai de bevestigingsring niet te hard vast zodat u de
lens in de gewenste richting kunt draaien.
Verbind de twee kabels voor een analoog PAL-signaal; verbind ze niet
voor een HD 1080P TVI-signaal.
Koppel de videoconnector [A] aan een monitor (niet meegelev.) of een
sequentiële schakelaar/splitter (niet meegelev.) wanneer u meerdere
camera's gebruikt.
Koppel de voedingsaansluiting [B] aan de 12VDC-voeding (niet meegelev.).
Regel de positie van de lensbehuizing [5] in de stelring [3], om de
bewakingszone te bepalen.
Stel de zoom [4] en de focus [8] handmatig in met de schroeven. De
plaats van de schroeven wordt bepaald door de positie van de
lichtsensor [9].
Draai de bevestigingsring [2] vast om de positie van de camera stevig
vast te zetten.
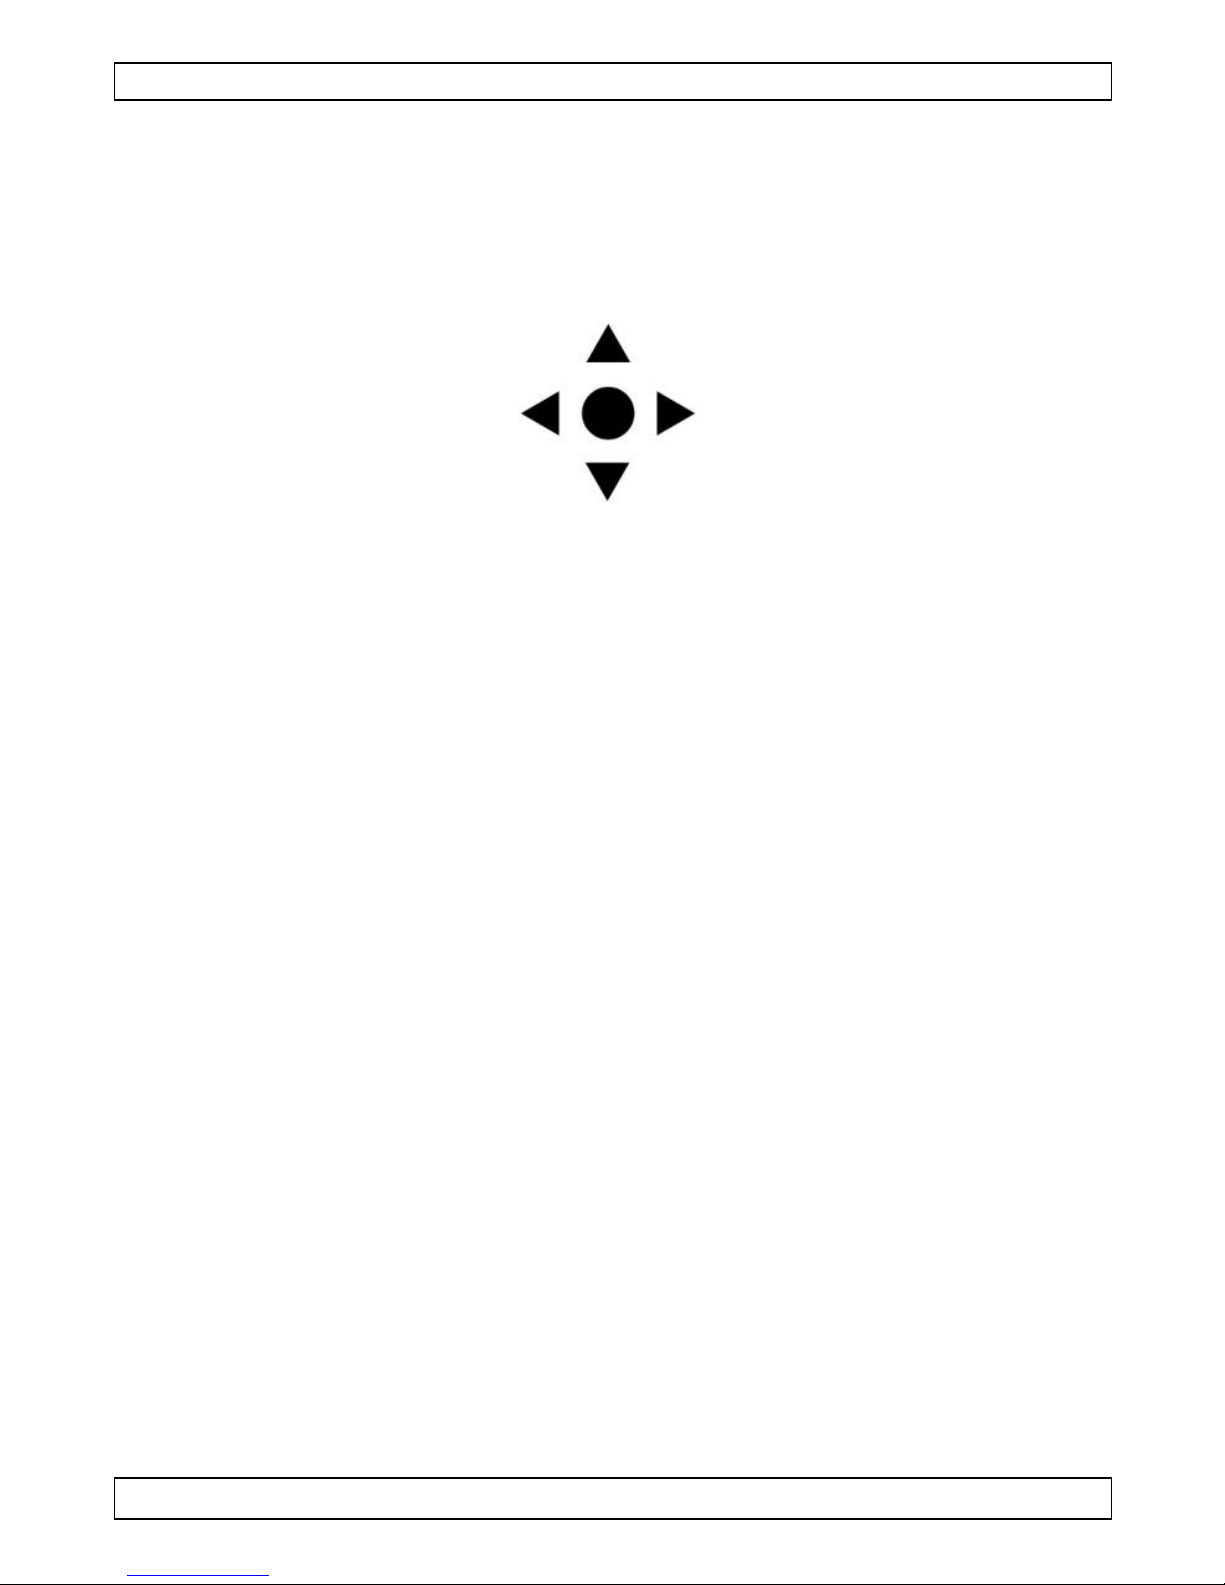
7. OSD-instellingen
Met een kleine joystick in de camerakabel kunt u de camera-instellingen via
een instelmenu (OSD) regelen.
Druk op de middelste knop om het menu te openen
of om een optie te selecteren.
Druk op de navigatieknoppen (omhoog/omlaag) om
door het menu te scrollen.
Druk op de navigatieknoppen (naar links/rechts)
om de parameters te wijzigen.
Het OSD-menu:
NEXT/BACK: selecteer deze optie en druk op de middelste knop om
naar de volgende/vorige pagina in het menu te gaan.
RETURN: selecteer deze optie en druk op de middelste knop om naar
het vorige niveau terug te keren.
EXIT: selecteer deze optie en druk op de middelste knop, om het OSD-
menu te verlaten zonder de instellingen op te slaan.
SAVE ALL: selecteer deze optie en druk op de middelste knop om alle
instellingen op te slaan.
CAMERA RESET: selecteer deze optie en druk op de middelste knop om
de camera terug te zetten naar de fabrieksinstellingen.
Zie hieronder voor meer informatie over de OSD-instellingen.
Raadpleeg de tabel op pagina 3.
Page 13

CAMTVI7N/CAMTVI7WN/CAMTVI8N/CAMTVI8WN
V. 01 – 18/07/2016 13 ©Velleman nv
7.1 Het videosignaal selecteren
Houd de knop van de joystick gedurende 5 seconden ingedrukt om het
videosignaal te selecteren (standaard: TVI).
AHD
CVBS
TVI
CVI
7.2 Automatic Exposure (AE)
Gebruik deze functie voor de standaardinstellingen.
7.3 White Balance (WB)
Gebruik deze functie, om de correcte kleurweergave van de camera in te
stellen.
7.4 Day & Night
De camera schakelt automatisch tussen dagmodus (kleurenbeelden) en
nachtmodus (Z/W-beelden). Gebruik deze functie om de dag- en
nachtfunctie van de camera te controleren.
Opmerking: Z/W-beelden zijn scherper en bevatten minder beeldruis bij
een lage lichtsterkte.
7.5 Video Setting
Gebruik deze functie om de verschillende videofuncties op te slaan.
7.6 Language
Gebruik deze functie om de taal van het OSD-menu in te stellen.
7.7 Reset
Gebruik deze functie om de camera terug te zetten naar de
fabrieksinstellingen.
Page 14

CAMTVI7N/CAMTVI7WN/CAMTVI8N/CAMTVI8WN
V. 01 – 18/07/2016 14 ©Velleman nv
7.8 Save-Exit
Gebruik deze functie om de instellingen op te slaan en om het menu te
verlaten.
7.9 Exit
Gebruik deze functies om het menu te verlaten zonder op te slaan.
8. Technische specificaties
IP-norm ...................................................................... IP66
opneemelement .............................. 1/2.7" CMOS-beeldsensor
pixels ................................................... 1920 (H) x 1080 (V)
resolutie............................................................ 1080P video
DSP .............................................. Techpoint & HTC1080 chip
min. verlichting ......................................................0.001 lux
IR-sperfilter ..................................................................... ja
S/R-verhouding .......................................... > 50 dB (AGC uit)
WDR ............................................................................... ja
AGC ............................................................................... ja
witbalans .......................................................... automatisch
video-uitgang ............................................... BNC-aansluiting
TVI-signaal .......................................................... 1080P
PAL-video 960H (selecteerbaar met de alarm-ingangskabels)
CVI-signaal .......................................................... 1080P
AHD-signaal ......................................................... 1080P
geluid ......................................................................... neen
voeding................................................................... 12 VDC
werktemperatuur .................. -10 °C tot 40 °C – RH max. 95 %
CAMTVI7(W)N
IR-leds........................................................................... 24
max. IR-bereik ............................................................ 20 m
lens .................................................................... f3.6 / F2.0
lenshoek
horizontaal ..............................................................83°
verticaal ..................................................................47°
diagonaal ................................................................96°
stroomverbruik .................... 100 mA (IR uit), 320 mA (IR aan)
afmetingen ..................................................... Ø 92 x 75 mm
gewicht ...................................................................... 300 g
Page 15

CAMTVI7N/CAMTVI7WN/CAMTVI8N/CAMTVI8WN
V. 01 – 18/07/2016 15 ©Velleman nv
CAMTVI8(W)N
IR-leds........................................................................... 36
max. IR-bereik ............................................................ 30 m
lens ............................................................... f2.8 ~ 12 mm
lenshoek .... 83° (horizontaal) - 47° (verticaal) - 96° (diagonaal)
stroomverbruik .................... 130 mA (IR uit), 420 mA (IR aan)
afmetingen ................................................. Ø 119 x 105 mm
gewicht ...................................................................... 570 g
Gebruik dit toestel enkel met originele accessoires. Velleman nv is
niet aansprakelijk voor schade of kwetsuren bij (verkeerd) gebruik
van dit toestel. Voor meer informatie over dit product en de laatste
versie van deze handleiding, zie www.velleman.eu. De informatie in
deze handleiding kan te allen tijde worden gewijzigd zonder
voorafgaande kennisgeving.
© AUTEURSRECHT
Deze handleiding is auteursrechtelijk beschermd. Velleman nv heeft
het auteursrecht voor deze handleiding.
Alle wereldwijde rechten voorbehouden. Het is niet toegestaan om deze
handleiding of gedeelten ervan over te nemen, te kopiëren, te vertalen, te
bewerken en op te slaan op een elektronisch medium zonder voorafgaande
schriftelijke toestemming van de rechthebbende.
Page 16

CAMTVI7N/CAMTVI7WN/CAMTVI8N/CAMTVI8WN
V. 01 – 18/07/2016 16 ©Velleman nv
MODE D'EMPLOI
1. Introduction
Aux résidents de l'Union européenne
Informations environnementales importantes concernant ce produit
Ce symbole sur l'appareil ou l'emballage indique que l’élimination
d’un appareil en fin de vie peut polluer l'environnement. Ne pas
jeter un appareil électrique ou électronique (et des piles
éventuelles) parmi les déchets municipaux non sujets au tri
sélectif ; une déchetterie traitera l’appareil en question. Renvoyer
l'appareil à votre fournisseur ou à un service de recyclage local. Il
convient de respecter la réglementation locale relative à la protection de
l’environnement.
En cas de questions, contacter les autorités locales pour élimination.
Nous vous remercions de votre achat ! Lire attentivement le présent mode
d'emploi avant la mise en service de l’appareil. Si l'appareil a été
endommagé pendant le transport, ne pas l’installer et consulter votre
revendeur.
2. Consignes de sécurité
Garder l'appareil hors de la portée des enfants et des personnes
non autorisées.
Risque d’électrocution lors de l’ouverture du boîtier.
NE JAMAIS démonter ni ouvrir le boîtier. Il n’y a aucune pièce
réparable par l’utilisateur dans l'appareil. Commander des pièces
de rechange éventuelles chez votre revendeur.
3. Directives générales
Se référer à la garantie de service et de qualité Velleman® en fin de ce
mode d'emploi.
Se familiariser avec le fonctionnement de l’appareil avant de l’utiliser.
Toute modification est interdite pour des raisons de sécurité. Les
dommages occasionnés par des modifications par le client ne tombent
pas sous la garantie.
N’utiliser l'appareil qu’à sa fonction prévue. Un usage impropre annule
d'office la garantie.
La garantie ne se s’applique pas aux dommages survenus en négligeant
certaines directives de ce mode d'emploi et votre revendeur déclinera
toute responsabilité pour les problèmes et les défauts qui en résultent.
Protéger cet appareil contre la chaleur extrême.
Page 17

CAMTVI7N/CAMTVI7WN/CAMTVI8N/CAMTVI8WN
V. 01 – 18/07/2016 17 ©Velleman nv
Protéger l’appareil des chocs et de l'abus. Traiter l'appareil avec
circonspection pendant l’opération.
Installer et utiliser la caméra en respectant la législation et la vie privée
des tiers.
4. Caractéristiques
Cette caméra HDCCTV est équipée d'un capteur d'image CMOS. La
qualité des images est de 1080P. Les signaux vidéo peuvent être réglés sur
HD-TVI, HD-CVI, AHD et signaux vidéo analogiques. Le filtre de
coupure IR filtre la lumière IR afin d'éviter la distorsion des images de
couleur. Quand il fait sombre, la caméra passe automatiquement en mode
nuit, allume les LEDs IR et désactive le filtre IR.
résistante aux intempéries
avec vision nocturne N/B (LEDs IR)
signal vidéo de 1080P
support de caméra antivandalisme
objectif varifocal
5. Description
Se référer aux illustrations en page 2 de ce mode d'emploi.
1
plaque de montage
7 objectif
2
anneau de fixation
8 focalisation manuelle
3
anneau de réglage
9 capteur lumineux
4
zoom manuel
10
fente pour câble
5
boîtier de l'objectif (rond)
11
câble
6
LEDs IR pour vision
nocturne
6. Installation de la caméra
Se référer aux illustrations en page 2 de ce mode d'emploi.
Choisir un endroit de montage approprié en tenant compte :
o de ne jamais installer la caméra dans un endroit sujet à des
températures extrêmes et à des vibrations ;
o de ne jamais installer la caméra à proximité de champs
électromagnétiques ;
o de ne pas pointer la caméra sur un objet réfléchissant la lumière
(p.ex. porte métallique).
Maintenir la plaque de montage [1] et dévisser la bague de fixation [2]
en la tournant dans le sens inverse des aiguilles d'une montre. Le boîtier
de l'objectif [5] et la bague de positionnement [3] sont également
libérés.
Page 18

CAMTVI7N/CAMTVI7WN/CAMTVI8N/CAMTVI8WN
V. 01 – 18/07/2016 18 ©Velleman nv
Utiliser la plaque de montage [1] pour déterminer la position des trous
de montage. Percer les trous.
Faire passer le câble d'alimentation [11] et vidéo [10] par une des
fentes et fixer la plaque de montage [1] au plafond ou mur avec les 4
vis.
Introduire le boîtier de l'objectif [5] dans la bague de réglage [3] et
introduire les deux dans la bague de fixation [2]. Ensuite, fixer la bague
de fixation [1] en la vissant à la plaque de montage [1]. S'assurer de ne
pas trop serrer l'anneau de fixation pour pouvoir positionner l'objectif
dans la direction souhaitée.
Connecter les deux fils pour un signal PAL analogique ; ne pas les
connecter pour un signal HD 1080P TVI.
Connecter le connecteur vidéo [A] à un moniteur (non incl.) ou un
commutateur cyclique/répartiteur (non incl.) pour utiliser plusieurs
caméras.
Connecter la fiche d’entrée [B] à l’alimentation 12 VCC (non inclus).
Régler la position du boîtier de l'objectif [5] dans la bague de réglage
[3] pour déterminer la zone de surveillance.
Ajuster manuellement le zoom [4] et la mise au point [8] avec les vis.
Déterminer la position des vis en observant la position du capteur
lumineux [9].
Serrer la bague de fixation [2] pour fixer la position de la caméra.
7. Réglages du menu à l'écran (OSD)
Il y a une petite manette de contrôle dans le câble de la caméra qui vous
permet de configurer la caméra par le menu à l'écran (OSD).
Appuyer sur le bouton central pour accéder au
menu, ou pour sélectionner une option.
Appuyer sur les boutons de navigation (haut/bas)
pour se déplacer dans le menu.
Appuyer sur les boutons de navigation (vers la
gauche/droite) pour modifier les paramètres du
menu
Le menu OSD :
NEXT/BACK : sélectionner cette option et appuyer sur le bouton central
pour aller à la page suivante/précédente du menu.
RETURN : sélectionner cette option et appuyer sur le bouton central
pour retourner au niveau précédent du menu.
EXIT : sélectionner cette option et appuyer sur ce bouton central pour
quitter le menu OSD sans sauvegarder les réglages.
SAVE ALL: sélectionner cette option et appuyer sur ce bouton central
pour sauvegarder tous les réglages.
Page 19

CAMTVI7N/CAMTVI7WN/CAMTVI8N/CAMTVI8WN
V. 01 – 18/07/2016 19 ©Velleman nv
CAMERA RESET: sélectionner cette option et appuyer sur le bouton
central pour rétablir les réglages d'usine.
Voir ci-après pour plus de détails sur les réglages du menu OSD.
Consulter la liste à la page 3.
7.1 Sélectionner le signal vidéo
Maintenir enfoncé le bouton de la manette pendant 5 secondes pour
sélectionner le signal vidéo (par défaut : TVI)
AHD
CVBS
TVI
CVI
7.2 Automatic Exposure (AE)
Utiliser cette option pour ajuster les réglages communs.
7.3 White Balance (WB)
Utiliser cette option pour ajuster la balance des blancs.
7.4 Day & Night
La caméra commute automatiquement entre les images couleur (jour) et les
images en noir et blanc (nuit). Utiliser cette fonction pour contrôler la
fonction jour/nuit.
Note : Les images en noir et blanc sont plus nettes et contiennent moins de
bruit à des intensités plus faibles.
7.5 Video Setting
Utiliser cette option pour ajuster les différentes options vidéo.
7.6 Language
Utiliser cette fonction pour définir la langue du menu OSD.
Page 20

CAMTVI7N/CAMTVI7WN/CAMTVI8N/CAMTVI8WN
V. 01 – 18/07/2016 20 ©Velleman nv
7.7 Reset
Utiliser ce menu pour rétablir tous les réglages par défaut.
7.8 Save-Exit
Utiliser cette option pour sauvegarder les réglages et pour quitter le menu.
7.9 Exit
Utiliser cette option pour quitter le menu sans sauvegarder.
8. Spécifications techniques
Indice IP ..................................................................... IP66
élément d'enregistrement ...... capteur d'images CMOS de 1/2.7"
pixels ................................................... 1920 (H) x 1080 (V)
résolution .......................................................... vidéo 1080P
DSP .............................................. Techpoint & HTC1080 chip
éclairement min. ....................................................0.001 lux
filtre IR ......................................................................... oui
rapport S/B ..................................... > 50 dB (AGC désactivé)
WDR ............................................................................. oui
AGC ............................................................................. oui
balance des blancs ............................................. automatique
sortie vidéo ................................................... connexion BNC
signal TVI ............................................................ 1080P
vidéo PAL .. 960H (sélectionnable avec les câbles d'entrée de
l'alarme)
signal CVI ............................................................ 1080P
signal AHD .......................................................... 1080P
audio ........................................................................... non
alimentation ............................................................ 12 VCC
température de service........ de -10 °C à 40 °C – RH max. 95 %
CAMTVI7(W)N
LEDs IR.......................................................................... 24
portée IR max. ............................................................ 20 m
objectif ............................................................... f3.6 / F2.0
angle d'objectif
horizontal ................................................................83°
vertical ...................................................................47°
diagonal ..................................................................96°
consommation de courant100 mA (IR éteint), 320 mA (IR allumé)
dimensions ..................................................... Ø 92 x 75 mm
poids ......................................................................... 300 g
Page 21

CAMTVI7N/CAMTVI7WN/CAMTVI8N/CAMTVI8WN
V. 01 – 18/07/2016 21 ©Velleman nv
CAMTVI8(W)N
LEDs IR.......................................................................... 36
portée IR max. ............................................................ 30 m
objectif .......................................................... f2.8 ~ 12 mm
angle d'objectif 83° (horizontal) - 47° (vertical) - 96° (diagonal)
consommation de courant130 mA (IR éteint), 420 mA (IR allumé)
dimensions ................................................. Ø 119 x 105 mm
poids ......................................................................... 570 g
N'employer cet appareil qu’avec des accessoires d’origine. Velleman
SA ne peut, dans la mesure conforme au droit applicable être tenue
responsable des dommages ou lésions (directs ou indirects) pouvant
résulter de l’utilisation de cet appareil. Pour plus d'informations
concernant cet article et la dernière version de ce mode d'emploi,
consulter notre site www.velleman.eu. Les spécifications et le
continu de ce mode d'emploi peuvent être modifiés sans notification
préalable.
© DROITS D’AUTEUR
Ce mode d'emploi est protégé par le droit d'auteur. Velleman SA est
l’ayant droit des droits d’auteur de ce mode d'emploi.
Tous droits mondiaux réservés. Toute reproduction, traduction, copie ou
diffusion, intégrale ou partielle, du contenu de ce mode d'emploi par
quelque procédé ou sur tout support électronique que ce soit est interdite
sans l’accord préalable écrit de l’ayant droit.
Page 22

CAMTVI7N/CAMTVI7WN/CAMTVI8N/CAMTVI8WN
V. 01 – 18/07/2016 22 ©Velleman nv
MANUAL DEL USUARIO
1. Introducción
A los ciudadanos de la Unión Europea
Importantes informaciones sobre el medio ambiente concerniente a
este producto
Este símbolo en este aparato o el embalaje indica que, si tira las
muestras inservibles, podrían dañar el medio ambiente. No tire
este aparato (ni las pilas, si las hubiera) en la basura doméstica;
debe ir a una empresa especializada en reciclaje. Devuelva este
aparato a su distribuidor o a la unidad de reciclaje local. Respete
las leyes locales en relación con el medio ambiente.
Si tiene dudas, contacte con las autoridades locales para residuos.
¡Gracias por elegir Velleman! Lea atentamente las instrucciones del manual
antes de usar el aparato. Si ha sufrido algún daño en el transporte no lo
instale y póngase en contacto con su distribuidor.
2. Instrucciones de seguridad
Mantenga el aparato lejos del alcance de personas no capacitadas
y niños.
Riesgo de descargas eléctricas al abrir la caja.
NUNCA desmonte ni abra la carcasa. El usuario no habrá de
efectuar el mantenimiento de ninguna pieza. Contacte con su
distribuidor si necesita piezas de recambio.
3. Normas generales
Véase la Garantía de servicio y calidad Velleman® al final de este
manual del usuario.
Familiarícese con el funcionamiento del aparato antes de utilizarlo.
Por razones de seguridad, las modificaciones no autorizadas del aparato
están prohibidas. Los daños causados por modificaciones no autorizadas,
no están cubiertos por la garantía.
Utilice sólo el aparato para las aplicaciones descritas en este manual Su
uso incorrecto anula la garantía completamente.
Los daños causados por descuido de las instrucciones de seguridad de
este manual invalidarán su garantía y su distribuidor no será responsable
de ningún daño u otros problemas resultantes.
No exponga este equipo a temperaturas extremas.
Proteja el aparato contra choques y golpes. Evite usar excesiva fuerza
durante el manejo.
Instale y utilice la cámara al respetar la legislación e la vida privada de
terceros.
Page 23

CAMTVI7N/CAMTVI7WN/CAMTVI8N/CAMTVI8WN
V. 01 – 18/07/2016 23 ©Velleman nv
4. Características
Esta cámara HD CCTV está equipada con un sensor de imágenes CMOS. La
calidad de las imágenes es de 1080P. Es posible elegir entre señales de
vídeo HD-TVI, HD-CVI, AHD y analógicas. El filtro de paso IR filtra la
luz infrarroja de tal modo que no distorsione los colores de las imágenes. De
noche, la cámara cambia automáticamente al modo nocturno Desactiva el
filtro de paso IR y activa los LEDs IR.
resistente a la intemperie
con visión nocturna B/N (LED IR)
señal de vídeo 1080
soporte de cámara antivandalismo
lente varifocal (sólo CAMTVI8(W)N)
5. Descripción
Véase las figuras en la página 2 de este manual del usuario.
1
placa de montaje
7 óptica
2
anillo de fijación
8 foco manual
3
anillo de ajuste
9 sensor
4
zoom manual
10
ranura para el cable
5
carcasa de la lente
(redonda)
11
cable
6
LEDs IR para visión
nocturna
6. Instalar la cámara
Véase las figuras en la página 2 de este manual del usuario.
Elija un lugar de montaje adecuado y asegúrese de que:
o nunca instale la cámara en un lugar donde esté expuesta a
temperaturas extremas ni vibraciones.
o nunca instale la cámara cerca de campos electromagnéticos.
o nunca dirija la cámara a un objeto reflectante (p.ej. puerta metálica).
Sujete la placa de montaje [1] y desatornille el anillo de fijación [2] al
girar en sentido contrario a las agujas del reloj. Tenga en cuenta que la
carcasa de la óptica [5] y el tornillo [3] se sueltan también.
Determine la posición de los agujeros de montaje con la placa de
montaje [1]. Taladre los agujeros.
Pase los cables de alimentación y vídeo [11] por uno de las ranuras
[10] y fije la placa de montaje [1] al techo o a una pared con los 4
tornillos.
Introduzca la carcasa de la lente [3] en el anillo de ajuste [5] e
introduzca ambos en el anillo de fijación [2]. Luego, fije el anillo de
fijación [2] a la placa de montaje [1] al atornillarlo. Asegúrese de que
Page 24

CAMTVI7N/CAMTVI7WN/CAMTVI8N/CAMTVI8WN
V. 01 – 18/07/2016 24 ©Velleman nv
no apriete demasiado el anillo de fijación para poder dirigir la lente a la
dirección deseada.
Conecte los dos hilos para una señal analógica PAL; No los conecte para
una señal HD 1080P TVI.
Conecte el conector de vídeo [A] a un monitor (no incl.). o un
switcher/splitter (no incl.) para obtener un circuito con varias cámaras.
Conecte el conector de entrada [B] a la alimentación 12 VDC (no incl.).
Ajuste la posición de la carcasa de la lente [5] en el anillo de ajuste [3]
para determinar la zona de vigilancia.
Ajuste el zoom [4] y el foco [8] de manera manual con sus tornillos.
Determine la posición de los tornillos observando la posición del sensor
de luz [9].
Atornille el anillo de fijación [2] para fijar la posición.
7. Ajustar el menú en pantalla (OSD)
El cable de la cámara incorpora una pequeña palanca de mando que le
permite configurar los ajustes con el menú en pantalla (OSD).
Pulse el botón central para acceder al menú o para
seleccionar una opción.
Pulse las teclas de dirección (hacia arriba/abajo)
para desplazarse por el menú.
Pulse las teclas de dirección (hacia la
izquierda/derecha) para cambiar los parámetros del
menú.
En el menú en pantalla (OSD):
NEXT/BACK: seleccione esta opción y pulse el botón central para ir a la
página siguiente/anterior del menú.
RETURN: seleccione esta opción y pulse el botón central para volver al
nivel anterior del menú.
EXIT: seleccione esta opción y pulse el botón central para salir del menú
OSD sin almacenar los ajustes.
SAVE ALL: seleccione esta opción y pulse el botón central para
almacenar todos los ajustes.
CAMERA RESET: seleccione esta opción y pulse el botón central para
volver a la configuración de fábrica.
Los ajustes del menú en pantalla (OSD) se describen de forma detallada a
continuación.
Consulte la lista en la página 3.
Page 25

CAMTVI7N/CAMTVI7WN/CAMTVI8N/CAMTVI8WN
V. 01 – 18/07/2016 25 ©Velleman nv
7.1 Seleccionar la señal de vídeo
Mantenga pulsado el botón del palanca de mando durante 5 segundos para
seleccionar la señal de vídeo (señal por defecto: TVI).
AHD
CVBS
TVI
CVI
7.2 AE (Exposición automática)
Utilice este menú para los ajustes estándares.
7.3 WB (Balance de blancos)
Utilice esta opción para ajustar el balance de blancos.
7.4 Day & Night (Día & Noche)
La cámara puede conmutar automáticamente entre las imágenes en color
(de día) y las imágenes en blanco y negro (de noche). Utilice esta función
para controlar la función día/noche.
Observación: imágenes en blanco y negro son más claras e incluyen
menos ruido a bajos niveles de luz.
7.5 Video Setting (Ajuste de vídeo)
Utilice esta función para ajustar las diferentes opciones de vídeo.
7.6 Idioma
Utilice esta función para ajustar el idioma del menú en pantalla (OSD).
7.7 Reset (reinicio)
Utilice este menú para volver a la configuración de fábrica.
Page 26

CAMTVI7N/CAMTVI7WN/CAMTVI8N/CAMTVI8WN
V. 01 – 18/07/2016 26 ©Velleman nv
7.8 Save-Exit (almacenar-Salir)
Utilice esta opción para almacenar los ajustes y salir del menú.
7.9 Exit
Utilice esta opción para salir del menú sin almacenar los ajustes.
8. Especificaciones
grado de protección IP .................................................. IP66
elemento de imagen ......... sensor de imágenes CMOS de 1/2.7"
píxeles .................................................. 1920 (H) x 1080 (V)
resolución ......................................................... vídeo 1080P
DSP .............................................. chip Techpoint & HTC1080
iluminación mínima .................................................0.001 lux
filtro de paso de IR ........................................................... sí
relación señal/ruido ....................... > 50 dB (AGC desactivado)
WDR ............................................................................... sí
control automático de ganancia (AGC) ................................ sí
balance de blancos .............................................. automático
salida de vídeo ................................................. conexión BNC
señal TVI ............................................................. 1080P
vídeo PAL960H (seleccionable con los cables de entrada de la
alarma)
señal CVI ............................................................ 1080P
señal AHD ........................................................... 1080P
audio ............................................................................. no
alimentación ............................................................ 12 VDC
temperatura de funcionamientode -10 °C a 40 °C - RH 95 % máx. 95
%
CAMTVI7(W)N
LEDs IR.......................................................................... 24
máx. alcance IR .......................................................... 20 m
óptica ................................................................. f3.6 / F2.0
ángulo de visión
horizontal ................................................................83°
vertical ...................................................................47°
diagonal ..................................................................96°
consumo de corriente100 mA (IR desactivado), 320 mA (IR activado)
dimensiones ................................................... Ø 92 x 75 mm
peso .......................................................................... 300 g
Page 27

CAMTVI7N/CAMTVI7WN/CAMTVI8N/CAMTVI8WN
V. 01 – 18/07/2016 27 ©Velleman nv
CAMTVI8(W)N
LEDs IR.......................................................................... 36
máx. alcance IR .......................................................... 30 m
óptica ............................................................ f2.8 ~ 12 mm
ángulo de visión .................................................. 104° ~ 33°
consumo de corriente .............. 130 mA (IR off), 420 mA (IR on)
dimensiones ............................................... Ø 119 x 105 mm
peso .......................................................................... 570 g
Utilice este aparato sólo con los accesorios originales. Velleman NV
no será responsable de daños ni lesiones causados por un uso
(indebido) de este aparato. Velleman NV no será responsable de
daños ni lesiones causados por un uso (indebido) de este aparato.
Se pueden modificar las especificaciones y el contenido de este
manual sin previo aviso.
© DERECHOS DE AUTOR
Este manual del usuario protegido por el derecho de autor. Velleman
NV dispone de los derechos de autor para este manual del usuario.
Todos los derechos mundiales reservados. Está estrictamente prohibido
reproducir, traducir, copiar, editar y guardar este manual del usuario o
partes de ello sin el consentimiento previo por escrito del propietario del
copyright.
Page 28
CAMTVI7N/CAMTVI7WN/CAMTVI8N/CAMTVI8WN
V. 01 – 18/07/2016 28 ©Velleman nv
BEDIENUNGSANLEITUNG
1. Einführung
An alle Einwohner der Europäischen Union
Wichtige Umweltinformationen über dieses Produkt
Dieses Symbol auf dem Produkt oder der Verpackung zeigt an,
dass die Entsorgung dieses Produktes nach seinem Lebenszyklus
der Umwelt Schaden zufügen kann. Entsorgen Sie die Einheit
(oder verwendeten Batterien) nicht als unsortierter Hausmüll; die
Einheit oder verwendeten Batterien müssen von einer
spezialisierten Firma zwecks Recycling entsorgt werden. Diese
Einheit muss an den Händler oder ein örtliches Recycling-Unternehmen
retourniert werden. Respektieren Sie die örtlichen Umweltvorschriften.
Falls Zweifel bestehen, wenden Sie sich für Entsorgungsrichtlinien
an Ihre örtliche Behörde.
Vielen Dank, dass Sie sich für Velleman entschieden haben! Lesen Sie diese
Bedienungsanleitung vor Inbetriebnahme sorgfältig durch. Überprüfen Sie,
ob Transportschäden vorliegen. Sollte dies der Fall sein, verwenden Sie das
Gerät nicht und wenden Sie sich an Ihren Händler.
2. Sicherheitshinweise
Halten Sie Kinder und Unbefugte vom Gerät fern.
Stromschlaggefahr beim Öffnen des Gehäuses.
niemals das Gerät. Es gibt keine zu wartenden Teile. Bestellen Sie
eventuelle Ersatzteile bei Ihrem Fachhändler.
3. Allgemeine Richtlinien
Siehe Velleman® Service- und Qualitätsgarantie am Ende dieser
Bedienungsanleitung.
Nehmen Sie das Gerät erst in Betrieb, nachdem Sie sich mit seinen
Funktionen vertraut gemacht haben.
Eigenmächtige Veränderungen sind aus Sicherheitsgründen verboten.
Bei Schäden verursacht durch eigenmächtige Änderungen erlischt der
Garantieanspruch.
Verwenden Sie das Gerät nur für Anwendungen beschrieben in dieser
Bedienungsanleitung. Bei falscher Anwendung dieses Gerätes erlischt der
Garantieanspruch.
Page 29

CAMTVI7N/CAMTVI7WN/CAMTVI8N/CAMTVI8WN
V. 01 – 18/07/2016 29 ©Velleman nv
Bei Schäden, die durch Nichtbeachtung der Bedienungsanleitung
verursacht werden, erlischt der Garantieanspruch. Für daraus
resultierende Folgeschäden übernimmt der Hersteller keine Haftung.
Schützen Sie das Gerät vor extremen Temperaturen.
Vermeiden Sie Erschütterungen. Wenden Sie bei der Bedienung keine
Gewalt an.
Installieren und verwenden Sie das Gerät nicht für illegale Praktiken und
beachten Sie die Intimsphäre aller.
4. Eigenschaften
Diese HD CCTV-Kamera ist mit einem CMOS-Bildsensor ausgestattet. Die
Videoqualität ist 1080P. Es ist möglich, HD-TVI-, HD-CVI-, AHD- und
analoge Videosignale einzustellen. Der IR-Sperrfilter filtert das IRLicht heraus, sodass die Farben der Bilder so wiedergegeben werden, wie
das menschliche Auge sie sieht. Nachts wechselt die Kamera automatisch in
den Nachtbetrieb um. Im Nachtmodus, werden die IR-LEDs eingeschaltet
und der IR-Sperrfilter ausgeschaltet.
wetterfest
mit S/W-Nachtsicht (IR-LED)
1080P Video Signal
vandalensichere Montagebügel
Varifokal-Objektiv (nur CAMTVI8(W)N)
5. Beschreibung
Siehe Abbildungen, Seite 2 dieser Bedienungsanleitung.
1
Montageplatte
7 Lupe
2
Befestigungsring
8 manueller Fokus
3
Stellring
9 Lichtsensor
4
manueller Zoom
10
Kabelführung
5
Objektivgehäuse (rund)
11
Kabel
6
IR-LEDs für Nachtsicht
6. Die Hardware installieren
Siehe Abbildungen, Seite 2 dieser Bedienungsanleitung.
Wählen Sie einen geeigneten Montageort für die Kamera und beachten
Sie Folgendes:
o Achten Sie bei der Wahl des Installationsortes darauf, dass das Gerät
keinen extremen Temperaturen und Vibrationen ausgesetzt werden.
o Montieren Sie die Kamera nie in der Nähe von elektromagnetischen
Feldern.
o Richten Sie die Kamera nie auf die Sonne oder andere reflektierende
Gegenstände.
Page 30

CAMTVI7N/CAMTVI7WN/CAMTVI8N/CAMTVI8WN
V. 01 – 18/07/2016 30 ©Velleman nv
Halten Sie die Montageplatte [1] fest und lockern Sie den
Befestigungsring [2], indem Sie gegen den Uhrzeigersinn drehen.
Beachten Sie, dass das Objektivgehäuse [5] und der Stellring [3] sich
auch lösen.
Verwenden Sie die Montageplatte [1], um die Position der
Montagelöcher zu bestimmen. Bohren Sie die Löcher.
Leiten Sie das Strom- und das Videokabel [11] durch eine der
Kabelöffnungen [10] und befestigen Sie die Montageplatte [1] an der
Decke oder der Wand mit den 4 Schrauben.
Legen Sie das Objektivgehäuse [5] in den Stellring [3] ein und legen
Sie beide in den Befestigungsring [2] ein. Befestigen Sie den
Befestigungsring [2] dann an der Montageplatte [1] indem Sie ihn
festschrauben. Überdrehen Sie aber nicht damit Sie das Objektiv in die
gewünschte Richtung drehen können.
Verbinden Sie die zwei Drähte für ein analoges PAL-Signal; verbinden Sie
diese nicht für ein HD 1080P TVI-Signal.
Verbinden Sie den Videostecker [A] mit einem Monitor (nicht
mitgeliefert.) oder einem Switcher/Splitter (nicht mitgeliefert) wenn Sie
mehrere Kameras anschließen möchten.
Verbinden Sie den 12 VDC-Eingang [B] mit dem 12 VDC-Netzteil (nicht
mitgeliefert).
Regeln Sie die Position des Objektivgehäuses [5] im Stellring[3], um die
Überwachungszone zu bestimmen.
Stellen Sie den Zoom [4] und den Fokus [8] über den Schrauben
manuell ein. Bestimmen Sie die Position der Schrauben indem Sie die
Position des Lichtsensors [9] beobachten.
Spannen Sie den Befestigungsring [2] an, um die Position festzustellen.
7. OSD-Einstellungen
Im Kamerakabel ist ein kleiner Joystick integriert zum Konfigurieren der
Kamera-Einstellungen per On-Screen-Display (OSD).
Halten Sie die mittlere Taste gedrückt, um in das
Menü zu wechseln oder, um eine Option
auszuwählen.
Drücken Sie die Navigationstasten (nach
oben/unten), um durch das Menü zu scrollen.
Drücken Sie die Navigationstasten (nach
links/rechts), um die Parameter zu ändern.
Im OSD-Menü:
NEXT/BACK: wählen Sie diese Option aus und drücken Sie die mittlere
Taste, um zur folgenden/vorigen Seite im Menü zu gehen.
RETURN: wählen Sie diese Option aus und drücken Sie die mittlere
Taste, um zur vorigen Ebene zurückzukehren.
Page 31

CAMTVI7N/CAMTVI7WN/CAMTVI8N/CAMTVI8WN
V. 01 – 18/07/2016 31 ©Velleman nv
EXIT: wählen Sie diese Option aus und drücken Sie die mittlere Taste,
um das OSD-Menü zu verlassen, ohne die Einstellungen zu speichern.
SAVE ALL: wählen Sie diese Option aus und drücken Sie die mittlere
Taste, um alle Einstellungen zu speichern.
CAMERA RESET: wählen Sie diese Option aus und drücken Sie die
mittlere Taste, um das Gerät auf die Werkseinstellungen zurückzusetzen.
Die OSD-Einstellungen werden im Nachfolgenden ausführlich beschrieben.
Siehe Liste, Seite 3.
7.1 Das Videosignal auswählen
Halten Sie die Joystick-Taste gedrückt, um das Videosignal auszuwählen
(standardmäßig: TVI).
AHD
CVBS
TVI
CVI
7.2 AE (Automatische Einstellung der Belichtung)
Verwenden Sie dieses Menü für die Standardeinstellungen.
7.3 WB (Weißabgleich)
Verwenden Sie diese Funktion, um die korrekte Farbdarstellung der Kamera
einzustellen.
7.4 Day & Night (Tag & Nacht)
Die Kamera kann automatisch zwischen Tagmodus (Farbbilder) und
Nachtmodus (S/W-Bilder) umschalten. Verwenden Sie diese Funktion um die
Tag-/Nachtfunktion zu kontrollieren.
Bemerkung: S/W-Bilder sind heller und enthalten weniger Rausch bei
niedriger Lichtstärke.
Page 32

CAMTVI7N/CAMTVI7WN/CAMTVI8N/CAMTVI8WN
V. 01 – 18/07/2016 32 ©Velleman nv
7.5 Video Setting (Video-Einstellung)
Verwenden Sie diese Option, um die verschieden Video-Optionen
einzustellen
7.6 Language
Verwenden Sie diese Funktion, um die Sprache des OSD-Menüs einzustellen.
7.7 Rücksetzung (Reset)
Verwenden Sie dieses Menü, um die Kamera auf Werkseinstellungen
zurücksetzen.
7.8 Save-Exit (Speichern-Verlassen)
Verwenden Sie diese Option, um die Einstellungen zu speichern und das
Menü zu verlassen.
7.9 Exit
Verwenden Sie diese Option, um das Menü ohne Speichern der
Einstellungen zu verlassen.
8. Technische Daten
IP-Schutzart ................................................................ IP66
Aufnahme-Element ............................. 1/2.7" CMOS Bildsensor
Pixel ..................................................... 1920 (H) x 1080 (V)
Auflösung ......................................................... 1080P Video
DSP ..............................................Techpoint & HTC1080-Chip
minimale Lichtstärke ...............................................0.001 lux
IR-Sperrfilter ................................................................... ja
Signal-/Rauschabstand .............................. > 50 dB (AGC aus)
WDR ............................................................................... ja
AGC ............................................................................... ja
Weißabgleich ..................................................... automatisch
Video-Ausgang ............................................... BNC-Anschluss
TVI-Signal ........................................................... 1080P
PAL Video .... 960H (wählbar mit den Alarm-Eingangskabeln)
CVI-Signal ........................................................... 1080P
AHD-Signal .......................................................... 1080P
Audio ........................................................................... nein
Stromversorgung ..................................................... 12 VDC
Betriebstemperatur ................ -10 °C bis 40 °C - RH max. 95 %
Page 33

CAMTVI7N/CAMTVI7WN/CAMTVI8N/CAMTVI8WN
V. 01 – 18/07/2016 33 ©Velleman nv
CAMTVI7(W)N
IR-LEDs ......................................................................... 24
max. IR-Bereich .......................................................... 20 m
Lupe ................................................................... f3.6 / F2.0
Blickwinkel
horizontal ................................................................83°
vertikal ...................................................................47°
diagonal ..................................................................96°
Stromverbrauch ................... 100 mA (IR aus), 320 mA (IR ein)
Abmessungen ................................................. Ø 92 x 75 mm
Gewicht ..................................................................... 300 g
CAMTVI8(W)N
IR-LEDs ......................................................................... 36
max. IR-Bereich .......................................................... 30 m
Lupe .............................................................. f2.8 ~ 12 mm
Blickwinkel ......................................................... 104° ~ 33°
Stromverbrauch ................... 130 mA (IR aus), 420 mA (IR ein)
Abmessungen ............................................. Ø 119 x 105 mm
Gewicht ..................................................................... 570 g
Verwenden Sie dieses Gerät nur mit originellen Zubehörteilen.
Velleman NV übernimmt keine Haftung für Schaden oder
Verletzungen bei (falscher) Anwendung dieses Gerätes. Mehr
Informationen zu diesem Produkt und die neueste Version dieser
Bedienungsanleitung finden Sie hier: www.velleman.eu. Alle
Änderungen ohne vorherige Ankündigung vorbehalten.
© URHEBERRECHT
Diese Bedienungsanleitung ist urheberrechtlich geschützt. Velleman
NV besitzt das Urheberrecht für diese Bedienungsanleitung.
Alle weltweiten Rechte vorbehalten. Ohne vorherige schriftliche
Genehmigung des Urhebers ist es nicht gestattet, diese
Bedienungsanleitung ganz oder in Teilen zu reproduzieren, zu kopieren, zu
übersetzen, zu bearbeiten oder zu speichern.
Page 34

CAMTVI7N/CAMTVI7WN/CAMTVI8N/CAMTVI8WN
V. 01 – 18/07/2016 34 ©Velleman nv
INSTRUKCJA OBSŁUGI
1. Wstęp
Przeznaczona dla mieszkańców Unii Europejskiej.
Ważne informacje dotyczące środowiska.
Niniejszy symbol umieszczony na urządzeniu bądź opakowaniu
wskazuje, że utylizacja produktu może być szkodliwa dla
środowiska. Nie należy wyrzucać urządzenia (lub baterii) do
zbiorczego pojemnika na odpady komunalne, należy je przekazać
specjalistycznej firmie zajmującej się recyklingiem. Niniejsze
urządzenie należy zwrócić dystrybutorowi lub lokalnej firmie
świadczącej usługi recyklingu. Przestrzegać lokalnych zasad dotyczących
środowiska
W razie wątpliwości należy skontaktować się z lokalnym organem
odpowiedzialnym za utylizację odpadów.
Dziękujemy za zakup produktu Velleman! Prosimy o dokładne zapoznanie
się z instrukcją obsługi przed użyciem urządzenia. Jeżeli urządzenie zostało
uszkodzone podczas transportu, nie należy montować ani używać
urządzenia, lecz skontaktować się ze sprzedawcą.
2. Instrukcje bezpieczeństwa
Chronić urządzenie przed dziećmi i nieupoważnionymi
użytkownikami.
Uwaga: ryzyko porażenia prądem w przypadku otwarcia
urządzenie.
NIE WOLNO rozkręcać ani otwierać urządzenia. W urządzeniu nie
występują części, które mogą być serwisowane przez użytkownika.
W sprawie serwisowania i/lub części zamiennych należy zwrócić się
do autoryzowanego sprzedawcy.
3. Informacje ogólne
Proszę zapoznać się z informacjami w części Usługi i gwarancja jakości
Velleman® na końcu niniejszej instrukcji.
Przed rozpoczęciem pracy z urządzeniem należy zapoznać się z jego
funkcjami.
Wprowadzanie zmian w urządzeniu jest zabronione ze względów
bezpieczeństwa. Uszkodzenia spowodowane zmianami wprowadzonymi
przez użytkownika nie podlegają gwarancji.
Urządzenia należy używać wyłącznie zgodnie z przeznaczeniem.
Używanie urządzenia niezgodnie z przeznaczeniem spowoduje
unieważnienie gwarancji.
Page 35

CAMTVI7N/CAMTVI7WN/CAMTVI8N/CAMTVI8WN
V. 01 – 18/07/2016 35 ©Velleman nv
Gwarancja nie obejmuje uszkodzeń spowodowanych nieprzestrzeganiem
niniejszej instrukcji, a sprzedawca nie ponosi odpowiedzialności za
wynikłe uszkodzenia ani problemy.
Chronić urządzenie przed nadmiernym ciepłem.
Chronić urządzenie przed wstrząsami i użytkowaniem niezgodnym z
przeznaczeniem. Podczas obsługi urządzenia unikać stosowania siły.
Nie używać produktu do celów naruszających przepisy dotyczące
prywatności ani do działań niezgodnych z prawem.
4. Cechy
Ta kamera HD CCTV wyposażona jest w przetwornik obrazu CMOS.
Jakość obrazu wideo - 1080P. Możliwość ustawienia sygnałów wideo HDTVI, HD-CVI, AHD i analogowego. Filtr odcinający promieniowanie
podczerwone (IR-cut) filtruje światło IR, dzięki czemu nie zniekształca
kolorowego obrazu. W ciemności kamera automatycznie przełącza się w tryb
nocny. W trybie nocnym kamera włącza diody LED IR i wyłącza filtr IR-cut.
odporność na działanie warunków atmosferycznych
noktowizja B/W z czarno-białym obrazem (diody LED IR)
sygnał video 1080P
uchwyt odporny na uszkodzenia
obiektyw zmiennoogniskowy (tylko CAMTVI8(W)N)
5. Przegląd
Patrz rysunki na stronie 2 niniejszej instrukcji.
1
płyta montażowa
7 soczewka
2
pierścień mocujący
8 ręczne ustawianie ostrości
3
pierścień nastawczy
9 czujnik światła
4
zoom ręczny
10
wpust kablowy
5
osłona obiektywu (sfery)
11
kabel
6
nocne diody LED IR
6. Montaż sprzętu
Patrz rysunki na stronie 2 niniejszej instrukcji.
Wybrać miejsce do zainstalowania kamery, uwzględniając poniższe
wskazówki:
o nie instalować kamery w miejscach, gdzie mogą występować skrajnie
wysokie lub niskie temperatury lub nadmierne drgania.
o unikać mocowania kamery w pobliżu silnych pól
elektromagnetycznych.
o nie kierować kamery w stronę słońca ani w stronę innych bardzo
jasnych lub odbijających światło przedmiotów (np. metalowe drzwi).
Page 36

CAMTVI7N/CAMTVI7WN/CAMTVI8N/CAMTVI8WN
V. 01 – 18/07/2016 36 ©Velleman nv
Przytrzymać płytę montażową [1] i odkręcić pierścień mocujący[2],
obracając go w lewo. Należy pamiętać, że jednocześnie wysunie się
osłona obiektywu [5] i pierścień nastawczy[3].
Przy użyciu płyty montażowej [1] wyznaczyć położenie otworów
montażowych. Wywiercić otwory.
Przeciągnąć kabel zasilania i video [11] przez jeden z wpustów
kablowych [10] i zamocować płytę montażową [1] na suficie lub ścianie
za pomocą czterech śrub.
Umieścić pierścień nastawczy [3] na płycie montażowej [1] nad osłoną
obiektywu[5] i całość zamocować, przykręcając pierścień mocujący [2]
na płycie montażowej [1]. Sprawdzić, czy pierścień mocujący nie jest
przykręcony zbyt mocno, aby umożliwić skierowanie obiektywu w
wybraną stronę.
Podłączyć dwa przewody analogowego sygnału PAL; w przypadku
sygnału HD 1080P TVI przewody pozostawić niepodłączone.
Podłączyć złącze video [A] do monitora (brak w zestawie) lub
przełącznika sekwencyjnego/rozdzielacza quad splitter (brak w
zestawie), w przypadku instalacji wielu kamer.
Podłączyć złącze zasilania [B] do zasilacza 12 VDC (brak w zestawie).
Ustawić odpowiednie pole obserwacji, regulując położenie osłony
obiektywu [5] , znajdującej się w pierścieniu nastawczym [3].
Wyregulować ręcznie zoom [4] i ostrość [8] przy użyciu odpowiednich
śrub. Umiejscowienie śrub można określić, spoglądając na pozycję
czujnika światła [9].
Dokręcić pierścień mocujący [2] , aby ustalić położenie kamery.
7. Ustawienia OSD
W przewodzie kamery znajduje się niewielki joystick za pomocą którego
można ustawiać parametry kamery przy użyciu OSD.
Nacisnąć środkowy przycisk, aby przejść do menu
lub wybrać opcję.
Naciskać przyciski góra/dół, aby poruszać się do
góry/do dołu w menu.
Naciskać przyciski w lewo/w prawo, aby
modyfikować parametry menu.
W menu OSD:
NEXT/BACK: wybrać tę opcję i nacisnąć środkowy przycisk, aby przejść
do kolejnej/poprzedniej strony opcji w menu.
RETURN: wybrać tę opcję i nacisnąć środkowy przycisk, aby wrócić do
poprzedniego poziomu w menu.
EXIT: wybrać tę opcję i nacisnąć środkowy przycisk, aby wyjść z menu
OSD bez zapisywania ustawień.
Page 37

CAMTVI7N/CAMTVI7WN/CAMTVI8N/CAMTVI8WN
V. 01 – 18/07/2016 37 ©Velleman nv
SAVE ALL: wybrać tę opcję i nacisnąć środkowy przycisk, aby zapisać
wszystkie ustawienia.
CAMERA RESET: wybrać tę opcję i nacisnąć środkowy przycisk, aby
przywrócić w kamerze ustawienia fabryczne.
Poniżej szczegółowo opisano ustawienia menu OSD.
Patrz tabela na stronie 3.
7.1 Wybór sygnału wideo.
Aby wybrać sygnał wideo (sygnał domyślny: TVI), należy nacisnąć i
przytrzymać przycisk joysticka przez 5 sekund.
AHD
CVBS
TVI
CVI
7.2 Ekspozycja automatyczna (AE)
Przy użyciu tego menu ustawić typowe parametry obrazów wideo.
7.3 Balans bieli (WB)
Przy użyciu tej opcji menu dostosować balans bieli.
7.4 Dzień i noc (Day & Night)
Kamera może automatycznie przełączać się między obrazami kolorowymi w
warunkach dziennych a obrazami czarno-białymi w nocy. Użyć tej funkcji,
aby kontrolować przełączanie trybu dzień/noc kamery.
Uwaga: obrazy czarno-białe są dużo wyraźniejsze i mają mniej zakłóceń
przy słabym oświetleniu.
7.5 Ustawianie wideo
Przy użyciu tej opcji menu ustawić różne opcje wideo.
Page 38

CAMTVI7N/CAMTVI7WN/CAMTVI8N/CAMTVI8WN
V. 01 – 18/07/2016 38 ©Velleman nv
7.6 Język
Użyć tej funkcji do ustawienia języka menu OSD.
7.7 Resetowanie
Użyć tego menu w celu zresetowania urządzenia do ustawień fabrycznych.
7.8 Zapis-Wyjście (Save-Exit)
Użyć tej opcji, aby zapisać wybrane ustawienia i wyjść z menu.
7.9 Wyjście (Exit)
Użyć tej opcji, aby wyjść z menu bez zapisywania.
8. Specyfikacja techniczna
stopień ochrony............................................................ IP66
przetwornik obrazu .................przetwornik obrazu 1/2,7" CMOS
rozdzielczość [piksele] ............................. 1920 (H) x 1080 (V)
rozdzielczość .................................................... wideo 1080P
DSP ................................................chip Techpoint i HTC1080
min. natężenie oświetlenia ........................................ 0,001 lx
filtr odcinający promieniowanie podczerwone (IR-cut) .......... tak
współczynnik S/N .....................................> 50 dB (AGC wył.)
WDR ............................................................................. tak
AGC ............................................................................. tak
balans bieli ..................................................... automatyczny
wyjście wideo ..................................................... złącze BNC
sygnał TVI ........................................................... 1080P
wideo PAL ........ 960H (wybór za pośrednictwem przewodów
wejściowych alarmu)
sygnał CVI ........................................................... 1080P
sygnał AHD .......................................................... 1080P
audio .......................................................................... brak
zasilanie .................................................................. 12 VDC
temperatura robocza ............ -10 °C do 40 °C – RH maks. 95 %
Page 39

CAMTVI7N/CAMTVI7WN/CAMTVI8N/CAMTVI8WN
V. 01 – 18/07/2016 39 ©Velleman nv
CAMTVI7(W)N
diody LED podczerwieni .................................................... 24
maks. zasięg projekcji IR .............................................. 20 m
soczewka ............................................................ f3.6 / F2.0
kąt widzenia obiektywu
poziomo ..................................................................83°
pionowo ..................................................................47°
ukośnie ...................................................................96°
zużycie prądu ..................... 100 mA (IR wył.), 320 mA (IR wł.)
wymiary ......................................................... Ø 92 x 75 mm
waga ......................................................................... 300 g
CAMTVI8(W)N
diody LED podczerwieni .................................................... 36
maks. zasięg projekcji IR .............................................. 30 m
soczewka ....................................................... f2.8 ~ 12 mm
kąt widzenia obiektywu ........................................ 104° ~ 33°
zużycie prądu ..................... 130 mA (IR wył.), 420 mA (IR wł.)
wymiary ..................................................... Ø 119 x 105 mm
waga ......................................................................... 570 g
Należy używać wyłącznie oryginalnych akcesoriów. Firma Velleman
nv nie ponosi odpowiedzialności w przypadku uszkodzeń lub
obrażeń ciała powstałych w wyniku (nieprawidłowej) obsługi
urządzenia. Więcej informacji dotyczących produktu oraz najnowsza
wersja niniejszej instrukcji obsługi znajduje się na stronie
www.velleman.eu. Informacje zawarte w niniejszej instrukcji
obsługi mogą ulec zmianie bez wcześniejszego powiadomienia.
© INFORMACJA O PRAWACH AUTORSKICH
Niniejsza instrukcja obsługi jest chroniona prawem autorskim.
Instrukcja jest własnością firmy Velleman nv i jest chroniona prawami
autorskimi.
Wszelkie prawa są zastrzeżone na całym świecie. Żadna część niniejszej
instrukcji nie może być kopiowana, powielana, tłumaczona ani przenoszona
na jakikolwiek nośnik elektroniczny (lub w inny sposób) bez wcześniejszej
pisemnej zgody właściciela praw autorskich.
Page 40

CAMTVI7N/CAMTVI7WN/CAMTVI8N/CAMTVI8WN
V. 01 – 18/07/2016 40 ©Velleman nv
MANUAL DO UTILIZADOR
1. Introdução
Aos cidadãos da União Europeia
Importantes informações sobre o meio ambiente no que respeita a
este produto
Este símbolo no aparelho ou na embalagem indica que, enquanto
desperdícios, poderão causar danos no meio ambiente. Não
coloque a unidade (ou as pilhas) no depósito de lixo municipal;
deve dirigir-se a uma empresa especializada em reciclagem.
Devolva o aparelho ao seu distribuidor ou ao posto de reciclagem
local. Respeite a legislação local relativa ao meio ambiente.
Em caso de dúvidas, contacte com as autoridades locais para os
resíduos.
Agradecemos o facto de ter adquirido este aparelho. Leia atentamente as
instruções do manual antes de usar o aparelho. Caso o aparelho tenha
sofrido algum dano durante o transporte não o instale e entre em contacto
com o seu distribuidor.
2. Instruções de segurança
Mantenha o aparelho fora do alcance de crianças e pessoas não
autorizadas.
Risco de choque elétrico ao tentar abrir o aparelho.
NUNCA desmonte ou tente abrir a capa exterior. O utilizador não
terá de fazer a manutenção das peças. Contacte um agente
autorizado para assistência e/ou peças de substituição.
3. Normas gerais
Consulte a Garantia de serviço e qualidade Velleman® na parte final
deste manual do utilizador.
Familiarize-se com o funcionamento do aparelho antes de o utilizar.
Por razões de segurança, estão proibidas quaisquer modificações do
aparelho desde que não autorizadas. Os danos causados por
modificações não autorizadas do aparelho não estão cobertos pela
garantia.
Utilize o aparelho apenas para as aplicações descritas neste manual.
Uma utilização incorreta anula a garantia completamente.
Danos causados pelo não cumprimento das normas de segurança
referidas neste manual anulam a garantia e o seu distribuidor não será
responsável por quaisquer danos ou outros problemas daí resultantes.
Page 41

CAMTVI7N/CAMTVI7WN/CAMTVI8N/CAMTVI8WN
V. 01 – 18/07/2016 41 ©Velleman nv
Mantenha o aparelho protegido de temperaturas extremas.
Proteja o aparelho de quedas e má utilização. Evite usar força excessiva
ao utilizar o aparelho.
Nunca utilize este aparelho para violar as leis de privacidade ou levar a
cabo quaisquer atividades ilegais.
4. Características
Esta câmara HD CCTV está equipada com um sensor de imagem
CMOS. A qualidade da imagem de vídeo é de 1080p. Pode optar pelos sinais
de vídeoHD-TVI, HD-CVI, AHD e sinais de vídeo analógicos. O filtro
corte-IR irá filtrar a luz IR (infravermelhos) de modo a que não haja
distorção da cor da imagem. Ao escurecer, a câmara passa
automaticamente para o modo noite. No modo noite, a câmara activa os
LEDs IR e desactiva o filtro.
à prova de água
com visão noturna P/B (LEDs IR)
sinal de vídeo 1080P
suporte anti-vandalismo
lente varifocal (apenas CAMTVI8(W)N)
5. Descrição
Consulte as imagens da página 2 deste manual.
1
placa de montagem
7 lente
2
anel de fixação
8 focagem manual
3
anel de posicionamento
9 Sensor de luz
4
zoom manual
10
ranhura para o cabo
5
invólucro da lente (esfera)
11
cabo
6
LEDs IR noturnos
6. Instalação do hardware
Veja as imagens na página 2 deste manual.
Escolha a localização da câmara, tendo em conta as seguintes linhas de
orientação:
o não instale a câmara em locais com temperaturas muito baixas ou
muito elevadas ou onde possa ocorrer excessiva vibração.
o evite montar a câmara perto de campos electromagnéticos.
o não aponte a câmara na direção do sol ou de quaisquer objetos
excessivamente birlhantes ou que produzam reflexos (por ex. portas
metálicas).
Segure a placa de montagem [1] e desaperte o anel de fixação [2]
rodando-o no sentido contrário aos ponteiros do relógio. Repare que o
Page 42

CAMTVI7N/CAMTVI7WN/CAMTVI8N/CAMTVI8WN
V. 01 – 18/07/2016 42 ©Velleman nv
invólucro da lente [5] e o anel de posicionamento [3] também ficam
soltos.
Use a placa de montagem [1] para apontar a localização dos furos. Faça
os furos.
Faça passar o cabo de alimentação e o cabo de vídeo [11] por uma das
passagens para os cabos [10] e fixe a placa de montagem [1] à parede
ou ao teto usando os quatro parafusos.
Coloque o anel de posicionamento [3] por cima do invólucro da lente
[5] sobre a placa [1] e de seguida fixe o conjunto apertando o anel de
fixação [2] na placa de montagem [1]. Certifique-se de que o anel de
fixação não fica demasiado apertado de modo a poder ter a opção de
posicionar a lente na direção do campo de ação pretendido.
Ligue os dois fios para o sinal PAL analógico; deixe-os desligados para o
sinal 1080P TVI HD.
Ligue o conector de vídeo [A] a um monitor (não incl.) ou a um
comutador sequencial/divisor quadrilateral (não incl.) no caso de
existirem várias cúpulas.
Ligue o conector de alimentação [B] a uma tomada 12 VDC (não incl.).
Determine a área de observação ajustando a posição do invólucro da
lente [5] no anel de posicionamento [3].
Ajuste manualmente o zoom [4] e a focagem [8] usando os respetivos
parafusos. A localização dos parafusos pode ser determinada através da
observação do sensor de luz [9].
Aperte o anel de fixação [2] para segurar a câmara na posição desejada.
7. Configurações OSD
Existe um pequeno joystick no cabo da câmara que lhe permite ajustar as
configurações da câmara através da visualização no ecrã (OSD).
Pressione o botão do meio para aceder ao menu, ou
para selecionar uma opção.
Pressione os botões para cima e para baixo para se
deslocar no menu.
Pressione os botões esquerda e direita para
modificar os parâmetros do menu.
No menu OSD:
NEXT/BACK: selecione esta opção e pressione o botão do meio para ir
para a página seguinte/anterior de opções do menu.
RETURN: selecione esta opção e pressione o botão do meio para voltar
ao nível anterior do menu.
EXIT: selecione esta opção e pressione o botão do meio para abandonar
o menu OSD sem salvar as configurações.
Page 43
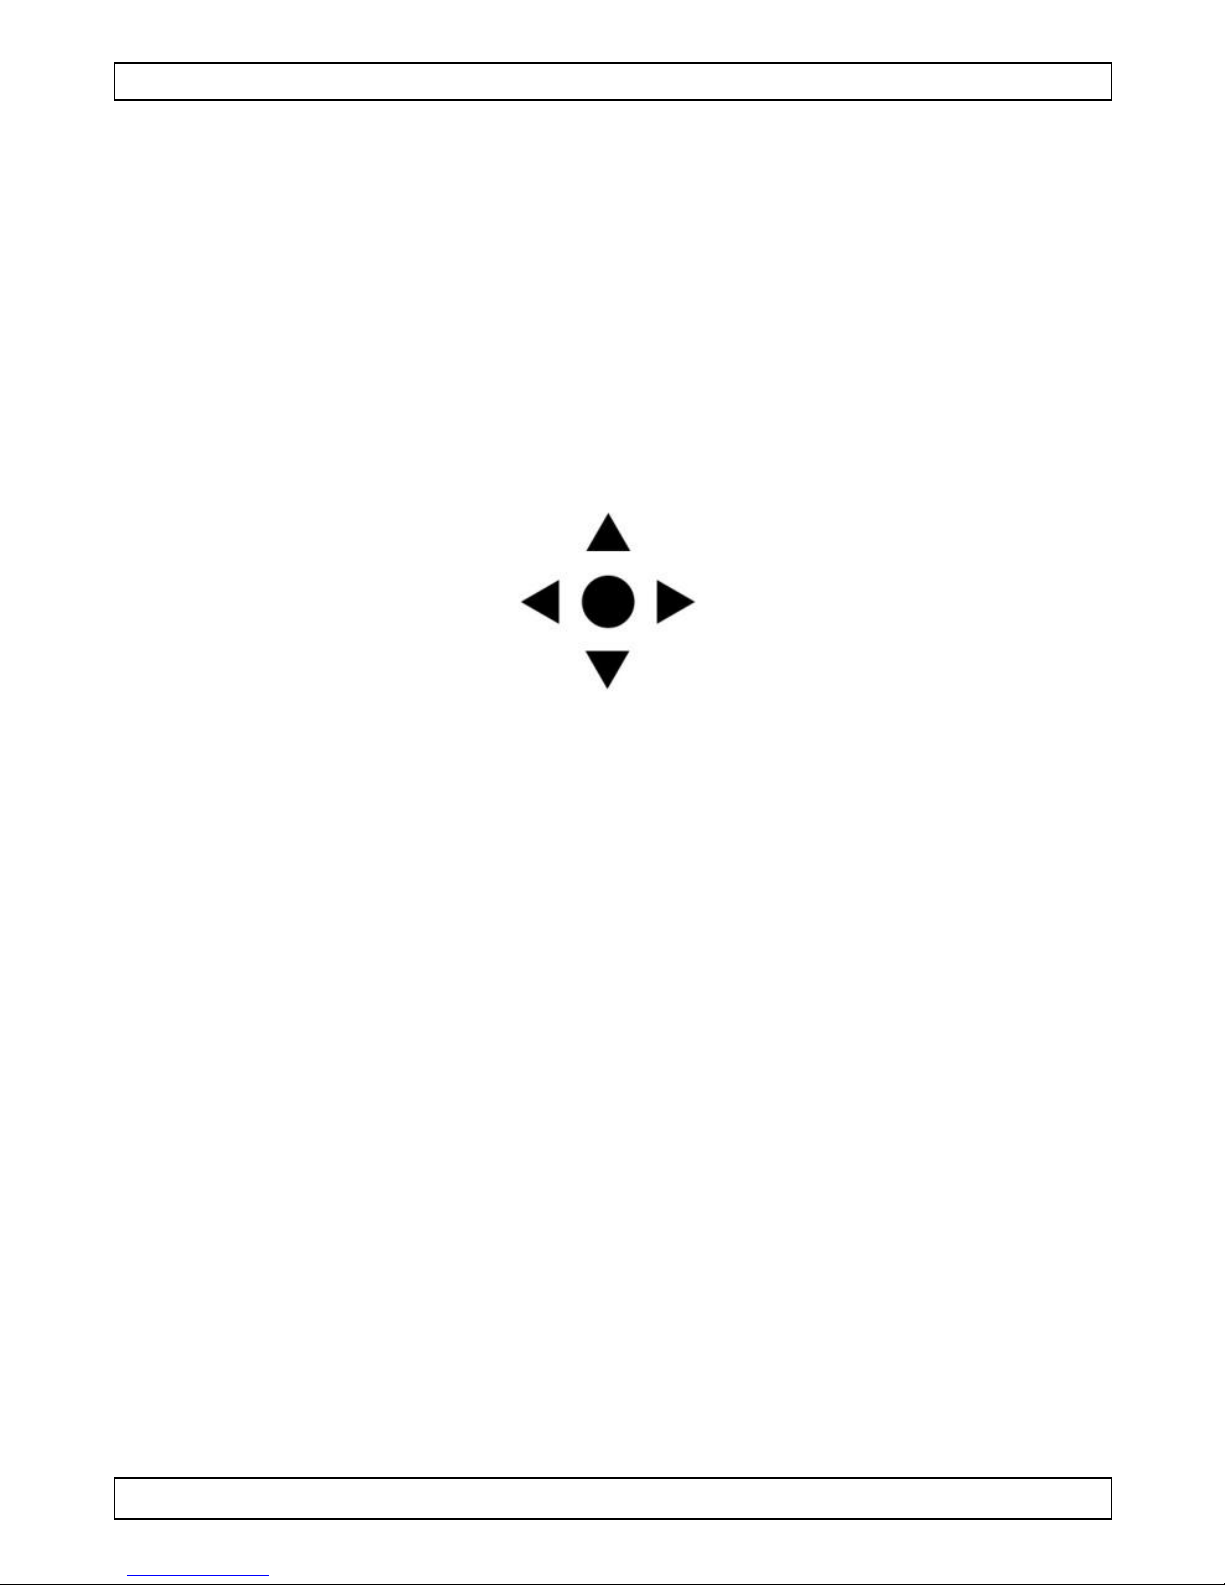
CAMTVI7N/CAMTVI7WN/CAMTVI8N/CAMTVI8WN
V. 01 – 18/07/2016 43 ©Velleman nv
SAVE ALL: selecione esta opção e pressione o botão do meio para salvar
todas as configurações.
CAMERA RESET: selecione esta opção e pressione o botão do meio para
restaurar as definições de fábrica.
As configurações do menu OSD estão descritas em pormenor mais abaixo.
Consulte a tabela na página 3.
7.1 Selecionar o Sinal de Vídeo
Mantenha o botão do joystick pressionado durante 5 segundos para
selecionar o sinal de vídeo (sinal por defeito: TVI)
AHD
CVBS
TVI
CVI
7.2 Exposição Automática (EA)
Use este menu para fazer os ajustes mais frequentes em termos de imagem
de vídeo.
7.3 Equilíbrio de Brancos (EB)
Use esta opção para fazer a regulação do equilíbrio dos brancos.
7.4 Dia & Noite
A câmara pode alternar automaticamente entre imagens a cor durante o dia
e imagens a preto e branco durante a noite. Use esta função para controlar
o comportamento da câmara durante o dia/noite.
Nota: as imagens a preto e branco são bastante mais nítidas e contém
menos ruído com níveis de luz reduzidos.
7.5 Configuração de Vídeo
Use este menu para definir as diferentes opções de vídeo.
Page 44

CAMTVI7N/CAMTVI7WN/CAMTVI8N/CAMTVI8WN
V. 01 – 18/07/2016 44 ©Velleman nv
7.6 Idioma
Use esta função para definir o idioma do menu OSD.
7.7 Reinicializar
Use este menu para restaurar todas as definições de fábrica.
7.8 Salvar-Sair
Use esta opção para salvar as suas configurações e sair do menu.
7.9 Exit
Use esta opção para sair do menu sem salvar as configurações.
8. Especificações Técnicas
grau de proteção IP ...................................................... IP66
elemento de imagem ............... sensor de imagem 1/2.7" CMOS
píxeis ................................................... 1920 (H) x 1080 (V)
resolução .......................................................... vídeo 1080P
DSP .............................................. Chip Techpoint & HTC1080
iluminação mínima ..................................................0.001 lux
filto de corte infravermelhos ............................................. sim
relação sinal/ruído ..............................> 50 dB (CAG apagado)
WDR ............................................................................. sim
controlo automático de ganho (CAG) ................................. sim
equilíbrio de brancos ............................................ automático
saída de vídeo ................................................... Ligação BNC
sinal TVI ............................................................. 1080P
vídeo PAL .. 960H (selecionável através de fios de entrada de
alarme)
sinal CVI ............................................................. 1080P
sinal AHD ............................................................ 1080P
áudio ........................................................................... não
alimentação ............................................................. 12 VDC
temperatura de funcionamentode -10 °C a 40 °C - RH máx. 95. 95 %
Page 45

CAMTVI7N/CAMTVI7WN/CAMTVI8N/CAMTVI8WN
V. 01 – 18/07/2016 45 ©Velleman nv
CAMTVI7(W)N
LEDs IR.......................................................................... 24
máx. distância de projecção IR ...................................... 20 m
lente .................................................................. f3.6 / F2.0
ângulo da lente
horizontal ................................................................83°
vertical ...................................................................47°
diagonal ..................................................................96°
consumo de corrente100 mA (IR apagados), 320 mA (IR acesos)
dimensões ...................................................... Ø 92 x 75 mm
peso .......................................................................... 300 g
CAMTVI8(W)N
LEDs IR.......................................................................... 36
máx. distância de projecção IR ...................................... 30 m
lente ............................................................. f2.8 ~ 12 mm
ângulo da lente ................................................... 104° ~ 33°
consumo de corrente130 mA (IR apagados), 420 mA (IR acesos)
dimensões .................................................. Ø 119 x 105 mm
peso .......................................................................... 570 g
Utilize este aparelho apenas com acessórios originais. A Velleman
NV não será responsável por quaisquer danos ou lesões causados
pelo uso (indevido) do aparelho. Para mais informação relacionada
com este produto e para aceder à versão mais recente deste manual,
por favor vá ao nosso site www.velleman.eu. Podem alterar-se as
especificações e o conteúdo deste manual sem aviso prévio.
© DIREITOS DE AUTOR
Este manual tem direitos de autor. A Velleman NV detém os direitos de
autor deste manual do utilizador.
Todos os direitos mundiais reservados. É estritamente proibido reproduzir,
traduzir, copiar, editar e gravar este manual do utilizador ou partes deste
sem prévia autorização escrita por parte da detentora dos direitos.
Page 46

Velleman® Service and Quality Warranty
Since its foundation in 1972, Velleman® acquired extensive
experience in the electronics world and currently distributes its
products in over 85 countries.
All our products fulfil strict quality requirements and legal
stipulations in the EU. In order to ensure the quality, our
products regularly go through an extra quality check, both by an
internal quality department and by specialized external
organisations. If, all precautionary measures notwithstanding,
problems should occur, please make appeal to our warranty
(see guarantee conditions).
General Warranty Conditions Concerning Consumer
Products (for EU):
• All consumer products are subject to a 24-month warranty on
production flaws and defective material as from the original
date of purchase.
• Velleman® can decide to replace an article with an equivalent
article, or to refund the retail value totally or partially when the
complaint is valid and a free repair or replacement of the article
is impossible, or if the expenses are out of proportion.
You will be delivered a replacing article or a refund at the value
of 100% of the purchase price in case of a flaw occurred in the
first year after the date of purchase and delivery, or a replacing
article at 50% of the purchase price or a refund at the value of
50% of the retail value in case of a flaw occurred in the second
year after the date of purchase and delivery.
• Not covered by warranty:
- all direct or indirect damage caused after delivery to the article
(e.g. by oxidation, shocks, falls, dust, dirt, humidity...), and by
the article, as well as its contents (e.g. data loss),
compensation for loss of profits;
- consumable goods, parts or accessories that are subject to an
aging process during normal use, such as batteries
(rechargeable, non-rechargeable, built-in or replaceable),
lamps, rubber parts, drive belts... (unlimited list);
- flaws resulting from fire, water damage, lightning, accident,
natural disaster, etc.…;
- flaws caused deliberately, negligently or resulting from
improper handling, negligent maintenance, abusive use or use
contrary to the manufacturer’s instructions;
- damage caused by a commercial, professional or collective
use of the article (the warranty validity will be reduced to six (6)
months when the article is used professionally);
- damage resulting from an inappropriate packing and shipping
of the article;
- all damage caused by modification, repair or alteration
performed by a third party without written permission by
Velleman®.
• Articles to be repaired must be delivered to your Velleman®
dealer, solidly packed (preferably in the original packaging),
and be completed with the original receipt of purchase and a
clear flaw description.
• Hint: In order to save on cost and time, please reread the
manual and check if the flaw is caused by obvious causes prior
to presenting the article for repair. Note that returning a nondefective article can also involve handling costs.
• Repairs occurring after warranty expiration are subject to
shipping costs.
• The above conditions are without prejudice to all commercial
warranties.
The above enumeration is subject to modification
according to the article (see article’s manual).
Velleman® service- en kwaliteitsgarantie
Velleman® heeft sinds zijn oprichting in 1972 een ruime
ervaring opgebouwd in de elektronicawereld en verdeelt op dit
moment producten in meer dan 85 landen. Al onze producten
beantwoorden aan strikte kwaliteitseisen en aan de wettelijke
bepalingen geldig in de EU. Om de kwaliteit te waarborgen,
ondergaan onze producten op regelmatige tijdstippen een extra
kwaliteitscontrole, zowel door onze eigen kwaliteitsafdeling als
door externe gespecialiseerde organisaties. Mocht er ondanks
deze voorzorgen toch een probleem optreden, dan kunt u
steeds een beroep doen op onze waarborg (zie
waarborgvoorwaarden).
Algemene waarborgvoorwaarden
consumentengoederen (voor Europese Unie):
• Op alle consumentengoederen geldt een garantieperiode van
24 maanden op productie- en materiaalfouten en dit vanaf de
oorspronkelijke aankoopdatum.
• Indien de klacht gegrond is en een gratis reparatie of
vervanging van een artikel onmogelijk is of indien de kosten
hiervoor buiten verhouding zijn, kan Velleman® beslissen het
desbetreffende artikel te vervangen door een gelijkwaardig
artikel of de aankoopsom van het artikel gedeeltelijk of volledig
terug te betalen. In dat geval krijgt u een vervangend product of
terugbetaling ter waarde van 100% van de aankoopsom bij
ontdekking van een gebrek tot één jaar na aankoop en levering,
of een vervangend product tegen 50% van de kostprijs of
terugbetaling van 50 % bij ontdekking na één jaar tot 2 jaar.
• Valt niet onder waarborg:
- alle rechtstreekse of onrechtstreekse schade na de levering
veroorzaakt aan het toestel (bv. door oxidatie, schokken, val,
stof, vuil, vocht...), en door het toestel, alsook zijn inhoud (bv.
verlies van data), vergoeding voor eventuele winstderving.
- verbruiksgoederen, onderdelen of hulpstukken die onderhevig
zijn aan veroudering door normaal gebruik zoals bv. batterijen
(zowel oplaadbare als niet-oplaadbare, ingebouwd of
vervangbaar), lampen, rubberen onderdelen, aandrijfriemen...
(onbeperkte lijst).
- defecten ten gevolge van brand, waterschade, bliksem,
ongevallen, natuurrampen, enz.
- defecten veroorzaakt door opzet, nalatigheid of door een
onoordeelkundige behandeling, slecht onderhoud of abnormaal
gebruik of gebruik van het toestel strijdig met de voorschriften
van de fabrikant.
- schade ten gevolge van een commercieel, professioneel of
collectief gebruik van het apparaat (bij professioneel gebruik
wordt de garantieperiode herleid tot 6 maand).
- schade veroorzaakt door onvoldoende bescherming bij
transport van het apparaat.
- alle schade door wijzigingen, reparaties of modificaties
uitgevoerd door derden zonder toestemming van Velleman®.
• Toestellen dienen ter reparatie aangeboden te worden bij uw
Velleman®-verdeler. Het toestel dient vergezeld te zijn van het
oorspronkelijke aankoopbewijs. Zorg voor een degelijke
verpakking (bij voorkeur de originele verpakking) en voeg een
duidelijke foutomschrijving bij.
• Tip: alvorens het toestel voor reparatie aan te bieden, kijk nog
eens na of er geen voor de hand liggende reden is waarom het
toestel niet naar behoren werkt (zie handleiding). Op deze wijze
kunt u kosten en tijd besparen. Denk eraan dat er ook voor nietdefecte toestellen een kost voor controle aangerekend kan
worden.
• Bij reparaties buiten de waarborgperiode zullen
transportkosten aangerekend worden.
• Elke commerciële garantie laat deze rechten onverminderd.
Bovenstaande opsomming kan eventueel aangepast
worden naargelang de aard van het product (zie
handleiding van het betreffende product).
Page 47

Garantie de service et de qualité Velleman®
Depuis 1972, Velleman® a gagné une vaste expérience dans le
secteur de l’électronique et est actuellement distributeur dans
plus de 85 pays.
Tous nos produits répondent à des exigences de qualité
rigoureuses et à des dispositions légales en vigueur dans l’UE.
Afin de garantir la qualité, nous soumettons régulièrement nos
produits à des contrôles de qualité supplémentaires, tant par
notre propre service qualité que par un service qualité externe.
Dans le cas improbable d’un défaut malgré toutes les
précautions, il est possible d’invoquer notre garantie (voir les
conditions de garantie).
Conditions générales concernant la garantie sur les
produits grand public (pour l’UE) :
• tout produit grand public est garanti 24 mois contre tout vice
de production ou de matériaux à dater du jour d’acquisition
effective ;
• si la plainte est justifiée et que la réparation ou le
remplacement d’un article est jugé impossible, ou lorsque les
coûts s’avèrent disproportionnés, Velleman® s’autorise à
remplacer ledit article par un article équivalent ou à rembourser
la totalité ou une partie du prix d’achat. Le cas échéant, il vous
sera consenti un article de remplacement ou le remboursement
complet du prix d’achat lors d’un défaut dans un délai de 1 an
après l’achat et la livraison, ou un article de remplacement
moyennant 50% du prix d’achat ou le remboursement de 50%
du prix d’achat lors d’un défaut après 1 à 2 ans.
• sont par conséquent exclus :
- tout dommage direct ou indirect survenu à l’article après
livraison (p.ex. dommage lié à l’oxydation, choc, chute,
poussière, sable, impureté…) et provoqué par l’appareil, ainsi
que son contenu (p.ex. perte de données) et une indemnisation
éventuelle pour perte de revenus ;
- toute pièce ou accessoire nécessitant un remplacement causé
par un usage normal comme p.ex. piles (rechargeables comme
non rechargeables, intégrées ou remplaçables), ampoules,
pièces en caoutchouc, courroies… (liste illimitée) ;
- tout dommage qui résulte d’un incendie, de la foudre, d’un
accident, d’une catastrophe naturelle, etc. ;
- out dommage provoqué par une négligence, volontaire ou
non, une utilisation ou un entretien incorrect, ou une utilisation
de l’appareil contraire aux prescriptions du fabricant ;
- tout dommage à cause d’une utilisation commerciale,
professionnelle ou collective de l’appareil (la période de
garantie sera réduite à 6 mois lors d’une utilisation
professionnelle) ;
- tout dommage à l’appareil qui résulte d’une utilisation
incorrecte ou différente que celle pour laquelle il a été
initialement prévu comme décrit dans la notice ;
- tout dommage engendré par un retour de l’appareil emballé
dans un conditionnement non ou insuffisamment protégé.
- toute réparation ou modification effectuée par une tierce
personne sans l’autorisation explicite de SA Velleman® ; - frais
de transport de et vers Velleman® si l’appareil n’est plus
couvert sous la garantie.
• toute réparation sera fournie par l’endroit de l’achat. L’appareil
doit nécessairement être accompagné du bon d’achat d’origine
et être dûment conditionné (de préférence dans l’emballage
d’origine avec mention du défaut) ;
• tuyau : il est conseillé de consulter la notice et de contrôler
câbles, piles, etc. avant de retourner l’appareil. Un appareil
retourné jugé défectueux qui s’avère en bon état de marche
pourra faire l’objet d’une note de frais à charge du
consommateur ;
• une réparation effectuée en-dehors de la période de garantie
fera l’objet de frais de transport ;
• toute garantie commerciale ne porte pas atteinte aux
conditions susmentionnées.
La liste susmentionnée peut être sujette à une
complémentation selon le type de l’article et être
mentionnée dans la notice d’emploi.
Garantía de servicio y calidad Velleman®
Desde su fundación en 1972 Velleman® ha adquirido una
amplia experiencia como distribuidor en el sector de la
electrónica en más de 85 países. Todos nuestros productos
responden a normas de calidad rigurosas y disposiciones
legales vigentes en la UE. Para garantizar la calidad,
sometemos nuestros productos regularmente a controles de
calidad adicionales, tanto a través de nuestro propio servicio de
calidad como de un servicio de calidad externo. En el caso
improbable de que surgieran problemas a pesar de todas las
precauciones, es posible recurrir a nuestra garantía (véase las
condiciones de garantía).
Condiciones generales referentes a la garantía sobre
productos de venta al público (para la Unión
Europea):
• Todos los productos de venta al público tienen un período de
garantía de 24 meses contra errores de producción o errores
en materiales desde la adquisición original;
• Si la queja está fundada y si la reparación o sustitución de un
artículo no es posible, o si los gastos son desproporcionados,
Velleman® autoriza reemplazar el artículo por un artículo
equivalente o reembolsar la totalidad o una parte del precio de
compra. En este caso, usted recibirá un artículo de recambio o
el reembolso completo del precio de compra si encuentra algún
fallo hasta un año después de la compra y entrega, o un
artículo de recambio al 50% del precio de compra o el
reembolso del 50% del precio de compra si encuentra un fallo
después de 1 año y hasta los 2 años después de la compra y
entrega.
Por consiguiente, están excluidos entre otras cosas:
- todos los daños causados directa o indirectamente al aparato
(p.ej. por oxidación, choques, caída,...) y a su contenido (p.ej.
pérdida de datos) después de la entrega y causados por el
aparato, y cualquier indemnización por posible pérdida de
ganancias;
- partes o accesorios, que estén expuestos al desgaste
causado por un uso normal, como por ejemplo baterías (tanto
recargables como no recargables, incorporadas o
reemplazables), bombillas, partes de goma, etc. (lista ilimitada);
- defectos causados por un incendio, daños causados por el
agua, rayos, accidentes, catástrofes naturales, etc.;
- defectos causados a conciencia, descuido o por malos tratos,
un mantenimiento inapropiado o un uso anormal del aparato
contrario a las instrucciones del fabricante;
- daños causados por un uso comercial, profesional o colectivo
del aparato (el período de garantía se reducirá a 6 meses con
uso profesional);
- daños causados por un uso incorrecto o un uso ajeno al que
está previsto el producto inicialmente como está descrito en el
manual del usuario;
- daños causados por una protección insuficiente al transportar
el aparato.
- daños causados por reparaciones o modificaciones
efectuadas por una tercera persona sin la autorización explícita
de Velleman®;
- se calcula gastos de transporte de y a Velleman® si el
aparato ya no está cubierto por la garantía.
• Cualquier artículo que tenga que ser reparado tendrá que ser
devuelto a su distribuidor Velleman®. Devuelva el aparato con
la factura de compra original y transpórtelo en un embalaje
sólido (preferentemente el embalaje original). Incluya también
una buena descripción del fallo;
• Consejo: Lea el manual del usuario y controle los cables, las
pilas, etc. antes de devolver el aparato. Si no se encuentra un
Page 48

defecto en el artículo los gastos podrían correr a cargo del
cliente;
• Los gastos de transporte correrán a carga del cliente para una
reparación efectuada fuera del período de garantía.
• Cualquier gesto comercial no disminuye estos derechos.
La lista previamente mencionada puede ser adaptada
según el tipo de artículo (véase el manual del usuario del
artículo en cuestión).
Velleman® Service- und Qualitätsgarantie
Seit der Gründung in 1972 hat Velleman® sehr viel Erfahrung
als Verteiler in der Elektronikwelt in über 85 Ländern aufgebaut.
Alle Produkte entsprechen den strengen Qualitätsforderungen
und gesetzlichen Anforderungen in der EU. Um die Qualität zu
gewährleisten werden unsere Produkte regelmäßig einer
zusätzlichen Qualitätskontrolle unterworfen, sowohl von
unserer eigenen Qualitätsabteilung als auch von externen
spezialisierten Organisationen. Sollten, trotz aller
Vorsichtsmaßnahmen, Probleme auftreten, nehmen Sie bitte
die Garantie in Anspruch (siehe Garantiebedingungen).
Allgemeine Garantiebedingungen in Bezug auf
Konsumgüter (für die Europäische Union):
• Alle Produkte haben für Material- oder Herstellungsfehler eine
Garantieperiode von 24 Monaten ab Verkaufsdatum.
• Wenn die Klage berechtigt ist und falls eine kostenlose
Reparatur oder ein Austausch des Gerätes unmöglich ist, oder
wenn die Kosten dafür unverhältnismäßig sind, kann
Velleman® sich darüber entscheiden, dieses Produkt durch ein
gleiches Produkt zu ersetzen oder die Kaufsumme ganz oder
teilweise zurückzuzahlen. In diesem Fall erhalten Sie ein
Ersatzprodukt oder eine Rückzahlung im Werte von 100% der
Kaufsumme im Falle eines Defektes bis zu 1 Jahr nach Kauf
oder Lieferung, oder Sie bekommen ein Ersatzprodukt im
Werte von 50% der Kaufsumme oder eine Rückzahlung im
Werte von 50 % im Falle eines Defektes im zweiten Jahr.
• Von der Garantie ausgeschlossen sind:
- alle direkten oder indirekten Schäden, die nach Lieferung am
Gerät und durch das Gerät verursacht werden (z.B. Oxidation,
Stöße, Fall, Staub, Schmutz, Feuchtigkeit, ...), sowie auch der
Inhalt (z.B. Datenverlust), Entschädigung für eventuellen
Gewinnausfall.
- Verbrauchsgüter, Teile oder Zubehörteile, die durch normalen
Gebrauch dem Verschleiß ausgesetzt sind, wie z.B. Batterien
(nicht nur aufladbare, sondern auch nicht aufladbare,
eingebaute oder ersetzbare), Lampen, Gummiteile,
Treibriemen, usw. (unbeschränkte Liste).
- Schäden verursacht durch Brandschaden, Wasserschaden,
Blitz, Unfälle, Naturkatastrophen, usw.
- Schäden verursacht durch absichtliche, nachlässige oder
unsachgemäße Anwendung, schlechte Wartung,
zweckentfremdete Anwendung oder Nichtbeachtung von
Benutzerhinweisen in der Bedienungsanleitung.
- Schäden infolge einer kommerziellen, professionellen oder
kollektiven Anwendung des Gerätes (bei gewerblicher
Anwendung wird die Garantieperiode auf 6 Monate
zurückgeführt).
- Schäden verursacht durch eine unsachgemäße Verpackung
und unsachgemäßen Transport des Gerätes.
- alle Schäden verursacht durch unautorisierte Änderungen,
Reparaturen oder Modifikationen, die von einem Dritten ohne
Erlaubnis von Velleman® vorgenommen werden.
• Im Fall einer Reparatur, wenden Sie sich an Ihren Velleman®Verteiler. Legen Sie das Produkt ordnungsgemäß verpackt
(vorzugsweise die Originalverpackung) und mit dem OriginalKaufbeleg vor. Fügen Sie eine deutliche Fehlerbeschreibung
hinzu.
• Hinweis: Um Kosten und Zeit zu sparen, lesen Sie die
Bedienungsanleitung nochmals und überprüfen Sie, ob es
keinen auf de Hand liegenden Grund gibt, ehe Sie das Gerät
zur Reparatur zurückschicken. Stellt sich bei der Überprüfung
des Gerätes heraus, dass kein Geräteschaden vorliegt, könnte
dem Kunden eine Untersuchungspauschale berechnet.
• Für Reparaturen nach Ablauf der Garantiefrist werden
Transportkosten berechnet.
• Jede kommerzielle Garantie lässt diese Rechte unberührt.
Die oben stehende Aufzählung kann eventuell angepasst
werden gemäß der Art des Produktes (siehe
Bedienungsanleitung des Gerätes).
Velleman ® usługi i gwarancja jakości
Od czasu założenia w 1972, Velleman® zdobył bogate
doświadczenie w dziedzinie światowej elektroniki. Obecnie
firma dystrybuuje swoje produkty w ponad 85 krajach.
Wszystkie nasze produkty spełniają surowe wymagania
jakościowe oraz wypełniają normy i dyrektywy obowiązujące w
krajach UE. W celu zapewnienia najwyższej jakości naszych
produktów, przechodzą one regularne oraz dodatkowo
wyrywkowe badania kontroli jakości, zarówno naszego
wewnętrznego działu jakości jak również wyspecjalizowanych
firm zewnętrznych. Pomimo dołożenia wszelkich starań czasem
mogą pojawić się problemy techniczne, prosimy odwołać się do
gwarancji (patrz warunki gwarancji).
Ogólne Warunki dotyczące gwarancji:
• Wszystkie produkty konsumenckie podlegają 24-miesięcznej
gwarancji na wady produkcyjne i materiałowe od daty zakupu.
• W przypadku, gdy usterka jest niemożliwa do usunięcia lub
koszt usunięcia jest nadmiernie wysoki Velleman ® może
zdecydować o wymianie artykułu na nowy, wolny od wad lub
zwrócić zapłaconą kwotę. Zwrot gotówki może jednak nastąpić
z uwzględnieniem poniższych warunków:
- zwrot 100% ceny zakupu w przypadku, gdy wada wystąpiła w
ciągu pierwszego roku od daty zakupu i dostawy
- wymiana wadliwego artykułu na nowy, wolny od wad z
odpłatnością 50% ceny detalicznej lub zwrot 50% kwoty ceny
nabycia w przypadku gdy wada wystąpiła w drugim roku od
daty zakupu i dostawy.
• Produkt nie podlega naprawie gwarancyjnej:
- gdy wszystkie bezpośrednie lub pośrednie szkody
spowodowane są działaniem czynników środowiskowych lub
losowych (np. przez utlenianie, wstrząsy, upadki, kurz, brud,
...), wilgotności;
- gwarant nie ponosi odpowiedzialności za szkody
wynikających z utraty danych;
- produkty konsumenckie, części zamienne lub akcesoria
podatne na process starzenia, wynikającego z normalnego
użytkowania, np: baterie (
lub wymienne), żarówki, paski napędowe, gumowe elementy
napędowe... (nieograniczona lista);
- usterka wynika z działania pożaru, zalania wszelkimi cieczami,
uderzenia pioruna, upadku lub klęski żywiołowej, itp.;
- usterka wynika z zaniedbań eksploatacyjnych tj. umyślne
bądź nieumyślne zaniechanie czyszczenia, konserwacji,
wymiany materiałów ekspolatacyjnych, niedbalstwa lub z
niewłaściwego obchodzenia się lub niezgodnego użytkowania z
instrukcją producenta;
- szkody wynikające z nadmiernego użytkowania gdy nie jest
do tego celu przeznaczony tj. działalność komerycjna,
zawodowa lub wspólne użytkowanie przez wiele osób - okres
obowiązywania gwarancji zostanie obniżony do 6 (sześć)
miesięcy;
- Szkody wynikające ze źle zabezpieczonej wysyłki produktu;
- Wszelkie szkody spowodowane przez nieautoryzowaną
naprawę, modyfikację, przeróbkę produktu przez osoby trzecie
jak również bez pisemnej zgody firmy Velleman ®.
• Uszkodzony produkt musi zostać dostarczony do sprzedawcy
® Velleman, solidnie zapakowany (najlepiej w oryginalnym
ładowalne, nieładowalne, wbudowane
Page 49

opakowaniu), wraz z wyposażeniem z jakim produkt został
sprzedany. W przypadku wysyłki towaru w opakowaniu innym
niż oryginalnym ryzyko usterki produktu oraz tego skutki
przechodzą na właściciela produktu. Wraz z niesprawnym
produktem należy dołączyć jasny i szczegółowy opis jego
usterki, wady;
• Wskazówka: Aby zaoszczędzić na kosztach i czasie, proszę
szczegółowo zapoznać się z instrukcja obsługi; czy przyczyną
wady są okoliczności techniczne czy też wynikaja wyłącznie z
nieznajomości obsługi produktu. W przypadku wysyłki
sprawnego produktu do serwisu nabywca może zostać
obciążony kosztmi obsługi oraz transportu.
• W przypadku napraw pogwarancyjnych lub odpłatnych klient
ponosi dodatkowo koszt wysyłki produktu do i z serwisu.
wymienione wyżej warunki są bez uszczerbku dla wszystkich
komercyjnych gwarancji.
Powyższe postanowienia mogą podlegać modyfikacji w
zależności od wyrobu (patrz art obsługi).
Garantia de serviço e de qualidade Velleman®
Desde a sua fundação em 1972 Velleman® tem adquirido uma
amplia experiencia no sector da eletrónica com uma
distribuição em mais de 85 países.
Todos os nossos produtos respondem a exigências rigorosas e
a disposições legais em vigor na UE. Para garantir a qualidade,
submetemos regularmente os nossos produtos a controles de
qualidade suplementares, com o nosso próprio serviço
qualidade como um serviço de qualidade externo. No caso
improvável de um defeito mesmo com as nossas precauções, é
possível invocar a nossa garantia. (ver as condições de
garantia).
Condições gerais com respeito a garantia sobre os produtos
grande público (para a UE):
• qualquer produto grande público é garantido 24 mês contra
qualquer vício de produção ou materiais a partir da data de
aquisição efectiva;
• no caso da reclamação ser justificada e que a reparação ou
substituição de um artigo é impossível, ou quando os custo são
desproporcionados, Velleman® autoriza-se a substituir o dito
artigo por um artigo equivalente ou a devolver a totalidade ou
parte do preço de compra. Em outro caso, será consentido um
artigo de substituição ou devolução completa do preço de
compra no caso de um defeito no prazo de 1 ano depois da
data de compra e entrega, ou um artigo de substituição
pagando o valor de 50% do preço de compra ou devolução de
50% do preço de compra para defeitos depois de 1 a 2 anos.
• estão por consequência excluídos:
- todos os danos directos ou indirectos depois da entrega do
artigo (p.ex. danos ligados a oxidação, choques, quedas,
poeiras, areias, impurezas…) e provocado pelo aparelho, como
o seu conteúdo (p.ex. perca de dados) e uma indemnização
eventual por perca de receitas;
- consumíveis, peças ou acessórios sujeitos a desgaste
causado por um uso normal, como p.ex. pilhas (recarregáveis,
não recarregáveis, incorporadas ou substituíveis), lâmpadas,
peças em borracha correias… (lista ilimitada);
- todos os danos que resultem de um incêndio, raios, de um
acidente, de una catastrophe natural, etc.;
- danos provocados por negligencia, voluntária ou não, uma
utilização ou manutenção incorrecta, ou uma utilização do
aparelho contrária as prescrições do fabricante;
- todos os danos por causa de uma utilização comercial,
profissional ou colectiva do aparelho ( o período de garantia
será reduzido a 6 meses para uma utilização profissional);
- todos os danos no aparelho resultando de uma utilização
incorrecta ou diferente daquela inicialmente prevista e descrita
no manual de utilização;
- todos os danos depois de uma devolução não embalada ou
mal protegida ao nível do acondicionamento.
- todas as reparações ou modificações efectuadas por terceiros
sem a autorização de SA Velleman®;
- despesas de transporte de e para Velleman® se o aparelho
não estiver coberto pela garantia.
• qualquer reparação será fornecida pelo local de compra. O
aparelho será obrigatoriamente acompanhado do talão ou
factura de origem e bem acondicionado (de preferência dentro
da embalagem de origem com indicação do defeito ou avaria);
• dica: aconselha-mos a consulta do manual e controlar cabos,
pilhas, etc. antes de devolver o aparelho. Um aparelho
devolvido que estiver em bom estado será cobrado despesas a
cargo do consumidor;
• uma reparação efectuada fora da garantia, será cobrado
despesas de transporte;
• qualquer garantia comercial não prevalece as condições aqui
mencionadas.
A lista pode ser sujeita a um complemento conforme o tipo de
artigo e estar mencionada no manual de utilização.
Made in PRC
Imported by Velleman nv
Legen Heirweg 33, 9890 Gavere, Belgium
www.velleman.eu
 Loading...