

Page 1
CAMSETW13
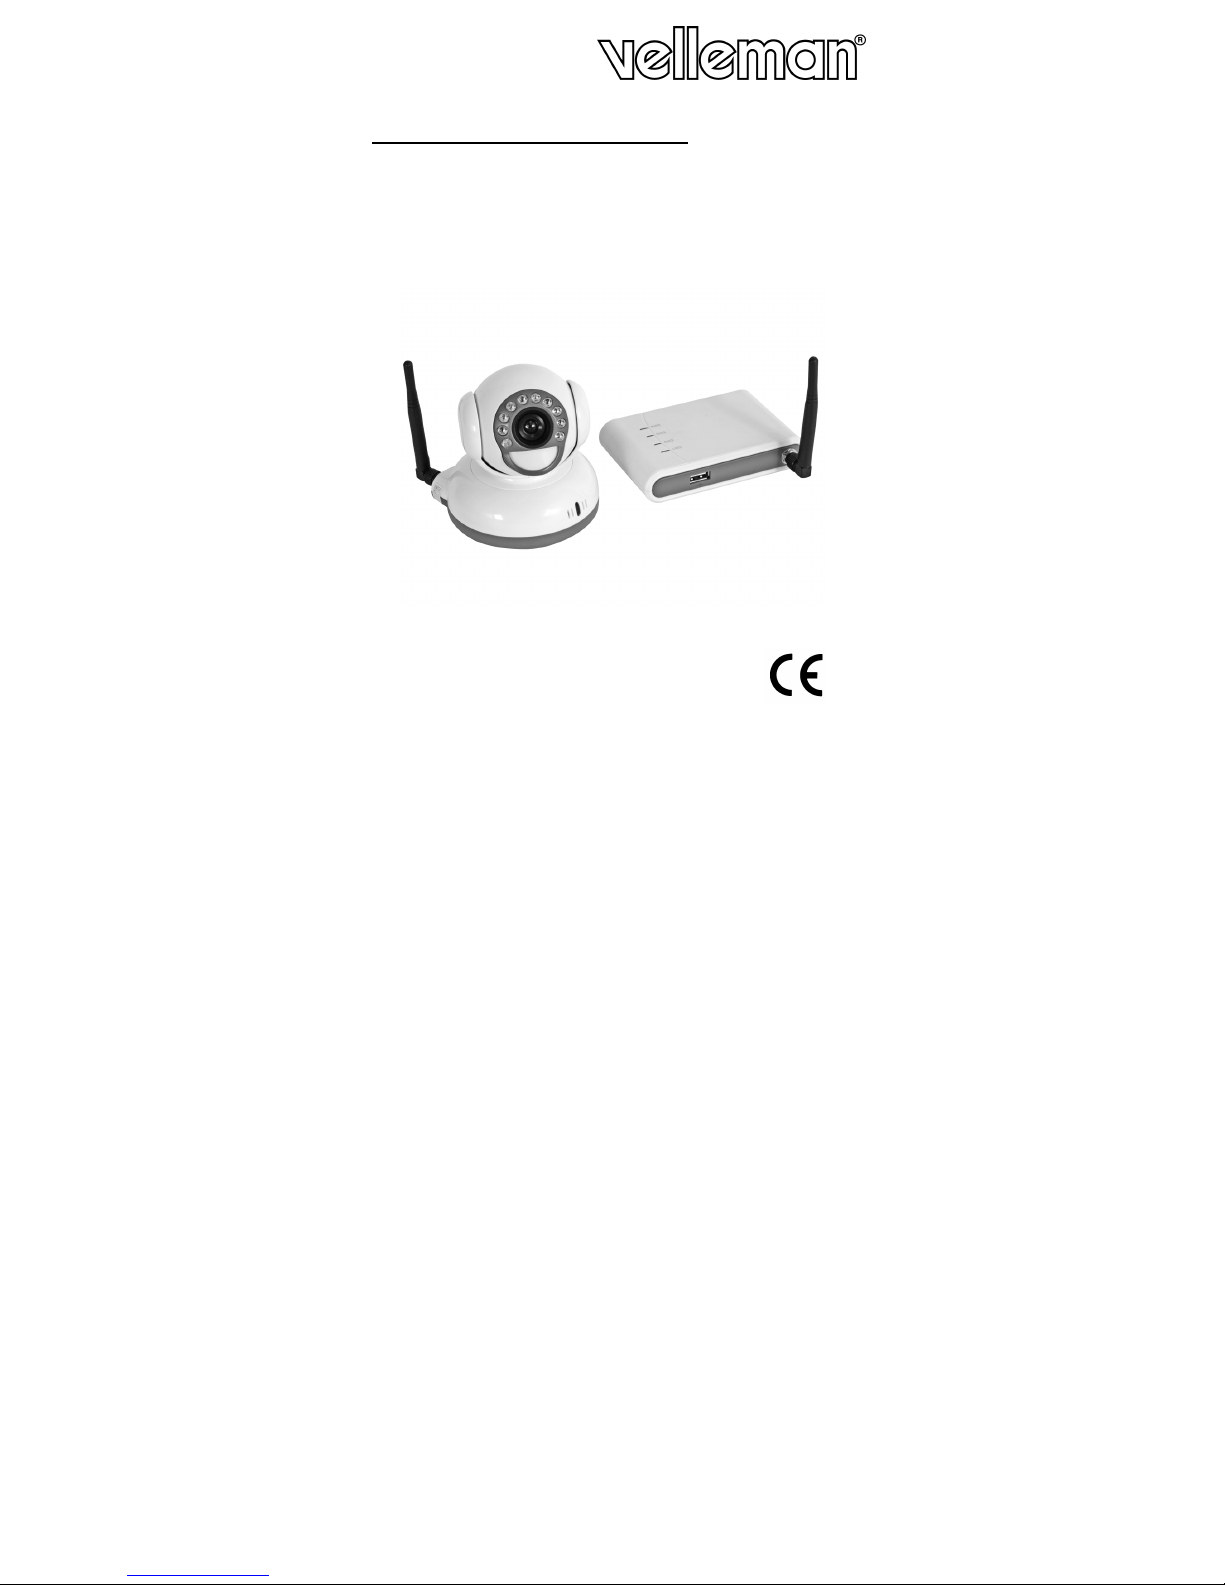
WIRELESS CAMERA WITH RECEIVER – 2.4GHz
DRAADLOZE CAMERA MET ONTVANGER – 2,4 GHz
CAMÉRA SANS FIL AVEC RÉCEPTEUR – 2,4 GHz
CÁMARA INALÁMBRICA CON RECEPTOR – 2.4GHz
DRAHTLOSE FARBKAMERA
MIT EMPFÄNGER
–
2.4GHz
USER MANUAL
GEBRUIKERSHANDLEIDING
NOTICE D’EMPLOI
MANUAL DEL USUARIO
BEDIENUNGSHANDLEITUNG
Page 2

CAMSETW13 VELLEMAN
2
Page 3

CAMSETW13 VELLEMAN
3
CAMSETW13 – WIRELESS CAMERA WITH RECEIVER – 2.4GHz
1. Introduction
To all residents of the European Union
Important environmental information about this product
This symbol on the device or the package indicates that disposal of the device after its lifecycle could harm the
environment.
Do not dispose of the unit (or batteries) as unsorted municipal waste; it should be taken to a specialized
company for recycling.
This device should be returned to your distributor or to a local recycling service.
Respect the local environmental rules.
If in doubt, contact your local waste disposal authorities.
Thank you for choosing Velleman! Please read the manual thoroughly before bringing this device into service. If the device was
damaged in transit, do not install or use it and contact your dealer. The CAMSETW13 should come with: 1 x wireless 2.4GHz
camera, 1 x wireless 2.4GHZ receiver, 2 x antenna, 1 x camera adapter, 1 x USB cable, 1 x CD-ROM, mounting hardware and
this manual.
2. Safety Instructions
• Damage caused by disregard of certain guidelines in this manual is not covered by the warranty and the dealer will not
accept responsibility for any ensuing defects or problems.
• This product may cause interference with other wireless equipment operating at 2.4GHZ. Please switch off one of the
devices to eliminate interference.
• Do not use this product to violate one’s privacy. Monitoring activities without written consent is illegal and this product is
not designed and manufactured for such purpose. Velleman nv will not be held responsible for any illegal acts
committed by the user.
• Do not install this product near medical equipment. Radio waves might potentially cause breakdown of electrical medical
appliances.
• Keep this product away from magnetic objects and electromagnetic waves, heat sources, aggressive chemicals, water
and moisture. Install the camera and receiver in a well-ventilated area and keep out of direct sunlight.
• Protect this device from shocks and abuse. Avoid brute force when installing or operating the device.
• Switch off the camera when not in use.
• Do not disassemble the camera or the receiver. Doing so may cause damages and will void the warranty.
• Note that damage caused by user modifications to the device is not covered by the warranty.
• Keep the device away from children and unauthorised users.
• Use the original packaging if the device is to be transported.
• Only use the device for its intended purpose. All other uses may lead to short circuits, burns, electroshocks, crash, etc.
Using the device in an unauthorised way will void the warranty.
3. PC System Requirements
CPU 2.0GHz or higher
Memory 256MB RAM
HDD 30GB or more
USB 2.0 port
CD-ROM drive
colour monitor or LCD
audio/video card supporting DirectX 9.0 or later
Windows® XP
Page 4

CAMSETW13 VELLEMAN
4
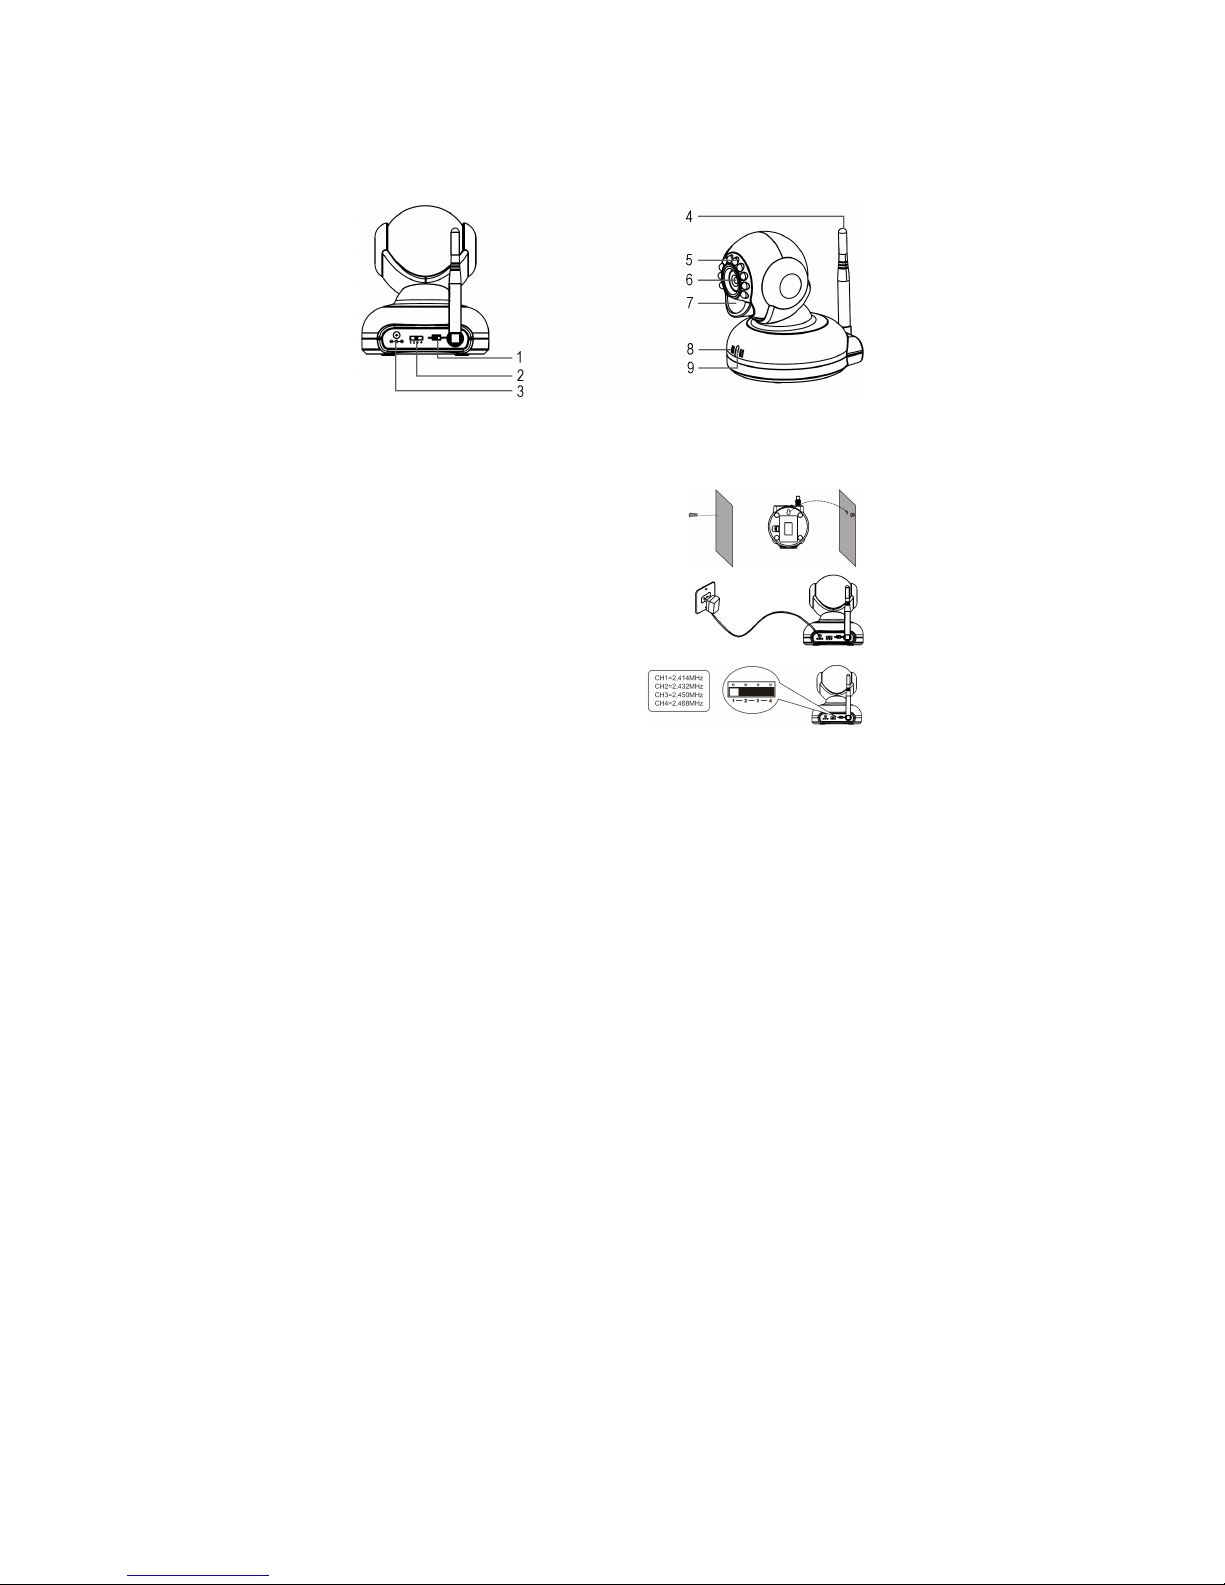
4. Description
1. power switch 6. lens
2. channel selector 7. PIR sensor
3. DC power jack 8. microphone
4. antenna 9. power LED
5. IR LEDs
5. Installing the Camera
• Wall-Mounting the Camera
Choose an appropriate mounting spot. Drive a hole in the wall and insert a
nylon plug into the hole. Insert a screw into the anchor. Hang the camera
onto the screw.
Next, connect the camera to the power adapter. Insert the power adapter into
the mains. Switch on the camera. The power LED will light.
• Setting the Channel
Select the channel through the channel selector at the back of the
camera. Make sure the receiver and the channel are both set to
the same channel.
6. Installing the Software
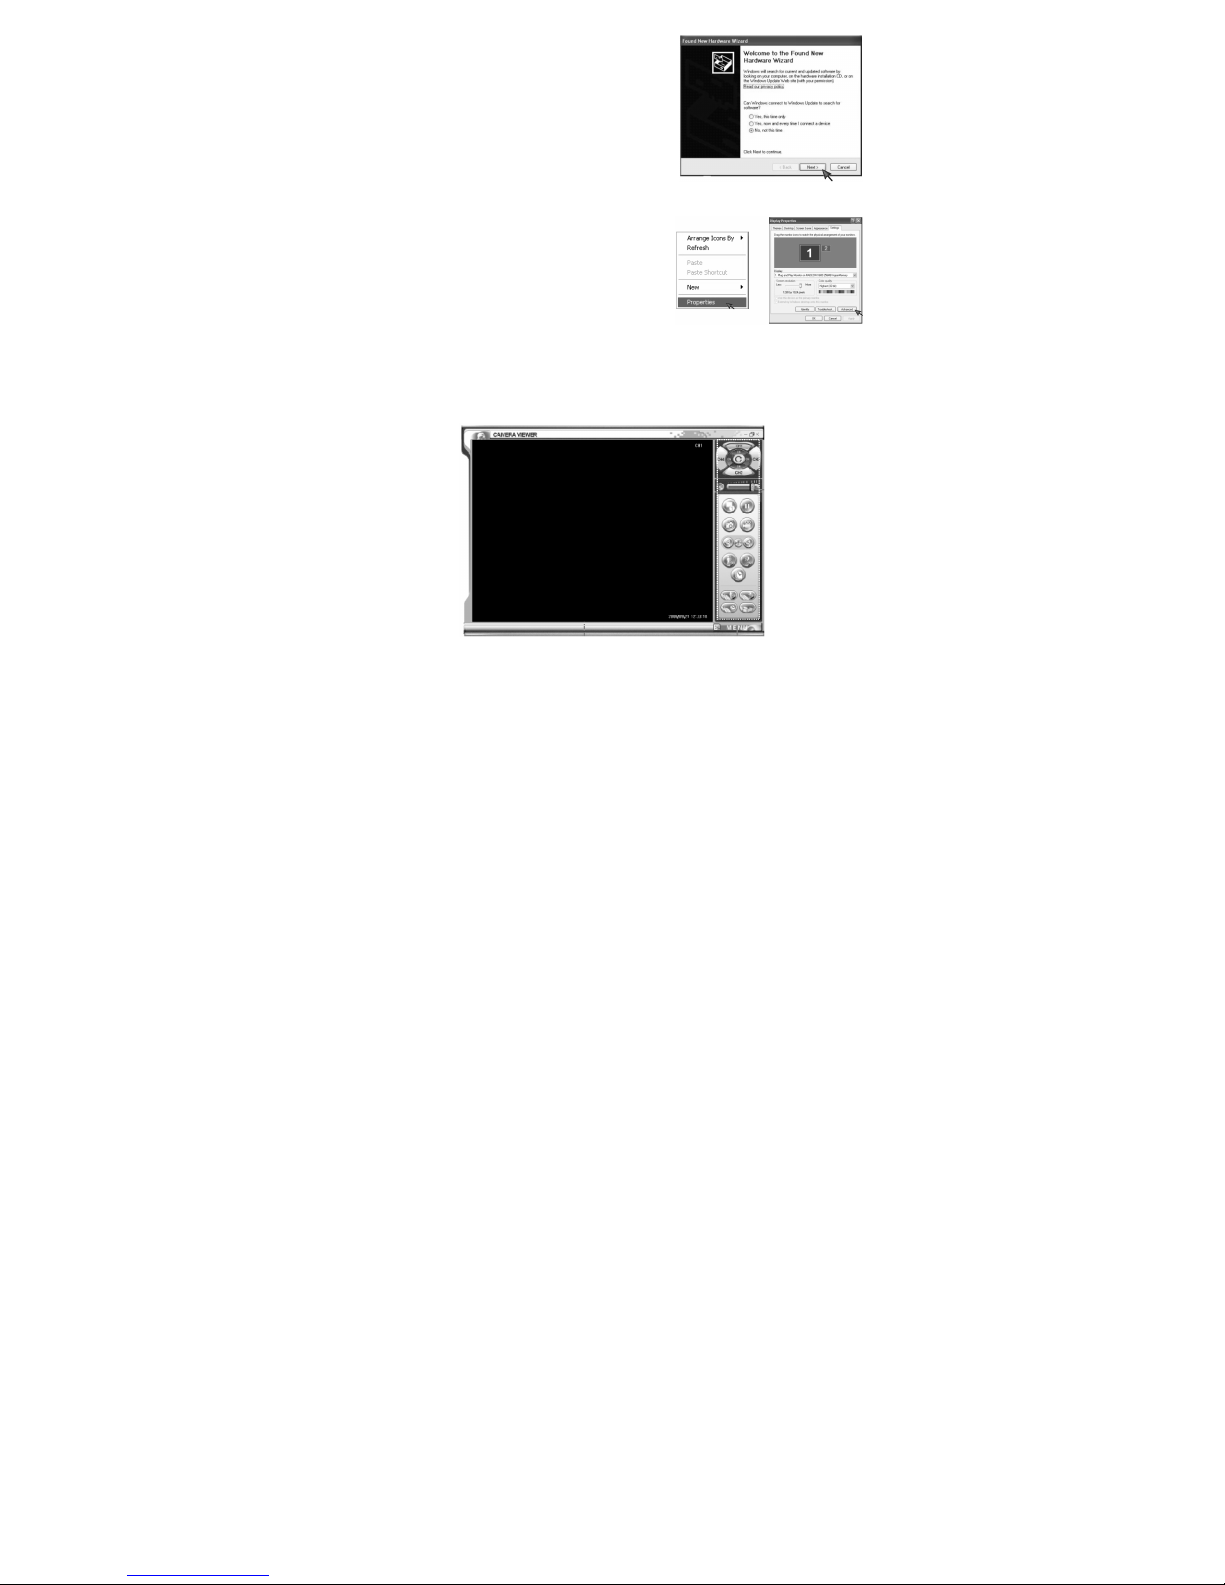
Insert the CD-ROM into the drive. The installation wizard will be launched
automatically. Install the USB driver, the CameraViewer software and the
MPEG4 codec, and follow the instruction windows.
Installing the Trident Analog Video software
Connect the receiver to your computer. Following window will pop up.
Choose not to update the software and follow the instruction windows to
finish the installation.
Page 5
CAMSETW13 VELLEMAN
5
Go to [My Computer] → [Properties] → [Hardware] → [Device Manager] → [Sound, video and game controllers] to
check if the software has been installed. If you cannot find the device or if there is a yellow exclamation mark before the
device, please disconnect the receiver and connect it again.
For Windows® 2003 Users Only
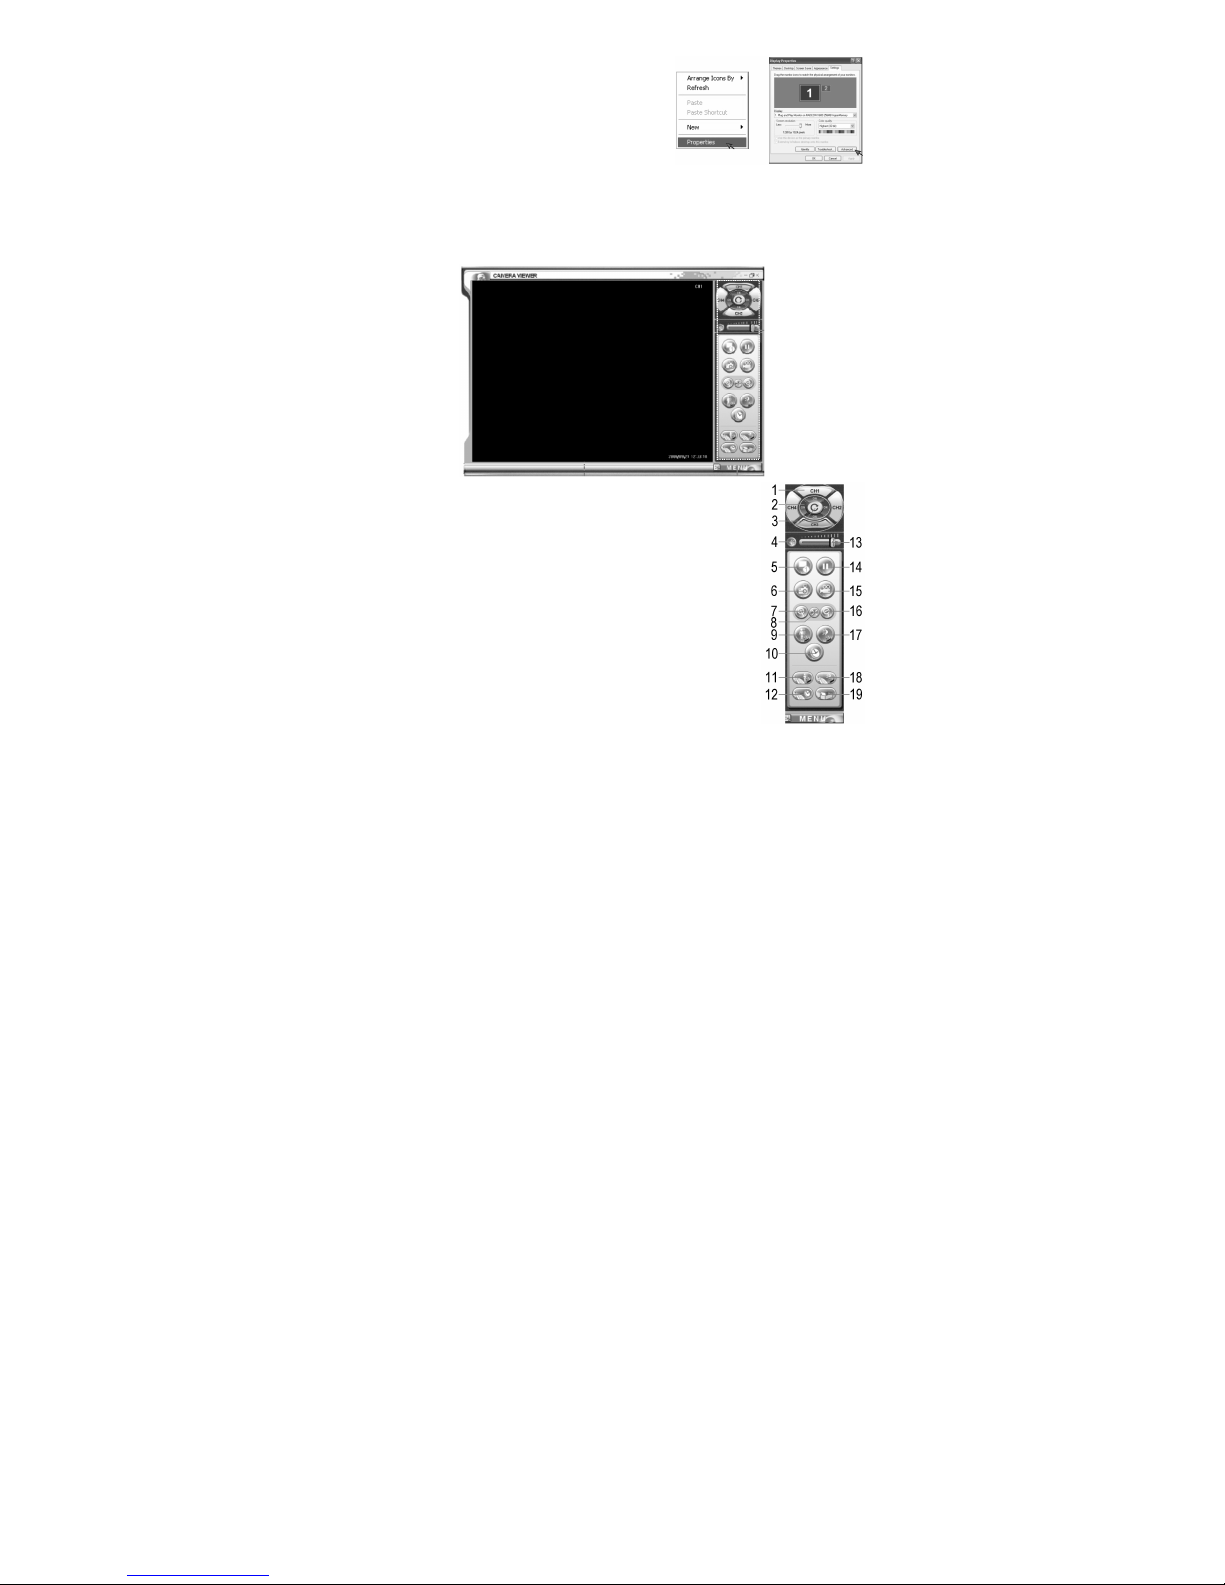
Go to [Desktop] → [Properties]. Following window will pop up. Select
[Settings] and click [Advanced].
Click the [Troubleshoot] tab and slide the arrow to the far right. Confirm
by clicking [Apply] and click [OK] to finish. The application is now ready
for use.
7. Using Your Camera
Install both your camera and receiver. Select a channel on both the camera and the receiver (make sure to select the same
channel on both devices). Double-click on the CameraViewer icon on your computer’s desktop. Following interface will be
shown:
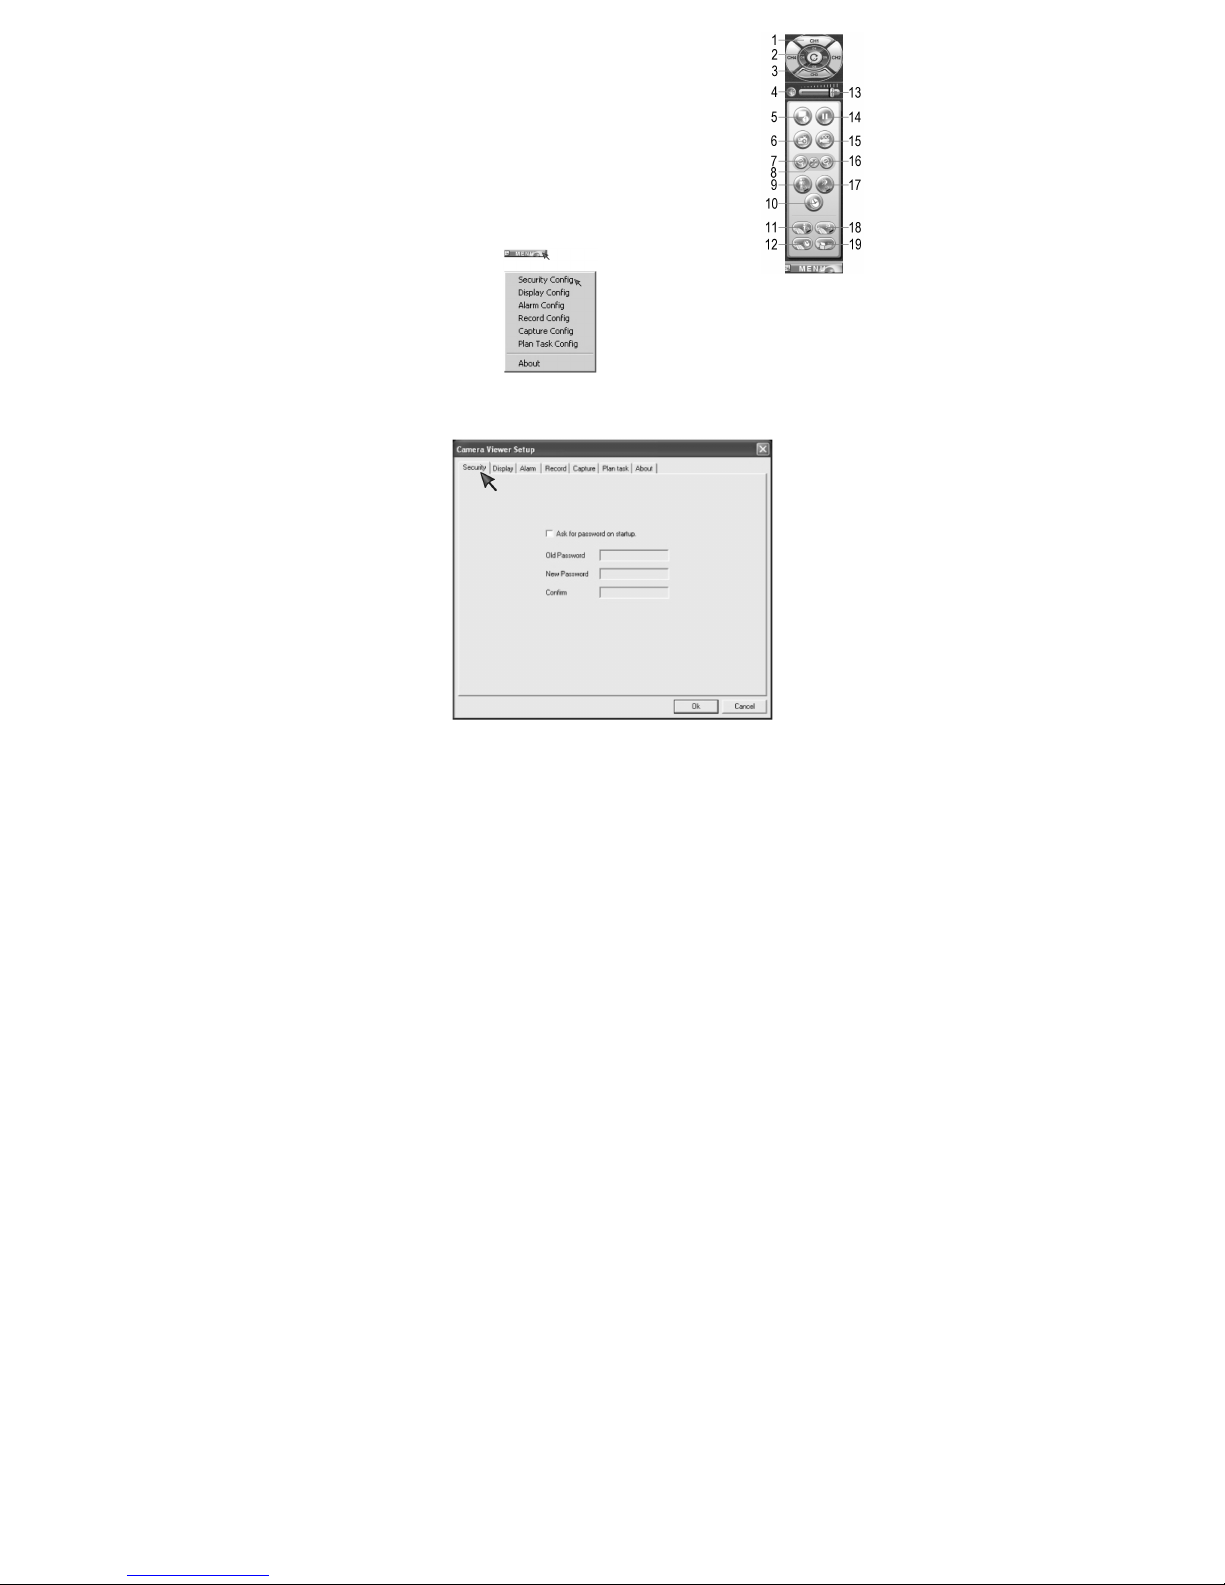
• The Operation Bar
1. chan nel buttons 1 to 4 11. IR detection configuration
2. chan nel on/off 12. schedule monitoring configuration
3. chan nel loop on/off 13. volume setting
4. mute button 14. pause button
5. split scr een button 15. record button
6. snapsho t button 16. zoom out
7. zoom in 17. sound detection on/off
8. full screen button 18. sound detection configuration
9. IR detection on/off 19. record file management
10. schedule monitoring on/off
Page 6
CAMSETW13 VELLEMAN
6
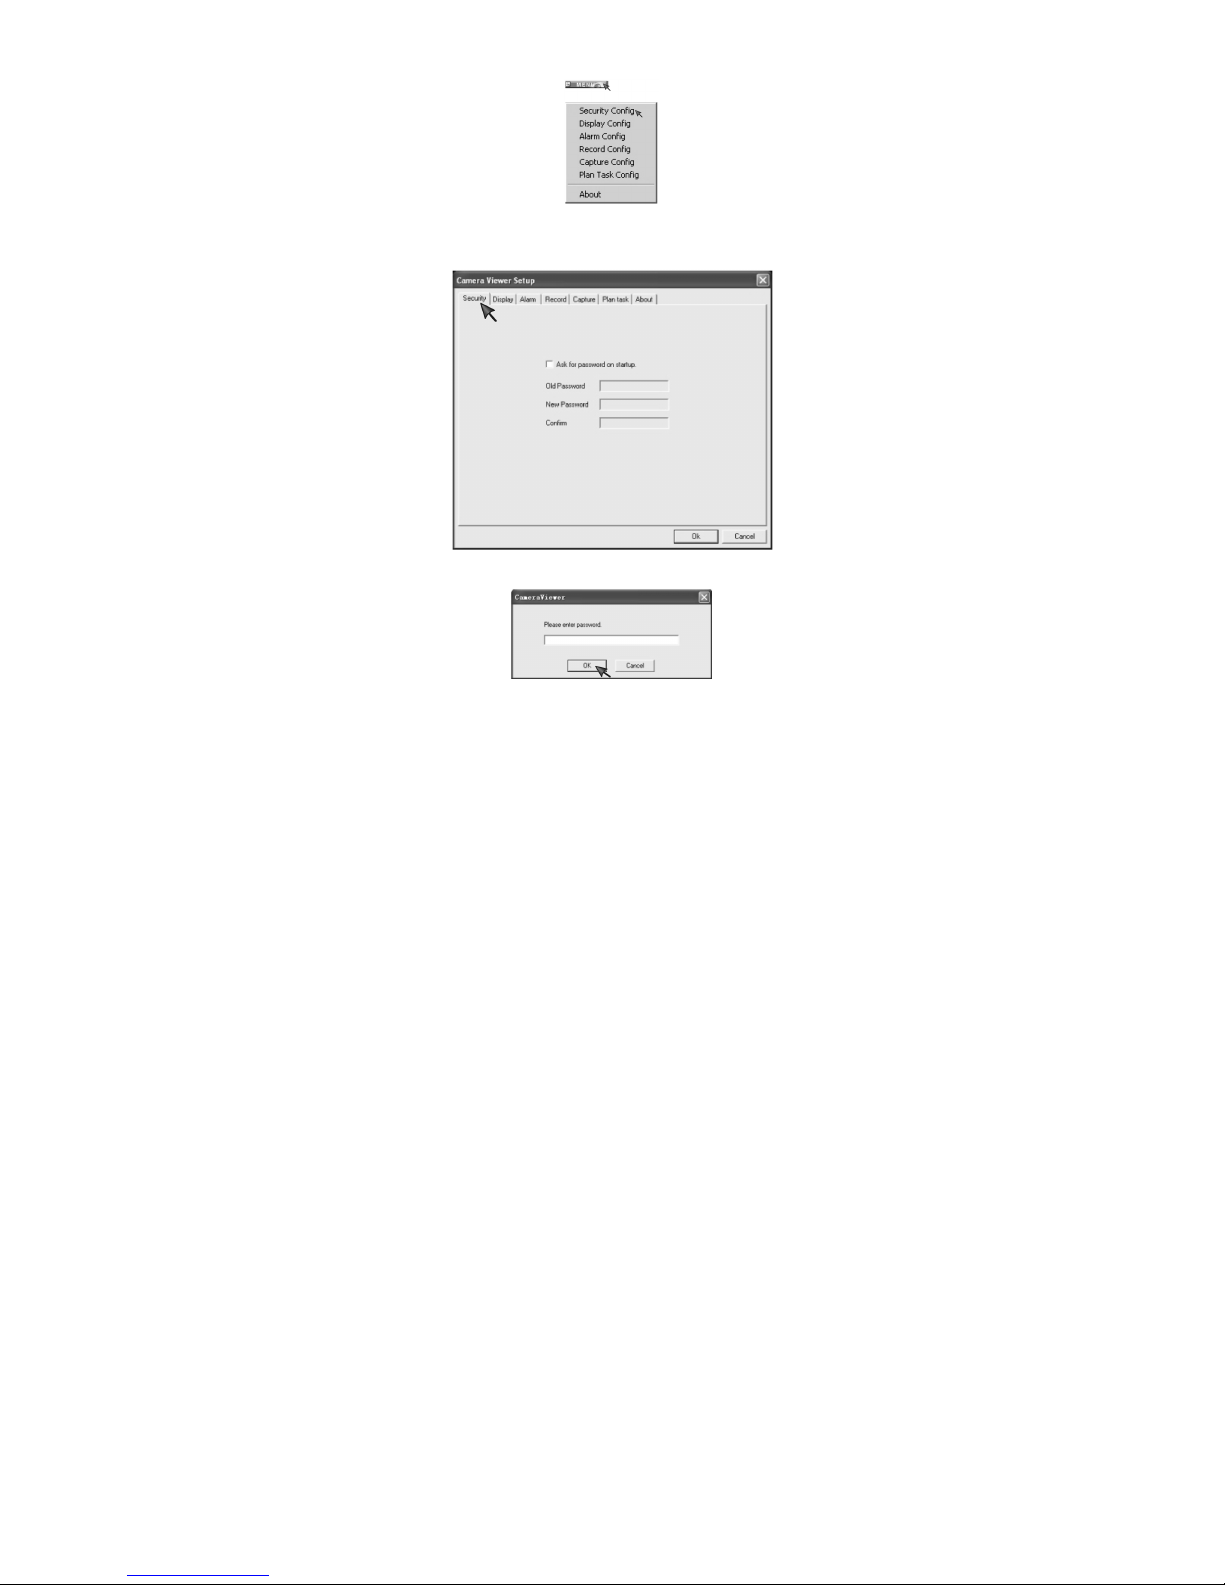
• The Parameter Setup Window
Click the [Menu] button to show following interface. Click a submenu to enter.
o Security Configuration
Check the [Ask for password on startup] box. Enter your password and click [OK] to confirm.
Next time you access the CameraViewer software, you will be asked to enter your password.
Page 7
CAMSETW13 VELLEMAN
7
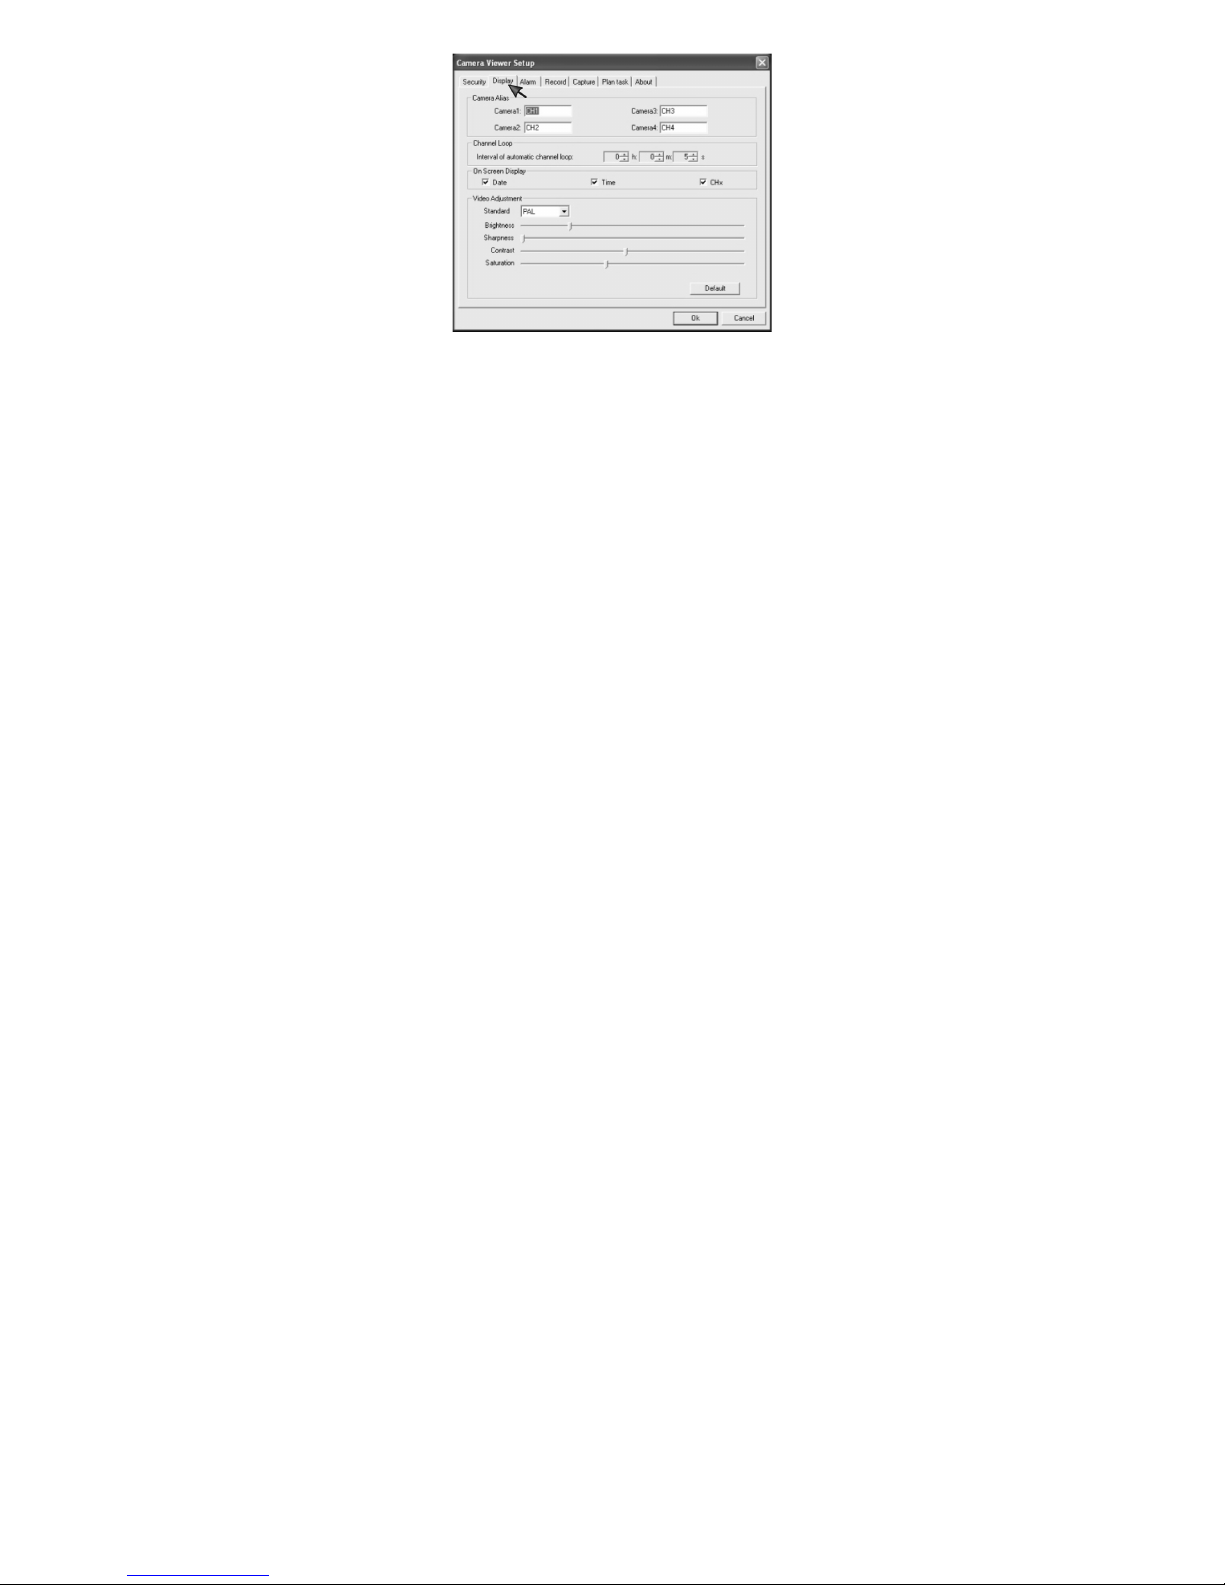
o Display Configuration
Camera Alias
Each camera can be given a specific name.
Channel Loop
Set the switching interval time in hours, minutes and seconds.
On Screen Display
Check the box if you would like the item to be displayed on the screen.
Video Adjustment
Standard: select your camera standard (PAL or NTSC).
Brightness: adjust the image brightness through the slide.
Contrast: adjust the image contrast through the slide.
Saturation: adjust the image saturation through the slide.
Page 8

CAMSETW13 VELLEMAN
8
o Alarm Configuration
Alarm Setup
Select the camera from which you would like to receive the alarm and the alarm type.
Operating of Alarm
Select the operating mode when the alarm has been triggered.
Record: the software will start recording soon as the alarm has been triggered.
Capture: the software will capture and store images soon as the alarm has been triggered.
Play alarm sound: an alarm siren will sound soon as the alarm has been triggered.
Record Strategy of Alarm
Set the duration of each recording in hours, minutes and seconds.
Capture Strategy of Alarm
Set the time when to capture an image after the alarm has been triggered.
Page 9

CAMSETW13 VELLEMAN
9
o Record Configuration
Record File Path
Click [Change] and select your record files’ save path.
Record File Setup
Compression: MPEG4
File Format: AVI
Image Size: 3 image formats are available: 720 x 576, 352 x 576, 352 x 288, (PAL)
720 x 480, 352 x 480, 352 x 240 (NTSC)
Frame Rate: 5, 10, 15, 20, 25 fps (PAL) – 5, 10, 15, 20, 25, 30 fps (NTSC)
Storage Strategy
Set the maximum storage space for your record files.
Take Following Operation When Total File Size Limit Reached
Select the action to be taken when the maximum storage space has been reached.
Page 10

CAMSETW13 VELLEMAN
10
o Capture Configuration
Picture Path
Click [Change] and select your record files’ save path.
Picture Format
Compression: JPEG
Image Size: 3 image formats are available: 720 x 576, 352 x 576, 352 x 288, (PAL)
720 x 480, 352 x 480, 352 x 240 (NTSC)
Frame Rate: 5, 10, 15, 20, 25 fps (PAL) – 5, 10, 15, 20, 25, 30 fps (NTSC)
Storage Strategy
Set the maximum storage space for your captured images.
Take Following Operation When Total File Size Limit Reached
Select the action to be taken when the maximum storage space has been reached.
Page 11

CAMSETW13 VELLEMAN
11
o Plan Task Configuration
Task Strategy
Set the alarm frequency (daily, weekly, monthly or only once).
Timing
Set the record time.
Operation
Set the duration of each recording in hours, minutes and seconds, or set the image capturing frequency.
Channel
Select the channels on which the above settings must be applied.
Setting a New Scheduled Recording
Click [New].
Set the [Task Strategy], [Timing], [Operation], [Channel] and click [Add] to confirm.
Select a task and click [Delete] to delete the programmed recording.
Click [OK] to confirm.
Page 12

CAMSETW13 VELLEMAN
12
8. Troubleshooting
Problem Possible Solution
I forgot the password
• Uninstall the CameraViewer software and re-install it.
No image display
• Make sure both the camera and the receiver are set on the same channel.
• Signal is weak. Relocate the camera.
• Switch off the interference source.
Distorted picture colour
• Set the colour on your PC as 16 bits or higher.
No wireless communication
• Make sure both the camera and the receiver are set on the same channel.
Black and white or flickering image
• Make sure both the camera and the receiver are set on the same video
system.
Alarm does not work
• Engage the alarm function by clicking the IR detection button/sound
detection.
Unreadable character display
• Make sure the language of the CameraViewer is identical to the language
of your computer’s operating system.
Playing time of the video is much
shorter than recorded time
• Your computer cannot handle the frame rate. Select a lower recording
frame rate.
9. Technical Specifications
Camera
Sensor CMOS
Resolution 628 x 582
Viewing Angle 55°
Min. Illumination 5 lux (F1.2, IR off)
Transmission Frequency ISM 2,400MHz ~ 2,483MHz
Transmission Power 10mW
Modulation Type FM
Bandwidth 18MHz
Power Supply 8VDC/300mA (PSU incl.) or 3 x 1.5V batteries (order code
LR03C, not incl.)
Motion Detection Distance 8m
Motion Detection Area 120° (H), 15° ~ 25° (V)
Sound Sensitivity > 50dB
Power Consumption 180mA (IR off), 230mA (IR on)
Transmission Range max. 80m in open field
Night Vision Range 5m
Dimensions 85 x 109 x 111mm
Weight 170g
Selectable Channels 2,414MHz, 2,432MHz, 2,450MHz, 2,486MHz
Receiver
Intermediate Frequency 480MHz
Demodulation Type FM
Sensitivity < -85dBm
Transmission Interface USB 2.0
Dimensions 105 x 22 x 69mm
Weight 90g
Page 13

CAMSETW13 VELLEMAN
13
Recording
Compression MPEG4
File Format AVI
Image Size 720 x 576, 352 x 576, 352 x 288
Frame Rate 5, 10, 15, 20, 25 fps
Use this device with original accessories only. Velleman nv cannot be held responsible in the event of damage or
injury resulted from (incorrect) use of this device.
For more info concerning this product, please visit our website www.velleman.eu.
The information in this manual is subject to change without prior notice.
CAMSETW13 – DRAADLOZE CAMERA MET ONTVANGER – 2,4 GHz
1. Inleiding
Aan alle ingezetenen van de Europese Unie
Belangrijke milieu-informatie betreffende dit product
Dit symbool op het toestel of de verpakking geeft aan dat, als het na zijn levenscyclus wordt weggeworpen, dit
toestel schade kan toebrengen aan het milieu.
Gooi dit toestel (en eventuele batterijen) niet bij het gewone huishoudelijke afval; het moet bij een
gespecialiseerd bedrijf terechtkomen voor recyclage.
U moet dit toestel naar uw verdeler of naar een lokaal recyclagepunt brengen.
Respecteer de plaatselijke milieuwetgeving.
Hebt u vragen, contacteer dan de plaatselijke autoriteiten inzake verwijdering.
Dank u voor uw aankoop! Lees deze handleiding grondig voor u het toestel in gebruik neemt. Werd het toestel beschadigd
tijdens het transport, installeer het dan niet en raadpleeg uw dealer. De CAMSETW13 wordt geleverd met: 1 x draadloze
camera (2,4 GHz), 1 x draadloze ontvanger, 2 x antenne, 1 x voedingsadapter, 1 x usb-kabel, 1 x cd-rom, montageaccessoires
en deze handleiding.
2. Veiligheidsinstructies
• De garantie geldt niet voor schade door het negeren van bepaalde richtlijnen in deze handleiding en uw dealer zal de
verantwoordelijkheid afwijzen voor defecten of problemen die hier rechtstreeks verband mee houden.
• Dit product kan storing veroorzaken bij andere draadloze apparatuur die een frequentie van 2,4 GHz gebruiken. Schakel
een van de toestellen uit om storing uit te sluiten.
• Denk bij gebruik van deze camera aan de privacy. Het filmen zonder schriftelijke toelating is wettelijk verboden en dit
product is niet voor deze doeleinden bestemd. Velleman nv is niet aansprakelijk voor illegale activiteiten door de
gebruiker.
• Installeer deze camera niet in de buurt van medische apparatuur. De radiogolven kunnen deze apparatuur ernstig
storen.
• Houd dit product uit de buurt van magnetische objecten en elektromagnetische velden, hittebronnen, chemicaliën, water
en vochtigheid. Installeer de camera en de ontvanger uit de zon in een goed geventileerde ruimte.
• Bescherm dit toestel tegen schokken. Vermijd brute kracht tijdens de installatie en de bediening van dit toestel.
• Schakel de camera uit wanneer u hem niet gebruikt.
• Demonteer de camera of de ontvanger niet. Demontage kan beschadiging veroorzaken en doet de garantie vervallen.
• Schade door wijzigingen die de gebruiker heeft aangebracht aan het toestel vallen niet onder de garantie.
• Houd dit toestel uit de buurt van kinderen en onbevoegden.
• Om veiligheidsredenen mag de gebruiker geen wijzigingen aanbrengen aan het toestel.
• Gebruik het toestel enkel waarvoor het gemaakt is. Andere toepassingen kunnen leiden tot kortsluitingen, brandwonden,
elektrische schokken, enz. Bij onoordeelkundig gebruik vervalt de garantie.
Page 14
CAMSETW13 VELLEMAN
14
3. Systeemvereisten
Microprocessor 2,0 GHz of hoger
Geheugen 256 MB RAM
Harde schijf 30 GB of meer
USB 2.0-poort
cd-romdrive
kleurenmonitor of lcd-scherm
audio-videokaart met DirectX 9.0 of hoger
Windows® XP
4. Omschrijving
1. voedingschakelaar 6. lens
2. kanaalschakelaar 7. PIR-sensor
3. voedingingang 8. microfoon
4. antenne 9. voedingsled
5. infraroodleds
5. Installeren van de camera
• Muurmontage
Kies een geschikt montageplaats. Boor een gaatje en plaats een nylon plug
in het gaatje. Plaats een schroef in de plug en hang de camera aan de
schroef.
Koppel vervolgens de camera aan de voedingsadapter. Koppel de
voedingsadapter aan het lichtnet een schakel de camera in. De voedingsled
licht op.
• Instellen van het kanaal
Kies een kanaal met de kanaalschakelaar achteraan de camera.
Zorg er wel voor dat zowel de camera als de ontvanger op
hetzelfde kanaal ingesteld staan.
Page 15
CAMSETW13 VELLEMAN
15
6. Installeren van de software
Plaats de cd-rom in de drive. De installation wizard start automatisch.
Installeer de usb-driver, de C ameraViewer-software en de MPEG4-codec,
en volg de instructies op het scherm.
Installeren van Trident Analog Video
Koppel de ontvanger aan uw computer. Een venster zoals hiernaast
afgebeeld verschijnt op het scherm. Vink de derde optie aan en volg de
instructies om de installatie te vervolledigen.
Ga naar [My Computer] → [Properties] → [Hardware] → [Device Manager] → [Sound, video and game controllers]
en controleer of de software geïnstalleerd werd. Ziet u geen referentie naar het toestel of staat ere en geel uitroepteken
voor de referentie, ontkoppel dan de ontvanger en koppel opnieuw.
Enkel voor Windows® 2003-gebruikers
Ga naar [Desktop] → [Properties] en selecteer [Settings]. Klik op
[Advanced].
Klik op de tab [Troubleshoot] en verschuif het blokje volledig naar
rechts. Bevestig met [Apply] en klik op [OK] om te beëindigen. Het
programma is nu klaar voor gebruik.
7. Uw camera gebruiken
Installeer zowel de camera als de ontvanger. Selecteer hetzelfde kanaal op de camera en de ontvanger. Dubbelklik op het
CameraViewer-icoon op het bureaublad. U krijgt volgende interface te zien:
Page 16
CAMSETW13 VELLEMAN
16
• De bedieningsbalk
1. kana alknoppen 1 tot 4 11. instelling infraroodwaarneming
2. kana al aan/uit 12. instelling geprogrammeerde bewaking
3. kana allus aan/uit 13. volumeregeling
4. muteknop 14. pauzeknop
5. ver deelde weergave 15. opna meknop
6. stilstaand bee ld 16. uitzoo mknop
7. inzoomk nop 17. waa rneming met geluid aan/uit
8. volledig e schermweergave 18. instelling wa arneming met geluid
9. infraroo dwaarneming aan/uit 19. behe ren van de opnamebestanden
10. geprogrammeerde bewaking aan/uit
• Het instelmenu
Klik op [Menu] om de interface hieronder weer te geven. Klik op een submenu.
o Veiligheidsinstellingen (Security Config)
Klik op [Ask for password on startup]. Geef nu uw paswoord in en klik op [OK] om te bevestigen.
Page 17

CAMSETW13 VELLEMAN
17
Bij een volgende opstartprocedure van de CameraViewer-software wordt u gevraagd om uw paswoord in te geven.
o Scherminstellingen (Display Config)
Camera Alias
Geef een naam aan elke aangesloten camera.
Channel Loop
Stel de schakeltijd in uren, minuten en seconden in.
On Screen Display
Vink het vakje aan indien u de datum, de tijd of het kanaalnummer op het scherm wenst weer te geven.
Video Adjustment
Standard: selecteer hier uw camerastandaard (PAL of NTSC).
Brightness: regel de helderheid via de schuifbalk.
Contrast: regel het contrast via de schuifbalk.
Saturation: regel de intensiteit via de schuifbalk.
Page 18

CAMSETW13 VELLEMAN
18
o Alarminstellingen (Alarm Config)
Alarm Setup
Selecteer het type alarm en de camera die alarm zal slaan.
Operating of Alarm
Selecteer de te ondernemen functie bij alarm.
Record: de software start een opname bij alarm.
Capture: de software neemt beelden en slaat ze op.
Play alarm sound: bij alarm hoort u een alarmsirene.
Record Strategy of Alarm
Stel de opnameduur in uren, minuten en seconden in.
Capture Strategy of Alarm
Stel in hoelang de camera na het alarm beelden vastlegt.
Page 19

CAMSETW13 VELLEMAN
19
o Opname-instellingen (Record Config)
Record File Path
Klik [Change] en selecteer de doelmap voor de opnamebestanden.
Record File Setup
Compressie: MPEG4
Bestandsformaat: AVI
Beeldgrootte: 3 beschikbare beeldgroottes: 720 x 576, 352 x 576, 352 x 288, (PAL)
720 x 480, 352 x 480, 352 x 240 (NTSC)
Beeldfrequentie: 5, 10, 15, 20, 25 beelden per seconde (PAL) – 5, 10, 15, 20, 25, 30 beelden per seconde s(NTSC)
Storage Strategy
Stel hier de maximaal beschikbare ruimte voor uw opnamebestanden in.
Take Following Operation When Total File Size Limit Reached
Selecteer de te ondernemen functie bij gebrek aan opslagruimte.
Page 20

CAMSETW13 VELLEMAN
20
o Instellingen voor het vastleggen van beelden (Capture Config)
Picture Path
Klik [Change] en selecteer de doelmap voor de beeldbestanden.
Picture Format
Compressie: JPEG
Beeldgrootte: 3 beschikbare beeldgroottes: 720 x 576, 352 x 576, 352 x 288, (PAL)
720 x 480, 352 x 480, 352 x 240 (NTSC)
Beeldfrequentie: 5, 10, 15, 20, 25 beelden per seconde (PAL) – 5, 10, 15, 20, 25, 30 beelden per seconde s(NTSC)
Storage Strategy
Stel hier de maximaal beschikbare ruimte voor uw beeldbestanden in.
Take Following Operation When Total File Size Limit Reached
Selecteer de te ondernemen functie bij gebrek aan opslagruimte.
Page 21

CAMSETW13 VELLEMAN
21
o Geprogrammeerde opnames (Plan Task Config)
Task Strategy
Stel de opnamefrequentie in (dagelijks, wekelijks, maandelijks of een enkele opname).
Timing
Programmeer de opname.
Operation
Stel de opnameduur in uren, minuten en seconden in of bepaal wanneer de camera een beeld moet vastleggen.
Channel
Selecteer de toepasselijke camera’s.
Een nieuwe opname programmeren
Klik op [New].
Stel [Task Strategy], [Timing], [Operation] en [Channel] in en bevestig met [Add].
Selecteer een opname en klik op [Delete] om de geprogrammeerde opname te wissen.
Bevestig met [OK].
Page 22

CAMSETW13 VELLEMAN
22
8. Problemen en oplossingen
Probleem Mogelijke oplossing
Wachtwoord vergeten
• Herinstalleer de CameraViewer-software.
Geen beeldweergave
• Zorg dat de camera en de ontvanger op hetzelfde kanaal ingesteld staan.
• Zwak signaal. Kies een andere montageplaats.
• Schakel de storingsbron uit.
Onjuiste kleuren
• Stel de kleur op uw pc in als 16 bits of hoger.
Geen draadloze ontvangst
• Zorg dat de camera en de ontvanger op hetzelfde kanaal ingesteld staan.
Zwart-witbeeld of trillend beeld
• Zorg dat de camera en de ontvanger op dezelfde standaard ingesteld
staan.
Alarm slaat niet af
• Schakel de alarmfunctie in door te klikken op de knop voor
infraroodwaarneming.
Onleesbare karakters
• Zorg dat de taal van de CameraViewer dezelfde is als deze van uw
computer.
Afspeelduur van de opnamebestanden
is veel korter dan de opnameduur
• Selecteer een lagere beeldfrequentie.
9. Technische specificaties
Camera
Sensor CMOS
Resolutie 628 x 582
Kijkhoek 55°
Min. verlichting 5 lux (F1.2, IR uit)
Zendfrequentie ISM 2.400 MHz ~ 2.483 MHz
Zendvermogen 10 mW
Modulatietype FM
Bandbreedte 18 MHz
Voeding 8 VDC/300 mA (voedingsadap ter meegelev.) of 3 x 1.5 V-
batterijen (ordercode LR03C, niet meegelev.)
Max. bereik bewegingswaarneming 8 m
Veld bewegingswaarneming 120° (H), 15° ~ 25° (V)
Geluidsgevoeligheid > 50 dB
Verbruik 180 mA (IR uit), 230 mA (IR aan)
Zendbereik max. 80 m zonder obstakels
Bereik nachtzicht 5 m
Afmetingen 85 x 109 x 111 mm
Gewicht 170 g
Beschikbare kanalen 2.414 MHz, 2.432 MHz, 2.450 MHz, 2.486 MHz
Ontvanger
Tussenfrequentie 480 MHz
Demodulatie FM
Gevoeligheid < -85 dBm
Zendinterface USB 2.0
Afmetingen 105 x 22 x 69 mm
Gewicht 90 g
Page 23

CAMSETW13 VELLEMAN
23
Opname
Compressie MPEG4
Bestandsformaat AVI
Beeldgrootte 720 x 576, 352 x 576, 352 x 288
Beeldfrequentie 5, 10, 15, 20, 25 beelden per seconde
Gebruik dit toestel enkel met originele accessoires. Velleman nv is niet aansprakelijk voor schade of kwetsuren bij
(verkeerd) gebruik van dit toestel.
Voor meer informatie omtrent dit product, zie www.velleman.eu.
De informatie in deze handleiding kan te allen tijde worden gewijzigd zonder voorafgaande kennisgeving.
CAMSETW13 – CAMÉRA SANS FIL AVEC RÉCEPTEUR – 2,4 GHz
1. Introduction
Aux résidents de l'Union européenne
Des informations environnementales importantes concernant ce produit
Ce symbole sur l'appareil ou l'emballage indique que l’élimination d’un appareil en fin de vie peut polluer
l'environnement.
Ne pas jeter un appareil électrique ou électronique (et des piles éventuelles) parmi les déchets municipaux non
sujets au tri sélectif ; une déchèterie traitera l’appareil en question.
Renvoyer les équipements usagés à votre fournisseur ou à un service de recyclage local.
Il convient de respecter la réglementation locale relative à la protection de l’environnement.
En cas de questions, contacter les autorités locales pour élimination.
Nous vous remercions de votre achat ! Lire la présente notice attentivement avant la mise en service de l’appareil. Si
l’appareil a été endommagé pendant le transport, ne pas l’installer et consulter votre revendeur. La CAMSETW13 est livrée
avec 1 x caméra sans fil 2,4 GHz, 1 x récepteur sans fil, 2 x antenne, 1 x adaptateur secteur, 1 x câble USB, 1 x cédérom, 1 x jeu
d’accessoires de montage et cette notice.
2. Prescriptions de sécurité
• La garantie ne s’applique pas aux dommages survenus en négligeant certaines directives de cette notice et votre
revendeur déclinera toute responsabilité pour les problèmes et les défauts qui en résultent.
• Ce produit peut interférer avec d’autres appareils utilisant la fréquence 2,4 GHz. Éteindre un des appareils pour éliminer
l’interférence
• Respecter l’intimité de la vie privée. Le monitorage sans consentement exprès est illégal et ce produit n’est pas destiné
pour à une telle activité. SA Velleman ne sera aucunement responsable pour l’emploi illégal par l’utilisateur.
• Ne pas installer ce produit à proximité d’appareils médicaux. Les ondes radio peuvent entraver le fonctionnement
d’outillage médical.
• Tenir cet appareil loin de tout objet magnétique et de champs magnétiques, de sources de chaleur, de produits
chimiques, de l’eau et de l’humidité. Installer la caméra à l’abri du soleil dans un endroit bien ventilé.
• Protéger cet appareil contre les chocs et le traiter avec circonspection pendant l’installation et l’opération.
• Éteindre la caméra lorsqu’elle n’est pas utilisée.
• Ne pas désassembler la caméra ou le récepteur. Le désassemblage peut causer des endommagements et annulera la
garantie.
• Les dommages occasionnés par des modifications à l’appareil par le client, ne tombent pas sous la garantie.
• Garder votre CAMSETW13 hors de la portée de personnes non qualifiées et de jeunes enfants.
• Transporter l’appareil dans son emballage originel.
• N’utiliser votre CAMSETW13 qu’à sa fonction prévue. Tout autre usage peut causer des courts-circuits, des brûlures,
des électrochocs etc. Un usage impropre annule d'office la garantie.
Page 24

CAMSETW13 VELLEMAN
24
3. Système requis
Microprocesseur 2,0 GHz ou plus
Mémoire 256 Mo de mémoire vive
Disque dur 30 Go ou plus
port USB 2.0
lecteur cédérom
moniteur ou afficheur LCD couleur
carte audio/vidéo avec DirectX 9.0 ou plus
Windows® XP
4. Description
1. interrupteur d’alimentation 6. objectif
2. sélecteur de canal 7. c apteur PIR
3. prise d’entrée d’alimentation 8. microphone
4. antenne 9. LED d’alimentation
5. LED infrarouges
5. Installation de la caméra
• Montage mural
Choisir un endroit d’installation approprié. Percer un trou et y insérer une
cheville en nylon. Insérer une vis et y accrocher la caméra.
Raccorder ensuite l’adaptateur secteur à la caméra. Insérer l’adaptateur
secteur dans une prise de courant et allumer la caméra. La LED
d’alimentation s’allume.
• Sélection du canal
Sélectionner un canal à l’aide du sélecteur à l’arrière de la
caméra. Veiller à sélectionner le même canal sur la camera
comme sur le récepteur.
Page 25

CAMSETW13 VELLEMAN
25
6. Installation du logiciel
Insérer le cédérom dans le lecteur. L’assistant d’installation sera lance
automatiquement. Installer le pilote USB, le logiciel CameraViewer et le
codec MPEG4, et suivre les instructions à l’écran.
Installation du logiciel Trident Analog Video
Raccorder le récepteur à votre ordinateur. Une fenêtre s’ouvre. Cocher la
troisième case (pas de mise à jour) et finir l’installation.
Cliquer [My Computer] → [Properties] → [Hardware] → [Device Manager] → [Sound, video and game controllers]
pour vérifier si le logiciel a été dûment installé. Déconnecter le récepteur et le reconnecter lorsqu’il n’y a pas de mention de
matériel ou lorsque la mention est précédée d’un point d’exclamation.
Uniquement pour les utilisateurs du système d’exploitation Windows® 2003
Cliquer [Desktop] → [Properties]. Une fenêtre s’ouvre. Sélectionner
[Settings] et cliquer [Advanced].
Cliquer l’onglet [Troubleshoot] et glisser la barre vers la droite.
Confirmer avec [Apply] et cliquer [OK] pour terminer. L’application est
prête à être employée.
7. Emploi de la caméra
Installer la caméra et le récepteur. Sélectionner le même canal sur la camera comme sur le récepteur. Cliquer double sur
l’icône CameraViewer sur le bureau de votre ordinateur. L’interface suivante s’ouvre :
Page 26

CAMSETW13 VELLEMAN
26
• La barre de commandes
1. boutons des canaux 1 à 4 11. co nfiguration détection infrarouge
2. cana l marche/arrêt 12. configuration monitorage programmé
3. cana ux en boucle marche/arrêt 13. rég lage du volume
4. coup ure du volume 14. pause
5. écr an divisé 15. enregistrement
6. image arrê tée 16. réduire l’image
7. agran dir l’image 17. détec tion sonore marche/arrêt
8. affichage plein éc ran 18. co nfiguration détection sonore
9. détection infraro uge marche/arrêt 19. ges tion des fichiers d’enregistrement
10. monitorage programmé marche/arrêt
• La fenêtre de paramétrage
Cliquer [Menu] pour ouvrir le menu ci-dessous. Cliquer un sous-menu.
o Configuration des paramètres de sécurité (Security Config)
Cocher la case [Ask for password on startup]. Saisir votre mot de passe et cliquer [OK] pour confirmer.
Page 27

CAMSETW13 VELLEMAN
27
Saisir votre mot de passe lorsque le logiciel CameraViewer affiche la fenêtre ci-dessous.
o Configuration des paramètres d’affichage (Display Config)
Camera Alias
Attribution d’un nom à chaque caméra.
Channel Loop
Configuration de la commutation entre les canaux en heures, minutes et secondes.
On Screen Display
Cocher la case de l’option à afficher.
Video Adjustment
Standard : sélection du standard de la caméra (PAL ou NTSC).
Brightness : réglage de la clarté de l’image à l’aide de la glissière.
Contrast : réglage du contraste de l’image à l’aide de la glissière.
Saturation : réglage de la saturation de l’image à l’aide de la glissière.
Page 28

CAMSETW13 VELLEMAN
28
o Configuration des paramétrages d’alarme (Alarm Config)
Alarm Setup
Sélectionner le type d’alarme et la caméra qui amorcera l’alarme.
Operating of Alarm
Sélectionner l’action à entreprendre dès l’amorçage de l’alarme.
Record : enregistrement.
Capture : capture d’image et sauvegarde.
Play alarm sound : enclenchement d’une sirène d’alarme.
Record Strategy of Alarm
Configuration de la durée d’un enregistrement en heures, minutes et secondes.
Capture Strategy of Alarm
Configuration du délai entre l’amorçage de l’alarme et la capture d’image.
Page 29

CAMSETW13 VELLEMAN
29
o Configuration des paramètres d’enregistrement (Record Config)
Record File Path
Cliquer [Change] et sélectionner le document de sauvegarde des fichiers d’enregistrement.
Record File Setup
Compression : MPEG4
Format des fichiers : AVI
Taille de l’image : 3 tailles disponibles : 720 x 576, 352 x 576, 352 x 288, (PAL)
720 x 480, 352 x 480, 352 x 240 (NTSC)
Fréquence d’image : 5, 10, 15, 20, 25 images par seconde (PAL) – 5, 10, 15, 20, 25, 30 images par seconde (NTSC)
Storage Strategy
Configuration de l’espace de stockage destiné aux fichiers d’enregistrement.
Take Following Operation When Total File Size Limit Reached
Sélectionner l’action à entreprendre lorsque l’espace de stockage est plein.
Page 30

CAMSETW13 VELLEMAN
30
o Configuration des paramètres de capture d’image (Capture Config)
Picture Path
Cliquer [Change] et sélectionner le document de sauvegarde des fichiers d’image.
Picture Format
Compression : MPEG4
Taille de l’image : 3 tailles disponibles : 720 x 576, 352 x 576, 352 x 288, (PAL)
720 x 480, 352 x 480, 352 x 240 (NTSC)
Fréquence d’image : 5, 10, 15, 20, 25 images par seconde (PAL) – 5, 10, 15, 20, 25, 30 images par seconde (NTSC)
Storage Strategy
Configuration de l’espace de stockage destiné aux fichiers d’image.
Take Following Operation When Total File Size Limit Reached
Sélectionner l’action à entreprendre lorsque l’espace de stockage est plein.
Page 31

CAMSETW13 VELLEMAN
31
o Configuration des paramètres d’un enregistrement programmé (Plan Task Config)
Task Strategy
Configuration de la fréquence d’enregistrement (enregistrement quotidien, hebdomadaire, mensuel ou unique).
Timing
Paramétrage de l’heure du début d’enregistrement.
Operation
Paramétrages de la durée d’enregistrement (en heures, minutes et secondes) ou de la fréquence de cap ture d’image.
Channel
Sélectionner les canaux applicables.
Setting a New Scheduled Recording
Cliquer [New].
Configurer les options [Task Strategy], [Timing], [Operation] et [Channel], et confirmer avec [Add].
Sélectionner un enregistrement programmé et cliquer [Delete] pour l’effacer de la liste.
Cliquer [OK] pour confirmer.
Page 32

CAMSETW13 VELLEMAN
32
8. Problèmes et solution
Problèmes Solution éventuelle
J’ai oublié le mot de passe
• Désinstaller et réinstaller CameraViewer.
Aucune image
• Veiller à sélectionner le même canal sur la camera et le récepteur.
• Signal faible. Choisir un emplacement d’installation différent.
• Désactiver la source d’interférence.
Distorsion des couleurs
• Paramétrer les couleurs de votre ordinateur en 16 bits ou plus.
Pas de communication
• Veiller à sélectionner le même canal sur la camera et le récepteur.
Image en noir et blanc ou image
scintillante
• Veiller à sélectionner le même standard sur la camera et le récepteur.
Alarme ne fonctionne pas
• Activer l’alarme en cliquant le bouton de détection infrarouge/détection
sonore.
Caractères illisibles
• Veiller à installer le logiciel dans la même langue que celle du système
d’exploitation de l’ordinateur.
Durée de lecture d’un fichier inférieur
à la durée d’enregistrement time
• Fréquence d’image trop élevée pour votre ordinateur. Sélectionner une
fréquence inférieure.
9. Spécifications techniques
Caméra
Capteur CMOS
Résolution 628 x 582
Angle de vue 55°
Éclairage min. 5 lux (F1.2, IR éteint)
Fréquence de transmission ISM 2.400 MHz ~ 2.483 MHz
Puissance de transmission 10 mW
Modulation FM
Largeur de bande 18 MHz
Alimentation 8 VCC/300 mA (adaptateur sec teur incl.) ou 3 piles de
1.5 V (référence LR03C, non incl.)
Portée de la détection de mouvement 8 m
Champ de la détection de mouvement 120° (H), 15° ~ 25° (V)
Sensibilité sonore > 50 dB
Consommation 180 mA (IR éteint), 230 mA (IR allumé)
Portée de la transmission max . 80 m sans obstacles
Portée de la vision nocturne 5 m
Dimensions 85 x 109 x 111 mm
Poids 170 g
Canaux disponibles 2.414 MHz, 2.432 MHz, 2.450 MHz, 2.486 MHz
Récepteur
Fréquence intermédiaire 480 MHz
Démodulation FM
Sensibilité < -85 dBm
Interface USB 2.0
Dimensions 105 x 22 x 69 mm
Poids 90 g
Page 33

CAMSETW13 VELLEMAN
33
Enregistrement
Compression MPEG4
Format des fichiers AVI
Taille de l’image 720 x 576, 352 x 576, 352 x 288
Fréquence d’image 5, 10, 15, 20, 25 images par seconde
N’employer cet appareil qu’avec des accessoires d’origine. SA Velleman ne sera aucunement responsable de
dommages ou lésions survenus à un usage (incorrect) de cet appareil.
Pour plus d’information concernant cet article, visitez notre site web www.velleman.eu.
Toutes les informations présentées dans cette notice peuvent être modifiées sans notification préalable.
CAMSETW13 – CÁMARA INALÁMBRICA CON RECEPTOR - 2.4 GHz
1. Introducción
A los ciudadanos de la Unión Europea
Importantes informaciones sobre el medio ambiente concerniente a este producto
Este símbolo en este aparato o el embalaje indica que, si tira las muestras inservibles, podrían dañar el medio
ambiente.
No tire este aparato (ni las pilas, si las hubiera) en la basura doméstica; debe ir a una empresa especializada en
reciclaje. Devuelva este aparato a su distribuidor o a la unidad de reciclaje local.
Respete las leyes locales en relación con el medio ambiente.
Si tiene dudas, contacte con las autoridades locales para residuos.
Gracias por haber comprado la CAMSETW13! Lea atentamente las instrucciones del manual antes de usarla. La
CAMSETW13 se entrega con 1 x cámara inalámbrica 2,4 GHz, 1 x receptor inalámbrico, 2 x antena, 1 x adaptador de red, 1 x
cable USB, 1 x lector de CD-ROM, 1 x juego de accesorios de montaje y el manual del usuario.
2. Instrucciones de seguridad
• Daños causados por descuido de las instrucciones de seguridad de este manual invalidarán su garantía y su
distribuidor no será responsable de ningún daño ni de otros problemas resultantes.
• El aparato puede interferir con otros aparatos al utilizar la frecuencia de 2,4 GHz. Desactive uno de los aparatos para
eliminar la interferencia.
• Respete la intimidad de la vida privada. La vigilancia sin consentimiento explícito es ilegal y este aparato no está
destinado para semejante actividad. Velleman SL no será responsable del uso ilegal por el usuario.
• No instale este producto cerca de aparatos médicos. Las radioondas pueden causar interferencias con el equipo
médico.
• Mantenga este aparato lejos del alcance de cualquier objeto magnético y campos magnéticos, fuentes de calor,
productos químicos, agua y humedad. Instale la cámara lejos del alcance del sol y en un lugar bien aireado.
• No agite el aparato. Evite usar excesiva fuerza durante la instalación y la reparación.
• Desactive la cámara si no la utiliza.
• No desmonte la cámara ni el receptor. El desmontaje puede causar daños y anulará la garantía.
• Los daños causados por modificaciones no autorizadas, no están cubiertos por la garantía.
• Mantenga la CAMSETW13 lejos del alcance de personas no capacitadas y niños.
• Transporte el aparato en su embalaje original.
• Utilice sólo la CAMSETW13 para las aplicaciones descritas en este manual a fin de evitar p.ej. cortocircuitos,
quemaduras, descargas eléctricas, explosión de la lámpara, etc. Un uso desautorizado puede causar daños y anula la
garantía completamente.
Page 34

CAMSETW13 VELLEMAN
34
3. exigencias del sistema
Microprocesador 2,0 GHz o más reciente
Memoria 256 MB RAM
Disco duro 30 GB o más reciente
puerto USB 2.0
lector de CD-ROM
monitor o pantalla LCD color
tarjeta audio/vídeo con DirectX 9.0 o más reciente
Windows® XP
4. Descripción
1. interruptor de alimentación 6. óptica
2. selector de canal 7. sensor PIR
3. entrada de alimentación 8. micrófono
4. antena 9. LED de alimentación
5. LED infrarrojos
5. Instalación de la cámara
• Montaje mural
Seleccione un lugar de instalación adecuado. Taladre un agujero e
introduzca un taco de nylon. Introduzca un tornillo y fije la cámara.
Luego, conecte el adaptador de red a la cámara. Conecte el adaptador a la
red eléctrica y active la cámara. El LED de alimentación se ilumina.
• Seleccionar el canal
Seleccione un canal con el selector de la parte trasera de la
cámara. Asegúrese de que seleccione el mismo canal tanto para
la cámara como para el receptor.
Page 35

CAMSETW13 VELLEMAN
35
6. Instalar el software
Introduzca el CD-ROM en el lector. El asistente de instalación
(installation Wizard) se activará automáticamente. Instale el driver USB,
el software CameraViewer y el codec MPEG4. Siga las instrucciones de
la pantalla.
Instalar el software Trident Analog Video
Conecte el receptor con su ordenador. Una pantalla se abra. Marque el
tercer cajetín (no actualización) y siga las instrucciones para terminar la
instalación.
Haga click en [My Computer] → [Properties] → [Hardware] → [Device Manager] → [Sound, video and game
controllers] para controlar si el software ha sido instalado de manera correcta. Desconecte el receptor y vuelva a
conectarlo si no se refiere al aparato o si hay un signo de exclamación al lado de la referencia.
Sólo para los usuarios del sistema operativo Windows® 2003
Haga click en [Desktop] → [Properties]. Una pantalla se abra.
Seleccione [Settings] y haga click en [Advanced].
Haga click en el tabulador [Troubleshoot] y deslice la barra hacia la
derecha. Confirme con [Apply] y haga click en [OK] para terminar. La
aplicación está lista para utilizar.
7. Utilizar la cámara
Instale la cámara y el receptor. Seleccione el mismo canal tanto en la cámara como en el receptor. Haga click dos veces el
icono CameraViewer del escritorio. La interfaz siguiente se abra:
Page 36

CAMSETW13 VELLEMAN
36
• La barra de mandos
1. botones de los canales de 1 a 4 11. ajus tar detección infrarroja
2. cana l ON/OFF 12. ajus tar vigilancia programada
3. cana les en bucle ON/OFF 13. ajustar el volumen
4. silenc iar el volumen 14. pausa
5. pantalla dividida 15. grabar
6. imagen para da 16. disminuir la imagen
7. ampliar la imagen 17. detec ción con sonido ON/OFF
8. visu alización completa de la pantalla 18. ajus tar detección con sonido
9. detecc ión infrarroja ON/OFF 19. ges tión de los ficheros de grabación
10. vigilancia programada ON/OFF
• La pantalla de parámetros
Haga click en [Menú] para abrir el siguiente menú. Haga click en un submenú.
o Ajustar los parámetros de seguridad (Security Config)
Marque el cajetín [Ask for password on startup]. Introduzca la contraseña y haga click en [OK] para confirmar.
Page 37

CAMSETW13 VELLEMAN
37
Introduzca su contraseña si el software CameraViewer visualiza la siguiente pantalla.
o Ajustar los parámetros de visualización (Display Config)
Camera Alias
Atribuir un nombre a cada cámara.
Channel Loop
Ajustar la conmutación entre los canales en horas, minutos y segundos.
On Screen Display
Marque el cajetín si quiere que la opción se visualice en la pantalla.
Video Adjustment
Standard: seleccionar el estándar de la cámara (PAL o NTSC).
Brightness: ajustar el brillo de la imagen con el interruptor deslizante.
Contrast: ajustar el contraste de la imagen con el interruptor deslizante.
Saturation: ajustar la saturación de la imagen con el interruptor deslizante.
Page 38

CAMSETW13 VELLEMAN
38
o Ajustar los parámetros de la alarma (Alarm Config)
Alarm Setup
Seleccionar el tipo de alarma y la cámara que activará la alarma.
Operating of Alarm
Seleccione la acción que se debe emprender en caso de alarma.
Record: grabación
Capture: capturar la imagen y guardar.
Play alarm sound: activación de una sirena de alarma.
Record Strategy of Alarm
Ajustar la duración de una grabación en horas, minutos y segundos.
Capture Strategy of Alarm
Ajustar el tiempo entre la activación de la alarma y la captura de imagen.
Page 39

CAMSETW13 VELLEMAN
39
o Ajustar los parámetros de grabación (Record Config)
Record File Path
Haga click en [Change] y seleccione el documento que guarda los ficheros de grabación.
Record File Setup
Compresión: MPEG4
Formato de los ficheros: AVI
Tamaño de la imagen: 3 tamaños disponibles: 720 x 576, 352 x 576, 352 x 288, (PAL)
720 x 480, 352 x 480, 352 x 240 (NTSC)
Frecuencia de imágenes: 5, 10, 15, 20, 25 imágenes por segundo (PAL) – 5, 10, 15, 20, 25, 30 imágenes por
segundo (NTSC)
Storage Strategy
Ajustar el espacio de almacenamiento de los ficheros de grabación.
Take Following Operation When Total File Size Limit Reached
Seleccione la función que quiere emprender por falta de espacio de almacenamiento.
Page 40

CAMSETW13 VELLEMAN
40
o Ajustar los parámetros de captura de imagen (Capture Config)
Picture Path
Haga click en [Change] y seleccione el documento que guarda los ficheros de imagen.
Picture Format
Compresión: MPEG4
Tamaño de la imagen: 3 tamaños disponibles: 720 x 576, 352 x 576, 352 x 288, (PAL)
720 x 480, 352 x 480, 352 x 240 (NTSC)
Frecuencia de imágenes: 5, 10, 15, 20, 25 imágenes por segundo (PAL) – 5, 10, 15, 20, 25, 30 imágenes por
segundo (NTSC)
Storage Strategy
Ajustar el espacio de almacenamiento de los ficheros de imagen.
Take Following Operation When Total File Size Limit Reached
Seleccione la función que quiere emprender por falta de espacio de almacenamiento.
Page 41

CAMSETW13 VELLEMAN
41
o Ajustar los parámetros de una grabación programada (Plan Task Config)
Task Strategy
Ajustar la frecuencia de grabación (grabación diaria, semanal, mensual o única).
Timing
Programar la hora del inicio de la grabación.
Operation
Ajustar la duración de grabación (horas, minutos y segundos) o la frecuencia de captura de imagen.
Channel
Seleccionar los canales aplicables.
Setting a New Scheduled Recording
Haga click en [New].
Ajustar las opciones [Task Strategy], [Timing], [Operation] y [Channel], y confirme con [Add].
Seleccione una grabación programada y haga click en [Delete] para borrarla de la lista.
Haga click en [OK] para confirmar.
Page 42

CAMSETW13 VELLEMAN
42
8. Solución de problemas
Problemas Solución eventual
He olvidado la contraseña
• Desinstale y vuelva a instalar CameraViewer.
No hay imagen
• Asegúrese de que seleccione el mismo canal tanto para la cámara como
para el receptor.
• Señal débil. Seleccione otro lugar de instalación.
• Desactive la fuente de interferencia.
Distorsión de los colores
• Ajuste los colores del ordenador en 16 bits o superior.
No hay comunicación
• Asegúrese de que seleccione el mismo canal tanto para la cámara como
para el receptor.
Imagen en negro y blanco o imagen
centelleante
• Asegúrese de que seleccione el mismo estándar tanto para la cámara
como para el receptor.
La alarma no funciona
• Active la alarma al hacer click en el botón de detección por
infrarrojos/detección sonora.
Caracteres ilegibles
• Asegúrese de que instale el software en el mismo idioma que el del
sistema operativo del ordenador.
Duración de visualización de un
fichero inferior a la duración de
grabación
• Frecuencia de imagen demasiado elevada para el ordenador. Seleccione
una frecuencia inferior.
9. Especificaciones
Cámara
Sensor CMOS
Resolución 628 x 582
Ángulo de visión 55°
Iluminación mínima. 5 lux (F1.2, sin IR)
Frecuencia de transmisión ISM 2.400MHz ~ 2.483MHz
Emisión de potencia 10mW
Modulación FM
Ancho de banda 18MHz
Alimentación 8 VCC/300 mA (adaptador de red incl.) o 3 pilas de 1.5 V
(referencia LR03C, no incl.)
Alcance máx. de la detección de movimientos 8m
Área de detección de movimientos 120° (H), 15° ~ 25° (V)
Sensibilidad sonora > 50dB
Consumo 180mA (con IR), 230mA (sin IR)
Alcance de la transmisión máx. 80m sin obstáculos
Alcance de la visión nocturna 5m
Dimensiones 85 x 109 x 111mm
Peso 170g
Canales disponibles 2.414MHz, 2.432MHz , 2.450MHz, 2.486MHz
Receptor
Frecuencia intermediaria 480MHz
Demodulación FM
Sensibilidad < -85dBm
Interfaz USB 2.0
Dimensiones 105 x 22 x 69mm
Peso 90 g
Page 43

CAMSETW13 VELLEMAN
43
Grabación
Compresión MPEG4
Formato de los ficheros AVI
Tamaño de la imagen 720 x 576, 352 x 576, 352 x 288
Frecuencia de las imágenes 5, 10, 15, 20, 25 imágenes por segundo
Utilice este aparato sólo con los accesorios originales. Velleman SL no será responsable de daños ni lesiones
causados por un uso (indebido) de este aparato.
Para más información sobre este producto, visite nuestra página web www.velleman.eu.
Se pueden modificar las especificaciones y el contenido de este manual sin previo aviso.
CAMSETW13 –
DRAHTLOSE FARBKAMERA MIT EMPFÄNGER - 2.4GHz
1. Einführung
An alle Einwohner der Europäischen Union
Wichtige Umweltinformationen über dieses Produkt
Dieses Symbol auf dem Produkt oder der Verpackung zeigt an, dass die Entsorgung dieses Produktes nach seinem
Lebenszyklus der Umwelt Schaden zufügen kann.
Entsorgen Sie die Einheit (oder verwendeten Batterien) nicht als unsortiertes Hausmüll; die Einheit oder
verwendeten Batterien müssen von einer spezialisierten Firma zwecks Recycling entsorgt werden.
Diese Einheit muss an den Händler oder ein örtliches Recycling-Unternehmen retourniert werden.
Respektieren Sie die örtlichen Umweltvorschriften.
Falls Zweifel bestehen, wenden Sie sich für Entsorgungsrichtlinien an Ihre örtliche Behörde.
Wir bedanken uns für den Kauf der CAMSETW13! Lesen Sie diese Bedienungsanleitung vor Inbetriebnahme sorgfältig
durch. Überprüfen Sie, ob Transportschäden vorliegen. Sollte dies der Fall sein, verwenden Sie das Gerät nicht und
wenden Sie sich an Ihren Händler. Lieferumfang: 1 x drahtlose Kamera (2,4 GHz), 1 x drahtloser Empfänger, 2 x Antenne, 1 x
Netzteil, 1 x USB-Kabel, 1 x CD-Rom-Laufwerk, Montagezubehör und diese Bedienungsanleitung.
2. Sicherheitshinweise
• Bei Schäden, die durch Nichtbeachtung der Bedienungsanleitung verursacht werden, erlischt der Garantieanspruch. Für
daraus resultierende Folgeschäden übernimmt der Hersteller keine Haftung.
• Dieses Gerät kann Störungen bei anderen drahtlosen Geräten, die eine 2,4 GHz-Frequenz verwenden, verursachen.
Schalten Sie eines der Geräte ab, um Störungen zu vermeiden.
• Beachten Sie die Intimsphäre bei Anwendung dieser Kamera. Das Filmen ohne schriftliche Genehmigung ist gesetzlich
verboten, Außerdem ist das Gerät nicht für diese Zwecke bestimmt. Velleman NV übernimmt keine Haftung für illegale
Aktivitäten des Anwenders.
• Installieren Sie diese Kamera nicht in der Nähe von medizinischen Geräten. Die Radiowellen könnten diese Geräte
ernsthaft stören.
• Halten Sie dieses Gerät von magnetischen Gegenständen und elektromagnetischen Feldern, Wärmequellen,
Chemikalie, Wasser und Feuchte fern. Installieren Sie die Kamera und den Empfänger außer Bereich der Sonne und in
einem gut gelüfteten Raum.
• Vermeiden Sie Erschütterungen. Vermeiden Sie rohe Gewalt während der Installation und Bedienung des Gerätes.
• Schalten Sie die Kamera aus wenn Sie diese nicht verwenden.
• Demontieren Sie die Kamera oder den Empfänger nicht. Demontage kann zu Schäden am Produkt führen und
verursacht, dass der Garantieanspruch erlischt.
• Bei Schäden verursacht durch eigenmächtige Änderungen erlischt der Garantieanspruch.
• Halten Sie Kinder und Unbefugte vom Gerät fern.
• Eigenmächtige Veränderungen sind aus Sicherheitsgründen verboten.
• Verwenden Sie das Gerät nur für Anwendungen beschrieben in dieser Bedienungsanleitung sonst kann dies zu
Schäden am Produkt führen und erlischt der Garantieanspruch. Jede andere Verwendung ist mit Gefahren wie
Kurzschluss, Brandwunden, elektrischem Schlag, usw. verbunden.
Page 44

CAMSETW13 VELLEMAN
44
3. Systemvoraussetzungen
Microprozessor 2,0 GHz oder höher
Speicher 256 MB RAM
Festplatte 30 GB oder höher
USB 2.0-Port
CD-Rom-Laufwerk
Farbmonitor oder LCD-Display
Audio-/Videokarte mit DirectX 9.0 oder höher
Windows® XP
4. Umschreibung
6. Netzschalter 6. Objektiv
7. Kanalschalter 7. PIR-Sensor
8. Stromversorgungseingang 8. Mikro fon
9. Antenne 9. Stromversorgungs-LED
10. IR-LEDs
5. Die Kamera installieren
• Wandmontage
Wählen Sie einen geeigneten Montageort. Bohren Sie ein Loch und bringen
Sie einen Nylondübel ein. Befestigen Sie die Schraube am Dübel und die
Kamera an der Schraube.
Verbinden Sie nun die Kamera mit dem Netzteil. Verbinden Sie das Netzteil
mit dem Netz und schalten Sie die Kamera ein. Die Stromversorgungs-LED
leuchtet.
• Den Kanal einstellen
Wählen Sie einen Kanal mit dem Kanalwahlschalter auf der
Rückseite der Kamera aus. Beachten Sie, dass sowohl die
Kamera als auch der Empfänger auf denselben Kanal eingestellt
sind.
Page 45

CAMSETW13 VELLEMAN
45
6. Die Software installieren
Legen Sie das CD-ROM in das Laufwerk ein. Der Installation Wizard
startet automatisch. Installieren Sie den USB-Treiber, die KameraViewerSoftware und MPEG4-Codec, und befolgen Sie die Hinweise im Display.
Trident Analog Video installieren
Verbinden Sie den Empfänger mit Ihrem Computer. Ein Fenster (siehe
Abb, rechts) erscheint im Display, Deuten Sie die dritte Option an und
befolgen Sie die Hinweise, um die Installation zu komplettieren.
Wählen Sie [My Computer] → [Properties] → [Hardware] → [Device Manager] → [Sound, video and game
controllers] und überprüfen Sie, ob die Software korrekt installiert worden ist. Wenn Sie keinen Verweis auf das Gerät
finden oder wenn ein gelbes Ausrufezeichen vor der Referenz steht, so
trennen Sie den Empfänger vom Computer und verbinden Sie ihn
danach wieder.
Nur für Windows® 2003-Gebraucher
Wählen Sie [Desktop] → [Properties] und danach [Settings]. Klicken
Sie auf [Advanced].
Klicken Sie auf den Tabulator [Troubleshoot] und verschieben Sie den Pfeil nach naar rechts. Befestigen Sie mit [Apply]
en klicken Sie auf [OK] um zu beenden. Das Programm ist nun gebrauchsfertig.
7. Die Kamera verwenden
Installieren Sie sowohl die Kamera als auch den Empfänger. Wählen Sie denselben Kanal für Kamera und Empfänger.
Doppelklicken Sie auf das CameraViewer-Symbol im Desktop. Nachfolgende Schnittstelle erscheint:
Page 46

CAMSETW13 VELLEMAN
46
• Der Bedienbalken
1. Kanaltasten 1 bis 4 11.Einsttellung IR-Erfassung
2. Kanal EIN/AUS 12. Einstellung programmierte Überwachung
3. Kanalsc hleife EIN/AUS 13. Lautstärkeregelung
4. Stumm schalten (mute) 14. Pause
5. Geteilter Bildschirm (s plit screen) 15. Aufnahmen
6. Standbild (snapsho t) 16. Herauszoomen (zoom out)
7. fokuss ieren (zoom in) 17. Erfassung mit Klang EIN/AUS
8. volle Bildsch irmgröße (full screen) 18. Einstellung Erfass ung mit Klang
9. IR-Erfass ung EIN/AUS 19. Verwaltung Aufnahmedateien
10. programmierte Überwachung EIN/AUS
• Das Einstellmenü
Klicken Sie auf [Menu] um die Schnittstelle (siehe unten) anzuzeigen. Klicken Sie auf ein
Untermenü.
o Sicherheitseinstellungen (Security Config)
Klicken Sie auf [Ask for password on startup]. Geben Sie nun das Passwort ein und klicken Sie auf [OK] zum
Bestätigen.
Page 47

CAMSETW13 VELLEMAN
47
Das nächste Mal, dass Sie auf die CameraViewer-Software zugreifen, werden Sie das Passwort eingeben müssen.
o Bildschirmeinstellungen (Display Config)
Kamera Alias
Geben Sie jeder angeschlossenen Kamera einen Namen.
Channel Loop
Stellen Sie den Schaltzeit (Stunden, Minuten und Sekunden) ein.
On Screen Display
Deuten Sie das Häuschen an wenn Sie das Datum, die Uhr oder die Kanalnummer im Bildschirm anzeigen möchten.
Video Adjustment
Standard: wählen Sie den Kamerastandard (PAL oder NTSC).
Brightness: regeln Sie die Helligkeit über den Schiebebalken.
Contrast: regeln Sie den Kontrast über den Schiebebalken.
Saturation: regeln Sie die Intensität über den Schiebebalken.
Page 48

CAMSETW13 VELLEMAN
48
o Alarmeinstellungen (Alarm Config)
Alarm Setup
Wählen Sie den Alarmtyp und die Kamera, die den Alarm aktivieren wird.
Operating of Alarm
Wählen Sie den Betriebsmodus wenn der Alarm aktiviert wird.
Record: die Software startet eine Aufnahme bei Alarm.
Capture: die Software nimmt Bilder auf und speichert diese.
Play alarm sound: bei Alarm ertönt eine Alarmsirene.
Record Strategy of Alarm
Stellen Sie die Aufnahmedauer (Stunden, Minuten und Sekunden) ein.
Capture Strategy of Alarm
Stellen Sie ein, wie lange die Kamera nach dem Alarm Bilder speichert.
Page 49

CAMSETW13 VELLEMAN
49
o Aufnahme-Einstellungen (Record Config)
Record File Path
Klicken Sie auf [Change] und wählen Sie den Pfad für die Aufnahmedateien.
Record File Setup
Kompression: MPEG4
Dateiformat: AVI
Bildgröße: 3 verfügbare Bildgrößen: 720 x 576, 352 x 576, 352 x 288, (PAL)
720 x 480, 352 x 480, 352 x 240 (NTSC)
Bildfrequenz: 5, 10, 15, 20, 25 Bilder per Sekunde (PAL) – 5, 10, 15, 20, 25, 30 Bilder per Sekunde (NTSC)
Storage Strategy
Stellen Sie hier den max. verfügbaren Raum für die Aufnahmedateien ein.
Take Following Operation When Total File Size Limit Reached
Wählen Sie die Funktion die Sie, bei Mangel an Speicherplatz, unternehmen möchten.
Page 50

CAMSETW13 VELLEMAN
50
o Einstellung der Erfassung (Capture Config)
Picture Path
Klicken Sie auf [Change] und wählen Sie den Pfad für die Bilddateien.
Picture Format
Kompression: JPEG
Bildgröße: 3 verfügbare Bildgrößen: 720 x 576, 352 x 576, 352 x 288, (PAL)
720 x 480, 352 x 480, 352 x 240 (NTSC)
Bildfrequenz: 5, 10, 15, 20, 25 Bilder per Sekunde (PAL) – 5, 10, 15, 20, 25, 30 Bilder per Sekunde (NTSC)
Storage Strategy
Stellen Sie hier den max. verfügbaren Raum für die Bilddateien ein.
Take Following Operation When Total File Size Limit Reached
Wählen Sie die Funktion die Sie, bei Mangel an Speicherplatz, unternehmen möchten.
Page 51

CAMSETW13 VELLEMAN
51
o Programmierte Aufnahmen (Plan Task Config)
Task Strategy
Stellen Sie die Aufnahmefrequenz ein (täglich, wöchentlich, monatlich oder nur eine Aufnahme).
Timing
Programmieren Sie die Aufnahme.
Operation
Stellen Sie die Aufnahmedauer (Stunden, Minuten und Sekunden) ein oder bestimmen Sie wenn die Kamera ein Bild
festlegen muss.
Channel
Wählen Sie die passenden Kameras.
Eine neue Aufnahme programmieren
Klicken Sie auf [New].
Stellen Sie [Task Strategy], [Timing], [Operation] und [Channel] ein und befestigen Sie mit [Add].
Wählen Sie eine Aufnahme und klicken Sie auf [Delete] um die programmierte Aufnahme zu löschen.
Befestigen Sie mit [OK].
8. Problemlösung
Problem Mögliche Lösung
Passwort vergessen
• Installieren Sie die CameraViewer-Software.
Keine Bildwiedergabe
• Beachten Sie, dass die Kamera und den Empfänger auf denselben Kanal
eingestellt sind.
• Schwaches Signal. Wählen Sie einen anderen Montageort.
• Schalten Sie die Störungswelle aus.
Ungenaue Farben
• Stellen Sie die Farbe vom Computer als 16 bits oder höher ein.
Page 52

CAMSETW13 VELLEMAN
52
Keiner drahtlose Empfang
• Beachten Sie, dass die Kamera und den Empfänger auf denselben Kanal
eingestellt sind.
Schwarz-Weißbild oder zitterendes
Bild
• Beachten Sie, dass die Kamera und den Empfänger auf demselben
Standard eingestellt sind.
Alarm schaltet nicht aus
• Schalten Sie die Alarmfunktion ein, indem Sie die Taste für IR-Detektion
klicken.
Unlesbare Zeichen
• Beachten Sie, dass die Sprache vom CameraViewer dieselbe als diese
vom Computer ist.
Abspieldauer der Aufnahmedateien ist
viel kurzer als die Aufnahmedauer
• Wählen Sie eine niedrigere Bildfrequenz.
9. Technische Daten
Kamera
Sensor CMOS
Auflösung 628 x 582
Blickwinkel 55°
minimale Lichtstärke 5 lux (F1.2, IR off)
Sendefrequenz ISM 2.400 MHz ~ 2.483 MHz
Sendeleistung 10mW
Modulation FM
Bandbreite 18 MHz
Stromversorgung 8 VDC/300 mA (Netzteil mitgeliefert) oder 3 x 1.5 V-
Batterien (Bestell-Nr. LR03C, nicht mitgeliefert)
max. Abstand Bewegungsdetektion 8m
Gebiet Bewegungsdetektion 120° (H), 15° ~ 25° (V)
Schallempfindlichkeit > 50dB
Stromverbrauch 180mA (IR off), 230mA (IR on)
Sendebereich max. 80m ohne Hindernisse
Bereich Nachtsicht 5m
Abmessungen 85 x 109 x 111mm
Gewicht 170 g
Verfügbare Kanäle 2.414 MHz, 2.432 MHz, 2.450 MHz, 2.486 MHz
Empfänger
Tussenfrequentie 480 MHz
Demodulatie FM
Gevoeligheid < -85dBm
Zendinterface USB 2.0
Abmessungen 105 x 22 x 69mm
Gewicht 90 g
Aufnahme
Kompression MPEG4
Dateiformat AVI
Bildgröße 720 x 576, 352 x 576, 352 x 288
Bildfrequenz 5, 10, 15, 20, 25 Bilder per Sekunde
Verwenden Sie dieses Gerät nur mit originellen Zubehörteilen. Velleman NV übernimmt keine Haftung für Schaden
oder Verletzungen bei (falscher) Anwendung dieses Gerätes.
Für mehr Informationen zu diesem Produkt, siehe www.velleman.eu.
Alle Änderungen ohne vorherige Ankündigung vorbehalten.
 Loading...