

Page 1

CAMSETW12
WEATHERPROOF WIRELESS COLOUR CAMERA KIT
KIT MET DRAADLOZE WEERBESTENDIGE KLEURENCAMERA
ENSEMBLE CAMÉRA COULEUR SANS FIL RÉSISTANTE AUX INTEMPÉRIES
JUEGO CON CÁMARA COLOR INALÁMBRICA RESISTENTE A LA INTEMPERIE
KIT MIT DRAHTLOSER WETTERFESTER FARBKAMERA
USER MANUAL
GEBRUIKERSHANDLEIDING
NOTICE D’EMPLOI
MANUAL DEL USUARIO
BEDIENUNGSANLEITUNG
Page 2

CAMSETW12 VELLEMAN
-
2
-
Page 3
CAMSETW12 VELLEMAN
-
3
-
CAMSETW12 – WEATHERPROOF WIRELESS COLOUR CAMERA KIT
1. Introduction & Features
To all residents of the European Union
Important environmental information about this product
This symbol on the device or the package indicates that disposal of the device after its lifecycle could harm
the environment.
Do not dispose of the unit (or batteries) as unsorted municipal waste; it should be taken to a specialized
company for recycling.
This device should be returned to your distributor or to a local recycling service.
Respect the local environmental rules.
If in doubt, contact your local waste disposal authorities.
Thank you for choosing Velleman! Please read the manual thoroughly before bringing this device into service. If the
device was damaged in transit, don't install or use it and contact your dealer. Your CAMSETW12 comes with 1 x
2.4GHz wireless colour camera, 1 x 2.4GHz receiver, 1 x camera stand, 1 x 7.5VDC power adapter for camera, 1 x
7.5VDC power adapter for receiver, A/V cable and this manual.
2. Safety Instructions
• Damage caused by disregard of certain guidelines in this manual is not covered by the warranty and the dealer
will not accept responsibility for any ensuing defects or problems.
• This unit should only be installed, disassembled, repaired and serviced by an authorized technician.
• Make sure that the available voltage does not exceed the voltage stated in the specifications of this manual.
• Make sure that all electric connections and connection cables between the devices of the camera system as well as
the devices to be connected meet the pertaining regulations and are in conformity with the operating instructions.
• Observe the safety notices and operating instructions of the connected appliances.
• Do not operate the devices unsupervised.
• Do not crimp the power cord and protect it against damage. Have an authorised dealer replace it if necessary.
• Disconnect the device from the mains to clean it or when it is not in use. Handle the power cord by the plug only.
Never handle the power adapter with wet hands.
• Disconnect from the mains during thunderstorms.
• Note that damage caused by user modifications to the device is not covered by the warranty.
• Keep the device away from children and unauthorised users.
3. Description
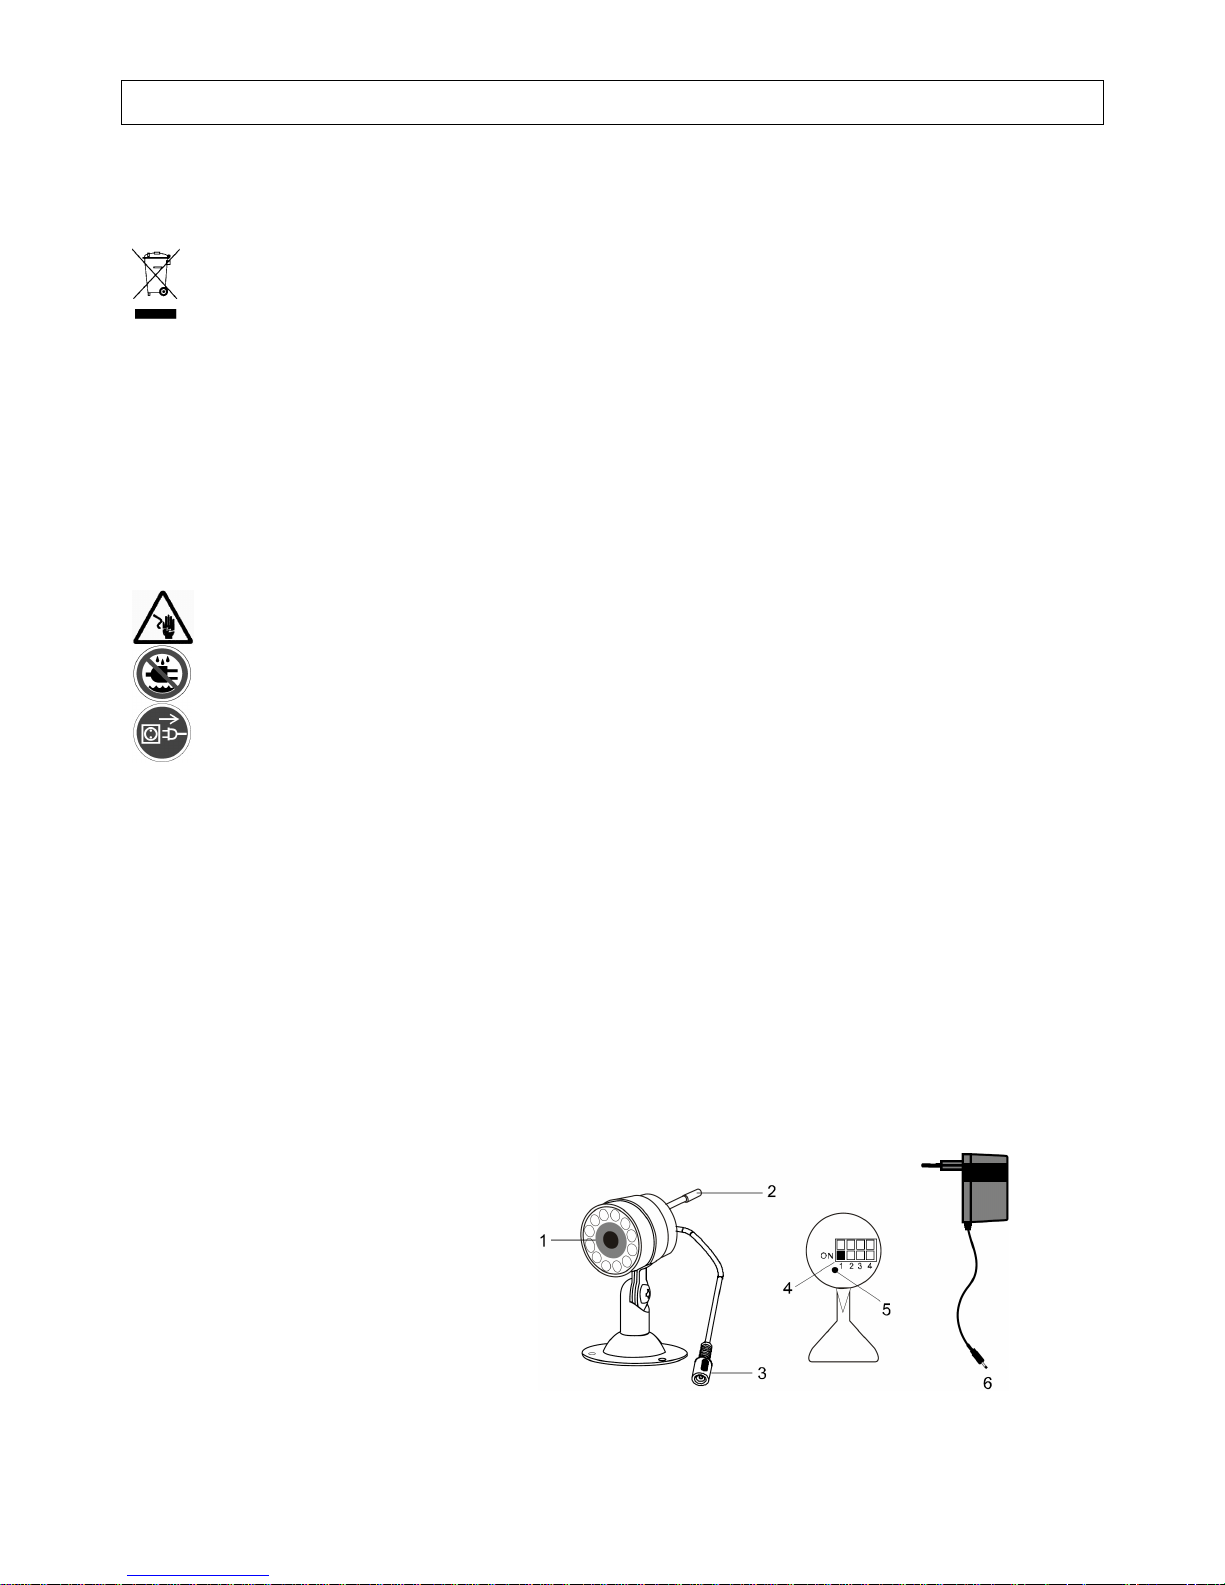
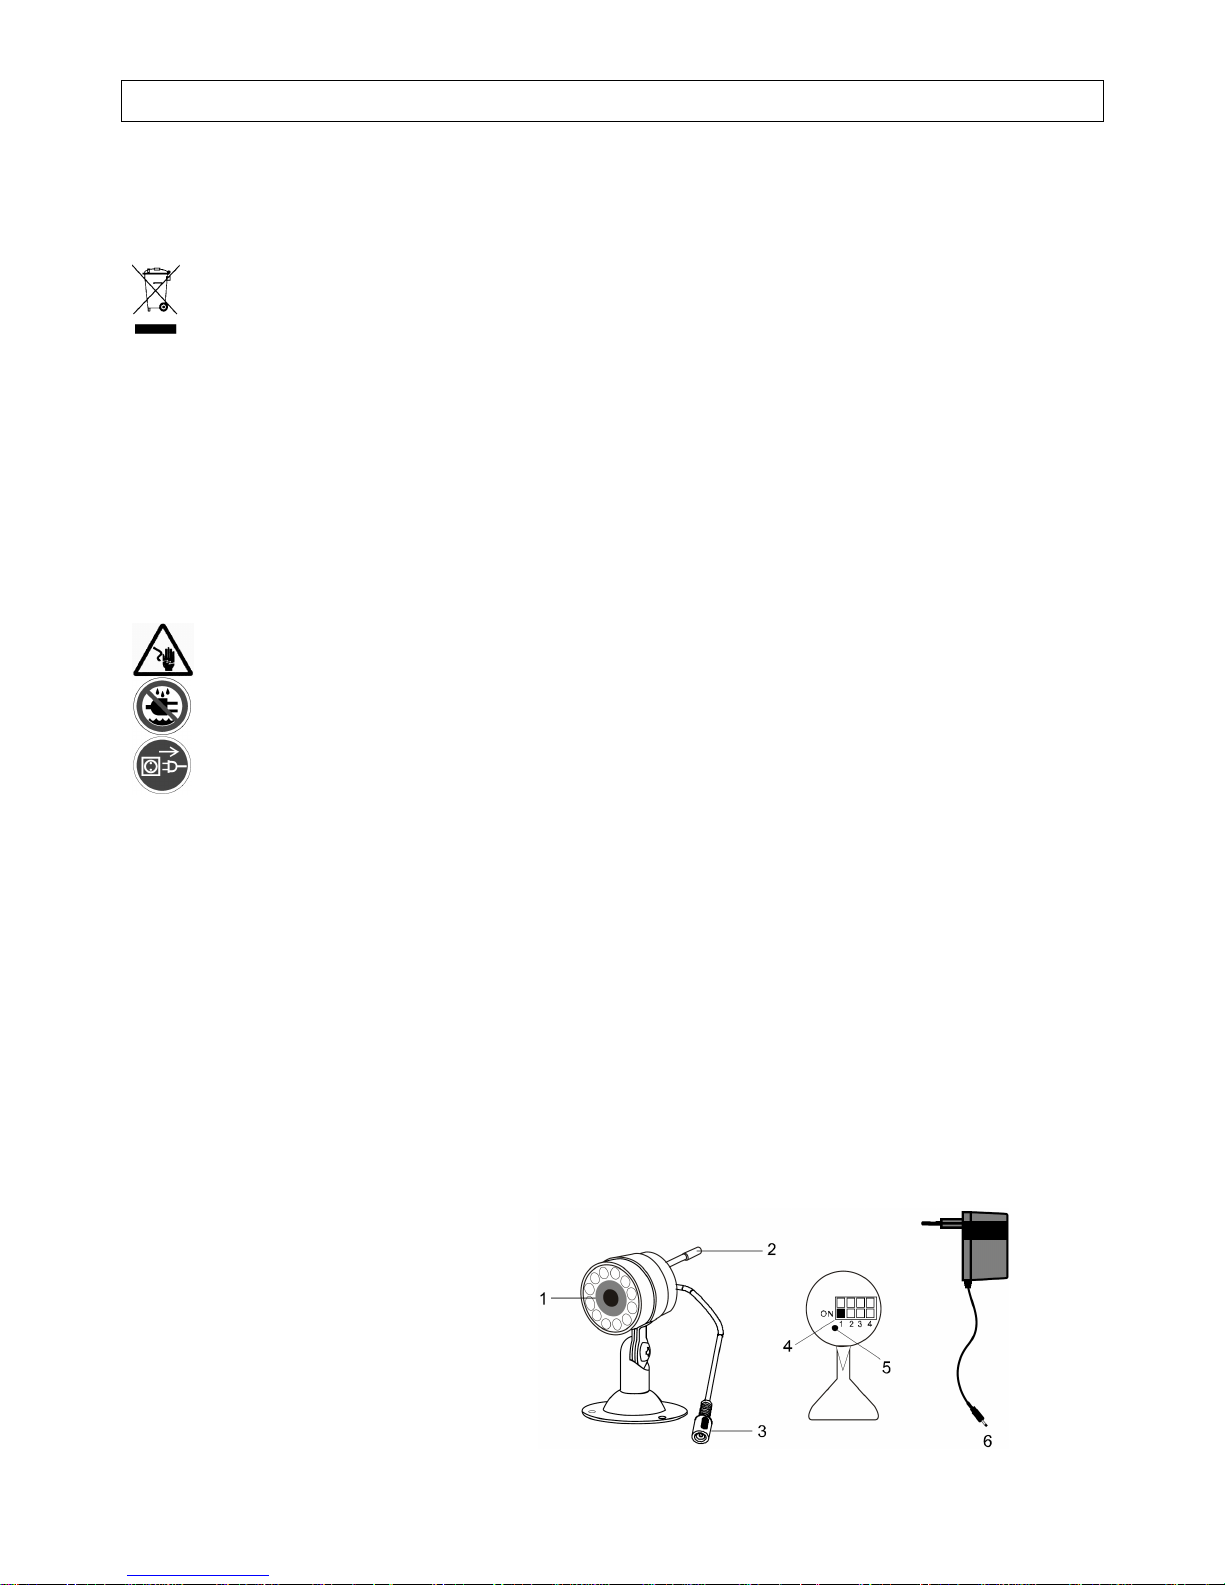
a. Camera
1. lens
2. aerial
3. power jack
4. channel DIP switches
5. microphone
6. DC power adapter
Be very careful during the installation: touching live wires can cause life-threatening electroshocks.
Keep this device away from rain and moisture.
Unplug the mains lead before opening the
housing
.
Page 4

CAMSETW12 VELLEMAN
-
4
-
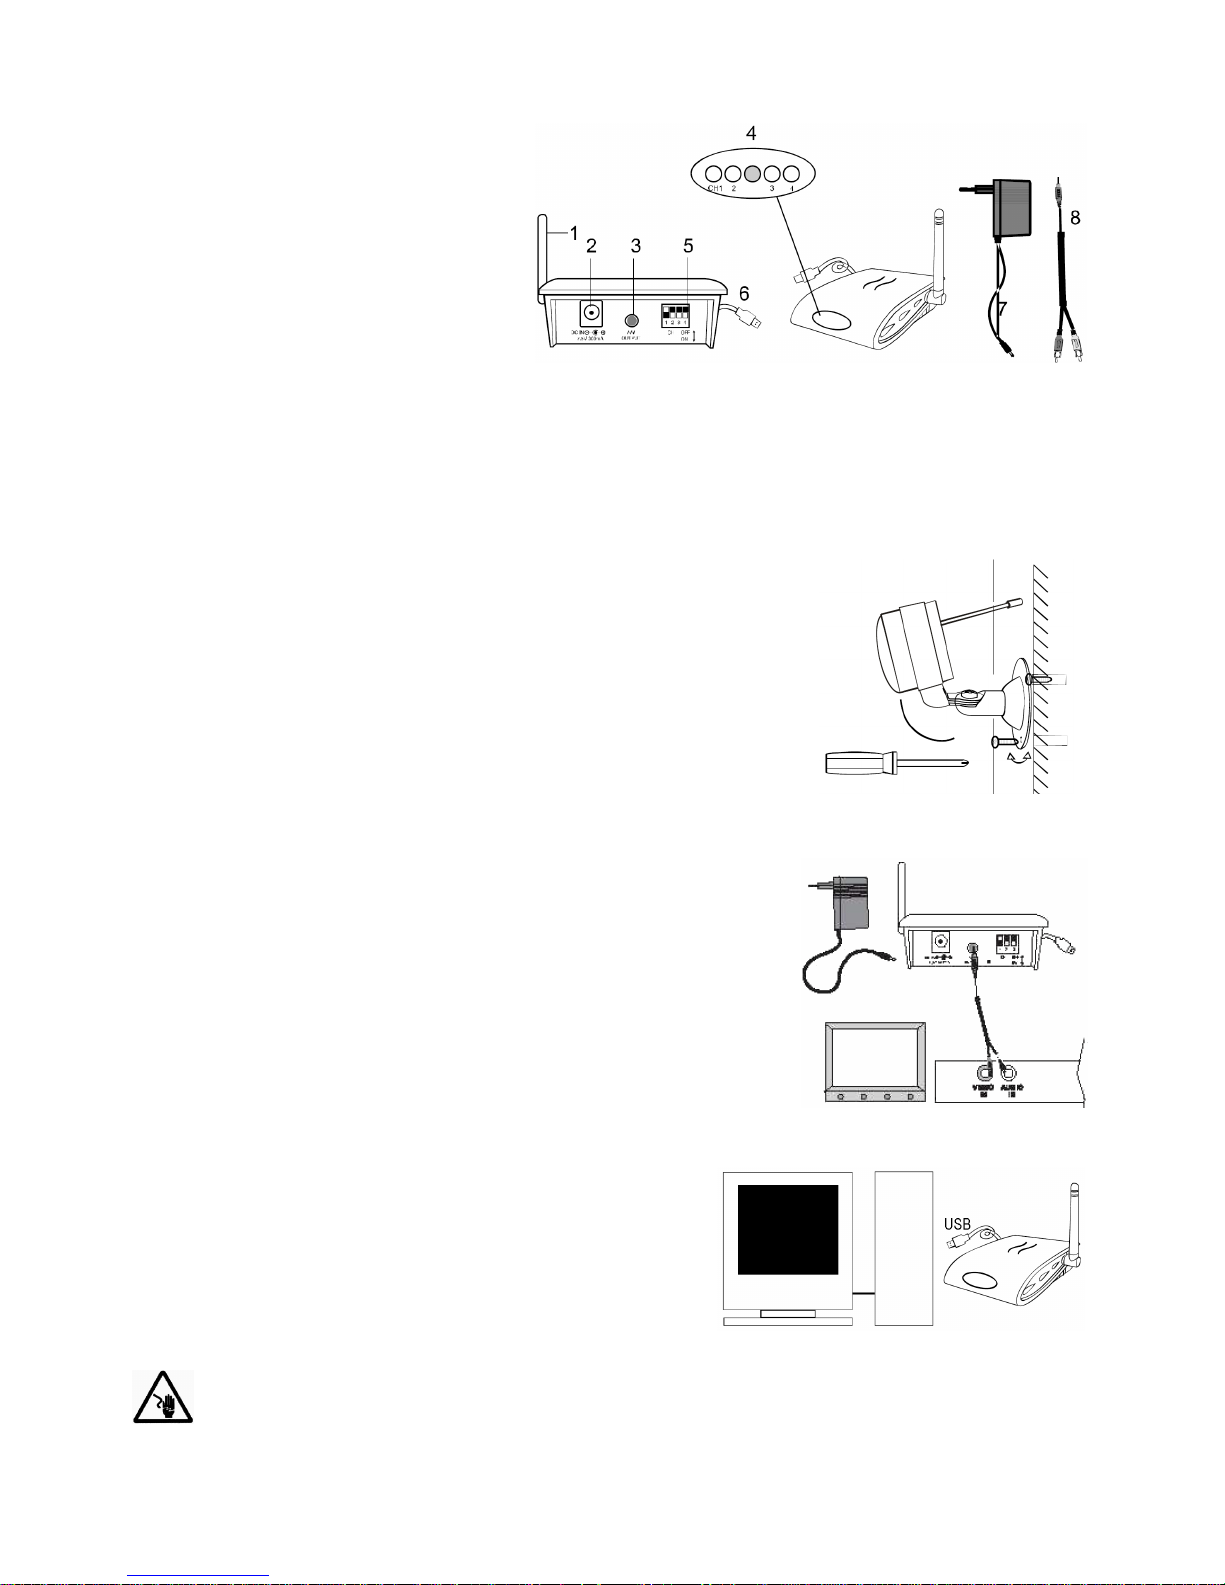
b. Receiver
1. aerial
2. power input
3. A/V output
4. power LED
5. channel DIP switches
6. USB connector
7. DC power adapter
8. A/V cable
4. Installation
a. Camera
Select a suitable location which is dry and as dust-free as possible, and presents good air circulation and little
vibrations. The location must not be screened off by reinforced concrete walls, mirrors, metal shelves, etc. and
should be exempt of appliances emitting a strong electric field. Any strong electric environment could cause
interference. Make sure there is a mains outlet in the vicinity.
Fasten the wall bracket to a wall using the included screws. Use nylon plugs if
necessary. Make sure the wall is exempt of any electric wiring before drilling.
Note: Do not point the camera directly towards a source of light as this could lead
to overexposure and an unclear picture.
b. Receiver
Set up the receiver on a rugged and stable surface at approximately 1m above the ground for better reception. Make
sure there is a mains outlet in the vicinity.
5. Connection
a. Camera
• Connect the AV cable to a suitable monitor or TV set (white plug = audio,
yellow = video) as illustrated.
• Connect the power supply.
• Select the correct channel according to the channel selected on the receiver
(see “6. System Installation”).
b. Receiver
• Connect the USB plug with the USB port of the computer (see
“10. Technical Specifications – System Requirements”).
• Insert the included CD-ROM into the drive and install the
CamGuard software and the driver (see “7. Software”).
6. System Installation
Unplug the devices from the mains prior to setting the channel.
Page 5
CAMSETW12 VELLEMAN
-
5
-
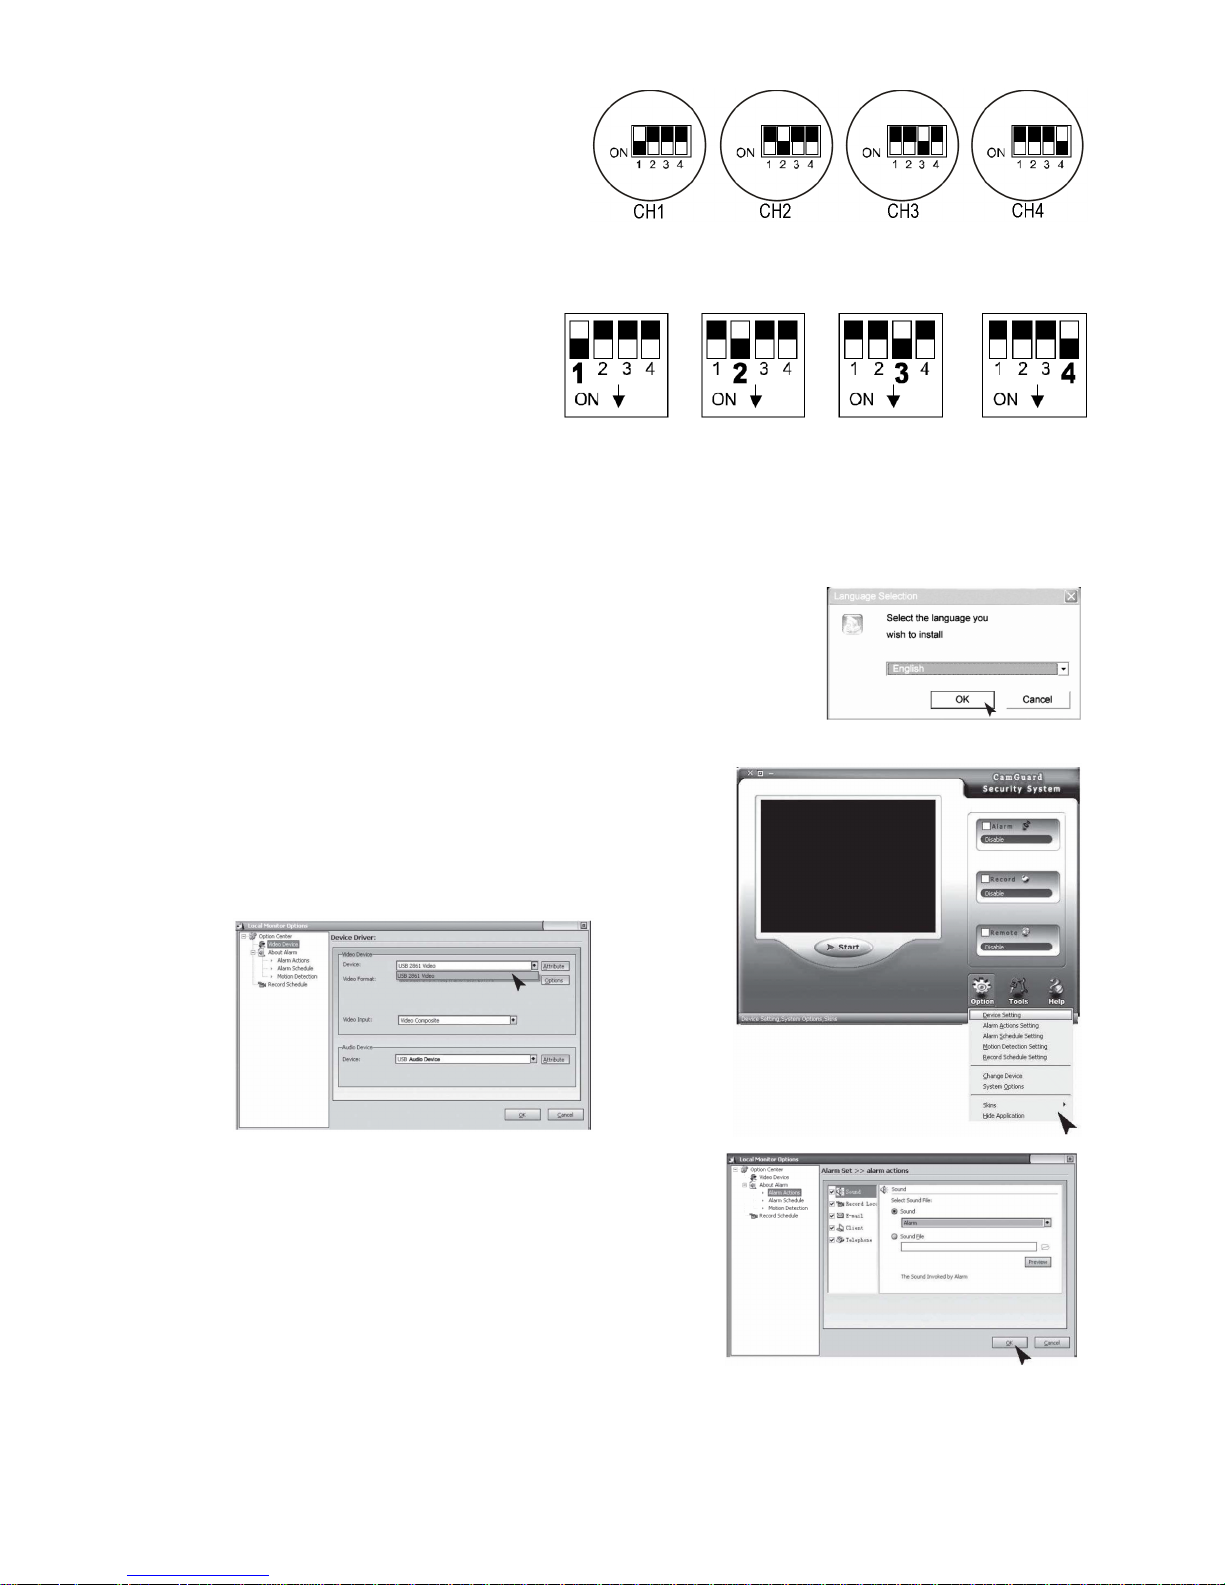
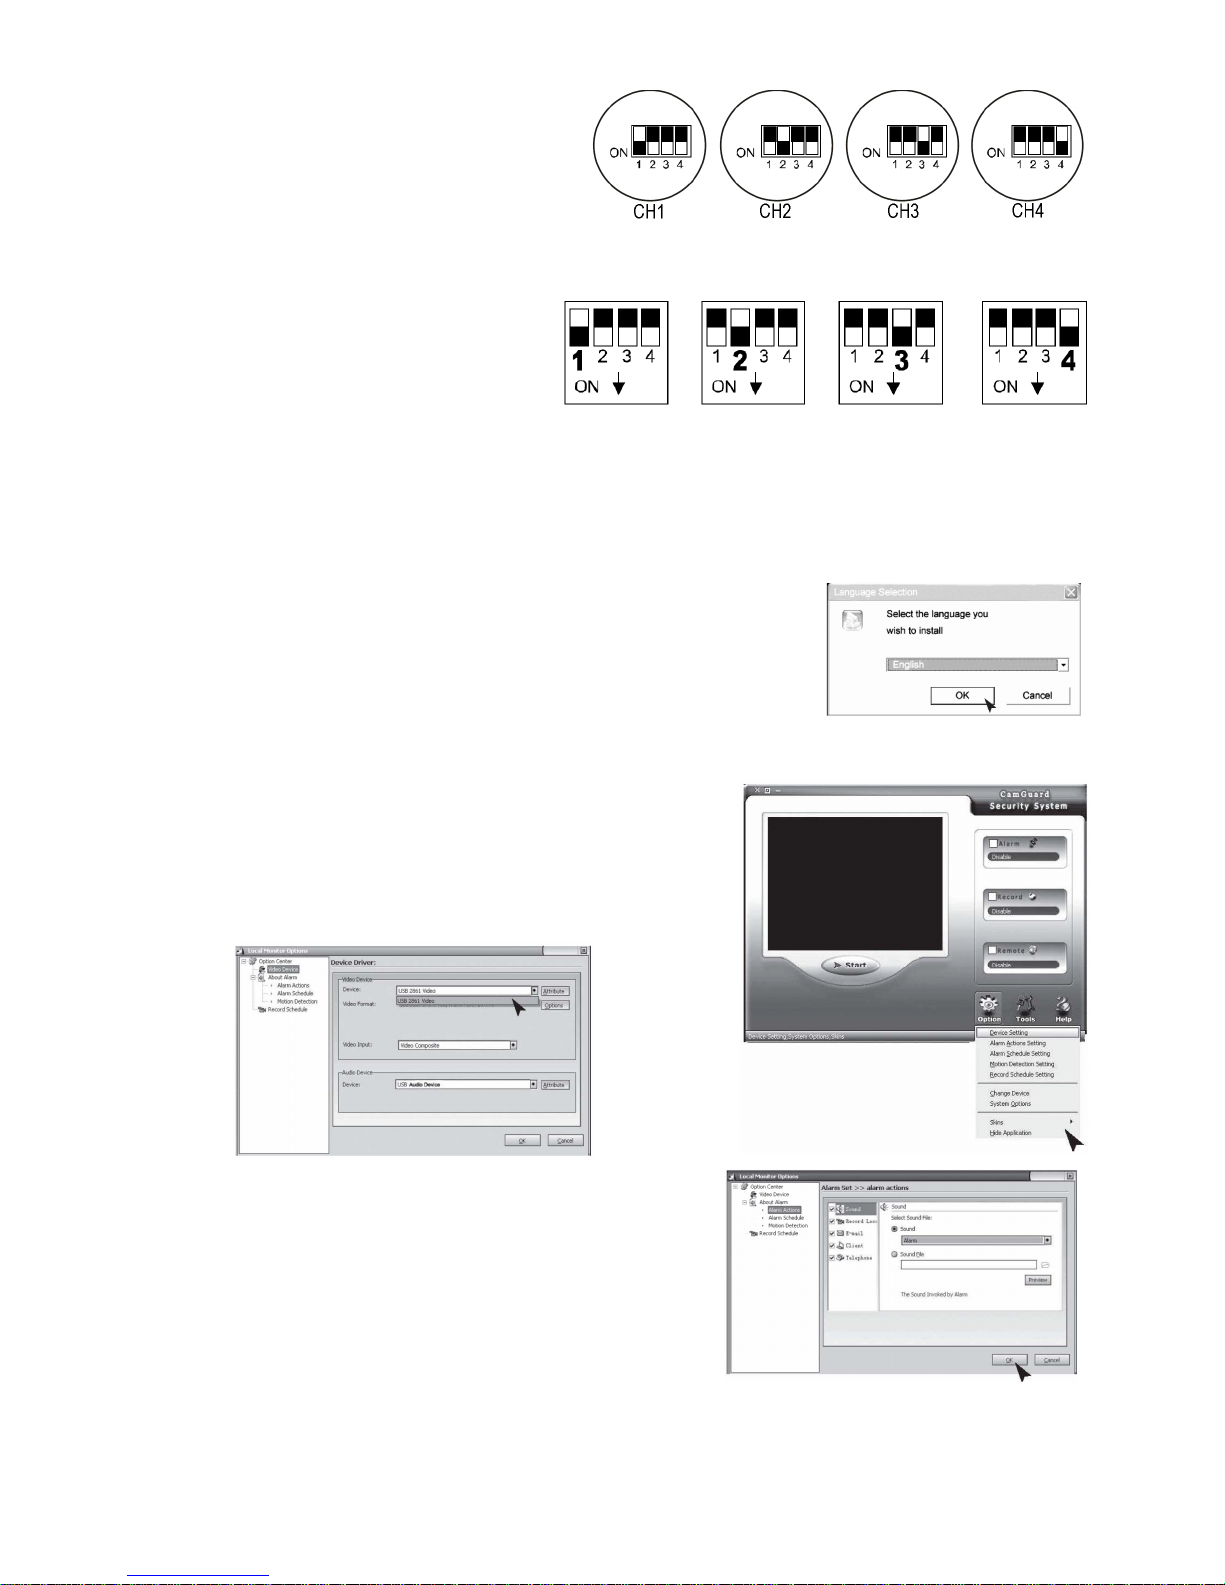
a. Camera
Select the channel using a pointed object. The
selected channel will remain activated. Only one
channel may be activated at one time.
b. Receiver
• Manual Channel Selection
Select the channel using a pointed object. The
selected channel will remain activated.
• Auto Scan
This mode is useful when there is more than one camera connected. Assign a unique channel to each camera and
place all DIP switches on the receiver to ON. Place the DIP to OFF when the channel is not being occupied by a
camera. The monitor will switch channel every 5 seconds.
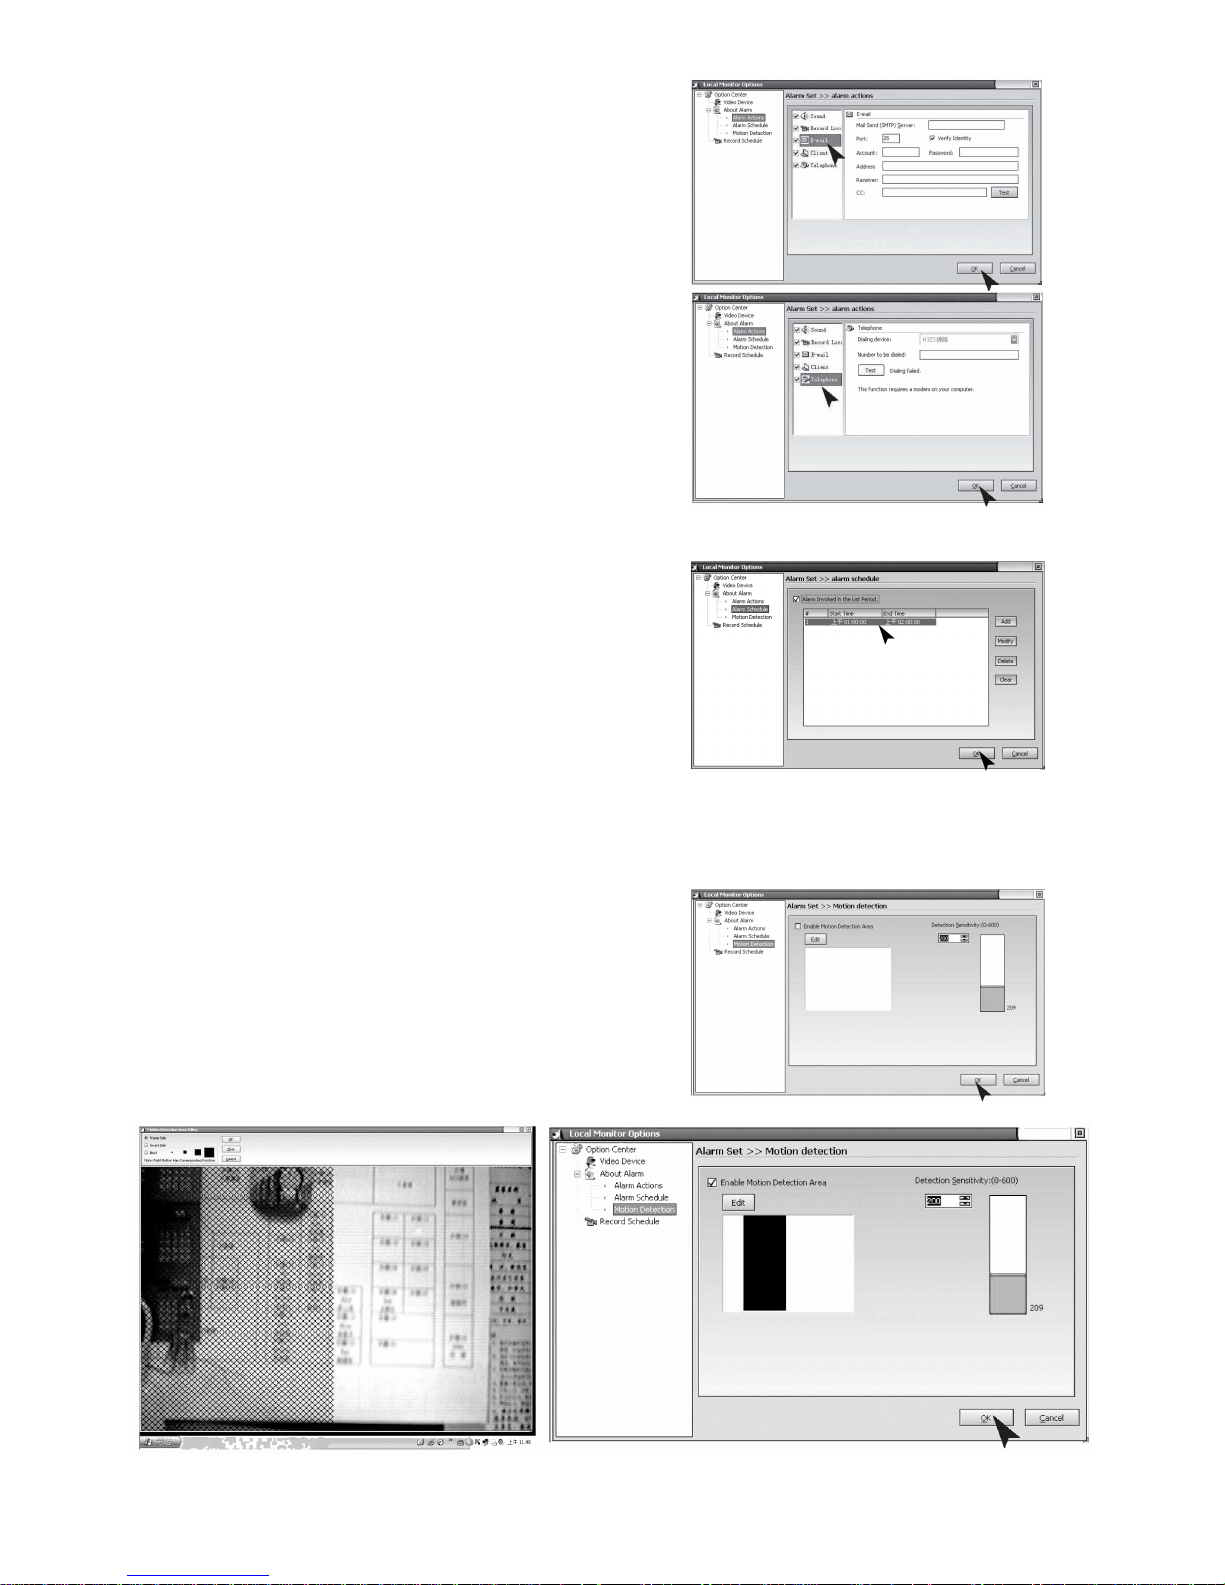
7. Software
Insert the CD-ROM into the drive. Double click on the CamGuard icon to start the
installation. Next, select the desired language and click OK to confirm. Follow the
installation procedure and click Finish to complete.
• Device Setting
Select Device Setting under Option.
Device: Choose a device for the audio and video source.
Attribute: Display the dialogue box of the selected device.
Options: Set the size and frame rate of the selected device.
• About Alarm
Set the alarm duration by entering the seconds in the box.
Alarm Actions:
Sound: The alarm will sound as soon as an anomaly is detected.
Select a sound type from the sound files (*.wav) in your
computer or from the provided list. Select Sound, and select
one from the list. Click OK to confirm.
Record Location: As soon as an anomaly is detected, the images will automatically be saved on the local disc.
Select to save as an image file (*.jpeg) or a video file. An image file will be saved every 5 seconds.
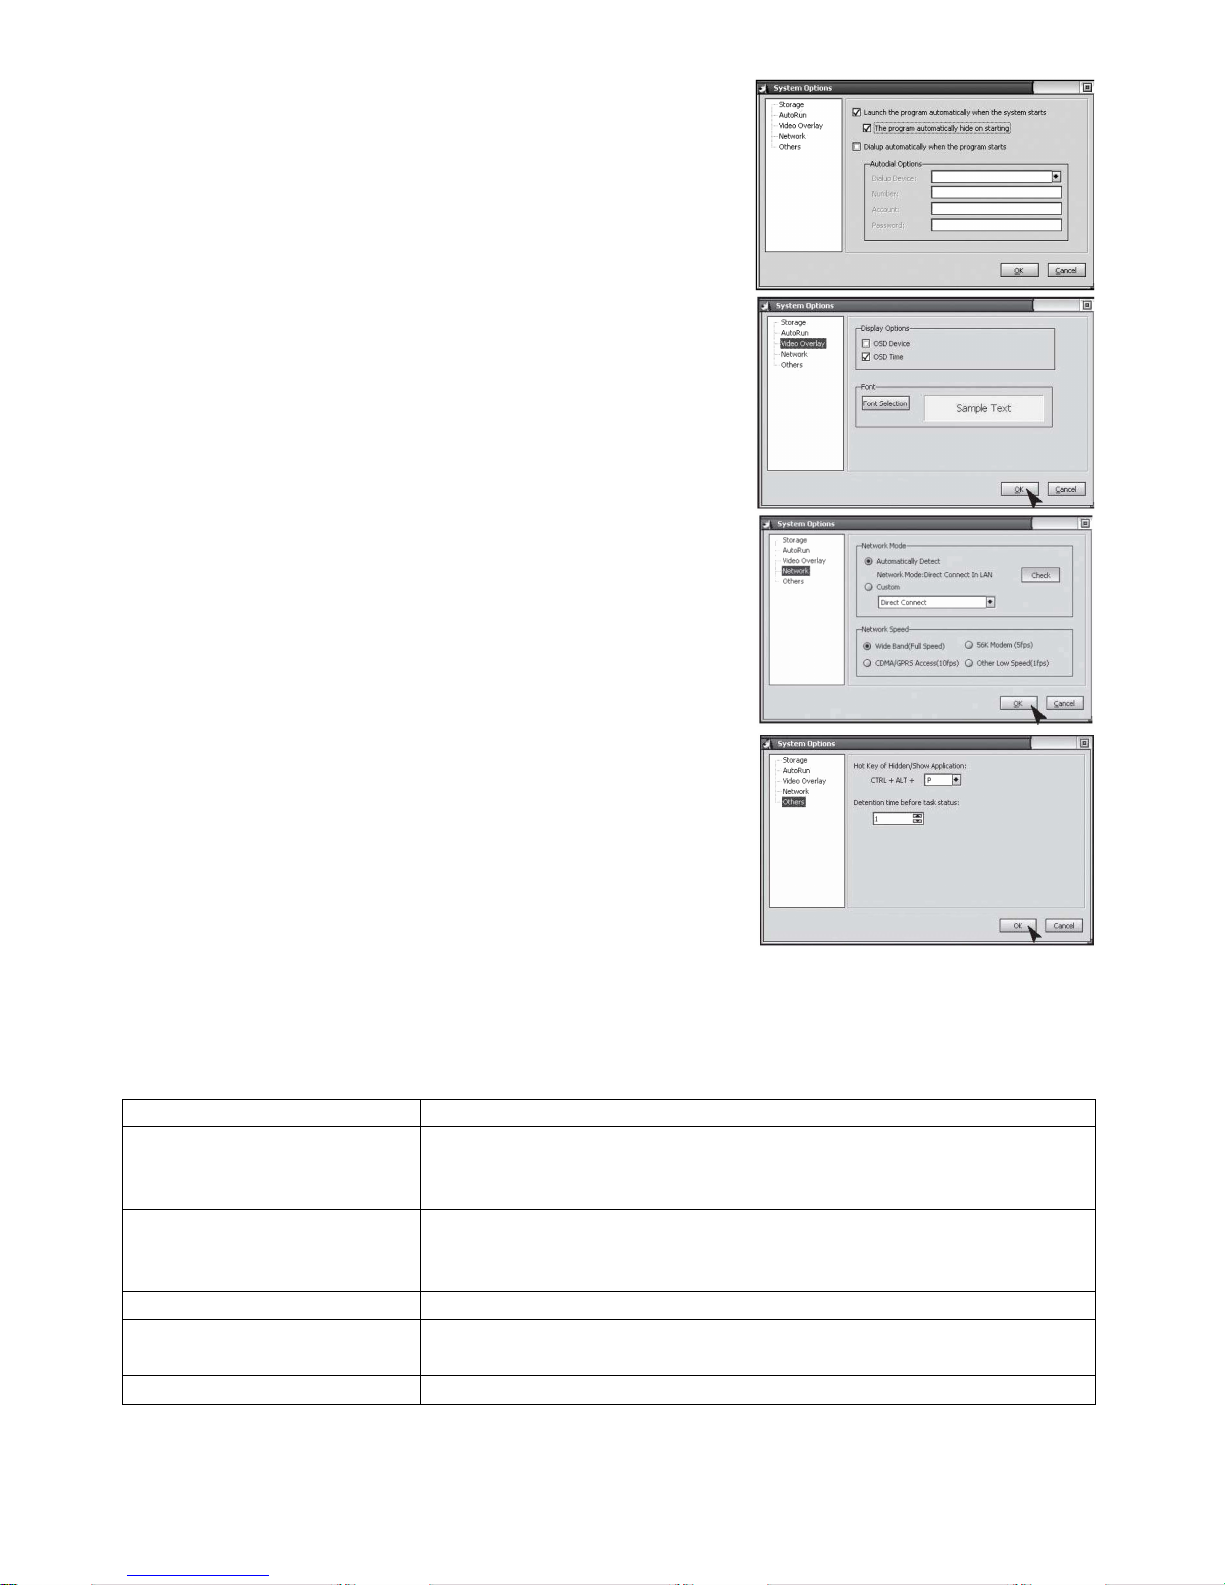
Email: As soon as an anomaly is detected, you will be automatically informed by email with the images in an
attachment.
Page 6
CAMSETW12 VELLEMAN
-
6
-
Mail Send (SMTP) Server – the server sending an email.
Details are available from the mailbox provider.
Port – port of the SMTP server which is generally 25.
Details are available from the mailbox provider.
Verify Identity – account authenticity.
Account – email account.
Password – email password.
Recipient – email address receiving the notification.
CC – copy of the notification to other email accounts.
Telephone: As soon as an anomaly is detected, you will be
automatically informed by telephone. To enable the
function, equip your PC with a modem.
Dialup Device – list with all dial-up devices on your PC.
Select your modem here.
Call Number – number to call in case of an anomaly.
Test – test the dialling.
Alarm Schedule
You can program the start and end time of the monitoring period.
Check the “Alarm Invoked in the List Period” box to enable the
function.
New: add a new period.
Modify: modify the currently selected period.
Delete: delete the currently selected period.
Clear: delete all periods.
Motion Detection
The CAMSETW12 allows you to set the monitoring area and sensitivity according to local needs.
Enable Motion Detection Area: check the box to enable the
function.
Edit: edit the monitoring area.
Detection Sensitivity: set the motion detection sensitivity.
Sensitivity Bar: the green area indicates the current detected
value; the red line indicates the set value limit. When the
green bar exceeds the red line, the alarm will be triggered.
Page 7

CAMSETW12 VELLEMAN
-
7
-
Click Edit to edit the monitoring area. You can determine the area with the computer mouse. Click the right button of
the mouse or click Clear to delete the monitoring area.
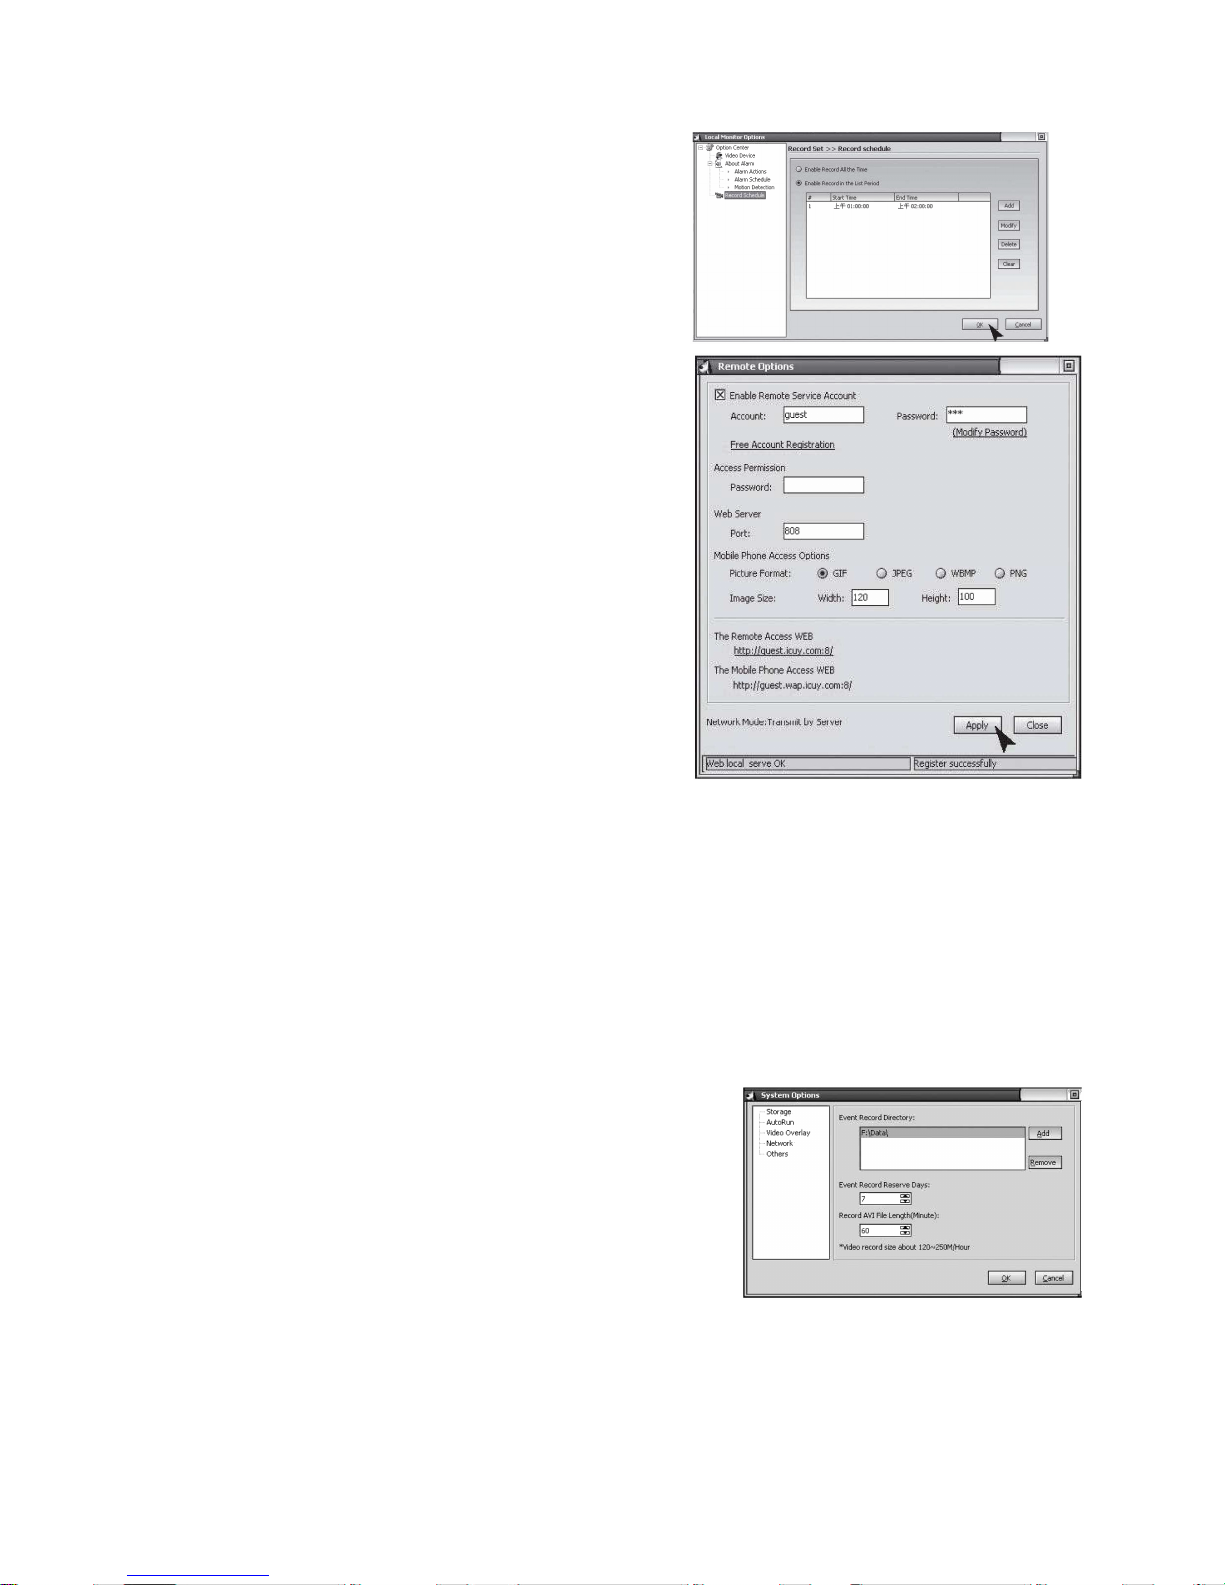
• Record Schedule
You can program the start and end time of the monitoring period.
Here, the images will be automatically recorded. Check the
“Enable Record in the List Period” box to enable the function.
New: add a new period
Modify: modify the currently selected period.
Delete: delete the currently selected period.
Clear: delete all periods.
• Remote Options
Since the IP address of your computer will be changed for some
connection modes each time you connect to the internet, you
need to know the current IP address of your computer each time
you conduct remote access, which is very inconvenient. After
enabling the remote service account by checking the box, use the
fixed access address to conduct remote access. Application for an
account is free, which can be made by clicking Free Account
Registration.
Click Remote Options on the toolbar of the main interface, or
Tool and then Remote Options in the main menu to pop up the
Remote Options window.
Access Permission: set the account password for remote access. Both the account and the password are required
when accessing. It is strongly recommended that you set this item to protect your privacy and the security of your
computer.
Web Server Port: port used by the web server embedded in the program, which normally does not need any
changes. However, you can reconfigure this port according to your requirement. If using another web server, such
as MS IIS, you must assign other values or conflicts will occur.
Mobile Phone Access Options: The program supports WAP mobile phone remote access. You can view the
images of the historical records on your mobile phone.
Picture Format: select the image format which will be supported by your mobile phone.
Image Size: select the image size according to the screen size of your mobile phone.
Remote Access WEB: displays the address accessed remotely.
Mobile Phone Access WEB: displays the WAP address accessed by your mobile phone.
Network Mode: displays the current network connection mode.
• System Options – Storage
Path for saving record files. Click Add to add a directory; click Delete to
delete a directory in the box.
Event Record Reserve Days: the number of days the recorded file will
be saved on the hard disk.
Record AVI File Length: length of the record file in minutes.
Files saved on the hard disk for more days than the set period will automatically be deleted. If the available disk
space is less than 100MB, the program will automatically delete the oldest record files.
Page 8
CAMSETW12 VELLEMAN
-
8
-
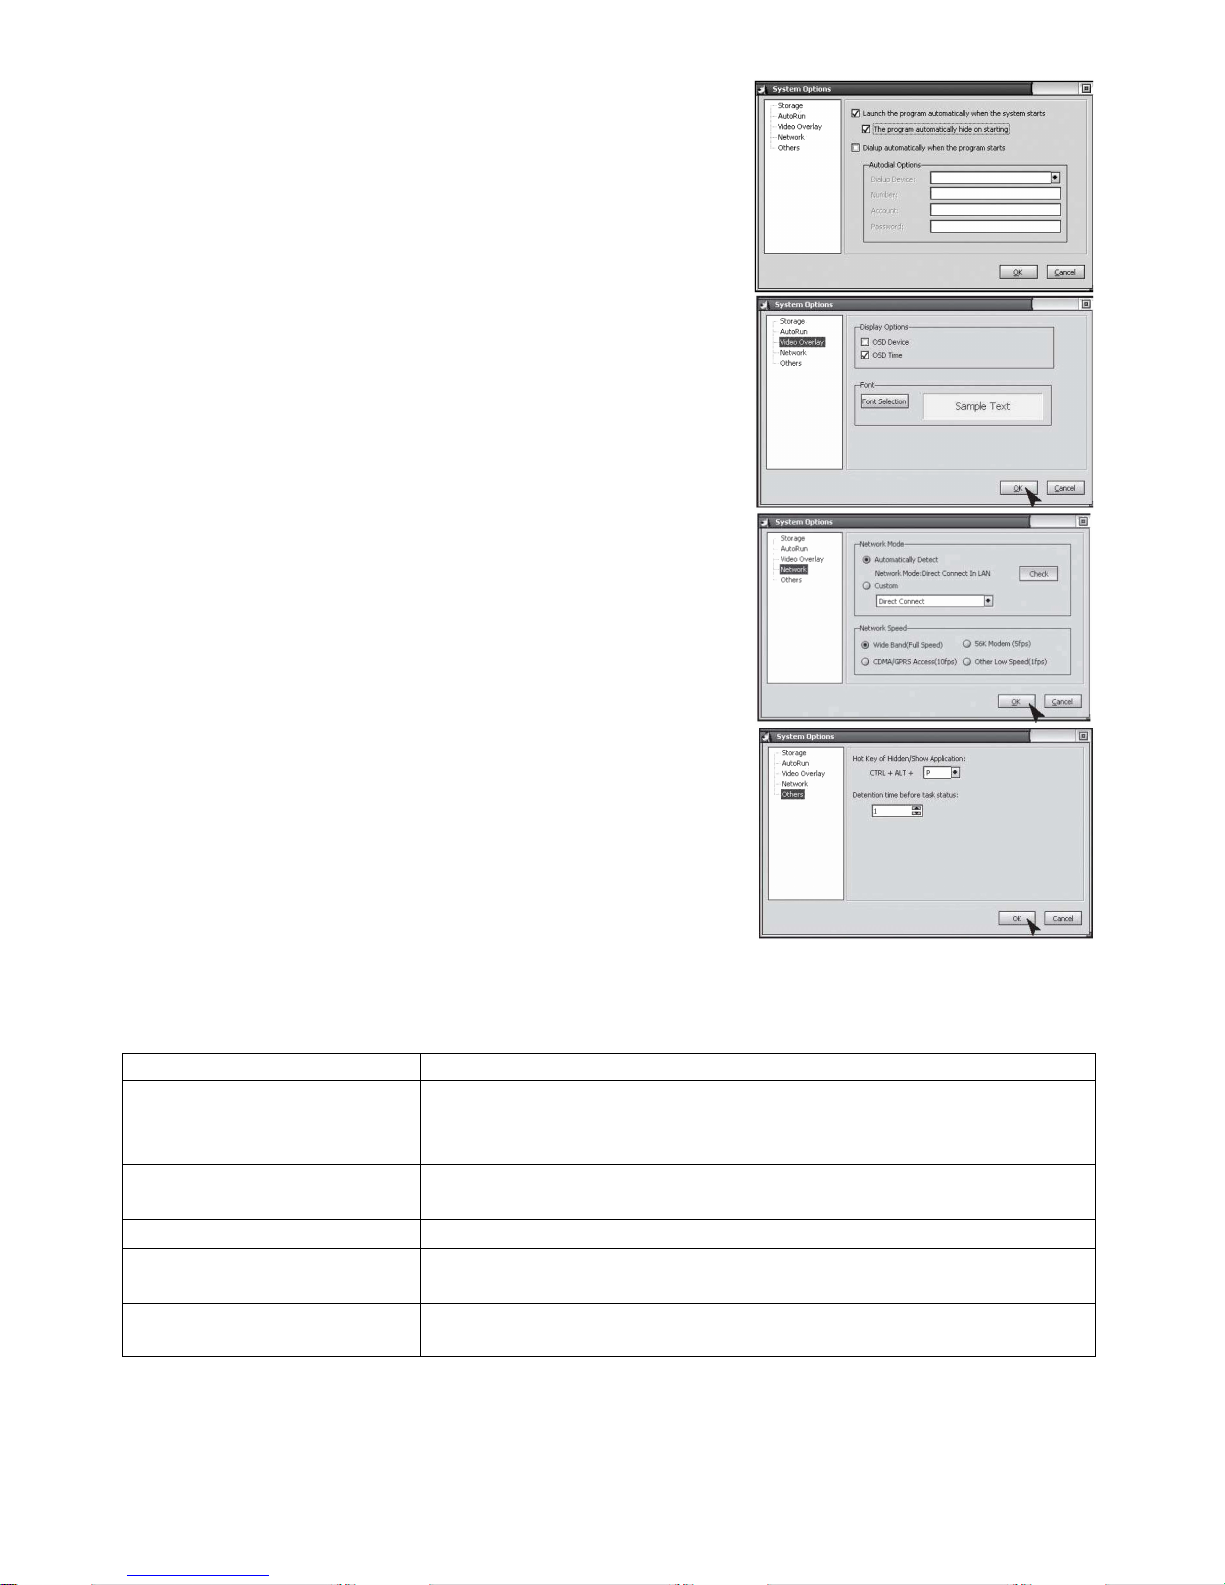
• System Options – Auto Run
Launch the program automatically when the system starts: select
this option to enable the auto run and to resume the status before
shutdown.
Dialup automatically when the program starts: check this box to
enable the automatic dialup with internet connection needing a
manual dialup.
• System Options – On-Screen Display
Display Options OSD Device: displays the name of the device on the
captured images.
Display Options OSD Time: displays the date and time on the captured
images.
Font: set the font of the displayed content.
• System Options – Network
Network Mode: can be set in auto mode or direct mode. Generally the
auto mode will do. If the program cannot detect the network, select the
direct mode.
Network Speed: this setting determines the frame rate according to the
internet connection type.
• System Options – Other
Displays the hot keys.
8. Cleaning and Maintenance
The devices are maintenance-free and will not need to be disassembled. Wipe the devices regularly with a dry, lintfree cloth. Do not use alcohol or solvents. Disconnect the devices from the mains prior to cleaning.
9. Troubleshooting
Problem Possible Cause
No image/sound
• Camera or receiver is not powered.
• Power adapter incorrectly connected to the mains.
• Distance between camera and receiver is too important.
Distorted image/sound
• Range of the system has been exceeded. Shorten the distance between
camera and receiver.
• Strong interference source from e.g. electric engine, walkie-talkie…
Flickering/running image
• Strong spotlight or neon light nearby.
Image is too light/dark
• Surveillance monitor wrongly set up.
• Strong spotlight or neon light nearby.
White screen
• Supply voltage is too low.
Page 9

CAMSETW12 VELLEMAN
-
9
-
10. Technical Specifications
Camera
Power Supply 7.5VDC
Power Consumption 300mA
Transmission Frequency 2.4GHz~2.4835GHz
Modulation FM
Channels 3
Light Sensitivity 3 lux (day), 0 lux (night)
Picture Sensor 1/3” colour CMOS
Resolution 628 x 562 pixels
TV Lines 330
Microphone mono
Range ± 100m (under ideal circumstances)
Operating Temperature -10°C~+50°C
Dimensions 26 x 26 x 32mm
Weight 50g
Receiver
Power Supply 7.5VDC
Power Consumption 300mA
Transmission Frequency 2.4GHz~2.4835GHz
Channels 3
Video Output 1Vpp @ 75Ω
Video Output (mono) 1Vpp @ 600Ω
Audio Connection 3.5mm jack
Video Connection USB 2.0
TV Lines 330
Range ± 100m (under ideal circumstances)
Operating Temperature -10°C~+50°C
Dimensions 105 x 86 x 28mm
Weight 120g
System Requirements
Pentium® III or higher
256MB RAM
USB 2.0 port
CD-ROM drive
Colour monitor or LCD display
Windows® XP
Use this device with original accessories only. Velleman nv cannot be held responsible in the event of
damage or injury resulted from (incorrect) use of this device. This camera is subject to interference from cell
phones, microwave ovens and other wireless devices operating at 2.4GHz. Keep the system at least 5m away
from such devices.
For more info concerning this product, please visit our website www.velleman.eu.
The information in this manual is subject to change without prior notice.
Page 10
CAMSETW12 VELLEMAN
-
10
-
CAMSETW12 – KIT MET DRAADLOZE WEERBESTENDIGE KLEURENCAMERA
1. Inleiding en kenmerken
Aan alle ingezetenen van de Europese Unie
Belangrijke milieu-informatie betreffende dit product
Dit symbool op het toestel of de verpakking geeft aan dat, als het na zijn levenscyclus wordt weggeworpen,
dit toestel schade kan toebrengen aan het milieu.
Gooi dit toestel (en eventuele batterijen) niet bij het gewone huishoudelijke afval; het moet bij een
gespecialiseerd bedrijf terechtkomen voor recyclage.
U moet dit toestel naar uw verdeler of naar een lokaal recyclagepunt brengen.
Respecteer de plaatselijke milieuwetgeving.
Hebt u vragen, contacteer dan de plaatselijke autoriteiten inzake verwijdering.
Dank u voor uw aankoop! Lees deze handleiding grondig voor u het toestel in gebruik neemt. Werd het toestel
beschadigd tijdens het transport, installeer het dan niet en raadpleeg uw dealer. Uw CAMSETW12 wordt geleverd
met 1 x 2.4GHz draadloze kleurencamera, 1 x 2.4GHz ontvanger, 1 x statief, 1 x 7.5VDC voedingsadapter voor
camera, 1 x 7.5VDC voedingsadapter voor ontvanger, A/V-kabel en deze handleiding.
2. Veiligheidsinstructies
• De garantie geldt niet voor schade door het negeren van bepaalde richtlijnen in deze handleiding en uw dealer zal
de verantwoordelijkheid afwijzen voor defecten of problemen die hier rechtstreeks verband mee houden.
• Laat dit toestel enkel installeren, openen, repareren en onderhouden door een geschoolde technicus.
• De beschikbare netspanning mag niet hoger zijn dan de spanning in de specificaties achteraan de handleiding.
• Zorg ervoor dat alle elektrische aansluitingen en aansluitingkabels tussen de toestellen en de aangesloten toestellen
aan de veiligheidsnormen en de gebruiksinstructies voldoen.
• Respecteer de veiligheid- en gebruiksinstructies van de aangesloten toestellen.
• Laat een aangeschakeld toestel niet onbeheerd achter.
• De voedingskabel mag niet omgeplooid of beschadigd zijn. Laat uw dealer zo nodig een nieuwe kabel plaatsen.
• Trek de stekker uit het stopcontact (trek nooit aan de kabel!) voordat u het toestel reinigt en als u het niet gebruikt.
Raak de stekker nooit met natte handen.
• Ontkoppel het systeem van het lichtnet bij onweer.
• Schade door wijzigingen die de gebruiker heeft aangebracht aan het toestel vallen niet onder de garantie.
• Houd dit toestel uit de buurt van kinderen en onbevoegden.
3. Omschrijving
a. Camera
1. lens
2. antenne
3. voedingsjack
4. DIP-schakelaars voor kanaal
5. microfoon
6. DC voedingsadapter
Wees voorzichtig bij de installatie: raak geen kabels aan die onder stroom staan om
dodelijke elektroshocks
te vermijden.
Bescherm dit toestel tegen regen en vochtigheid.
Verzeker u ervan dat het toestel niet aangesloten is op een stroombron alvorens het te openen.
Page 11
CAMSETW12 VELLEMAN
-
11
-
b. Ontvanger
1. antenne
2. voedingsingang
3. A/V-uitgang
4. voedingsled
5. DIP-schakelaars voor kanaal
6. usb-uitgang
7. DC voedingsadapter
8. A/V-kabel
4. Installatie
a. Camera
Kies een geschikte montageplaats: droog en stofvrij met een goede luchtcirculatie en zonder trillingen. De
montageplaats mag echter niet zijn afgeschermd door betonnen muren, spiegels, metalen rekken, enz. Verwijder alle
apparatuur die een sterk magnetisch veld veroorzaken. Zorg voor een stopcontact in de buurt.
Bevestig de montagebeugel aan de muur met de meegeleverde schroeven.
Gebruik eventueel nylon pluggen. Zorg ervoor dat de muur geen elektrische of
andere leidingen bevat.
Opmerking: Richt de camera nooit naar een intense lichtbron om overbelichting
en onduidelijke beelden te vermijden.
b. Ontvanger
Installeer de ontvanger op een vlak en stabiel oppervlak op een hoogte van ongeveer 1m voor een optimale
ontvangst. Zorg voor een stopcontact in de buurt.
5. Aansluiting
a. Camera
• Sluit de AV-kabel aan een geschikte monitor of tv-toestel (witte plug =
audio, geel = video) zoals afgebeeld.
• Sluit de voeding aan.
• Selecteer het geschikte kanaal volgens het kanaal op de ontvanger (zie
“6. Het systeem installeren”).
b. Ontvanger
• Steek de usb-stekker in de usb-poort van de computer (zie
“10. Technische specificaties – Systeemvereisten
• Plaats de meegeleverde cd-rom in de lezer en installeer de
CamGuard-software en de driver (zie “7. Software”).
6. Het systeem installeren
Ontkoppel de toestellen van het lichtnet alvorens de kanalen in te stellen.
Page 12

CAMSETW12 VELLEMAN
-
12
-
a. Camera
Selecteer het kanaal met een puntig voorwerp. Het
geselecteerde kanaal blijft actief. Er kan enkel één
kanaal tegelijkertijd worden geactiveerd.
b. Ontvanger
• Manuele kanaalselectie
Selecteer het kanaal met een puntig voorwerp.
Het geselecteerde kanaal blijft actief.
• Auto Scan
Deze modus is handig wanneer er meer dan één camera is aangesloten. Wijs elke camera een uniek kanaal toe en
plaats de DIP-schakelars van de ontvanger op ON. Plaats de DIP-schakelaar op OFF wanneer u het kanaal wenst
uit te schakelen. De monitor schakelt elke 5 seconden over naar het volgende kanaal.
7. Software
Plaats de cd-rom in de lezer. Dubbelklik op het CamGuard-icoon om de
installatieprocedure te starten. Selecteer vervolgens de gewenste taal aan en
bevestig met OK. Volg de procedure en klik Finish om te beëindigen.
• Device Setting
Selecteer Device Setting onder Option.
Device: Kies een audio- en een videobron.
Attribute: Geef het dialoogvenster van de geselecteerde bron weer.
Options: Selecteer de grootte en het aantal beelden per seconde.
• About Alarm
Stel de alarmduur in door het aantal seconden in te geven.
Alarm Actions:
Sound: Het alarm wordt ingeschakeld van zodra zich een
onregelmatigheid meldt. Selecteer een alarmgeluid uit de
geluidsbestanden (*.wav) in de computer of uit de lijst. Selecteer Sound, en kies een geluid uit de lijst.
Bevestig met OK.
Record Location: Bij alarm worden de opgenomen automatisch op de harde schijf opgeslagen. Kies om ze als
een beeldbestand (*.jpeg) of een videobestand op te slaan. Er wordt elke 5 seconden een beeld opgeslagen.
Email: Bij alarm wordt u automatisch op de hoogte gebracht via een e-mail met de opgenomen beelden in bijlage.
Page 13

CAMSETW12 VELLEMAN
-
13
-
Mail Send (SMTP) Server – de server die de e-mail zendt.
Meer details bij uw mailbox provider.
Port – poort van de SMTP server, gewoonlijk 25. Meer
details bij uw mailbox provider.
Verify Identity – authenticiteit van het account.
Account – e-mailaccount.
Password – e-mailpaswoord.
Recipient – e-mailadres dat het bericht ontvangt.
CC – kopie van het bericht naar andere accounts.
Telephone: Bij alarm wordt u onmiddellijk via telefoon
gewaarschuwd. Rust uw pc uit met een modem om deze
functie te kunnen gebruiken.
Dialup Device – lijst met alle inbeltoestellen op de pc.
Selecteer hier uw modem.
Call Number – nummer dat moet worden gebeld bij alarm.
Test – testen.
Alarm Schedule
U kunt het start- en het einduur van de bewakingsduur bepalen.
Vink “Alarm Invoked in the List Period” aan om deze functie in te
schakelen.
New: voeg een nieuwe periode toe.
Modify: wijzig de geselecteerde periode.
Delete: wis de geselecteerde periode.
Clear: wis alle periodes.
Motion Detection
Met de CAMSETW12 kunt u de bewakingszone en de gevoeligheid volgens uw eigen eisen instellen.
Enable Motion Detection Area: vink het vakje aan om de
functie in te schakelen.
Edit: wijzig de bewakingszone.
Detection Sensitivity: stel de gevoeligheid in.
Sensitivity Bar: de groene balk geeft de huidige
waargenomen waarde weer: de rode lijn geeft de maximale
waarde weer. Het alarm wordt ingeschakeld wanneer de
groene balk de rode lijn overschrijdt.
Page 14
CAMSETW12 VELLEMAN
-
14
-
Klik op Edit om de bewakingszone te wijzigen. U kunt de zone met de computermuis bepalen. Klik de
rechtermuisknop of klik op Clear om de zone te wissen.
• Record Schedule
U kunt het start- en het einduur van de bewakingsduur bepalen.
Hier worden de beelden automatisch opgenomen. Vink “Enable
Record in the List Period” aan om de functie in te schakelen.
New: voeg een nieuwe periode toe.
Modify: wijzig de geselecteerde periode.
Delete: wis de geselecteerde periode.
Clear: wis alle periodes.
• Remote Options
Omdat het IP-adres van de computer bij sommige aansluitingen
kan wijzigen, moet u het huidige IP-adres kennen, wat nogal
onhandig is. Vink het vakje “Enable Remote Service Account” aan
en gebruik het vaste accountadres. De inschrijving is gratis door
op Free Account Registration te klikken.
Klik op Remote Options op de takenbalk van de hoofdinterface,
of op Tool en dan op Remote Options in het hoofdmenu om het
Remote Options window-venster weer te geven.
Access Permission: geef een paswoord in. Zowel het account
als het paswoord is voor de toegang verseist. We raden aan
deze beveiliging zeker te gebruiken om uw privacy en uw computer te beschermen.
Web Server Port: poort die wordt gebruikt door de web server in het programma. Normaal hoeft die niet gewijzigd te
worden. U kunt deze poort echter naar wens opnieuw configureren. Gebruikt u een andere web server, zoals MS
IIS, dan moet u andere waarden ingeven om conflicten te vermijden.
Mobile Phone Access Options: het programma communiceert op afstand met een mobiele telefoon via WAP.
Hiermee krijgt u op uw eigen telefoon de opgenomen beelden toegestuurd.
Picture Format: selecteer het geschikte beeldformaat voor uw telefoon.
Image Size: selecteer de geschikte beeldgrootte volgens het scherm van uw mobiele telefoon.
Remote Access WEB: geeft het adres weer.
Mobile Phone Access WEB: geeft het WAP-adres weer waar uw mobiele telefoon op inlogt.
Network Mode: geeft de huidige aansluitmodus weer.
• System Options – Storage
Venster om de opgenomen beelden op te slaan. Klik Add om een
directory toe te voegen, klik Delete om een directory te wissen.
Event Record Reserve Days: het aantal dagen dat het opgenomen
beeld op de harde schijf wordt opgeslagen.
Record AVI File Length: duur van het opgenomen bestand in minuten.
Bestanden die langer dan de ingestelde periode op de harde schijf opgeslagen blijven, worden automatisch gewist.
Is de beschikbare ruimte op de harde schijf minder dan 100MB, dan wist het programma automatische de oudste
bestanden.
Page 15

CAMSETW12 VELLEMAN
-
15
-
• System Options – Auto Run
Launch the program automatically when the system starts: selecteer
deze optie om de automatische herstart in te schakelen. U zal
hernemen waar u de vorige keer hebt afgebroken.
Dialup automatically when the program starts: vink dit vakje aan om
het automatisch inbellen in te schakelen. Dit is handig voor
internetaansluitingen met een manuele inbelprocedure.
• System Options – On-Screen Display
Display Options OSD Device: geeft de opgenomen beelden een naam.
Display Options OSD Time: markeert de opgenomen beelden met een
datum en een uur.
Font: selecteer het lettertype van de tekst.
• System Options – Network
Network Mode: stel in als automatische of directe modus. Doorgaans
werkt de automatische modus. Wordt het programma niet herkend,
selecteer dan de directe modus.
Network Speed: selecteer hier de framesnelheid volgens het type
internetverbinding.
• System Options – Other
Geeft de sneltoetsen weer.
8. Reiniging en onderhoud
De toestellen zijn zo goed als onderhoudsvrij en hoeven dus niet geopend te worden. Maak de toestellen geregeld
schoon met een vochtige, niet pluizende doek. Gebruik geen alcohol of solvent. Ontkoppel de toestellen van het
lichtnet alvorens ze schoon te maken.
9. Problemen en oplossingen
Probleem Mogelijke oorzaak
Geen beeld/geluid
• Camera of ontvanger wordt niet gevoed.
• Voedingsadapter niet goed aangesloten.
• Afstand tussen camera en ontvanger is te groot.
Verstoord beeld/geluid
• Bereik is overschreden. Plaats de camera en ontvanger dichter bij elkaar.
• Sterke storingsbron van elektrische motor, walkietalkie…
Trillend beeld
• Sterke spot of neonverlichting in de buurt.
Beeld is te donker/helder
• Monitor fout ingesteld.
• Sterke spot of neonverlichting in de buurt.
Wit scherm
• Voedingsspanning is te laag.
Page 16

CAMSETW12 VELLEMAN
-
16
-
10. Technische specificaties
Camera
Voeding 7.5VDC
Verbruik 300mA
Zendfrequentie 2.4GHz~2.4835GHz
Modulatie FM
Kanalen 3
Lichtsterkte 3 lux (dag), 0 lux (nacht)
Sensor 1/3” kleuren-CMOS
Resolutie 628 x 562 pixels
Tv-lijnen 330
Microfoon mono
Bereik ± 100m (ideale omstandigheden)
Werktemperatuur -10°C~+50°C
Afmetingen 26 x 26 x 32mm
Gewicht 50g
Ontvanger
Voeding 7.5VDC
Verbruik 300mA
Zendfrequentie 2.4GHz~2.4835GHz
Kanalen 3
Video-uitgang 1Vpp @ 75Ω
Video-uitgang (mono) 1Vpp @ 600Ω
Audioaansluiting 3.5mm jack
Videoaansluiting USB 2.0
Tv-lijnen 330
Bereik ± 100m (ideale omstandigheden)
Werktemperatuur -10°C~+50°C
Afmetingen 105 x 86 x 28mm
Gewicht 120g
Systeemvereisten
Pentium® III of hoger
256MB RAM
USB 2.0-poort
Cd-rom drive
Kleurenmonitor of lcd-scherm
Windows® XP
Gebruik dit toestel enkel met originele accessoires. Velleman nv is niet aansprakelijk voor schade of
kwetsuren bij (verkeerd) gebruik van dit toestel. De camera is onderhevig aan storing van mobiele telefoons,
magnetrons en andere toestellen met een frequentie van 2.4GHz. Houd het camerasysteem minstens 5m
buiten bereik van zulke toestellen.
Voor meer informatie omtrent dit product, zie www.velleman.eu.
De informatie in deze handleiding kan te allen tijde worden gewijzigd zonder voorafgaande kennisgeving.
Page 17

CAMSETW12 VELLEMAN
-
17
-
CAMSETW12 – ENSEMBLE CAMÉRA COULEUR SANS FIL RÉSISTANTE AUX INTÉMPERIES
1. Introduction et caractéristiques
Aux résidents de l'Union européenne
Des informations environnementales importantes concernant ce produit
Ce symbole sur l'appareil ou l'emballage indique que l’élimination d’un appareil en fin de vie peut polluer
l'environnement.
Ne pas jeter un appareil électrique ou électronique (et des piles éventuelles) parmi les déchets municipaux
non sujets au tri sélectif ; une déchèterie traitera l’appareil en question.
Renvoyer les équipements usagés à votre fournisseur ou à un service de recyclage local.
Il convient de respecter la réglementation locale relative à la protection de l’environnement.
En cas de questions, contacter les autorités locales pour élimination.
Nous vous remercions de votre achat ! Lire la présente notice attentivement avant la mise en service de l’appareil. Si
l’appareil a été endommagé pendant le transport, ne pas l’installer et consulter votre revendeur.
2. Prescriptions de sécurité
• La garantie ne s’applique pas aux dommages survenus en négligeant certaines directives de cette notice et votre
revendeur déclinera toute responsabilité pour les problèmes et les défauts qui en résultent.
• Confier l’installation, l’entretien et la réparation à un personnel qualifié.
• La tension réseau ne peut pas dépasser la tension mentionnée dans les spécifications à la fin de cette notice.
• Veiller à ce que tous les raccordements électriques et les câbles entre le système et les appareils connectés soient
conforme aux régulations.
• Observer les prescriptions de sécurité des appareils connectés.
• Ne pas laisser un système en service sans surveillance.
• Le câble d’alimentation ne peut pas être replissé ou endommagé. Demander à votre revendeur de renouveler le
câble d’alimentation si nécessaire.
• Débrancher l’appareil s’il n’est pas utilisé ou pour le nettoyer. Tirer la fiche pour débrancher l'appareil ; non pas le
câble. Ne jamais manipuler la fiche avec les mains mouillées.
• Déconnecter le système du réseau par temps orageux.
• Les dommages occasionnés par des modifications à l’appareil par le client, ne tombent pas sous la garantie.
• Garder votre CAMSETW12 hors de la portée de personnes non qualifiées et de jeunes enfants.
3. Description
a. Caméra
1. objectif
2. antenne
3. prise d’alimentation
4. interrupteurs DIP (sélection du canal)
5. microphone
6. adaptateur secteur CC
Être prudent lors de l’installation : toucher un câble sous tension peut causer des électrochocs mortels.
Protéger l’appareil contre la pluie et l’humidité.
Débrancher le câble d'alimentation avant d'ouvrir le boîtier.
Page 18

CAMSETW12 VELLEMAN
-
18
-
b. Récepteur
1. antenne
2. prise d’alimentation
3. sortie A/V
4. LED d’alimentation
5. interrupteurs DIP (sélection du canal)
6. connexion USB
7. adaptateur secteur CC
8. câble A/V
4. Installation
a. Caméra
Sélectionner un endroit approprié, c.à.d. sec, sans poussière, avec une bonne circulation de l’air et sans vibrations.
Veiller à ce que l’endroit ne soit pas isolé par des murs en béton, des miroirs, des étagères métalliques, etc. et qu’il
ne contient aucun appareil émettant un champ électrique important, pouvant causer des interférences. Installer la
caméra à proximité d’une prise de courant.
Fixer le montage mural à l’aide des vis incluses. Utiliser des chevilles nylon si
nécessaire. Éviter les câblages électriques en forant.
Remarque : Ne pas aligner la caméra dans le faisceau d’une source de lumière
afin d’éviter la surexposition et les images floues.
b. Récepteur
Installer le récepteur sur une surface rugueuse et stable à une hauteur d’environ 1m pour une bonne réception.
Installer le récepteur à proximité d’une prise de courant.
5. Raccordement
a. Caméra
• Raccorder le câble AV à un moniteur ou téléviseur approprié (fiche blanche
= audio, jaune = vidéo) comme illustré.
• Raccorder l’alimentation.
• Sélectionner le canal selon le canal du récepteur (voir « 6. Installation du
système »).
b. Récepteur
• Raccorder la fiche USB au port USB de votre ordinateur (voir
« 10. Spécifications techniques – Système requis »).
• Insérer le cédérom inclus dans le lecteur et installer le logiciel
CamGuard et le pilote (voir « 7. Logiciel »).
6. Installation du système
Déconnecter les appareils du réseau électrique avant de sélectionner le canal.
Page 19

CAMSETW12 VELLEMAN
-
19
-
a. Caméra
Sélectionner le canal en utilisant un objet pointu. Le
canal sélectionne restera actif. Ne sélectionner qu’un
seul canal à la fois.
b. Récepteur
• Sélection de canal manuelle
Sélectionner le canal en utilisant un objet pointu.
Le canal sélectionne restera actif.
• Balayage automatique
Cette fonction est pratique lorsqu’il y a plusieurs caméras raccordées. Attribuer un canal unique à chaque caméra et
placer les interrupteurs DIP du récepteurs sur ON. Placer l’interrupteur DIP du canal non utilisé sur OFF. Le moniteur
commutera vers le prochain canal toutes les 5 secondes.
7. Logiciel
Insérer le cédérom dans le lecteur. Double cliquer sur l’icône CamGuard pour
lancer l’installation. Ensuite, sélectionner la langue de votre choix et cliquer OK
pour confirmer. Suivre la procédure d’installation et cliquer Finish pour compléter.
• Device Setting
Sélectionner Device Setting sous Option.
Device : Sélection d’un appareil audio et vidéo.
Attribute : Affichage de la fenêtre de dialogue de l’appareil sélectionné.
Options : Taille et taux d’images de l’appareil sélectionné.
• About Alarm
Paramétrer la durée de l’alarme en saisissant les secondes.
Alarm Actions :
Sound : l’alarme se déclenche dès qu’une irrégularité est
détectée. Sélectionner un type de son des fichiers son (*.wav)
dans votre ordinateur ou de la liste. Cliquer Sound et
sélectionner un son de la liste. Confirmer avec OK.
Record Location : dès qu’une irrégularité est détectée, les images seront automatiquement sauvegardées sur le
disque dur local. Sauvegarder comme un fichier image (*.jpeg) ou vidéo. Un fichier image sera sauvegardé
toutes les 5 secondes.
Email : dès qu’une irrégularité est détectée, vous serez immédiatement avisé par un courriel contenant des
images en annexe.
Page 20

CAMSETW12 VELLEMAN
-
20
-
Mail Send (SMTP) Server – le serveur envoyant le courriel.
Plus de détails chez votre fournisseur d’accès.
Port – port du serveur SMTP, généralement 25. Plus de
détails chez votre fournisseur d’accès.
Verify Identity – authenticité du compte.
Account – compte courriel.
Password – mot de passe du compte.
Recipient – adresse de courriel recevant la notification.
CC – copie de notification envoyée à d’autres comptes.
Telephone : dès qu’une irrégularité est détectée, vous serez
immédiatement avisé par téléphone. Équiper votre
ordinateur d’un modem.
Dialup Device – liste contenant tous les appareils de
connexion. Sélectionner ici votre modem.
Call Number – numéro à composer en cas d’alarme.
Test – test de connexion.
Alarm Schedule
Il est possible de programmer l’heure de départ et de fin du
monitorage. Cocher la case « Alarm Invoked in the List Period »
pour activer la fonction.
New : ajouter une nouvelle période.
Modify : modifier la période sélectionnée.
Delete : effacer la période sélectionnée.
Clear : effacer toutes les périodes.
Motion Detection
Le CAMSETW12 permet de déterminer la surface de monitorage et la sensibilité.
Enable Motion Detection Area : cocher la case pour activer la
fonction.
Edit : éditer la surface de monitorage.
Detection Sensitivity : déterminer la sensibilité au
mouvement.
Sensitivity Bar : la barre verte indique la valeur actuellement
détectée ; la ligne rouge démarque la valeur limite. L’alarme
s’enclenche dès que cette valeur est excédée.
Page 21

CAMSETW12 VELLEMAN
-
21
-
Cliquer Edit pour éditer la surface de monitorage en utilisant la souris. Cliquer le bouton droit de la souris ou cliquer
Clear pour effacer la surface.
• Record Schedule
Il est possible de programmer l’heure de départ et de fin du
monitorage. Ici, les images seront automatiquement enregistrées.
Cocher la case « Enable Record in the List Period » pour activer la
fonction.
New : ajouter une nouvelle période.
Modify : modifier la période sélectionnée.
Delete : effacer la période sélectionnée.
Clear : effacer toutes les périodes.
• Remote Options
Puisque l’adresse IP de l’ordinateur se modifie selon certains
modes de connexion, il est nécessaire de connaître l’adresse IP
actuelle, ce qui est très inconvénient. Après avoir activé le compte
à distance, établir la connexion à distance en utilisant l’adresse
d’accès fixe. L’enregistrement à un compte est gratuit ; cliquer
Free Account Registration.
Cliquer Remote Options sur la barre d’outils de l’interface
principal, ou Tool et ensuite Remote Options dans le menu
principal pour ouvrir la fenêtre Remote Options.
Access Permission : saisir le mot de passe du compte. L’accès
nécessite l’accès comme le mot de passe. Il est conseillé
d’utiliser cette fonction afin d’assurer la sécurité de votre ordinateur.
Web Server Port : port utilisé par le serveur web du programme. Le serveur ne nécessite généralement pas de
modifications. Toutefois, il est possible de reconfigurer le port selon vos besoins. Saisir d’autres valeurs avec un
serveur web comme MS IIS afin d’éviter les conflits.
Mobile Phone Access Options : le logiciel supporte l’accès à distance depuis le standard WAP afin de pouvoir
visionner les images sur votre téléphone mobile.
Picture Format : sélection du format de l’image supporté par le téléphone mobile.
Image Size : sélection de la taille de l’image selon la taille de l’afficheur du téléphone mobile.
Remote Access WEB : affichage de l’adresse d’accès à distance.
Mobile Phone Access WEB : affichage de l’adresse WAP.
Network Mode : affichage du mode de connexion au réseau.
• System Options – Storage
Chemin d’accès pour la sauvegarde des fichiers. Cliquer Add pour
ajouter un répertoire ; cliquer Delete pour effacer un répertoire.
Event Record Reserve Days : nombre de jours que le fichier sera
sauvegardé sur le disque dur.
Record AVI File Length : longueur du fichier en minutes.
Les fichiers sur le disque dur dépassant la période de sauvegarde initialement paramétrée seront automatiquement
effacés. Le logiciel efface automatiquement les fichiers les plus anciens lorsque l’espace disque disponible est
inférieur à 100Mo.
Page 22

CAMSETW12 VELLEMAN
-
22
-
• System Options – Auto Run
Launch the program automatically when the system starts :
lancement automatique et poursuivre où l’on s’est arrêté.
Dialup automatically when the program starts : cocher pour activer la
connexion automatique.
• System Options – On-Screen Display
Display Options OSD Device : affichage du nom de l’appareil sur
l’image.
Display Options OSD Time : affichage de la date et de l’heure sur
l’image.
Font : sélection du type de caractère du texte.
• System Options – Network
Network Mode : mode automatique ou direct. Généralement, le mode
automatique conviendra parfaitement. Sélectionner le mode direct
lorsque le mode automatique ne fonctionne pas.
Network Speed : taux d’images selon le type de connexion à l’Internet.
• System Options – Other
Affichage des touches de raccourci.
8. Nettoyage et entretien
Les appareils ne nécessitent pas d’entretien et ne devront pas être
ouverts. Essuyer les appareils régulièrement avec un chiffon humide non
pelucheux. Éviter l’usage d’alcool et de solvants. Déconnecter d’abord le
système.
9. Problèmes et solutions
Problème Cause probable
Pas d’image/de son
• Caméra ou récepteur non alimenté.
• Adaptateur secteur mal raccordé au réseau.
• Distance entre la caméra et le récepteur trop important.
Distorsion de l’Image/du son
• Portée excédé. Réduire la distance entre la caméra et le récepteur.
• Présence d’une forte source d’interférence d’un moteur électrique, d’un talkie-
walkie…
Image tremblante
• Présence d’une source lumineuse intense.
Image trop claire/foncée
• Moiteur de surveillance mal réglé.
• Présence d’une source lumineuse intense.
Écran blanc
• Tension d’alimentation trop basse.
Page 23

CAMSETW12 VELLEMAN
-
23
-
10. Spécifications techniques
Caméra
Alimentation 7.5VCC
Consommation 300mA
Fréquence de transmission 2.4GHz~2.4835GHz
Modulation FM
Canaux 3
Intensité lumineuse 3 lux (jour), 0 lux (nuit)
Capteur CMOS couleur 1/3”
Résolution 628 x 562 pixels
Lignes TV 330
Microphone mono
Portée ± 100m (circonstances idéales)
Température de service -10°C~+50°C
Dimensions 26 x 26 x 32mm
Poids 50g
Récepteur
Alimentation 7.5VCC
Consommation 300mA
Fréquence de transmission 2.4GHz~2.4835GHz
Canaux 3
Sortie vidéo 1Vpp @ 75Ω
Sortie vidéo (mono) 1Vpp @ 600Ω
Connexion audio jack 3.5mm
Connexion vidéo USB 2.0
Lignes TV 330
Portée ± 100m (circonstances idéales)
Température de service -10°C~+50°C
Dimensions 105 x 86 x 28mm
Poids 120g
Système requis
Pentium® III ou plus
256MB RAM
Port USB 2.0
Lecteur CD-ROM
Moniteur couleur ou afficheur LCD
Windows® XP
N’employer cet appareil qu’avec des accessoires d’origine. SA Velleman ne sera aucunement responsable
de dommages ou lésions survenus à un usage (incorrect) de cet appareil. La caméra est sujette à des
interférences de téléphones mobiles, de fours à micro-ondes et tout autre appareil émettant à une fréquence
de 2.4GHz. Tenir le système à l’écart de ces appareils.
Pour plus d’information concernant cet article, visitez notre site web www.velleman.eu.
Toutes les informations présentées dans cette notice peuvent être modifiées sans notification préalable.
Page 24

CAMSETW12 VELLEMAN
-
24
-
CAMSETW12 – JUEGO CON CÁMARA COLOR INALÁMBRICA RESISTENTE A LA INTEMPERIE
1. Introducción & características
A los ciudadanos de la Unión Europea
Importantes informaciones sobre el medio ambiente concerniente a este producto
Este símbolo en este aparato o el embalaje indica que, si tira las muestras inservibles, podrían dañar el
medio ambiente.
No tire este aparato (ni las pilas, si las hubiera) en la basura doméstica; debe ir a una empresa
especializada en reciclaje. Devuelva este aparato a su distribuidor o a la unidad de reciclaje local.
Respete las leyes locales en relación con el medio ambiente.
Si tiene dudas, contacte con las autoridades locales para residuos.
¡Gracias por haber comprado el CAMSETW12! Lea atentamente las instrucciones del manual antes de usarlo. Si el
aparato ha sufrido algún daño en el transporte no lo instale y póngase en contacto con su distribuidor. Incluye 1 x
cámara color inalámbrica de 2.4GHz, 1 x receptor de 2.4GHz, 1 x pie, 1 x adaptador de red de 7.5VDC para la cámara,
1 x adaptador de red de 7.5VDC para el receptor, cable A/V y este manual del usuario.
2. Instrucciones de seguridad
• Daños causados por descuido de las instrucciones de seguridad de este manual invalidarán su garantía y su
distribuidor no será responsable de ningún daño ni de otros problemas resultantes.
• La instalación y el mantenimiento deben ser realizados por personal especializado.
• Asegúrese de que la tensión de red no sea mayor que la tensión indicada en las especificaciones.
• Asegúrese de que todas las conexiones eléctricas y los cables conectados entre el sistema y los aparatos cumplan
con las normas de seguridad y las instrucciones.
• Tenga en cuenta los dispositivos de seguridad de los aparatos conectados.
• Nunca deje un aparato activado sin vigilancia.
• No aplaste el cable de alimentación y protéjalo contra posibles daños causados por algún tipo de superficie
afilada. Si es necesario, pida a su distribuidor reemplazar el cable de alimentación.
• Desconecte siempre el aparato si no va a usarlo durante un largo periodo de tiempo o antes de limpiarlo. Tire
siempre del enchufe para desconectar el cable de red, nunca del propio cable. Nunca maneje el enchufe con las
manos húmedas.
• Desconecte el aparato de la red durante una tormenta.
• Los daños causados por modificaciones no autorizadas, no están cubiertos por la garantía.
• Mantenga el CAMSETW12 lejos del alcance de personas no capacitadas y niños.
3. Descripción
a. Cámara
1. óptica
2. antena
3. conector de alimentación
4. interruptores DIP (selección del canal)
5. micrófono
6. adaptador de red CC
Cuidado durante la instalación: puede sufrir una peligrosa descarga eléctrica al tocar los cables con un
voltaje peligroso
.
No exponga este equipo a lluvia ni humedad.
Desconecte el cable de alimentación de la red antes de abrir la caja.
Page 25

CAMSETW12 VELLEMAN
-
25
-
b. Receptor
1. antena
2. conector de alimentación
3. salida A/V
4. LED de alimentación
5. interruptores DIP (selección del canal)
6. conexión USB
7. adaptador de red CC
8. cable A/V
4. Instalación
a. Cámara
Seleccione un lugar adecuado, es decir, seco, sin polvo, bien aireado y sin vibraciones. Asegúrese de que el lugar
no esté blindado por paredes de hormigón, espejos, estanterías metálicas, etc. Saque cualquier aparato que emita
un importante campo eléctrico porque podría causar interferencias. Instale la cámara cerca de una toma de
corriente.
Fije el montaje mural con los tornillos incluidos. Utilice tacos de nylon si fuera
necesario. Asegúrese de que la pared no contenga cables eléctricos antes de
taladrar.
Nota: Nunca dirija la cámara a una intensa fuente de luz para evitar una
sobreexposición e imágenes borrosas.
b. Receptor
Instale el receptor en una superficie plana y estable a una altura de aproximadamente 1m para una buena
recepción. Instale el receptor cerca de una toma de corriente.
5. Conexión
a. Cámara
• Conecte el cable AV a un monitor o televisor adecuado (conector blanco =
audio, amarillo = vídeo) (véase figura).
• Conecte la alimentación.
• Seleccione el canal según el canal del receptor (véase « 6. Instalar el
sistema »).
b. Receptor
• Conecte el conector USB al puerto USB del ordenador (véase
« 10. Especificaciones – Exigencias del sistema »).
• Introduzca el CD-ROM incluido en el lector e instale el software
CamGuard y el driver (véase « 7. Software »).
6. Instalar el sistema
Desconecte los aparatos de la red eléctrica antes de seleccionar el canal.
Page 26
CAMSETW12 VELLEMAN
-
26
-
a. Cámara
Seleccione el canal al utilizar un objeto puntiagudo.
El canal seleccionado quedará activo. Seleccione
sólo un canal a la vez.
b. Receptor
• Selección manual del canal
Seleccione el canal al utilizar un objeto
puntiagudo. El canal seleccionado quedará
activo.
• Exploración automática
Esta función es útil si están conectadas varias cámaras. Atribuya un canal único a cada cámara y ponga los
interruptores DIP del receptor en ON. Ponga el interruptor DIP del canal no utilizado en OFF. El monitor conmutará
cada 5 segundos al canal siguiente.
7. Software
Introduzca el CD-ROM en el lector. Haga click dos veces en el icono CamGuard
para activar la instalación. Luego, seleccione el idioma deseado y haga click en
OK para confirmar. Siga el procedimiento de instalación y haga click en Finish
para completar.
• Device Setting
Seleccione Device Setting bajo Option.
Device: Seleccione un aparato de audio y vídeo.
Attribute: visualiza la ventana de diálogo del aparato seleccionado.
Options: Seleccione el tamaño y el número de imágenes por segundo.
• La alarma
Ajuste la duración de la alarma al introducir los segundos.
Alarm Actions:
Sound: la alarma se activa en cuanto detecte una irregularidad.
Seleccione un tipo de sonido de los ficheros de sonido (*.wav)
del ordenador o de la lista. Haga click en Sound y seleccione
un sonido de la lista. Confirme con OK.
Record Location: Las imágenes se guardarán automáticamente en el disco duro local en cuanto se detecte una
irregularidad. Guárdelas como fichero de imagen (*.jpeg) o fichero de vídeo. Un fichero de imagen se
guardará cada 5 segundos.
Page 27

CAMSETW12 VELLEMAN
-
27
-
Email: Un mensaje de correo electrónico con las imágenes guardadas le avisará inmediatamente en cuanto
detecte una irregularidad.
Mail Send (SMTP) Server – el servidor que envía el e-mail el.
Para más detalles contacte con su proveedor de acceso.
Port – puerto del servidor SMTP, generalmente 25. Para más
detalles contacte con su proveedor de acceso.
Verify Identity – autenticidad de la cuenta.
Account – cuenta de correo electrónico.
Password – contraseña de correo electrónico.
Recipient – dirección del correo electrónico que recibe la
notificación.
CC – copia de la notificación enviada a otras cuentas.
Telephone: en cuanto se detecte una irregularidad, el sistema le le
avisará inmediatamente por teléfono. Equipe el ordenador con
un módem.
Dialup Device – lista con todos los aparatos de conexión.
Seleccione el módem aquí.
Call Number – número que se debe marcar en caso de alarma.
Test – prueba de conexión.
Alarm Schedule
Es posible programar la hora inicial y la hora final de la vigilancia.
Marque el cajetín « Alarm Invoked in the List Period » para activar la
la función.
New: añadir un nuevo período.
Modify: modificar el período seleccionado.
Delete: borrar el período seleccionado.
Clear: borrar todos los períodos.
Motion Detection
El CAMSETW12 permite determinar la zona de vigilancia y la sensibilidad.
Enable Motion Detection Area: Marcar el cajetín para activar la
la función.
Edit: modificar la zona de vigilancia.
Detection Sensitivity: determinar la sensibilidad.
Sensitivity Bar: la barra verde visualiza el valor actual detectado;
la línea roja visualiza el valor máx. La alarma se activa en
cuanto la barra verde sobrepase la línea roja.
Page 28

CAMSETW12 VELLEMAN
-
28
-
Haga click en Edit para modificar la zona de vigilancia con el ratón. Haga click en el botón derecho del ratón o haga
click en Clear para borrar la zona.
• Record Schedule
Es posible programar la hora inicial y la hora final de la vigilancia.
Aquí, las imágenes se guardarán automáticamente. Marque el cajetín
« Enable Record in the List Period » para activar la función.
New: añadir un nuevo período.
Modify: modificar el período seleccionado.
Delete: borrar el período seleccionado.
Clear: borrar todos los períodos.
• Remote Options
Porque la dirección IP del ordenador se modifica según algunos
modos de conexión, es necesario conocer la dirección IP actual,
lo que es poco práctico. Marque el cajetín “Enable Remote
Service Account” y utilice la dirección de cuenta fija. La
suscripción a una cuenta es gratis; Haga click en Free Account
Registration.
Haga click en Remote Options de la barra de herramientas de la
interfaz principal o haga click en Tool y luego en Remote
Options del menú principal para abrir la ventana « Remote
Options ».
Access Permission: introduzca una contraseña. Para poder
entrar necesita tanto la cuenta como la contraseña. Utilice esta función para asegurar la seguridad del ordenador.
Web Server Port: puerto utilizado por el servidor web del programa. Normalmente no es necesario modificarlo. Sin
embargo, es posible configurar el puerto de nuevo a su antojo. Introduzca otros valores con un servidor web
como MS IIS para evitar conflictos.
Mobile Phone Access Options: el software soporta el acceso a distancia por WAP para poder ver las imágenes en
su móvil.
Picture Format: selección del formato de la imagen soportado por el móvil.
Image Size: selección del tamaño de la imagen según el tamaño de la pantalla del móvil.
Remote Access WEB: visualización de la dirección de acceso a distancia.
Mobile Phone Access WEB: visualización de la dirección WAP.
Network Mode: visualización del modo de conexión a la red.
• System Options – Storage
Ventana para guardar ficheros. Haga click en Add para añadir un
directorio; Haga click en Delete para borrar un directorio.
Event Record Reserve Days: número de días que el fichero se
guardará en el disco duro.
Record AVI File Length: longitud del fichero en minutos.
Los ficheros del disco duro que sobrepasan el período de almacenamiento inicialmente introducido se borrarán
automáticamente. El software borra automáticamente los ficheros más viejos si el espacio disponible en el disco
duro es inferior a 100Mo.
Page 29
CAMSETW12 VELLEMAN
-
29
-
• System Options – Auto Run
Launch the program automatically when the system starts: para abrir
el programa automáticamente y seguir donde haya parado la vez
pasada.
Dialup automatically when the program starts: marque este cajetín
para activar la conexión automática por línea telefónica.
• System Options – On-Screen Display
Display Options OSD Device: visualización del nombre en la imagen.
Display Options OSD Time: visualización de la fecha y la hora en la
imagen.
Font: selección del tipo de letra.
• System Options – Network
Network Mode: modo automático o modo directo. Generalmente, el
modo automático funciona. Seleccione el modo directo si el modo
automático no funciona.
Network Speed: seleccione la frecuencia de imágenes según el tipo de
conexión a Internet.
• System Options – Other
Visualización de las teclas rápidas (hotkey).
8. Limpieza y mantenimiento
El usuario no habrá de efectuar el mantenimiento de ninguna pieza. No
abra el aparato. Limpie los aparatos regularmente con un paño húmedo
sin pelusas. Evite el uso de alcohol y disolventes. Desconecte los aparatos de toda fuente antes de limpiarlo.
9. Solución de problemas
Problema Causa probable
No hay imagen/sonido
• La cámara o el receptor no está conectado(a).
• El adaptador de red no está conectado de manera correcta a la red.
• La distancia entre la cámara y el receptor está demasiado grande.
Hay interferencias en la imagen/
el sonido
• Los aparatos se encuentran fuera del alcance. Disminuya la distancia.
• Hay interferencias, p.ej. un motor eléctrico, walkie-talkie, etc.
La imagen oscila
• Está presente intensa fuente de luz.
La imagen es demasiado clara o
demasiado oscura
• El monitor no está ajustado de manera correcta.
• Está presente una intensa fuente de luz.
La pantalla muestra una imagen
blanca
• La tensión de alimentación de alimentación es demasiado débil.
Page 30

CAMSETW12 VELLEMAN
-
30
-
10. Especificaciones
Cámara
Alimentación 7.5VCC
Consumo 300mA
Frecuencia de transmisión 2.4GHz~2.4835GHz
Modulación FM
Canales 3
Intensidad luminosa 3 lux (día), 0 lux (noche)
Sensor CMOS color 1/3”
Resolución 628 x 562 píxeles
Líneas TV 330
Micrófono mono
Alcance ± 100m (en condiciones ideales)
Temperatura de funcionamiento -10°C~+50°C
Dimensiones 26 x 26 x 32mm
Peso 50g
Receptor
Alimentación 7.5VCC
Consumo 300mA
Frecuencia de transmisión 2.4GHz~2.4835GHz
Canales 3
Salida de vídeo 1Vpp @ 75Ω
Salida de vídeo (mono) 1Vpp @ 600Ω
Conexión de audio jack de 3.5mm
Conexión de vídeo USB 2.0
Líneas TV 330
Alcance ± 100m (en condiciones ideales)
Temperatura de funcionamiento -10°C~+50°C
Dimensiones 105 x 86 x 28mm
Peso 120g
Exigencias del sistema
Pentium® III o más reciente
256MB RAM
Puerto USB 2.0
Lector de CD-ROM
Monitor de color o display LCD
Windows® XP
Utilice este aparato sólo con los accesorios originales. SA Velleman no será responsable de daños ni
lesiones causados por un uso (indebido) de este aparato. La cámara está expuesta a interferencias de
móviles, microondas y cualquier otro aparato emitiendo una frecuencia de 2.4GHz. Mantenga el aparato
lejos del alcance de este aparato.
Para más información sobre este producto, visite nuestra página web www.velleman.eu.
Se pueden modificar las especificaciones y el contenido de este manual sin previo aviso.
Page 31

CAMSETW12 VELLEMAN
-
31
-
CAMSETW12 – KIT MIT DRAHTLOSER WETTERFESTER FARBKAMERA
1. Einführung & Eigenschaften
An alle Einwohner der Europäischen Union
Wichtige Umweltinformationen über dieses Produkt
Dieses Symbol auf dem Produkt oder der Verpackung zeigt an, dass die Entsorgung dieses Produktes nach
seinem Lebenszyklus der Umwelt Schaden zufügen kann.
Entsorgen Sie die Einheit (oder verwendeten Batterien) nicht als unsortiertes Hausmüll; die Einheit oder
verwendeten Batterien müssen von einer spezialisierten Firma zwecks Recycling entsorgt werden.
Diese Einheit muss an den Händler oder ein örtliches Recycling-Unternehmen retourniert werden.
Respektieren Sie die örtlichen Umweltvorschriften.
Falls Zweifel bestehen, wenden Sie sich für Entsorgungsrichtlinien an Ihre örtliche Behörde.
Wir bedanken uns für den Kauf des CAMSETW12! Lesen Sie vor Inbetriebnahme diese Bedienungsanleitung
sorgfältig durch. Überprüfen Sie, ob Transportschäden vorliegen. Sollte dies der Fall sein, benutzen Sie das Gerät
nicht und wenden Sie sich an Ihren Händler. Lieferumfang: 1 x 2.4GHz drahtlose Farbkamera, 1 x 2.4GHzEmpfänger, 1 x Stativ, 1 x 7.5VDC-Netzteil für Kamera, 1 x 7.5VDC-Netzteil für Empfänger, A/V-Kabel und diese
Bedienungsanleitung.
2. Sicherheitshinweise
• Bei Schäden, die durch Nichtbeachtung der Bedienungsanleitung verursacht werden, erlischt der
Garantieanspruch. Für daraus resultierende Folgeschäden übernimmt der Hersteller keine Haftung.
• Installation und Wartung sind einer autorisierten Fachkraft vorbehalten.
• Vergewissern Sie sich, dass die anzuschließende Netzspannung nicht höher ist als die Netzspannung
beschrieben in dieser Bedienungsanleitung.
• Beachten Sie, dass alle elektrischen Anschlüsse und Kabel zwischen dem Gerät und den angeschlossenen Geräten
den Sicherheitsnormen und der Betriebsanleitung entsprechen.
• Beachten Sie die Sicherheits- und Bedienungsvorschriften aller angeschlossenen Geräte.
• Verwenden Sie das Gerät darf nie ohne Beaufsichtigung.
• Achten Sie darauf, dass die Netzleitung nicht gequetscht oder durch scharfe Kanten beschädigt werden kann. Bei
Beschädigungen soll eine Fachkraft das Kabel ersetzen.
• Trennen Sie das Gerät bei Nichtbenutzung und vor jeder Reinigung vom Netz. Fassen Sie dazu den Netzstecker
an der Grifffläche an und ziehen Sie nie an der Netzleitung. Berühren Sie das Netzgerät nie mit nassen Händen.
• Trennen Sie das Gerät bei Gewitter immer vom Netz.
• Bei Schäden verursacht durch eigenmächtige Änderungen erlischt der Garantieanspruch.
• Halten Sie Kinder und Unbefugte vom Gerät fern.
3. Umschreibung
a. Kamera
1. Objektiv
2. Antenne
3. Stromstecker
4. DIP-Schalter für Kanal
5. Mikrofon
6. DC-Netzteil
Seien Sie vorsichtig bei der Installation: Fass
en Sie keine Kabel an, die unter Strom stehen um
einen
lebensgefährlichen elektrischen Schlag zu vermeiden.
Schützen Sie das Gerät vor Feuchtigkeit und Nässe.
Trennen Sie das Gerät immer vom Netz, bevor Sie es öffnen.
Page 32

CAMSETW12 VELLEMAN
-
32
-
b. Empfänger
1. Antenne
2. Stromeingang
3. A/V-Ausgang
4. Strom-LED
5. DIP-Schalter für Kanal l
6. USB-Ausgang
7. DC-Netzteil
8. A/V-Kabel
4. Installation
a. Kamera
Wählen Sie einen geeigneten Montageort: eine trockene und staubfreie, gut gelüftete Stelle ohne
Erschütterungen. Wählen Sie eine Stelle, die nicht mit Betonwänden, Spiegeln, Metallbrettern, usw. abgeschirmt ist.
Vermeiden Sie die Anwesenheit von Geräten mit einem starken Magnetfeld wie Schnurlos-Telefonen, Funkgeräten,
usw. Sorgen Sie dafür, dass es eine Steckdose in der Nähe gibt.
Befestigen Sie den Montagebügel mit den mitgelieferten Schrauben an der
Wand. Verwenden Sie, falls nötig, Nylondübel. Bevor Sie bohren und die
Schrauben befestigen, müssen Sie überprüfen, ob sich keine elektrischen Kabel
in den Wänden befinden.
Bemerkung: Richten Sie die Kamera nie auf eine intensive Lichtquelle um
Überbelichting und undeutliche Bilder zu vermeiden.
b. Empfänger
Stellen Sie den Empfänger auf eine stabile und feste Oberfläche in einer Höhe von ± 1m für einen besseren
Empfang. Sorgen Sie dafür, dass es eine Steckdose in der Nähe gibt.
5. Anschluss
a. Kamera
• Verbinden Sie das AV-Kabel mit einem geeigneten Monitor oder
Fernsehgerät (weißer Stecker = Audio, gelber = Video) (siehe Abb.).
• Schließen Sie das Netzteil an das Netz an.
• Wählen Sie den geeigneten Kanal in Übereinstimmung mit dem Kanal des
Empfängers (siehe “6. Das System installieren”).
b. Empfänger
• Stecken Sie den USB-Stecker in den USB-Port des Computers
(siehe “10. Technische Daten – Systemvoraussetzungen
• Legen Sie die mitgelieferte CD-ROM in das Laufwerk und
installieren Sie die CamGuard-Software und den Treiber (siehe
“7. Software”).
6. Das System installieren
Trennen Sie die Geräte vom Netz bevor Sie die Kanäle einstellen.
Page 33

CAMSETW12 VELLEMAN
-
33
-
a. Kamera
Wählen Sie den Kanal mit einem spitzen Gegenstand
aus. Der ausgewählte Kanal bleibt aktiv. Es kann nur
einen Kanal gleichzeitig aktiviert werden.
b. Empfänger
• Manuelle Kanalauswahl
Wählen Sie den Kanal mit einem spitzen
Gegenstand aus. Der ausgewählte Kanal bleibt
aktiv.
• Auto Scan
Dieser Modus ist praktisch wenn Sie mehr als eine Kamera angeschlossen haben. Weisen Sie jeder Kamera einen
einzigartigen Kanal zu und stellen Sie die DIP-Schalter des Empfängers auf ON. Stellen Sie die DIP-Schalter auf
OFF wenn Sie den Kanal ausschalten möchten. Der Monitor schaltet jede 5 Sekunden auf den nächsten Kanal um.
7. Software
Legen Sie die CD-ROM in das Laufwerk. Doppelklicken Sie das CamGuardSymbol, um die Installation zu starten. Wählen Sie danach die gewünschte
Sprache aus und bestätigen Sie mit OK. Befolgen Sie das Verfahren und klicken
Sie Finish zum Beenden.
• Device Setting
Wählen Sie Device Setting unter Option aus.
Device: Wählen Sie eine Audio- und Videoquelle.
Attribute: Zeigt das Dialogfenster der ausgewählten Quelle an.
Options: Wählen Sie die Größe und die Anzahl Bilder pro Sekunde.
• About Alarm
Stellen Sie die Alarmdauer ein, indem Sie die Anzahl Sekunden
eingeben.
Alarm Actions:
Sound: Der Alarm wird aktiviert sobald es eine Unregelmäßigkeit
gibt. Wählen Sie einen Alarmton aus den Tondateien (*.wav) im Computer oder aus der Liste aus. Wählen Sie
Sound aus, und wählen Sie einen Ton aus der Liste. Bestätigen Sie mit OK.
Record Location: Bei Alarm werden die Bilder automatisch auf der Festplatte gespeichert. Wählen Sie, um diese
als Bilddatei (*.jpeg) oder Videodatei zu speichern. Es wird jede 5 Sekunden ein Bild gespeichert.
Page 34

CAMSETW12 VELLEMAN
-
34
-
Email: Bei Alarm sendet das System automatisch eine E-Mail mit
den gespeicherten Bildern in Anlage.
Mail Send (SMTP) Server – der Server, der die E-Mail sendet.
Mehr Details bei Ihrem Dienstanbieter.
Port – Port vom SMTP-Server, normalerweise 25. Mehr Details
bei Ihrem Dienstanbieter.
Verify Identity – Authentizität des Kontos.
Account – E-Mail-Konto.
Password – E-Mail-Passwort.
Recipient – E-Mail-Adresse die den Bericht empfängt.
CC – Kopie vom Bericht an anderes Konto.
Telephone: Bei Alarm werden Sie sofort über Telefon gewarnt.
Rüsten Sie Ihren PC mit einem Modem aus, damit Sie diese
Funktion verwenden können.
Dialup Device – Liste mit allen Einwahlgeräte auf PC. Wählen Sie
hier das Modem.
Call Number – Nummer die bei Alarm angerufen werden muss.
Test – Überprüfen.
Alarm Schedule
Sie können die Start- und Endzeit der
Überwachungsperiode bestimmen. Kreuzen Sie “Alarm Invoked in the List Period” an, um diese Funktion
einzuschalten.
New: fügen Sie eine neue Periode hinzu.
Modify: ändern Sie die ausgewählte Periode aus.
Delete: löschen Sie die ausgewählte Periode.
Clear: löschen Sie alle Perioden.
Motion Detection
Mit dem CAMSETW12 können Sie die Überwachungszone und die Empfindlichkeit gemäß Ihren eigenen
Anforderungen einstellen.
Enable Motion Detection Area: Kreuzen Sie dies an, um diese
Funktion einzuschalten.
Edit: ändern Sie die Überwachungszone.
Detection Sensitivity: stellen Sie die Empfindlichkeit ein.
Sensitivity Bar: der grüne Balken zeigt den aktuellen
wahrgenommenen Wert an: die rote Linie zeigt den maximalen
Wert an. Der Alarm wird eingeschaltet wenn der grüne Balken die
rote Linie überschreitet.
Page 35

CAMSETW12 VELLEMAN
-
35
-
Klicken Sie auf Edit, um die Überwachungszone zu ändern. Sie können die Zone mit der Maus bestimmen. Klicken
Sie die rechte Maustaste oder klicken Sie auf Clear,um die Zone zu
löschen.
• Record Schedule
Sie können die Start- und Endzeit der
Überwachungsperiode bestimmen. Hier werden die Bilder automatisch
aufgenommen. Kreuzen Sie “Enable Record in the List Period” an, um
diese Funktion einzuschalten.
New: fügen Sie eine neue Periode hinzu.
Modify: ändern Sie die ausgewählte Periode aus.
Delete: löschen Sie die ausgewählte Periode.
Clear: löschen Sie alle Perioden
• Remote Options
Weil die IP-Adresse des Computers sich bei manchen Anschlüssen
ändern kann, müssen Sie die aktuelle IP-Adresse kennen. Dies ist
ziemlich unbequem. Kreuzen Sie “Enable Remote Service Account”
an und verwenden Sie die feste Konto-Adresse. Die Submission ist
gratis indem Sie Free Account Registration anklicken.
Klicken Sie auf Remote Options in der Werkzeugleiste von der
Hauptschnittstelle, oder auf Tool und dann auf Remote Options im
Hauptmenü, um das “Remote Options Window”-Fenster
anzuzeigen.
Access Permission: geben Sie ein Passwort ein. Sowohl das Konto als auch das Passwort ist für den Zugriff
erforderlich. Verwenden Sie beiden, um die Privatsphäre und Ihren Computer zu schützen.
Web Server Port: der Webserver im Programm verwendet diesen Port. Normalerweise brauchen Sie diese nicht zu
ändern. Sie können diesen Port aber nach Wünsch wieder konfigurieren. Verwenden Sie einen anderen
Webserver, wie MS IIS, so müssen Sie andere Werte eingeben, um Konflikte zu vermeiden.
Mobile Phone Access Options: das Programm unterstützt den Fernzugriff auf ein Handy über WAP. Hierdurch
können Sie die gespeicherten Bilder auf dem eigenen Telefon sehen.
Picture Format: wählen Sie einen geeigneten Bildformat für das Telefon aus.
Image Size: wählen Sie die geeignete Bildgröße in Übereinstimmung mit dem Display Ihres Handys aus.
Remote Access WEB: zeigt die Adresse an.
Mobile Phone Access WEB: zeigt die WAP-Adresse an auf die das Handy einloggt.
Network Mode: zeigt den aktuellen Anschlussmodus an.
• System Options – Storage
Fenster um die aufgenommenen Bilder zu speichern. Klicken Sie auf
Add, um ein Datenverzeichnis hinzuzufügen. Klicken Sie auf Delete,
um ein Datenverzeichnis zu löschen.
Event Record Reserve Days: Die Zeit, die das aufgenommene Bild auf
der Festplatte gespeichert ist.
Record AVI File Length: Dauer der aufgenommenen Datei in Minuten.
Dateien, die länger als die eingestellte Periode auf der Festplatte gespeichert bleiben, werden automatisch gelöscht.
Ist der verfügbare Speicherplatz auf der Festplatte weniger als 100MB, so löscht das Programm automatisch die
ältesten Dateien.
Page 36

CAMSETW12 VELLEMAN
-
36
-
• System Options – Auto Run
Launch the program automatically when the system starts: wählen
Sie diese Option, um den automatischen Programmstart
auszuschalten. Sie werden wieder anfangen wo Sie voriges Mal
abeschaltet haben.
Dialup automatically when the program starts: kreuzen Sie dies an,
um das automatische Einwahlen einzuschalten. Dies ist praktisch für
Internetanschlüsse mit einem manuellen Einwahlverfahren.
• System Options – On-Screen Display
Display Options OSD Device: gibt den aufenommenen Bilder einen
Namen.
Display Options OSD Time: markiert die aufgenommenen Bilder mit
Datum und Uhrzeit.
Font: wählen Sie die Schriftart vom Text aus.
• System Options – Network
Network Mode: stellen Sie den automatischen oder direkten Modus ein.
Normalerweise funktioniert der automatische Modus. Wenn das
Programm da Netzwerk nicht findet, so wählen Sie den direkten
Modus aus.
Network Speed: Wählen Sie die Bildfrequenz in Übereinstimmung mit
dem Typ Internetverbindung aus.
• System Options – Other
Zeigt die Hotkeys an.
8. Reinigung und Wartung
Die Geräte sind wartungsfrei und müssen also nicht geöffnet werden. Reinigen Sie die Geräte regelmäßig mit einem
feuchten fusselfreien Tuch. Verwenden Sie auf keinen Fall Alkohol oder irgendwelche Lösungsmittel. Trennen Sie
die Geräte vom Netz, ehe Sie mit den Servicearbeiten anfangen.
9. Problemlösung
Problem Mögliche Ursache
Kein Bild/keinen Ton
• Die Kamera oder der Monitor bekommt keinen Strom.
• Das Netzteil wurde falsch angeschlossen.
• Der Abstand zwischen der Kamera und dem Empfänger ist zu groß.
Das Bild/der Ton wird gestört
• Die Reichweite wurde überschritten. Verringern Sie den Abstand zwischen
Kamera und Empfänger.
• Es gibt Störung, z.B. Elektromotor, Funkgerät, usw.
Das Bild zittert
• Ein starker Scheinwerfer hindert die Kamera.
Das Bild ist zu hell/zu dunkel
• Der Monitor ist nicht gut abgestimmt.
• Ein starker Scheinwerfer hindert die Kamera.
Der Schirm zeigt ein weißes Bild
• Die Stromversorgung ist zu niedrig.
Page 37

CAMSETW12 VELLEMAN
-
37
-
10. Technische Daten
Kamera
Stromversorgung 7.5VDC
Stromverbrauch 300mA
Sendefrequenz 2.4GHz~2.4835GHz
Modulation FM
Kanäle 3
Lichtstärke 3 lux (Tag), 0 lux (Nacht)
Sensor 1/3” CMOS-Farbkamera
Auflösung 628 x 562 Pixel
TV-Zeilen 330
Mikrofon mono
Bereich ± 100m (bei idealen Verhältnissen)
Betriebstemperatur -10°C~+50°C
Abmessungen 26 x 26 x 32mm
Gewicht 50g
Empfänger
Stromversorgung 7.5VDC
Stromverbrauch 300mA
Sendefrequenz 2.4GHz~2.4835GHz
Kanäle 3
Video-Ausgang 1Vpp @ 75Ω
Video- Ausgang (mono) 1Vpp @ 600Ω
Audio-Anschluss 3.5mm jack
Video-Anschluss USB 2.0
TV-Zeilen 330
Bereich ± 100m (bei idealen Verhältnissen)
Betriebstemperatur -10°C~+50°C
Abmessungen 105 x 86 x 28mm
Gewicht 120g
Systemvoraussetzungen
Pentium® III oder höher
256MB RAM
USB 2.0-Port
CD-ROM-Laufwerk
Farbmonitor oder LCD-Display
Windows® XP
Verwenden Sie dieses Gerät nur mit originellen Zubehörteilen. Velleman NV übernimmt keine Haftung für
Schaden oder Verletzungen bei (falscher) Anwendung dieses Gerätes. Die Kamera unterliegt kräftigen
Interferenzen von Handys, Magnetrons und anderen Geräten mit einer Frequenz von 2.4GHz. Halten Sie das
Kamerasystem mindestens 5m solcher Geräte fern.
Für mehr Informationen zu diesem Produkt, siehe www.velleman.eu.
Alle Änderungen ohne vorherige Ankündigung vorbehalten.
Page 38

CAMSETW12 VELLEMAN
-
38
-
R&TTE Declaration of Conformity
R&TTE-verklaring van overeenstemming
Déclaration de conformité R&TTE
R&TTE Konformitätserklärung
Declaración de conformidad R&TTE
We / wij / nous / Wir / nostros
Velleman Components NV
Legen Heirweg, 33
9890 Gavere (België)
Declare on our own responsibility that the finished product(s):
Verklaren op eigen verantwoordelijkheid dat het afgewerkte product:
Déclarons sous notre propre responsabilité que le produit fini :
Erklären voll verantwortlich dass nachfolgendes Produkt:
Declaramos bajo nuestra sola responsabilidad que el producto mencionado a continuación:
Brand / merk / marque / Marke / marca:
VELLEMAN
Trade name / handelsnaam / denomination commerciale / Markenname / denominación commercial:
WEATHERPROOF WIRELESS COLOUR CAMERA KIT / AV OUT + USB OUT
Type or model / type of model / type ou modèle / Typ oder Modell / tipo o modelo :
CAMSETW12
constituting the subject of this declaration, conforms with the essential requirements and other relevant
stipulations of the R&TTE Directive (1999/5/EC).
die het voorwerp uitmaakt van deze verklaring, voldoet aan de essentiële vereisten en andere relevante
bepalingen van de R&TTE-richtlijn (1999/5/EC).
faisant l’objet de la présente déclaration, satisfait aux exigences essentielles et toute autre stipulation
pertinente de la directive R&TTE Directive (1999/5/EC).
auf das sich diese Erklärung bezieht, den grundlegenden Anforderungen und anderen relevanten
Vereinbarungen der R&TTE-Richtlinie (1999/5/EC) entspricht.
cumple los requisitos esenciales y las otras estipulaciones relevantes de la Directiva R&TTE (1999/5/EC).
The product conforms to the following norm(s) and/or one or several other normative documents:
Het product voldoet aan de volgende norm(en) en/of meerdere andere normgevende documenten:
Le produit est conforme à la norme suivante / aux normes suivantes et/ou à plusieurs autres documents normatifs :
Das Produkt entspricht den folgenden Normen und/oder anderen normativen Dokumenten:
Es conforme a la(s) siguiente(s) norma(s) y/o a uno o varios otros documentos normativos:
Page 39

CAMSETW12 VELLEMAN
-
39
-
EMC: EN 300 440-1: 2001 V1.3.1
EN 300 440-2: 2004 V1.1.2
LVD: EN 60065: 2002
R&TTE: EN 301 489-1: 2005 V1.6.1
EN 301 489-3: 2002 V1.4.1
Technical data are available and can be obtained from :
Les données techniques sont disponibles et peuvent être obtenues chez :
Technische gegevens zijn beschikbaar en kunnen worden aangevraagd bij :
Die technische Dokumentation zu den oben gennanten Produkten wird geführt bei:
Los datos técnicos están disponibles y pueden ser solicitados a:
Velleman Components NV
Legen Heirweg, 33
9890 Gavere (België)
Place and date of issue / Plaats en datum van uitgifte / Place et date d’émission / Ort und Datum der Ausstellung /
Lugar y fecha de emisión:
Gavere, 1/7/2007
Authorised signatory for the company / Bevoegde ondertekenaar voor de firma / Signataire autorisé(e) de la société /
bevollmächtigte Person/ Respabonsle de la empresa:
Mr. Luc De Meyer - Purchasing Manager
 Loading...