

Page 1

US
ER MANUAL
M
ANUALE UTENTE
CAMSET18
B/W VIDEO INTERCOM
Z/W VIDEO INTERCOMSYSTEEM
INTERPHONE VIDÉO N/B
VIDEOPORTERO B/N
S/W VIDEO-TÜRSPRECHANLAGE
VIDEOCITOFONO BIANCO/NERO
GEBRUIKERSHANDLEIDING
NOTICE D’EMPLOI
MANUAL DEL USUARIO
BEDIENUNGSANLEITUNG
Page 2

-
2
-
CAMSET18 VELLEMAN
Page 3
-
3
-
CAMSET18 – B/W VIDEO INTERCOM
1. Introduction
To all residents of the European Union
Important environmental information about this product
This symbol on the device or the package indicates that disposal of the device after its lifecycle could harm
the environment.
Do not dispose of the unit (or batteries) as unsorted municipal waste; it should be taken to a specialized
company for recycling.
This device should be returned to your distributor or to a local recycling service.
Respect the local environmental rules.
If in doubt, contact your local waste disposal authorities.
Thank you for choosing Velleman! Please read the manual thoroughly before bringing this device into service. If the
device was damaged in transit, don't install or use it and contact your dealer. The set comes with: 1 x monitor handset,
1 x mounting plate for monitor handset, 1 x outdoor camera system, 1 x mounting plate for outdoor camera system, 1 x
bracket, telephone connection cable (10m), 1 x PSU and this manual.
2. Safety Instructions
Be very careful during the installation: touching live wires can cause life-threatening electroshocks.
• Damage caused by disregard of certain guidelines in this manual is not covered by the warranty and the dealer
will not accept responsibility for any ensuing defects or problems.
• A qualified technician should install and service this device.
• Do not open the device to avoid electroshocks.
• Install the indoor device in a well-ventilated room and away of direct sunlight.
• Wipe the device regularly with a moist, lint-free cloth. Do not use alcohol or solvents.
• Note that damage caused by user modifications to the device is not covered by the warranty.
• Keep the device away from children and unauthorised users.
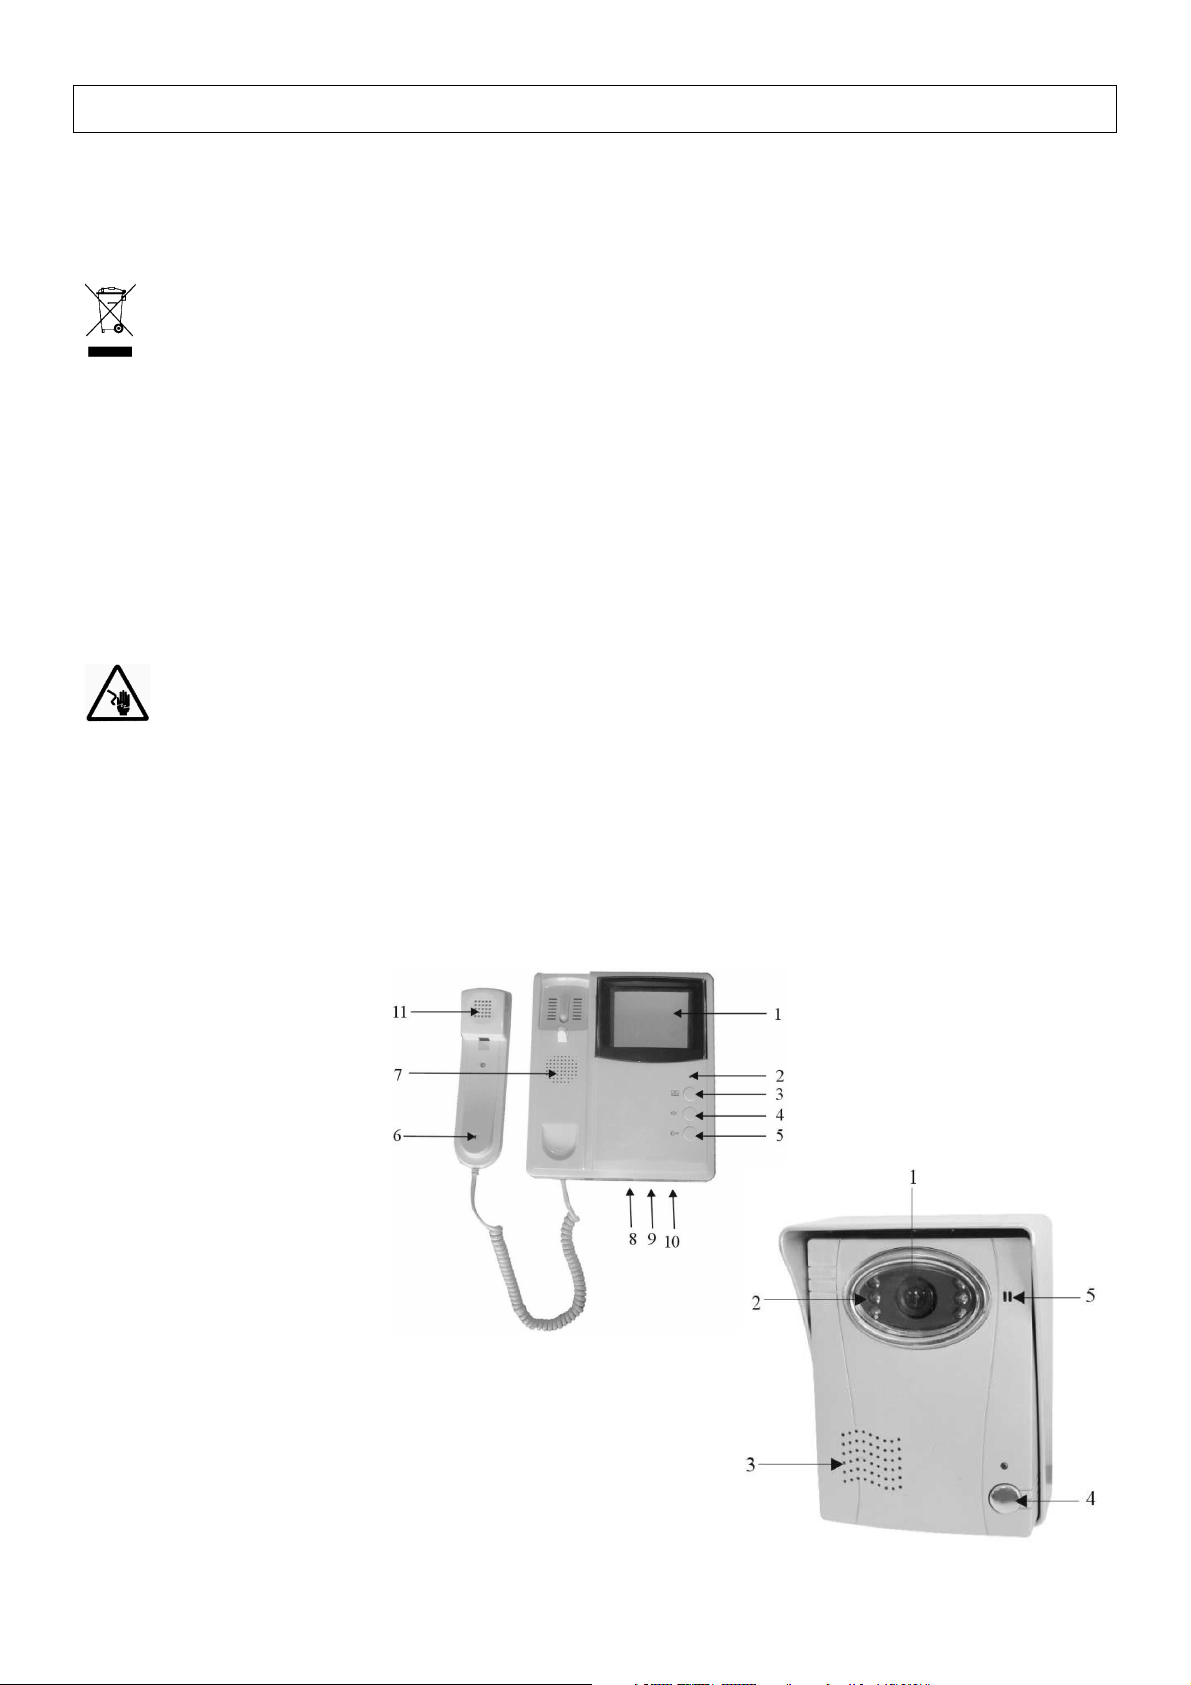
3. Description
1. 4” monitor
2. power LED
3. monitor button
4. alarm button
5. door key button
6. microphone
7. speaker
8. brightness adjustment
9. contrast adjustment
10. volume adjustment
11. receiver
1. camera lens
2. night vision LEDs
3. speaker
4. door bell
5. microphone
CAMSET18 VELLEMAN
Page 4
-
4
-
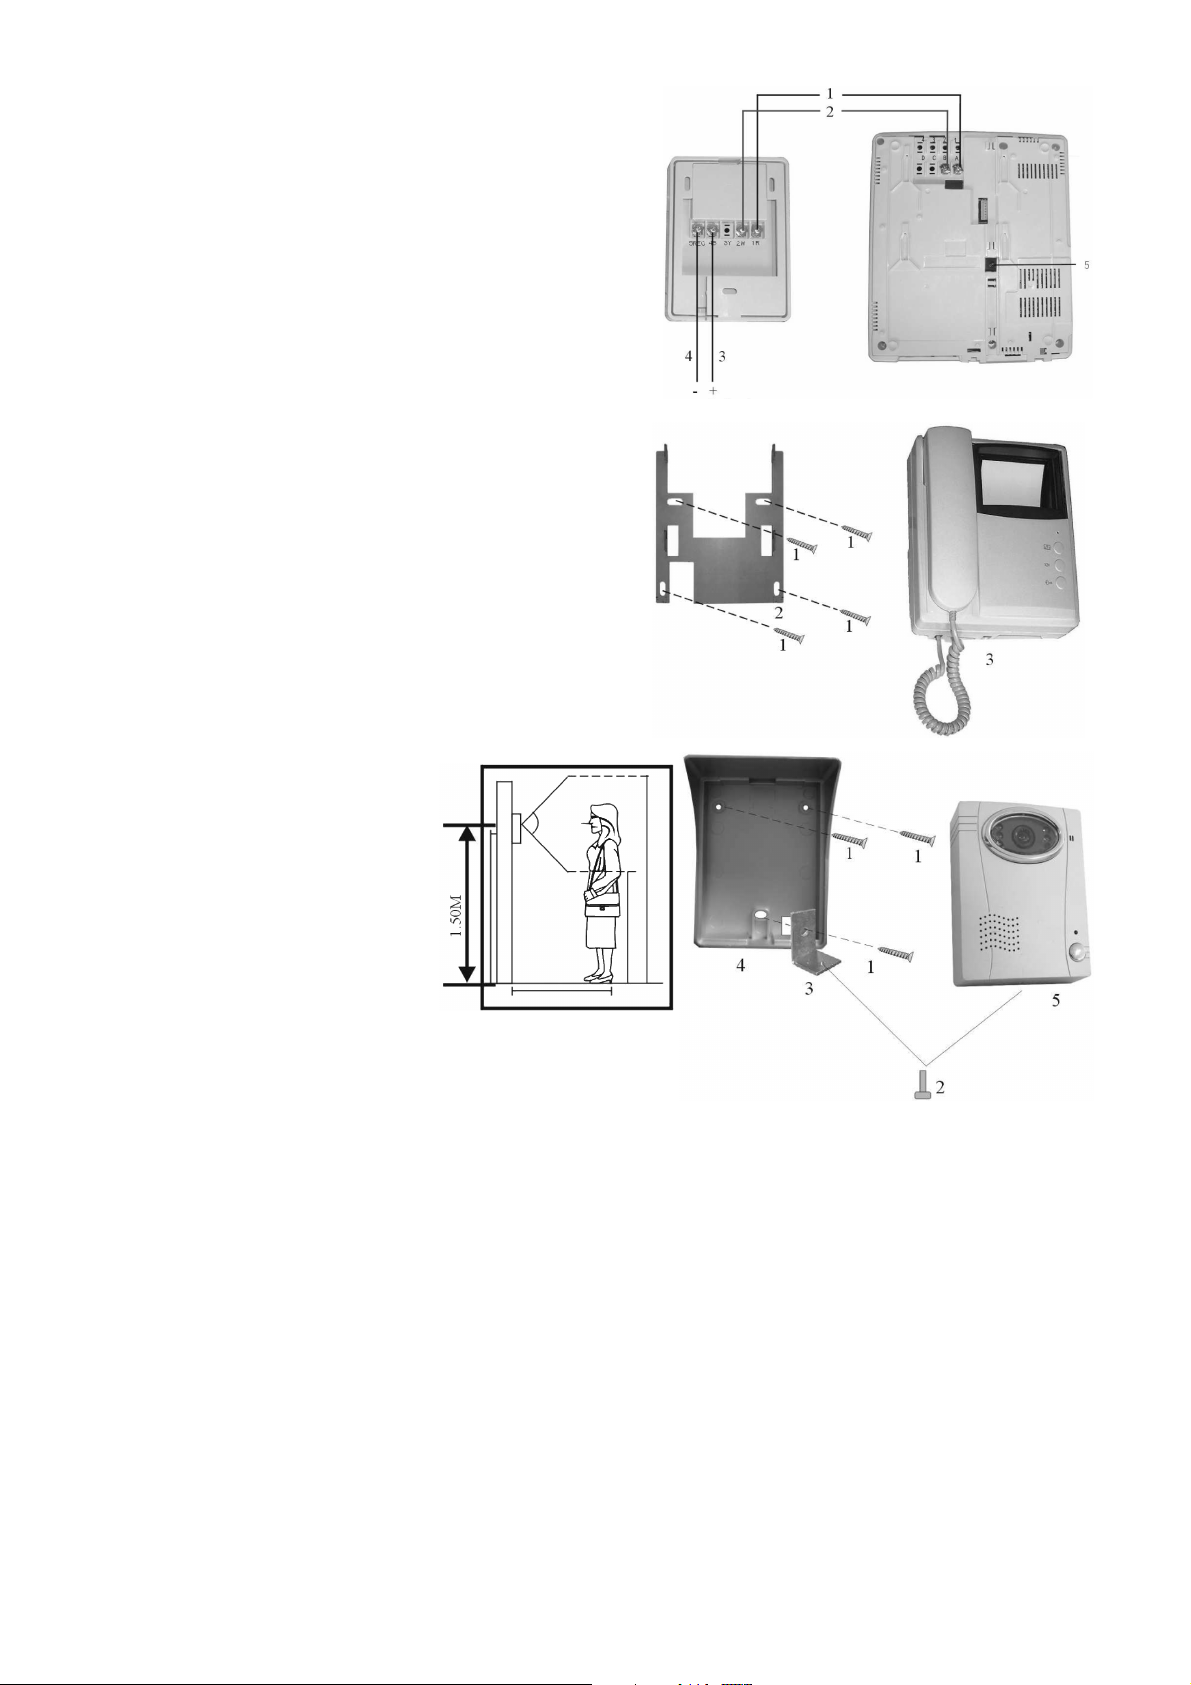
4. Wiring and Installation
a. Wiring
Connect the monitor handset and the outdoor camera system as
illustrated. Terminals no 4 and 5 run to the electric door lock.
Terminal no 5 is the monitor handset power supply connection
(13.5VDC).
b. Installing the Monitor Handset
Choose an appropriate installation spot. Mount the monitor
handset on a non inflammable spot away from chemicals,
excessive humidity, direct sunlight and other sources of heat,
and magnetic fields such as television sets and speakers.
Ensure the mounting surface is flat. Mount the plate at a height
of ± 1.5m. Use the bracket as a template to mark the holes
location. Drill the holes using a power drill and the appropriate
bit. Insert a nylon plug in each of the holes. Fix the plate onto
the wall using the appropriate screws. Fix the monitor handset
to the plate.
c. Installing the Camera System
Ensure the installation spot is
sheltered and as much protected form
wind, rain and snow as possible.
Mount the plate at a height of ± 1.5m.
Use the bracket as a template to mark
the holes location. Drill the holes
using a power drill and the
appropriate bit. Insert a nylon plug in
each of the holes. Fix the plate onto the wall using the appropriate
screws. Fix the bracket and the camera system to the plate.
5. Operation
• As soon as a visitor presses the doorbell, the videophone will chime and display the image picked up from the
intercom unit. The image will be displayed for 30 seconds if the receiver is not picked up. When picking up the
receiver, the image will be displayed for 2 minutes.
• The door can be opened by pressing the unlocking button provided that an optional door latch has been
installed (drive voltage of 12V, lock resistor of 15Ω min.).
• Press the monitor button to display the image picked up from the intercom unit at any time.
• Hold the panic button pressed to activate the alarm on the camera system. Release the button to deactivate
the alarm.
• Adjust the brightness, the contrast and the volume if necessary.
6. Troubleshooting
Unclear monitor picture
Sunlight is hitting the monitor. Try shadowing the monitor with your hand.
CAMSET18 VELLEMAN
Page 5

-
5
-
Interrupted or blurred picture
There is cable noise during communications, presence of radio waves when an automobile passes by or
presence of magnetic field caused by the receiver being too close to the monitor. Move the receiver away from
the monitor.
7. Technical Specifications
Input Signal 1Vp-p @ 75Ω
Monitor
Power Supply 13.5VDC
Power Consumption max. 12.3W (0.5W in standby)
Pixels 350 x 380 TV lines
Max. Wire Length 30m
Dimensions 219 x 198 x 78mm
Weight 1.8kg
Camera max. 300W
Power Supply 12VDC / 0.5A
Power Consumption max. 2.5W
Resolution CMOS 380 TV lines
Min. Illumination 0.01 lux
Viewing Angle 92°
Dimensions 130 x 96 x 31mm
Weight 0.6kg
Display Time
Calling Only 30s
Monitoring 10s
Picking Up Receiver 2 min
Alarm Key 10s
For more info concerning this product, please visit our website www.velleman.eu.
The information in this manual is subject to change without prior notice.
CAMSET18 – Z/W VIDEO INTERCOMSYSTEEM
1. Inleiding
Aan alle ingezetenen van de Europese Unie
Belangrijke milieu-informatie betreffende dit product
Dit symbool op het toestel of de verpakking geeft aan dat, als het na zijn levenscyclus wordt weggeworpen,
dit toestel schade kan toebrengen aan het milieu.
Gooi dit toestel (en eventuele batterijen) niet bij het gewone huishoudelijke afval; het moet bij een
gespecialiseerd bedrijf terechtkomen voor recyclage.
U moet dit toestel naar uw verdeler of naar een lokaal recyclagepunt brengen.
Respecteer de plaatselijke milieuwetgeving.
Hebt u vragen, contacteer dan de plaatselijke autoriteiten inzake verwijdering.
Dank u voor uw aankoop! Lees deze handleiding grondig voor u het toestel in gebruik neemt. Werd het toestel
beschadigd tijdens het transport, installeer het dan niet en raadpleeg uw dealer. Deze set wordt geleverd met: 1 x
monitorset, 1 x montageplaat voor monitorset, 1 x camerasysteem, 1 x montageplaat voor camerasysteem, 1 x beugel,
telefoonkabel (10m), 1 x voedingsadapter en deze handleiding.
CAMSET18 VELLEMAN
Page 6
-
6
-
2. Veiligheidsinstructies
Wees voorzichtig bij de installatie: raak geen kabels aan die onder stroom staan om
dodelijke elektroshocks
te vermijden
.
• De garantie geldt niet voor schade door het negeren van bepaalde richtlijnen in deze handleiding en uw dealer zal
de verantwoordelijkheid afwijzen voor defecten of problemen die hier rechtstreeks verband mee houden.
• Laat dit toestel installeren en onderhouden door een geschoolde technicus.
• Open de behuizing niet teneinde elektroshocks te vermijden.
• Installeer de videofoon in een goed geventileerde ruimte en uit de zon.
• Maak het toestel geregeld schoon met een droge, niet pluizende doek. Gebruik geen alcohol of solvent.
• Schade door wijzigingen die de gebruiker heeft aangebracht aan het toestel vallen niet onder de garantie.
• Houd dit toestel uit de buurt van kinderen en onbevoegden.
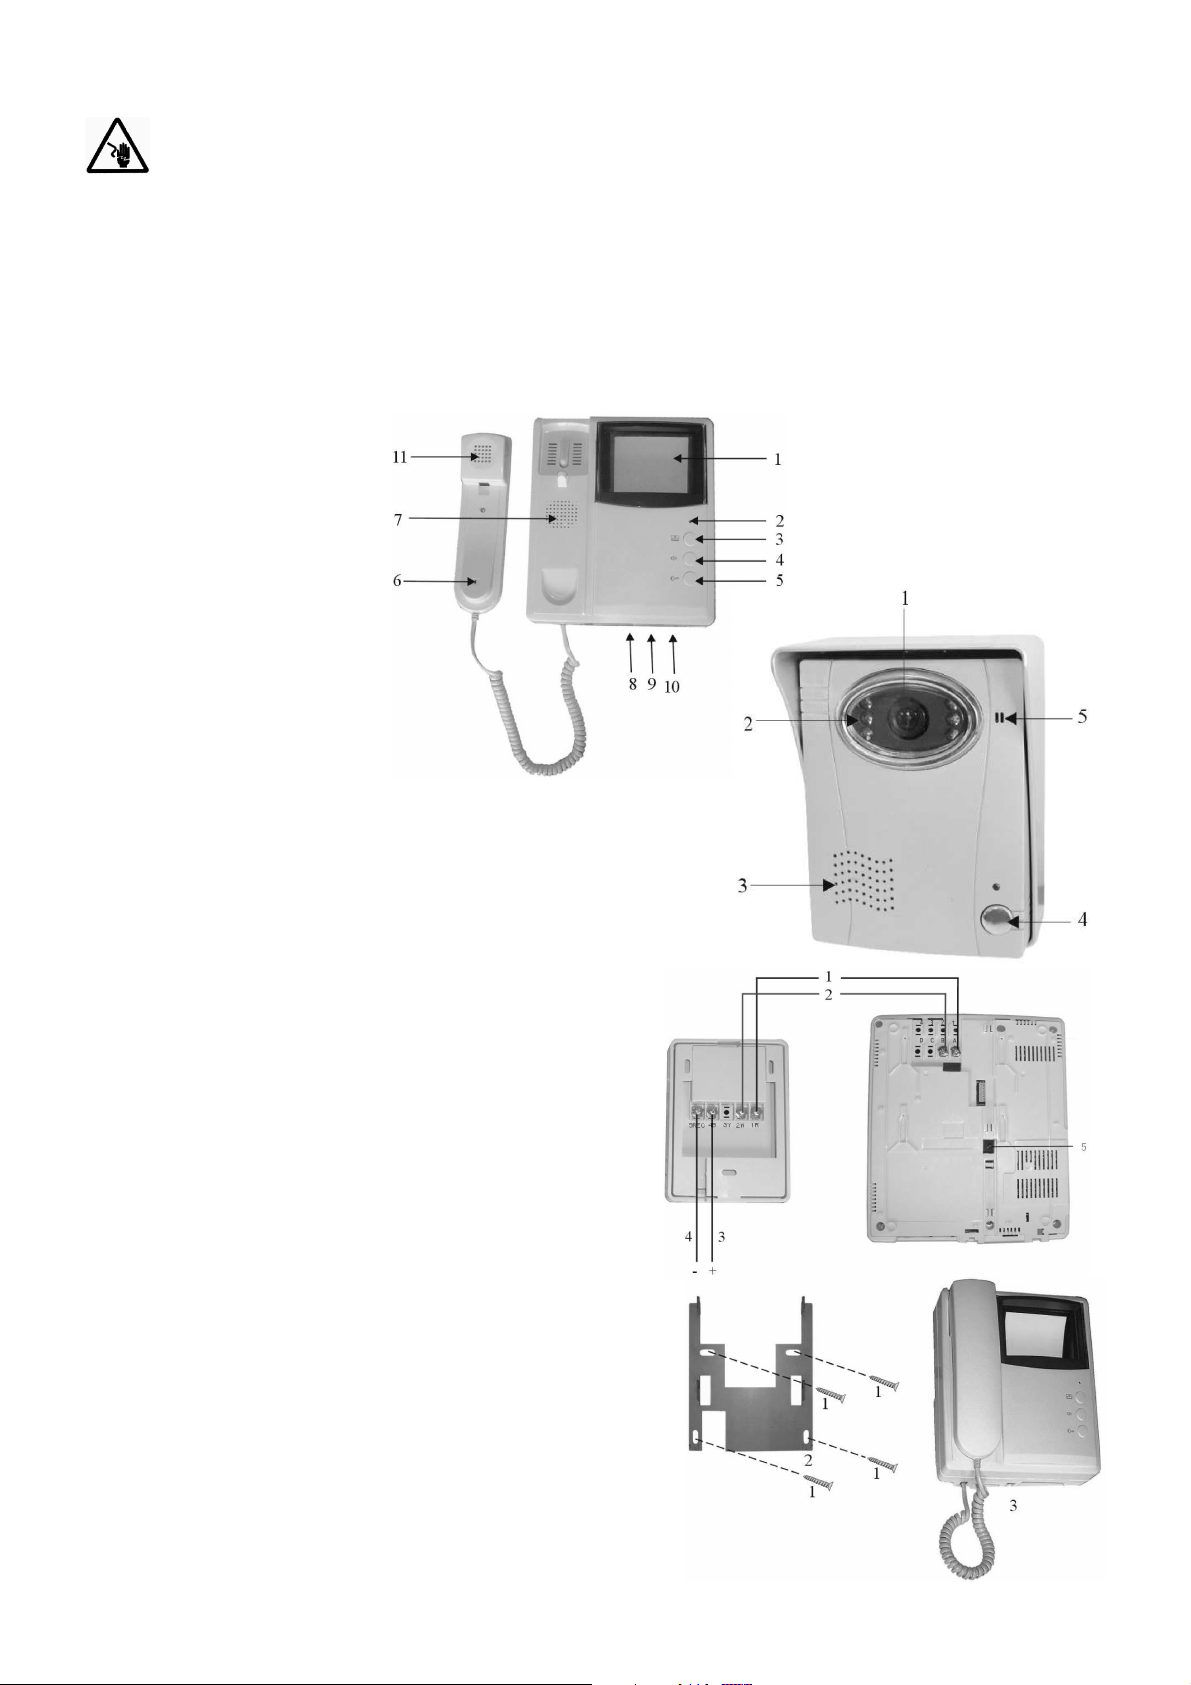
3. Omschrijving
1. 4” monitor
2. voedingled
3. monitortoets
4. alarmtoets
5. ontgrendelknop
6. microfoon
7. luidspreker
8. instelling helderheid
9. instelling contrast
10. instelling volume
11. hoorn
1. cameralens
2. nachtzichtleds
3. luidspreker
4. deurbel
5. microfoon
4. Aansluiting en installatie
a. Aansluiting
Koppel de videofoon aan de buitencamera zoals afgebeeld.
Terminals nr. 4 en 5 sluit u aan de deurontgrendeling. Terminal
nr. 5 is de aansluiting voor de voeding (13.5VDC).
b. Installeren van de videofoon
Kies een geschikte montageplaats. Monteer de videofoon op een
niet-brandbare locatie en weg van chemische producten,
vochtigheid, direct zonlicht en andere hittebronnen, en
magnetische velden zoals televisietoestellen en luidsprekers.
Zorg voor een vlakke montageplaats op een hoogte van ± 1.5m.
Gebruik de plaat als patroon en markeer de gaten. Boor de gaten
met een elektrische boor en geschikte bit. Plaats een nylon plug in
elk van de gaten. Bevestig de plaat met de geschikte schroeven.
Bevestig de videofoon aan de plaat.
CAMSET18 VELLEMAN
Page 7

-
7
-
c. Installeren van de camera
Zorg voor een montageplaats die
zoveel mogelijk beschermd is tegen
wind, regen en sneeuw. Monteer de
plaat op een hoogte van ± 1.5m.
Gebruik de plaat als patroon en
markeer de gaten. Boor de gaten met
een elektrische boor en geschikte bit.
Plaats een nylon plug in elk van de
gaten. Bevestig de plaat met de
geschikte schroeven. Bevestig de
beugel en de camera aan de plaat.
5. Gebruik
• De videofoon luidt en geeft het opgenomen beeld weer van zodra iemand op de deurbel van de intercom
drukt. Het beeld blijft gedurende 30 seconden zichtbaar indien u de hoorn niet van de haak neemt. Neemt u de
hoorn van de haak, dan blijft het beeld gedurende 2 minuten zichtbaar.
• Open de deur met een druk op de ontgrendelknop indien u een elektrisch slot hebt (spanning van 12V,
weerstand op het slot van min. 15Ω).
• Druk op de monitorknop om op elk moment het beeld dat door de intercom is opgenomen weer te geven.
• Houd de paniektoets ingedrukt om het alarm op het camerasysteem in te schakelen. Laat los om het alarm uit
te schakelen.
• Regel de helderheid, het contrast en het volume indien nodig.
6. Problemen en oplossingen
Vervaagd beeld op de videofoon
De zon schijnt op de videofoon. Probeer het scherm te beschaduwen.
Onderbroken of onduidelijk
Er is ruis gedurende de communicatie, er zijn radiogolven van voorbijrijdende voertuigen of er is een magnetisch
veld doordat u de hoorn te dicht bij de videofoon houdt. Houd de hoorn weg van de videofoon.
7. Technische specificaties
Ingangsignaal 1Vp-p @ 75Ω
Monitor
Voeding 13.5VDC
Verbruik max. 12.3W (0.5W in stand-by)
Pixels 350 x 380 tv-lijnen
Max. lengte kabel 30m
Afmetingen 219 x 198 x 78mm
Gewicht 1.8kg
Camera max. 300W
Voeding 12VDC / 0.5A
Verbruik max. 2.5W
Resolutie CMOS 380 tv-lijnen
Min. verlichting 0.01 lux
Kijkhoek 92°
Afmetingen 130 x 96 x 31mm
Gewicht 0.6kg
CAMSET18 VELLEMAN
Page 8

-
8
-
Tijdsduur weergave
Enkel bellen 30s
Monitoring 10s
Hoorn opnemen 2 min.
Alarmtoets 10s
Voor meer informatie omtrent dit product, zie www.velleman.eu.
De informatie in deze handleiding kan te allen tijde worden gewijzigd zonder voorafgaande kennisgeving.
CAMSET18 – INTERPHONE VIDÉO N/B
1. Introduction
Aux résidents de l'Union européenne
Des informations environnementales importantes concernant ce produit
Ce symbole sur l'appareil ou l'emballage indique que l’élimination d’un appareil en fin de vie peut polluer
l'environnement.
Ne pas jeter un appareil électrique ou électronique (et des piles éventuelles) parmi les déchets municipaux
non sujets au tri sélectif ; une déchèterie traitera l’appareil en question.
Renvoyer les équipements usagés à votre fournisseur ou à un service de recyclage local.
Il convient de respecter la réglementation locale relative à la protection de l’environnement.
En cas de questions, contacter les autorités locales pour élimination.
Nous vous remercions de votre achat ! Lire la présente notice attentivement avant la mise en service de l’appareil. Si
l’appareil a été endommagé pendant le transport, ne pas l’installer et consulter votre revendeur. Cet ensemble
interphone vidéo est livré avec : 1 x vidéophone intérieur, 1 x plaque de montage pour le vidéophone intérieur, 1 x
interphone extérieur, 1 x plaque de montage pour l’interphone extérieur, 1 x support, câble téléphonique de connexion
(10m), 1 x adaptateur secteur et cette notice.
2. Prescriptions de sécurité
Être prudent lors de l’installation : toucher un câble sous tension peut causer des électrochocs mortels.
• La garantie ne s’applique pas aux dommages survenus en négligeant certaines directives de cette notice et votre
revendeur déclinera toute responsabilité pour les problèmes et les défauts qui en résultent.
• Confier l’installation et l’entretien à un personnel qualifié.
• Ne pas ouvrir le boîtier afin d’éviter tout risque d’électrochoc.
• Installer le vidéophone dans un endroit bien ventilé à l’abri du soleil.
• Essuyer l’appareil régulièrement avec un chiffon sec non pelucheux. Éviter l’usage d’alcool et de solvants.
• Les dommages occasionnés par des modifications à l’appareil par le client, ne tombent pas sous la garantie.
• Garder votre CAMSET18 hors de la portée de personnes non qualifiées et de jeunes enfants.
• Choisir un endroit de montage respectant l’intimité des personnes.
3. Description
1. moniteur 4” 7. haut-parleur
2. LED d’alimentation 8. réglage clarté
3. touche du moniteur 9. réglage contraste
4. touche d’alarme 10. réglage volume
5. touche de déverrouillage 11. cornet
6. microphone
CAMSET18 VELLEMAN
Page 9

-
9
-
1. objectif de la caméra
2. LED de vision nocturne
3. haut-parleur
4. sonnette
5. microphone
4. Câblage et installation
a. Câblage
Raccorder le vidéophone à l’interphone comme illustré.
Connecter les bornes n° 4 et 5 à la gâche de la porte. La borne
n° 5 est une prise d’alimentation (13.5VCC).
b. Installation du vidéophone
Choisir un endroit approprié. Monter le vidéophone à un endroit non inflammable et à l’écart de produits chimiques,
d’humidité excessive, du soleil et d’autres sources de chaleur,
et de champs magnétiques provenant de téléviseurs et de
haut-parleurs.
Monter le vidéophone sur une surface plate et à une hauteur
de ± 1.5m. Utiliser la plaque comme gabarit et marquer les
trous. Percer les trous à l’aide d’une perceuse électrique et le
foret approprié. Insérer une cheville en nylon dans chaque
trou. Fixer la plaque à l’aide des vis appropriées. Fixer le
vidéophone à la plaque.
c. Installation de l’interphone
Monter l’interphone à l’abri du vent,
de la pluie et de la neige et à une
hauteur de ± 1.5m. Utiliser la plaque
comme gabarit et marquer les trous.
Percer les trous à l’aide d’une
perceuse électrique et le foret
approprié. Insérer une cheville en
nylon dans chaque trou. Fixer le
support et la plaque à l’aide des vis
appropriées. Fixer l’interphone à la plaque.
5. Emploi
• Le vidéophone retentit et affiche l’image captée par l’interphone dès que le bouton de la sonnette est actionné.
L’image sera affichée pendant un délai de 30 secondes lorsque le récepteur n’est pas décroché. Lorsque le
récepteur est décroché, l’image sera affichée pendant un délai de 2 minutes.
• La porte s’ouvre dès que le bouton de déverrouillage est actionné, pourvu qu’une gâche électronique ait été
installée (tension de 12V, résistance de la gâche de 15
• Enfoncer la touche de monitorage pour afficher l’image captée par l’interphone à tout moment.
Ω min.).
CAMSET18 VELLEMAN
Page 10

-
10
-
• Maintenir enfoncé la touche d’alarme pour enclencher l’alarme sur l’interphone extérieur. Relâcher la touche
pour la désactiver.
• Ajuster la clarté, le contraste et le volume si nécessaire.
6. Problèmes et solutions
Affichage distordue
Le moniteur se trouve au soleil. Ombrager le moniteur avec la main.
Image floue ou interrompue
Présence de bruit pendant la communication, d’ondes radio provenant d’un véhicule ou d’un champ magnétique
lorsque le cornet se trouve trop prêt du vidéophone. Éloigner le cornet du vidéophone.
7. Spécifications techniques
Signal d’entrée 1Vp-p @ 75Ω
Moniteur
Alimentation 13.5VCC
Consommation max. 12.3W (0.5W en veille)
Pixels 350 x 380 lignes TV
Longueur max. du câble 30m
Dimensions 219 x 198 x 78mm
Poids 1.8kg
Caméra max. 300W
Alimentation 12VCC / 0.5A
Consommation max. 2.5W
Résolution CMOS 380 lignes TV
Éclairage min. 0.01 lux
Angle de visée 92°
Dimensions 130 x 96 x 31mm
Poids 0.6kg
Durée d’affichage
Appel 30s
Monitorage 10s
Décrochage du cornet 2 min
Alarme 10s
Pour plus d’information concernant cet article, visitez notre site web www.velleman.eu.
Toutes les informations présentées dans cette notice peuvent être modifiées sans notification préalable.
CAMSET18 – VIDEOPORTERO B/N
1. Introducción
A los ciudadanos de la Unión Europea
Importantes informaciones sobre el medio ambiente concerniente a este producto
Este símbolo en este aparato o el embalaje indica que, si tira las muestras inservibles, podrían dañar el
medio ambiente.
No tire este aparato (ni las pilas, si las hubiera) en la basura doméstica; debe ir a una empresa
especializada en reciclaje. Devuelva este aparato a su distribuidor o a la unidad de reciclaje local.
Respete las leyes locales en relación con el medio ambiente.
Si tiene dudas, contacte con las autoridades locales para eliminación.
CAMSET18 VELLEMAN
Page 11

-
11
-
Gracias por haber comprado el CAMSET18! Lea atentamente las instrucciones del manual antes de usarlo. Si el
Cuidado durante la instalación: puede sufrir una peligrosa descarga eléctrica al tocar los cables con un
aparato ha sufrido algún daño en el transporte no lo instale y póngase en contacto con su distribuidor. Este
videoportero se entrega con: 1 x videófono interior, 1 x soporte de montaje para el videófono interior, 1 x interfono
exterior, 1 x soporte de montaje para el interfono exterior, 1 x soporte, cable telefónica de conexión (10m), 1 x
adaptador de red y manual del usuario.
2. Instrucciones de seguridad
voltaje peligroso
• Daños causados por descuido de las instrucciones de seguridad de este manual invalidarán su garantía y su
distribuidor no será responsable de ningún daño u otros problemas resultantes.
• La instalación y el mantenimiento deben ser realizados por personal especializado.
• No abra la caja para evitar cualquier riesgo de descargas eléctricas.
• Instale el videófono en un lugar bien aireado lejos del alcance del sol.
• Limpie el aparato regularmente con un paño húmedo sin pelusas. Evite el uso de alcohol y de disolventes.
• Los daños causados por modificaciones no autorizadas, no están cubiertos por la garantía.
• Mantenga el CAMSET18 lejos del alcance de personas no capacitadas y niños.
• Respete la intimidad de personas al seleccionar un lugar de montaje.
3. Descripción
1. monitor 4” 7. altavoz
2. LED de alimentación 8. ajuste del brillo
3. tecla del monitor 9. ajuste del contraste
4. tecla de la alarma 10.ajuste del volumen
5. tecla de desbloqueo 11.receptor
6. micrófono
1. óptica de la cámara
2. LED de visión nocturna
3. altavoz
4. timbre
5. micrófono
4. Cableado e instalación
a. Cableado
Conecte el videófono al interfono (véase fig.). Conecte los
bornes n° 4 y 5 a la cerradura de la porte. El borne n° 5 es la
conexión para la alimentación (13.5VCC).
b. Instalar el videófono
Seleccione un lugar adecuado. Seleccione un lugar de montaje
no inflamable y donde el aparato no esté expuesto a productos
químicos, la humedad excesiva, el sol y otras fuentes de calor,
ni campos magnéticos causados por televisores y altavoces.
CAMSET18 VELLEMAN
Page 12

-
12
-
Monte el videófono en una superficie plana y a una altura de ± 1.5m. Utilice la placa como gálibo y marque los
agujeros. Taladre los agujeros con un taladro eléctrico y la broca adecuada. Introduzca un taco de nylon en cada
agujero. Fije la placa con los tornillos adecuados. Fije el videófono a la placa.
c. Instalar el interfono
Monte el interfono donde el aparato
no esté expuesto al viento, la lluvia ni
la nieve y a una altura de ± 1.5m.
Utilice la placa como gálibo y marque
los agujeros. Taladre los agujeros con
un taladro eléctrico y la broca
adecuada. Introduzca un taco de
nylon en cada agujero. Fije la placa
con los tornillos adecuados. Fije el
interfono a la placa.
5. Uso
• El videófono suena y visualiza la imagen capturada por el interfono en cuanto se pulse el botón del timbre. La
imagen se visualizará durante un tiempo de 30 segundos si no se descuelga el receptor. Al descolgar el
receptor, la imagen se visualizará durante 2 minutos.
• La puerta se abre en cuanto se pulse la tecla de desbloqueo (14) si ha instalado una cerradura electrónica
(tensión de 12V, resistencia de la cerradura de 15Ω min.).
• Pulse la tecla del monitor (12) para visualizar la imagen capturada por el interfono en cualquier momento.
• Mantenga pulsada la tecla de la alarma para activar la alarma del interfono exterior. Suelte la tecla para
desactivarla.
• Ajuste el brillo, el contraste y el volumen si fuera necesario.
6. Solución de problemas
Imagen vaga
El monitor está en el sol. Sombree el monitor.
Imagen borrosa o interrumpida
Hay interferencias durante la comunicación, ondas de radio que vienen de un vehículo o un campo magnético si
el receptor está demasiado cerca del videófono. Aleje el receptor del videófono.
7. Especificaciones
Señal de entrada 1Vp-p @ 75Ω
Monitor
Alimentación 13.5VCC
Consumo máx. 12.3W (0.5W en standby)
Píxeles 350 x 380 líneas TV
Longitud máx. del cable 30m
Dimensiones 219 x 198 x 78mm
Peso 1.8kg
Cámara máx. 300W
Alimentación 12VCC / 0.5A
Consumo máx. 2.5W
Resolución CMOS 380 líneas TV
Iluminación mín. 0.01 lux
Ángulo de visión 92°
CAMSET18 VELLEMAN
Page 13

-
13
-
Dimensiones 130 x 96 x 31mm
Seien Sie während der Installation des Gerätes sehr vorsichtig: das Berühren von unter Spannung stehenden
Peso 0.6kg
Duración de la visualización
Llamar 30s
Vigilancia 10s
Descolgar 2 min.
Alarma 10s
Para más información sobre este producto, visite nuestra página web www.velleman.eu.
Se pueden modificar las especificaciones y el contenido de este manual sin previo aviso.
CAMSET18 – S/W VIDEO-TÜRSPRECHANLAGE
1. Einführung
An alle Einwohner der Europäischen Union
Wichtige Umweltinformationen über dieses Produkt
Dieses Symbol auf dem Produkt oder der Verpackung zeigt an, dass die Entsorgung dieses Produktes nach
seinem Lebenszyklus der Umwelt Schaden zufügen kann.
Entsorgen Sie die Einheit (oder verwendeten Batterien) nicht als unsortiertes Hausmüll; die Einheit oder
verwendeten Batterien müssen von einer spezialisierten Firma zwecks Recycling entsorgt werden.
Diese Einheit muss an den Händler oder ein örtliches Recycling-Unternehmen retourniert werden.
Respektieren Sie die örtlichen Umweltvorschriften.
Falls Zweifel bestehen, wenden Sie sich für Entsorgungsrichtlinien an Ihre örtliche Behörde.
Wir bedanken uns für den Kauf der CAMSET18! Lesen Sie vor Inbetriebnahme diese Bedienungsanleitung sorgfältig
durch. Überprüfen Sie, ob Transportschäden vorliegen. Sollte dies der Fall sein, verwenden Sie das Gerät nicht und
wenden Sie sich an Ihren Händler. Lieferumfang: 1 x Monitorset, 1 x Montageplatte für Monitorset, 1 x Kamerasystem,
1 x Montageplatte für Kamerasystem, 1 x Montagebügel, Telefonkabel (10m), 1 x Netzteil und diese
Bedienungsanleitung.
2. Sicherheitshinweise
Leitungen könnte zu lebensgefährlichen elektrischen Schlägen führen.
• Bei Schäden, die durch Nichtbeachtung der Bedienungsanleitung verursacht werden, erlischt der
Garantieanspruch. Für daraus resultierende Folgeschäden übernimmt der Hersteller keine Haftung.
• Lassen Sie dieses Gerät von einem Fachmann installieren und warten.
• Öffnen Sie das Gehäuse nicht, um elektrische Schläge zu vermeiden.
• Installieren Sie das Videotelefon in einem gut gelüfteten Raum und schützen Sie es vor direktem Sonnenlicht.
• Verwenden Sie zur Reinigung ein feuchtes, fusselfreies Tuch. Verwenden Sie auf keinen Fall Alkohol oder
irgendwelche Lösungsmittel.
• Bei Schäden verursacht durch eigenmächtige Änderungen erlischt der Garantieanspruch.
• Halten Sie Kinder und Unbefugte vom Gerät fern.
• Respektieren Sie die Privatsphäre der Personen beim Installieren des Gerätes.
CAMSET18 VELLEMAN
Page 14

-
14
-
3. Umschreibung
1. 4” Monitor
2. Stromversogungs-LED
3. Monitortaste
4. Alarmtaste
5. Entriegelungstaste
6. Mikrofon
7. Lautsprecher
8. Helligkeitsregelung
9. Kontrastregelung
10. Lautstärkeregelung
11. Hörer
1. Kameraobjektiv
2. Nachtsicht-LEDs
3. Lautsprecher
4. Türklingel
5. Mikrofon
4. Anschluss und Installation
a. Anschluss
Verbinden Sie das Videotelefon mit der Außenkamera (siehe
Abb.). Anschluss Nr. 4 und 5 verbinden Sie mit der
Türverriegelung. Anschluss Nr. 5 ist der Anschluss für die
Stromversorgung (13.5VDC).
b. Das Videotelefon installieren
Wählen Sie einen geeigneten nicht-brennbaren Montageort.
Schützen Sie das Gerät vor chemischen Produkten, Feuchte,
direktem Sonnenlicht und anderen Hitzequellen, und
Magnetfeldern wie Fernseher und Lautsprecher.
Sorgen Sie für einen flachen Montageort in einer Höhe von ±
1.5m. Verwenden Sie die Montageplatte als Muster und markieren
Sie die Löcher. Bohren Sie die Löcher mit einem elektrischen
Bohrer und einem geeigneten Bit. Stecken Sie einen Nylondübel
in jedes Loch. Befestigen Sie die Platte mit den geeigneten
Schrauben. Befestigen Sie das Videotelefon an der Platte.
c. Die Kamera installieren
Wählen Sie einen geeigneten Montageort und schützen Sie das
Gerät vor Wind, Regen und Schnee. Montieren Sie die Platte in
einer Höhe von ± 1.5m. Verwenden Sie die Montageplatte als
Muster und markieren Sie die Löcher. Bohren Sie die Löcher mit
einem elektrischen Bohrer und einem geeigneten Bit. Stecken Sie
einen Nylondübel in jedes Loch. Befestigen Sie den Bügel und die
Kamera an der Platte.
CAMSET18 VELLEMAN
Page 15

-
15
-
5. Anwendung
• Das Videotelefon ertönt und zeigt das aufgenommene Bild an sobald eine Person die Klingel der
Sprechanlage drückt. Das Bild bleibt 30 Sekunden sichtbar wenn Sie den Hörer nicht abnehmen. Nehmen Sie
den Hörer ab, dann bleibt das Bild 2 Minuten sichtbar.
• Öffnen Sie die Tür mit einem Druck auf der Entriegelungstaste wenn Sie ein elektrisches Schloss haben
(Spannung von 12V, Widerstand Schloss min. 15Ω).
• Drücken Sie die Monitortaste damit Sie in jedem Moment das Bild, das durch die Sprechanlage aufgenommen
wurde, anzuzeigen.
• Halten Sie die Paniktaste gedrückt, um den Alarm des Kamerasystems einzuschalten. Lassen Sie los, um den
Alarm auszuschalten.
• Regeln Sie die Helligkeit, den Kontrast, wenn nötig.
6. Problemlösung
Verwischtes Bild im Videotelefon
Die Sonne scheint auf dem Videotelefon. Versuchen Sie, den Schirm zu überschatten.
Unterbrochen oder undeutlich
Es gibt Interferenzen während der Kommunikation, es gibt Radiowellen der vorbeifahrenden Fahrzeuge oder es
gibt ein magnetisches Feld weil Sie den Hörer zu dicht beim Videotelefon halten. Entfernen Sie den Hörer vom
Videotelefon.
7. Technische Daten
Eingangsignal 1Vp-p @ 75Ω
Monitor
Stromversorgung 13.5VDC
Stromverbrauch max. 12.3W (0.5W in Standby)
Pixel 350 x 380 TV-Zeilen
Max. Länge Kabel 30m
Abmessungen 219 x 198 x 78mm
Gewicht 1.8kg
Kamera max. 300W
Stromversorgung 12VDC / 0.5A
Stromverbrauch max. 2.5W
Auflösung CMOS 380 TV-Zeilen
Minimale Lichtstärke 0.01 lux
Blickwinkel 92°
Abmessungen 130 x 96 x 31mm
Gewicht 0.6kg
Dauer der Wiedergabe
Klingeln 30s
Überwachung 10s
den Hörer abnehmen 2 min.
Alarmtaste 10s
Für mehr Informationen zu diesem Produkt, siehe www.velleman.eu.
Alle Änderungen ohne vorherige Ankündigung vorbehalten.
CAMSET18 VELLEMAN
Page 16

-
16
-
CAMSET18 – VIDEOCITOFONO BIANCO/NERO
Prestare molta attenzione durante l’installazione; toccare con il corpo i conduttori elettrici non isolati,
può causare elettroshock o folgorazione.
1. Introduzione
A tutti i residenti dell’Unione Europea
Importanti informazioni ambientali relative a questo prodotto
Questo simbolo riportato sul prodotto o sull’imballaggio, indica che è vietato smaltire il prodotto nell’ambiente
al termine del suo ciclo vitale in quanto può essere nocivo per l’ambiente stesso.
Non smaltire il prodotto (o le pile, se utilizzate) come rifiuto urbano indifferenziato; dovrebbe essere smaltito
da un’impresa specializzata nel riciclaggio.
Per informazioni più dettagliate circa il riciclaggio di questo prodotto, contattare l’ufficio comunale, il
servizio locale di smaltimento rifiuti oppure il negozio presso il quale è stato effettuato l’acquisto.
La ringraziamo per aver acquistato questo prodotto Velleman! Si prega di leggere attentamente le informazioni
contenute nel presente manuale prima di utilizzare il dispositivo. Assicurarsi che l’apparecchio non sia stato
danneggiato durante il trasporto; in tale evenienza, contattare il proprio fornitore.
Il set comprende: 1 unità interna con monitor, 1 staffa di fissaggio per unità monitor, 1 unità esterna con telecamera, 1
staffa di fissaggio per unità esterna, 1 squadretta metallica, 10 metri di cavo per il collegamento elettrico, 1 adattatore di
rete ed il presente manuale utente.
2. Informazioni relative alla sicurezza
• I danni derivanti dall’inosservanza delle indicazioni fornite nel presente manuale non sono coperti da garanzia; il
venditore non sarà ritenuto responsabile di eventuali danni cagionati a cose o persone.
• Si consiglia di far eseguire l’installazione del dispositivo, ed eventuali manutenzioni, ad un tecnico qualificato.
• Non aprire il dispositivo onde evitare elettroshock.
• Installare l’unità monitor in un locale ben ventilato e lontano dalla luce diretta del sole.
• Pulire regolarmente l’apparecchio con un panno umido (non usare alcol o solventi).
• Eventuali danni causati da modifiche apportate al dispositivo, da parte dell’utente, non sono coperti dalla
garanzia.
• Tenere il dispositivo lontano dalla portata di bambini e di persone non qualificate.
3. Descrizione
1. monitor 4”
2. LED power
3. tasto monitoraggio
4. tasto allarme
5. tasto apriporta
6. microfono
7. altoparlante
8. regolazione luminosità
9. regolazione contrasto
10. regolazione volume
11. auricolare
1. obiettivo telecamera
2. Illuminatore IR per visione notturna
3. altoparlante
4. campanello
5. microfono
CAMSET18 VELLEMAN
Page 17

-
17
-
4. Collegamento e installazione
a. Collegamento elettrico
Eseguire i collegamenti elettrici tra le due unità seguendo lo
schema riportato a fianco. I terminali 4 e 5 devono essere
collegati all’elettroserratura. Al connettore 5 dell’unità monitor
deve essere collegata la spina dell’adattatore di rete fornito in
dotazione (13,5VDC).
b. Installazione dell’unità monitor
Installare l’unità monitor su di una parete realizzata con materiale
non infiammabile lontana da prodotti chimici, eccessivo calore,
umidità, luce diretta del sole e da ogni altra fonte di calore o di
campi elettromagnetici come ad esempio televisori o casse
acustiche. Assicurarsi che la superficie di fissaggio sia piana.
Posizionare la piastra di fissaggio ad un’altezza di circa 1,5m da
terra, quindi contrassegnare con una matita i punti di foratura.
Praticare i fori sulla parete utilizzando un trapano elettrico ed una
punta adeguata. Fissare la piastra con i tasselli e le viti fornite in
dotazione quindi agganciare a questa l’unità monitor.
c. Installazione dell’unità esterna
Collocare l’unità esterna in un punto
lontano da pioggia, neve e dalla luce
diretta del sole. Posizionare il supporto
ad un’altezza di circa 1,5m da terra
quindi contrassegnare con una matita i
punti di foratura. Praticare i fori sulla
parete utilizzando un trapano elettrico ed
una punta adeguata. Fissare il supporto
con i tasselli e le viti fornite in dotazione
quindi inserire l’unità esterna nel relativo alloggiamento bloccandola
con la squadretta metallica e la vite 3MA incluse nella confezione.
5. Funzionamento
• Non appena un visitatore preme il pulsante del campanello (4), l’unità interna emette un suono acustico e
l’immagine ripresa dall’unità esterna appare sul monitor. Sollevare la cornetta per dialogare con il visitatore
(l’immagine rimane visualizzata per 2 minuti). Per terminare la comunicazione riporre la cornetta: il monitor si
spegne automaticamente. Se la cornetta non viene sollevata il monitor si spegne dopo circa 30 secondi.
• Per aprire la porta dotata di elettroserratura (opzionale, 12V, 15Ω min.) premere il tasto apriporta (5).
• Premere il tasto (3) per visualizzare in qualsiasi momento l’immagine ripresa dalla telecamera dell’unità
esterna.
• Tenere premuto il tasto allarme (4) per attivare l’allarme acustico sull’unità esterna. Rilasciare il tasto per
interrompere l’allarme.
• Se necessario, agire sui comandi (8) (9) (10) per regolare luminosità, contrasto e volume.
CAMSET18 VELLEMAN
Page 18

-
18
-
6. Analisi guasti
Immagine poco chiara sullo schermo
Il monitor è colpito dai raggi solari. Provare a fare ombra con la mano.
Immagine assente od offuscata
Vi è la presenza di disturbi sul cavo di collegamento, presenza di onde radio o di forti campi elettromagnetici
dovuti alla vicinanza di apparecchi radio. Allontanare questi apparecchi dall’unità monitor.
7. Specifiche tecniche
Segnale d’ingresso 1Vp-p @ 75Ω
Unità monitor
Alimentazione 13,5VDC
Potenza assorbita max. 12,3W (0,5W in standby)
Pixel 350 x 380 linee TV
Max. lunghezza cavo di collegamento 30m
Dimensioni 219 x 198 x 78mm
Peso 1,8kg
Unità telecamera max. 300W
Alimentazione 12VDC / 0,5A
Potenza assorbita max. 2,5W
Risoluzione sensore CMOS 380 linee TV
Sensibilità 0,01 lux
Angolo di ripresa 92°
Dimensioni 130 x 96 x 31mm
Peso 0,6kg
Durata visualizzazione immagine
Chiamata (cornetta non sollevata) 30secondi
Monitoraggio 10 secondi
Risposta (cornetta sollevata) 2 minuti
Tasto allarme 10 secondi
Per ulteriori informazioni relative a questo prodotto, vi preghiamo di visitare il nostro sito www.velleman.eu.
Le informazioni contenute in questo manuale possono essere soggette a modifiche senza alcun preavviso.
CAMSET18 VELLEMAN
 Loading...