

Page 1
CAMIP4
REAL PLUG AND PLAY IP COLOUR CAMERA
REAL PLUG-AND-PLAY IP-KLEURENCAMERA
CAMÉRA COULEUR IP REAL PLUG-AND-PLAY
CÁMARA COLOR IP REAL PLUG-AND-PLAY
REAL PLUG-AND-PLAY IP-FARBKAMERA
USER MANUAL 3
GEBRUIKERSHANDLEIDING 19
NOTICE D’EMPLOI 35
MANUAL DEL USUARIO 51
BEDIENUNGSANLEITUNG 67
Page 2
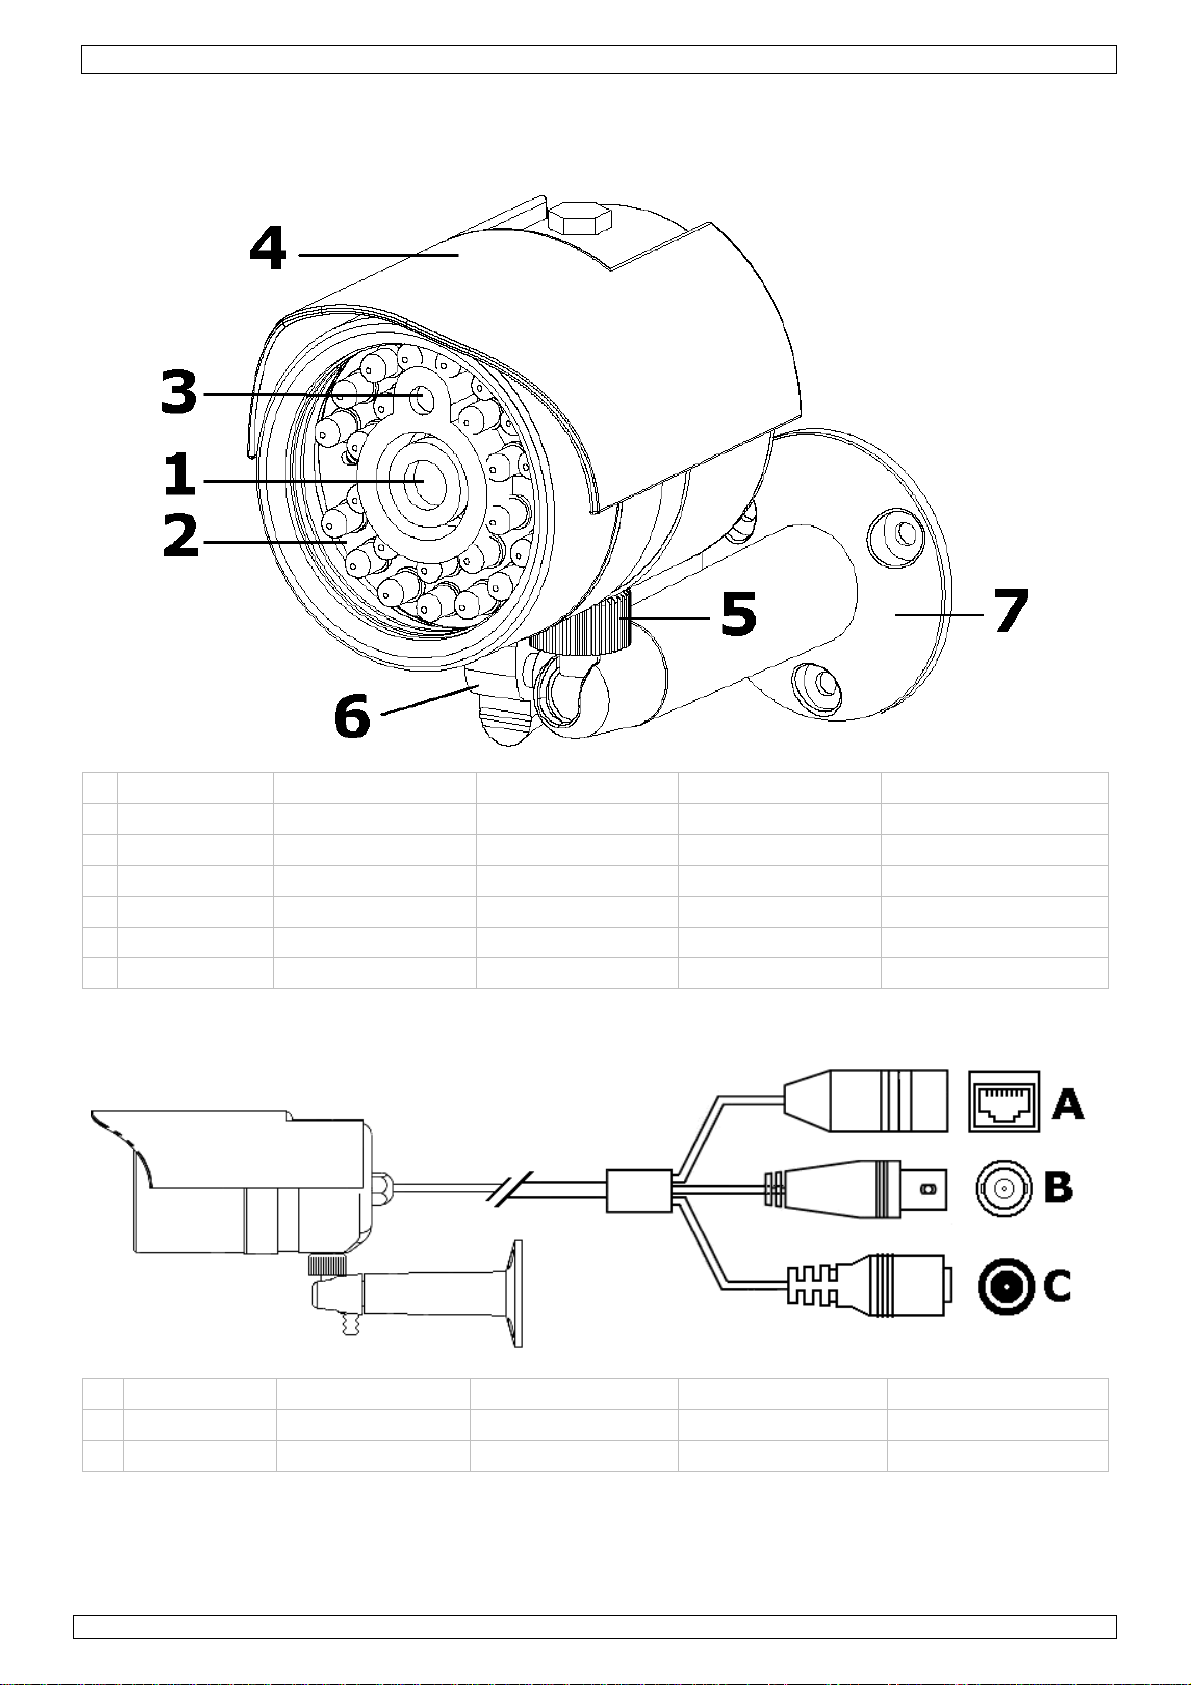
Table 1
CAMIP4
1 lens lens objectif óptica Objektiv
2 IR LEDs IR-leds DEL IR LEDs IR IR-LEDs
3 light sensor lichtsensor capteur sensor Lichtsensor
4 sunshield zonnekap pare-soleil capa antisolar Sonnenblende
5 camera bolt gewricht articulation articulación Gelenk
6 position bolt klemschroef vis de fixation tornillo de fijación Befestigungsschraube
7 bracket beugel étrier soporte Halterung
A RJ45 RJ45-stekker fiche RJ45 conector RJ45 RJ45-Stecker
B BNC BNC-stekker fiche BNC conector BNC BNC-Stecker
C 12VDC in 12 VDC-ingang entrée 12 VCC entrada de 12 VCC 12 VDC-Eingang
17/07/2009 © 2008 Velleman nv
2
Page 3
CAMIP4 Rev. 02
User manual
1. Introduction
To all residents of the European Union
Important environmental information about this product
This symbol on the device or the package indicates that disposal of the device after its
lifecycle could harm the environment. Do not dispose of the unit (or batteries) as unsorted
municipal waste; it should be taken to a specialized company for recycling. This device
should be returned to your distributor or to a local recycling service. Respect the local
environmental rules.
If in doubt, contact your local waste disposal authorities.
Thank you for choosing Velleman! Please read the manual thoroughly before bringing this device into
service. If the device was damaged in transit, do not install or use it and contact your dealer. Damage
caused by disregard of certain guidelines in this manual is not covered by the warranty and the
dealer will not accept responsibility for any ensuing defects or problems.
2. Safety Instructions
Keep the device away from children and unauthorised users.
Risk of electric shock when opening the cover.
DO NOT disassemble or open the cover. There are no user-serviceable parts
inside the device.
Refer to an authorized dealer for service and/or spare parts.
3. General Guidelines
Refer to the Velleman® Service and Quality Warranty on the last pages of this manual.
• Protect this device from shocks and abuse. Avoid brute force when operating the device.
• Protect the device against extreme heat, dust and moisture.
• Familiarise yourself with the functions of the device before actually using it.
• All modifications of the device are forbidden for safety reasons.
• Only use the device for its intended purpose. Using the device in an unauthorised way will void the
warranty.
• Damage caused by disregard of certain guidelines in this manual is not covered by the warranty and
the dealer will not accept responsibility for any ensuing defects or problems.
4. Features
• connect to the IP camera from anywhere in the world by using the software and a unique camera
ID number and password
• view live images and record from any PC in the world
• easy to use “CamView” software to view up to 16 cameras at the same time
• manually started, scheduled or motion triggered (software) recording
• adjustable bandwidth to balance between image resolution and internet access speed
5. Hardware installation
Refer to the illustrations on page 2 of this manual.
• Choose the location for the camera, keeping following guidelines in mind:
o do not install the camera in locations where extremely high or low temperatures or excessive
vibrations may occur.
o avoid mounting the camera near high electro-magnetic fields.
o do not aim the camera at the sun or other extremely bright objects or reflections (e.g. metal
doors).
• Use the mounting bracket [7] to determine the location of the mounting holes. Drill the holes and
secure the bracket [7] using 3 screws.
• Attach the camera to the mounting bracket [7] with the camera bolt [5]. The camera has two
mounting holes, make sure to use the one that provides an upright image. This depends on the type
of mounting (ceiling or wall). When using the top hole (ceiling mounting or camera hanging on
bracket), place the sunshield [4] over the camera bolt [5] before mounting the camera. When using
17/07/2009 © 2008 Velleman nv
3
Page 4

CAMIP4 Rev. 02
the bottom hole (camera resting on top of the bracket), mount the sunshield [4] by using the top
hole and the included bolt and washer.
• Point the camera towards the zone of interest and tighten the position bolt [6].
• Connect the power connector [C] to the 12VDC power supply (incl.).
• Connect the BNC connector [B] to a monitor (not incl.) and/or to a computer network via the RJ45
connector [A]. If in doubt, contact your local network service provider.
6. Software installation
• The camera comes with a CD-ROM containing the CamView software. Insert the CDROM into a
suitable computer (refer to §9 - Technical specifications).
• Locate the CamViewInstaller-V1.04.xx.exe (xx is de current version number) and double click on
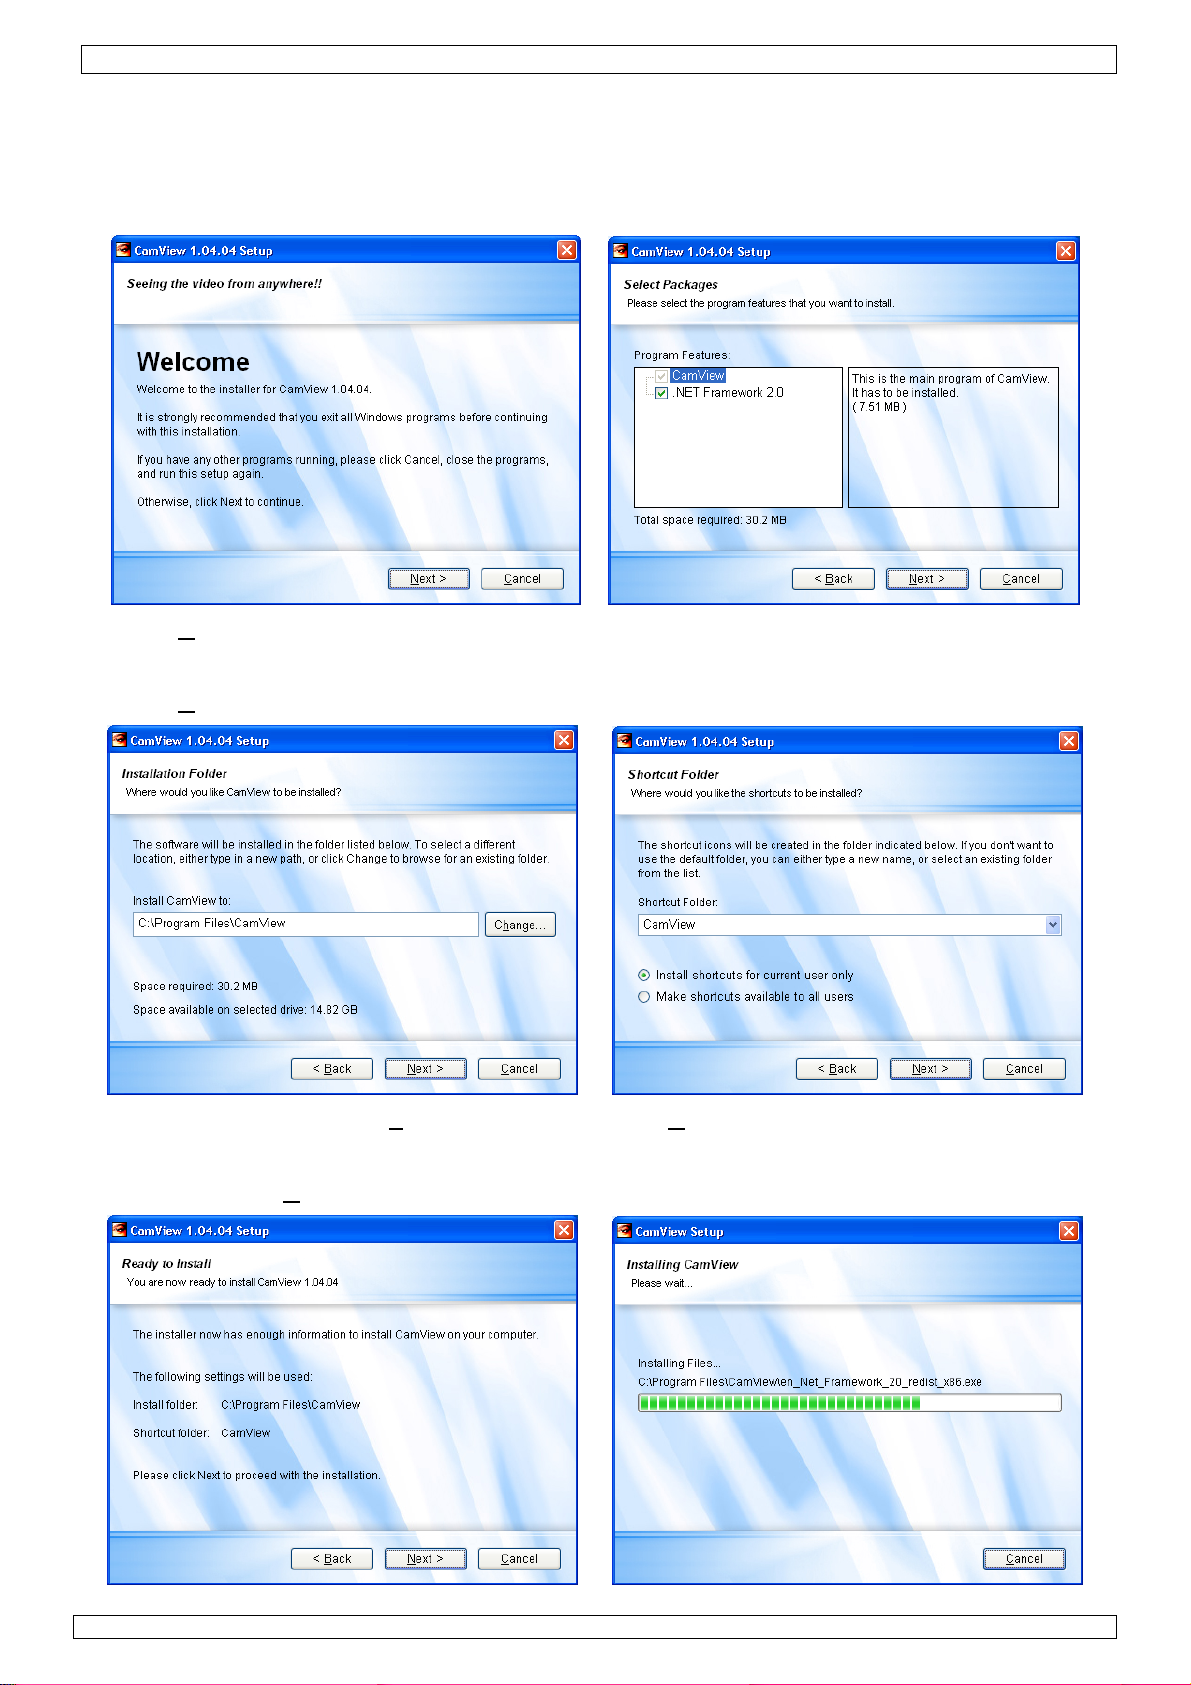
it. The installation starts and the welcome screen is shown.
• Click Next >. The Select Packages screen is shown.
• If Framework 2.0 is already installed on the computer, uncheck the checkbox. If in doubt, leave it
checked, the computer will check.
• Click Next >. The Installation Folder screen is shown.
• Select the desired location with the Change… button and click Next >. The Shortcut Folder
window appears.
• Select the desired location from the dropdown menu, select whether to make shortcuts available
for all users or not and click Next >. The Ready to Install window appears.
17/07/2009 © 2008 Velleman nv
4
Page 5
CAMIP4 Rev. 02
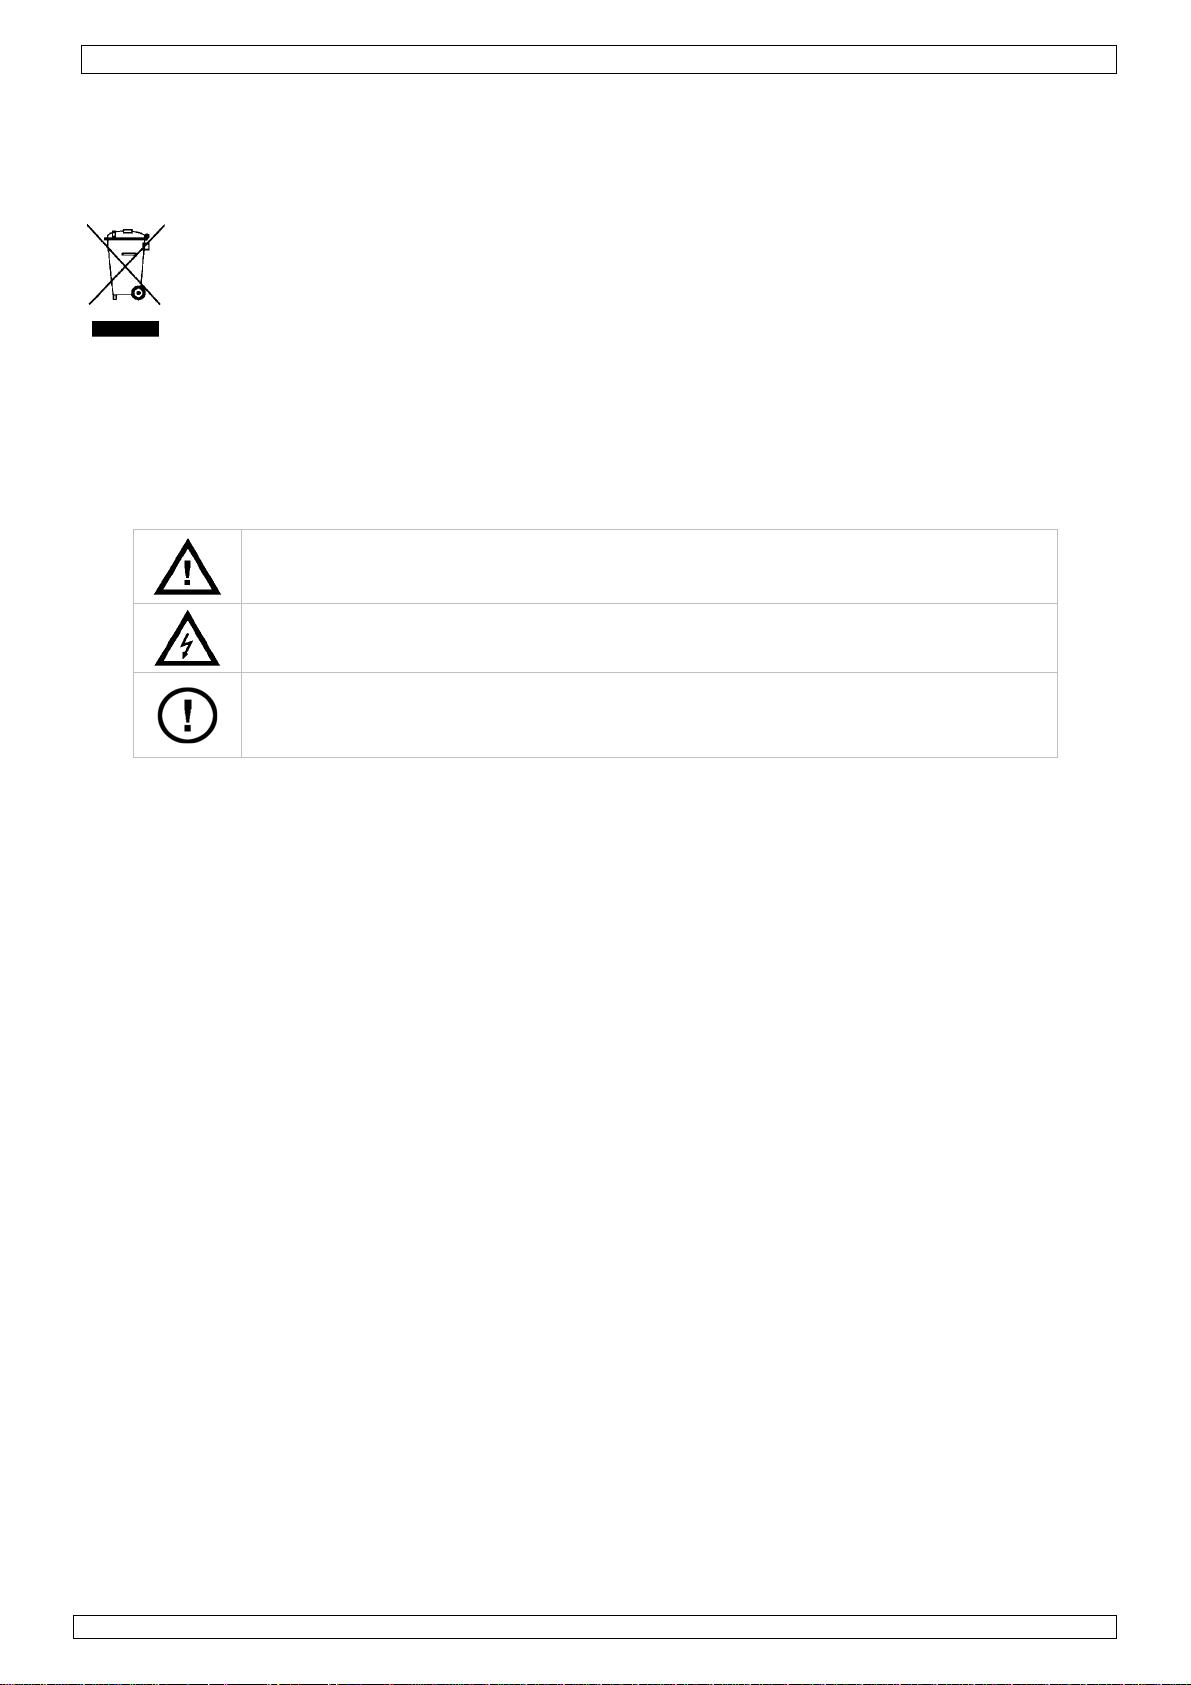
• Click < Back to change settings or Next > to start the installation.
• If Framework 2.0 (or higher) was already installed, a message is displayed. Click OK to continue
installation of the CamView software.
• The Installation Finished window appears. Click on Finish.
7. Software configuration
7.1 General
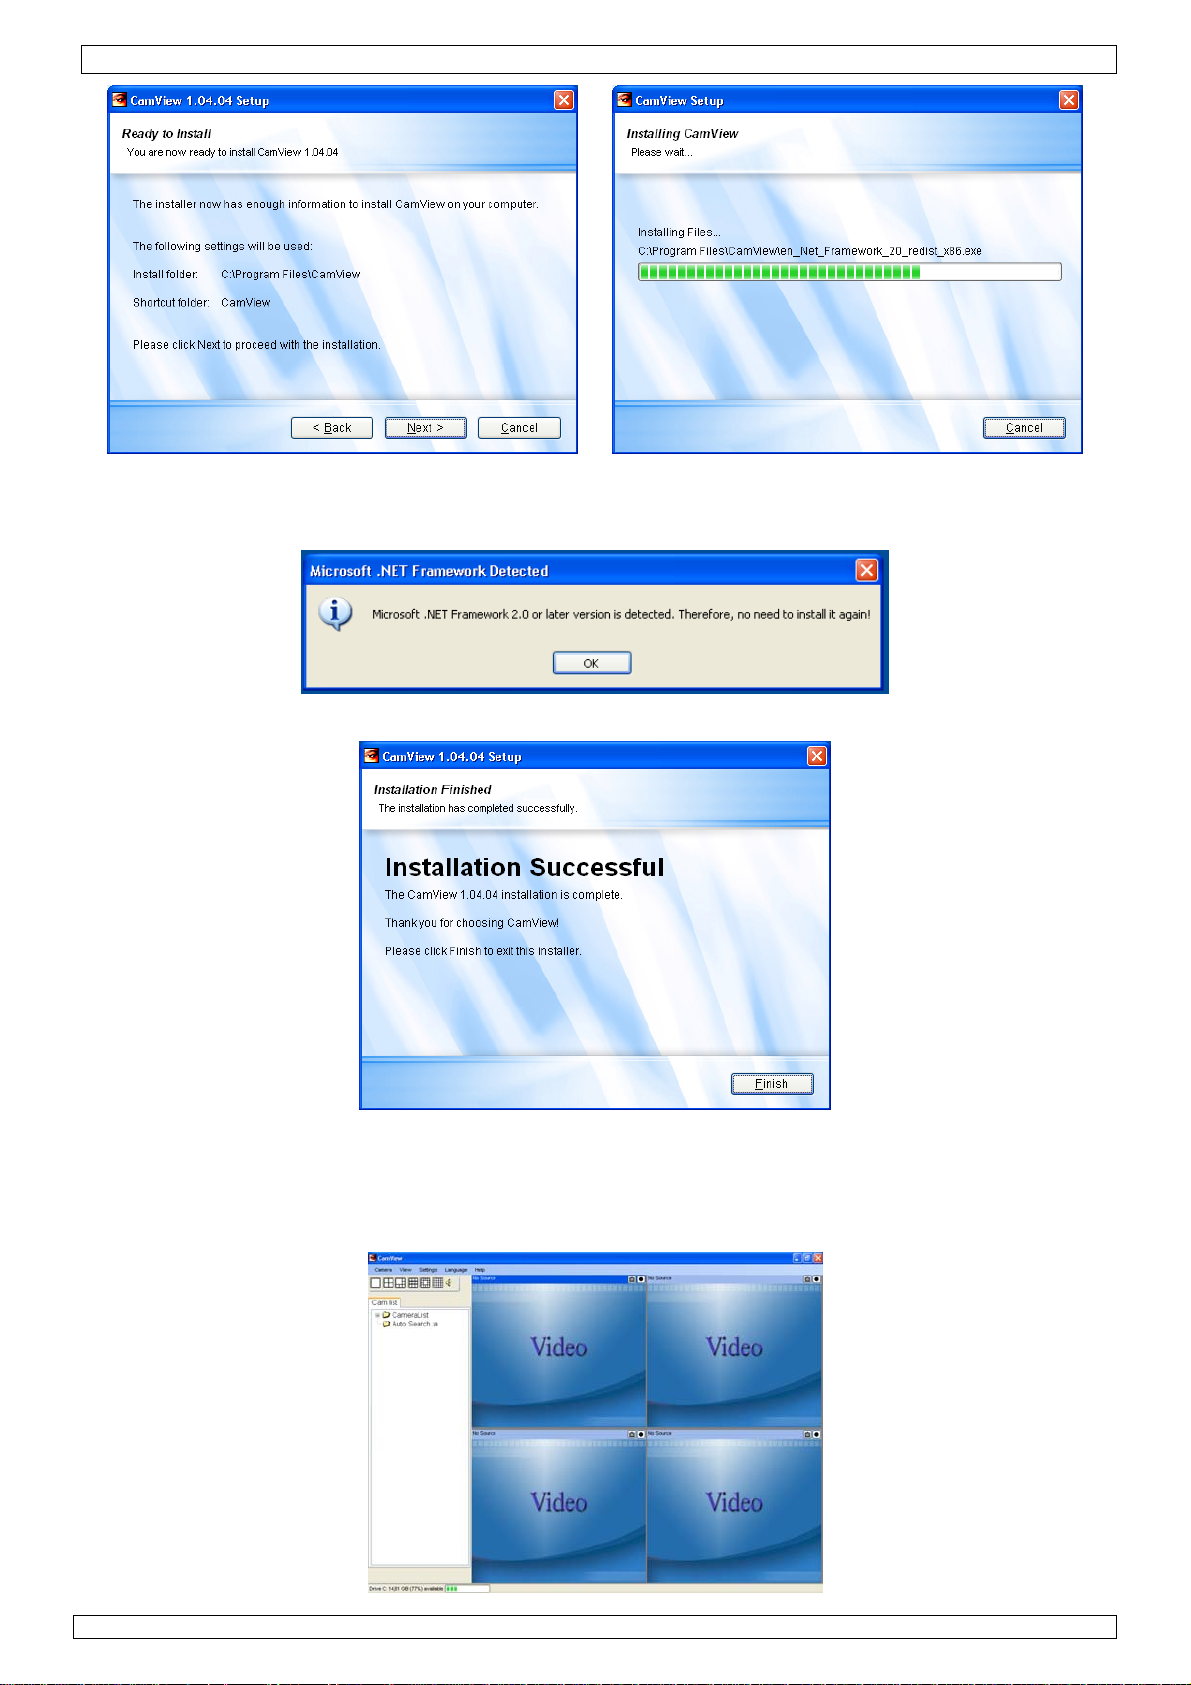
• To start the CamView software, locate the CamView icon on the desktop and click on it, or go to
Start → Programs → CamView.
17/07/2009 © 2008 Velleman nv
5
Page 6
CAMIP4 Rev. 02
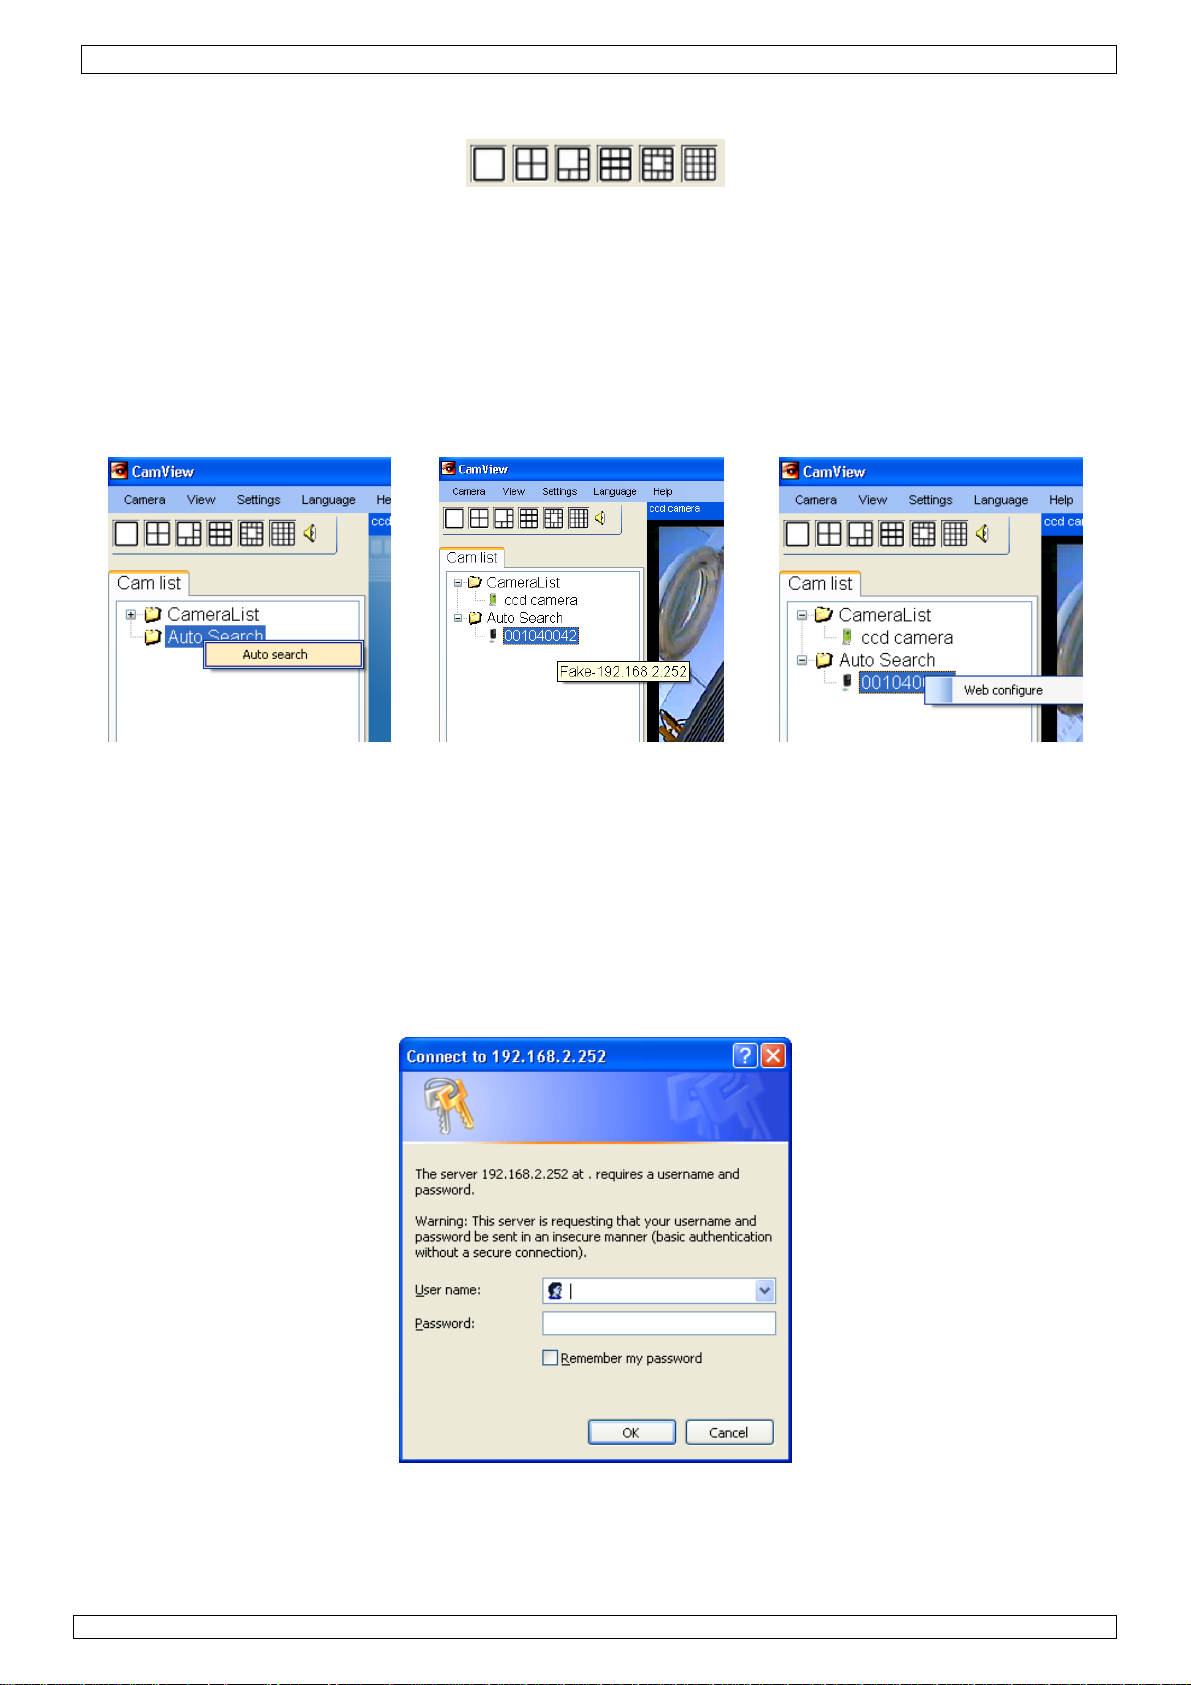
• The initial screen shows the display area(s) (Video). The layout can be changed and set to 1 – 4 –
6 – 9 – 13 or 16 display areas by clicking on the desired icon in the top left corner:
Note: the content (displayed camera) of each area can be set individually.
• The list of available cameras is shown on the left of the screen. When using the software for the
first time, the list will be empty.
7.2 Auto Search
• In order to use Auto Search, a camera must be connected to the same LAN (Local Area Network)
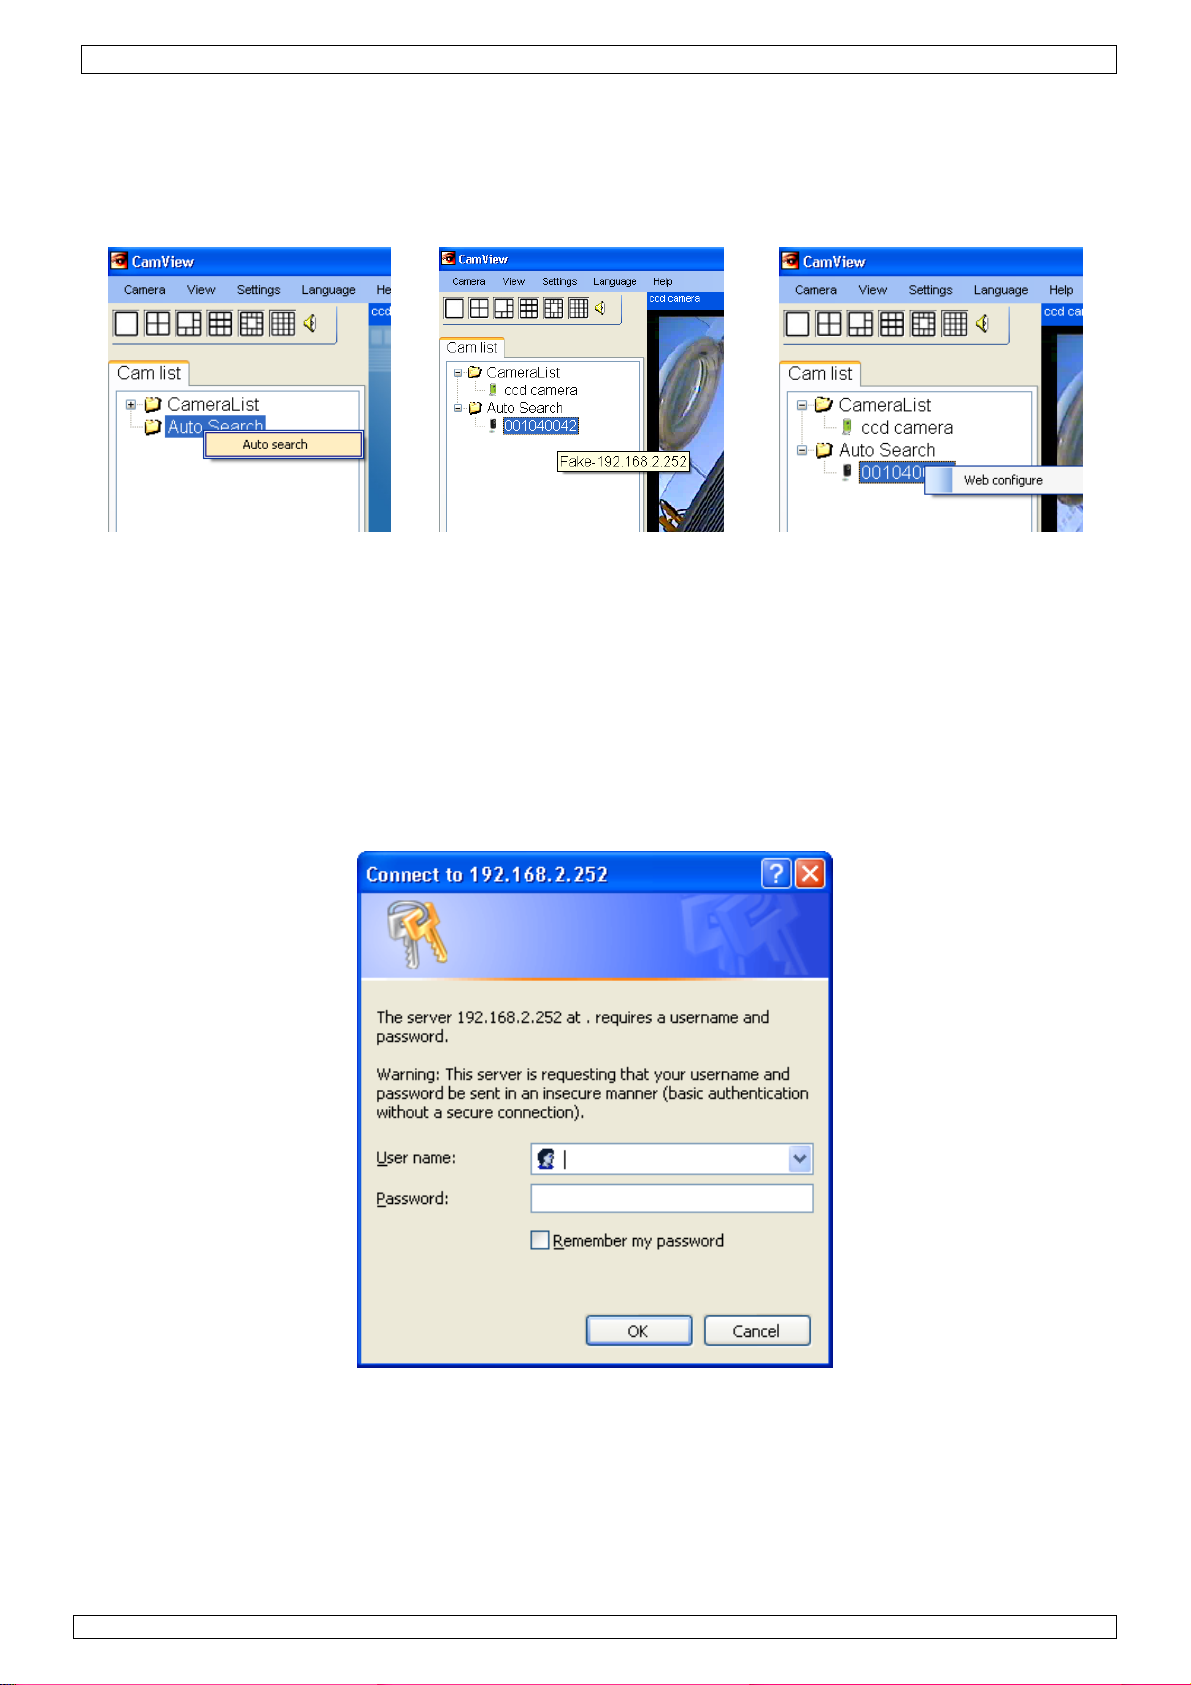
as the computer. Double-click on the Auto Search directory or right-click on Auto Search and
left-click again on Auto search to start searching the network.
Note: be aware that routers or firewalls might prevent the software from seeing the IP-camera. Get
advice from a network administrator when this is the case.
• The software interrogates the local LAN and shows all the found IP-camera IDs (e.g. 001040042)
under the Auto Search directory. Scroll the mouse over the camera ID to see the IP-address.
Note: a camera which is shown under the Auto Search directory is not available worldwide. It must
be moved to the Camera List (see § 7.4) to become accessible from another network.
7.3 Web configuration
• Right-click on the camera ID and left-click on Web configure to configure the camera using a
web browser.
Note: when configured in the appropriate way, the IP-camera can be reached from any
computer/web browser in the world. Simply type the IP-address into the address bar of the
web browser and enter the user name and password.
• The browser requires a username and password to set-up the camera. The default user name is
admin, no password required.
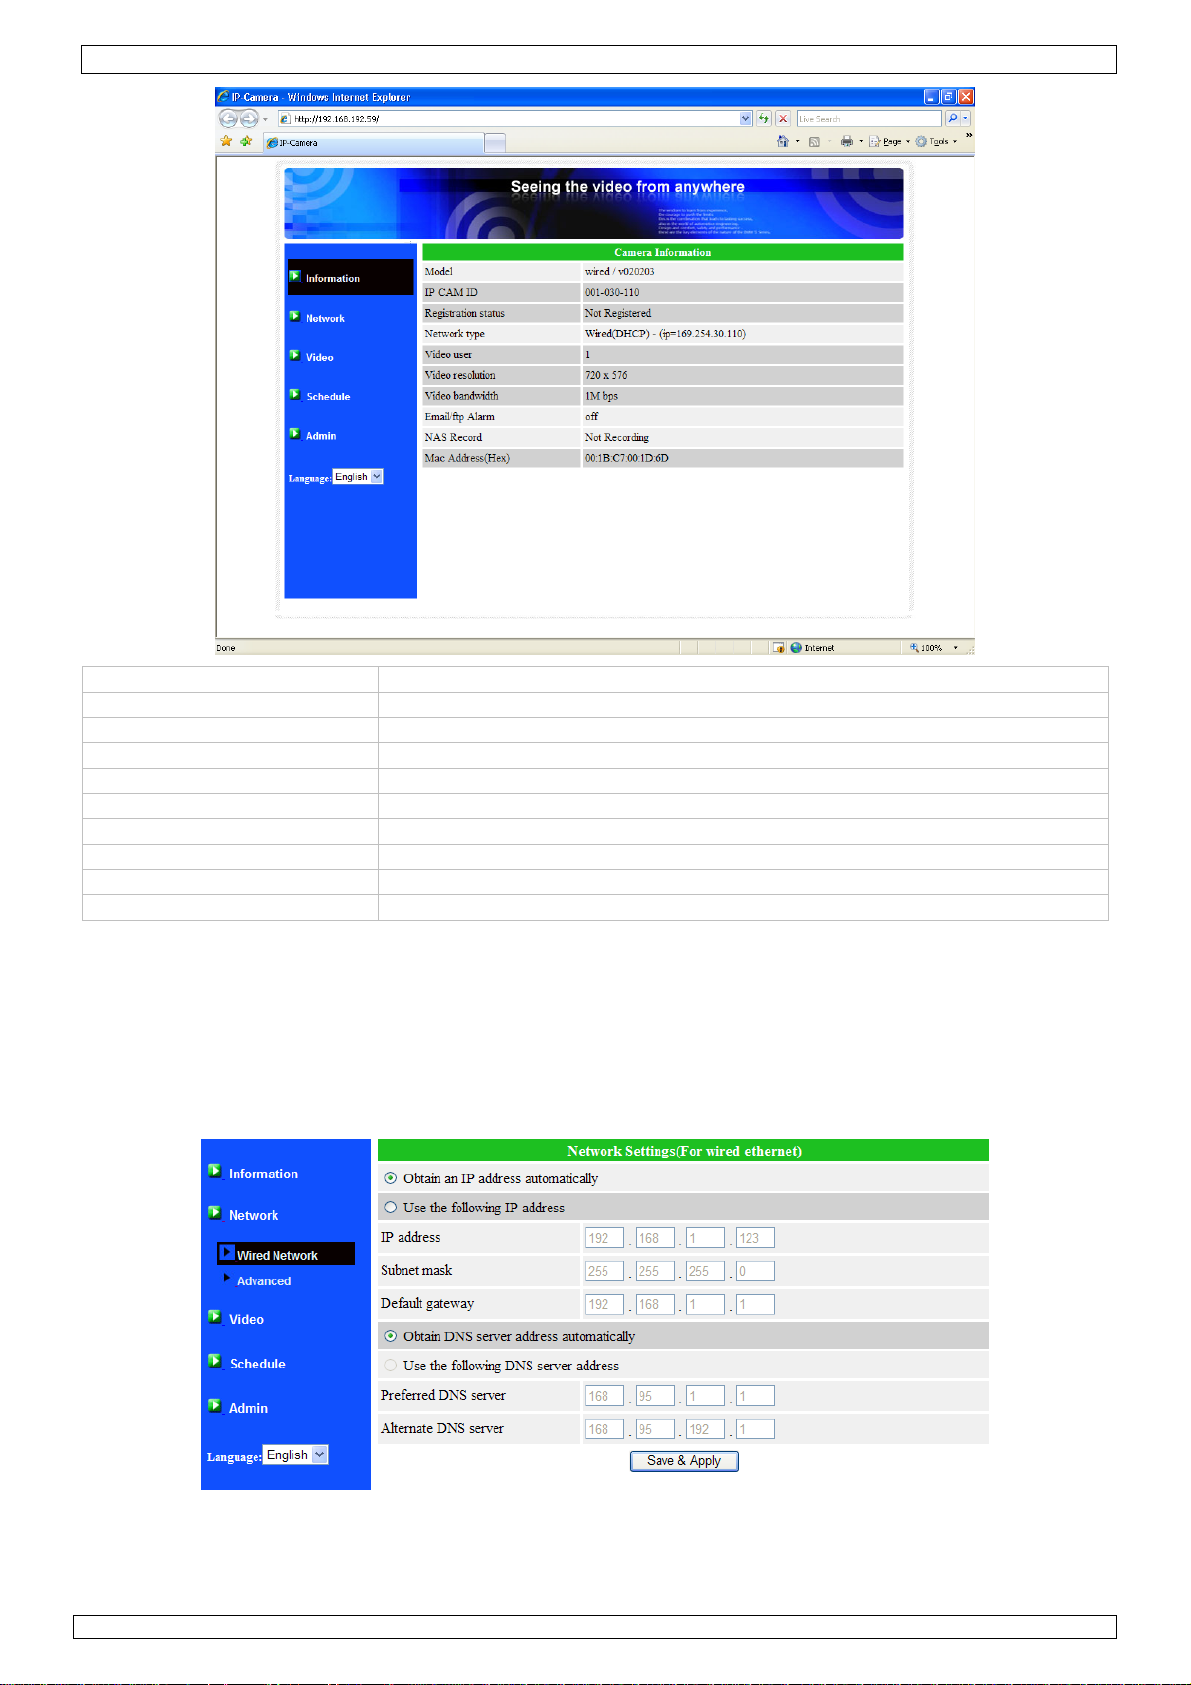
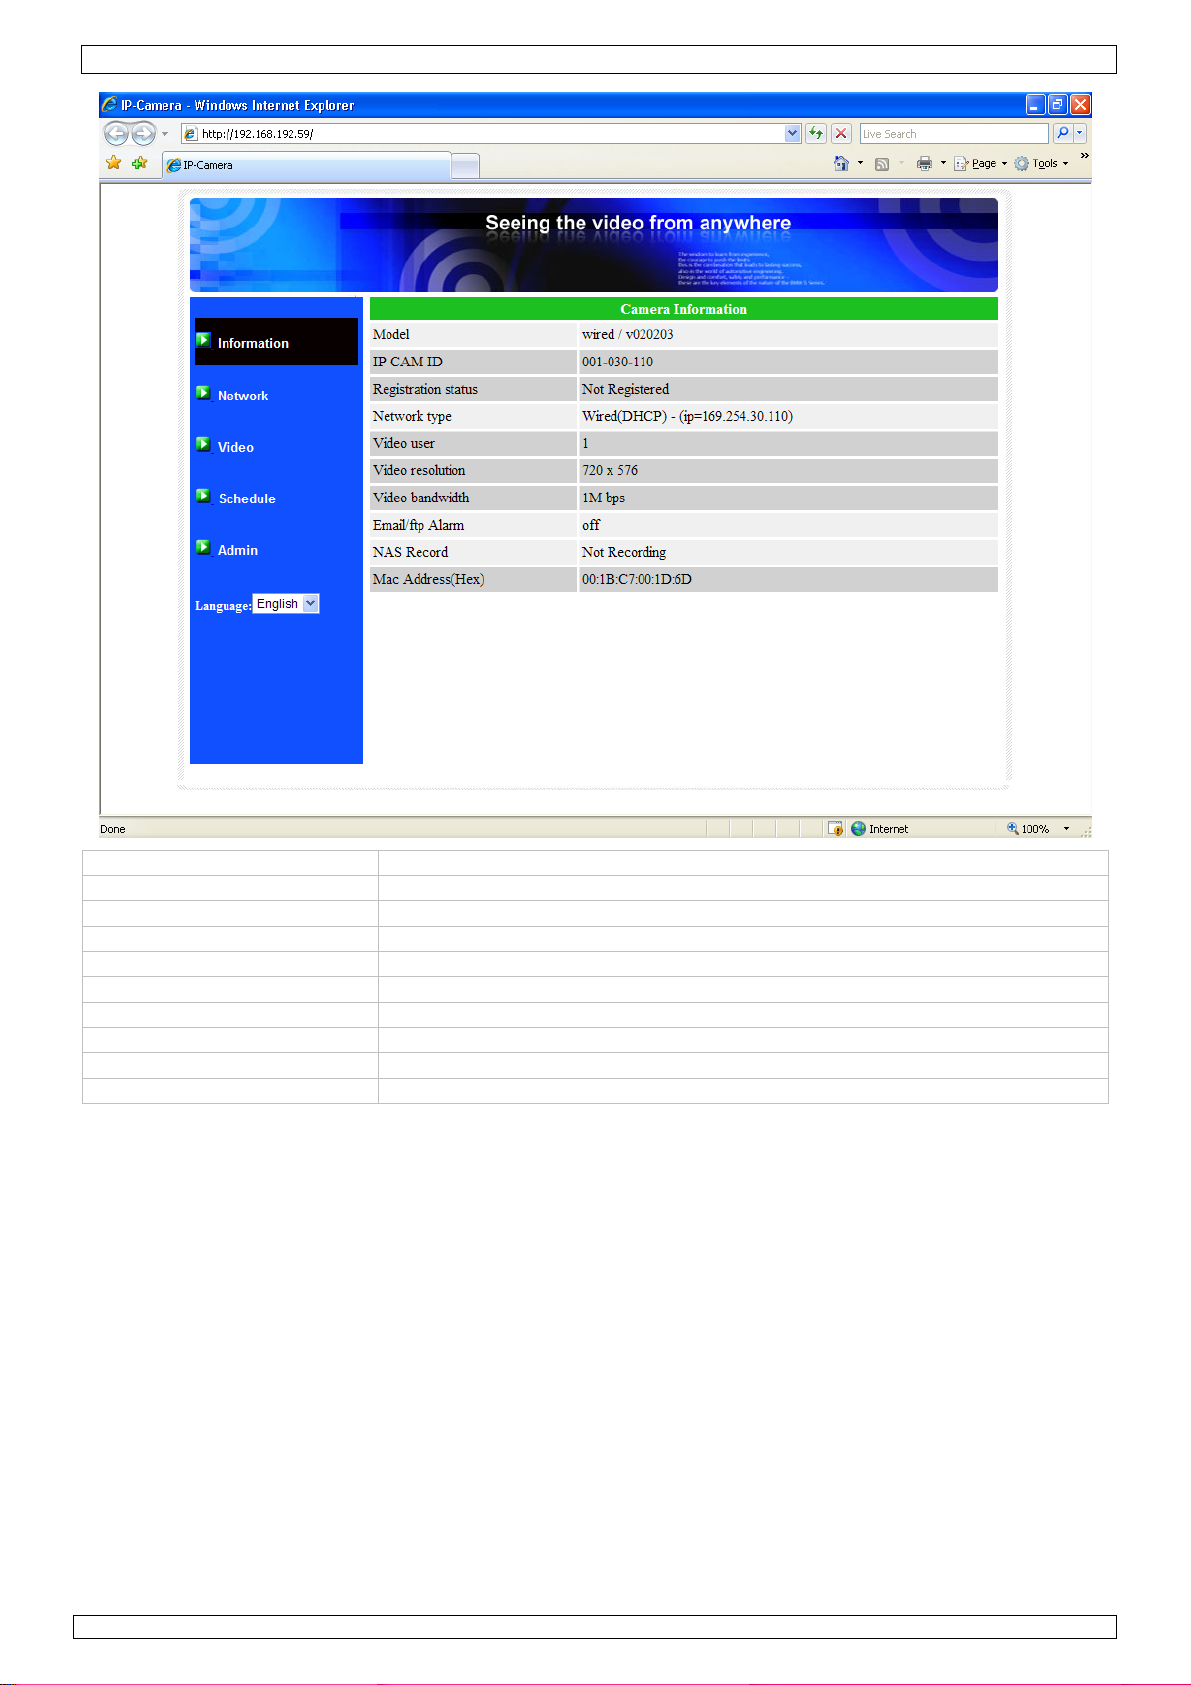
• When user name and password are validated, the information page is shown.
17/07/2009 © 2008 Velleman nv
6
Page 7
CAMIP4 Rev. 02
Model current firmware version
IP CAM ID camera identification number
Registration status is camera registered with CamView software or not.
Network type shows current network type
Video user number of people that currently access the camera
Video resolution current display resolution
Video bandwidth current bandwidth setting
Email/ftp Alarm Email and ftp alarm warning enabled
NAS Record NAS (Network Attached Storage) settings
Mac Address (Hex) Mac address of the camera
• Use the navigation items on the left of the screen to access the set-up pages.
• Select Video - Display to show live images of the camera within the browser window.
Note: this function requires an activeX component which will automatically be downloaded when
connected to the Internet. This may take some time to complete.
The size of the display can be set under Video Settings.
• Select Network to configure the network settings of the camera. Default setting is DHCP
(Dynamic Host Configuration Protocol), which will obtain an IP-address automatically. If DHCP is
not available, refer to your network administrator for correct settings.
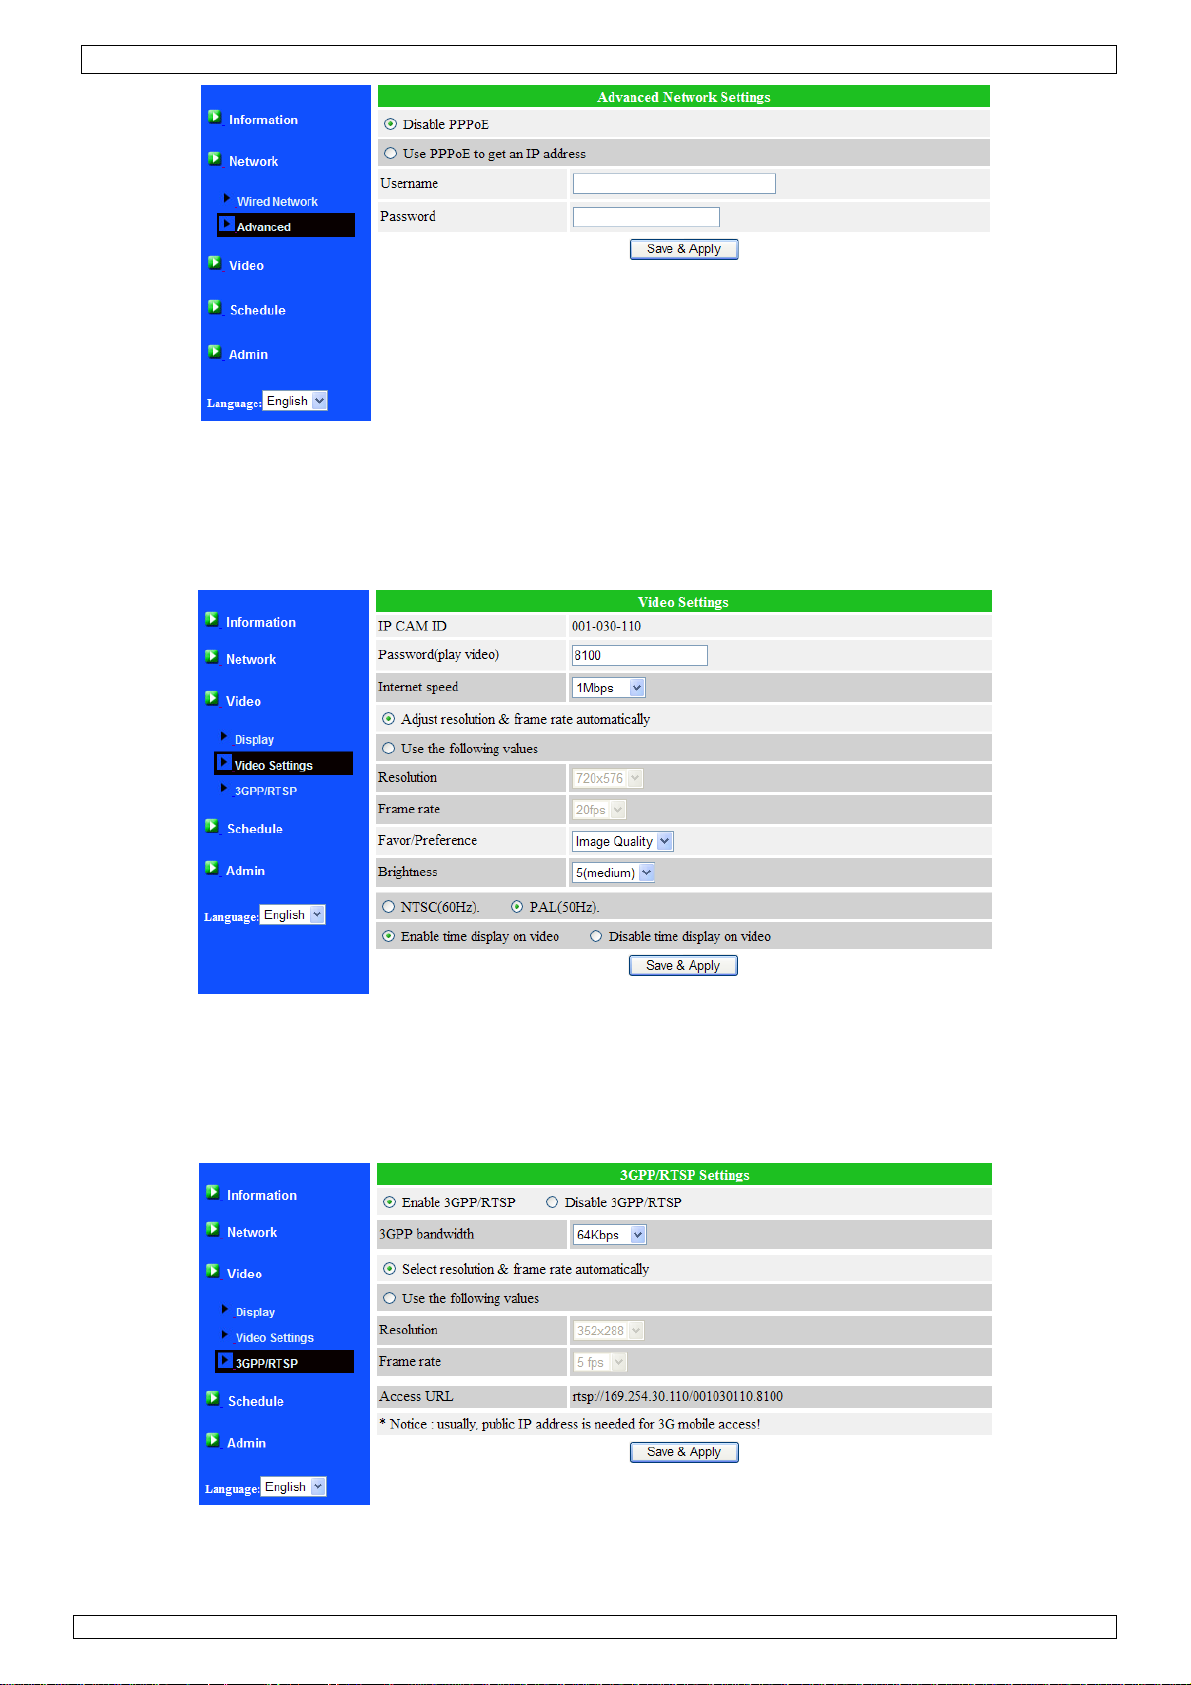
• Select Advanced Network to configure the camera for PPPoE connection (ADSL service). Enter
PPPoE user name and password.
17/07/2009 © 2008 Velleman nv
7
Page 8
CAMIP4 Rev. 02
Note: both DHCP/manual IP setting and PPPoE can be selected together. However, PPPoE will have
priority and will be used when possible.
• Select Video Settings to configure the video set-up. On this page, it is also possible to retrieve or
set the password which is required to get access to the video images.
Note: the original password can be found on the ID/Password card that is provided with the camera.
For security and privacy reasons, make sure to change the camera password
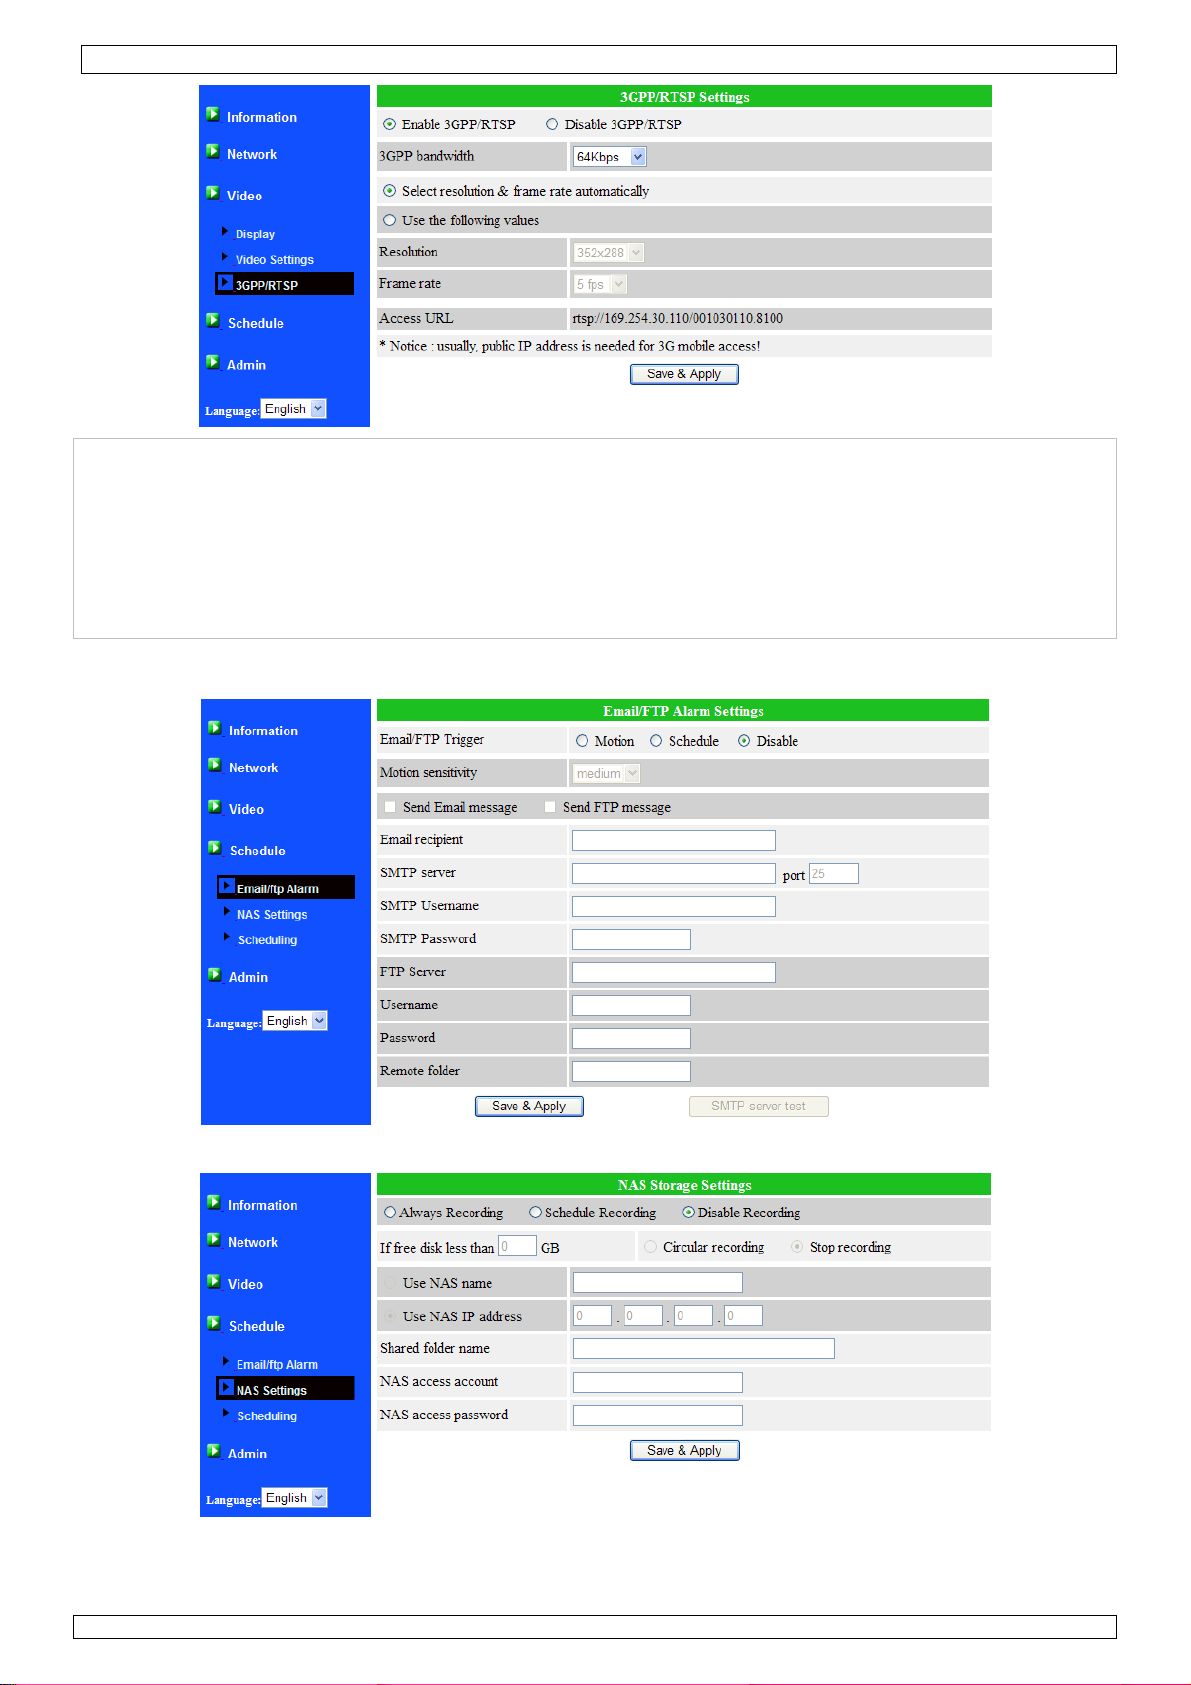
• The camera can also be viewed over a 3G mobile telephone network. To set-up this connection,
select 3GPP/RTSP. Copy the Access URL line into the 3G phone to receive images from the IP
camera. However, the format in which to enter the URL may be different depending on the 3G
mobile phone type - refer to the user manual that came with the 3G phone for more information.
Note: the last part of the URL is composed of the cameras’ ID followed by the video playback
password. This is unique for each camera.
17/07/2009 © 2008 Velleman nv
8
Page 9
CAMIP4 Rev. 02
Note: 3GPP/ISMA is using RTSP protocol for 3G mobile phones to display the video stream from some network devices,
including IP cameras. This camera supports the RTSP protocol and video/audio codec needed by 3GPP/ISMA. Users
only need to access the address rtsp://ip_cam_address/CAM_ID.password on the 3G mobile phone to access the
video stream of the IP camera. No other extra configuration is needed on the IP camera. Different 3G mobile phone
may need different operation to be able to key in the rtsp address, please contact the 3G mobile phone customer
service for more details.
The video quality and resolution is the same value as set on the “video settings” page. Since the bandwidth provided
by the 3G service is fewer than 256k bps, it is advised to configure the “Internet speed” of the IP camera to 128k or
64k bps.
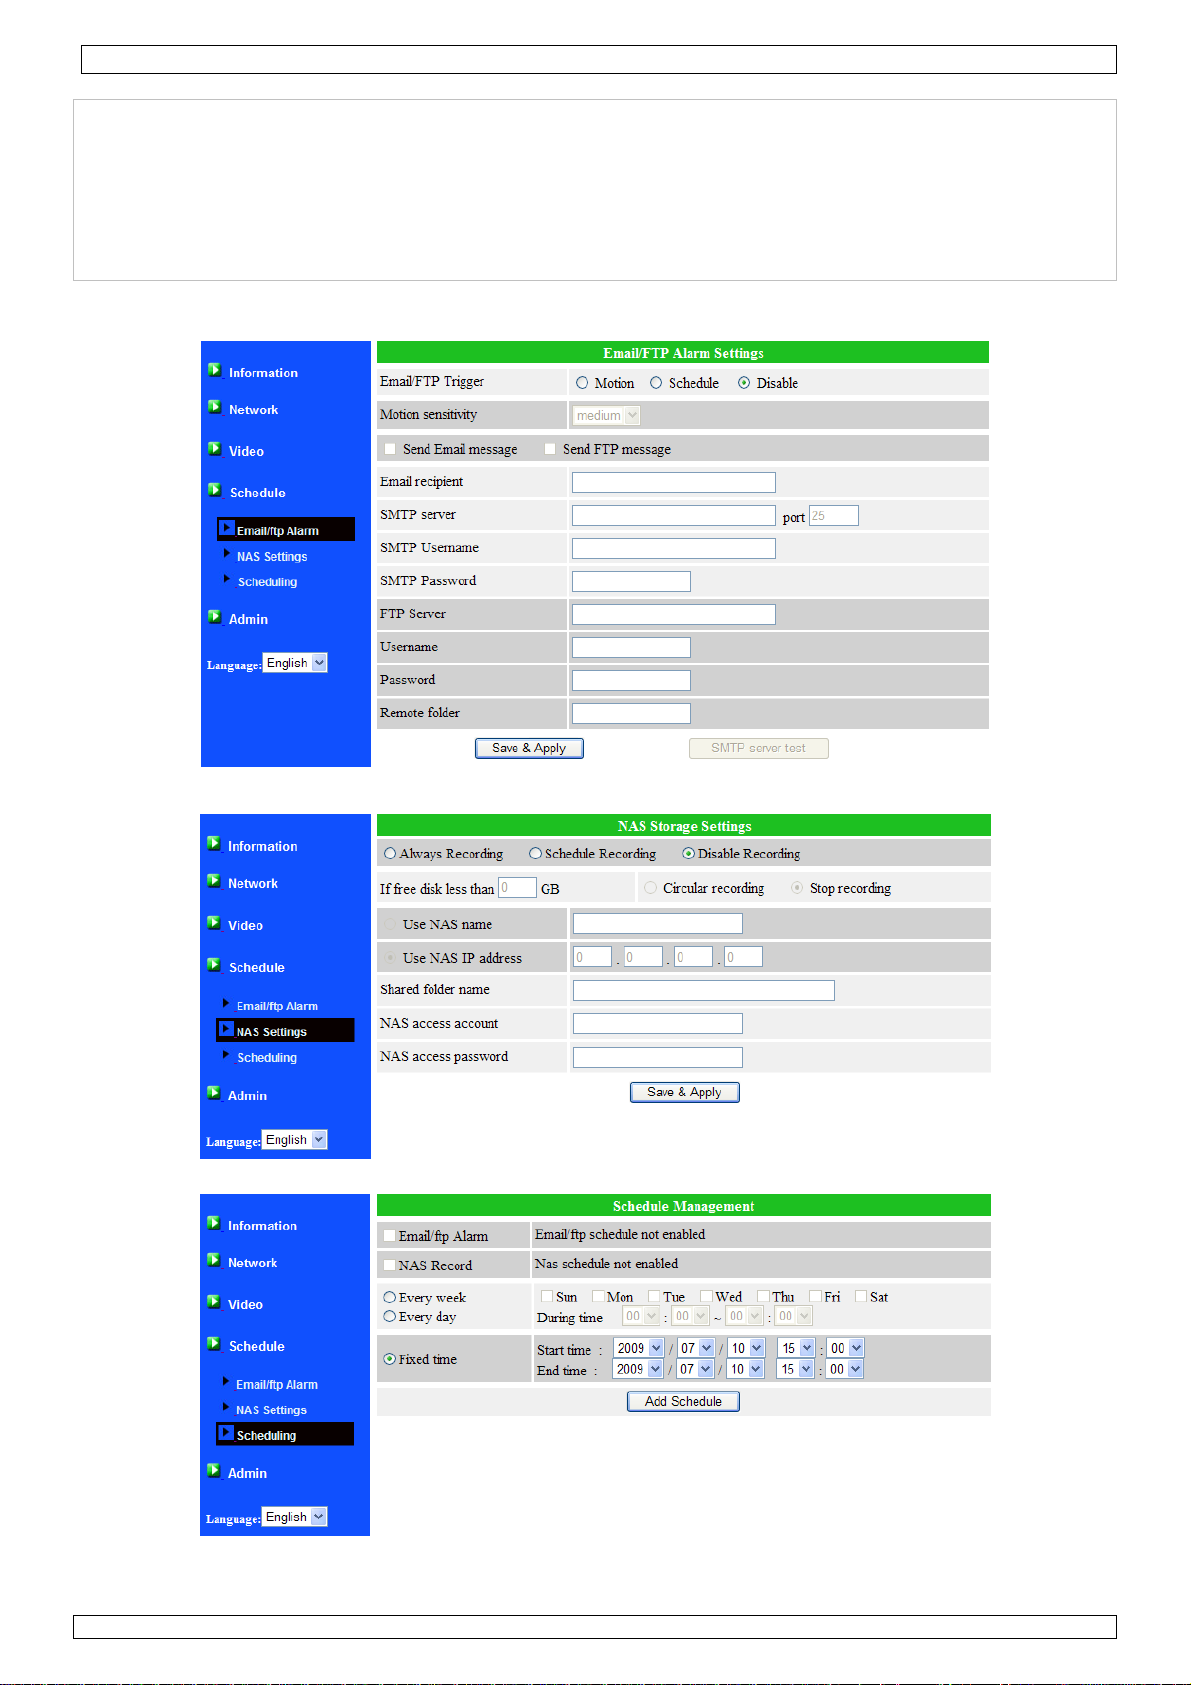
• When motion is detected, the IP-camera can send snapshots to an e-mail account or FTP server.
Use the Schedule – Email/ftp Alarm page to set up the e-mail account and/or FTP site.
• To configure a NAS (Network Attached Storage) system, go to the NAS Settings page.
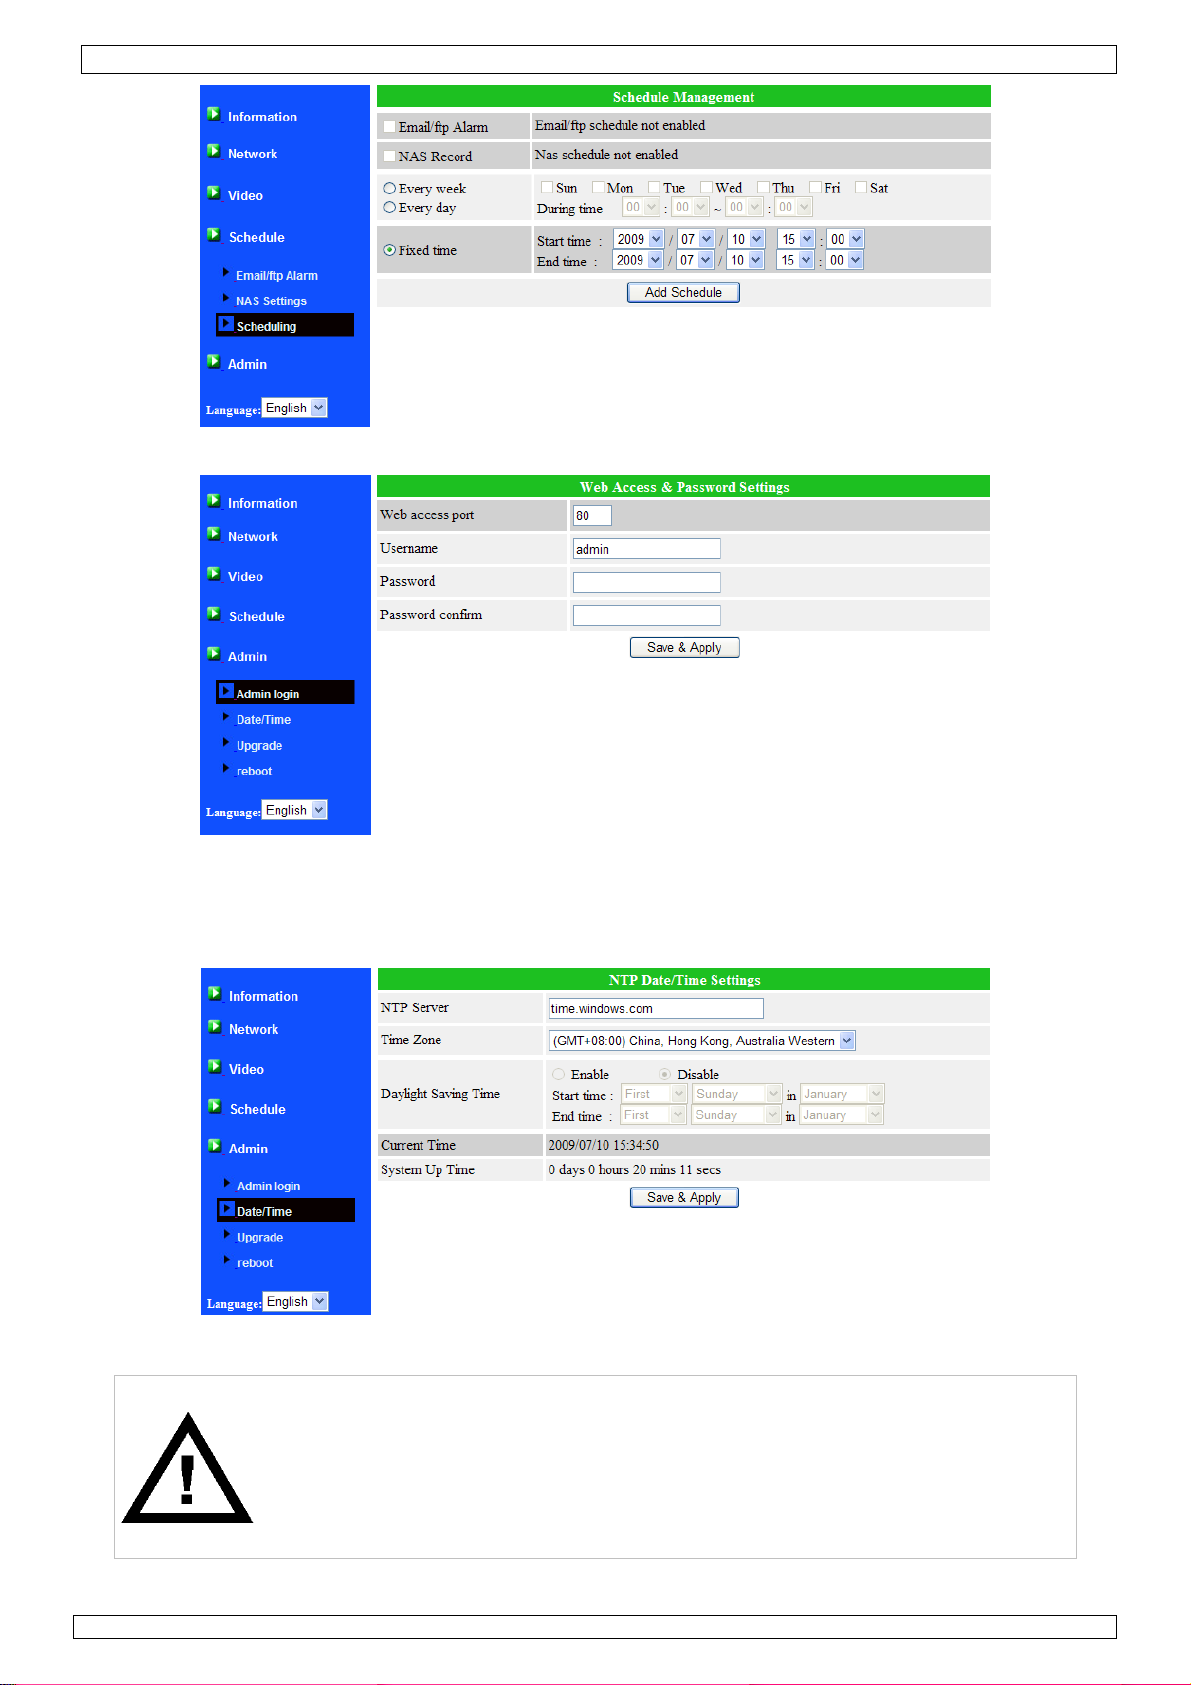
• The Email/ftp and NAS schedule can be enabled via the Scheduling page.
• To change administrator settings, go to the Admin - Admin login page. Change the administrator
password regularly to increase security.
17/07/2009 © 2008 Velleman nv
9
Page 10

CAMIP4 Rev. 02
Note: always remember the admin password, as it is not possible to configure the camera without
it.
• The NTP date and time settings can be set via the Date/Time menu. When connected to the
Internet, the camera can synchronise its internal date and time setting using a time server (e.g.
ntp.asql.co.uk - refer to www.ntp.org
for a list) through the NTP protocol.
• The firmware of the camera can be upgraded via the Upgrade page. Upgrade can be done from a
local file or using an ftp server.
Warning: be very careful when loading new firmware into the camera. Loading
wrong firmware will render it useless.
An upgrade should not be performed unless the necessity is proven.
The operation should be carried out by a qualified person only.
Never power off the camera during upgrade.
The manufacturer or dealer will not accept responsibility for any ensuing
defects or problems.
17/07/2009 © 2008 Velleman nv
10
Page 11
CAMIP4 Rev. 02
• The firmware filename can be found by browsing to the ftp-site (ftp:60.250.194.78), username
upgrade and password upgrade. Scroll through the available list and locate the correct version.
The name must start with VS316-gen.
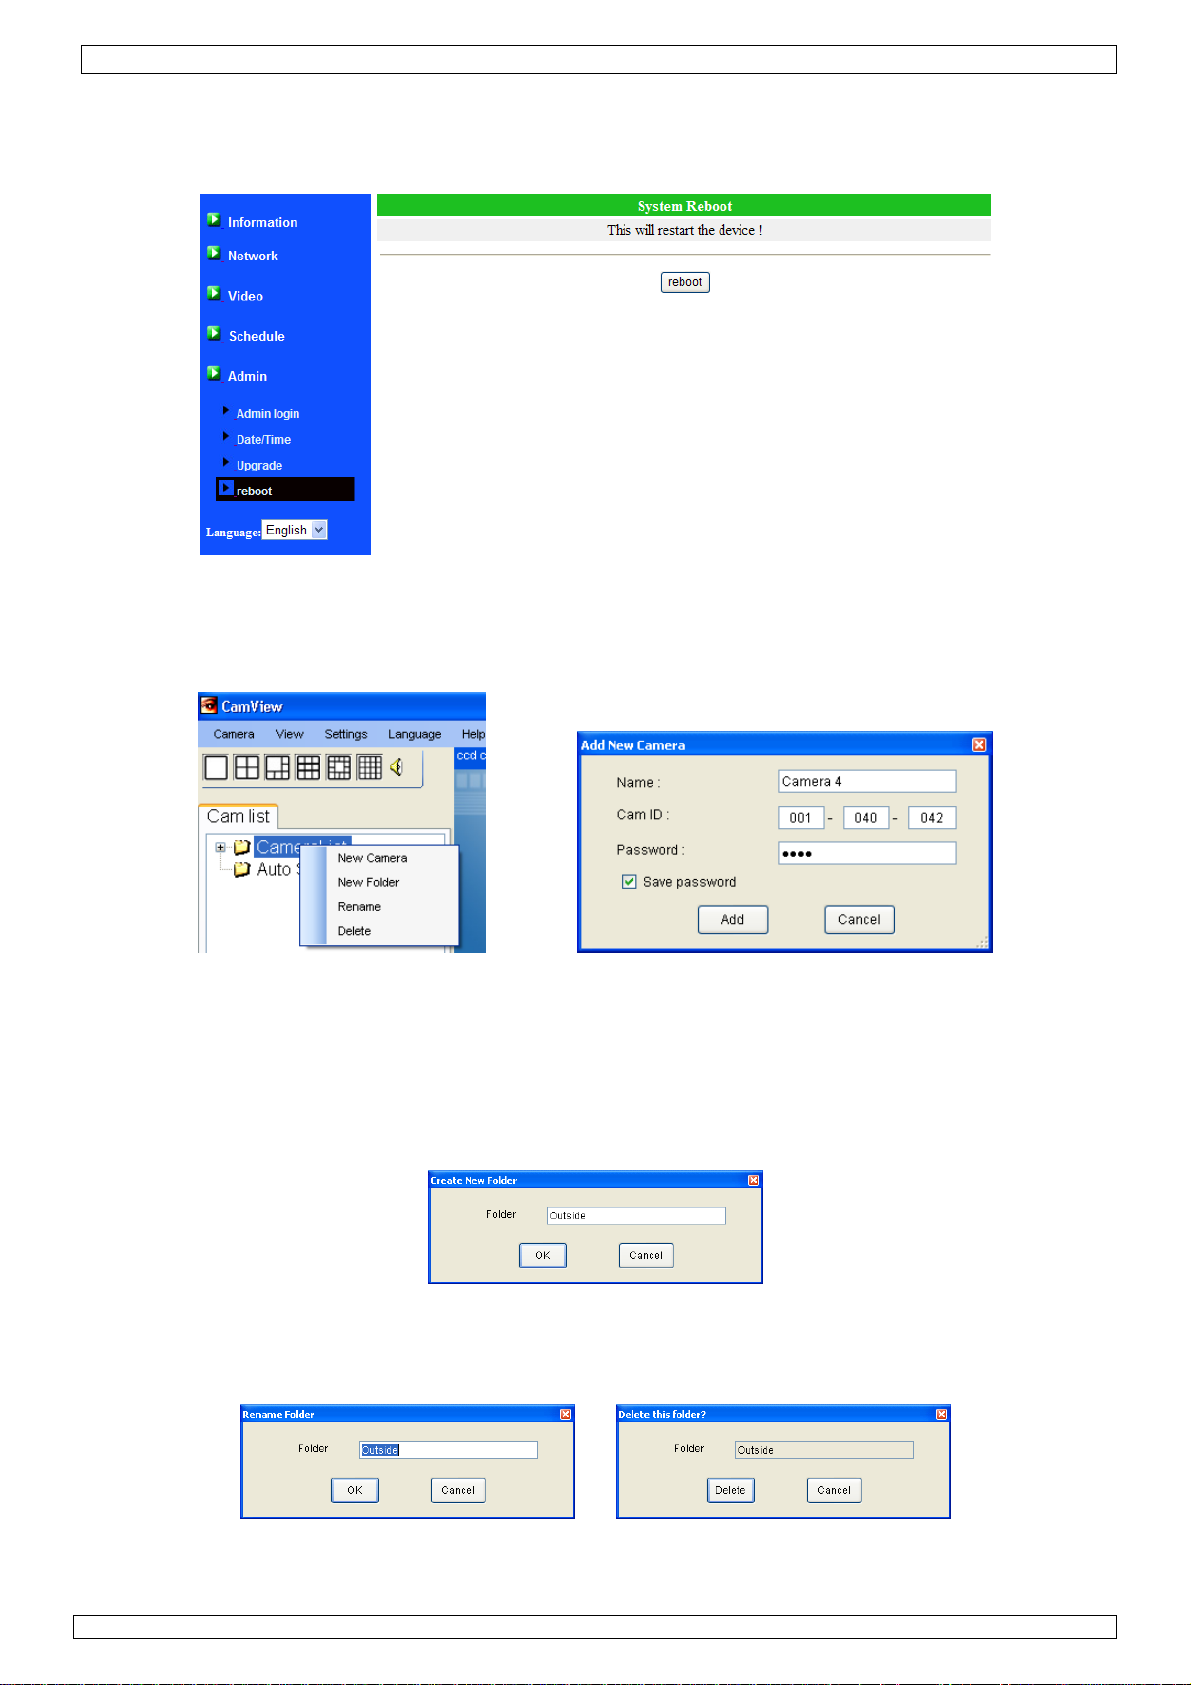
• To reboot the camera, go to the reboot page and click on Reboot.
7.4 Camera List
• Once a camera has been set-up in the Auto Search directory, it must be added to the Camera
List. Right-click on Camera List and left-click on New Camera.
Note: when the camera is not added to the Camera list, it will not be available worldwide.
• Give the camera a name (e.g. its location), enter the camera ID and password and click Add. The
camera now appears under the Camera List directory.
Note: the icon in front of the camera name indicates the status.
RED: the camera is offline, not connected to the Internet
YELLOW: camera is online, but not responding (e.g. due to router settings)
GREEN: camera is online and responding
• Cameras can be grouped and placed under specific folders. To create a new folder, right-click on
Camera List and left-click on New Folder. Give the folder a name and click OK.
• Simply drag & drop the desired cameras under the newly created folder.
• To rename a folder, right-click on the folder and left-click on Rename. Give a new name and click
OK.
Note: the folder names CameraList and Auto Search can not be renamed.
• To delete a folder, right-click on the folder and left-click on Delete.
17/07/2009 © 2008 Velleman nv
11
Page 12
CAMIP4 Rev. 02
Note: if there were cameras under the deleted folder, they will move back under the Auto Search
folder.
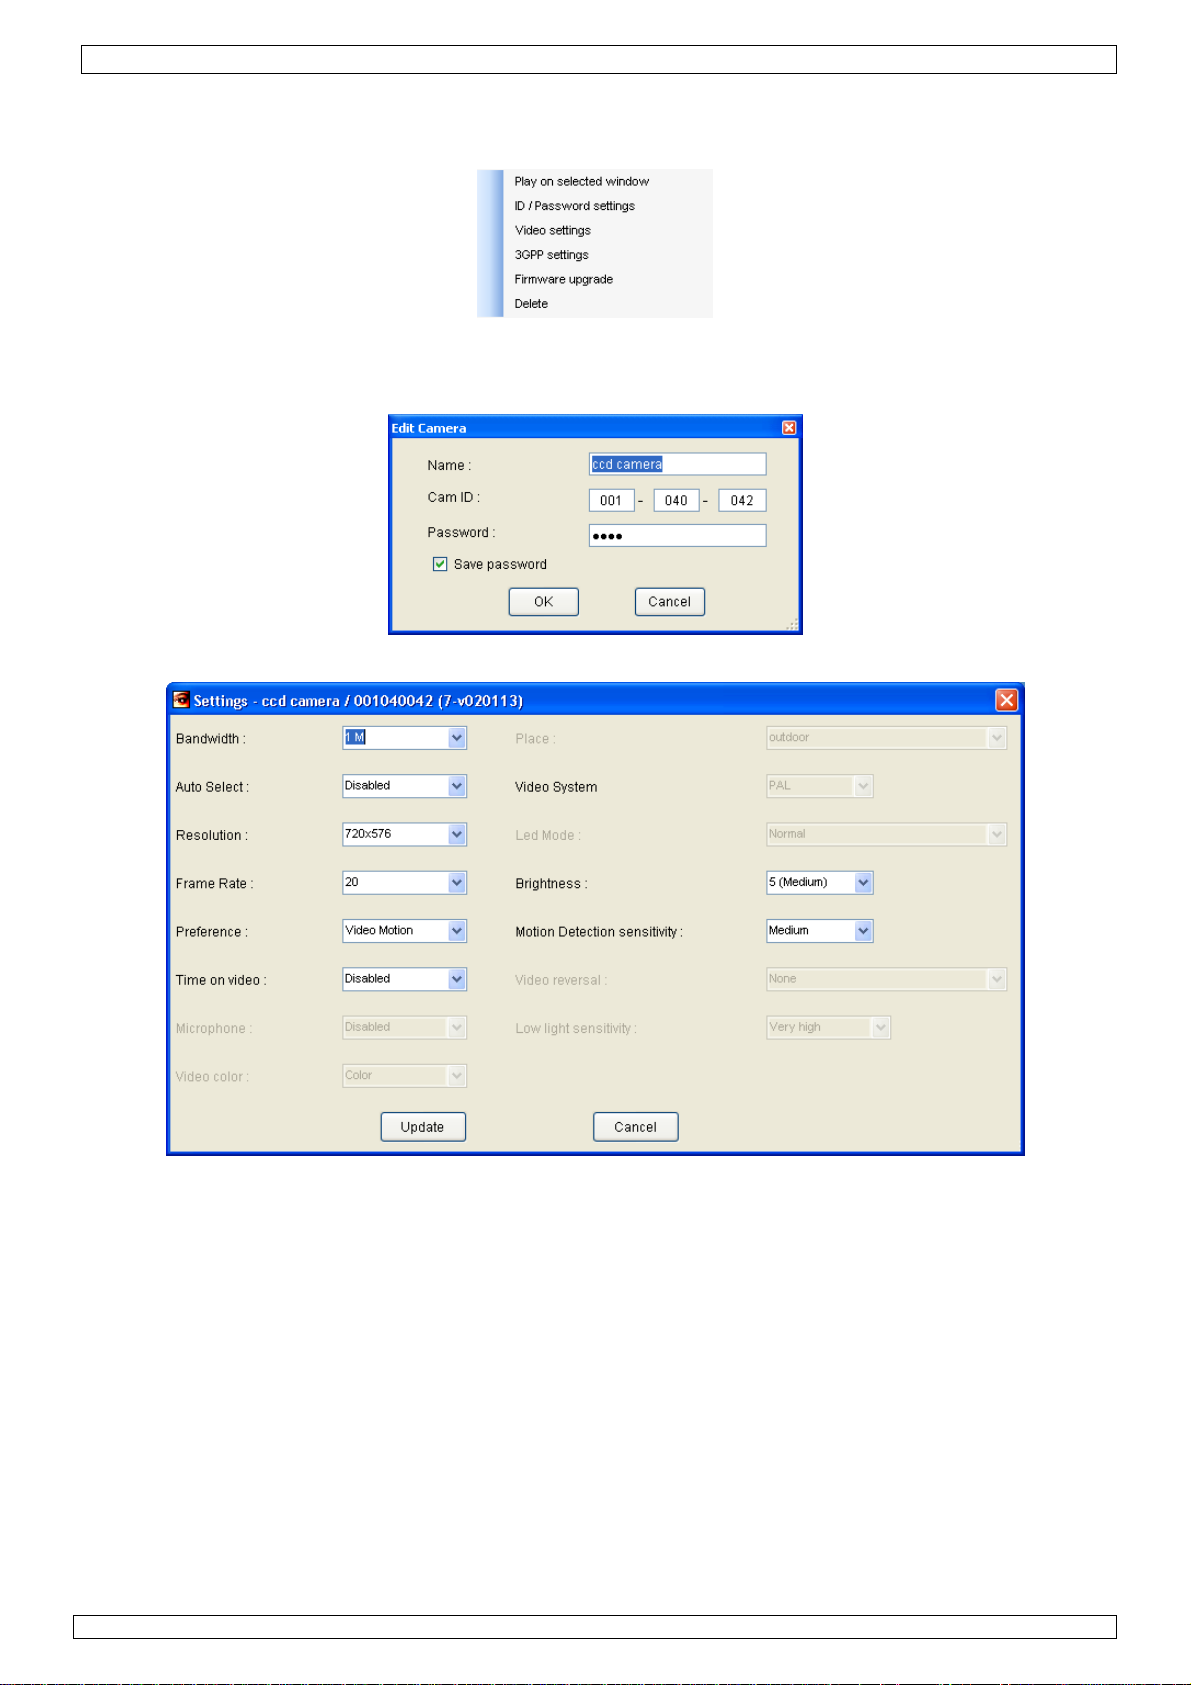
• When right-clicking on a camera under the Camera List directory, following options are available:
• First click on the desired playback-window, then right-click on the desired camera and left-click on
Play on selected window. The images are shown in the desired area.
• Click on ID/Password settings to edit camera name.
• Click on Video settings to adjust the cameras’ video setup:
Notes:
• Set Bandwidth to match the locations’ uploading bandwidth.
• Set Auto Select to enable to automatically set the most appropriate camera settings to
match the current network.
• Higher frame rates require more bandwidth.
• Set Preference to the users’ most important feature : Video motion or image quality
• Enable Time on video to see the date and time at the cameras’ location displayed.
• Switching between PAL and NTSC can only be done via Webconfig – Video settings.
• Choose the Brightness from 10 predefined values.
• Select the Motion Detection Sensitivity between high, medium and low
• After adjusting the settings, click the Update button. The administrators’ account and
password are required.
17/07/2009 © 2008 Velleman nv
12
Page 13

CAMIP4 Rev. 02
• Change the 3GPP settings by selecting the 3GPP settings option.
• After adjusting the settings, click the Update button. The administrators’ account and
password are required.
• To update the firmware, click on firmware upgrade (see §7.3 Web configuration – Upgrade
page)
• Clicking the Delete button will remove the camera from the camera list.
7.5 Display control
• Double-click on any video area to see that video full-screen size. Double-click again to return to
normal display.
• Double-click on a videos’ information bar to go to single video display.
• The information bar contains following icons:
swap: only available in 6 and 13 windows display mode. The current
snapshot: take an instant copy of the displayed image
record: to record the current video
• Right-clicking on a video area will give following options:
video will be shown on the larger area.
black not recording
red recording
green motion recording
Full window: show current video in full window mode
Auto reconnect: reconnect video session automatically after changing
settings or loss of connection
Stop: end video display
Pause: temporarily halt video display
Motion recording: enable recording triggered by motion
Properties: show current settings for the camera (frame rate,
bandwidth, time)
17/07/2009 © 2008 Velleman nv
13
Page 14
CAMIP4 Rev. 02
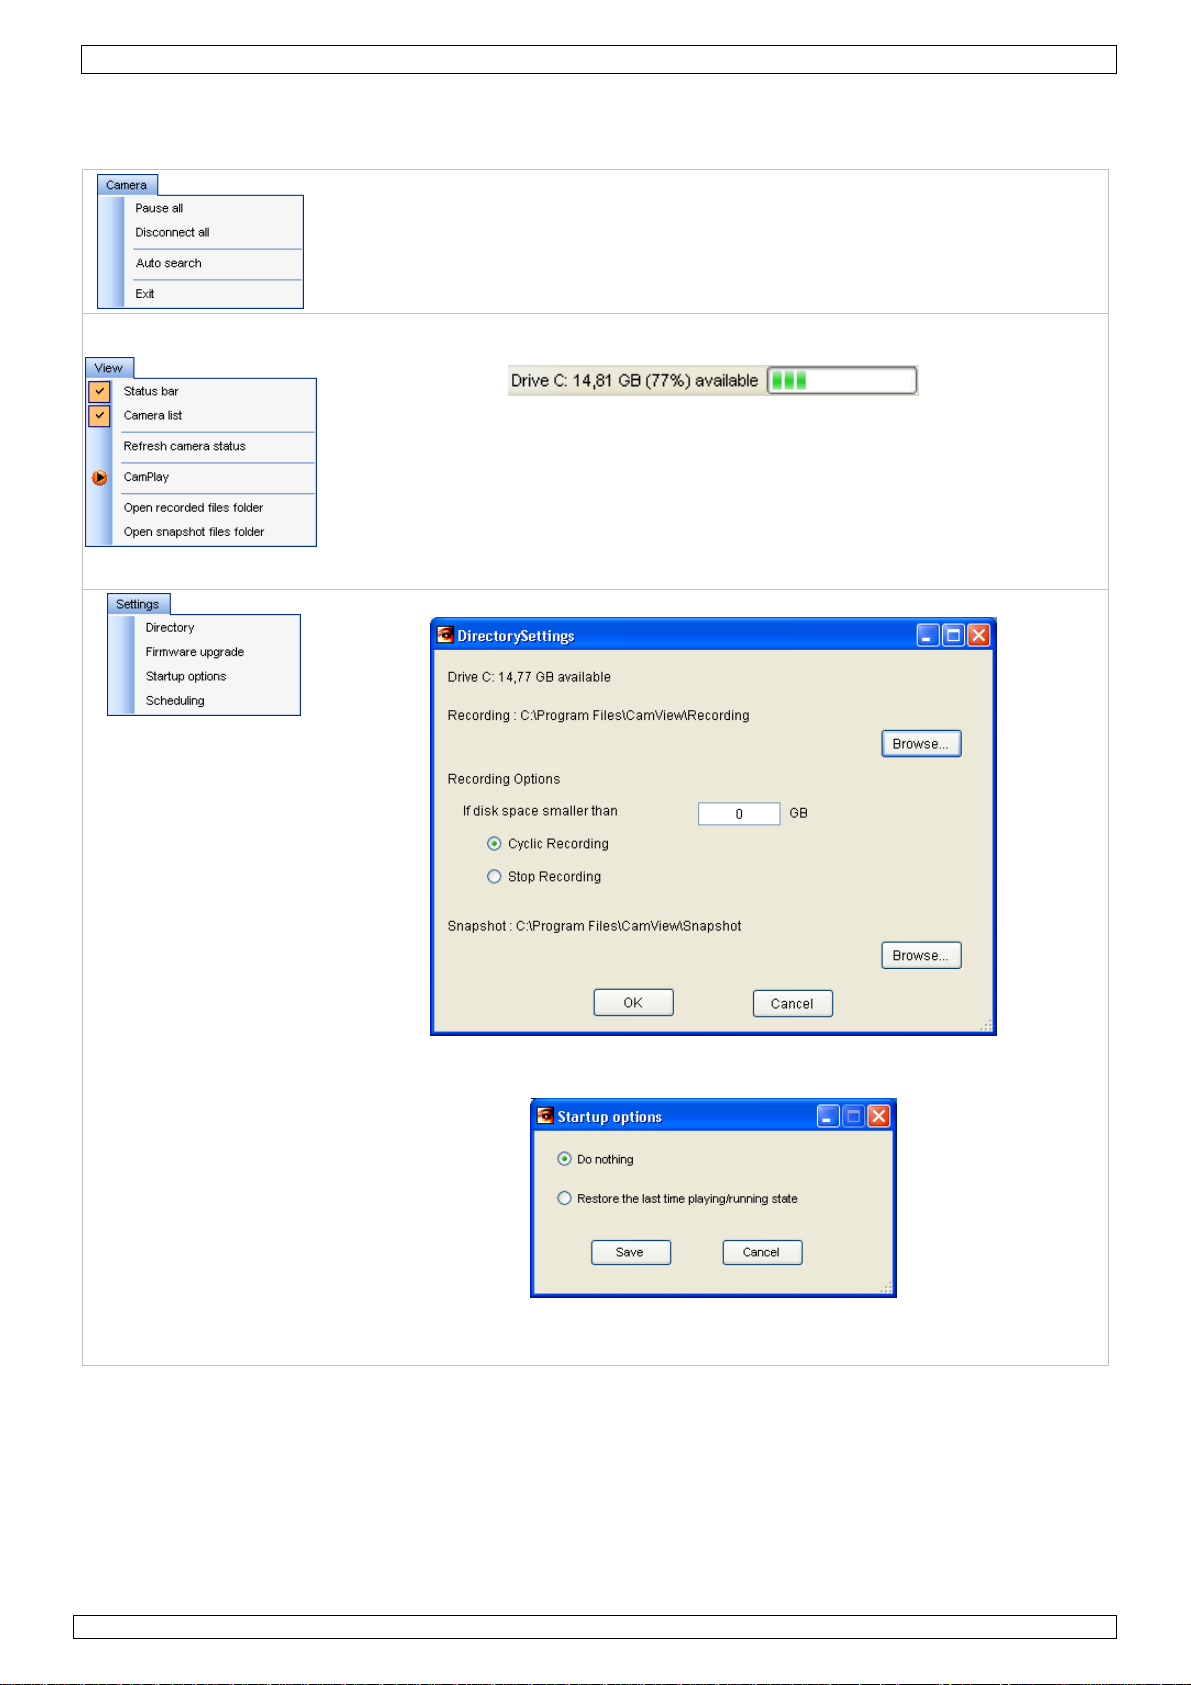
7.6 CamView Software options
• Following menus are available:
Pause all: pause all video displays
Disconnect all: disconnect all cameras
Auto search: start auto search function
Exit: exit and close CamView software
Status bar: show the status bar which indicates the free disk space (see
bottom left of the software window)
Camera list: show the camera list
Refresh camera status: refresh all cameras
CamPlay: start up the CamPlay software to view recorded videos and
snapshots (see §7.7 CamPlay)
Open recorded files folder
Open snapshot files folder
Directory: set up the directory for recorded videos and snapshots
Firmware upgrade: see §7.3 Web configuration – Upgrade page
Startup options: set option at start-up
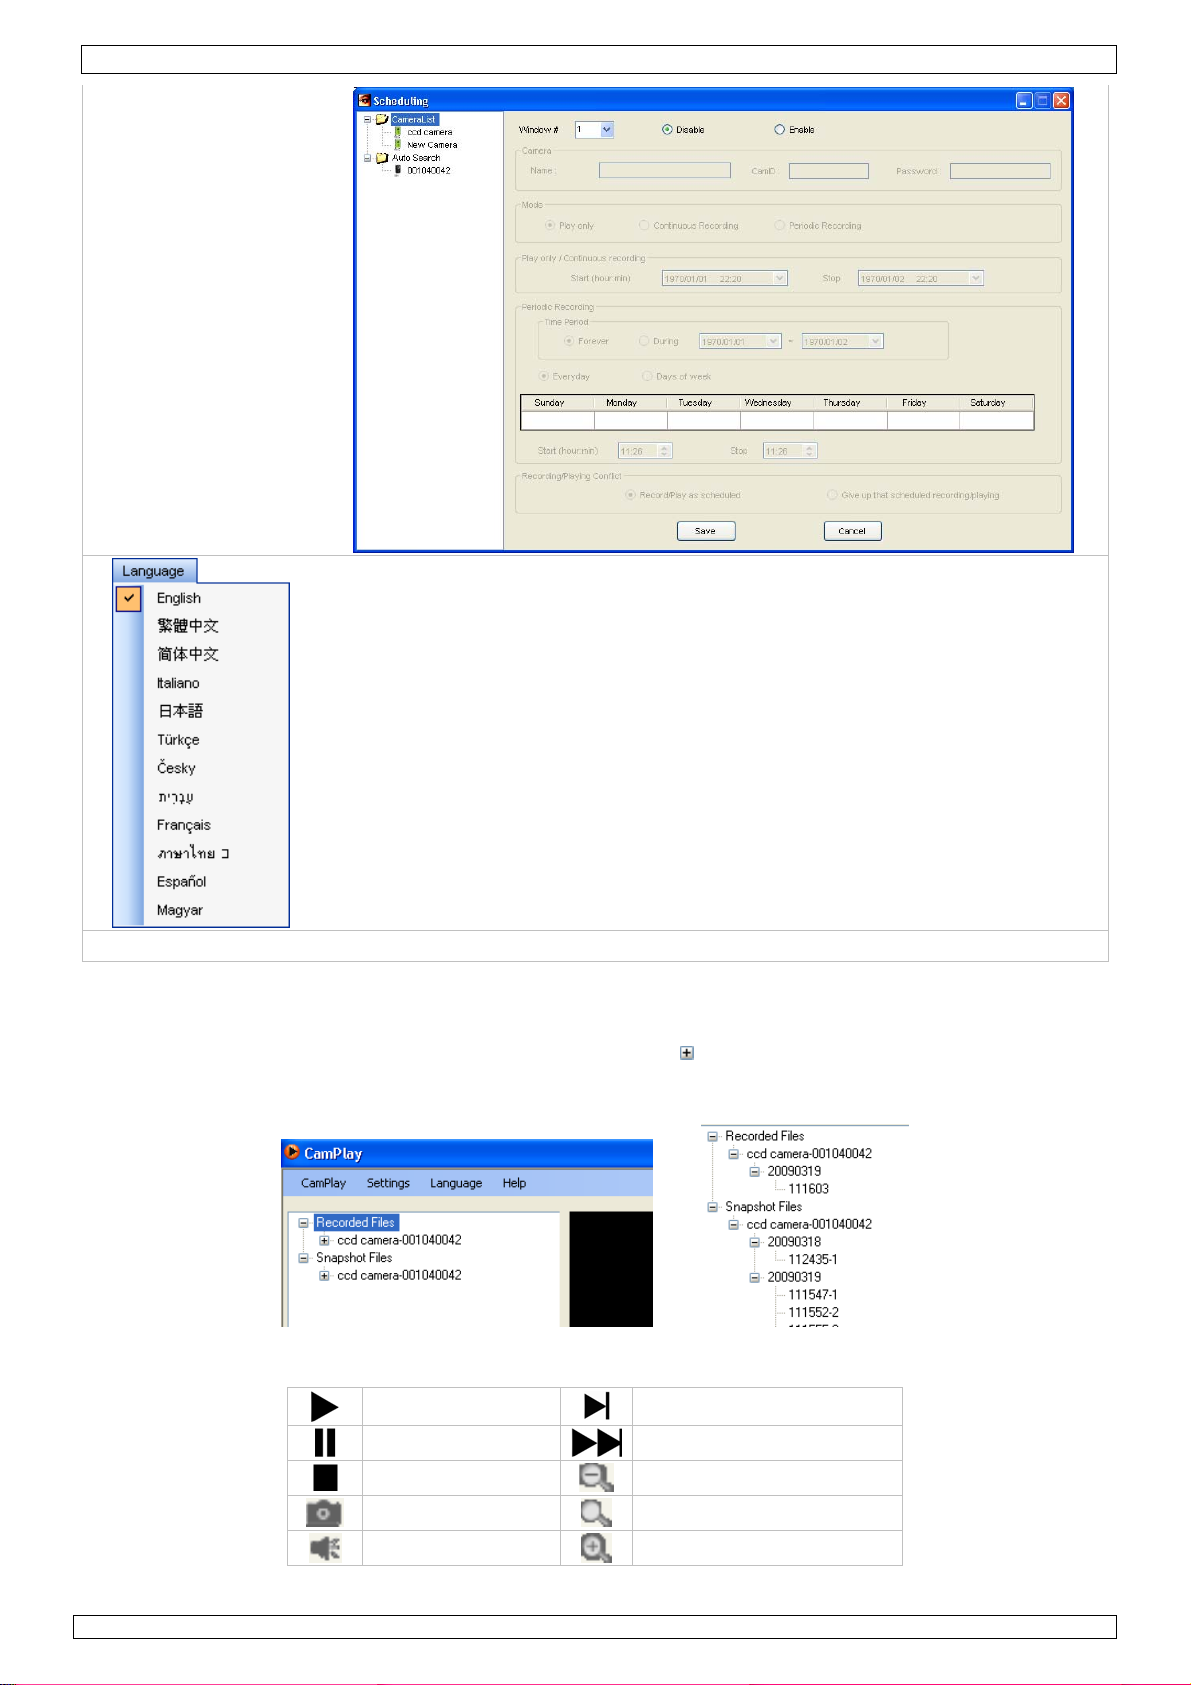
Scheduling: set options for scheduled recording
17/07/2009 © 2008 Velleman nv
14
Page 15
CAMIP4 Rev. 02
Select desired software language.
Help Clicking Help will show the current CamView version
7.7 CamPlay
• Click View → Camplay to start the CamPlay software. The two directories are shown – Recorded
files (videos) and Snapshot files (images). Click on the
Subdirectories are organized according to camera name, date and time. For snapshots, a
sequential number is added.
• Double-click on a snapshot to open it or on a video file to start play-back.
play
pause
stop
snapshot
mute/no mute
Note: maximum zoom-in resolution is 640x480, minimum zoom-out is the original video resolution.
to see the directory structure.
½ speed forward
fast forward
zoom in
zoom to original size
zoom out
17/07/2009 © 2008 Velleman nv
15
Page 16
CAMIP4 Rev. 02
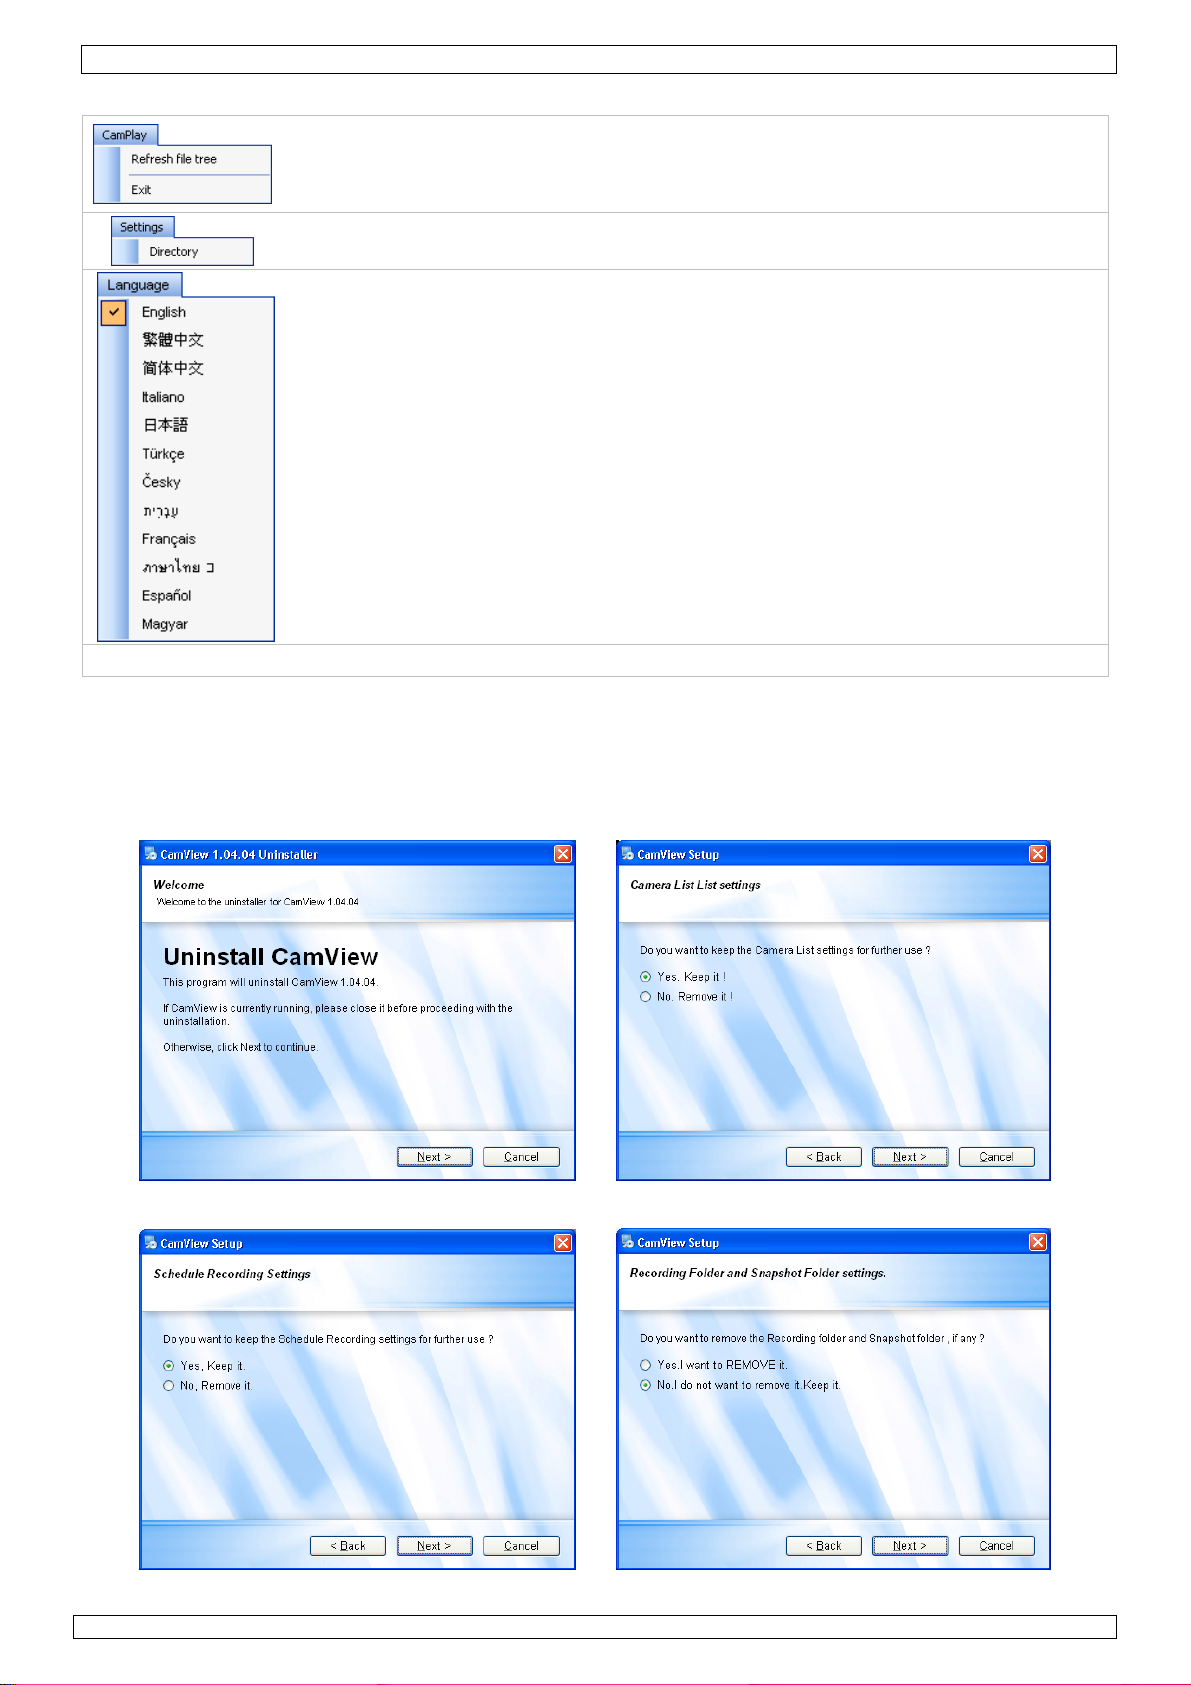
• Following menus are available:
Refresh file tree: to update the directories
Exit: to close CamPlay
Directory: define the location to save the recordings and snapshots
Language: set the desired language
Help Clicking Help will show the current CamPlay version
7.8 Uninstall CamView
• There are two ways to uninstall the CamView software.
o Uninstall from the start menu .Start → CamView →Uninstall CamView
o Uninstall from the control panel .Start → Settings → Control Panel → Add or Remove
Programs .Select CamView program and click “Change/Remove”.
• Click Next >. If the CamView or similar software will be installed, keep all files.
17/07/2009 © 2008 Velleman nv
16
Page 17

CAMIP4 Rev. 02
• Click Finish to close the uninstaller.
8. Troubleshooting
Q: The camera status indicator shows a green icon, but I can not view the video or change
the settings.
A: The green icon only denotes that the camera is online and responding, not guarantees that the
video session can be established. The reason is due to a firewall or strict access rules of the router.
Q: The video quality is not that good when I view remotely via the Internet.
A: The video quality is greatly affected by your Internet connection speed. Therefore, it is
recommended to change the bandwidth settings of the camera to a value which is smaller than the
one that your ISP provides you.
Q. The video quality is not good when the status indicator of the IP Cam is yellow. Why is
that?
A: If the status indicator is yellow, it means the connection between CamView and the camera is not
good. There might be a firewall in between or the routers between camera and CamView have strict
access rules.
Q: Can the password for playing video be blank (no password)?
A: No. For security reasons, we do not allow to set the video playing password blank.
Q: Can I change the settings of the camera through CamView?
A: Yes, partially. You can change the resolution, frame rate, bandwidth, microphone, auto select,
indoor/outdoor mode, light frequency, LED mode, and brightness settings of the Cam through
CamView. The rest of the settings can only be configured via the web page of the Cam.
Q. Sometimes connection to the camera fails after changing the settings of the IP Cam.
A: The IP camera needs some time (±5 seconds) to re-initialize the system. Therefore, wait 5
seconds and try to connect. If the auto reconnection is enabled, CamView will reconnect
automatically.
Q: How many simultaneous users are allowed?
A: The maximum allowed video users for a camera at the same time depends on the video settings
including “Internet speed” and resolution. See below for a summary of the maximum allowed video
users:
bandwidth (5 ~25fps)
Resolution
176x144 20 20 20 4 4
52x288 20 20 18 9 4 4
720x576 8 6 4 4
64K 256K 512K 768K 1M 1.5M
17/07/2009 © 2008 Velleman nv
17
Page 18

CAMIP4 Rev. 02
9. Technical specifications
IP rating IP66
scanning system PAL
pick-up element Sony Super HAD colour CCD
image size 1/3"
number of pixels 512(H) x 582(V) pixels
resolution 420 TV lines
min. illumination 0.5 lux - F1.4 (IR off) / 0 lux (IR on)
IR LEDs 21 pcs
max. IR projection distance ± 15m
interlace 2:1
video output level 1.0Vpp, 75 ohms, composite
video S/N ratio > 48dB (AGC off)
AEI 1/50 ~ 1/100 000s
gamma 0.45
lens 4mm
lens angle 73°
network interface Ethernet 10BaseT/100BaseTX, Auto-MDIX, RJ-45, BNC
video compression format MPEG-4
image quality setting
resolution 176x144, 352x288, 720x576
bandwidth 64k, 128k, 256k, 512k, 768k, 1M, 1.2M, 1.5M bps
frame rate 1, 2, 3, 4, 5, 10, 15, 20, 25 fps
supported protocols IPv4, HTTP, TCP, ICNP, RTSP RTP, UDP, IGMP, RTCP, SMTP, FTP,
DHCP, UPnP, ARP, DNS, PPPoE
software supported languages English, Chinese, Italian, Japanese, Turkish, Hebrew, French, Hindi,
Spanish, Hungarian
hardware requirements Pentium 4 CPU 1.5 GHz or higher
Windows
®
XP SP2 or higher; Framework 2.0
RAM 512 MB or higher
free network port
operating temperature -10°C ~ 50°C
power supply 12Vdc adapter PSS1212 (incl.)
power consumption 3.8W
dimensions Ø62 x 85mm
weight 365g
Use this device with original accessories only. Velleman nv cannot be held responsible in the event
of damage or injury resulted from (incorrect) use of this device.
For more info concerning this product, please visit our website www.velleman.eu.
The information in this manual is subject to change without prior notice.
© COPYRIGHT NOTICE
The copyright to this manual is owned by Velleman nv. All worldwide rights reserved.
No part of this manual or may be copied, reproduced, translated or reduced to any electronic medium or otherwise without
the prior written consent of the copyright holder.
17/07/2009 © 2008 Velleman nv
18
Page 19
CAMIP4 Rev. 02
GEBRUIKERSHANDLEIDING
1. Inleiding
Aan alle ingezetenen van de Europese Unie
Belangrijke milieu-informatie betreffende dit product
Dit symbool op het toestel of de verpakking geeft aan dat, als het na zijn levenscyclus
wordt weggeworpen, dit toestel schade kan toebrengen aan het milieu. Gooi dit toestel (en
eventuele batterijen) niet bij het gewone huishoudelijke afval; het moet bij een
gespecialiseerd bedrijf terechtkomen voor recyclage. U moet dit toestel naar uw verdeler of
naar een lokaal recyclagepunt brengen. Respecteer de plaatselijke milieuwetgeving.
Hebt u vragen, contacteer dan de plaatselijke autoriteiten betreffende de verwijdering.
Dank u voor uw aankoop! Lees deze handleiding grondig voor u het toestel in gebruik neemt. Werd
het toestel beschadigd tijdens het transport, installeer het dan niet en raadpleeg uw dealer.
2. Veiligheidsinstructies
Houd buiten het bereik van kinderen en onbevoegden.
Elektrocutiegevaar bij het openen van de camera.
Deze camera mag NIET geopend worden. U mag geen onderdelen
vervangen. Bestel eventuele reserveonderdelen bij uw dealer.
3. Algemene richtlijnen
Raadpleeg de Velleman® service- en kwaliteitsgarantie achteraan deze handleiding.
• Bescherm de camera tegen schokken. Vermijd brute kracht tijdens de bediening.
• Bescherm tegen extreme temperaturen, stof en vochtigheid.
• Leer eerst de functies van het toestel kennen voor u het gaat gebruiken.
• Om veiligheidsredenen mag u geen wijzigingen aanbrengen.
• Gebruik het toestel enkel waarvoor het gemaakt is. Bij onoordeelkundig gebruik vervalt de garantie.
• De garantie geldt niet voor schade door het negeren van bepaalde richtlijnen in deze handleiding
en uw dealer zal de verantwoordelijkheid afwijzen voor defecten of problemen die hier
rechtstreeks verband mee houden.
4. Eigenschappen
• waar u zich ook bevindt, log in op de camera dankzij de software, het unieke ID-nummer en het
paswoord
• bekijk livebeelden en neem ze op vanaf om het even welke pc
• simultaan viewen van 16 camera’s via de gebruikersvriendelijke CamView-software
• opname: manueel, geprogrammeerd of na bewegingswaarneming (software)
• regelbare balans tussen beeldresolutie en internetsnelheid via instelbare bandbreedte
5. Hardware-installatie
Raadpleeg de figuur op pagina 2 van deze handleiding.
• Kies een geschikte installatieplaats en houd rekening met volgende punten:
o Houd de camera weg van extreme temperaturen en trillingen.
o Installeer de camera niet in de buurt van magnetische velden.
o Richt de camera niet naar de zon of naar een lichtweerkaatsend voorwerp (bv. een metalen deur).
• Gebruik de beugel [7] om de plaats van de montagegaten te bepalen. Boor de gaten en bevestig de
beugel [7] met drie schroeven.
• Bevestig de camera aan de beugel [7] met de schroef aan het gewricht [5]. De camera heeft twee
montagegaten: een voor montage aan het plafond en een voor muurmontage. Montage aan het
plafond: plaats de zonnekap [4] tussen de camera en de beugel [7]. Muurmontage: bevestig de
zonnekap [4] bovenaan de camera met de meegeleverde bout en sluitring.
• Richt de camera naar de bewakingszone en draai de klemschroef [6] vast.
• Koppel de voedingsaansluiting [C] aan de 12VDC-voeding (meegeleverd).
• Koppel de BNC-stekker [B] aan een monitor (niet meegeleverd) en/of aan een computernetwerk via
de RJ45-stekker [A]. neem bij twijfel conatct op met uw netwerkprovider.
17/07/2009 © 2008 Velleman nv
19
Page 20
CAMIP4 Rev. 02
6. Software-installatie
• Deze camera wordt geleverd met het CamView-software op cd-rom. Plaats de cd-rom in de cd-
romdrive van uw computer (zie §9 Technische specificaties).
• Open het bestand CamViewInstaller-V1.04.xx.exe (xx is de huidige versie). De
installatieprocedure start automatisch en het welkomstvenster verschijnt op uw scherm.
• Klik op N
• Vink het vakje uit indien Framework 2.0 al op uw computer geïnstalleerd is. Laat het vakje
aangevinkt bij twijfel.
• Klik op N
ext >. Het venster Select Packages verschijnt op uw scherm.
ext >. Het venster Installation Folder verschijnt op uw scherm.
• Selecteer de doelmap met Ch
ange… en klik daarna op Next >. Het venster Shortcut Folder
verschijnt op uw scherm.
• Selecteer de doelmap uit het uitrolmenu. Kies of u de shortcut voor iedereen toegankelijk wilt
maken en klik op N
ext >. Het venster Ready to Install verschijnt op uw scherm.
17/07/2009 © 2008 Velleman nv
20
Page 21

CAMIP4 Rev. 02
• Klik op < B
• Indien Framework 2.0 (of hoger) al op de computer geïnstalleerd was, krijgt u volgend bericht.
Klik op OK om CamView verder te installeren.
• Het venster Installation Successful verschijnt op uw scherm. Klik op F
voltooien.
ack indien u wijzigingen wilt aanbrengen of klik op Next > om verder te gaan.
inish om de installatie te
7. Softwareconfiguratie
7.1 Algemeen
• Start CamView door op de shortcut te klikken of klik op Start → Programs → CamView.
• Het standaard gebruikersvenster geeft de gebruikte camera’s weer (Video) en kan opgesplitst
worden in 1 – 4 – 6 – 9 – 13 of 16 schermen met een muisklik op de overeenkomstige icoon in de
linkerbovenhoek:
Opmerking: Elk scherm kan afzonderlijk worden ingesteld.
• De beschikbare camera’s staan links in het gebruikersvenster weergegeven. Bij het eerste gebruik
van CamView is deze lijst nog leeg.
17/07/2009 © 2008 Velleman nv
21
Page 22
CAMIP4 Rev. 02
7.2 Auto Search
• Deze functie is enkel beschikbaar indien de camera en de computer op hetzelfde LAN-netwerk zijn
aangesloten. Open de directory Auto Search om het netwerk te zoeken.
Opmerking: Routers en firewalls kunnen de toegang tot de IP-camera blokkeren. Neem in dit geval
contact op met uw netwerkprovider.
• De software zoekt op het hele LAN en geeft de ID van alle beschikbare IP-camera’s (bv.
001040042) weer in de directory Auto Search. Scroll met de muis over de ID om het IP-adres
weer te geven.
Opmerking: Een camera die onder de directory Auto Search verschijnt, is NIET wereldwijd
beschikbaar. Verplaats hiervoor de camera naar de map Camera List (zie §7.4).
7.3 Webconfiguratie
• Klik met de rechtermuisknop op de ID van de camera en klik daarna op Web configure om de
camera via de webbrowser te configureren.
Opmerking: Een correct geconfigureerde IP-camera is vanaf elke computer/webbrowser
toegankelijk. Typ het IP-adres in de adresbalk van de webbrowser en geef
gebruikersnaam en paswoord in.
• Met de standaard gebruikersnaam admin hebt u geen paswoord nodig.
• Bij een geldig ingegeven gebruikersnaam en paswoord verschijnt de informatiepagina hieronder.
17/07/2009 © 2008 Velleman nv
22
Page 23
CAMIP4 Rev. 02
Model huidige firmwareversie
IP CAM ID ID-nummer van de camera
Registration status registratiestatus
Network type huidig netwerktype
Video user aantal gebruikers die op de camera zijn aangesloten
Video resolution huidige beeldresolutie
Video bandwidth huidige bandbreedte
Email/ftp Alarm e-mail en ftp-alarm ingeschakeld
NAS Record instellingen NAS (Network Attached Storage)
Mac Address (Hex) Mac-adres van de camera
• Open de configuratiepagina’s via de menulijst links van de informatiepagina.
• Video -> Display: livebeelden in het browservenster.
Opmerking: Deze functie vereist ActiveX die bij aansluiting op het internet automatisch gedownload
wordt. Het downloaden kan enkel minuten in beslag nemen.
Stel de beeldgrootte in vanaf Video Settings.
• Network: configuratie van het netwerk. De standaard instelling is DHCP (Dynamic Host
Configuration Protocol) en krijgt automatisch een IP-adres. Neem contact op met uw
netwerkprovider indien DHCP niet beschikbaar is.
17/07/2009 © 2008 Velleman nv
23
Page 24

CAMIP4 Rev. 02
• Advanced Network: configuratie van de PPPoE-aansluiting (ADSL). Geef gebruikersnaam en
paswoord in.
Opmerking: Zowel DHCP/handmatige IP-configuratie als PPPoE zijn selecteerbaar. De camera
verkiest echter PPPoE.
• Video Settings: configuratie video. Op deze pagina kunt u het paswoord instellen of opvragen dat
u toegang geeft tot de videobeelden.
Opmerking: Het originele paswoord kunt u vinden op de meegeleverde ID/Password-kaart. Wijzig
om veiligheidsredenen het paswoord van de camera.
• De camerabeelden zijn ook beschikbaar vanaf een 3G-netwerk onder het menu 3GPP/RTSP.
Kopieer hiervoor de toegangs-URL onder Access URL naar de 3G-telefoon. Let op: Het ingegeven
URL-formaat verschilt van toestel tot toestel. Raadpleeg de handleiding van de 3G-telefoon voor
meer informatie.
Opmerking: De laatste cijfers in de URL bestaan uit het ID-nummer van de camera gevolgd door
het paswoord. Deze cijfers zijn uniek voor elke camera.
17/07/2009 © 2008 Velleman nv
24
Page 25
CAMIP4 Rev. 02
Opmerking: Evenals 3GPP/ISMA maakt deze camera gebruik van het RTSP-protocol en de video-
/audiocodec om de beelden te streamen. U hoeft dus enkel het adres
rtsp://ip_cam_address/CAM_ID.password in de 3G-telefoon te geven. De IP-
camera hoeft verder geen instellingen. Het ingeven van het RTSP-adres verschilt van
toestel tot toestel. Neem contact op met de fabrikant van de 3G-telefoon voor meer
details. De beeldkwaliteit en –resolutie zijn dezelfde als die in het menu Video
Settings. Omdat de bandbreedte van het 3G-netwerk kleiner is dan 256k stelt u de
internetsnelheid van de IP-camera best in op 128k of 64k.
• Bij een bewegingswaarneming zendt de IP-camera snapshots naar een e-mailadres of FTP-server.
Configureer het e-mail- en/of FTP-adres onder Schedule – Email/ ftp Alar m .
• Ga naar NAS Settings om het NAS-systeem (Network Attached Storage) te configureren.
• Ga naar Scheduling om Email/ftp en NAS in te schakelen.
17/07/2009 © 2008 Velleman nv
25
Page 26
CAMIP4 Rev. 02
• Wijzig de administratorinstellingen onder Admin – Admin login. Het is aan te raden het
administratorpaswoord regelmatig te wijzigen.
Opmerking: Noteer het administratorpaswoord. Zonder dit paswoord kunt u de camera niet
instellen.
• Een IP-camera die is aangesloten op het internet kan haar interne klok synchroniseren via een
NTP-server (bv. ntp.asql.co.uk – raadpleeg www.ntp.org voor een overzicht). Stel in onder
Date/Time.
• Upgrade de firmware van de camera onder Upgrade. De upgrade gebeurt vanaf een lokaal
bestand of vanaf een FTP-server.
Let op: Wees voorzichtig bij het laden van nieuwe firmware in de camera. De
camera functioneert niet met incompatibele firmware.
Upgrade de camera enkel indien echt noodzakelijk.
Laat de camera enkel upgraden door een informaticus.
Schakel de camera nooit uit tijdens de upgrade.
Velleman Components nv, de fabrikant en de verdeler zijn niet aansprakelijk
voor problemen of beschadiging na een upgrade.
17/07/2009 © 2008 Velleman nv
26
Page 27

CAMIP4 Rev. 02
• De bestandsnaam van de firmware is beschikbaar op de FTP-site (ftp:60.250.194.78), upgrade
bestandsnaam en upgrade paswoord. Scroll door de lijst en kies de correcte versie. De naam
moet met VS316-gen starten.
• Om de camera te herstarten, klik op reboot onder reboot.
7.4 Camera List
• Nu de camera geconfigureerd is, moet ze aan de lijst toegevoegd worden. Klik met de
rechtermuisknop op Camera List en klik daarna op New Camera.
Opmerking: Indien u de camera niet aan de lijst toevoegt, zal ze niet wereldwijd beschikbaar zijn.
• Geef uw camera een naam (bv. haar locatie), geef ID-nummer en paswoord in en klik op Add. De
camera verschijnt nu in de directory Cam List.
Opmerking: De icoon voor de cameranaam geeft de status weer.
ROOD: de camera is offline en niet op het internet aangesloten
GEEL: de camera is online maar reageert niet (bv. verkeerde routerinstellingen)
GROEN: de camera is online en reageert
• U kunt meerdere camera’s groeperen in een specifieke map. Klik met de rechtermuisknop op
Camera List en klik op New Folder om een nieuwe map aan te maken. Geef die nieuwe map ook
een naam en klik daarna op OK.
17/07/2009 © 2008 Velleman nv
27
Page 28

CAMIP4 Rev. 02
• Sleep de gewenste camera en plaats die in de nieuwe map.
• Klik met de rechtermuisknop op een map en klik op Rename om de map een nieuwe naam te
geven. Bevestig met OK.
Opmerking: U kunt de mappen CameraList en Auto Search geen andere naam geven.
• Klik met de rechtermuisknop op een map en klik op Delete om de map te wissen.
Opmerking: Bestaande camera’s in een gewiste map worden opnieuw naar de directory Auto
Search verplaatst.
• Klik met de rechtermuisknop op een camera onder Camera List. U krijgt volgende optie:
• Klik eerst op het gewenste afspeelscherm, klik daarna met de rechtermuisknop op de gewenste
camera en klik ten slotte op Play on selected window. De beelden worden in het geselecteerde
scherm weergegeven.
• Klik op ID/Password settings om de cameranaam te wijzigen.
• Klik op Video settings om de video-instellingen van de camera te wijzigen.
17/07/2009 © 2008 Velleman nv
28
Page 29

CAMIP4 Rev. 02
Opmerkingen:
• Bandwidth: Kies dezelfde bandbreedte als de internetverbinding.
• Auto Select: Kies enable om to automatisch de meest geschikte camera-instellingen te
selecteren.
• Een hogere framesnelheid vereist een hogere bandbreedte.
• Preference: Kies de gewenste instelling: Video Motion (bewegend beeld) of Image Quality
(beeldkwaliteit).
• Time on video: Kies enable om de datum en tijd in het scherm weer te geven.
• Selecteer PAL of NTSC via Web configure – Video settings.
• Brightness: Kies een van de 10 helderheidinstellingen.
• Motion Detection Sensitivity: Stel de gevoeligheid in op high, medium of low.
• Klik daarna op Update en geef naam en paswoord in.
• Klik op 3GPP settings om de 3GPP-instellingen te wijzigen.
• Klik daarna op Update en geef naam en paswoord in.
• Klik op Firmware upgrade om de firmware te upgraden (zie §7.3 Webconfiguratie –
Upgrade).
• Klik op Delete om de camera uit de lijst te wissen.
7.5 Weergavefuncties
• Dubbelklik in een scherm om dit scherm uit te vergroten. Dubbelklik opnieuw in dit scherm om
naar de normale beeldweergave terug te keren.
• Dubbelklik op de titelbalk om een enkel scherm weer te geven.
• De titelbalk bevat volgende iconen:
swap: Enkel beschikbaar in 6- en 13-delige schermweergave. De
snapshot: Stilstaand beeld.
opname: Opnamestatus.
17/07/2009 © 2008 Velleman nv
huidige beelden worden op het grootste scherm weergegeven.
zwart geen opname
rood opname
groen opname na beweging
29
Page 30

CAMIP4 Rev. 02
• Klik met de rechtermuisknop in een scherm om volgende opties weer te geven:
Full window: Volledige schermweergave.
Auto reconnect: Automatisch herstel van de verbinding.
Stop: Uitschakeling.
Pause: Pauzeren.
Motion recording: Inschakelen van opname na beweging.
Properties…: Camera-instellingen (framesnelheid, bandbreedte, klok).
7.6 Opties in CamView
• Volgende menu’s zijn beschikbaar:
Pause all: Pauzeren.
Disconnect all: Ontkoppelen van alle camera’s.
Auto search: Automatisch opzoeken starten.
Exit: CamView verlaten en afsluiten.
Status bar: Geeft de beschikbare schijfruimte weer (zie onderaan links het
venster).
Camera list: Geeft de cameralijst weer.
Refresh camera status: Alle camera’s opfrissen.
CamPlay: CamPlay opstarten, bekijken van opnames en snapshots (zie §7.7
CamPlay).
Open recorded files folder
Open snapshot files folder
Directory: Configureren van de directory.
Firmware upgrade: Zie §7.3 Web configure – Upgrade
Startup options: Kies de gewenste optie bij het opstarten.
17/07/2009 © 2008 Velleman nv
30
Page 31

CAMIP4 Rev. 02
Scheduling: Configuratie van de geprogrammeerde opname.
Kies de gewenste softwaretaal.
Help Klik op Help om de huidige CamView-versie weer te geven.
7.7 CamPlay
• Klik op View → Camplay om CamPlay op te starten. De twee directory’s – Recorded Files
(video’s) en Snapshot Files (afbeeldingen) – worden weergegeven. Klik op
de directory uit te vouwen. Subdirectory’s worden opgedeeld volgens cameranaam, datum en
tijd. Snapshots krijgen ook een volgnummer.
• Open een snapshot of start een videobestand met dubbele klik.
afspelen
pauzeren
stoppen
snapshot
mute
½ afspeelsnelheid
doorspoelen
inzoomen
terug naar originele grootte
uitzoomen
Opmerking: De maximale resolutie bij het inzoomen bedraagt 640x480, de minimale resolutie bij
het uitzoomen is de originele videoresolutie.
om de structuur van
17/07/2009 © 2008 Velleman nv
31
Page 32

CAMIP4 Rev. 02
• Volgende menu’s zijn beschikbaar:
Refresh file tree: Updaten van de directory’s.
Exit: CamPlay sluiten.
Directory: Selecteren van de doelmap voor de opnames en snapshots.
Language: Kies de gewenste taal.
Help Klik op Help om de huidige CamPlay-versie weer te geven.
7.8 CamView deïnstalleren
• U kunt CamView op twee manieren deïnstalleren:
o Klik op Start → CamView → Uninstall CamView.
o Klik op Start → Settings → Control Panel → Add or Remove Programs. Selecteer
CamView en klik op Change/Remove.
• Klik op Next >. Vink de gewenste opties aan en klik op Next >.
17/07/2009 © 2008 Velleman nv
32
Page 33

CAMIP4 Rev. 02
• Klik op Finish om de deïnstallatie te voltooien.
8. Problemen en oplossingen
De camera geeft een groen icoontje weer maar ik kan de beelden niet bekijken of de
instellingen niet wijzigen.
De groene icoon wijst er enkel op dat de camera online is maar garandeert niet dat u de beelden
kunt bekijken. Controleer de instellingen van de firewall of de router.
De beelden via het internet zijn van een lage kwaliteit.
De kwaliteit is grotendeels afhankelijk van de internetverbinding. Pas daarom de bandbreedte van
de camera aan zodat deze kleiner is dan die van uw internetprovider.
De beelden zijn van een lage kwaliteit wanneer de camera een geel icoontje weergeeft.
De gele icoon wijst erop dat de verbinding tussen de camera en CamView niet optimaal is.
Controleer de aanwezigheid van een firewall of de instelling van de router.
Krijg ik ook toegang zonder paswoord?
Neen. Om veiligheidsredenen krijgt u zonder paswoord geen toegang tot de camera.
Kan ik de instellingen van de camera wijzigen via CamView?
Gedeeltelijk. De resolutie, framesnelheid, bandbreedte, microfooninstellingen, automatische selectie,
modus binnen-/buitenshuis, lichtfrequentie, ledmodus, en helderheid kunt u via CamView wijzigen.
Andere instellingen zijn enkel toegankelijk vanaf Web configure.
De verbinding met de camera wordt verbroken nadat ik de instellingen heb gewijzigd.
De camera reset het systeem gedurende ongeveer 5 seconden. Daarna kan de verbinding opnieuw
gemaakt worden.
Hoeveel gebruikers krijgen simultaan toegang tot de camera?
Het aantal gebruikers is afhankelijk van de video-instellingen, netwerksnelheid en resolutie.
Raadpleeg de tabel hieronder:
Bandbreedte (5 ~ 25 fps)
Resolutie
176x144 20 20 20 4 4
52x288 20 20 18 9 4 4
720x576 8 6 4 4
64k 256k 512k 768k 1M 1,5M
17/07/2009 © 2008 Velleman nv
33
Page 34

CAMIP4 Rev. 02
9. Technische specificaties
IP-norm IP66
scansysteem PAL
opneemelement Sony Super HAD kleuren CCD
beeldgrootte 1/3"
aantal pixels 512(H) x 582(V) pixels
resolutie 420 tv-lijnen
min. verlichting 0,5 lux - F1.4 (IR uit)/0 lux (IR aan)
IR-leds 21 stuks
max. bereik IR ± 15 m
interlacing 2:1
video-uitgang 1,0 Vpp, 75 Ω, composiet
signaal-ruisverhouding video > 48 dB (AGC uit)
AEI 1/50 ~ 1/100 000s
gamma 0,45
lens 4 mm
lenshoek 73°
netwerkinterface Ethernet 10BaseT/100BaseTX, Auto-MDIX, RJ-45, BNC
videocompressie MPEG-4
beeldkwaliteit
resolutie 176x144, 352x288, 720x576
bandbreedte 64k, 128k, 256k, 512k, 768k, 1M, 1.2M, 1,5M bps
framesnelheid 1, 2, 3, 4, 5, 10, 15, 20, 25 fps
ondersteunde protocols IPv4, HTTP, TCP, ICNP, RTSP RTP, UDP, IGMP, RTCP, SMTP, FTP,
DHCP, UPnP, ARP, DNS, PPPoE
beschikbare talen software Engels, Chinees, Italiaans, Japans, Turks, Hebreeuws, Frans, Hindi,
Spaans, Hongaars
vereiste hardware Pentium® 4, 1,5 GHz of hoger
Windows
®
XP sp2 of hoger; Framework 2.0
RAM 512 MB of hoger
vrije netwerkpoort
werktemperatuur -10°C ~ 50°C
voeding 12 VDC adapter PSS1212 (meegelev.)
verbruik 3,8 W
afmetingen Ø 62 x 85 mm
gewicht 365 g
Gebruik dit toestel enkel met originele accessoires. Velleman nv is niet aansprakelijk voor schade of
kwetsuren bij (verkeerd) gebruik van dit toestel. Voor meer informatie over dit product, zie
www.velleman.eu. De informatie in deze handleiding kan te allen tijde worden gewijzigd zonder
voorafgaande kennisgeving.
© AUTEURSRECHT
Velleman nv heeft het auteursrecht voor deze handleiding.
Alle wereldwijde rechten voorbehouden. Het is niet toegestaan om deze handleiding of gedeelten ervan over te nemen, te
kopiëren, te vertalen, te bewerken en op te slaan op een elektronisch medium zonder voorafgaande schriftelijke toestemming
van de rechthebbende.
17/07/2009 © 2008 Velleman nv
34
Page 35

CAMIP4 Rev. 02
NOTICE D’EMPLOI
1. Introduction
Aux résidents de l'Union européenne
Des informations environnementales importantes concernant ce produit
Ce symbole sur l'appareil ou l'emballage indique que l’élimination d’un appareil en fin de vie peut
polluer l'environnement. Ne pas jeter un appareil électrique ou électronique (et des piles
éventuelles) parmi les déchets municipaux non sujets au tri sélectif ; une déchèterie traitera
l’appareil en question. Renvoyer les équipements usagés à votre fournisseur ou à un service
de recyclage local. Il convient de respecter la réglementation locale relative à la protection
de l’environnement.
En cas de questions, contacter les autorités locales pour élimination.
Nous vous remercions de votre achat ! Lire la présente notice attentivement avant la mise en
service de l’appareil. Si l’appareil a été endommagé pendant le transport, ne pas l’installer et
consulter votre revendeur.
2. Consignes de sécurité
Garder hors de la portée des enfants et des personnes non autorisées.
Risque d’électrocution lors de l’ouverture du boîtier.
Ne jamais ouvrir ni désassembler la caméra. Il n’y a aucune pièce
maintenable par l’utilisateur. Commander des pièces de rechange éventuelles
chez votre revendeur.
3. Directives générales
Se référer à la garantie de service et de qualité Velleman® en fin de notice.
• Protéger contre les chocs et le traiter avec circonspection pendant l’opération.
• Tenir à l’écart de la poussière, l’humidité et des températures extrêmes.
• Se familiariser avec le fonctionnement avant l’emploi.
• Toute modification est interdite pour des raisons de sécurité.
• N’utiliser qu’à sa fonction prévue. Un usage impropre annule d'office la garantie.
• La garantie ne s’applique pas aux dommages survenus en négligeant certaines directives de cette
notice et votre revendeur déclinera toute responsabilité pour les problèmes et les défauts qui en
résultent.
4. Caractéristiques
• où que vous vous trouviez, connectez-vous à la caméra grâce au logiciel, au numéro
d’identification unique et au mot de passe
• visionnage et enregistrement d’images à partir de n’importe quel ordinateur dans le monde
• visionnage simultané jusqu’à 16 caméras grâce au logiciel convivial CamView
• enregistrements manuel, programmé ou après détection de mouvement (logiciel)
• balance entre la résolution d’image et la vitesse d’accès sur l’internet réglable grâce à la largeur de
bande configurable
5. Installation de la caméra
Se référer à l’illustration à la page 2 de cette notice.
• Choisir un endroit où installer la caméra en tenant compte des points suivants :
o Ne pas exposer la caméra à des températures extrêmes, à des vibrations et à des champs
magnétiques.
o Ne pas pointer la caméra vers un objet réfléchissant la lumière (p.ex. porte métallique).
• Déterminer la position des trous de montage à l’aide de l’étrier [7]. Fixer l’étrier à l’aide de trois vis.
• Fixer la caméra à l’étrier [7] à l’aide de la vis de l’articulation [5]. La caméra est munie de deux
trous de montage : un pour montage mural, l’autre pour montage au plafond. Montage au plafond :
fixer le pare-soleil [4] entre la caméra et l’étrier [7]. Montage mural : fixer le pare-soleil sur la
partie supérieure de la caméra à l’aide du boulon et de la rondelle inclus.
• Pointer la caméra vers la zone à surveiller et serrer la vis de fixation [6].
• Connecter la fiche d’entrée [C] à l’alimentation 12 VCC (incluse).
• Connecter la fiche BNC [B] à un moniteur (non inclus) et/ou à un réseau ordinateur à l’aide de la
fiche RJ45 [A]. En cas de questions, contacter votre fournisseur de réseau local.
17/07/2009 © 2008 Velleman nv
35
Page 36

CAMIP4 Rev. 02
6. Installation du logiciel
• Cette caméra est livrée avec un cédérom contenant le logiciel CamView. Insérer le cédérom dans
le lecteur de l’ordinateur (voir §9 Spécifications techniques).
• Ouvrir le fichier CamViewInstaller-V1.04.xx.exe (xx étant la version actuelle). La procédure
d’installation est automatiquement lancée. La fenêtre d’accueil s’affiche.
• Cliquer sur N
• Décocher la case si Framework 2.0 est déjà installé sur l’ordinateur. Laisser la case cochée en cas
de doute.
• Cliquer sur Next >. La fenêtre Installation Folder s’affiche.
ext >. La fenêtre Select Packages s’affiche.
• Sélectionner le dossier d’installation. Cliquer sur Ch
ange… et ensuite sur Next >. La fenêtre
Shortcut Folder s’affiche.
• Sélectionner le dossier d’installation dans le menu à déroulement. Sélectionner le niveau
d’accessibilité du raccourci et cliquer sur N
ext >. La fenêtre Ready to Install s’affiche.
17/07/2009 © 2008 Velleman nv
36
Page 37

CAMIP4 Rev. 02
• Cliquer sur < B
• Le message ci-dessous surgit lorsque Framework 2.0 (ou plus) est déjà installé sur l’ordinateur.
Cliquer sur OK pour continuer l’installation de CamView.
• La fenêtre Installation Finished s’affiche. Cliquer sur F
ack pour retourner à la fenêtre précédente et cliquer sur Next > pour continuer.
inish.
7. Configuration du logiciel
7.1 En général
• Ouvrir CamView en cliquant sur le raccourci sur le bureau de votre ordinateur ou en cliquant sur
Start → Programs → CamView.
• La page utilisateur affiche l’image des caméras connectées (Video). Cette page peut être
subdivisée en 1 – 4 – 6 – 9 – 13 ou 16 écrans en cliquant sur l’icône correspondant :
Remarque : Chaque écran peut être individuellement configuré.
• La liste des caméras disponibles s’affiche à la gauche de la page. Cette liste n’affiche aucune
caméra lors de la première utilisation.
17/07/2009 © 2008 Velleman nv
37
Page 38

CAMIP4 Rev. 02
7.2 Auto Search
• Cette fonction n’est disponible que lorsque la caméra et l’ordinateur sont connectés sur le même
réseau local LAN. Ouvrir le répertoire Auto Search pour rechercher le réseau.
Remarque : Certains routeurs et coupe-feux peuvent bloquer l’accès à la caméra. Contacter votre
fournisseur de réseau en cas de problèmes.
• Le logiciel recherche sur le réseau local et affiche le numéro d’identification de toutes les caméras
disponibles (p.ex. 001040042). Pointer ce numéro d’identification avec la souris pour afficher
l’adresse IP.
Remarque : Une caméra affichée dans le répertoire Auto Search n’est pas automatiquement
mondialement accessible. Il faut la déplacer vers le répertoire Camera List (voir
§7.4).
7.3 Configuration web
• Cliquer avec le bouton droit de la souris sur le numéro d’identification de la caméra et ensuite sur
Web configure pour configurer la caméra depuis le navigateur web.
Remarque : Une caméra correctement configurée sera accessible depuis n’importe quel
ordinateur/navigateur web dans le monde. Il suffit de taper l’adresse IP dans la barre
d’adresse du navigateur web et de saisir le nom d’utilisateur et le mot de passe.
• Le nom d’utilisateur par défaut admin ne nécessite pas de mot de passe.
• La page d’information s’affiche après la validation du nom d’utilisateur et du mot de passe.
17/07/2009 © 2008 Velleman nv
38
Page 39

CAMIP4 Rev. 02
Model version du firmware
IP CAM ID numéro d’identification de la caméra
Registration status état d’enregistrement de la caméra
Network type type de réseau utilisé
Video user nombre d’utilisateurs ayant accès à la caméra
Video resolution résolution de l’image
Video bandwidth largeur de bande
Email/ftp Alarm notification par courriel et alarme FTP activées
NAS Record configuration NAS (Network Attached Storage)
Mac Address (Hex) adresse Mac de la caméra
• Ouvrir les pages de configuration en cliquant dans la liste à la gauche de la page d’information.
• Video -> Display : Affichage des images en direct dans une fenêtre de navigation.
Remarque : Cette fonction nécessite ActiveX. Ce composant logiciel est automatiquement
téléchargé lors de la connexion à Internet.
Configurer la taille de l’image sous Video Settings.
• Network : Configuration du réseau. Le protocole par défaut est DHCP (Dynamic Host
Configuration Protocol) qui assurera un adressage IP automatique. Contacter votre administrateur
réseau si le protocole DHCP n’est pas disponible.
17/07/2009 © 2008 Velleman nv
39
Page 40

CAMIP4 Rev. 02
• Advanced Network : Configuration de la connexion PPPoE (ADSL). Saisir le nom d’utilisateur et
le mot de passe.
Remarque : Il est possible de sélectionner le protocole DHCP/la configuration IP manuelle et le
protocole PPPoE. Le protocole PPPoE sera préconisé et utilisé si possible.
• Video Settings : Configuration vidéo. Cette page permet la configuration et la réinitialisation du
mot de passe nécessaire à l’accès des images vidéo.
Remarque : Le mot de passe d’origine est inclus avec la caméra. Modifier le mot de passe de la
caméra pour des raisons de sécurité.
• Les images captées par la caméra sont également disponible sur un réseau téléphonique 3G.
Configurer la connexion sous 3GPP/RTSP. Copier l’adresse l’URL d’accès sous Access URL dans
le téléphone 3G. Attention : Le format de l’URL peut changer selon le type de téléphone. Se
reporter à la notice d’emploi du téléphone 3G pour plus d’information.
Remarque : Les derniers chiffres de l’adresse URL sont composés du numéro d’identification de la
caméra et du mot de passe. Ces chiffres sont uniques pour chaque caméra.
17/07/2009 © 2008 Velleman nv
40
Page 41

CAMIP4 Rev. 02
Remarque : Tout comme la technologie 3GPP/ISMA, la caméra télécharge les images en utilisant le
protocole RTSP et le codec vidéo/audio. Il suffit de taper l’adresse
rtsp://ip_cam_address/CAM_ID.password dans le téléphone 3G. La caméra IP ne
nécessite pas de configuration supplémentaire. La saisie de l’adresse RSTP peut
changer selon le type de téléphone. Se reporter à la notice d’emploi du téléphone 3G
pour plus d’information. Les valeurs de la qualité d’image et la résolution sont
identiques à celles sous Video Settings. Vu que la largeur de bande du service 3G est
inférieure à 256k bps, il est conseillé d’utiliser une vitesse de connexion sur la caméra
de 128k ou de 64k bps.
• La caméra transmet des captures d’image vers le compte de messagerie électronique ou le serveur
FTP dès la détection d’un mouvement. Configurer le compte et/ou l’adresse FTP sous Schedule –
Email/ftp Alarm.
• Accéder à la page NAS Settings pour configurer le système NAS (Network Attached Storage).
• Accéder à la page Scheduling pour activer les fonctions Email/ftp et NAS.
17/07/2009 © 2008 Velleman nv
41
Page 42

CAMIP4 Rev. 02
• Modifier la configuration de l’administrateur sous Admin – Admin login. Il est conseillé de
modifier régulièrement le mot de passe de l’administrateur.
Remarque : Noter le mot de passe de l’administrateur. La caméra n’est pas configurable sans ce
mot de passe.
• L’horloge interne d’une caméra IP connectée à Internet peut être synchronisée depuis un serveur
NTP (p.ex. ntp.asql.co.uk – consulter le site www.ntp.org pour un aperçu). La configuration
s’effectue sous Date/Time.
• Mettre le firmware à jour sous Upgrade à partir d’un fichier local ou d’un serveur FTP.
Attention : Télécharger le nouveau firmware avec précaution. Le
téléchargement de firmware non compatible peut endommager la caméra.
N’effectuer une mise à jour que si absolument nécessaire.
Confier la mise à jour de la caméra à un informaticien qualifié.
Ne jamais éteindre la caméra pendant le téléchargement du firmware.
SA Velleman Components, le fabricant et le revendeur ne seront aucunement
responsables de dommages survenus au téléchargement de firmware.
17/07/2009 © 2008 Velleman nv
42
Page 43

CAMIP4 Rev. 02
• Le nom du firmware est disponible sur le serveur FTP (ftp:60.250.194.78) (nom d’utilisateur
upgrade et mot de passe upgrade). Dérouler la liste et choisir la version correcte. Le nom doit
commencer par VS316-gen.
• Cliquer sur reboot sous reboot pour redémarrer l’ordinateur.
7.4 Camera List
• Une fois la caméra configurée, elle doit être ajoutée à la liste Camera List. Cliquer avec le bouton
droit de la souris sur Camera List et ensuite cliquer sur New Camera.
Remarque : Une caméra qui ne se trouve pas sous Camera List ne sera pas disponible depuis
Internet.
• Donner un nom à la caméra (p.ex. son emplacement), taper le numéro d’identification de la
caméra et le mot de passe, et cliquer sur Add. La caméra s’affiche sous le répertoire Cam List.
Remarque : Le symbole devançant le nom de la caméra indique l’état.
ROUGE : la caméra est déconnectée et n’est pas disponible sur Internet
JAUNE : la caméra est connectée mais ne répond pas (p.ex. dû à la configuration du routeur)
VERT : la caméra est connectée et disponible
• Il est possible de grouper des caméras et de les placer dans un dossier dédié. Créer un nouveau
dossier en cliquant avec le bouton droit de la souris sur Camera List et ensuite sur New Folder.
Donner un nom au dossier et cliquer sur OK.
17/07/2009 © 2008 Velleman nv
43
Page 44

CAMIP4 Rev. 02
• Glisser-déposer les caméras dans le nouveau dossier.
• Donner un nouveau nom au dossier en cliquant avec le bouton droit de la souris sur le dossier et
en cliquant sur Rename. Donner un nom au dossier et cliquer sur OK.
Remarque : Les dossiers CameraList et Auto Search n’acceptent pas de nouveau nom.
• Pour supprimer un dossier, cliquer avec le bouton droit de la souris sur le dossier en question et
cliquer ensuite sur Delete.
Remarque : Les caméras dans le dossier supprimé seront déplacées sous le répertoire Auto
Search.
• Cliquer avec le bouton droit de la souris sur une caméra dans le répertoire Camera List. Les
options suivantes sont disponibles :
• Cliquer d’abord dans l’écran souhaité et cliquer avec le bouton droit de la souris sur la caméra.
Cliquer ensuite sur Play on selected window. Les images sont affichées dans l’écran sélectionné.
• Cliquer sur ID/Password settings pour éditer le nom d’une caméra.
• Cliquer sur Video settings pour modifier la configuration vidéo d’une caméra.
17/07/2009 © 2008 Velleman nv
44
Page 45

CAMIP4 Rev. 02
Remarque :
• Bandwidth : Choisir la même largeur de bande que celle de la connexion Internet.
• Auto Select : Sélectionner enable pour effectuer une sélection automatique de la
configuration la plus appropriée.
• Une vitesse d’image plus élevée nécessite une largeur de bande plus élevée.
• Preference : Choisir la configuration souhaitée : Video Motion (image fluide) ou Image quality
(qualité d’image).
• Time on video : Sélectionner enable pour afficher la date et l’heure dans l’image.
• Sélectionner le format PAL ou NTSC sous Web configure – Video settings.
• Brightness : Sélectionner une des 10 valeurs d’intensité.
• Motion Detection Sensitivity : Configurer la sensibilité (high, medium ou low).
• Cliquer sur Update et saisir le nom d’utilisateur et le mot de passe.
• Cliquer sur 3GPP settings pour modifier la configuration 3GPP.
• Cliquer sur Update et saisir le nom d’utilisateur et le mot de passe.
• Cliquer sur Firmware upgrade pour mettre à jour le firmware (voir §7.3 Configuration web –
Upgrade)
• Cliquer sur Delete pour supprimer une caméra de la liste.
7.5 Fonctions d’affichage
• Cliquer double dans un écran pour changer le format de l’écran en format plein écran. Recliquer
double pour revenir au format initial.
• Cliquer double sur la barre de titre pour n’afficher qu’un seul écran.
• La barre de titre contient les icônes suivants :
swap : Disponible en format 6 ou 13 écrans. Les images sont
capture d’image : Capture de l’image affichée.
enregistrement : État de l’enregistrement.
17/07/2009 © 2008 Velleman nv
affichées dans l’écran le plus grand.
noir pas d’enregistrement
rouge enregistrement en cours
vert enregistrement après détection de mouvement
45
Page 46

CAMIP4 Rev. 02
• Cliquer avec le bouton droit de la souris dans un écran. Les options sont les suivantes :
Full window : Format plein écran.
Auto reconnect : Réouverture automatique d’une session après
modification de la configuration ou perte de la connexion.
Stop : Arrêt d’affichage des images.
Pause : Interruption de l’affichage.
Motion recording : Activation de l’enregistrement après détection de
mouvement.
Properties : Affichage de la configuration de la caméra (vitesse de
l’image, larguer de bande, heure).
7.6 Options dans CamView
• Les menus suivants sont disponibles :
Pause all : Interruption.
Disconnect all : Déconnexion de toutes les caméras.
Auto search : Recherche automatique.
Exit : Quitter et fermer le logiciel CamView.
Status bar : Indique l’espace restant sur le disque dur (voir au bas à gauche
de la fenêtre).
Camera list : Liste des caméras.
Refresh camera status : Rafraîchissement de toutes les caméras.
CamPlay : Lancement du logiciel CamPlay, visionnage des enregistrements
et des capture d’image (voir §7.7 CamPlay)
Open recorded files folder
Open snapshot files folder
Directory : Configuration du répertoire.
Firmware upgrade : Voir §7.3 Web configure – Upgrade.
Startup options : Sélection de l’option lors du démarrage.
17/07/2009 © 2008 Velleman nv
46
Page 47

CAMIP4 Rev. 02
Scheduling : Configuration de l’enregistrement programmé.
Sélectionner la langue du logiciel.
Help Cliquer sur Help pour afficher la version du logiciel CamView.
7.7 CamPlay
• Cliquer sur View → Camplay pour démarrer l’application CamPlay. Les deux répertoires –
Recorded Files (fichiers vidéo) et Snapshot Files (captures d’image) – sont affichés. Cliquer sur
pour déployer un répertoire. Les sous-répertoires sont disposés selon le nom de la caméra, la
date et l’heure. Les captures d’image ont également un numéro séquentiel.
• Cliquer double sur un fichier vidéo ou une capture d’image pour l’ouvrir.
lecture
pause
arrêt
capture d’image
sourdine
Remarque : Résolution minimale : 640x480, résolution maximale : résolution du fichier.
lecture ½ vitesse
avance rapide
zoom arrière
revenir au format original
zoom avant
17/07/2009 © 2008 Velleman nv
47
Page 48

CAMIP4 Rev. 02
• Les menus suivants sont disponibles :
Refresh file tree : Mise à jour des répertoires.
Exit : Quitter l’application CamPlay.
Directory : Sélection du dossier d’installation des enregistrements et des
captures d’image.
Language : Sélectionner la langue.
Help Cliquer sur Help pour afficher la version du logiciel CamPlay.
7.8 Désinstaller le logiciel CamView
• Le logiciel peut être désinstallé de deux façons :
o Cliquer sur Start → CamView → Uninstall CamView.
o Cliquer sur Start → Settings → Control Panel → Add or Remove Programs. Sélectionner
CamView et cliquer sur Change/Remove.
• Cliquer sur Next >. Cocher l’option souhaitée et cliquer sur Next >.
17/07/2009 © 2008 Velleman nv
48
Page 49

CAMIP4 Rev. 02
• Cliquer sur Finish pour compléter la désinstallation.
8. Problèmes et solutions
Q : La caméra affiche un icône vert mais les images ne peuvent pas être visionnées ou
modifiées.
R : L’icône vert n’indique que la caméra est connectée et qu’elle répond, mais ne garantit pas
l’accessibilité des images. Vérifier la configuration du coupe-feu ou du routeur.
Q : Mauvaise qualité des images vidéo lorsqu’elles sont visionnées depuis Internet.
R : La qualité des images dépend largement de la vitesse de connexion Internet. Modifier la largeur
de bande de la caméra et choisir une largeur inférieure à celle fourni par votre fournisseur d’accès.
Q : Mauvaise qualité des images vidéo lors d’un icône jaune.
R : Un icône jaune indique une mauvaise connexion entre CamView et la caméra. Contrôler la
présence d’un coupe-feu ou la configuration du routeur.
Q : Puis-je accéder aux fichiers vidéo sans mot de passe ?
R : Non. La saisie du mot de passe est nécessaire pour des rasions de sécurité.
Q : Puis-je modifier la configuration de la caméra depuis CamView ?
A : Oui, en partie, c'est-à-dire la résolution, la vitesse d’image, la largeur de bande, le microphone,
la sélection automatique, le mode d’utilisation intérieure/extérieure, fréquence de la lumière, le
mode DEL et l’intensité. Les autres valeurs ne sont accessibles que depuis Web configure.
Q : La connexion avec la caméra est interrompue après une modification de la
configuration de la caméra.
R : La caméra réinitialise le système pendant environ 5 secondes. Rétablir la connexion après le
processus de réinitialisation.
Q : Combien d’utilisateurs la caméra peut-elle simultanément accepter ?
R : Le nombre d’utilisateurs dépend de la configuration vidéo, de la vitesse de connexion Internet et
de la résolution. Se référer à la table ci-dessous :
Largeur de bande (5 ~ 25 IPS)
Résolution
176x144 20 20 20 4 4
52x288 20 20 18 9 4 4
720x576 8 6 4 4
64K 256K 512K 768K 1M 1.5M
17/07/2009 © 2008 Velleman nv
49
Page 50

CAMIP4 Rev. 02
9. Spécifications techniques
indice IP IP66
système de balayage PAL
capteur CCD couleur Sony Super HAD
taille de l’image 1/3"
nombre de pixels 512(H) x 582(V) pixels
résolution 420 lignes TV
éclairement min. 0,5 lux - F1.4 (IR éteint)/0 lux (IR allumé)
DEL IR 21
portée max. IR ± 15 m
entrelacement 2:1
sortie vidéo 1,0 Vpp, 75 Ω, composite
rapport signal-bruit vidéo > 48 dB (AGC éteint)
AEI 1/50 ~ 1/100 000s
gamma 0,45
objectif 4 mm
angle de l’objectif 73°
interface réseau Ethernet 10BaseT/100BaseTX, Auto-MDIX, RJ-45, BNC
compression vidéo MPEG-4
qualité de l’image
résolution 176x144, 352x288, 720x576
largeur de bande 64k, 128k, 256k, 512k, 768k, 1M, 1.2M, 1,5M bps
vitesse de l’image 1, 2, 3, 4, 5, 10, 15, 20, 25 IPS
protocoles supportés IPv4, HTTP, TCP, ICNP, RTSP RTP, UDP, IGMP, RTCP, SMTP, FTP,
DHCP, UPnP, ARP, DNS, PPPoE
langues supportées logiciel anglais, chinois, italien, japonnais, turc, hébeux, français, hindi,
espagnol, hongrois
système requis Pentium® 4, 1,5 GHz ou plus
Windows
®
XP SP2 ou plus ; Framework 2.0
RAM 512 Mo ou plus
port de réseau libre
température de service -10°C ~ 50°C
alimentation alimentation 12 VCC PSS1212 (incl.)
consommation 3,8 W
dimensions Ø 62 x 85 mm
poids 365 g
N’employer cet appareil qu’avec des accessoires d’origine. SA Velleman ne sera aucunement
responsable de dommages ou lésions survenus à un usage (incorrect) de cet appareil. Pour plus
d’information concernant cet article, visitez notre site web www.velleman.eu. Toutes les
informations présentées dans cette notice peuvent être modifiées sans notification préalable.
© DROITS D’AUTEUR
SA Velleman est l’ayant droit des droits d’auteur pour cette notice.
Tous droits mondiaux réservés. Toute reproduction, traduction, copie ou diffusion, intégrale ou partielle, du contenu de cette
notice par quelque procédé ou sur tout support électronique que se soit est interdite sans l’accord préalable écrit de l’ayant
droit.
17/07/2009 © 2008 Velleman nv
50
Page 51

CAMIP4 Rev. 02
MANUAL DEL USUARIO
1. Introducción
A los ciudadanos de la Unión Europea
Importantes informaciones sobre el medio ambiente concerniente a este producto
Este símbolo en este aparato o el embalaje indica que, si tira las muestras inservibles,
podrían dañar el medio ambiente. No tire este aparato (ni las pilas, si las hubiera) en la
basura doméstica; debe ir a una empresa especializada en reciclaje. Devuelva este
aparato a su distribuidor o a la unidad de reciclaje local. Respete las leyes locales en
relación con el medio ambiente.
Si tiene dudas, contacte con las autoridades locales para residuos.
¡Gracias por haber comprado la CAMIP4! Lea atentamente las instrucciones del manual antes de
usarla. Si el aparato ha sufrido algún daño en el transporte no lo instale y póngase en contacto con
su distribuidor.
2. Instrucciones de seguridad
Mantenga el aparato lejos del alcance de personas no capacitadas y niños.
Riesgo de descargas eléctricas al abrir la caja.
Nunca abra ni desmonte la cámara. El usuario no habrá de efectuar el
mantenimiento de ninguna pieza. Contacte con su distribuidor si necesita
piezas de recambio.
3. Normas generales
Véase la Garantía de servicio y calidad Velleman® al final de este manual del usuario.
• No agite el aparato. Evite usar excesiva fuerza durante el manejo y la instalación.
• No exponga este aparato a polvo, humedad y temperaturas extremas.
• Familiarícese con el funcionamiento del aparato antes de utilizarlo.
• Por razones de seguridad, las modificaciones no autorizadas del aparato están prohibidas.
• Utilice sólo el aparato para las aplicaciones descritas en este manual. Su uso incorrecto anula la
garantía completamente.
• Los daños causados por descuido de las instrucciones de seguridad de este manual invalidarán su
garantía y su distribuidor no será responsable de ningún daño u otros problemas resultantes.
4. Características
• estés donde estés, acceda a la cámara gracias al software, el número de identificación y la
contraseña
• mire las imágenes en directo y grábelas desde cualquier ordenador
• visualice simultáneamente hasta 16 cámaras gracias al software CamView fácil de usar
• modos de grabación: manual, programado o después de detección de movimientos (software)
• equilibrio entre la resolución de la imagen y la velocidad de acceso a internet regulable gracias a la
anchura de banda ajustable
5. Instalar la cámara
Véase las figuras en la página 2 de este manual del usuario.
• Elija un lugar de montaje adecuado y asegúrese de que:
o nunca instale la cámara en un lugar donde esté expuesta a temperaturas extremas ni vibraciones.
o nunca instale la cámara cerca de campos electromagnéticos
o nunca dirija la cámara a un objeto reflectante (p.ej. puerta metálica).
• Instale la cámara en el lugar deseado. Utilice el soporte [7] para determinar el lugar de los
agujeros de montaje. Fije el soporte con los tres tornillos.
• Fje la cámara al soporte [7] con el tornillo de la articulación [5]. La cámara está equipada con dos
agujeros de montaje: uno para el montaje mural, el otro para el montaje al techo. Montaje al techo:
fije la capa antisolar [4] entre la cámara y el soporte [7]. Montaje mural: fije la capa antisolar a la
parte superior de la cámara con el tornillo y la arandela incluidos.
• Apunte la cámara a la zona que quiere vigilar y apriete el tornillo de fijación [6].
• Conecte el conector de entrada [C] a la alimentación 12 VCC (incl.).
• Conecte el conector BNC [B] a un monitor (no incl.) y/o a una red ordenador con el conector RJ45
[A]. En caso de preguntas, contacte con su proveedor de red local.
17/07/2009 © 2008 Velleman nv
51
Page 52

CAMIP4 Rev. 02
6. Instalar el software
• Esta cámara se entrega con un CD-ROM que incluye el software CamView. Introduzca el CD-ROM
en el reproductor de CD (véase §9 Especificaciones).
• Abra el fichero CamViewInstaller-V1.04.xx.exe (xx es la versión actual). El procedimiento de
instalación se ejecuta automáticamente. Se visualiza la pantalla de entrada.
• Haga click en N
• Desmarque la casilla si Framework 2.0 ya está instalado en el ordenador. Deje la casilla marcada
en caso de duda.
• Haga click en Next >. Se visualiza la pantalla Installation Folder.
ext >. Se visualiza la pantalla Select Packages.
• Seleccione la carpeta de destino. Haga click en Ch
ange… y luego en Next >. Se visualiza la
pantalla Shortcut Folder.
• Seleccione la carpeta de destino en el menú desplegable. Seleccione el nivel de accesibilidad del
atajo y haga click en N
ext >. Se visualiza la pantalla Ready to Install.
17/07/2009 © 2008 Velleman nv
52
Page 53

CAMIP4 Rev. 02
• Haga click en < B
• El siguiente mensaje aparece si Framework 2.0 (o superior) ya ha sido instaldado en el ordenador.
Haga click en OK para continuar la instalación de CamView.
• Se visualiza la pantalla Installation Finished. Haga click en F
ack para volver a la pantalla anterior y haga click en Next > para continuar.
inish.
7. Configurar el software
7.1 En general
• Abra CamView al hacer click en el atajo del escritorio de su ordenador o al hacer click en Start →
Programs → CamView.
• La página inicial visualiza la imagen de las cámaras conectadas (Vídeo). Es posible subdividir esta
página en 1 – 4 – 6 – 9 – 13 ó 16 pantalla al hacer click en el icono correspondiente:
Nota: Es posible configurar cada pantalla por separado.
• La lista de las cámaras disponibles se visualiza a la izquierda de la página. Esta lista no visualiza
ninguna cámara durante el primer uso.
17/07/2009 © 2008 Velleman nv
53
Page 54

CAMIP4 Rev. 02
7.2 Auto Search
• Esta función sólo está disponible si la cámara y el ordenador están conectados a la misma red local
LAN. Abra le directorio Auto Search para buscar la red.
Nota: algunos enrutadores y cortafuegos pueden bloquear el acceso a la cámara. Contacte con su
proveedor de red en caso de problemas.
• El software busca en le red local y visualiza el número de identificación de todas las cámaras
disponibles (p.ej. 001040042). Marque este número de identificación con el ratón para visualizar la
dirección IP.
Nota: Una cámara visualizada en el directorio Auto Search NO siempre es accesible por el mundo
entero. Desplácela al directorio Camera List (véase §7.4).
7.3 Configuración web
• Haga click con el botón derecho del ratón en el número de identificación de la cámara y luego en
Web configure para configurar la cámara por el navegador Web.
Nota: Una cámara correctamente configurada será accesible desde cualquier ordenador/navegador
web en el mundo. Introduzca la dirección IP en la barra de dirección del navegador
web y luego el nombre de usuario y la contraseña.
• El nombre de usuario por defecto admin no necesita una contraseña.
• La página de información se visualiza después de haber introducido un nombre de usuario y una
contraseña válidos.
17/07/2009 © 2008 Velleman nv
54
Page 55

CAMIP4 Rev. 02
Model versión del firmware
IP CAM ID número de identificación de la cámara
Registration status estado de grabación de la cámara
Network type tipo de red utilizado
Video user número de usuarios que tienen acceso a la cámara
Video resolution resolución de la imagen
Video bandwidth anchura de banda
Email/ftp Alarm notificación por correa electrónico y alarma FTP activados
NAS Record configuración NAS (Network Attached Storage)
Mac Address (Hex) dirección Mac de la cámara
• Abra las páginas de configuración al hacer click en la lista a la izquierda de la página de
información.
• Video -> Display: Visualización de las imágenes en directo en una pantalla de navegación.
Nota: Esta función necesita ActiveX que se descarga automáticamente al conectarse a Internet.
Configure el tamaño de la imagen bajo Video Settings.
• Network: Configuración de la red. El protocolo por defecto es DHCP (Dynamic Host Configuración
Protocol) y recibe automáticamente una dirección IP. Contacte con su proveedor de red si el
protocolo DHCP no está disponible.
17/07/2009 © 2008 Velleman nv
55
Page 56

CAMIP4 Rev. 02
• Advanced Network: Configuración de la conexión PPPoE (ADSL). Introduzca el nombre de
usuario y la contraseña.
Nota: Es posible seleccionar el protocolo DHCP/la configuración IP manual y el protocolo PPPoE. Sin
embargo la cámara prefiere el protocolo PPPoE.
• Video Settings : Configuración vídeo. Esta página permite configurar y reinicializar la contraseña
que le da acceso a las imágenes de vídeo.
Nota: La contraseña original está incluida con la cámara. Por razones de seguridad modifique la
contraseña de la cámara.
• Las imágenes captadas por la cámara también están disponibles en una red telefónica 3G.
Configure la conexión bajo 3GPP/RTSP. Copie la dirección del URL de acceso bajo Access URL
en el teléfono 3G. ¡Ojo!: El formato del URL puede cambiar según el tipo de teléfono. Véase el
manual del usuario del teléfono 3G para más información.
Nota: Las últimas cifras de la dirección URL constan del número de identificación de la cámara y la
contraseña. Estas cifras son únicas para cada cámara.
17/07/2009 © 2008 Velleman nv
56
Page 57
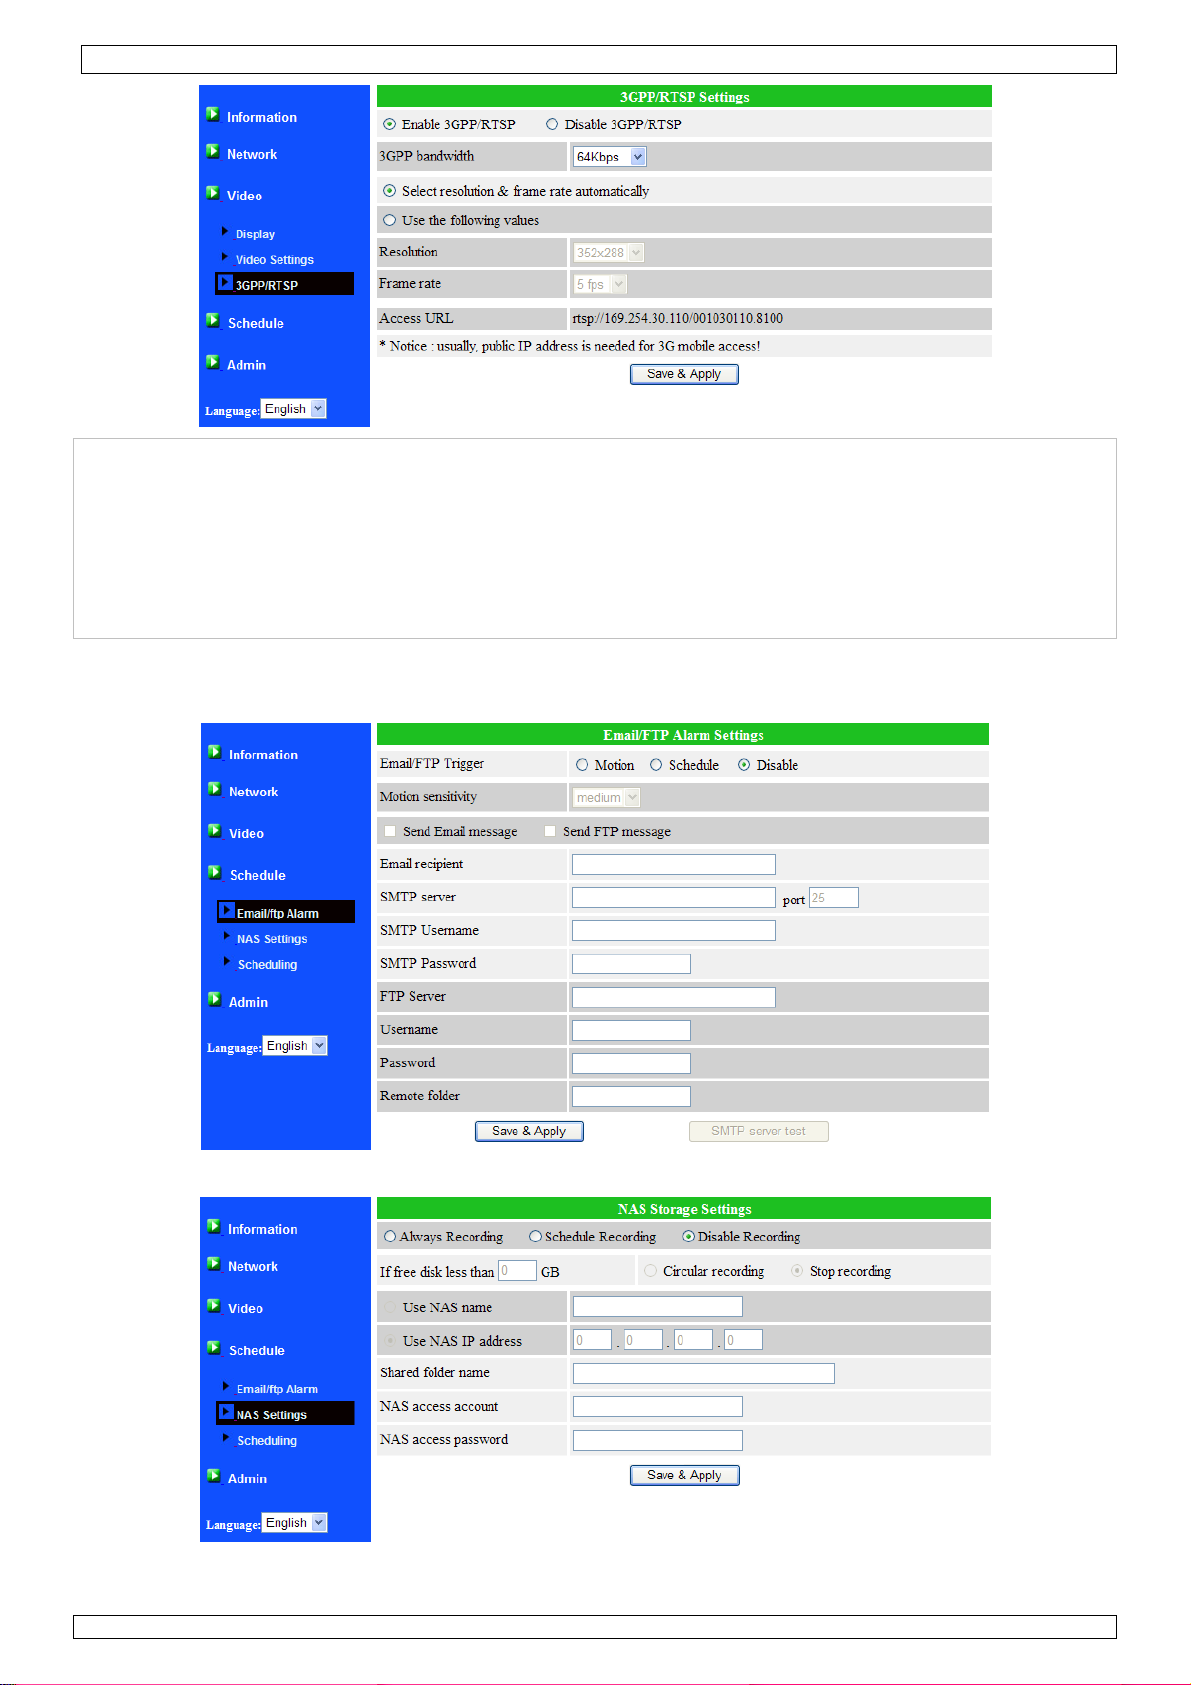
CAMIP4 Rev. 02
Nota: Al igual que la tecnología 3GPP/ISMA, la cámara descarga las imágenes al utilizar el protocolo
RTSP y el codec vídeo/audio. Introduzca la dirección
rtsp://ip_cam_address/CAM_ID.password en el teléfono 3G. La cámara IP no necesita
una configuración adicional. La introducción de la dirección RSTP puede cambiar según el tipo
de teléfono. Véase el manual de usuario del teléfono 3G para más información. Los valores
de la calidad de imagen y la resolución coinciden con los valores bajo Video Settings.
Porque la anchura de banda del servicio 3G es inferior a 256k bps, utilice una velocidad de
conexión de 128k o 64k bps para la cámara.
• La cámara transmite las capturas de imagen a una dirección de correo electrónico o el servidor FTP
en cuanto detecte un movimiento. Configure la dirección de correo electrónico y/o la dirección FTP
bajo Schedule – Email/ftp Alarm.
• Entre en la página NAS Settings para configurar el sistema NAS (Network Attached Storage).
• Entre en la página Scheduling para activar las funciones Email/ftp y NAS.
17/07/2009 © 2008 Velleman nv
57
Page 58

CAMIP4 Rev. 02
• Modifique la configuración del administrador bajo Admin - Admin login. Modifique la contraseña
del administrador regularmente.
Nota: Apunte la contraseña del administrador. No es posible configurar la cámara sin contraseña.
• Es posible sincronizar el reloj interno de una cámara IP conectado a Internet por un servidor NTP
(p.ej. ntp.asql.co.uk – consulte la página web www.ntp.org para un resumen). La configuración se
efectúa bajo Date/Time.
• Instale una versión mejorada del firmware bajo Upgrade a partir de un fichero local o un servidor
FTP.
¡Ojo!: Descargue el nuevo firmware cuidadosamente. La descarga de firmware
no compatible puede dañar la cámara.
Sólo instale una versión mejorada si fuera absolutamente necesario.
Confíe la instalación de una versión mejorada de la cámara a un especialista
en informática cualificado.
Nunca desactive la cámara durante la descarga del firmware.
Velleman Components NV, el fabricante ni el distribuidor serán responsable de
daños causados por el descarga del firmware.
17/07/2009 © 2008 Velleman nv
58
Page 59

CAMIP4 Rev. 02
• El nombre del firmware está disponible en el servidor FTP (ftp:60.250.194.78) (nombre de
usuario upgrade y contraseña upgrade). Desplácese por la liste y seleccione la versión correcta.
Asegúrese de que el nombre empiece por VS316-gen.
• Haga click en reboot bajo reboot para reiniciar el ordenador.
7.4 Lista de cámaras
• Después de haber ajustado la cámara, añádala a la lista Camera List. Haga click en Camera List
con el botón derecho del ratón y luego haga click en New Camera.
Nota: Una cámara que no está bajo Camera List no estará disponible en Internet.
• Ponga un nombre a la cámara (p.ej. su posición), introduzca el número de identificación de la
cámara y la contraseña y haga click en Add. La cámara se visualiza bajo el directorio Cam List.
Nota: el símbolo delante del nombre de la cámara indica el estado.
ROJO: la cámara está desconectada y no está disponible en Internet
AMARILLO: la cámara está conectada pero no reacciona (p.ej. configuración del enrutador
incorrecta)
VERDE: la cámara está desconectada y está disponible
• Es posible agrupar cámaras y ponerlas en una carpeta adecuada. Crea una nueva carpeta al hacer
click en Camera List con el botón derecho del ratón y luego, haga click en New Folder. Ponga un
nombre a la carpeta y haga click en OK.
17/07/2009 © 2008 Velleman nv
59
Page 60

CAMIP4 Rev. 02
• Arrastrar y soltar las cámaras a una nueva carpeta.
• Ponga un nombre a la carpeta nueva al hacer click en la carpeta con el botón derecho del ratón y
al hacer click en Rename. Ponga un nombre a la carpeta y haga click en OK.
Nota: Las carpetas CameraList y Auto Search no aceptan un nombre nuevo.
• Para borrar una carpeta, haga click en la carpeta en cuestión con el botón derecho del ratón y
luego haga click en Delete.
Nota: Las cámaras en la carpeta borrada se desplazarán de nuevo al directorio Auto Search.
• Haga click en una cámara bajo el directorio Camera List con el botón derecho del ratón. Están
disponibles las siguientes opciones:
• Primero, haga click en la pantalla deseada y haga click en la cámara con el botón derecho del
ratón. Luego, haga click en Play on selected window. Las imágenes se visualizan en la pantalla
seleccionada.
• Haga click en ID/Password settings para editar el nombre de una cámara.
• Haga click en Video settings para modificar la configuración vídeo de una cámara.
17/07/2009 © 2008 Velleman nv
60
Page 61

CAMIP4 Rev. 02
Nota:
• Bandwidth: Seleccione la misma anchura de banda que la de la conexión Internet.
• Auto Select: Seleccione enable para efectuar una selección automática de la configuración
más adecuada.
• Una velocidad de imagen más elevada necesita una anchura de banda más elevada.
• Preference: Seleccione la configuración deseada: Video Motion (imagen fluida) o Imagen
quality (calidad de imagen).
• Time on video: Seleccione enable para visualizar la fecha y la hora en la imagen.
• Seleccione el formato PAL o NTSC bajo Web configure – Video settings.
• Brightness : Seleccione uno de los 10 valores de intensidad.
• Motion Detection Sensitivity: Ajuste la sensibilidad (high, medium o low).
• Haga click en Update e introduzca el nombre de usuario y la contraseña.
• Haga click en 3GPP settings para modificar la configuración 3GPP.
• Haga click en Update e introduzca el nombre de usuario y la contraseña.
• Haga click en Firmware upgrade para instalar una versión mejorada del firmware (véase §7.3
Configuración web – Upgrade)
• Haga click en Delete para borrar una cámara de la lista.
7.5 Funciones de visualización
• Haga click dos veces en una pantalla para cambiar el formato de la pantalla en formato pantalla
completa. Vuelva a hacer click dos veces para volver al formato inicial.
• Haga click dos veces en la barra de título para visualizar una sola pantalla.
• La barra de título contiene los siguientes iconos:
swap: Disponible en formato 6 ó 13 pantallas. Las imágenes se
captura de imagen: Captura de la imagen visualizada.
grabación: Estado de la grabación.
17/07/2009 © 2008 Velleman nv
visualizan en la pantalla más grande.
negro No hay grabación
rojo grabación
verde grabación después de detección de movimientos
61
Page 62

CAMIP4 Rev. 02
• Haga click en una pantalla con el botón derecho del ratón. Están disponibles las siguientes opciones:
Full window: Formato pantalla completa.
Auto reconnect: Restablecer la conexión de manera automática después
de una modificación de la configuración o la pérdida de la conexión.
Stop: Parar la visualización de las imágenes.
Pause: Interrumpir la visualización.
Motion recording: Activar la grabación después de la detección de
movimientos.
Properties: Visualización de la configuración de la cámara (velocidad de
la imagen, anchura de banda, hora).
7.6 Opciones en CamView
• Están disponibles los siguientes menús:
Pause all: Interrupción.
Disconnect all: Desconexión de todas las cámaras.
Auto search: Búsqueda automática.
Exit: Salir de y cerrar el software CamView.
Status bar: Indica el espacio restante en el disco duro (véase en la parte
inferior izquierda de la pantalla).
Camera list: Lista de las cámaras.
Refresh camera status: Actualizar todas las cámaras.
CamPlay : Ejecutar el software CamPlay, mirar las grabaciones y las
capturas de imagen (véase §7.7 CamPlay)
Open recorded files folder
Open snapshot files folder
Directory : Configuración del directorio.
Firmware upgrade: Véase §7.3 Web configure – Upgrade.
Startup options: Seleccionar la opción durante la iniciación.
17/07/2009 © 2008 Velleman nv
62
Page 63
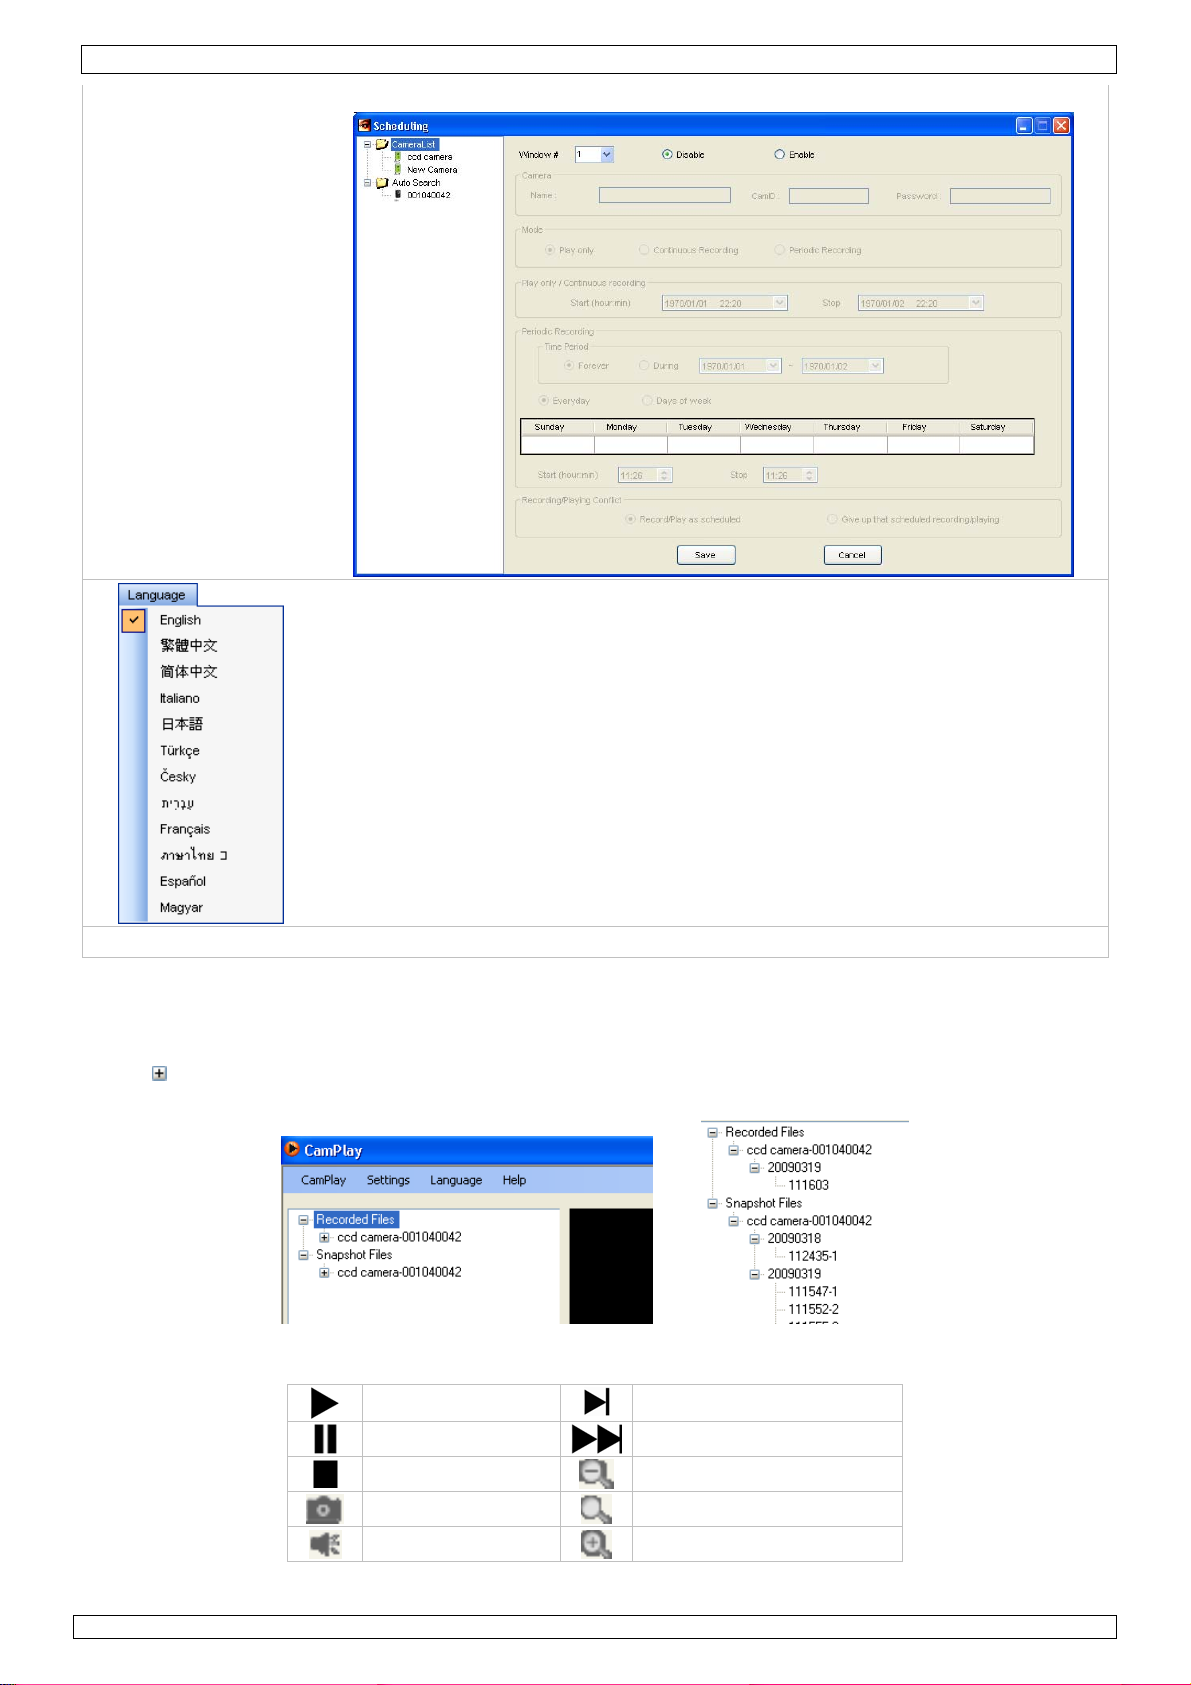
CAMIP4 Rev. 02
Scheduling: Configuración de la grabación programada.
Seleccionar el idioma del software.
Help Haga click en Help para visualizar la versión del software CamView.
7.7 CamPlay
• Haga click en View → Camplay para iniciar la aplicación CamPlay. Los dos directorios –
Recorded Files (ficheros vídeo) y Snapshot Files (capturas de imagen) – se visualizan. Haga click
para desplegar un directorio. Los subdirectorios están organizados según el nombre de la
en
cámara, la fecha y la hora. Las capturas de imagen tienen también un número secuencial.
• Haga click dos veces en un fichero vídeo para iniciarlo o una captura de imagen para abrirla.
reproducir
hacer una pausa
parar
captura de imagen
silenciar
Nota: Resolución mínima: 640x480, resolución máxima: resolución del fichero.
Reproducir a ½ velocidad
avanzar de forma rápida
acercar
volver al formato original
alejar
17/07/2009 © 2008 Velleman nv
63
Page 64

CAMIP4 Rev. 02
• Están disponibles los siguientes menús:
Refresh file tree: actualizar los directorios.
Exit: salir de la aplicación CamPlay.
Directory: Seleccionar la carpeta de instalación de las grabaciones y las
capturas de imagen.
Language: Seleccionar el idioma.
Help Haga click en Help para visualizar la versión del software CamPlay.
7.8 Desinstalar el software CamView
• Es posible desinstalar el software de dos maneras:
o Haga click en Start → CamView → Uninstall CamView.
o Haga click en Start → Settings → Control Panel → Add or Remove Programs.
Seleccione CamView y haga click en Change/Remove.
• Haga click en Next >. Marque la opción deseada y haga click en Next >.
17/07/2009 © 2008 Velleman nv
64
Page 65

CAMIP4 Rev. 02
• Haga click en Finish para terminar la desinstalación.
8. Solución de problemas
Q : La cámara visualiza un icono verde pero no es posible mirar ni modificar las imágenes.
R : El icono verde sólo indica que la cámara está conectada y reacciona, pero no garantiza la
accesibilidad de las imágenes. Controle la configuración del cortafuegos o el enrutador.
Q : Las imágenes vídeo miradas por Internet están de mala calidad.
R : La calidad de las imágenes depende en gran parte de la velocidad de conexión Internet.
Modifique la anchura de banda de la cámara y seleccione una anchura de banda inferior a la anchura
de banda suministrada por el proveedor de Internet.
Q : Mala calidad de las imágenes vídeo si la cámara visualiza un icono amarillo.
R : Un icono amarillo significa una mala conexión entre CamView y la cámara. Controle la presencia
de un cortafuegos o la configuración del enrutador.
Q : ¿Es posible acceder a los ficheros vídeo sin contraseña?
R : No. Por razones de seguridad, es obligatorio introducir la contraseña.
Q : ¿Es posible modificar la configuración de la cámara con CamView ?
A : Sí, en parte, es decir, la resolución, la velocidad de imagen, la anchura de banda, el micrófono,
la selección automática, el modo de uso interior/exterior, frecuencia de la luz, el modo LED y la
intensidad. Los otros valores sólo son accesibles por Web configure.
Q : La conexión con la cámara está interrumpida después de una modificación de la
configuración de la cámara.
R : La cámara reinicializa el sistema durante aproximadamente 5 segundos. Restablezca la conexión
después del procedimiento de reinicialización.
Q : ¿Cuántos usuarios puede aceptar la cámara simultáneamente?
R : El nombre de usuarios depende de la configuración vídeo, la velocidad de conexión Internet y la
resolución. Véase la lista a continuación:
Anchura de banda (5 ~ 25 IPS)
Resolución
176x144 20 20 20 4 4
52x288 20 20 18 9 4 4
720x576 8 6 4 4
64K 256K 512K 768K 1M 1.5M
17/07/2009 © 2008 Velleman nv
65
Page 66

CAMIP4 Rev. 02
9. Especificaciones
grado de protección IP IP66
sistema de exploración PAL
sensor de imagen cámara color CCD Sony Super HAD
tamaño de la imagen 1/3"
número de píxeles 512(H) x 582(V) píxeles
resolución 420 líneas TV
iluminación mínima 0,5 lux - F1.4 (IR desactivado)/0 lux (IR activado)
LEDs IR 21
alcance IR máx. ± 15 m
entrelazado 2:1
nivel de salida de vídeo 1,0 Vpp, 75 Ω, compuesto
relación señal / ruido vídeo > 48 dB (AGC desactivado)
AEI 1/50 ~ 1/100 000s
corrección de contraste (gama) 0,45
óptica 4 mm
ángulo de visión 73°
interfaz de red Ethernet 10BaseT/100BaseTX, Auto-MDIX, RJ-45, BNC
formato de compresión vídeo MPEG-4
ajuste de la calidad de imagen
resolución 176x144, 352x288, 720x576
anchura de banda 64k, 128k, 256k, 512k, 768k, 1M, 1.2M, 1,5M bps
velocidad de la imagen 1, 2, 3, 4, 5, 10, 15, 20, 25 IPS
protocolos soportados IPv4, HTTP, TCP, ICNP, RTSP RTP, UDP, IGMP, RTCP, SMTP, FTP,
DHCP, UPnP, ARP, DNS, PPPoE
idiomas disponibles en el
software
exigencias del sistema Pentium® 4, 1,5 GHz o superior
inglés, chino, italiano, japonés, turco, hebreo, francés, hindi,
español, húngaro
®
Windows
XP SP2 o superior; Framework 2.0
RAM 512 Mo o superior
conexión de red libre
temperatura de funcionamiento -10°C ~ 50°C
alimentación alimentación 12 VCC PSS1212 (incl.)
consumo 3,8 W
dimensiones Ø 62 x 85 mm
peso 365 g
Utilice este aparato sólo con los accesorios originales. Velleman NV no será responsable de daños ni
lesiones causados por un uso (indebido) de este aparato. Para más información sobre este
producto, visite nuestra página web www.velleman.eu. Se pueden modificar las especificaciones y
el contenido de este manual sin previo aviso.
© DERECHOS DE AUTOR
Velleman NV dispone de los derechos de autor para este manual del usuario. Todos los derechos mundiales
reservados. Está estrictamente prohibido reproducir, traducir, copiar, editar y guardar este manual del usuario o partes de
ello sin previo permiso escrito del derecho habiente.
17/07/2009 © 2008 Velleman nv
66
Page 67

CAMIP4 Rev. 02
BEDIENUNGSANLEITUNG
1. Einführung
An alle Einwohner der Europäischen Union
Wichtige Umweltinformationen über dieses Produkt
Dieses Symbol auf dem Produkt oder der Verpackung zeigt an, dass die Entsorgung dieses
Produktes nach seinem Lebenszyklus der Umwelt Schaden zufügen kann. Entsorgen Sie die
Einheit (oder verwendeten Batterien) nicht als unsortiertes Hausmüll; die Einheit oder
verwendeten Batterien müssen von einer spezialisierten Firma zwecks Recycling entsorgt
werden. Diese Einheit muss an den Händler oder ein örtliches Recycling-Unternehmen retourniert
werden. Respektieren Sie die örtlichen Umweltvorschriften.
Falls Zweifel bestehen, wenden Sie sich für Entsorgungsrichtlinien an Ihre örtliche
Behörde.
Wir bedanken uns für den Kauf der CAMIP4! Lesen Sie diese Bedienungsanleitung vor
Inbetriebnahme sorgfältig durch. Überprüfen Sie, ob Transportschäden vorliegen. Sollte dies der Fall
sein, verwenden Sie das Gerät nicht und wenden Sie sich an Ihren Händler.
2. Sicherheitshinweise
Halten Sie Kinder und Unbefugte vom Gerät fern.
Stromschlaggefahr beim Öffnen der Kamera.
Öffnen Sie diese Kamera NICHT. Es gibt keine zu wartenden Teile. Bestellen
Sie eventuelle Ersatzteile bei Ihrem Fachhändler.
3. Allgemeine Richtlinien
Siehe Velleman® Service- und Qualitätsgarantie am Ende dieser Bedienungsanleitung.
• Vermeiden Sie Erschütterungen. Vermeiden Sie rohe Gewalt während der Installation und Bedienung des
Gerätes.
• Schützen Sie das Gerät vor extremen Temperaturen, Staub und Feuchte.
• Nehmen Sie das Gerät erst in Betrieb, nachdem Sie sich mit seinen Funktionen vertraut gemacht haben.
• Eigenmächtige Veränderungen sind aus Sicherheitsgründen verboten.
• Verwenden Sie das Gerät nur für Anwendungen beschrieben in dieser Bedienungsanleitung sonst
kann dies zu Schäden am Produkt führen und erlischt der Garantieanspruch.
4. Eigenschaften
• egal wo Sie sind, loggen Sie dank der Software, der einzigartigen ID-Nummer und des Kennworts
auf der Kamera ein
• schauen Sie sich Live-Bilder an und nehmen Sie diese auf ab egal welchem PC
• sehen Sie sich gleichzeitig 16 Kameras über die benutzerfreundliche CamView-Software an
• Aufnahmemodi: manuell, programmiert oder nach Bewegungsdetektion (Software)
• regelbares Gleichgewicht zwischen der Bildauflösung und der Internetgeschwindigkeit über
einstellbare Bandbreite
5. Die Hardware installieren
Siehe Abbildungen, Seite 2 dieser Bedienungsanleitung.
• Wählen Sie einen geeigneten Montageort für die Kamera und beachten Sie Folgendes:
o Achten Sie bei der Wahl des Installationsortes darauf, dass das Gerät keinen extremen
Temperaturen und Vibrationen ausgesetzt werden.
o Montieren Sie die Kamera nie in der Nähe von elektromagnetischen Feldern.
o Richten Sie die Kamera nie auf die Sonne oder andere reflektierende Gegenstände.
• Verwenden Sie die Halterung [7] um die Position der Montagelöcher zu bestimmen. Bohren Sie die
Löcher und befestigen Sie die Halterung [7] mit drei Schrauben.
• Befestigen Sie die Kamera mit der Schraube am Gelenk [5] an der Halterung [7]. Die Kamera hat
zwei Montagelöcher: ein Montageloch für die Deckenmontage und ein Montageloch für die
Wandmontage. Deckenmontage: installieren Sie die Sonnenblende [4] zwischen der Kamera und
der Halterung [7]. Wandmontage: befestigen Sie die Sonnenblende [4] an der Oberseite der
Kamera mit dem Bolzen und der Dichtung (mitgeliefert).
17/07/2009 © 2008 Velleman nv
67
Page 68

CAMIP4 Rev. 02
• Richten Sie die Kamera auf die Zone, die Sie überwachen möchten, und drehen Sie die
Befestigungsschraube [6] fest.
• Verbinden Sie den 12 VDC-Eingang [C] mit dem 12VDC-Netzteil (mitgeliefert).
• Verbinden Sie den BNC-Stecker [B] über den RJ45-Stecker [A] mit einem Monitor (nicht
mitgeliefert) und/oder einem Rechnernetz. Im Zweifelsfall, setzen Sie sich mit Ihrem Netzanbieter in
Verbindung.
6. Die Software installieren
• Diese Kamera wird mit der CamView-Software auf CD-ROM geliefert. Legen Sie das CD-ROM in das
CD-ROM-Laufwerk des PC (Siehe §9 Technische Daten).
• Öffnen Sie die Datei CamViewInstaller-V1.04.xx.exe (xx ist die aktuelle Version). Das
Installationsverfahren startet automatisch und der Startbildschirm erscheint.
• Klicken Sie auf N
ext >. Das Fenster Select Packages erscheint auf dem Bildschirm.
• Entmarkieren Sie das Kästchen wenn Framework 2.0 schon installiert ist. Im Zweifelsfall, lassen
Sie das Kästchen angekreuzt.
• Klicken Sie auf N
ext >. Das Fenster Installation Folder erscheint auf dem Bildschirm.
• Wählen Sie den Zielordner mit Ch
ange… aus und klicken Sie danach auf Next >. Das Fenster
Verknüpfung Folder erscheint auf dem Bildschirm.
• Wählen Sie den Zielordner aus dem Aufklappmenü aus. Wählen Sie, ob Sie die Verknüpfung für
jedermann verfügbar machen möchten und klicken Sie auf N
ext >. Das Fenster Ready to Install
erscheint auf dem Bildschirm.
17/07/2009 © 2008 Velleman nv
68
Page 69

CAMIP4 Rev. 02
• Klicken Sie auf < B
um weiterzugehen.
• Wenn Framework 2.0 (oder höher) schon installiert ist, erscheint folgende Nachricht. Klicken Sie
auf OK um CamView weiter zu installieren.
ack wenn Sie die Einstellungen ändern möchten oder klicken Sie auf Next >
• Das Fenster Installation Successful erscheint auf dem Bildschirm. Klicken Sie auf F
Installation zu beenden.
inish um die
7. Konfiguration der Software
7.1 Allgemein
• Starten Sie CamView, indem Sie auf die Verknüpfung klicken oder klicken Sie auf Start →
Programs → CamView.
17/07/2009 © 2008 Velleman nv
69
Page 70

CAMIP4 Rev. 02
• Das Anfangsbild zeigt die verwendeten Kameras an (Video) und kann in 1 – 4 – 6 – 9 – 13 oder 16
Schirme aufgeteilt werden, indem Sie das entsprechende Symbol oben links anklicken:
Bemerkung: Jeder Schirm kann separat eingestellt werden.
• Die verfügbaren Kameras werden links im Anfangsbild angezeigt. Bei der ersten Inbetriebnahme
von CamView ist diese Liste noch leer.
7.2 Auto Search
• Diese Funktion steht nur zur Verfügung wenn die Kamera und der PC mit demselben LAN-
Netzwerk verbunden sind. Öffnen Sie das Datenverzeichnis Auto Search um das Netzwerk zu
suchen.
Bemerkung: Router und Firewalls können den Zugang zur IP-Kamera blockieren. Setzen Sie sich in
diesem Fall mit Ihrem Netzanbieter in Verbindung.
• Die Software sucht im ganzen LAN und zeigt im Datenverzeichnis Auto Search die ID aller
verfügbaren IP-Kameras (z.B. 001040042) an. Scrollen Sie mit der Maus über die ID um die IPAdresse anzuzeigen.
Bemerkung: Eine Kamera, die unter das Datenverzeichnis Auto Search erscheint, ist NICHT
weltweit verfügbar. Versetzen Sie hierfür die Kamera in den Ordner Camera List
(Siehe §7.4).
7.3 Webkonfiguration
• Klicken Sie mit der rechten Maustaste auf die ID der Kamera und klicken Sie danach auf Web
configure um die Kamera über den Webbrowser zu konfigurieren.
Bemerkung: Eine korrekt konfigurierte IP-Kamera ist über jede PC/Webbrowser zugänglich. Tippen
Sie die IP-Adresse in der Adressleiste des Webbrowsers ein und geben Sie den
Benutzername und das Passwort ein.
17/07/2009 © 2008 Velleman nv
70
Page 71

CAMIP4 Rev. 02
• Mit dem Standard Benutzername admin brauchen Sie kein Passwort.
• Bei einer gültigen Eingabe des Benutzernamen und des Passworts erscheint folgende
Informationsseite.
Model aktuelle Firmware-Version
IP CAM ID ID-Nummer der Kamera
Registration status Registrierungsstatus
Network tippen Siee aktueller Netzwerktyp
Video user Anzahl Benutzer, die mit der Kamera verbunden sind
17/07/2009 © 2008 Velleman nv
71
Page 72

CAMIP4 Rev. 02
Video resolution aktuelle Bildauflösung
Video bandwidth aktuelle Bandbreite
Email/ftp Alarm E-Mail und ftp-Alarm eingeschaltet
NAS Record Einstellungen NAS (Network Attached Storage)
Mac Address (Hex) Mac-Adresse der Kamera
• Öffnen Sie die Konfigurationsseiten über die Menüliste links der Informationsseite.
• Video -> Display: Live-Bilder im Browserfenster.
Bemerkung: Für diese Funktion brauchen Sie ActiveX. Das Programm wird beim Anschluss an das
Internet automatisch heruntergeladen. Das Herunterladen kann einzige Minuten
dauern.
Stellen Sie die Bildgröße über Video Settings ein.
• Network: Konfiguration des Netzwerks. Die Standard Einstellung ist DHCP (Dynamic Host
Configuration Protokoll) und bekommt automatisch eine IP-Adresse. Stellen Sie sich mit Ihrem
Netzanbieter in Verbindung wenn DHCP nicht verfügbar ist.
• Advanced Network: Konfiguration des PPPoE-Anschlusses (ADSL). Geben Sie den Benutzername
und das Passwort ein.
Bemerkung: Sowohl die DHCP/manuelle IP-Konfiguration als auch PPPoE können ausgewählt
werden. Die Kamera bevorzugt aber PPPoE.
• Video Settings: Konfiguration Video. Auf dieser Seite können Sie auch das Passwort, das Ihnen
Zugang zu den Videobildern gibt, einstellen oder abfragen.
Bemerkung: Das originelle Passwort befindet sich auf der mitgelieferten ID/Password-Karte.
Ändern Sie das Passwort der Kamera aus Sicherheitsgründen.
17/07/2009 © 2008 Velleman nv
72
Page 73

CAMIP4 Rev. 02
• Die Kamerabilder stehen auch ab einem 3G-Netzwerk unter das Menü 3GPP/RTSP zur Verfügung.
Kopieren Sie dafür die URL unter Access URL auf das 3G-Mobiltelefon. Achtung: Jedes Gerät hat
ein anderes URL-Format. Für mehr Informationen, ziehen Sie die Bedienungsanleitung des 3GMobiltelefons zu Rate.
Bemerkung: Die letzten Ziffern der URL bestehen aus der ID-Nummer der Kamera und danach dem
Passwort. Diese Ziffern sind für jede Kamera einzigartig.
Bemerkung: Genauso wie 3GPP/ISMA verwendet diese Kamera das RTSP-Protokoll und Video-
/Audiocodec, um die Bilder herunterzuladen. Sie brauchen also nur die Adresse
rtsp://ip_cam_address/CAM_ID.password in das 3G-Mobiltelefon einzugeben.
Die IP-Kamera braucht keine weiter Einstellungen. Die RTSP-Adresse ist für jedes
Gerät anders.Für mehr Informationen, setzen Sie sich mit dem Fabrikanten des 3GMobiltelefons in Verbindung. Die Bildqualität und –Auflösung sind dieselbe als die in
das Menü Video Settings. Weil die Bandbreite vom 3G-Netzwerk kleiner als 256k ist,
stellen Sie die Internetgeschwindigkeit der IP-Kamera am besten auf 128k oder 64k
ein.
• Bei einer Bewegungserfassung sendet die IP-Kamera Schnappschüsse nach einer E-Mail-Adresse
oder einem FTP-Server. Konfigurieren Sie die E-Mail- und/oder FTP-Adresse unter Schedule –
Email/ftp Alarm.
17/07/2009 © 2008 Velleman nv
73
Page 74

CAMIP4 Rev. 02
• Gehen Sie zu NAS Settings um das NAS-System (Network Attached Storage) zu konfigurieren.
• Gehen Sie zu Scheduling um Email/ftp und NAS einzuschalten.
• Ändern Sie die Administratoreinstellungen unter Admin – Admin login. Ändern Sie das
Administratorpasswort regelmäßig.
17/07/2009 © 2008 Velleman nv
74
Page 75

CAMIP4 Rev. 02
Bemerkung: Notieren Sie das Administratorpasswort. Ohne dieses Passwort können Sie die Kamera
nicht einstellen.
• Eine IP-Kamera, die mit dem Internet verbunden ist, kann die interne Uhr über einen NTP-Server
synchronisieren (z.B. ntp.asql.co.uk – siehe www.ntp.org
für einen Überblick). Stellen Sie unter
Date/Time ein.
• Aktualisieren Sie die Firmware der Kamera unter Upgrade. Das Upgrade kann ab einer lokalen
Datei oder ab einem FTP-Server geschehen.
Achtung: Seien Sie vorsichtig beim Laden neuer Firmware. Die Kamera
funktioniert nicht mit inkompatibeler Firmware.
Aktualisieren Sie die Kamera nur wenn es wirklich nötig ist.
Lassen Sie ein Upgrade der Kamera nur von einem Informatiker durchführen.
Schalten Sie die Kamera nie aus während des Upgrades.
Weder Velleman Components NV noch der Händler übernehmen Haftung für
Probleme oder Folgeschäden eines Upgrades.
17/07/2009 © 2008 Velleman nv
75
Page 76

CAMIP4 Rev. 02
• Der Dateiname der Firmware steht auf der FTP-Site (ftp:60.250.194.78), upgrade Dateiname
und upgrade Passwort zur Verfügung. Blättern Sie durch die Liste und wählen Sie die genaue
Version aus. Der Name muss mit VS316-gen starten.
• Um die Kamera neu zu starten, klicken Sie auf reboot unter reboot.
7.4 Kameraliste
• Die Kamera ist jetzt konfiguriert. Fügen Sie diese nun der Liste hinzu. Klicken Sie mit der rechten
Maustaste auf Camera List und klicken Sie danach auf New Kamera.
Bemerkung: Wenn Sie die Kamera nicht der Liste hinzufügen, ist diese nicht weltweit verfügbar.
• Geben Sie die Kamera einen Namen (z.B. Position), geben Sie die ID-Nummer und das Passwort
ein und klicken Sie auf Add. Die Kamera erscheint nun im Datenverzeichnis Cam List.
Bemerkung: Das Symbol, das vor dem Kameranamen steht, zeigt den Status an.
ROT: die Kamera ist offline und nicht mit Internet verbunden
GELB: die Kamera ist online aber reagiert nicht (z.B. falsche Routereinstellungen)
GRÜN: die Kamera ist online und reagiert
• Sie können mehrere Kameras in einem spezifischen Ordner gruppieren. Klicken Sie mit der rechten
Maustaste auf Camera List und klicken Sie auf New Folder um einen neuen Ordner zu kreieren.
Geben Sie den neuen Ordner auch einen Namen und klicken Sie danach auf OK.
• Ziehen Sie die gewünschte Kamera zum neuen Ordner.
• Klicken Sie mit der rechten Maustaste einen Ordner an und klicken Sie auf Rename um den
Ordner einen neuen Namen zu geben. Befestigen Sie mit OK.
Bemerkung: Sie können die Ordner Camera List und Auto Search keinen anderen Namen geben.
17/07/2009 © 2008 Velleman nv
76
Page 77

CAMIP4 Rev. 02
• Klicken Sie mit der rechten Maustaste auf einen Ordner und klicken Sie auf Delete um den Ordner
zu löschen.
Bemerkung: Bestehende Kameras in einem gelöschten Ordner befinden sich wieder im
Datenverzeichnis Auto Search.
• Klicken Sie mit der rechten Maustaste eine Kamera unter Camera List an. Es erscheint
nachfolgende Option:
• Klicken Sie zuerst auf das gewünschte Wiedergabefenster, klicken Sie danach mit der rechten
Maustaste auf die gewünschte Kamera und klicken Sie schließlich auf Play on selected window.
Die Bilder werden im ausgewählten Fenster angezeigt.
• Klicken Sie auf ID/Password settings um den Kameranamen zu ändern.
• Klicken Sie auf Video settings um die Video-Einstellungen der Kamera zu ändern.
Bemerkungen:
• Bandwidth: Wählen Sie dieselbe Bandbreite als die der Internetverbindung aus.
• Auto Select: Wählen Sie enable aus, um automatisch die meist geeigneten Kamera-
Einstellungen auszuwählen.
• Eine höhere Bildgeschwindigkeit erfordert eine höhere Bandbreite.
• Preference: Wählen Sie die gewünschte Einstellung: Video Motion (bewegendes Bild) oder
Image Quality (Bildqualität).
• Time on video: Wählen Sie enable um das Datum und die Uhrzeit im Bildschirm anzuzeigen.
• Wählen Sie PAL oder NTSC über Web configure – Video settings aus.
• Brightness: Wählen Sie eine der 10 Helligkeitseinstellungen aus.
• Motion Detection Sensitivity: Stellen Sie die Empfindlichkeit auf High, Medium oder Low ein.
• Klicken Sie danach auf Update und geben Sie den Namen und das Passwort ein.
17/07/2009 © 2008 Velleman nv
77
Page 78

CAMIP4 Rev. 02
• Klicken Sie auf 3GPP settings um die 3GPP-Einstellungen zu ändern.
• Klicken Sie danach auf Update und geben Sie den Namen und das Passwort ein.
• Klicken Sie auf Firmware upgrade um die Firmware zu aktualisieren (Siehe §7.3
WebKonfiguration – Upgrade).
• Klicken Sie auf Delete um die Kamera aus der Liste zu löschen.
7.5 Anzeigefunktionen
• Doppelklicken Sie auf ein Fenster, um es zu vergrößern. Doppelklicken Sie das Fenster wieder, um
zur normalen Bildanzeige zurückzukehren.
• Doppelklicken Sie auf die Titelleiste, um ein einziges Fenster anzuzeigen.
• Die Titelleiste enthält nachfolgende Symbole:
swap: Nur in einer 6- en 13-teiligen Bildschirmanzeige verfügbar. Die
Schnappschuss: Still stehendes Bild.
Aufnahme: Aufnahmestatus.
• Klicken Sie mit der rechten Maustaste auf einem Fenster, um nachfolgende Optionen anzuzeigen:
aktuellen Bilder werden im großen Fenster angezeigt.
schwarz keine Aufnahme
rot Aufnahme
grün Aufnahme nach Bewegung
17/07/2009 © 2008 Velleman nv
78
Page 79

CAMIP4 Rev. 02
Full window: Völlige Bildschirmanzeige.
Auto reconnect: es gibt automatische eine neue Verbindung nachdem
Sie die Einstellungen geändert haben oder nach Verlust der Verbindung.
Stop: Ausschaltung.
Pause: pausieren.
Motion recording: die Aufnahme nach einer Bewegung einschalten.
Properties…: Kamera-Einstellungen (Bildgeschwindigkeit, Bandbreite,
Uhr).
7.6 Optionen in CamView
• Nachfolgende Menüs sind verfügbar:
Pause all: Pausieren.
Disconnect all: Alle Kameras abschalten.
Auto search: Automatische Suche starten.
Exit: CamView verlassen und abschließen.
Status bar: Zeigt den verfügbaren Speicherplatz an (Siehe unten links im
Fenster).
Camera List: Zeigt die Kameraliste an.
Refresh Kamera status: Alle Kameras aktualisieren.
CamPlay: CamPlay starten, sich Aufnahmen und Schnappschüsse ansehen
(siehe §7.7 CamPlay).
Open recorded files folder
Open Snapshot files folder
Datenverzeichnis: Das Datenverzeichnis konfigurieren.
Firmware upgrade: Siehe §7.3 Web configure – Upgrade
Startup options: Wählen Sie die gewünschte Option beim Starten aus.
17/07/2009 © 2008 Velleman nv
79
Page 80

CAMIP4 Rev. 02
Scheduling: die programmierte Aufnahme konfigurieren.
Wählen Sie die gewünschte Softwaresprache aus.
Help Klicken Sie auf Help um die aktuelle CamView-Version anzuzeigen.
7.7 CamPlay
• Klicken Sie auf View → Camplay um CamPlay zu starten. Die zwei Datenverzeichnisse –
Recorded Files (Videos) und Snapshot Files (Abbildungen) – werden angezeigt. Klicken Sie auf
um die Struktur des Datenverzeichnisses aufzuklappen. Subdatenverzeichnisse werden gemäß
Kameranamen, Datum und Uhrzeit aufgeteilt. Schnappschüsse bekommen auch eine
Laufnummer.
• Öffnen Sie einen Schnappschuss oder starten Sie eine Videodatei mit einem Doppelklick.
Wiedergabe
Pausieren
Stoppen
Schnappschuss
Stumm schalten
½ Abspielgeschwindigkeit
vorspulen
heranzoomen
Zur Originalgröße
zurückkehren
herauszoomen
17/07/2009 © 2008 Velleman nv
80
Page 81

CAMIP4 Rev. 02
Bemerkung: Die Höchstauflösung beim Heranzoomen ist 640x480, die Mindestauflösung beim
Herauszoomen ist die originelle Video-Auflösung.
• Nachfolgende Menüs sind verfügbar:
Refresh file tree: Die Datenverzeichnisse aktualisieren.
Exit: CamPlay schließen.
Datenverzeichnis: Den Zielordner für die Aufnahmen und die Schnappschüsse
auswählen.
Language: Wählen Sie die gewünschte Sprache aus.
Help Klicken Sie auf Help um die aktuelle CamPlay-Version anzuzeigen.
7.8 CamView deinstallieren
• Sie können CamView auf zwei Weisen deinstallieren:
o Klicken Sie auf Start → CamView → Uninstall CamView.
o Klicken Sie auf Start → Settings → Control Panel → Add or Remove Programs. Wählen
Sie CamView aus und klicken Sie auf Change/Remove.
• Klicken Sie auf Next >. Kreuzen Sie die gewünschten Optionen an und klicken Sie auf Next >.
17/07/2009 © 2008 Velleman nv
81
Page 82

CAMIP4 Rev. 02
• Klicken Sie auf Finish um das Deinstallieren zu beenden.
8. Problemlösung
Die Kamera zeigt ein grünes Symbol an aber ich kann mich weder die Bilder ansehen noch
die Einstellungen ändern.
Das grüne Symbol bedeutet nur, dass die Kamera online ist aber gewährleistet nicht, dass Sie sich
die Bilder ansehen können. Überprüfen Sie die Einstellungen der Firewall oder des Routers.
Die Bilder über das Internet sind einer niedrigeren Qualität.
Die Qualität hängt größtenteils vom der Internetverbindung ab. Passen Sie deshalb die Bandbreite
der Kamera an so, dass diese kleiner ist als diese vom Internetanbieter.
Die Bilder haben eine niedrige Qualität wenn die Ka mera ein gelbes Symbol anzeigt.
Das gelbe Symbol bedeutet, dass die Verbindung zwischen der Kamera und CamView nicht optimal
ist. Überprüfen Sie, ob es da eine Firewall gibt oder die Einstellung des Routers.
Bekomme ich auch Zutritt ohne Passwort?
Nein. Aus Sicherheitsgründen bekommen Sie ohne Passwort keinen Zutritt zur Kamera.
Kann ich die Einstellungen der Kamera über CamView ändern?
Teilweise. Die Auflösung, Bildgeschwindigkeit, Bandbreite, Mikrofoneinstellungen, automatische
Auswahl, Modus Innen-/Außenbereich, Lichtfrequenz, LED-Modus, und Helligkeit können Sie über
CamView ändern. Andere Einstellungen stehen nur über Web configure zur Verfügung.
Die Verbindung mit der Kamera wird verbrochen, nachdem ich die Einstellungen geändert
habe.
Die Kamera setzt das System während etwa 5 Sekunden zurück. Danach kann die Verbindung
wieder hergestellt werden.
Wie viel Benutzer bekommen simultan Zutritt zur Kamera?
Die Anzahl Benutzer hängt von den Video-Einstellungen, der Netzwerkgeschwindigkeit und der
Auflösung ab. Siehe nachfolgende Liste:
Bandbreite (5 ~ 25 fps)
Auflösung
176x144 20 20 20 4 4
52x288 20 20 18 9 4 4
720x576 8 6 4 4
64k 256k 512k 768k 1M 1,5M
17/07/2009 © 2008 Velleman nv
82
Page 83

CAMIP4 Rev. 02
9. Technische Daten
IP-Schutzart IP66
Abtastsystem PAL
Bildsensor Sony Super HAD CCD-Farbkamera
Bildgröße 1/3"
Pixelanzahl 512(H) x 582(V) Pixel
Auflösung 420 TV-Zeilen
Mindestbeleuchtung 0,5 lux - F1.4 (IR aus)/0 lux (IR ein)
IR-LEDs 21 stuks
max. IR-Bereich ± 15 m
Zeilensprung 2:1
Video-Ausgangspegel 1,0 Vpp, 75 Ω, komposit
Signal-/Rauschabstand Video > 48 dB (AGC uit)
AEI 1/50 ~ 1/100 000s
Gammakorrektur 0,45
Objektiv 4 mm
Blickwinkel 73°
Netzwerkschnittstelle Ethernet 10BaseT/100BaseTX, Auto-MDIX, RJ-45, BNC
Videokompressionsformat MPEG-4
Regelung Bildqualität
Auflösung 176x144, 352x288, 720x576
Bandbreite 64k, 128k, 256k, 512k, 768k, 1M, 1.2M, 1,5M bps
Bildgeschwindigkeit 1, 2, 3, 4, 5, 10, 15, 20, 25 fps
unterstützte Protokolle IPv4, HTTP, TCP, ICNP, RTSP RTP, UDP, IGMP, RTCP, SMTP, FTP,
DHCP, UPnP, ARP, DNS, PPPoE
verfügbare Sprachen in
Software
minimale
Systemanforderungen
Englisch, Chinesisch, Italienisch, Japanisch, Türkisch, Hebräisch,
Französisch, Hindi, Spanisch, Ungarisch
Pentium® 4, 1,5 GHz oder höher
Windows
®
XP SP2 oder höher; Framework 2.0
RAM 512 MB oder höher
freie Netzverbindung
Betriebstemperatur -10°C ~ 50°C
Stromversorgung 12VDC-Netzteil PSS1212 (mitgeliefert)
Stromverbrauch 3,8 W
Abmessungen Ø 62 x 85 mm
Gewicht 365 g
Verwenden Sie dieses Gerät nur mit originellen Zubehörteilen. Velleman NV übernimmt
keine Haftung für Schaden oder Verletzungen bei (falscher) Anwendung dieses Gerät es.
Für mehr Informationen zu diesem Produkt, siehe www.velleman.eu. Alle Änderungen
ohne vorherige Ankündigung vorbehalten.
© URHEBERRECHT
Velleman NV besitzt das Urheberrecht für diese Bedienungsanleitung.
Alle weltweiten Rechte vorbehalten. Ohne vorherige schriftliche Genehmigung des Urhebers ist es
nicht gestattet, diese Bedienungsanleitung ganz oder in Teilen zu reproduzieren, zu kopieren, zu
übersetzen, zu bearbeiten oder zu speichern.
17/07/2009 © 2008 Velleman nv
83
Page 84

Velleman® Service and Quality Warranty
Velleman® has over 35 years of experience in the electronics world
and distributes its products in more than 85 countries.
All our products fulfil strict quality requirements and legal stipulations
in the EU. In order to ensure the quality, our products regularly go
through an extra quality check, both by an internal quality
department and by specialized external organisations. If, all
precautionary measures notwithstanding, problems should occur,
please make appeal to our warranty (see guarantee conditions).
General Warranty Conditions Concerning Consumer Products
(for EU):
• All consumer products are subject to a 24-month warranty on
production flaws and defective material as from the original date of
purchase.
• Velleman® can decide to replace an article with an equivalent
article, or to refund the retail value totally or partially when the
complaint is valid and a free repair or replacement of the article is
impossible, or if the expenses are out of proportion.
You will be delivered a replacing article or a refund at the value of
100% of the purchase price in case of a flaw occurred in the first year
after the date of purchase and delivery, or a replacing article at 50%
of the purchase price or a refund at the value of 50% of the retail
value in case of a flaw occurred in the second year after the date of
purchase and delivery.
• Not covered by warranty:
- all direct or indirect damage caused after delivery to the article (e.g.
by oxidation, shocks, falls, dust, dirt, humidity...), and by the article,
as well as its contents (e.g. data loss), compensation for loss of
profits;
- frequently replaced consumable goods, parts or accessories such as
batteries, lamps, rubber parts, drive belts... (unlimited list);
- flaws resulting from fire, water damage, lightning, accident, natural
disaster, etc. …;
- flaws caused deliberately, negligently or resulting from improper
handling, negligent maintenance, abusive use or use contrary to the
manufacturer’s instructions;
- damage caused by a commercial, professional or collective use of
the article (the warranty validity will be reduced to six (6) months
when the article is used professionally);
- damage resulting from an inappropriate packing and shipping of the
article;
- all damage caused by modification, repair or alteration performed by
a third party without written permission by Velleman®.
• Articles to be repaired must be delivered to your Velleman® dealer,
solidly packed (preferably in the original packaging), and be
completed with the original receipt of purchase and a clear flaw
description.
• Hint: In order to save on cost and time, please reread the manual
and check if the flaw is caused by obvious causes prior to presenting
the article for repair. Note that returning a non-defective article can
also involve handling costs.
• Repairs occurring after warranty expiration are subject to shipping
costs.
• The above conditions are without prejudice to all commercial
warranties.
The above enumeration is subject to modification according to
the article (see article’s manual).
Velleman® service- en kwaliteitsgarantie
Velleman® heeft ruim 35 jaar ervaring in de elektronicawereld en
verdeelt in meer dan 85 landen.
Al onze producten beantwoorden aan strikte kwaliteitseisen en aan de
wettelijke bepalingen geldig in de EU. Om de kwaliteit te waarborgen,
ondergaan onze producten op regelmatige tijdstippen een extra
kwaliteitscontrole, zowel door onze eigen kwaliteitsafdeling als door
externe gespecialiseerde organisaties. Mocht er ondanks deze
voorzorgen toch een probleem optreden, dan kunt u steeds een
beroep doen op onze waarborg (zie waarborgvoorwaarden).
Algemene waarborgvoorwaarden consumentengoederen (voor
Europese Unie):
• Op alle consumentengoederen geldt een garantieperiode van 24
maanden op productie- en materiaalfouten en dit vanaf de
oorspronkelijke aankoopdatum.
• Indien de klacht gegrond is en een gratis reparatie of vervanging
van een artikel onmogelijk is of indien de kosten hiervoor buiten
verhouding zijn, kan Velleman® beslissen het desbetreffende artikel
te vervangen door een gelijkwaardig artikel of de aankoopsom van
het artikel gedeeltelijk of volledig terug te betalen. In dat geval krijgt
u een vervangend product of terugbetaling ter waarde van 100% van
de aankoopsom bij ontdekking van een gebrek tot één jaar na
aankoop en levering, of een vervangend product tegen 50% van de
kostprijs of terugbetaling van 50 % bij ontdekking na één jaar tot 2
jaar.
• Valt niet onder waarborg:
- alle rechtstreekse of onrechtstreekse schade na de levering
veroorzaakt aan het toestel (bv. door oxidatie, schokken, val, stof,
vuil, vocht...), en door het toestel, alsook zijn inhoud (bv. verlies van
data), vergoeding voor eventuele winstderving.
- verbruiksgoederen, onderdelen of hulpstukken die regelmatig dienen
te worden vervangen, zoals bv. batterijen, lampen, rubberen
onderdelen, aandrijfriemen... (onbeperkte lijst).
- defecten ten gevolge van brand, waterschade, bliksem, ongevallen,
natuurrampen, enz.
- defecten veroorzaakt door opzet, nalatigheid of door een
onoordeelkundige behandeling, slecht onderhoud of abnormaal
gebruik of gebruik van het toestel strijdig met de voorschriften van de
fabrikant.
- schade ten gevolge van een commercieel, professioneel of collectief
gebruik van het apparaat (bij professioneel gebruik wordt de
garantieperiode herleid tot 6 maand).
- schade veroorzaakt door onvoldoende bescherming bij transport van
het apparaat.
- alle schade door wijzigingen, reparaties of modificaties uitgevoerd
door derden zonder toestemming van Velleman®.
• Toestellen dienen ter reparatie aangeboden te worden bij uw
Velleman®-verdeler. Het toestel dient vergezeld te zijn van het
oorspronkelijke aankoopbewijs. Zorg voor een degelijke verpakking
(bij voorkeur de originele verpakking) en voeg een duidelijke
foutomschrijving bij.
• Tip: alvorens het toestel voor reparatie aan te bieden, kijk nog eens
na of er geen voor de hand liggende reden is waarom het toestel niet
naar behoren werkt (zie handleiding). Op deze wijze kunt u kosten en
tijd besparen. Denk eraan dat er ook voor niet-defecte toestellen een
kost voor controle aangerekend kan worden.
• Bij reparaties buiten de waarborgperiode zullen transportkosten
aangerekend worden.
• Elke commerciële garantie laat deze rechten onverminderd.
Bovenstaande opsomming kan eventueel aangepast worden
naargelang de aard van het product (zie handleiding van het
betreffende product).
Garantie de service et de qualité Velleman®
Velleman® jouit d’une expérience de plus de 35 ans dans le
monde de l’électronique avec une distribution dans plus de 85
pays.
Tous nos produits répondent à des exigences de qualité
rigoureuses et à des dispositions légales en vigueur dans l’UE.
Afin de garantir la qualité, nous soumettons régulièrement nos
produits à des contrôles de qualité supplémentaires, tant par
notre propre service qualité que par un service qualité externe.
Dans le cas improbable d’un défaut malgré toutes les
précautions, il est possible d’invoquer notre garantie (voir les
conditions de garantie).
Conditions générales concernant la garantie sur les
produits grand public (pour l’UE) :
• tout produit grand public est garanti 24 mois contre tout vice
de production ou de matériaux à dater du jour d’acquisition
effective ;
• si la plainte est justifiée et que la réparation ou le
remplacement d’un article est jugé impossible, ou lorsque les
coûts s’avèrent disproportionnés, Velleman® s’autorise à
remplacer ledit article par un article équivalent ou à rembourser
la totalité ou une partie du prix d’achat. Le cas échéant, il vous
sera consenti un article de remplacement ou le remboursement
complet du prix d’achat lors d’un défaut dans un délai de 1 an
après l’achat et la livraison, ou un article de remplacement
moyennant 50% du prix d’achat ou le remboursement de 50%
du prix d’achat lors d’un défaut après 1 à 2 ans.
• sont par conséquent exclus :
- tout dommage direct ou indirect survenu à l’article après
livraison (p.ex. dommage lié à l’oxydation, choc, chute,
poussière, sable, impureté…) et provoqué par l’appareil, ainsi que
son contenu (p.ex. perte de données) et une indemnisation
éventuelle pour perte de revenus ;
- tout bien de consommation ou accessoire, ou pièce qui
nécessite un remplacement régulier comme p.ex. piles,
ampoules, pièces en caoutchouc, courroies… (liste illimitée) ;
- tout dommage qui résulte d’un incendie, de la foudre, d’un
accident, d’une catastrophe naturelle, etc. ;
- out dommage provoqué par une négligence, volontaire ou non,
une utilisation ou un entretien incorrects, ou une utilisation de
l’appareil contraire aux prescriptions du fabricant ;
- tout dommage à cause d’une utilisation commerciale,
professionnelle ou collective de l’appareil (la période de garantie
sera réduite à 6 mois lors d’une utilisation professionnelle) ;
- tout dommage à l’appareil qui résulte d’une utilisation
incorrecte ou différente que celle pour laquelle il a été
initialement prévu comme décrit dans la notice ;
Page 85

- tout dommage engendré par un retour de l’appareil emballé
dans un conditionnement non ou insuffisamment protégé.
- toute réparation ou modification effectuée par une tierce
personne sans l’autorisation explicite de SA Velleman® ; - frais
de transport de et vers Velleman® si l’appareil n’est plus couvert
sous la garantie.
• toute réparation sera fournie par l’endroit de l’achat. L’appareil
doit nécessairement être accompagné du bon d’achat d’origine et
être dûment conditionné (de préférence dans l’emballage
d’origine avec mention du défaut) ;
• tuyau : il est conseillé de consulter la notice et de contrôler
câbles, piles, etc. avant de retourner l’appareil. Un appareil
retourné jugé défectueux qui s’avère en bon état de marche
pourra faire l’objet d’une note de frais à charge du
consommateur ;
• une réparation effectuée en-dehors de la période de garantie
fera l’objet de frais de transport ;
• toute garantie commerciale ne porte pas atteinte aux conditions
susmentionnées.
La liste susmentionnée peut être sujette à une
complémentation selon le type de l’article et être
mentionnée dans la notice d’emploi.
Velleman® Service- und Qualitätsgarantie
Velleman® hat gut 35 Jahre Erfahrung in der Elektronikwelt und
vertreibt seine Produkte in über 85 Ländern.
Alle Produkte entsprechen den strengen Qualitätsforderungen
und gesetzlichen Anforderungen in der EU. Um die Qualität zu
gewährleisten werden unsere Produkte regelmäßig einer
zusätzlichen Qualitätskontrolle unterworfen, sowohl von unserer
eigenen Qualitätsabteilung als auch von externen spezialisierten
Organisationen. Sollten, trotz aller Vorsichtsmaßnahmen,
Probleme auftreten, nehmen Sie bitte die Garantie in Anspruch
(siehe Garantiebedingungen).
Allgemeine Garantiebedingungen in Bezug auf
Konsumgüter (für die Europäische Union):
• Alle Produkte haben für Material- oder Herstellungsfehler eine
Garantieperiode von 24 Monaten ab Verkaufsdatum.
• Wenn die Klage berechtigt ist und falls eine kostenlose
Reparatur oder ein Austausch des Gerätes unmöglicht ist, oder
wenn die Kosten dafür unverhältnismäßig sind, kann Velleman®
sich darüber entscheiden, dieses Produkt durch ein gleiches
Produkt zu ersetzen oder die Kaufsumme ganz oder teilweise
zurückzuzahlen. In diesem Fall erhalten Sie ein Ersatzprodukt
oder eine Rückzahlung im Werte von 100% der Kaufsumme im
Falle eines Defektes bis zu 1 Jahr nach Kauf oder Lieferung, oder
Sie bekommen ein Ersatzprodukt im Werte von 50% der
Kaufsumme oder eine Rückzahlung im Werte von 50 % im Falle
eines Defektes im zweiten Jahr.
• Von der Garantie ausgeschlossen sind:
- alle direkten oder indirekten Schäden, die nach Lieferung am
Gerät und durch das Gerät verursacht werden (z.B. Oxidation,
Stöße, Fall, Staub, Schmutz, Feuchtigkeit, ...), sowie auch der
Inhalt (z.B. Datenverlust), Entschädigung für eventuellen
Gewinnausfall.
- Verbrauchsgüter, Teile oder Zubehörteile, die regelmäßig
ausgewechselt werden, wie z.B. Batterien, Lampen, Gummiteile,
Treibriemen, usw. (unbeschränkte Liste).
- Schäden verursacht durch Brandschaden, Wasserschaden, Blitz,
Unfälle, Naturkatastrophen, usw.
- Schäden verursacht durch absichtliche, nachlässige oder
unsachgemäße Anwendung, schlechte Wartung,
zweckentfremdete Anwendung oder Nichtbeachtung von
Benutzerhinweisen in der Bedienungsanleitung.
- Schäden infolge einer kommerziellen, professionellen oder
kollektiven Anwendung des Gerätes (bei gewerblicher
Anwendung wird die Garantieperiode auf 6 Monate
zurückgeführt).
- Schäden verursacht durch eine unsachgemäße Verpackung und
unsachgemäßen Transport des Gerätes.
- alle Schäden verursacht durch unautorisierte Änderungen,
Reparaturen oder Modifikationen, die von einem Dritten ohne
Erlaubnis von Velleman® vorgenommen werden.
• Im Fall einer Reparatur, wenden Sie sich an Ihren Velleman®Verteiler. Legen Sie das Produkt ordnungsgemäß verpackt
(vorzugsweise die Originalverpackung) und mit dem OriginalKaufbeleg vor. Fügen Sie eine deutliche Fehlerumschreibung
hinzu.
• Hinweis: Um Kosten und Zeit zu sparen, lesen Sie die
Bedienungsanleitung nochmals und überprüfen Sie, ob es keinen
auf de Hand liegenden Grund gibt, ehe Sie das Gerät zur
Reparatur zurückschicken. Stellt sich bei der Überprüfung des
Geräts heraus, dass kein Geräteschaden vorliegt, könnte dem
Kunden eine Untersuchungspauschale berechnet.
• Für Reparaturen nach Ablauf der Garantiefrist werden
Transportkosten berechnet.
• Jede kommerzielle Garantie lässt diese Rechte unberührt.
Die oben stehende Aufzählung kann eventuell angepasst
werden gemäß der Art des Produktes (siehe
Bedienungsanleitung des Gerätes).
Garantía de servicio y calidad Velleman®
Velleman® disfruta de una experiencia de más de 35 años en el
mundo de la electrónica con una distribución en más de 85
países.
Todos nuestros productos responden a normas de calidad
rigurosas y disposiciones legales vigentes en la UE. Para
garantizar la calidad, sometimos nuestros productos
regularmente a controles de calidad adicionales, tanto por
nuestro propio servicio de calidad como por un servicio de calidad
externo. En el caso improbable de que surgieran problemas a
pesar de todas las precauciones, es posible apelar a nuestra
garantía (véase las condiciones de garantía).
Condiciones generales referentes a la garantía sobre
productos de venta al público (para la Unión Europea):
• Todos los productos de venta al público tienen un período de
garantía de 24 meses contra errores de producción o errores en
materiales desde la adquisición original;
• Si la queja está fundada y si la reparación o la sustitución de un
artículo es imposible, o si los gastos son desproporcionados,
Velleman® autoriza reemplazar el artículo por un artículo
equivalente o reembolsar la totalidad o una parte del precio de
compra. En este caso, recibirá un artículo de recambio o el
reembolso completo del precio de compra al descubrir un defecto
hasta un año después de la compra y la entrega, o un artículo de
recambio al 50% del precio de compra o la sustitución de un
50% del precio de compra al descubrir un defecto después de 1 a
2 años.
• Por consiguiente, están excluidos entre otras cosas:
- todos los daños causados directamente o indirectamente al
aparato y su contenido después de la entrega (p.ej. por
oxidación, choques, caída,...) y causados por el aparato, al igual
que el contenido (p.ej. pérdida de datos) y una indemnización
eventual para falta de ganancias;
- partes o accesorios que deban ser reemplazados regularmente,
como por ejemplo baterías, lámparas, partes de goma, ... (lista
ilimitada)
- defectos causados por un incendio, daños causados por el agua,
rayos, accidentes, catástrofes naturales, etc. ;
- defectos causados a conciencia , descuido o por malos tratos,
un mantenimiento inapropiado o un uso anormal del aparato
contrario a las instrucciones del fabricante;
- daños causados por un uso comercial, profesional o colectivo
del aparato (el período de garantía se reducirá a 6 meses con uso
profesional) ;
- daños causados por un uso incorrecto o un uso ajeno al que est
está previsto el producto inicialmente como está descrito en el
manual del usuario ;
- daños causados por una protección insuficiente al transportar el
aparato.
- daños causados por reparaciones o modificaciones efectuadas
por una tercera persona sin la autorización explicita de SA
Velleman® ;
- se calcula gastos de transporte de y a Velleman® si el aparato
ya no está cubierto por la garantía.
• Cualquier reparación se efectuará por el lugar de compra.
Devuelva el aparato con la factura de compra original y
transpórtelo en un embalaje sólido (preferentemente el embalaje
original). Incluya también una buena descripción del defecto ;
• Consejo: Lea el manual del usuario y controle los cables, las
pilas, etc. antes de devolver el aparato. Si no se encuentra un
defecto en el artículo los gastos podrían correr a cargo del
cliente;
• Los gastos de transporte correrán a carga del cliente para una
reparación efectuada fuera del periode de garantía.
• Cualquier gesto comercial no disminuye estos derechos.
La lista previamente mencionada puede ser adaptada
según el tipo de artículo (véase el manual del usuario del
artículo en cuestión)
 Loading...