

Page 1
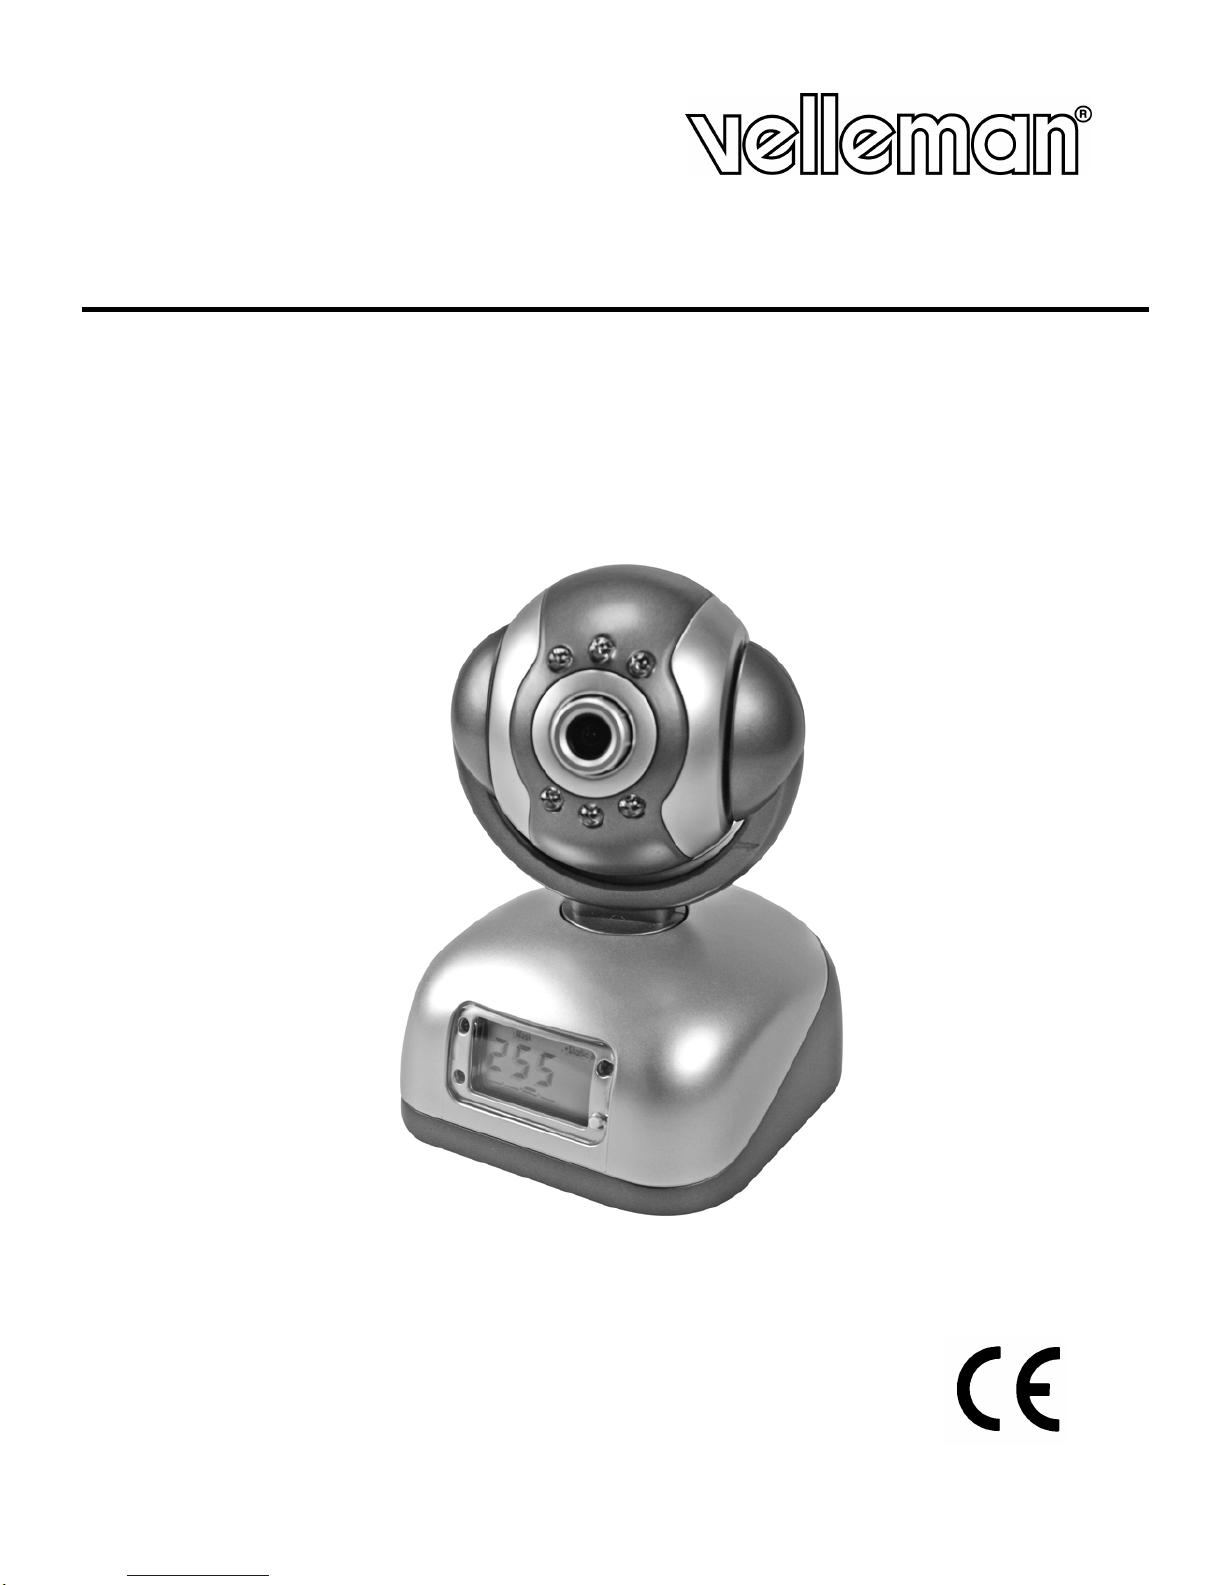
CAMIP3
IP CAMERA (NETWORK CAMERA)
IP-CAMERA (NETWERKCAMERA)
CAMÉRA IP (CAMÉRA RÉSEAU)
CÁMARA IP (CÁMARA DE RED)
IP-KAMERA (NETZWERKKAMERA)
USER MANUAL
GEBRUIKERSHANDLEIDING
NOTICE D’EMPLOI
MANUAL DEL USUARIO
BEDIENUNGSANLEITUNG
Page 2

CAMIP3_v2 VELLEMAN
-
2
-
Page 3
CAMIP3_v2 VELLEMAN
-
3
-
CAMIP3 – IP CAMERA (NETWORK CAMERA)
1. Introduction
To all residents of the European Union
Important environmental information about this product
This symbol on the device or the package indicates that disposal of the device after its lifecycle could harm
the environment.
Do not dispose of the unit (or batteries) as unsorted municipal waste; it should be taken to a specialized
company for recycling.
This device should be returned to your distributor or to a local recycling service.
Respect the local environmental rules.
If in doubt, contact your local waste disposal authorities.
Thank you for choosing Velleman! Please read the manual thoroughly before bringing this device into service. If the
device was damaged in transit, don't install or use it and contact your dealer.
2. Quick Start
• Connection to the LAN
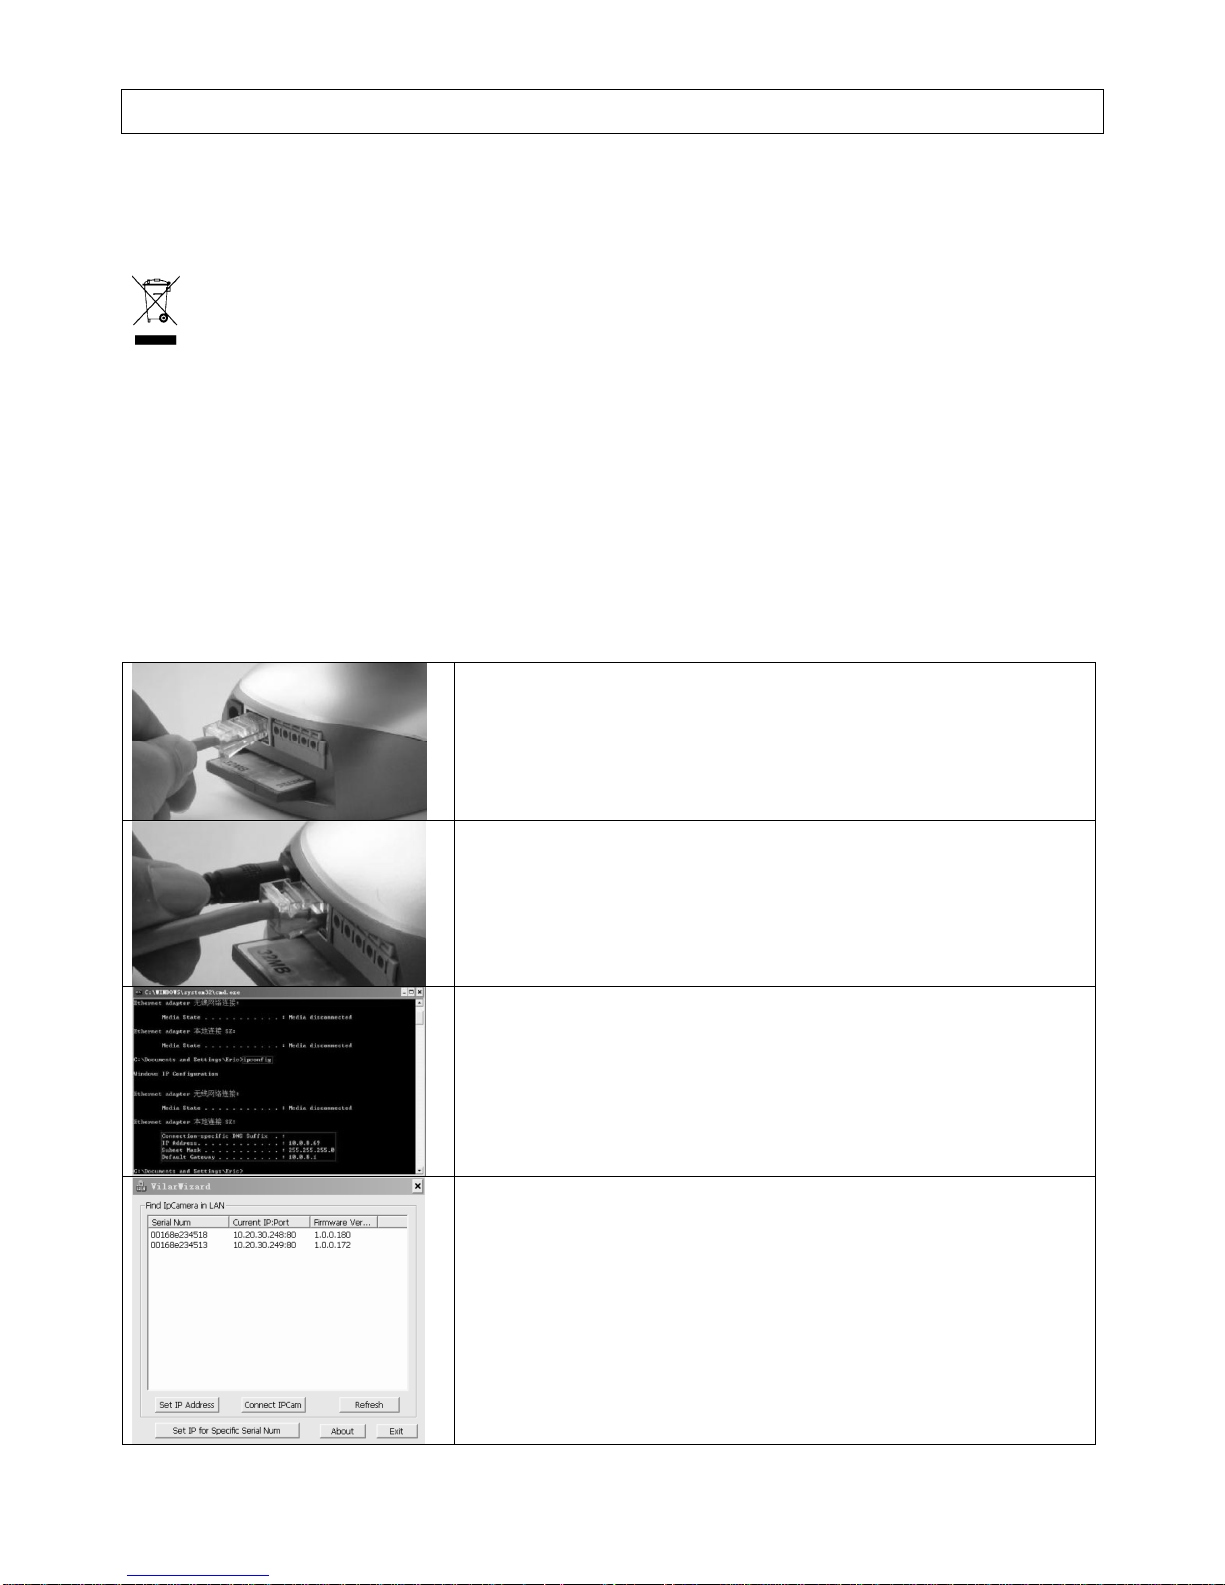
Connect the network cable to the RJ45 port.
Connect the power adapter to the power socket and connect the adapter to
the mains.
Start up your computer and make sure it connects to the LAN. Click Start >
Running and enter Command (Windows® 95/95/ME) or Cmd (Windows®
2000/XP). Select OK, enter ipconfig and press Enter.
The basic setting of your network will look as illustrated.
Record the IP address, the subnet mask and the default gateway. This
information can be used to set your device.
Insert the CD into the CD-ROM drive and copy the VilarWizard_CN.exe file
onto your computer. Open the file. The interface will pop up.
This interface shows us all the IP cameras in your LAN. Press the refresh
button to refresh the list.
If your LAN contains many cameras, find your camera by checking the
serial number.
Page 4
CAMIP3_v2 VELLEMAN
-
4
-
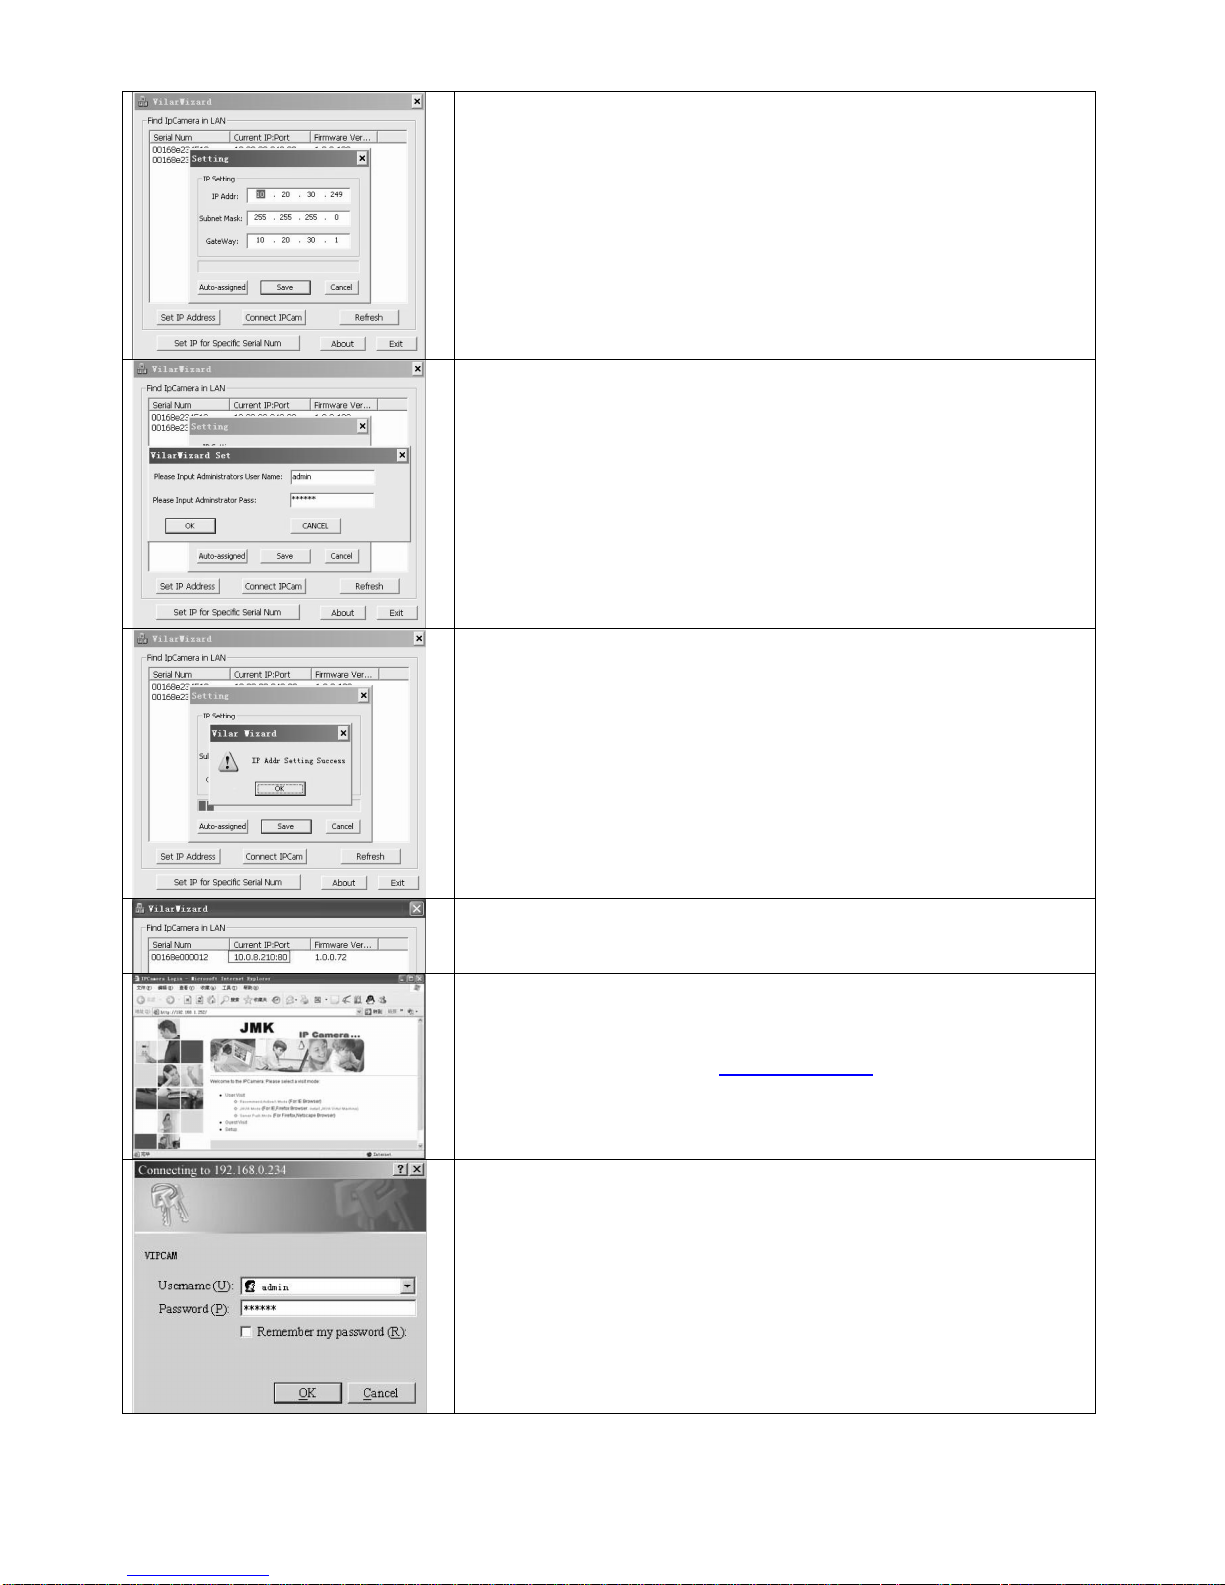
Make sure the camera’s IP address is the same as the computer IP
address. Click the Set IP Address button to change the address if
necessary.
Enter the LAN parameters which were recorded before (IP address, the
subnet mask and the default gateway).
Attention: The IP address consists of the first three values. Make sure to
enter a different last value for the camera IP address than that of the
computer’s. Contact your provider to make sure how to set the last value of
your camera’s IP address. See example.
Click OK and enter the administrator’s user name (admin) and password
(123456).
Click OK. The system assigns a new IP address for the camera.
Click OK. The new IP address of your camera is displayed.
Select the camera and click visitIPCam. The Internet Explorer will connect
your camera automatically.
The user interface will be displayed. Enter your camera IP address in the
Internet Explorer browser, e.g. http://10.20.30.249.
Click the User Zone button. The login window will be displayed.
Enter the user name (admin) and password (123456) and click OK.
Page 5

CAMIP3_v2 VELLEMAN
-
5
-
Install ActiveX if necessary. Click Install to continue. Modify the Internet
Explorer security configuration if the window does not appear. ActiveX
cannot be downloaded without authorization until the Internet Explorer
security is properly configured.
Set the Internet Explorer security configuration as follows:
• Select Internet Options in the Tools menu.
• Click the Security tab.
• Select Custom Level and set up as on the left.
• Click OK to confirm.
In addition, the camera IP address can also be set as a trusted site.
• Select Internet Options in the Tools menu.
• Click the Security tab.
• Select Trusted Sites.
• Uncheck the √.
• Enter the camera IP address or URL.
• Click Add and then OK to confirm.
• Access from the Internet
You might need to connect to your camera on a computer other than yours. In this case, you can connect to the
camera by using the internet provided you modify the router configuration. Enable the RNAT function of the IP
sharing device:
o Many routers support VirtualServer. Forward the WAN 80 TCP port to the LAN IP address and port.
o You can also use the DMZ Host method. This method only supports one LAN device. If you have more than
one camera, use the above method.
• Dynamic Domain Name Access
Visit http://www.vipcam.cn, enter the serial number of the camera and the original password login. Enter a valid email address. Visit your camera by selecting system setting > network setting > dynamic domain name. Choose
DDNS supplier, enter your user name and password, and click apply. The camera will reboot. Make sure to open
the UDP port.
• Connecting to the Internet Via ADSL
This network framework is similar as your LAN. You may need to open the PPPoE service. With an open PPPoE,
use network cables and connect the camera to the PC network card directly. Run VilarWizard_CN.exe or enter the
camera IP address into the Internet Explorer browser. Select System Setting > Network Setting and enter your
user name and password in the PPPoE section.
Check both boxes and reboot your computer after clicking OK.
Start the DDNS service.
For more info concerning this product, please visit our website www.velleman.eu.
The information in this manual is subject to change without prior notice.
Page 6

CAMIP3_v2 VELLEMAN
-
6
-
CAMIP3 – IP-CAMERA (NETWERKCAMERA)
1. Inleiding
Aan alle ingezetenen van de Europese Unie
Belangrijke milieu-informatie betreffende dit product
Dit symbool op het toestel of de verpakking geeft aan dat, als het na zijn levenscyclus wordt weggeworpen,
dit toestel schade kan toebrengen aan het milieu.
Gooi dit toestel (en eventuele batterijen) niet bij het gewone huishoudelijke afval; het moet bij een
gespecialiseerd bedrijf terechtkomen voor recyclage.
U moet dit toestel naar uw verdeler of naar een lokaal recyclagepunt brengen.
Respecteer de plaatselijke milieuwetgeving.
Hebt u vragen, contacteer dan de plaatselijke autoriteiten inzake verwijdering.
Dank u voor uw aankoop! Lees deze handleiding grondig voor u het toestel in gebruik neemt. Werd het toestel
beschadigd tijdens het transport, installeer het dan niet en raadpleeg uw dealer.
2. Beknopte gebruiksaanwijzing
• Aansluiting op het LAN
Koppel de netwerkkabel aan de RJ45-poort.
Koppel de voedingsadapter aan de voedingsingang en koppel de adapter
aan het lichtnet.
Start uw computer op en zorg ervoor dat hij zich met het LAN verbindt. Klik
Start > Running en geef Command (Windows® 95/95/ME) of Cmd
(Windows® 2000/XP) in. Selecteer OK, geef ipconfig in en druk op Enter.
De basisinstellingen van uw netwerk zien er ongeveer zo uit.
Noteer het IP-adres, het subnetmasker en de default gateway. Gebruik
deze gegevens om uw toestel in te stellen.
Plaats de cd in de cd-romdrive en kopieer het bestand
VilarWizard_CN.exe naar uw computer. Open het bestand. De interface
verschijnt.
Deze interface toont alle IP-camera’s in uw LAN. Druk op de refresh-knop
om de lijst bij te werken.
Indien het LAN verscheidene camera’s bevat, kunt u uw camera zoeken op
serienummer.
Page 7

CAMIP3_v2 VELLEMAN
-
7
-
Zorg ervoor dat het adres van de IP-camera dezelfde is als het IP-adres
van de computer. Klik op de Set IP Address-knop om eventueel het adres
te wijzigen.
Geef de LAN-parameters die u eerder noteerde (IP-adres, subnetmasker
en default gateway).
Let op: Het IP-adres bestaat uit de eerste drie getallen. Zorg ervoor dat het
laatste getal van het IP-adres van de camera verschilt van het IP-adres van
de computer. Neem contact op met uw provider indien u vragen hebt over
het instellen van het IP-adres. Zie voorbeeld.
Klik op OK en geef de gebruikersnaam (admin) en het paswoord (123456)
van de administrator in.
Klik op OK. Het systeem kent een nieuw IP-adres aan de camera toe.
Klik op OK. Het nieuwe IP-adres van de camera wordt weergegeven.
Selecteer de camera en klik op visitIPCam. Internet Explorer verbindt zich
automatisch met uw camera.
De gebruikersinterface wordt afgebeeld. Geef het IP-adres van de camera
in de Internet Explorer-browser, bv. http://10.20.30.249.
Klik op User Zone. Het inlogvenster verschijnt.
Geef de gebruikersnaam (admin) en het paswoord (123456) in en klik op
OK.
Page 8

CAMIP3_v2 VELLEMAN
-
8
-
Installeer ActiveX indien nodig. Klik op Install om verder te gaan. Wijzig de
veiligheidsinstellingen van Internet Explorer indien het venster niet
verschijnt. ActiveX kan niet zonder toestemming worden gedownload
zolang de veiligheidsinstellingen van Internet Explorer niet correct zijn
ingesteld.
Stel de veiligheidsinstellingen van Internet Explorer als volgt in:
• Selecteer Internet Options in het Tools-menu.
• Klik op de Security-tab.
• Selecteer Custom Level en configureer zoals hiernaast afgebeeld.
• Klik op OK om te bevestigen.
Het IP-adres van de camera kan ook als trusted site opgenomen worden.
• Selecteer Internet Options in het Tools-menu.
• Klik op de Security-tab.
• Selecteer Trusted Sites.
• Vink √ af.
• Geef het IP-adres of de URL van de camera in.
• Klik op Add en daarna op OK om te bevestigen.
• Toegang via het internet
Soms moet u tot de camera toegang hebben vanaf een andere computer dan de uwe. In dit geval verkrijgt u toegang
tot de camera via internet indien u de routerconfiguratie wijzigt. Schakel de RNAT-functie van het IP-toestel in:
o Veel routers ondersteunen VirtualServer. Zend de WAN 80 TCP-poort naar het IP-adres en de poort van het
LAN.
o U kunt ook de DMZ Host-methode gebruiken. Deze methode ondersteunt slechts één LAN-toestel. Gebruik de
eerste methode indien u over meer camera’s beschikt.
• Dynamic Domain Name
Ga naar http://www.vipcam.cn en geef het serienummer van de camera en het originele paswoord in. Geef een
geldig e-mailadres in. Selecteer system setting > network setting > dynamic domain name om toegang tot de
camera te verkrijgen. Kies DDNS supplier, geef uw gebruikersnaam en paswoord in, en klik op apply. De camera
wordt herstart. Zorg ervoor dat u de UDP-poort opent.
• Aansluiting met het internet via ADSL
Dit netwerk is vergelijkbaar met uw LAN. Open de PPPoE-service indien nodig. Gebruik bij een open PPPoE
netwerkkabels en verbind de camera rechtstreeks aan de netwerkkaart in de pc. Start VilarWizard_CN.exe of geef
het IP-adres van de camera in de Internet Explorer-browser. Selecteer System Setting > Network Setting en geef
uw gebruikersnaam en paswoord in het PPPoE-gedeelte.
Vink beide vakjes af en herstart uw computer nadat u op OK hebt geklikt.
Start de DDNS-service.
Voor meer informatie omtrent dit product, zie www.velleman.eu.
De informatie in deze handleiding kan te allen tijde worden gewijzigd zonder voorafgaande kennisgeving.
Page 9

CAMIP3_v2 VELLEMAN
-
9
-
CAMIP3 – CAMÉRA IP (CAMÉRA DE RÉSEAU)
1. Introduction
Aux résidents de l'Union européenne
Des informations environnementales importantes concernant ce produit
Ce symbole sur l'appareil ou l'emballage indique que l’élimination d’un appareil en fin de vie peut polluer
l'environnement.
Ne pas jeter un appareil électrique ou électronique (et des piles éventuelles) parmi les déchets municipaux
non sujets au tri sélectif ; une déchèterie traitera l’appareil en question.
Renvoyer les équipements usagés à votre fournisseur ou à un service de recyclage local.
Il convient de respecter la réglementation locale relative à la protection de l’environnement.
En cas de questions, contacter les autorités locales pour élimination.
Nous vous remercions de votre achat ! Lire la présente notice attentivement avant la mise en service de l’appareil. Si
l’appareil a été endommagé pendant le transport, ne pas l’installer et consulter votre revendeur.
2. Démarrage rapide
• Connexion au réseau LAN
Raccorder le câble réseau au port RJ45.
Raccorder la fiche de l’adaptateur secteur à l’entrée d’alimentation.
Raccorder l’adaptateur secteur au réseau électrique.
Allumer l’ordinateur et veiller à ce qu’il se connecte au réseau LAN. Cliquer
Start > Running et accéder à Command (Windows® 95/95/ME) ou à Cmd
(Windows® 2000/XP). Cliquer OK, accéder à ipconfig et enfoncer Enter.
La configuration de base du réseau ressemblera comme illustré.
Noter l’adresse IP, le masque de sous-réseau et la passerelle par
défaut. Ces données seront utilisées pour la configuration de la caméra.
Insérer le CD dans le lecteur CD-ROM et copier le fichier
VilarWizard_CN.exe sur le bureau de votre ordinateur. Ouvrir le fichier.
Une interface apparaît.
Cette interface affiche toutes les cameras IP connectées au réseau LAN.
Cliquer sur refresh pour rafraîchir la liste.
Si votre réseau LAN contient plusieurs caméras, chercher la caméra en
vérifiant le numéro de série de celle-ci.
Page 10

CAMIP3_v2 VELLEMAN
-
10
-
Veiller à ce que l’adresse IP de la caméra soit identique à celle de
l’ordinateur. Cliquer Set IP Address pour modifier l’adresse si nécessaire.
Entrer les paramètres du réseau LAN saisis au préalable (adresse IP,
masque de sous-réseau et passerelle par défaut).
Attention : L’adresse IP est constituée des trios premiers valeurs. Veiller à
entrer une valeur différente que celle de l’adresse de l’ordinateur. Contacter
votre fournisseur. Voir exemple ci-contre.
Cliquer OK et entrer le nom d’utilisateur de l’administrateur (admin) et le
mot de passe (123456).
Cliquer OK. Le système désigne une nouvelle adresse IP à la caméra.
Cliquer OK. La nouvelle adresse IP de la caméra est affichée.
Sélectionner la caméra et cliquer visitIPCam. Le navigateur Web IE se
connecte automatiquement à la camera.
L’interface apparaît. Entrer l’adresse IP de la caméra dans le navigateur,
p.ex. http://10.20.30.249.
Cliquer User Zone. La fenêtre de connexion apparaît.
Entrer le nom d’utilisateur de l’administrateur (admin) et le mot de passe
(123456), et cliquer OK.
Page 11

CAMIP3_v2 VELLEMAN
-
11
-
Installer ActiveX si nécessaire. Cliquer Install pour continuer. Modifier la
configuration de sécurité du navigateur au cas où la fenêtre n’apparaît pas.
ActiveX n’est pas téléchargeable sans autorisation sans que le protocole de
sécurité du navigateur soit correctement configuré.
Configurer le protocole de sécurité du navigateur comme suit :
• Sélectionner Internet Options dans le menu Tools.
• Cliquer l’onglet Security.
• Sélectionner Custom Level et configurer comme ci-contre.
• Cliquer OK pour confirmer.
En outre, l’adresse IP de la caméra peut être configurée comme site de
confiance :
• Sélectionner Internet Options dans le menu Tools.
• Cliquer l’onglet Security.
• Sélectionner Trusted Sites.
• Décocher la case √.
• Entrer l’adresse IP de la caméra ou l’URL.
• Cliquer Add et OK pour confirmer.
• Accès depuis l’Internet
Il est possible que vous désiriez vous connecter à la camera depuis un ordinateur autre que le votre. Le cas échéant,
la connexion à la caméra peut se faire depuis l’Internet à condition que la configuration du routeur soit modifiée.
Activer la fonction RNAT de l’appareil utilisant le même IP :
o Beaucoup de routeurs supportent VirtualServer. Relayer le port TCP WAN 80 vers l’adresse IP et le port du
LAN.
o La méthode de l’hôte DMZ est également utilisable. Cette méthode ne supporte toutefois qu’un seul appareil
LAN. Si vous avez plusieurs caméras, utilisez la méthode ci-dessus.
• DNS dynamique
Consulter le site http://www.vipcam.cn, entrer le numéro de série de la caméra et le mot de passe d’origine. Entrer
une adresse de courriel valide. Sélectionner system setting > network setting > dynamic domain name.
Sélectionner DDNS supplier, entrer votre nom d’utilisateur et le mot de passe, et cliquer apply. La caméra se
réinitialisera. Veiller à ouvrir le port UDP.
• Connexion à l’Internet depuis une ligne ADSL
La configuration du réseau est similaire au réseau LAN. L’ouverture du service PPPoE pourrait être nécessaire. Avec
un PPPoE ouvert, utiliser des câbles et raccorder la caméra directement à la carte réseau de l’ordinateur. Démarrer
VilarWizard_CN.exe ou taper l’adresse IP de la caméra dans le navigateur Web. Sélectionner System Setting >
Network Setting et entrer votre nom d’utilisateur et le mot de passe dans la case PPPoE.
Cocher les deux cases et réinitialiser l’ordinateur après avoir cliqué OK.
Démarrer le service DDNS.
Pour plus d’information concernant cet article, visitez notre site web www.velleman.eu.
Toutes les informations présentées dans cette notice peuvent être modifiées sans notification préalable.
Page 12

CAMIP3_v2 VELLEMAN
-
12
-
CAMIP3 – CÁMARA IP (CÁMARA DE RED)
1. Introducción
A los ciudadanos de la Unión Europea
Importantes informaciones sobre el medio ambiente concerniente a este producto
Este símbolo en este aparato o el embalaje indica que, si tira las muestras inservibles, podrían dañar el
medio ambiente.
No tire este aparato (ni las pilas, si las hubiera) en la basura doméstica; debe ir a una empresa
especializada en reciclaje. Devuelva este aparato a su distribuidor o a la unidad de reciclaje local.
Respete las leyes locales en relación con el medio ambiente.
Si tiene dudas, contacte con las autoridades locales para residuos.
¡Gracias por haber comprado la CAMIP3! Lea atentamente las instrucciones del manual antes de usarla. Si el
aparato ha sufrido algún daño en el transporte no lo instale y póngase en contacto con su distribuidor.
2. Activación rápida
• Conexión a la red LAN
Conecte el cable de red al puerto RJ45.
Conecte el conector del adaptador de red a la entrada de alimentación.
Conecte el adaptador de red a la red eléctrica.
Active el ordenador y asegúrese de que se conecte a la red LAN. Haga
click en Start > Running y entre en Command (Windows® 95/95/ME) o en
Cmd (Windows® 2000/XP). Haga click en OK, entre en ipconfig y pulse
Enter.
La configuración básica de la red tiene el siguiente aspecto (véase fig.).
Apunte la dirección IP, la máscara de subred (subnet mask) y la puerta
de enlace por defecto (default gateaway). Estos datos se utilizarán para
configurar la cámara.
Introduzca el CD en el lector CD-ROM y copie el fichero
VilarWizard_CN.exe al ordenador. Abra el fichero. Una interfaz aparece.
Esta interfaz visualiza todas las cámaras IP conectadas a la red LAN. Haga
click en refresh para actualizar la lista.
Si la red LAN incluye varias cámaras, busque la cámara al controlar su
número de serie.
Page 13

CAMIP3_v2 VELLEMAN
-
13
-
Asegúrese de que la dirección IP de la cámara coincida con la del
ordenador. Haga click en Set IP Address para modificar la dirección si
fuera necesario.
Introduzca los parámetros de la red LAN grabados de antemano (adresse
IP, máscara de subred y puerta de enlace por defecto).
¡OJO!: La dirección IP consta de los tres primeros valores. Asegúrese de
que entre otro valor que el de la dirección del ordenador. Contacte con su
proveedor. Véase el ejemplo de al lado.
Haga click en OK y entre el nombre de usuario del administrador (admin) y
la contraseña (123456).
Haga click en OK. El sistema atribuye una nueva dirección IP a la cámara.
Haga click en OK. La nueva dirección IP de la cámara se visualiza.
Seleccione la cámara y haga click en visitIPCam. El navegador Web IE se
conecta automáticamente a la cámara.
La interfaz aparece. Introduzca la dirección IP de la cámara en el
navegador, p.ej. http://10.20.30.249.
Haga click en User Zone. La pantalla de conexión aparece.
Introduzca el nombre del usuario del administrador (admin) y la contraseña
(123456) y haga click en OK.
Page 14

CAMIP3_v2 VELLEMAN
-
14
-
Instale ActiveX si fuera necesario. Haga click en Install para continuar.
Modifique la configuración de seguridad del navegador si la pantalla no
aparece. No es posible descargar ActiveX sin autorización mientras que el
protocolo de seguridad del navegador no esté correctamente configurado.
Configure el protocolo de seguridad del navegador de la siguiente manera:
• Seleccione Internet Options en el menú Tools.
• Haga click en Security.
• Seleccione Custom Level y configúrelo. Véase la figura de al lado.
• Haga click en OK para confirmar.
Además, es posible configurar la dirección IP de la cámara como página de
confianza (trusted site):
• Seleccione Internet Options en el menú Tools.
• Haga click en Security.
• Seleccione Trusted Sites.
• Marque el cajetín con √.
• Introduzca la dirección IP de la cámara o URL.
• Haga click en Add y OK para confirmar.
• Acceso desde Internet
Es posible que quiera conectarse a la cámara desde otro ordenador. Si es el caso, la conexión a la cámara puede
hacerse desde Internet a condición de que se modifique la configuración del router. Active la función RNAT del
aparato al utilizar el mismo IP:
o Muchos routers soportan VirtualServer. Envíe el puerto TCP WAN 80 a la dirección IP y el puerto del LAN.
o También se puede utilizar el método del anfitrión DMZ. Este método soporta sólo un aparato LAN. Si tiene
varias cámaras, utilice el primer método.
• DNS dinámico
Consulte la página http://www.vipcam.cn, introduzca el número de serie de la cámara y la contraseña original.
Introduzca una dirección de correo electrónico válida. Seleccione system setting > network setting > dynamic
domain name. Seleccione DDNS supplier, introduzca el nombre del usuario y la contraseña, y haga click en
apply. La cámara se reinicializará. Asegúrese de que abra el puerto UDP.
• Conexión a Internet desde una línea ADSL
Es posible comparar la configuración de la red con la de la red LAN. Es posible que necesite abrir el servicio PPPoE.
Con un PPPoE abierto, utilice los cables y conecte la cámara directamente a la tarjeta red del ordenador. Active
VilarWizard_CN.exe o introduzca la dirección IP de la cámara en el navegador Web. Seleccione System Setting >
Network Setting e introduzca el nombre de usuario y la contraseña en el cajetín PPPoE.
Marque los dos cajetines y reinicialice el ordenador después de haber hecho click en OK.
Active el servicio DDNS.
Para más información sobre este producto, visite nuestra página web www.velleman.eu.
Se pueden modificar las especificaciones y el contenido de este manual sin previo aviso.
Page 15

CAMIP3_v2 VELLEMAN
-
15
-
CAMIP3 – IP-KAMERA (NETZWERKKAMERA)
1. Einführung
An alle Einwohner der Europäischen Union
Wichtige Umweltinformationen über dieses Produkt
Dieses Symbol auf dem Produkt oder der Verpackung zeigt an, dass die Entsorgung dieses Produktes nach
seinem Lebenszyklus der Umwelt Schaden zufügen kann.
Entsorgen Sie die Einheit (oder verwendeten Batterien) nicht als unsortiertes Hausmüll; die Einheit oder
verwendeten Batterien müssen von einer spezialisierten Firma zwecks Recycling entsorgt werden.
Diese Einheit muss an den Händler oder ein örtliches Recycling-Unternehmen retourniert werden.
Respektieren Sie die örtlichen Umweltvorschriften.
Falls Zweifel bestehen, wenden Sie sich für Entsorgungsrichtlinien an Ihre örtliche Behörde.
Wir bedanken uns für den Kauf der CAMIP3! Lesen Sie diese Bedienungsanleitung vor Inbetriebnahme sorgfältig
durch. Überprüfen Sie, ob Transportschäden vorliegen. Sollte dies der Fall sein, verwenden Sie das Gerät nicht und
wenden Sie sich an Ihren Händler.
2. Schnellstart
• Anschluss an das LAN
Verbinden Sie das Netzwerkkabel mit dem RJ45-Anschluss.
Verbinden Sie den Adapter mit dem Stromeingang und verbinden Sie den
Adapter mit dem Netz.
Starten Sie den Computer und beachten Sie, dass er sich mit dem LAN
verbindet. Klicken Sie Start > Running und geben Sie Command
(Windows® 95/95/ME) oder Cmd (Windows® 2000/XP) ein. Wählen Sie OK
aus, geben Sie ipconfig ein und drücken Sie Enter.
Die Basiseinstellungen des Netzes sehen etwa aus wie folgt.
Notieren Sie die IP-Adresse, die Subnetzmaske (subnetmasker) und das
default gateway. Verwenden Sie diese Daten, um das Gerät einzustellen.
Legen Sie die CD in das CD-ROM-Laufwerk ein und kopieren Sie die Datei
VilarWizard_CN.exe auf Ihren Computer. Öffnen Sie die Datei. Die
Schnittstelle erscheint.
Diese Schnittstelle zeigt alle IP-Kameras im LAN an. Drücken Sie die
Refresh-Taste, um die Liste zu aktualisieren.
Wenn LAN verschiedene Kameras enthält, können Sie die Kamera über die
Serienummer suchen.
Page 16

CAMIP3_v2 VELLEMAN
-
16
-
Beachten Sie, dass die Adresse der IP-Kamera dieselbe ist als die IPAdresse des Computers. Klicken Sie die Set IP Address-Taste, um
eventuell die Adresse zu ändern.
Geben Sie die LAN-Parameter, die Sie eher notiert haben (IP-Adresse,
Subnetzmaske und Default Gateway) ein.
Achtung: Die IP-Adresse besteht aus den ersten drei Zahlen. Beachten
Sie, dass die letzte Zahl der IP-Adresse der Kamera sich von der IPAdresse des Computers unterscheidet. Wenden Sie sich an Ihren
Dienstanbieter wenn Sie Fragen über das Einstellen der IP-Adresse haben.
Siehe Beispiel.
Klicken Sie OK und geben Sie den Benutzernamen (admin) und das
Passwort (123456) des Administrators ein.
Klicken Sie OK. Das System weist der Kamera eine neue IP-Adresse zu.
Klicken Sie OK. Die neue IP-Adresse der Kamera wird angezeigt.
Wählen Sie de Kamera aus und klicken Sie visitIPCam. Internet Explorer
verbindet sich automatisch mit Ihrer Kamera.
Die Benutzerschnittstelle wird dargestellt. Geben Sie die IP-Adresse der
Kamera in den Internet Explorer-Browser, z.B. http://10.20.30.249 ein.
Klicken Sie User Zone. Das Log-In-Fenster erscheint.
Geben Sie den Benutzernamen (admin) und das Passwort (123456) ein
und klicken Sie OK.
Page 17

CAMIP3_v2 VELLEMAN
-
17
-
Installieren Sie ActiveX wenn nötig. Klicken Sie Install um weiterzugehen.
Ändern Sie die Sicherheitseinstellungen von Internet Explorer wenn das
Fenster nicht erscheint. ActiveX kann nicht ohne Zustimmung
heruntergeladen werden solange die Sicherheitseinstellungen von Internet
Explorer nicht korrekt eingestellt wurden.
Stellen Sie die Sicherheitseinstellungen von Internet Explorer ein wie folgt:
• Wählen Sie Internet Options in das Tools-Menü aus.
• Klicken Sie Security.
• Wählen Sie Custom Level aus und konfigurieren Sie (siehe nebenan).
• Klicken Sie OK zum Bestätigen.
Die IP-Adresse der Kamera kann auch als Ttrusted Site aufgenommen
werden.
• Wählen Sie Internet Options in das Tools-Menü aus.
• Klicken Sie Security.
• Wählen Sie Trusted Sites aus.
• Haken Sie √ ab.
• Geben Sie die IP-Adresse oder URL der Kamera ein.
• Klicken Sie Add und danach OK zum Bestätigen.
• Zugriff über Internet
Manchmal müssen Sie ab anderen Computern Zugriff auf die Kamera haben. In diesem Fall bekommen Sie über
Internet Zugriff auf die Kamera wenn Sie die Routerkonfiguration ändern. Schalten Sie die RNAT-Funktion des IPGerät ein:
o Viele Router unterstützen VirtualServer. Senden Sie den WAN 80 TCP-Anschluss zur IP-Adresse und zum
LAN-Anschluss.
o Sie können auch die DMZ Host-Methode verwenden. Diese Methode unterstützt nur ein LAN-Gerät.
Verwenden Sie die erste Methode wenn Sie über mehr Kameras verfügen.
• Dynamic Domain Name
Gehen Sie zu http://www.vipcam.cn und geben Sie die Seriennummer der Kamera und das original Passwort ein.
Geben Sie eine gültige E-Mail-Adresse ein. Wählen Sie system setting > network setting > dynamic domain
name aus, um Zugriff auf die Kamera zu bekommen. Wählen Sie DDNS supplier aus, geben Sie den
Benutzernamen und das Passwort ein und klicken Sie apply. Die Kamera wird neu gestartet. Sorgen Sie dafür,
dass Sie den UDP-Anschluss öffnen.
• Anschluss mit Internet über ADSL
Dieses Network ist mit Ihrem LAN vergleichbar. Öffnen Sie den PPPoE-Service wenn nötig. Verwenden Sie bei
einem offenen PPPoE Netzwerkkabel und verbinden Sie die Kamera direkt mit der Netzwerkkarte im PC. Starten Sie
VilarWizard_CN.exe oder geben Sie die IP-Adresse der Kamera in den Internet Explorer-Browser ein. Wählen Sie
System Setting > Network Setting aus und geben Sie den Benutzernamen und das Passwort in den PPPoE-Teil
ein.
Haken Sie beide
Kästchen
ab und starten Sie den Computer wieder nachdem Sie OK geklickt haben.
Starten Sie den DDNS-Service.
Für mehr Informationen zu diesem Produkt, siehe www.velleman.eu.
Page 18

CAMIP3_v2 VELLEMAN
-
18
-
Alle Änderungen ohne vorherige Ankündigung vorbehalten.
 Loading...