

Page 1
CAMIP17
MEGAPIXEL IR BULLET VIDEO IP CAMERA – EAGLE EYES – ETS
MEGAPIXEL CILINDRISCHE IR VIDEO IP-CAMERA – EAGLE EYES – ETS
CAMÉRA CYLINDRIQUE IP VIDÉO IR MÉGAPIXEL – EAGLE EYES – ETS
CÁMARA CILÍNDRICA IP VÍDEO IR MEGAPÍXEL – EAGLE EYES – ETS
MEGAPIXEL ZYLINDRISCHE IR VIDEO IP-KAMERA – EAGLE EYES – ETS
QUICK INSTALLATION GUIDE 2
KORTE HANDLEIDING 8
GUIDE D'INSTALLATION RAPIDE 15
GUÍA RÁPIDA 22
SCHNELLEINSTIEG 29
Page 2
CAMIP17
Keep this device away from children and unauthorized users.
Risk of electroshock when opening the cover. Touching live wires can cause lifethreatening electroshocks. Do not disassemble or open the housing yourself. Have the
device repaired by qualified personnel.
There are no user-serviceable parts inside the device. Refer to an authorized dealer for
service and/or spare parts.
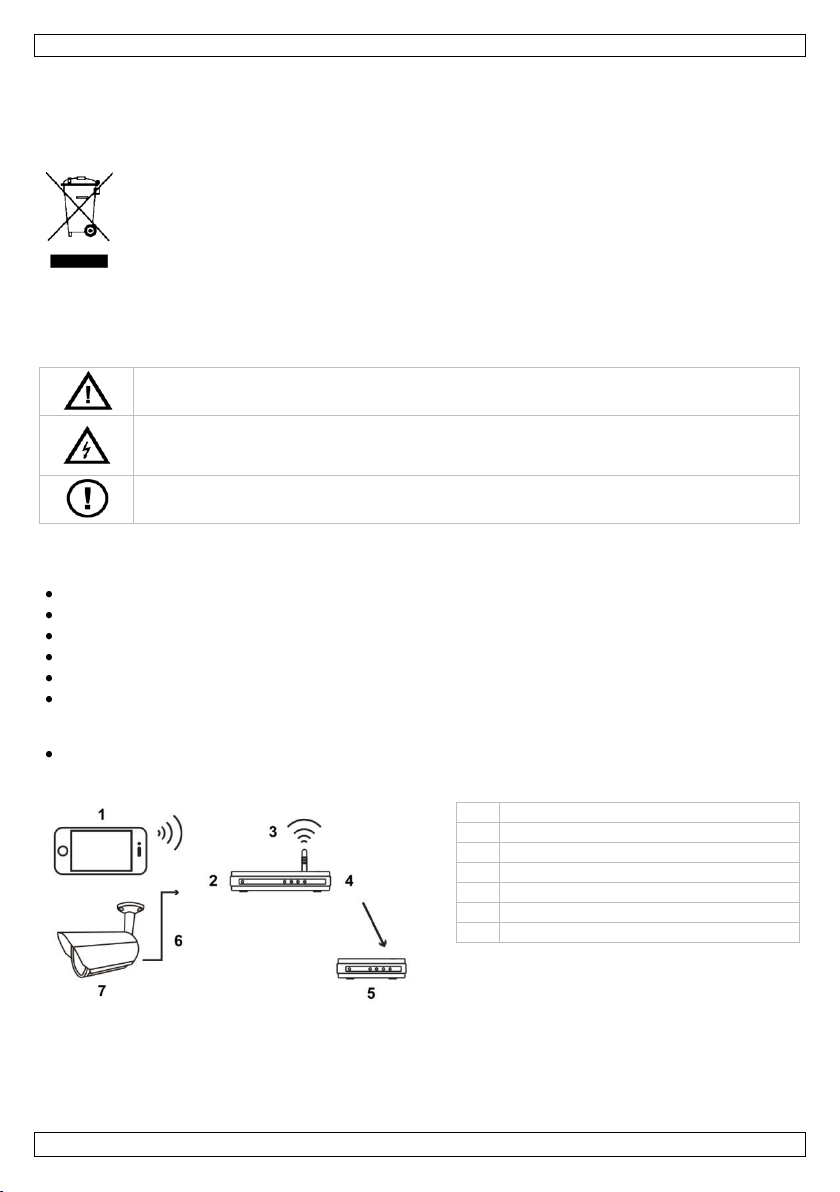
1
mobile device
2
LAN port
3
wireless router
4
WAN port
5
modem
6
8P8C network cable
7
camera
QUICK INSTALLATION GUIDE
1. Introduction
To all residents of the European Union
Important environmental information about this product
Thank you for choosing Velleman! Please read the manual thoroughly before bringing this device into
service. If the device was damaged in transit, don't install or use it and contact your dealer.
2. Safety Instructions
3. General Guidelines
Refer to the Velleman® Service and Quality Warranty on the last pages of this manual.
Keep this device away from dust and extreme heat.
Protect this device from shocks and abuse. Avoid brute force when operating the device.
Familiarise yourself with the functions of the device before actually using it.
All modifications of the device are forbidden for safety reasons.
Only use the device for its intended purpose. Using the device in an unauthorised way will void the
Damage caused by disregard of certain guidelines in this manual is not covered by the warranty and
DO NOT use this product to violate privacy laws or perform other illegal activities.
4. Overview
This symbol on the device or the package indicates that disposal of the device after its lifecycle
could harm the environment. Do not dispose of the unit (or batteries) as unsorted municipal
waste; it should be taken to a specialized company for recycling. This device should be
returned to your distributor or to a local recycling service. Respect the local environmental
rules.
If in doubt, contact your local waste disposal authorities.
warranty.
the dealer will not accept responsibility for any ensuing defects or problems.
V. 01 – 08/08/2013 2 ©Velleman nv
Page 3
CAMIP17
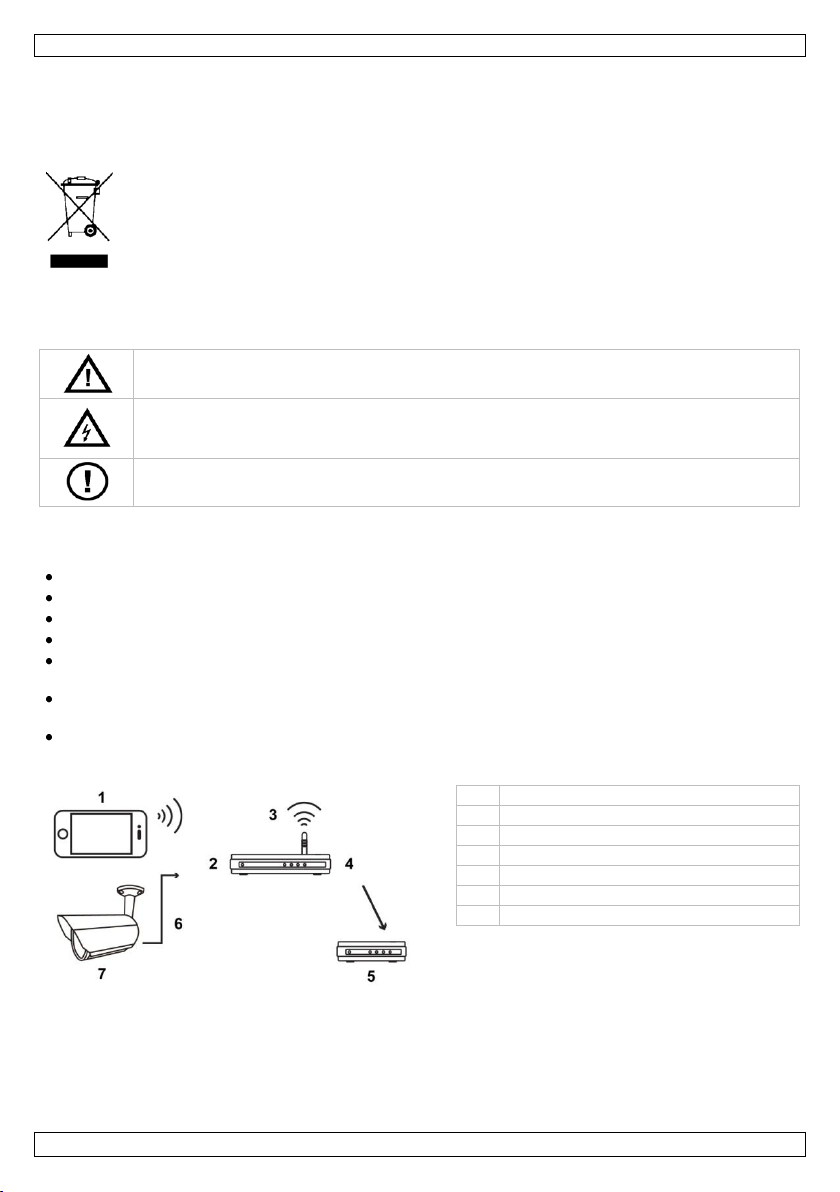
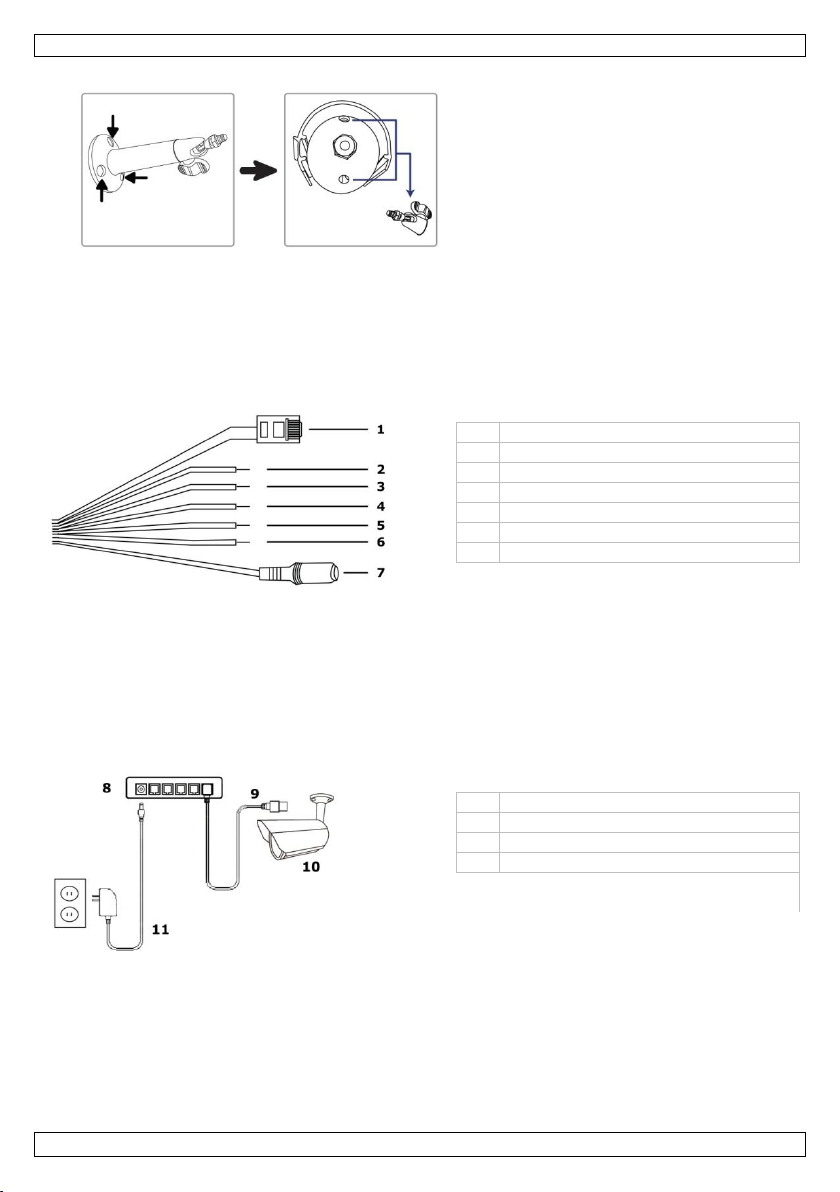
1
8P8C network cable
2
alarm in (yellow)
3
GND (brown)
4
RESET (red)
5
GND (black)
6
alarm out (pink)
7
power cable
8
PoE router/hub
9
LAN cable
10
camera
11
power
5. Installation: Hardware
1. Fasten the round base of the bracket to where you want to install the camera with the supplied
three screws. For details about viewing angle and infrared range, refer to the documentation on the
included CD-ROM.
2. Connect the camera with the joint lock connected to the bracket. Next, secure the joint lock.
6. Installation: Power Supply and PoE (Power over Ethernet)
Connection
Power Supply
For your camera to work properly, you need to connect the camera cables as follows:
1. Connect the network cable [1] to your network.
2. Plug the camera’s power cable [7] in a suitable power adapter (12 Vdc 1 A, for example PSSE1210,
not incl.) and connect it to a power socket.
PoE (Power over Ethernet) Connection
The camera features PoE (Power over Ethernet). If your router or hub supports PoE, you do not need to
connect the camera to a power socket. You can then connect the camera as shown below:
1. Use a network cable [9] to connect your camera [10] to a PoE port of your router [8].
2. Make sure your router is connected to a power socket [11].
Note: If your router does not support PoE, you can use a PoE injector (not included) to use the PoE
feature.
V. 01 – 08/08/2013 3 ©Velleman nv
Page 4
CAMIP17
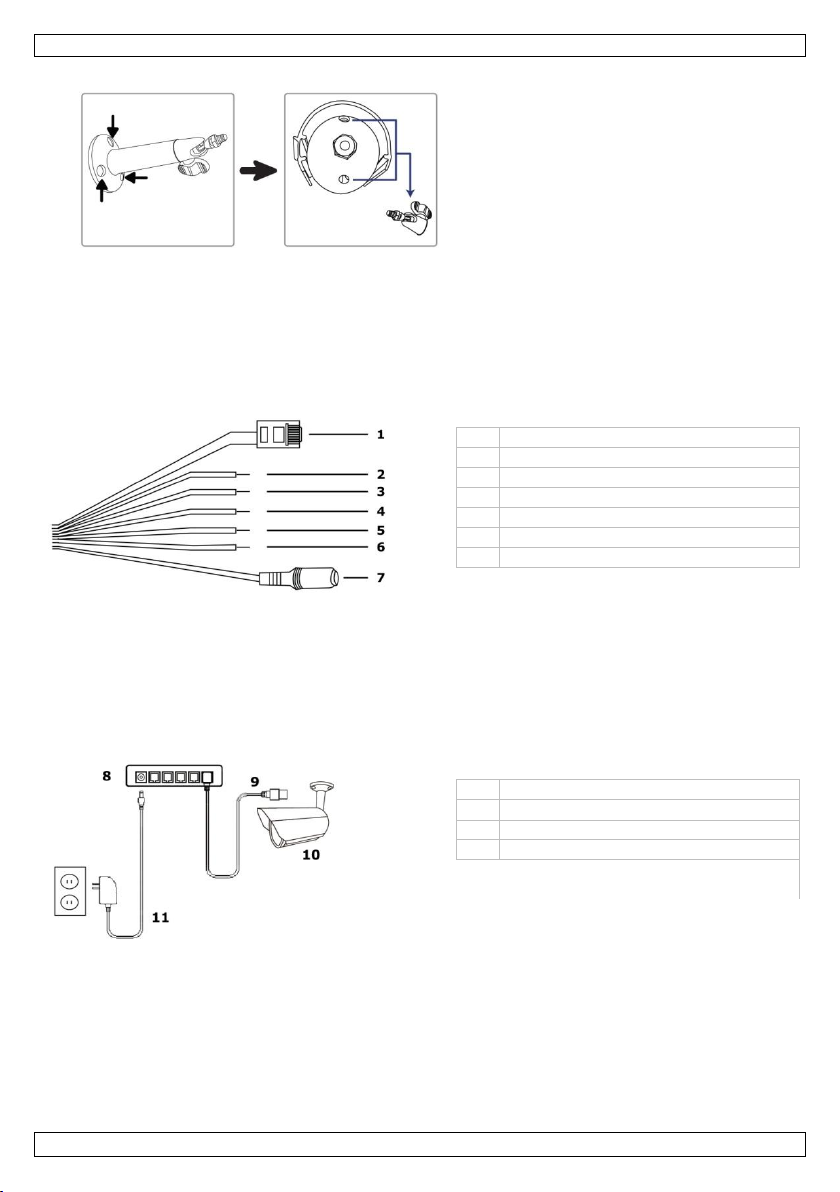
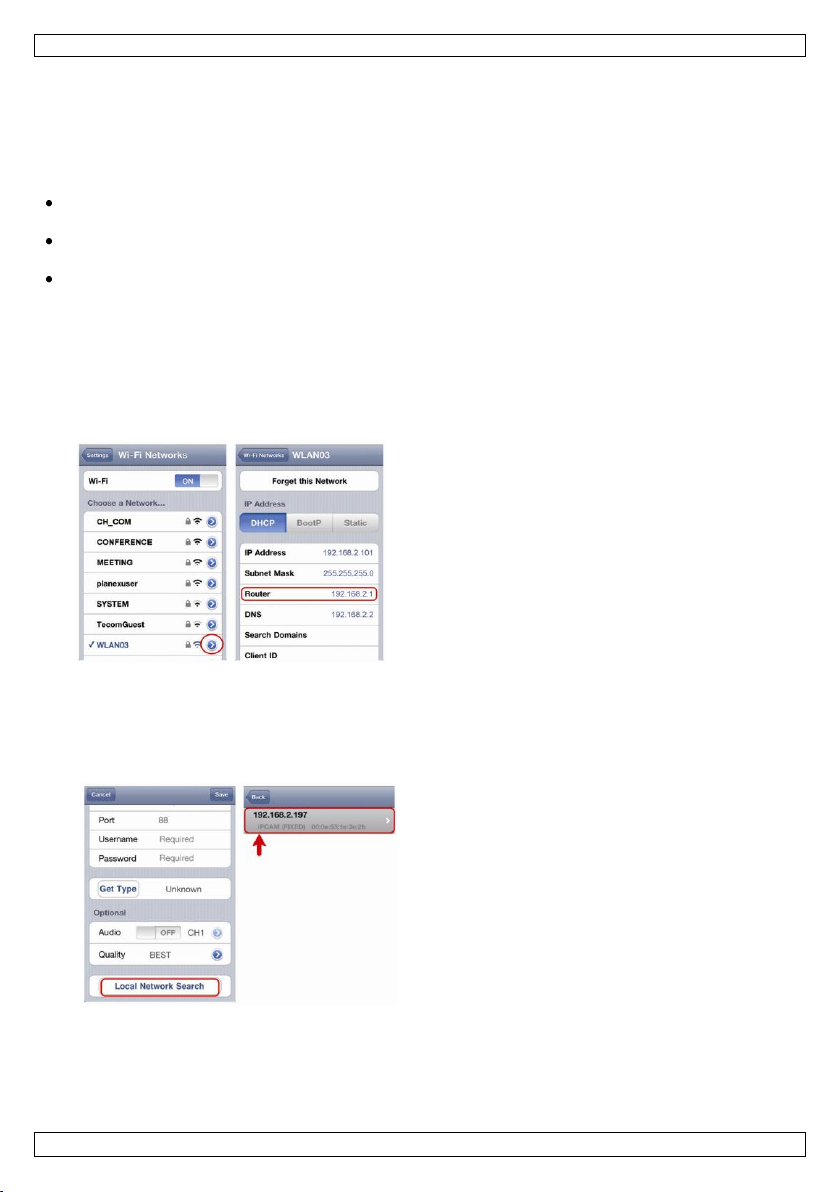
3. Connect your mobile device to the wireless router
that has the camera connected.
4. Go to Settings > WiFi.
5. Press the “>” button to see the details of the
selected wireless network.
The IP address is visible next to “Router”.
(In the sample screen, the IP address is
192.168.2.1)
The device will show a list of devices on the
network. The displayed IP address is the address
that your router assigned to your camera.
7. Software Configuration
The installation method below describes the setup with an iPhone® with a D-Link® wireless router and
modem. The installation procedure is similar for iPad® or Android™ devices. Refer to the full manual on
the included CD-ROM for more information.
Prerequisites
Before proceeding, check the following:
We recommend that you use your own ADSL or cable internet service for easy network configuration.
Your camera is connected to your wireless router with an 8P8C network cable, and it is powered on.
EagleEyes-Lite or EagleEyes-Plus is installed on your device.
If not, download it from your device’s app store.
Note: EagleEyes HD for iPad does not support network configuration. Please install EagleEyes-Lite or
EagleEyes Plus on your iPad instead.
Preparing the Network Configuration
1. Connect your camera to your wireless router using an 8P8C network cable (see “Overview” above).
2. Write down the IP address of your wireless router. You will need it later. To find the IP address,
proceed as follows:
Adding Your Camera to the EagleEyes App
1. Establish a wireless connection between your mobile device and the wireless router that has the
camera connected.
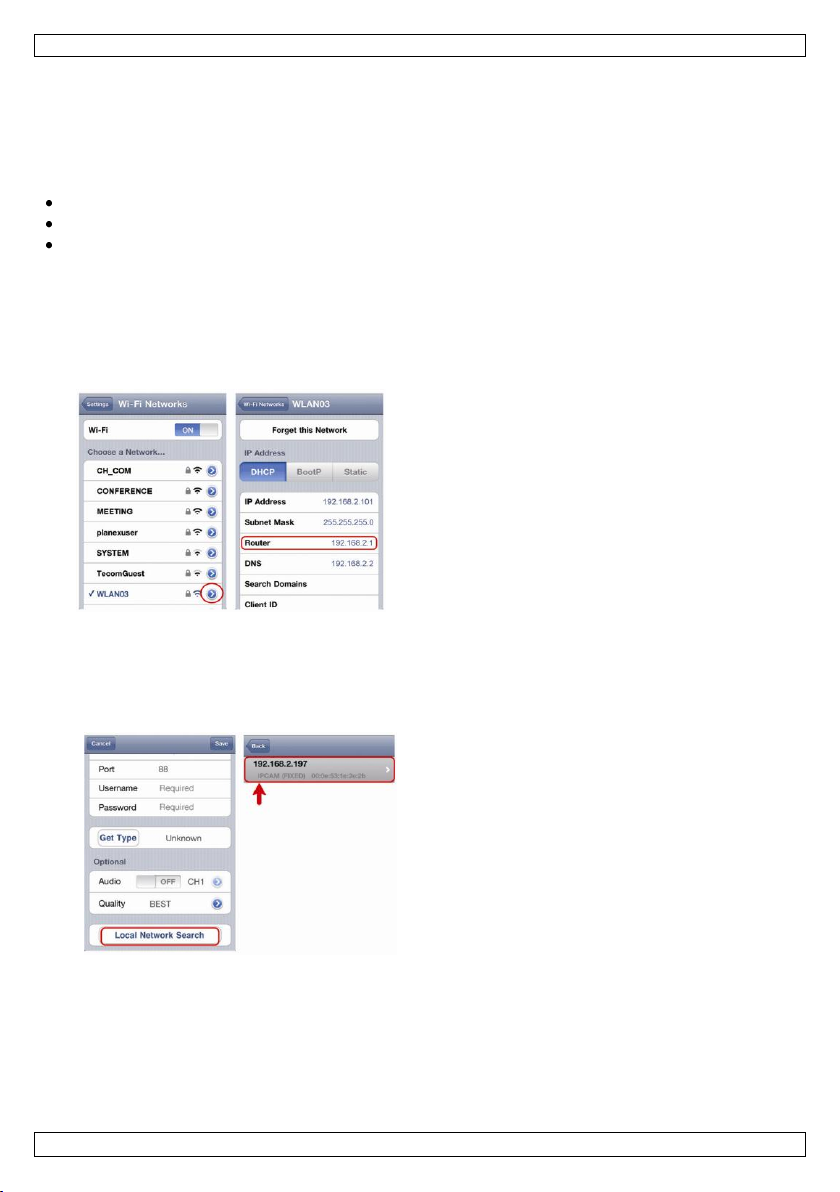
2. Open the EagleEyes app and click the “+” button to add a new device.
3. Select “Local Network Search” to search for the camera.
4. Select the camera from the list. The settings page appears.
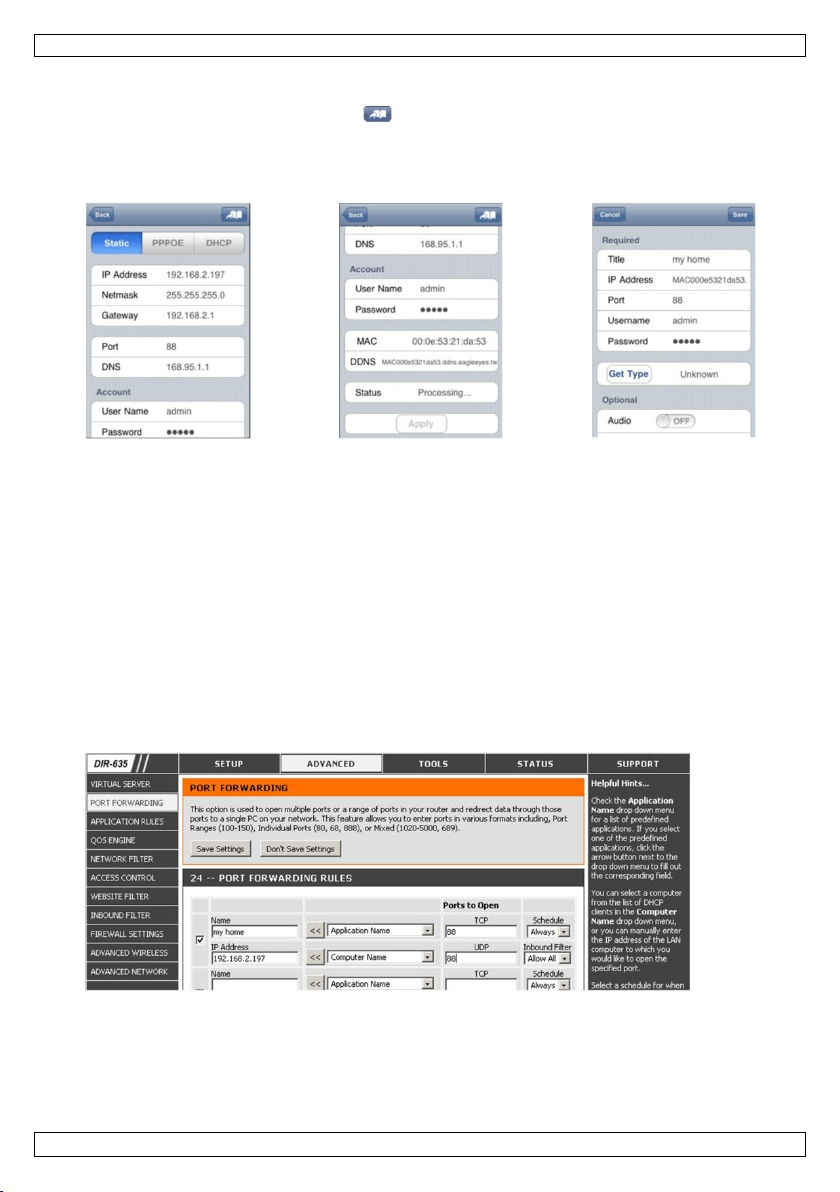
5. Change the port number of the camera as needed. The default port number is 88. If port number 88
is blocked, you can change it to any value between 1-9999 (for example 8080).
6. Write down the IP address and the port number of the camera. You will need them later.
(In the sample screens below [A], the IP address is 192.168.2.197 and the port number is 88.)
7. Press “Apply” to confirm your settings.
V. 01 – 08/08/2013 4 ©Velleman nv
Page 5
CAMIP17
A B C
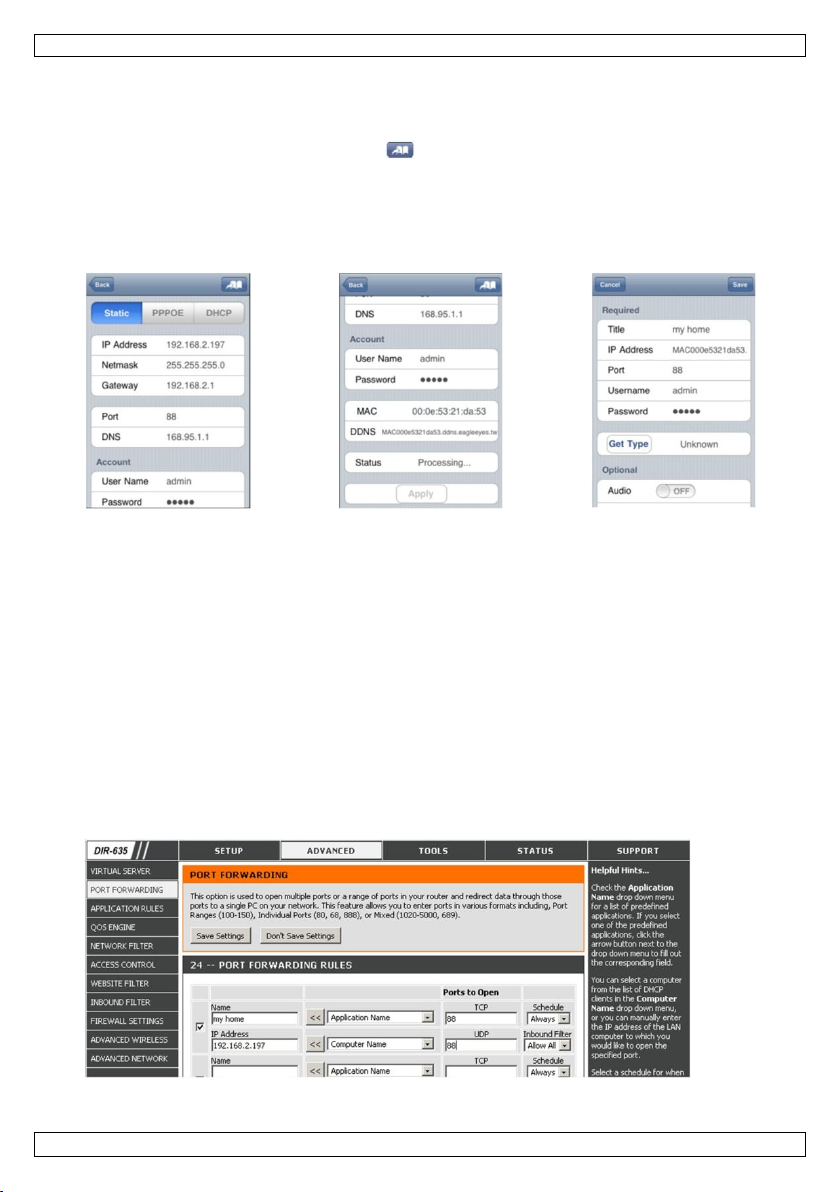
8. Wait until “Status” [B] indicates “Done” or “Fail”.
o If the status shows “Done”, the device page appears again. Proceed with the next step.
o If the status shows “Fail”, press the button on the top right side of your device. In the
popup window, select “DDNS”. The device page appears again. Proceed with the next step.
9. In “Title” [C], enter a meaningful name for your camera connection and press “Save” to confirm.
Port Forwarding
At this moment, you can only access the camera when connected to your own wireless network, not
through the internet. This is because a home network is usually connected to the internet through a
router. Only the router’s external IP address (assigned to you by your Internet Service Provider) can be
seen on the internet. Moreover, the router will also block access to any device in your home network,
including your camera. To bypass this, most routers support a mechanism called port forwarding that
allows access from the internet to a device in the home network.
You can set up port forwarding as follows:
1. Open your web browser on your mobile device, and enter the IP address of your router you wrote
down in the address bar.
Your router configuration page appears.
2. Go to the port forwarding (or virtual server) rule configuration page.
Note: The naming of port forwarding or virtual server may vary based on the brand of your router.
Refer to the user manual of your specific router for more information.
The example below shows the screen for a D-Link router: select the “Advanced” tab and then
choose “Port Forwarding”.
3. Enter the camera IP address and port number that you noted down and enable this rule. You can
now access your camera through the internet.
4. If your wireless router supports UPnP (Universal Plug and Play), make sure the function is enabled.
UPnP enhances communication between the router and wireless devices. If necessary, refer to the
manual of the router software.
V. 01 – 08/08/2013 5 ©Velleman nv
Page 6

CAMIP17
Address Book
Live View & Control
Configuration
1
Info
Press for more information on how to use EagleEyes
2
Toolbar
Add, edit, and delete items from Address Book
3
Setting
Configure EagleEyes parameters
Select the camera connection in Address Book to enter Live View & Control.
4
Configuration
Press to enter the camera’s configuration page.
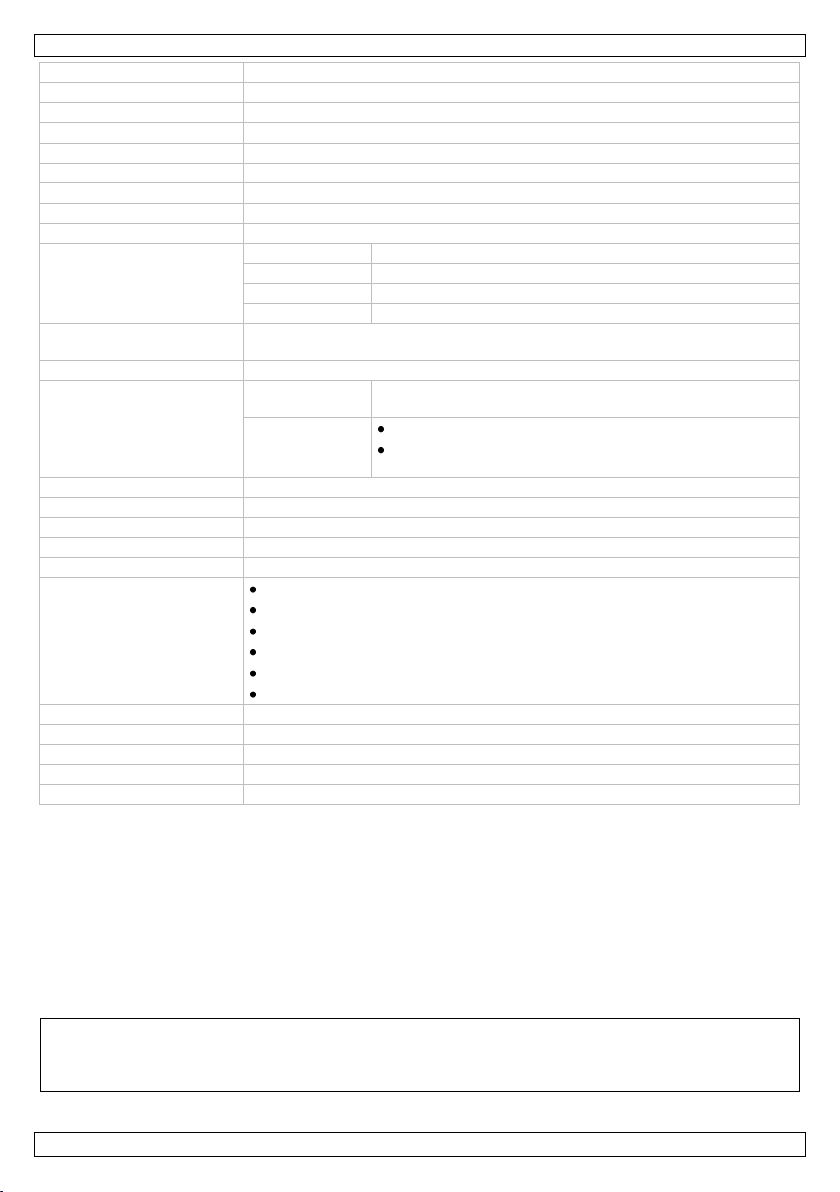
pick-up element
Sony HR image sensor
image size
1/2.9"
number of pixels
2 Megapixel
min. illumination
0.1 lux / F1.5, 0 lux (IR LED on)
white balance
ATW
Checking the Connection
When you have completed network setup and port forwarding, check your connection setup as follows:
1. On your mobile device, switch your network mode to 3G or connect to a different wireless network
than the one that has your camera connected.
2. Start EagleEyes and select the camera you just added to see if you can access it.
o If yes, your network connection works. Proceed with “Changing the Account User Name and
Password” below.
o If not, proceed with the following step.
3. Switch your network mode back to the wireless network that has your camera connected.
4. Start EagleEyes, and add a new connection with the IP address and port number that you set up in
“Adding Your Camera to the EagleEyes App”.
5. See if you can access the camera with this connection.
o If yes, return to “Port Forwarding” to set up port forwarding again.
o If not, return to step 4 of “Adding Your Camera to the EagleEyes App” and reconfigure the
connection.
Changing the Account User Name and Password in EagleEyes
To ensure the safety of your camera connection, modify the default user name and password as follows:
1. On your mobile device, access the camera in EagleEyes.
2. Press the Configuration button .
3. Select Advance Setup > Account.
4. Modify the default user name (admin) and password (admin) to the ones you prefer.
8. EagleEyes Operation
When you start EagleEyes, Address Book is displayed.
For detailed information, please check the full manual on the included CD-ROM.
The CAMIP17 IP camera is ONVIF certified: it is compatible with all major IP camera brands which are
ONVIF certified as well. For more information, please refer to www.onvif.org.
9. Technical Specifications
V. 01 – 08/08/2013 6 ©Velleman nv
Page 7
CAMIP17
AGC
automatic
IRIS mode
AES
lens
f3.8mm / F1.5
lens angle
85.4°
IR LEDs
35
network interface
Ethernet 10/100BASE-T
PoE
IEEE 802.3af
multiple video streaming
3 (H.264, MPEG4, MJPEG)
frame rate
30
image quality setting
1080P
1920 x 1080
720P
1280 x 720
VGA
640 x 480
QVGA
320 x 240
supported protocols
DDNS, PPPoE, DHCP, NTP, SNTP, TCP/IP, ICMP, SMTP, FTP, HTTP, RTP,
RTSP, RTCP, IPv4, Bonjour, UPnP, DNS, UDP, IGMP, QoS
event notification
FTP / E-mail
mobile surveillance
smart phones
remote login via EagleEyes software on all major smart
phone platforms (iPad, iPhone and Android)
computer
video viewer software on Windows and Mac
web browser: Internet Explorer, Firefox, Google
Chrome and Safari via Java, QuickTime or VLC plug-in
backup
remote via smart phone
memory storage
10 MB (built-in)
external alarm I/O
yes
microphone
no
speaker
no
hardware requirements
Pentium 4 CPU 1.3 GHz or higher, or equivalent AMD
Windows® 7, Vista & XP, DirectX 9.0 or later
AGP graphics card, Direct Draw, 32 MB RAM
RAM 256 MB or higher
free network port
Internet Explorer 7.x or higher
operating temperature
-20 °C to 40 °C
power supply
12 Vdc 1 A (not incl.)
dimensions
151 x 68 mm
weight
550 g
IP rating
IP67
Use this device with original accessories only. Velleman nv cannot be held responsible in the
event of damage or injury resulting from (incorrect) use of this device.
For more info concerning this product and the latest version of this manual, please visit our
website www.velleman.eu.
The information in this manual is subject to change without prior notice.
All registered trademarks and trade names are properties of their respective owners and are used only
for the clarification of the compatibility of our products with the products of the different manufacturers.
iPhone and iPad are trademarks of Apple Inc., registered in the U.S. and other countries. D-Link, the DLink logo are trademarks or registered trademarks of D-Link Corporation or its subsidiaries in the United
States and other countries. Android is a trademark of Google Inc.
© COPYRIGHT NOTICE
The copyright to this manual is owned by Velleman nv. All worldwide rights reserved. No part
of this manual may be copied, reproduced, translated or reduced to any electronic medium or otherwise
without the prior written consent of the copyright holder.
V. 01 – 08/08/2013 7 ©Velleman nv
Page 8
CAMIP17
Houd dit toestel buiten het bereik van kinderen en onbevoegden.
Elektrocutiegevaar bij het openen van het toestel. Raak geen kabels aan die onder
stroom staan om dodelijke elektrische schokken te vermijden. Open de behuizing niet zelf.
Laat het onderhoud van het toestel over aan een geschoolde vakman.
Er zijn geen door de gebruiker vervangbare onderdelen in dit toestel. Voor onderhoud en/of
reserveonderdelen, contacteer uw dealer.
1
draagbaar toestel
2
LAN-poort
3
draadloze router
4
WAN-poort
5
modem
6
8P8C-netwerkkabel
7
camera
KORTE HANDLEIDING
1. Inleiding
Aan alle ingezetenen van de Europese Unie
Belangrijke milieu-informatie betreffende dit product
verwijdering.
Dank u voor uw aankoop! Lees deze handleiding grondig voor u het toestel in gebruik neemt. Werd het
toestel beschadigd tijdens het transport, installeer of gebruik het dan niet en raadpleeg uw dealer.
2. Veiligheidsinstructies
3. Algemene richtlijnen
Raadpleeg de Velleman® service- en kwaliteitsgarantie achteraan deze handleiding.
Bescherm dit toestel tegen stof en extreme hitte.
Bescherm het toestel tegen schokken. Vermijd brute kracht tijdens de bediening van het toestel.
Leer eerst de functies van het toestel kennen voor u het gaat gebruiken.
Om veiligheidsredenen mag u geen wijzigingen aanbrengen aan het toestel.
Gebruik het toestel enkel waarvoor het gemaakt is. Bij onoordeelkundig gebruik vervalt de garantie.
De garantie geldt niet voor schade door het negeren van bepaalde richtlijnen in deze handleiding en
Installeer en gebruik deze camera NIET voor illegale praktijken en respecteer ieders privacy.
4. Omschrijving
Dit symbool op het toestel of de verpakking geeft aan dat, als het na zijn levenscyclus wordt
weggeworpen, dit toestel schade kan toebrengen aan het milieu. Gooi dit toestel (en eventuele
batterijen) niet bij het gewone huishoudelijke afval; het moet bij een gespecialiseerd bedrijf
terechtkomen voor recyclage. U moet dit toestel naar uw verdeler of naar een lokaal
recyclagepunt brengen. Respecteer de plaatselijke milieuwetgeving.
Hebt u vragen, contacteer dan de plaatselijke autoriteiten betreffende de
uw dealer zal de verantwoordelijkheid afwijzen voor defecten of problemen die hier rechtstreeks
verband mee houden.
V. 01 – 08/08/2013 8 ©Velleman nv
Page 9
CAMIP17
1
8P8C-netwerkkabel
2
alarmingang (geel)
3
aarding (bruin)
4
RESET (rood)
5
aarding (zwart)
6
alarmuitgang (roze)
7
voedingskabel
8
PoE-router/hub
9
LAN-kabel
10
camera
11
voeding
5. Installatie: hardware
1. Bevestig de ronde voet van de beugel op de gewenste installatieplaats met de 3 meegeleverde
schroeven. Raadpleeg de meegeleverde cd-rom voor meer informatie over de gezichtshoek en het
infraroodbereik.
2. Verbind de camera met het gewricht, dat aangesloten is op de montagebeugel en zet het gewricht
vast.
6. Installatie: voedings- en PoE-aansluiting (Power over Ethernet)
Voeding
Om een correcte werking van uw camera te garanderen, sluit u de camerakabels aan zoals beschreven
hieronder:
1. Verbind de netwerkkabel [1] met uw netwerk.
2. Sluit de voedingskabel van de camera [7] aan op een geschikte netadapter (12 Vdc 1 A, bijv.
PSSE1210, niet meegelev.) en steek in een stopcontact.
PoE-aansluiting (Power over Ethernet)
De camera is uitgerust met Power over Ethernet. Indien uw router of hub PoE ondersteunt dan moet u de
camera niet aansluiten op het lichtnet maar kunt u de camera aansluiten zoals beschreven hieronder:
1. Gebruik een netwerkkabel [9] om uw camera [10] aan te sluiten op een PoE-poort van uw router
[8].
2. Zorg ervoor dat uw router aangesloten is op het lichtnet [11].
Opmerking: Indien uw router PoE niet ondersteunt, gebruik dan een PoE-injector (niet meegeleverd) om
PoE te gebruiken.
V. 01 – 08/08/2013 9 ©Velleman nv
Page 10
CAMIP17
3. Verbind uw draagbaar toestel met de draadloze
router waarmee de camera verbonden is.
4. Ga naar Settings > WiFi.
5. Druk op de “>” toets om meer details van het
geselecteerde draadloze netwerk te zien.
Het IP-adres wordt naast “Router” weergegeven.
(In het voorbeeldscherm is het IP-adres
192.168.2.1)
Het toestel zal een lijst tonen met toestellen die
verbonden zijn met het netwerk. Het IP-adres dat
verschijnt, is het adres dat door uw router werd
toegekend aan uw camera.
7. Softwareconfiguratie
De installatiemethode hieronder beschrijft de configuratie voor iPhone® met een draadloze D-Link®
router en modem. De installatieprocedure is gelijkaardig voor iPad® of Android™ toestellen. Raadpleeg
de uitgebreide handleiding op de meegeleverde cd-rom voor informatie.
Vereisten
Alvorens verder te gaan:
We raden u aan om uw eigen ADSL of internetkabeldienst te gebruiken voor een eenvoudige
netwerkconfiguratie.
Verifieer of uw camera verbonden is met uw draadloze router via een 8P8C-netwerkkabel en dat uw
camera ingeschakeld is.
Verifieer of EagleEyes-Lite of EagleEyes-Plus geïnstalleerd is op uw toestel.
Zo niet, download de app via de app store van uw toestel.
Opmerking: EagleEyes HD voor iPad ondersteunt geen netwerkconfiguratie. Gelieve EagleEyes -Lite
of EagleEyes Plus te installeren op uw iPad als alternatief.
De netwerkconfiguratie voorbereiden
1. Verbind uw camera met uw draadloze router via een 8P8C-netwerkkabel (zie “Omschrijving”
hierboven).
2. Noteer het IP-adres van uw draadloze router. U zal dit later nog nodig hebben. Om het IP-adres te
vinden, gaat u als volgt te werk:
Uw camera toevoegen aan de EagleEyes app
1. Maak een draadloze verbinding tussen uw draagbaar toestel en de draadloze router waarmee de
camera verbonden is.
2. Open de EagleEyes app en klik op “+” om een nieuw toestel toe te voegen.
3. Selecteer “Local Network Search” om te zoeken naar de camera.
4. Selecteer de camera in de lijst. De configuratiepagina verschijnt.
5. Verander het poortnummer van de camera indien nodig. Het standaard poortnummer is 88. Als
poortnummer 88 geblokkeerd is, kunt u dit aanpassen naar een willekeurige waarde tussen 1-9999
(bijvoorbeeld 8080).
6. Noteer het IP-adres en het poortnummer van de camera. U zal deze nog nodig hebben.
(In de voorbeeldschermen hieronder [A], is het IP-adres 192.168.2.197 en het poortnummer 88.)
V. 01 – 08/08/2013 10 ©Velleman nv
Page 11
CAMIP17
A B C
7. Druk op “Apply” om uw instellingen te bevestigen.
8. Wacht totdat “Status” [B] “Done” of “Fail” weergeeft.
o Als de status “Done” weergeeft, verschijnt de pagina van het toestel opnieuw. Ga verder met de
volgende stap.
o Geeft de status “Fail” weer, druk op de knop rechtsboven op uw toestel. In het pop-
upvenster selecteert u “DDNS”. De pagina van het toestel verschijnt opnieuw. Ga verder met de
volgende stap.
9. Geef in “Title” [C] een herkenbare naam in voor de aansluiting van uw camera en druk op “Save”
om te bevestigen.
Port forwarding
Momenteel heeft u enkel toegang tot de camera indien deze verbonden is met uw eigen draadloos
netwerk, niet via het internet. Dit komt omdat een standaard thuisnetwerk meestal verbonden is met het
internet via een router. Enkel het externe IP-adres van de router (toegewezen door uw internetprovider)
is zichtbaar op het internet. Bovendien blokkeert de router ook alle toegang tot de toestellen in uw
thuisnetwerk, ook uw camera. Om dit te omzeilen, gebruiken de meeste routers een port forwardingmechanisme waardoor er internettoegang is naar een toestel in het thuisnetwerk.
Om de functie port forwarding in te stellen, gaat u als volgt te werk:
1. Open de webbrowser op uw draagbaar toestel en tik het IP-adres van uw router dat u hebt
genoteerd in de adresbalk.
De configuratiepagina van uw router verschijnt.
2. Ga naar de configuratiepagina met de instellingen van de functie port forwarding (of virtuele
server).
Opmerking: Het definiëren van de port forwarding of virtuele server kan variëren afhankelijk van
het type router. Raadpleeg de gebruikershandleiding van uw router voor meer informatie.
Het voorbeeld hieronder toont het scherm voor een D-Link router: selecteer “Advanced” en
vervolgens “Port Forwarding”.
3. Geef het IP-adres van de camera en het poortnummer in die u noteerde en activeer deze instelling.
U kunt nu de camera bereiken via internet.
V. 01 – 08/08/2013 11 ©Velleman nv
Page 12

CAMIP17
Address Book
Live View & Control
Configuratie
1
Info
Druk voor meer informatie over het gebruik van EagleEyes
2
Werkbalk
Toevoegen, veranderen en items wissen uit Address Book
3
Instelling
EagleEyes parameters instellen
Selecteer de verbinding met de camera in Adress Book om naar Live View & Control te gaan.
4
Configuratie
Druk om naar de configuratiepagina van de camera te gaan.
4. Als uw draadloze router UPnP ondersteunt (Universal Plug and Play), zorg er dan voor dat deze
functie actief is. UPnP versterkt de communicatie tussen de router en draadloze toestellen.
Raadpleeg de handleiding van de routersoftware indien nodig.
De verbinding controleren
Wanneer de netwerkconfiguratie en poortdoorschakeling voltooid zijn, controleert u de set-up van uw
verbinding als volgt:
1. Via uw draagbaar toestel stelt u uw netwerkmodus in naar 3G of maakt u verbinding met een ander
draadloos netwerk dan dat waarmee uw camera verbonden is.
2. Start EagleEyes en selecteer de camera die u zopas heeft toegevoegd om te zien of u toegang heeft.
o Hebt u toegang, dan is uw netwerkverbinding OK. Ga door naar het punt “Gebruiksnaam en
wachtwoord wijzigen in EagleEyes”.
o Indien niet, ga verder met de volgende stap.
3. Verander de netwerkmodus van het draadloze netwerk waarmee uw camera verbonden is.
4. Start EagleEyes en voeg een nieuwe verbinding toe met het IP-adres en poortnummer die u hebt
ingesteld onder “Uw camera toevoegen aan de EagleEyes app”.
5. Controleer of u toegang hebt tot de camera met deze verbinding.
o Hebt u toegang, ga verder met “Port forwarding” om de port forwarding opnieuw in te stellen.
o Zo niet, keer terug naar stap 4 in “Uw camera toevoegen aan de EagleEyes app” en pas de
verbinding aan.
Gebruiksnaam en wachtwoord wijzigen in EagleEyes
Om de verbinding met uw camera veilig te stellen, verander de standaard gebruikersnaam en
wachtwoord als volgt:
1. Via uw draagbaar toestel gaat u naar de camera in EagleEyes.
2. Druk op de configuratieknop .
3. Selecteer Advance Setup > Account.
4. Verander de standaard gebruikersnaam (admin) en het wachtwoord (admin) naar keuze.
8. Werken met EagleEyes
Wanneer u EagleEyes opstart, verschijnt Adress Book.
Raadpleeg de uitgebreide handleiding op de meegeleverde cd-rom voor informatie.
De CAMIP17 IP-camera is ONVIF-gecertificeerd: de camera is compatibel met de voornaamste IPcameramerken die ook ONVIF-gecertificeerd zijn. Zie www.onvif.org voor meer informatie.
V. 01 – 08/08/2013 12 ©Velleman nv
Page 13

CAMIP17
opneemelement
Sony HR image sensor
beeldgrootte
1/2.9"
aantal pixels
2 megapixel
min. verlichting
0.1 lux / F1.5, 0 lux (IR leds aan)
witbalans
ATW
AGC
automatisch
irissturing
AES
lens
f3.8mm / F1.5
lenshoek
85,4°
IR-leds
35
netwerkinterface
Ethernet 10/100BASE-T
PoE
IEEE 802.3af
meervoudige
videostreaming
3 (H.264, MPEG4, MJPEG)
beelden per seconde
30
regeling beeldkwaliteit
1080P
1920 x 1080
720P
1280 x 720
VGA
640 x 480
QVGA
320 x 240
ondersteunde protocols
DDNS, PPPoE, DHCP, NTP, SNTP, TCP/IP, ICMP, SMTP, FTP, HTTP, RTP,
RTSP, RTCP, IPv4, Bonjour, UPnP, DNS, UDP, IGMP, QoS
waarschuwingsbericht
FTP / e-mail
mobiele bewaking
smartphones
login op afstand via EagleEyes software op de
voornaamste smartphones (iPad, iPhone en Android)
computer
'video viewer'-software op Windows en Mac
webbrowser Internet Explorer, Firefox, Google Chrome
en Safari via Java, QuickTime of VLC plug-in
back-up
op afstand via smartphone
geheugen
10 MB (ingebouwd)
externe alarm I/O
ja
microfoon
nee
luidspreker
nee
systeemvereisten
Pentium 4, 1.3 GHz of hoger, of gelijkwaardige AMD
Windows® 7, Vista & XP, DirectX 9.0 of hoger
AGP grafische kaart, Direct Draw, RAM 32 MB
RAM 256 MB of hoger
vrije netwerkaansluiting
Internet Explorer 7.x of hoger
werktemperatuur
-20 °C tot 40 °C
voeding
12 Vdc 1 A (niet meegelev.)
afmetingen
151 x 68 mm
gewicht
550 g
IP-norm
IP67
9. Technische specificaties
Gebruik dit toestel enkel met originele accessoires. Velleman nv is niet aansprakelijk voor
schade of kwetsuren bij (verkeerd) gebruik van dit toestel.
Voor meer informatie over dit product en de laatste versie van deze handleiding, zie
www.velleman.eu.
De informatie in deze handleiding kan te allen tijde worden gewijzigd zonder voorafgaande
kennisgeving.
V. 01 – 08/08/2013 13 ©Velleman nv
Page 14

CAMIP17
Alle geregistreerde handelsmerken en handelsnamen zijn eigendom van hun respectieve bezitters, en
zijn enkel gebruikt als voorbeeld van de compatibiliteit tussen onze producten en de producten van de
verschillende fabrikanten.
iPhone en iPad zijn handelsmerken van Apple Inc., geregistreerd in de V.S. en andere landen. D-Link, de
D-Link logo's, zijn handelsmerken of geregistreerde handelsmerken van de D-Link Corporation of haar
dochterondernemingen in de Verenigde Staten en andere landen. Android is een handelsmerk van Google
Inc.
© AUTEURSRECHT
Velleman nv heeft het auteursrecht voor deze handleiding. Alle wereldwijde rechten
voorbehouden. Het is niet toegestaan om deze handleiding of gedeelten ervan over te nemen, te
kopiëren, te vertalen, te bewerken en op te slaan op een elektronisch medium zonder voorafgaande
schriftelijke toestemming van de rechthebbende.
V. 01 – 08/08/2013 14 ©Velleman nv
Page 15

CAMIP17
Garder l'appareil hors de la portée des enfants et des personnes non autorisées.
Risque d’électrocution lors de l’ouverture du boîtier. Toucher un câble sous tension peut
causer des électrochocs mortels. Non pas ouvrir le boîtier. Confier la réparation de l'appareil
à du personnel qualifié.
L'appareil ne contient aucune pièce réparable par l'utilisateur. Commander des pièces de
rechange éventuelles chez votre revendeur.
1
dispositif portable
2
port LAN
3
routeur sans fil
4
port WAN
5
modem
6
câble de réseau 8P8C
7
caméra
GUIDE D'INSTALLATION RAPIDE
1. Introduction
Aux résidents de l'Union européenne
Informations environnementales importantes concernant ce produit
En cas de questions, contacter les autorités locales pour élimination.
Nous vous remercions de votre achat ! Lire la présente notice attentivement avant la mise en service de
l’appareil. Si l’appareil a été endommagé pendant le transport, ne pas l’installer et consulter votre
revendeur.
2. Consignes de sécurité
3. Directives générales
Se référer à la garantie de service et de qualité Velleman® en fin de notice.
Protéger cet appareil contre la poussière et la chaleur extrême.
Protéger l’appareil des chocs. Traiter l'appareil avec circonspection pendant l’opération.
Se familiariser avec le fonctionnement de l’appareil avant de l’utiliser.
Toute modification est interdite pour des raisons de sécurité.
N’utiliser l'appareil qu’à sa fonction prévue. Un usage impropre annule d'office la garantie.
La garantie ne s’applique pas aux dommages survenus en négligeant certaines directives de cette
Installer et utiliser la caméra en respectant la législation et la vie privée des tiers.
4. Description
Ce symbole sur l'appareil ou l'emballage indique que l’élimination d’un appareil en fin de vie
peut polluer l'environnement. Ne pas jeter un appareil électrique ou électronique (et des piles
éventuelles) parmi les déchets municipaux non sujets au tri sélectif ; une déchèterie traitera
l’appareil en question. Renvoyer cet appareil à votre fournisseur ou à un service de recyclage
local. Il convient de respecter la réglementation locale relative à la protection de
l’environnement.
notice et votre revendeur déclinera toute responsabilité pour les problèmes et les défauts qui en
résultent.
V. 01 – 08/08/2013 15 ©Velleman nv
Page 16

CAMIP17
1
câble de réseau 8P8C
2
entrée d'alarme (jaune)
3
masse (brun)
4
RESET (rouge)
5
masse (noir)
6
sortie d'alarme (rose)
7
câble d’alimentation
8
routeur/hub PoE
9
câble LAN
10
caméra
11
alimentation
5. Installation du matériel
1. Fixer la base ronde du support à l'emplacement d'installation de la caméra. Pour plus de détails sur
l'angle de vue et la portée infrarouge, consulter le CD-ROM livré.
2. Connecter la camera au joint connecté au support de montage. Ensuite, sécuriser le joint.
6. Installation : connexion d'alimentation et PoE (Power over
Ethernet)
Alimentation
Pour garantir un fonctionnement correct de la camera, connecter les câbles de la camera comme suit :
1. Connecter le câble réseau [1] à votre réseau.
2. Raccorder le câble d'alimentation [7] à l'adaptateur secteur (12 Vcc 1 A, p.ex. PSSE1210, non incl.)
et brancher sur une prise.
Connexion PoE (Power over Ethernet)
La caméra est dotée de PoE (Power over Ethernet). Si votre routeur ou hub supporte PoE, il ne faut pas
connecter la caméra au réseau électrique mais connecter la caméra comme décrit ci-après :
1. Utiliser un câble réseau [9] pour connecter votre camera [10] au port PoE de votre routeur [8].
2. S'assurer que votre routeur soit connecté au réseau électrique [11].
Remarque : Si votre routeur ne supporte pas PoE, il est possible d'utiliser un injecteur PoE (non incl.)
pour utiliser la caractéristique PoE.
V. 01 – 08/08/2013 16 ©Velleman nv
Page 17

CAMIP17
3. Connecter votre dispositif portable au routeur
sans fil auquel la caméra est connectée.
4. Aller vers Settings > WiFi.
5. Appuyer sur le bouton « > » pour entrer dans les
détails du réseau sans fil sélectionné.
L'adresse IP est affichée à côté de « Router ».
(Dans l'écran d'exemple, l'adresse est
192.168.2.1)
L'appareil affichera une liste d'appareils connectés
au réseau. L'adresse IP affichée est l'adresse
attribuée par votre routeur à votre caméra.
7. Configuration du logiciel
La méthode d'installation ci-dessous décrit la configuration pour iPhone® avec un routeur sans fil et
modem D-Link®. La procédure d'installation est similaire pour les appareils iPad® ou Android™. Pour
plus d'informations, consulter le mode d'emploi détaillée sur le CD-ROM livré.
Conditions préalables
Avant de continuer :
Nous vous recommandons d'utiliser votre propre service internet par ADSL ou par câble pour faciliter
la configuration de réseau.
S'assurer que la camera soit connectée à votre routeur sans fil avec un câble réseau 8P8C et que la
caméra soit sous tension.
Vérifier si EagleEyes-Lite ou EagleEyes-Plus est installé sur votre appareil.
Sinon, télécharger-le à partir de votre 'App Store'.
Remarque : Puisque EagleEyes HD pour iPad ne supporte pas de configuration réseau, installer
EagleEyes-Lite ou EagleEyes Plus sur votre iPad.
Préparer la configuration du réseau
1. Connecter votre caméra à votre routeur sans fil avec un câble réseau 8P8C (voir « Description »
ci-dessus).
2. Noter l'adresse IP de votre routeur sans fil. Vous en aurez besoin plus tard. Pour retrouver l'adresse
IP, procéder comme suit :
Ajouter votre camera à l'application EagleEyes
1. Etablir une connexion sans fil entre votre dispositif portable et le routeur sans fil auquel la camera
est connectée.
2. Ouvrir EagleEyes et cliquer sur le bouton « + » pour ajouter un nouvel appareil.
3. Sélectionner « Local Network Search » pour rechercher votre caméra réseau.
4. Sélectionner la caméra depuis la liste. La page de configuration s'affiche.
5. Modifier le numéro de port de la caméra si nécessaire. Le numéro de port par défaut est 88. Si le
numéro de port 88 est bloqué, il est possible de le modifier dans une valeur quelconque entre
1-9999 (par exemple 8080).
V. 01 – 08/08/2013 17 ©Velleman nv
Page 18

CAMIP17
A B C
6. Noter l'adresse IP et le numéro de port de la caméra. Vous en aurez besoin plus tard.
(Dans les écrans d'exemple ci-dessous [A], l'adresse IP est 192.168.2.197 et le numéro de port
est 88.)
7. Appuyer sur « Apply » pour confirmer vos paramétrages.
8. Attendre jusqu'à ce « Status » [B] affiche « Done » (terminé) ou « Fail » (échec).
o Si l'état affiche « Done », la page de l'appareil réapparaît. Passer à l'étape suivante.
o Si l'état affiche « Fail », appuyer sur le bouton en haut à droite de votre appareil.
Sélectionner « DDNS » dans la fenêtre intruse. La page de l'appareil réapparaît. Passer à l'étape
suivante.
9. Dans « Title » [C], donner un nom représentatif pour votre connexion caméra et sélectionner
« Save » pour confirmer.
Redirection de port (port forwarding)
Pour le moment, vous n'avez accès à la caméra que si vous êtes connecté à votre propre réseau sans fil,
et pas via l'internet parce qu'en général un réseau local est connecté à l'internet par un router. Seule
l'adresse IP externe du routeur (affectée par votre fournisseur d'accès à internet) est visible sur
l'internet. En outre, le routeur va bloquer tout accès aux dispositifs dans votre réseau local, y compris
votre caméra. Pour contourner cela, la plupart des routeurs supportent un mécanisme dénommé
redirection de port permettant d'accéder à un dispositif dans le réseau local depuis l'internet.
Pour la configuration de la fonction port forwarding, procéder comme suit :
1. Ouvrir le navigateur web sur votre dispositif portable, et saisir l'adresse IP notée dans la barre
d'adresse.
La page de configuration de votre routeur apparaît.
2. Aller à la page de configuration des règles de redirection de port (ou serveur virtuel).
Remarque : L'affectation de nom à la redirection de port ou à un serveur virtuel peut varier en
fonction des différentes marques de routeurs. Pour plus d'informations, consulter le mode d'emploi
détaillée sur le CD-ROM livré.
L'exemple ci-dessous illustre l'écran pour un routeur D-Link : sélectionner l'onglet « Advanced » et
ensuite sélectionner « Port Forwarding ».
V. 01 – 08/08/2013 18 ©Velleman nv
Page 19

CAMIP17
Address Book
Live View & Control
Configuration
1
Info
Appuyer pour apprendre d’avantage sur l'emploi d'EagleEyes
2
Barre d'outils
Ajouter, modifier et supprimer des éléments du carnet d'adresses
3
Réglage
Configurer les paramètres d'EagleEyes
Sélectionner la connexion caméra configurée pour entrer dans Live View & Control.
4
Configuration
Appuyer pour accéder à la page de configuration de la caméra.
3. Saisir l'adresse IP de la camera et le numéro de port notés et activer cette règle. Maintenant vous
avez accès à la caméra via l'internet.
4. S'assurer que la fonction soit activée si votre routeur sans fil supporte UPnP (Universal Plug and
Play). Avec UPnP, la communication entre le routeur et dispositifs portables est améliorée. Consulter
le manuel du logiciel du routeur si nécessaire.
Vérifier la connexion
Après la configuration du réseau, vérifier votre connexion comme indiqué ci-dessous :
1. Régler votre mode réseau sur le mode 3G sur votre dispositif portable, ou connecter-le à un réseau
sans fil différent à celui auquel la caméra est connectée.
2. Démarrer EagleEyes et sélectionner la camera ajouté pour voir s'il est possible d'accéder à la
camera.
o Si oui, votre configuration réseau est réussie. Continuer avec « Ajuster le nom d'utilisateur et
mot de passe ».
o Sinon, passer à l'étape suivante.
3. Régler votre mode réseau dans le mode sans fil auquel votre caméra est connectée.
4. Démarrer EagleEyes, et ajouter une nouvelle connexion avec l'adresse IP et numéro de port définis
sous « Ajouter votre caméra à l'application EagleEyes ».
5. Vérifier s'il est possible d'accéder à la camera avec cette connexion.
o Si oui, continuer avec « Redirection de port » pour reconfigurer la redirection de port.
o Sinon, retourner à l'étape 4 de la procédure « Ajouter votre caméra à l'application
EagleEyes ».
Ajuster le nom d'utilisateur et mot de passe dans EagleEyes
Pour la sécurité de votre connexion caméra, modifier le nom d'utilisateur par défaut et mot de passé
comme indiqué ci-dessous :
1. Accéder la camera dans EagleEyes sur votre dispositif portable.
2. Appuyer sur le bouton de configuration .
3. Sélectionner Advance Setup > Account.
4. Ajuster et définir le nom d'utilisateur par défaut (admin) et mot de passe (admin) de votre choix.
8. Fonctionnement de EagleEyes
Démarrer EagleEyes pour entrer dans Address Book (carnet d'adresses).
Pour plus d'informations, consulter le mode d'emploi détaillée sur le CD-ROM livré.
La caméra IP CAMIP17 est certifiée ONVIF : compatible avec les principales marques de caméras IP qui
sont également certifiées ONVIF. Pour plus d'informations, consulter le site web www.onvif.org.
V. 01 – 08/08/2013 19 ©Velleman nv
Page 20

CAMIP17
élément d'enregistrement
Sony HR image sensor
taille d'image
1/2.9"
nombre de pixels
2 mégapixels
éclairage min.
0.1 lux / F1.5, 0 lux (LEDs IR allumées)
balance des blancs
ATW
AGC
automatique
contrôle de l'iris
AES
objectif
f3.8mm / F1.5
angle de vue
85,4°
LEDs IR
35
interface réseau
Ethernet 10/100BASE-T
PoE
IEEE 802.3af
multiples flux vidéo
3 (H.264, MPEG4, MJPEG)
images par seconde
30
qualité d'image
1080P
1920 x 1080
720P
1280 x 720
VGA
640 x 480
QVGA
320 x 240
protocoles supportés
DDNS, PPPoE, DHCP, NTP, SNTP, TCP/IP, ICMP, SMTP, FTP, HTTP, RTP,
RTSP, RTCP, IPv4, Bonjour, UPnP, DNS, UDP, IGMP, QoS
message d'alerte
FTP / e-mail
surveillance mobile
smartphones
connexion à distance via smartphone depuis le logiciel
EagleEyes disponible sur les principales plateformes
mobiles (iPad, iPhone et Android)
ordinateur
logiciel 'video viewer' sur Windows et Mac
navigateur web Internet Explorer, Firefox, Google
Chrome et Safari depuis Java, QuickTime ou plugin
VLC
sauvegarde
à distance sur le smartphone
mémoire
10 Mo (intégrée)
I/O alarme externe
oui
microphone
non
haut-parleur
non
système requis
Pentium 4, 1.3 GHz ou supérieur, ou équivalent AMD
Windows® 7, Vista & XP, DirectX 9.0 ou supérieur
carte graphique AGP, Direct Draw, RAM 32 Mo
RAM 256 Mo ou supérieur
connexion réseau libre
Internet Explorer 7.x ou supérieur
température de service
de -20 °C à 40 °C
alimentation
12 Vcc 1 A (non incl.)
dimensions
151 x 68 mm
poids
550 g
indice IP
IP67
9. Spécifications techniques
N’employer cet appareil qu’avec des accessoires d’origine. La SA Velleman ne peut, dans la
mesure conforme au droit applicable être tenue responsable des dommages ou lésions
(directs ou indirects) pouvant résulter de l’utilisation de cet appareil.
Pour plus d’information concernant cet article et la dernière version de cette notice, visiter
notre site web www.velleman.eu.
Toutes les informations présentées dans cette notice peuvent être modifiées sans notification
préalable.
V. 01 – 08/08/2013 20 ©Velleman nv
Page 21

CAMIP17
Les marques déposées et les raisons sociales sont la propriété de leurs détenteurs respectifs, et sont
uniquement utilisées dans le but de démontrer la compatibilité entre nos articles et les articles des
fabricants.
iPhone et iPad sont des marques d'Apple Inc., déposées aux Etats-Unis et dans d'autres pays. D-Link et
le logo D-Link sont des marques déposées de D-Link Corporation ou de ses filiales aux Etats-Unis et dans
d'autres pays. Android est une marque de Google Inc.
© DROITS D’AUTEUR
SA Velleman est l’ayant droit des droits d’auteur pour cette notice. Tous droits mondiaux
réservés. Toute reproduction, traduction, copie ou diffusion, intégrale ou partielle, du contenu de cette
notice par quelque procédé ou sur tout support électronique que ce soit est interdite sans l’accord
préalable écrit de l’ayant droit.
V. 01 – 08/08/2013 21 ©Velleman nv
Page 22

CAMIP17
Mantenga el aparato lejos del alcance de personas no capacitadas y niños.
Riesgo de descargas eléctricas al abrir la caja. Puede sufrir una peligrosa descarga
eléctrica al tocar un cable conectado a la red eléctrica No abra la caja. La reparación debe
llevarla a cabo un técnico cualificado.
El usuario no habrá de efectuar el mantenimiento de ninguna pieza. Contacte con su
distribuidor si necesita piezas de recambio.
1
móvil
2
puerto LAN
3
enrutador inalámbrico
4
puerto WAN
5
módem
6
cable de red 8P8C
7
cámara
GUÍA RÁPIDA
1. Introducción
A los ciudadanos de la Unión Europea
Importantes informaciones sobre el medio ambiente concerniente a este producto
¡Gracias por elegir Velleman! Lea atentamente las instrucciones del manual antes de usar el aparato. Si
ha sufrido algún daño en el transporte no lo instale y póngase en contacto con su distribuidor.
2. Instrucciones de seguridad
3. Normas generales
Véase la Garantía de servicio y calidad Velleman® al final de este manual del usuario.
No exponga este equipo a polvo ni temperaturas extremas.
Proteja el aparato contra choques. Evite usar excesiva fuerza durante el manejo y la instalación.
Familiarícese con el funcionamiento del aparato antes de utilizarlo.
Por razones de seguridad, las modificaciones no autorizadas del aparato están prohibidas.
Utilice sólo el aparato para las aplicaciones descritas en este manual. Su uso incorrecto anula la
Los daños causados por descuido de las instrucciones de seguridad de este manual invalidarán su
Instale y utilice la cámara al respetar la legislación et la vida privada de terceros.
4. Descripción
Este símbolo en este aparato o el embalaje indica que, si tira las muestras inservibles, podrían
dañar el medio ambiente. No tire este aparato (ni las pilas, si las hubiera) en la basura
doméstica; debe ir a una empresa especializada en reciclaje. Devuelva este aparato a su
distribuidor o a la unidad de reciclaje local. Respete las leyes locales en relación con el medio
ambiente.
Si tiene dudas, contacte con las autoridades locales para residuos.
garantía completamente.
garantía y su distribuidor no será responsable de ningún daño u otros problemas resultantes.
V. 01 – 08/08/2013 22 ©Velleman nv
Page 23

CAMIP17
1
cable de red 8P8C
2
entrada de la alarma (amarillo)
3
GND (marrón)
4
RESET (rojo)
5
GND (negro)
6
salida de la alarma (rosa)
7
cable de alimentación
8
enrutador/hub PoE
9
cable LAN
10
cámara
11
alimentación
5. Instalación: el hardware
1. Fije la base redonda del soporte a la superficie donde quiera instalar la cámara utilizando los tres
tornillos incluidos. Para más detalles sobre el ángulo de visión y el alcance infrarrojo, consulte la
documentación en el CD-ROM incluido.
2. Enganche la cámara con la articulación que lleva el soporte. Luego, fije la articulación.
6. Instalación: alimentación y conexión PoE (Power over Ethernet)
Alimentación
Para que la cámara funcione correctamente, conecte los cables de la siguiente manera:
1. Conecte el cable de red [1] a la red.
2. Conecte el cable de alimentación de la cámara [7] a un adaptador de red adecuado (12 Vdc 1 A,
por ejemplo PSSE1210, no incl.) y enchúfelo.
Conexión PoE (Power over Ethernet)
La cámara está equipada con la función PoE (Power over Ethernet/alimentación sobre Ethernet). Por
tanto, no es necesario conectar la cámara a la red eléctrica si el enrutador o el hub soportan esta
función. Si fuera el caso, conecte la cámara de la siguiente manera:
1. Utilice un cable de red [9] para conectar la cámara [10] al puerto PoE del enrutador [8].
2. Asegúrese de que el enrutador esté conectado a la red eléctrica [11].
Observación: Conecte un inyector PoE (no incl.) para poder utilizar la función PoE si el enrutador no la
soporta.
V. 01 – 08/08/2013 23 ©Velleman nv
Page 24

CAMIP17
3. Conecte su dispositivo móvil al enrutador
inalámbrico conectado a la cámara.
4. Seleccione Settings > WiFi.
5. Pulse la tecla « > » para ver las detalles sobre la
red inalámbrica seleccionada.
La dirección IP se visualiza al lado de « Router ».
(En la pantalla de la izquierda, la dirección IP es
192.168.2.1)
El aparato visualiza una lista con aparatos
conectados a la red. La dirección IP visualizada es la
dirección que el enrutador ha asignado a la cámara.
7. Configurar el software
El siguiente procedimiento de instalación describe la configuración paran iPhone® con un enrutador
inalámbrico a D-Link® y un módem. Dispositivos iPad® o Android™ tienen un procedimiento de
instalación similar. Para más información, consulte el amplio manual del usuario en el CD-ROM (incl.).
Prerrequisitos
Antes de continuar, controle lo siguiente:
Utilice su propio servicio de Internet por ADSL o cable para una fácil configuración de red.
Asegúrese de que la cámara esté conectada al enrutador inalámbrico con un cable de red 8P8C, y
que esté activada.
La app EagleEyes-Lite o EagleEyes-Plus está instalada en el aparato.
Si no fuera el caso, descargue la app del App Store.
Observación: EagleEyes HD para iPad no soporta la configuración de red. Instale EagleEyes-Lite o
EagleEyes Plus en el iPad.
Preparar la configuración de red
1. Utilice un cable de red 8P8C para conectar la cámara al enrutador inalámbrico (véase Descripción).
2. Apunte la dirección IP del enrutador inalámbrico porque la necesitará más tarde. Para encontrar la
dirección IP, haga lo siguiente:
Añadir la cámara a la app EagleEyes
1. Conecte su dispositivo móvil al enrutador inalámbrico conectado a la cámara.
2. Abra la app « EagleEyes » y haga clic en la tecla « + » para añadir un aparato nuevo.
3. Seleccione « Local Network Search » para buscar la cámara.
4. Seleccione la cámara de la lista. La página de configuración se visualiza.
5. Modifique el número de puerto de la cámara si fuera necesario. El número de puerto por defecto
es 88. Es posible modificar el número 88 en cualquier otro número entre 1-9999 (por ejemplo 8080)
si está bloqueado.
6. Apunte la dirección IP y el número de puerto de la cámara. Necesitará ambos números más tarde.
(En la pantalla [A] de abajo, la dirección IP es 192.168.2.197 y el número de puerto es 88.)
7. Pulse « Apply » para confirmar las configuraciones.
V. 01 – 08/08/2013 24 ©Velleman nv
Page 25

CAMIP17
A B C
8. Espere hasta que « Status » (pantalla [B]) visualice « Done » o « Fail ».
o La página del aparato se visualiza de nuevo en cuanto aparezca « Done ». Proceda con el
siguiente paso.
o Si aparece « Fail », pulse la tecla de la parte superior derecha del aparato. Seleccione
« DDNS » en la ventana emergente. La página del aparato se visualiza de nuevo. Proceda con el
siguiente paso.
9. Introduzca un nombre para la conexión de cámara (pantalla [C] al lado de « Title ») y pulse
« Save » para confirmar.
Redirección de puertos (Port Forwarding)
En este momento, sólo puede acceder a la cámara si está conectado a su propia red inalámbrica. No es
posible acceder por Internet. Esto se debe a que la red doméstica normalmente está conectada a internet
por un enrutador. Sólo es posible ver la dirección IP externa (asignada por el proveedor de internet) del
enrutador. Además, el enrutador bloqueará también el acceso a cualquier aparato de la red doméstica,
incluso a la cámara. Para evitar esto, la mayoría de los enrutadores lleva una función llamada « port
forwarding » que permite acceder desde internet a un dispositivo de la red doméstica.
Para configurar la función « port forwarding », siga los pasos siguientes:
1. Abra el navegador del móvil e introduzca la dirección IP del enrutador que ha introducido en la barra
de dirección.
La página de configuración del enrutador se visualiza.
2. Seleccione la página de configuración de la función « port forwarding » (o el servidor virtual).
Observación: El nombre puede variar y depende de la marca de su enrutador. Véase el manual del
usuario de su enrutador para más información.
El ejemplo siguiente visualiza la pantalla de un enrutador D-Link: seleccione « Advanced » y luego
« Port Forwarding ».
3. Introduzca la dirección IP de la cámara y el número de puerto que ha apuntado y marque la casilla.
Ahora se puede acceder a la cámara a través de Internet.
V. 01 – 08/08/2013 25 ©Velleman nv
Page 26

CAMIP17
Libreta de direcciones
Visualización en
directo & Control
Configuración
1
Información
Pulse para más informaciones sobre « EagleEyes »
2
Barra de
herramientas
Para añadir, editar y borrar informaciones
3
Configuración
Para configurar los ajustes « EagleEyes »
Seleccione la conexión de cámara para una visualización en directo & el control.
4
Configuración
Pulse para entrar en la página de configuración de la cámara.
4. Asegúrese de que la función UPnP (Universal Plug and Play) esté activada si el enrutador
inalámbrico la soporta. La función UPnP mejora la comunicación entre el enrutador y los aparatos
inalámbricos. Si fuera necesario, consulte el manual del usuario del software del enrutador.
Controlar la conexión
Después de haber terminado la configuración de la red y la función « port forwarding », controle la
configuración de la conexión:
1. En el dispositivo móvil: modifique el modo de red en el modo 3G o conecte a otra red inalámbrica
que la red a la que está conectada la cámara.
2. Inicie « EagleEyes » y seleccione la cámara que acaba de añadir para ver si tiene acceso.
o Si fuera el caso, la conexión de red está buena. Seleccione Modificar el nombre de usuario y
la contraseña en EagleEyes.
o Si no fuera el caso, proceda con el paso siguiente.
3. Vuelva a seleccionar la red inalámbrica a la que está conectada la cámara.
4. Inicie « EagleEyes » y añada una nueva conexión utilizando la dirección IP y el número de puerto
que ha apuntado (véase Añadir la cámara a la app EagleEyes).
5. Controle si puede acceder a la cámara con esta conexión.
o Si fuera el caso, seleccione Redirección de puertos (Port Forwarding) para configurar la
función.
o Si no fuera el caso, vuelva a configurar la conexión (véase Añadir la cámara a la app
EagleEyes).
Modificar el nombre de usuario y la contraseña en EagleEyes
Para asegurar la seguridad de la conexión de cámara, modifique el nombre de usuario y la contraseña
estándar:
1. En el móvil, entre la cámara por EagleEyes.
2. Pulse la tecla de configuración .
3. Seleccione « Advanced Setup » > « Account ».
4. Introduzca otro nombre de usuario (admin) y otra contraseña (admin).
8. EagleEyes
Se visualiza la libreta de direcciones al iniciar « EagleEyes ».
Para más información, véase el amplio manual del usuario en el CD-ROM incl.
V. 01 – 08/08/2013 26 ©Velleman nv
Page 27

CAMIP17
sensor de imagen
Sony HR image sensor
dimensiones
1/2.9"
número de píxeles
2 megapíxeles
iluminación mínima
0.1 lux / F1.5, 0 lux (LEDs IR activados)
balance de blancos
ATW
AGC
control automático de ganancia
iris
AES
óptica
f3.8mm / F1.5
ángulo de visión
85,4°
LEDs IR
35
interfaz de red
Ethernet 10/100BASE-T
PoE
IEEE 802.3af
múltiple Video Streaming
3 (H.264, MPEG4, MJPEG)
imágenes por segundo
30
ajuste de la calidad de
imagen
1080P
1920 x 1080
720P
1280 x 720
VGA
640 x 480
QVGA
320 x 240
protocolos soportados
DDNS, PPPoE, DHCP, NTP, SNTP, TCP/IP, ICMP, SMTP, FTP, HTTP, RTP,
RTSP, RTCP, IPv4, Bonjour, UPnP, DNS, UDP, IGMP, QoS
aviso de alarma
FTP / e-mail
vigilancia a distancia por el
móvil
smartphones
acceso remota a las plataformas smartphone más
importantes (iPad, iPhone y Android) por el software
EagleEyes
ordenador
software 'video viewer' en Windows y Mac
navegador Internet Explorer, Firefox, Google Chrome
y Safari mediante Java, QuickTime o plug-in VLC
copia de seguridad
por su smartphone
memoria
10 MB de memoria incorporada
entrada/saldia de alarma
externa
sí
micrófono
no
altavoz
no
exigencias del hardware
Pentium 4, 1.3 GHz o superior, o AMD equivalente
Windows® 7, Vista & XP, DirectX 9.0 o superior
tarjeta gráfica AGP, Direct Draw, RAM 32 MB
RAM 256 MB o superior
conexión de red libre
Internet Explorer 7.x o superior
temperatura de
funcionamiento
de -20 °C a 40 °C
alimentación
12 Vdc 1 A (no incl.)
dimensiones
151 x 68 mm
peso
550 g
grado de protección IP
IP67
La CAMIP17 cumple con la norma ONVIF: es compatible con la mayoría de las marcas de cámaras IP que
también cumplen con la norma ONVIF. Para obtener más información, consulte www.onvif.org.
9. Especificaciones
Utilice este aparato sólo con los accesorios originales. Velleman NV no será responsable de
daños ni lesiones causados por un uso (indebido) de este aparato.
Para más información sobre este producto y la versión más reciente de este manual del
usuario, visite nuestra página www.velleman.eu.
V. 01 – 08/08/2013 27 ©Velleman nv
Page 28

CAMIP17
Se pueden modificar las especificaciones y el contenido de este manual sin previo aviso.
Todas las marcas registradas y nombres comerciales son propiedad de sus respectivos dueños y se
utilizan sólo para aclarar la compatibilidad de nuestros productos con los de diferentes fabricantes.
iPhone y iPad son marcas comerciales de Apple Inc., registradas en los Estados Unidos y otros países. DLink y el logo D-Link son marcas comerciales o marcas registradas de D-Link Corporation o sus
sucursales en los Estados Unidos y otros países. Android es una marca comercial de Google Inc.
© DERECHOS DE AUTOR
Velleman NV dispone de los derechos de autor para este manual del usuario. Todos los
derechos mundiales reservados. Está estrictamente prohibido reproducir, traducir, copiar, editar y
guardar este manual del usuario o partes de ello sin previo permiso escrito del derecho habiente.
V. 01 – 08/08/2013 28 ©Velleman nv
Page 29

CAMIP17
Halten Sie Kinder und Unbefugte vom Gerät fern.
Stromschlaggefahr beim Öffnen des Gehäuses. Das Berühren von unter Spannung
stehenden Leitungen könnte zu lebensgefährlichen elektrischen Schlägen führen. Öffnen Sie
das Gehäuse nie selber. Die Reparation darf nur von einer Fachkraft durchgeführt werden.
Es gibt keine zu wartenden Teile. Bestellen Sie eventuelle Ersatzteile bei Ihrem Fachhändler.
1
Handy
2
LAN-Port
3
drahtloser Router
4
WAN-Port
5
Modem
6
8P8C-Netzwerkkabel
7
Kamera
SCHNELLEINSTIEG
1. Einführung
An alle Einwohner der Europäischen Union
Wichtige Umweltinformationen über dieses Produkt
Falls Zweifel bestehen, wenden Sie sich für Entsorgungsrichtlinien an Ihre örtliche Behörde.
Vielen Dank, dass Sie sich für Velleman entschieden haben! Lesen Sie diese Bedienungsanleitung vor
Inbetriebnahme sorgfältig durch. Überprüfen Sie, ob Transportschäden vorliegen. Sollte dies der Fall
sein, verwenden Sie das Gerät nicht und wenden Sie sich an Ihren Händler.
2. Sicherheitshinweise
3. Allgemeine Richtlinien
Siehe Velleman® Service- und Qualitätsgarantie am Ende dieser Bedienungsanleitung.
Schützen Sie das Gerät vor extremen Temperaturen und Staub.
Vermeiden Sie Erschütterungen. Vermeiden Sie rohe Gewalt während der Installation und Bedienung
Nehmen Sie das Gerät erst in Betrieb, nachdem Sie sich mit seinen Funktionen vertraut gemacht
Eigenmächtige Veränderungen sind aus Sicherheitsgründen verboten.
Verwenden Sie das Gerät nur für Anwendungen beschrieben in dieser Bedienungsanleitung sonst
Bei Schäden, die durch Nichtbeachtung der Bedienungsanleitung verursacht werden, erlischt der
Installieren und verwenden Sie das Gerät nicht für illegale Praktiken und beachten Sie die
4. Beschreibung
Dieses Symbol auf dem Produkt oder der Verpackung zeigt an, dass die Entsorgung dieses
Produktes nach seinem Lebenszyklus der Umwelt Schaden zufügen kann. Entsorgen Sie die
Einheit (oder verwendeten Batterien) nicht als unsortiertes Hausmüll; die Einheit oder
verwendeten Batterien müssen von einer spezialisierten Firma zwecks Recycling entsorgt
werden. Diese Einheit muss an den Händler oder ein örtliches Recycling-Unternehmen
retourniert werden. Respektieren Sie die örtlichen Umweltvorschriften.
des Gerätes.
haben.
kann dies zu Schäden am Produkt führen und erlischt der Garantieanspruch.
Garantieanspruch. Für daraus resultierende Folgeschäden übernimmt der Hersteller keine Haftung.
Intimsphäre aller.
V. 01 – 08/08/2013 29 ©Velleman nv
Page 30

CAMIP17
1
8P8C-Netzwerkkabel
2
Alarmeingang (Gelb)
3
GND (Braun)
4
RESET (Rot)
5
GND (Schwarz)
6
Alarmausgang (Rosa)
7
Stromkabel
8
PoE Router/Hub
9
LAN-Kabel
10
Kamera
11
Stromversorgung
5. Installation: Hardware
1. Befestigen Sie die runde Basis der Halterung mit den mitgelieferten Schrauben an dem dafür
vorgesehenen Ort. Weitere Informationen zu dem Blickwinkel und dem IR-Bereich finden Sie auf der
mitgelieferten CD-ROM.
2. Befestigen Sie die Kamera am Verbindungselement der Halterung und fixieren Sie es danach.
6. Installation: Stromversorgung und PoE-Anschluss (Power over
Ethernet)
Stromversorgung
Für ein korrektes Funktionieren der Kamera, schließen Sie die Kamerakabel wie folgt an:
1. Verbinden Sie das Netzwerkkabel [1] mit dem Netz.
2. Verbinden Sie das Stromversorgungskabel der Kamera [7] mit einem geeigneten Netzteil (12 Vdc
1 A, z.B. PSSE1210, nicht mitgeliefert) und stecken Sie ihn in eine Steckdose.
PoE-Anschluss (Power over Ethernet)
Die Kamera verfügt über PoE (Power over Ethernet). Unterstützt der Router/Hub die PoE-Funktion, dann
müssen Sie die Kamera nicht mit dem Netz zu verbinden. Verbinden Sie die Kamera wie folgt:
1. Verwenden Sie ein Netzwerkkabel [9], um die Kamera [10] mit einem PoE-Anschluss des Routers
[8] zu verbinden.
2. Beachten Sie, dass der Router über das Netzteil [11] mit dem Netz verbunden ist.
Bemerkung: Unterstützt der Router die PoE-Funktion nicht, so schließen Sie einen PoE-Injektor an
(nicht mitgeliefert), um die PoE-Funktion zu verwenden.
V. 01 – 08/08/2013 30 ©Velleman nv
Page 31

CAMIP17
3. Verbinden Sie das mobile Gerät mit dem
drahtlosen Router, der mit der Kamera
verbunden ist.
4. Wählen Sie Settings > WiFi aus.
5. Drücken Sie die „>“-Taste für mehr Details über
das ausgewählte drahtlose Netzwerk.
Die IP-Adresse finden Sie neben „Router“.
(Im Beispiel ist die IP-Adresse 192.168.2.1)
Das Gerät zeigt eine Liste mit Geräten, die mit dem
Netzwerk verbunden sind. Die angezeigte IPAdresse ist die Adresse, die der Router der Kamera
zugeerkennt hat.
7. Softwarekonfiguration
Nachfolgender Installationsvorgang beschreibt die Konfiguration für iPhone® mit einem D-Link®
drahtlosen Router und einem Modem. iPad® oder Android™-Geräte haben einen ähnlichen
Installationsvorgang. Mehr Information finden Sie in der ausführlichen Bedienungsanleitung auf der
mitgelieferten CD-ROM.
Vorbedingungen
Überprüfen Sie Nachfolgendes, bevor Sie fortfahren:
Für eine einfache Netzwerkkonfiguration verwenden Sie am besten Ihren eigenen ADSL - oder Kabel-
Internetdienst.
Beachten Sie, dass die Kamera über das 8P8C-Netzwerkkabel mit dem drahtlosen Router verbunden
und eingeschaltet ist.
Beachten Sie, dass EagleEyes-Lite oder EagleEyes-Plus auf Ihrem Handy installiert ist.
Wenn nötig, laden Sie die App für Ihr Mobiltelefon im App Store herunter.
Bemerkung: EagleEyes HD für iPad unterstützt die Netzwerkkonfiguration nicht. Installieren Sie
EagleEyes-Lite oder EagleEyes Plus auf das iPad.
Die Netzwerkkonfiguration vorbereiten
1. Verbinden Sie die Kamera über das 8P8C-Netzwerkkabel mit dem drahtlosen Router (Siehe
Beschreibung).
2. Notieren Sie die IP-Adresse vom drahtlosen Router. Sie brauchen diese Adresse später noch. Um
die IP-Adresse zu finden, gehen Sie wie folgt vor:
Die Kamera mit der EagleEyes-App verbinden
1. Verbinden Sie das mobile Gerät mit dem drahtlosen Router, der mit der Kamera verbunden ist.
2. Öffnen Sie die EagleEyes-App und klicken Sie auf „+“, um ein neues Gerät hinzuzufügen.
3. Wählen Sie „Local Network Search“ aus, um die Kamera zu suchen.
4. Wählen Sie die Kamera in der Liste aus. Die Einstellungsseite erscheint.
5. Wenn nötig, ändern Sie die Portnummer der Kamera. Die Standard-Portnummer lautet 88. Ist die
Portnummer 88 blockiert, dann wählen Sie eine andere Nummer zwischen 1-9999 (z.B. 8080) aus.
6. Notieren Sie die IP-Adresse und die Portnummer der Kamera. Sie brauchen beide später noch.
(Im Beispiel [A] unten, ist die IP-Adresse 192.168.2.197 und die Portnummer 88.)
7. Drücken Sie „Apply“, um die Einstellungen zu bestätigen.
V. 01 – 08/08/2013 31 ©Velleman nv
Page 32

CAMIP17
A B C
8. Warten Sie bis „Status“ (Beispiel [B]) „Done“ oder „Fail“ anzeigt.
o Wird „Done“ angezeigt, dann erscheint die Geräteseite wieder. Fahren Sie mit dem nächsten
Schritt fort.
o Wird „Fail“ anzeigt, drücken Sie die -Taste (rechts oben). Wählen Sie „DDNS“ im
Dialogfenster aus. Die Geräteseite erscheint wieder. Fahren Sie mit dem nächsten Schritt fort.
9. Geben Sie einen Namen für den Kamera-Anschluss (Beispiel [C] neben „Title“) ein und drücken Sie
„Save“, um zu bestätigen.
Portweiterleitung (Port Forwarding)
Zu diesem Zeitpunkt können Sie nur auf die Kamera zugreifen wenn diese mit dem eigenen drahtlosen
Netzwerk verbunden ist, nicht über Internet. Das kommt daher, dass das Heimnetzwerk normalerweise
über einen Router mit dem Internet verbunden ist. Nur die externe IP-Adresse des Routers (vom
Internetanbieter zugeordnet) kann im Internet gesehen werden. Darüber hinaus blockiert der Router den
Zugriff auf egal welches Gerät des Heimnetzwerkes, sogar auf die Kamera. Um dies zu vermeiden,
unterstützen die meisten Router die Funktion „Port Forwarding“. Diese Funktion erlaubt den Zugriff via
Internet auf ein Gerät im Heimnetzwerk.
Um die Funktion „Port Forwarding“ einzustellen, gehen Sie wie folgt vor:
1. Öffnen Sie den Webbrowser Ihres mobilen Gerätes und geben Sie die IP-Adresse des Routers in die
Addressleiste ein.
Die Einstellungsseite des Routers erscheint.
2. Wählen Sie die Einstellungsseite der Funktion „Port Forwarding“ (oder virtueller Server) aus.
Bemerkung: Der Namen der „Port Forwarding“-Funktion oder des virtuellen Servers kann variieren.
Dies hängt von der Marke Ihres Routers ab. Für mehr Informationen, siehe die Bedienungsanleitung
des Routers.
Nachfolgendes Bespiel zeigt den Bildschirm für einen D-Link-Router: Wählen Sie „Advanced“ und
dann „Port Forwarding“ aus.
3. Geben Sie die IP-Adresse und die Portnummer, die Sie notiert haben, ein, und aktivieren Sie. Jetzt
können Sie Ihre Kamera über das Internet zugreifen.
V. 01 – 08/08/2013 32 ©Velleman nv
Page 33

CAMIP17
Addressbuch
Live-Anzeige &
Kontrolle
Konfiguration
1
Information
Drücken Sie für mehr Information über den Gebrauch von „EagleEyes“
2
Werkzeugliste
Daten hinzufügen, editieren und löschen
3
Konfiguration
Die „EagleEyes“-Einstellungen konfigurieren
Wählen Sie die Kameraverbindung im Addressbuch für eine Live-Anzeige & Kontrolle.
4
Konfiguration
Drücken Sie, um in die Konfigurationsseite des Kameras zu gelangen.
4. Unterstützt der drahtlose Router die UPnP-Funktion (Universal Plug and Play), dann sorgen Sie
dafür, dass diese Funktion eingeschaltet ist. UPnP verbessert die Kommunikation zwischen dem
Router und drahtlosen Geräten. Mehr Informationen hierzu finden Sie in der Bedienungsanleitung
der Routersoftware.
Die Verbindung überprüfen
Haben Sie die Netzwerkkonfiguration und die „Port Forwarding“-Funktion beendet, dann gehen Sie wie
folgt vor:
1. Auf dem mobilen Gerät, wechseln Sie den Netzwerkmodus auf 3G um oder verbinden Sie mit einem
anderen drahtlosen Netzwerk als dasjenige mit dem die Kamera verbunden ist.
2. Starten Sie „EagleEyes“ und wählen Sie die hinzugefügte Kamera aus, um zu kontrollieren, ob Sie
Zugriff haben.
o Ist dies der Fall, dann ist die Netzwerkverbindung in Ordnung. Fahren Sie mit Den
Benutzernamen und das Passwort in EagleEyes ändern fort.
o Ist dies nicht der Fall, dann fahren Sie mit dem nächsten Schritt fort.
3. Schalten Sie wieder auf das drahtlose Netzwerk mit dem die Kamera verbunden ist, um.
4. Starten Sie „EagleEyes“ und fügen Sie eine neue Verbindung hinzu. Geben Sie die IP-Adresse und
die Portnummer, die Sie notiert haben (Siehe Die Kamera mit der EagleEyes-App verbinden).
5. Überprüfen Sie, ob Sie mit dieser Verbindung Zugriff auf diese Kamera haben.
o Ist dies der Fall, dann müssen Sie die Funktion „Port Forwarding“ wieder konfigurieren (siehe
„Portweiterleitung (Port Forwarding)“).
o Ist dies nicht der Fall, dann müssen Sie die Verbindung wieder konfigurieren (siehe Die Kamera
mit der EagleEyes-App verbinden).
Den Benutzernamen und das Passwort in EagleEyes ändern
Um die Sicherheit der Kameraverbindung zu gewährleisten, ändern Sie den Benutzernamen und das
Passwort wie folgt:
1. Auf dem mobilen Gerät, greifen Sie über „EagleEyes“ auf die Kamera zu.
2. Drücken Sie die Konfigurationstaste .
3. Wählen Sie „Advanced Setup“ > „Account“.
4. Geben Sie einen anderen Benutzernamen (admin) und ein anderes Passwort (admin) ein.
8. EagleEyes
Starten Sie „EagleEyes“, dann wird das Addressbuch angezeigt.
Mehr Informationen hierzu finden Sie in der ausführlichen Bedienungsanleitung auf der mitgelieferten
CD-ROM.
V. 01 – 08/08/2013 33 ©Velleman nv
Page 34

CAMIP17
Bildsensor
Sony HR image sensor
Abmessungen
1/2.9"
Pixelanzahl
2 Megapixel
Mindestbeleuchtung
0.1 lux / F1.5, 0 lux (IR LEDs eingeschaltet)
Weißabgleich
ATW
AGC
automatische Verstärkungsregelung
Blende
AES
Objektiv
f3.8mm / F1.5
Blickwinkel
85,4°
IR-LEDs
35
Netzwerkschnittstelle
Ethernet 10/100BASE-T
PoE
IEEE 802.3af
mehrfaches VideoStreaming
3 (H.264, MPEG4, MJPEG)
Bilder per Sekunde
30
Regelung Bildqualität
1080P
1920 x 1080
720P
1280 x 720
VGA
640 x 480
QVGA
320 x 240
unterstützte Protokolle
DDNS, PPPoE, DHCP, NTP, SNTP, TCP/IP, ICMP, SMTP, FTP, HTTP, RTP,
RTSP, RTCP, IPv4, Bonjour, UPnP, DNS, UDP, IGMP, QoS
Alarmmeldung
FTP / e-mail
Fernüberwachung über
Handy
Smartphones
Fernzugriff über EagleEyes-Software auf die wichtigsten
Smartphone-Plattforme (iPad, iPhone und Android)
Rechner
'Video Viewer'-Software auf Windows und Mac
Webbrowser Internet Explorer, Firefox, Google
Chrome und Safari über Java, QuickTime oder VLC
Plug-in
Sicherungskopie
über das Smartphone
Speicher
10 MB (eingebaut)
externer Alarm I/O
ja
Mikrofon
nein
Lautsprecher
nein
minimale
Systemanforderungen
Pentium 4, 1.3 GHz oder höher, oder AMD (gleichwertig)
Windows® 7, Vista & XP, DirectX 9.0 oder höher
AGP grafische Karte, Direct Draw, RAM 32 MB
RAM 256 MB oder höher
freie Netzverbindung
Internet Explorer 7.x oder höher
Betriebstemperatur
-20 °C bis 40 °C
Stromversorgung
12 Vdc 1 A (nicht mitgeliefert)
Abmessungen
151 x 68 mm
Gewicht
550 g
IP-Schutzart
IP67
Die CAMIP17 entspricht der ONVIF-Norm: kompatibel mit den meisten IP-Kameramarken, die ebenfalls
der ONVIF-Norm entsprechen. Weitere Informationen finden Sie auf www.onvif.org.
9. Technische Daten
Verwenden Sie dieses Gerät nur mit originellen Zubehörteilen. Velleman NV übernimmt keine
Haftung für Schaden oder Verletzungen bei (falscher) Anwendung dieses Gerätes.
Mehr Informationen zu diesem Produkt und die neueste Version dieser Bedienungsanleitung
finden Sie hier: www.velleman.eu.
V. 01 – 08/08/2013 34 ©Velleman nv
Page 35

CAMIP17
Alle Änderungen ohne vorherige Ankündigung vorbehalten.
Alle eingetragenen Warenzeichen und Handelsnamen sind Eigentum Ihrer jeweiligen Inhaber und dienen
nur zur Verdeutlichung der Kompatibilität unserer Produkte mit den Produkten verschiedener Hersteller.
iPhone und iPad sind Warenzeichen von Apple Inc., eingetragen in den USA und anderen Ländern. DLink, das D-Link logo, sind eingetragene Warenzeichen von D-Link Corporation oder den
Tochterunternehmen in den USA und anderen Ländern. Android ist ein eingetragenes Warenzeichen von
Google Inc.
© URHEBERRECHT
Velleman NV besitzt das Urheberrecht für diese Bedienungsanleitung. Alle weltweiten Rechte
vorbehalten. Ohne vorherige schriftliche Genehmigung des Urhebers ist es nicht gestattet, diese
Bedienungsanleitung ganz oder in Teilen zu reproduzieren, zu kopieren, zu übersetzen, zu bearbeiten
oder zu speichern.
V. 01 – 08/08/2013 35 ©Velleman nv
Page 36

Velleman® Service and Quality Warranty
Since its foundation in 1972, Velleman® acquired extensive experience in
the electronics world and currently distributes its products in over 85
countries.
All our products fulfil strict quality requirements and legal stipulations in
the EU. In order to ensure the quality, our products regularly go through
an extra quality check, both by an internal quality department and by
specialized external organisations. If, all precautionary measures
notwithstanding, problems should occur, please make appeal to our
warranty (see guarantee conditions).
General Warranty Conditions Concerning Consumer Products (for
EU):
• All consumer products are subject to a 24-month warranty on production
flaws and defective material as from the original date of purchase.
• Velleman® can decide to replace an article with an equivalent article, or
to refund the retail value totally or partially when the complaint is valid and
a free repair or replacement of the article is impossible, or if the expenses
are out of proportion.
You will be delivered a replacing article or a refund at the value of 100%
of the purchase price in case of a flaw occurred in the first year after the
date of purchase and delivery, or a replacing article at 50% of the
purchase price or a refund at the value of 50% of the retail value in case
of a flaw occurred in the second year after the date of purchase and
delivery.
• Not covered by warranty:
- all direct or indirect damage caused after delivery to the article (e.g. by
oxidation, shocks, falls, dust, dirt, humidity...), and by the article, as well
as its contents (e.g. data loss), compensation for loss of profits;
- consumable goods, parts or accessories that are subject to an aging
process during normal use, such as batteries (rechargeable, nonrechargeable, built-in or replaceable), lamps, rubber parts, drive belts...
(unlimited list);
- flaws resulting from fire, water damage, lightning, accident, natural
disaster, etc.…;
- flaws caused deliberately, negligently or resulting from improper
handling, negligent maintenance, abusive use or use contrary to the
manufacturer’s instructions;
- damage caused by a commercial, professional or collective use of the
article (the warranty validity will be reduced to six (6) months when the
article is used professionally);
- damage resulting from an inappropriate packing and shipping of the
article;
- all damage caused by modification, repair or alteration performed by a
third party without written permission by Velleman®.
• Articles to be repaired must be delivered to your Velleman® dealer,
solidly packed (preferably in the original packaging), and be completed
with the original receipt of purchase and a clear flaw description.
• Hint: In order to save on cost and time, please reread the manual and
check if the flaw is caused by obvious causes prior to presenting the
article for repair. Note that returning a non-defective article can also
involve handling costs.
• Repairs occurring after warranty expiration are subject to shipping costs.
• The above conditions are without prejudice to all commercial warranties.
The above enumeration is subject to modification according to the
article (see article’s manual).
Velleman® service- en kwaliteitsgarantie
Velleman® heeft sinds zijn oprichting in 1972 een ruime ervaring
opgebouwd in de elektronicawereld en verdeelt op dit moment producten
in meer dan 85 landen. Al onze producten beantwoorden aan strikte
kwaliteitseisen en aan de wettelijke bepalingen geldig in de EU. Om de
kwaliteit te waarborgen, ondergaan onze producten op regelmatige
tijdstippen een extra kwaliteitscontrole, zowel door onze eigen
kwaliteitsafdeling als door externe gespecialiseerde organisaties. Mocht
er ondanks deze voorzorgen toch een probleem optreden, dan kunt u
steeds een beroep doen op onze waarborg (zie waarborgvoorwaarden).
Algemene waarborgvoorwaarden consumentengoederen (voor
Europese Unie):
• Op alle consumentengoederen geldt een garantieperiode van 24
maanden op productie- en materiaalfouten en dit vanaf de oorspronkelijke
aankoopdatum.
• Indien de klacht gegrond is en een gratis reparatie of vervanging van
een artikel onmogelijk is of indien de kosten hiervoor buiten verhouding
zijn, kan Velleman® beslissen het desbetreffende artikel te vervangen
door een gelijkwaardig artikel of de aankoopsom van het artikel
gedeeltelijk of volledig terug te betalen. In dat geval krijgt u een
vervangend product of terugbetaling ter waarde van 100% van de
aankoopsom bij ontdekking van een gebrek tot één jaar na aankoop en
levering, of een vervangend product tegen 50% van de kostprijs of
terugbetaling van 50 % bij ontdekking na één jaar tot 2 jaar.
• Valt niet onder waarborg:
- alle rechtstreekse of onrechtstreekse schade na de levering veroorzaakt
aan het toestel (bv. door oxidatie, schokken, val, stof, vuil, vocht...), en
door het toestel, alsook zijn inhoud (bv. verlies van data), vergoeding voor
eventuele winstderving.
- verbruiksgoederen, onderdelen of hulpstukken die onderhevig zijn aan
veroudering door normaal gebruik zoals bv. batterijen (zowel oplaadbare
als niet-oplaadbare, ingebouwd of vervangbaar), lampen, rubberen
onderdelen, aandrijfriemen... (onbeperkte lijst).
- defecten ten gevolge van brand, waterschade, bliksem, ongevallen,
natuurrampen, enz.
- defecten veroorzaakt door opzet, nalatigheid of door een
onoordeelkundige behandeling, slecht onderhoud of abnormaal gebruik of
gebruik van het toestel strijdig met de voorschriften van de fabrikant.
- schade ten gevolge van een commercieel, professioneel of collectief
gebruik van het apparaat (bij professioneel gebruik wordt de
garantieperiode herleid tot 6 maand).
- schade veroorzaakt door onvoldoende bescherming bij transport van het
apparaat.
- alle schade door wijzigingen, reparaties of modificaties uitgevoerd door
derden zonder toestemming van Velleman®.
• Toestellen dienen ter reparatie aangeboden te worden bij uw
Velleman®-verdeler. Het toestel dient vergezeld te zijn van het
oorspronkelijke aankoopbewijs. Zorg voor een degelijke verpakking (bij
voorkeur de originele verpakking) en voeg een duidelijke foutomschrijving
bij.
• Tip: alvorens het toestel voor reparatie aan te bieden, kijk nog eens na
of er geen voor de hand liggende reden is waarom het toestel niet naar
behoren werkt (zie handleiding). Op deze wijze kunt u kosten en tijd
besparen. Denk eraan dat er ook voor niet-defecte toestellen een kost
voor controle aangerekend kan worden.
• Bij reparaties buiten de waarborgperiode zullen transportkosten
aangerekend worden.
• Elke commerciële garantie laat deze rechten onverminderd.
Bovenstaande opsomming kan eventueel aangepast worden
naargelang de aard van het product (zie handleiding van het
betreffende product).
Garantie de service et de qualité Velleman®
Depuis 1972, Velleman® a gagné une vaste expérience dans le secteur
de l’électronique et est actuellement distributeur dans plus de 85 pays.
Tous nos produits répondent à des exigences de qualité rigoureuses et à
des dispositions légales en vigueur dans l’UE. Afin de garantir la qualité,
nous soumettons régulièrement nos produits à des contrôles de qualité
supplémentaires, tant par notre propre service qualité que par un service
qualité externe. Dans le cas improbable d’un défaut malgré toutes les
précautions, il est possible d’invoquer notre garantie (voir les conditions
de garantie).
Conditions générales concernant la garantie sur les produits grand
public (pour l’UE) :
• tout produit grand public est garanti 24 mois contre tout vice de
production ou de matériaux à dater du jour d’acquisition effective ;
• si la plainte est justifiée et que la réparation ou le remplacement d’un
article est jugé impossible, ou lorsque les coûts s’avèrent
disproportionnés, Velleman® s’autorise à remplacer ledit article par un
article équivalent ou à rembourser la totalité ou une partie du prix d’achat.
Le cas échéant, il vous sera consenti un article de remplacement ou le
remboursement complet du prix d’achat lors d’un défaut dans un délai de
1 an après l’achat et la livraison, ou un article de remplacement
moyennant 50% du prix d’achat ou le remboursement de 50% du prix
d’achat lors d’un défaut après 1 à 2 ans.
• sont par conséquent exclus :
- tout dommage direct ou indirect survenu à l’article après livraison (p.ex.
dommage lié à l’oxydation, choc, chute, poussière, sable, impureté…) et
provoqué par l’appareil, ainsi que son contenu (p.ex. perte de données) et
une indemnisation éventuelle pour perte de revenus ;
- toute pièce ou accessoire nécessitant un remplacement causé par un
usage normal comme p.ex. piles (rechargeables comme non
rechargeables, intégrées ou remplaçables), ampoules, pièces en
caoutchouc, courroies… (liste illimitée) ;
- tout dommage qui résulte d’un incendie, de la foudre, d’un accident,
d’une catastrophe naturelle, etc. ;
- out dommage provoqué par une négligence, volontaire ou non, une
utilisation ou un entretien incorrect, ou une utilisation de l’appareil
contraire aux prescriptions du fabricant ;
Page 37

- tout dommage à cause d’une utilisation commerciale, professionnelle ou
collective de l’appareil (la période de garantie sera réduite à 6 mois lors
d’une utilisation professionnelle) ;
- tout dommage à l’appareil qui résulte d’une utilisation incorrecte ou
différente que celle pour laquelle il a été initialement prévu comme décrit
dans la notice ;
- tout dommage engendré par un retour de l’appareil emballé dans un
conditionnement non ou insuffisamment protégé.
- toute réparation ou modification effectuée par une tierce personne sans
l’autorisation explicite de SA Velleman® ; - frais de transport de et vers
Velleman® si l’appareil n’est plus couvert sous la garantie.
• toute réparation sera fournie par l’endroit de l’achat. L’appareil doit
nécessairement être accompagné du bon d’achat d’origine et être dûment
conditionné (de préférence dans l’emballage d’origine avec mention du
défaut) ;
• tuyau : il est conseillé de consulter la notice et de contrôler câbles, piles,
etc. avant de retourner l’appareil. Un appareil retourné jugé défectueux
qui s’avère en bon état de marche pourra faire l’objet d’une note de frais à
charge du consommateur ;
• une réparation effectuée en-dehors de la période de garantie fera l’objet
de frais de transport ;
• toute garantie commerciale ne porte pas atteinte aux conditions
susmentionnées.
La liste susmentionnée peut être sujette à une complémentation
selon le type de l’article et être mentionnée dans la notice d’emploi.
Garantía de servicio y calidad Velleman®
Desde su fundación en 1972 Velleman® ha adquirido una amplia
experiencia como distribuidor en el sector de la electrónica en más de 85
países. Todos nuestros productos responden a normas de calidad
rigurosas y disposiciones legales vigentes en la UE. Para garantizar la
calidad, sometemos nuestros productos regularmente a controles de
calidad adicionales, tanto a través de nuestro propio servicio de calidad
como de un servicio de calidad externo. En el caso improbable de que
surgieran problemas a pesar de todas las precauciones, es posible
recurrir a nuestra garantía (véase las condiciones de garantía).
Condiciones generales referentes a la garantía sobre productos de
venta al público (para la Unión Europea):
• Todos los productos de venta al público tienen un perìodo de garantìa
de 24 meses contra errores de producción o errores en materiales desde
la adquisición original;
• Si la queja está fundada y si la reparación o sustitución de un artìculo no
es posible, o si los gastos son desproporcionados, Velleman® autoriza
reemplazar el artículo por un artículo equivalente o reembolsar la
totalidad o una parte del precio de compra. En este caso, usted recibirá
un artículo de recambio o el reembolso completo del precio de compra si
encuentra algún fallo hasta un año después de la compra y entrega, o un
artículo de recambio al 50% del precio de compra o el reembolso del 50%
del precio de compra si encuentra un fallo después de 1 año y hasta los 2
años después de la compra y entrega.
Por consiguiente, están excluidos entre otras cosas:
- todos los daños causados directa o indirectamente al aparato (p.ej. por
oxidación, choques, caída,...) y a su contenido (p.ej. pérdida de datos)
después de la entrega y causados por el aparato, y cualquier
indemnización por posible pérdida de ganancias;
- partes o accesorios, que estén expuestos al desgaste causado por un
uso normal, como por ejemplo baterías (tanto recargables como no
recargables, incorporadas o reemplazables), bombillas, partes de goma,
etc. (lista ilimitada);
- defectos causados por un incendio, daños causados por el agua, rayos,
accidentes, catástrofes naturales, etc.;
- defectos causados a conciencia, descuido o por malos tratos, un
mantenimiento inapropiado o un uso anormal del aparato contrario a las
instrucciones del fabricante;
- daños causados por un uso comercial, profesional o colectivo del
aparato (el período de garantía se reducirá a 6 meses con uso
profesional);
- daños causados por un uso incorrecto o un uso ajeno al que está
previsto el producto inicialmente como está descrito en el manual del
usuario;
- daños causados por una protección insuficiente al transportar el
aparato.
- daños causados por reparaciones o modificaciones efectuadas por una
tercera persona sin la autorización explícita de Velleman®;
- se calcula gastos de transporte de y a Velleman® si el aparato ya no
está cubierto por la garantía.
• Cualquier artìculo que tenga que ser reparado tendrá que ser devuelto a
su distribuidor Velleman®. Devuelva el aparato con la factura de compra
original y transpórtelo en un embalaje sólido (preferentemente el
embalaje original). Incluya también una buena descripción del fallo;
• Consejo: Lea el manual del usuario y controle los cables, las pilas, etc.
antes de devolver el aparato. Si no se encuentra un defecto en el artículo
los gastos podrían correr a cargo del cliente;
• Los gastos de transporte correrán a carga del cliente para una
reparación efectuada fuera del período de garantía.
• Cualquier gesto comercial no disminuye estos derechos.
La lista previamente mencionada puede ser adaptada según el tipo
de artículo (véase el manual del usuario del artículo en cuestión).
Velleman® Service- und Qualitätsgarantie
Seit der Gründung in 1972 hat Velleman® sehr viel Erfahrung als Verteiler
in der Elektronikwelt in über 85 Ländern aufgebaut.
Alle Produkte entsprechen den strengen Qualitätsforderungen und
gesetzlichen Anforderungen in der EU. Um die Qualität zu gewährleisten
werden unsere Produkte regelmäßig einer zusätzlichen Qualitätskontrolle
unterworfen, sowohl von unserer eigenen Qualitätsabteilung als auch von
externen spezialisierten Organisationen. Sollten, trotz aller
Vorsichtsmaßnahmen, Probleme auftreten, nehmen Sie bitte die Garantie
in Anspruch (siehe Garantiebedingungen).
Allgemeine Garantiebedingungen in Bezug auf Konsumgüter (für die
Europäische Union):
• Alle Produkte haben für Material- oder Herstellungsfehler eine
Garantieperiode von 24 Monaten ab Verkaufsdatum.
• Wenn die Klage berechtigt ist und falls eine kostenlose Reparatur oder
ein Austausch des Gerätes unmöglich ist, oder wenn die Kosten dafür
unverhältnismäßig sind, kann Velleman® sich darüber entscheiden,
dieses Produkt durch ein gleiches Produkt zu ersetzen oder die
Kaufsumme ganz oder teilweise zurückzuzahlen. In diesem Fall erhalten
Sie ein Ersatzprodukt oder eine Rückzahlung im Werte von 100% der
Kaufsumme im Falle eines Defektes bis zu 1 Jahr nach Kauf oder
Lieferung, oder Sie bekommen ein Ersatzprodukt im Werte von 50% der
Kaufsumme oder eine Rückzahlung im Werte von 50 % im Falle eines
Defektes im zweiten Jahr.
• Von der Garantie ausgeschlossen sind:
- alle direkten oder indirekten Schäden, die nach Lieferung am Gerät und
durch das Gerät verursacht werden (z.B. Oxidation, Stöße, Fall, Staub,
Schmutz, Feuchtigkeit, ...), sowie auch der Inhalt (z.B. Datenverlust),
Entschädigung für eventuellen Gewinnausfall.
- Verbrauchsgüter, Teile oder Zubehörteile, die durch normalen Gebrauch
dem Verschleiß ausgesetzt sind, wie z.B. Batterien (nicht nur aufladbare,
sondern auch nicht aufladbare, eingebaute oder ersetzbare), Lampen,
Gummiteile, Treibriemen, usw. (unbeschränkte Liste).
- Schäden verursacht durch Brandschaden, Wasserschaden, Blitz,
Unfälle, Naturkatastrophen, usw.
- Schäden verursacht durch absichtliche, nachlässige oder
unsachgemäße Anwendung, schlechte Wartung, zweckentfremdete
Anwendung oder Nichtbeachtung von Benutzerhinweisen in der
Bedienungsanleitung.
- Schäden infolge einer kommerziellen, professionellen oder kollektiven
Anwendung des Gerätes (bei gewerblicher Anwendung wird die
Garantieperiode auf 6 Monate zurückgeführt).
- Schäden verursacht durch eine unsachgemäße Verpackung und
unsachgemäßen Transport des Gerätes.
- alle Schäden verursacht durch unautorisierte Änderungen, Reparaturen
oder Modifikationen, die von einem Dritten ohne Erlaubnis von Velleman®
vorgenommen werden.
• Im Fall einer Reparatur, wenden Sie sich an Ihren Velleman®-Verteiler.
Legen Sie das Produkt ordnungsgemäß verpackt (vorzugsweise die
Originalverpackung) und mit dem Original-Kaufbeleg vor. Fügen Sie eine
deutliche Fehlerbeschreibung hinzu.
• Hinweis: Um Kosten und Zeit zu sparen, lesen Sie die
Bedienungsanleitung nochmals und überprüfen Sie, ob es keinen auf de
Hand liegenden Grund gibt, ehe Sie das Gerät zur Reparatur
zurückschicken. Stellt sich bei der Überprüfung des Gerätes heraus, dass
kein Geräteschaden vorliegt, könnte dem Kunden eine
Untersuchungspauschale berechnet.
• Für Reparaturen nach Ablauf der Garantiefrist werden Transportkosten
berechnet.
• Jede kommerzielle Garantie lässt diese Rechte unberührt.
Die oben stehende Aufzählung kann eventuell angepasst werden
gemäß der Art des Produktes (siehe Bedienungsanleitung des
Gerätes).
Made in Taiwan
Legen Heirweg 33, 9890 Gavere, Belgium
Imported by Velleman nv
www.velleman.eu
 Loading...