

Page 1

CAMIP14n
MEGAPIXEL PUSH VIDEO WIFI IP CAMERA - EAGLE EYES -
SD CARD RECORDING
MEGAPIXEL IP CAMERA MET PUSH VIDEO - EAGLE EYES
CAMERA IP 1.3 MEGAPIXEL A VEC PUSH VIDEO - EAGLE EYES
CÁMARA IP PUSH VIDEO 1.3 MEGAPÍXELES - EAGLE EYES
1.3 MEGAPIXEL PUSH VIDEO IP-KAMERA - EAGLE EYES
QUICK REFERENCE GUIDE 2
K ORTE HANDLEIDING 11
GUIDE D'INSTALLATION RAPIDE 20
GUÍA RÁPIDA 29
SCHNELLEINSTIEG 38
Page 2

CAMIP14n
V. 02 – 31/03/2014 2 ©Velleman nv
QUICK REFERENCE GUIDE
1. Introduction
To all residents of the European Union
Important environmental information about this product
This symbol on the d evice or the package indicates that d isp osal of the d evice after i ts lif ecycle
could harm the environment. D o not dispose of the unit (or batteries) as unsorted municipal
waste; it should be taken to a specialized company for recycling. This device should be
returned to your distributor or to a local recycling service. Respect the local environmental
rules.
If in d o ub t , co n t ac t yo u r loc a l w a s te dis p o s al au t h o rit ie s.
Thank you for choosing Velleman! Please read the manual thoroughly before bringing this device into
service. If the d evice was damaged in transit, don't in stall or use it a nd contact your dealer.
2. Safety Instructions
Keep the device away from chil dren and unauthorised users.
Risk of electroshock when opening the cover. Touching live wires can cause life-threatening
el ectr o shocks. Do not open the housing yoursel f. Have the device rep a ired by q ualified
personnel.
DO NOT disassemble or open the cover. Th ere are no user-serviceable parts inside the device.
Refer to an authorized dealer for service and/or spare parts.
3. General Guideline s
Refer to the Velleman® Service and Quality Warranty on the last pages of the full user manual which
can be found on the included CD ROM.
• Indoor use only. Keep thi s device away form rain, moisture, splashing and dripping liquids.
• Keep thi s d evice awa y f rom dust and extreme heat.
• Protect th is device f r o m shocks and abu se. Avoid br ute force when operating the devi ce.
• Familiarise yourself with the functions of the device before actually using it.
• All modif ications of the device are forbidden for safety reas ons.
• Only use the device for its intended purpose. Using the device in an unauthorised way will void the
warranty.
• Damage caused by disregard of certain guidelines in this manual is not covered by the warranty and
the dealer will not accept responsibility for any ensu ing def ects or problems.
• DO NOT use this product to violate privacy laws or perform other illegal activit ies.
Page 3

CAMIP14n
V. 02 – 31/03/2014 3 ©Velleman nv
4. Overview
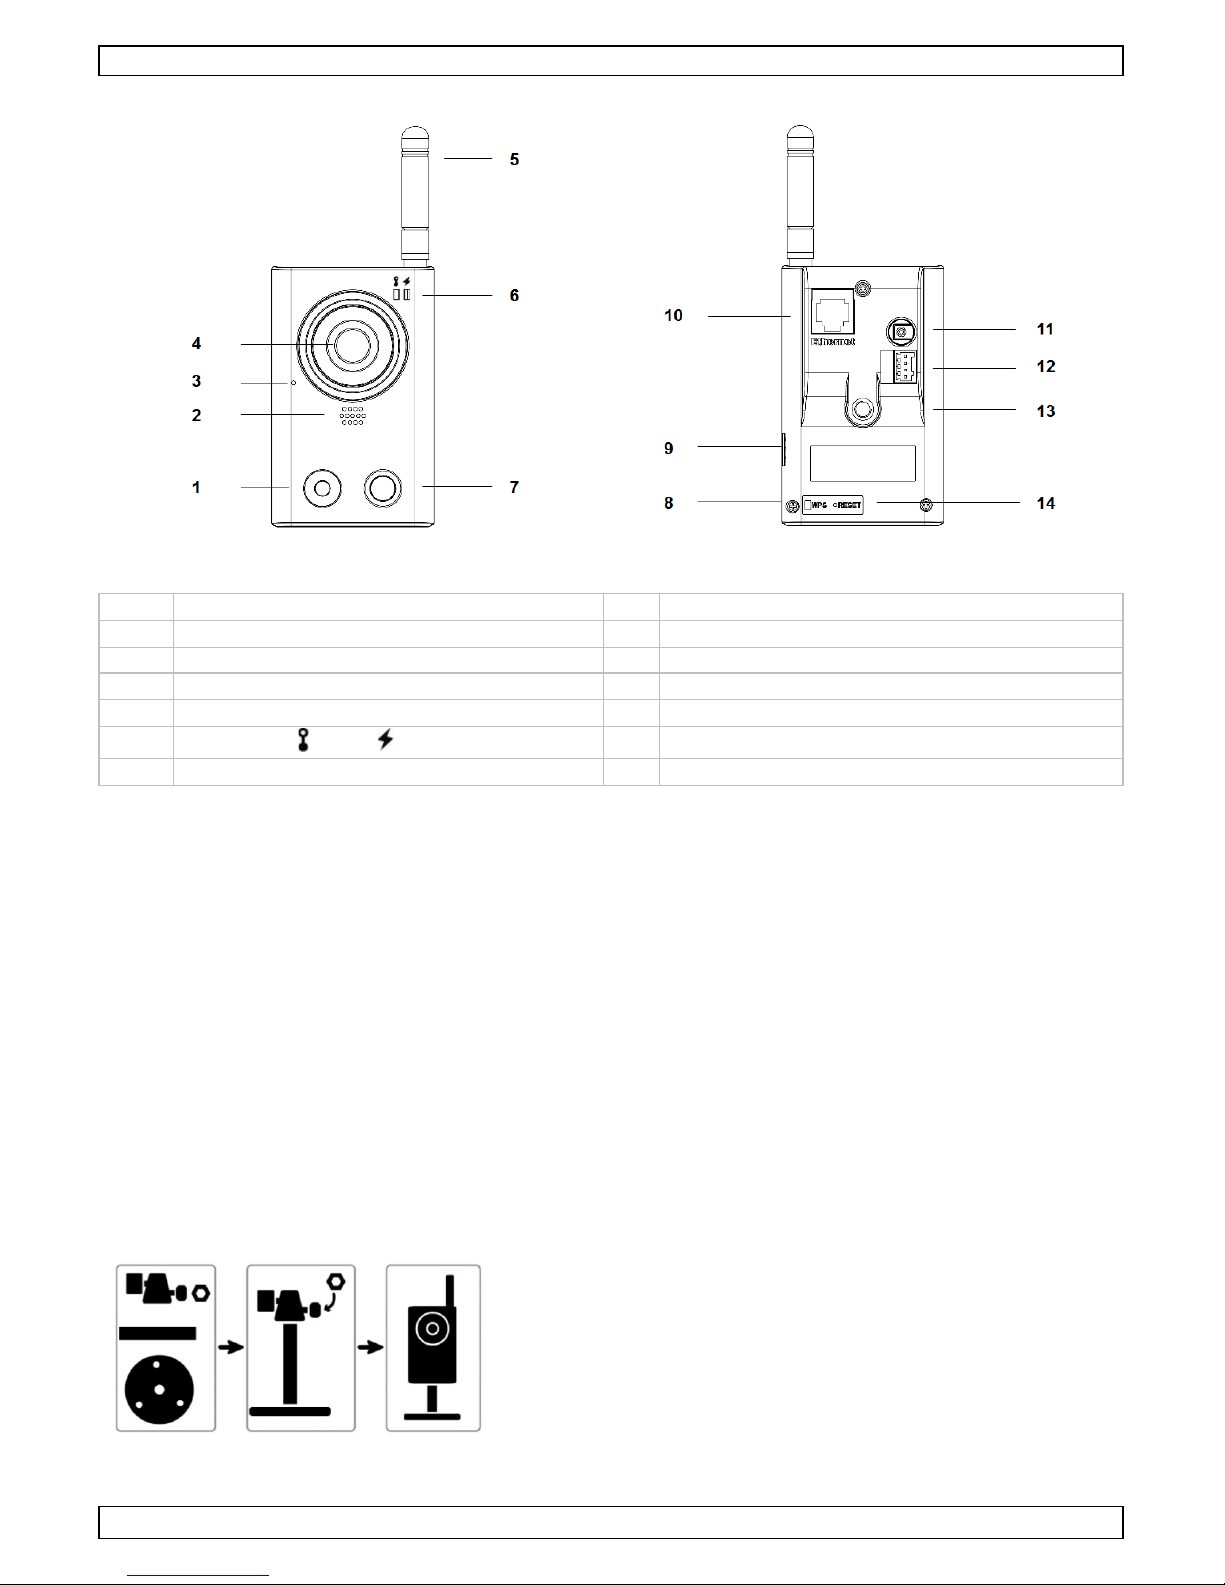
front
back
1
white LED light
8
WPS button (Wi-Fi Prote cted Setu p)
2
speaker
9
mi cro SD card slot
3
microphone
10
ethernet connection
4
camera lens
11
power jack
5
antenna
12
external I/O port
6
status LEDs: = lan, = interne t
13
bracket
7
PIR sensor
14
reset bu tton
5. Insert a Mic ro SD Ca rd
• Y ou can rec ord vi deo to a micr o SD card. The m icro SD card slot is on the s ide of the camera.
• For a list of compatible micro SD cards, pl ease refer to user guide on th e cd .
Notes
• T he c amera does not support hot-swapping. Insert or remove the micro SD card with power
disconnected.
• Any data on the micro SD card will be deleted when you insert the card and turn on the camera.
6. Hardware Installation
1. Fasten the round base of the b rack et to where you want to install the camera. Th e d istance between
your camera and the location you want to monitor should be 3 to 4 metres.
2. Assemble the bracket and the camera, and adjust the viewing angle of the camera.
3. Fasten the antenna for wireless network c onnection.
4. Plug the included power adapter into the camera and connect it to a power socket.
Page 4
CAMIP14n
V. 02 – 31/03/2014 4 ©Velleman nv
7. Netw o r k Setup
We recommend that y ou use your own ADSL or cable internet service for easy network configuration,
pref erably with EaZ y N etw orki ng or WPS (WiFi Protect ed S etup).
The setu p method below describes:
• Preparing the Network Configuration
• Setup with EaZy Networking
• Manual Network Setup
• Setup using WPS
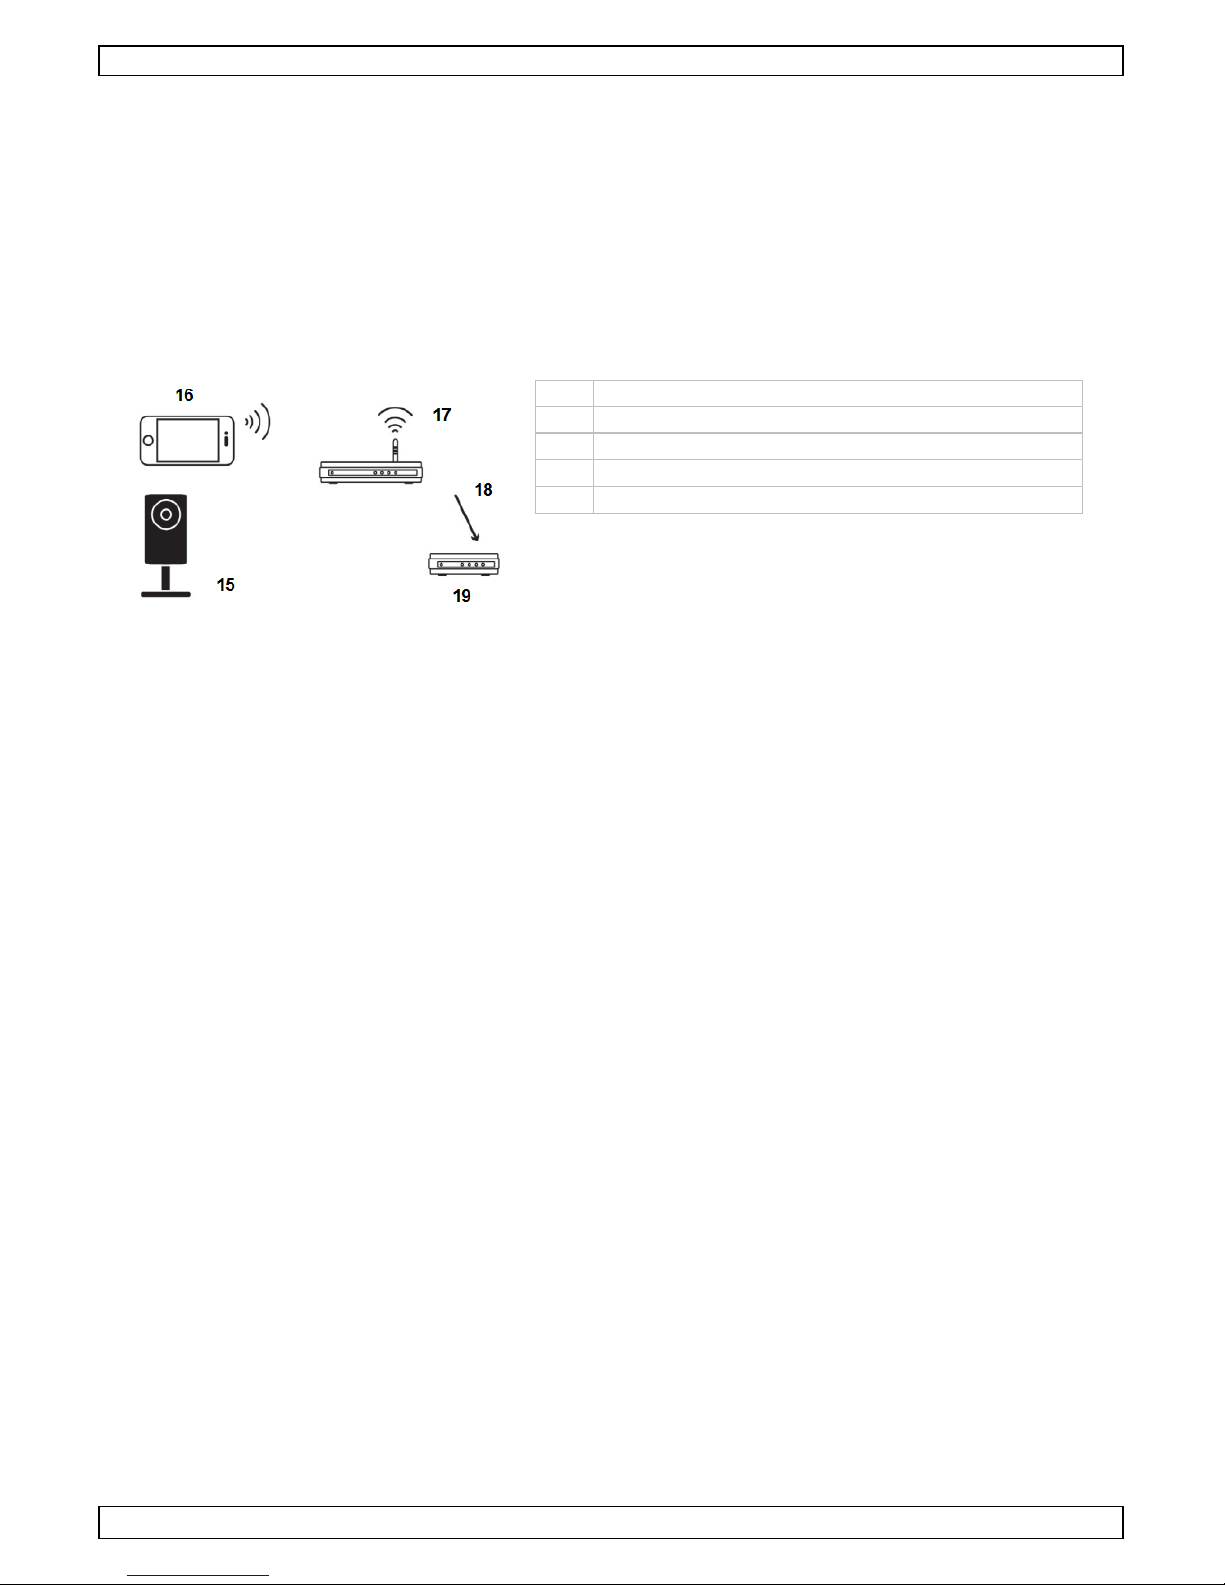
7.1 Preparing the Ne two rk Configuration
Make su re your network contains the foll owing elements:
15
Camera
16
mobile device (iPhone, iPad, Android phone)
17
wireless router
18
WAN port
19
modem
• If you have not done so already, install the EagleEyes-Li te(+) or Eagl eE yes-Plus app on your mobile
device. You can download the app fr om your device’s app store.
• Optional: if your wireless router supports UPnP, make sure the function is enabled.
7.2 Setup with EaZy Networking
About EaZy Networking
About EaZy Networking is a plug-and-play service that all ows automatic connection of your IP camera to
the internet. T he service is not free.
To use this service, you need to create an accoun t for the cloud service from Eag leEyes.
Initially, EagleEyes will provide 500MB data allowance (approx. 260 minutes) per EaZy Networking
camer a for free, which wi l l be expired 6 months after your camera was added to the cloud ser ver . The
camera connection is down if you reach 500MB of data transfer or after six months.
To restore the service, you need to subscribe a data plan from EagleEyes, or configure th e network
settings manually (see below).
This service r equir es:
• The network environment where a router or wireless router is used with the DHCP function enabled
and you know where it is.
• An iPhone, iPad or Android device.
To be able to use EaZy Networki ng, you need to create an accoun t.
• Start EagleEyes on y our d evice.
• Tap "+" and th en "EaZy".
• On first use, you may be prompted to install VLC player, Software or H264 Streaming Viewer. It is
recommen d ed to install the software. Otherwise, you might not be able to see th e live view properly.
Page 5
CAMIP14n
V. 02 – 31/03/2014 5 ©Velleman nv
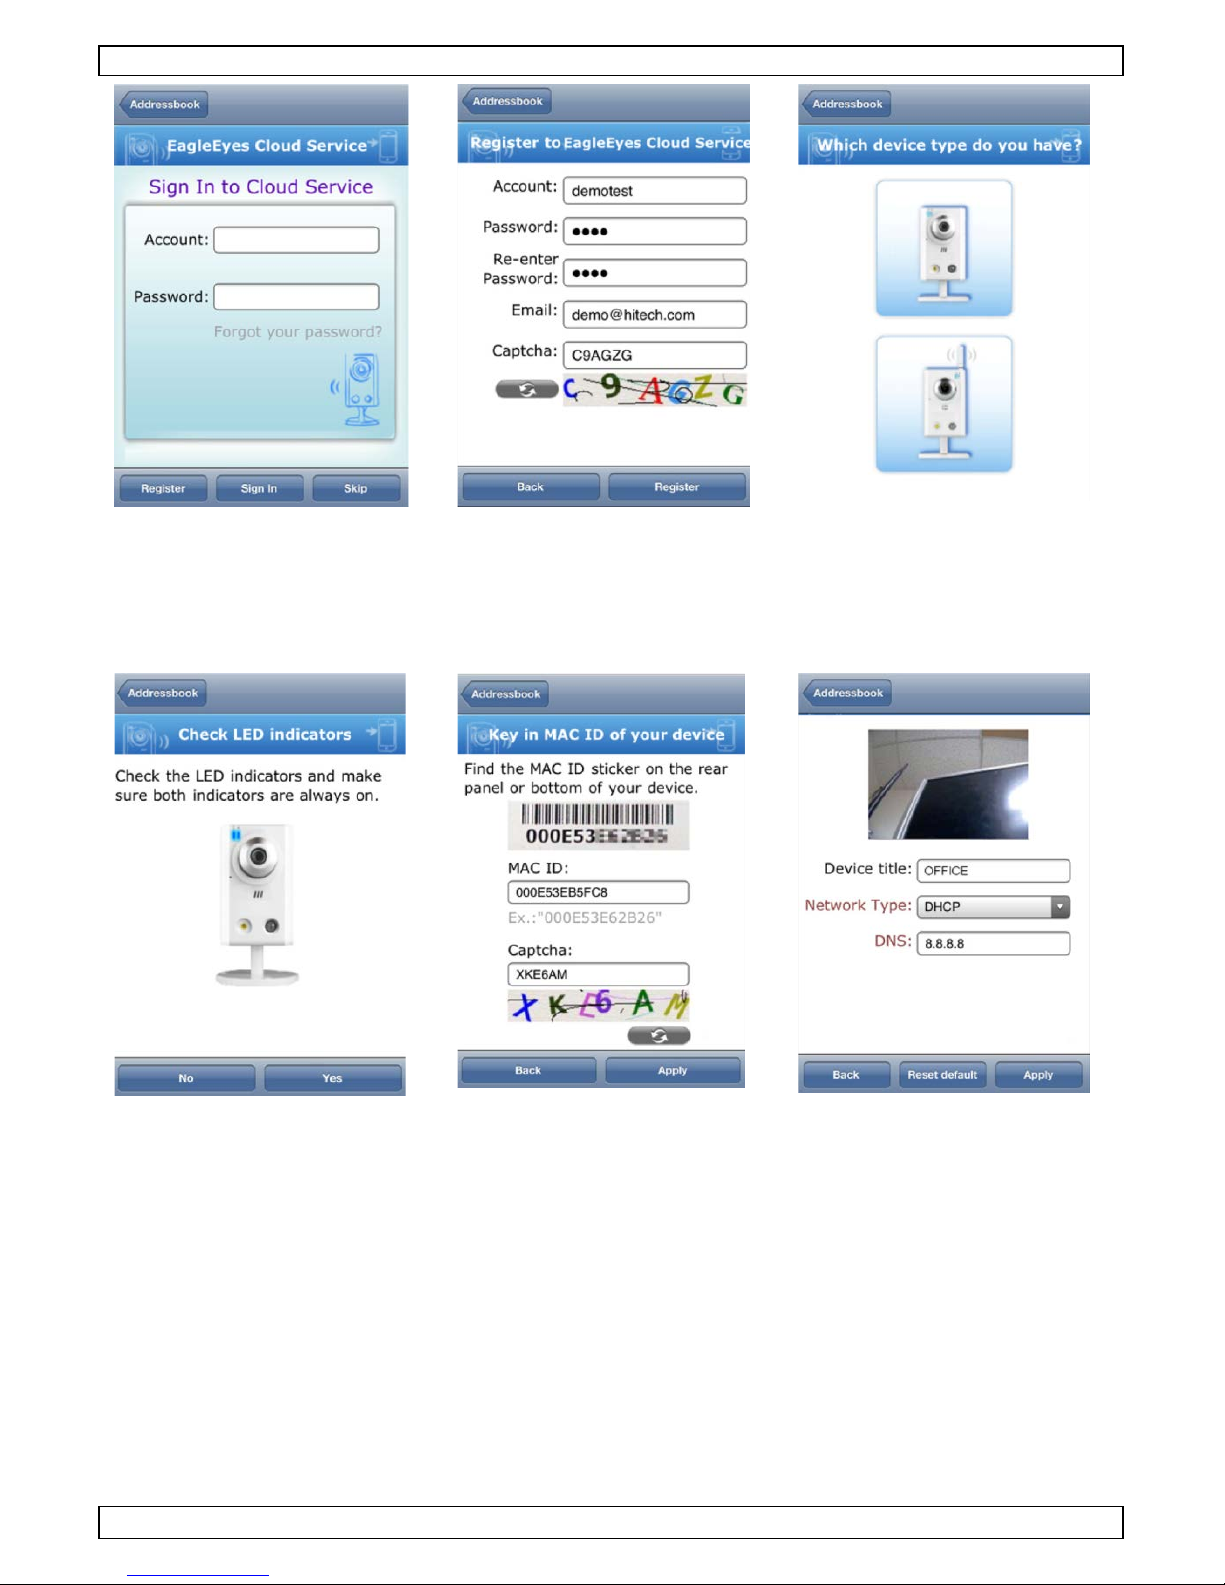
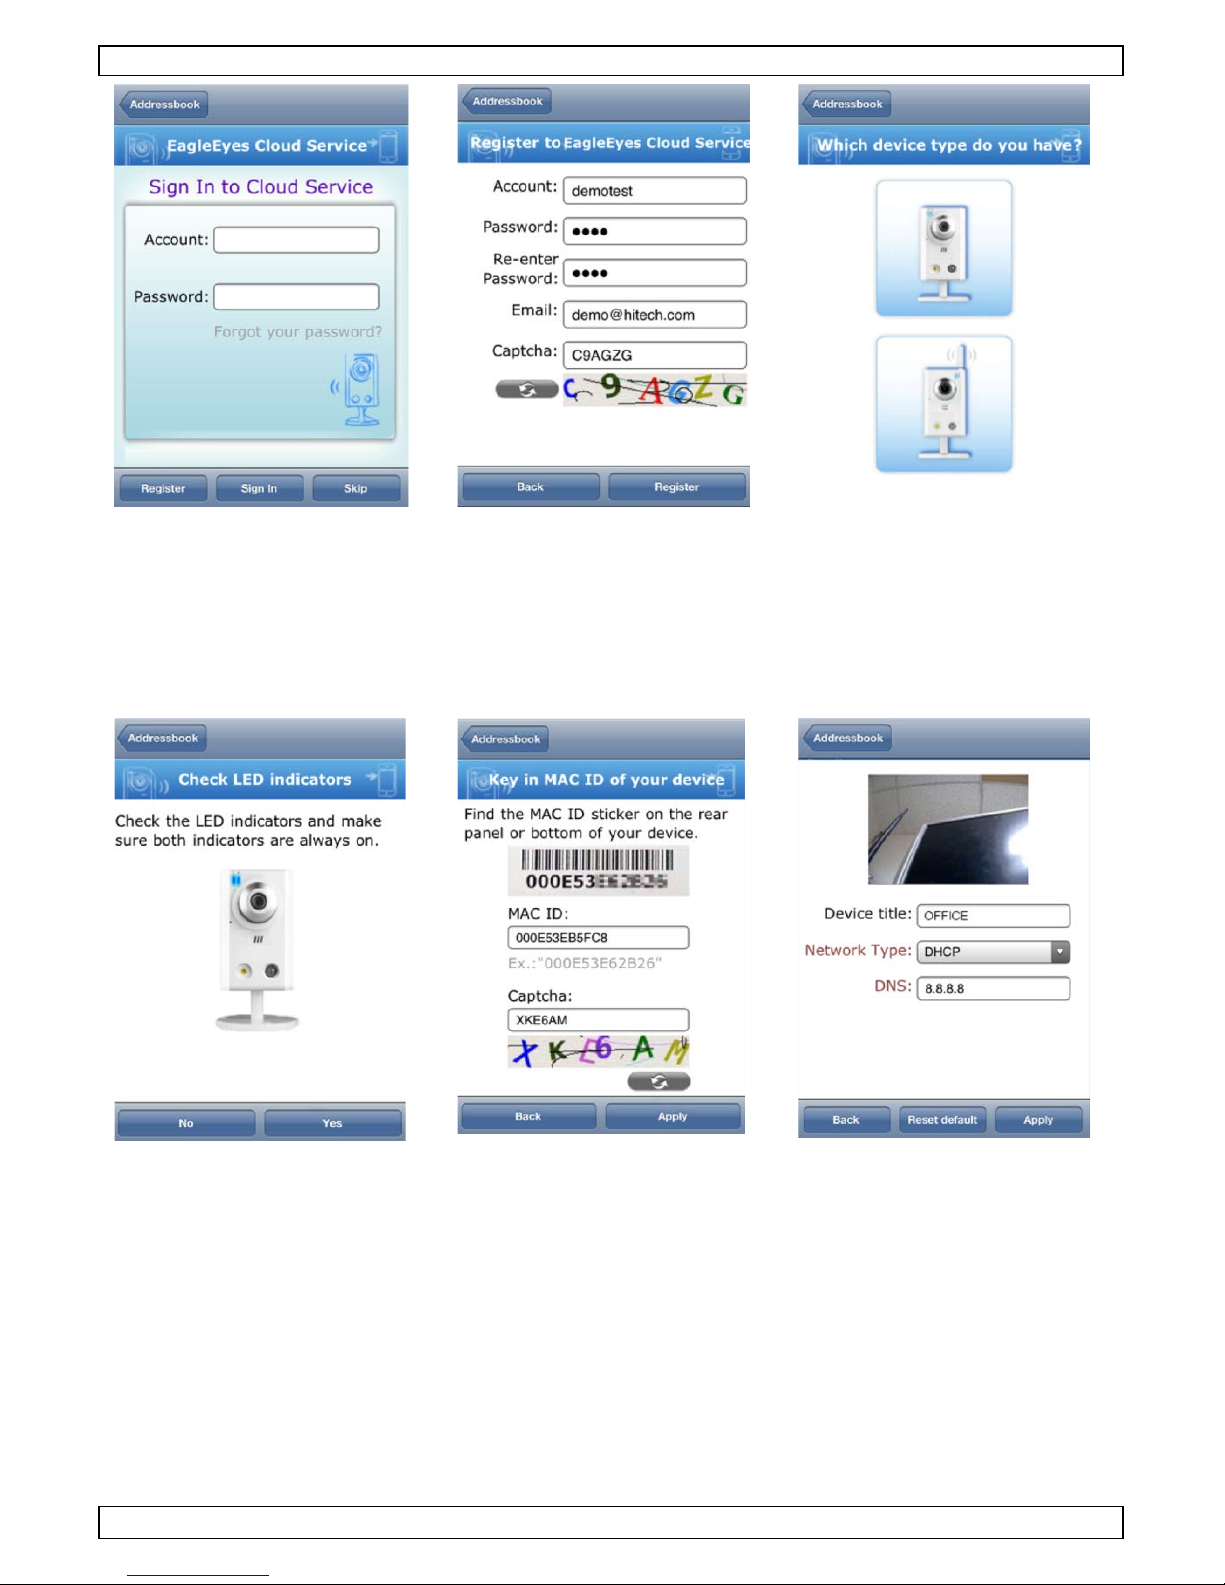
1. Tap Register.
2. F ill in th e information
needed and tap "Register".
3. Select your devi ce typ e. For
a wir eless camera, tap the
lower icon.
4. Connect your camera as
shown on the screen and
tap Ready when the ca mera
is on.
5. Check both LED indicators.
I f b oth are always on, tap
Yes.
6. Fill in your device's MAC
add ress (the address ca n
be found on the back or the
bott om of your device) and
tap Apply.
7. A preview of your camera
appears. Check if the
camer a is oriented the way
you want.
8. Fill in a name for the
camer a next t o Device ti tle
(for e xample: "Of f ice").
9. Tap Apply to finish.
7.3 Manual Network setup
You can configure the network setup manually as follows:
1. Write down the IP address of your wi reless router. You will need it later. To find the I P address,
p roceed as follows:
Page 6

CAMIP14n
V. 02 – 31/03/2014 6 ©Velleman nv
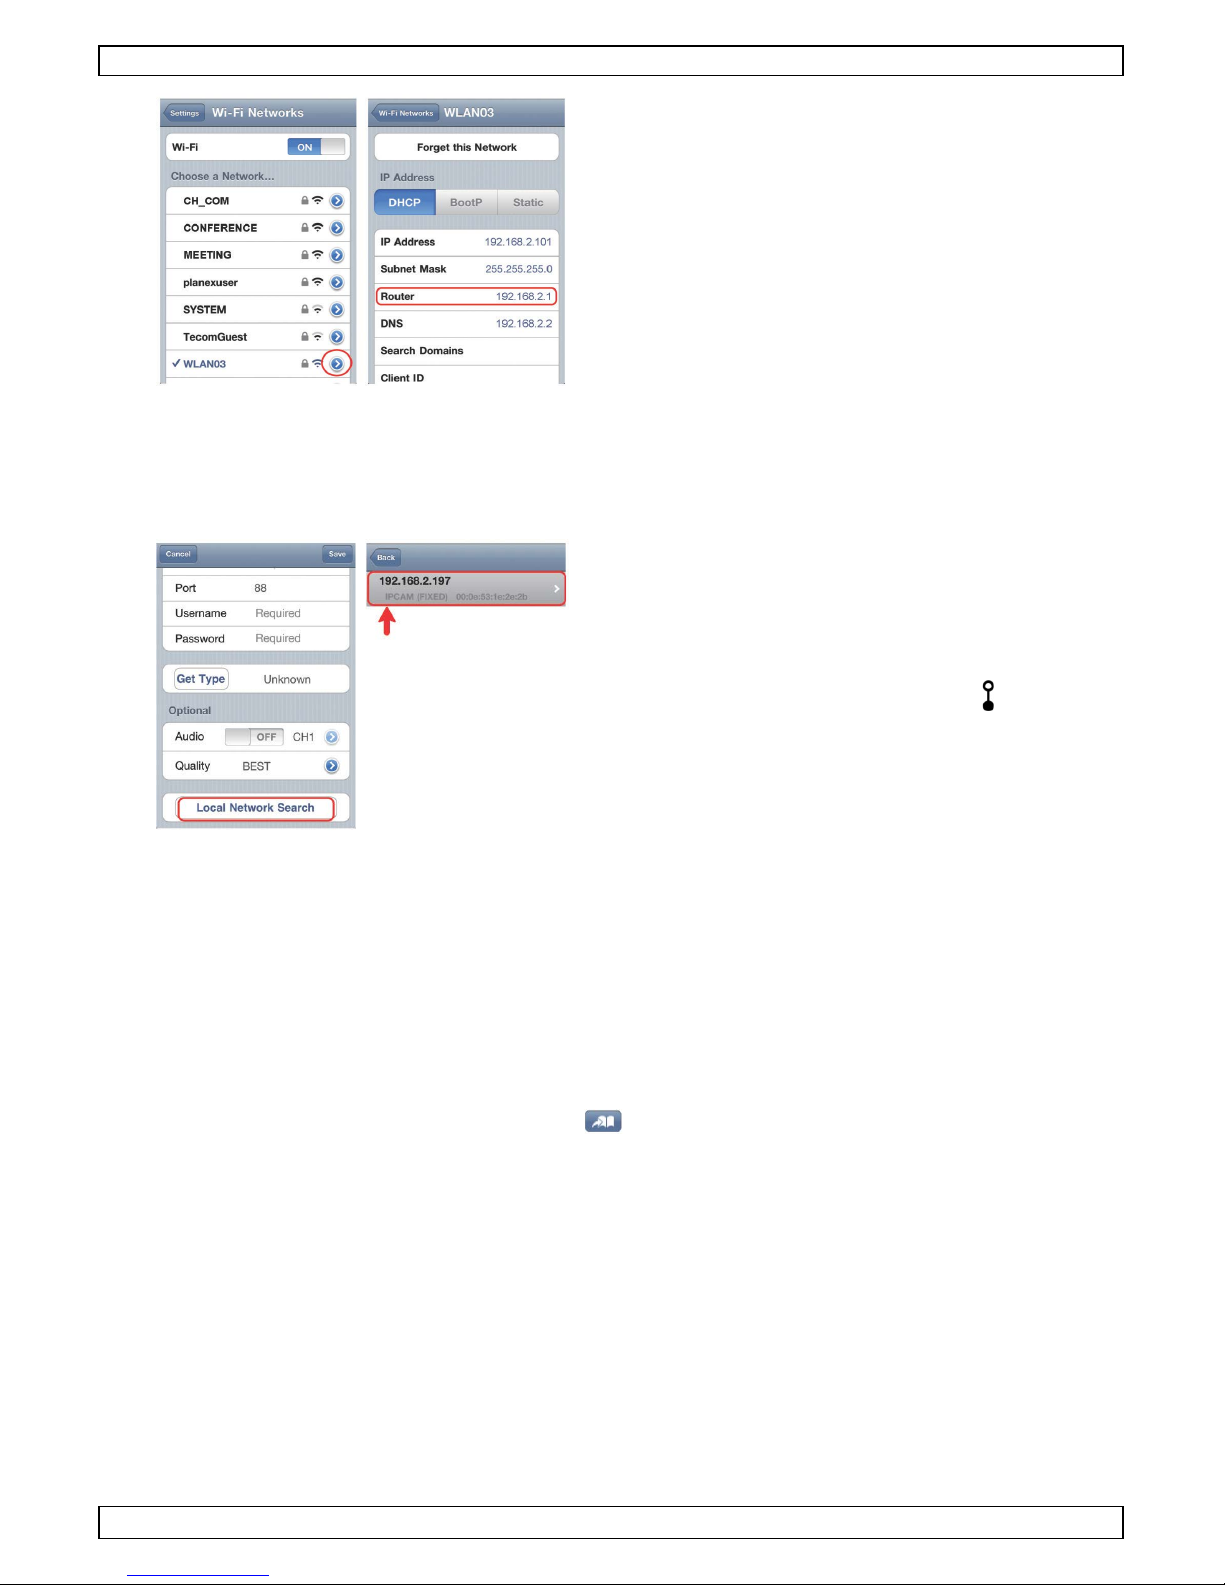
2. Connect your mobile device to the wireless
router that has the camera connected.
3. Go to Settings > WiFi.
4. Press the ">" button to see the details of the
sel ected wirel ess networ k.
The IP address is visible next to "Ro uter".
(I n the sample screen, the IP ad dress is
192.168.2.1)
7.4 Configuring the Network
1. Connect your mobile device to the wi reless router tha t ha s th e camera connected.
2. Open the EagleEyes app and click the "+" button to add a new device.
3. Select "Local Network Sear ch " to search for the camera.
The device will show a list of devices on the network.
The displayed IP address is th e address tha t your
router assigned to your camera.
If the IPCAM camera is not in the list, make sure the
LAN status i ndicator on the camera is on (not
blinking). Reset [13] the camera i f necessary. Wai t
for 3 minutes and then use "Local Network Search"
again.
4. Select the camera from the l ist. The settings pag e appears.
5. In the settings page, switch from "DHCP" to "Static".
6. Change the port number of the camera as needed. The default port number is 88. If port number 88
is blocked, you can change it to any value from 1 to 9999 (for example 9890).
7. Write down t he IP address an d the port n umber of the ca mera. You will need them later.
(I n the sample screens below [A], the IP address is 19 2.168.2.197 and th e port number is 88.)
8. Press "Apply" to confirm your settings.
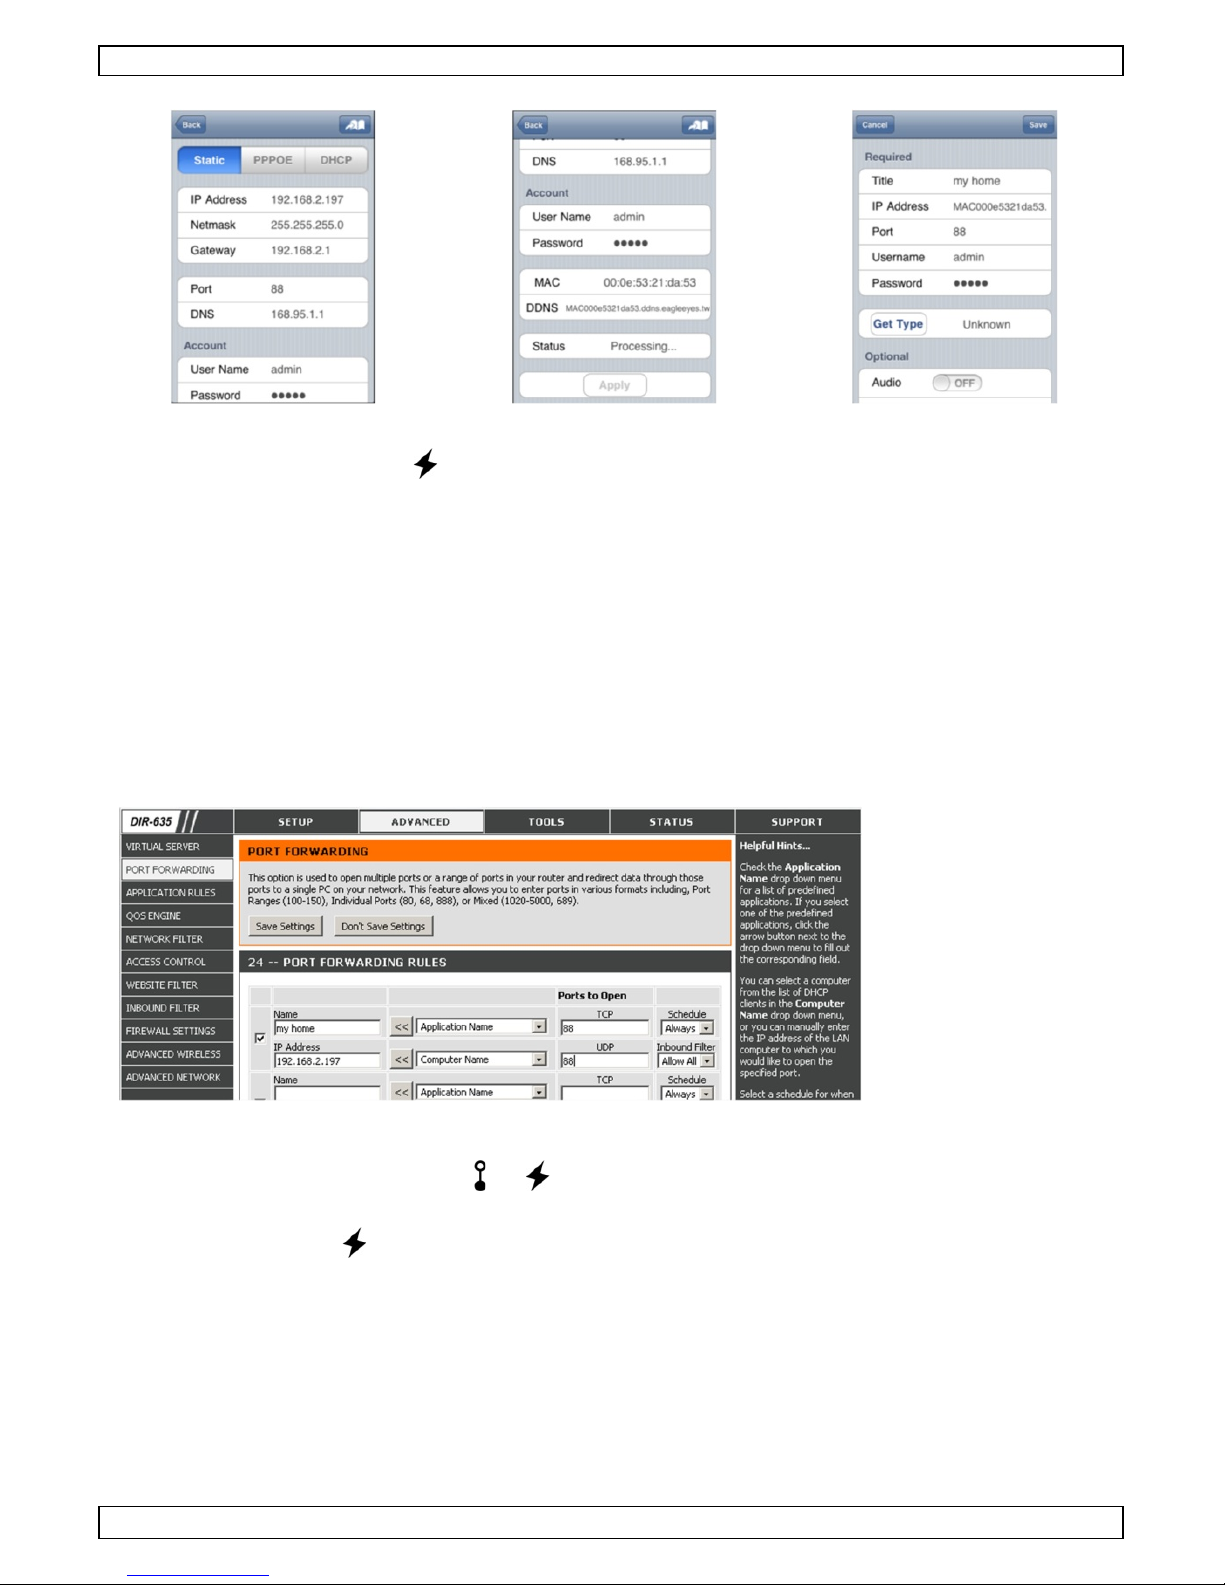
9. W a it until "Status" [B] indicates "Done" or "Fail".
o If t he status shows "Done", the device page app ea r s again. Proceed with th e next step.
o If t he status shows "Fail", press the button on the top right side of your device. In the
popup window, select "DDNS". The d evice page app ears again. P r oceed with the next step.
10. In "Title" [C], enter a meaningful name for your camera connection and press "Save" to confirm.
A B C
Page 7

CAMIP14n
V. 02 – 31/03/2014 7 ©Velleman nv
7.5 Port Forwardi ng
Before you continue, check the internet indicator on the camera.
• If the indicator blinks slowly every 5 seconds, you can proceed with port forwarding.
• If the indicator blinks rapidly, make sure that y our router is connected to internet. Then proceed with
port forwardin g.
To set up port forwarding, proceed as foll ows:
1. Open your web bro w ser on your mobile device, and enter the IP address of your router in the
address bar.
Your router configuration page appears.
2. Go to the por t f orwardi ng (or virtual server) rule configuration page.
Note: the naming of port forwarding or virtual server may vary based on the brand of your router.
Refer to the user manual of your specific router for more information.
The example below show s the screen for a D-Lin k router: select the "Advanced" tab and then
choose "Port Forwarding".
3. En ter the camer a IP address and port number that you noted down in step 7 of "Configuring the
Network", and enable this rule.
4. Check if the status indicators and on the ca mera are both on (n ot bli nking).
o If yes, continue with "Checking the Connection".
o If the interne t ind icat or keeps blinking, check the port forwarding settings again.
7.6 Checking the Connection
When you have completed network setup and port forwarding, check your connection setup as follows:
1. On your mobile device, switch your n etwork mode to 3G or connect to a di f f erent wi rel ess n etwork
than the one that has your camera connected.
2. Start EagleEyes and select the camera y ou just added t o see if you can access it.
o If yes, your network connection is OK.
o If no, the port number that you are using for the camera may be blocked. Return to step 7 in
"Configuring the Network" to change the port number.
7.7 Set up your camera with WPS
The WPS button allows y ou to quickly and easily connect th e camera to your wireless router if it also ha s
WPS functionality.
If your wireless router does n ot have a WPS function, you can set up your network manuall y. Refer to the
user guide on the included cd-rom or download instructions from from http://www.surveillancedownload.com/user/n812.swf
1. On the back of the camera, press and hold the WPS button. Release when you hear a tone.
2. On your wireless router, press the WPS button within 30 seconds.
Note: The WPS function on your router can be a virtual button on the configuration page, or a
physical button, depending on the brand. Check your router’s documentation for more information.
The camera and wireless router now connect automatically. The connection is successful if you hear a
tone, and if the LAN status indicator on the camera is on (not blinking).
Note: If the connection fails, check if the wireless authentication of your router is WPA or WPA2. If not,
please change the authentication method and try again.
Page 8

CAMIP14n
V. 02 – 31/03/2014 8 ©Velleman nv
8. Set a c am era to rec o r d to an SD card
In EagleEyes, you can set a ca mer a to record to its SD ca rd as follows:
1. Select the camera and tap
the Settings b utton .
2. Under Record
Configuration, set the
r es olution to SXGA
/HD720P.
3. Set the option Triggered
by to Internal Alarm.
4.
T ap Save on th e bottom of
the page.
5. Tap Advanced.
6. Open the Trigger setting.
7. Make su re the setti ngs are
as shown above.
8. Save and exi t the pag e.
Page 9
CAMIP14n
V. 02 – 31/03/2014 9 ©Velleman nv
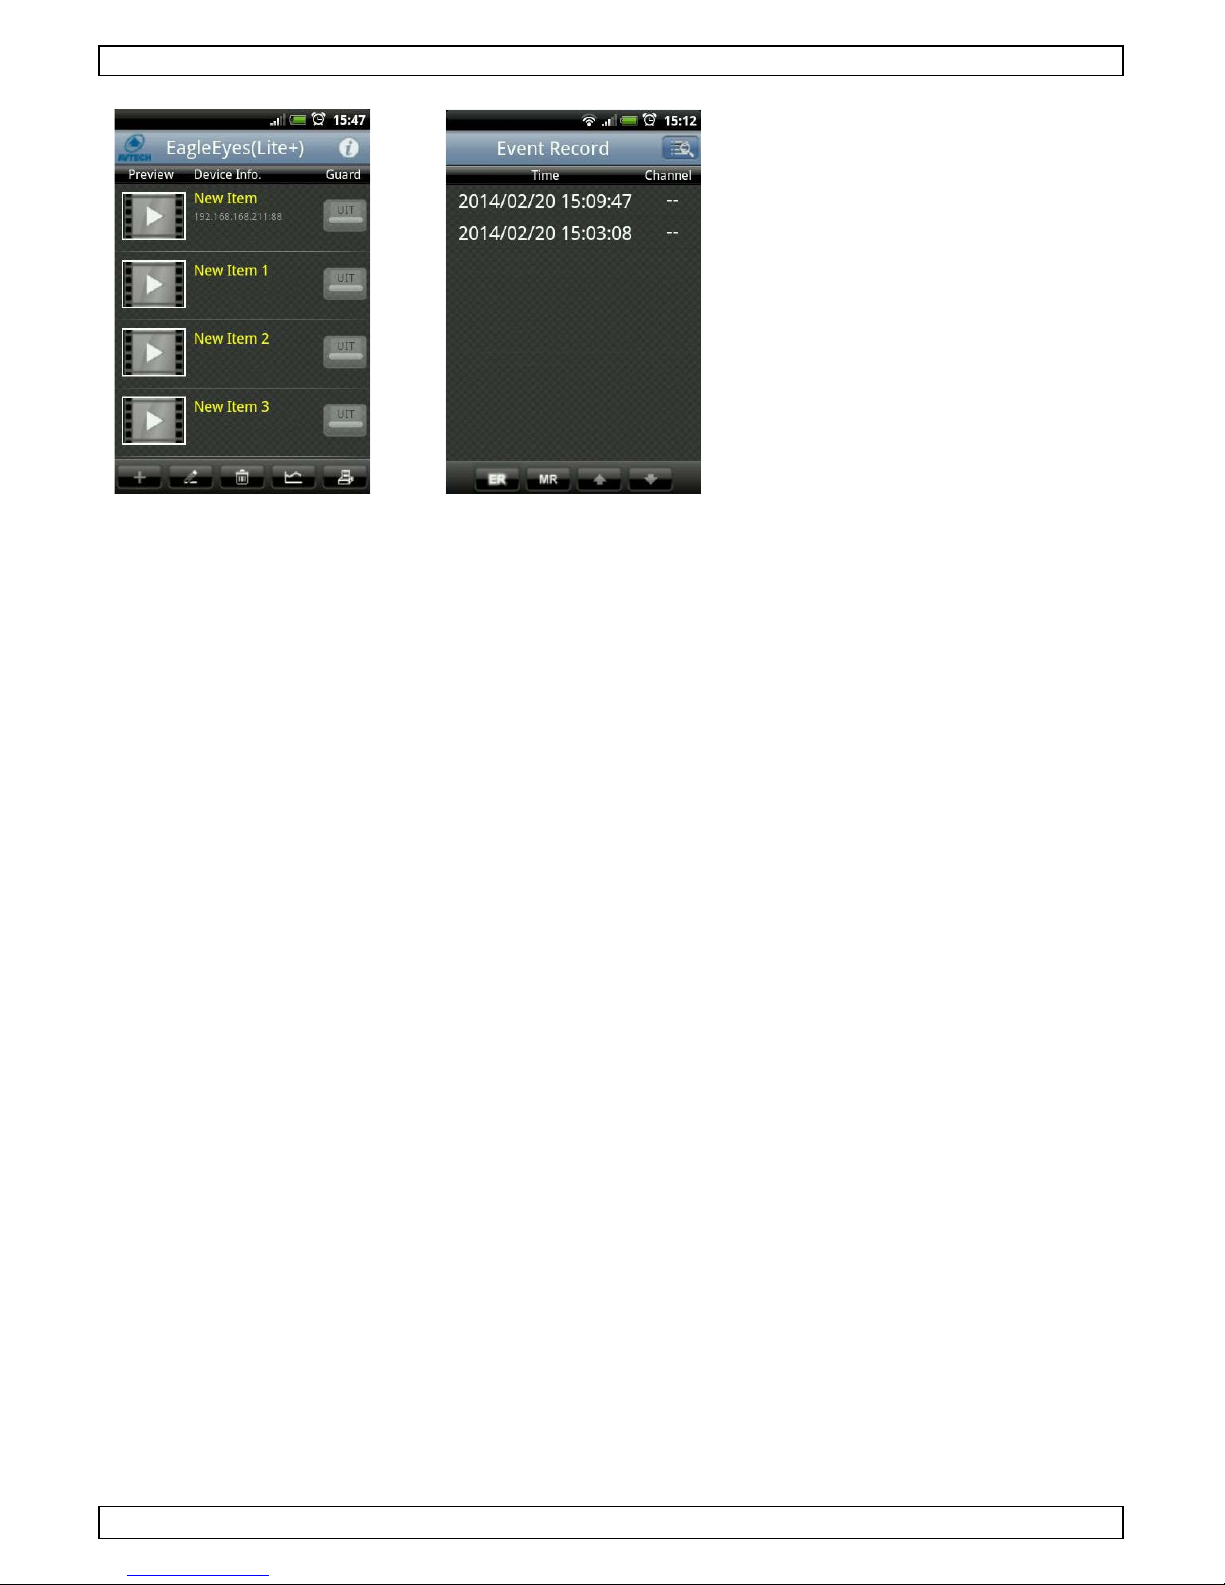
Viewing recorded video
1. In EagleEyes, tap the
button at the bottom of
the screen .
2. Select the camera from
which you want to view
video.
3. Select the even t you want
to view.
The video starts playing.
9. Viewing a video fro m the micro SD card on your computer
You can view the files recorded on the micro SD card with your computer and the VideoPlayer so ftware.
Download and I n s tal l Video Player
1. Go t o www.v el l eman.eu .
2. In the Search product box, type CAMIP14n and click P roduct.
3. Under Support, click Downloads.
4. Click the VideoPlayer for Windows installer and save the file to your computer.
5. When the installer is downloaded, double-click it to start the installation.
6. Follow the instructions in the wiz ard.
7. Refer to the manual on the for details on how to use the s oftware.
Copy recorded video to your c ompu ter
1. Rem ove the micro SD card from the camera and insert it in your computer.
2. Copy the fil es from the card to your computer.
View recorded files
1. To launch VideoPlayer, double-click the icon on the desktop.
2. Select the fi le you want to vi ew.
The file starts p laying, togeth er with a control panel:
Page 10

CAMIP14n
V. 02 – 31/03/2014 10 ©Velleman nv
Parts of the control panel
A
Display
G
Close b utton
B
Progress bar
H
Snapshot. Click this button to take a
snapshot.
C
Volume. Click the dot on the right and select
a volume setting.
I
Playback speed. Slide this button to increase
or decrease playback speed.
D
Previous/next
J
[no function]
E
AVI. Click this button to convert the video to
AVI format.
K
Show/hide information in the playback
window.
F
Playback buttons
L
Show/hide the file properti es.
Use this device with original accessories only. Velleman nv cannot be held responsible in the
event of damage or injury resulted from (incor rect) use o f this device. For mor e info
concerning this product and the latest version of this manua l, please visit our website
www.velleman.eu. The information in this manual is subject to change without prior notice.
All registered trademarks and trade names ar e properties of thei r respective owners and ar e used only
for the clarification of the compatibility of our products with the products of the different manufacturers.
iPhone and iPad are trademarks of Apple Inc., registered in the U.S. and other countries. D-Link, the DLink logo, are trademarks or registered trademarks of D-Lin k Corporation or its subsidiaries in the United
States and other countries. Android is a trademark of Google Inc.
© COPYRIGHT NOTICE
The copyright to this manual is owned by Velleman nv. All worldwide rights reserved. No part
of this manual may be c opied, reproduced, translated or red uced to any electronic medium or oth erwise
without the prior written consent of the copyright holder.
A
B
C D
E F G
HI
J
K
L
Page 11

CAMIP14n
V. 02 – 31/03/2014 11 ©Velleman nv
KORTE HAND LEIDI NG
1. Inleiding
Aan alle ingezeten en van de Europese Unie
Belangrijke milieu-informatie betreffende dit product
Dit symbool op het toestel of de ver pak king geef t aan dat, al s het na zij n levenscycl us wordt
wegg eworpen, d it toestel schade kan toebrengen aan het mi l ieu. Gooi d it toestel (en eventuele
batterijen) niet bi j het gewone h ui shoudelijke afval; h et moet bij een gespecialiseerd bedrijf
terechtkomen voor recycl age. U m oe t d it toestel naar u w verd eler of naar een lokaal
recyclagepunt b rengen. Respecte er de plaatselijke milieu wetgeving.
Heb t u vragen, contacteer dan de plaatselijke autoriteiten betreffende de
verwijdering.
Dank u voor uw aankoop! Lees deze handleiding grondig voor u het toestel in gebruik neemt. Werd het
toestel beschadigd tijd ens het transport, installeer het da n niet en raad pleeg u w dealer.
2. Veiligheidsinstructies
Houd dit toestel uit de buurt van kinderen en onbevoegden.
Elektrocutiegevaar bij het openen van het t oe stel. Raak geen kabels aan d ie onder stroom
staan, om dod elij ke elektr o schokken te vermi j d en. Om vei l igheidsredenen mag u geen
wijzigingen aanbrengen aan het toestel. Laat het onderhoud van het t o estel over aan een
geschoolde vakman.
Demonteer of open dit toestel N OOIT. Er zijn geen door de gebruiker vervangbare
onderdelen in di t toestel . Voor onderhoud en /of reserveonderd elen, conta cteer uw de aler.
3. Alg em ene richtlijnen
Raadpleeg de Velleman® service- en kwaliteitsgarantie achteraan de uitgebreide handleiding op de
meeg eleverde cd-rom.
• Gebruik het toestel enkel bi nnenshui s. Bescherm het t oe stel tegen reg en, vochti g heid en
opspatten de vl oeist offen.
• Bescherm dit toestel tegen st of en extreme temperaturen.
• Bescherm tegen s chokken. Vermi j d bru te kr acht ti j dens de bedieni ng.
• Leer eerst de fu ncti es van het toestel ken nen voor u het gaat gebruiken.
• Om veiligheidsredenen mag u geen wijzigingen aanbrengen.
• Gebru ik het toestel enkel waarvoor het g emaa kt is. De garan tie vervalt automatisch bij ongeoorloofd
gebruik.
• De g arantie geldt niet vo or s chade door h et negeren van bepaalde richtlijn en in deze handleidi ng en
uw dealer zal d e ver a ntwoordelijkheid afwij zen voor defecten of problemen die hi er rechtstreeks
verband mee houden.
• Installeer en gebruik deze camera NI ET voor illegale praktijken en respecteer ieders
privacy.
Page 12
CAMIP14n
V. 02 – 31/03/2014 12 ©Velleman nv
4. Omschrijving
voorkant
achterkant
1
witte led
8
WPS-knop (Wi-Fi Protected Setup)
2
luidspreker
9
poort voor microSD-kaart
3
microfoon
10
ethernetaansluiting
4
cameralens
11
voedingsaansluiting
5
antenne
12
externe I/O-poort
6
statusleds: = lan, = interne t
13
beugel
7
PIR-sensor
14
resetknop
5. E en micro S D-kaart p laat s en
• U kunt beelden opslaan op een microSD-kaar t. Het microSD-kaartslot bevindt zich aan de zijkant van
de camera.
• Raadpleeg de gebruikershandleiding op de cd-rom voor de lijst met compatibele microSD-kaarten.
Opmerkingen
• De camera ondersteunt geen hot s wapping. Schakel de camera in voordat u de microSD-kaart plaatst
of verwijdert.
• Wann eer u de camera inschakelt bij het plaatsen van de kaart in de camera, worden alle geg evens
op de microSD-kaart gewist.
6. Hardware-installatie
1. Beves tig de ronde voet van de beu g el op de gewenste install atieplaats. De afstand tussen uw
camer a en de zone die u wi lt bewaken moet 3-4 meter zijn.
2. Monteer d e beug el en de camera en stel de kijkhoek van d e camera in.
3. Beves tig de antenne voor een draadloze netwerkverbindi ng.
4. Sluit d e meegeleverde v oedingsadapter aan op de camer a en steek in een stopcontact.
Page 13

CAMIP14n
V. 02 – 31/03/2014 13 ©Velleman nv
7. Netwerkconfiguratie
We raden u aan om u w eigen A DSL of internetkab eldienst te gebruiken voor een eenv oudige
netwerkconfiguratie, bij voorkeu r met EaZy Networki ng of WPS ( Wi-Fi Prote cted Se tup).
De configuratiemethode hieronder beschri j f t:
• De n etw erkconfigur atie voorber eiden
• Configuratie met EaZy Networking
• Manuele netwerkconfiguratie
• Configuratie met WPS
7.1 De netwerkco n f iguratie voorbereiden
Zorg ervoor dat uw netwerk bestaat uit:
15
camera
16
draagbaar toestel (iPhone, iPad, Android-toestel)
17
draadloze router
18
WAN-poort
19
modem
• Mocht u d it nog niet geda an heb b en, installeer d e EagleE yes-Lite (+) of Eag leEyes-Pl u s app op uw
draagbaar toestel. U kunt de app downl oaden via de app store van uw toestel.
• Optioneel: Zorg ervoor dat de UPnP-functie ingeschakeld is indien de draadloze router deze functie
ondersteunt.
7.2 Configuratie met EaZy Networking
Over EaZy Networking
EaZy Networking is een plug-and-play-servi ce d ie zorgt voor een automatische verbinding tussen uw IPcamer a en het internet. De ser vice is ni et g ratis.
Om deze service te g eb ruiken, moet u een a ccount aanmaken voor de clouds ervi ce van Eagl eEyes.
EagleEyes biedt 500 MB gratis surfvolume (ong. 260 minuten) per EaZy Net w orking cam era, dat n a 6
maanden zal verval len nad at u de camera aan de cloudserver hebt toegevoegd. De inter netverbindin g
wordt geb lokkeerd wan neer u d e 50 0 MB opgebru ikt hebt of de 6 m a anden ver streken zi j n.
Om deze service opnieuw te acti ver en, moet u een data-abonnement van EagleEyes afslui ten of de
netwerkinstellingen manueel configureren (zie onder).
Deze service vereist:
• De n etw erk omgeving waar een router of draadloze router wordt gebruikt met ingeschakelde DHCP-
functie en de plaats waar de router zich bevindt.
• Een iPhone, iPad of Android-toestel.
Om EaZy Networking te kunnen gebruiken, moet u een account aanmaken.
• Start EagleEyes op uw to estel.
• Dr uk op "+" en d a arna op "Ea Zy".
• Bij het eerste gebruik is h et mogelijk dat u g evr a ag d wordt om VCL player, Software of H264
Streaming Viewer te i nstalleren . In stalleer de software. A nders is het mogelijk dat d e live-beelden
ni et correct worden weerg egev en.
Page 14
CAMIP14n
V. 02 – 31/03/2014 14 ©Velleman nv
1. Dr uk op "Register".
2. Vul de nodige informatie in
en druk op "Register".
3. Selecteer h et type toestel.
Druk op de onderste icoon
om een dr a ad loze camera
te selecteren.
4. Sluit uw camera aan zoals
weerg egeven op het
scher m en dru k op "R eady"
wanneer de ca mera
ing esch a keld is.
5. Controleer b eide led-
indicators.
Indi en de bei de leds bijven
branden, druk op "Yes".
6. Geef het MAC-adres van uw
toestel in (u vindt dit aan
de achterkant of onderkant
van het toestel) en druk op
"Apply".
7. Het ca mer abe eld verschijnt.
Controleer of de camera in
de gew enste positi e staat.
8. Vul een naam in voor de
camera n aast "Device ti tle"
(bijvoorbeeld: "Off ice").
9. Dr uk op "App ly" om te
voltooien.
7.3 Manuele netwerkconfiguratie
U kunt de netwerkconfiguratie manueel instellen als volgt:
1. Noteer het IP-adres van uw draadloze rou ter. U zal het later nog nodig hebben. Om het IP-adres te
vinden, gaat u als volgt te werk:
Page 15
CAMIP14n
V. 02 – 31/03/2014 15 ©Velleman nv
2. Verbind uw draagbaar toestel met de
draad l oze router waar mee de camera
verbonden is.
3. Ga naar Setti ngs > WiFi.
4. Dr uk op de “>” t o ets om meer d eta ils van het
geselecteerde draadloze net w erk te zien.
Het IP-adres wordt naast “Router”
weergegeven.
(I n het voorbeeldscherm is het IP-adres
192.168.2.1)
7.4 De netwerkconfiguratie
1. Verb ind uw draagb a ar toes tel met de draadloze r outer waarmee de ca mera verb ond en i s.
2. Open d e EagleE yes ap p en klik op “+” om een nieuw toestel toe te voegen.
3. Selecteer “Local Network Search” om te zoeken naar de camer a.
Het t oe stel zal een l ijst tonen met toestel len die
verbonden zijn met het netwerk. Het IP-adres dat
verschijnt, is het adres dat door uw router werd
toegekend aan uw camera.
Indi en de I P CAM c amera niet op de li j st staat, zorg er
dan voor dat de in dicatieled van de LAN op de
camer a b randt (niet knip p ert). Reset [13] de ca mera
indien nodig. Wacht 3 mi nuten en selecteer daarn a
opnieuw “Local Network Search”.
4. Selecteer de camera in de lijst. De configuratiepagina verschijnt.
5. I n de configuratiep agina, schakel "DHCP" naar "Stati c" om.
6. Verander het poortnummer van de camera indien nodig. Het standaard poortnummer is 88. Als
poortnummer 88 geblokkeerd is, kunt u dit aanpassen naar een wi l lekeurige waarde tussen 1 -9999
(bijvoorbeeld 9890).
7. Noteer het IP-adres en het poortnummer van d e camera. U zal d eze n og nodig h eb ben.
(I n de voorbeelden hieronder [A], is het IP-adr es 192.168.2.197 en het poor t nummer 88.)
8. Dr uk op “App ly” om uw in stell ingen te b evestigen.
9. W a cht totdat “Status” [B] “Done” of “Fail ” weerg eeft.
o Als d e statu s “Done” weergeeft, verschi j nt de pagi na van het toestel opnieuw. Ga v erder met
de volgende stap.
o Geeft de status “Fail ” weer, dru k op de knop rechtsboven op uw t oes tel. In het pop -
upvenster select eer t u “DDNS". De pagi na van het toestel verschijnt opni euw. Ga ver d er met
de volgende stap.
10. Geef in “Title” [C] een herkenbare naam in voor de aansluiting van uw camera en druk op “Save”
om te bevestigen.
A B C
Page 16
CAMIP14n
V. 02 – 31/03/2014 16 ©Velleman nv
A B C
7.5 Port forwardi ng
Controleer d e interneti ndicator op de camera alvorens verder te gaan.
• Indien de led langzaam knippert om de 5 seconden, kunt u verder gaan met het instell en van de port
forwarding.
• Indi en de led snel kni ppert, moet u ervo or zorg en dat uw router verbonden is met het internet. Ga
vervolgens verder met het instel len van de port forwarding.
Om de functie port forwarding in te stellen, gaat u als volgt te werk:
1. Open de webbrowser op uw draagbaar toestel en tik het IP-adres van uw router in de adresbalk.
De configuratiepagina van uw router verschijnt.
2. Ga naar de configuratiepagina met de instellingen van de functie port for warding (of virtuele
server).
Opmerking: h et definiëren van de port for ward ing of vi r tuele server kan variër en afh ankelijk van
het type router. Ra ad pl eeg de gebru ikershandleiding van uw router v oor meer informatie.
Het v o orbeeld hieronder toont het scherm voor een D-Link router: selecteer “Ad vanced” en
vervolgens “Port Forwardi ng".
3. Geef het IP-adres van de camera en het poortnummer in die u noteerde in stap 7 “De
netwerkconfiguratie” en acti veer deze instelling.
4. Controleer of beide indicatieleds en op de camera branden (niet kni pperen).
o In dien ze branden , ga verder m et “De v erbinding control eren".
o In dien de led blijft knipperen, controleer de instellingen van de port forwarding opnieuw.
7.6 De verbinding controleren
Wann eer de netwer kconfiguratie en poortdoorschakel ing voltooi d zijn, contr oleert u d e set-up van uw
verbinding als volgt:
1. Via uw draagb aar toestel stelt u uw netwerkmodus in naar 3G of maakt u verbinding met een ander
draadl oos netwerk dan da t w aa rmee uw ca mera verbonden is.
2. Start EagleEyes en sel ecteer de ca mera di e u zopas hebt toegevoegd o m te zien of u toegang hebt.
o Hebt u toegang, dan is uw netwerkaansluiting OK.
Page 17

CAMIP14n
V. 02 – 31/03/2014 17 ©Velleman nv
o Is di t niet het geval , dan i s h et mogeli j k d a t het poortnummer dat u gebruikt voor de camera,
geblokkeer d is. Keer ter ug n aa r stap 7 "De netwerk configuratie" om het p o ortnummer te
wijzigen.
7.7 Uw camera instellen met WPS
Met de WPS-knop kunt u de camera snel en eenvoudig aansl uiten op uw dr aa d loze router indien d eze
eveneens voor zien is van een WPS -functie.
Indien uw router niet beschikt over een WPS-functie, dan kunt u uw netwerk manueel instellen.
Raadpleeg de gebruikershandleiding op de meegeleverde cd -rom of download de instructies via
http://www.surveillance-download.com/user/n812.swf
1. Aan de achterkant van de camera, h oud de WPS-knop ingedrukt. Laat los wanneer u een signaal
hoort.
2. Op uw draadloze r outer, druk op de WPS-knop binnen de 30 seconden.
Opmerking: De WPS-functie op uw router kan een virtuele knop zijn op de configuratiepagina of
een fysieke knop, afhan kelijk van het merk. R a ad pl eeg de h andleidi ng van uw router v oor meer
informatie.
De camera en draadloze router maken nu automatisch een verbin ding. De verbinding is geslaagd
wanneer de camera een signaal laat h oren en de LA N -indicator op de camera brandt (niet knippert).
Opmerking: Indien de verbinding mislukt, controleer of de draadloze authenticatie van uw router WPA
of WPA2 is. Is di t niet het geval , wijzig de au thenticatiemethod e en probeer opnieuw.
8. Ee n c am e r a in s tel len o m naar een SD -kaart te schrijve n
In EagleEyes kunt u een camera instellen om naar de SD-kaart te schrijven als volgt:
1. Selecteer de camera en
druk op de kn op "Settin gs"
.
2. Onder "Record
Configuration", stel de
resolutie in op
"SXGA/HD720P".
3. Stel de optie "Triggered
by" in op "Internal Al a rm".
4. Druk onderaan de pagina
op "Sa ve".
5. Dr uk op "Advanced".
Page 18

CAMIP14n
V. 02 – 31/03/2014 18 ©Velleman nv
6. Open de instelling
"Trigger".
7. Zorg ervoor dat de
instellingen er uitzien als
weerg egeven hier boven.
8. Sla de instellingen op en
sluit de pagina.
Opna mes beki j k en
1. In EagleEyes, druk op de
knop onderaan het
scherm.
2. Selecteer de camera
waarvan uw opnames wilt
bekijken.
3. Selecteer h et event dat u
wilt bekijken.
De opname wordt
afgespeeld.
9. E en opname van d e micro SD-k aart b eki jken o p uw c o m pu ter
U kunt de opgenomen bestanden op de microSD-kaar t b ekijken via uw comput er en de V ideoPlayersoftware.
VideoP layer downloaden en instal ler en
1. Ga naar ww w.vell eman.eu
2. In het vel d "Product zoeken", geef CAMIP14n in en kl ik op "Pr odu ct".
3. Onder de rubriek "Ondersteuning", klik op de link "Downloads".
4. Klik op het installatieprogramma "VideoPlayer f or Windows" en sla het bestand op uw computer op.
5. Dubbelklik om de installatie te starten.
6. Volg de instructies in de wizard.
7. Raadpleeg de handlei din g voor meer informatie over het geb ruik van de s oft ware.
Opnames naar uw computer kopiëren
1. Verwi j der de microSD-kaart uit de camera en plaats deze in uw computer.
2. Kopi eer de bestanden van de kaart naar uw computer .
Opgenomen bestanden bekijken
1. Dubbelklik op de icoon op het bureaublad om VideoPlayer te starten.
2. Selecteer h et b estand dat uw wilt bekij ken.
Het bestand wordt afgespeeld, een controlepaneel verschijnt:
Page 19

CAMIP14n
V. 02 – 31/03/2014 19 ©Velleman nv
Het con trolepaneel
A
Display
G
Knop Sluiten
B
Statusbalk
H
Screen shot. Kl ik op deze knop om een
screenshot te nemen.
C
Volu me. K lik op de stip rechts en stel het
volume in.
I
Afspeelsnel heid. Verschuif deze knop om de
afspeelsnelheid te verhogen of te ver lagen.
D
Vorige/volgende
J
[geen functie]
E
AVI. Klik op deze knop om de video naar
AVI-formaat te c onverteren.
K
Informatie weergeven/verbergen in het
afspeelvenster.
F
Afspeelknoppen
L
Bestandseigenschappen
weergeven/verbergen.
Gebruik dit toestel enkel met or igin el e accessoir es. Velleman nv is niet aansprakelijk voor
schade of kwetsuren bij ( verkeerd ) gebrui k van dit toestel. Voor meer informati e over dit
product en de laatste versie van deze h andleiding, zi e www.velleman. eu. De informatie in
deze handl eiding kan te allen tij de worden gewijzi gd zond er voorafgaande kennisgeving.
Alle geregistreerde ha ndelsmerken en handelsnamen zijn eigen dom va n hu n respectieve bezitters, en
zijn enkel gebruikt als voorbeeld van de co mpatibilitei t tussen on ze producten en de producten van de
verschillende fabrikanten.
iPhone en iPad zijn handelsmerken van Apple Inc., geregistreerd in de VS en andere landen. D-Link, de
D-Link logo's, z ijn handelsmerken of gereg istreerde hand elsmerken va n de D -Link Cor poration of haar
dochterondern emingen in de Verenigde Staten en and ere l a nden. Andr oi d i s een han delsmerk van Google
Inc.
© AUTEURSRECHT
Velleman nv heeft het auteursrecht voor d eze handleiding. Alle wereldwijde rechten
voorbehouden. Het is ni et toegestaan om deze handleiding of ged eelten ervan over te nemen, te
kopiëren, te ver talen, te bewerken en op te slaan op een elektronisch mediu m zonder voorafgaande
schrifteli jke toestemming van d e r echthebbend e.
A
B
C D
E F G
HI
J
K
L
Page 20

CAMIP14n
V. 02 – 31/03/2014 20 ©Velleman nv
GUIDE D'INSTALLATION RAPIDE
1. Introduction
Aux résidents de l 'Unio n européenne
Informations environnementales importantes concernant ce produit
Ce symbole sur l'appareil ou l'emballage indique que l'élimination d'un appareil en fin de vie
peut polluer l'environnement. N e p as jeter un a p pareil électrique ou électroni q ue (et des piles
éventuelles) pa r mi les déch ets munici paux n on su j ets au tr i sélectif; une déchetterie traiter a
l'appareil en q uesti on. Renvoyer cet ap pareil à votre fournisseur ou à un servi ce d e recyclage
l ocal . Il convient d e r esp ecter la r églementation local e r elative à la p rotecti on d e
l'environnement.
En cas de doute, contacter les autorités locales pour élim inat ion.
Nous v ous re mercion s de v otre achat ! L ire l e p résent m ode d' emploi atten tivement avant l a mise en
service de l'appareil. Si l'appar eil a été endomm agé pendant le transport, ne pas installer et consul ter
votre revendeur.
2. Consignes de sécurité
Garder l'appareil hors de l a portée de jeunes enfants et de personnes non q ualifiées.
Risque d’électrocution lors de l’ouverture du boîtier. Toucher un câble sous tensi on peut
causer des électrochocs mortels. Ne jamais ouvrir le boîtier. Confier la réparation de l'appareil
à du personnel qualifié.
N E JAMAIS désassembler ou ouvrir le boîtier. Il n’y a aucune pièce réparable par l’utilisateur.
Commander des pièces de rechange éventuelles chez votre revendeur.
3. Directives générales
Se réf érer à la garanti e de service et de qualité Vel leman® en fin du mode d'emploi détaillé su r le
cédérom inclus.
• Utiliser cet appareil uniquement à l'intérieur. P r otéger de l a p l uie, de l’humidité et des
projections d’eau.
• Protég er cet appareil contre la poussière et la chaleur extrême.
• Protéger l’appareil des chocs. Traiter l'appareil avec circonspection pendant l’opération.
• Se familiariser avec le fonctionnement de l'appareil avant de l'utiliser.
• Il est interdit de modifier l'appareil pour des raisons de sécurité.
• N’utiliser l'appareil qu’à sa fonction prévue. Un usage impropre annule d'office la garantie.
• Les dommages oc ca sionnés par des modi fications à l'appareil par l e cl ient, ne tombent pas s ous la
garantie et votre r evendeu r décl inera toute responsabilité pour les problèmes et les défauts qu i en
résultent.
• Installer et utiliser l a caméra en r espec tant la législation et la vie privée des tiers.
Page 21

CAMIP14n
V. 02 – 31/03/2014 21 ©Velleman nv
4. Description
fac e avant
face arrière
1
LED blanche
8
bouton WPS (Wi-Fi Protected Setup)
2
haut-parleur
9
slot pour carte micro SD
3
microphone
10
connexion Ethernet
4
objectif
11
connexion d'alimentation
5
antenne
12
port I/O externe
6
LEDs d'état = la n , = internet
13
support
7
capteur PIR
14
bouton de réinitialisation
5. Insérer une carte micro SD
• Il est possible d'enr eg istrer une vidéo sur une car te micro SD. L e slot pour carte mi cr o SD est situé
sur le côté de la ca méra .
• Consulter le mode d'emploi su r le cédérom pour u ne liste de cartes mi cr o SD compatibles.
Remarques
• La camér a n e su p porte pas le hot-swap. Insérer ou retirer la carte micro SD avant d'allumer la
caméra.
• Les données de la carte micro SD seront eff acées lorsque vous insérez la car te et vous allumez la
caméra.
6. In s tallation de la c am ér a
1. Fixer la base ronde d u su p p ort à l'empl acement d'installation de la caméra. L a di stan ce entr e votre
camér a et la zone qu e vous v oulez survei l ler doit êtr e d e 3-4 mètres.
2. Asse mbler l e support et la caméra et ajuster l'angle d e vue de la caméra.
3. Fixer l'antenne pour une connexion r éseau sans fil.
4. Connecter votre caméra à l'alimen tation livrée et b r a ncher l a sur u ne pri se électri q ue.
Page 22

CAMIP14n
V. 02 – 31/03/2014 22 ©Velleman nv
7. Co nfi gurati o n d u réseau
Utiliser votre propre service internet par ADSL ou par câble pour faciliter la configuration du réseau, de
préf érence avec EaZ y N etworking ou WPS (Wi-Fi Protect ed S etup).
La méthode d'installation ci-dessous décrit :
• Préparer la configuration du réseau
• Configuration avec EaZy Networking
• Configuration manuelle du réseau
• Configuration avec WPS
7.1 Préparer la configuration du résea u
S'assur er qu e le réseau contient les él émen ts su ivants :
15
caméra
16
dispositif mobile (iPhone, iPad, smartphone
Android)
17
routeur sans fil
18
port WAN
19
modem
• Si nécessaire, installer le pr ogramme mobile EagleEyes-Li te (+ ) ou E ag leEyes-Plus (-) sur votre
dispositif mobile. Vous pouvez le télécharger à partir de votre 'App Store'.
• Optionnel : si votre r outeu r supporte UPnP, veiller à ce que la fonction s oi t a ctivée.
7.2 Conf igu ration avec EaZy Networking
Sur EaZy Networking
EaZy Networking est un service plug-and-play permettant d'établir une connexion automatique entre la
caméra IP et l'Internet. Le ser vice n'est pas gr a tu it.
Pour utiliser ce ser vice, créer u n nouveau compte d'uti l isateur pour le servi ce cloud d' EagleE yes.
EagleEyes offre fourn ira gratuitement 5 00 Mo d e d onn ées (env. 260 mi nutes) par ca méra avec EaZ y
Networking, qui expireront 6 mois après la connexion de votre caméra au serveur cloud. La connexion
i ntern et est b loquée une fois l es 500 Mo att eints ou après 6 mois.
Pour se reconnect er, il faut s'in scrire au ser vice d e données d'Ea g leEyes ou configu rer manuellement les
paramètres du réseau (voir ci-dessous).
Ce service requiert :
• L'environnement réseau dans lequel un routeur ou routeur sans fil est utilisé avec la fonction DHCP
acti vée et l'emplacement du routeur .
• Un iPhone, iPad ou smartphone Android.
Créer un compte d'utilisateur pour utiliser EaZy Networking.
• Démarrer EagleEyes sur votre dispositif.
• Taper sur " + " et ensuite sur " E aZy ".
• Lors de la première utilisation, il est possible qu'il vous soit demandé d'installer VLC player, Sofware
ou H264 Streaming Viewer. Installer le logiciel. Dans le cas contraire, il est possible que les images
en direct ne s'aff ichent pa s correctement.
Page 23

CAMIP14n
V. 02 – 31/03/2014 23 ©Velleman nv
1. Taper sur " Register ".
2. Remp lir les in f or mations
néces saires et taper sur "
Register ".
3. Sélecti onn er l e type de
dispositif. Pour sélectionner
une caméra sans fil, taper
sur l'icône du bas.
4. Connect er votre ca méra
comme affiché et taper su r
" Ready " lorsque l a caméra
est al lumée.
5. Contrôler les deux
indicateurs LED.
Si les deux LEDs restent
allumées, tap er sur " Y es ".
6. Saisir l'a d resse MAC de
v otre disposi tif (l'adresse se
trouve sur la partie arrière
ou inférieure de votre
dispositif) et taper sur "
Apply ".
7. L'image de la caméra
s'affiche. Vérifier si la
camér a est orientée dans l a
position souhaitée.
8. Saisir un nom pour la
camér a à côté de " Device
title " (par exemple : "
Office ").
9. Taper sur " Apply " pour
terminer.
7.3 Configuratio n manuelle d u réseau
Il est possible de confi gur er man uellement les paramètr es d u réseau, procéder comme suit :
Page 24

CAMIP14n
V. 02 – 31/03/2014 24 ©Velleman nv
1. Noter l'adresse IP de votre routeur sans fil. Vous en aurez besoin pl us tard. Pour retrouver
l'adresse IP, procéder comme suit :
2. Connecter votre dispositif mobile au routeur
sans fil auquel la caméra est connectée.
3. Aller à Settings > WiFi.
4. Appuyer sur le bouton '' > " pour voir les
détails du réseau sans fil sélectionné.
L'adresse IP est affichée à côté de " Router ".
(Dan s l'écran d'exemple, l' adresse es t
192.168.2.1)
7.4 Configuration du réseau
1. Connecter votre dispositif mobile au routeur sans fil auquel la caméra est c onnectée.
2. Ouvrir EagleEyes et cliquer sur le bouton " + " pour ajouter un nouvel appareil.
3. Sélecti onn er " Local Networ k Sear ch " pour rech ercher votre caméra réseau.
L'appareil af fichera u ne liste d'appar eils connectés au
réseau. L'adress e IP affich ée est l'adresse attribuée
par votre routeur à votre caméra.
Si la caméra IPCAM ne se trouve pas sur la liste,
s'assurer que l'indicateur d'état LAN sur la caméra
est al lumé (et ne cl ignote pas). Si nécessair e,
réinitialiser [13] l a caméra. Patienter 3 minutes et
sél ectionner de nouv ea u “Local Network Search”.
4. Sélectionner la caméra depuis la liste. La page de configuration s'affiche.
5. Dans la page de configuration, passer de " DHCP " en " Static ".
6. Modifier le nu méro de port de la caméra si nécessai re. Le numéro de port par défau t est 88. Si le
numéro de port 88 e st b loqué, il est possible d e l e modi f ier dan s une valeur quelconque entre 1 9999 (par exemple 9890).
7. Noter l'adresse I P et le numéro de port de la caméra. Vous en a urez besoin plus tar d.
(Dans les écr a ns d'exempl e ci-dessous [A],
8. Appuyer sur " Apply " pour confirmer vos configurations.
9. Attendre jusqu'à ce " Status " [B] affiche " Done " (terminé) ou " Fail " (échec).
o Si l'état affiche " Done ", la page de l'appareil r éap p araît. Passer à l'étape suivante.
o Si l'état affiche " Fail ", appuyer sur le bouton en haut à d roite de votre appareil .
Sélecti onn er " DDNS " dans la fenêtre intruse. La page de l'appareil réapparaît. Passer à l'étape
suivante.
10. Dans " Title " [C], donner un nom représentatif pour votre connexion caméra et sélectionner
" Save " pour confirmer.
A B C
Page 25

CAMIP14n
V. 02 – 31/03/2014 25 ©Velleman nv
A B C
7.5 Redirection de port (port forwarding)
Avant de continuer, contrôler l'indicateur internet de la caméra.
• Si l'indicateur clignote lentement toutes les 2 secondes, vous p ouvez continuer avec la configuration
de la redirection de port.
• Si l'indicateur clignote rapidement, s'assurer que le routeur est connecté à l'Internet. Puis, continuer
avec la configuration de la redirection de port.
Pour la configuration de la redirection de port, procéder comme suit :
1. Ouvrir le navigateur web sur votre dispositif mobile et saisir l'adresse IP dans la barre d'adresse.
La page de configuration de votre routeur apparaît.
2. Aller à l a p a g e de confi gur ation des r ègl es d e redir ection de p ort (ou serveur virtuel).
Remarque : L'af fectation de nom à l a r edi recti on d e p ort ou à un ser veur virtuel peu t var ier en
fonction des différentes marques de routeurs. Pour plus d'informations, consulter le mode d'emploi
de votre r outeu r.
L'exemple ci-dessous affiche l'écran d'un routeur D-Link : sélectionner l'onglet " Advanced " et
ensuite sélectionner " Port Forwarding ".
3. Saisi r l'adres s e I P d e la caméra et le numéro de port que vous a vez n otés dans l'étape 7
“Configuration du réseau”, et activer cette r èg le.
4. Vérifi er que l es indicateu rs d'état et de la caméra sont allumées (ne cl ignotent pas).
o Le cas échéant, continuer avec “ Vérifier la connexion ".
o S i l'indic ateu r continue à clignoter, vér ifi er à nouveau les réglages de la redir ection de port.
7.6 Vérifi er la connexion
Après la configuration du réseau, vérifier votre connexion comme suit :
1. Régler votre m ode réseau sur le mode 3G sur votre dispositif mobi le, ou le conn ecter à un r éseau
sans fil différ ent à celui auquel la caméra est conn ectée.
2. Démarr er Eag leEyes et sélectionner la caméra aj outée pour voir s'il est possibl e d'accéder à la
caméra.
o Le cas échéant, la connexion réseau est réu ssie.
o Si ce n 'est p a s le cas, il est p ossible que le numéro de port utilisé pour la caméra soit b loqué.
Retourner à l'étape 7 " Configuration du r éseau " pour modifier le numéro de port.
Page 26

CAMIP14n
V. 02 – 31/03/2014 26 ©Velleman nv
7.7 Configurer votre ca méra avec WPS
Le bouton WPS vous permet de connecter r api dement et facilement la caméra au routeur san s f il si celuici est équipé de la fonction WPS.
Si votre r outeu r sans fil n'est pas équipé de la fonction WPS, i l est possi bl e de confi gur er l e réseau
manuellement. Consulter le mode d'emploi sur le cédéro m ou télécharger les instructions su r
http://www.surveillance-download.com/user/n812.swf
1. Maintenir enfoncé le bout on WPS su r la par tie arrièr e d e l a caméra . Relâcher lorsque vous ent endez
un signal.
2. Appuyer sur le bouton WPS de votre routeur sans fil dans l es 30 sec ond e s.
Remarque : La fonction WPS du routeur peut être un bouton virtuel dans la page de configuration
ou un bouton authentique. Cela dépend de la marque. Pour plus d'informations, consulter le mode
d'emploi du routeur.
Maintenant, la caméra et le routeur sans fils se connectent automatiquement. La connexion est réussie si
vous entendez un signal et si l'indicateur d'état LAN de la caméra es t allumé (ne clign ote pas).
Remarque : Si la connexion a échoué, contrôler si l'authentification sans fil du routeur est WPA ou
WPA2. Si ce n'est pas l e cas, modifi er la méthode d'authentification et essa yer à nouveau.
8. Configurer une caméra pour enregistrer sur une carte SD
Dan s EagleEyes, il est possible de confi g urer un e caméra pour enregistrer sur une carte SD, procéder
comme suit :
1. Sélecti onn er l a caméra et
taper sur le bouton "
Settings " .
2. Sous la rubrique " Record
Configuration ", régler la
résolution sur "
SXGA/HD720P ".
3. Régler l'option " Triggered
by " sur " Internal Alarm ".
4. Taper sur le bouton " Save
" en bas de la page.
5. Taper sur " Advanced ".
6. Ouvrir le réglage " Trigger
".
7. S'assur er qu e les réglages
sont configurés comme
8. Sauveg a r der et quitter la
page.
Page 27

CAMIP14n
V. 02 – 31/03/2014 27 ©Velleman nv
aff ichés ci-dessus.
Visualiser d es vidéos enregistrées
1. Dans EagleEyes, taper su r
le bouton en bas de
l'écran.
2. Sélecti onn er l a caméra
depuis laquelle vous
souhaitez visualiser une
vidéo.
3. Sélecti onn er l ' événement
que vous souhaitez
visualiser.
La lecture de la vidéo
commence.
9. V isualiser une vid éo e nregis trée de l a ca rte mi c ro SD s ur vot r e
ordinateur
Il est possible de vi sualiser les fi chiers enregistrés su r l a car te micro SD avec votre ordinateur et le
logiciel VideoPlayer.
Télécharger et installer VideoPl a yer
1. Visiter www.velleman.eu
2. Dan s la zone " Rechercher arti cle ", taper sur CAMIP14n et cliquer sur " Article ".
3. Dans la rubrique " Assistance ", cliquer sur le lien " Téléchargements ".
4. Cliquer sur le programme d'installation " VideoPlayer for Windows " et sauvegarder le fichier sur
votre ordinateur.
5. Double-cliquer pour lancer l'installat ion.
6. Suivre les instructions de l'assistant d'installation.
7. Consulter le mode d'emploi pour plus d'informations sur le logiciel.
Copier des vidéos enreg istrées vers l'ordinateur
1. Retirer la carte micro SD de la caméra et insérer la carte dans votre ordinateur.
2. Copier les fichiers de la carte vers l'ordinateur.
Visualiser d es fic hiers enregistrés
1. Pour lancer VideoPlayer, double-cliquer sur l'icône sur le bureau.
2. Sélectionner le fichier que vous souhaitez visualiser.
La lecture du fichier commence, un panneau de contrôle s'affiche.
Page 28

CAMIP14n
V. 02 – 31/03/2014 28 ©Velleman nv
Panneau de contrôle :
A
Afficheur
G
Bouton Fermer
B
Barre de progression
H
Capture d'image. Cliquer sur ce bouton pour
effectu er une capture d'image.
C
Volume. Cliquer sur le point à droite et régler
le volume.
I
Vitesse de lectur e. Faire glisser ce bouton
pour augmenter ou diminuer la vitesse de
lecture.
D
Précédent/suivant
J
[pas de fonction]
E
AVI. Cliquer sur ce bouton pour convertir la
vidéo au format AVI .
K
Afficher/masquer l'information dans la fenêtre
de lectur e.
F
Boutons de lecture
L
Afficher/masquer les propriétés du fichi er .
N'empl oyer cet appareil qu'avec des ac cessoires d'origine. SA Velleman ne sera aucunement
responsable de dommages ou lésions survenus à un usage (incorrect) de cet appareil. Pour
plus d'informations concernant cet ar ti cle et la d erni ère version de ce mode d'emploi,
consulter notre site www.velleman.eu. Les spécifications et l e contenu de ce mo de d'empl oi
peuvent être modi fiés sans avis préalable.
Les ma r ques déposées et les raisons soci a les sont l a p ropriété de leurs détenteurs resp ectifs, et sont
un iquement uti l isées dans le bu t d e démontr er la compatibilité entr e nos articles et les articles des
fabricants.
i Phone et i Pad sont de s marq ues commerciales d'Apple In c., enregistrées aux Eta ts-Unis et dans d'autres
pays. D-Link et le logo D-Link sont des marques déposées de D-Link Corporation ou de ses filiales aux
Etats-Unis et dans d'autres pays. Android est une marque de Google Inc.
© DROITS D’AUTEUR
SA Velleman est l’ayant droit des droits d’auteur pour ce mode d'emploi. Tous droits mondiaux
réservés. Toute reproduction, traduction, copie ou diffusion, intégrale ou partielle, du contenu de ce
mode d'emploi p ar quelque procédé ou sur tout su p port électronique qu e ce soit est interdite sans
l’accord préalable écrit de l’ayant droit.
A
B
C D
E F G
HI
J
K
L
Page 29

CAMIP14n
V. 02 – 31/03/2014 29 ©Velleman nv
GUÍA RÁPI DA
1. Introducción
A los ciudadanos de la Unión Europea
Importantes informaciones sobre el medio ambiente concernien te a este producto
Este símbolo en este aparato o el embalaje indica que, si tira las muestras inservibles, podrían
dañar el medio ambiente. No tire este aparat o (n i las pilas, si las h ubiera) en la basura
doméstica; debe ir a un a empr esa especi alizada en reciclaj e. Devuelva este aparat o a su
distribuidor o a la unidad de reciclaje local. Respete las leyes locales en relación con el medio
ambiente.
Si tiene dudas, contacte con las autoridades loca les para residuos.
¡Gracias por eleg ir Velleman! Lea atentamente las instr ucciones del manual antes de usar el aparato. Si
el aparato ha sufrido algún daño en el transporte no lo instale y póngase en contacto con su distribuidor.
2. Instrucci ones de seguridad
Mantenga el aparato l ejos d el al cance de per sonas no capa citadas y niños.
riesgo de descarg as eléctricas al ab ri r la caja. Pu ed e suf rir una peligrosa descarga eléctrica al
tocar un cable cone ctado a la red eléctrica. N o abra n i desmonte la caja. L a r ep aración debe
ll evar la a cabo un técnico cualificado.
NUNCA desmonte ni abra la caja. El usuario no habrá de efectuar el mantenimiento de ninguna
pieza. Contacte con su distribuidor si necesita piezas de recambio.
3. Norm a s g ene ra les
Véase la G arantía de servicio y calidad Velleman® al final del amplio manual del usuario en el CD
ROM (incl ).
• Utilice el a parato sólo en interi ores. No exponga este equipo a lluvia, humedad ni a ningún tipo
de salpicadura o goteo.
• No exponga este equi p o a polvo ni temperaturas ex tre mas.
• No agite el aparato. Evite usar excesiva fuerza durante el manejo y la instalación.
• Familiarícese con el func ionamiento del aparato antes de utilizarlo.
• Por razon es de seguridad, las modifi caciones no aut orizadas del aparato están prohibidas.
• Utilice sólo el aparato para las aplicaciones d e scri ta s en este man ual. Su uso incorrecto anula l a
garan tía completamente.
• Los daños causad os por descui do de las instru cciones de seguridad de este manual invalidarán su
garantía y su distribuidor no será responsable de ningún daño u otros problemas resultantes.
• Instale y utilice la cámara al respetar la legislación et l a vida privada de terceros.
Page 30

CAMIP14n
V. 02 – 31/03/2014 30 ©Velleman nv
4. Descripción
parte frontal
parte trasera
1
LED blanco
8
botón WPS (Wi -Fi Protected S etup/
configuración Wi-Fi protegida)
2
altavoz
9
puerto para tarjeta micro SD
3
micrófono
10
conexión Ethernet
4
óptica
11
entrada de al imentación
5
antena
12
puerto de entrada/salida exter no
6
LEDs de estado = lan, = internet
13
soporte
7
sensor PIR
14
botón de reinicialización (reset)
5. Introducir una tarjeta micro SD
• Es posible grabar vídeos en una tar j eta mi cro SD. El puerto para tarjeta micro SD está en el lateral
de la cámara.
• Para una lista de tarjetas micro SD compatibles, consulte el manual del usuario del CD-ROM.
Observaciones
• La cámar a no soporta la conexión y l a d esconexión en cal iente. Desc onect e la cámara de la red
eléctrica antes de introducir o quitar la tarjeta micro SD.
• Los datos de la tarjeta mi cro SD se borrarán si in tr oduce la tarjeta mi cro SD y activa l a cám ara.
6. Instalar la cámara
1. Fij e la base redonda del soporte a la superf icie d ond e q uiera instal a r l a cámar a. Asegúrese de q ue la
distanci a entre la cámara y el área que qui er e vigil ar sea d e 3-4 metros.
2. Instale el soporte y la cámara y ajuste el ángulo de visión de la cámara.
3. Fije la antena para una conexión de r ed inalámbrica.
4. I ntroduzca el ad ap tad or de red en l a cámara y c onéctelo a la r ed eléctrica.
Page 31

CAMIP14n
V. 02 – 31/03/2014 31 ©Velleman nv
7. La con fig u ració n de re d
Utilice su propio servicio de Internet por ADSL o cable para una fácil configuración de red,
preferentemente, con EaZy Networking o la función WPS (WiFi Protected Setup).
El siguiente método des cr ibe:
• Preparar la configuración de red
• Configuración con « EaZy Networking »
• Configuración de red manual
• Configuración con WPS
7.1 Preparar la configuración de red
Asegú rese de que su red i ncl uya los siguientes elementos:
15
Cámara
16
teléfono móvil ( iPhone, iPad, Android phone)
17
router inalámbrico
18
puerto WAN
19
módem
• Si fuera necesario, instale la app « EagleEyes-Lite » (+) o « EagleEyes-Plus » en su dispositivo móvil.
Es posible descargar esta app del Apple Store.
• Opcional: Asegúrese de que la función UPnP esté activada si el enrutador inalámbrico la soporta.
7.2 Configuración con EaZy Networking
Sobre EaZy Networking
Función plug-and-play (ench ufar y u sar ) para una conexión automáti ca d e la cámara IP a internet. Esta
función no es gratis.
Si quiere u tili zar esta función, cree una cu enta para el servicio Cloud d e EagleEyes.
Al principio, EagleEyes pone gratis a su disposición 500MB (apr ox. 260 min utos) por cámara EaZy
Networking. Esto expirará 6 meses después de haber añadido la cámara al servidor Cloud. La conexión
de la cámara se desacti var á d espués de 6 meses o al alcanzar 500MB.
Para volver a activar ese servicio, debe suscribirse a un plan de datos de EagleEyes o configurar los
ajustes de red manualmente (véase a continuación).
Este servicio requiere:
• El entorno de red, donde se utiliza un router o un router inalámbrico con función DHCP activada.
• Un iPhone, iPad o dispositivo Android.
Para poder utilizar EaZy Networking, cree una cuenta.
• Abra EagleEyes en el dispositivo.
• Pu lse « + » y luego « EaZy ».
• Du rante el primer u so, es posible que se le solicite que instale VLC pl a yer , Software o H26 4
Streaming Viewer. Instale el software para u na vi su alización en línea correcta.
Page 32

CAMIP14n
V. 02 – 31/03/2014 32 ©Velleman nv
1. Pulse « Register ».
2. Introduzca la información
necesaria y pulse « Register
».
3. Selecci one el tipo de
dispositivo. Para una
cámara inalámbrica, pul se
el icono de la parte inferior.
4. Conecte su cámara como se
indica en la pantalla y pulse
« Ready » si la cámara está
activada.
5. Controle los dos LEDs .
Si ambos LEDs están
activados, p ulse « YES ».
6. Introduzca la dirección MAC
de su apar ato (part e
trasera o parte inferior) del
dispositivo y pulse « Apply
».
7. La imagen de la cámara
aparece. Verifique si la
cámara está en la posición
deseada.
8. Introduzca un nombre para
l a cámara en el espacio
junto a « Device title »
(p. e j .: « Oficina »).
9. Pulse « Apply ».
7.3 Configuración de red manual
Para configurar la red de forma manual, proceda de la f orm a sigui en te:
1. Apu n te la dirección IP del enrutad or inalámbr ico porqu e la necesitará más tar d e. P ar a encontrar la
dirección IP, haga lo siguiente:
Page 33

CAMIP14n
V. 02 – 31/03/2014 33 ©Velleman nv
2. Conecte su dispositivo móvil al enrutador
i n al ámbr ico conectado a la cámara.
3. Seleccione Settings > WiFi.
4. Pulse la tecla « > » para ver las detalles sobre
la red inalámbrica seleccionada.
La dirección IP se visualiza al lado de
« Router ».
(En la pantalla siguiente, la dirección IP es
192.168.2.1)
7.4 Configurar la red
1. Conecte su dispositivo móvil al enrutador inalámbrico conectado a la cámara.
2. Abra la app « EagleEyes » y haga clic en la tecla « + » para añad ir un ap arato nuevo.
3. Selecci one « Local Networ k Sear ch » para bu scar la cámara.
El aparato visu aliza una lista con aparatos conectados
a la red. La dirección IP visualizada es la dirección que
el enrutad or ha asignado a la cámara.
Si no encuentra la cámara en la lista, asegúrese de
que el indicador de estado LAN de l a cámara esté
activado (no puede parpadear). Reinicialice l a cámara
con el botón de reinicialización [13] si fuera
necesari o. Espere 3 minutos y, luego, vuelva a
seleccionar « L ocal Networ k S ear ch ».
4. Sel eccione la cámara de la lista. L a página de configuración se visualiza.
5. Pong a « DHCP » e n « St a t ic ».
6. Modifique el número de puert o de la cámara si fu er a necesari o. E l númer o de puerto por def ecto
es 88. Es posible modificar el número 88 en cualquier otro número entre 1-9999 (por ejemplo 9890)
si está bloqueado.
7. Apunte la dirección IP y el número de puerto de la cámar a. N ecesi tar á ambos númer os más tarde.
(En la pantalla [A] de abajo,
8. Pulse « Apply » para confi rmar l as configur aciones.
9. Espere hasta que « Status » (pant alla [B]) visualice « Done » o « Fail ».
o La página del ap arato se visualiza de nuevo en cuanto apar ezca « Done ». Proceda con el
siguiente paso.
o Si aparece « Fail », pulse la tecla de la parte sup erior derech a del a p a r a to. Selecci one
« DDNS » en la ven tan a emergen te". L a p ág ina del aparato se visualiza de nuev o. Proceda con
el siguiente paso.
10. I ntroduzca un nombre p ar a la conexión de cá mara (pantalla [C] al lado de « Title ») y pulse
« Save » para confirmar.
A B C
Page 34

CAMIP14n
V. 02 – 31/03/2014 34 ©Velleman nv
A B C
7.5 Redirección de puertos (Po rt Fo rwardi n g)
Antes de continuar, controle el indicador internet de la cámara.
• Si el indicador parpadea lentamente cada 5 segundos, puede continuar con « port forwarding ».
• Si el in dicador par p adea de m a nera r áp ida, aseg úrese de q ue el router esté conectado a i ntern et.
Luego, continúe con « p ort forwarding ».
Para c onfigurar l a función « port forwarding », siga los pasos siguientes:
1. Abra el navegador del móvil e introduzca la dirección IP de l enrutador que ha introducido en la barra
de dirección.
La página de configuración del enrutador se visualiza.
2. Selecci one la página de confi guración de la función « port for warding » (o el servidor virtual).
Observación: El nombre puede variar y depende de la marca de su en rutador. V éase el manual del
usuario de su enrutador para más información.
El ejemplo siguiente visualiza la pantalla de un enrutador D-Link: selecci one « Advanced » y luego
« Port For wardin g ».
3. Introduzca la dirección IP d e la cámara y el número de pu er to que ha ap untado (véase « Configurar
la red », paso 7) y marq ue l a casilla.
4. Verifique que los indicadores de estado y de la cámara estén activados (aseg úrese de que no
parpadeen).
o Si fuera el ca so, seleccione « Controlar la conexión ».
o Si el indicador sigue parpadeando, vuelva a controlar los ajustes de la redir ección de
puertos (port forwarding).
7.6 Control ar la conexión
Después de haber terminado la configuración de la red y la función « port forwarding », controle la
configuración de la conexión:
1. En el dispositivo móvil: modifique el modo de red en el modo 3G o conecte a otra red inalámbrica
que la red a la que está c onectada la cámara.
2. Inicie « EagleEyes » y seleccione la cámara qu e acaba de añadir para ver si tien e acces o.
o Si fuera el caso, la conexión de red está buena.
Page 35

CAMIP14n
V. 02 – 31/03/2014 35 ©Velleman nv
o Si no fuera el caso, es posible que el número de puert o utilizado par a la cámara esté
bloqueado. Vuelva al p aso 6 (“Confi g urar la red”) para cambi ar el nú mero de puer to.
7.7 Conf igu rar la cámara con WPS
El botón W PS le permite conectar la cámara de manera r áp ida y fácil al router inalámbrico si tambi én
está equipado con la función WPS.
Si el router inalámbrico no está equipado con función WPS, puede configurar la red manualmente.
Consulte el manual del usuario en el CD-ROM incluido o visite http://www.surveillancedownload.com/user/n812.swf.
1. Mantenga p u lsado el bot ón WPS de la parte traser a de l a cám ar a. Suéltelo en cuanto oiga un tono.
2. Pulse el botón WPS del router inalámbrico dentro de los 30 segundos.
Observación: La función WPS del router puede ser un botón virtual en la página de configuración
o un botón auténtico. Esto depende de la marca. Para más información, consulte el manual de l
usuario del router.
Ahora, la cámara y el router inalámbri co se conectan au tomáti camente. L a conexión es exitosa si oye u n
tono en la cámara, y si el indicador de estado LAN de la cámara está a ctivado (no parpadea).
Observación: Si la conexión falla, controle si la autentificación inalámbrica del router es WPA o WPA2. Si
no fuera el caso, modifique el método de autentificación y vuelva a intentar.
8. Prep arar una cám ar a p ara grabar en un a tarjet a SD
Proceda de la forma sig uiente en EagleE yes:
1. Sel eccione la cámara y
pulse « Settings ». .
2. Selecci one « Record
Configuration » y ponga la
resolución en « SXGA
/HD720P ».
3. Pong a l a opción «
Triggered by » en «
Internal Alarm »
4. Pulse « Save » (parte
inferior de la página).
5. Pulse « Advanced ».
6. Abra la opción « Trigger ».
7. Asegú rese de que haya
8. Guarde los ajustes y salg a
Page 36

CAMIP14n
V. 02 – 31/03/2014 36 ©Velleman nv
sel ecci onad o los ajuste s
adecuad os (véase arri ba).
de la página.
Visualizar el v ídeo grabado
1. Pulse el botón de l a p arte
inferior de la pantalla en
EagleEyes.
2. Sel eccione la cámara
cuyas imágenes quiere
visualizar.
3. Selecci one el fich ero
deseado.
El video comenzará a
reproducir.
9. Visualizar un vídeo de la tarjeta m icro SD en el o rden ador.
Es p o sible visualizar los ficheros grabados de la tarjeta micro SD en el ordenador con el software
VideaoPlayer.
Desc argar e instalar VideoPlayer
1. Visite www.velleman.eu.
2. Introduzca CAMIP14n en el espacio junto a « Buscar » y haga cli c en « Producto ».
3. Seleccione « Support » y luego « Downloads ».
4. Haga clic en « VideoPlayer » para el instalador de Windows y guarde el fichero en el ordenador.
5. Despu és de haber descargad o el instalad or, h ag a clic dos veces en el lo para iniciar la instala ción .
6. Siga las in st rucciones del asistente de conf iguración.
7. Consulte el manual del usuario para más información sobre el uso del software.
Copie las imágenes al ordenador.
1. Quite la tar j eta micro SD de la cámara e i ntrodú zcala en el ordenad or.
2. Copie los ficheros de la tarjeta al ordenador.
Visualizar ficheros grabados.
1. Para iniciar VideoPlayer, haga clic dos veces en el icono del escritorio.
2. Selecci one el fich ero deseado.
El ficher o comenzar á a reproduci r y un panel de contr ol aparecerá:
Page 37

CAMIP14n
V. 02 – 31/03/2014 37 ©Velleman nv
Panel de control
A
Pantalla
G
Botón « cerrar »
B
Barra de progreso
H
Captura de imagen Haga clic en este botón
para h acer u na captur a d e imagen.
C
Volumen Haga clic en el punto de la parte
derech a y selecci one u n ajuste del volumen.
I
Velocidad de reproducci ón. Desli ce este botón
para aumentar o disminuir la velocidad de
reproducción.
D
Anterior/siguiente
J
[sin función]
E
AVI. Haga cli c en este botón pa r a convertir el
vídeo en formato AVI.
K
Mostrar /ocultar la in f ormación de la pantalla
de reproducción.
F
B otones de reproducción
L
Mos trar/ocultar las caracter ística s del fichero.
Utilice este aparato sólo con los accesorios originales. Velleman NV no será resp onsable de
daños ni lesiones causados por un uso (indebido) de este aparato. Para más información sobre
este produ cto y la versión más reciente de este manual del usuario, visite nuestra pág i na
www.velleman. eu. Se pued en modificar las especificaciones y el contenido de este manual sin
previo aviso.
Todas las marcas registrada s y nombres c omerciales son p ropie dad de sus respectivo s dueños y se
utilizan sólo para aclarar la compatibili dad de nuestros productos con los de diferentes fabricantes.
i P hone y iPad son marcas reg istrad a s de Ap ple Inc., registradas en EE.U U . y otr os países. D -Link y el
logo D-Li nk son marcas comercia les o marcas registradas de D-Li nk Corporation o sus sucursales en los
Estados Unidos y otros países. Android es una mar ca comercial de Google Inc.
© DERECHOS DE AUTOR
Velleman NV dispone de los derechos de autor pa ra este ma nual del u suari o. Todos los
derechos mundi ales reservados. Está estrictamente prohibido reproducir, traducir, copiar, editar y
guardar este manual del usuario o partes de ello sin previo permiso escrito del derecho habiente.
A
B
C D
E F G
HI
J
K
L
Page 38

CAMIP14n
V. 02 – 31/03/2014 38 ©Velleman nv
SCHNELLEINSTIEG
1. Einführung
An alle Einwohner der Europäischen Union
Wichtige Umweltinformationen über dieses Produkt
Dieses Symbol auf dem Produkt oder der Verpackung zeigt an, dass die Entsorgung dieses
Produktes nach seinem Lebenszyklus der Umwelt Schaden zufügen kann. Entsorgen Sie die
Einheit (oder verwendeten Batterien) ni cht als unsortier tes H ausmü ll; di e Einheit oder
verwendeten B atteri en müssen von einer spezi al isierten Firma zwecks Re cycli ng entsorgt
werden. Diese Einheit muss an den Händler oder ein örtliches Recycling-Unternehmen
retourn iert werden. Respekti eren S ie di e örtlichen Umweltv orschriften.
Falls Zweifel bestehen, wenden Sie sich für Entsorgungsrichtlinien an Ihre ör tliche Behörde.
Vielen Dank, dass Sie sich für Velleman entschieden haben! Lesen Sie diese Bedienungsanleitung vor
In betriebnahme sorgfältig du rch. Überprüfen Sie, ob Transportschäden vorli egen. Sollte dies der Fall
sein, verwenden Sie das Gerät nicht und wenden Sie sich an Ihren Händler.
2. Sicherheitshinweise
Halten Sie Kinder und Unbefugte vom Gerät fern.
Stromschlaggefahr beim Öffnen des Gehäuses. Das Berühren von unter Spannung stehenden
Leitungen könnte zu lebensgefährlichen elektrischen Schlägen führen. Versuchen Sie nie,
selbst das Gerät zu öffnen. Die Reparation darf nur von einer Fachkraft durchgeführt werden.
Dem ontieren oder öffnen S ie das Gerä t N IE. Es gibt keine zu warten d en Teile. Bestell en Sie
eventuelle Ersatzteile bei Ihr em Fachhä ndler.
3. Allgemeine Richtl inien
Siehe V elleman® Service- und Qualitätsgarantie am Ende der ausführlichen Bedienungsanleitung
(mitg elieferte CD-ROM).
• Verwenden Sie das Gerät nur im Innenbereich. Schützen Sie das Gerät vor Regen und Feuchte.
• Schützen Sie das Gerät vor extremen Temperaturen und Staub.
• Vermeiden Sie Erschütter ungen. Wen den Si e bei der Bedienung keine Gewalt an.
• Nehmen Sie das Gerät erst in Betrieb, nachdem Sie sich mit seinen Funktionen vertraut gemacht
haben.
• Eigenmächtige Veränderungen sind aus Sicherheitsgründen verboten.
• Verwenden Sie das Gerät nur für Anwendungen beschrieben in dieser Bedienungsanleitung sonst
kann dies zu Schäden am Produkt führen und erlischt der Garantieanspruch.
• Bei Schäden, die durch Nichtbeachtung der Bedienung sanleitung ver ursacht werden, er l ischt der
Garantieanspruch. Für daraus resultierende Folgeschäden übernimmt der Hersteller keine Haftung.
• Installieren und verwenden Sie das Gerät nicht für illegale Praktiken und beachten Sie die
Intimsphäre aller.
Page 39

CAMIP14n
V. 02 – 31/03/2014 39 ©Velleman nv
4. Beschreibung
Vorderseite
Rückseite
1
weiße L ED
8
WPS-Taste (Wi-Fi Protected Setup/ Wi-FI
geschützte Einstellung)
2
Lautsprecher
9
An schluss für mi cro SD-Karte
3
Mikrofon
10
Ethernet-Anschluss
4
Kamera-Objektiv
11
Netzanschluss
5
Antenne
12
externer I/O-Port
6
Status-LEDs = lan, = i nternet
13
Halterung
7
PIR-Sensor
14
Reset-Taste (Rücksetzung)
5. Eine micro SD-K arte einstecken
• Videos können auf Micro SD-Karte gespeichert werden . Der Anschl uss für die micro SD-Karte
befindet sich au f der S eite der Kamer a.
• Für eine Liste mit kompatiblen Micro SD-Karten, siehe die Bedi enungsanl eitung auf d er CD-ROM.
Bemerkungen
• Die Kamera unterstützt keinen Anschluss ohne Neustart. Schalten Sie die Kamera aus, bevor Sie eine
Micro SD-Kart e einstecken oder entfernen.
• Die Daten werden gel öscht wen n Sie die Micro SD-K arte ei nstecken un d die Kamera ei nschalten.
6. Die Hardware installieren
1. Befestigen Sie die run de Basis der Hal terun g an d em Install a tionsort der K amera. Der Abstand
zwischen der Kamera und der Zone, die Sie überwachen möchten, soll 3-4 m sein.
2. Befestigen Sie die H a lterung und die Kamera, un d stel len Sie den Betrachtungswinkel der Ka mera
ein.
3. Befestigen Sie die A ntenn e für eine drahtlose Netzw erkverbin d ung.
4. Steck en Sie das mitgelieferte Netzteil in d er Kamera und verbin den Si e mit einer Steckdose.
Page 40

CAMIP14n
V. 02 – 31/03/2014 40 ©Velleman nv
7. Netzwerkkonfiguration
Für eine einfa ch e N etzwerkkonfigur ation verwenden Sie am besten Ihren eigenen ADSL- oder KabelInter netdien st, vorzugswei se mit EaZy Net working oder WPS-Funktion (WiFi Protected Setup).
Die fol g ende Methode beschreibt:
• Die Netzwerkk onfiguration vorbereiten
• Konfiguration mit EaZy Networking
• Manuelle Netzwerkkonfiguration
• Konfiguration mit WPS
7.1 Die Net zwerkkon figuration vorbereiten
Beachten Sie, dass I hr Netzwerk fol g ende E lemente enthält:
15
Kamera
16
Mobilgerät (iPhone, iPad, Android phone)
17
drahtloser Router
18
WAN-Port
19
Modem
• Wenn nötig, installieren Sie di e EagleE yes-Lite- oder Eag leEyes-Plus-App auf Ihrem Mobiltelefon.
Laden Sie die A pp für I hr Mobil telefon im Ap p Store her unter .
• Optional: Beachten Sie, dass die UPnP-Funktion eingeschaltet ist wenn der drahtlose Router diese
unterstützt.
7.2 Konfiguration mit EaZy Networking
Über EaZy Networking
Plug-and-Play-Funkton für eine automatische Verbindung der IP-Kamera mit Internet. Diese Funktion ist
kostenpflichtig.
Möchten Sie diese Funktion benutzen, dann kreieren Sie ein Konto für den Cloud-Service von Eag leEyes.
Am Anfang, steht Ihnen 500MB (ungefähr 260 Minuten) pro EaZy Networking-Kamera zur Verfügung.
Diese Option läuf t aber 6 Monate n achdem Sie die Kamera dem Cloud-Server hinzugefügt haben ab. Die
Kameraverbindung wird nach 6 Monate oder wenn Sie di e 500MB er rei chen au sg eschaltet.
Möcht en Sie di esen Service wied er einschalten, dann ab onni eren S ie einen Datentari f von EagleEyes oder
konfigurieren Sie die Netzwerkeinstellungen manuell (siehe unten).
Dieser Service erfordert
• Die Netzwerkumgebung, in der ein Router oder ein drahtloser Router mit eingeschalteter DHCP-
Funktion verwendet wird.
• Ein iPhone, iPad oder Android-Gerät.
Um EaZy Networking verwenden zu können, müssen Sie ein Konto kreieren.
• Starten Sie Eagl eEyes auf Ihr em Gerät.
• Klicken Sie auf "+" und danach auf "EaZy".
• Bei erster Anwendung, können S ie aufg ef ordert werd en, VLC Pl ayer , Software oder H2 64 S trea ming
Viewer zu installi er en. Installieren Si e die Software f ür ein e korrekte Live-Anzeige.
Page 41

CAMIP14n
V. 02 – 31/03/2014 41 ©Velleman nv
1. Klicken Si e auf "Register".
2. Geben Sie die gewünschten
Informationen ein und
kli cken Sie auf "Regi ster ".
3. Wählen Si e den Gerätetyp .
Für eine drahtlose Kamera ,
klicken Sie auf das untere
Symbol.
4. Verb inden Si e die Kamera
wie auf dem Bildschirm
gezeigt und klicken Sie auf
"Ready" wenn d ie Kamera
eingeschaltet ist.
5. Überprüfen Sie beide LEDs
Sind beide LEDs
eingeschaltet, dann klicken
Sie auf "Y es".
6. Geben Sie di e MAC-Adresse
Ihres Gerät es (R ückseite
oder Unterseite) ein und
klicken S ie auf "A pply".
7. Das Kamerabild erschei nt.
Kontrollieren Sie, ob die
Kamera die gewünschte
Position hat.
8. Geben Sie bei "Devi ce title"
einen Namen ein (z.B.:
"Büro").
9. Klicken Sie auf "Ap ply".
7.3 Manuelle Netzwerkkonfiguration
Konfigurier en Sie d as N etzwerk wie folg t:
1. Notier en Sie die IP -Adresse v o m drahtlosen Router. S ie brau chen di ese A d resse sp äter noch. Um die
IP-Adresse zu find en, gehen Si e wie folg t vor:
Page 42

CAMIP14n
V. 02 – 31/03/2014 42 ©Velleman nv
2. Verb inden Si e d as mobi le Gerät mit d em
drahtlosen Router, der mit der Kamera
verbunden ist.
3. Wählen Sie Settings > WiFi aus.
4. Drücken Sie die ">"-Taste für mehr Details
über das ausgewählte drahtlose Netzwerk.
Die IP -Adresse finden Sie neb en "Router".
(Im Beispiel ist die IP-Adresse
192.168.2.1)
7.4 Das Netzwerk konf iguri eren
1. Verb inden Si e d as mobi le Gerät mit d em drahtlosen Router, d er mit der Kamera verbunden ist.
2. Öffn en Sie die EagleE yes-App und klicken Sie auf "+", um ein neues Gerät hinzuzufügen.
3. Wählen Sie "Local Network Search" aus, um die Kamera zu suchen.
Das Gerät zeigt eine Liste mi t Ger äten, die mit dem
Netzwerk verbunden sind. Die angezeigte IP-Adresse
i st die Adr esse, di e der R outer der Ka mera
zugeerkennt hat.
Befindet die I P CAM-Kamera sich nicht in der Li ste , so
beachten Sie, dass die LAN-Statusanzeige der
Kamera eingeschaltet ist (und nicht blinkt). Wenn
nötig, setzen Sie die Kamer a mit der Reset-Taste
[13] zurück. Warten Sie 3 Minuten und wählen Sie
dann wieder "Local Network Search" aus.
4. Wählen Si e die Kamera in der Liste au s. Die Einstellungsseite ersch eint.
5. Stellen Sie "DHCP" auf "Static".
6. Wenn nötig, ändern Sie die Portnummer der Kamera. Die Standard-Portnummer lautet 88. Ist die
Portnummer 88 blockiert, dann wählen Sie eine andere Nummer zwischen 1-9999 (z.B. 9890) aus.
7. Notieren Sie die IP-Adresse un d die Portnu mmer der Kamera. Sie brau chen bei d e später n och.
(Im Beispiel [A] unten,
8. Drücken Sie "Apply", um die Einstellungen zu bestätigen.
9. Warten Sie bis "Status" (Beispiel [B]) "Done" oder "Fail" anzeigt.
o Wird "Done" angezeig t, dan n erscheint die Geräteseite wied er . Fahr en Sie mi t d em n ächsten
Schri tt fort.
o Wird "Fail" anzeigt, drücken Sie die -Taste (rechts oben). Wählen Sie "DDNS" im
Dialogfen ster a us. D ie Geräteseite erschei nt wieder. Fahren S ie mit dem nächsten Schritt fort.
10. Geben Sie einen Namen f ür den Kamer a-Anschluss (Beispiel [C] neben "Title") ein und drücken Sie
"Save", um zu bestätigen.
A B C
Page 43

CAMIP14n
V. 02 – 31/03/2014 43 ©Velleman nv
A B C
7.5 Portwe iterleit ung ( Port Forw a rding)
Bev or Sie fortfahren, überprü f en Sie di e Inter netanzeig e der Kamera.
• Blinkt die Anzeige langsam alle 5 Sekunden, dann können Sie mit "Port Forwarding" fortfahren.
• Blinkt die Anzeige schnell, dann beachten Sie, dass der Router mit Internet verbunden ist. Fahren Sie
danach mit "Port Forwarding" fort.
Um die Funktion "Port Forwarding" einzustellen, gehen Sie wie folgt vor:
1. Öffn en Sie den Webbr o wser Ihres mobilen Ger ätes u nd geben Si e die IP-Ad resse des Rout er s in die
Adr essleiste ein.
Die Einstellungsseite des Routers er schei nt.
2. Wählen Si e die Einstellungsseite der Funktion "Port Forward ing" (oder virtu eller Server ) aus.
Bemerkung: Der Namen der "Port For warding"-Funktion oder des vi rtuellen Server s kann var i ieren.
Dies hängt von der Marke Ihres Routers ab. Für mehr Informationen, siehe die Bedienungsanleitung
des Routers.
Nachfolgendes Bespiel zeigt den Bildschirm für einen D-Link-Router: Wählen Sie "Advanced" und
dann "Port Forwarding" aus.
3. Geben Sie di e IP-Adresse und die Portnummer ein ("Das Netzwerk konfigurieren", Schritt 7), und
aktivieren Sie.
4. Überprü f en Sie, ob die S ta tusanzeigen und der Kamera eingeschaltet sind (und nicht blinken).
o Ist di es d er Fall, fahren Sie mit "Die Verbindung überprüfen" fort.
o Bleibt die Internetanzeig e blinken, so überprüfen Sie die "Port Forwarding"-Einstellungen
wieder.
7.6 Die Verbindung überprüfen
Haben Sie die Netzwerkkonfiguration und die "Port Forwarding"-Funktion beendet, dann gehen Sie wie
f olgt vor:
1. Auf dem mobi len Gerät, we ch seln Sie den Netzwer kmodu s auf 3 G u m oder v erbinden Si e mit ein em
anderen drahtlosen Netzwerk al s d asj eni ge mit d em d ie Kamera v erbunden i st.
2. Starten Sie Eagl eEyes un d wählen Sie di e hinzugef ügte Ka mera aus, um zu kontrollieren, ob Sie
Zugriff haben.
o Ist dies der Fall, dann ist die Netzwerkverbindung in Ordnung.
Page 44

CAMIP14n
V. 02 – 31/03/2014 44 ©Velleman nv
o Ist di es n icht der Fall, dann kan n die ver wend ete Portnummer für di e K a mera b lockiert sei n.
Kehren S ie zu Schri tt 6 ("Da s Netzwerk konfigurier en") zurück, um die Portnummer zu ändern
7.7 Die Kam era mit W PS einstellen
Mit der WPS-Ta ste können Si e di e Kamera schn ell und einf ach mit d em Wireless R outer verbind en, wenn
dieser au ch üb er ei ne WPS-Funkti on verfügt.
Hat der Wirel ess R outer keine WPS -Funktion, so können Sie Ihr Netzwerk manuell einstellen. Die
Bedienungsanleitung finden Sie auf der mitgelieferten CD-ROM oder auf http://www.surveillancedownload.com/user/n812.swf.
1. Auf der Rücksei te d er Kamera, halten Sie die WPS-T aste gedrü ckt. Lassen Sie los, wenn ein Signal
ertönt.
2. Auf dem drahtlosen Router, drücken Sie die WPS-Taste innerhalb von 30 Sekunden.
Bemerkung: Die WPS-Funktion des Routers ist eine virtuelle Taste auf der Konfigurationsseite oder
ei ne echte Taste. Dies hängt von der Mar ke ab. Für mehr Informationen, lesen Sie die Anleitung
Ihres Routers.
Die Kamera und der Wireless Router stell en nun automatisch eine Verbindung her. Bei erfolgreicher
Verbindung ertönt ein Signal (Kamera), und ist die LAN-Statusanzeige der Kamer a eingeschaltet
(blinkt nicht).
Bemerkung: Wenn die Verbindung fehlschlägt, überprüfen Sie die drahtlose Authentifizierung des
Routers ist WPA oder WPA2. Ist dies nicht der Fall, dann ändern Sie den Authentifizierungsvorgang und
versuch en Sie es wieder.
8. Ein e Kamera ei ns telle n, um auf eine SD-Karte aufzune hm en.
In EagleEyes, gehen Sie wie folg t vor :
1. Wählen Si e die Kamera
und klicken Sie auf
"Settings". .
2. Wählen Si e "Record
Configuration" aus und
stellen Sie die Auflösung
auf "SXGA /HD720P".
3. Stellen Si e "T riggered by"
auf "Internal Alarm ".
4. Klicken Sie auf "Save"
(unten auf der Seite).
5. Klicken Sie auf "Ad va nce".
Page 45

CAMIP14n
V. 02 – 31/03/2014 45 ©Velleman nv
6. Öffn en Sie "Tri g ger".
7. Beachten Sie, dass Sie die
geeigneten Einstellungen
ausgewählt haben.
8. Speichern Sie die
Einstellungen und
verlassen Sie di e Seite.
Das aufgezeich nete Video anzeigen
1. In EagleEyes, klicken Sie
die Taste, unten auf dem
Bildschirm.
2. Wählen Sie die
gewünschte Kamera aus.
3. Wählen Sie die
gewünschte Datei.
Das Video wird abgespielt.
9. Ein Video d er Micro SD-Karte a uf dem Computer anschauen.
Sie können di e a ufgezeichneten Dateien d er Micr o SD -K arte mit der VideoPla yer -S oftware auf dem
Computer betrachten.
VideoPlayer herunterladen und i nstallier en
1. Besuch en Sie ww w.velleman. eu.
2. Geben Sie CAMIP14n in das Feld "Artikel suchen" ein und klicken Sie auf ‘Produkt’.
3. Wählen Sie "Support" und klicken Sie danach auf "Downloads".
4. Klicken Sie auf VideoPlayer für Windows Installer und speichern Sie die Datei auf dem Rechner.
5. Haben Sie den Instal ler heruntergeladen, dann klicken Sie zwei Mal darauf, um die Installation zu
starten.
6. Befolgen Sie die An weisungen d es S etup-Assistenten.
7. Für mehr Informationen über den Gebrauch der Soft ware, lesen Sie bitte die Bedienungsanleitung.
Kopieren Sie das Video auf Ihren Computer.
1. En tf ernen Sie die Micro SD-Karte aus der Kam era und steck en Sie diese in den Computer.
Page 46

CAMIP14n
V. 02 – 31/03/2014 46 ©Velleman nv
2. Kopi eren Sie die Dateien von der K arte auf Ihren Computer .
Die aufgezeichnete Dateien betrachten
1. Starten Sie VideoPlayer, indem Sie zwei Mal auf das S ymbol des Desktops klicken.
2. Wählen Sie die gewünschte Datei aus.
Die Datei wird abgespielt und ein Bedienfeld erscheint:
Bedienfeld
A
Display
G
Taste "Schließen"
B
Fortschrittbalken
H
Sch nappschuss Klicken Sie auf diese Taste,
um einen Schnappschuss zu machen.
C
Lautstärke. Klicken Sie auf diesen Punkt
(rechts) und wählen Sie eine LautstärkeEinstellung aus.
I
Wiedergabegeschwindigkeit Gleiten Sie diese
Taste, um die Wiedergabegeschwindigkeit zu
erhöhen oder zu verringern.
D
Vori g e/nächste Datei
J
[Keine Funktion]
E
AVI. Klicken Sie diese T aste, um das Video in
AVI-Format umzusetzen.
K
die In f ormationen im Wi ed ergabefenster ein-
/ausblenden.
F
Wiedergabetasten
L
Die Ei genschaften der Datei ein-/ausblenden.
Verwenden Sie dieses Gerät nur mit originellen Zubehörteilen. Velleman NV übernimmt keine
Haftung für Schaden oder Verletzungen bei (falscher) Anwendung dieses Gerätes. Für mehr
Informationen zu diesem Produkt und die neueste Version dieser Bedienungsanleitung, siehe
www.velleman.eu. Alle Änderungen ohne vorherige Ankündigung vorbehalten.
Alle eingetragenen Warenzeichen und Handelsnamen sind Eigentum Ihrer jeweiligen Inhaber und dienen
nur zur Verdeutlichung der Kompatibilität unserer Produkte mit den Produkten verschiedener Hersteller.
iPhone und iPad sind eingetragene Warenzeichen von Apple Inc., eingetragen in den USA und anderen
Ländern. D-Link, das D-Link logo, sind eingetragene Warenzeichen von D-Link Corporation oder de n
Tochterunternehmen in den USA und anderen Ländern. Android ist ein ein getragenes Warenzeich en von
Google Inc.
© URHEBERRECHT
Velleman NV besitzt das Urheberrecht fü r diese Bedienung sanleitu ng. Alle wel tweiten Rechte
vorbehalten. Ohne vorherige schriftli ch e Gen ehmigun g des Urhebers ist es ni ch t gestattet, diese
Bedienungsanleitung ganz oder in Teilen zu reproduzieren, zu kopieren, zu übersetzen, zu bearbeiten
oder zu speichern.
A
B C
D E
F G
H
I
J
K
L
Page 47

R&TT
E
We, Velle
declare onBrand:
Trade namType or mconstitutinother relevThe produEMC:
R&TTE:
Technical
Place andGavere,
1
A
uthorise
Vince Va
n
Decl
a
man NV
our own
e:
odel:
g the sub
j
vant stipul
ct is in co
EN 30
1
EN 301EN 550EN 501
300 32
8
data are
a
date of i
s
8/02/201
4
d signator
y
Balberg
h
ratio
n
responsib
i
V
ellema
n
MEGAPIXCARD RECAMIP1
4
ect of this
ations of t
h
nformity
w
489-1 V1
489-17 V22:2010
30-4:201
1
V1.7.1
vailable
a
sue:
for the c
o
e – Qualit
y
of C
o
lity that th
e
EL PUS
H
CORDIN
G
N
declarati
o
e R&TTE
ith the foll
o
.9.2
2.2.1
nd can be
mpany:
Manage
r
nform
e finished
VIDEO
W
n, confor
m
Directive
wing sta
n
obtained
f
ity
A
d
d
product:
IFI IP C
A
s with th
e
(1999/5/E
C
dards:
rom the a
d
ress:
L9B
MERA -
E
essential
).
dress ab
o
egen Hei
890 Gav
e
elgium
AGLE E
Y
requirem
e
ve.
weg, 33
re
ES - SD
nts and
R&TT
E
Wij, Velle
m
verklaren
Merk:
Handelsn
Type of mdat het voandere re
Het produEMC:
R&TTE:
Technischadres.
Plaats en
Gavere, 1BevoegdeVince Va
n
Verk
man NV
op eigen
v
aam:
odel:
orwerp ui
t
levante b
e
ct voldoet
EN 30
1
EN 301EN 550EN 501
300 32
8
e gegeve
datum va
n
8/02/201
4
ondertek
e
Balberg
h
laring
v
erantwoo
r
V
elle
m
MEGACAMI
P
maakt va
n
palingen
v
aan de v
o
489-1 V1
489-17 V22:2010
30-4:201
1
V1.7.1
ns zijn be
s
uitgifte:
naar voo
r
e – Qualit
y
an o
v
delijkheid
an
PIXEL IP
14N
deze ver
k
an de R&
T
lgende n
o
.9.2
2.2.1
chikbaar
e
de firma:
Manage
r
ereen
s
dat het af
g
CAMERA
laring, vo
l
TE Richt
l
rmen:
n kunnen
tem
m
A
dr
ewerkte
p
MET PU
S
doet aan dijn (1999/
5
worden a
a
ing
s:
L9B
roduct:
H VIDEO
e essenti
ë
/EC).
ngevraa
g
egen Hei
890 Gav
e
elgië
- EAGLE
le vereis
t
d via bov
e
weg, 33
re
YES
en en
nstaand
Page 48

Décla
r
Nous, Ve
l
déclaronsMarque :
DenominaType ou mfaisant l’o
stipulationLe produitEMC:
R&TTE:
Les donnéPlace et dGavere, 1SignataireVince Va
n
ation
d
leman N
V
sous not
r
tion com
m
odèle :
bjet de la
p
pertinent
e
est conf
o
EN 301EN 301EN 550EN 501
300 32
8
es techni
q
ate d’émi
s
8/02/201
4
autorisé
d
Balberg
h
e co
n
e propre r
e
erciale :
résente
d
de la dir
e
rme aux n
489-1 V1
489-17 V22:2010
30-4:201
1
V1.7.1
ues sont
sion :
e la soci
é
e – Qualit
y
formit
sponsabi
l
V
ellema
n
CAMÉRAEAGLE ECAMIP1
4
éclaration
ctive R&
T
ormes suiv.9.2
2.2.1
disponibl
e
té :
Manage
r
é R&T
T
lité que le
n
IP 1.3
M
YES
N
, satisfait
a
TE Direct
antes :
s et peuv
e
E
A
dr
produit fin
ÉGAPIXE
ux exigen
ive (1999/
5
nt être ob
sse :
L9B
:
L AVEC
P
ces essen
/EC).
enues à l'
egen Hei
890 Gav
e
elgique
USH VID
E
tielles et t
o
adresse c
i
weg, 33
re
O -
ute autre
-dessus.
Decla
r
Nosotros,
declaramocontinuacMarca:
DenominaTipo o mocumple lo
R&TTE (1Es confor
EMC:
R&TTE:
Los datosLugar y feGavere, 1ResponsaVince Va
n
ación
Velleman
s bajo nu
ión:
ción com
e
delo:
s requisit
o
999/5/EC
)
me a las
s
EN 301EN 301EN 550EN 501
300 32
8
técnicos
e
cha de e
m
8/02/201
4
ble de la
e
Balberg
h
de co
n
NV
estra sola
rcial:
s esencia
l
.
iguientes
n
489-1 V1
489-17 V22:2010
30-4:201
1
V1.7.1
stán disp
o
isión:
mpresa:
e – Qualit
y
formi
d
responsa
b
V
ellema
n
CÁMARAEYES
CAMIP1
4
es y las o
t
ormas:
.9.2
2.2.1
nibles y
p
Manage
r
ad R
&
ilidad qu
e
n
IP PUS
H
N
ras estipu
ueden se
r
TTE
Dir
e
el produ
c
VIDEO 1
laciones r
e
solicitad
o
cción:
L9B
to mencio
n
.3 MEGA
P
levantes
d
s a la dire
egen Hei
890 Gav
e
élgica
ado a
ÍXELES
-
e la Dire
c
cción de
a
weg, 33
re
EAGLE
tiva
rriba.
Page 49

R&TT
E
Wir, Velle
erklären vMarke:
MarkennaTyp oder
auf das si
relevantenDas ProduEMC:
R&TTE:
Die techn
A
dresse
g
Ort und DGavere, 1BevollmäcVince Va
n
Kon
f
man NV
oll verant
w
me:
Modell:
ch diese
E
Vereinb
a
kt entspr
i
EN 301EN 301EN 550EN 501
300 32
8
ische Dok
u
eführt.
atum der
A
8/02/201
4
htigte Pe
r
Balberg
h
ormit
ä
ortlich da
V
elle
1.3
M
CAM
rklärung
b
rungen d
e
cht den fo
489-1 V1
489-17 V22:2010
30-4:201
1
V1.7.1
mentatio
n
usstellun
son:
e – Qualit
y
tserkl
ä
ss nachfol
man
EGAPIX
E
IP14N
ezieht, de
r R&TTE-
lgenden N
.9.2
2.2.1
zu den o
:
Manage
r
rung
gendes P
r
L PUSH
V
n grundle
g
Richtlinie
(
ormen:
ben genn
a
A
dr
odukt:
IDEO IP-
K
enden A
n
1999/5/E
C
nten Pro
d
sse:
L9B
AMERA
-
forderung
e
) entspri
c
ukten wir
d
egen Hei
890 Gav
e
elgien
- EAGLE
E
n und an
d
ht.
bei oben
weg, 33
re
YES
eren
erwähnte
r
Page 50

Velleman® Service and Quality Warranty
Since its foundation in 1972, Velleman® acquired extensive experience in
the electronics world and currently distributes its products in over 85
countries.
All our products fulfil strict quality requirements and legal stipulations in
the EU. In order to ensure the quality, our products regularly go through
an extra quality check, both by an internal quality department and by
specialized external organisations. If, all precautionary measures
notwithstanding, problems should occur, please make appeal to our
warranty (see guarantee conditions).
General Warranty Conditions Concerning Consumer Products (for
EU):
• All consumer products are subject to a 24-month warranty on production
flaws and defective material as from the original date of purchase.
• Velleman® can decide to replace an article with an equivalent article, or
to refund the retail value totally or partially when the complaint is valid and
a free repair or replacement of the article is impossible, or if the expenses
are out of proportion.
You will be delivered a replacing article or a refund at the value of 100%
of the purchase price in case of a flaw occurred in the first year after the
date of purchase and delivery, or a replacing article at 50% of the
purchase price or a refund at the value of 50% of the retail value in case
of a flaw occurred in the second year after the date of purchase and
delivery.
• Not covered by warranty:
- all direct or indirect damage caused after delivery to the article (e.g. by
oxidation, shocks, falls, dust, dirt, humidity...), and by the article, as well
as its contents (e.g. data loss), compensation for loss of profits;
- consumable goods, parts or accessories that are subject to an aging
process during normal use, such as batteries (rechargeable, nonrechargeable, built-in or replaceable), lamps, rubber parts, drive belts...
(unlimited list);
- flaws resulting from fire, water damage, lightning, accident, natural
disaster, etc.…;
- flaws caused deliberately, negligently or resulting from improper
handling, negligent maintenance, abusive use or use contrary to the
manufacturer’s instructions;
- damage caused by a commercial, professional or collective use of the
article (the warranty validity will be reduced to six (6) months when the
article is used professionally);
- damage resulting from an inappropriate packing and shipping of the
article;
- all damage caused by modification, repair or alteration performed by a
third party without written permission by Velleman®.
• Articles to be repaired must be delivered to your Velleman® dealer,
solidly packed (preferably in the original packaging), and be completed
with the original receipt of purchase and a clear flaw description.
• Hint: In order to save on cost and time, please reread the manual and
check if the flaw is caused by obvious causes prior to presenting the
article for repair. Note that returning a non-defective article can also
involve handling costs.
• Repairs occurring after warranty expiration are subject to shipping costs.
• The above conditions are without prejudice to all commercial warranties.
The above enumeration is subject to modification according to the
article (see article’s manual).
Velleman® service- en kwaliteitsgarantie
Velleman® heeft sinds zijn oprichting in 1972 een ruime ervaring
opgebouwd in de elektronicawereld en verdeelt op dit moment producten
in meer dan 85 landen. Al onze producten beantwoorden aan strikte
kwaliteitseisen en aan de wettelijke bepalingen geldig in de EU. Om de
kwaliteit te waarborgen, ondergaan onze producten op regelmatige
tijdstippen een extra kwaliteitscontrole, zowel door onze eigen
kwaliteitsafdeling als door externe gespecialiseerde organisaties. Mocht
er ondanks deze voorzorgen toch een probleem optreden, dan kunt u
steeds een beroep doen op onze waarborg (zie waarborgvoorwaarden).
Algemene waarborgvoorwaarden consumentengoederen (voor
Europese Unie):
• Op alle consumentengoederen geldt een garantieperiode van 24
maanden op productie- en materiaalfouten en dit vanaf de oorspronkelijke
aankoopdatum.
• Indien de klacht gegrond is en een gratis reparatie of vervanging van
een artikel onmogelijk is of indien de kosten hiervoor buiten verhouding
zijn, kan Velleman® beslissen het desbetreffende artikel te vervangen
door een gelijkwaardig artikel of de aankoopsom van het artikel
gedeeltelijk of volledig terug te betalen. In dat geval krijgt u een
vervangend product of terugbetaling ter waarde van 100% van de
aankoopsom bij ontdekking van een gebrek tot één jaar na aankoop en
levering, of een vervangend product tegen 50% van de kostprijs of
terugbetaling van 50 % bij ontdekking na één jaar tot 2 jaar.
• Valt niet onder waarborg:
- alle rechtstreekse of onrechtstreekse schade na de levering veroorzaakt
aan het toestel (bv. door oxidatie, schokken, val, stof, vuil, vocht...), en
door het toestel, alsook zijn inhoud (bv. verlies van data), vergoeding voor
eventuele winstderving.
- verbruiksgoederen, onderdelen of hulpstukken die onderhevig zijn aan
veroudering door normaal gebruik zoals bv. batterijen (zowel oplaadbare
als niet-oplaadbare, ingebouwd of vervangbaar), lampen, rubberen
onderdelen, aandrijfriemen... (onbeperkte lijst).
- defecten ten gevolge van brand, waterschade, bliksem, ongevallen,
natuurrampen, enz.
- defecten veroorzaakt door opzet, nalatigheid of door een
onoordeelkundige behandeling, slecht onderhoud of abnormaal gebruik of
gebruik van het toestel strijdig met de voorschriften van de fabrikant.
- schade ten gevolge van een commercieel, professioneel of collectief
gebruik van het apparaat (bij professioneel gebruik wordt de
garantieperiode herleid tot 6 maand).
- schade veroorzaakt door onvoldoende bescherming bij transport van het
apparaat.
- alle schade door wijzigingen, reparaties of modificaties uitgevoerd door
derden zonder toestemming van Velleman®.
• Toestellen dienen ter reparatie aangeboden te worden bij uw
Velleman®-verdeler. Het toestel dient vergezeld te zijn van het
oorspronkelijke aankoopbewijs. Zorg voor een degelijke verpakking (bij
voorkeur de originele verpakking) en voeg een duidelijke foutomschrijving
bij.
• Tip: alvorens het toestel voor reparatie aan te bieden, kijk nog eens na
of er geen voor de hand liggende reden is waarom het toestel niet naar
behoren werkt (zie handleiding). Op deze wijze kunt u kosten en tijd
besparen. Denk eraan dat er ook voor niet-defecte toestellen een kost
voor controle aangerekend kan worden.
• Bij reparaties buiten de waarborgperiode zullen transportkosten
aangerekend worden.
• Elke commerciële garantie laat deze rechten onverminderd.
Bovenstaande opsomming kan eventueel aangepast worden
naargelang de aard van het product (zie handleiding van het
betreffende product).
Garantie de service et de qualité Velleman®
Depuis 1972, Velleman® a gagné une vaste expérience dans le secteur
de l’électronique et est actuellement distributeur dans plus de 85 pays.
Tous nos produits répondent à des exigences de qualité rigoureuses et à
des dispositions légales en vigueur dans l’UE. Afin de garantir la qualité,
nous soumettons régulièrement nos produits à des contrôles de qualité
supplémentaires, tant par notre propre service qualité que par un service
qualité externe. Dans le cas improbable d’un défaut malgré toutes les
précautions, il est possible d’invoquer notre garantie (voir les conditions
de garantie).
Conditions générales concernant la garantie sur les produits grand
public (pour l’UE) :
• tout produit grand public est garanti 24 mois contre tout vice de
production ou de matériaux à dater du jour d’acquisition effective ;
• si la plainte est justifiée et que la réparation ou le remplacement d’un
article est jugé impossible, ou lorsque les coûts s’avèrent
disproportionnés, Velleman® s’autorise à remplacer ledit article par un
article équivalent ou à rembourser la totalité ou une partie du prix d’achat.
Le cas échéant, il vous sera consenti un article de remplacement ou le
remboursement complet du prix d’achat lors d’un défaut dans un délai de
1 an après l’achat et la livraison, ou un article de remplacement
moyennant 50% du prix d’achat ou le remboursement de 50% du prix
d’achat lors d’un défaut après 1 à 2 ans.
• sont par conséquent exclus :
- tout dommage direct ou indirect survenu à l’article après livraison (p.ex.
dommage lié à l’oxydation, choc, chute, poussière, sable, impureté…) et
provoqué par l’appareil, ainsi que son contenu (p.ex. perte de données) et
une indemnisation éventuelle pour perte de revenus ;
- toute pièce ou accessoire nécessitant un remplacement causé par un
usage normal comme p.ex. piles (rechargeables comme non
rechargeables, intégrées ou remplaçables), ampoules, pièces en
caoutchouc, courroies… (liste illimitée) ;
- tout dommage qui résulte d’un incendie, de la foudre, d’un accident,
d’une catastrophe naturelle, etc. ;
- out dommage provoqué par une négligence, volontaire ou non, une
utilisation ou un entretien incorrect, ou une utilisation de l’appareil
contraire aux prescriptions du fabricant ;
Page 51

- tout dommage à cause d’une utilisation commerciale, professionnelle ou
collective de l’appareil (la période de garantie sera réduite à 6 mois lors
d’une utilisation professionnelle) ;
- tout dommage à l’appareil qui résulte d’une utilisation incorrecte ou
différente que celle pour laquelle il a été initialement prévu comme décrit
dans la notice ;
- tout dommage engendré par un retour de l’appareil emballé dans un
conditionnement non ou insuffisamment protégé.
- toute réparation ou modification effectuée par une tierce personne sans
l’autorisation explicite de SA Velleman® ; - frais de transport de et vers
Velleman® si l’appareil n’est plus couvert sous la garantie.
• toute réparation sera fournie par l’endroit de l’achat. L’appareil doit
nécessairement être accompagné du bon d’achat d’origine et être dûment
conditionné (de préférence dans l’emballage d’origine avec mention du
défaut) ;
• tuyau : il est conseillé de consulter la notice et de contrôler câbles, piles,
etc. avant de retourner l’appareil. Un appareil retourné jugé défectueux
qui s’avère en bon état de marche pourra faire l’objet d’une note de frais à
charge du consommateur ;
• une réparation effectuée en-dehors de la période de garantie fera l’objet
de frais de transport ;
• toute garantie commerciale ne porte pas atteinte aux conditions
susmentionnées.
La liste susmentionnée peut être sujette à une complémentation
selon le type de l’article et être mentionnée dans la notice d’emploi.
Garantía de servicio y calidad Velleman®
Desde su fundación en 1972 Velleman® ha adquirido una amplia
experiencia como distribuidor en el sector de la electrónica en más de 85
países. Todos nuestros productos responden a normas de calidad
rigurosas y disposiciones legales vigentes en la UE. Para garantizar la
calidad, sometemos nuestros productos regularmente a controles de
calidad adicionales, tanto a través de nuestro propio servicio de calidad
como de un servicio de calidad externo. En el caso improbable de que
surgieran problemas a pesar de todas las precauciones, es posible
recurrir a nuestra garantía (véase las condiciones de garantía).
Condiciones generales referentes a la garantía sobre productos de
venta al público (para la Unión Europea):
• Todos los productos de venta al público tienen un perìodo de garantìa
de 24 meses contra errores de producción o errores en materiales desde
la adquisición original;
• Si la queja está fundada y si la reparación o sustitución de un artìculo no
es posible, o si los gastos son desproporcionados, Velleman® autoriza
reemplazar el artículo por un artículo equivalente o reembolsar la
totalidad o una parte del precio de compra. En este caso, usted recibirá
un artículo de recambio o el reembolso completo del precio de compra si
encuentra algún fallo hasta un año después de la compra y entrega, o un
artículo de recambio al 50% del precio de compra o el reembolso del 50%
del precio de compra si encuentra un fallo después de 1 año y hasta los 2
años después de la compra y entrega.
Por consiguiente, están excluidos entre otras cosas:
- todos los daños causados directa o indirectamente al aparato (p.ej. por
oxidación, choques, caída,...) y a su contenido (p.ej. pérdida de datos)
después de la entrega y causados por el aparato, y cualquier
indemnización por posible pérdida de ganancias;
- partes o accesorios, que estén expuestos al desgaste causado por un
uso normal, como por ejemplo baterías (tanto recargables como no
recargables, incorporadas o reemplazables), bombillas, partes de goma,
etc. (lista ilimitada);
- defectos causados por un incendio, daños causados por el agua, rayos,
accidentes, catástrofes naturales, etc.;
- defectos causados a conciencia, descuido o por malos tratos, un
mantenimiento inapropiado o un uso anormal del aparato contrario a las
instrucciones del fabricante;
- daños causados por un uso comercial, profesional o colectivo del
aparato (el período de garantía se reducirá a 6 meses con uso
profesional);
- daños causados por un uso incorrecto o un uso ajeno al que está
previsto el producto inicialmente como está descrito en el manual del
usuario;
- daños causados por una protección insuficiente al transportar el
aparato.
- daños causados por reparaciones o modificaciones efectuadas por una
tercera persona sin la autorización explícita de Velleman®;
- se calcula gastos de transporte de y a Velleman® si el aparato ya no
está cubierto por la garantía.
• Cualquier artìculo que tenga que ser reparado tendrá que ser devuelto a
su distribuidor Velleman®. Devuelva el aparato con la factura de compra
original y transpórtelo en un embalaje sólido (preferentemente el
embalaje original). Incluya también una buena descripción del fallo;
• Consejo: Lea el manual del usuario y controle los cables, las pilas, etc.
antes de devolver el aparato. Si no se encuentra un defecto en el artículo
los gastos podrían correr a cargo del cliente;
• Los gastos de transporte correrán a carga del cliente para una
reparación efectuada fuera del período de garantía.
• Cualquier gesto comercial no disminuye estos derechos.
La lista previamente mencionada puede ser adaptada según el tipo
de artículo (véase el manual del usuario del artículo en cuestión).
Velleman® Service- und Qualitätsgarantie
Seit der Gründung in 1972 hat Velleman® sehr viel Erfahrung als Verteiler
in der Elektronikwelt in über 85 Ländern aufgebaut.
Alle Produkte entsprechen den strengen Qualitätsforderungen und
gesetzlichen Anforderungen in der EU. Um die Qualität zu gewährleisten
werden unsere Produkte regelmäßig einer zusätzlichen Qualitätskontrolle
unterworfen, sowohl von unserer eigenen Qualitätsabteilung als auch von
externen spezialisierten Organisationen. Sollten, trotz aller
Vorsichtsmaßnahmen, Probleme auftreten, nehmen Sie bitte die Garantie
in Anspruch (siehe Garantiebedingungen).
Allgemeine Garantiebedingungen in Bezug auf Konsumgüter (für die
Europäische Union):
• Alle Produkte haben für Material- oder Herstellungsfehler eine
Garantieperiode von 24 Monaten ab Verkaufsdatum.
• Wenn die Klage berechtigt ist und falls eine kostenlose Reparatur oder
ein Austausch des Gerätes unmöglich ist, oder wenn die Kosten dafür
unverhältnismäßig sind, kann Velleman® sich darüber entscheiden,
dieses Produkt durch ein gleiches Produkt zu ersetzen oder die
Kaufsumme ganz oder teilweise zurückzuzahlen. In diesem Fall erhalten
Sie ein Ersatzprodukt oder eine Rückzahlung im Werte von 100% der
Kaufsumme im Falle eines Defektes bis zu 1 Jahr nach Kauf oder
Lieferung, oder Sie bekommen ein Ersatzprodukt im Werte von 50% der
Kaufsumme oder eine Rückzahlung im Werte von 50 % im Falle eines
Defektes im zweiten Jahr.
• Von der Garantie ausgeschlossen sind:
- alle direkten oder indirekten Schäden, die nach Lieferung am Gerät und
durch das Gerät verursacht werden (z.B. Oxidation, Stöße, Fall, Staub,
Schmutz, Feuchtigkeit, ...), sowie auch der Inhalt (z.B. Datenverlust),
Entschädigung für eventuellen Gewinnausfall.
- Verbrauchsgüter, Teile oder Zubehörteile, die durch normalen Gebrauch
dem Verschleiß ausgesetzt sind, wie z.B. Batterien (nicht nur aufladbare,
sondern auch nicht aufladbare, eingebaute oder ersetzbare), Lampen,
Gummiteile, Treibriemen, usw. (unbeschränkte Liste).
- Schäden verursacht durch Brandschaden, Wasserschaden, Blitz,
Unfälle, Naturkatastrophen, usw.
- Schäden verursacht durch absichtliche, nachlässige oder
unsachgemäße Anwendung, schlechte Wartung, zweckentfremdete
Anwendung oder Nichtbeachtung von Benutzerhinweisen in der
Bedienungsanleitung.
- Schäden infolge einer kommerziellen, professionellen oder kollektiven
Anwendung des Gerätes (bei gewerblicher Anwendung wird die
Garantieperiode auf 6 Monate zurückgeführt).
- Schäden verursacht durch eine unsachgemäße Verpackung und
unsachgemäßen Transport des Gerätes.
- alle Schäden verursacht durch unautorisierte Änderungen, Reparaturen
oder Modifikationen, die von einem Dritten ohne Erlaubnis von Velleman®
vorgenommen werden.
• Im Fall einer Reparatur, wenden Sie sich an Ihren Velleman®-Verteiler.
Legen Sie das Produkt ordnungsgemäß verpackt (vorzugsweise die
Originalverpackung) und mit dem Original-Kaufbeleg vor. Fügen Sie eine
deutliche Fehlerbeschreibung hinzu.
• Hinweis: Um Kosten und Zeit zu sparen, lesen Sie die
Bedienungsanleitung nochmals und überprüfen Sie, ob es keinen auf de
Hand liegenden Grund gibt, ehe Sie das Gerät zur Reparatur
zurückschicken. Stellt sich bei der Überprüfung des Gerätes heraus, dass
kein Geräteschaden vorliegt, könnte dem Kunden eine
Untersuchungspauschale berechnet.
• Für Reparaturen nach Ablauf der Garantiefrist werden Transportkosten
berechnet.
• Jede kommerzielle Garantie lässt diese Rechte unberührt.
Die oben stehende Aufzählung kann eventuell angepasst werden
gemäß der Art des Produktes (siehe Bedienungsanleitung des
Gerätes).
Made in PRC
Imported by Velleman nv
Legen Heirweg 33, 9890 Gavere, Belgium
www.velleman.eu
 Loading...