

Page 1

L
T
M
É
R
R
A
S
M
L
T
A
A
M
R
O
A
2
CAMCO
VIDEO CAP
BALLPOINT
STYLO-CAM
BOLÍGRAFO
KUGELSCH
PENNA CON
MINI KAME
VC9
URE PEN CAMER
ET VIDEOCAME
RA ESPION - 2 G
CON CÁMARA DE
EIBER MIT VIDE
TELECAMERA E D
A W DŁUGOPISIE
- 2GB
A - 2 GB
o
VÍDEO - 2GB
KAMERA - 2GB
VR INTEGRATI – 2GB
GB
USER MANU
GEBRUIKER
NOTICE D’E
MANUAL DE
BEDIENUNG
MANUALE U
INSTRUKCJ
L
HANDLEIDING
PLOI
USUARIO
SANLEITUNG
ENTE
UŻYTKOWNIKA
3
6
9
13
16
20
24
Page 2
k
U
a
e
t
e
s
O
r
u5
k
t
o
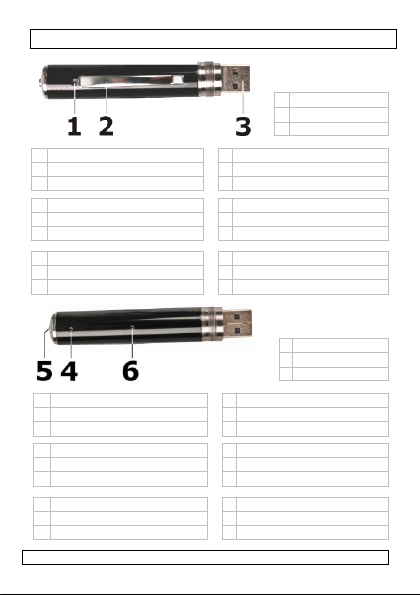
1 camera
2 microfoon
USB-stek
3
1 cámara
2 micrófono
3 conector
1 telecamer
2 microfono
3 connettor
4 DEL d’éta
5 bouton
6 bouton d
4 Status-LE
5 Schalter
6 Reset-Ta
1 Kamera
2 Mikrofon
3 Port USB
05.10.2010
CAMC
e
SB
USB
réinitialisation
D
te
2
LVC9
1
2 micro
3 USB
1 caméra
2 microphone
3 fiche USB
1 Kamera
2 Mikrofon
3 USB-Stecker
4 Status LED
5 Control button
6 Reset
4 stat
6 rese
4 LED de estado
5 botón
6 botón de reinic
4 LED di stato
5 tasto di control
6 tasto Reset
4 Dioda statusu
5 Przycisk kontr
6 Reset
came
scha
Rev. 02
ra
phone
sled
elaar
knop
ialización
lo
lny
©Velleman nv
Page 3

c
n
n
s
s
o
t
a
n
c
o
ging
n
n
e
epag
m
h
d
e
n
y
t
u
a
e
r
u
e
t
g
s
n
e
O
A
m
o
s
t
c
r
e
a
v
n
h
n
d
m
e
e
c
e
n
f
a
e
o
t
r
h
o
a
y
e
e
g
e
h
g
g
1. Introdu
To all reside
Important e
This
dispo
envir
unsor
speci
retur
Respect the lo
If in doubt, c
Thank you for
before brin
transit, don't i
2. Safety I
Keep th
3. General
Refer to the V
es of this
• Protect this
operating t
• Protect the
• Indoor us
splashing a
• Familiarise
using it.
• All modifica
Damage ca
by the warr
• Only use th
an unautho
• Damage ca
is not cover
responsibili
• DO NOT us
al activi
ille
4. Feature
• for audio a
• 2GB integra
• only one op
05.10.2010
USER M
tion
ts of the European
vironmental infor
ymbol on the device
al of the device after
nment. Do not dispo
ed municipal waste;
lized company for re
ed to your distributo
al environmental rul
ntact your local w
choosing Velleman! P
this device into ser
stall or use it and co
structions
device away from c
Guidelines
lleman® Service a
anual.
device from shocks a
e device.
evice against extre
only. Keep this devi
d dripping liquids.
ourself with the func
ions of the device ar
sed by user modifica
nty.
device for its intend
ised way will void th
sed by disregard of
d by the warranty a
y for any ensuing de
e this product to viol
ties.
d video recording
ted flash memory
ration switch
CAMC
LVC9
NUAL
Union
ation about this pr
r the package indica
its lifecycle could ha
e of the unit (or batt
it should be taken to
ycling. This device s
or to a local recyclin
s.
ste disposal auth
lease read the manu
ice. If the device was
tact your dealer.
ildren and unauthori
d Quality Warrant
nd abuse. Avoid brut
e heat and dust.
ce away from rain, m
tions of the device b
forbidden for safety
tions to the device is
ed purpose. Usin
warranty.
ertain guidelines in t
d the dealer will not
ects or problems.
te privacy laws or pe
3
duct
es that
m the
eries) as
a
ould be
service.
rities.
l thoroughly
dama
sed users.
on the final
force when
oisture,
fore actually
reasons.
not covered
th
device in
is manual
accept
rform other
©Velleman nv
Rev. 02
ed in
Page 4

CAMCOLVC9 Rev. 02
(
(
• USB 2.0 plug and play device
• USB cable included
5. Operation
Recording
• Point the camera [1] towards the field of interest.
• Press and hold the control button [5] for ±3s. The status LED [4]
turns on orange to indicate that the device is ready.
• To start recording a movie, short press the control button [5].
The status LED [4] turns on blue to indicate that the device is
recording. The recorded format is AVI. Short press the control
button [5] again to stop recording (LED [4] orange). Note that
this might take a few seconds.
• To take a picture, press and hold the control button [5] for ±3s.
The status LED [4] turns on blue to indicate that the device is in
picture mode. Short press the control button [5] to take a
snapshot; the orange status LED [4] blinks when the snapshot is
taken. Note that this can take ±3s. The image format is JPG.
• To switch the device off, (when necessary) quit picture mode by
pressing the control button [5] for ±3s. Then short press the
control button [5] (status LED [4] turns blue), immediately
followed by a long press on the control button [5].
Overview:
picture mode
blue)
[5] picture
[4] orange)
Play back
• Hold the camera part of the device and turn the pen part counter
clockwise.
• Insert the USB connector [3] into a USB port of a computer (not
incl.). When necessary, use the included USB extension cable.
• The status LED [4] will light up orange and the device will now act
as a regular USB memory stick. Copy, open or delete the
recordings as you would with other files on your computer system.
Charging
• The battery charges when the device is connected to a powered
USB port.
Reset
• When the device does not react anymore, use a small pin (e.g. a
paper clip) to gently press the reset-button [6].
05.10.2010 4 ©Velleman nv
Í
Î
[5]
(long)
Ð [5] (long)
ON
([4] orange)
OFF
Í
Î
[5]
(short)
[5] Ï (long)
recording
([4] blue)
Page 5
s
x
s
2
A
t
S
C
c
d
e
e
a
p
n
t
ps
g
p
a
c
l
m
h
s
O
t
n
D
o
r
o
p
s
(C
f
n
/
e
e
n
=
C
g
h
r
y
gl
e
a
v
.
e
e
o
.
6. Update
• Create a te
• In that text
(YYYY=yea
ss= second
e.g.:
• Plug the C
• Copy time.
• Shut the U
USB port.
• Switch the
time as spe
memory an
7. Battery
• This record
device is en
• Wear suffici
when break
WARNI
Dispos
regulat
8. Technic
ick-up eleme
video resolutio
lens angle
storage capaci
recording form
frame rate (f
video recordin
recording capa
ower supply
USB power ad
dimensions
weight
Use this devi
cannot be he
resulted fro
concerning t
manual, plea
05.10.2010
ystem time
t file named time.tx
file, enter the date a
YYYY/MM/D
r, MM= month, DD=
)
009/11/18/13:43
MCOLVC9 into the U
xt to the root direct
B device down in a p
AMCOLVC9 off and
ified in the time.txt
the file itself is rem
r contains an interna
d-of-life, this battery
ent and appropriate
ing the housing.
NG:
of batteries in acc
ions. Keep batterie
l Specification
t colour CMOS
n 640 x 480
58°
2GB built-in
at AVI
15~30
mode continuous u
city < 4MB/min
built-in Li-io
tor 100-240VAC
150 x 15 x 1
45g
e with original acc
d responsible in th
(incorrect) use of
is product and the
e visit our websit
CAMC
LVC9
.
d time in the followi
/hh:mm:ss
date, hh=hour, mm
:00
SB port of your PC.
ry of the CAMCOLV
oper way and unplu
on again. At this poin
file are loaded into t
ved from the directo
l rechargeable batter
has to be removed.
rotection (goggles,
ordance with local
away from childr
sensor
IF)
lash memory
ntil memory full or m
battery (recharged
50-60Hz - 5.0VDC/0
5mm
essories only. Vell
event of damage
this device. For mo
latest version of th
www.velleman.eu
5
Rev. 02
format:
minutes,
9.
it from the
t, date and
e system
y.
. When the
oves …)
n.
nually off
ia USB)
5A
man nv
r injury
re info
is user
©Velleman nv
Page 6

i
t
c
u
E
z
m
e
u
r
y
n
n
d
w
a
i
n
V
h
e
e
g
d
ghe
d
O
s
T
gh
e
s
o
e
o
e
n
b
p
R
e
t
n
r
a
n
s
e
e
ge
ge
n
d
d
G
o
f
,
t
u
e
j
r
jd
e
t
a
g
s
e
e
e
b
j
d
j
eg
et g
The informat
prior notice.
© COPYRIGHT
The copyright
rights reserved.
copied, reprodu
otherwise witho
1. Inleid
Aan alle inge
Belangrijke
Dit sy
als he
schad
event
afval;
voor
een lokaal rec
milieuwetgevi
Hebt u vrage
betreffende
Dank u voor u
toestel in gebr
transport, inst
2. Veilighe
3. Algeme
Raadpleeg de
achteraan de
• Bescherm t
bediening.
• Bescherm t
• Gebruik het
vochti
• Leer eerst
gebruiken.
• Om veili
Schade doo
niet onder
• Gebruik het
05.10.2010
on in this manual i
NOTICE
o this manual is own
his manual is copyri
ed, translated or reduc
t the prior written con
G
BRUIKERSH
ing
etenen van de Eur
ilieu-informatie b
mbool op het toestel
t na zijn levenscyclus
kan toebrengen aa
ele batterijen) niet
het moet bij een ges
ecyclage. U moet dit
clagepunt brengen.
.
, contacteer dan d
e verwijdering.
aankoop! Lees dez
uik neemt. Werd het
lleer het dan niet en
dsinstructies
Houd
buiten het bereik va
e richtlijnen
elleman® service-
andleiding.
en schokken en ve
en extreme temper
toestel enkel binne
heid
en opspattende vloei
e functies van het to
idsredenen mag u ge
r wijzigingen die de
e garantie.
toestel enkel waarvo
CAMC
LVC9
subject to chan
ed by Velleman nv. Al
ted. No part of this ma
d to any electronic me
ent of the copyright hol
ANDLEIDIN
pese Unie
treffende dit produ
f de verpakking gee
wordt weggeworpen
het milieu. Gooi dit
ij het gewone huisho
ecialiseerd bedrijf te
toestel naar uw verd
especteer de plaatse
e plaatseli
handleiding grondig
oestel beschadigd ti
raadpleeg uw dealer.
kinderen en onbevo
en kwaliteitsgaran
mijd brute kracht tijd
turen en stof.
shuis. Bescherm te
toffen.
stel kennen voor u h
n wijzigingen aanbr
bruiker heeft aange
or het gemaakt is. Bi
6
ke auto
Rev. 02
without
l worldwide
ual may be
ium or
er.
ct
t aan dat,
dit toestel
oestel (en
delijke
rechtkomen
ler of naar
ke
li
iteiten
voor u het
ens het
den.
ie
ens de
en regen,
aat
ngen.
racht valt
©Velleman nv
Page 7

CAMCOLVC9 Rev. 02
(
(
[4]
onoordeelkundig gebruik vervalt de garantie.
• De garantie geldt niet voor schade door het negeren van bepaalde
richtlijnen in deze handleiding en uw dealer zal de
verantwoordelijkheid afwijzen voor defecten of problemen die hier
rechtstreeks verband mee houden.
• Installeer en gebruik deze camera niet voor illegale praktijken en
respecteer ieders privacy.
4. Eigenschappen
• video-opname met audio
• ingebouwd flashgeheugen van 2 GB
• inschakeling via slechts een enkele knop
• USB 2.0 plug-and-play
• geleverd met USB-kabel
5. Gebruik
Opname
• Richt de camera [1].
• Houd de schakelaar [5] gedurende ±3 seconden ingedrukt. De
oranje statusled [4] licht op om aan te geven dat de camera klaar
is om op te nemen.
• Druk de schakelaar [5] opnieuw in om de opname te starten. De
blauwe statusled [4] licht op om aan te geven dat de opname
(AVI) is begonnen. Druk de schakelaar [5] kort in om de opname
stil te leggen. De oranje statusled [4] licht op. Dit kan enkele
seconden duren.
• Houd de schakelaar [5] gedurende ±3 seconden ingedrukt. De
blauwe statusled [4] licht op om aan te geven dat de camera
klaar is om een beeld vast te leggen. Druk nu kort op de
schakelaar [5] om het beeld vast te leggen. De oranje statusled
[4] licht op om aan te geven dat het beeld (AVI) is vastgelegd.
Dit kan enkele seconden duren.
• Om het toestel uit te schakelen: Houd de schakelaar [5]
gedurende ±3 seconden ingedrukt om de opnamefunctie te
verlaten. Druk daarna kort op dezelfde schakelaar [5] (de blauwe
statusled [4] licht op) en houd opnieuw ingedrukt.
Overzicht:
beeldopname
blauw)
[5] beeld
oranje)
Afspelen
• Draai de bovenste helft van de CAMCOLVC9 los.
05.10.2010 7 ©Velleman nv
Í
Î
[5]
(lang)
Ð [5] (lang)
ON
([4] oranje)
OFF
Í
Î
[5]
(kort)
[5] Ï (lang)
filmopname
([4] blauw)
Page 8

S
d
t
B
p
v
e
b
jaa
e
C
C
C
h
e
e
d
g
h
k
n
a
t
O
U
d
k
o
D
=
e
U
a
o
g
w
e
b
e
n
d
e
(C
g
g
g
u
v
n
g
n
=
e
e
o
h
G
m
j
j
• Steek de U
meegelever
• De oranje s
als een US
Herladen
• Steek de ba
herladen.
Resetten
• Reset de ba
(bv. een pa
6. Update
• Maak een t
• Voer in dit
formaat:
(YYYY=
ss= second
Voorbeeld:
• Koppel de
• Kopieer het
CAMCOLV
• Schakel het
• Schakel de
in time.txt
systeemge
directory v
7. De batt
• Deze recor
batterij aan
besc
• Draa
opneemeleme
beeldresolutie
lenshoek
opslagcapacite
opnameforma
framesnelheid
opnamemodi
opnamecapaci
05.10.2010
B-stekker [3] in de
e verlengkabel indie
atusled [4] licht op.
-stick en bestanden
llpoint in een USB-aa
llpoint door de resetk
erclip) zachtjes in te
an de systeemt
kstbestand aan en n
estand datum en tijd
YYYY/MM/D
r, MM= maand, DD
n)
2009/11/18/13:
AMCOLVC9 aan de
bestand time.txt na
9.
USB-apparaat uit en
AMCOLVC9 uit en
econfigureerd zijn,
eugen gekopieerd. H
rwijderd.
rij
er bevat een herlaad
het einde van de lev
ermende kleding wa
WAA
RSCHUWING: Hou
inderen.
van
8.
Technische sp
t kleuren CMO
it ingebouwd fl
t AVI
fps) 15~30
eit < 4 MB/min.
CAMC
640 x 480
58°
continu tot
uitschakelin
LVC9
SB-poort van uw pc.
.
n nodi
U kunt de ballpoint n
opiëren, openen en
nsluiting om de batte
nop [6] met een klei
drukken.
ijd
em het time.txt.
in vol
ens het volge
/hh:mm:ss
dag, hh= uur, mm
43:00
SB-poort van uw pc.
r de rootdirectory va
ontkoppel het van d
pnieuw in. Datum en
orden nu naar het
t bestand zelf wordt
are batterij. Verwijd
nscyclus van de rec
neer u de behuizing
de batterij buiten
cificaties
S
IF)
ashgeheugen van 2
eheugen vol of hand
8
Gebruik de
gebruiken
erwijderen.
te
ri
voorwerp
de
minuten,
n de
USB-poort.
ti
d zoals ze
uit de
r deze
rder.
opent.
et bereik
B
atige
©Velleman nv
Rev. 02
Page 9
a
g
o
n
ge
n
e
g
C
e
ge
p
s
d
s
i
y
r
c
e
e
s
m
e
m
g
u
e
o
s
O
l
C
i
h
m
z
e
n
n
e
D
e
t
o
je
é
c
t
s
e
a
v
r
n
a
/
b
m
n
e
d
g
o
v
o
e
l
r
s
t
è
u
o
l
o
a
t
/
g. o
voeding
USB-voedings
afmetingen
ewicht
Gebruik dit t
nv is niet aa
(verkeerd)
dit product e
zie www.vell
te allen tijde
kennisgevin
© AUTEURSRE
Velleman nv h
Alle wereldwijde
handleiding of
bewerken en o
schriftelijke toe
1. Intro
Aux résident
Des informat
ce produit
usagés à votr
convient de re
de l’environne
En cas de qu
élimination.
Nous vous re
attentivement
été endomma
votre revende
2. Consign
Garder h
autorisée
05.10.2010
dapter 100-240 VA
estel enkel met or
sprakelijk voor sc
bruik van dit toest
de meest recente
man.eu. De infor
worden gewijzigd
.
HT
eft het auteursrecht
rechten voorbehouden.
deelten ervan over te
te slaan op een elektro
temming van de rechth
NOTICE
uction
de l'Union europé
ons environnemen
Ce s
mbole sur l'appareil
l’élim
ination d’un appareil
l'envi
ronnement. Ne pas
onique (et des piles
élect
muni
ipaux non sujets au
trait
ra l’appareil en quest
fournisseur ou à un
pecter la réglementa
ent.
stions, contacter l
ercions de votre ach
avant la mise en ser
é pendant le transpo
r.
s de sécurité
rs de la portée des e
.
CAMC
ingebouwde
USB)
150 x 15 x 1
45 g
LVC9
ithiumbatterij (herla
/50-60 Hz – 5,0 VDC
5 mm
inele accessoires.
ade of kwetsuren
el. Voor meer infor
versie van deze ha
atie in deze handl
onder voorafgaan
voor deze handleidin
Het is niet toegestaan
emen, te kopiëren, te
isch medium zonder v
bbende.
’EMPLOI
nne
ales importantes c
u l'emballage indiqu
en fin de vie peut pol
ter un appareil élect
ventuelles) parmi le
ri sélectif ; une déch
ion. Renvoyer les éq
ervice de recyclage l
tion locale relative à
s autorités locales
t ! Lire la présente n
ice de l’appareil. Si l’
t, ne pas l’installer e
fants et des personn
9
Rev. 02
dbaar via
0,5 A
Velleman
ij
atie over
dleiding,
iding kan
e
m deze
ertalen, te
orafgaande
oncernant
que
uer
ique ou
déchets
terie
ipements
cal. Il
a protection
pour
tice
ppareil a
consulter
es non
©Velleman nv
Page 10

CAMCOLVC9 Rev. 02
3. General Guidelines
Se reporter à la garantie de service et de qualité Velleman® en
fin de notice.
• Protéger contre les chocs et le traiter avec circonspection pendant
l’opération.
• Tenir à l’écart de la poussière et des températures extrêmes.
• Utiliser cet appareil uniquement à l'intérieur. Protéger de la
pluie, de l’humidité et des projections d’eau.
• Se familiariser avec le fonctionnement avant l’emploi.
• Toute modification est interdite pour des raisons de sécurité. Les
dommages occasionnés par des modifications par le client ne
tombent pas sous la garantie.
• N’utiliser qu’à sa fonction prévue. Un usage impropre annule
d'office la garantie.
• La garantie ne s’applique pas aux dommages survenus en
négligeant certaines directives de cette notice et votre revendeur
déclinera toute responsabilité pour les problèmes et les défauts
qui en résultent.
• Installer et utiliser la caméra en respectant la législation et la vie
privée des tiers.
4. Caractéristiques
• enregistrement vidéo avec audio
• mémoire flash intégrée de 2 Go
• activation depuis un seul bouton
• USB 2.0 plug-and-play
• livré avec câble USB
5. Emploi
Enregistrement
• Pointer la caméra [1].
• Maintenir enfoncé le bouton [5] pendant ±3 secondes. La DEL
d’état [4] s’allume en orange pour indiquer que l’appareil est prêt
à enregistrer.
• Pour démarrer un enregistrement, enfoncer brièvement le bouton
[5]. La DEL d’état [4] s’allume en bleu pour indiquer un
enregistrement en cours (format AVI). Renfoncer brièvement le
bouton [5] pour interrompre l’enregistrement. La DEL d’état [4]
se rallume en orange. Ceci peut durer quelques secondes.
• Pour capturer une image, maintenir enfoncé le bouton [5]
pendant ±3 secondes. La DEL d’état [4] s’allume en bleu pour
indiquer que l’appareil prêt à capturer l’image. À présent, enfoncer
brièvement le bouton [5] pour capturer l’image (format JPG). La
DEL d’état [4] s’allume en orange. Ceci peut durer quelques
secondes.
05.10.2010 10 ©Velleman nv
Page 11

CAMCOLVC9 Rev. 02
(
(
[4]
• Pour éteindre l’appareil, quitter d’abord la fonction de capture
d’image en maintenant enfoncé le bouton [5] pendant
± 3 secondes. Ensuite, renfoncer brièvement ce même bouton [5]
(la DEL [4] s’allume en bleu) et maintenir enfoncé.
• Éteindre l’appareil en maintenant enfoncé le bouton [5] pendant
± 3 secondes.
Résumé :
capture d’image
bleu)
[5] image
orange)
Lecture de l’enregistrement
• Désolidariser la partie supérieure du stylo.
• Insérer la fiche USB [3] dans un port USB. Utiliser le câble USB
inclus si nécessaire.
• La DEL [4] s’allume en orange. Le stylo peut être utilisé comme
une clef USB et les fichiers peuvent être ouverts, copiés ou
effacés.
Recharge
• Insérer la fiche dans un port USB.
Réinitialisation
• Enfoncer le bouton de réinitialisation [6] à l’aide d’un trombone.
6. Mise à jour de l’heure du système
• Créer un fichier texte time.txt.
• Entrer dans ce fichier la date et l’heure selon le format suivant :
(YYYY=année, MM=mois, DD=jour, hh=heure, mm=minutes,
ss=secondes)
Exemple : 2009/11/18/13:43:00
• Insérer le CAMCOLVC9 dans un port USB de votre ordinateur.
• Copier le fichier time.txt dans le répertoire racine du
CAMCOLVC9.
• Éteindre le périphérique USB et le déconnecter dûment du port
USB.
• Éteindre et rallumer le CAMCOLVC9. À ce point, date et heure
comme paramétrées dans le fichier time.txt sont copiées dans la
mémoire du CAMCOLVC9. Le fichier est effacé du répertoire.
05.10.2010 11 ©Velleman nv
YYYY/MM/DD/hh:mm:ss
Í
Î
[5]
(long)
Ð [5] (long)
ON
([4] orange)
OFF
Í
Î
[5]
(court)
[5] Ï (long)
enregistrement
([4] bleu)
Page 12

m
e
v
R
n
a
é
o
g
a
g
e
p
s
m
e
a
p
U
s
a
p
t
O
e
u
e
e
c
4
r
r
/
p
1
s
e
c
e
n
f
é
r
e
e
e
e
x
a
/
U
0
o
m
a
o
é
é
o
t
q
t
g
a
7. La pile
• Ce stylo-ca
en fin de vi
• Porter des
de l’ouvertu
8. Spécific
capteur
résolution vid
angle de l’obje
capacité mém
format d’enre
vitesse de l’im
modes d’enre
capacité d’enr
alimentation
adaptateur US
dimensions
oids
N’employer c
Velleman ne
lésions surve
plus d’infor
récente de c
www.vellem
cette notice
préalable.
© DROITS D’A
SA Velleman e
Tous droits mon
diffusion, intégr
rocédé ou sur
l’accord préalabl
éra contient une pil
de l’appareil.
êtements adaptés (l
re du boîtier.
AVE
TISSEMENT : Gard
enfa
ts.
tions techniqu
o 640 x
ctif 58°
ire mémoi
istrement AVI
e (IPS) 15~30
istrement
istrement < 4 Mo
B 100-24
et appareil qu’avec
era aucunement r
nus à un usage (in
ation concernant c
tte notice, visitez
n.eu. Toutes les in
euvent être modifi
TEUR
t l’ayant droit des d
diaux réservés. Toute r
le ou partielle, du cont
out support électroniqu
e écrit de l’ayant droit.
CAMC
LVC9
rechargeable. Retir
nettes de protection,
r la pile hors de la
s
CMOS
ouleur
80 (CIF)
e flash intégrée de 2
continu
jusqu'à capacité ma
mémoi
e ou désactivation m
min
ile Li-i
on rechargeable via
0 VCA/50-60 Hz – 5,
150 x
5 x 15 mm
45 g
des accessoires d’
sponsable de dom
orrect) de cet app
t article et la versi
otre site web
ormations présent
es sans notificati
oits d’auteur pour ce
roduction, traduction,
nu de cette notice par
que se soit est interdi
Rev. 02
r cette pile
ants) lors
portée des
Go
imale de la
nuelle
SB
VCC/0,5 A
rigine. SA
ages ou
reil. Pour
n la plus
es dans
n
te notice.
copie ou
uelque
e sans
05.10.2010
12
©Velleman nv
Page 13
d
a
s
a
e
c
b
a
d
.
c
e
c
n
u
a
c
a
e
á
d
e
g
p
i
t
O
L
r
r
a
e
e
d
M
d
a
x
a
o
n
o
ñ
o
p
o
a
p
t
c
m
a
p
s
a
a
o
n
e
e
d
g
m
d
s
1. Intro
A los ciudad
Importantes
concerniente
leyes locales e
Si tiene duda
residuos.
¡Gracias por h
instrucciones
algún daño en
su distribuidor
2. Instruc
3. Normas
Véase la Gara
manual del us
• No agite el
y la instala
• No exponga
• Utilice el ap
lluvia, hum
• Familiaríces
• Por razones
aparato est
no autoriza
• Utilice sólo
manual. Su
• Los daños c
se
uridad d
no será res
resultantes.
• Instale y ut
privada de
05.10.2010
MANUAL DE
ucción
nos de la Unión Eu
informaciones sob
a este producto
ímbolo en este apar
Este
tira l
s muestras inservibl
ambi
nte. No tire este apa
en la
basura doméstica; d
espe
ializada en reciclaje.
distri
uidor o a la unidad
n relación con el med
s, contacte con las
ber comprado el CA
el manual antes de u
el transporte no lo in
iones de seguri
Mant
nga el aparato lejos
capa
itadas y niños.
generales
tía de servicio y c
ario.
parato. Evite usar e
ión.
este aparato a polvo
rato sólo en interi
dad ni a ningún tipo
e con el funcionamie
de seguridad, las m
n prohibidas. Los da
as, no están cubiert
l aparato para las a
uso incorrecto anula
ausados por descuid
e este manual invalid
onsable de ningún d
lice la cámara al res
erceros.
CAMC
LVC9
USUARIO
opea
e el medio ambien
to o el embalaje indi
s, podrían dañar el
rato (ni las pilas, si l
be ir a una empresa
Devuelva este aparat
e reciclaje local. Res
io ambiente.
autoridades locale
COLVC9! Lea atent
sarlo. Si el aparato h
stale y póngase en c
ad
del alcance de perso
lidad Velleman® al
cesiva fuerza durant
ni temperaturas extr
res. No exponga est
de salpicadura o gote
to del aparato antes
dificaciones no autori
os causados por mo
s por la garantía.
licaciones descritas e
la
de las instrucciones
arán su garantía y su
ño u otros problema
ectar la legislación y
13
arantía completa
Rev. 02
e
a que, si
edio
s hubiera)
o a su
ete las
para
mente las
sufrido
ntacto con
as no
final de este
el manejo
emas.
equipo a
o.
de utilizarlo.
zadas del
ificaciones
n este
ente.
e
distribuidor
la vida
©Velleman nv
Page 14

CAMCOLVC9 Rev. 02
ga)
ga)
)
4. Características
• grabación en vídeo con audio
• memoria flash incorporada de 2GB
• activación con sólo un botón
• USB 2.0 plug-and-play
• se entrega con cable USB
5. Uso
Grabar
• Apunte la cámara [1].
• Mantenga pulsado el botón [5] durante ±3 segundos. El LED de
estado [4] se ilumina (naranja) para indicar que el aparato está
listo para grabar.
• Para iniciar una grabación, pulse el botón [5] brevemente. El LED
de estado [4] se ilumina (azul) para indicar que el aparato está
grabando (formato AVI). Vuelva a pulsar el botón [5] brevemente
para interrumpir la grabación. El LED de estado [4] vuelve a
iluminarse (naranja). Esto puede durar algunos segundos.
• Para capturar una imagen, mantenga pulsado el botón [5]
durante ±3 segundos. El LED de estado [4] se ilumina (azul) para
indicar que el aparato está listo para capturar la imagen. Ahora,
pulse el botón [5] brevemente para capturar la imagen (formato
JPG). El LED de estado [4] se ilumina (naranja). Esto puede durar
algunos segundos.
• Para desactivar la grabación, primero, salga de la función de
captura de imagen al mantener pulsado el botón [5] durante
±3 segundos. Luego, vuelva a pulsar este botón [5] brevemente
(el LED [4] se ilumina (azul)) y mantenga pulsado.
• Desactive el aparato al mantener pulsado el botón [5]
± 3 segundos.
Vista general:
captura de
imagen
(azul)
Reproducir
• Desatornille la parte superior del bolígrafo.
• Introduzca el conector USB [3] en un puerto USB. Utilice el cable
USB incluido si fuera necesario.
• El LED de estado [4] se ilumina (naranja). Es posible utilizar el
bolígrafo como memoria USB y abrir, copiar o borrar archivos.
05.10.2010 14 ©Velleman nv
Í
Î
[5]
(presión
lar
Ð [5] (presión
lar
ON
([4]
naranja)
OFF
Í
Î
[5]
(presión
corta
[5] Ï (presión
larga)
grabación
([4] azul)
Page 15

t
a
h
o
o
2
e
h
l
o
r
o
o
a
O
c
m
e
p
m
a
a
(fps)
a
g
r
p
O
e
s
t
e
/
t
o
A
o
o
C
l
r
l
o
f
a
m
p
o
A
x
j
e
f
u
n
L
t
s
e
m
e
a
n
U
C
Recargar
• Introduzca
Reinicializar
• Pulse el bo
6. Actualiz
• Cree un fic
• Introduzca l
siguiente:
(YYYY=añ
ss=segund
Ejemplo:
• Introduzca
• Copie el fic
• Desactive e
USB.
• Desactive y
fecha y la h
time.txt, a
borra del di
7. La pila
• Este aparat
tirar aparat
• Lleve ropa
caja.
8. Especifi
elemento de i
resolución víd
ángulo de la ó
capacidad de
formato de gr
velocidad de l
modo de grab
capacidad de
alimentación
adaptador de
dimensiones
eso
05.10.2010
el conector en un pu
ón de reinicialización
r la hora del si
ero de texto time.tx
a fecha y al hora en
YYYY/MM
, MM=mes, DD=día,
s)
009/11/18/13:43
l CAMCOLVC9 en un
ero time.txt al direc
aparato USB y desc
vuelva a activar el C
ra, como han sido c
la memoria del CAM
ectorio.
funciona con una pi
.
decuada (gafas de p
¡OJ
!: Mantenga las pi
aciones
agen CMOS col
o 640 x 480
tica 58°
emoria memoria
bación AVI
imagen
ción
rabación < 4MB/mi
ed USB 100-240V
CAMC
15~30
de maner
de la me
ila de liti
150 x 15
45 g
15
LVC9
rto USB.
[6] con un ob
tema
.
ste fichero según el
DD/hh:mm:ss
hh=hora, mm=min
:00
puerto USB del orde
orio raíz del CAMCO
néctelo correctamen
MCOLVC9. Ahora,
nfiguradas en el fich
OLVC9. El fichero
a recargable. Saque l
otección, guantes) al
as lejos del alcanc
r
(CIF)
lash 2GB incorporad
continua hasta capa
oria o activación ma
n.
-ion recargable por
C/50-60Hz - 5.0VD
15 mm
eto p
Rev. 02
queño.
ormato
tos,
ador.
VC9.
e del puerto
e copian la
ro
ismo se
a pila al
abrir la
de niños.
cidad máx.
ual
SB
/0.5A
©Velleman nv
Page 16

p
r
s
d
a
d
D
h
u
n
h
o
w
s
a
n
e
R
e
e
gungsr
g
e
e
e
e
a
O
o
n
o
o
a
S
c
ü
o
e
S
o
m
s
e
g
h
S
ö
g
a
e
t
b
Qu
e
n
a
e
i
p
t
c
s
n
t
l
m
a
h
e
Utilice este a
Velleman NV
causados po
información
este manual
www.vellem
el contenido
© DERECHOS
Velleman NV d
usuario.
Todos los derec
reproducir, trad
partes de ello si
1. Einfü
A
n alle Einw
Wichtige Um
Diese
an, d
Lebe
Entso
nicht
verw
Firma zwecks
Händler oder
werden. Resp
Falls Zweifel
Entsor
Wir bedanken
Bedienun
Überprüfen Si
sein, verwend
Händler.
2. Sicherh
3. Allgeme
Siehe Vellem
Bedienungsanl
05.10.2010
arato sólo con los
no será responsabl
un uso (indebido)
obre este product
el usuario, visite
n.eu. Se pueden m
e este manual sin
E AUTOR
ispone de los derech
os mundiales reservad
cir, copiar, editar y gu
previo permiso escrito
BEDIENUNG
rung
hner der Europäis
eltinformationen
Symbol auf dem Pr
ss die Entsorgung di
szyklus der Umwelt
rgen Sie die Einheit (
als unsortiertes Haus
ndeten Batterien mü
ecycling entsorgt w
in örtliches Recyclin
ktieren Sie die örtlic
bestehen, wenden
ichtlinien an Ihre
uns für den Kauf des
sanl
vor Inbetriebn
eitun
, ob Transportschäd
n Sie das Gerät nich
itshinweise
Halt
n Sie Kinder und Un
ine Richtlinien
n® Service- und
eitung.
CAMC
LVC9
accesorios original
e de daños ni lesio
de este aparato. P
y la versión más r
uestra página
odificar las especif
previo aviso.
s de autor para este
s. Está estrictamente
rdar este manual del u
del derecho habiente.
ANLEITUNG
hen Union
ber dieses Produk
dukt oder der Verpa
ses Produktes nach
chaden zufügen kan
der verwendeten Ba
üll; die Einheit oder
sen von einer spezia
rden. Diese Einheit
-Unternehmen retour
en Umweltvorschrifte
ie sich für
rtliche Behörde.
CAMCOLVC9! Lesen
hme sorgfältig durc
n vorliegen. Sollte di
und wenden Sie sich
efugte vom Gerät fer
alitätsgarantie am
16
Rev. 02
s.
es
ra más
ciente de
caciones y
manual del
rohibido
suario o
kung zeigt
einem
.
terien)
isierten
uss an den
niert
n.
Sie diese
.
s der Fall
an Ihren
n.
Ende dieser
©Velleman nv
Page 17

CAMCOLVC9 Rev. 02
• Vermeiden Sie Erschütterungen. Vermeiden Sie rohe Gewalt
während der Installation und Bedienung des Gerätes.
• Schützen Sie das Gerät vor extremen Temperaturen und Staub.
• Verwenden Sie das Gerät nur im Innenbereich. Schützen Sie
das Gerät vor Regen und Feuchte.
• Nehmen Sie das Gerät erst in Betrieb, nachdem Sie sich mit
seinen Funktionen vertraut gemacht haben.
• Eigenmächtige Veränderungen sind aus Sicherheitsgründen
verboten. Bei Schäden verursacht durch eigenmächtige
Änderungen erlischt der Garantieanspruch.
• Verwenden Sie das Gerät nur für Anwendungen beschrieben in
dieser Bedienungsanleitung sonst kann dies zu Schäden am
Produkt führen und erlischt der Garantieanspruch.
• Bei Schäden, die durch Nichtbeachtung der Bedienungsanleitung
verursacht werden, erlischt der Garantieanspruch. Für daraus
resultierende Folgeschäden übernimmt der Hersteller keine
Haftung.
• Installieren und verwenden Sie die Kamera nicht für illegale
Praktiken und beachten Sie die Intimsphäre aller.
4. Eigenschaften
• Videoaufzeichnung mit Audio
• eingebauter Flash-Spei cher von 2 GB
• Einschaltung über nur eine Taste
• USB 2.0 plug-and-play
• Lieferung mit USB-Kabel
5. Anwendung
Aufnahme
• Richten Sie die Kamera [1].
• Halten Sie die Taste [5] ±3 Sekunden gedrückt. Die
orangefarbige Status-LED [4] leuchtet, um anzuzeigen, dass die
Kamera gebrauchsfertig ist.
• Drücken Sie die Taste [5] wieder, um die Aufnahme zu starten.
Die blaue Status-LED [4] leuchtet, um anzuzeigen, dass die
Aufnahme (AVI) begonnen ist. Drücken Sie die Taste [5] kurz, um
die Aufnahme zu stoppen. Die orangefarbige Status-LED [4]
leuchtet. Dies kann einige Sekunden dauern.
• Halten Sie die Taste [5] ±3 Sekunden gedrückt. Die blaue Status-
LED [4] leuchtet, um anzuzeigen, dass die Kamera fertig ist, um
ein Bild zu erfassen. Drücken Sie die Taste [5] nun kurz, um das
Bild zu machen. Die orangefarbige Status-LED [4] leuchtet, um
anzuzeigen, dass das Bild (AVI) erfasst worden ist. Dies kann
einige Sekunden dauern.
• Um das Gerät auszuschalten: Halten Sie die Taste [5]
±3 Sekunden gedrückt, um die Aufnahmefunktion zu verlassen.
05.10.2010 17 ©Velleman nv
Page 18

CAMCOLVC9 Rev. 02
(
(
Drücken Sie dieselbe Taste [5] danach kurz (Die blaue StatusLED [4] leuchtet) und halten Sie wieder gedrückt.
Überblick:
Bilderfassung
(blau)
Abspielen
• Drehen Sie die obere Hälfte des Kugelschreibers los.
• Stecken Sie den USB-Stecker [3] in den USB-Anschluss des PC.
Verwenden Sie das mitgelieferte Verlängerungskabel wenn nötig.
• Die orangefarbige Status-LED [4] leuchtet. Sie können den
Kugelschreiber nun als Memorystick verwenden und Dateien
kopieren, öffnen und löschen.
Laden
• Stecken Sie den Kugelschreiber in einen USB-Anschluss, um die
Batterie zu laden.
Rüscksetzen
• Setzen Sie das Gerät zurück, indem Sie die Reset-Taste [6] mit
einem kleinen Gegenstand (z.B. Heftklammer) vorsichtig
drücken.
6. Die Systemzeit aktualisieren
• Kreieren Sie eine Textdatei mit dem Namen time.txt.
• Geben Sie in dieser Datei das Datum und die Uhrzeit ein (siehe
folgendes Format):
(YYYY=Jahr, MM=Monat, DD=Tag, hh=Stunden, mm=Minuten,
ss=Sekunden
Beispiel: 2009/11/18/13:43:00
• Verbinden Sie den CAMCOLVC9 mit dem USB-Port des PC.
• Kopieren Sie die Datei time.txt zum Hauptverzeichnis des
CAMCOLVC9.
• Schalten Sie das USB-Gerät aus und trennen Sie es vom USB-
Port.
• Schalten Sie den CAMCOLVC9 aus und wieder ein. Datum und
Uhrzeit, wie in time.txt konfiguriert, werden zum Speicher
kopiert. Die Datei selber wird gelöscht.
05.10.2010 18 ©Velleman nv
YYYY/MM/DD/hh:mm:ss
Í
Î
[5]
lang)
Ð [5] (lang)
ON
([4] orange)
OFF
Í
Î
[5]
kurz)
[5] Ï (lang)
Aufnahme
([4] blau)
Page 19

e
f
S
T
eACH
c
m
n
m
pa
gu
z
S
n
a
e
g
b
l
crep
O
e
d
4
g
u
m
B
geba
z
4
1
H
w
P
t
ge
c
r
u
a
u
a
n
c
h
a
t
V
b
n
ä
u
mng
p
h
7. Die Batt
• Das Gerät
Entfernen
Gerätes.
8. Technis
Aufnahme-Ele
Video-Auflösu
Blickwinkel
Speicherkapaz
Aufnahmefor
Bildgeschwindi
Aufnahmemod
Aufnahmeka
Stromversor
USB-Schaltnet
Abmessungen
Gewicht
Verwenden
Velleman NV
Verletzunge
mehr Inform
Version dies
Alle Änderun
© URHEBERRE
Velleman NV
Bedienungsan
Alle weltweiten Re
Urhebers ist es ni
roduzieren, zu
rie
unktioniert mit einer
ie diese Batterie am
ragen Sie geeignete
•
öffn
n.
TUNG: Halten Sie
he Daten
ent CMOS 640 x
ität 2GB ei
at AVI
keit (fps) 15~30
us
zität < 4 M
ng
teil 100-2
ie dieses Gerät nur
übernimmt keine
bei (falscher) An
tionen zu diesem
r Bedienungsanlei
en ohne vorheri
CHT
esitzt das Urheberre
eitung.
chte vorbehalten. ohne vo
ht gestattet, diese Bedien
kopieren, zu übersetzen, z
CAMC
LVC9
wiederaufladbaren B
Ende des Lebenszykl
Kleidung wenn Sie d
ie Batterien von Ki
Farbkamera
80 (CIF)
58°
ngebauter Flash-Spei
kontin
ierlich bis den Speic
oder
anuelle Abschaltung
/Min.
ein
ute Lithium-Ion-Bat
über U
SB)
0VAC/50-60Hz - 5.0
150 x
5 x 15 mm
45 g
mit originellen Zu
aftung für Schade
endung dieses Ger
rodukt und die ne
ung, siehe www.ve
Ankündigung vorb
ht für diese
herige schriftliche Geneh
sanleitung ganz oder in
u bearbeiten oder zu s
tterie.
s des
s Gehäuse
dern fern.
her
er voll ist
erie (Laden
DC/0.5A
ehörteilen.
oder
tes. Für
este
lleman.eu.
ehalten.
igung des
Teilen zu
eic
ern.
Rev. 02
05.10.2010
19
©Velleman nv
Page 20

d
n
s
a
b
’
i
n
c
o
d
u
r
n
t
gg
i
e
i
t
p
v
a
o
O
r
t
s
e
e
a
m
g
c
n
s
i
d
g
u
n
g
i
u
n
e
a
o
n
t
b
b
e
e
e
e
d
o
e
gg
n
o
a
b
V
gg
i
o
u
p
g
u
a
a
n
n
1. Intro
A tutti i resid
Importanti i
utilizzate) com
smaltito da un
Per informaz
prodotto, co
smaltimento
effettuato l’a
La ringraziam
attentamente l
di utilizzare il
danneggiato d
proprio fornito
2. Istruzio
Tenere i
persone
3. Informa
Fare riferimen
riportate nell’u
• Prote
con delicat
• Proteggere
• Solo per u
lontano da
• Familiarizza
• Per ovvie ra
al dispositiv
dispositivo,
• Utilizzare il
progettato.
garanzia.
• I danni deri
presente m
sarà ritenut
persone.
05.10.2010
MANUALE
uzione
enti nell’Unione Eu
formazioni ambien
Que
to simbolo riportato
indic
che è vietato smalti
term
ine del suo ciclo vital
l’am
iente stesso. Non sm
e rifiuto urbano indiff
impresa specializzat
oni più dettagliate
tattare l’ufficio co
rifiuti oppure il ne
quisto.
per aver scelto Velle
e informazioni conte
ispositivo. Assicurar
rante il trasporto; in
e.
i relative alla s
l dispositivo lontano
non qualificate.
zioni generali
o alle condizioni di
ltima pagina del man
ere
l dispositivo da urti e
zza.
l dispositivo da ecces
ilizzo in ambienti i
ioggia, umidità, spru
re con le funzioni del
ioni di sicurezza è v
o. Eventuali danni ca
da parte dell’utente,
dispositivo solament
Ogni altro tipo di utili
anti dall’inosservanz
nuale non sono cope
responsabile di eve
CAMC
LVC9
UTENTE
opea
ali relative a ques
ul prodotto o sull’im
re il prodotto nell’am
in quanto può esser
altire il prodotto (o l
renziato; dovrebbe
nel ricicl aggio.
circa il riciclaggio
unale, il servizio l
ozio presso il qual
man! Si prega di le
ute nel presente ma
i che l’apparecchio n
tale evenienza, cont
curezza
alla portata dei bam
aranzia e qualità
ale.
cadute. Mane
sivo calore e polvere.
terni. Tenere il disp
zzi e gocciolamento d
dispositivo prima di
etato apportare delle
sati da modifiche ap
on sono coperti da
per lo scopo per il q
zzo determina la dec
delle indicazioni for
rti da garanzia; il ve
tuali danni cagionati
20
iare
a cose o
Rev. 02
o prodotto
allaggio,
iente al
nocivo per
pile, se
ssere
i questo
cale di
è stato
ere
uale prima
n sia stato
ttare il
ini e delle
elleman®
l dispositivo
sitivo
i liquidi.
tilizzarlo.
modifiche
ortate al
aranzia.
ale è stato
denza della
ite nel
ditore non
©Velleman nv
Page 21

CAMCOLVC9 Rev. 02
• NON UTILIZZARE il dispositivo per violare la privacy altrui o per
svolgere attività illegali.
4. Caratteristiche
• registrazione audio/video
• memoria flash da 2GB integrata
• controllo delle funzioni tramite singolo tasto
• dispositivo USB 2.0 plug and play
• cavo USB incluso.
5. Funzionamento
Registrazione
• Puntare la telecamera [1] verso la scena che si desidera
riprendere.
• Premere e tenere premuto per circa 3 secondi il tasto di controllo
[5]. Il LED di stato [4] si illumina di arancio ad indicare che il
dispositivo è in stand-by.
• Per avviare la registrazione premere brevemente il tasto di
controllo [5]. Il LED di stato [4] si illumina di blu ad indicare che
il dispositivo è in registrazione. Il video viene sa lvato in formato
AVI. Premere nuovamente e rilasciare il tasto di controllo [5] per
arrestare la registrazione (il LED [4] si illumina di arancio ad
indicare che il dispositivo è in stand-by). Questa operazione può
richiedere alcuni secondi.
• Per passare alla modalità fotocamera premere e tenere premuto
per circa 3 secondi il tasto di controllo [5]. Il LED di stato [4] si
illumina di blu per indicare la modalità fotocamera. Per scattare
un’istantanea premere brevemente il tasto di controllo [5]; il LED
di stato [4] emette un lampeggio di colore arancio ogni volta che
viene scattata una foto. L’operazione può richiedere anche 3
secondi. L’immagine viene salvata in formato JPG.
• Per spegnere il dispositivo è necessario uscire dalla modalità
fotocamera premendo e tenendo premuto per circa 3 secondi il
tasto di controllo [5] (il LED di stato [4] diventa arancio). Ora il
dispositivo è in modalità stand-by. Premere brevemente il tasto di
controllo [5] (il LED di stato [4] si illumina di blu) e
immediatamente dopo premere e tenere premuto il tasto fino a
quando il LED di stato [4] non diventa arancio e poi si spegne.
05.10.2010 21 ©Velleman nv
Page 22

CAMCOLVC9 Rev. 02
ga)
(
ga)
Funzionamento:
fotocamera
[4] blu)
[5] scatto
istantanea
([4] arancio)
Riproduzione di un filmato
• Svitare la parte inferiore della penna ruotandola in senso
antiorario.
• Inserire il connettore USB [3] nella porta USB del PC (non
incluso). Se necessario utilizzare il cavo prolunga USB incluso
nella confezione.
• Il LED di stato [4] si illuminerà di arancio ed il dispositivo verrà
riconosciuto come unità disco esterna. Con il proprio PC sarà
possibile copiare, aprire o cancellare i file memorizzati nel
registratore A/V.
Ricarica della batteria
• La batteria interna si ricarica automaticamente ogniqualvolta il
dispositivo viene collegato alla porta USB del PC.
Reset
• Quando il dispositivo non reagisce ai comandi, premere con
delicatezza il tasto di reset [6] utilizzando un oggetto appuntito
(ad esempio una graffetta).
6. Aggiornare l’orologio di sistema
• Creare un file di testo time.txt.
• Inserire nel suddetto file la data e l’ora con il seguente formato:
(YYYY=anno, MM= mese, DD= giorno, hh=ore, mm=minuti,
ss= secondi)
esempio: 2009/11/18/13:43:00
• Collegare il CAMCOLVC9 alla porta USB del PC.
• Copiare il file time.txt nella directory radice del CAMCOLVC9.
• Eseguire la rimozione sicura dell’hardware quindi scollegare il
dispositivo dalla porta USB del PC.
• Spegnere e riaccendere il CAMCOLVC9; così facendo l’ora e la
data specificati nel file time.txt vengono caricati nella memoria
del sistema e il file stesso rimosso dalla directory.
05.10.2010 22 ©Velleman nv
[5]
(pressione
lun
YYYY/MM/DD/hh:mm:ss
Ð [5]
(pressione
lun
Í
Î
ON
([4]
arancio)
OFF
Í
Î
[5]
(pressione
corta)
[5] Ï (pressione
lunga)
registrazione
([4] blu)
Page 23

a
(
c
Z
h
e
n
gi
ps
g
g
r
p
e
V
o
e
s
n
L
Q
N
q
s
O
n
d
a
4
u
/
a
(
a
145g
o
e
p
r
m
o
t
e
o
z
o
r
e
v
a
a
o
g
c
g
o
u
o
m
gge
t
e
e
t
e
7. Batteria
• Il registrato
• Per estrarre
8. Specific
sensore d’imm
risoluzione vid
apertura angol
supporto di
memorizzazio
formato di re
frame rate (f
modalità di re
video
capacità di re
alimentazione
adattatore da
dimensioni
eso
Utilizzare qu
nessun caso
ritenuti resp
improprio o
informazioni
visitare il no
contenute in
modifiche se
© NOTA LEGA
uesto manua
Velleman nv.
uesto manuale
elettronico e/o
re integra una batteri
rimossa qu
dispositivo
esempio oc
ndo il dispositivo giu
la batteria è necessa
utilizzare una protezi
hiali, guanti, ecc...).
ATTEN
IONE:
Smaltir
e le batterie secon
le batterie lontano
Tenere
e tecniche
agine CMOS
o 640 x
are 58°
e
strazione AVI
15~30
istrazione continu
istrazione < 4MB
ete USB 100-24
sto dispositivo sol
elleman nv ed i su
nsabili di danni o l
rrato di questo dis
relative a questo p
tro sito www.velle
questo manuale po
za alcun preavvis
E
le è protetto dai dirit
on è possibile riprodurr
indipendentemente o c
tampato senza l'autoriz
CAMC
LVC9
a ricaricabile. Questa
rio rompere l’involuc
one sufficiente ed ad
o le vigenti diretti
dalla portata dei b
colori
80 (CIF)
memor
ia flash 2GB integrat
a (fino a esauriment
ale
o man
min
batteri
agli ioni di Litio inte
ricaric
bile tramite USB)
0VAC/50-60Hz - 5Vd
150 x
5 x 15mm
con accessori ori
oi rivenditori poss
sioni derivanti da
ositivo. Per ulteri
odotto, vi preghia
ssono essere so
.
i di proprietà intellet
, duplicare e distribuir
me parte di un pacche
azione esplicita di Vell
e al termine del su
an.eu. Le informa
Rev. 02
deve essere
ciclo vitale.
o del
uata, ad
e locali.
mbini.
memoria)
rata
/0,5A
inali. In
no essere
n uso
ri
o di
zioni
tte a
uale di
liberamente
to in formato
man nv
05.10.2010
23
©Velleman nv
Page 24

N
a
m
n
a
j
j zgodn
ezajmuj
ę
z
k
j
r
w
z
w
g
e
e
z
g
o
o
b
u
O
Ż
U
o
y
e
z
y
jmuj
ę
r
ś
w
r
t
a
w
ż
m
j
z
z
u
p
A
s
b
e
z
e
m
f
d
ą
y
ż
z
z
w
j
s
j
1.Wstęp
Przeznaczon
Ważne infor
skontaktu
możesz oddać
Postępu
środowiska. J
ącą si
Dziękujemy za
zapoznanie się
zostało uszkod
niego i skonta
2.Instrukc
Chronić
nieauto
3.Wskazó
Chroń to urząd
trakcie użytko
Zapoznaj się z
lędów b
Ze wz
urządzenia.
Używaj urządz
niezgodne z pr
NIE UŻYWAJ
innych bądź w
4. Cechy o
• Zapis audi
• 2GB wbud
• Łatwy w o
• USB 2.0 pl
05.10.2010
I
STRUKCJA U
dla mieszkańców
acje dotyczące śr
Te
symbol umieszczon
ws
kazuje, że wyrzuceni
dl
środowiska. Nie wyr
zbi
orczego śmietnika, t
tego pojemników na
do
się
z firmą za
dystrybutorowi lub fi
ie z zasadami bezpie
śli masz wątpliwo
utylizacją odpadó
wybór produktu firmy
z instrukcją obsługi p
one podczas transpor
towanie się ze sprzed
e bezpieczeńst
przed dziećmi oraz u
yzowanymi.
ki ogólne
enie przed wstrząsa
ania.
ninie
szą instrukcją pr
zpieczeństwa zabroni
nie zgodnie z jego pr
eznaczeniem spowod
tego urządzenia w sp
sposób naruszający
ólne
I video
wanej pamięci
słudze – 1 przycisk o
and play device
CAMC
LVC9
YTKOWNIK
nii Europejskiej.
dowiska.
na urządzeniu bądź
produktu może być
ucaj urządzenia lub
lko do specjalnie prz
urządzenia elektronic
ącą si
recyklingiem. Urząd
mie zajmującej się r
czeństwa dotyczący
ci skontaktuj się z
.
Velleman! Prosimy o
zed użyciem. Jeśli urz
u prosimy o nie korz
wcą.
a, środki ostro
ytkownikami
i i uderzeniami, zwłas
ed używaniem urząd
one są jakiekolwiek m
eznaczeniem. Użytko
e utratę gwarancji.
osób narusza
rawo.
peratora
24
ący pry
Rev. 02
opakowaniu
zkodliwe
aterii do
znaczonych
zne lub
enie
cyklingiem.
i
irmą
okładne
dzenie
stanie z
ności
cza w
enia.
e
odyfikac
anie
watność
©Velleman nv
Page 25

CAMCOLVC9 Rev. 02
(
• USB kabel w zestawie
5. Użytkowanie
Nagrywanie
• Skieruj kamerę [1] w kierunku pola zainteresowania.
• Naciśnij I przytrzymaj przycisk [5] przez ±3s. Dioda statusu [4]
zaświeci na pomarańczowy- urządzenie jest gotowe do działania.
• Aby rozpocząć nagrywanie, przytrzymaj krótko przycisk kontrolny
[5]. Dioda statusu [4] zaświeci na niebiesko- nagrywanie
rozpoczęte. Nagrywanie w formacie AVI. Naciśnij krótko przycisk
kontrolny [5] jeszcze raz aby zatrzymać nagrywanie (Dioda [4]
pomarańczowa). Może to potrwać kilka sekund.
• Aby zrobić zdjęcie, naciśnij I prztrzymaj przycisk kontrolny [5]
przez ±3s. Dioda statusu [4] zaświeci na niebiesko- urządzenie
jest w trybie robienia zdjęć. Naciśnij krótko przycisk kontrolny [5]
aby zrobić zdjęcie, migająca pomarańczowa dioda statusu [4]
oznacza iż zdjęcie jest zrobione. Może to potrwać
obrazu JPG.
• Aby wyłączyć urządzenie, (w razie potrzeby) wyjdz z trybu
robienia zdjęć poprzez naciśnięcie przyci sku kontrolnego [5] przez
±3s. Następnie naciśnij krótko przycisk kontrolny [5] (Dioda
statusu [4] zaświeci na niebiesko), po czym od razu naciij i
przytrzymaj przez chwilę przycisk kontrolny [5].
Przegląd:
Tryb robienia
zdjęć
niebieski)
[5] zdjęcie
([4]
pomarańczowy)
Odtwarzanie
• Przytrzymaj część urządzenie gdzie znajduje się kamera,
następnie przekręć część urządzenia z długopisem zgodnie ze
wskazówkami zegara/w lewo.
• Włóż złącze USB [3] do portu USB komputera (brak w zestawie).
Jeśli to konieczne, należy użyć dołączonego do zestawu
przedłużacza USB.
• Dioda statusu [4] zaświeci na pomarańczowy I urządzenie zacznie
działać jak standardowy nośnik pamięcie USB. Kopiuj, odtwarzaj
lub kasuj dane pliki dokładnie tak samo jak postępujesz z innymi
plikami na swoim komputerze.
05.10.2010 25 ©Velleman nv
Í
Î
[5]
(długo)
OFF- wyłączony
Ð [5] (długo)
ON-
włączony
([4]
pomarańczowy)
Í
Î
[5]
(krótko)
±3s. Format
[5] Ï (długo)
nagrywanie
([4] niebieski)
Page 26

a
u
g
n
,
y
2
M
d
n
o
s
a
S
m
w
Wognbat
k
b
v
e
yw
p
n
g
O
o
guj
y
D
y
g
a
ą
O
d
e
ż
w
j
g
y
.
u
k
n
w
p
z
p
m
z
gu
o
p
a
r
y
z
g
Ładowanie b
• Bateria jest
USB kolmp
Reset
• Kiedy urząd
biurowy i ła
6.Ustawia
• Stwórz plik
• W danym pl
(YYYY=rok
mm=minut
np.:
• Podłącz CA
• Skopiuj tim
• Wyłącz w o
portu USB.
• Wyłącz i po
czas ustawi
plik jest na
7. Akumul
• Urządzenie
do portu U
końca, aku
• Załóż odpo
podczas roz
8. Specyfi
Przetwornik o
Rozdzielczość
szerokość kąta
obiektywu
Wielkość pami
Format nagr
Ilość klatek (f
Tryb nagrywa
Pojemność na
05.10.2010
terii
ładowana podczas p
tera
zenie nie rea
odnie naciśnij przyci
ie czasu
o nazwie time.txt.
iku tekstowym wpisz
YYYY/MM/D
MM= miesiąc, DD=
, ss= sekundy)
009/11/18/13:43
COLVC9 do portu U
łównego k
e.txt do
powiedni sposób urz
ownie włącz CAMC
ne w time.txt są ła
tępnie automatyczni
tor
posiada wbudowany,
B) akumulator. Gdy
ulator musi zostać u
iednie okulary, ręka
montowywania urząd
U
AGA: Nie wrzuca
ia, ponieważ mo
erie/akumulator
acja techniczna
razu Kolorowy cz
ideo 640 x 480 pi
58° (przekąt
ci 2GB wbudo
ania AVI
s) 15~30
Bez przerwy
ia
amięci bąd
rania < 4MB/min
CAMC
LVC9
dłączenia urządzenia
e, uż
szpilkę, agrafkę, s
sk reset [6].
datę i czas w formaci
/hh:mm:ss
dzień, hh=godzina,
:00
SB komputera.
talogu CAMCOLVC9.
dzenie USB i wyjmij
LVC9. w danym mo
owane do pamięci ur
kasowany z katalo
ładowany (poprzez p
ywot urządzenia dobi
sunięta.
iczki- ubranie zabez
zenia.
baterii/akumul
ą wybuchnąć. T
z dala od dzieci.
nik CMOS
sele
a)
ana
do momentu wykorz
wyłączenia urządzen
26
Rev. 02
do portu
inacz
e:
wtyczkę z
encie data i
ądzenia,
.
dłączenie
nie
e
ieczające
torów do
zymaj
stania całej
ia
©Velleman nv
Page 27

CAMCOLVC9 Rev. 02
)
Zasilanie
Zasilacz USB 100-240VAC/50-60Hz - 5.0VDC/0.5A
Wymiary 150 x 15 x 15mm
waga 45g
Używaj tylko oryginalnych akcesoriów. Ve lleman N.V. nie
ponosi odpowiedzialności za uszkodzenie urządzenia lub
zranienie spowodowane złym korzystaniem z urządzenia.
Właścicielem niniejszej instrukcji jest firma Velleman N.V.
Wszelkie prawa autorskie zastrzeżone. Jeśli chcesz uzyskać
więcej informacji o tym produkcie oraz najnowszą wersję
instrukcji obsługi, wejdź na stronę: www.velleman.eu.
Informacje zawarte w niniejszej instrukcji obsługi mogą ulec
zmianie bez wcześniejszego powiadomienia.
© INFORMACJA O PRAWACH WŁASNOŚCI
Instrukcja ta jest własnością firmy Velleman NV i jest chroniona
prawami autorskimi. Wszystkie prawa są zastrzeżone na całym
świecie. Żadna część tej instrukcji nie może być kopiowana,
przedrukowywana, tłumaczona lub konwertowana na wszelkie
nośniki elektronicznych lub w inny sposób, bez uprzedniej pisemnej
zgody właściciela praw autorskich.
05.10.2010 27 ©Velleman nv
wbudowany akumulator Li (ładowanie przez
USB
Page 28

Velleman® Service and Quality
Warranty
Velleman® has over 35 years of
experience in the electronics world and
distributes its products in more than 85
countries.
All our products fulfil strict quality
requirements and legal stipulations in the
EU. In order to ensure the quality, our
products regularly go through an extra
quality check, both by an internal quality
department and by specialized external
organisations. If, all precautionary
measures notwithstanding, problems
should occur, please make appeal to our
warranty (see guarantee conditions).
General Warranty Conditions
Concerning Consumer Products (for
EU):
• All consumer products are subject to a
24-month warranty on production flaws
and defective material as from the original
date of purchase.
• Velleman® can decide to replace an
article with an equivalent article, or to
refund the retail value totally or partially
when the complaint is valid and a free
repair or replacement of the article is
impossible, or if the expenses are out of
proportion.
You will be delivered a replacing article or
a refund at the value of 100% of the
purchase price in case of a flaw occurred
in the first year after the date of purchase
and delivery, or a replacing article at 50%
of the purchase price or a refund at the
value of 50% of the retail value in case of
a flaw occurred in the second year after
the date of purchase and delivery.
• Not covered by warranty:
- all direct or indirect damage caused after
delivery to the article (e.g. by oxidation,
shocks, falls, dust, dirt, humidity...), and
by the article, as well as its contents (e.g.
data loss), compensation for loss of
profits;
- frequently replaced consumable goods,
parts or accessories such as batteries,
lamps, rubber parts, drive belts...
(unlimited list);
- flaws resulting from fire, water damage,
lightning, accident, natural disaster, etc.
…;
- flaws caused deliberately, negligently or
resulting from improper handling,
negligent maintenance, abusive use or use
contrary to the manufacturer’s
instructions;
- damage caused by a commercial,
professional or collective use of the article
(the warranty validity will be reduced to
six (6) months when the article is used
professionally);
- damage resulting from an inappropriate
packing and shipping of the article;
- all damage caused by modification ,
repair or alteration performed by a third
party without written permission by
Velleman®.
• Articles to be repaired must be delivered
to your Velleman® dealer, solidly packed
(preferably in the original packaging), and
be completed with the original receipt of
purchase and a clear flaw description.
• Hint: In order to save on cost and time,
please reread the manual and check if the
flaw is caused by obvious causes prior to
presenting the article for repair. Note that
returning a non-defective article can also
involve handling costs.
• Repairs occurring after warranty
expiration are subject to shipping costs.
• The above conditions are without
prejudice to all commercial warranties.
The above enumeration is subject to
modification according to the articl e
(see article’s manual).
Velleman® service- en
kwaliteitsgarantie
Velleman® heeft ruim 35 jaar ervaring in
de elektronicawereld en verdeelt in meer
dan 85 landen.
Al onze producten beantwoorden aan
strikte kwaliteitseisen en aan de wettelijke
bepalingen geldig in de EU. Om de
kwaliteit te waarborgen,
ondergaan onze producten op regelmatige
tijdstippen een extra kwaliteitscontrole,
zowel door onze eigen kwaliteitsafdeling
als door externe gespecialiseerde
organisaties. Mocht er ondanks deze
voorzorgen toch een probleem optreden,
dan kunt u steeds een beroep doen op
onze waarborg (zie
waarborgvoorwaarden).
Algemene waarborgvoorwaarden
consumentengoederen (voor
Europese Unie):
• Op alle consumentengoederen geldt een
garantieperiode van 24 maanden op
productie- en materiaalfouten en dit vanaf
de oorspronkelijke aankoopdatum.
Page 29

• Indien de klacht gegrond is en een gratis
reparatie of vervanging van een artike l
onmogelijk is of indien de kosten hiervoor
buiten verhouding zijn, kan Velleman®
beslissen het desbetreffende artikel te
vervangen door een gelijkwaardig artikel
of de aankoopsom van het artikel
gedeeltelijk of volledig terug te betalen. In
dat geval krijgt u een vervangend product
of terugbetaling ter waarde van 100% van
de aankoopsom bij ontdekking van een
gebrek tot één jaar na aankoop en
levering, of een vervangend product tegen
50% van de kostprijs of terugbetaling van
50 % bij ontdekking na één jaar tot 2
jaar.
• Valt niet onder waarborg:
- alle rechtstreekse of onrechtstreekse
schade na de levering veroorzaakt aan het
toestel (bv. door oxidatie, schokken, val,
stof, vuil, vocht...), en door het toestel,
alsook zijn inhoud (bv. verlies van data),
vergoeding voor eventuele winstderving.
- verbruiksgoederen, onderdelen of
hulpstukken die regelmatig dienen te
worden vervangen, zoals bv. batterijen,
lampen, rubberen onderdelen,
aandrijfriemen... (onbeperkte lijst).
- defecten ten gevolge van brand,
waterschade, bliksem, ongevallen,
natuurrampen, enz.
- defecten veroorzaakt door opzet,
nalatigheid of door een onoordeelkundige
behandeling, slecht onderhoud of
abnormaal gebruik of gebruik van het
toestel strijdig met de voorschriften van
de fabrikant.
- schade ten gevolge van een
commercieel, professioneel of collectief
gebruik van het apparaat (bij
professioneel gebru ik wordt de
garantieperiode herleid tot 6 maand).
- schade veroorzaakt door onvoldoende
beschermi ng bij transp ort van het
apparaat.
- alle schade door wijzigingen, reparaties
of modificaties uitgevoerd door derden
zonder toestemming van Velleman®.
• Toestellen dienen ter reparatie
aangeboden te worden bij uw Velleman®verdeler. Het toestel dient vergezeld te
zijn van het oorspronkelijke
aankoopbewijs. Zorg voor een degelijk e
verpakking (bij voorkeur de originele
verpakking) en voeg een duidelijke
foutomschrijving bij.
• Tip: alvorens het toestel voor reparatie
aan te bieden, kijk nog een s na of er geen
voor de hand liggende reden is waarom
het toestel niet naar behoren werkt (zie
handleiding). Op deze wijze kunt u kosten
en tijd besparen. Denk eraan dat er ook
voor niet-defecte toestellen een kost voor
controle aangerekend kan worden.
• Bij reparaties buiten de waarborgperiode
zullen transportkosten aangerekend
worden.
• Elke commerciële garantie laat deze
rechten onverminderd.
Bovenstaande opsomming kan
eventueel aangepast worden
naargelang de aard van het product
(zie handleiding van het betreffende
product).
Garantie de service et de qualité
Velleman®
Velleman® jouit d’une expérience de plus
de 35 ans dans le monde de l’électronique
avec une distribution dans plus de 85
pays.
Tous nos produits répondent à des
exigences de qualité rigoureuses et à des
dispositions légales en vigueur dans l’ UE.
Afin de garantir la qualité, nous
soumettons régulièrement nos produits à
des contrôles de qualité supplémentaires,
tant par notre propre service qualité que
par un service qualité externe. Dans le cas
improbable d’un défaut malgré toutes les
précautions, il est possible d’invoquer
notre garantie (voir les conditions de
garantie).
Conditions générales concernant la
garantie sur les produits grand public
(pour l’UE) :
• tout produit grand public est garanti 24
mois contre tout vice de production ou de
matériaux à dater du jour d’acquisition
effective ;
• si la plainte est justifiée et que la
réparation ou le remplacement d’un article
est jugé impossible, ou lorsque les coûts
s’avèrent disproportionnés, Velleman®
s’autorise à remplacer ledit article par un
article équivalent ou à rembourser la
totalité ou une partie du prix d’achat. Le
cas échéant, il vous sera consenti un
article de remplacement ou le
remboursement complet du prix d’achat
lors d’un défaut dans un délai de 1 an
après l’achat et la livraison, ou un article
de remplacement moyennant 50% du prix
d’achat ou le remboursement de 50% du
prix d’achat lors d’un défaut après 1 à 2
ans.
Page 30

• sont par conséquent exclus :
- tout dommage direct ou indirect survenu
à l’article après livraison (p.ex. dommage
lié à l’oxydation, choc, chute, poussière,
sable, impureté…) et provoqué par
l’appareil, ainsi que son contenu (p.ex.
perte de données) et une indemnisation
éventuelle pour perte de revenus ;
- tout bien de consommation ou
accessoire, ou pièce qui nécessite un
remplacement régulier comme p.ex. piles,
ampoules, pièces en caoutchouc,
courroies… (liste illimitée) ;
- tout dommage qui résulte d’un incendie,
de la foudre, d’un accident, d’une
catastrophe naturelle, etc. ;
- out dommage provoqué par une
négligence, volontaire ou non, une
utilisation ou un entretien incorrects, ou
une utilisation de l’appareil contraire aux
prescriptions du fabricant ;
- tout dommage à cause d’une utilisation
commerciale, professionnelle ou collective
de l’appareil (la période de garantie sera
réduite à 6 mois lors d’une utilisation
professionnelle) ;
- tout dommage à l’appareil qui résulte
d’une utilisation incorrecte ou différente
que celle pour laquelle il a été initialement
prévu comme décrit dans la notice ;
- tout dommage engendré par un retour
de l’appareil emballé dans un
conditionnement non ou insuffisamment
protégé.
- toute réparation ou modification
effectuée par une tierce personne sans
l’autorisation explicite de SA Velleman® ;
- frais de transport de et vers Velleman®
si l’appareil n’est plus couvert sous la
garantie.
• toute réparation sera fournie par
l’endroit de l’achat. L’appareil doit
nécessairement être accompagné du bon
d’achat d’origine et être dûment
conditionné (de préférence dans
l’emballage d’origine avec mention du
défaut) ;
• tuyau : il est conseillé de consulter la
notice et de contrôler câbles, piles, etc.
avant de retourner l’appareil. Un appareil
retourné jugé défectueux qui s’avère en
bon état de marche pourra faire l’objet
d’une note de frais à charge du
consommateur ;
• une réparation effectuée en-dehors de la
période de garantie fera l’objet de frais de
transport ;
• toute garantie commerciale ne porte pas
atteinte aux conditions susmentionnées.
La liste susmentionnée peut être
sujette à une complémentation selon
le type de l’article et être mentionnée
dans la notice d’emploi.
Garantía de servicio y calidad
Velleman®
Velleman® disfruta de una experiencia de
más de 35 años en el mundo de la
electrónica con una distribución en más de
85 países. Todos nuestros productos
responden a normas de calidad rigurosas
y disposiciones legales vigentes en la UE.
Para garantizar la calidad, sometemos
nuestros productos regularmente a
controles de calidad adicionales, tanto a
través de nuestro propio servicio de
calidad como de un servicio de calidad
externo. En el caso improbable de que
surgieran problemas a pesar de todas las
precauciones, es posible recurrir a nuestra
garantía (véase las condiciones de
garantía).
Condiciones generales referentes a la
garantía sobre productos de venta al
público (para la Unión Europea):
• Todos los productos de ve nta al público
tienen un período de garantía de 24
meses contra errores de producción o
errores en materiales desde la adquisición
original;
• Si la queja está fu ndada y si la
reparación o sustitución de un artículo
no es posible, o si los gastos son
desproporcionados, Velleman® autoriza
reemplazar el artícu lo por un artículo
equivalente o reembolsar la totalidad o
una parte del precio de compra. En este
caso, usted recibirá un artículo de
recambio o el re embolso completo del
precio de compra si encuentra algún
fallo hasta un año después de la compra
y entrega, o un artículo de recambio al
50% del precio de compra o el
reembolso del 5 0% del precio de
compra si encuentra un fallo después de
1 año y hasta los 2 años después de la
compra y entrega.
Por consiguiente, están excluidos
entre otras cosas:
- todos los daños causados directa o
indirectamente al ap arato (p.ej. por
oxidación, choques, caída,...) y a su
contenido (p.ej. pérdida de datos)
después de la entrega y causados por el
aparato, y cualquier indemnización por
posible pérdida de ganancias;
Page 31

- partes o accesorios que deban ser
reemplazados regularmente, como por
ejemplo baterías, lámparas, partes de
goma, etc. (lista ilimitada)
- defectos causados por un incendio,
daños causados por el agua, rayos,
accidentes, catástrofes naturales, etc.;
- defectos causados a conciencia, descuido
o por malos tratos, un mantenimiento
inapropiado o un uso anormal del aparato
contrario a las instrucciones del
fabricante;
- daños causados por un uso comercial,
profesional o colectivo del aparato (el
período de garantía se reducirá a 6 meses
con uso profesional);
- daños causados por un uso incorrecto o
un uso ajeno al que está prev isto el
producto inicialmente como está descrito
en el manual del usuario;
- daños causados por una protección
insuficiente al transportar el aparato.
- daños causados por reparaciones o
modificaciones efectuadas por una tercera
persona sin la autorización explicita de SA
Velleman®;
- se calcula gastos de transporte de y a
Velleman® si el aparato ya no está
cubierto por la garantía.
• Cualquier artículo q ue tenga que ser
reparado tendrá que ser devuelto a su
distribuidor Velleman®. Devuelva el
aparato con la factura de compra
original y transpórtelo en un embalaje
sólido (preferentemente el embalaje
original). Incluya también una buena
descripción d el fallo;
• Consejo: Lea el manual del usuario y
controle los cables, las pilas, etc. antes de
devolver el aparato. Si no se encuentra un
defecto en el artículo los gastos podrían
correr a cargo del cliente;
• Los gastos de transporte correrán a
carga del cliente para una reparación
efectuada fuera del período de garantía.
• Cualquier gesto comercial no disminuye
estos derechos.
La lista previament e mencionada
puede ser adaptada según el tipo de
artículo (véase el manual del usuario
del artículo en cuestión)
Velleman® Service- und
Qualitätsgarantie
Velleman® hat gut 35 Jahre Erfahrung in
der Elektronikwelt und vertreibt seine
Produkte in über 85 Ländern. Alle
Produkte entsprechen den strengen
Qualitätsforderungen und gesetzlichen
Anforderungen in der EU. Um die Qualität
zu gewährleisten werden unsere Produkte
regelmäßig einer zusätzlichen
Qualitätskontrolle unterworfen, sowohl
von unserer eigenen Qualitätsabteilung als
auch von externen spezialisierten
Organisationen. Sollten, trotz aller
Vorsichtsmaßnahmen, Probleme auftreten,
nehmen Sie bitte die Garantie in Anspruch
(siehe Garantiebedingungen).
Allgemeine Garantiebedingungen in
Bezug auf Konsumgüter (für die
Europäische Union ):
• Alle Produkte haben für Material- oder
Herstellungsfehler eine Garantieperiode
von 24 Monaten ab Verkaufsdatum.
• Wenn die Klage berechtigt ist und falls
eine kostenlose Reparatur oder ein
Austausch des Gerätes unmöglicht ist,
oder wenn die Kosten dafür
unverhältnismäßig sind, kann Velleman®
sich darüber entscheiden, dieses Produkt
durch ein gleiches Produkt zu ersetzen
oder die Kaufsumme ganz oder teilweise
zurückzuzahlen. In diesem Fall erhalten
Sie ein Ersatzprodukt oder eine
Rückzahlung im Werte von 100% der
Kaufsumme im Falle eines Defektes bis zu
1 Jahr nach Kauf oder Lief erung, oder Sie
bekommen ein Ersatzprodukt im Werte
von 50% der Kaufsumme oder eine
Rückzahlung im Werte von 50 % im Falle
eines Defektes im zweiten Jahr.
• Von der Garantie ausgeschlossen
sind:
- alle direkten oder indirekten Schäden,
die nach Lieferung am Gerät und durch
das Gerät verursacht werden (z.B.
Oxidation, Stöße, Fall, Staub, Schmutz,
Feuchtigkeit, ...), sowie auch der Inhalt
(z.B. Datenverlust), Entschädigung für
eventuellen Gewinnausfall.
- Verbrauchsgüter, Teile oder
Zubehörteile, die regelmäßig
ausgewechselt werden, wie z.B. Batterien,
Lampen, Gummiteile, Treibriemen, usw.
(unbeschränkte Liste).
- Schäden, verursacht durch
Brandschaden, Wasserschaden, Blitz,
Unfälle, Naturkatastrophen, usw.
- Schäden, verursacht durch absichtliche,
nachlässige oder unsachgemäße
Anwendung, schlechte Wartung,
zweckentfremdete Anwendung oder
Nichtbeachtung von Benutzerhinweisen in
der Bedienungsanleitung.
- Schäden, infolge einer kommerziellen,
professionellen oder kollektiven
Page 32

Anwendung des Gerätes (bei gewerblicher
Anwendung wird die Garantieperiode auf 6
Monate zurückgeführt).
- Schäden, verursacht durch eine
unsachgemäße Verpackung und
unsachgemäßen Transport des Gerätes.
- alle Schäden, verursacht durch
unautorisierte Änderungen, Reparaturen
oder Modifikationen, die von einem Dritten
ohne Erlaubnis von Velleman®
vorgenommen werden.
• Im Fall einer Reparatur, wenden Sie sich
an Ihren Velleman®-Verteiler. Legen Sie
das Produkt ordnungsgemäß verpackt
(vorzugsweise die Originalverpackung)
und mit dem Original-Kaufbeleg vor.
Fügen Sie eine deutliche
Fehlerumschreibung hinzu.
• Hinweis: Um Kosten und Zeit zu sparen,
lesen Sie die Bedienungsanleitung
nochmals und überprüfen Sie, ob es
keinen auf de Hand liegenden Grund gibt,
ehe Sie das Gerät zur Reparatur
zurückschicken. Stellt sich bei der
Überprüfung des Geräts heraus, dass kein
Geräteschaden vorliegt, könnte dem
Kunden eine Untersuchungspauschale
berechnet.
• Für Reparaturen nach Ablauf der
Garantiefrist werden Transportkosten
berechnet.
• Jede kommerzielle Garantie lässt diese
Rechte unberührt.
Die oben stehende Aufzählung kann
eventuell angepasst werden gemäß
der Art des Produktes (siehe
Bedienungsanleitung des Gerätes).
Garanzia di Qualità Velleman®
Velleman® ha oltre 35 anni di esperienza
nel mondo dell'elettronica e distribuisce i
suoi prodotti in oltre 85 paesi. Tutti i
nostri prodotti soddisfano rigorosi requisiti
di qualità e rispettano le disposizioni
giuridiche dell'Unione europea. Al fine di
garantire la massima qualità, i nostri
prodotti vengono regolarmente sottoposti
ad ulteriori controlli, effettuati sia da un
reparto interno di qualità che da
organizzazioni esterne specializzate. Se,
nonostante tutti questi accorgimenti,
dovessero sorgere dei problemi, si prega
di fare appello alla garanzia prevista (vedi
condizioni generali di garanzia).
Condizioni generali di garanzia per i
prodotti di consumo:
• Questo prodotto è garantito per il
periodo stabilito dalle vigenti norme
legislative, a decorrere dalla data di
acquisto, contro i difetti di materiale o di
fabbricazione. La garanzia è valida
solamente se l’unità è accompagnata dal
documento d’acquisto originale.
• Futura Elettronica provvederà, in
conformità con la presente garanzia (fatto
salvo quanto previsto dalla legge
applicabile), a eliminare i difetti mediante
la riparazione o, qualora Futura Elettronica
lo ritenesse necessario, alla sostituzione
dei componenti difettosi o del prodotto
stesso con un altro avente identiche
caratteristiche.
• Le spese di spedizione o riconsegna del
prodotto sono a carico del cliente.
• La garanzia decade nel caso di uso
improprio, manomissione o installazione
non corretta dell’apparecchio o se il difetto
di conformità non viene denunciato entro
un termine di 2 mesi dalla data in cui si è
scoperto il difetto.
• Il venditore non è ritenuto responsa bile
dei danni derivanti dall’uso improprio del
dispositivo.
• L’apparecchio deve essere rispedito con
l’imballaggio originale; non si assumono
responsabilità per danni derivanti dal
trasporto.
• Il prodotto deve essere accompagnato
da un’etichetta riportante i propri dati
personali e un recapito telefonico; è
necessario inoltre allegare copia dello
scontrino fiscale o della fattura attestante
la data dell’acquisto.
L’eventuale riparazione sarà a
pagamento se:
• Sono scaduti i tempi previsti.
• Non viene fornito un documento
comprovante la data d’acquisto.
• Non è visibile sull’apparecchio il numero
di serie.
• L’unità è stata usata oltre i limiti
consentiti, è stata modificata, installata
impropriamente, è stata aperta o
manomessa.
Page 33

®
Velleman
®
ma ponad 35-letnie
Velleman
doświadczenie w świecie elektroniki.
Dystrybuujemy swoje produkty do ponad
85 krajów.
Wszystkie nasze produkty spełniają
surowe wymagania jakościowe oraz
wypełniają normy i dyrektywy
obowiązujące w krajach UE. W celu
zapewnienia najwyższej jakości naszych
produktów, przechodzą one regularne oraz
dodatkowo wyrywkowe badania kontroli
jakości, zarówno naszego wewnętrznego
działu jakości jak również
wyspecjalizowanych firm zewnętrznych.
Pomimo dołożenia wszelkich starań
czasem mogą pojawić się problemy
techniczne, prosimy odwołać się do
gwarancji (patrz warunki gwarancji).
Ogólne Warunki dotyczące gwarancji:
Wszystkie produkty konsumenckie
podlegają 24-miesięcznej gwarancji na
wady produkcyjne i materiałowe od daty
zakupu.
W przypadku, gdy usterka jest niemożliwa
do usunięcia lub koszt usunięcia jest
nadmiernie wysoki Velleman
zdecydować o wymianie artykułu na nowy,
wolny od wad lub zwrócić zapłaconą
kwotę. Zwrot gotówki może jednak
nastąpić z uwzględnieniem poniższych
warunków:
zwrot 100% ceny zakupu w przypadku,
gdy wada wystąpiła w ciągu pierwszego
roku od daty zakupu i dostawy
wymiana wadliwego artykułu na nowy,
wolny od wad z odpłatnością 50% ceny
detalicznej lub zwrot 50% kwoty ceny
nabycia w przypadku gdy wada wystąpiła
w drugim roku od daty zakupu i dosta wy.
Produkt nie podlega naprawie
gwarancyjnej:
- gdy wszystkie bezpośrednie lub
pośrednie szkody spowodowane są
działaniem czynników środowiskowych lub
losowych (np. przez utlenianie, wstrząsy,
upadki, kurz, brud, ...), wilgotności;
- gwarant nie ponosi odpowiedzialności za
szkody wynikających z utraty danych;
- utrata zysków z tytułu niesprawności
produktu; z gwarancji wyłaczone są
matriały eksploatacyjne: baterie, żarówki,
paski napędowe, gumowe elementy
napędowe... (nieograniczona lista);
- usterka wynika z działania po
zalania wszelkimi cieczami, uderzenia
pioruna, upadku lub klęski żywiołowej,
itp.;
usługi i gwarancja jakości
®
może
żaru,
- usterka wynika z zaniedbań
eksploatacyjnych tj. umyślne bądź
nieumyślne zaniechanie czyszczenia,
konserwacji, wymiany materiałów
ekspolatacyjnych, niedbalstwa lub z
niewłaściwego obchodzenia się lub
niezgodnego użytkowania z instrukcją
producenta;
- szkody wynikające z nadmiernego
użytkowania gdy nie jest do tego celu
przeznaczony tj. działalność komerycjna,
zawodowa lub wspólne użytkowanie przez
wiele osób - okres obowiązywania
gwarancji zostanie obniżony do 6 (sześć)
miesięcy;
- Szkody wynikające ze źle zabezpieczonej
wysyłki produktu;
- Wszelkie szkody spowodowane przez
nieautoryzowaną naprawę, modyfikację,
przeróbkę produktu przez osoby trzecie
jak również bez pisemnej zgody firmy
®
.
Velleman
Uszkodzony produkt musi zostać
dostarczony do sprzedawcy Velleman
solidnie zapakowany (najlepiej w
oryginalnym opakowaniu), wraz z
wyposażeniem z jakim prod ukt został
sprzedany. W przypadku wysyłki towaru w
opakowaniu innym niż oryginalnym ryzyko
usterki produktu oraz tego skutki
przechodzą na właściciela produktu. Wraz
z niesprawnym produktem należy dołączyć
jasny i szczegółowy opis jego usterki,
wady;
Wskazówka: Aby zaoszczędzić na kosztach
i czasie, proszę szczegółowo zapoznać się
z instrukcja obsługi; czy przyczyną wady
są okoliczności techniczne czy też
wynikaja wyłącznie z nieznajomości
obsługi produktu. W przypadku wysyłki
sprawnego produktu do serwisu nabywca
może zostać obciążony kosztmi obsługi
oraz transportu.
W przypadku napraw pogwar ancyjnych
lub odpłatnych klient ponosi dodatkowo
koszt wysyłki produktu do i z serwisu.
wymienione wyżej warunki są bez
uszczerbku dla wszystkich komercyjnych
gwarancji.
Powyższe postanowienia mogą
podlegać modyfikacji w zależności od
wyrobu (patrz art obsługi).
®
,
 Loading...