

Page 1
CAMCOLVC26N
TRAIL CAMERA
WILDCAMERA
CAMÉRA DE CHASSE
CÁMARA DE CAZA
WILDKAMERA
FOTOPUŁAPKA/KAMERA OBSERWACYJNA
CÂMARA DE CAÇA
USER MANUAL 4
HANDLEIDING 16
MODE D'EMPLOI 28
MANUAL DEL USUARIO 40
BEDIENUNGSANLEITUNG 52
INSTRUKCJA OBSŁUGI 65
MANUAL DO UTILIZADOR 78
Page 2

CAMCOLVC26N
V. 01 – 20/09/2016 2 ©Velleman nv
Page 3
CAMCOLVC26N
V. 01 – 20/09/2016 3 ©Velleman nv
Page 4

CAMCOLVC26N
V. 01 – 20/09/2016 4 ©Velleman nv
USER MANUAL
1. Introduction
To all residents of the European Union
Important environmental information about this product
This symbol on the device or the package indicates that disposal of
the device after its lifecycle could harm the environment. Do not
dispose of the unit (or batteries) as unsorted municipal waste; it
should be taken to a specialized company for recycling. This device
should be returned to your distributor or to a local recycling
service. Respect the local environmental rules.
If in doubt, contact your local waste disposal authorities.
Thank you for choosing Velleman! Please read the manual thoroughly before
bringing this device into service. If the device was damaged in transit, do
not install or use it and contact your dealer.
2. Safety Instructions
WARNING
Do not puncture or throw batteries in fire as they might explode.
Keep batteries away from children.
This device contains an internal rechargeable battery. When the
device is end-of-life, it must be disposed of in accordance with
local regulations.
There are no user-serviceable parts inside the device.
3. General Guidelines
Refer to the Velleman® Service and Quality Warranty on the last pages
of this manual.
Keep this device away from dust and extreme temperatures.
Protect this device from shocks and abuse. Avoid brute force when
operating the device.
Do not aim the camera at the sun or other extremely bright objects.
Do not touch the lens.
Familiarise yourself with the functions of the device before actually
using it.
All modifications of the device are forbidden for safety reasons. Damage
caused by user modifications to the device is not covered by the
warranty.
Page 5

CAMCOLVC26N
V. 01 – 20/09/2016 5 ©Velleman nv
Only use the device for its intended purpose. Using the device in an
unauthorised way will void the warranty.
Damage caused by disregard of certain guidelines in this manual is not
covered by the warranty and the dealer will not accept responsibility for
any ensuing defects or problems.
There are no user-serviceable parts inside the device. Refer to an
authorized dealer for service and/or spare parts.
Do not use this product to violate privacy laws or perform illegal
activities.
4. Features
video recording on SD card (not incl.)
video recording quality: 720p HD video - 30 fps
easy and user-friendly setup
built-in 2.4" TFT monitor
interface: USB, SD card and DC port
5. Overview
Refer to the illustrations on page 2 of this manual.
1
light sensor
11
speaker
2
LED IR light
12
SD card slot
3
motion indicator
13
mini USB slot
4
microphone
14
mode switch
5
lens
15
control panel
6
PIR sensor
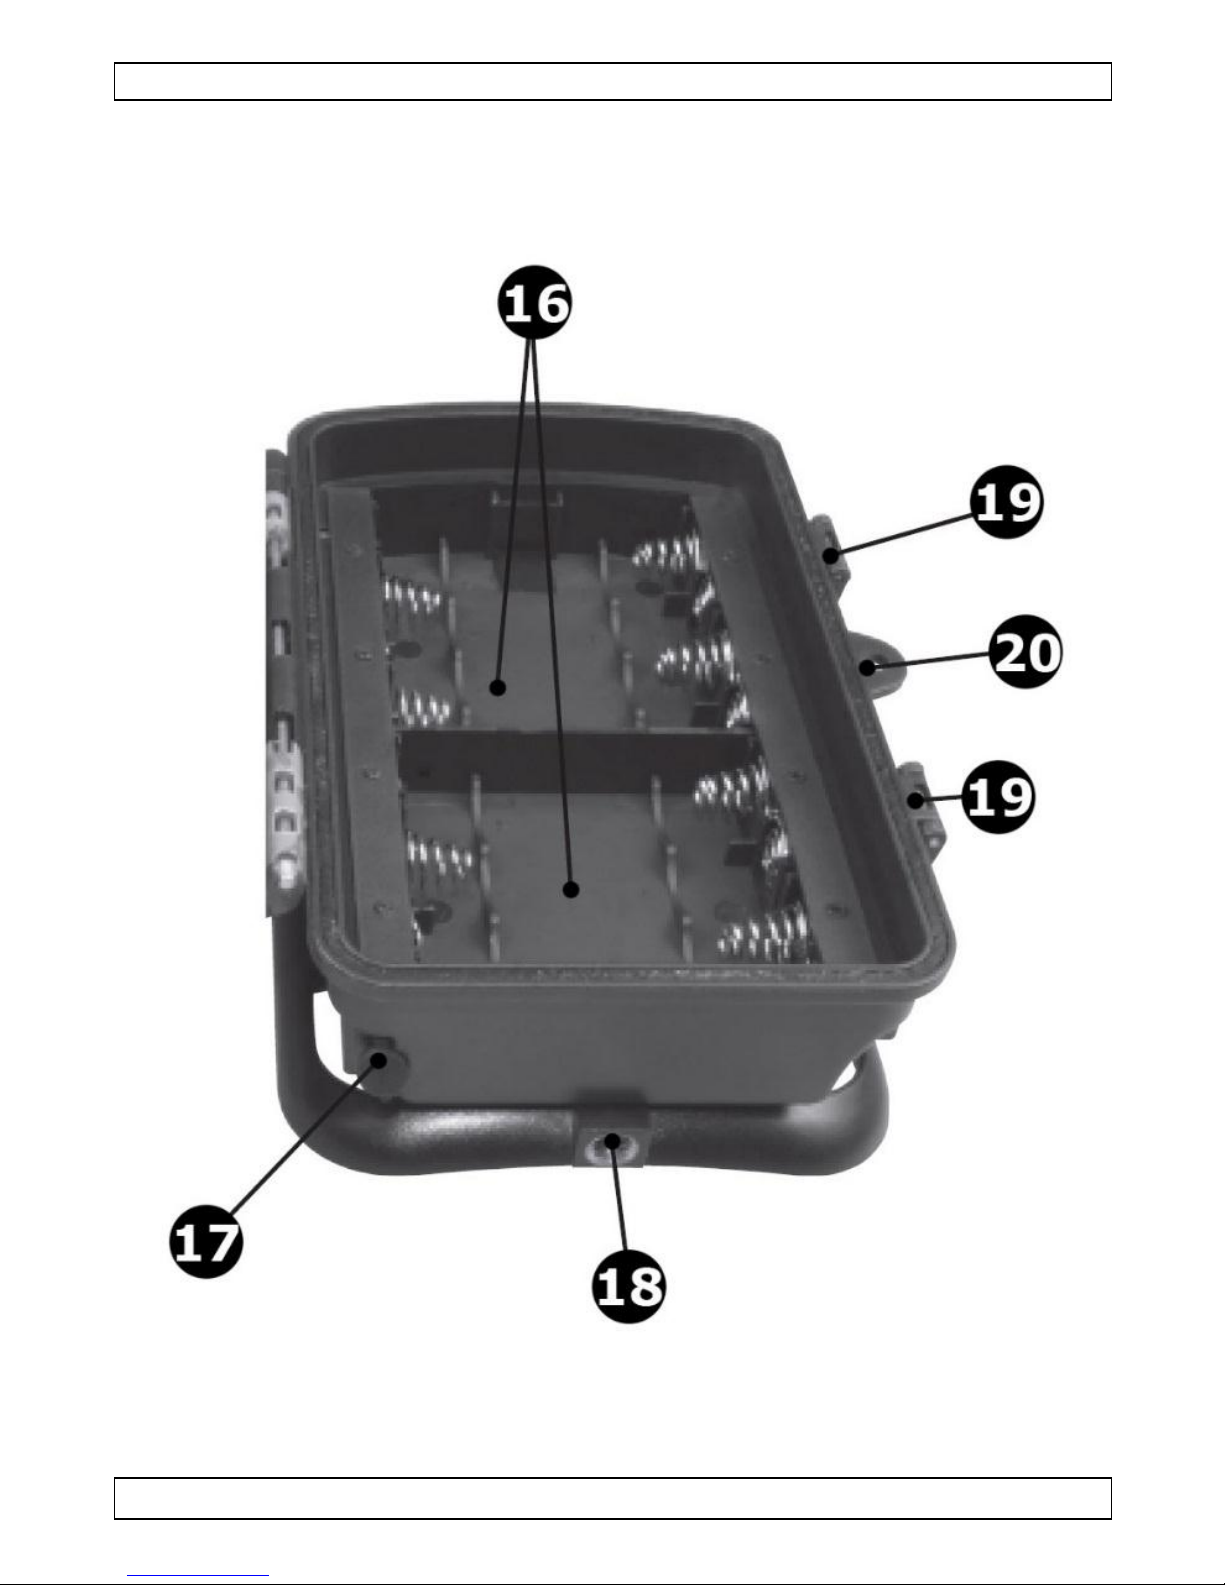
16
battery compartment
7
locking bracket
17
power input
8
locking hole
18
tripod connection
9
monitor
19
locking bracket
10
locking hole
20
locking hole
Page 6

CAMCOLVC26N
V. 01 – 20/09/2016 6 ©Velleman nv
6. Preparing the Camera
6.1 Opening and Closing the Camera
Operating buttons, connections and batteries are located inside the camera.
To open the camera, undo the two lateral locking brackets as shown in
fig. 1. To lock the camera again, engage the metal hoops of the locking
brackets into the mount and press down the plastic tab as in fig. 2.
A fixing for a padlock is provided between the two locking brackets, allowing
the camera to be securely locked.
6.2 Inserting the Batteries
Open the camera as described above. Open the protective cover of the
battery compartment by pulling the clamping closure at the top slightly
inwards before lifting the cover.
Insert eight fully charged batteries according to the correct polarity.
Close the battery compartment again with the protective cover.
Note
An alarm is sounded if battery charge is too low.
WARNING
Do not puncture batteries or throw them in fire as
they may explode. Do not attempt to recharge nonrechargeable batteries (alkaline). Dispose of batteries
in accordance with local regulations. Keep batteries
away from children.
Page 7

CAMCOLVC26N
V. 01 – 20/09/2016 7 ©Velleman nv
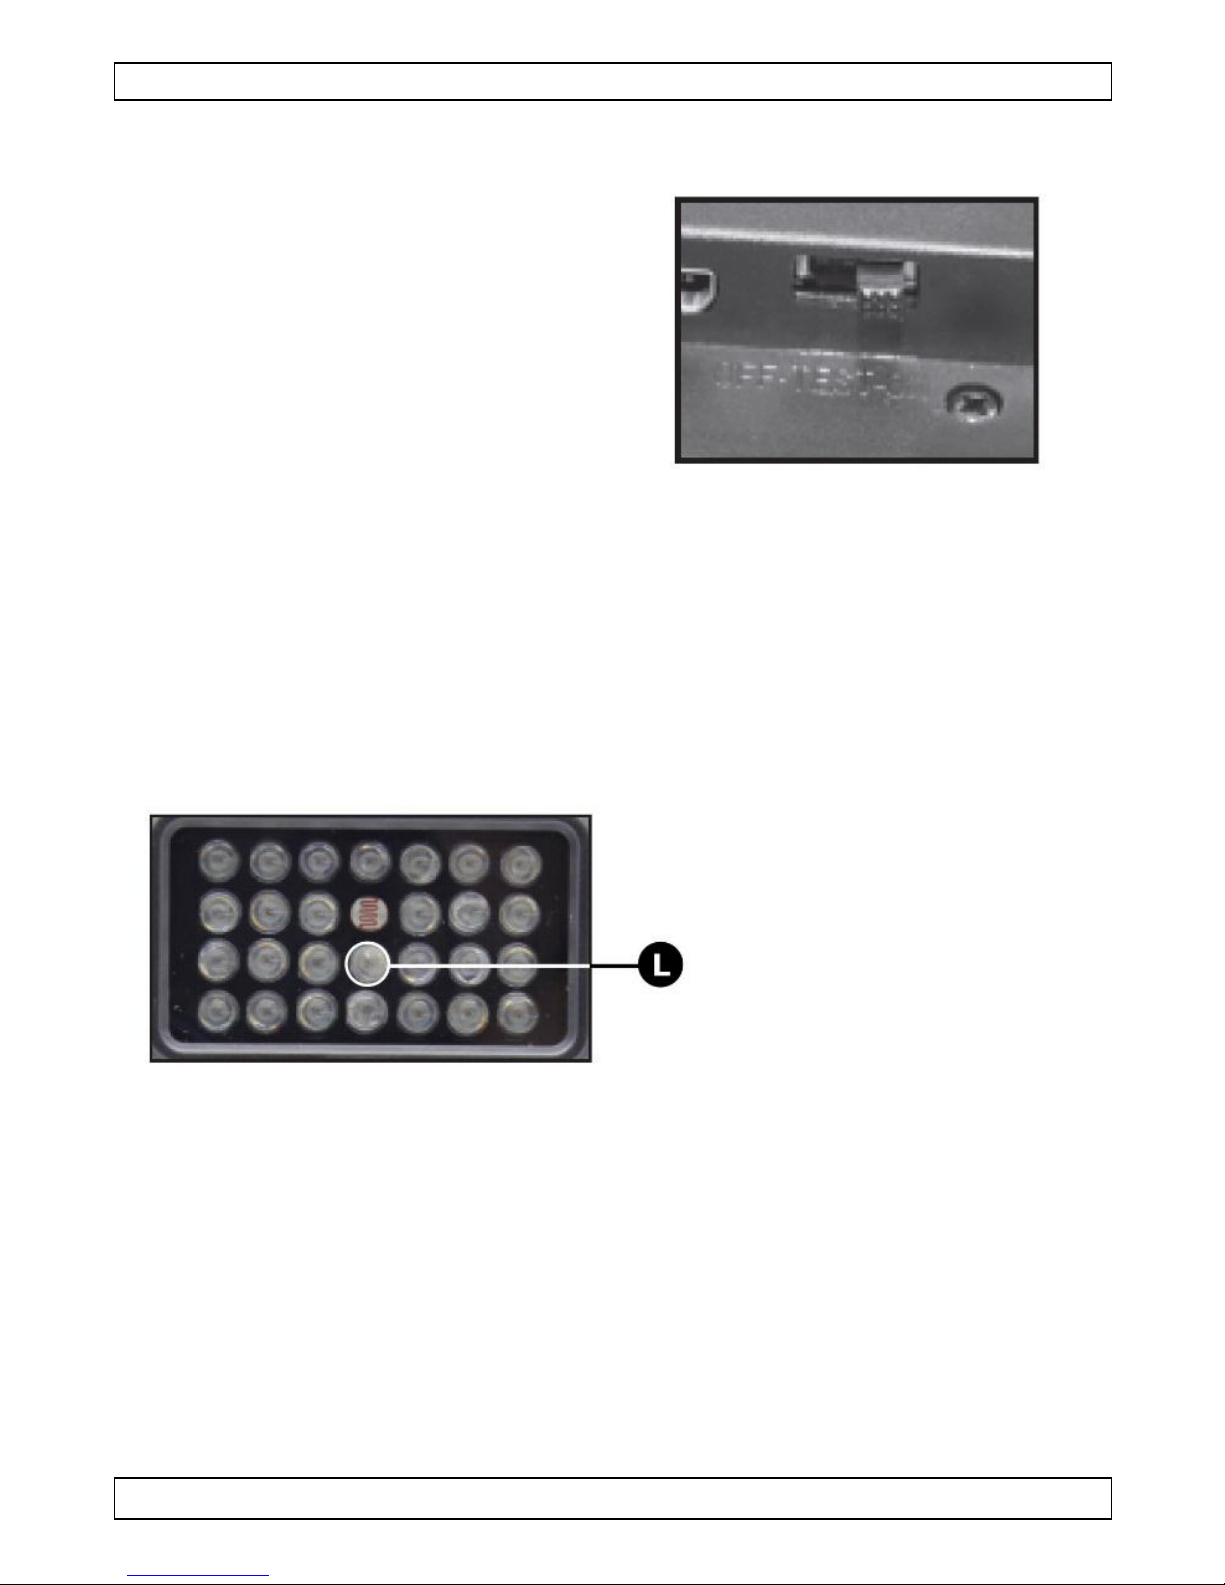
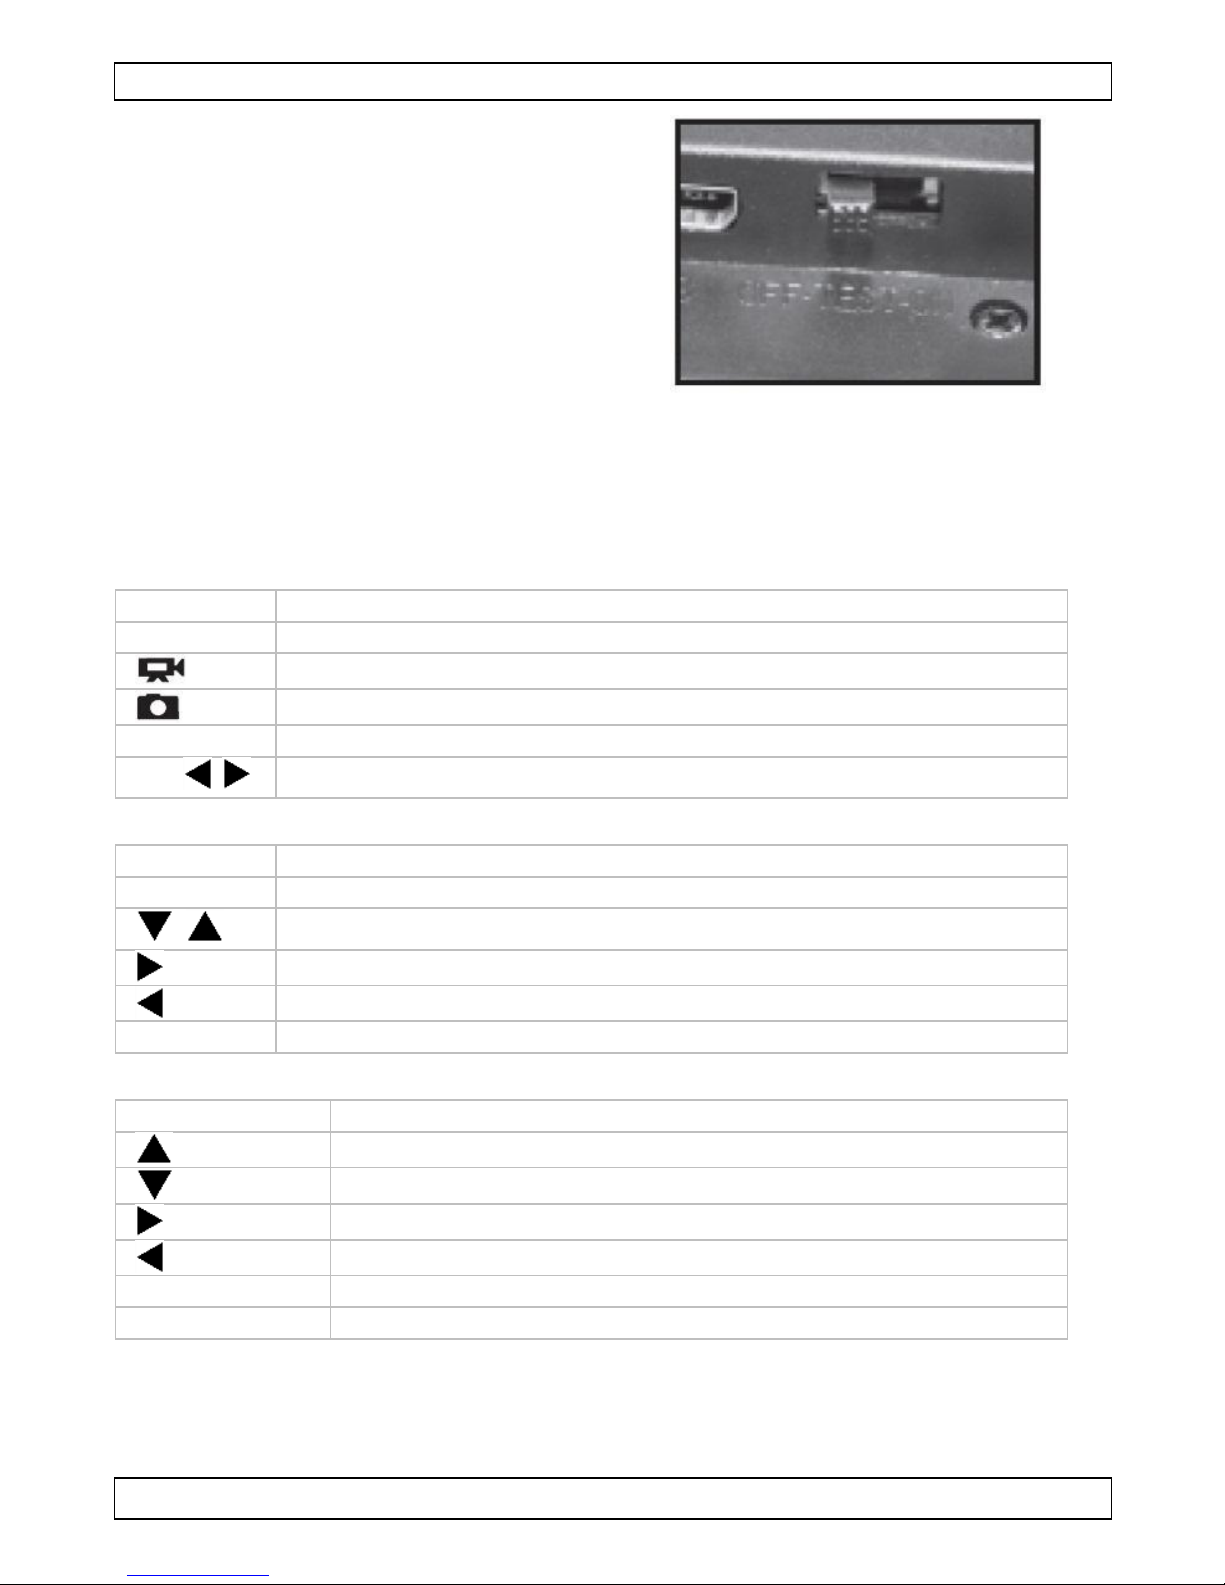
6.3 Inserting the Memory Card
Before switching on the camera, insert
an SD/SDHC memory card in the card
slot in order to save photos and
videos.
Switch off the camera and open as
described above.
Ensure that the lateral protection on
the card has not been activated. Insert
the card as shown. Push the memory
card into the slot until it clicks into
place.
To remove the card, push it again until
it is partly ejected.
6.4 External Power Supply
The camera can be operated using power from an external power supply.
Use a 6 VDC with at least 1.5 A.
Note
Rechargeable batteries cannot be recharged in the camera using an external
power supply.
6.5 Assembly with Strap
Use the securing strap supplied to attach the camera to a tree or another object.
Position the camera a desired and pull the loose end of the strap tight until
the camera is securely fixed.
To release the strap again, pull at the tab of the securing strap.
Page 8

CAMCOLVC26N
V. 01 – 20/09/2016 8 ©Velleman nv
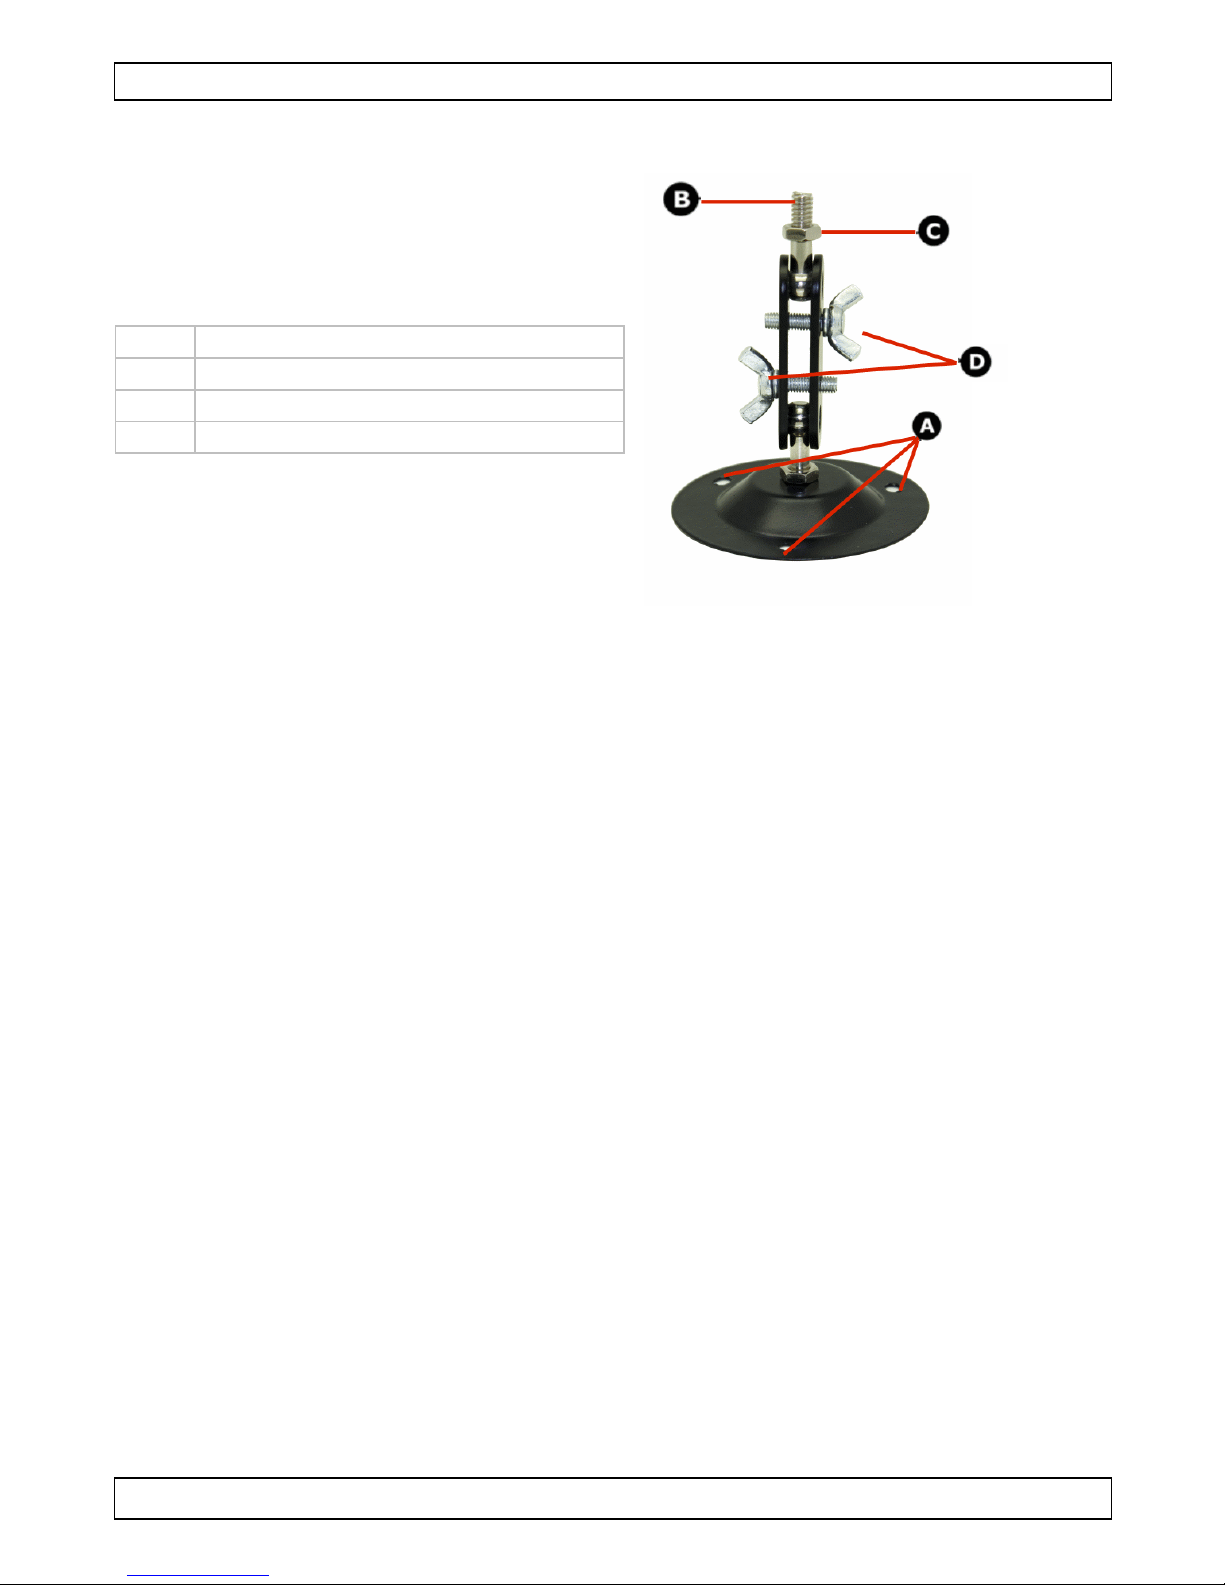
6.6 Using the Wall Mount
A
mounting holes
B
tripod bolt
C
counter screw
D
hinge screws
Use the supplied wall mount to attach the camera securely to a wall or
ceiling. Prior to installing the wall mount, ensure that all existing bolts are
securely tightened and that no supply pipes are concealed in the wall.
Mark the holes on the wall or ceiling using the wall mount as a template.
Use a 6 mm drill to drill the holes and secure the wall mount.
Make sure the camera is loaded with the memory card, and batteries
inserted or the power supply connected. Switch the camera to standby
mode.
Fix the camera onto the wall mount and position into the desired direction.
7. Operation
7.1 Mode Switch
Prior to setting up the camera for surveillance, it must be tested for the
respective purpose. For this purpose, there is a test mode available. In
addition to changing settings, photos and videos can be taken, and existing
photos can be viewed in this mode.
OFF: the camera is completely
switched off.
TEST: select the test mode to
adjust the settings and make or
playback photos and videos.
ON: the camera is activated to
take photos.
Page 9

CAMCOLVC26N
V. 01 – 20/09/2016 9 ©Velleman nv
7.2 Control Panel
Set the mode switch to TEST and the camera and monitor are switched on.
Recording Mode
MENU
Enter the menu
REPLAY
Start the replay mode
Switch to manual recording mode
Switch to manual photo mode
SHOT
Start/stop manual recording; take photo
OK/ /
No function
Replay Mode
MENU
Enter the replay menu
REPLAY
Return to recording mode
/
View existing photos forwards/backwards
Enlarge video (up to 16x)
Decrease enlarged video
OK/SHOT
Start/stop video replay
Normal Mode
MENU
Close the main or sub menu
Move up one menu item/increase value
Move down one menu item/decrease value
Enlarge photo (up to 16x)
Decrease enlarged photo
OK
Open selected menu item/confirm selection
SHOT/REPLAY
No function
7.3 Settings
Prior to using the camera, change the
settings as required.
Slide the mode switch to TEST to start
the test mode. In photo or video mode,
press MENU to call up the menu.
All menu options and possible setting
values for the recording mode are
listed below. The standard setting is
always highlighted in bold.
Mode
Settings: Photo, Video, Photo + Video
Page 10

CAMCOLVC26N
V. 01 – 20/09/2016 10 ©Velleman nv
Select whether photos or videos should be taken when motion is detected.
When in Photo + Video mode, the camera first takes a set number of photos
prior to recording a video.
Image size
Settings: 8M, 5M, 3M, 2M, 1M
Select the desired photo resolution. A higher resolution produces a
somewhat better quality but results in larger files requiring more space on
the memory card.
Video size
Settings: 720p (1080x720), WVGA (848x480), VGA (640x480) @ 30 fps
Select the desired video resolution. A higher resolution produces a
somewhat better quality but results in larger files requiring more space on
the memory card.
Videos are recorded in AVI format, which can be played back on most video
equipment.
Number
Settings: 1 photo, 2 photos, 3 photos
Select the number of photos to be taken in succession when the camera is
triggered in photo mode. Please also observe the parameter Interval (see
below).
Length of video
Settings: 10 sec, optional 1-60 sec and 3, 5 and 10 min
Specify the duration of a video when the camera is triggered automatically.
The recording period for videos is not limited in test mode.
Interval
Settings: 30 sec, optional from 5 sec to 60 min
Select the shortest period for the camera to wait before it reacts to the
successive triggering of the main sensor after an animal has first been
detected. The camera does not record any images or videos during the
selected intervals. This prevents the memory card from being filled with
unnecessary shots.
Time stamp
Settings: On/Off (only available in photo mode)
Select whether to display the date, time, temperature and moon phase on
each photo.
Timer
Settings: Off/On
Switch on the timer if the camera should only be active within a certain
time. Once activated, the start and end time can be set.
Example: If the start time is set to 18h35 and the end time set to 8h25, the
camera will be operational from 18h35 to 8h25 the following day. The
Page 11

CAMCOLVC26N
V. 01 – 20/09/2016 11 ©Velleman nv
camera will not be triggered and will not take any photos or videos outside
this period.
Password
Settings: Off/On
When this option is activated, the four-digit password must be entered each
time the camera is switched on in the test mode before the camera can be
used.
The camera will no longer be useable in case of a lost password. Please
contact your nearest dealer.
Serial no.
Settings: Off/On (only available in photo mode)
Activate this option to assign a serial number to the camera.
Use a combination of four digits or letters so you can identify your camera in
a multi-camera set-up.
Time lapse
Settings: Off/On
When this option is activated, the camera automatically takes photos or
videos in the selected time interval, irrespective of whether or not the PIR
sensor has detected a motion. This is useful for observing cold-blooded
animals or plants opening.
Energy saving mode
Settings: Off/On
This option comes into effect when battery power is low. When this option is
activated, the camera automatically reduces the brightness of the IR lights
in order to extend battery life.
Language
Settings: Select the desired menu language
Available languages: English, German, Danish, Polish, French, Italian,
Dutch, Spanish, Hungarian, Portuguese, Chinese.
Formatting
Settings: No/Yes
All files are deleted by formatting the memory card.
We recommend formatting the memory card if it has already been used in
other devices or if it is a new card.
Ensure that files still required have been backed up prior to formatting.
Setting the time
Settings: Set date and time
Use the / buttons to skip between values and change the selected
values by pressing the / buttons. Confirm with OK.
Page 12

CAMCOLVC26N
V. 01 – 20/09/2016 12 ©Velleman nv
Default settings
Settings: No/Yes
Reset the camera to the default factory settings.
Auto switch
Settings: 3 min, 5 min, 10 min, off
Determine whether the camera should be automatically switched off when
not used for some time in test mode.
Switch on the camera again by pressing a random button.
Recording volume
Settings: Low, Normal, High
Select at which volume level audio recordings are to be recorded.
Playback volume
Settings: Low, Normal, High
Select at which volume level audio recordings are to be played back.
System
Settings: FW Update, FW Version
FW Update: If the memory card contains new firmware this can be installed
using this option. During the update, the respective status is displayed.
FW Version: Shows the firmware version installed on the camera.
Delete
Settings: Single, All
Select this option to delete files from the memory card.
Single: Delete individual files. Toggle between the files using the /
buttons.
All: Delete all files on your memory card.
7.4 Night Recording
During night recording, the IR LEDs at the front provide the light required
for taking photos.
The camera uses IR LEDs with a long wavelength to keep red light to a
minimum. The provided number of LEDs generate a high deflection angle,
thus allowing night recording at a distance of 3 to 15 m without
overexposing the object.
Reflecting objects can, however, also cause overexposure within this range.
Please not that night recording using the IR LEDs produces black and white
images.
Page 13
CAMCOLVC26N
V. 01 – 20/09/2016 13 ©Velleman nv
7.5 Live Mode
In live mode, photos are triggered by
movement sensors or at intervals
according to the respective setting.
To set up the live mode, switch to the
ON position. The red status LED flashes
for 5 seconds, after which the camera
operates automatically and enters the
standby mode. Recording photos or
videos starts as soon as an animal
enters the detection area of the PIR
sensor zone.
7.6 Aligning the Camera
The test mode is advantageous for determining the best possible detection
angle and range of the movement sensor. For this purpose, attach the
camera to a tree at a height of approximately 1-2 m, and align the camera
with a desired direction.
Move slowly from one side of the observed area to the other. Move parallel
to the camera and try out different angles and distances.
The red LED [L] indicates that you were detected by the PIR sensor zone.
In order to prevent incorrect signals and unnecessary photos, we
recommend not using the camera at sunny points and check that no
branches are in the active area of the sensor. Optimum alignment is in
North or South direction. The detection range of the sensor is approximately
60°.
Also, check that the camera is installed at the correct height in line with the
point to be observed. When necessary, point the camera down for optimum
alignment.
Note
This camera corresponds to protection class IP54. It is protected against
dust and spray, and can thus be used in any weather condition.
Page 14

CAMCOLVC26N
V. 01 – 20/09/2016 14 ©Velleman nv
7.7 File Format
The camera stores photos and videos on the memory card in the folder
\DCIM\100MEDIA.
Photos are given extension JPG, videos are given extension AVI.
8. System Requirements
Connect the camera to your computer using the included USB cable.
System Requirements
Windows®
Mac®
Pentium® III or higher
Windows® XP/Vista/7/8
512 MB RAM
1 GB available hard disk space
Screen resolution 1024x768
or higher
Available USB connection
PowerPC G3/G4/G5
OS 10.3.9 or newer system
512 MB RAM
1 GB available hard disk space
Screen resolution 1024x768
or higher
Available USB connection
9. Cleaning and Maintenance
There are no user-serviceable parts.
This device does not need any particular maintenance.
Occasionally clean with a damp cloth to keep it looking new. Do not use
harsh chemicals, cleaning solvents or strong detergents.
10. Technical Specifications
storage capacity .................... max. 32 GB on SD card (not incl.)
pick-up element .................................................... 2 MP CMOS
viewing angle ..................................................................70°
built-in microphone .......................................................... yes
PIR sensor
PIR distance .......................................................... 15 m
PIR angle .................................................................60°
IR LEDs
IR range ............................................................... 15 m
IR LEDs ...............................................................26 pcs
aperture ....................................................................... F3.3
white balance ................................................................ auto
AV port ........................................................................... no
PC camera function ........................................................... no
video
video resolution .........................................720p @ 30 fps
video file format ............................................. MJPG (AVI)
Page 15

CAMCOLVC26N
V. 01 – 20/09/2016 15 ©Velleman nv
recording capacity ..................................... ± 140 MB/min.
video length .......................... 1 sec-10 min, programmable
image .................................................... 1-3 photos per burst
image resolution ..................................................... 2 MP
image resolution ....................................8 MP interpolated
battery in camera ............ 8 x AA batteries (HR6C/27B, not incl.)
stand-by time ....................................................... 4-6 months
working temperature ....................................... -20° C to 60° C
storage temperature........................................ -20° C to 70° C
dimensions ............................................. 135 x 97 x 66.5 mm
weight ......................................................................... 270 g
Use this device with original accessories only. Velleman nv cannot
be held responsible in the event of damage or injury resulting from
(incorrect) use of this device. For more info concerning this product
and the latest version of this manual, please visit our website
www.velleman.eu. The information in this manual is subject to
change without prior notice.
All registered trademarks and trade names are properties of their respective
owners and are used only for the clarification of the compatibility of our
products with the products of the different manufacturers. Windows,
Windows XP, Windows 2000, Windows Vista, Windows Aero, Windows 7,
Windows 8, Windows Mobile, Windows Server are registered trademarks of
Microsoft Corporation in the United States and other countries. Mac, Mac OS
are trademarks of Apple Inc., registered in the U.S. and other countries.
Pentium is a registered trademark of Intel Corporation.
© COPYRIGHT NOTICE
The copyright to this manual is owned by Velleman nv. All
worldwide rights reserved. No part of this manual may be copied,
reproduced, translated or reduced to any electronic medium or otherwise
without the prior written consent of the copyright holder.
Page 16
CAMCOLVC26N
V. 01 – 20/09/2016 16 ©Velleman nv
HANDLEIDING
1. Inleiding
Aan alle ingezetenen van de Europese Unie
Belangrijke milieu-informatie betreffende dit product
Dit symbool op het toestel of de verpakking geeft aan dat, als het
na zijn levenscyclus wordt weggeworpen, dit toestel schade kan
toebrengen aan het milieu. Gooi dit toestel (en eventuele
batterijen) niet bij het gewone huishoudelijke afval; het moet bij
een gespecialiseerd bedrijf terechtkomen voor recyclage. U moet
dit toestel naar uw verdeler of naar een lokaal recyclagepunt
brengen. Respecteer de plaatselijke milieuwetgeving.
Hebt u vragen, contacteer dan de plaatselijke autoriteiten
betreffende de verwijdering.
Dank u voor uw aankoop! Lees deze handleiding grondig door voor u het
toestel in gebruik neemt. Werd het toestel beschadigd tijdens het transport,
installeer het dan niet en raadpleeg uw dealer.
2. Veiligheidsvoorschriften
WAARSCHUWING
U mag batterijen nooit doorboren of in het vuur gooien
(explosiegevaar).
Houd batterijen buiten het bereik van kinderen.
Dit toestel bevat een interne herlaadbare batterij. Wanneer het
product het einde van zijn levensduur heeft bereikt, ontdoe u er
dan van volgens de plaatselijke regelgeving.
Er zijn geen onderdelen in het toestel die door de gebruiker
gerepareerd kunnen worden.
3. Algemene richtlijnen
Raadpleeg de Velleman® service- en kwaliteitsgarantie achteraan deze
handleiding.
Bescherm het toestel tegen stof en extreme temperaturen.
Bescherm tegen schokken. Vermijd brute kracht tijdens de bediening
van het toestel.
Richt de camera nooit naar de zon of naar andere weerkaatsende
objecten.
Bedek de lens nooit.
Leer eerst de functies van het toestel kennen voor u het gaat
gebruiken.
Page 17

CAMCOLVC26N
V. 01 – 20/09/2016 17 ©Velleman nv
Om veiligheidsredenen mag u geen wijzigingen aanbrengen aan het
toestel. Schade door wijzigingen die de gebruiker heeft aangebracht aan
het toestel valt niet onder de garantie.
Gebruik het toestel enkel waarvoor het gemaakt is. De garantie vervalt
automatisch bij ongeoorloofd gebruik.
De garantie geldt niet voor schade door het negeren van bepaalde
richtlijnen in deze handleiding en uw dealer zal de verantwoordelijkheid
afwijzen voor defecten of problemen die hier rechtstreeks verband mee
houden.
Er zijn geen onderdelen in het toestel die door de gebruiker gerepareerd
kunnen worden. Contacteer uw verdeler voor eventuele
reserveonderdelen.
Installeer en gebruik dit toestel NIET voor illegale praktijken en
respecteer ieders privacy.
4. Eigenschappen
opname op SD-kaart (niet meegelev.)
opnamekwaliteit: 720p HD Video - 30 fps
gebruiksvriendelijke configuratie
ingebouwde in 2.4" TFT-monitor
interface: USB, SD-kaart en DC-poort
5. Omschrijving
Raadpleeg de afbeeldingen op pagina 2 van deze handleiding.
1
lichtsensor
11
luidspreker
2
IR-led
12
SD-kaartslot
3
bewegingsindicator
13
mini USB-aansluiting
4
microfoon
14
modusschakelaar
5
lens
15
controlepaneel
6
PIR-sensor
16
batterijvak
7
sluitbeugel
17
voedingsingang
8
oog voor hangslot
18
aansluiting driepoot
9
monitor
19
sluitbeugel
10
oog voor hangslot
20
oog voor hangslot
Page 18

CAMCOLVC26N
V. 01 – 20/09/2016 18 ©Velleman nv
6. De camera voorbereiden
6.1 De camera openen en sluiten
Bedieningstoetsen, aansluitingen en batterijen bevinden zich binnenin de
camera.
Om de camera te openen, maak de twee sluitbeugels aan de zijkant los (zie
afb.)1. Om de camera opnieuw te sluiten, maak het metalen beugeltje van
de sluitbeugel in de houder en druk vervolgens het plastic lipje omhoog (zie
afb.).2.
Tussen de twee sluitbeugels bevindt zich een oogje voor een hangslot om de
camera veilig af te sluiten.
6.2 De batterijen plaatsen
Open de camera (zie hierboven). Open het klepje van het batterijvak door
de vergrendeling aan de bovenkant naar omhoog te trekken en het klepje
op te wippen.
Plaats 8 volledig opgeladen batterijen volgens de aangegeven polariteit.
Sluit het batterijvak opnieuw met het klepje.
Opmerking
Bij te lage batterijspanning weerklinkt een alarmsignaal.
WAARSCHUWING
U mag batterijen nooit doorboren of in het vuur
gooien (explosiegevaar). Herlaad geen
alkalinebatterijen. Gooi batterijen weg volgens de
plaatselijke milieuwetgeving. Houd batterijen buiten
het bereik van kinderen.
Page 19

CAMCOLVC26N
V. 01 – 20/09/2016 19 ©Velleman nv
6.3 Geheugenkaart plaatsen
Voordat u de camera inschakelt, plaats
een SD-/SDHC-geheugenkaart in de
kaartsleuf om foto's en video's op te
slaan.
Schakel de camera uit en open deze
zoals beschreven hierboven.
Zorg ervoor dat de schrijfbeveiliging
aan de zijkant van de geheugenkaart
niet vergrendeld is. Plaats de
geheugenkaart (zie afb.). Schuif de
geheugenkaart in de sleuf tot deze
vastklikt.
Om de kaart te verwijderen, druk
nogmaals tot deze gedeeltelijk wordt
uitgeworpen.
6.4 Externe voeding
De camera kan ook via een externe netadapter van stroom worden
voorzien. Gebruik een 6 V-netadapter (min. 1.5 A).
Opmerking
Oplaadbare batterijen in de camera kunnen niet worden opgeladen via een
externe voeding.
6.5 Bevestiging met riem
Gebruik de meegeleverde riem om de camera aan een boom of een ander
voorwerp te bevestigen.
Hang de camera in de gewenste positie en trek het vrije uiteinde van de
riem aan tot de camera stevig bevestigd is.
Om de riem los te maken, trek aan de lus van de gesp.
Page 20
CAMCOLVC26N
V. 01 – 20/09/2016 20 ©Velleman nv
6.6 De muurbeugel gebruiken
A
bevestigingsgaten
B
bout voor statief
C
contramoer
D
scharniermoeren
Gebruik de meegeleverde muurbeugel om de camera aan een muur of
plafond te bevestigen. Voor het bevestigen van de beugel, controleer of alle
bouten stevig bevestigd zijn en dat er geen leidingen in de muur lopen.
Markeer de boorgaten op de muur of het plafond. Gebruik de muurbeugel
als sjabloon. Gebruik een 6 mm-steenboortje om de gaten te boren en om
de muurbeugel te bevestigen.
Zorg ervoor dat u een geheugenkaart en batterijen plaatst of de netadapter
aansluit. Zet de camera in stand-bymodus.
Bevestig de camera aan de muurbeugel en plaats deze in de gewenste
positie.
7. Gebruik
7.1 Modusschakelaar
Voordat u de camera opstelt voor observatie, dan dient u deze in te stellen
voor de beoogde toepassing. Voor deze toepassing is een testmodus
beschikbaar. In deze modus kunt u de instellingen wijzigen, handmatig
foto's maken en video's opnemen en de reeds gemaakte opnamen bekijken.
Page 21
CAMCOLVC26N
V. 01 – 20/09/2016 21 ©Velleman nv
OFF: de camera is volledig
uitgeschakeld.
TEST: selecteer de testmodus om
de instellingen te wijzigen en om
foto's en video's te maken of weer
te geven.
ON: de camera is ingesteld om
foto's te nemen.
7.2 Bedieningspaneel
Zet de modusschakelaar op TEST, de camera en de monitor worden
ingeschakeld.
Opnamemodus
MENU
Het instellingsmenu openen
REPLAY
De weergavemodus openen
Naar manuele opnamemodus schakelen
Naar manuele fotomodus schakelen
SHOT
Manuel opnamemodus starten/stoppen; foto nemen
OK/ /
Geen functie
Weergavemodus
MENU
Het weergavemenu openen
REPLAY
Naar opnamemodus terugkeren
/
Achterwaarts door bestaande foto's bladeren
Videoweergave vergroten (tot 16x)
Vergrote videoweergave verkleinen
OK/SHOT
Afspelen van video starten/stoppen
Normale modus
MENU
Het hoofd- of submenu sluiten
Een menu-optie omhoog/waarde verhogen
Een menu-optie omlaag/waarde verlagen
Fotoweergave vergroten (tot 16x)
Vergrote fotoweergave verkleinen
OK
Geselecteerde optie openen/selectie bevestigen
SHOT/REPLAY
Geen functie
Page 22

CAMCOLVC26N
V. 01 – 20/09/2016 22 ©Velleman nv
7.3 Instellingen
Voordat u de camera gebruikt, pas de
instellingen naar wens aan.
Schuif de modusschakelaar naar TEST
om de testmodus te starten. In foto- of
videomodus, druk op MENU op het
menu op te roepen.
Alle menu-opties en de mogelijke
instellingswaarden voor de
opnamemodus worden weergeven (zie
onder). De standaardinstelling wordt
telkens vet weergegeven.
Modus
Instellingen: Photo, Video, Photo + Video
Selecteer of u foto's of video's wilt maken bij bewegingsdetectie. In 'Photo +
Video'-modus neemt de camera eerst een ingesteld aantal foto's en
vervolgens een video op.
Fotoformaat
Instellingen: 8M, 5M, 3M, 2M, 1M
Selecteer de gewenste fotoresolutie. Een hogere resolutie leidt tot een deels
verbeterde kwaliteit maar ook tot grotere bestanden die meer ruimte op de
geheugenkaart in beslag nemen.
Videoresolutie
Instellingen: 720p (1080x720), WVGA (848x480), VGA (640x480) @ 30 fps
Selecteer de gewenste videoresolutie. Een hogere resolutie leidt tot een
betere kwaliteit maar ook tot grotere bestanden die meer ruimte nodig
hebben op de geheugenkaart.
De video’s worden opgeslagen in AVI-formaat, dat op de meeste
videospelers kan worden afgespeeld.
Aantal
Instellingen: 1 photo, 2 photos, 3 photos
Selecteer het aantal foto's dat in één serie moet worden genomen bij de
activering in fotomodus. Let ook op de parameter Interval (zie onder).
Videolooptijd
Instellingen: 10 sec, optional 1-60 sec and 3, 5 and 10 min
Selecteer de duur van een video-opname bij de automatische activering. In
testmodus is de opnameduur voor video's onbeperkt.
Interval
Instellingen: 30 sec, optional from 5 sec to 60 min
Selecteer het kortste interval voordat de camera reageert op de
daaropvolgende activering van de hoofdsensor na de bewegingsdetectie van
een dier. Tijdens het geselecteerde interval neemt de camera geen beelden
Page 23

CAMCOLVC26N
V. 01 – 20/09/2016 23 ©Velleman nv
op. Op die manier wordt voorkomen dat de geheugenkaart vol raakt met
overbodige opnamen.
Tijdstempel
Instellingen: On/Off (enkel in fotomodus)
Selecteer 'On' als u de datum, tijd, temperatuur en maanstand op elke foto
wilt weergeven.
Timer
Instellingen: Off/On
Zet de timer op 'On' als de camera alleen op bepaalde uren actief moet zijn.
Zodra de timer is geactiveerd, dan kunt u de start- en eindtijd instellen.
Bijvoorbeeld: Als de starttijd wordt ingesteld op 18:35 uur en de eindtijd op
8:25 uur, dan is de camera vanaf 18:35 uur tot 8:25 uur de volgende dag in
werking. Buiten die periode wordt de camera niet geactiveerd en maakt
deze geen beelden.
Wachtwoord
Instellingen: Off/On
Elke keer dat de testmodus wordt geactiveerd, dan moet u een viercijferige
code invoeren voordat u de camera kunt gebruiken
Mocht u uw wachtwoord vergeten zijn, dan kunt de camera niet meer
gebruiken. Contacteer uw verdeler.
Serienr.
Instellingen: Off/On (enkel in fotomodus)
Activeer deze optie om een serienummer toe te wijzen aan de camera.
Gebruik een combinatie van vier cijfers of letters om uw camera te
identificeren bij het gebruik van meerdere camera's.
Time-lapse
Instellingen: Off/On
Wanneer geactiveerd, dan maakt de camera automatisch foto's of video's
overeenkomstig het gekozen tijdsinterval, los van het feit of de PIR-sensor
een beweging heeft waargenomen of niet. Deze functie is handig bij het
observeren van koudbloedige dieren zoals slangen of bij de bloei van
planten.
Energiebesparende modus
Instellingen: Off/On
Deze modus wordt bij laag batterijvermogen geactiveerd. Daarmee
vermindert de camera automatisch de intensiteit van de IR-belichting om de
looptijd van de batterijen te verlengen.
Taal
Instellingen: Selecteer de gewenste menutaal
Beschikbare talen: Engels, Duits, Deens, Pools, Frans, Italiaans,
Nederlands, Spaans, Hongaars, Portugees, Chinees.
Formatteren
Instellingen: No/Yes
Page 24
CAMCOLVC26N
V. 01 – 20/09/2016 24 ©Velleman nv
Bij het formatteren van de geheugenkaart worden alle bestanden gewist.
Formatteer de geheugenkaart als die eerder gebruikt is in andere toestellen
of als de kaart nieuw is.
Controleer of de nodige bestanden op de geheugenkaart zijn opgeslagen
vóór het formatteren.
De tijd instellen
Instellingen: Stel datum en tijd in
Druk op / om tussen de waarden te schakelen en wijzig de
geselecteerde waarden met de / knoppen. Bevestig met OK.
Standaardinstellingen
Instellingen: No/Yes
De camera naar de fabrieksinstellingen terugzetten.
Automatisch uitschakelen
Instellingen: 3 min, 5 min, 10 min, off
Stel in na hoeveel tijd de camera in testmodus moet worden uitgeschakeld.
Druk op een willekeurige knop om de camera opnieuw in te schakelen.
Geluidsniveau opname
Instellingen: Low, Normal, High
Selecteer het geluidsniveau van de opname.
Geluidsniveau afspelen
Instellingen: Low, Normal, High
Selecteer het geluidsniveau voor het afspelen van geluidsbestanden.
Systeem
Instellingen: FW Update, FW Version
FW Update: Als er nieuwe firmware beschikbaar is op de geheugenkaart,
dan kunt u deze installeren met deze optie. Tijdens het bijwerken wordt de
actuele status weergegeven.
FW Version: Geeft de geïnstalleerde firmwareversie van de camera weer.
Wissen
Instellingen: Single, All
Selecteer deze optie om alle bestanden van de geheugenkaart te wissen.
Single: Enkele bestanden wissen. Schakel tussen de bestanden met de /
knoppen.
All: Alle bestanden op de geheugenkaart wissen.
7.4 Nachtopname
Bij nachtopname leveren de IR-leds aan de voorkant van de camera het
nodige licht om foto's te nemen.
De camera gebruikt hiervoor IR-leds met een grote golflengte om het rood
licht zo weinig mogelijk te gebruiken. Het aantal IR-leds genereert een grote
Page 25

CAMCOLVC26N
V. 01 – 20/09/2016 25 ©Velleman nv
uitvalshoek en maakt op deze manier nachtopnamen mogelijk op een
afstand van 3 m tot 15 m, zonder het voorwerp te overbelichten.
Reflecterende voorwerpen kunnen echter overbelichting veroorzaken binnen
dit bereik.
Opgelet: nachtopnamen met IR-leds leveren zwart/wit-beelden.
7.5 Live-modus
In live-modus worden opnamen via de
bewegingssensoren geactiveerd of
periodiek indien zo ingesteld.
Om de live-modus in te stellen, schakel
naar de ON-positie. De rode led
knippert gedurende ongeveer 5
seconden, daarna functioneert de
camera automatisch en gaat in standbymodus. Zodra dieren binnen het
detectiebereik van de PIR-sensor
komen, begint de camera met het
vastleggen van foto’s en/of video’s.
7.6 De camera afstellen
De testmodus is zeer handig om de optimale detectiehoek en het bereik van
de bewegingssensor te bepalen. Bevestig de camera aan een boom op een
hoogte van ongeveer 1-2 m, en stel de camera in de gewenste richting af.
Loop langzaam vanaf de ene kant van het geobserveerde gebied naar de
andere kant. Loop parallel aan de camera en probeer verschillende hoeken
en afstanden uit.
Brandt de rode led [L], dan werd u door de PIR-sensor waargenomen.
Om verkeerde signalen en onnodige opnamen te vermijden, raden wij u aan
om de camera niet op zonnige plaatsen te gebruiken en erop te letten dat er
zich geen takken binnen het bereik van de sensor bevinden. Optimaal is een
afstelling in noordelijke of zuidelijke richting. Het detectiebereik van de
sensor is ongeveer 60°.
Page 26

CAMCOLVC26N
V. 01 – 20/09/2016 26 ©Velleman nv
Let u er bovendien op dat de camera op de juiste hoogte wordt afgesteld
ten opzichte van het te observeren punt. Indien nodig, plaats de camera
schuin voor een optimale afstelling.
Opmerking
Deze camera voldoet aan beschermingsklasse IP54. De camera is stof- en
spatwaterdicht en kan dus onder alle weersomstandigheden worden
gebruikt.
7.7 Bestandsformaat
De camera slaat foto’s en video’s op de geheugenkaart op in de map
\DCIM\100MEDIA.
Foto's krijgen een bestandsnaam met extensie JPG, video's krijgen extensie
AVI.
8. Systeemvereisten
Sluit de camera aan op de computer met de meegeleverde USB-kabel.
Systeemvereisten
Windows®
Mac®
Pentium® III of hoger
Windows® XP/Vista/7/8
512 MB RAM
1 GB beschikbare schijfruimte
Beeldschermresolutie
1024x768 of hoger
Vrije USB-aansluiting
PowerPC G3/G4/G5
OS 10.3.9 of nieuwer systeem
512 MB RAM
1 GB beschikbare schijfruimte
Beeldschermresolutie
1024x768 of hoger
Vrije USB-aansluiting
9. Reiniging en onderhoud
De gebruiker mag geen onderdelen vervangen.
Dit toestel heeft geen speciaal onderhoud nodig.
Reinig het toestel af en toe met een vochtige doek. Gebruik geen
bijtende chemische producten, reinigingsmiddelen of sterke
detergenten.
10. Technische specificaties
opslagcapaciteit .......... max. 32 GB op SD-kaart (niet meegelev.)
opneemelement .................................................... 2 MP CMOS
gezichtshoek ...................................................................70°
ingebouwde microfoon ........................................................ ja
PIR-sensor
PIR-bereik ............................................................. 15 m
PIR-hoek .................................................................60°
Page 27

CAMCOLVC26N
V. 01 – 20/09/2016 27 ©Velleman nv
IR-leds
IR-bereik .............................................................. 15 m
IR-leds ................................................................. 26 st.
lensopening .................................................................. F3.3
witbalans ...................................................................... auto
AV-poort ...................................................................... neen
pc-camerafunctie ........................................................... neen
video
videoresolutie ............................................720p @ 30 fps
videoformaat ................................................. MJPG (AVI)
opnamecapaciteit ...................................... ± 140 MB/min.
video-lengte ................................. 1 s - 10 min, instelbaar
beeld .............................................. 1 - 3 foto's per activering
beeldresolutie ......................................................... 2 MP
beeldresolutie ......................... 8 megapixels geïnterpoleerd
batterij (camera) ...... 8 x AA-batterij (HR6C/27B, niet meegelev.)
autonomie in stand-bymodus ........................... 4 tot 6 maanden
werktemperatuur ........................................... -20 °C tot 60 °C
opslagtemperatuur ......................................... -20 °C tot 70 °C
afmetingen ............................................. 135 x 97 x 66.5 mm
gewicht ....................................................................... 270 g
Gebruik dit toestel enkel met originele accessoires. Velleman nv is
niet aansprakelijk voor schade of kwetsuren bij (verkeerd) gebruik
van dit toestel. Voor meer informatie over dit product en de laatste
versie van deze handleiding, zie www.velleman.eu. De informatie in
deze handleiding kan te allen tijde worden gewijzigd zonder
voorafgaande kennisgeving.
Alle geregistreerde handelsmerken en handelsnamen zijn eigendom van hun
respectieve bezitters, en zijn enkel gebruikt als voorbeeld van de
compatibiliteit tussen onze producten en de producten van de verschillende
fabrikanten. Windows, Windows XP, Windows 2000, Windows Vista,
Windows Aero, Windows 7, Windows 8, Windows Mobile, Windows Server
zijn geregistreerde handelsmerken van Microsoft Corporation in de
Verenigde Staten en in andere landen. Mac, Mac OS zijn handelsmerken van
Apple Inc., geregistreerd in de VS en andere landen. Pentium is een
geregistreerd handelsmerk van Intel Corporation.
© AUTEURSRECHT
Velleman nv heeft het auteursrecht voor deze handleiding. Alle
wereldwijde rechten voorbehouden. Het is niet toegestaan om deze
handleiding of gedeelten ervan over te nemen, te kopiëren, te vertalen, te
bewerken en op te slaan op een elektronisch medium zonder voorafgaande
schriftelijke toestemming van de rechthebbende.
Page 28

CAMCOLVC26N
V. 01 – 20/09/2016 28 ©Velleman nv
MODE D'EMPLOI
1. Introduction
Aux résidents de l'Union européenne
Informations environnementales importantes concernant ce produit
Ce symbole sur l'appareil ou l'emballage indique que l’élimination
d’un appareil en fin de vie peut polluer l'environnement. Ne pas
jeter un appareil électrique ou électronique (et des piles
éventuelles) parmi les déchets municipaux non sujets au tri sélectif
; une déchetterie traitera l’appareil en question. Renvoyer l'appareil
à votre fournisseur ou à un service de recyclage local. Il convient
de respecter la réglementation locale relative à la protection de
l’environnement.
En cas de questions, contacter les autorités locales pour élimination.
Nous vous remercions de votre achat ! Lire attentivement le présent mode
d'emploi avant la mise en service de l’appareil. Si l'appareil a été
endommagé pendant le transport, ne pas l’installer et consulter votre
revendeur.
2. Consignes de sécurité
AVERTISSEMENT
Ne jamais perforer les piles et ne pas les jeter au feu (danger
d’explosion).
Garder les piles hors de la portée des enfants.
Cet appareil comporte une batterie interne rechargeable. A la fin
de sa durée de vie, se débarrasser de ce produit en respectant la
législation d'élimination locale.
Il n’y a aucune pièce réparable par l’utilisateur dans l'appareil.
3. Directives générales
Se référer à la garantie de service et de qualité Velleman® en fin de ce
mode d'emploi.
Protéger cet appareil contre la poussière et les températures extrêmes.
Protéger l’appareil des chocs et de l'abus. Traiter l'appareil avec
circonspection pendant l’opération.
Ne pas orienter la caméra vers le soleil ou vers tout autre objet
réfléchissant.
Ne pas couvrir la lentille.
Se familiariser avec le fonctionnement de l'appareil avant de l'utiliser.
Page 29

CAMCOLVC26N
V. 01 – 20/09/2016 29 ©Velleman nv
Toute modification est interdite pour des raisons de sécurité. Les
dommages occasionnés par des modifications par le client ne tombent
pas sous la garantie.
N’utiliser l'appareil qu’à sa fonction prévue. Un usage impropre annule
d'office la garantie.
La garantie ne se s’applique pas aux dommages survenus en négligeant
certaines directives de ce mode d'emploi et votre revendeur déclinera
toute responsabilité pour les problèmes et les défauts qui en résultent.
Il n’y a aucune pièce réparable par l’utilisateur dans l'appareil.
Commander des pièces de rechange éventuelles chez votre revendeur.
Installer et utiliser l'appareil en respectant la législation et la vie privée
des tiers.
4. Caractéristiques
enregistrement sur carte SD (non incl.)
qualité d'enregistrement : 720p HD vidéo - 30 fps
configuration facile
moniteur TFT de 2.4" TFT incorporé
interface : USB, carte SD et port DC
5. Description
Se référer aux illustrations en page 2 de ce mode d'emploi.
1
capteur de lumière
11
haut-parleur
2
LED IR
12
fente pour carte SD
3
indicateur de mouvement
13
port mini-USB
4
microphone
14
sélecteur de mode
5
objectif
15
panneau de contrôle
6
capteur PIR
16
compartiment à piles
7
bride de fermeture
17
entrée d'alimentation
8
trou pour cadenas
18
connexion pour support
9
moniteur
19
bride de fermeture
10
trou pour cadenas
20
trou pour cadenas
Page 30

CAMCOLVC26N
V. 01 – 20/09/2016 30 ©Velleman nv
6. Préparer la caméra.
6.1 Ouvrir et fermer la caméra
Les boutons, les connexions et les piles se trouvent à l'intérieur de la
caméra.
Pour ouvrir la caméra, desserrer les deux brides de fermeture (voir fig. 1.).
Pour fermer la caméra, accrocher l'étrier métallique des brides de fermeture
dans le support et appuyer la patte en plastique vers le bas (fig. 2.).
Entre les deux brides de fermeture se trouve un dispositif pour un cadenas,
permettant de fermer la caméra en toute sécurité.
6.2 Insérer les piles
Ouvrir la caméra (voir ci-dessus). Ouvrir le couvercle du compartiment à
piles en tirant le verrou de la partie supérieure vers l'intérieur et en
soulevant le couvercle.
Insérer huit piles chargées en respectant la polarité.
Refermer le compartiment à piles avec le couvercle de protection.
Remarque
Un signal sonore retentit si la tension des piles est faible.
AVERTISSEMENT
Ne jamais perforer les piles et ne pas les jeter au feu
(danger d’explosion). Ne jamais recharger des piles
alcalines. Se débarrasser des piles en respectant la
réglementation locale relative à la protection de
l’environnement. Garder les piles hors de la portée
des enfants.
Page 31

CAMCOLVC26N
V. 01 – 20/09/2016 31 ©Velleman nv
6.3 Insérer la carte mémoire
Avant d'allumer la caméra, insérer une
carte SD/SDHC dans la fente pour
enregistrer des photos et vidéos.
Eteindre la caméra et ouvrir comme
décrit ci-dessus.
S'assurer que la protection d'écriture
sur le côté de la carte n'est pas
activée. Insérer la carte (voir fig.).
Enfoncer la carte mémoire dans la
fente jusqu'à ce qu'elle s'enclenche
avec un déclic.
Pour retirer la carte, appuyer à
nouveau sur la carte jusqu'à ce qu'elle
s'éjecte partiellement.
6.4 Alimentation externe
Il est possible d'alimenter la caméra par un bloc secteur externe. Utiliser un
adaptateur de 6 VCC (min. 1.5 A).
Remarque
Il n'est pas possible de recharger des piles rechargeables dans la caméra au
moyen de l’alimentation électrique.
6.5 Montage avec sangle
Utiliser la sangle fournie pour fixer la caméra à un arbre ou à d'autres
objets.
Positionner la caméra dans l'angle souhaité et tirer sur l'extrémité libre de la
sangle jusqu'à ce que la caméra soit fixée fermement.
Pour libérer la sangle, tirer sur la patte du fermoir de la sangle.
Page 32

CAMCOLVC26N
V. 01 – 20/09/2016 32 ©Velleman nv
6.6 Utiliser le support mural
A
trous de montage
B
boulon pour support
C
contre-vis
D
vis d'articulation
Utiliser le support mural pour fixer fermement la caméra à un mur ou au
plafond. Avant de monter le support mural, s'assurer que les boulons sont
serrés fermement et qu’aucune conduite électrique ne passe dans le mur.
Marquer les trous sur le mur ou plafond. Utiliser le support mural comme
gabarit. Utiliser un foret à béton de 6 mm pour percer les trous et fixer le
support mural.
S'assurer de placer une carte mémoire et des piles ou de brancher le bloc
secteur. Mettre la caméra en mode veille.
Fixer la caméra au support mural et tourner dans la position souhaitée.
7. Emploi
7.1 Sélecteur de mode
Avant d'installer la caméra pour la surveillance, régler la en fonction de
l'utilisation. Pour ce faire, la caméra dispose d'un mode test. En plus des
réglages, il est également possible de prendre des photos ou d'enregistrer
des vidéos, et de voir les enregistrements existants.
OFF : la caméra est complètement
éteinte.
TEST: sélectionner le mode test
pour ajuster les réglages et
faire/visualiser des photos et
vidéos.
ON : la caméra est activée pour
prendre des photos.
Page 33

CAMCOLVC26N
V. 01 – 20/09/2016 33 ©Velleman nv
7.2 Panneau de contrôle
Mettre le sélecteur de mode sur TEST, la caméra et l'écran s'allument.
Mode d'enregistrement
MENU
Accéder au menu
REPLAY
Activer le mode de lecture
Passer en mode d'enregistrement manuel
Passer en mode photo manuel
SHOT
Démarrer/arrêter l'enregistrement manuel ; prendre une
photo
OK/ /
Pas de fonction
Mode de lecture
MENU
Activer le mode de lecture
REPLAY
Revenir au mode d’enregistrement
/
Faire défiler les photos en avant/arrière
Agrandir l’affichage des photos (jusqu’à 16x)
Réduire l'affichage des photos agrandies
OK/SHOT
Démarrer/arrêter la lecture des vidéos
Mode normal
MENU
Fermer le menu principal ou sous-menu
Option de menu suivante/augmenter une valeur
Option de menu précédente/diminuer une valeur
Agrandir l’affichage des photos (jusqu’à 16x)
Réduire l'affichage des photos agrandies
OK
Ouvrir l'option sélectionnée/confirmer la sélection
SHOT/REPLAY
Pas de fonction
7.3 Réglages
Avant d'utiliser la caméra, modifier les
réglages comme souhaité.
Mettre le sélecteur de mode sur TEST
pour activer le mode test. En mode
photo ou vidéo, appuyer sur MENU
pour faire afficher le menu.
Toutes les options de menu et les
valeurs de réglages pour le mode
d'enregistrement sont affichées (voir
ci-dessous). Le réglage par défaut est
toujours marqué en gras.
Page 34

CAMCOLVC26N
V. 01 – 20/09/2016 34 ©Velleman nv
Mode
Réglages : Photo, Vidéo, Photo + Vidéo
Sélectionner si les photos ou vidéos doivent être enregistrées en cas de
détection d'un mouvement. En mode « Photo + Vidéo », la caméra prend
d’abord un nombre de photos programmé et enregistre ensuite une vidéo.
Taille des images
Réglages : 8M, 5M, 3M, 2M, 1M
Sélectionner la résolution photo. Une résolution plus élevée offre une
meilleure qualité, mais les fichiers sont plus volumineux et prennent plus de
place sur la carte mémoire.
Taille des vidéos
Réglages : 720p (1080x720), WVGA (848x480), VGA (640x480) @ 30 fps
Sélectionner la résolution vidéo. Une résolution plus élevée offre une
meilleure qualité, mais les fichiers sont plus volumineux et prennent plus de
place sur la carte mémoire.
Les vidéos sont enregistrées au format AVI qui peut être lu sur la plupart
des appareils vidéo.
Nombre
Réglages : 1 photo, 2 photos, 3 photos
Sélectionner le nombre de photos qui, en mode photo, doit être pris
successivement lors du déclenchement de la caméra. Faire attention au
paramètre Intervalle (voir ci-dessous).
Durée de vidéo
Réglages : 10 sec, optional 1-60 sec and 3, 5 and 10 min
Indiquer la durée de la vidéo lors d'un déclenchement automatique. En
mode test, la durée d'enregistrement des vidéos n'est pas limitée dans le
temps.
Intervalle
Réglages : 30 sec, optional from 5 sec to 60 min
Sélectionner la période la plus courte que doit attendre la caméra avant de
réagir aux déclenchements successifs du capteur principal après la détection
d'un animal. La caméra n'enregistre aucune photo ni vidéo pendant
l'intervalle sélectionné. Ceci évite que la carte mémoire se remplisse de
photos superflues.
Horodatage
Réglages : On/Off (uniquement en mode photo)
Sélectionner pour afficher la date, l’heure, la température et la phase lunaire
sur chaque photo.
Minuteur
Réglages : Off/On
Page 35

CAMCOLVC26N
V. 01 – 20/09/2016 35 ©Velleman nv
Activer le minuteur si la caméra ne doit être activée que pendant une
certaine période. Après l'activation, il est possible de régler l'heure de
démarrage et l'heure d'arrêt.
Exemple : Si l’heure de démarrage est 18h35 et l’heure d’arrêt 8h25, alors
la caméra fonctionnera de 18h35 jusqu’à 8h25 du jour suivant. En dehors de
cette période, la caméra ne se déclenchera pas et n'enregistrera aucune
photo ou vidéo.
Mot de passe
Réglages : Off/On
Lorsque cette option est activée, un mot de passe à quatre chiffres doit être
saisi à chaque activation en mode test avant de pouvoir utiliser la caméra.
La caméra ne peut plus être utilisée en cas d'oubli du mot de passe.
Contacter votre revendeur.
N° de série
Réglages : Off/On (uniquement disponible en mode photo)
Activer cette option pour attribuer un numéro de série à la caméra.
Utiliser une combinaison à 4 chiffres ou lettres pour identifier votre caméra
en cas d'usage de multiples caméras.
Accéléré
Réglages : Off/On
Lorsque cette option est activée, la caméra prend automatiquement des
photos et/ou des vidéos, selon l'intervalle sélectionné, indépendamment du
fait que le capteur PIR a détecté ou non un mouvement. Cette fonction est
utile pour observer des animaux à sang froid ou l'éclosion de fleurs.
Mode d'économie d'énergie.
Réglages : Off/On
Ce mode est activé lorsque les piles sont faibles. Si le mode est activé, la
caméra réduit automatiquement la luminosité de l'éclairage IR pour
prolonger la durée de vie des piles.
Langue
Réglages : Sélectionner la langue de menu souhaitée
Langues disponibles : anglais, allemand, danois, polonais, français, italien,
néerlandais, espagnol, hongrois, portugais, chinois.
Formater
Réglages : No/Yes
Tous les fichiers sont supprimés en formatant la carte mémoire.
Il est conseillé de formater la carte mémoire si elle a été utilisée dans
d'autres appareils ou si la carte est neuve.
S'assurer que les fichiers sont sauvegardés avant de formater la carte.
Régler l'heure
Réglages : Régler la date et l'heure
Page 36

CAMCOLVC26N
V. 01 – 20/09/2016 36 ©Velleman nv
Utiliser les boutons / pour commuter entre les valeurs et modifier les
valeurs sélectionnées en appuyant sur / . Confirmer avec OK.
Réglages d'usine
Réglages : No/Yes
Rétablir les réglages d'usine de la caméra.
Extinction automatique
Réglages : 3 min, 5 min, 10 min, off
En mode test, déterminer si la caméra doit s'éteindre automatiquement
lorsqu'elle n'est pas utilisée pendant une longue période.
Appuyer sur un bouton quelconque pour rallumer la caméra.
Niveau sonore de l'enregistrement
Réglages : Faible, Normal, Fort
Sélectionner le niveau sonore des enregistrements audio.
Niveau sonore de la lecture
Réglages : Faible, Norma, Fort
Sélectionner le niveau sonore des enregistrements audio lors de la lecture
Système
Réglages : FW Update, FW Version
FW Update: Si un nouveau micrologiciel est disponible sur la carte mémoire,
il est possible de l'installer avec cette option. Pendant l’actualisation, l'état
s'affiche à l'écran.
FW Version: Affiche la version du micrologiciel installée sur la caméra.
Supprimer
Réglages : Single, All
Sélectionner cette option pour supprimer des fichiers de la carte mémoire.
Single: Supprimer individuellement un fichier. Commuter entre les fichiers
avec les boutons / .
All: Supprimer tous les fichiers de la carte mémoire.
7.4 Enregistrement nocturne
Lors des prises de nuit, les LEDs IR sur la partie frontale de la caméra
fournissent la lumière nécessaire pour prendre des photos.
La caméra utilise des LEDs IR ayant une longueur d'onde élevée pour que la
qualité de lumière rouge soit le plus faible possible. Le nombre de LEDs IR
produit un grand angle de rayonnement et permet ainsi des prises de nuit à
une distance d’environ 3 à 25 m sans surexposer l’objet.
En dehors de cette portée, les objets réfléchissants peuvent causer une
surexposition.
Attention : Les prises de vue de nuit avec les LEDs IR fournissent des
images en noir et blanc.
Page 37

CAMCOLVC26N
V. 01 – 20/09/2016 37 ©Velleman nv
7.5 Mode En direct
Dans ce mode, les enregistrements
sont déclenchés soit par les capteurs
de mouvements soit périodiquement
par un réglage correspondant.
Pour régler le mode En direct,
commuter le sélecteur de mode en
position ON. La LED rouge clignote
pendant 5 secondes, ensuite la caméra
commence à fonctionner
automatiquement et passe en mode
veille. Dès qu'un animal passe dans la
zone de détection du capteur PIR, la
caméra commence à enregistrer des
photos et/ou des vidéos.
7.6 Orienter la caméra
Le mode test est très utile pour déterminer l'angle de détection optimal et la
portée du capteur de mouvements. Pour cela, fixer la caméra à environ 1-2
m de haut à un arbre et orienter la caméra dans la direction souhaitée.
Maintenant, aller lentement d’un côté à l’autre de la zone observée. Se
déplacer parallèlement à la caméra.
La LED rouge [L] s'allume pour indiquer que vous êtes détecté dans la zone
de détection du capteur PIR.
Pour éviter de faux signaux et donc des prises inutiles, il est conseillé de ne
pas utiliser la caméra à des endroits ensoleillés et veiller à ce qu'aucune
branche ne se trouve dans la zone active du capteur. L’orientation optimale
se fait en direction du Nord ou du Sud. La portée de détection du capteur
est d'environ 60°.
De plus, veiller à ce que la caméra soit installée à la bonne hauteur par
rapport à l'endroit à observer. Si nécessaire, incliner la caméra vers le bas
pour qu'elle soit orientée correctement.
Page 38

CAMCOLVC26N
V. 01 – 20/09/2016 38 ©Velleman nv
Remarque
Cette caméra correspond à l'indice de protection IP54. La caméra est
protégée contre la poussière et les projections d'eau et peut donc être
utilisée dans toute condition météorologique.
7.7 Format du fichier
La caméra enregistre des photos et des vidéos sur la carte mémoire dans le
dossier \DCIM\100MEDIA.
Les photos ont un nom de fichier ayant l'extension JPG, les vidéos ont
l'extension AVI.
8. Système requis
Connecter la caméra à l'ordinateur avec le câble USB inclus.
Système requis
Windows®
Mac®
Pentium® III ou supérieur
Windows® XP/Vista/7/8
512 Mo de RAM
1 Go disponible sur le disque
dur
Résolution de l'écran
1024x768 ou supérieur
Port USB libre
PowerPC G3/G4/G5
OS 10.3.9 ou système plus
récent
512 Mo de RAM
1 Go disponible sur le disque
dur
Résolution de l'écran
1024x768 ou supérieur
Port USB libre
9. Nettoyage et entretien
Il n’y a aucune pièce réparable par l’utilisateur.
L'appareil ne nécessite aucun entretien particulier.
Nettoyer occasionnellement avec un chiffon humide pour conserver son
aspect neuf. Ne pas utiliser d'agents chimiques agressifs, de solvants ni
de détergents puissants.
10. Spécifications techniques
capacité de stockage ........... max. 32 Go sur carte SD (non incl.)
élément d'enregistrement ...................................... 2 MP CMOS
angle de vue ...................................................................70°
microphone incorporé ....................................................... oui
capteur PIR
portée PIR............................................................. 15 m
angle PIR .................................................................60°
LEDs IR
Page 39

CAMCOLVC26N
V. 01 – 20/09/2016 39 ©Velleman nv
portée IR .............................................................. 15 m
LEDs IR ...............................................................26 pcs
ouverture ..................................................................... F3.3
balance des blancs ......................................................... auto
port AV ......................................................................... non
fonction de caméra PC ..................................................... non
vidéo
résolution vidéo .........................................720p @ 30 fps
format de fichier vidéo .................................... MJPG (AVI)
capacité d'enregistrement ........................... ± 140 Mo/min.
durée de vidéo ................................. 1 s - 10 min, réglable
image ............................................. 1-3 photos par activation
résolution d'image ................................................... 2 MP
résolution d'image ......................... 8 mégapixels interpolés
batterie (caméra) .................... 8 x pile AA (HR6C/27B, non incl.)
autonomie en mode veille ......................................... 4-6 mois
température de service ................................. de -20° C à 60° C
température de stockage .............................. de -20° C à 70° C
dimensions ............................................. 135 x 97 x 66.5 mm
poids .......................................................................... 270 g
N'employer cet appareil qu’avec des accessoires d’origine. Velleman
SA ne peut, dans la mesure conforme au droit applicable être tenue
responsable des dommages ou lésions (directs ou indirects) pouvant
résulter de l’utilisation de cet appareil. Pour plus d'informations
concernant cet article et la dernière version de ce mode d'emploi,
consulter notre site www.velleman.eu. Les spécifications et le
continu de ce mode d'emploi peuvent être modifiés sans notification
préalable.
Les marques déposées et les raisons sociales sont la propriété de leurs
détenteurs respectifs, et sont uniquement utilisées dans le but de démontrer
la compatibilité entre nos articles et les articles des fabricants. Windows,
Windows XP, Windows 2000, Windows Vista, Windows Aero, Windows 7,
Windows 8, Windows Mobile, Windows Server sont des marques
commerciales enregistrées de Microsoft Corporation aux Etats-Unis et
d'autres pays. Mac, Mac OS sont des marques commerciales d'Apple Inc.,
enregistrées aux Etats-Unis et dans d'autres pays. Pentium est une marque
déposée d'Intel Corporation.
© DROITS D’AUTEUR
Velleman SA est l’ayant droit des droits d’auteur de ce mode
d'emploi. Tous droits mondiaux réservés. Toute reproduction,
traduction, copie ou diffusion, intégrale ou partielle, du contenu de ce mode
d'emploi par quelque procédé ou sur tout support électronique que ce soit
est interdite sans l’accord préalable écrit de l’ayant droit.
Page 40

CAMCOLVC26N
V. 01 – 20/09/2016 40 ©Velleman nv
MANUAL DEL USUARIO
1. Introducción
A los ciudadanos de la Unión Europea
Importantes informaciones sobre el medio ambiente concerniente a
este producto
Este símbolo en este aparato o el embalaje indica que, si tira las
muestras inservibles, podrían dañar el medio ambiente. No tire
este aparato (ni las pilas, si las hubiera) en la basura doméstica;
debe ir a una empresa especializada en reciclaje. Devuelva este
aparato a su distribuidor o a la unidad de reciclaje local. Respete
las leyes locales en relación con el medio ambiente.
Si tiene dudas, contacte con las autoridades locales para residuos.
¡Gracias por elegir Velleman! Lea atentamente las instrucciones del manual
antes de usar el aparato. Si ha sufrido algún daño en el transporte no lo
instale y póngase en contacto con su distribuidor.
2. Instrucciones de seguridad
ADVERTENCIA
Nunca perfore las pilas y no las eche al fuego (peligro de
explosión).
Mantenga las pilas lejos del alcance de niños.
Este aparato funciona con una batería recargable. Al final de su
vida útil, respete las leyes locales en relación con el medio
ambiente.
El usuario no habrá de efectuar el mantenimiento de ninguna
pieza.
3. Normas generales
Véase la Garantía de servicio y calidad Velleman® al final de este
manual del usuario.
No exponga este equipo a polvo ni temperaturas extremas.
Proteja el aparato contra choques y golpes. Evite usar excesiva fuerza
durante el manejo.
Nunca dirija la cámara al sol ni un objeto reflectante.
No toque la lente.
Familiarícese con el funcionamiento del aparato antes de utilizarlo.
Por razones de seguridad, las modificaciones no autorizadas del aparato
están prohibidas. Los daños causados por modificaciones no
autorizadas, no están cubiertos por la garantía.
Page 41

CAMCOLVC26N
V. 01 – 20/09/2016 41 ©Velleman nv
Utilice sólo el aparato para las aplicaciones descritas en este manual Su
uso incorrecto anula la garantía completamente.
Los daños causados por descuido de las instrucciones de seguridad de
este manual invalidarán su garantía y su distribuidor no será
responsable de ningún daño u otros problemas resultantes.
El usuario no habrá de efectuar el mantenimiento de ninguna pieza.
Contacte con su distribuidor si necesita piezas de recambio.
Instale y utilice la cámara al respetar la legislación et la vida privada de
terceros.
4. Características
el aparato graba las imágenes en una tarjeta SD (no incl.)
calidad de grabación 720p HD vídeo - 30 fps
fácil configuración
monitor TFT de 2.4" incorporado
interfaz: USB, tarjeta SD y puerto DC
5. Descripción
Véase las figuras en la página 2 de este manual del usuario.
1
sensor
11
altavoz
2
LEDs IR
12
ranura para tarjeta SD
3
indicador de movimiento
13
puerto mini USB
4
micrófono
14
selector de modo
5
óptica
15
panel de control
6
sensor PIR
16
compartimento de pilas
7
soporte de bloqueo
17
entrada de alimentación
8
orificio para candado
18
rosca de tornillo para el
trípode
9
monitor
19
soporte de bloqueo
10
orificio para candado
20
orificio para candado
Page 42

CAMCOLVC26N
V. 01 – 20/09/2016 42 ©Velleman nv
6. Preparar la cámara
6.1 Abrir y cerrar la cámara
Los botones de funcionamiento, las conexiones y las pilas se encuentran
dentro de la cámara.
Para abrir la cámara, abra los dos soportes de bloqueo (véase fig).1. Para
volver a cerrar la cámara, encaje los aros de metal de los soportes de
bloqueo y presione la lengüeta de plástico hacia abajo (véase fig).2.
Entre los dos soportes de bloqueo hay un orificio para candado para poder
fijar bien la cámara.
6.2 Introducir las baterías
Abra la cámara como se describe arriba. Saque la tapa del compartimento
de pilas presionando ligeramente en el cierre de la parte superior y levante
la tapa.
Introduzca 8 baterías completamente cargadas. ¡Respete la polaridad!
Vuelva a cerrar el compartimento de pilas con la tapa.
Observación
El aparato emitirá una señal acústica en caso de batería baja.
ADVERTENCIA
Nunca perfore las pilas y no las eche al fuego (peligro
de explosión). Nunca recargue pilas no recargables
(alcalinas). Respete las leyes locales en relación con
el medio ambiente al tirar las pilas. Mantenga las
pilas lejos del alcance de niños.
Page 43

CAMCOLVC26N
V. 01 – 20/09/2016 43 ©Velleman nv
6.3 Introducir una tarjeta de memoria
Antes de encender la cámara,
introduzca una tarjeta SD/SDHC que le
permite almacenar fotos y vídeos en la
ranura para tarjetas.
Desactive la cámara y ábrala como se
describe arriba.
Asegúrese de que la tarjeta SD ya no
esté en estado de protección contra
escritura. Introduzca la tarjeta como
se indica en la figura. Introduzca la
tarjeta en la ranura para tarjetas hasta
que encaje.
Para retirar la tarjeta, presiónela hasta
que salga parcialmente de la ranura.
6.4 Adaptador de red
El aparato funciona también con un adaptador de red. Por esto, necesitará
un adaptador de red de 6 VDC y mín. 1.5 A.
Observación
No es posible recargar las baterías recargables cuando esté conectado un
adaptador de red.
6.5 Fijar la cámara con la correa
Utilice la correa de fijación incluida para fijar la cámara a un árbol u otro
objeto.
Ponga la cámara en la posición deseada y tire del extremo de la correa
hasta que la cámara esté bien sujeta.
Para volver a soltar la correa, tire de la lengüeta hacia arriba.
Page 44

CAMCOLVC26N
V. 01 – 20/09/2016 44 ©Velleman nv
6.6 Utilizar el soporte de pared
A
agujeros de montaje
B
tornillo para el trípode
C
tuerca
D
tornillos para el bisagra
Fije la cámara a la pared o el techo con el soporte de pared incluido. Antes
de instalar el soporte de pared, asegúrese de que haya apretado todos los
tornillos firmemente y que no haya cables o tubos escondidos.
Utilice el soporte de pared como plantilla para marcar los agujeros en la
pared o el techo. Taladre los agujeros con un taladro (6 mm) y fije el
soporte de pared.
Asegúrese de que haya introducido la tarjeta de memoria y las baterías o de
que esté conectado el adaptador de red. Ponga la cámara en el modo de
espera (standby).
Fije la cámara al soporte de pared y seleccione la posición deseada.
7. Funcionamiento
7.1 Selector de modo
Antes de la primera puesta en marcha, debe probar la cámara. Ponga la
cámara en el modo de prueba. En este modo puede cambiar los ajustes,
hacer y visualizar fotos y vídeos.
OFF: La cámara está desactivada.
TEST: Seleccione el modo de
prueba para cambiar los ajustes y
hacer o visualizar fotos y vídeos.
ON: La cámara está activada para
hacer fotos.
Page 45

CAMCOLVC26N
V. 01 – 20/09/2016 45 ©Velleman nv
7.2 Panel de control
Ponga el selector de modo en TEST y asegúrese de que la cámara y el
monitor estén activados.
Modo de grabación
MENU
Entrar en el menú
REPLAY
Iniciar el modo de reproducción
Conmutar al modo de grabación manual
Conmutar al modo de fotos manual
SHOT
activar/desactivar la grabación manual hacer una foto
OK/ /
Sin función
Modo de reproducción
MENU
entrar en el menú de reproducción
REPLAY
Volver al modo de grabación
/
Visualizar fotos (hacia adelante/hacia atrás)
Ampliar vídeo (máx. 16x)
Reducir vídeo ampliado
OK/SHOT
activar/desactivar la reproducción de vídeo
Modo normal
MENU
Cerrar el menú principal o el submenú.
Ir al punto de menú siguiente/aumentar el valor
Ir al punto de menú anterior/disminuir el valor
Ampliar foto (máx. 16x)
Reducir foto ampliada
OK
Abrir el punto de menú seleccionado/confirmar la
selección
SHOT/REPLAY
Sin función
7.3 Ajustes
Antes de utilizar la cámara, seleccione
los ajustes deseados.
Ponga el selector de modo en la
posición TEST para iniciar el modo de
prueba. En el modo de foto o vídeo,
pulse MENU para abrir el menú.
Se visualizarán a continuación todas las
opciones y ajustes posibles para el
modo de grabación. El ajuste
seleccionado siempre destaca en
Page 46

CAMCOLVC26N
V. 01 – 20/09/2016 46 ©Velleman nv
negrita.
Modo
Ajustes: Photo, Video, Photo + Video
Seleccione si la cámara debe hacer fotos o vídeos en caso de detección de
movimiento. En el modo 'Photo + Video', la cámara sacará primero un
número de fotos determinado y luego empezará a grabar un vídeo.
Image size (tamaño de imagen)
Ajustes: 8M, 5M, 3M, 2M, 1M
Seleccione la resolución deseada. Obtendrá una mejor calidad si selecciona
una resolución más alta, pero necesitará más memoria en la tarjeta de
memoria.
Video size (tamaño de vídeo)
Ajustes: 720p (1080x720), WVGA (848x480), VGA (640x480) @ 30 fps
Seleccione la resolución deseada. Obtendrá una mejor calidad si selecciona
una resolución más alta, pero necesitará más memoria en la tarjeta de
memoria.
Vídeos se graban en el formato AVI que es apto para la mayoría de los
aparatos de vídeo.
Number (número)
Ajustes: 1 photo, 2 photos, 3 photos
Seleccione el número de fotos que la cámara debe sacar cuando se active en
el modo de foto. Tenga en cuenta también el intervalo (véase abajo).
Length of video (duración del vídeo)
Ajustes: 10 sec, opcional 1-60 sec y 3, 5 y 10 min
Determine la duración de un vídeo cuando la cámara se active
automáticamente. El período de grabación para vídeos no está limitado en el
modo de prueba.
Intervalo
Ajustes: 30 sec, opcional de 5 seg. a 60 min
Seleccione el intervalo de tiempo más corto que la cámara debe esperar
hasta volver a reaccionar a una activación sucesiva del sensor principal
después de detectar un animal por primera vez. La cámara no hará fotos ni
vídeos durante los intervalos seleccionados. Así se evita que la tarjeta de
memoria se llene con imágenes innecesarias.
Time stamp (sello de tiempo)
Ajustes: On/Off (sólo disponible en el modo de foto)
Seleccione si se debe visualizar o no la fecha, la hora, la temperatura y la
fase lunar.
Timer (temporizador)
Ajustes: Off/On
Page 47

CAMCOLVC26N
V. 01 – 20/09/2016 47 ©Velleman nv
Active el temporizador si la cámara sólo debe activarse durante un período
determinado. Después de la activación del temporizador, es posible ajustar
los momentos de inicio y fin.
Ejemplo: Si pone el inicio a las 18h35 y el fin a las 8h25, la cámara sólo
funcionará entre las 18h35 y las 8h25. Así, la cámara no se activará y no
hará ni fotos ni vídeos fuera de este período.
Password (contraseña)
Ajustes: Off/On
Si está activada esta opción, debe introducir una contraseña de 4 dígitos
cada vez que active la cámara en el modo de prueba.
No podrá utilizar la cámara si pierde la contraseña. Contacte con su
distribuidor.
Serial no. (número de serie)
Ajustes: Off/On (sólo disponible en el modo de foto)
Active esta opción para asignar un número de serie a la cámara.
Si utiliza varias cámaras, introduzca una combinación de cuatro dígitos o
letras.
Time lapse (lapso de tiempo)
Ajustes: Off/On
Si está activada esta opción, es posible seleccionar un período de tiempo
para la grabación de fotos o vídeos. La activación no depende de una
detección de movimientos por el sensor PIR. Esta función es ideal para
observar animales de sangre fría o plantas en floración.
Energy saving mode (modo de ahorro de energía)
Ajustes: Off/On
Esta función es apta en caso de batería baja. Si está activada esta opción, el
brillo de los LEDs IR disminuirá automáticamente para maximizar la
autonomía de la batería.
Language (idioma)
Ajustes: Seleccione el idioma deseado para el menú.
Idiomas disponibles: English, German, Danish, Polish, French, Italian,
Dutch, Spanish, Hungarian, Portuguese, Chinese.
Formatting (formatear)
Ajustes: No/Yes
Todos los ficheros se borrarán al formatear la tarjeta de memoria.
Formatee la tarjeta de memoria si ya ha sido utilizada en otros aparatos o si
es nueva.
Asegúrese de haber almacenado los ficheros que quiere guardar antes de
formatearla.
Setting the time (ajustar la hora)
Ajustes: Introduzca la fecha y la hora
Page 48

CAMCOLVC26N
V. 01 – 20/09/2016 48 ©Velleman nv
Utilice los botones / para conmutar entre los valores y cambiar los
valores seleccionados pulsando los botones / . Confirme con OK.
Configuración de fábrica
Ajustes: No/Yes
Vuelva a la configuación de fábrica.
Auto switch (desactivación automática)
Ajustes: 3 min, 5 min, 10 min, off
Determine si la cámara debe desactivarse automáticamente después de no
haberse utilizado durante un tiempo en el modo de prueba.
Pulse cualquier botón para volver a activar la cámara.
Recording volume (volumen de grabación)
Ajustes: Low, Normal, High
Seleccione el volumen de grabación.
Playback volume (volumen de reproducción)
Ajustes: Low, Normal, High
Seleccione el volumen de reproducción.
System (sistema)
Ajustes: FW Update, FW Version
FW Update: Gracias a esta opción puede actualizar el firmware. Durante la
actualización se visualizará el estado actual.
FW Version: Visualiza la versión del firmware de la cámara.
Delete (borrar)
Ajustes: Single, All
Seleccione esta opción para borrar ficheros.
Single: Borrar los ficheros seleccionados. Conmute entre los ficheros con los
botones / .
All: Borrar todos los ficheros.
7.4 Night Recording (grabación de noche)
Durante la grabación de noche, los LEDs IR de la parte frontal dan la luz
necesaria para sacar fotos.
La cámara utiliza LEDs IR con una larga longitud de onda para minimizar la
luz roja. Los LEDs incorporados generan un alto ángulo de desviación y
permiten, por tanto, una grabación nocturna a una distancia de 3 a 15 m sin
sobreexponer el objeto.
Sin embargo, los objetos reflectantes pueden causar una sobreexposición
dentro del rango.
Tenga en cuenta que cuando la cámara utilice los LEDs IR (de noche) hará
fotos o vídeos en blanco y negro.
Page 49

CAMCOLVC26N
V. 01 – 20/09/2016 49 ©Velleman nv
7.5 Live Mode (modo en directo)
En el modo en directo, la cámara hará
fotos después de haber sido activada
por los sensores de movimiento o a
intervalos según los ajustes.
Para activar el modo en directo, ponga
la cámara en la posición ON. El LED de
estado rojo parpadeará durante 5
segundos. Luego, la cámara funcionará
automáticamente y entrará en el modo
de espera. La grabación de fotos o
vídeos se iniciará en cuanto un animal
entre en la zona de detección.
7.6 Alinear la cámara
El modo de prueba es ideal para determinar el mejor ángulo de detección y
el rango del sensor de movimientos. Por ello, fije la cámara a un árbol a una
altura de aproximadamente 1-2 m y alinéela en la posición adecuada.
Muévase lentamente de un lado de la zona vigilada al otro. Muévase
paralelamente con respecto a la cámara e intente diferentes ángulos y
distancias.
Si el LED rojo [L] se ilumina, estará indicando que ha sido detectado por el
sensor PIR.
Para evitar señales incorrectas y fotos innecesarias, no exponga la cámara a
los rayos solares y compruebe que no hay ramas en el rango de detección
del sensor. La alineación ideal es en dirección norte o dirección sur. El rango
de detección del sensor es de aproximadamente 60°.
Asegúrese también de que la cámara esté instalada a la altura correcta y en
línea con la zona que quiere vigilar. Si fuera necesario, apunte la cámara
hacia abajo para una alineación óptima.
Observación
Esta cámara pertenece a la clase de protección IP54. Está protegida contra
polvo y chorros de agua. Por ello es resistente a la intemperie.
Page 50

CAMCOLVC26N
V. 01 – 20/09/2016 50 ©Velleman nv
7.7 Formato del fichero
La cámara almacenará las fotos y los vídeos en la tarjeta de memoria en el
fichero \DCIM\100MEDIA.
Las fotos tienen la extensión JPG, los vídeos la extensión AVI.
8. Exigencias del sistema
Conecte la cámara al ordenador con el cable USB incluido.
Exigencias del sistema
Windows®
Mac®
Pentium® III o superior
Windows® XP/Vista/7/8
512 MB RAM
1 GB disponible en el disco
duro
Resolución de pantalla
1024x768 o superior
conexión USB disponible
PowerPC G3/G4/G5
OS 10.3.9 o superior
512 MB RAM
1 GB disponible en el disco
duro
Resolución de pantalla
1024x768 o superior
conexión USB disponible
9. Limpieza y mantenimiento
El usuario no habrá de efectuar el mantenimiento de ninguna pieza.
Este aparato no necesita mantenimiento especial.
Limpie el aparato de vez en cuando con un paño húmedo. No utilice
químicos abrasivos, detergentes fuertes ni disolventes de limpieza para
limpiar el aparato.
10. Especificaciones
capacidad de memoria .......... máx. 32 GB en tarjeta SD (no incl.)
elemento de imagen .............................................. 2 MP CMOS
ángulo de visión ..............................................................70°
micrófono incorporado ........................................................ sí
sensor PIR
alcance PIR ........................................................... 15 m
ángulo PIR ...............................................................60°
LEDs IR
alcance IR ............................................................. 15 m
LEDs IR ............................................................. 26 uds.
abertura ....................................................................... F3.3
balance de blancos ......................................................... auto
puerto AV ........................................................................ no
función de cámara PC ........................................................ no
vídeo
Page 51

CAMCOLVC26N
V. 01 – 20/09/2016 51 ©Velleman nv
resolución vídeo .........................................720p @ 30 fps
formato de fichero de vídeo ............................. MJPG (AVI)
capacidad de grabación .............................. ± 140 MB/min.
duración de vídeo ...................... 1 seg. - 10 min., regulable
imagen ....................................... 1 - 3 imágenes por activación
resolución de la imagen ............................................ 2 MP
resolución de la imagen ........... 8 megapíxeles, interpolación
batería (cámara) ........................ 8 x pila AA (HR6C/27, no incl.)
autonomía en el modo de espera ........................ de 4 a 6 meses
temperatura de funcionamiento...................... de -20° C a 60° C
temperatura de almacenamiento .................... de -20° C a 70° C
dimensiones ............................................ 135 x 97 x 66.5 mm
peso ........................................................................... 270 g
Utilice este aparato sólo con los accesorios originales. Velleman NV
no será responsable de daños ni lesiones causados por un uso
(indebido) de este aparato. Para más información sobre este
producto y la versión más reciente de este manual del usuario, visite
nuestra página www.velleman.eu. Se pueden modificar las
especificaciones y el contenido de este manual sin previo aviso.
Todas las marcas registradas y nombres comerciales son propiedad de sus
respectivos dueños y se utilizan sólo para aclarar la compatibilidad de
nuestros productos con los de diferentes fabricantes. Windows, Windows XP,
Windows 2000, Windows Vista, Windows Aero, Windows 7, Windows 8,
Windows Mobile, Windows Server son marcas registradas de Microsoft
Corporation en los Estados Unidos y otros países. Mac, Mac OS son marcas
de Apple Inc., registradas en EE.UU. y otros países. Pentium es una marca
registrada de Intel Corporation.
© DERECHOS DE AUTOR
Velleman NV dispone de los derechos de autor para este manual del
usuario. Todos los derechos mundiales reservados. Está estrictamente
prohibido reproducir, traducir, copiar, editar y guardar este manual del
usuario o partes de ello sin el consentimiento previo por escrito del
propietario del copyright.
Page 52

CAMCOLVC26N
V. 01 – 20/09/2016 52 ©Velleman nv
BEDIENUNGSANLEITUNG
1. Einführung
An alle Einwohner der Europäischen Union
Wichtige Umweltinformationen über dieses Produkt
Dieses Symbol auf dem Produkt oder der Verpackung zeigt an,
dass die Entsorgung dieses Produktes nach seinem Lebenszyklus
der Umwelt Schaden zufügen kann. Entsorgen Sie die Einheit (oder
verwendeten Batterien) nicht als unsortierter Hausmüll; die Einheit
oder verwendeten Batterien müssen von einer spezialisierten Firma
zwecks Recycling entsorgt werden. Diese Einheit muss an den
Händler oder ein örtliches Recycling-Unternehmen retourniert werden.
Respektieren Sie die örtlichen Umweltvorschriften.
Falls Zweifel bestehen, wenden Sie sich für Entsorgungsrichtlinien
an Ihre örtliche Behörde.
Vielen Dank, dass Sie sich für Velleman entschieden haben! Lesen Sie diese
Bedienungsanleitung vor Inbetriebnahme sorgfältig durch. Überprüfen Sie,
ob Transportschäden vorliegen. Sollte dies der Fall sein, verwenden Sie das
Gerät nicht und wenden Sie sich an Ihren Händler.
2. Sicherheitshinweise
WARNUNG
Durchbohren Sie nie die Batterien und werfen Sie diese nicht ins
Feuer (Explosionsgefahr).
Halten Sie die Batterien von Kindern fern.
Dieses Gerät ist mit einer internen wieder aufladbaren Batterie
ausgestattet. Entsorgen Sie das Produkt am Ende seiner
Lebensdauer gemäß den geltenden gesetzlichen.
Es gibt keine zu wartenden Teile.
3. Allgemeine Richtlinien
Siehe Velleman® Service- und Qualitätsgarantie am Ende dieser
Bedienungsanleitung.
Schützen Sie das Gerät vor Staub und vor extremen Temperaturen.
Vermeiden Sie Erschütterungen. Wenden Sie bei der Bedienung keine
Gewalt an.
Richten Sie die Kamera nie auf die Sonne oder andere reflektierende
Gegenstände.
Berühren Sie niemals die Linse.
Page 53

CAMCOLVC26N
V. 01 – 20/09/2016 53 ©Velleman nv
Nehmen Sie das Gerät erst in Betrieb, nachdem Sie sich mit seinen
Funktionen vertraut gemacht haben.
Eigenmächtige Veränderungen sind aus Sicherheitsgründen verboten.
Bei Schäden verursacht durch eigenmächtige Änderungen erlischt der
Garantieanspruch.
Verwenden Sie das Gerät nur für Anwendungen beschrieben in dieser
Bedienungsanleitung. Bei falscher Anwendung dieses Gerätes erlischt
der Garantieanspruch.
Bei Schäden, die durch Nichtbeachtung der Bedienungsanleitung
verursacht werden, erlischt der Garantieanspruch. Für daraus
resultierende Folgeschäden übernimmt der Hersteller keine Haftung.
Es gibt keine zu wartenden Teile. Bestellen Sie eventuelle Ersatzteile bei
Ihrem Fachhändler.
Installieren und verwenden Sie das Gerät nicht für illegale Praktiken und
beachten Sie die Intimsphäre aller.
4. Eigenschaften
Aufnahme auf SD-Karte (nicht mitgeliefert)
Aufnahmequalität: 720p HD Video - 30 fps
einfache Konfiguration
integrierter 2.4" TFT-Monitor
Schnittstelle USB, SD-Karte und DC-Port
5. Beschreibung
Siehe Abbildungen, Seite 2 dieser Bedienungsanleitung.
1
Lichtsensor
11
Lautsprecher
2
IR-LEDs
12
SD-Kartenslot
3
Bewegungsanzeige
13
mini USB-Port
4
Mikrofon
14
Schalter für
Betriebsmodus
5
Objektiv
15
Bedienfeld
6
PIR-Sensor
16
Batteriefach
7
Verschlussbügel
17
Netzeingang
8
Verschlussöse
18
Stativgewinde
9
Monitor
19
Verschlussbügel
10
Verschlussöse
20
Verschlussöse
Page 54

CAMCOLVC26N
V. 01 – 20/09/2016 54 ©Velleman nv
6. Die Kamera vorbereiten
6.1 Die Kamera öffnen und schließen
Die Funktionstasten, Anschlüsse und Batterien befinden sich im
Geräteinneren.
Um die Kamera zu öffnen, lösen Sie die zwei Verschlussbügel (siehe Abb.).1.
Um die Kamera wieder zu schließen, fixieren Sie die Metallringe und drücken
Sie die Kunststoff-Klappe nach unten (siehe Abb.).2.
Stecken Sie ein Schloss durch die Verschlussöse zwischen den zwei
Verschlussbügeln, um die Kamera zu sichern.
6.2 Die Batterien einlegen
Öffnen Sie die Kamera wie auf der Abbildung gezeigt. Öffnen Sie die
Batteriefachabdeckung, indem Sie den Klemmverschluss an der oberen
Seite leicht nach innen drücken und die Abdeckung anheben.
Legen Sie 8 vollgeladene Akkus polungsrichtig ein.
Schließen Sie das Batteriefach wieder mit der Abdeckung.
Bemerkung
Es ertönt ein Alarmsignal bei schwacher Batterie.
WARNUNG
Durchbohren Sie nie die Batterien und werfen Sie
diese nicht ins Feuer (Explosionsgefahr). Laden Sie
keine nicht-wiederaufladbare Batterien (Alkali).
Entsorgen Sie die Batterien gemäß den örtlichen
Vorschriften. Halten Sie die Batterien von Kindern
fern.
Page 55

CAMCOLVC26N
V. 01 – 20/09/2016 55 ©Velleman nv
6.3 Eine Speicherkarte einsetzen
Vor dem Einschalten der Kamera,
schieben Sie eine SD/SDHC-Karte in
den Kartenslot, um Fotos und Videos
zu speichern.
Schalten Sie die Kamera aus und
öffnen Sie die Kamera wie auf der
Abbildung gezeigt.
Vergewissern Sie sich davon, dass der
Schreibschutz von der Karte entfernt
ist. Setzen Sie die Karte ein wie auf
der Abbildung gezeigt. Schieben Sie
die Speicherkarte in den Kartenslot, bis
diese einrastet.
Zum Entnehmen der Karte, drücken
Sie darauf und ziehen Sie sie heraus.
6.4 Externes Netzteil
Das Gerät kann auch über ein externes Netzteil betrieben werden. Sie
benötigen dazu ein 6 VDC-Netzteil und min. 1.5 A.
Bemerkung
Wird ein Netzteil angeschlossen, dann können wiederaufladbare Batterien
nicht aufgeladen werden.
6.5 Montage mit Riemen
Verwenden Sie das mitgelieferte Band, um die Kamera an einem Baum oder
einem anderen Gegenstand zu befestigen.
Montieren Sie die Kamera wie gewünscht und ziehen Sie das Ende des
Riemens fest an bis die Kamera straff befestigt ist.
Um den Riemen wieder zu lösen, ziehen Sie in Schnallenhöhe am Band.
Page 56

CAMCOLVC26N
V. 01 – 20/09/2016 56 ©Velleman nv
6.6 Die Wandhalterung verwenden
A
Montagelöcher
B
Bolzen für das Stativ
C
Mutter
D
Schrauben für das Scharnier
Befestigen Sie die Kamera mit der mitgelieferten Wandhalterung an der
Wand oder der Decke. Stellen Sie vor der Montage sicher, dass alle
Schrauben fest angezogen sind und, dass es keine verlegten Leitungen in
der Wand gibt.
Verwenden Sie die Halterung als Schablone, um die Löcher auf der Wand
oder der Decke zu markieren. Bohren Sie die Löcher mit einem Bohrer (6
mm) und befestigen Sie die Wandhalterung.
Vergewissern Sie sich davon, dass Sie die Speicherkarte und die Akkus
eingelegt haben oder, dass Sie das Netzteil angeschlossen haben. Stellen
Sie die Kamera in den Standby-Modus.
Befestigen Sie die Kamera an der Wandhalterung und wählen Sie die
gewünschte Position aus.
7. Anwendung
7.1 Schalter für Betriebsmodus
Vor der ersten Inbetriebnahme muss die Kamera getestet werden. Stellen
Sie die Kamera hierzu in den Test-Modus. In diesem Modus können Sie die
Kamera-Einstellungen ändern und Fotos und Videos machen oder
wiedergeben.
Page 57

CAMCOLVC26N
V. 01 – 20/09/2016 57 ©Velleman nv
OFF: Die Kamera ist ausgeschaltet.
TEST: Wählen Sie den Test-Modus,
um die Einstellungen zu ändern
und Videos und Fotos zu machen
oder wiederzugeben.
ON: Die Kamera ist eingeschaltet,
um Fotos zu machen.
7.2 Bedienfeld
Stellen Sie den Modus-Schalter auf TEST und die Kamera und Monitor sind
eingeschaltet.
Aufnahmemodus
MENU
In das Menü wechseln
REPLAY
die Wiedergabemodus/ Wiederholungsmodus starten
In den manuellen Aufnahmemodus wechseln
In den manuellen Fotomodus wechseln
SHOT
die manuelle Aufnahem starten/stoppen Foto machen
OK/ /
Ohne Funktion
Wiedergabemodus
MENU
In den Wiedergabemodus wechseln
REPLAY
Zum Aufnahmemodus zurückkehren
/
Fotos wiedergeben (vorwärts/rückwärts)
Video vergrößern (max. 16x)
Vergrößertes Video verkleinern
OK/SHOT
die Wiedergabemodus starten/stoppen
Normaler Modus
MENU
Haupt- oder Untermenü schließen
Zum nächsten Menüpunkt gehen/Wert erhöhen
Zum vorigen Menüpunkt gehen/Wert verringern
Foto vergrößern (max. 16x)
Vergrößertes Foto verkleinern
OK
ausgewählten Menüpunkt öffnen/Wahl bestätigen
SHOT/REPLAY
Ohne Funktion
Page 58

CAMCOLVC26N
V. 01 – 20/09/2016 58 ©Velleman nv
7.3 Einstellungen
Stellen Sie vor Gebrauch die
gewünschten Einstellungen ein.
Stellen Sie den Modus-Schalter auf
TEST, um den Testmodus zu starten.
Im Foto- oder Videomodus, drücken
Sie auf MENU, um das Menü zu öffnen.
Alle Menü-Optionen und möglichen
Werten für den Aufnahmemodus
werden angezeigt (siehe unten). Die
ausgewählte Einstellung wird immer
fett gedruckt.
Modus
Einstellungen: Photo, Video, Photo + Video
Wählen Sie, ob die Kamera bei Bewegungserfassung Bilder oder Videos
machen muss. Im Modus 'Photo + Video' macht die Kamera zuerst Fotos
(eingestellt) und nimmt anschließend ein Video auf.
Image size (Bildgröße)
Einstellungen: 8M, 5M, 3M, 2M, 1M
Stellen Sie die gewünschte Bildauflösung ein. Eine höhere Auflösung für eine
bessere Qualität. Beachten Sie aber, dass eine höhere Auflösung mehr
Speicher auf der eingesetzten Speicherkarte benötigt.
Video size (Videogröße)
Einstellungen: 720p (1080x720), WVGA (848x480), VGA (640x480) @
30 fps
Stellen Sie die gewünschte Video-Auflösung ein. Eine höhere Auflösung für
eine bessere Qualität. Beachten Sie aber, dass eine höhere Auflösung mehr
Speicher auf der eingesetzten Speicherkarte benötigt.
Videos werden in AVI-Format aufgenommen. Dieses Format eignet sich für
die meisten Videogeräte.
Number (Anzahl)
Einstellungen: 1 photo, 2 photos, 3 photos
Stellen Sie ein, wie viele Bilder die Kamera macht, wenn die Kamera im
Fotomodus ausgelöst wird. Beachten Sie auch das Intervall (siehe unten).
Length of video (Videolänge)
Einstellungen: 10 sec, optional 1-60 sec und 3, 5 und 10 min
Stellen Sie ein, wie lange die Videoaufzeichnung dauern soll, wenn die
Kamera ausgelöst wird. Die Aufnahmedauer für Videos ist im Testmodus
nicht limitiert.
Interval (Intervall)
Einstellungen: 30 sec, optionell von 5 Sek. bis 60 Min
Page 59

CAMCOLVC26N
V. 01 – 20/09/2016 59 ©Velleman nv
Wählen Sie die Länge der Wartezeit der Kamera bis sie auf weitere Auslöser
reagiert, nachdem das Tier das erste Mal von der Kamera entdeckt wurde.
Die Kamera nimmt während der ausgewählten Intervalle weder Fotos noch
Videos auf. Hierdurch wird vermieden, dass der Speicherplatz auf der Karte
sich schnell mit zu vielen unerwünschten Bildern belegt.
Time stamp (Zeitstempel)
Einstellungen: On/Off (nur verfügbar im Photomodus)
Wählen Sie, ob das Datum, die Uhrzeit, die Temperatur und die Mondphase
eingeblendet werden müssen oder nicht.
Timer
Einstellungen: Off/On
Schalten Sie den Timer ein und stellen Sie ein, wann die Kamera aktiviert
sein soll. Nach dem Einschalten des Timers können Sie die Start- und
Endzeit einstellen.
Beispiel: Stellen Sie die Startzeit auf 18:35 Uhr und die Endzeit auf 8:25
Uhr, dann funktioniert die Kamera in der Zeit zwischen 18:35 und 08:25
Uhr. Während dieser Periode wird die Kamera nicht aktiviert und nimmt sie
weder Fotos noch Videos auf.
Passwort
Einstellungen: Off/On
Ist diese Option aktiviert, dann müssen Sie jedesmal beim Einschalten der
Kamera im Testmodus ein 4-stelliges Passwort eingeben.
Verlieren Sie das Passwort, dann können Sie die Kamera nicht langer
verwenden. Kontaktieren Sie ihren Händler.
Serial no. (Seriennummer)
Einstellungen: Off/On (nur verfügbar im Photomodus)
Schalten Sie diese Option ein, um der Kamera eine Seriennummer
zuzuweisen.
Setzen Sie mehrere Kameras ein, so stellen Sie eine 4-stellige Ziffern/Buchstabenkombination ein.
Time lapse (Zeitraffer)
Einstellungen: Off/On
Ist diese Option eingeschaltet, dann können Sie für die Bildaufnahme eine
Zeitspanne einstellen, die unabhängig von einer Aktivierung durch den PIRBewegungsmelder erfolgt. Diese Option eignet sich sehr zum Observieren
von kaltblutigen Tiere oder aufblühenden Pflanzen.
Energy saving mode (Energiesparmodus)
Einstellungen: Off/On
Diese Funktion ist praktisch bei geringem Ladestand. Ist diese Option
aktiviert, wird automatisch die Helligkeit der IR-LEDs reduziert, um die
Batterieautonomie zu maximieren.
Page 60

CAMCOLVC26N
V. 01 – 20/09/2016 60 ©Velleman nv
Language (Sprache)
Einstellungen: Wählen Sie die gewünschte Sprache aus.
Verfügbare Sprachen: English, German, Danish, Polish, French, Italian,
Dutch, Spanish, Hungarian, Portuguese, Chinese.
Formatting (Formatieren)
Einstellungen: No/Yes
Beim Formatieren gehen alle Daten auf der Speicherkarte verloren.
Formatieren Sie die Speicherkarte wenn Sie diese schon in anderen Geräten
verwendet haben oder wenn die Karte neu ist.
Achten Sie darauf, dass Sie alle Dateien, die Sie aufbewahren möchten,
gespeichert haben.
Setting the time (Zeiteinstellung)
Einstellungen: Geben Sie das Datum und die Uhrzeit ein.
Verwenden Sie die / Tasten, um zwischen den Werten zu schalten und
die gewünschten Werte zu ändern, indem Sie die Tasten / drücken.
Bestätigen Sie mit OK.
Werkseinstellungen
Einstellungen: No/Yes
Setzen Sie die Kamera auf Werkseinstellungen zurück.
Auto switch (automatische Abschaltung)
Einstellungen: 3 min, 5 min, 10 min, off
Bestimmen Sie, ob die Kamera nach längerem Nichtgebrauch im Testmodus
automatisch ausgeschaltet werden muss.
Drücken Sie eine beliebige Taste, um die Kamera wieder einzuschalten.
Recording volume (Aufnahmelautstärke)
Einstellungen: Low, Normal, High
Stellen Sie die Lautstärke für die Aufnahme ein.
Playback volume (Wiedergabelautstärke)
Einstellungen: Low, Normal, High
Stellen Sie die Lautstärke für die Wiedergabe ein.
System
Einstellungen: FW Update, FW Version
FW Update: Mit dieser Option können Sie die Firmware aktualisieren.
Während des Updates wird der aktuelle Status angezeigt.
FW Version: Zeigt die Firmware-Version der Kamera an.
Page 61

CAMCOLVC26N
V. 01 – 20/09/2016 61 ©Velleman nv
Delete (Löschen)
Einstellungen: Single, All
Wählen Sie diese Option aus, um Dateien zu löschen.
Single: Die gewünschten Dateien löschen. Schalten Sie mit den Tasten /
zwischen den Dateien
All: Alle Dateien löschen.
7.4 Night Recording (Nachtaufnahme)
Bei Nachtaufnahme, erzeugen die IR-LEDs der Frontseite genügend Licht,
um Fotos zu machen.
Die Kamera verwendet IR-LEDs mit einer langen Wellenlänge, um das rote
Licht zu minimisieren. Die integrierten LEDs erzeugen einen hohen
Ablenkwinkel, wodurch Nachtaufnahmen in einem Abstand von 3 bis 15 m
möglich sind, ohne dass Sie das Objekt überbelichten.
Reflektierende Gegenstände können aber auch eine Überbelichtung im
Bereich verursachen.
Beachten Sie, dass bei Verwendung der IR-LEDs (nachts) Schwarzweißfotos
aufgenommen werden.
7.5 Live Mode (Live-Modus)
Im Live-Modus, nimmt die Kamera
Fotos, wenn diese von
Bewegungssensoren ausgelöst wird
oder mit Intervallen gemäß de,
Einstellungen.
Um den Live-Modus einzustellen,
stellen Sie die Kamera auf ON. Die rote
Status-LED blinkt während 5
Sekunden. Danach funktioniert die
Kamera automatisch und wechselt in
den Standby-Modus. Die Kamera
startet und beginnt Fotos oder Videos
aufzunehmen, sobald sich ein Tier in
dem Erfassungsbereich des PIRSensors bewegt.
7.6 Die Kamera ausrichten
Der Testmodus ist ideal, um den bestmöglichsten Erfassungswinkel und
Bereich des Bewegungsmelders zu bestimmen. Befestigen Sie die Kamera in
einer Höhe von 1-2 m an einem Baum und richten Sie diese auf die
gewünschte Zone.
Page 62

CAMCOLVC26N
V. 01 – 20/09/2016 62 ©Velleman nv
Bewegen Sie langsam von der einen Seite der zu überwachenden Zone zur
anderen Seite. Bewegen Sie sich parallel zur Kamera und probieren Sie
verschiedene Winkel und Abstände aus.
Leuchtet die rote LED, bedeutet dies, dass der PIR-Sensor die Bewegung
korrekt erfasst hat.
Um falsche Signale und unnötige Fotos zu vermeiden, setzen Sie das Gerät
keiner Sonne aus und beachten Sie, dass es keine Äste im zu
überwachenden Bereich gibt. Die optimale Ausrichtung ist diese nach
Norden oder nach Süden. Der Erfassungsbereich vom Sensor ist ungefähr
60°.
Überprüfen Sie auch, ob Sie die Kamera auf der korrekten Höhe und in einer
Linie mit dem zu überwachenden Bereich installiert haben. Richten Sie die
Kamera gegebenenfalls nach unten für eine optimale Ausrichtung.
Bemerkung
Diese Kamera entspricht der Schutzklasse IP54. Die Kamera ist gegen Staub
und Strahlwasser geschützt.
7.7 Dateiformat
Die Kamera speichert die Fotos undd Videos auf der Speicherkarte in dem
Ordner \DCIM\100MEDIA.
Die Fotos haben die Extension JPG, die Videos haben die Extension AVI.
Page 63

CAMCOLVC26N
V. 01 – 20/09/2016 63 ©Velleman nv
8. Systemvoraussetzungen
Verbinden Sie die Kamera über das beiliegende USB-Kabel mit dem
Computer.
Systemvoraussetzungen
Windows®
Mac®
Pentium® III oder höher
Windows® XP/Vista/7/8
512 MB RAM
1 GB verfügbarer
Speicherplatz
Bildschirmauflösung 1024x768
oder höher
verfügbarer USB-Anschluss
PowerPC G3/G4/G5
OS 10.3.9 oder höher
512 MB RAM
1 GB verfügbarer
Speicherplatz
Bildschirmauflösung 1024x768
oder höher
verfügbarer USB-Anschluss
9. Reinigung und Wartung
Es gibt keine zu wartenden Teile.
Das Gerät erfordert keine besondere Wartung.
Reinigen Sie das Gerät ab und zu mit einem feuchten Tuch. Verwenden
Sie keine aggressiven Chemikalien, Lösungsmittel oder starke
Reinigungsmittel.
10. Technische Daten
Speicherkapazität max. max. 32 GB SD-Karte (nicht mitgeliefert)
Aufnahme-Element ............................................... 2 MP CMOS
Abstrahlwinkel .................................................................70°
integriertes Mikrofon .......................................................... ja
PIR-Sensor
PIR-Reichweite ...................................................... 15 m
PIR-Winkel ...............................................................60°
IR-LEDs
IR-Bereich ............................................................. 15 m
IR-LEDs ............................................................... 26 St.
Öffnung ........................................................................ F3.3
Weißabgleich ................................................................. auto
AV-Port ......................................................................... nein
PC-Kamerafunktion ......................................................... nein
Video
Video-Auflösung .........................................720p @ 30 fps
Video format ................................................. MJPG (AVI)
Aufnahmekapazität .................................. ± 140 MB / Min.
Videolänge ............................. 1 Sek. - 10 Min., einstellbar
Page 64

CAMCOLVC26N
V. 01 – 20/09/2016 64 ©Velleman nv
Bild 1 - 3 Bilder pro Auslösung
Bildauflösung .......................................................... 2 MP
Bildauflösung ............................. 8 Megapixel, Interpolation
Akku (Kamera) ....... 8 x AA-Batterie (HR6C/27, nicht mitgeliefert)
Autonomie im Standby-Modus............................ 4 bis 6 Monate
Betriebstemperatur ........................................ -20° C bis 60° C
Lagertemperatur ............................................ -20° C bis 70° C
Abmessungen .......................................... 135 x 97 x 66.5 mm
Gewicht ....................................................................... 270 g
Verwenden Sie dieses Gerät nur mit originellen Zubehörteilen.
Velleman NV übernimmt keine Haftung für Schaden oder
Verletzungen bei (falscher) Anwendung dieses Gerätes. Mehr
Informationen zu diesem Produkt und die neueste Version dieser
Bedienungsanleitung finden Sie hier: www.velleman.eu. Alle
Änderungen ohne vorherige Ankündigung vorbehalten.
Alle eingetragenen Warenzeichen und Handelsnamen sind Eigentum Ihrer
jeweiligen Inhaber und dienen nur zur Verdeutlichung der Kompatibilität
unserer Produkte mit den Produkten verschiedener Hersteller. Windows,
Windows XP, Windows 2000, Windows Vista, Windows Aero, Windows 7,
Windows 8, Windows Mobile, Windows Server sind eingetragene
Warenzeichen von Microsoft Corporation in den VS und anderen Ländern.
Mac, Mac OS sind Warenzeichen Apple Inc., eingetragen in den USA und
anderen Ländern. Pentium ist ein eingetragenes Warenzeichen von Intel
Corporation.
© URHEBERRECHT
Velleman NV besitzt das Urheberrecht für diese
Bedienungsanleitung. Alle weltweiten Rechte vorbehalten. Ohne
vorherige schriftliche Genehmigung des Urhebers ist es nicht gestattet,
diese Bedienungsanleitung ganz oder in Teilen zu reproduzieren, zu
kopieren, zu übersetzen, zu bearbeiten oder zu speichern.
Page 65

CAMCOLVC26N
V. 01 – 20/09/2016 65 ©Velleman nv
INSTRUKCJA OBSŁUGI
1. Wstęp
Przeznaczona dla mieszkańców Unii Europejskiej.
Ważne informacje dotyczące środowiska.
Niniejszy symbol umieszczony na urządzeniu bądź opakowaniu
wskazuje, że utylizacja produktu może być szkodliwa dla
środowiska. Nie należy wyrzucać urządzenia (lub baterii) do
zbiorczego pojemnika na odpady komunalne, należy je przekazać
specjalistycznej firmie zajmującej się recyklingiem. Niniejsze
urządzenie należy zwrócić dystrybutorowi lub lokalnej firmie
świadczącej usługi recyklingu. Przestrzegać lokalnych zasad dotyczących
środowiska
W razie wątpliwości należy skontaktować się z lokalnym organem
odpowiedzialnym za utylizację odpadów.
Dziękujemy za zakup produktu Velleman! Prosimy o dokładne zapoznanie
się z instrukcją obsługi przed użyciem urządzenia. Nie montować ani nie
używać urządzenia, jeśli zostało uszkodzone podczas transportu - należy
skontaktować się ze sprzedawcą.
2. Wskazówki bezpieczeństwa
UWAGA
Nie przebijać i nie wrzucać baterii do ognia.
Baterie należy chronić przed dziećmi.
Niniejsze urządzenie posiada wewnętrzny akumulator. Gdy
urządzenie ulegnie zużyciu, należy je utylizować zgodnie z
lokalnymi przepisami.
W urządzeniu nie występują części, które mogą być serwisowane
przez użytkownika.
3. Informacje ogólne
Proszę zapoznać się z informacjami w części Usługi i gwarancja jakości
Velleman® na końcu niniejszej instrukcji.
Chronić urządzenie przed pyłem i zbyt wysoką temperaturą.
Chronić urządzenie przed wstrząsami i użytkowaniem niezgodnym z
przeznaczeniem. Podczas obsługi urządzenia unikać stosowania siły.
Nie kierować kamery w stronę słońca ani innych bardzo jasnych
przedmiotów.
Nie dotykać obiektywu.
Przed rozpoczęciem pracy z urządzeniem należy zapoznać się z jego
funkcjami.
Page 66

CAMCOLVC26N
V. 01 – 20/09/2016 66 ©Velleman nv
Wprowadzanie zmian w urządzeniu jest zabronione ze względów
bezpieczeństwa. Uszkodzenia spowodowane zmianami wprowadzonymi
przez użytkownika nie podlegają gwarancji.
Stosować urządzenie wyłącznie zgodnie z przeznaczeniem. Używanie
urządzenia niezgodnie z przeznaczeniem spowoduje unieważnienie
gwarancji.
Gwarancja nie obejmuje uszkodzeń spowodowanych nieprzestrzeganiem
niniejszej instrukcji, a sprzedawca nie ponosi odpowiedzialności za
wynikłe uszkodzenia ani problemy.
W urządzeniu nie występują części, które mogą być serwisowane przez
użytkownika. W sprawie serwisowania i/lub części zamiennych należy
zwrócić się do autoryzowanego sprzedawcy.
Nie używać produktu do celów naruszających przepisy dotyczące
prywatności ani do działań niezgodnych z prawem.
4. Cechy
nagrywanie filmów wideo na karcie SD (brak w zestawie)
jakość rejestrowanego obrazu wideo: wideo HD 720p - 30 fps
prosta i łatwa konfiguracja
wbudowany monitor TFT 2,4"
interfejs: USB, karta SD i port DC
5. Przegląd
Patrz rysunki na stronie 2 niniejszej instrukcji.
1
czujnik światła
11
głośnik
2
dioda LED IR
12
gniazdo na kartę SD
3
wskaźnik ruchu
13
gniazdo mini USB
4
mikrofon
14
przełącznik trybu
5
obiektyw
15
panel sterowania
6
czujnik PIR
16
gniazdo baterii
7
zaczep mocujący
17
wejście zasilania
8
otwór do mocowania
18
złącze na statyw
9
monitor
19
zaczep mocujący
10
otwór do mocowania
20
otwór do mocowania
Page 67

CAMCOLVC26N
V. 01 – 20/09/2016 67 ©Velleman nv
6. Przygotowanie kamery
6.1 Otwieranie i zamykanie kamery
Przyciski obsługi, złącza i baterie są umieszczone wewnątrz kamery.
Aby otworzyć kamerę, należy zwolnić dwa boczne zaczepy mocujące zgodnie
z rysunkiem. 1. Aby ponownie zamknąć kamerę, nałożyć metalowe pętle
zaczepów na mocowania i docisnąć plastikowe klapki zgodnie z
rysunkiem. 2.
Pomiędzy dwoma zaczepami mocującymi znajduje się mocowanie kłódki, co
pozwala na bezpieczne zamknięcie kamery.
6.2 Wkładanie baterii
Otworzyć kamerę zgodnie z opisem powyżej. Otworzyć pokrywę ochronną
gniazda baterii, pociągając lekko zacisk znajdujący się na górze do środka
(przed podniesieniem pokrywy).
Włożyć osiem całkowicie naładowanych baterii zachowując właściwą
biegunowość.
Zamknąć ponownie gniazdo baterii pokrywą ochronną.
Uwaga
W przypadku niskiego poziomu naładowania baterii emitowany jest alarm
dźwiękowy.
UWAGA
Nie przebijać ani nie wrzucać baterii do ognia,
ponieważ mogą eksplodować. Nie ładować baterii,
które nie są akumulatorkami (alkaliczne). Usuwać
baterie zgodnie z lokalnymi przepisami. Baterie
należy chronić przed dziećmi.
Page 68

CAMCOLVC26N
V. 01 – 20/09/2016 68 ©Velleman nv
6.3 Wkładanie karty pamięci
Przed włączeniem kamery, do gniazda
kart należy włożyć kartę pamięci
SD/SDHC, aby umożliwić zapisywanie
zdjęć i filmów.
Wyłączyć kamerę i otworzyć zgodnie z
opisem powyżej.
Upewnić się, że ochrona karty przed
zapisem (przełącznik z boku) nie
została włączona. Włożyć kartę jak
przedstawiono na rysunku. Wciskać
kartę pamięci do gniazda, aż zatrzaśnie
się we właściwym położeniu.
Aby wyjąć, nacisnąć kartę ponownie,
aż częściowo się wysunie.
6.4 Zasilanie zewnętrzne
Kamera może pracować na zasilaniu zewnętrznym. Należy zastosować
zasilacz 6 V DC, przynajmniej 1,5 A.
Uwaga
Jeżeli kamera pracuje na zasilaniu zewnętrznym, akumulatory nie będą
ładowane.
6.5 Montaż z użyciem paska
Za pomocą dołączonego paska przymocować kamerę do drzewa lub innego
obiektu.
Ustawić kamerę w żądanej pozycji, a następnie pociągać za luźny koniec
paska, do momentu solidnego zamocowania urządzenia.
Aby zwolnić pasek, pociągnąć za klapkę.
Page 69

CAMCOLVC26N
V. 01 – 20/09/2016 69 ©Velleman nv
6.6 Zastosowanie uchwytu ściennego
A
otwory montażowe
B
śruba statywu
C
przeciwnakrętka
D
śruby zawiasów
Aby przymocować kamerę do ściany lub sufitu, należy użyć dołączonego
uchwytu ściennego. Przed montażem uchwytu ściennego należy sprawdzić,
czy wszystkie istniejące śruby są mocno dokręcone, a w ścianie nie są
ukryte rury doprowadzające media.
Oznaczyć otwory na ścianie lub suficie, wykorzystując uchwyt jako szablon.
Wywiercić otwory wiertłem 6 mm i przymocować uchwyt.
Upewnić się, że w kamerze zamontowano kartę pamięci i baterie lub
zasilanie zewnętrzne. Uruchomić kamerę w trybie gotowości.
Przymocować kamerę do uchwytu ściennego i ustawić w wybranym
kierunku.
7. Obsługa
7.1 Przełącznik trybu
Należy odpowiednio skonfigurować kamerę zanim zostanie ustawiona do
celów obserwacyjnych. W tym celu dostępny jest tryb testowy. Oprócz
zmiany ustawień, w tym trybie można wykonywać zdjęcia i nagrywać filmy,
a także przeglądać istniejące zdjęcia.
Page 70

CAMCOLVC26N
V. 01 – 20/09/2016 70 ©Velleman nv
OFF: kamera jest całkowicie
wyłączona.
TEST: wybrać tryb testowy, aby
zmienić ustawienia oraz
wykonywać lub przeglądać zdjęcia i
filmy.
ON: kamera jest uruchomiona i
może wykonywać zdjęcia.
7.2 Panel sterowania
Ustawić przełącznik trybu na TEST, a kamera i monitor włączą się.
Tryb nagrywania
MENU
Przejście do menu
REPLAY
Uruchomienie trybu odtwarzania
Przełączenie na tryb nagrywania ręcznego
Przełączenie na tryb ręcznego wykonywania zdjęć
SHOT
Uruchomienie/zatrzymanie nagrywania ręcznego;
wykonanie zdjęcia
OK/ /
Brak funkcji
Tryb odtwarzania
MENU
Przejście do menu odtwarzania
REPLAY
Powrót do trybu nagrywania
/
Przeglądanie istniejących zdjęć: dalej/wstecz
Powiększenie filmu (do 16x)
Zmniejszenie powiększonego filmu
OK/SHOT
Włączenie/wyłączenie odtwarzania filmu
Tryb normalny
MENU
Zamknięcie menu głównego lub podmenu
Przejście do kolejnej pozycji menu do góry/zwiększenie
wartości
Przejście do kolejnej pozycji menu w dół/zmniejszenie
wartości
Powiększenie zdjęcia (do 16x)
Zmniejszenie powiększonego zdjęcia
OK
Otwarcie wybranej pozycji menu/potwierdzenie wyboru
SHOT/REPLAY
Brak funkcji
Page 71

CAMCOLVC26N
V. 01 – 20/09/2016 71 ©Velleman nv
7.3 Ustawienia
Przed użyciem kamery przeprowadzić
konfigurację, zgodnie z wymaganiami.
Ustawić przełącznik trybu w pozycji
TEST, aby uruchomić tryb testowy. W
trybie zdjęć lub filmów nacisnąć MENU,
aby wywołać menu.
Poniżej wyszczególniono wszystkie
opcje menu i dopuszczalne wartości
ustawień dla trybu nagrywania.
Ustawienia standardowe są zaznaczone
wytłuszczoną czcionką.
Tryb
Ustawienia: Zdjęcia, Filmy, Zdjęcia + Filmy
Wybrać, czy po wykryciu ruchu mają być wykonywane zdjęcia, czy
nagrywane filmy. W trybie Zdjęcia + Filmy kamera najpierw wykonuje kilka
zdjęć, a następnie rozpoczyna nagrywanie filmu.
Rozmiar zdjęcia
Ustawienia: 8M, 5M, 3M, 2M, 1M
Wybór żądanej rozdzielczości zdjęć. Wyższa rozdzielczość oznacza nieco
lepszą jakość, ale także większe pliki wymagające więcej miejsca na karcie
pamięci.
Rozmiar filmu
Ustawienia: 720p (1080x720), WVGA (848x480), VGA (640x480) przy
30 fps
Wybór wymaganej rozdzielczości filmów wideo. Wyższa rozdzielczość
oznacza nieco lepszą jakość, ale także większe pliki wymagające więcej
miejsca na karcie pamięci.
Filmy są nagrywane w formacie AVI, który można odtworzyć na większości
urządzeń.
Liczba
Ustawienia: 1 zdjęcie, 2 zdjęcia, 3 zdjęcia
Wybór liczby zdjęć, jaka ma zostać wykonana po aktywacji kamery w trybie
zdjęć. Należy pamiętać również o parametrze Interwał (patrz niżej).
Długość filmu
Ustawienia: 10 sek., opcjonalnie 1-60 sek. oraz 3, 5 i 10 min
Określenie długości filmu po automatycznej aktywacji kamery. Czas
nagrywania filmów w trybie testowym nie jest ograniczony.
Interwał
Ustawienia: 30 sek., opcjonalnie od 5 sek. do 60 min
Page 72

CAMCOLVC26N
V. 01 – 20/09/2016 72 ©Velleman nv
Wybrać najkrótszy czas oczekiwania kamery przed reakcją na kolejną
aktywację głównego czujnika po pierwszym wykryciu zwierzęcia. Podczas
trwania ustawionego interwału kamera nie będzie wykonywać żadnych zdjęć
ani nagrywać filmów. Zapobiega to zapełnieniu się karty pamięci zbędnymi
zdjęciami.
Znacznik czasu
Ustawienia: Wł./wył. (dostępny wyłącznie w trybie zdjęć)
Wybrać, czy na każdym zdjęciu ma również być zapisywana data, czas,
temperatura i faza księżyca.
Timer
Ustawienia: Wył/Wł
Uruchomienie zegara, jeżeli kamera ma być aktywna wyłącznie w
określonym czasie. Po aktywacji można ustawić czas początkowy i końcowy.
Przykład: Jeżeli czas początkowy zostanie ustawiony na 18:35, a czas
końcowy na 8:25, wówczas kamera będzie aktywna od 18:35 do 8:25
następnego dnia. Poza tym okresem kamera nie będzie aktywowana ani nie
będzie wykonywać zdjęć ani nagrywać filmów.
Hasło
Ustawienia: Wył/Wł
Po uruchomieniu tej opcji za każdym razem, gdy kamera jest włączana w
trybie testowym, przed jej użyciem konieczne będzie wprowadzenia 4cyfrowego hasła.
W przypadku utraty hasła kamery nie będzie można używać. Proszę
skontaktować się z najbliższym dystrybutorem.
Nr seryjny
Ustawienia: Wył/Wł (dostępne tylko w trybie zdjęć)
Aktywować tę opcję, aby przyporządkować kamerze numer seryjny.
Użyć kombinacji czterech cyfr lub liter w celu umożliwienia identyfikacji
konkretnej kamery w systemie składającym się z kilku kamer.
Aktywacja czasowa
Ustawienia: Wył/Wł
Po uruchomieniu tej opcji w ustawionym przedziale czasowym kamera
automatycznie będzie wykonywać zdjęcia lub nagrywać filmy, niezależnie od
tego, czy czujnik PIR wykrył ruch, czy nie. Jest to użyteczne do obserwacji
zwierząt zimnokrwistych lub otwierania się roślin.
Tryb oszczędzania energii
Ustawienia: Wył/Wł
Opcja ta uruchamia się przy niskim stanie naładowania baterii. Po
uruchomieniu tej opcji kamera automatycznie zmniejsza jasność lamp IR w
celu wydłużenia żywotności baterii.
Page 73

CAMCOLVC26N
V. 01 – 20/09/2016 73 ©Velleman nv
Język
Ustawienia: Wybór żądanego języka menu
Dostępne języki: angielski, niemiecki, duński, polski, francuski, włoski,
holenderski, hiszpański, węgierski, portugalski, chiński.
Formatowanie
Ustawienia: Nie/Tak
Formatowanie karty pamięci powoduje usunięcie wszystkich plików.
Zalecamy sformatowanie karty, jeżeli była wcześniej używana w innych
urządzeniach, lub jeżeli jest to nowa karta.
Przed formatowaniem należy się upewnić, że została sporządzona kopia
zapasowa wszystkich niezbędnych plików.
Ustawienia czasu
Ustawienia: Data i godzina
Użyć / przycisków , aby przełączać się pomiędzy poszczególnymi
wartościami i zmienić wybrane wartości, wciskając / przyciski .
Potwierdzić, naciskając OK.
Ustawienia domyślne
Ustawienia: Nie/Tak
Przywrócenie ustawień fabrycznych kamery.
Wyłączanie automatyczne
Ustawienia: 3 min, 5 min, 10 min, wył.
Określa, czy kamera ma być wyłączona automatycznie, jeżeli nie była
używana przez jakiś czas w trybie testowym.
Kamerę można uruchomić ponownie, naciskając dowolny przycisk.
Głośność nagrywania
Ustawienia: Niska, Normalna, Wysoka
Wybór głośności, z jaką mają być wykonywane nagrania dźwiękowe.
Głośność odtwarzania
Ustawienia: Niska, Normalna, Wysoka
Wybór głośności, z jaką mają być odtwarzane nagrania dźwiękowe.
System
Ustawienia: Aktualizacja oprogramowania, wersja oprogramowania
Aktualizacja oprogramowania: Jeżeli na karcie pamięci zapisano nową
wersję oprogramowania, za pomocą tej opcji można ją zainstalować.
Podczas aktualizacji wyświetlany jest bieżący stan.
Wersja oprogramowania: Wyświetla wersję oprogramowania
zainstalowanego w kamerze.
Page 74

CAMCOLVC26N
V. 01 – 20/09/2016 74 ©Velleman nv
Usuwanie
Ustawienia: Pojedyncze, Wszystkie
Użyć tej opcji w celu usunięcia plików z karty pamięci.
Pojedyncze: Usuwanie pojedynczych plików. Pliki można przełączać /
przyciskami .
Wszystkie: Usuwanie wszystkich plików z karty pamięci.
7.4 Nagrywanie nocne
W trybie nagrywania nocnego diody IR LED z przodu dostarczają światła
niezbędnego do wykonania zdjęć.
Kamera wykorzystuje diody LED pracujące w podczerwieni długofalowej, aby
ograniczyć ilość czerwonego światła. Kamera jest wyposażona w taką ilość
diod, aby uzyskać wysoki kąt załamania, co umożliwia nagrywanie z
odległości od 3 do 15 m bez nadmiernej ekspozycji.
Obiekty odbijające światło mogą jednakże spowodować nadmierną
ekspozycję także w tym zasięgu.
Należy pamiętać, że podczas nagrywania nocnego przy użyciu diod IR LED
generowane są czarno-białe obrazy.
7.5 Tryb Live
W tym trybie wykonywanie zdjęć jest
aktywowane przez czujniki ruchu lub w
interwałach zgodnych z odpowiednimi
ustawieniami.
Aby uruchomić tryb live, ustawić
przełącznik w pozycji ON. Czerwona
dioda LED stanu miga przez 5 sekund,
po czym kamera pracuje
automatycznie i przechodzi w tryb
oczekiwania. Rejestrowanie zdjęć i
filmów rozpoczyna się natychmiast, gdy
zwierzę wejdzie w obszar wykrywania
czujnika PIR.
Page 75

CAMCOLVC26N
V. 01 – 20/09/2016 75 ©Velleman nv
7.6 Ustawienie pozycji kamery
Tryb testowy dobrze nadaje się do określenia najlepszego możliwego kąta i
zasięgu wykrywania dla czujnika ruchu. W tym celu należy przymocować
kamerę do drzewa na wysokości ok. 1-2 m i ustawić ją zgodnie z
wymaganiami.
Następnie powoli przejść z jednej strony obserwowanego obszaru na drugą.
Poruszać się równolegle do kamery, wypróbować różne kąty i odległości.
Wykrycie ruchu przez czujnik PIR jest wskazywane przez czerwoną diodę
LED [L].
Aby zapobiec niewłaściwym sygnałom i zbędnym zdjęciom, nie zaleca się
używania kamery w nasłonecznionych miejscach, ponadto należy upewnić
się, że w aktywnym obszarze czujnika nie znajdują się gałęzie. Najlepiej
ustawić kamerę w kierunku północnym lub południowym. Kąt wykrywania
czujnika wynosi około 60°.
Należy również sprawdzić, czy kamera została zamontowana na właściwej
wysokości dla obserwacji danego punktu. W razie konieczności należy
skierować kamerę w dół, aby uzyskać optymalne ustawienie.
Uwaga
Kamera odpowiada klasie ochrony IP54. Jest odporna na pył i rozpryski
cieczy, może więc być stosowana w dowolnych warunkach pogodowych.
7.7 Format plików
Kamera przechowuje zdjęcia i filmy na karcie pamięci w folderze
\DCIM\100MEDIA.
Zdjęcia wykonywane są w formacie JPG, a filmy - AVI.
Page 76

CAMCOLVC26N
V. 01 – 20/09/2016 76 ©Velleman nv
8. Wymagania systemowe
Podłączyć kamerę do komputera za pomocą dołączonego kabla USB.
Wymagania systemowe
Windows®
Mac®
Pentium® III lub nowszy
Windows® XP/Vista/7/8
512 MB RAM
Dostępne miejsce na dysku
1 GB
Rozdzielczość ekranu
1024x768 lub wyższa
Wolny port USB
PowerPC G3/G4/G5
OS 10.3.9 lub nowszy
512 MB RAM
Dostępne miejsce na dysku
1 GB
Rozdzielczość ekranu
1024x768 lub wyższa
Wolny port USB
9. Czyszczenie i konserwacja
W urządzeniu nie występują części, które mogą być serwisowane przez
użytkownika.
Urządzenie nie wymaga szczególnej konserwacji.
Co jakiś czas przetrzeć urządzenie wilgotną ściereczką, aby utrzymać je
w dobrym stanie. Nie stosować szorstkich środków chemicznych,
rozpuszczalników czyszczących ani silnych detergentów.
10. Specyfikacja techniczna
pojemność pamięci.. maks. 32 GB na karcie SD (brak w zestawie)
przetwornik obrazu ............................................... 2 MP CMOS
kąt widzenia ....................................................................70°
wbudowany mikrofon ....................................................... tak
czujnik PIR
odległość czujnika PIR ............................................. 15 m
kąt czujnika PIR ........................................................60°
diody LED IR
zakres IR ............................................................. 15 m
diody LED IR ....................................................... 26 szt.
apertura ....................................................................... F3.3
balans bieli ................................................................... auto
port AV ........................................................................ brak
funkcja kamery PC ......................................................... brak
wideo
rozdzielczość wideo ................................. 720P przy 30fps
format pliku wideo.......................................... MJPG (AVI)
prędkość zapisu ........................................ ± 140 MB/min.
długość filmu wideo ............... 1 sek-10 min, programowana
Page 77

CAMCOLVC26N
V. 01 – 20/09/2016 77 ©Velleman nv
obraz ........................................................ 1-3 zdjęć na serię
rozdzielczość .......................................................... 2 MP
rozdzielczość ...................................... 8 MP interpolowana
bateria w kamerze ... 8 x bateria AA (HR6C/27B, brak w zestawie)
stan gotowości ................................................... 4-6 miesięcy
temperatura robocza ...................................... -20° C do 60° C
temperatura przechowywania .......................... -20° C do 70° C
wymiary ................................................. 135 x 97 x 66.5 mm
waga .......................................................................... 270 g
Należy używać wyłącznie oryginalnych akcesoriów. Firma Velleman
nv nie ponosi odpowiedzialności za uszkodzenia lub urazy
wynikające z (niewłaściwego) korzystania z niniejszego urządzenia.
Aby uzyskać więcej informacji dotyczących produktu oraz
najnowszą wersję niniejszej instrukcji, należy odwiedzić naszą
stronę internetową www.velleman.eu. Informacje zawarte w
niniejszej instrukcji obsługi mogą ulec zmianie bez wcześniejszego
powiadomienia.
Wszystkie zarejestrowane znaki i nazwy handlowe są własnością odnośnych
podmiotów i są stosowane wyłącznie w celu określenia kompatybilności
naszych produktów z produktami innych producentów. Windows, Windows
XP, Windows 2000, Windows Vista, Windows Aero, Windows 7, Windows 8,
Windows Mobile oraz Windows Server to zarejestrowane znaki handlowe
firmy Microsoft Corporation w Stanach Zjednoczonych i innych krajach. Mac,
Mac OS są znakami handlowymi Apple Inc., zarejestrowanymi w USA i
innych krajach. Pentium jest zarejestrowanym znakiem handlowym Intel
Corporation.
© INFORMACJA O PRAWACH AUTORSKICH
Właścicielem praw autorskich do niniejszej instrukcji jest firma
Velleman nv. Wszelkie prawa są zastrzeżone na całym świecie.
Żadna część niniejszej instrukcji nie może być kopiowana, powielana,
tłumaczona ani przenoszona na jakikolwiek nośnik elektroniczny (lub w inny
sposób) bez wcześniejszej pisemnej zgody właściciela praw autorskich.
Page 78

CAMCOLVC26N
V. 01 – 20/09/2016 78 ©Velleman nv
MANUAL DO UTILIZADOR
1. Introdução
Aos cidadãos da União Europeia
Importantes informações sobre o meio ambiente no que respeita a
este produto
Este símbolo no aparelho ou na embalagem indica que, enquanto
desperdícios, poderão causar danos no meio ambiente. Não
coloque a unidade (ou as pilhas) no depósito de lixo municipal;
deve dirigir-se a uma empresa especializada em reciclagem.
Devolva o aparelho ao seu distribuidor ou ao posto de reciclagem
local. Respeite a legislação local relativa ao meio ambiente.
Em caso de dúvidas, contacte com as autoridades locais para os
resíduos.
Agradecemos o facto de ter adquirido este aparelho. Leia atentamente as
instruções do manual antes de usar o aparelho. Caso o aparelho tenha
sofrido algum dano durante o transporte não o instale e entre em contacto
com o seu distribuidor.
2. Instruções de segurança
ADVERTÊNCIA
Nunca perfura as pilhas nem jogá-las no fogo, pois elas podem
explodir.
Mantenha as pilhas fora do alcance das crianças.
Este equipamento tem incorporada uma bateria recarregável
interna. No termo da sua duração o equipamento deve ser
eliminado de acordo com a legislação local.
O utilizador não terá de fazer a manutenção das peças.
3. Normas gerais
Consulte a Garantia de serviço e qualidade Velleman® na parte final
deste manual do utilizador.
Não exponha o equipamento ao pó nem a temperaturas extremas.
Proteja o aparelho de quedas e má utilização. Evite usar força excessiva
ao utilizar o aparelho.
Não aponte a câmara para o sol ou para objetos demasiado brilhantes.
Não toque na lente.
Familiarize-se com as funções do aparelho antes de o utilizar.
Por razões de segurança, estão proibidas quaisquer modificações do
aparelho desde que não autorizadas. Os danos causados por
Page 79

CAMCOLVC26N
V. 01 – 20/09/2016 79 ©Velleman nv
modificações não autorizadas do aparelho não estão cobertos pela
garantia.
Utilize o aparelho apenas para as aplicações descritas neste manual.
Uma utilização incorreta anula a garantia completamente.
Danos causados pelo não cumprimento das normas de segurança
referidas neste manual anulam a garantia e o seu distribuidor não será
responsável por quaisquer danos ou outros problemas daí resultantes.
O utilizador não terá de fazer a manutenção das peças. Contacte um
agente autorizado para assistência e/ou peças de substituição.
Não use este produto para violar as leis de privacidade ou desempenhar
atividades ilegais.
4. Características
gravação de vídeo em cartão SD (não incl.)
qualidade de gravação de vídeo vídeo 720p HD - 30 fps
fácil instalação
monitor TFT 2.4" incorporado
interface: USB, cartão SD e porta DC
5. Descrição
Veja as imagens na página 2 deste manual.
1
Sensor de luz
11
alto-falante
2
luz LED IR
12
ranhura para cartão SD
3
indicador de movimento
13
ranhura mini USB
4
microfone
14
interruptor de modo
5
lente
15
painel de controlo
6
sensor PIR
16
compartimento das pilhas
7
travador
17
entrada da alimentação
8
orifício de travamento
18
conexão para o tripé
9
monitor
19
travador
10
orifício de travamento
20
orifício de travamento
Page 80

CAMCOLVC26N
V. 01 – 20/09/2016 80 ©Velleman nv
6. Preparar a Câmara
6.1 Abrir e Fechar a Câmara
Os botões de comando, ligações e pilhas estão localizados no interior da
câmara.
Para abrir a câmara, solte os dois travadores laterais conforme indicado na
figura1. Para fechar a câmara novamente, encaixe os anéis metálicos dos
travadores e pressione para baixo a patilha em plástico conforme indicado
na figura2.
Existe a possibilidade de colocar um cadeado entre os dois travadores para
permitir fechar a câmara com maior segurança.
6.2 Colocar as Baterias
Abra a câmara conforme indicado mais acima. Abra a tampa de proteção do
compartimento das pilhas puxando ligeiramente o fecho na parte de cima
para dentro antes de levantar a tampa.
Coloque oito pilhas totalmente carregadas respeitando a polaridade.
Volte a fechar o compartimento das pilhas com a tampa de proteção.
Nota
Ouve-se um alarme sonoro no caso da carga das pilhas ser demasiado
fraca.
ADVERTÊNCIA
Nunca perfure as baterias nem as deite no fogo, pois
podem explodir. Não tente recarregar baterias não
recarregáveis (alcalinas). Descarte as baterias de
acordo com as regulamentações locais. Mantenha as
pilhas fora do alcance das crianças.
Page 81

CAMCOLVC26N
V. 01 – 20/09/2016 81 ©Velleman nv
6.3 Introduzir o Cartão de Memória
Antes de ligar a câmara, introduza um
cartão de memória SD/SDHC na
ranhura de forma a poder gravar
fotografias e vídeos.
Desligue a câmara e abra conforme
descrito mais acima.
Verifique se a proteção lateral do
cartão não foi ativada. Introduza o
cartão conforme indicado. Empurre o
cartão de memória pela ranhura até
ficar no devido lugar (click).
Para retirar o cartão, empurre
novamente até que este seja
parcialmente ejectado.
6.4 Fonte de Alimentação Externa
A câmara pode ser utilizada usando energia a partir de uma fonte
alimentação externa. Use uma 6 VDC com pelo menos 1.5 A.
Nota
As pilhas recarregáveis não podem ser recarregadas na câmara usando uma
fonte de alimentação externa.
6.5 Montagem com Correia
Utilize a correia fornecida para prender a câmara a uma árvore ou a outro
objeto.
Coloque a câmara na posição desejada e puxe a ponta solta da correia até a
câmara ficar fixa em segurança.
Para soltar a correia novamente, puxe a patilha da correia de segurança.
Page 82

CAMCOLVC26N
V. 01 – 20/09/2016 82 ©Velleman nv
6.6 Suporte para Montagem na Parede
A
furos de montagem
B
parafuso do tripé
C
parafuso oposto
D
parafusos da dobradiça
Use o suporte de montagem na parede para fixar a câmara com segurança
a uma parede ou ao teto. Antes de instalar o suporte de parede, certifiquese que todos os parafusos existentes estão bem apertados e que não há
tubos de alimentação no interior na parede.
Marque os furos na parede ou teto usando o suporte de parede como
modelo de orientação. Use uma broca de 6mm para fazer os furos e fixe o
suporte de parede.
Certifique-se de que a câmara já tem o cartão de memória e as pilhas
introduzidas ou a fonte de alimentação devidamente conectada. Coloque a
câmara no modo de espera (standby).
Fixe a câmara ao suporte de parede e posicione-a na direção desejada.
7. Utilização
7.1 Interruptor de Modo
Antes de instalar a câmara de vigilância, esta deve ser configurada para a
respetiva finalidade. Para tal, está disponível o modo de teste. Para além
deste modo permitir alterar as definições, podem ser tiradas fotografias e
gravados vídeos, e podem ainda ser visualizadas as fotografias já
existentes.
Page 83

CAMCOLVC26N
V. 01 – 20/09/2016 83 ©Velleman nv
OFF: a câmara está
completamente desligada.
TESTE: selecione o modo de teste
para ajustar as definições e fazer
ou reproduzir fotografias e vídeos.
ON: a câmara está preparada para
tirar fotografias.
7.2 Painel de Controlo
Colocar o interruptor de modo em TEST e a câmara e o monitor estão
ligados.
Modo Gravação
MENU
Aceder ao menu
REPETIÇÃO
Iniciar o modo de repetição
Passar ao modo de gravação manual
Passar ao modo de fotografia manual
DISPARAR
Iniciar/parar gravação manual; tirar fotografia
OK/ /
sem função
Modo Repetição
MENU
Aceder ao menu repetição
REPETIÇÃO
Voltar ao modo gravação
/
Visualizar fotografias existentes avançando/retrocedendo
Ampliar vídeo (até 16x)
Diminuir ampliação do vídeo
OK/DISPARAR
Iniciar/parar reprodução de vídeo
Modo Normal
MENU
Fechar o menu principal ou o sub-menu
Subir um item do menu/aumentar valor
Descer um item do menu/diminuir valor
Ampliar fotografia (até 16x)
Diminuir ampliação da fotografia
OK
Abrir o item de menu selecionado/confirmar
seleção
DISPARAR/REPETIÇÃO
sem função
Page 84

CAMCOLVC26N
V. 01 – 20/09/2016 84 ©Velleman nv
7.3 Configurações
Antes de usar a câmara, altere as
definições conforme necessário.
Faça deslizar o interruptor para TESTE
para iniciar o modo de teste. No modo
fotografia ou vídeo, pressione MENU
para aceder ao menu.
Todas as opções de menu e possíveis
valores de configuração para o modo
de gravação são indicados mais abaixo.
A configuração padrão está sempre
indicada em negrito.
Modo
Configurações: Fotografia, Vídeo, Fotografia + Vídeo
Selecione se devem ser tiradas fotografias ou gravados vídeos sempre que
for detectado movimento. No modo Fotografia + Vídeo, a câmara tira
sempre umas quantas fotografias antes de começar a gravar o vídeo.
Tamanho da imagem
Configurações: 8M, 5M, 3M, 2M, 1M
Selecione a resolução de fotografia pretendida. Uma resolução mais elevada
produz uma fotografia de melhor qualidade mas resulta num ficheiro maior
o que ocupa mais espaço no cartão de memória.
Tamanho do vídeo
Configurações: 720p (1080x720), WVGA (848x480), VGA (640x480) @
30 fps
Selecione a resolução de vídeo pretendida. Uma resolução mais elevada
produz um vídeo de melhor qualidade mas resulta num ficheiro maior o que
ocupa mais espaço no cartão de memória.
Os vídeo são gravados no formato AVI, o que permite serem reproduzido na
maioria dos equipamentos.
Número
Configurações: 1 fotografia, 2 fotografias, 3 fotografias
Selecione o número de fotos que devem ser tiradas sucessivamente sempre
que a câmara disparar no modo fotografia. Faça atenção também ao
parâmetro Intervalo (ver abaixo).
Tamanho do vídeo
Configurações: 10 seg, opcional 1-60 seg e 3, 5 e 10 min
Especifique a duração do vídeo sempre que a câmara for disparada
automaticamente. O tempo de gravação de vídeos não é limitado no modo
de teste.
Page 85

CAMCOLVC26N
V. 01 – 20/09/2016 85 ©Velleman nv
Intervalo
Confirgurações: 30 seg, opcional de 5 seg a 60 min
Selecione o período mais curto para a câmara aguardar antes de reagir ao
acionamento sucessivo do sensor principal, depois de um animal ter sido
primeiro detectado. A câmara não grava quaisquer vídeos ou imagens
durante os intervalos selecionados. Isto evita que o cartão de memória fique
cheio com ficheiros desnecessários.
Inscrição da hora
Configurações: On/Off (apenas disponível no modo fotografia)
Escolha se pretende apresentar a data, hora, temperatura e fase da lua em
cada uma das fotografias.
Temporizador
Configurações: Off/On
Ligue o temporizador caso a câmara só deva estar ativa durante um certo
período de tempo. Uma vez ativado, pode definir o a hora de início e de
termo.
Exemplo: Se a hora de início for 18h35 e a hora de termo for 8h25, a
câmara estará operacional entre as 18h35 e as 8h25 do dia seguinte. A
câmara não será disparada e não tirará quaisquer fotos ou gravará vídeos
fora deste período.
Password
Configurações: Off/On
Quando esta opção está ativa, deve ser introduzida uma password de quatro
dígitos sempre que a câmara for ligada no modo de teste e antes de poder
ser utilizada.
A câmara não poderá voltar a ser usada no caso de perder a password. Por
favor contacte o agente mais próximo.
Número de série.
Configurações: Off/On (apenas disponível no modo fotografia)
Ative esta opção para atribuir um número de série à câmara.
Use uma combinação de quatro dígitos ou letras de modo a que possa
identificar a sua câmara numa instalação multi-câmaras.
Período de tempo
Configurações: Off/On
Quando esta opção é ativada, a câmara tira fotos e grava vídeos
automaticamente, dentro do período de tempo selecionado,
independentemente de o sensor PIR ter detetado movimento ou não. Isto é
útil na observação de animais de sangue frio ou plantas a abrir.
Page 86

CAMCOLVC26N
V. 01 – 20/09/2016 86 ©Velleman nv
Modo poupança de energia
Configurações: Off/On
Este opção produz efeito sempre que as pilhas ficarem fracas. Quando esta
opção é ativada, a câmara reduz automaticamente o brilho das luzes IR de
modo a prolongar a vida da pilha.
Idioma
Configurações: Selecione o idioma pretendido
Idiomas disponíveis: Inglês, Alemão, Dinamarquês, Polaco, Francês,
Italiano, Holandês, Espanhol, Húngaro, Português, Chinês.
Formatar
Configurações: Não/Sim
Todos os ficheiros serão apagados ao formatar o cartão de memória.
Recomendamos que formate o cartão de memória caso este já tenha sido
usado noutros dispositivos ou caso se trate de um cartão novo.
Certifique-se de que foi feita uma cópia de segurança dos ficheiros que
pretende salvaguardar antes de iniciar a formatação.
Ajustar a hora
Definições: Data e hora
Use os / botões para saltar entre os valores e altere os valores
selecionados pressionando os / botões. Confirme com OK.
Definições por defeito
Definições: Sim/Não
Para restaurar as definições de fábrica da câmara.
Ligação Automática
Definições 3 min, 5 min, 10 min, desligada
Indique se a câmara deve ser desligada automaticamente caso não seja
usada durante algum tempo no modo de teste.
Ligue a câmara novamente pressionando um botão qualquer.
Volume da gravação
Definições: Baixo, Normal, Alto
Selecione qual o nível de volume em que pretende fazer a gravação.
Volume da reprodução
Definições: Baixo, Normal, Alto
Selecione qual o nível de volume em que pretende fazer as reprodução da
gravação.
Page 87

CAMCOLVC26N
V. 01 – 20/09/2016 87 ©Velleman nv
System
Definições: Atualização FW, Versão FW
Atualização FW: Se o cartão de memória contém firmware novo, este pode
ser instalado usando esta opção. Durante a atualização é indicado o
respetivo estado.
Versão FW: Indica a versão do firmware instalado na câmara.
Delete
Definições: Um Só, Todos
Selecione esta opção para apagar ficheiros do cartão de memória.
Um Só: Apaga os ficheiros um a um. Desloque-se entre os ficheiros usando
os / botões
Todos: Apaga todos os ficheiros do cartão de memória.
7.4 Gravação Noturna
Durante a gravação noturna, os LEDs IR na parte frontal garantem a luz
necessária para tirar as fotografias.
A câmara usa LEDs IR com um grande comprimento de onda para manter a
luz vermelha no máximo. O número de LEDs fornecido gera um alto ângulo
de deflexão, permitindo assim a gravação durante a noite a uma distância
de 3 a 15 m sem sobreexposição do objecto.
Os objectos reflectores podem, no entanto, também causar sobreexposição
dentro desta distância.
Note que a gravação noturna através de LEDs IR produz imagens a preto e
branco.
7.5 Modo Ao Vivo
No modo ao vivo, as fotos são
disparadas pelos sensores de
movimento ou em invervalos de acordo
com as configurações criadas.
Para escolher o modo ao vivo, coloque
o interruptor na posição ON. O LED
vermelho pisca durante 5 segundos,
após o que a câmara entra em
funcionamento automaticamente e fica
no modo de espera. A gravação de
fotografias ou vídeos começa assim
que um animal entrar na zona de
detecção do sensor PIR.
Page 88

CAMCOLVC26N
V. 01 – 20/09/2016 88 ©Velleman nv
7.6 Alinhamento da Câmara
O modo de teste é muito vantajoso para determinar o melhor ângulo de
detecção possível e o alcance do sensor de movimento. Para tal, prenda a
câmara a uma árvore a uma altura de aproximadamente 1-2 m, e alinhe a
câmara na direcção desejada.
Mova lentamente de um dado da área observada até ao outro. Mova-se em
paralelo à câmara e experimento diferentes ângulos e distâncias.
O LED [L] vermelho indica que foi detectado pelo sensor de zona PIR.
De modo a evitar sinais incorretos e fotos desnecessárias, recomendamos
que não use a câmara em pontos com sol e que verifique se não existem
ramos de árvore na área ativa do sensor. O alinhamento perfeito é na
direção Norte ou Sul. O ângulo de detecção do sensor é de
aproximadamente 60°.
Verifique também se a câmara está instalada à altura correta e alinhada
com o ponto a observar. Sempre que necessário aponte a câmara para
baixo para um alinhamento perfeito.
Nota
Esta câmara corresponde à classe de proteção IP54. Está protegida contra o
pó e a pulverização pelo que pode assim ser utilizada sob qualquer condição
meteorológica.
7.7 Formato do Ficheiro
A câmara grava fotografias e vídeos no cartão de memória na pasta
\DCIM\100MEDIA.
Às fotografias é atribuída a extensão JPG e aos vídeo a extensão AVI.
Page 89

CAMCOLVC26N
V. 01 – 20/09/2016 89 ©Velleman nv
8. Requisitos dos sistema
Ligue a câmara ao seu computador usando o cabo USB fornecido.
requisitos dos sistema
Windows®
Mac®
Pentium® III ou superior
Windows® XP/Vista/7/8
512 MB RAM
1 GB de espaço disponível no
disco rígido
Ecrã com resolução de
1024x768 ou superior
Ligação USB disponível
PowerPC G3/G4/G5
OS 10.3.9 ou sistema mais
recente
512 MB RAM
1 GB de espaço disponível no
disco rígido
Ecrã com resolução de
1024x768 ou superior
Ligação USB disponível
9. Limpeza e manutenção
O utilizador não deverá fazer a manutenção das peças.
Este aparelho não necessita de qualquer manutenção especial.
De vez em quando limpe o aparelho com um pano húmido para que
fique como novo. Não use químicos, solventes ou detergentes
abrasivos.
10. Especificações
capacidade de memória ......... máx. 32 GB no SD card (não incl.)
elemento de imagem ............................................. 2 MP CMOS
ângulo de visão ...............................................................70°
microfone incorporado ...................................................... sim
sensor PIR
distância PIR ......................................................... 15 m
ângulo PIR ...............................................................60°
LEDs IR
alcance IR (infravermelhos) ..................................... 15 m
LEDs IR ....................................................... 26 unidades
abertura ....................................................................... F3.3
equilíbrio de brancos ............................................. automático
porta AV ........................................................................ não
função câmara PC ........................................................... não
vídeo
resolução de vídeo .....................................720p @ 30 fps
formato do ficheiro de vídeo ............................ MJPG (AVI)
capacidade de gravação ............................. ± 140 MB/min.
duração do vídeo...................... 1 seg-10 min, programável
Page 90

CAMCOLVC26N
V. 01 – 20/09/2016 90 ©Velleman nv
imagem ................................................ 1-3 fotos por ativação
resolução de imagem ............................................... 2 MP
resolução de imagem ............................. 8 MP interpolados
bateria da câmara .................. 8 pilhas AA (HR6C/27B, não incl.)
tempo em modo de espera .................................... 4 - 6 meses
temperatura de funcionamento .......................... -20° C a 60° C
temperatura de armazenamento ........................ -20° C a 70° C
dimensões .............................................. 135 x 97 x 66.5 mm
peso ........................................................................... 270 g
Utilize este aparelho apenas com acessórios originais. A Velleman
NV não será responsável por quaisquer danos ou lesões causados
pelo uso (indevido) do aparelho. Para mais informação sobre este
produto e para aceder à versão mais recente deste manual do
utilizador, visite a nossa página www.velleman.eu. Podem alterar-se
as especificações e o conteúdo deste manual sem aviso prévio.
Todas as marcas registadas e designações comerciais são propriedade dos
seus respetivos donos e são usadas apenas para clarificar a compatibilidade
dos nossos produtos relativamente aos produtos dos diferentes fabricantes.
Windows, Windows XP, Windows 2000, Windows Vista, Windows Aero,
Windows 7, Windows 8, Windows Mobile, Windows Server são marcas da
Microsoft Corporation registadas tanto nos Estados Unidos como em outros
países. iPad, iPod, iPod touch, iPhone, Mac, iMac, MacBook, PowerBook,
Power Mac, Mac OS são marcas da Apple Inc., registadas nos U.S. e em
outros países. Mac, Mac OS são marcas da Apple Inc., registadas no EUA e
em outros países. Pentium é uma marca registada da Intel Corporation.
© DIREITOS DE AUTOR
A Velleman NV detém os direitos de autor deste manual do
utilizador. Todos os direitos mundiais reservados. É estritamente
proibido reproduzir, traduzir, copiar, editar e gravar este manual do
utilizador ou partes deste sem prévia autorização escrita por parte da
detentora dos direitos.
Page 91

Velleman® Service and Quality Warranty
Since its foundation in 1972, Velleman® acquired extensive
experience in the electronics world and currently distributes its
products in over 85 countries.
All our products fulfil strict quality requirements and legal
stipulations in the EU. In order to ensure the quality, our
products regularly go through an extra quality check, both by an
internal quality department and by specialized external
organisations. If, all precautionary measures notwithstanding,
problems should occur, please make appeal to our warranty
(see guarantee conditions).
General Warranty Conditions Concerning Consumer
Products (for EU):
• All consumer products are subject to a 24-month warranty on
production flaws and defective material as from the original
date of purchase.
• Velleman® can decide to replace an article with an equivalent
article, or to refund the retail value totally or partially when the
complaint is valid and a free repair or replacement of the article
is impossible, or if the expenses are out of proportion.
You will be delivered a replacing article or a refund at the value
of 100% of the purchase price in case of a flaw occurred in the
first year after the date of purchase and delivery, or a replacing
article at 50% of the purchase price or a refund at the value of
50% of the retail value in case of a flaw occurred in the second
year after the date of purchase and delivery.
• Not covered by warranty:
- all direct or indirect damage caused after delivery to the article
(e.g. by oxidation, shocks, falls, dust, dirt, humidity...), and by
the article, as well as its contents (e.g. data loss),
compensation for loss of profits;
- consumable goods, parts or accessories that are subject to an
aging process during normal use, such as batteries
(rechargeable, non-rechargeable, built-in or replaceable),
lamps, rubber parts, drive belts... (unlimited list);
- flaws resulting from fire, water damage, lightning, accident,
natural disaster, etc.…;
- flaws caused deliberately, negligently or resulting from
improper handling, negligent maintenance, abusive use or use
contrary to the manufacturer’s instructions;
- damage caused by a commercial, professional or collective
use of the article (the warranty validity will be reduced to six (6)
months when the article is used professionally);
- damage resulting from an inappropriate packing and shipping
of the article;
- all damage caused by modification, repair or alteration
performed by a third party without written permission by
Velleman®.
• Articles to be repaired must be delivered to your Velleman®
dealer, solidly packed (preferably in the original packaging),
and be completed with the original receipt of purchase and a
clear flaw description.
• Hint: In order to save on cost and time, please reread the
manual and check if the flaw is caused by obvious causes prior
to presenting the article for repair. Note that returning a nondefective article can also involve handling costs.
• Repairs occurring after warranty expiration are subject to
shipping costs.
• The above conditions are without prejudice to all commercial
warranties.
The above enumeration is subject to modification
according to the article (see article’s manual).
Velleman® service- en kwaliteitsgarantie
Velleman® heeft sinds zijn oprichting in 1972 een ruime
ervaring opgebouwd in de elektronicawereld en verdeelt op dit
moment producten in meer dan 85 landen. Al onze producten
beantwoorden aan strikte kwaliteitseisen en aan de wettelijke
bepalingen geldig in de EU. Om de kwaliteit te waarborgen,
ondergaan onze producten op regelmatige tijdstippen een extra
kwaliteitscontrole, zowel door onze eigen kwaliteitsafdeling als
door externe gespecialiseerde organisaties. Mocht er ondanks
deze voorzorgen toch een probleem optreden, dan kunt u
steeds een beroep doen op onze waarborg (zie
waarborgvoorwaarden).
Algemene waarborgvoorwaarden
consumentengoederen (voor Europese Unie):
• Op alle consumentengoederen geldt een garantieperiode van
24 maanden op productie- en materiaalfouten en dit vanaf de
oorspronkelijke aankoopdatum.
• Indien de klacht gegrond is en een gratis reparatie of
vervanging van een artikel onmogelijk is of indien de kosten
hiervoor buiten verhouding zijn, kan Velleman® beslissen het
desbetreffende artikel te vervangen door een gelijkwaardig
artikel of de aankoopsom van het artikel gedeeltelijk of volledig
terug te betalen. In dat geval krijgt u een vervangend product of
terugbetaling ter waarde van 100% van de aankoopsom bij
ontdekking van een gebrek tot één jaar na aankoop en levering,
of een vervangend product tegen 50% van de kostprijs of
terugbetaling van 50 % bij ontdekking na één jaar tot 2 jaar.
• Valt niet onder waarborg:
- alle rechtstreekse of onrechtstreekse schade na de levering
veroorzaakt aan het toestel (bv. door oxidatie, schokken, val,
stof, vuil, vocht...), en door het toestel, alsook zijn inhoud (bv.
verlies van data), vergoeding voor eventuele winstderving.
- verbruiksgoederen, onderdelen of hulpstukken die onderhevig
zijn aan veroudering door normaal gebruik zoals bv. batterijen
(zowel oplaadbare als niet-oplaadbare, ingebouwd of
vervangbaar), lampen, rubberen onderdelen, aandrijfriemen...
(onbeperkte lijst).
- defecten ten gevolge van brand, waterschade, bliksem,
ongevallen, natuurrampen, enz.
- defecten veroorzaakt door opzet, nalatigheid of door een
onoordeelkundige behandeling, slecht onderhoud of abnormaal
gebruik of gebruik van het toestel strijdig met de voorschriften
van de fabrikant.
- schade ten gevolge van een commercieel, professioneel of
collectief gebruik van het apparaat (bij professioneel gebruik
wordt de garantieperiode herleid tot 6 maand).
- schade veroorzaakt door onvoldoende bescherming bij
transport van het apparaat.
- alle schade door wijzigingen, reparaties of modificaties
uitgevoerd door derden zonder toestemming van Velleman®.
• Toestellen dienen ter reparatie aangeboden te worden bij uw
Velleman®-verdeler. Het toestel dient vergezeld te zijn van het
oorspronkelijke aankoopbewijs. Zorg voor een degelijke
verpakking (bij voorkeur de originele verpakking) en voeg een
duidelijke foutomschrijving bij.
• Tip: alvorens het toestel voor reparatie aan te bieden, kijk nog
eens na of er geen voor de hand liggende reden is waarom het
toestel niet naar behoren werkt (zie handleiding). Op deze wijze
kunt u kosten en tijd besparen. Denk eraan dat er ook voor nietdefecte toestellen een kost voor controle aangerekend kan
worden.
• Bij reparaties buiten de waarborgperiode zullen
transportkosten aangerekend worden.
• Elke commerciële garantie laat deze rechten onverminderd.
Bovenstaande opsomming kan eventueel aangepast
worden naargelang de aard van het product (zie
handleiding van het betreffende product).
Page 92

Garantie de service et de qualité Velleman®
Depuis 1972, Velleman® a gagné une vaste expérience dans le
secteur de l’électronique et est actuellement distributeur dans
plus de 85 pays.
Tous nos produits répondent à des exigences de qualité
rigoureuses et à des dispositions légales en vigueur dans l’UE.
Afin de garantir la qualité, nous soumettons régulièrement nos
produits à des contrôles de qualité supplémentaires, tant par
notre propre service qualité que par un service qualité externe.
Dans le cas improbable d’un défaut malgré toutes les
précautions, il est possible d’invoquer notre garantie (voir les
conditions de garantie).
Conditions générales concernant la garantie sur les
produits grand public (pour l’UE) :
• tout produit grand public est garanti 24 mois contre tout vice
de production ou de matériaux à dater du jour d’acquisition
effective ;
• si la plainte est justifiée et que la réparation ou le
remplacement d’un article est jugé impossible, ou lorsque les
coûts s’avèrent disproportionnés, Velleman® s’autorise à
remplacer ledit article par un article équivalent ou à rembourser
la totalité ou une partie du prix d’achat. Le cas échéant, il vous
sera consenti un article de remplacement ou le remboursement
complet du prix d’achat lors d’un défaut dans un délai de 1 an
après l’achat et la livraison, ou un article de remplacement
moyennant 50% du prix d’achat ou le remboursement de 50%
du prix d’achat lors d’un défaut après 1 à 2 ans.
• sont par conséquent exclus :
- tout dommage direct ou indirect survenu à l’article après
livraison (p.ex. dommage lié à l’oxydation, choc, chute,
poussière, sable, impureté…) et provoqué par l’appareil, ainsi
que son contenu (p.ex. perte de données) et une indemnisation
éventuelle pour perte de revenus ;
- toute pièce ou accessoire nécessitant un remplacement causé
par un usage normal comme p.ex. piles (rechargeables comme
non rechargeables, intégrées ou remplaçables), ampoules,
pièces en caoutchouc, courroies… (liste illimitée) ;
- tout dommage qui résulte d’un incendie, de la foudre, d’un
accident, d’une catastrophe naturelle, etc. ;
- out dommage provoqué par une négligence, volontaire ou
non, une utilisation ou un entretien incorrect, ou une utilisation
de l’appareil contraire aux prescriptions du fabricant ;
- tout dommage à cause d’une utilisation commerciale,
professionnelle ou collective de l’appareil (la période de
garantie sera réduite à 6 mois lors d’une utilisation
professionnelle) ;
- tout dommage à l’appareil qui résulte d’une utilisation
incorrecte ou différente que celle pour laquelle il a été
initialement prévu comme décrit dans la notice ;
- tout dommage engendré par un retour de l’appareil emballé
dans un conditionnement non ou insuffisamment protégé.
- toute réparation ou modification effectuée par une tierce
personne sans l’autorisation explicite de SA Velleman® ; - frais
de transport de et vers Velleman® si l’appareil n’est plus
couvert sous la garantie.
• toute réparation sera fournie par l’endroit de l’achat. L’appareil
doit nécessairement être accompagné du bon d’achat d’origine
et être dûment conditionné (de préférence dans l’emballage
d’origine avec mention du défaut) ;
• tuyau : il est conseillé de consulter la notice et de contrôler
câbles, piles, etc. avant de retourner l’appareil. Un appareil
retourné jugé défectueux qui s’avère en bon état de marche
pourra faire l’objet d’une note de frais à charge du
consommateur ;
• une réparation effectuée en-dehors de la période de garantie
fera l’objet de frais de transport ;
• toute garantie commerciale ne porte pas atteinte aux
conditions susmentionnées.
La liste susmentionnée peut être sujette à une
complémentation selon le type de l’article et être
mentionnée dans la notice d’emploi.
Garantía de servicio y calidad Velleman®
Desde su fundación en 1972 Velleman® ha adquirido una
amplia experiencia como distribuidor en el sector de la
electrónica en más de 85 países. Todos nuestros productos
responden a normas de calidad rigurosas y disposiciones
legales vigentes en la UE. Para garantizar la calidad,
sometemos nuestros productos regularmente a controles de
calidad adicionales, tanto a través de nuestro propio servicio de
calidad como de un servicio de calidad externo. En el caso
improbable de que surgieran problemas a pesar de todas las
precauciones, es posible recurrir a nuestra garantía (véase las
condiciones de garantía).
Condiciones generales referentes a la garantía sobre
productos de venta al público (para la Unión
Europea):
• Todos los productos de venta al público tienen un período de
garantía de 24 meses contra errores de producción o errores
en materiales desde la adquisición original;
• Si la queja está fundada y si la reparación o sustitución de un
artículo no es posible, o si los gastos son desproporcionados,
Velleman® autoriza reemplazar el artículo por un artículo
equivalente o reembolsar la totalidad o una parte del precio de
compra. En este caso, usted recibirá un artículo de recambio o
el reembolso completo del precio de compra si encuentra algún
fallo hasta un año después de la compra y entrega, o un
artículo de recambio al 50% del precio de compra o el
reembolso del 50% del precio de compra si encuentra un fallo
después de 1 año y hasta los 2 años después de la compra y
entrega.
Por consiguiente, están excluidos entre otras cosas:
- todos los daños causados directa o indirectamente al aparato
(p.ej. por oxidación, choques, caída,...) y a su contenido (p.ej.
pérdida de datos) después de la entrega y causados por el
aparato, y cualquier indemnización por posible pérdida de
ganancias;
- partes o accesorios, que estén expuestos al desgaste
causado por un uso normal, como por ejemplo baterías (tanto
recargables como no recargables, incorporadas o
reemplazables), bombillas, partes de goma, etc. (lista ilimitada);
- defectos causados por un incendio, daños causados por el
agua, rayos, accidentes, catástrofes naturales, etc.;
- defectos causados a conciencia, descuido o por malos tratos,
un mantenimiento inapropiado o un uso anormal del aparato
contrario a las instrucciones del fabricante;
- daños causados por un uso comercial, profesional o colectivo
del aparato (el período de garantía se reducirá a 6 meses con
uso profesional);
- daños causados por un uso incorrecto o un uso ajeno al que
está previsto el producto inicialmente como está descrito en el
manual del usuario;
- daños causados por una protección insuficiente al transportar
el aparato.
- daños causados por reparaciones o modificaciones
efectuadas por una tercera persona sin la autorización explícita
de Velleman®;
- se calcula gastos de transporte de y a Velleman® si el
aparato ya no está cubierto por la garantía.
• Cualquier artículo que tenga que ser reparado tendrá que ser
devuelto a su distribuidor Velleman®. Devuelva el aparato con
la factura de compra original y transpórtelo en un embalaje
sólido (preferentemente el embalaje original). Incluya también
una buena descripción del fallo;
• Consejo: Lea el manual del usuario y controle los cables, las
pilas, etc. antes de devolver el aparato. Si no se encuentra un
Page 93

defecto en el artículo los gastos podrían correr a cargo del
cliente;
• Los gastos de transporte correrán a carga del cliente para una
reparación efectuada fuera del período de garantía.
• Cualquier gesto comercial no disminuye estos derechos.
La lista previamente mencionada puede ser adaptada
según el tipo de artículo (véase el manual del usuario del
artículo en cuestión).
Velleman® Service- und Qualitätsgarantie
Seit der Gründung in 1972 hat Velleman® sehr viel Erfahrung
als Verteiler in der Elektronikwelt in über 85 Ländern aufgebaut.
Alle Produkte entsprechen den strengen Qualitätsforderungen
und gesetzlichen Anforderungen in der EU. Um die Qualität zu
gewährleisten werden unsere Produkte regelmäßig einer
zusätzlichen Qualitätskontrolle unterworfen, sowohl von
unserer eigenen Qualitätsabteilung als auch von externen
spezialisierten Organisationen. Sollten, trotz aller
Vorsichtsmaßnahmen, Probleme auftreten, nehmen Sie bitte
die Garantie in Anspruch (siehe Garantiebedingungen).
Allgemeine Garantiebedingungen in Bezug auf
Konsumgüter (für die Europäische Union):
• Alle Produkte haben für Material- oder Herstellungsfehler eine
Garantieperiode von 24 Monaten ab Verkaufsdatum.
• Wenn die Klage berechtigt ist und falls eine kostenlose
Reparatur oder ein Austausch des Gerätes unmöglich ist, oder
wenn die Kosten dafür unverhältnismäßig sind, kann
Velleman® sich darüber entscheiden, dieses Produkt durch ein
gleiches Produkt zu ersetzen oder die Kaufsumme ganz oder
teilweise zurückzuzahlen. In diesem Fall erhalten Sie ein
Ersatzprodukt oder eine Rückzahlung im Werte von 100% der
Kaufsumme im Falle eines Defektes bis zu 1 Jahr nach Kauf
oder Lieferung, oder Sie bekommen ein Ersatzprodukt im
Werte von 50% der Kaufsumme oder eine Rückzahlung im
Werte von 50 % im Falle eines Defektes im zweiten Jahr.
• Von der Garantie ausgeschlossen sind:
- alle direkten oder indirekten Schäden, die nach Lieferung am
Gerät und durch das Gerät verursacht werden (z.B. Oxidation,
Stöße, Fall, Staub, Schmutz, Feuchtigkeit, ...), sowie auch der
Inhalt (z.B. Datenverlust), Entschädigung für eventuellen
Gewinnausfall.
- Verbrauchsgüter, Teile oder Zubehörteile, die durch normalen
Gebrauch dem Verschleiß ausgesetzt sind, wie z.B. Batterien
(nicht nur aufladbare, sondern auch nicht aufladbare,
eingebaute oder ersetzbare), Lampen, Gummiteile,
Treibriemen, usw. (unbeschränkte Liste).
- Schäden verursacht durch Brandschaden, Wasserschaden,
Blitz, Unfälle, Naturkatastrophen, usw.
- Schäden verursacht durch absichtliche, nachlässige oder
unsachgemäße Anwendung, schlechte Wartung,
zweckentfremdete Anwendung oder Nichtbeachtung von
Benutzerhinweisen in der Bedienungsanleitung.
- Schäden infolge einer kommerziellen, professionellen oder
kollektiven Anwendung des Gerätes (bei gewerblicher
Anwendung wird die Garantieperiode auf 6 Monate
zurückgeführt).
- Schäden verursacht durch eine unsachgemäße Verpackung
und unsachgemäßen Transport des Gerätes.
- alle Schäden verursacht durch unautorisierte Änderungen,
Reparaturen oder Modifikationen, die von einem Dritten ohne
Erlaubnis von Velleman® vorgenommen werden.
• Im Fall einer Reparatur, wenden Sie sich an Ihren Velleman®Verteiler. Legen Sie das Produkt ordnungsgemäß verpackt
(vorzugsweise die Originalverpackung) und mit dem OriginalKaufbeleg vor. Fügen Sie eine deutliche Fehlerbeschreibung
hinzu.
• Hinweis: Um Kosten und Zeit zu sparen, lesen Sie die
Bedienungsanleitung nochmals und überprüfen Sie, ob es
keinen auf de Hand liegenden Grund gibt, ehe Sie das Gerät
zur Reparatur zurückschicken. Stellt sich bei der Überprüfung
des Gerätes heraus, dass kein Geräteschaden vorliegt, könnte
dem Kunden eine Untersuchungspauschale berechnet.
• Für Reparaturen nach Ablauf der Garantiefrist werden
Transportkosten berechnet.
• Jede kommerzielle Garantie lässt diese Rechte unberührt.
Die oben stehende Aufzählung kann eventuell angepasst
werden gemäß der Art des Produktes (siehe
Bedienungsanleitung des Gerätes).
Velleman ® usługi i gwarancja jakości
Od czasu założenia w 1972, Velleman® zdobył bogate
doświadczenie w dziedzinie światowej elektroniki. Obecnie
firma dystrybuuje swoje produkty w ponad 85 krajach.
Wszystkie nasze produkty spełniają surowe wymagania
jakościowe oraz wypełniają normy i dyrektywy obowiązujące w
krajach UE. W celu zapewnienia najwyższej jakości naszych
produktów, przechodzą one regularne oraz dodatkowo
wyrywkowe badania kontroli jakości, zarówno naszego
wewnętrznego działu jakości jak również wyspecjalizowanych
firm zewnętrznych. Pomimo dołożenia wszelkich starań czasem
mogą pojawić się problemy techniczne, prosimy odwołać się do
gwarancji (patrz warunki gwarancji).
Ogólne Warunki dotyczące gwarancji:
• Wszystkie produkty konsumenckie podlegają 24-miesięcznej
gwarancji na wady produkcyjne i materiałowe od daty zakupu.
• W przypadku, gdy usterka jest niemożliwa do usunięcia lub
koszt usunięcia jest nadmiernie wysoki Velleman ® może
zdecydować o wymianie artykułu na nowy, wolny od wad lub
zwrócić zapłaconą kwotę. Zwrot gotówki może jednak nastąpić
z uwzględnieniem poniższych warunków:
- zwrot 100% ceny zakupu w przypadku, gdy wada wystąpiła w
ciągu pierwszego roku od daty zakupu i dostawy
- wymiana wadliwego artykułu na nowy, wolny od wad z
odpłatnością 50% ceny detalicznej lub zwrot 50% kwoty ceny
nabycia w przypadku gdy wada wystąpiła w drugim roku od
daty zakupu i dostawy.
• Produkt nie podlega naprawie gwarancyjnej:
- gdy wszystkie bezpośrednie lub pośrednie szkody
spowodowane są działaniem czynników środowiskowych lub
losowych (np. przez utlenianie, wstrząsy, upadki, kurz, brud,
...), wilgotności;
- gwarant nie ponosi odpowiedzialności za szkody
wynikających z utraty danych;
- produkty konsumenckie, części zamienne lub akcesoria
podatne na process starzenia, wynikającego z normalnego
użytkowania, np: baterie (
lub wymienne), żarówki, paski napędowe, gumowe elementy
napędowe... (nieograniczona lista);
- usterka wynika z działania pożaru, zalania wszelkimi cieczami,
uderzenia pioruna, upadku lub klęski żywiołowej, itp.;
- usterka wynika z zaniedbań eksploatacyjnych tj. umyślne
bądź nieumyślne zaniechanie czyszczenia, konserwacji,
wymiany materiałów ekspolatacyjnych, niedbalstwa lub z
niewłaściwego obchodzenia się lub niezgodnego użytkowania z
instrukcją producenta;
- szkody wynikające z nadmiernego użytkowania gdy nie jest
do tego celu przeznaczony tj. działalność komerycjna,
zawodowa lub wspólne użytkowanie przez wiele osób - okres
obowiązywania gwarancji zostanie obniżony do 6 (sześć)
miesięcy;
- Szkody wynikające ze źle zabezpieczonej wysyłki produktu;
- Wszelkie szkody spowodowane przez nieautoryzowaną
naprawę, modyfikację, przeróbkę produktu przez osoby trzecie
jak również bez pisemnej zgody firmy Velleman ®.
• Uszkodzony produkt musi zostać dostarczony do sprzedawcy
® Velleman, solidnie zapakowany (najlepiej w oryginalnym
ładowalne, nieładowalne, wbudowane
Page 94

opakowaniu), wraz z wyposażeniem z jakim produkt został
sprzedany. W przypadku wysyłki towaru w opakowaniu innym
niż oryginalnym ryzyko usterki produktu oraz tego skutki
przechodzą na właściciela produktu. Wraz z niesprawnym
produktem należy dołączyć jasny i szczegółowy opis jego
usterki, wady;
• Wskazówka: Aby zaoszczędzić na kosztach i czasie, proszę
szczegółowo zapoznać się z instrukcja obsługi; czy przyczyną
wady są okoliczności techniczne czy też wynikaja wyłącznie z
nieznajomości obsługi produktu. W przypadku wysyłki
sprawnego produktu do serwisu nabywca może zostać
obciążony kosztmi obsługi oraz transportu.
• W przypadku napraw pogwarancyjnych lub odpłatnych klient
ponosi dodatkowo koszt wysyłki produktu do i z serwisu.
wymienione wyżej warunki są bez uszczerbku dla wszystkich
komercyjnych gwarancji.
Powyższe postanowienia mogą podlegać modyfikacji w
zależności od wyrobu (patrz art obsługi).
Garantia de serviço e de qualidade Velleman®
Desde a sua fundação em 1972 Velleman® tem adquirido uma
amplia experiencia no sector da eletrónica com uma
distribuição em mais de 85 países.
Todos os nossos produtos respondem a exigências rigorosas e
a disposições legais em vigor na UE. Para garantir a qualidade,
submetemos regularmente os nossos produtos a controles de
qualidade suplementares, com o nosso próprio serviço
qualidade como um serviço de qualidade externo. No caso
improvável de um defeito mesmo com as nossas precauções, é
possível invocar a nossa garantia. (ver as condições de
garantia).
Condições gerais com respeito a garantia sobre os produtos
grande público (para a UE):
• qualquer produto grande público é garantido 24 mês contra
qualquer vício de produção ou materiais a partir da data de
aquisição efectiva;
• no caso da reclamação ser justificada e que a reparação ou
substituição de um artigo é impossível, ou quando os custo são
desproporcionados, Velleman® autoriza-se a substituir o dito
artigo por um artigo equivalente ou a devolver a totalidade ou
parte do preço de compra. Em outro caso, será consentido um
artigo de substituição ou devolução completa do preço de
compra no caso de um defeito no prazo de 1 ano depois da
data de compra e entrega, ou um artigo de substituição
pagando o valor de 50% do preço de compra ou devolução de
50% do preço de compra para defeitos depois de 1 a 2 anos.
• estão por consequência excluídos:
- todos os danos directos ou indirectos depois da entrega do
artigo (p.ex. danos ligados a oxidação, choques, quedas,
poeiras, areias, impurezas…) e provocado pelo aparelho, como
o seu conteúdo (p.ex. perca de dados) e uma indemnização
eventual por perca de receitas;
- consumíveis, peças ou acessórios sujeitos a desgaste
causado por um uso normal, como p.ex. pilhas (recarregáveis,
não recarregáveis, incorporadas ou substituíveis), lâmpadas,
peças em borracha correias… (lista ilimitada);
- todos os danos que resultem de um incêndio, raios, de um
acidente, de una catastrophe natural, etc.;
- danos provocados por negligencia, voluntária ou não, uma
utilização ou manutenção incorrecta, ou uma utilização do
aparelho contrária as prescrições do fabricante;
- todos os danos por causa de uma utilização comercial,
profissional ou colectiva do aparelho ( o período de garantia
será reduzido a 6 meses para uma utilização profissional);
- todos os danos no aparelho resultando de uma utilização
incorrecta ou diferente daquela inicialmente prevista e descrita
no manual de utilização;
- todos os danos depois de uma devolução não embalada ou
mal protegida ao nível do acondicionamento.
- todas as reparações ou modificações efectuadas por terceiros
sem a autorização de SA Velleman®;
- despesas de transporte de e para Velleman® se o aparelho
não estiver coberto pela garantia.
• qualquer reparação será fornecida pelo local de compra. O
aparelho será obrigatoriamente acompanhado do talão ou
factura de origem e bem acondicionado (de preferência dentro
da embalagem de origem com indicação do defeito ou avaria);
• dica: aconselha-mos a consulta do manual e controlar cabos,
pilhas, etc. antes de devolver o aparelho. Um aparelho
devolvido que estiver em bom estado será cobrado despesas a
cargo do consumidor;
• uma reparação efectuada fora da garantia, será cobrado
despesas de transporte;
• qualquer garantia comercial não prevalece as condições aqui
mencionadas.
A lista pode ser sujeita a um complemento conforme o tipo de
artigo e estar mencionada no manual de utilização.
Made in PRC
Imported by Velleman nv
Legen Heirweg 33, 9890 Gavere, Belgium
www.velleman.eu
 Loading...