

Page 1
CA
M
D
A
E
A
A
R
A
K
’
U
V
A
A
H
I
G
O
A
R
4
32232
1
C
HIGH
CAMER
HD-KL
CAMÉR
CÁMAR
HD-FA
COL
EFINITION
URENCAMER
COULEUR
HD A COLO
BKAMERA
C18
CTION VIDE
D
CAPTURE
OLOUR
USER M
GEBRUI
MODE D
MANUAL
BEDIEN
NUAL
ERSHANDLEID
EMPLOI
DEL USUARIO
NGSANLEITUN
NG 1
4
Page 2

CAMCOLVC18
V. 02 – 02/10/2012 2 ©Velleman nv
Page 3
CAMCOLVC18
A
B
C
E
D
F
G
H
V. 02 – 02/10/2012 3 ©Velleman nv
Page 4

2
t
s
n
Ttd
sss
u
t
f
e
aas
hau
U
E
t
i
n
u
e
e
c
t
o
o
r
-
C
n
d
c
b
n
d
r
v
e
o
a
o
d
e
o
n
y
a
i
e
z
s
c
n
o
c
r
'
I
CAMCOLV
18
J
1. In
To all re
Importa
If in dou
Thank yo
bringing
install or
2. Sa
roduction
idents of the
t environmen
his symbol on t
he device after
ispose of the u
hould be taken
hould be return
ervice. Respect
bt, contact yo
for choosing V
his device into s
use it and conta
ety Instruc
K
ep this device a
C
ution: Do not
this may lead t
T
ere are no use
thorized dealer
SER MA
uropean Unio
al information
he device or the
ts lifecycle coul
it (or batteries)
to a specialized
ed to your distri
the local enviro
r local waste
lleman! Please
rvice. If the de
t your dealer.
ions
way from childr
perate buttons
hazardous situ
serviceable part
for service and/
NUAL
about this pro
package indicat
harm the envir
as unsorted mu
ompany for rec
utor or to a loc
mental rules.
isposal author
ead the manual
ice was damag
n and unauthori
r adjust setting
tions.
s inside the devi
r spare parts.
uct
s that disposal
nment. Do not
icipal waste; it
cling. This devi
l recycling
ties.
thoroughly befo
d in transit, don
ed users.
while in motion
e. Refer to an
f
e
e
t
V. 02 – 0
/10/2012
4
©Velleman
v
Page 5
CAMCOLVC18
3. General Guidelines
Refer to the Velleman® Service and Quality Warranty on the last pages
of this manual.
• Protect this device from heavy shocks and abuse. Avoid brute force
when operating the device.
• Protect the device against extreme heat and dust.
• Familiarise yourself with the functions of the device before actually
using it.
• All modifications of the device are forbidden for safety reasons.
• Only use the device for its intended purpose. Using the device in an
unauthorised way will void the warranty.
• Damage caused by disregard of certain guidelines in this manual is not
covered by the warranty and the dealer will not accept responsibility for
any ensuing defects or problems.
• Keep this manual for future reference.
4. Features
• portable action camera with different mounting brackets
• the video capture camera records images on SD card (not included)
• video recording quality: 720p HD video – 20 fps
• easy and user-friendly setup
• comes with USB cable, A/V cable, and brackets
• weatherproof design
• white LED backlight screen.
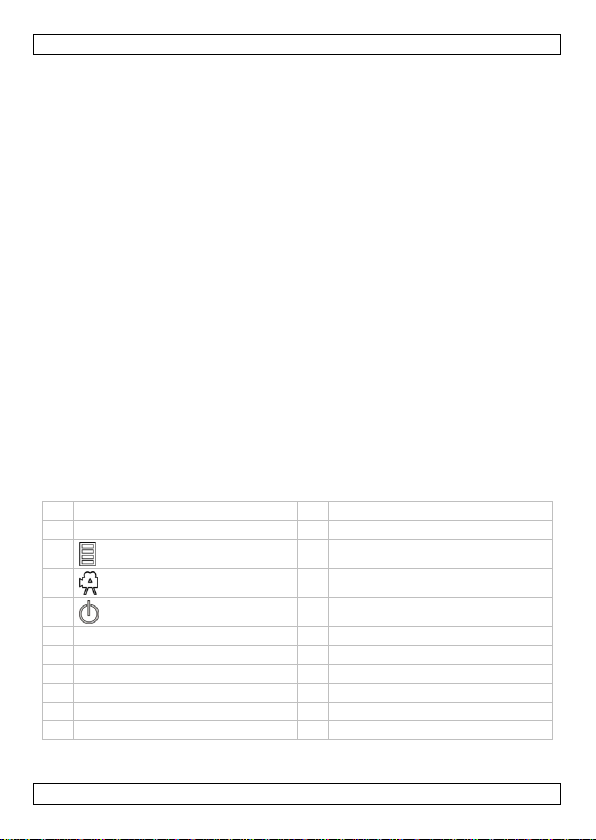
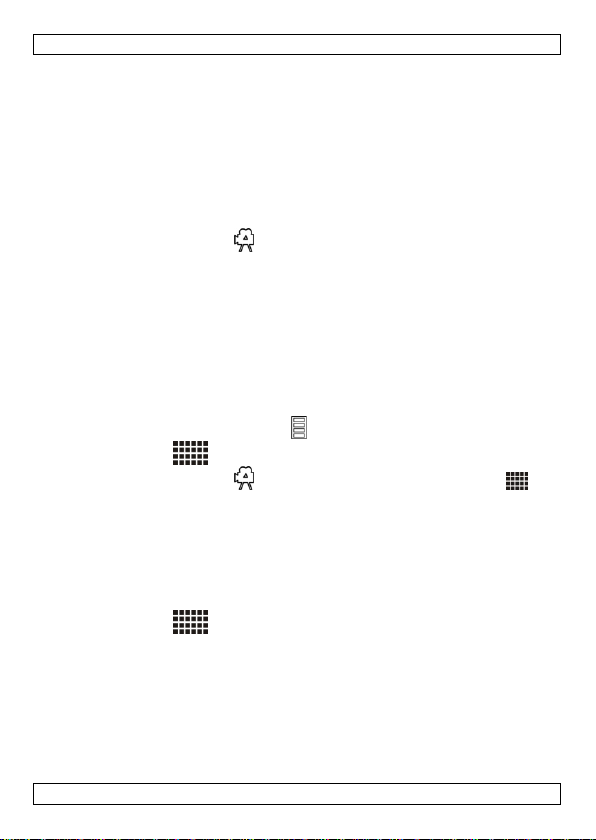
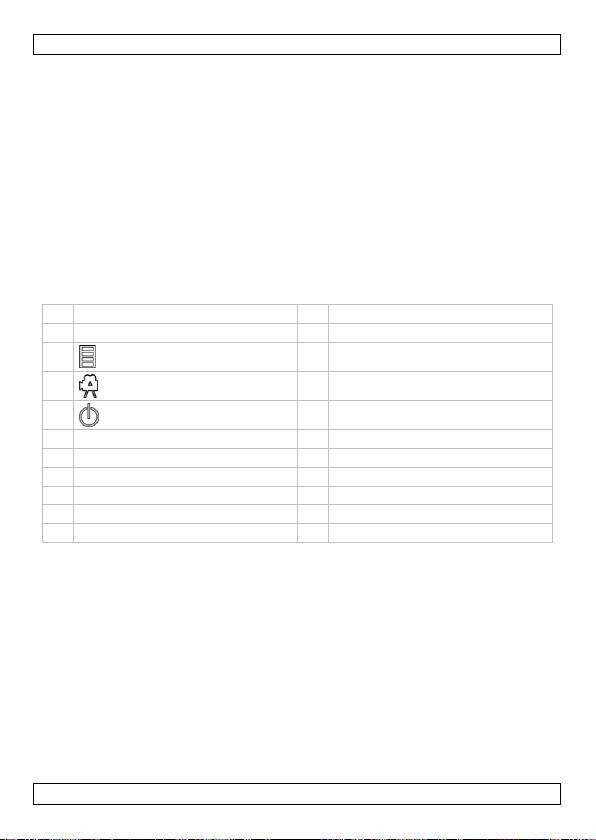
5. Overview
Refer to the illustrations on page 2 of this manual.
1
cap
2
control buttons
2a
menu button
2b
record button
2c
power button
3
display
4
lens
5
ring
6
mini-USB port
7
SD card slot
8
video output
9
battery compartment
10
microphone
11
camera base
12
camera base handles
13
handlebar bracket
14
screw and bolt
15
helmet bracket
16
hook-and-loop strap
17
rubber strap
18
USB cable
19
video cable
V. 02 – 02/10/2012 5 ©Velleman nv
Page 6

CAMCOLVC18
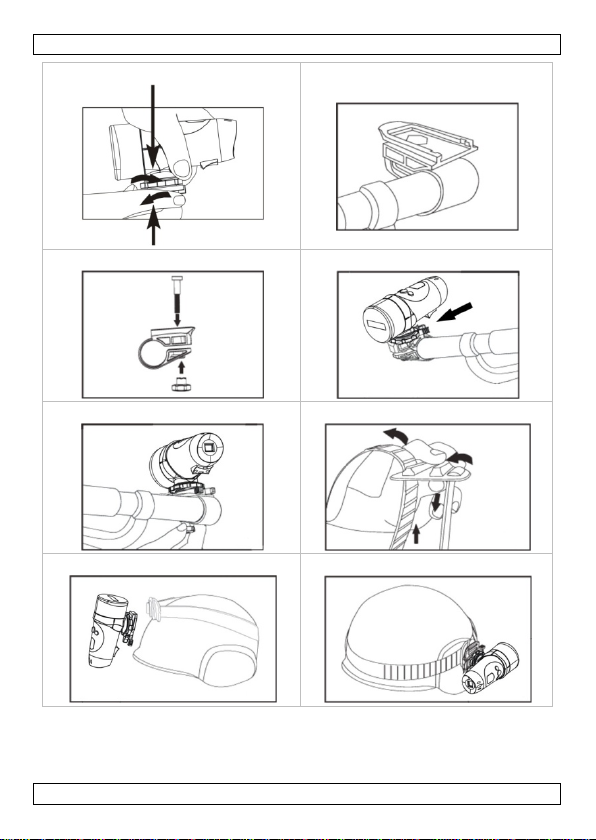
6. Installation
6.1 Connecting the Base of the Camera
If it is not yet done, screw the base [11] on the bottom of the camera (see
illustration A). The base allows you to fix the camera:
• on the handlebar of your bicycle using the handlebar bracket
• on your helmet using the Velcro or rubber strap using the helmet
bracket
• or directly onto a tripod, using the screw hole in the base.
6.2 Mounting the Camera on a Handlebar
1. Slide the handlebar bracket [13] over the handlebar (see
illustration B).
Tip: If necessary, insert one or more rubber pads between bracket and
handlebar to ensure a tight grip.
2. Fix the bracket with the screw and bolt [14] (see illustration C).
3. Slide the camera base in the handlebar bracket until it clicks into place
(see illustration D).
4. Adjust the camera position: loosen the ring [5], adjust, then tighten
again to keep the camera firmly in place.
5. To adjust the bracket position: loosen the bolt [14], reposition the
bracket on the handlebar, then tighten the bolt again (see
illustration E).
6. To take the camera off the bracket again, squeeze the camera base
handles [12] together and slide the camera off the bracket.
6.3 Mounting the Camera on a Helmet Using the Rubber Strap
1. Thread the rubber strap [17] through the helmet bracket [15] (see
illustration F).
2. Fit the strap over the helmet with the bracket in the desired position
(see illustration G).
3. Make sure the strap fits tightly around the helmet.
4. Slide the camera into the bracket (see illustration H).
5. Adjust the camera position: loosen the ring [5], adjust, then tighten
again to keep the camera firmly in place.
6.4 Mounting the Camera on a Helmet Using the Hook-and-Loop
Strap
1. Thread the hook-and-loop strap [16] through the helmet bracket [15]
(see illustration F).
2. Place the bracket on the helmet in the desired position and thread the
strap through the helmet vents (see illustration I).
3. Tighten the strap and fix the ends together to keep the bracket in place.
4. Slide the camera into the bracket (see illustration J).
V. 02 – 02/10/2012 6 ©Velleman nv
Page 7
2
s
n
e
t
Doex(aKe
h
W
a
w
r
p
r
t
d
e
w
s
a
t
t
s
1
m
e
h
g
r
m
t
e
a
e
a
b
a
f
k
m
O
e
m
d
s
o
a
c
r
a
f
C
e
a
w
g
a
.
y
y
t
f
f
e
b
k
h
v
r
o
f
f
f
t
a
l
)
a
T
n
.
T
t
5. Adju
agai
7. Op
7.1 Bat
Replace t
display.
and the c
Note: Al
1. Make
2. Unsc
3. Push
com
4. Inse
with
bran
5. Clos
6. Scre
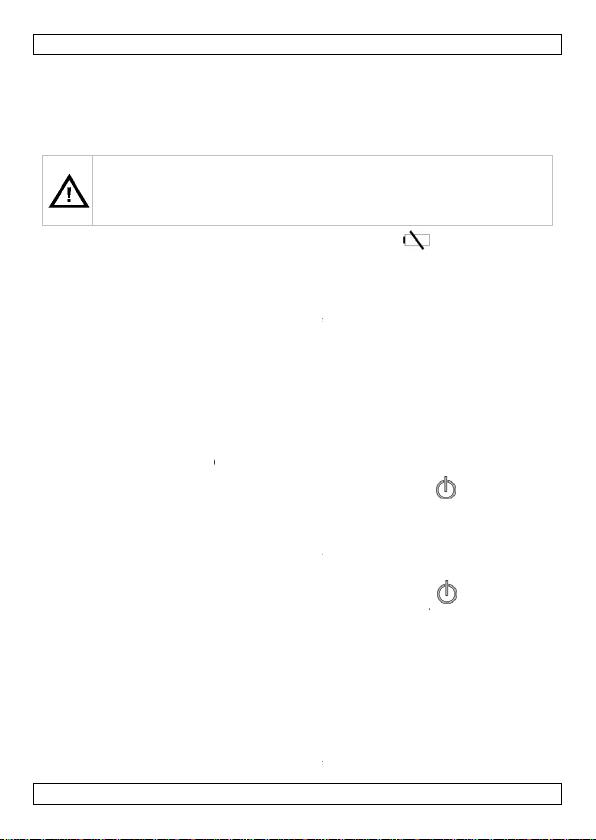
7.2 Swi
To switch
2 second
The displ
minutes.
Note: If
camera,
To switch
2 second
off after
7.3 Me
Recomm
• Use
• Form
Insertin
1. Make
2. Unsc
V. 02 – 0
t the camera po
to keep the ca
ration
eries
not puncture b
plode. Do not a
lkaline). Dispos
ep batteries aw
e batteries whe
hen the batteri
mera shuts off
ays replace all
sure the camer
ew the cap [1]
the battery com
artment.
t 2 new 1.5V AA
he polarity mar
.
the battery co
the cap [1] ba
tching On and
the camera on,
. You hear a be
y shows the re
he memory car
he display show
the camera off,
. The display sh
second.
ory Card
ndations:
igh-speed SD c
at the memory
a Memory Ca
sure the camer
ew the cap [1]
/10/2012
CAMCOLV
sition: loosen th
era firmly in pl
atteries or thro
tempt to rechar
of batteries in
y from children
n the low batter
s are completel
utomatically af
atteries at once
is switched off.
rom the back o
partment lid [9]
alkaline batteri
ings. Only use
partment.
ck onto the bac
ff
press and hold t
p and the displa
aining time for
is full, or if the
“FULL”.
press and hold t
ws “OFF” and y
rds for best per
ard before use.
d
is switched off.
rom the back o
7
18
ring [5], adjus
ce.
them in fire as
e non-recharge
ccordance with
indication
empty, you will
er 20 seconds.
.
the camera.
downwards to o
s (LR6, not incl.
atteries of the s
of the camera.
e power button
y lights up.
ideo recording i
e is no memory
he power button
u hear a beep.
ormance and qu
the camera.
t, then tighten
hey may
ble batteries
ocal regulations
appears on the
hear a long bee
pen the battery
in accordance
me type and
for about
n hours and
card in the
for about
he camera shu
ality.
©Velleman
p
s
v
Page 8
CAMCOLVC18
3. Insert an SD card (not included) in the card slot [7]. Push it in until it
clicks into place.
4. To remove the SD card again, push the card gently so that it pops out.
5. Screw the cap [1] back onto the back of the camera.
Formatting a Memory Card
Caution: Formatting erases all data from the card. If necessary, connect
the camera to a pc to back up the data before formatting.
1. Make sure the camera is switched off.
2. Insert the memory card in the card slot [7].
3. Switch the camera on.
4. Press the record button for about 5 seconds.
The display shows “FOR” ( for “formatting’).
5. Wait until the display shows the remaining recording time again.
The card is now empty and ready for use with the camera.
7.4 Configuration
Setting the Video Resolution
You can set the resolution of the recorded video to 720p (1280×720) or
VGA (640x480).
To set the resolution:
1. Switch the camera on.
2. Press and hold the menu button for 2 seconds.
The 720p icon blinks.
3. Press the record button once to switch to VGA. The VGA icon
blinks.
4. Press the menu button to confirm.
Note: The remaining recording time is adjusted to the resolution. You can
record longer in VGA mode (lower resolution) than in 720p mode.
Setting the Time and Date
1. Switch the camera on.
2. Press and hold the menu button for 2 seconds.
The 720p icon blinks.
3. Press the record button repeatedly until “ALL” appears on the display.
4. Press the menu button for 2 seconds.
“Y” (for “year”) and the third digit of the year blink on the display.
5. Press the record button repeatedly to set the digit. Then press the menu
button to confirm and move to the next digit.
6. Repeat for the last digit of the year, the month (“M”), day (“D”), hour
(“H”), and minutes (“M”).
The camera returns to video recording mode after you set all the digits.
V. 02 – 02/10/2012 8 ©Velleman nv
Page 9

CAMCOLVC18
7.5 Recording Video
Normal Recording
1. Make sure there is a memory card installed in the camera.
2. Switch the camera on. The display shows the remaining recording time.
3. Press the record button to start recording.
The display backlight blinks. The display shows the recording time in
minutes and seconds. The camera saves a video file every 5 minutes.
4. Press the record button again to stop recording.
The display backlight stops blinking. The display shows the remaining
recording time.
Note: When the memory card is full, the display shows “FULL”. The camera
automatically stops recording.
Loop Recording
If you use the camera with a USB charger, you can record continuously. The
camera then saves a video file every 2 minutes. When the memory card is
full, it overwrites the oldest recordings.
Caution: Make sure that the charger matches the camera’s specifications
(3 VDC, 2.0 W).
There are two possibilities:
• Camera off, batteries installed: Plug the camera into a suitable USB
charger (3 VDC, 2.0 W). The camera switches on and starts loop
recording automatically. Press the record button to stop recording.
When you unplug the USB charger, the camera stops recording and
switches off after 2 seconds.
• Camera off, no batteries installed: Plug the camera into a suitable USB
charger (3 VDC, 2.0 W). The camera switches on after 6 seconds and
starts loop recording automatically. Press the record button to stop
recording. When you unplug the USB charger, the camera switches off
immediately.
7.6 Playing Video
Playing on TV
1. Switch the camera on.
2. Unscrew the cap [1] from the back of the camera.
3. Insert the black plug of the video cable (included) in the video output
[8] of the camera.
4. Insert the other end (yellow, red, white plugs) of the cable in the
corresponding RCA connectors on your TV.
The camera display shows “AU”.
5. Make sure the TV is set to the correct channel.
6. On the camera, press the menu button to select the video file you want
to play.
7. Press the record button to start playback.
V. 02 – 02/10/2012 9 ©Velleman nv
Page 10

CAMCOLVC18
8. Press the record button to pause/continue.
9. Press the menu button to stop playback. You can now select a different
video file for playback.
Tip: During playback on TV, you can quickly delete the video file from the
memory card by pressing and holding the menu button. If there are no files
on the memory card, the TV displays “NO FILE”.
Playing on PC
1. Unscrew the cap [1] from the back of the camera.
2. Insert one end of the USB cable (included) in the mini-USB port [6] of
the camera.
3. Insert the other end in a free USB port on your computer.
The camera display shows “PC”.
4. On the pc, open My Computer and look for the drive that represents
the camera.
You can copy, delete, or view the files from here.
Note: to disconnect the camera from the pc, use Windows’ Safely Remove
Hardware function to stop the device before you unplug the USB cable.
7.7 Deleting Video Files
Caution: Back up the video files to your pc first, if necessary.
1. Make sure that recording is stopped.
2. Press and hold the menu button for 2 seconds.
3. Press the record button repeatedly.
The display shows ”D” (for “delete”). On the display blinks, in sequence:
o “NO”: press the record button to go to the next option.
o “ONE”: press the menu button to delete the last recorded video file.
“ONE” stops blinking while the camera deletes the file. Wait until
“ONE” starts blinking again: then you can delete the next recorded
video file. Or, press the record button to exit.
o “ALL”: press the menu button to delete all recorded video files.
“ALL” stops blinking while the camera deletes the files. Wait until
“ALL” starts blinking again, then press the record button to exit.
7.8 Using as a Webcam
You can use the camera as a webcam if you install the included software.
1. Make sure the camera is not connected to your pc.
2. Insert the included CD in your computer's CD drive.
3. Locate and double-click the STK03N icon on the CD-ROM.
4. Follow the instructions of the installation wizard.
5. When the software is installed, make sure the camera is switched off.
6. Unscrew the cap [1] from the back of the camera.
7. Insert one end of the USB cable (included) in the mini-USB port [6] of
the camera.
V. 02 – 02/10/2012 10 ©Velleman nv
Page 11

CAMCOLVC18
8. While you press and hold the menu button on the camera, plug the
camera in a free USB port on your computer.
9. Release the menu button only when you hear a beep and the camera
display lights. The camera display shows “PC”.
Windows® automatically recognises the device and installs the driver.
Depending on the settings, Windows may (not) display the message
“Your new hardware is installed and ready for use”.
The camera is now ready for use as a webcam.
8. Troubleshooting
There is nothing on the display
Make sure the batteries are installed correctly.
Replace empty batteries.
The camera shuts off automatically
The batteries are empty. Replace them immediately.
I cannot record video
Make sure there is sufficient free space on the memory card. The display
indicates how much time there is left for recording.
Make sure the memory card is not locked . Make sure the lock switch on the
side of the memory card is in the correct position.
The camera stops recording automatically
The memory card is full.
• Back up the files on the card to your pc, then delete files on the card to
create free space.
• Insert a new, empty card.
I connected the camera to my pc, but I cannot find it in My
Computer
Make sure that each end of the USB cable is properly connected.
Make sure the USB port on the pc is working properly. Try connecting
another USB device and see if it functions well. If no, the USB port may be
malfunctioning.
The video does not play on my TV
Make sure that each end of the video cable is properly connected.
Make sure that the camera is switched on.
The remaining recording time is not accurate
The remaining recording time is an estimate. It depends not only on the
time already recorded, but also on the conditions in which you have
recorded. Recording in high-contrast condit io ns, su ch as outdo ors , req ui res
more memory space than recording in low-contrast conditions, such as
indoors.
V. 02 – 02/10/2012 11 ©Velleman nv
Page 12

CAMCOLVC18
9. Cleaning and maintenance
• Wipe the exterior of the device with a moist, lint-free cloth. Do not use
alcohol or solvents.
• Use a lens blower to blow dust off the lens, then wipe gently with a soft,
lint-free cloth. Do not use household cleaning fluids to clean the lens.
• Remove the batteries from the device if it will not be used for a long
time. Old batteries can begin to leak and damage the device.
• Remove the memory card from the device if it will not be used for a
long time.
• Store the device in a dry, well-ventilated, and dust-free place at room
temperature. Do not leave the camera in places exposed to extremely
high temperatures, such as under direct sunlight, for extended p eriods
of time. This may affect the camera housing and internal components.
10. Technical Specifications
storage capacity max. 32 GB SD-HC card (not incl.)
pick-up element 1.3 Megapixel CMOS
viewing angle 54°
recording format MJPEG (audio PCM)
frame rate (fps) 20
video resolution 1280 x 720 pixels
recording capacity ± 150 MB/min
power supply 2 x 1.5V AA (LR6), not incl.
dimensions Ø 47 x 110 mm
weight 160 g
working temperature -10°C ~ 50°C
Use this device with original accessories only. Velleman nv cannot
be held responsible in the event of damage or injury resulting from
(incorrect) use of this device. For more info concerning this product
and the latest version of this manual, please visit our website
www.velleman.eu. The information in this manual is subject to
change without prior notice.
All registered trademarks and trade names are properties of their respective
owners and are used only for the clarification of the compatibility of our
products with the products of the different manufacturers. Windows,
Windows XP, Windows Vista, Windows 7, are registered trademarks of
Microsoft Corporation in the United States and other countries.
© COPYRIGHT NOTICE
The copyright to this manual is owned by Velleman nv. All worldwide
rights reserved. No part of this manual may be copied, reproduced, translated or
reduced to any electronic medium or otherwise without the prior written consent of
the copyright holder.
V. 02 – 02/10/2012 12 ©Velleman nv
Page 13

2
e
j
Dntbe
d
r
n
o
k
i
o Wbe
r
o
g
g
n
h
e
h
e
u
v
n
u
u
a
I
a
r
h
c
h
b
e
u
l
e
r
e
r
r
e
S
e
d
e
t
®
r
e
s
d
n
r
t
n
C
A
e
e
v
e
d
u
h
a
a
a
e
m
n
v
e
w
m
p
i
f
e
o
d
t
v
a
c
c
t
o
d
j
d
t
i
t
e
a
j
a
n
j
t
e
d
CAMCOLV
18
1. Inl
Aan alle
Belangri
brengen.
Hebt u v
betreffe
Dank u v
in gebrui
installeer
2. Ve
3. Al
Raadplee
handleidi
• Besc
bedi
• Besc
• Leer
gebr
• Om
door
gara
• Gebr
gebr
• De g
richtl
GEBRU
iding
ingezetenen v
ke milieu-info
it symbool op
a zijn levenscy
oebrengen aan
atterijen) niet
en gespecialise
it toestel naar
Respecteer de p
agen, contact
d de verwijde
or uw aankoop!
neemt. Werd h
het dan niet en
ligheidsinst
H
ud buiten het b
aarschuwing:
nt om ongelukk
E
zijn geen door
t
estel. Voor ond
emene rich
de Velleman
g.
erm tegen zwa
ning.
erm tegen stof
erst de functie
iken.
eiligheidsredene
wijzigingen die
tie.
ik het toestel e
ik vervalt de ga
antie geldt nie
ijnen in deze ha
KERSH
n de Europes
matie betreff
et toestel of de
lus wordt wegg
et milieu. Gooi
ij het gewone h
rd bedrijf terec
w verdeler of n
aatselijke milieu
er dan de pla
ing.
Lees deze handl
t toestel besch
aadpleeg uw de
ucties
reik van kinder
tel de videoca
n te voorkome
e gebruiker ver
rhoud of reserv
lijnen
service- en k
e schokken. Ver
n extreme tem
van het toestel
n mag u geen w
e gebruiker hee
kel waarvoor h
antie.
voor schade do
dleiding en uw
NDLEID
Unie
nde dit produc
erpakking geeft
worpen, dit toes
it toestel (en e
ishoudelijke afv
tkomen voor re
ar een lokaal re
wetgeving.
tselijke autori
eiding grondig v
digd tijdens het
aler.
n en onbevoeg
era niet in terwi
.
angbare onder
onderdelen, con
aliteitsgarant
ijd brute krach
eraturen.
kennen voor u h
jzigingen aanbr
t aangebracht v
t gemaakt is. Bi
r het negeren v
ealer zal de ver
ING
aan dat, als het
tel schade kan
entuele
l; het moet bij
yclage. U moet
yclagepunt
eiten
or u het toestel
transport,
en.
l u in beweging
elen in dit
acteer uw deal
e achteraan dez
tijdens de
et gaat
ngen. Schade
lt niet onder de
onoordeelkundi
an bepaalde
ntwoordelijkhei
r.
e
g
V. 02 – 0
/10/2012
13
©Velleman
v
Page 14
CAMCOLVC18
afwijzen voor defecten of problemen die hier rechtstreeks verband mee
houden.
• Bewaar deze handleiding voor verdere raadpleging.
4. Eigenschappen
• draagbare camera geleverd met meerdere montagebeugels
• opname op SD-kaart (niet meegelev.)
• opnamekwaliteit: 720p HD-video – 20 fps
• gemakkelijke en gebruiksvriendelijke configuratie
• geleverd met USB-kabel, A/V-kabel en montagebeugels
• weerbestendige behuizing
• display met witte LED-achtergrondverlichting.
5. Omschrijving
Raadpleeg de afbeeldingen op pagina 2 van deze handleiding.
1
kap
2
bedieningsknoppen
2a
menuknop
2b
opnameknop
2c
aan/uit-knop
3
display
4
lens
5
ring
6
mini-USB-poort
7
slot voor SD-kaart
8
video-uitgang
9
batterijvak
10
microfoon
11
cameravoet
12
klem voor cameravoet
13
stuurbeugel
14
schroef en bout
15
helmbeugel
16
klittenband
17
rubberen band
18
USB-kabel
19
videokabel
6. Installatie
6.1 De cameravoet aansluiten
Indien de voet nog niet is aangeslo ten, draai de voet [11] in de onderkant
van de camera (zie afbeelding A). Met de voet kunt u de camera vastzetten:
• op het stuur van uw fiets met de stuurbeugel
• op uw helm met het klittenband, rubberen band of helmbeugel
• of rechtstreeks op een driepoot, via het schroefgat in de voet.
6.2 De camera monteren op een stuur
1. Schuif de stuurbeugel [13] op het stuur (zie afbeelding B).
Tip: Indien nodig, plaats één of meerdere rubberen plaatjes tussen de
beugel en het stuur voor een stevige greep.
V. 02 – 02/10/2012 14 ©Velleman nv
Page 15
2
s
i
k
d
n
d
e
e
d
d
c
e
e
i
d
e
c
s
p
i
d
e
b
t
U ge
m
d
W
m
t
n
t
e
u
a
r
a
d
c
r
[
e
s
d
c
n
e
H
n
e
t
j
a
v
C
g
o
o
m
h
t
b
g
h
m
w
e
g
b
g
h
o
u
a
e
k
n
a
p
n
k
]
n
o
z
m
o
o
n
n
e
a
n
o
2. Beve
3. Schu
vast
4. Stel
daar
5. Om
beug
afbe
6. Om
van
6.3 De
1. Haal
afbe
2. Trek
afbe
3. Zorg
4. Schu
5. Stel
opni
6.4 De
1. Haal
2. Plaat
klitte
3. Trek
zijn
4. Schu
5. Stel
opni
7. Ge
7.1 Bat
Vervang
scherm.
en de ca
Opmerki
1. Zorg
2. Draai
tig de beugel m
f de cameravoe
likt (zie afbeeldi
e camerapositie
a opnieuw vast
e beugelpositie
l opnieuw op h
lding E).
e camera opnie
e cameravoet s
amera monte
de rubberen ban
lding F).
de band over de
lding G).
ervoor dat de b
f de camera in
e camerapositie
uw vast om de
amera monte
het klittenband
de beugel op d
nband door de v
het klittenband
laats te houden.
f de camera in
e camerapositie
uw vast om de
ruik
erijen
mag batterijen
en alkalinebatt
ilieuwetgeving.
e batterijen wa
anneer de batt
era schakelt au
ng: vervang alti
ervoor dat de c
de kap [1] los
CAMCOLV
et de schroef en
in de stuurbeug
g D).
in: draai de rin
om de camera g
e regelen: schr
t stuur, draai da
w van de beuge
men en schuif d
en op een hel
d [17] door de
helm met de be
nd stevig vastzi
e beugel (zie af
in: draai de rin
amera goed op
en op een hel
16] door de hel
e helm in de ge
ntilatieopening
trak en bevesti
e beugel (zie af
in: draai de rin
amera goed op
ooit doorboren
rijen. Gooi batte
oud batterijen
neer het lege b
rijen volledig le
omatisch uit na
d alle batterijen
mera uitgescha
an de achterka
18
bout [14] (zie
el totdat deze o
[5] los, stel de
ed op haar plaa
ef de bout [14]
arna de bout op
l te nemen, dru
e camera uit de
met de rubbe
elmbeugel [15
ugel in de gewe
rond de helm.
eelding H).
[5] los, stel in,
aar plaats te h
met klittenba
mbeugel [15] (
enste positie en
n van de helm (
de uiteinden o
eelding J).
[5] los, stel in,
aar plaats te h
f in het vuur go
rijen weg volge
it het bereik va
tterij-icoon
g zijn, hoort u
20 seconden.
tegelijk.
eld is.
t van de camer
fbeelding C).
haar plaats
positie in, draai
ts te houden.
los, plaats de
ieuw vast (zie
de klem [12]
beugel.
ren band
(zie
ste positie (zie
draai daarna
uden.
nd
ie afbeelding F).
haal het
zie afbeelding I)
de beugel op
draai daarna
uden.
ien. Herlaad
s de plaatselijke
kinderen.
verschijnt op he
en lange piepto
.
.
t
n
V. 02 – 0
/10/2012
15
©Velleman
v
Page 16
CAMCOLVC18
3. Duw het klepje van het batterijvak [9] naar beneden om het batterijvak
te openen.
4. Plaats twee nieuwe alkalinebatterijen type AA van 1.5 V (LR6, niet
meegelev.) conform de polariteitsymbolen aangegeven binnenin het
batterijvak. Gebruik enkel batterijen van hetzelfde type en merk.
5. Sluit het batterijvak.
6. Draai de kap [1] opnieuw vast op de achterkant van de camera.
7.2 In –en uitschakelen
Om de camera in te schakelen, houd de aan/uit-knop 2 seconden
ingedrukt. U hoort een pieptoon en het scherm licht op.
Het scherm geeft de resterende opnametijd weer in uren en minuten.
Opmerking: Is de geheugenkaart vol, of is er geen geheugenkaart in de
camera, dan verschijnt er “FULL” op scherm.
Om de camera uit te schakelen, houd de aan/uit- knop 2 seconden
ingedrukt. Op het scherm verschijnt “OFF” en u hoort een pieptoon. De
camera schakelt uit na 1 seconde.
7.3 Geheugenkaart
Aanbevelingen:
• Gebruik snelle SD-kaarten voor het beste resultaat en kwaliteit.
• Formatteer de geheugenkaart voor gebruik.
Een geheugenkaart plaatsen
1. Zorg ervoor dat de camera uitgeschakeld is.
2. Draai de kap [1] los van de achterkant van de camera.
3. Plaats een SD-kaart (niet meegelev.) in het kaartslot [7]. Duw de kaart
naar binnen, totdat deze op zijn plaats vastklikt.
4. Om de SD-kaart opnieuw te verwijderen, duw voorzichtig tegen de
kaart tot deze uit de sleuf springt.
5. Draai de kap [1] opnieuw op de achterkant van de ca mera.
Een geheugenkaart formatteren
Opgelet: Formatteren wist alle gegevens op de geheugenkaart. Indien
nodig, sluit de camera aan op een pc om een back-up te nemen vóór het
formatteren.
1. Zorg ervoor dat de camera uitgeschakeld is.
2. Plaats de geheugenkaart in het kaartslot [7].
3. Schakel de camera in.
4. Houd de opnameknop 5 seconden ingedrukt.
Op het scherm verschijnt “FOR” ( voor “formatting’).
5. Wacht totdat het scherm de resterende opnametijd opnieuw weergeeft.
De geheugenkaart is nu leeg en gebruiksklaar.
V. 02 – 02/10/2012 16 ©Velleman nv
Page 17

CAMCOLVC18
7.4 Configuratie
De videoresolutie instellen
U kunt de resolutie van de opgenomen video instellen op 720p (1280×720)
of VGA (640x480).
Om de resolutie in te stellen:
1. Schakel de camera in.
2. Houd de menuknop 2 seconden ingedrukt.
Het icoontje 720p knippert.
3. Druk eenmaal op de opnameknop om over te schakelen naar VGA-
modus. Het VGA-icoontje knippert.
4. Druk op de menuknop om te bevestigen.
Opmerking: De resterende opnametijd wordt aangepast aan de resolutie. U
kunt langer opnemen in VGA-modus (lagere resolutie) dan in 720p-modus.
Datum en tijd instellen
1. Schakel de camera in.
2. Houd de menuknop 2 seconden ingedrukt.
Het icoontje 720p knippert.
3. Druk herhaaldelijk op de opnameknop totdat het scherm “ALL”
weergeeft.
4. Houd de menuknop 2 seconden ingedrukt.
“Y” (voor “year”) en het derde cijfer van het jaartal knipperen op het
scherm.
5. Druk herhaaldelijk op de opnameknop om het cijfer in te stellen. Druk
daarna op de menuknop om te bevestigen en verder te gaan met het
volgend cijfer.
6. Herhaal deze stappen voor het instellen van het laatste cijfer van het
jaartal, maand (“M”), dag (“D”), uur (“H”), en minuten (“M”).
De camera keert terug naar de opnamemodus na het instellen van alle
cijfers.
7.5 Video-opname
Normale opname
1. Zorg ervoor dat er een geheugenkaart geplaatst is in de camera.
2. Schakel de camera in. De resterende opnametijd wordt op het scherm
weergegeven.
3. Druk op de opnameknop om met de opname te beginnen.
De achtergrondverlichting van het scherm knippert. De opnametijd
wordt rechtsonder op het scherm weergegeven in minuten en seconden.
Het videobestand wordt om de 5 minuten opgeslagen.
V. 02 – 02/10/2012 17 ©Velleman nv
Page 18

CAMCOLVC18
4. Druk nogmaals op de opnameknop om de opname te stoppen.
De achtergrondverlichting van het scherm begint te knipperen. De
resterende opnametijd wordt op het scherm weergegeven.
Opmerking: Wanneer de geheugenkaart vol is, verschijnt er “FULL” op het
scherm en de camera stopt de opname.
Doorlopende lusopname
Als u de camera gebruikt met een USB-lader, dan kunt u doorlopend
opnemen. Het videobestand wordt om de 2 minuten opgeslagen. Wanneer
de geheugenkaart vol is, worden de oudste bestanden overschreven.
Opgelet: Zorg ervoor dat de lader voldoet aan de specificaties van de
camera (3 VDC, 2.0 W).
Er bestaan 2 mogelijkheden:
• Camera is uitgeschakeld, batterijen zijn geplaatst: Sluit de camera aan
op een geschikte USB-lader (3 VDC, 2.0 W). De camera schakelt in en
en start de doorlopende lusopname automatisch. Druk op de
opnameknop om de opname te stoppen. Wanneer u de USB-lader
loskoppelt, stopt de camera met de opname en schakelt uit na 2
seconden.
• Camera is uitgeschakeld, geen batterijen: Sluit de camera aan op een
geschikte USB-lader (3 VDC, 2.0 W). Na 6 seconden schakelt de camera
in en start de doorlopende lusopname automatisch. Druk op de
opnameknop om de opname te stoppen. Wanneer u de USB-lader
loskoppelt, schakelt de camera onmiddellijk uit.
7.6 Video afspelen
Afspelen op tv
1. Schakel de camera in.
2. Draai de kap [1] los van de achterkant van de camera.
3. Sluit de zwarte connector van de videokabel (meegeleverd) aan op de
video-uitgang [8] van de camera.
4. Verbind het andere uiteinde (gele, rode, witte connectoren) van de
kabel met de overeenstemmende RCA-aansluitingen van uw tv.
Het scherm geeft “AU” weer.
5. Zorg ervoor dat de tv is ingesteld op het juiste kanaal.
6. Op de camera, druk op de menuknop om het gewenste videobestand af
te spelen.
7. Druk op de opnameknop om het afspelen te starten.
8. Druk op de opnameknop om te onderbreken/verder te gaan.
9. Druk op de menuknop om het afspelen te stoppen. U kunt nu een ander
videobestand selecteren om af te spelen.
Tip: Tijdens het afspelen op tv, kunt u het videobestand snel wissen van de
geheugenkaart door de menuknop ingedrukt te houden. Staan er geen
bestanden op de geheugenkaart, dan verschijnt er “NO FILE” op het tvscherm.
V. 02 – 02/10/2012 18 ©Velleman nv
Page 19

CAMCOLVC18
Afspelen op pc
1. Draai de kap [1] los van de achterkant van de camera.
2. Sluit één uiteinde van de USB-kabel (meegeleverd) aan op de mini
USB-poort [6] van de camera.
3. Sluit het andere uiteinde aan op een vrije USB-poort op uw computer.
Op het camerascherm verschijnt “PC”.
4. Op de pc, open My Computer en zoek naar de drive van de camera.
Van hieruit kunt u de bestanden kopiëren, verwijderen of bekijken.
Opmerking: om de camera los te koppelen van de pc, gebruik de Windowsfunctie Safely Remove Hardware om het toestel te deactiveren voordat u
de USB-kabel loskoppelt.
7.7 Videobestanden wissen
Opgelet: Maak eerst een back-up van de videobestanden naar uw pc,
indien nodig.
1. Zorg ervoor dat de video-opname is stopgezet.
2. Houd de menuknop 2 seconden ingedrukt.
3. Druk herhaaldelijk op de opnameknop.
Op het scherm verschijnt ”D” (voor “delete”). Op het scherm knippert,
sequentieel:
o “NO”: druk op de opnameknop om naar de volgende optie te gaan.
o “ONE”: druk op de menuknop om het laatst opgenomen
videobestand te wissen. “ONE” stopt met knipperen tijdens het
wissen van het bestand. Wacht totdat “ONE” opnieuw knippert: dan
u kunt het volgende opgenomen videobestand wissen. Of, druk op
de opnameknop om het menu te verlaten.
o “ALL”: druk op de menuknop om alle opgeslagen videobestanden te
wissen. “ALL” stopt met knipperen tijdens het wissen van de
bestanden. Wacht totdat “ALL” opnieuw knippert, druk daarna op
de opnameknop om het menu te verlaten.
7.8 Als webcam gebruiken
U kunt de camera als webcam gebruiken als u de meegeleverde software
installeert.
1. Zorg ervoor dat de camera niet aangesloten is op uw pc.
2. Plaats de meegeleverde CD in het cd-romstation van uw computer.
3. Lokaliseer en dubbelklik op het STK03N-icoontje op de cd-rom.
4. Volg de instructies in de installatiewizard.
5. Schakel de camera uit, wanneer de software geïnstalleerd is.
6. Draai de kap [1] los van de achterkant van de camera.
7. Sluit één uiteinde van de USB-kabel (meegeleverd) aan op de mini
USB-poort [6] van de camera.
V. 02 – 02/10/2012 19 ©Velleman nv
Page 20

CAMCOLVC18
8. Terwijl u de menuknop ingedrukt houdt, sluit de camera aan op een
vrije USB-poort op uw computer.
9. Laat de menuknop pas los wanneer u een pieptoon hoort en het
camerascherm oplicht. Op het scherm verschijnt “PC”.
Windows® herkent het toestel automatisch en installeert de driver.
Afhankelijk van de instellingen, geeft Windows het bericht (of niet)
“Your new hardware is installed and ready for use” ("Uw nieuwe
hardware is geïnstalleerd en is gebruiksklaar").
De camera kan nu gebruikt worden als webcam.
8. Problemen oplossen
Er verschijnt niets op het scherm
Zorg ervoor dat de batterijen correct geplaatst zijn.
Vervang lege batterijen.
De camera schakelt automatisch uit
De batterijen zijn leeg. Vervang deze onmiddellijk.
Ik kan geen video opnemen
Zorg ervoor dat er voldoende vrije ruimte is op de geheugenkaart. Het
scherm geeft de resterende opnametijd weer.
Verifieer of de geheugenkaart niet vergrendeld is. Zorg ervoor dat de
vergrendelschakelaar aan de zijkant van de geheugenkaart in de correcte
positie staat.
De camera stopt de opname automatisch
De geheugenkaart is vol.
• Maak een back-up van de bestanden op de kaart naar uw pc, wis
daarna de bestanden op de kaart om vrije ruimte te creëren.
• Plaats een nieuwe, lege kaart.
De camera is aangesloten op mijn pc, maar ik kan deze niet
terugvinden in My Computer
Zorg ervoor dat elk uiteinde van de USB-kabel goed aangesloten is. Verifieer
of de USB-poort op de pc correct werkt. Probeer om een ander USB-toestel
aan te sluiten en controleer of dit goed functioneert. Is dit niet het geval,
dan is het mogelijk dat de USB-poort slecht functioneert.
De video speelt niet af op mijn tv
Zorg ervoor dat elk uiteinde van de videok abel goed aangesloten is.
Verifieer of de camera ingeschakeld is.
De resterende opnametijd is onnauwkeurig
De resterende opnametijd is slechts een schatting. De opnametijd hangt niet
enkel af van de reeds opgenomen tijd, maar ook van de omstandigheden
van de opname. Een opname in omstandigheden met een hoog contrast,
V. 02 – 02/10/2012 20 ©Velleman nv
Page 21

CAMCOLVC18
zoals buitenshuis, vereist meer geheugenruimte dan een opname in
omstandigheden met een laag contrast, zoals binnenshuis.
9. Reiniging en onderhoud
• Maak de buitenkant geregeld schoon met een vochtige, niet pluizende
doek. Gebruik geen alcohol of solventen.
• Gebruik een lensblazer om het stof in de lens te verwijderen, veeg
daarna zachtjes af met een droge, pluisvrije doek. Gebruik geen
huishoudelijke reinigingsproducten om de lens te reinigen.
• Verwijder de batterijen uit het apparaat als het gedurende een langere
tijd niet gebruik wordt. Oude batterijen kunnen lekken en het toestel
beschadigen.
• Verwijder de geheugenkaart uit het apparaat als het gedurende een
langere tijd niet gebruik wordt.
• Bewaar het toestel in een droge, goed geventileerde, en stofvrije ruimte
op kamertemperatuur. Stel de camera niet gedurende lange tijd bloot
aan extreem hoge temperaturen, zoals direct zonlicht. Dit zou de
behuizing en interne onderdelen van de camera kunnen beschadigen.
10. Technische specificaties
opslagcapaciteit max. 32 GB op SD-HC kaart (niet meegelev.)
opneemelement 1.3 Megapixel CMOS
kijkhoek 54°
opnameformaat MJPEG (audio PCM)
beelden per seconde 20
videoresolutie 1280 x 720 pixels
opnamecapaciteit ± 150 MB/min
voeding 2 x 1.5V AA (LR6), niet meegelev.
afmetingen Ø 47 x 110 mm
gewicht 160 g
werktemperatuur -10°C ~ 50°C
Gebruik dit toestel enkel met originele accessoires. Velleman nv is
niet aansprakelijk voor schade of kwetsuren bij (verkeerd) gebruik
van dit toestel. Voor meer informatie over dit product en de laatste
versie van deze handleiding, zie www.velleman.eu. De informatie in
deze handleiding kan te allen tijde worden gewijzigd zonder
voorafgaande kennisgeving.
Alle geregistreerde handelsmerken en handelsnamen zijn eigendom van hun
respectievelijke bezitters, en zijn enkel gebruikt als voorbeeld van de
compatibiliteit tussen onze producten en de producten van de verschillende
fabrikanten. Windows, Windows XP, Windows Vista, Windows 7, zijn
geregistreerde handelsmerken van Microsoft Corporation in de Verenigde
Staten en andere landen.
V. 02 – 02/10/2012 21 ©Velleman nv
Page 22

2
R
j
k
t
d
r
Cdjés
n
e
s
m
n
aau
v
m
r
r
a
t
j
r
v
a
O
o
m
c
t
m
d
p
è
e
é
d
h
u
C
n
m
M
i
m
p
e
m
f
o
e
c
n
e
e
p
e
e
r
g
v
o
q
e
e
u
p
t
n
e
q
C
m
u
n
n
n
n
© AUTEU
Velleman
wereldwi
handleidin
bewerken
schriftelij
1. In
Aux rési
Des info
produit
recyclage
protectio
En cas d
Nous vou
avant la
pendant l
2. Co
3. Di
Se référe
notice.
• Proté
pend
• Proté
V. 02 – 0
SRECHT
nv heeft het au
de rechten voo
g of gedeelten er
en op te slaan op
e toestemming v
roduction
ents de l'Unio
mations envir
e symbole sur l
’un appareil en
eter un appareil
ventuelles) par
électif ; une dé
les équipements
local. Il convien
de l’environne
questions, co
remercions de
ise en service
e transport, ne
signes de s
G
rder hors de la
torisées.
A
ertissement :
ouvement afin d
Il
n’y a aucune pi
pi
èces de rechang
ectives gén
à la garantie
ger contre les c
nt l’opération.
ger contre la po
/10/2012
eursrecht voor
behouden. Het i
an over te neme
een elektronisch
n de rechthebben
M
DE D’E
n européenne
nnementales
'appareil ou l'e
fin de vie peut
électrique ou él
i les déchets
hèterie traitera
usagés à votre
de respecter la
ent.
ntacter les aut
votre achat ! Lir
e l’appareil. Si l’
as l’installer et
écurité
portée des enfa
Ne pas configur
’éviter des accid
ce maintenable
éventuelles ch
rales
e service et d
ocs puissants et
ssière. Protége
CAMCOLV
22
18
deze handleidin
s niet toegestaan
, te kopiëren, te
edium zonder v
de.
PLOI
mportantes co
ballage indique
olluer l'environn
ctronique (et d
unicipaux non s
l’appareil en que
ournisseur ou à
réglementation
rités locales
la présente no
appareil a été e
onsulter votre r
ts et des person
r la caméra lors
nts.
ar l’utilisateur.
z votre revende
qualité Velle
le traiter avec c
contre la chale
. Alle
om deze
ertalen, te
orafgaande
ncernant ce
ue l’élimination
ment. Ne pas
s piles
jets au tri
stion. Renvoyer
un service de
locale relative à
our éliminatio
ice attentiveme
dommagé
vendeur.
nes non
ue vous êtes e
ommander des
ur.
an® en fin de
irconspection
r extrême.
©Velleman
la
.
t
v
Page 23

CAMCOLVC18
• Se familiariser avec le fonctionnement avant l’emploi.
• Toute modification est interdite pour des raisons de sécurité. Les
dommages occasionnés par des modifications par le client ne tombent
pas sous la garantie.
• N’utiliser qu’à sa fonction prévue. Un usage impropre annule d'office la
garantie.
• La garantie ne s’applique pas aux dommages survenus en négligeant
certaines directives de cette notice et votre revendeur déclinera toute
responsabilité pour les problèmes et les défauts qui en résultent.
• Garder cette notice pour toute référence ultérieure.
4. Caractéristiques
• caméra portable livrée avec plusieurs étriers de montage
• enregistrement sur carte SD (pas incl.)
• qualité d'enregistrement : 720p HD-video – 20 fps
• configuration facile
• livrée avec câble USB, câble A/V et étriers de montage
• boîtier résistant aux intempéries
• afficheur avec rétro-éclairage à LED blanche.
5. Description
Se référer aux illustrations en page 2 de cette notice.
1
capuchon
2
boutons de commande
2a
bouton de menu
2b
bouton d'enregistrement
2c
bouton marche/arrêt
3
afficheur
4
objectif
5
anneau en O
6
port mini-USB
7
slot pour carte SD
8
sortie vidéo
9
compartiment à piles
10
microphone
11
support de caméra
12
pince pour caméra
13
support de guidon
14
vis et boulon
15
support de casque
16
bande autoagrippante
17
serre-tête en caoutchouc
18
câble USB
19
câble vidéo
6. Installation
6.1 Connecter le support de caméra
Si le support n'a pas encore été installé, visser le support [11] dans la
partie inférieure de la caméra (voir illustration A). Le support vous permet
de fixer la caméra :
V. 02 – 02/10/2012 23 ©Velleman nv
Page 24

CAMCOLVC18
• au guidon de votre bicyclette avec le support de guidon
• à votre casque avec la bande autoagrippante, le serre-tête en
caoutchouc ou support de casque.
• ou directement sur un trépied, depuis le trou de vis dans le support.
6.2 Monter la caméra sur un guidon
1. Glisser le support de guidon [13] sur le guidon (voir illustration B).
Conseil : Si nécessaire, insérer un ou plusieurs tampons en caoutchouc
entre le support et le guidon pour garantir une adhérence maximale.
2. Fixer le support avec la vis et boulon [14] (voir illustration C).
3. Glisser le support de caméra dans le support de guidon jusqu'au déclic
(voir illustration D).
4. Ajuster l'angle de la caméra : desserrer l'anneau [5], ajuster, puis
resserrer pour maintenir fermement la é en position.
5. Pour ajuster la position du support : desserrer le boulon [14],
repositionner le support sur le guidon, puis resserrer le bouton (voir
illustration E).
6. Pour enlever la caméra du support à nouveau, presser la pince du
support de la caméra [12] et enlever la caméra du support.
6.3 Monter la caméra sur un casque avec le serre-tête en
caoutchouc
1. Enfiler le serre-tête en caoutchouc [17] à travers le support de guidon
[15] (voir illustration F).
2. Fixer le serre-tête sur le casque avec le support dans la position
souhaitée (voir illustration G).
3. S'assurer que le serre-tête s'ajuste fermement autour du casque.
4. Glisser la caméra dans le support (voir illustration H).
5. Ajuster l'angle de la caméra : desserrer l'anneau [5], ajuster, puis
resserrer pour maintenir fermement la caméra en position.
6.4 Monter la caméra sur un casque avec la bande autoagrippante
1. Enfiler la bande autoagrippante [16] à travers le support de casque
[15] (voir illustration F).
2. Placer le support sur le casque dans la position souhaitée et enfiler la
bande à travers les fentes du casque (voir illustration I).
3. Serrer la bande et fixer les extrémités pour maintenir le support en
position.
4. Glisser la caméra dans le support (voir illustration J).
5. Ajuster l'angle de la caméra : desserrer l'anneau [5], ajuster, puis
resserrer la caméra fermement en position.
V. 02 – 02/10/2012 24 ©Velleman nv
Page 25

2
m
Nere
a
e
r
e
u
s
s
r
e
ê
s
u
m
e
u
a
n
e
t
a
e
u
s
r
s
o
m
é
d
n
é
e
e
m
r
m
a
m
i
m
o
é
C
p
é
d
e
d
t
1
é
e
m
é
n
e
g
d
e
i
a
s
s
R
m
h
f
a
c
n
n
.
t
7. E
7.1 Les
Remplac
l'afficheu
s'entend
Remarq
1. S'ass
2. Dévi
3. Pous
ouvri
4. Insé
resp
la m
5. Ferm
6. Revi
7.2 All
Pour allu
pendant
L'afficheu
minutes.
Remarq
la camér
Pour étei
pendant
s'entend.
7.3 Car
Recomm
• Utilis
et qu
• Form
Insérer
1. S'ass
2. Dévi
ploi
piles
jamais perfore
charger des pile
la
réglementation
rder les piles h
G
r les piles lorsqu
. Si les piles son
t la caméra s'ét
e : Toujours re
urer que la cam
ser le capuchon
er le couvercle
r le compartime
er 2 nouvelles pi
ctant les polarit
me marque.
er le compartim
ser le capuchon
mer et éteindr
er la caméra,
nviron 2 second
r visualise la du
e : Si la carte
, l'afficheur visu
dre la caméra,
nviron 2 second
La caméra s'éte
e mémoire
ndations :
r des cartes SD
alité.
ater la carte mé
ne carte mém
urer que la cam
ser le capuchon
CAMCOLV
les piles et ne
alcalines. Se d
locale relative à
rs de la portée
e l'indicateur de
t complètement
eint automatiqu
placer toutes le
ra soit éteinte.
[1] de l'arrière
u compartimen
t à piles.
les alcalines de
s. N'employer q
nt à piles.
[1] sur l'arrière
aintenir enfonc
es. Un bip sonor
ée d'enregistre
émoire est plein
lise “FULL”.
aintenir enfonc
es. L'afficheur vi
nt après 1 seco
de haute vitess
oire avant usa
ire
ra soit éteinte.
[1] de l'arrière
18
as les jeter au f
barrasser des p
la protection de
es enfants.
pile faible
épuisées, un lon
ment après 20
s piles à la fois.
e la caméra.
à piles [9] ver
.5V type AA (L
ue des piles du
de la caméra.
le bouton marc
s'entend et l'a
ent restante en
e, ou s'il n'y a p
le bouton mar
sualise “OFF” et
de.
pour obtenir le
e.
e la caméra.
u. Ne jamais
les en respecta
l’environnement
pparaît sur
g bip sonore
econdes.
le bas pour
6, non incl.) en
ême type et de
e/arrêt
ficheur s'allume.
heures et
s de carte dans
he/arrêt
un bip sonore
meilleur résulta
t
V. 02 – 0
/10/2012
25
©Velleman
v
Page 26

CAMCOLVC18
3. Insérer une carte SD (non incl.) dans le slot pour carte mémoire [7].
Pousser la carte jusqu'au déclic.
4. Pour retirer la carte SD à nouveau, pousser doucement pour que la
carte s'éjecte.
5. Revisser le capuchon [1] sur l'arrière de la caméra.
Formater une carte mémoire
Attention : Le formatage supprimera toutes les données de la carte
mémoire. Si nécessaire, connecter la caméra à un ordinateur pour
sauvegarder les données avant de formater.
1. S'assurer que la caméra soit éteinte.
2. Insérer la carte mémoire dans l'emplacement pour carte SD [7].
3. Allumer la caméra.
4. Maintenir le bouton d'enregistrement pendant environ 5 secondes.
L'afficheur visualise “FOR” (pour “formatting’).
5. Patienter jusqu'à ce que l'afficheur visualise la durée d'enregistrement
restante à nouveau.
La carte est maintenant vide est prête à l'emploi.
7.4 Configuration
Régler la résolution vidéo
Il est possible de régler la résolution de la vidéo enregistrée sur 720p
(1280×720) ou VGA (640x480).
Pour régler la résolution :
1. Allumer la caméra.
2. Maintenir enfoncé le bouton de menu pendant 2 secondes.
L'icône 720p clignote.
3. Appuyer une fois sur le bouton d'enregistrement pour passer au
mode VGA. L'icône VGA clignote.
4. Appuyer sur le bouton de menu pour confirmer.
Remarque : La durée d'enregistrement restante s'ajuste à la résolution. Il
est possible d'enregistrer plus longtemps en mode VGA (résolution plus
basse) qu'en mode 720p.
Régler la date et l'heure
1. Allumer la caméra.
2. Maintenir enfoncé le bouton de menu pendant 2 secondes.
L'icône 720p clignote.
3. Maintenir enfoncé le bouton d'enregistrement jusqu'à ce que “ALL”
s'affiche.
4. Maintenir enfoncé le bouton de menu pendant 2 secondes.
“Y” (pour “year”) et le troisième chiffre de l'année clignotent à l'écran.
V. 02 – 02/10/2012 26 ©Velleman nv
Page 27

CAMCOLVC18
5. Appuyer plusieurs fois sur le bouton d'enregistrement pour régler le
chiffre. Puis appuyer sur le bouton de menu pour confirmer et pour
passer au chiffre suivant.
6. Répéter les étapes pour régler le dernier chiffre de l'année, le mois
(“M”), jour (“D”), heure (“H”), et minutes (“M”).
La caméra retourne au mode d'enregistrement après le réglage de tous les
chiffres.
7.5 Enregistrer un fichier vidéo
Enregistrement normal
1. S'assurer qu'une carte mémoire soit insérée dans la caméra.
2. Allumer la caméra. L'afficheur visualise la durée d'enregistrement
restante.
3. Appuyer sur le bouton d'enregistrement pour lancer l'enregistrement.
Le retro-éclairage de l'afficheur clignote. L'afficheur visualise la durée
d'enregistrement en minutes et secondes. Le fichier vidéo est
sauvegardé toutes les 5 minutes.
4. Appuyer de nouveau sur le bouton d'enregistrement pour arrêter
l'enregistrement.
Le retro-éclairage de l'afficheur s'arrête de clignoter. L'afficheur
visualise la durée d'enregistrement restante.
Conseil : Lorsque la carte mémoire est pleine, “ FULL” s'affiche et
l'enregistrement s'arrête.
Enregistrement en boucle
En utilisant la caméra avec un chargeur USB, il est possible d'enregistrer en
boucle. Le fichier vidéo est sauvegardé toutes les 2 minutes. Lorsque la
carte mémoire est pleine, les plus anciens fichiers sont écrasés.
Attention : S'assurer que le chargeur convienne aux spécifications de la
caméra (3 VCC, 2.0 W).
Il existe deux possibilités :
• Caméra est éteinte, piles sont installées : Enficher la caméra dans un
chargeur USB approprié (3 VCC, 2.0 W). La caméra s'allume et
l'enregistrement en boucle commence automatiquement. Appuyer sur le
bouton d'enregistrement pour arrêter l'enregistrement. Lorsque le
chargeur USB est déconnecté, la caméra arrêt l'enregistrement et
s'éteint après 2 secondes.
• Caméra est éteinte, pas de piles : Enficher la caméra dans un chargeur
USB approprié (3 VCC, 2.0 W). La caméra s'allume après 6 secondes et
l'enregistrement en boucle commence automatiquement. Appuyer sur le
bouton d'enregistrement pour arrêter l'enregistrement. Lorsque le
chargeur USB est déconnecté, la caméra s'éteint immédiatement.
V. 02 – 02/10/2012 27 ©Velleman nv
Page 28

CAMCOLVC18
7.6 Lecture de vidéo
Lecture sur un téléviseur
1. Allumer la caméra.
2. Dévisser le capuchon [1] de l'arrière de la caméra.
3. Enficher le connecteur noir du câble vidéo (inclus) dans la sortie vidéo
[8] de la caméra.
4. Brancher l'autre extrémité (connecteurs jaune, rouge, blanc) du câble
dans les prises RCA correspondantes de votre téléviseur.
“AU” s'affiche sur la caméra.
5. S'assurer que le téléviseur soit réglé sur le canal correct.
6. Sur la caméra, appuyer sur le bouton de menu pour sélectionner et lire
le fichier vidéo souhaité.
7. Appuyer sur le bouton d'enregistrement pour lancer la lecture.
8. Appuyer sur le bouton d'enregistrement pour interrompre/continuer la
lecture.
9. Appuyer sur le bouton de menu pour arrêter la lecture. Il est
maintenant possible de sélectionner et lire un autre fichier vidéo.
Conseil : Durant la lecture sur le téléviseur, le fichier vidéo peut rapidement
être supprimé de la carte mémoire en maintenant enfoncé le bouton de
menu. S'il n'y a pas de fichiers sur la carte mémoire, “NO FILE” s'affiche à
l'écran.
Lecture sur PC
1. Dévisser le capuchon [1] de l'arrière de la caméra.
2. Connecter une extrémité du câble USB (inclus) dans le port mini USB
[6] de la caméra.
3. Connecter l'autre extrémité à un port USB libre sur votre ordinateur.
L'afficheur de la caméra visualise “PC”.
4. Sur le pc, ouvrez My Computer et recherchez le lecteur de disque qui
représente la caméra.
Depuis ce disque, il est possible de copier, supprimer ou de visualiser les
fichiers.
Remarque : pour déconnecter la caméra du pc, utilisez la fonction Safely
Remove Hardware de Windows pour désactiver l'appareil avant de
déconnecter le câble USB.
7.7 Supprimer des fichiers vidéo
Attention : Sauvegarder d'abord les fichiers vidéo sur votre pc, si
nécessaire.
1. S'assurer que l'enregistrement vidéo se soit arrêté.
2. Maintenir enfoncé le bouton de menu pendant 2 secondes.
3. Appuyer plusieurs fois sur le bouton d'enregistrement.”D” s'affiche
(pour “delete”). Sur l'afficheur clignote, séquentiellement :
o “NO” : appuyer sur le bouton d'enregistrement pour accéder à
l'option suivante.
V. 02 – 02/10/2012 28 ©Velleman nv
Page 29

CAMCOLVC18
o “ONE” : appuyer sur le bouton d'enregistrement pour supprimer le
dernier fichier vidéo enregistré. “ONE” s'arrête de clignoter lorsque
le fichier est supprimé. Patienter jusqu'à ce que “ONE” recommence
à clignoter : après cela, il est possible de supprimer le fichier vidéo
suivant. Ou, appuyer sur le bouton d'enregistrement pour quitter le
menu.
o “ALL” : appuyer sur le bouton de menu pour supprimer tous les
fichiers vidéo enregistrés. “ALL” s'arrête de clignoter lorsque les
fichiers sont supprimés. Patienter jusqu'à ce que “ALL” recommence
à clignoter, puis appuyer sur le bouton d'enregistrement pour
quitter le menu.
7.8 Utiliser comme webcam
Il est possible d'utiliser la caméra comme webcam après l'installation du
logiciel inclus.
1. S'assurer que la caméra ne soit pas connectée à votre pc.
2. Glisser le CD inclus dans le lecteur de votre ordinateur.
3. Localiser et double-cliquer sur l'icône sur le CD-ROM.
4. Suivre les instructions de l'assistant d'installation.
5. Après l'installation du logiciel, s'assurer que la caméra soit éteinte.
6. Dévisser le capuchon [1] de l'arrière de la caméra.
7. Connecter une extrémité du câble USB (inclus) au port mini USB [6] de
la caméra.
8. En maintenant enfoncé le bouton de menu sur la caméra, connecter la
caméra à un port USB libre sur votre ordinateur.
9. Relâcher le bouton de menu uniquement lorsqu'un bip sonore s'entend
et l'afficheur de la caméra s'allume. “PC” s'affiche à l'écran.
Windows® reconnaît automatiquement l'appareil et installe le pilote.
Selon les réglages, Windows affiche (ou pas) le message “Your new
hardware is installed and ready for use” ("Votre nouveau matériel est
installé et prêt à l'emploi").
La caméra peut maintenant être utilisée comme webcam.
8. Problèmes et solutions
L'écran ne s'allume pas
S'assurer que les piles soient correctement installées.
Remplacer les piles épuisées.
La caméra s'éteint automatiquement
Les piles sont épuisées. Remplacer-les immédiat eme nt .
Impossible d'effectuer un enregistrement vidéo
S'assurer que la carte mémoire contienne suffisamment d'espace libre.
L'écran affiche la durée d'enregistrement restante.
V. 02 – 02/10/2012 29 ©Velleman nv
Page 30

CAMCOLVC18
S'assurer que la carte mémoire ne soit pas verrouillée. Vérifier si
l'interrupteur de verrouillage sur le côté de la carte mémoire soit placé dans
la position correcte.
L'enregistrement s'arrête automatiquement
La carte mémoire est pleine.
• Sauvegarder les fichiers sur la carte vers votre pc, puis supprimer des
fichiers sur la carte pour créer d'espace libre.
• Insérer une nouvelle carte vide.
La caméra est connectée à mon ordinateur, mais l'icône ne s'affiche
pas dans My Computer
S'assurer que chaque extrémité du câble USB soit fermement raccordée.
Vérifier si le port USB sur le pc fonctionne proprement. Essayer de connecter
un autre périphérique USB et contrôler si celui-ci fonctionne bien. Si cela
n'est pas le cas, cela indique que le port USB dysfonctionne.
Impossible de lire un enregistrement vidéo sur mon téléviseur
S'assurer que chaque extrémité du câble vidéo soit fermement raccordée.
S'assurer que la caméra soit allumée.
La durée d'enregistrement restante est imprécise
La durée d'enregistrement restante n'est qu'une estimation. La durée
d'enregistrement ne dépend non seulem ent de la durée d'enregistrement
mais également des conditions de l'enregistrement. Sous des conditions
d'un niveau de contraste élevé, tel qu'à l'extérieur, la durée
d'enregistrement réelle disponible sera inférieure à celle d'un
enregistrement sous un faible niveau de contraste, comme à l'intérieur.
9. Nettoyage et entretien
• Essuyer l’extérieur régulièrement avec un chiffon humide non
pelucheux. Éviter l’usage d’alcool et de solvants.
• Utiliser un souffleur pour enlever la poussière dans la lentille, puis
effacer doucement avec un chiffon non pelucheux. N'utiliser pas de
détergents ménagers pour nettoyer la lentille.
• Retirer les piles si l'appareil n'est pas utilisé durant une longue durée.
Des piles usées peuvent fuir et endommager l'appareil.
• Retirer la carte mémoire si l'appareil n'est pas utilisé durant une longue
durée.
• Stocker l'appareil dans un endroit sec, bien ventilé, et sans poussière à
température de chambre. N'exposer pas l'appareil à des températures
très élevées, aux rayons directs du soleil pendant des périodes
prolongées. Cela risquerait d'endommager le boîtier et les composants
internes de la caméra.
V. 02 – 02/10/2012 30 ©Velleman nv
Page 31

CAMCOLVC18
10. Spécifications techniques
capacité de mémoire max. 32 Go sur carte SD-HC (non incl.)
capteur 1.3 Mégapixels CMOS
angle de vue 54°
format d'enregistrement MJPEG (audio PCM)
images par seconde 20
résolution vidéo 1280 x 720 pixels
capacité d'enregistrement ± 150 MB/min
alimentation 2 x pile de 1.5V type R6 (LR6), non incl.
dimensions Ø 47 x 110 mm
poids 160 g
température de service -10°C ~ 50°C
N’employer cet appareil qu’avec des accessoires d’origine. La SA
Velleman ne peut, dans la mesure conforme au droit applicable être
tenue responsable des dommages ou lésions (directs ou indirects)
pouvant résulter de l’utilisation de cet appareil. Pour plus
d’information concernant cet article et la dernière version de cette
notice, visiter notre site web www.velleman.eu. Toutes les
informations présentées dans cette notice peuvent être modifiées
sans notification préalable.
Les marques déposées et les raisons sociales sont la propriété de leurs
détenteurs respectifs, et sont uniquement utilisées dans le but de démontrer
la compatibilité entre nos articles et les articles des fabricants. Windows,
Windows XP, Windows Vista, Windows 7, sont des marques déposées de
Microsoft Corporation aux Etats-Unis et dans d'autres pays.
© DROITS D’AUTEUR
SA Velleman est l’ayant droit des droits d’auteur pou r cette notice. Tous
droits mondiaux réservés. Toute reproduction, traduction, copie ou diffusion,
intégrale ou partielle, du contenu de cette notice par quelque procéd é ou sur tout
support électronique que se soit est interdite sans l’accord préalable écrit de
l’ayant droit.
V. 02 – 02/10/2012 31 ©Velleman nv
Page 32

2
t
d
n
d
d
p
e
o
s
dev
o
r
G
e
a
x
l
a
n
r
e
n
m
o
U
U
o
i
r
e
p
e
a
a
d
a
r
i
a
r
n
c
a
u
p
n
C
m
e
s
i
i
V
S
a
d
n
e
e
a
i
l
a
I
a
b
e
e
i
p
a
c
d
e
u
n
d
n
n
a
e
y
t
t
S
CAMCOLV
18
1. In
A los ciu
Importa
este pro
Si tiene
¡Gracias
instruccio
daño en
distribuid
2. In
3. No
Véase la
manual d
• Prote
el m
• No e
temp
• Fami
• Por r
está
auto
• Utilic
uso i
• Los d
este
resp
V. 02 – 0
MAN
roducción
adanos de la
tes informaci
ucto
Este símbolo en
muestras inserv
No tire este apa
doméstica; deb
Devuelva este a
local. Respete la
udas, contact
or haber compr
nes del manual
l transporte no l
r.
trucciones
M
antenga el apar
ni
ños.
A
vertencia: No
itar accidentes.
El
usuario no hab
C
ntacte con su d
mas gener
arantía de se
l usuario.
ge el aparato co
nejo y la instala
ponga este equi
eraturas extrem
iarícese con el f
zones de seguri
prohibidas. Los
izadas, no están
sólo el aparato
correcto anula l
años causados
anual invalidar
nsable de ningú
/10/2012
AL DEL
nión Europea
nes sobre el
este aparato o
bles, podrían da
ato (ni las pilas,
ir a una empre
arato a su distr
s leyes locales e
con las autor
do la CAMCOL
ntes de usarla.
o instale y póng
e segurida
to lejos del alca
configure la cám
á de efectuar el
stribuidor si nec
les
vicio y calidad
tra los choques.
ión.
po a polvo. No e
s.
ncionamiento d
dad, las modific
daños causados
cubiertos por la
para las aplicac
a garantía comp
or descuido de l
án su garantía y
daño u otros p
32
USUAR
edio ambiente
l embalaje indic
ñar el medio am
si las hubiera)
a especializada
buidor o a la un
n relación con el
dades locales
C18! Lea atent
i el aparato ha
se en contacto
ce de personas
ara si está en m
mantenimiento
sita piezas de r
Velleman ® al
Evite usar exces
xponga este eq
l aparato antes
ciones no autori
por modificacio
garantía.
ones descritas e
etamente.
s instrucciones
su distribuidor
roblemas resulta
O
concerniente
que, si tira las
iente.
n la basura
n reciclaje.
dad de reciclaje
medio ambient
ara residuos.
mente las
sufrido algún
on su
no capacitadas
ovimiento para
e ninguna pieza
cambio.
final de este
iva fuerza duran
ipo a
de utilizarlo.
zadas del apara
es no
n este manual.
e seguridad de
o será
ntes.
©Velleman
.
.
e
o
u
v
Page 33

CAMCOLVC18
• Guarde este manual del usuario para cuando necesite consultarlo.
4. Características
• la cámara portátil se entrega con varios soportes de montaje
• grabación en tarjeta SD (no incl.)
• calidad de grabación: 720p HD video – 20 fps
• fácil configuración
• se entrega con cable USB, cable A/V y soportes de montaje
• resistente a la intemperie
• retroiluminación con LEDs blancos.
5. Descripción
Véase las figuras en la página 2 de este manual del usuario.
1
tapa
2
botones de control
2a
botón del menú
2b
botón de grabación
2c
botón ON/OFF
3
pantalla
4
óptica
5
anillo
6
puerto mini-USB
7
ranura para tarjeta SD
8
salida de vídeo
9
compartimiento de pilas
10
micrófono
11
soporte base
12
enganches del soporte base
13
soporte de manillar
14
tornillo y tuerca
15
soporte de casco
cinta con cierre de gancho y
16
bucle
17
correa de caucho
18
cable USB
19
cable de vídeo
6. Instalación
6.1 Conectar la base de la cámara
Si todavía no está hecho, atornille el soporte base [11] a la parte inferior de
la cámara (véase fig. A). Utilice el soporte base para montar la cámara:
• en el manillar de su bicicleta con el soporte de manillar
• en un casco con el soporte de casco y la cinta con cierre de gancho y
bucle o la correa de caucho
• o directamente en un trípode con los agujeros de tornillo de la base.
6.2 Montar la cámara en un manillar
1. Deslice el soporte de manillar [13] sobre el manillar (véase fig. B).
Consejo: Si fuera necesario, coloque uno o más almohadillas de goma
entre el soporte y el manillar para asegurar una buena fijación.
V. 02 – 02/10/2012 33 ©Velleman nv
Page 34

2
e
c
s
o
u
f
s
n
c
a
ú
c
o
u
n
u
e
a
e
c
o
u
o
Nu
m
t
s
n
e
c
G
c
e
l
n
e
r
t
o
e
l
n
a
C
t
c
e
a
a
s
n
s
o
e
e
a
n
a
e
e
a
h
g
i
á
r
h
c
n
c
a
á
a
á
c
n
a
t
t
o
o
t
s
2. Fije
3. Desli
que
4. Ajust
Lueg
en s
5. Ajust
modi
(véa
6. Para
base
6.3 Mo
1. Pase
fig. F
2. Desli
dese
3. Aseg
4. Desli
5. Ajust
Lueg
en s
6.4 Mo
y b
1. Pase
[15]
2. Fije
por l
3. Tens
4. Desli
5. Ajust
Lueg
en s
7. Us
7.1 Las
l soporte con el
e el soporte ba
e encaje (véase
ar la posición de
, vuelva a ator
lugar.
ar la posición de
ique la posición.
e fig. E).
sacar la cámara
[12] y saque la
tar la cámara
la correa de cau
).
e la correa sobr
da (véase fig.
rese de que la
e la cámara en
e la posición de
, vuelva a ator
lugar.
tar la cámara
cle
la cinta con cier
(véase fig. F).
l soporte al casc
s rejillas de ven
la cinta y una l
e la cámara en
e la posición de
, vuelva a ator
lugar.
pilas
nca perfore las
calinas. Respete
al
a
biente al tirar l
ni
ños.
CAMCOLV
ornillo y la tuer
e de la cámara
fig. D).
la cámara: Suel
illar el anillo par
l soporte: suelte
Luego, vuelva
del soporte, pre
cámara deslizán
n un casco co
ho [17] por el
e el casco y colo
).
orrea esté fijad
l soporte (véas
a cámara: Suelt
illar el anillo par
n un casco co
e de gancho y b
o y colóquelo en
ilación (véase fi
s extremos par
l soporte (véas
a cámara: Suelt
illar el anillo par
pilas y no las ec
las leyes locales
s pilas. Manten
18
a [14] (véase f
n el soporte de
te el anillo [5] y
mantener la c
la tuerca y el to
atornillar la tue
ione los enganc
dola.
la correa de
oporte de casco
que el soporte e
firmemente al
fig. H).
el anillo [5] y
mantener la c
la cinta con c
ucle [16] por el
la posición dese
g. I).
mantener el so
fig. J).
el anillo [5] y
mantener la c
e al fuego. Nun
en relación con
a las pilas lejos
g. C).
manillar hasta
ajuste la cámar
mara firmemen
nillo [14] y
rca y el tornillo
es del soporte
aucho
[15] (véase
la posición
asco.
juste la cámara
mara firmemen
ierre de ganch
soporte de casc
ada. Pase la cint
porte en su luga
juste la cámara
mara firmemen
a recargue pila
el medio
del alcance de
.
e
.
e
a
r.
.
e
V. 02 – 0
/10/2012
34
©Velleman
v
Page 35

CAMCOLVC18
Reemplace las pilas en cuanto aparezca el i cono de batería baja en la
pantalla. Si las pilas están completamente agotadas, oirá un pitido largo y la
cámara se desactiva automáticamente después de 20 segundos.
Observación: Cambie siempre todas las pilas al mismo tiempo.
1. Asegúrese de que la cámara esté desactivada.
2. Desatornille la tapa [1] de la parte trasera de la cámara.
3. Empuje el compartimiento de pilas [9] hacia abajo para abrirlo.
4. Introduzca 2 pilas alcalinas tipo AA, de 1.5 V (LR6, no incl.). Respete la
polaridad. Utilice sólo pilas del mismo tipo y de la misma marca.
5. Cierre el compartimiento de pilas.
6. Vuelva a fijar la tapa [1] a la parte trasera de la cámara.
7.2 Activar y desactivar la cámara
Para activar la cámara, mantenga pulsado el botón ON/OFF unos
2 segundos. La cámara emite un sonido y la pantalla se ilumina.
La pantalla visualiza el tiempo de grabación restante en horas y minutos.
Observación: La pantalla visualiza “FULL” si la tarjeta de memoria está
llena o si no ha introducida una tarjeta de memoria en la cámara.
Para desactivar la cámara, mantenga pulsado el botón ON/OFF unos
2 segundos. La pantalla visualiza “OFF” y oirá un sonido. La cámara se
desactiva después de 1 segundo.
7.3 Tarjeta de memoria
Recomendaciones:
• Utilice tarjetas SD de alta velocidad para obtener el rendimiento
máximo y la mejor calidad.
• Formatee la tarjeta de memoria antes de utilizarla.
Introducir una tarjeta de memoria
1. Asegúrese de que la cámara esté desactivada.
2. Desatornille la tapa [1] de la parte trasera de la cámara.
3. Introduzca la tarjeta SD (no incl.) en la ranura [7]. Introdúzcala
presionando hasta donde sea posible.
4. Para quitar la tarjeta SD, empuje la tarjeta cuidadosamente para que
salga.
5. Vuelva a fijar la tapa [1] a la parte trasera de la cámara.
Formatear una tarjeta de memoria
Advertencia: Se borran todos los datos al formatear la tarjeta. Si fuera
necesario, conecte la cámara al PC para hacer una copia de seguridad de los
ficheros antes de borrarlos.
1. Asegúrese de que la cámara esté desactivada.
2. Introduzca la tarjeta de memoria en la ranura [7].
3. Active la cámara.
V. 02 – 02/10/2012 35 ©Velleman nv
Page 36

CAMCOLVC18
4. Pulse el botón de grabación unos 5 segundos.
La pantalla visualiza “FOR” (“formatting”).
5. Espere hasta que la pantalla visualice el tiempo de grabación restante.
Ahora, la tarjeta está vacía y lista para utilizar.
7.4 Configuración
Ajustar la resolución
Es posible ajustar la resolución del vídeo grabado: 720p (1280×720) o VGA
(640x480).
Para ajustar la resolución:
1. Active la cámara.
2. Mantenga pulsado el botón del menú 2 segundos.
El icono para 720p parpadea.
3. Pulse el botón de grabación una vez para cambiar a VGA. El icono
VGA parpadea.
4. Pulse el botón del menú para confirmar.
Observación: El tiempo de grabación restante depende de la resolución
seleccionada. Puede grabar más tiempo en el modo VGA (resolución más
baja) que en el modo 720p.
Ajustar la fecha y la hora
1. Active la cámara.
2. Mantenga pulsado el botón del menú 2 segundos.
El icono para 720p parpadea.
3. Pulse el botón de grabación varias veces hasta que “ALL” aparezca en la
pantalla.
4. Pulse el botón del menú 2 segundos.
“Y” (“year”) y el tercer dígito del año parpadean en la pantalla.
5. Pulse el botón de grabación varias veces para ajustar el dígito. Luego,
pulse el botón del menú para confirmar y para ir al dígito siguiente.
6. Repita para introducir el último dígito del año, el mes (“M”), el día
(“D”), la hora (“H”) y los minutos (“M”).
La cámara vuelve al modo de grabación después de que haya introducido
todos los dígitos.
7.5 Grabar
Grabación normal
1. Asegúrese de que haya introducido la tarjeta SD en la cámara.
2. Active la cámara. La pantalla visualiza el tiempo de grabación restante.
3. Pulse el botón de grabación para activar la grabación.
La iluminación parpadea. La pantalla visualiza el tiempo de grabación en
V. 02 – 02/10/2012 36 ©Velleman nv
Page 37

CAMCOLVC18
minutos y segundos. La cámara almacena un fichero de vídeo cada
5 minutos.
4. Vuelva a pulsar el botón de grabación para desactivar la grabación.
La iluminación para de parpadear. La pantalla visualiza el tiempo de
grabación restante.
Observación: Si la tarjeta está llena, “FULL” aparece en la pantalla y se
desactiva la grabación.
Grabación en bucle
Es posible grabar de manera continua si utiliza la cámara con un cargador
USB. La cámara guardará un fichero de vídeo cada 2 minutos. Se sobreescriben las grabaciones más viejas si la tarjeta de memoria está llena.
Advertencia: Asegúrese de que el cargador coincide con las
especificaciones de la cámara (3 VDC, 2.0 W).
Hay dos posibilidades:
• La cámara está desactivada, las pilas están instaladas: Conecte la
cámara a un cargador USB adecuado (3 VDC, 2.0 W). La cámara se
activa y empieza a grabar en bucle automáticamente. Pulse el botón de
grabación para desactivar la grabación. La cámara para de grabar y se
desactiva después de 2 segundos al desconectar el cargador USB.
• La cámara está desactivada, las pilas no están instaladas: Conecte la
cámara a un cargador USB adecuado (3 VDC, 2.0 W). La cámara se
activa después de 6 segundos y empieza a grabar en bucle
automáticamente. Pulse el botón de grabación para desactivar la
grabación. La cámara se desactiva inmediatamente al descon ect ar el
cargador USB.
7.6 Reproducir un vídeo
Reproducir un vídeo en la TV
1. Active la cámara.
2. Desatornille la tapa [1] de la parte trasera de la cámara.
3. Introduzca el conector negro del cable de vídeo (incl.) en la salida de
vídeo [8] de la cámara.
4. Introduzca el otro extremo (conector amarillo, rojo, blanco) del cable en
las entradas RCA del TV.
La cámara de pantalla visualiza “AU”.
5. Asegúrese de que la TV esté en el canal correcto.
6. En la cámara, pulse el botón del menú para seleccionar el vídeo que
quiere reproducir.
7. Pulse el botón de grabación para activar la reproducción.
8. Pulse el botón de grabación para hacer una pausa/continuar.
9. Pulse el botón del menú para desactivar la reproducción. Ahora, puede
seleccionar otro fichero de vídeo para reproducir.
Consejo: Durante la reproducción, puede borrar un fichero de vídeo
rápidamente de la tarjeta de memoria al mantener pulsado el botón del
V. 02 – 02/10/2012 37 ©Velleman nv
Page 38

CAMCOLVC18
menú. La TV visualiza “NO FILE” si la tarjeta de memoria no incluye
ficheros.
Reproducir un vídeo en el PC
1. Desatornille la tapa [1] de la parte trasera de la cámara.
2. Introduzca un extremo del cable USB (incl.) en el puerto mini-USB [6]
de la cámara.
3. Introduzca el otro extrema en un puerto USB libre del PC.
La pantalla de la cámara visualiza “PC”.
4. En el PC, abra My Computer y busque la unidad de disco de la cámara.
Aquí, es posible copiar, borrar o ver los ficheros.
Observación: Para desconectar la cámara del PC y antes de desconectar el
cable USB, utilice la función Safely Remove Hardware de Windows.
7.7 Borrar ficheros de vídeo
Advertencia: Primero, si fuera necesario, haga una copia de seguridad.
1. Asegúrese de que ha desactivado la grabación.
2. Mantenga pulsado el botón del menú 2 segundos.
3. Pulse el botón de grabación varias veces.
La pantalla visualiza ”D” (“delete”). En la pantalla parpadea, en
secuencia:
o “NO”: Pulse el botón de grabación para ir a la opción siguiente.
o “ONE”: Pulse el botón del menú para borrar el último vídeo
grabado. “ONE” para de parpadear mientras que la cámara borra el
fichero. Espere hasta que “ONE” vuelva a parpadear: Luego, puede
borrar el siguiente vídeo. O, pulse el botón de grabación para salir.
o “ALL”: Pulse el botón del menú para borrar todos los ficheros
grabados. “ALL” para de parpadear mientras que la cámara borra
los ficheros. Espere hasta que “ALL” vuelva a parpadear. Luego,
pulse el botón de grabación para salir.
7.8 Utilizar el aparato como cámara web
Es posible utilizar la cámara como cámara web si instala el software
incluido.
1. Asegúrese de que la cámara no esté conectada al PC.
2. Introduzca el CD incluido en el lector de CD-ROM.
3. Haga clic dos veces en el icono STK03N del CD-ROM.
4. Siga las instrucciones del asistente de instalación.
5. Asegúrese de que la cámara esté desactivada al instalar el software.
6. Desatornille la tapa [1] de la parte trasera de la cámara.
7. Introduzca un extremo del cable USB (incl.) en el puerto mini-USB [6]
de la cámara.
8. Introduzca la cámara en un puerto USB libre del PC mientras que
mantiene pulsado el botón del menú de la cámara.
V. 02 – 02/10/2012 38 ©Velleman nv
Page 39

CAMCOLVC18
9. Suelte el botón del menú sólo después de que haya oído un tono y que
la pantalla de la cámara se ilumine. La pantalla visualiza “PC”.
Windows® reconoce el aparato automát icamente e instale el driver.
Dependiendo de los ajustes, Windows visualiza (o no) el siguiente
mensaje “Your new hardware is installed and ready for use”.
Ahora, la cámara está lista para utilizar como cámara web.
8. Solución de problemas
No se visualiza nada en la pantalla
Asegúrese de que haya instalado las pilas correctamente.
Reemplace las pilas agotadas.
La cámara se desactiva automáticamente
Las pilas están agotadas. Reemplácelas inmediatamente.
No es posible grabar un vídeo
Asegúrese de que haya suficiente espacio libre en la tarjeta de memoria. La
pantalla indica el tiempo de grabación restante.
Asegúrese de que la tarjeta de memoria no esté bloqueada. Asegúrese de
que el interruptor de bloqueo del lateral de la tarjeta de memoria esté en la
posición correcta.
La cámara para de grabar automáticamente
La tarjeta de memoria está llena.
• Primero, haga una copia de seguridad. Luego, borre unos ficheros de la
tarjeta para crear espacio libre.
• Introduzca una tarjeta nueva y vacía.
No encuentras la cámara en “My Computer” después de haberla
conectado al PC
Asegúrese de que cada extremo del cable USB esté correctamente
conectado.
Asegúrese de que el puerto USB del PC funcione correctamente. Conecte
otro aparato USB para controlar el funcionamiento. Si no fuera el caso, el
puerto USB no funciona correctamente.
No es posible reproducir el vídeo en la TV
Asegúrese de que cada extremo de cable de vídeo esté conectado
correctamente.
Asegúrese de que la cámara esté activada.
No es correcto el tiempo de grabación restante
El tiempo de grabación restante es un tiempo estimado. No sólo depende
del tiempo que ya ha grabado, sino también de las condiciones de
grabación. Grabar en condiciones de alto contraste (p.ej. en exteriores)
requiere más espacio que grabar en condiciones de bajo contraste (p.ej. en
interiores).
V. 02 – 02/10/2012 39 ©Velleman nv
Page 40

CAMCOLVC18
9. Limpieza y mantenimiento
• Limpie el exterior del aparato con un paño húmedo sin pelusas. Evite el
uso de alcohol y de disolventes.
• Utilice un cepillo soplador para eliminar el polvo y limpie la lente con un
paño suave sin pelusas. Do not use household detergents to clean the
lens.
• Quite las pilas del aparato si no va a utilizarlo durante un largo período
de tiempo. Pilas agotadas pueden tener fugas y dañar el aparato.
• Quite la tarjeta de memoria del aparato si no va a utilizarlo durante un
largo período de tiempo.
• Guarde el aparato en un lugar seco, bien aireado y sin polvo a
temperatura ambiente. No exponga la cámara a temperaturas extremas
ni a la luz directa del sol durante un período prolongado. Esto puede
causar daños permanentes en los componentes internos de la cámara.
10. Especificaciones
capacidad de memoria tarjeta SD-HC, máx. 32 GB (no incl.)
elemento de imagen 1.3 Megapíxeles CMOS
ángulo de visión 54°
formato de grabación MJPEG (audio PCM)
imágenes por segundo 20
resolución vídeo 1280 x 720 píxeles
capacidad de grabación ± 150 MB/min.
alimentación 2 x pila AA de 1.5V (LR6), no incl.
dimensiones Ø 47 x 110 mm
peso 160 g
temperatura de funcionamiento -10°C ~ 50°C
Utilice este aparato sólo con los accesorios originales. Velleman NV
no será responsable de daños ni lesiones causados por un uso
(indebido) de este aparato. Para más información sobre este
producto y la versión más reciente de este manual del usuario, visite
nuestra página www.velleman.eu. Se pueden modificar las
especificaciones y el contenido de este manual sin previo aviso.
Las marcas registradas y el nombre comercial son propiedad de sus
propietarios respectivos, y sólo se utilizan para mostrar la compatibilidad
entre nuestros productos y los productos de los fabricantes. Windows,
Windows XP, Windows Vista, Windows 7, son marcas comerciales o marcas
registradas de Microsoft Corporation en los Estados Unidos y otros países.
V. 02 – 02/10/2012 40 ©Velleman nv
Page 41

2
H
T
r
e
n
E
e
DdUvo
z
o
e
e
ö
n
g
p
h
r WBe
s
e
g
l
g
e
l
h
N
E
m
u
n
g
c
I
S
w
e
m
n
c
r
C
e
y
e
A
U
d
o
E
s
n
c
O
s
s
d
K
n
B
t
e
n
e
n
b
e
m
i
u
e
h
e
E
n
s
i
s
l
© DEREC
Velleman
usuario.
prohibido
partes de
OS DE AUTOR
NV dispone de
odos los derec
eproducir, traduc
llo sin previo per
CAMCOLV
os derechos de
os mundiales r
ir, copiar, editar
miso escrito del d
18
autor para este
servados. Está
guardar este ma
recho habiente.
manual del
strictamente
ual del usuario o
1. Ei
An alle
Wichtig
Händler
Respekti
Falls Zw
an Ihre
Wir beda
Bedienun
ob Trans
Gerät nic
2. Sic
3. All
Siehe Ve
Bedienun
• Verm
währ
BEDIE
führung
inwohner der
Umweltinfor
ieses Symbol a
ie Entsorgung d
mwelt Schaden
erwendeten Bat
der verwendete
wecks Recyclin
der ein örtliches
ren Sie die örtli
ifel bestehen,
rtliche Behörd
ken uns für den
sanleitung vor
ortschäden vorli
t und wenden
herheitshin
D
ücken und halt
arnung: Konfig
wegung sind, u
E
gibt keine zu w
b
i Ihrem Fachhä
emeine Ric
leman® Servi
sanleitung.
eiden Sie schwe
nd der Installat
UNGS
uropäischen
ationen über
f dem Produkt
ieses Produktes
zufügen kann.
terien) nicht als
Batterien müs
entsorgt werde
Recycling-Unter
hen Umweltvors
wenden Sie si
e.
Kauf der CAMC
nbetriebnahme
egen. Sollte die
ie sich an Ihren
eise
n Sie Kinder un
urieren Sie die
gefährliche U
artenden Teile.
dler.
htlinien
e- und Qualitä
e Erschütterung
ion und Bedienu
NLEITU
nion
ieses Produkt
der der Verpack
nach seinem Le
ntsorgen Sie die
unsortiertes Hau
en von einer sp
. Diese Einheit
nehmen retourn
chriften.
h für Entsorg
LVC18! Lesen
orgfältig durch.
der Fall sein, v
Händler.
Unbefugte vom
amera nicht wä
fälle zu vermeid
estellen Sie eve
sgarantie am
n. Vermeiden S
g des Gerätes.
NG
ung zeigt an, da
enszyklus der
Einheit (oder
smüll; die Einhe
zialisierten Firm
uss an den
ert werden.
ngsrichtlinien
Sie diese
Überprüfen Sie,
rwenden Sie da
Gerät fern.
rend Sie in
n.
ntuelle Ersatztei
nde dieser
ie rohe Gewalt
s
t
a
e
V. 02 – 0
/10/2012
41
©Velleman
v
Page 42

CAMCOLVC18
• Schützen Sie das Gerät vor Staub. Schützen Sie das Gerät vor
extremen Temperaturen.
• Nehmen Sie das Gerät erst in Betrieb, nachdem Sie sich mit seinen
Funktionen vertraut gemacht haben.
• Eigenmächtige Veränderungen sind aus Sicherheitsgründen verboten.
Bei Schäden verursacht durch eigenmächtige Änderungen erlischt der
Garantieanspruch.
• Verwenden Sie das Gerät nur für Anwendungen beschrieben in dieser
Bedienungsanleitung sonst kann dies zu Schäden am Produkt führen
und erlischt der Garantieanspruch.
• Bei Schäden, die durch Nichtbeachtung der Bedienungsanleitung
verursacht werden, erlischt der Garantieanspruch. Für daraus
resultierende Folgeschäden übernimmt der Hersteller keine Haftung.
• Bewahren Sie diese Bedienungsanleitung für künftige Einsichtnahme
auf.
4. Eigenschaften
• die tragbare Kamera wird mit mehreren Montagebügeln geliefert
• Aufnahme auf SD-Karte (nicht mitgeliefert)
• Aufnahmequalität: 720p HD Video – 20 fps
• einfache Konfiguration
• Lieferung mit USB-Kabel, A/V-Kabel und Montagebügeln
• wetterfest
• weiße LED-Hintergrundbeleuchtung
5. Umschreibung
Siehe Abbildungen, Seite 2 dieser Bedienungsanleitung.
1
Deckel
2
Bedientasten
2a
Menü-Taste
2b
Aufnahme-Taste
2c
EIN/AUS-Taste
3
Display
4
Objektiv
5
Ring
6
Mini-USB-Port
7
Einschub für SD-Karte
8
Video-Ausgang
9
Batteriefach
10
Mikrofon
11
Basishalterung
12
Zapfen der Basishalterung
13
Lenkstangenhalterung
14
Schraube und Mutter
15
Helmhalterung
16
klettverschluss
17
Gummiband
18
USB-Kabel
19
Video-Kabel
V. 02 – 02/10/2012 42 ©Velleman nv
Page 43

CAMCOLVC18
6. Installation
6.1 Die Basis montieren
Falls noch nicht geschehen, befestigen Sie die Basishalterung [11] an der
Unterseite der Kamera (siehe Abb. A). Verwenden Sie die Basishalterung,
um die Kamera zu befestigen:
• an der Lenkstange Ihres Fahrrads via die Lenkstangenhalteru ng
• an einem Helm via die Helmhalterung und den Klettverschluss oder das
Gummiband
• oder direkt an einem Stativ via das Loch in der Basishalterung.
6.2 Die Kamera an einer Lenkstange befestigen
1. Schieben Sie die Lenkstangenhalterung [13] über die Lenk st an ge
(siehe Abb. B).
Hinweis: Wenn nötig, stecken Sie ein oder mehrere Gummipads
zwischen der Basishalterung und der Lenkstange.
2. Befestigen Sie die Halterung mit der Schraube und der Mutter [14]
(siehe Abb. C).
3. Schieben Sie die Basishalterung in die Lenkstangenhalterung ein, bis
diese einrastet (siehe Abb. D).
4. Die Position der Kamera regeln: Lockern Sie den Ring [5] und regeln
Sie die Position. Schrauben Sie den Ring wieder fest und verg e wiss er n
Sie sich, dass die Kamera gut fest sitz t.
5. Die Position der Halterung regeln: Lockern Sie die Schraube und die
Mutter [14], regeln Sie die Position und schrauben Sie die Mutter und
die Schraube wieder fest zu (siehe Abb. E).
6. Zum Lösen aus der Halterung, drücken Sie die beiden Zapfen der Basis
[12] leicht zusammen und ziehen Sie die Kamera aus der
Lenkstangenhalterung.
6.3 Die Kamera via das Gummiband an einem Helm befestigen
1. Stecken Sie das Gummiband [17] durch die Helmhalterung [15] (siehe
Abb. F).
2. Schieben Sie das Gummiband über den Helm und stellen Sie die
Halterung in die gewünschte Position (siehe Abb. G).
3. Beachten Sie, dass das Gummiband gut fest sitzt.
4. Schieben Sie die Kamera in die Halterung ein (siehe Abb. H).
5. Die Position der Kamera regeln: Lockern Sie den Ring [5] und regeln
Sie die Position. Schrauben Sie den Ring wieder fest und verg e wiss er n
Sie sich, dass die Kamera gut fest sitz t.
V. 02 – 02/10/2012 43 ©Velleman nv
Page 44

2
k
e
s
f
e
e
i
w
DuFeUmha
m
u
u
h
k
n
n
h
e
e
a
a
a
u
n
l
a
d
t
e
a
m
n
k
t
w
z
k
e
e
c
e
V
e
n
c
s
C
u
r
e
z
r
r
w
e
m
s
e
h
L
e
u
e
h
e
u
b
n
d
A
t
a
g
.
n
n
K
n
e
s
6.4 Die
1. Stec
(sieh
2. Befe
und
(sieh
3. Span
die H
4. Schi
5. Die P
Sie d
Sie s
7. An
7.1 Die
Führen Si
Bildschir
Piepston
Bemerk
1. Beac
2. Entfe
3. Drüc
4. Lege
polu
gleic
5. Schli
6. Setz
7.2 Die
Um die K
etwa
leuchtet.
Das Displ
Minuten
Bemerk
so ersche
Kamera via de
en Sie den Klett
Abb. F).
tigen Sie die Ha
ühren Sie das B
Abb. I).
nen Sie das Ban
alterung gut fes
ben Sie die Kam
osition der Kam
ie Position. Schr
ch, dass die Ka
endung
Batterien
rchbohren Sie
uer. Laden Sie
weltvorschrifte
lten Sie die Bat
e einen Batterie
erscheint. Bei
nd nach 20 Se
ng: Ersetzen Si
ten Sie, dass di
rnen Sie den De
en Sie das Batt
Sie 2 neue 1.5
gsrichtig in das
en Typs und Ma
ßen Sie das Bat
n Sie den Deck
Kamera ein- u
mera einzuscha
2 Sekunden ged
y zeigt die Rest
n.
ng: Ist die Spei
int “FULL” im Di
CAMCOLV
Klettverschl
verschluss [16]
terung am Helm
nd in die die vo
an und binden
sitzt.
era in die Halter
ra regeln: Lock
uben Sie den Ri
era gut fest sit
ie die Batterien
eine Alkalibatte
n beim Entsorge
erien von Kinde
echsel durch,
u geringer Batt
unden schaltet s
alle Batterien i
Kamera ausge
kel [1] (Rücks
riefach [9] nac
AA-Batterien (
Batteriefach ein.
rke.
teriefach.
l [1] wieder auf
d ausschalten
lten, drücken un
rückt. Es ertönt
zeit für Video-A
herkarte voll od
play.
18
ss an einem H
durch die Helm
. Positionieren S
gesehenen Büg
Sie die Enden z
ung ein (siehe A
rn Sie den Ring
ng wieder fest u
t.
und werfen Sie
ien. Respektiere
n der Batterien.
n fern.
enn die Lo-Bat-
riespannung, er
ich die Kamera
mer gleichzeiti
chaltet ist.
ite der Kamera)
unten, um es z
R6, nicht mitgel
Verwenden Sie
.
d halten Sie die
inen Piepston u
fzeichnungen in
er wurde keine
lm befestigen
alterung [15]
ie die Halterung
l des Helms ein
sammen, damit
b. J).
[5] und regeln
d vergewissern
iese nicht ins
n Sie die örtlich
Drücken und
nzeige im
önt ein langer
utomatisch aus.
.
u öffnen.
iefert)
ur Batterien de
EIN/AUS-Taste
d das Display
Stunden und
arte eingesetzt,
n
V. 02 – 0
/10/2012
44
©Velleman
v
Page 45

CAMCOLVC18
Um die Kamera auszuschalten, drück en und halten Sie die EIN/AUS-Taste
etwa 2 Sekunden gedrückt. Das Display zeigt “OFF” an und es ertönt
einen Piepston. Die Kamera wird nach etwa 1 Sekunde ausgeschaltet.
7.3 Speicherkarte
Empfehlungen:
• Verwenden Sie Hochgeschwindigkeits-SD-Karten für die beste Leistung
und die beste Qualität.
• Formattieren Sie die Speicherkarte vor Gebrauch.
Eine Speicherkarte einsetzen
1. Beachten Sie, dass die Kamera ausgeschaltet ist.
2. Entfernen Sie den Deckel [1] (Rückseite der Kamera).
3. Schieben Sie die SD-Karte (nicht mitgeliefert) vorsichtig in den
Karteneinschub [7] ein bis Sie einen Klick hören.
4. Um die SD-Karte zu entnehmen, drücken Sie vorsichtig.
5. Setzen Sie den Deckel [1] wieder auf.
Eine Speicherkarte Formattieren
Achtung: Beim Formatieren werden alle Daten gelöscht. Wenn nötig,
verbinden Sie die Kamera mit einem PC, um zuerst eine Sicherungskopie zu
machen.
1. Beachten Sie, dass die Kamera ausgeschaltet ist.
2. Schieben Sie die Speicherkarte in den Kartenslot [7] ein.
3. Schalten Sie die Kamera ein.
4. Drücken Sie die Aufnahme-Taste etwa 5 Sekunden.
Im Display erscheint “FOR” (for “formatting’).
5. Warten Sie bis das Display wieder die Restzeit anzeigt.
Die Karte ist nun leer und gebrauchsfertig.
7.4 Konfiguration
Die Auflösung einstellen
Wählen Sie die gewünschte Auflösng: 720p (1280×720) o VGA (640x480).
Um die Auflösung einzustellen:
1. Schalten Sie die Kamera ein.
2. Drücken und halten Sie die Menü-Taste 2 Sekunden gedrückt.
Das 720p-Symbol blinkt.
3. Drücken Sie die Aufnahme-Taste ein Mal, um auf VGA
umzuschalten. Das VGA-Symbol blinkt.
4. Drücken Sie die Menü-Taste, um zu bestätigen.
V. 02 – 02/10/2012 45 ©Velleman nv
Page 46

CAMCOLVC18
Bemerkung: Die Aufnahmedauer hängt von der Auflösung ab. Der VGA-
Modus (niedrigere Auflösung) ermöglicht eine längere Aufnahmedauer als
der 720p-Modus.
Das Datum und die Uhrzeit einstellen
1. Schalten Sie die Kamera ein.
2. Drücken und halten Sie die Menü-Taste 2 Sekunden gedrückt.
Das 720p-Symbol blinkt.
3. Drücken Sie die Aufnahme-Taste mehrmals bis “ALL” erscheint im
Display.
4. Drücken Sie die Menü-Taste 2 Sekunden.
“Y” (“year”) und die dritte Ziffer des Jahres blinkt im Display.
5. Drücken Sie die Aufnahme-Taste wiederholt um die Ziffer einzustellen.
Drücken Sie nun die Menü-Taste, um zu bestätigen und zur nächsten
Ziffer zu gehen.
6. Wiederholen Sie, um die letzte Ziffer des Jahres, den Monat (“M”), den
Tag (“D”), die Stunde (“H”) und die Minuten (“M”) einzugeben.
Die Kamera springt nach der letzten Eingabe automatisch in den AufnahmeModus zurück.
7.5 Video-Aufnahme
Normale Aufnahme
1. Beachten Sie, dass Sie eine SD-Karte in die Kamera eingesetzt haben.
2. Schalten Sie die Kamera ein. Das Display zeigt die Restzeit an.
3. Drücken Sie die Aufnahme-Taste, um die Aufnahme zu starten.
Die Hintergrundbeleuchtung des Displays blinkt. Das Display zeigt die
Aufnahmezeit in Minuten und Sekunden an. Die Kamera speichert eine
Video-Datei alle 5 Minuten.
4. Drücken Sie die Aufnahme-Taste wieder, um die Aufnahme zu been de n.
Die Hintergrundbeleuchtung hört auf, zu blinken. Die verbleibende
Aufnahmezeit wird im Display dargestellt.
Bemerkung: Ist die Speicherkarte voll oder wurde keine Karte eingesetzt,
so erscheint “FULL” im Display.
Loop-Aufnahme
Verwenden Sie die Kamera mit einem USB-Ladegerät, dann können Sie
ständig aufnehmen. Die Kamera speichert eine Video-Datie alle 2 Minuten.
Ist die Speicherkarte voll, so werden die ersten aufgenommenen Videos
überspielt.
Achtung: Beachten Sie, dass das die technischen Daten des Ladegerätes
mit den technischen Daten der Kamera übereinstimmen (3 VDC, 2.0 W).
Es gibt zwei Möglichkeiten:
• Die Kamera ist ausgeschaltet, die Batterien wurden eingelegt:
Verbinden Sie die Kamera mit einem geeigneten USB-Ladegerät
(3 VDC, 2.0 W). Die Kamera schaltet ein und startet die Loop-Aufnahme
V. 02 – 02/10/2012 46 ©Velleman nv
Page 47

CAMCOLVC18
automatisch. Drücken Sie die Aufnahme-Taste, um die Aufnahme zu
stoppen. Trennen Sie das USB-Ladegerät, dann wird die Aufnah me
gestoppt und die Kamera wird die nach 2 Sekunden ausgeschaltet.
• Die Kamera ist ausgeschaltet, es wurden keine Batterien eingelegt:
Verbinden Sie die Kamera mit einem geeigneten USB-Ladegerät
(3 VDC, 2.0 W). Die Kamera schaltet nach 6 Sekunden ein und die
Loop-Aufnahme startet automatisch. Drücken Sie die Aufnahme-Taste
um die Aufnahme zu beenden. Trennen Sie das USB-Ladegerät, dann
wird die Kamera sofort ausgeschaltet.
7.6 Eine Video-Aufnahme abspielen
Via TV
1. Schalten Sie die Kamera ein.
2. Entfernen Sie den Deckel [1] (Rückseite der Kamera).
3. Stecken Sie den schwarzen Stecker des Videokabels (mitgeliefert) in
den Video-Ausgang [8] der Kamera.
4. Stecken Sie den anderen Stecker (gelb, rot, weiß) des Kabels in den
entsprechenden RCA-Eingängen vom TV.
Im Display erscheint “AU”.
5. Beachten Sie, dass der richtige Kanal eingestellt ist.
6. Auf der Kamera, drücken Sie die Menü-Taste, um die gewünschte
Video-Datei zu wählen.
7. Drücken Sie die Aufnahme-Taste, um das Abspielen zu starten.
8. Drücken Sie die Aufnahme-Taste um das Abspielen zu
pausieren/fortzusetzen.
9. Drücken Sie die Menü-Taste, um das Abspielen zu stoppen. Sie können
nun zwischen verschiedenen Videos wählen.
Hinweis: Drücken und halten Sie die Menü-Taste gedrückt, um das Video
während der Wiedergabe schnell zu löschen. Ist die Speicherkarte leer, dann
erscheint “NO FILE”.
Via PC
1. Entfernen Sie den Deckel [1] (Rückseite der Kamera).
2. Stecken Sie den einen Teil des USB-Kabels (mitgeliefert) in den Mini-
USB-Port [6] der Kamera.
3. Stecken Sie den anderen Teil in den freien USB-Port des Computers.
Im Display erscheint “PC”.
4. Auf dem PC, öffnen Sie My Computer und suchen Sie das Laufwerk der
Kamera.
Die Dateien können hier kopiert, gelöscht oder betrachtet werden.
Bemerkung: Um die Kamera vom PC zu trennen und bevor Sie das USBKabel trennen, verwenden Sie die Windows-Funktion Safely Remove
Hardware.
V. 02 – 02/10/2012 47 ©Velleman nv
Page 48

CAMCOLVC18
7.7 Eine Video-Aufnahme löschen
Achtung: Wenn nötig, machen Sie zuerst eine Sicherungskopie.
1. Beachten Sie, dass die Aufnahme gestoppt ist.
2. Drücken und halten Sie die Menü-Taste 2 Sekunden gedrückt.
3. Drücken Sie die Aufnahme-Taste wiederholt.
Im Display erscheint ”D” (“delete” ) und der Reihe nach blinken die
folgenden Anzeigen:
o “NO”: Drücken Sie die Aufnahme-Taste, um auf die nächste Option
zu springen.
o “ONE”: Drücken Sie die Menü-Taste, um das letzte aufgenommene
Video zu löschen. “ONE” blinkt nicht während des Löschens. Warten
Sie, bis “ONE” wieder blinkt. Nun kö nnen Sie die nächste Videodatei
löschen. Oder, drücken Sie die Aufnahme-Taste um diesen Mod us
zu verlassen.
o “ALL”: Drücken Sie die Menü-Taste um all e Videodateien zu
löschen. “ALL” blinkt nicht währen d des Löschens. Warten Sie, bis
“ALL” wieder blinkt und drücken Si e dann die Aufnahme-Taste um
diesen Modus zu verlassen.
7.8 Eine Webcam verwenden
Sie können die Kamera als Webcam verwe nden, wenn Sie die mitgelieferte
Software installieren.
1. Beachten Sie, dass die Kamera nicht an den PC angeschlossen ist.
2. Legen Sie die mitgelieferte CD in das CD-ROM-Laufwerk ein.
3. Klicken Sie zwei Mal auf das STK03N-Symbol .
4. Folgen Sie den Anweisungen des Installationsassistenten.
5. Beachten Sie, dass die Kamera ausgeschaltet ist wenn die Software
installiert wird.
6. Entfernen Sie den Deckel [1] (Rückseite der Kamera).
7. Stecken Sie den einen Teil des USB-Kabels (mitgeliefert) in den Mini-
USB-Port [6] der Kamera.
8. Stecken Sie die Kamera in einen freien USB-Port des Computers und
drücken und halten Sie gleichzeitig die Menü-Taste gedrückt.
9. Lassen Sie die Menü-Taste erst los, nachdem ein Ton ertönt hat und
nachdem die Hintergrundbeleuchtung leuchtet. Im Display erscheint
“PC”.
Windows® erkennt das Gerät automatisch und installiert den Treiber.
Abhängig von den Einstellungen, zeigt Windows die Nachricht “Your new
hardware is installed and ready for use” an (oder nicht).
Sie können die Kamera nun als Webcam verwenden.
V. 02 – 02/10/2012 48 ©Velleman nv
Page 49

CAMCOLVC18
8. Problemlösung
Es erscheint nichts im Display
Beachten Sie, dass Sie die Batterien polungsrichtig eingelegt haben.
Ersetzen Sie leere Batterien.
Die Kamera schaltet sich automatisch aus
Die Batterien sind leer. Ersetzen Sie die Batterien.
Keine Video-Aufnahme möglich
Beachten Sie, dass es genügend Speicherplatz auf der Speicherkarte gibt.
Das Display zeigt die verbleibende Aufnahmedauer an.
Beachten Sie, dass die Speicherkarte nicht verriegelt ist. Beachten Sie, dass
die Verriegelungstaste auf der Seite der Speicherkarte sich in der richtigen
Position befindet.
Die Kamera stoppt die Aufnahme automatisch
Die Speicherkarte ist voll.
• Machen Sie eine Sicherungskopie und löschen Sie danach alle Dateien
auf der Speicherkarte um Platz zu haben.
• Setzen Sie eine neue, leere Karte ein.
Obwohl die Kamera mit dem PC verbunden ist, können Sie diese
nicht unter “My Computer“ finden
Beachten Sie, dass jedes Ende des USB-Kabels korrekt angeschlossen ist.
Beachten Sie, dass der USB-Port vom PC korrekt funktioniert. Versuchen
Sie, ein anderes USB-Gerät anzuschli eßen und überprüfen Sie, ob es korrekt
funktioniert. Ist dies nicht den Fall, dann gibt es wahrscheinlich ein Problem
mit dem USB-Port.
Das Video kann nicht auf dem TV abgespielt werden
Beachten Sie, dass jedes Ende des Videokabels korrekt angeschlossen ist.
Beachten Sie, dass die Kamera eingeschaltet ist.
Die Restzeit ist nicht korrekt
Die verbleibende Aufnahmedauer ist eine geschätzte Zeit. Diese hängt nicht
nur von der schon aufgenommenen Zeit ab, sondern auch von den
Aufnahmebedingungen. Aufnahmen in kontrastreicher Umgebung (z.B. im
Außenbereich) brauchen mehr Speicherplatz als Aufnahmen in
kontrastarmer Umgebung (z.B. im Innenbereich).
9. Reinigung und Wartung
• Verwenden Sie zur Reinigung der Außenseite des Gerätes ein feuchtes,
fusselfreies Tuch. Verwenden Sie auf keinen Fall Alkohol oder
irgendwelche Lösungsmittel.
• Verwenden Sie einen Blasenbalg und ein sanftes, füsselfreies Tuch zum
Reinigen der Linse. Verwenden Sie auf keinen Fall Reinigungsmittel.
V. 02 – 02/10/2012 49 ©Velleman nv
Page 50

CAMCOLVC18
• Entfernen Sie die Batterien bei längerem Nichtgebrauch aus dem Gerät.
Alte Batterien können auslaufen und das Gerät beschädigen.
• Entfernen Sie die Speicherkarte bei längerem Nichtgebrauch aus dem
Gerät.
• Lagern Sie das Gerät bei einer normalen Umgebungstemperatur an
einem trockenen, gut gelüfteten und staubfreien Ort. Setzen Sie die
Kamera weder extremen Temperaturen noch direktem Sonnenlicht aus.
Dies kann das Gehäuse und die internen Komponenten beschädigen.
10. Technische Daten
Speicherkapazität max. 32 GB SD-HC-Karte (nicht mitgeliefert)
Aufnahme-Element 1.3 Megapixel CMOS
Gesichtswinkel 54°
Aufnahmeformat MJPEG (Audio PCM)
Bilder pro Sekunde (fps) 20
Video-Auflösung 1280 x 720 Pixel
Aufnahmekapazität ± 150 MB/Min.
Stromversorgung 2 x 1.5V AA-Batterie (LR6), nicht mitgeliefert
Abmessungen Ø 47 x 110 mm
Gewicht 160 g
Betriebstemperatur -10°C ~ 50°C
Verwenden Sie dieses Gerät nur mit originellen Zubehörteilen.
Velleman NV übernimmt keine Haftung für Schaden oder
Verletzungen bei (falscher) Anwendung dieses Gerätes. Für mehr
Informationen zu diesem Produkt und die neueste Version dieser
Bedienungsanleitung, siehe www.velleman.eu. Alle Änderungen
ohne vorherige Ankündigung vorbehalten.
Alle registrierten Schutzmarken und Handelsnamen sind das Eigentum Ihrer
jeweiligen Eigentümer und werden nur als Beispiel verwendet, um die
Kompatibilität zwischen unseren Artikeln und diesen der verschiedenen
Fabrikanten anzuzeigen. Windows, Windows XP, Windows Vista, Windows 7,
sind eingetragene Warenzeichen von Microsoft Corporation in den USA und
anderen Ländern.
© URHEBERRECHT
Velleman NV besitzt das Urheberrecht für diese Bedienungsanleitung. Alle
weltweiten Rechte vorbehalten. Ohne vorherige schriftliche Genehmigung des
Urhebers ist es nicht gestattet, diese Bedienungsanleitung ganz oder in Teilen zu
reproduzieren, zu kopieren, zu übersetzen, zu bearbeiten oder zu speichern.
V. 02 – 02/10/2012 50 ©Velleman nv
Page 51

Velleman® Service and Quality Warranty
Since its foundation in 1972, Velleman® acquired
extensive experience in the electronics world and currently
distributes its products in over 85 countries.
All our products fulfil strict quality requirements and legal
stipulations in the EU. In order to ensure the quality, our
products regularly go through an extra quality check, both
by an internal quality department and by specialized
external organisations. If, all precautionary measures
notwithstanding, problems should occur, please make
appeal to our warranty (see guarantee conditions).
General Warranty Conditions Concerning Consumer
Products (for EU):
• All consumer products are subject to a 24-month
warranty on production flaws and defective material as
from the original date of purchase.
• Velleman® can decide to replace an article with an
equivalent article, or to refund the retail value totally or
partially when the complaint is valid and a free repair or
replacement of the article is impossible, or if the expenses
are out of proportion.
You will be delivered a replacing article or a refund at the
value of 100% of the purchase price in case of a flaw
occurred in the first year after the date of purchase and
delivery, or a replacing article at 50% of the purchase
price or a refund at the value of 50% of the retail value in
case of a flaw occurred in the second year after the date
of purchase and delivery.
• Not covered by warranty:
- all direct or indirect damage caused after delivery to the
article (e.g. by oxidation, shocks, falls, dust, dirt,
humidity...), and by the article, as well as its contents (e.g.
data loss), compensation for loss of profits;
- consumable goods, parts or accessories that are subject
to an aging process during normal use, such as batteries
(rechargeable, non-rechargeable, built-in or replaceable),
lamps, rubber parts, drive belts... (unlimited list);
- flaws resulting from fire, water damage, lightning,
accident, natural disaster, etc.…;
- flaws caused deliberately, negligently or resulting from
improper handling, negligent maintenance, abusive use or
use contrary to the manufacturer’s instructions;
- damage caused by a commercial, professional or
collective use of the article (the warranty validity will be
reduced to six (6) months when the article is used
professionally);
- damage resulting from an inappropriate packing and
shipping of the article;
- all damage caused by modification, repair or alteration
performed by a third party without written permission by
Velleman®.
• Articles to be repaired must be delivered to your
Velleman® dealer, solidly packed (preferably in the
original packaging), and be completed with the original
receipt of purchase and a clear flaw description.
• Hint: In order to save on cost and time, please reread the
manual and check if the flaw is caused by obvious causes
prior to presenting the article for repair. Note that returning
a non-defective article can also involve handling costs.
• Repairs occurring after warranty expiration are subject to
shipping costs.
• The above conditions are without prejudice to all
commercial warranties.
The above enumeration is subject to modification
according to the article (see article’s manual).
Velleman® service- en kwaliteitsgarantie
Velleman® heeft sinds zijn oprichting in 1972 een ruime
ervaring opgebouwd in de elektronicawereld en verdeelt
op dit moment producten in meer dan 85 landen. Al onze
producten beantwoorden aan strikte kwaliteitseisen en
aan de wettelijke bepalingen geldig in de EU. Om de
kwaliteit te waarborgen, ondergaan onze producten op
regelmatige tijdstippen een extra kwaliteitscontrole, zowel
door onze eigen kwaliteitsafdeling als door externe
gespecialiseerde organisaties. Mocht er ondanks deze
voorzorgen toch een probleem optreden, dan kunt u
steeds een beroep doen op onze waarborg (zie
waarborgvoorwaarden).
Algemene waarborgvoorwaarden
consumentengoederen (voor Europese Unie):
• Op alle consumentengoederen geldt een garantieperiode
van 24 maanden op productie- en materiaalfouten en dit
vanaf de oorspronkelijke aankoopdatum.
• Indien de klacht gegrond is en een gratis reparatie of
vervanging van een artikel onmogelijk is of indien de
kosten hiervoor buiten verhouding zijn, kan Velleman®
beslissen het desbetreffende artikel te vervangen door
een gelijkwaardig artikel of de aankoopsom van het artikel
gedeeltelijk of volledig terug te betalen. In dat geval krijgt
u een vervangend product of terugbetaling ter waarde van
100% van de aankoopsom bij ontdekking van een gebrek
tot één jaar na aankoop en levering, of een vervangend
product tegen 50% van de kostprijs of terugbetaling van
50 % bij ontdekking na één jaar tot 2 jaar.
• Valt niet onder waarborg:
- alle rechtstreekse of onrechtstreekse schade na de
levering veroorzaakt aan het toestel (bv. door oxidatie,
schokken, val, stof, vuil, vocht...), en door het toestel,
alsook zijn inhoud (bv. verlies van data), vergoeding voor
eventuele winstderving.
- verbruiksgoederen, onderdelen of hulpstukken die
onderhevig zijn aan veroudering door normaal gebruik
zoals bv. batterijen (zowel oplaadbare als niet-oplaadbare,
ingebouwd of vervangbaar), lampen, rubberen
onderdelen, aandrijfriemen... (onbeperkte lijst).
- defecten ten gevolge van brand, waterschade, bliksem,
ongevallen, natuurrampen, enz.
- defecten veroorzaakt door opzet, nalatigheid of door een
onoordeelkundige behandeling, slecht onderhoud of
abnormaal gebruik of gebruik van het toestel strijdig met
de voorschriften van de fabrikant.
- schade ten gevolge van een commercieel, professioneel
of collectief gebruik van het apparaat (bij professioneel
gebruik wordt de garantieperiode herleid tot 6 maand).
- schade veroorzaakt door onvoldoende bescherming bij
transport van het apparaat.
- alle schade door wijzigingen, reparaties of modificaties
uitgevoerd door derden zonder toestemming van
Velleman®.
• Toestellen dienen ter reparatie aangeboden te worden
bij uw Velleman®-verdeler. Het toestel dient vergezeld te
zijn van het oorspronkelijke aankoopbewijs. Zorg voor een
Page 52

degelijke verpakking (bij voorkeur de originele verpakking)
en voeg een duidelijke foutomschrijving bij.
• Tip: alvorens het toestel voor reparatie aan te bieden,
kijk nog eens na of er geen voor de hand liggende reden
is waarom het toestel niet naar behoren werkt (zie
handleiding). Op deze wijze kunt u kosten en tijd
besparen. Denk eraan dat er ook voor niet-defecte
toestellen een kost voor controle aangerekend kan
worden.
• Bij reparaties buiten de waarborgperiode zullen
transportkosten aangerekend worden.
• Elke commerciële garantie laat deze rechten
onverminderd.
Bovenstaande opsomming kan eventueel aangepast
worden naargelang de aard van het product (zie
handleiding van het betreffende product).
Garantie de service et de qualité Velleman®
Depuis 1972, Velleman® a gagné une vaste expérience
dans le secteur de l’électronique et est actuellement
distributeur dans plus de 85 pays.
Tous nos produits répondent à des exigences de qualité
rigoureuses et à des dispositions légales en vigueur dans
l’UE. Afin de garantir la qualité, nous soumettons
régulièrement nos produits à des contrôles de qualité
supplémentaires, tant par notre propre service qualité que
par un service qualité externe. Dans le cas improbable
d’un défaut malgré toutes les précautions, il est possible
d’invoquer notre garantie (voir les conditions de garantie).
Conditions générales concernant la garantie sur les
produits grand public (pour l’UE) :
• tout produit grand public est garanti 24 mois contre tout
vice de production ou de matériaux à dater du jour
d’acquisition effective ;
• si la plainte est justifiée et que la réparation ou le
remplacement d’un article est jugé impossible, ou lorsque
les coûts s’avèrent disproportionnés, Velleman®
s’autorise à remplacer ledit article par un article équivalent
ou à rembourser la totalité ou une partie du prix d’achat.
Le cas échéant, il vous sera consenti un article de
remplacement ou le remboursement complet du prix
d’achat lors d’un défaut dans un délai de 1 an après
l’achat et la livraison, ou un article de remplacement
moyennant 50% du prix d’achat ou le remboursement de
50% du prix d’achat lors d’un défaut après 1 à 2 ans.
• sont par conséquent exclus :
- tout dommage direct ou indirect survenu à l’article après
livraison (p.ex. dommage lié à l’oxydation, choc, chute,
poussière, sable, impureté…) et provoqué par l’appareil,
ainsi que son contenu (p.ex. perte de données) et une
indemnisation éventuelle pour perte de revenus ;
- toute pièce ou accessoire nécessitant un remplacement
causé par un usage normal comme p.ex. piles
(rechargeables comme non rechargeables, intégrées ou
remplaçables), ampoules, pièces en caoutchouc,
courroies… (liste illimitée) ;
- tout dommage qui résulte d’un incendie, de la foudre,
d’un accident, d’une catastrophe naturelle, etc. ;
- out dommage provoqué par une négligence, volontaire
ou non, une utilisation ou un entretien incorrect, ou une
utilisation de l’appareil contraire aux prescriptions du
fabricant ;
- tout dommage à cause d’une utilisation commerciale,
professionnelle ou collective de l’appareil (la période de
garantie sera réduite à 6 mois lors d’une utilisation
professionnelle) ;
- tout dommage à l’appareil qui résulte d’une utilisation
incorrecte ou différente que celle pour laquelle il a été
initialement prévu comme décrit dans la notice ;
- tout dommage engendré par un retour de l’appareil
emballé dans un conditionnement non ou insuffisamment
protégé.
- toute réparation ou modification effectuée par une tierce
personne sans l’autorisation explicite de SA Velleman® ; frais de transport de et vers Velleman® si l’appareil n’est
plus couvert sous la garantie.
• toute réparation sera fournie par l’endroit de l’achat.
L’appareil doit nécessairement être accompagné du bon
d’achat d’origine et être dûment conditionné (de
préférence dans l’emballage d’origine avec mention du
défaut) ;
• tuyau : il est conseillé de consulter la notice et de
contrôler câbles, piles, etc. avant de retourner l’appareil.
Un appareil retourné jugé défectueux qui s’avère en bon
état de marche pourra faire l’objet d’une note de frais à
charge du consommateur ;
• une réparation effectuée en-dehors de la période de
garantie fera l’objet de frais de transport ;
• toute garantie commerciale ne porte pas atteinte aux
conditions susmentionnées.
La liste susmentionnée peut être sujette à une
complémentation selon le type de l’article et être
mentionnée dans la notice d’emploi.
Garantía de servicio y calidad Velleman®
Desde su fundación en 1972 Velleman® ha adquirido una
amplia experiencia como distribuidor en el sector de la
electrónica en más de 85 países. Todos nuestros
productos responden a normas de calidad rigurosas y
disposiciones legales vigentes en la UE. Para garantizar
la calidad, sometemos nuestros productos regularmente a
controles de calidad adicionales, tanto a través de nuestro
propio servicio de calidad como de un servicio de calidad
externo. En el caso improbable de que surgieran
problemas a pesar de todas las precauciones, es posible
recurrir a nuestra garantía (véase las condiciones de
garantía).
Condiciones generales referentes a la garantía sobre
productos de venta al público (para la Unión
Europea):
• Todos los productos de venta al público tienen un
período de garantía de 24 meses contra errores de
producción o errores en materiales desde la adquisición
original;
• Si la queja está fundada y si la reparación o sustitución
de un artículo no es posible, o si los gastos son
desproporcionados, Velleman® autoriza reemplazar el
artículo por un artículo equivalente o reembolsar la
totalidad o una parte del precio de compra. En este caso,
usted recibirá un artículo de recambio o el reembolso
completo del precio de compra si encuentra algún fallo
hasta un año después de la compra y entrega, o un
artículo de recambio al 50% del precio de compra o el
reembolso del 50% del precio de compra si encuentra un
Page 53

fallo después de 1 año y hasta los 2 años después de la
compra y entrega.
Por consiguiente, están excluidos entre otras cosas:
- todos los daños causados directa o indirectamente al
aparato (p.ej. por oxidación, choques, caída,...) y a su
contenido (p.ej. pérdida de datos) después de la entrega y
causados por el aparato, y cualquier indemnización por
posible pérdida de ganancias;
- partes o accesorios, que estén expuestos al desgaste
causado por un uso normal, como por ejemplo baterías
(tanto recargables como no recargables, incorporadas o
reemplazables), bombillas, partes de goma, etc. (lista
ilimitada);
- defectos causados por un incendio, daños causados por
el agua, rayos, accidentes, catástrofes naturales, etc.;
- defectos causados a conciencia, descuido o por malos
tratos, un mantenimiento inapropiado o un uso anormal
del aparato contrario a las instrucciones del fabricante;
- daños causados por un uso comercial, profesional o
colectivo del aparato (el período de garantía se reducirá a
6 meses con uso profesional);
- daños causados por un uso incorrecto o un uso ajeno al
que está previsto el producto inicialmente como está
descrito en el manual del usuario;
- daños causados por una protección insuficiente al
transportar el aparato.
- daños causados por reparaciones o modificaciones
efectuadas por una tercera persona sin la autorización
explícita de Velleman®;
- se calcula gastos de transporte de y a Velleman® si el
aparato ya no está cubierto por la garantía.
• Cualquier artículo que tenga que ser reparado tendrá
que ser devuelto a su distribuidor Velleman®. Devuelva el
aparato con la factura de compra original y transpórtelo en
un embalaje sólido (preferentemente el embalaje original).
Incluya también una buena descripción del fallo;
• Consejo: Lea el manual del usuario y controle los cables,
las pilas, etc. antes de devolver el aparato. Si no se
encuentra un defecto en el artículo los gastos podrían
correr a cargo del cliente;
• Los gastos de transporte correrán a carga del cliente
para una reparación efectuada fuera del período de
garantía.
• Cualquier gesto comercial no disminuye estos derechos.
La lista previamente mencionada puede ser adaptada
según el tipo de artículo (véase el manual del usuario
del artículo en cuestión).
Velleman® Service- und Qualitätsgarantie
Seit der Gründung in 1972 hat Velleman® sehr viel
Erfahrung als Verteiler in der Elektronikwelt in über 85
Ländern aufgebaut.
Alle Produkte entsprechen den strengen
Qualitätsforderungen und gesetzlichen Anforderungen in
der EU. Um die Qualität zu gewährleisten werden unsere
Produkte regelmäßig einer zusätzlichen Qualitätskontrolle
unterworfen, sowohl von unserer eigenen
Qualitätsabteilung als auch von externen spezialisierten
Organisationen. Sollten, trotz aller Vorsichtsmaßnahmen,
Probleme auftreten, nehmen Sie bitte die Garantie in
Anspruch (siehe Garantiebedingungen).
Allgemeine Garantiebedingungen in Bezug auf
Konsumgüter (für die Europäische Union):
• Alle Produkte haben für Material- oder Herstellungsfehler
eine Garantieperiode von 24 Monaten ab Verkaufsdatum.
• Wenn die Klage berechtigt ist und falls eine kostenlose
Reparatur oder ein Austausch des Gerätes unmöglich ist,
oder wenn die Kosten dafür unverhältnismäßig sind, kann
Velleman® sich darüber entscheiden, dieses Produkt
durch ein gleiches Produkt zu ersetzen oder die
Kaufsumme ganz oder teilweise zurückzuzahlen. In
diesem Fall erhalten Sie ein Ersatzprodukt oder eine
Rückzahlung im Werte von 100% der Kaufsumme im Falle
eines Defektes bis zu 1 Jahr nach Kauf oder Lieferung,
oder Sie bekommen ein Ersatzprodukt im Werte von 50%
der Kaufsumme oder eine Rückzahlung im Werte von 50
% im Falle eines Defektes im zweiten Jahr.
• Von der Garantie ausgeschlossen sind:
- alle direkten oder indirekten Schäden, die nach Lieferung
am Gerät und durch das Gerät verursacht werden (z.B.
Oxidation, Stöße, Fall, Staub, Schmutz, Feuchtigkeit, ...),
sowie auch der Inhalt (z.B. Datenverlust), Entschädigung
für eventuellen Gewinnausfall.
- Verbrauchsgüter, Teile oder Zubehörteile, die durch
normalen Gebrauch dem Verschleiß ausgesetzt sind, wie
z.B. Batterien (nicht nur aufladbare, sondern auch nicht
aufladbare, eingebaute oder ersetzbare), Lampen,
Gummiteile, Treibriemen, usw. (unbeschränkte Liste).
- Schäden verursacht durch Brandschaden,
Wasserschaden, Blitz, Unfälle, Naturkatastrophen, usw.
- Schäden verursacht durch absichtliche, nachlässige oder
unsachgemäße Anwendung, schlechte Wartung,
zweckentfremdete Anwendung oder Nichtbeachtung von
Benutzerhinweisen in der Bedienungsanleitung.
- Schäden infolge einer kommerziellen, professionellen
oder kollektiven Anwendung des Gerätes (bei
gewerblicher Anwendung wird die Garantieperiode auf 6
Monate zurückgeführt).
- Schäden verursacht durch eine unsachgemäße
Verpackung und unsachgemäßen Transport des Gerätes.
- alle Schäden verursacht durch unautorisierte
Änderungen, Reparaturen oder Modifikationen, die von
einem Dritten ohne Erlaubnis von Velleman®
vorgenommen werden.
• Im Fall einer Reparatur, wenden Sie sich an Ihren
Velleman®-Verteiler. Legen Sie das Produkt
ordnungsgemäß verpackt (vorzugsweise die
Originalverpackung) und mit dem Original-Kaufbeleg vor.
Fügen Sie eine deutliche Fehlerbeschreibung hinzu.
• Hinweis: Um Kosten und Zeit zu sparen, lesen Sie die
Bedienungsanleitung nochmals und überprüfen Sie, ob es
keinen auf de Hand liegenden Grund gibt, ehe Sie das
Gerät zur Reparatur zurückschicken. Stellt sich bei der
Überprüfung des Gerätes heraus, dass kein
Geräteschaden vorliegt, könnte dem Kunden eine
Untersuchungspauschale berechnet.
• Für Reparaturen nach Ablauf der Garantiefrist werden
Transportkosten berechnet.
• Jede kommerzielle Garantie lässt diese Rechte
unberührt.
Die oben stehende Aufzählung kann eventuell
angepasst werden gemäß der Art des Produktes
(siehe Bedienungsanleitung des Gerätes).
Legen Heirweg 33, 9890 Gavere, Belgium
Made in PRC
Imported by Velleman nv
www.velleman.eu
 Loading...