

Page 1

L
R
A
C
A
O
O
U
A
A
–
H
A
I
D
N
Ó
CAMCO
MINI HIGH
MINI DIGIT
MINI CAMÉS
MINI CÁMAR
DIGITALE H
VC17
ESOLUTION DIGIT
LE VIDEOCAMERA
OPE NUMÉRIQUE
DE VÍDEO DIGIT
CHAUFLÖSENDE M
L CAMERA RECOR
HOGE RESOLUTIE
AUTE RÉSOLUTIO
L DE ALTA RESOLU
NI-VIDEOKAMERA
ER
CI
N
USER MANUAL
GEBRUIKERSH
MODE D’EMPL
MANUAL DEL
BEDIENUNGS
ANDLEIDING
I
SUARIO
NLEITUNG
3
10
17
24
31
Page 2
CAMCOLVC17
V. 01 – 13/07/2012 2 ©Velleman nv
Page 3

/
t
n
n
o
r
i
u
o
o
ging
n
n
t
.
t
d
e
d
h
G
epag
m
e
h
L
A
m
o
;
e
a
v
n
t
m
t
m
e
o
n
n
©
o
a
a
o
s
o
a
s
t
t
y
a
e
b
g
t
t
CAMCO
VC17
1. Introduc
To all reside
Important e
This
disp
envi
unso
spec
returned to yo
the local envir
If in doubt, c
Thank you for
before brin
transit, don't i
2. Safety I
USER M
ion
ts of the European
vironmental infor
symbol on the device
sal of the device afte
onment. Do not disp
rted municipal waste
alized company for r
r distributor or to a l
nment a l rules.
ntact your local w
choosing Velleman! P
this device into ser
stall or use it a nd co
structions
NUAL
Union
ation about this pr
or the package indic
r its lifecycle could h
se of the unit (or bat
it should be taken t
cycling. This device
ocal recycling service
ste disposal auth
lease read the manu
ice. If the device was
tact your dealer.
duct
tes that
rm the
teries) as
a
hould be
. Respect
rities.
l thoroughly
dama
ed in
Keep
users
Keep
drippi
This
the d
accor
into t
3. General
Refer to the V
es of this
• Keep this d
• Protect this
operating t
• Do not aim
objects.
his device away fro
his device away fro
ng liquids.
evice contains an int
vice is end-of-life, it
ance with local regul
e fire as it may expl
uidelines
lleman® Service a
anual.
vice away from dust
device from shocks a
e device.
the camera at the su
children and unauth
rain, moisture, spla
rnal rechargeable ba
must be disposed of i
ations. Do no t throw
de.
d Quality War rant
and extreme temper
nd abuse. Avoid brut
or other extrem ely
orized
hing and
tery. When
n
he device
on the last
tures.
force when
right
V. 01 – 13/07
2012 3
Velleman nv
Page 4

CAMCOLVC17
• Familiarise yourself with the functions of the device before actually
using it .
• All modifications of the device are forbidden for safety reasons.
Damage caused by user modifications to the device is not covered
by the warranty.
• Only use the device for its intended purpose. Using the device in
an unauthorised way will void the warranty.
• Damage caused by disregard of certain guidelines in this manual
is not covered by the warranty and the dealer will not accept
responsibility for any ensuing defects or problems.
• There are no user-serviceable par ts inside the device. Refer to an
authorized dealer for service and/or spare parts.
• Do not use this product to violate privacy laws or perform illegal
activities.
4. Features
• compact design camera recorder
• different mounting brackets and silicone pro tection sleeve included
• the video capture camera records images on micro SD card (not
included)
• recording quality:
o video: 720P HD video - 30FPS
o picture: 1600 x 1200 pixels
• built-in high-sensitivity micr ophone
• easy and user-friendly setup
• comes with USB cable and brackets
• alloy housing.
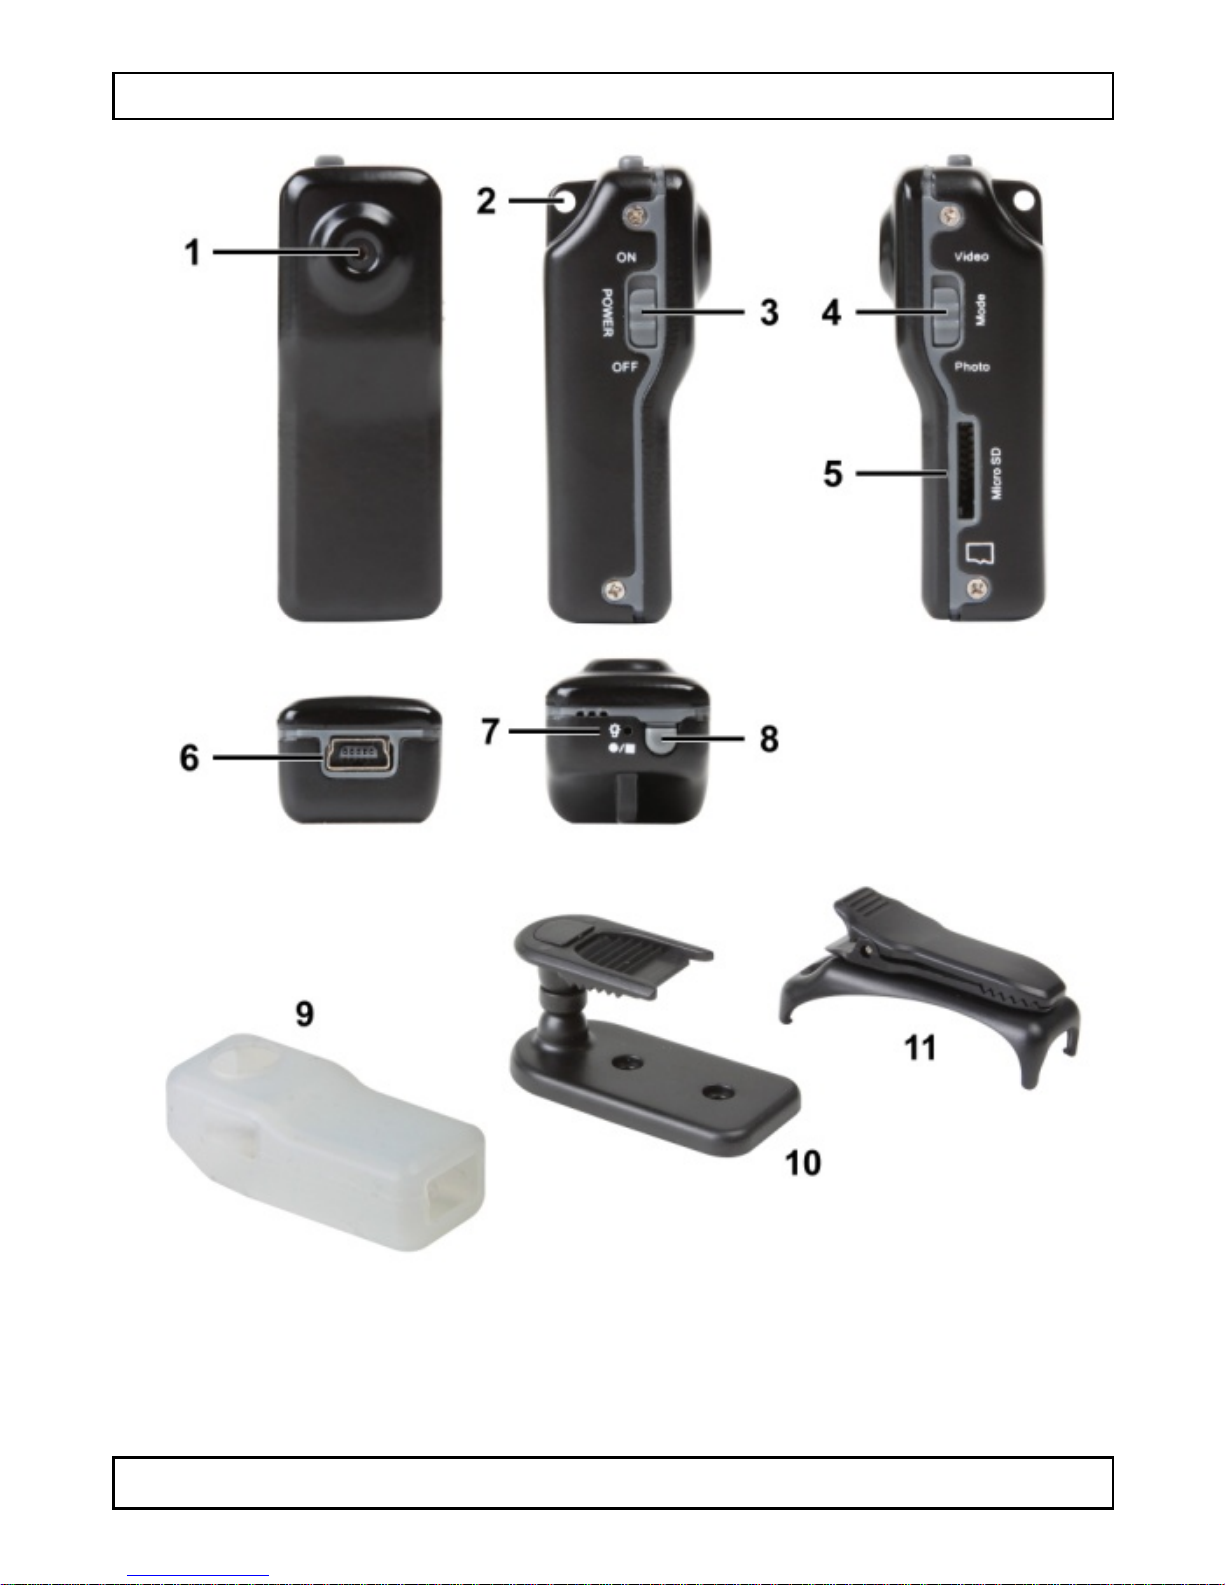
5. Overview
Refer to the illustrations o n page 2 of this manual.
1
lens
2
hanging ring
3
power switch
7
LED indicators
8
record button
9
protection sleeve
4
mode switch
5
micro SD card slot
6
USB plug
V. 01 – 13/07/2012 4 ©Velleman nv
10
11
bracket
clip
Page 5

CAMCOLVC17
6. Installation
You can use the camera while holding it in yo ur hand. Fit the camera
into the protection sleeve [9] and attach a lanyard to the hanging
ring [2] so you can carry it around easily.
Or you can fix the camera to a wall as follows:
1. Fix the bracket [10] to the wall using screws. Note: you can
also use Velcro or magnetic strips.
2. Attach the clip [11] to the back of the camera.
3. Attach the camera to the bracket [10] using the clip [11].
4. Adjust the viewing angle of the camera.
Caution: Do not aim the camera at the sun or other extremely
bright objects.
7. Operation
Turning the camera on and off
• To switch on the camera, place the power switch [3] in the ON
position.
• To switch off the camera, place the power switch [3] in the OFF
position.
If the camera is idle for more than 1 minute, it switches off
automatically.
Inserting a micro SD card
1. Switch the camera off.
2. Insert a micro SD card (not included) in the card slot [5]. Push
it in until it clicks into plac e.
3. To remove the micro SD card again, push it gently so that it
pops out.
Using the video function
1. Switch the camera on.
2. Set the mode switch [4] to Video.
3. Press the record button [8] to initialise th e camera.
The LED lights blue during initialisation. When the camera is
ready, the LED lights orange continuously.
4. To start recording, briefly press the record button [8].
The LED flashes blue during recording.
5. To stop recording, press the record button [8] again.
The camera saves the video file on the memory card.
V. 01 – 13/07/2012 5 ©Velleman nv
Page 6

CAMCOLVC17
Note: do not switch the camera off while recording: your video file
will not be saved on the memory card.
Using the photo function
1. Switch the camera on.
2. Set the mode switch [4] to Photo.
3. Press the record button [8] to initialise th e camera.
The LED lights blue during initialisation. When the camera is
ready, the LED flashes orange.
4. To take a photo, briefly press the record button [8].
The camera saves the photo on the memory card. The blue LED
lights while the photo is taken and saved.
5. Wait until the LED f lashes orange before you take the next
photo.
Connecting to a pc
1. Switch the camera off.
2. Plug one end of the included USB cable into the USB jack [6].
3. Plug the other end into a USB port on your computer.
4. On the pc, open My Computer and look for the drive that
represents the camer a.
The photos are in the IMAGE folder; the recorded video files are in
the VIDEO folder. You can copy, delete, or view the files from here.
Note: to disconnect the camera from the pc, use Windows ’ Safely
Remove Hardware function to stop the device before you unplug
the USB cable.
Setting the camera time
Setting the camera date and time ensures that your photos and
video have a correct time stamp.
1. Make sure there is a micro SD card in the camera.
2. Switch the camera on.
3. Connect the camera to your compute r with the included USB
cable.
4. Insert the included CD in your computer's CD drive.
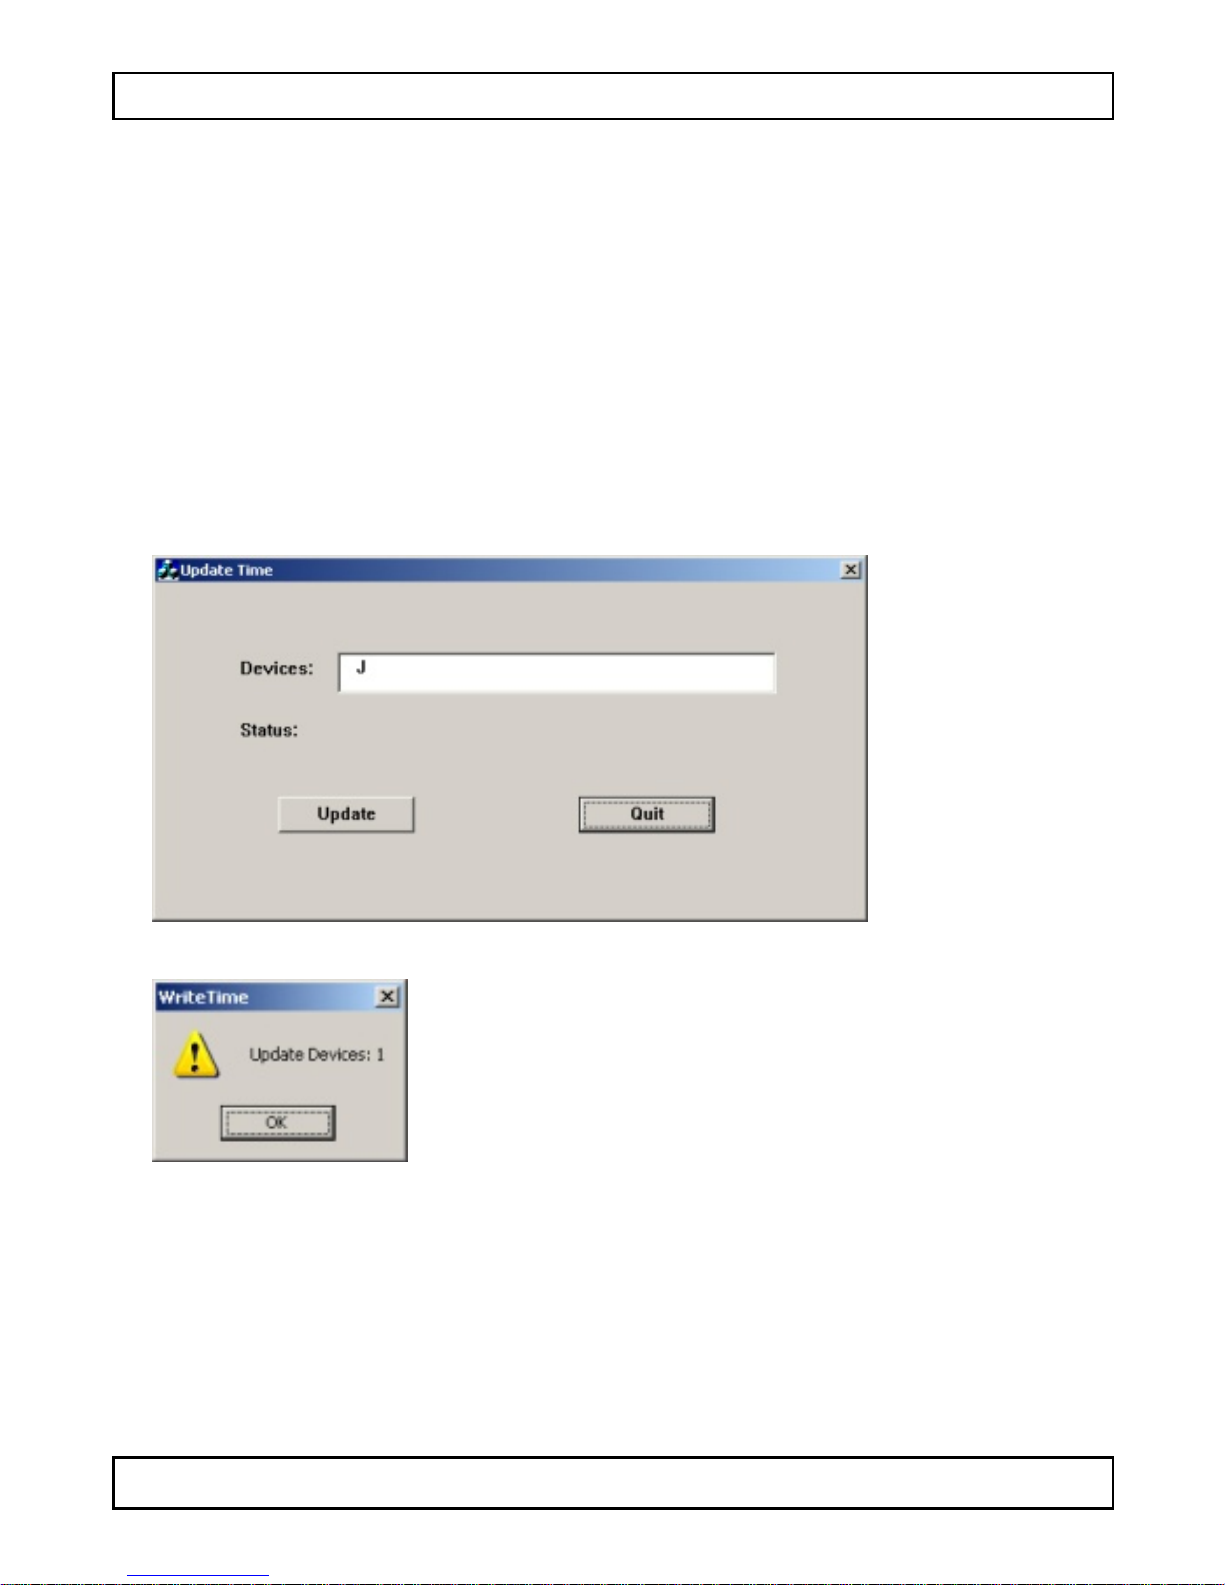
5. Locate and double-click the WriteTime.exe file on the CD-ROM.
The screen below appears:
V. 01 – 13/07/2012 6 ©Velleman nv
Page 7

CAMCOLVC17
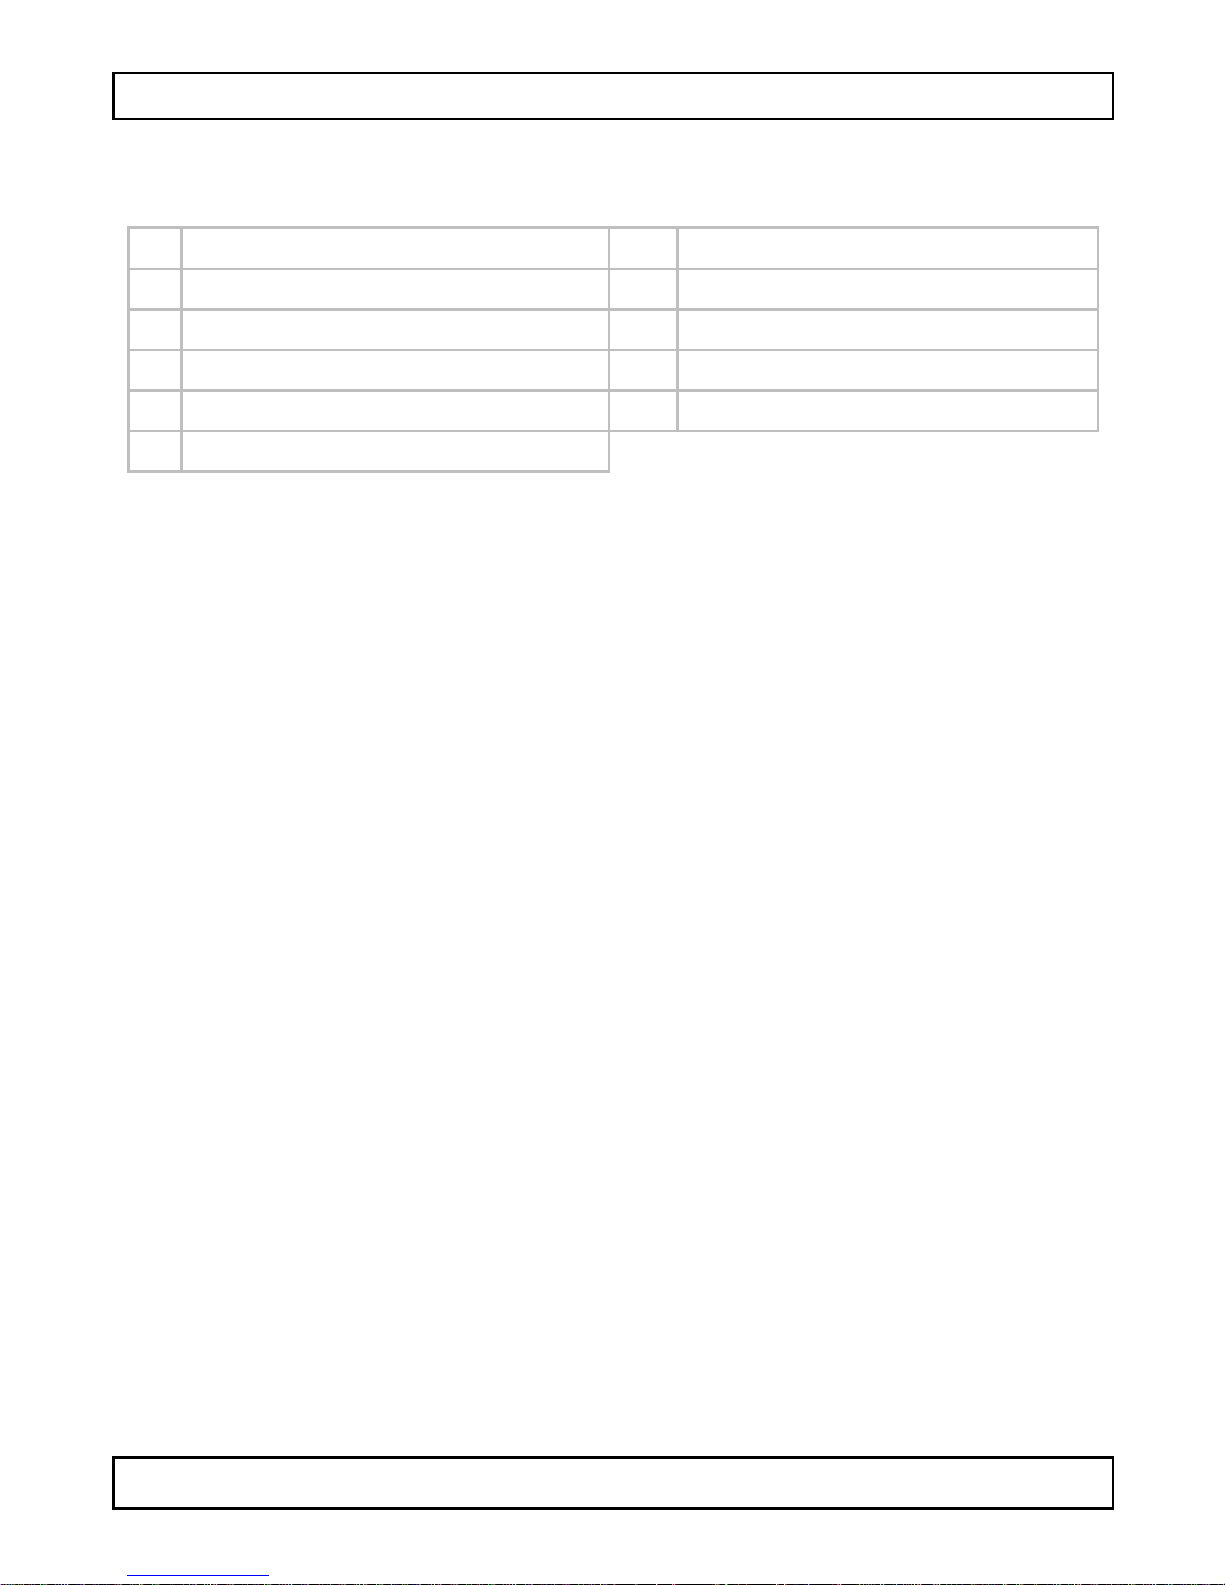
6. Click Update. The screen below appears:
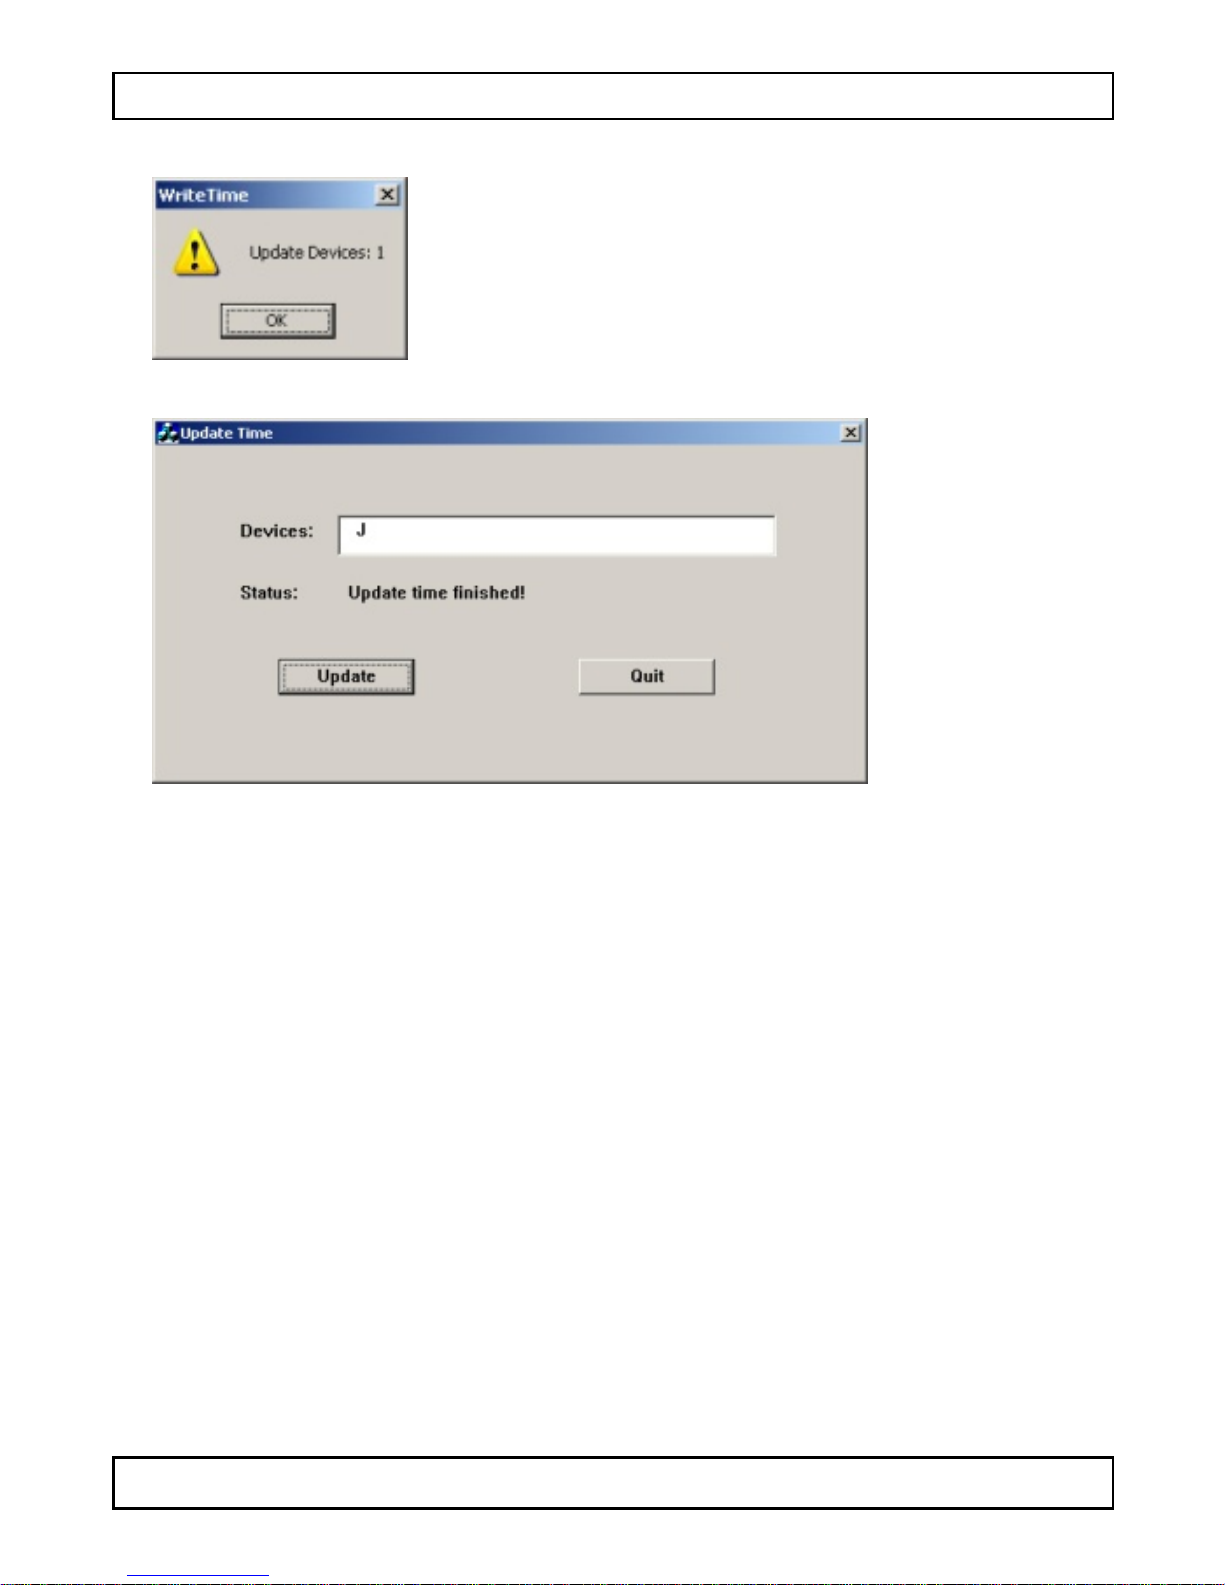
7. Click OK. The screen below appears:
8. Click Quit to exit.
Using the camera as a webcam
1. Switch the camera on.
2. Connect the camera to your compute r with the included USB
cable.
3. Briefly press the record button [8].
V. 01 – 13/07/2012 7 ©Velleman nv
Page 8

/
,
gin
d
g
.
c
n
t
l
t
n
m
g
n
t
e
L
y
g
g
t
f
gu
m
C
f
t
p
C
©
B
g
h
a
o
w
t
0
CAMCO
VC17
4. On the pc
Device to
8. Battery
8.1 Char
To charge the
USB cable.
• While char
LED flashes
• When fully
8.2 Dispos
This
Whe
acco
into
open My Computer
see the webcam ima
evice, connect it to
ing, the green LED li
harged, both LEDs li
al
device contains an in
the device is end-o
rdance with local re
he fire as it may exp
and double-click US
es.
our computer with t
hts continuously and
ht continuously.
ernal rechargeable b
-life, it must be disp
lations. Do not thro
lode.
Video
e included
the yellow
ttery.
sed of in
the device
9. Technica
storage capaci
pick-up eleme
viewing angle
minimum illu
video recordin
image recordi
charging time
battery capaci
operating time
dimensions
weight
working temp
Specifications
y max. 16GB
t 2 Megapixel
icro SD-HC card (no
MOS
62°
ination 1 lux
recording for
frame rate (
video resolu
recording ca
recording for
image resolu
mat MJPEG (aud
ps) 30
ion 1280 x 720
acity ±100MB/mi
mat JPEG
tion 1600 x 120
2.5 hours
y 260mAH
±70 min
55 x 28 x 20
mm
37g
rature -10°C ~ 50°
incl.)
io PCM)
pixels
n
pixels
V. 01 – 13/07
2012 8
Velleman nv
Page 9
CAMCOLVC17
Use this device with original accessories only. Velleman nv
cannot be held responsible in the event of damage or injury
resul t ing from (incorrect) use of this device.
For more info concerning this product and the latest version
of this manual, please visit our website www.velleman.eu.
The information in this manual is subject to change without
prior notice.
© COPYRIGHT NOTICE
The copyright to this manual is owned by Velleman nv. All
worldwide rig hts reserved. No part of this manual may be copied,
reproduced, translated or reduced to any electronic medium or
otherwise without the prior written c onsent of the copyright holder.
V. 01 – 13/07/2012 9 ©Velleman nv
Page 10
/
E
gez
m
y
e
d
t
v
a
n
n
e
w
a
d
u
p
a
a
e
V
e
e
e
L
0
o
e
s
j
s
v
e
g
e
t
n
b
e
v
g.
i
©
G
o
g gee
n
j
o
a
r
jd
e
e
d
n
n
CAMCO
VC17
G
1. Inleiding
Aan alle in
Belangrijke
Dit s
als h
scha
even
afval
terechtkomen
naar een loka
milieuwetgevi
Hebt u vrage
betreffend d
Dank u voor u
toe stel in gebr
transport, inst
BRUIKERSH
etenen van de Eur
ilieu-informatie b
mbool op het toestel
t na zijn levenscyclu
e kan toebrengen aa
uele batterijen) niet
; het moet bi
oor recyclage. U mo
l recyclagepunt bren
.
, contacteer dan d
verwijdering.
aankoop! Lees dez
uik neemt. Werd het
lleer het dan niet en
een ge
ANDLEIDIN
pese Unie
treffende dit produ
of de verpakkin
wordt weggeworpe
n het milieu. Gooi dit
bi
het gewone huish
pecialiseerd be drijf
t dit toestel naar uw
en. Respecteer de pl
e plaatselijke auto
handleiding grondig
oestel beschadigd ti
raadpleeg uw dealer.
ct
ft aan dat,
, dit toestel
toestel (en
udelijke
verdeler of
atselijke
iteiten
voor u het
ens het
2. Veilighei
Houd
Gebr
regen
Dit a
u, op
de pl
het k
3. Algemen
Raadpleeg de
achteraan dez
• Bescherm t
• Bescherm t
bediening.
sinstructies
buiten het bereik va
ik het toestel enkel
, vochtigheid en opsp
paraat bevat een int
het einde van zijn le
atselijke regelgevin
n immers ontploffen.
richtlijnen
elleman® ser vic e-
handleiding.
en stof en extreme
en schokken. Verm
kinderen en onbevo
innenshuis. Besche
attende vloeistoffen.
rne herlaadbare batt
ensduur, van dit pro
Gooi het toestel niet
en kwaliteitsgara
temperaturen.
d brute kracht tijde
den.
rm tegen
rij. Ontdoe
uct volgens
in het vuur,
tie
s de
V. 01 – 13/07
2012 1
Velleman nv
Page 11

CAMCOLVC17
• Richt de camera nooit naar de zon of naar andere weerkaatsende
objecten.
• Leer eerst de func tie s van het toestel kennen voor u het gaat
gebruiken.
• Om veiligheidsredenen mag u geen wijzigingen aanbrengen.
Schade door wijzigingen die de gebruiker heeft aangebracht valt
niet onder de garantie.
• Gebruik het toestel enkel waarvoor het gemaakt is. Bij
onoordeelkundig gebruik vervalt de garantie.
• De garantie geldt niet voor schade door het negere n van bepaalde
richtlijnen in deze handleiding en uw dealer zal de
verantwoordelijkheid afwijzen v oor defecten of problemen die hier
rechtstreeks verband mee houden.
• Er zijn geen door de gebruiker vervangbare onderdelen in dit
toestel. Voor onderhoud of reserveonderdelen, contacteer uw
dealer.
• Installeer en gebruik dit apparaat niet voor illegale praktijken en
respecteer ieders privacy.
4. Eigenschappen
• compacte videocamera
• geleverd met meerdere montagebeugels
• de camera legt de beelden vast op een micro SD-kaart (niet
meegelev.)
• opnamekwaliteit:
o video: 720P HD video - 30FPS
o beeld: 1600 x 1200 pixels
• ingebouwde zeer gevoelige microfoon
• gemakkelijke en gebruiksvriendelijke instelling
• geleverd met USB-kabel en montagebeugels
• metalen behuizing.
V. 01 – 13/07/2012 11 ©Velleman nv
Page 12

CAMCOLVC17
5. Omschrijving
Raadpleeg de afbeeldingen op pagina 2 van deze handleiding.
1
lens
7
statusleds
2
ophangoogje
3
aan/uit-schakelaar
4
modusschakelaar
5
slot voor micro SD-kaart
6
USB-poort
8
9
10
11
opnameknop
beschermhoesje
montagebeugel
clip
6. Installatie
U kunt de camera gebruiken terw ijl u deze v a sthoudt in uw hand.
Steek de camera in het beschermhoesje [9] en b ev est ig een
polsbandje aan het ophangoogje [2] zodat u de camera gemakkelijk
kunt meenemen.
Ofwel kunt u camera aan de muur bevestigen als volgt:
1. Monteer de beugel [10] aan de muur met schroeven.
Opmerking: u kunt ook velcro of magnetische strips gebruiken.
2. Beve stig de clip [11] aan de achterkant van de camera.
3. Bevestig de camera aan de beugel [10] met de clip [11].
4. Pas de kijkhoek aan van de camera.
Opgelet: Richt de camera nooit naar de zon of andere
weerkaatsende objecten.
7. Gebruik
De camera in- en uitschakelen
• Om de camera in te schakelen, zet de aan/uit-schakelaar [3] op
ON.
• Om de camera uit te schakelen, zet de aan/uit-schakelaar [3] op
OFF.
Indien de camera langer dan 1 minuut niet ge bruikt wordt, schakelt
deze automatisch uit.
Een micro SD-kaart plaatsen
1. Schakel de camera uit.
2. Plaats een micro SD-kaart (niet meegelev.) in het kaartslot [5].
Duw de kaart naar binnen, totdat deze op zijn plaats vastklikt.
V. 01 – 13/07/2012 12 ©Velleman nv
Page 13

CAMCOLVC17
3. Om de micro SD-kaart opnieuw te verwijderen, duw voorzichtig
tegen de kaart tot deze uit de sleuf springt.
De videofunctie gebruiken
1. Schakel de camera in.
2. Zet de modusschakelaar [4] op Video.
3. Druk op de opnameknop [8] om de camera op t e sta rt en .
De blauwe led licht op tijdens het opstarten. Wanneer de camera
gebruiksklaar is, blijft de oranje led branden.
4. Om een opname te starten, druk kort op de opnameknop [8].
De blauwe led knippert tijdens de opname.
5. Om de opname te stoppen, druk nogmaals op de opnameknop
[8].
De camera zet het videobestand op de geheugenkaart.
Opmerking: schakel de camera niet uit tijdens de opname: uw
bestand zal niet opgeslagen worden op de geheugenkaart.
De fotofunctie gebruiken
1. Schakel de camera in.
2. Zet de modusschakelaar [4] op Photo.
3. Druk op de opnameknop [8] om de camera op t e sta rt en .
De blauwe led blijft branden tijdens het opstarten. Wanneer de
camera gebruiksklaar is, knippert de oranje led.
4. Om een foto te nemen, druk kort op de opnameknop [8].
De camera zet de foto op de geheugenkaart. De blauwe led
brandt tijdens het nemen en het bewaren van de foto.
5. Wacht totdat de oranje led knippert voor het nemen van de
volgende foto.
Aansluiten op een pc
1. Schakel de camera uit.
2. Sluit het ene uiteinde van de meegeleverde USB-kabel aan op
de USB-poort [6] van de camera.
3. Sluit het andere uiteinde aan op een USB-poort van uw
computer.
4. Op de pc, open My Computer en zoek naar de drive van de
camera.
De foto's zijn geplaatst in de map IMAGE; de opgeslagen
videobestanden zijn geplaatst in de map VIDEO. Van hieruit kunt u
de bestanden kopiëren, verwijderen of bekijken.
V. 01 – 13/07/2012 13 ©Velleman nv
Page 14

CAMCOLVC17
Opmerking: om de camera los te koppelen van de pc, gebruik de
Windows-functie Safely Remove Hardware om het toestel te
deactiveren voordat u de USB-kabel loskoppelt.
De camera ti jd instellen
Het instellen van de cameradatum en -tijd zorgt ervoor dat uw foto' s
en video voorzien zijn van een correcte tijdstempel.
1. Plaats een micro SD-kaart in de camera.
2. Schakel de camera in.
3. Sluit de camera aan op uw computer met de meeleverde USB-
kabel.
4. Plaats de meegeleverde CD in de CD-rom drive van uw
computer.
5. Lokaliseer en dubbelklik op het WriteTime.exe bestand op de
CD-rom. Het scherm hi eron d e r ve rschijnt :
6. Klik op Update. Het scherm hieronder verschijnt:
V. 01 – 13/07/2012 14 ©Velleman nv
Page 15

/
K
Qu
ge
e
a
m
e
l
j
o
jd
n
g
e
L
5
d
m
8
w
t
groe
v
t
e
v
s
©
gele
B
r
e
e
d
e
h
j
CAMCO
VC17
7. Klik op O
8. Klik op
De camera
1. Schakel d
2. Sluit de c
kabel.
3. Druk kort
4. Op de pc,
Device o
. Het scherm hier on
it om te verlaten.
bruike n als webca
camera in.
mera aan op uw com
op de opnameknop [
open My Computer
de beelden van de
er verschijnt:
puter met de mee
].
en dubbelklik op US
ebcamera te zien.
verde USB-
Video
8. Batterij
8.1 Oplad
Om het toeste
meegeleverde
• Ti
dens het
• Wanneer v
8.2 Verwi
Dit a
Wan
bere
re
e
imm
n
op te laden, sluit he
USB-kabel.
laden, brandt de
lledig opgeladen, blij
eren
pparaat bevat een in
eer het product het
ikt, ontdoe u er dan
lgeving. Gooi het toe
rs ontploffen.
aan op uw compute
ne led en knippert d
en beide leds brand
erne herlaadbare bat
inde van zijn levens
an volgens de plaats
tel niet in het vuur,
met de
gele led.
n.
.
teri
uur heeft
lijke
et kan
V. 01 – 13/07
2012 1
Velleman nv
Page 16

CAMCOLVC17
9. Technische specificaties
opslagcapaciteit max. 16GB micro SDHC-kaart (niet
meegeleverd)
beeldsensor 2 Megapixel CMOS
kijkhoek 62°
minimale lichtsterkte 1 lux
video-opname opnameformaat MJPEG (audio PCM)
beelden per seconde 30
videoresolutie 1280 x 720 pixels
opnamecapaciteit ±100MB/min
beeldopname opnameformaat JPEG
beeldresolutie 1600 x 1200 pixels
laadtijd 2,5u
capaciteit batterij 260mAH
autonomie ±70 min
afmetingen 55 x 28 x 20mm
gewicht 37g
werktemperatuur -10°C ~ 50°C
Gebruik dit toestel enkel met originele accessoires. Velleman
nv is niet aansprakelijk v oo r schade of kwets uren bij
(ver keerd) gebruik van dit toest el.
Voor meer informatie over dit product en de laatste versie van
deze handleiding , zie www.velleman.eu.
De informatie in deze handleiding kan te allen tijde worden
gewijzigd zonder voorafgaande kennisgeving.
© AUTEURSRECHT
Velleman nv heeft het auteursrecht voor deze handleiding.
Alle wereldwijde rechten voorbehouden. Het is niet toegestaan
om deze handleiding of gedeelten ervan over te nemen, te kopiëren,
te vertalen, te bewerken en op te slaan op een elektronisch medium
zonder voorafgaande schriftelijke toestemming van de
rechthebbende.
V. 01 – 13/07/2012 16 ©Velleman nv
Page 17
/
t
s
i
y
m
i
e
e
s
m
e
m
g
u
e
e
e
i
p
gi
o
L
7
E
e
t
o
je
é
t
s
e
a
v
r
e
e
e
v
©
e
r
s
u
o
l
o
a
t
s
j
a
CAMCO
VC17
1. Introduc
Aux résident
Des informat
ce produit
Ce s
l’éli
l'env
élect
mun
trait
usagés à votr
convient de re
de l’environne
En cas de qu
élimination.
Nous vous re
attentivement
été endomma
votre revende
MODE D’
ion
de l'Union europé
ons environnemen
mbole sur l'appareil
ination d’un appareil
ironnement. Ne pas
ronique (et des piles
cipaux non sujets au
ra l’ appareil en ques
fournisseur ou à un
pecter la réglementa
ent.
stions, contacter l
ercions de votre ach
avant la mise en ser
é pendant le transpo
r.
MPLOI
nne
ales impo rt antes c
u l'emballage indiqu
en fin de vie peut pol
ter un appareil élect
ventuelles) par mi le
tri sélectif ; une déch
ion. Renvoyer les éq
ervice de recyclage l
tion locale relative à
s autorités lo ca les
t ! Lire la présente n
ice de l’appareil. Si l’
t, ne pas l’installer e
oncernant
que
luer
ique ou
déchets
èterie
ipements
cal. Il
a protection
pour
tice
ppareil a
consulter
2. Consign
Gard
autori
Utilis
la plu
Cet a
durée
la lé
feu p
s de sécurité
r hors de la portée d
sées.
r cet appareil uniqu
e, de l’humidité et d
pareil contient une p
de vie, débarrassez-
slation d'élim ination l
ur éviter tout risque
s enfants et des per
ment à l'int ér ieur.
s projections d’eau.
ile rechargeable. A la
ous de ce produit en
ocale. Ne
d'explosion.
etez pas l'
onnes non
Protéger de
fin de sa
respectant
ppareil au
V. 01 – 13/07
2012 1
Velleman nv
Page 18

CAMCOLVC17
3. Directives générales
Se référer à la garantie de service et de qualité Velleman® en
fin de notice.
• Protéger contre la poussière. Protéger contre la chaleur extrême.
• Protéger contre les chocs et le traiter avec circonspection pendant
l’opération.
• Ne jamais aligner la caméra vers le soleil ou vers to ut autre objet
réfléchissant.
• Se familiariser avec le fonctionnement avant l’emploi.
• Toute modification est interdite pour des raisons de sécurité. Les
dommages occasionnés par des modifications par le client ne
tombent pas sous la garantie.
• N’utiliser qu’à sa fonction prévue. Un usage impropre annule
d'office la garantie.
• La garantie ne s’applique pas aux dommages survenus en
négligeant certaines directives de cette notice et votre revendeur
déclinera toute responsabilité pour les problèmes et les défauts
qui en résu ltent.
• Il n’y a aucune pièce maintenable par l’utilisateur. Commander
des pièces de rechange éventuelles chez votre revendeur.
• Installer et utiliser l’appareil en respectant la législation et la vie
privée des tiers.
4. Caractéristiques
• caméscope compact
• livré avec plusieurs étriers de montage
• la caméra enregistre les images sur une micro carte SD (non incl.)
• qualité d'enregistrement :
o vidéo : 720P HD-Video - 30FPS
o image : 1600 x 1200 pixels
• microphone incorporé très sensible
• configuration facile
• livré avec câble USB et étriers de montage
• boîtier métallique.
V. 01 – 13/07/2012 18 ©Velleman nv
Page 19

CAMCOLVC17
5. Description
Se référer aux illustrations en page 2 de cette notice.
1
objectif
7
LEDs d’état
2
Œillet de suspension
3
interrupteur marche/arrêt
4
commutateur de mode
5
slot pour microcarte SD
6
port USB
8
9
10
11
bouton d'enregistrement
housse protectrice
étrier
clip
6. Installation
Vous pouvez utiliser le caméscope en le tenant dans votre main.
Glissez la caméra dans la housse protectrice [9] et passez une
dragonne à travers l'œillet de suspension [2] pour l'emporter
facilement avec vous.
Ou vous pouvez également fixer la caméra comme suit :
1. Fixez l'étrier [10] au mur avec des vis. Remarque : vous pouvez
également utiliser du velcro ou des bandes magnétiques.
2. Attachez le clip [11] au dos de la caméra.
3. Attachez la caméra à l'étrier [10] avec le c lip [11].
4. Ajustez l'angle de vue de la caméra.
Attention : N'orientez jamais la caméra vers le soleil ou to ut autre
objet réfléchissant.
7. Emploi
Allumer et éteindre la cam éra
• Pour allumer la cam éra, me ttez le commutateur de mode [3] sur
ON.
• Pour éteindre la caméra, mettez le commutateur de mode [3] sur
OFF.
Si la caméra n'est pas utilisée pendant plus d'une minute, celle-ci
s'éteindra automatiquement.
Insérer une carte micro SD
1. Eteignez la caméra.
2. Insérez une carte micro SD (non incl.) dans le slot pour carte
mémoire [5]. Poussez la carte jusqu'à ce que vous entendiez un
clic.
V. 01 – 13/07/2012 19 ©Velleman nv
Page 20

CAMCOLVC17
3. Pour retirer la c ar t e micro SD à nouveau, poussez-la doucement
pour que la carte s'éjecte.
Utilise r la fonction vid éo
1. Allumez la caméra.
2. Mettez le commutateur de mode [4] sur Video.
3. Appuyez sur le bouton d'enregistrement [8] pour in itialiser la
caméra.
La LED bleue s'allume durant l'initialisation. Lorsque la c améra
est prête à l'usage, la LED orange s'allume en continu.
4. Pour commencer à enregistrer, appuyez brièvement sur le
bouton d'enregistrement [8].
La LED bleue clignote durant l'enregistrement.
5. Pour arrêter l'enregistrement, appuyez de nouveau s ur le bouton
d'enregistrement [8].
La caméra enregistre le fichier vidéo sur la carte mémoire.
Remarque : n'éteignez pas la caméra pendant l'enregistrement :
votre fichier vidéo ne sera pas sauvegardé sur la carte mémoire.
Utiliser la fonction photo
1. Allumez la caméra.
2. Mettez le commutateur de mode [4] sur Photo.
3. Appuyez sur le bouton d'enregistrement [8] pour in itialiser la
caméra.
La LED bleue s'allume durant l'initialisation. Lorsque la c améra
est prête à l'usage, la LED orange clignote .
4. Pour prendre une photo, appuyez brièvement sur le bouton
d'enregistrement [8].
La caméra enregistre la photo sur la carte mémoire. La LED
bleue s'allume pendant la prise de la photo et la mémorisation.
5. Patientez jusqu'à ce la LED orange clignote avant de prendre la
photo suivante.
Connecter à un pc
1. Eteignez la caméra.
2. Connectez une extrémité du câble USB livré dans le port USB
[6] de la caméra.
3. Connectez l'autre extrémité dans le port USB sur votre
ordinateur.
4. Sur le pc, ouvrez My Computer et recherchez le lecteur de
disque qui représente la ca méra.
V. 01 – 13/07/2012 20 ©Velleman nv
Page 21

CAMCOLVC17
Les photos sont enregistrées dans le répertoire IM AGE; le s fichiers
vidéo enregistrés sont stockés dans le répertoire VIDEO. Depuis ce
menu, il est possible de copier, supprimer ou de visualiser les
fichiers.
Remarque : pour déconnecter la caméra du pc, utilisez la fonction
Safely Remove Hardware de Windows pour désactiver l'appareil
avant de déconnecter le câble USB.
Régler l'heure de la caméra
1. Assurez-vous qu'une carte micro SD soit insérée dans la caméra.
2. Allumez la caméra.
3. Connectez la caméra à votre ordinateur avec le câble USB livré.
4. Insérez le CD livré dans le lecteur optique de votre ordinateur.
5. Localisez et double-cl iquez sur le f ichier WriteTime.exe sur le
CD-ROM. La fenêtre ci-dessous apparaît :
6. Cliquez sur Update. La fenêtre ci-dessous apparaît :
V. 01 – 13/07/2012 21 ©Velleman nv
Page 22

/
m
a
z
b
v
e
h
gn
a
a
g
p
L
2
e
a
t
e
earg
g
d
e
©
e
u
a
l
l
a
j
CAMCO
VC17
7. Cliquez su
8. Cliquez su
Utiliser la ca
1. Allumez l
2. Connecte
3. Appuyez
4. Sur le pc,
Video De
r OK. La fenêtre ci-d
r Quit pour quitter.
éra comme webc
caméra.
la caméra à votre or
rièvement sur le bou
ouvrez My Compute
ice pour visualiser l
ssous apparaît :
m
dinateur avec le câbl
on d'enregistrement
r et double-cliquez s
s images de la webc
USB livré.
[8].
r USB
m.
8. Pile
8.1 Charg
Pour charger l'
USB livré.
• Lors de la c
orange cli
• Après une c
continu.
8.2 Elimin
Cet
duré
la lé
feu
r
appareil, connectez-l
e, la LED verte s'
ote.
har
e complète, les
tion
ppareil contient une
e de vie, débarrassez
islation d'élim ination
our éviter tout risqu
à votre ordinateur a
allume en continu et
eux LEDs orange s'al
pile r echargeable. A l
-vous de ce produit e
locale. Ne
etez pas l
d'explosion.
vec le câble
a LED
ument en
fin de sa
n respectant
'appareil au
V. 01 – 13/07
2012 2
Velleman nv
Page 23

CAMCOLVC17
9. Spécifications techniques
capacité de mémoire micro carte SD-HC (non incl.) de max.16Go
capteur 2 Mégapixels CMOS
angle de vue 62°
illumination min. 1 lux
enregistrement vidéo for mat
MJPEG (audio PCM)
d'enregistrement
images par seconde 30
résolution vidéo 1280 x 720 pixels
capacité
±100MB/min
d'enregistrement
capture d'image format
JPEG
d'enregistrement
résolution d'image 1600 x 1200 pixels
durée de recharge 2,5h.
capacité de la pile 260mAH
autonomie ±70 min
dimensions 55 x 28 x 20mm
poids 37g
température de
-10°C ~ 50°C
service
N’employer cet appareil qu’avec des accessoires d’origine. SA
Velleman ne sera a ucunement responsable de dommages ou
lésions survenus à un usage (incorrect) de cet appareil.
Pour plus d’information concernant cet article et la dernière
version de ce tte notice, visiter notre site we b
www.velleman.eu.
Toutes les informations présentées dans cette notice peuvent
être modifiées sans notification préalable.
© DROITS D’AUTEUR
SA Velleman est l’ayant droit des droits d’auteur pour cette
notice. Tous droits mondiaux réservés. Toute reproduction,
traduction, copie ou diffusion, intégrale ou partielle, du contenu de
cette notice par quelque procédé ou sur tout support électronique
que se soit est interdite sans l’accord préalable écrit de l’ayant droit.
V. 01 – 13/07/2012 23 ©Velleman nv
Page 24

/
c
a
i
u
c
c
t
a
d
.
o
e
e
o
a
d
o
t
L
4
L
r
r
r
rlaj
M
o
d
n
u
e
e
©
t
i
m
)
o
a
s
a
o
a
g
p
e
r
CAMCO
VC17
1. Introduc
A los ciudad
Importantes
concerniente
Este
tira l
amb
No t
bas
reci
unidad de reci
medio ambien
Si tiene duda
residuos.
¡Gracias por h
instrucciones
algún daño en
su distribuidor
MANUAL DE
ión
nos de la Unión Eu
informaciones sob
a este producto
símbolo en este apa
as muestras inservibl
iente.
re este aparato (ni la
ra doméstica; debe i
e. Devuelva este a
laje local. Respete la
e.
s, contacte con las
ber comprado la CA
el manual antes de u
el transporte no lo in
USUARIO
opea
e el medio ambien
ato o el embalaje ind
es, podrían dañar el
s pilas, si las hubiera
a una empresa espe
parato a su distribuid
s ley es locales en rel
autoridades locale
COLVC17! Lea aten
sarla. Si el aparato h
stale y póngase en c
e
ca que, si
edio
en la
cializada en
r o a la
ción con el
para
tamente las
sufrido
ntacto con
2. Instrucci
Mant
capac
Utilic
equip
goteo
Este
su vi
medi
explo
nes de seguridad
nga el aparato lejos
itadas y niños.
el aparato sólo en i
a lluvia, humedad n
.
parato funciona con
a útil, respete las ley
ambiente. No eche
ar.
el alcance de person
teriores. No expon
i a ningún tipo de sal
na batería recargabl
s locales en rela ción
l aparato al fuego po
s no
a este
icadura o
. Al final de
con el
que puede
V. 01 – 13/07
2012 2
Velleman nv
Page 25

CAMCOLVC17
3. Normas generales
Véase la Garantía de servicio y calidad Vellem an ® al final de
este manual del usuario.
• No exponga este equipo a polvo. No exponga este equipo a
temperaturas extremas.
• No agite el aparato. Evite usar excesiva fuerza durante el manejo
y la instalación.
• Nunca dirija la cámara al sol ni un objeto reflectante.
• Familiarícese con el funcionamiento del aparato antes de utilizarlo.
• Por razones de seguridad, las modificacione s no autorizadas del
aparato están prohibidas. Los daños causados por modificaciones
no autorizadas, no están cubiertos por la garantía.
• Utilice sólo el aparato para las aplicaciones descritas en este
manual. Su uso incorrecto anula la gar a ntía completamente.
• Daños causados por descuido de las instrucciones de seguridad de
este manual invalidarán su garantía y s u distribuidor no será
responsable de ningún daño u otros problemas resultantes.
• El usuario no habrá de efectuar el mantenimiento de ninguna
pieza. Contacte con su distribuidor si necesita piezas de re cambio.
• Instale y utilice el aparato al respectar la legislación y la vida
privada de terceros.
4. Características
• videocámara compacta
• se entrega con diferentes soportes de montaje
• la cámara graba las imágenes en una micro tarjeta SD (no incl.)
• calidad de grabación:
o vídeo: 720P HD-Vídeo - 30 FPS
o imagen: 1600 x 1200 píxeles
• micrófono de alta sensibilidad incorporado
• fácil configuración
• se entrega con cable USB y soportes de montaje
• carcasa de metal.
V. 01 – 13/07/2012 25 ©Velleman nv
Page 26

CAMCOLVC17
5. Descripción
Véase las figuras en la página 2 de este manual del usuario.
1
óptica
7
LEDs de estado
2
ojete
3
botón ON/OFF
4
botón « mode »
5
ranura para micro tarjeta SD
6
conector USB
8
9
10
11
botón de grabación
funda de protección
soporte
clip
6. Instalación
Puede utilizar la cámara al mantenerla en su mano. Introduzca la
cámara en la funda de protección [9] y pase una correa por el ojete
[2] para llevar la cómodamente co nsigo.
También es posible fijar la cá mara a la pared:
1. Fije el soporte [10] a la pared con los tornillos. Observación:
También puede utilizar cinta con cierre de gancho y bucle o
bandas magnéticas.
2. Fije el clip [11] a la parte trasera de la cámara.
3. Fije la cámara al soporte [10] con el clip [11].
4. Ajuste el ángulo de visión de la cámara.
Advertencia: Nunca dirija la cámara al sol ni un objeto reflectante.
7. Uso
Activar y desactivar la cámara
• Para activar la cámara, ponga el botón ON/OFF [3] en la posición
ON.
• Para desactivar la cámara, ponga el botón ON/OFF [3] en l a
posición OFF.
En caso de una inactividad de más de 1 minuto, la cámara se
desactiva automáticamente.
Introducir una tarjeta micro SD
1. Desactive la cámara.
2. Introduzca la tarjeta micro SD (no incl.) en la ranura [5].
Introdúzcala pres ionando hasta donde sea posible.
3. Para quitar la tarjeta micro SD, empújela cuidadosamente para
que salga.
V. 01 – 13/07/2012 26 ©Velleman nv
Page 27

CAMCOLVC17
Utilizar la función de vídeo
1. Active la cámara.
2. Ponga el botón « mode » [4] en la posición Video.
3. Pulse el botón de grabación [8] para empezar.
El LED se ilumina en azul mientras que se está activando. Si la
cámara está lista, el LED se ilumina en naranja de manera
continua.
4. Para empezar a grabar, pulse brevemente el botón de grabación
[8].
El LED parpadea en azul durante la grabación.
5. Para desactivar la grabación, vuelva a pulsar el botón de
grabación [8].
La cámara guarda el fichero de vídeo en la tarjeta.
Observación: No desactive la cámara durante la grabación: no se
guardará el fichero en la tarjeta de memoria.
Utilizar la función de fotos
1. Active la cámara.
2. Ponga el botón « mode » [4] en la posición Photo.
3. Pulse el botón de grabación [8] para empezar.
El LED se ilumina en azul mientras que se está activando. Si la
cámara está lista, el LED parpadea en naranja.
4. Para hacer una foto, pulse brevemente el botón de grabación
[8].
La cámara guarda la foto en la tarjeta. El LED azul se ilumina
mientras está hacienda una foto y mientras está guardándola.
5. Espere hasta que el LED parpadee en naranja antes de hacer la
siguiente foto.
Conectar el aparato al PC
1. Desactive la cámara.
2. Introduzca un extre m o del cable USB (incl.) en el conector USB
[6].
3. Conecte el otro extremo al puerto USB del ordenador.
4. En el PC, abra My Comput er y busque la unidad de disco de la
cámara.
La fotos están en la carpeta IMAGE folder. Los ficheros de vídeo
grabados están en la carpeta VIDEO. Aquí, es posible copiar, borrar o
ver estos ficheros.
V. 01 – 13/07/2012 27 ©Velleman nv
Page 28
CAMCOLVC17
Observación: Para de sconectar la cámara del PC y antes de
desconectar el cable USB, utilice la función Sa fely Remove
Hardware de Windows.
Ajustar la hora y la fecha de la cá mara
Introduzca la fecha y la hora correctas para sus fotos y vídeos.
1. Asegúrese de que haya introducido una tarjeta micro SD en la
cámara.
2. Active la cámara.
3. Conecte la cámara al ordenador con el cable USB incluido.
4. Introduzca el CD (incl.) en el lector de CD-ROM.
5. Localice el fichero WriteTime.exe en el CD-ROM y haga clic dos
veces en ello. La siguiente pantalla aparece:
6. Haga clic en Update. La siguiente pantalla aparece:
V. 01 – 13/07/2012 28 ©Velleman nv
Page 29

/
e
e
m
c
a
v
a
v
g
e
u
s
e
a
u
i
o
L
9
r
g
g
e
s
©
g
e
w
a
r
b
o
CAMCO
VC17
7. Haga clic
8. Haga clic
Utilizar l a c á
1. Active la
2. Conecte l
3. Pulse bre
4. En el PC,
Video De
n OK. La siguiente p
n Quit para salir.
ara como cámara
ámara.
cámara al ordenado
emente el botón de
bra My Computer y
ice para ver las imá
antalla aparece:
web
con el cable USB inc
rabación [8].
a clic dos veces
ha
enes de la cámara
luido.
n USB
eb.
8. Batería
8.1 Cargar
Para car
ar el
incluido.
• El LED verd
parpadea d
• Ambos LED
completam
8.2 Elimin
Este
de s
med
expl
aparato, conéctelo al
se ilumina de mane
rante la carga.
se iluminan de man
nte cargado.
ción de residuos
aparato funciona con
vida útil, respete la
o ambiente. No eche
tar.
ordenador con el cab
ra continua y el LED
ra continua si el apa
una batería recarga
leyes locales en rela
el aparato al fuego p
le USB
marillo
ato está
le Al final
ción con el
rque puede
V. 01 – 13/07
2012 2
Velleman nv
Page 30

CAMCOLVC17
9. Especificaciones
capacidad de
micro tarjeta SD-HC (no incl.) de máx. 16GB
memoria
elemento de imagen 2 Megapíxeles CMOS
ángulo de visión 62°
iluminación mínima 1 lux
grabación de vídeo formato de grabación MJPEG (audio PCM)
imágenes por segundo
30
(fps)
resolución vídeo 1280 x 720 píxeles
capacidad de grabación ±100MB/min
captura de imagen formato de grabación JPEG
resolución de la imagen 1600 x 1200 píxeles
tiempo de carga 2.5h
capacidad de la
260mAH
batería
autonomía ±70 min
dimensiones 55 x 28 x 20mm
peso 37g
temperatura de
-10°C ~ 50°C
funcionamiento
Utilice este aparato sólo con los accesorios originales.
Velleman NV no será responsable de daños ni lesiones
causados por un uso (indebido) de este aparato.
Para más información sobre este producto y la versión más
reciente de este manual del usuario, visite nuestra página
www.velleman.eu.
Se pueden modificar las especificaciones y el contenido de
este manual sin previo aviso.
© DERECHOS DE AUTOR
Velleman NV dispone de los derechos de autor para este
manual del usuario. Todos los de rechos mundiales
reservados. Está estrictamente prohibido re produc ir, traducir,
copiar, editar y guardar este manual del usuario o partes de ello sin
pre vio permiso escrito del derecho habiente.
V. 01 – 13/07/2012 30 ©Velleman nv
Page 31

/
B
n
o
w
e
a
n
i
r
s
e
c
e
gungsr
g
e
e
i
n
e
a
r
n
L
1
S
c
ü
o
S
e
s
s
t
n
S
ö
C
a
e
t
e
n
n
s
ge
d
©
t
c
s
n
c
d
r
s
n
h
e
n
h
i
.
d
g
CAMCO
VC17
1. Einführu
An alle Einw
Wichtige Um
Dies
an, d
Lebe
Sie d
unso
Batterien müs
entsorgt werd
ört liches Recy
Sie die örtlich
Falls Zweifel
Entsor
Wir bedanken
Bedienun
Überprüfen Si
sein, verwend
Händler.
sanl
EDIENUNG
hner der Europäis
eltinformationen
s Symbol auf dem Pr
ss die Entsorgung di
szyklus der Umwelt
e Einheit (oder verw
tiertes Hausmüll; die
en von einer speziali
n. Diese Einheit mus
ling-Unternehmen re
n Umweltvorschrifte
bestehen, wenden
ichtlinien an Ihre
uns für den Kauf der
eitung vor Inbetriebn
, ob Transportsch äd
n Sie das Gerät nich
ANLEITUNG
hen Union
ber dieses Produk
dukt oder der Verpa
eses Produktes nach
chaden zufügen kan
ndeten Batterien) ni
Einheit oder verwen
ierten Firma zwecks
an den Händler ode
ourniert werden. Re
.
ie sich für
rtliche Behörde.
AMCOLVC17! Lese
hme sorgfältig durc
n vorliegen. Sollte di
und wenden Sie sich
kung zeigt
einem
. Entsorgen
ht als
eten
Recyclin
ein
pektieren
Sie diese
.
s der Fall
an Ihren
2. Sicherhe
Halte
Verw
Sie d
Diese
Batte
Lebe
das G
tshinweise
Sie Kinder und Unb
nden Sie das Gerät
s Gerät vor Regen u
Kamera enthält eine
ie. Entsorgen Sie da
sdauer gemäß den
erät nicht ins Feuer,
fugte vom Gerät fer
ur im Innenbereic
d Feuchte.
interne wieder auflad
Produkt am Ende se
ltenden gesetzlichen
enn es könnte explo
.
. Schützen
bare
ner
Werfen Sie
ieren.
V. 01 – 13/07
2012 3
Velleman nv
Page 32

CAMCOLVC17
3. Allgemeine Richtlinien
Siehe Ve lleman® Serv ic e- und Qualität sgarantie am Ende dieser
Bedienungsanleitung.
• Schützen Sie das Gerät vor Staub. Schützen Sie das Gerät vor
extremen Temperaturen.
• Vermeiden Sie Erschütte rungen. Vermeiden Sie rohe Gewalt
während der Installation und Bedienung des Gerätes.
• Richten Sie die Kamera nie auf die Sonne oder andere
reflektierende Gegenstände.
• Nehmen Sie das Gerät erst in Betrieb, nachdem Sie sich mit
seinen Funktionen vertraut gemacht haben.
• Eigenmächtige Veränderungen sind aus Sicherheitsgründen
verboten. Bei Schäden verursacht dur ch eigenmächtige
Änderungen erlischt der Garantieanspruch.
• Verwenden Sie das Gerät nur f ür Anwendungen beschrieben in
dieser Bedienungsanle it ung sonst kann dies zu Schäden am
Produkt führe n und erlischt der Garantieanspruch.
• Bei Schäden, die durch Nichtbeachtung der Bedienungsanleitung
verursacht werden, erlischt der Garantieanspruch. Für daraus
resultierende Folgeschäden über nimmt der Hersteller keine
Haftung.
• Es gibt keine zu wartenden Teile. Bestellen Sie eventuelle
Ersatzteile bei Ihrem Fachhändler.
• Installieren und verwenden Sie das Gerät nicht für illegale
Praktiken und beachten Sie die Intimsphäre aller.
4. Eigenschaften
• kompakte Videokamera
• Lieferung mit verschiedenen Halterungen
• die Kamera zeichnet die Bilder auf eine Micro SD-Karte (nicht
mitgeliefert) auf
• Aufzeichnungsqualität:
o Video: 720P HD-Video - 30 FPS
o Bild: 1600 x 1200 Pixel
• eingebautes sehr empfindliches Mikrofon
• einfache und benutzerfreundliche Konfiguration
• Lieferung mit USB-Kabel und Halterungen
• Metallgehäuse
V. 01 – 13/07/2012 32 ©Velleman nv
Page 33
CAMCOLVC17
5. Umschreibung
Siehe Abbildungen, Seite 2 dieser Bedienungsanleitung.
1
Objektiv
7
Status-LEDs
2
Aufhängeöse
3
EIN/AUS-Taste
4
Mode-Taste
5
Einschub für Micro SD-Karte
6
USB-Anschluss
8
9
10
11
Aufnahme-Taste
Schutztasche
Halterung
Clip
6. Installation
Sie können die Kamera verwenden während Sie diese in der Hand
halten. Stecken Sie die Kamera in die Schutztasche [9] und
befestigen Sie das Trageband a der Aufhängeöse [2] um es einfach
zu transportieren.
Sie können die Kamera ebenfalls an einer Wand befestigen:
1. Befestigen Sie die Halterung [10] mit Schrauben an der Wand.
Bemerkung: Sie können auch Klettverschluss oder
Magnetstreifen verwenden.
2. Befestigen Sie den Clip [11] an der Rückseite der Kamera.
3. Befestigen Sie die Kamera mit dem Clip [11] an der Halterung
[10].
4. Regeln Sie den Blickwinkel der Kamera.
Achtung: Richten Sie die Kamera nie auf die Sonne oder andere
reflektier en d e G eg en st ände.
7. Anwendung
Die Kamera ein- und aussch alten
• Um die Kamera einzuschalten, stellen Sie die EIN/AUS-Taste [3]
auf ON.
• Um die Kamera auszuschalten, stellen Sie die EIN/AUS-Taste [3]
auf OFF.
Ist die Kamera mehr als 1 Minute inaktiv, so wird diese automatisch
ausgeschaltet.
V. 01 – 13/07/2012 33 ©Velleman nv
Page 34

CAMCOLVC17
Eine Micro SD-Karte einlegen
1. Schalten Sie die Kamera aus.
2. Legen Sie eine Micro SD-Karte (nicht mitgeliefert) in den
Karteneinschub [5] ein. Drücken Sie vorsichtig bis sich die Karte
einrastet.
3. Um die Micro SD-Karte wieder zu entfernen, drücken Sie
vorsichtig, sodass sie herausspringt.
Die Video-Funktion verw enden
1. Schalten Sie die Kamera ein.
2. Stellen Sie die Mode-Taste [4] auf Video.
3. Drücken Sie die Aufnahme-Taste [8] um die Kamera zu starten.
Die LED leuchtet beim Starten blau. Ist die Kamera fertig, so
leuchtet die LED ständig orange.
4. Um die Aufnahme zu starten, drücken Sie kurz die Aufnahme-
Taste [8].
Die LED blinkt blau während der Aufnahme.
5. Um die Aufnahme zu stoppen, drücken Sie die Aufnahme-Taste
[8] wieder.
Die Kamera speichert die Videodatei auf der SD-Karte.
Bemerkung: Schalten Sie die Kamera während der Aufnahme nicht
aus: die Videodatei wird nämlich nicht gespeichert auf der SD-Karte.
Die Photo-Funktion verwend en
1. Schalten Sie die Kamera ein.
2. Stellen Sie die Mode-Taste [4] auf Photo.
3. Drücken Sie die Aufnahme-Taste [8] um die Kamera zu starten.
Die LED leuchtet beim Starten blau. Ist die Kamera fertig, so
leuchtet die LED ständig orange.
4. Um ein Photo zu machen, drücke n Sie kurz die Aufnahme-Taste
[8].
Die Kamera speichert das Photo auf der SD-Karte. Die LED
leuchtet blau wenn Sie ein Photo machen und wenn es
gespeichert wird.
5. Warten Sie bis die LED orange blinkt, bevor Sie das nächste
Photo machen.
Das Gerät mit einem PC verbinden
1. Schalten Sie die Kamera aus.
2. Verbinden Sie ein Ende des mitgelieferten USB-Kabels mit dem
USB-Anschluss [6].
V. 01 – 13/07/2012 34 ©Velleman nv
Page 35

CAMCOLVC17
3. Stecken Sie das andere Ende in den USB-Anschluss des
Rechners.
4. Auf dem PC, öffnen Sie My Computer und suchen Sie das
Laufwerk der Kamera.
Die Photos finden Sie im IMAGE-Ordner. Die aufgenommenen
Videodateien finden Sie im VIDEO-Ordner zurück. Diese Dateien
können hier ko pie rt, gelöscht oder betrachtet werden.
Bemerkung: Um die Kamera vom PC zu trennen und bevor Sie das
USB-Kabel trennen, verwenden Sie die Windows-Funktion Safely
Remove Hardware.
Das Daum und die Uhrzeit der Kamera einstellen
Geben Sie das korrekte Datum und die korrekte Uhrzeit für Ihre
Videos und Photos ein.
1. Beachten Sie, dass eine Micro SD-Karte in die Kamera eingelegt
worden ist.
2. Schalten Sie die Kamera ein.
3. Verbinden Sie die Kamera über das mitgeliefer te USB-Kabel mit
Ihrem P C .
4. Legen Sie die mitgelieferte CD in das CD-ROM-Laufwerk ein.
5. Lokalisie ren und klicken Sie zwei Mal auf die Datei
WriteTime.exe. Nachfolgendes Fenster erscheint:
V. 01 – 13/07/2012 35 ©Velleman nv
Page 36
CAMCOLVC17
6. Klicken Sie auf Update. Nachfolgendes Fenster erscheint:
7. Klicken Sie auf OK. Nachfolgendes Fenster erscheint:
8. Klicken Sie auf Quit zum Verlassen.
Die Kamera als Webcam verwenden
1. Schalten Sie die Kamera ein.
2. Verbinden Sie die Kamera über das mitgeliefer te USB-Kabel mit
Ihrem P C .
3. Drücken Sie kurz die Aufnahme-T aste [8].
4. Auf dem PC, öffnen Sie My Computer und klicken Sie zwei Mal
auf USB Video Dev ice um die Bilder zu betrachten.
8. Batterie
8.1 Aufladen
Um das Gerät aufzuladen, verbinden Sie es über das mitgeliefert
USB-Kabel mit dem Rechner.
• Während des Aufladens, leuchtet die grüne LED ständig und die
gelbe LED blinkt.
• das Gerät völlig aufgeladen, dann leuchten beide LEDs ständig.
V. 01 – 13/07/2012 36 ©Velleman nv
Page 37

/
g
e
e
e
d
h
m
m
S
n
a
e
g
L
7ung
e
a
g
u
M
C
r
u
p
r
g
g
C
H
w
P
t
ge
©
d
e
n
e
d
0
b
n
ä
u
CAMCO
VC17
8.2 Entsor
Dies
Batt
Leb
Sie
9. Technisc
Speicherkapaz
Aufnahme-Ele
Gesichtswinkel
minimale Licht
Video-Aufnah
Kamera enthält ein
rie. Entsorgen Sie d
nsdauer gemäß den
as Gerät nicht ins Fe
interne wieder aufla
s Produkt am Ende s
eltenden gesetzliche
er, denn es könnte
e Daten
ität max. 16GB
icro SD-HC-Karte (ni
mitgeliefert)
ent 2 Megapixel
MOS
62°
stärke 1 lux
e Aufnahmefo
Bilder pro Se
mat MJPEG (Au
kunde 30
(fps)
Video-Auflös
ng 1280 x 720
bare
iner
. Werfen
xplodieren.
cht
io PCM)
Pixel
Bildaufnahme
Ladezeit
Batterieleistun
Autonomie
Abmessungen
Gewicht
Betriebstempe
Verwenden
Velleman NV
Verletzunge
mehr Inform
Version dies
Alle Änderun
Aufnahmeka
Aufnahmefo
Bildauflösun
2.5 Std.
260mAH
±70 Min.
55 x 28 x 20
37g
ratur -10°C ~ 50°
ie dieses Gerät nur
übernimmt keine
bei (falscher) An
tionen zu diesem
r Bedienungsanlei
en ohne vorheri
azität ±100MB/Mi
mat JPEG
1600 x 120
mm
mit originellen Zu
aftung für Schade
endung dieses Ger
rodukt und die ne
ung, siehe www.ve
Ankündigung vorb
n.
Pixel
ehörteilen.
oder
tes. Für
este
lleman.eu.
ehalten.
V. 01 – 13/07
2012 3
Velleman nv
Page 38
CAMCOLVC17
© URHEBERRECHT
Velleman NV besitz t das Urheberrecht für diese
Bedienungsanleitung. Alle weltweiten Rechte vorbehalten.
Ohne vorherige schriftliche Genehmigung des Urhebers ist es nicht
gestattet, diese Bedienungsanleitung ganz oder in Teilen zu
reproduzieren, zu kopieren, zu übersetzen, zu bearbeiten oder zu
speichern.
V. 01 – 13/07/2012 38 ©Velleman nv
Page 39

Velleman® Service and Quality Warranty
Since its foundation in 1972, Velleman®
acquired extensive experience in the
electronics world and currently distributes its
products in over 85 countries.
All our products fulfil strict quality requirements
and legal stipulations in the EU. In order to
ensure the quality, our products regularly go
through an extra quality check, both by an
internal quality department and by specialized
external organisations. If, all precautionary
measures notwithstanding, problems should
occur, please make appeal to our warranty
(see guarantee conditions).
General Warranty Conditions Concerning
Consumer Products (for EU):
• All consumer products are subject to a 24month warranty on production flaws and
defective material as from the original date of
purchase.
• Velleman® can decide to replace an article
with an equivalent article, or to refund the retail
value totally or partially when the complaint is
valid and a free repair or replacement of the
article is impossible, or if the expenses are out
of proportion.
You will be delivered a replacing article or a
refund at the value of 100% of the purchase
price in case of a flaw occurred in the first year
after the date of purchase and delivery, or a
replacing article at 50% of the purchase price
or a refund at the value of 50% of the retail
value in case of a flaw occurred in the second
year after the date of purchase and delivery.
• Not covered by warranty:
- all direct or indirect damage caused after
delivery to the article (e.g. by oxidation, shocks,
falls, dust, dirt, humidity...), and by the article,
as well as its contents (e.g. data loss),
compensation for loss of profits;
- consumable goods, parts or accessories that
are subject to an aging process during normal
use, such as batteries (rechargeable, nonrechargeable, built-in or replaceable), lamps,
rubber parts, drive belts... (unlimited list);
- flaws resulting from fire, water damage,
lightning, accident, natural disaster, etc.…;
- flaws caused deliberately, negligently or
resulting from improper handling, negligent
maintenance, abusive use or use contrary to
the manufacturer’s instructions;
- damage caused by a commercial,
professional or collective use of the article (the
warranty validity will be reduced to six (6)
months when the article is used professionally);
- damage resulting from an inappropriate
packing and shipping of the article;
- all damage caused by modification, repair or
alteration performed by a third party without
written permission by Velleman®.
• Articles to be repaired must be delivered to
your Velleman® dealer, solidly packed
(preferably in the original packaging), and be
completed with the original receipt of purchase
and a clear flaw description.
• Hint: In order to save on cost and time, please
reread the manual and check if the flaw is
caused by obvious causes prior to presenting
the article for repair. Note that returning a nondefective article can also involve handling
costs.
• Repairs occurring after warranty expiration
are subject to shipping costs.
• The above conditions are without prejudice to
all commercial warranties.
The above enumeration is subject to
modification according to the article (see
article’s manual).
Page 40

Velleman® service- en kwaliteitsgarantie
Velleman® heeft sinds zijn oprichting in 1972
een ruime ervaring opgebouwd in de
elektronicawereld en verdeelt op dit moment
producten in meer dan 85 landen. Al onze
producten beantwoorden aan strikte
kwaliteitseisen en aan de wettelijke bepalingen
geldig in de EU. Om de kwaliteit te
waarborgen, ondergaan onze producten op
regelmatige tijdstippen een extra
kwaliteitscontrole, zowel door onze eigen
kwaliteitsafdeling als door externe
gespecialiseerde organisaties. Mocht er
ondanks deze voorzorgen toch een probleem
optreden, dan kunt u steeds een beroep doen
op onze waarborg (zie waarborgvoorwaarden).
Algemene waarborgvoorwaarden
consumentengoederen (voor Europese
Unie):
• Op alle consumentengoederen geldt een
garantieperiode van 24 maanden op productieen materiaalfouten en dit vanaf de
oorspronkelijke aankoopdatum.
• Indien de klacht gegrond is en een gratis
reparatie of vervanging van een artikel
onmogelijk is of indien de kosten hiervoor
buiten verhouding zijn, kan Velleman®
beslissen het desbetreffende artikel te
vervangen door een gelijkwaardig artikel of de
aankoopsom van het artikel gedeeltelijk of
volledig terug te betalen. In dat geval krijgt u
een vervangend product of terugbetaling ter
waarde van 100% van de aankoopsom bij
ontdekking van een gebrek tot één jaar na
aankoop en levering, of een vervangend
product tegen 50% van de kostprijs of
terugbetaling van 50 % bij ontdekking na één
jaar tot 2 jaar.
• Valt niet onder waarborg:
- alle rechtstreekse of onrechtstreekse schade
na de levering veroorzaakt aan het toestel (bv.
door oxidatie, schokken, val, stof, vuil, vocht...),
en door het toestel, alsook zijn inhoud (bv.
verlies van data), vergoeding voor eventuele
winstderving.
- verbruiksgoederen, onderdelen of
hulpstukken die onderhevig zijn aan
veroudering door normaal gebruik zoals bv.
batterijen (zowel oplaadbare als nietoplaadbare, ingebouwd of vervangbaar),
lampen, rubberen onderdelen, aandrijfriemen...
(onbeperkte lijst).
- defecten ten gevolge van brand,
waterschade, bliksem, ongevallen,
natuurrampen, enz.
- defecten veroorzaakt door opzet, nalatigheid
of door een onoordeelkundige behandeling,
slecht onderhoud of abnormaal gebruik of
gebruik van het toestel strijdig met de
voorschriften van de fabrikant.
- schade ten gevolge van een commercieel,
professioneel of collectief gebruik van het
apparaat (bij professioneel gebruik wordt de
garantieperiode herleid tot 6 maand).
- schade veroorzaakt door onvoldoende
bescherming bij transport van het apparaat.
- alle schade door wijzigingen, reparaties of
modificaties uitgevoerd door derden zonder
toestemming van Velleman®.
• Toestellen dienen ter reparatie aangeboden
te worden bij uw Velleman®-verdeler. Het
toestel dient vergezeld te zijn van het
oorspronkelijke aankoopbewijs. Zorg voor een
degelijke verpakking (bij voorkeur de originele
verpakking) en voeg een duidelijke
foutomschrijving bij.
• Tip: alvorens het toestel voor reparatie aan te
bieden, kijk nog eens na of er geen voor de
hand liggende reden is waarom het toestel niet
naar behoren werkt (zie handleiding). Op deze
wijze kunt u kosten en tijd besparen. Denk
eraan dat er ook voor niet-defecte toestellen
een kost voor controle aangerekend kan
worden.
• Bij reparaties buiten de waarborgperiode
zullen transportkosten aangerekend worden.
• Elke commerciële garantie laat deze rechten
onverminderd.
Bovenstaande opsomming kan eventueel
aangepast worden naargelang de aard van
het product (zie handleiding van het
betreffende product).
Page 41

Garantie de service et de qualité Velleman®
Depuis 1972, Velleman® a gagné une vaste
expérience dans le secteur de l’électronique et
est actuellement distributeur dans plus de 85
pays.
Tous nos produits répondent à des exigences
de qualité rigoureuses et à des dispositions
légales en vigueur dans l’UE. Afin de garantir la
qualité, nous soumettons régulièrement nos
produits à des contrôles de qualité
supplémentaires, tant par notre propre service
qualité que par un service qualité externe.
Dans le cas improbable d’un défaut malgré
toutes les précautions, il est possible
d’invoquer notre garantie (voir les conditions de
garantie).
Conditions générales concernant la
garantie sur les produits grand public (pour
l’UE) :
• tout produit grand public est garanti 24 mois
contre tout vice de production ou de matériaux
à dater du jour d’acquisition effective ;
• si la plainte est justifiée et que la réparation
ou le remplacement d’un article est jugé
impossible, ou lorsque les coûts s’avèrent
disproportionnés, Velleman® s’autorise à
remplacer ledit article par un article équivalent
ou à rembourser la totalité ou une partie du prix
d’achat. Le cas échéant, il vous sera consenti
un article de remplacement ou le
remboursement complet du prix d’achat lors
d’un défaut dans un délai de 1 an après l’achat
et la livraison, ou un article de remplacement
moyennant 50% du prix d’achat ou le
remboursement de 50% du prix d’achat lors
d’un défaut après 1 à 2 ans.
• sont par conséquent exclus :
- tout dommage direct ou indirect survenu à
l’article après livraison (p.ex. dommage lié à
l’oxydation, choc, chute, poussière, sable,
impureté…) et provoqué par l’appareil, ainsi
que son contenu (p.ex. perte de données) et
une indemnisation éventuelle pour perte de
revenus ;
- toute pièce ou accessoire nécessitant un
remplacement causé par un usage normal
comme p.ex. piles (rechargeables comme non
rechargeables, intégrées ou remplaçables),
ampoules, pièces en caoutchouc, courroies…
(liste illimitée) ;
- tout dommage qui résulte d’un incendie, de la
foudre, d’un accident, d’une catastrophe
naturelle, etc. ;
- out dommage provoqué par une négligence,
volontaire ou non, une utilisation ou un
entretien incorrect, ou une utilisation de
l’appareil contraire aux prescriptions du
fabricant ;
- tout dommage à cause d’une utilisation
commerciale, professionnelle ou collective de
l’appareil (la période de garantie sera réduite à
6 mois lors d’une utilisation professionnelle) ;
- tout dommage à l’appareil qui résulte d’une
utilisation incorrecte ou différente que celle
pour laquelle il a été initialement prévu comme
décrit dans la notice ;
- tout dommage engendré par un retour de
l’appareil emballé dans un conditionnement
non ou insuffisamment protégé.
- toute réparation ou modification effectuée par
une tierce personne sans l’autorisation explicite
de SA Velleman® ; - frais de transport de et
vers Velleman® si l’appareil n’est plus couvert
sous la garantie.
• toute réparation sera fournie par l’endroit de
l’achat. L’appareil doit nécessairement être
accompagné du bon d’achat d’origine et être
dûment conditionné (de préférence dans
l’emballage d’origine avec mention du défaut) ;
• tuyau : il est conseillé de consulter la notice et
de contrôler câbles, piles, etc. avant de
retourner l’appareil. Un appareil retourné jugé
défectueux qui s’avère en bon état de marche
pourra faire l’objet d’une note de frais à charge
du consommateur ;
• une réparation effectuée en-dehors de la
période de garantie fera l’objet de frais de
transport ;
• toute garantie commerciale ne porte pas
atteinte aux conditions susmentionnées.
La liste susmentionnée peut être sujette à
une complémentation selon le type de
l’article et être mentionnée dans la notice
d’emploi.
Page 42

Garantía de servicio y calidad Velleman®
Desde su fundación en 1972 Velleman® ha
adquirido una amplia experiencia como
distribuidor en el sector de la electrónica en
más de 85 países. Todos nuestros productos
responden a normas de calidad rigurosas y
disposiciones legales vigentes en la UE. Para
garantizar la calidad, sometemos nuestros
productos regularmente a controles de calidad
adicionales, tanto a través de nuestro propio
servicio de calidad como de un servicio de
calidad externo. En el caso improbable de que
surgieran problemas a pesar de todas las
precauciones, es posible recurrir a nuestra
garantía (véase las condiciones de garantía).
Condiciones generales referentes a la
garantía sobre productos de venta al
público (para la Unión Europea):
• Todos los productos de venta al público
tienen un período de garantía de 24 meses
contra errores de producción o errores en
materiales desde la adquisición original;
• Si la queja está fundada y si la reparación o
sustitución de un artículo no es posible, o si los
gastos son desproporcionados, Velleman®
autoriza reemplazar el artículo por un artículo
equivalente o reembolsar la totalidad o una
parte del precio de compra. En este caso,
usted recibirá un artículo de recambio o el
reembolso completo del precio de compra si
encuentra algún fallo hasta un año después de
la compra y entrega, o un artículo de recambio
al 50% del precio de compra o el reembolso
del 50% del precio de compra si encuentra un
fallo después de 1 año y hasta los 2 años
después de la compra y entrega.
Por consiguiente, están excluidos entre
otras cosas:
- todos los daños causados directa o
indirectamente al aparato (p.ej. por oxidación,
choques, caída,...) y a su contenido (p.ej.
pérdida de datos) después de la entrega y
causados por el aparato, y cualquier
indemnización por posible pérdida de
ganancias;
- partes o accesorios, que estén expuestos al
desgaste causado por un uso normal, como
por ejemplo baterías (tanto recargables como
no recargables, incorporadas o
reemplazables), bombillas, partes de goma,
etc. (lista ilimitada);
- defectos causados por un incendio, daños
causados por el agua, rayos, accidentes,
catástrofes naturales, etc.;
- defectos causados a conciencia, descuido o
por malos tratos, un mantenimiento
inapropiado o un uso anormal del aparato
contrario a las instrucciones del fabricante;
- daños causados por un uso comercial,
profesional o colectivo del aparato (el período
de garantía se reducirá a 6 meses con uso
profesional);
- daños causados por un uso incorrecto o un
uso ajeno al que está previsto el producto
inicialmente como está descrito en el manual
del usuario;
- daños causados por una protección
insuficiente al transportar el aparato.
- daños causados por reparaciones o
modificaciones efectuadas por una tercera
persona sin la autorización explícita de
Velleman®;
- se calcula gastos de transporte de y a
Velleman® si el aparato ya no está cubierto por
la garantía.
• Cualquier artículo que tenga que ser
reparado tendrá que ser devuelto a su
distribuidor Velleman®. Devuelva el aparato
con la factura de compra original y transpórtelo
en un embalaje sólido (preferentemente el
embalaje original). Incluya también una buena
descripción del fallo;
• Consejo: Lea el manual del usuario y controle
los cables, las pilas, etc. antes de devolver el
aparato. Si no se encuentra un defecto en el
artículo los gastos podrían correr a cargo del
cliente;
• Los gastos de transporte correrán a carga del
cliente para una reparación efectuada fuera del
período de garantía.
• Cualquier gesto comercial no disminuye estos
derechos.
La lista previamente mencionada puede ser
adaptada según el tipo de artículo (véase el
manual del usuario del artículo en
cuestión).
Page 43

Velleman® Service- und Qualitätsgarantie
Seit der Gründung in 1972 hat Velleman® sehr
viel Erfahrung als Verteiler in der Elektronikwelt
in über 85 Ländern aufgebaut.
Alle Produkte entsprechen den strengen
Qualitätsforderungen und gesetzlichen
Anforderungen in der EU. Um die Qualität zu
gewährleisten werden unsere Produkte
regelmäßig einer zusätzlichen
Qualitätskontrolle unterworfen, sowohl von
unserer eigenen Qualitätsabteilung als auch
von externen spezialisierten Organisationen.
Sollten, trotz aller Vorsichtsmaßnahmen,
Probleme auftreten, nehmen Sie bitte die
Garantie in Anspruch (siehe
Garantiebedingungen).
Allgemeine Garantiebedingungen in Bezug
auf Konsumgüter (für die Europäische
Union):
• Alle Produkte haben für Material- oder
Herstellungsfehler eine Garantieperiode von 24
Monaten ab Verkaufsdatum.
• Wenn die Klage berechtigt ist und falls eine
kostenlose Reparatur oder ein Austausch des
Gerätes unmöglich ist, oder wenn die Kosten
dafür unverhältnismäßig sind, kann Velleman®
sich darüber entscheiden, dieses Produkt
durch ein gleiches Produkt zu ersetzen oder
die Kaufsumme ganz oder teilweise
zurückzuzahlen. In diesem Fall erhalten Sie ein
Ersatzprodukt oder eine Rückzahlung im Werte
von 100% der Kaufsumme im Falle eines
Defektes bis zu 1 Jahr nach Kauf oder
Lieferung, oder Sie bekommen ein
Ersatzprodukt im Werte von 50% der
Kaufsumme oder eine Rückzahlung im Werte
von 50 % im Falle eines Defektes im zweiten
Jahr.
• Von der Garantie ausgeschlossen sind:
- alle direkten oder indirekten Schäden, die
nach Lieferung am Gerät und durch das Gerät
verursacht werden (z.B. Oxidation, Stöße, Fall,
Staub, Schmutz, Feuchtigkeit, ...), sowie auch
der Inhalt (z.B. Datenverlust), Entschädigung
für eventuellen Gewinnausfall.
- Verbrauchsgüter, Teile oder Zubehörteile, die
durch normalen Gebrauch dem Verschleiß
ausgesetzt sind, wie z.B. Batterien (nicht nur
aufladbare, sondern auch nicht aufladbare,
eingebaute oder ersetzbare), Lampen,
Gummiteile, Treibriemen, usw. (unbeschränkte
Liste).
- Schäden verursacht durch Brandschaden,
Wasserschaden, Blitz, Unfälle,
Naturkatastrophen, usw.
- Schäden verursacht durch absichtliche,
nachlässige oder unsachgemäße Anwendung,
schlechte Wartung, zweckentfremdete
Anwendung oder Nichtbeachtung von
Benutzerhinweisen in der
Bedienungsanleitung.
- Schäden infolge einer kommerziellen,
professionellen oder kollektiven Anwendung
des Gerätes (bei gewerblicher Anwendung wird
die Garantieperiode auf 6 Monate
zurückgeführt).
- Schäden verursacht durch eine
unsachgemäße Verpackung und
unsachgemäßen Transport des Gerätes.
- alle Schäden verursacht durch unautorisierte
Änderungen, Reparaturen oder Modifikationen,
die von einem Dritten ohne Erlaubnis von
Velleman® vorgenommen werden.
• Im Fall einer Reparatur, wenden Sie sich an
Ihren Velleman®-Verteiler. Legen Sie das
Produkt ordnungsgemäß verpackt
(vorzugsweise die Originalverpackung) und mit
dem Original-Kaufbeleg vor. Fügen Sie eine
deutliche Fehlerbeschreibung hinzu.
• Hinweis: Um Kosten und Zeit zu sparen,
lesen Sie die Bedienungsanleitung nochmals
und überprüfen Sie, ob es keinen auf de Hand
liegenden Grund gibt, ehe Sie das Gerät zur
Reparatur zurückschicken. Stellt sich bei der
Überprüfung des Gerätes heraus, dass kein
Geräteschaden vorliegt, könnte dem Kunden
eine Untersuchungspauschale berechnet.
• Für Reparaturen nach Ablauf der Garantiefrist
werden Transportkosten berechnet.
• Jede kommerzielle Garantie lässt diese
Rechte unberührt.
Die oben stehende Aufzählung kann
eventuell angepasst werden gemäß der Art
des Produktes (siehe Bedienungsanleitung
des Gerätes).
Page 44

EN HIGH RESOLUTION DIGITAL
CAMERA RECORDER
FEATURES
• differentmountingbrackets&silicone
protectionsleeveincluded
• thevideocapturecamerarecordsimages
onmicroSDcard(notincluded)
• built-inhigh-sensitivitymicrophone
• comeswithUSBcableandbrackets
• alloyhousing
SPECIFICATIONS
• storagecapacity:max.16GBmicro
SD-HCcard(notincl.)
• pick-upelement:2MegapixelCMOS
• viewingangle:62°
• minimumillumination:1lux
• videorecording:
- recordingformat:MJPEG
(audioPCM)
- framerate(fps):30
- videoresolution:1280x720pixels
- recordingcapacity:±100MB/min
• imagerecording:
- recordingformat:JPEG
- imageresolution:1600x1200pixels
• chargingtime:2.5hours
• batterycapacity:260mAH.
FR CAMÉSCOPE NUMÉRIQUE
HAUTE RÉSOLUTION
CARACTÉRISTIQUES
• livréavecplusieursétriersdemontage
• lacaméraenregistrelesimagessurune
microcarteSD(nonincl.)
• microphoneincorporétrèssensible
• livréaveccâbleUSBetétriersde
montage
• boîtiermétallique
SPÉCIFICATIONS
• capacitédemémoire:microcarteSD-HC
(nonincl.)demax.16Go
• capteur:2MégapixelsCMOS
• angledevue:62°
• illuminationminimale:1lux
• enregistrementvidéo:
- formatd’enregistrement:MJPEG
(audioPCM)
- imagesparseconde:30
- résolutionvidéo:1280x720pixels
- capacitéd’enregistrement:±100MB/min
• captured’image:
- formatd’enregistrement:JPEG
- résolutiond’image:1600x
1200pixels
• duréederecharge:2,5h.
• autonomiedelabatterie:260mAH.
NL DIGITALE VIDEOCAMERA
HOGE RESOLUTIE
KENMERKEN
• geleverdmetmeerderemontagebeugels
• decameralegtdebeeldenvastopeen
microSD-kaart(nietmeegelev.)
• ingebouwdezeergevoeligemicrofoon
• geleverdmetUSB-kabelen
montagebeugels
• metalenbehuizing
SPECIFICATIES
• opslagcapaciteit:max.16GBmicro
SDHC-kaart(nietmeegelev.)
• opneemelement:2MegapixelCMOS
• kijkhoek:62°
• minimalelichtsterkte:1lux
• video-opname:
- opnameformaat:MJPEG(audioPCM)
- beeldenperseconde:30
- videoresolutie:1280x720pixels
- opnamecapaciteit:±100MB/min
• beeldopname:
- opnameformaat:JPEG
- beeldresolutie:1600x1200pixels
• laadduur:2,5u.
• autonomiebatterij:260mAH.
DE DIGITALE HOCHAUFLÖSENDE
VIDEOKAMERA
EIGENSCHAFTEN
• LieferungmitverschiedenenHalterungen
• dieKamerazeichnetdieBilderaufeineMicro
SD-Karte(nichtmitgeliefert)auf
• eingebautessehrempfindlichesMikrofon
• LieferungmitUSB-KabelundHalterungen
• Metallgehäuse
TECHNISCHE DATEN
• Speicherkapazität:max.16GBmicroSD-HCKarte(nichtmitgeliefert)
• Aufnahme-Element:2MegapixelCMOS
• Gesichtswinkel:62°
• minimaleLichtstärke:1lux
• Video-Aufnahme:
- Aufnahmeformat:MJPEG(audioPCM)
- BilderproSekunde(fps):30
- Video-Auflösung:1280x720Pixel
- Aufnahmekapazität:±100MB/Min.
• Bildaufnahme:
- Aufnahmeformat:JPEG
- Bildauflösung:1600x1200Pixel
• Ladezeit:2.5Std.
• Batterieleistung:260mAH
ES CÁMARA DE VÍDEO DIGITAL DE
ALTA RESOLUCIÓN
CARACTERÍSTICAS
• seentregacondiferentessoportesdemontaje
• lacámaragrabalasimágenesenunamicro
tarjetaSD(noincl.)
• micrófonodealtasensibilidadincorporado
• seentregaconcableUSBysoportes
demontaje
• carcasademetal
ESPECIFICACIONES
• capacidaddememoria:microtarjetaSD-HC
(noincl.)demáx.16GB
• elementodeimagen:2MegapíxelesCMOS
• ángulodevisión:62°
• iluminaciónmínima:1lux
• grabacióndevídeo:
- formatodegrabación:MJPEG
(audioPCM)
- imágenesporsegundo:30
- resoluciónvídeo:1280x720píxeles
- capacidaddegrabación:±100MB/min.
• capturadeimagen:
- formatodegrabación:JPEG
- resolucióndelaimagen:1600x
1200píxeles
• tiempodecarga:2.5h
• batterycapacity:260mAH
 Loading...