

Page 1

R
É
Á
R
CAMCOLBUL18
SONY SUPER HAD WATERPROOF 1/3" IR COLOR CAMERA
SONY SUPER HAD 1/3" I
CAM
RA IR COULEUR ÉTANCHE SONY SUPER HAD 1/3"
MARA IR COLOR SONY SUPER HAD 1/3" - RESISTENTE AL AGUA
C
SONY SUPER HAD 1/3" I
-KLEURENCAMERA - WATERBESTENDIG
-FARBKAMERA - WASSERDICHT
USER MANUAL 3
GEBRUIKERSHANDLEIDING 6
NOTICE D’EMPLOI 9
MANUAL DEL USUARIO 12
BEDIENUNGSANLEITUNG 15
Page 2
CAMCOLBUL18
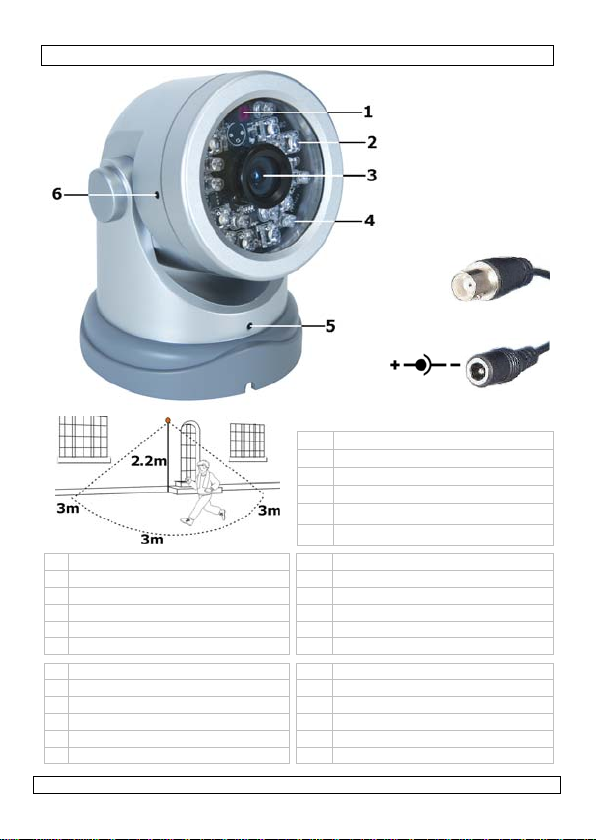
figure 1
1 IR sensor
2 white LED
3 lens
4 IR LED
5 base hex screw (2x)
6 lens hex screw (2x)
1 IR-sensor 1 capteur IR
2 witte leds 2 DEL blanches
3 lens 3 objectif
4 IR-leds 4 DEL IR
5 inbusschroeven basis (2x) 5 vis Allen socle (2x)
6 inbusschroeven lens (2x) 6 vis Allen objectif (2x)
1 sensor IR 1 IR-Sensor
2 LEDs blancos 2 weiße LEDs
3 óptica 3 Objektiv
4 LED IR 4 IR-LEDs
5 tornillo Allen base (2x) 5
6 tornillo Allen óptica (2x) 6
25/03/2009 ©2008 Velleman® Components nv
Sechskantschraube Basis (2x)
Sechskantschraube Objektiv (2x)
2
Page 3
CAMCOLBUL18
User manual
1. Introduction
To all residents of the European Union
Important environmental information about this product
If in doubt, contact your local waste disposal authorities.
Thank you for choosing Velleman! Please read the manual thoroughly before
bringing this device into service. If the device was damaged in transit, don't
install or use it and contact your dealer. Damage caused by disregard of
certain guidelines in this manual is not covered by the warranty and the
dealer will not accept responsibility for any ensuing defects or problems.
2. Safety Instructions
3. General Guidelines
Refer to the Velleman® Service and Quality Warranty on the last pages
of this manual.
• Damage caused by disregard of certain guidelines in this manual is not
• Note that damage caused by user modifications to the device is not covered
• Protect this device from shocks and abuse. Avoid brute force when
• Protect the device against extreme heat and dust.
• Familiarise yourself with the functions of the device before actually using it.
• All modifications of the device are forbidden for safety reasons.
• Only use the device for its intended purpose. Using the device in an
• Do not use this product to violate privacy laws or perform other illegal
25/03/2009 ©2008 Velleman® Components nv
This symbol on the device or the package indicates that disposal
of the device after its lifecycle could harm the environment. Do
not dispose of the unit (or batteries) as unsorted municipal
waste; it should be taken to a specialized company for recycling.
This device should be returned to your distributor or to a local
recycling service. Respect the local environmental rules.
Keep this device away from children and unauthorized users.
There are no user-serviceable parts inside the device.
Refer to an authorized dealer for service and/or spare parts.
covered by the warranty and the dealer will not accept responsibility for any
ensuing defects or problems.
by the warranty.
operating the device.
unauthorised way will void the warranty.
activities.
3
Page 4

CAMCOLBUL18
4. Installation
Refer to the illustration on page 2 of this manual.
• Choose the location for the dome camera, keeping following guidelines in
mind:
• Do not install the camera in locations where extremely high or low
temperatures, high humidity, water vapour or steam, dust or excessive
vibrations may occur.
• Avoid mounting the camera near high electro-magnetic fields as this will
influence image quality.
• Do not aim the camera at the sun or other extremely bright objects or
reflections.
• Best mounting height: at least 2m20.
• Use the included hex key to unscrew both base hex head screws [5] (one
on either side of the base) until the camera can rotate versus the base. Do
not remove the screws completely.
• Rotate the camera while pulling base and camera apart. When internal
protrusions (hex screw) and slots line up, the camera can be removed from
its base.
• Use the base to determine the mounting holes. Make sure to guide the
cables through the base before mounting it on the wall or ceiling.
• Line up protrusions (hex screws) from the camera with the slots in the base
and place the camera back on the base. Rotate the camera to secure it. Do
not tighten the base screws [5] yet.
• Unscrew lens screws [6] (one on either side of the camera) until the lens
can rotate versus the camera body. Do not remove the screws completely.
• Point the camera towards the detection area and connect it to a security
system (not included).
• Tighten both base hex screws [5] until the camera can not rotate versus
the base anymore. Do not force to avoid deformation of or damage to the
housing.
• Rotate the lens until the received image is upright, than tighten both hex
screws [6] until the camera can not rotate versus the camera body
anymore. Do not force to avoid deformation of or damage to the housing.
5. Useful information
• IR LEDs [4] are automatically activated when environmental light
conditions are lower than 8 lux.
• Motion detection is based on light and image changes. Avoid placing the
camera in places with frequent changes in light (e.g. streets).
• White LEDs are activated at night time (IR ON) when motion is detected,
thus providing colour images at night. They stay active for 15 seconds
after last motion detection. When activated, IR LEDs are off.
25/03/2009 ©2008 Velleman® Components nv
4
Page 5
CAMCOLBUL18
6. Technical specifications
IP rating IP67
scanning system PAL
pick-up element colour CCD image sensor
image size 1/3" (±4.8 x 3.6mm)
picture element
horizontal resolution 420 TV lines
min. illumination 0.05 lux (IR off)
IR LEDs
white LEDs
interlace 2:1
video output level 1.0Vpp, 75 ohms, composite
video S/N ratio > 70dB (AGC off)
white balance 2400K ~ 9400K
AEI 1/50 ~ 1/100 000s
gamma 0.45
built-in lens
lens angle 53°
PIR detection range 3m
operating temperature -10°C ~ 50°C
power supply 12Vdc adapter PSS1212 (not incl.)
power consumption < 3.36W
Use this device with original accessories only. Velleman nv cannot
be held responsible in the event of damage or injury resulted from
(incorrect) use of this device.
For more info concerning this product, please visit our website
www.velleman.eu
The information in this manual is subject to change without prior
notice.
© COPYRIGHT NOTICE
This manual is copyrighted. The copyright to this manual is owned by Velleman Components
nv. All worldwide rights reserved. No part of this manual may be copied, reproduced, translated or
reduced to any electronic medium or otherwise without the prior written consent of the copyright
holder.
total 537(H) x 597(V) pixels
effective 500(H) x 582(V) pixels
number of LEDs 12
max. IR distance <15m
number of LEDs 8
distance < 10m
type 6mm
iris fixed: F2.0
.
25/03/2009 ©2008 Velleman® Components nv
5
Page 6
CAMCOLBUL18
Gebruikershandleiding
1. Inleiding
Aan alle ingezetenen van de Europese Unie
Belangrijke milieu-informatie betreffende dit product
Dit symbool op het toestel of de verpakking geeft aan dat, als het na zijn
levenscyclus wordt weggeworpen, dit toestel schade kan
toebrengen aan het milieu. Gooi dit toestel (en eventuele
batterijen) niet bij het gewone huishoudelijke afval; het moet bij
een gespecialiseerd bedrijf terechtkomen voor recyclage. U moet
dit toestel naar uw verdeler of naar een lokaal recyclagepunt brengen.
Respecteer de plaatselijke milieuwetgeving.
Hebt u vragen, contacteer dan de plaatselijke autoriteiten
betreffende de verwijdering.
Dank u voor uw aankoop! Lees deze handleiding grondig voor u het toestel
in gebruik neemt. Werd het toestel beschadigd tijdens het transport,
installeer het dan niet en raadpleeg uw dealer.
2. Veiligheidsinstructies
Houd buiten het bereik van kinderen en onbevoegden.
U mag geen onderdelen vervangen. Bestel eventuele
reserveonderdelen bij uw dealer.
3. Algemene richtlijnen
Raadpleeg de Velleman® service- en kwaliteitsgarantie achteraan deze
handleiding.
• De garantie geldt niet voor schade door het negeren van bepaalde
richtlijnen in deze handleiding en uw dealer zal de verantwoordelijkheid
afwijzen voor defecten of problemen die hier rechtstreeks verband mee
houden.
• Schade door wijzigingen die de gebruiker heeft aangebracht valt niet
onder de garantie.
• Bescherm dit toestel tegen schokken. Vermijd brute kracht tijdens de
bediening.
• Bescherm tegen extreme temperaturen en stof.
• Leer eerst de functies van het toestel kennen voor u het gaat gebruiken.
• Om veiligheidsredenen mag u geen wijzigingen aanbrengen.
• Gebruik het toestel enkel waarvoor het gemaakt is. Bij onoordeelkundig
gebruik vervalt de garantie.
• Leef de wetten op de privacy van derden na. Deze camera mag niet
gebruikt om illegale beelden te filmen of op te nemen.
25/03/2009 ©2008 Velleman® Components nv
6
Page 7

CAMCOLBUL18
4. Installatie
Raapleeg de figuren op pagina 2 van deze handleiding.
• Kies een geschikte installatieplaats en houd rekening met volgende punten:
• Installeer de camera niet op een plaats onderhevig aan extreem lage of
hoge temperaturen, hoge vochtigheid, waterdamp of stoom, stof of
trillingen.
• Vermijd plaatsen onderhevig aan elektromagnetische velden.
• Richt de camera niet naar de zon of naar een lichtweerkaatsend object.
• Minimale installatiehoogte: 2,20 m.
• Draai de twee inbusschroeven van de basis [5] lichtjes los met de
meegeleverde inbussleutel tot de camera vrij kan draaien. Verwijder de
schroeven niet uit de basis.
• Draai de camera tot u ze lichtjes voelt vastklikken. Wanneer u de
uitsteeksels van de inbusschroeven en de inkepingen in de basis met elkaar
uitlijnt, kunt u de camera voorzichtig van de basis verwijderen.
• Gebruik de basis om de plaats van de montagegaten te bepalen. Steek de
voedingskabel door de basis voor u de basis aan de muur of het plafond
bevestigt.
• Draai de camera terug op de basis zonder de inbusschroeven [5] vast te
draaien.
• Draai de twee inbusschroeven van de lens [6] lichtjes los met de
meegeleverde inbussleutel tot de lens vrij kan draaien. Verwijder de
schroeven niet uit de lens.
• Koppel de camera aan uw bewakingsysteem (niet meegeleverd), schakel
uw bewakingsysteem in en richt de camera naar de bewakingszone.
• Draai de twee inbusschroeven van de basis [5] zo vast zodat de camera
niet meer kan draaien.
• Draai de lens tot het beeld recht op de monitor verschijnt. Draai de twee
inbusschroeven van de lens [6] zo vast zodat de lens niet meer kan
draaien.
5. Nuttige informatie
• De IR-leds [4] schakelen automatisch in bij een omgevinglicht lager dan
8 lux.
• Deze camera neemt een beweging waar dankzij veranderingen in
lichtsterkte. Kies dus een installatieplaats waar het omgevinglicht weinig
wijzigt.
• De witte leds schakelen ’s nachts in (IR-leds ingeschakeld) van zodra de
camera een beweging waarneemt. Zo krijgt u een beeld in kleur. Ze
blijven gedurende 15 seconden na de laatste bewegingwaarneming
ingeschakeld. Bij het inschakelen van de witte leds worden de IR-leds
uitgeschakeld.
25/03/2009 ©2008 Velleman® Components nv
7
Page 8

CAMCOLBUL18
6. Technische specificaties
IP-norm IP67
scansysteem PAL
opneemelement kleuren CCD
beeldgrootte 1/3" (± 4,8 x 3,6 mm)
pixels
horizontale resolutie 420 tv-lijnen
min. verlichting 0,05 lux (IR uit)
IR-leds
witte leds
interlacing 2:1
niveau video-uitgang 1,0 Vpp, 75 Ω, composiet
signaal-ruisverhouding > 70 dB (AGC uit)
witbalans 2400K ~ 9400K
AEI 1/50 ~ 1/100 000s
gamma 0,45
ingebouwde
lens
lenshoek 53°
PIR waarnemingshoek 3 m
werktemperatuur -10°C ~ 50°C
voeding 12 V-adapter PSS1212 (niet meegelev.)
verbruik < 3,36 W
Gebruik dit toestel enkel met originele accessoires. Velleman nv is
niet aansprakelijk voor schade of kwetsuren bij (verkeerd) gebruik
van dit toestel. Voor meer informatie over dit product, zie
www.velleman.eu. De informatie in deze handleiding kan te allen
tijde worden gewijzigd zonder voorafgaande kennisgeving.
© AUTEURSRECHT
Velleman Components nv heeft het auteursrecht voor deze
handleiding.
Alle wereldwijde rechten voorbehouden. Het is niet toegestaan om deze
handleiding of gedeelten ervan over te nemen, te kopiëren, te vertalen, te
bewerken en op te slaan op een elektronisch medium zonder voorafgaande
schriftelijke toestemming van de rechthebbende.
25/03/2009 ©2008 Velleman® Components nv
totaal 537(H) x 597(V) pixels
effectieve 500(H) x 582(V) pixels
aantal 12
max. bereik < 15 m
aantal 8
max. bereik < 10 m
type 6 mm
iris vast: F2.0
8
Page 9

CAMCOLBUL18
NOTICE D’EMPLOI
1. Introduction
Aux résidents de l'Union européenne
Des informations environnementales importantes concernant ce
produit
Ce symbole sur l'appareil ou l'emballage indique que l’élimination d’un
appareil en fin de vie peut polluer l'environnement. Ne pas jeter un appareil
électrique ou électronique (et des piles éventuelles) parmi les
déchets municipaux non sujets au tri sélectif ; une déchèterie
traitera l’appareil en question. Renvoyer les équipements usagés à
votre fournisseur ou à un service de recyclage local. Il convient de
respecter la réglementation locale relative à la protection de
l’environnement.
En cas de questions, contacter les autorités locales pour élimination.
Nous vous remercions de votre achat ! Lire la présente notice attentivement
avant la mise en service de l’appareil. Si l’appareil a été endommagé
pendant le transport, ne pas l’installer et consulter votre revendeur.
2. Consignes de sécurité
Garder hors de la portée des enfants et des personnes non
autorisées.
Il n’y a aucune pièce maintenable par l’utilisateur. Commander des
pièces de rechange éventuelles chez votre revendeur.
3. Directives générales
Se référer à la garantie de service et de qualité Velleman® en fin de
cette notice.
• La garantie ne s’applique pas aux dommages survenus en négligeant
certaines directives de cette notice et votre revendeur déclinera toute
responsabilité pour les problèmes et les défauts qui en résultent.
• Les dommages occasionnés par des modifications par le client ne
tombent pas sous la garantie.
• Protéger contre les chocs et le traiter avec circonspection pendant
l’opération.
• Tenir à l’écart de la poussière et des températures extrêmes.
• Se familiariser avec le fonctionnement avant l’emploi.
• Toute modification est interdite pour des raisons de sécurité.
• N’utiliser qu’à sa fonction prévue. Un usage impropre annule d'office la
garantie.
• Respecter la législation concernant le respect de la vie privée. Cette
caméra ne peut pas être utilisée pour le visionnage ou l’enregistrement
illégal.
25/03/2009 ©2008 Velleman® Components nv
9
Page 10

CAMCOLBUL18
4. Installation
Se référer aux illustrations à la page 2 de cette notice.
• Choisir un emplacement d’installation en tenant compte des points
suivants :
• Éviter un endroit poussiéreux, ou sujet à des températures extrêmes, un
taux d’humidité élevé, des vibrations ou de la vapeur d’eau.
• Ne pas installer la caméra à proximité d’un champ électromagnétique.
• Ne pas aligner la caméra vers le soleil ou vers un objet réfléchissant la
lumière.
• Hauteur d’installation minimale : 2,20 m.
• Desserrer légèrement les deux vis Allen du socle [5] avec la clef Allen
fournie jusqu’à ce que la caméra puisse tourner librement. Ne pas retirer
les vis Allen.
• Tourner la caméra jusqu’à ce que les encoches dans le socle et les vis Allen
du socle s’alignent. Retirer délicatement la caméra du socle.
• Utiliser le socle pour déterminer l’emplacement des trous de fixation. Passer
le câble d’alimentation à travers le socle avant fixer ce dernier au mur ou au
plafond.
• Aligner les encoches dans le socle et les vis Allen du socle, et visser la
caméra sur le socle. Ne pas encore serrer les vis Allen [5].
• Desserrer légèrement les deux vis Allen de l’objectif [6] avec la clef Allen
fournie jusqu’à ce que l’objectif puisse tourner librement. Ne pas retirer les
vis Allen.
• Raccorder la caméra au système de vidéosurveillance (non inclus), brancher
le système et pointer la caméra vers la zone de surveillance.
• Serrer les deux vis Allen du socle [5] afin de fixer la position de la caméra.
Ne pas serrer excessivement les vis afin d’éviter d’endommager le boîtier.
• Tourner l’objectif jusqu’à ce que l’image sur le moniteur soit droite.
Resserrer les vis Allen de l’objectif [6] afin de fixer la position de l’objectif.
Ne pas serrer excessivement les vis afin d’éviter d’endommager le boîtier.
5. Information utile
• Les DEL IR [4] s’allument automatiquement dès que la luminosité
ambiante est inférieure à 8 lux.
• Le dispositif de détection de mouvement de cette caméra réagit aux
changements de luminosité. Éviter d’installer la caméra dans un endroit
sujet à des changements fréquents de la luminosité.
• Les DEL blanches s’allument la nuit (IR allumé) dès une détection de
mouvement afin d’offrir une image en couleur. Elles restent allumées
pendant 15 secondes après la dernière détection de mouvement. Les DEL
IR s’éteignent lorsque les DEL blanches sont allumées.
25/03/2009 ©2008 Velleman® Components nv
10
Page 11

CAMCOLBUL18
6. Spécifications techniques
indice IP IP67
système de balayage PAL
capteur CCD couleur
taille de l’image 1/3" (± 4,8 x 3,6 mm)
pixels
résolution horizontale 420 lignes TV
éclairement min. 0,05 lux (IR éteint)
DEL IR
DEL blanches
entrelacement 2:1
signal de sortie vidéo 1,0 Vpp, 75 Ω, composite
rapport signal/bruit > 70 dB (AGC éteint)
balance des blancs 2400K ~ 9400K
AEI 1/50 ~ 1/100 000s
gamma 0,45
objectif
intégré
angle de vue de l’objectif 53°
portée de détection PIR 3 m
température de service -10°C ~ 50°C
alimentation adaptateur 12 V PSS1212 (non inclus)
consommation < 3,36 W
N’employer cet appareil qu’avec des accessoires d’origine. SA
Velleman ne sera aucunement responsable de dommages ou lésions
survenus à un usage (incorrect) de cet appareil. Pour plus
d’information concernant cet article, visitez notre site web
www.velleman.eu. Toutes les informations présentées dans cette
notice peuvent être modifiées sans notification préalable.
© DROITS D’AUTEUR
SA Velleman Components est l’ayant droit des droits d’auteur pour
cette notice.
Tous droits mondiaux réservés. Toute reproduction, traduction, copie ou
diffusion, intégrale ou partielle, du contenu de cette notice par quelque
procédé ou sur tout support électronique que se soit est interdite sans
l’accord préalable écrit de l’ayant droit.
total 537(H) x 597(V) pixels
effectifs 500(H) x 582(V) pixels
nombre 12
portée max. < 15 m
nombre 8
portée max. < 10 m
type 6 mm
iris fixe : F2.0
25/03/2009 ©2008 Velleman® Components nv
11
Page 12

CAMCOLBUL18
MANUAL DEL USUARIO
1. Introducción
A los ciudadanos de la Unión Europea
Importantes informaciones sobre el medio ambiente
este producto
las leyes locales en relación con el medio ambiente.
Si tiene dudas, contacte con las autoridades locales para residuos.
¡Gracias por haber comprado la CAMCOLBUL18! Lea atentamente las
instrucciones del manual antes de usarla. Si el aparato ha sufrido algún
daño en el transporte no lo instale y póngase en contacto con su
distribuidor.
Este símbolo en este aparato o el embalaje indica que, si tira las
muestras inservibles, podrían dañar el medio ambiente. No tire
este aparato (ni las pilas, si las hubiera) en la basura doméstica;
debe ir a una empresa especializada en reciclaje. Devuelva este
aparato a su distribuidor o a la unidad de reciclaje local. Respete
2. Instrucciones de seguridad
Mantenga el aparato lejos del alcance de personas no capacitadas
y niños.
El usuario no habrá de efectuar el mantenimiento de ninguna
pieza. Contacte con su distribuidor si necesita piezas de recambio.
3. Normas generales
Véase la Garantía de servicio y calidad Velleman® al final de este
manual del usuario.
• Los daños causados por descuido de las instrucciones de seguridad de
este manual invalidarán su garantía y su distribuidor no será responsable
de ningún daño u otros problemas resultantes.
• Los daños causados por modificaciones no autorizadas, no están
cubiertos por la garantía.
• No agite el aparato. Evite usar excesiva fuerza durante el manejo y la
instalación.
• No exponga este aparato a polvo, humedad y temperaturas extremas.
• Familiarícese con el funcionamiento del aparato antes de utilizarlo.
• Por razones de seguridad, las modificaciones no autorizadas del aparato
están prohibidas.
• Utilice sólo el aparato para las aplicaciones descritas en este manual. Su
uso incorrecto anula la garantía completamente.
• Respete las leyes en relación con la protección de la intimidad. No se
puede utilizar esta cámara para filmar o grabar imágenes ilegales.
25/03/2009 ©2008 Velleman® Components nv
12
concerniente a
Page 13

CAMCOLBUL18
4. Instalación
Véase las figuras en la página 2 de este manual del usuario.
• Elija un lugar de montaje adecuado y asegúrese de que:
• nunca instale la cámara en un lugar donde esté expuesta a temperaturas
extremas, humedad, polvo ni vibraciones.
• nunca instale la cámara cerca de campos electromagnéticos.
• nunca dirija la cámara al sol ni otro objeto reflectante.
• altura de instalación mínima: 2,20 m.
• Desatornille ligeramente los dos tornillos Allen de la base [5] con la llave
Allen incl. hasta que la cámara pueda girar libremente. No quite los tornillos
Allen.
• Gire la cámara hasta que las muescas de la base y los tornillos Allen de la
base coincidan. Saque la cámara cuidadosamente de la base.
• Utilice la base para determinar el lugar de los agujeros de fijación. Pase el
cable de alimentación a través de la base antes de fijarla a la pared o el
techo.
• Alinee las muescas de la base y los tornillos Allen de la base, y fije la
cámara a la base. Todavía no atornille los tornillos Allen [5].
• Desatornille ligeramente los dos tornillos Allen de la óptica [6] con la llave
Allen incl. hasta que la óptica pueda girar libremente. No quite los tornillos
Allen.
• Conecte la cámara al sistema de vídeo vigilancia (no incl.). Conecte el
sistema y apunte la cámara a la zona de vigilancia.
• Atornille los dos tornillos Allen de la base [5] para fijar la posición de la
cámara. No atornille excesivamente los tornillos para no dañar la caja.
• Gire la óptica hasta que la imagen del monitor aparezca de forma recta.
Vuelva a atornillar los tornillos Allen de la óptica [6] para fijar la posición de
la óptica. No atornille excesivamente los tornillos para no dañar la caja.
5. Información útil
• Los LEDs IR [4] se iluminan automáticamente en cuanto la luz ambiental
sea inferior a 8 lux.
• El sistema de detección de movimientos de esta cámara reacciona a los
cambios de luminosidad. No instale la cámara en un lugar sujeto a
cambios frecuentes de la luminosidad.
• Los LEDs blancos se iluminan de noche (IR activado) en cuanto la cámara
detecte un movimiento para ofrecer una imagen en color. Quedan
iluminados durante 15 segundos después de la última detección de
movimientos. Los LEDs IR se apagan si los LEDs blancos están activados.
25/03/2009 ©2008 Velleman® Components nv
13
Page 14

CAMCOLBUL18
6. Especificaciones
grado de protección IP IP67
sistema de exploración PAL
sensor de imagen CCD color
dimensiones 1/3" (± 4,8 x 3,6 mm)
número de
píxeles
resolución horizontal 420 líneas TV
iluminación mínima 0,05 lux (IR activado)
LEDs IR
LEDs blancos
entrelazado 2:1
señal de salida de vídeo 1,0 Vpp, 75 Ω, compuesto
relación señal / ruido vídeo > 70 dB (AGC activado)
balance de blancos 2400K ~ 9400K
AEI 1/50 ~ 1/100 000s
corrección de contraste (gama) 0,45
óptica
incorporada
ángulo de visión de la óptica 53°
rango de detección PIR 3 m
temperatura de funcionamiento -10°C ~ 50°C
alimentación adaptador de red de 12 V PSS1212 (no incl.)
consumo < 3,36 W
Utilice este aparato sólo con los accesorios originales. Velleman NV
no será responsable de daños ni lesiones causados por un uso
(indebido) de este aparato. Para más información sobre este
producto, visite nuestra página web www.velleman.eu. Se pueden
modificar las especificaciones y el contenido de este manual sin
previo aviso.
© DERECHOS DE AUTOR
Velleman NV dispone de los derechos de autor para este manual del
usuario.
Todos los derechos mundiales reservados. Está estrictamente prohibido
reproducir, traducir, copiar, editar y guardar este manual del usuario o
partes de ello sin previo permiso escrito del derecho habiente.
total 537(H) x 597(V) píxeles
píxeles
efectivos
número de LEDs 12
alcance IR máx. < 15 m
número 8
alcance máx. < 10 m
tipo 6 mm
iris fijo: F2.0
500(H) x 582(V) píxeles
25/03/2009 ©2008 Velleman® Components nv
14
Page 15

CAMCOLBUL18
BEDIENUNGSANLEITUNG
1. Einführung
An alle Einwohner der Europäischen Union
Wichtige Umweltinformationen über dieses Produkt
Einheit muss an den Händler oder ein örtliches Recycling-Unternehmen
retourniert werden. Respektieren Sie die örtlichen Umweltvorschriften.
Falls Zweifel bestehen, wenden Sie sich für Entsorgungsrichtlinien
an Ihre örtliche Behörde.
Wir bedanken uns für den Kauf der CAMCOLBUL18! Lesen Sie diese
Bedienungsanleitung vor Inbetriebnahme sorgfältig durch. Überprüfen Sie,
ob Transportschäden vorliegen. Sollte dies der Fall sein, verwenden Sie das
Gerät nicht und wenden Sie sich an Ihren Händler.
2. Sicherheitshinweise
3. Allgemeine Richtlinien
Siehe Velleman® Service- und Qualitätsgarantie am Ende dieser
Bedienungsanleitung.
• Bei Schäden, die durch Nichtbeachtung der Bedienungsanleitung
• Bei Schäden verursacht durch eigenmächtige Änderungen erlischt der
• Vermeiden Sie Erschütterungen. Vermeiden Sie rohe Gewalt während der
• Schützen Sie das Gerät vor extreme Temperaturen, Staub und Feuchte.
• Nehmen Sie das Gerät erst in Betrieb, nachdem Sie sich mit seinen
• Eigenmächtige Veränderungen sind aus Sicherheitsgründen verboten.
• Verwenden Sie das Gerät nur für Anwendungen beschrieben in dieser
Dieses Symbol auf dem Produkt oder der Verpackung zeigt an,
dass die Entsorgung dieses Produktes nach seinem Lebenszyklus
der Umwelt Schaden zufügen kann. Entsorgen Sie die Einheit
(oder verwendeten Batterien) nicht als unsortiertes Hausmüll; die
Einheit oder verwendeten Batterien müssen von einer
spezialisierten Firma zwecks Recycling entsorgt werden. Diese
Halten Sie Kinder und Unbefugte vom Gerät fern.
Es gibt keine zu wartenden Teile. Bestellen Sie eventuelle
Ersatzteile bei Ihrem Fachhändler.
verursacht werden, erlischt der Garantieanspruch. Für daraus
resultierende Folgeschäden übernimmt der Hersteller keine Haftung.
Garantieanspruch.
Installation und Bedienung des Gerätes.
Funktionen vertraut gemacht haben.
Bedienungsanleitung sonst kann dies zu Schäden am Produkt führen und
erlischt der Garantieanspruch.
25/03/2009 ©2008 Velleman® Components nv
15
Page 16

CAMCOLBUL18
• Befolgen Sie das Gesetz zum Schutz der Intimsphäre. Verwenden Sie diese
Kamera nicht, um illegale Bilder zu filmen oder aufzunehmen.
4. Installation
Siehe Abbildungen, Seite 2 dieser Bedienungsanleitung.
• Wählen Sie einen geeigneten Montageort für die Kamera und beachten Sie
Folgendes:
• Achten Sie bei der Wahl des Installationsortes darauf, dass das Gerät
keinen extremen Temperaturen und Vibrationen ausgesetzt werden.
• Montieren Sie die Kamera nie in der Nähe von elektromagnetischen
Feldern.
• Richten Sie die Kamera nie auf die Sonne oder andere reflektierende
Gegenstände.
• Min. Installationshöhe: 2,20 m.
• Lockern Sie die zwei Sechskantschrauben der Basis [5] leicht mit dem
mitgelieferten Sechskantschlüssel bis die Kamera frei drehen kann.
Entfernen Sie die Schrauben nicht aus der Basis.
• Drehen Sie die Kamera bis diese festklickt. Wenn Sie die herausragenden
Spitzen der Sechskantschrauben und die Einkerbungen der Basis miteinander
ausrichten, können Sie die Kamera vorsichtig von der Basis trennen.
• Verwenden Sie die Basis um die Position der Montagelöcher zu bestimmen.
Stecken Sie das Netzkabel durch die Basis, ehe Sie die Basis an der Wand
oder der Decke befestigen.
• Befestigen Sie die Kamera zurück an der Basis ohne die
Sechskantschrauben [5] festzudrehen.
• Lockern Sie die zwei Sechskantschrauben des Objektivs [6] leicht mit dem
mitgelieferten Sechskantschlüssel bis das Objektiv frei drehen kann.
Entfernen Sie die Schrauben nicht aus dem Objektiv.
• Verbinden Sie die Kamera mit dem Überwachungssystem (nicht
mitgeliefert). Schalten Sie das Überwachungssystem ein und richten Sie die
Kamera auf die Zone, die Sie überwachen möchten.
• Schrauben Sie die zwei Sechskantschrauben der Basis [5] so fest, dass die
Kamera nicht mehr drehen kann.
• Drehen Sie das Objektiv bis das Bild gerade im Monitor erscheint.
Schrauben Sie die zwei Sechskantschrauben des Objektivs [6] so fest, dass
das Objektiv nicht mehr drehen kann.
5. Interessante Information
• Die IR-LEDs [4] schalten automatisch bei einem Umgebungslicht
niedriger als 8 lux ein.
• Diese Kamera detektiert eine Bewegung dank der Änderungen in
Lichtstärke. Wählen Sie also einen Installationsort wo das
Umgebungslicht sich wenig ändert.
• Die weißen LEDs schalten nachts ein (IR-LEDs eingeschaltet) sobald die
Kamera eine Bewegung erfasst. So bekommen Sie ein Bild in Farbe.
Diese bleiben während 15 Sekunden nach der letzten
25/03/2009 ©2008 Velleman® Components nv
16
Page 17

CAMCOLBUL18
Bewegungserfassung eingeschaltet. Beim Einschalten der weißen LEDs
werden die IR-LEDs ausgeschaltet.
6. Technische Daten
IP-Schutzart IP67
Abtastsystem PAL
Aufnahme-Element CCD-Farbkamera
Abmessungen 1/3" (± 4,8 x 3,6 mm)
Pixelanzahl
horizontale Auflösung 420 TV-Zeilen
Mindestbeleuchtung 0,05 lux (IR aus)
IR-LEDs
weiße LEDs
Zeilensprung 2:1
Video-Ausgangspegel 1,0 Vpp, 75 Ω, komposit
Signal-/Rauschabstand Video > 70 dB (AGC aus)
Weißabgleich 2400K ~ 9400K
AEI 1/50 ~ 1/100 000s
Gammakorrektur 0,45
eingebautes
Objektiv
Blickwinkel 53°
PIR Reichweite 3 m
Betriebstemperatur -10°C ~ 50°C
Stromversorgung 12 V-Netzteil PSS1212 (nicht mitgeliefert)
Stromverbrauch < 3,36 W
Verwenden Sie dieses Gerät nur mit originellen Zubehörteilen.
Velleman NV übernimmt keine Haftung für Schaden oder
Verletzungen bei (falscher) Anwendung dieses Gerätes. Für mehr
Informationen zu diesem Produkt, siehe www.velleman.eu. Alle
Änderungen ohne vorherige Ankündigung vorbehalten.
© URHEBERRECHT
Velleman Components NV besitzt das Urheberrecht für diese
Bedienungsanleitung.
Alle weltweiten Rechte vorbehalten. Ohne vorherige schriftliche
Genehmigung des Urhebers ist es nicht gestattet, diese
Bedienungsanleitung ganz oder in Teilen zu reproduzieren, zu kopieren, zu
übersetzen, zu bearbeiten oder zu speichern.
25/03/2009 ©2008 Velleman® Components nv
total 537(H) x 597(V) Pixel
effektiv 500(H) x 582(V) Pixel
Anzahl 12
max. Bereich < 15 m
Anzahl 8
max. Bereich < 10 m
Typ 6 mm
Blende fest: F2.0
17
Page 18

Velleman® Service and Quality Warranty
Velleman® has over 35 years of experience in
the electronics world and distributes its
products in more than 85 countries.
All our products fulfil strict quality
requirements and legal stipulations in the EU.
In order to ensure the quality, our products
regularly go through an extra quality check,
both by an internal quality department and by
specialized external organisations. If, all
precautionary measures notwithstanding,
problems should occur, please make appeal to
our warranty (see guarantee conditions).
General Warranty Conditions Concerning
Consumer Products (for EU):
• All consumer products are subject to a 24month warranty on production flaws and
defective material as from the original date of
purchase.
• Velleman® can decide to replace an article
with an equivalent article, or to refund the
retail value totally or partially when the
complaint is valid and a free repair or
replacement of the article is impossible, or if
the expenses are out of proportion.
You will be delivered a replacing article or a
refund at the value of 100% of the purchase
price in case of a flaw occurred in the first year
after the date of purchase and delivery, or a
replacing article at 50% of the purchase price
or a refund at the value of 50% of the retail
value in case of a flaw occurred in the second
year after the date of purchase and delivery.
• Not covered by warranty:
- all direct or indirect damage caused after
delivery to the article (e.g. by oxidation,
shocks, falls, dust, dirt, humidity...), and by
the article, as well as its contents (e.g. data
loss), compensation for loss of profits;
- frequently replaced consumable goods, parts
or accessories such as batteri es, lamps, rubber
parts, drive belts... (unlimited list);
- flaws resulting from fire, water damage,
lightning, accident, natural disaster, etc. …;
- flaws caused deliberately, negligently or
resulting from improper handling, negligent
maintenance, abusive use or use contrary to
the manufacturer’s instructions;
- damage caused by a commercial, professional
or collective use of the article (the warranty
validity will be reduced to six (6) months when
the article is used professionally);
- damage resulting from an inappropriate
packing and shipping of the article;
- all damage caused by modification, repair or
alteration performed by a third party without
written permission by Velleman®.
• Articles to be repaired must be delivered to
your Velleman® dealer, solidly packed
(preferably in the original packaging), and be
completed with the original receipt of purchase
and a clear flaw description.
• Hint: In order to save on cost and time,
please reread the manual and check if the flaw
is caused by obvious causes prior to presenting
the article for repair. Note that returning a
non-defective article can also involve handling
costs.
• Repairs occurring after warranty expiration
are subject to shipping costs.
• The above conditions are without prejudice to
all commercial warranties.
The above enumeration is subject to
modification according to the article (see
article’s manual).
Velleman® service- en kwaliteitsgarantie
Velleman® heeft ruim 35 jaar ervaring in de
elektronicawereld en verdeelt in meer dan 85
landen.
Al onze producten beantwoorden aan strikte
kwaliteitseisen en aan de wettelijke bepalingen
geldig in de EU. Om de kwaliteit te
waarborgen,
ondergaan onze producten op regelmatige
tijdstippen een extra kwaliteitscontrole, zowel
door onze eigen kwaliteitsafdeling als door
externe gespecialiseerde organisaties. Mocht er
ondanks deze voorzorgen toch een probleem
optreden, dan kunt u steeds een beroep doen
op onze waarborg (zie waarborgvoorwaarden).
Algemene waarborgvoorwaarden
consumentengoederen (voor Europese
Unie):
• Op alle consumentengoederen geldt een
garantieperiode van 24 maanden op productieen materiaalfouten en dit vanaf de
oorspronkelijke aankoopdatum.
• Indien de klacht gegrond is en een gratis
reparatie of vervanging van een artikel
onmogelijk is of indien de kosten hiervoor
buiten verhouding zijn, kan Velleman®
beslissen het desbetreffende artikel te
vervangen door een gelijkwaardig artikel of de
aankoopsom van het artikel gedeeltelijk of
volledig terug te betalen. In dat geval krijgt u
een vervangend product of terugbetaling ter
waarde van 100% van de aankoopsom bij
ontdekking van een gebrek tot één jaar na
aankoop en levering, of een vervangend
product tegen 50% van de kostprijs of
terugbetaling van 50 % bij ontdekking na één
jaar tot 2 jaar.
• Valt niet onder waarborg:
Page 19

- alle rechtstreekse of onrechtstreekse schade
na de levering veroorzaakt aan het toestel (bv.
door oxidatie, schokken, val, stof, vuil,
vocht...), en door het toestel, alsook zijn
inhoud (bv. verlies van data), vergoeding voor
eventuele winstderving.
- verbruiksgoederen, onderdelen of
hulpstukken die regelmatig dienen te worden
vervangen, zoals bv. batterijen, lampen,
rubberen onderdelen, aandrijfriemen...
(onbeperkte lijst).
- defecten ten gevolge van brand,
waterschade, bliksem, ongevallen,
natuurrampen, enz.
- defecten veroorzaakt door opzet, nalatigheid
of door een onoordeelkundige behandeling,
slecht onderhoud of abnormaal gebruik of
gebruik van het toestel strijdig met de
voorschriften van de fabrikant.
- schade ten gevolge van een commercieel,
professioneel of collectief gebruik van het
apparaat (bij professioneel gebruik wordt de
garantieperiode herleid tot 6 maand).
- schade veroorzaakt door onvoldoende
bescherming bij transport van het apparaat.
- alle schade door wijzigingen, reparaties of
modificaties uitgevoerd door derden zonder
toestemming van Velleman®.
• Toestellen dienen ter reparatie aangeboden
te worden bij uw Velleman®-verdeler. Het
toestel dient vergezeld te zijn van het
oorspronkelijke aankoopbewijs. Zorg voor een
degelijke verpakking (bij voorkeur de originele
verpakking) en voeg een duidelijke
foutomschrijving bij.
• Tip: alvorens het toestel voor reparatie aan
te bieden, kijk nog eens na of er geen voor de
hand liggende reden is waarom het toestel niet
naar behoren werkt (zie handleiding). Op deze
wijze kunt u kosten en tijd besparen. Denk
eraan dat er ook voor niet-defecte toestellen
een kost voor controle aangerekend kan
worden.
• Bij reparaties buiten de waarborgperiode
zullen transportkosten aangerekend worden.
• Elke commerciële garantie laat deze rechten
onverminderd.
Bovenstaande opsomming kan eventueel
aangepast worden naargelang de aard van
het product (zie handleiding van het
betreffende product).
Garantie de service et de qualité
Velleman®
Velleman® jouit d’une expérience de plus de
35 ans dans le monde de l’électronique avec
une distribution dans plus de 85 pays.
Tous nos produits répondent à des exigences
de qualité rigoureuses et à des dispositions
légales en vigueur dans l’UE. Afin de garantir la
qualité, nous soumettons régulièrement nos
produits à des contrôles de qualité
supplémentaires, tant par notre propre service
qualité que par un service qualité externe.
Dans le cas improbable d’un défaut malgré
toutes les précautions, il est possible
d’invoquer notre garantie (voir les conditions
de garantie).
Conditions générales concernant la
garantie sur les produits grand public
(pour l’UE) :
• tout produit grand public est garanti 24 mois
contre tout vice de production ou de matériaux
à dater du jour d’acquisition effective ;
• si la plainte est justifiée et que la réparation
ou le remplacement d’un article est jugé
impossible, ou lorsque les coûts s’avèrent
disproportionnés, Velleman® s’autorise à
remplacer ledit article par un article équivalent
ou à rembourser la totalité ou une partie du
prix d’achat. Le cas échéant, il vous sera
consenti un article de remplacement ou le
remboursement complet du prix d’achat lors
d’un défaut dans un délai de 1 an après l’achat
et la livraison, ou un article de remplacement
moyennant 50% du prix d’achat ou le
remboursement de 50% du prix d’achat lors
d’un défaut après 1 à 2 ans.
• sont par conséquent exclus :
- tout dommage direct ou indirect survenu à
l’article après livraison (p.ex. dommage lié à
l’oxydation, choc, chute, poussière, sable,
impureté…) et provoqué par l’appareil, ainsi
que son contenu (p.ex. perte de données) et
une indemnisation éventuelle pour perte de
revenus ;
- tout bien de consommation ou accessoire, ou
pièce qui nécessite un remplacement régulier
comme p.ex. piles, ampoul es, pièces en
caoutchouc, courroies… (liste illimitée) ;
- tout dommage qui résulte d’un incendie, de la
foudre, d’un accident, d’une catastrophe
naturelle, etc. ;
- out dommage provoqué par une négligence,
volontaire ou non, une utilisation ou un
entretien incorrects, ou une utilisation de
l’appareil contraire aux prescriptions du
fabricant ;
- tout dommage à cause d’une utilisation
commerciale, professionnelle ou collective de
l’appareil (la période de garantie sera réduite à
6 mois lors d’une utilisation professionnelle) ;
- tout dommage à l’appareil qui résulte d’une
utilisation incorrecte ou différente que celle
Page 20

pour laquelle il a été initialement prévu comme
décrit dans la notice ;
- tout dommage engendré par un retour de
l’appareil emballé dans un conditionnement
non ou insuffisamment protégé.
- toute réparation ou modification effectuée par
une tierce personne sans l’autorisation explicite
de SA Velleman® ; - frais de transport de et
vers Velleman® si l’appareil n’est plus couvert
sous la garantie.
• toute réparation sera fournie par l’endroit de
l’achat. L’appareil doit nécessairement être
accompagné du bon d’achat d’origine et être
dûment conditionné (de préférence dans
l’emballage d’origine avec mention du défaut) ;
• tuyau : il est conseillé de consulter la notice
et de contrôler câbles, piles, etc. avant de
retourner l’appareil. Un appareil retourné jugé
défectueux qui s’avère en bon état de marche
pourra faire l’objet d’une note de frais à charge
du consommateur ;
• une réparation effectuée en-dehors de la
période de garantie fera l’objet de frais de
transport ;
• toute garantie commerciale ne porte pas
atteinte aux conditions susmentionnées.
La liste susmentionnée peut être sujette à
une complémentation selon le type de
l’article et être mentionnée dans la notice
d’emploi.
Velleman® Service- und Qualitätsgarantie
Velleman® hat gut 35 Jahre Erfahrung in der
Elektronikwelt und vertreibt seine Produkte in
über 85 Ländern.
Alle Produkte entsprechen den strengen
Qualitätsforderungen und gesetzlichen
Anforderungen in der EU. Um die Qualität zu
gewährleisten werden unsere Produkte
regelmäßig einer zusätzlichen
Qualitätskontrolle unterworfen, sowohl von
unserer eigenen Qualitätsabteilung als auch
von externen spezialisierten Organisationen.
Sollten, trotz aller Vorsichtsmaßnahmen,
Probleme auftreten, nehmen Sie bitte die
Garantie in Anspruch (siehe
Garantiebedingungen).
Allgemeine Garantiebedingungen in Bezug
auf Konsumgüter (für die Europäische
Union):
• Alle Produkte haben für Material- oder
Herstellungsfehler eine Garantieperiode von 24
Monaten ab Verkaufsdatum.
• Wenn die Klage berechtigt ist und falls eine
kostenlose Reparatur oder ein Austausch des
Gerätes unmöglicht ist, oder wenn die Kosten
dafür unverhältnismäßig sind, kann Velleman®
sich darüber entscheiden, dieses Produkt durch
ein gleiches Produkt zu ersetzen oder die
Kaufsumme ganz oder teilweise
zurückzuzahlen. In diesem Fall erhalten Sie ein
Ersatzprodukt oder eine Rückzahlung im Werte
von 100% der Kaufsumme im Falle eines
Defektes bis zu 1 Jahr nach Kauf oder
Lieferung, oder Sie bekommen ein
Ersatzprodukt im Werte von 50% der
Kaufsumme oder eine Rückzahlung im Werte
von 50 % im Falle eines Defektes im zweiten
Jahr.
• Von der Garantie ausgeschlossen sind:
- alle direkten oder indirekten Schäden, die
nach Lieferung am Gerät und durch das Gerät
verursacht werden (z.B. Oxidation, Stöße, Fall,
Staub, Schmutz, Feuchtigkeit, ...), sowie auch
der Inhalt (z.B. Datenverlust), Entschädigung
für eventuellen Gewinnausfall.
- Verbrauchsgüter, Teile oder Zubehörteile, die
regelmäßig ausgewechselt werden, wie z.B.
Batterien, Lampen, Gummiteile, Treibriemen,
usw. (unbeschränkte Liste).
- Schäden verursacht durch Brandschaden,
Wasserschaden, Blitz, Unfälle,
Naturkatastrophen, usw.
- Schäden verursacht durch absichtliche,
nachlässige oder unsachgemäße Anwendung,
schlechte Wartung, zweckentfremdete
Anwendung oder Nichtbeachtung von
Benutzerhinweisen in der Bedienungsanleitung.
- Schäden infolge einer kommerziellen,
professionellen oder kollektiven Anwendung
des Gerätes (bei gewerblicher Anwendung wird
die Garantieperiode auf 6 Monate
zurückgeführt).
- Schäden verursacht durch eine
unsachgemäße Verpackung und
unsachgemäßen Transport des Gerätes.
- alle Schäden verursacht durch unautorisierte
Änderungen, Reparaturen oder Modifikationen,
die von einem Dritten ohne Erlaubnis von
Velleman® vorgenommen werden.
• Im Fall einer Reparatur, wenden Sie sich an
Ihren Velleman®-Verteiler. Legen Sie das
Produkt ordnungsgemäß verpackt
(vorzugsweise die Originalverpackung) und mit
dem Original-Kaufbeleg vor. Fügen Sie eine
deutliche Fehlerumschreibung hinzu.
• Hinweis: Um Kosten und Zeit zu sparen,
lesen Sie die Bedienungsanleitung nochmals
und überprüfen Sie, ob es keinen auf de Hand
liegenden Grund gibt, ehe Sie das Gerät zur
Reparatur zurückschicken. Stellt sich bei der
Überprüfung des Geräts heraus, dass kein
Geräteschaden vorliegt, könnte dem Kunden
eine Untersuchungspauschale berechnet.
• Für Reparaturen nach Ablauf der Garantiefrist
werden Transportkosten berechnet.
Page 21

• Jede kommerzielle Garantie lässt diese
Rechte unberührt.
Die oben stehende Aufzählung kann
eventuell angepasst werden gemäß der
Art des Produktes (siehe
Bedienungsanleitung des Gerätes).
Garantía de servicio y calidad Velleman®
Velleman® disfruta de una experiencia de más
de 35 años en el mundo de la electrónica con
una distribución en más de 85 países.
Todos nuestros productos responden a normas
de calidad rigurosas y disposiciones legales
vigentes en la UE. Para garantizar la calidad,
sometimos nuestros productos regularmente a
controles de calidad adicionales, tanto por
nuestro propio servicio de calidad como por un
servicio de calidad externo. En el caso
improbable de que surgieran problemas a
pesar de todas las precauciones, es posible
apelar a nuestra garantía (véase las
condiciones de garantía).
Condiciones generales referentes a la
garantía sobre productos de venta al
público (para la Unión Europea):
• Todos los productos de venta al público
tienen un período de garantía de 24 meses
contra errores de producción o errores en
materiales desde la adquisición original;
• Si la queja está fundada y si la reparación o
la sustitución de un artículo es imposible, o si
los gastos son desproporcionados, Velleman®
autoriza reemplazar el artículo por un artículo
equivalente o reembolsar la totalidad o una
parte del precio de compra. En este caso,
recibirá un artículo de recambio o el reembolso
completo del precio de compra al descubrir un
defecto hasta un año después de la compra y
la entrega, o un artículo de recambio al 50%
del precio de compra o la sustitución de un
50% del precio de compra al descubrir un
defecto después de 1 a 2 años.
• Por consiguiente, están excluidos entre
otras cosas:
- todos los daños causados directamente o
indirectamente al aparato y su contenido
después de la entrega (p.ej. por oxidación,
choques, caída,...) y causados por el aparato,
al igual que el contenido (p.ej. pérdida de
datos) y una indemnización eventual para falta
de ganancias;
- partes o accesorios que deban ser
reemplazados regularmente, como por ejemplo
baterías, lámparas, partes de goma, ... (lista
ilimitada)
- defectos causados por un incendio, daños
causados por el agua, rayos, accidentes,
catástrofes naturales, etc. ;
- defectos causados a conciencia , descuido o
por malos tratos, un mantenimiento
inapropiado o un uso anormal del aparato
contrario a las instrucciones del fabricante;
- daños causados por un uso comercial,
profesional o colectivo del aparato (el período
de garantía se reducirá a 6 meses con uso
profesional) ;
- daños causados por un uso incorrecto o un
uso ajeno al que est está previsto el producto
inicialmente como está descrito en el manual
del usuario ;
- daños causados por una protección
insuficiente al transportar el aparato.
- daños causados por reparaciones o
modificaciones efectuadas por una tercera
persona sin la autorización explicita de SA
Velleman® ;
- se calcula gastos de transporte de y a
Velleman® si el aparato ya no está cubierto
por la garantía.
• Cualquier reparación se efectuará por el lugar
de compra. Devuelva el aparato con la factura
de compra original y transpórtelo en un
embalaje sólido (preferentemente el embalaje
original). Incluya también una buena
descripción del defecto ;
• Consejo: Lea el manual del usuario y controle
los cables, las pilas, etc. antes de devolver el
aparato. Si no se encuentra un defecto en el
artículo los gastos podrían correr a cargo del
cliente;
• Los gastos de transporte correrán a carga del
cliente para una reparación efectuada fuera del
periode de garantía.
• Cualquier gesto comercial no disminuye estos
derechos.
La lista previamente mencionada puede
ser adaptada según el tipo de artículo
(véase el manual del usuario del artículo
en cuestión)
 Loading...