

Page 1

CAMCOLBUL11
1/3" IR COLOUR CCD CAMERA
1/3" KLEUREN CCD-CAMERA MET IR
CAMÉRA CCD COULEUR 1/3" AVEC IR
CÁMARA CCD COLOR 1/3" CON IR
1/3" CCD IR-FARBKAMERA
USER MANUAL
GEBRUIKERSHANDLEIDING
NOTICE D’EMPLOI
MANUAL DEL USUARIO
BEDIENUNGSANLEITUNG
Page 2

CAMCOLBUL11 VELLEMAN
-
2
-
Page 3

CAMCOLBUL11 VELLEMAN
-
3
-
CAMCOLBUL11 – 1/3" IR COLOUR CCD CAMERA
1. Introduction
To all residents of the European Union
Important environmental information about this product
This symbol on the device or the package indicates that disposal of the device after its lifecycle could harm
the environment.
Do not dispose of the unit (or batteries) as unsorted municipal waste; it should be taken to a specialized
company for recycling.
This device should be returned to your distributor or to a local recycling service.
Respect the local environmental rules.
If in doubt, contact your local waste disposal authorities.
Thank you for choosing Velleman! Please read the manual thoroughly before bringing this device into service. If the
device was damaged in transit, don't install or use it and contact your dealer. Contents: 1 x IR camera, 1 x video/power
cable, 1 x sun shield, 1 x bracket, 1 x screw and wall plug set and this manual.
This camera features an IR shifter, Smart Light Control and a large aperture lens providing sharp and clear images.
IR shifter: true colour images at daytime and automatic IR night vision with low visibility
Smart Light Control: dynamic adjustment for clear and accurate image
Large aperture lens: clear images at low power consumption
2. Safety Instructions
• Damage caused by disregard of certain guidelines in this manual is not covered by the warranty and the dealer
will not accept responsibility for any ensuing defects or problems.
• Keep this device away from rain and moisture.
• Make sure that the available voltage does not exceed the voltage stated in the specifications of this manual.
• Note that damage caused by user modifications to the device is not covered by the warranty.
• Keep the device away from children and unauthorised users.
3. Installation
You may need following tools: 1 x power drill and 1 x Phillips-headed screwdriver
• STEP 1
Choose a suitable mounting location and position the bracket onto the wall.
Mark the holes with a pencil, drill the holes and insert a plug into each of the
holes. Also drill a hole for the video/power cable.
• STEP 2
Remove the lock from the bracket using the wrench. Fix the lock onto
the camera. Choose the hole which best suits the installation location.
Push the sun shield a little forward to facilitate the installation.
Page 4
CAMCOLBUL11 VELLEMAN
-
4
-
• STEP 3
Fix the camera onto the bracket. Adjust the angle and fasten. Adjust the
sun shield. Pass the video/power cable through the hole and proceed
with the electric connection.
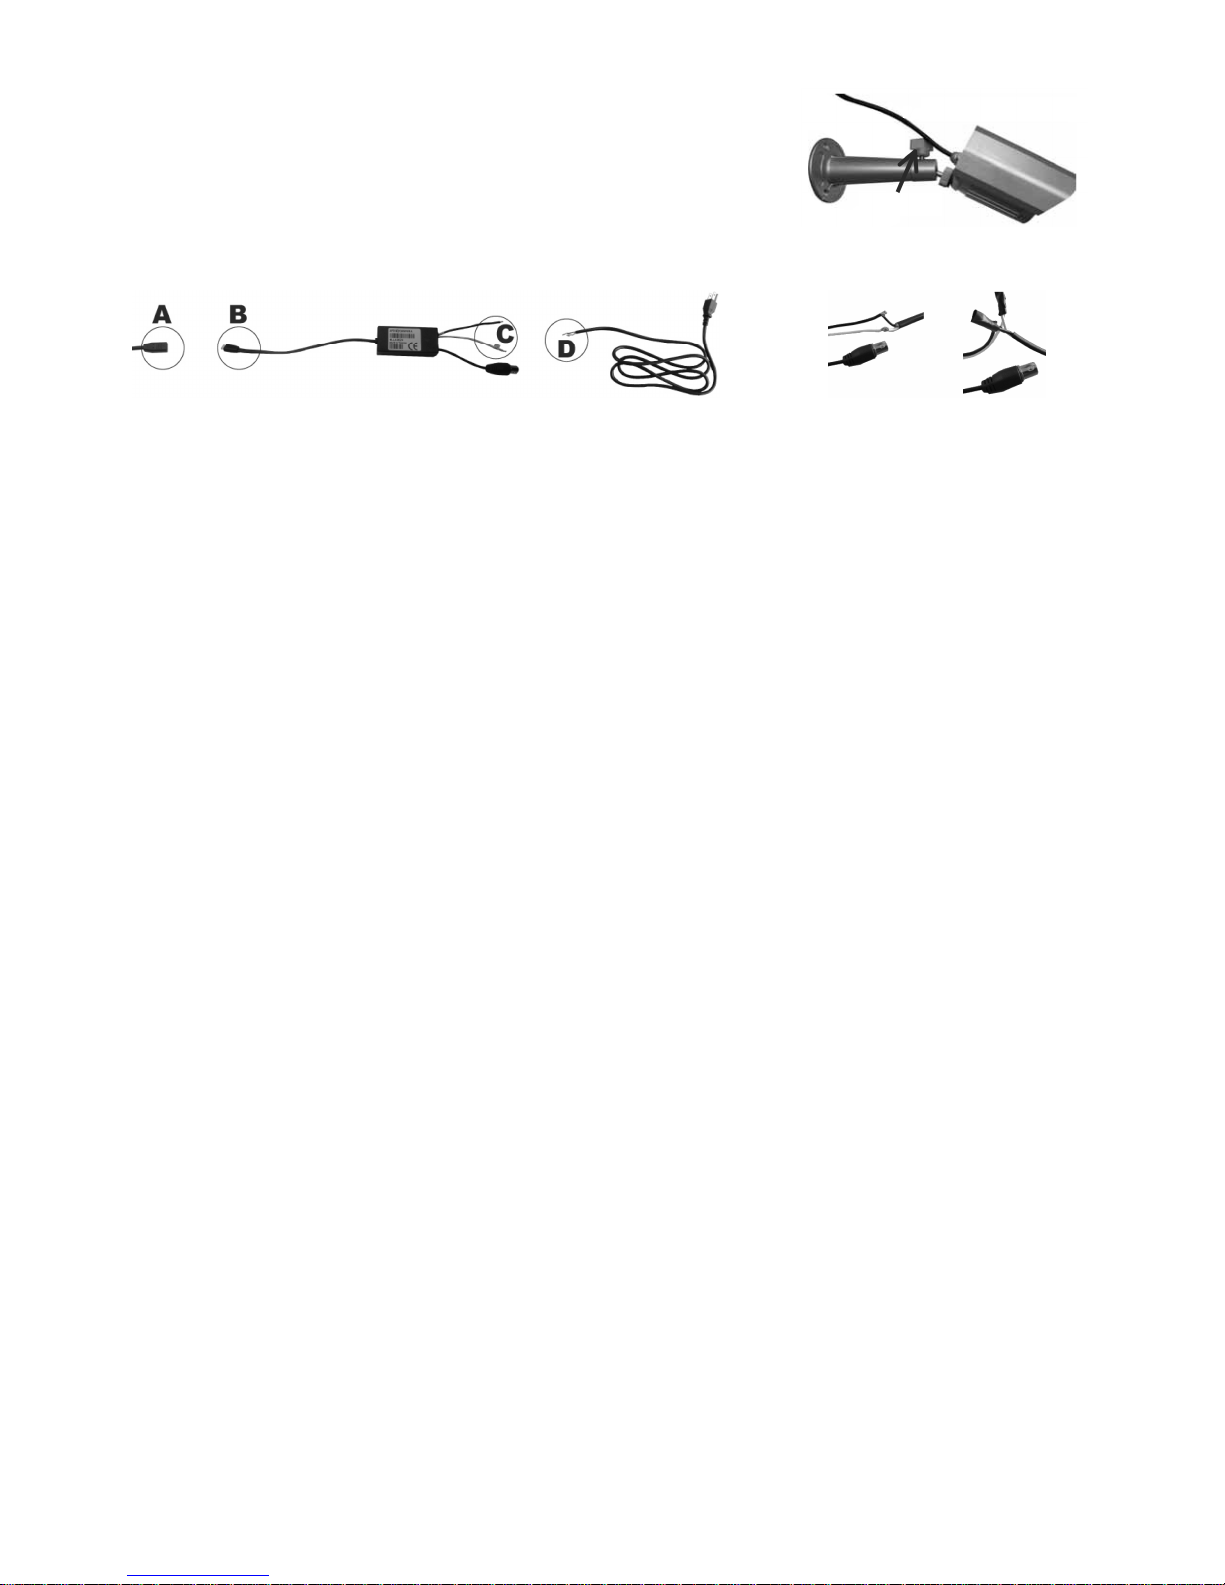
• STEP 4
Connect the video/power cable (A) of the camera to the video/power cable (B) of the adapter. Connect the
camera power lines (C) to a power cable (D, not incl.) (white = +, black = -). Twist the braids together, solder
and cover with insulation tape or heat-shrinking tubes.
• STEP 5
Connect the video cable to a monitor video input with a 75Ω coaxial cable.
4. Technical Specifications
Pick-Up Element 1/3” colour CCD image sensor
Pixels 500 (H) x 582 (V)
Resolution 350 TV lines
Min. Illumination 0.25 lux/F1.4
IR LEDs 24
Effective Range ± 20m
S/N Ratio > 48dB
Electronic Shutter 1/60 (1/50) to 1/100000s
Lens f6.0/F1.4
Lens Angle 56°
D&N Filter Control built-in IR filter
Line Lock yes
Iris Mode AES
White Balance ATW
Video Output 1.0Vp-p composite, 75Ω
Microphone no
IP Rating IP67
Power Supply 100~240VAC +/- 10%
Power Consumption max. 5W
Dimensions 112 x 82 x 75mm
Total Weight 775g
Use this device with original accessories only. Velleman nv cannot be held responsible in the event of
damage or injury resulted from (incorrect) use of this device.
For more info concerning this product, please visit our website www.velleman.eu.
The information in this manual is subject to change without prior notice.
Page 5

CAMCOLBUL11 VELLEMAN
-
5
-
CAMCOLBUL11 – 1/3" KLEUREN CCD-CAMERA MET IR
1. Inleiding
Aan alle ingezetenen van de Europese Unie
Belangrijke milieu-informatie betreffende dit product
Dit symbool op het toestel of de verpakking geeft aan dat, als het na zijn levenscyclus wordt weggeworpen,
dit toestel schade kan toebrengen aan het milieu.
Gooi dit toestel (en eventuele batterijen) niet bij het gewone huishoudelijke afval; het moet bij een
gespecialiseerd bedrijf terechtkomen voor recyclage.
U moet dit toestel naar uw verdeler of naar een lokaal recyclagepunt brengen.
Respecteer de plaatselijke milieuwetgeving.
Hebt u vragen, contacteer dan de plaatselijke autoriteiten inzake verwijdering.
Dank u voor uw aankoop! Lees deze handleiding grondig voor u het toestel in gebruik neemt. Werd het toestel
beschadigd tijdens het transport, installeer het dan niet en raadpleeg uw dealer. Inhoud: 1 x IR-camera, 1 x
video/voedingskabel, 1 x zonnekap, 1 x montagebeugel, 1 x schroef- en pluggenset en deze handleiding.
Deze camera is uitgerust met een IR-shifter, Smart Light Control en een grote apertuurlens voor een scherper en
helderder beeld.
IR-shifter: kleurenbeelden overdag en automatische schakeling naar IR nachtzicht bij lage verlichting
Smart Light Control: dynamische regeling voor een helder en precies beeld
Grote apertuurlens: heldere beelden en een lag verbruik
2. Veiligheidsinstructies
• De garantie geldt niet voor schade door het negeren van bepaalde richtlijnen in deze handleiding en uw dealer zal
de verantwoordelijkheid afwijzen voor defecten of problemen die hier rechtstreeks verband mee houden.
• Bescherm dit toestel tegen regen en vochtigheid.
• De beschikbare netspanning mag niet hoger zijn dan de spanning in de specificaties achteraan de handleiding.
• Schade door wijzigingen die de gebruiker heeft aangebracht aan het toestel vallen niet onder de garantie.
• Houd dit toestel uit de buurt van kinderen en onbevoegden.
3. Installatie
Benodigdheden: 1 x elektrische boor en een kruiskopschroevendraaier
• STAP 1
Kies een geschikte montageplaats en plaats de beugel tegen de wand.
Markeer de gaten met een potlood, boor de gaten en plaats een plug in elk
van de gaten. Boor ook een opening voor de video/voedingskabel.
• STAP 2
Verwijder het koppelstuk van de beugel met behulp van een sleutel.
Bevestig het koppelstuk op de camera. Kies de meest geschikte
opening volgens de montageplaats. Duw eventueel de zonnekap naar
voren om de montage te vergemakkelijken.
Page 6

CAMCOLBUL11 VELLEMAN
-
6
-
• STAP 3
Bevestig de camera aan de beugel. Regel de hoek en maak stevig vast.
Regel de zonnekap. Duw de video/voedingskabel door de opening in de
wand en verbind de kabel met de adapter.
• STAP 4
Verbind de video/voedingskabel van de camera (A) met de video/voedingskabel van de adapter (B). Verbind
de aders van de camera (C) met een voedingskabel (D, niet meegeleverd) (wit = +, zwart = -). Vlecht de
draden ineen, soldeer en bedek met isolatietape of krimpkousen.
• STAP 5
Verbind de videokabel met de monitor met behulp van een coaxkabel van 75Ω.
4. Technische specificaties
Opneemelement 1/3” kleuren CCD-sensor
Pixels 500 (H) x 582 (V)
Resolutie 350 tv-lijnen
Min. verlichting 0.25 lux/F1.4
IR-leds 24
Effectief bereik ± 20m
S/R-verhouding > 48dB
Elektronische sluiter 1/60 (1/50) tot 1/100000s
Lens f6.0/F1.4
Lenshoek 56°
D&N filtersturing ingebouwde IR-filter
Line Lock ja
Irismodus AES
Witbalans ATW
Video-uitgang 1.0Vp-p composiet, 75Ω
Microfoon neen
IP-waarde IP67
Voeding 100~240VAC +/- 10%
Verbruik max. 5W
Afmetingen 112 x 82 x 75mm
Gewicht 775g
Gebruik dit toestel enkel met originele accessoires. Velleman nv is niet aansprakelijk voor schade of
kwetsuren bij (verkeerd) gebruik van dit toestel.
Voor meer informatie omtrent dit product, zie www.velleman.eu.
De informatie in deze handleiding kan te allen tijde worden gewijzigd zonder voorafgaande kennisgeving.
Page 7

CAMCOLBUL11 VELLEMAN
-
7
-
CAMCOLBUL11 – CAMÉRA CCD COULEUR 1/3" AVEC IR
1. Introduction
Aux résidents de l'Union européenne
Des informations environnementales importantes concernant ce produit
Ce symbole sur l'appareil ou l'emballage indique que l’élimination d’un appareil en fin de vie peut polluer
l'environnement.
Ne pas jeter un appareil électrique ou électronique (et des piles éventuelles) parmi les déchets municipaux
non sujets au tri sélectif ; une déchèterie traitera l’appareil en question.
Renvoyer les équipements usagés à votre fournisseur ou à un service de recyclage local.
Il convient de respecter la réglementation locale relative à la protection de l’environnement.
En cas de questions, contacter les autorités locales pour élimination.
Nous vous remercions de votre achat ! Lire la présente notice attentivement avant la mise en service de l’appareil. Si
l’appareil a été endommagé pendant le transport, ne pas l’installer et consulter votre revendeur. Contenu : 1 x
camera IR, 1 x câble vidéo/d’alimentation, 1 x pare-soleil, 1 x support de montage, 1 x jeu de vis et de chevilles et cette
notice.
Cette caméra intègre un filtre IR, Smart Light Control et une large ouverture de l’objectif pour une image claire et
précise.
Filtre IR mécanique: images couleur pendant la journée et vision nocturne IR automatique lors d’une faible intensité
lumineuse
Smart Light Control: réglage dynamique pour une image nette et précise
Large ouverture de l’objectif: images claires et une faible consommation
2. Prescriptions de sécurité
• La garantie ne s’applique pas aux dommages survenus en négligeant certaines directives de cette notice et votre
revendeur déclinera toute responsabilité pour les problèmes et les défauts qui en résultent.
• Protéger l’appareil contre la pluie et l’humidité.
• La tension réseau ne peut pas dépasser la tension mentionnée dans les spécifications à la fin de cette notice.
• Les dommages occasionnés par des modifications à l’appareil par le client, ne tombent pas sous la garantie.
• Garder votre CAMCOLBUL11 hors de la portée de personnes non qualifiées et de jeunes enfants.
3. Installation
Outillage requis : une perceuse électrique et un tournevis cruciforme
• ÉTAPE 1
Choisir un emplacement approprié et positionner le support de montage sur
la paroi. Marquer les trous à l’aide d’un crayon, percer les trous et placer une
cheville dans chacun des trous. Percer un trou pour le câble
vidéo/d’alimentation.
• ÉTAPE 2
Retirer la pièce de jonction à l’aide d’une clef Allen. Fixer la pièce sur
la caméra. Choisir le trou adapté à l’emplacement. Pousser le paresoleil vers l’avant pour faciliter l’installation.
Page 8

CAMCOLBUL11 VELLEMAN
-
8
-
• ÉTAPE 3
Fixer la caméra sur le support. Ajuster l’angle et fixer. Ajuster le paresoleil. Passer le câble vidéo/d’alimentation à travers le trou et passer au
raccordement.
• ÉTAPE 4
Raccorder la câble vidéo/d’alimentation de la caméra (A) au câble vidéo/d’alimentation de l’adaptateur (B).
Raccorder les fils (C) à un cordon d’alimentation (D, non incl.) (blanc = +, noir = -). Tresser les conducteurs,
souder et couvrir les connexions à l’aide de ruban d’isolation ou des gaines rétractiles.
• ÉTAPE 5
Raccorder le câble vidéo à un moniteur à l’aide d’un câble coaxial de 75Ω.
4. Spécifications techniques
Élément d’enregistrement capteur d’image CCD couleur 1/3”
Pixels 500 (H) x 582 (V)
Résolution 350 lignes TV
Éclairement min. 0.25 lux/F1.4
LED IR 24
Portée effective ± 20m
Rapport S/B > 48dB
Obturateur électronique 1/60 (1/50) à 1/100000s
Objectif f6.0/F1.4
Angle de l’objectif 56°
Contrôle du filtre D&N filtre IR intégré
Line Lock oui
Iris AES
Balance des blancs ATW
Sortie vidéo 1.0Vp-p composite, 75Ω
Microphone non
Valeur IP IP67
Alimentation 100~240VCA +/- 10%
Consommation max. 5W
Dimensions 112 x 82 x 75mm
Poids 775g
N’employer cet appareil qu’avec des accessoires d’origine. SA Velleman ne sera aucunement responsable
de dommages ou lésions survenus à un usage (incorrect) de cet appareil.
Pour plus d’information concernant cet article, visitez notre site web www.velleman.eu.
Toutes les informations présentées dans cette notice peuvent être modifiées sans notification préalable.
Page 9

CAMCOLBUL11 VELLEMAN
-
9
-
CAMCOLBUL11 – CÁMARA CCD COLOR 1/3" CON IR
1. Introducción
A los ciudadanos de la Unión Europea
Importantes informaciones sobre el medio ambiente concerniente a este producto
Este símbolo en este aparato o el embalaje indica que, si tira las muestras inservibles, podrían dañar el
medio ambiente.
No tire este aparato (ni las pilas, si las hubiera) en la basura doméstica; debe ir a una empresa
especializada en reciclaje. Devuelva este aparato a su distribuidor o a la unidad de reciclaje local.
Respete las leyes locales en relación con el medio ambiente.
Si tiene dudas, contacte con las autoridades locales para residuos.
¡Gracias por haber comprado la CAMCOLBUL11! Lea atentamente las instrucciones del manual antes de usarla. Si
el aparato ha sufrido algún daño en el transporte no lo instale y póngase en contacto con su distribuidor. Incluye: 1 x
cámara IR, 1 x cable de vídeo/alimentación, 1 x capa antisolar, 1 x soporte de montaje, 1 x juego de tornillos y tacos y
este manual del usuario.
Esta cámara está equipado con un filtro IR, Smart Light Control y una larga abertura de la óptica para una imagen clara
y precisa.
Filtro IR mecánico: imágenes en color durante el día y visión nocturna IR automática en caso de luz ambiente
insuficiente.
Smart Light Control: ajuste dinámico para una imagen clara y precisa
Larga abertura de la óptica: imágenes claras y bajo consumo
2. Instrucciones de seguridad
• Daños causados por descuido de las instrucciones de seguridad de este manual invalidarán su garantía y su
distribuidor no será responsable de ningún daño u otros problemas resultantes.
• No exponga este equipo a lluvia ni humedad.
• Asegúrese de que la tensión de red no sea mayor que la tensión indicada en las especificaciones.
• Por razones de seguridad, las modificaciones no autorizadas del aparato están prohibidas.
• Mantenga la CAMCOLBUL11 lejos del alcance de personas no capacitadas y niños.
3. Instalación
Herramientas requeridas: un taladro eléctrico y un destornillador philips.
• PASO 1
Seleccione un lugar adecuado y ponga el soporte de montaje en la pared.
Marque los agujeros con un lápiz, taladre los agujeros e introduzca un taco
en cada agujero. Taladre un agujero para el cable de vídeo/alimentación.
• PASO 2
Quite la juntura con una llave Allen. Fije la juntura a la cámara.
Seleccione el agujero más adecuado según el lugar de montaje.
Empuje la capa antisolar hacia adelante para facilitar la instalación.
Page 10

CAMCOLBUL11 VELLEMAN
-
10
-
• PASO 3
Fije la cámara al soporte. Ajuste el ángulo y fíjelo. Ajuste la capa
antisolar. Pase el cable de vídeo/alimentación por el agujero y conecte
el cable al adaptador.
• PASO 4
Conecte el cable de vídeo/alimentación de la cámara (A) al cable de vídeo/alimentación del adaptador (B).
Conecte los hilos (C) a un cable de alimentación (D, no incl.) (blanco = +, negro = -). Trence los conductores,
suelde y cubra las conexiones con cinta aislante o tubos termorretráctiles.
• PASO 5
Conecte el cable de vídeo a un monitor con un cable coaxial de 75Ω.
4. Especificaciones
Elemento de imagen sensor de imagen CCD color 1/3”
Número de píxeles 500 (H) x 582 (V)
Resolución 350 líneas TV
Iluminación mínima 0.25 lux/F1.4
LED IR 24
Alcance efectivo ± 20m
Relación señal / ruido > 48dB
Shutter electrónico de 1/60 (1/50) a 1/100000s
Óptica f6.0/F1.4
Ángulo de la óptica 56°
Control filtro D&N filtro IR incorporado
Line Lock sí
Iris AES
Balance de blancos ATW
Salida de vídeo 1.0Vp-p compuesto, 75Ω
Micrófono non
Grado de protección IP IP67
Alimentación 100~240VCA +/- 10%
Consumo máx. 5W
Dimensiones 112 x 82 x 75mm
Peso 775g
Utilice este aparato sólo con los accesorios originales. Velleman SA no será responsable de daños ni
lesiones causados por un uso (indebido) de este aparato.
Para más información sobre este producto, visite nuestra página web www.velleman.eu.
Se pueden modificar las especificaciones y el contenido de este manual sin previo aviso.
Page 11

CAMCOLBUL11 VELLEMAN
-
11
-
CAMCOLBUL11 – 1/3" CCD IR-FARBKAMERA
1. Einführung
An alle Einwohner der Europäischen Union
Wichtige Umweltinformationen über dieses Produkt
Dieses Symbol auf dem Produkt oder der Verpackung zeigt an, dass die Entsorgung dieses Produktes nach
seinem Lebenszyklus der Umwelt Schaden zufügen kann.
Entsorgen Sie die Einheit (oder verwendeten Batterien) nicht als unsortiertes Hausmüll; die Einheit oder
verwendeten Batterien müssen von einer spezialisierten Firma zwecks Recycling entsorgt werden.
Diese Einheit muss an den Händler oder ein örtliches Recycling-Unternehmen retourniert werden.
Respektieren Sie die örtlichen Umweltvorschriften.
Falls Zweifel bestehen, wenden Sie sich für Entsorgungsrichtlinien an Ihre örtliche Behörde.
Wir bedanken uns für den Kauf der CAMCOLBUL11! Lesen Sie diese Bedienungsanleitung vor Inbetriebnahme
sorgfältig durch. Überprüfen Sie, ob Transportschäden vorliegen. Sollte dies der Fall sein, verwenden Sie das Gerät
nicht und wenden Sie sich an Ihren Händler. Lieferumfang: 1 x IR-Kamera, 1 x Video-/Stromversorgungskabel, 1 x
Sonnenblende, 1 x Montagebügel, 1 x Schrauben- und Dübelsatz und diese Bedienungsanleitung.
Diese Kamera ist mit einem IR-Shifter, Smart Light Control und einer breiten Objektivöffnung für ein helles und präzises
Bild ausgerüstet.
IR-Shifter: Farbbilder tagsüber und automatische Einschaltung der IR-Beleuchtung bei ungenügend Umgebungslicht.
Smart Light Control: dynamische Regelung für ein helles und präzises Bild.
Breite Objektivöffnung: helle Bilder und niedriger Stromverbrauch
2. Sicherheitshinweise
• Bei Schäden, die durch Nichtbeachtung der Bedienungsanleitung verursacht werden, erlischt der
Garantieanspruch. Für daraus resultierende Folgeschäden übernimmt der Hersteller keine Haftung.
• Schützen Sie das Gerät vor Regen und Feuchte.
• Vergewissern Sie sich, dass die anzuschließende Netzspannung nicht höher ist als die Netzspannung
beschrieben in dieser Bedienungsanleitung.
• Bei Schäden verursacht durch eigenmächtige Änderungen erlischt der Garantieanspruch.
• Halten Sie Kinder und Unbefugte vom Gerät fern.
3. Installation
Erforderliche Werkzeuge: 1 x elektrischer Bohrer und Kreuzschlitzschraubendreher
• SCHRITT 1
Wählen Sie einen geeigneten Montageort und stellenen Sie den
Montagebügel an die geeignete Wand. Markieren Sie die Löcher mit einem
Bleistift, bohren Sie die Löcher und bringen Sie einen Dübel in die Löcher
ein. Bohren Sie auch eine Öffnung für das Video-/Stromversorgungskabel.
• SCHRITT 2
Entfernen Sie das Verbindungsstück mit einem Schlüssel vom
Montagebügel. Befestigen Sie das Verbindungsstück an der Kamera.
Wählen Sie die meist geeignete Öffnung gemäß Montageort.
Schieben Sie die Sonnenblende eventuell de nach vorne, um die
Montage zu
erleichtern.
Page 12

CAMCOLBUL11 VELLEMAN
-
12
-
• SCHRITT 3
Befestigen Sie die Kamera am Montagebügel. Regeln Sie den Winkel
und machen Sie gut fest. Regeln Sie die Sonnenblende. Schieben Sie
das Video-/Stromversorgungskabel durch die Öffnung in der Wand und
verbinden Sie das Kabel mit dem Adapter.
• SCHRITT 4
Verbinden Sie das Video-/Stromversorgungskabel der Kamera (A) mit dem Video-/Stromversorgungskabel
des Netzteils (B). Verbinden Sie die Adern der Kamera (C) mit einem Stromversorgungskabel (D, nicht
mitgeliefert) (weiß = +, schwarz = -). Verflechten Sie die Drähte, Löten und bedecken Sie mit Isolatierband
oder Schrumpfschläuche.
• SCHRITT 5
Verbinden Sie das Videokabel mit einem Koaxialkabel von 75Ω mit dem Monitor.
4. Technische Daten
Aufnahme-Element 1/3" CCD-Farbkamera
Pixelanzahl 500 (H) x 582 (V)
Auflösung 350 TV-Zeilen
Mindestbeleuchtung 0.25 lux/F1.4
IR-LEDs 24
Effektiver Bereich ± 20m
Signal-/Rauschabstand > 48dB
elektronischer Verschluss 1/60 (1/50) bis 1/100000s
Objektiv f6.0/F1.4
Objektivwinkel 56°
D&N Filterkontrolle IR-Schifter eingebaut
Line Lock ja
Blende AES
Weißabgleich ATW
Video-Ausgang 1.0Vp-p Komposite, 75Ω
Mikrofon nein
IP-Schutzart IP67
Stromversorgung 100~240VAC +/- 10%
Stromverbrauch max. 5W
Abmessungen 112 x 82 x 75mm
Gewicht 775g
Verwenden Sie dieses Gerät nur mit originellen Zubehörteilen. Velleman NV übernimmt keine Haftung für
Schaden oder Verletzungen bei (falscher) Anwendung dieses Gerätes.
Für mehr Informationen zu diesem Produkt, siehe www.velleman.eu.
Alle Änderungen ohne vorherige Ankündigung vorbehalten.
 Loading...